

Page 1

CS
Návod k použití 2
EN
User manual 18
ET
Kasutusjuhend 34
FR
Notice d'utilisation 50
Pračka
Washing Machine
Pesumasin
Lave-linge
ZWG 7100K
Page 2

Obsah
Bezpečnostní informace _ _ _ _ _ _ _ _ _ _ 2
Bezpečnostní pokyny _ _ _ _ _ _ _ _ _ _ _ 3
Poznámky k ochraně životního prostředí
_ _ _ _ _ _ _ _ _ _ _ _ _ _ _ _ _ _ _ _ _ _ _ 4
Popis spotřebiče _ _ _ _ _ _ _ _ _ _ _ _ _ _ 5
Ovládací panel _ _ _ _ _ _ _ _ _ _ _ _ _ _ 6
Prací programy _ _ _ _ _ _ _ _ _ _ _ _ _ _ 7
Údaje o spotřebě _ _ _ _ _ _ _ _ _ _ _ _ _ 8
Funkce _ _ _ _ _ _ _ _ _ _ _ _ _ _ _ _ _ _ _ 8
Před prvním použitím _ _ _ _ _ _ _ _ _ _ 10
Denní používání _ _ _ _ _ _ _ _ _ _ _ _ _ 10
Tipy a rady _ _ _ _ _ _ _ _ _ _ _ _ _ _ _ _ 13
Čištění a údržba _ _ _ _ _ _ _ _ _ _ _ _ _ 14
Odstraňování závad _ _ _ _ _ _ _ _ _ _ _ 15
Technické informace _ _ _ _ _ _ _ _ _ _ _ 17
Zmĕny vyhrazeny.
Bezpečnostní informace
Tento návod si pečlivě přečtěte ještě před instalací spotřebiče a
jeho prvním použitím. Výrobce nezodpovídá za škody a zranění
způsobená nesprávnou instalací či chybným používáním. Návod
k použití vždy uchovávejte spolu se spotřebičem pro jeho budoucí použití.
Bezpečnost dětí a postižených osob
Upozornění Hrozí nebezpečí udušení, úrazu nebo jiných
trvalých následků.
• Tento spotřebič smí používat děti starší osmi let nebo osoby se
sníženými fyzickými, smyslovými nebo duševními schopnostmi
nebo osoby bez patřičných zkušeností a znalostí pouze, pokud
tak činí pod dozorem nebo vedením, které zohledňuje bezpeč-
ný provoz spotřebiče, a pokud rozumí rizikům spojeným s provozem spotřebiče.
• Nenechte děti hrát si se spotřebičem.
• Všechny obaly uschovejte z dosahu dětí.
• Všechny prací prostředky uschovejte z dosahu dětí.
• Jsou-li dvířka spotřebiče otevřená, nedovolte dětem a domácím zvířatům, aby se k němu přibližovaly.
• Pokud je spotřebič vybaven dětskou bezpečnostní pojistkou,
doporučuje se ji aktivovat.
2
www.zanussi.com
Page 3
• Čištění a uživatelskou údržbu spotřebiče by neměly provádět
děti bez dozoru.
Všeobecné bezpečnostní informace
•Před čištěním nebo údržbou spotřebič vždy vypněte a vytáhně-
te síťovou zástrčku ze zásuvky.
•Neměňte technické parametry tohoto spotřebiče.
• Dodržujte maximální náplň 6 kg (viz část „Tabulka programů“).
• Jestliže je poškozený přívodní kabel, smí ho vyměnit pouze výrobce, servisní technik nebo osoba s podobnou příslušnou kvalifikací, jinak by mohlo dojít k úrazu.
• Hodnota provozního tlaku vody (minimální a maximální) musí
být mezi 0,5 bar (0,05 MPa) a 8 bar (0,8 MPa)
•Větrací otvory umístěné vespod spotřebiče (jsou-li součástí
spotřebiče) nesmí být ničím zakryté (např. kobercem).
•Spotřebič musí být připojen k vodovodnímu potrubí pomocí no-
vé dodané soupravy hadic. Neinstalujte již jednou použitou
soupravu hadic znovu.
Bezpečnostní pokyny
Instalace
•Odstraňte všechny obaly nebo přepravní
šrouby.
•Přepravní šrouby uschovejte. Při opětov-
ném stěhování spotřebiče je nutné zajistit
buben.
• Poškozený spotřebič neinstalujte ani ne-
používejte.
• Neinstalujte nebo nepoužívejte spotřebič
tam, kde může teplota klesnout pod 0 °C
nebo kde je vystaven povětrnostním podmínkám.
• Řiďte se pokyny k instalaci dodanými spolu
s tímto spotřebičem.
• Ujistěte se, že podlaha, na které instalujte
spotřebič, je plochá, stabilní, odolná proti
teplu a čistá.
www.zanussi.com
•Spotřebič neinstalujte tam, kde nelze
dvířka spotřebiče plně otevřít.
•Při přemisťování spotřebiče buďte vždy
opatrní, protože je těžký. Vždy noste
ochranné rukavice.
• Zkontrolujte, zda mezi spotřebičem a podlahou může proudit vzduch.
• Nastavte nožičky tak, aby mezi spotřebičem a kobercem byl požadovaný prostor.
Připojení k elektrické síti
Upozornění Hrozí nebezpečí požáru
nebo úrazu elektrickým proudem.
•Spotřebič musí být uzemněn.
• Zkontrolujte, zda údaje o napájení na typovém štítku souhlasí s parametry elektrické
sítě. Pokud tomu tak není, obraťte se na
elektrikáře.
3
Page 4
• Vždy používejte správně instalovanou síťo-
vou zásuvku s ochranou proti úrazu elektrickým proudem.
• Nepoužívejte rozbočovací zástrčky ani prodlužovací kabely.
• Dbejte na to, abyste nepoškodili napájecí
kabel a síťovou zástrčku. Jestliže potřebu-
jete vyměnit přívodní kabel, musí výměnu
provést autorizované servisní středisko.
•Síťovou zástrčku zapojte do síťové zásuv-
ky až na konci instalace spotřebiče. Po instalaci musí zůstat síťová zástrčka nadále
dostupná.
• Neodpojujte spotřebič ze zásuvky tahem
za kabel. Vždy tahejte za zástrčku.
• Nedotýkejte se napájecího kabelu či síťové
zástrčky mokrýma rukama.
• Tento spotřebič je v souladu s směrnicemi
EEC.
Vodovodní přípojka
• Dbejte na to, abyste hadice nepoškodili.
•Spotřebič musí být připojen k vodovodnímu
potrubí pomocí nové dodané soupravy hadic. Neinstalujte již jednou použitou soupravu hadic znovu.
•Před připojením spotřebiče k novým hadi-
cím nebo k hadicím, které nebyly dlouho
používané, nechte vodu na několik minut
odtéct, dokud nebude čistá.
•Při prvním použití spotřebiče se ujistěte, že
nedochází k únikům vody.
Použití spotřebiče
Upozornění Hrozí nebezpečí poranění,
zásahu elektrickým proudem, požáru
nebo poškození spotřebiče.
• Tento spotřebič používejte v domácnosti.
•Neměňte technické parametry tohoto
spotřebiče.
• Řiďte se bezpečnostními pokyny uvedenými na balení pracího prostředku.
• Do spotřebiče, do jeho blízkosti nebo na
spotřebič neumísťujte hořlavé předměty
nebo předměty obsahující hořlavé látky.
•Při probíhajícím programu se nedotýkejte
skla dvířek. Sklo může být horké.
•Ujistěte se, že se v prádle nenachází žá-
dné kovové předměty.
• Pod spotřebič nepokládejte nádoby na zachycení případného úniku vody. Informace
o vhodném příslušenství vám poskytne autorizované servisní středisko.
Čištění a údržba
Upozornění Hrozí nebezpečí poranění
nebo poškození spotřebiče.
•Před čištěním nebo údržbou spotřebič vždy
vypněte a vytáhněte síťovou zástrč
zásuvky.
•K čištění spotřebiče nepoužívejte proud vo-
dy nebo páru.
•Vyčistěte spotřebič vlhkým měkkým had-
rem. Používejte pouze neutrální mycí
prostředky. Nepoužívejte prostředky s
drsnými částicemi, drátěnky, rozpouštědla
nebo kovové předměty.
Likvidace
Upozornění Hrozí nebezpečí úrazu či
udušení.
• Odpojte spotřebič od elektrické sítě.
•Odřízněte a vyhoďte síťový kabel.
•Odstraňte dveřní západku, abyste zabránili
uvěznění dětí a domácích zvířat ve
spotřebiči.
ku ze
Poznámky k ochraně životního prostředí
Symbol na výrobku nebo jeho balení
udává, že tento výrobek nepatří do domácího
odpadu. Je nutné odvézt ho do sběrného
4
místa pro recyklaci elektrického a
elektronického zařízení. Zajištěním správné
likvidace tohoto výrobku pomůžete zabránit
www.zanussi.com
Page 5

negativním důsledkům pro životní prostředí a
lidské zdraví, které by jinak byly způsobeny
nevhodnou likvidací tohoto výrobku.
Podrobnější informace o recyklaci tohoto
výrobku zjistíte u příslušného místního úřadu,
služby pro likvidaci domovního odpadu nebo
v obchodě, kde jste výrobek zakoupili.
Obalové materiály
Recyklujte materiály označené symbolem
.
Obaly vyhoďte do příslušných odpadních
kontejnerů k recyklaci.
Ekologické rady
Menší spotřeby vody a energie, která napomáhá šetřit životní prostředí, dosáhnete, budete-li se řídit následujícími pokyny:
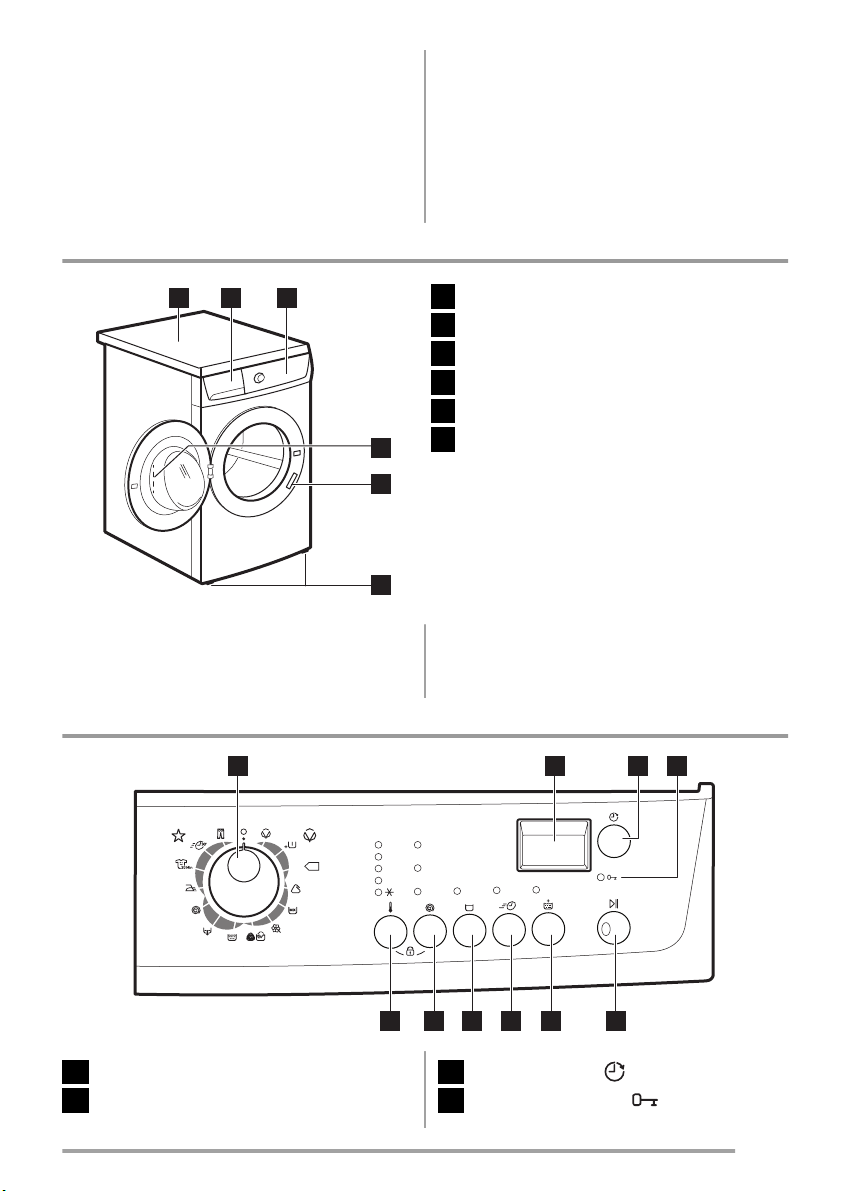
Popis spotřebiče
1 2 3
4
•Běžně zašpiněné prádlo perte pomocí pro-
gramu bez předpírky.
• Vždy spouštějte prací program s maximální
možnou náplní prádla.
• Pokud nastavíte program s nízkou teplotou, použijte v případě nutnosti odstraňo-
vač skvrn.
• Pro používání správného množství pracího
prostředku zkontrolujte tvrdost vody ve vašem vodovodním řadu.
Horní deska
1
Dávkovač pracího prostředku
2
Ovládací panel
3
Držadlo dvířek
4
Typový štítek
5
Nožičky pro vyrovnání spotřebiče
6
5
6
Souprava fixovacích destiček (405517114)
Dostupná u vašeho autorizovaného prodejce.
Pokud spotřebič instalujete na podstavec, zajistěte jej pomocí fixovacích destiček.
www.zanussi.com
Řiďte se pokyny dodanými s příslušnou soupravou.
5
Page 6
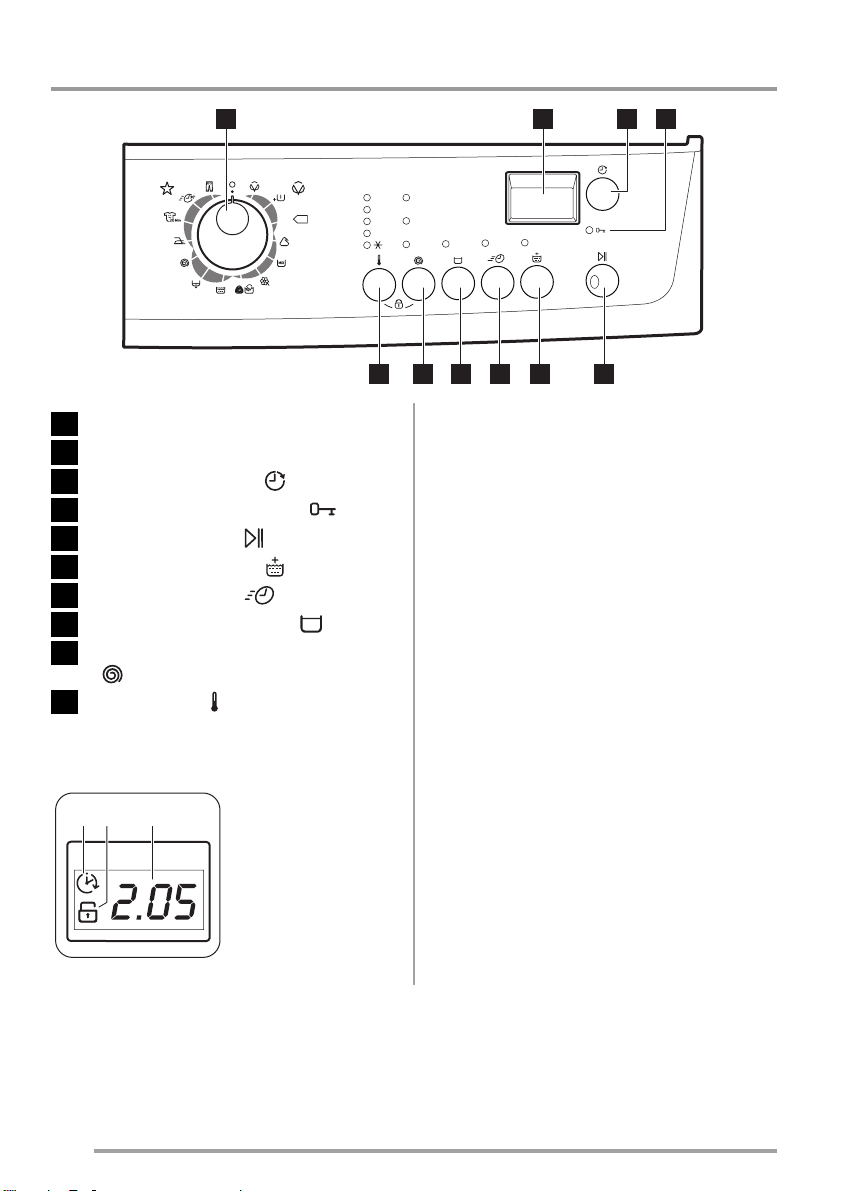
Ovládací panel
1
Eco
Volič programů
1
Displej
2
Tlačítko Odložený start
3
Kontrolka zablokování dvířek
4
Tlačítko Start/Pauza
5
Tlačítko Extra máchání
6
Tlačítko Extra krátký
7
Tlačítko Zastavení máchání
8
Tlačítko pro snížení rychlosti odstřeďová-
9
ní
Tlačítko teploty
10
Displej
Na displeji se zobrazuje:
2
1000
90°
60°
900
40°
30°
700
6 578910
3 4
B) Symbol funkce Dětská pojistka.
Tento symbol se na displeji zobrazí, když je
nastavena příslušná funkce.
C) Délka programu a výstražné kódy.
Pokud dojde k poruše spotřebiče, na displeji
se zobrazí výstražné kódy. Viz kapitola „Odstraňování závad“.
Na displeji se zobrazí hlášení Err na několik
sekund, když:
– Nastavíte funkci, která není použitelná se
zvoleným programem.
–Změníte program během jeho chodu.
A CB
Když stisknete tlačít-
ko odloženého startu, na displeji se zobrazí čas do odloženého startu.
A) Odložený start.
6
www.zanussi.com
Page 7
Prací programy
Program
Teplotní rozsah
Bavlna
90 °C – studená
+ Bavlna s předpírkou
90 °C – studená
Eco Bavlna Úsporný
60 °C a 40 °C
Syntetika
60 °C – studená
Smíšené tkaniny
Studená
Jemné
40 °C – studená
Vlna/Ruční praní
40 °C – studená
Máchání
Vypouštění
Odstřeďování
Snadné Žehlení
60 °C – studená
Osvěžení 20
30 °C
Mini 30
30 °C
Džíny
60 °C – studená
1) Standardní programy s hodnotami spotřeby uvedenými na energetickém štítku.
Na základě směrnice 1061/2010 tyto programy odpovídají „standardnímu 60 °C programu pro bavlnu“ a
„standardnímu 40 °C programu pro bavlnu“. Jedná se o nejúspornější programy ve smyslu kombinované
spotřeby energie a vody při praní běžně znečištěného bavlněného prádla.
Teplota vody prací fáze se může lišit od teploty uvedené pro zvolený program.
1)
Bílá a stálobarevná bavlna (normálně a lehce znečištěná).
6 kg, 1000 ot/min
Bílá a stálobarevná bavlna (normálně a velmi znečištěná).
6 kg, 1000 ot/min
Bílá a stálobarevná bavlna. Normálně znečištěné.
6 kg, 1000 ot/min
Prádlo ze syntetických nebo směsových tkanin. Normálně znečištěné.
3 kg, 1000 ot/min
Energeticky velmi úsporný, studený prací program. Lehce znečištěné.
3 kg, 1000 ot/min
Prádlo ze jemných tkanin jako akryl, viskóza, polyester. Normálně znečištěné.
3 kg, 700 ot/min
Vlna vhodná k praní v pračce, ručně prané vlněné a jemné prádlo označené symbolem „ručního praní“.
2 kg, 1000 ot/min
Máchání a odstředění prádla. Všechny tkaniny.
6 kg, 1000 ot/min
Vypuštění vody z bubnu. Všechny tkaniny.
6 kg
Odstředění prádla a vypuštění vody z bubnu. Všechny tkaniny.
6 kg, 1000 ot/min
Prádlo ze syntetických tkanin. Normálně znečištěné. Zabraňuje
zmačkání prádla.
1 kg, 900 ot/min
Prádlo ze syntetických a směsových tkanin. Lehce znečištěné
a prádlo k osvěžení.
Pro 5–6 košil, 900 ot/min
Syntetické a jemné prádlo. Lehce znečištěné nebo prádlo k
osvěžení.
3 kg, 700 ot/min
Oděvy z džínoviny nebo žerzeje. Také pro prádlo tmavé barvy.
Funkce Extra máchání je automaticky zapnutá.
3 kg, 1000 ot/min
Druh náplně a stupeň znečištění
Maximální náplň, Maximální odstředění
2)
www.zanussi.com
7
Page 8

2) Výchozí rychlost je 700 ot/min.
Údaje o spotřebě
Údaje v této tabulce jsou přibližné. Údaje se mohou měnit vlivem různých příčin: množství a typ prádla, teplota vody a prostředí.
Programy Náplň
(kg)
Bavlna 60 °C 6 1.05 60 160 60
Bavlna 40 °C 6 0.65 60 140 60
Syntetika 40 °C 3 0.47 45 90 37
Jemné 40 °C 3 0.50 60 80 37
Vlna/Ruční praní
30 °C
Standardní programy pro bavlnu
Standardní 60 °C
program pro bavlnu
Standardní 60 °C
program pro bavlnu
Standardní 40 °C
program pro bavlnu
1) Na konci odstřeďovací fáze.
Režim vypnuto (W) Režim zapnuto (W)
0.65 0.65
Údaje ve výše uvedené tabulce splňují normu Evropské komise 1015/2010, která obsahuje nařízení
2009/125/EC.
Spotřeba ener-
gie (kWh)
2 0.27 47 55 32
6 0.98 50 185 60
3 0.76 36 173 60
3 0.59 37 169 60
Spotřeba vody
(litry)
Přibližná délka
programu (mi-
nuty)
Zbytková
vlhkost (%)
1)
Funkce
Kombinace programů a funkcí
Program
Bavlna
+ Bavlna s předpírkou
Eco Bavlna úsporný
Syntetika
8
1)
∎ ∎ ∎ ∎ ∎
∎ ∎ ∎ ∎ ∎
∎ ∎
∎ ∎ ∎ ∎ ∎
∎ ∎
www.zanussi.com
Page 9

Smíšené tkaniny
Jemné
Vlna/Ruční praní
Máchání ∎
Vypouštění
Odstřeďování
Snadné žehlení
Osvěžení 20
Mini 30
Džíny
1) Pokud nastavíte délku programu Extra krátký, doporučujeme snížit množství prádla. Je možné prát
plnou náplň, ale výsledky praní nemusí být uspokojivé. Doporučená náplň: bavlna: 3 kg, syntetika a
jemné: 1,5 kg.
∎ ∎
∎ ∎ ∎ ∎
∎ ∎
∎
∎
∎ ∎
∎
∎ ∎
∎ ∎
∎
∎ ∎
∎
∎ ∎
∎
∎
∎
Tlačítko teploty
Stisknutím tohoto tlačítka změníte výchozí teplotu.
Symbol
— studená voda.
Tlačítko Odstředění
Pomocí tohoto tlačítka můžete snížit rychlost
odstřeďování.
Rozsvítí se kontrolka nastavené rychlosti.
Tlačítko Zastavení máchání
Nastavením této funkce zabráníte zmačkání
tkanin.
Po dokončení tohoto programu zůstane
v bubnu voda.
Extra krátký
Stisknutím tohoto tlačítka zkrátíte délku programu.
Tuto funkci nastavte pro lehce zašpiněné prádlo nebo prádlo k osvěžení.
Extra máchání
Stisknutím tohoto tlačítka přidáte k programu
fáze máchání.
Tato funkce se používá pro osoby alergické
na prací prostředky a v oblastech s měkkou
vodou.
Odložený start
Stisknutím tohoto tlačítka odložíte start programu o 30 minut až 20 hodin.
Funkce trvalého extra máchání
S touto funkcí můžete trvale zapnout přídav-
né máchání při volbě nového programu.
• Tuto funkci zapnete současným stisknutím
tlačítka
a . Kontrolka tlačítka se
rozsvítí.
• Tuto funkci vypnete opětovným stisknutím
stejných tlačítek, dokud kontrolka tlačítka
nezhasne.
Funkce dětské pojistky
Tato funkce zabraňuje dětem, aby si hrály s
ovládacím panelem.
• Funkci zapnete současným stisknutím tlačítka
brazí symbol
a , dokud se na displeji nezo-
.
• Tuto funkci vypnete stisknutím stejných tlačítek, dokud symbol
nezhasne.
Funkci lze zapnout:
•
Před tím, než stisknete tlačítko Start
:
spotřebič nelze spustit.
•
Poté, co stisknete tlačítko Start
, nezle
použít žádná tlačítka ani volič programů.
www.zanussi.com
9
Page 10

Funkce zvukové signalizace
Zvuková signalizace zazní, když:
•Dokončí se program.
• Vyskytla se závada či porucha na spotřebi-
či.
K vypnutí či zapnutí zvukové signalizace
stiskněte současně tlačítko
a na dobu
šesti sekund.
Před prvním použitím
Když zvukovou signalizaci vypnete, bude
stále funkční v případě poruchy spotřebi-
če.
Dejte malé množství pracího prostředku do
komory pro hlavní praní dávkovače pracího
prostředku. Nastavte a spusťte program pro
Denní používání
1. Otevřete vodovodní kohoutek.
2. Zasuňte zástrčku do zásuvky.
3. Vložte prádlo do spotřebiče.
4. Použijte správné množství pracího
prostředku a přísad.
5. Nastavte a spusťte správný program pro
daný druh prádla a stupeň znečištění.
Vkládání prádla
1. Otevřete dvířka spotřebiče.
2. Vložte prádlo do bubnu kus po kuse.
Prádlo před vložením do spotřebiče
protřepte. Ujistěte se, že do bubnu nevkládáte příliš mnoho prádla.
3. Zavřete dvířka.
Pozor Ujistěte
se, že mezi těs-
něním a dvířky nezůstane žádné prádlo. Hrozí nebezpečí
úniku vody nebo poškození prádla.
bavlnu na nejvyšší teplotu bez prádla. Tímto
postupem odstraníte všechny možné nečisto-
ty z bubnu a vany spotřebiče.
Použití pracího prostředku a přísad
Komora pracího prostředku pro fázi
praní.
Pokud používáte tekutý prací
prostředek, odměřte jej okamžitě před
spuštěním programu.
Komora pro přísady (aviváž, škrob).
Produkt vložte do komory před spuštěním programu.
Klapka pro práškový nebo tekutý prací prostředek.
Když nastavujete program s předpírkou,
vložte prací prostředek pro předpírku přímo
do bubnu.
10
www.zanussi.com
Page 11
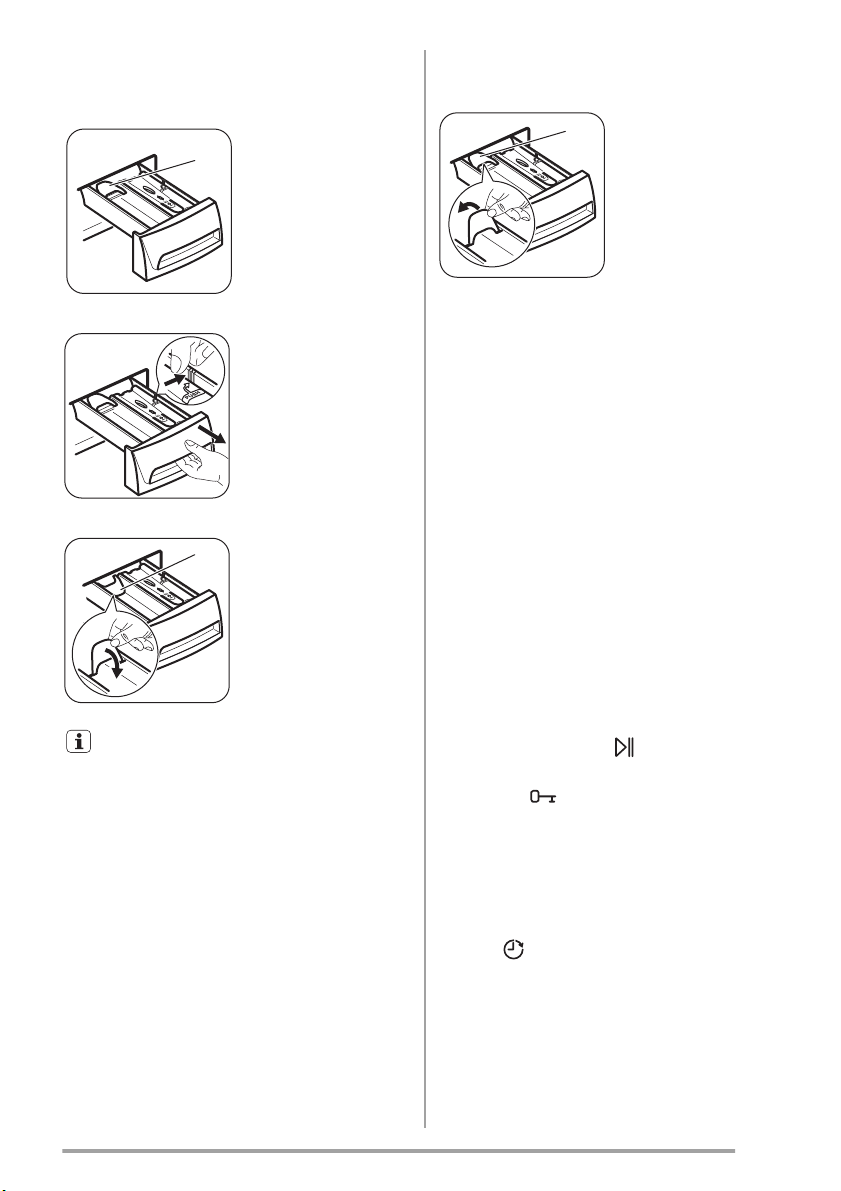
Použití tekutého a práškového pracího
prostředku
Výchozí poloha klapky je A (práškový
A
prací prostředek).
Použití tekutého pracího prostředku:
1. Zásuvku vyndejte. Zatlačte na
okraj zásuvky v
místě označeném šipkou
(PUSH), abyste
ji snadno vysunuli.
2. Nastavte klapku
B
do polohy B.
3. Zasuňte zásuvku zpět do výklenku.
Při použití tekutého pracího
prostředku:
– Nepoužívejte gelové nebo husté tekuté
prací prostředky.
– Nepoužívejte více tekutiny než 120 ml.
– Nenastavujte fázi předpírky.
– Nenastavujte odložený start.
Když je klapka v poloze B a vy chcete
použít práškový pra-
A
cí prostředek:
1. Zásuvku vyndejte.
2. Nastavte klapku
do polohy A.
3. Zasuňte zásuvku zpět do výklenku.
•Odměřte prací prostředek a aviváž.
• Vložte prací prostředek a aviváž do
příslušných komor.
•Opatrně zavřete zásuvku pracího
prostředku.
Nastavení programu
1. Otočením voliče programů nastavte program:
– Kontrolka tlačítka Start bliká.
– Na displeji se zobrazí délka programu.
2. V případě potřeby změňte teplotu a rychlost odstřeďování nebo přidejte dostupné funkce.
Když stisknete příslušné tlačítko, kontrolka nastavené funkce se rozsvítí.
Spuštění programu bez odloženého startu
Stiskněte tlačítko Start
:
• Kontrolka tlačítka Start přestane blikat a
kontrolka
svítí.
• Program se spustí a dvířka se zablokují.
• Délka programu se zkracuje po jedné mi-
nutě.
Spuštění programu s odloženým startem
•Stiskněte opakovaně tlačítko odloženého
startu
, dokud se na displeji nezobrazí
požadovaná prodleva. Příslušný symbol se
rozsvítí.
•Stiskněte tlačítko Start:
Spotřebič spustí odpočet.
Po dokončení odpočtu se automaticky
spustí zvolený program.
www.zanussi.com
11
Page 12

Odložený start lze změnit nebo zrušit
před tím, než stisknete tlačítko Start. Po
stisknutí tlačítka Start lze odložení pouze zrušit.
Zrušení odloženého startu:
1.
Stisknutím tlačítka Start
POZASTAV-
TE chod spotřebiče.
2.
Stiskněte tlačítko odloženého startu
Na displeji se zobrazí
3.
Opětovným stisknutím tlačítka Start
’.
.
program okamžitě spustíte.
Přerušení programu
1.
Stiskněte tlačítko
. Kontrolka začne
blikat.
2.
Stiskněte opět tlačítko
. Prací program
bude pokračovat.
Zrušení programu
1.
Otočením voliče programů do polohy
zrušíte program a vypnete spotřebič.
2. Opětovným otočením voliče programů
spotřebič zapnete. Nyní můžete zadat
nový prací program.
Spotřebič nevypouští vodu.
Změna funkcí
Před vlastním spuštěním můžete měnit jen
některé funkce.
1.
Stiskněte tlačítko
. Kontrolka začne
blikat.
2. Změňte funkce.
3.
Stiskněte opět tlačítko
. Program bude
pokračovat.
Otevření dvířek
Zatímco probíhá program nebo odpočet odloženého startu, dvířka spotřebiče jsou zablokovaná. Kontrolka dvířek
svítí.
Pozor Pokud je teplota a hladina vody v
bubnu příliš vysoká, nelze dvířka otevřít.
Otevření dvířek spotřebiče během
odloženého startu:
1.
Stisknutím tlačítka
POZASTAVTE
chod spotřebiče.
2.
Počkejte, dokud kontrolka
nezhasne.
3. Dvířka lze nyní otevřít.
4. Zavřete dvířka a opět stiskněte tlačítko
. Odložený start bude pokračovat v
chodu.
Otevření dvířek spotřebiče během
probíhajícího programu:
1.
Otočením voliče programů do polohy
vypnete spotřebič.
2. Před otevřením dvířek spotřebiče vyčkej-
te několik minut.
3. Zavřete dvířka spotřebiče.
4. Nastavte opět program.
Na konci programu
• Spotřebič se automaticky zastaví.
• Zazní zvukový signál.
•
Na displeji se rozsvítí
•
Kontrolka tlačítka Start/Pauza
•
Kontrolka zámku dvířek
1.
Otočte voličem programů na
.
zhasne.
zhasne.
.
2. Vyjměte prádlo ze spotřebiče. Zkontroluj-
te, zda je buben prázdný.
3. Nechte dvířka otevřená, abyste zabránili
vzniku plísní a nepříjemných pachů.
4. Zavřete vodovodní kohoutek.
Prací program je dokončen, ale v bubnu
není voda:
– Buben se otáčí pravidelně, aby se zabráni-
lo zmačkání prádla.
–
Kontrolka zámku dvířek
svítí. Dvířka
zůstanou zamčená.
–Před otevřením dvířek je nutné vypustit vo-
du.
Vodu vypustíte následujícím způsobem:
1. Zvolte program Vypouštění nebo
Odstředění.
2. Stiskněte tlačítko Start/Pauza. Spotřebič
vypustí vodu a odstředí prádlo.
3. Po dokončení programu a zhasnutí kon-
trolky zámku dvířek můžete dvířka
otevřít.
12
www.zanussi.com
Page 13

4.
Otočením voliče programů do polohy
vypnete spotřebič.
Pohotovostní režim
Pokud spotřebič nevypnete, aktivuje se po
několika minutách po konci pracího programu
úsporný režim.
Tento úsporný režim snižuje spotřebu energie, když se spotřebič nachází v pohotovostním režimu.
Tipy a rady
• Všechny kontrolky a displej zhasnou.
• Kontrolka tlačítka Start pomalu bliká.
Stisknutím jakéhokoliv tlačítka úsporný režim
vypnete.
Vkládání náplně prádla
• Prádlo rozdělte na: bílé, barevné, syntetické, jemné a vlněné.
• Řiďte se pokyny na etiketách praného prádla.
• Neperte současně bílé a barevné prádlo.
•Některé barevné oblečení může během
prvního praní pouštět barvu. Doporučuje-
me proto, abyste jej při prvním praní prali
odděleně.
• Zapněte knoflíky polštářů, zatáhněte zipy,
zapněte háčky a patenty. Svažte pásky.
• Vyprázdněte kapsy a jednotlivé kusy prádla
rozložte.
• Vícevrstvé tkaniny, vlněné prádlo a prádlo
s potiskem či obrázky obraťte naruby.
•Odstraňte odolné skvrny.
• Silně zašpiněné skvrny vyperte pomocí
speciálního pracího prostředku.
•Při praní záclon buďte opatrní. Odstraňte
háčky nebo záclony vložte do pracího pytle
nebo povlečení na polštář.
• Ve spotřebiči neperte:
– Nezaobroubené prádlo nebo prádlo, kte-
ré se zatrhává
– Podprsenky s kovovými kosticemi.
ři praní malých kusů prádla používejte
–P
prací pytel.
• Velmi malá náplň prádla může způsobit
problémy s vyvážením během fáze
odstřeďování. Pokud tak nastane, ručně
rozložte prádlo v bubnu a spusťte
odstřeďovací fázi znovu.
www.zanussi.com
Odolné skvrny
U některých skvrn voda a prací prostředek
nestačí.
Takovéto skvrny doporučujeme odstranit
před vložení příslušných kusů prádlo do
spotřebiče.
K dispozici jsou speciální odstraňovače
skvrn. Použijte speciální odstraňovač skvrn
vhodný pro daný druh skvrny a tkaniny.
Prací prostředky a přísady
• Používejte výhradně prací prostředky a
přísady určené speciálně pro pračky.
• Nemíchejte různé typy pracích prostředků.
• Abyste chránili životní prostředí, nepoužívejte více pracího prostředku, než je nutné.
• Dodržujte pokyny uvedené na balení těchto
výrobků.
• Používejte správné výrobky odpovídající
druhu a barvě tkanin, teplotě pracího programu a míře znečištění.
• Používáte-li tekuté prací prostředky, nenastavujte fázi předpírky.
• Pokud váš spotřebič není vybaven dávkovačem pracího prostř
klapkou, tekuté prací prostředky dávkujte
pomocí dávkovací odměrky/kuličky.
Tvrdost vody
Pokud je tvrdost vody ve vaší oblasti vysoká
či střední, doporučujeme používat změkčovač vody určený pro pračky. V oblastech s
měkkou vodou není změkčovač vody nutné
používat.
Tvrdost vody ve vaší oblasti zjistíte u místní
vodárenské společnosti.
edku vybaveným
13
Page 14
Dodržujte pokyny uvedené na balení těchto
výrobků.
Čištění a údržba
Čištění vnějších ploch
Spotřebič čistěte pouze pomocí mýdla a vlažné vody. Všechny plochy důkladně osušte.
Pozor Nepoužívejte alkohol,
rozpouštědla ani chemické výrobky.
Odstraňování vodního kamene
Voda, která se při praní používá, obsahuje
vodní kámen. V případě potřeby použijte pro
odstranění vodního kamene změkčovač vody.
Použijte výrobek speciálně určený pro prač-
ky. Dodržujte pokyny výrobce uvedené na
balení těchto výrobků.
Tento proces proveďte odděleně od praní
prádla.
Údržbové praní
U programů s nízkou teplotou je možné, že v
bubnu zůstane určité množství pracího
prostředku. Pravidelně proto provádějte
údržbové praní, které provedete následovně:
•Vyjměte prádlo z bubnu.
• Zvolte prací program pro bavlnu s nejvyšší
teplotou.
• Použijte správné množství práškového pracího prostředku s biologickými vlastnostmi.
Po každém praní, nechte dvířka na chvíli
otevřená, abyste v
plísní a nepříjemných pachů.
Buben
Pravidelně kontrolujte buben, zda se na něm
netvoří nános vodního kamene nebo stopy
rzi.
Na odstraňování rzi z bubnu používejte výhradně speciální přípravky.
Proveďte následující:
•Vyčistěte buben pomocí speciálního
přípravku na nerezovou ocel.
•Spusťte krátký program pro bavlnu při ma-
ximální teplotě s malým množstvím pracího
prostředku.
ětráním zabránili vzniku
Těsnění dvířek
Pravidelně kontrolujte těsnění a odstraň-
te všechny předměty
zachycené uvnitř.
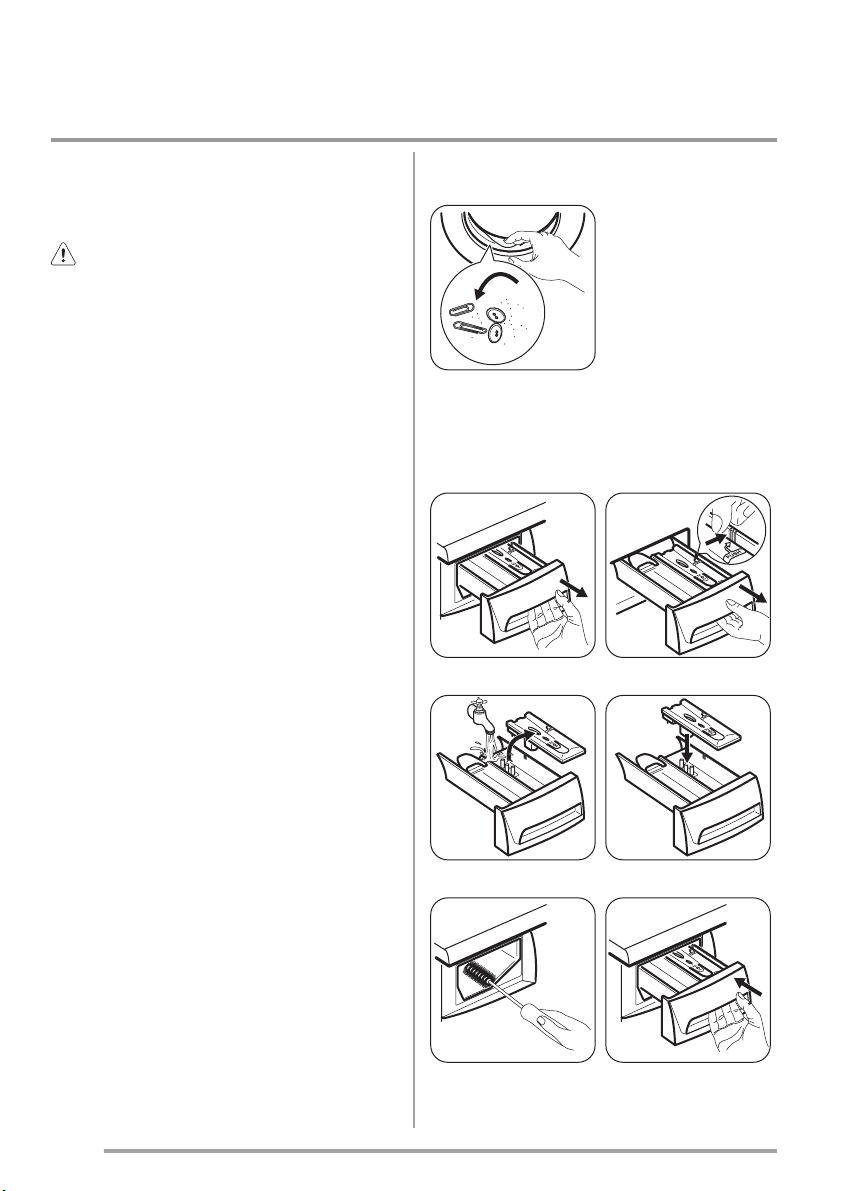
Dávkovač pracího prostředku
Čištění dávkovače pracího prostředku:
1.
3. 4.
5. 6.
2.
14
www.zanussi.com
Page 15
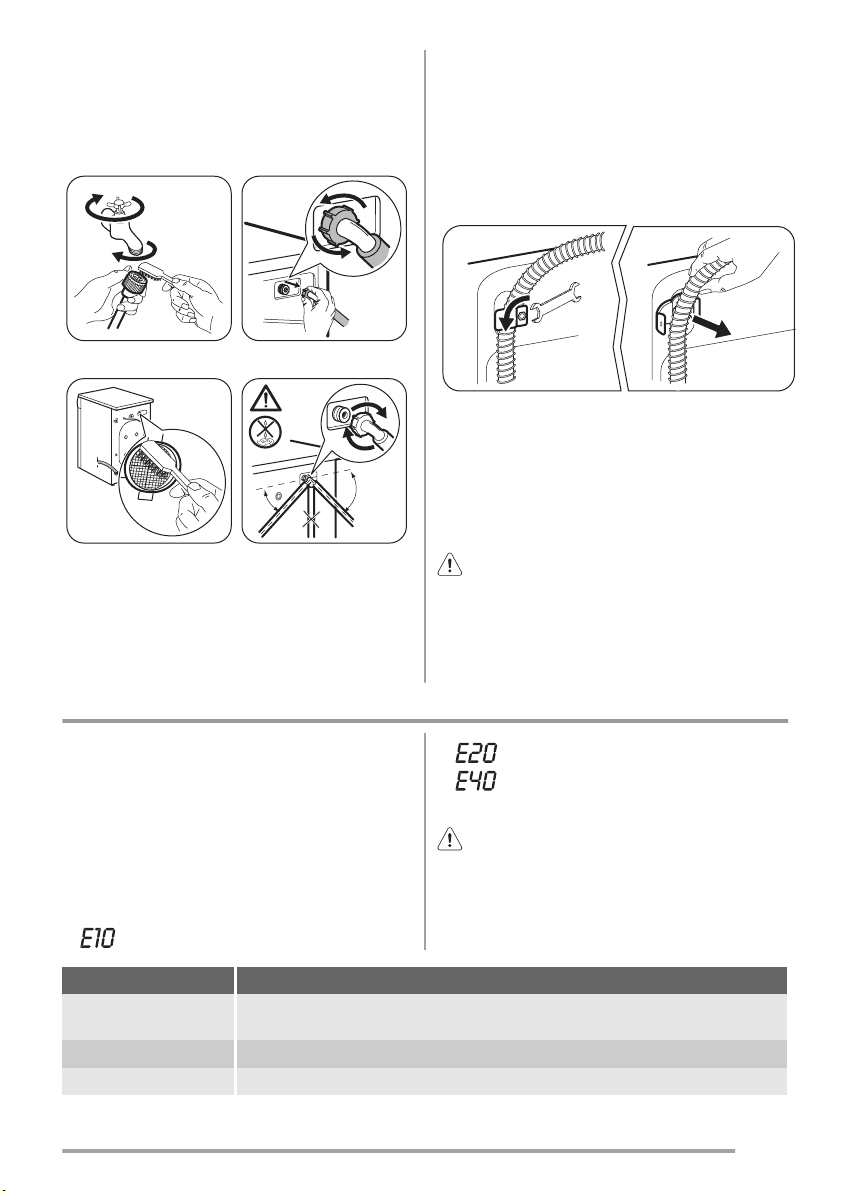
Filtr v přívodní hadici a filtr přívodního
ventilu
Čistění filtrů na přívodu vody:
1.
2.
1
2
3
3. 4.
45°
20°
1. Vytáhněte zástrčku ze zásuvky.
2. Zavřete vodovodní kohoutek.
3. Odšroubujte přívodní hadici.
4. Odstraňte vypouštěcí hadici ze zadního
držáku a vyhákněte ji ze dřezu nebo sifonu.
5. Oba konce vypouštěcí a přívodní hadice vložte do nádoby. Nechte z hadic
vytéct vodu.
6. Když již žádná voda nevytéká, namontujte přívodní a vypouštěcí hadici zpět.
Opatření proti vlivu mrazu
Pokud spotřebič instalujete v místě, kde mů-
že teplota klesnout pod 0 °C, vypusťte zbylou
vodu z přívodní hadice a vypouštěcího čerpa-
spotřebiče se ujistěte, že je okolní
teplota vyšší než 0 °C.
Výrobce neručí za škody způsobené nízkými
teplotami.
dla.
Odstraňování závad
Upozornění Před opětovným použitím
Spotřebič se nespustí nebo se zastaví během
provozu.
Nejprve zkuste najít řešení problému (viz tabulka). Pokud řešení nenajdete, kontaktujte
servisní středisko.
U některých problémů zazní zvuková
signalizace a na displeji se zobrazí
výstražný kód:
•
- Spotřebič se neplní vodou.
Problém Možné řešení
Spotřebič nelze spustit.
Přesvědčte se, že jsou dvířka spotřebiče zavřená.
Ujistěte se, že není poškozená domovní pojistka či jistič.
Ujistěte se, že je zástrčka zapojená do síťové zásuvky.
www.zanussi.com
•
- Spotřebič nevypouští vodu.
•
- Dvířka spotřebiče jsou otevřená ne-
bo nejsou správně zavřená.
Upozornění Před kontrolou spotřebič
vypněte.
15
Page 16

Problém Možné řešení
Ujistěte se, že jste stisknuli tlačítko Start/Pauza.
Pokud je nastavený odložený start, zrušte jej nebo vyčkejte do konce odpočtu.
Ujistěte se, že je volič programů ve správné poloze.
Vypněte funkci dětské bezpečnostní pojistky, pokud je zapnutá.
Spotřebič se neplní vo-
dou.
Ujistěte se, že není příliš malý tlak na přívodu vody. Ohledně těchto informací
Ujistěte se, že není zanesený vodovodní kohoutek.
Ujistěte se, že filtr na přívodní hadici a filtr na ventilu není ucpaný. Řiďte se
Ujistěte se, že přívodní hadice není přehnutá či přiskřípnutá.
Ujistěte se, že je přívodní hadice správně umístěná.
Spotřebič nevypouští
vodu.
Ujistěte se, že vypouštěcí hadice není přehnutá či přiskřípnutá.
Ujistěte se, že je vypouštěcí hadice správně umístěná.
Nastavte vypouštěcí program, pokud jste zvolili program bez vypouštěcí fáze.
Nastavte vypouštěcí program, pokud jste zvolili funkci, která končí s vodou v
Pokud žádné z výše uvedených řešení nepomohlo, obraťte se na servisní
Fáze odstřeďování nefunguje.
nebo
prací cyklus trvá déle
než obvykle.
Nastavte program odstřeďování.
Nastavte vypouštěcí program, pokud jste zvolili funkci, která končí s vodou v
Pokud žádné z výše uvedených řešení nepomohlo, obraťte se na servisní
Na podlaze je voda. Ujistěte se, že spojky na vodních hadicích jsou těsné a neuniká z nich žádná
Ujistěte se, že přívodní a vypouštěcí hadice není poškozená.
Ujistěte se, že používáte správný prací prostředek ve správném množství.
Nelze otevřít dvířka
spotřebiče.
Nastavte vypouštěcí či odstřeďovací program, pokud je v bubnu voda.
Spotřebič vydává ne-
zvyklý hluk.
Zkontrolujte, zda je přívod vody otevřený.
se obraťte na místní vodárenský podnik.
částí „Čištění a údržba“.
Ujistěte se, že není zanesený sifon.
bubnu.
středisko (může jít o ucpaný filtr či vypouštěcí čerpadlo).
Ručně rozložte prádlo v bubnu a spusťte odstřeďovací fázi znovu. Tento pro-
blém může být zapříčiněn potížemi s vyvážením.
bubnu.
středisko (může jít o ucpaný filtr či vypouštěcí čerpadlo).
voda.
Ujistěte se, že se prací program dokončil.
Ujistěte se, že je spotřebič správně vyrovnán. Viz „Pokyny k instalaci“.
16
www.zanussi.com
Page 17

Problém Možné řešení
Ujistěte se, že jste odstranili veškerý obalový materiál a přepravní šrouby. Viz
Do bubnu přidejte více prádla. Může se jednat o příliš malou náplň.
Spotřebič se naplní vo-
dou a okamžitě vypustí.
Neuspokojivé výsledky
praní.
Před vypráním prádla odstraňte odolné skvrny pomocí speciálního přípravku.
Nastavte správnou teplotu.
Snižte náplň prádla.
„Pokyny k instalaci“.
Ujistěte se, že je vypouštěcí hadice ve správné poloze. Konec vypouštěcí hadice je příliš nízko. Viz „Pokyny k instalaci“.
Zvyšte množství pracího prostředku nebo použijte jiný.
Po kontrole spotřebič zapněte. Program bude
pokračovat od okamžiku, ve kterém byl přerušen.
Pokud se problém objeví znovu, obraťte se
na servisní středisko.
Pokud se na displeji zobrazí jiné výstražné
kódy, spotřebič zapněte a vypněte. Pokud
problém přetrvává, obraťte se na servisní
Obsluha
Doporučujeme používat originální náhradní
díly.
Při kontaktu se servisním střediskem se ujistěte, že máte k dispozici následující údaje.
Tyto údaje lze nalézt na typovém štítku: Model (Mod.), výrobní číslo (PNC) (Prod.No.),
sériové číslo (Ser.No.).
středisko.
Technické informace
Rozměry Šířka / Výška / Hloubka 600 / 850 / 501 mm
Celková hloubka 519 mm
Připojení k elektrické síti: Napětí
Úroveň ochrany proti průniku pevných částic a vlhkosti, kterou zajišťuje ochranný kryt s výjimkou míst, kde není nízkonapěťové vybavení chráněno proti vlhkosti
Tlak přívodu vody Minimální 0,5 barů (0,05 MPa)
Přívod vody
Maximální množství prádla Bavlna 6 kg
Rychlost otáček Maximální 1000 ot/min
1) Přívodní hadici připojte ke kohoutku se závitem 3/4".
1)
Celkový příkon
Pojistka
Frekvence
Maximální 8 barů (0,8 MPa)
Studená voda
230 V
2100 W
10 A
50 Hz
IPX4
www.zanussi.com
17
Page 18

Contents
Safety information _ _ _ _ _ _ _ _ _ _ _ _ _ _ 18
Safety instructions _ _ _ _ _ _ _ _ _ _ _ _ _ 19
Environment concerns _ _ _ _ _ _ _ _ _ _ _ 20
Product description _ _ _ _ _ _ _ _ _ _ _ _ _ 21
Control panel _ _ _ _ _ _ _ _ _ _ _ _ _ _ _ _ 21
Washing programmes _ _ _ _ _ _ _ _ _ _ _ 22
Consumption values _ _ _ _ _ _ _ _ _ _ _ _ 23
Options _ _ _ _ _ _ _ _ _ _ _ _ _ _ _ _ _ _ _ 24
Before first use _ _ _ _ _ _ _ _ _ _ _ _ _ _ _ 25
Daily use _ _ _ _ _ _ _ _ _ _ _ _ _ _ _ _ _ _ _ 25
Hints and tips _ _ _ _ _ _ _ _ _ _ _ _ _ _ _ _ 28
Care and cleaning _ _ _ _ _ _ _ _ _ _ _ _ _ 29
Troubleshooting _ _ _ _ _ _ _ _ _ _ _ _ _ _ _ 30
Technical information _ _ _ _ _ _ _ _ _ _ _ _ 32
Subject to change without notice.
Safety information
Before the installation and use of the appliance, carefully read the
supplied instructions. The manufacturer is not responsible if an incorrect installation and use causes injuries and damages. Always
keep the instructions with the appliance for future reference.
Children and vulnerable people safety
Warning! Risk of suffocation, injury or permanent disability.
• This appliance can be used by children aged from 8 years and
above and persons with reduced physical, sensory or mental capabilities or lack of experience and knowledge if they have been
given supervision or instruction concerning use of the appliance in
a safe way and understand the hazards involved.
• Do not let children play with the appliance.
• Keep all packaging away from children.
• Keep all detergents away from children.
• Keep children and pets away from the appliance door when it is
open.
• If the appliance has a child safety device, we recommend you activate it.
• Cleaning and user maintenance shall not be made by children
without supervision.
18
www.zanussi.com
Page 19
General Safety
• Before maintenance, deactivate the appliance and disconnect the
mains plug from the mains socket.
• Do not change the specification of this appliance.
• Obey the maximum load volume of 6 kg (refer to the “Programme
chart” chapter).
• If the supply cord is damaged, it must be replaced by the manufacturer, its service agent or similarly qualified persons in order to
avoid a hazard.
• The operating water pressure (minimum and maximum) must be
between 0,5 bar (0,05 MPa) and 8 bar (0,8 MPa)
• The ventilation openings in the base (if applicable) must not be
obstructed by a carpet.
• The appliance is to be connected to the water mains using the
new supplied hose-sets. Old hose sets must not be reused.
Safety instructions
Installation
• Remove all the packaging and the transit
bolts.
• Keep the transit bolts. When you move the
appliance again you must block the drum.
• Do not install or use a damaged appliance.
• Do not install or use the appliance where the
temperature is less than 0 °C or where it is
exposed to the weather.
• Obey the installation instruction supplied
with the appliance.
• Make sure that the floor where you install the
appliance is flat, stable, heat resistant and
clean.
• Do not install the appliance where the appli-
ance door can not be fully opened.
• Always be careful when you move the appli-
ance because it is heavy. Always wear safety
gloves.
• Make sure that there is air circulation be-
tween the appliance and the floor.
www.zanussi.com
• Adjust the feet to have the necessary space
between the appliance and the carpet.
Electrical connection
Warning! Risk of fire and electrical shock.
• The appliance must be earthed.
• Make sure that the electrical information on
the rating plate agrees with the power supply. If not, contact an electrician.
• Always use a correctly installed shockproof
socket.
• Do not use multi-plug adapters and extension cables.
• Make sure not to cause damage to the mains
plug and to the mains cable. Should the appliance power supply cable need to be replaced, this must be carried out by our Service Centre.
• Connect the mains plug to the mains socket
only at the end of the installation. Make sure
19
Page 20

that there is access to the mains plug after
the installation.
• Do not pull the mains cable to disconnect
the appliance. Always pull the mains plug.
• Do not touch the mains cable or the mains
plug with wet hands.
• This appliance complies with the E.E.C. Directives.
Water connection
• Make sure not to cause damage to the water
hoses.
• The appliance is to be connected to the water mains using the new supplied hose-sets.
Old hose sets must not be reused.
• Before you connect the appliance to new
pipes or pipes not used for a long time, let
the water flow until it is clean.
• The first time you use the appliance, make
sure that there is no leakage.
Use
Warning! Risk of injury, electrical shock,
fire, burns or damage to the appliance.
• Use this appliance in a household environment.
• Do not change the specification of this appliance.
• Obey the safety instructions on the detergent
packaging.
• Do not put flammable products or items that
are wet with flammable products in, near or
on the appliance.
• Do not touch the glass of the door while a
programme operates. The glass can be hot.
• Make sure that you remove all metal objects
from the laundry.
• Do not put a container to collect possible
water leakage under the appliance. Contact
the Service to ensure which accessories can
be used.
Care and Cleaning
Warning! Risk of injury or damage to the
appliance.
• Before maintenance, deactivate the appliance and disconnect the mains plug from the
mains socket.
• Do not use water spray and steam to clean
the appliance.
• Clean the appliance with a moist soft cloth.
Only use neutral detergents. Do not use
abrasive products, abrasive cleaning pads,
solvents or metal objects.
Disposal
Warning! Risk of injury or suffocation.
• Disconnect the appliance from the mains
supply.
• Cut off the mains cable and discard it.
• Remove the door catch to prevent children
and pets to get closed in the appliance.
Environment concerns
The symbol on the product or on its
packaging indicates that this product may not
be treated as household waste. Instead it
should be taken to the appropriate collection
point for the recycling of electrical and
electronic equipment. By ensuring this product
is disposed of correctly, you will help prevent
potential negative consequences for the
environment and human health, which could
otherwise be caused by inappropriate waste
20
handling of this product. For more detailed
information about recycling of this product,
please contact your local council, your
household waste disposal service or the shop
where you purchased the product.
Packaging materials
Recycle the materials with the symbol
Put the packaging in applicable containers to
recycle it.
www.zanussi.com
.
Page 21
Ecological hints
To help the environment, use less water and
energy, obey these instructions:
• Set a programme without the prewash phase
to wash laundry with normal soil.
• Always start a washing programme with the
maximum load of laundry.
Product description
1 2 3
4
5
6
• If necessary, use a stain remover when you
set a programme with a low temperature.
• To use the correct quantity of the detergent,
check the water hardness of your domestic
system
Worktop
1
Detergent dispenser
2
Control panel
3
Door handle
4
Rating plate
5
Feet for the appliance level
6
Fixing plate kit (405517114)
Available from your authorized dealer.
Control panel
1
Eco
Programme knob
1
Display
2
www.zanussi.com
If you install the appliance on a plinth, secure
the appliance in the fixing plates.
Follow the instructions supplied with the kit.
2
1000
90°
60°
900
40°
30°
700
6 578910
Delay start button
3
Door locked indicator
4
3 4
21
Page 22

Start/pause button
5
Extra rinse button
6
Super quick button
7
Rinse hold button
8
Spin reduction button
9
Temperature button
10
Display
The display shows:
A) The delay start.
A CB
When you press the
delay start button, the
display shows the delay start time.
Washing programmes
B) The child lock symbol.
The symbol comes on the display when the related function is set.
C) The programme time and the alarm codes.
If the appliance has a malfunction, the display
shows the alarm codes. Refer to the chapter
'Troubleshooting' .
The display shows the message Err for some
seconds if:
– You set a function that is not applicable for
the programme.
– You change the programme while it oper-
ates.
Programme
Temperature range
Cotton
90 °C — Cold
+ Cotton with prewash
90 °C — Cold
Eco Cotton Eco
60 °C and 40 °C
Synthetics
60 °C— Cold
Mixed fabrics
Cold
Delicates
40 °C - Cold
Wool/Handwash
40 °C – Cold
Rinse
Drain
1)
22
Type of load and soil
Maximum load, Maximum spin
White cotton and coloured cotton (normal soil and light soil).
6 kg, 1000 rpm
White cotton and coloured cotton (heavy soil and normal soil).
6 kg, 1000 rpm
White cotton and colour-fast cotton. Normal soil.
6 kg, 1000 rpm
Synthetic items or mixed fabric items. Normal soil.
3 kg, 1000 rpm
Very energy efficient cold wash programme. Light soil.
3 kg, 1000 rpm
Delicate fabrics as acrylics, viscose, polyester items. Normal soil.
3 kg, 700 rpm
Machine washable wool, hand washable wool and delicate fabrics
with «hand washing» care symbol.
2 kg, 1000 rpm
To rinse and spin the laundry. All fabrics.
6 kg, 1000 rpm
To drain the water in the drum. All fabrics.
6 kg
2)
www.zanussi.com
Page 23

Programme
Temperature range
Spin
Easy iron
60 °C - Cold
Refresh 20
30 °C
Mini 30
30 °C
Jeans
60 °C - Cold
1) Standard programmes for the Energy Label consumption values.
According to regulation 1061/2010, these programmes are respectively the «Standard 60 °C cotton
programme» and the «Standard 40 °C cotton programme». They are the most efficient programmes in terms
of combined energy and water consumptions for washing normally soiled cotton laundry.
The water temperature of the washing phase may differ from the temperature declared for the selected
programme.
2) The default speed is 700 rpm.
To spin the laundry and to drain the water in the drum. All fabrics.
6 kg, 1000 rpm
Synthetic fabric items. Normal soil. It prevents the laundry creases.
1 kg, 900 rpm
Synthetic and mixed fabric items. Light soil and items to freshen
up.
For 5 - 6 shirts, 900 rpm
Synthetic and delicate items. Light soil or items to freshen up.
3 kg, 700 rpm
Items in denim and jersey. Also for items in dark colours. The Extra
Rinse option activates automatically.
3 kg, 1000 rpm
Type of load and soil
Maximum load, Maximum spin
Consumption values
The data of this table are approximate. Different causes can change the data: the quantity
and type of laundry, the water and ambient temperature.
Programmes Load
Cottons 60 °C 6 1.05 60 160 60
Cottons 40 °C 6 0.65 60 140 60
Synthetics 40 °C 3 0.47 45 90 37
Delicates 40 °C 3 0.50 60 80 37
Wool/Hand wash
30 °C
Standard cotton programmes
Standard 60 °C
cotton
Standard 60 °C
cotton
(Kg)
2 0.27 47 55 32
6 0.98 50 185 60
3 0.76 36 173 60
Energy con-
sumption
(kWh)
Water con-
sumption (litre)
Approximate
programme
duration (mi-
nutes)
Remaining
moisture
(%)
www.zanussi.com
1)
23
Page 24

Programmes Load
Standard 40 °C
cotton
1) At the end of spin phase.
The information given in the charts above are in compliance with the EU Commission regulation 1015/2010
implementing directive 2009/125/EC.
(Kg)
3 0.59 37 169 60
Off Mode (W) Left On Mode (W)
0.65 0.65
Energy con-
sumption
(kWh)
Water con-
sumption (litre)
Approximate
programme
duration (mi-
nutes)
Remaining
moisture
1)
(%)
Options
Programme options compatibility
Programme
Cotton
+ Cotton with prewash
Eco Cotton economy
Synthetics
Mixed fabrics
Delicates
Wool/Handwash
Rinse ∎
Drain
Spin
Easy iron
Refresh 20
Mini 30
Jeans
1) When you set the Super Quick option, we recommend that you decrease the quantity of the laundry. It is
possible to keep the full load but the washing results can be unsatisfactory. Recommended load: cotton: 3
kg, synthetics and delicates: 1,5 kg.
Temperature button
Press this button to change the default temperature.
Symbol
— cold water.
∎ ∎ ∎ ∎ ∎
∎ ∎ ∎ ∎ ∎
∎ ∎
∎ ∎ ∎ ∎ ∎
∎ ∎
∎ ∎ ∎ ∎
∎ ∎
∎
∎
∎ ∎
∎
∎ ∎
Spin button
With this button you can decrease the spin
speed.
The indicator of the set speed comes on.
1)
∎ ∎
∎ ∎
∎
∎ ∎
∎
∎ ∎
∎
∎
∎
24
www.zanussi.com
Page 25

Rinse Hold button
Set this function to prevent the laundry creases.
There is a water in the drum when the programme is completed.
Super quick
Press this button to decrease the programme
duration.
Set this function for items with light soil or
items to refresh.
Extra rinse
Press this button to add rinsing phases to a
programme.
Use this function for persons allergic to detergents and in areas where the water is soft.
Delay start
Press this button to delay the start of a programme from 30 minutes to 20 hours.
Permanent extra rinse function
With this option you can permanently have an
extra rinse when you set a new programme.
•
To activate this function press the button
and the button at the same time. The indicator of the button
• To deactivate this function press the same
buttons again until the indicator of the button
goes off.
comes on.
Child lock function
This function prevents the children to play with
the control panel.
•
To activate the function, press the button
and the button at the same time until the
display shows the symbol
• To deactivate the function, press the same
buttons until the symbol
You can activate the function:
•
Before you press the Start button
appliance cannot start.
•
After you press the Start button
buttons and the programme knob do not operate.
Acoustic signals function
The acoustic signals operate when:
• The programme is completed.
• The appliance has a malfunction.
To deactivate/activate the acoustic signals,
press the button
same time for 6 seconds.
If you deactivate the acoustic signals, they
continue operate when the appliance has
a malfunction.
and the button at the
.
goes off.
: the
, all the
Before first use
Put a small quantity of detergent in the main
wash compartment of the detergent dispenser.
Set and start a programme for cotton at the
Daily use
1. Open the water tap.
2. Connect the mains plug to the mains socket.
3. Put the laundry in the appliance.
4. Use the correct quantity of detergent and
additives.
5. Set and start the correct programme for
the type of laundry and soil.
www.zanussi.com
highest temperature without laundry. This removes all possible dirt from the drum and the
tub.
Loading the laundry
1. Open the appliance door.
2. Put the laundry in the drum, one item at a
time. Shake the items before you put
them in the appliance. Make sure not to
put too much laundry in the drum.
3. Close the door.
25
Page 26

Caution! Make
sure that no
laundry stays between the seal and
the door. There is a
risk of water leakage
or damage to the
laundry.
Using the detergent and additives
The detergent compartment for the
washing phase.
If you use a liquid detergent, put it immediately before you start the programme.
Liquid additives compartment (fabric
conditioner, starch).
Put the product in the compartment before you start the programme.
Flap for powder or liquid detergent.
When you set a programme with a prewash,
put the detergent for prewash phase directly into
the drum.
Using the liquid and the powder
detergent
The default position
of the flap is A (pow-
A
der detergent).
To use liquid detergent:
1. Remove the
drawer. Push the
drawer edge in
the place with
the arrow
(PUSH) to remove the drawer
easily.
2. Adjust the flap in
B
position B.
3. Put back the
drawer in the recess.
When you use the liquid detergent:
Do not use gelatinous or thick liquid de-
–
tergents.
– Do not put more liquid then 120 ml.
– Do not set the prewash phase.
– Do not set the delay start.
When the flap is in
position B and you
want to use powder
A
detergent:
1. Remove the
drawer.
2. Adjust the flap in
position A.
3. Put back the
drawer in the recess.
• Measure out the detergent and the fabric
conditioner.
• Put the detergent and the fabric conditioner into the compartments.
• Carefully close the detergent drawer.
26
Setting a programme
1. Turn the programme knob and set the programme:
www.zanussi.com
Page 27

– The indicator of Start button flashes.
– The display shows the programme dura-
tion.
2. If necessary, change the temperature and
the spin speed or add available functions.
When you press the relevant button, the indicator of the set function comes on.
Starting a programme without the delay
start
Press the Start button
:
• The indicator of button Start stops to flash
and the indicator
is on.
• The programme starts and the door locks.
• The programme time decreases with steps of
one minute.
Starting a programme with the delay start
•
Press the Delay start button
again and
again until the display shows the delay you
want to set. The related symbol comes on.
• Press the Start button :
The appliance starts the countdown.
When the countdown is completed, the programme starts automatically.
You can change or cancel the delay start
before you press the Start button. After
pressing the Start button you can only cancel
the delay.
To cancel the delay start:
1.
Press the Start button
to set the appli-
ance to PAUSE.
2.
Press the Delay button
shows
3.
Press the Start button
’.
. The display
again to start the
programme immediately.
Interruption of a programme
1.
Press the button
2.
Press the button
. The indicator flashes.
again. The washing
programme continues.
Cancel a programme
1.
Turn the programme knob to
to cancel
the programme and to deactivate the appliance.
2. Turn the programme knob again to activate
the appliance. Now, you can set a new
washing programme.
The appliance does not drain the water.
Changing the options
You can change only some options before they
operate.
1.
Press the button
. The indicator flashes.
2. Change the options.
3.
Press the button
again. The programme
continues.
Open the door
While a programme or the delay start operates,
the appliance door is locked. The indicator
is on.
Caution! If the temperature and level of
the water in the drum are too high, you
cannot open the door.
To open the appliance door when the
delay start operates:
1.
Press the button
to set the appliance to
PAUSE.
2.
Wait until the indicator
goes off.
3. You can open the door..
4. Close the door and press the button but-
again. The delay start continues to
ton
operate.
To open the appliance door when the
programme operates:
1.
Turn the programme knob to
to deacti-
vate the appliance.
2. Wait for some minutes and then open the
appliance door.
3. Close the appliance door.
4. Set the programme again.
At the end of the programme
• The appliance stops automatically.
• The acoustic signals operate.
•
In the display
•
The indicator of the Start/Pause button
comes on.
goes off.
www.zanussi.com
27
Page 28

•
The door lock indicator
1.
Turn the programme knob to
2. Remove the laundry from the appliance.
Make sure that the drum is empty.
3. Keep the door ajar, to prevent the mildew
and odours.
4. Close the water tap.
The washing programme is completed,
but there is water in the drum:
– The drum turns regularly to prevent the crea-
ses in the laundry.
–
The door lock indicator
stays locked.
– You must drain the water to open the door.
To drain the water:
1. Set the Drain or the Spin programme.
2. Press the Start/Pause button . The appliance drain the water and spin.
goes off.
.
is on. The door
Hints and tips
3. When the programme is completed and
the door lock indicator goes off, you can
open the door
4.
Turn the programme knob to
vate the appliance.
Stand by
Some minutes after the end of the washing programme, if you do not deactivate the appliance,
the energy saving status activates.
The energy saving status decreases the energy
consumption when the appliance is on the
standby.
• All indicators and the display go off.
• The indicator of button Start flashes slowly
Press one of the buttons to deactivate the energy saving status.
to deacti-
The laundry load
• Divide the laundry in: white, coloured, synthetics, delicates and wool.
• Obey the washing instructions that are on
the laundry care labels.
• Do not wash together white and coloured
items.
• Some coloured items can discolour with the
first wash. We recommend that you wash
them separately for the first times.
• Button up pillowcases, close zippers, hooks
and poppers. Tie up belts.
• Empty the pockets and unfold the items.
• Turn inside out multilayered fabrics, wool and
items with painted illustrations.
• Remove hard stains.
• Wash with a special detergent heavy soil
stains.
• Be careful with the curtains. Remove the
hooks or put the curtains in a washing bag or
pillowcase.
• Do not wash in the appliance :
– Laundry without hems or with cuts
28
– Underwired bras.
– Use a washing bag to wash small items.
• A very small load can cause balance problems with the spin phase. If this occurs, adjust manually the items in the tub and start
the spin phase again.
Stubborn stains
For some stains, water and detergent is not
sufficient.
We recommend that you remove these stains
before you put the items in the appliance.
Special stain removers are available. Use the
special stain remover that is applicable to the
type of stain and fabric.
Detergents and additives
• Only use detergents and additives specially
made for washing machines.
• Do not mix different types of detergents.
• To help the environment, do not use more
than the correct quantity of detergent.
• Obey the instructions that you find on the on
packaging of these products.
www.zanussi.com
Page 29

• Use the correct products for the type and
colour of the fabric, the programme temperature and the level of soil.
• If you use liquid detergents, do not set the
prewash phase.
• If your appliance has not the detergent dispenser with the flap device, add the liquid
detergents with a dosing ball.
Water hardness
If the water hardness in your area is high or
moderate, we recommend that you use a water
Care and cleaning
softener for washing machines. In areas where
the water hardness is soft it is not necessary to
use a water softener.
To know the water hardness in your area, contact your local water authority.
Obey the instructions that you find on the packaging of the products.
External cleaning
Clean the appliance only with soap and warm
water. Fully dry all the surfaces.
Caution! Do not use alcohol, solvents or
chemical products.
Descaling
The water we use contains limescale. If it becomes necessary, use a water softener to remove limescales.
Use a special product made for washing machines. Obey the instructions that you find on
the packaging of the manufacturer.
Do this separately from the laundry wash.
Maintenance wash
With the low temperature programmes it is
possible that some detergent stays in the drum.
Make regularly a maintenance wash. To do this:
• Empty the laundry from the drum.
• Set the hottest cotton wash programme
• Use a correct quantity of powder detergent
with biological properties.
After each wash, keep the door open for a
while to prevent mould and to let unpleasant
smells go out.
Drum
Regularly examine the drum to prevent limescale and rust particles.
Only use special products to remove rust particles from the drum.
To do this:
• Clean the drum with special product for
stainless steel.
• Start a short programme for cotton at the
maximum temperature with a small quantity
of detergent.
Door seal
Regularly examine the
seal and remove all
objects from the inner
part.
Detergent dispenser
To clean the dispenser:
1.
2.
www.zanussi.com
29
Page 30

3. 4.
5. 6.
The inlet hose filter and the valve filter
Frost precautions
If the appliance is installed in an area where the
temperature can be less than 0 °C, remove the
remaining water from the inlet hose and the
drain pump.
1. Disconnect the mains plug from the
mains socket.
2. Close the water tap.
3. Remove the water inlet hose
4. Remove the drain hose from the rear
support and unhook it from sink or spigot
To clean the water inlet filters:
1.
1
2
3
3. 4.
2.
45°
20°
Troubleshooting
The start of the appliance does not occur or it
stops during operation.
First try to find a solution to the problem (refer
to the table). If not, contact the service centre.
30
5. Put the ends of the drain and inlet hose
in a container. Let the water flow out of
the hoses.
6. When no more water flows, install the inlet hose and the drain hose again.
Warning! Make sure that the temperature
is more than 0 °C before you use the
appliance again.
The manufacturer is not responsible for
damages caused by low temperatures.
www.zanussi.com
Page 31

With some problems, the acoustic signals
operate and the display shows an alarm
code:
•
- The appliance does not fill with water.
•
- The appliance does not drain the wa-
•
- The appliance door is open or not
closed correctly.
Warning! Deactivate the appliance before
you do the checks.
ter.
Problem Possible solution
The appliance does not
start.
Make sure that the appliance door is closed.
Make sure that there is not a damaged fuse in the household fuse box.
Make sure that the button Start/Pause has been pressed.
If the delay start is set, cancel the setting or wait for the end of the countdown.
Make sure that the programme knob is in the correct position.
Deactivate the Child Lock function if it is on.
The appliance does not
fill with water.
Make sure that the pressure of the water supply is not too low. For this informa-
Make sure that the water tap is not clogged.
Make sure that the filter of the inlet hose and the filter of the valve are not clogged.
Make sure that the inlet hose has no kinks or bends.
Make sure that the connection of the water inlet hose is correct.
The appliance does not
drain the water.
Make sure that the water drain hose has no kinks or bends.
Make sure that the connection of the water drain hose is correct.
Set the drain programme if you set a programme without the drain phase.
Set the drain programme if you set an option which ends with water in the drum.
If above mentioned solutions do not help, contact the Service (as the filter of the
The spin phase does
not operate
or
the washing cycle lasts
longer than usually.
Set the spin programme.
Set the drain programme if you set an option which ends with water in the drum.
If above mentioned solutions do not help, contact the Service (as the filter of the
Make sure that the mains plug is connected in the mains socket.
Make sure that the water tap is opened.
tion, contact your local water authority.
Refer to 'Care and cleaning'.
Make sure that the sink spigot is not clogged.
drain pump may be clogged).
Adjust manually the items in the drum and start the spin phase again. This problem
may be caused by balance problems.
drain pump may be clogged).
www.zanussi.com
31
Page 32

Problem Possible solution
There is water on the
floor.
Make sure that the water inlet hose and the water drain hose has no damages.
Make sure you use the correct detergent and the correct quantity of it.
You cannot open the
appliance door.
Set the drain or the spin programme if there is water in the drum.
The appliance makes an
unusual noise.
Make sure that the packaging and/or the transit bolts are removed. Refer to 'Instal-
Add more laundry in the drum. The load may be too small.
The appliance fills with
water and drain immediately.
The washing results are
not satisfactory.
Use special products to remove the stubborn stains before you wash the laundry.
Make sure that you set the correct temperature.
Decrease the laundry load.
Make sure that the couplings of the water hoses are tight and there are no water
leakages.
Make sure that the washing programme is finished.
Make sure that the leveling of the appliance is correct. Refer to 'Installation instruction'.
lation instruction'.
Make sure that the drain hose is in the correct position. The end of the hose may
be is too low. Refer to 'Installation instruction'.
Increase the detergent quantity or use a different detergent.
After the check, activate the appliance. The
programme continues from the point of interruption.
If the problem occurs again, contact the Service.
If the display shows other alarm codes, activate
Service
We recommend the use of original spare parts.
When contacting the Service, make sure that
these data are available. You can find the information on the rating plate: model (Mod.), PNC
(Prod.No.), Serial number (Ser.No.).
and deactivate the appliance. If the problem
continues, contact the Service.
Technical information
Dimensions Width / Height / Depth 600 / 850 / 501 mm
Total depth 519 mm
Electrical connection: Voltage
Level of protection against ingress of solid particles and moisture ensured by the protective cover, except where the low voltage equipment
has no protection against moisture
Water supply pressure Minimum 0,5 bar (0,05 MPa)
32
Overall power
Fuse
Frequency
Maximum 8 bar (0,8 MPa)
www.zanussi.com
230 V
2100 W
10 A
50 Hz
IPX4
Page 33

Water supply
Maximum load Cotton 6 kg
Spin speed Maximum 1000 rpm
1) Connect the water inlet hose to a water tap with a 3/4'' thread.
1)
Cold water
www.zanussi.com
33
Page 34

Sisukord
Ohutusinfo _ _ _ _ _ _ _ _ _ _ _ _ _ _ _ _ 34
Ohutusjuhised _ _ _ _ _ _ _ _ _ _ _ _ _ _ 35
Jäätmekäitlus _ _ _ _ _ _ _ _ _ _ _ _ _ _ 36
Seadme kirjeldus _ _ _ _ _ _ _ _ _ _ _ _ _ 37
Juhtpaneel _ _ _ _ _ _ _ _ _ _ _ _ _ _ _ _ 37
Pesuprogrammid _ _ _ _ _ _ _ _ _ _ _ _ _ 38
Tarbimisväärtused _ _ _ _ _ _ _ _ _ _ _ _ 39
Valikud _ _ _ _ _ _ _ _ _ _ _ _ _ _ _ _ _ _ 40
Enne esimest kasutamist _ _ _ _ _ _ _ _ 41
Igapäevane kasutamine _ _ _ _ _ _ _ _ _ 41
Vihjeid ja näpunäiteid _ _ _ _ _ _ _ _ _ _ 44
Puhastus ja hooldus _ _ _ _ _ _ _ _ _ _ _ 45
Veaotsing _ _ _ _ _ _ _ _ _ _ _ _ _ _ _ _ 46
Tehnilised andmed _ _ _ _ _ _ _ _ _ _ _ _ 48
Jäetakse õigus teha muutusi.
Ohutusinfo
Enne seadme paigaldamist ja kasutamist lugege kaasasolev juhend tähelepanelikult läbi. Tootja ei vastuta vale paigaldamise või
ebaõige kasutuse tõttu tekkinud vigastuste ja kahjude eest. Hoidke juhend alles, et saaksite seda ka edaspidi kasutada.
Laste ja ohustatud inimeste turvalisus
Hoiatus Lämbumise, vigastuse või püsiva kahjustuse oht!
• Seda seadet võivad kasutada vähemalt 8-aastased lapsed
ning füüsilise, sensoorse või vaimse puudega inimesed või kogemuste ja teadmisteta isikud juhul, kui nende tegevuse üle on
järelvalve ja neid juhendatakse seadme turvalise kasutamise
osas ning nad mõistavad seadme kasutamisega kaasnevaid
ohte.
• Ärge lubage lastel seadmega mängida.
• Hoidke pakendid lastele kättesaamatuna.
• Hoidke puhastusvahendid lastele kättesaamatuna.
• Hoidke lapsed ja lemmikloomad seadme uksest eemal, kui see
on avatud.
• Kui seadmel on lapselukk, on soovitatav seda kasutada.
• Ilma järelvalveta ei tohi lapsed seadet puhastada ega hooldustoiminguid läbi viia.
34
www.zanussi.com
Page 35

Üldine ohutus
• Enne hooldust lülitage seade välja ja ühendage toitepistik pistikupesast lahti.
• Ärge muutke seadme tehnilisi omadusi.
• Ärge ületage maksimaalset pesukogust 6 kg (vt jaotist "Programmitabel").
• Kui toitejuhe on vigastatud, laske see ohutuse mõttes välja vahetada tootja, selle volitatud hooldekeskuses või lihtsalt kvalifitseeritud isiku poolt.
• Kasutatav veesurve (minimaalne ja maksimaalne) peab olema
vahemikus 0,5 baari (0,05 MPa) kuni 8 baari (0,8 MPa)
• Põhjal olevaid ventilatsiooniavasid (kui need on olemas) ei tohi
vaipkattega tõkestada.
• Seade tuleb veevarustusega ühendada kaasasolevate uute
voolikukomplektide abil. Vanu voolikukomplekte kasutada ei tohi.
Ohutusjuhised
Paigaldamine
• Eemaldage pakend ja transportimispoldid.
• Jätke transportimispoldid alles. Seadme lii-
gutamisel peate trumli fikseerima.
• Kahjustatud seadet ei tohi paigaldada ega
kasutada.
• Do not install or use the appliance where
the temperature is less than 0 °C or where
it is exposed to the weather.
• Järgige seadmega kaasas olevaid paigal-
dusjuhiseid.
• Veenduge, et põrand, kuhu te seadme pai-
galdate, on tasane, stabiilne, kuumakindel
ja puhas.
• Ärge paigaldage seadet kohta, kus selle
ust ei saa täielikult avada.
• Olge seadme teise kohta viimisel ettevaat-
lik, sest see on raske. Kasutage alati kaitsekindaid.
www.zanussi.com
• Veenduge, et seadme ja põranda vahel
oleks tagatud õhuringlus.
• Reguleerige jalgu, et seadme ja vaiba vahele jääks piisavalt ruumi.
Elektriühendus
Hoiatus Tulekahju- ja elektrilöögioht!
• Seade peab olema maandatud.
• Kontrollige, kas andmesildil toodud elektrilised parameetrid vastavad vooluvõrgu näitajatele. Vastasel juhul võtke ühendust
elektrikuga.
• Kasutage alati nõuetekohaselt paigaldatud
ohutut pistikupesa.
• Ärge kasutage mitmikpistikuid ega pikenduskaableid.
• Veenduge, et te ei vigastaks toitepistikut
ega -juhet. Kui seadme toitekaabel tuleb
35
Page 36

välja vahetada, siis pöörduge meie teeninduskeskusse.
• Ühendage toitepistik seinakontakti alles pärast paigalduse lõpuleviimist. Veenduge, et
pärast paigaldamist säilib juurdepääs toitepistikule.
• Seadet välja lülitades ärge tõmmake toitekaablist. Hoidke alati kinni toitepistikust.
• Ärge katsuge toitejuhet ega toitepistikut
märgade kätega.
• See seade vastab EÜ direktiividele.
Veeühendus
• Veenduge, et te veevoolikuid ei vigastaks.
• Seade tuleb veevarustusega ühendada
kaasasolevate uute voolikukomplektide
abil. Vanu voolikukomplekte kasutada ei tohi.
• Enne seadme ühendamist uute torude või
pikalt kasutamata torudega laske neist vett
läbi voolata, kuni vesi jääb puhtaks.
• Seadme esmakordsel kasutamisel veenduge, et kusagil ei oleks lekkeid.
Kasutamine
Hoiatus Vigastuse, elektrilöögi,
tulekahju, põletuste või seadme
kahjustamise oht!
• Kasutage seda seadet ainult kodustes tingimustes.
• Ärge muutke seadme tehnilisi omadusi.
• Järgige pesuainepakendil olevaid kasutusjuhiseid.
• Ärge pange süttivaid või süttiva ainega
määrdunud esemeid seadmesse, selle lähedusse või peale.
• Ärge puudutage programmi töötamisel ukseklaasi. Klaas võib olla kuum.
• Jälgige, et pesu hulgas ei oleks metallist
esemeid.
• Ärge asetage võimaliku lekkevee kogumiseks seadme alla nõusid. Sobivate tarvikute kohta saate lisateavet teeninduskeskusest.
Hooldus ja puhastus
Hoiatus Seadme vigastamise või
kahjustamise oht!
• Enne hooldust lülitage seade välja ja ühendage toitepistik pistikupesast lahti.
• Ärge kasutage seadme puhastamiseks
vee- või aurupihustit.
• Puhastage seadet pehme niiske lapiga.
Kasutage ainult neutraalseid puhastusaineid. Ärge kasutage abrasiivseid tooteid,
küürimisšvamme, lahusteid ega metallist
esemeid.
Jäätmekäitlus
Hoiatus Lämbumis- või vigastusoht!
• Eemaldage seade vooluvõrgust.
• Lõigake toitekaabel seadme küljest lahti ja
visake ära.
• Eemaldage seadme uks, et vältida laste ja
loomade seadmesse lõksujäämist.
Jäätmekäitlus
Tootel või selle pakendil asuv sümbol
näitab, et seda toodet ei tohi kohelda
majapidamisjäätmetena. Selle asemel tuleb
toode anda taastöötlemiseks vastavasse
elektri- ja elektroonikaseadmete kogumise
punkti. Toote õige utiliseerimise
kindlustamisega aitate ära hoida võimalikke
negatiivseid tagajärgi keskkonnale ja
inimtervisele, mida võiks vastasel juhul
põhjustada selle toote ebaõige käitlemine.
36
Lisainfo saamiseks selle toote taastöötlemise
kohta võtke ühendust kohaliku omavalitsuse,
oma majapidamisjäätmete käitlejaga või
kauplusega, kust te toote ostsite.
Pakkematerjal
Sümboliga
ringlusse.
Selleks viige pakendid vastavatesse konteineritesse.
tähistatud materjalid saatke
www.zanussi.com
Page 37

Ökoloogilised näpunäited
Keskkonna säästmiseks kasutage vähem vett
ja elektrit, järgige neid juhendeid:
• valige ilma eelpesuta programm, et pesta
tavalise määrdumisastmega pesu;
• programmi käivitamisel sisestage alati
maksimaalne kogus pesu;
Seadme kirjeldus
1 2 3
4
5
6
• vajadusel kasutage madala temperatuuriga
pestes plekieemaldajat.
• Õige pesuaine koguse kasutamiseks kontrollige oma kodust veekaredust.
Tööpind
1
Pesuaine jaotur
2
Juhtpaneel
3
Ukse käepide
4
Andmesilt
5
Jalad seadme loodimiseks
6
Kinnitusplaadikomplekt (405517114)
Saadaval volitatud edasimüüjalt.
Juhtpaneel
1
Eco
Programminupp
1
Ekraan
2
www.zanussi.com
Kui paigaldate seadme soklile, kinnitage see
spetsiaalsete kinnitusplaatide abil.
Järgige komplektiga kaasasolevaid juhiseid.
2
1000
90°
60°
900
40°
30°
700
6 578910
Viitkäivituse nupp
3
Lukustatud ukse indikaator
4
3 4
37
Page 38

Start/paus-nupp
5
Lisaloputuse nupp
6
Eriti kiire pesu nupp
7
Loputusvee hoidmise nupp
8
Pöörete arvu vähendamisnupp
9
Temperatuurinupp
10
Ekraan
Ekraanil kuvatakse:
A) Viitkäivitus.
A CB
Kui vajutate viitkäivituse nuppu, kuvatakse ekraanil viitkäivituse aeg.
Pesuprogrammid
B) Lapseluku sümbol.
Kindla funktsiooni käivitumisel ilmub ekraanile vastav sümbol.
C) Programmi aeg ja veakoodid.
Kui seadmel ilmneb rike, kuvatakse ekraanil
veakoode. Vt jaotist "Veaotsing".
Ekraanil kuvatakse mõni sekund teadet Err,
kui:
– Valite funktsiooni, mis programmiga ei so-
bi.
– Muudate programmi selle töösoleku ajal.
Programm
Temperatuurivahemik
Puuvillane
90 °C – külm
+ Puuvillane eelpesuga
90 °C – külm
Eco Puuvillane ökonoomne
60 °C ja 40 °C
Tehiskiud
60 °C – külm
Segakangad
Külm
Õrn pesu
40 °C – külm
Villane/käsipesu
40 °C – külm
Loputamine
38
Maksimaalne pesukogus, maksimaalne pöörete arv
Valge puuvillane ja värviline puuvillane (tavaline ja kerge määrdumisaste).
6 kg, 1000 p/min
Valge puuvillane ja värviline puuvillane (tugev ja tavaline määrdumisaste).
6 kg, 1000 p/min
1)
Valge puuvillane ja värvikindel puuvillane. Tavaline määrdumisaste.
6 kg, 1000 p/min
Tehiskiust või segakiust esemed. Tavaline määrdumisaste.
3 kg, 1000 p/min
Väga energiatõhus külma pesu programm. Kerge määrdumisaste.
3 kg, 1000 p/min
Õrnad kangad nagu akrüül, viskoos, polüester. Tavaline määrdumisaste.
3 kg, 700 p/min
Masinpestav villane, käsitsipestav villane ja õrnad kangad, millel on "käsitsipestava" eseme sümbol.
2 kg, 1000 p/min
Pesu loputamiseks ja tsentrifuugimiseks. Kõik materjalid.
6 kg, 1000 p/min
Pesu ja määrdumise tüüp
2)
www.zanussi.com
Page 39

Programm
Temperatuurivahemik
Tühjendamine
Tsentrifuugimine
Kerge triikimine
60 °C - külm
Värskendus 20
30 °C
Mini 30
30 °C
Teksad
60 °C - külm
1) Standardprogrammid energiaklassi tarbimisväärtustele.
Vastavalt määrusele 1061/2010 on need programmid vastavalt "puuvillase pesu 60 °C
standardprogramm" ja "puuvillase pesu 40 °C standardprogramm". Kombineeritud energiakasutust ja
veetarbimist silmas pidades on need kõige tõhusamad programmid tavalise määrdumisastmega pesu
pesemiseks.
Pesufaasi veetemperatuur võib erineda valitud programmi kohta esitatud temperatuurist.
2) Vaikekiirus on 700 p/min.
Maksimaalne pesukogus, maksimaalne pöörete arv
Trumli tühjendamiseks veest. Kõik materjalid.
6 kg
Pesu kuivatamiseks ning trumli veest tühjendamiseks. Kõik
materjalid.
6 kg, 1000 p/min
Tehiskiust esemed. Tavaline määrdumisaste. Vähendab pesu
kortsumist.
1 kg, 900 p/min
Tehis- ning segakiust esemed. Kerge määrdumisaste ja värskendamine.
5 - 6 särki, 900 p/min
Tehiskiust ja õrn pesu. Kerge määrdumisaste või värskendamine.
3 kg, 700 p/min
Teksariidest ja venivast materjalist esemed. Ka tumedad esemed. Lisaloputus on aktiveeritud automaatselt.
3 kg, 1000 p/min
Pesu ja määrdumise tüüp
Tarbimisväärtused
Selles tabelis toodud andmed on ligikaudsed. Andmeid võivad muuta erinevad asjaolud:
pesu kogus ja tüüp, vee ja ümbritseva õhu temperatuur.
Programmid Pesu
Puuvillane 60 °C 6 1.05 60 160 60
Puuvillane 40 °C 6 0.65 60 140 60
Tehiskiud 40 °C 3 0.47 45 90 37
Õrn pesu 40 °C 3 0.50 60 80 37
Vill/käsipesu 30
°C
Puuvillase standardprogrammid
kogus
(kg)
2 0.27 47 55 32
www.zanussi.com
Energiatarve
(kWh)
Veekulu (liitrid) Programmi ligi-
kaudne kestus
(minutid)
Jääkniiskus
(%)
1)
39
Page 40

Programmid Pesu
Puuvillase 60 °C
standardprogramm
Puuvillase 60 °C
standardprogramm
Puuvillase 40 °C
standardprogramm
1) Tsentrifuugimisfaasi lõpus.
Tabelites toodud andmed vastavad ELi komisjoni määruse 1015/2010 rakendusdirektiivile 2009/125/EC.
kogus
(kg)
6 0.98 50 185 60
3 0.76 36 173 60
3 0.59 37 169 60
Väljas-režiim (W) Ooterežiim (W)
0.65 0.65
Energiatarve
(kWh)
Veekulu (liitrid) Programmi ligi-
kaudne kestus
(minutid)
Jääkniiskus
1)
(%)
Valikud
Programmi valikute ühilduvus
Programm
Puuvillane
+ Puuvillane eelpesuga
Eco Puuvillase säästlik pesu
Tehiskiud
Segakangad
Õrn pesu
Villane/käsipesu
Loputamine ∎
Tühjendamine
Tsentrifuugimine
Kerge triikimine
Värskendus 20
Mini 30
Teksad
1) Kui valite Eriti kiire pesu, on soovitatav pesukogust vähendada. Võite pesta ka täiskogust, kuid
pesutulemused võivad olla mitterahuldavad. Soovitatav pesukogus: puuvillane: 3 kg, tehiskiust ja õrn
pesu: 1,5 kg.
∎ ∎ ∎ ∎ ∎
∎ ∎ ∎ ∎ ∎
∎ ∎
∎ ∎ ∎ ∎ ∎
∎ ∎
∎ ∎ ∎ ∎
∎ ∎
∎
∎
∎ ∎
∎
∎ ∎
40
1)
∎ ∎
∎ ∎
∎ ∎
∎ ∎
www.zanussi.com
∎
∎
∎
∎
∎
Page 41

Temperatuurinupp
Vaiketemperatuuri muutmiseks vajutage nuppu.
Sümbol
Tsentrifuuginupp
Selle nupuga saate vähendada pöörlemiskiirust.
Süttib valitud kiiruse indikaator.
Loputusvee hoidmise nupp
Valige see funktsioon, et vältida pesu kortsumist.
Eriti kiire pesu
Vajutage seda nuppu, et vähendada pesuprogrammi pikkust.
Valige see funktsioon kergelt määrdunud pesule või värskendamiseks.
Lisaloputus
Puudutage seda nuppu, et lisada programmile loputuskordi.
Kasutage seda programmi, kui pesete pesuainete suhtes allergiliste inimeste pesu või
kui asute pehme veega piirkonnas.
Viitkäivitus
Vajutage seda nuppu, et lükata programmi
käivitamine 30 minutit kuni 20 tundi edasi.
Püsiva lisaloputuse funktsioon
Selle valikuga jääb uue programmi valimisel
lisaloputus alati valituks.
— külm vesi.
Trumlis on vett pärast programmi lõpetamist.
• Funktsiooni aktiveerimiseks vajutage nup-
ja nuppu samaaegselt. Nupu
pu
indikaator süttib.
• Funktsiooni väljalülitamiseks vajutage samu nuppe uuesti kuni nupu
kustub.
Lapselukk
See funktsioon takistab lastel juhtpaneeliga
mängimast.
• Funktsiooni aktiveerimiseks vajutage samaaegselt nuppu
ekraanil kuvatakse sümbol
• Funktsiooni väljalülitamiseks vajutage samu nuppe uuesti kuni sümbol
Funktsiooni saate sisse lülitada:
•
Enne nupu Start vajutamist
saa sisse lülitada.
•
Pärast Start nupu vajutamist
ükski nupp ega ka programminupp.
Helisignaalide funktsioon
Helisignaalid kõlavad, kui:
• programm on lõppenud.
• Seadmel on tõrge.
Helisignaalide välja/sisselülitamiseks vajutage korraga nuppu
kundit.
Helisignaalide väljalülitamisel töötavad
need ikka, kui seadmel on rike.
ja nuppu , kuni
ja nuppu 6 se-
indikaator
.
kustub.
: seadet ei
ei tööta
Enne esimest kasutamist
Pange väike kogus pesuainet pesuaine jaoturi põhipesu lahtrisse. Valige ja käivitage kõrgeima temperatuuriga programm puuvillasele
Igapäevane kasutamine
1. Keerake veekraan lahti.
2. Ühendage toitepistik pistikupessa.
3. Pange pesu masinasse.
4. Kasutage õiges koguses pesuainet ja lisandeid.
www.zanussi.com
ilma pesuta. See eemaldab kõikvõimaliku
mustuse trumlist ja paagist.
5. Määrake ja käivitage pesu tüübile ja
määrdumisastmele vastav programm.
41
Page 42

Pesu panemine masinasse
Vedela pesuaine ja pesupulbri kasutamine
1. Avage seadme uks.
2. Asetage pesuesemed ükshaaval trumlisse. Raputage esemeid enne seadmesse asetamist. Jälgige, et te ei paneks liiga palju pesu trumlisse.
3. Sulgege uks.
Ettevaatust
Veenduge, et
pesu ei jääks ukse ja
tihendi vahele. Vastasel juhul tekib vee
lekkimise ja pesu
kahjustamise oht.
Pesuaine ja lisandite kasutamine
Pesuaine lahter pesemistsüklile.
Vedelat pesuainet kasutades lisage
see vahetult enne programmi käivitamist.
Vedelate lisaainete sahtel (kanga
pehmendaja, tärgeldusvahend).
Lisage toode lahtrisse enne programmi käivitamist.
Klapp pesupulbri või vedela pesuaine
jaoks.
Eelpesuga pesuprogrammi määramisel
pange eelpesu-pesuaine otse trumlisse.
Klapi vaikeasend on
A (pesupulber).
A
Vedela pesuaine kasutamiseks:
1. Eemaldage sahtel. Vajutage
sahtli äär noolega kohakuti
(PUSH), et see
lihtsasti eemaldada.
2. Seadke klapp
B
asendisse B.
3. Pange sahtel tagasi oma kohale.
Kui kasutate vedelat pesuainet:
Ärge kasutage želatiinitaolisi või pakse
–
vedelaid pesuaineid.
– Ärge pange rohkem ainet, kui 120 ml.
– Ärge valige eelpesutsüklit.
– Ärge valige viitkäivituse funktsiooni.
Kui klapp on asendis
B ja te soovite kasu-
A
tada pesupulbrit:
1. Eemaldage sahtel.
2. Seadke klapp
asendisse A.
3. Pange sahtel tagasi oma kohale.
42
www.zanussi.com
Page 43

• Mõõtke välja vajalik kogus pesuainet ja
kanga pehmendajat.
• Pange pesuaine ja kangapehmendaja
sektsioonidesse.
• Sulgege pesuaine sahtel ettevaatlikult.
Programmi valimine
1. Keerake programminuppu ja valige pesuprogramm:
– Start-nupu indikaator vilgub.
– Ekraanil kuvatakse programmi kestus.
2. Vajadusel muutke temperatuuri ja pöörlemiskiirust või lisage saadaolevaid funktsioone.
Funktsioonide valimisel süttivad vastavate nuppude indikaatorid.
Programmi käivitamine ilma viitkäivituseta
Vajutage Start-nuppu
:
• Start-nupu indikaator lõpetab vilkumise
ning süttib indikaator
.
• Programm käivitub ja uks lukustub.
• Programmi aeg väheneb ühe minuti kaupa.
Programmi käivitamine viitkäivitusega
•
Vajutage korduvalt viitkäivituse nuppu
,
kuni ekraanil kuvatakse soovitud aeg. Kuvatakse vastav sümbol.
• Vajutage Start-nuppu:
Seade alustab pöördloendust.
Kui pöördloendus on lõppenud, käivitub
programm automaatselt.
Enne Start-nupu vajutamist saate viitkäi-
vitust muuta või tühistada. Pärast Startnupu vajutamist saate viivituse ainult tühistada.
Viitkäivituse tühistamine:
1.
Vajutage Start-nuppu
, et PEATADA
masina töö.
2.
Vajutage viitkäivituse nuppu
kuvatakse
’.
. Ekraanil
3. Pesuprogrammi koheseks käivitamiseks
vajutage Start-nuppu
uuesti.
www.zanussi.com
Programmi katkestamine
1.
Vajutage nuppu
2.
Vajutage uuesti nuppu
. Märgutuli vilgub.
. Pesupro-
gramm jätkab tööd.
Programmi tühistamine
1. Programmi tühistamiseks ja seadme väljalülitamiseks keerake programminupp
asendisse
.
2. Keerake programminuppu uuesti, et seade sisse lülitada. Nüüd võite valida uue
pesuprogrammi.
Seade ei tühjene veest.
Valikute muutmine
Enne töölehakkamist saate muuta vaid mõnda funktsiooni.
1.
Vajutage nuppu
. Märgutuli vilgub.
2. Muutke valikuid.
3.
Vajutage uuesti nuppu
. Pesupro-
gramm jätkab tööd.
Avage uks.
Programmi või viitkäivituse töösoleku ajal on
seadme uks lukustatud. Indikaator
põleb.
Ettevaatust Kui trumlis oleva vee
temperatuur ja tase on liiga kõrged, ei
saa te ust avada.
Viitkäivituse ajal seadme ukse avamiseks:
1.
Vajutage nuppu
2.
Oodake, kuni indikaator
, et seade PEATADA.
kustub.
3. Te võite ukse avada.
4.
Sulgege uks ja vajutage nuppu
uuesti.
Viitkäivitus jätkab.
Pesuprogrammi ajal seadme ukse
avamiseks:
1.
Keerake programminupp asendisse
et seade välja lülitada.
2. Oodake mõni minut ja seejärel avage
uks.
3. Sulgege seadme uks.
4. Valige programm uuesti.
Programmi lõpus
• Seade peatub automaatselt.
,
43
Page 44

• Kõlavad helisignaalid.
•
Ekraanil kuvatakse
•
Nupu start/paus
•
Ukseluku indikaator
1. Keerake programmi valikunupp asendis .
se
2. Eemaldage seadmest pesu. Veenduge,
et trummel on tühi.
3. Niiskuse ja lõhnade vältimiseks hoidke
ust paokil.
4. Sulgege veekraan.
Pesuprogramm on lõppenud, kuid trumlis
on vesi.
– Trummel pöörleb regulaarselt, et takistada
pesu kortsumist.
–
Ukseluku indikaator
kustatud.
– Ukse avamiseks tuleb seadmest vesi välja
lasta.
.
indikaator kustub.
kustub.
põleb. Uks on lu-
Vihjeid ja näpunäiteid
Vee tühjendamiseks toimige järgmiselt.
1. Valige tühjendus- või tsentrifuugimisprogramm.
2. Vajutage nuppu Start/Pause. Seade tühjeneb veest ja tsentrifuugib.
3. Kui programm on lõppenud ja ukseluku
indikaator kustunud, saate avada ukse.
4.
Keerake programminupp asendisse
et seade välja lülitada.
Ooterežiim
Mõni minut pärast pesuprogrammi lõppemist,
kui te ei lülita seadet välja, lülitub sisse energiat säästev olek.
Energiat säästev olek vähendab energiatarvet, kui seade on ooterežiimil.
• Kõik indikaatorid ja ekraan kustuvad.
• Start-nupu indikaator vilgub aeglaselt.
Vajutage suvalist nuppu, et energiat säästev
olek välja lülitada.
,
Pesu asetamine masinasse
• Jaotage pesu: valge, värviline, sünteetiline,
õrn pesu ja villane pesu.
• Järgige pesemisjuhiseid, mis on riiete hooldussiltidel.
• Ärge peske korraga valgeid ja värvilisi esemeid.
• Mõned värvilised esemed võivad esmasel
pesul oma värvi kaotada. Soovitame esimestel kordadel neid esemeid pesta eraldi.
• Nööpige kinni padjapüürid, sulgege lukud,
haagid ja trukid. Pange kinni rihmad.
• Tühjendage taskud ja voltige riided lahti.
• Keerake pahupidi mitmekihilised riided, villased ja värvitud riided.
• Eemaldage tugevad plekid.
• Peske rasketele plekkidele sobiva pesuainega.
• Olge kardinatega ettevaatlikud. Eemaldage
kardinatelt klambrid või asetage need pesukotti või padjapüüri.
• Ärge peske seadmes:
44
– Palistamata või katkiseid esemeid
– Tugikaartega rinnahoidjaid
– Väikeste esemete pesemiseks kasutage
pesukotti.
• Väike pesukogus võib tekitada probleeme
masina tasakaaluga väänamisfaasis. Kui
see juhtub, kohendage käsitsi esemeid
trumlis ning käivitage tsentrifuugimistsükkel
uuesti.
Raskestieemaldatavad plekid
Mõnele plekile ei piisa ainult veest ja pesuainest.
Soovitame need plekid eemaldada enne esemete masinasse panemist.
Vastavad plekieemaldajad on olemas. Kasutage plekieemaldajat, mis on vastav pleki tüübile ja kangale.
Pesuained ja lisandid
• Kasutage ainult pesumasinate jaoks valmistatud pesuaineid ja lisandeid.
• Ärge segage erinevaid pesuaineid.
www.zanussi.com
Page 45

• Looduse säästmiseks ärge kasutage pesuainet rohkem, kui ette nähtud.
• Järgige toodete pakenditel olevaid juhiseid.
• Kasutage kanga tüübile ja värvile, programmi temperatuurile ja määrdumisastmele vastavaid tooteid.
• Vedelate pesuainete kasutamisel ärge valige eelpesu tsüklit.
• Kui seadmel ei ole klapiga pesuaine dosaatorit, lisage vedel pesuaine doseerimiskuuliga.
Puhastus ja hooldus
Vee karedus
Kui vee karedus teie piirkonnas on kõrge või
keskmine, soovitame pesumasinates kasutada veepehmendajat. Madala veekaredusega
piirkondades ei ole tarvis veepehmendajat
kasutada.
Veekareduse väljauurimiseks võtke ühendust
kohaliku vee-ettevõttega.
Järgige toodete valmistajate pakenditel olevaid juhiseid.
Välispinna puhastamine
Puhastage masin ainult seebi ja sooja veega.
Kuivatage täielikult kõik pinnad.
Ettevaatust Ärge kasutage alkoholi,
lahusteid ega keemilisi aineid.
Katlakivi eemaldamine
Meie kasutatav vesi sisaldab katlakivi. Vajadusel kasutage katlakivi eemaldamiseks veepehmendajat.
Kasutage spetsiaalselt pesumasinatele tehtud toodet. Järgige toodete pakenditel olevaid
juhiseid.
Ärge tehke seda koos pesupesemisega.
Hoolduspesu
Madalate temperatuuridega programmide puhul on võimalik, et osa pesuainest jääb trumlisse. Tehke regulaarselt hoolduspesusid.
Selleks:
• eemaldage trumlis olevad esemed;
• valige kõige kõrgema temperatuuriga puuvillase pesu programm;
• kasutage õiget kogust biolisanditega pesupulbrit.
Pärast iga pesukorda hoidke ust natuke aega
lahti, et vältida hallitust ning et ebameeldivad
lõhnad pääseksid välja.
Trummel
Kontrollige regulaarselt trumlit, et vältida katlakivi- ja roostejääke.
Roostejääkide trumlist eemaldamiseks kasutage vaid spetsiaalseid tooteid.
Selleks toimige järgmiselt:
• puhastage trummel spetsiaalselt roostevabale terasele mõeldud tootega;
• käivitage lühike programm puuvillasele pesule maksimaalsel temperatuuril vähese
koguse pesuainega.
Uksetihend
Kontrollige regulaarselt uksetihendit ja
eemaldage kõik objektid siseosalt.
Pesuaine jaotur
Jaoturi puhastamine.
1.
2.
www.zanussi.com
45
Page 46

3. 4.
5. 6.
Sissevõtuvooliku filter ja -ventiili filter
Ettevaatusabinõud külmumise vastu
Kui seade on paigaldatud kohta, kus temperatuur võib langeda alla 0°C, eemaldage allesjäänud vesi sissevõtuvoolikust ja tühjenduspumbast.
1. Ühendage toitepistik pistikupesast lahti.
2. Sulgege veekraan.
3. Eemaldage vee sissevõtuvoolik.
4. Tehke tühjendusvoolik tagatoe küljest
lahti ja vabastage see kraanikausi või
äravooluliidese küljest.
Vee sissevõtuvooliku filtrite puhastamine.
1.
1
2
3
3. 4.
2.
45°
20°
Veaotsing
Seadet ei õnnestu käivitada või see jääb töö
käigus seisma.
5. Pange vee tühjendus- ja sisselaskevoolikute otsad nõusse. Laske veel
voolikutest välja voolata.
6. Kui vesi on välja voolanud, paigaldage
sisse- ja tühjendusvoolikud uuesti.
Hoiatus Enne seadme uuesti kasutamist
veenduge, et temperatuur oleks üle 0 °C.
Tootja ei vastuta madalatest
temperatuuridest tingitud kahjude eest.
Püüdke esmalt leida probleemi lahendus (vt
tabelit). Kui see ei õnnestu, pöörduge teeninduskeskusse.
46
www.zanussi.com
Page 47

Mõne probleemi puhul kõlab helisignaal
ning ekraanil kuvatakse veateade:
•
- Seade ei täitu veega.
•
- Seade ei tühjene veest.
Probleem Võimalik lahendus
Seade ei käivitu. Veenduge, et pistik on pistikupesasse ühendatud.
Veenduge, et seadme uks on suletud.
Veenduge, et kaitsmekapis ei ole kaitse läbi läinud.
Veenduge, et nuppu Start/Pause on vajutatud.
Kui olete valinud viitkäivituse, siis tühistage see või oodake pöördloenduse lõp-
Veenduge, et programminupp on õiges asendis.
Deaktiveerige lapseluku funktsioon, kui see on sisse lülitatud.
Seade ei täitu veega. Veenduge, et veekraan on lahti.
Veenduge, et veevarustuse surve ei ole liiga väike. Selle teabe saamiseks
Veenduge, et veekraan ei ole ummistunud.
Veenduge, et vee sisselaskevooliku ja klapi filtrid ei ole ummistunud. Vt jaotist
Veenduge, et sisselaskevoolik ei oleks muljutud ega väänatud.
Veenduge, et vee sisselaskevooliku ühendus oleks õige.
Seade ei tühjene
veest.
Veenduge, et vee tühjendusvoolik ei ole muljutud ega väänatud.
Veenduge, et vee tühjendusvooliku ühendus oleks õige.
Valige tühjendusprogramm, kui olete valinud programmi ilma tühjendamisfaa-
Valige tühjendusprogramm, kui olete valinud programmi, mille lõpus jääb vesi
Kui ülalmainitud lahendused ei aita, võtke ühendust teeninduskeskusega (tüh-
Tsentrifuugimistsükkel
ei tööta.
või
pesutsükkel kestab
kauem kui tavaliselt.
Valige tsentrifuugimisprogramm.
Valige tühjendusprogramm, kui olete valinud programmi, mille lõpus jääb vesi
Kui ülalmainitud lahendused ei aita, võtke ühendust teeninduskeskusega (tüh-
Põrandal on vett. Veenduge, et veevoolikute ühendused on tihedad ning et vesi kuskilt ei leki.
pemiseni.
pöörduge kohaliku vee-ettevõtte poole.
"Puhastus ja hooldus".
Veenduge, et valamu äravool ei ole ummistunud.
sita.
trumlisse.
jendusvooliku pumba filter võib olla ummistunud).
Kohendage esemeid trumlis ning käivitage uuesti tsentrifuugimistsükkel. Pro-
bleem võib tekkida, kui seade on tasakaalust väljas.
trumlisse.
jendusvooliku pumba filter võib olla ummistunud).
•
- Seadme uks on lahti või ei ole kor-
ralikult suletud.
Hoiatus Enne kontrollima asumist
lülitage seade välja.
www.zanussi.com
47
Page 48

Probleem Võimalik lahendus
Veenduge, et vee sisselaske- ega tühjendusvoolikul ei oleks vigastusi.
Veenduge, et kasutate õiget pesuvahendit ning sobilikku kogust.
Seadme ust ei saa
avada.
Kui trumlis on vett, valige tühjendus- või tsentrifuugimisprogramm.
Seade teeb imelikku
häält.
Veenduge, et pakend ja/või transpordipoldid on eemaldatud. Vt jaotist "Paigal-
Lisage veel pesu trumlisse. Pesukogus võib olla liiga väike.
Seade täitub veega
ning tühjeneb koheselt.
Pesutulemused on
ebarahuldavad.
Enne pesu pesemist eemaldage spetsiaalsete toodetega tugevamad plekid.
Veenduge, et valisite õige temperatuuri.
Vähendage pesukogust.
Veenduge, et pesuprogramm on lõppenud.
Veenduge, et seade on tasakaalus. Vt jaotist "Paigaldamine".
damine".
Veenduge, et tühjendusvoolik on õiges asendis. Tühjendusvooliku ots võib olla
liiga madalal. Vt jaotist "Paigaldamine".
Suurendage pesuaine kogust või kasutage teist pesuainet.
Pärast kontrollimist lülitage seade sisse. Programm jätkub kohast, kus see katkes.
Kui viga ilmneb uuesti, pöörduge teeninduskeskusse.
Kui ekraanil on teised veakoodid, lülitage
seade välja ja uuesti sisse. Kui probleem jät-
Hooldus
Soovitame alati kasutada originaalvaruosi.
Teeninduskeskusega ühendust võttes veenduge, et teil oleks järgnevad andmed. Leiate
info andmeplaadilt: mudel (Mod.), tootenumber (Prod.No.), seerianumber (Ser.No.).
kub, pöörduge teeninduskeskusse.
Tehnilised andmed
Mõõdud Laius/kõrgus/sügavus 600/850/501 mm
Kogusügavus 519 mm
Elektriühendus: Pinge
Kaitsekate hoiab ära tahkete osakeste ja niiskuse juurdepääsu, välja
arvatud kohtades, kus madalpingeseadmel puudub kaitse niiskuse
eest
Veesurve Minimaalne 0,5 baari (0,05 MPa)
Veevarustus
Maksimaalne pesukogus Puuvillane 6 kg
1)
Üldvõimsus
Kaitse
Sagedus
Maksimaalne 8 baari (0,8 MPa)
Külm vesi
230 V
2100 W
10 A
50 Hz
IPX4
48
www.zanussi.com
Page 49

Pöörlemiskiirus Maksimaalne 1000 p/min
1) Ühendage vee sisselaskevoolik 3/4'' keermega kraani külge.
www.zanussi.com
49
Page 50

Sommaire
Consignes de sécurité _ _ _ _ _ _ _ _ _ _ _ 50
Instructions de sécurité _ _ _ _ _ _ _ _ _ _ _ 51
En matière de protection de l'environnement
_ _ _ _ _ _ _ _ _ _ _ _ _ _ _ _ _ _ _ _ _ _ _ _ 53
Description de l'appareil _ _ _ _ _ _ _ _ _ _ 53
Bandeau de commande _ _ _ _ _ _ _ _ _ _ 54
Programmes de lavage _ _ _ _ _ _ _ _ _ _ _ 55
Valeurs de consommation _ _ _ _ _ _ _ _ _ 56
Options _ _ _ _ _ _ _ _ _ _ _ _ _ _ _ _ _ _ _ 56
Avant la première utilisation _ _ _ _ _ _ _ _ _ 58
Utilisation quotidienne _ _ _ _ _ _ _ _ _ _ _ 58
Conseils _ _ _ _ _ _ _ _ _ _ _ _ _ _ _ _ _ _ _ 61
Entretien et nettoyage _ _ _ _ _ _ _ _ _ _ _ 62
En cas d'anomalie de fonctionnement _ _ _ 64
Caracteristiques techniques _ _ _ _ _ _ _ _ 66
Sous réserve de modifications.
Consignes de sécurité
Avant d'installer et d'utiliser cet appareil, lisez soigneusement les
instructions fournies. Le fabricant ne peut être tenu pour responsable des dommages et blessures liés à une mauvaise installation ou
utilisation. Conservez toujours cette notice avec votre appareil pour
vous y référer ultérieurement.
Sécurité des enfants et des personnes vulnérables
Avertissement Risque d'asphyxie, de blessure ou d'invalidité
permanente.
• Cet appareil peut être utilisé par des enfants de plus de 8 ans,
ainsi que des personnes dont les capacités physiques, sensorielles et mentales sont réduites ou dont les connaissances et l'expérience sont insuffisantes, à condition d'être surveillés ou d'avoir
reçu des instructions concernant l'utilisation sécurisée de l'appareil et de comprendre les risques encourus.
• Ne laissez pas les enfants jouer avec l'appareil.
• Ne laissez pas les emballages à la portée des enfants.
• Ne laissez pas les détergents à la portée des enfants.
• Tenez les enfants et les animaux éloignés du couvercle de l'appareil lorsque celui-ci est ouvert.
• Si l'appareil est équipé d'un dispositif de sécurité enfants, nous
vous recommandons de l'activer.
50
www.zanussi.com
Page 51

• Les enfants ne doivent pas nettoyer ni entreprendre une opération
de maintenance sur l'appareil sans surveillance.
Sécurité générale
• Avant toute opération d'entretien, éteignez l'appareil et débranchez la fiche de la prise secteur.
• Ne modifiez pas les caractéristiques de cet appareil.
• Respectez la charge maximale de 6 kg (reportez-vous au chapitre
« Tableau des programmes »).
• Si le câble d'alimentation est endommagé, il doit être remplacé
par le fabricant, son atelier d'entretien ou un technicien qualifié
afin d'éviter tout danger.
• La pression de l'eau en service (minimale et maximale) doit être
comprise entre 0,5 bar (0,05 MPa) et 8 bar (0,8 MPa)
• Les orifices d'aération situés à la base (si présents) ne doivent
pas être obstrués par de la moquette.
• L'appareil doit être raccordé au circuit d'eau à l'aide des tuyaux
neufs fournis. N'utilisez pas de tuyaux provenant d'anciens appareils.
Instructions de sécurité
Installation
• Retirez l'intégralité de l'emballage et les bou-
lons de transport.
• Conservez les boulons de transport. Si vous
devez déplacer à nouveau l'appareil, il est
conseillé de bloquer le tambour.
• N'installez pas et ne branchez pas un appa-
reil endommagé.
• Do not install or use the appliance where the
temperature is less than 0 °C or where it is
exposed to the weather.
• Suivez scrupuleusement les instructions
d'installation fournies avec l'appareil.
• Assurez-vous que le sol sur lequel vous in-
stallez l'appareil est plat, stable, résistant à la
chaleur et propre.
www.zanussi.com
• N'installez pas l'appareil dans un endroit où il
ne pourrait pas être complètement ouvert.
• L'appareil est lourd, soyez toujours prudent
lorsque vous le déplacez. Portez toujours des
gants de sécurité.
• Assurez-vous que de l'air circule entre l'appareil et le sol.
• Réglez les pieds pour laisser un espace suffisant entre l'appareil et la surface en moquette.
Branchement électrique
Avertissement Risque d'incendie ou
d'électrocution.
• L'appareil doit être relié à la terre.
51
Page 52

• Vérifiez que les données électriques figurant
sur la plaque signalétique correspondent à
celles de votre réseau. Si ce n'est pas le cas,
contactez un électricien.
• Utilisez toujours une prise de courant de sécurité correctement installée.
• N'utilisez pas d'adaptateurs multiprises ni de
rallonges.
• Veillez à ne pas endommager la fiche secteur
ni le câble d'alimentation. Le remplacement
du cordon d'alimentation de l'appareil doit
être effectué par notre service après-vente.
• Ne connectez la fiche d'alimentation à la prise de courant qu'à la fin de l'installation. Assurez-vous que la prise de courant est accessible une fois l'appareil installé.
• Ne tirez jamais sur le câble d'alimentation
électrique pour débrancher l'appareil. Tirez
toujours sur la prise.
• Ne touchez jamais le câble d'alimentation ou
la prise avec des mains mouillées.
• Cet appareil est conforme aux directives
CEE.
Raccordement à l'arrivée d'eau
• Veillez à ne pas endommager les tuyaux de
circulation d'eau.
• The appliance is to be connected to the water mains using the new supplied hose-sets.
Old hose sets must not be reused.
• Avant de brancher l'appareil à des tuyaux
neufs ou n'ayant pas servi depuis longtemps,
laissez couler l'eau jusqu'à ce qu'elle soit
propre.
• Avant d'utiliser l'appareil pour la première
fois, assurez-vous de l'absence de fuites.
Utilisation
Avertissement Risque de blessure, de
choc électrique, d'incendie, de brûlures ou
de dommage matériel à l'appareil.
• Cet appareil est conçu uniquement pour un
usage domestique et des situations telles
que :
• Utilisez cet appareil dans un environnement
domestique.
• Ne modifiez pas les caractéristiques de cet
appareil.
• Suivez les consignes de sécurité figurant sur
l'emballage du produit de lavage.
• Ne placez pas de produits inflammables ou
d'éléments imbibés de produits inflammables
à l'intérieur, à proximité ou sur l'appareil.
• Ne touchez pas la vitre du hublot pendant le
déroulement d'un programme. La vitre peut
être chaude.
• Ne placez aucun récipient sous l'appareil
pour récupérer tout éventuel écoulement.
Contactez le service après-vente pour connaître les accessoires disponibles.
Entretien et nettoyage
Avertissement Risque de blessure
corporelle ou de dommages matériels.
• Avant toute opération d'entretien, éteignez
l'appareil et débranchez la prise secteur.
• Ne pulvérisez pas d'eau ni de vapeur pour
nettoyer l'appareil.
• Nettoyez l'appareil avec un chiffon doux humide. Utilisez uniquement des produits de lavage neutres. N'utilisez pas de produits abrasifs, de tampons à récurer, de solvants ou
d'objets métalliques.
Mise au rebut
Avertissement Risque de blessure ou
d'asphyxie.
• Débranchez l'appareil de l'alimentation électrique.
• Coupez le câble d'alimentation au ras de
l'appareil et mettez-le au rebut.
• Retirez le dispositif de verrouillage de la porte pour empêcher les enfants et les animaux
de s'enfermer dans l'appareil.
52
www.zanussi.com
Page 53

En matière de protection de l'environnement
Déposez les emballages dans les conteneurs
Le symbole sur le produit ou son emballage
indique que ce produit ne peut être traité
comme déchet ménager. Il doit être remis au
point de collecte dédié à cet effet (collecte et
recyclage du matériel électrique et
électronique).
En procédant à la mise au rebut de l'appareil
dans les règles de l’art, nous préservons
l'environnement et notre sécurité, s’assurant
ainsi que les déchets seront traités dans des
conditions optimum.
Pour obtenir plus de détails sur le recyclage de
ce produit, veuillez prendre contact avec les
services de votre commune ou le magasin où
vous avez effectué l'achat.
Matériaux d’emballage
Recyclez les matériaux portant le symbole
prévus à cet effet.
Conseils écologiques
Pour préserver l'environnement et utiliser moins
d'eau et d'énergie, suivez ces instructions :
• Réglez un programme sans prélavage pour
laver du linge normalement sale.
• Commencez toujours un programme de lavage avec une charge maximum de linge.
• Si nécessaire, utilisez un détachant quand
vous réglez un programme à basse température.
• Pour utiliser la quantité correcte de produit
de lavage, vérifiez la dureté de l'eau de votre
système domestique
.
Description de l'appareil
Plan de travail
1 2 3
4
1
Distributeur de produit de lavage
2
Bandeau de commande
3
Poignée d'ouverture du hublot
4
Plaque signalétique
5
Pieds pour la mise de niveau de l'appareil
6
5
6
Kit de plaques de fixation (405517114)
Disponible auprès de votre magasin vendeur.
www.zanussi.com
Si vous installez l'appareil sur un socle, stabilisez l'appareil à l'aide des plaques de fixation.
Suivez les instructions fournies avec le kit.
53
Page 54

Bandeau de commande
1
Eco
Sélecteur de programme
1
Affichage
2
Touche Départ différé
3
Voyant Hublot verrouillé
4
Touche Départ/Pause (
5
Touche Rinçage plus
6
Touche Rapide
7
Touche Arrêt cuve pleine
8
Touche de réduction de la vitesse d'esso-
9
)
rage
Touche de sélection de la température
10
Affichage
L'affichage indique :
2
1000
90°
60°
900
40°
30°
700
6 578910
3 4
B) Le symbole de la sécurité enfants.
Le symbole s'allume lorsque la fonction correspondante est activée.
C) La durée du programme et les codes d'alarme.
En cas de dysfonctionnement de l'appareil, les
codes d'alarme s'affichent. Reportez-vous au
chapitre « En cas d'anomalie de fonctionnement ».
Le message Err s'affiche pendant quelques se-
condes si :
– Vous avez sélectionné une fonction qui n'est
pas compatible avec ce programme.
– Vous avez modifié le programme alors qu'il
est en cours.
54
A CB
A) Le Départ différé.
Lorsque vous appuyez sur la touche
Départ différé, l'heure
du départ différé s'affiche.
www.zanussi.com
Page 55

Programmes de lavage
Programme
Plage de températures
Coton
90 °C - Froid
+ Coton avec prélavage
90 °C - Froid
Eco Coton Éco
60 °C et 40 °C
Synthétiques
60 °C - Froid
Textiles mixtes
Froid
Délicats
40 °C- Froid
Laine/Lavage à la main
40 °C – Froid
Rinçage
Vidange
Essorage
Repassage facile
60 °C- Froid
Rafraîchir 20
30 °C
Mini 30
30 °C
Jeans
60 °C- Froid
1) Programmes standard pour les valeurs de consommation de l'étiquette énergétique.
Conformément à la norme 1061/2010, ces programmes sont respectivement le « programme standard à
60 °C pour le coton » et le « programme standard à 40 °C pour le coton ». Ce sont les programmes les plus
économes en termes de consommation d'eau et d'électricité pour laver du linge en coton normalement sale.
La température de l'eau de la phase de lavage peut différer de la température indiquée pour le programme
sélectionné.
1)
Coton blanc et couleurs (normalement sale ou légèrement sale).
6 kg, 1000 tr/min
Coton blanc et couleurs (très sale ou normalement sale).
6 kg, 1000 tr/min
Coton blanc et couleurs grand teint. Normalement sale.
6 kg, 1000 tr/min
Articles en textiles synthétiques ou mixtes. Normalement sale.
3 kg, 1000 tr/min
Programme de lavage à froid très économe en énergie. Légèrement sale.
3 kg, 1000 tr/min
Articles en textiles délicats tels que l'acrylique, la viscose ou le polyester. Normalement sale.
3 kg, 700 tr/min
Laine lavable en machine, lainages lavables à la main et textiles
délicats portant le symbole « Lavage à la main ».
2 kg, 1000 tr/min
Tous textiles.
6 kg, 1000 tr/min
Pour vidanger l'eau du tambour. Tous textiles.
6 kg
Pour essorer le linge et vidanger l'eau du tambour. Tous textiles.
6 kg, 1000 tr/min
Articles en textiles synthétiques. Normalement sale. Évite le froissement du linge.
1 kg, 900 tr/min
Articles en textiles synthétiques ou mixtes. Légèrement sale ou articles à rafraîchir.
Pour 5 à 6 chemises, 900 tr/min
Articles en textiles synthétiques et délicats. Légèrement sale ou
articles à rafraîchir.
3 kg, 700 tr/min
Articles en jean ou en jersey. Également pour les articles de couleurs foncées. L'option Rinçage plus est automatiquement activée.
3 kg, 1000 tr/min
Type de charge et degré de salissure
Charge maximale, vitesse d'essorage maximale
2)
www.zanussi.com
55
Page 56

2) La vitesse par défaut est de 700 tr/min.
Valeurs de consommation
Les données de ce tableau sont approximatives. Les données peuvent différer pour différentes raisons : la quantité et le type de linge, la température ambiante ou de l'eau.
Programmes Charge
(kg)
Coton 60 °C 6 1.05 60 160 60
Coton 40 °C 6 0.65 60 140 60
Synthétiques
40 °C
Textiles délicats
40 °C
Laine/Lavage à la
main 30 °C
Programmes coton standard
Coton 60 °C stan-
dard
Coton 60 °C stan-
dard
Coton 40 °C stan-
dard
1) Au terme de la phase d'essorage.
Mode « Éteint » (W) Mode « Veille » (W)
0.65 0.65
Les informations fournies dans les tableaux ci-dessus sont conformes à la directive d'application 2009/125/
EC de la réglementation 1015/2010 de la commission européenne.
Consommation
énergétique
(kWh)
3 0.47 45 90 37
3 0.50 60 80 37
2 0.27 47 55 32
6 0.98 50 185 60
3 0.76 36 173 60
3 0.59 37 169 60
Consommation
d'eau (litres)
Durée approximative du pro-
gramme (minu-
tes)
Taux d'humi-
dité restant
(%)
1)
Options
Compatibilité des options avec les programmes
Programme
Coton
+ Coton avec prélavage
Eco Coton éco
Synthétiques
56
∎ ∎ ∎ ∎ ∎
∎ ∎ ∎ ∎ ∎
∎ ∎
∎ ∎ ∎ ∎ ∎
1)
∎ ∎
www.zanussi.com
Page 57

Textiles mixtes
Délicats
Laine/Lavage à la
main
Rinçage ∎
Vidange
Essorage
Repassage facile
Rafraîchir 20
Mini 30
Jeans
1) Si vous sélectionnez l'option Rapide, nous vous recommandons de réduire la charge de linge. Il est possible
de charger entièrement le lave-linge, mais les résultats du lavage seront alors moins bons. Charge
conseillée : coton : 3 kg, textiles synthétiques et délicats : 1,5 kg.
∎ ∎
∎ ∎ ∎ ∎
∎ ∎
∎
∎
∎ ∎
∎
∎ ∎
∎ ∎
∎
∎ ∎
∎
∎ ∎
∎
∎
∎
Touche de sélection de la température
Appuyez sur cette touche pour modifier la température par défaut.
Symbole
- eau froide.
Touche Essorage
A l'aide de cette touche, vous pouvez réduire la
vitesse d'essorage.
Le voyant de la vitesse sélectionnée s'allume.
Touche Arrêt cuve pleine
Sélectionnez cette fonction pour éviter que le
linge ne se froisse.
Il reste de l'eau dans le tambour lorsque le
programme est terminé.
Rapide
Appuyez sur cette touche pour réduire la durée
d'un programme.
Sélectionnez cette fonction pour le linge légèrement sale ou à rafraîchir.
Rinçage plus
Appuyez sur cette touche pour ajouter des
phases de rinçage à un programme.
Utilisez cette fonction pour les personnes allergiques aux produits de lavage et dans les régions où l'eau est douce.
Départ différé
Appuyez sur cette touche pour retarder le départ d'un programme de 30 minutes à 20 heures.
Fonction Rinçage plus activée en
permanence
Cette fonction vous permet de maintenir la
fonction Rinçage Plus en permanence lorsque
vous sélectionnez un nouveau programme.
• Pour activer cette fonction, appuyez simultanément sur les touches
de la touche
s'allume.
et . Le voyant
• Pour désactiver cette fonction, appuyez à
nouveau sur ces deux touches jusqu'à ce
que le voyant de la touche
s'éteigne.
Fonction Sécurité enfants
Cette fonction empêche les enfants de jouer
avec le bandeau de commande.
• Pour activer cette fonction, appuyez simultanément sur les touches
que
s'affiche.
et jusqu'à ce
• Pour désactiver cette fonction, appuyez sur
ces mêmes touches simultanément jusqu'à
ce que le symbole
s'éteigne.
Vous pouvez activer la fonction :
www.zanussi.com
57
Page 58

•
Avant d'appuyer sur la touche Départ
l'appareil ne peut pas démarrer.
•
Après avoir appuyé sur la touche Départ
l'ensemble des touches et le sélecteur de
programme ne fonctionnent pas.
Fonction des signaux sonores
Les signaux sonores retentissent quand :
• Le programme est terminé.
Avant la première utilisation
:
• L'appareil présente une anomalie de fonctionnement.
Pour désactiver/activer les signaux sonores,
,
appuyez simultanément sur les touches
et
pendant 6 secondes.
Si vous désactivez les signaux sonores, ils
continueront à retentir si l'appareil présen-
te une anomalie.
Mettez une petite quantité de produit de lavage
dans le compartiment de lavage principal de la
boîte à produits. Sélectionnez et lancez, sans
Utilisation quotidienne
1. Ouvrez le robinet d'eau.
2. Branchez l'appareil sur le secteur.
3. Introduisez le linge dans l'appareil.
4. Utilisez la bonne quantité de produit de lavage et d'additifs.
5. Sélectionnez et lancez le programme de lavage adapté en fonction de la charge et du
degré de salissure.
Chargement du linge
1. Ouvrez le hublot.
2. Mettez le linge dans le tambour, un article à la fois. Dépliez-les le plus possible.
Assurez-vous de ne pas surcharger le
tambour.
3. Fermez le hublot.
Attention Veil-
lez à ce qu'il n'y
ait pas de linge coincé entre le joint et le
hublot. Cela pourrait
provoquer une fuite
d'eau ou endommager le linge.
linge, un programme pour le coton à la température la plus élevée. Ceci permet d'éliminer
toutes salissures du tambour et de la cuve.
Utilisation du produit de lavage et des
additifs
Compartiment à lessive pour la phase
de lavage.
Si vous utilisez de la lessive liquide,
versez-la immédiatement avant de démarrer le programme.
Compartiment réservé aux additifs liquides (assouplissant, amidon).
Versez le produit dans le compartiment
avant de démarrer le programme.
Volet pour produit de lavage en poudre
ou liquide.
Si vous sélectionnez un programme avec prélavage, versez la lessive destinée à la phase
de prélavage directement dans le tambour.
58
www.zanussi.com
Page 59

Utilisation du produit de lavage en poudre
ou liquide
La position par défaut
du volet est A (lessi-
A
ve en poudre).
Pour utiliser une lessive liquide :
1. Retirez la boîte à
produits. Poussez le bord de la
boîte vers l'extérieur au niveau
de la flèche
(PUSH) pour faciliter son retrait.
2. Ajustez le volet
B
en position B.
3. Remettez la boîte
dans son logement.
Si vous utilisez une lessive liquide :
N'utilisez pas de lessives liquides gélati-
–
neuses ou épaisses.
– Ne versez pas plus de 120 ml de liquide.
– Ne sélectionnez pas de phase de prélava-
ge.
– Ne sélectionnez pas la fonction Départ dif-
féré.
Le volet est en position B alors que vous
souhaitez utiliser de
A
la lessive en poudre :
1. Retirez la boîte à
produits.
2. Ajustez le volet
en position A.
3. Remettez la boîte
dans son logement.
• Dosez les produits de lavage et l'assouplissant.
• Mettez le produit de lavage et l'assouplissant dans les compartiments.
• Fermez soigneusement la boîte à produits.
Réglage d'un programme
1. Tournez le sélecteur pour choisir votre programme :
– Le voyant de la touche Départ clignote.
– L'affichage indique la durée du program-
me.
2. Si nécessaire, modifiez la température et la
vitesse d'essorage ou sélectionnez les
fonctions dont vous avez besoin.
Lorsque vous appuyez sur la touche correspondante, le voyant de la fonction sélectionnée s'allume.
Démarrage d'un programme sans départ
différé
Appuyez sur la touche Départ
:
• Le voyant de la touche Départ arrête de cli-
gnoter et le voyant
s'allume.
• Le programme démarre et le hublot est ver-
rouillé.
• Le décompte se fait par intervalles d'une mi-
nute.
Démarrage d'un programme avec départ
différé
• Appuyez plusieurs fois sur la touche de dé-
part différé
jusqu'à ce que l'écran indique
l'heure que vous souhaitez sélectionner. Le
symbole correspondant s'allume.
www.zanussi.com
59
Page 60

• Appuyez sur la touche Départ :
L'appareil commence le décompte.
Lorsque le décompte est terminé, le programme démarre automatiquement.
Vous pouvez à tout moment modifier ou
annuler le départ différé, avant d'appuyer
sur la touche Départ. Une fois que vous avez
appuyé sur la touche Départ, vous ne pouvez
qu'annuler le départ différé.
Pour annuler le départ différé :
1.
Appuyez sur la touche Départ
pour
mettre l'appareil en PAUSE.
2.
Appuyez sur la touche Départ différé
L'affichage indique
'.
.
3. Appuyez de nouveau sur la touche Départ
pour lancer le programme immédiate-
ment.
Interruption d'un programme
1.
Appuyez sur la touche
. Le voyant cli-
gnote.
2.
Appuyez de nouveau sur la touche
. Le
programme de lavage se poursuit.
Annuler un programme
1.
Tournez le sélecteur de programme sur
pour annuler le programme et éteindre l'appareil.
2. Tournez de nouveau le sélecteur pour allu-
mer l'appareil. Vous pouvez alors sélectionner un nouveau programme de lavage.
L'appareil ne vidange pas l'eau.
Modification des options
Vous ne pouvez modifier que quelques options
avant qu'elles ne soient actives.
1.
Appuyez sur la touche
. Le voyant cli-
gnote.
2. Modifiez les options.
3.
Appuyez de nouveau sur la touche
. Le
programme se poursuit.
Ouvrir le hublot
Lorsqu'un programme ou le départ différé est
en cours, le hublot de l'appareil est verrouillé.
Le voyant
s'allume.
Attention Si la température et le niveau
de l'eau dans le tambour sont trop élevés,
vous ne pouvez pas ouvrir le hublot.
Pour ouvrir le hublot lorsque le départ
différé est en marche :
1.
Appuyez sur la touche
pour mettre l'ap-
pareil en PAUSE.
2.
Attendez que le voyant
s'éteigne.
3. Vous pouvez ouvrir le hublot.
4. Fermez le hublot et appuyez de nouveau
sur la touche
. Le départ différé se
poursuit.
Pour ouvrir le hublot lorsqu'un
programme est en marche :
1.
Tournez le sélecteur de programme sur
pour éteindre l'appareil.
2. Attendez quelques minutes avant d'ouvrir le
hublot.
3. Fermez le hublot.
4. Sélectionnez à nouveau le programme.
À la fin du programme
• L'appareil s'arrête automatiquement.
• Les signaux sonores retentissent.
•
Le symbole
•
Le voyant de la touche Départ/Pause
s'affiche.
s'éteint.
• Le voyant du dispositif de verrouillage du hu-
s'éteint.
blot
1. Tournez le sélecteur de programmes sur
.
2. Sortez le linge de l'appareil. Vérifiez que le
tambour est vide.
3. Laissez le hublot entrouvert pour éviter la
formation de moisissures et l'apparition de
mauvaises odeurs.
4. Fermez le robinet d'eau.
Le programme de lavage est terminé,
mais il reste de l'eau dans le tambour :
– Le tambour tourne régulièrement pour éviter
que le linge ne se froisse.
–
Le voyant Hublot verrouillé
est allumé. Le
hublot reste verrouillé.
60
www.zanussi.com
Page 61

– Vous devez vidanger l'eau pour pouvoir ouvrir
le hublot.
Pour vidanger l'eau :
1. Sélectionnez le programme de vidange ou
d'essorage.
2. Appuyez sur la touche Départ/pause. L'appareil vidange et essore.
3. Une fois le programme terminé et le voyant
Hublot verrouillé éteint, vous pouvez ouvrir
le hublot.
4.
Tournez le sélecteur de programme sur
pour éteindre l'appareil.
Veille
Quelques minutes après la fin du programme,
si vous n'avez pas éteint l'appareil, la fonction
Conseils
d'économie d'énergie éteint automatiquement
l'appareil.
La fonction d'économie d'énergie réduit la consommation d'énergie lorsque l'appareil est en
veille.
• Tous les voyants et l'affichage s'éteignent.
• Le voyant de la touche Départ clignote lentement
Appuyez sur l'une des touches pour désactiver
la fonction d'économie d'énergie.
Chargement du linge
• Répartissez le linge entre : blanc, couleur,
synthétiques, délicats et laine.
• Respectez les instructions de lavage qui figurent sur les étiquettes des vêtements.
• Ne lavez pas ensemble les articles blancs et
en couleur.
• Certains articles en couleur peuvent déteindre lors des premiers lavages. Il est recommandé de les laver séparément lors des premiers lavages.
• Boutonnez les taies d'oreiller, fermez les fermetures à glissière et à pression et les crochets. Attachez les ceintures.
• Videz les poches des vêtements et dépliezles.
• Tournez vers l'intérieur les tissus multi-couches, la laine et les articles portant des illustrations imprimées.
• Enlevez les taches.
• Lavez avec un produit spécial les taches incrustées.
• Traitez les rideaux avec précautions. Enlevez
les crochets et placez les rideaux dans un
sac de lavage ou une taie d'oreiller.
• Ne lavez pas dans l'appareil :
– Le linge sans ourlet ou déchiré
www.zanussi.com
– Les soutien-gorges à armatures.
– Utilisez un sac de lavage pour les articles
très petits.
• Un très petite charge peut provoquer des
problèmes d'équilibre pendant la phase d'essorage. Si cela se produit, répartissez manuellement les articles dans la cuve et lancez
à nouveau la phase d'essorage.
Taches tenaces
Pour certaines taches, l'eau et les produits de
lavage ne suffisent pas.
Il est recommandé d'éliminer ces taches avant
de mettre les articles dans l'appareil.
Des détachants spéciaux sont disponibles. Utilisez le détachant spécial adapté au type de tache et au tissu.
Produits de lavage et additifs
• Utilisez uniquement des produits de lavage
et des additifs spécialement conçus pour les
lave-linge.
• Ne mélangez pas différents types de produits
de lavage.
• Afin de préserver l'environnement, n'utilisez
que la quantité nécessaire de produit de lavage.
• Respectez les instructions qui se trouvent
sur les emballages de ces produits.
61
Page 62

• Utilisez les produits adaptés au tissu, à la
température du programme et au niveau de
salissure.
• Si vous utilisez des produits de lavage liquides, ne sélectionnez pas la phase de prélavage.
• Si votre appareil ne dispose pas d'un distributeur de produit de lavage avec volet, ajoutez les produits de lavage avec une boule
doseuse.
Dureté de l'eau
Si, dans votre région, la dureté de l'eau est élevée ou moyenne, il est recommandé d'utiliser
Entretien et nettoyage
un adoucisseur d'eau pour les lave-linge. Dans
les régions où l'eau est douce, il n'est pas nécessaire d'utiliser un adoucisseur d'eau.
Pour connaître la dureté de l'eau dans votre région, prenez contact avec l'organisme local de
distribution d'eau.
Respectez les instructions figurant sur l'emballage des produits.
Nettoyage externe
Nettoyez l'appareil uniquement à l'eau savonneuse chaude. Séchez complètement toutes
les surfaces.
Attention N'utilisez pas d'alcool, de
solvants ou de produits chimiques.
Détartrage de l’appareil
L'eau du robinet contient du calcaire. Si cela
s'avère nécessaire, utilisez un adoucisseur
d'eau pour éliminer le tartre.
Utilisez un produit spécialement conçu pour les
lave-linge. Respectez les instructions inscrites
sur l'emballage par le fabricant.
Procédez séparément d'un lavage de linge.
Entretien régulier
Avec les programmes à basse température, il
est possible que certains produits de lavage
restent dans le tambour. Procédez à un entretien régulier. Pour ce faire :
• Videz le linge du tambour.
• Sélectionnez le programme de lavage pour le
coton le plus chaud
• Utilisez une quantité correcte de poudre de
lavage dotée de propriétés biologiques.
Après chaque lavage, laissez la porte ouverte
pendant un moment pour éviter les moisissures
et les mauvaises odeurs.
Tambour
Examinez régulièrement le tambour pour éviter
la formation de calcaire ou de particules de
rouille.
N'utilisez que des produits spéciaux pour éliminer les particules de rouille du tambour.
Pour ceci :
• Nettoyez le tambour à l'aide d'un produit
spécial inox.
• Mettez en route un programme coton court à
température maximale avec une petite quantité de lessive.
Joint du hublot
Examinez régulièrement le joint et enlevez tous les objets situés à l'intérieur.
62
www.zanussi.com
Page 63

Distributeur de produit de lavage
Pour nettoyer la boîte à produits :
1.
2.
3. 4.
5. 6.
3. 4.
45°
20°
Précautions contre le gel
Si l'appareil est installé dans un local où la température peut être négative, évacuez toute l'eau
restant dans le tuyau d'arrivée d'eau et la pompe de vidange.
1. Débranchez la fiche de l'appareil de la
prise secteur.
2. Fermez le robinet d'eau.
3. Retirez le tuyau d'arrivée d'eau.
4. Retirez le tuyau de vidange du support
arrière et décrochez-le de l'évier ou du
siphon.
Filtre du tuyau d'arrivée d'eau et filtre de
la vanne
Pour nettoyer les filtres du tuyau d'arrivée
d'eau :
1.
1
2
3
2.
www.zanussi.com
5. Placez les extrémités du tuyau de vidange et du tuyau d'arrivée d'eau dans un récipient. Laissez l'eau s'écouler des
tuyaux.
6. Une fois toute l'eau évacuée, réinstallez
le tuyau d'arrivée d'eau et le tuyau de vidange.
Avertissement Assurez-vous que la
température est supérieure à 0 °C avant
d'utiliser l'appareil à nouveau.
Le fabricant ne pourra être tenu pour
responsable en cas de dommages dus aux
basses températures.
63
Page 64

En cas d'anomalie de fonctionnement
L'appareil ne démarre pas ou se met à l'arrêt en
cours de programme.
Dans un premier temps, essayez de trouver une
solution au problème (reportez-vous au tableau). Si vous n'y parvenez pas, contactez le
service après-vente.
•
- L'appareil ne se vidange pas.
•
- Le hublot de l'appareil n'est pas fer-
mé.
Avertissement Mettez à l'arrêt l'appareil
avant de procéder aux vérifications.
Pour certaines anomalies, un signal
sonore se fait entendre et l'écran affiche
un code d’alarme :
•
- L'appareil n'est pas approvisionné en
eau.
Problème Solution possible
L'appareil ne démarre
pas :
Assurez-vous que le hublot est fermé.
Assurez-vous qu'aucun fusible n'a grillé dans la boîte à fusibles de votre habita-
Assurez-vous que la touche Départ/pause est enfoncée.
Si le départ différé est sélectionné, annulez la sélection ou attendez la fin du dé-
Vérifiez que le sélecteur de programme est correctement positionné.
Désactivez la sécurité enfants si elle a été préalablement activée.
L'appareil ne se remplit
pas d'eau.
Assurez-vous que la pression de l'eau n'est pas trop faible. Si nécessaire, contac-
Assurez-vous que le robinet d'arrivée d'eau n'est pas obstrué.
Assurez-vous que le filtre du tuyau d'arrivée d'eau et le filtre de la vanne ne sont
Assurez-vous que le tuyau d'arrivée d'eau n'est pas plié ou tordu.
Vérifiez que le raccordement du tuyau d'arrivée d'eau est correct.
L'appareil ne vidange
pas l'eau.
Assurez-vous que le tuyau d'arrivée d'eau n'est pas plié ou tordu.
Vérifiez que le raccordement du tuyau d'arrivée d'eau est correct.
Sélectionnez le programme de vidange si vous avez choisi un programme sans
Sélectionnez le programme de vidange si vous avez choisi une option se terminant
Assurez-vous que la fiche est branchée sur la prise secteur.
tion.
compte.
Assurez-vous que le robinet d'arrivée d'eau est ouvert.
tez votre Compagnie locale de distribution des eaux.
pas obstrués. Reportez-vous au chapitre « Entretien et nettoyage ».
Assurez-vous que le siphon de l'évier n'est pas bouché.
phase de vidange.
avec de l'eau dans le tambour.
64
www.zanussi.com
Page 65

Problème Solution possible
Si les solutions mentionnées ci-dessus s'avèrent inefficaces, contactez le service
La phase d'essorage ne
fonctionne pas
ou
le cycle de lavage dure
plus longtemps que
d'habitude.
Sélectionnez le programme d'essorage.
Sélectionnez le programme de vidange si vous avez choisi une option se terminant
Si les solutions mentionnées ci-dessus s'avèrent inefficaces, contactez le service
Il y a de l'eau sur le sol. Assurez-vous que les raccords des tuyaux d'eau sont bien serrés et qu'il n'y a au-
Assurez-vous que le tuyau d'arrivée d'eau et le tuyau de vidange ne sont pas en-
Assurez-vous d'utiliser une lessive adaptée en quantité correcte.
Impossible d'ouvrir le
hublot de l'appareil.
Sélectionnez le programme de vidange ou d'essorage s'il y a de l'eau dans le tam-
L'appareil fait un bruit
inhabituel.
Vérifiez que l'emballage et/ou les boulons de transport ont été retirés. Reportez-
Ajoutez plus de linge dans le tambour. Il est possible que la charge soit trop légè-
L'appareil se remplit
d'eau et se vidange immédiatement.
Les résultats de lavage
ne sont pas satisfaisants.
Utilisez des produits spéciaux pour enlever les taches tenaces avant de laver le
Veillez à sélectionner la température correcte.
Réduisez la charge de linge.
après-vente (le filtre de la pompe de vidange peut être bouché).
Répartissez manuellement les vêtements dans le tambour et lancez à nouveau la
phase d'essorage. Ce problème peut résulter de problèmes d'équilibrage.
avec de l'eau dans le tambour.
après-vente (le filtre de la pompe de vidange peut être bouché).
cune fuite d'eau.
dommagés.
Assurez-vous que le programme de lavage est terminé.
bour.
Vérifiez que l'appareil est de niveau. Reportez-vous au chapitre « Instructions
d'installation ».
vous au chapitre « Instructions d'installation ».
re.
Vérifiez que la position du tuyau de vidange est correcte. Il est possible que l'ex-
trémité du tuyau de vidange soit placée trop bas. Reportez-vous au chapitre « Instructions d'installation ».
Augmentez la quantité de produit de lavage ou utilisez-en un autre mieux adapté.
linge.
Après avoir effectué ces contrôles, mettez l'appareil en marche. Le programme reprend là où
il s'était interrompu.
Si le problème persiste, contactez le service
après-vente.
www.zanussi.com
Si d'autres codes d'alarme s'affichent, allumez
et éteignez l'appareil. Si le problème persiste,
contactez le service après-vente.
Maintenance
N'utilisez que des pièces de rechange d'origine.
65
Page 66

Avant de contacter le service, assurez-vous de
disposer des informations suivantes. Vous trou-
que : Modèle (Mod.), PNC (Prod.No.), numéro
de série (Ser.No.).
verez ces informations sur la plaque signaléti-
Caracteristiques techniques
Dimensions Largeur / Hauteur / Profondeur 600 / 850 / 501 mm
Profondeur totale 519 mm
Branchement électrique : Voltage
Niveau de protection contre l'infiltration de particules solides et d'humidité assuré par le couvercle de protection, excepté là où l'équipement
basse tension ne dispose d'aucune protection contre l'humidité
Pression de l'arrivée d'eau Minimum 0,5 bar (0,05 MPa)
Arrivée d'eau
Charge maximale Coton 6 kg
Vitesse d'essorage Maximum 1000 tr/min
1) Raccordez le tuyau d'arrivée d'eau à un robinet fileté (3/4 po).
1)
Puissance totale
Fusible
Fréquence
Maximum 8 bar (0,8 MPa)
Eau froide
230 V
2100 W
10 A
50 Hz
IPX4
66
www.zanussi.com
Page 67

www.zanussi.com
67
Page 68

www.zanussi.com/shop
192984531-A-342012
 Loading...