

Zanussi ZSM 705 W, ZSM 705 k USER MANUAL

35668 - 0801
ZANUSSI
Built-in oven
model ZSM 705 W/K
OPERATING AND INSTALLATION MANUAL
2

Warnings and guidance
It is most important that this instruction book should be retained with the appliance for future
reference. Should the appliance be sold or transferred, always ensure that the book is left with the
appliance in order that the new owner can get to know the functions of the appliance and the
relevant warnings.
These warnings are provided in the interest of safety. You MUST read them carefully before
installing or using the appliance.
This oven incorporates new Electronic
Technology and therefore may work differently
from a traditional product which you have
become accustomed to.
The heating elements will become hot very
quickly and care should be taken when placing
or removing items from the oven.
If you are concerned about the operation of the
oven, please study the instruction book
carefully, as it contains advice about how to
achieve excellent results from your new oven.
BEFORE INSTALLATION
• This oven is heavy and care must be taken
when moving it.
• Ensure that all packaging, both inside and
outside the cooker, has been removed before
the cooker is used.
• The oven must be installed according to the
instructions supplied. Any electrical work
must be undertaken by a qualified electrician/
competent person.
• It is dangerous to alter the specifications in any
way.
• After installation, please dispose of the
packaging with due regard to safety and the
environment.
DURING OPERATION
• Do not use this oven if it is in contact with
water and never operate it with wet hands.
• Ensure that the anti-tip oven shelves are
installed in the correct way.
• This oven is designed to be operated by adults
and children under supervision. Young
children must not be allowed to tamper with
the controls or play near or with the cooker.
• CAUTION - accessible parts, especially
around the grill area, may become hot when
the cooker is in use. Children should be kept
away until it has cooled.
• Take great care when heating fats and oils as
they will ignite if they become too hot.
• This oven has been designed for cooking
edible foodstuffs only and must not be used for
any other purposes.
• Never place plastic or any other material
which may melt in or on the oven.
• Only clean this oven in accordance with the
instructions.
• Take care to follow the recommendations
given for tending the food when grilling. Use
the handles provided in the recommended
way.
• Always grill with the oven door closed.
• Always remove the grill pan handles when
grilling.
• Always use oven gloves to remove and replace
food in the oven. Similarly always use oven
gloves to remove and replace the grill pan
handles, before and after grilling.
• Ensure that you support the grill pan when
removing it from the oven.
• Never line any part of the oven with
aluminium foil. Do not allow heatproof
cooking material, e.g. roasting bags, to come
into contact with oven elements.
• Always stand back from the oven when
opening the oven door, to allow any build-up
of steam or heat to release.
• Stand clear when opening the drop down oven
door. Do not allow it to fall open - support it
using the door handle, until it is fully open.
• Do not place sealed cans or aerosols inside the
oven. They may explode if they are heated.
• Do not hang towels or clothes from the oven
or its handle. They are a safety hazard.
3

AFTER USE
• Ensure that all control knobs are in the OFF
position when not in use.
• For hygiene and safety reasons, this oven
should be kept clean at all times. A build-up of
fats or other foodstuffs could result in a fire,
especially in the grill pan.
• Always allow the cooling fan to cool the oven
down before switching off at the electrical
supply prior to carrying out any cleaning or
maintenance work.
• Do not leave utensils containing foodstuffs,
e.g. fat or oil in or on the oven in case it is
inadvertently switched ON.
• Ovens and hobs become very hot, and retain
their heat for a long period of time after use.
Children should be kept well away from the
cooker until it has cooled.
• The timer display should show only the time
of day when the oven is not in use.
• Under no circumstances should you attempt to
repair the appliance yourself. Repairs carried
out by inexperienced persons may cause injury
or serious malfunctioning. Refer to your local
authorised Service Centre. Always insist on
genuine Zanussi spare parts.
WARNING
Please remember that an appliance used for cooking does get hot, so make sure that children are
kept well away it is in use.
4

Contents
Warnings & Guidance Page 3-4
Technical Data Page 5
Installation Page 6
Electrical Connections Page 7
General information Page 8
Control Panel Page 9
How to set the main functions Page 10
Timer display Page 11
Using the Programmes Page 12/15
Oven functions Page 16
Cooking tips Page 17/19
Grilling Page 20-21
Pizza oven - Bread proving Page 22
Helpful hints when buying and preparing food Page 23
Cleaning the oven Page 24
Cleaning the hinged grill Page 25
What happens if Something Goes Wrong Page 26
Technical data
External Dimensions:
Internal Dimensions:
Power Absorbtion:
Model Number ZSM 705 W - ZSM 705 K
Height 59.4 cm
Width 59.4 cm
Depth 53.9 cm
Height 32.5 cm
Width 42 cm
Depth 39.0 cm
Oven capacity 2.0 cu.ft.
Conventional oven 2.0 kW
Fan ducted oven 2.5 kW
Defrost cold fan 30 W
Fan ducted / Bottom Element 3.5 kW
Economy Grill 2.0 kW
Grill 2.8 kW
Oven Light 25 W
Cooling Fan 25 W
Maximum Power Absorbed 3.575 kW
Voltage 240 V
Frequency 50 Hz
5
Installation
It is mandatory that all operations required for the
installation be carried out by a qualified or
competent person - in accordance with existing
rules and regulations.
Please ensure that when the appliance is installed
it is easily accessible for the engineer in the event
of a breakdown.
BUILDING IN
It is important that the dimensions and materials of
the surround or cabinet into which the oven will be
built are correct and will withstand a temperature
increase of at least 60°C above ambient; and that
proper arrangements are made of a continuous
supply of air to the oven so it does not overheat.
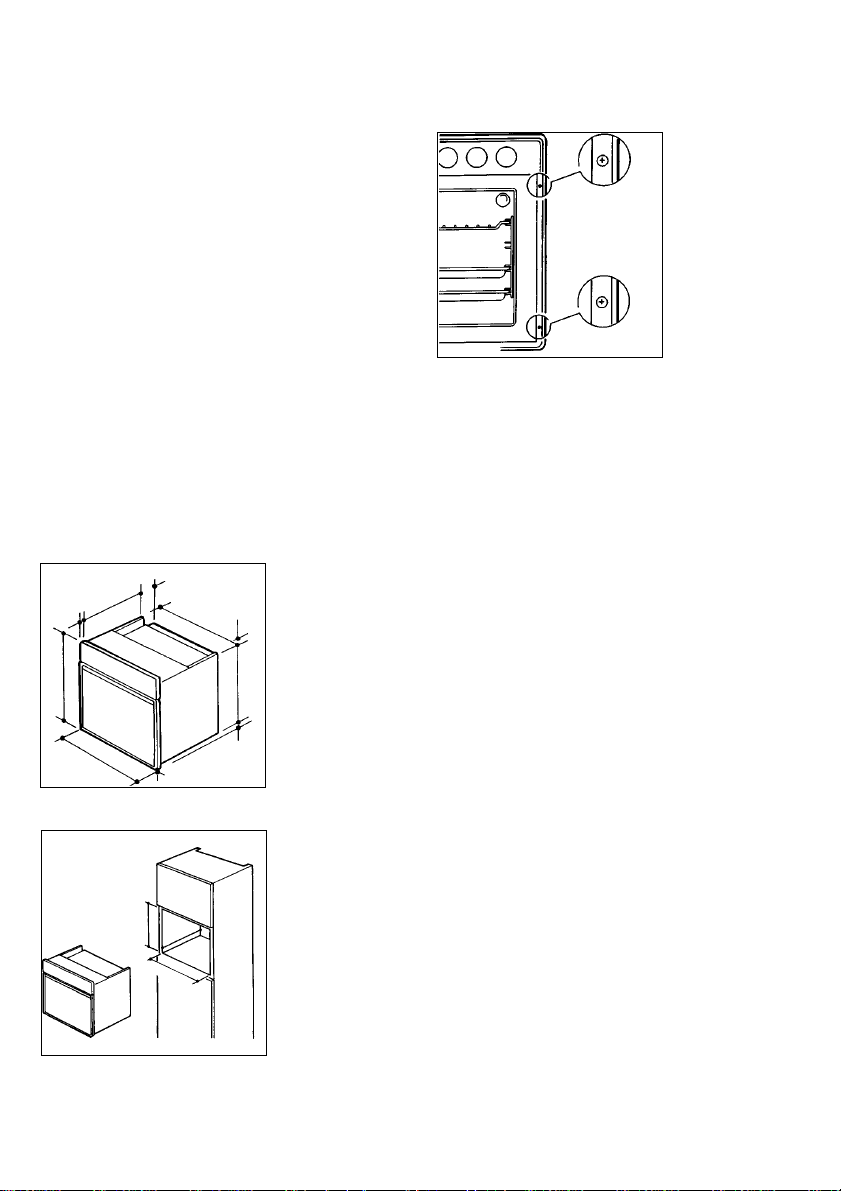
Dimensions of the appliance and recess
required are given below (Fig. 1-2).
FO 0039
Fig. 3
Securing The Oven To The Cabinet
Fit the appliance into the cabinet recess, open the
oven door and secure the oven to the kitchen
cabinet with four wood screws, which fit the holes
provided in the oven frame (Fig. 3).
20
594
FO 0374
FO 0687
6
594
479
60
580
560-570
556
550 min
17
570
7
Important
Before the appliance is connected, check that the
main fuse and the domestic installation can
support the load; and that the power supply is
properly earthed.
The manufacturer disclaims any responsibility
should these safety instructions not be carried
out.
Fig. 1
Fig. 2
Electrical connection
We strongly recommend that all operations for the
installation of your oven be carried out by
QUALIFIED PERSONNEL to the relevant
British Standards.
The oven designed to be connected to 240V
(50Hz) electricity supply.
The oven has an easily accessible terminal block
which is marked as follows:
Letter L - Live terminal
Letter N - Neutral terminal
- Earth terminal
THIS APPLIANCE MUST BE
EARTHED
The cable used to connect the oven to the
electrical supply should have the characteristics
indicated in the table.
It is necessary that you install a double pole switch
between the appliance and the electricity supply
(mains), with a minimum gap of 3 mm between
the switch contacts and of a type suitable for the
required load in compliance with the current rules.
The switch must not break the yellow and green
earth cable at any point.
Important
After installation and connecting, the cable must
be placed so that it cannot at any point reach a
temperature of more than 50°C above the ambient
temperature.
Before the appliance is connected, check that the
main fuse and the domestic installation can
support the load; and that the power supply is
properly earthed.
The manufacturer disclaims any responsibility
should these safety measures not be carried out.
This appliance meets the requirements laid down
in EEC Directive No. 89/336 relating to the
suppression of radio and TV interference.
Models Rating Cable cross Fuse
ZSM 705 W/K
3575 W 4 mm
section mm2 and
Type of the cable min.
Ho5 RR-F 20 A
7

General information
RATING PLATE
These numbers can be found on the rating plate on
the lower front frame of the cooker upon opening
the oven door.
The oven must be protected by a suitable rated
fuse or circuit breaker. The rating of the oven is
given on the rating plate.
MEAT PAN AND GRID
When grilling and roasting, food can be placed on
the grid in the pan. Fat and meat juices will drain
into the base and can be poured off and used to
make gravy.
Important notes:
1) The meat tin should not be placed on a hotplate
GENERAL NOTES ON USING THE OVENS
2) Do not line the meat pan will aluminium foil.
We suggest that you run all the elements for a
short period, to burn off any residue from their
surfaces.
During this period, an unpleasant odour may be
emitted. It is therefore advisable to open a window
for ventilation.
Select the Fan ducted and conventional
oven programmes. Select a temperature of
170°C for approximately 30 mins. on each
programme.
ABOUT CONDENSATION AND STEAM
When food is heated, it produces steam in the
same way as boiling a kettle. The oven is vented to
allow some of this steam to escape. However,
always stand back from the oven when opening
the oven door to allow any build up of steam or
heat to release.
If the steam comes into contact with a cool surface
on the outside of the oven, e. g. a trim, it will
condense and produce water droplets. This is quite
normal and is not caused by a fault on the oven.
To prevent any discolouration, regularly wipe
away condensation any soilage from surfaces.
COOKWARE
Baking trays, oven dishes, etc. should not be
placed directly against the grid covering the fan at
the back of the oven, or placed on the oven base.
Do not use baking trays larger than 30 cm x 35 cm
(12 in x 14 in) as they will restrict the circulation
of heat and may affect the performance. Advice on
the effect of different materials and finishes of
bakeware is given in "Hints and Tips" in the
appropriate oven section.
(See page 20)
THE COOLING FAN
The cooling fan comes on immediately when the
oven is in use, and switches off when cooking is
completed.
During the initial period, the cooling fan may cycle
ON and OFF. This is quite normal.
It may run on after the oven or grill is switched off
to keep the controls cool.
Always allow the cooling fan to cool the cooker
down completely before switching off at the wall
prior to carrying out any cleaning or maintenance
work.
NOTE: The action of the cooling fan will depend
on how long the oven or grill has been used and at
what temperature settings, it may not operate
where the grill or oven has only been used for a
short time.
CONTROL PANEL INDICATOR
DISPLAY
This indicates whenever the oven or grill is
switched ON. The display also indicates when the
set temperature has been reached. It will cycle ON
and OFF during use to show that the temperature is
being maintained.
If display indicator does not operate as the
instructions indicate, the controls have been
incorrectly set. Return all controls to zero or
switch off and reset following the instructions for
the required setting.
as this may cause the enamel to crack.
8
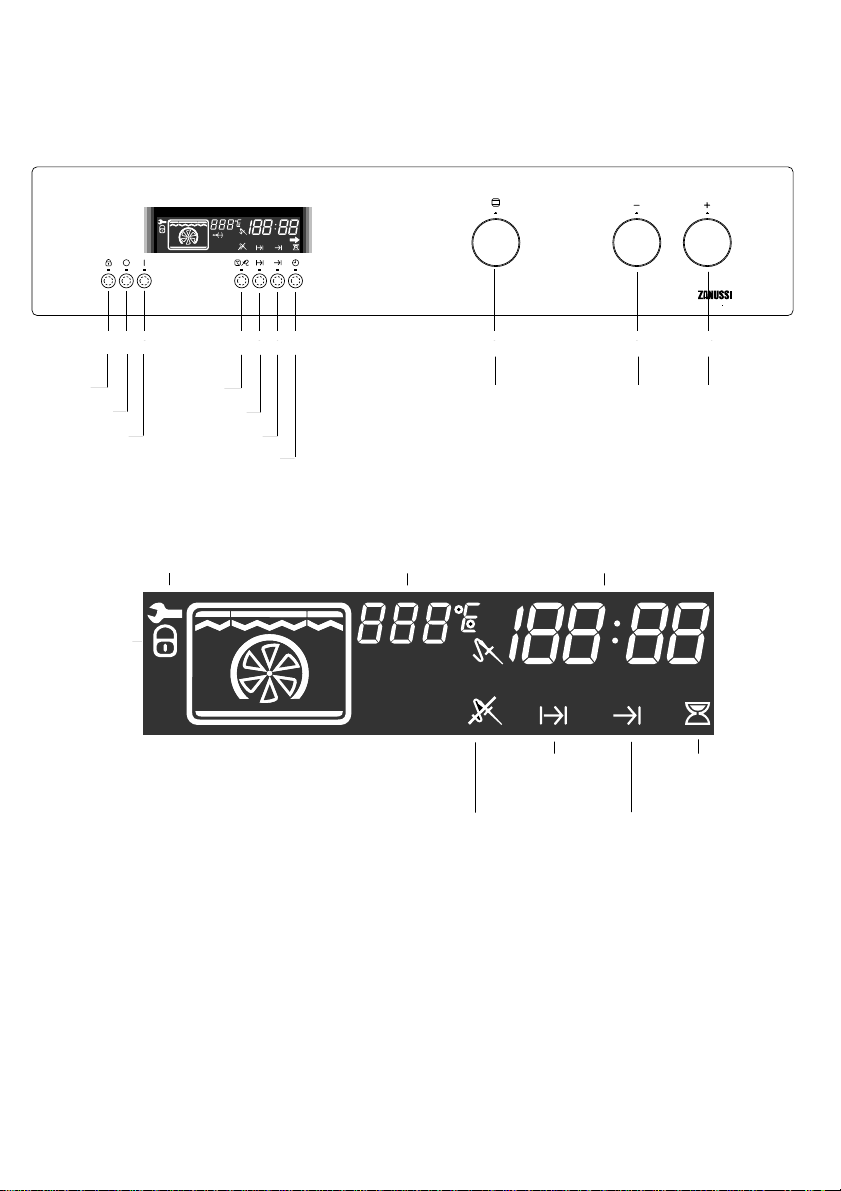
Control panel
Fig. 4
PM
123 4567 8 9 10
1
2
3
4
56
7
B U I L T
I N
8
9
10
Child Safety
Oven Off
Oven On
CHILD SAFETY
Meat Probe
Cooking Time
End of Cooking
TECHNICAL
ASSISTANCE
Minute Minder
PROGRAMME BUTTONS
Small Push Buttons
TEMPERATURE
MEAT PROBE
Large Push Buttons
Function Selector
COOKING TIME
Decrease Increase
TIME
PM
MINUTE MINDER
END OF COOKING
1 Child Safety
2 Oven Off
3 Oven On
4 Meat Probe
5 Cooking Time
6 End of Cooking
7 Minute Minder
8 Oven Function Selector
9 Decrease Temperature or Time
10 Increase Temperature or Time
9
 Loading...