

Zanussi ZSF 2440S User Manual
DISHWASHER
ZSF 2440
156 989 310

Contents
For the user
Safety Information 3
Description of the appliance 4-5
- Spray arm
- Coarse strainer/microfilter
- Fine filter
- Detergent dispenser
- Rinse aid dispenser
- Water softener
The control panel 6
- How to set the delayed start
Adjusting the water softener 7
Programme chart 8
Loading and unloading 9
Using the appliance 10
- Starting the programme
- Interrupting the programme temporarily
- Cancelling the programme
- Pause function
- Cancelling the drying phase
- Switching the dishwasher off
For the Installer
Technical Specifications 15
Unpacking 16
- Damages
- Use
- Positioning
Installation 17-18
- Water inlet
- Water drainage
- Power supply
Information for test centres 19
Maintenance and cleaning 11
Something Not Working 12-13
Service 13
- Service and Spare Parts
- Customer Care Department
Guarantee Conditions 14
Guide to use the instruction book
The following symbols will be found in the text to guide you throughout the instructions:
Safety information
Step by step instructions
Hints and tips
Environmental information
- 2 -

Safety information
Before installing and first using the dishwasher, read this instruction booklet carefully, including its hints
and warnings. To avoid unnecessary mistakes and accidents, it is important to ensure that all people using
the dishwasher are thoroughly familiar with its operation and safety features. Save these instructions and
make sure they remain with the dishwasher if it is moved or sold, so that everyone using it through its life
an be properly informed on appliance use and safety.
c
Installation and servicing
ll installation work should be done by a qualified or
● A
competent person. Any servicing must be carried by
qualified and authorised engineer. Work performed
a
by persons with inadequate knowledge may adversely
affect the satisfactory functioning of the product and
may cause personal injury or damage. Before any work
is carried out on the dishwasher, it must be isolated
from the electrical supply. To do this the power plug
must be removed from the wall socket.
● Water connection should be made via an easily
accessible tap.
● The power cable must be plugged into an earthed
socket, which must to be easily accessible. Permanent
installation must only be carried out by an authorised
electrician or competent person.
● If the power cable is damaged, it must be replaced
by a Service Force engineer. Please contact your
local service centre on 08705 929 929.
● Make sure that the power cable is not nipped or other-
wise damaged and that the hoses do not get crushed
or kinked when moving the dishwasher when installing
or cleaning etc.
● Servicing and possible repairs must be carried out by
a Service Force engineer. Always insist on genuine
spare parts. Never try to repair the dishwasher yourself.
Child Safety
● The dishwasher should be used by adults only. Do not
let children play with the controls or other parts of it.
● Do not allow children to play with the packaking. Risk
of suffocation.
● Keep all detergents in safe place out of children´s
reach.
● Prevent children from sitting, swinging or standing
on the open door.
During Use
● This dishwasher is designed solely for washing house-
hold utensils suitable for machine washing. Using it for
other purposes could lead to physical injury or damage
to property and invalidate the guarantee.
● Avoid opening the door while the dishwasher is running,
as hot steam may escape.
● Only use detergent specifically designed for use in
dishwashers.
● Do not place sharp knives with their points upwards.
It is much safer to lay them horizontally in the basket.
● Ensure that the door of the dishwasher is always closed
when it is not being loaded or unloaded. In this way you
will avoid anybody injuring themselves on the open door.
f you take any dishes out of the dishwasher before the
● I
end of the dishwashing cycle, it is extremely important
to rinse them thoroughly under running water to remove
any remaining detergent.
● The water safety system protects against water damages.
The following requirements must be fulfilled:
- The dishwasher must be electrically connected when
it is switched off.
- The dishwasher must be correctly installed.
- Always shut off the water supply whenever the dishwasher is left unattended for an extended period.
● In the event of flooding or leakage, switch off the water
supply immediately by closing the stopcock and disconnect the power supply by unplugging the power cable
or removing the fuse. When removing the electrical
plug, grip the plug, not the cable.
Never touch the
switch or plug with wet hands!
Conservation
- packaging:
All materials used in packaging this appliance are
environmentally-friendly. The various plastics used are
identified and can be recycled:
● PE stands for polyethylene, which is used for the
bag around the appliance and the bag in which these
instructions were supplied.
● PS stands for polystyrene (moulded), which is used
for the sections of packaging needed to cushion the
appliance.
The cardboard components of the packaging are made
from recyclable paper and should be taken to a collection
point for recycling.
- old apparatus:
The symbol on the product or on its packaging indicates
that this product may not be treated as household waste.
Instead it shall be handed over to the applicable collection
point for the recycling of electrical and electronic equipment.
By ensuring this product is disposed of correctly, you will
help prevent potential negative consequences for the
environment and human health, which could otherwise be
caused by inappropriate waste handling of this product.
For more detailed information about recycling of this product,
please contact your local city office, your household waste
disposal service or the shop where you purchased the
product.
- 3 -
156 989 310
Description of the appliance
4 5
- 4 -
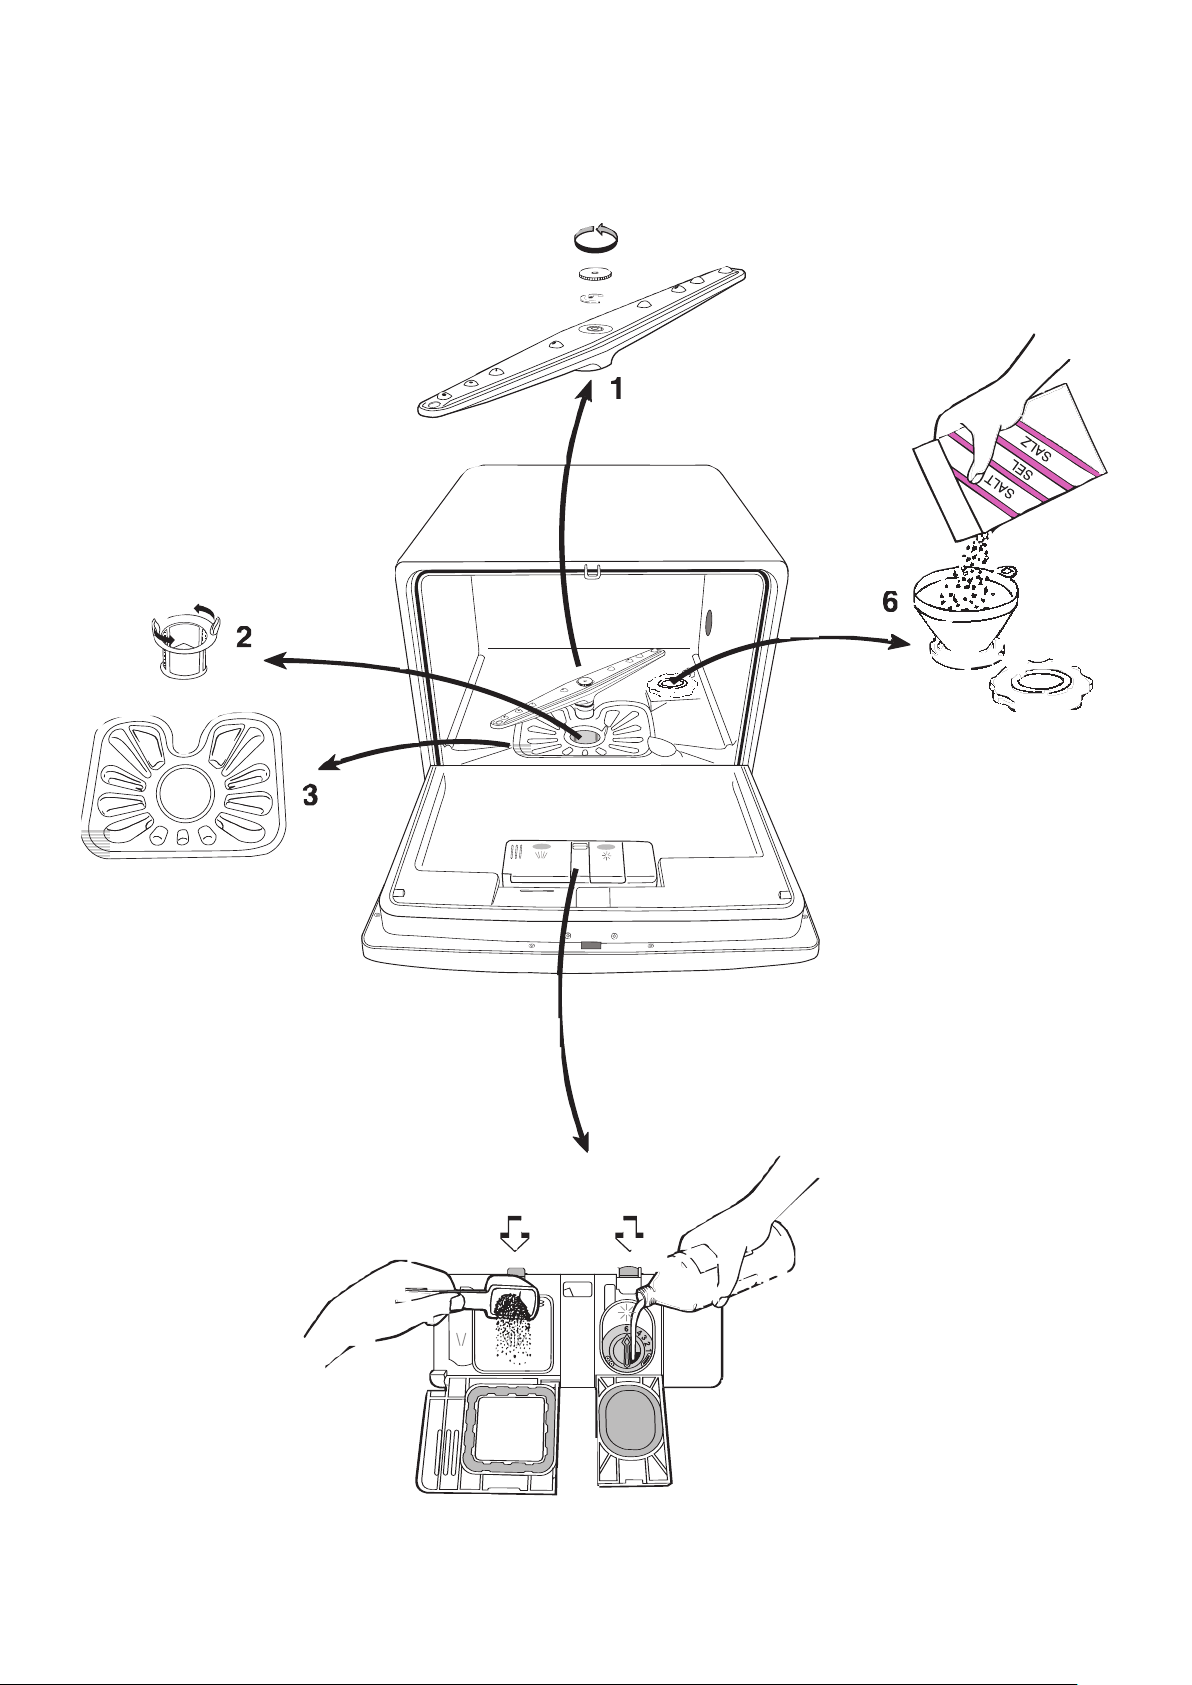
Spray arm (1)
t is important to keep all the holes in the spray arm clear.
I
clogged hole can seriously affect washing efficiency.
A
If the spray arm needs cleaning, unscrew the nut anticlockwise, remove the washer and lift off the spray arm.
Clear the holes and shake out any food remnants.
Coarse strainer/microfilter (2)
The purpose of the coarse strainer is to catch large objects
such as a cocktail stick and pieces of eggshell. Make sure
that the strainer is always clean. Turn the coarse strainer
anti-clockwise. Lift it out and rinse it under running water
whenever necessary.
Fine filter (3)
It is just as important to keep this filter clean. A dirty or
clogged filter will always impair washing efficiency.
The fine filter can easily be lifted out for cleaning when
you have removed the coarse strainer.
Detergent dispenser (4)
Open the lid to the dispenser by pressing the lid catch
towards the compartment. Consult the instructions on the
detergent packet, fill the compartment accordingly and
close the lid. Remember that the instructions usually refer
to full-size dishwashers, for example when using detergent
tablets, it is sufficient to use just half a tablet. Pre-wash
detergent is poured into the smaller compartment to the
left when needed. This detergent is used during the prerinsing. Make sure that nothing prevents the lid from
opening.
Only use detergents specially designed for
dishwashers.
Rinse aid dispenser (5)
Use of rinse aid will result in cleaner and faster drying of
the load, since it helps water and residues to run off.
Too much rinse aid may result in streakiness, too little
may cause white spots. The dispenser holds about 150 ml.
This is enough for approx. 60 wash cycles, depending
on the dosage setting. Adjust the dosage setting according
to the hardness of the water.
Do not fill the rinse aid dispenser with liquid
detergent.
Zanussi recommends the use of Finish dishwasher detergent and Rinse Aid.
Water softener (6)
This dishwasher is equipped with a water softener for hard
water. The lime in hard water causes white deposits to
occur on dishes and to the interior of the dishwasher.
To prevent this, the water has to pass through a special
container where the hardness is removed.
Since the water softener uses dishwasher salt, you will
have to refill the salt container after a certain number of
dishwasher cycles.
It is extremely important, that the salt
container is filled up with the dishwasher
salt before using the dishwasher for the
first time.
The indicator light on the control panel is lit when the
container requires refilling.
1. Unscrew the filler cap to the salt container anticlockwise.
2. Fill the salt container with water (only the first
time).
3. Fill the container with dishwasher salt, using the
funnel supplied.
4. Remove the funnel and wipe off any spillage
around the filler opening.
5. Screw the filler cap back properly in place.
The water softener is now ready for the first load of dishes.
Always make sure that there is dishwasher salt in the
container, which holds about 1 litre.
How to adjust the
the water softener”.
Only use special salt for dishwashing
machines, ordinary domestic salt, especially
table salt, can damage the water softener.
water softener, see chapter ”Adjusting
You can set the dosage between 1 - 6, the appliance is factory set to
Begin at the lowest dosage setting and increase
if necessary by turning the setting arrow with e.g.
the handle of a spoon.
The indicator light on the control panel is lit when the
dispenser requires refilling.
1. Open the lid to the dispenser by pressing the lid
catch towards the compartment and lift the lid.
2. Fill up with rinse aid; do not overfi
3. Wipe off any spillage carefully to prevent excessive
foaming during the next wash programme.
4. Close the lid and press until it locks again.
1.
ll.
- 5 -
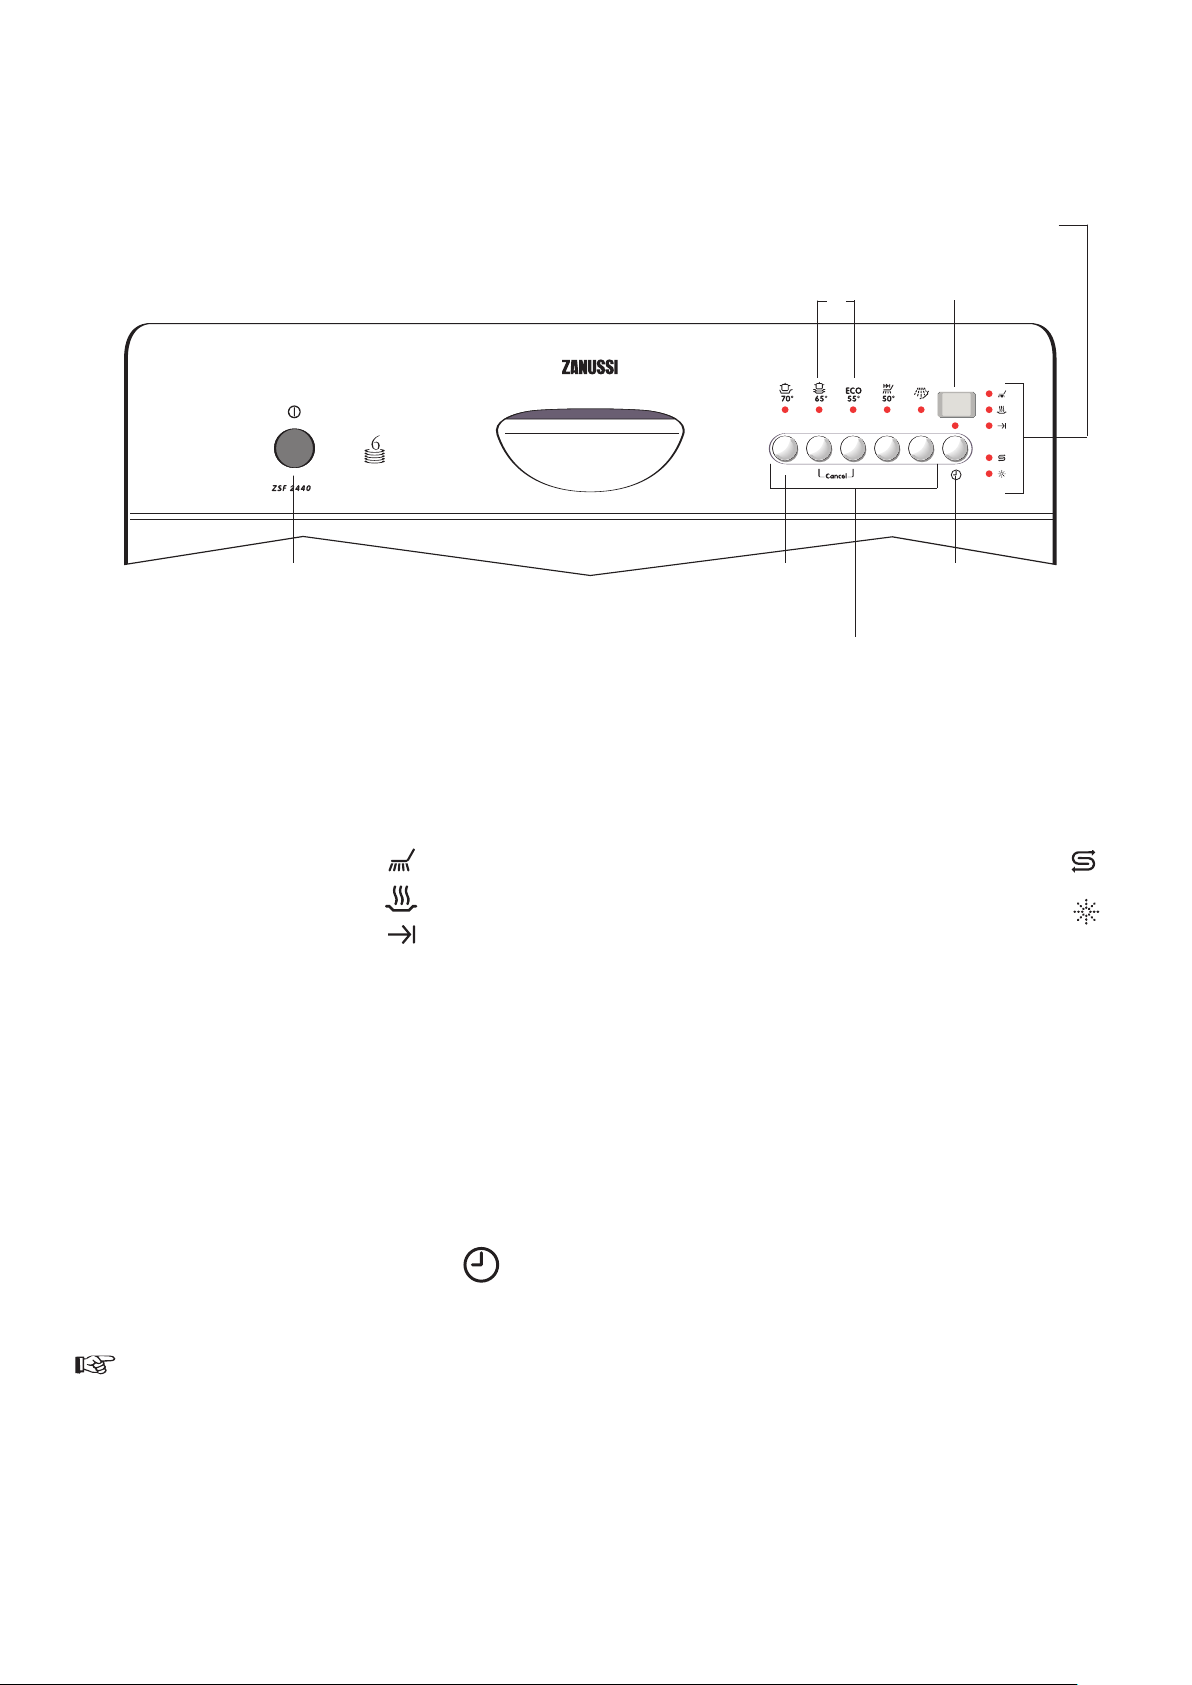
The control panel
Indicator and
c
ontrol lamps
On/Off button
Combination buttons ”A”:
In addition to selecting a programme, you can by
pressing these two buttons adjust the setting of the
water softener and cancel a programme in progress.
Indicator lamps:
Shows current phase of the selected programme.
Water softener
button
Control lamps:
Shows that
A
Display
Delay start
button
Programme
buttons
• Wash cycle in progress top lamp
• Drying in progress middle lamp
• Programme cycle lowest lamp
completed
The display can show:
• Which
adjusted to.
• Which start time is set.
• Remaining time of a programme in progress.
• An error code.
hardness level the water softener is
How to set the delayed start
The programme start can be delayed between 1 and 19
hours.
1. Press in the On/Off button.
2. Press the delay start button repeatedly, until the
required delay shows on the display. Indicator
lamp for the delay start button is lit.
3. Press the button for the required programme.
4. The remaining time to the start is shown in the
display. After the set delayed start time has
elapsed, the programme starts.
• Refilling of salt container is necessary
• Refilling of the rinse aid dispenser
is necessary
Changing the delayed start:
If the programme has not started, you are still able
to change the set time with the delay start button.
Cancelling the delayed start:
If the programme has not started, the delayed start
can be cancelled. Press the delay start button
repeatedly, until the running time of the selected
programme appears on the display. The required
programme starts immediately.
- 6 -
 Loading...