

Page 1

EN
User manual 2
FR
Notice d'utilisation 16
HU
Használati útmutató 32
ES
Manual de instrucciones 49
Fridge Freezer
Réfrigérateur/congélateur
Hűtő - fagyasztó
Frigorífico-congelador
ZRB935NX2
Page 2
Contents
Safety instructions _ _ _ _ _ _ _ _ _ _ _ _ _ _ 2
Product description _ _ _ _ _ _ _ _ _ _ _ _ _ _ 4
Control panel _ _ _ _ _ _ _ _ _ _ _ _ _ _ _ _ _ 5
Operation _ _ _ _ _ _ _ _ _ _ _ _ _ _ _ _ _ _ _ 5
First use _ _ _ _ _ _ _ _ _ _ _ _ _ _ _ _ _ _ _ _ 8
Daily use _ _ _ _ _ _ _ _ _ _ _ _ _ _ _ _ _ _ _ _ 8
Safety instructions
In the interest of your safety and to ensure the
correct use, before installing and first using the
appliance, read this user manual carefully, including its hints and warnings. To avoid unnecessary mistakes and accidents, it is important to
ensure that all people using the appliance are
thoroughly familiar with its operation and safety
features. Save these instructions and make sure
that they remain with the appliance if it is moved
or sold, so that everyone using it through its life
will be properly informed on appliance use and
safety.
For the safety of life and property keep the precautions of these user's instructions as the manufacturer is not responsible for damages caused
by omission.
Children and vulnerable people safety
• This appliance is not intended for use by persons (including children) with reduced physical, sensory or mental capabilities, or lack of
experience and knowledge, unless they have
been given supervision or instruction concerning use of the appliance by a person responsible for their safety.
Children should be supervised to ensure that
they do not play with the appliance.
• Keep all packaging well away from children.
There is risk of suffocation.
• If you are discarding the appliance pull the
plug out of the socket, cut the connection cable (as close to the appliance as you can)
and remove the door to prevent playing children to suffer electric shock or to close themselves into it.
• If this appliance featuring magnetic door
seals is to replace an older appliance having
2
Helpful hints and tips _ _ _ _ _ _ _ _ _ _ _ _ _ 9
Care and cleaning _ _ _ _ _ _ _ _ _ _ _ _ _ _ 10
Troubleshooting _ _ _ _ _ _ _ _ _ _ _ _ _ _ _ 11
Technical data _ _ _ _ _ _ _ _ _ _ _ _ _ _ _ _ 13
Installation _ _ _ _ _ _ _ _ _ _ _ _ _ _ _ _ _ _ 13
Environmental concerns _ _ _ _ _ _ _ _ _ _ _ 15
Subject to change without notice.
a spring lock (latch) on the door or lid, be
sure to make that spring lock unusable before
you discard the old appliance. This will prevent it from becoming a death trap for a child.
General safety
Warning!
Keep ventilation openings, in the appliance enclosure or in the built-in structure, clear of obstruction.
• The appliance is intended for keeping foodstuff and/or beverages in a normal household
and similar applications such as:
– staff kitchen areas in shops, offices and
other working environments;
– farm houses and by clients in hotels, mo-
tels and other residential type environ-
ments;
– bed and breakfast type environments;
– catering and similar non-retail applications.
• Do not use a mechanical device or any artificial means to speed up the thawing process.
• Do not use other electrical appliances (such
as ice cream makers) inside of refrigerating
appliances, unless they are approved for this
purpose by the manufacturer.
• Do not damage the refrigerant circuit.
• The refrigerant isobutane (R600a) is contained within the refrigerant circuit of the appliance, a natural gas with a high level of environmental compatibility, which is nevertheless
flammable.
During transportation and installation of the
appliance, be certain that none of the compo-
www.zanussi.com
Page 3
nents of the refrigerant circuit become damaged.
If the refrigerant circuit should become damaged:
– avoid open flames and sources of ignition
– thoroughly ventilate the room in which the
appliance is situated
• It is dangerous to alter the specifications or
modify this product in any way. Any damage
to the cord may cause a short-circuit, fire
and/or electric shock.
Warning! Any electrical component (pow-
er cord, plug, compressor) must be replaced by a certified service agent or qualified
service personnel to avoid hazard.
1. Power cord must not be lengthened.
2. Make sure that the power plug is not
squashed or damaged by the back of the
appliance. A squashed or damaged power plug may overheat and cause a fire.
3. Make sure that you can come to the
mains plug of the appliance.
4. Do not pull the mains cable.
5. If the power plug socket is loose, do not
insert the power plug. There is a risk of
electric shock or fire.
6. You must not operate the appliance without the lamp cover (if foreseen) of interior
lighting.
• This appliance is heavy. Care should be taken
when moving it.
• Do not remove nor touch items from the
freezer compartment if your hands are damp/
wet, as this could cause skin abrasions or
frost/freezer burns.
• Avoid prolonged exposure of the appliance to
direct sunlight.
• Bulb lamps (if foreseen) used in this appliance are special purpose lamps selected for
household appliances use only. They are not
suitable for household room illumination.
Daily Use
• Do not put hot pot on the plastic parts in the
appliance.
www.zanussi.com
• Do not store flammable gas and liquid in the
appliance, because they may explode.
• Do not place food products directly against
the air outlet on the rear wall. (If the appliance
is Frost Free)
• Frozen food must not be re-frozen once it has
been thawed out.
• Store pre-packed frozen food in accordance
with the frozen food manufacturer's instructions.
• Appliance's manufacturers storage recommendations should be strictly adhered to. Refer to relevant instructions.
• Do not place carbonated or fizzy drinks in the
freezer compartment as it creates pressure
on the container, which may cause it to explode, resulting in damage to the appliance.
• Ice lollies can cause frost burns if consumed
straight from the appliance.
Care and cleaning
• Before maintenance, switch off the appliance
and disconnect the mains plug from the
mains socket.
• Do not clean the appliance with metal objects.
• Do not use sharp objects to remove frost
from the appliance. Use a plastic scraper.
• Regularly examine the drain in the refrigerator
for defrosted water. If necessary, clean the
drain. If the drain is blocked, water will collect
in the bottom of the appliance.
Installation
Important! For electrical connection carefully
follow the instructions given in specific
paragraphs.
• Unpack the appliance and check if there are
damages on it. Do not connect the appliance
if it is damaged. Report possible damages
immediately to the place you bought it. In that
case retain packing.
• It is advisable to wait at least four hours before connecting the appliance to allow the oil
to flow back in the compressor.
• Adequate air circulation should be around the
appliance, lacking this leads to overheating.
3
Page 4
To achieve sufficient ventilation follow the instructions relevant to installation.
• Wherever possible the back of the product
should be against a wall to avoid touching or
catching warm parts (compressor, condenser) to prevent possible burn.
• The appliance must not be located close to
radiators or cookers.
• Make sure that the mains plug is accessible
after the installation of the appliance.
• Connect to potable water supply only (If a
water connection is foreseen).
Service
• Any electrical work required to do the servicing of the appliance should be carried out by
a qualified electrician or competent person.
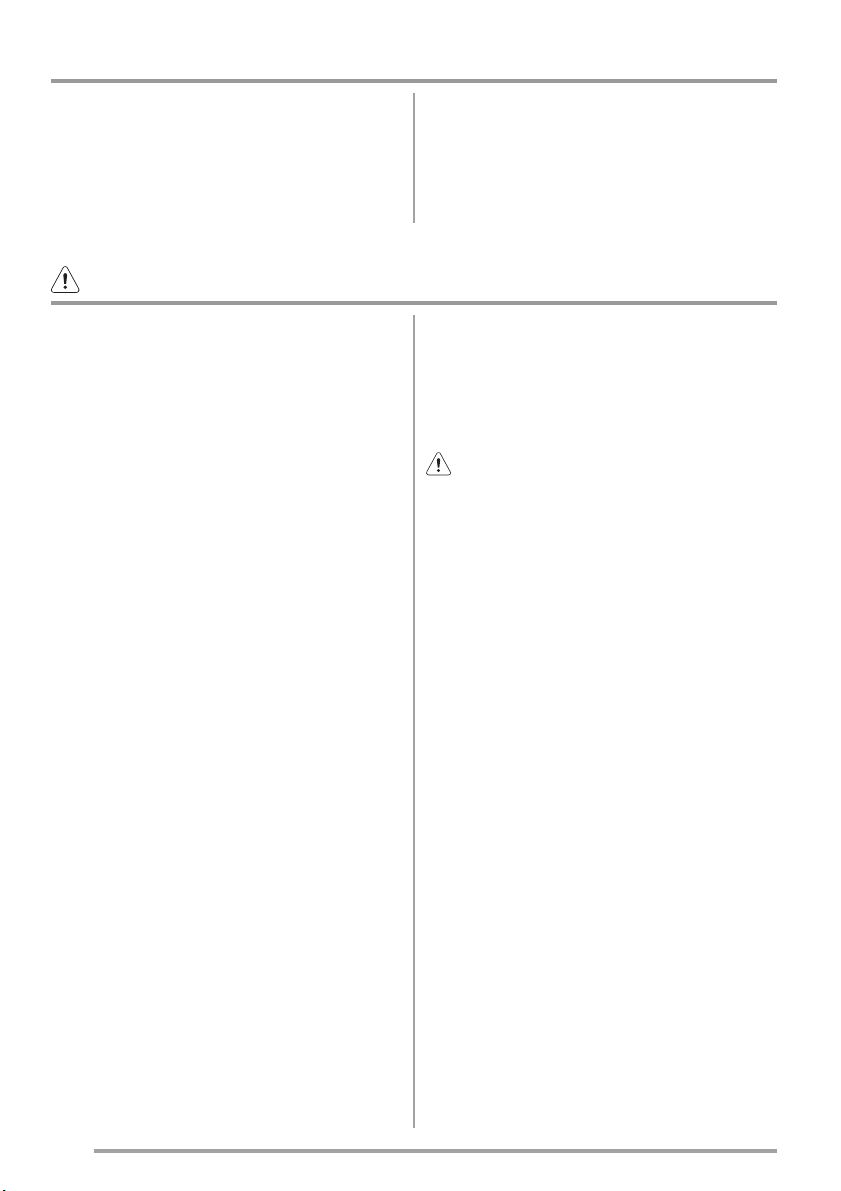
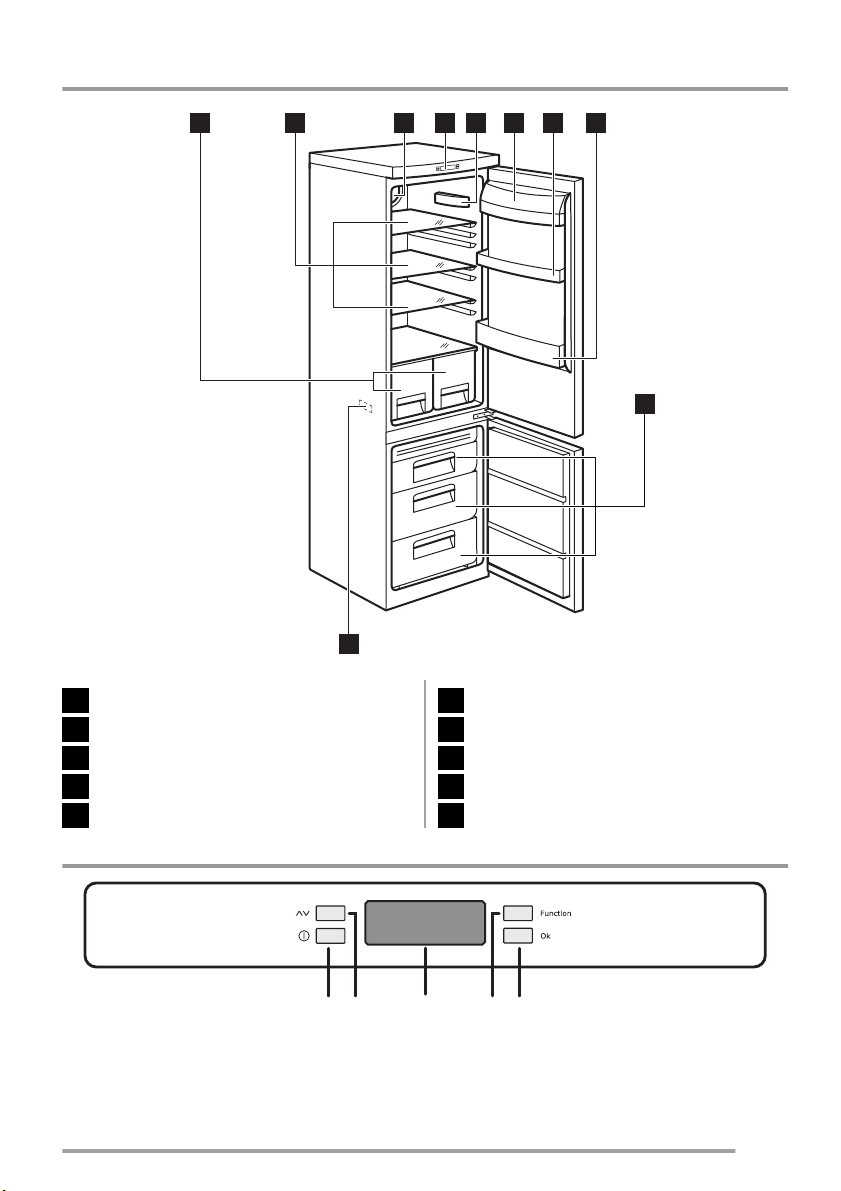
Product description
• This product must be serviced by an authorized Service Centre, and only genuine spare
parts must be used.
Environment Protection
This appliance does not contain gasses
which could damage the ozone layer, in either its refrigerant circuit or insulation materials.
The appliance shall not be discarded together
with the urban refuse and rubbish. The insulation foam contains flammable gases: the appliance shall be disposed according to the applicable regulations to obtain from your local authorities. Avoid damaging the cooling unit, especially at the rear near the heat exchanger. The
materials used on this appliance marked by the
symbol
are recyclable.
6 7 841 3 52
Vegetable drawers
1
Glass shelves
2
4
10
Dynamic Air Cooling
3
Control panel
4
9
www.zanussi.com
Page 5
Led light
5
Dairy shelf
6
Door shelf
7
Bottle shelf
8
Freezer baskets
9
Rating plate
10
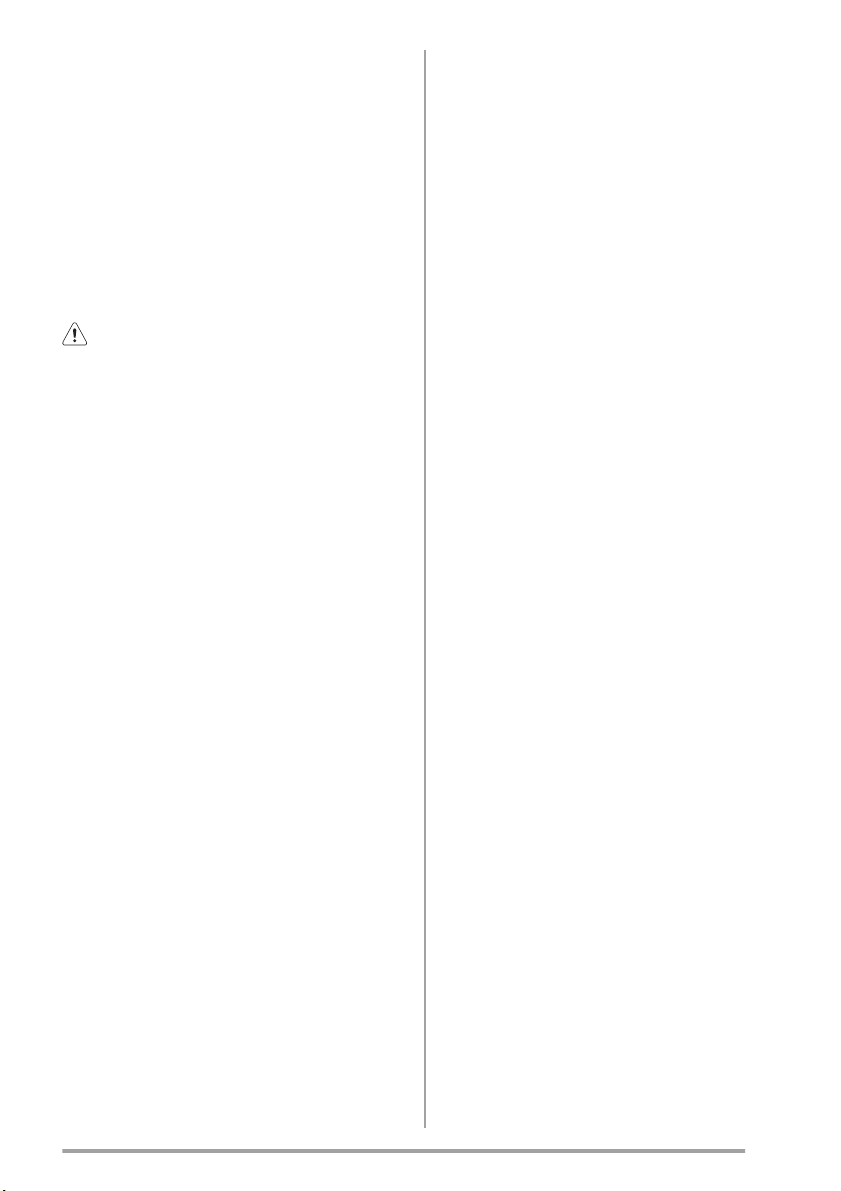
Control panel
AC
BDE
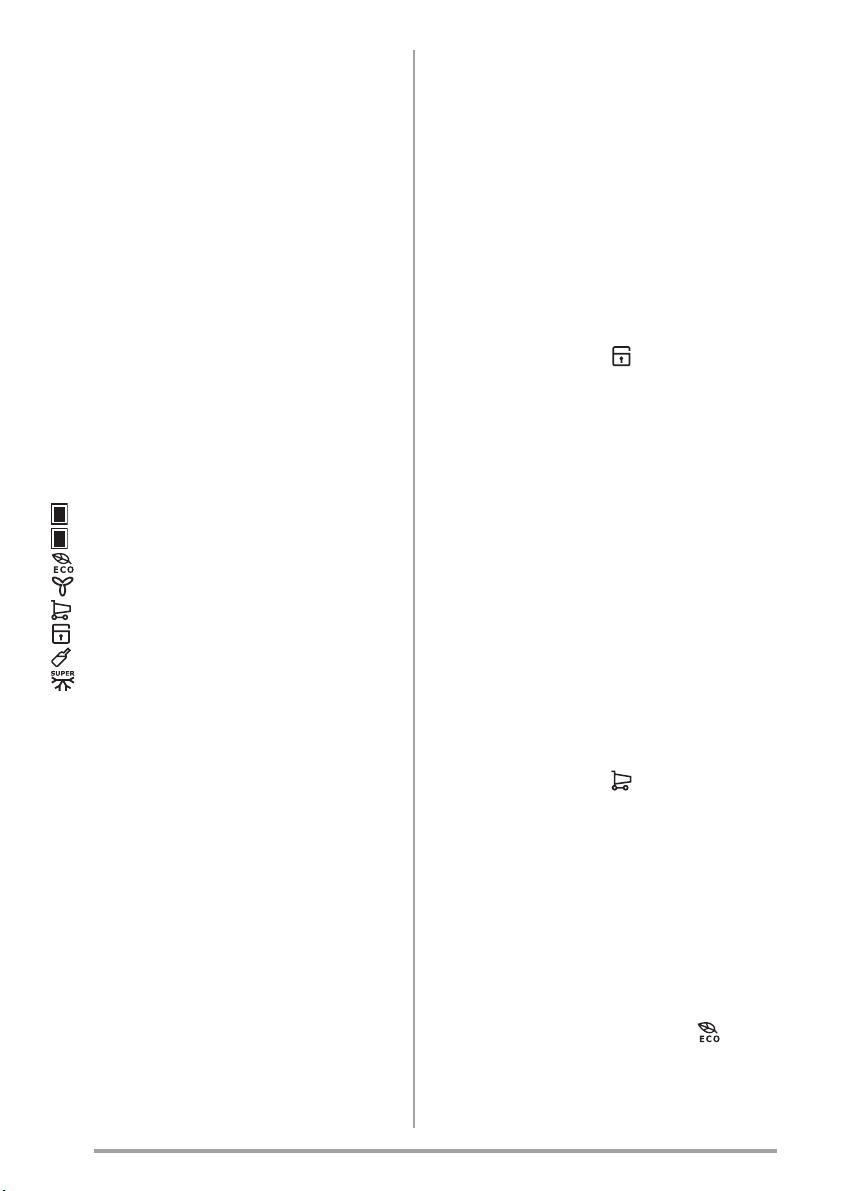
A - Appliance button ON/OFF D - Function button
B - Temperature regulation button E - Confirmation button
C - Temperature and function indicator
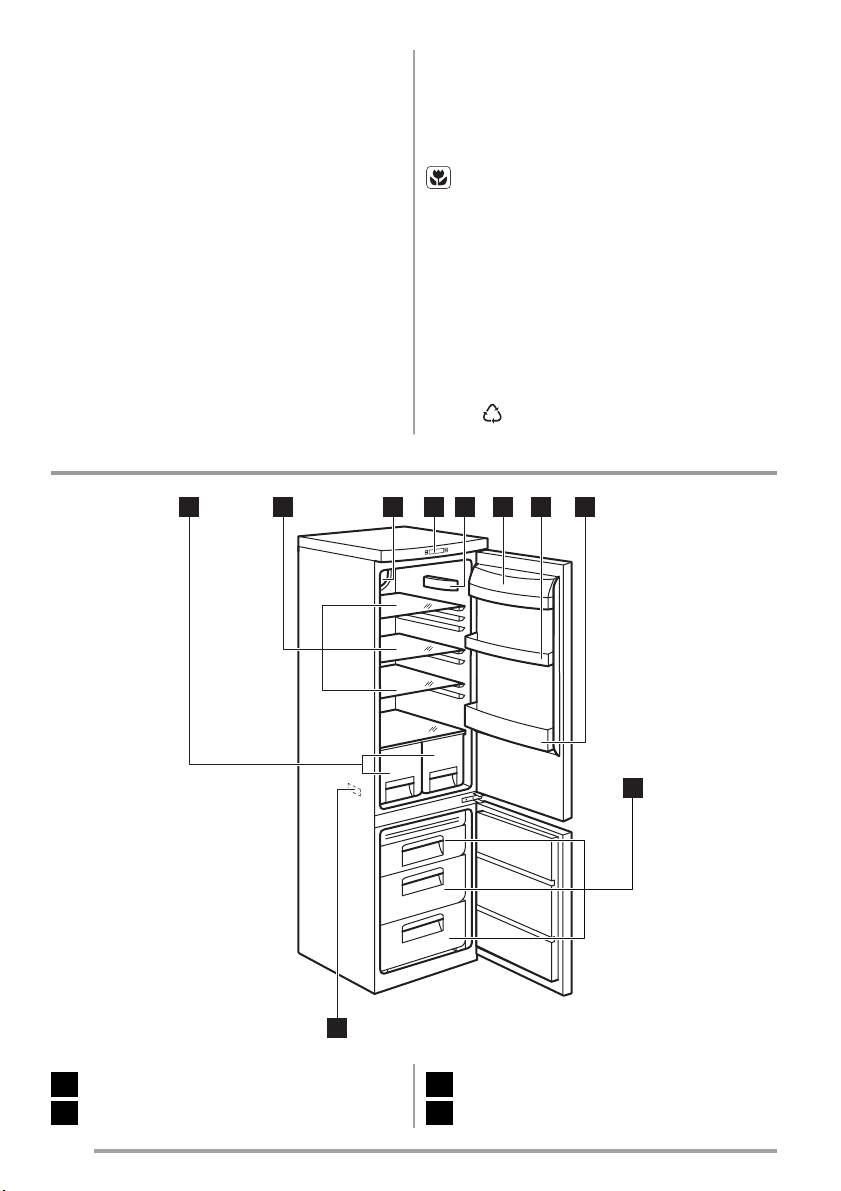
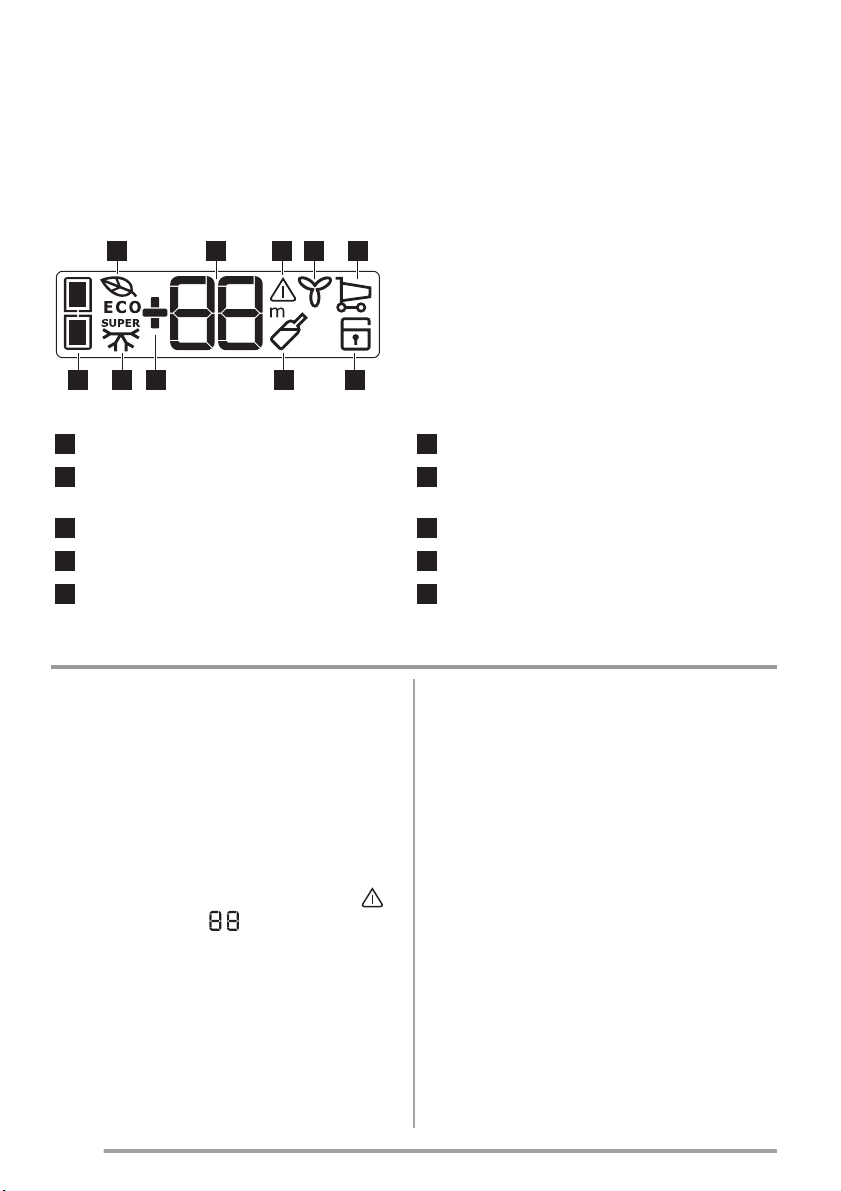
Display
10 1 2 3 4
56789
Temperature indicator.
1
Excessive temperature alarm.
2
FreeStore function indicator.
3
Shopping function indicator.
4
Child Lock function indicator.
5
Operation
First switch on
After plugging the plug into the power outlet, if
the display is not illuminated, press key (A), appliance on.
As soon as the appliance is turned on, it is in
alarm condition, the temperature flashes and
you will hear a buzzer.
www.zanussi.com
Timer function indicator.
6
Positive or negative temperature indicator.
7
Action Freeze function indicator.
8
Compartment indicator.
9
Eco Mode function indicator.
10
Press key (E) and the buzzer will go off (also
see the section on "excessive temperature
alarm" ) the icon
cator
will appear the warmest temperature
still flashes and on the indi-
reached.
For a correct storage of the food select the Eco
mode function that guarantee the following temperatures are set:
5
Page 6
+5°C in the fridge
-18°C in the freezer
• Wait until the inside compartment temperature reach -18°C, before introducing the
goods in the freezer compartment.
• To select a different temperature see "Temperature regulation".
Switching off
The appliance is shut off by pressing key (A) for
more than 1 second.
During this, a countdown of the temperature
from -3 -2 -1 will be shown.
Functions Menu
By activating the key (D) the functions menu is
operating. Each function could be confirmed by
pressing button (E). If there is no confirmation
after some seconds the display will go out from
the menu and return in normal condition.
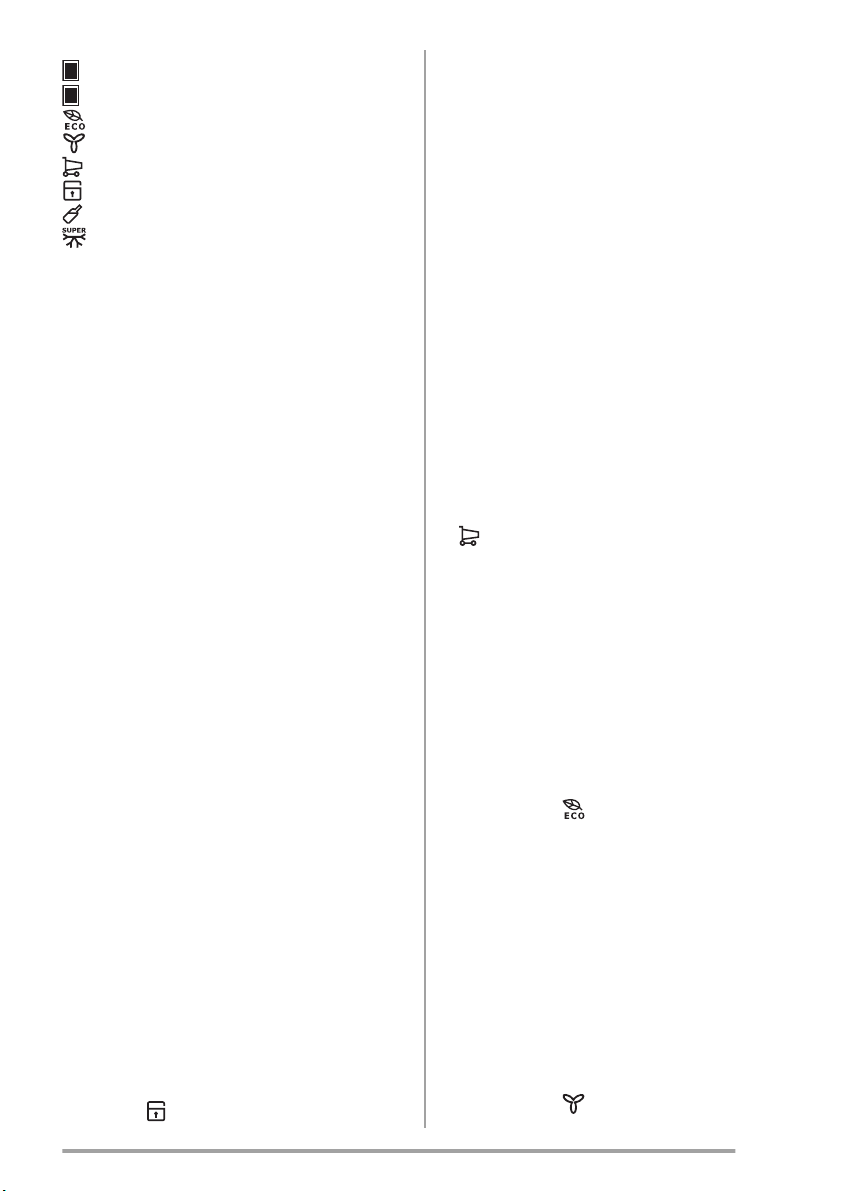
The following functions are indicated:
Select the fridge compartment
Select the freezer compartment
Eco Mode function
FreeStore function
Shopping function
Child Lock function
Drinks Chill function
Action Freeze function
Temperature regulation
Press the key (D) to select the compartment
and than the key (B) to set the necessary temperature.
Press the key (E) to confirm the selection.
The temperature indicator shows the set temperature. The set temperature will be reached
within 24 hours.
Fluctuations of some degrees around set temperature are normal and does not mean any
fault in the appliance.
Holiday Function "H"
The holiday function sets the temperature at +
15°C.
This function allows you to keep the refrigerator
shut and empty during a long holiday period ( e.
g. the summer holidays) without the formation of
a bad odours.
To turn on the holiday function operate as per
modify the selected temperature. The temperature indicator can modify the displayed temperature up to + 8 °C, 1 °at a tim. + 2 °C will be followed by the letter "H ". Press key E to confirm.
Now the refrigerator is in the "holiday "function
in the energy- saving mode.
Important! The fridge compartment must be
empty with holiday function on.
Child Lock Function
The Child Lock function is activated by pressing
key (D) (several times if necessary) until the corresponding icon appears
.
You must confirm the choice by pressing key
(E) within few seconds. You will hear the buzzer
and the icon remains lighted. In this condition
any possible operation through the keys does
not cause any change as long as this function is
activated.
It is possible to de-activate the function at any
time by pressing key (D) until the corresponding
icon will flash and then key (E).
Shopping Function
If you need to insert a large amount of warm
food, for example after doing the grocery shopping, we suggest activating the Shopping function to chill the products more rapidly and to
avoid warming the other food which is already in
the refrigerator.
The Shopping function is activated by pressing
key (D) (several times if necessary) until the cor-
responding icon appears
. You must confirm
the choise by pressing key (E) within few seconds. You will hear the buzzer and the icon remains lighted.
The Shopping function shuts off automatically
after approximately 6 hours. It is possible to deactivate the function at any time by pressing key
(D) until the corresponding icon will flash and
then key (E).
Eco Mode Function
Press the key (D) (several times if necessary)
until the corresponding icon appears
.
Press the key (E) to confirm the selection. You
will hear the buzzer and the icon remains lighted.
6
www.zanussi.com
Page 7
In this condition the temperatures are automatically set (+ 5°C and - 18°C), in the best conditions for storing food.
Set a different temperature in one of the compartment to switch off the function.
FreeStore Function
Press the key (D) (several times if necessary)
until the corresponding icon appears
Press the key (E) to confirm the selection. You
will hear the buzzer and the icon remains lighted.
Important! If the function is activated
automatically the FreeStore icon is not shown
(refer to "Daily use").
The activation of the FreeStore function
increase the energy consumption.
Action Freeze Function
The freezer compartment is suitable for long
term storage of commercially frozen and deepfrozen food, and for freezing fresh food.
The maximum quantity of foods to freeze in 24
hours is shown on the rating plate.
To freeze the amount of food indicated on the
rating plate, place the food directly in touch with
the cooling surface (remove the drawer or basket). In case the food is frozen inside the drawers or baskets, the maximum quantity is slightly
reduced.
To freeze fresh foods, you will need to activate
the Action Freeze function. Press key (D) (sev-
eral times if necessary) until
indicator appears.
You must confirm the choice by pressing key
(E) within few seconds. You will hear the buzzer
and on the display will appear some animation
with lines.
After a pre-cooling period of 24 hours, place
the foods in the freezer.
Place the food to be frozen in the
compartment, as this is the coldest point.
The freezing process takes 24 hours. During
this period do not put other foods in the freezer.
This function stops automatically after 52 hours.
It is possible to deactivate the function at any
time by pressing key (D) until
indicator will
flash and then press key (E).
Drinks Chill Function
The Drinks Chill function is to be used as a
safety warning when placing bottles in the freezer compartment. It is activated by pressing key
(D) (several times if necessary) until the corresponding icon appears
.
You must confirm the choice by pressing key
(E) within few seconds. You will hear the buzzer
and the icon remains lighted.
In this condition it operates a timer with a default value of 30 min. and it could change from 1
to 90 min., by pressing key (B) you select the
minutes needed.
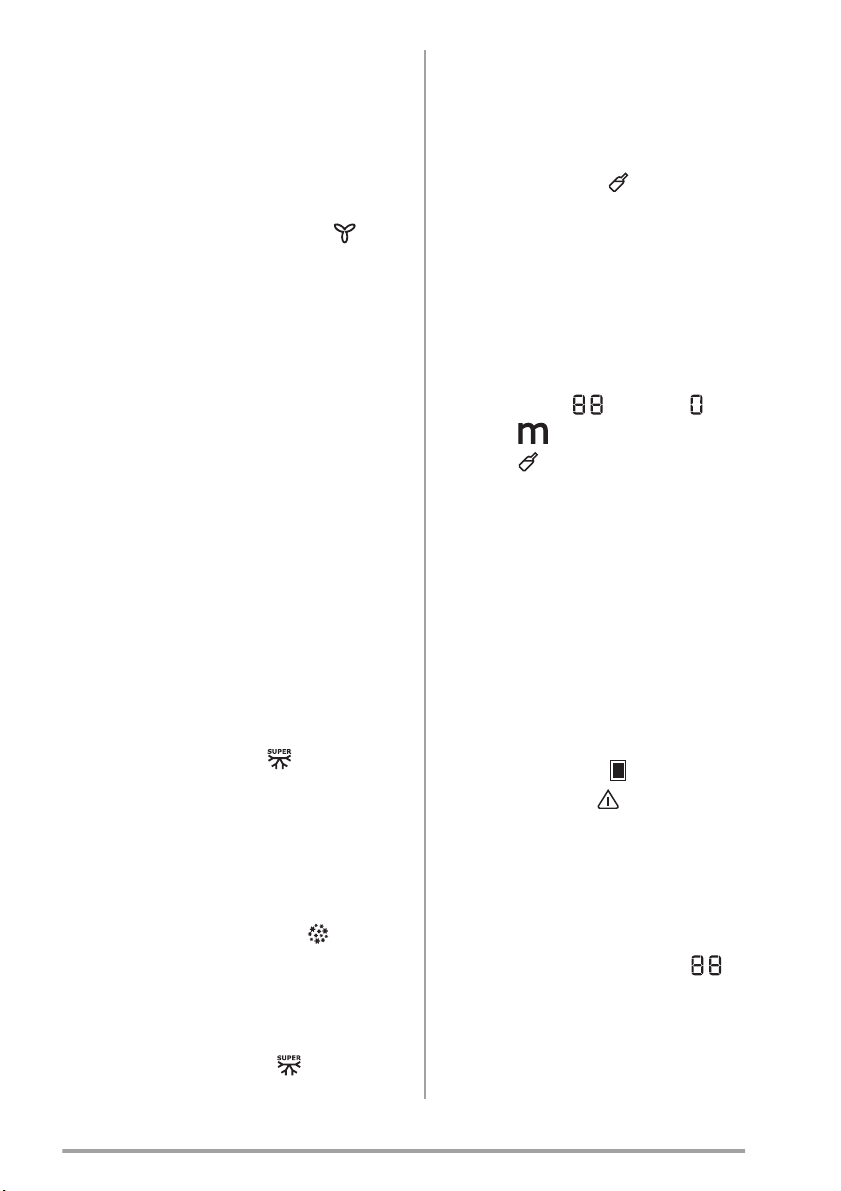
At the end of the selected time there are the following indications:
•
on the indicator
•
the icon
•
the icon
flashing
the symbol flashing
flashing
• sounding of an acoustic alarm until key (E) is
pressed
At this point bear in mind to remove the drinks
contained in the freezer compartment.
It is possible to deactivate the function at any
time by pressing key (D) until the corresponding
icon will flash and then key (E).
Excessive temperature alarm
An increase in the temperature in a compartment (for example due to an power failure) is indicated by:
• flashing temperature
•
freezer compartment
•
flashing of the icon
flashing
• sounding of buzzer
When normal conditions are restored:
• the acoustic signal shuts off
• the temperature value continues to flash
When you press key (E) to de-activate the
alarm, the highest temperature reached in the
compartment appears on indicator
for
some seconds.
Then it returns on the normal operation showing
the temperature of the selected compartment.
During the alarm phase, the buzzer can be
switched off by pressing key (E).
www.zanussi.com
7
Page 8

First use
Cleaning the interior
Before using the appliance for the first time,
wash the interior and all internal accessories
with lukewarm water and some neutral soap so
Daily use
Storage of frozen food
When first starting-up or after a period out of
use, before putting the products in the compartment let the appliance run at least 2 hours.
The freezer drawers ensure that it is quick and
easy to find the food package you want. If large
quantities of food are to be stored, remove all
drawers except for the bottom drawer which
needs to be in place to provide good air circulation. On all shelves it is possible to place food
that protrude until 15 mm from the door.
Important! In the event of accidental
defrosting, for example due to a power failure, if
the power has been off for longer that the value
shown in the technical characteristics chart
under "rising time", the defrosted food must be
consumed quickly or cooked immediately and
then re-frozen (after cooling).
Freezing fresh food
The freezer compartment is suitable for freezing
fresh food and storing frozen and deep-frozen
food for a long time.
To freeze fresh food activate the Fast Freezing
function at least 24 hours before placing the
food to be frozen in the freezer compartment.
Place the fresh food to be frozen in the bottom
compartment.
The maximum amount of food that can be frozen
in 24 hours is specified on the rating plate, a label located on the inside of the fridge.
The freezing process lasts 24 hours: during this
period do not add other food to be frozen.
After 24 hours, when the freezing process is
completed, deactivate the Fast Freezing function (see "Fast Freezing function").
as to remove the typical smell of a brand-new
product, then dry thoroughly.
Important! Do not use detergents or abrasive
powders, as these will damage the finish.
Thawing
Deep-frozen or frozen food, prior to being used,
can be thawed in the refrigerator compartment
or at room temperature, depending on the time
available for this operation.
Small pieces may even be cooked still frozen,
directly from the freezer: in this case, cooking
will take longer.
Movable shelves
The walls of the refrigerator are equipped with a series of
runners so that the
shelves can be positioned as desired.
FreeStore
The refrigerator compartment is equipped
with a device that allows for rapid cooling
of foods and more
uniform temperature
in the compartment.
This device activates
by itself when needed, for example for a
quick temperature recovering after door
opening or when the
ambient temperature
is high.
Allows you to switch on the device manually by
activating the Shopping function when needed.
8
www.zanussi.com
Page 9
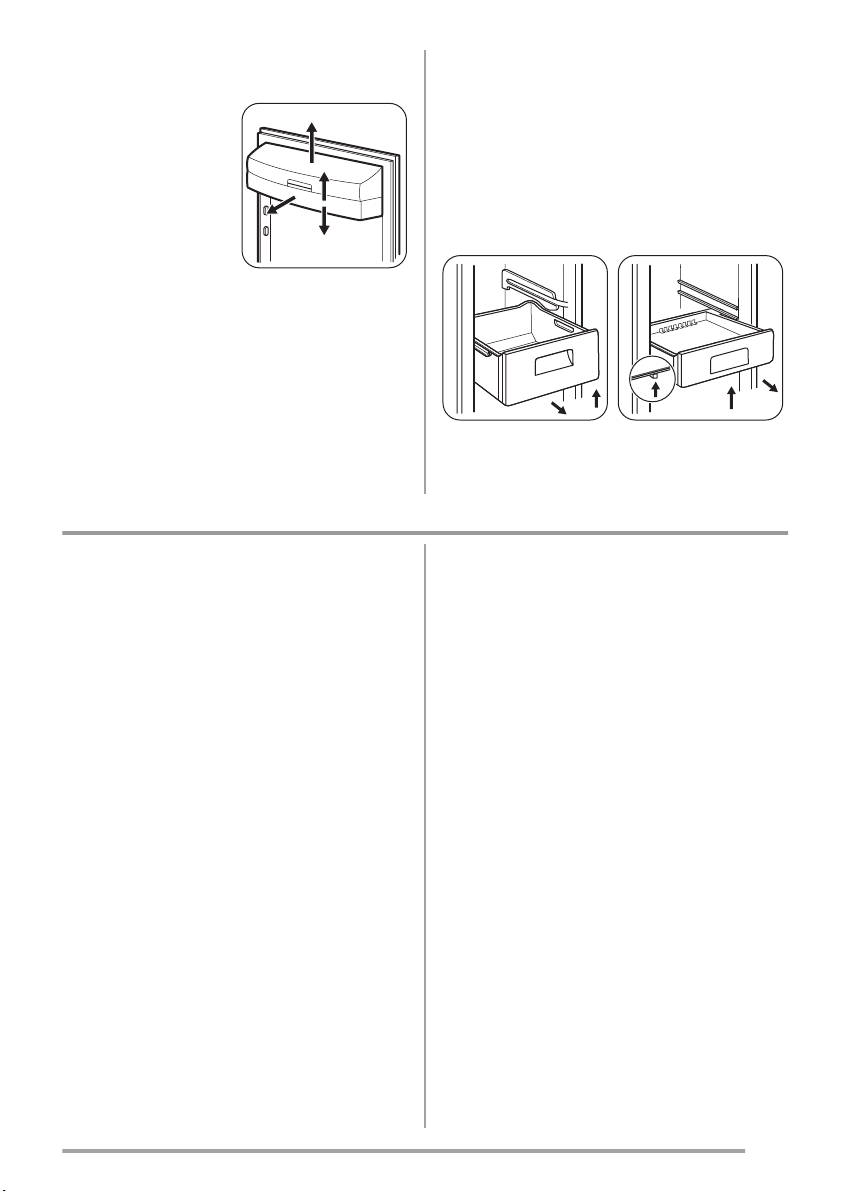
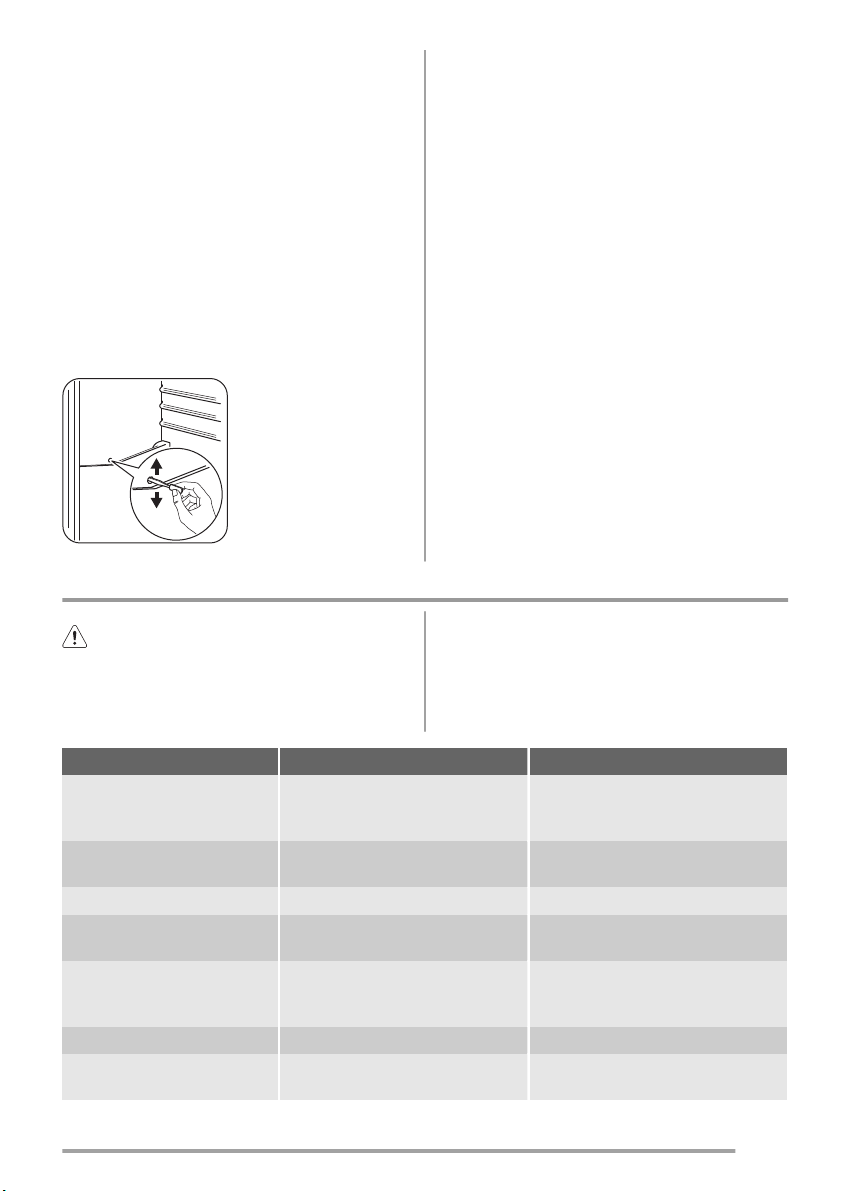
Positioning the door shelves
To permit storage of
food packages of various sizes, the door
shelves can be
placed at different
heights.
Gradually pull the
shelf in the direction
of the arrows until it
comes free, then reposition as required.
Removal of freezing baskets from the
freezer
The freezing baskets have a limit stop to prevent
their accidental removal or falling out. At the
1
3
2
Helpful hints and tips
time of its removal from the freezer, pull the basket towards yourself and, upon reaching the end
point, remove the basket by tilting its front upwards.
At the time of putting it back, slightly lift the front
of the basket to insert it into the freezer. Once
you are over the end points, push the baskets
back in their position.
12
12
Normal Operating Sounds
• You may hear a faint gurgling and a bubbling
sound when the refrigerant is pumped
through the coils or tubing. This is correct.
• When the compressor is on, the refrigerant is
being pumped around and you will hear a
whirring sound and a pulsating noise from the
compressor. This is correct.
• The thermic dilatation might cause a sudden
cracking noise. It is natural, not dangerous
physical phenomenon. This is correct.
Hints for energy saving
• Do not open the door frequently or leave it
open longer than absolutely necessary.
• If the ambient temperature is high and the
Temperature Regulator is set to low temperature and the appliance is fully loaded, the
compressor may run continuously, causing
frost or ice on the evaporator. If this happens,
set the Temperature Regulator toward warmer settings to allow automatic defrosting and
so a saving in electricity consumption.
Hints for fresh food refrigeration
To obtain the best performance:
www.zanussi.com
• do not store warm food or evaporating liquids
in the refrigerator
• do cover or wrap the food, particularly if it has
a strong flavour
• position food so that air can circulate freely
around it
Hints for refrigeration
Useful hints:
Meat (all types) : wrap in polythene bags and
place on the glass shelf above the vegetable
drawer.
For safety, store in this way only one or two
days at the most.
Cooked foods, cold dishes, etc.: these should
be covered and may be placed on any shelf.
Fruits and vegetables: these should be thoroughly cleaned and placed in the special drawer(s) provided. When in contact, lemon juice
can discolor the plastic parts of your fridge. It is
therefore recommended to keep citruses in separate containers.
Butter and cheese: these should be placed in
special airtight containers or wrapped in aluminium foil or polythene bags to exclude as much
air as possible.
9
Page 10
Bottles: these should have a cap and should be
stored in the bottle rack on the door.
Bananas, potatoes, onions and garlic, if not
packed, must not be kept in the refrigerator.
Hints for freezing
To help you make the most of the freezing process, here are some important hints:
• the maximum quantity of food which can be
frozen in 24 hrs. is shown on the rating plate;
• the freezing process takes 24 hours. No further food to be frozen should be added during this period;
• only freeze top quality, fresh and thoroughly
cleaned, foodstuffs;
• prepare food in small portions to enable it to
be rapidly and completely frozen and to make
it possible subsequently to thaw only the
quantity required;
• wrap up the food in aluminium foil or polythene and make sure that the packages are
airtight;
• do not allow fresh, unfrozen food to touch
food which is already frozen, thus avoiding a
rise in temperature of the latter;
Care and cleaning
• lean foods store better and longer than fatty
ones; salt reduces the storage life of food;
• water ices, if consumed immediately after removal from the freezer compartment, can
possibly cause the skin to be freeze burnt;
• it is advisable to show the freezing in date on
each individual pack to enable you to keep
tab of the storage time.
Hints for storage of frozen food
To obtain the best performance from this appliance, you should:
• make sure that the commercially frozen foodstuffs were adequately stored by the retailer;
• be sure that frozen foodstuffs are transferred
from the foodstore to the freezer in the shortest possible time;
• not open the door frequently or leave it open
longer than absolutely necessary;
• once defrosted, food deteriorates rapidly and
cannot be refrozen;
• do not exceed the storage period indicated
by the food manufacturer.
Caution! Unplug the appliance before
carrying out any maintenance operation.
This appliance contains hydrocarbons in its
cooling unit; maintenance and recharging
must therefore only be carried out by authorized
technicians.
Periodic cleaning
The equipment has to be cleaned regularly:
• clean the inside and accessories with luke-
warm water and some neutral soap.
• regularly check the door seals and wipe clean
to ensure they are clean and free from debris.
• rinse and dry thoroughly.
Important! Do not pull, move or damage any
pipes and/or cables inside the cabinet.
Never use detergents, abrasive powders, highly
perfumed cleaning products or wax polishes to
10
clean the interior as this will damage the surface
and leave a strong odour.
Clean the condenser (black grill) and the compressor at the back of the appliance with a
brush. This operation will improve the performance of the appliance and save electricity consumption.
Important! Take care of not to damage the
cooling system.
Many proprietary kitchen surface cleaners contain chemicals that can attack/damage the plastics used in this appliance. For this reason it is
recommended that the outer casing of this appliance is only cleaned with warm water with a
little washing-up liquid added.
After cleaning, reconnect the equipment to the
mains supply.
www.zanussi.com
Page 11
Defrosting of the refrigerator
Frost is automatically eliminated from the evaporator of the refrigerator compartment every time
the motor compressor stops, during normal use.
The defrost water drains out through a trough
into a special container at the back of the appliance, over the motor compressor, where it
evaporates.
It is important to periodically clean the defrost
water drain hole in the middle of the refrigerator
compartment channel to prevent the water overflowing and dripping onto the food inside. Use
the special cleaner provided, which you will find
already inserted into the drain hole.
Troubleshooting
Defrosting of the freezer
The freezer compartment of this model, on the
other hand, is a "no frost" type. This means that
there is no buildup of frost when it is in operation, neither on the internal walls nor on the
foods.
The absence of frost is due to the continuous
circulation of cold air inside the compartment,
driven by an automatically controlled fan.
Caution! Before troubleshooting,
disconnect the power supply.
Only a qualified electrician or competent person
Important! There are some sounds during
normal use (compressor, refrigerant circulation).
must do the troubleshooting that is not in this
manual.
Problem Possible cause Solution
The appliance is noisy. The appliance is not supported
The compressor operates
continually.
The door is not closed correctly. Refer to "Closing the door".
The door has been opened too fre-
The product temperature is too
The room temperature is too high. Decrease the room temperature.
The Action Freeze function is
properly.
The Temperature regulator may be
set incorrectly.
quently.
high.
switched on.
Check if the appliance stands stable
(all the four feet should be on the
floor).
Set a warmer temperature.
Do not keep the door open longer
than necessary.
Let the product temperature decrease to room temperature before
storage.
Refer to "Action Freeze function".
www.zanussi.com
11
Page 12
Problem Possible cause Solution
Water flows on the rear
plate of the refrigerator.
Water flows into the refrigerator.
Products prevent that water flows
Water flows on the ground. The melting water outlet does not
There is too much frost
and ice.
The door is not closed correctly. Refer to "Closing the door".
The Temperature regulator may be
The temperature in the appliance is too high.
The product temperature is too
Many products are stored at the
The temperature in the refrigeration is too high.
The temperature in the
freezer is too high.
The appliance does not operate.
The mains plug is not connected to
The appliance has no power. There
The lamp does not work. The lamp is in stand-by. Close and open the door.
The lamp is defective. Refer to "Replacing the lamp".
During the automatic defrosting
process, frost defrosts on the rear
plate.
The water outlet is clogged. Clean the water outlet.
into the water collector.
flow in the evaporative tray above
the compressor.
Products are not wrapped properly. Wrap the products better.
set incorrectly.
The door is not closed correctly. Refer to "Closing the door".
high.
same time.
There is no cold air circulation in the
appliance.
Products are too near to each other. Store products so that there is cold
The appliance is switched off. Switch on the appliance.
the mains socket correctly.
is no voltage in the mains socket.
This is correct.
Make sure that products do not touch
the rear plate.
Attach the melting water outlet to the
evaporative tray.
Set a higher temperature.
Let the product temperature decrease to room temperature before
storage.
Store less products at the same time.
Make sure that there is cold air circulation in the appliance.
air circulation.
Connect the mains plug to the mains
socket correctly.
Connect a different electrical appliance to the mains socket. Contact a
qualified electrician.
As much as the advice does not lead to result, call the nearest brand-mark service.
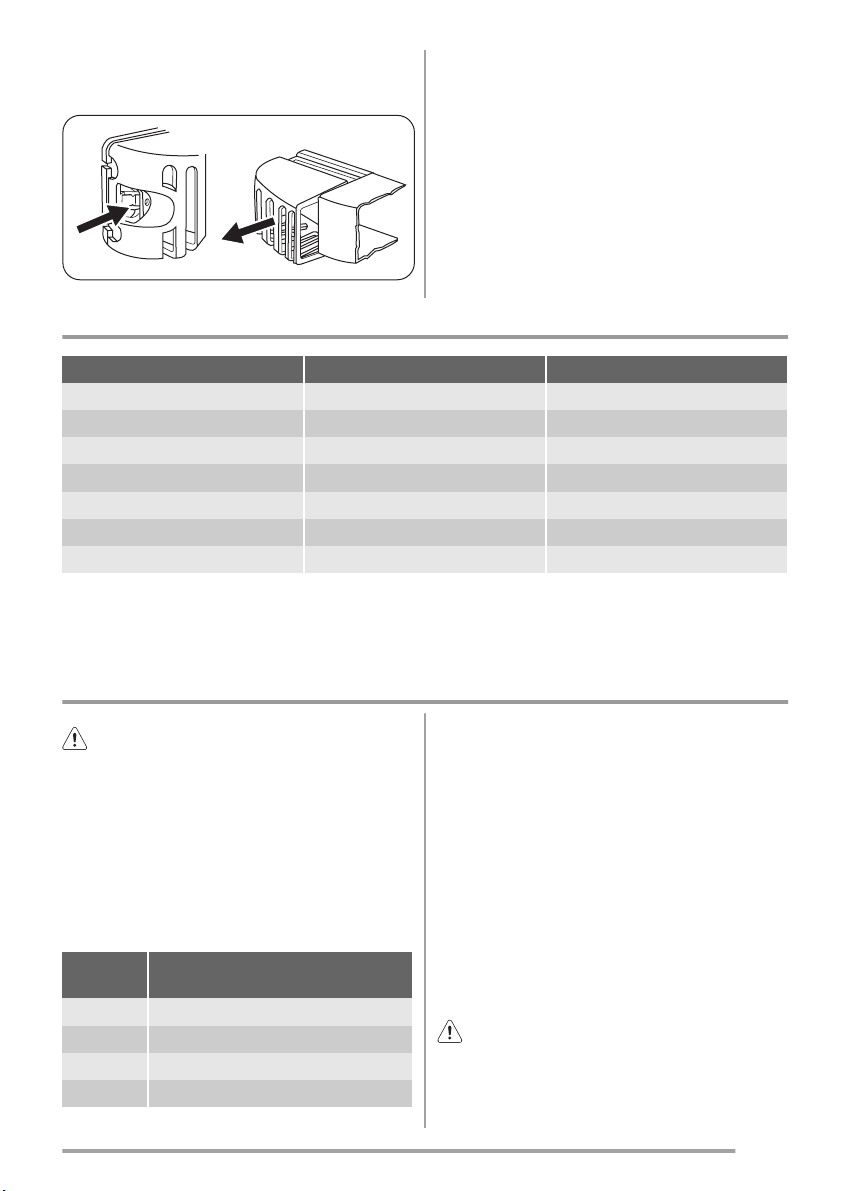
Replacing the lamp
1. Disconnect the appliance.
2. Push the movable part to unhook the lamp
cover (1).
3. Remove the lamp cover (2).
4. If needed replace the lamp with a light of
similar characteristic and power. It is suggested to use Osram PARATHOM SPECIAL T26 0.8 Watts.
5. Install the lamp cover.
6. Connect the appliance.
12
www.zanussi.com
Page 13
7. Open the door. Make sure that the lamp
comes on.
Closing the door
1. Clean the door gaskets.
2. If necessary, adjust the door. Refer to "Installation".
3. If necessary, replace the defective door
gaskets. Contact the Service Center.
1
2
Technical data
Dimension
Height 1850 mm
Width 595 mm
Depth 658 mm
Rising Time 18 h
Voltage 230-240 V
Frequency 50 Hz
The technical information are situated in the rating plate on the internal left side of the appliance and in the energy label.
Installation
Caution! Read the "Safety Information"
carefully for your safety and correct
operation of the appliance before installing the
appliance.
Positioning
Install this appliance at a location where the ambient temperature corresponds to the climate
class indicated on the rating plate of the appliance:
Climate
class
SN +10°C to + 32°C
N +16°C to + 32°C
ST +16°C to + 38°C
T +16°C to + 43°C
www.zanussi.com
Ambient temperature
Location
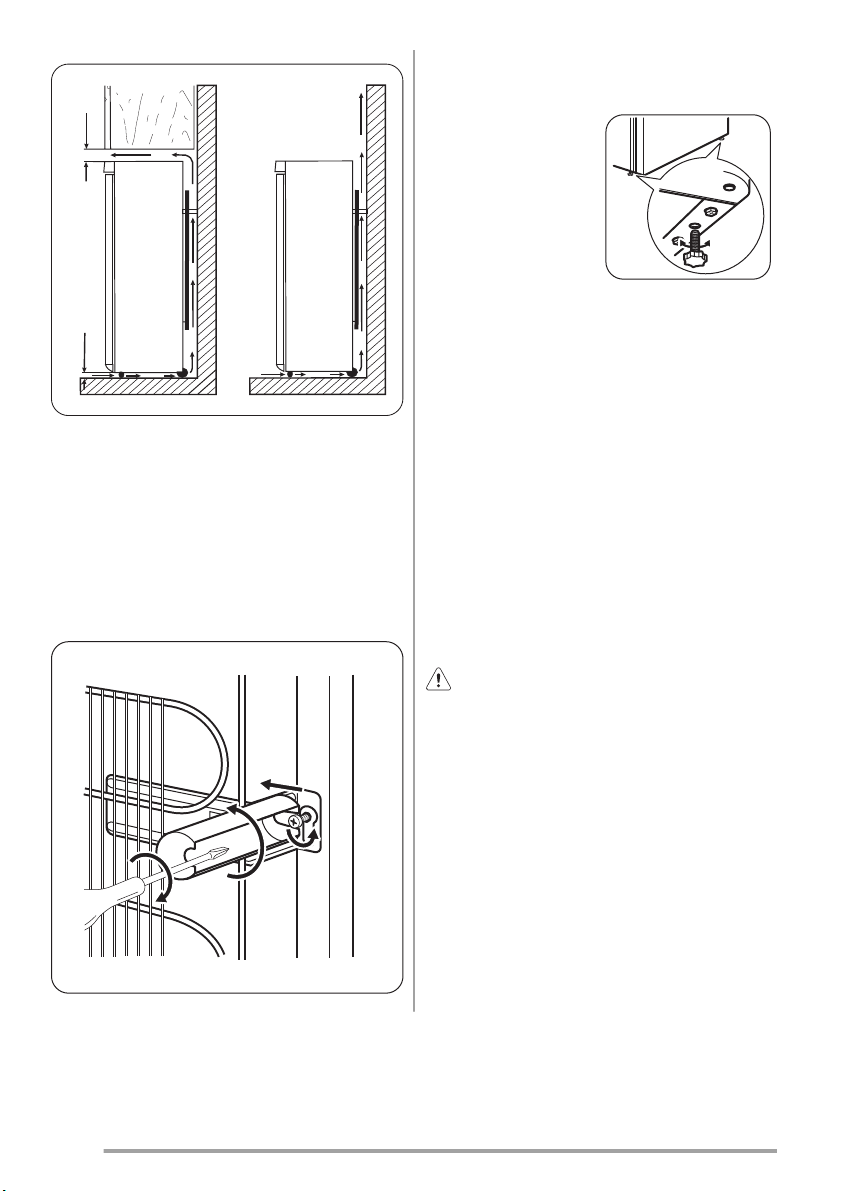
The appliance should be installed well away
from sources of heat such as radiators, boilers,
direct sunlight etc. Ensure that air can circulate
freely around the back of the cabinet. To ensure
best performance, if the appliance is positioned
below an overhanging wall unit, the minimum
distance between the top of the cabinet and the
wall unit must be at least 100 mm . Ideally, however, the appliance should not be positioned
below overhanging wall units. Accurate levelling
is ensured by one or more adjustable feet at the
base of the cabinet.
Warning! It must be possible to
disconnect the appliance from the mains
power supply; the plug must therefore be easily
accessible after installation.
13
Page 14
100 mm
min
Levelling
When placing the appliance ensure that it
stands level. This can
be achieved by two
adjustable feet at the
bottom in front.
A
20 mm
Rear spacers
You can find the two spacers in the bag with
documentation.
Do these steps to install the spacers:
1. Release the screw.
2. Engage the spacer below the screw.
3. Turn the spacer to the right position.
4. Tighten again the screws.
B
2
Electrical connection
Before plugging in, ensure that the voltage and
frequency shown on the rating plate correspond
to your domestic power supply.
The appliance must be earthed. The power supply cable plug is provided with a contact for this
purpose. If the domestic power supply socket is
not earthed, connect the appliance to a separate earth in compliance with current regulations, consulting a qualified electrician.
The manufacturer declines all responsibility if
the above safety precautions are not observed.
This appliance complies with the E.E.C. Directives.
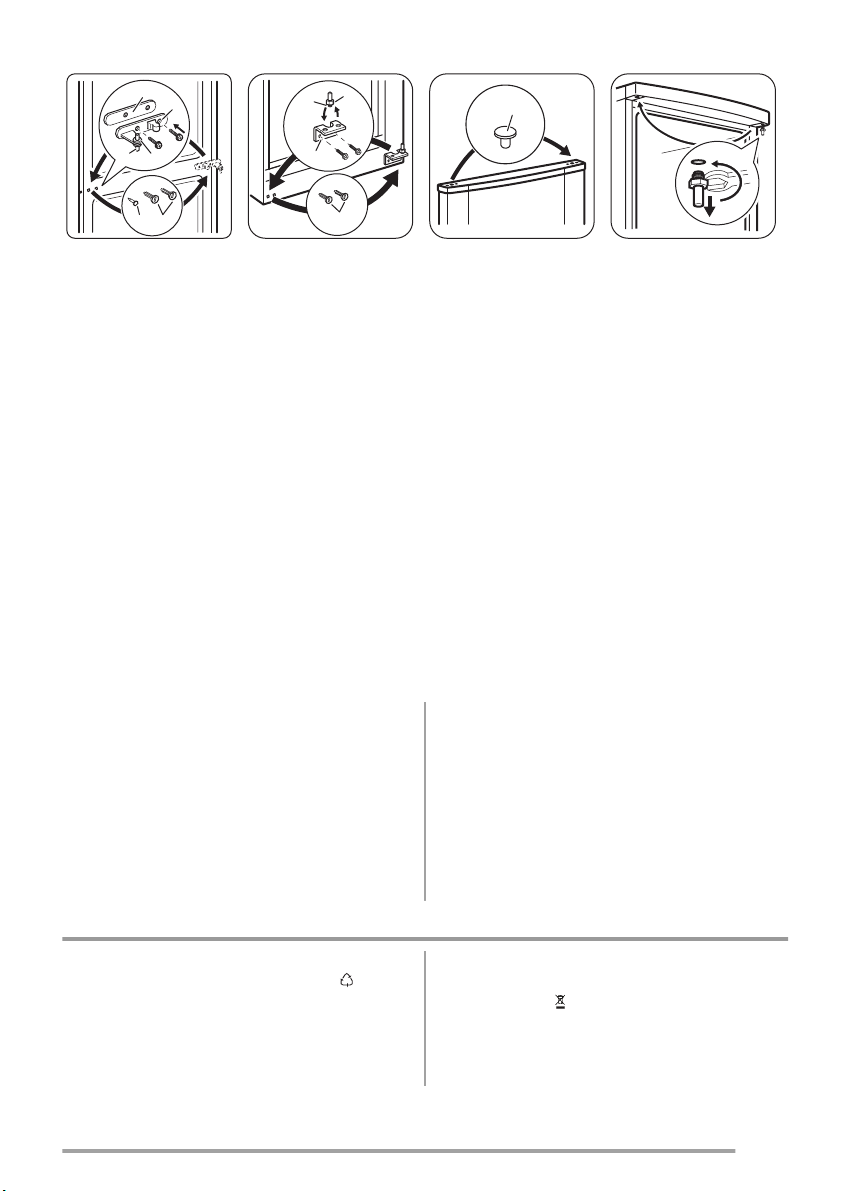
Door reversibility
Warning! Before carrying out any
operations, remove the plug from the
power socket.
Important! To carry out the following
operations, we suggest that this be made with
another person that will keep a firm hold on the
doors of the appliance during the operations.
14
1
4
3
www.zanussi.com
Page 15
A
B
E
F
C
B
A
A
2
DC
• Open the doors.
Unscrew the middle
hinge (B). Remove
the plastic spacer
(A).
• Remove the spacer
(F) and move to the
other side of the
hinge pivot (E).
• Remove the doors.
• Remove the lefthand cover pin of
the middle hinge
(C,D) and move to
• Unscrew the lower
hinge (A)
• Remove the lefthand cover pins (D)
and move to the
other side.
• Re-screw the lower
hinge (A) on the opposite side.
• Unscrew the lower
hinge pivot (B) and
the spacer (C) and
place them on the
opposite side.
D
the other side.
• Fit the pin of the
middle hinge (C) into the left-hand hole
of the lower door.
Do a final check to make sure that:
• All screws are tightened.
• The edges of the doors run parallel to the
side edge of the appliance.
• The magnetic seal adheres to the cabinet.
• The door opens and closes correctly.
If the ambient temperature is cold (i.e. in Winter), the gasket may not fit perfectly to the cabi-
1
• Remove the plugs
(1)on the upper side
of both doors and
move them to the
other side.
• Re-insert the lower
door on the lower
hinge pivot.
• Insert the middle
hinge into the left
drill of the lower
door.
• Unscrew the upper
hinge pivot and
place it on the opposite side.
• Fit the upper door
on the upper door
pivot.
• Re-insert the upper
door on the middle
hinge pivot slightly
tilting both doors.
• Re-screw the middle hinge . Do not
forget the plastic
spacer .
net. In that case, wait for the natural fitting of the
gasket.
In case you do not want to carry out the above
mentioned operations, contact the nearest After
Sales Service Force. The After Sales Service
specialist will carry out the reversibility of the
doors at your cost.
Environmental concerns
Recycle the materials with the symbol . Put
the packaging in applicable containers to
recycle it.
Help protect the environment and human health
and to recycle waste of electrical and electronic
www.zanussi.com
appliances. Do not dispose appliances marked
with the symbol
with the household waste.
Return the product to your local recycling facility
or contact your municipal office.
15
Page 16

Sommaire
Instructions de sécurité _ _ _ _ _ _ _ _ _ _ _ 16
Description de l'appareil _ _ _ _ _ _ _ _ _ _ _ 19
Bandeau de commande _ _ _ _ _ _ _ _ _ _ _ 19
Fonctionnement _ _ _ _ _ _ _ _ _ _ _ _ _ _ _ 20
Première utilisation _ _ _ _ _ _ _ _ _ _ _ _ _ 23
Utilisation quotidienne _ _ _ _ _ _ _ _ _ _ _ _ 23
Conseils utiles _ _ _ _ _ _ _ _ _ _ _ _ _ _ _ _ 24
Instructions de sécurité
Pour votre sécurité et garantir une utilisation
correcte de l'appareil, lisez attentivement cette
notice, y compris les conseils et avertissements,
avant d'installer et d'utiliser l'appareil pour la
première fois. Pour éviter toute erreur ou accident, veillez à ce que toute personne qui utilise
l'appareil connaisse bien son fonctionnement et
ses fonctions de sécurité. Conservez cette notice avec l'appareil. Si l'appareil doit être vendu
ou cédé à une autre personne, veillez à remettre
cette notice au nouveau propriétaire, afin qu'il
puisse se familiariser avec son fonctionnement
et sa sécurité.
Pour la sécurité des personnes et des biens,
conservez et respectez les consignes de sécurité figurant dans cette notice. Le fabricant décline toute responsabilité en cas de dommages
dus au non-respect de ces instructions.
Sécurité des enfants et des personnes
vulnérables
• Cet appareil n'est pas destiné à être utilisé
par des enfants ou des personnes dont les
capacités physiques, sensorielles ou mentales, ou le manque d'expérience et de connaissance les empêchent d'utiliser l'appareil sans
risque lorsqu'ils sont sans surveillance ou en
l'absence d'instruction d'une personne responsable qui puisse leur assurer une utilisation de l'appareil sans danger.
Empêchez les enfants de jouer avec l'appareil.
• Ne laissez pas les différents emballages à
portée des enfants. Ils pourraient s'asphyxier.
• Si l'appareil doit être mis au rebut, sortez la fiche de la prise électrique, coupez le cordon
16
Entretien et nettoyage _ _ _ _ _ _ _ _ _ _ _ _ 26
En cas d'anomalie de fonctionnement _ _ _ 27
Caractéristiques techniques _ _ _ _ _ _ _ _ 29
Installation _ _ _ _ _ _ _ _ _ _ _ _ _ _ _ _ _ _ 29
En matière de sauvegarde de l'environnement
_ _ _ _ _ _ _ _ _ _ _ _ _ _ _ _ _ _ _ _ _ _ _ _ 31
Sous réserve de modifications.
d'alimentation au ras de l'appareil et démontez la porte pour éviter les risques d'électrocution et que des enfants ne restent enfermés à l'intérieur.
• Cet appareil est muni de fermetures magnétiques. S'il remplace un appareil équipé d'une
fermeture à ressort, nous vous conseillons de
rendre celle-ci inutilisable avant de vous en
débarrasser. Ceci afin d'éviter aux enfants de
s'enfermer dans l'appareil et de mettre ainsi
leur vie en danger.
Consignes générales de sécurité
Avertissement
Veillez à ce que les orifices de ventilation, situés
dans l'enceinte de l'appareil ou la structure intégrée, ne soient pas obstrués.
• Les appareils sont destinés uniquement à la
conservation des aliments et/ou des boissons
dans le cadre d’un usage domestique normal,
tel que celui décrit dans la présente notice.
– dans des cuisines réservées aux employés
dans des magasins, bureaux et autres lieux
de travail ;
– dans les fermes et par les clients dans des
hôtels, motels et autres lieux de séjour ;
– dans des hébergements de type chambre
d'hôte ;
– pour la restauration et autres utilisations
non commerciales.
• N'utilisez pas d'appareils électriques,
d'agents chimiques ou tout autre système artificiel pour accélérer le processus de dégivrage.
www.zanussi.com
Page 17
• Ne faites pas fonctionner d'appareils électriques (comme des sorbetières électriques, ...)
à l'intérieur des appareils de réfrigération à
moins que cette utilisation n'ait reçu l'agrément du fabricant.
• N'endommagez pas le circuit frigorifique.
• Le circuit frigorifique de l’appareil contient de
l’isobutane (R600a), un gaz naturel offrant un
haut niveau de compatibilité avec l’environnement mais qui est néanmoins inflammable.
Pendant le transport et l'installation de votre
appareil, assurez-vous qu'aucune partie du
circuit frigorifique n'est endommagée.
Si le circuit frigorifique est endommagé :
– évitez les flammes vives et toute autre
source d'allumage
– aérez soigneusement la pièce où se trouve
l'appareil
• Ne modifiez pas les spécifications de l'appareil. Si le câble d'alimentation est endommagé, il peut causer un court circuit, un incendie
et/ou une électrocution.
Avertissement Les éventuelles répara-
tions ou interventions sur votre appareil,
ainsi que le remplacement du câble d'alimentation, ne doivent être effectuées que par un professionnel qualifié.
1. Ne branchez pas le cordon d'alimentation à une rallonge.
2. Assurez-vous que la prise n'est pas écrasée ou endommagée par l'arrière de l'appareil. Une prise de courant écrasée ou
endommagée peut s'échauffer et causer
un incendie.
3. Vérifiez que la prise murale de l'appareil
est accessible.
4. Ne débranchez pas l'appareil en tirant
sur le câble.
5. Si la prise murale n'est pas bien fixée,
n'introduisez pas de prise dedans. Risque d'électrocution ou d'incendie.
6. N'utilisez pas l'appareil sans le diffuseur
de l'ampoule (si présent) de l'éclairage
intérieur.
• Cet appareil est lourd. Faite attention lors de
son déplacement.
www.zanussi.com
• Ne touchez pas avec les mains humides les
surfaces givrées et les produits congelés (risque de brûlure et d'arrachement de la peau).
• Évitez une exposition prolongée de l'appareil
aux rayons solaires.
• Les ampoules (si présentes) utilisées dans
cet appareil sont des ampoules spécifiques
uniquement destinées à être utilisées sur des
appareils ménagers. Elles ne sont pas du tout
adaptées à un éclairage quelconque d'une
habitation.
Utilisation quotidienne
• Ne posez pas d'éléments chauds sur les parties en plastique de l'appareil.
• Ne stockez pas de gaz ou de liquides inflammables dans l'appareil (risque d'explosion).
• Ne placez pas d'aliments directement contre
la sortie d'air sur la paroi arrière de l'appareil.
(Si l'appareil est sans givre.)
• Un produit décongelé ne doit jamais être recongelé.
• Conservez les aliments emballés conformément aux instructions de leur fabricant.
• Respectez scrupuleusement les conseils de
conservation donnés par le fabricant de l'appareil. Consultez les instructions respectives.
• Ne mettez pas de bouteilles ni de boîtes de
boissons gazeuses dans le compartiment
congélateur, car la pression se formant à l'intérieur du contenant pourrait le faire éclater et
endommager ainsi l'appareil.
• Ne consommez pas certains produits tels que
les bâtonnets glacés dès leur sortie de l'appareil, car ils peuvent provoquer des brûlures.
Entretien et nettoyage
• Avant toute opération d'entretien, mettez l'appareil hors tension et débranchez-le de la prise de courant.
• N'utilisez pas d'objets métalliques pour nettoyer l'appareil.
• N'utilisez pas d'objet tranchant pour gratter la
couche de givre. Utilisez une spatule en plastique.
• Contrôlez régulièrement l'orifice d'évacuation
de l'eau de dégivrage dans le compartiment
17
Page 18
réfrigérateur. Nettoyez-le, si besoin. Si l'orifice
est bouché, l'eau s'écoulera en bas de l'appareil.
Installation
Important Avant de procéder au branchement
électrique, respectez scrupuleusement les
instructions fournies dans cette notice.
• Déballez l'appareil et vérifiez qu'il n'est pas
endommagé. Ne branchez pas l'appareil s'il
est endommagé. Signalez immédiatement au
revendeur de l'appareil les dommages constatés. Dans ce cas, gardez l'emballage.
• Il est conseillé d'attendre au moins quatre
heures avant de brancher l'appareil pour que
le circuit frigorifique soit stabilisé.
• Veillez à ce que l'air circule librement autour
de l'appareil pour éviter qu'il ne surchauffe.
Pour assurer une ventilation suffisante, respectez les instructions de la notice (chapitre
Installation).
• Placez l'appareil dos au mur pour éviter tout
contact avec le compresseur et le condenseur (risque de brûlure).
• Placez de préférence votre appareil loin d'une
source de chaleur (chauffage, cuisson ou rayons solaires trop intenses).
• Assurez-vous que la prise murale reste accessible après l'installation de l'appareil.
• Branchez à l'alimentation en eau potable uniquement. (Si un branchement sur le réseau
d'eau est prévu.)
Maintenance
• Les branchements électriques nécessaires à
l'entretien de l'appareil doivent être réalisés
par un électricien qualifié ou une personne
compétente.
• Cet appareil ne doit être entretenu et réparé
que par un Service après-vente autorisé, exclusivement avec des pièces d'origine.
Protection de l'environnement
Le système frigorifique et l'isolation de vo-
tre appareil ne contiennent pas de C.F.C.
contribuant ainsi à préserver l'environnement.
L'appareil ne doit pas être mis au rebut avec les
ordures ménagères et les déchets urbains. La
mousse d'isolation contient des gaz inflammables : l'appareil sera mis au rebut conformément
aux règlements applicables disponibles auprès
des autorités locales. Veillez à ne pas détériorer
les circuits frigorifiques, notamment au niveau
du condenseur. Les matériaux utilisés dans cet
appareil identifiés par le symbole
sont recy-
clables.
18
www.zanussi.com
Page 19
Description de l'appareil
6 7 841 3 52
9
10
Bacs à légumes
1
Clayettes en verre
2
« Dynamic Air Cooling »
3
Bandeau de commande
4
Voyant
5
Bandeau de commande
www.zanussi.com
Compartiment à produits laitiers
6
Balconnet de porte
7
Compartiment à bouteilles
8
Paniers de congélation
9
Plaque signalétique
10
B
DEAC
19
Page 20
A - Touche Marche/Arrêt D - Touche Fonctions
B - Touche de réglage de la température E - Touche de confirmation
C - Affichage de la température et de la fonc-
tion
Afficheur
10 1 2 3 4
56789
Affichage de la température
1
Alarme de température
2
Voyant de la fonction FreeStore.
3
Voyant de la fonction Shopping
4
Voyant de la fonction Sécurité enfants
5
Fonctionnement
Première mise en service de l'appareil
Si, après avoir branché l'appareil, l'afficheur
n'est pas allumé, appuyez sur la touche (A) pour
mettre l'appareil sous tension.
Dès que l'appareil est mis en service, il se trouve en condition d'alarme : l'afficheur de température clignote et un signal sonore retentit.
Appuyez sur la touche (E) : le signal sonore se
désactive (reportez-vous également au paragra-
phe "Alarme de température" ), le symbole
clignote et l'affichage indique la température la plus élevée qui a été atteinte.
Pour une conservation correcte des aliments,
sélectionnez la fonction Mode Eco, qui permet
de garantir les réglages de température suivants :
+5 °C dans le compartiment réfrigérateur
-18°C dans le compartiment congélateur
20
Voyant de la fonction Minuteur
6
Indicateur de température positif ou néga-
7
tif
Voyant de la fonction Congélation rapide
8
Voyant du compartiment
9
Voyant de la fonction Mode Éco.
10
• Avant d'introduire des aliments dans le con-
gélateur, attendez que la température du
compartiment soit de -18°C.
• Si vous souhaitez sélectionner une tempéra-
ture différente, reportez-vous au paragraphe
"Réglage de la température".
Mise à l'arrêt
Pour mettre l'appareil à l'arrêt, appuyez sur la
touche (A) pendant plus de 1 seconde.
L'afficheur effectue un décompte de 3 à 1.
Menu Fonctions
Pour activer le menu Fonctions, appuyez sur la
touche (D). Pour confirmer la fonction sélectionnée, appuyez sur la touche (E). Si la sélection
de la fonction n'est pas confirmée dans les secondes qui suivent, l'affichage s'éteint puis reprend son aspect initial.
Les fonctions affichées sont les suivantes :
www.zanussi.com
Page 21
Sélection du compartiment réfrigérateur
Sélection du compartiment congélateur
Fonction Mode Éco
Fonction FreeStore
Fonction Shopping
Fonction Sécurité enfants
Fonction Refroidissement des boissons
Fonction Congélation Rapide
Réglage de la température
Appuyez sur la touche (D) pour sélectionner le
compartiment, puis sur la touche (B) pour régler
la température nécessaire.
Appuyez sur la touche (E) pour confirmer votre
sélection.
L'indicateur de température indique la température programmée. La température programmée
sera atteinte au bout de 24 heures.
Une fluctuation de quelques degrés par rapport
à la température réglée est normale et ne signifie pas que l'appareil ne fonctionne pas correctement.
Fonction Vacances "H"
La fonction Vacances règle la température à
+15 °C dans le compartiment réfrigérateur.
Grâce à cette fonction, vous pouvez laisser votre réfrigérateur vide et fermé durant de longues
périodes (par exemple, pendant les vacances
d'été), sans formation de mauvaises odeurs.
Pour activer la fonction Holiday, procédez de la
même façon que pour modifier la température
sélectionnée. L'indicateur de température peut
modifier la température affichée jusqu'à +8 °C,
par paliers d'1 °C. La température +2 °C est
suivi de la lettre « H ». Appuyez sur la touche E
pour confirmer.
Le réfrigérateur est à présent en fonction "Vacances" et en mode économie d'énergie.
Important Le compartiment réfrigérateur doit
être vide quand la fonction Vacances est
activée. Vous ne devez pas conserver de
marchandises dans ce compartiment !
Fonction Sécurité enfants
Pour activer la fonction Sécurité enfants, appuyez sur la touche (D) (plusieurs fois, si nécessaire), jusqu'à ce que le symbole correspondant
apparaisse
www.zanussi.com
Vous devez valider votre sélection en appuyant
sur la touche (E) dans les secondes qui suivent.
Un signal sonore retentit et le symbole reste allumé. Dans ce cas, aucune modification n'est
possible en appuyant sur l'une des touches tant
que la fonction est activée.
Il est possible de désactiver la fonction à tout
moment en appuyant sur la touche (D) jusqu'à
ce que le symbole correspondant clignote, puis
sur la touche (E).
Fonction Shopping
Si vous avez besoin de stocker une grande
quantité d'aliments dans votre réfrigérateur, par
exemple après avoir fait vos courses, nous vous
suggérons d'activer la fonction Shopping : elle
permet de refroidir rapidement les aliments tout
en évitant le réchauffement des denrées déjà
stockées dans le compartiment.
Pour activer la fonction Shopping, appuyez sur
la touche (D) (plusieurs fois, si nécessaire), jusqu'à ce que le symbole correspondant apparais-
Vous devez valider votre sélection en ap-
se
puyant sur la touche (E) dans les secondes qui
suivent. Un signal sonore retentit et le symbole
reste allumé.
La fonction Shopping se désactive automatiquement au bout de 6 heures. Il est possible de
désactiver la fonction à tout moment en appuyant sur la touche (D) jusqu'à ce que le symbole
correspondant clignote, puis sur la touche (E).
Fonction Mode Éco
Appuyez sur la touche (D) (plusieurs fois si nécessaire) jusqu'à ce que le symbole correspon-
dant apparaisse.
.
Appuyez sur la touche (E) pour confirmer votre
sélection. Un signal sonore retentit et le symbole reste allumé.
Dans ce cas, les températures sont automatiquement programmées (+ 5 °C et -18 °C), assurant des conditions optimales de conservation des aliments.
Pour désactiver la fonction, réglez une température différente dans l'un des compartiments.
Fonction FreeStore
Appuyez sur la touche (D) (plusieurs fois si nécessaire) jusqu'à ce que le symbole correspondant apparaisse.
21
Page 22

Appuyez sur la touche (E) pour confirmer votre
sélection. Un signal sonore retentit et le symbole reste allumé.
Important Si la fonction est activée de manière
automatique, le symbole de la fonction
FreeStore n'apparaît pas (voir « Utilisation
quotidienne »).
L'activation de la fonction FreeStore augmente
la consommation d'énergie.
Fonction Congélation Rapide
Le compartiment congélateur est idéal pour
congeler des denrées fraîches et conserver des
aliments surgelés ou congelés pendant une longue période.
La quantité maximale de denrées que vous pouvez congeler par 24 heures est indiquée sur la
plaque signalétique.
Pour congeler la quantité d'aliments indiquée
sur la plaque signalétique, placez les denrées
directement en contact avec la surface de refroidissement (retirez les tiroirs ou les compartiments de rangement). Si vous souhaitez congeler les aliments en les plaçant directement dans
les tiroirs/compartiments de rangement, la
quantité maximale sera légèrement inférieure.
Pour congeler des aliments frais, vous devez activer la fonction Congélation rapide. Appuyez
sur la touche (D) (plusieurs fois, si nécessaire),
jusqu'à ce que le symbole
apparaisse.
Vous devez valider votre sélection en appuyant
sur la touche (E) dans les secondes qui suivent.
Un signal sonore retentit et une animation sous
forme de petits traits apparaît sur l'afficheur.
Placez les aliments à congeler dans le congélateur dès que la période de pré-refroidissement
de 24 heures est écoulée.
Placez les aliments à congeler dans le comparti-
ment marqué du symbole
, car il s'agit du
point le plus froid.
Le temps de congélation est de 24 heures.
Vous ne devez ajouter aucune autre denrée à
congeler au cours de cette période.
Cette fonction s'arrête automatiquement au
bout de 52 heures.
Il est possible de désactiver la fonction à tout
moment en appuyant sur la touche (D), jusqu'à
ce que le symbole clignote, puis sur la touche (E).
Fonction Refroidissement des boissons
Une alarme sonore retentit pour rappeler que
des boissons ont été placées dans le compartiment congélateur. Pour activer la fonction, appuyez sur la touche (D) (plusieurs fois, si nécessaire), jusqu'à ce que le symbole correspondant
apparaisse
.
Vous devez valider votre sélection en appuyant
sur la touche (E) dans les secondes qui suivent.
Un signal sonore retentit et le symbole reste allumé.
Dans ce cas, une minuterie est réglée par défaut sur 30 minutes. Il vous est possible de sélectionner une durée différente (de 1 à 90 minutes) en appuyant sur la touche (B).
Dès que le temps réglé est écoulé, les indications suivantes s'affichent :
•
sur l'afficheur de température
clignote
le
•
le symbole
•
le symbole
clignote
clignote
, le symbo-
• un signal sonore retentit jusqu'à ce que la
touche (E) soit activée
À ce stade, n'oubliez pas de retirer les boissons
qui sont à l'intérieur du compartiment congélateur.
Il est possible de désactiver la fonction à tout
moment en appuyant sur la touche (D) jusqu'à
ce que le symbole correspondant clignote, puis
sur la touche (E).
Alarme de température
Une augmentation de la température dans un
compartiment (par exemple, à cause d'une coupure de courant) est indiquée par :
• le clignotement de la température
• le clignotement du symbole du compartiment
congélateur
•
Le clignotement du symbole
• le déclenchement d'une alarme sonore
Dès que les conditions normales de fonctionnement sont rétablies, vous constaterez ce qui
suit :
• le signal sonore s'éteint
22
www.zanussi.com
Page 23

• la température clignote
Lorsque vous appuyez sur la touche (E) pour
désactiver le signal sonore, l'afficheur
que pendant quelques secondes la température
la plus élevée atteinte dans le compartiment.
indi-
Première utilisation
Il retourne ensuite en condition de fonctionnement normal et indique la température du compartiment sélectionné.
Pendant la phase d'alarme, l'alarme sonore peut
être désactivée en appuyant sur la touche (E).
Nettoyage intérieur
Avant d'utiliser l'appareil pour la première fois,
nettoyez l'intérieur et tous les accessoires internes avec de l'eau tiède savonneuse pour supprimer l'odeur caractéristique du "neuf" puis séchez soigneusement.
Utilisation quotidienne
Conservation d'aliments congelés
À la mise en service ou après un arrêt prolongé,
faites fonctionner l'appareil pendant 2 heures
environ, avant d’introduire les produits dans le
compartiment.
Les tiroirs de congélation vous permettent de
trouver facilement et rapidement les aliments
dont vous avez besoin. Si vous devez stocker
une grande quantité d'aliments, retirez tous les
tiroirs et le bac à glace sauf le tiroir inférieur qui
doit être en place afin de permettre une circulation d'air optimale. Des denrées alimentaires
peuvent être stockées sur chaque clayette en
respectant un espace de 15 mm max. à partir
de la porte.
Important En cas de décongélation
accidentelle, due par exemple à une coupure de
courant, si la coupure a duré plus de temps qu'il
n'est prévu au paragraphe « Autonomie de
fonctionnement », au chapitre Caractéristiques
techniques, consommez rapidement les
aliments décongelés ou cuisez-les
immédiatement avant de les recongeler (une
fois refroidis).
Congélation d'aliments frais
Le compartiment congélateur est idéal pour
congeler des denrées fraîches et conserver à
long terme des aliments surgelés ou congelés.
Pour congeler les denrées fraîches, activez la
fonction Congélation Rapide au moins 24 heu-
Important N'utilisez pas de produits abrasifs,
poudre à récurer, éponge métallique pour ne
pas abîmer la finition.
res avant de placer les denrées à congeler dans
le compartiment congélateur.
Placez les denrées fraîches à congeler dans le
compartiment inférieur.
La quantité maximale de denrées que vous pouvez congeler par 24 heures figure sur la plaque
signalétique, située à l'intérieur de l’appareil.
Le processus de congélation dure 24 heures :
vous ne devez ajouter aucune autre denrée à
congeler au cours de cette période.
Au bout de 24 heures, lorsque le processus de
congélation est terminé, désactivez la fonction
Congélation Rapide (reportez-vous au chapitre
« Fonction Congélation Rapide »).
Décongélation
Avant utilisation, les aliments surgelés ou congelés peuvent être décongelés dans le compartiment du réfrigérateur ou à température ambiante en fonction du temps disponible pour
cette opération.
Les petites portions peuvent même être cuites
sans décongélation préalable (la cuisson sera
cependant un peu plus longue).
www.zanussi.com
23
Page 24

Clayettes amovibles
Emplacement des balconnets de la porte
Les parois du réfrigérateur sont équipées
d'une série de glissières pour que les clayettes puissent être
placées en fonction
des besoins.
FreeStore
Le compartiment réfrigérateur est équipé
d'un dispositif qui
permet le refroidissement rapide des aliments et qui maintient
une température plus
homogène dans le
compartiment.
Ce dispositif s'active
automatiquement en
cas de besoin, par
exemple pour rafraîchir rapidement le réfrigérateur lorsque la
porte est laissée ouverte ou si la température ambiante est
élevée.
En fonction de la taille
des paquets d'aliments conservés, les
balconnets de la porte peuvent être positionnés à différentes
hauteurs.
Tirez progressivement
le balconnet dans le
sens des flèches pour
le dégager, puis repositionnez-le selon les
besoins.
Retrait des paniers de congélation du
congélateur
Les paniers de congélation sont équipés d'un
arrêt afin d'empêcher leur retrait accidentel ou
chute. Pour retirer le panier du congélateur, tirez-le vers vous et en atteignant l'arrêt, retirez-le
en inclinant la partie avant vers le haut.
Pour le remettre, relevez légèrement l'avant du
panier et insérez-le dans le congélateur. Une
fois que vous avez dépassé les butées d'arrêt,
poussez les paniers dans la bonne position.
1
3
2
Vous pouvez mettre en fonctionnement le dispositif manuellement en activant la fonction
Shopping au besoin.
Conseils utiles
Bruits de fonctionnement normaux
• Il n'est pas anormal d'entendre le bruit de circulation du fluide frigorigène selon son état liquide, gazeux ou vaporeux. Ce phénomène
est normal.
• Le compresseur peut produire un ronronnement aigu ou un bruit de pulsation. Ce phénomène est normal.
24
12
• La dilatation thermique peut provoquer un
soudain, léger bruit de craquement. C'est un
phénomène normal et sans gravité. Ce phénomène est normal.
Conseils pour l'économie d'énergie
• N'ouvrez pas la porte trop souvent ou plus
longtemps que nécessaire.
www.zanussi.com
12
Page 25

• Si la température ambiante est élevée, le dispositif de réglage de température est sur la
position de froid maximum et l'appareil est
plein : il est possible que le compresseur
fonctionne en régime continu, d'où un risque
de formation excessive de givre sur l'évaporateur. Pour éviter ceci, modifiez la position du
dispositif de réglage de température de façon
à obtenir des périodes d'arrêt du compresseur et ainsi permettre un dégivrage automatique, d'où des économies d'énergie.
Conseils pour la réfrigération de denrées
fraîches
Pour obtenir les meilleures performances possibles :
• N'introduisez pas d'aliments encore chauds
ou de liquides en évaporation dans le réfrigérateur.
• Couvrez ou enveloppez soigneusement les
aliments, surtout s'ils sont aromatiques.
• Placez les aliments pour que l'air puisse circuler librement autour.
Conseils pour la réfrigération
Conseils utiles :
Viande (tous les types) : enveloppez-la dans
des sachets en plastique et placez-la sur la tablette en verre au-dessus du bac à légumes.
La période de conservation est de 1 à 2 jours
au maximum.
Aliments cuits, plats froids, etc. : ils doivent être
couverts et peuvent être placés sur n'importe
quelle clayette.
Fruits et légumes : placez-les une fois nettoyés
dans le bac à légumes. Le jus de citron peut décolorer les parties en plastique de votre réfrigérateur s'il les touche. C'est pourquoi il est recommandé de conserver les agrumes dans des
bacs séparés.
Beurre et fromage : placez-les dans des récipients étanches spéciaux ou enveloppez-les
soigneusement dans des feuilles d'aluminium ou
de polyéthylène, pour emmagasiner le moins
d'air possible.
Bouteilles : elles doivent être munies d'un bouchon et être placées dans le balconnet portebouteilles de la porte.
Bananes, pommes de terre, oignons et ail ne se
conservent pas au réfrigérateur, s'ils ne sont pas
correctement emballés.
Conseils pour la congélation
Pour obtenir les meilleurs résultats, voici quelques conseils importants :
• la quantité maximale de denrées que vous
pouvez congeler par 24 heures est indiquée
sur la plaque signalétique.
• le temps de congélation est de 24 heures.
Aucune autre denrée à congeler ne doit être
ajoutée pendant cette période.
• congelez seulement les denrées alimentaires
fraîches, de qualité supérieure (une fois nettoyées).
• préparez la nourriture en petits paquets pour
une congélation rapide et uniforme, adaptés à
l'importance de la consommation.
• enveloppez les aliments dans des feuilles
d'aluminium ou de polyéthylène et assurezvous que les emballages sont étanches ;
• ne laissez pas des aliments frais, non congelés, toucher des aliments déjà congelés pour
éviter une remontée en température de ces
derniers.
• les aliments maigres se conservent mieux et
plus longtemps que les aliments gras ; le sel
réduit la durée de conservation des aliments
• la température très basse à laquelle se trouvent les bâtonnets glacés, s'ils sont consommés dès leur sortie du compartiment congélateur, peut provoquer des brûlures.
• L'identification des emballages est importante : indiquez la date de congélation du produit, et respectez la durée de conservation indiquée par le fabricant.
Conseils pour la conservation des
produits surgelés et congelés du
commerce
Pour obtenir les meilleures performances possibles :
• assurez-vous que les denrées surgelées
achetées dans le commerce ont été correctement entreposées par le revendeur ;
www.zanussi.com
25
Page 26

• prévoyez un temps réduit au minimum pour le
transport des denrées du magasin d'alimentation à votre domicile ;
• évitez d'ouvrir trop souvent la porte du congélateur et ne la laissez ouverte que le temps
nécessaire ;
Entretien et nettoyage
• une fois décongelés, les aliments se détériorent rapidement et ne peuvent pas être recongelés ;
• ne dépassez pas la durée de conservation indiquée par le fabricant.
Attention débrancher l'appareil avant
toute opération d'entretien.
Cet appareil contient des hydrocarbures
dans son circuit réfrigérant : l'entretien et la
recharge ne doivent donc être effectués que par
du personnel autorisé.
Nettoyage périodique
Cet appareil doit être nettoyé régulièrement :
• Nettoyez l'intérieur et tous les accessoires
avec de l'eau tiède savonneuse.
• Vérifiez régulièrement les joints de porte et
nettoyez-les en les essuyant pour éviter toute
accumulation de déchets.
• Rincez et séchez soigneusement.
Important Ne pas tirer, déplacer ou
endommager les tuyaux et/ou câbles qui se
trouvent à l'intérieur de l'appareil.
Ne JAMAIS utiliser de produits abrasifs ou
caustiques ni d'éponges avec grattoir pour
nettoyer l'intérieur de façon à ne pas l'abîmer et
laisser de fortes odeurs.
Nettoyer le condenseur (grille noire) et le compresseur situés à l'arrière de l'appareil avec une
brosse ou un aspirateur. Cette opération améliore les performances de l'appareil et permet
des économies d'énergie.
Important Attention à ne pas endommager le
système de réfrigération.
De nombreux détergents pour la cuisine recommandés par les fabricants contiennent des produits chimiques qui peuvent attaquer/endommager les pièces en plastique utilisées dans cet
appareil. Il est par conséquent recommandé
d'utiliser seulement de l'eau chaude additionnée
d'un peu de savon liquide pour nettoyer la carrosserie de l'appareil.
Après le nettoyage, rebranchez l'appareil.
Dégivrage du réfrigérateur
Le givre est automatiquement éliminé de l'évaporateur du compartiment réfrigérateur à chaque arrêt du compresseur, en cours d'utilisation
normale. L'eau de dégivrage est collectée dans
un récipient spécial situé à l'arrière de l'appareil,
au-dessus du compresseur, d'où elle s'évapore.
Il est important de nettoyer régulièrement l'orifice d'écoulement de la goulotte d'évacuation de
l'eau de dégivrage située au milieu du compartiment réfrigérateur pour empêcher l'eau de déborder et de couler à l'intérieur de l'appareil.
Nettoyez l'orifice d'écoulement de l'eau de dégivrage avec le bâtonnet spécial se trouvant déjà
dans l'orifice.
Dégivrage du congélateur
Le compartiment congélateur de ce modèle est
"sans givre". Cela signifie qu'il n'y a aucune formation de givre pendant son fonctionnement, ni
sur les parois internes si sur les aliments.
L'absence de givre est due à la circulation continuelle de l'air froid à l'intérieur du compartiment, sous l'impulsion d'un ventilateur à commande automatique.
26
www.zanussi.com
Page 27

En cas d'anomalie de fonctionnement
Attention Avant d'intervenir sur l'appareil,
débranchez-le.
La résolution des problèmes non mentionnés
dans le présent manuel doit être exclusivement
Important Certains bruits pendant le
fonctionnement (compresseur, circuit de
réfrigérant) sont normaux.
confiée à un électricien qualifié ou une
personne compétente.
Anomalie Cause possible Remède
L'appareil est bruyant. L'appareil n'est pas stable. Vérifiez la stabilité (les quatre pieds
Le compresseur fonctionne
en permanence.
La porte n'est pas bien fermée. Consultez le paragraphe "Fermeture
La porte a été ouverte trop souvent. Ne laissez pas la porte ouverte plus
La température du produit est trop
La température ambiante est trop
La fonction Congélation rapide est
De l'eau s'écoule sur la plaque arrière du réfrigérateur.
De l'eau s'écoule dans le
réfrigérateur.
Des produits empêchent que l'eau
De l'eau coule sur le sol. L'eau de dégivrage ne s'écoule pas
Il y a trop de givre et de
glace.
La porte n'est pas bien fermée. Consultez le paragraphe "Fermeture
Cela peut être dû à un mauvais ré-
La température à l'intérieur
de l'appareil est trop élevée.
Cela peut être dû à un mauvais réglage de la température.
élevée.
élevée.
activée.
Pendant le dégivrage automatique,
le givre fond sur la plaque arrière.
L'orifice d'écoulement de l'eau est
obstrué.
s'écoule dans le réservoir d'eau.
dans le plateau d'évaporation situé
au-dessus du compresseur.
Les produits ne sont pas correctement emballés.
glage de la température.
La porte n'est pas bien fermée. Consultez le paragraphe "Fermeture
doivent être en contact avec le sol).
Choisissez une température plus éle-
vée.
de la porte".
longtemps que nécessaire.
Laissez le produit revenir à tempéra-
ture ambiante avant de le ranger dans
le congélateur.
Réduisez la température ambiante.
Consultez le paragraphe "Fonction
Congélation rapide".
Ce phénomène est normal.
Nettoyez l'orifice.
Assurez-vous que les produits ne
touchent pas la plaque arrière.
Fixez le tuyau de sortie de l'eau au
plateau d'évaporation.
Emballez les produits de façon plus
adaptée.
de la porte".
Sélectionnez une température plus
élevée.
de la porte".
www.zanussi.com
27
Page 28

Anomalie Cause possible Remède
La température du produit est trop
Trop de produits ont été introduits
La température du compartiment réfrigérateur est
trop élevée.
La température du congélateur est trop élevée.
L'appareil ne fonctionne
pas.
La fiche n'est pas correctement
Le courant n'arrive pas à l'appareil.
L'ampoule ne fonctionne
pas.
L'ampoule est défectueuse. Consultez le paragraphe « Remplace-
élevée.
simultanément.
L'air froid ne circule pas dans l'ap-
pareil.
Les produits sont trop près les uns
des autres.
L'appareil est éteint. Mettez l'appareil en fonctionnement.
branchée sur la prise de courant.
La prise de courant n'est pas alimentée.
L'ampoule est en mode Veille. Fermez puis ouvrez la porte.
Laissez le produit revenir à température ambiante avant de le ranger dans
le congélateur.
Introduisez moins de produits en même temps.
Assurez-vous que l'air froid circule
dans l'appareil.
Stockez les produits de façon à permettre la circulation de l'air froid.
Branchez correctement la fiche sur la
prise.
Branchez un autre appareil électrique
à la prise de courant. Faites appel à
un électricien qualifié.
ment de l'ampoule ».
Si ces conseils n'apportent pas de solution à votre problème, veuillez consulter le Service Aprèsvente de votre magasin vendeur.
Remplacement de l'éclairage
1. Débranchez l'appareil.
2. Poussez la pièce amovible pour décrocher
le diffuseur (1).
3. Enlevez le diffuseur (2).
4. Si nécessaire, remplacez l'ampoule par une
ampoule dont les caractéristiques et la
puissance sont identiques. Il est recommandé d'utiliser une ampoule Osram PARATHOM SPECIAL T26 0,8 W.
5. Installez le diffuseur de l'ampoule.
6. Branchez la prise d'alimentation.
7. Ouvrez la porte. Vérifiez que l'ampoule s'allume.
28
1
2
Fermeture de la porte
1. Nettoyez les joints de la porte.
2. Si nécessaire, ajustez la porte. Reportezvous au chapitre « Installation ».
3. Si nécessaire, remplacez les joints de porte
défectueux. Contactez votre service aprèsvente.
www.zanussi.com
Page 29

Caractéristiques techniques
Dimension
Hauteur 1850 mm
Largeur 595 mm
Profondeur 658 mm
Autonomie de fonctionnement 18 h
Tension 230-240 V
Fréquence 50 Hz
Les caractéristiques techniques figurent sur la
plaque signalétique située sur le côté gauche à
Installation
Attention Pour votre sécurité et le bon
fonctionnement de l'appareil, veuillez lire
attentivement les "Consignes de sécurité" avant
d'installer l'appareil.
Emplacement
Installez cet appareil à un endroit où la température ambiante correspond à la classe climatique
indiquée sur la plaque signalétique de l'appareil :
Classe
climati-
que
SN +10 à + 32 °C
N +16 à + 32 °C
ST +16 à + 38 °C
T +16 à + 43 °C
Emplacement
L'appareil ne doit pas être installé près d'une
source de chaleur comme un radiateur, une
chaudière, la lumière directe du soleil, etc. Assurez-vous que l'air circule librement à l'arrière
de l'appareil. Pour garantir un rendement optimum si l'appareil est installé sous un élément
suspendu, la distance entre le haut de l’appareil
et l'élément suspendu doit être de 100 mm minimum. Si possible, évitez de placer l'appareil
sous des éléments suspendus. La mise à niveau
www.zanussi.com
Température ambiante
l'intérieur de l'appareil et sur l'étiquette énergétique.
se fait à l'aide d'un ou de plusieurs pieds réglables à la base de la carrosserie de l’appareil.
Avertissement L'appareil doit pouvoir
être débranché à tout moment ; il est donc
nécessaire que la prise murale reste accessible
après l'installation.
100 mm
min
A
20 mm
B
Entretoises arrière
Vous trouverez les deux entretoises dans le sachet avec la documentation.
Pour installer les entretoises, procédez comme
suit :
1. Desserrez la vis.
29
Page 30

2. Insérez l'entretoise sous la vis.
3. Tournez l'entretoise dans la bonne position.
4. Resserrez les vis.
2
1
4
Mise à niveau
Lorsque vous installez
l'appareil, veillez à ce
qu'il soit d'aplomb.
Utilisez les deux pieds
réglables se trouvant
à l'avant de l'appareil.
3
Branchement électrique
Contrôlez, avant de brancher l'appareil, si la tension et la fréquence indiquées sur la plaque signalétique correspondent à celles de votre réseau.
L'appareil doit être relié à la terre. La fiche du
câble d'alimentation comporte un logement pour
mise à la terre. Si la prise de courant murale
n'est pas mise à la terre, branchez l'appareil sur
une prise de terre conformément aux normes en
vigueur, en demandant conseil à un électricien
qualifié.
Le fabricant décline toute responsabilité en cas
d'incident suite au non-respect des consignes
de sécurité sus-mentionnées.
Cet appareil est conforme aux directives communautaires.
Réversibilité de la porte
Avertissement Avant toute opération,
débranchez la fiche de la prise de courant.
Important Pour effectuer les opérations
suivantes, il est conseillé de se faire aider par
une autre personne pour maintenir fermement
les portes lors de toute manipulation de
l'appareil.
30
A
B
E
F
DC
C
B
A
D
A
2
1
www.zanussi.com
Page 31

• Ouvrez les portes.
Dévissez la charnière intermédiaire (B).
Retirez l'entretoise
en plastique (A).
• Retirez l'entretoise
(F) et placez-la de
l'autre côté du gond
de charnière (E).
• Enlevez les portes.
• Retirez la goupille
du cache gauche de
la charnière centrale
(C, D) et placez-la
de l'autre côté
• Insérez la goupille
de la charnière centrale (C) dans le
trou gauche de la
porte inférieure.
• Dévissez la charnière inférieure (A)
• Retirez les goupilles
du cache gauche
(D) placez-les de
l'autre côté.
• Revissez la charnière inférieure (A) du
côté opposé.
• Dévissez le gond de
la charnière inférieure (B) et l'entretoise
(C) et placez-les du
côté opposé.
• Enlevez les caches
(1) situés sur l'arête
supérieure des deux
portes et placez-les
sur le côté opposé.
• Replacez la porte
inférieure sur le
gond de la charnière
inférieure.
• Insérez la charnière
centrale dans le trou
gauche de la porte
inférieure.
• Dévissez le gond de
la charnière supérieure et placez-le sur
le côté opposé.
• Installez la porte supérieure sur le gond
supérieur.
• Replacez la porte
supérieure sur le
gond de la charnière
centrale en inclinant
légèrement les deux
portes.
• Revissez la charnière centrale. N'oubliez pas l'entretoise
en plastique.
Faites une dernière vérification pour vous assurer que :
• Toutes les vis sont bien serrées.
• Les bords des portes sont parallèles au côté
de l'appareil.
• Le joint magnétique adhère bien à l'appareil.
• La porte s'ouvre et se ferme correctement.
Si la température ambiante est basse (par
exemple, en hiver), il se peut que le joint n'adhè-
re pas parfaitement. Dans ce cas, attendez que
le joint reprenne sa taille naturelle.
Si vous ne souhaitez pas effectuer personnellement les opérations décrites ci-dessus, contactez votre service après-vente. Un technicien du
service après-vente procédera à la réversibilité
des portes à vos frais.
En matière de sauvegarde de l'environnement
Recyclez les matériaux portant le symbole .
Déposez les emballages dans les conteneurs
prévus à cet effet.
Contribuez à la protection de l'environnement et
à votre sécurité, recyclez vos produits
www.zanussi.com
électriques et électroniques. Ne jetez pas les
appareils portant le symbole
ménagères. Emmenez un tel produit dans votre
centre local de recyclage ou contactez vos
services municipaux.
avec les ordures
31
Page 32

Tartalomjegyzék
Biztonsági előírások _ _ _ _ _ _ _ _ _ _ _ 32
Termékleírás _ _ _ _ _ _ _ _ _ _ _ _ _ _ _ 35
Kezelőpanel _ _ _ _ _ _ _ _ _ _ _ _ _ _ _ 35
Működés _ _ _ _ _ _ _ _ _ _ _ _ _ _ _ _ _ 36
Első használat _ _ _ _ _ _ _ _ _ _ _ _ _ _ 39
Napi használat _ _ _ _ _ _ _ _ _ _ _ _ _ _ 39
Biztonsági előírások
Saját biztonsága és a helyes használat biztosítása érdekében a készülék üzembe helyezése és első használata előtt olvassa át figyelmesen ezt a használati útmutatót, beleértve a tippeket és figyelmeztetéseket is. A szükségtelen hibák és balesetek elkerülése érdekében fontos annak biztosítása, hogy mindenki, aki a készüléket használja, jól ismerje annak működését és biztonságos használatát.
Őrizze meg ezt a használati útmutatót, és ha
a készüléket elajándékozza vagy eladja, az
útmutatót is mellékelje hozzá, hogy annak teljes élettartamán keresztül mindenki, aki használja, megfelelő információkkal rendelkezzen
annak használatát és biztonságát illetően.
Az emberi élet és a vagyontárgyak biztonsága
érdekében tartsa be a jelen használati útmutatóban szereplő óvintézkedéseket, mivel a
gyártó nem felelős az ezek elmulasztása miatt
bekövetkező károkért.
Gyermekek és fogyatékkal élő személyek
biztonsága
• A készülék kialakítása nem olyan, hogy azt
csökkent fizikai, értelmi vagy mentális képességű, illetve megfelelő tapasztalatok és
ismeretek híján lévő személyek (beleértve
a gyermekeket is) használhassák, hacsak a
biztonságukért felelős személy nem biztosít
számukra felügyeletet és útmutatást a készülék használatára vonatkozóan.
Gondoskodni kell a gyermekek felügyeletéről annak biztosítása érdekében, hogy ne
játsszanak a készülékkel.
• Minden csomagolóanyagot tartson a gyermekektől távol. Fulladásveszélyesek.
32
Hasznos javaslatok és tanácsok _ _ _ _ _ 40
Ápolás és tisztítás _ _ _ _ _ _ _ _ _ _ _ _ 42
Hibaelhárítás _ _ _ _ _ _ _ _ _ _ _ _ _ _ _ 43
Műszaki adatok _ _ _ _ _ _ _ _ _ _ _ _ _ _ 45
Üzembe helyezés _ _ _ _ _ _ _ _ _ _ _ _ _ 45
Környezetvédelmi tudnivalók _ _ _ _ _ _ _ 48
A változtatások jogát fenntartjuk.
• A készülék kiselejtezésekor húzza ki a dugaszt a hálózati aljzatból, vágja el a hálózati tápkábelt (olyan közel a készülékhez,
amennyire csak lehet), és távolítsa el az ajtót annak megelőzése érdekében, hogy a
játszó gyermekek áramütést szenvedjenek,
vagy magukat a készülékbe zárják.
• Ha ez a mágneszáras ajtóval ellátott készülék egy rugózáras (kilincses) ajtóval vagy
fedéllel ellátott régi készülék helyére kerül,
akkor ne felejtse el a régi készülék kidobása előtt használatra alkalmatlanná tenni a
rugós zárat. Ennek az a célja, hogy gyerekek ne tudjanak bennrekedni a készülékben.
Általános biztonsági tudnivalók
Vigyázat
A készülékházon vagy a beépített szerkezeten lévő szellőzőnyílásokat tartsa akadálymentesen
• A készülék rendeltetése háztartási élelmiszerek és/vagy italok tárolása, és hasonló
felhasználási területen való alkalmazása,
mint például:
– üzletek, irodák és egyéb munkahelyeken
kialakított személyzeti konyhák;
– tanyaházak, hotelek, motelek és egyéb
lakás céljára szolgáló ingatlanok esetén
az ügyfelek számára;
– szállások reggelivel;
– étkeztetés és hasonló, nem kereskedelmi
jellegű alkalmazások.
• Ne használjon mechanikus szerkezetet
vagy mesterséges eszközöket a leolvasztási folyamat elősegítésére.
www.zanussi.com
Page 33

•Ne működtessen más elektromos készülé-
ket (például fagylaltkészítő gépet) hűtőbe-
rendezések belsejében, hacsak ezt a gyártó kifejezetten jóvá nem hagyja.
• Ügyeljen arra, hogy ne sérüljön meg a hű-
tőkör.
• Izobután (R600a) hűtőanyagot tartalmaz a
készülék hűtőköre, ez a környezetre csekély hatást gyakorló, természetes gáz,
amely ugyanakkor gyúlékony.
A készülék szállítása és üzembe helyezése
során bizonyosodjon meg arról, hogy a hű-
tőkör semmilyen összetevője nem sérült
meg.
Ha a hűtőkör megsérült:
– kerülje nyílt láng és tűzgyújtó eszközök
használatát
– alaposan szellőztesse ki azt a helyiséget,
ahol a készülék található
• Veszélyes a termék műszaki jellemzőit
megváltoztatni vagy a terméket bármilyen
módon átalakítani. A hálózati tápkábel bármilyen sérülése rövidzárlatot, tüzet vagy
áramütést okozhat.
Vigyázat A veszélyhelyzetek megelőzé-
se érdekében mindenféle elektromos
részegység (hálózati tápkábel, dugasz, kompresszor) cseréjét hivatalos szervizképviselő-
nek vagy szakképzett szervizmunkatársnak
kell elvégeznie.
1. A hálózati tápkábelt nem szabad meghosszabbítani.
2. Ügyeljen arra, hogy a hálózati dugaszt
ne nyomja össze vagy károsítsa a készülék hátlapja. Az összenyomott vagy
sérült hálózati dugasz túlmelegedhet
és tüzet okozhat.
3. Gondoskodjon arról, hogy a készülék
hálózati dugasza hozzáférhető legyen.
4. Ne húzza a hálózati kábelt.
5. Ha a hálózati aljzat ki van lazulva, ne
csatlakoztassa a hálózati dugaszt. Áramütés vagy tűz veszélye.
6. Nem szabad működtetni a készüléket,
ha a belső világítás lámpabúrája nincs
a helyén (ha van a készüléken).
www.zanussi.com
• Ez a készülék nehéz. Mozgatásakor körültekintéssel járjon el.
• Ne szedjen ki semmit a fagyasztóból, és ne
is érjen hozzá ilyenekhez, ha a keze nedves vagy vizes, mivel ez a bőrsérüléseket,
illetve fagyás miatti égési sérüléseket eredményezhet.
• Ne tegye ki hosszú időn keresztül közvetlen
napsütésnek a készüléket.
• Az ebben a készülékben működő izzólámpák (ha vannak ilyenek a készülékben) kizárólag háztartási eszközökhöz kifejlesztett, különleges fényforrások. Nem alkalmasak helyiségek megvilágítására.
Napi használat
• Ne tegyen meleg edényt a készülék műa-
nyag részeire.
• Ne tároljon gyúlékony gázt vagy folyadékot
a készülékben, mert azok felrobbanhatnak.
• Ne tegyen élelmiszereket közvetlenül a hátsó falon lévő levegőkimenet elé. (Ha a készülék Frost Free rendszerű)
• A fagyasztott élelmiszert kiolvasztás után
többé nem szabad újra lefagyasztani.
•Az előrecsomagolt fagyasztott élelmiszere-
ket az élelmiszergyártó utasításaival összhangban tárolja.
• A készülék gyártójának tárolásra vonatkozó
ajánlásait szigorúan be kell tartani. Olvassa
el az idevonatkozó utasításokat.
• Ne tegyen szénsavas italokat a fagyasztóba, mert nyomás keletkezik a palackban,
ami miatt felrobbanhat és kárt okozhat a
készülékben.
• A jégnyalóka fagyásból eredő égéseket
okozhat, ha rögtön a készülékből kivéve
enni kezdik.
Ápolás és tisztítás
• A karbantartás előtt kapcsolja ki a készüléket, és a húzza ki a vezetéket a fali aljzatból.
• Ne tisztítsa a készüléket fémtárgyakkal.
• Ne használjon éles tárgyakat a dérnek a
készülékről történő eltávolításához. Használjon műanyag kaparókést.
33
Page 34

• Rendszeresen vizsgálja meg a hűtőszek-
rényben a leolvadt víz számára kialakított
vízelvezetőt. Szükség esetén tisztítsa meg
a vízelvezetőt. Ha a vízelvezető el van záródva, a víz összegyűlik a készülék aljában.
Üzembe helyezés
Fontos Az elektromos hálózatra való
csatlakoztatást illetően kövesse a megfelelő
fejezetek útmutatását.
• Csomagolja ki a készüléket, és ellenőrizze,
vannak-e sérülések rajta. Ne csatlakoztassa a készüléket, ha sérült. Az esetleges sérüléseket azonnal jelentse ott, ahol a készüléket vásárolta. Ilyen esetben őrizze
meg a csomagolást.
• Ajánlatos legalább négy órát várni a készülék bekötésével és hagyni, hogy az olaj visszafolyjon a kompresszorba.
•Megfelelő levegőáramlást kell biztosítani a
készülék körül, ennek hiánya túlmelegedéshez vezet. Az elégséges szellőzés elérése
érdekében kövesse a vonatkozó üzembe
helyezési utasításokat.
• Amikor csak lehetséges, a készülék hátlapja fal felé nézzen, hogy el lehessen kerülni
a forró alkatrészek (kompresszor, kondenzátor) megérintését vagy megfogását az
esetleges égési sérülések megelőzése érdekében.
• A készüléket nem szabad radiátorok vagy
tűzhelyek közelében elhelyezni.
• Ügyeljen arra, hogy a hálózati dugasz hozzáférhető legyen a készülék telepítése
után.
• Csak ivóvízhálózatra csatlakoztatható (Ha
fel van szerelve vízcsatlakozóval).
Szerviz
• A készülék szervizeléséhez szükséges
minden villanyszerelési munkát szakképzett
villanyszerelőnek vagy kompetens személynek kell elvégeznie.
• A készüléket kizárólag arra felhatalmazott
szervizközpont javíthatja, és csak eredeti
pótalkatrészek használhatók.
Környezetvédelem
Ez a készülék sem a hűtőfolyadék-kerin-
gető rendszerben, sem a szigetelő
anyagokban nem tartalmaz az ózonréteget
károsító gázokat. A készüléket nem szabad a
lakossági hulladékkal és szeméttel együtt kidobni. A szigetelőhab gyúlékony gázokat tartalmaz: a készüléket a helyi hatóságoktól beszerezhető vonatkozó rendelkezésekkel összhangban kell hulladékba helyezni. Vigyázzon,
ne sérüljön meg a hűtőegység, különösen hátul a hőcserélő környéke. A készüléken használt és
szimbólummal megjelölt anyagok
újrahasznosíthatóak.
34
www.zanussi.com
Page 35

Termékleírás
6 7 841 3 52
9
10
Zöldséges fiókok
1
Üvegpolcok
2
Dynamic Air hűtés
3
Kezelőpanel
4
LED lámpa
5
Kezelőpanel
www.zanussi.com
Tejtermék polc
6
Ajtóban lévő polc
7
Palacktartó polc
8
Fagyasztó kosarak
9
Adattábla
10
AC
BDE
35
Page 36

A - Készülék BE/KI gomb D - Funkció gomb
B - Hőmérséklet-szabályozó gomb E - Megerősítés gomb
C - Kijelző
Kijelző
10 1 2 3 4
56789
Hőmérséklet-visszajelző.
1
Magas hőmérséklet miatti riasztás.
2
FreeStore funkció visszajelző.
3
Bevásárlás funkció visszajelző.
4
Gyermekzár funkció visszajelző.
5
Működés
Első bekapcsolás
A kijelző nem világít, miután a csatlakozódugaszt a hálózati aljzatba csatlakoztatta, az (A)
gombot megnyomva kapcsolja be a készüléket.
Amint a készülék bekapcsolt, riasztási állapotban van, a hőmérséklet értéke villog, és a
csengő hangjelzést ad.
A csengő kikapcsolásához nyomja meg az (E)
gombot (lásd még a "magas hőmérséklet mi-
att riasztás" c. részt), az
villog, és a
kijelzőn megjelenik az elért
legmagasabb hőmérséklet.
Az élelmiszer helyes tárolása érdekében válassza az Eco üzemmód funkciót, ami garantálja a következő hőmérsékletek beállítását:
+5°C a hűtőszekrényben
-18°C a fagyasztóban
ikon továbbra is
Időzítés funkció visszajelző
6
Pozitív vagy negatív hőmérséklet-vis-
7
szajelző.
Intenzív fagyasztás funkció visszajelző.
8
Rekesz viszajelző.
9
Eco üzemmód visszajelző.
10
• Várjon, amíg a rekeszen belül a hőmérsék-
let eléri a -18°C-ot, mielőtt behelyezi az
élelmiszereket a fagyasztó rekeszbe.
•Eltérő hőmérséklet kiválasztásához lásd a
"Hőmérséklet-szabályozás" c. részt.
Kikapcsolás
A készülék úgy kapcsolható ki, hogy az (A)
gombot egy másodpercnél tovább lenyomva
tartja.
Ez alatt a hőmérsékletérték visszaszámolása
(-3 -2 -1) látható.
Funkciómenü
A (D) gomb aktiválásával a funkciómenü mű-
ködésbe lép. Minden egyes funkció az (E)
gomb megnyomásával erősíthető meg. Ha
néhány másodperc elteltével nem történik
megerősítés, a kijelző kilép a menüből, és visszatér normál állapotba.
A következő funkciók kerülnek kijelzésre:
36
www.zanussi.com
Page 37

Hűtőrekesz kiválasztása
Fagyasztórekesz kiválasztása
Eco üzemmód
FreeStore funkció
Bevásárlás funkció
Gyermekzár funkció
Italhűtő funkció
Intenzív fagyasztás funkció
A hőmérséklet beállítása
A (D) gombbal válassza ki a rekeszt, majd a
(B) gombbal állítsa be a szükséges hőmér-
sékletet.
Nyomja meg az (E) gombot a kiválasztás
megerősítéséhez.
A hőmérséklet-visszajelző a beállított hőmér-
sékletet mutatja. A beállított új hőmérsékletet
a készülék 24 órán belül éri el.
A beállított hőmérséklettől való néhány fokos
eltérés normális jelenség, nem a készülék
meghibásodását jelzi.
Nyaralás üzemmód "H"
A nyaralás üzemmód a hőmérsékletet + 15°C-
ra állítja.
Ez a funkció lehetővé teszi, hogy a hűtőszek-
rény a szabadság (pl. nyaralás) hosszú idő-
tartama alatt zárva és üresen álljon anélkül,
hogy benne kellemetlen szagok képződné-
nek.
A nyaralás üzemmód bekapcsolásához úgy
kell eljárni, mintha a kiválasztott hőmérsékle-
tet módosítaná. A hőmérséklet-visszajelző
egyszerre 1 °C-kal egészen +8 °C-ig tudja
módosítani a kijelzett hőmérsékletet. A +2 °C
kiírását a „H” betű követi. A megerősítéshez
nyomja meg az E gombot.
Ekkor a hűtőszekrény energiatakarékos "nyaralás" üzemmódban van.
Fontos A hűtőszekrényrekeszt ki kell üríteni,
ha a nyaralás funkció be van kapcsolva.
Gyermekzár funkció
A gyermekzár funkció a (D) gomb (szükség
szerint többszöri) megnyomásával aktiválható, amíg a megfelelő
ikon meg nem jelenik.
A választást meg kell erősítenie az (E) gomb
néhány másodpercen belüli megnyomásával.
Hangjelzés hallható, az ikon pedig tovább vi-
www.zanussi.com
lágít. Ilyen feltételek mellett a gombok bármilyen esetleges működtetése nem eredményez
semmilyen változást mindaddig, amíg a funkció be van kapcsolva.
Lehetőség van arra, hogy bármikor kikapcsolja a funkciót a (D) gomb megnyomásával
mindaddig, amíg a megfelelő ikon villogni
nem kezd, utána pedig az (E) gomb megnyomásával.
Bevásárlás funkció
Ha nagyobb mennyiségű meleg élelmiszert
kell behelyeznie, például egy élelmiszer-bevásárlás után, azt javasoljuk, hogy aktiválja a
Bevásárlás funkciót a termékek gyorsabb lehűtése és annak megelőzése érdekében,
hogy a már a hűtőszekrényben lévő élelmiszerek felmelegedjenek.
A Bevásárlás funkció a (D) gomb (szükség
szerint többszöri) megnyomásával aktiválha-
tó, amíg a megfelelő
ikon meg nem jelenik.
A választást meg kell erősítenie az (E) gomb
néhány másodpercen belüli megnyomásával.
Hangjelzés hallható, az ikon pedig tovább világít.
A Bevásárlás funkció kb. 6 óra elteltével automatikusan kikapcsol. Lehetőség van arra,
hogy bármikor kikapcsolja a funkciót a (D)
gomb megnyomásával mindaddig, amíg a
megfelelő ikon villogni nem kezd, utána pedig
az (E) gomb megnyomásával.
Eco üzemmód
Nyomja meg (szükség szerint többször) a (D)
gombot, amíg a megfelelő ikon meg nem jele-
.
nik
Nyomja meg az (E) gombot a kiválasztás
megerősítéséhez. Hangjelzés hallható, az
ikon pedig tovább világít.
Ilyen esetben a hőmérsékletek automatikusan
beállításra kerülnek (+ 5°C, illetve - 18°C),
amelyek a legjobb feltételeket biztosítják az
élelmiszerek tárolásához.
A funkció kikapcsolásához állítson be eltérő
hőmérsékletet valamelyik rekeszben.
FreeStore funkció
Nyomja meg (szükség szerint többször) a (D)
gombot, amíg a megfelelő ikon meg nem jele-
nik
37
Page 38

Nyomja meg az (E) gombot a kiválasztás
megerősítéséhez. Hangjelzés hallható, az
ikon pedig tovább világít.
Fontos Ha a funkció automatikusan
bekapcsol, a FreeStore ikon nem látható (lásd
a "Napi használat" című részt).
A FreeStore funkció bekapcsolása növeli az
energiafelhasználást.
Intenzív fagyasztás funkció
A fagyasztórekesz alkalmas kereskedelmileg
fagyasztott és mélyhűtött élelmiszerek hosszú
távú tárolására és friss élelmiszerek lefagyasztására.
A 24 óra alatt lefagyasztható maximális élelmiszer-mennyiség az adatlapon van feltüntetve.
Az adatlapon feltüntetett élelmiszer-mennyiség lefagyasztásához helyezze az élelmiszert
a hűtőfelületre (vegye ki a fiókot vagy a kosarat). Abban az esetben, ha az élelmiszert a
fiókokban vagy a kosarakban fagyasztja le, a
maximális mennyiség némileg kevesebb.
Friss élelmiszerek lefagyasztásához aktiválnia
kell az intenzív fagyasztás funkciót. Nyomja
meg (szükség szerint többször) a (D) gombot,
amíg a
kijelző meg nem jelenik.
A választást meg kell erősítenie az (E) gomb
néhány másodpercen belüli megnyomásával.
Hangjelzés hallható, és a kijelzőn megjelenik
egy animáció vonalakkal.
A 24 órás előhűtési időszak után helyezze be
az élelmiszereket a fagyasztóba.
Tegye a fagyasztásra váró élelmiszert a
rekeszbe, mivel ez a leghidegebb pont.
A fagyasztási folyamat 24 órát vesz igénybe.
Ez alatt az idő alatt ne tegyen további élelmiszereket a fagyasztóba.
A funkció 52 óra elteltével automatikusan kikapcsol.
Lehetőség van arra, hogy bármikor kikapcsolja a funkciót a (D) gomb megnyomásával
mindaddig, amíg a
kijelző villogni nem
kezd, utána pedig az (E) gomb megnyomásával.
Italhűtő funkció
Az Italhűtő funkció biztonsági figyelmeztetésként szolgál, amikor italos palackokat helyez
38
a fagyasztó rekeszbe. Ez a funkció a (D)
gomb (szükség szerint többszöri) megnyomá-
sával aktiválható, amíg a megfelelő
ikon
meg nem jelenik.
A választást meg kell erősítenie az (E) gomb
néhány másodpercen belüli megnyomásával.
Hangjelzés hallható, az ikon pedig tovább világít.
Ilyen körülmények között a készülék egy idő-
zítőt működtet, melynek alapértelmezett értéke 30 perc, 1 és 90 perc között módosítható,
a (B) gomb lenyomásával kiválaszthatja a kívánt időtartamot.
A kiválasztott időtartam végén a következő
jelzések vannak:
•
•
•
kijelzőn a szimbólum villog
a
ikon villog
az
ikon villog
az
• a hangjelzés addig szól, amíg meg nem
nyomja az (E) gombot.
Ezen a ponton ne feledje, hogy kivegye a fagyasztórekeszben lévő italokat.
Lehetőség van arra, hogy bármikor kikapcsolja a funkciót a (D) gomb megnyomásával
mindaddig, amíg a megfelelő ikon villogni
nem kezd, utána pedig az (E) gomb megnyomásával.
Magas hőmérséklet miatti riasztás
A rekeszben a hőmérséklet (például áramkimaradás miatti) emelkedését a következők
jelzik:
• villogó hőmérséklet
•
a fagyasztó rekesz
•
ikon villogása
az
villogása
•a csengő hangjelzése
Amikor a normál feltételek helyreálltak:
• a hangjelzés kikapcsol
•a hőmérsékletérték továbbra is villog
Amikor a riasztás kikapcsolásához megnyomja az (E) gombot, a rekeszben elért legmagasabb hőmérséklet jelenik meg a
kijelzőn
néhány másodpercre.
Ezután a kijelző visszatér a normál működés-
re, a kiválasztott rekesz hőmérsékletét mutatva.
www.zanussi.com
Page 39

A riasztási fázisban a csengő az (E) gomb
megnyomásával kikapcsolható.
Első használat
A készülék belsejének tisztítása
A készülék legelső használata előtt mossa ki
a készülék belsejét semleges szappanos langyos vízzel, hogy eltávolítsa a tökéletesen új
termékek tipikus szagát, majd alaposan szárítsa ki.
Napi használat
Fagyasztott élelmiszerek tárolása
Az első indításkor, illetve hosszabb használaton kívüli periódus után, mielőtt élelmiszereket
helyezne a fagyasztótérbe, üzemeltesse legalább 2 óráig a készüléket.
A fagyasztófiókok használatával könnyen és
gyorsan megtalálja a kívánt élelemcsomagot.
Ha nagyobb mennyiségű élelmet kell tárolni,
eltávolíthatja a fiókokat, kivéve az alsót, melynek mindig a helyén kell maradnia, a levegő
megfelelő áramlásának biztosítása érdekében. Minden polcra helyezhető az ajtótól 15
mm-re kinyúló étel.
Fontos Véletlenszerű, például
áramkimaradás miatt bekövetkező leolvadás
esetén, amikor az áramszünet hosszabb ideig
tart, mint az az érték, amely a műszaki
jellemzők között az „áramkimaradási
biztonság” alatt van feltüntetve, a felolvadt
élelmiszert gyorsan el kell fogyasztani, vagy
azonnal meg kell főzni, majd pedig a (kihűlés
után) újra lefagyasztani.
Friss élelmiszer lefagyasztása
A fagyasztórekesz alkalmas friss élelmiszerek
lefagyasztására, valamint fagyasztott és mélyhűtött élelmiszerek hosszú távú tárolására is.
Friss élelmiszer lefagyasztásához aktiválja a
Gyorsfagyasztás funkciót legalább 24 órával
azelőtt, hogy a lefagyasztani kívánt élelmiszert behelyezi a fagyasztórekeszbe.
Helyezze a lefagyasztandó friss élelmiszert az
alsó rekeszbe.
Fontos Ne használjon mosószereket vagy
súrolóporokat, mert ezek megsérthetik a felületét.
A 24 óra alatt lefagyasztható maximális élelmiszer-mennyiség az adatlapon van feltüntetve, amely a készülék belsejében található.
A fagyasztási folyamat 24 órát vesz igénybe:
ez alatt az idő alatt ne tegyen be további lefagyasztandó élelmiszert.
24 óra elteltével, amikor a fagyasztási folyamat befejeződött, kapcsolja ki a Gyorsfagyasztás funkciót (lásd a: „Gyorsfagyasztás
funkció” c. részt).
Kiolvasztás
A mélyfagyasztott vagy fagyasztott élelmiszerek használat előtt a hűtőrekeszben vagy szobahőmérsékleten kiolvaszthatók, attól függő-
en, hogy mennyi idő áll rendelkezésre ehhez
a művelethez.
A kisebb darabok még akár fagyasztott állapotban, közvetlenül a fagyasztóból kivéve is
megfőzhetők: ebben az esetben a főzés ideje
meghosszabbodik.
Mozgatható polcok
A hûtõszekrény falai
több sor csúszósínnel vannak ellátva,
hogy a polcokat tetszés szerinti helyre
lehessen tenni.
www.zanussi.com
39
Page 40

FreeStore
A hűtőrekesz olyan
eszközzel van felszerelve, mely lehetővé teszi az ételek
gyors lehűtését, és
egyenletesebb hő-
mérséklet-eloszlást
biztosít a rekeszben.
Ez az eszköz automatikusan bekapcsol, amikor szükség
van rá, például az ajtónyitás utáni hőmér-
séklet-visszaállításnál, illetve amikor a
külső hőmérséklet
magas.
A fagyasztókosarak kivétele a
fagyasztóból
A fagyasztókosarakon van egy ütközõ, amely
megakadályozza véletlen kivételüket vagy leesésüket. Amikor ki szeretné venni a fagyasztóból, húzza maga felé a kosarat, és amikor
az elérte a végpontot, az elejét felfele billentve vegye ki a kosarat.
Amikor vissza kívánja rakni, kissé emelje meg
a kosár elejét, hogy be lehessen illeszteni a
fagyasztóba. Amikor túljutott a végpontokon,
nyomja vissza a kosarakat a helyükre.
Ha szükséges, az eszköz manuálisan is bekapcsolható a Bevásárlás funkció bekapcsolásával.
Az ajtó polcainak elhelyezése
Ha különbözõ méretû élelmiszercsomagok tárolásának szeretne helyet biztosítani, az ajtópolcokat
különbözõ magasságokba állíthatja.
Fokozatosan húzza
a polcot a nyilakkal
jelölt irányba, amíg ki
nem szabadul, majd
szükség szerint tegye új helyre.
1
3
2
Hasznos javaslatok és tanácsok
Normál működéssel járó hangok
• Esetleg egy halk csobogó vagy bugyborékoló hangot is lehet hallani, amikor a hűtő-
közeget a rendszer a hátsó tekercseken
vagy vezetéken. Ez normális jelenség.
12
• Amikor a kompresszor be van kapcsolva, a
hűtőszekrényben körbe halad a szivattyúzott anyag; ekkor zümmögő és pulzáló zaj
hallatszik a kompresszor felől. Ez normális
jelenség.
12
40
www.zanussi.com
Page 41

•A hőtágulás hirtelen recsegő zajt okozhat.
Ez egy természetes, veszélytelen fizikai jelenség. Ez normális jelenség.
Energiatakarékossági ötletek
• Ne nyitogassa gyakran az ajtót, illetve ne
hagyja a feltétlenül szükségesnél tovább
nyitva.
• Ha a környezeti hőmérséklet magas, a hő-
mérséklet-szabályozó magas beállításon
van, és a készülék teljesen meg van töltve,
be, előfordulhat, hogy a kompresszor folyamatosan üzemel, ami miatt jég vagy dér
képződik a párologtatón. Ha ez bekövetkezik, forgassa a hőmérséklet-szabályozót
alacsonyabb beállításokra, hogy lehetővé
tegye az automatikus leolvasztást, és így
takarékoskodjon az áramfogyasztással.
Ötletek friss élelmiszerek hűtéséhez
A legjobb teljesítmény elérése érdekében:
• ne tároljon meleg ételt vagy párolgó folyadékot a hűtőszekrényben
• takarja le vagy csomagolja be az élelmiszereket, különösen ha valamelyiknek erős az
aromája
• úgy helyezze be az ételeket, hogy a levegő
szabadon körbe tudja járni őket.
Ötletek a hűtőszekrény használatához
Hasznos tanácsok:
Hús (minden fajtája): csomagolja nejlonzacskóba és helyezze a zöldséges fiók feletti
üveglapra.
Biztonsági okokból ne tárolja egy vagy két
napnál hosszabb ideig ily módon a húst.
Készételek, hidegtálak stb.: ezeket le kell takarni, majd bármelyik polcon elhelyezhetők.
Gyümölcsök és zöldségek: alaposan meg kell
őket tisztítani és számukra külön biztosított fiók(ok)ban elhelyezni. Amikor citromlé érintkezik a hűtővel, annak műanyag részeit elszínezheti. Ezért ajánlott a citrusféléket külön tárolóedényben tartani.
Vaj és sajt: speciális légmentes tartóedényekbe kell helyezni, vagy alufóliába vagy nejlonzacskókba csomagolni őket, és a lehető legtöbb levegőt kiszorítani körülöttük.
Palackok: legyen kupakjuk, és tárolja őket az
ajtó palacktartó rekeszében.
Ha a banán, krumpli, hagyma vagy fokhagyma nincs becsomagolva, tilos őket a hűtő-
szekrényben tartani.
Ötletek fagyasztáshoz
Ha a legjobban szeretné hasznosítani a fagyasztási eljárást, tartson be néhány fontos
ajánlást:
• az adatlapon megtekintheti azt a maximális
élelmiszer-mennyiséget, amely 24 órán belül lefagyasztható;
• a fagyasztási folyamat 24 órát vesz igénybe. Ez alatt az időszak alatt nem szabad további fagyasztásra váró élelmiszert betenni;
• csak első osztályú, friss és alaposan megtisztított élelmiszereket fagyasszon le;
• készítsen kisebb adag ételeket, hogy gyorsan és teljesen megfagyjanak, és hogy a
későbbiekben csak a kívánt mennyiséget
kelljen felolvasztani;
• csomagolja az ételt alufóliába vagy folpackba, és ellenőrizze, hogy sikerült-e a csomagolással kizárni a levegőt;
• ne hagyja, hogy a friss, még meg nem fagyott élelmiszerek hozzáérjenek a már lefagyasztott adagokhoz, mert különben az
utóbbiaknak megemelkedik a hőmérsékle-
te;
• a zsírszegény ételeket könnyebben és hosszabb ideig lehet tárolni, mint a zsírosakat;
a só csökkenti az élelmiszerek élettartamát;
• ha a vízből képződött jeget a fagyasztórekeszből történő kivétel után rögtön fogyasztani kezdik, fagyásból eredő égési sérüléseket okozhat a bőrön;
• ajánlatos minden egyes csomagon feltüntetni a lefagyasztás dátumát, hogy nyomon
lehessen követni a tárolási időket.
Ötletek fagyasztott élelmiszerek
tárolásához
Annak érdekében, hogy a legjobb teljesítményt érje el a készüléknél:
www.zanussi.com
41
Page 42

•ellenőrizze, hogy a kereskedelmileg lefa-
gyasztott élelmiszereket megfelelően tárolta-e az eladó;
• gondoskodjon róla, hogy a fagyasztott élelmiszerek a lehető legrövidebb időn belül elkerüljenek az élelmiszerüzletből a fagyasztóba;
• ne nyitogassa gyakran az ajtót, illetve ne
hagyja a feltétlenül szükségesnél tovább
nyitva;
Ápolás és tisztítás
• a kiolvasztott élelmiszerek nagyon gyorsan
romlanak, és nem fagyaszthatók vissza;
• ne lépje túl az élelmiszergyártó által feltüntetett tárolási időtartamot.
Figyelem Bármilyen karbantartási
művelet előtt áramtalanítsa a készüléket
a hálózati csatlakozódugó kihúzásával.
Ennél a készüléknél szénhidrogén van a
hűtőegységben; ezért csak megbízott
szerelő végezhet rajta karbantartást, és töltheti fel újra.
Időszakos tisztítás
A készüléket rendszeresen tisztítani kell:
• a készülék belsejét és a tartozékokat lan-
gyos vízzel és egy kevés semleges mosogatószerrel tisztítsa meg.
• rendszeresen ellenőrizze az ajtótömítése-
ket, és törölje tisztára, hogy biztosítsa azok
tisztaságát és szennyeződésmentességét.
• gondosan öblítse le és szárítsa meg.
Fontos Ne húzza meg, ne mozgassa és ne
sértse meg a készülékházban lévő csöveket
és/vagy kábeleket.
Soha ne használjon mosószereket,
súrolóporokat, erőteljesen illatosított
tisztítószereket vagy viaszos polírozószereket
a beltér tisztításához, mivel ezek károsítják a
felületet, és erőteljes illatot hagynak maguk
után.
Tisztítsa meg a kondenzátort (fekete rács),
majd a készülék hátulján lévő kompresszort
egy kefével. Ezzel a művelettel javíthatja a
készülék teljesítményét, és csökkentheti az
áramfogyasztást.
Fontos Ügyeljen arra, hogy ne sérüljön meg
a hűtőrendszer.
Számos konyhai felülettisztító olyan vegyszereket tartalmaz, amelyek megtámadhatják/károsíthatják a készülékben használt műanya-
gokat. Ebből az okból javasoljuk, hogy a készülék külső felületét kizárólag meleg vízzel
tisztítsa, amelyhez egy kevés mosogatószert
adott.
A tisztítás után csatlakoztassa a készüléket a
táphálózathoz.
A hûtõszekrény leolvasztása
Rendeltetésszerû használat közben a dér
minden alkalommal automatikusan leolvad a
hûtõrekesz párologtatójáról, amint leáll a
kompresszor. A jégmentesítéssel keletkezett
víz a készülék hátulján a kompresszor felett
egy vályún keresztül belefolyik egy különleges
tartályba, és ott elpárolog.
Fontos, hogy a hűtőszekrény-csatorna közepén látható lefolyónyílást, amely a jégmentesítésből származó vizet befogadja, rendszeresen megtisztítsa, nehogy a víz túlfolyjon és
rácsöpögjön a készülékben lévő élelmiszerekre. Használja a mellékelt speciális tisztítót,
amelyet gyárilag elhelyeztünk a lefolyócső
belsejében.
42
www.zanussi.com
Page 43

A fagyasztó leolvasztása
Ennek a modellnek a fagyasztórekesze "no
frost" típusú. Ez azt jelenti, hogy a működés
közben nem képződik dér a készülékben,
sem a belső falakon, sem pedig az élelmiszereken.
Hibaelhárítás
A dér hiánya annak köszönhető, hogy a rekesz belsejében folyamatos a hideg levegő
keringetése, amelyet egy automatikus vezérlésű ventillátor biztosít.
Figyelem A hibakeresés előtt válassza le
a készüléket a táphálózatról.
Csak szakképzett villanyszerelő vagy
kompetens személy végezhet el bármilyen
Fontos Normál használat közben a bizonyos
hangok hallhatók (kompresszor, hűtőfolyadék
áramlása).
olyan hibaelhárítást, amely nem szerepel a
jelen kézikönyvben.
Probléma Lehetséges ok Megoldás
A készülék zajos. A készülék alátámasztása nem
A kompresszor folyamatosan működik.
Az ajtó nincs jól becsukva. Olvassa el "Az ajtó bezárása" c.
Túl gyakori az ajtó nyitogatása. Ne hagyja nyitva az ajtót a szüksé-
A termékhőmérséklet túl magas. Hagyja, hogy a termékhőmérséklet
A szobahőmérséklet túl magas. Csökkentse a szobahőmérsékletet.
Az Intenzív fagyasztás be van
Víz folyik le a hűtőszekrény
hátlapján.
Víz folyik be a hűtőszek-
rénybe.
Az élelmiszerek megakadályoz-
Víz folyik a padlóra. A leolvasztási vízkifolyó nem a
Túl sok dér és jég képző-
dött.
Az ajtó nincs jól becsukva. Olvassa el "Az ajtó bezárása" c.
megfelelő.
Lehet, hogy a hőmérséklet-szabá-
lyozó beállítása nem megfelelő.
kapcsolva.
Az automatikus leolvasztási folya-
mat során a zúzmara leolvad a
hátlapon.
A vízkifolyó eltömődött. Tisztítsa ki a vízkifolyót.
zák, hogy a víz a vízgyűjtőbe folyjon.
kompresszor fölötti párologtató tálcához csatlakozik.
Az élelmiszerek nincsenek megfelelően becsomagolva.
Ellenőrizze, hogy a készülék stabilan áll-e (mind a négy lábnak a padlón kell állnia).
Állítson be magasabb hőmérsékle-
tet.
szakaszt.
gesnél hosszabb időn át.
a szobahőmérsékletre csökkenjen a
tárolás előtt.
Lásd az "Intenzív fagyasztás funkció" c. szakaszt.
Ez normális jelenség.
Ügyeljen rá, hogy a termékek ne érjenek a hátsó falhoz.
Csatlakoztassa a leolvasztási vízkifolyót a párologtató tálcához.
Csomagolja be jobban az élelmiszereket.
szakaszt.
www.zanussi.com
43
Page 44

Probléma Lehetséges ok Megoldás
Lehet, hogy a hőmérséklet-szabá-
A készülékben a hőmérsék-
let túl magas.
A termékhőmérséklet túl magas. Hagyja, hogy a termékhőmérséklet
Túl sok termék van tárolva egy
A hűtőszekrényben a hő-
mérséklet túl magas.
A fagyasztóban a hőmér-
séklet túl magas.
A készülék nem működik. A készülék ki van kapcsolva. Kapcsolja be a készüléket.
A hálózati dugasz nincs helyesen
A készülék nem kap áramot.
A lámpa nem működik. A lámpa készenléti üzemmódban
A lámpa hibás. Olvassa el az "Izzó kicserélése" c.
lyozó beállítása nem megfelelő.
Az ajtó nincs jól becsukva. Olvassa el "Az ajtó bezárása" c.
időben.
Nincs hideglevegő-keringetés a
készülékben.
A termékek túl közel vannak egymáshoz.
csatlakoztatva a hálózati aljzatba.
Nincs feszültség a hálózati aljzatban.
van.
Állítson be magasabb hőmérsékle-
tet.
szakaszt.
a szobahőmérsékletre csökkenjen a
tárolás előtt.
Tároljon kevesebb terméket egy
időben.
Gondoskodjon arról, hogy legyen
hideglevegő-keringetés a készülékben.
Tárolja a termékeket úgy, hogy legyen hideglevegő-keringés a készülékben.
Csatlakoztassa a hálózati dugaszt
helyesen a hálózati aljzatba.
Csatlakoztasson egy másik elektromos készüléket a hálózati aljzatba.
Forduljon szakképzett villanyszerelőhöz.
Zárja be és nyissa ki az ajtót.
szakaszt.
Amennyiben a fenti tanácsok nem vezetnek eredményre, hívja a legközelebbi márkaszervizt.
A lámpa izzójának cseréje
1. Válassza le a készüléket a hálózatról.
2. Nyomja be a mozgatható részt a burkolat
kioldásához (1).
3. Vegye le a lámpaburkolatot (2).
1
2
4. Szükség esetén cserélje ki az izzót egy
hasonló kialakítású és teljesítményű izzóra. Az Osram PARATHOM SPECIAL T26
0,8 Watt jelű izzó használatát javasoljuk.
5. Helyezze vissza a lámpaburkolatot.
6. Csatlakoztassa a készüléket.
7. Nyissa ki az ajtót. Győződjön meg arról,
hogy a világítás bekapcsol-e.
Az ajtó záródása
1. Tisztítsa meg az ajtótömítéseket.
2. Szükség esetén állítsa be az ajtót. Olvassa el az „Üzembe helyezés” c. szakaszt.
3. Szükség esetén cserélje ki a hibás ajtótömítéseket. Forduljon a márkaszervizhez.
44
www.zanussi.com
Page 45

Műszaki adatok
Az 1/1998. (I. 12.) IKIM sz. miniszteri rendeletnek megfelelően
Gyártó védjegye Electrolux
A készülék kategóriája Hűtőszekrény - fagyasztószekrény
Magasság mm 1850
Szélesség mm 595
Mélység mm 658
Hűtőtér nettó térfogata liter 245
Fagyasztótér nettó térfogata liter 76
Energiaosztály (A++ és G között, ahol az A+
+ a leghatékonyabb, a G a legkevésbé hatékony)
Villamosenergia -fogyasztás (24 órás szabványos vizsgálati eredmények alapján. A
mindenkori energiafogyasztás a készülék
használatától és elhelyezéstől függ.)
Fagyasztótér csillagszám jele ****
Áramkimaradási biztonság óra 18
Fagyasztási teljesítmény kg/24 óra 10
Klímaosztály SN-N-ST-T
Feszültség Volt 230-240
Zajteljesítmény dB/A 43
Beépíthető Nem
A+
kWh/év 313
A műszaki adatok megtalálhatók a készülék
belsejében bal oldalon lévő adattáblán és az
energiatakarékossági címkén.
Üzembe helyezés
Figyelem A készülék üzembe helyezése
előtt figyelmesen olvassa el a „Biztonsági
információk” című szakaszt saját biztonsága
és a készülék helyes üzemeltetése
érdekében.
Elhelyezés
Olyan helyen helyezze üzembe a készüléket,
amelynek környezeti hőmérséklete megfelel
annak a klímabesorolásnak, amely a készülék
adattábláján fel van tüntetve:
www.zanussi.com
Klímabe-
sorolás
SN +10°C és +32°C között
N +16°C és +32°C között
ST +16°C és + 38°C között
T +16°C és + 43°C között
Környezeti hőmérséklet
Elhelyezés
A készüléket minden hőforrástól, például radiátortól, kazántól, közvetlen napsütéstől stb.
távol kell üzembe helyezni. Gondoskodjon ar-
45
Page 46

ról, hogy a levegő szabadon áramolhasson a
készülék hátoldala körül. Ha a készüléket egy
falra függesztett egység alá helyezik, a legjobb teljesítmény érdekében a készülék felső
lapja és a fali egység között legalább 100 mm
távolságot kell hagyni. Azonban az az ideális,
ha a készüléket nem egy falra függesztett
elem alatt helyezik el. A pontos vízszintbe állítás a készülék alján található egy vagy több
állítható láb révén biztosítható.
Vigyázat Gondoskodni kell arról, hogy a
készüléket probléma esetén
haladéktalanul le lehessen választani a
hálózati áramkörről, ezért a dugasznak az
üzembe helyezés után könnyen elérhető
helyen kell lennie.
Vízszintbe állítás
2
1
4
3
100 mm
min
A
20 mm
Hátsó távtartók
A két távtartó a készülék dokumentációját tartalmazó tasakban található.
A távtartók felszerelésekor az alábbi módszert
kövesse:
1. Lazítsa meg a csavart.
2. Helyezze a távtartót a csavarfej alá.
3. Fordítsa a távtartót a megfelelő helyzet-
be.
4. Csavarozza be a csavart.
B
Amikor elhelyezi a
készüléket, ügyeljen
arra, hogy vízszintben álljon. Ez az alul
elöl található két szabályozható láb segítségével érhető el.
Elektromos csatlakoztatás
Az elektromos csatlakoztatás előtt győződjön
meg arról, hogy az adattáblán feltüntetett feszültség és frekvencia megegyezik-e a háztartási hálózati áram értékeivel.
A készüléket kötelező földelni. A elektromos
hálózatba illő vezeték dugója ilyen érintkezéssel van ellátva. Ha a háztartási hálózati csatlakozóaljzat nincs leföldelve, csatlakoztassa a
készüléket az érvényben lévő jogszabályok
szerint külön földpólushoz, miután konzultált
egy képesített villanyszerelővel.
A gyártó minden felelősséget elhárít magától,
ha a fenti biztonsági óvintézkedéseket nem
tartják be.
Ez a készülék megfelel az EGK irányelveknek.
46
www.zanussi.com
Page 47

Az ajtó nyitási irányának megfordítása
Vigyázat Bármilyen művelet
végrehajtása előtt húzza ki a hálózati
vezetéket a hálózati aljzatból.
Fontos Azt javasoljuk, hogy a következő
műveleteket egy másik személy segítségével
végezze, aki a készülék ajtóit a műveletek
során megtartja.
A
B
E
F
DC
• Nyissa ki az ajtót.
Csavarozza ki a
középső zsanért
(B). Vegye le a mű-
anyag távtartót (A).
• Távolítsa el a távtartót (F), és helyezze át a zsanér
forgócsapjának (E)
másik oldalára.
• Vegye le az ajtókat.
• Távolítsa el a középső zsanér bal
oldali borítócsapját
(C, D), és helyezze
át a másik oldalra.
• Illessze a középső
zsanér csapját (C)
az alsó ajtó bal oldali furatába.
C
B
A
D
• Csavarozza ki az
alsó zsanért (A)
• Távolítsa el a bal
oldali borítócsapokat (D), és helyezze át a másik oldalra.
• Csavarozza vissza
az alsó zsanért (A)
az ellenkező oldalra.
• Szerelje le az alsó
zsanér forgócsapját
(B) és a távtartót
(C), majd szerelje
fel őket a másik oldalon.
A
• Távolítsa el mindkét ajtó felső oldalán lévő dugaszokat (1), és helyezze
át őket a másik oldalra.
• Tegye vissza az alsó ajtót az alsó
zsanér forgócsapjára.
• Illessze a középső
zsanért az alsó ajtó
bal oldali furatába.
2
1
• Csavarozza ki a
felső zsanér forgócsapját, és helyezze át az ellenkező
oldalra.
• Illessze a felső ajtót
a felső ajtó forgócsapjára.
• Tegye vissza a felső ajtót a középső
zsanér forgócsapjára, kissé megdöntve mindkét ajtót.
• Csavarozza vissza
a középső zsanért.
Ne feledkezzen
meg a műanyag
távtartóról.
Hajtson végre egy végső ellenőrzést, hogy
megbizonyosodjon a következőkről:
• Minden csavar meg van-e húzva.
• Az ajtók élei párhuzamosan futnak-e a készülék oldalsó élével.
• A mágneses tömítés a készülékházhoz tapad-e.
• Az ajtó megfelelően nyílik és csukódik-e.
Ha a környezeti hőmérséklet alacsony (pl. télen), előfordulhat, hogy az ajtótömítés nem ta-
www.zanussi.com
pad hozzá tökéletesen a szekrénytesthez. Ebben az esetben várja meg, amíg a tömítés
magától hozzáidomul a szekrénytesthez.
Ha nem szeretné saját maga végrehajtani a
fenti műveleteket, forduljon a legközelebbi
márkaszervizhez. A márkaszerviz szakembere költségtérítés ellenében elvégzi az ajtók
nyitásirányának megfordítását.
47
Page 48

Környezetvédelmi tudnivalók
A következő jelzéssel ellátott anyagokat
hasznosítsa újra:
tegye a megfelelő konténerekbe a
csomagolást.
Járuljon hozzá környezetünk és egészségünk
védelméhez, és hasznosítsa újra az
. Újrahasznosításhoz
elektromos és elektronikus hulladékot. A
tiltó szimbólummal ellátott készüléket ne
dobja a háztartási hulladék közé. Juttassa el a
készüléket a helyi újrahasznosító telepre,
vagy lépjen kapcsolatba a hulladékkezelésért
felelős hivatallal.
48
www.zanussi.com
Page 49

Índice de materias
Instrucciones de seguridad _ _ _ _ _ _ _ _ _ 49
Descripción del producto _ _ _ _ _ _ _ _ _ _ 52
Panel de mandos _ _ _ _ _ _ _ _ _ _ _ _ _ _ 52
Funcionamiento _ _ _ _ _ _ _ _ _ _ _ _ _ _ _ 53
Primer uso _ _ _ _ _ _ _ _ _ _ _ _ _ _ _ _ _ _ 56
Uso diario _ _ _ _ _ _ _ _ _ _ _ _ _ _ _ _ _ _ 56
Instrucciones de seguridad
Por su seguridad y para garantizar el funcionamiento correcto del aparato, antes de instalarlo
y utilizarlo por primera vez lea atentamente este
manual del usuario, incluidos los consejos y advertencias. Para evitar errores y accidentes, es
importante que todas las personas que utilicen
el aparato estén perfectamente al tanto de su
funcionamiento y de las características de seguridad. Conserve estas instrucciones y no olvide
mantenerlas junto al aparato en caso de su desplazamiento o venta para que quienes lo utilicen
a lo largo de su vida útil dispongan siempre de
la información adecuada sobre el uso y la seguridad.
Por la seguridad de personas y bienes, siga las
normas de seguridad indicadas en estas instrucciones, ya que el fabricante no se hace responsable de daños provocados por omisiones.
Seguridad de niños y personas
vulnerables
• Este electrodoméstico no está diseñado para
que lo usen personas (incluidos niños) con
discapacidad física, sensorial o mental, o con
experiencia y conocimiento insuficientes, a
menos que una persona responsable de su
seguridad les supervise o instruya en el uso
del electrodoméstico.
No permita que los niños jueguen con el
electrodoméstico.
• Mantenga los materiales de embalaje alejados de los niños. Existe riesgo de asfixia.
• Si va a desechar el aparato, extraiga el enchufe de la toma, corte el cable de conexión
(tan cerca del aparato como pueda) y retire la
puerta para impedir que los niños al jugar
Consejos útiles _ _ _ _ _ _ _ _ _ _ _ _ _ _ _ 58
Mantenimiento y limpieza _ _ _ _ _ _ _ _ _ _ 59
Solución de problemas _ _ _ _ _ _ _ _ _ _ _ 60
Datos técnicos _ _ _ _ _ _ _ _ _ _ _ _ _ _ _ _ 62
Instalación _ _ _ _ _ _ _ _ _ _ _ _ _ _ _ _ _ _ 62
Aspectos medioambientales _ _ _ _ _ _ _ _ 64
Salvo modificaciones.
puedan sufrir descargas eléctricas o quedar
atrapados en su interior.
• Si este aparato, que cuenta con juntas de
puerta magnéticas, sustituirá a un aparato
más antiguo con cierre de muelle (pestillo) en
la puerta, cerciórese de inutilizar el cierre de
muelle antes de desechar el aparato antiguo.
Evitará así que se convierta en una trampa
mortal para niños.
Instrucciones generales de seguridad
Advertencia
Mantenga libres de obstrucciones las aberturas
de ventilación del alojamiento del aparato o de
la estructura empotrada
• El aparato está diseñado para conservar los
alimentos y bebidas de una vivienda normal,
como se explica en este folleto de instrucciones.
– áreas de cocina para el personal en tien-
das, oficinas y otros entornos de trabajo;
– granjas y por clientes en hoteles, moteles y
otros entornos de tipo residencial;
– entornos de tipo hostales o pensiones;
– servicios de catering y actividades simila-
res al por mayor.
• No utilice dispositivos mecánicos ni medios
artificiales para acelerar el proceso de descongelación.
• No utilice otros aparatos eléctricos (como
máquinas para hacer helados) dentro de los
aparatos de refrigeración, a menos que el fabricante haya autorizado su utilización para
estos fines.
www.zanussi.com
49
Page 50

• No dañe el circuito del refrigerante.
• El circuito del refrigerante del aparato contiene isobutano (R600a). Se trata de un gas natural con un alto nivel de compatibilidad medioambiental, aunque es inflamable.
Durante el transporte y la instalación del aparato, cerciórese de no provocar daños en el
circuito de refrigeración.
Si el circuito de refrigeración se daña:
– mantenga el aparato alejado de las llamas
y de cualquier fuente de encendido
– ventile bien la habitación en la que se en-
cuentra el aparato
• Es peligroso alterar las especificaciones o
modificar este producto en modo alguno.
Cualquier daño en el cable de alimentación
puede provocar un cortocircuito, un incendio
o una descarga eléctrica.
Advertencia Los componentes eléctricos
(cable de alimentación, enchufe, compresor) debe sustituirlos un técnico autorizado o
personal de reparaciones profesional a fin de
evitar riesgos.
1. El cable de alimentación no se debe prolongar.
2. Compruebe que la parte posterior del
aparato no aplaste ni dañe el enchufe.
Un enchufe aplastado o dañado puede
recalentarse y provocar un incendio.
3. Cerciórese de que tiene acceso al enchufe del aparato.
4. No tire del cable de alimentación.
5. Si la toma de red está floja, no introduzca
el enchufe. Existe riesgo de descarga
eléctrica o incendio.
6. No utilice el aparato sin la tapa de la
bombilla (si está provisto de ella) de iluminación interior.
• Este aparato es pesado. Debe tener precauciones durante su desplazamiento.
• No retire ni toque elementos del compartimento congelador con las manos húmedas o
mojadas, ya que podría sufrir abrasión de la
piel o quemaduras por congelación.
• Evite la exposición prolongada del aparato a
la luz solar directa.
• Las bombillas que se utilizan en este aparato
(si está provisto de ellas) son especiales, y se
han seleccionado exclusivamente para uso en
aparatos domésticos. No pueden utilizarse
para la iluminación de la vivienda.
Uso diario
• No coloque recipientes calientes sobre las
piezas plásticas del aparato.
• No almacene gas ni líquido inflamable en el
aparato, ya que podrían estallar.
• No coloque alimentos directamente contra la
salida de aire de la pared posterior. (Si el
aparato es No Frost, es decir, no acumula escarcha.)
• Los alimentos que se descongelen no deben
volver a congelarse.
• Guarde los alimentos congelados, que se adquieren ya envasados, siguiendo las instrucciones del fabricante.
• Se deben seguir estrictamente las recomendaciones del fabricante del aparato sobre el
almacenamiento. Consulte las instrucciones
correspondientes.
• No coloque bebidas carbonatadas o con gas
en el congelador, ya que se genera presión
en el recipiente, que podría estallar y dañar el
aparato.
• Si se consumen polos helados retirados directamente del aparato, se pueden sufrir quemaduras causadas por el hielo.
Cuidado y limpieza
• Antes de realizar tareas de mantenimiento,
apague el aparato y desconecte el enchufe
de la toma de red.
• No limpie el aparato con objetos metálicos.
• No utilice objetos afilados para eliminar el
hielo del aparato. Utilice un raspador plástico.
• Inspeccione habitualmente el desagüe del
agua descongelada del frigorífico. Si es necesario, limpie el desagüe. Si el desagüe se
bloquea, el agua se acumulará en la base del
aparato.
50
www.zanussi.com
Page 51

Instalación
Importante Para realizar la conexión eléctrica,
siga atentamente las instrucciones de los
párrafos correspondientes.
• Desembale el aparato y compruebe que no
tiene daños. No conecte el aparato si está
dañado. Informe de los posibles daños de inmediato a la tienda donde lo adquirió. En ese
caso, conserve el material de embalaje.
• Es recomendable esperar al menos dos horas antes de conectar el aparato, para permitir que el aceite regrese al compresor.
• El aparato debe contar con circulación de aire adecuada alrededor, ya que de lo contrario
se produce recalentamiento. Para conseguir
una ventilación suficiente, siga las instrucciones correspondientes a la instalación.
• Siempre que sea posible, la parte posterior
del producto debe estar contra una pared,
para evitar que se toquen las partes calientes
(compresor, condensador) y se produzcan
quemaduras.
• El aparato no debe colocarse cerca de radiadores ni de hornillas de cocina.
• Asegúrese de que es posible acceder al enchufe después de instalar el electrodoméstico.
• Realice la conexión sólo a un suministro de
agua potable (si está prevista una conexión
de agua).
Servicio técnico
• Un electricista homologado deberá realizar
las tareas que se requieran para ejecutar el
servicio o mantenimiento de este electrodoméstico.
• Las reparaciones de este aparato debe realizarlas un centro de servicio técnico autorizado y sólo se deben utilizar recambios originales.
Protección del medio ambiente
Este aparato no contiene gases perjudicia-
les para la capa de ozono, ni en el circuito
de refrigerante ni en los materiales aislantes. El
aparato no se debe desechar junto con los residuos urbanos. La espuma aislante contiene gases inflamables: el aparato se debe desechar
de acuerdo con la normativa vigente, que puede
solicitar a las autoridades locales. No dañe la
unidad de refrigeración, en especial la parte trasera, cerca del intercambiador de calor. Los
materiales de este aparato marcados con el
símbolo
son reciclables.
www.zanussi.com
51
Page 52

Descripción del producto
6 7 841 3 52
9
10
Cajones de verduras
1
Estantes de cristal
2
Refrigeración de aire dinámico
3
Panel de control
4
Indicador LED
5
Panel de mandos
52
Estante para productos lácteos
6
Estante de la puerta
7
Estante para botellas
8
Cajones de congelador
9
Placa de características
10
B
DEAC
www.zanussi.com
Page 53

A - Tecla de encendido/apagado del aparato D - Tecla de función
B - Tecla de regulación de la temperatura E - Tecla de confirmación
C - Indicador de función y temperatura
Visor digital
10 1 2 3 4
56789
Indicador de la temperatura.
1
Indicador de Alarma por exceso de tem-
2
peratura.
Indicador de la función FreeStore.
3
Indicador de la función Compra.
4
Indicador de la función Seguridad para ni-
5
ños.
Funcionamiento
Primera puesta en marcha
Si el visor digital no se enciende una vez enchufado el aparato, pulse la tecla (A) para encenderlo.
En cuanto se enciende el aparato, se activa la
condición de alarma, el indicador de temperatura comienza a parpadear y se emite una señal
acústica.
Pulse la tecla (E) para apagar la señal acústica
(consulte también la sección sobre "alarma por
exceso de temperatura"), el icono
parpadeando y el indicador
temperatura más alta alcanzada.
La selección de la función de modo Eco facilita
el almacenamiento correcto de los alimentos y
garantiza el ajuste de las temperaturas siguientes:
+5 °C en el frigorífico
-18 °C en el congelador
www.zanussi.com
seguirá
mostrará la
Indicador de la función Temporizador.
6
Indicador de temperatura positiva o nega-
7
tiva.
Indicador de la función Congelación rápi-
8
da.
Indicador de compartimento.
9
Indicador de la función de modo Eco.
10
• Antes de introducir alimentos en el congela-
dor, espere a que la temperatura interior del
mismo sea de -18°C.
• Para seleccionar otra temperatura, consulte la
sección "Regulación de la temperatura".
Apagado
Para apagar el aparato, pulse la tecla (A) poco
más de un (1) segundo.
Durante este tiempo, aparecerá el indicador de
temperatura con la cuenta atrás, -3 -2 -1.
Menú de funciones
El menú de funciones se pone en marcha con la
tecla (D). Cada función se puede confirmar con
la tecla (E). Si después de unos segundos no
se confirma ninguna función, la pantalla saldrá
del menú de funciones y regresará a su estado
normal.
53
Page 54

Las funciones que se indican son las siguientes:
Seleccionar el compartimento frigorífico
Seleccionar el compartimento congelador
Función de modo Eco
Función FreeStore
Función Compra
Función Seguro contra la manipulación por
niños
Función Bebidas frías
Función Congelación rápida
Regulación de la temperatura
Pulse la tecla (D) para seleccionar el compartimento y la tecla (B) para ajustar la temperatura
que desee.
Confirme la selección con la tecla (E).
El indicador de temperatura muestra la temperatura programada. La temperatura programada
se alcanza en un plazo de 24 horas.
Puede haber fluctuaciones de algunos grados
sobre la temperatura programada, pero eso no
supone un fallo del aparato.
Función Vacaciones "H"
La función de vacaciones regula la temperatura
en +15 °C.
Gracias a esta función, el frigorífico puede mantenerse cerrado y vacío por periodos largos (por
ejemplo, las vacaciones de verano) sin que se
formen olores desagradables en su interior.
La función de vacaciones se activa modificando
la temperatura seleccionada. El indicador de
temperatura puede modificar la temperatura
mostrada en hasta +8 °C, en intervalos de 1 °C
cada vez. El visor digital mostrará +2 °C seguido de la letra "H" (holidays, vacaciones en inglés). Pulse la tecla E para confirmar.
El frigorífico tiene ahora activados la función
"vacaciones" y el modo de ahorro de energía.
Importante El compartimento frigorífico debe
estar vacío mientras la función vacaciones esté
activada.
Función Seguro contra la manipulación
por niños
Esta función se activa pulsando la tecla (D) (varias veces si fuera necesario) hasta que aparez-
ca el icono correspondiente
.
54
Confirme la selección pulsando la tecla (E) inmediatamente después. Se emitirá una señal
acústica y el icono permanecerá activado. Mientras la función esté activa, no tendrá efecto ninguna posible acción sobre las teclas.
Para desactivar la función en cualquier momento, pulse la tecla (D) hasta que comience a parpadear el icono correspondiente, y luego pulse
la tecla (E).
Función Compra
Si necesita introducir una gran cantidad de alimentos calientes, por ejemplo, después de haber hecho la compra, se aconseja activar esta
función para enfriarlos más rápidamente y evitar
que suba la temperatura de los que ya se guardan en el frigorífico.
Esta función se activa pulsando la tecla (D) (varias veces si fuera necesario) hasta que aparez-
ca el icono correspondiente
. Confirme la
selección pulsando la tecla (E) inmediatamente
después. Se emitirá una señal acústica y el icono permanecerá activado.
La función se desactiva automáticamente después de unas 6 horas. Para desactivar la función en cualquier momento, pulse la tecla (D)
hasta que comience a parpadear el icono correspondiente, y luego pulse la tecla (E).
Función de modo Eco
Pulse la tecla D (varias veces si es necesario)
hasta que aparezca el icono correspondiente.
.
Confirme la selección con la tecla (E). Se emitirá una señal acústica y el icono permanecerá
activado.
Con esta función, las temperaturas se ajustan
automáticamente (entre +5°C y -18°C), ofreciendo las mejores condiciones para almacenar
los alimentos.
Ajuste una temperatura diferente en uno de los
compartimentos para apagar la función.
Función FreeStore
Pulse la tecla D (varias veces si es necesario)
hasta que aparezca el icono correspondiente.
Confirme la selección con la tecla (E). Se emitirá una señal acústica y el icono permanecerá
activado.
www.zanussi.com
Page 55

Importante Si la función se activa
automáticamente, el icono FreeStore no
aparece (consulte "Uso diario").
La activación de la función FreeStore
incrementa el consumo de energía.
Función Congelación rápida
El compartimento congelador es apropiado para
el almacenamiento prolongado de los alimentos
que se compran congelados y ultracongelados
y para el congelado doméstico de alimentos
frescos.
La placa de datos técnicos indica la cantidad
máxima de alimentos que se pueden congelar
en 24 horas.
Para congelar la cantidad de alimentos indicada
en la placa de datos técnicos, coloque los alimentos en contacto directo con la superficie de
enfriamiento (para ello, retire el cajón o el cesto). La cantidad máxima de alimentos se deberá
reducir si los alimentos se congelan en el interior del cajón o los cestos.
Para congelar alimentos frescos, necesita activar la función de congelación rápida. Pulse la
tecla (D) (varias veces si fuera necesario) hasta
que aparezca el indicador
.
Confirme la selección pulsando la tecla (E) inmediatamente después. Se emitirá una señal
acústica y el visor digital mostrará varias líneas
animadas.
Después de un tiempo de enfriamiento de 24
horas, introduzca los alimentos en el congelador.
Coloque los alimentos que desea congelar en el
compartimento marcado con
, ya que es el
punto de máximo frío.
El proceso de congelación tarda 24 horas. Durante este periodo no introduzca otros alimentos en el congelador.
La función se para automáticamente después
de 52 horas.
Para desactivar la función en cualquier momento, pulse la tecla (D) hasta que comience a par-
padear el icono correspondiente
, y luego
pulse la tecla (E).
Función Bebidas frías
Utilice esta función como advertencia de seguridad cuando coloque botellas en el comparti-
www.zanussi.com
mento congelador. Active la función pulsando la
tecla (D) (varias veces si fuera necesario) hasta
que aparezca el icono correspondiente
.
Confirme la selección pulsando la tecla (E) inmediatamente después. Se emitirá una señal
acústica y el icono permanecerá activado.
Se pone en marcha una temporización con un
tiempo fijado en 30 minutos que puede cambiarse, de 1 a 90, pulsando la tecla (B) hasta
que aparezcan los minutos que desee en cada
caso.
Al final del tiempo seleccionado observaremos
las siguientes indicaciones:
•
en el visor digital
•
parpadea el icono
•
parpadea el icono
parpadea el símbolo
• se emite una señal acústica hasta que se pul-
sa la tecla (E)
Llegado este momento no olvide extraer la bebida del compartimento congelador.
Si desea desactivar la función en cualquier momento, pulse la tecla (D) hasta que comience a
parpadear el icono correspondiente, y confirme
con la tecla (E).
Alarma por exceso de temperatura
El aumento de la temperatura en uno de los
compartimentos (por ejemplo, a causa de un fallo eléctrico) se indicará mediante:
• parpadeo de la temperatura
• parpadeo del icono correspondiente al com-
partimento congelador
•
parpadeo del icono
• emisión de una señal acústica
Cuando se restablecen las condiciones normales se observará:
• desconexión de la señal acústica
• parpado continuo del valor de la temperatura
Cuando se pulsa la tecla (E) para desactivar la
alarma, el visor digital
muestra durante
unos segundos la temperatura más alta alcanzada en el compartimento.
Seguidamente regresará al modo de funcionamiento normal indicando la temperatura del
compartimento seleccionado.
Durante la fase de alarma, se puede desactivar
la señal acústica con la tecla (E).
55
Page 56

Primer uso
Limpieza de las partes internas
Antes del empleo limpiar todas las partes internas con agua tibia y jabón neutro, a fin de eliminar el característico olor de nuevo y secarlas
luego cuidadosamente.
Uso diario
Almacenamiento de alimentos
congelados
Al poner en marcha el aparato por primera vez o
después de un periodo sin uso, déjelo en marcha al menos durante 2 horas antes de colocar
los productos en el compartimento.
Los cajones de congelados aseguran una búsqueda fácil y rápida del paquete de alimentos
que se desea encontrar. Cuando tenga que
conservar grandes cantidades de alimentos,
quite todos los cajones excepto el último, que
debe permanecer en su sitio para la correcta
circulación del aire. En todos los estantes se
pueden colocar alimentos que sobresalgan hasta 15 mm de la puerta
Importante En caso de producirse una
descongelación accidental, por ejemplo, por un
corte del suministro eléctrico, si la interrupción
ha durado más que el valor indicado en la tabla
de características técnicas bajo la
especificación "periodo de tiempo en
descongelación", los alimentos descongelados
deberán consumirse cuanto antes o cocinarse
de inmediato, y luego volverse a congelar
(después de que se hayan enfriado).
Congelación de alimentos frescos
El compartimento congelador es adecuado para
congelar alimentos frescos y para conservar a
largo plazo los alimentos congelados y ultracongelados.
Para congelar alimentos frescos, active la función de congelación rápida al menos 24 horas
antes de introducir los alimentos en el compartimento congelador.
Coloque los alimentos que vaya a congelar en
el compartimento inferior.
Importante No utilice detergentes ni polvos
abrasivos, ya que podrían dañar el acabado
La cantidad máxima de alimentos que puede
congelarse en 24 horas se indica en la placa de
datos técnicos, una etiqueta situada en el interior del frigorífico.
El proceso de congelación tarda 24 horas. Durante ese periodo no deben añadirse otros alimentos para congelación.
Al cabo de 24 horas y cuando haya finalizado el
proceso, desactive la función (consulte "Función de congelación rápida").
Descongelación
Los alimentos ultracongelados o congelados,
antes de utilizarlos, se pueden descongelar en
el compartimento frigorífico o a temperatura ambiente, dependiendo del tiempo de que se disponga.
Es posible incluso cocinar piezas pequeñas
congeladas, tomadas directamente del congelador; en tal caso, el tiempo de cocción será más
prolongado.
Estantes móviles
Las paredes del frigorífico cuentan con una
serie de guías para
colocar los estantes
del modo que se prefiera.
56
www.zanussi.com
Page 57

FreeStore
El compartimento frigorífico cuenta con
un dispositivo que
permite enfriar los alimentos con más rapidez y mantener una
temperatura más uniforme dentro del
compartimento.
El dispositivo se activa por sí solo cuando
es necesario, por
ejemplo, cuando sea
necesario recuperar
rápidamente la temperatura después de
abrir la puerta o cuando la temperatura ambiente sea elevada.
Permite encender el dispositivo manualmente
cuando sea necesario activando la función de
compra.
Colocación de los estantes de la puerta
Extracción de los cestos de congelados
del congelador
Los cestos de congelados llevan un tope para
impedir que se salgan de las guías o se caigan.
Para extraer un cesto del congelador, tire de él
hacia fuera y, cuando llegue al tope, levante
suavemente la parte delantera del cesto para liberarlo.
Para volver a colocarlo en su lugar, levante ligeramente la parte delantera del cesto e insértelo
en el congelador. Cuando haya superado los topes, empuje los cestos hasta el fondo.
12
12
Para poder guardar
alimentos de distintos
tamaños, los estantes
de la puerta se pueden colocar a diferentes alturas.
www.zanussi.com
1
3
2
Eleve paulatinamente
el estante en la dirección de las flechas
hasta retirarlo del soporte y colóquelo en
la posición que desee.
57
Page 58

Consejos útiles
Sonidos de funcionamiento normal
• Es posible que oiga un gorgoteo o un burbujeo cuando el refrigerante se bombea por el
serpentín o los tubos. Esto es correcto.
• Cuando está en marcha, el compresor bombea el refrigerante a través de todo el circuito
y emite un zumbido o un sonido intermitente.
Esto es correcto.
• La dilatación térmica puede causar una serie
de crujidos repentinos. Se trata de un fenómeno físico natural y no peligroso. Esto es
correcto.
Consejos para ahorrar energía
• No abra la puerta con frecuencia ni la deje
abierta más tiempo del estrictamente necesario.
• Si la temperatura ambiente es elevada, la
temperatura del aparato se ha ajustado en los
valores más altos y está totalmente lleno, el
compresor podría funcionar de manera continua, provocando la formación de escarcha o
hielo en el evaporador. Si esto sucede, gire el
regulador de temperatura a valores inferiores
para permitir la descongelación automática y
ahorrar en el consumo eléctrico.
Consejos para la refrigeración de
alimentos frescos
Para obtener los mejores resultados:
• no guarde en el frigorífico alimentos calientes
ni líquidos en evaporación;
• cubra o envuelva los alimentos, en especial si
tienen sabores fuertes;
• coloque los alimentos de modo que el aire
pueda circular libremente entre ellos.
Consejos para la refrigeración
Consejos útiles:
Carne (de todo tipo): guárdela en bolsas de
plástico y colóquela en el estante de vidrio, sobre el cajón de las verduras.
Por razones de seguridad, guárdela de ese modo durante uno o dos días, como máximo.
Alimentos cocinados, platos fríos, etc.: cúbralos
y colóquelos en cualquier estante.
Frutas y verduras: una vez lavadas a fondo,
guárdelas en los cajones especiales suministrados al efecto. Si entra en contacto, el zumo de
limón puede decolorar las partes de plástico del
frigorífico. Por ello, se recomienda guardar los
cítricos en contenedores separados.
Mantequilla y queso: colóquelos en recipientes
herméticos especiales o envueltos en papel de
aluminio o en bolsas de plástico, para excluir
tanto aire como sea posible.
Botellas: deben guardarse tapadas en el estante para botellas de la puerta.
Los plátanos, las patatas, las cebollas y los ajos,
si no están empaquetados, no deben guardarse
en el frigorífico.
Consejos sobre la congelación
Estos consejos son importantes para poder
aprovechar al máximo el proceso de congelación:
• la cantidad máxima de alimentos que puede
congelarse en 24 horas se muestra en la placa de datos técnicos;
• el proceso de congelación requiere 24 horas.
Durante ese periodo no deben añadirse otros
alimentos para congelación;
• congele sólo productos alimenticios de máxima calidad, frescos y perfectamente limpios;
• prepare los alimentos en porciones pequeñas
para que se congelen de manera rápida y total, así como para poder descongelar posteriormente sólo las cantidades necesarias;
• envuelva los alimentos en papel de aluminio o
polietileno y compruebe que los envoltorios
quedan herméticamente cerrados;
• no permita que alimentos frescos y sin congelar entren en contacto con alimentos ya
congelados, para evitar el aumento de temperatura de los segundos;
• los alimentos magros se congelan mejor que
los grasos; la sal reduce el tiempo de almacenamiento de los alimentos;
• el hielo, si se consume inmediatamente después de retirarlo del compartimento congela-
58
www.zanussi.com
Page 59

dor, puede provocar quemaduras por congelación en la piel;
• es recomendable etiquetar cada paquete con
la fecha de congelación para controlar el
tiempo que permanecen almacenados.
Consejos para el almacenamiento de
alimentos congelados
Para obtener el máximo rendimiento de este
aparato, deberá:
• comprobar que el comerciante ha mantenido
los productos congelados correctamente almacenados;
Mantenimiento y limpieza
• procurar que los alimentos congelados pasen
de la tienda al congelador en el menor tiempo
posible;
• evitar la apertura frecuente de la puerta o dejarla abierta más del tiempo estrictamente necesario;
• los alimentos descongelados se deterioran
con rapidez y no pueden congelarse de nuevo;
• no supere el tiempo de almacenamiento indicado por el fabricante de los alimentos.
Precaución Antes de realizar tareas de
mantenimiento, desenchufe el aparato.
Este equipo contiene hidrocarburos en la
unidad de refrigeración; por tanto, el mantenimiento y la recarga deben estar a cargo exclusivamente de técnicos autorizados.
Limpieza periódica
El equipo debe limpiarse de manera habitual:
• Limpie el interior y los accesorios con agua
templada y un jabón neutro.
• Revise y limpie periódicamente las juntas de
la puerta para mantenerlas limpias y sin restos.
• Aclare y seque a fondo.
Importante No mueva, dañe ni tire de los
conductos o cables del interior del armario.
No utilice detergentes, polvos abrasivos,
productos de limpieza perfumados ni cera para
limpiar el interior, ya que dañarán la superficie y
dejarán un fuerte olor.
Limpie el condensador (rejilla negra) y el compresor de la parte posterior del aparato con un
cepillo. Esa operación mejorará el rendimiento
del aparato y reducirá el consumo eléctrico.
Importante Tenga cuidado para no dañar el
sistema de refrigeración.
Muchas marcas de limpiadores de superficies
de cocina contienen químicos que pueden atacar o dañar los plásticos del aparato. Por tal ra-
zón, se recomienda que el exterior del aparato
se limpie sólo con agua templada a la que se
añadirá un poco de líquido lavavajillas.
Después de la limpieza, vuelva a conectar el
aparato a la toma de red.
Descongelación del frigorífico
La escarcha se elimina automáticamente del
evaporador del frigorífico cada vez que se detiene el compresor, durante el funcionamiento normal. El agua de la descongelación se descarga
hacia un recipiente especial situado en la parte
posterior del aparato, sobre el motor compresor, donde se evapora.
Es importante limpiar periódicamente el orificio
de salida del agua de descongelación situado
en la mitad del canal del compartimento frigorífico para evitar que el agua se desborde y caiga
sobre los alimentos del interior. Utilice el limpiador especial suministrado, que hallará ya colocado en el orificio de desagüe.
Descongelación del congelador
El compartimento congelador de este modelo
es de tipo "no frost" y no produce escarcha. Es-
www.zanussi.com
59
Page 60

to significa que, durante el funcionamiento, no
se forma escarcha ni en las paredes internas
del aparato ni sobre los alimentos.
La ausencia de escarcha se debe a la continua
circulación del aire frío en el interior del compar-
Solución de problemas
timento impulsado por un ventilador controlado
automáticamente.
Precaución Desenchufe el aparato antes
de realizar cualquier reparación.
Las reparaciones que no figuran en este manual
sólo pueden ser llevadas a cabo por un técnico
Importante Durante el funcionamiento normal
del aparato suelen producirse ciertos ruidos
(compresor, circulación del refrigerante).
profesional homologado.
Problema Causa posible Solución
El aparato hace ruido. El aparato no está bien apoyado en
El compresor funciona
continuamente.
La puerta no está bien cerrada. Consulte la sección "Cierre de la
La puerta se ha abierto con excesi-
La temperatura de los productos es
La temperatura ambiente es dema-
La función Congelación rápida está
El agua fluye por la placa
posterior del frigorífico.
El agua fluye al interior del
frigorífico.
Los productos impiden que el agua
Gotea agua al suelo. El agua de la descongelación no
Hay demasiada escarcha y
hielo.
La puerta no está bien cerrada. Consulte la sección "Cierre de la
el suelo.
Puede que el ajuste del regulador
de temperatura sea incorrecto.
va frecuencia.
demasiado alta.
siado alta.
activada.
Durante el proceso de descongela-
ción automática, el hielo se descongela en la placa posterior.
La salida de agua está obstruida. Limpie la salida de agua.
fluya al colector de agua.
fluye hacia la bandeja de evaporación situada sobre el compresor.
Los productos no están bien envueltos.
Compruebe que los soportes del
aparato descansan sobre una superficie estable (las cuatro patas deben
estar bien apoyadas en el suelo).
Seleccione una temperatura más alta.
puerta".
No mantenga abierta la puerta más
tiempo del necesario.
Deje que la temperatura de los ali-
mentos descienda a la temperatura
ambiente antes de guardarlos.
Reduzca la temperatura ambiente.
Consulte la sección "Función congelación rápida".
Esto es normal.
Asegúrese de que los alimentos no
entran en contacto con la placa posterior.
Fije la salida de agua de descongelación a la bandeja de evaporación.
Envuelva mejor los productos.
puerta".
60
www.zanussi.com
Page 61

Problema Causa posible Solución
Puede que el ajuste del regulador
La temperatura del aparato
es demasiado alta.
La temperatura de los productos es
Se han guardado muchos produc-
La temperatura del frigorífico es demasiado alta.
La temperatura del congelador es demasiado alta.
El aparato no funciona. El aparato está apagado. Encienda el aparato.
El aparato no está correctamente
El aparato no recibe suministro
La bombilla no funciona. La bombilla está en espera. Cierre y abra la puerta.
La bombilla es defectuosa. Consulte "Sustitución de la bombilla".
de temperatura sea incorrecto.
La puerta no está bien cerrada. Consulte la sección "Cierre de la
demasiado alta.
tos al mismo tiempo.
No hay circulación de aire frío en el
aparato.
Los productos están demasiado
juntos.
enchufado a la toma de corriente.
eléctrico. No hay tensión en la toma
de corriente.
Seleccione una temperatura más alta.
puerta".
Deje que la temperatura de los ali-
mentos descienda a la temperatura
ambiente antes de guardarlos.
Guarde menos productos al mismo
tiempo.
Compruebe que el aire frío circula libremente en el aparato.
Disponga los productos de modo
que el aire frío pueda circular entre
ellos.
Enchufe el aparato correctamente a
la toma de red.
Enchufe un aparato eléctrico diferente a la toma de corriente. Llame a un
electricista cualificado.
Si los consejos anteriores no ofrecen resultados, llame al centro de servicio técnico más cercano.
Cambio de la bombilla
1. Desconecte la lavadora.
2. Empuje la pieza móvil para desenganchar la
tapa de la bombilla (1).
3. Retire la tapa de la bombilla (2).
4. Si es necesario, cambie la bombilla por una
de características y potencia similares. Recomendamos el modelo Osram PARATHOM SPECIAL T26 de 0,8 vatios.
5. Instale la tapa de la bombilla.
6. Conecte el aparato.
7. Abra la puerta. Compruebe que la bombilla
se ilumina.
www.zanussi.com
1
2
Cierre de la puerta
1. Limpie las juntas de la puerta.
2. Si es necesario, ajuste la puerta. Consulte
"Instalación".
3. Si es necesario, cambie las juntas defectuosas. Póngase en contacto con el servicio técnico.
61
Page 62

Datos técnicos
Medidas
Altura 1850 mm
Anchura 595 mm
Profundidad 658 mm
Tiempo de estabilización 18 h
Tensión 230-240 V
Frecuencia 50 Hz
La información técnica se encuentra en la placa
de características, situada en el lado interior iz-
Instalación
Antes de instalar el aparato, lea atentamente el
apartado "Información sobre seguridad" para
garantizar su propia seguridad y el funcionamiento correcto del aparato.
Positionnement
Instale el aparato en un punto en el que la temperatura ambiente se corresponda con la clase
climática indicada en la placa de datos técnicos
del aparato:
Climate
class
SN +10°C a + 32°C
N +16°C a + 32°C
ST +16°C a + 38°C
T +16°C a + 43°C
Ubicación
Instale el aparato alejado de fuentes de calor,
como radiadores, calderas, luz solar directa, etc.
Asegúrese también de que el aire puede circular sin obstáculos por la parte trasera del armario. Para garantizar un rendimiento óptimo, si el
aparato se coloca debajo de un mueble de cocina instalado en la pared, deje una distancia
mínima de 100 mm entre la parte superior del
aparato y el mueble de pared. No obstante, lo
ideal sería que el aparato no se colocara debajo
de ningún mueble instalado en la pared. La ba-
Ambient temperature
quierdo del aparato, y en la etiqueta de consumo energético.
se del aparato va provista de una o varias patas
ajustables para garantizar un nivelado correcto
del mismo.
Advertencia Puede que en algún
momento sea necesario desenchufar el
aparato de la toma de corriente; por lo tanto, el
enchufe debe ser fácilmente accesible tras la
instalación del aparato.
100 mm
min
A
20 mm
B
Separadores traseros
Encontrará los dos separadores en la bolsa que
contiene la documentación.
Siga estos pasos para colocar los separadores:
62
www.zanussi.com
Page 63

1. Afloje el tornillo.
2. Encaje el separador debajo del tornillo.
3. Gire el separador a la posición derecha.
4. Apriete de nuevo los tornillos.
2
1
4
Nivelado
Al colocar el aparato
compruebe que queda nivelado. Esto se
puede conseguir utilizando las dos patas
ajustables de la parte
inferior delantera.
3
Conexión eléctrica:
Antes de conectar el aparato, compruebe que
el voltaje y la frecuencia indicados en la placa
de datos técnicos se corresponden con el suministro de la vivienda.
El aparato debe tener conexión a tierra. El enchufe del cable de alimentación se suministra
con un contacto para tal fin. Si la toma de red
de la vivienda carece de conexión a tierra, conecte el aparato a una toma de tierra conforme
con la normativa, después de consultar a un
electricista profesional.
El fabricante declina toda responsabilidad si no
se toman las precauciones antes indicadas.
Este aparato cumple las directivas CEE.
Cambio del sentido de apertura de la
puerta
Advertencia Desenchufe siempre el
electrodoméstico antes de llevar a cabo
cualquier operación.
Importante Los procedimientos que se indican
a continuación requieren la ayuda de otra
persona que sujete bien las puertas del aparato
durante todo el proceso.
A
B
E
F
DC
www.zanussi.com
C
B
A
D
A
2
1
63
Page 64

• Abra la puerta. Desatornille la bisagra
intermedia (B) Retire el separador de
plástico (A).
• Extraiga el separador (F) y colóquelo
en el otro lado del
pivote de la bisagra
(E).
• Retire las puertas.
• Extraiga el pasador
de la tapa izquierda
de la bisagra intermedia (C, D) y colóquelo en el otro lado.
• Introduzca el pasador de la bisagra intermedia (C) en el
orificio izquierdo de
la puerta inferior.
• Desatornille la bisagra inferior (A).
• Extraiga los pasadores de la tapa izquierda (D) y colóquelos en el otro lado.
• Vuelva a atornillar la
bisagra inferior (A)
en el lado contrario.
• Desatornille el pivote de la bisagra inferior (B) y el separador (C), y colóquelos en el lado contrario.
• Retire los tacos (1)
de la parte superior
de ambas puertas y
colóquelos en el
otro lado.
• Vuelva a colocar la
puerta inferior en el
pivote de la bisagra
inferior.
• Inserte la bisagra intermedia en el orificio izquierdo de la
puerta inferior.
• Desatornille el pivote de la bisagra superior y colóquelo
en el lado contrario.
• Encaje la puerta superior en el pivote
de la puerta superior.
• Vuelva a colocar la
puerta superior en
el pivote de la bisagra intermedia e incline ligeramente las
dos puertas.
• Vuelva a atornillar la
bisagra intermedia.
No olvide colocar el
separador de plástico.
Finalmente, compruebe que:
• Todos los tornillos están apretados.
• Los bordes de las puertas quedan paralelos
al borde lateral del aparato.
• La junta magnética se adhiere al mueble.
• La puerta abre y cierra correctamente.
Es posible que la junta no encaje a la perfección en el mueble si la temperatura ambiente es
Aspectos medioambientales
Recicle los materiales con el símbolo .
Coloque el material de embalaje en los
contenedores adecuados para su reciclaje.
Ayude a proteger el medio ambiente y la salud
pública, así como a reciclar residuos de
64
baja (es decir, en invierno). En tal caso, espere
hasta que la junta se fije al mueble de forma natural.
Si prefiere no realizar los procedimientos anteriores, póngase en contacto con el centro de
servicio técnico más próximo. El personal del
centro de servicio técnico cambiará el sentido
de apertura de las puertas con gastos a su cargo.
aparatos eléctricos y electrónicos. No deseche
los aparatos marcados con el símbolo
con los residuos domésticos. Lleve el producto
a su centro de reciclaje local o póngase en
contacto con su oficina municipal.
www.zanussi.com
junto
Page 65

www.zanussi.com
65
Page 66

66
www.zanussi.com
Page 67

www.zanussi.com
67
Page 68

www.zanussi.com/shop
280151764-A-172013
 Loading...