

Page 1
CS
Návod k použití 2
EN
User manual 14
FR
Notice d'utilisation 24
DE
Benutzerinformation 36
HU
Használati útmutató 48
Chladnička s mrazničkou
Fridge Freezer
Réfrigérateur/congélateur
Kühl - Gefrierschrank
Hűtő - fagyasztó
ZRB632FW
ZRB634FW
ZRB638FW
Page 2
Obsah
Bezpečnostní informace _ _ _ _ _ _ _ _ _ _ 2
Provoz _ _ _ _ _ _ _ _ _ _ _ _ _ _ _ _ _ _ _ 4
Při prvním použití _ _ _ _ _ _ _ _ _ _ _ _ _ 4
Denní používání _ _ _ _ _ _ _ _ _ _ _ _ _ _ 5
Užitečné rady a tipy _ _ _ _ _ _ _ _ _ _ _ _ 6
Bezpečnostní informace
V zájmu své bezpečnosti a správného chodu
spotřebiče si před jeho instalací a prvním
použitím pozorně Přečtěte návod k použití
včetně rad a upozornění. K ochraně před nežádoucími omyly a nehodami je důležité, aby
se všechny osoby, které budou používat tento spotřebič, seznámily s jeho provozem a
bezpečnostními funkcemi. Tyto pokyny
uschovejte a zajistěte, aby zůstaly u spotřebi-
če i v případě jeho přestěhování na jiné místo
nebo prodeje dalším osobám, aby se tak všichni uživatelé po celou dobu životnosti
spotřebiče mohli řádně informovat o jeho
používání a bezpečnosti.
Dodržujte pokyny uvedené v tomto návodu k
použití, abyste neohrozili své zdraví a majetek, a uvědomte si, že výrobce neručí za úrazy a poškození způsobené jejich nedodržením.
Bezpečnost dětí a hendikepovaných
osob
• Tento spotřebič nesmějí používat osoby
(včetně dětí) se sníženými fyzickými, smyslovými nebo duševními schopnostmi, nebo
bez patřičných zkušeností a znalostí, pokud je nesledují osoby odpovědné za jejich
bezpečnost, nebo jim nedávají příslušné
pokyny k použití spotřebiče.
Na děti je třeba dohlédnout, aby si se
spotřebičem nehrály.
• Všechny obaly uschovejte z dosahu dětí.
Hrozí nebezpečí udušení.
• Jestliže likvidujete starý spotřebič, vytáhně-
te zástrčku ze zásuvky, odřízněte napájecí
kabel (co nejblíže u spotřebiče) a odstraňte
dveře, aby nedošlo k úrazu dětí elektrickým
Čištění a údržba _ _ _ _ _ _ _ _ _ _ _ _ _ _ 7
Co dělat, když... _ _ _ _ _ _ _ _ _ _ _ _ _ _ 8
Technické údaje _ _ _ _ _ _ _ _ _ _ _ _ _ 10
Instalace _ _ _ _ _ _ _ _ _ _ _ _ _ _ _ _ _ 10
Poznámky k životnímu prostředí _ _ _ _ _ 13
Zmĕny vyhrazeny
proudem, nebo se děti nemohly zavřít
uvnitř.
• Jestliže je tento spotřebič vybaven magnetickým těsněním dveří a nahrazuje starší
spotřebič s pružinovým zámkem (západkou) na dveřích nebo víku, nezapomeňte
před likvidací pružinový zámek znehodnotit. Děti se pak nemohou ve spotřebiči
zavřít jako ve smrtelně nebezpečné pasti.
Všeobecné bezpečnostní informace
Pozor Udržujte větrací otvory volně
průchodné.
• Tento spotřebič je určen k uchovávání potravin nebo nápojů v běžné domácnosti, jak
je uvedeno v návodu k použití.
• K urychlení odmrazování nepoužívejte mechanické nebo jiné pomocné prostředky.
• V prostoru chladicích spotřebičů nepoužívejte jiné elektrické přístroje (např. zmrzli-
nové strojky) než typy schválené k tomuto
účelu výrobcem.
• Nepoškozujte okruh chladicí kapaliny.
• Chladivo isobutan (R600a), které je obsaženo v chladicím okruhu spotřebiče, je
přírodní plyn, který je dobře snášen životním prostředím, ale je hořlavý.
Během přepravy a instalace spotřebiče
dbejte na to, aby nedošlo k poškození žádné části chladicího okruhu.
Pokud dojde k poškození chladicího okruhu,
– nepoužívejte v blízkosti spotřebiče
otevřený oheň a jiné zápalné zdroje;
–důkladně vyvětrejte místnost, ve které je
spotřebič umístěný.
2
Page 3
•Změna technických parametrů nebo jaká-
koli jiná úprava spotřebiče je nebezpečná.
Jakékoli poškození kabelu může způsobit
zkrat, požár nebo úraz elektrickým proudem.
Upozornění Jakoukoliv elektrickou sou-
část (napájecí kabel, zástrčku, kompresor) smí z důvodu možného rizika vyměňovat
pouze autorizovaný zástupce nebo kvalifikovaný pracovník servisu.
1. Napájecí kabel se nesmí nastavovat.
2. Zkontrolujte, zda není zástrčka stlačená
nebo poškozená zadní stranou
spotřebiče. Stlačená nebo poškozená
zástrčka se může přehřát a způsobit
požár.
3. Dbejte na to, aby byla zástrčka
spotřebiče dobře přístupná.
4. Netahejte za napájecí kabel.
5. Pokud je síťová zásuvka uvolněná, nezasunujte do ní zástrčku. Hrozí nebezpečí úrazu elektrickým proudem nebo
požáru.
6. Spotřebič nesmí být spuštěn bez krytu
1)
žárovky
vnitřního osvětlení.
• Tento spotřebič je těžký. Při přemísťování
spotřebiče buďte proto opatrní.
• Nevytahujte věci z mrazničky, ani se jich
nedotýkejte, máte-li vlhké nebo mokré ruce, protože byste si mohli způsobit odřeniny nebo omrzliny.
• Spotřebič nesmí být dlouhodobě vystaven
přímému slunečnímu záření.
•
Žárovky
2)
použité v tomto spotřebiči jsou
určené pouze pro použití v domácích
spotřebičích. Tyto žárovky nejsou vhodné
pro osvětlení místností.
Denní používání
• Ve spotřebiči nestavte horké nádoby na
plastové části spotřebiče.
• Neskladujte v něm hořlavý plyn nebo tekutiny, protože by mohly vybuchnout.
• Potraviny neukládejte přímo na větrací otvory v zadní stěně.
3)
• Zmrazené potraviny se nesmí po rozmrznutí znovu zmrazovat.
• Zakoupené zmrazené potraviny skladujte
podle pokynů daného výrobce.
• Pokyny výrobce spotřebiče týkající se
uchování potravin je nutné přísně dodržovat. Řiďte se příslušnými pokyny.
• Do mrazicího oddílu nevkládejte nápoje s
vysokým obsahem kysličníku uhličitého nebo nápoje s bublinkami, protože vytvářejí
tlak na nádobu, a mohou dokonce vybuchnout a poškodit spotřebič.
• Nejezte zmrzlinu ihned po vyjmutí z mrazničky, hrozí nebezpečí popálení.
Čištění a údržba
•Před čištěním nebo údržbou vždy spotřebič
vypněte a vytáhněte síťovou zástrčku ze
sítě. Jestliže nemůžete vytáhnout zástrčku,
přerušte přívod proudu.
•Nečistěte spotřebič kovovými předměty.
•K odstranění námrazy nepoužívejte ostré
předměty. Použijte plastovou škrabku.
• Pravidelně kontrolujte a čistěte odtokový
otvor na rozmrazenou vodu. Je-li zanesený, uvolněte ho. Jestliže je otvor ucpaný,
rozlije se voda na dno chladničky.
Instalace
Důležité U elektrického připojení se pečlivě
řiďte pokyny uvedenými v příslušných
odstavcích.
• Vybalte spotřebič a zkontrolujte, zda není
poškozený. Je-li spotřebič poškozený, nezapojujte ho do sítě. Případné poškození
okamžitě nahlaste prodejci, u kterého jste
spotřebič koupili. V tomto případě si uschovejte obal.
• Doporučujeme vám, abyste se zapojením
spotřebiče počkali nejméně čtyři hodiny,
aby olej mohl natéct zpět do kompresoru.
1) Pokud je spotřebič vybaven krytem žárovky.
2) Pokud je spotřebič vybaven osvětlením.
3) Pokud je spotřebič beznámrazový.
3
Page 4
•Okolo spotřebiče musí být dostatečná cir-
kulace vzduchu, jinak by se přehříval. K
dosažení dostatečného větrání se řiďte pokyny k instalaci.
• Pokud je to možné, měl by spotřebič stát
zadní stranou ke stěně, aby byly jeho horké části nepřístupné (kompresor, kondenzátor), a nemohli jste o ně zachytit nebo se
spálit.
• Spotřebič nesmí být umístěn v blízkosti radiátorů nebo sporáků.
• Zkontrolujte, zda je zástrčka po instalaci
spotřebiče přístupná.
• Spotřebič připojte výhradně k přívodu pitné
vody.
4)
Servis
• Jakékoliv elektrikářské práce, nutné pro zapojení tohoto spotřebiče, smí provádět pouze kvalifikovaný elektrikář nebo osoba s
příslušným oprávněním.
Provoz
• Pokud je spotřebič nutné opravit, obraťte
se na autorizované servisní středisko, které
smí použít výhradně originální náhradní díly.
Ochrana životního prostředí
Tento přístroj neobsahuje plyny, které
mohou poškodit ozónovou vrstvu, ani v
chladicím okruhu, ani v izolačních materiálech. Spotřebič nelikvidujte společně s domácím odpadem a smetím. Izolační pěna obsahuje hořlavé plyny: spotřebič je nutné zlikvidovat podle příslušných předpisů, které získáte na obecním úřadě. Zabraňte poškození
chladicí jednotky, hlavně vzadu v blízkosti výměníku tepla. Materiály použité u tohoto
spotřebiče označené symbolem
klovatelné.
jsou recy-
Zapnutí
Zasuňte zástrčku do nástěnné zásuvky.
Otočte regulátorem teploty doprava na
střední nastavení.
Vypnutí
Chcete-li spotřebič vypnout, otočte regulátorem teploty do polohy "O".
Regulace teploty
Teplota se reguluje automaticky.
Chcete-li spotřebič nastavit, postupujte takto:
•otočte regulátorem teploty směrem na nižší
nastavení, chcete-li dosáhnout vyšší teploty.
•otočte regulátorem teploty směrem na vy-
šší nastavení, chcete-li dosáhnout nižší teploty.
Při prvním použití
Čistění vnitřku spotřebiče
Před prvním použitím spotřebiče vymyjte
vnitřek a všechno vnitřní příslušenství vla-
4) Pokud je spotřebič vybaven vodovodní přípojkou.
4
Nejvhodnější je obvykle střední nastavení.
Při hledání přesného nastavení mějte na paměti, že teplota uvnitř spotřebiče závisí na:
• teplotě místnosti
• četnosti otevření dveří
• množství vložených potravin
•umístění spotřebiče.
Důležité Jestliže je okolní teplota vysoká,
nebo je spotřebič zcela zaplněný, a spotřebič
je přitom nastavený na nejnižší teplotu, může
běžet nepřetržitě a na zadní stěně se pak
tvoří námraza. V tomto případě je nutné
nastavit vyšší teplotu, aby se spotřebič
automaticky odmrazil, a tím snížil spotřebu
energie.
žnou vodou s trochou neutrálního mycího
prostředku, abyste odstranili typický pach no-
Page 5
vého výrobku, a pak vše důkladně utřete do
sucha.
Důležité Nepoužívejte čisticí prostředky nebo
abrazivní prášky, které mohou poškodit povrch spotřebiče.
Denní používání
Zmrazování čerstvých potravin
Mrazicí oddíl se hodí pro zmrazování čerstvých potravin a dlouhodobé uložení zmrazených a hlubokozmrazených potravin.
Chcete-li zmrazovat čerstvé potraviny, je nutné změnit střední nastavení.
K rychlejšímu zmrazování otočte regulátorem
teploty směrem na vyšší nastavení, abyste
dosáhli maximálního chladu.
Důležité Teplota chladicího oddílu pak může
klesnout pod 0°C. V tomto případě otočte
regulátorem teploty zpět na teplejší
nastavení.
Čerstvé potraviny, které chcete zmrazit, položte do horního oddílu.
Skladování zmrazených potravin
Po prvním spuštění spotřebiče nebo po jeho
dlouhodobé odstávce nechte spotřebič před
vložením potravin běžet nejméně 2 hodiny na
vyšší nastavení.
Důležité V případě náhodného rozmrazení,
například z důvodu výpadku proudu, a pokud
výpadek proudu trval delší dobu, než je
uvedeno v tabulce technických údajů, je
nutné rozmrazené potraviny rychle
spotřebovat nebo ihned uvařit či upéct a
potom opět zmrazit (po ochlazení).
Rozmrazování
Hlubokozmrazené nebo zmrazené potraviny
je možné před použitím rozmrazit v chladnič-
ce nebo při pokojové teplotě, podle toho, kolik máte času.
Malé kousky lze dokonce připravit ještě zmrazené, přímo z mrazničky: čas přípravy bude
ale v tomto případě delší.
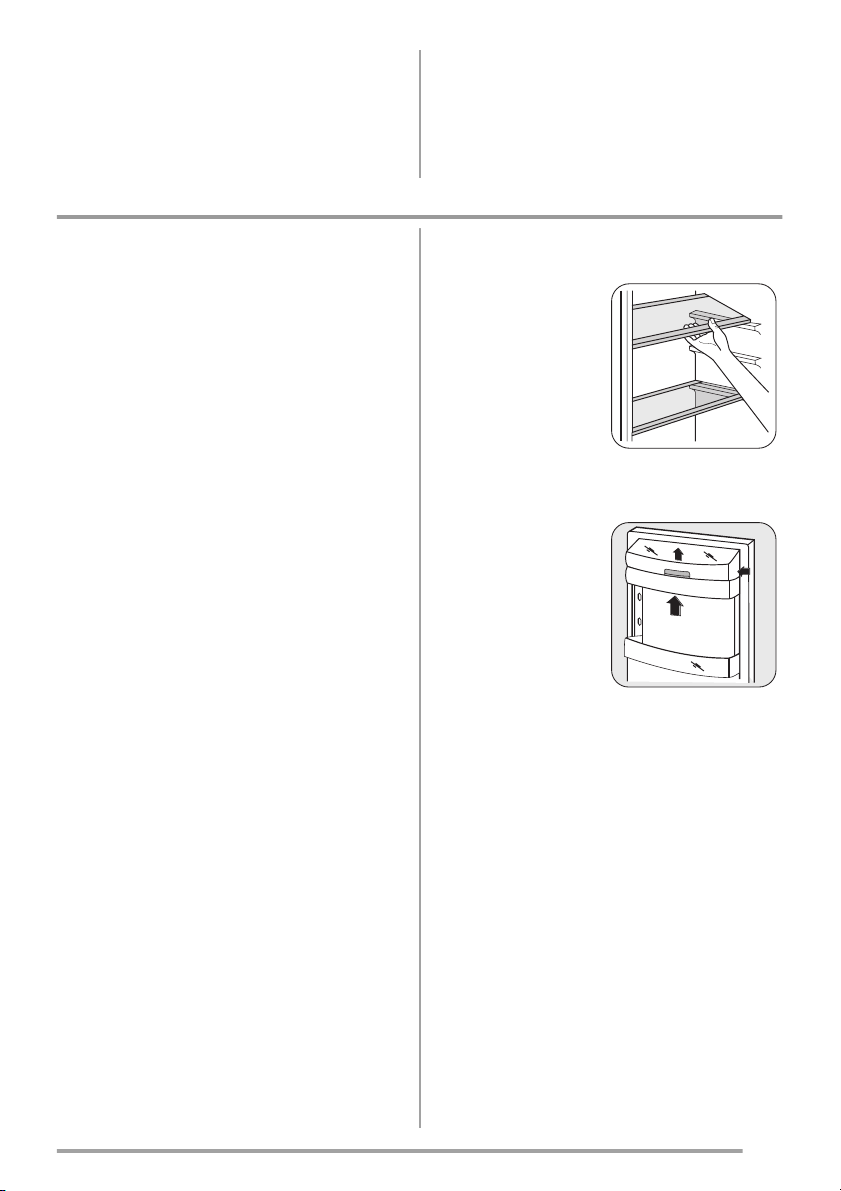
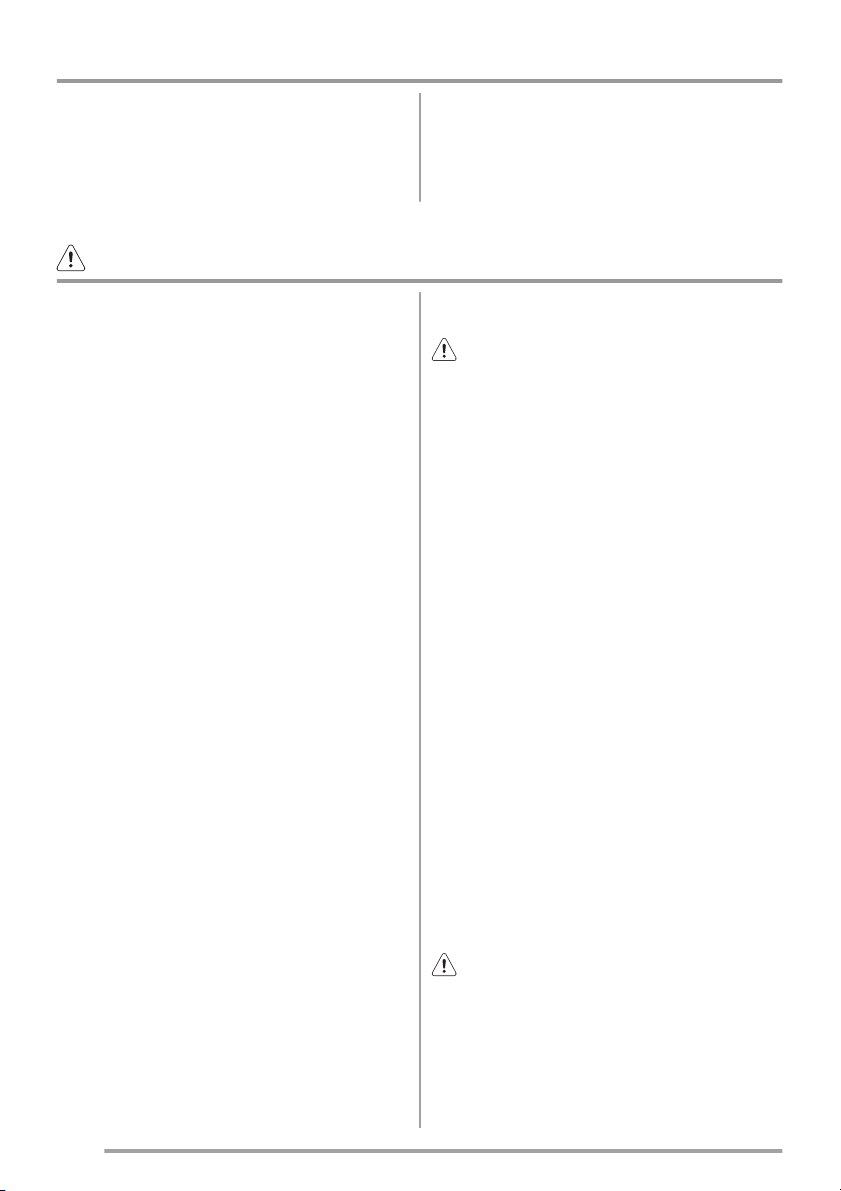
Přemístitelné police
Na stěnách chladničky jsou kolejničky,
do kterých se podle
přání zasunují police.
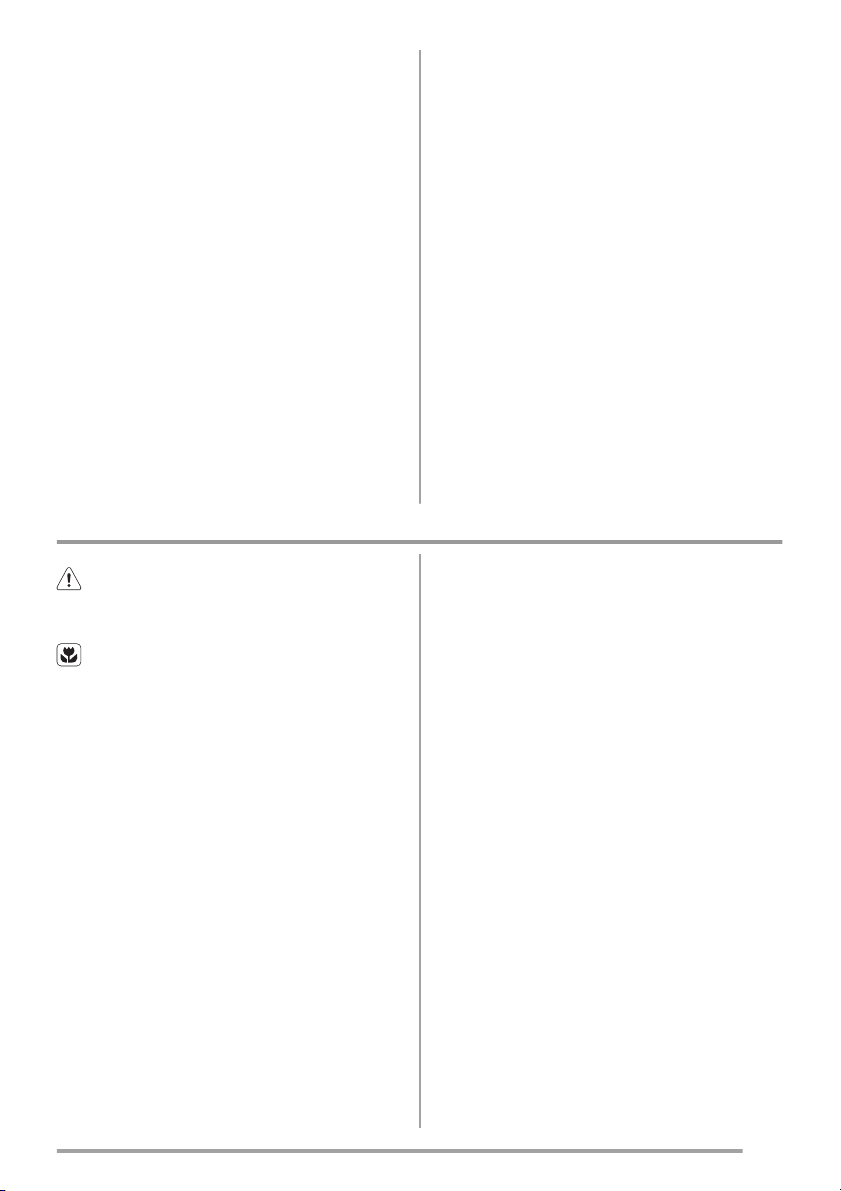
Umístění dveřních poliček
Dveřní poličky mů-
žete umístit do různé
výšky a vkládat tak
do nich různě velká
balení potravin.
Pomalu posunujte
polici ve směru šipek, až se uvolní, a
pak ji zasuňte do
zvolené polohy.
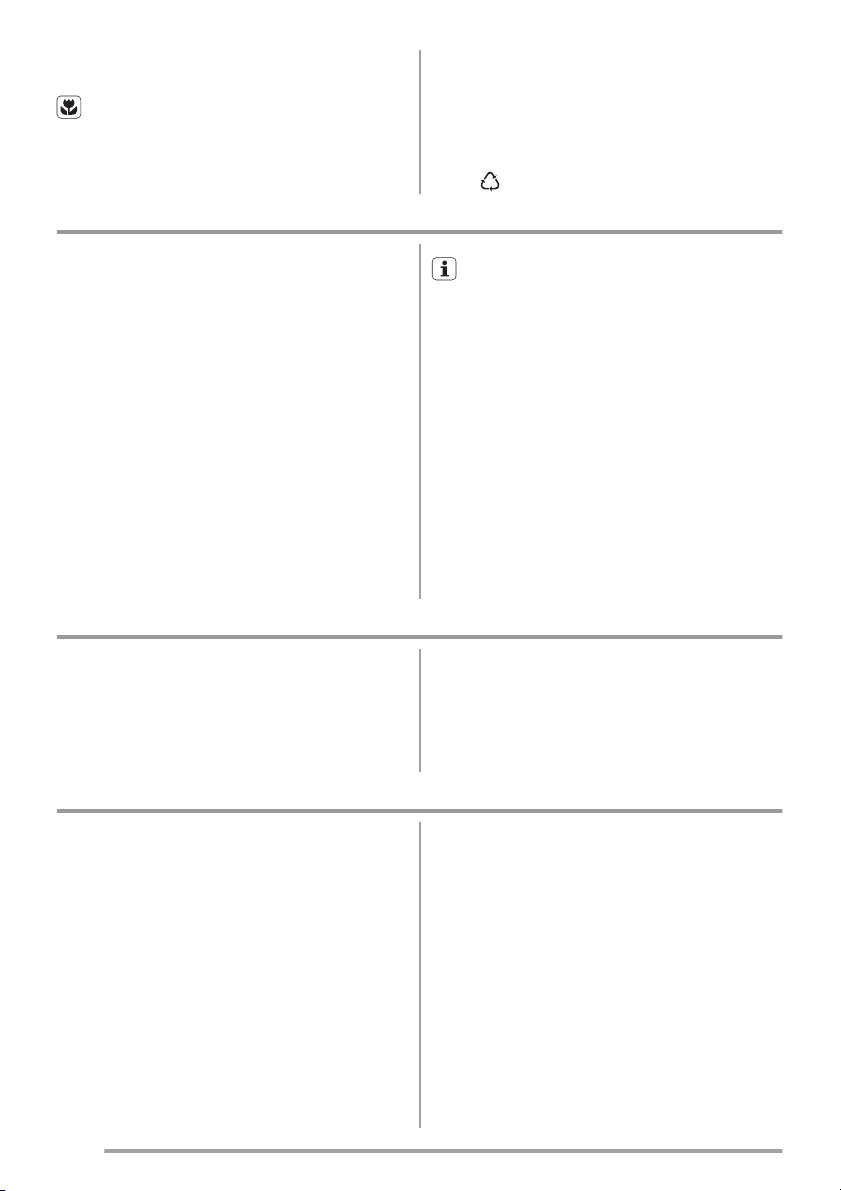
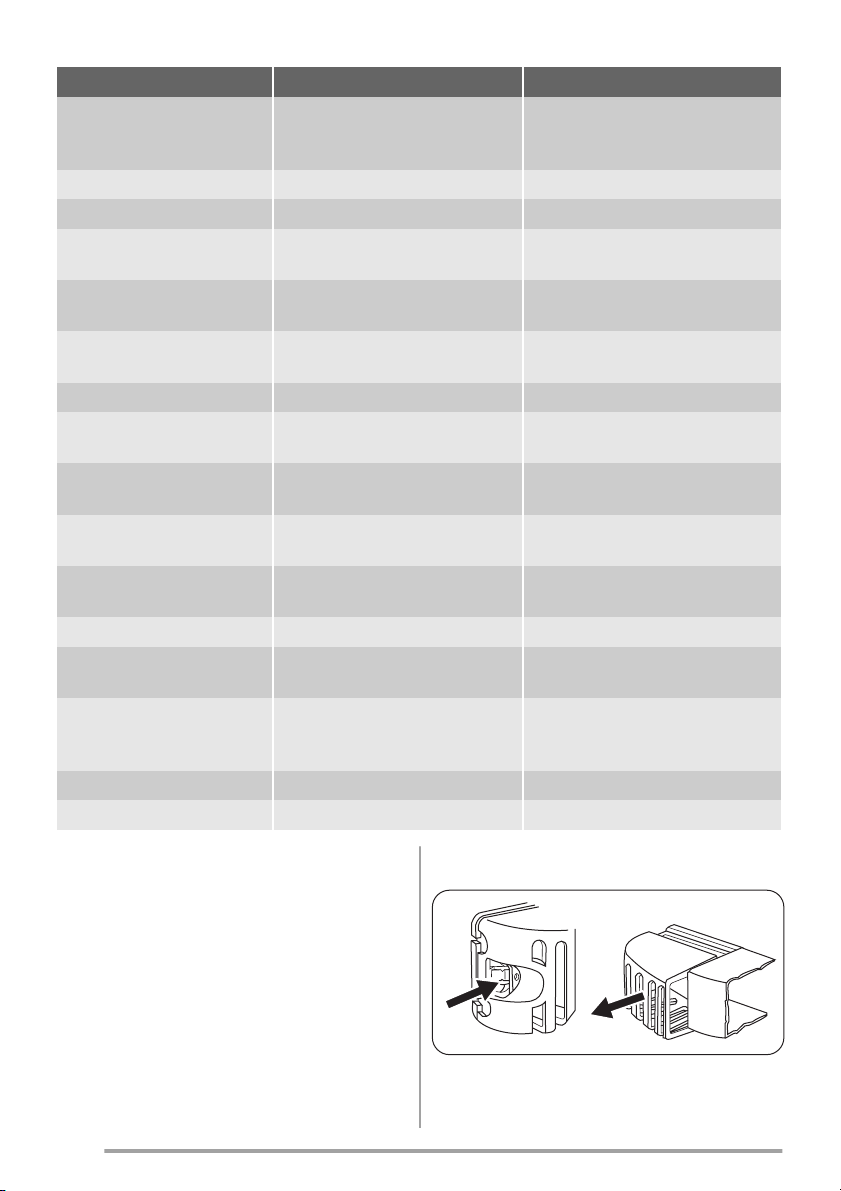
Vyjmutí mrazicích košů z mrazničky
Koše na zmrazování potravin jsou vybaveny
zarážkou, aby se nedaly náhodně odstranit,
nebo nevypadly. Chcete-li je z mrazničky vyjmout, vytáhněte koš směrem k sobě až na
doraz, a pak koš vytáhněte zdvihnutím jeho
přední části směrem nahoru.
Chcete-li koš vrátit zpět, lehce nadzdvihněte
přední část koše, abyste ho mohli vložit do
mrazničky. Jakmile je koš nad zarážkami, zasuňte koš dozadu do jeho polohy.
5
Page 6

Užitečné rady a tipy
2
1
Normální provozní zvuky
• Když je chladicí kapalina čerpána chladicím hadem nebo potrubím, můžete slyšet
zvuk slabého bublání či zurčení. Nejde o
závadu.
• Když je kompresor spuštěný a čerpá se
chladící médium, může to být doprovázeno
drnčením nebo pulsujícím zvukem kompresoru. Nejde o závadu.
• Tepelné roztažení může způsobit náhlé zapraskání. Jde o přirozený a neškodný fyzikální jev. Nejde o závadu.
• Když se kompresor spustí nebo vypne, mů-
žete zaslechnout slabé kliknutí regulátoru
teploty. Nejde o závadu.
Tipy pro úsporu energie
• Neotvírejte často dveře, ani je nenechávejte otevřené déle, než je nezbytně nutné.
• Jestliže je okolní teplota vysoká, regulátor
teploty je na vyšším nastavení a spotřebič
je zcela zaplněný, může kompresor běžet
nepřetržitě a na výparníku se pak tvoří námraza nebo led. V tomto případě je nutné
nastavit regulátor teploty na nižší nastavení, aby se spotřebič automaticky odmrazil,
a tím snížil spotřebu energie.
Tipy pro chlazení čerstvých potravin
K dosažení nejlepšího výkonu:
•do chladničky nevkládejte teplé potraviny
nebo tekutiny, které se odpařují;
• potraviny zakrývejte nebo je zabalujte, zejména mají-li silnou vůni;
• potraviny položte tak, aby okolo nich mohl
proudit volně vzduch.
6
Tipy pro chlazení
Užitečné rady:
Maso (všechny druhy): zabalte do polyetylénového sáčku a položte na skleněnou polici
nad zásuvku se zeleninou.
Z hlediska bezpečné konzumace takto skladujte maso pouze jeden nebo dva dny.
Vařená jídla, studená jídla apod.: můžete zakrýt a položit na jakoukoli polici.
Ovoce a zelenina: musí být důkladně očiště-
né, vložte je do speciální zásuvky (nebo zásuvek), které jsou součástí vybavení.
Máslo a sýr: musí být ve speciální vzduchotěsné nádobě nebo zabalené do hliníkové fólie či do polyetylénového sáčku, aby k nim
měl vzduch co nejméně přístup.
Láhve s mlékem: musí být uzavřeny víčkem a
uloženy v držáku na láhve ve dveřích.
Banány, brambory, cibule a česnek smí být v
chladničce pouze tehdy, jsou-li zabalené.
Tipy pro zmrazování potravin
K dosažení dokonalého zmrazovacího procesu dodržujte následující důležité rady:
• maximální množství potravin, které je možné zmrazit za 24 hodin je uvedeno na typovém štítku;
• zmrazovací postup trvá 24 hodin. V této
době nepřidávejte žádné další potraviny ke
zmrazení;
• zmrazujte pouze potraviny prvotřídní kvality, čerstvé a dokonale čisté;
•připravte potraviny v malých porcích, aby
se mohly rychle a zcela zmrazit, a bylo pak
možné rozmrazit pouze požadované množství;
Page 7
• zabalte potraviny do alobalu nebo polyetylénu a přesvědčte se, že jsou balíčky vzduchotěsné;
• čerstvé, nezmrazené potraviny se nesmí
dotýkat již zmrazených potravin, protože by
zvýšily jejich teplotu;
• libové potraviny vydrží uložené déle a v lepším stavu, než tučné; sůl zkracuje délku
bezpečného skladování potravin;
• vodové zmrzliny mohou při konzumaci
okamžitě po vyjmutí z mrazicího oddílu
způsobit popáleniny v ústech;
• doporučujeme napsat na každý balíček viditelně datum uskladnění, abyste mohli
správně dodržet dobu uchování potravin.
Tipy pro skladování zmrazených
potravin
K dosažení nejlepšího výkonu zakoupeného
spotřebiče dodržujte následující podmínky:
Čištění a údržba
• vždy si při nákupu ověřte, že zakoupené
zmrazené potraviny byly prodejcem správně skladované;
•zajistěte, aby zmrazené potraviny byly z
obchodu přineseny v co nejkratším možném čase;
• neotvírejte často dveře, ani je nenechávejte otevřené déle, než je nezbytně nutné;
• již rozmrazené potraviny se rychle kazí a
nesmí se znovu zmrazovat;
• nepřekračujte dobu skladování uvedenou
výrobcem na obalu.
Pozor Před každou údržbou vytáhněte
zástrčku spotřebiče ze zdroje
elektrického napájení.
Tento spotřebič obsahuje uhlovodíky v
chladicí jednotce; údržbu a doplňování
smí proto provádět pouze autorizovaný pracovník.
Pravidelné čištění
Spotřebič je nutné pravidelně čistit:
•vnitřek a všechno vnitřní příslušenství
omyjte vlažnou vodou s trochou neutrálního mycího prostředku;
•pravidelně kontrolujte těsnění dvířek a ot-
írejte je, aby bylo čisté, bez usazených nečistot;
•důkladně vše opláchněte a osušte.
Důležité Nehýbejte s žádnými trubkami nebo
kabely uvnitř spotřebiče, netahejte za ně a
nepoškozujte je.
Nikdy nepoužívejte k čištění vnitřku
spotřebiče abrazivní prášky, vysoce
parfémované čisticí prostředky nebo vosková
leštidla, protože mohou poškodit povrch a
zanechat silný pach.
Kondenzátor (černá mřížka) a kompresor na
zadní straně spotřebiče čistěte kartáčem nebo vysavačem. Tím se zlepší výkon spotřebiče a sníží spotřeba energie.
Důležité Dbejte na to, abyste nepoškodili
chladicí systém.
Řada prostředků na čistění povrchů v kuchyni
obsahuje chemikálie, které mohou poškodit
umělou hmotu použitou v tomto spotřebiči.
Doporučujeme proto čistit povrch spotřebiče
pouze teplou vodou s trochou tekutého mycího prostředku na nádobí.
Po čištění znovu připojte spotřebič k elektrické síti.
Odmrazování chladničky
Během normálního používání se námraza
automaticky odstraňuje z výparníku chladicího oddílu při každém zastavení motoru kompresoru. Rozmrazená voda vytéká žlábkem
do speciální nádoby na zadní straně spotřebi-
7
Page 8
če nad motorem kompresoru, kde se odpařuje.
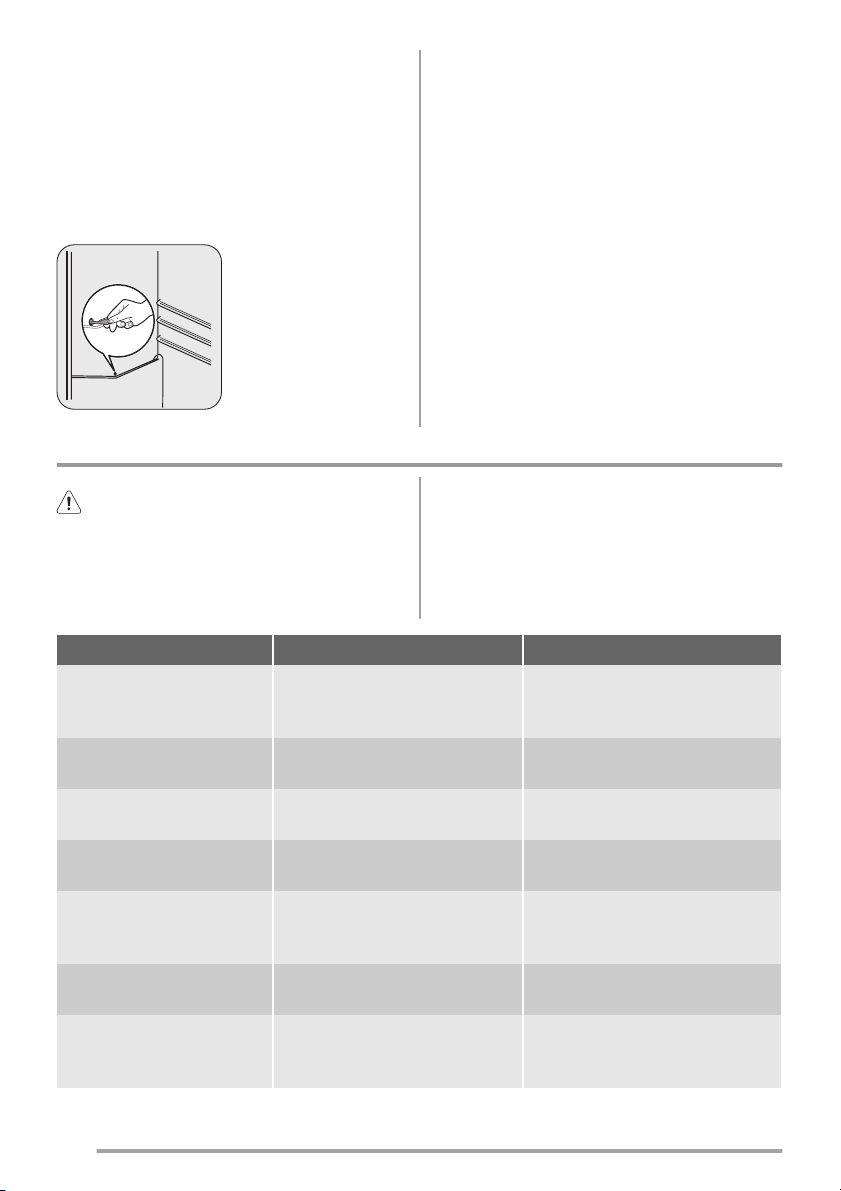
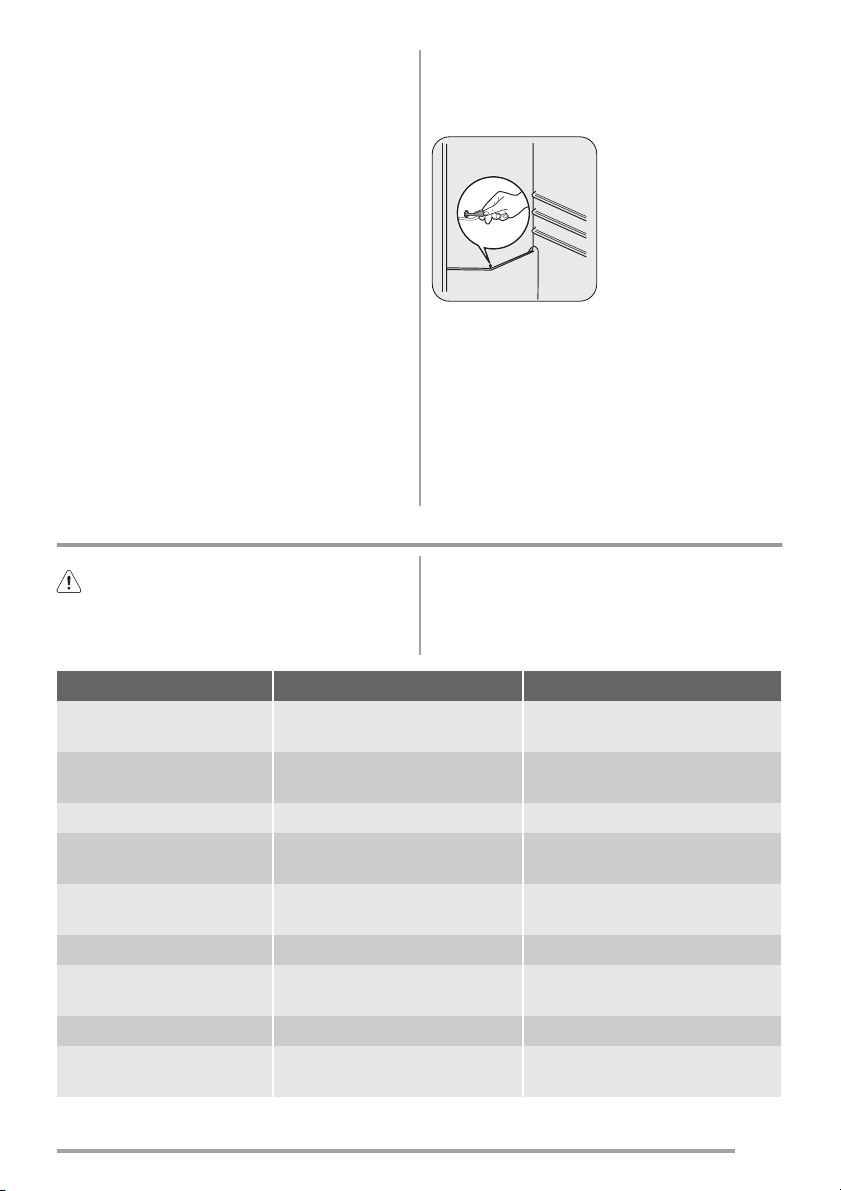
Odtokový otvor pro rozmrazenou vodu, který
se nachází uprostřed žlábku v chladicím oddíle, se musí pravidelně čistit, aby voda ne-
mohla přetéct na uložené potraviny. Používejte speciální čisticí nástroj, který najdete již
zasunutý do odtokového otvoru.
Co dělat, když...
Rozmrazování mrazničky
Mrazicí oddíl tohoto modelu je beznámrazového typu "no frost". To znamená, že se v zapnutém spotřebiči nevytváří námraza ani na
vnitřních stěnách, ani na potravinách.
Zajišťuje to nepřetržitá cirkulace chladného
vzduchu uvnitř oddílu automaticky řízeným
ventilátorem.
Pozor Při hledání a odstraňování závady
vytáhněte zástrčku ze zásuvky.
Odstraňování závady, které není uvedeno v
tomto návodu, smí provádět pouze
kvalifikovaný elektrikář nebo osoba s
příslušným oprávněním.
Problém Možná příčina Řešení
Spotřebič je hlučný. Spotřebič není správně posta-
ven.
Kompresor funguje
nepřetržitě.
Dveře nejsou správně
Otvírali jste příliš často dveře. Nenechávejte dveře otevřené
Teplota jídla je příliš vysoká. Před vložením nechte potraviny
Teplota v místnosti je příliš vy-
Po vnitřní zadní stěně
chladničky stéká voda.
Regulátor teploty může být
nesprávně nastavený.
zavřené.
soká.
Během automatického odmra-
zování se na zadní stěně rozmrazuje námraza.
Důležité Zapnutý spotřebič vydává různé
zvuky (kompresor a zvuk cirkulace). Tyto
zvuky neznamenají poruchu, ale normální
provoz.
Zkontrolujte, zda spotřebič stojí
stabilně (všechny čtyři nožičky
musí stát na podlaze).
Nastavte vyšší teplotu.
Viz „Zavření dveří“.
déle, než je nezbytně nutné.
vychladnout na pokojovou teplotu.
Snižte teplotu v místnosti.
Nejde o závadu.
8
Page 9
Problém Možná příčina Řešení
V chladničce teče voda. Odtokový otvor je ucpaný. Vyčistěte odtokový otvor.
Vložené potraviny brání odto-
ku vody do odtokového otvo-
Přemístěte potraviny tak, aby
se nedotýkaly zadní stěny.
ru.
Na podlahu teče voda. Vývod rozmražené vody neú-
stí do odpařovacího tácu nad
Připojte vývod rozmražené vody k vypařovacímu tácu.
kompresorem.
Příliš mnoho námrazy a
ledu.
Dveře nejsou správně
Potraviny nejsou řádně zabalené.
Zabalte potraviny lépe.
Viz „Zavření dveří“.
zavřené.
Regulátor teploty může být
Nastavte vyšší teplotu.
nesprávně nastavený.
Teplota ve spotřebiči je
příliš nízká.
Teplota ve spotřebiči je
příliš vysoká.
Dveře nejsou správně
Regulátor teploty může být
nesprávně nastavený.
Regulátor teploty může být
nesprávně nastavený.
Nastavte vyšší teplotu.
Nastavte nižší teplotu.
Viz „Zavření dveří“.
zavřené.
Teplota jídla je příliš vysoká. Před vložením nechte potraviny
vychladnout na pokojovou teplotu.
Vložili jste příliš velké množ-
ství potravin najednou.
Teplota v chladničce je
příliš vysoká.
Ve spotřebiči neobíhá chladný
vzduch.
Dávejte do spotřebiče méně
potravin najednou.
Zkontrolujte, zda ve spotřebiči
může dobře obíhat chladný
vzduch.
Příliš vysoká teplota v
mrazničce.
Potraviny jsou položeny příliš
těsně u sebe.
Uložte potraviny tak, aby mohl
dobře obíhat chladný vzduch.
Spotřebič nefunguje. Spotřebič je vypnutý. Zapněte spotřebič.
Zástrčka není zasunutá správ-
ně do zásuvky.
Spotřebič je bez proudu. Zá-
suvka není pod proudem.
Zasuňte zástrčku správně do
zásuvky.
Zasuňte do zásuvky zástrčku jiného elektrického spotřebiče.
Obraťte se na kvalifikovaného
elektrikáře.
Osvětlení nefunguje. Osvětlení je v pohotovostním
Zavřete a otevřete dveře.
režimu.
Vadná žárovka. Viz „Výměna žárovky“.
9
Page 10
Projevuje-li se závada i po provedení výše
uvedených úkonů, zavolejte do nejbližšího
poprodejního střediska.
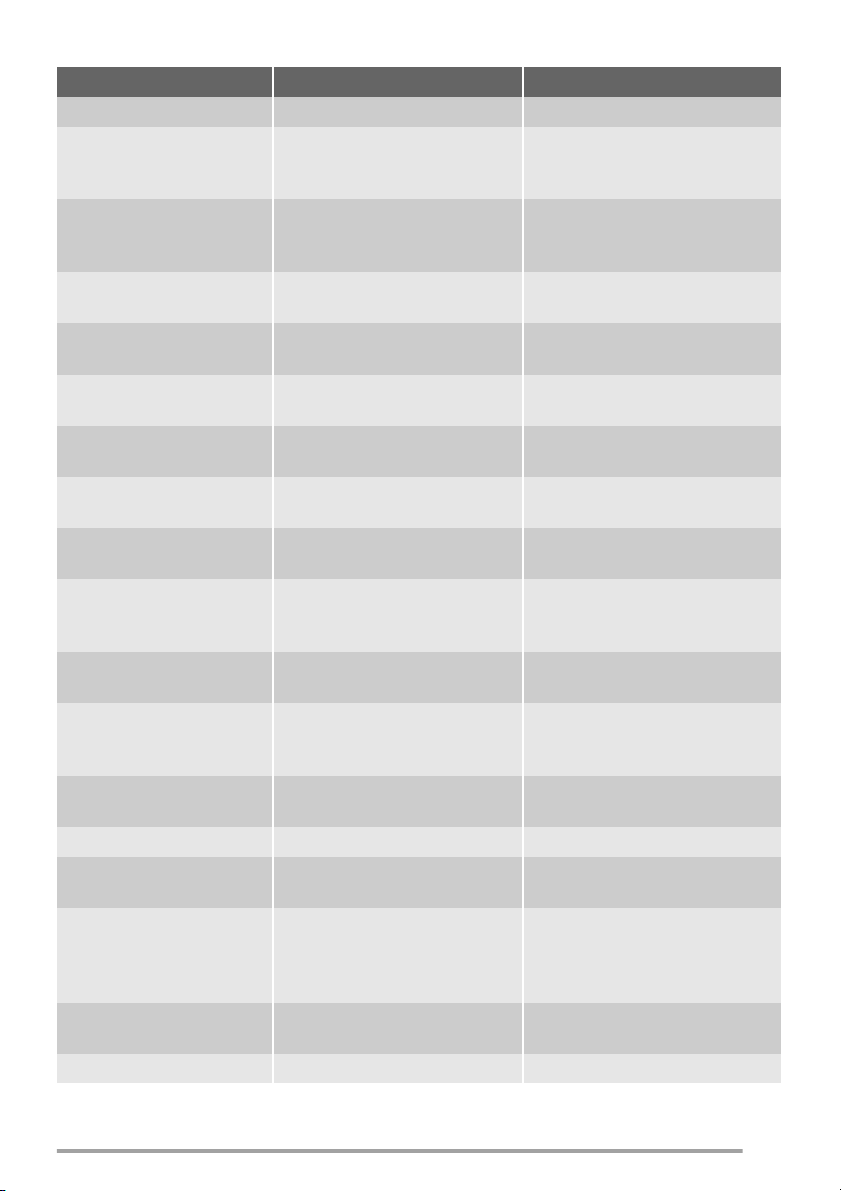
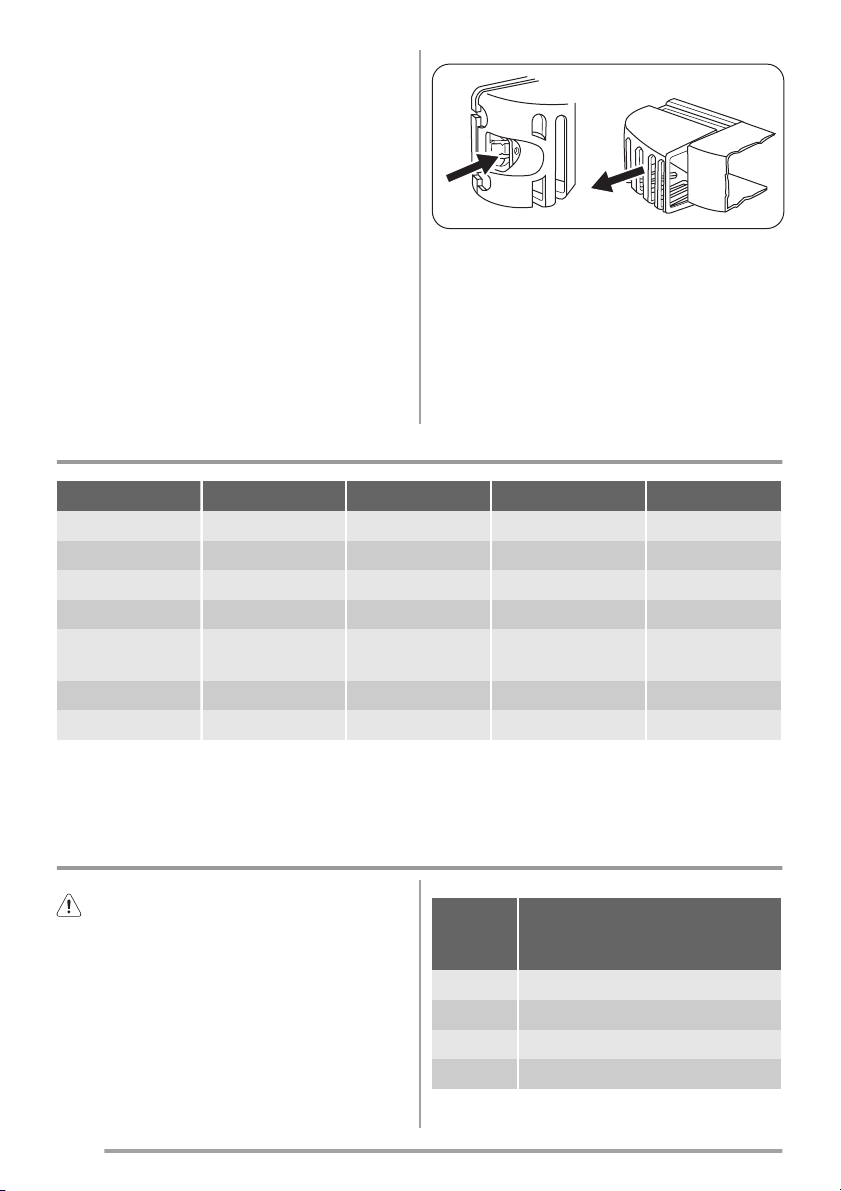
Výměna žárovky
1. Spotřebič odpojte od sítě.
2. Zatlačením na pohyblivou část uvolněte
kryt žárovky (1).
3. Sejměte kryt žárovky (2).
4. Vyměňte žárovku za novou o stejném vý-
konu a určenou pouze pro použití v domácích spotřebičích.
5. Nasaďte kryt žárovky.
6. Připojte spotřebič k síti.
7. Otevřete dveře spotřebiče. Přesvědčte se,
že se osvětlení rozsvítí.
1
Zavření dveří
1. Vyčistěte těsnění dveří.
2. Pokud je to nutné, dveře seřiďte. Řiďte se
pokyny v části "Instalace".
3. V případě potřeby vadné těsnění dveří vyměňte. Obraťte se na servisní středisko.
2
Technické údaje
ZRB632FW ZRB634FW ZRB638FW
Rozměry
Výška 1750 mm 1850 mm 2010 mm
Šířka 595 mm 595 mm 595 mm
Hloubka 658 mm 658 mm 658 mm
Skladovací čas
při poruše
Napětí 230 V 230 V 230 V
Frekvence 50 Hz 50 Hz 50 Hz
16 h 18 h 18 h
Technické údaje jsou uvedeny na typovém
štítku umístěném na vnitřní levé straně
spotřebiče a na energetickém štítku.
Instalace
Pozor Přečtěte si pečlivě "Bezpečnostní
informace" ještě před instalací k zajištění
bezpečnosti a správného provozu spotřebiče.
Umístění
Spotřebič instalujte na místě, jehož okolní teplota odpovídá klimatické třídě uvedené na
typovém štítku spotřebiče:
10
Klima-
tická
třída
SN +10°C až + 32°C
N +16°C až + 32°C
ST +16°C až + 38°C
T +16°C až + 43°C
Okolní teplota
Page 11
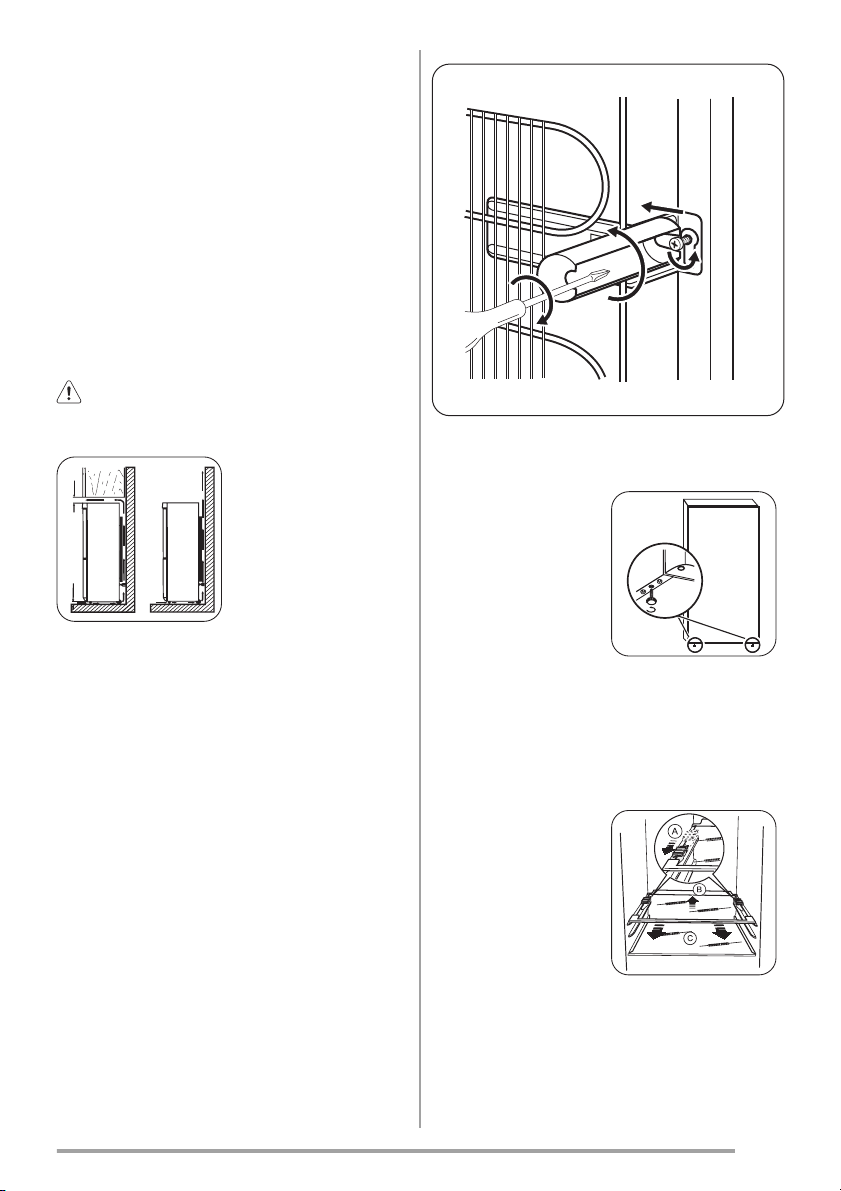
Umístění
Spotřebič musí být instalovaný v dostatečné
vzdálenosti od zdrojů tepla, jako jsou radiátory, bojlery, přímý sluneční svit apod. Ujistěte
se, že vzduch může volně cirkulovat kolem
zadní části spotřebiče. Jestliže je spotřebič
umístěný pod závěsnými skříňkami kuchyň-
ské linky, je pro zajištění správného výkonu
nutná minimální vzdálenost mezi horní částí
spotřebiče a závěsnými skříňkami alespoň
100 mm. Pokud je to ale možné, spotřebič
pod závěsné skříňky nestavte. Správné vyrovnání zajišťuje jedna nebo více seřiditel-
ných nožiček na spodku spotřebiče.
Upozornění Spotřebič musí být
odpojitelný od elektrické sítě, proto musí
být zástrčka i po instalaci dobře př
min.100 mm
A
20 mm
B
ístupná.
Zadní rozpěrky
Dvě rozpěrky naleznete v sáčku s dokumentací.
Při montáži rozpěrek postupujte následovně:
1. Uvolněte šroub.
2. Zasuňte rozpěrku pod šroub.
3. Otočte rozpěrku do správné polohy.
4. Utáhněte všechny šrouby.
2
1
4
Vyrovnání
Při umístění
spotřebiče zajistěte,
aby stál vodorovně
podle vodováhy. Mů-
žete ho vyrovnat
seřízením dvou dolních předních nožiček.
Odstranění držáků polic
Spotřebič je vybaven držáky polic, kterými je
možné police bezpečně zajistit během
přepravy.
Chcete-li je odstranit, postupujte takto:
1. Posuňte držáky
polic ve směru
šipky (A).
2. Nadzvedněte polici zezadu a pak
ji zatlačte
dopředu, až se
uvolní (B).
3. Odstraňte zarážky (C).
3
11
Page 12
Připojení k elektrické síti
Spotřebič smí být připojen k síti až po
ověření, že napětí a frekvence uvedené na
typovém štítku odpovídají napětí v domácí síti.
Spotřebič musí být podle zákona uzemněn.
Zástrčka napájecího kabelu je k tomuto účelu
vybavena příslušným kontaktem. Pokud není
domácí zásuvka uzemněná, poraďte se s od-
borníkem a připojte spotřebič k samostatnému uzemnění v souladu s platnými předpisy .
m1
m2
m6
m5
m4
m3
Výrobce odmítá veškerou odpovědnost v
případě nedodržení výše uvedených pokynů.
Tento spotřebič je v souladu se směrnicemi
EHS.
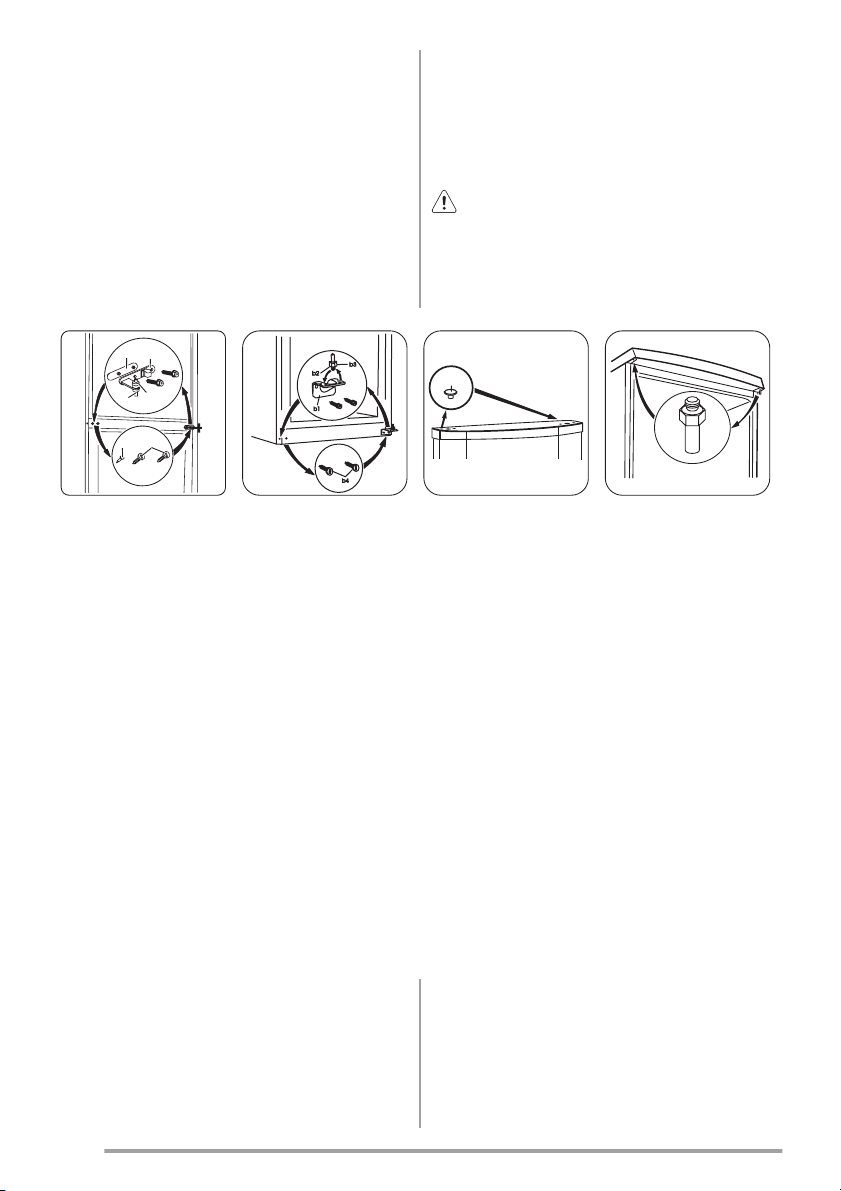
Změna směru otvírání dveří
Upozornění Před každou činností
vytáhněte zástrčku ze síťové zásuvky.
Důležité K provedení následujících činností
doporučujeme přizvat další osobu, která bude
v průběhu prácí držet dveře spotřebiče.
1
•Otevřete dveře.
Vyšroubujte střední
závěs (m2). Sejměte plastovou distanční podložku
(m1).
•Vyjměte podložku
(m6) a přesuňte ji
na opačnou stranu
čepu závěsu (m5).
•Sejměte dveře.
•Vyjměte levý čep
středního závěsu
(m3,m4) a přemon-
tujte jej na opač-
• Odšroubujte dolní
závěs (b1)
•Vyjměte levé čepy
(b4) a přemontujte
je na opačnou stranu.
• Zašroubujte dolní
závěs (b1) na
opačné straně.
• Odšroubujte dolní
dveřní čep (b2) s
ní podlož-
distanč
kou (b3) a zašroubujte je na opačné
straně.
nou stranu.
• Čep středního závěsu (m5) přemontujte do levého otvoru dolních dveří.
Na závě
r zkontrolujte, zda:
• Jsou všechny šrouby utažené.
• Okraje dveří jsou rovnoběžné s bočními
hranami chladničky.
• Magnetické těsnění přiléhá ke skříni.
• Vytáhněte záslepky (1) na horní
straně obou dveří a
umístěte je na druhou stranu.
• Dolní dveře opět
nasaďte na čep dolního závěsu (b2).
•Střední závěs (m2)
nasaďte do levého
otvoru dolních
dveří.
• Odšroubujte čep
horního závěsu a
zašroubujte ho na
opačné straně.
•Nasaďte horní
dveře na čep horních dveří.
• Dolní dveře nasaď-
te na čep středního
závěsu (m5), oboje
dveře lehce nakloňte.
• Zašroubujte
prostřední závěs
(m2). Nezapomeň-
te vložit pod
střední závěs plastovou podložku
(m1).
•Dveře se dobře otvírají i zavírají.
Při nízké okolní teplotě (např. v zimě) se může stát, že těsnění nebude dokonale doléhat.
V tomto případě počkejte, až těsnění samo
změkne.
12
Page 13
Pokud nechcete změnu směru otvírání dveří
provádět sami, obraťte se na nejbližší středisko poprodejního servisu. Odborník z popro-
Poznámky k životnímu prostředí
dejního servisu provede změnu směru otevírání dveří na vaše náklady.
Symbol na výrobku nebo jeho balení
udává, že tento výrobek nepatří do domácího
odpadu. Je nutné odvézt ho do sběrného
místa pro recyklaci elektrického a
elektronického zařízení. Zajištěním správné
likvidace tohoto výrobku pomůžete zabránit
negativním důsledkům pro životní prostředí a
lidské zdraví, které by jinak byly způsobeny
nevhodnou likvidací tohoto výrobku.
Podrobnější informace o recyklaci tohoto
výrobku zjistíte u příslušného místního úřadu,
služby pro likvidaci domovního odpadu nebo
v obchodě, kde jste výrobek zakoupili.
13
Page 14
Contents
Safety information _ _ _ _ _ _ _ _ _ _ _ _ _ _ _ _ _ 14
Operation _ _ _ _ _ _ _ _ _ _ _ _ _ _ _ _ _ _ _ _ _ 16
First use _ _ _ _ _ _ _ _ _ _ _ _ _ _ _ _ _ _ _ _ _ _ 16
Daily use _ _ _ _ _ _ _ _ _ _ _ _ _ _ _ _ _ _ _ _ _ 16
Helpful hints and tips _ _ _ _ _ _ _ _ _ _ _ _ _ _ _ 17
Safety information
In the interest of your safety and to ensure the correct use,
before installing and first using the appliance, read this
user manual carefully, including its hints and warnings.
To avoid unnecessary mistakes and accidents, it is important to ensure that all people using the appliance are thoroughly familiar with its operation and safety features. Save
these instructions and make sure that they remain with the
appliance if it is moved or sold, so that everyone using it
through its life will be properly informed on appliance use
and safety.
For the safety of life and property keep the precautions of
these user's instructions as the manufacturer is not responsible for damages caused by omission.
Children and vulnerable people safety
• This appliance is not intended for use by persons (including children) with reduced physical, sensory or
mental capabilities, or lack of experience and knowledge, unless they have been given supervision or instruction concerning use of the appliance by a person
responsible for their safety.
Children should be supervised to ensure that they do
not play with the appliance.
• Keep all packaging well away from children. There is
risk of suffocation.
• If you are discarding the appliance pull the plug out of
the socket, cut the connection cable (as close to the
appliance as you can) and remove the door to prevent
playing children to suffer electric shock or to close
themselves into it.
• If this appliance featuring magnetic door seals is to replace an older appliance having a spring lock (latch)
on the door or lid, be sure to make that spring lock unusable before you discard the old appliance. This will
prevent it from becoming a death trap for a child.
Care and cleaning _ _ _ _ _ _ _ _ _ _ _ _ _ _ _ _ _ 18
What to do if… _ _ _ _ _ _ _ _ _ _ _ _ _ _ _ _ _ _ 19
Technical data _ _ _ _ _ _ _ _ _ _ _ _ _ _ _ _ _ _ _ 21
Installation _ _ _ _ _ _ _ _ _ _ _ _ _ _ _ _ _ _ _ _ 21
Environmental concerns _ _ _ _ _ _ _ _ _ _ _ _ _ _ 23
Subject to change without notice
General safety
Caution! Keep ventilation openings clear of
obstruction.
• The appliance is intended for keeping foodstuff and/or
beverages in a normal household as explained in this
instruction booklet.
• Do not use a mechanical device or any artificial means
to speed up the thawing process.
• Do not use other electrical appliances (such as ice
cream makers) inside of refrigerating appliances, unless they are approved for this purpose by the manufacturer.
• Do not damage the refrigerant circuit.
• The refrigerant isobutane (R600a) is contained within
the refrigerant circuit of the appliance, a natural gas
with a high level of environmental compatibility, which
is nevertheless flammable.
During transportation and installation of the appliance,
be certain that none of the components of the refrigerant circuit become damaged.
If the refrigerant circuit should become damaged:
– avoid open flames and sources of ignition
– thoroughly ventilate the room in which the appli-
ance is situated
• It is dangerous to alter the specifications or modify this
product in any way. Any damage to the cord may cause
a short-circuit, fire and/or electric shock.
Warning! Any electrical component (power cord,
plug, compressor) must be replaced by a certified
service agent or qualified service personnel to avoid hazard.
1. Power cord must not be lengthened.
2. Make sure that the power plug is not squashed or
damaged by the back of the appliance. A squashed
14
Page 15

or damaged power plug may overheat and cause a
fire.
3. Make sure that you can come to the mains plug of
the appliance.
4. Do not pull the mains cable.
5. If the power plug socket is loose, do not insert the
power plug. There is a risk of electric shock or fire.
6. You must not operate the appliance without the
5)
lamp cover
of interior lighting.
• This appliance is heavy. Care should be taken when
moving it.
• Do not remove nor touch items from the freezer compartment if your hands are damp/wet, as this could
cause skin abrasions or frost/freezer burns.
• Avoid prolonged exposure of the appliance to direct
sunlight.
•
Bulb lamps
6)
used in this appliance are special purpose lamps selected for household appliances use only. They are not suitable for household room illumination.
Daily Use
• Do not put hot pot on the plastic parts in the appliance.
• Do not store flammable gas and liquid in the appliance,
because they may explode.
• Do not place food products directly against the air outlet on the rear wall.
• Frozen food must not be re-frozen once it has been
thawed out.
• Store pre-packed frozen food in accordance with the
frozen food manufacturer's instructions.
• Appliance's manufacturers storage recommendations
should be strictly adhered to. Refer to relevant instructions.
• Do not place carbonated or fizzy drinks in the freezer
compartment as it creates pressure on the container,
which may cause it to explode, resulting in damage to
the appliance.
• Ice lollies can cause frost burns if consumed straight
from the appliance.
7)
Care and cleaning
• Before maintenance, switch off the appliance and disconnect the mains plug from the mains socket.
• Do not clean the appliance with metal objects.
• Do not use sharp objects to remove frost from the appliance. Use a plastic scraper.
• Regularly examine the drain in the refrigerator for defrosted water. If necessary, clean the drain. If the drain
is blocked, water will collect in the bottom of the appliance.
Installation
Important! For electrical connection carefully follow the
instructions given in specific paragraphs.
• Unpack the appliance and check if there are damages
on it. Do not connect the appliance if it is damaged.
Report possible damages immediately to the place you
bought it. In that case retain packing.
• It is advisable to wait at least four hours before connecting the appliance to allow the oil to flow back in
the compressor.
• Adequate air circulation should be around the appliance, lacking this leads to overheating. To achieve sufficient ventilation follow the instructions relevant to installation.
• Wherever possible the back of the product should be
against a wall to avoid touching or catching warm parts
(compressor, condenser) to prevent possible burn.
• The appliance must not be located close to radiators or
cookers.
• Make sure that the mains plug is accessible after the
installation of the appliance.
•
Connect to potable water supply only.
8)
Service
• Any electrical work required to do the servicing of the
appliance should be carried out by a qualified electrician or competent person.
• This product must be serviced by an authorized Service
Centre, and only genuine spare parts must be used.
5) If the lamp cover is foreseen.
6) If the lamp is foreseen.
7) If the appliance is Frost Free.
8) If a water connection is foreseen.
15
Page 16
Environment Protection
This appliance does not contain gasses which could
damage the ozone layer, in either its refrigerant circuit or insulation materials. The appliance shall not be
discarded together with the urban refuse and rubbish. The
Operation
insulation foam contains flammable gases: the appliance
shall be disposed according to the applicable regulations
to obtain from your local authorities. Avoid damaging the
cooling unit, especially at the rear near the heat exchanger. The materials used on this appliance marked by the
symbol
are recyclable.
Switching on
Insert the plug into the wall socket.
Turn the Temperature regulator clockwise to a medium
setting.
Switching off
To turn off the appliance, turn the Temperature regulator
to the "O" position.
Temperature regulation
The temperature is automatically regulated.
To operate the appliance, proceed as follows:
• turn the Temperature regulator toward lower settings to
obtain the minimum coldness.
• turn the Temperature regulator toward higher settings
to obtain the maximum coldness.
First use
Cleaning the interior
Before using the appliance for the first time, wash the interior and all internal accessories with lukewarm water and
some neutral soap so as to remove the typical smell of a
brand-new product, then dry thoroughly.
Daily use
Freezing fresh food
The freezer compartment is suitable for freezing fresh food
and storing frozen and deep-frozen food for a long time.
To freeze fresh foods it is not necessary to change the medium setting.
However, for a faster freezing operation, turn the temperature regulator toward higher settings to obtain the maximum coldness.
Important! In this condition, the refrigerator compartment
temperature might drop below 0°C. If this occurs reset the
temperature regulator to a warmer setting.
Place the fresh food to be frozen on the top compartment.
A medium setting is generally the most suitable.
However, the exact setting should be chosen keeping in
mind that the temperature inside the appliance depends
on:
• room temperature
• how often the door is opened
• the quantity of food stored
• the location of the appliance.
Important! If the ambient temperature is high or the
appliance is fully loaded, and the appliance is set to the
lowest temperatures, it may run continuously causing
frost to form on the rear wall. In this case the dial must be
set to a higher temperature to allow automatic defrosting
and therefore reduced energy consumption.
Important! Do not use detergents or abrasive powders, as
these will damage the finish.
Storage of frozen food
When first starting-up or after a period out of use, before
putting the products in the compartment let the appliance
run at least 2 hours on the higher settings.
Important! In the event of accidental defrosting, for
example due to a power failure, if the power has been off
for longer than the value shown in the technical
characteristics chart under "rising time", the defrosted
food must be consumed quickly or cooked immediately
and then re-frozen (after cooling).
16
Page 17
Thawing
Deep-frozen or frozen food, prior to being used, can be
thawed in the refrigerator compartment or at room temperature, depending on the time available for this operation.
Small pieces may even be cooked still frozen, directly
from the freezer: in this case, cooking will take longer.
Movable shelves
The walls of the refrigerator are equipped with a
series of runners so that
the shelves can be positioned as desired.
Positioning the door shelves
To permit storage of food
packages of various sizes,
the door shelves can be
placed at different heights.
Removal of freezing baskets from the freezer
The freezing baskets have a limit stop to prevent their accidental removal or falling out. At the time of its removal
from the freezer, pull the basket towards yourself and,
upon reaching the end point, remove the basket by tilting
its front upwards.
At the time of putting it back, slightly lift the front of the
basket to insert it into the freezer. Once you are over the
end points, push the baskets back in their position.
2
1
Gradually pull the shelf in
the direction of the arrows
until it comes free, then
reposition as required.
Helpful hints and tips
Normal Operating Sounds
• You may hear a faint gurgling and a bubbling sound
when the refrigerant is pumped through the coils or
tubing. This is correct.
• When the compressor is on, the refrigerant is being
pumped around and you will hear a whirring sound
and a pulsating noise from the compressor. This is
correct.
• The thermic dilatation might cause a sudden cracking
noise. It is natural, not dangerous physical phenomenon. This is correct.
• When the compressor switches on or switches off, you
will hear a faint "click" of the temperature regulator.
This is correct.
Hints for energy saving
• Do not open the door frequently or leave it open longer
than absolutely necessary.
• If the ambient temperature is high and the Temperature
Regulator is set to low temperature and the appliance is
fully loaded, the compressor may run continuously,
causing frost or ice on the evaporator. If this happens,
set the Temperature Regulator toward warmer settings
to allow automatic defrosting and so a saving in electricity consumption.
17
Page 18
Hints for fresh food refrigeration
To obtain the best performance:
• do not store warm food or evaporating liquids in the
refrigerator
• do cover or wrap the food, particularly if it has a strong
flavour
• position food so that air can circulate freely around it
Hints for refrigeration
Useful hints:
Meat (all types) : wrap in polythene bags and place on the
glass shelf above the vegetable drawer.
For safety, store in this way only one or two days at the
most.
Cooked foods, cold dishes, etc..: these should be covered
and may be placed on any shelf.
Fruit and vegetables: these should be thoroughly cleaned
and placed in the special drawer(s) provided.
Butter and cheese: these should be placed in special airtight containers or wrapped in aluminium foil or polythene
bags to exclude as much air as possible.
Milk bottles: these should have a cap and should be stored in the bottle rack on the door.
Bananas, potatoes, onions and garlic, if not packed, must
not be kept in the refrigerator.
Hints for freezing
To help you make the most of the freezing process, here
are some important hints:
• the maximum quantity of food which can be frozen in
24 hrs. is shown on the rating plate;
• the freezing process takes 24 hours. No further food to
be frozen should be added during this period;
• only freeze top quality, fresh and thoroughly cleaned,
foodstuffs;
• prepare food in small portions to enable it to be rapidly
and completely frozen and to make it possible subsequently to thaw only the quantity required;
• wrap up the food in aluminium foil or polythene and
make sure that the packages are airtight;
• do not allow fresh, unfrozen food to touch food which
is already frozen, thus avoiding a rise in temperature of
the latter;
• lean foods store better and longer than fatty ones; salt
reduces the storage life of food;
• water ices, if consumed immediately after removal from
the freezer compartment, can possibly cause the skin to
be freeze burnt;
• it is advisable to show the freezing in date on each individual pack to enable you to keep tab of the storage
time.
Hints for storage of frozen food
To obtain the best performance from this appliance, you
should:
• make sure that the commercially frozen foodstuffs were
adequately stored by the retailer;
• be sure that frozen foodstuffs are transferred from the
foodstore to the freezer in the shortest possible time;
• not open the door frequently or leave it open longer
than absolutely necessary.
• Once defrosted, food deteriorates rapidly and cannot be
refrozen.
• Do not exceed the storage period indicated by the food
manufacturer.
Care and cleaning
Caution! Unplug the appliance before carrying out
any maintenance operation.
This appliance contains hydrocarbons in its cooling
unit; maintenance and recharging must therefore
only be carried out by authorized technicians.
Periodic cleaning
The equipment has to be cleaned regularly:
• clean the inside and accessories with lukewarm water
and some neutral soap.
18
• regularly check the door seals and wipe clean to ensure
they are clean and free from debris.
• rinse and dry thoroughly.
Important! Do not pull, move or damage any pipes and/or
cables inside the cabinet.
Never use detergents, abrasive powders, highly perfumed
cleaning products or wax polishes to clean the interior as
this will damage the surface and leave a strong odour.
Clean the condenser (black grill) and the compressor at
the back of the appliance with a brush or a vacuum clean-
Page 19
er. This operation will improve the performance of the appliance and save electricity consumption.
Important! Take care of not to damage the cooling system.
Many proprietary kitchen surface cleaners contain chemi-
cals that can attack/damage the plastics used in this appliance. For this reason it is recommended that the outer
casing of this appliance is only cleaned with warm water
with a little washing-up liquid added.
After cleaning, reconnect the equipment to the mains supply.
Defrosting of the refrigerator
Frost is automatically eliminated from the evaporator of
the refrigerator compartment every time the motor compressor stops, during normal use. The defrost water
drains out through a trough into a special container at the
back of the appliance, over the motor compressor, where
it evaporates.
It is important to periodically clean the defrost water drain
hole in the middle of the refrigerator compartment channel
What to do if…
to prevent the water overflowing and dripping onto the
food inside. Use the special cleaner provided, which you
will find already inserted into the drain hole.
Defrosting of the freezer
The freezer compartment of this model, on the other hand,
is a "no frost" type. This means that there is no buildup of
frost when it is in operation, neither on the internal walls
nor on the foods.
The absence of frost is due to the continuous circulation
of cold air inside the compartment, driven by an automatically controlled fan.
Caution! Before troubleshooting, disconnect the
power supply.
Only a qualified electrician or competent person must do
the troubleshooting that is not in this manual.
Problem Possible cause Solution
The appliance is noisy. The appliance is not supported prop-
erly.
The compressor operates continually.
The door is not closed correctly. Refer to "Closing the door".
The door has been opened too fre-
The product temperature is too high. Let the product temperature decrease to
The room temperature is too high. Decrease the room temperature.
Water flows on the rear plate of
the refrigerator.
Water flows into the refrigerator. The water outlet is clogged. Clean the water outlet.
Products prevent that water flows into
The Temperature regulator may be set
incorrectly.
quently.
During the automatic defrosting process, frost defrosts on the rear plate.
the water collector.
Important! There are some sounds during normal use
(compressor, refrigerant circulation).
Check if the appliance stands stable (all
the four feet should be on the floor).
Set a warmer temperature.
Do not keep the door open longer than
necessary.
room temperature before storage.
This is correct.
Make sure that products do not touch
the rear plate.
19
Page 20
Problem Possible cause Solution
Water flows on the ground. The melting water outlet does not flow
in the evaporative tray above the com-
pressor.
There is too much frost and ice. Products are not wrapped properly. Wrap the products better.
The door is not closed correctly. Refer to "Closing the door".
The Temperature regulator may be set
incorrectly.
The temperature in the appliance
is too low.
The temperature in the appliance
is too high.
The door is not closed correctly. Refer to "Closing the door".
The product temperature is too high. Let the product temperature decrease to
Many products are stored at the same
The temperature in the refrigeration is too high.
The temperature in the freezer is
too high.
The appliance does not operate. The appliance is switched off. Switch on the appliance.
The mains plug is not connected to the
The appliance has no power. There is
The lamp does not work. The lamp is in stand-by. Close and open the door.
The lamp is defective. Refer to "Replacing the lamp".
The Temperature regulator may be set
incorrectly.
The Temperature regulator may be set
incorrectly.
time.
There is no cold air circulation in the
appliance.
Products are too near to each other. Store products so that there is cold air
mains socket correctly.
no voltage in the mains socket.
Attach the melting water outlet to the
evaporative tray.
Set a higher temperature.
Set a higher temperature.
Set a lower temperature.
room temperature before storage.
Store less products at the same time.
Make sure that there is cold air circulation in the appliance.
circulation.
Connect the mains plug to the mains
socket correctly.
Connect a different electrical appliance
to the mains socket. Contact a qualified
electrician.
If your appliance is still not working properly after making
the above checks, contact the After Sales Centre.
Replacing the lamp
1. Disconnect the appliance.
2. Push the movable part to unhook the lamp cover (1).
3. Remove the lamp cover (2).
4. Replace the lamp with one of the same power and
specifically designed for domestic appliances only.
5. Install the lamp cover.
6. Connect the appliance.
20
7. Open the door. Make sure that the lamp comes on.
1
2
Closing the door
1. Clean the door gaskets.
Page 21

2. If necessary, adjust the door. Refer to "Installation". 3. If necessary, replace the defective door gaskets. Con-
tact the Service Center.
Technical data
ZRB632FW ZRB634FW ZRB638FW
Dimension
Height 1750 mm 1850 mm 2010 mm
Width 595 mm 595 mm 595 mm
Depth 658 mm 658 mm 658 mm
Rising Time 16 h 18 h 18 h
Voltage 230 V 230 V 230 V
Frequency 50 Hz 50 Hz 50 Hz
The technical information are situated in the rating plate
on the internal left side of the appliance and in the energy
label.
Installation
Caution! Read the "Safety Information" carefully for
your safety and correct operation of the appliance
before installing the appliance.
Positioning
Install this appliance at a location where the ambient temperature corresponds to the climate class indicated on the
rating plate of the appliance:
Climate
Ambient temperature
class
SN +10°C to + 32°C
N +16°C to + 32°C
ST +16°C to + 38°C
T +16°C to + 43°C
Location
The appliance should be installed well away from sources
of heat such as radiators, boilers, direct sunlight etc. Ensure that air can circulate freely around the back of the
cabinet. To ensure best performance, if the appliance is
positioned below an overhanging wall unit, the minimum
distance between the top of the cabinet and the wall unit
must be at least 100 mm . Ideally, however, the appliance
should not be positioned below overhanging wall units.
Accurate levelling is ensured by one or more adjustable
feet at the base of the cabinet.
Warning! It must be possible to disconnect the
appliance from the mains power supply; the plug
must therefore be easily accessible after installation.
min.100 mm
A
20 mm
B
Rear spacers
You can find the two spacers in the bag with documentation.
Do these steps to install the spacers:
1. Release the screw.
2. Engage the spacer below the screw.
3. Turn the spacer to the right position.
4. Tighten again the screws.
21
Page 22

4
Levelling
When placing the appliance ensure that it stands
level. This can be achieved
by two adjustable feet at
the bottom in front.
Electrical connection
Before plugging in, ensure that the voltage and frequency
shown on the rating plate correspond to your domestic
power supply.
The appliance must be earthed. The power supply cable
2
1
3
plug is provided with a contact for this purpose. If the domestic power supply socket is not earthed, connect the
appliance to a separate earth in compliance with current
regulations, consulting a qualified electrician.
The manufacturer declines all responsibility if the above
safety precautions are not observed.
This appliance complies with the E.E.C. Directives.
Door reversibility
Warning! Before carrying out any operations,
remove the plug from the power socket.
Important! To carry out the following operations, we
suggest that this be made with another person that will
keep a firm hold on the doors of the appliance during the
operations.
Removing the shelf holders
Your appliance is equipped with shelf retainers that make
it possible to secure the shelves during transportation.
To remove them proceed
as follows:
1. Move the shelf hold-
ers in the direction of
the arrow (A).
2. Raise the shelf from
the rear and push it
forward until it is
freed (B).
3. Remove the retainers
(C).
22
Page 23

m1
m2
m6
m5
m4
m3
1
• Open the doors. Un-
screw the middle hinge
(m2). Remove the plastic spacer (m1).
• Remove the spacer (m6)
and move to the other
side of the hinge pivot
(m5).
• Remove the doors.
• Remove the left-hand
cover pin of the middle
hinge (m3,m4) and
move to the other side.
• Unscrew the lower hinge
(b1)
• Remove the left-hand
cover pins (b4) and
move to the other side.
• Re-screw the lower
hinge (b1) on the opposite side.
• Unscrew the lower hinge
pivot (b2) and the
spacer (b3) and place
them on the opposite
side.
• Fit the pin of the middle
hinge (m5) into the lefthand hole of the lower
door.
Do a final check to make sure that:
• All screws are tightened.
• The edges of the doors run parallel to the side edge of
the appliance.
• The magnetic seal adheres to the cabinet.
• The door opens and closes correctly.
If the ambient temperature is cold (i.e. in Winter), the gasket may not fit perfectly to the cabinet. In that case, wait
for the natural fitting of the gasket.
• Remove the plugs (1) on
the upper side of both
doors and move them to
the other side.
• Re-insert the lower door
on the lower hinge pivot
(b2).
• Insert the middle hinge
(m2) into the left drill of
the lower door.
• Unscrew the upper
hinge pivot and place it
on the opposite side.
• Fit the upper door on the
upper door pivot.
• Re-insert the upper door
on the middle hinge pivot (m5) slightly tilting
both doors.
• Re-screw the middle
hinge (m2). Do not forget the plastic spacer
(m1).
In case you do not want to carry out the above mentioned
operations, contact the nearest After Sales Service Force.
The After Sales Service specialist will carry out the reversibility of the doors at your cost.
Environmental concerns
The symbol on the product or on its packaging
indicates that this product may not be treated as
household waste. Instead it should be taken to the
appropriate collection point for the recycling of electrical
and electronic equipment. By ensuring this product is
disposed of correctly, you will help prevent potential
negative consequences for the environment and human
health, which could otherwise be caused by inappropriate
waste handling of this product. For more detailed
information about recycling of this product, please contact
your local council, your household waste disposal service
or the shop where you purchased the product.
23
Page 24

Sommaire
Consignes de sécurité _ _ _ _ _ _ _ _ _ _ _ _ _ _ _ 24
Fonctionnement _ _ _ _ _ _ _ _ _ _ _ _ _ _ _ _ _ _ 26
Première utilisation _ _ _ _ _ _ _ _ _ _ _ _ _ _ _ _ 26
Utilisation quotidienne _ _ _ _ _ _ _ _ _ _ _ _ _ _ _ 27
Conseils utiles _ _ _ _ _ _ _ _ _ _ _ _ _ _ _ _ _ _ _ 28
Consignes de sécurité
Pour votre sécurité et garantir une utilisation correcte de
l'appareil, lisez attentivement cette notice, y compris les
conseils et avertissements, avant d'installer et d'utiliser
l'appareil pour la première fois. Pour éviter toute erreur ou
accident, veillez à ce que toute personne qui utilise l'appareil connaisse bien son fonctionnement et ses fonctions
de sécurité. Conservez cette notice avec l'appareil. Si l'appareil doit être vendu ou cédé à une autre personne, veillez à remettre cette notice au nouveau propriétaire, afin
qu'il puisse se familiariser avec son fonctionnement et sa
sécurité.
Pour la sécurité des personnes et des biens, conservez et
respectez les consignes de sécurité figurant dans cette notice. Le fabricant décline toute responsabilité en cas de
dommages dus au non-respect de ces instructions.
Sécurité des enfants et des personnes vulnérables
• Cet appareil n'est pas destiné à être utilisé par des enfants ou des personnes dont les capacités physiques,
sensorielles ou mentales, ou le manque d'expérience et
de connaissance les empêchent d'utiliser l'appareil
sans risque lorsqu'ils sont sans surveillance ou en
l'absence d'instruction d'une personne responsable qui
puisse leur assurer une utilisation de l'appareil sans
danger.
Empêchez les enfants de jouer avec l'appareil.
• Ne laissez pas les différents emballages à portée des
enfants. Ils pourraient s'asphyxier.
• Si l'appareil doit être mis au rebut, veillez à couper le
câble d'alimentation électrique au ras de l'appareil pour
éviter les risques d'électrocution. Démontez la porte
pour éviter que des enfants ne restent enfermés à l'intérieur.
• Cet appareil est muni de fermetures magnétiques. S'il
remplace un appareil équipé d'une fermeture à ressort,
nous vous conseillons de rendre celle-ci inutilisable
avant de vous en débarrasser. Ceci afin d'éviter aux en-
Entretien et nettoyage _ _ _ _ _ _ _ _ _ _ _ _ _ _ _ 29
En cas d'anomalie de fonctionnement _ _ _ _ _ _ _ _ 29
Caractéristiques techniques _ _ _ _ _ _ _ _ _ _ _ _ 32
Installation _ _ _ _ _ _ _ _ _ _ _ _ _ _ _ _ _ _ _ _ 32
En matière de sauvegarde de l'environnement _ _ _ _ 34
Sous réserve de modifications
fants de s'enfermer dans l'appareil et de mettre ainsi
leur vie en danger.
Mesures générales de sécurité
Attention Veillez à ce que les orifices de ventilation
ne soient pas obstrués.
• Cet appareil est destiné uniquement à la conservation
d’aliments et/ou de boissons dans le cadre d’un usage
domestique normal, tel que celui décrit dans la présente notice.
• N'utilisez pas d'appareils électriques, d'agents chimiques ou tout autre système artificiel pour accélérer le
processus de dégivrage.
• N’utilisez pas d'autres appareils électriques (par exemple, sorbetières) à l'intérieur d’appareils réfrigérants
sauf s’ils sont homologués pour cet usage par leur fabricant.
• Faites très attention lorsque vous déplacez l'appareil
afin de ne pas endommager des parties du circuit de
refroidissement et ainsi d'éviter des risques de fuite.
• Le circuit de refroidissement de l’appareil contient de
l’isobutane (R600a), un gaz naturel offrant un haut niveau de compatibilité avec l’environnement mais qui
est néanmoins inflammable.
Pendant le transport et l'installation de l’appareil, assurez-vous qu'aucune pièce du circuit de refroidissement
n'est endommagée.
Si tel est le cas :
– Évitez les flammes vives (briquet) et tout autre allu-
mage (étincelles).
– Aérez soigneusement la pièce où se trouve l'appa-
reil.
• Ne modifiez pas les spécifications de l'appareil. Un
cordon d'alimentation endommagé peut être la cause
de courts-circuits, d'incendies et/ou de décharges
électriques.
24
Page 25

Avertissement Les éventuelles réparations ou inter-
ventions sur votre appareil, ainsi que le remplacement du câble d'alimentation, ne doivent être effectuées
que par un professionnel qualifié.
1. L'appareil ne doit pas être raccordé à l'aide d'un
prolongateur, d'une prise multiple ou d'un raccordement multiple (risque d'incendie).
2. Assurez-vous que la prise n'est pas écrasée ou endommagée par l'arrière de l'appareil. Une prise de
courant endommagée peut surchauffer et provoquer un incendie.
3. Vérifiez que la prise murale reste accessible une
fois que l'installation est terminée.
4. Ne débranchez pas l'appareil en tirant sur le câble,
particulièrement lorsque l'appareil est tiré de son
logement.
5. Si la fiche du cordon d'alimentation est desserrée,
ne la branchez pas dans la prise murale. Risque
d'électrocution ou d'incendie !
6. N'utilisez pas l'appareil si le diffuseur de l'ampou-
9)
le d'éclairage n'est pas présent
pour l'éclairage
intérieur.
• Cet appareil est lourd. Faites attention en le déplaçant.
• Ne touchez pas avec les mains humides les surfaces
givrées et les produits congelés (risque de brûlure et
d'arrachement de la peau).
• Évitez une exposition prolongée de l'appareil aux rayons solaires.
•
Ampoules
10)
utilisées dans cet appareil sont des ampoules spéciales dédiées uniquement à un usage avec
des appareils ménagers. Elles ne conviennent pas à
l'éclairage des pièces d'une habitation.
Utilisation quotidienne
• Ne posez pas d'éléments chauds sur les parties en
plastique de l'appareil.
• Ne stockez pas de gaz ou de liquides inflammables
dans l'appareil (risque d'explosion).
• Ne placez pas d'aliments directement contre la sortie
d'air sur la paroi arrière de l'appareil.
• Un produit décongelé ne doit jamais être recongelé.
• Conservez les aliments emballés conformément aux
instructions de leur fabricant.
9) Si le diffuseur est prévu.
10) Si l'ampoule est prévue.
11) Si l'appareil est sans givre.
11)
• Respectez scrupuleusement les conseils de conservation donnés par le fabricant de l'appareil. Consultez les
instructions respectives.
• Ne mettez pas de bouteilles ni de boîtes de boissons
gazeuses dans le compartiment congélateur, car la
pression se formant à l'intérieur du contenant pourrait
le faire éclater et endommager ainsi l'appareil.
• Ne consommez pas certains produits tels que les bâtonnets glacés dès leur sortie de l'appareil, car ils peuvent provoquer des brûlures.
Entretien et nettoyage
• Avant toute opération d'entretien, mettez l'appareil hors
tension et débranchez-le de la prise de courant.
• N'utilisez pas d'objets métalliques pour nettoyer l'appareil.
• N'utilisez pas d'objet tranchant pour gratter la couche
de givre. Utilisez une spatule en plastique.
• Contrôlez régulièrement l'orifice d'évacuation de l'eau
de dégivrage dans le compartiment réfrigérateur. Nettoyez-le, si besoin. Si l'orifice est bouché, l'eau s'écoulera en bas de l'appareil.
Installation
Important Avant de procéder au branchement électrique,
respectez scrupuleusement les instructions fournies dans
cette notice.
• Déballez l'appareil et vérifiez qu'il n'est pas endommagé. Ne branchez pas l'appareil s'il est endommagé. Signalez immédiatement au revendeur de l'appareil les
dommages constatés. Dans ce cas, gardez l'emballage.
• Il est conseillé d'attendre au moins quatre heures avant
de brancher l'appareil pour que le circuit frigorifique
soit stabilisé.
• Veillez à ce que l'air circule librement autour de l'appareil pour éviter qu'il ne surchauffe. Pour assurer une
ventilation suffisante, respectez les instructions de la
notice (chapitre Installation).
• Placez l'appareil dos au mur pour éviter tout contact
avec le compresseur et le condenseur (risque de brûlure).
• Placez de préférence votre appareil loin d'une source
de chaleur (chauffage, cuisson ou rayons solaires trop
intenses).
25
Page 26

• Assurez-vous que la prise murale reste accessible
après l'installation de l'appareil.
• Branchez à l'alimentation en eau potable uniquement.
12)
Maintenance
• Les branchements électriques nécessaires à l'entretien
de l'appareil doivent être réalisés par un électricien
qualifié ou une personne compétente.
• Cet appareil ne doit être entretenu et réparé que par un
Service après-vente autorisé, exclusivement avec des
pièces d'origine.
Protection de l'environnement
Le système frigorifique et l'isolation de votre appareil ne contiennent pas de C.F.C. contribuant ainsi à
Fonctionnement
préserver l'environnement. L'appareil ne doit pas être mis
au rebut avec les ordures ménagères et les déchets urbains. La mousse d'isolation contient des gaz inflammables : l'appareil sera mis au rebut conformément aux règlements applicables disponibles auprès des autorités locales. Veillez à ne pas détériorer les circuits frigorifiques,
notamment au niveau du condenseur. Les matériaux utilisés dans cet appareil identifiés par le symbole
recyclables.
sont
Mise en fonctionnement
Branchez l'appareil sur une prise murale.
Tournez le bouton du thermostat dans le sens des aiguilles d'une montre sur une position moyenne.
Mise à l'arrêt
Pour mettre à l'arrêt l'appareil, tournez le bouton du thermostat sur la position "O".
Réglage de la température
La température est réglée automatiquement.
Pour faire fonctionner l'appareil, procédez comme suit :
• tournez le bouton du thermostat vers le bas pour obtenir un réglage de froid minimum.
• tournez le bouton du thermostat vers le haut pour obtenir un réglage de froid maximum.
Une position moyenne est la plus indiquée.
Première utilisation
Nettoyage intérieur
Avant d'utiliser l'appareil pour la première fois, nettoyez
l'intérieur et tous les accessoires internes avec de l'eau
tiède savonneuse pour supprimer l'odeur caractéristique
du "neuf" puis séchez soigneusement.
Toutefois, le réglage doit être choisi en tenant compte du
fait que la température à l'intérieur de l'appareil dépend de
plusieurs facteurs :
• la température ambiante
• la fréquence d'ouverture de la porte
• la quantité de denrées stockées
• l'emplacement de l'appareil.
Important Si le thermostat est réglé sur la position de froid
maximum, lorsque la température ambiante est élevée et
que l'appareil est plein, il est possible que le compresseur
fonctionne en régime continu. Dans ce cas, il y a un
risque de formation excessive de givre sur la paroi
postérieure à l'intérieur de l'appareil. Pour éviter cet
inconvénient, placez le thermostat sur une température
plus élevée de façon à permettre un dégivrage
automatique et, par conséquent, des économies de
courant.
Important N'utilisez pas de produits abrasifs, poudre à récurer, éponge métallique pour ne pas abîmer la finition.
12) Si un branchement sur le réseau d'eau est prévu.
26
Page 27

Utilisation quotidienne
Congélation d'aliments frais
Le compartiment congélateur est idéal pour congeler des
denrées fraîches et conserver les aliments surgelés ou
congelés pendant longtemps.
Pour congeler les denrées fraîches, il n'est pas nécessaire
de modifier le réglage moyen.
Toutefois, pour une congélation plus rapide, tournez le
bouton du thermostat vers le haut pour obtenir un réglage
de froid maximum.
Important Dans ce cas, la température du compartiment
réfrigérateur peut chuter au-dessous de 0°C. Si cela se
produit, repositionnez le bouton du thermostat sur un
réglage plus chaud.
Placez les denrées fraîches à congeler dans le compartiment supérieur.
Conservation des aliments congelés
À la mise en service ou après un arrêt prolongé, placez le
thermostat sur la position Max pendant 2 heures environ,
avant d'introduire les produits dans le compartiment.
Important En cas de dégivrage accidentel, dû par exemple
à une panne de courant, si la panne doit se prolonger plus
longtemps qu'il n'est indiqué à la rubrique "temps
d'augmentation" dans la section Caractéristiques
techniques, consommez les aliments décongelés le plus
rapidement possible ou recongelez-les après les avoir
cuits (une fois refroidis).
La décongélation
Les aliments surgelés ou congelés peuvent être décongelés dans le compartiment réfrigérateur ou à température
ambiante, avant d'être utilisés, en fonction du temps disponible pour cette opération.
Les petites pièces peuvent même être cuites sans décongélation préalable : dans ce cas, la cuisson est plus longue.
Clayettes amovibles
Les parois du réfrigérateur
sont équipées d'une série
de glissières pour que les
clayettes puissent être placées en fonction des besoins.
Emplacement des balconnets de la porte
En fonction de la taille des
paquets d'aliments conservés, les balconnets de
la porte peuvent être positionnés à différentes hauteurs.
Tirez progressivement le
balconnet dans le sens
des flèches pour le dégager, puis repositionnez-le
selon les besoins.
Retrait des paniers de congélation du congélateur
Les paniers de congélation sont équipés d'un arrêt afin
d'empêcher leur retrait accidentel ou chute. Pour retirer le
panier du congélateur, tirez-le vers vous et en atteignant
l'arrêt, retirez-le en inclinant la partie avant vers le haut.
Pour le remettre, relevez légèrement l'avant du panier et
insérez-le dans le congélateur. Une fois que vous avez dépassé les butées d'arrêt, poussez les paniers dans la bonne position.
2
1
27
Page 28

Conseils utiles
Bruits de fonctionnement normaux
• Le liquide de refroidissement qui passe dans le circuit
d'évaporation peut produire un bruit de gargouillis ou
de bouillonnement. Ce phénomène est normal.
• Le compresseur peut produire un ronronnement aigu
ou un bruit de pulsation. Ce phénomène est normal.
• La dilatation thermique peut provoquer un soudain, léger bruit de craquement. C'est un phénomène normal
et sans gravité. Ce phénomène est normal.
• Un léger claquement se produit lors de la mise en
fonctionnement/à l'arrêt du compresseur. Ce phénomène est normal.
Conseils pour l'économie d'énergie
• N'ouvrez pas la porte trop souvent ou plus longtemps
que nécessaire.
• Si la température ambiante est élevée, le dispositif de
réglage de température est sur la position de froid
maximum et l'appareil est plein : il est possible que le
compresseur fonctionne en régime continu, d'où un
risque de formation excessive de givre sur l'évaporateur. Pour éviter ceci, modifiez la position du dispositif
de réglage de température de façon à obtenir des périodes d'arrêt du compresseur et ainsi permettre un dégivrage automatique, d'où des économies d'énergie.
Conseils pour la réfrigération de denrées fraîches
Pour obtenir les meilleures performances possibles :
• N'introduisez pas d'aliments encore chauds ou de liquides en évaporation dans le réfrigérateur.
• Couvrez ou enveloppez soigneusement les aliments,
surtout s'ils sont aromatiques.
• Placez les aliments pour que l'air puisse circuler librement autour.
Conseils pour la réfrigération
Conseils utiles :
Viande (tous les types) : enveloppez-la dans des sachets
en plastique et placez-la sur la tablette en verre au-dessus
du bac à légumes.
La période de conservation est de 1 à 2 jours au maximum.
Aliments cuits, plats froids, etc. : placez-les bien couverts
sur une clayette.
Fruits et légumes : placez-les une fois nettoyés dans le(s)
bac(s) à légumes fourni(s).
Beurre et fromage : placez-les dans des récipients étanches spéciaux ou enveloppez-les soigneusement dans des
feuilles d'aluminium ou de polyéthylène, pour emmagasiner le moins d'air possible.
Lait en bouteille : bouchez-le et placez-le dans le balconnet de la contreporte réservé aux bouteilles.
Bananes, pommes de terre, oignons et ail ne se conservent pas au réfrigérateur, s'ils ne sont pas correctement
emballés.
Conseils pour la congélation
Pour obtenir les meilleurs résultats, voici quelques conseils importants :
• la quantité maximale de denrées que vous pouvez congeler par 24 heures est indiquée sur la plaque signalétique.
• le temps de congélation est de 24 heures. Aucune autre
denrée à congeler ne doit être ajoutée pendant cette période.
• congelez seulement les denrées alimentaires fraîches,
de qualité supérieure (une fois nettoyées).
• préparez la nourriture en petits paquets pour une congélation rapide et uniforme, adaptés à l'importance de
la consommation.
• enveloppez les aliments dans des feuilles d'aluminium
ou de polyéthylène et assurez-vous que les emballages
sont étanches ;
• ne laissez pas des aliments frais, non congelés, toucher des aliments déjà congelés pour éviter une remontée en température de ces derniers.
• les aliments maigres se conservent mieux et plus longtemps que les aliments gras ; le sel réduit la durée de
conservation des aliments
• la température très basse à laquelle se trouvent les bâtonnets glacés, s'ils sont consommés dès leur sortie
du compartiment congélateur, peut provoquer des brûlures.
• L'identification des emballages est importante : indiquez la date de congélation du produit, et respectez la
durée de conservation indiquée par le fabricant.
Conseils pour la conservation des produits surgelés
et congelés du commerce
Pour une bonne conservation des produits surgelés et
congelés, vous devez :
28
Page 29

• vous assurer qu'ils ont bien été conservés au magasin ;
• prévoir un temps réduit au minimum pour leur transport du magasin d'alimentation à votre domicile ;
• éviter d'ouvrir trop souvent la porte du congélateur et
ne la laisser ouverte que le temps nécessaire.
Entretien et nettoyage
• une fois décongelés, les aliments se détériorent rapidement et ne peuvent pas être recongelés.
• respecter la durée de conservation indiquée par le fabricant.
Attention débrancher l'appareil avant toute opération
d'entretien.
Cet appareil contient des hydrocarbures dans son
circuit réfrigérant : l'entretien et la recharge ne doi-
vent donc être effectués que par du personnel autorisé.
Nettoyage périodique
Cet appareil doit être nettoyé régulièrement :
• Nettoyez l'intérieur et tous les accessoires avec de l'eau
tiède savonneuse.
• Vérifiez régulièrement les joints de porte et nettoyez-les
en les essuyant pour éviter toute accumulation de déchets.
• Rincez et séchez soigneusement.
Important Ne pas tirer, déplacer ou endommager les
tuyaux et/ou câbles qui se trouvent à l'intérieur de
l'appareil.
Ne JAMAIS utiliser de produits abrasifs ou caustiques ni
d'éponges avec grattoir pour nettoyer l'intérieur de façon à
ne pas l'abîmer et laisser de fortes odeurs.
Nettoyer le condenseur (grille noire) et le compresseur situés à l'arrière de l'appareil avec une brosse ou un aspirateur. Cette opération améliore les performances de l'appareil et permet des économies d'énergie.
Important Attention à ne pas endommager le système de
réfrigération.
De nombreux détergents pour la cuisine recommandés
par les fabricants contiennent des produits chimiques qui
peuvent attaquer/endommager les pièces en plastique utilisées dans cet appareil. Il est par conséquent recommandé d'utiliser seulement de l'eau chaude additionnée d'un
peu de savon liquide pour nettoyer la carrosserie de l'appareil.
Après le nettoyage, rebranchez l'appareil.
Dégivrage du réfrigérateur
Le givre est automatiquement éliminé de l'évaporateur du
compartiment réfrigérateur à chaque arrêt du compresseur, en cours d'utilisation normale. L'eau de dégivrage
est collectée dans un récipient spécial situé à l'arrière de
l'appareil, au-dessus du compresseur, d'où elle s'évapore.
Il est important de nettoyer régulièrement l'orifice d'écoulement de la gouttière d'évacuation de l'eau de dégivrage
située au milieu du compartiment réfrigérateur pour empêcher l'eau de déborder et de couler sur les aliments qui
se trouvent à l'intérieur. Nettoyez l'orifice d'écoulement de
l'eau de dégivrage avec le bâtonnet spécial se trouvant déjà dans l'orifice.
Dégivrage du congélateur
Le compartiment congélateur de ce modèle est "sans givre". Cela signifie qu'il n'y a aucune formation de givre
pendant son fonctionnement, ni sur les parois internes si
sur les aliments.
L'absence de givre est due à la circulation continuelle de
l'air froid à l'intérieur du compartiment, sous l'impulsion
d'un ventilateur à commande automatique.
En cas d'anomalie de fonctionnement
Attention Avant d'essayer de résoudre un
quelconque problème, débranchez l'appareil.
Tout problème non mentionné dans le présent manuel,
doit être exclusivement confié à un électricien qualifié ou
une personne compétente.
29
Page 30

Important Le fonctionnement de l'appareil produit certains
bruits (compresseur et système réfrigérant). Ces bruits
sont normaux.
Anomalie Cause possible Solution
L'appareil est bruyant. L'appareil n'est pas bien appuyé. Vérifiez la stabilité de l'appareil (les
quatre pieds doivent reposer par terre).
Le compresseur fonctionne en
continu.
Le bouton du thermostat n'est peutêtre pas bien réglé.
Choisissez une température plus élevée.
La porte n'est pas bien fermée. Consultez le paragraphe "Fermeture de
la porte".
La porte a été ouverte trop souvent. Ne laissez pas la porte ouverte plus
longtemps que nécessaire.
La température du produit est trop éle-
vée.
Laissez la température du produit rejoindre la température ambiante avant
de le stocker.
La température ambiante est trop éle-
Abaissez la température de la pièce.
vée.
De l'eau coule sur la plaque arrière du réfrigérateur.
De l'eau coule dans le réfrigérateur.
Des produits empêchent que l'eau
De l'eau coule sur le sol. L'eau de dégivrage ne coule pas dans
Pendant le dégivrage automatique, le
givre fond sur la plaque arrière.
L'orifice d'écoulement de l'eau est
obstrué.
coule dans le réservoir d'eau.
le plateau d'évaporation situé au des-
Ce phénomène est normal.
Nettoyez l'orifice.
Assurez-vous que les produits ne touchent pas la plaque arrière.
Fixez le tuyau de sortie de l'eau au plateau d'évaporation.
sus du compresseur.
Il y a trop de givre. Les produits ne sont pas bien enve-
Enveloppez mieux les produits.
loppés.
La porte n'est pas bien fermée. Consultez le paragraphe "Fermeture de
la porte".
Le bouton du thermostat n'est peut-
Choisissez une température plus élevée.
être pas bien réglé.
La température de l'appareil est
trop basse.
La température de l'appareil est
trop élevée.
Le bouton du thermostat n'est peutêtre pas bien réglé.
Le bouton du thermostat n'est peutêtre pas bien réglé.
Choisissez une température plus élevée.
Choisissez une température plus basse.
La porte n'est pas bien fermée. Consultez le paragraphe "Fermeture de
la porte".
La température du produit est trop éle-
vée.
Laissez la température du produit rejoindre la température ambiante avant
de le stocker.
30
Page 31

Anomalie Cause possible Solution
Trop de produits ont été introduits en-
semble.
La température du réfrigérateur
est trop élevée.
La température du congélateur
est trop élevée.
L'appareil ne fonctionne pas. L'appareil est à l'arrêt. Mettez l'appareil en marche.
La fiche n'est pas correctement bran-
Le courant n'arrive pas à l'appareil. La
L'ampoule ne fonctionne pas. L'ampoule est en mode veille. Fermez puis ouvrez la porte.
L'ampoule est défectueuse. Consultez le paragraphe « Remplace-
En cas d'anomalie de fonctionnement et si malgré toutes
les vérifications une intervention s'avère nécessaire, contactez le service après-vente de votre magasin vendeur.
Remplacement de l'ampoule
1. Débranchez l'appareil.
2. Poussez la pièce amovible pour décrocher le diffu-
seur (1).
3. Enlevez le diffuseur (2).
4. Remplacez l'ampoule par une ampoule de même
puissance spécifiquement conçue pour les appareils
ménagers.
5. Installez le diffuseur.
6. Branchez l'appareil.
7. Ouvrez la porte. Vérifiez que l'ampoule s'allume.
Il n'y a aucune circulation d'air froid
dans l'appareil.
Les produits sont trop près les uns
des autres.
chée sur la prise.
prise n'est pas alimentée.
1
Fermeture de la porte
1. Nettoyez les joints de la porte.
2. Si nécessaire, ajustez la porte. Consultez le paragraphe "Installation".
3. Si nécessaire, remplacez les joints défectueux. Contactez le Service Après-vente.
Introduisez moins de produits en même
temps.
Assurez-vous qu'il y ait une circulation
d'air froid dans l'appareil.
Stockez les produits de façon à permettre la circulation de l'air froid.
Branchez correctement la fiche sur la
prise.
Branchez un autre appareil électrique
sur la prise. Faites appel à un électricien
qualifié.
ment de l'ampoule ».
2
31
Page 32

Caractéristiques techniques
ZRB632FW ZRB634FW ZRB638FW
Dimensions
Hauteur 1750 mm 1850 mm 2010 mm
Largeur 595 mm 595 mm 595 mm
Profondeur 658 mm 658 mm 658 mm
Augmentation du
16 h 18 h 18 h
temps
Tension 230 V 230 V 230 V
Fréquence 50 Hz 50 Hz 50 Hz
Les données techniques figurent sur la plaque signalétique située sur le côté gauche à l'intérieur de l'appareil et
sur l'étiquette d'énergie.
Installation
Attention Pour votre sécurité et le bon
fonctionnement de l'appareil, veuillez lire
attentivement les "Consignes de sécurité" avant d'installer
l'appareil.
Emplacement
Installez cet appareil à un endroit où la température ambiante correspond à la classe climatique indiquée sur la
plaque signalétique de l'appareil :
Classe cli-
Température ambiante
matique
SN +10 à + 32 °C
N +16 à + 32 °C
ST +16 à + 38 °C
T +16 à + 43 °C
Emplacement
L'appareil doit être installé à bonne distance de toute
source de chaleur telle que les radiateurs, chauffe-eau, lumière directe du soleil etc. Assurez-vous que l'air circule
librement à l'arrière de l'appareil. Pour garantir un rendement optimum si l'appareil est installé sous un élément
suspendu, la distance entre le haut de l'armoire et l'élément suspendu doit être de 100 mm minimum. Si possible, évitez de placer l'appareil sous des éléments sus-
pendus. La mise à niveau se fait à l'aide d'un ou de plusieurs pieds réglables à la base de l'armoire.
Avertissement L'appareil doit pouvoir être
débranché à tout moment ; il est donc nécessaire
que la prise murale reste accessible après l'installation.
min.100 mm
A
20 mm
B
Entretoises arrière
Vous trouverez les deux entretoises dans le sachet avec la
documentation.
Pour installer les entretoises, procédez comme suit :
1. Desserrez la vis.
2. Insérez l'entretoise sous la vis.
3. Tournez l'entretoise dans la bonne position.
4. Resserrez les vis.
32
Page 33

4
Mise à niveau
Lorsque vous installez
l'appareil, veillez à ce qu'il
soit d'aplomb. Utilisez les
deux pieds réglables se
trouvant à l'avant de l'appareil.
Branchement électrique
Contrôlez, avant de brancher l'appareil, si la tension et la
fréquence indiquées sur la plaque signalétique correspondent à celles de votre réseau.
L'appareil doit être relié à la terre. La fiche du câble d'ali-
2
1
3
mentation comporte un logement pour mise à la terre. Si
la prise de courant murale n'est pas mise à la terre, branchez l'appareil sur une prise de terre conformément aux
normes en vigueur, en demandant conseil à un électricien
qualifié.
Le fabricant décline toute responsabilité en cas d'incident
suite au non-respect des consignes de sécurité sus-mentionnées.
Cet appareil est conforme aux directives communautaires.
Réversibilité de la porte
Avertissement Avant toute opération, débranchez la
prise d'alimentation électrique.
Important Pour effectuer les opérations suivantes, il est
conseillé de se faire aider par une autre personne pour
maintenir fermement les portes de l'appareil pendant les
opérations.
Retrait des supports de clayette
Votre appareil est équipé de dispositifs de retenue qui
permettent d'immobiliser les clayettes au cours du transport.
Pour les enlever, procédez
comme suit :
1. Déplacez les supports
de clayette dans le
sens de la flèche (A).
2. Soulevez la clayette
de l'arrière et poussez-la vers l'avant
pour la dégager (B).
3. Enlevez les dispositifs
de retenue (C).
33
Page 34

m1
m2
m6
m5
m4
m3
1
• Ouvrez les portes. Dé-
vissez la charnière centrale (m2). Déposez l'entretoise en plastique
(m1).
• Retirez les entretoises
(m6) et placez-les de
l'autre côté des gonds
de charnière (m5).
• Enlevez les portes.
• Retirez la goupille du
cache gauche de la
charnière centrale (m3,
m4) et placez-la de l'au-
• Dévissez la charnière inférieure (b1)
• Retirez les goupilles du
cache gauche (b4) et
placez-les de l'autre côté.
• Revissez la charnière inférieure (b1) sur le côté
opposé.
• Dévissez le gond de la
charnière inférieure (b2)
et l'entretoise (b3) et
placez-les du côté opposé.
tre côté.
• Insérez la goupille de la
charnière centrale (m5)
dans le trou gauche de
la porte inférieure.
Contrôlez une dernière fois pour vous assurer que :
• Toutes les vis sont correctement serrées.
• Les bords des portes sont parallèles au côté de l'appareil.
• Le joint magnétique adhère bien à l'appareil.
• La porte ouvre et ferme correctement.
Si la température ambiante est basse (en hiver, par exemple), il se peut que le joint n'adhère pas parfaitement.
• Enlevez les caches (1)
situés sur l'arête supérieure des deux portes et
placez-les sur le côté
opposé.
• Replacez la porte inférieure sur le gond de la
charnière inférieure (b2).
• Insérez la charnière centrale (m2) dans le trou
gauche de la porte inférieure.
• Dévissez le gond de la
charnière supérieure et
placez-le sur le côté opposé.
• Installez la porte supérieure sur le gond supérieur.
• Replacez la porte supérieure sur le gond de la
charnière centrale (m5)
en inclinant légèrement
les deux portes.
• Revissez la charnière
centrale (m2). N'oubliez
pas l'entretoise en plastique (m1).
Dans ce cas, attendez que le joint reprenne sa taille naturelle.
Si vous ne voulez pas effectuer personnellement les opérations décrites ci-dessus, contactez le S.A.V. le plus proche. Un technicien du S.A.V. inversera le sens d'ouverture
de la porte à vos frais.
En matière de sauvegarde de l'environnement
Le symbole sur le produit ou son emballage indique
que ce produit ne peut être traité comme déchet ménager.
Il doit être remis au point de collecte dédié à cet effet
(collecte et recyclage du matériel électrique et
électronique).
34
En procédant à la mise au rebut de l'appareil dans les
règles de l’art, nous préservons l'environnement et notre
sécurité, s’assurant ainsi que les déchets seront traités
dans des conditions optimum.
Page 35

Pour obtenir plus de détails sur le recyclage de ce produit,
veuillez prendre contact avec les services de votre
commune ou le magasin où vous avez effectué l'achat.
35
Page 36

Inhalt
Sicherheitshinweise _ _ _ _ _ _ _ _ _ _ _ _ _ _ _ _ 36
Betrieb _ _ _ _ _ _ _ _ _ _ _ _ _ _ _ _ _ _ _ _ _ _ 38
Erste Inbetriebnahme _ _ _ _ _ _ _ _ _ _ _ _ _ _ _ _ 38
Täglicher Gebrauch _ _ _ _ _ _ _ _ _ _ _ _ _ _ _ _ 39
Praktische Tipps und Hinweise _ _ _ _ _ _ _ _ _ _ _ 40
Sicherheitshinweise
Lesen Sie zu Ihrer Sicherheit und für die optimale Geräteanwendung vor der Installation und dem Gebrauch des
Gerätes die vorliegende Benutzerinformation aufmerksam
durch, einschließlich der Ratschläge und Warnungen. Es
ist wichtig, dass zur Vermeidung von Fehlern und Unfällen alle Personen, die das Gerät benutzen, mit der Bedienung und den Sicherheitsvorschriften vertraut sind. Heben
Sie die Benutzerinformation gut auf und übergeben Sie sie
bei einem Weiterverkauf des Gerätes dem neuen Besitzer,
so dass jeder während der gesamten Lebensdauer des Gerätes über Gebrauch und Sicherheit informiert ist.
Halten Sie sich zu Ihrer Sicherheit und zum Schutz Ihres
Eigentums strikt an die Vorsichtsmaßnahmen der vorliegenden Benutzerinformation, da der Hersteller bei Missachtung derselben von jeder Haftung freigestellt ist.
Sicherheit von Kindern und hilfsbedürftigen
Personen
• Das Gerät darf von Personen (einschließlich Kindern),
deren physische, sensorische Fähigkeiten und deren
Mangel an Erfahrung und Kenntnissen einen sicheren
Gebrauch des Gerätes ausschließen nur unter Aufsicht
oder nach ausreichender Einweisung durch eine verantwortungsbewusste Person benutzt werden, die sicherstellt, dass sie sich der Gefahren des Gebrauchs
bewusst sind.
Kinder müssen beaufsichtigt werden, damit sie nicht
am Gerät herumspielen können.
• Halten Sie das Verpackungsmaterial unbedingt von
Kindern fern. Erstickungsgefahr!
• Ziehen Sie vor der Entsorgung des Gerätes den Netzstecker, schneiden Sie das Netzkabel (so nah wie möglich am Gerät) ab und entfernen Sie die Tür, so dass
spielende Kinder vor elektrischem Schlag geschützt
sind und sich nicht in dem Gerät einschließen können.
• Wenn dieses Gerät mit magnetischer Türdichtung ein
älteres Modell mit Schnappverschluss (Türlasche) an
Reinigung und Pflege _ _ _ _ _ _ _ _ _ _ _ _ _ _ _ 41
Was tun, wenn … _ _ _ _ _ _ _ _ _ _ _ _ _ _ _ _ _ 42
Technische Daten _ _ _ _ _ _ _ _ _ _ _ _ _ _ _ _ _ 44
Montage _ _ _ _ _ _ _ _ _ _ _ _ _ _ _ _ _ _ _ _ _ _ 44
Hinweise zum Umweltschutz _ _ _ _ _ _ _ _ _ _ _ _ 46
Änderungen vorbehalten
der Tür oder auf dem Deckel ersetzt, machen Sie den
Schnappverschluss vor dem Entsorgen des Altgerätes
unbrauchbar. So verhindern Sie, dass das Gerät nicht
zu einer Todesfalle für Kinder wird.
Allgemeine Sicherheitshinweise
Vorsicht! Die Belüftungsöffnungen müssen immer
frei zugänglich sein.
• Das Gerät ist für die Aufbewahrung von Lebensmitteln
und/oder Getränken in einem normalen Haushalt bestimmt, wie in der vorliegenden Gebrauchsanweisung
beschrieben wird.
• Benutzen Sie keine mechanischen oder sonstigen
Hilfsmittel, um den Abtauprozess zu beschleunigen.
• Verwenden Sie keine anderen Elektrogeräte (wie Speiseeisbereiter) in Kühlgeräten, wenn solche Geräte nicht
ausdrücklich vom Hersteller für diesen Zweck zugelassen sind.
• Achten Sie darauf, den Kältekreislauf nicht zu beschädigen.
• Das Kältemittel Isobutan (R600a) im Kältekreislauf des
Gerätes ist ein natürliches und sehr umweltfreundliches Gas, das jedoch leicht entflammbar ist.
Achten Sie beim Transport und bei der Aufstellung des
Gerätes darauf, nicht die Komponenten des Kältekreislaufs zu beschädigen.
Bei einer eventuellen Beschädigung des Kältekreislaufs:
– Offene Flammen und Zündfunken vermeiden
– Den Raum, in dem das Gerät installiert ist, gut lüften
• Änderungen der technischen Eigenschaften oder am
Gerät sind gefährlich. Ein defektes Netzkabel kann
Kurzschlüsse und einen Brand verursachen und/oder
zu Stromschlägen führen.
36
Page 37

Warnung! Elektrische Bauteile (Netzkabel, Stecker,
Kompressor) dürfen zur Vermeidung von Unfällen
nur vom Kundendienst oder einer kompetenten Fachkraft
ausgewechselt werden.
1. Das Netzkabel darf nicht verlängert werden.
2. Vergewissern Sie sich, dass der Netzstecker nicht
von der Geräterückseite gequetscht oder beschädigt wird. Ein gequetschter oder beschädigter
Netzstecker überhitzt und kann einen Brand verursachen.
3. Vergewissern Sie sich, dass der Netzstecker des
Gerätes frei zugänglich ist.
4. Ziehen Sie nicht am Netzkabel.
5. Stecken Sie den Netzstecker nie in eine lockere
Steckdose. Es besteht Brand- und Stromschlaggefahr.
6. Betreiben Sie das Gerät nicht ohne Lampenabde-
13)
, der Innenbeleuchtung.
ckung
• Dieses Gerät ist schwer. Vorsicht beim Transport.
• Entnehmen oder berühren Sie nie mit nassen/feuchten
Händen Tiefkühlgut, da dies zu Hautverletzungen oder
Kälteverbrennungen führen kann.
• Das Gerät nicht direkter Sonneneinstrahlung aussetzen.
•
Die Leuchtmittel
14)
in diesem Gerät sind Speziallampen, die nur für Haushaltsgeräte geeignet sind. Sie eignen sich nicht zur Raumbeleuchtung.
Täglicher Gebrauch
• Stellen Sie keine heißen Töpfe auf die Kunststoffteile
des Gerätes.
• Lagern Sie keine feuergefährlichen Gase oder Flüssigkeiten in dem Gerät. Explosionsgefahr.
• Legen Sie Lebensmittel nicht direkt vor den Luftauslass
auf der Rückwand.
• Ein aufgetautes Produkt darf nicht wieder eingefroren
werden.
• Abgepackte Tiefkühlkost immer entsprechend den Herstellerangaben aufbewahren.
• Die Lagerempfehlungen des Geräteherstellers sollten
strikt eingehalten werden. Halten Sie sich an die betreffenden Anweisungen.
• Keine kohlensäurehaltigen Getränke oder Sprudel in
den Tiefkühlschrank stellen, da der Druckanstieg in
13) Falls Lampenabdeckung vorhanden.
14) Falls Lampe vorhanden.
15) Wenn das Gerät mit dem Frost-Free-System ausgestattet ist.
15)
den Behältern zur Explosion führen und das Gerät beschädigen kann.
• Eis am Stiel kann Kälteverbrennungen verursachen,
wenn es direkt nach der Entnahme aus dem Gefrierschrank gegessen wird.
Reinigung und Pflege
• Schalten Sie vor Wartungsarbeiten immer das Gerät ab
und ziehen Sie den Netzstecker aus der Steckdose.
• Reinigen Sie das Gerät nicht mit Metallgegenständen.
• Keine scharfen Gegenstände zum Entfernen von Reif
und Eis im Gerät verwenden. Verwenden Sie einen
Kunststoffschaber.
• Kontrollieren Sie den Tauwasserabfluss im Kühlraum
in regelmäßigen Abständen. Reinigen Sie den Ablauf,
falls nötig. Bei verstopftem Wasserabfluss sammelt
sich das Wasser auf dem Boden des Geräts an.
Montage
Wichtig! Halten Sie sich für den elektrischen Anschluss
strikt an die Anweisungen der betreffenden Abschnitte.
• Kontrollieren Sie nach dem Auspacken das Gerät auf
eventuelle Beschädigungen. Nehmen Sie das Gerät
nicht in Betrieb, wenn es beschädigt ist. Melden Sie
die Schäden umgehend dem Händler, bei dem Sie es
erworben haben. Bewahren Sie in diesem Fall die Verpackung auf.
• Lassen Sie das Gerät mindestens vier Stunden stehen,
bevor Sie es elektrisch anschließen, damit das Öl in
den Kompressor zurückfließen kann.
• Ausreichenden Freiraum zur Luftzirkulation um das Gerät lassen; anderenfalls besteht Überhitzungsgefahr.
Halten Sie sich für die Belüftung an die Installationsanweisungen.
• Das Gerät sollte zur Vermeidung von Verbrennungen
durch Berührung von heißen Bauteilen (Kompressor,
Kondensator) möglichst mit der Rückseite gegen eine
Wand aufgestellt werden.
• Das Gerät darf nicht in der Nähe von Heizkörpern oder
Kochern installiert werden.
• Vergewissern Sie sich, dass der Netzstecker des Gerätes nach der Installation frei zugänglich ist.
• Verbinden Sie das Gerät ausschließlich mit einer Trinkwasserzuleitung.
16)
37
Page 38

Kundendienst
• Sollte die Wartung des Gerätes elektrische Arbeiten
verlangen, so dürfen diese nur von einem qualifizierten
Elektriker oder einem Elektro-Fachmann durchgeführt
werden.
• Wenden Sie sich für Reparaturen und Wartung nur an
Fachkräfte der autorisierten Kundendienststellen und
verlangen Sie stets Original-Ersatzteile.
Umweltschutz
Das Gerät enthält im Kältekreis oder in dem Isoliermaterial keine ozonschädigenden Gase. Das Gerät
Betrieb
darf nicht wie normaler Hausmüll entsorgt werden. Die
Isolierung enthält entzündliche Gase: das Gerät muss gemäß den geltenden Vorschriften entsorgt werden; sie erhalten diese bei Ihrer Gemeindeverwaltung. Nicht das Kälteaggregat beschädigen, insbesondere nicht in der Nähe
des Wärmetauschers. Die Materialien, die bei der Herstellung dieses Geräts verwendet wurden und mit dem Sym-
markiert sind, können recycelt werden.
bol
Einschalten des Geräts
Stecken Sie den Stecker in die Wandsteckdose.
Drehen Sie den Temperaturregler im Uhrzeigersinn auf eine mittlere Einstellung.
Ausschalten des Geräts
Drehen Sie den Temperaturregler zum Ausschalten des
Geräts in die Position "O".
Temperaturregelung
Die Temperatur wird automatisch geregelt.
Bedienen Sie das Gerät wie folgt:
• drehen Sie den Temperaturregler auf eine niedrigere
Einstellung, um die minimal mögliche Kühlung zu erreichen.
• drehen Sie den Temperaturregler auf eine höhere Einstellung, um die maximal mögliche Kühlung zu erreichen.
eine mittlere Einstellung ist im Allgemeinen am besten geeignet.
Erste Inbetriebnahme
Reinigung des Innenraums
Bevor Sie das Gerät in Betrieb nehmen, beseitigen Sie den
typischen "Neugeruch" am besten durch Auswaschen der
Innenteile mit lauwarmem Wasser und einem neutralen
Reinigungsmittel. Sorgfältig nachtrocknen.
Allerdings muss für eine exakte Einstellung berücksichtigt
werden, dass die Temperatur im Innern des Gerätes von
verschiedenen Faktoren abhängt:
• von der Raumtemperatur
• von der Häufigkeit der Türöffnung
• von der Menge der eingelagerten Lebensmittel
• und vom Standort des Geräts.
Wichtig! Ist die Umgebungstemperatur hoch oder das
Gerät voll beladen, dieses aber auf die niedrigste
Temperatur eingestellt, so kann es bei andauerndem
Betrieb des Geräts an der Rückwand zu Frostbildung
kommen. In diesem Fall muss eine höhere Temperatur
gewählt werden, die ein automatisches Abtauen
ermöglicht und damit auch einen niedrigeren
Energieverbrauch.
Wichtig! Verwenden Sie keine Reinigungsmittel oder
Scheuerpulver, da hierdurch die Oberfläche beschädigt
wird.
16) Falls ein Wasseranschluss erforderlich ist.
38
Page 39

Täglicher Gebrauch
Einfrieren frischer Lebensmittel
Das Gefrierfach eignet sich zum Einfrieren von frischen
Lebensmitteln und zum Lagern von gefrorenen und tiefgefrorenen Lebensmitteln für einen längeren Zeitraum.
Für das Einfrieren frischer Lebensmittel ist eine Änderung
der mittleren Einstellung nicht erforderlich.
Möchten Sie den Gefriervorgang beschleunigen, drehen
Sie bitte den Temperaturregler auf eine höhere Einstellung, um die maximal mögliche Kühlung zu erreichen.
Wichtig! In diesem Fall kann die Temperatur im
Kühlschrank unter 0°C fallen. Ist dies der Fall, drehen Sie
den Temperaturregler auf eine wärmere Einstellung.
Legen Sie die einzufrierenden frischen Lebensmittel in das
obere Fach.
Lagerung gefrorener Produkte
Lassen Sie das Gerät vor der ersten Inbetriebnahme oder
nach einer Zeit, in der das Gerät nicht benutzt wurde, mindestens zwei Stunden lang auf den höheren Einstellungen
laufen, bevor Sie Lebensmittel in das Gefrierfach hinein
legen.
Wichtig! Kam es zum Beispiel durch einen Stromausfall,
der länger dauerte als der in der Tabelle mit den
technischen Daten angegebene Wert (siehe
"Ausfalldauer") zu einem ungewollten Abtauen, dann
müssen die aufgetauten Lebensmittel sehr rasch
verbraucht oder sofort gekocht und (nach dem Abkühlen)
erneut eingefroren werden.
Auftauen
Tiefgefrorene oder gefrorene Lebensmittel können vor der
Verwendung je nach der zur Verfügung stehenden Zeit im
Kühlschrank oder bei Raumtemperatur aufgetaut werden.
Kleinere Gefriergutteile können unter Umständen sogar direkt aus dem Gefrierschrank entnommen und anschließend sofort gekocht oder gegart werden: in diesem Fall
dauert der Garvorgang allerdings etwas länger.
Verstellbare Ablagen
Die Wände des Kühlschranks sind mit einer
Reihe von Führungsschienen ausgestattet, die verschiedene Möglichkeiten
für das Einsetzen der Ablagen bieten.
Positionierung der Türeinsätze
Die Türeinsätze können in
verschiedener Höhe positioniert werden; damit ermöglichen Sie das Lagern
verschieden großer Lebensmittelpackungen.
Ziehen Sie das Türabstellfach nach und nach in
Pfeilrichtung, bis es sich
herausheben lässt und
setzen Sie es dann in die
neue Position ein.
Entnahme von Gefrierkörben aus dem
Gefrierschrank
Die Gefrierkörbe sind mit einem Anschlag ausgestattet,
der die versehentliche Entnahme oder ein Herausfallen
verhindert. Um einen Gefrierkorb aus dem Gefrierschrank
zu nehmen, ziehen Sie den Korb zu sich her, bis er den
Anschlag erreicht, und kippen den Korb mit der Vorderseite nach oben, bis er sich herausnehmen lässt.
Wenn Sie den Gefrierkorb wieder zurück in das Gerät legen möchten, heben Sie die Vorderseite des Korbs leicht
an und setzen ihn in das Gefriergerät ein. Sobald Sie über
die Endpunkte sind, drücken Sie den Gefrierkorb wieder in
seine ursprüngliche Position.
39
Page 40

Praktische Tipps und Hinweise
2
1
Normale Betriebsgeräusche
• Unter Umständen ist ein leichtes Gurgeln und Blubbern
zu hören, wenn das Kältemittel durch die Leitungen gepumpt wird. Das ist normal.
• Bei eingeschaltetem Kompressor wird das Kältemittel
umgewälzt und Sie hören ein Surren und ein pulsierendes Geräusch vom Kompressor. Das ist normal.
• Die thermische Ausdehnung kann ein plötzliches Krachen verursachen. Das ist eine natürliche und nicht gefährliche physikalische Erscheinung. Das ist normal.
• Beim Ein- oder Ausschalten des Kompressors ist ein
leises "Klicken" des Temperaturreglers zu hören. Das
ist normal.
Energiespartipps
• Öffnen Sie die Tür nicht zu häufig, und lassen Sie diese
nicht länger offen als unbedingt notwendig.
• Wenn die Umgebungstemperatur hoch ist und der
Temperaturregler auf eine niedrige Temperatur eingestellt und das Gerät voll beladen ist, kann es zu andauerndem Betrieb des Kompressors und damit zu Reifoder Eisbildung am Verdampfer kommen. Stellen Sie
in diesem Fall den Temperaturregler auf eine höhere
Einstellung ein, die ein automatisches Abtauen und damit auch einen niedrigeren Energieverbrauch ermöglicht.
Hinweise für die Kühlung frischer Lebensmittel
So erzielen Sie beste Ergebnisse:
• Legen Sie bitte keine warmen Lebensmittel oder
dampfende Flüssigkeiten in den Kühlschrank.
• Decken Sie die Lebensmittel ab oder verpacken Sie
diese entsprechend, besonders wenn diese stark riechen.
• Legen Sie die Lebensmittel so hinein, dass um sie Luft
frei zirkulieren kann.
40
Hinweise für die Kühlung
Tipps:
Fleisch (alle Sorten): wickeln Sie Fleisch in lebensmittelechte Tüten und legen Sie diese auf die Glasablage über
der Gemüseschublade.
Bitte lagern Sie Fleisch aus Sicherheitsgründen nur einen
oder maximal zwei Tage auf diese Weise.
Gekochte Lebensmittel, kalte Gerichte usw.: diese können
abgedeckt auf eine Ablage gelegt werden.
Obst und Gemüse: bitte waschen Sie Obst und Gemüse
gründlich und legen Sie es in die speziell dafür vorgesehene(n) Schublade(n).
Butter und Käse: diese sollten stets in speziellen luftdichten Behältern verpackt sein oder in Aluminiumfolie bzw. in
lebensmittelechte Tüten eingepackt werden, um so wenig
Luft wie möglich in der Verpackung zu haben.
Milchflaschen: bitte bewahren Sie Milchflaschen stets mit
Deckel im Flaschenregal in der Tür auf.
Bananen, Kartoffeln, Zwiebeln und Knoblauch sollten
nicht im Kühlschrank aufbewahrt werden, außer diese sind
dafür speziell verpackt.
Hinweise zum Einfrieren
Im Folgenden finden Sie einige wertvolle Tipps für einen
optimalen Gefriervorgang:
• die maximale Menge an Lebensmitteln, die innerhalb
von 24 Stunden eingefroren werden kann. ist auf dem
Typschild angegeben;
• der Gefriervorgang dauert 24 Stunden. Legen Sie während dieses Zeitraums keine weiteren einzufrierenden
Lebensmittel in das Gefrierfach;
• frieren Sie ausschließlich frische und gründlich gewaschene Lebensmittel von sehr guter Qualität ein;
• teilen Sie die Lebensmittel in kleinere Portionen ein,
damit diese schnell und vollständig gefrieren und Sie
Page 41

später nur die Menge auftauen müssen, die Sie gerade
benötigen;
• die einzufrierenden Lebensmittelportionen sollten stets
luftdicht in Aluminiumfolie oder in lebensmittelechte
Gefrierbeutel verpackt werden, um so wenig Luft wie
möglich in der Verpackung zu haben;
• achten Sie beim Hineinlegen von frischen, noch ungefrorenen Lebensmitteln darauf, dass diese keinen Kontakt mit Gefriergut bekommen, da dieses sonst antauen
kann;
• weniger fetthaltige Lebensmittel lassen sich besser lagern als fetthaltigere; Salz verkürzt die Lagerzeit von
Lebensmitteln im Gefrierfach;
• werden Gefrierwürfel direkt nach der Entnahme aus
dem Gefrierfach verwendet, können Sie zu Frostbrand
auf der Haut führen;
• es empfiehlt sich, das Einfrierdatum auf jeder einzelnen
Packung zu notieren, um einen genauen Überblick über
die Lagerzeit zu haben.
Reinigung und Pflege
Hinweise zur Lagerung gefrorener Produkte
So erzielen Sie die besten Ergebnisse mit Ihrem Gerät:
• Prüfen Sie sorgfältig, dass die im Handel erworbenen
gefrorenen Lebensmittel sachgerecht gelagert wurden.
• Achten Sie unbedingt darauf, die eingekauften gefrorenen Lebensmittel in der kürzest möglichen Zeit in Ihren
Gefrierschrank zu bringen.
• Öffnen Sie die Tür nicht zu häufig, und lassen Sie diese
nicht länger offen als unbedingt notwendig.
• Abgetaute Lebensmittel verderben sehr schnell und
eignen sich nicht für ein erneutes Einfrieren.
• Das Haltbarkeitsdatum auf der Tiefkühlkostverpackung
sollte nicht überschritten werden.
Vorsicht! Ziehen Sie bitte vor jeder Reinigungsarbeit
immer den Netzstecker aus der Steckdose.
Der Kältekreis des Gerätes enthält Kohlenwasser-
stoffe; Wartungsarbeiten und Nachfüllen von Kältemittel dürfen daher nur durch vom Hersteller autorisiertes
Fachpersonal ausgeführt werden.
Regelmäßige Reinigung
Der gesamte Kühlschrank muss regelmäßig gereinigt werden:
• Reinigen Sie die Innenseiten und die Zubehörteile mit
lauwarmem Wasser und etwas Neutralseife.
• Prüfen und säubern Sie die Türdichtungen in regelmä-
ßigen Abständen und kontrollieren Sie, dass diese sauber und frei von Verunreinigungen sind.
• Spülen und trocknen Sie diese sorgfältig ab.
Wichtig! Ziehen Sie nicht an Leitungen und/oder Kabeln
im Innern des Kühlschranks und achten Sie darauf, diese
nicht zu verschieben oder zu beschädigen.
Benutzen Sie zur Reinigung des Innenraums keinesfalls
Putzmittel, Scheuerpulver, stark parfümierte
Reinigungsmittel oder Wachspolituren, da diese die
Oberfläche des Innenraums beschädigen und einen
starken Eigengeruch hinterlassen können.
Reinigen Sie den Kondensator (schwarzes Gitter) und den
Motorkompressor auf der Geräterückseite mit einer Bürste
oder einem Staubsauger. Dadurch verbessert sich die
Leistung des Geräts und es verbraucht weniger Strom.
Wichtig! Bitte achten Sie darauf, das Kühlsystem nicht zu
beschädigen.
Viele Haushaltsreiniger für Küchen enthalten Chemikalien,
die den im Gerät verwendeten Kunststoff angreifen können. Aus diesem Grund ist es empfehlenswert, das Gerät
außen nur mit warmem Wasser und etwas flüssigem Tellerspülmittel zu reinigen.
Schließen Sie das Gerät nach der Reinigung wieder an die
Netzversorgung an.
Abtauen des Kühlschranks
Bei normalem Betrieb wird Reif bei jedem Anhalten des
Motorkompressors automatisch aus dem Verdampfer des
Kühlschranks entfernt. Das Tauwasser läuft durch eine
Rinne in einen speziellen Behälter an der Rückseite des
Geräts über dem Motorkompressor, wo es verdampft.
Reinigen Sie deshalb regelmäßig die Abflussöffnung des
Tauwassers in der Mitte des Kühlschrankkanals, damit
das Wasser nicht überfließt und auf die gelagerten Lebensmittel tropft. Benutzen Sie dazu bitte das mitgelieferte
Reinigungswerkzeug, das sich bereits in der Ablauföffnung befindet.
41
Page 42

Was tun, wenn …
Abtauen des Gefrierschranks
Das Gefrierfach dieses Modells ist vom Typ "No Frost".
Dies bedeutet, dass es während des Betriebs weder an den
Innenwänden noch auf den Lebensmitteln zu Frostbildung
kommt.
Die Bildung von Frost wird durch die ständig zirkulierende
Kaltluft in diesem Fach verhindert; eine automatische Lüfterregelung sorgt für den Ventilatorantrieb.
Vorsicht! Ziehen Sie vor der Fehlersuche immer den
Netzstecker aus der Steckdose.
Die Fehlersuche, die in der vorliegenden
Gebrauchsanweisung nicht beschrieben ist, darf nur von
einem qualifizierten Elektriker oder einer kompetenten
Person durchgeführt werden.
Störung Mögliche Ursache Abhilfe
Das Gerät ist zu laut. Das Gerät ist nicht korrekt abgestützt. Prüfen Sie, ob das Gerät stabil steht (al-
Der Kompressor arbeitet ständig. Der Temperaturregler kann falsch ein-
gestellt sein.
Die Tür ist nicht richtig geschlossen. Siehe hierzu "Schließen der Tür".
Die Tür wurde zu häufig geöffnet. Lassen Sie die Tür nicht länger als un-
Die Produkttemperatur ist zu hoch. Lassen Sie die Produkttemperatur auf
Die Raumtemperatur ist zu hoch. Senken Sie die Raumtemperatur.
Wasser fließt auf die hintere Plat-
te des Kühlschranks.
Wasser fließt in den Kühl-
schrank.
Die eingelegten Produkte verhindern,
Wasser fließt auf den Boden. Der Tauwasserablauf läuft nicht in die
Zu hohe Reif- und Eisbildung. Das Gefriergut ist nicht korrekt ver-
Die Tür ist nicht richtig geschlossen. Siehe hierzu "Schließen der Tür".
Beim automatischen Abtauen schmilzt
der Frost auf der hinteren Platte.
Der Wasserabflusskanal ist verstopft. Reinigen Sie den Wasserabflusskanal.
dass das Wasser zum Kollektor fließt.
Verdampferschale über dem Kompres-
sor.
packt.
Wichtig! Während das Gerät in Betrieb ist, entstehen
bestimmte Geräusche (Kompressor und kreisende
Geräusche). Dies ist normal und kein Grund zur
Beunruhigung.
le vier Füße müssen fest auf dem Boden
stehen).
Stellen Sie eine wärmere Temperatur
ein.
bedingt erforderlich offen.
Raumtemperatur abkühlen, bevor Sie
die Produkte einlagern.
Das ist normal.
Stellen Sie sicher, dass die Produkte
nicht die hintere Platte berühren.
Befestigen Sie den Tauwasserablauf an
der Verdampferschale.
Verpacken Sie die Produkte besser.
42
Page 43

Störung Mögliche Ursache Abhilfe
Der Temperaturregler kann falsch ein-
gestellt sein.
Die Temperatur im Gerät ist zu
niedrig.
Die Temperatur im Gerät ist zu
hoch.
Die Tür ist nicht richtig geschlossen. Siehe hierzu "Schließen der Tür".
Die Produkttemperatur ist zu hoch. Lassen Sie die Produkttemperatur auf
Es wurden gleichzeitig zu viele Pro-
Die Temperatur im Kühlschrank
ist zu hoch.
Die Temperatur im Gefrierschrank ist zu hoch.
Das Gerät funktioniert nicht. Das Gerät ist abgeschaltet. Schalten Sie das Gerät ein.
Der Netzstecker ist nicht richtig in die
Das Gerät bekommt keinen Strom. Es
Die Lampe funktioniert nicht. Die Lampe ist im Standby-Modus. Öffnen und schließen Sie die Tür.
Die Lampe ist defekt. Siehe hierzu "Ersetzen der Lampe".
Der Temperaturregler kann falsch ein-
gestellt sein.
Der Temperaturregler kann falsch ein-
gestellt sein.
dukte zum Eingefrieren eingelegt.
Es zirkuliert keine Kaltluft im Innern
des Gerätes.
Die einzufrierenden Packungen liegen
zu dicht aneinander.
Steckdose gesteckt.
liegt keine Spannung an der Netz-
steckdose an.
Stellen Sie eine höhere Temperatur ein.
Stellen Sie eine höhere Temperatur ein.
Stellen Sie eine niedrigere Temperatur
ein.
Raumtemperatur abkühlen, bevor Sie
die Produkte einlagern.
Legen Sie gleichzeitig weniger Produkte
zum Eingefrieren ein.
Stellen Sie sicher, dass die Kaltluft im
Gerät zirkuliert.
Stellen Sie sicher, dass die Kaltluft im
Gerät zirkuliert und die Produkte dies
nicht verhindern.
Stecken Sie den Netzstecker richtig in
die Steckdose.
Versuchen Sie bitte, ob ein anderes Gerät an dieser Steckdose funktioniert.
Kontaktieren Sie einen qualifizierten
Elektriker.
Wenden Sie sich bitte an den Kundendienst, falls Ihr Gerät
nach dem Durchführen der oben genannten Überprüfungen noch immer nicht korrekt arbeitet.
Austauschen der Lampe
1. Schalten Sie das Gerät aus.
2. Drücken Sie das bewegliche Teil, um die Lampenabdeckung auszuhängen (1).
3. Nehmen Sie die Lampenabdeckung ab (2).
4. Ersetzen Sie die Lampe durch eine mit der gleichen
Leistung, die für Haushaltsgeräte geeignet sein muss.
5. Bringen Sie die Lampenabdeckung an.
6. Schalten Sie das Gerät wieder ein.
7. Öffnen Sie die Tür. Prüfen Sie, ob die Lampe brennt.
1
2
Schließen der Tür
1. Reinigen Sie die Türdichtungen.
2. Stellen Sie die Tür nach Bedarf ein. Siehe hierzu
"Montage".
3. Ersetzen Sie die defekten Türdichtungen, falls erforderlich. Kontaktieren Sie den Kundendienst.
43
Page 44

Technische Daten
ZRB632FW ZRB634FW ZRB638FW
Abmessungen
Höhe 1750 mm 1850 mm 2010 mm
Breite 595 mm 595 mm 595 mm
Tiefe 658 mm 658 mm 658 mm
Ausfalldauer 16 h 18 h 18 h
Spannung 230 V 230 V 230 V
Frequenz 50 Hz 50 Hz 50 Hz
Die technischen Informationen befinden sich auf dem
Typschild innen links im Gerät sowie auf der Energieplakette.
Montage
Vorsicht! Lesen Sie bitte die "Sicherheitshinweise"
sorgfältig vor der Aufstellung des Geräts durch, um
Gefahren für Sie selbst zu vermeiden und einen korrekten
Betrieb des Geräts zu gewährleisten.
Aufstellung
Installieren Sie dieses Gerät an einem Ort, an dem die
Umgebungstemperatur mit der Klimaklasse übereinstimmt, die auf dem Typschild des Geräts angegeben ist:
Klimaklas-
Umgebungstemperatur
se
SN +10°C bis + 32°C
N +16°C bis + 32°C
ST +16°C bis + 38°C
T +16°C bis + 43°C
Standort
Das Gerät sollte möglichst weit entfernt von Wärmequellen wie Heizungen, Boilern oder direktem Sonnenlicht
usw. aufgestellt werden. Die Luft muss frei auf der Geräterückseite zirkulieren können. Damit das Gerät die optimale
Leistung bringen kann, wenn es unter einer überhängenden Wand installliert wird, muss der Mindestabstand zwischen der Geräteoberseite und der Wand mindestens 100
mm betragen. Allerdings sollte die Aufstellung des Gerätes unter einer überhängenden Wand nach Möglichkeit
vermieden werden. Die korrekte waagerechte Ausrichtung
des Gerätes kann mit Hilfe eines oder mehrerer Schraubfüße am Sockel des Gerätes erfolgen.
Warnung! Es muss möglich sein, das Gerät vom
Netz zu trennen; nach der Installation muss die
Steckdose daher zugänglich bleiben.
min.100 mm
A
20 mm
B
Hintere Distanzstücke
Die beiden Distanzstücke befinden sich im Beutel mit den
Unterlagen.
Gehen Sie wie folgt vor, um die Distanzstücke anzubringen:
1. Lösen Sie die Schraube.
2. Setzen Sie das Distanzstück unter der Schraube ein.
3. Drehen Sie das Distanzstück in die richtige Position.
4. Ziehen Sie die Schrauben wieder an.
44
Page 45

4
Ausrichten
Bei der Aufstellung des
Gerätes ist dieses waagerecht auszurichten. Dies
lässt sich mit zwei
Schraubfüßen am vorderen Sockel des Gerätes erreichen.
Elektrischer Anschluss
Kontrollieren Sie vor der ersten Benutzung des Gerätes,
ob die Netzspannung und -frequenz Ihres Hausanschlusses mit den auf dem Typenschild angegebenen Anschlusswerten übereinstimmen.
2
1
3
Das Gerät muss geerdet sein. Zu diesem Zweck ist die
Netzkabelsteckdose mit einem Schutzkontakt ausgestattet.
Falls die Steckdose Ihres Hausanschlusses nicht geerdet
sein sollte, lassen Sie das Gerät bitte gemäß den geltenden Vorschriften erden und fragen Sie dafür einen qualifizierten Elektriker.
Der Hersteller übernimmt keinerlei Haftung für Schäden
oder Verletzungen, die durch Missachtung der oben genannten Sicherheitshinweise entstehen.
Das Gerät entspricht den EU- Richtlinien.
Wechsel des Türanschlags
Warnung! Vor dem Durchführen von Arbeiten am
Gerät ist stets der Netzstecker aus der Steckdose zu
ziehen.
Wichtig! Die nachfolgend beschriebenen Tätigkeiten
müssen mit Hilfe einer zweiten Person durchgeführt
werden, um ein Herunterfallen der Türen zu vermeiden.
Entfernen der Ablagenhalter
Das Gerät ist mit Ablagenhaltern ausgestattet, die zum Sichern der Ablagen während des Transports dienen.
Entfernen Sie diese Halter
wie folgt:
1. Schieben Sie die Ab-
lagenhalter in Pfeilrichtung (A).
2. Heben Sie die Ablage
hinten an und drücken Sie sie nach
vorn, bis sie sich herausnehmen lässt (B).
3. Entfernen Sie die Hal-
ter (C).
45
Page 46

m1
m2
m6
m5
m4
m3
1
• Öffnen Sie die Tür. Das
mittlere Scharnier (m2)
lösen. Das KunststoffDistanzstück (m1) entfernen.
• Das Distanzstück (m6)
entfernen und an der anderen Seite des Scharnierhaltestifts (m5) befestigen.
• Die Türen entfernen.
• Den linken Stift der mitt-
leren Abdeckung (m3,
m4) entfernen und an
der anderen Seite befes-
• Das untere Scharnier
(b1) abschrauben.
• Die Stifte der linken Abdeckung (b4) entfernen
und an der anderen Seite befestigen.
• Das untere Scharnier
(b1) an der anderen Seite wieder anschrauben.
• Den Haltestift (b2) des
unteren Scharniers lösen, das Distanzstück
(b3) entfernen und an
der gegenüberliegenden
Seite montieren.
tigen.
• Den Stift der mittleren
Abdeckung (m5) in der
linken Bohrung der unteren Tür befestigen.
Prüfen Sie alles erneut, um sicherzustellen, dass:
• Alle Schrauben fest angezogen sind.
• die Türkanten parallel zum Seitenrand des Gerätes laufen.
• Der magnetische Dichtungsstreifen fest am Gerät befestigt ist.
• Die Tür korrekt öffnet und schließt.
Bei niedrigen Umgebungstemperaturen (z.B. im Winter)
kann es sein, dass die Türdichtung nicht richtig am Gerät
• Entfernen Sie die Stöpsel (1) an der Oberseite
beider Türen und befestigen Sie diese an der
anderen Seite.
• Die untere Tür wieder in
den Haltestift des unteren Scharniers (b2) einhängen.
• Das mittlere Scharnier
(m2) in die linke Bohrung der unteren Tür
einsetzen.
• Den Haltestift des oberen Scharniers lösen
und an der gegenüberliegenden Seite montieren.
• Die obere Tür in den
Haltestift des oberen
Scharniers einhängen.
• Die obere Tür wieder in
den Haltestift des mittleren Scharniers (m5) einhängen; dabei beide Türen leicht neigen.
• Das mittlere Scharnier
(m2) festschrauben. Das
Kunststoff-Distanzstück
(m1) nicht vergessen.
anliegt. Warten Sie in diesem Fall auf die natürliche Anpassung der Dichtung.
Wenden Sie sich bitte an den Kundendienst, falls Sie die
oben beschriebenen Tätigkeiten nicht selber durchführen
möchten. Ein Kundendiensttechniker wird die Türen dann
auf Ihre Kosten umbauen.
Hinweise zum Umweltschutz
Das Symbol auf dem Produkt oder seiner Verpackung
weist darauf hin, dass dieses Produkt nicht als normaler
Haushaltsabfall zu behandeln ist, sondern an einem
Sammelpunkt für das Recycling von elektrischen und
46
elektronischen Geräten abgegeben werden muss. Durch
Ihren Beitrag zum korrekten Entsorgen dieses Produkts
schützen Sie die Umwelt und die Gesundheit Ihrer
Mitmenschen. Umwelt und Gesundheit werden durch
Page 47

falsches Entsorgen gefährdet. Weitere Informationen über
das Recycling dieses Produkts erhalten Sie von Ihrem
Rathaus, Ihrer Müllabfuhr oder dem Geschäft, in dem Sie
das Produkt gekauft haben.
47
Page 48

Tartalomjegyzék
Biztonsági információk _ _ _ _ _ _ _ _ _ _ 48
Működés _ _ _ _ _ _ _ _ _ _ _ _ _ _ _ _ _ 50
Első használat _ _ _ _ _ _ _ _ _ _ _ _ _ _ 51
Napi használat _ _ _ _ _ _ _ _ _ _ _ _ _ _ 51
Hasznos javaslatok és tanácsok _ _ _ _ _ 52
Biztonsági információk
Saját biztonsága és a helyes használat biztosítása érdekében a készülék üzembe helyezése és első használata előtt olvassa át figyelmesen ezt a használati útmutatót, beleértve a tippeket és figyelmeztetéseket is. A
szükségtelen hibák és balesetek elkerülése
érdekében fontos annak biztosítása, hogy
mindenki, aki a készüléket használja, jól ismerje annak működését és biztonságos
használatát. Őrizze meg ezt a használati útmutatót, és ha a készüléket elajándékozza
vagy eladja, az útmutatót is mellékelje hozzá,
hogy annak teljes élettartamán keresztül mindenki, aki használja, megfelelő információkkal rendelkezzen annak használatát és biztonságát illetően.
Az emberi élet és a vagyontárgyak biztonsága érdekében tartsa be a jelen használati útmutatóban szereplő óvintézkedéseket, mivel
a gyártó nem felelős az ezek elmulasztása
miatt bekövetkező károkért.
Gyermekek és fogyatékkal élő
személyek biztonsága
• A készülék kialakítása nem olyan, hogy azt
csökkent fizikai, értelmi vagy mentális képességű, illetve megfelelő tapasztalatok és
ismeretek híján lévő személyek (beleértve
a gyermekeket is) használhassák, hacsak
a biztonságukért felelős személy nem biztosít számukra felügyeletet és útmutatást a
készülék használatára vonatkozóan.
Gondoskodni kell a gyermekek felügyeletéről annak biztosítása érdekében, hogy ne
játsszanak a készülékkel.
• Minden csomagolóanyagot tartson a gyermekektől távol. Fulladásveszélyesek.
Ápolás és tisztítás _ _ _ _ _ _ _ _ _ _ _ _ 53
Mit tegyek, ha... _ _ _ _ _ _ _ _ _ _ _ _ _ 54
Műszaki adatok _ _ _ _ _ _ _ _ _ _ _ _ _ 57
Üzembe helyezés _ _ _ _ _ _ _ _ _ _ _ _ 57
Környezetvédelmi tudnivalók _ _ _ _ _ _ _ 60
A változtatások jogát fenntartjuk
• A készülék kiselejtezésekor húzza ki a dugaszt a hálózati aljzatból, vágja el a hálózati tápkábelt (olyan közel a készülékhez,
amennyire csak lehet), és távolítsa el az ajtót annak megelőzése érdekében, hogy a
játszó gyermekek áramütést szenvedjenek,
vagy magukat a készülékbe zárják.
• Ha ez a mágneszáras ajtóval ellátott készülék egy rugózáras (kilincses) ajtóval
vagy fedéllel ellátott régi készülék helyére
kerül, akkor ne felejtse el a régi készülék
kidobása előtt használatra alkalmatlanná
tenni a rugós zárat. Ennek az a célja, hogy
gyerekek ne tudjanak bennrekedni a készülékben.
Általános biztonsági tudnivalók
Figyelem A szellőzőnyílásokat ne
takarja el semmivel.
• A készülék rendeltetése élelmiszerek és/
vagy italok tárolása a normál háztartásban,
amint azt a jelen használati útmutató ismerteti.
• Ne használjon mechanikus szerkezetet
vagy mesterséges eszközöket a leolvasztási folyamat elősegítésére.
•Ne működtessen más elektromos készülé-
ket (például fagylaltkészítő gépet) hűtőbe-
rendezések belsejében, hacsak ezt a gyártó kifejezetten jóvá nem hagyja.
• Ügyeljen arra, hogy ne sérüljön meg a hű-
tőkör.
• Izobután (R600a) hűtőanyagot tartalmaz a
készülék hűtőköre, ez a környezetre csekély hatást gyakorló, természetes gáz,
amely ugyanakkor gyúlékony.
48
Page 49

A készülék szállítása és üzembe helyezése
során bizonyosodjon meg arról, hogy a hű-
tőkör semmilyen összetevője nem sérült
meg.
Ha a hűtőkör megsérült:
– kerülje nyílt láng és tűzgyújtó eszközök
használatát
– alaposan szellőztesse ki azt a helyisé-
get, ahol a készülék található
• Veszélyes a termék műszaki jellemzőit
megváltoztatni vagy a terméket bármilyen
módon átalakítani. A hálózati tápkábel bármilyen sérülése rövidzárlatot, tüzet vagy
áramütést okozhat.
Vigyázat A kockázatok elkerülése érde-
kében mindenféle elektromos részegység (hálózati tápkábel, dugasz, kompresszor)
cseréjét hivatalos szervizképviselőnek vagy
szakképzett szervizmunkatársnak kell elvégeznie.
1. A hálózati tápkábelt nem szabad meghosszabbítani.
2. Ügyeljen arra, hogy a hálózati dugaszt
ne nyomja össze vagy károsítsa a készülék hátlapja. Az összenyomott vagy
sérült hálózati dugasz túlmelegedhet és
tüzet okozhat.
3. Gondoskodjon arról, hogy a készülék
hálózati dugasza hozzáférhető legyen.
4. Ne húzza a hálózati kábelt.
5. Ha a hálózati aljzat ki van lazulva, ne
csatlakoztassa a hálózati dugaszt. Áramütés vagy tűz veszélye.
6. Tilos üzemeltetni a készüléket a lámpa-
17)
burkolat
nélkül.
• Ez a készülék nehéz. Mozgatásakor körültekintéssel járjon el.
• Ne szedjen ki semmit a fagyasztóból, és ne
is érjen hozzá ilyenekhez, ha a keze nedves vagy vizes, mivel ez a bőrsérüléseket,
illetve fagyás miatti égési sérüléseket eredményezhet.
• Ne tegye ki hosszú időn keresztül közvetlen napsütésnek a készüléket.
•
Az ebben a
18)
készülékben működő izzók
kizárólag háztartási eszközökhöz kifejlesztett fényforrások! Nem használhatók a helyiség megvilágítására.
Napi használat
• Ne tegyen meleg edényt a készülék műa-
nyag részeire.
• Ne tároljon gyúlékony gázt vagy folyadékot
a készülékben, mert azok felrobbanhatnak.
• Ne tegyen élelmiszereket közvetlenül a
hátsó falon lévő levegőkimenet elé.
19)
• A fagyasztott élelmiszert kiolvasztás után
többé nem szabad újra lefagyasztani.
•Az előrecsomagolt fagyasztott élelmiszere-
ket az élelmiszergyártó utasításaival összhangban tárolja.
• A készülék gyártójának tárolásra vonatkozó ajánlásait szigorúan be kell tartani. Olvassa el az idevonatkozó utasításokat.
• Ne tegyen szénsavas italokat a fagyasztóba, mert nyomás keletkezik a palackban,
ami miatt felrobbanhat és kárt okozhat a
készülékben.
• A jégnyalóka fagyásból eredő égéseket
okozhat, ha rögtön a készülékből kivéve
enni kezdik.
Ápolás és tisztítás
• A karbantartás előtt kapcsolja ki a készüléket, és a húzza ki a vezetéket a fali aljzatból.
• Ne tisztítsa a készüléket fémtárgyakkal.
• Ne használjon éles tárgyakat a dérnek a
készülékről történő eltávolításához. Használjon műanyag kaparókést.
• Rendszeresen vizsgálja meg a hűtőszek-
rényben a leolvadt víz számára kialakított
vízelvezetőt. Szükség esetén tisztítsa meg
a vízelvezetőt. Ha a vízelvezető el van záródva, a víz összegyűlik a készülék aljában.
17) Ha a belső világításnak van burkolata
18) Ha készülék rendelkezik lámpával.
19) Ha a készülék dérmentesítő rendszerű.
49
Page 50

Üzembe helyezés
Fontos Az elektromos hálózatra való
csatlakoztatást illetően kövesse a megfelelő
fejezetek útmutatását.
• Csomagolja ki a készüléket, és ellenőrizze,
vannak-e sérülések rajta. Ne csatlakoztassa a készüléket, ha sérült. Az esetleges sérüléseket azonnal jelentse ott, ahol a készüléket vásárolta. Ilyen esetben őrizze
meg a csomagolást.
• Ajánlatos legalább négy órát várni a készülék bekötésével és hagyni, hogy az olaj visszafolyjon a kompresszorba.
•Megfelelő levegőáramlást kell biztosítani a
készülék körül, ennek hiánya túlmelegedéshez vezet. Az elégséges szellőzés elérése érdekében kövesse a vonatkozó
üzembe helyezési utasításokat.
• Amikor csak lehetséges, a készülék hátlapja fal felé nézzen, hogy el lehessen kerülni
a forró alkatrészek (kompresszor, kondenzátor) megérintését vagy megfogását az
esetleges égési sérülések megelőzése érdekében.
• A készüléket nem szabad radiátorok vagy
tűzhelyek közelében elhelyezni.
• Ügyeljen arra, hogy a hálózati dugasz hozzáférhető legyen a készülék telepítése
után.
• A készüléket csak ivóvízhálózathoz csatlakoztassa.
20)
Szerviz
• A készülék szervizeléséhez szükséges
minden villanyszerelési munkát szakképzett villanyszerelőnek vagy kompetens személynek kell elvégeznie.
• A készüléket kizárólag arra felhatalmazott
szervizközpont javíthatja, és csak eredeti
pótalkatrészek használhatók.
Környezetvédelem
Ez a készülék sem a hűtőfolyadék-kerin-
gető rendszerben, sem a szigetelő
anyagokban nem tartalmaz az ózonréteget
károsító gázokat. A készüléket nem szabad a
lakossági hulladékkal és szeméttel együtt kidobni. A szigetelőhab gyúlékony gázokat tartalmaz: a készüléket a helyi hatóságoktól beszerezhető vonatkozó rendelkezésekkel
összhangban kell hulladékba helyezni. Vigyázzon, ne sérüljön meg a hűtőegység, különösen hátul a hőcserélő környéke. A készü-
léken használt és
anyagok újrahasznosíthatóak.
szimbólummal megjelölt
Működés
Bekapcsolás
Illessze a csatlakozódugót a hálózati aljzatba.
Forgassa a hőmérséklet-szabályozót az óramutató járásával megegyező irányban egy
közepes beállításra.
Kikapcsolás
A készülék kikapcsolásához forgassa a hő-
mérséklet-szabályozót "O" állásba.
Hőmérséklet-szabályozás
A hőmérséklet szabályozása automatikusan
történik.
A készülék üzemeltetéséhez a következők
szerint járjon el:
20) Ha van vízcsatlakozás.
50
• Forgassa a hőmérséklet-szabályozót az
alacsonyabb beállítások felé, hogy minimális hűtést érjen el.
• Forgassa a hőmérséklet-szabályozót a ma-
gasabb beállítások felé, hogy maximális
hűtést érjen el.
Általában egy közepes beállítás a legin-
kább megfelelő.
A pontos beállítás kiválasztásakor azonban
szem előtt kell tartani, hogy a készülék belsejében uralkodó hőmérséklet az alábbi tényezőktől függ:
• szobahőmérséklet
Page 51

• az ajtónyitások gyakorisága
• a tárolt élelmiszer mennyisége
• a készülék helye.
Fontos Ha a környezeti hőmérséklet magas,
vagy a készülék a maximális határig meg van
terhelve, a hűtőszekrényt pedig a
Első használat
legalacsonyabb értékre állították be,
előfordulhat, hogy folyamatosan hűt, s emiatt
dér képződik a belső falán. Ebben az esetben
a tárcsát a legmagasabb hőmérsékleti
értékre kell állítani az automatikus
jégmentesítés elindításához, ezzel pedig
csökkentett energiafogyasztást lehet elérni.
A készülék belsejének tisztítása
A készülék legelső használata előtt mossa ki
a készülék belsejét semleges szappanos langyos vízzel, hogy eltávolítsa a tökéletesen új
termékek tipikus szagát, majd alaposan szárítsa ki.
Napi használat
Friss élelmiszerek lefagyasztása
A fagyasztórekesz alkalmas friss élelmiszerek lefagyasztására, valamint fagyasztott és
mélyhűtött élelmiszerek hosszú távú tárolására.
Friss élelmiszerek lefagyasztásához nem
szükséges megváltoztatnia a közepes beállítást.
Azonban gyorsabb fagyasztási művelet érdekében forgassa a hőmérséklet-szabályozót a
magasabb beállítások felé, hogy maximális
hűtést érjen el.
Fontos Ilyen feltételek mellett a hűtőrekesz
hőmérséklete 0°C alá eshet. Ha ez történik,
állítsa a hőmérséklet-szabályozót melegebb
beállításra.
Helyezze a lefagyasztandó friss élelmiszert a
felső rekeszbe.
Fagyasztott élelmiszerek tárolása
Az első indításkor, illetve hosszabb használaton kívüli idő után, mielőtt az élelmiszereket a
rekeszbe pakolná, üzemeltesse legalább 2
óráig a készüléket a magasabb beállításokon.
Fontos Véletlenszerűen, például
áramkimaradás miatt bekövetkező leolvadás
esetén, amikor az áramszünet hosszabb
ideig tart, mint az az érték, amely a műszaki
Fontos Ne használjon mosószereket vagy
súrolóporokat, mert ezek megsérthetik a felületét.
jellemzők között a "felolvadási idő" alatt fel
van tüntetve, a felolvadt élelmiszert gyorsan
el kell fogyasztani, vagy azonnal meg kell
főzni, majd pedig a (kihűlés után) újra
lefagyasztani.
Kiolvasztás
A mélyfagyasztott vagy fagyasztott élelmiszerek használat előtt a hűtőrekeszben vagy
szobahőmérsékleten kiolvaszthatók, attól függően, hogy mennyi idő áll rendelkezésre eh-
hez a művelethez.
A kisebb darabok még akár fagyasztott állapotban, közvetlenül a fagyasztóból kivéve is
megfőzhetők: ebben az esetben a főzés ideje
meghosszabbodik.
Mozgatható polcok
A hûtõszekrény falai
több sor csúszósínnel vannak ellátva,
hogy a polcokat tetszés szerinti helyre
lehessen tenni.
51
Page 52

Az ajtó polcainak elhelyezése
Ha különbözõ méretû élelmiszercsomagok tárolásának szeretne helyet biztosítani, az ajtópolcokat
különbözõ magasságokba állíthatja.
Fokozatosan húzza
a polcot a nyilakkal
jelölt irányba, amíg
ki nem szabadul,
majd szükség szerint tegye új helyre.
A fagyasztókosarak kivétele a
fagyasztóból
A fagyasztókosarakon van egy ütközõ, amely
megakadályozza véletlen kivételüket vagy le-
Hasznos javaslatok és tanácsok
esésüket. Amikor ki szeretné venni a fagyasztóból, húzza maga felé a kosarat, és
amikor az elérte a végpontot, az elejét felfele
billentve vegye ki a kosarat.
Amikor vissza kívánja rakni, kissé emelje
meg a kosár elejét, hogy be lehessen illeszteni a fagyasztóba. Amikor túljutott a végpontokon, nyomja vissza a kosarakat a helyükre.
2
1
Normál működéssel járó hangok
• Esetleg egy halk csobogó vagy bugyborékoló hangot is lehet hallani, amikor a hűtő-
közeget a rendszer a hátsó tekercseken
vagy vezetéken. Ez normális jelenség.
• Amikor a kompresszor be van kapcsolva, a
hűtőszekrényben körbe halad a szivattyúzott anyag; ekkor zümmögő és pulzáló zaj
hallatszik a kompresszor felől. Ez normális
jelenség.
•A hőtágulás hirtelen recsegő zajt okozhat.
Ez egy természetes, veszélytelen fizikai jelenség. Ez normális jelenség.
• A kompresszor ki- vagy bekapcsolásakor
hallani lehet a hőmérséklet-szabályozó
halk kattanását. Ez normális jelenség.
Energiatakarékossági ötletek
• Ne nyitogassa gyakran az ajtót, illetve ne
hagyja a feltétlenül szükségesnél tovább
nyitva.
• Ha a környezeti hőmérséklet magas, a hő-
mérséklet-szabályozó magas beállításon
van, és a készülék teljesen meg van töltve,
52
be, előfordulhat, hogy a kompresszor folyamatosan üzemel, ami miatt jég vagy dér
képződik a párologtatón. Ha ez bekövetkezik, forgassa a hőmérséklet-szabályozót
alacsonyabb beállításokra, hogy lehetővé
tegye az automatikus leolvasztást, és így
takarékoskodjon az áramfogyasztással.
Ötletek friss élelmiszerek hűtéséhez
A legjobb teljesítmény elérése érdekében:
• ne tároljon meleg ételt vagy párolgó folyadékot a hűtőszekrényben
• takarja le vagy csomagolja be az élelmiszereket, különösen ha valamelyiknek erős
az aromája
• úgy helyezze be az ételeket, hogy a levegő
szabadon körbe tudja járni őket.
Ötletek a hűtőszekrény használatához
Hasznos tanácsok:
Hús (minden fajtája): csomagolja nejlonzacskóba és helyezze a zöldséges fiók feletti
üveglapra.
Biztonsági okokból ne tárolja egy vagy két
napnál hosszabb ideig ily módon a húst.
Page 53

Készételek, hidegtálak stb.: ezeket le kell takarni, majd bármelyik polcon elhelyezhetők.
Gyümölcsök és zöldségek: alaposan meg kell
őket tisztítani és számukra külön biztosított fiók(ok)ban elhelyezni.
Vaj és sajt: speciális légmentes tartóedényekbe kell helyezni, vagy alufóliába vagy
nejlonzacskókba csomagolni őket, és a lehető legtöbb levegőt kiszorítani körülöttük.
Tejesüvegek: legyen kupakjuk, és tárolja őket
az ajtó palacktartó rekeszében.
Ha a banán, krumpli, hagyma vagy fokhagyma nincs becsomagolva, tilos őket a hűtő-
szekrényben tartani.
Ötletek fagyasztáshoz
Ha a legjobban szeretné hasznosítani a fagyasztási eljárást, tartson be néhány fontos
ajánlást:
• az adatlapon megtekintheti azt a maximális
élelmiszer-mennyiséget, amely 24 órán belül lefagyasztható;
• a fagyasztási folyamat 24 órát vesz igénybe. Ez alatt az időszak alatt nem szabad
további fagyasztásra váró élelmiszert betenni;
• csak első osztályú, friss és alaposan megtisztított élelmiszereket fagyasszon le;
• készítsen kisebb adag ételeket, hogy gyorsan és teljesen megfagyjanak, és hogy a
későbbiekben csak a kívánt mennyiséget
kelljen felolvasztani;
• csomagolja az ételt alufóliába vagy folpackba, és ellenőrizze, hogy sikerült-e a
csomagolással kizárni a levegőt;
• ne hagyja, hogy a friss, még meg nem fagyott élelmiszerek hozzáérjenek a már le-
fagyasztott adagokhoz, mert különben az
utóbbiaknak megemelkedik a hőmérsékle-
te;
• a zsírszegény ételeket könnyebben és hosszabb ideig lehet tárolni, mint a zsírosakat;
a só csökkenti az élelmiszerek élettartamát;
• ha a vízből képződött jeget a fagyasztórekeszből történő kivétel után rögtön fogyasztani kezdik, fagyásból eredő égési
sérüléseket okozhat a bőrön;
• ajánlatos minden egyes csomagon feltüntetni a lefagyasztás dátumát, hogy nyomon
lehessen követni a tárolási időket.
Ötletek fagyasztott élelmiszerek
tárolásához
Annak érdekében, hogy a legjobb teljesítményt érje el a készüléknél:
•ellenőrizze, hogy a kereskedelmileg lefa-
gyasztott élelmiszereket megfelelően tárolta-e az eladó;
• gondoskodjon róla, hogy a fagyasztott élelmiszerek a lehető legrövidebb időn belül elkerüljenek az élelmiszerüzletből a fagyasztóba.
• ne nyitogassa gyakran az ajtót, illetve ne
hagyja a feltétlenül szükségesnél tovább
nyitva.
• A kiolvasztott élelmiszerek nagyon gyorsan
romlanak, nem fagyaszthatók vissza.
• Ne lépje túl az élelmiszergyártó által feltüntetett tárolási időtartamot.
Ápolás és tisztítás
Figyelem Bármilyen karbantartási
művelet előtt áramtalanítsa a készüléket
a hálózati csatlakozódugó kihúzásával.
Ennél a készüléknél szénhidrogén van a
hűtőegységben; ezért csak megbízott
szerelő végezhet rajta karbantartást, és töltheti fel újra.
Időszakos tisztítás
A készüléket rendszeresen tisztítani kell:
• a készülék belsejét és a tartozékokat langyos vízzel és egy kevés semleges mosogatószerrel tisztítsa meg.
• rendszeresen ellenőrizze az ajtótömítéseket, és törölje tisztára, hogy biztosítsa azok
tisztaságát és szennyeződésmentességét.
53
Page 54

• gondosan öblítse le és szárítsa meg.
Fontos Ne húzza meg, ne mozgassa és ne
sértse meg a készülékházban lévő csöveket
és/vagy kábeleket.
Soha ne használjon mosószereket,
súrolóporokat, erőteljesen illatosított
tisztítószereket vagy viaszos
polírozószereket a beltér tisztításához, mivel
ezek károsítják a felületet, és erőteljes illatot
hagynak maguk után.
Tisztítsa meg a kondenzátort (fekete rács),
majd a készülék hátulján lévő kompresszort
kefével vagy porszívóval. Ezzel a művelettel
javítani tud a készülék teljesítményén, és villamos áramot takaríthat meg a fogyasztásnál.
Fontos Ügyeljen arra, hogy ne sérüljön meg
a hűtőrendszer.
Számos konyhai felülettisztító olyan vegyszereket tartalmaz, amelyek megtámadhatják/károsíthatják a készülékben használt műanya-
gokat. Ebből az okból javasoljuk, hogy a készülék külső felületét kizárólag meleg vízzel
tisztítsa, amelyhez egy kevés mosogatószert
adott.
A tisztítás után csatlakoztassa a készüléket a
táphálózathoz.
A hûtõszekrény leolvasztása
Rendeltetésszerû használat közben a dér
minden alkalommal automatikusan leolvad a
hûtõrekesz párologtatójáról, amint leáll a
kompresszor. A jégmentesítéssel keletkezett
víz a készülék hátulján a kompresszor felett
egy vályún keresztül belefolyik egy különleges tartályba, és ott elpárolog.
Fontos, hogy a hûtõszekrény-csatorna közepén látható lefolyónyílást, amely a jégmentesítésbõl származó vizet befogadja, rendszeresen megtisztítsa, nehogy a víz túlfolyjon
és rácsöpögjön a készülékben lévõ élelmiszerekre. Használja a kapott speciális tisztítót, amely már eleve bent található a lefolyónyílás belsejében.
A fagyasztó leolvasztása
Ennek a modellnek a fagyasztórekesze "no
frost" típusú. Ez azt jelenti, hogy a működés
közben nem képződik dér a készülékben,
sem a belső falakon, sem pedig az élelmiszereken.
A dér hiánya annak köszönhető, hogy a rekesz belsejében folyamatos a hideg levegő
keringetése, amelyet egy automatikus vezérlésű ventillátor biztosít.
Mit tegyek, ha...
Figyelem A hibakeresés elõtt válassza
le a készüléket a táphálózatról.
Csak szakképzett villanyszerelõ vagy
kompetens személy végezhet el bármilyen
olyan hibaelhárítást, amely nem szerepel a
jelen kézikönyvben.
Probléma Lehetséges ok Megoldás
A készülék zajos A készülék alátámasztása
nem megfelelő.
54
Fontos A készülék működése bizonyos
hangokkal jár (kompresszor és keringési
hang). Ez azonban a normál működés része,
vagyis nem jelent meghibásodást.
Ellenőrizze, hogy a készülék
stabilan áll-e (mind a négy lábnak a padlón kell állnia).
Page 55

Probléma Lehetséges ok Megoldás
A kompresszor folyamatosan működik
Lehet, hogy a hőmérséklet-
szabályozó beállítása nem
Állítson be magasabb hőmér-
sékletet.
megfelelő.
Az ajtó nincs jól becsukva. Olvassa el "Az ajtó bezárása"
c. szakaszt.
Túl gyakori az ajtó nyitogatá-
sa.
A termékhőmérséklet túl ma-
gas.
Ne tartsa nyitva az ajtót a szükségesnél hosszabb időn át.
Hagyja, hogy a termékhőmér-
séklet a szobahőmérsékletre
csökkenjen a tárolás előtt.
A szobahőmérséklet túl ma-
gas.
Víz folyik le a hűtőszek-
rény hátlapján.
Az automatikus leolvasztási
folyamat során a zúzmara le-
Csökkentse a szobahőmérsék-
letet.
Ez helyes.
olvad a hátlapon.
Víz folyik be a hűtőszek-
A vízkifolyó eltömődött. Tisztítsa ki a vízkifolyót.
rénybe
Az élelmiszerek megakadá-
lyozzák, hogy a víz a vízgyűj-
Ügyeljen rá, hogy a termékek
ne érjenek a hátsó falhoz.
tőbe folyjon.
Víz folyik a padlóra. A leolvasztási vízkifolyó nem
a kompresszor fölötti párologtató tálcához csatlakozik.
Túl sok a jég és a zúzmara.
Az élelmiszerek nincsenek
megfelelően becsomagolva.
Csatlakoztassa a leolvasztási
vízkifolyót a párologtató tálcához.
Csomagolja be jobban az élelmiszereket.
Az ajtó nincs jól becsukva. Olvassa el "Az ajtó bezárása"
c. szakaszt.
Lehet, hogy a hőmérséklet-
szabályozó beállítása nem
Állítson be magasabb hőmér-
sékletet.
megfelelő.
A készülékben a hőmér-
séklet túl alacsony.
Lehet, hogy a hőmérséklet-
szabályozó beállítása nem
Állítson be magasabb hőmér-
sékletet.
megfelelő.
A készülékben a hőmér-
séklet túl magas.
Lehet, hogy a hőmérséklet-
szabályozó beállítása nem
Állítson be alacsonyabb hőmér-
sékletet.
megfelelő.
Az ajtó nincs jól becsukva. Olvassa el "Az ajtó bezárása"
c. szakaszt.
55
Page 56

Probléma Lehetséges ok Megoldás
A termékhőmérséklet túl ma-
gas.
Túl sok termék van tárolva
egy időben.
A hűtőszekrényben a
hőmérséklet túl magas.
A fagyasztóban a hő-
mérséklet túl magas.
A készülék nem műkö-
dik.
A hálózati dugasz nincs he-
A készülék nem kap áramot.
A lámpa nem működik. A lámpa készenléti üzemmód-
A lámpa hibás. Olvassa el az "Izzó kicserélé-
Nincs hideglevegő-keringetés
a készülékben.
A termékek túl közel vannak
egymáshoz.
A készülék ki van kapcsolva. Kapcsolja be a készüléket.
lyesen csatlakoztatva a hálózati aljzatba.
Nincs feszültség a hálózati aljzatban.
ban van.
Hagyja, hogy a termékhőmér-
séklet a szobahőmérsékletre
csökkenjen a tárolás előtt.
Tároljon kevesebb terméket
egy időben.
Gondoskodjon arról, hogy legyen hideglevegő-keringetés a
készülékben.
Tárolja a termékeket úgy, hogy
legyen hideglevegő-keringés a
készülékben.
Csatlakoztassa a hálózati dugaszt helyesen a hálózati aljzatba.
Csatlakoztasson egy másik
elektromos készüléket a hálózati aljzatba. Forduljon szakképzett villanyszerelőhöz.
Zárja be és nyissa ki az ajtót.
se" c. szakaszt.
Ha a készülék a fenti ellenõrzések elvégzése
után még mindig nem megfelelõen mûködik,
forduljon az ügyfélszolgálati központhoz.
Az izzó cseréje
1. Válassza le a készüléket a hálózatról.
2. Nyomja be a mozgatható részt a burkolat
kioldásához (1).
3. Vegye le a lámpaburkolatot (2).
4. Olyan csereizzót használjon, melynek tel-
jesítményjellemzői azonosak az eredetivel, és kifejezetten háztartási eszközökhöz gyártották.
5. Helyezze vissza a lámpaburkolatot.
6. Csatlakoztassa a készüléket.
7. Nyissa ki az ajtót. Győződjön meg arról,
hogy a világítás bekapcsol-e.
56
1
2
Az ajtó záródása
1. Tisztítsa meg az ajtótömítéseket.
2. Szükség esetén állítsa be az ajtót. Olvassa el az "Üzembe helyezés" c. szakaszt.
3. Szükség esetén cserélje ki a hibás ajtótömítéseket. Forduljon a márkaszervizhez.
Page 57

Műszaki adatok
Az 1/1998. (I. 12.) IKIM sz. miniszteri rendeletnek megfelelően
ZRB632FW ZRB634FW ZRB638FW
Gyártó védjegye Electrolux
A készülék kategóriája Hűtőszekrény - fagyasztószekrény
Magasság mm 1750 1850 2010
Szélesség mm 595 595 595
Mélység mm 658 658 658
Hűtőtér nettó térfogata Litre 223 245 285
Fagyasztótér nettó tér-
fogata
Energiaosztály (A++ és
G között, ahol az A++ a
leghatékonyabb, a G a
legkevésbé hatékony)
Energiafogyasztás (a
használattól és az elhelyezéstől függően)
Fagyasztótér csillagszám jele
Áramkimaradási biztomság
Fagyasztási teljesítmény
Klímaosztály SN/N/ST SN/T SN/N/ST
Feszültség Volt 230 230 230
Zajteljesítmény dB/A 42 42 42
Beépíthető Nem Nem Nem
Litre 78 78 78
A A A
kWh/év 346 357 374
**** **** ****
óra 16 18 18
kg/24 óra 4 4 4
A műszaki adatok megtalálhatók a készülék
belsejében bal oldalon lévő adattáblán és az
energiatakarékossági címkén.
Üzembe helyezés
Figyelem A készülék üzembe helyezése
előtt figyelmesen olvassa el a
"Biztonsági információk" c. szakaszt saját
biztonsága és a készülék helyes
üzemeltetése érdekében.
Elhelyezés
Olyan helyen helyezze üzembe a készüléket,
amelynek környezeti hőmérséklete megfelel
annak a klímabesorolásnak, amely a készülék adattábláján fel van tüntetve:
57
Page 58

Klíma-
besoro-
lás
SN +10°C és +32°C között
N +16°C és +32°C között
ST +16°C és + 38°C között
T +16°C és + 43°C között
Környezeti hőmérséklet
Elhelyezés
A készüléket minden hõforrástól, például radiátoroktól, kazánoktól, közvetlen napsütéstõl
stb. távol kell üzembe helyezni. Gondoskodjon arról, hogy a levegõ szabadon áramolhasson a készülék hátlapja körül. A legjobb
teljesítmény elérése érdekében, ha a készüléket egy falra függesztett elem alá helyezik,
a készülék felsõ lapja és a fali elem között
legalább 100 mm minimális távolságot kell
hagyni. Azonban az az ideális, ha a készüléket nem egy falra függesztett elem alatt helyezik el. A pontos vízszintezés a készülék alján található egy vagy több állítható láb révén
van biztosítva.
Vigyázat Lehetõvé kell tenni, hogy a
készüléket le lehessen kötni a hálózati
áramról; ezért a dugónak az üzembe
helyezés után legyen könnyen elérhetõnek
kell lennie.
min.100 mm
A
B
4. Csavarozza be a csavart.
2
1
4
Vízszintbe állítás
Amikor elhelyezi a
készüléket, ügyeljen
arra, hogy vízszintben álljon. Ez az alul
elöl található két
szabályozható láb
segítségével érhető
el.
A polctartók eltávolítása
A készülékében olyan polctartók találhatók,
amelyek segítségével a polcokat szállítás
közben fixálni lehet.
3
20 mm
Hátsó távtartók
A két távtartó a készülék dokumentációját tartalmazó tasakban található.
A távtartók felszerelésekor az alábbi módszert kövesse:
1. Lazítsa meg a csavart.
2. Helyezze a távtartót a csavarfej alá.
3. Fordítsa a távtartót a megfelelő helyzetbe.
58
Page 59

A polctartókat az
alábbi eljárással tudja kivenni:
1. Forgassa a polctartókat a nyíl (A)
irányába.
2. Emelje ki a polcot hátulról, és
nyomja előrefele,
amíg ki nem szabadul (B).
3. Vegye ki a rögzítőket (C).
Elektromos csatlakoztatás
Az elektromos csatlakoztatás előtt győződjön
meg arról, hogy az adattáblán feltüntetett feszültség és frekvencia megegyezik-e a háztartási hálózati áram értékeivel.
A készüléket kötelező földelni. A elektromos
hálózatba illő vezeték dugója ilyen érintke-
m1
m2
m6
m5
zéssel van ellátva. Ha a háztartási hálózati
csatlakozóaljzat nincs leföldelve, csatlakoztassa a készüléket az érvényben lévő jogszabályok szerint külön földpólushoz, miután
konzultált egy képesített villanyszerelővel.
A gyártó minden felelősséget elhárít magától,
ha a fenti biztonsági óvintézkedéseket nem
tartják be.
Ez a készülék megfelel az EGK irányelveknek.
Az ajtó megfordításának lehetõsége
Vigyázat Bármilyen mûvelet
végrehajtása elõtt húzza ki a dugaszt a
hálózati aljzatból.
Fontos Azt javasoljuk, hogy a következõ
mûveletek végrehajtásához vegye igénybe
egy másik személy segítségét, aki a
mûveletek során erõsen fogja a készülék
ajtajait.
1
m4
m3
59
Page 60

• Nyissa ki az ajtó-
kat. Csavarozza ki
a középsõ zsanért
(m2). Vegye le a
mûanyag távtartót
(m1).
• Távolítsa el a táv-
tartót (m6), és helyezze át a zsanér
forgócsapjának
(m5) másik oldalára.
• Vegye le az ajtó-
kat.
• Távolítsa el a kö-
zépsõ zsanér bal
oldali borítócsapját
(m3, m4), és helyezze át a másik
oldalra.
• Illessze a középsõ
zsanér csapját
(m5) az alsó ajtó
bal oldali furatába.
• Csavarozza ki az
alsó zsanért (b1).
• Távolítsa el a bal
oldali borítócsapot
(b4), és helyezze
át a másik oldalra.
• Csavarozza vissza
az alsó zsanért
(b1) az ellenkezõ
oldalra.
• Csavarja le az alsó
zsanér forgócsapját (b2) és a távtartót (b3), majd szerelje fel õket a másik oldalon.
• Távolítsa el mindkét ajtó felsõ oldalán lévõ dugaszokat (1), és helyezze át õket a másik
oldalra.
• Illessze az alsó ajtót az alsó zsanér
forgócsapjára (b2).
• Illessze a középsõ
zsanért (m2) az alsó ajtó bal oldali furatába.
• Csavarozza ki a
felsõ zsanér forgócsapját, és helyezze át az ellenkezõ
oldalra.
• Illessze a felsõ ajtót a felsõ ajtó forgócsapjára.
• Illessze a felsõ ajtót a középsõ zsanér forgócsapjára
(m5), kissé megdöntve mindkét ajtót.
• Csavarozza vissza
a középsõ zsanért
(m2). Ne feledkezzen meg a mûanyag távtartóról
(m1).
Hajtson végre egy végleges ellenõrzést, hogy
megbizonyosodjon következõkrõl:
• Minden csavar meg van szorítva.
• Az ajtók élei párhuzamosan futnak a készülék oldalsó élével.
• A mágneses tömítés a konyhaszekrényhez
tapad.
• Az ajtó jól nyílik és csukódik.
Ha a környezeti hőmérséklet alacsony (pl. télen), előfordulhat, hogy a tömítés nem tapad
Környezetvédelmi tudnivalók
A terméken vagy a csomagoláson található
szimbólum azt jelzi, hogy a termék nem
kezelhető háztartási hulladékként. Ehelyett a
terméket el kell szállítani az elektromos és
elektronikai készülékek újrahasznosítására
szakosodott megfelelő begyűjtő helyre.
Azzal, hogy gondoskodik ezen termék helyes
hulladékba helyezéséről, segít megelőzni
60
hozzá tökéletesen a készülékszekrényhez.
Ebben az esetben meg kell várnia a tömítés
természetes illeszkedését.
Ha nem szeretné saját maga végrehajtani a
fenti mûveleteket, forduljon a legközelebbi
szervizközponthoz. A szervizszakember elvégzi az ajtók megfordítását költségtérítés ellenében.
azokat, a környezetre és az emberi
egészségre gyakorolt potenciális kedvezőtlen
következményeket, amelyeket ellenkező
esetben a termék nem megfelelő
hulladékkezelése okozhatna. Ha
részletesebb tájékoztatásra van szüksége a
termék újrahasznosítására vonatkozóan,
kérjük, lépjen kapcsolatba a helyi
Page 61

önkormányzattal, a háztartási hulladékok
kezelését végző szolgálattal vagy azzal a
bolttal, ahol a terméket vásárolta.
61
Page 62

62
Page 63

63
Page 64

www.zanussi.com/shop
210621746-A-512010
 Loading...