


Fridge freezer
Réfrigérateur-congélateur
Kühl-Gefrierschrank
Frigo-congelatore
User manual
Manuel d'utilisation
Benutzerhandbuch
Manuale per l’utente
FR
ZRB22130WA
2
14
26
38
DE
IT
EN

2
www.zanussi.com
Safety information _____________ 2
Safety instructions_____________ 3
Control ___________________ 4
First Use __________________ 5
Daily Use__________________ 5
Helpful hints and tips ___________ 6
Care and cleaning _____________ 7
What to do if … ______________ 8
Technical data _______________ 9
Installation _________________ 10
Environmental concerns__________ 12
Contents
Subject to change without notice.
Safety information
Before the installation and use of the appliance, carefully read the
supplied instructions. The manufacturer is not responsible if an incorrect installation and use causes injuries and damages. Always
keep the instructions with the appliance for future reference.
Children and vulnerable people safety
• This appliance can be used by children aged from 8 years and
above and persons with reduced physical, sensory or mental
capabilities or lack of experience and knowledge if they have
been given supervision or instruction concerning use of the appliance in a safe way and understand the hazards involved
• Do not let children play with the appliance
• Cleaning and user maintenance shall not be made by children
without supervision
• Keep all packaging away from children
General Safety
• This appliance is intended to be used in household and similar
applications such as:
– Farm houses; staff kitchen areas in shops, offices and other
working environments
– By clients in hotels, motels, bed and breakfast and other resi-
dential type environments
• Keep ventilation openings, in the appliance enclosure or in the
built-in structure, clear of obstruction
• Do not use mechanical devices or other means to accelerate
the defrosting process, other than those recommended by the
manufacturer
3
www.zanussi.com
• Do not damage the refrigerant circuit
• Do not use electrical appliances inside the food storage compartments of the appliance, unless they are of the type recommended by the manufacturer
• Do not use water spray and steam to clean the appliance
• Clean the appliance with a moist soft cloth. Only use neutral
detergents. Do not use abrasive products, abrasive cleaning
pads, solvents or metal objects
• Do not store explosive substances such as aerosol cans with a
flammable propellant in this appliance
• If the supply cord is damaged, it must be replaced by the manufacturer, its service agent or similarly qualified persons in order
to avoid a hazard
Safety instructions
Installation
Warning! Only a qualified person must
install this appliance
• Remove all the packaging
• Do not install or use a damaged appliance
• Obey the installation instruction supplied with the appliance
• Always be careful when you move the
appliance because it is heavy. Always
wear safety gloves
• Make sure the air can circulate around
the appliance
• Wait at least 4 hours before connecting
the appliance to the power supply. This
is to allow the oil to flow back in the
compressor
• Do not install the appliance close to
radiators or cookers, oven or hobs
• The rear of the appliance must stand
against the wall
• Do not install the appliance where there
is direct sunlight
• Do not install this appliance in areas
that are too humid or too cold, such as
the construction appendices, garages
or wine cellars
• When you move the appliance, lift it by
the front edge to avoid scratching the
floor
Electrical connection
Warning! Risk of fire and electrical
shock.
• The appliance must be earthed
• All electrical connections should be
made by a qualified electrician
• Make sure that the electrical information on the rating plate agrees with
the power supply. If not, contact an
electrician
• Always use a correctly installed shockproof socket
• Do not use multi-plug adapters and
extension cables
• Make sure not to cause damage to the
electrical components (e.g. mains plug,
mains cable, compressor). Contact the
Service or an electrician to change the
electrical components
• The mains cable must stay below the
level of the mains plug
• Connect the mains plug to the mains
socket only at the end of the installation.
Make sure that there is access to the
mains plug after the installation
4
www.zanussi.com
Control
Control
Starting up and temperature regulation
Insert the mains plug into the socket with
earthing contact. When the refrigerator compartment door is open, the internal lighting
is switched on. The temperature regulator is
located at the right-hand side of the refrigerator compartment.
Position "0" means
Off
Turn the knob clockwise to switch on the
appliance.
Position "1" means
Maximum temperature, warmest setting.
• Do not pull the mains cable to disconnect the appliance. Always pull the
mains plug
Use
Warning! Risk of injury, burns, electri-
cal shock or fire.
• Do not change the specification of this
appliance
• Do not put electrical appliances (e.g.
ice cream makers) in the appliance
unless they are stated applicable by the
manufacturer
• Be careful not to cause damage to the
refrigerant circuit. It contains isobutane
(R600a), a natural gas with a high level
of environmental compatibility. This gas
is flammable
• If damage occurs to the refrigerant circuit, make sure that there are no flames
and sources of ignition in the room.
Ventilate the room
• Do not let hot items to touch the plastic
parts of the appliance
• Do not put soft drinks in the freezer
compartment. This will create pressure
on the drink container
• Do not store flammable gas and liquid
in the appliance
• Do not put flammable products or items
that are wet with flammable products in,
near or on the appliance
• Do not touch the compressor or the
condenser. They are hot
• Do not remove or touch items from the
freezer compartment if your hands are
wet or damp
• Do not freeze again food that has been
thawed
• Obey the storage instructions on the
packaging of frozen food
Care and cleaning
Warning! Risk of injury or damage to
the appliance.
• Before maintenance, deactivate the appliance and disconnect the mains plug
from the mains socket
• This appliance contains hydrocarbons
in the cooling unit. Only a qualified
person must do the maintenance and
the recharging of the unit
• Regularly examine the drain of the appliance and if necessary, clean it. If the
drain is blocked, defrosted water collects in the bottom of the appliance
Disposal
Warning! Risk of injury or suffocation.
• Disconnect the appliance from the
mains supply
• Cut off the mains cable and discard it
• Remove the door to prevent children
and pets to be closed inside of the
appliance
• The refrigerant circuit and the insulation
materials of this appliance are ozonefriendly
• The insulation foam contains flammable
gas. Contact your municipal authority
for information on how to discard the
appliance correctly
• Do not cause damage to the part of
the cooling unit that is near the heat
exchanger
5
www.zanussi.com
Position "7" (end stop) means
Lowest temperature, coldest setting.
We recommend a setting of 3 or 4. If you
want a higher or lower temperature, turn the
regulator accordingly.
Important! In the event of a high ambient temperature (e.g. on hot summer days)
and a cold setting (6 or 7), the compressor
may run continuously. Cause: If the ambient
temperature is high, the compressor must run
continuously to maintain the low temperature
in the appliance.
First use
Cleaning the interior
Before using the appliance for the first time,
clean the interior with lukewarm water and
some neutral soap to remove the typical smell
of a brand-new product. Dry thoroughly.
Important! Do not use detergents or abrasive powders, as these will damage the finish.
Daily use
Accessories
Movable shelves
The walls of the refrigerator are equipped with
a series of runners so that the shelves can be
positioned as desired.
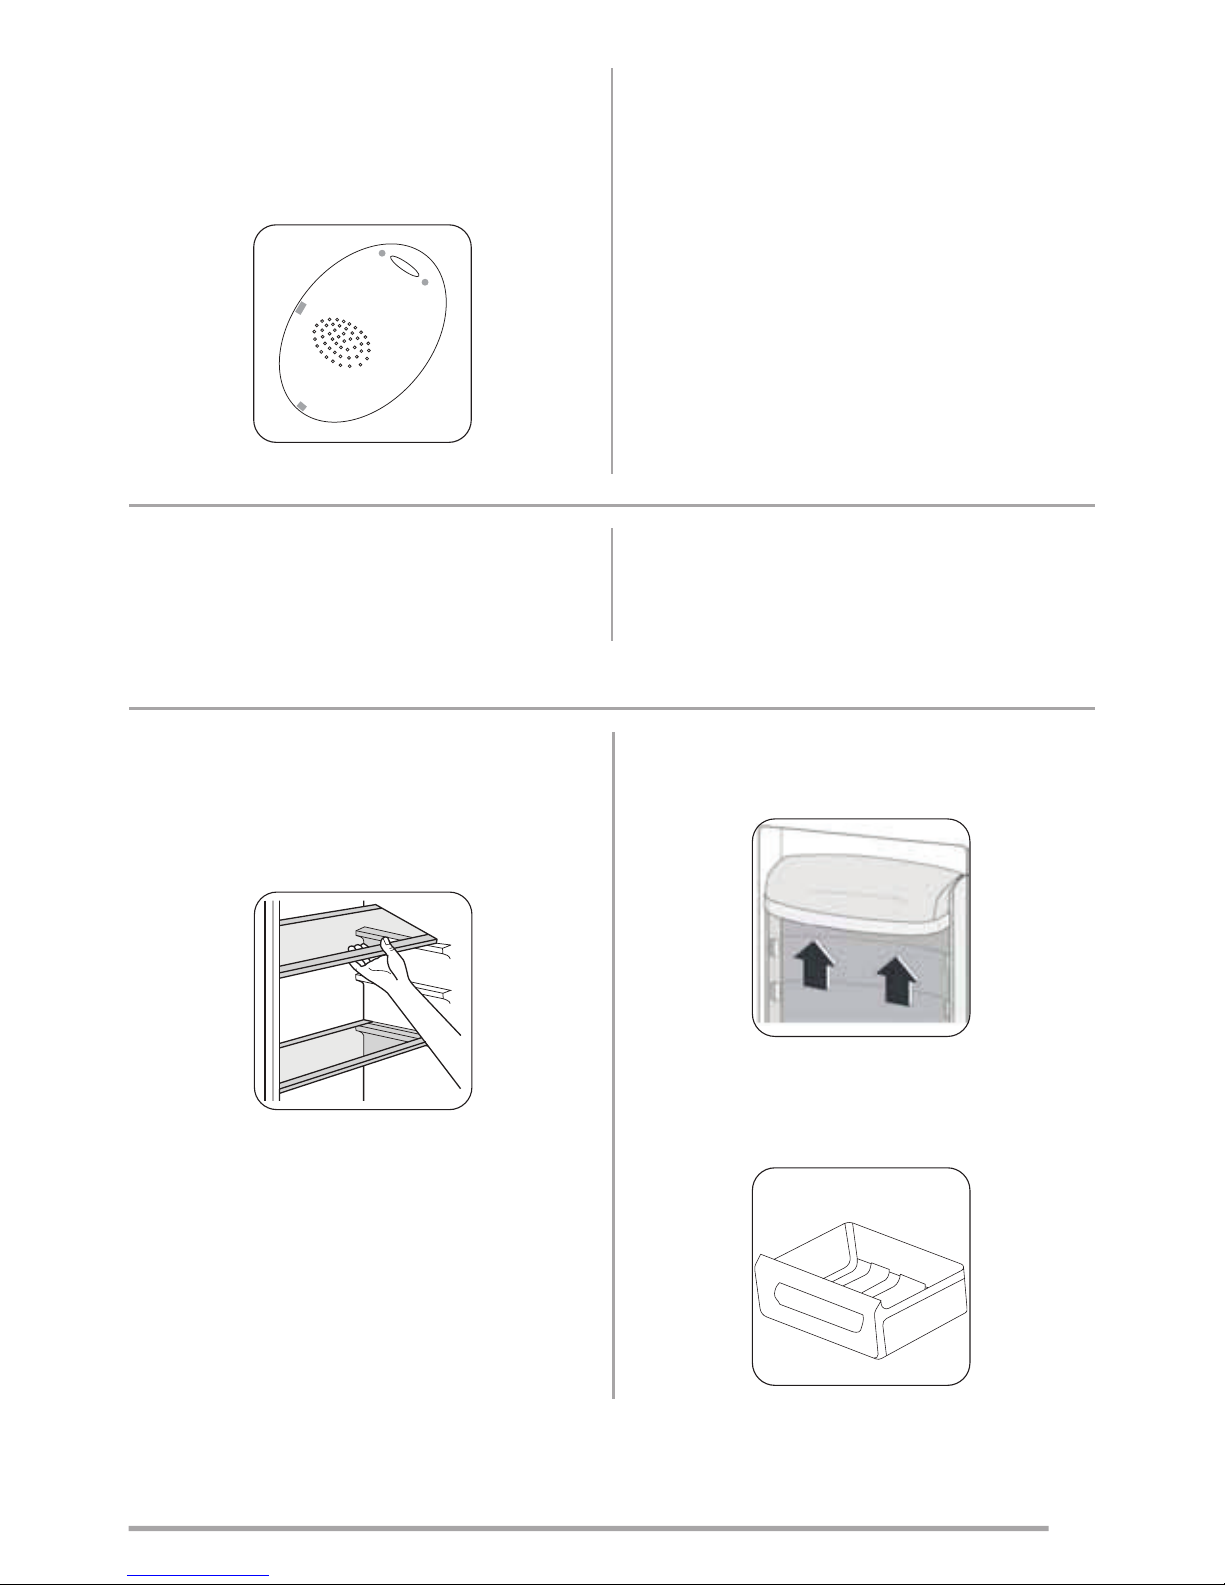
Positioning the door shelves
To permit storage of food packages of various
sizes, the door shelves can be placed at different heights.
Adjust the shelves as follows: Gradually pull
the shelf in the direction of the arrows until it
comes free, then reposition as required.
Vegetable drawer
The drawer is suitable for storing fruit and
vegetables.

6
www.zanussi.com
Freezing fresh food
• The freezer compartment is suitable for
freezing fresh food and storing frozen
and deep-frozen food for a long time
• Place the fresh food to be frozen in the
bottom compartment
• The maximum amount of food that can
be frozen in 24 hours is specified on
the rating plate, a label located on the
inside of the appliance
• The freezing process takes 24 hours.
during this period do not add other food
to be frozen
Storing frozen foods
When first starting-up or after a period out of
use. Before putting the food in the compartment, let the appliance run for at least two
hours on the highest settings.
Important! In the event of accidental defrosting, for example due to a power failure that
lasts longer than the value shown in the technical data under "rising time", the defrosted
food must be consumed quickly or cooked
immediately and then re-frozen (after cooling).
Defrosting
Prior to being used, deep-frozen or frozen
food can be thawed in the refrigerator compartment or at room temperature, depending
on the time available for this. Smaller pieces
can even be taken directly from the freezer
and cooked from frozen. In this case, cooking
will take a little longer.
Making ice cubes
This appliance is equipped with one or more
trays for the production of ice- cubes.
Helpful hints and tips
Normal operating sounds
• You may hear a faint gurgling and a
bubbling sound when the refrigerant
is pumped through the coils or tubing.
These operating sounds are normal
• When the compressor is on, the refrigerant is being pumped around and you
will hear a whirring sound and a pulsating noise from the compressor. These
operating sounds are normal
• Thermal expansion may cause a sudden
cracking noise. This noise is natural and
not a physical phenomenon
Ideas for saving energy
• Not open the door frequently or leave it
open longer than absolutely necessary
• If the ambient temperature is high and
the Temperature Regulator is set to
low temperature and the appliance is
fully loaded, the compressor may run
continuously, causing frost or ice on
the evaporator. If this happens, set the
Temperature Regulator toward warmer
settings to allow automatic defrosting
and so a saving in electricity consumption
Hints for fresh food refrigeration
To obtain the best performance:
• Do not store warm food or evaporating
liquids in the refrigerator
• Do cover or wrap the food, particularly if
it has a strong flavour
• Position food so that air can circulate
freely round it
Hints for refrigeration
Tips:
Meat (all types): Wrap meat in food-safe
bags and place on the glass shelf above the
vegetable drawer.
For safety, store in this way only one or two
days at the most.
Pre-cooked food, cold meals etc. These
should be covered and placed on one of the
shelves. Fruit and vegetables: Clean thoroughly and place in the designated drawer(s).
Butter and cheese: These should always
be placed in special airtight containers or
wrapped in aluminium foil or food-safe bags
so that there is as little air as possible in the
package.
Milk bottles: Please always store milk bottles
with a lid and in the bottle rack in the door.
7
www.zanussi.com
Bananas, potatoes, onions and garlic, if not
packed, must not be kept in the refrigerator.
Hints for freezing
To help you make the most of the freezing
process, here are some Important! hints:
• The maximum quantity of foods to
freeze in 24 hours is shown on the serial number plate
• The freezing process takes 24 hours.
No further food to be frozen should be
added during this period
• Only freeze top quality, fresh and thoroughly cleaned, foodstuffs
• Prepare food in small portions to enable
it to be rapidly and completely frozen
and to make it possible subsequently to
thaw only the quantity required
• Wrap up the food in aluminium foil or
polythene and make sure that the packages are airtight
• Do not allow fresh, unfrozen food to
touch food which is already frozen, thus
avoiding a rise in temperature of the
latter
• Lean foods store better and longer than
fatty ones; salt reduces the storage life
of food
• Water ices, if consumed immediately
after removal from the freezer compartment, can possibly cause the skin to be
freeze burnt
• It is advisable to show the freezing in
date on each individual pack to enable
you to keep tab of the storage time
Hints for storage of frozen food
To obtain the best performance from this appliance, you should:
• Make sure that the commercially frozen
foodstuffs were adequately stored by
the retailer
• Be sure that frozen foodstuffs are transferred from the food-store to the freezer
in the shortest possible time
• Not open the door frequently or leave it
open longer than absolutely necessary
• Once defrosted, food deteriorates
rapidly and cannot be refrozen
• Do not exceed the storage period indicated by the food manufacturer
Care and cleaning
Cleaning
For hygienic reasons the appliance interior,
including interior accessories, should be
cleaned regularly.
Warning! The appliance must not be
connected to the mains during cleaning.
Danger of electrical shock! Before cleaning,
switch off the appliance and remove the plug
from the mains or switch off the circuit
breaker or fuse. Never clean the appliance
with a steam cleaner. Moisture could accumulate in the electrical components, which leads
to the risk of electric shock. Hot vapours can
lead to the damage of plastic parts. The
appliance must be dry before it is placed back
into service.
Important! Ethereal oils and organic solvents
can attack plastic parts, e.g. lemon juice, juice
from orange peel, butyric acid or cleaners that
contain acetic acid.
• Do not allow such substances to come
into contact with appliance parts
• Do not use abrasive cleaners
• Remove any food from the appliance.
Store it in a cool place, well covered
• Switch off the appliance and remove
the plug from the mains or switch off
the appliance with the circuit breaker
or fuse
• Clean the appliance and the interior
accessories with a cloth and lukewarm
water. Commercially available dish
washing detergents may also be used.
After cleaning wipe with fresh water
and rub dry
• Accumulation of dust at the condenser
increases energy consumption. For this
reason, clean the heat exchanger at the
back of the appliance once a year with
a soft brush or a vacuum cleaner

8
www.zanussi.com
• Check the water drainage hole on the
rear wall of the refrigerator compartment. Clear a blocked drainage hole
with the aid of a blunt pencil and be
careful not to damage the casing with
sharp objects
• After everything is dry place appliance
back into service
Defrosting the freezer compartment
The rear wall of the refrigerator compartment
is covered in frost while the compressor is
running and thaws when the compressor is
not running. The water from the thawing frost
evaporates by itself.
However, with time, a layer of ice forms in
the freezer compartment. This should be
removed.
Never use sharp metal tools to scrape off
frost and ice from the evaporator as this may
damage it. However, if a very thick layer of ice
forms on the interior lining, you should fully
defrost the appliance. Proceed as follows:
• Disconnect the mains plug from the
mains socket
• Remove any frozen food, wrap it in
several layers of newspaper and put it
in a cool place
• Leave the appliance door open and
place a container under the appliance
to collect the defrost water
• When defrosting is completed, dry the
interior thoroughly
• Reinsert the mains plug into the socket
to switch on the appliance
What to do if …
Caution! Before troubleshooting, disconnect
the mains plug from the socket.
Only a qualified electrician or qualified person
may repair a fault that is not described in this
instruction manual.
Important! Certain sounds occur whilst the
appliance is in operation (compressor and
refrigerant circulation).
Problem Probable cause Remedy
The appliance
does not operate.
The appliance is not activated. Remedy Switch on the appliance.
Mains plug is not plugged in or
is loose.
Insert mains plug.
The fuse has blown or is faulty. Check and replace the fuse, if required.
The mains socket is faulty.
Mains supply malfunctions must be rectified by
an electrician.
The appliance
cools too much.
Temperature is set too cold.
Turn the temperature regulator to a warmer
setting temporarily.
The food is too
warm.
The temperature regulator is not
set correctly.
Please refer to the "Control" section.
Door was open for an extended
period.
Open the door only as long as necessary.
A large quantity of warm food
was stored in the appliance
within the last 24 hours.
Turn the temperature regulation to a colder
setting temporarily.
The appliance is near a heat
source.
Please refer to the "Installation location" section.
Heavy build-up of
frost, possibly also
on the door.
Door seal is not air-tight (possibly after reversing the door).
Carefully warm the leaking sections of the
door seal with a hair dryer (on a cool setting).
At the same time, shape the warmed door seal
by hand until it sits correctly.

9
www.zanussi.com
Problem Probable cause Remedy
The internal lamp
is off.
The lamp is burned.
Please refer to the "Changing the light bulb"
section.
Unusual noises.
The cabinet is not level. Adjust the feet.
The appliance is touching the
wall or other objects.
Move the appliance slightly.
A component, e.g. a pipe at the
rear of the appliance, is touching
another part of the appliance or
the wall.
If necessary, carefully bend the component to
the side.
The compressor
does not start
immediately after
changing the temperature setting.
This is normal, no error has occurred.
The compressor starts after a period of time.
Water on the floor
or storage shelves.
Water drain hole is blocked. Please see the "Care and cleaning" section.
If the malfunction shows again, contact the
service centre.
These data are necessary to help you quickly
and correctly. Write the necessary data here,
refer to the rating plate.
Model description ............................................
(Mod.)
Product Number ............................................
(PNC)
Serial number ............................................
(S.N.)
Changing the light bulb
Warning! If the LED lamp is faulty, DO
NOT CHANGE IT YOURSELF.
If the LED lamp is changed by a person
who is not qualified to do so, there is a risk
of injury and there could be serious malfunctions. The LED lamp must be replaced by an
expert in order to prevent any damage. Speak
your local Service Force Centre.
Before replacing the LED lamp, switch off the
appliance and disconnect the mains plug or
switch off the fuse or the circuit breaker.
LED lamp technical data: 220–240V.
Technical data
For further technical information please refer to the rating plate on the internal left
side of the appliance and in the energy label.
Dimensions
Height 1593 mm
Width 554 mm
Depth 551 mm
Rising time 13 hours
10
www.zanussi.com
Installation
Read the “Safety Information” carefully
for your safety and correct operation of
the appliance before installing the appliance.
Positioning
Install this appliance at a location where the
ambient temperature corresponds to the
climate class indicated on the rating plate of
the appliance:
Climatic class Ambient Temperature
SN +10°C to +32°C
N +16°C to +32°C
ST +16°C to +38°C
T +16°C to +43°C
Location
The appliance should be installed as far away
as possible from sources of heat such as
radiators, boilers, direct sunlight etc. Ensure
that air can circulate freely around the back
of the appliance. If the appliance is installed
below an overhanging wall unit, the minimum
distance between the top of the appliance
and the wall unit must be at least 100mm
to guarantee the best possible performance.
Accurate levelling is ensured by one or more
adjustable feet at the base of the cabinet.
Warning! It must be possible to
disconnect the appliance from the main
power supply; therefore the plug must
be easily accessible after installation.
Electrical connection
Caution! Any electrical work required
to install this appliance may only be
carried out by a qualified electrician or
qualified person.
Warning! The earthing of the appliance
is prescribed by law. The manufacturer
accepts no responsibility if the safety
measures set out in this manual are
disregarded.
Levelling
The appliance must be level in order to prevent vibrations. To level the appliance, it must
be upright and both adjustable feet must be
touching the floor. You can also level the appliance by unscrewing the front feet (you can
do this manually or with a suitable spanner).
Door reversibility
The side at which the door opens can be
changed from the left side (as supplied) to the
right side. Before you start to do this, lay the
refrigerator on its back to access the base.
Place the refrigerator on soft foam packaging
material or other similar material so that the
cooling pipes at the back of the refrigerator
are not damaged.
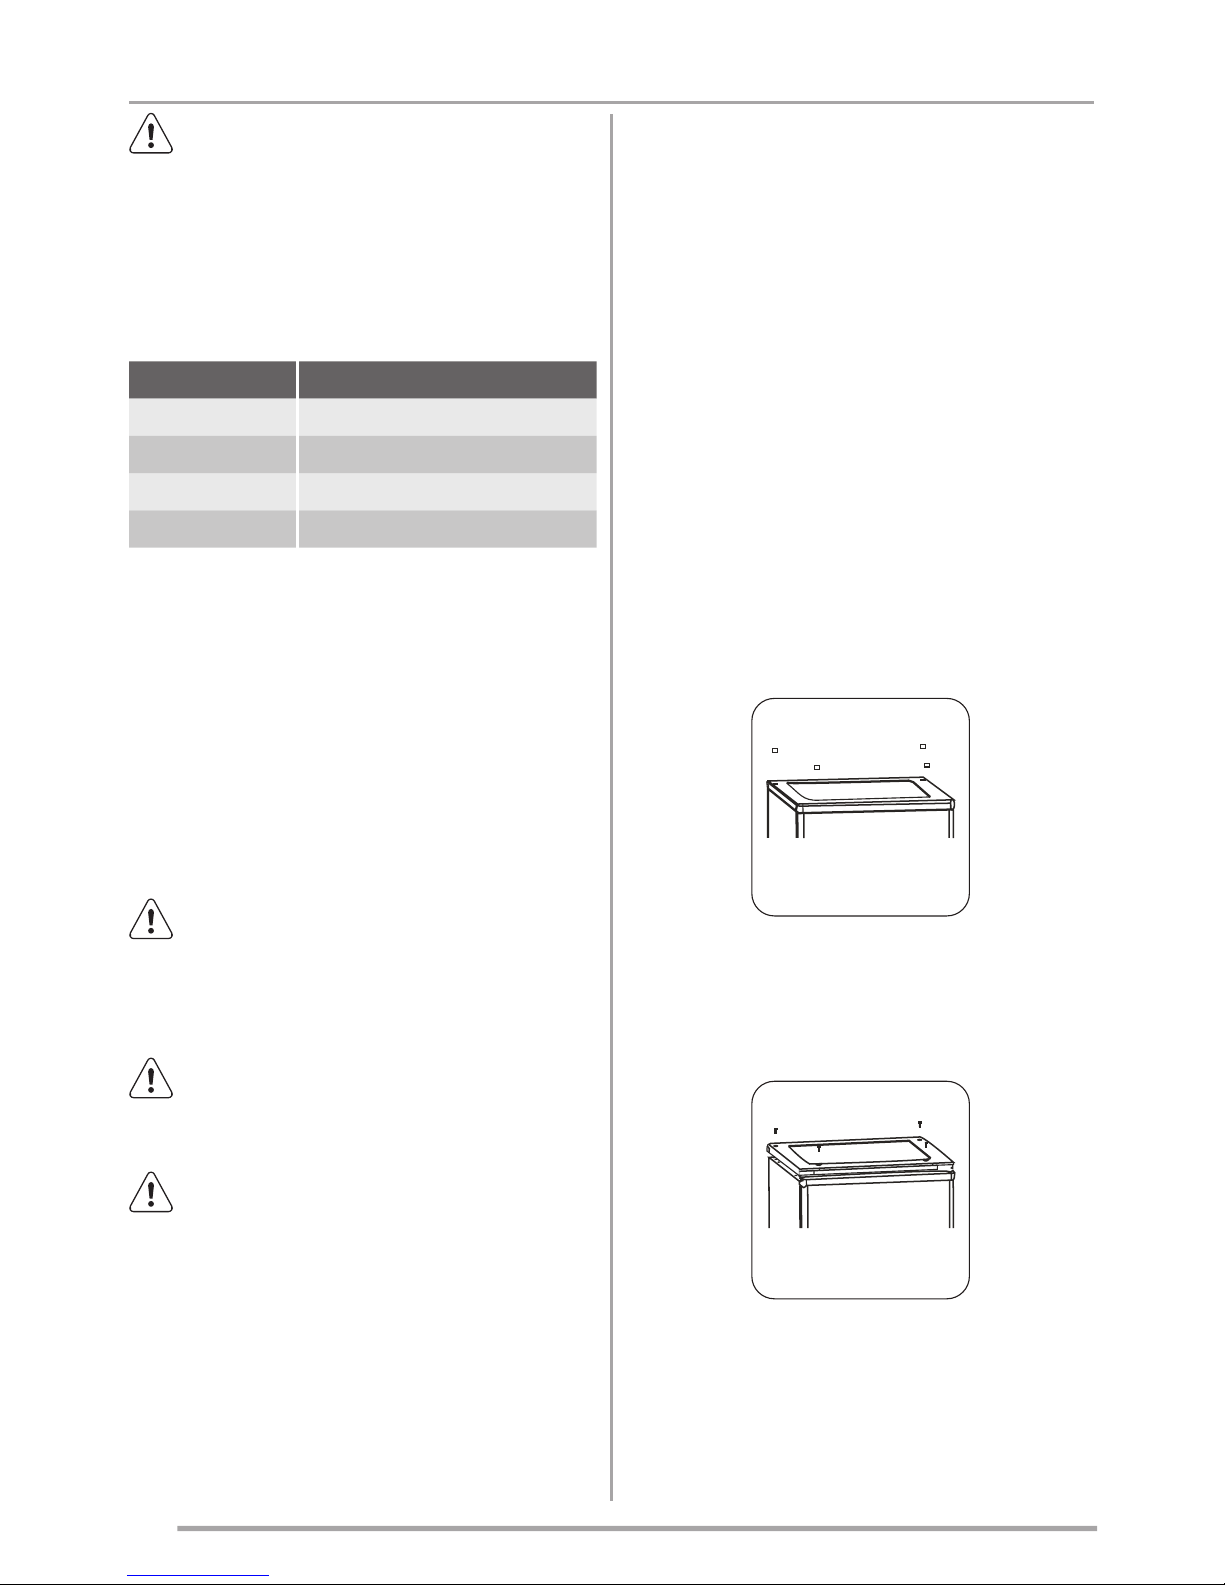
1. Stand the refrigerator up and use a flat
blade screwdriver to remove the four
screw covers at the rear of the refrigerator cover.
2. Unscrew the cover and then lift it to
remove the back panel. Then, lift the
upper door and place it on a padded
surface to prevent it from being
scratched.
11
www.zanussi.com
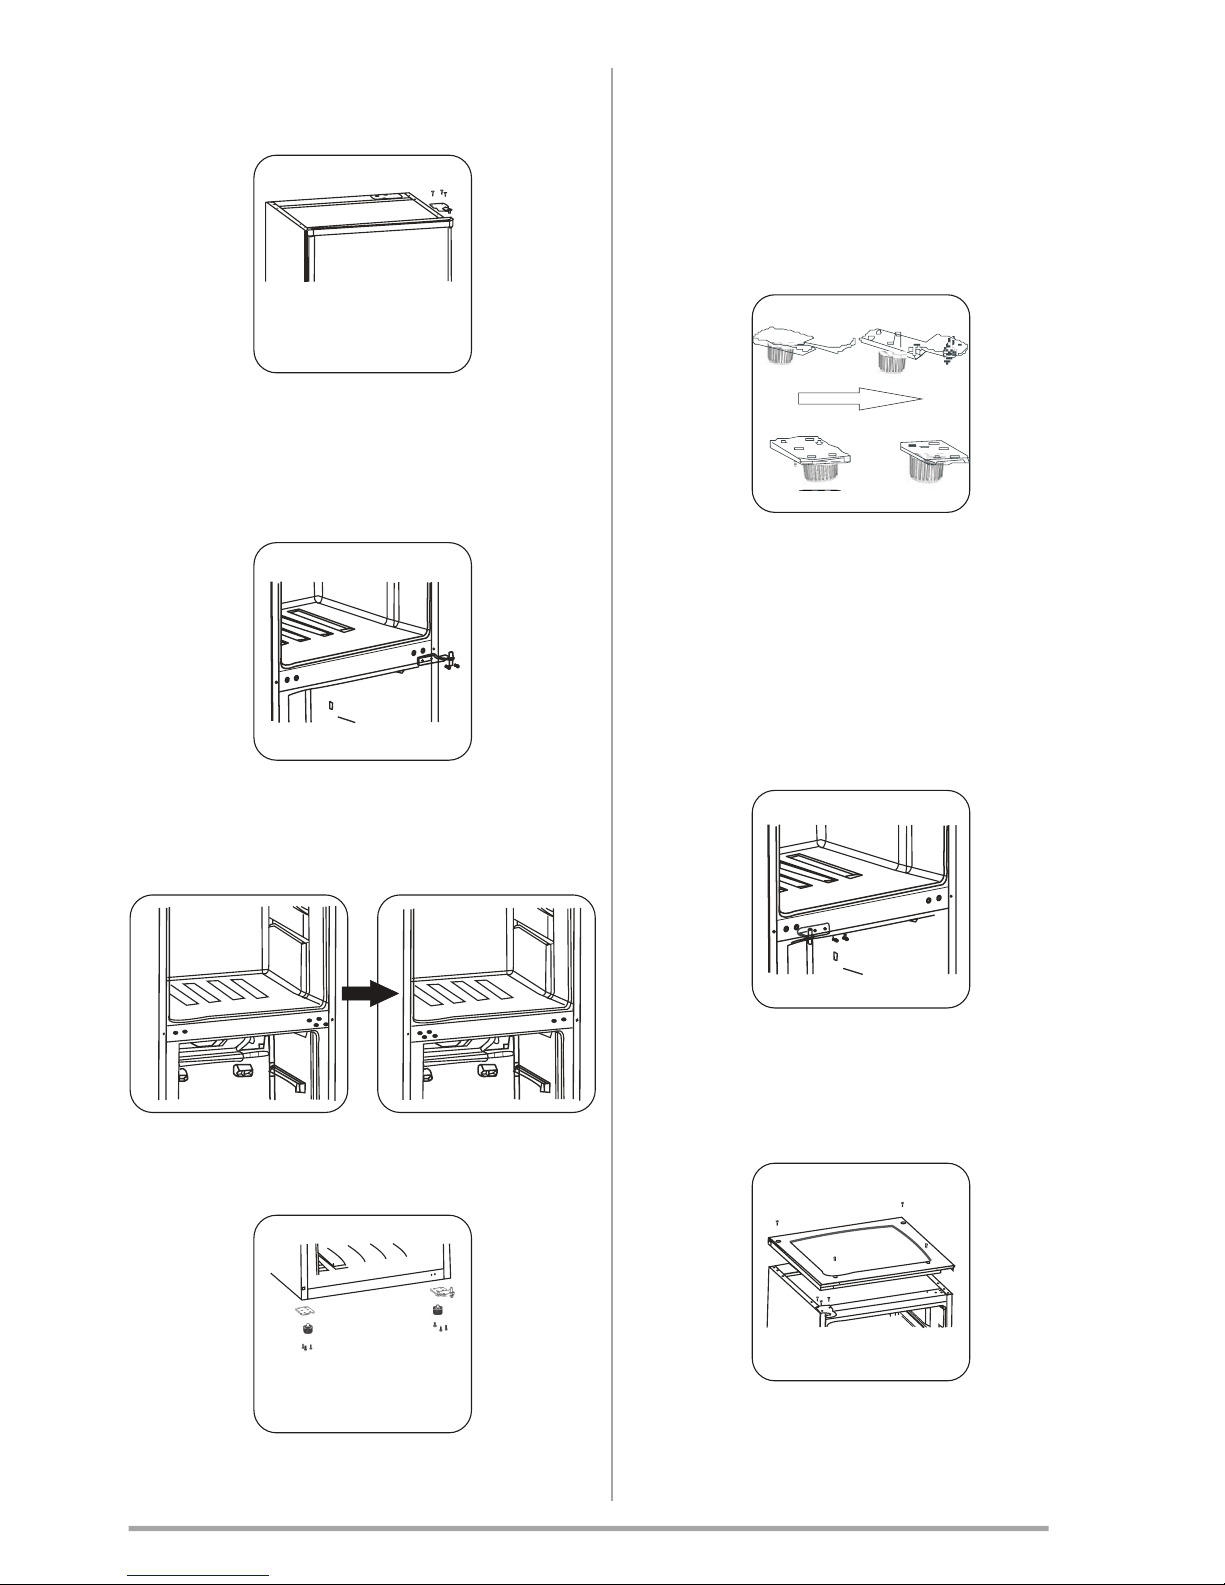
3. Remove the upper hinge core, transfer
it to the left side, tighten securely and
then put it in a safe place.
4. Remove the two flange screws and then
remove the middle hinge that holds the
lower door in place. Lift the lower door
and place it on a padded surface to
prevent it from being scratched.
5. Remove the hinge hole covers from the
right holes as illustrated and transfer
them to the uncovered hole on the left
side.
6. Remove both adjustable feet and
remove the bottom hinge bracket by
unscrewing the screws.
7. Unscrew and remove the bottom hinge
pin, turn the bracket over and replace it.
Refit the bracket fitting the bottom
hinge pin. Replace both adjustable feet.
Attach the lower door in the opposite
position. Secure the door’s position, fit
the bottom hinge pin into the lower hole
in the door and tighten the screws.
8. Make the middle hinge reverse the
direction 180 degree, then transfer it to
the left property position. Make the
middle hinge pin in the upper hole of
the lower door, then tight the bolts.
Attach the lower door in the opposite
position. Secure the door’s level; make
the middle hinge pin into the lower hole
of the upper door.
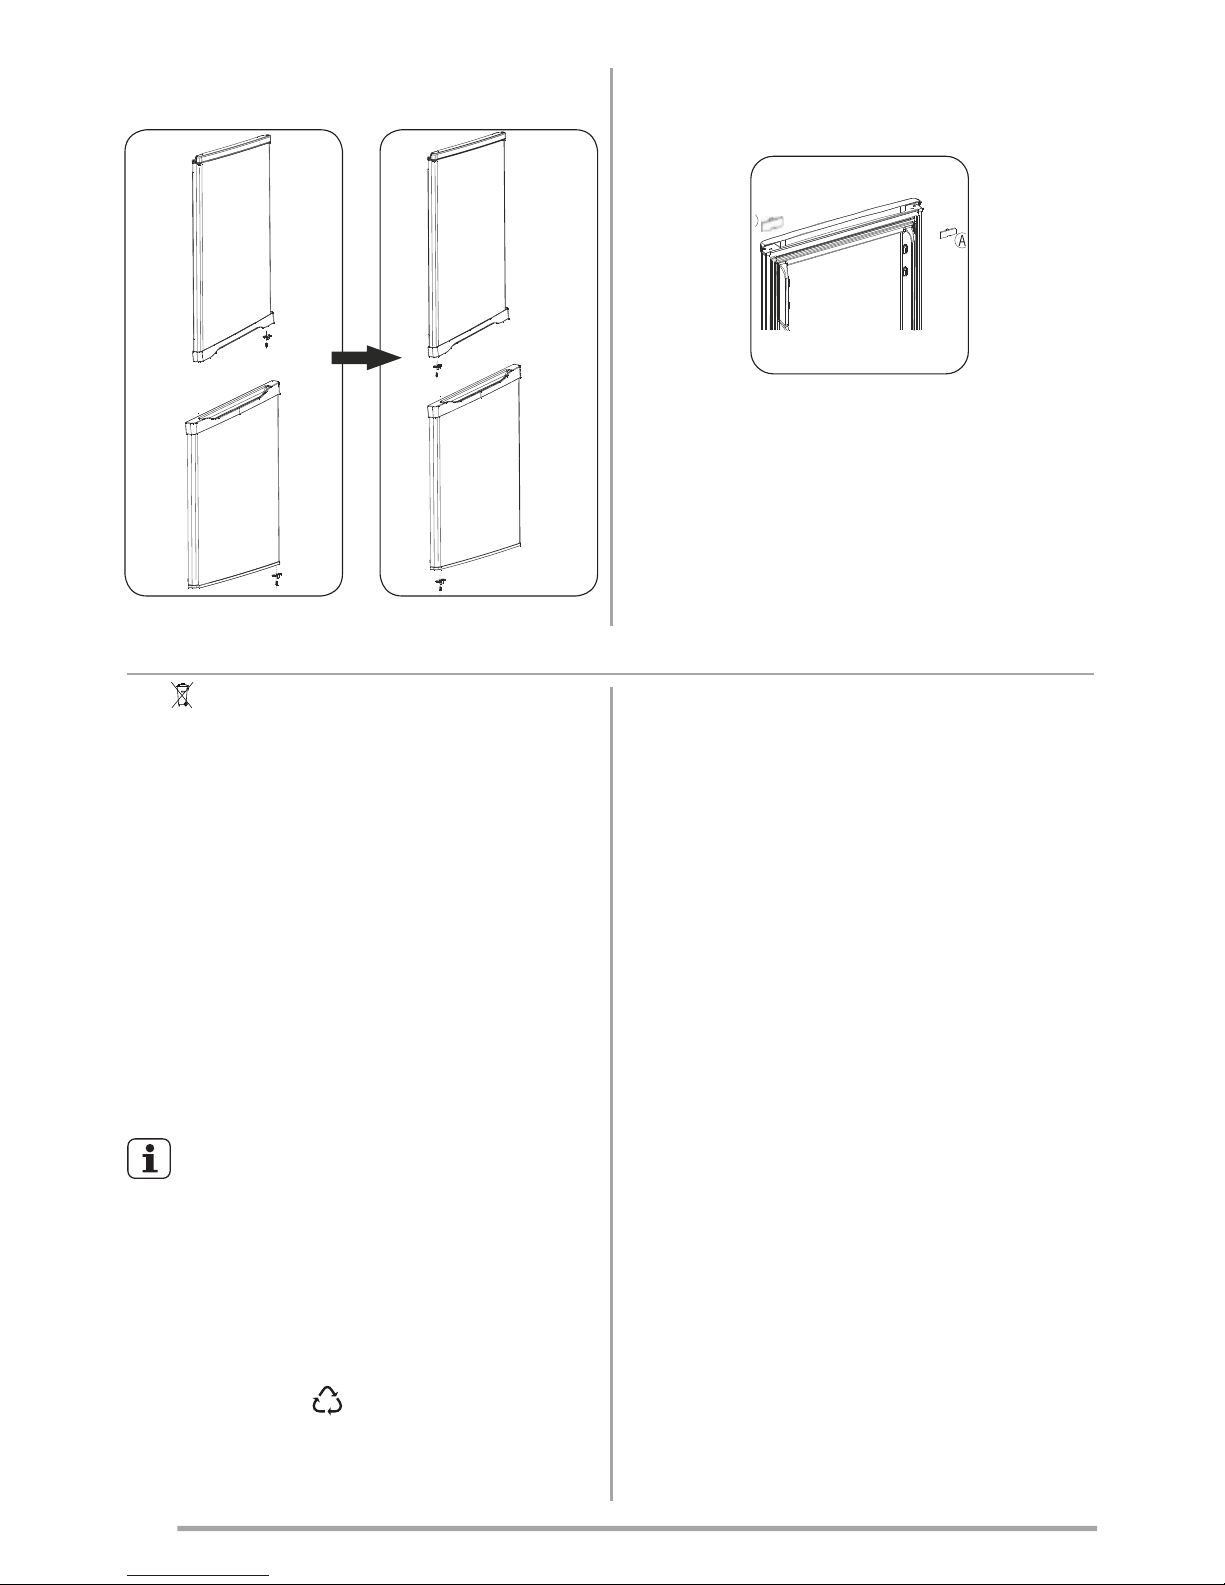
9. Refit the cover by fitting the upper hinge
pin into the upper hole in the door and
securing it with the four screws. Refit
the screw covers.
12
www.zanussi.com
10. When you replace the door stop, use
the door stop on the opposite side.
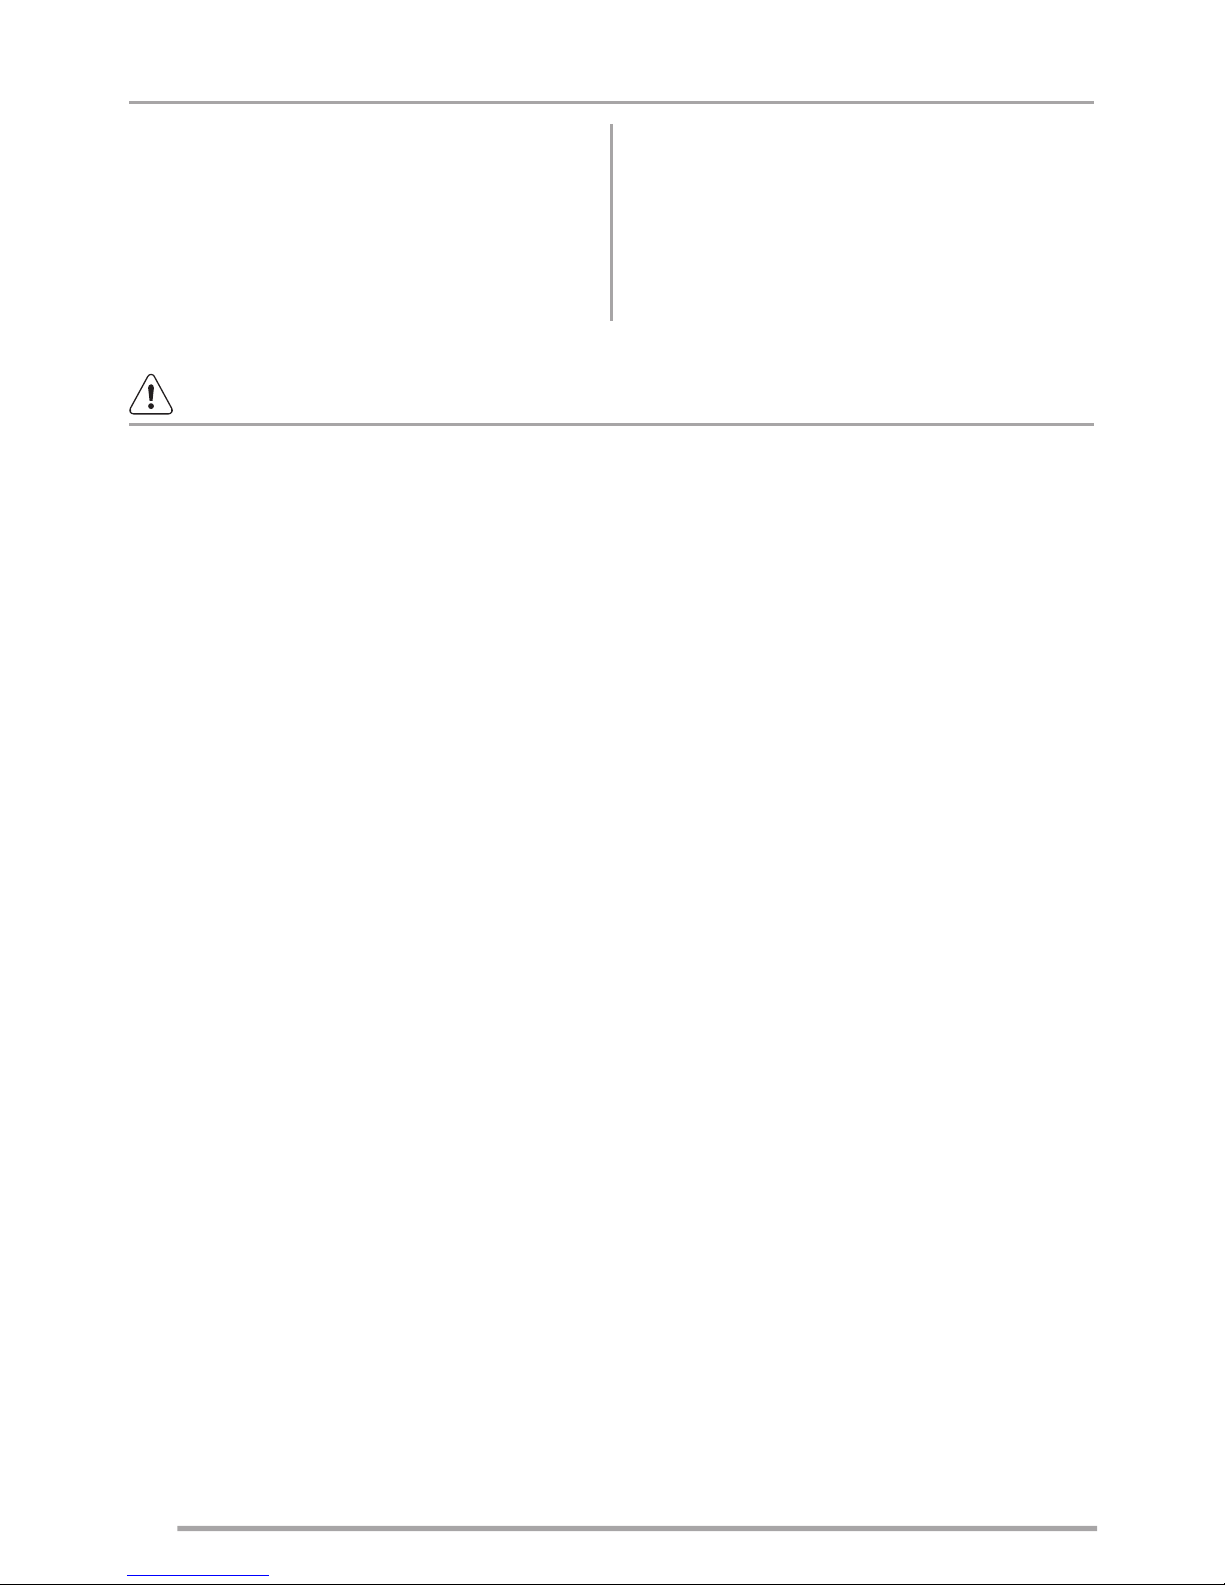
11. Remove hinge cover A from the door
and attach cover B—located in the
accessory pack—to the opening.
Environmental concerns
The symbol on the product or its packaging indicates that this product should not be
treated as normal household waste. Instead,
it should be taken to an appropriate collection
point for the recycling of electrical and electronic appliances. By ensuring this product
is disposed of correctly, you are protecting
the environment, your health and the health of
others. Disposing of the appliance incorrectly
endangers the environment, your health and
the health of others. For more detailed information about recycling of this product, please
contact your local city office, your household
waste disposal service or the shop where you
purchased the product.
Where should old appliances be
taken?
Wherever new appliances are sold or dispose
of at official SENS collection centres or official SENS recyclers.
The list of official SENS collection centres
can be found at www.sens.ch.
Packaging materials
Materials with the
symbol are recyclable.
Dispose the packaging in a suitable collection
containers to recycle it.
Discard the appliance
1. Remove the plug from the wall socket.
2. Cut off the mains cable and dispose
of it.

13
www.zanussi.com
14
www.zanussi.com
Informations sur la sécurité ________ 14
Consignes de sécurité __________ 15
Commande ________________ 16
Première utilisation ____________ 17
Utilisation quotidienne___________ 17
Conseils utiles _______________ 18
Entretien et Nettoyage___________ 19
En cas d'anomalie de fonctionnement...
__ 20
Caractéristiques techniques _______ 22
Installation _________________ 23
Protection de l'environnement_______ 25
Sommaire
Sous réserve de modifications.
Informations sur la sécurité
Avant d'installer et d'utiliser cet appareil, lisez soigneusement les
instructions fournies. Le fabricant ne peut être tenu responsable
des dommages et blessures liés à une mauvaise installation ou
utilisation. Conservez toujours cette notice avec votre appareil
pour vous y référer ultérieurement.
Sécurité des enfants et des personnes vulnérables
• Cet appareil peut être utilisé par des enfants de plus de 8ans,
ainsi que des personnes dont les capacités physiques, sensorielles et mentales sont réduites ou dont les connaissances et
l'expérience sont insuffisantes, à condition d'être surveillés ou
d'avoir reçu des instructions concernant l'utilisation sécurisée
de l'appareil et de comprendre les risques encourus
• Ne laissez pas les enfants jouer avec l'appareil
• Les enfants ne doivent pas nettoyer ou entreprendre une
opération de maintenance sur l'appareil sans surveillance
• Ne laissez pas les emballages à la portée des enfants
Sécurité générale
• Cet appareil est conçu uniquement pour un usage domestique
et des utilisations telles que:
– Dans les bâtiments de ferme, les cuisines réservées aux
employés dans des magasins, les bureaux et autres lieux de
travail
– Pour une utilisation privée, par les clients, dans des hôtels et
autres lieux de séjour
• Veillez à ce que les orifices de ventilation, situés dans l'enceinte
de l'appareil ou la structure intégrée, ne soient pas obstrués
• N'utilisez aucun autre dispositif mécanique ou autre pour accélérer le processus de dégivrage que ceux recommandés par le
fabricant
• N'endommagez pas le circuit de refroidissement
15
www.zanussi.com
• N'utilisez pas d'appareils électriques à l'intérieur des
compartiments de conservation des aliments de l'appareil, sauf
s'ils sont du type recommandé par le fabricant
• Ne pulvérisez pas d'eau ni de vapeur pour nettoyer l'appareil
• Nettoyez l'appareil avec un chiffon doux humide. Utilisez
uniquement des produits de nettoyage neutres. N'utilisez pas
de produits abrasifs, de tampons à récurer, de solvants ni
d'objets métalliques
• Ne conservez aucune substance explosive dans cet appareil,
comme des aérosols contenant un produit inflammable
• Si le câble d'alimentation est endommagé, il doit être remplacé
par le fabricant, son service après-vente ou des personnes de
qualification similaire afin d'éviter tout risque
Consignes de sécurité
Installation
Avertissement! L'appareil doit être
installé uniquement par un
professionnel qualifié
• Retirez l'intégralité de l'emballage
• N'installez pas et ne branchez pas un
appareil endommagé
• Suivez scrupuleusement les instructions
d'installation fournies avec l'appareil
• L'appareil est lourd, soyez toujours prudent lorsque vous le déplacez. Portez
toujours des gants de sécurité
• Assurez-vous que l'air circule autour de
l'appareil
• Attendez au moins 4heures avant de
brancher l'appareil sur le secteur. Cela
permet à l'huile de refouler dans le
compresseur
• N'installez pas l'appareil à proximité d'un
radiateur, d'une cuisinière, d'un four ou
d'une table de cuisson
• La surface arrière de l'appareil doit être
positionnée contre un mur
• N'installez pas l'appareil dans un endroit
exposé à la lumière directe du soleil
• N'installez pas l'appareil dans un endroit
trop humide ou trop froid, comme une
dépendance extérieure, un garage ou
une cave
• Lorsque vous déplacez l'appareil, veillez
à le soulever par l'avant pour éviter de
rayer le sol
Branchement électrique
Avertissement! Risque d'incendie
ou d'électrocution.
• L'appareil doit être relié à la terre
• L'ensemble des branchements électriques doit être effectué par un technicien qualifié
• Vérifiez que les données électriques
figurant sur la plaque signalétique
correspondent à celles de votre réseau.
Si ce n'est pas le cas, contactez un
électricien
• Branchez toujours la fiche principale
dans une prise correctement installée,
protégée contre les chocs et comportant une borne de mise à la terre
• N'utilisez pas d'adaptateurs multiprises
ni de rallonges
• Veillez à ne pas endommager les
composants électriques tels que la
fiche secteur, le câble d'alimentation ou
le compresseur. Contactez le service
après-vente ou un électricien pour
changer les composants électriques
• Le câble d'alimentation doit rester en
dessous du niveau de la fiche secteur
• Ne branchez la fiche d'alimentation à la
prise de courant qu'à la fin de l'installation. Assurez-vous que la prise de courant est accessible une fois l'appareil
installé
16
www.zanussi.com
Commande
Commande
Mise en fonctionnement et réglage de la
température
Insérez le câble d'alimentation dans la prise
reliée à la terre. Lorsque la porte du compar
timent réfrigérateur est ouverte, l'éclairage
intérieur s'allume. Le thermostat est situé sur le
côté droit du compartiment réfrigérateur.
La position « 0 » signifie
Off (Arrêt)
Tournez le thermostat vers la droite pour mettre
l'appareil en marche.
La position « 1 » signifie
Température maximale, réglage le plus chaud.
• Ne tirez jamais sur le câble d'alimentation
pour débrancher l'appareil. Détachez,
pour ce faire, la fiche de la prise secteur
Usage
Avertissement! Risque de blessures,
de brûlures, d'électrocution ou d'incen
-
die.
• Ne modifiez pas les caractéristiques de
cet appareil
• Ne placez aucun appareil électrique (sor
betière, etc.) dans l'appareil, en l'absence
d'indications du fabricant
• Veillez à ne pas endommager le circuit
frigorifique. Il contient de l'isobutane
(R600a), un gaz naturel ayant un niveau
élevé de compatibilité environnementale.
Ce gaz est inflammable
• Si le circuit frigorifique est endommagé,
assurez-vous de l'absence de flammes
et de sources d'ignition dans la pièce.
Aérez la pièce
• Évitez tout contact d'éléments chauds
avec les parties en plastique de l'appareil
• Ne placez jamais de boissons gazeuses
dans le compartiment congélateur. Cela
engendrerait une pression sur le réci
-
pient de la boisson
• Ne stockez jamais de gaz ou de liquide
inflammable dans l'appareil
• Ne placez pas de produits inflammables
ou d'éléments imbibés de produits in
flammables à l'intérieur ou à proximité de
l'appareil, ni sur celui-ci
• Ne touchez pas le compresseur ni le
condenseur. Ils sont chauds
• Ne retirez pas et ne touchez pas les
éléments du compartiment congélateur
avec les mains mouillées ou humides
• Ne recongelez jamais un aliment qui a
été décongelé
• Respectez les instructions de stockage
figurant sur l'emballage des aliments
surgelés
Entretien et Nettoyage
Avertissement! Risque de blessure
corporelle ou de dommages matériels.
• Avant toute opération d'entretien, étei
gnez l'appareil et débranchez la fiche de
la prise secteur
• Cet appareil contient des hydrocar
bures dans son circuit de réfrigération.
L'entretien et la recharge du circuit de
réfrigération doivent être effectués par un
professionnel qualifié
• Vérifiez régulièrement l'orifice d'écoule
ment d'eau de dégivrage de l'appareil et
si nécessaire, nettoyez-le. Si l'orifice est
bouché, l'eau provenant du dégivrage
s'écoulera en bas de l'appareil
Mise au rebut
Avertissement! Risque de blessure ou
d'asphyxie.
• Débranchez l'appareil de l'alimentation
électrique
• Coupez le câble d'alimentation et met
-
tez-le au rebut
• Retirez la porte pour empêcher les en
fants et les animaux de s'enfermer dans
l'appareil
• Le circuit frigorifique et les matériaux
d'isolation de cet appareil préservent la
couche d'ozone
• La mousse isolante contient un gaz
inflammable. Contactez votre service mu
nicipal pour obtenir des informations sur
la marche à suivre pour mettre l'appareil
au rebut
• N'endommagez pas la partie du circuit
de réfrigération située à proximité du
condenseur thermique

17
www.zanussi.com
La position «7» (en butée) signifie:
Température minimale, réglage le plus froid.
Nous vous recommandons de sélectionner
les positions3 ou 4. Si vous souhaitez obtenir
une température plus élevée ou plus basse,
tournez le thermostat en conséquence.
Important! Si la température ambiante
est élevée (par ex. pendant les vagues de
chaleur) et que le thermostat est réglé sur une
température froide (positions 6 ou7),
le compresseur peut fonctionner en continu.
La raison est simple: lorsque la température
ambiante est élevée, le compresseur doit
fonctionner sans interruption pour maintenir
une température basse constante à l'intérieur
de l'appareil.
Première utilisation
Nettoyage de l'intérieur
Avant d'utiliser l'appareil pour la première fois,
nettoyez l'intérieur avec de l'eau tiède et un
savon inodore afin de supprimer toute odeur
de neuf, puis séchez soigneusement.
Important! N'utilisez jamais de produits
abrasifs ou caustiques car ils pourraient
endommager le revêtement.
Utilisation quotidienne
Accessoires
Glissières amovibles
Les parois du réfrigérateur sont équipées
d'une série de glissières pour que les
clayettes puissent être placées en fonction
des besoins.
Mise en place des balconnets de la
porte
En fonction de la taille des emballages des
aliments conservés, les balconnets de la
porte peuvent être positionnés à différentes
hauteurs.
Pour effectuer ces réglages, procédez
comme suit: tirez progressivement sur le
balconnet dans le sens des flèches pour le
dégager, puis repositionnez-le selon vos
besoins.
Bac à légumes
Ce bac est adapté pour la conservation
de fruits et légumes.

18
www.zanussi.com
Congeler les aliments frais
• Le compartiment congélateur est idéal
pour congeler des denrées fraîches et
conserver à long terme des aliments
surgelés ou congelés
• Placez les denrées fraîches à congeler
dans le compartiment inférieur
• La quantité maximale de denrées
fraîches que vous pouvez congeler par
tranche de 24 heures est indiquée sur
la plaque signalétique (située à l'intérieur de l'appareil)
• Le temps de congélation est de
24heures. Vous ne devez ajouter aucune autre denrée à congeler au cours
de cette période
Conservation d'aliments surgelés
Lors de la première utilisation ou après une
période de non-utilisation. Avant de ranger
les aliments dans le compartiment, laissez
l'appareil fonctionner au moins deuxheures
au réglage maximal.
Important! En cas de décongélation accidentelle, due par exemple à une coupure de
courant ayant duré plus de temps qu'indiqué
au paragraphe «Autonomie de fonctionnement» des données techniques, consommez
rapidement les aliments décongelés ou cuisez-les immédiatement avant de les recongeler (une fois refroidis).
Décongélation
Avant utilisation, les aliments surgelés ou
congelés peuvent être décongelés dans le
compartiment réfrigérateur ou à température
ambiante, en fonction du temps disponible
pour cette opération. Les petites portions
peuvent même être cuites sans décongélation
préalable. La cuisson sera cependant un peu
plus longue.
Fabrication des glaçons
Cet appareil est équipé d'un ou de plusieurs
bacs à glaçons.
Conseils utiles
Bruits de fonctionnement normaux
• I
l est possible que vous entendiez le bruit
de circulation du liquide réfrigérant dans
les serpentins ou les tubes. Ces bruits de
fonctionnement sont normaux
• Lorsque le compresseur est en marche,
le liquide réfrigérant est pompé dans
l'appareil, ce qui peut produire un ronron
nement aigu ou un bruit pulsation. Ces
bruits de fonctionnement sont normaux
• La dilatation thermique peut provoquer un
bruit de craquement soudain. Il s'agit d'un
phénomène naturel sans gravité
Suggestions pour économiser
de l'énergie
• Évitez d'ouvrir trop souvent la porte du
congélateur et ne la laissez ouverte que le
temps nécessaire
• Si la température ambiante est élevée, le
thermostat réglé sur la position maximale et
l'appareil plein, il est possible que le com
presseur fonctionne en régime continu, d'où
un risque de formation de givre ou de glace
sur l'évaporateur. Dans ce cas, réglez le
thermostat sur une température plus élevée
pour faciliter le dégivrage automatique, ce
qui permet ainsi d'économiser de l'énergie
Conseils pour la réfrigération des
aliments frais
Pour obtenir les meilleurs résultats:
• N'introduisez pas d'aliments encore
chauds ou de liquides en évaporation
dans le réfrigérateur
• Couvrez ou enveloppez soigneusement
les aliments, surtout s'ils sont aromatiques
• Placez les aliments de sorte que l'air
puisse circuler librement autour d'eux
Conseils pour la réfrigération
Conseils:
Viande (tous types): enveloppez la viande
dans des sachets refermables et placez-la
sur la clayette en verre au-dessus du bac à
légumes.
Pour des raisons de sécurité, ne la conservez
de cette manière que pendant un ou deux
jours maximum.
Plats cuisinés, plats froids, etc.: ils doivent
être couverts et placés sur l'une des
clayettes. Fruits et légumes: placez-les une
fois nettoyés dans le(s) bac(s) à légumes.

19
www.zanussi.com
Beurre et fromage : ils doivent systématiquement être placés dans des récipients hermétiques spéciaux ou enveloppés soigneusement dans des feuilles d'aluminium ou dans
des sachets refermables, pour emmagasiner
le moins d'air possible.
Bouteilles de lait : elles doivent être munies
d'un bouchon et placées dans le balconnet
porte-bouteilles de la porte.
Bananes, pommes de terre, oignons et ail ne
doivent pas être mis dans le réfrigérateur s'ils
ne sont pas emballés.
Conseils pour la congélation
Voici quelques conseils importants pour obtenir un processus de congélation optimal:
• La quantité maximale de denrées que
vous pouvez congeler par 24 heures est
indiquée sur la plaque signalétique
• Le temps de congélation est de
24heures. N'ajoutez pas d'autres aliments à congeler pendant cette période
• Congelez uniquement des aliments de
bonne qualité, frais et nettoyés
• Préparez la nourriture en petits paquets
pour une congélation rapide et uniforme, adaptés à l'importance de la
consommation
• Enveloppez les aliments dans des
feuilles d'aluminium ou de polyéthylène
et assurez-vous que les emballages
sont étanches
• Ne laissez pas des aliments frais, non
congelés, toucher des aliments déjà
congelés pour éviter une remontée en
température de ces derniers
• Les aliments maigres se conservent
mieux et plus longtemps que les
aliments gras; le sel réduit la durée de
conservation des aliments
• La température très basse à laquelle se
trouvent les bâtonnets glacés, s'ils sont
consommés dès leur sortie du compartiment congélateur, peut provoquer des
brûlures
• L'identification des emballages est
importante : indiquez la date de congélation du produit sur chaque paquet et
respectez les durées de conservation
indiquées
Conseils pour le stockage des aliments
surgelés
Pour obtenir les meilleures performances
possibles:
• Assurez-vous que les aliments congelés
vendus dans le commerce aient été
correctement stockés par le vendeur
• Prévoyez un temps réduit au minimum
pour leur transport du magasin
d'alimentation à votre domicile
• Évitez d'ouvrir trop souvent la porte du
congélateur et ne la laissez ouverte que
le temps nécessaire
• Une fois décongelés, les aliments se
détériorent rapidement et ne peuvent
être recongelés
• Ne dépassez pas la durée de
conservation indiquée par le fabricant
Entretien et Nettoyage
Nettoyage
Pour des raisons d'hygiène, l'intérieur de l'appareil et tous les accessoires internes doivent
être nettoyés régulièrement.
Avertissement! L'appareil ne doit pas
être branché sur le secteur pendant son
nettoyage. Risque d'électrocution! Avant
toute opération de nettoyage, éteignez
l'appareil et débranchez-le du réseau
électrique, ou bien retirez le fusible ou coupez
le disjoncteur. N'utilisez pas de nettoyeur à
vapeur pour nettoyer l'appareil. L'humidité
pourrait s'accumuler sur les composants
électriques et entraîner un risque
d'électrocution. La vapeur chaude peut
endommager les pièces en plastiques.
Essuyez et séchez l'appareil avant de le
remettre en fonctionnement.
Important! Les huiles essentielles et les solvants organiques peuvent attaquer les pièces
en plastique utilisées dans cet appareil, par
exemple le jus de citron ou le jus d'un zeste
d'orange, l'acide butyrique, les produits d'entretien qui contiennent de l'acide acétique.
• Veillez à ce que ces substances
n'entrent pas en contact direct avec les
pièces de l'appareil

20
www.zanussi.com
• N'utilisez pas de détergents abrasifs
• Retirez les aliments de l'appareil.
Conservez les aliments bien couverts,
dans un endroit frais
• Éteignez l'appareil, débranchez-le de la
prise de courant et retirez le fusible ou
coupez le disjoncteur
• Nettoyez l'appareil et les accessoires
internes avec un chiffon et de l'eau
tiède. Vous pouvez également utiliser
des produits détergents disponibles
dans le commerce. Après le nettoyage,
rincez l'appareil à l'eau claire et séchez
soigneusement
• L'accumulation de poussière sur le
condenseur fait augmenter la consommation d'énergie. Dépoussiérez une fois
par an le condenseur situé à l'arrière de
l'appareil à l'aide d'une brosse souple
ou d'un aspirateur
• Vérifiez l'orifice d'évacuation de l'eau
situé sur la paroi arrière du compartiment réfrigérateur. Débouchez l'orifice
d'évacuation à l'aide du bâtonnet spécial; veillez à ne pas endommager la
structure avec des objets tranchants
• Après avoir tout essuyé, remettez l'appareil en fonctionnement
Dégivrage du compartiment congélateur
La paroi arrière du réfrigérateur se couvre de
givre lorsque le compresseur est en fonctionnement et se dégivre lorsque le compresseur
est à l'arrêt. L'eau de dégivrage s'évapore
toute seule.
Toutefois, avec le temps, une couche de
glace se forme dans le compartiment congélateur. Cette couche doit être enlevée.
N'utilisez en aucun cas d'objets métalliques
ou tranchants pour gratter la couche de givre
ou de glace sur l'évaporateur; vous risqueriez de le détériorer. Toutefois, si une couche
de glace très épaisse se forme sur la paroi
intérieure, décongelez entièrement l'appareil.
Procédez comme suit :
• Débranchez l'appareil du secteur
• Sortez les denrées congelées, enveloppez-les dans plusieurs feuilles de papier
journal et conservez-les dans un endroit
frais
• Laissez la porte ouverte et placez un
récipient sous l'appareil pour recueillir
l'eau de dégivrage
• Le dégivrage terminé, épongez et séchez bien l'intérieur
• Rebranchez la fiche sur la prise secteur
pour mettre l'appareil en marche
En cas d'anomalie de fonctionnement...
Attention! Avant d'intervenir sur l'appareil,
débranchez la fiche de la prise secteur.
La résolution des problèmes non mentionnés
dans la présente notice doit être exclusivement confiée à un électricien qualifié ou à une
personne compétente.
Important! L'appareil émet certains bruits
au cours de son fonctionnement (compresseur, circuit frigorifique).
Symptôme Cause probable Solution
L'appareil ne fonctionne pas.
L'appareil est éteint. Solution: mettez l'appareil en marche.
La fiche d'alimentation n'est
pas branchée ou n'est pas bien
enfoncée.
Branchez correctement la fiche dans la prise.
Le fusible a disjoncté ou est
défectueux.
Vérifiez et remplacez le fusible, le cas échéant.
La fiche d'alimentation est défectueuse.
Les anomalies liées à l'alimentation électrique
doivent être réparées par un électricien
qualifié.

21
www.zanussi.com
Symptôme Cause probable Solution
L'appareil refroidit
trop.
La température est trop basse.
Modifiez la position du thermostat pour obtenir
moins de froid.
Les aliments sont
trop chauds.
Le thermostat n'est pas réglé
correctement.
Reportez-vous au chapitre «Contrôle».
La porte a été ouverte plus
longtemps que nécessaire.
Ne laissez la porte ouverte que le temps
nécessaire.
Trop de produits chauds ont été
stockés dans l'appareil au cours
des dernières 24heures.
Modifiez la position du thermostat pour obtenir
plus de froid.
L'appareil est installé près d'une
source de chaleur.
Consultez le chapitre «Emplacement».
Accumulation de
givre, probablement aussi sur la
porte.
Le joint de porte n'est pas
étanche (peut-être après avoir
inversé le sens d'ouverture de la
porte).
Chauffez la partie concernée à l'aide d'un
sèche-cheveux (air froid). En même temps,
aidez manuellement le joint à reprendre sa
dimension naturelle.
L'éclairage intérieur
est éteint.
L'éclairage est défectueux.
Veuillez consulter le chapitre «Remplacement
de l'ampoule».
Bruits inhabituels.
L'appareil n'est pas correctement
de niveau.
Ajustez les pieds.
L'appareil est appuyé contre un
mur ou d'autres objets.
Déplacez légèrement l'appareil.
Un composant (ex. un tuyau)
situé à l'arrière de l'appareil
touche un autre composant
de l'appareil ou le mur.
Si nécessaire, pliez le tuyau avec précaution
pour le dégager.
Le compresseur
ne démarre pas immédiatement après
la modification
de la position du
thermostat.
Ce phénomène est normal, il ne
s'agit pas d'une anomalie.
Le compresseur démarre au bout d'un certain
temps.
De l'eau s'écoule
sur le sol ou les
clayettes.
L'orifice d'évacuation de l'eau est
bouché.
Veuillez vous reporter au chapitre «Entretien
et nettoyage».

22
www.zanussi.com
Si l'anomalie persiste, contactez le service
après-vente.
Ces informations sont nécessaires pour
pouvoir vous offrir une aide rapide et adaptée.
Vous trouverez ces informations sur la plaque
signalétique située sur l'appareil.
Désignation du modèle .........................................
(Mod.)
Numéro du produit ............................................
(PNC)
Numéro de série ............................................
(S.N.)
Remplacement de l'ampoule
Avertissement! Si l'ampoule LED est
endommagée, NE LA REMPLACEZ
PAS VOUS-MÊME.
Si l'ampoule LED est changée par une personne non compétente pour effectuer cette
opération, car cela pourrait entraîner des
blessures ou un dysfonctionnement grave.
L'ampoule LED doit être remplacée par une
personne qualifiée pour éviter tout risque.
Contactez le service après-vente.
Avant de changer l'ampoule LED, éteignez
l'appareil et débranchez-le de la prise secteur,
retirez le fusible ou coupez le disjoncteur.
Caractéristiques techniques de l'ampoule
LED: 220–240V.
Caractéristiques techniques
Les caractéristiques techniques figurent sur la plaque signalétique située sur le
côté gauche à l'intérieur de l'appareil et sur l'étiquette énergétique.
Dimensions
Hauteur 1593 mm
Largeur 554 mm
Profondeur 551 mm
Autonomie de fonctionnement 13heures

23
www.zanussi.com
Installation
Pour votre sécurité et pour le bon
fonctionnement de l'appareil, veuillez lire
attentivement les «Consignes de sécurité»
avant d'installer l'appareil.
Mise en place
Installez cet appareil à un endroit où la
température ambiante correspond à la classe
climatique indiquée sur la plaque signalétique
de l'appareil:
Classe clima-
tique
Température ambiante
SN +10°C à +32°C
N +16°C à +32°C
ST +16°C à +38°C
T +16°C à +43°C
Emplacement
L'appareil doit être installé aussi loin que possible de toute source de chaleur telle qu'un
radiateur, un chauffe-eau, la lumière directe
du soleil, etc. Assurez-vous que l'air circule
librement à l'arrière de l'appareil. Pour garantir
un fonctionnement optimal, si l'appareil est
installé sous un élément suspendu, la distance entre le haut de l’appareil et l'élément
suspendu doit être de 100mm minimum. La
mise de niveau se fait à l'aide d'un ou de plusieurs pieds réglables à la base de l'appareil.
Avertissement! L'appareil doit pouvoir
être débranché à tout moment ; il est
donc nécessaire que la prise murale
reste accessible après l'installation.
Branchement électrique
Attention! Ne confiez les travaux
électriques nécessaires à l'installation
de votre appareil qu'à un électricien
qualifié ou une personne compétente.
Avertissement! La loi requiert que
l'appareil soit raccordé à la terre. Le
fabricant décline toute responsabilité en
cas de non-respect des consignes de
sécurité mentionnées dans ce manuel.
Mise de niveau
L'appareil doit être stable et d'aplomb afin
de supprimer toute vibration. Pour mettre
l'appareil de niveau, il doit être mis en position
droite et les deux pieds réglables doivent
toucher le sol. Vous pouvez également mettre
l'appareil de niveau en dévissant les pieds
avant (manuellement ou à l'aide d'une clé).
Réversibilité de la porte
Le sens d'ouverture de la porte peut être modifié, du côté gauche (comme fourni) au côté
droit. Avant de commencer, couchez l'appareil
sur le dos afin d'accéder à la base. Placez le
réfrigérateur sur un emballage en plastique
mousse ou similaire pour éviter d'endommager la tuyauterie de refroidissement qui se
trouve à l'arrière du réfrigérateur.
1. Remettez le réfrigérateur en position
verticale et utilisez un tournevis plat
pour retirer les quatrecache-vis à
l'arrière du panneau supérieur du
réfrigérateur.
2. Dévissez le panneau, puis soulevez-le
pour retirer le panneau arrière. Soulevez
la porte supérieure et placez-la sur une
surface rembourrée pour éviter de la
rayer.

24
www.zanussi.com
3. Retirez le pivot de la charnière supérieure,
placez-le du côté gauche et serrez-le
soigneusement, puis mettez la charnière
dans un endroit sûr.
4. Retirez les deux vis à collerette, puis
retirez la charnière centrale qui maintient
la porte inférieure en place. Soulevez la
porte inférieure et placez-la sur une
surface rembourrée pour éviter de la rayer.
5. Retirez les caches des orifices de
charnière situés à droite, comme illustré,
et placez-les dans les orifices libres du
côté gauche.
6. Dévissez les deux pieds réglables et
retirez la patte de fixation de la charnière
inférieure en dévissant les vis.
7. Dévissez et retirez l'axe de la charnière
inférieure, retournez la patte de fixation et
remontez l'axe. Réinstallez la patte de
fixation portant l'axe de la charnière
inférieure. Remettez en place les deux
pieds réglables. Placez la porte inférieure
dans sa nouvelle position. Maintenez la
porte en place, insérez l'axe de la
charnière inférieure dans l'orifice inférieur
de la porte, puis serrez les vis.
8. Inversez le sens de la charnière centrale
(180degrés), puis mettez-la à gauche à
l'emplacement prévu. Insérez l'axe de la
charnière centrale dans l'orifice supérieur
de la porte inférieure, puis serrez les vis.
Placez la porte inférieure dans sa nouvelle
position. Mettez la porte de niveau;
insérez l'axe de la charnière centrale dans
l'orifice inférieur de la porte supérieure.
9. Remettez le panneau en place en ajustant
le pivot de la charnière supérieure dans
l'orifice de la porte supérieure et revissez
les quatrevis. Remettez les cache-vis en
place.

25
www.zanussi.com
10. Lorsque vous replacez la butée de la
porte, utilisez la butée de la porte sur le
côté opposé.
11. Retirez le cache de charnière A de la
porte et insérez le cache de charnière B
se trouvant dans le sachet d'accessoires dans l'orifice.
Protection de l'environnement
Le symbole sur l'appareil ou l'emballage
indique que le produit ne doit pas être traité
comme des ordures ménagères normales. Il
doit être remis à un point de collecte et de
recyclage des appareils électriques et électroniques. En procédant à la mise au rebut
de l'appareil dans les règles, vous contribuez
à protéger l'environnement ainsi que votre
santé et celle des autres. Ne pas procéder
correctement à la mise au rebut de l'appareil
est dangereux pour l'environnement, votre
santé et celle des autres. Pour obtenir plus
de détails sur le recyclage de ce produit,
veuillez prendre contact avec les services de
votre commune ou le magasin où vous avez
effectué l'achat.
Où doit-on mettre au rebut les
vieux appareils?
Dans n'importe quel point de vente d'appareils ou dans des points de collecte ou de
recyclage SENS.
Vous trouverez une liste des points de collecte SENS officiels à l'adresse www.sens.ch.
Matériaux d'emballage
Les matériaux portant le symbole
sont
recyclables. Déposez-les en déchetterie dans
les conteneurs prévus à cet effet pour qu'ils
puissent être recyclés.
Mise au rebut de l'appareil
1. Débranchez l'appareil de prise murale.
2. Coupez le câble d'alimentation et mettez-le au rebut.

26
www.zanussi.com
Inhalt
Änderungen vorbehalten
Sicherheitshinweise
Lesen Sie vor der Montage und dem ersten Gebrauch des Geräts die mitgelieferte Anleitung sorgfältig durch. Der Hersteller
übernimmt keine Verantwortung für Verletzungen und Beschädigungen durch unsachgemäße Montage. Bewahren Sie die Anleitung zusammen mit dem Gerät für den zukünftigen Gebrauch auf.
Sicherheit von Kindern und hilfsbedürftigen Personen
• Das Gerät kann von Kindern ab 8Jahren und Personen mit eingeschränkten physischen, sensorischen oder geistigen Fähigkeiten oder mit mangelnder Erfahrung und/oder mangelndem
Wissen nur dann verwendet werden, wenn sie durch eine für
ihre Sicherheit zuständige Person beaufsichtigt werden oder in
die sichere Verwendung des Geräts eingewiesen wurden und
die mit dem Gerät verbundenen Gefahren verstanden haben.
• Kinder dürfen nicht mit dem Gerät spielen.
• Die Wartung oder Reinigung des Geräts darf nicht von Kindern
ohne Aufsicht durchgeführt werden.
• Alle Verpackungsmaterialien von Kindern fernhalten.
Allgemeine Sicherheit
• Dieses Gerät ist für die Verwendung im Haushalt und ähnliche
Zwecke vorgesehen, wie z.B.:
– Bauernhöfe, Personalküchenbereiche in Geschäften, Büros
und anderen Arbeitsumfeldern
– Für Gäste in Hotels, Motels, Pensionen und anderen woh-
nungsähnlichen Räumlichkeiten.
• Achten Sie darauf, dass die Belüftungsöffnungen im Gehäuse
oder in der Einbaunische nicht blockiert sind.
Sicherheitshinweise ____________ 26
Sicherheitsanweisungen _________ 27
Bedienfeld _________________ 29
Erste Inbetriebnahme ___________ 29
Täglicher Gebrauch ____________29
Praktische Tipps und Hinweise ______30
Reinigung und Pflege ___________ 32
Was tun, wenn... ______________33
Technische Daten _____________34
Montage __________________ 34
Umwelttipps ________________ 37

27
www.zanussi.com
• Versuchen Sie nicht, den Abtauvorgang durch andere als vom
Hersteller empfohlene mechanische oder sonstige Hilfsmittel zu
beschleunigen.
• Achten Sie darauf, den Kältekreislauf nicht zu beschädigen.
• Betreiben Sie in den Lebensmittelfächern des Geräts keine
anderen als die vom Hersteller empfohlenen Elektrogeräte.
• Reinigen Sie das Gerät nicht mit einem Wasser- oder Dampfstrahl.
• Reinigen Sie das Gerät mit einem weichen, feuchten Tuch. Verwenden Sie ausschließlich Neutralreiniger. Benutzen Sie keine
Scheuermittel, scheuernde Reinigungsschwämme, Lösungsmittel oder Metallgegenstände.
• Bewahren Sie in dem Gerät keine explosiven Substanzen, wie
Spraydosen mit entzündlichen Treibgasen auf.
• Wenn das Netzkabel beschädigt ist, muss es vom Hersteller,
einem autorisierten Kundendienst oder einer gleichermaßen
qualifizierten Person ersetzt werden, um Gefahrenquellen zu
vermeiden.
Sicherheitsanweisungen
Montage
Warnung Nur eine qualifizierte Fachkraft
darf den elektrischen Anschluss des Geräts
vornehmen.
• Entfernen Sie das Verpackungsmaterial.
• Stellen Sie ein beschädigtes Gerät nicht auf
und benutzen Sie es nicht.
• Halten Sie sich an die mitgelieferte Monta
-
geanleitung.
• Seien Sie beim Umsetzen des Geräts vor
sichtig, denn es ist schwer. Tragen Sie stets
Sicherheitshandschuhe.
• Stellen Sie sicher, dass die Luft um das
Gerät zirkulieren kann.
• Warten Sie mindestens 4 Stunden, bevor
Sie das Gerät an das Stromnetz anschlie
ßen. Dies ist erforderlich, damit das Öl in
den Kompressor zurückfließen kann.
• Stellen Sie das Gerät nicht in der Nähe
von Heizkörpern, Herden, Backöfen oder
Kochfeldern auf.
• Die Geräterückseite muss gegen die Wand
gestellt werden.
• Stellen Sie das Gerät nicht dort auf, wo
es direktem Sonnenlicht ausgesetzt sein
könnte.
• Stellen Sie das Gerät nicht an zu feuchten
oder kalten Orten, wie Nebengebäuden,
Garagen oder Weinkellern, auf.
• Wenn Sie das Gerät verschieben, heben
Sie es bitte an der Vorderkante an, um den
Fußboden nicht zu verkratzen.
Elektrischer Anschluss
Warnung Brand- und Stromschlaggefahr.
• Das Gerät muss geerdet sein.
• Alle elektrischen Anschlüsse sind von einem
geprüften Elektriker vorzunehmen.
• Stellen Sie sicher, dass die elektrischen
Daten auf dem Typenschild den Daten Ihrer
Stromversorgung entsprechen. Wenden Sie
sich andernfalls an eine Elektrofachkraft.

28
www.zanussi.com
• Schließen Sie das Gerät unbedingt an eine
ordnungsgemäß installierte Schutzkontakt
-
steckdose an.
• Verwenden Sie keine Mehrfachsteckdosen
oder Verlängerungskabel.
• Achten Sie darauf, elektrische Bauteile (wie
Netzstecker, Netzkabel und Kompressor)
nicht zu beschädigen. Wenden Sie sich an
den technischen Kundendienst oder einen
Elektriker, um die elektrischen Bauteile
auszutauschen.
• Das Netzkabel muss unterhalb des Netzste
-
ckers verlegt werden.
• Stecken Sie den Netzstecker erst nach
Abschluss der Montage in die Steckdose.
Stellen Sie sicher, dass der Netzstecker
nach der Montage noch zugänglich ist.
• Ziehen Sie nicht am Netzkabel, wenn Sie
das Gerät von der Stromversorgung trennen
möchten. Ziehen Sie stets am Netzstecker.
Bedienungshinweise
Warnung Es besteht Verletzungs-,
Verbrennungs-, Stromschlag- oder
Brandgefahr.
• Nehmen Sie keine technischen Änderungen
am Gerät vor.
• Stellen Sie keine elektrischen Geräte
(z.B. Eisbereiter) in das Gerät, wenn solche
Geräte nicht ausdrücklich vom Hersteller für
diesen Zweck zugelassen sind.
• Achten Sie darauf, den Kältekreislauf
nicht zu beschädigen. Er enthält Isobutan
(R600a), ein Erdgas mit einem hohen Grad
an Umweltverträglichkeit. Dieses Gas ist
brennbar.
• Wird der Kältekreislauf beschädigt, stellen
Sie bitte sicher, dass es keine Flammen
und Zündquellen im Raum gibt. Den Raum
belüften.
• Stellen Sie keine heißen Gegenstände auf
die Kunststoffteile des Geräts.
• Legen Sie keine Erfrischungsgetränke in das
Gefrierfach. Dadurch entsteht Druck auf den
Getränkebehälter.
• Bewahren Sie keine entzündbaren Gase
und Flüssigkeiten im Gerät auf.
• Platzieren Sie keine entflammbaren Produk
-
te oder Gegenstände, die mit entflammba-
ren Produkten benetzt sind, im Gerät, auf
dem Gerät oder in der Nähe des Geräts.
• Berühren Sie nicht den Kompressor oder
den Kondensator. Sie sind heiß.
• Nehmen keine Gegenstände aus dem Ge
frierfach oder berühren Sie diese nicht, falls
Ihre Hände nass oder feucht sind.
• Frieren Sie aufgetaute Lebensmittel nicht
wieder ein.
• Befolgen Sie die Hinweise auf der Ver
packung zur Aufbewahrung tiefgekühlter
Lebensmittel.
Reinigung und Pflege
Warnung Andernfalls besteht Verletzungs-
gefahr und das Gerät könnte beschädigt
werden.
• Schalten Sie das Gerät immer aus und zie
hen Sie den Netzstecker aus der Steckdose,
bevor Reinigungsarbeiten durchgeführt
werden.
• Der Kältekreis des Gerätes enthält
Kohlenwasserstoffe. Das Gerät muss von
einer qualifizierten Fachkraft gewartet und
nachgefüllt werden.
• Prüfen Sie regelmäßig den Wasserabfluss
des Geräts und reinigen Sie ihn gegebe
nenfalls. Bei verstopftem Wasserabfluss
sammelt sich das Abtauwasser am Boden
des Geräts an.
Entsorgung
Warnung Verletzungs- und Erstickungsge-
fahr.
• Trennen Sie das Gerät von der Stromver
-
sorgung.
• Schneiden Sie das Netzkabel ab und ent
-
sorgen Sie es.
• Entfernen Sie die Tür, um zu verhindern,
dass sich Kinder oder Haustiere in dem
Gerät einschließen.
• Der Kältekreislauf und die Isolierungsmateri
-
alien dieses Gerätes sind ozonfreundlich.
• Die Isolierung enthält entzündliches Gas. Für
Informationen zur korrekten Entsorgung des
Geräts wenden Sie sich an Ihre kommunale
Behörde.
• Achten Sie darauf, dass die Kühleinheit
in der Nähe des Wärmetauschers nicht
beschädigt wird.

29
www.zanussi.com
Bedienfeld
Bedienfeld
Inbetriebnahme und Temperaturregelung
Stecken Sie den Netzstecker in die Steckdose mit
Schutzkontakt. Bei geöffneter Kühlraumtür schaltet
sich die Innenbeleuchtung ein. Der Temperaturreg
-
ler befindet sich rechts am Kühlraum.
Stellung „0“ bedeutet
Aus
Drehen Sie den Knopf im Uhrzeigersinn, um das
Gerät einzuschalten.
Stellung „1“ bedeutet
Höchste Temperatur, wärmste Einstellung.
Stellung „7“ (Anschlag) bedeutet
Niedrigste Temperatur, kälteste Einstellung.
Wir empfehlen eine Einstellung von 3 oder 4.
Wenn Sie eine wärmere oder kältere Temperatur
wünschen, drehen Sie den Regler entsprechend.
Wichtig Bei einer hohen Raumtemperatur (z. B. an
heißen Sommertagen) und einer kalten Einstellung
(6 oder 7) läuft der Kompressor möglicherweise
ununterbrochen! Ursache: Wenn die Umge
bungstemperatur hoch ist, muss der Kompressor
ständig laufen, um die niedrige Temperatur im
Gerät aufrecht zu erhalten.
Erste Inbetriebnahme
Reinigung des Innenraums
Bevor Sie das Gerät in Betrieb nehmen, beseitigen
Sie den typischen „Neugeruch“ am besten durch
Reinigen der Innenteile mit lauwarmem Wasser
und einer neutralen Seife. Sorgfältig nachtrocknen.
Wichtig Verwenden Sie keine Reinigungsmittel
oder Scheuerpulver, da hierdurch die Oberfläche
beschädigt wird.
Täglicher Gebrauch
Zubehörteile
Verstellbare Ablagen/Einsätze
Die Wände des Kühlschranks sind mit einer Anzahl
von Führungsschienen ausgestattet, die verschie
dene Möglichkeiten für das Einsetzen der Ablagen
bieten.
Positionierung der Türeinsätze
Die Türeinsätze können in verschiedener Höhe
positioniert werden; damit ermöglichen Sie das La
-
gern verschieden großer Lebensmittelpackungen.
Bitte nehmen Sie die Einstellungen wie folgt vor:
Ziehen Sie den Einsatz langsam in Pfeilrichtung,
bis er sich herausheben lässt, und setzen Sie ihn
dann nach Wunsch wieder ein.

30
www.zanussi.com
Obst-/Gemüseschublade
Die Schublade eignet sich zur Aufbewahrung
von Obst und Gemüse.
Einfrieren frischer Lebensmittel
• Der Gefrierraum eignet sich zum Einfrieren von frischen Lebensmitteln und zum
Lagern von gefrorenen und tiefgefrorenen Lebensmitteln über einen längeren
Zeitraum.
• Legen Sie die frischen Lebensmittel, die
eingefroren werden sollen, in das untere
Fach.
• Die maximale Menge an Lebensmitteln,
die in 24 Stunden eingefroren werden
kann, ist auf dem Typenschild angegeben; eine Plakette befindet sich im
Innern des Gerätes.
• Der Gefriervorgang dauert 24 Stunden.
Legen Sie während dieses Zeitraums
keine weiteren einzufrierenden Lebensmittel in den Gefrierraum.
Lagern von gefrorenen Lebensmitteln
Beim ersten Einschalten oder nach einem
langen Zeitraum ohne Benutzung. Bevor Sie
Lebensmittel in das Fach einlegen, lassen Sie
das Gerät vorher mindestens 2 Stunden lang
mit hohen Einstellungen laufen.
Wichtig
Kam es zum Beispiel durch einen Stromausfall, der länger dauerte als der in der Tabelle
mit den technischen Daten angegebene Wert
(siehe „Lagerzeit bei Störung“) zu einem
ungewollten Abtauen, dann müssen die aufgetauten Lebensmittel sehr rasch verbraucht
oder sofort gekocht und nach dem Abkühlen
erneut eingefroren werden.
Auftauen
Tiefgefrorene oder gefrorene Lebensmittel
können vor der Verwendung je nach der zur
Verfügung stehenden Zeit im Gefrierraum
oder bei Raumtemperatur aufgetaut werden.
Kleinere Teile können sogar direkt aus dem
Gefrierraum entnommen und anschließend
sofort gekocht werden. In diesem Fall dauert
der Garvorgang etwas länger.
Eiswürfelbereitung
Dieses Gerät ist mit einer oder mehreren
Schalen für die Herstellung von Eiswürfeln
ausgestattet.
Praktische Tipps und Hinweise
Normale Betriebsgeräusche
• Unter Umständen ist ein leichtes Gurgeln
und Blubbern zu hören, wenn das Kälte
mittel durch die Leitungen gepumpt wird.
Diese Betriebsgeräusche sind normal.
• Bei eingeschaltetem Kompressor wird
das Kältemittel umgewälzt und Sie hören
ein Surren und ein pulsierendes Ge
räusch vom Kompressor. Diese Betriebsgeräusche sind normal.
• Die thermische Ausdehnung kann ein
plötzliches Knacken verursachen. Dieses
Geräusch ist natürlich und kein physikali
-
sches Phänomen.
Energiespartipps
• Öffnen Sie die Tür nicht zu häufig, und
lassen Sie diese nicht länger offen als
unbedingt notwendig.
• Wenn die Umgebungstemperatur hoch
ist und der Temperaturregler auf eine
niedrige Temperatur eingestellt und das
Gerät voll beladen ist, kann es zu andau
erndem Betrieb des Kompressors und
damit zu Reif- oder Eisbildung am Ver
dampfer kommen. Stellen Sie in diesem
Fall den Temperaturregler auf eine höhere
Einstellung ein, die ein automatisches Ab
tauen und damit auch einen niedrigeren
Energieverbrauch ermöglicht.

31
www.zanussi.com
Hinweise für die Kühlung frischer
Lebensmittel
So erzielen Sie die besten Ergebnisse:
• Legen Sie keine warmen Lebensmittel
oder dampfende Flüssigkeiten in den
Kühlschrank.
• Decken Sie die Lebensmittel ab oder
verpacken Sie diese entsprechend, be
-
sonders wenn sie stark riechen.
• Legen Sie die Lebensmittel so hinein,
dass um sie Luft frei zirkulieren kann.
Hinweise für die Kühlung
Tipps:
Fleisch (alle Sorten): Wickeln Sie Fleisch in
lebensmittelechte Tüten und legen Sie diese auf
die Glasablage über der Gemüseschublade.
Bitte lagern Sie Fleisch aus Sicherheitsgründen
nur einen oder maximal zwei Tage auf diese
Weise.
Vorgekochte Lebensmittel, kalte Gerichte etc...
Diese sollten abgedeckt auf eine der Ablagen
gelegt werden. Obst und Gemüse: Gründ
lich reinigen und in die dafür vorgesehene(n)
Schublade(n) legen.
Butter und Käse: diese sollten stets in speziel
len luftdichten Behältern verpackt sein oder in
Aluminiumfolie bzw. in lebensmittelechte Tüten
eingepackt werden, um so wenig Luft wie mög
-
lich in der Verpackung zu haben.
Milchflaschen: Bitte bewahren Sie Milchfla
schen stets mit Deckel im Flaschenregal in der
Tür auf.
Bananen, Kartoffeln, Zwiebeln und Knoblauch
sollten im Kühlschrank nicht unverpackt aufbe
-
wahrt werden.
Hinweise zum Einfrieren
Im Folgenden finden Sie einige wertvolle Tipps
für einen optimalen Gefriervorgang:
• Die maximale Menge an Lebensmitteln,
die in 24 Stunden eingefroren werden
kann, ist auf dem Typenschild angegeben.
• Der Gefriervorgang dauert 24 Stunden.
Legen Sie während dieses Zeitraums kei
ne weiteren einzufrierenden Lebensmittel
in das Gefrierfach.
• Frieren Sie ausschließlich frische und
gründlich gewaschene Lebensmittel von
sehr guter Qualität ein.
• Teilen Sie die Lebensmittel in kleinere
Portionen ein, damit diese schnell und
vollständig gefrieren und Sie später nur
die Menge auftauen müssen, die Sie
gerade benötigen.
• Verpacken Sie die einzufrierenden
Lebensmittelportionen stets luftdicht in
Alufolie oder in lebensmittelechte Gefrier
beutel und achten Sie darauf, dass die
Verpackung so wenig Luft wie möglich
enthält.
• Achten Sie beim Hineinlegen von
frischen, noch ungefrorenen Lebensmit
teln darauf, dass sie keinen Kontakt mit
Gefriergut bekommen, da diese sonst
antauen können.
• Magere Zutaten lassen sich besser und
länger als fetthaltige lagern; durch Salz
wird die Lagerungsdauer von Zutaten
verkürzt.
• Werden Eiswürfel direkt nach der Ent
nahme aus dem Gefrierfach verwendet,
können sie Frostbrand auf der Haut
verursachen.
• Es empfiehlt sich, das Einfrierdatum auf
jeder einzelnen Packung zu notieren, um
einen genauen Überblick über die Lager
-
zeit zu haben.
Hinweise zur Lagerung gefrorener
Lebensmittel
So erzielen Sie die besten Ergebnisse mit Ihrem
Gerät:
• Prüfen Sie sorgfältig, ob die im Handel
erworbenen gefrorenen Lebensmittel
sachgerecht gelagert wurden.
• Achten Sie unbedingt darauf, die einge
kauften gefrorenen Lebensmittel in der
kürzest möglichen Zeit in Ihr Gefriergerät
zu bringen.
• Öffnen Sie die Tür nicht zu häufig, und
lassen Sie diese nicht länger offen als
unbedingt notwendig.
• Aufgetaute Lebensmittel verderben sehr
schnell und eignen sich nicht für ein
erneutes Einfrieren.
• Das Haltbarkeitsdatum auf der Tiefkühl
kostverpackung sollte nicht überschritten
werden.

32
www.zanussi.com
Reinigung und Pflege
Reinigung
Aus Gründen der Hygiene sollte das Innere
des Geräts einschließlich des inneren Zubehörs regelmäßig gereinigt werden.
Warnung Während der Reinigung
sollte das Gerät nicht an der Netzversorgung angeschlossen sein. Stromschlaggefahr! Vor der Reinigung schalten Sie das
Gerät ab und ziehen Sie den Netzstecker
oder schalten Sie den Trennschalter oder die
Sicherung aus. Reinigen Sie das Gerät nie
mit einem Dampfreiniger. In den elektrischen
Bauteilen könnte sich Feuchtigkeit ansammeln, die zu einer Stromschlaggefahr führt.
Heiße Dämpfe können Kunststoffteile
beschädigen. Das Gerät muss trocken sein,
bevor es wieder in Betrieb gesetzt wird.
Wichtig Ätherische Öle und organische Lösungsmittel können Kunststoffteile angreifen,
wie z. B. Zitronensaft, der Saft in der Orangenschale, Buttersäure oder Reinigungsmittel, die Essigsäuren enthalten.
• Lassen Sie solche Substanzen mit den
Teilen des Geräts nicht in Berührung
kommen.
• Verwenden Sie keine Scheuermittel
• Entfernen Sie Lebensmittelreste aus
dem Gerät. Lagern Sie diese gut abgedeckt an einem kühlen Platz.
• Schalten Sie das Gerät aus und ziehen
Sie den Netzstecker oder schalten Sie
das Gerät mit dem Trennschalter der
Sicherung aus.
• Reinigen Sie das Innere des Geräts
und das innere Zubehör mit einem Tuch
und lauwarmem Wasser. Es können
auch handelsübliche Geschirrspülmittel
verwendet werden.
Wischen Sie nach der Reinigung mit
klarem Wasser nach und reiben Sie das
Gerät trocken.
• Eine Ansammlung von Staub auf dem
Wärmetauscher erhöht den Energieverbrauch. Reinigen Sie aus diesem Grund
den Wärmetauscher auf der Rückseite
des Geräts einmal pro Jahr mit einer
weichen Bürste oder mit einem Staubsauger.
• Prüfen Sie das Wasserablaufloch an
der hinteren Wand der Kühlraums.
Reinigen Sie ein blockiertes Ablaufloch
unter Zuhilfenahme eines weichen Stiftes und seien Sie vorsichtig, dass Sie
das Gehäuse nicht mit einem scharfen
Gegenstand beschädigen.
• Nachdem alles wieder trocken ist, setzen Sie das Gerät wieder in Betrieb.
Abtauen des Gefrierraums
Die Rückwand des Kühlraums ist mit Reif
bedeckt, während der Kompressor läuft und
taut ab, wenn der Kompressor nicht läuft.
Das Wasser des tauenden Reifs verdunstet
selbstständig.
Im Gefrierraum bildet sich jedoch mit der Zeit
eine Eisschicht. Diese sollte entfernt werden.
Entfernen Sie Reif und Eis vom Verdampfer
niemals mit scharfen metallischen Gegenständen, da dieser dadurch beschädigt werden könnte. Wenn sich jedoch eine sehr dicke
Eisschicht auf der Innenauskleidung bildet,
sollten Sie das Gerät vollständig abtauen.
Gehen Sie dabei folgendermaßen vor:
• Ziehen Sie den Netzstecker aus der
Netzsteckdose.
• Verpacken Sie das gesamte Gefriergut
in mehrere Schichten Zeitungspapier
und lagern Sie es an einem kühlen Ort.
• Lassen Sie die Tür des Geräts offen
stehen und stellen Sie einen Behälter
zum Auffangen des Tauwassers unter
das Gerät.
• Wenn der Gefrierraum vollständig
abgetaut ist, wischen Sie das Innere
sorgfältig trocken.
• Stecken Sie den Netzstecker wieder in
die Steckdose, um das Gerät einzuschalten.

33
www.zanussi.com
Was tun, wenn...
Vorsicht Ziehen Sie vor der Fehlersuche
immer den Netzstecker aus der Steckdose.
Die Reparatur eines Fehlers, der in der
vorliegenden Bedienungsanleitung nicht beschrieben ist, darf nur von einem qualifizierten
Elektriker oder einer Fachkraft durchgeführt
werden.
Wichtig Während das Gerät in Betrieb ist,
entstehen bestimmte Geräusche (Kompressor und Kühlkreislauf).
Problem Mögliche Ursache Abhilfe
Das Gerät funktioniert nicht.
Das Gerät ist nicht eingeschaltet. Schalten Sie das Gerät ein.
Der Netzstecker ist nicht oder nur
lose eingesteckt.
Stecken Sie den Netzstecker ein.
Die Sicherung ist durchgebrannt
oder defekt.
Prüfen und falls notwendig, ersetzen Sie die
Sicherung.
Die Netzsteckdose ist defekt.
Fehlfunktionen an der Netzversorgung müssen
von einem Elektriker repariert werden.
Das Gerät kühlt zu
stark.
Die Temperatur ist zu niedrig
eingestellt.
Drehen Sie den Temperaturregler vorübergehend auf eine höhere Einstellung.
Die Lebensmittel
sind zu warm.
Die Temperatur ist nicht richtig
eingestellt.
Beachten Sie bitte den Abschnitt „Bedienfeld“.
Die Tür war für einen längeren
Zeitraum offen.
Öffnen Sie die Tür nur so lange wie erforderlich.
Innerhalb der letzten 24 Stunden
wurde eine große Menge warmer
Speisen in das Gerät eingelagert.
Drehen Sie den Temperaturregler vorübergehend auf eine niedrigere Einstellung.
Das Gerät steht in der Nähe
einer Heizquelle.
Lesen Sie bitte im Abschnitt „Aufstellungsort“
nach.
Starke Reifbildung,
möglicherweise
auch an der Tür.
Türdichtung ist nicht luftdicht
(möglich nach dem Anschlagwechsel der Tür).
Erwärmen Sie die undichten Abschnitte der
Türdichtung mit einem Haartrockner (auf einer
kühlen Einstellung). Formen Sie gleichzeitig
die erwärmte Türdichtung von Hand, bis sie
richtig sitzt.
Die Innenbeleuchtung funktioniert
nicht.
Die Lampe ist defekt.
Lesen Sie bitte den Abschnitt „Austauschen
der Lampe”.
Ungewöhnliche
Geräusche
Das Gerät steht nicht waagrecht. Stellen Sie die Füße des Geräts ein.
Das Gerät berührt die Wand
oder andere Gegenstände.
Bewegen Sie das Gerät ein wenig.
Ein Bauteil, z.B. ein Rohr auf der
Rückseite des Geräts, berührt
ein anderes Teil des Geräts oder
die Wand.
Falls erforderlich, biegen Sie das Bauteil
vorsichtig auf die Seite.
Der Kompressor
startet nicht sofort
nach dem Ändern
der Temperatureinstellung.
Das ist keine Störung, sondern
normal.
Der Kompressor schaltet sich nach einer Weile
ein.
Wasser auf dem
Boden oder auf
den Ablagen.
Der Wasserablauf ist blockiert. Siehe Abschnitt „Reinigung und Pflege“.

34
www.zanussi.com
Tritt eine Störung erneut auf, wenden Sie sich
an den Kundendienst.
Halten Sie folgende Angaben bereit, damit
Ihnen schnell und korrekt geholfen werden
kann. Notieren Sie hier die erforderlichen
Daten, die Sie dem Typenschild entnehmen.
Modellbeschreibung ............................................
(Mod.)
Produktnummer ............................................
(PNC)
Seriennummer ............................................
(S.N.)
Austauschen der Lampe für die
Innenbeleuchtung
Warnung! Ist die LED-Lampe defekt,
TAUSCHEN SIE SIE NICHT SELBST
AUS!
Wird die LED -Lampedurch unerfahrene
Personen ausgetauscht, besteht Verletzungsgefahr oder es könnte zu ernsthaften
Funktionsstörungen kommen. Um Schäden zu
vermeiden, muss die LED-Lampe von einem
Fachmann ersetzt werden. Wenden Sie sich
an Ihren Kundendienst.
Schalten Sie das Gerät vor dem Austausch
der LED-Lampe aus und ziehen Sie den Netzstecker oder schalten Sie die Sicherung oder
den Trennschalter aus.
Technische Daten der LED-Lampe:
220-240V.
Technische Daten
Die technischen Informationen befinden sich auf dem Typenschild innen links im
Gerät sowie auf der Energieplakette.
Abmessungen
Höhe 1593 mm
Breite 554 mm
Tiefe 551 mm
Lagerzeit bei Störung 13 Stunden
Montage
Lesen Sie bitte die „Sicherheitshinweise“
vor der Montage des Geräts sorgfältig
durch, um Gefahren für die eigene Person zu
vermeiden und einen korrekten Betrieb des
Geräts zu gewährleisten.
Aufstellung
Installieren Sie dieses Gerät an einem Ort, an
dem die Umgebungstemperatur mit der Klima
-
klasse übereinstimmt, die auf dem Typenschild
des Geräts angegeben ist:
Klimaklasse Umgebungstemperatur
SN +10 °C bis +32 °C
N +16 °C bis +32 °C
ST +16 °C bis +38 °C
T +16 °C bis +43 °C
Ort
Das Gerät sollte möglichst weit entfernt von
Wärmequellen wie Heizungen, Boilern oder
direktem Sonnenlicht usw. aufgestellt werden.
Die Luft muss frei auf der Geräterückseite
zirkulieren können. Wenn das Gerät unter
einem Hängeschrank installiert wird, muss der
Mindestabstand zwischen der Geräteoberseite und dem Hängeschrank mindestens
100mm betragen, um die bestmögliche Leistung zu garantieren. Die korrekte waagerechte
Ausrichtung des Gerätes kann mit Hilfe eines
oder mehrerer Schraubfüße am Sockel des
Gerätes erfolgen.

35
www.zanussi.com
Warnung Es muss möglich sein, das
Gerät von der Hauptstromversorgung
zu trennen; daher sollte der Stecker
nach der Installation leicht zugänglich
sein.
Elektrischer Anschluss
Vorsicht Der elektrische Anschluss des
Gerätes darf nur von qualifizierten
Elektrikern oder Fachkräften ausgeführt
werden.
Warnung Die Erdung des Gerätes ist
gesetzlich vorgeschrieben: Der
Hersteller übernimmt keine Haftung bei
Missachtung der vorliegenden Sicher-
heitsvorschriften.
Ausrichten
Das Gerät sollte waagerecht ausgerichtet
sein, um Vibrationen zu vermeiden. Um das
Gerät auszurichten, muss es aufrecht stehen
und beide Schraubfüße müssen den Boden
berühren. Sie können das Gerät auch ausrichten, indem Sie die entsprechenden vorderen
Füße herausschrauben (Sie können hierzu
die Finger oder einen geeigneten Schraubenschlüssel verwenden).
Wechseln des Türanschlags
Die Seite, an der sich die Tür öffnet, kann von
der linken Seite (wie geliefert) auf die rechte
Seite geändert werden. Bevor Sie damit
beginnen, legen Sie den Kühlschrank auf
seine Rückseite, um an den Sockel Zugang
zu haben. Legen Sie ihn dabei auf weiches
Schaumstoffverpackungsmaterial oder ähnliches Material, damit die Kühlrohre auf der
Rückseite des Kühlschranks nicht beschädigt
werden.
1. Stellen Sie den Kühlschrank aufrecht
und entfernen Sie mit einem Schlitzschraubendreher die 4 Schraubenabdeckungen auf der Rückseite der Kühlschankabdeckung.
2. Schrauben Sie die Abdeckung ab und
heben Sie sie zum Entfernen an der
Rückseite an. Heben Sie dann die
obere Tür ab und platzieren Sie sie auf
eine gepolsterte Oberfläche, damit sie
nicht verkratzt wird.
3. Entfernen Sie den oberen Scharnierkern, übertragen Sie ihn auf die linke
Seite, ziehen Sie ihn fest und legen Sie
ihn dann an einem sicheren Platz ab.
4. Entfernen Sie die zwei Flanschschrauben und dann das mittlere Scharnier,
das die untere Tür hält. Heben Sie die
untere Tür ab und setzen Sie sie auf
eine gepolsterte Oberfläche, damit sie
nicht verkratzt wird.

36
www.zanussi.com
5. Entfernen Sie die Scharnierbohrungsabdeckungen von den rechten Löchern
wie abgebildet und übertragen Sie
diese auf das nicht abgedeckte Loch
auf der linken Seite.
6. Entfernen Sie beide einstellbaren Füße
und entfernen Sie die untere Scharnierhalterung durch Herausdrehen der
Schrauben.
7. Schrauben Sie den unteren Scharnierbolzen ab und entfernen Sie ihn, drehen
Sie die Halterung um und bringen Sie
sie an. Montieren Sie die Halterung
wieder am unteren Scharnierbolzen.
Schrauben Sie beide Schraubfüße
wieder hinein. Bringen Sie die untere
Tür in der gegenüberliegenden Position
an. Sichern Sie die Türstellung,
montieren Sie den unteren Scharnierbolzen im unteren Loch der Tür und
ziehen Sie die Schrauben an.
8. Montieren Sie das mittlere Scharnier in
umgekehrter Richtung um 180 Grad in
der linken Position. Montieren Sie den
mittleren Scharnierbolzen im oberen
Loch der unteren Tür und ziehen Sie die
Schrauben an. Bringen Sie die untere
Tür in der gegenüberliegenden Position
an. Sichern Sie die Türstellung,
montieren Sie den mittleren Scharnierbolzen im unteren Loch der oberen Tür.
9. Montieren Sie wieder die Abdeckung,
indem Sie den oberen Scharnierbolzen
in das obere Loch in der Tür einführen
und mit den 4 Schrauben festschrauben. Montieren Sie wieder die Schraubenabdeckungen.
10. Wenn Sie den Türanschlag wechseln,
setzen Sie den Türanschlag auf der
gegenüberliegenden Seite ein.

37
www.zanussi.com
11. Entfernen Sie die Scharnierabdeckung
A von der Tür und bringen Sie die
Abdeckung B, die sich im Beipack
befindet, auf der Öffnung an.
Umwelttipps
Das Symbol auf dem Produkt oder seiner
Verpackung weist darauf hin, dass dieses
Produkt nicht als normaler Haushaltsabfall zu
behandeln ist, sondern an einem Sammelpunkt für das Recycling von elektrischen und
elektronischen Geräten abgegeben werden
muss. Durch Ihren Beitrag zum korrekten
Entsorgen dieses Produkts schützen Sie die
Umwelt und die Gesundheit Ihrer Mitmenschen. Umwelt und Gesundheit werden
durch falsches Entsorgen gefährdet. Weitere
Informationen über das Recycling dieses Produkts erhalten Sie von Ihrem Rathaus, Ihrer
Müllabfuhr oder dem Geschäft, in dem Sie
das Produkt gekauft haben.
Wohin mit den Altgeräten?
Überall dort wo neue Geräte verkauft werden oder Abgabe bei den offiziellen SENS-Sammelstellen oder offiziellen
SENS-Recyclern.
Die Liste der offiziellen SENS Sammelstellen
findet sich unter www.sens.ch.
Verpackungsmaterial
Mit dem Symbol
gekennzeichnete Materialien sind wieder verwertbar. Bitte entsorgen
Sie das Verpackungsmaterial in geeigneten
Recycling-Sammelbehältern.
Entsorgung des Geräts
1. Trennen Sie den Netzstecker von der
Netzversorgung.
2. Schneiden Sie das Netzkabel ab und
entsorgen Sie es.

38
www.zanussi.com
Sommario
Con riserva di modifiche senza obbligo
di preavviso.
Informazioni per la sicurezza
Leggere attentamente le istruzioni fornite prima di installare e
utilizzare l'apparecchiatura. Il produttore non è responsabile di
lesioni e danni derivanti da un'installazione e un uso non corretti dell'apparecchiatura. Tenere sempre le istruzioni a portata di
mano come riferimento futuro.
Sicurezza dei bambini e delle persone vulnerabili
• Questa apparecchiatura può essere usata da bambini a partire
dagli 8 anni di età e da adulti con ridotte capacità fisiche, sensoriali o mentali o con scarsa esperienza o conoscenza sull'uso
dell'apparecchiatura, solo se sorvegliati o istruiti relativamente
all'uso dell'apparecchiatura e se hanno capito i rischi associati
• Non consentire ai bambini di giocare con l'apparecchiatura
• La pulizia e gli interventi di manutenzione non devono essere
eseguiti da bambini senza supervisione
• Tenere i materiali di imballaggio fuori dalla portata dei bambini
Avvertenze di sicurezza generali
• L'apparecchiatura è destinata all'uso domestico e usi simili, ad
esempio:
– fattorie, cucine di negozi, uffici e altri ambienti di lavoro
– da clienti di hotel, motel, bed and breakfast e altri ambienti
residenziali
• Verificare che le aperture di ventilazione, sia sull'apparecchiatura che nella struttura da incasso, siano libere da ostruzioni
• Non utilizzare dispositivi meccanici o altri mezzi per accelerare
lo sbrinamento, se non esplicitamente consigliato dal
costruttore
• Non danneggiare il circuito refrigerante
Informazioni per la sicurezza _______ 38
Istruzioni di sicurezza ___________ 39
Controllo __________________ 40
Primo utilizzo________________ 41
Utilizzo quotidiano _____________ 41
Consigli e suggerimenti utili________ 42
Pulizia e cura________________ 43
Cosa fare se … ______________ 44
Dati tecnici_________________ 46
Installazione ________________ 47
Aspetti ambientali _____________ 49

39
www.zanussi.com
• Non utilizzare apparecchiature elettriche all'interno dei comparti
di conservazione degli alimenti, ad eccezione di quelle consigliate dal costruttore
• Non nebulizzare acqua né utilizzare vapore per pulire l'apparecchiatura
• Pulire l'apparecchiatura con un panno inumidito e morbido.
Utilizzare solo detergenti neutri. Non usare prodotti abrasivi,
spugnette abrasive, solventi oppure oggetti metallici
• Non conservare in questa apparecchiatura sostanze esplosive
come bombolette spray contenenti un propellente infiammabile
• Se il cavo di alimentazione è danneggiato, deve essere sostituito dal produttore, da un tecnico autorizzato o da una persona
qualificata per evitare situazioni di pericolo
Istruzioni di sicurezza
Installazione
Avvertenza! L'installazione dell'appa-
recchiatura deve essere eseguita solo
da personale qualificato
• Rimuovere tutti i materiali di imballaggio
• Non installare né utilizzare l'apparecchiatura se danneggiata
• Attenersi alle istruzioni fornite insieme
all'apparecchiatura
• Considerato il peso dell'apparecchiatura, prestare sempre attenzione in fase
di spostamento della stessa. Indossare
sempre guanti di sicurezza
• Assicurarsi che l'aria possa circolare
liberamente attorno all'apparecchiatura
• Attendere almeno 4 ore prima di collegare l'apparecchiatura all'alimentazione.
Questo serve a consentire all'olio di
fluire nuovamente nel compressore
• Non installare l'apparecchiatura in
prossimità di termosifoni, fornelli, forni o
piani cottura
• La superficie posteriore dell'apparecchiatura deve essere appoggiata alla
parete
• Non installare l'apparecchiatura dove
sia esposta alla luce solare diretta
• Non installare l'apparecchiatura in
luoghi troppo umidi o freddi, come aggiunte strutturali, garage o cantine
• Quando si sposta l'apparecchiatura,
sollevarla per il bordo anteriore per
evitare di graffiare il pavimento
Collegamento elettrico
Avvertenza! Rischio di incendio e
scosse elettriche.
• L'apparecchiatura deve essere dotata di
messa a terra conforme
• Tutti i collegamenti elettrici devono
essere realizzati da un elettricista
qualificato
• Verificare che i dati elettrici riportati
sulla targhetta matricola corrispondano
a quelli dell'impianto. In caso contrario,
contattare un elettricista
• Utilizzare sempre una presa antishock
elettrico correttamente installata
• Non utilizzare prese multiple e
prolunghe
• Accertarsi di non danneggiare i
componenti elettrici (ad es. la spina di
alimentazione, il cavo di alimentazione,
il compressore). Contattare il Centro di
Assistenza o un elettricista per sostituire i componenti elettrici
• Il cavo di alimentazione deve rimanere
sotto il livello della spina di alimentazione

40
www.zanussi.com
Controllo
Controllo
Avvio e regolazione della temperatura
Inserire la spina nella presa con messa a
terra. Quando la porta del vano frigorifero è
aperta, la luce interna è accesa. Il regolatore
della temperatura si trova sul lato destro del
vano frigorifero.
La posizione "0" indica
Off
Girare la manopola in senso orario per accen-
dere l'apparecchiatura.
La posizione "1" indica
Temperatura massima, impostazione più
calda.
• Inserire la spina di alimentazione nella
presa solo al termine dell'installazione.
Assicurarsi che la spina di alimentazione
rimanga accessibile dopo l'installazione
• Non tirare il cavo di alimentazione per
scollegare l'apparecchiatura. Tirare solo
la spina
Uso dell'apparecchiatura
Avvertenza! Rischio di lesioni, scottatu-
re o scosse elettriche.
• Non apportare modifiche alle specifiche
di questa apparecchiatura
• Non introdurre apparecchiature elettriche
(ad es. gelatiere) nell'apparecchiatura
se non specificamente consentito dal
produttore
• Fare attenzione a non danneggiare il
circuito refrigerante. Esso contiene
isobutano (R600a), un gas naturale con
un alto livello di compatibilità ambientale;
tuttavia il gas è infiammabile
• Nel caso di danno al circuito refrigerante,
assicurarsi che non si sviluppino fiamme
libere e scintille nel locale. Aerare bene
l'ambiente
• Non appoggiare oggetti incandescenti
sulle parti in plastica dell'apparecchiatura
• Non introdurre bevande analcoliche nel
vano congelatore, in quanto si verrebbe
a creare una pressione nel contenitore
della bevanda
• Non conservare gas e liquidi infiammabili
nell'apparecchiatura
• Non appoggiare o tenere prodotti infiam
mabili, né oggetti imbevuti di prodotti
infiammabili sull'apparecchiatura, al suo
interno o nelle immediate vicinanze
• Non toccare il compressore o il conden
-
satore. Sono incandescenti
• Non togliere o toccare gli oggetti nel
vano congelatore con le mani bagnate o
umide
• Non ricongelare del cibo precedente
-
mente scongelato
• Attenersi alle istruzioni per la conserva
zione riportate sulla confezione del cibo
surgelato
Pulizia e cura
Avvertenza! Vi è il rischio di ferirsi o
danneggiare l'apparecchiatura.
• Prima di eseguire qualunque intervento
di manutenzione, spegnere l'apparec
-
chiatura ed estrarre la spina dalla presa
• L'unità refrigerante di questa apparec
chiatura contiene idrocarburi. L'unità
deve essere ricaricata ed ispezionata
esclusivamente da personale qualificato
• Controllare regolarmente lo scarico
dell'apparecchiatura e, se necessario,
pulirlo. L'ostruzione dello scarico può
causare un deposito di acqua di sbrina
-
mento sul fondo dell'apparecchiatura
Smaltimento
Avvertenza! Rischio di lesioni o
soffocamento.
• Scollegare l'apparecchiatura dall'alimen
-
tazione elettrica
• Tagliare il cavo di rete e smaltirlo
• Rimuovere la porta per evitare che bam
bini e animali domestici rimangano chiusi
all'interno dell'apparecchiatura
• Il circuito refrigerante e i materiali isolanti
di questa apparecchiatura rispettano
l'ozono
• La schiuma isolante contiene gas infiam
mabili. Contattare le autorità locali per
ricevere informazioni su come smaltire
correttamente l'apparecchiatura
• Non danneggiare i componenti dell'unità
refrigerante che si trovano vicino allo
scambiatore di calore

41
www.zanussi.com
La posizione "7" (ultima) indica
Temperatura più bassa, impostazione più
fredda.
L'impostazione consigliata è 3 o 4. Se si
desidera una temperatura più alta o più bassa,
girare il regolatore secondo le proprie preferen
-
ze.
Importante! Se la temperatura ambiente è
elevata (ad esempio nelle calde giornate estive)
e l'impostazione è su molto freddo
(6 o 7), il compressore può funzionare in maniera ininterrotta. Causa: quando la temperatura ambiente è elevata, il compressore deve
funzionare ininterrottamente per mantenere la
temperatura bassa all'interno dell'apparecchia
-
tura.
Primo utilizzo
Pulizia dell'interno
Prima di utilizzare l'apparecchiatura per la
prima volta, pulire l'interno con acqua tiepida e
sapone neutro per eliminare il tipico odore dei
prodotti nuovi, quindi asciugare accuratamente.
Importante! Non usare detergenti corrosivi o
polveri abrasive che possano danneggiare la
finitura.
Utilizzo quotidiano
Accessori
Ripiani rimovibili
Le guide presenti sulle pareti del frigorifero
permettono di posizionare i ripiani a diverse
altezze.
Posizionamento dei ripiani della porta
Per facilitare l'introduzione di alimenti di diverse
dimensioni, i ripiani della porta possono essere
posizionati ad altezze differenti.
Regolare i ripiani come segue: tirare delicata
mente il ripiano nella direzione indicata dalle
frecce fino a sganciarlo, quindi riposizionarlo
dove necessario.
Cassetto delle verdure
Questo cassetto è particolarmente adatto per
la conservazione di frutta e verdura.

42
www.zanussi.com
Congelamento di alimenti freschi
• Il vano congelatore è adatto al congelamento di alimenti freschi e alla conservazione a lungo termine di alimenti
congelati e surgelati
• Riporre gli alimenti freschi da congelare
nel vano inferiore
• La quantità massima di alimenti che è
possibile congelare in 24 ore è riportata
sulla targhetta matricola, un'etichetta
presente sulle pareti interne dell'apparecchiatura
• Il processo di congelamento dura
24ore. Finché non è concluso, non
aggiungere altro cibo da congelare
Conservazione di alimenti surgelati
Al primo avvio o dopo un periodo di inutilizzo,
prima di inserire gli alimenti all’interno del
vano, lasciare l’apparecchiatura in funzione
per almeno due ore con le impostazioni più
alte.
Importante! In caso di scongelamento
accidentale, ad esempio se si verifica un'interruzione della corrente elettrica di durata
superiore al "tempo di salita" indicato nella
tabella dei dati tecnici, gli alimenti scongelati
devono essere consumati rapidamente o
cucinati immediatamente e quindi ricongelati
(dopo il raffreddamento).
Scongelamento
Prima dell'utilizzo, gli alimenti surgelati o
congelati possono essere scongelati nel vano
frigorifero o, per un processo più veloce, a
temperatura ambiente. I pezzi piccoli possono anche essere estratti dal congelatore e
cucinati direttamente da congelati. In questo
caso, tuttavia, la cottura durerà più a lungo.
Produzione di cubetti di ghiaccio
Questa apparecchiatura è dotata di una o
più vaschette per la produzione di cubetti di
ghiaccio.
Consigli e suggerimenti utili
Rumori normali durante il
funzionamento
• Quando il refrigerante viene pompato
attraverso le bobine o le tubazioni, si
potrebbe udire un fievole gorgoglio e
un borbottio. I seguenti rumori durante
il funzionamento sono da considerarsi
normali
• Quando il compressore è in funzione, viene pompato il refrigerante e si
potrebbe udire un ronzio e un rumore
pulsante provenienti dal compressore. I
seguenti rumori durante il funzionamento sono da considerarsi normali
• La dilatazione termica potrebbe provocare uno schiocco improvviso. È un fenomeno fisico naturale e non pericoloso
Idee per risparmiare energia
• Non aprire frequentemente la porta e limitare il più possibile i tempi di apertura
• Se la temperatura ambiente è elevata, il
regolatore di temperatura è impostato
su un valore basso e l'apparecchiatura è a pieno carico, il compressore
può funzionare in maniera ininterrotta,
causando la formazione di brina o di
ghiaccio sull'evaporatore. In tal caso,
ruotare il regolatore di temperatura
verso valori più caldi per consentire
lo sbrinamento automatico e ridurre il
consumo energetico
Consigli per la refrigerazione di alimenti
freschi
Per ottenere risultati ottimali:
• Non introdurre alimenti o liquidi caldi nel
vano frigorifero
• Coprire o avvolgere gli alimenti, in particolare quelli con un gusto o un aroma
forte
• Disporre gli alimenti in modo da garantire un'adeguata circolazione dell'aria
Consigli per la refrigerazione
Suggerimenti:
Carne (tutti i tipi): deve essere avvolta in sac-
chetti salvafreschezza e collocata sul ripiano
in vetro, sopra il cassetto delle verdure.
La carne conservata in questo modo deve
essere consumata entro uno o due giorni.

43
www.zanussi.com
Alimenti precotti, piatti freddi, ecc. devono
essere coperti e possono essere disposti su
uno dei ripiani. Frutta e verdura: pulire accuratamente e sistemare negli appositi cassetti.
Burro e formaggi: devono essere sempre
chiusi in appositi contenitori ermetici o in
sacchetti salvafreschezza oppure avvolti con
pellicola di alluminio, per limitare il più possibile l'ingresso di aria nelle confezioni.
Bottiglie del latte: riporre sempre le bottiglie
del latte con il tappo ben chiuso sul ripiano
portabottiglie della porta.
Non conservare in frigorifero banane, patate,
cipolle o aglio non confezionati.
Consigli per il congelamento
Consigli importanti per un congelamento
ottimale:
• La quantità massima di alimenti che è
possibile congelare in 24 ore è riportata
sulla targhetta di identificazione
• Il processo di congelamento dura
24ore. Finché non è concluso, non
aggiungere altro cibo da congelare
• Congelare solo alimenti freschi, di ottima qualità e accuratamente lavati
• Dividere gli alimenti in piccole porzioni,
in modo da facilitare un congelamento
rapido e consentire lo scongelamento
solo della quantità necessaria
• Avvolgere gli alimenti in pellicola di
alluminio o politene in modo da evitare il
contatto con l'aria
• Non disporre gli alimenti freschi non
congelati a contatto con quelli già congelati, per evitare l'innalzamento della
temperatura di questi ultimi
• Gli alimenti magri si conservano meglio
e più a lungo di quelli ricchi di grassi; il
sale riduce la durata di conservazione
dell'alimento
• I ghiaccioli, se consumati appena
prelevati dal vano congelatore, possono
causare ustioni da freddo
• È consigliabile riportare su ogni confezione la data di congelamento, in modo
da poter controllare il tempo di conservazione
Consigli per la conservazione dei
surgelati
Per ottenere risultati ottimali è consigliabile:
• Controllare che i surgelati esposti nei
punti vendita non presentino segni di
interruzione della catena del freddo
• Accertarsi che il tempo di trasferimento dei surgelati dal punto vendita al
congelatore domestico sia il più breve
possibile
• Non aprire frequentemente la porta e limitare il più possibile i tempi di apertura
• Una volta scongelati, gli alimenti si
deteriorano rapidamente e non possono
essere ricongelati
• Non superare la durata di conservazione indicata sulla confezione
Pulizia e cura
Pulizia
Per motivi igienici, è necessario pulire regolarmente l'interno dell'apparecchiatura, inclusi gli
accessori interni.
Avvertenza! L’apparecchiatura non
deve essere collegata alla rete di
alimentazione durante la pulizia. Pericolo di
scossa elettrica! Prima della pulizia, spegnere
l'apparecchiatura e staccare la spina dalla
presa oppure spegnere l'interruttore automatico o il fusibile. Non pulire mai l'apparecchiatura con una pulitrice a vapore. L'umidità
potrebbe accumularsi nei componenti elettrici
con conseguente pericolo di scossa elettrica.
I vapori caldi possono provocare danni alle
parti in plastica. L'apparecchiatura deve
essere asciutta prima di essere rimessa in
funzione.
Importante! Gli oli essenziali e i solventi
organici, ad es. il succo di limone o la scorza
dell'arancia, l'acido butirrico o i detergenti
contenenti acido acetico, possono attaccare
le parti in plastica.
• Evitare che queste sostanze vengano a
contatto con parti dell’apparecchiatura
• Non utilizzare detergenti abrasivi

44
www.zanussi.com
• Rimuovere gli alimenti presenti nell'apparecchiatura. Conservarli in luogo
fresco, ben coperti
• Spegnere l’apparecchiatura e staccare
la spina dalla presa oppure spegnerla
con l'interruttore automatico o il fusibile
• Pulire l'apparecchiatura e gli accessori
interni con un panno e acqua tiepida.
È possibile utilizzare anche i detergenti
per lavare i piatti reperibili in commercio. Dopo la pulizia, risciacquare
con acqua fresca e strofinare fino ad
asciugare
• L'accumulo di polvere sul condensatore
aumenta il consumo di energia. Per
questo motivo, pulire lo scambiatore di
calore sul retro dell’apparecchiatura una
volta all’anno con una spazzola morbida
o con un aspirapolvere
• Controllare il foro di scarico dell'acqua
sulla parete posteriore del vano frigorifero. Pulire il foro di scarico bloccato
servendosi di una matita spuntata,
facendo attenzione a non danneggiare il
rivestimento con oggetti appuntiti
• Dopo che tutto è asciutto, rimettere in
funzione l’apparecchiatura
Sbrinamento del congelatore
La parete posteriore del vano frigorifero si
riempie di brina quando il compressore è in
funzione e si sbrina quando il compressore è
spento. L'acqua prodotta dallo sbrinamento
evapora da sola.
Tuttavia, con il passare del tempo, si forma
uno strato di ghiaccio nel vano congelatore.
Rimuovere questa formazione.
Per rimuovere la brina e il ghiaccio dall'evaporatore, non usare utensili metallici appuntiti che possano danneggiarlo. Tuttavia, se
si forma uno strato spesso di ghiaccio sul
rivestimento interno, è necessario sbrinare
completamente l'apparecchiatura. Procedere
come segue:
• Scollegare la spina dalla presa elettrica
• Rimuovere gli alimenti surgelati, avvolgerli in alcuni strati di carta di giornale
e riporli in un luogo fresco
• Lasciare aperta la porta e posizionare
un contenitore sotto l'apparecchiatura
per raccogliere l'acqua di sbrinamento
• Una volta completato lo sbrinamento,
asciugare accuratamente l'interno
• Reinserire la spina nella presa per
accendere l'apparecchiatura
Cosa fare se …
Attenzione! Prima di eseguire la ricerca gua-
sti, estrarre la spina dalla presa.
La riparazione di un guasto, non descritta
nel presente manuale, deve essere eseguita
esclusivamente da elettricisti qualificati o da
personale competente.
Importante! Quando l'apparecchiatura è in
funzione, è possibile udire alcuni rumori (funzionamento del compressore e circolazione
del refrigerante).
Problema Possibile causa Soluzione
L'apparecchiatura
non funziona.
L'apparecchiatura è spenta. Accendere l'apparecchiatura.
La spina di rete non è inserita o
è allentata.
Inserire la spina di rete.
Il fusibile è bruciato o è guasto.
Controllare e sostituire il fusibile, se necessario.
La presa di corrente è guasta.
I malfunzionamenti dell'alimentazione di rete
devono essere corretti da un elettricista.
L’apparecchiatura
raffredda troppo.
La temperatura è impostata
troppo fredda.
Ruotare temporaneamente il regolatore di
temperatura verso valori più caldi.

45
www.zanussi.com
Problema Possibile causa Soluzione
Gli alimenti sono
troppo caldi.
Il regolatore della temperatura
non è impostato correttamente.
Fare riferimento alla sezione "Controllo".
La porta è rimasta aperta per un
periodo prolungato.
Aprire la porta solo il tempo necessario.
Nel corso delle ultime 24 ore,
è stata inserita una grande quantità di alimenti caldi nell'apparecchiatura.
Ruotare temporaneamente il termostato su
una temperatura più fredda.
L’apparecchiatura è vicina ad una
fonte di calore.
Fare riferimento alla sezione "Posizione
di installazione".
Consistente accumulo di ghiaccio,
probabilmente
anche sulla porta.
La guarnizione della porta non
è a tenuta (probabilmente dopo
l'inversione della porta).
Scaldare con cura le sezioni della guarnizione
della porta che mostrano perdite usando un
asciugacapelli (su un'impostazione fresca).
Contemporaneamente, sagomare con le mani
la guarnizione scaldata della porta in modo
che si inserisca correttamente in sede.
La lampadina interna è spenta.
La lampadina è bruciata.
Fare riferimento alla sezione "Sostituzione della
lampadina".
Rumorosità
insolita.
Un errato livellamento del mobiletto.
Regolare i piedini.
L’apparecchiatura è a contatto
con la parete o con altri oggetti.
Spostare leggermente l’apparecchiatura.
Un componente, ad es. un tubo
sul retro dell’apparecchiatura,
è a contatto con un’altra parte
dell’apparecchiatura o della
parete.
Se necessario, flettere con cura il componente
sul lato.
Il compressore non si avvia
immediatamente
dopo la modifica
della temperatura
impostata.
Ciò è normale, non si è verificato
alcun errore.
Il compressore si avvia dopo un certo periodo
di tempo.
Acqua sul fondo
o sui ripiani di
appoggio.
Il foro di scarico dell’acqua è
ostruito.
Fare riferimento alla sezione "Pulizia e cura".

46
www.zanussi.com
In caso di ricomparsa del codice di allarme
o dell'anomalia, contattare il centro di
assistenza.
Per consentirci di effettuare un intervento
corretto e tempestivo, tenere a portata
di mano questi dati. Annotare qui i dati
necessari; consultare la targhetta di
identificazione.
Descrizione modello ............................................
(Mod.)
Numero prodotto ............................................
(PNC)
Numero serie ............................................
(N.S.)
Sostituzione della lampadina
Avvertenza! Se la lampadina a LED
è guasta, NON SOSTITUIRLA
AUTONOMAMENTE.
La sostituzione della lampadina a LED da
parte di persone non qualificate potrebbe
causare lesioni personali e gravi malfunzionamenti. Per evitare danni, la sostituzione della
lampadina a LED deve essere effettuata da
personale esperto. Contattare il Servizio di
Assistenza Locale.
Prima di sostituire la lampadina a LED,
spegnere l'apparecchiatura e scollegare
la spina oppure spegnere l’interruttore
automatico o il fusibile.
Dati tecnici della lampadina a LED:
220 - 240V.
Dati tecnici
I dati tecnici sono riportati sulla targhetta matricola, applicata sul lato sinistro
interno dell'apparecchiatura, e sull'etichetta dei valori energetici.
Dimensioni
Altezza 1593 mm
Larghezza 554 mm
Profondità 551 mm
Tempo di risalita 13 ore

47
www.zanussi.com
Installazione
Prima di procedere all'installazione,
leggere attentamente le "Informazioni di
sicurezza", che riportano le precauzioni da
rispettare per la propria incolumità e il
corretto funzionamento dell'apparecchiatura.
Posizionamento
Installare l'apparecchiatura in un luogo la cui
temperatura ambiente corrisponda alla classe
climatica indicata sulla targhetta matricola
dell’apparecchiatura:
Classe clima-
tica
Temperatura ambiente
SN Da +10 °C a +32 °C
N Da +16° C a +32 °C
ST Da +16° C a +38° C
T Da +16° C a +43° C
Ubicazione
L'apparecchiatura deve essere installata il
più lontano possibile da fonti di calore come
ad esempio termosifoni, boiler, luce solare
diretta, ecc. Verificare che sul lato posteriore
sia garantita un'adeguata circolazione dell'aria. Se l'apparecchiatura è installata sotto
un pensile, si raccomanda di mantenere una
distanza minima di 100 mm tra quest'ultimo e
lo spigolo superiore dell'apparecchiatura. Per
consentire un perfetto livellamento dell'apparecchiatura, sono disponibili uno o più piedini
regolabili.
Avvertenza! L'apparecchiatura deve
poter essere scollegabile dalla rete
elettrica; pertanto, al termine dell'instal-
lazione, la spina deve essere facilmente
accessibile.
Collegamento elettrico
Attenzione! Se si rendesse necessaria
una modifica all'impianto elettrico per
l'installazione dell’apparecchiatura,
l’intervento dovrà essere effettuato solo
da personale qualificato e competente.
Avvertenza! La messa a terra dell'ap-
parecchiatura è obbligatoria per legge.
Il produttore declina ogni responsabilità
in caso di mancata osservanza delle
misure di sicurezza indicate nel
presente manuale.
Livellamento
L'apparecchiatura deve essere a livello per
evitare le vibrazioni. Per collocare l'apparecchiatura a livello, questa deve essere in
posizione verticale ed entrambi i piedini regolabili devono toccare il pavimento. L'apparecchiatura può essere collocata a livello anche
svitando il piedino anteriore (è possibile farlo
manualmente o con una chiave idonea).
Reversibilità dello sportello
Il senso di apertura della porta può essere
cambiato da sinistra a destra (come caratteristica predefinita). Prima di iniziare, posizionare
il frigorifero sul lato posteriore per accedere
alla base. Appoggiarlo su materiale morbido,
tipo schiuma da imballaggio, per evitare di
danneggiare i tubi di raffreddamento sulla
parte posteriore del frigorifero.
1. Sollevare il frigorifero e servirsi di un
cacciavite e testa piatta per rimuovere i
quattro coprivite sul lato posteriore del
pannello di copertura del frigorifero.
2. Svitare il pannello di copertura e
sollevarlo per rimuovere il pannello
posteriore. Quindi, sollevare la porta
superiore e appoggiarla su una
superficie imbottita per evitare che
venga graffiata.

48
www.zanussi.com
3. Togliere il corpo interno della cerniera
superiore, trasferirlo sul lato sinistro,
serrarlo saldamente e riporlo in un
luogo sicuro.
4. Togliere le due viti flangiate e rimuovere
la cerniera centrale che mantiene in
posizione la porta inferiore. Sollevare la
porta inferiore e appoggiarla su una
superficie imbottita per evitare che si
graffi.
5. Togliere i tappi di chiusura dei fori della
cerniera dai fori di destra, come
illustrato, e trasferirli nel foro scoperto a
sinistra.
6. Togliere entrambi i piedini regolabili e la
staffa della cerniera inferiore svitando le
viti.
7. Svitare e rimuovere il perno della
cerniera inferiore, ruotare la staffa e
applicare nuovamente il perno. Montare
di nuovo la staffa applicando il perno
della cerniera inferiore. Riposizionare i
due piedini regolabili. Attaccare la porta
inferiore nella posizione opposta.
Fissare in posizione la porta, montare il
perno della cerniera inferiore nel foro
inferiore della porta e serrare le viti.
8. Far invertire la direzione alla cerniera
centrale di 180°, quindi spostarla a
sinistra in posizione corretta. Inserire il
perno della cerniera centrale nel foro
superiore della porta inferiore, quindi
serrare i bulloni. Attaccare la porta
inferiore nella posizione opposta.
Fissare il livello della porta, infilare il
perno della cerniera inferiore nel foro
inferiore della porta.
9. Montare nuovamente il pannello di
copertura inserendo il perno della
cerniera superiore nel foro superiore
della porta e fissandolo con le quattro
viti. Reinserire le coperture delle viti.

49
www.zanussi.com
10. Quando si sostituisce il fermaporta,
utilizzare il fermaporta sul lato opposto.
11. Rimuovere il copricerniera A dalla porta
e montare il copricerniera B, reperibile
nella confezione degli accessori, sul
foro.
Aspetti ambientali
Il simbolo sul prodotto o sulla confezione
indica che il prodotto non deve essere considerato come un normale rifiuto domestico,
ma deve essere portato nel punto di raccolta
appropriato per il riciclaggio di apparecchiature elettriche ed elettroniche. Se si smaltisce
il prodotto nel modo corretto, si proteggono
l'ambiente, la salute propria e quella degli altri.
Se si smaltisce l'apparecchiatura in modo
errato si mettono in pericolo l'ambiente, la
salute propria e quella degli altri. Per informazioni più dettagliate sul riciclaggio di questo
prodotto, contattare l'ufficio municipale
competente, il servizio locale di smaltimento
dei rifiuti o il negozio presso il quale è stato
acquistato il prodotto.
Dove si devono portare le vecchie
apparecchiature?
Dove si vendono le apparecchiature nuove,
dove vengono smaltite, presso i punti di raccolta o di riciclo SENS ufficiali.
L'elenco dei punti di raccolta ufficiali SENS
è disponibile sul sito www.sens.ch.
Materiali di imballaggio
I materiali con il simbolo
sono riciclabili.
Smaltire i materiali di imballaggio negli
appositi contenitori per il riciclaggio.
Smaltire l'apparecchiatura
1. Estrarre la spina dalla presa di corrente.
2. Tagliare il cavo di alimentazione
e smaltirlo.

50
www.zanussi.com

51
www.zanussi.com

www
.zanussi.com/shop
502012
 Loading...