

ZANUSSI ZRA627CW User Manual
NL
Gebruiksaanwijzing 2
EN
User manual 12
FR
Notice d'utilisation 22
DE
Benutzerinformation 33
PT
Manual de instruções 44
ES
Manual de instrucciones 54
Koelkast
Refrigerator
Réfrigérateur
Kühlschrank
Frigorífico
Frigorífico
ZRA627CW

Inhoud
Veiligheidsinformatie _ _ _ _ _ _ _ _ _ _ _ _ _ _ _ 2
Bediening _ _ _ _ _ _ _ _ _ _ _ _ _ _ _ _ _ _ _ _ 4
Het eerste gebruik _ _ _ _ _ _ _ _ _ _ _ _ _ _ _ _ _ 4
Dagelijks gebruik _ _ _ _ _ _ _ _ _ _ _ _ _ _ _ _ _ 4
Nuttige aanwijzingen en tips _ _ _ _ _ _ _ _ _ _ _ _ 5
Veiligheidsinformatie
In het belang van uw veiligheid en om een correct gebruik
te kunnen waarborgen is het van belang dat u, alvorens
het apparaat te installeren en in gebruik te nemen, deze
gebruiksaanwijzing, inclusief de tips en waarschuwingen,
grondig doorleest. Om onnodige vergissingen en ongevallen te voorkomen is het belangrijk ervoor te zorgen dat
alle mensen die het apparaat gebruiken, volledig bekend
zijn met de werking ervan en de veiligheidsvoorzieningen.
Bewaar deze instructies en zorg ervoor dat zij bij het apparaat blijven als het wordt verplaatst of verkocht, zodat
iedereen die het apparaat gedurende zijn hele levensduur
gebruikt, naar behoren is geïnformeerd over het gebruik
en de veiligheid van het apparaat.
Voor de veiligheid van mensen en eigendommen dient u
zich aan de voorzorgsmaatregelen uit dit instructieboekje
te houden, de fabrikant is niet verantwoordelijk voor
schade die door het niet opvolgen van de aanwijzingen
veroorzaakt is.
Veiligheid van kinderen en kwetsbare mensen
• Dit apparaat is niet bedoeld voor gebruik door personen (waaronder begrepen kinderen) met verminderde
fysieke, zintuiglijke vermogens of een gebrek aan ervaring en kennis, tenzij dit onder toezicht gebeurt van
een voor hun veiligheid verantwoordelijke persoon of
tenzij zij van een dergelijke persoon instructie hebben
ontvangen over het gebruik van het apparaat.
Houd kinderen uit de buurt om te voorkomen dat ze
met het apparaat gaan spelen.
• Houd alle verpakkingsmateriaal buiten het bereik van
kinderen. Gevaar voor verstikking.
• Als u het apparaat afdankt trek dan de stekker uit het
stopcontact, snij de voedingskabel door (zo dicht mogelijk bij het apparaat) en verwijder de deur om te
voorkomen dat kinderen een elektrische schok krijgen
of zichzelf in het apparaat opsluiten.
• Als dit apparaat, dat voorzien is van een magnetische
deursluiting, een ouder apparaat vervangt, dat voorzien
2
Onderhoud en reiniging _ _ _ _ _ _ _ _ _ _ _ _ _ _ 6
Problemen oplossen _ _ _ _ _ _ _ _ _ _ _ _ _ _ _ 6
Technische gegevens _ _ _ _ _ _ _ _ _ _ _ _ _ _ _ 8
Montage _ _ _ _ _ _ _ _ _ _ _ _ _ _ _ _ _ _ _ _ _ 8
Het milieu _ _ _ _ _ _ _ _ _ _ _ _ _ _ _ _ _ _ _ _ 11
Wijzigingen voorbehouden
is van een veerslot (slot) op de deur of het deksel, zorg
er dan voor dat u het slot onbruikbaar maakt voordat
u het oude apparaat weggooit. Dit voorkomt dat kinderen er in opgesloten kunnen raken.
Algemene veiligheid
Let op! Houd de ventilatie-openingen altijd vrij van
obstructies.
• Dit apparaat is bedoeld voor het bewaren van levensmiddelen en/of dranken in een gewoon huishouden,
zoals uitgelegd in dit instructieboekje.
• Gebruik geen mechanische hulpmiddelen of kunstgrepen om het ontdooiproces te versnellen.
• Gebruik geen andere elektrische apparaten (bijvoorbeeld ijsmachines) in koelkasten, tenzij ze v oor dit doel
goedgekeurd zijn door de fabrikant.
• Let op dat u het koelcircuit niet beschadigt.
• Het koelmiddel isobutaan (R600a) bevindt zich in het
koelcircuit van het apparaat, dit is een natuurlijk gas
dat weliswaar milieuvriendelijk is, maar ook uiterst
ontvlambaar.
Controleer of de onderdelen van het koelcircuit tijdens
transport en installatie van het apparaat niet beschadigd zijn geraakt.
Indien het koelcircuit beschadigd is:
– open vuur en ontstekingsbronnen vermijden
– de ruimte waar het apparaat zich bevindt grondig
ventileren

• Het is gevaarlijk om wijzigingen aan te brengen in de
specificaties of dit product op enigerlei wijze te modificeren. Een beschadigd netsnoer kan kortsluiting,
brand en/of een elektrische schok veroorzaken.
Waarschuwing! Alle elektrische onderdelen (net-
snoer, stekker, compressor) mogen uitsluitend vervangen worden door een erkende onderhoudsdienst of
gekwalificeerd onderhoudspersoneel.
1. Het netsnoer mag niet verlengd worden.
2. Verzeker u ervan dat de stekker niet platgedrukt of
beschadigd wordt door de achterkant van het apparaat. Een platgedrukte of beschadigde stekker
kan oververhit raken en brand veroorzaken.
3. Verzeker u ervan dat u de stekker van het apparaat
kunt bereiken.
4. Trek niet aan het snoer.
5. Als de stekker los zit, steek hem dan niet in het
stopcontact. Dit kan gevaar opleveren van een
elektrische schok of brand.
6. U mag het apparaat niet gebruiken zonder de af-
1)
dekking van het lampje
voor de binnenverlich-
ting.
• Dit apparaat is zwaar. Wees voorzichtig als u het apparaat verplaatst.
• Haal geen artikelen uit het vriesvak en raak ze niet aan
als uw handen vochtig/nat zijn, dit kan uw huid beschadigen of vrieswonden veroorzaken.
• Stel het apparaat niet langdurig bloot aan direct zonlicht.
Dagelijks gebruik
• Zet geen hete potten op de kunststof onderdelen in het
apparaat.
• Bewaar geen brandbare gassen of vloeistoffen in het
apparaat, deze kunnen ontploffen.
• U dient zich strikt te houden aan de aanbevelingen van
de fabrikant van het apparaat met betrekking tot het
bewaren van voedsel. Raadpleeg de betreffende aanwijzingen.
Onderhoud en reiniging
• Schakel het apparaat uit en trek de stekker uit het stopcontact voordat u onderhoudshandelingen verricht.
• Maak het apparaat niet schoon met metalen voorwerpen.
1) Als er een afdekking voor het lampje is voorzien
2) Indien er een wateraansluiting voorzien is
• Controleer de afvoer in de koelkast regelmatig op
dooiwater. Maak de afvoer, indien nodig, schoon. Als
de afvoer verstopt is, zal er water op de bodem van het
apparaat liggen.
Installatie
Belangrijk! Voor de aansluiting van elektriciteit dienen de
instructies in de desbetreffende paragrafen nauwgezet te
worden opgevolgd.
• Pak het apparaat uit en controleer of er beschadigingen
zijn. Sluit het apparaat niet aan als het beschadigd is.
Meld mogelijke beschadigingen onmiddellijk bij de
winkel waar u het apparaat gekocht heeft. Gooi in dat
geval de verpakking niet weg.
• Wij adviseren u om 4 uur te wachten voordat u het
apparaat aansluit, dan kan de olie terugvloeien in de
compressor.
• Rond het apparaat dient adequate luchtcirculatie te zijn,
anders kan dit tot oververhitting leiden. Om voldoende
ventilatie te verkrijgen de instructies met betrekking tot
de installatie opvolgen.
• De achterkant dient zo mogelijk tegen een muur geplaatst te worden, teneinde te voorkomen dat hete onderdelen (compressor, condensator) aangeraakt kunnen worden en brandwonden veroorzaken.
• Het apparaat mag niet vlakbij radiatoren of kooktoestellen geplaatst worden.
• Verzeker u ervan dat de stekker bereikbaar is nadat het
apparaat geïnstalleerd is.
• Sluit het apparaat alleen aan op een drinkwaterleiding.
2)
Onderhoud
• Alle elektrotechnische werkzaamheden die noodzakelijk zijn voor het uitvoeren van onderhoud aan het apparaat, dienen uitgevoerd te worden door een gekwalificeerd elektricien of competent persoon.
• Dit product mag alleen worden onderhouden door een
erkend onderhoudscentrum en er dient alleen gebruik
te worden gemaakt van originele reserveonderdelen.
3

Bescherming van het milieu
Dit apparaat bevat geen gassen die de ozonlaag
kunnen beschadigen, niet in het koelcircuit en evenmin in de isolatiematerialen. Het apparaat mag niet worden weggegooid bij het normale huishoudelijke afval. Het
isolatieschuim bevat ontvlambare gassen: het apparaat
Bediening
moet weggegooid worden conform de van toepassing
zijnde regels die u bij de lokale overheidsinstanties kunt
verkrijgen. Voorkom beschadiging aan de koeleenheid,
vooral aan de achterkant bij de warmtewisselaar. De materialen die gebruikt zijn voor dit apparaat en die voorzien
zijn van het symbool
zijn recyclebaar.
Inschakelen
Steek de stekker in het stopcontact.
Draai de thermostaatknop op een gemiddelde stand.
Uitschakelen
Draai de thermostaatknop op de stand "O" om het apparaat
uit te schakelen.
Temperatuurregeling
De temperatuur wordt automatisch geregeld.
Ga als volgt te werk om het apparaat in werking te stellen:
• draai de thermostaatknop op een lagere stand om de
minimale koude te verkrijgen.
• draai de thermostaatknop op een hogere stand om de
maximale koude te verkrijgen.
Een gemiddelde instelling is over het algemeen het
meest geschikt.
Het eerste gebruik
De binnenkant schoonmaken
Voordat u het apparaat voor de eerste keer gebruikt, wast
u de binnenkant en de interne accessoires met lauwwarm
water en een beetje neutrale zeep om de typische geur van
Dagelijks gebruik
De exacte instelling moet echter gekozen worden rekening
houdend met het feit dat de temperatuur in het apparaat
afhankelijk is van:
• de omgevingstemperatuur
• hoe vaak de deur geopend wordt
• de hoeveelheid voedsel die bewaard wordt
• plaatsing van het apparaat.
Belangrijk! Als de omgevingstemperatuur hoog is of als
het apparaat volledig gevuld is en de thermostaatknop op
de koudste instelling staat, kan het apparaat continu
werken waardoor er ijs op de achterwand gevormd wordt.
In dat geval moet de knop op een hogere temperatuur
gezet worden om automatische ontdooiing mogelijk te
maken en zodoende het energieverbruik te beperken.
een nieuw product weg te nemen. Droog daarna grondig
af.
Belangrijk! Gebruik geen oplosmiddelen of schuurpoeders. Deze beschadigen de lak.
Verplaatsbare schappen
De wanden van de koelkast zijn voorzien van een
aantal geleiders zodat de
schappen op de gewenste
plaats gezet kunnen worden.
4
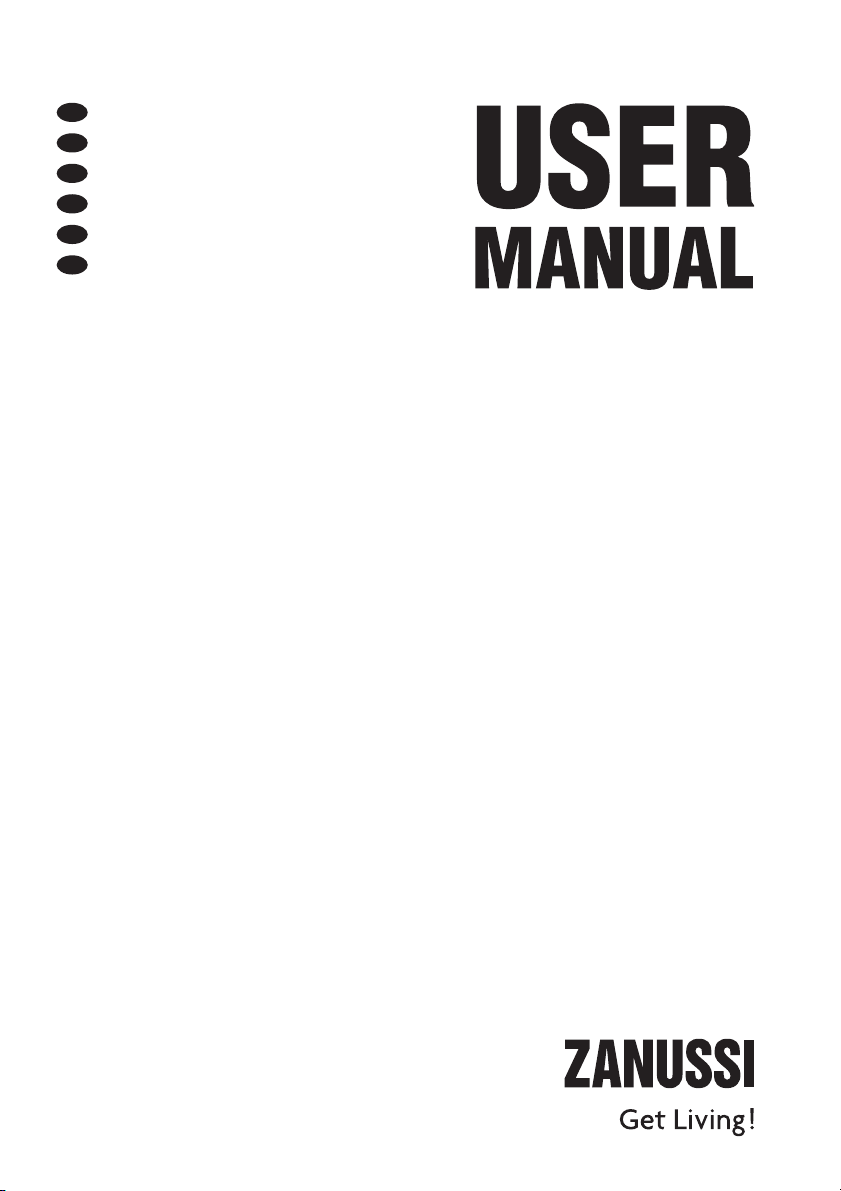
Het plaatsen van de deurschappen
Om het bewaren van voedselpakketten van verschillende afmetingen mogelijk te maken, kunnen de
schappen op verschillende hoogtes geplaatst worden.
Trek het plateau geleidelijk in de richting van de
pijlen totdat het los komt
en plaats op een andere
gewenste hoogte terug.
Nuttige aanwijzingen en tips
Normale bedrijfsgeluiden
• U kunt een zwak gorgelend en borrelend geluid horen
wanneer het koelmiddel door leidingen wordt gepompt. Dat is normaal.
• Als de compressor aan staat, wordt het koelmiddel
rondgepompt en dan zult u een zoemend en kloppend
geluid van de compressor horen. Dat is normaal.
• De thermische uitzetting kan een plotseling krakend
geluid veroorzaken. Dit is een natuurlijk, niet gevaarlijk
fysisch verschijnsel. Dat is normaal.
• Als de compressor in- of uitgeschakeld wordt, zult u
een zacht "klikje" van de thermostaat horen. Dat is
normaal.
Tips voor energiebesparing
• De deur niet vaker openen of open laten staan dan strikt
noodzakelijk.
• Als de omgevingstemperatuur hoog is, de thermo-
staatknop op een lage temperatuur staat en het apparaat
volledig gevuld is, kan de compressor continu aan
staan waardoor er ijs op de verdamper ontstaat. Als dit
gebeurt, zet u de thermostaatknop naar een warmere
instelling om de koelkast automatisch te laten ontdooien en zo elektriciteitsverbruik te besparen.
Tips voor het koelen van vers voedsel
Om de beste prestatie te verkrijgen:
• Zet geen warm voedsel of verdampende vloeistoffen in
de koelkast
• dek het voedsel af of verpak het, in het bijzonder als
het een sterke geur heeft
• plaats het voedsel zodanig dat de lucht er vrijelijk omheen kan circuleren
Nuttige tips voor het koelen
Nuttige tips:
Vlees (alle soorten) in plastic zakken verpakken en op het
glazen schap leggen, boven de groentelade.
Bewaar het, voor de veiligheid, slechts een of maximaal
twee dagen op deze manier.
Gekookt voedsel, koude schotels, enz.: deze moeten afgedekt worden en mogen op willekeurig welk schap gezet
worden.
Fruit en groente: deze moeten zorgvuldig schoongemaakt
worden en in de speciaal daarvoor bedoelde lade(n) geplaatst worden.
Boter en kaas: dit moet in speciale luchtdichte bakjes gelegd of in aluminiumfolie of plastic zakjes gewikkeld worden om zoveel mogelijk lucht buiten te sluiten.
Melkflessen: deze moeten een afdekdop hebben en opgeslagen worden in het flessenrek in de deur.
Bananen, aardappelen, uien en knoflook, indien niet verpakt, mogen niet in de koelkast bewaard worden.
5
Onderhoud en reiniging
Let op! Voordat u welke onderhoudshandeling dan
ook verricht, de stekker uit het stopcontact trekken.
Het koelcircuit van dit apparaat bevat koolwaterstoffen; onderhoud en herladen mag alleen uitge-
voerd worden door bevoegde technici.
Periodieke reiniging
Het apparaat moet regelmatig worden schoongemaakt:
• maak de binnenkant en de accessoires schoon met
lauw water en wat neutrale zeep.
• controleer de afdichtingen regelmatig en wrijf ze
schoon om u ervan te verzekeren dat ze schoon zijn en
vrij van restjes zijn.
• spoel ze af en maak ze grondig droog.
Belangrijk! Trek niet aan leidingen en/of kabels aan de
binnenkant van de kast en verplaats of beschadig ze niet.
Gebruik nooit schoonmaakmiddelen, schuurpoeders, erg
geparfumeerde reinigingsproducten en
waspolijstmiddelen om de binnenkant schoon te maken,
aangezien deze het oppervlak beschadigen en een sterke
geur achterlaten.
Maak de condensor (zwart rooster) en de compressor op
de achterkant van het apparaat schoon met een borstel of
stofzuiger. Deze handeling zal de prestatie van het apparaat verbeteren en het elektriciteitsverbruik besparen.
Belangrijk! Zorg ervoor dat u het koelsysteem niet
beschadigt.
Veel normaal verkrijgbare keukenreinigers bevatten chemicaliën die de kunststoffen die in dit apparaat gebruikt
zijn kunnen aantasten/beschadigen. Daarom wordt het
aanbevolen de buitenkant van dit apparaat alleen schoon
te maken met warm water met een beetje afwasmiddel.
Steek, na het schoonmaken van het apparaat, de stekker
weer in het stopcontact.
Het ontdooien van de koelkast
Rijp wordt elke keer als de compressormotor tijdens normale werking stopt, automatisch van de verdamper van
het koelvak verwijderd. Het dooiwater loopt via een gootje
in een speciale opvangbak aan de achterkant van het apparaat, boven de compressormotor, waar het verdampt.
Het is belangrijk om het afvoergaatje van het dooiwater in
het midden van het koelvak regelmatig schoon te maken,
om te voorkomen dat het water overloopt en op het voedsel in de koelkast gaat druppelen. Gebruik daarvoor de
speciale reiniger, die al in het afvoergaatje zit.
Periodes dat het apparaat niet gebruikt wordt
Als het apparaat gedurende lange tijd niet gebruikt wordt,
neem dan de volgende voorzorgsmaatregelen:
1. trek de stekker uit het stopcontact
2. haal al het voedsel eruit
3. Ontdooi het apparaat en maak het apparaat en alle
toebehoren schoon
4. laat de deur/deuren op een kier staan om de vorming
van onaangename luchtjes te voorkomen.
Belangrijk! Als uw apparaat aan blijft staan, vraag dan
iemand om het zo nu en dan te controleren, om te
voorkomen dat het bewaarde voedsel bederft, als de
stroom uitvalt.
Problemen oplossen
Waarschuwing! Voordat u problemen oplost, trekt
u eerst de stekker uit het stopcontact.
Het opsporen van storingen die niet in deze handleiding
vermeld zijn, dient te worden verricht door een
gekwalificeerd technicus of deskundig persoon.
6
Belangrijk! Er zijn tijdens de normale werking geluiden
te horen (compressor, koelcircuit).

Probleem Mogelijke oorzaak Oplossing
Het apparaat maakt lawaai Het apparaat wordt niet goed onder-
steund
Het apparaat werkt niet. Het
lampje brandt niet.
De stekker zit niet goed in het stop-
Het apparaat krijgt geen stroom. Er
Het lampje brandt niet. Het lampje staat in stand-by. Open en sluit de deur.
Het lampje is stuk. Zie "Het lampje vervangen".
De compressor werkt continu. De temperatuur is niet goed ingesteld. Stel een hogere temperatuur in.
De deur is niet goed gesloten. Zie "De deur sluiten".
De deur is te vaak open gedaan. Laat de deur niet langer open staan dan
De temperatuur van het voedsel is te
De kamertemperatuur is te hoog. Verlaag de kamertemperatuur.
Er loopt water over de achterkant
van de koelkast.
Er loopt water in de koelkast. De waterafvoer is verstopt. Maak de waterafvoer schoon.
Producten verhinderen het water om
Er loopt water over de vloer. De dooiwaterafvoer loopt niet in de
De temperatuur in het apparaat is
te laag.
De temperatuur in het apparaat is
te hoog.
De deur is niet goed gesloten. Zie "De deur sluiten".
De temperatuur van het voedsel is te
Er zijn veel producten tegelijk gecon-
De temperatuur in de koelkast is
te hoog.
Het apparaat is uitgeschakeld. Schakel het apparaat in.
contact.
staat geen spanning op het stopcontact.
hoog.
Tijdens het automatische ontdooiproces, ontdooit de rijp tegen de achterwand.
in de wateropvangbak te lopen.
verdamperbak boven de compressor.
De temperatuur is niet goed ingesteld. Stel een hogere temperatuur in.
De temperatuur is niet goed ingesteld. Stel een lagere temperatuur in.
hoog.
serveerd.
Er is geen koude luchtcirculatie in het
apparaat.
Controleer of het apparaat stabiel staat
(alle vier de voetjes moeten op de vloer
staan)
Steek de stekker goed in het stopcontact.
Sluit een ander elektrisch apparaat aan
op het stopcontact.
Neem contact op met een gekwalificeerde elektricien.
noodzakelijk.
Laat het voedsel afkoelen tot kamertem-
peratuur voordat u het conserveert.
Dat is normaal.
Zorg ervoor dat de producten de achterwand niet raken.
Maak de dooiwaterafvoer vast op de
verdamperbak.
Laat het voedsel afkoelen tot kamertemperatuur voordat u het conserveert.
Conserveer minder producten tegelijk.
Zorg ervoor dat er koude luchtcirculatie
in het apparaat is.
7
Het lampje vervangen
Volg onderstaande aanwijzingen om het lampje te vervangen:
1. Koppel het apparaat los van de stroomtoevoer.
2. Draai de schroef voor de afdekking van het lampje
los.
3. Haak het bewegende deel los door erop te drukken,
zoals afgebeeld.
4. Vervang het lampje met één van hetzelfde vermogen
(het maximale vermogen wordt weergegeven op de
lamp zelf)
5. Bevestig de afdekking van het lampje op zijn plaats.
6. Draai de schroef voor de afdekking van het lampje
vast.
7. Sluit het apparaat opnieuw aan.
8. Open de deur en controleer of het lampje gaat branden.
De deur sluiten
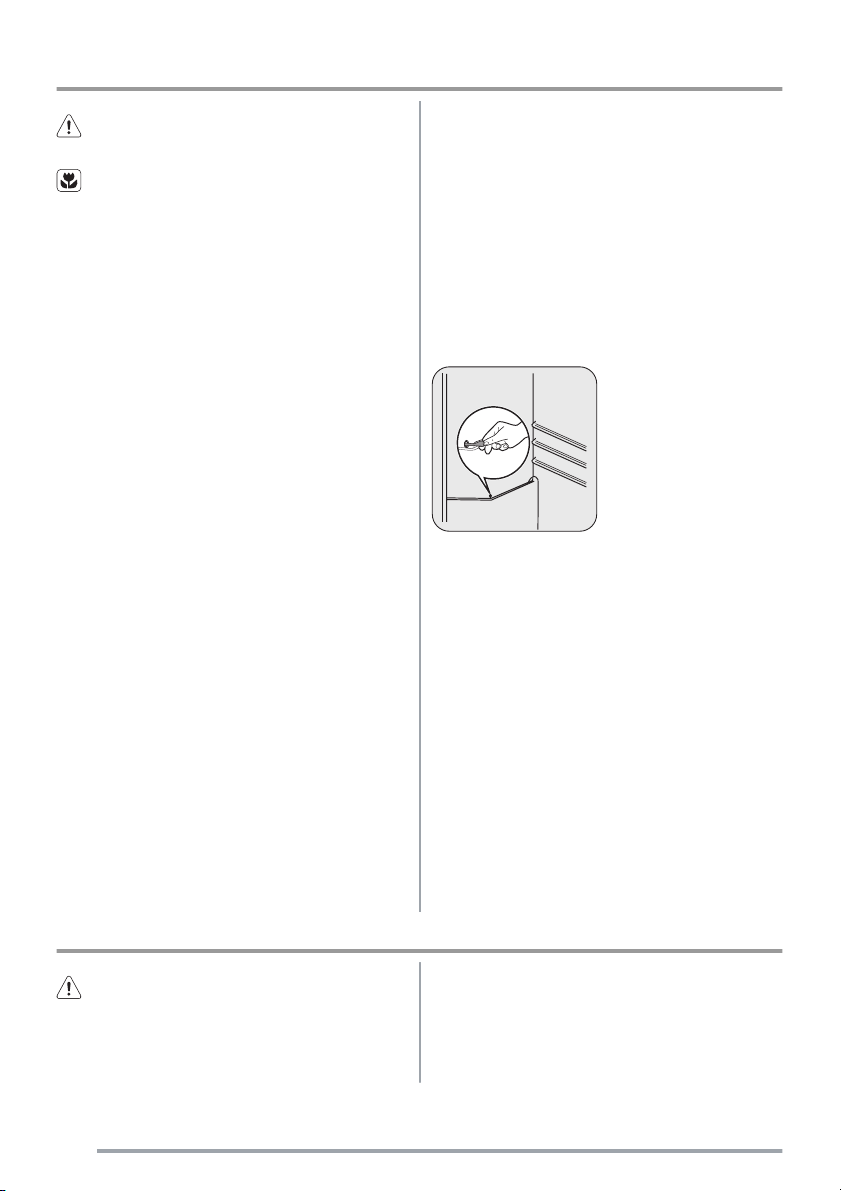
1. Maak de afdichtingen van de deur schoon.
2. Stel de deur, indien nodig, af. Raadpleeg "Montage".
3. Vervang, indien nodig, de defecte deurafdichtingen.
Neem contact met de service-afdeling.
Technische gegevens
Afmeting
Hoogte 1250 mm
Breedte 550 mm
Diepte 612 mm
De technische gegevens staan op het typeplaatje aan de
linker binnenkant in het apparaat en op het energielabel.
Montage
Let op! Lees voor uw eigen veiligheid en correcte
werking van het apparaat eerst de
"veiligheidsinformatie" aandachtig door, alvorens het
apparaat te installeren.
Opstelling
Installeer dit apparaat op een plaats waar de omgevingstemperatuur overeenkomt met de klimaatklasse die vermeld is op het typeplaatje van het apparaat:
8
Klimaat-
klasse
SN +10°C tot + 32°C
N +16°C tot + 32°C
ST +16°C tot + 38°C
T +16°C tot + 43°C
Omgevingstemperatuur
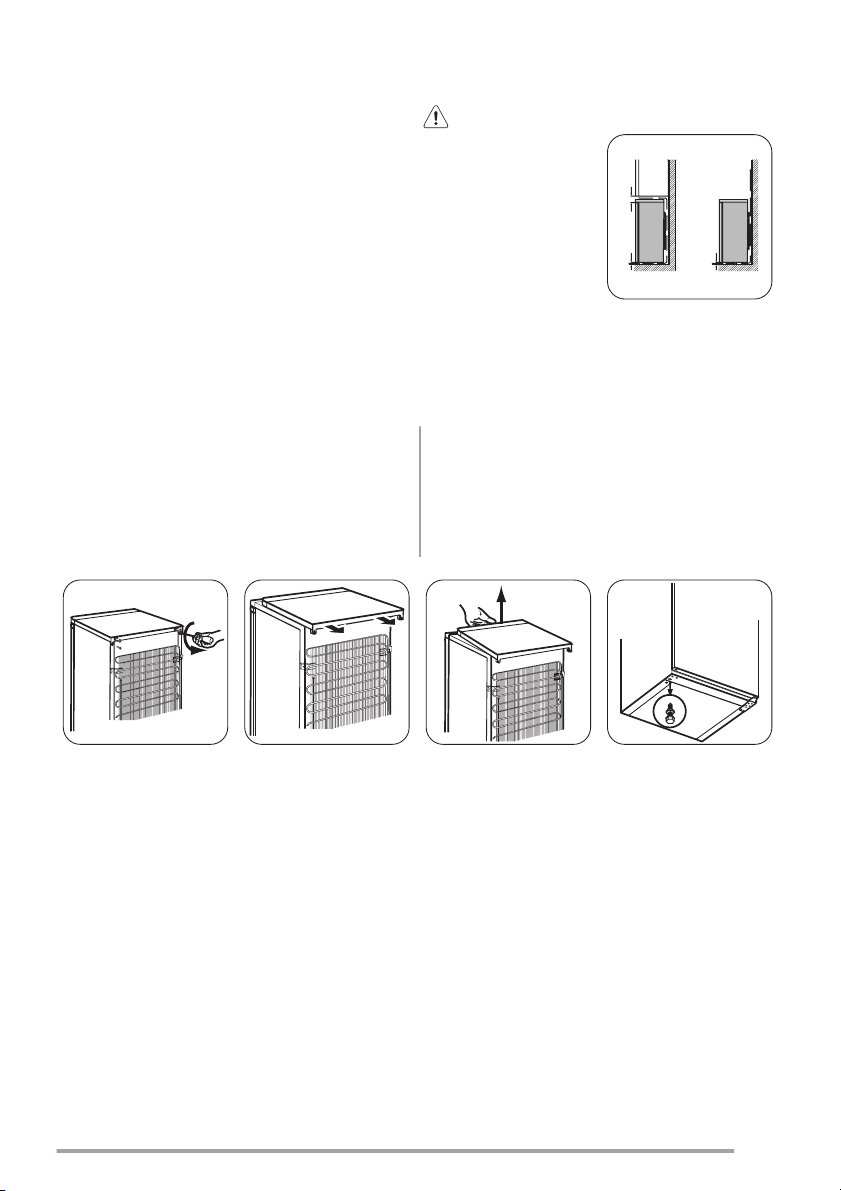
Afstandsstukken achterkant
In het zakje met de handleiding zitten twee afstandhouders
die gemonteerd moeten worden zoals te zien is in de afbeelding.

1. Plaats de afstandhouders in de openingen.
Zorg er voor dat de pijl
(A) is gepositioneerd,
zoals in de afbeelding
te zien is.
2. Draai de houders 45°
linksom totdat ze vergrendelen op de juiste
plaats.
Plaats
Waterpas zetten
Zorg er voor dat, wanneer
u het apparaat plaatst, het
waterpas staat. Deze stand
A
45˚
kan bereikt worden met de
twee afstelbare voetjes (2)
die aan de voorkant en onderkant van het apparaat
bevestigd zijn. Stel de
voetjes indien nodig bij
door het afstandsstuk (1)
te verwijderen.
1
2
Het apparaat moet ver van hittebronnen, zoals radiatoren,
boilers, direct zonlicht enz., vandaan worden geïnstalleerd. Zorg er voor dat lucht vrij kan circuleren aan de
achterkant van het meubel. Als het apparaat onder een
hangend keukenkastje wordt geplaatst, moet de minimale
afstand tussen de bovenkant van het meubel en het wandkastje minstens 100 mm bedragen om optimale prestaties
te garanderen. Voor de beste prestaties kunt u het apparaat beter niet onder een hangend keukenkastje zetten. De
afstelbare voetjes aan de onderkant van het apparaat garanderen een nauwkeurig horizontale uitlijning.
Als het meubel in een hoek is geplaatst en de zijkant bevat
scharnieren die naar de muur wijzen, moet de afstand
tussen de muur en het meubel ten minste 10 mm zijn om
de deur ver genoeg open te krijgen zodat de planken verwijderd kunnen worden.
Omkeerbaarheid van de deur
Belangrijk! Om de volgende handelingen uit te voeren,
raden we aan dat dit wordt gedaan met de hulp van een
tweede persoon die de deuren van het apparaat stevig
vasthoudt tijdens de werkzaamheden.
Waarschuwing!
Het moet mogelijk zijn het
apparaat van de hoofdstroomtoevoer af te koppelen; de stekker moet daarom
na installatie gemakkelijk
min.100 mm
toegankelijk zijn.
15 mm
15 mm
Om de draairichting van de deur te veranderen, gaat u als
volgt te werk:
9

1. Trek de stekker uit het
stopcontact.
2. Draai de beide schroeven
aan de achterkant los.
1
3
2
3. Duw de bovenplaat naar
achteren en til hem op.
4. Schroef beide verstelbare voetjes los.
1
3
2
5. Draai de schroeven van
het onderste scharnier van
de deur los. Verwijder het
scharnier. Breng de pin
over in de richting van de
pijl
6. Draai de schroef los en
monteer deze aan de andere
kant.
1
3
2
11. Draai het scharnier
vast.
1) indien aanwezig
Controleer goed en verzeker u ervan dat:
• alle schroeven zijn aangehaald,
• de deur goed open en dicht gaat.
Als de omgevingstemperatuur laag is (bijv. in de winter),
kan het zijn dat de pakking niet precies op de kast past.
12. Leg de bovenplaat weer
op zijn plaats.
7. Monteer het scharnier
aan de andere kant.
8. Schroef de verstelbare
voetjes vast.
13. Duw op de voorkan t van
de bovenplaat.
14. Draai de schroeven aan
de achterkant weer vast.
Wacht in dat geval tot de pakking op natuurlijke wijze
passend wordt.
Als u bovenstaande handelingen liever niet zelf uitvoert,
neem dan contact op met de dichtstbijzijnde Klantenservice. De deskundige van de Klantenservice zal de draairichting van de deuren op uw kosten veranderen.
9. Draai de schroeven van
het bovenste deurscharnier
los.
10. Verwijder het scharnier.
Breng de pin over in de
richting van de pijl. Monteer het scharnier aan de
andere kant.
15. Verwijder en monteer
het handvat
overliggende zijde.
16. Zet het apparaat op zijn
plaats, zet het waterpas,
wacht minstens vier uur en
steek dan de stekker in het
stopcontact.
1)
op de tegen-
10

Elektrische aansluiting
Zorg er vóór het aansluiten voor dat het voltage en de
frequentie op het typeplaatje overeenkomen met de
stroomtoevoer in uw huis.
Het apparaat moet geaard zijn. De netsnoerstekker is
voorzien van een contact voor dit doel. Als het stopcontact
niet geaard is, sluit het apparaat dan aan op een afzon-
Het milieu
derlijk aardepunt, in overeenstemming met de geldende
regels, raadpleeg hiervoor een gekwalificeerd elektricien.
De fabrikant kan niet aansprakelijk gesteld worden als
bovenstaande veiligheidsvoorschriften niet opgevolgd
worden.
Dit apparaat voldoet aan de EU. richtlijnen.
Het symbool op het product of op de verpakking wijst
erop dat dit product niet als huishoudafval mag worden
behandeld, maar moet worden afgegeven bij een
verzamelpunt waar elektrische en elektronische
apparatuur wordt gerecycled. Als u ervoor zorgt dat dit
product op de juiste manier wordt verwijderd, voorkomt
u mogelijke negatieve gevolgen voor mens en milieu die
zich zouden kunnen voordoen in geval van verkeerde
afvalverwerking. Voor gedetailleerde re informatie over het
recyclen van dit product, kunt u contact opnemen met de
gemeente, de gemeentereiniging of de winkel waar u het
product hebt gekocht.
11
Contents
Safety information _ _ _ _ _ _ _ _ _ _ _ _ _ _ _ _ 12
Operation _ _ _ _ _ _ _ _ _ _ _ _ _ _ _ _ _ _ _ _ 14
First use _ _ _ _ _ _ _ _ _ _ _ _ _ _ _ _ _ _ _ _ 14
Daily use _ _ _ _ _ _ _ _ _ _ _ _ _ _ _ _ _ _ _ _ 14
Helpful hints and tips _ _ _ _ _ _ _ _ _ _ _ _ _ _ 15
Safety information
In the interest of your safety and to ensure the correct use,
before installing and first using the appliance, read this
user manual carefully, including its hints and warnings.
To avoid unnecessary mistakes and accidents, it is important to ensure that all people using the appliance are
thoroughly familiar with its operation and safety features.
Save these instructions and make sure that they remain
with the appliance if it is moved or sold, so that everyone
using it through its life will be properly informed on appliance use and safety.
For the safety of life and property keep the precautions of
these user's instructions as the manufacturer is not responsible for damages caused by omission.
Children and vulnerable people safety
• This appliance is not intended for use by persons (including children) with reduced physical, sensory or
mental capabilities, or lack of experience and knowledge, unless they have been given supervision or instruction concerning use of the appliance by a person
responsible for their safety.
Children should be supervised to ensure that they do
not play with the appliance.
• Keep all packaging well away from children. There is
risk of suffocation.
• If you are discarding the appliance pull the plug out of
the socket, cut the connection cable (as close to the
appliance as you can) and remove the door to prevent
playing children to suffer electric shock or to close
themselves into it.
• If this appliance featuring magnetic door seals is to
replace an older appliance having a spring lock (latch)
on the door or lid, be sure to make that spring lock
unusable before you discard the old appliance. This
will prevent it from becoming a death trap for a child.
Care and Cleaning _ _ _ _ _ _ _ _ _ _ _ _ _ _ _ _ 15
What to do if… _ _ _ _ _ _ _ _ _ _ _ _ _ _ _ _ _ 16
Technical data _ _ _ _ _ _ _ _ _ _ _ _ _ _ _ _ _ _ 18
Installation _ _ _ _ _ _ _ _ _ _ _ _ _ _ _ _ _ _ _ 18
Environmental concerns _ _ _ _ _ _ _ _ _ _ _ _ _ 20
Subject to change without notice
General safety
Caution! Keep ventilation openings clear of
obstruction.
• The appliance is intended for keeping foodstuff and/or
beverages in a normal household as explained in this
instruction booklet.
• Do not use a mechanical device or any artificial means
to speed up the thawing process.
• Do not use other electrical appliances (such as ice
cream makers) inside of refrigerating appliances, unless they are approved for this purpose by the manufacturer.
• Do not damage the refrigerant circuit.
• The refrigerant isobutane (R600a) is contained within
the refrigerant circuit of the appliance, a natural gas
with a high level of environmental compatibility, which
is nevertheless flammable.
During transportation and installation of the appliance,
be certain that none of the components of the refrigerant circuit become damaged.
If the refrigerant circuit should become damaged:
– avoid open flames and sources of ignition
– thoroughly ventilate the room in which the appli-
ance is situated
12

• It is dangerous to alter the specifications or modify this
product in any way. Any damage to the cord may cause
a short-circuit, fire and/or electric shock.
Warning! Any electrical component (power cord,
plug, compressor) must be replaced by a certified
service agent or qualified service personnel.
1. Power cord must not be lengthened.
2. Make sure that the power plug is not squashed or
damaged by the back of the a ppliance. A squashed
or damaged power plug may overheat and cause
a fire.
3. Make sure that you can come to the mains plug of
the appliance.
4. Do not pull the mains cable.
5. If the power plug socket is loose, do not insert the
power plug. There is a risk of electric shock or fire.
6. You must not operate the appliance without the
3)
lamp cover
of interior lighting.
• This appliance is heavy. Care should be taken when
moving it.
• Do not remove nor touch items from the freezer compartment if your hands are damp/wet, as this could
cause skin abrasions or frost/freezer burns.
• Avoid prolonged exposure of the appliance to direct
sunlight.
Daily use
• Do not put hot pot on the plastic parts in the appliance.
• Do not store flammable gas and liquid in the appliance,
because they may explode.
• Appliance's manufacturers storage recommendations
should be strictly adhered to. Refer to relevant instructions.
Care and cleaning
• Before maintenance, switch off the appliance and disconnect the mains plug from the mains socket.
• Do not clean the appliance with metal objects.
• Regularly examine the drain in the refrigerator for defrosted water. If necessary, clean the drain. If the drain
is blocked, water will collect in the bottom of the appliance.
Installation
Important! For electrical connection carefully follow the
instructions given in specific paragraphs.
• Unpack the appliance and check if there are damages
on it. Do not connect the appliance if it is damaged.
Report possible damages immediately to the place you
bought it. In that case retain packing.
• It is advisable to wait at least four hours before connecting the appliance to allow the oil to flow back in
the compressor.
• Adequate air circulation should be around the appliance, lacking this leads to overheating. To achieve
sufficient ventilation follow the instructions relevant to
installation.
• Wherever possible the back of the product should be
against a wall to avoid touching or catching warm parts
(compressor, condenser) to prevent possible burn.
• The appliance must not be located close to radiators
or cookers.
• Make sure that the mains plug is accessible after the
installation of the appliance.
•
Connect to potable water supply only.
4)
Service
• Any electrical work required to do the servicing of the
appliance should be carried out by a qualified electrician or competent person.
• This product must be serviced by an authorized Service
Centre, and only genuine spare parts must be used.
Environment Protection
This appliance does not contain gasses which could
damage the ozone layer, in either its refrigerant circuit or insulation materials. The appliance shall not be
discarded together with the urban refuse and rubbish. The
insulation foam contains flammable gases: the appliance
shall be disposed according to the applicable regulations
to obtain from your local authorities. Avoid damaging the
cooling unit, especially at the rear near the heat exchanger. The materials used on this appliance marked by the
symbol
are recyclable.
3) If the lamp cover is foreseen
4) If a water connection is foreseen
13

Operation
Switching on
Insert the plug into the wall socket.
Turn the Temperature regulator clockwise to a medium
setting.
Switching off
To turn off the appliance, turn the Temperature regulator
to the "O" position.
Temperature regulation
The temperature is automatically regulated.
To operate the appliance, proceed as follows:
• turn the Temperature regulator toward lower settings
to obtain the minimum coldness.
• turn the Temperature regulator toward higher settings
to obtain the maximum coldness.
First use
Cleaning the interior
Before using the appliance for the first time, wash the
interior and all internal accessories with lukewarm water
and some neutral soap so as to remove the typical smell
of a brand-new product, then dry thoroughly.
Daily use
Movable shelves
A medium setting is generally the most suitable.
However, the exact setting should be chosen keeping in
mind that the temperature inside the appliance depends
on:
• room temperature
• how often the door is opened
• the quantity of food stored
• the location of the appliance.
Important! If the ambient temperature is high or the
appliance is fully loaded, and the appliance is set to the
lowest temperatures, it may run continuously causing
frost to form on the rear wall. In this case the dial must be
set to a higher temperature to allow automatic defrosting
and therefore reduced energy consumption.
Important! Do not use detergents or abrasive powders,
as these will damage the finish.
Positioning the door shelves
The walls of the refrigerator are equipped with a
series of runners so that
the shelves can be positioned as desired.
14
To permit storage of food
packages of various sizes,
the door shelves can be
placed at different heights.
Gradually pull the shelf in
the direction of the arrows
until it comes free, then
reposition as required.
Helpful hints and tips
Normal Operating Sounds
• You may hear a faint gurgling and a bubbling sound
when the refrigerant is pumped through the coils or
tubing. This is correct.
• When the compressor is on, the refrigerant is being
pumped around and you will hear a whirring sound
and a pulsating noise from the compressor. This is
correct.
• The thermic dilatation might cause a sudden cracking
noise. It is natural, not dangerous physical phenomenon. This is correct.
• When the compressor switches on or switches off, you
will hear a faint "click" of the temperature regulator.
This is correct.
Hints for energy saving
• Do not open the door frequently or leave it open longer
than absolutely necessary.
• If the ambient temperature is high and the Temperature
Regulator is set to low temperature and the appliance
is fully loaded, the compressor may run continuously,
causing frost or ice on the evaporator. If this happens,
set the Temperature Regulator toward warmer settings
to allow automatic defrosting and so a saving in electricity consumption.
Care and Cleaning
Hints for fresh food refrigeration
To obtain the best performance:
• do not store warm food or evaporating liquids in the
refrigerator
• do cover or wrap the food, particularly if it has a strong
flavour
• position food so that air can circulate freely around it
Hints for refrigeration
Useful hints:
Meat (all types) : wrap in polythene bags and place on the
glass shelf above the vegetable drawer.
For safety, store in this way only one or two days at the
most.
Cooked foods, cold dishes, etc..: these should be covered
and may be placed on any shelf.
Fruit and vegetables: these should be thoroughly cleaned
and placed in the special drawer(s) provided.
Butter and cheese: these should be placed in special airtight containers or wrapped in aluminium foil or polythene
bags to exclude as much air as possible.
Milk bottles: these should have a cap and sh ould be stored
in the bottle rack on the door.
Bananas, potatoes, onions and garlic, if not packed, must
not be kept in the refrigerator.
Caution! Unplug the appliance before carrying out
any maintenance operation.
This appliance contains hydrocarbons in its cooling
unit; maintenance and recharging must therefore
only be carried out by authorized technicians.
Periodic cleaning
The equipment has to be cleaned regularly:
• clean the inside and accessories with lukewarm water
and some neutral soap.
• regularly check the door seals and wipe clean to ensure
they are clean and free from debris.
• rinse and dry thoroughly.
Important! Do not pull, move or damage any pipes and/
or cables inside the cabinet.
Never use detergents, abrasive powders, highly perfumed
cleaning products or wax polishes to clean the interior as
this will damage the surface and leave a strong odour.
Clean the condenser (black grill) and the compressor at
the back of the appliance with a brush or a vacuum cleaner.
This operation will improve the performance of the appliance and save electricity consumption.
Important! Take care of not to damage the cooling system.
Many proprietary kitchen surface cleaners contain chem-
icals that can attack/damage the plastics used in this appliance. For this reason it is recommended that the outer
casing of this appliance is only cleaned with warm water
with a little washing-up liquid added.
After cleaning, reconnect the equipment to the mains
supply.
15

Defrosting of the refrigerator
Frost is automatically eliminated from the evaporator of
the refrigerator compartment every time the motor compressor stops, during normal use. The defrost water
drains out through a trough into a special container at the
back of the appliance, over the motor compressor, where
it evaporates.
It is important to periodically clean the defrost water drain
hole in the middle of the refrigerator compartment channel
to prevent the water overflowing and dripping onto the
food inside. Use the special cleaner provided, which you
will find already inserted into the drain hole.
What to do if…
Periods of non-operation
When the appliance is not in use for long periods, take
the following precautions:
1. disconnect the appliance from electricity supply
2. remove all food
3. defrost and clean the appliance and all accessories
4. leave the door/doors open to prevent unpleasant
smells.
Important! If the cabinet will be kept on, ask somebody
to check it once in a while to prevent the food inside from
spoiling in case of a power failure.
Warning! Before troubleshooting, disconnect the
mains plug from the mains socket.
Only a qualified electrician or competent person must do
the troubleshooting that is not in this manual.
Problem Possible cause Solution
The appliance is noisy The appliance is not supported prop-
erly
The appliance does not operate.
The lamp does not operate.
The mains plug is not connected to the
The appliance has no power. There is
The lamp does not work. The lamp is in stand-by. Close and open the door.
The lamp is defective. Refer to "Replacing the lamp".
The compressor operates con-
tinually.
The door is not closed correctly. Refer to "Closing the door".
16
The appliance is switched off. Switch on the appliance.
mains socket correctly.
no voltage in the mains socket.
The temperature is not set correctly. Set a higher temperature.
Important! There are some sounds during normal use
(compressor, refrigerant circulation).
Check if the appliance stands stable (all
the four feet should be on the floor)
Connect the mains plug to the mains
socket correctly.
Connect a different electrical appliance
to the mains socket.
Contact a qualified electrician.

Problem Possible cause Solution
The door has been opened too fre-
quently.
The product temperature is too high. Let the product temperature decrease to
The room temperature is too high. Decrease the room temperature.
Water flows on the rear plate of
the refrigerator.
Water flows into the refrigerator. The water outlet is clogged. Clean the water outlet.
Products prevent that water flows into
Water flows on the ground. The melting water outlet does not flow
The temperature in the appliance
is too low.
The temperature in the appliance
is too high.
The door is not closed correctly. Refer to "Closing the door".
The product temperature is too high. Let the product temperature decrease to
Many products are stored at the same
The temperature in the refrigerator is too high.
During the automatic defrosting process, frost defrosts on the rear plate.
the water collector.
in the evaporative tray above the compressor.
The temperature regulator is not set
correctly.
The temperature regulator is not set
correctly.
time.
There is no cold air circulation in the
appliance.
Do not keep the door open longer than
necessary.
room temperature before storage.
This is correct.
Make sure that products do not touch
the rear plate.
Attach the melting water outlet to the
evaporative tray.
Set a higher temperature.
Set a lower temperature.
room temperature before storage.
Store less products at the same time.
Make sure that there is cold air circulation in the appliance.
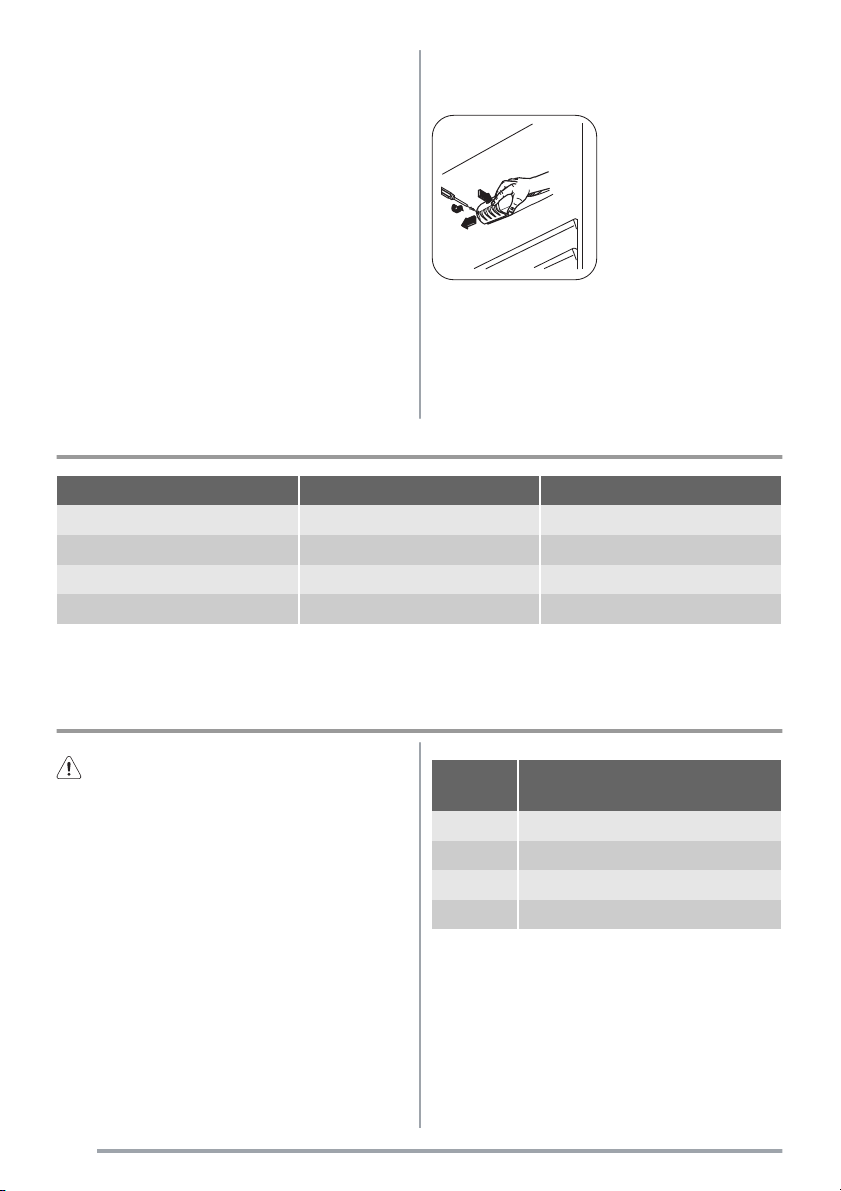
Replacing the bulb
If you want to replace the bulb, do these steps:
1. Break the circuit of the appliance.
2. Unscrew the lamp cover securing screw.
3. Unhook the moving part by pressing it as shown in
the figure.
4. Replace the bulb with one of the same power (the
maximum power is shown on the light bulb cover)
5. Fix the lamp cover in place.
6. Screw the lamp cover securing screw.
7. Reconnect the appliance.
8. Open the door and check if the light comes on.
Closing the door
1. Clean the door gaskets.
2. If necessary, adjust the door. Refer to "Installation".
3. If necessary, replace the defective door gaskets. Contact the Service Center.
17

Technical data
Dimension
Height 1250 mm
Width 550 mm
Depth 612 mm
The technical information are situated in the rating plate
on the internal left side of the appliance and in the energy
label.
Installation
Caution! Read the "Safety Information" carefully for
your safety and correct operation of the appliance
before installing the appliance.
Positioning
Install this appliance at a location where the ambient temperature corresponds to the climate class indicated on the
rating plate of the appliance:
Climate
class
SN +10°C to + 32°C
N +16°C to + 32°C
ST +16°C to + 38°C
T +16°C to + 43°C
Ambient temperature
Rear spacers
In the bag with the documentation, there are two spacers
which must be fitted as shown in the figure.
1. Fit the spacers into
the holes. Make sure
that the arrow (A) is
positioned as shown
in the picture.
2. Turn counter-clock-
wise the spacers
through 45° until they
lock into place.
45˚
A
Levelling
When placing the appliance ensure that it stands
level. This can be achieved
by two adjustable feet at
the bottom in front (2). If
necessary adjust the feet
by removing the spacer
(1).
1
2
18
Location
The appliance should be installed well away from sources
of heat such as radiators, boilers, direct sunlight etc. Ensure that air can circulate freely around the back of the
cabinet. To ensure best performance, if the appliance is
positioned below an overhanging wall unit, the minimum
distance between the top of the cabinet and the wall unit
must be at least 100 mm . Ideally, however, the appliance
should not be positioned below overhanging wall units.
Accurate levelling is ensured by one or more adjustable
feet at the base of the cabinet.
If the cabinet is placed in a corner and the side with the
hinges facing the wall, the distance between the wall and
the cabinet must be at least 10 mm to allow the door to
open enough so that the shelves can be removed.
Door reversibility
Important! To carry out the following operations, we
suggest that this be made with another person that will
keep a firm hold on the doors of the appliance during the
operations.
Warning!
It must be possible to disconnect the appliance from
the mains power supply; the
plug must therefore be easily accessible after installa-
min.100 mm
tion.
15 mm
15 mm
To change the opening direction of the door, do these
steps:
1. Remove the plug from
the power socket.
2. Unscrew both screws on
the rear side.
3. Push back the top and lift
it.
4. Unscrew both adjustable
feet.
19

2
1
3
1
3
2
5. Unscrew the screws of
the door bottom hinge. Remove the hinge. Put over
the pin in the direction of
the arrow
6. Unscrew and install the
screw on the opposite side.
1
3
2
11. Tighten the hinge. 12. Put the top in position.
1) If foreseen
Do a final check to make sure that:
• All screws are tightened.
• The door opens and closes correctly.
If the ambient temperature is cold (i.e. in Winter), the
gasket may not fit perfectly to the cabinet. In that case,
wait for the natural fitting of the gasket.
In case you do not want to carry out the above mentioned
operations, contact the nearest After Sales Service Force.
The After Sales Service specialist will carry out the reversibility of the doors at your cost.
Electrical connection
Before plugging in, ensure that the voltage and frequency
shown on the rating plate correspond to your domestic
power supply.
7. Install the hinge on the
opposite side.
8. Screw both adjustable
feet.
13. Push front the top.
14. Screw both screws on
the rear side.
The appliance must be earthed. The power supply cable
plug is provided with a contact for this purpose. If the
domestic power supply socket is not earthed, connect the
appliance to a separate earth in compliance with current
regulations, consulting a qualified electrician.
The manufacturer declines all responsibility if the above
safety precautions are not observed.
This appliance complies with the E.E.C. Directives.
9. Unscrew the screws of
the door top hinge.
10. Remove the hinge. Put
over the pin in the direction
of the arrow. Install the
hinge on the opposite side.
15. Remove and install the
1)
on the opposite
handle
side.
16. Reposition, level the
appliance, wait for at least
four hours and then connect it to the power socket.
Environmental concerns
The symbol on the product or on its packaging
indicates that this product may not be treated as
household waste. Instead it should be taken to the
20
appropriate collection point for the recycling of electrical
and electronic equipment. By ensuring this product is
disposed of correctly, you will help prevent potential
 Loading...