

Page 1

Bedienungs-
anleitung
User
manual
Einbau-Herd
Built-under
oven
ZOU 482
Page 2

Electrolux
Inhaltsverzeichnis
Warnungen und wichtige Sicherheitshinweise .................................................................................................. 3
Gerätebeschreibung ......................................................................................................................................... 5
Bedienung ....................................................................................................................................................... 6
Vor der erstmaligen Benutzung......................................................................................................................... 8
Elektronische Zeitschaltuhr ............................................................................................................................... 9
Benutzung des Backofens ............................................................................................................................. 13
Tabellen Backen und Braten ........................................................................................................................... 17
Reinigung und Wartung .................................................................................................................................. 20
Störungen - Was tun? .................................................................................................................................... 23
Technische Daten .......................................................................................................................................... 24
Anweisungen für den Installateur .................................................................................................................... 25
Elektroanschluss ........................................................................................................................................... 25
Einbau-Anweisungen .................................................................................................................................... 27
Anleitung zur Gebrauchsanweisung
Sicherheitshinweise
Schritt-für-Schritt-Anleitung
)
Praktische Tipps
Dieses Gerät entspricht den folgenden EWG-Richtlinien:
- 2006/95 (Niederspannungsrichtlinie);
- 2004/108 (EMV-Richtlinie);
und nachfolgende Änderungen.
2
Page 3

Electrolux
Deutsch
Warnungen und wichtige Sicherheitshinweise
Heben Sie auf jeden Fall die mit diesem Gerät gelieferte Gebrauchsanweisung auf. Sollte das Gerät an
Dritte abgegeben oder verkauft werden, oder falls Sie das Gerät bei einem Umzug in der alten Wohnung
lassen, ist es von größter Wichtigkeit, dass der/die neue Nutzer(in) über diese Gebrauchsanweisung und
die Hinweise verfügen kann.
Diese Hinweise dienen der Sicherheit des Nutzers und seiner Mitbewohner. Lesen Sie sie also
aufmerksam, bevor Sie das Gerät anschließen und/oder in Gebrauch nehmen.
Aufstellung
• Die Installation muss von fachkundigem Personal
vorgenommen werden, unter Beachtung der beste-
henden Vorschriften. Die einzelnen Installations-
arbeiten sind unter den Hinweisen für den Installa-
teur beschrieben.
• Lassen Sie die Installation und den Anschluß von
einem Fachmann, gemäß den ihm dank seiner
Fachkenntnis bekannten Richtlinien ausführen.
• Auch gegebenenfalls auf Grund der Installation erfor-
derliche Modifikationen an der Stromversorgung ha-
ben durch einen Fachmann zu erfolgen.
• Dieser Backofen wurde je nach Ausführung als
Einzelgerät oder als Kombinationsgerät mit Elektro-
platte für den Anschluß an jeweils 1,2 oder 3 Pha-
sen (oder Gruppen) an 230 V hergestellt. Der
Anschluß an mehr Phasen ohne Nulleiter (400 V)
führt zu Zerstörung des Ofens und der angeschlos-
senen Kochplatten.
Betrieb
• Dieser Backofen ist zur Zubereitung von Speisen
gedacht; gebrauchen Sie ihn niemals zu Anderem.
• Beim Öffnen der Backofentür, während oder
am Ende des Garens auf den Heißluftstrom
achten, der aus dem Backofen austritt.
• Beim Herdbetrieb mit erhöhter Vorsicht vorgehen.
Durch die starke Hitze der Heizstäbe sind Rost und
sonstige Teile sehr heiß.
• Falls Sie - aus welchen Gründen auch immer - Alu-
folie zur Zubereitung von Speisen im Backofen ver-
wenden sollten, lassen Sie diese nie in direkten
Kontakt mit dem Boden des Backofens kommen.
• Gehen Sie bei der Reinigung des Backofens vor-
sichtig vor: sprühen Sie nie auf den Fettfilter (falls
vorhanden), die Heizstäbe und den Thermostat-
fühler.
• Es ist gefährlich, Veränderungen jeglicher Art an die-
sem Gerät oder an seinen Eigenschaften vorzunehmen.
• Während des Back-, Brat- und Grillvorgangs wer-
den das Backofenfenster und die übrigen Geräteteile
heiß. Kinder sollten daher von dem Gerät ferngehalten werden. Bei Anschluss von Elektrogeräten
an Steckdosen in Backofennähe ist darauf zu achten, dass Anschlussleitungen nicht mit heißen
Kochstellen in Berührung kommen oder in der heißen Backofentür eingeklemmt werden.
• Verwenden Sie immer Topfhandschuhe, um feuer-
feste heiße Schüsseln oder Töpfe aus dem Backofen zu nehmen.
• Eine regelmäßige Reinigung verhindert die Ver-
schlechterung des Oberflächenmaterials.
• Schalten Sie vor der Reinigung des Backofens ent-
weder den Strom ab, oder ziehen Sie den Netzstecker.
• Stellen Sie sicher, dass sich der der Backofen in
der Position «AUS» befindet, wenn er nicht mehr
benutzt wird.
• Das Gerät darf nicht mit einem Heißdampf- oder
Dampfstrahlreiniger gereinigt werden.
• Benutzen Sie keine Scheuermittel oder scharfe
Metallschaber. Sie können die Türscheiben verkratzen und dadurch zum Zerspringen der Scheiben führen.
Kindersicherheit
• Dieses Gerät ist für den Gebrauch durch Erwachse-
ne bestimmt. Es ist gefährlich, wenn Sie es Kindern
zum Gebrauch oder Spiel überlassen.
• Halten Sie Kinder fern, solange der Backofen in Be-
trieb ist. Auch nachdem Sie den Backofen ausgeschaltet haben, bleibt die Tür noch lange heiß.
3
Page 4

Electrolux
• Das Gerät darf von Kindern oder Personen, deren
physische, sensorische oder geistige Fähigkeiten
und deren Mangel an Erfahrung und Kenntnissen ei-
nen sicheren Gebrauch des Gerätes ausschließen,
nur unter Aufsicht oder nach ausreichender Einwei-
sung durch eine verantwortungsbewußte Person
benutzt werden, die sicherstellt, dass sie sich der
Gefahren des Gebrauchs bewusst sind.
Kundendienst
• Lassen Sie Überprüfungsarbeiten und/oder Repara-
turen vom Kundendienst des Herstellers oder von
einem vom Hersteller autorisierten Kundendienst
ausführen, und verwenden Sie nur Original-Ersatz-
teile.
• Versuchen Sie nicht, das Gerät bei Funktionsstörun-
gen oder Schäden selbst zu reparieren. Durch Re-
paraturen seitens ungeschulter Personen können
Schäden oder Verletzungen hervorgerufen werden.
Das Symbol
Verpackungsmaterial weist darauf hin, dass es nicht
über den normalen Hausmüll entsorgt werden darf.
Es muss stattdessen an eine Sammelstelle für das
Recycling von elektrischen und elektronischen Ge-
räten übergeben werden. Durch Ihren Beitrag zum
korrekten Entsorgen dieses Produkts schützen Sie
die Umwelt und die Gesundheit Ihrer Mitmenschen.
Umwelt und Gesundheit werden durch falsches Ent-
sorgen gefährdet. Weitere Informationen über das
Recycling dieses Produkts erhalten Sie bei Ihrem
Rathaus, der Müllabfuhr oder dem Geschäft, in dem
Sie das Produkt gekauft haben.
auf dem Gerät bzw. auf dem
4
Page 5

Gerätebeschreibung
1
15
Electrolux
84
6
1097532
11
12
13
14
1. Bedienblende
2. Knebel für Kochstelle vorne links
3. Knebel für Kochstelle hinten links
4. Temperaturregler - Kontrollanzeige
5. Temperaturregler
6. Elektronische Zeitschaltuhr
7. Backofenregler
8. Betriebsanzeige
Zubehör
Backblech
9. Knebel für Kochstelle hinten rechts
10. Knebel für Kochstelle vorne rechts
11. Lüftungsschlitze für Kühlgebläse
12. Grill
13. Innenbeleuchtung
14. Backofen-Ventilator
15. Typenschild
Rost
Fettpfanne
5
Page 6
Electrolux
Bedienung
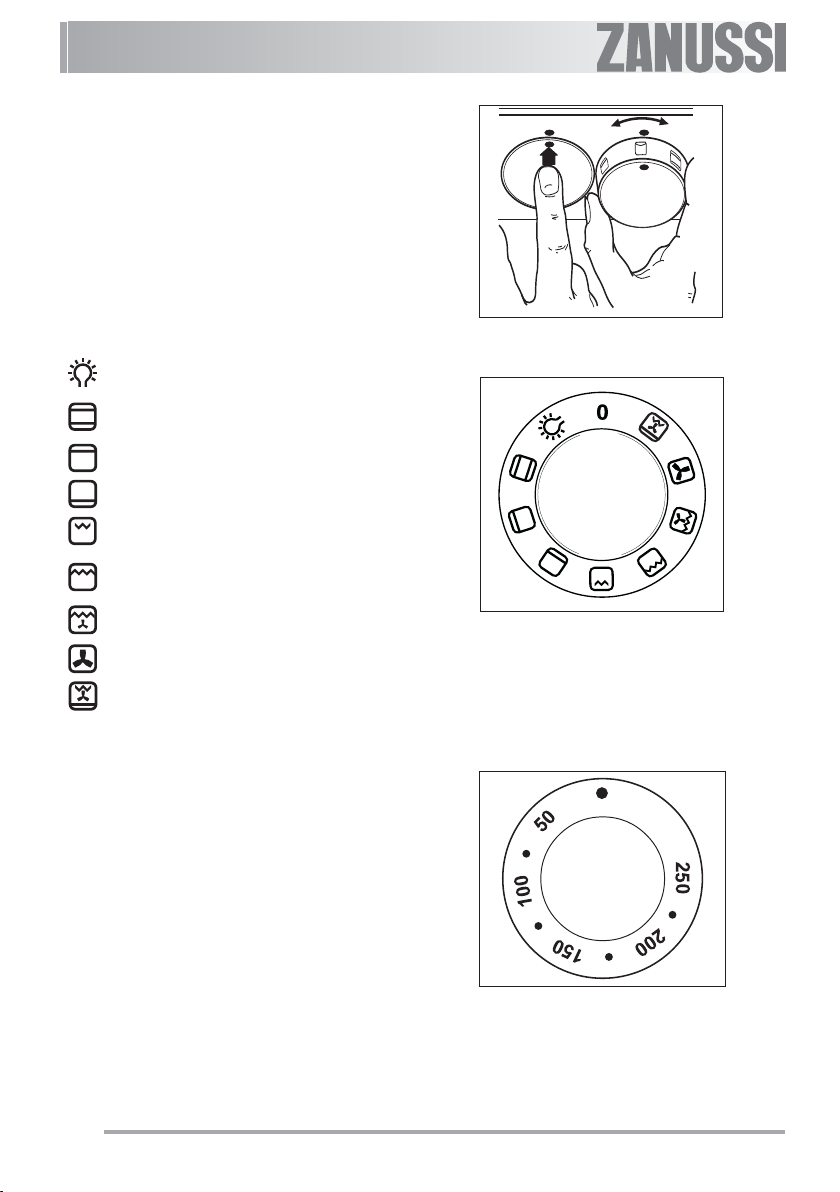
Versenkbare Knebel
Diese Modelle sind mit versenkbaren Knebeln
ausgestattet. Diese Schalterknebel funktionieren nach
dem Druck-Zug System. Sie können vollständig in die
Blende versenkt werden, wenn der Backofen außer
Betrieb ist.
Backofenregler
0 Der Backofen ist ausgeschaltet.
Beleuchtung
Ober- und Unterhitze
Oberhitze
Unterhitze
Kleinflächengrill
Großflächengrill
Heißluftgrill
Umluft
Pizza
Betriebsanzeige
Die Betriebsanzeige leuchtet, wenn der
Backofenregler eingestellt wird.
Temperaturregler
Drehen Sie den Temperaturregler gegen den
Uhrzeigersinn, um Temperaturen zwischen 50 °C and
250 °C auszuwählen.
Temperaturregler - Kontrollanzeige
Diese Kontrollanzeige leuchtet, wenn der
Temperaturregler gedreht wird. Die Anzeige leuchtet so
lange, bis die gewünschte Temperatur erreicht ist. Sie
schaltet sich dann zyklisch ein und aus und zeigt damit
an, dass die Temperatur aufrecht erhalten wird.
6
Page 7
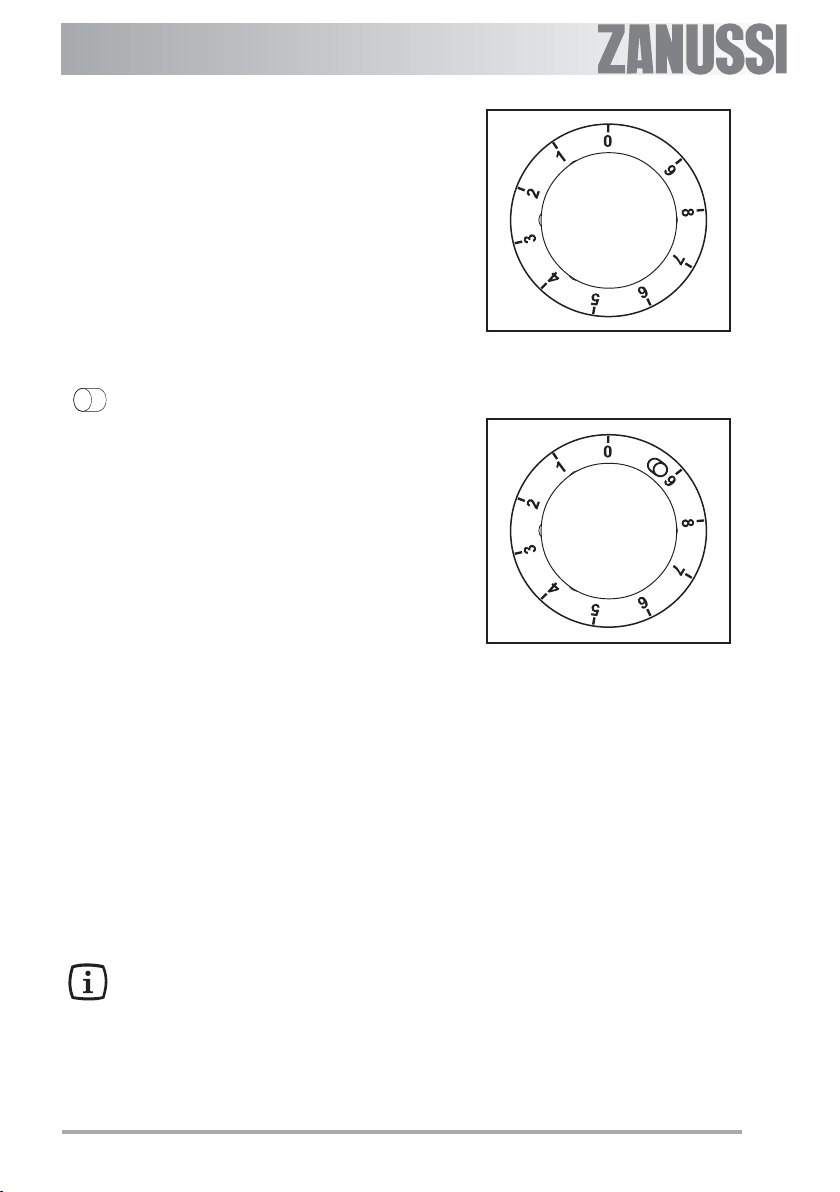
Bedienungsknebel für Kochmulde
An der Schalterblende befinden sich die SchaltKnebel für die vier Kochmulden-Heizelemente. Die
Kochstellen werden mit einem 9-Takt-schalter geregelt,
wovon die folgenden Arbeitsstufen benutzt werden
können:
0 = AUS
1 = Minimum
9 = Maximum
Zweikreis - Zuschaltung
(siehe die Liste der Geräte im Kapitel
"Technische Daten")
Das Zuschalten beider Heizkreise erfolgt durch das
Drehen des Kochzonenknebels von Stufe 9 auf Position
” (im Uhrzeigersinn); “Klick” ist hörbar. Beide
“
Heizkreise sind jetzt gleichzeitig eingeschaltet.
Anschließend wird die gewünschte Stufe eingestellt
(Knebel gegen den Uhrzeigersinn drehen).
Die Zubereitung von Speisen mit Öl oder Fett wie
z.B. pommes frites, darf nicht ohne Aufsicht geschehen,
da Öle und Fette bei überhitzung leicht entflammen
können.
Sicherheits-Thermostat
Um gefährliche Überhitzung zu vermeiden (durch
unsachgemäßen Gebrauch des Gerätes oder defekte
Bestandteile), ist der Backofen mit einem SicherheitsThermostat ausgestattet, welcher die Stromversorgung
unterbricht. Die Wiedereinschaltung erfolgt automatisch
bei Temperaturabfall.
Sollte der Sicherheits-Thermostat aufgrund
unsachgemäßen Gebrauchs des Gerätes ansprechen,
genügt es, nach der Abkühlung des Backofens die
Fehlerursache zu beseitigen. Spricht dagegen der
Thermostat wegen eines defekten Bauteiles an, so
wenden Sie sich bitte an den Kundendienst.
Electrolux
Kühlventilator
Der Kühlventilator kühlt den Backofen und das
Bedienfeld. Der Ventilator springt automatisch an, wenn
der Backofen einige Minuten in Betrieb ist. Warme Luft
wird durch die Blende in der Nähe des Ofentürgriffs
ausgeblasen. Nachdem der Backofen ausgeschaltet
wurde, läuft der Ventilator möglicherweise noch weiter,
um die Bedienelemente zu kühlen. Das ist normal.
Wie lange der Ventilator weiterläuft, richtet sich
danach, wie lange der Backofen in Betrieb war
und welche Temperatur gewählt wurde. Bei
niedrigeren Temperatureinstellungen schaltet sich
der Ventilator möglicherweise gar nicht ein, oder
er läuft nicht weiter, wenn der Backofen nur
kurzzeitig in Betrieb war.
7
Page 8
Electrolux
Vor der erstmaligen Benutzung
Entfernen Sie das gesamte
Verpackungsmaterial innen und außen am
Backofen, bevor Sie ihn in Betrieb nehmen.
Vor dem erstmaligen Gebrauch sollte der Backofen
einmal aufgeheizt werden, ohne dass sich Lebensmittel
darin befinden.
Dabei kann sich ein unangenehmer Geruch
entwickeln. Das ist normal. Die Ursache sind
Herstellungsrückstände.
Stellen Sie sicher, dass der Raum gut belüftet ist.
1. Drehen Sie den Backofenregler auf Umluft.
.
2. Drehen Sie den Temperaturregler auf 250
)
Wiederholen Sie den Vorgang mit der Funktion "Oberund Unterhitze"
etwa 5-10 Minuten.
°C.
4 Öffnen Sie zur Belüftung ein Fenster.
5. Lassen Sie den Backofen nun leer etwa 45
Minuten lang laufen.
und "Großflächengrill" für
Lassen Sie den Backofen anschließend
abkühlen. Feuchten Sie dann ein weiches Tuch
gut mit warmem Wasser und etwas mildem
Spülmittel an, und reinigen Sie damit den
Garraum.
Reinigen Sie vor dem ersten Gebrauch auch die
Zubehörteile gründlich.
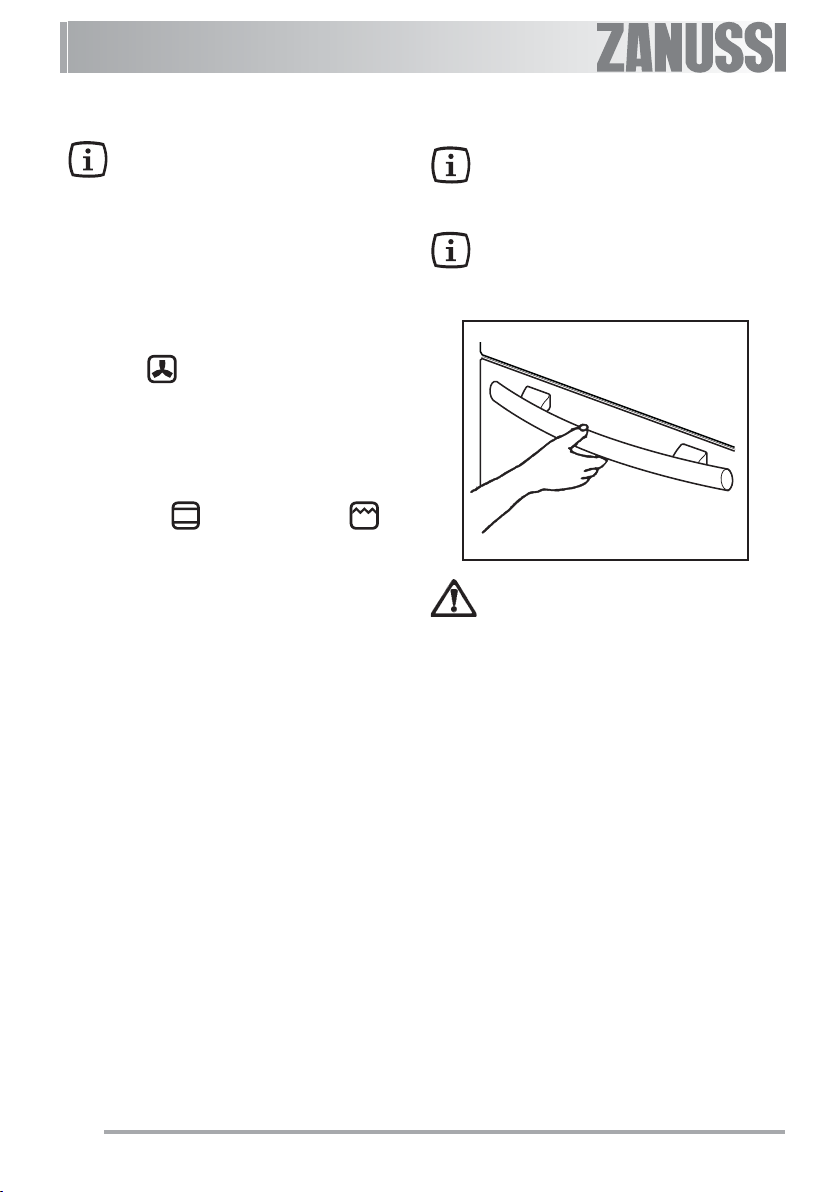
Fassen Sie zum Öffnen der Tür den Griff
immer in der Mitte an.
8
Page 9

Elektronische Zeitschaltuhr
Electrolux
4
5
6
7
8
123
Der Backofen funktioniert erst nach dem
Einstellen der Uhrzeit.
Der Backofen kann jedoch auch ohne Einstellen
eines Programms betrieben werden.
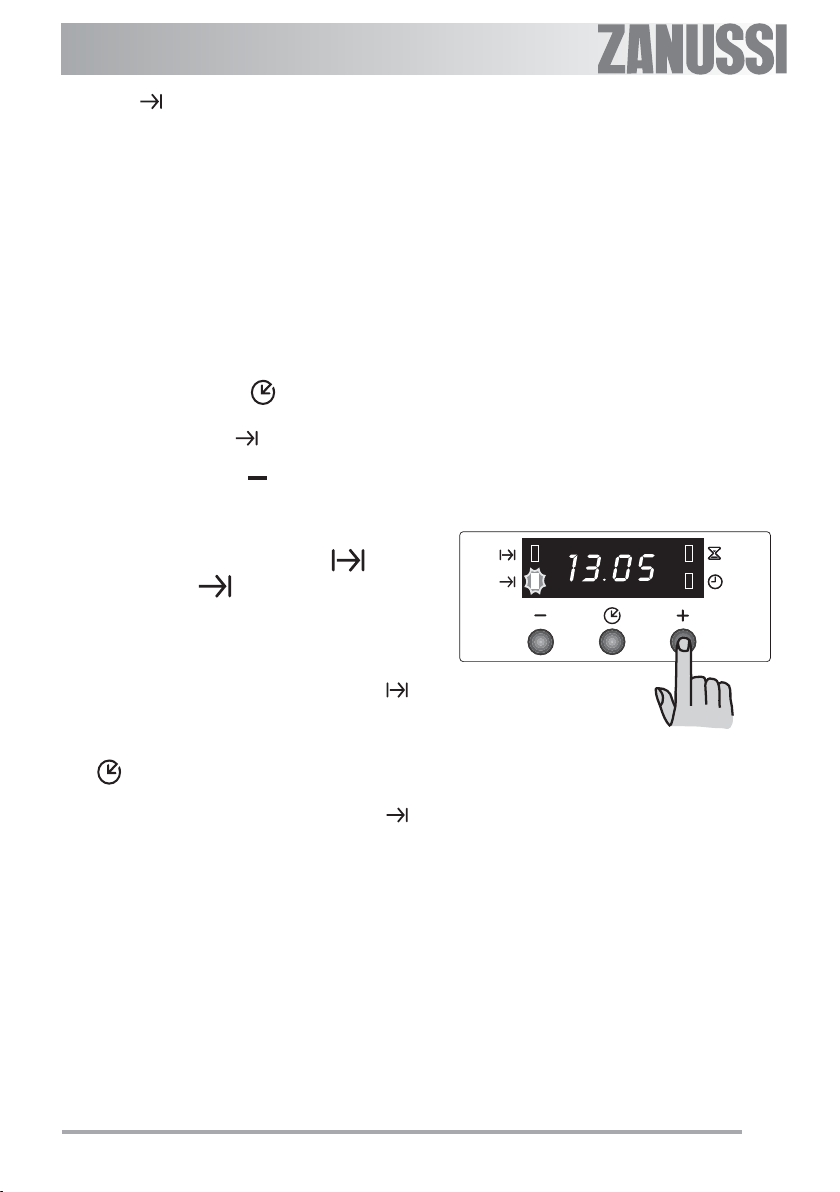
Einstellen der Uhrzeit
Nachdem die Stromversorgung eingeschaltet wurde
oder wenn ein Stromausfall aufgetreten ist, blinkt die
Kontrolllampe „Uhrzeit“ auf dem Display.
So stellen Sie die Uhrzeit ein:
1. Drücken Sie die Taste „ “ oder „ “.
2. Warten Sie anschließend 5 Sekunden: die Kontroll-
lampe „Uhrzeit“ erlischt, und auf dem Display
wird die eingestellte Zeit angezeigt. Das Gerät ist nun
betriebsbereit.
So stellen Sie die Uhrzeit erneut ein:
1. Taste für die Funktionsauswahl
2. Taste „ “
3. Taste „ “
4. Anzeige
5. „Gardauer“- Kontrolllampe
6. „Garzeitende“- Kontrolllampe
7. „Kurzzeit“ - Kontrolllampe
8. „Uhrzeit“- Kontrolllampe
1. Drücken Sie die Taste
Funktion „Uhrzeit“ auszuwählen. Die entsprechende
Kontrolllampe beginnt zu blinken. Gehen Sie dann
wie oben beschrieben vor.
Die Uhrzeit kann nur zurückgesetzt werden, wenn
keine automatische Funktion (Gardauer
Garzeitende
) eingestellt wurde.
wiederholt, um die
oder
9
Page 10
Electrolux
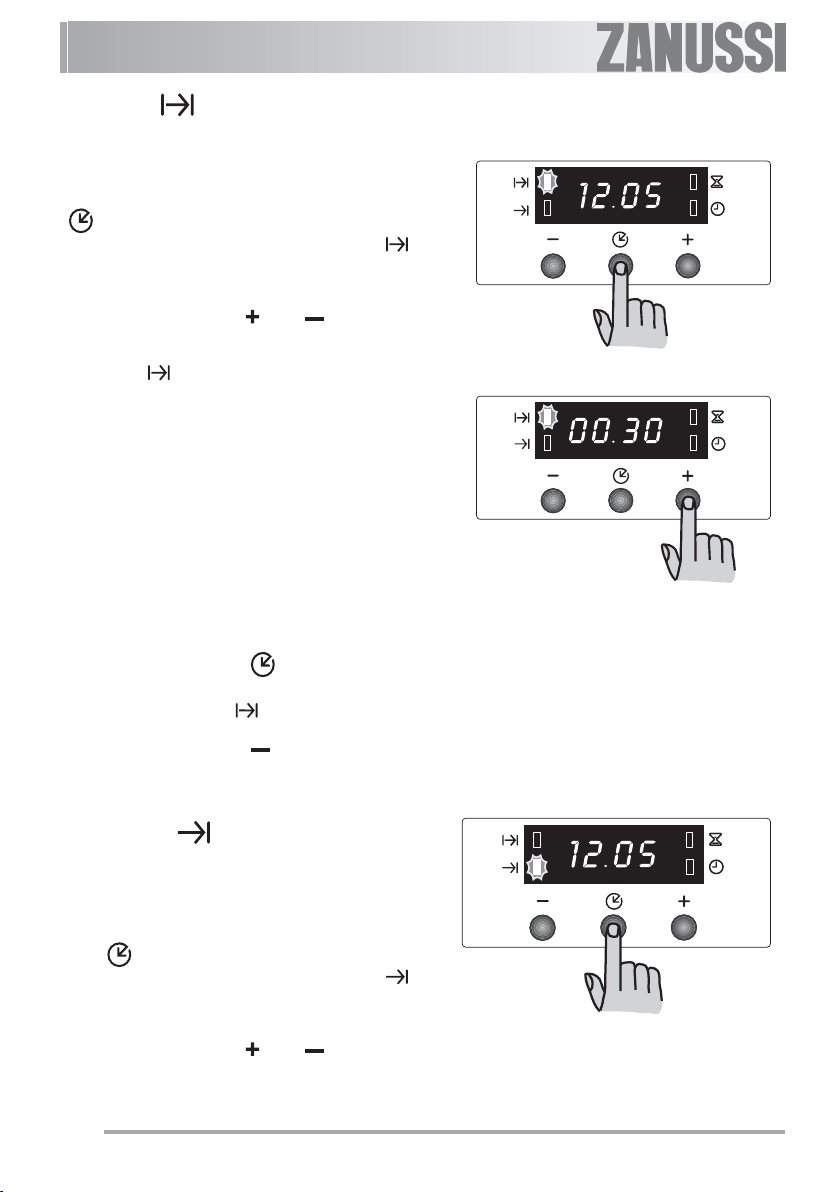
Gardauer
Bei Wahl dieser Funktion wird der Backofen
automatisch nach Ablauf einer programmierten Gardauer
ausgeschaltet. Stellen Sie Lebensmittel in den Backofen,
wählen Sie eine Garfunktion aus, und stellen Sie die
gewünschte Gartemperatur ein. Drücken Sie die Taste
wiederholt, um die Funktion „Gardauer“
auszuwählen. Die entsprechende Kontrolllampe
beginnt zu blinken. Gehen Sie dann wie folgt vor:
So programmieren Sie die Gardauer:
1. Drücken Sie die Taste „
2. Nachdem Sie die Einstellung vorgenommen haben,
warten Sie 5 Sekunden: die Kontrolllampe „Gar-
dauer“.
wieder die Uhrzeit angezeigt.
3. Wenn die programmierte Zeit abgelaufen ist, schaltet
sich der Backofen automatisch aus. Ein akustisches
Signal ertönt, und die Kontrolllampe blinkt. Drehen
Sie den Backofenregler und den Temperaturregler
auf Null.
Der Signalton lässt sich durch Drücken einer beliebi-
gen Taste abstellen.
HINWEIS: Durch das Ausschalten des akustischen
Signals wird der Backofen auf manuellen Betrieb
zurückgesetzt. Wenn der Backofenregler und der
Temperaturregler nicht auf Null gedreht werden, heizt
sich der Backofen nun wieder auf.
So löschen Sie eine programmierte Gardauer:
leuchtet, und auf dem Display wird
“ oder „ “.
1. Drücken Sie die Taste
Funktion „Gardauer“ auszuwählen. Die entspre-
chende Kontrolllampe blinkt, und auf dem Dis-
play wird die restliche Garzeit angezeigt.
2. Drücken Sie die Taste „ “ bis auf dem Display
„0:00“ angezeigt wird. Nach 5 Sekunden erlischt
die Kontrolllampe, und auf dem Display wird wieder
die Uhrzeit angezeigt.
wiederholt, um die
Garzeitende
Bei Wahl dieser Funktion wird der Backofen
automatisch ausgeschaltet, wenn ein programmiertes
Garzeitende ereicht ist. Stellen Sie Lebensmittel in den
Backofen, wählen Sie eine Garfunktion aus, und stellen
Sie die gewünschte Gartemperatur ein. Drücken Sie die
Taste
auszuwählen. Die entsprechende Kontrolllampe
beginnt zu blinken. Gehen Sie dann wie folgt vor:
So programmieren Sie das Ende der Garzeit:
1. Drücken Sie die Taste „
2. Nachdem Sie die Einstellung vorgenommen haben,
10
wiederholt, um die Funktion „Garzeitende“
“ oder „ ”.
warten Sie 5 Sekunden: die Kontrolllampe „Garzeit-
Page 11
Electrolux
ende“
wieder die Uhrzeit angezeigt.
3. Wenn die programmierte Zeit abgelaufen ist, schaltet
sich der Backofen automatisch aus. Ein akustisches
Signal ertönt, und die Kontrolllampe blinkt. Drehen
Sie den Backofenregler und den Temperaturregler
auf Null.
Der Signalton lässt sich durch Drücken einer beliebi-
gen Taste abstellen. HINWEIS: Durch das Aus-
schalten des akustischen Signals wird der Backofen
auf manuellen Betrieb zurückgesetzt. Wenn der
Backofenregler und der Temperaturregler nicht auf
Null gedreht werden, heizt sich der Backofen nun
wieder auf.
So löschen Sie ein programmiertes Garzeitende:
1. Drücken Sie die Taste wiederholt, um die
Funktion „Garzeitende“ auszuwählen. Die entspre-
chende Kontrolllampe blinkt, und auf dem Dis-
play wird das programmierte Garzeitende angezeigt.
2. Drücken Sie die Taste „ “, bis die auf dem Dis-
play die Uhrzeit angezeigt wird. Es wird ein akusti-
sches Signal ausgegeben, und die Kontrolllampe er-
lischt.
leuchtet, und auf dem Display wird
Kombination von „Gardauer“ und
„Garzeitende“
Die Funktionen „Gardauer“ und „Garzeitende“
können gleichzeitig verwendet werden, damit sich der
Backofen zu einem späteren Zeitpunkt automatisch ausund wieder einschaltet.
1. Legen Sie mithilfe der Funktion „Gardauer“
(nehmen Sie die in dem entsprechenden Kapitel er-
läuterten Einstellungen für die Gardauer vor) die
Gardauer fest. Drücken Sie anschließend die Taste
: die programmierte Einstellung wird auf dem
Display angezeigt.
2. Legen Sie mithilfe der Funktion „Garzeitende“
(nehmen Sie die in dem entsprechenden Kapitel er-
läuterten Einstellungen für das Garzeitende vor) das
Ende der Garzeit fest.
Die entsprechenden Kontrolllampen leuchten, und
auf dem Display wird die Uhrzeit angezeigt. Der
Backofen schaltet sich gemäß der eingestellten Pro-
gramme ein und aus.
11
Page 12
Electrolux
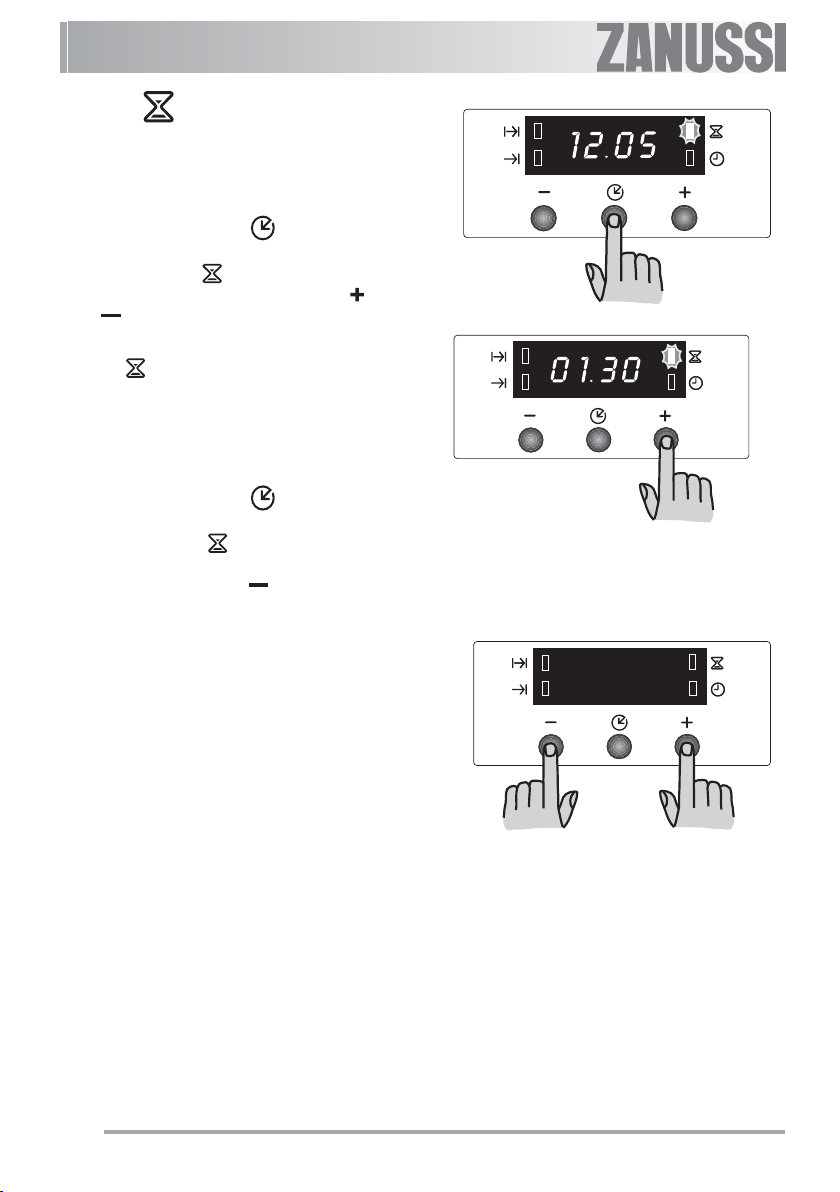
Kurzzeit
Das Kurzzeitsignal ertönt am Ende eines
eingestellten Zeitraums; der Backofen bleibt jedoch
eingeschaltet, falls er gerade benutzt wird.
So stellen Sie den Kurzzeitwecker ein:
1. Drücken Sie die Taste wiederholt, um die
Funktion „Kurzzeit“ auszuwählen. Die entsprechen-
de Kontrolllampe beginnt zu blinken.
2. Drücken Sie anschließend die Taste „
„ “ (längster Zeitraum: 2 Stunden, 30 Minuten).
3. Nachdem Sie die Einstellung vorgenommen haben,
warten Sie 5 Sekunden. Die Kontrolllampe „Kurz-
zeit“ leuchtet.
4. Ist das Ende des eingestellten Zeitraums erreicht,
beginnt die Kontrolllampe zu blinken, und ein akusti-
sches Signal ertönt. Drücken Sie eine beliebige Tas-
te, um den Signalton abzustellen.
So schalten Sie den Kurzzeitwecker aus:
“ oder
1. Drücken Sie die Taste
Funktion „Kurzzeit“ auszuwählen. Die entsprechen-
de Kontrolllampe blinkt, und auf dem Display
wird die verbleibende Zeit angezeigt.
2. Drücken Sie die Taste „ “, bis auf dem Display
„0:00“ angezeigt wird. Nach 5 Sekunden erlischt
die Kontrolllampe, und auf dem Display wird wieder
die Uhrzeit angezeigt.
wiederholt, um die
Ausschalten der Anzeige
1. Drücken Sie zwei der Programmtasten gleichzeitig,
und halten Sie sie ca. 5 Sekunden lang gedrückt.
Die Anzeige wird ausgeschaltet.
2. Um die Anzeige wieder einzuschalten, drücken Sie
eine beliebige Taste.
Die Anzeige kann nur dann ausgeschaltet wer-
den, wenn keine anderen Funktionen program-
miert wurden.
12
Page 13

Benutzung des Backofens
Der Backofen wird mit einem exklusiven natürlichen
Umluft- und Dampfsystem geliefert.
Das Garen mit Dampf macht Ihre Speisen innen
weich und außen knusprig. Die Gardauer und der
Energieverbrauch werden dabei auch noch reduziert.
Während des Backens kann Dampf entstehen, der beim
Öffnen der Tür entweichen kann. Das ist normal.
Stellen Sie sich daher nicht vor den Backofen,
wenn Sie die Tür während des Backens öffnen,
und lassen Sie nach dem Backvorgang den
Ofen und Dampf abkühlen.
Wichtig! - Legen Sie den Backofen nicht mit
Alufolie aus, und stellen Sie kein Backblech usw.
auf den Boden, da sonst das Backofen-Email
durch den entstehenden Hitzestau beschädigt
wird. Stellen Sie Pfannen und Töpfe,
hitzebeständige Pfannen und Töpfe sowie
Aluminiumbleche immer auf den Einschub, der
in eine der Einschubschienen eingesetzt ist.
Beim Erhitzen von Lebensmitteln wird Dampf
erzeugt wie in einem Kessel. Wenn der Dampf
mit dem Backofen-Türglas in Berührung kommt,
kondensiert er und es entstehen
Wassertröpfchen.
Um Kondensation zu verringern, den leeren
Backofen immer 10 Minuten vorheizen.
Wir empfehlen Ihnen, die Wassertropfen nach jedem
Garvorgang wegzuwischen.
Die Backofentür muss beim Garen
geschlossen sein. Gehen Sie beim Öffnen der
Backofentür sorgfältig vor. Lassen Sie die Tür
nicht „offen fallen“, sondern benutzen Sie den
Türgriff, bis die Tür vollständig geöffnet ist.
Der Backofen hat vier Einschubebenen und
wird mit zwei Einschüben geliefert. Die Positionen
der Einschübe werden vom Boden des
Backofens aus gezählt, wie in der Abbildung
gezeigt.
Die Einschübe müssen unbedigt richtig
eingesetzt werden (siehe Abbildung).
Stellen Sie Geschirr und Töpfe nicht direkt auf
den Boden des Backofens.
Electrolux
4
3
2
1
13
Page 14

Electrolux
Heiß-/Umluft
- Die Speisen werden mit Heißluft gegart, die über ein
Gebläse an der Ofenrückwand gleichmäßig im
Backofen-Innenraum verteilt wird.
- Die Hitze erreicht schnell und gleichmäßig alle Ofen-
zonen. Das bedeutet, Sie können gleichzeitig unter-
schiedliche Speisen auf mehreren Ebenen backen,
braten und dünsten. Heißluftgaren beseitigt rasch die
Feuchtigkeit; die trockene Ofenluft verhindert, dass
die verschiedenen Aromen und Gerüche von einer
Speise auf die anderen übertragen werden.
- Die Möglichkeit, auf mehreren Ebenen zu garen,
bedeutet, dass Sie verschiedene Gerichte
gleichzeitig und bis zu drei Kuchenformen oder Mini-
pizzas für den Verzehr oder zum Einfrieren backen
können.
- Natürlich können Sie den Backofen auch mit nur ei-
nem Einschub benutzen. In diesem Fall sollten Sie
die unterste Schiene verwenden, sodass Sie den
Backvorgang besser im Auge behalten können.
- Zusätzlich ist der Backofen besonders zum Sterili-
sieren von Eingemachtem, zum Kochen von -selbst-
gemachter Konfitüre und zum Trocknen von Pilzen
und Obst geeignet.
Grillen -
- Die meisten Lebensmittel sollten auf den Rost in der
Grillpfanne gelegt werden, um ein Höchstmaß an
Luftzirkulation zu ermöglichen und damit die Lebens-
mitteln nicht im Fett und ihrem eigenen Saft liegen.
Fisch, Leber und Nieren können bei Bedarf auch di-
rekt in die Grillpfanne gelegt werden.
- Die Lebensmittel sollten möglichst trocken sein, be-
vor sie gegrillt werden, um Spritzen zu vermeiden.
Pinseln Sie mageres Fleisch oder Fisch leicht mit
Öl oder geschmolzener Butter ein, damit das Grillgut
beim Garen saftig bleibt.
- Gemüse als Beilage, wie zum Beispiel Tomaten
und Pilze, können beim Grillen von Fleisch unter
den Grillrost gelegt werden.
- Brot sollte auf der obersten Einschubleiste geröstet
werden.
- Das Grillgut sollte von Zeit zu Zeit gewendet werden.
schnell oder langsam die Lebensmittel gegrillt werden sollen, platzieren Sie das Grillgut näher am Grillelement oder weiter davon entfernt.
Heizen Sie den Grill einige Minuten lang auf
höchster Stufe vor, bevor Sie Steaks anbraten oder Brot
toasten. Passen Sie die Hitze und die Einschubhöhe falls
notwendig während des Grillvorgangs an.
Während des Grillvorgangs funktionieren der
Ventilator und die Kontrollanzeige für die Temperatur auf
die gleiche Weise wie beim Betrieb mit Heiß-/Umluft.
Benutzung des Kleinflächengrills
Über den Kleinflächengrill gelangt schnell direkte
Hitze in den mittleren Bereich der Grillpfanne. Mit dem
Kleinflächengrill lassen sich gut kleinere Mengen grillen.
Auf diese Weise kann auch Energie gespart werden.
1. Drehen Sie den Backofenregler, um den Backofen
einzuschalten
2. Drehen Sie den Temperaturregler auf die gewünschte
Temperatur.
3. Wählen Sie die passende Einschubleiste für Grill-
pfanne und Rost, je nachdem, ob es sich um flaches
oder dickeres Grillgut handelt. Befolgen Sie dann die
Anweisungen zum Grillen.
Das Grillelement wird über den Thermostat
gesteuert. Während des Grillvorgangs schaltet sich der
Grill in regelmäßigen Abständen ein und aus, um
Überhitzung zu vermeiden.
.
Benutzung des Großflächengrills
1. Drehen Sie den Backofenregler, um den Backofen
einzuschalten
2. Drehen Sie den Temperaturregler auf die gewünschte
Temperatur.
3. Wählen Sie die passende Einschubleiste für Grillpfanne und Rost, je nachdem, ob es sich um flaches
oder dickeres Grillgut handelt. Je nachdem, wie
14
.
Page 15

Electrolux
Unterhitze
Diese Funktion ist besonders nützlich beim
Blindbacken von Teig. Sie kann auch für Quiches oder
Pasteten verwendet werden, damit gewährleistet ist,
dass der Grundteig durchgebacken ist.
Die Kontrolllampe des Temperaturreglers leuchtet
so lange, bis die richtige Temperatur erreicht ist.
Sie schaltet sich dann zyklisch ein und aus und
zeigt damit an, dass die Temperatur aufrecht
erhalten wird.
Oberhitze
Diese Funktion eignet sich zum Überbacken von
fertigen Gerichten, zum Beispiel Lasagne oder
überbackener Blumenkohl usw.
Ober- und Unterhitze
- Auf der mittleren Einschubhöhe verteilt sich die Hitze
am besten. Wenn die Unterseite von Speisen stärker gebräunt sein soll, verwenden Sie einfach eine
niedrigere Einschubhöhe. Soll die Oberseite stärker
gebräunt sein, setzen Sie den Einschub auf einer
Position weiter oben ein.
- Das Material und die Verarbeitung der Backbleche
und des Kochgeschirrs beeinflussen den
Bräunungsgrad der Unterseite der Speisen. Emaillierte, dunkle, schwere oder unbeschichtete Formen
und Küchengeräte ermöglichen eine stärkere Bräunung der Unterseite, während Formen aus Glas
oder glänzendem Aluminium oder polierte Stahlbleche die Hitze reflektieren und daher nur eine geringe
Bräunung der Unterseite zulassen.
- Stellen Sie die Gerichte immer in die Mitte des Einschubs, um eine gleichmäßige Bräunung zu erzielen.
- Stellen Sie die Gerichte auf Backbleche angemessener Größe, sodass Flüssigkeiten nicht auf den
Backofenboden auslaufen können. Sie sparen so
auch Reinigungsaufwand.
- Stellen Sie Gerichte, Dosen oder Backbleche nie
direkt auf den Boden des Backofens, da dieser sehr
heiß wird und Beschädigungen auftreten können.
Bei dieser Einstellung wird die Hitze von Heizelementen oben und unten erzeugt. Sie benötigen
daher nur eine einzige Einschubebene für den Garvorgang. Diese Einstellung eignet sich insbesondere
für Gerichte, die zusätzlich von unten gebräunt werden müssen, wie zum Beispiel Quiches und Pasteten.
Gratins, Lasagne und andere überbackene
Gerichte, die insbesondere von oben gebräunt werden
müssen, lassen sich mit dieser Einstellung ebenfalls gut
zubereiten.
So verwenden Sie Ober- und Unterhitze:
1. Drehen Sie den Backofenregler auf die gewünschte
Funktion
2. Drehen Sie den Temperaturregler auf die gewünschte Temperatur.
.
Heißluftgrill
Beim Heißluftgrill eine maximale Temperatur
von 200°C stellen.
Daraufhin setzt ein abwechselndes
Funktionieren von Grill und Ventilator ein
(Konvektionsbetrieb). Diese Betriebsweise ermöglicht
das gleichmäßige Eindringen der Wärme in das
Kochgut, ohne die Oberfläche über zu lange Zeit
hinweg der direkten Bestrahlung des Grills
auszusetzen.
Pizza
Wahlschalter-Knebel auf drehen,dann ThermostatKnebel auf die geeignete Temperatur einstellen. Die
kombinierte Wirkung der von unten kommenden Hitze, des Ringheizkörpers und der vom Gebläse verteilten Heißluft ermöglicht das einheitliche Backen
von Pizzas oder gesalzenen Torten. Funktions-Wahl-
schalter auf
.
15
Page 16

Electrolux
Praktische Tipps
Backen:
Backgut erfordert gewöhnlich eine mittlere Temperatur
(150°C - 200°C). Daher muss der Backofen ca. 10
Minuten lang vorgeheizt werden.
Öffnen Sie die Backofentür nicht, bevor 3/4 der
Backzeit abgelaufen ist.
Mürbeteig wird in der Springform oder auf dem
Blech bis zu 2/3 der Backzeit gebacken und danach
garniert, bevor er fertiggebacken wird. Diese weitere
Backzeit ist abhängig von der Art und Menge der
Garnitur. Rührteige müssen schwer vom Löffel reißen.
Die Backzeit würde durch zuviel Flüssigkeit unnötig
verlängert werden.
Werden zwei Backbleche mit Gebäck gleichzeitig in
den Backofen eingeschoben, muss zwischen den
Blechen eine Einschiebeleiste freigelassen werden.
Werden zwei Backbleche mit Gebäck gleichzeitig in
den Backofen eingeschoben, müssen die Bleche nach
etwa 2/3 der Backzeit von oben nach unten getauscht
und gedreht werden.
Braten:
Braten Sie keine Stücke, die weniger als 1 kg
wiegen. Kleinere Stücke könnten beim Braten
austrocknen. Dunkles Fleisch, das außen gut gegart,
jedoch innen noch rosa bis rot bleiben soll, muss bei
höherer Temperatur (200°C - 250°C) gebraten werden.
Helles Fleisch, Geflügel, und Fisch erfordern
dagegen eine niedrigere Temperatur (150°C - 175°C).
Die Soßenzutaten werden nur bei kurzer Garzeit gleich
zu Beginn in die Bratenpfanne gegeben. Andernfalls
werden sie in der letzten halben Stunde zugegeben.
Ob das Fleisch gar ist, können Sie mit einem Löffel
prüfen: lässt es sich nicht eindrücken, so ist es
durchgebraten. Roastbeef und Filet, die innen rosa bleiben
sollen, müssen bei höherer Temperatur in kürzerer Zeit
gebraten werden.
Beim Garen von Fleischgerichten direkt auf dem
Rost zum Auffangen des Saftes Fettpfanne in die Leiste
unten einschieben.
Den Braten vor dem Anschneiden mindestens 15
Minuten stehen lassen, damit der Fleischsaft nicht
ausfließen kann.
Um die Rauchbildung im Backofen zu vermindern,
empfiehlt es sich, ein wenig Wasser in die Fettpfanne zu
gießen. Um Kondensbildung zu vermeiden, mehrmals
Wasser zugeben. Die Teller können bis zum Servieren
im Backofen bei Mindesttemperatur warmgehalten
werden.
Vorsicht!
Den Backofen nicht mit Alufolie auslegen
und kein Kochgeschirr, keine Fettpfanne
oder Backblech auf den Boden stellen, da
sonst das Backofenemail durch den
entstehenden Hitzestau beschädigt wird.
Garzeiten
Die Garzeiten können unterschiedlich sein, je nach
Zusammensetzung, Zutaten- und Flüssigkeitsmenge der
einzelnen Speisen.
Notieren Sie sich die Einstellungen, die Sie bei Ihren
ersten Gar- und Bratversuchen vorgenommen haben,
um Erfahrungen für den Fall zu sammeln, dass Sie
dieselben Speisen später erneut zubereiten möchten.
Aufgrund Ihrer eigenen Erfahrungen können Sie die
angegebenen Werte individuell verändern.
16
Page 17

Tabellen Backen und Braten
Ober- und Unterhitze, Heiß-/Umluft -
Zeitangaben beinhalten kein Vorheizen.
Den leeren Backofen immer 10 Minuten vorheizen.
GERICHT
KUCHEN
Rührkuchen 2 170 2 (1 und 3)* 160 4 5 - 60 Kuchenform
Teekuchen 2 170 2 (1 und 3)* 160 20 - 3 0 Kuchenform
Buttermilch-Käsekuchen 1 175 2 165 60 - 80 Kuchenform
Apfelkuchen 1 170 2 links + rechts 160 90 - 120 Kuchenform
Strudel 2 180 2 160 60 - 80 Backblech
Marmeladentörtchen 2 190 2 (1 und 3)* 180 40 - 4 5 Kuchenform
Obstkuchen 2 170 2 150 60 - 70 Kuchenform
Biskuitkuchen 1 170 2 (1 und 3)* 165 30 - 40 Kuchenform
Früchtekuchen 1 150 2 150 120 - 150 Kuchenform
Pflaumenkuchen 1 175 2 160 50 - 60 Backform
Kleingebäck 3 170 2 160 20 - 35 Backblech
Biskuitteig 2 160 2 (1 und 3)* 150 2 0 - 30 Backblech
Baiser 2 135 2 (1 und 3)* 150 60 - 90 Backblech
Striezel 2 200 2 190 12 - 20 Backblech
Brandteig 2 oder 3 210 2 (1 und 3)* 170 25 - 35 Backblech
Blechkuchen 2 180 2 170 45 - 70 Kuchenform
BROT UND PIZZA
Weißbrot 1 195 2 185 60 - 70
Graubrot 1 190 1 180 30 - 45 Backform
Brötchen 2 200 2 (1 und 3)* 175 25 - 40 Backblech
Pizza 2 200 2 200 20 - 30 Backblech
PASTETEN
Teigwaren 2 200 2 (1 und 3)* 175 40 - 50 Backform
Gemüsepasteten 2 200 2 (1 und 3)* 175 45 - 60 Backform
Quiche 1 210 1 190 30-40 Backform
Lasagne 2 200 2 200 25 - 3 5 Backform
Cannelloni 2 200 2 200 2 5 - 35 Backform
FLEISCH
Rind 2 190 2 175 50 - 70 Auf dem Rost
Schwein 2 180 2 175 100 - 130 Auf dem Rost
Kalb 2 190 2 175 90 - 120 Auf dem Rost
Englisches Roastbeef
Englisch 2 210 2 200 50 - 60 Auf dem Rost
Medium 2 210 2 200 6 0 - 70 Auf dem Rost
Durchgebraten 2 210 2 200 70 - 8 0 Auf dem Rost
Schweineschulter 2 180 2 170 120-150 Mit Schwarte
Schweinehaxe 2 180 2 160 100-120 2 Stücke
Lamm 2 190 2 175 110 - 130 Keule
Hähnchen 2 190 2 200 70 - 85 Ganz
Truthahn 2 180 2 160 210 - 240 Ganz
Ente 2 175 2 220 120 - 150 Ganz
Gans 2 175 1 160 150 - 200 Ganz
Kaninchen 2 190 2 175 60 - 80 Stücke / Zerlegt
Hase 2 190 2 175 150 - 200 Stücke / Zerlegt
Fasan 2 190 2 175 90 - 120 Ganz
Hackbraten 2 180 2 170 Gesamt 150 Ofenform
FISCH
Forelle/Brasse 2 190 2 (1 und 3)* 175 40-55 3 - 4 Fische
Thunfisch/Lachs 2 190 2 (1 und 3)* 175 35-60 4 - 6 Fillets
4
3
2
1
Temp.
°C
4
3
2
1
Ober- und Unterhitze Heiß-/Umluft
Garzeit in Minuten
Te m p .
°C
HINWEISE
Electrolux
(*)
Falls Sie gleichzeitig mehrere Gerichte garen, empfehlen wir, diese auf den in Klammern angegebenen Ebenen
abzustellen.
17
Page 18

Electrolux
Grillen -
Zeitangaben beinhalten kein Vorheizen.
Den leeren Backofen immer 10 Minuten vorheizen.
Menge Garzeit in Minuten
4
3
2
1
Grillen
Temp. °CStück Gr.
1. Seite
2. Seite
Filetsteak 4 800 3 250 12 - 15 12 - 14
Beefsteak 4 600 3 250 10 - 12 6 - 8
Bratwurst 8 / 3 250 12 - 15 10 - 12
Schweinekotelett 4 600 3 250 12 - 16 12 - 14
Hähnchen (halbiert) 2 1000 3 250 30 - 35 2 5 - 30
Schaschlik 4 / 3 250 10 - 15 10 - 12
Hühnchenbrust 4 400 3 250 12 - 15 12 - 14
Hamburger* 6 600 2 250 20 - 30
*
Vorheizen 5.00 Min.
Fisch (Filet) 4 400 3 250 12 - 14 10 - 12
Sandwich 4 - 6 / 3 250 5 - 7 /
Toast 4~6 / 3 250 2 - 4 2 - 3
Die angegebenen Temperaturen sind Richtwerte. Gegebenenfalls müssen die Temperaturen
persönlichen Ansprüchen angepasst werden.
18
Page 19

Heißluftgrill
Für Umluftgrill wählen Sie eine maximal Temperatur bis 200°C.
Electrolux
Kochzeit in
Minuten
Ober-
Unter-
seite
ART DER
SPEISE
Menge
Stücke Gr.
Ebene
Temperature
4
3
2
1
°C
Rollbraten (Pute) 1 1000 3 200 30-40 20-30
Hähnchen 2 800 3 200 25-30 20-25
Hähnchen,
(in 2 Hälften) 2 1000 3 200 32-30 20-30
Geflügelschlegel 6 — 3 200 15-20 15-18
Wachtel 4 500 3 200 25-30 20-25
Gemüsegratin — — 3 200 20-25 —
Jakobsmuscheln 6 — 3 200 15-20 —
Makrele 2-4 — 3 200 15-20 10-15
Fishfilet 4-6 800 3 200 12-18 8-10
Die angegebenen Temperaturen sind Richtwerte. Gegebenenfalls müssen die Temperaturen
persönlichen Ansprüchen angepasst werden.
Pizza Funktion
Pizza Funktion
GERICHT
4
3
2
1
Temp. (°C)
Pizza, groß 1 200 15~25 Backblech
Pizza, klein 1 200 10~20
Brötchen 1 200 15~25 Backblech
Garzeit in Minuten
ANM
Backblech oder Rost
seite
Die Temperatur ist unter Umständen persönlichen Ansprüchen anzupassen.
19
Page 20

Electrolux
Reinigung und Wartung
Vor dem Reinigen den Backofen
ausschalten und abkühlen lassen.
Das Gerät darf nicht mit einem Heißdampfoder Dampfstrahlreiniger gereinigt
werden.
Wichtig: Vor jeder Reinigungsarbeit das Gerät
unbedingt spannungslos machen.
Für eine lange Lebensdauer des Gerätes ist es
nötig, regelmäßig folgende Reinigungsarbeiten
durchzuführen:
- Durchführung nur bei abgekühltem Backofen.
- Die emaillierten Teile mit Seifenlauge reinigen.
- Keine Scheuermittel verwenden.
- Edelstahlteile und Glasscheiben mit einem weichen
Tuch trockenreiben.
- Bei hartnäckigen Flecken handelsübliche
Reinigungsmittel für Edelstahl oder warmen Essig
benutzen.
Die Emaillierung des Backofens ist äußerst haltbar
und weitgehenst unempfindlich. Die Einwirkung von
heißen Fruchtsäuren (Zitronen, Pflaumen oder ähnliches)
kann jedoch auf der Emailoberfläche bleibende, matte und
rauhe Flecken hinterlassen. Solche Flecken in der
Hochglanzoberfläche der Emaille beeinträchtigen die
Funktion des Backofens jedoch nicht. Reinigen Sie den
Backofen grundsätzlich nach jedem Gebrauch.
Verschmutzungen lassen sich so am leichtesten
entfernen. Ein weiteres Einbrennen wird damit
vermieden.
Reinigungsmittel
Kontrollieren Sie vor der Verwendung von
Reinigungsmitteln immer, ob diese für Ihren Backofen
geeignet sind und vom Hersteller empfohlen werden.
Reinigungsmittel, die Bleiche enthalten, sollten NIE
verwendet werden, da sie die Oberflächenbehandlung
stumpf werden lassen. Vermeiden Sie ebenso die
Verwendung von Scheuermitteln.
Reinigung der Außenseiten
Wischen Sie regelmäßig die Bedienblende, die
Backofentür und die Türdichtungen mit einem weichen
Lappen ab, den Sie in warmem Wasser mit etwas
flüssigem Reinigungsmittel angefeuchtet haben.
Verwenden Sie zur Vermeidung von
Beschädigungen der Backofenglastür auf keinen Fall
Folgendes:
• Haushaltsreiniger und Bleichlauge
• Imprägnierte Reinigungschwämme, die für Kochtöpfe
mit Antihaftbeschichtung ungeeignet sind
• Brillo/Ajax - Schwämme oder Schwämmchen aus
Stahlwolle
• Chemische Ofenreiniger oder Sprühdosen
• Rostentferner
• Fleckentferner für Waschbecken/Spülen
Reinigen Sie die Außen- und Innenseite der Glastür
mit warmem Seifenwasser. Sollte die Innenseite der
Glastür stark verschmutzt sein, benutzen Sie
Reinigungsprodukte wie ‘Hob Brite’. Benutzen Sie keine
Schaber, um den Schmutz zu entfernen.
Garraum
Der emaillierte Boden des Garraums lässt sich am
besten reinigen, solange der Backofen noch warm ist.
Wischen Sie den Backofen mit einem weichen
Lappen aus, der nach jeder Benutzung in warmem
Seifenwasser ausgewaschen wird. Von Zeit zu Zeit ist
eine gründlichere Reinigung erforderlich. Verwenden Sie
hierfür einen handelsüblichen Backofenreiniger.
20
Page 21

Reinigung der Backofentür
Bauen Sie die Ofentür aus, bevor Sie mit der
Reinigung beginnen.
Gehen Sie hierzu folgendermaßen vor:
1. Öffnen Sie die Backofentür ganz.
2. Die Tür ist über Scharniere mit dem Backofen verbunden (Abb. A).
3. Heben Sie die kleinen Hebel auf den beiden Scharnieren an, und drehen Sie die Hebel nach innen
(Abb. B).
4. Fassen Sie die Tür an der linken und rechten Seite,
und drücken Sie die Tür langsam gegen den Ofen,
bis sie halb geschlossen ist.
5. Ziehen Sie jetzt die Ofentür vorsichtig aus dem Rahmen (Abb. C).
6. Legen Sie sie auf einer flachen Unterlage ab.
Reinigen Sie die Ofentürscheiben nur mit warmem
Wasser und einem weichen Tuch. Verwenden Sie
niemals Scheuermittel. Bauen Sie nach dem Reinigen die
Ofentür wieder ein, und gehen Sie dabei in umgekehrter
Reihenfolge vor.
Geräte aus Edelstahl oder Aluminium:
Die Ofentür sollte nur mit einem feuchten Schwamm
gereinigt und danach mit einem weichen Tuch
trockengerieben werden.
Verwenden Sie nie Stahlwolle, Säuren oder
Scheuermittel, die die Oberflächen beschädigen können.
Reinigen Sie die Bedienblende auf dieselbe Weise.
REINIGEN Sie die Backofentür NICHT,
solange die Scheiben noch warm sind. Bei
Missachtung dieser Anweisung kann die
Glasscheibe zersplittern.
Falls die Glasscheibe Risse oder tiefe
Kratzer aufweist, ist die Struktur des
Glases beeinträchtigt. Die Scheibe muss
dann wegen des möglichen Risikos der
Zersplitterung ersetzt werden. Wenden Sie
sich an den lokalen Kundendienst, der
Ihnen gern weiter hilft.
Electrolux
Abb. A
Abb. B
Abb. C
21
Page 22

Electrolux
Auswechseln der Innenbeleuchtung
Ziehen Sie den Netzstecker.
Bei einem Ersatz der Backofenlampe muss die
neue Lampe folgende Merkmale aufweisen:
- Elektrische Leistung: 15 W/25 W
- Elektrische Spannung: 230 V (50 Hz)
- Hitzebeständigkeit bis 300 °C
- Anschlussart: E14.
Sie können Ersatzlampen bei Ihrem Fachhändler
beziehen.
So wechseln Sie die Backofenlampe aus:
1. Vergewissern Sie sich zunächst, dass der Backofen abgekühlt und von der Stromversorgung getrennt
ist.
2. Drehen Sie dann die Glasabdeckung der Lampe gegen den Uhrzeigersinn.
3. Entfernen Sie die durchgebrannte Lampe, und setzen
Sie eine neue ein.
4. Setzen Sie die Glasabdeckung wieder auf, und
schließen Sie den Backofen wieder an die Stromversorgung an.
Ofenroste und Rostauflagen
Einschubgitter
Zur Reinigung der Seitenwände lassen sich die
Einschubgitter auf der linken und rechten Seite im
Backofen abnehmen.
Einschubgitter abnehmen
Gitter zuerst vorne von der Backofenwand wegziehen
und dann hinten aushängen (1, 2).
Einschubgitter einsetzen
Zum Einbau Gitter zuerst hinten wieder einhängen und
dann vorne anlegen und andrücken (3). Tauchen Sie die
Einschubgitter zum Reinigen in warmes Seifenwasser
und entfernen Sie hartnäckigen Schmutz mit einem gut
eingeseiften imprägnierten Schwamm. Gut nachwischen
und mit einem weichen Tuch trocken wischen.
Fig. 1
Fig. 2
22
Fig. 3
Page 23

Störungen - Was tun?
Wenn das Gerät nicht richtig arbeitet, bitte Folgendes überprüfen, bevor Sie sich an das Electrolux Service-Center
wenden:
Electrolux
PROBLEM
Der Backofen schaltet sich nicht ein.
Die Kontrolllampe für die Backofen-
temperatur brennt nicht.
Die Innenbeleuchtung des Backofens
brennt nicht.
Die Zubereitung der Gerichte dauert zu
lange, oder sie garen zu schnell.
Dampf und Kondenswasser setzen sich
auf den Speisen und im Garraum ab.
Das Gebläse ist zu laut.
Die elektronische Zeitschaltuhr funktioniert
nicht.
Das Display zeigt "12.00".
ABHILFE
Überprüfen Sie, ob eine Garfunktion und eine Tempe-
ratur eingestellt wurde,
oder
prüfen Sie, ob das Gerät ordnungsgemäß angeschlos-
sen ist und der Steckdosen-Schalter oder die Netzstromzufuhr zum Backofen auf EIN stehen.
Wählen Sie mit dem Temperaturregler eine Temperatur
aus,
oder
wählen Sie mit dem Backofenregler eine Funktion aus.
Wählen Sie mit dem Temperaturregler eine Temperatur
aus,
oder
überprüfen Sie die Glühbirne, und tauschen Sie sie, falls
notwenig, aus (Siehe „Auswechseln der Innenbeleuchtung“)
Gegebenenfalls muss die Temperatur geändert werden,
oder
ziehen Sie den Inhalt dieser Anweisung zu Rate,
insbesondere das Kapitel „Praktische Tipps“.
Lassen Sie die Gerichte nach Beendigung des Garvor-
gang nicht länger als 15 - 20 Minuten im Backofen stehen.
Überprüfen Sie, ob die Einschübe und das Kochgeschirr
nicht an die Rückseite des Backofens stoßen und
dadurch vibrieren.
Lesen Sie die Anweisungen für die Zeitschaltuhr.
Stellen Sie die Uhrzeit ein (siehe Kapitel "Einstellen der
Uhrzeit ").
23
Page 24

Electrolux
Technische Daten
Heizleistung
Unterhitzeheizkörper 1000 W
Oberhitzeheizkörper 800 W
Ober-/Unterhitze 1800 W
Heiß-/Umluft 2000 W
Grill 1650 W
Großflächengrill 2450 W
Heißluftgrill 2475 W
Pizza Funktion 2650 W
Backofenlampe 25 W
Motor des Heißluftgebläses 25 W
Motor der Kühlungsbelüftung 25 W
Gesamtanschlusswert 2750 W
Betriebsspannung (50 Hz) 230 V ~ / 400 V ~ 3N
Einbaunische
Höhe mm 600
Breite mm 560
Tiefe mm 550
Das Gerät kann mit folgenden Einbau-Kochmulden
bzw. Glaskeramik-Einbau-Kochfeldern kombiniert
werden:
zz
z Glaskeramik-Kochmulde Typen:
zz
ZVD 868 (2 Zweikreis-Kochzonen)
Gesamtanschlußwert k W 7,6
Betriebsspannung (50 Hz) 230 V
zz
z Glaskeramik-Kochmulde Typen:
zz
ZK 630 L - ZK 630 F
(2 Zweikreis-Kochzonen)
Gesamtanschlußwert k W 7,6
Betriebsspannung (50 Hz) 230 V
zz
z Glaskeramik-Kochmulde Typen:
zz
ZC 6695 (1 Zweikreis-Kochzone)
Gesamtanschlußwert k W 6,4
Betriebsspannung (50 Hz) 230 V
zz
z Glaskeramik-Kochmulde Typen:
zz
ZC 6675 (Kein Zweikreis-Kochzone)
Gesamtanschlußwert k W 5,8
Betriebsspannung (50 Hz) 230 V
Maximale Nennheizleistung
zz
z Backofen + Glaskeramik-Kochmulde
zz
10,350 kW
Einsatz
Höhe mm 335
Breite mm 405
Tiefe mm 410
Backofenkapazität 53 l
24
Page 25

Anweisungen für den Installateur
Electrolux
Einbau und Installation sind streng unter
Beachtung der bestehenden Vorschriften
durchzuführen. Jegliche Eingriffe müssen
bei ausgeschaltetem Gerät vorgenommen
werden. Eingriffe dürfen nur von
anerkannten Fachleuten durchgeführt
werden.
Die Herstellerfirma lehnt jede Haftung ab,
falls die Sicherheitsmaßnahmen nicht
beachtet werden.
Elektroanschluss
Vor dem Anschluss bitte folgendes beachten:
- Die Sicherung und die Hausinstallation müssen auf
die max. Belastung des Gerätes ausgelegt sein (siehe Typenschild).
- Die Hausinstallation muss mit einem vorschriftsmässigen und den geltenden Vor-schriften
entsprechenden Erdanschluss ausgestattet sein.
- Die Steckdose oder der mehrpolige Aus-schalter
müssen auch nach erfolgter Instal-lation des Gerätes
einfach zu erreichen sein.
Das Gerät wird ohne Netzkabel ausgeliefert, da je
nach vorhandener Versorgungsart, ein Anschlusskabel
mit normgerechtem Stecker erforderlich ist, welcher auf
die auf dem Typenschild angegebene Belastung
ausgelegt sein muss. Den Stecker in eine
vorschriftsmässige Steckdose stecken.
Als Anschlußleitungen sind, unter Berücksichtigung
des jeweils erforderlichen Nennquerschnittes, folgende
Typen geeignet:
H07RN-F, H05RN-F, H05RR-F, H05VV-F,
H05V2V2-F (T90), H05BB-F.
Wird der Anschluss ohne Stecker vorgenommen,
oder ist dieser nicht zugänglich muss zwischen Gerät
und Netzleitung ein mehrpoliger Ausschalter (z.B.
Sicherungen, LS-Schalter) mit Mindestabstand zwischen
den Kontakten von 3 mm angebracht werden. Der
Schalter darf den Schutzleiter an keinem Punkt
unterbrechen. Der Gelb-grüne Schutzleiter sollte 2-3 cm
länger als alle anderen Kabel sein.
Das Anschlusskabel muss jedenfalls so aus-gelegt
sein, dass es an keiner Stelle 50°C (über der
Raumtemperatur) erreicht.
Nach erfolgtem Anschluss müssen die
Heizelemente geprüft werden, indem sie ca. 3 Minuten
lang in Betrieb gesetzt werden.
Anschluß der Klemmleiste
Das Gerät ist mit einer leicht zugäanglichen 6-poligen
Klemmleiste ausgestattet, deren Brücken bereits für den
Betrieb bei 400 V mit Nulleiter vorgesehen sind (Abb. 4).
Im Falle von verschiedener Neztpannung müßen die
Brücken der Klemmleiste entsprechend dem Schema
Abb. 5 umgelegt werden. Der Schutzleiter kommt an die
Klemme
Klemmleiste mit Zugentlastung befestigen.
Abb. 4
Abb. 5
. Kabel nach dem Anschluß an die
FO 0330
230V 3~
Ø 4x2,5mm²
230V 1~
Ø 3x2,5mm²
400V 2N~
Ø 4x2,5mm²
400V 3N~
Ø 5x1,5mm²
1 2 3 4 5
L1 L2 L3 PE
1 2 3 4 5
L1 N PE
1 2 3 4 5
L1 L2 N PE
1 2 3 4 5
L1 L2 L3 N PE
25
Page 26

Electrolux
Elektrische Verbindung mit der
Kochmulde
Achtung - Montageanleitung für
Kochmulde, Einbauherd oder Schaltkasten
beachten!
Dieses Gerät kann mit den im Kapitel "Technischen
Daten" angegebenen Kochmulde-Modellen angeschlossen
werden. Die Steckdose für die Verbindung der Kochmulde befindet sich auf dem Herd-Gehäuse. Aus der
Einbaukochmulde sind die Verbin-dungskabel der
Heizelemente und das Schutz-leiterkabel herausgeführt;
diese Kabel sind mit Steckanschluß versehen. Stecker
und Verbindungskabel in die ent-sprechende Steckdose
des Herdes stecken. Die Möglichkeit einer falschen
Verbindung ist somit ausgeschlossen.
Die Erzeugerfirma lehnt jede Haftung ab, falls die
Sicherheitsmassnahmen nicht beachtet werden.
26
Page 27

Einbau-Anweisungen
Damit ein störungsfreier Betrieb des Einbaugerätes
gewährleistet werden kann, müssen die Küchenmöbel
oder die Nische, in die das Gerät eingebaut wird,
passende Abmessungen haben.
Gemäß den bestehenden Vorschriften müssen alle
Teile, die den Berührungsschutz spannungsführender und
betriebsisolierter Teile gewährleisten, so befestigt sein,
dass sie nicht ohne Werkzeug abgenommen werden
können.
Hierzu gehört auch die Befestigung eventueller
Abschluss-Seiten am Anfang oder Ende einer Anbaulinie.
Der Berührungsschutz muss auf jeden Fall durch
den Einbau sichergestellt sein.
Das Gerät kann mit seiner Rückseite oder einer
Seitenwand an höhere Küchenmöbel, Geräte oder
Wände angestellt werden. An die andere Seitenwand
dürfen jedoch nur andere Geräte oder Möbel mit gleicher
Höhe wie das Gerät angestellt werden.
Abmessungen des Backofens (Abb. 6)
Einbau-Anweisungen
Damit ein störungsfreier Betrieb des Einbaugerätes
gewährleistet werden kann, müssen die Küchenmöbel
oder die Nische, in die das Gerät eingebaut wird,
passende Abmessungen haben (Abb. 7).
550 M
560 - 570
Electrolux
Abb. 6
IN
600
80÷100
Befestigung im Möbel
- Öffnen Sie die Backofentür.
- Befestigen Sie den Ofen mithilfe der vier Abstandhalter im Möbel (Abb. 8 - A). Diese passen genau in
die Löcher in dem Rahmen. Ziehen Sie anschließend die vier mitgelieferten Holzschrauben (Abb. 8 B) fest.
Abb. 7
Abb. 8
27
Page 28

Electrolux
Contents
Warnings and Important Safety Information ..................................................................................................... 29
Description of the appliance ............................................................................................................................ 31
Controls ........................................................................................................................................................ 32
Before using the oven for the first time ............................................................................................................ 34
Electronic programmer ................................................................................................................................... 35
Using the oven.............................................................................................................................................. 39
Baking and Roasting Table ............................................................................................................................. 42
Cleaning and Maintenance ............................................................................................................................ 44
Something Not Working ................................................................................................................................. 47
Technical Data ............................................................................................................................................... 48
Instructions for the Installer ............................................................................................................................. 49
Electrical connection ...................................................................................................................................... 49
Building-in ..................................................................................................................................................... 50
Service and spare parts ................................................................................................................................ 51
Guide to using the user instructions
Safety instructions
Step by step instructions
)
Hints and Tips
This appliance conforms with the following ECC Directives:
- 2006/95 (Low Voltage Directive);
- 2004/108 (EMC Directive);
and subsequent modifications.
28
Page 29

Electrolux
English
Warnings and Important Safety Information
Always keep these user instructions with the appliance. Should the appliance be passed on to third
persons or sold, or if you leave this appliance behind when you move house, it is very important that the
new user has access to these user instructions and the accompanying information.
These warnings are provided for the safety of the users and those living with them. So read them
carefully before connecting and/or using the appliance.
Installation
• The installation must be performed by a qualified
person in accordance with the rules and regulations
in force. The individual operations for installing the
appliance are described under the instructions for the
installer.
• Have the appliance installed and connected by a
qualified person with specialist knowledge, who will
carry it out in accordance with the directives.
• If any modifications to the power supply are required
because of the installation, these should also be
carried out by a qualified electrician.
• This appliance is meant to operate with a single-
phase or a three-phase connection to 230V electrical
supply, or to a doublephase with neutral wire or
three phase with neutral wire 400V electrical supply.
A polyphasic 400V connection without neutral wire
will cause the destruction of the oven and the
combined hob.
Operation
• This oven is designed for cooking foodstuffs; never
use it for other purposes.
• When opening the oven door during or at the
end of cooking be careful of the stream of hot
air, which comes out of the oven.
• Be very careful when using the cooker. The extre-
me heat of the heating elements makes the shelves
and other parts very hot.
• If you should for whatever reason use aluminium foil
to cook food in the oven, never allow it to come into
direct contact with the floor of the oven.
• When cleaning the oven, proceed with care: never
spray anything onto the grease filter (if fitted), the
heating elements and the thermostat sensor.
• If is dangerous to make modifications of any kind to
this appliance or to its specifications.
• During the baking, roasting and grilling process, the
oven window and the other parts of the appliance
get hot, so children should be kept away from the
appliance. Take care, if connecting electrical
appliances to sockets near the oven, that cables do
not come into contact with hot rings or get caught in
the oven door.
• Always use oven gloves to take hot ovenproof
dishes or pots out of the oven.
• Regular cleaning prevents the surface material from
deteriorating.
• Before cleaning the oven, either turn the power off or
pull the mains plug out.
• Make sure that the oven is in the “OFF” position,
when the oven is no longer being used.
• The appliance must not be cleaned with a
superheated steam cleaner or a steam jet cleaner.
• Do not use abrasive cleaners or sharp metal
scrapers. These can scratch the glass in the oven
door, which may result in the shattering of the glass.
Child Safety
• This appliance is intended for use by adults. It is
dangerous to allow children to use it or play with it.
• Children should be kept away while the oven is
working. Also, after you have switched the oven
off, it remains hot for a long time.
• This appliance is not intended for use by children or
other persons whose physical, sensory or mental
capabilities or lack of experience and knowledge
prevents them from using the appliance safely
without supervision or instruction by a responsible
person to ensure that they can use the appliance
safely.
29
Page 30

Electrolux
Customer Service
• Have checks and/or repairs carried out by the
manufacturer’s service department or by a service
department authorised by the manufacturer and use
only original spare parts.
• Do not attempt to repair the appliance yourself in the
event of malfunctions or damage. Repairs carried
out by untrained persons may cause damage or
injury.
The symbol
indicates that this product is not to be treated as normal
household waste. Instead it must be handed over to a
collection point for the recycling of electrical and electronic
equipment. The correct disposal of this product will help to
protect the environment and human health. Environment
and health are endangered by incorrect disposal. For
more detailed information about recycling of this product,
please contact your local town hall, your household
waste disposal service or the shop where you
purchased the product.
on the product or its packaging
30
Page 31

Description of the appliance
6
1
15
Electrolux
84
1097532
11
12
13
14
1. Control Panel
2. Front-Left Cooking Zone Control Knob
3. Rear-Left Cooking Zone Control Knob
4. Thermostat Control Indicator
5. Thermostat Control Knob
6. Electronic Programmer
7. Oven Function Control Knob
8. Mains On Indicator
Oven accessories
Cake tray
9. Rear-Right Cooking Zone Control Knob
10. Front-Right Cooking Zone Control Knob
11. Air Vents for Cooling Fan
12. Grill
13. Oven light
14. Oven Fan
15. Rating plate
Anti-tip shelf
Dripping pan
31
Page 32

Electrolux
Controls
Push-Pull control knobs
Some models are provided with push-pull control knobs.
These knobs can be completely sunken inside the control
panel when the oven is not working.
Oven Function Control Knob
0 The oven is off
Oven light - The oven light will be on without any
cooking function.
Conventional cooking - The heat comes from
both the top and bottom element, ensuring even
heating inside the oven
Top heating element - The heat comes from the
top of the oven only
Bottom heating element - The heat comes from
the bottom of the oven only
Inner grill element only - Can be used for grilling
small quantities
Full Grill - The full grill element will be on.
Recommended for large quantities.
Thermal Grilling - This function offers an alternative method of cooking food items, normally
associated with conventional grilling. The grill
element and the oven fan operate together,
circulating hot air around the food.
Fan cooking - This allows you to roast or roast
and bake simoultaneously using any shelf,
without flavour transference.
Pizza - The bottom heating element,and the inner
grill are on and the fan ensures air is circulated
tocook the pizza toppings or pie fillings.
Mains on Indicator
The mains on light will come on when the oven
function control knob is set.
Thermostat Control Knob
Turn the thermostat control knob anti-clockwise to
select temperatures between 50°C and 250°C.
32
Page 33

Thermostat Control Indicator
The thermostat control indicator will come on when
the thermostat control knob is turned. The indicator will
remain on until the correct temperature is reached. It will
then cycle on and off to show the temperature is being
maintained.
Hotplate control knobs
The control knobs for the hotplates (Fig. 4) can be found on
the oven control panel. The energy regulator of the hotplates
can be set by means of a 7-position control knob:
0 = OFF
1 = Minimum
9 = Maximum
The intermediate positions give an increasing heating
power.
Double circuit cooking zone
(Check the combination hob list in the "Technical
Data" chapter)
If you wish to have the two electric circuits work
simultaneously, turn the knob to maximum position 9
and then turn it towards symbol “
hear a click. Now the 2 circuits work together.
Then, you can regulate the power of the cooking
zone by turning the control knob anticlockwise.
Carefully supervise cookings with oil or
fats, since these types of food can result in
a fire, when over-heated.
”. You will
Electrolux
33
Page 34

Electrolux
Safety Thermostat
To prevent dangerous overheating (through incorrect
use of the appliance or defective components), the oven
is fitted with a safety thermostat, which interrupts the
power supply. The oven switches back on again
automatically, when the temperature drops.
Should the safety thermostat trigger due to incorrect
use of the appliance, it is enough to remedy the error after
the oven has cooled down; if on the other hand, the
thermostat triggers because of a defective component,
please contact Customer Service.
The cooling fan
The cooling fan is designed to cool the the oven and
the control panel. The fan switches on automatically after
a few minutes of cooking. Warm air is blown out through
the aperture near the oven door handle. When the oven is
switched off, the fan may run on after the oven is
switched off to keep the controls cool. This is quite
normal.
The action of the cooling fan will depend on how
long the oven has been used and at what
temperature. It may not switch in at all at lower
temperature settings nor run on where the oven
has only been used for a short time.
Before using the oven for the first time
Remove all packaging, both inside and
outside the oven, before using the oven.
Before using for the first time, the oven should be
heated up without food.
During this time, an unpleasant odour may be
emitted. This is absolutely normal. It is caused by
manufacturing residues.
Ensure the room is well ventilated.
1. Switch the oven function control knob to fan
)
Conventional Cooking and the Full Grill
functions for approximately 5-10 minutes.
cooking
2. Set the thermostat control knob to 250.
4. Open a window for ventilation.
5. Allow the oven to run empty for
approximately 45 minutes.
This procedure should be repeated with the
.
Then let the oven cool down. Then dampen a soft
cloth with warm water and a little mild washingup liquid and use this to clean the oven cavity.
Before using for the first time, carefully wash the
oven accessories as well.
34
To open the oven door, always hold the
handle in the centre.
Page 35

Electronic programmer
Electrolux
4
5
6
123
Fig. 4
The oven will only work if the time of day
has been set.
However, the oven can also be operated without
any programme.
Setting the time of day
When the power supply is switched on, or after a
power failure, the “Time of day” pilot lamp
on the display.
To set the correct time of day:
1. Press button “
2. After the setting is carried out, wait for 5 seconds: the
“Time of day” pilot lamp will go out and the
display will show the set time. The appliance is ready for use.
To reset the correct time of day:
” or “ ”.
7
will flash
1. Push button for selecting a function
2. Decreasing control button “ ”
3. Increasing control button “ ”
4. Display
5. “Cooking Duration” pilot lamp
8
6. “End of cooking” pilot lamp
7. “Minute minder” pilot lamp
8. “Time of day” pilot lamp
1. Press button
day” function. The relevant pilot lamp will start
flashing. Then proceed as described above.
The time of day can only be reset if no automatic
function (cooking duration or end of cooking
) has been set.
repeatedly to select the “Time of
35
Page 36

Electrolux
“Cooking Duration” function
This function allows the oven to automatically switch
off at the end of a programmed cooking duration time.
Place food in the oven, select a cooking function and
adjust the cooking temperature. Press button
repeatedly to select the “Cooking Duration” function. The
relevant pilot lamp will start flashing. Then, proceed
as follows:
To set the duration time:
1. Press button “
2. After the setting is carried out, wait for 5 seconds: the
"Cooking Duration" pilot lamp
the display will revert to the time of day.
3. When cooking time is over, the oven will be
switched off automatically and an acoustic alarm will
be heard, while the pilot lamp will start flashing. Turn
the oven function and the thermostat control knob to
zero.
To switch off the acoustic alarm, press any button.
NOTE: turning the acoustic alarm off will reset the
oven to manual, and if the oven function and the
thermostat knobs are not set to zero the oven will
start to heat again.
To cancel the duration time:
1. Press button repeatedly to select the “Cooking
Duration” function. The relevant pilot lamp
flash and the display will show the remaining
cooking time.
2. Press button “
After 5 seconds the pilot lamp will go out and the
display will revert to the time of day.
” or “ ”.
will come on and
will
” until the display shows “0:00”.
36
Page 37

“End of cooking” function
With this function, you can set the oven to switch off
automatically when a programmed end of cooking time is
over. Place food in the oven, select a cooking function
and adjust the cooking temperature. Press button
repeatedly to select the “End of cooking” function. The
relevant pilot lamp will start flashing. Then, proceed
as follows:
To set the End of cooking time:
1. Press button “
2. After the setting is carried out, wait for 5 seconds: the
“End of cooking” pilot lamp
the display will revert to the time of day.
3. When cooking time is over, the oven will be
switched off automatically and an acoustic alarm will
be heard, and the pilot lamp will start flashing. Turn
the oven function and the thermostat control knob to
zero.
To switch off the acoustic alarm, press any button.
NOTE: turning the acoustic alarm off will reset the
oven to manual, and if the oven function and the
thermostat knobs are not set to zero the oven will
start to heat again.
To cancel the End of cooking time:
1. Press button
cooking” function. The relevant pilot lamp
flash and the display will show the programmed
End of cooking time.
2. Press button “
current time of day. The programmer will beep and
the pilot lamp will go out.
” or “ ”.
will come on and
repeatedly to select the “End of
will
” until the display shows the
Electrolux
37
Page 38

Electrolux
“Cooking duration” and “End of
cooking time” combined
The functions “Cooking duration” and “End of
cooking time” can be used simultaneously to set the oven
to switch on and off automatically at a later time.
1. With the “Cooking duration” function
the cooking duration setting as described in the rele-
vant chapter) set the duration time. Then, press
button : the display will show the programmed
setting.
2. With the “End of cooking time” function (carry
out the End of cooking setting as described in the re-
levant chapter) set the end of cooking time.
The relevant pilot lamps will come on and the
display will show the time of day. The oven will
switch on and off according to the set programmes.
(carry out
“Minute minder” function
The minute minder alarm will sound at the end of a
timed period, but the oven will remain on, if it is in use.
To set the minute minder:
1. Press button
minder” function. The relevant pilot lamp will start
flashing.
2. Then, press button “
hours, 30 minutes).
3. After the setting is carried out, wait for 5 seconds: the
“Minute minder” pilot lamp
4. At the end of the timed period, the pilot lamp will start
flashing and an acoustic alarm will be heard. To
switch off the acoustic alarm, press any button.
To cancel the minute minder:
1. Press button
minder” function. The relevant pilot lamp
flash and the display will show the remaining time.
2. Press button “
After 5 seconds the pilot lamp will go out and the
display will revert to the time of day.
How to switch off the display
1. Press two programmer push buttons
simoultaneously and keep them pressed for about 5
seconds. The display will switch off.
2. To switch on the display, press any button.
The display can be switched off only if no
other functions have been set.
repeatedly to select the “Minute
” or “ ” (maximum: 2
will come on.
repeatedly to select the “Minute
will
” until the display shows “0:00”.
38
Page 39

Using the oven
The oven has four shelf levels, and is supplied with
two shelves. The shelf positions are counted from the
bottom of the oven as shown in the diagram.
It is important that these shelves are correctly
positioned as shown in the diagram.
Do not place cookware directly on the oven base.
The oven is supplied with an exclusive system
which produces a natural circulation of air and the
constant recycling of steam.
This system makes it possible to cook in a steamy
environment and keep the dishes soft inside and crusty
outside. Moreover, the cooking time and energy
consumption are reduced to a minimum. During cooking
steam may be produced which can be released when
opening the oven door. This is absolutely normal.
However, always stand back from the oven
when opening the oven door during cooking or at
the end of it to allow any build up of steam or
heat to release.
Attention! - Do not place objects on the oven
base and do not cover any part of the oven with
aluminium foil while cooking, as this could cause
a heat build-up which would affect the baking
results and damage the oven enamel. Always
place pans, heat-resisting pans and aluminium
trays on the shelf which has been inserted in the
shelf runners.When food is heated, steam is
created, like in a kettle. When the steam comes
into contact with the glass in the oven door, it condenses and creates water droplets.
To reduce condensation, always preheat the
empty oven for 10 minutes.
We recommend you wipe the water droplets away
after every cooking process.
Always cook with the oven door closed.
Stand clear when opening the drop down oven
door. Do not allow it to fall open - support the
door using the door handle, until it is fully open.
Electrolux
4
3
2
1
39
Page 40

Electrolux
Fan cooking
- The food is cooked by means of preheated air force
blown evenly round the inside of the oven by a fan
set on the rear wall of the oven itself.
- Heat thus reaches all parts of the oven evenly and
fast and this means that you can simultaneously cook
different types of foods positioned on the various oven
shelves . Fan cooking ensures rapid elimination of
moisture and the dryer oven environment stops the
different aromas and flavours from being transmitted
from one food to another.
- The possibility of cooking on several shelf heights
means that you can cook several different dishes at
the same time and up to three tins of biscuits and mini
pizzas to be eaten immediately or subsequently deep
frozen.
- Naturally the oven can also be used for cooking on
just one shelf. In this case you should use the lowest
set of runners so that you can keep an eye on
progress more easily.
- In addition, the oven is particularly recommended for
sterilizing preserves, cooking home-made fruit in
syrup, and for drying mushrooms or fruit.
Grilling -
- Most foods should be placed on the grid in the grill pan
to allow maximum circulation of air and to lift the food
out of the fats and juices. Food such as fish, liver and
kidneys may be placed directly on the grill pan, if
preferred.
- Food should be thoroughly dried before grilling to
minimise splashing. Brush lean meats and fish lightly
with a little oil or melted butter to keep them moist
during cooking.
- Accompaniments such as tomatoes and mushrooms
may be placed underneath the grid when grilling
meats
- When toasting bread, we suggest that the top runner
position is used.
- The food should be turned over during cooking, as
required.
How to use the Full Grill
1. Turn the oven control function knob on .
2. Turn the thermostat control knob on the required
temperature.
3. Adjust the grid and grill pan runner position to allow for
different thicknesses of food. Position the food close to
the element for faster cooking and further away for
more gentle cooking.
Preheat the grill on a full setting for a few minutes before
sealing steaks or toasting. Adjust the heat setting and the
shelf as necessary, during cooking.
During cooking, the cooling fan and the thermostat control
light will operate in the same way as described for the fan
oven function.
How to use the Inner Grill Element
The inner grill provides quick direct heat to the central area
of the grill pan. By using the inner grill element for cooking
small quantities, it can help to save energy.
1. Turn the oven control function knob on
2. Turn the thermostat control knob on the required
temperature.
3. Adjust the grid and grill pan runner position to allow for
different thicknesses of food and follow the instructions
for grilling.
The grill element is controlled by the thermostat.
During cooking, the grill cycles on and off to prevent
overheating.
.
Top oven element only
This function is suitable for finishing cooked dishes, e.g.
lasagne, shepherds pie, cauliflower cheese etc.
Bottom oven element only
This function is particularly useful when blind-baking
pastry. It may also be used to finish off quiches or flans to
ensure the base pastry is cooked through.
The thermostat control light will remain on until
the correct temperature is reached. It will then
cycle on and off to show the temperature is
being maintained.
Conventional Cooking
- The middle shelf position allows for the best heat distribution. To increase base browning simply lower the
shelf position. To increase top browning, raise the shelf
position.
- The material and finish of the baking trays and dishes
used will affect base browning. Enamelware, dark,
heavy or non-stick utensils increase base browning,
while oven glassware, shiny aluminium or polished
steel trays reflect the heat away and give less base
browning.
- Always place dishes centrally on the shelf to ensure
even browning.
40
Page 41

Electrolux
- Stand dishes on suitably sized baking trays to prevent
spillage onto the base of the oven and make cleaning
easier.
- Do not place dishes, tins or baking trays directly on
the oven base as it becomes very hot and damage
will occur.When using this setting, heat comes from
both the top and bottom elements. This allows you to
cook on a single level and is particularly suitable for
dishes which require extra base browning such as
quiches and flans.
Gratins, lasagnes and hotpots which require extra top
browning also cook well in the conventional oven.
How to use the conventional oven
1. Turn the oven function control knob to the required
cooking function
2. Turn the thermostat control knob to the required
temperature.
.
Thermal grilling
Turn the oven function control knob to position and
regulate the thermostat to the temperature required.
This function offers an alternative method of cooking
food items, normally associated with conventional
grilling. The grill element and the oven fan operate
alternately, circulating hot air around the food.
When using this function, select a
maximum temperature of 200°C.
Pizza
1. Turn the oven function control knob to the required
cooking function
2. Turn the thermostat control knob to the required
temperature.
The bottom element provides direct heat to the base of
pizzas, quiches or pies, while the fan ensures air is
circulated to cook the pizza toppings or pie fillings.
.
Hints and Tips
On baking:
Cakes and pastries usually require a medium
temperature (150°C-200°C) and therefore it is necessary
to preheat the oven for about 10 minutes.
Do not open the oven door before 3/4 of the baking time
has elapsed.
Shortcrust pastry is baked in a springform tin or on a tray
for up to 2/3 of the baking time and then garnished before
being fully baked. This further baking time depends on the
type and amount of topping or filling. Sponge mixtures
must separate with difficulty from the spoon. The baking
time would be unnecessarily extended by too much liquid.
If two baking trays with pastries or biscuits are inserted
into the oven at the same time, a shelf level must be left
free between the trays.
If two baking trays with pastries or biscuits are inserted
into the oven at the same time, the trays must be swapped
and turned around after about 2/3 of the baking time.
On Roasting:
Do not roast joints smaller than 1 kg. Smaller pieces could
dry out when roasting. Dark meat, which is to be well
done on the outside but remain medium or rare inside, must
be roasted at a higher temperature (200°C-250°C).
White meat, poultry and fish, on the other hand, require a
lower temperature (150°C-175°C). The ingredients for a
sauce or gravy should only be added to the roasting pan
right at the beginning if the cooking time is short. Otherwise
add them in the last half hour.
You can use a spoon to test whether the meat is cooked:
if it cannot be depressed, it is cooked through. Roast beef
and fillet, which is to remain pink inside, must be roasted at
a higher temperature in a shorter time.
If cooking meat directly on the oven shelf, insert the roasting pan in the shelf level below to catch the juices.
Leave the joint to stand for at least 15 minutes, so that the
meat juices do not run out.
To reduce the build up of smoke in the oven, it is recommended to pour a little water in the roasting pan. To prevent condensation forming, add water several times. The
plates can be kept warm in the oven at minimum temperature until serving.
Caution!
Do not line the oven with aluminium foil
and do not place a roasting pan or baking
tray on the floor, as otherwise the oven
enamel will be damaged by the heat build-
up.
Cooking times
Cooking times can vary according to the different composition, ingredients and amounts of liquid in the individual
dishes.
Note the settings of your first cooking or roasting experiments to gain experience for later preparation of the same
dishes.
Based upon your own experiences you will be able to
alter the values given in the tables.
41
Page 42

Electrolux
Baking and Roasting Table
Conventional Cooking -
Timings do not include pre-heating.
The empty oven should always be pre-heated for 10 minutes.
TYPE OF DISH
CAKES
Whisked recipies 2 170 2 (1and3)* 160 45-60 In cake mould
Shortbread dough 2 170 2 (1and3)* 160 20-30 In cake mould
Butter-milk cheese cake 1 175 2 165 60-80 In cake mould
Apple cake (Apple pie) 1 170 2lef+righ. 160 90-120 In cake mould
Strudel 2 180 2 160 60-80 In baking tray
Jam- tart 2 190 2(1and3)* 180 40-45 In cake mould
Fruit cake 2 170 2 150 60-70 In cake mould
Sponge cake 1 170 2(1and3)* 165 30-40 In cake mould
Christmas cake 1 150 2 150 120-150 In cake mould
Plum cake 1 175 2 160 50-60 In bread tin
Small cake 3 170 2 160 20-35 In baking tray
Biscuits 2 160 2(1and3)* 150 20-30 In baking tray
Meringues 2 135 2(1and3)* 150 60-90 In baking tray
Buns 2 200 2 190 12~20 In baking tray
Pastry: Choux 2or 3 210 2(1and3)* 170 25-35 In braking tray
Plate tarts 2 180 2 170 45-70 In cake mould
BREAD AND PIZZA
White bread 1 195 2 185 60-70
Rye bread 1 190 1 180 30-45 In bread tin
Bread rolls 2 200 2(1and3)* 175 25-40 In baking tray
Pizza 2 200 2 200 20-30 In baking tray
FLANS
Pasta flan 2 200 2(1and3)* 175 40-50 In mould
Vegetable flan 2 200 2(1and3)* 175 45-60 In mould
Quiches 1 210 1 190 30-40 In mould
Lasagne 2 200 2 200 25-35 In mould
Cannelloni 2 200 2 200 25-35 In mould
MEAT
Beef 2 190 2 175 50-70 On grid
Pork 2 180 2 175 100-130 On grid
Veal 2 190 2 175 90-120 On grid
English roast beef
rare 2 210 2 200 50-60 On grid
medium 2 210 2 200 60-70 On grid
well done 2 210 2 200 70-80 On grid
Shoulder of pork 2 180 2 170 120-150 With rind
Shin of pork 2 180 2 160 100-120 2 pieces
Lamb 2 190 2 175 110-130 Leg
Chicken 2 190 2 200 70-85 Whole
Turkey 2 180 2 160 210-240 Whole
Duck 2 175 2 220 120-150 Whole
Goose 2 175 1 160 150-200 Whole
Rabbit 2 190 2 175 60-80 Cut in pieces
Hare 2 190 2 175 150-200 Cut in pieces
Pheasant 2 190 2 175 90-120 Whole
Meat loaf 2 180 2 170 tot.150 in bread pan
FISH
Trout/Sea bream 2 190 2(1and3)* 175 40-55 3-4 fishes
Tuna fish/Salmon 2 190 2(1and3)* 175 35-60 4-6 fillets
(*)
If you cook more than one dish at the same time, we recommend you place them on the levels
quoted between brackets.
4
3
2
1
temp °C
4
3
2
1
Conventional Cooking Fan Cooking
Cooking times
in minutes
temp
°C
NOTES
42
Page 43

Electrolux
Grilling -
Timings do not include pre-heating.
The empty oven should always be pre-heated for 10 minutes.
TYPE OF DISH
Quantity Cooking time in
Fillet steaks 4 800 3 250 12~15 12~14
Beef-steaks 4 600 3 250 10~12 6~8
Sausages 8 / 3 250 12~15 10~12
Pork chops 4 600 3 250 12~16 12~14
Chicken (cut in two) 2 1000 3 250 30~35 25~30
Kebabs 4 / 3 250 10~15 10~12
Chicken (breast) 4 400 3 250 12~15 12~14
Hamburger* 6 600 2 250 20-30
*
Preheat 5’00'’
Fish (fillets) 4 400 3 250 12~14 10~12
Sandwiches 4~6 / 3 250 5~7 /
Toast 4~6 / 3 250 2~4 2~3
The temperatures quoted are guidelines. The temperatures may have to be adapted to personal
requirements.
4
3
2
1
Grilling
temp.°CPieces g.
1st side
minutes
2nd side
Thermal grilling
With thermal grilling select a maximum temperature of 200°C.
TYPE OF DISH Quantity Shelf Temp. Cooking time (minutes)
(gr.) level lower upper
Rolled joints
Chicken (cut in two) 1000 3 200 25 ~ 30 20 ~ 30
Chicken legs — 3 200 15 ~ 20 15 ~ 18
Quail
Vegetable gratin — 3 200 20 ~ 25 —
St. Jacques shells — 3 200 15 ~ 20 —
Mackerel — 3 200 15 ~ 20 10 ~ 15
Fish slices 800 3 200 12 ~ 15 8 ~ 10
(turkey) 1000 3 200 30 ~ 40 20 ~ 30
500 3 200 25 ~ 30 20 ~ 25
The oven temperatures are intended as a guide only. It may be necessary to increase or decrease
the temperatures to suit individual preferences and requirements.
°C
side side
43
Page 44

Electrolux
Pizza Function
TYPE OF DISH
Pizza Function
4
3
2
1
temp.°C
Cooking time in
minutes
NOTES
Pizza , large 1 200 15~25 on baking tray
Pizza , small 1 200 10~20
on baking tray or on grid
Bread rolls 1 200 15~25 on baking tray
The temperatures quoted are guidelines. The temperatures may have to be adapted to personal
requirements.
Cleaning and Maintenance
Before cleaning switch the oven off and let
it cool down.
The appliance must not be cleaned with a
superheated steam cleaner or a steam jet
cleaner.
Important: Before carrying out any cleaning
operation, the appliance must be disconnected from the
power supply.
To ensure a long life for your appliance, it is
necessary to perform the following cleaning operations
regularly:
- Only perform when the oven has cooled down.
- Clean the enamelled parts with soapy water.
- Do not use abrasive cleaners.
- Dry the stainless steel parts and glass with a soft
cloth.
- If there are stubborn stains, use commercially
available for stainless steel or warm vinegar.
The oven’s enamel is extremely durable and highly
impermeable. The action of hot fruit acids (from lemons,
plums or similar) can however leave permanent, dull,
rough marks on the surface of the enamel. However
such marks in the brightly polished surface of the enamel
does not affect the operation of the oven. Clean the oven
thoroughly after every use. This is the easiest way to
clean dirt off. It prevents dirt being burnt on.
External cleaning
Regularly wipe over the control panel, oven door
and door seal using a soft cloth well wrung out in warm
water to which a little liquid detergent has been added.
To prevent damaging or weakening the door glass
panels avoid the use of the following:
• Household detergent and bleaches
• Impregnated pads unsuitable for non-stick
saucepans
• Brillo/Ajax pads or steel wool pads
• Chemical oven pads or aerosols
• Rust removers
• Bath/Sink stain removers
Clean the outer and inner door glass using warm
soapy water. Should the inner door glass become
heavily soiled it is recommended that a cleaning product
such as Hob Brite is used. Do not use paint scrapers to
remove soilage.
Cleaning materials
Before using any cleaning materials on your oven,
check that they are suitable and that their use is
recommended by the manufacturer.
Cleaners that contain bleach should NOT be used as
they may dull the surface finishes. Harsh abrasives
should also be avoided.
44
Page 45

Oven Cavity
The enamelled base of the oven cavity is best
cleaned whilst the oven is still warm.
Wipe the oven over with a soft cloth soaked in
warm soapy water after each use. From time to time it
will be necessary to do a more thorough cleaning, using
a proprietary oven cleaner.
Cleaning the Oven Door
Before cleaning the oven door, we recommend you
to remove it from the oven.
Proceed as follows:
1. open the oven door completely;
2. find the hinges linking the door to the oven (Fig. 1);
3. unlock and turn the small levers located on the two
hinges (Fig. 2);
4. handle the door by its left- and right-hand sides, then
slowly turn it towards the oven until it is half-closed
(Fig. 3);
5. gently pull the oven door off its site (Fig. 3);
6. place it on a steady plan;
Clean the oven door glass with warm soapy water
and a softh cloth only. Never use harsh abrasives. Once
the cleaning is carried out, refit the oven door, following
the procedure in reverse.
Stainless steel or aluminium appliances:
We recommend that the oven door is only cleaned
using a wet sponge and dried after cleaning with a soft
cloth.
Never use steel wool, acids or abrasive products
as they can damage the oven surface. Clean the oven
control panel following the same precautions.
DO NOT clean the oven door while the
glass panels are warm. If this precaution
is not observed the glass panel may
shatter.
If the door glass panel becomes chipped or has deep
scratches, the glass will be weakened and must be
replaced to prevent the possibility of the panel shattering.
Contact your local Service Centre who will be pleased
to advise further.
Electrolux
Fig. 1
Fig. 2
Fig. 3
45
Page 46

Electrolux
Oven Shelves and Shelf Supports
Oven shelf support rails
The shelf support rails on the left and right hand sides of
the oven can be removed for cleaning the side walls.
Removing the shelf support rails
First pull the front of the rail away from the oven wall and
then unhitch at the back (4, 5).
Fitting the shelf support rails
To install, first reattach the rails at the back, then put them
into position at the front and press them into place (6).To
clean the shelf support rails, soak in warm soapy water
and remove stubborn marks with a well wetted soap
impregnated pad. Rinse well and dry with a soft cloth.
Fig. 4
Fig. 5
Fig. 6
Replacing The Oven Light
Disconnect the appliance
If the oven bulb needs replacing, it must comply with the
following specifications:
- Electric power: 15 W/25 W,
- Electric rate: 230 V (50 Hz),
- Resistant to temperatures of 300°C,
- Connection type: E14.
These bulbs are available from your local Service Force
Centre.
To replace the faulty bulb:
1. Ensure the oven is isolated from the electrical supply.
2. Push in and turn the glass cover anticlockwise
(Fig. 7).
3. Remove the faulty bulb and replace with the new
one.
4. Refit the glass cover and restore the electrical supply.
46
Fig. 7
Page 47

Something Not Working
If the appliance is not working correctly, please check the following before contacting the Electrolux Service
Centre:
Electrolux
PROBLEM
The oven is not switching on.
The oven temperature light does not come
on.
The oven light does not come on.
It takes too long to cook the dishes or they
cook too quickly.
Steam and condensation settle on the food
and in the oven cavity.
The oven fan is noisy.
SOLUTION
Check that both a cookingfunction and temperature
have been selected
or
Check whether the appliance is correctly connected
and the socket switch or the mains supply to the oven
is ON.
Select a temperature with the thermostat control knob
or
Select a function with the oven function control knob.
Select a temperature with the thermostat control knob
or
Check the light bulb, and replace it if necessary (see
"Cleaning the Oven")
The temperature may need adjusting
or
Following the advice contained in these instructions,
especially the section “Practical Tips“.
When the cooking process is completed, do not leave
the dishes standing in the oven for longer than 15-20
minutes.
Check that shelves and bakeware are not vibrating in
contact with the oven back panel.
The electronic programmer does not work.
The display shows "12.00".
Check the instructions for the timer.
Set the time of day (see chapter "Setting the time of
day").
47
Page 48

Electrolux
Technical Data
Heating element ratings
Bottom heating element 1000 W
Top Heating element 800 W
Full oven (Top+Bottom) 1800 W
Fan cooking 2000 W
Grill 1650 W
Full Grill 2450 W
Thermal Grill 2475 W
Pizza 2650 W
Oven light 25 W
Hot air fan motor 25 W
Cooling fan motor 25 W
Turnspit motor 0,4 W
Total rating 2750 W
Operating voltage (50 Hz) 230 V ~ / 400 V ~ 3N
This appliance can be connected to the below listed
ceramic hobs:
Type: ZVD 868
(with 2 double-circuit cooking zones)
Maximum power absorbed: 7,6 kW
Power supply voltage (50 Hz) 230 V
Type: ZK 630 L - ZK 630 F
(with 2 double-circuit cooking zones)
Maximum power absorbed 7,6 kW
Power supply voltage (50 Hz) 230 V
Type: ZC 6695
(with 1 double-circuit cooking zone)
Maximum power absorbed 6,4 kW
Power supply voltage (50 Hz) 230 V
Type: ZC 6675
(without double-circuit cooking zone)
Maximum power absorbed 5,8 kW
Power supply voltage (50 Hz) 230 V
Maximum Total Power Rate
Oven + ceramic hob 10,350 kW
Dimensions of the recess
Height mm 600
Width mm 5 60
Depth mm 5 50
Oven
Height mm 335
Width mm 4 05
Depth mm 410
Oven capacity 53 l
48
Page 49

Instructions for the Installer
The instructions given below are designed
specifically for a qualified installer and
should aid him or her to perform all installation, adjustment, and maintenance
operations with absolute precision and in
compliance with all current legislation and
regulations. We strongly recommend that all
operations for the installation of your cooker
be carryed out by Qualified Personnel in
accordance with existing rules and
regulations.
Electrical connection
Prior to making the electrical connection, make sure that:
— the protection fuse and the domestic wiring
system are suitable to carry the total electric load of the
oven (see rating plate);
— your domestic wiring system has an efficient
earth connection in compliance with rules and laws in
force;
— the wall socket or the omnipole switch used for
the electrical connection can easily be reached after the
oven is built in.
This appliance is delivered without an electric supply cable,
therefore, you will have to fit to it a supply cable with standard
plug, suitable for the total electric load shown on the rating plate.
The plug is to be inserted into a suitable wall socket. If you
require a direct connection to the electric network (mains), it
will be necessary to fit between the appliance and the mains an
omnipole switch, with a minimum gap between contacts of 3
mm, suitable for the required load and in compliance with rules
in force. The green & yellow ground wire must not be
interrupted by the switch, and should be 2-3 cm longer than the
phase and neutral wires. The supply cable must in all cases
be laid out in such a way as to ensure that it does not reach at
any given point a temperature 50°C higher than the ambient
temperature.
Suitable power supply cables are the following types,
considering the respective necessary section of cable: H07
RN-F, H05 RN-F, H05 RR-F, H05 VV-F, H05 V2V2-F (T90),
H05 BB-F.
Connecting the terminal board
The appliance incorporates an easily accessible 6-pole
terminal board whose jumpers (bridges) are already pre-set for
operation on 400 V tri-phase with neutral wire (Fig. 8). In case
a different mains voltage is present, the jumpers on the terminal
board must be rearranged as shown in the diagram (Fig. 9).
The ground cable must be connected to terminal
connecting the supply cable to the terminal board, secure it with
a junction clamp.
. After
Electrolux
Electrical connection with the hob
This oven can be connected to hobs indicated in the
paragraph "Technical data". The socket for connecting the
hob is located at the top of the oven cabinet. The hobs
come complete with connecting leads for the hot plates/
heat areas and ground cable; these leads feature plug-in
connectors. Connection of the hob to the oven is carried
out by plugging-in these connectors to the corresponding
oven socket.
The plug-to-socket connection design is such as to
prevent possible wrong plugging-ins.
The Manufacturer disclaims any liability in case
these accident-preventing rules are not observed.
FO 0330
Fig. 8
1 2 3 4 5
L1 L2 L3 PE
1 2 3 4 5
L1 N PE
1 2 3 4 5
L1 L2 N PE
1 2 3 4 5
L1 L2 L3 N PE
Fig. 9
230V 3~
Ø 4x2,5mm²
230V 1~
Ø 3x2,5mm²
400V 2N~
Ø 4x2,5mm²
400V 3N~
Ø 5x1,5mm²
49
Page 50

Electrolux
Building-in
To ensure correct operation of the built-in assembly, the
kitchen cabinet and the recess for the built-in appliance
must have suitable dimensions. When the appliance is
fitted-in, there must be no open spaces left and it must be
closed on all sides by the kitchen furniture to prevent the
possibility of inadvertently touching “live” (current carrying)
parts of the oven. All parts ensuring such a protection,
including any covering panel (for instance, if the appliance
is installed at the end or at the beginning of a kitchen
counter) must be fastened in such a way as to prevent
removal of the same without the aid of some tool. This
appliance can be placed with its back and with one side
close to appliances or walls of higher height. The other
side, instead, must be placed close to furniture or
appliances, having the same height.
Overall oven dimensions (Fig. 10)
Building-in under a kitchen counter
The recess must have the dimensions shown in Fig. 10.
Before carrying out the building-in of the oven, connect it
to the hob (see corresponding chapter); then recess
completely the oven under the counter; open the oven
door and secure the oven to the kitchen cabinet .
Securing the oven to the cabinet (Fig. 12).
- Fit the appliance into the cabinet recess.
- Open the oven door and secure the oven to the
kitchen cabinet by placing the four distance holders
(A) in the holes provided in the oven frame and then
inserting the four wood screws (B)
550 MIN
560 - 570
600
Fig. 10
0
0
1
÷
0
8
Fig. 11
50
Fig. 12
Page 51

Service and spare parts
If after the checks listed in the chapter "What happens if
something goes wrong", the appliance still does not work
correctly, contact your local Service Centre, specifying
the type of malfunctioning, the appliance model (Mod.),
the product number (Prod. No.) and the serial number
(Ser. No.) marked on the identification plate. This plate
is placed on the front external edge of the oven cavity.
Original spare parts, certified by the product
manufacturer and carrying this symbol, are only
available at our Service Centre
and authorized spare parts shops.
Electrolux
51
Page 52

Electrolux
www.zanussi.de
52
35696-8702 11/08 R.0
 Loading...