

Page 1

Gebrauchs- und Einbauanweisung Istruzioni per l'uso e montaggio
Operating and assembly instructions Gebruiksaanwijzing en inbouwinstrukties
Notice d'utilisation et de montage Brugs- og monteringsanvisning
ZANUSSI
GLASKERAMIK-KOCHFELD D
GLASS CERAMIC HOB GB
PLAN DE CUISSON VITROCÉRAMIQUE F
PIANO DI COTTURA IN VETROVERAMICA I
KERAMISCH KOOKPLATEAU NL
GLASKERAMISKE KOGEPLADER DK
ZME 3043
Page 2
DEAR CUSTOMER GB
We thank you for choosing a ceramic hob of ZANUSSI.
Thus you chose quality, innovation and durability. These
operating and assembly instructions will allow you to
become acquainted with the appliance and to do
everything within its possibilities.
10
Page 3

CONTENT GB
Unpacking and control ........................................... 12
Preparation for installation ..................................... 12
Electrical connection ............................................. 13
Before the first use ................................................ 14
Description of appliances ...................................... 14
Hot plates ............................................................. 14
Cooking equipment ............................................... 15
Maintenance and cleaning ..................................... 16
Specifications ....................................................... 17
What to do in case of a defect............................... 17
11
Page 4
UNPACKING AND CONTROL
Please examine the appliance for
any damage sustained during
transportation! If the appliance is
damaged please immediately inform
the forwarding company before the
appliance is connected. The packing
material should be disposed properly.
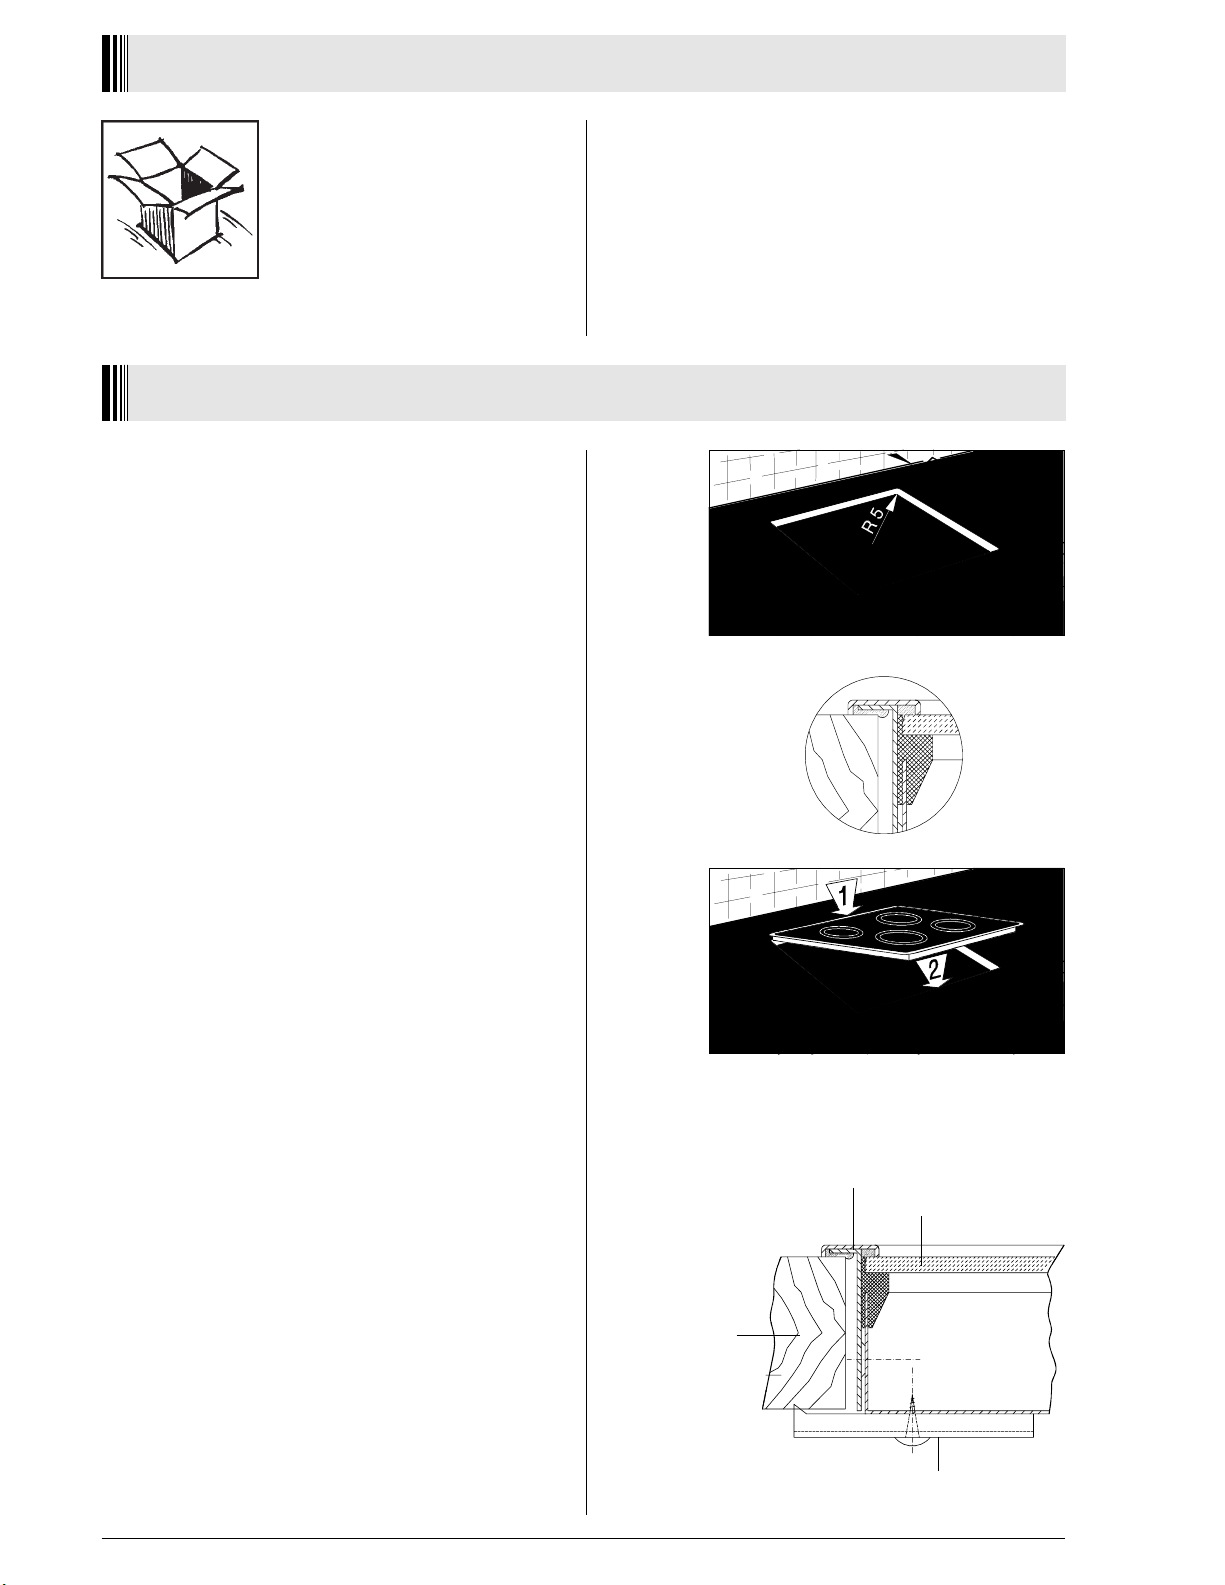
PREPARATION FOR INSTALLATION
Cut out worktop to prescribed measurements or
templates (saw exactly along the scribing).
Check seal for perfect fit and overall cover.
Lower the ceramic hob into place and align correctly.
In terms of fire protection, the appliance conforms to
Type Y (IEC 335-2-6). Only appliances of this type
may be installed on one side of adjacent upright
furniture housings or walls.
Fastening according to Fig. 1
Fasten bracket against the underside of the worktop.
Using a standard or Phillips screwdriver, tighten the
tension clamps evenly starting at the centre and
moving diagonally, until the built-in rim is tight on the
worktop.
Do not overtighten!
Do not use an electric or pneumatic screw driver
without an adjustable safety clutch! (pos. 1 - 1.1 Nm)
Fig. 1
Seal
Ceramic
Worktop
12
Bracket
Page 5

ELECTRICAL CONNECTIONS
The electrical connection of the
ceramic hob to the specially provided built-in switch box and to the
built-in range should only be carried
out by a trained technician.
During assembly the switch box and
the stove must be idle.
Connect cable-plug with appropriate receptacle fixed on
range or controlbox.
Furthermore attention should be paid to the assembly
instructions for the built-in switch box or oven with which
the hob is connected!
Protection against accidental contact must be ensured
by assembly.
If the hob is operated from a switch box then it is
necessary to have an intermediate bottom to ensure
protection against accidental contact!
The distance between the underside of the hob and the
furniture beneath must be at least 20 mm.
If the appliance is not connected by means of plugs,
then, at the time of installation, a device which makes it
possible to separate the appliance at all its terminals
from the mains by a gap of least 3mm must be added.
Arrangements of hob - built - in oven/switch box may be
looked-up in a special table which is an appendix to
these instructions.
Before installation and operation of the appliance the
range of possibilities for combining the hob with the oven
/switch box is to be checked by referring to the appropriate
instructions for installation and operation.
Using other hobs than those of the ZANUSSI BRAND excludes any liability.
If these regulations are not observed all given
approvals of test institutes are void.
Important for the disassembly of the hob
The supply of mains current to the appliance must be cut
off (for example by unscrewing the safety devices).
13
Page 6

BEFORE THE FIRST USE
Clean your ceramic hob carefully before its first use.
Afterwards clean it regularly when it is just warm or cold.
Avoid continued burning of food or dirt until it is solified.
Ceramic hobs are treated and cleaned the same way as
glass. Never use aggressive detergents or sponges with
abrasive surface. When you use the ceramic hob for the
first time it can temporarely emit an odeur caused by a
vaporation of water in the isolation.
DESCRIPTION OF APPLIANCES
ZME 3043 KB/KW/KN/KS
1. Heat Zone ∅ 180 mm, 1700 W
2. Heat Zone ∅ 145 mm, 1200 W
3. Heat Zone ∅ 180 mm, 1700 W
4. Heat Zone ∅ 145 mm, 1200 W
HOT PLATES
The cooking zones are indicated by markings on the
ceramic top.
The cooking zones are operated via the corresponding
switch box or built-in oven and this is in the respective
manuals.
The dimensions of the cooking zones are such that they
accommodate standard sized sauce pans.
14
Page 7

COOKING EQUIPMENT
Specially tested cooking and frying pans for ceramic
hobs exist. Pay attention to the declaration of the
manufacturer.
The following advice should be considered to achieve an
optimal energy consumption as well as to avoid that
overboiling food can be burnt onto the cooking zones.
Cooking pans with aluminium or copper bottoms
are unsuitable for use. These materials can cause
stains which can not be removed anymore.
Bottom of pans:
Cooking and frying pans should have a flat and solid
base. A base with rough edges can scratch and leave
abrasion marks on the ceramic surface! Ask for electric
saucepans.
Size of pans:
Pan or pot diameters should be a little bit larger than the
diameter of the cooking zone.
Lid of pans:
A lid prevents heat to escape.
Note:
Always place the pan first before you switch on the
cooking zone, otherwise unnecessary energy is
consumed.
Do not deposit items on the hob's surface.
The cooking zone and the bottoms of saucepans
should be dry and clean. Thus you save unnecessary
cleaning work.
Sugar (solid or liquid) as well as plastic material
should never get onto the hot surface of the hob. If it does
happen do not turn off the cooking zone!
Sugar, plastic or kitchen foil remains should immediately
be scraped off the hot cooking zone with a scraper. If the
cooking zone cools down without being cleaned it could
lead to fissures and cracks in the ceramic surface.
The ceramic hob surface is resistant to extreme
temperatures. Neither cold nor heat can harm it. Punctiform
impacts, e.g. by the fall of a salt shaker, can cause
fissures and cracks. The maintenance remains the
same for glass and ceramic hobs. Never use aggressive
detergents or scouring powder and sponges with abrasive
surfaces.
15
Page 8

MAINTENANCE AND CLEANING
Ceramic hobs are treated and
cleaned the same way as glass.
Never use aggressive detergents or
sponges with abrasive surface.
Cleaning after each use
Slight, not burnt soiling
has to be wiped off with a damp cloth without using
detergents. The use of detergents may lead to discolouring. These heavy stains can not be wiped off easily
by the first attempt and sometimes not even with a
special detergent.
Burnt soiling
has to be removed with a scraper. Afterwards wipe off the
ceramic hob with a damp cloth.
Stain removal
Light metallic stains (aluminium remains)
can be removed from the cooled down cooking zone with
a special detergent. Calcareous deposits (caused by
overboiling water) can be removed with vinegar or a
special detergent.
Removal of sugar, sugar-containing food,plastic
objects or kitchen foil
The cooking zone involved must not be turned off! The
remains have to be scraped off the hot cooking zone
immediately with a scraper. The cooking zone can be
switched off after the removal of the soiling. It may be
cleaned with a special detergent after it has cooled down.
The mentioned detergents are available in super-markets,
electrical shops, drug stores, grocery stores and kitchen
studios.
Scrapers are available in craft shops and department
stores as well as in decoration stores.
Do not apply detergents on hot cooking zones. Best is
to let the detergent dry on the surface and to wipe it off
with a damp cloth.
If there are remains of cleaning agents wipe them off
before you turn on the heat again.
Remains could corrode.
ZANUSSI declines any liability should the appliance
be used improperly and the safety measures not be
observed!
16
Page 9

SPECIFICATIONS
Rating plates:
Outside Dimensions : Width : 572 mm
Depth : 502 mm
Cut-out Dimensions : Width : 560 mm
Depth : 490 mm
Supply Voltage : 230 V
Frequency : 50 Hz
Total Connected Load : 5,8 kW
WHAT TO DO IN CASE OF A DEFECT
Typ 011.0 Ser.Nr.
T.Nr.402040 230V ~ 50 Hz 5.8 kW
Typ 011.0 Ser.Nr.
T.Nr.402041 230V ~ 50 Hz 5.8 kW
Typ 011.0 Ser.Nr.
T.Nr.402042 230V ~ 50 Hz 5.8 kW
Typ 011.0 Ser.Nr.
T.Nr.402790 230V ~ 50 Hz 5.8 kW
ZME 3043 KB
ZME 3043 KW
ZME 3043 KN
ZME 3043 KS
Prod.Nr. 941 683 645
SWISS MADE
Prod.Nr. 941 683 646
SWISS MADE
Prod.Nr. 941 683 647
SWISS MADE
Prod.Nr. 941 683 652
SWISS MADE
If your hob needs servicing, please
give your customer service the
following details:
Important!
type .................................................................................................................................................
product-no. .................................................................................................................................................
part-no .................................................................................................................................................
You will find these details under "Specifications" on this
page.
Technical changes are subject to modification.
17
Page 10

ZME 3043 KB/KW/KN/KS
ZHE 5011 NB/HN 12
ZHE 5011 NW/HNW 12
ZHE 5021 UB/HM 14
ZHE 5021 UW/HMW 14
ZHE 5021 UN/HM 14X
ZHE 5031 NN / HN 112 X
ZHE 5031 NS / HN 112 S
ZHE 5041 US / HM 114 S
51
Page 11

01.94 374 0334-01
 Loading...