

Zanussi ZMD905W USER MANUAL

35668 - 2001
ZANUSSI
BUILT-IN
DOUBLE OVENS
ZMD 905 W/K
OPERATING AND INSTALLATION MANUAL
2

Warnings and guidance
It is most important that this instruction book should be retained with the appliance for future
reference. Should the appliance be sold or transferred, always ensure that the book is left with the
appliance in order that the new owner can get to know the functions of the appliance and the
relevant warnings.
These warnings are provided in the interest of safety. You MUST read them carefully before
installing or using the appliance.
This oven incorporates new Electronic
Technology and therefore may work differently
from a traditional product which you have
become accustomed to.
The heating elements will become hot very
quickly and care should be taken when placing
or removing items from the oven.
If you are concerned about the operation of the
oven, please study the instruction book
carefully, as it contains advice about how to
achieve excellent results from your new oven.
BEFORE INSTALLATION
• This oven is heavy and care must be taken
when moving it.
• Ensure that all packaging, both inside and
outside the cooker, has been removed before
the cooker is used.
• The oven must be installed according to the
instructions supplied. Any electrical work
must be undertaken by a qualified electrician/
competent person.
• It is dangerous to alter the specifications in any
way.
• After installation, please dispose of the
packaging with due regard to safety and the
environment.
DURING OPERATION
• Do not use this oven if it is in contact with
water and never operate it with wet hands.
• Ensure that the anti-tip oven shelves are
installed in the correct way.
• This oven is designed to be operated by adults
and children under supervision. Young
children must not be allowed to tamper with
the controls or play near or with the cooker.
• CAUTION - accessible parts, especially
around the grill area, may become hot when
the cooker is in use. Children should be kept
away until it has cooled.
• Take great care when heating fats and oils as
they will ignite if they become too hot.
• This oven has been designed for cooking
edible foodstuffs only and must not be used for
any other purposes.
• Never place plastic or any other material
which may melt in or on the oven.
• Only clean this oven in accordance with the
instructions.
• Take care to follow the recommendations
given for tending the food when grilling. Use
the handles provided in the recommended
way.
• Always grill with the oven door closed.
• Always remove the grill pan handles when
grilling.
• Always use oven gloves to remove and replace
food in the oven. Similarly always use oven
gloves to remove and replace the grill pan
handles, before and after grilling.
• Ensure that you support the grill pan when
removing it from the oven.
• Never line any part of the oven with
aluminium foil. Do not allow heatproof
cooking material, e.g. roasting bags, to come
into contact with oven elements.
• Always stand back from the oven when
opening the oven door, to allow any build-up
of steam or heat to release.
• Stand clear when opening the drop down oven
door. Do not allow it to fall open - support it
using the door handle, until it is fully open.
• Do not place sealed cans or aerosols inside the
oven. They may explode if they are heated.
• Do not hang towels or clothes from the oven
or its handle. They are a safety hazard.
3

AFTER USE
• Ensure that all control knobs are in the OFF
position when not in use.
• For hygiene and safety reasons, this oven
should be kept clean at all times. A build-up of
fats or other foodstuffs could result in a fire,
especially in the grill pan.
• Always allow the cooling fan to cool the oven
down before switching off at the electrical
supply prior to carrying out any cleaning or
maintenance work.
• Do not leave utensils containing foodstuffs,
e.g. fat or oil in or on the oven in case it is
inadvertently switched ON.
• Ovens and hobs become very hot, and retain
their heat for a long period of time after use.
Children should be kept well away from the
cooker until it has cooled.
• The timer display should show only the time
of day when the oven is not in use.
• Under no circumstances should you attempt to
repair the appliance yourself. Repairs carried
out by inexperienced persons may cause injury
or serious malfunctioning. Refer to your local
authorised Service Centre. Always insist on
genuine Zanussi spare parts.
WARNING
Please remember that an appliance used for cooking does get hot, so make sure that children are
kept well away it is in use.
4

Contents
Warnings and Guidance Page 3
Technical specification Page 5
Installation into Built in Units Page 6
Electrical Connection Page 7
Use and Care - How to Set the Main Functions Page 8
Control Panel Page 9
Timer Display (upper onven - lower oven) Page 11
Using the Programmes Page 12
Cooking Tips Page 17
Cooking Charts Page 18
Helpful Hints Buying and Preparing Food Page 23
Cleaning the Oven Page 24
Cleaning the Hinged Grill Page 25
What Happens if Something Goes Wrong Page 26
Technical Assistance Page 26
Technical specification
UPPER OVEN
Dimensions: Power Absorbtion:
Height 320 mm Traditional System 2.0 kW
Width 420 mm Convection Oven 2.5 kW
Depth 390 mm Fan Only (Defrost) 30 W
Capacity 52,5 litres Convection With Bottom Element 3.5 kW
Small Grill System 1.8 kW
Large Grill System 2.8 kW
Oven Light 25 W
Cooling Fan 25 W
LOWER OVEN
Dimensions: Power Absorbtion:
Height 185 mm Traditional System 2.0 kW
Width 425 mm Large Grill System 2.8 kW
Depth 400 mm Oven Light 25 W
Capacity 31 litres
Maximum Power Absorbed 6.4 kW
Voltage 240 V
Frequency 50 Hz
5
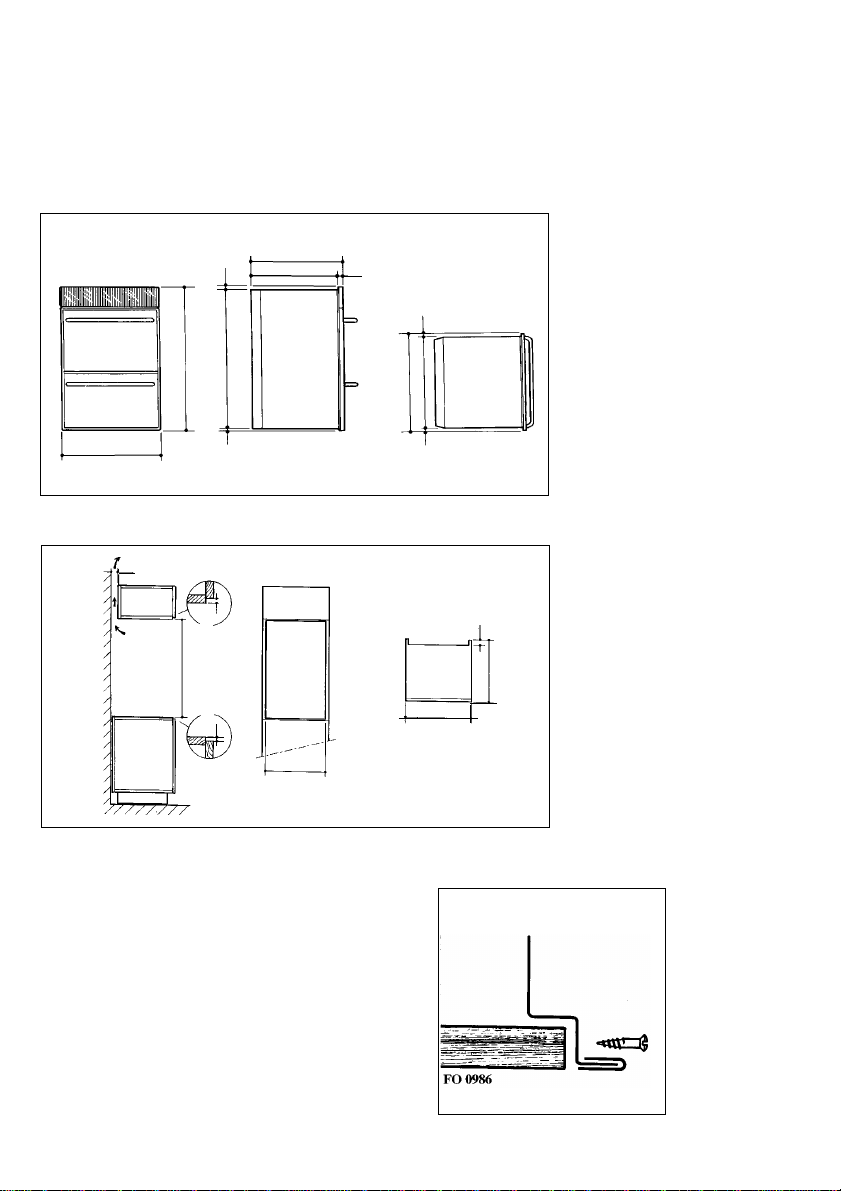
Installation into built in units
It is important that the dimensions and materials of
the surround or cabinet into which the oven will be
built are correct and will withstand a temperature
increase of at least (60°C); and that proper
FO 0929
594
888
20
560
540
863
5
20
arrangements are made for a continous air supply
to the oven so it does not averheat.
Dimensions of the appliance and recess required
are given below.
19
594
556
19
Dimensions of the recess for building into a kitchen unit (mm).
50
7 min
7 min
560 min
50
600
Fig. 1
550
FO 0793
Important
To ensure an efficient ventilation, it is necessary to
leave the vents provided at the bottom of the oven
clear.
Securing The Oven To The Cabinet
Fit the appliance into the cabinet recess.
Open the oven door and secure the oven to the
kitchen cabinet with six wood screws which fit
exactly the holes provided in the oven frame (Fig.
3).
6
Fig. 2
Fig. 3
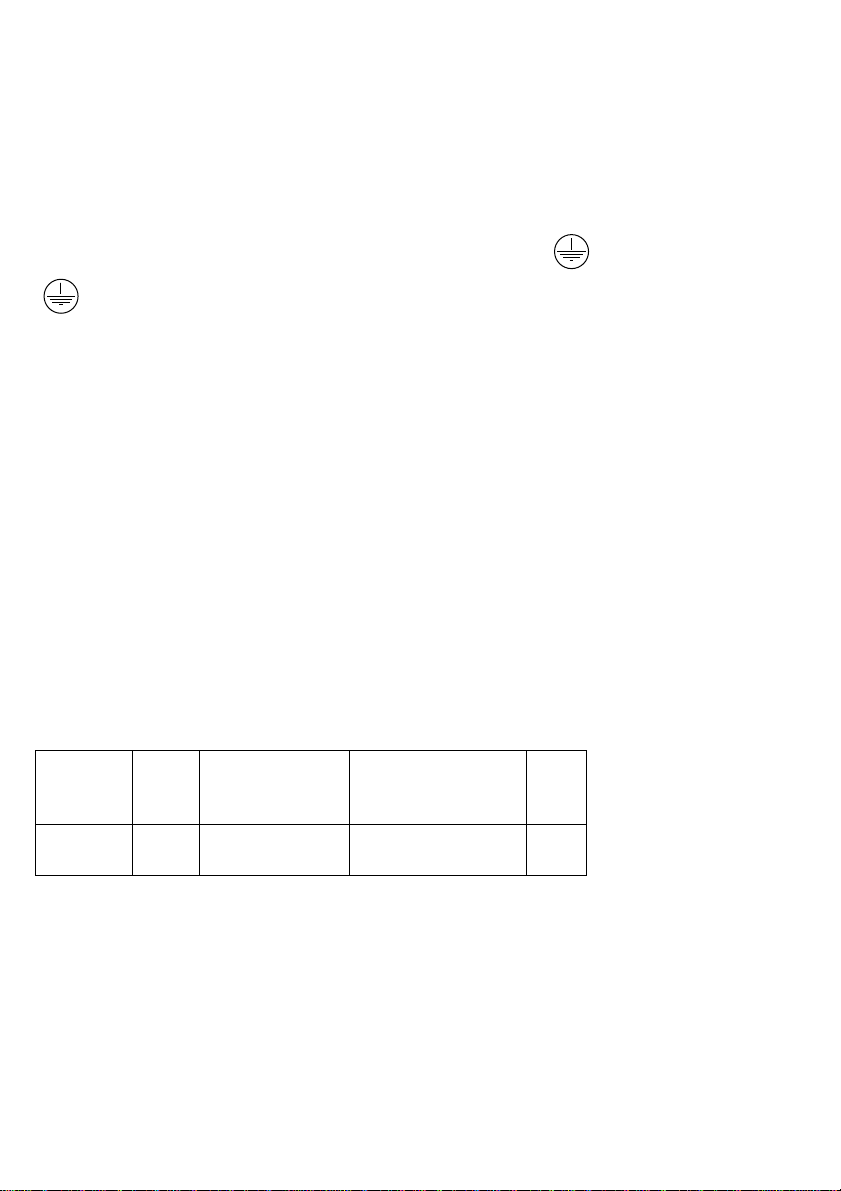
Electrical connection
The oven designed to be connected to 240V
(50Hz) electricity supply.
The oven has an easily accessible terminal block
which is marked as follows:
Letter L - Live Terminal
Letter N - Neutral Terminal
- Earth
THIS APPLIANCE MUST BE
EARTHED
The cable used to connect the oven to the
electrical supply should have the characteristics
indicated in the table.
If you require a direct connection to the electric
network (mains), it is necessary that you install an
omnipole switch between the appliance and the
mains, with a minimum gap of 3 mm between the
switch contacts and of a type suitable for the
required lead in compliance with the current rules.
This switch must be easily accessible to the user
on completion of the installation and must not
break the yellow and green earth cable at any
point.
In order to connect the oven it is necessary to
remove the plate at the back of the oven to reach
the terminal block. Connect the brown insulated
wire to the terminal marked "L".
Connect the blue insulated wire to the terminal
marked "N".
Connect the green and yellow insulated wite to the
terminal marked .
Tighten the cable clamps ensuring that there is no
strain on the mains terminal.
Replace the cover and tighten securing screws.
Important
After installation and connecting, the cable must
be placed so that it cannot at any point reach a
temperature of more than 50°C above the ambient
temperature.
Before the appliance is connected, check that the
main fuse and the domestic installation can
support the load; and that the power supply is
properly earthed.
The manufacturer disclaims any responsibility
should these safety measures not be carried out.
This appliance meets the requirements laid down
in EEC Directive No. 89/336 relating to the
suppression of radio and TV interference.
Models Upper Lower Cable cross
ZMD 905 W/K
oven oven section mm
rating rating and type of the cable
3580 W 2825 W 4.0 HO7 RR-F 30 A
2
Fuse
7
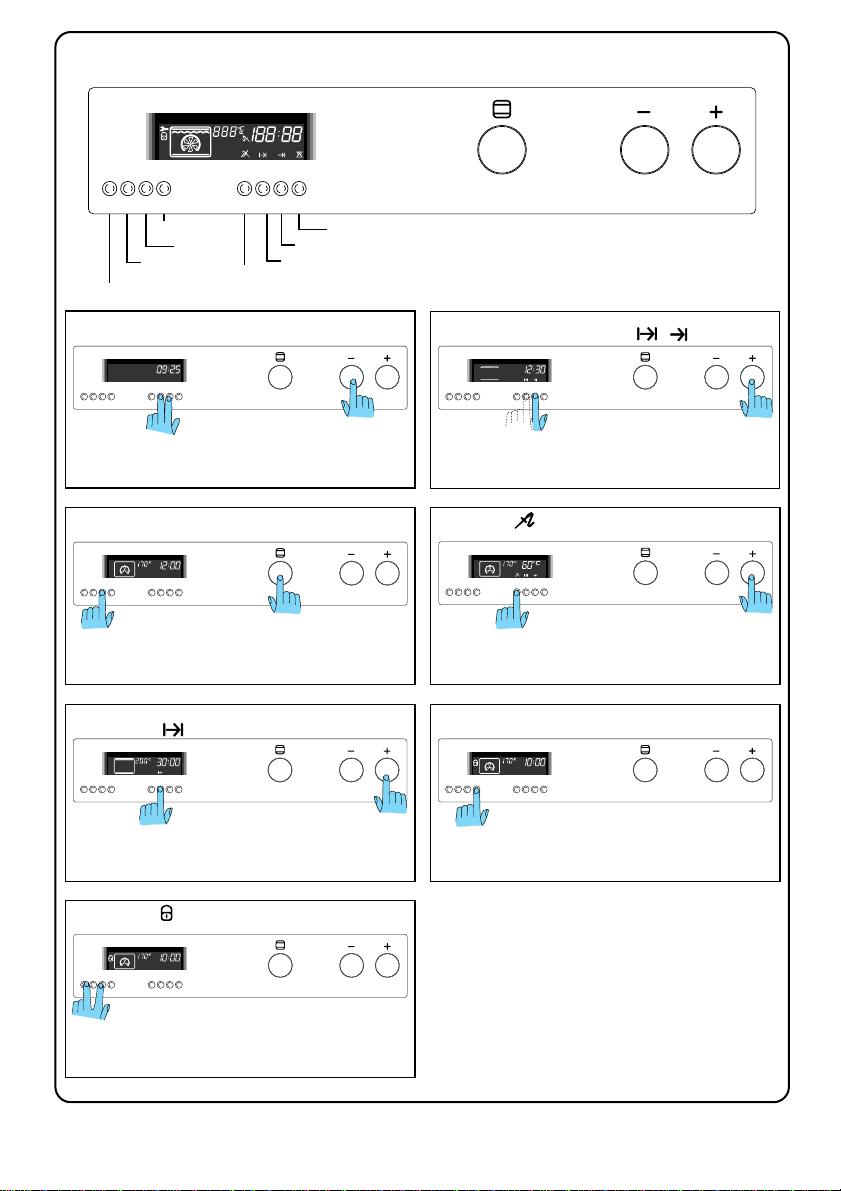
HOW TO SET THE MAIN FUNCTIONS
PM
123 567
48
91011
OVEN CAVITY
OVEN ON
OVEN OFF
MEAT PROBE
MINUTE MINDER
END OF COOKING
COOKING TIME
CHILD SAFETY
CLOCK-SETTING THE TIME OF DAY
123 5678
4
Press button 6 and 7 at the same time, release them and
enter the time pressing large buttons 10 or 11.
SELECTING A PROGRAMME
123 56784
To switch on the oven press button 3 then press large button
9 to select the required programme. To decrease or increase
the programme temperature press the large buttons 10 or 11.
SEMI AUTOMATIC FUNCTION
COOKING TIME
123 56784
AUTOMATIC FUNCTION
(COOKING TIME END OF COOKING)
123 56784
Select the required programme and temperature. Then press
button 6 and either large button 11 to set the required cooking time
(max h 9, 59 min.). Press button 7, then button 11 to set the
required end cooking time.
MEAT PROBE
123 56774
Insert the probe into the meat . Place the jackplug into the socket inside
the oven. Select the required cook function. Then press button 5 and
large button 11 to increase or decrease the required temperature.
SELECTING THE OVEN CAVITY
1 2 3 5678
4
9
11
10
Select the required cook function and temperature then
press button 6 and either large button 11 to set the required
cooking time.
CHILD SAFETY
123 56774
Press buttons 1 and 3 simultaneously for about 5 seconds. The padlock symbol
will be displayed when this functions is entered. It is only possible to select a
programme if button 1 is pressed at the same time as function button 8.
8
Press button 4 to change the cavity display.
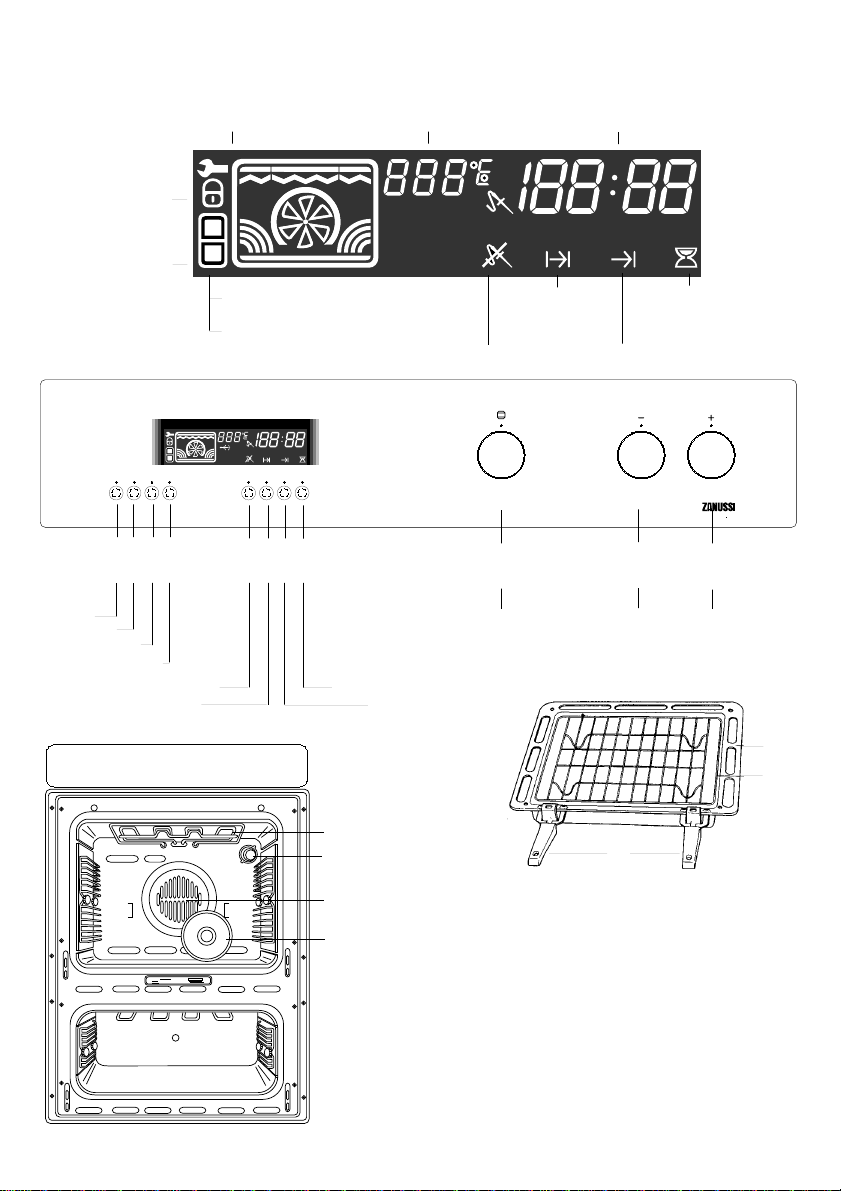
Control Panel
CHILD SAFETY
OVEN CAVITY
CHILD
SAFETY
OVEN OFF
OVEN ON
OVEN SELECTOR
CHILD
OVEN
OFF ON
SAFETY
SELECTOR
2 3
4
1
MEAT PROBE
COOKING TIME
TECNICAL
ASSISTANCE
UPPER OVEN
LOWER OVEN
PROBE
COOK
TEMP
TIME
678
5
TEMPERATURE
TIME
PM
COOKING TIME
PROBE
FUNCTIONS SETTING
PM
MINUTE
STOP
MINDER
TIME
END OF COOKING
9
FUNCTION SELECTOR
MINUTE MINDER
END OF COOKING
DECREASE
TIMER
B U I L T
I N
10
11
IN CREASE
12
13
14
MEANING OF PROGRAMME BUTTONS
Small Push Buttons
15
Large Push Buttons
9 Oven Function Selector
1 Child Safety
2 Oven Off
3 Oven On
4 Oven Selector
5 Meat Probe
6 Cooking Time
7 End of Cooking
8 Minute Minder
10 Decrease Temperature or Time
11 Increase Temperature or Time
12 Hinged grill elements
13 Interior light (oven light)
14 Fan
15 Grease filter
16 Grill / roasting pan
17 Grill trivet
18 Removable handle (2)
16
17
18
9
 Loading...