

Page 1
Elektro-Glaskeramikkochfeld
Elektric Ceramic Glass Hob
Plan de cuisson vitrocéramique électrique
Elektrisch Keramisch Kookplateau
Keramisen Keittotason
ZKT 622 HX -- ZKT 622 HN
Gebrauchs- und Installationsanweisung
Operating and Installation Instructions
Gebruiksaanvijzing en installatievoorschrift
319 5032--00 2001.03.20 PE--D
Mode d’emploi
Käyttö-ja assennusohje
GB
Page 2
2
Dear Customer
Please read these instructions carefully for using your
new appliance. Pay special attention to the chapter
“Hints on safety”.
Keep these instructions in a safe place for future reference and pass them on to any subsequent owner of
the appliance.
The warning triangle and/or specific words (warning, caution, important) are used to highlight information that is important for your safety or the
functioning of the appliance.
After this symbol you will find supplementary
informationon operating and practical use of the
appliance.
Tips and instructions for the economical and environmentally sound use of the appliance are
marked with this symbol.
These instructions contain informations on how to rectify faults yourself. See the section “What to do if ... “
Should you require further assistance, please contact
your local Service Force Centre.
Page 3

3
Content
For the user
Dear Customer ! 2
Safety information 4
Disposal 5
of packaging material 5
Hints of disposal 5
Before the first use 5
Cleaning for the first time 5
Description of the hob 6
Digital indicators 6
Special features of the appliance 7
Operating instructions 8
General information 8
TOUCH--CONTROL--sensorfields 8
Switchin on the appliance 8
Switching off the appliance 8
Cooking zone selection 9
Setting selection 9
Cooking zone switch--off 9
Residual heat indicator 9
Child safety device 10
Safety cut--off after time 11
Safety cut--off due to a spillage 11
Application, charts, tips 12
Cooking and frying utensils 12
General hints 12
Energyconsumption 12
Chart: boiling and frying 13
Cleaning and care 14
Ceramic glass surface 14
Light soilage 14
Stubborn soilage 14
Special soilage 15
Sugar 15
Dark spots and decor damages 15
Scratches in the ceramic glass surface 15
The hob frame 15
What to do ... 16
Guarantee conditions, Customer care 17
For the installer
Installation instructions 18
Hints on safety 18
Buit--in in the kichen--worktop 18
Electrical connection 20
Technical data, rating plate 21
Page 4

4
Important Safety Information
The safety of this appliance corresponds to the
acknowledged rules of technique and to the law on
appliance safety. The safety measures existing as a
matter of self-understandingwould,however, not cover
all of possible risks of accidents.
Moreover, we feel compelled as the manufacturer to
make you familiar with the following hints on safety.
Electrical safety
D This appliance must be installed by qualified
personnel.
D Repairs to the appliance should only be carreid
out by authorised service enginneers. Improper
repairs can lead to injury or serious malfunction.
If your appliance need repairing please contact
your local Service Force Centre.
Please observe this instruction, otherwise the
guarantee will not cover any damage that may
occur.
D Built--in appliances must be installed in built--in
cupboards and worktops. The cupboards have to
belocatedandfastenedin a way thatthey are stable. The protection against accidental contact required by the VDE will then be ensured.
D Damaged appliances must not be installed.
D Do not use the hob if the ceramic glass is dama-
ged:
- switch off the cooking zones,
- disconnect from the electricity supply.
D A special electronically controlled safety--switch--
off makes sure that all cooking zones are switchedoff automaticallyafter a defined time, in case
there will be no variation of settings.
Safety for children
D Take care when plugging electrical items into
mains sockets near the hob. Connecting leads
must not come into connection with the hot
surface or vessels.
D Hot oils can ignite very quickly. Do not leave the
hob unattended when preparing foods in pans of
oil, i.e. frying chips.
D The sensor technique provides best--possible sa-
fety with the manipulation of the appliance, but to
the same extent it needs care when setting cooking zones, output or periods of time.
D After use make sure that the appliance is
switched off.
Safety when cleaning
D Ensure that all heating zones are switched off
while cleaning the hob.
D For safety reasonsdonotcleanthe appliancewith
a steam jet or high pressure cleaner.
How to avoid damaging your appliance
D Do not use the hob surface as a working surface
or for storage.
D Do not use the cooking zones with empty pans or
without pans. This could cause damage to the
pans or the hob.
D Ceramicglassis insensitive to temperatureshock
and very robust, however, it is not unbreakable.
Hard and sharp objects, in particular,can damage
the cooking surface if they fall on it.
D Do not use cast iron pots or pans with damaged
bases that are rough or burred. Scratching may
occur when the lids are slid.
D This appliance is designed to be operated by
adults only. Do not allow children to play with the
product or tamper with the controls.
D This hob is fitted with a safety device of the elec-
tronic control which prevents playing children
from turning the hob.
Safety during use
D This hob is intended for domestic cooking only. It
is not designed for commercial or industrial
purposes.
D The appliancegets hot when in use. In case of ca-
reless handling there is danger of burning oneself at the heating zones.
D Do not use the cooking zones to heat the room.
D Do not place any pans on the hob frame. Scrat-
ching may occur or the paint damaged.
D Ensure that liquids containing acids, e.g. vinegar,
lemon limescale removing agents do not come
into contact with the hob frame, otherwise matt
spots will appear.
D If sugar or adishcontainingsugarcomes intocon-
tact with a hot cooking zone and then melts, remove the soiling immediately whilst still warm,
using a glass scraper. If it cools, damage to the
surface may occur.
D Keep all items and materials that melt away from
the ceramic glass surface, e.g. plastics, aluminium foil or oven foils. If something of this nature
should melt onto the ceramic glass surface, it
must be removed immediately using a glassscraper.
Page 5
5
Disposal
Disposal of packaging material
All parts of the packaging can be recycled and
hard foam parts are appropriately marked.
PE = Polyethylene
(outer wrapping and the bag inside)
PS = Polystyrene foam (eg. packing pieces)
Please dispose of all packaing and old
appliances with due regard for safety and the
environment.
Pleaseobservethenationalandregional regulations on appliancesand packing material as well
as the material marking (material separation,
refuse collection, waste disposal sites).
Hints on disposal
The appliance must not be disposed of with the
household rubbish.
Please contact your local council or
Environmental Health Office to see if there are
facilities in your area to recycle the appliance.
Before the first use
Cleaning for the first time
The hob has to be cleaned thouroughly beforeit is first
used.
D Wash the ceramic glass surface and the frame
with warm water with a little washing up liquid added and wipe dry.
Never use aggressive or abrasive cleaning
agents, they may damage the ceramic glass and
hob frame.
Page 6
6
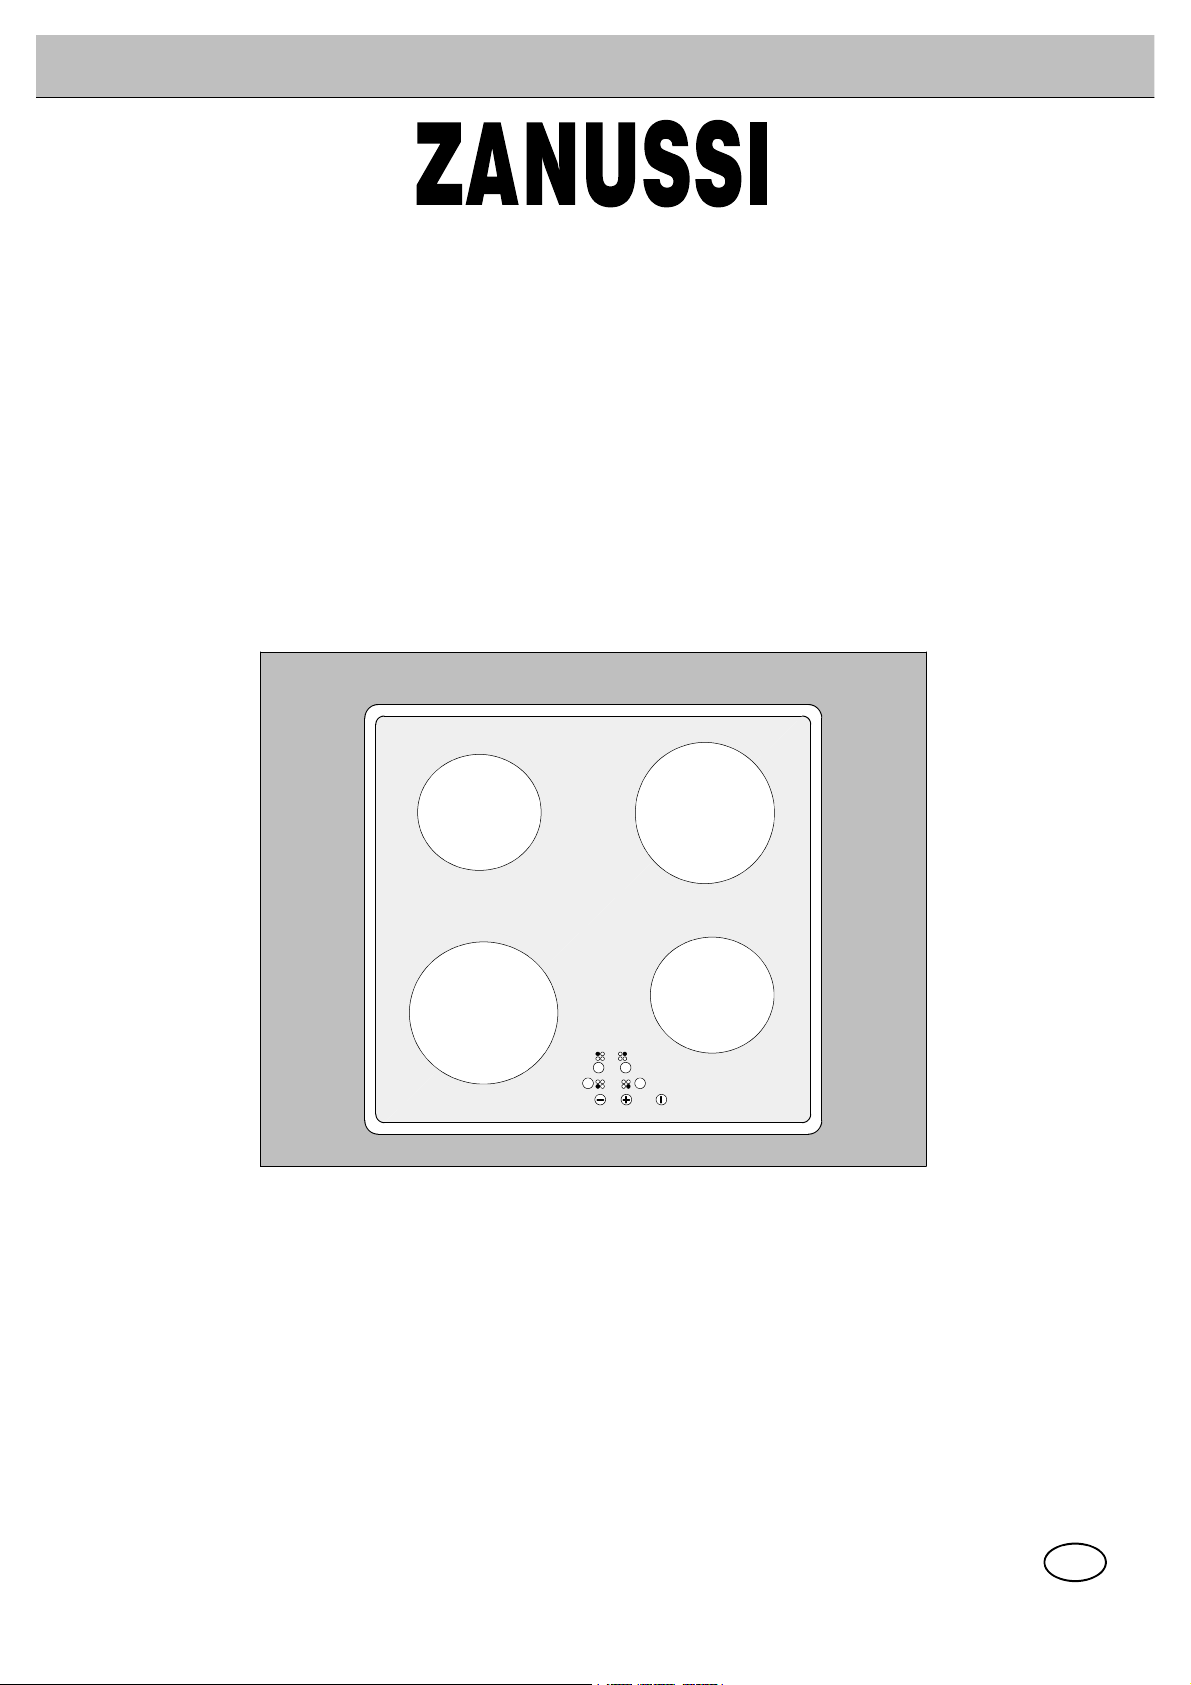
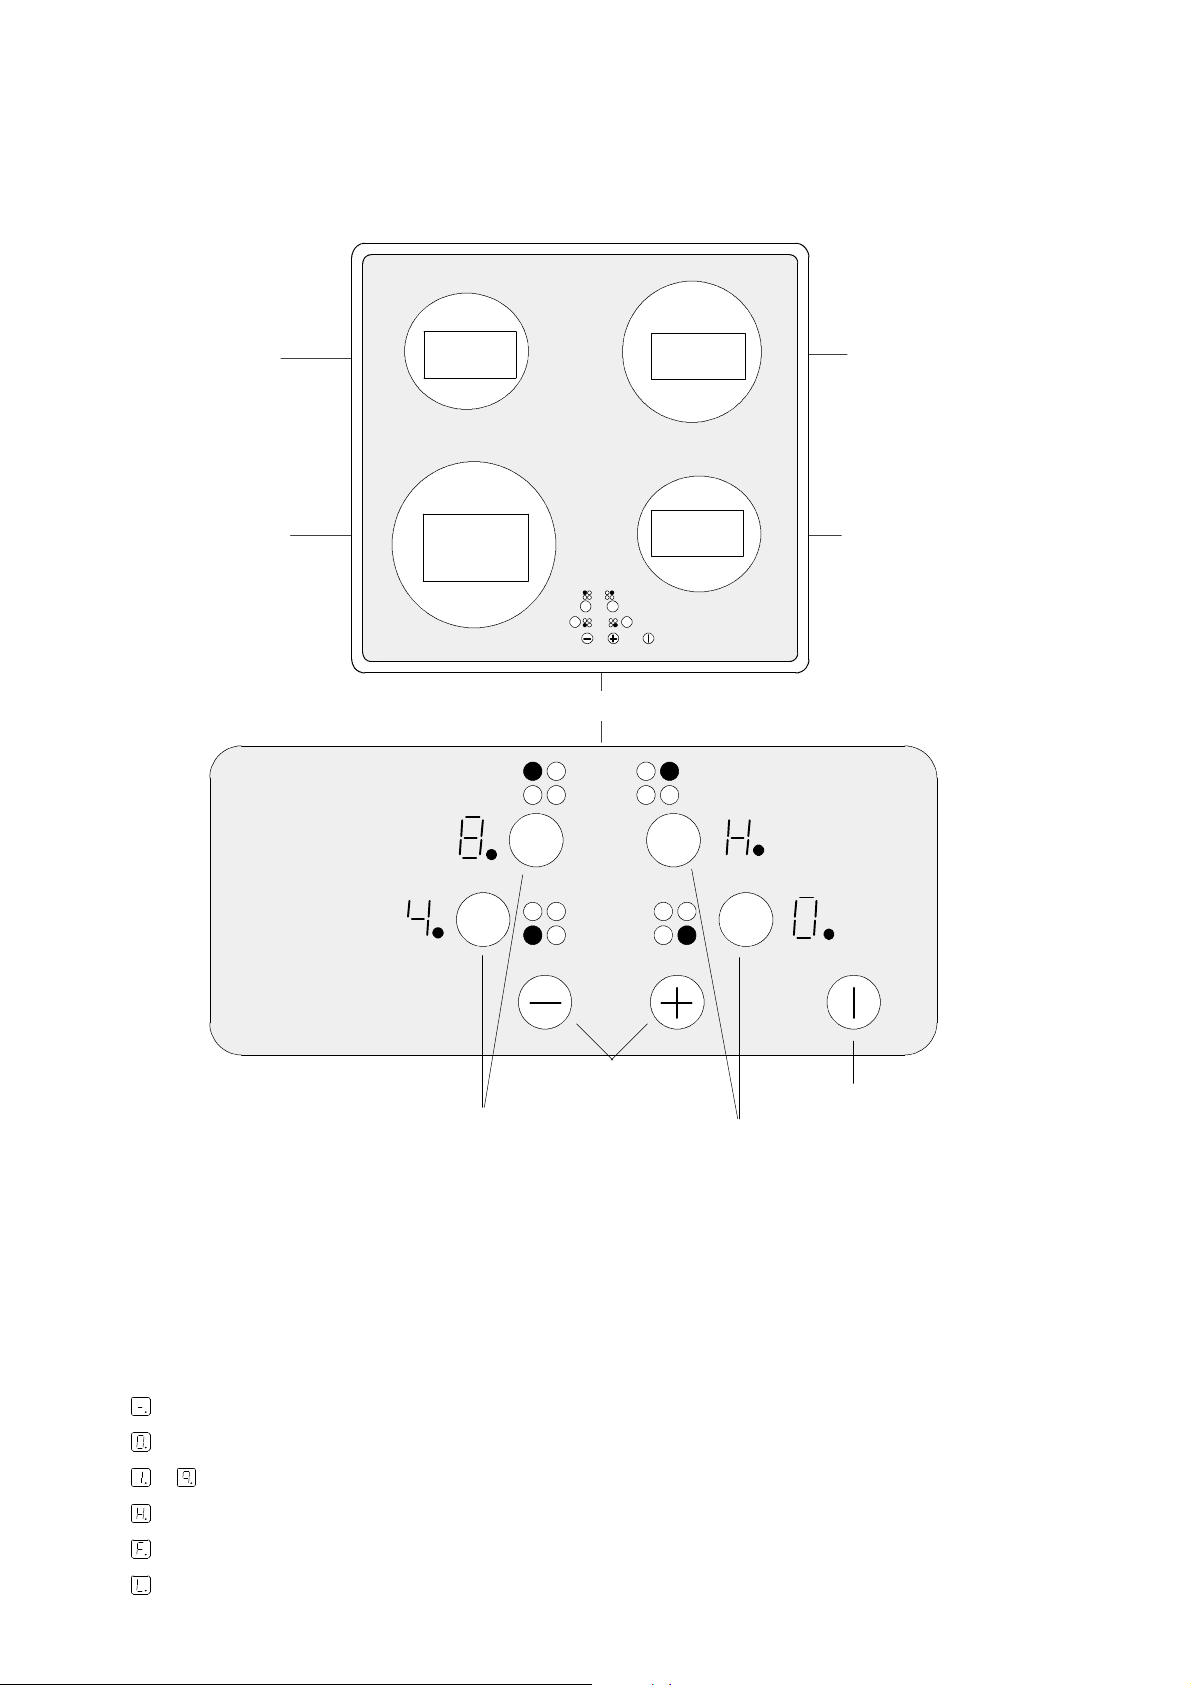
Description of the hob
Cooking and control section features
Cooking zone
145 mm
1200 W
210 mm
2400 W
Halolight
Control section
180 mm
1800 W
145 mm
1200 W
Cooking zone
Cooking zoneCooking zone
Heat Setting selection
Cooking zone selector
rear left
front left
Cooking zone selector
Digital indicators
Four display fields, one for each cooking zones show up as follows:
after switch--on and with automatic switch--off by the safety function,
when selecting a cooking zone,
-- depending on heat setting selected,
with residual heat,
with malfunction,
with child safety device switched on.
Main switch ON/OFF
rear right
front right
Page 7
7
Special features of the appliance
D Ceramic glass cooking area:
The appliance is comprised of a ceramic glass
cooking surface and 4 quick--heating cooking zones. Due to especially efficient radiant heating
elements the cooking zones will heat up very
quickly.
D Touch controls:
The appliance is controlled by TOUCH--CONTROL.
D Touch control ON/OFF:
With use of the ON/OFF touch controls the power
supply to the appliance can be switched on and
off.
D Control and function indicators:
Digital indicators or control lamp provide information about settings made / , functions activated / as well as any residual heat of the
corresponding cooking zone.
D Warm--keeping setting:
= this setting allows you to keep dishes warm.
D Residual heat indicator:
A (“hot”) for residual heat indication will come
on in the display in caseof acookingzone temperature that implies the danger of burning.
D Safety lock / children safety device:
With this function the cooking area can be secured against unintended switching--on.
D Safety cut--off:
A safety cut--off makes surethat all cookingzones
will be switched off automatically after some time
if there is no variation of settings.
D Cleaning:
Due to the ceramic glass cooking area and the
touch controls being a single unit, it is very easy
to keep the hob clean.
Page 8

8
Operating instructions
General information
The cooking surface is made of proven ceramic glass.
and consists of 4 cooking zones. The rapid glowing
cooking zones with that the especially efficient radiant
heating elements will considerably reduce the duration
of heating--up.
The cooking surface is pore--free and also insensitive to rapid changes in temperature. Pots can
therefore be moved from a hot to cold zone.
When switching on a cooking zone you may hear
a short buzz. That is a characteristicofall ceramic
glasscookingzonesanddoesnot impair the function or the lifetime of the appliance.
Always put pots and pans onto the cooking zone
before switching on.
TOUCH--CONTROL sensor fields
D To operate the TOUCH--CONTROL sensor fields
put your finger flat from top onto the desired field,
until corresponding indicators will come on or go
out, respectively until the desired function will be
carried out.
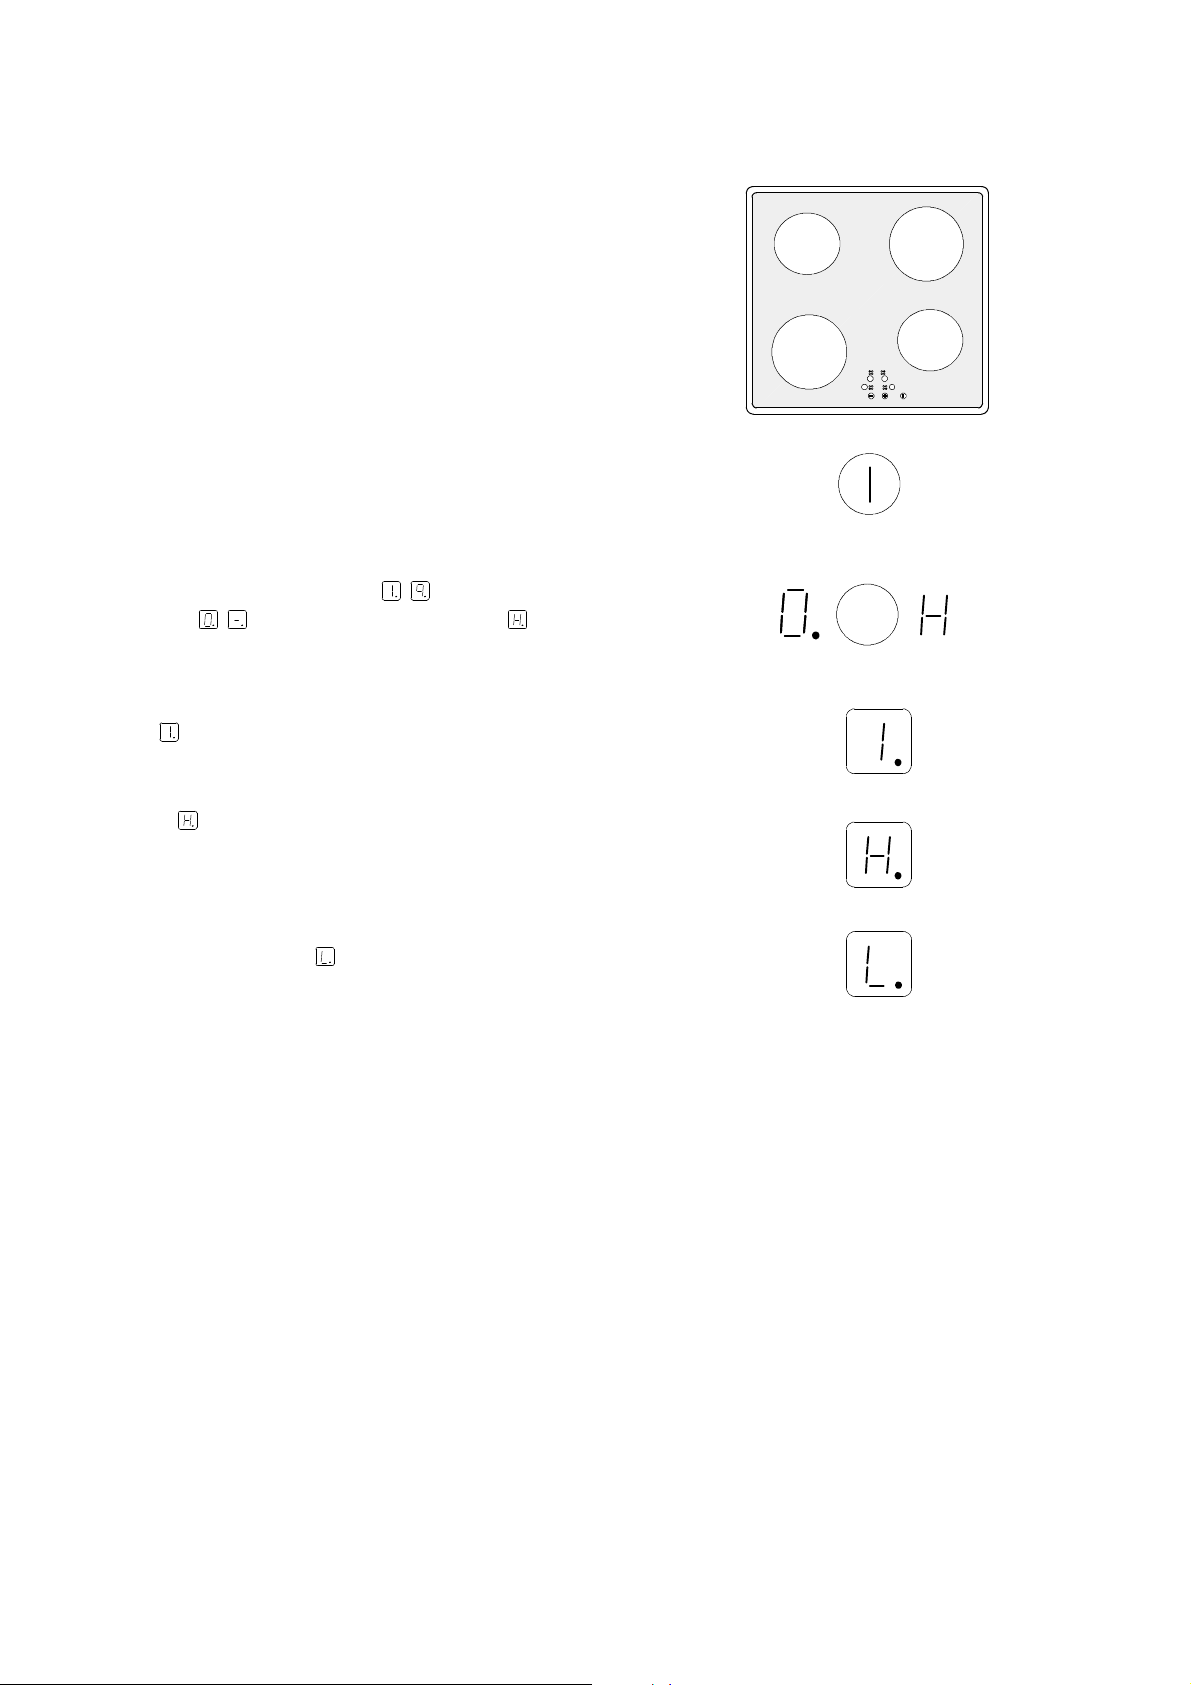
Switching on the appliance
The entire appliance is switched on by means of the
touch control ON/OFF.
D Keep the control ON/OFF touched for about two
seconds.
The digital indicators show andthe digital point
flashes.
Once the appliance has been switched on, a coo-
king zone must be selected within 10 seconds
with use of the cooking zone selector. If a cooking
zone is not selected the appliance will switch off
for safety reasons.
Switching off the appliance
To fully switch off the appliance use the touch control
ON/OFF.
D Keep the sensor field ON/OFF touched for about
two seconds.
After switching off of one individual cooking zone
or of the entire cooking area, the residual heat is
indicated with (“hot”) in the digital indicators of
the corresponding cooking zones.
Page 9

9
Cooking zone selection
D To activate a cooking zone keep the correspon-
dingcontrol touched for about one second. A zero
with digital point comes on in the correspon-
ding cooking zone display.
Setting selection --
D For selecting or changing the setting for the coo-
king zone from to .
use the touch control to increase the setting.
use the touch control to reduce the setting.
Cooking zone switch--off
D 1. Select the desired cooking zone by means of
the cooking zone touch control.
D 2. For switchingoffpushthe and touch con-
trols at thesame time or returnto zero with the
touch control.
Residual heat indicator
After switching off a single cooking zone or the entire
hob any residual heat is indicated by (“hot”)showing
in the display of the corresponding cooking zone.
Even after switching off a cooking zone the residual
heat indicator will go out only after sufficient cooling
down of the cooking zone.
The residual heat can be used for the melting and
keeping dishes warm.
Caution! While the is illuminated the hob is hot
and there is a risk of burning.
Caution! If there is a power failure the will go
out even if there is residual heat in the hob. Care
will have to be taken until there is no longer a risk
of burning.
Page 10

1
0
Child--safety device
Acitivating the child--safety device
The child--safety device prevents the cooking zones
being switched on accidentally.
The child--safety device can only be activated
when the hob is switched on.
D 1. Touch the ON/OFF control.
D 2. Immediately after (within 10seconds)touch the
and controls at the same time for about two
seconds and then release.
D 3. Touch the control again. will be indicated
in the digital displays for about 10 seconds. The
child--safety device is now activated.
Use of the cooking areawith the child--safetydevice activated
D 1. Touch the ON/OFF control.
D 2. Within 10 seconds touch the and con-
trols at the same time for about two seconds.
The digital displays show and the digital point
flashes.
2
2
3
1
D 3. Select the cooking zone and set the heat set-
ting as desired.
The child--safetydevice remains deactivated until
younext switch off the apliance.All cookingzones
and settings can be used as normal.
Deacitivating the child--safety device
The child--safety device can only be deactivated
when the hob is switched off.
D 1. Touch ON/OFFcontrol, is indicated in the
digital displays.
D 2. Touch and controls at the same time for
about 2 seconds and the release.
D 3. Touch control again. Symbol will go out
in the digitaldisplaysand will be indicated. The
child--safety device is now deactivated.
2 1
3
2
Page 11

1
1
Safety cut off after a time
If a cooking zone is not switched off or if a setting isnot
varied after a defined time, the corresponding cooking
zone will switch off automatically.
appears in the cooking zone display and after
cooling down.
D The cooking zones switch off as follows:
S setting 1 – 2 after 6 hours
S setting 3 – 4 after 5 hours
S setting 5 after 4 hours
S setting 6 – 9 after 1.5 hours
To re--set the cooking zones, if required, the appliance
must be switched back on using the main switch
ON/OFF.
Safety cut off due to a spillage
Liquids that boil over and spill onto the surface will
cause the cooking zones to switch off.
The hob will also switch itself off if a wet cloth is placed
on the control panel.
In either case the appliance must be switched back on,
once the liquid or cloth has been removed, with the
main switch ON/OFF for further use.
Page 12

1
2
Application, Charts, Tips
Cooking and frying utensils
The better thepot or thepan, thebetter the boiling
or frying result.
D You can recognise good quality pans by their
base. The base should be thick andas flat aspossible.
D Rough bases (i.e. burrs and sharp edges) will
scratch the ceramic glass surface.
D Utensils with aluminium and copper bases can
leave behind metallic discolorations which can
only be removed with difficulty or sometimes not
at all.
D Saucepans andfrying pans should not besmaller
than the cooking zone, and preferably not more
than 10--15 mm larger than the diameter of the
cooking zone.
D When cold, pan bases normally curve slightly
inwards (are concave). In no case should they
curve outwards (be convex).
8
8
8
8
D When buying new pots or pans pay attention to
the base diameter. Manufacturers often state the
upper diameter of the edge of a dish.
D If you are using special cooking utensils like pres-
surecookersor a WOK,followthemanufacturer’s
instructions.
D Follow any guidelines provided by the saucepan
manufacturer. Ensure they are recommended for
use on ceramic hobs.
General hints
D The bases should always be clean and dry.
D To avoid scratching or damaging the ceramic
glass surface, pots and pans should be moved on
the hob by lifting them, and not by sliding.
D Scratches can also be caused by grains of sand
(e.g. originating from the previous washing of
vegetables), drawn over the cooking surface with
the pan, or by burrs and the rims of pan bases.
D Use high sided pans for dishes with a lot of liquid,
so that nothing boils over.
8
8
8
Energy consumption
To save energy, you should:
D place pots and pans in position before switching
on the cooking zone.
D use only cooking and frying utensils withsmooth,
flat bases.
Page 13

1
3
D whereverpossible, cover pots and pans with alid.
D never place pots or pans on cooking zones with
a higher diameter.
D because of wet or dirty cooking zones and pots
energy will be wasted.
D switch off the cooking zone a few minutes before
the end of the cooking time, in order to make use
of the residual heat.
8
8
D When using pressure cookers you can reducethe
cooking time by up to 50%. As well as saving
energy, more vitamins and minerals are retained
in the food.
8
8
Chart:: Boiling and frying
The setting position required for cooking processes is dependent on the quality of the pots and on the type
and amount of the food.
Switch position Cooking method Examples
9
7 - 9
6 - 7
Parboiling
Quick frying
Frying
Deep fat frying
Roasting
Frying without crust
Starting of cooking and roasting, cooking of large quantities of
liquid, then switch--back to appropriate setting
French fries, pan--cakes
Fillet of pork and beef, steaks goulash
Frying of meat, schnitzel, cutlets, meat--balls, sausages, liver,
fish--fillet in deep fat,
Frying eggs or chops
4 - 5
3 - 4
2 - 3 Gentle simmering
1--2
0 Residual heat Residual heat, OFF--position
When heating up or frying, we recommend heat setting“9”, andthen continuecookingfoods at an appropriate
lower heat setting.
Boiling
Braising
Simmering
Stewing
Keeping warm
Melting
Boiled potatoes, stews, soups, hot--pot, sauces in large quantities
Simmering of vegetables, braising of meat, lightly cooking
small amount of fruit with little liquid
Simmering of rice and food with milk (sometimes stirring),
Stewing of smaller amount of potatoes or vegetables,
Warming up of prepared meal
Omelette, fried eggs, Hollandaise sauce,
Keeping warm a meal or small amount of hot--pot
Melting of butter, chocolate, gelatine.
Page 14

1
4
Cleaning and care
Attention! Cleaners must not get onto thehot ce-
ramic glass surface! After cleaning all residues of
cleaners must be removed with sufficient clean
water, as they may be caustic when being reheated.
Never use aggressive or abrasive agents, such
as oven sprays, stain or rust removers, scouring
powder, or sponges with an abrasive effect.
Suitable cleaning materials are: clean cloth or
household paper, hot water with detergent, suitable commercial cleaners and cleaning scrapers.
Cleaning scrapers and ceramic glass cleaners
are availablefrom the expert trade and in markets
for building material.
Ceramic glass surface
D Clean the ceramic glass surface after every use
when it is hand warm or cold. This will avoid spills
becoming burnt on.
D Remove scale and water marks, fat spots and
metallicshimmeringdiscoloration with acommercial ceramic glass cleaner such as Vitroclen.
Light soilage
D Wipethe ceramic glass surface with a dampcloth,
and a little washing up liquid.
D Then rub dry with a clean cloth. No residues of
cleaner must be left on the surface.
D Once a week, throroughly clean the entire cera-
mic glass surface with a commercial ceramic
glass cleaner such as “Vitroclen”. Always ensure
that the hob is dry after cleaning.
Stubborn soilage
D To remove food that has boiled over or burnt on
spots, use a glass scraper.
D Place the glassscraper at anangleto the ceramic
glass surface. Removesoiling byslidingthe scraper.
Page 15

1
5
Special soilage
Sugar
D Remove burnt--on sugar, melted plastics, alumi-
num foil immedeiately -- whenthey are still warm
-- using a glass scraper, otherwise damage may
be caused.
Warning! Whenusing the cleaning scraper on the
warm cooking zone care should be taken.
D Afterwards clean the cooking surface normally.
If the cooking zone and melted material has cooled down, reheat the cooking zone gently to aid
the cleaning process.
Dark spots, decor damages
If aggressive cleaners or pans with abrasive bases areused, thenthe decor will take on an abraded appearence and dark spots will appear over
time.
These marks cannot be removed. However, they
do impair the fuctionability of the hob.
.
Scratches in the ceramic glass surface
Scratches in the ceramic glass surface resulting
from burrs on a pan base or sand grains cannot
be removed.
However, they do impair the fuction of the hob.
The hob frame
Do not allow vinegar, lemons orscale removers to
come into contact with the hob frame, matt spots
will appear.
D Clean the hob frame with water and a little was-
hing up liquid.
D Soften dried dirt with a wet cloth. Then wipe off
and rub dry.
Page 16

1
6
What to do ...
If the hob does not function correctly, please carry out
the following checks, as it may be something you can
remedy yourself.
... if the cooking zones will not function?
D The overheating protection of the electronic con-
trols has blocked the use of the hob. Once the
cooking zone has cooled down it can be operated
again.
... if the display flashes?
Check, whether
D the main fuse has failed.
D the appliance is correctly switched on.
D the safety cut off has operated.
D the control lamps of the control panel are lighting.
D the corresponding cooking zone is switched on.
D the cooking zones are set for cooking as desired.
... if cooking zones cannot be switched on/off?
Check, whether
D the control panel is locked.
D a period of more than 10 seconds has elapsed
between pressing the on/off switch and selecting
a cooking zone.
D the touch controls are entirelyor partly covered by
liquid or by a wet cloth.
... if the whole indicator section for residual heat,
except , will fail all of a sudden?
Check, whether
D the ON/OFF touch control was accidentally
touched.
D the touch controls are entirelyor partly covered by
liquid or by a wet cloth.
D the safety cut off has operated.
D there was a power cut for a short while.
... if the displays suddenly go out?
Check, whether
D the fuse has failed.
D there has been a power cut.
D the setting operation was correctly made.
If the hob has been used at a high setting for a
long period of time, the overheating protection of
the electronic control will become active and the
front left cooking zone will become inoperable.
This occurs to prevent damage to the electronic
controls. The front left cooking zone will operate
againoncethe appliancehascooleddownand
is no longer in the display. The front right and rear
cooking zones can still be operated during this
time.
... if the display lights up?
Check, whether
D the touch controls are entirely orpartly covered or
contaminated by liquid or by a wet cloth.
D Clean the ceramic glass surface and wipe it dry.
D If after switching the appliance back on, the dis-
play still shows . Contact your local Service
Force Centre.
... the cooking zone automatically switches back
to setting 7 during cooking?
D Because the temperature is too high, the electro-
nic control thermal cutoff has triggered an automatic reduction of thecookingsetting. You can increase the cooking setting again, after the
cookuing zone has cooled down. If you try to increase the setting again and the display flashes,
this means that it is not yet possible to carry out
the desired increase, because the appliance is
still too hot.
... if after cooking zone switch--off the display will
not show or for residual heat?
Check, whether
D the cooking zone has only been inoperation for a
short while, and is therefore not hot enough.
If after carrying out the above checks your appliance is
still faulty, disconnect from the mains supply and contact your local Service Force Centre.
... if a cooking zone cannot be switched on?
Check, whether
D the child--safety is switched on.
... if all displays (inclusive of residual heat indica-
tor ) go out during cooking?
In guarantee customers should ensure that the
above checks have been as theengineer will make
a charge if thefault is notamechanical or electrical
breakdown.
Please note that proof of purchase is required for
any in--guarantee service calls.
Page 17

1
7
Service and Spare Parts
If you require an engineer or you wish to purchase
spare parts contact your local Service ForceCentre by
telephoning:
0990--929929
Your call will be routed to the Service Centre covering
your post code area.
When you contact the Service Centre you will need to
give the following details:
1 Your name, address and post code.
2 Your telephone number.
3 Clear and concise details of the fault.
4 The model and serial numer of the appliance
(Found on the rating plate).
5 The purchase date.
In guarantee customer should ensure that the checks
listed in „What to do“ have been made as the engineer
will make a charge if the fault is not a mechanical or
electrical breakdown.
Page 18

1
8
Guarantee Conditions
Standard guarantee conditions
We undertake that ifwithin 12 months of the date of the
purchase this appliance or any part thereof is proved
to be defective by reason only of fault workmanship or
materials, we will, at our option repair or replace the
same FREE OF CHARGE for labour, materials or carriage on condition that:
D The appliancehasbeencorrectlyinstalledandused
only on the electricity supply stated on the rating
plate.
D The appliance has been used for normal domestic
purposes only, and in accordance with the manufacturer’s instructions.
D The appliance has not been serviced, maintained
repared, taken apart or tampered with any person
not authorised by us.
D All service work under this guarantee must be
undertaken by a Service Force Centre.
D Any appliance or defective part replaced shall
become to Company’s property.
European Guarantee
If you should move to another country within Europe
then your guarantee moves with you toyour new home
subject to the following qualifications:
D The guaranteestarts from thedate you first purcha-
sed your product.
D The guarantee is for the same period and to the
same extent for labour and parts as exists in the
new country of use for this brand or range of products.
D This guarantee relates to you and cannot be trans-
ferred to another user.
D Your new home is within the European community
(EC) or European Free Trade Area.
D The product is installed and used in accordance
with our instructions and is only used domestically,
i.e. a normal household.
D The product is installed taking into account regula-
tions in your new country.
Before you move please contact your nearest Customer Care Department, listed below, to give them
detailsof your new home. They willthenensurethatthe
local Service Organisation is aware of your move and
able to look after your appliances.
D This guarantee is in addition to your statutory and
other legal rights.
Home visits are made between 8.30 am and 5.30 pm
Monday to Friday. Visits may be available outside
these hours in which case a premium will be charged.
Exclusions
This guarantee does not cover:
D Damage or calls resulting from transportation,
improper use or neglect, the replacement of any
light bulbs or removable parts of glass or plastic.
D Coasts incurred for calls to put right an appliance
which is improperly installed or calls to appliances
outside the United Kingdom.
D Appliances found to be in use within a commercial
environment, plus thosewhichare subjected to rental agreements.
France Senlis +33 (0)3 44 62 22 22
Germany Nürnberg +49 (0)911 3232 2600
Italy Pordenone +39 (0)1678 47053
Sweden Stockholm +46 (0)20 78 77 50
UK Slough +44 (0)1753 219 897
Customer Care
For general enquiries or for furtherinformationonElectrolux products, please contact our
Customer Care Department.
Electrolux
55--77 High Street
Slough
Berkshire
SL1 1DZ
Tel: 08705 950 950
European:
+44 (0) 1753 219898
D Products of Electrolux manufacture which are not
marketed by Electrolux.
Page 19

1
9
Installation instructions
Hints on safety
This appliance must be installed and connected byqualified personel. Please observe this
instruction, otherwise the warranty will not
cover any dmage which may occur.
During the installationand incase of a servicefailure the appliance must not be connected to the
mains.
The general rules for the operation of electric appliances, the provisions by the competent electricity supply board and the specifications of these
instructions for installation have to be strictly adhered to.
distance from worktop
opening to the rear wall
55 mm
20 mm
Built--in in the kitchen worktop
Electrical safety is to be ensured by professional
installation.
Protection against accidental contact according
to the regulations set by VDE or other local authorities must be ensured by correct installation of
the appliances. Thesamerefers to thebackof the
appliance which, even incase of built--in solutions
away from thewall,must not be freely accessible.
Built--in cupboards have to be located and fastened in a way that they are stable.
D Note down the data from the rating plate of your
appliance in the printed rating plate form in this
manual. These numbers are needed in case of
service calls.
Installation dimensions
distance from worktop opening to
the left or right side wall or to a
high cupboard
50 mm
20 mm
The opening in the cabinet must correspond to the
standard dimensions. The necessary information can
be found in the dimensional sketch.
D The separation between the lower surface of the
hob and theparts of the furniture below it must be
at least 20 mm
D The lateral separation between the sides of the
hob and the cabinet must be at least 55 mm, and
must be at least 55 mm from the rear panel.
R5
Page 20

2
0
With regard to the protection against overheating
of surrounding furniture surfaces this appliance
corresponds totype Y. Thisappliance or thebuilt-in cupboard for theappliance respectively may be
locatedwiththe rear wall and one side wallto whatever high walls or furniture respectively and with
the other side to another appliance or furniture of
the same height as this appliance.
Hob installation
D Cut out the worktop with the cut--out size as sta-
ted. Thetolerancedsizes must not be exceeded..
Saw exactly at the marking line. Recommendation: Mark the cut--out with a steel needle.Cover-glue the line in order to avoid splintering of the
coating when cutting.
D Clean the worktop in the cut--out section
D With tiled worktops the grooves within the contact
area of thecookingarea must completely befilled
up with groove material.
D Then fasten the catch springs with screws in the
cut--out at the marked position. The distortion of
the springs serves as a stop on the worktop.
R5
D With natural, artificial stone, orceramic plates the
springs can be glued in with special adhesive
(synthetic resin, two--component adhesive, etc.)
D The cooking area is entered from the top into the
cut--out section, centered and firmly pressed on
until the springs will catch.
D Check the sealin the supporting frame for perfect
seating and gapless support. Please do not apply
further silicone sealing matter as this will complicate the removal of the hob if servicing is necessary.
sealing
1
2
frame
ceramic glass plate
worktop
snap--in clamp
Page 21

2
1
Electrical connections
Before connecting the appliance, check that the
voltage quoted on the ratingplate - that is, the nominal voltage of the appliance - corresponds to
the available mains voltage. The rating plate can
be found on the lower housing of the ceramic
glass hob.
D The mains connection must be carried out by an
expert electrician. The VDE-regulations and the
valid prescriptions by the local power suppy
boards have to be compiled with.
D Prior to connection it should be checked whether
the voltage stated on the rating plate -- i.e. the
nominal voltage of the appliance and of the oven/
control box -- is identical with the prevailing mains
voltage. The rating plate is located on the lower
housing of the hob.
D The heatingelement voltage amounts to 230 V ~.
The appliance will also perfectly perform with the
former mains voltage of 220 V ~.
Mains terminal
in the base of the hob
changing bridges of the terminal
D The mains connection must be carried out in a
way that an all--pole insulating device is existing
with a contact opening of at least 3 mm, e.g. LS-automatism, earth--leakage circuit--breaker or
fuse.
D A wire of typeH05VV-F or of higher ratingis to be
used as supply cable.
D The mains terminal is located in the bottom of the
appliance behind a covering slide. It can be opened with a screw driver (pict.).
D Accordingto existing mainsvoltage the appliance
has to be connected in correspondence with the
diagrams of connecting possibilities. The bridges
of theterminal board are tobe changed accordingly, if need be.
D The protective conductor is to be connected to
terminal . The protective conductor must be
longer than live leads.
D The cable connections have to be connected
as shown and the terminal screws be firmly
tightened.
D Afterwards the supply cable has to be secured by
strain relief device and thecovering slide must be
closed by firmly pressing down until it engages.
strain relief device
Connecting possibilities
AnschlussleitungMulde
connecting line hob
conexiònartesa
schwarz / black/ negro
•
schwarz / black/ negro
‚
Elektrischer Anschluss
ƒ
blau / blue / azul
„
…
grün--gelb / green-- yellow
verde-- amarillo
electrical connection
conexiónelèctrica
L1
L2
~
230V
N
PE
AnschlussleitungMulde
connecting line hob
conexiònartesa
schwarz / black/ negro
•
schwarz / black/ negro
‚
ƒ
blau / blue / azul
„
…
grün--gelb / green-- yellow
verde-- amarillo
Elektrischer Anschluss
electrical connection
conexiónelèctrica
L1
~
230V
N
PE
Prior to first use remove any existing labels and
protective film from the ceramic glass plate or the
frame of the hob.
After connecting the electrical supply, all cooking
zones should be briefly switched on one after the
other at their maximum power, in order to test
whether they are operational.
Page 22

2
2
Technical data
Dimensions of the appliance :
Length 572 mm. . . . . . . . . . . . . . . . . . . . . . . . . .
Depth 502 mm. . . . . . . . . . . . . . . . . . . . . . . . . . .
Height 49 mm. . . . . . . . . . . . . . . . . . . . . . . . . .
Volume 49 l. . . . . . . . . . . . . . . . . . . . . . . . .
Cut--out dimensions
Length 560 mm. . . . . . . . . . . . . . . . . . . . . . . . . .
Depth 490 mm. . . . . . . . . . . . . . . . . . . . . . . . . . .
Radius R5. . . . . . . . . . . . . . . . . . . . . . . . .
Power of cooking zones:
Cooking zone front left 2400 W. . . . . . . . . . . . . . .
Cooking zone rear left 1200 W. . . . . . . . . . . . . . . .
Cooking zone rear right 1800 W. . . . . . . . . . . . . .
Cooking zone front right 1200 W. . . . . . . . . . . . . .
Total connected load max. 6,6 kW. . . . . . . . .
Voltage 230V ~50 Hz. . . . . . . . . . . . . . . . . . . . . . . .
Specifications, Standards, Guidelines
This appliancecorresponds to the following standards:
D EN 60 335--1 and EN 60 335--2--6
with regard to the safety of electric appliances for
domestic use and similar purposes
D DIN 44546 / 44547 / 44548
with regard to the criteria for electric cookers for
domestic use.
D EN 55014--2 / VDE 0875 part 14--2
D EN 55014 / VDE 0875 part 14 / 12.93
D EN 61000--3--2 / VDE 0838 part 2
D EN 61000--3--3 / VDE 0838 part 3
with regard to the basic protection demands for
electromagnetic compatibility (EMC).
This appliance corresponds to EC--guidelines
D 73/23/EC dt. 19.02.1973
(low--voltage--guideline)
D 89/336/EC dt. 03.05.1989
(EMC--guideline inclusive of
amendment--guideline 92/31/EC)
Rating plate
Note down here the data from the rating plate of your appliance. The rating plate is on the base of the hob.
The rating plate is not visible after the hob has been built--in.
This information will be required:
-- when requesting a service call
-- when ordering spare parts or accessories
-- with technical queries.
ZANUSSI
TYP: PEE2 021 PNC: 949 590 795 MODELL: ZKT 622 HX
230 V ~
Total max. 6,6 kW
ZANUSSI
TYP: PEE2 021 PNC: 949 590 803 MODELL: ZKT 622 HN
230 V ~
Total max. 6,6 kW
F.Nr.: . . . . . . . . . . . .
F.Nr.: . . . . . . . . . . . .
MADE IN GERMANY
MADE IN GERMANY
 Loading...