

Page 1

Glaskeramik-Kochfeld
Ceramic glass hob
Table de cuisson vitrocéramique
ZKT 621 LX/LN
Montage- und Gebrauchsanweisung
Installation and Operating Instructions
Instructions de montage et mode d’emploi
d
g
f
Page 2

Sehr geehrte Kundin, sehr geehrter Kunde,
lesen Sie bitte diese Gebrauchsanweisung sorgfältig durch und bewahren
Sie sie zum späteren Nachschlagen auf.
Geben Sie diese Gebrauchsanweisung an eventuelle Nachbesitzer des Gerätes weiter.
Folgende Symbole werden im Text verwendet:
1 Sicherheitshinweise
Warnung! Hinweise, die Ihrer persönlichen Sicherheit dienen.
Achtung! Hinweise, die zur Vermeidung von Schäden am Gerät dienen.
3 Hinweise und praktische Tipps
2 Umweltinformationen
2
Page 3

Inhalt
Gebrauchsanweisung . . . . . . . . . . . . . . . . . . . . . . . . . . . . . . . . . . . . . . 4
Sicherheitshinweise . . . . . . . . . . . . . . . . . . . . . . . . . . . . . . . . . . . . . . . . . . . 4
Gerätebeschreibung . . . . . . . . . . . . . . . . . . . . . . . . . . . . . . . . . . . . . . . . . . . 6
Ausstattung Kochfeld . . . . . . . . . . . . . . . . . . . . . . . . . . . . . . . . . . . . . . . . . . . 6
Ausstattung Bedienfeld. . . . . . . . . . . . . . . . . . . . . . . . . . . . . . . . . . . . . . . . . . 6
Touch Control-Sensorfelder. . . . . . . . . . . . . . . . . . . . . . . . . . . . . . . . . . . . 7
Anzeigen . . . . . . . . . . . . . . . . . . . . . . . . . . . . . . . . . . . . . . . . . . . . . . . . . . 7
Restwärmeanzeige. . . . . . . . . . . . . . . . . . . . . . . . . . . . . . . . . . . . . . . . . . . 7
Bedienung des Geräts . . . . . . . . . . . . . . . . . . . . . . . . . . . . . . . . . . . . . . . . . 8
Gerät ein- und ausschalten. . . . . . . . . . . . . . . . . . . . . . . . . . . . . . . . . . . . . . . 8
Kochzone auswählen . . . . . . . . . . . . . . . . . . . . . . . . . . . . . . . . . . . . . . . . . . . 8
Kochstufe einstellen . . . . . . . . . . . . . . . . . . . . . . . . . . . . . . . . . . . . . . . . . . . . 8
Kindersicherung verwenden . . . . . . . . . . . . . . . . . . . . . . . . . . . . . . . . . . . . . . 9
Kindersicherung einschalten . . . . . . . . . . . . . . . . . . . . . . . . . . . . . . . . . . . 9
Kindersicherung überwinden . . . . . . . . . . . . . . . . . . . . . . . . . . . . . . . . . . . 9
Kindersicherung ausschalten. . . . . . . . . . . . . . . . . . . . . . . . . . . . . . . . . . . 10
Sicherheitsabschaltung. . . . . . . . . . . . . . . . . . . . . . . . . . . . . . . . . . . . . . . . . . 10
Tipps zum Kochen und Braten . . . . . . . . . . . . . . . . . . . . . . . . . . . . . . . . . . 11
Kochgeschirr . . . . . . . . . . . . . . . . . . . . . . . . . . . . . . . . . . . . . . . . . . . . . . . . . . 11
Energiesparen . . . . . . . . . . . . . . . . . . . . . . . . . . . . . . . . . . . . . . . . . . . . . . . . . 11
Anwendungsbeispiele zum Kochen . . . . . . . . . . . . . . . . . . . . . . . . . . . . . . . . 12
Reinigung und Pflege . . . . . . . . . . . . . . . . . . . . . . . . . . . . . . . . . . . . . . . . . . 13
Was tun, wenn …. . . . . . . . . . . . . . . . . . . . . . . . . . . . . . . . . . . . . . . . . . . . . . 14
Entsorgung . . . . . . . . . . . . . . . . . . . . . . . . . . . . . . . . . . . . . . . . . . . . . . . . . . 16
Montageanweisung . . . . . . . . . . . . . . . . . . . . . . . . . . . . . . . . . . . . . . . . 17
Garantie/Kundendienst. . . . . . . . . . . . . . . . . . . . . . . . . . . . . . . . . . . . . 19
Service. . . . . . . . . . . . . . . . . . . . . . . . . . . . . . . . . . . . . . . . . . . . . . . . . . . . . 21
Montage . . . . . . . . . . . . . . . . . . . . . . . . . . . . . . . . . . . . . . . . . . . . . . . . . . . 64
Typenschilder . . . . . . . . . . . . . . . . . . . . . . . . . . . . . . . . . . . . . . . . . . . . . . 67
3
Page 4

Gebrauchsanweisung
1 Sicherheitshinweise
3 Beachten Sie bitte diese Hinweise, da sonst bei auftretenden Schäden der
Garantieanspruch entfällt.
5 Dieses Gerät entspricht den folgenden EG-Richtlinien:
– 73/23/EWG vom 19.02.1973 Niederspannungs-Richtlinie
– 89/336/EWG vom 03.05.1989 EMV-Richtlinie einschließlich Änderungs-
Richtlinie 92/31/EWG
– 93/68/EWG vom 22.07.1993 CE-Kennzeichnungs-Richtlinie
Bestimmungsgemäße Verwendung
• Dieses Gerät darf nur für das haushaltsübliche Kochen und Braten von
Speisen verwendet werden.
• Das Gerät darf nicht als Arbeits- oder Abstellfläche verwendet werden.
• Umbauten oder Veränderungen am Gerät sind nicht zulässig.
• Brennbare Flüssigkeiten, leicht entzündliche Materialien oder schmelzbare
Gegenstände (z.B. Folien, Kunststoff, Aluminium) nicht auf dem Gerät
oder in dessen Nähe abstellen oder lagern.
Sicherheit für Kinder
• Kleinkinder grundsätzlich vom Gerät fernhalten.
• Größere Kinder nur unter Anleitung und Aufsicht am Gerät arbeiten las-
sen.
Allgemeine Sicherheit
• Montage und Anschluss des Gerätes dürfen nur durch ausgebildete und
autorisierte Fachkräfte vorgenommen werden.
• Einbaugeräte dürfen nur nach dem Einbau in normgerechte, passende
Einbauschränke und Arbeitsplatten betrieben werden.
• Bei Störungen am Gerät oder Schäden an der Glaskeramik (Brüche,
Sprünge bzw. Risse) muss das Gerät ausgeschaltet und vom Stromnetz
getrennt werden, um einen möglichen elektrischen Schlag zu vermeiden.
• Reparaturen am Gerät dürfen nur von ausgebildeten und autorisierten
Fachkräften durchgeführt werden.
4
Page 5

Sicherheit während der Benutzung
• Aufkleber und Folien von der Glaskeramik entfernen.
• Am Gerät besteht beim unachtsamen Arbeiten Verbrennungsgefahr.
• Kabel von Elektrogeräten dürfen nicht an die heiße Geräteoberfläche bzw.
heißes Kochgeschirr gelangen.
• Überhitzte Fette und Öle entzünden sich sehr schnell. Kochvorgänge mit
Fett oder Öl (z.B. Pommes frites) nicht unbeaufsichtigt lassen.
• Die Kochzonen nach jedem Gebrauch ausschalten.
Sicherheit beim Reinigen
• Zum Reinigen muss das Gerät ausgeschaltet und abgekühlt sein.
• Die Reinigung des Gerätes mit einem Dampfstrahl- oder Hochdruckreini-
ger ist aus Sicherheitsgründen nicht zugelassen.
Vermeidung von Schäden am Gerät
• Die Glaskeramik kann durch herabfallende Gegenstände beschädigt werden.
• Stöße mit dem Kochgeschirr können den Rand der Glaskeramik beschädigen.
• Kochgeschirr aus Gusseisen, Aluguss oder mit beschädigten Böden können beim Verschieben die Glaskeramik verkratzen.
• Schmelzbare Gegenstände und Überkochendes können auf der Glaskeramik einbrennen und sollten sofort entfernt werden.
• Das Leerkochen von Töpfen und Pfannen vermeiden. Es kann Beschädigungen am Kochgeschirr oder der Glaskeramik verursachen.
• Die Kochzonen nicht mit leerem oder ohne Kochgeschirr benutzen.
5
Page 6
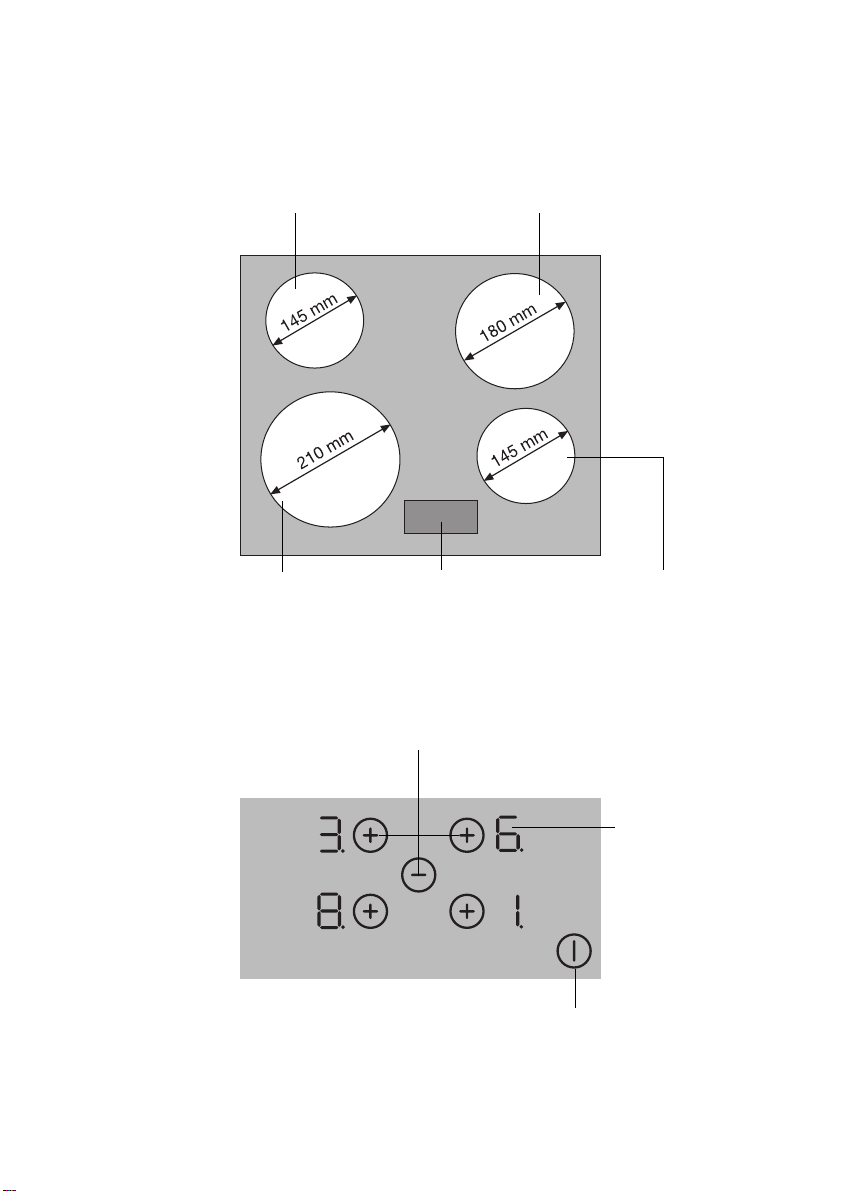
Gerätebeschreibung
Ausstattung Kochfeld
Einkreis-Kochzone
1200W
Einkreis-Kochzone
1800W
Einkreis-Kochzone
2300W
Ausstattung Bedienfeld
Kochzonen- und Kochstufenwahl
6
Bedienfeld
Einkreis-Kochzone
1200W
Anzeige
Ein/Aus
Page 7
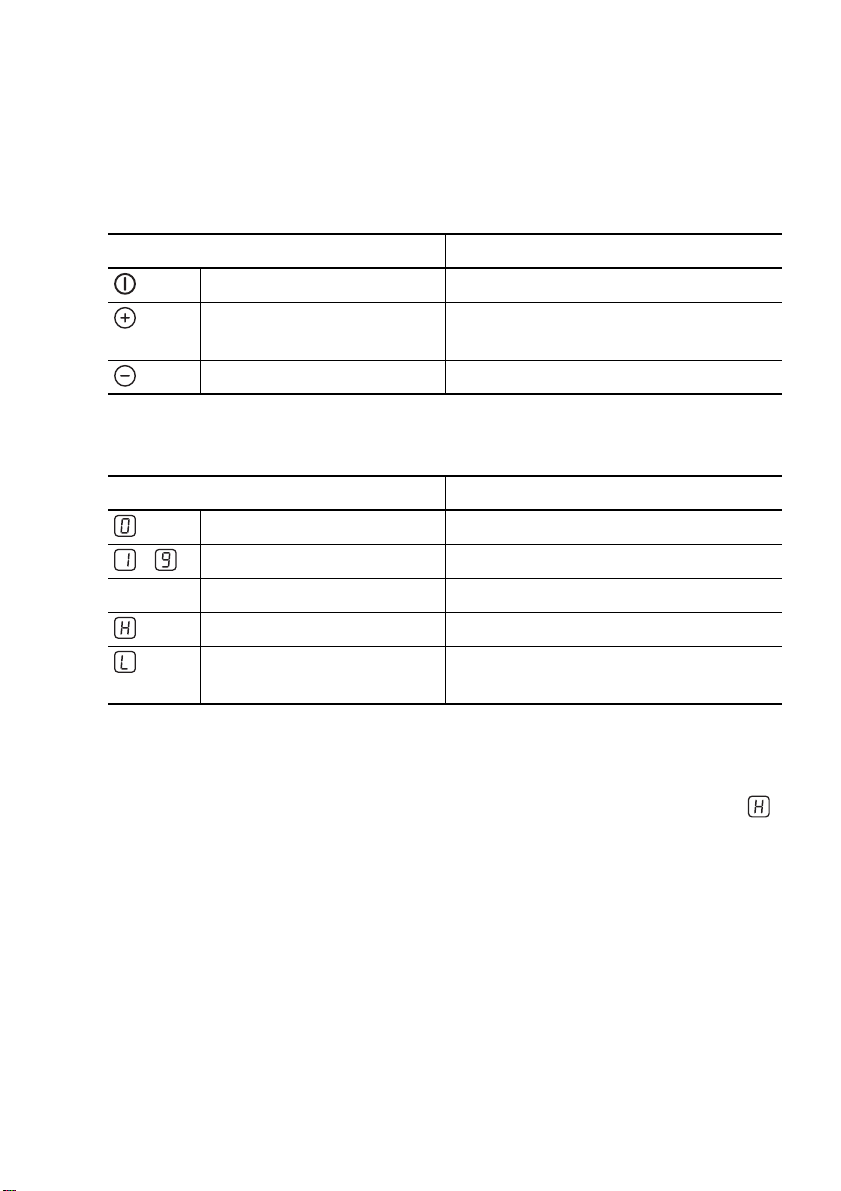
Touch Control-Sensorfelder
Das Gerät wird mit Touch Control-Sensorfeldern bedient. Funktionen werden durch Berühren der Sensorfeldern gesteuert und durch Anzeigen bestätigt.
Berührt werden die Sensorfelder von oben, ohne weitere Sensorfelder zu
verdecken.
Sensorfeld Funktion
Ein / Aus Gerät ein- und ausschalten
Einstellungen erhöhen Kochzone auswählen
Kochstufe erhöhen
Einstellungen verringern Kochstufe verringern
Anzeigen
Anzeige Beschreibung
Kochzone ist ausgeschaltet
- Kochstufen Kochstufe ist eingestellt
ER Fehler Fehlfunktion ist aufgetreten
Restwärme Kochzone ist noch warm
Kindersicherung Verriegelung/Kindersicherung ist
eingeschaltet
Restwärmeanzeige
1 Warnung! Verbrennungsgefahr durch Restwärme. Nach dem Ausschalten
brauchen die Kochzonen einige Zeit zum Abkühlen. Restwärmeanzeige
beachten.
3 Restwärme kann zum Schmelzen und Warmhalten von Speisen genutzt
werden.
7
Page 8
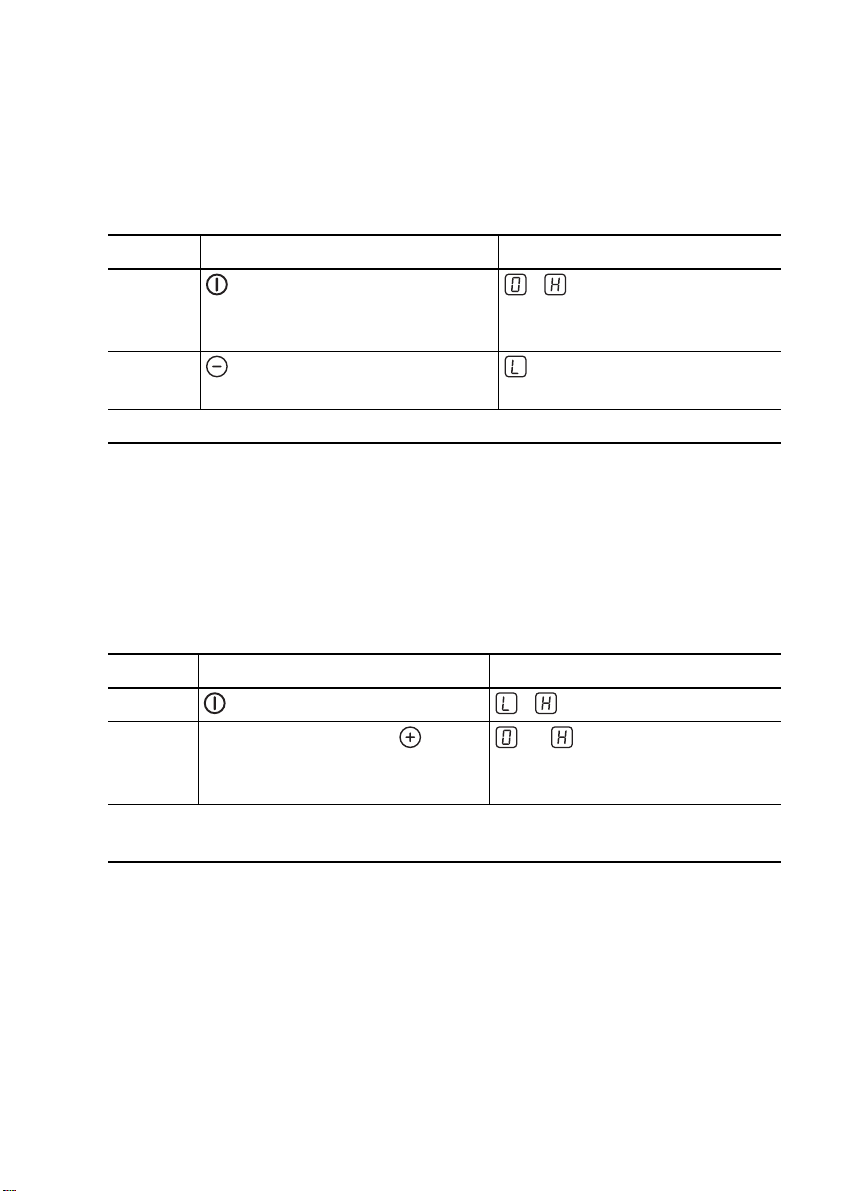
Bedienung des Geräts
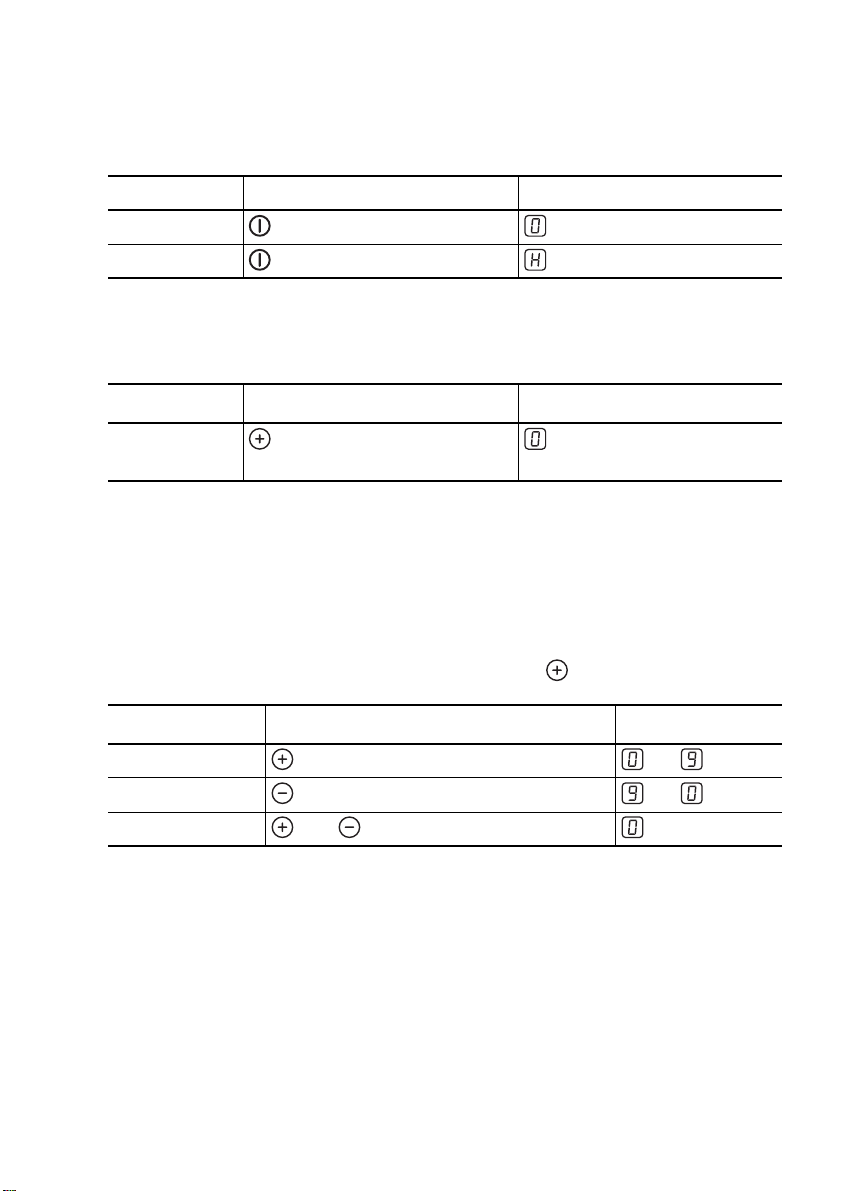
Gerät ein- und ausschalten
Bedienfeld Anzeige
Einschalten 2 Sekunden berühren / Dezimalpunkt blinkt
Ausschalten 1 Sekunde berühren
/ keine
Kochzone auswählen
Bedienfeld Anzeige
Auswählen berühren
Dezimalpunkt leuchtet
3 Bei der ausgewählten Kochzone wird der Dezimalpunkt angezeigt. Danach
muss bei dieser Kochzone innerhalb von 6 Sekunden eine Kochstufe eingestellt werden, sonst muss sie erneut angewählt werden.
Kochstufe einstellen
3 Nach der Auswahl der Kochzone das Sensorfeld kurz loslassen.
Bedienfeld Anzeige
Erhöhen berühren bis
Verringern berühren bis
Ausschalten und gleichzeitig berühren
3 Nach 6 Sekunden ohne Eingabe wird die Auswahl aufgehoben und der De-
zimalpunkt erlischt. Zum erneuten Einstellen die gewünschte Kochzone
wieder anwählen.
8
Page 9
Kindersicherung verwenden
Die Kindersicherung verhindert eine unerwünschte Benutzung des Geräts.
3 Die Kindersicherung kann nur unmittelbar nach dem Einschalten des Gerä-
tes aktiviert werden.
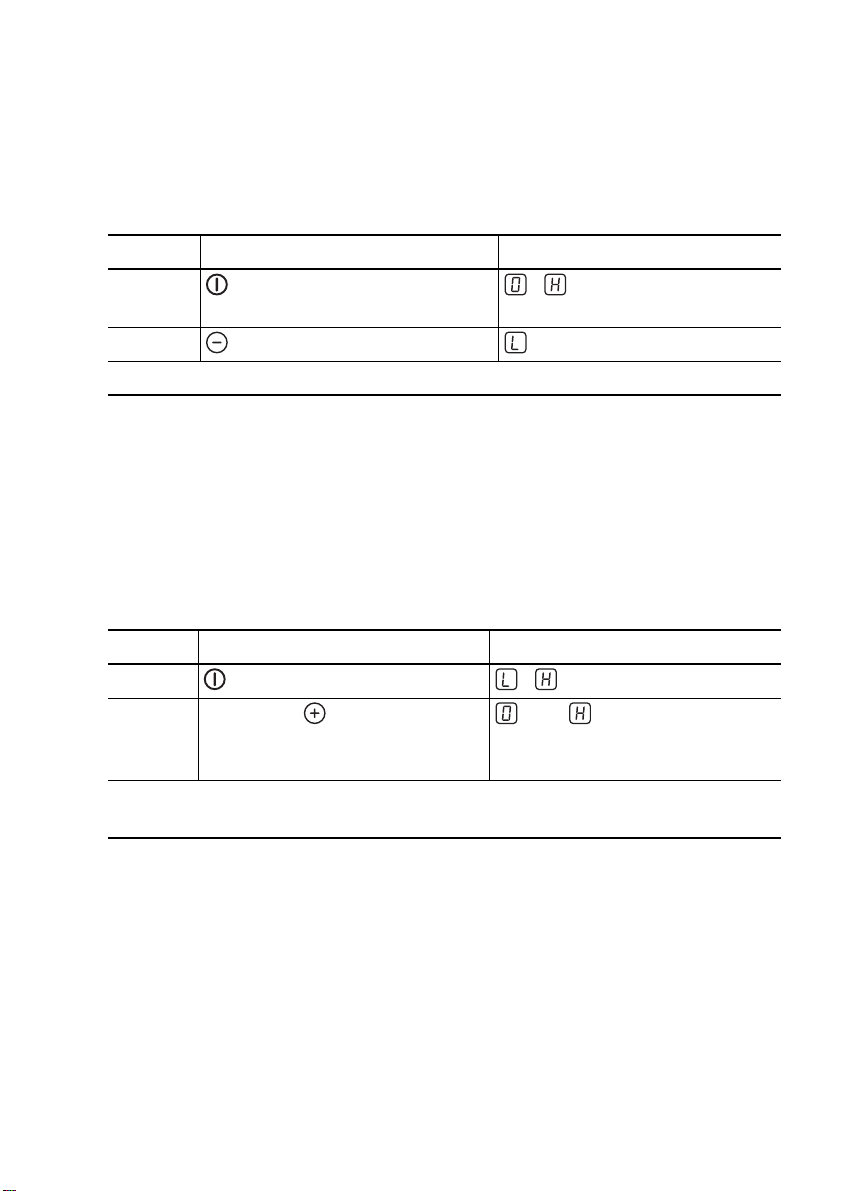
Kindersicherung einschalten
Schritt Bedienfeld Anzeige
1.
2.
Gerät schaltet aus.
Gerät einschalten (keine
Kochstufe einstellen)
5 Sekunden lang berühren wird angezeigt.
/ (falls heiß)
3 Um die Kindersicherung erfolgreich zu überwinden oder auszuschalten,
müssen die Bedienschritte unmittelbar nacheinander ausgeführt werden.
Zwischen den beschriebenen Bedienschritten dürfen keine anderen Sensorfelder berührt werden.
Kindersicherung überwinden
Die Kindersicherung kann damit für einen einmaligen Kochvorgang ausgeschaltet werden; sie bleibt danach weiter aktiv.
Schritt Bedienfeld Anzeige
1.
2.
Bis zum nächsten Ausschalten des Geräts kann es normal benutzt werden.
Gerät einschalten / (falls heiß)
die beiden der vorderen
Kochzonen gleichzeitig berühren
oder
Dezimalpunkte blinken
9
Page 10
Kindersicherung ausschalten
Schritt Bedienfeld Anzeige
1.
Gerät einschalten / (falls heiß)
2.
5 Sekunden lang berühren oder
Dezimalpunkte blinken
Gerät schaltet aus.
Sicherheitsabschaltung
Kochfeld
• Wird nach dem Einschalten des Geräts nicht innerhalb von ca. 10 Sekunden bei einer Kochzone eine Kochstufe eingestellt, schaltet das Gerät automatisch ab.
• Wird ein oder mehrere Sensorfelder länger als ca. 10 Sekunden berührt,
schaltet das Kochfeld automatisch ab. ER03 wird blinkend angezeigt bzw.
wechselt auf falls Restwärme vorhanden ist.
• Werden alle Kochzonen ausgeschaltet, schaltet sich das Kochfeld nach
ca. 10 Sekunden automatisch aus.
Bedienfeld
3 Feuchtigkeit (z.B. ein nasses Tuch) oder überkochende Flüssigkeiten auf
dem Bedienfeld schalten alle Kochzonen aus.
Kochzonen
• Wird eine der Kochzonen nach einer bestimmten Zeit nicht ausgeschaltet
oder die Kochstufe nicht verändert, schaltet sich die entsprechende
Kochzone automatisch aus. wird angezeigt.
Kochstufe Abschaltung nach
1 - 2 6 Stunden
3 - 4 5 Stunden
5 4 Stunden
6 - 9 1,5 Stunden
10
Page 11
Tipps zum Kochen und Braten
3 Acrylamidhinweis
Nach neuesten wissenschaftlichen Erkenntnissen kann eine intensive Bräunung der Lebensmittel, speziell bei stärkehaltigen Produkten, eine gesundheitliche Gefährdung durch Acrylamid verursachen. Daher empfehlen wir,
möglichst bei niedrigen Temperaturen zu garen und die Speisen nicht zu
stark zu bräunen.
Kochgeschirr
• Gutes Kochgeschirr erkennen Sie am Topfboden. Der Boden sollte so
dick und plan wie möglich sein.
• Geschirr aus Stahlemail oder mit Aluminium- oder Kupferböden kann Verfärbungen auf der Glaskeramikfläche hinterlassen, die nur schwer oder
gar nicht mehr zu entfernen sind.
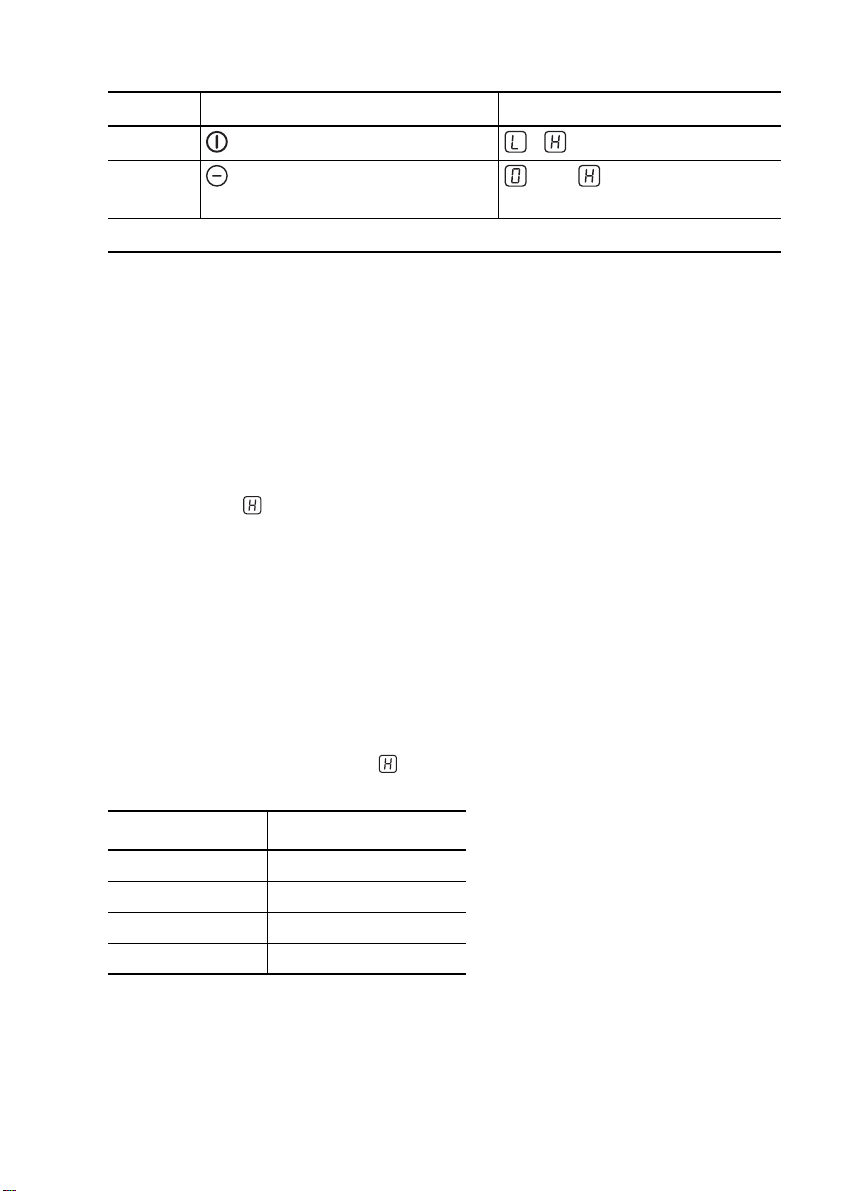
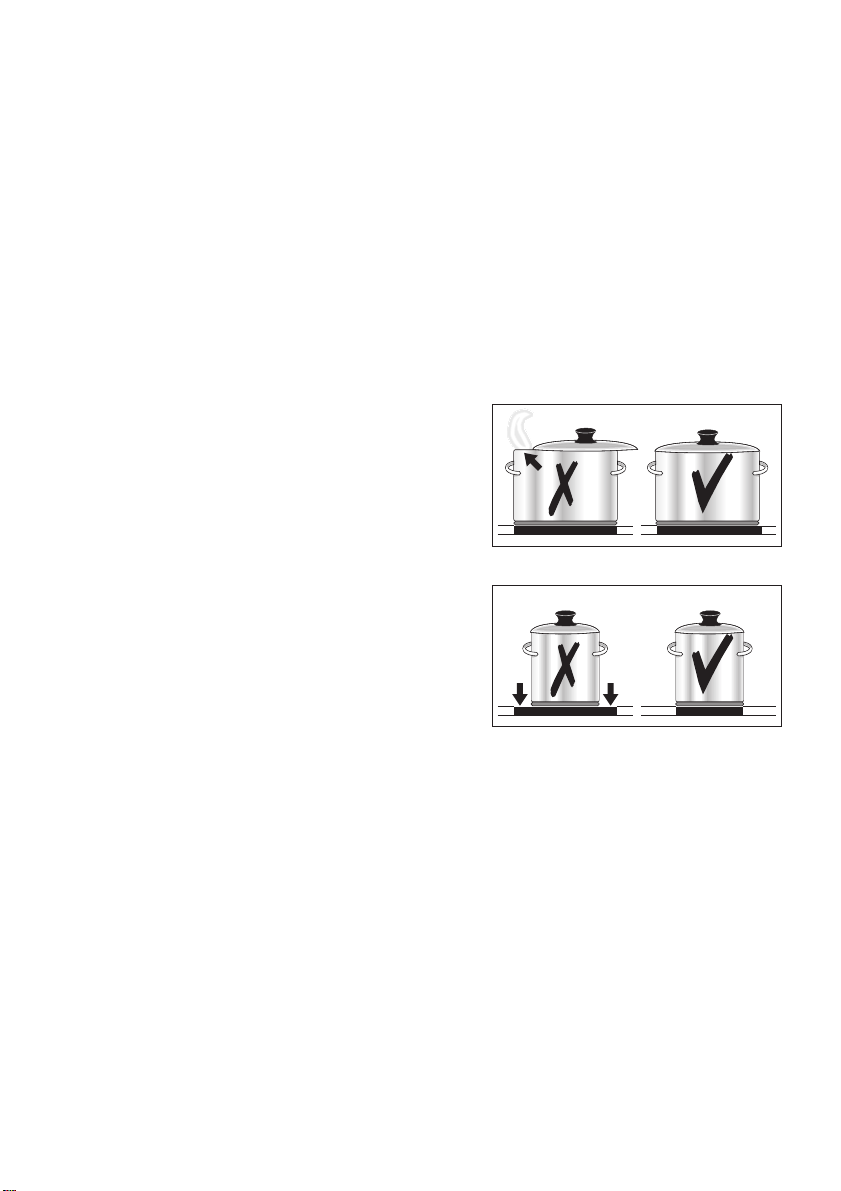
Energiesparen
2 Kochgeschirr grundsätzlich vor dem Ein-
schalten der Kochzone aufsetzen.
2 Töpfe, wenn möglich, immer mit dem De-
ckel verschließen.
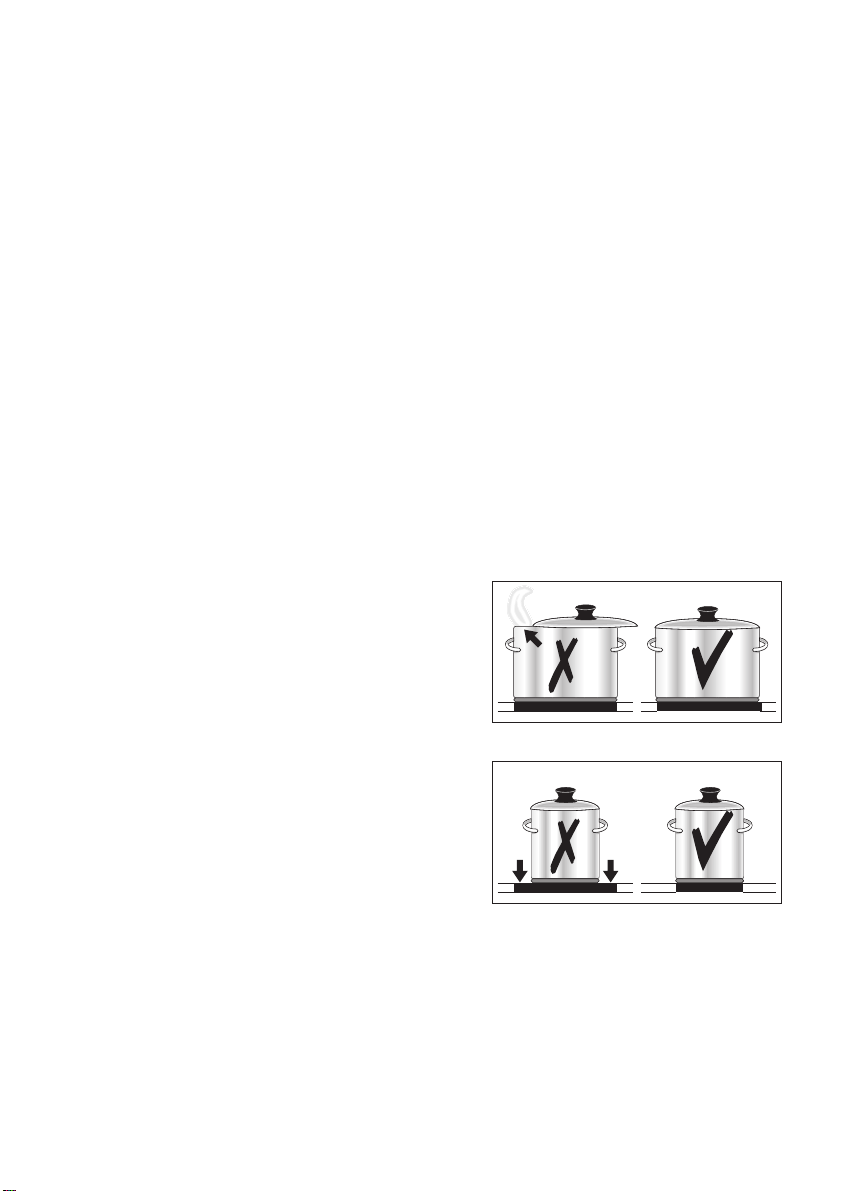
2 Kochzonen vor Ende der Garzeit aus-
schalten, um die Restwärme zu nutzen.
2 Topfboden und Kochzone sollten gleich
groß sein.
11
Page 12

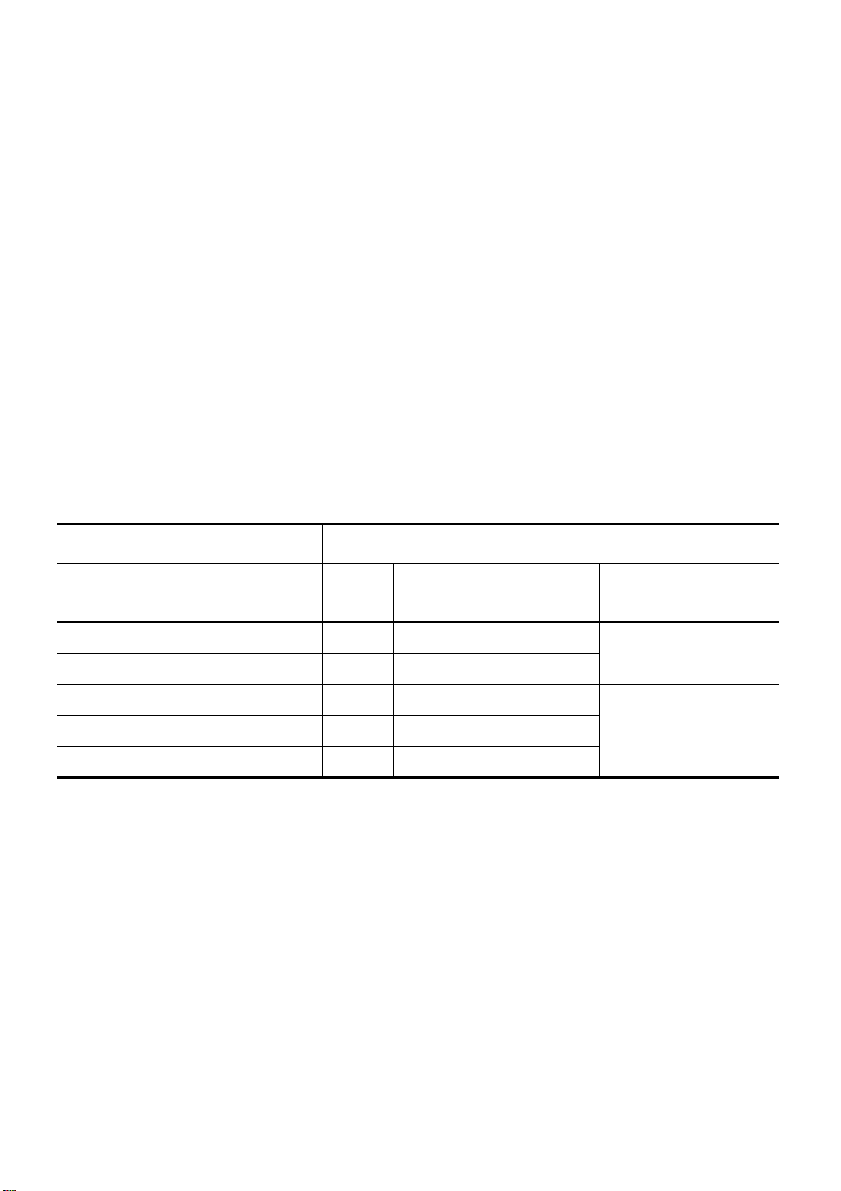
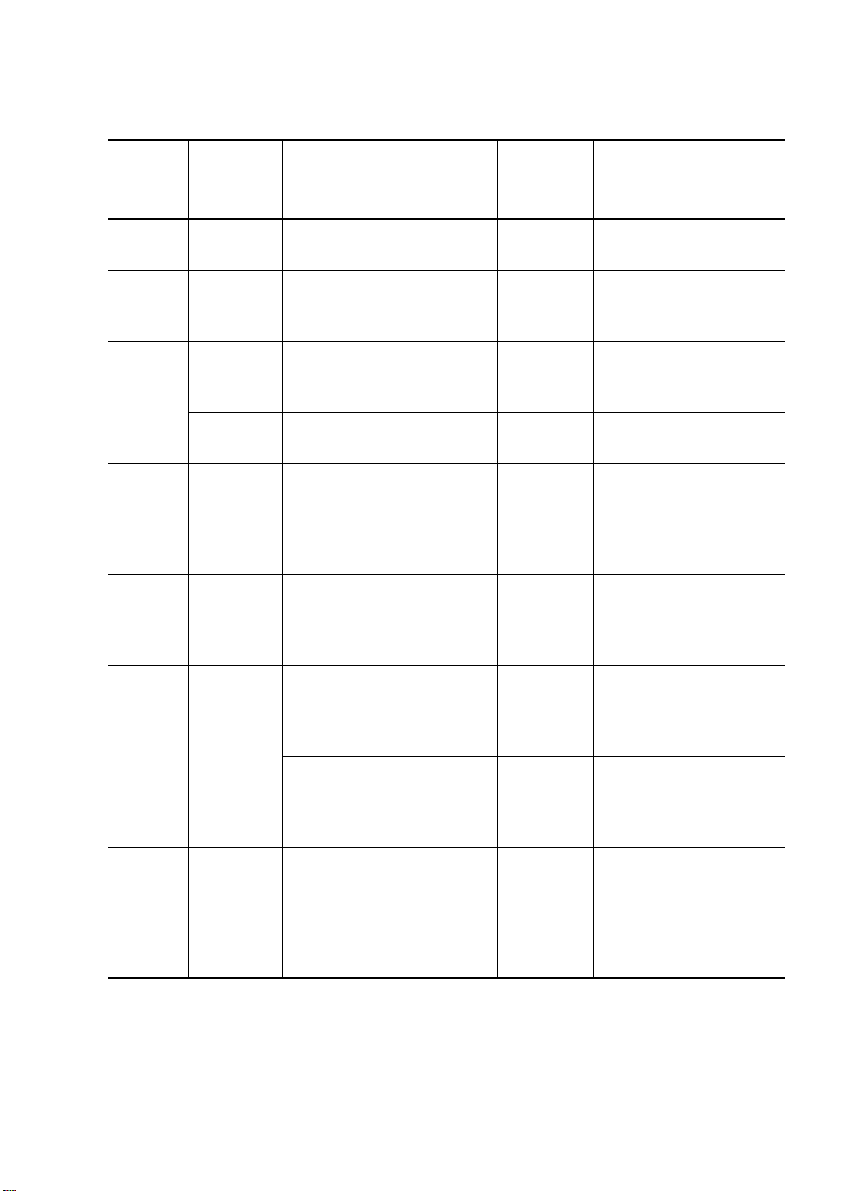
Anwendungsbeispiele zum Kochen
Die Angaben in folgender Tabelle sind Richtgrößen.
Koch-
stufe
0 Nachwärme, Aus-Stellung
1
1-2
2-3
3-4
4-5
6-7
7-8
9
Gar-
vorgang
Warm-
halten
Schmel-
zen
Stocken
Quellen
Dämpfen
Dünsten
Kochen
Mildes
Braten
Starkes
Braten
Ankochen
Anbraten
Frittieren
Geeignet für Dauer Hinweise/Tipps
Warmhalten von gegarten
Speisen
Sauce hollandaise,
Schmelzen von Butter,
Schokolade, Gelatine
Schaumomelett, Eierstich 10-40 Min. Mit Deckel garen
Quellen von Reis und Milch-
gerichten
Erhitzen von Fertiggerichten
Dünsten von Gemüse,
Fisch
Schmoren von Fleisch
Dämpfen von Kartoffeln 20-60 Min.
Kochen größerer Speise-
mengen, Eintopfgerichte
und Suppen
Schnitzel, Cordon bleu, Ko-
telett, Frikadellen, Brat-
würste, Leber,
Mehlschwitze, Eier, Eier-
kuchen, Krapfen frittieren
Kartoffelpuffer, Lenden-
stücke, Steaks, Flädle
Ankochen großer Mengen Wasser, Spätzle kochen, Anbraten von
Fleisch (Gulasch, Schmorbraten), Frittieren von Pommes frites
nach Bedarf Abdecken
5-25 Min.
25-50 Min.
20-45 Min.
60-150 Min.
fortlaufend
backen
5-15 Min.
pro Pfanne
Zwischendurch
umrühren
Mindestens doppelte
Menge Flüssigkeit zum
Reis geben, Milchgerichte zwischen-
durch umrühren
Bei Gemüse wenig
Flüssigkeit zugeben
(einige Esslöffel)
Wenig Flüssigkeit
verwenden, z. B.: Max.
¼
l Wasser auf
750 g Kartoffeln
Bis zu 3 l Flüssigkeit
plus Zutaten
Zwischendurch
wenden
Zwischendurch
wenden
12
Page 13

Reinigung und Pflege
1 Vorsicht! Verbrennungsgefahr durch Restwärme.
1 Achtung! Scharfe und scheuernde Reinigungsmittel beschädigen das Ge-
rät. Mit Wasser und Spülmittel reinigen.
1 Achtung! Rückstände von Reinigungsmitteln beschädigen das Gerät.
Rückstände mit Wasser und Spülmittel entfernen.
Gerät nach jedem Gebrauch reinigen
1. Gerät mit einem feuchten Tuch und ein wenig Spülmittel abwischen.
2. Gerät mit einem sauberen Tuch trockenreiben.
Verschmutzungen entfernen
1. Den Reinigungsschaber schräg zur Glaskeramikfläche ansetzen.
2. Verschmutzungen mit gleitender Klinge entfernen.
3. Gerät mit einem feuchten Tuch und ein wenig Spülmittel abwischen.
4. Gerät mit einem sauberen Tuch trockenreiben.
entfernen
Art der Verschmutzung sofort bei abgekühltem Gerät mit
Zucker, zuckerhaltige Speisen ja ---
Kunststoffe, Aluminiumfolien ja ---
Kalk- und Wasserränder --- ja
Fettspritzer --- ja
metallisch schimmernde
Verfärbungen
*Reinigungsschaber, Glaskeramik- oder Edelstahlreiniger sind im Fachhandel erhältlich
--- ja
Reinigungsschaber*
Glaskeramik- oder
Edelstahlreiniger*
3 Hartnäckige Verschmutzungen mit einem Glaskeramik- oder Edelstahlreini-
ger entfernen.
3 Kratzer oder dunkle Flecken in der Glaskeramik, lassen sich nicht mehr ent-
fernen, beeinträchtigen jedoch die Funktion des Geräts nicht.
13
Page 14
Was tun, wenn …
Problem Mögliche Ursache Abhilfe
Die Kochzonen funktionieren
nicht
Die Kochzonen lassen sich
nicht auswählen / Gerät reagiert nicht auf Eingaben am
Bedienfeld
Die Restwärme-Anzeige zeigt
nichts an
Er03
Er21
Er25
(nur 10 Sekunden)
Er40
wird angezeigt
wird angezeigt Sicherheitsabschaltung
wird angezeigt
wird angezeigt Überspannungsschutz hat
Keine Kochzone ausgewählt Kochzone innerhalb von 10
Seit dem Einschalten des
Geräts sind mehr als 10 Sekunden vergangen
Die Kindersicherung ist eingeschaltet
Die Sensorfelder sind durch
ein feuchtes Tuch oder mit
Flüssigkeit teilweise bedeckt
Sicherheitsabschaltung ist
ausgelöst
Die Kochzone ist nur kurz in
Betrieb gewesen und daher
noch nicht heiß
Mehrere Sensorfelder wurden
gleichzeitig berührt
durch Überhitzung
Gerät ist falsch angeschlossen
angesprochen (Falschanschluss siehe oben
oder Überhitzung der Elektronik siehe
Er21
Er25
)
Sekunden nach dem Einschalten auswählen (Dezimalpunkt leuchtet)
Gerät erneut einschalten.
Kochzone innerhalb von 10
Sekunden nach dem Einschalten auswählen
Kindersicherung deaktivieren (siehe Kapitel „Kindersicherung“)
Tuch oder Flüssigkeit entfernen
Gerät erneut einschalten
Sollte die Kochzone heiß
sein, den Kundendienst rufen.
Nur ein Sensorfeld berühren
Gerät abkühlen lassen.
Kochgeschirr entfernen.
Gerät vom Netz trennen und
richtig anschließen lassen
Gerät einige Minuten vom
Netz trennen (Sicherung der
Hausinstallation herausnehmen).
Gerät abkühlen lassen.
3 Bei allen anderen auftretenden Fehlercodes Gerät für einige Sekundenvom
Netz trennen (Sicherung der Hausinstallation herausnehmen). Wird der Fehlercode erneut angezeigt, bitte den Kundendienst rufen und den Fehlercode
angeben.
Wenn Sie das Problem mit der oben angegebenen Abhilfemaßnahme
nicht beheben können, wenden Sie sich bitte an Ihren Fachhändler
oder den Kundendienst.
14
Page 15

1 Warnung! Reparaturen am Gerät dürfen nur von Fachkräften durchgeführt
werden. Durch unsachgemäße Reparaturen können erhebliche Gefahren für
den Benutzer entstehen.
3 Bei Fehlbedienungen kann der Besuch des Kundendienst-Technikers bzw.
des Fachhändlers auch während der Garantiezeit nicht kostenlos erfolgen.
15
Page 16

Entsorgung
2 Verpackungsmaterial
Die Verpackungsmaterialien sind umweltverträglich und wiederverwertbar.
Die Kunststoffteile sind gekennzeichnet, z. B. >PE<, >PS< etc. Entsorgen
Sie die Verpackungsmaterialien entsprechend ihrer Kennzeichnung bei den
kommunalen Entsorgungsstellen in den dafür vorgesehenen Sammelbehältern.
2 Altgerät
Das Symbol
dass dieses Produkt nicht als normaler Haushaltsabfall zu behandeln ist,
sondern an einem Sammelpunkt für das Recycling von elektrischen und
elektronischen Geräten abgegeben werden muss. Durch Ihren Beitrag zum
korrekten Entsorgen dieses Produkts schützen Sie die Umwelt und die Gesundheit Ihrer Mitmenschen. Umwelt und Gesundheit werden durch falsches
Entsorgen gefährdet. Weitere Informationen über das Recycling dieses Produkts erhalten Sie von Ihrem Rathaus, Ihrer Müllabfuhr oder dem Geschäft,
in dem Sie das Produkt gekauft haben.
W auf dem Produkt oder seiner Verpackung weist darauf hin,
16
Page 17

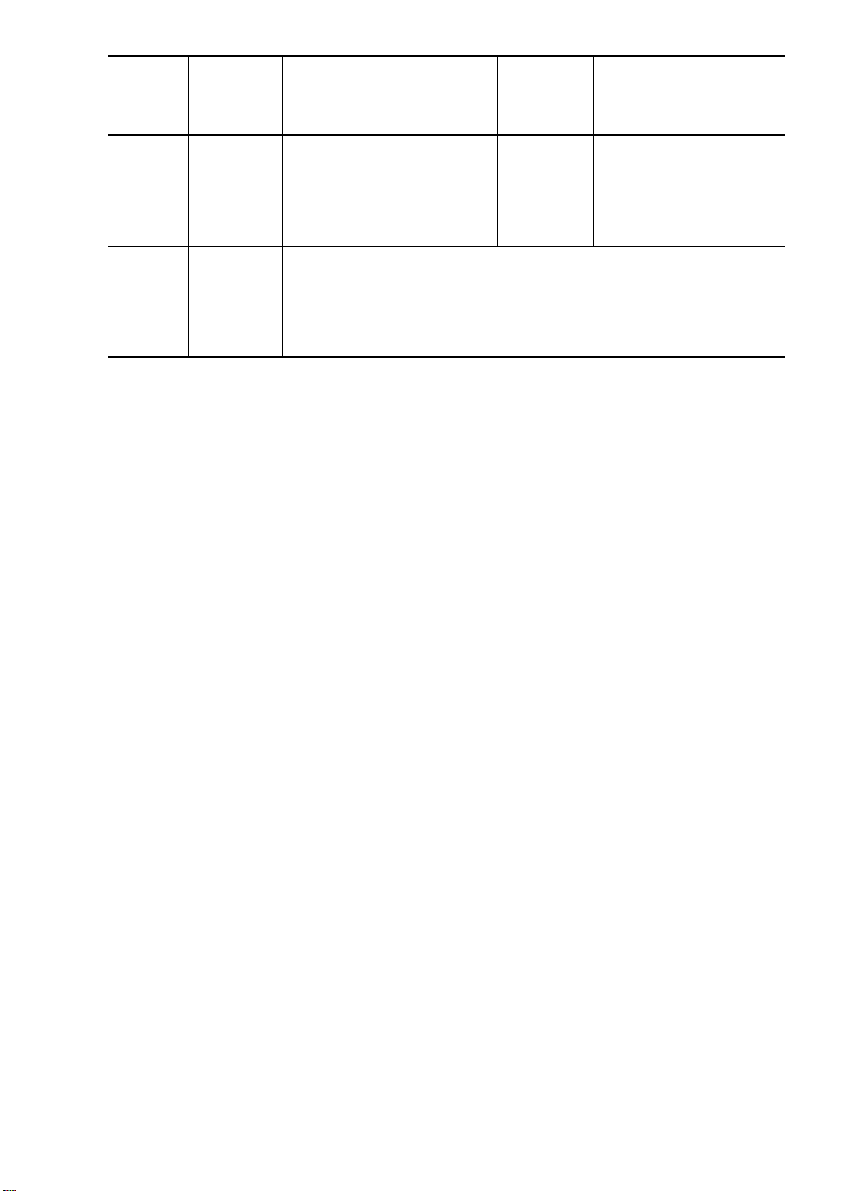
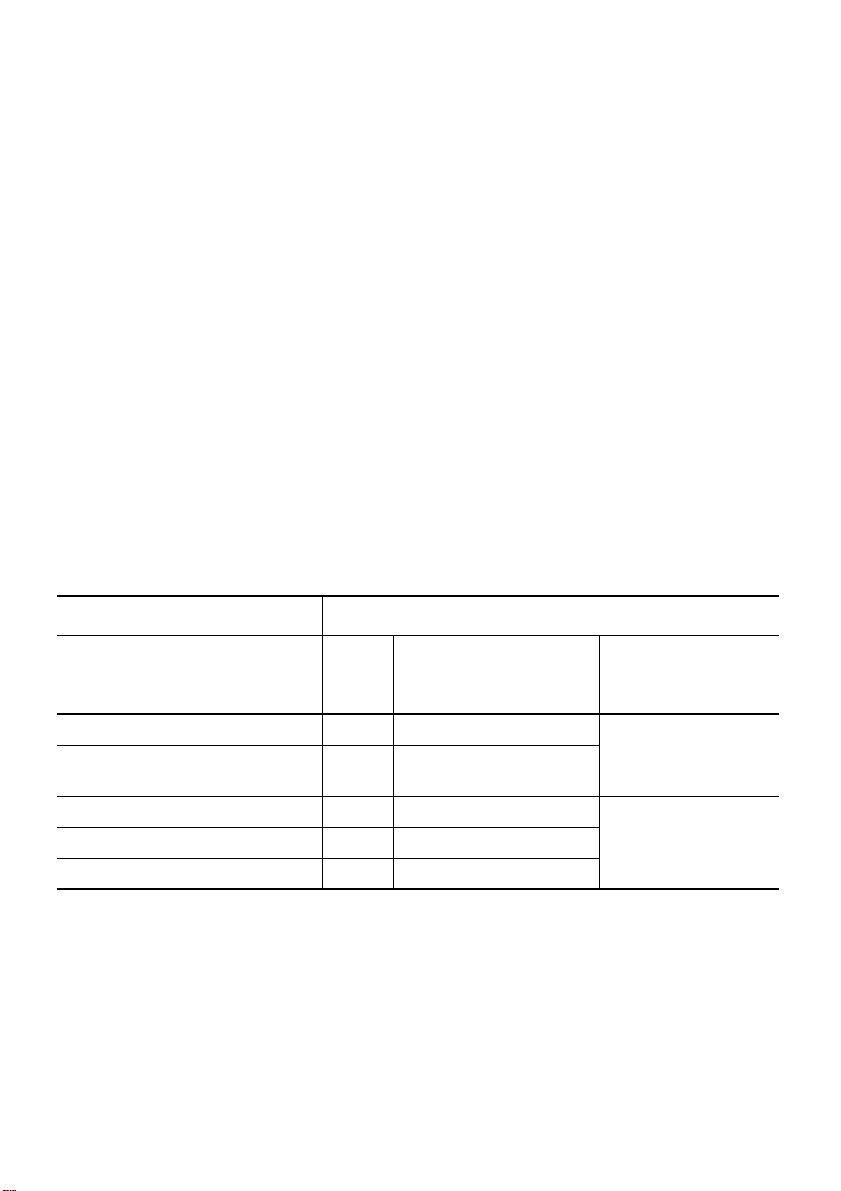
Montageanweisung
Sicherheitshinweise
Die im Einsatzland geltenden Gesetze, Verordnungen, Richtlinien und Normen sind einzuhalten (Sicherheitsbestimmungen, sach- und ordnungsgemäßes Recycling etc.).
Die Montage darf nur von einer Fachkraft ausgeführt werden.
Die Mindestabstände zu anderen Geräten und Möbeln sind einzuhalten.
Der Berührungsschutz muss durch den Einbau gewährleistet sein, zum Beispiel Schubladen dürfen nur mit Schutzboden direkt unter dem Gerät montiert sein.
Die Schnittflächen an der Arbeitsplatte sind mit einem geeigneten Dichtungsmaterial gegen Feuchtigkeit zu schützen.
Die Dichtung schließt das Gerät spaltfrei mit der Arbeitsplatte ab.
Zwischen Gerät und Arbeitsplatte keine Silikon-Dichtungsmasse aufbringen.
Vermeiden Sie die Montage des Gerätes direkt neben Türen und unter Fenstern. Aufklappende Türen und aufspringende Fenster können sonst heißes
Kochgeschirr von der Kochstelle reißen.
1 WARNUNG!
Verletzungsgefahr durch elektrischen Strom.
• Die Netzanschlussklemme liegt an Spannung.
• Netzanschlussklemme spannungsfrei machen.
• Anschlussschema beachten.
• Sicherheitsregeln der Elektrotechnik beachten.
• Berührungsschutz durch fachgerechten Einbau sicherstellen.
• Den Elektroanschluss durch eine Elektrofachkraft ausführen lassen.
17
Page 18

1 ACHTUNG!
Schäden durch elektrischen Strom.
Lockere und unsachgemäße Steckverbindungen können die Klemme überhitzen.
• Klemmverbindungen fachgerecht ausführen.
• Kabel zugentlasten.
• Bei 1 oder 2 phasigem Anschluss muss jeweils die passende Netzan-
schlussleitung vom Typ H05BB-F Tmax 90°C (oder höherwertig) eingesetzt werden.
• Wenn die Netzanschlussleitung dieses Gerätes beschädigt ist, muss sie
durch eine besondere Anschlussleitung (Typ H05BB-F Tmax 90°C; oder
höherwertig) ersetzt werden. Diese ist beim Kundendienst erhältlich.
In der elektrischen Installation ist eine Einrichtung vorzusehen, die es ermöglicht, das Gerät mit einer Kontaktöffnungsweite von mind. 3 mm allpolig
vom Netz zu trennen.
Als geeignete Trennvorrichtungen gelten z.B. LS-Schalter, Sicherungen
(Schraubsicherungen sind aus der Fassung herauszunehmen), FI-Schalter
und Schütze.
18
Page 19

Garantie/Kundendienst
Deutschland
Der Endabnehmer dieses Gerätes (Verbraucher) hat bei einem Kauf dieses Gerätes von einem
Unternehmer (Händler) in Deutschland im Rahmen der Vorschriften über den Verbrauchsgüterkauf gesetzliche Rechte, die durch diese Garantie nicht eingeschränkt werden. Diese Garantie
räumt dem Verbraucher also zusätzliche Rechte ein.
Dies vorausgeschickt, leisten wir, AEG Hausgeräte GmbH, gegenüber dem Verbraucher Ga-
rantie für dieses Gerät für den Zeitraum von 24 Monaten ab Übergabe zu den folgenden
Bedingungen:
1. Mit dieser Garantie haften wir dafür, daß dieses neu hergestellte Gerät im Zeitpunkt der
Übergabe vom Händler an den Verbraucher die in unserer Produktbeschreibung für dieses
Gerät aufgeführten Eigenschaften aufweist. Ein Mangel liegt nur dann vor, wenn der Wert
oder die Gebrauchs-tauglichkeit dieses Gerätes erheblich gemindert ist. Zeigt sich der Mangel nach Ablauf von sechs (6) Monaten ab dem Übergabezeitpunkt, so hat der Verbraucher
nachzuweisen, daß das Gerät bereits im Übergabezeitpunkt mangelhaft war. Nicht unter diese Garantie fallen Schäden oder Mängel aus nicht vorschriftsmäßiger Handhabung sowie
Nichtbeachtung der Einbauvorschriften und Gebrauchsanweisungen.
2. Dieses Gerät fällt nur dann unter diese Garantie, wenn es von einem Unternehmer in einem
der Mitgliedstaaten der Europäischen Union gekauft wurde, es bei Auftreten des Mangels in
Deutschland betrieben wird und Garantieleistungen auch in Deutschland erbracht werden
können. Mängel müssen uns innerhalb von zwei (2) Monaten nach dessen Kenntnis angezeigt werden.
3. Mängel dieses Gerätes werden wir innerhalb angemessener Frist nach Mitteilung des Mangels unentgeltlich beseitigen; die zu diesem Zweck erforderlichen Aufwendungen, insbesondere Transport-, Wege-, Arbeits- und Materialkosten werden von uns getragen. Über diese
Nachbesserung hinausgehende Ansprüche werden durch diese Garantie dem Verbraucher
nicht eingeräumt.
4. Bei Großgeräten (stationär betriebene Geräte) ist im Garantiefall unter der für den Endab-
nehmer kostengünstigen Rufnummer 0180 322 66 22 * die nächstgelegene Kunden-
dienststelle zu benachrichtigen, von der Ort, Art und Weise der Garantieleistungen festgelegt
werden. Nachbesserungsarbeiten werden, soweit möglich, am Aufstellungsort, sonst in unserer Kundendienstwerkstatt durchgeführt.
5. Garantieleistungen bewirken weder eine Verlängerung noch einen Neubeginn der Garantiezeit für dieses Gerät; ausgewechselte Teile gehen in unser Eigentum über.
6. Mängelansprüche aus dieser Garantie verjähren in zwei (2) Jahren ab dem Zeitpunkt der
Übergabe des Gerätes vom Händler an den Verbraucher, der durch Original-Kaufbeleg (Kassenzettel, Rechnung) zu belegen ist; wenn dieses Gerät gewerblich oder - bei Waschgeräten
und Wäschetrocknern - in Gemeinschaftsanlagen genutzt wird, beträgt die Verjährungsfrist
sechs (6) Monate.
AEG Hausgeräte GmbH
Markenvertrieb Zanussi
Muggenhofer Straße 135
90429 Nürnberg
* Deutsche Telekom
EUR 0,09 / Minute
Stand Jan. 2002
19
Page 20

Europäische Garantie
Für dieses Gerät besteht in den am Ende dieser Benutzerinformation aufgeführten Ländern
eine Garantie von Electrolux für den Zeitraum, der in der Gerätegarantie oder andernfalls gesetzlich festgelegt ist. Wenn Sie aus einem dieser Länder in ein anderes der aufgeführten
Länder ziehen, wird die Gerätegarantie unter folgenden Voraussetzungen mit übertragen:
• Die Gerätegarantie beginnt an dem Datum, an dem Sie das Gerät gekauft haben. Dies wird
durch ein gültiges Kaufdokument bescheinigt, das von dem Verkäufer des Gerätes ausgestellt wurde.
• Die Gerätegarantie gilt für denselben Zeitraum und in demselben Ausmaß für Arbeitszeit
und Teile, wie sie für dieses spezielle Modell oder diese spezielle Gerätereihe in Ihrem neuen Aufenthaltsland gelten.
• Die Gerätegarantie ist personengebunden, d. h. sie gilt für den Erstkäufer des Geräts und
kann nicht auf einen anderen Benutzer übertragen werden.
• Das Gerät wird in Übereinstimmung mit der von Electrolux herausgegebenen Anleitung in-
stalliert und verwendet und wird nur im Privathaushalt eingesetzt, d. h. nicht für gewerbliche Zwecke genutzt.
• Das Gerät wird in Übereinstimmung mit allen relevanten Bestimmungen installiert, die in Ih-
rem neuen Aufenthaltsland gelten.
Die Bestimmungen dieser europäischen Garantie haben keinerlei Auswirkungen auf die
Rechte, die Ihnen gesetzlich zustehen.
20
Page 21
Service
Bei technischen Störungen prüfen Sie bitte zunächst, ob Sie mit Hilfe der
Gebrauchsanweisung (Kapitel „Was tun, wenn...“) das Problem selbst beheben können.
Wenn Sie das Problem nicht beheben konnten, wenden Sie sich bitte an
den Kundendienst oder einen unserer Service-Partner.
Um Ihnen schnell helfen zu können, benötigen wir folgende Angaben:
– Modellbezeichnung
– Produkt-Nummer (PNC)
– Serien-Nummer (S-No.)
(Nummern siehe Typschild)
– Art der Störung
– eventuelle Fehlermeldung, die das Ge-
rät anzeigt
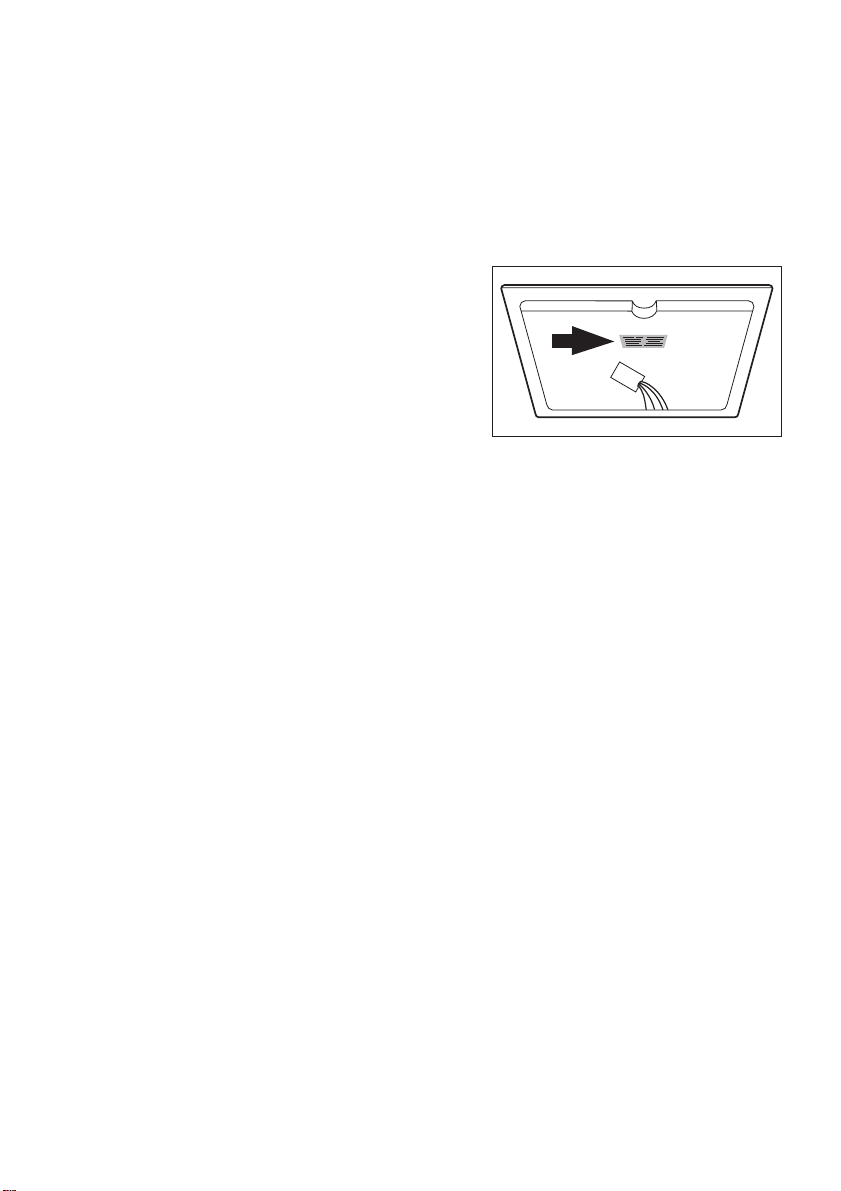
– dreistellige Buchstaben-Zahlenkombination der Glaskeramik
Damit Sie die benötigten Kennziffern Ihres Gerätes zur Hand haben, emp-
fehlen wir, sie hier einzutragen:
Modellbezeichnung: .....................................
PNC: .....................................
S-No: .....................................
21
Page 22

Dear Customer,
Please read these user instructions carefully and keep them to refer to later.
Please pass the user instructions on to any future owner of the appliance.
The following symbols are used in the text:
1 Safety instructions
Warning! Information that affects your personal safety.
Important! Information that prevents damage to the appliance.
3 Useful tips and hints
2 Environmental information
22
Page 23

Contents
Operating Instructions . . . . . . . . . . . . . . . . . . . . . . . . . . . . . . . . . . . . . 24
Safety instructions . . . . . . . . . . . . . . . . . . . . . . . . . . . . . . . . . . . . . . . . . . . . 24
Description of the Appliance . . . . . . . . . . . . . . . . . . . . . . . . . . . . . . . . . . . . 26
Cooking surface layout . . . . . . . . . . . . . . . . . . . . . . . . . . . . . . . . . . . . . . . . . . 26
Control panel layout . . . . . . . . . . . . . . . . . . . . . . . . . . . . . . . . . . . . . . . . . . . . 26
Touch Control sensor fields . . . . . . . . . . . . . . . . . . . . . . . . . . . . . . . . . . . . 27
Displays . . . . . . . . . . . . . . . . . . . . . . . . . . . . . . . . . . . . . . . . . . . . . . . . . . . 27
Residual heat indicator . . . . . . . . . . . . . . . . . . . . . . . . . . . . . . . . . . . . . . . 27
Operating the appliance . . . . . . . . . . . . . . . . . . . . . . . . . . . . . . . . . . . . . . . . 28
Switching the appliance on and off. . . . . . . . . . . . . . . . . . . . . . . . . . . . . . . . . 28
Selecting the cooking zone. . . . . . . . . . . . . . . . . . . . . . . . . . . . . . . . . . . . . . . 28
Setting the heat setting . . . . . . . . . . . . . . . . . . . . . . . . . . . . . . . . . . . . . . . . . . 28
Using the child safety device . . . . . . . . . . . . . . . . . . . . . . . . . . . . . . . . . . . . . 29
Switching on the child safety device . . . . . . . . . . . . . . . . . . . . . . . . . . . . . 29
Overriding the child safety device . . . . . . . . . . . . . . . . . . . . . . . . . . . . . . . 29
Switching off the child safety device . . . . . . . . . . . . . . . . . . . . . . . . . . . . . 30
Safety cut-out . . . . . . . . . . . . . . . . . . . . . . . . . . . . . . . . . . . . . . . . . . . . . . . . . 30
Tips on Cooking and Frying . . . . . . . . . . . . . . . . . . . . . . . . . . . . . . . . . . . . . 31
Cookware . . . . . . . . . . . . . . . . . . . . . . . . . . . . . . . . . . . . . . . . . . . . . . . . . . . . 31
Energy saving . . . . . . . . . . . . . . . . . . . . . . . . . . . . . . . . . . . . . . . . . . . . . . . . . 31
Examples of cooking applications . . . . . . . . . . . . . . . . . . . . . . . . . . . . . . . . . 32
Cleaning and Care. . . . . . . . . . . . . . . . . . . . . . . . . . . . . . . . . . . . . . . . . . . . . 33
What to do if … . . . . . . . . . . . . . . . . . . . . . . . . . . . . . . . . . . . . . . . . . . . . . . . 34
Disposal . . . . . . . . . . . . . . . . . . . . . . . . . . . . . . . . . . . . . . . . . . . . . . . . . . . . . 36
Installation Instructions . . . . . . . . . . . . . . . . . . . . . . . . . . . . . . . . . . . . 37
Guarantee/Customer Service . . . . . . . . . . . . . . . . . . . . . . . . . . . . . . 39
Service. . . . . . . . . . . . . . . . . . . . . . . . . . . . . . . . . . . . . . . . . . . . . . . . . . . . . 41
Assembly . . . . . . . . . . . . . . . . . . . . . . . . . . . . . . . . . . . . . . . . . . . . . . . . . . 64
Rating Plates. . . . . . . . . . . . . . . . . . . . . . . . . . . . . . . . . . . . . . . . . . . . . . . 67
23
Page 24

Operating Instructions
1 Safety instructions
3 Please comply with these instructions. If you do not, any damage resulting
is not covered by the warranty.
5 This appliance conforms with the following EU Directives:
– 73/23/EEC dated 19.02.1973 Low Voltage Directive
– 89/336/EEC dated 03.05.1989 EMC Directive inclusive of Amending Di-
rective 92/31/EEC
– 93/68/EEC dated 22.07.1993 CE Marking Directive
Correct use
• This appliance should be used only for normal domestic cooking and frying of food.
• The appliance must not be used as a work surface or as a storage surface.
• Additions or modifications to the appliance are not permitted.
• Do not place or store flammable liquids, highly inflammable materials or
fusible objects (e.g. plastic film, plastic, aluminium) on or near the appliance.
Children’s safety
• Small children must be kept away from the appliance.
• Only let bigger children work on the appliance under supervision.
General safety
• The appliance may only be installed and connected by trained, registered
service engineers.
• Built-in appliances may only be used after they have built in to suitable
built-in units and work surfaces that meet standards.
• In the event of faults with the appliance or damage to the glass ceramic
(cracks, scratches or splits), the appliance must be switched off and disconnected from the electrical supply, to prevent the possibility of an electric shock.
• Repairs to the appliance must only be carried out by trained registered
service engineers.
24
Page 25

Safety during use
• Remove stickers and film from the glass ceramic.
• There is the risk of burns from the appliance if used carelessly.
• Cables from electrical appliances must not touch the hot surface of the
appliance or hot cookware.
• Overheated fats and oils can ignite very quickly. When cooking with fat or
oil (e.g. chips) do not leave the appliance unattended.
• Switch the cooking zones off after each use.
Safety when cleaning
• For cleaning, the appliance must be switched off and cooled down.
• For safety reasons, the cleaning of the appliance with steam jet or high-
pressure cleaning equipment is not permitted.
How to avoid damage to the appliance
• The glass ceramic can be damaged by objects falling onto it.
• The edge of the glass ceramic can be damaged by being knocked by the
cookware.
• Cookware made of cast iron, cast aluminium or with damaged bottoms
can scratch the glass ceramic if pushed across the surface.
• Objects that melt and things that boil over can burn onto the glass ceramic and should be removed straightaway.
• To avoid damaging cookware and glass ceramics, do not allow saucepans
or frying pans to boil dry.
• Do not use the cooking zones with empty cookware or without cookware.
25
Page 26

Description of the Appliance
Cooking surface layout
Single cooking zone
1200W
Single cooking zone
1800W
Single cooking zone
2300W
Control panel layout
Cooking zone and heat setting selection
26
Control panel
Single cooking zone
1200W
Display
On/Off
Page 27

Touch Control sensor fields
The appliance is operated using the Touch Control sensor fields. Functions
are controlled by touching sensor fields and confirmed by displays.
Touch the sensor fields from above, without covering other sensor fields.
Sensor field Function
On / Off To switch the appliance on and off
Increase settings To select the cooking zone
To increase heat settings
Reduce settings To reduce heat settings
Displays
Display Description
Cooking zone is switched off
- Heat settings Heat setting is set
ER Fault Malfunction has occurred
Residual heat Cooking zone is still hot
Child safety device Lock/child safety device is engaged
Residual heat indicator
1 Warning! Risk of burns from residual heat. After being switched off, the
cooking zones need some time to cool down. Look at the residual heat indicator
.
3 Residual heat can be used for melting and keeping food warm.
27
Page 28

Operating the appliance
Switching the appliance on and off
Control panel Display
Switch on Touch for 2 seconds / decimal point flashes
Switch off Touch for 1 second
/ none
Selecting the cooking zone
Control panel Display
Select Touch Decimal point lights up
3 The decimal point is displayed by the selected cooking zone. Then a heat
setting must be set for this cooking zone within 6 seconds, otherwise it
must be re-selected.
Setting the heat setting
3 After selecting the cooking zone, briefly release the sensor field .
Control field Display
Increase Touch to
Decrease Touch to
Switch off Touch and at the same time
3 After 6 seconds with no input the selection is cancelled and the decimal
point goes out. To set a new setting, select the required cooking zone again.
28
Page 29

Using the child safety device
The child safety device prevents unintentional use of the appliance.
3 The child safety device can only be activated immediately after the appli-
ance has been switched on.
Switching on the child safety device
Step Control panel Display
1.
2.
Appliance switches off.
Switch on appliance.
(Do not set a heat setting.)
Touch for 5 seconds is displayed.
/ (if hot)
3 To override or switch the child safety device off sucessfully, the steps must
be performed immediately one after the other. No other sensor fields must
be touched between the steps described.
Overriding the child safety device
The child safety device can be switched off in this way for a single cooking
session; it remains activated afterwards.
Step Control panel Display
1.
2.
Until the appliance is next switched off, it can used as normal.
Switch appliance on / (if hot)
Touch the two of the front
cooking zones at the same
time
or
Decimal points flash
29
Page 30

Switching off the child safety device
Step Control panel Display
1.
Switch appliance on / (if hot)
2.
Touch for 5 seconds or
Decimal points flash
Appliance switches off.
Safety cut-out
Cooking surface
• If after switching on the appliance a heat setting is not set for a cooking
zone within approx. 10 seconds, the appliance automatically switches itself off.
• If one or more sensor fields are touched for longer than approx. 10 seconds, the cooking surface is automatically switched off. ER03 flashes on
the display or changes to if there is still residual heat.
• If all cooking zones are switched off, the cooking surface automatically
switches itself off after approx. 10 seconds.
Control panel
3 Moisture (e.g. a wet cloth) or liquid boiling over onto the control panel
switches all cooking zones off.
Cooking zones
• If one of the cooking zones is not switched off after a certain time, or if the
heat setting is not modified, the relevant cooking zone switches off automatically. is displayed.
Heat setting Switches off after
1 - 2 6 hours
3 - 4 5 hours
5 4 hours
6 - 9 1.5 hours
30
Page 31

Tips on Cooking and Frying
3 Information on acrylamides
According to the latest scientific knowledge, intensive browning of food, especially in products containing starch, can constitute a health risk due to
acrylamides. Therefore we recommend cooking at the lowest possible temperatures and not browning foods too much.
Cookware
• You can recognise good cookware from the bottoms of the pans. The bottom should be as thick and flat as possible.
• Cookware made of enamelled steel or with aluminium or copper bottoms
can leave discolorations on the glass ceramic surface which are difficult or
impossible to remove.
Energy saving
2 Always place cookware on the cooking
zone before it is switched on.
2 If possible, always place lids on the pans.
2 Switch cooking zones off before the end
of the cooking time, to take advantage of
residual heat.
2 Bottom of pans and cooking zones
should be the same size.
31
Page 32

Examples of cooking applications
The information given in the following table is for guidance only.
Heat
Cooking-
setting
process
0 Residual heat, Off position
Keeping
1
1-2
2-3
3-4
4-5
6-7
7-8
9
food
warm
Melting
Solidi-
fying
Simmer-
ing on
low heat
Steaming
Braising
Boiling
Gentle
Frying
Heavy
Frying
Boiling
Searing
Deep
frying
suitable for
Keeping cooked foods
warm
Hollandaise sauce,
melting butter, chocolate,
gelatine
Fluffy omelettes, baked
eggs
Simmering rice and milk-
based dishes
Heating up ready-cooked
meals
Steaming vegetables, fish
braising meat
Steaming potatoes 20-60 mins.
Cooking larger quantities of
food, stews and soups
Frying escalopes, veal cor-
don bleu, cutlets, rissoles,
sausages, liver, roux, eggs,
pancakes, doughnuts
Hash browns, loin steaks,
steaks, Flädle (pancakes for
garnishing soup)
Boiling large quantities of water, cooking pasta, searing meat (gou-
lash, pot roast), deep frying chips
Cooking
time
as required Cover
5-25 mins. Stir occasionally
10-40 mins. Cook with lid on
25-50 mins.
20-45 mins.
60-150 mins.
Steady frying
5-15 mins.
per pan
Tips/Hints
Add at least twice as
much liquid as rice, stir
milk dishes part way
through cooking
With vegetables add
only a little liquid (a few
tablespoons)
Use only a little liquid, e.
g.: max. ¼l water for
750 g potatoes
Up to 3 l liquid plus in-
gredients
Turn halfway through
cooking
Turn halfway through
cooking
32
Page 33
Cleaning and Care
1 Take care! Risk of burns from residual heat.
1 Warning! Sharp objects and abrasive cleaning materials will damage the
appliance. Clean with water and washing up liquid.
1 Warning! Residues from cleaning agents will damage the appliance. Re-
move residues with water and washing up liquid.
Cleaning the appliance after each use
1. Wipe the appliance with a damp cloth and a little washing up liquid.
2. Rub the appliance dry using a clean cloth.
Removing deposits
1. Place a scraper on the glass ceramic surface at an angle.
2. Remove residues by sliding the blade over the surface.
3. Wipe the appliance with a damp cloth and a little washing up liquid.
4. Rub the appliance dry using a clean cloth.
Remove
Type of dirt
sugar, food containing sugar yes ---
plastics, tin foil yes ---
limescale and water rings --- yes
fat splashes --- yes
shiny metallic discolouration --- yes
*Scrapers and cleaners for glass ceramic and stainless steel can be purchased in specialist shops
imme-
diately
when the appliance has
cooled down
using
a scraper*
cleaner for glass ce-
ramic or stainless
steel*
3 Remove stubborn residues with a cleaner for glass ceramic or stainless
steel.
3 Scratches or dark stains on the glass ceramic that cannot be removed do
not however affect the functioning of the appliance.
33
Page 34

What to do if …
Problem Possible cause Remedy
The cooking zones are not
functioning.
The cooking zones cannot be
selected / Appliance does
not react to the control panel
input
The residual heat indicator is
not displaying anything
Er03
Er21
Er25
(only for 10 seconds)
Er40
is displayed
is displayed
is displayed
is displayed The overvoltage protector
No cooking zone selected Select cooking zone within
More than 10 seconds have
passed since the appliance
was switched on
The child safety device is activated
The sensor fields are partly
covered by a damp cloth or
with liquid
Safety cut-out has been triggered
The cooking zone was only
on for a short time and is
therefore not hot
Several sensor fields were
touched at the same time
Safety cut-out due to overheating
Appliance is incorrectly connected
has been activated (for an incorrect connection see
above
Er25
ing of the electronic components see
or for overheat-
Er21
)
10 seconds of switching on
(Decimal point lights up)
Switch on the appliance
again.
Select cooking zone within
10 seconds of switching on
Deactivate the child safety
device (See section “Child
safety device”)
Remove the cloth or the liquid
Switch on the appliance
again
If the cooking zone is supposed to be hot, call the Customer Service Department.
Only touch one sensor field
Let the appliance cool down.
Remove cookware.
Disconnect the appliance
from the electrical supply and
have it connected properly
Separate the appliance from
the mains for a few minutes
(remove the mains fuse).
Let the appliance cool down.
3 In the event of any other fault codes that arise, disconnect the appliance
from the electrical supply for a few seconds. (Take out the fuse from the
house’s wiring system.) If the fault is displayed again, please call the
Customer Care Department and inform them of the fault code.
If you are unable to remedy the problem by following the above suggestions, please contact your dealer or the Customer Care Department.
34
Page 35

1 Warning! Repairs to the appliance are only to be carried out by qualified
service engineers. Considerable danger to the user may result from improper repairs.
3 If the appliance has been wrongly operated, the visit from the customer
service technician or dealer may not take place free of charge, even during
the warranty period.
35
Page 36

Disposal
2 Packaging material
The packaging materials are environmentally friendly and can be recycled.
The plastic components are identified by markings, e.g. >PE<, >PS<, etc.
Please dispose of the packaging materials in the appropriate container at
the community waste disposal facilities.
2 Old appliance
The symbol
uct may not be treated as household waste. Instead it shall be handed over
to the applicable collection point for the recycling of electrical and electronic
equipment. By ensuring this product is disposed of correctly, you will help
prevent potential negative consequences for the environment and human
health, which could otherwise be caused by inappropriate waste handling of
this product. For more detailed information about recycling of this product,
please contact your local city office, your household waste disposal service
or the shop where you purchased the product.
W on the product or on its packaging indicates that this prod-
36
Page 37

Installation Instructions
Safety instructions
The laws, ordinances, directives and standards in force in the country of use
are to be followed (safety regulations, proper recycling in accordance with
the regulations, etc.)
Installation may only be carried out by a qualified electrician.
The minimum distances to other appliances and units are to be observed.
Anti-shock protection must be provided by the installation, for example
drawers may only be installed with a protective floor directly underneath the
appliance.
The cut surfaces of the worktop are to be protected against moisture using
a suitable sealant.
The sealant seals the appliance to the work top with no gap.
Do not use silicon sealant between the appliance and the work top.
Avoid installing the appliance next to doors and under windows. Otherwise
hot cookware may be knocked off the rings when doors and windows are
opened.
1 WARNING!
Risk of injury from electrical current.
• The electrical mains terminal is live.
• Make electrical mains terminal free of voltage.
• Observe connection schematic.
• Observe electrical safety rules.
• Ensure anti-shock protection through correct installation by a qualified
electrician.
• The appliance must be connected to the electrical supply by a qualified
electrician.
37
Page 38

1 IMPORTANT!
Risk of injury from electrical current.
Loose and inappropriate plug and socket connections can make the terminal overheat.
• Have the clamping joints correctly installed by a qualified electrician.
• Use strain relief clamp on cable.
• In the event of single-phase or two-phase connection, the appropriate
mains cable of type H05BB-F Tmax 90°C(or higher) must be used.
• If this appliance’s mains cable is damaged, it must be replaced by a special cable (type H05BB-F Tmax 90°C; or higher). The latter is available
from the Customer Care Department.
A device must be provided in the electrical installation which allows the appliance to be disconnected from the mains at all poles with a contact opening width of at least 3 mm.
Suitable isolation devices include line protecting cut-outs, fuses (screw type
fuses are to be removed from the holder), earth leakage trips and contactors.
38
Page 39

Guarantee/Customer Service
Belgium
DECLARATION OF GUARANTEE TERMS.
Our appliances are produced with the greatest of care. However, a defect may still occur.
Our consumer services department will repair this upon request, either during or after the
guarantee period. The service life of the appliance will not, however, be reduced as a result.
This declaration of guarantee terms is based on European Union Directive 99/44/EC and the
provisions of the Civil Code. The statutory rights that the consumer has under this legislation
are not affected by this declaration of guarantee terms.
This declaration does not affect the vendor's statutory warranty to the end user. The appliance is guaranteed within the context of and in adherence with the following terms:
1.
In accordance with provisions laid down in paragraphs 2 to 15, we will remedy free of
charge any defect that occurs within 24 months from the date the appliance is delivered to
the first end user.
These guarantee terms do not apply in the event of use for professional or equivalent purposes.
2.
Performing the guarantee means that the appliance is returned to the condition it was in
before the defect occurred. Defective parts are replaced or repaired. Parts replaced free of
charge become our property.
3.
So as to avoid more severe damage, the defect must be brought to our attention immediately.
4.
Applying the guarantee is subject to the consumer providing proof of purchase showing
the purchase and/or delivery date.
5.
The guarantee will not apply if damage caused to delicate parts, such as glass (vitreous
ceramic), synthetic materials and rubber, is the result of inappropriate use.
6.
The guarantee cannot be called on for minor faults that do not affect the value or the overall reliability of the appliance.
7.
The statutory warranty does not apply when defects are caused by:
–
a chemical or electrochemical reaction caused by water,
–
abnormal environmental conditions in general,
–
unsuitable operating conditions,
–
contact with harsh substances.
8.
The guarantee does not apply to defects due to transport which have occurred outside of
our responsibility. Nor will the guarantee cover those caused by inadequate installation or
assembly, lack of maintenance or failure to respect the assembly instructions or directions
for use.
9.
Defects that result from repairs or measures carried out by people who are not qualified or
expert or defects that result from the addition of non-original accessories or spare parts
are not covered by the guarantee.
10.
Appliances that are easy to transport may be delivered or sent to the consumer services
department. Home repairs are only anticipated for bulky appliances or built-in appliances.
11.
If the appliances are built-in, built-under, fixed or suspended in such a way that removing
and replacing them in the place where they are fitted takes more than half an hour, the
costs that result therefrom will be charged for. Connected damage caused by these removal and replacement operations will be the responsibility of the user.
12.
If, during the guarantee period, repairing the same defect repeatedly is not conclusive, or
if the repair costs are considered disproportionate, in agreement with the consumer, the
defective appliance may be replaced with another appliance of the same value.
In this event, we reserve the right to ask for a financial contribution calculated according
to the length of time it has been used.
39
Page 40

13.
A repair under guarantee does not mean that the normal guarantee period will be extended nor that a new guarantee period begins.
14.
We give a twelve month guarantee for repairs, limited to the same defect.
15.
Except in the event where liability is legally imposed, this declaration of guarantee terms
excludes any compensation for damage outside the appliance for which the consumer
wishes to assert his rights. In the event of legally admitted liability, compensation will not
exceed the purchase price paid for the appliance.
These guarantee terms are only valid for appliances purchased and used in Belgium. For exported appliances, the user must first make sure that they satisfy the technical conditions
(e.g.: voltage, frequency, installation instructions, type of gas, etc.) for the country concerned and that they can withstand the local climatic and environmental conditions. For appliances purchased abroad, the user must first ensure that they meet the qualifications
required in Belgium. Non-essential or requested adjustments are not covered by the guarantee and are not possible in all cases.
Our consumer services department is always at your disposal, even after the guarantee period has expired.
Address for our consumer services department:
Belgium
Te l. : F a x. :
Electrolux Home Products Belgium
ELECTROLUX SERVICE
Bergensesteenweg 719
1502 Lembeek
E-mail: consumer.services@electrolux.be
Consumer servic-es02/363.04.44 02/363.04.00
02/363.04.60
Luxembourg
Te l. : Fa x .:
Grand-Duché de Luxembourg
ELECTROLUX HOME PRODUCTS
Rue de Bitbourg. 7
L-1273 Luxembourg-Hamm
E-mail: consumer-service.luxembourg@electrolux.lu
Consumer servic-es00 352 42 431-1 00 352 42 431-360
European Guarantee
This appliance is guaranteed by Electrolux in each of the countries listed at the back of this
user manual, for the period specified in the appliance guarantee or otherwise by law. If you
move from one of these countries to another of the countries listed below the appliance guarantee will move with you subject to the following qualifications:
• The appliance guarantee starts from the date you first purchased the appliance which will
be evidenced by production of a valid purchase document issued by the seller of the appliance.
• The appliance guarantee is for the same period and to the same extent for labour and parts
as exists in your new country of residence for this particular model or range of appliances.
• The appliance guarantee is personal to the original purchaser of the appliance and cannot
be transferred to another user.
• The appliance is installed and used in accordance with instructions issued by Electrolux
and is only used within the home, i.e. is not used for commercial purposes.
• The appliance is installed in accordance with all relevant regulations in force within your
new country of residence.
The provisions of this European Guarantee do not affect any of the rights granted to you by
law.
40
Page 41

Service
In the event of technical faults, please first check whether you can remedy
the problem yourself with the help of the operating instructions (section
“What to do if…”).
If you were not able to remedy the problem yourself, please contact the
Customer Care Department or one of our service partners.
In order to be able to assist you quickly,
we require the following information:
– Model description
– Product number (PNC)
– Serial number (S No.)
(for numbers see rating plate)
– Type o f fau l t
– Any error messages displayed by the
appliance
– three digit letter-number combination for glass ceramic
So that you have the necessary reference numbers from your appliance at
hand, we recommend that you write them in here:
Model description: .....................................
PNC: .....................................
S No: .....................................
41
Page 42

Chère cliente, cher client,
Veuillez lire attentivement la notice d’utilisation dans son intégralité et la
conserver pour pouvoir la consulter ultérieurement.
Veuillez la transmettre à l’éventuel propriétaire ultérieur de l’appareil.
Les symboles suivants sont utilisés dans ce document :
1 Consignes de sécurité
Avertissement : conseils pour votre sécurité personnelle.
Avertissement ! Pour éviter d'endommager l'appareil
3 Conseils généraux et pratiques
2 Informations environnementales
42
Page 43

Sommaire
Notice d'utilisation . . . . . . . . . . . . . . . . . . . . . . . . . . . . . . . . . . . . . . . . . 44
Avertissements importants . . . . . . . . . . . . . . . . . . . . . . . . . . . . . . . . . . . . . 44
Description de l'appareil. . . . . . . . . . . . . . . . . . . . . . . . . . . . . . . . . . . . . . . . 46
Equipement du plan de cuisson . . . . . . . . . . . . . . . . . . . . . . . . . . . . . . . . . . . 46
Bandeau de commande . . . . . . . . . . . . . . . . . . . . . . . . . . . . . . . . . . . . . . . . . 46
Touche sensitive “Touch Control” . . . . . . . . . . . . . . . . . . . . . . . . . . . . . . . 47
Voyants . . . . . . . . . . . . . . . . . . . . . . . . . . . . . . . . . . . . . . . . . . . . . . . . . . . 47
Indicateur de chaleur résiduelle . . . . . . . . . . . . . . . . . . . . . . . . . . . . . . . . . 47
Utilisation de l’appareil . . . . . . . . . . . . . . . . . . . . . . . . . . . . . . . . . . . . . . . . . 48
Mettre l’appareil sous/hors tension. . . . . . . . . . . . . . . . . . . . . . . . . . . . . . . . . 48
Sélectionner une zone de cuisson . . . . . . . . . . . . . . . . . . . . . . . . . . . . . . . . . 48
Sélectionner le niveau de cuisson. . . . . . . . . . . . . . . . . . . . . . . . . . . . . . . . . . 48
Utilisation de la sécurité enfants . . . . . . . . . . . . . . . . . . . . . . . . . . . . . . . . . . . 49
Activer le dispositif de sécurité enfant . . . . . . . . . . . . . . . . . . . . . . . . . . . . 49
Forcer le dispositif de sécurité enfant . . . . . . . . . . . . . . . . . . . . . . . . . . . . 49
Désactiver le dispositif de sécurité enfant . . . . . . . . . . . . . . . . . . . . . . . . . 50
Désactivation de sécurité . . . . . . . . . . . . . . . . . . . . . . . . . . . . . . . . . . . . . . . . 50
Conseils de cuisson . . . . . . . . . . . . . . . . . . . . . . . . . . . . . . . . . . . . . . . . . . . 51
Plats de cuisson . . . . . . . . . . . . . . . . . . . . . . . . . . . . . . . . . . . . . . . . . . . . . . . 51
Economie d’énergie . . . . . . . . . . . . . . . . . . . . . . . . . . . . . . . . . . . . . . . . . . . . 51
Exemples d’utilisation pour la cuisson . . . . . . . . . . . . . . . . . . . . . . . . . . . . . . 52
Nettoyage et entretien . . . . . . . . . . . . . . . . . . . . . . . . . . . . . . . . . . . . . . . . . 54
Que faire si … . . . . . . . . . . . . . . . . . . . . . . . . . . . . . . . . . . . . . . . . . . . . . . . . 55
Protection de l’environnement. . . . . . . . . . . . . . . . . . . . . . . . . . . . . . . . . . . 57
Instructions d'installation . . . . . . . . . . . . . . . . . . . . . . . . . . . . . . . . . . 58
Garantie. . . . . . . . . . . . . . . . . . . . . . . . . . . . . . . . . . . . . . . . . . . . . . . . . . . . 60
Si vous devez nous contacter . . . . . . . . . . . . . . . . . . . . . . . . . . . . . . 61
Service après-vente . . . . . . . . . . . . . . . . . . . . . . . . . . . . . . . . . . . . . . . . 63
Montage . . . . . . . . . . . . . . . . . . . . . . . . . . . . . . . . . . . . . . . . . . . . . . . . . . . 64
Plaques signalétiques . . . . . . . . . . . . . . . . . . . . . . . . . . . . . . . . . . . . . . 67
43
Page 44

Notice d'utilisation
1 Avertissements importants
3 Pour ne pas perdre le bénéfice de la garantie en cas de panne, veuillez ob-
server ces recommandations.
5 Cet appareil est conforme aux directives CE suivantes :
– directive 73/23/CEE du 19.02.1973 basse tension
– directive 89/336/CEE du 03.05.1989 relative à la compatibilité électroma-
gnétique (CEM) y compris la directive de révision 92/31/CEE
– directive 93/68/CEE du 22.07.1993 relative à la certification CE
Utilisation réglementaire
• Cet appareil est uniquement destiné à l’usage domestique habituel et
pour faire cuire et rôtir des aliments.
• L’appareil ne peut en aucun cas servir de plan de travail ou de support.
• Ne pas procéder à des transformations ou à modifications de l’appareil.
• Ne pas placer de liquides susceptibles de brûler, de matériaux facilement
inflammables ou d’objets susceptibles de fondre (par ex. du papier aluminium, des matières synthétiques ou de l’aluminium) sur ou à promité de
l’appareil.
Sécurité enfants
• Eviter systématiquement que les enfants en bas âge s’approchent de l’appareil.
• Les enfants plus âgés ne doivent être autorisés à utiliser l’appareil qu’accompagnés et sous surveillance.
Consignes générales de sécurité
• Le montage et le branchement de l’appareil sont du ressort exclusif de
spécialistes agréés.
• Les appareils encastrables ne peuvent être mis en fonctionnement
qu’après avoir été montés dans des armoires et des plans de travail homologués et adaptés.
• En cas de panne de l’appareil ou de dommages à la vitrocéramique (cassures, fêlures ou déchirures), mettre l’appareil hors et débranchez-le pour
éviter un éventuel choc électrique.
• Le montage et le branchement de l’appareil sont du ressort exclusif de
spécialistes agréés.
44
Page 45

Précautions d’utilisation.
• Retirer les étiquettes et les films protecteurs de la vitrocéramique.
• Attention aux risques de brûlures lors de l’utilisation de l’appareil.
• S’assurer que les câbles d’appareils électriques n’entrent pas en contact
avec les surfaces brûlantes de l’appareil ou les récipients brûlants.
• Les graisses et les huiles surchauffées peuvent très rapidement s’enflammer. Surveiller constamment les mets cuits avec de la graisse ou de l’huile
(par ex. des frites).
• Mettre les foyers hors fonctionnement après chaque utilisation.
Précautions de nettoyage
• Mettre l’appareil hors fonctionnement et le laisser refroidir avant de le nettoyer.
• Pour des raisons de sécurité, il est interdit de nettoyer l’appareil avec un
jet à vapeur ou un appareil à haute pression.
Comment éviter d’endommager l’appareil
• Des objets peuvent endommager la vitrocéramque en tombant.
• Les plats de cuisson peuvent endommager la vitrocéramique en heurtant
le bord.
• Les plats de cuisson en fonte ou pourvus d’un fonds abîmé peuvent érafler la vitrocéramique lorsqu’on les déplace.
• Les objets susceptibles de fondre ou les produits ayant débordé peuvent
se consumer sur la vitrocéramique et doivent par conséquent être immédiatement enlevés.
• Eviter de faire chauffer à vide les casseroles et les poêles. Cela peut endommager l'ustensile de cuisson ou la vitrocéramique.
• Ne pas placer de plats de cuisson vides sur les zones de cuisson et ne
pas mettre ces dernières en fonctionnement sans récipient.
45
Page 46

Description de l'appareil
Equipement du plan de cuisson
Zone de cuisson
1200W
Zone de cuisson
1800W
Zone de cuisson un circuit
2300W
Bandeau de commande
Sélection des zones et du niveau de cuisson
46
Bandeau de
commande
Zone de cuisson
1200W
Voyant
Marche/Arrêt
Page 47

Touche sensitive “Touch Control”
Les touches sensitives Touch Control permettent de manipuler l’appareil.
Appuyez sur les touches sensitives pour activer les fonctions, les voyants
confirment l’activation d’une fonction.
Touche sensitive Fonction
Marche / Arrêt Mettre l’appareil sous/hors tension
Augmenter les paramétra-
ges
Diminuer les paramétra-
ges
Sélectionner une zone de cuisson
Augmenter le niveau de cuisson
Diminuer le niveau de cuisson
Voyants
Voyant Description
La zone de cuisson est désactivée
- Niveaux de cuisson Le niveau de cuisson est sélectionné
ER Erreur Présence d’un dysfonctionnement
Chaleur résiduelle La zone de cuisson est encore
chaude
Sécurité enfants Verrouillage/la sécurité enfants est
activée
Indicateur de chaleur résiduelle
1 Avertissement ! Danger de brûlures dû à la chaleur résiduelle ! Les zones
de cuisson mettent un peu de temps à se refroidir après avoir été désactivées. Surveillez le voyant indiquant la chaleur résiduelle
.
3 La chaleur résiduelle peut être utilisée pour faire fondre un ingrédient et pour
conserver les plats au chaud.
47
Page 48

Utilisation de l’appareil
Mettre l’appareil sous/hors tension
Bandeau de commande Voyant
Activer Toucher pendant 2 secon-
des
Désactiver Toucher pendant une se-
conde
/ le point décimal cligno-
te
/ aucun
Sélectionner une zone de cuisson
Bandeau de commande Voyant
Sélection Effleurez Le point décimal s'allu-
me.
3 Le point décimal s’affiche sur la zone de cuisson sélectionnée. Lorsque la
zone de cuisson est sélectionnée, il faut ensuite choisir un niveau de cuisson dans les 6 secondes qui suivent, si non il faut la resélectionner.
Sélectionner le niveau de cuisson
3 Lorsque vous avez sélectionné la zone de cuisson, relâcher brièvement la
touche sensitive .
Bandeau de commande Voyant
Augmenter Appuyez sur
Diminuer Appuyez sur jusqu’à
Désactiver Appuyez simultanément sur et
jusqu’à
3 S’il ne se passe rien dans les 6 secondes suivantes, la sélection est annulée
et le point décimal s’éteint. Choisissez de nouveau la zone de cuisson souhaitée et sélectionnez un niveau de cuisson.
48
Page 49
Utilisation de la sécurité enfants
La sécurité enfants évite toute activation non souhaitée de l’appareil.
3 Le dispositif de sécurité enfant ne peut être activé que tout de suite après la
mise en marche de l'appareil.
Activer le dispositif de sécurité enfant
Etape Touche Affichage
Mettre en marche l’appareil
1.
2.
L’appareil s’éteint
(ne pas régler de niveau de réglage)
5toucher pendant quel-
ques secondes
/ (s’il est chaud)
s’affiche.
3 Afin de forcer ou de désactiver avec succès le dispositif de sécurité enfant,
les étapes doivent être exécutées tout de suite les unes après les autres.
Entre les étapes décrites, aucun autre champ tactile ne doit être touché.
Forcer le dispositif de sécurité enfant
Le dispositif de sécurité enfant peut être désactivé de la manière suivante
pour un processus de cuisson unique; il reste activé par la suite.
Etape Touche Affichage
1.
2.
Jusqu'au prochain arrêt de l’appareil, celui-ci peut être utilisé normalement .
Mettre l’appareil en marche / (s’il est chaud)
Appuyer sur les deux des
zones de cuisson avant simul-
tanément
ou
les points décimaux clignotent
49
Page 50

Désactiver le dispositif de sécurité enfant
Etape Touche Affichage
1.
Mettre l’appareil en marche / (s’il est chaud)
5toucher pendant quel-
2.
ques secondes
ou
les points décimaux clignotent
L’appareil s’éteint
Désactivation de sécurité
Tabl e de c uis s on
• Si, lorsque l’appareil est tension, vous ne sélectionnez pas un niveau de
cuisson d’une zone de cuisson dans les 10 secondes env. qui suivent,
l’appareil se met automatiquement hors tension.
• Si vous appuyez sur une ou plusieurs touches sensitives pendant plus
d’env. 10 secondes, la table de cuisson se met automatiquement hors
tension. En cas de chaleur résiduelle, ER03 clignote ou passe sur .
• Lorsque toutes les zones de cuisson sont désactivées, la table de cuisson
se met automatiquement hors tension au bout d’env. 10 secondes.
Bandeau de commande
3 En cas d’humidité (par ex. un linge mouillé) ou de débordement d’un liquide
sur le bandeau de commande, toutes les zones de cuisson sont automatiquement désactivées.
Zones de cuisson
• Si l’une des zones de cuisson reste activée et si le niveau de cuisson n’est
pas modifié, elle se désactive automatiquement aut bout d’un certain
temps. s’affiche.
Niveau de cuisson Désactivation au bout de
1 - 2 6 heures
3 - 4 5 heures
54 heures
6 - 9 1,5 heure
50
Page 51
Conseils de cuisson
Plats de cuisson
• Le type de fond des plats de cuisson détermine ou non leur bonne qualité.
Le fond doit être aussi plat et épais que possible.
• Les plats de cuisson avec fond en émail, en aluminium ou en cuivre peuvent laisser des traces sur les plaques en vitrocéramique difficilement nettoyables ou même impossibles à enlever.
Economie d’énergie
2 Il est impératif de placer les plats de cuis-
son avant d’activer la zone de cuisson.
2 Si possible, recouvrez toujours les réci-
pients avec leur couvercle.
2 Eteignez la zone de cuisson avant la fin
de la cuisson afin de bénéficier de la chaleur résiduelle.
2 Veillez à ce que le fond du plat de cuis-
son corresponde à la dimension de la
zone de cuisson.
51
Page 52
Exemples d’utilisation pour la cuisson
Les valeurs indiquées dans le tableau suivant sont indicatives.
Niveau
de
cuisson
0
1
1-2
2-3
3-4
4-5
6-7
Type de
cuisson
Conser-
ver au
chaud
Faire fon-
dre
Conser-
ver
Faire gon-
fler
Cuire à
l’étuvée
Cuire à la
vapeur
Cuire à
l’eau
Faire
cuire
à feu
doux
adapté à Durée Remarques/conseils
Chaleur restante, en posi-
Conserver des plats cuits
:
de la sauce hollandaise,
faire fondre du beurre, du
chocolat, de la gélatine
une omelette norvégienne,
Faire gonfler du riz ou des
Faire réchauffer des plats
Cuire des légumes ou du
Cuire de la viande à l’étouf-
Faire cuire des pommes de
Faire cuire des quantités
d’aliments, ragoûts et sou-
des escalopes, des cordons
bleus, des steaks de vian-
de hâchée, des saucisses,
du foie, des roux, des œufs,
des gâteaux aux œufs, faire
tion
au chaud
royale
plats à base de riz
cuisinés
poisson à la vapeur
fée
terre à l’étuvée
assez importantes
pes
frire des beignets.
si néces-
saire
5-25 min
10-40 min
25-50 min
20-45 min
20-60 min
60-150 min
cuisson
continue
les recouvrir
Remuez de temps en
temps
Couvrez-la avec un cou-
vercle
Versez au moins le dou-
ble de quantité d’eau
que de riz, remuez le riz
au lait de temps en
temps.
Pour les légumes, utilisez juste un peu d’eau
(quelques cuillères à
soupe)
Utilisez juste un peu
d’eau, par ex. max. ¼l
d’eau pour 750 g de
pommes de terre
Jusqu’à 3 l d’eau plus
les ingrédients
Retournez de temps en
temps
52
Page 53
Niveau
de
cuisson
7-8
9
Type de
cuisson
Faire
cuire
à tempé-
rature
élevée
Porter à
ébullition
Faire re-
venir
Faire frire
adapté à Durée Remarques/conseils
des beignets de pommes
de terre, des rognons, des
steaks, des galettes
5-15 min
poêle pro
Retournez de temps en
temps
Porter des quantités importantes d’eau à ébullition, faire revenir de
la viande (goulasch, bœuf brais), faire frire des pommes frites
53
Page 54
Nettoyage et entretien
1 Attention ! Risque de brûlure dû à la chaleur résiduelle.
1 Attention ! Les produits de nettoyage agressifs ou abrasifs endommagent
l’appareil. Nettoyez l’appareil avec de l’eau et de la lessive.
1 Attention ! Les restes de produits de nettoyage endommagent l’appareil.
Nettoyez les restes avec de l’eau et un produit de nettoyage.
Nettoyez l’appareil après chaque utilisation
1. Nettoyez l’appareil à l’aide d’un chiffon humide et un peu de produit de
nettoyage.
2. Séchez l’appareil avec un chiffon propre.
Enlever les salissures
1. Placez le grattoir de nettoyage obliquement par rapport à la surface de la
vitrocéramique.
2. Enlevez les salissures en faisant glisser la lame.
3. Nettoyez l’appareil à l’aide d’un chiffon humide et un peu de produit de
nettoyage.
4. Séchez l’appareil avec un chiffon propre.
enlevez
immé-
Type de salissure
Sucre, mets contenant du sucre oui ---
Matériaux en plastique, feuilles en
aluminium
Bords calcaires et d’eau --- oui
Burette à graisse --- oui
Colorations métalliques luisantes --- oui
*grattoir de nettoyage, produit de nettoyage de vitrocéramique ou d’acier inoxydable sont
disponibles dans les magasins spécialisés.
diate-
ment
oui ---
lorsque l’appareil a
refroidi
avec
Grattoir de
nettoyage*
Produit de nettoyage
de vitrocéramique ou
d’acier inoxydable*
3 Nettoyez les salissures tenaces à l’aide d’un produit de nettoyage pour vi-
trocéramique ou acier inoxydable.
3 Même s’il n’est plus possible de faire disparaître les égratignures ou les ta-
ches sombres sur la vitrocéramique, cela n’a aucune influence sur le fonctionnement de l’appareil.
54
Page 55

Que faire si …
Symptôme Cause possible Solution
Les zones de cuisson ne
fonctionnent pas.
Il est impossible de sélectionner une zone de cuisson /
L’appareil ne réagit pas aux
commandes du bandeau de
commande
L’indicateur de chaleur résiduelle ne s'affiche pas
Er03
Er21
Er25
(pendant 10 secondes seulement)
Er40
s’affiche
s’affiche
s’affiche
s’affiche Le dispositif de protection
Aucune zone de cuisson n’a
été sélectionnée
Il s’est écoulé plus de 10 secondes depuis la mise sous
tension de l’appareil
La sécurité enfants est activée
Les touches sensitives sont
partiellement recouvertes
avec un chiffon humide ou
par un liquide
Le dispositif de sécurité de
mise hors tension s’est enclenché
La zone de cuisson fonctionne seulement depuis peu et
n’est par conséquent pas encore chaude
Vous avez simultanément appuyé sur plusieurs touches
sensitives
Activation de la mise hors
tension de sécurité en raison
d’une surchauffe
L’appareil n’est pas correctement branché
contre la surtension s’est déclenché (consultez ci-dessus
le point relatif à une erreur de
raccordement
relatif à une surchauffe des
composants électroniques
Er21
)
Er25
ou celui
Sélectionnez une zone de
cuisson dans les 10 secondes après la mise sous tension (le point décimal
s’allume).
Remettez de nouveau l’appareil sous tension.
Sélectionnez une zone de
cuisson dans les 10 secondes après la mise sous tension
Désactivez la sécurité enfants (voir chapitre « Sécurité
enfants »)
Enlevez le chiffon ou le liquide
Remettez de nouveau l’appareil sous tension
Si la zone de cuisson est
chaude, contactez le service
après-vente.
N’appuyez que sur une seule
touche sensitive à la fois
Laissez refroidir l’appareil.
Enlevez les plats de cuisson
Débranchez l’appareil et faites-le brancher correctement
Débranchez l’appareil pendant quelques minutes (coupez le fusible de votre
installation électrique).
Laissez refroidir l’appareil.
55
Page 56

3 Pour tout autre code d’erreur, débranchez l’appareil pendant quelques se-
condes (enlevez le fusible de l’installation domestique). Si le code d’erreur
s’affiche de nouveau, contactez le service après-vente et indiquez le code
d’erreur.
Si les indications ci-dessus ne vous permettent pas de remédier au
problème, veuillez vous adresser au service après-vente de votre magasin vendeur.
1 Avertissement ! L'installation, le branchement et les réparations doivent
être effectuées uniquement par des professionnels qualifiés. Des réparations non effectuées dans les règles peuvent s’avérer très dangereuses pour
l’utilisateur.
3 En cas d’erreur de manipulation de la part de l’utilisateur, le déplacement du
technicien du service après-vente ou du vendeur peut être facturé même en
cours de garantie.
56
Page 57

Protection de l’environnement
2 Elimination du matériel d’emballage
Les matériaux d’emballage sont écologiques et recyclables. Les matières
plastiques portent un signe distinctif, par ex. >PE<, >PS<, etc. Déposez les
matériaux d’emballage en fonction de leur signe distinctif dans les containeurs prévus à cet effet (renseignez-vous auprès des services de votre
commune).
2 Appareils usagés
Le symbole
peut être traité comme déchet ménager. Il doit être remis au point de collecte dédié à cet effet (collecte et recyclage du matériel électrique et électronique). En procédant à la mise au rebut de l'appareil dans les règles de l'art,
nous préservons l'environnement et notre sécurité, s'assurant ainsi que le
déchets seront traités dans des conditions optimum. Pour obtenir plus de
détails sur le recyclage de ce produit, veuillez prendre contact avec les services de votre commune ou le magasin où vous avez
effectué l’achat.
W sur le produit ou son emballage indique que ce produit ne
57
Page 58

Instructions d'installation
Sécurité
L’utilisateur est tenu de respecter la législation, la réglementation, les directives et les normes en vigueur dans le pays de destination de l’appareil (dispositions réglementaires en matière de sécurité, de recyclage, etc.)
Le montage doit être exclusivement effectué par un spécialiste.
La distance minimum requise par rapport aux autres appareils et aux meubles adjacents doit être respectée.
La protection contre les contacts doit être garantie par l’installation ; par
exemple, des tiroirs peuvent être montés uniquement avec un fond de protection directement sous l’appareil.
Il faut protéger l’appareil contre l’humidité avec du mastic pour joints au niveau des découpes sur le plan de travail.
Le joint comble les fentes entre le plan de travail et l’appareil.
N’utilisez pas de masse d’étanchéité en silicone entre le plan de travail et
l’appareil.
Eviter de monter l’appareil à proximité d’une porte ou sous une fenêtre.
Autrement, l’ouverture d’une porte ou d’un battant de fenêtre peuvent arracher le plat de cuisson posé sur la plaque de cuisson.
1 Avertissement!
Danger de blessure due au courant électrique.
• La borne de raccordement est sous tension.
• Isolez la borne de raccordement au secteur.
• Respectez le schéma de raccordement.
• Respectez les régles de sécurité électrotechniques.
• Assurez vous lors de l’installation qu’il n’y ait pas de possibilité de con-
tact.
• Le raccordement électrique relève de la compétence d’un électricien.
58
Page 59

1 ATTENTION!
Le courant électrique peut provoquer des dommages.
Des raccordements mal ajustés ou incorrects peuvent provoquer une surchauffe de la borne.
• Installez correctement les jonctions par serrage.
• Délestez le câble.
• Pour les raccordements 1 ou 2 phases, utilisez respectivement un câble
approprié de type H05BB-F T de max. 90°C (ou de plus grande capacité).
• En cas d’endommagement du câble de raccordement de l’appareil, remplacez impérativement ce dernier par un câble spécifique (de type
H05BB-F Tmax. 90°C ou de plus grande capacité). Ce type de câble est
disponible auprès du service après-vente.
Au niveau de l'installation électrique, prévoir un dispositif qui permette de
couper cet appareil du secteur sur tous les pôles avec une ouverture des
contacts d'au moins 3 mm.
Des dispositifs de protection appropriés sont par exemple les disjoncteurs,
les fusibles (les fusibles vissés doivent être retirés de leur socle), les disjoncteurs différentiels et les contacteurs.
59
Page 60

Garantie
France
Conformément à la Législation en vigueur, votre Vendeur est tenu, lors de
l'acte d'achat de votre appareil, de vous communiquer par écrit les conditions de garantie et sa mise en œuvre appliquées sur celui-ci.
Sous son entière initiative et responsabilité, votre Vendeur répondra à toutes
vos questions concernant l'achat de votre appareil et les garanties qui y
sont attachées. N'hésitez pas à le contacter.
60
Page 61

Si vous devez nous contacter
France
Zanussi
Pour tenir nos engagements, nous écoutons les Consommateurs
Info Conso Electrolux est le lien privilégié entre la marque et ses Consommateurs. Il assure en
permanence une double mission : satisfaire au mieux vos exigences et tirer parti de cette proximité pour améliorer sans cesse les produits que nous vous proposons.
AVANT L’ACHAT
Toute une équipe répond avec clarté et précision à vos sollicitations concernant l’éventail de
nos gammes de produits et vous apporte des infos pour vous aider dans votre choix en fonction de vos propres besoins.
APRÈS L’ACHAT
Exprimez-vous sur la perception que vous avez de nos produits et votre satisfaction à l’usage.
Mais interrogez aussi nos spécialistes sur l’utilisation et l’entretien de vos appareils. C’est alors
que notre mission prend tout son sens. Ecouter, comprendre, agir : trois temps essentiels pour
tenir l’engagement de la marque dans le plus grand respect du Consommateur.
Dans le souci d’une amélioration constante de nos produits, nous nous réservons le droit d’apporter à leurs caractéristiques toutes modifications liées à l’évolution technique (décret du
24.03.78).
A bientôt !
BP 50142 – 60307 SENLIS CEDEX
Tél. : 08 90 71 03 44 (0,15 h TTC/mn)
Permanence téléphonique du lundi au vendredi
Fax : 03 44 62 21 54
E-MAIL : info.conso@electrolux.fr
Pour toute question technique :
Centre Contact Consommateurs
BP 20139 – 60307 SENLIS CEDEX
Tél. : 08 92 68 24 33 (0,34 h TTC/mn)
E-MAIL : ehp.consommateur@electrolux.fr
Permanence téléphonique du lundi au vendredi
61
Page 62

62
Page 63

Service après-vente
En cas d’anomalie de fonctionnemet vérifiez d’abord si vous ne pouvez pas
remédier vous-même au dysfonctionnement à l’aide de la notice d’utilisation (chapitre “Que faire, si...“).
Si vous ne parvenez pas à remédier au dysfonctionnement, veuillez contacter votre vendeur ou à défaut le Centre Contact Consommateurs qui vous
communiquera l’adresse service après-vente.
Pour un dépannage dans les plus brefs
délais, nous vous demandons de nous
fournir les informations suivantes :
– Désignation du modèle
– Numéro du produit (PNC)
– Numéro de série (S-No.)
(ces chiffres se trouvent sur la plaque signalétique)
– Type de dysfonctionnement
– Eventuellement le message d’erreur affiché par l’appareil
– Vitrocéramique avec une combinaison de lettres et de trois chiffres
Pour avoir les numéros d’identification de l’appareil sous la main, nous vous
recommandons de les inscrire ici.
Désignation du modèle .....................................
PNC: .....................................
S-No : .....................................
En cas d’intervention sur votre appareil, exigez du
service après-vente les pièces de rechange certifiées
Constructeur.
63
Page 64

Montage / Assembly
64
Page 65
66
65
Page 66

Page 67

Typenschilder / Rating Plates / Plaques signalétiques
ZKT 621 LX
PEE2019
230 V 50 Hz
ZANUSSI
ZKT 621 LN
PEE2019
230 V 50 Hz
ZANUSSI
949 592 199
6,5 kW
949 592 200
6,5 kW
67
Page 68

www.electrolux.com
www.zanussi.de
www.zanussi.at
www.zanussi.be
Änderungen vorbehalten
822 930 945-A-250906-01 Sous réserve de modifications
Subject to change without notice
 Loading...