

Zanussi ZKG6020WN, ZKG6020SN User Manual

User
Manual
Cooker
Model
ZKG6020
2
The following symbols are used in this user manual:
WARNING!
Important information concerning your
personal safety and information on
how to avoid damaging the appliance.
IMPORTANT!
General information and tips
Environmental information
Contents
Important safety instructions 3
Product description
Controls and their functions
Before first use
Grill and oven furniture
The electronic minute minder
The hob
The grill
Grilling chart
The top oven
The main oven
Oven cooking chart
Roasting chart
5
Slow cook
5
Food preparation – slow cooking
6
Care and cleaning
7
Troubleshooting
8
Technical details
10
Installation instructions
12
Environment
14
Guarantee / Custormer care
15
17
19
21
22
23
24
28
30
32
37
38
3
Important safety instructions
These warnings are provided in the interests of
your safety. Ensure that you understand them
all before installing or using the appliance.
Your safety is of paramount importance. If you
are unsure about any of the meanings of these
warnings please contact customer care.
Installation
• The appliance must be installed according to
the instructions supplied. The installation
work must be undertaken by a competent
person as stated in the Gas Safety
(Installation & Use) Regulations current
editions and the IEE Wiring Regulations.
• The appliance should be serviced by an
authorised Service Engineer and only
genuine approved spare parts should be
used.
• It is important that the appliance is suitable
for your gas supply. Your installer should
check the rating plate.
• Make sure that a stability chain is fitted.
• The appliance must be installed in an
adequately ventilated room.
• If the appliance is to be placed on a base,
measures must be taken to prevent the
appliance from slipping.
• This appliance is heavy and care must be
taken when moving it.
• Do not attempt to lift or move this appliance
by the handles.
• All packaging, both inside and outside the
appliance must be removed before the
appliance is used.
• It is dangerous to alter the specifications or
modify the appliance in any way.
Child safety
• Do not allow children to play with any part of
the packaging.
• Do not allow children to sit or climb on the
drop down doors.
• This appliance is not intended for use by
children and other persons whose physical,
sensory or mental capabilities or lack of
experience and knowledge prevents them
from using the appliance safely without
supervision or instruction by a responsible
person to ensure that they can use the
appliance safely.
• Children should be supervised to ensure that
they do not play with the appliance.
WARNING!
Accessible parts may be hot during use.
Young children should be kept away.
During use
• This appliance is not intended to be operated
by means of an external timer or separate
remote control system.
• This appliance has been designed for
domestic use to cook edible foodstuffs only
and must not be used for any other
purposes.
• Take great care when heating fats and oils,
as they will ignite if they become too hot.
• When you are lighting any burner check that
it is lit before you leave the appliance. When
turning off a burner, do not leave the
appliance until the flame has gone out.
• Never place plastic or any other material,
which may melt in or on the oven.
• Do not leave the grill pan handle in position
when grilling, as it will become hot.
4
• Always use oven gloves to remove and
replace the grill pan handle when grilling.
• Always support the grill pan when it is in the
withdrawn or partially withdrawn position.
• Always use oven gloves to remove and
place food in the oven.
• Ensure cooking utensils are large enough to
contain foods to prevent spillage and boil
over.
• The handles of saucepans, which are
smaller than the heated area on the hob, will
become hot.
• Ensure your hand is protected before
handling the pan.
• During use the appliance becomes hot. Care
should be taken to avoid touching heating
elements inside the oven.
• Ensure that all vents are not obstructed to
ensure ventilation of the oven cavity.
• Never line any part of the appliance with foil.
• Always stand back from the appliance when
opening the doors to allow any build up of
steam or heat to release.
WARNING!
Never leave the appliance unattended when
the oven door is open.
• Do not place sealed cans or aerosols inside
the oven. They may explode if they are
heated.
• Ensure that all control knobs are in the off
position when not in use.
• Do not stand on the appliance or on the
open oven doors.
• Do not hang towels, dishcloths or clothes
from the appliance or its handles.
• Do not use this appliance if it is in contact
with water.
• Never operate it with wet hands.
Cleaning and maintenance
WARNING!
For hygiene and safety reasons this
appliance should be kept clean at all times.
A build-up of fat or other foodstuff could
result in a fire especially in the grill pan.
• Do not leave the cookware-containing
foodstuff, e.g. fat or oil in the appliance in
case it is inadvertently switched on.
• Do not disconnect the appliance from the
gas supply if the supply pipe does not have a
bayonet connection as described in the
installation section. If this is the case contact
the person who installed the appliance.
• Always allow the appliance to cool before
switching off at the wall before carrying out
any cleaning/maintenance work.
• Only clean this appliance in accordance with
the instructions given in this book.
• Never use steam or high-pressure steam
cleaners to clean the appliance.
5
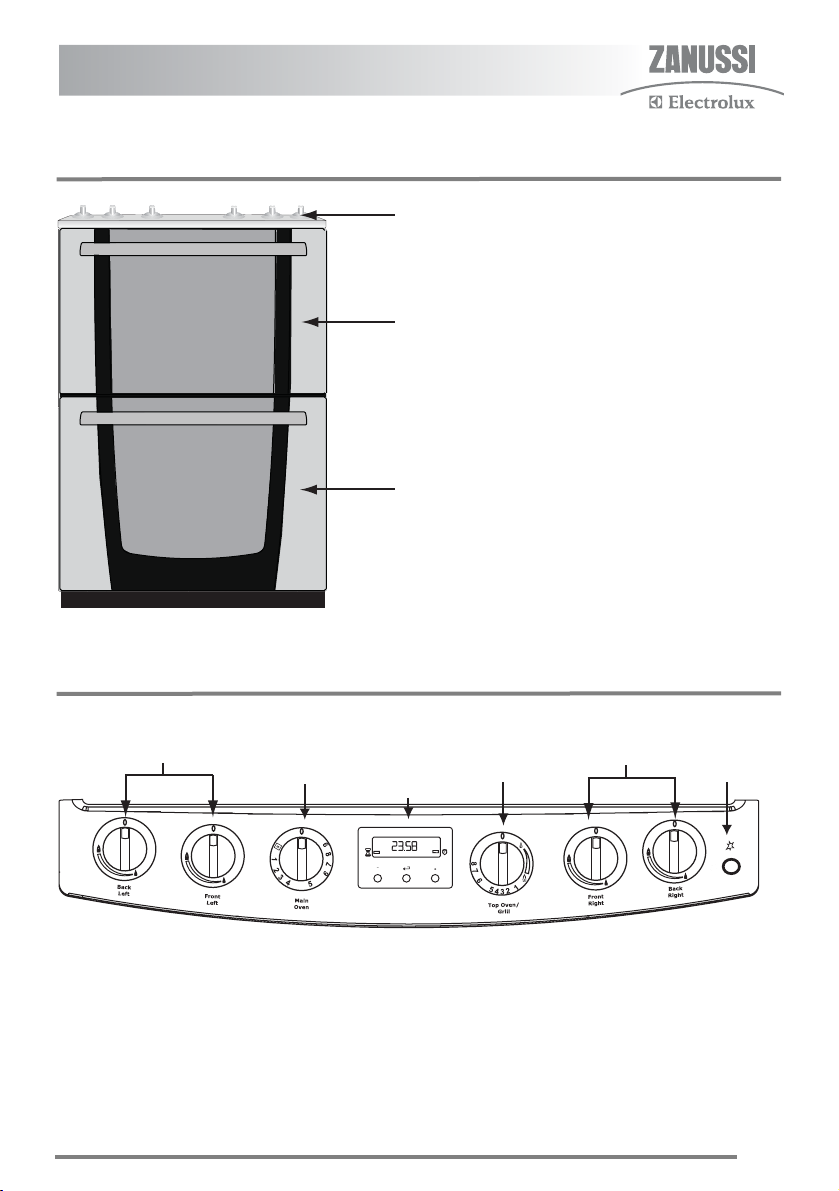
Product description
Controls and their functions
Control panel
Top oven / Grill
Main oven
Hob controls
1
Main oven
temperature control
Electronic Ignition
minute
minder
Top oven / Grill
temperature control
Hob controls
switch
6
Before using the appliance
Rating plate
• This is usually situated on the front frame of
the appliance and can be seen upon opening
either the main or top oven door.
Alternatively the rating plate may also be
found on the back or top of some models
(where applicable).
• The appliance must be protected by a
suitably rated fuse or circuit breaker.
• The rating of the appliance is given on the
rating plate.
• Do not remove the rating plate from the
appliance as this may invalidate the
guarantee.
Preparing to use your appliance
• Wipe over the base of the oven(s) with a soft
cloth using hot soapy water. Wash the
furniture before use.
• We suggest that you run the oven(s) and grill
for 10 – 15 minutes at maximum
temperature, to burn off any residue from
their surfaces. Accessible parts may become
hotter than in normal use. Children should be
kept away. During this period an odour may
be emitted, it is therefore advisable to open a
window for ventilation.
The cooling fan for the controls
• The cooling fan comes on immediately when
the grill/top oven is switched on and after a
short time when the main oven is in use. It
may run on after the controls are switched
off until the appliance has cooled.
• During the initial period the cooling fan may
turn on and off, this is quite normal.
WARNING!
Always allow the cooling fan to cool the
appliance down before switching off at
the wall prior to carrying out any
cleaning or maintenance work.
Condensation and steam
• When food is heated it produces steam
similar to a boiling kettle. The vents allow
some of this steam to escape. However,
always stand back from the appliance when
opening the door(s) to allow any build up of
steam or heat to release.
• If the steam comes into contact with a cool
surface on the outside of the appliance, e.g.
a trim, it will condense and produce water
droplets. This is quite normal and is not
caused by a fault on the appliance.
• To prevent discolouration, regularly wipe
away condensation and foodstuff from
surfaces.
• For your safety wall coverings at the rear of
the appliance should be securely fixed to the
wall.
Cookware
• Do not use baking trays larger than 30cm x
30cm (12” x 12”) as they will restrict the
circulation of heat and may affect
performance.
7
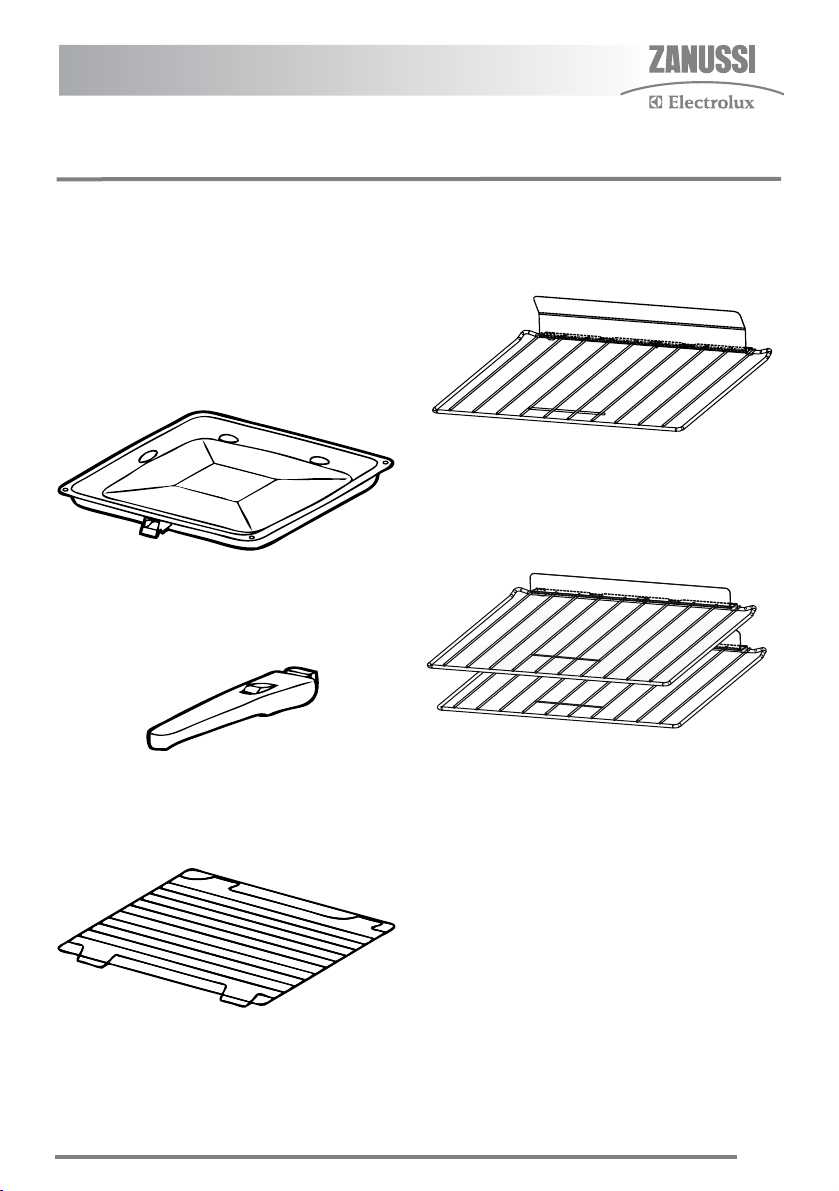
Grill and oven furniture
• The following items of grill and oven furniture
have been supplied with the appliance. If
you require replacements of any of the items
listed below please contact your local service
force centre.
1 grill pan
1 grill pan handle
1 straight shelf
(For grilling and top oven cooking)
2 straight shelves
(For main oven cooking)
1 grill pan grid
8
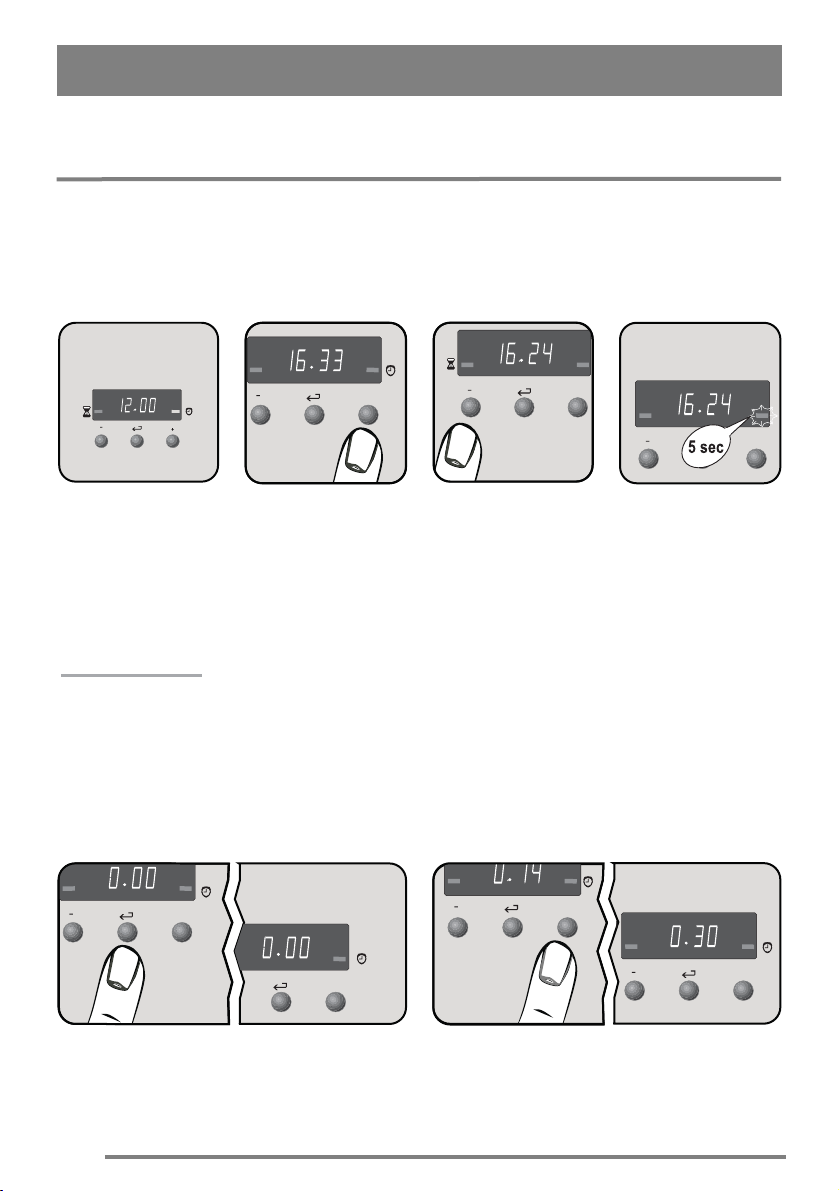
The electronic minute minder
This oven has a 24-hour clock. In the event of an interuption of the electricity
supply, the clock will stop and you will not be able
to use the main oven.
To set the time of day
+
When the electricity is
first switched on, the
display will show
Press the increase
button until the correct
time is showing.
12.00 and the time
indicator neon will
flash.
IMPORTANT!
The increase and decrease control buttons
operate slowly at first and then more rapidly. They
should be pressed separately.
To set the countdow n
The 'Countdown' gives an audible reminder at the
end of any period of cooking.
+
If necessary press the
decrease button to
help set the correct
time.
+
The time indicator
neon will flash for 5
seconds then go out.
+
+
Press the selector control button until the
countdown indicator neon is illuminated and the
display reads 0.00
+
+
Press the increase button. Release the button
once the interval to be timed is reached e.g. 30
minutes.
9
IMPORTANT!
This must be
completed within 5
seconds of first
pressing the selector
control button
If necessary press the
decrease button to
achieve the correct
time interval.
During the operation
of the countdown the
remaining time period
will show in the
display
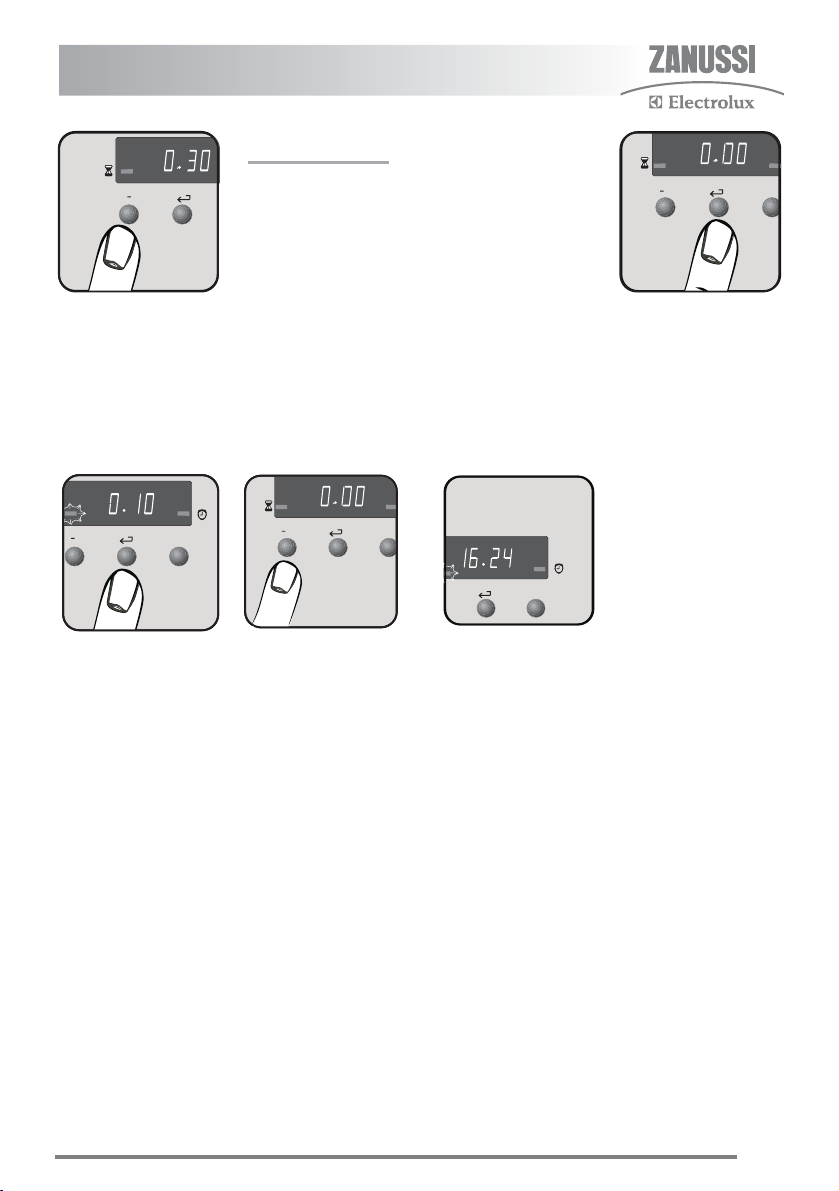
To cancel the coun tdow n
+
Press the selector
control button until the
countdown indicator
Press the decrease
button until 0.00 is
shown in the display.
neon flashes.
Things to note
Your timer has an energy save mode which allows
you to switch the display off. For setting details
please refer to the environmental chapter of this
manual.
+
At the end of the
timed period a sound
will be heard
intermittently for up to
2 minutes.
+
The countdown
indicator neon will
continue to flash for a
few seconds and then
return to the time of
day.
The sound can be
stopped by pressing
any button.
+

10
The hob
The gas hob has different burner sizes to suit
different types of cooking.
To ensure maximum burner efficiency only use
pots and pans with flat bases appropriate to the
burner size used.
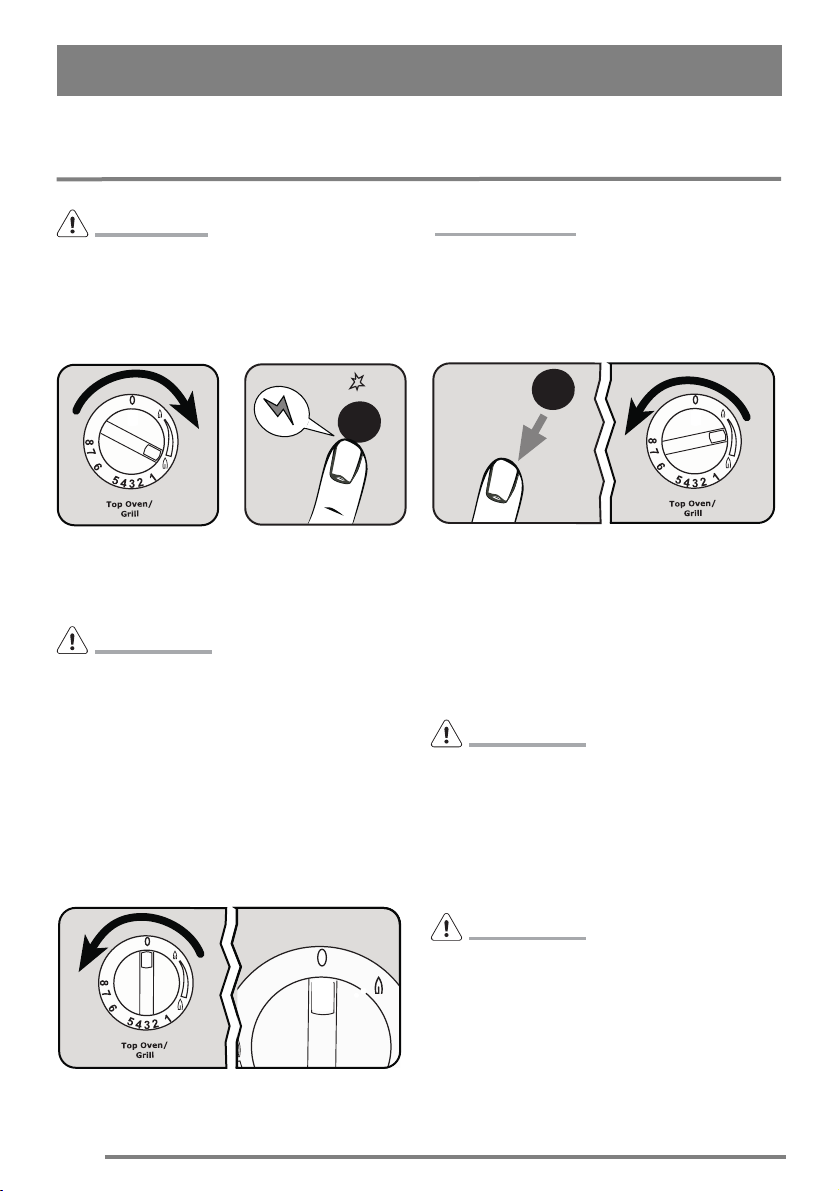
To light the hob bu rners
The hob ignition works by means of an electric spark system
The largest pan, which you should use on any
burner, is 230mm (9") and the smallest pan
should not measure less than 100mm (4").
WARNING!
Ensure the pan supports are correctly fitted
before using the hob.
Push in and turn the
control knob to the
highest setting.
WARNING!
If the ignition button is not pressed
immediately a build up of gas may cause the
flame to spread.
Press the ignition
button immediately.
To turn off any burner
Turn the control knob to the off position. This is
shown by a 0.
When the burner has lit release the control and
ignition button, adjust the setting as required
11
WARNING!
When lighting any burner, ensure that it is lit
before you leave the appliance.
When turning off a burner, ensure the flame
has gone out before leaving the appliance.
Things to note
If you are having any difficulty lighting a hob
burner turn all the hob controls off and make
sure the burner parts have been replaced
correctly.
Hints and tips
• Do not overfill pans or they will boil over.
• Do not use pans with very heavy handles,
which cause the pan to tip.
WARNING!
Place pans on the centre of the burners.
Position pans so the handles cannot be
accidentally knocked or overhang the
appliance. Lift pans on and off the pan
supports. Do not slide them across the hob
• Do not leave accidental spillage on the hob
or removable parts. The spillage should be
wiped up and the parts washed and carefully
dried as soon as the hob, pan supports and
burner parts are cool enough to touch.
• A flat-based Wok will stand stable on the pan
supports. If you use a round Wok with a
collar support, the collar must be the open
wirework type otherwise the performance of
the burner will be affected.
WARNING!
Take care to avoid burns and scalds when
reaching across the hotplate.
.
WARNING!
Take extra care when deep fat frying, do not
cover the pan with a lid. Do not leave a pan
unattended. If the pan catches fire, leave it
where it is and turn off all controls. Place a
damp cloth or a fitting lid over the pan to
smother the flames. Never put water on the
fire. Leave to cool for 30 minutes.
IMPORTANT!
Do not allow hot pans or baking trays to
touch the controls as damage may occur.
12
The grill
CAUTION!
Accessible parts may be hot when the grill is
in use. Young children should be kept away.
Using the grill
Fully open the door before lighting the grill.
IMPORTANT!
When you first operate the grill you may hear
some sounds as the burner heats up, this is
quite normal and is not a fault on the appliance.
Push in and turn the
control knob to the
highest setting.
WARNING!
The grill door must be left open when
grilling.
Press the ignition
button immediately.
Things to note
• Some smoke from fat splashes may be
evident as the grill cleans itself.
• The cooling fan for the controls may operate
after a time.
To turn off the grill
Turn the control knob to the off position. This is
shown by a 0.
When the burner has lit release the control and
ignition button, adjust the setting as required
• The shelf in the grill/top oven is different from
the shelves in the main oven. Only use the
shelf with the large solid metal plate in the
grill/top oven.
WARNING!
Never cover the grill pan or grid with foil as
this can lead to grill fires.
WARNING!
The grill door is fitted with a shut off valve.
This will cut off the gas when the door is
closed. The gas will flow again when the
door is opened. Always ensure that the grill
control is in the off position before closing
the door.
 Loading...