

Page 1
15
scrap off frost or ice. Frost may be removed
by using a plastic scraper. (See defrosting
instructions).
m Frozen food must not be re-frozen once it
has been thawed out.
m Manufacturer’s storage recommendations
should be strictly complied with.
m Lollies can cause frost burns if consumed
right away from the freezer.
m Do not place carbonate or fizzy drinks in the
freezer as these may explode.
m When an old freezer is to be discarded
make sure to:
m Dismount the doors in order to prevent
children from getting trapped inside.
Have the gas from the cooling system
withdrawn before making it to scrap iron.
The symbol on the product or on its
packaging indicates that this product
may not be treated as household waste.
Instead it shall be handed over to the
applicable collection point for the recycling of electrical and electronic equipment. By ensuring this product is disposed of correctly, you will help prevent
potential negative consequences for the
environment and human health, which
could otherwise be caused by inappropriate waste handling of this product. For
more detailed information about recycling of this product, please contact your
local city office, your household waste
disposal service or the shop where you
purchased the product.
m
Warnings for your safety
Warnings for your safety. Carefully read these instructions before installing and using the machine.
m This freezer is designed to be operated by
adults only. Children should not be allowed to
tamper with the controls or play with the product.
m Any electrical work required to install the
appliance should be carried out by a qualified
electrician or competent person.
m This appliance is heavy. Care should be taken
when moving it.
m Make sure that the cable is not trapped under-
neath the appliance, nor touches the motor.
m Repairs carried out by inexperienced persons
may cause injuries or serious malfunctioning.
Refer to the nearest Authorized Dealer.
m Make sure the rear part of the appliance stands
against a wall as there are working parts which
heat up and should not be of easy access.
m Make sure that there is a continous and ade-
quate ventilation as a failure to do so may
result in damage to the appliance or deterioration of the food.
m The appliance should be left for at least 4 hours
after installation before it is turned on ill order
to allow the refrigerant to settle.
m This product must be serviced only by an AUT-
HORIZED DEALER, and only GENUINE
SPARE PARTS must be employed.
m Before cleaning or reparing the appliance,
make sure it is unplugged.
m It is dangerous to alter the specifications or
modify this product in any way.
m These domestic refrigerators are designed to
be used specifically for the storage and conservation of food.
m DO NOT USE SHARP INSTRUMENTS to
Page 2

16
Índex
Warnings for your safety pag. 15
Installation pag. 17
Changing the opening directions
of the doors and Panelling pag. 18
Regulation and Control pag. 19
How to use your
Refrigerator-Freezer pag. 20 - 21
Maintenance of your
Refrigerator-Freezer pag. 22 - 23
Something not working pag. 24 - 25
Normal noises when
functioning pag. 26
Guarantee, Service
and Spare Parts pag. 27
Tecnical Features pag. 28
Page 3

17
Installation
PPoossiittiioonniinngg
• Place the refrigerator away from direct sunlight and
heat sources.
• Maintain recommended ventilation
• Make sure the refrigerator is accurately levelled turning the adjustable feet in order to avoid vibrations
and noises.
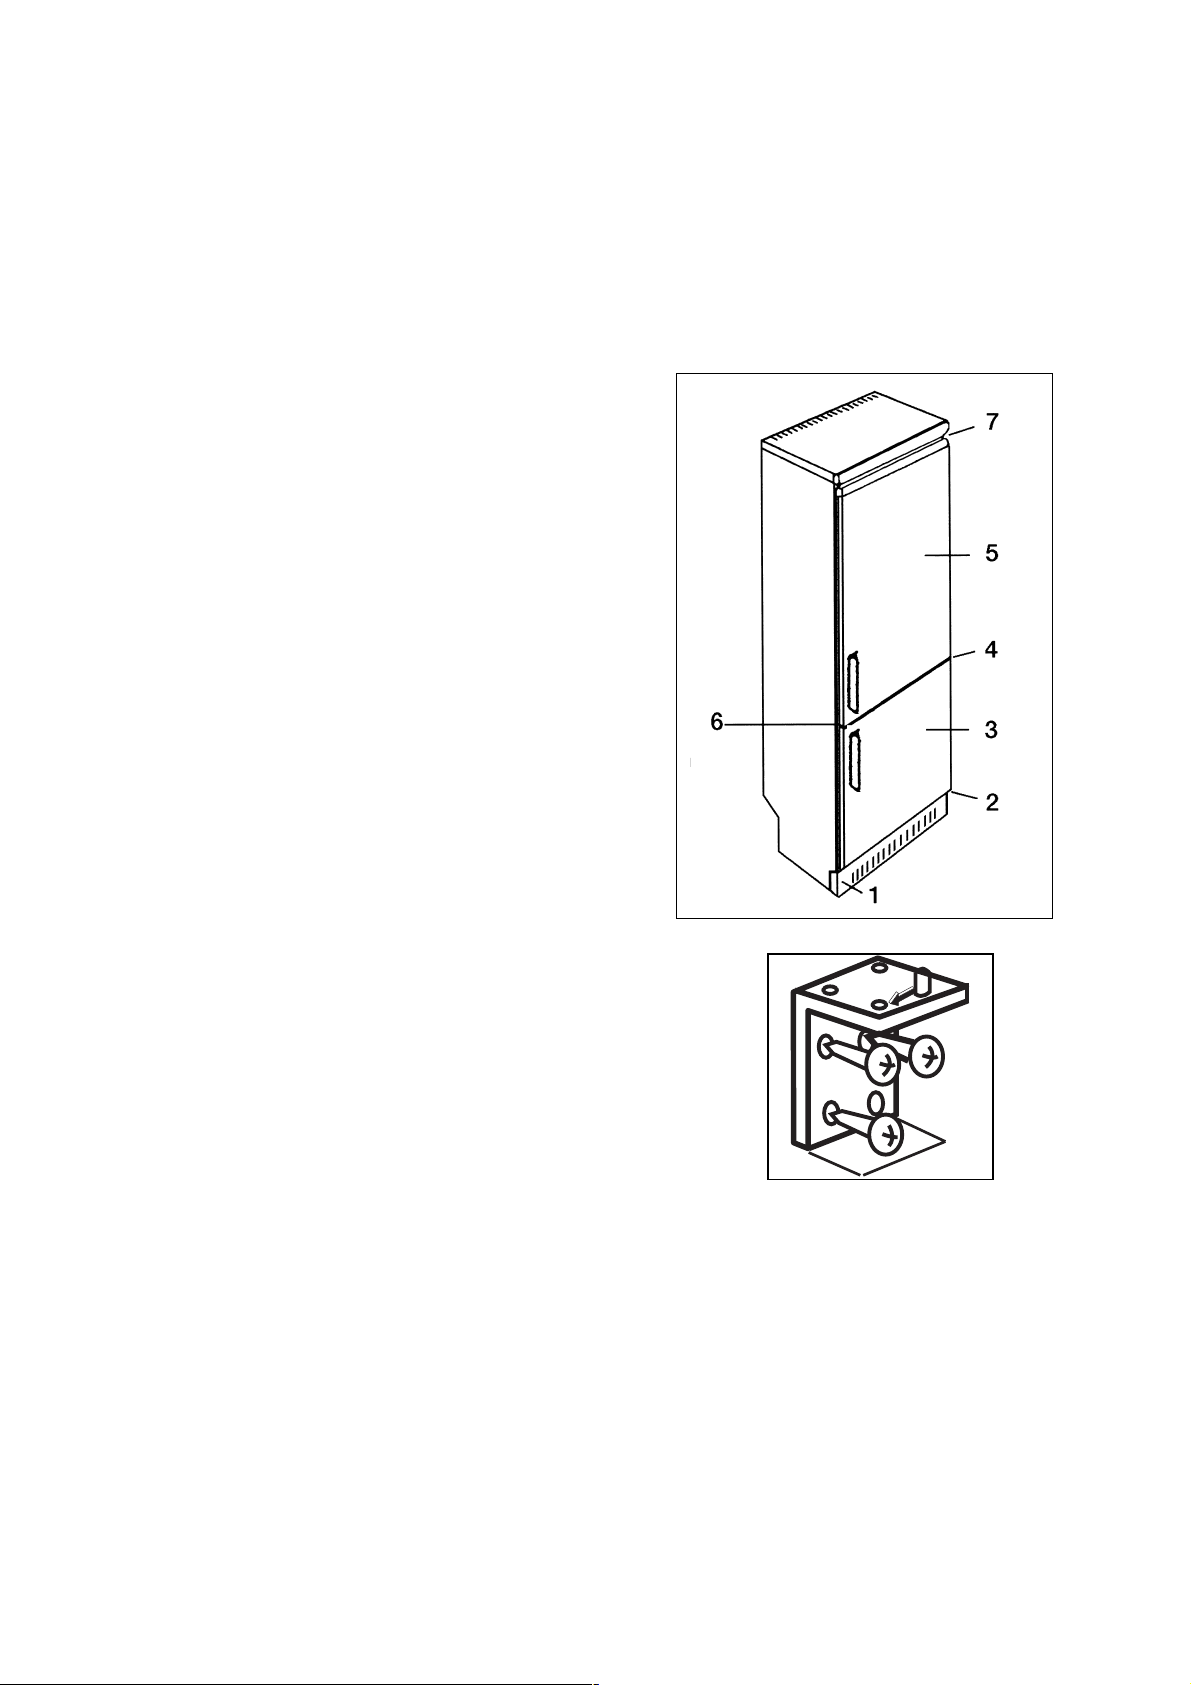
• In the documentation bag you will find two spacers that must be mounted as shown in the
figure in the back of your appliance.
Please loosen the screw under its head and
then unloosen again.
• This is a built in design to be aligned with other furniture
CClleeaanniinngg tthhee iinntteerriioorr
• Do not use alcohol or any cleanig product containing
alcohol because it can damage the cabinet.
• Before using the appliance for the first time wash the
interior whith luke warm water and some neutral soap
so as to remove the typical smell of a brand-new product arid then dry thoroughly.
• Do not use detergents or abrasive powders as these
will damage the finish.
• Remove security used for transportation.
EElleeccttrriiccaall ccoonnnneeccttiioonn
mBefore plugging the appliance make sure that the vol-
tage and frequency shown on the «Technical
Features» correspond to your home supply.
mIt is essential that the appliance be efficiently eart-
hed.
For this purpose the supply cable plug incorporates a
special earth contact. If the sockets of your domestic
wiring system are not grounded, have the appliance
connected to a separate ground wire in accordance
with existing safety regulations.
«THE MANUFACTURER DECLINES TO ACCEPT
ANY LIABILITY IF THIS SAFETY RULE IS NOT
OBSERVED».
Getting started
• Plug the appliance into the mains.
• Make sure the inner light turns on when opening
the door.
• Turn to intermediate position the knobs of the
«temperature regulators»: «A» for refrigerating
compartment and «C» for freezing compartment.
50mm
40mm
D594
Page 4
18
Changing the opening direction
of doors and Panelling
If you wish to change the opening side of the doors
proceed as follows:
1... Disconnect the appliance and dismounth the
plinth. Dismantle the vertical handles (in some
models) and assemble them in the opposite
side. Cover the holes with the plastic lids that
were situated where the handles are presently.
2... Remove the lower hinge taking care for the lower
door not to fall off. Using a 10mm spanner, unscrew the hinge pin and reassemble it on the
opposite side.
3... Lift the lower door off the central hinge.
4... Remove the central hinge taking care for the
upper door not to fall off and not to lose the plastic washer.
5... Take the upper door off the upper hinge. Be
carefull not to lose the plastic washer.
6... Unscrew the plastic plugs located on the opposite side of the central hinge and introduce them in
the holes occupied before by the hinge.
7…Unscrew the axle of the upper hing and screw it
into the hinge on the opposite side. Make sure to
fit in the metal washer for blocking.
8…Place upper door.
For the remaining parts proceed the other way
round.
Once finished make sure that all joints close
perfectly well all around the door and chek that
the internal light turns of when the fridge door
closes.
Page 5
19
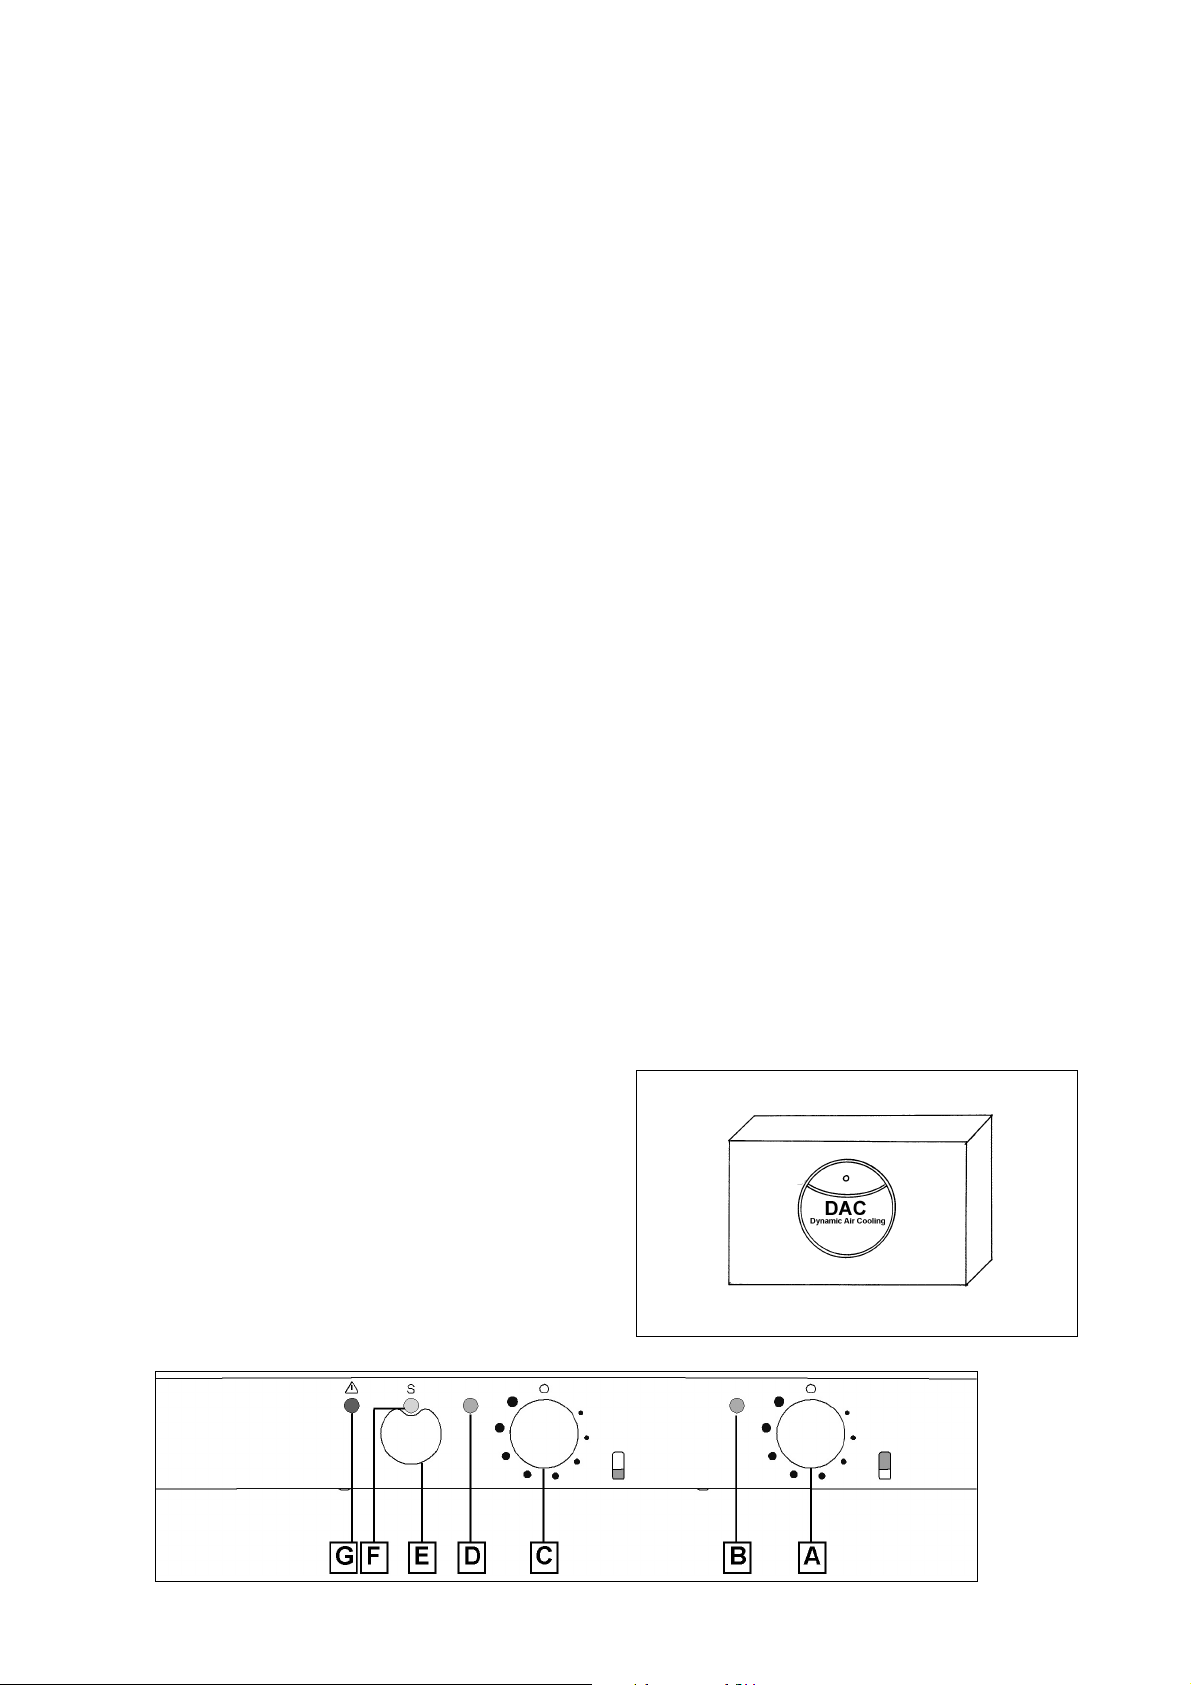
Regulation and Control
TTeemmppeerraattuurree RReegguullaattoorr ffoorr RReeffrriiggee--rraattoorr::
«A»
Allows to adjust the temperature inside the refrige-
rator according to use and external conditions.
• Pos. G = Minimum cold.
• Pos. G = Maximum cold.
• Pos. H = Motor disconnected.
TTeemmppeerraattuurree RReegguullaattoorr ffoorr FFrreeeezzeerr::
«C»
Allows to adjust the temperature inside the freezer
according to use and external conditions.
• Pos. G = Minimum cold.
• Pos. G = Maximum cold.
• Pos. H = Motor disconnected.
GGrreeeenn lliigghhtt::
«D» (some models only).
Indicates connection to mains when lighted.
OOrraannggee lliigghhtt::
«F» (some models only).
Indicates that the freezer is on freezing mode (S).
RReedd lliigghhtt::
«G» (some models only).
Whent lighted indicates abnormal temperature conditions in the freezer, but for the exceptions appearing of Pag «Freezing of Food» and Page
«Something not working».
IInntteerriioorr lliigghhtt::
Comes on when opening the door of the refrigerating compartment.
When changing the light bulb, first remove the protective cover «X» (see point A-3 «IF SOMETHING
DOES NOT WORK»).
SSuuppeerr sswwiittcchh::
«E»
Allows you to choose the freezing type you want in
the freezer compartiment.
To keep the equipment in good working
order, please consult the «Freezing
of food» paragraph.
GGrreeeenn ppiilloott::
«B» (some models only).
It is on when the fridge compartiment engines is
working.
DDiinnaammiicc RReeffrriiggeerraattiioonn::
(some models only)
The Dynamic Refrigeration System give, in the
fridge compartment, extra efficiency showed in:
• Quicker refrigeration.
• More homogeneous temperature.
DAC (Dynamic Air Cooling system) has been
mainly designed for hot weather (ambient temperature above 25°), and also when the refrigerator is plenty of food.
To start working, push the switch.
When DAC is switched on, the cold production
es higher, thus you should turn the temperature
regulator to an adequate position to avoid excesive cold.
Page 6

20
How to use your Refrigerator-Freezer
off by a fault or power cut, take the following
precautions:
• Keep the doors closed at all times.
• Find out how long the stoppage is expected
to last.
Once normal power is restored:
A) If the freezer is full and the stoppage has
been less than «Time for temperature
Rise» indicated for each model in the
«Technical Features» section, then no
damage will have been caused to the food.
B) If the freezer is not full, the cold will be lost
more quickly. If the food has not started to
thaw, then follow the instructions in «A».
C) If the food has begun to thaw, use them up
as quickly as possible, or cook them and
refreeze them.
RReeffrriiggeerraattoorr CCoommppaarrttmmeenntt::
This compartment is for storing drinks and
fresh food products.
The temperature inside is very evenly distributed. Make sure food does not touch
the back wall, since behind this surface is
where the cold is generated and food could
bee partially frozen. Also, this can impede the
circulation of cold air.
This appliance is provided with an automatic
defrosting system. Consequently you will
sometimes notice a thin layer of ice or drops of
water on the rear wall.
ColdStore Compartment (some
models)
The models equippied with this feature in the
fridge part, it is indicated for a best conservatiom of fresh foods as fish, meat seafood, etc.
It is placed in the lower part, directly above of
the vegetable conservation drawer.
FFrreeeezzeerr CCoommppaarrttmmeenntt
This freezer, is marked , and is suitable for freezing fresh foodstuffs and keeping
food for long periods.
FFrreeeezziinngg ooff ffoooodd
Freezing should take place as quickly as possible.
The procedure for this is as follows:
1... Press the button E (page 19)
• If the freezer was switched off and empty, 3
hours prior to placing the food to be frozen.
• If the freezer is already operating and contains frozen food, 24 hours before placing the
food to be frozen.
2... The maximum amount which can be frozen in
24 hours is indicated in the section
«Technical Features».
3... Place the food to be frozen inside the lower
compartment of the freezer. If it’s necessary,
the highest capacity of freezing is reached
removing the lower basket.
4... Red light «G», may be on for a few hours
during freezing process. Switch-on time for
this light will vary according to amount of food
being put in for congelation and time while
door remains open.
5... Once 24 hours from the introduction of the
food have elapsed the congelation can be
considered as finished.
Press the button E
KKeeeeppiinngg ffrroozzeenn ffoooodd
For optimum consevation, the temperature inside
the freezer compartment must be at least -18°C.
This temperature is adjusted automatically.
Check that the «Temperature Control» is in a
middle position. Sometimes it may be necessary
(insufficient ventilation, high roon temperature,
frequent opening and closing of the door…) to
change the position of the «Temperature
Control».
If the appliance should be accidentally switched
Page 7

21
How to use your Refrigerator-Freezer
UUsseeffuull HHiinnttss
Do not introduce any new food during a freezing period.
Do not put any newly introduced food for freezing near to already frozen food.
Wrap the food up properly or place it in hermethic recipies before introducing it into the
freezer.
Do not introduce any hot food into the freezer.
Food and drinks of a strong flavour may pass
this on to others and affect their flavour. Wrap
them up adequately or put them into tight closing bags.
Follow the instructions given in the cook books,
freezing books and wrapping utensiles for better conservation of food.
In some models, on the freezer inner door
there is usually an schematic showing the conservation time (in months) for the different
types of food. It will also depend on the food
quality in the moment of freezing and on the
specific instructions on packages.
Page 8

22
Maintenance of your
Refrigerator-Freezer
Unplug the appliance before performing any operations.
Removing the layer of ice from the freezer
The layer of ice inside the freezer forms very
slowly, as long as the doors are not opened too
frequently and the foods preserved are properly
wrapped.
When the layer of ice becomes more than 5 mm
thick, it must be removed. To remove it, proceed
as follows:
1... Remove the foods from the freezer and place
them in the coldest place possible.
2…Remove the drawers.
3…Remove the rubber plug (see figure 8) and
place it as shown in figure 9.
4…Place a container under the drain hole to
collect the water.
5…Remove the ice from the walls and shelves
using the plastic scraper.
• Never use sharp objects or heaters, which
could seriously damage the appliance.
• Under no circumstances should you try to rip
out the ice - wait for it to melt.
6…After removing the ice and cleaning and drying
the interior, remove the rubber plug and replace the drawers.
7…Plug in the appliance.
Fig. 8
Fig. 9
Page 9

23
Maintenance of your
Refrigerator-Freezer
DDeeffrroossttiinngg ooff tthhee rreeffrriiggeerraattoorr
Frost is automatically eliminated in the refrigerator. Clean regularly the water drain opening «G».
CClleeaanniinngg
• Do not use alcohol or any cleanig product containing alcohol because it can damage the cabinet.
• Use lukewarm water and neutral soap or bicarbonate of soda for cleaning the interior and the
exterior of the appliance. Never use detergents
nor abrasive powders.
• Clean the black grill on the read of the appliance (condeser), motor and the upper and downer
ventilation slots with a brush or vacuum cleaner.
This way the performance of the appliance will
improve and energy consumption reduced.
• Clean the water container above the motor.
• In order to remove the shelve over the vegetable drawer (some models only), first of all pull
out the security flanges as shows in the draw
(see fig. 13). Once it has been put back, return
the flanges to the original position.
IIddllee ppeerriiooddss
During periods when the appliance is not in use
take the following precautions:
• Unplug the appliance.
• Remove all the food.
• Defrost and clean the interior and all accessories.
• Leave the door ajar to permit the air to circulate
in the interior and thus avoid unpleasant smells.
Fig. 13
Page 10

24
Something not working
Some functioning problems may be due to causes which can easily be solved before calling the
Network Service. Follow theses instructions:
PPrroobblleemm CCaauussee SSoolluuttiioonn
A) LAMP
AND INDICATORS
1. Green lamp «D» does • Appliance not connected. • Plug it in.
not come on • No power at mains socket. • Check the domestic automatic
(If available) cut out.
2.The red light does not • Freezer is not properly closed. • Close the door. The light will
come off (if availabel) come off after a few hours.
• Freezer door has been • This is normal. The light will
open for too long. come off after a few hours.
• The «Temperature Regulator of • This is normal. The light will
the Freezer» has been recently come off after a few hours.
moved to a colder position.
• Food has been put into • This is normal. The light will
the freezer. come off after a few hours.
• The layer of ice in the • Remove it according to
freezer is too thick. instructions.
3.Inner light (Refrigerator • Appliance unplugged. • Plug the appliance into
mains.
compartment) does not • No power at mains socket. • Chek the domestic
come on. instalación doméstica. automatic cutout.
• Bulb loose or burnt out. • Tighteen or substitute it fo
another of same rating.
B) PERFORMANCE
1. The freezer or the refrigerator • The appropiate «Temperature • Change to another position.
do not cool. Regulator» is in position «H».
2. The freezer or the refrigerator • Door not properly closed. • Close well.
do not cool enough. • The door has been opened • Avoid frecuent opening.
frecuently.
• Inadequate position of • Change position to a cooler one.
«Temperature Regulator».
• Food has been introduced • The appliance will get back
recently in large quantities. to normal, wait.
Page 11

25
PPrroobblleemm CCaauussee SSoolluuttiioonn
3. Food gets frozen in the • «Temperature Regulator» • Change position to less cold.
refrigerator. Excessive Cold. on inadequate position.
• Food touches the back walls • Bring food forwards.
• The Dynamic Refrigeration is • Change the temperature regulator
connected. to an adequate position or switch
off the Dinamic Refrigeration.
4. The motor does not stop • Temperature regulator • Change position to less cold.
running: on inadequate position.
• Door not properly closed. • Close the door correctly.
• Door opened frequently. • Avoid frequent opening.
• Food has been put in • Wait for the appliance to come
recently in large quantity. back to normal.
• Temperature regulator of • This is normal.
freezer in position G.
C) WATER/ICE
1.Makes too much ice. • «Temperature Regulator» • Change position to less cold.
in inadequate position.
• Door not properly closed. • Close correctly.
• Escessive door opening. • Avoid frequent opening.
2. Water in the lower part • Drain blocked • Clean duct «G».
of the Refrigerator.
3. Water in the vegetable box. • Wet vegetables have been • This is normal.
introduced.
4. The outside of the cabinet • High humidity level . • This is normal. It does not
steams up. in the room affect the performance.
of the appliance
D) DOORS
1. Door does not close. • The appliance is not • Level smooth.
properly levelled.
• Door has benn banged • Never bang the door.
too hard and bounces back.
• Food protudes. • Place food properly.
• Drawers protude. • Push them into place.
E) NOISES
• Appliance not properly levelled. • Level properly.
• Friction from back pipes. • Space well.
• Some fixing screw is loose. • Tihten the screw.
• Something inside is vibrating • Place correctly.
• Others. • See next page.
Something not working
Page 12

26
Normal noises when functioning
11.. TTeemmppeerraattuurree RReegguullaattoorr..
May cause cracking sounds when the system
connects or disconnects.
22.. RReeffrriiggeerraattiinngg ssyysstteemm..
The injected cooling gas may produce a burbling
sound while running through the tubes.
33.. CCoommpprreessssoorr..
May cause zumbing noises and/or slight bumping.
44.. IInnssuullaattiioonn..
The material used has a tendency to increase noises, but it does insulate perfectly and is of low
energy consumption.
Page 13

27
Guarantee, Service
and Spare Parts
Together with the appliance you should receive an
instruction booklet like this together with: :
• A guarantee card «Certificado de Garantia»,
with the conditions of the guarantee printed on
the back.
This documentation should always be at hand for
consulting. Should this appliance be sold or transfered to another user, make sure that this documentation stays with the appliance so the new
owner can be acquainted with the functioning of
the appliance and relevant warnigns.
BBeeffoorree ccaalllliinngg tthhee rreeppaaiirrmmaann
Read the user instruction and follow the advice
and directives given. In many cases, you will be
able to clarify any doubts yourself and thus avoid
unnecessary service calls.
The preceding section entitled «If the appliance
does not perform correctly» includes suggestions
for what should be checked before a serviceman
is called.
If, after the above check, there is still a fault call
your nearest Service Centre «Asistencia
Tecnica».
Please make sure you give the model and serial
number of the appliance. This information can be
found on the data plate inside the cabinet.
GGuuaarraanntteeee
According to the enclosed Guarantee registration
card.
SSeerrvviiccee aanndd ssppaarree ppaarrttss
Can be obtained from our service organization
«Asistencia tecnica».
Model:
. . . . . . . . . . . . . . . . . . . . . . . . . . . . . . . . . . . . . . . . . . . . . . . . . . . . . . . . . . . . . . . . . . . . . . . . . . . . . . . . . . . . . . .
Product Number: . . . . . . . . . . . . . . . . . . . . . . . . . . . . . . . . . . . . . . . . . . . . . . . . . . . . . . . . . . . . . . . .
Serial Number: . . . . . . . . . . . . . . . . . . . . . . . . . . . . . . . . . . . . . . . . . . . . . . . . . . . . . . . . . . . . . . . . . . . . . . .
mm SSaaffeeyy
Read the safety and warning texts at the begining of the user instructions. The manufacturer
is not reponsible for faults caused by the product being used incorrectly or for purposes
other than those specified in the user instructions.
mm WWaarrnniinngg
Don’t use the fridge/freezer unit for storing
explosive gases or liquids, e.g. cigarette lighter gas, petrol (gasoline), ether, acetone.
Page 14

28
Tecnical Features
DIMENSIONS WITH
DOORS CLOSED
DIMENSIONS WITH
DOORS OPEN
MMOODDEELL CCBB11776600 CCBB11886600 CCBB22001100
TOTAL GROSS VOLUME (L) 319 335 372
HEIGHT «A» (mm) 1.760 1.850 2.010
VOLTAGE (V) ± 6% 230 230 230
FREQUENCY (Hz) 50 50 50
FREEZING
CAPACITY (Kg/24h) 14 14 14
POWER CONSUMPTION (W) 175 175 175
TEMPERATURE
RISING TIME (H) 20 20 20
This appliance complies with the following CEE Directives:
– 73/23 CEE of 19/02/73 (low voltage directive) and subsequent modifications.
– 89/336 CEE del 03/05/89 (electromagnetic compatibility directive) and subsequent
modifications.
DATA IN AGREEMENT WITH «UNE» REQUIREMENTS
 Loading...