

Zanussi ZIDW956 USER MANUAL

INSTRUCTION BOOKLET
DISHWASHER
ZIDW 956

CONTENTS
Warnings . . . . . . . . . . . . . . . . . . . . . . . . . . . . . . . . . . . . . . . . . . . . . . . . . . . . . . . . . . . . . . . . . . . . . . .page 3
Installation . . . . . . . . . . . . . . . . . . . . . . . . . . . . . . . . . . . . . . . . . . . . . . . . . . . . . . . . . . . . . . . . . . . . . .page 4
Positioning, levelling, water supply connections, water outlet connection, electrical connections . . . . . .page 4
Use . . . . . . . . . . . . . . . . . . . . . . . . . . . . . . . . . . . . . . . . . . . . . . . . . . . . . . . . . . . . . . . . . . . . . . . . . . . . .page 5
Control panel . . . . . . . . . . . . . . . . . . . . . . . . . . . . . . . . . . . . . . . . . . . . . . . . . . . . . . . . . . . . . . . . . . . . . .page 5
Use of rinse aid, use of detergent . . . . . . . . . . . . . . . . . . . . . . . . . . . . . . . . . . . . . . . . . . . . . . . . . . . . . . .page 7
Loading the machine, use of the lower basket, use of the upper basket . . . . . . . . . . . . . . . . . . . . . . . . .page 8
Adjusting the height of the upper basket . . . . . . . . . . . . . . . . . . . . . . . . . . . . . . . . . . . . . . . . . . . . . . . . .page 9
Helpful hints . . . . . . . . . . . . . . . . . . . . . . . . . . . . . . . . . . . . . . . . . . . . . . . . . . . . . . . . . . . . . . . . . . . .page 9
Washing programmes . . . . . . . . . . . . . . . . . . . . . . . . . . . . . . . . . . . . . . . . . . . . . . . . . . . . . . . . . . .page 10
Operating sequence . . . . . . . . . . . . . . . . . . . . . . . . . . . . . . . . . . . . . . . . . . . . . . . . . . . . . . . . . . . . . . . . .page 11
Maintenance and cleaning . . . . . . . . . . . . . . . . . . . . . . . . . . . . . . . . . . . . . . . . . . . . . . . . . . . . . .page 12
Cleaning the central filters, cleaning the large filter, internal and external cleaning . . . . . . . . . . . . . . . . .page 12
Prolonged periods of Non-Operation . . . . . . . . . . . . . . . . . . . . . . . . . . . . . . . . . . . . . . . . . . . . . . . . . . . .page 13
Servicing . . . . . . . . . . . . . . . . . . . . . . . . . . . . . . . . . . . . . . . . . . . . . . . . . . . . . . . . . . . . . . . . . . . . . . .page 14
Building-in . . . . . . . . . . . . . . . . . . . . . . . . . . . . . . . . . . . . . . . . . . . . . . . . . . . . . . . . . . . . . . . . . . . . . .page 16
TECHNICAL SPECIFICATIONS
DIMENSIONS Width cm 59,6
Height cm 81,8 - 87,8
Max depth cm 55,5
Max depth with door open cm 115
ELECTRICAL CONNECTION Voltage 220-240 V/50Hz
POWER OF HEATING ELEMENT 1900 W
OVERALL POWER 2100 W
WATER SUPPLY PRESSURE minimum 7 psi - 49 KN/cm
maximum 110 psi - 758 KN/cm
2
2
CAPACITY (STANDARD IEC PLACE SETTINGS) 12
CONSUMPTION: Water 19 lt
Electricity 1.4 kW/h
PID09GB
2

WARNINGS
It is most important that this instruction book
should be retained with the appliance for future
reference. Should the appliance be sold or transferred to another owner, or should you move
house and leave the appliance, always ensure that
the book is left with the appliance in order that the
new owner can get to know the functioning of the
appliance and the relevant warnings.
These warnings are provided in the interest of
safety. You MUST read them carefully before
installing or using the appliance.
■ If the appliance is supplied with obvious damage,
consult the supplier before installing it.
■ Any plumbing work required to install this appliance
should be carried out by a qualified plumber or
competent person.
■ Any electrical work required to install this appliance
should be carried out by a qualified electrician or
competent person.
■ This appliance is designed to be operated by adults.
■ Care must be taken to ensure that the appliance
does not stand on the electrical supply cable or on
the water inlet and drain hoses.
■ Under no circumstances should you attempt to
repair the machine yourself. Repairs carried out by
inexperienced persons may cause injury or serious
malfunctioning.
■ This appliance should be serviced only by an
authorised Zanussi Service Center.
■ Before disposing of the appliance, disconnect the
water hose, cut the electrical cable and ensure that
the door cannot close.
■ For proper disposal of the appliance, contact your
local waste collection service.
■ Zanussi dishwashers are designed to be used for
washing normal household utensils. Items that are
contaminated by petrol, paint, steel or iron debris,
corrosive, acidic or alkaline chemicals are not to be
washed in a dishwasher.
■ Under no circumstances should you open the door
whilst, the appliance is in operation. Always turn off
the appliance before opening the door.
However, the dishwasher features a special safety
device which cuts off the water inlet, should the door
be accidentally opened, thus avoiding water leaks.
■ Never touch the heating element during or
immediately after the end of the washing cycle.
■ When finishing loading or unloading close the door,
as an open door can be a hazard.
■ It is dangerous to lean or to sit on the dishwasher
door: the appliance could tip over.
■ Built-in dishwashers only: the appliance must be
secured to the underside of the worktop using the
brackets provided. Failure to do this could result in
an unstable appliance which may cause damage or
injury.
■ Unplug the appliance and turn off the water after
use.
PAV01GB
3
INSTALLATION
Remove all packaging before positioning the
machine.
Positioning
If possible, position the machine next to a water tap
and a drain.
This dishwasher features fill and drain hoses which
can be turned either to the left or the right to suit the
installation.
Water outlet connection
The end of the drain hose can be connected as
follows:
to the sink outlet siphon, securing it if necessary with
a clip;
to a wall outlet provided with vent-hole, minimum
internal diameter 4 cm;
The waste connection must be at a height of between
30 cm (minimum) and 100 cm (maximum) from the
floor.
It makes no difference which way the drain hose
faces, either to the right or left of the dishwasher.
Avoid bending or kinking the hose as this could
prevent or slow down the discharge of water.
If you use a drain hose extension it must be no longer
than 2 metres and its internal diameter must be no
smaller than the diameter of the hose provided.
Likewise the internal diameter of the couplings used
for connection to the waste outlet must be no smaller
than the diameter of the drain hose.
CS05
Ø 21
Ø 18
Ø 18
Ø 21
+ 2 m max
min 4 cm
min 30 cm
max 100 cm
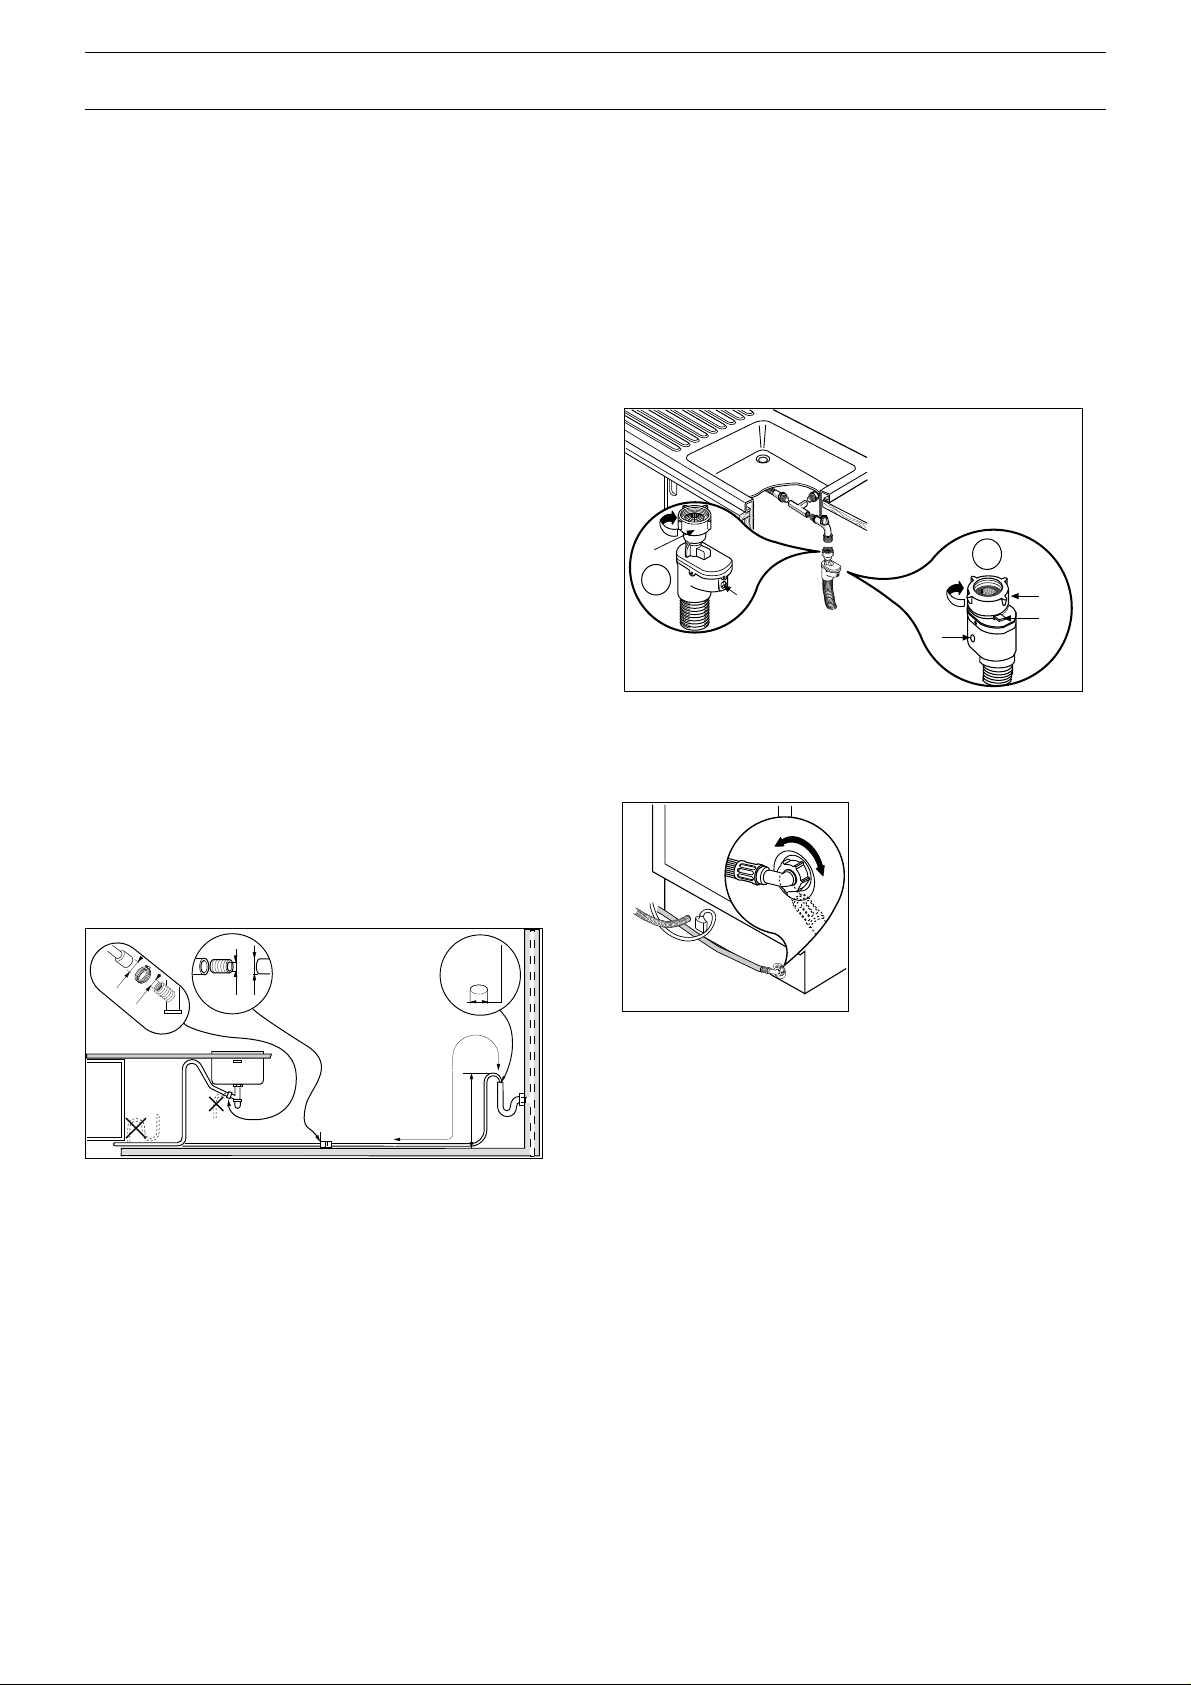
Water supply connections
This dishwasher may be fed with either hot (max.
60°C) or cold water.
Nevertheless we advise you a cold water supply.
A hot water supply is not always efficient with very
soiled crockery as it shortens the washing programmes a lot.
For making the connection itself, the coupling nut fitted
to the machine's supply hose is designed to screw
onto either a 3/4 inch gas thread spout, or to a
purpose-made quick-coupling tap such as the PressBlock.
The water pressure must be within the limits given in
the technical specifications, as it will not function
correctly if pressure is outside these specifications.
The water supply hose is fitted with a safety device,
which prevents water from entering the machine
should the inner hose split, due to wear.
The problem is signalled by a red or yellow indicator
which appears in window (B -➀ ➁).
If this happens, close the water tap and have the hose
replaced.
Warning: the retaining ring (A - ➀ ➁) must be proper-
ly fitted so as to avoid water leaks.
CA13
A
1
B
2
B
Note: Only for water supply hoses with lock-fast
safety device to prevent inadvertent loosening.
To detach the hose press yellow lever (C - ➁) and turn
the retaining ring anti-clockwise.
Note: the end of the hose
connected to the machine
can be positioned as required, by simply slackening the retaining ring.
Re-tighten the ring securely
to avoid water leaks.
CA06
Avoid bends or kinks in the hose, which could prevent
or slow down the flow of water.
If the machine is connected to new pipes or pipes
which have not been used for a long time, you are
advised to run the water for a few minutes before
connecting the inlet hose. This will prevent deposits of
sand or rust clogging the inlet hose filter.
Electrical connection
Before plugging the appliance into the wall socket,
make sure that:
1. the mains voltage corresponds to the voltage given
in the technical specifications;
2. the meter, fuses, mains power supply and wall
socket can all take the maximum load required.
Make sure that the socket and plug are compatible
without having to use any type of adapter. If necessary,
have the domestic wiring system socket
replaced.
Safety standards require the appliance to be
earthed.
The Manufacturer accepts no liability for failure to
observe the above safety precautions.
PIN22GB
4
A
C
USE
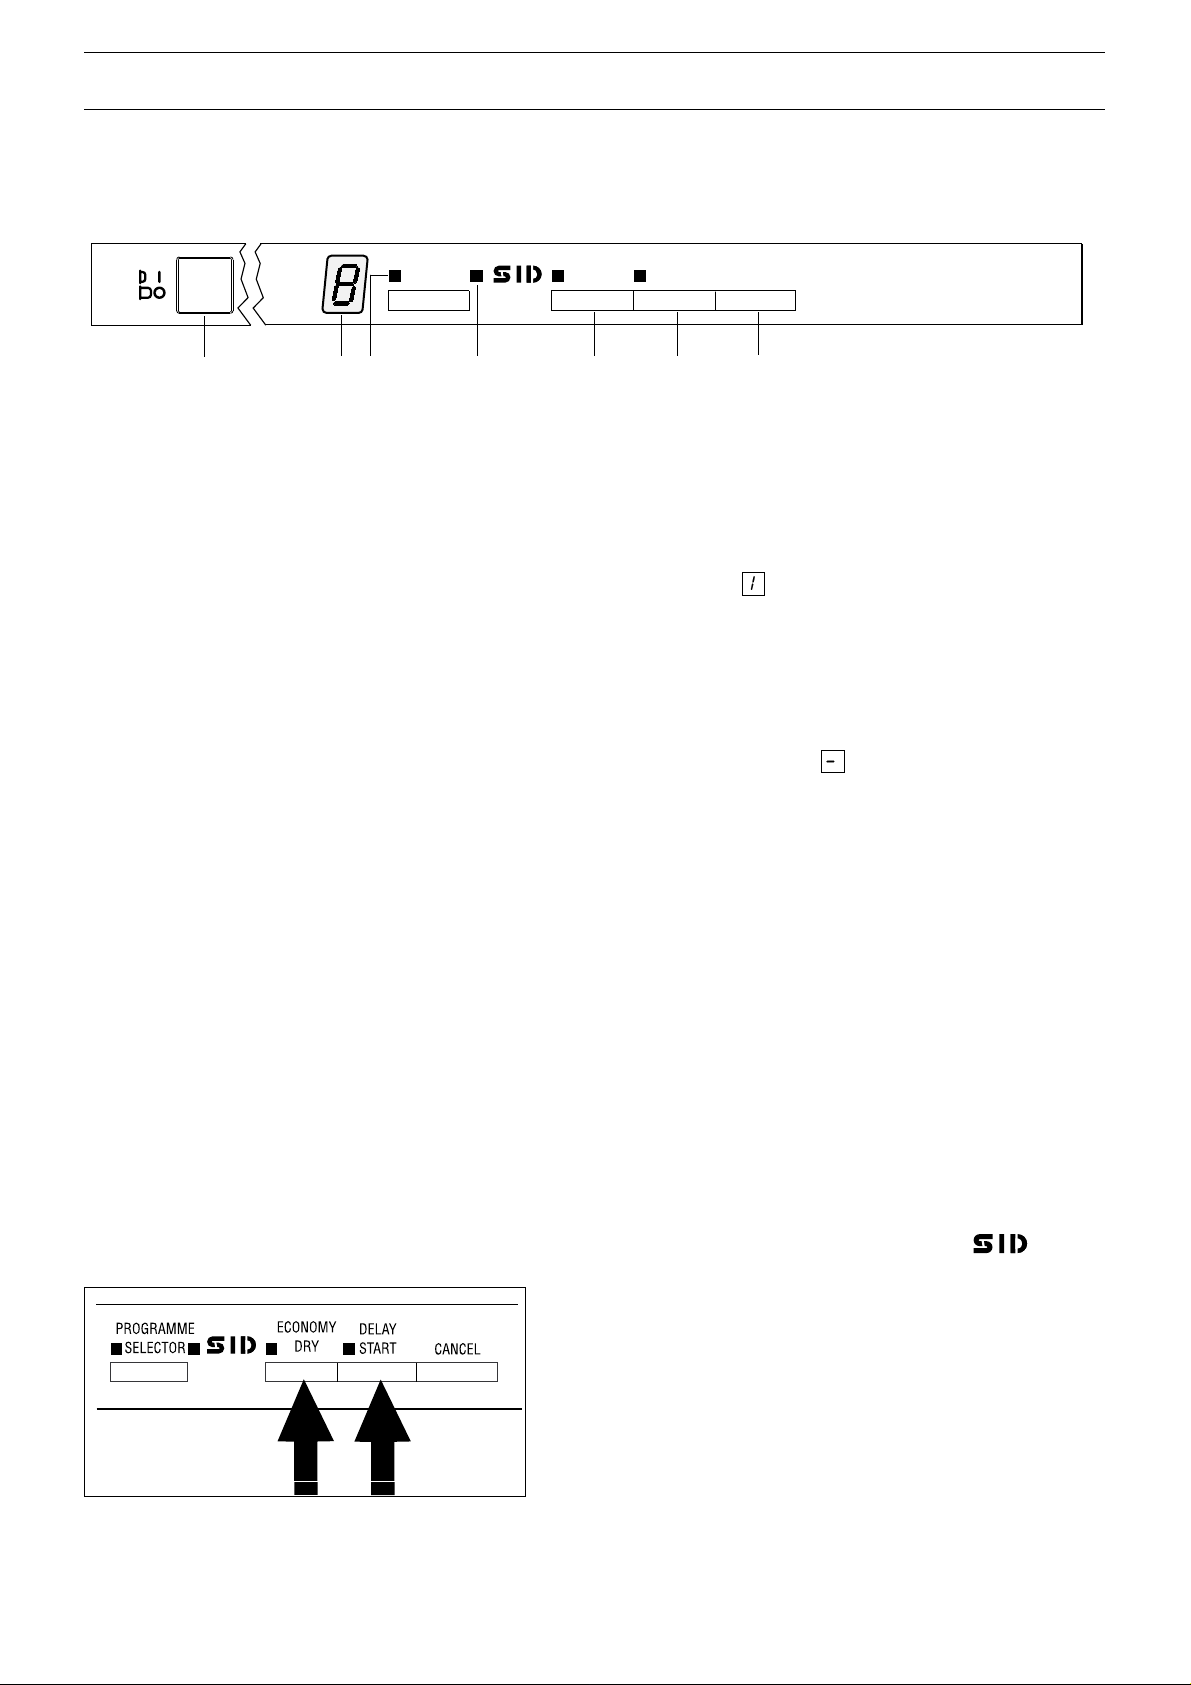
Control panel
PROGRAMME
SELECTOR
1
2
3
4
THE CONTROLS
In this fully integrated appliance the controls are located
on top of the door. When selecting a programme, the
door needs to be partially opened.
Audible signals have been introduced to help
indicate which operations the dishwasher is
performing.
Short «instruction accepted» signal
When any of the buttons is pressed: a short audible
signal informs you that the machine has accepted the
instruction given; if no signal is heard when a button is
pressed, this means that a programme is already
running or that the programme selected does not
include this function.
ECONOMY
DRY
5
DELAY
START
6
CANCEL
7
1. ON/OFF
ON
Press this button to preset the dishwasher to accept
settings (selection of wash programmes, drying
options, delayed start, etc.).
The number corresponding to the first selectable
programme (Rinse and Hold) appears in the digital
display (2).
OFF
When the wash programme has ended, the dishwasher
stops automatically (an intermittent audible signal
lasting about 5 seconds informs you of this) and a
flashing horizontal line appears in the digital display.
To switch off the dishwasher at the end of the
programme, press this button again.
2. Digital display
Long «programme run» signal
A continuous audible signal lasting about one second,
heard only when you close the dishwasher door,
informs you that the wash programme is starting.
Intermittent «end of programme» signal
An intermittent audible signal, lasting in total five seconds,
informs you that the wash programme has ended.
If you wish to deactivate these audible signals, press
both the «ECONOMY DRY» and «DELAY START»
buttons together for about 3 seconds, until three short
signals are heard.
SO76
3. Programme selector button
To select the required programme, press this button un til the number corresponding to the chosen programme
appears in the digital display (2) see «Washing
Programmes» chart.
To start the programme, simply close the dishwasher
door. A long audible signal (about 1 second) informs
you that the programme is starting.
4. Intensive programme light « »
This pilot light comes on when the most energetic programme is selected (no. 2 INTENSIVE) with hot prewash, suitable for pans and particulary dirty crockery,
to remind you that this programme requires an extra
dose of detergent (10 g) to be poured in the SID dispenser. Follow the dosing instructions in the «Washing Programmes» chart.
To reactivate the audible signals, press both buttons
together again for about 3 seconds, until the short
«instruction accepted» signal is heard.
PPC16GB
5

5. Economy dry button
7. Cancel / programme change button
When this button is pressed, the last rinse water is not
heated, with a significant saving in electrical energy.
The corresponding pilot light comes on.
In this case, the dishes are not dried automatically by
the dishwasher.
If the pilot light is not on, the full drying cycle will be
performed.
6. Delay start button
Allows the start of the programme to be delayed by a
minimum of 1 hour, up to 9 hours.
How to set the delayed start:
When the button is pressed, the number appears
in the display (2).
Press the button again to select the number of hours
by which you wish to delay the programme start, up to
a maximum of 9.
E.g.: if you have selected number , the wash
programme will start in 2 hours' time.
To cancel the delayed start set, press the button until
the number appears.
If you wish to cancel a programme which is already
running or a setting which has just been made, press
this button for about two seconds until the short
«instruction accepted» signal is heard.
The number for the first selectable programme
(Rinse and Hold) reappears in the display whilst the
programme selector light (3) flashes, to indicate that
the dishwasher has been reset and that a new
programme and new options may be selected.
Close the dishwasher door to start the countdown: a
long audible signal (about one second) informs you that
the function is active. If you open the door again you will
see, in the display (2), how long there is to go (in hours)
before the programme starts. Aflashing dot in the digital
display means that the delayed start function has been
activated. Opening the door has no effect on a
countdown which has already been started.
If, during the countdown, you wish to see the
programme number selected in the display, press the
Programme Selector button (3).
If, after having started the countdown by closing the
dishwasher door, you wish to cancel the delayed start,
press button (7) (CANCEL) for about 2 seconds until
the short «instruction accepted» signal is heard.
PPC17GB
6
 Loading...