

Page 1

FRIGORIFICO-
CONGELADOR
FRIDGE-FREEZER
REFRIGERATEUR-
CONGELATEUR
TWEEDEURS-
KOELKAST
ZI 9454A
LIBRO DE INSTRUCCIONES
INSTRUCTION BOOKLET
MODE D’EMPLOI
GEBRUIKSAANWIJZING
2223 214-24
Page 2

17
WARNINGS
Printed on recycled paper
It is most important that this instruction book should be retained with the appliance for future
reference. Should the appliance be sold or transferred to another owner, or should you move house
and leave the appliance, always ensure that the book is supplied with the appliance in order that the
new owner can be acquainted with the functioning of the appliance and the relevant warnings.
If this appliance featuring magnetic door seals is to replace an older appliance having a spring lock
(latch) on the door or lid, be sure to make that spring lock unusable before you discard the old
appliance. This will prevent it from becoming a death-trap for a child.
These warnings are provided in the interest of safety.You must read them carefully before installing or
using the appliance.
General Safety
• This appliance is designed to be operated by
adults. Children should not be allowed to tamper
with the controls or play with the product.
• It is dangerous to alter the specifications or
modify this product in any way.
• Before any cleaning or maintenance work is carried
out, be sure to switch off and unplug the appliance.
• This appliance is heavy. Care should be taken
when moving it
• Ice lollies can cause frost burns if consumed
straight from the appliance.
• Take utmost care when handling your
appliance so as not to cause any damages to
the cooling unit with consequent possible
fluid leakages.
• The appliance must not be located close to
radiators or gas cookers.
• Avoid prolonged exposure of the appliance to
direct sunlight.
• There must be adequate ventilation round the
back of the appliance and any damage to the
refrigerant circuit must be avoided.
• For freezers only (except built-in models): an
ideal location is the cellar or basement.
• Do not use other electrical appliances (such
as ice cream makers) inside of refrigerating
appliances.
Service/Repair
• Any electrical work required to install this
appliance should be carried out by a qualified
electrician or competent person
• This product should be serviced by an authorized
Service Centre, and only genuine spare parts
should be used.
• Under no circumstances should you attempt to
repair the appliance yourself. Repairs carried out
by inexperienced persons may cause injury or
more serious malfunctioning. Refer to your local
Service Centre, and always insist on genuine
spare parts.
• This appliance contains hydrocarbons in its
cooling unit; maintenance and recharging must
therefore only be carried out by authorized
technicians.
Use
• The domestic refrigerators and freezers are
designed to be used specifically for the storage of
edible foodstuffs only.
• Best performance is obtained with ambient
temperature between +18°C and +43°C (class T);
+18°C and +38°C (class ST); +16°C and +32°C
(class N); +10°C and +32°C (class SN).The class
of your appliance is shown on its rating plate.
Warning: when the ambient temperature is not
included within the range indicated for the class
of this appliance, the following instructions must
be observed: when the ambient temperature
drops below the minimum level, the storage
temperature in the freezer compartment cannot
be guaranteed; therefore it is advisable to use the
food stored as soon as possible.
• Frozen food must not be re-frozen once it has
been thawed out.
• Manufacturers’ storage recommendations should
be strictly adhered to. Refer to relevant
instructions.
• The inner lining of the appliance consists of
channels through which the refrigerant passes. If
these should be punctured this would damage the
appliance beyond repair and cause food loss.DO
NOT USE SHARP INSTRUMENTS to scrape off
frost or ice. Frost may be removed by using the
scraper provided. Under no circumstances should
solid ice be forced off the liner.Solid ice should be
allowed to thaw when defrosting the appliance.
• Do not place carbonated or fizzy drinks in the
freezer as it creates pressure on the container,
which may cause it to explode, resulting in
damage to the appliance.
Page 3
Installation
• During normal operation, the condenser and
compressor at the back of the appliance heat up
considerably. For safety reasons, minimum
ventilation must be as shown in the instructions.
Attention: keep ventilation openings clear of
obstruction.
• Care must be taken to ensure that the appliance
does not stand on the electrical supply cable.
Important: if the supply cord is damaged, it must
be replaced by a special cord or assembly available from the manufacturer or its service agent.
• If the appliance is transported horizontally, it is
possible that the oil contained in the compressor
flows in the refrigerant circuit. It is advisable to
wait at least two hours before connecting the
appliance to allow the oil to flow back in the
compressor.
• There are working parts in this product which
heat up. Always ensure that there is adequate
ventilation as a failure to do this will result in
component failure and possible food loss.See
installation instructions.
• Parts which heat up should not be exposed.
Wherever possible the back of the product should
be against a wall.
Environment Protection
This appliance does not contain gasses which
could damage the ozone layer, in either its
refrigerant circuit or insulation materials.The
appliance shall not be discarded together with
the urban refuse and rubbish. Avoid damaging
the cooling unit, especially at the rear near the
heat exchanger. Information on your local
disposal sites may be obtained from municipal
authorities.The materials used on this appliance
marked by the symbol are recyclable.
Disposal of old Appliances
The symbol on the product or on its packaging
indicates that this product may not be treated as
household waste. Instead it shall be handed over to
the applicable collection point for the recycling of
electrical and electronic equipment. By ensuring this
product is disposed of correctly, you will help prevent
potential negative consequences for the environment
and human health, which could otherwise be caused
by inappropriate waste handling of this product. For
more detailed information about recycling of this
product, please contact your local city office, your
household waste disposal service or the shop where
you purchased the product.
IMPORTANT SAFETY INFORMATION
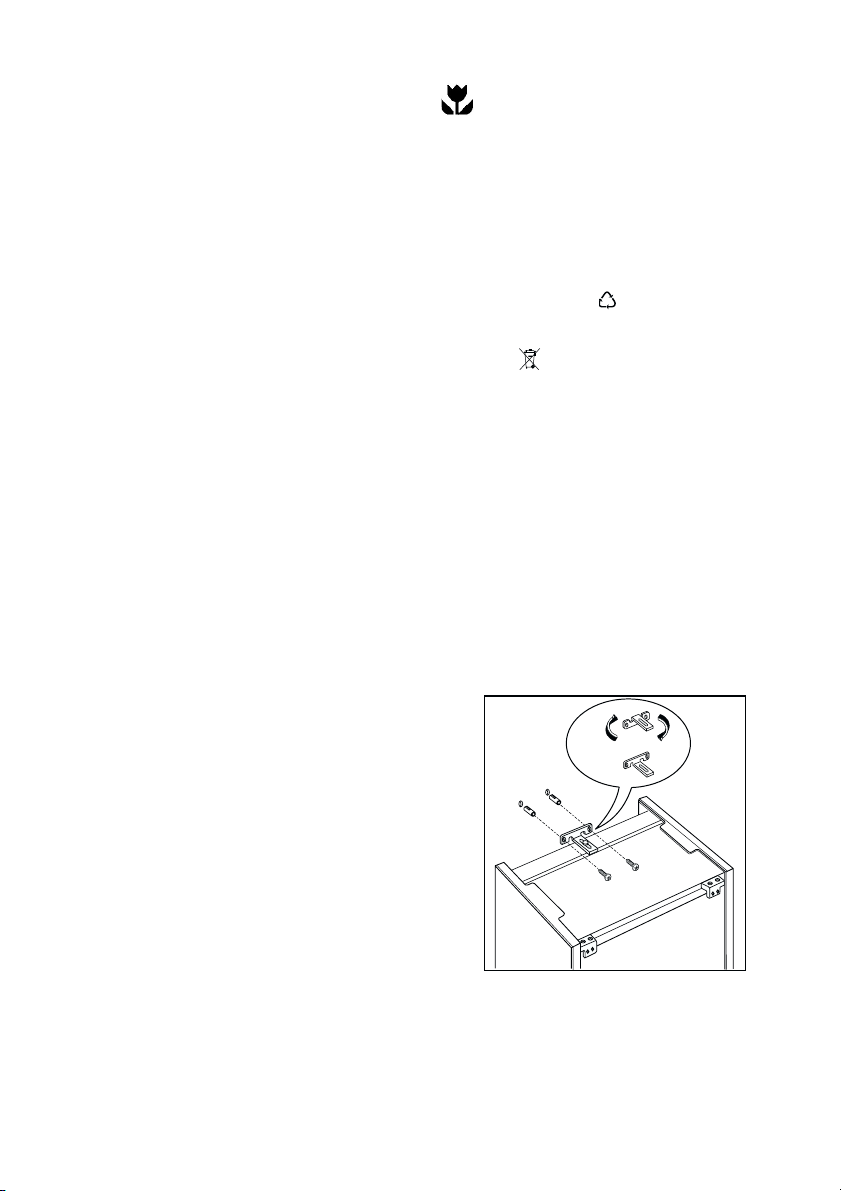
Building the appliance in
• Fit the appliance into the recess.
• Rotate the bracket of 180° in order to obtain the
right position ( 2).
The position (1) is on the delivery.
• Fix it to a solid wall with the appropriate bracket.
18
1
2
Page 4
OPERATION
Cleaning the interior
Before using the appliance for the first time, wash
the interior and all internal accessories with lukewarm water and some neutral soap so as to remove
the typical smell of a brand-new product, then dry
thoroughly.
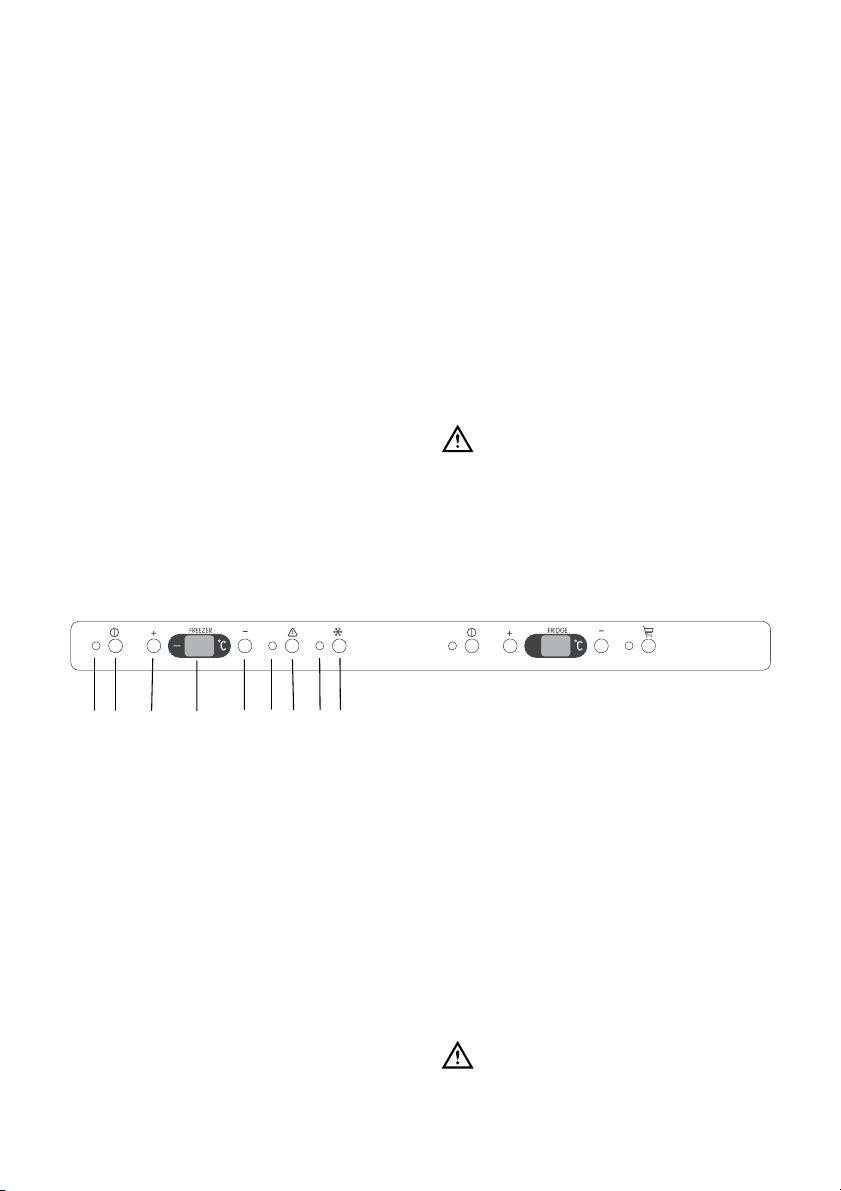
Use of the freezer
A ON/OFF light
B Freezer button ON/OFF
C Temperature setting button (warmest)
D Temperature indicator
E Temperature setting button (coldest)
A. Light ON/OFF
B. Button ON/OFF
ON: Press the button (B).The pilot light (A)
switches on.
OFF: Keep press the button (B) until the pilot light (A)
and the temperature indicator switched off.
Attention!
During the stability period by the first starting the
temperature displayed can not correspond to the
setting temperature.
C - E.Temperature setting buttons
The temperature can be adjusted between -15°C
and -24°C.
By pressing the button (C or E), the current
Do not use detergents or abrasive
powders, as these will damage the finish.
CONTENTS
Warnings . . . . . . . . . . . . . . . . . . . . . . . . . . . . . . . . . . . . . . . . . . . . . . . . . . . . . . . . . . . . . . . . . . . . . . . . . . .17
Use - Cleaning the interior - Use of the freezer - Control panel . . . . . . . . . . . . . . . . . . . . . . . . . . . . . . . . . . . . . .19
Use - Operation - Freezing fresh food - Storage of frozen food - Thawing - Ice-cube production - . . . . . . . . . . .20
Use - Freezer Compartment - Useful hints for freezing . . . . . . . . . . . . . . . . . . . . . . . . . . . . . . . . . . . . . . . . . . .21
Use - Use of the refrigerator - Control panel - Operation . . . . . . . . . . . . . . . . . . . . . . . . . . . . . . . . . . . . . . . . . . .22
Use - Refrigerator Compartment . . . . . . . . . . . . . . . . . . . . . . . . . . . . . . . . . . . . . . . . . . . . . . . . . . . . . . . . . . . . .23
Maintenance - Periodic cleaning - Defrosting - Interior light . . . . . . . . . . . . . . . . . . . . . . . . . . . . . . . . . . . . .24
Troubleshooting - Technical information - . . . . . . . . . . . . . . . . . . . . . . . . . . . . . . . . . . . . . . . . . . . . . . . .25
Installation - Location - Electrical connection . . . . . . . . . . . . . . . . . . . . . . . . . . . . . . . . . . . . . . . . . . . . . . . .26
Positioning - Height adjustment - Fitting the side panels . . . . . . . . . . . . . . . . . . . . . . . . . . . . . . . . . . . . . .27
Positioning - Fitting the door panels . . . . . . . . . . . . . . . . . . . . . . . . . . . . . . . . . . . . . . . . . . . . . . . . . . . . . .28
Positioning - Building the appliance in - Fitting the plinth . . . . . . . . . . . . . . . . . . . . . . . . . . . . . . . . . . . . . .30
Guarantee conditions . . . . . . . . . . . . . . . . . . . . . . . . . . . . . . . . . . . . . . . . . . . . . . . . . . . . . . . . . . . . . . . . .32
F Alarm reset light
G Alarm reset button
H Auto Freeze light
I Auto Freeze button
temperature setting flashes on the indicator. It is
possible to modify the setting temperature only with
flashed indicator.To set a warmer temperature, press
button (C). To set a colder temperature, press button
(E). The indicator display the newly selected
temperature for a few seconds and then shows again
the inside compartment temperature.
The newly selected-temperature must be reached
after 24 hours.
19
Control panel
F
GHI
B
A
ECD
Page 5
20
Storage of frozen food
When first starting-up or after a period out of use,
before putting the products in the compartment let
the appliance run for at least two hours on the Auto
freeze setting, then push again the Auto Freeze
button.
Important
In the event of accidental defrosting, for example
due to a power failure, if the power has been off
for longer that the value shown in the technical
characteristics chart under “rising time”, the
defrosted food must be consumed quickly or
cooked immediately and then refrozen (after
cooling).
F. Alarm reset light
G. Alarm reset button
In the event of an abnormal temperature rise inside
the freezer (e.g. power cut) warning light (F) will start
to flash and a buzzer will sound.
After the temperature has returned to normal, the
warning light (F) will continue to flash, although the
buzzer has stopped.
When the alarm button (G) is pressed, the warmest
temperature reached in the compartment flashes on
the indicator (D).
If the power has been off for a long time, frozen food
should be consumed as quickly as possible, or
cooked and then re-frozen.
Operation
Insert the plug in the power socket. Press the button
ON/OFF (B). The freezer is switched on.
The freezer is pre-set to run at -18°C. this
temperature will be reached in a few hours.
As soon as the appliance is switched on the
temperature indicator (D) shows the current
temperature inside the freezer, the alarm reset light
(F) flashes and a buzzer sounds. Press the alarm
reset button (G). The buzzer stops and the alarm
light (F) continues to flash until the setting
temperature is reached.
H. Auto Freeze pilot light
I. Auto Freeze button
To freeze fresh foods, the “Auto freeze” function must
be actived. Press the auto freeze button (I).The
relevant pilot light (H) switches on.When this function
is on, SP is shown on the dispay .
The function can be deactived at any time, by
pressing the button (I), otherwise it automatically
switched off.With deactived functionth pilot light (H)
switches off.
Freezing fresh food
To freeze fresh food, press the Auto freeze button (I)
at least 24 hours before.
Place the food to be frozen in the Auto freeze
compartment. The maximum quantity of food which
can be frozen in 24 hrs. is shown on the rating plate.
Warning!
When use the “Auto freeze” function:
about 6 hrs
before
about 24 hrs
before
not needed
not needed
Introducing small quantities of fresh food
(about 5 kg)
Introducing the maximum quantity of food
(see rating plate)
Introducing frozen food
Introducing small quantities of fresh food
daily 2 kg maximum
Thawing
Deep-frozen or frozen food, prior to being used, can
be thawed in the refrigerator compartment or at
room temperature, depending on the time available
for this operation.
Small pieces may even be cooked still frozen, directly
from the freezer: in this case, cooking will take longer.
Ice-cube production
This appliance is equipped with one or more trays
for the production of ice-cubes. Fill these trays with
water, then put them in the freezer compartment.
Do not use metallic instruments to remove the
trays from the freezer.
D.Temperature indicator
During normal functioning the indicator shows the
temperature inside the freezer.
Attention!
Difference between the temperature displayed and
temperature setting is normal. Especially when:
- a new setting has recently been selected
- the door has been left open for a long time
- warm food has been placed in the compartment.
Page 6
21
Freezer compartment
• If food is to be frozen immediately after having
installed the appliance or after a prolonged period
out of use, push the button and allow the
appliance to run for at least 4 hours before
placing the food in it.
If the freezer is already operating, with food inside
it, push the button 24 hours before loading food to
be frozen.
• The alarm light indicates when the temperature
inside the freezer compartment has risen to a
point at which safe storage of frozen foods can no
longer be guaranteed. When the appliance is first
started up, or after having loaded a quantity of
food to be frozen, this warning light will stay or
until a safe storage temperature has been
reached.
• Products to be frozen should be placed in the fast
freeze compartment and, once frozen, moved to
the storage baskets.
• The maximum freezing capacity is 13 kg in 24
hours. Do not freeze more than one quantity at a
time.
Useful hints for freezing
• Products to be frozen should be fresh and clean.
• Pack foods in suitable family portions which can
be used up all at once.
• Small packs allow fast and uniform freezing.
• Lean foods keep better and longer than fatty
foods. Salt reduces the storage life of food.
• Wrap foods closely in aluminium foil or plastic
bags or film, and make sure they are properly
sealed.
• Attach a label to each pack, indicating the
contents and the date on which it was prepared.
• Never place hot foods, bottles or containers with
fizy drinks in the freezer (they could explode).
• Do not fill containers with lids right to the brim.
• Do not add more food or open the doors during
the freezing process.
• Never place food to be frozen in contact with
already frozen food, as this would increase the
temperature of the latter.
Page 7

22
Control Panel
J ON/OFF light
K Fridge button ON/OFF
L Temperature setting button (warmest)
M Temperature indicator
J. Light ON/OFF
K. Button ON/OFF
ON: Press the button (K).The pilot light (J)
switches on.
OFF: Keep press the button (K) until the pilot light (J)
and the temperautre indicator switched off.
L - N.Temperature setting buttons
The temperature can be adjusted between +2°C and
+8°C.
By pressing the button (L or N), the current
temperature setting flashes on the indicator. It is
possible to modify the setting temperature only with
flashed indicator.To set a warmer temperature, press
button (L). To set a colder temperature, press button
(N). The indicator display the newly selected
temperature for a few seconds and then shows again
the inside compartment temperature.
The newly selected-temperature must be reached
after 24 hours.
Attention!
During the stability period by the first starting the
temperature displayed can not correspond to the
setting temperature. During this time it is possible
that the temperature displayed is lower than the
setting temperature.
M.Temperature indicator
During normal functioning the indicator shows the
temperature inside the fridge.
Use of the refrigerator
Attention!
Difference between the temperature displayed and
temperature setting is normal. Especially when:
- a new setting has recently been selected
- the door has been left open for a long time
- warm food has been placed in the compartment
O. Auto fresh pilot light
P. Auto fresh button
The maximum performance is obtained by setting
the Auto fresh function. It’s recommended when
loading large quantities of food.
Press the Auto fresh button (P).The relevant pilot
light (O) switches on.
The internal temperature goes down to +2°C.
After about 6 hours the Auto fresh function switches
off automatically.
Operation
Insert the plug in the power socket. Press the button
ON/OFF (K). The fridge is switched on.
The fridge is pre-set to run at +5°C. This temperature
will be reached in a few hours.
N Temperature setting button (coldest)
O Auto fresh light
P Auto fresh button
O
P
K
J
NLM
Page 8

23
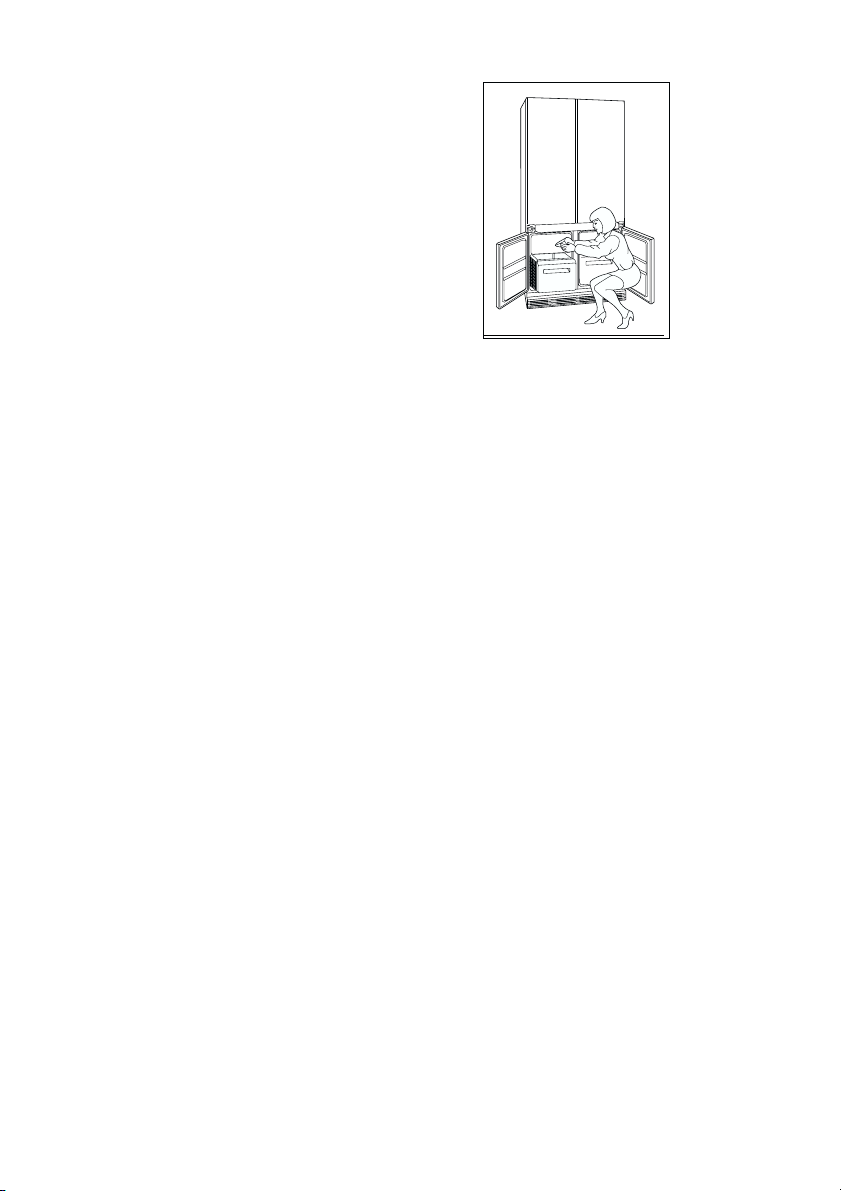
Refrigerator compartment
For proper opening and closing, it is advisable to act
on both doors simultaneously (as shown in the
figure).
• Do not place hot food or drinks in the refrigerator;
wait until they trave cooled to room temperature.
• Always cover foods, especially those which are
strong-smelling or aromatic.
• Place foods so that air can circuiate freely round
them.
The temperature selected may be adjusted to
compensate for temperature variations due to:
• The frequency with which the doors are opened.
• Difference in ambient temperature.
• Quantity of food being stored.
To make the best use of available space, the front
half-shelves may be stacked on top of the rear
halfshelves.
To achieve automatic defrosting of the refrigerator,
the compressor must cut out from time to time. If the
bottom of the compartment becomes covered with
too much frost, push the warmer temperature button
(L) until the compressor starts to cut out periodically.
Page 9

24
Before carrying out any maintenance operations,
including those described in this book, unplug
the appliance from the mains supply.
Warning
This appliance contains hydrocarbons in its cooling
unit; maintenance and recharging must therefore
only be carried out by authorized technicians.
Periodic cleaning
Clean the inside of the appliance and the accessories with a solution of lukewarm water and bicarbonate of soda (one tablespoonful of soda to 4 litres
of water). Rinse and dry thoroughly.
The freezer compartment drawers can be removed
for washing.To remove the drawers, pull them out
until they reach the stop, then lift and withdraw them
from the guides. To refit the drawers, engage them in
the guides then, keeping them tilted, push them
inwards.
Defrosting
To achieve automatic defrosting of the refrigerator,
the compressor must cut out from time to time. If the
bottom of the compartment becomes covered with
too much frost, select the temperature towards a
warmer setting until the compressor starts to cut out
periodically.
It is important to periodically clean the defrost water
drain hole in the middle of the refrigerator
compartment channel to prevent the water
overflowing and dripping onto the food inside.Use
the special cleaner provided, which you will find
already inserted into the drain hole.
Important:
Never use sharp metal tools to scrape off frost
from the evaporator as you could damage it.
Do not use a maechanical device or any artificial
means to speed up the thawing process other
than those recommended by the manufacturer.
Interior light
Refrigerator compartment
Remove the cover.
Replace the lamp with one of the same power (the
maximum power is shown on the light diffuser).
MAINTENANCE
D037
D051
Page 10

25
TROUBLESHOOTING
If something is not working properly, make sure that
all the instructions in this book trave been followed
before calling the SERVICECENTRE.
The compressore are not working
• Power cut or power supply problem.
• Mains On/Off switch in position “0”.
The interior lights are not working
• Bulb loose or blown.
Water in the refrigerator compartment
• Drain hole blocked.
Poor performance
• Frequent opening of doors, large quantity of food
placed in appliance all at the seme time.
• Inadequate ventilation.
To help the SERVICE CENTRE provide you with fast
efficient cervice, please quote the following details
when calling
Model (Mod.)
Product number (Prod. No.)
Serial number (Ser. No.)
which can be found on the guarantee certificate or
on the rating plate, visible in the position shown by
the arrow (see Fig.) after having removed the righthand drawer.
TECHNICAL INFORMATION
338
96
1,140
416
13
14
Net Fridge Capacity lt.
Net Freezer Capacity lt.
Energy Consumption kWh/24h
Energy Consumption kWh/year
Freezing Capacity 24h
Rising time
The technical infomation are situated in the rating plate on the internal left side of the appliance .
Page 11

26
If this appliance featuring magnetic door seals is
to replace an older appliance having a spring
lock (latch) on the door or lid, be sure to make
that spring lock unusable before you discard the
old appliance. This will prevent it from becoming
a death-trap for a child.
Location
The appliance should be installed well away from
sources of heat such as radiators, boilers, direct
sunlight etc.
For buiding into the kitchen units follow the special
“Building-in” instructions given.
Electrical connection
Before plugging in, ensure that the voltage and
frequency shown on the serial number plate
correspond to your domestic power supply. Voltage
can vary by ±6% of the rated voltage.
For operation with different voltages, a suitably sized
auto-transformer must be used.
The appliance must be earthed.
The power supply cable plug is provided with a
contact for this purpose.
If the domestic power supply socket is not earthed,
connect the appliance to a separate earth in
compliance with current regulations, consulting a
specialist technician.
The Manufacturer declines all responsibility if
the above safety precautions are not observed.
This appliance complies with the following
E.E.C. Directives:
- 87/308 EEC of 2/6/87 relative to radio interference
suppression.
- 73/23 EEC of 19.2.73 (Low Voltage Directive) and
subsequent modifications;
- 89/336 EEC of 3.5.89 (Electromagnetic
Compatibility Directive) and subsequent
modifications.
Important
It must be possible to disconnect the appliance from
the mains power supply; the plug must therefore be
easily accessible after installation
INSTALLATION
Page 12

27
Height adjustment
The height of the appliance is adjustable from 820 to
870 mm to fine up with existing kitchen units.
Before installing the appliance between unite, adjust
the height of the feet and rear wheels.The wheels
are factory set for a height of 820 mm.To align the
appliance to a height of 870 mm, raise it by adjusting
the feet with a spanner, then remove the wheels and
refit them in the lowest position.
Fitting the side panels
• Fit the brackets onto the panels in the positions
shown in the diagram.The dimension of 260* mm
is allowed for fitting a 100 mm plinth below the
panel. For different plinth sizes, increase the
dimension of 260* mm accordingly.
• Rest the panels against the appliance.
• Fit the rear brackets, taking into account the
thickness of the panels (maximum width of unit
900 mm).
• For a correct alignment make sure that the distance
between the appliance and the cabinet is of 45 mm.
• Secure the panels at the front.
• Fix the squares (contained in the bag) to the
lower part of the door (references already
provided).
POSITIONING
RIGHT HAND
SIDE PANEL
820
870
820
870
REAR
EDGE
820
280
15
15
INSIDE
FACE
541
37,5
FRONT
EDGE
27,5
997
82,2
520,8
260*
45
Page 13

28
Fitting the door panels
• Perforate the doors as in the drawing and insert
the two screws in the bag (do not tighten them all
the way down) for doors.
• Before installing the doors, carefully level the
appliance.
• Open one of the two lower doors and insert the
screws that had previously been positioned inside
the slot on the hinge and on the adjustment plate.
Move the door until it is perfectly in position.
• Repeat the operations for the other doors
• Shut the door again and check that it is
positioned at the requested height. If necessary,
use the adjustment screws situated above the
plate and the hinge.
• Use the same adjustment screws to align the
doors vertically.
1062
1051
BOTTOM
RIGHT-HAND
FRONT PANEL
300
85
85
24
TOP
TOP
RIGHT-HAND
FRONT PANEL
12
305 305
444 MIN.
447 MAX.
LEFT-HAND
FRONT PANEL
3 MIN
5
22
FRONT PANEL
80
80
A
A
300
24
22
BOTTOM
LEFT-HAND
1051
1062
12
Page 14

29
• Check horizontal alignment of the doors and, if
necessary, correct their position by moving them
along the slots.
• Open the door.
Adjust the planarity of the doors by means of the
adjustment bushings and the lower square.
• Once the doors are perfectly and completely
aligned, fix a clamp screw inside the bushings
(upper and lower hinge) on the lower bracket. The
screws must be tighten completely inside the
slots.
Page 15

30
Building the appliance in
• Fit the appliance into the recess.
• Rotate the bracket of 180° in order to obtain the
right position ( 2).
The position (1) is on the delivery.
• Fix it to the wali with the appropriate bracket.
• The top of the appliance must be kept ciear to
allow better air circulation. If a wall unit is fitted
above the appliance, there must be a gap of 50
mm between this unit and the wall and it must be
at least 50 mm below the ceiling.
Fitting the plinth
Alignment height of 820 mm
• If using a 140 to 170 mm plinth, make a cut-out
as shown.
• If using a plinth higher than 100 mm but less than
140 mm, cut the height compensation strip
supplied with the appliance to the required depth
and fit it between the plinth and the ventilation
griile, pressing it into position below this grille.
1
2
170
220
50
25
140
190
820
870
900
100
50
140
190
30
Page 16

31
• If using a 100 mm plinth, fit the complete height
compensation strip.
Alignment height of 870 mm
• If using a 190 to 220 mm plinth, make a shown.
• If using a plinth higher than 150 mm but less than
190 mm, cut the height compensation strip
supplied with the appliance to the required depth
and fit it between the plinth and the ventilation
grille.
• If using a 150 mm plinth, fit the complete height
compensation strip.
• If the appliance is installed at the end of a row of
units, insert foot E to hold the plinth in place.
100
150
30
100
E
Page 17

32
DECLARATION OF GUARANTEE TERMS
Our appliances are produced with the greatest of care. However, a defect may still occur. Our consumer
services department will repair this upon request, either during or after the guarantee period. The service life of
the appliance will not, however, be reduced as a result.
This declaration of guarantee terms is based on European Union Directive 99/44/EC and the provisions of the
CE Civil Code. The statutory rights that the consumer has under this legislation are not affected by this
declaration of guarantee terms.
This declaration does not affect the vendor’s statutory warranty to the end user. The appliance is guaranteed
within the context of and in adherence with the following terms.
1. In accordance with provisions laid down in paragraphs 2 to 15, we will remedy free of charge any defect that
occurs within 24 months from the date the appliance is delivered to the first end user.
These guarantee terms do not apply in the event of use for professional or equivalent purposes.
2. Performing the guarantee means that the appliance is returned to the condition it was in before the defect
occurred. Defective parts are replaced or repaired. Parts replaced free of charge become our property.
3. So as to avoid more severe damage, the defect must be brought to our attention immediately.
4. Applying the guarantee is subject to the consumer providing proof of purchase showing the purchase and/or
delivery.
5. The guarantee will not apply if damage caused to delicate parts, such as glass, synthetic materials and
rubber, is the result ofles.
6. The guarantee cannot be called on for minor faults that do not affect the value or the overall reliability of the
appliance.
7. The statutory warranty does not apply when defects are caused by:
• a chemical or electrochemical reaction caused by water;
• abnormal environmental conditions in general;
• unsuitable operating conditions;
• contact with harsh substances.
8. The guarantee does not apply to defects due to transport which have occurred outside of our responsibility.
Nor will the guarantee cover those caused by inadequate installation or assembly, lack of maintenance or
failure to the assembly instructions or directions for use.
9. Defects that result from repairs or measures carried out by people who are not qualified or expert or defects
that result from the addition of non-original accessories or spare parts are not covered by the guarantee.
10.Appliances that are easy to transport may be delivered or sent to the consumer services department. Home
repairs are only anticipated for bulky appliances or built-in appliances .
11.If the appliances are built-in, built-under, fixed or suspended in such a way that removing and replacing
them in the place where they are fitted takes more than half an hour, the costs that result therefrom will be
charged for.Connected damage caused by these removal and replacement operations will be the
responsibility of the user.
12.If, during the guarantee period, repairing the same defect repeatedly is not conclusive, or if the repair costs
are considered disproportionate, in agreement with the consumer, the defective appliance may be replaced
with another appliance of the same value.
In this event, we reserve the right to ask for a financial contribution calculated according to the length of
time it has been used.
13.A repair under guarantee does not mean that the normal guarantee period will be extended nor that a new
guarantee period begins.
14.We give a twelve month guarantee for repairs, limited to the same.
15.Except in the event where liability is legally imposed, this declaration of guarantee terms excludes any
compensation for damage outside the appliance for which the consumer wishes to assert his right. In the
event of legally admitted liability, compensation will not exceed the purchase price paid for the appliance.
(B)
Page 18

33
These guarantee terms are only valid for appliances purchased and used in Belgium. For exported appliances,
the user must first make sure that they satisfy the technical conditions (e.g.: voltage, frequency, installation
instructions, type of gas, etc.) for the country concerned, and that they can withstand the local climatic and
environmental conditions. For appliances purchased abroad, the user must first ensure that they meet the
qualifications required in Belgium. Non-essential or requested adjustments are not covered by the guarantee
and are not possible in all cases.
Our consumer services department is always at your disposal, even after the guarantee period has expired.
Address for our consumer services department:
ELECTROLUX HOME PRODUCTS BELGIUM
Bergensesteenweg, 719 – 1502 LEMBEEK
Teél. 02.3630444
Page 19

 Loading...