

Zanussi ZHT659 USER MANUAL
INSTALLATION, USE AND MAINTENANCE HANDBOOK GB
MANUAL DE INSTRUCCIONES, USO Y MANTENIMIENTO E
MANUAL DE INSTRUÇÕES, UTILIZAÇÃO E MANUTENÇÃO P

Contenents - Contenidos
GENERAL INFORMA TION .................................................................... 4
1 - SAFETY W ARNINGS ...................................................................... 4
2 - INST ALLATION INSTRUCTIONS ........................................................ 5
2.1 - Instructions for opening and removing the metal grille panel ............................... 5
2.2 - Wall cabinet fixing........................................................................................ 5
2.3 - Wall mounting ............................................................................................. 5
2.4 - Choice of operating mode ............................................................................. 6
2.5 - Electrical connection and working test ............................................................ 6
3 - OPERA TION .................................................................................. 7
4 - MAINTENANCE AND CLEANING ...................................................... 7
4.1 - Grease filter ............................................................................................... 7
4.2 - Charcoal filter ............................................................................................. 8
4.3 - Worktop illumination .................................................................................... 8
4.4 - Cleaning ..................................................................................................... 8
GENERALIDADES ............................................................................... 9
1 - NORMAS DE SEGURIDAD ............................................................... 9
2 - INST ALACION ............................................................................... 9
2.1 - Apertura y extracción de la rejilla de aspiración ................................................ 9
2.2 - Instalación de la campana debajo de un armario de cocina .............................. 10
2.3 - Fijación a la pared...................................................................................... 10
2.4 - Elección de la versión ................................................................................. 11
2.5 - La conexión elétrica se puede realizar ........................................................... 11
3 - FUCIONAMIENTO ........................................................................ 12
4 - MANTENIMIENTO Y LIMPIEZA ...................................................... 12
4.1 - Filtro antigrasa .......................................................................................... 12
4.2 - Filtro de carbón activo ................................................................................ 13
4.3 - Iluminación ............................................................................................... 13
4.4 - Limpieza ................................................................................................... 13
2

Conteúdos
INFORMAÇÕES GERAIS .................................................................... 14
1 - PRECAUÇÕES DE SEGURANÇA ..................................................... 14
2 - INST ALAÇÃO .............................................................................. 14
2.1 - Abertura e remoção da grelha de aspiração .................................................. 14
2.2 - Instalação por baixo do móvel suspenso ........................................................ 15
2.3 - Instalação na parede .................................................................................. 15
2.4 - Escolha da versão ...................................................................................... 16
2.5 - Ligação eléctrica e controlo do funcionamento ............................................... 16
3 - FUNCIONAMENTO ....................................................................... 17
4 - MANUTENÇÃO E LIMPEZA ........................................................... 17
4.1 - Filtro antigordura ....................................................................................... 17
4.2 - Filtro a carvão activo .................................................................................. 18
4.3 - Iluminação ................................................................................................ 18
4.4 - Limpeza ................................................................................................... 18
3

Part 1 - INSTALLATION INSTRUCTIONS
GENERAL INFORMATION
This canopy hood is designed to be fixed to any rigid vertical surface, over a gas or
electric hotplate and can be used either in the extraction mode (ducted to the outside)
or in the recirculation mode (internal recycling). All cookers hood perform better when
used in evacuation mode. During winter time it may be convenient to use the hood in
the recycling mode to avoid heat loss from the kitchen. Before starting the
installation, consideration should be given to the difficulties to be found during
installation. The installation work must be undertaken by a qualified and
competent person in conformity to the rules concerning the evacuation of
contaminated air. The manufacturer disclaims all liability for any damage or
injury caused as a result of not following the instructions for installation
contained in the following text.
1 - SAFETY WARNINGS
1.1 - When used in the extraction mode, the cooker hood ducting must not be connected to
a flue which is used for exhausting fumes from appliances supplied with energy other
than electric, such as a central heating flue or water heating flue.
1.2 - Before connecting to the mains supply ensure that the mains voltage corresponds with
the voltage on the rating plate inside the hood.
1.3 - Connect the cooker hood to the mains via a bipolar switch which has 3mm clearance
between the contacts.
1.4 - For cooker hoods featuring an earth cable, make sure the electric plant of your house
is correctly earthed.
1.5 - Appliance in class II are provided with a double insulation; therefore do not connect
then through earthed plugs but through simple bipolar plugs.
1.6 - When installed, the hood must be positioned at least 65cm above the hotplate.
1.7 - Never do flambé cooking under this cooker hood.
1.8 - Never leave frying pans unattended during use as overheated fat and oil may catch fire.
1.9 - Before carrying out any kind of maintenance or cleaning, disconnect the hood from the
mains supply.
1.10 - If the room where the cooker hood is to be used contains a fuel burning appliance
such as a central heating boiler then this must be of the room sealed or balanced flue
type. If other types of flue or appliance are fitted, ensure that there is an adequate
supply of air into the room. When the cooker hood is used in conjunction with appliances
supplied with energy other than electric, the negative pressure in the room must not
exceed 0,04 mbar to prevent fumes being drawn back into the room by the cooker
hood.
4
Part 1 - INSTALLATION INSTRUCTIONS
2 - INSTALLATION INSTRUCTIONS
Some installation systems require the opening and removal of the metal grille panel.
2.1 - Instructions for opening and removing the metal grille panel
To open the grille panel, press inwardly on the two slider catches at each side of the
grille panel and the grille will pivot down. To remove the metal grille, pull forward on
the right hand side so that the hinge pin on the back of the grille will be released from
the slot in the side of the casing.
2.2 - Wall cabinet fixing
a) Predrilled wall cabinet: fix the hood onto the wall cabinet base panel using the four
screws 4.2 x 45 mm (supplied with the fixing kit). It is not necessary to open the
metal grille.
b) No predrilled wall cabinet:
b.1 - If the hood is provided with a paper fixing template, follow the instructions.
b.2 - If the hood is not provided with a paper fixing template, position the hood on the
wall cabinet base panel and pilot drill the 3.5 x 16 mm screws (not supplied with the
fixing kit) from the inside onto the wood.
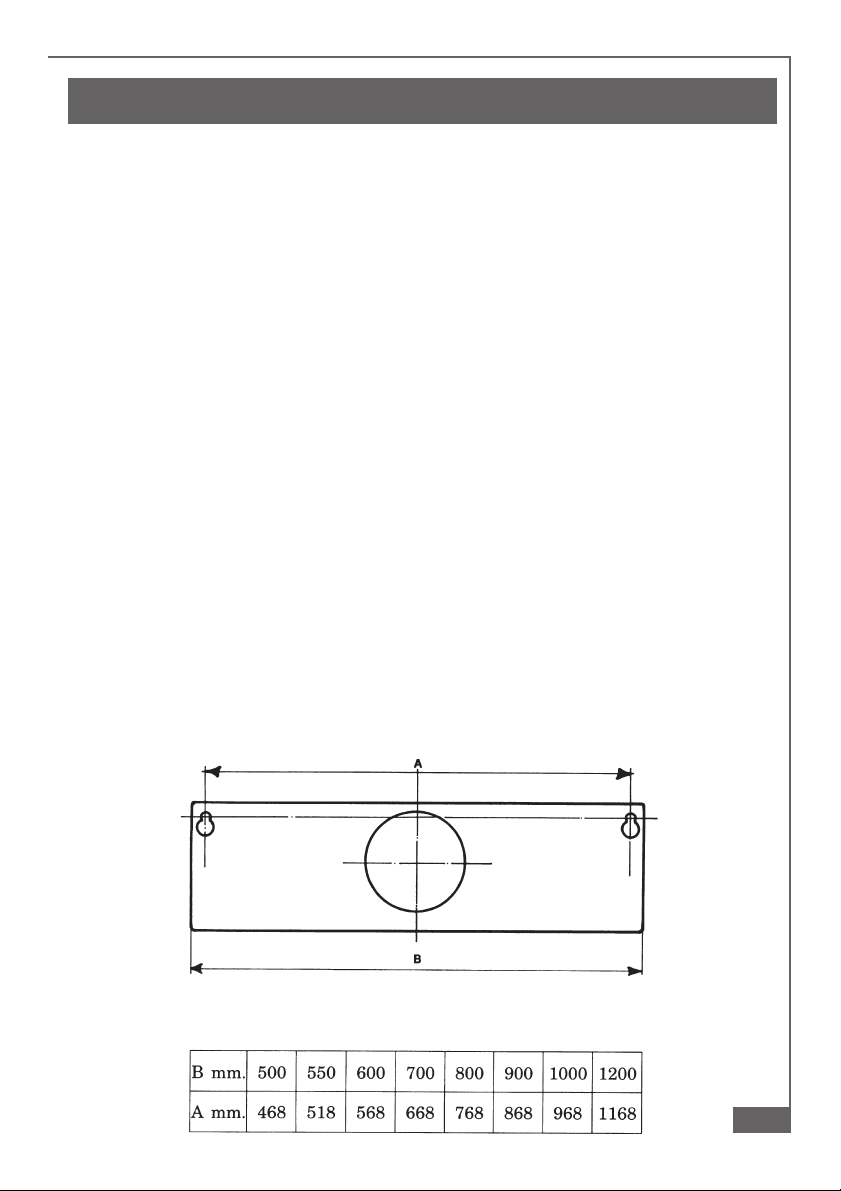
2.3 - Wall mounting
a) Drill two Ø 8 mm holes on the wall using the paper template, insert two rawl plugs
and two 4.2 x 44,4 mm screws leaving 5 mm untightened. Open the metal grille
panel, hook the hood on and fully tighten the screws.
b) If the hood is not provided with a paper fixing template, drill two Ø 8 mm holes (see
draw.), insert the plugs and screws, proceeding as directed under paragraph a.
c) For wall mounting using wallbrackets (optional), follow the instructions of the fixing
template.
d) Pay attention to the safety regulation of point 1. 6 .
5
Part 1 - INSTALLATION INSTRUCTIONS
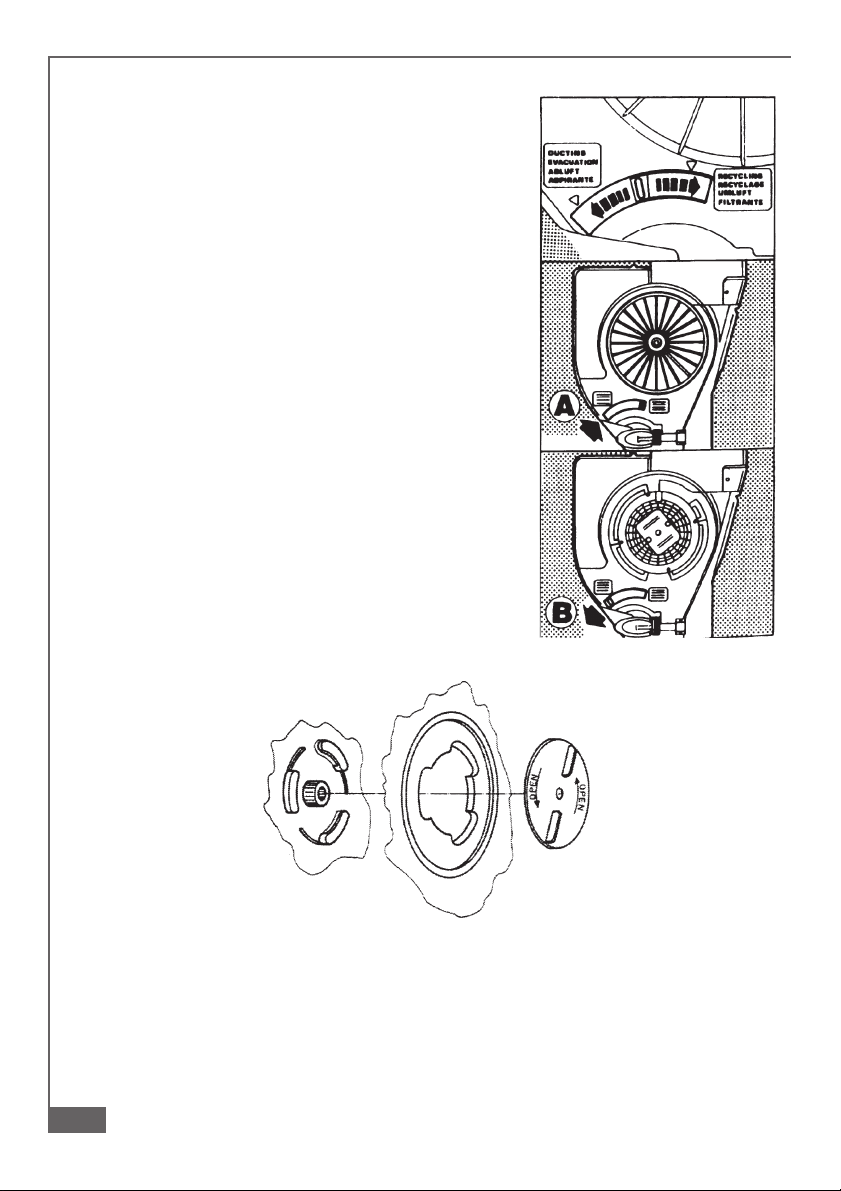
2.4 - Choice of operating mode
a) Evacuation mode
To check that the hood is set up for evacuation, open
the grille panel and make sure that the conversion
lever or the change over knob on the centrifugal unit
is in the DUCTING position. The charcoal filter is not
required. For ducting to the outside, the hood is
supplied with a rear and top outlet. A flange spigot of
100 mm diameter (120 mm in certain models) is
usually fitted on the top outlet and a blanking plug
on the rear outlet. If you choose to duct the hood
from the rear of the casing, you should invert the
position of the flange and of the blanking plug. Pay
attention to the safety regulation 1.1.
b) Internal recirculation mode
To check that the hood is set up for recycling, open
the grille panel and make sure that the conversion
lever or the change over knob on the centrifugal unit
is in the RECYCLING position. The charcoal filter is
to be fitted. To fit the charcoal filter, support the filter
with one hand and turn the thumb screw through the
centre of the charcoal filter. If the filter is of the
interlocking type, turn the filter clockwise. The hood
can remain connected to the outside.
2.5 - Electrical connection and working test
1 - The safety measures 1.2, 1.3, 1.4 and 1.5 of paragraph 1 are to be strictly observed.
2 - Once the electrical connection has been completed, check that the worktop
illumination, motor and speeds work properly.
6
 Loading...