

Page 1
Dir. 89/336/CEE
Cooker hood
Dunstabzugshaube
Hotte
Wasemkap
Cappa
ZH 6022
ZH 9022
4324142 - 01/98
Operating instructions
Bedienungsanleitung
Mode d'emploi
Gebruiksaanwijzing
Istruzioni per l'uso
Page 2

CONTENTS
DESCRIBING THE
COOKER HOOD
IDENTIFICATION OF
THE APPLIANCE
PRODUCT
SAFETY WARNINGS
DIMENSIONS
SETTING UP AND
INSTALLATION
ELECTRICAL
CONNECTION
CONTROLS
1
5
7
9
23
25
41
43
SWITCHING THE
APPLIANCE
ON AND OFF
MAINTENANCE AND
CLEANING
45
49
Page 3

DESCRIBING THE
COOKER HOOD
This cooker hood features
a through flow retractable
visor which allows the
hood to be installed inside
a wall cabinet with the
minimum loss of space
while offering a large
collection area for
contaminated air once
extended into its working
position.
The controls are located in
a concealed control box
which can be opened
during use; the opening of
the visor can be used to
switch the appliance on
when the controls have
been pre-set.
The cooker hood can be
installed in two different
ways:
1
2
Page 4
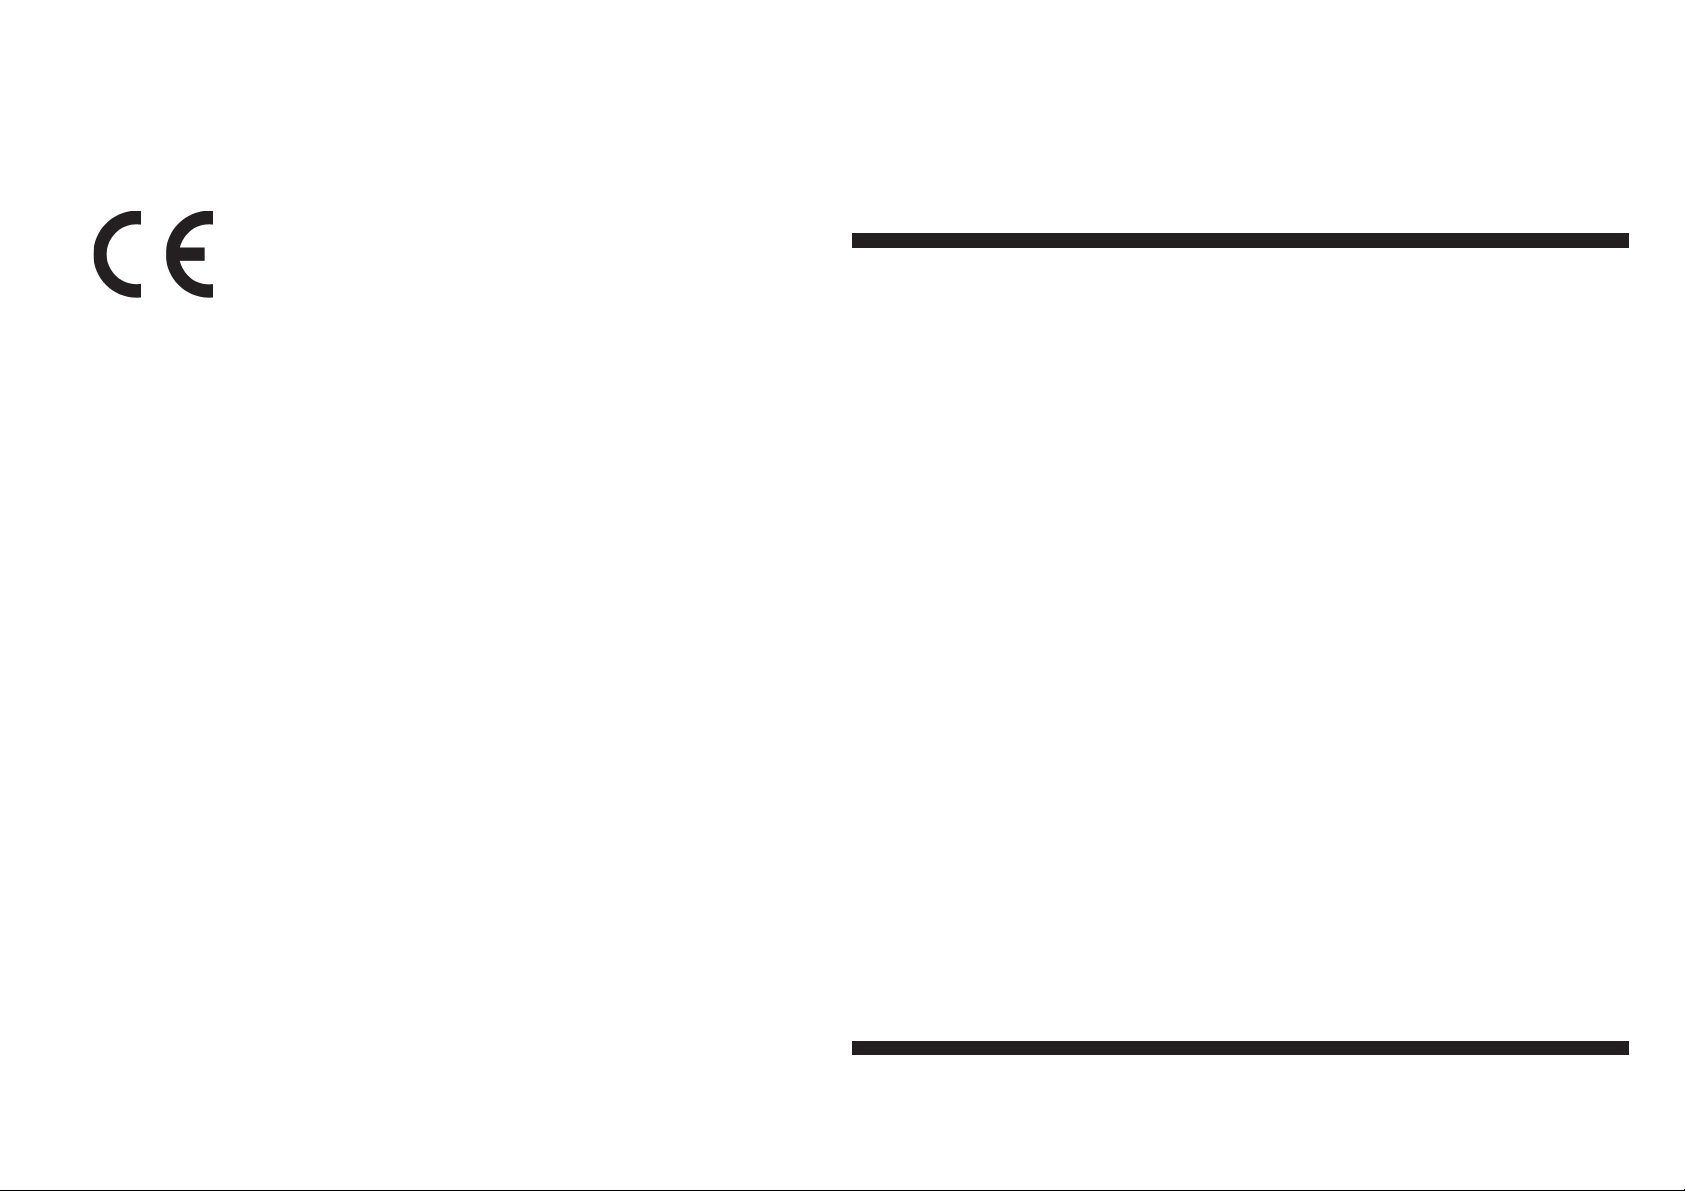
RECIRCULATION MODE
using charcoal filters to
purify the contaminated air.
EVACUATION MODE
Using ducting to extract
the contaminated air to the
atmosphere.
The grease filters are fitted
to absorb grease and dust
during cooking.
The hood can be supplied
with metal or paper filters.
The paper filters have
saturation indicators and
should be located on the
internal side of the grille
with the spots facing
outwards.
Worktop illumination
consists of a fluorescent
strip light
or of two lamps.
3
4
Page 5
IDENTIFICATION OF
THE APPLIANCE
The rating plate is situated
inside the casing. It gives
the model number and
serial number which should
be quoted in any
communication or if After
Sales Service is required.
5
6
Page 6
PRODUCT
This cooker hood has been
designed for the
purification of
contaminated air and to
remove odours in the
kitchen.
ATTENTION:
This cooker hood must
not be used for the
purification of air which
could contain harmful
gases or poisons or
other substances not to
be found during normal
cooking.
7
8
Page 7
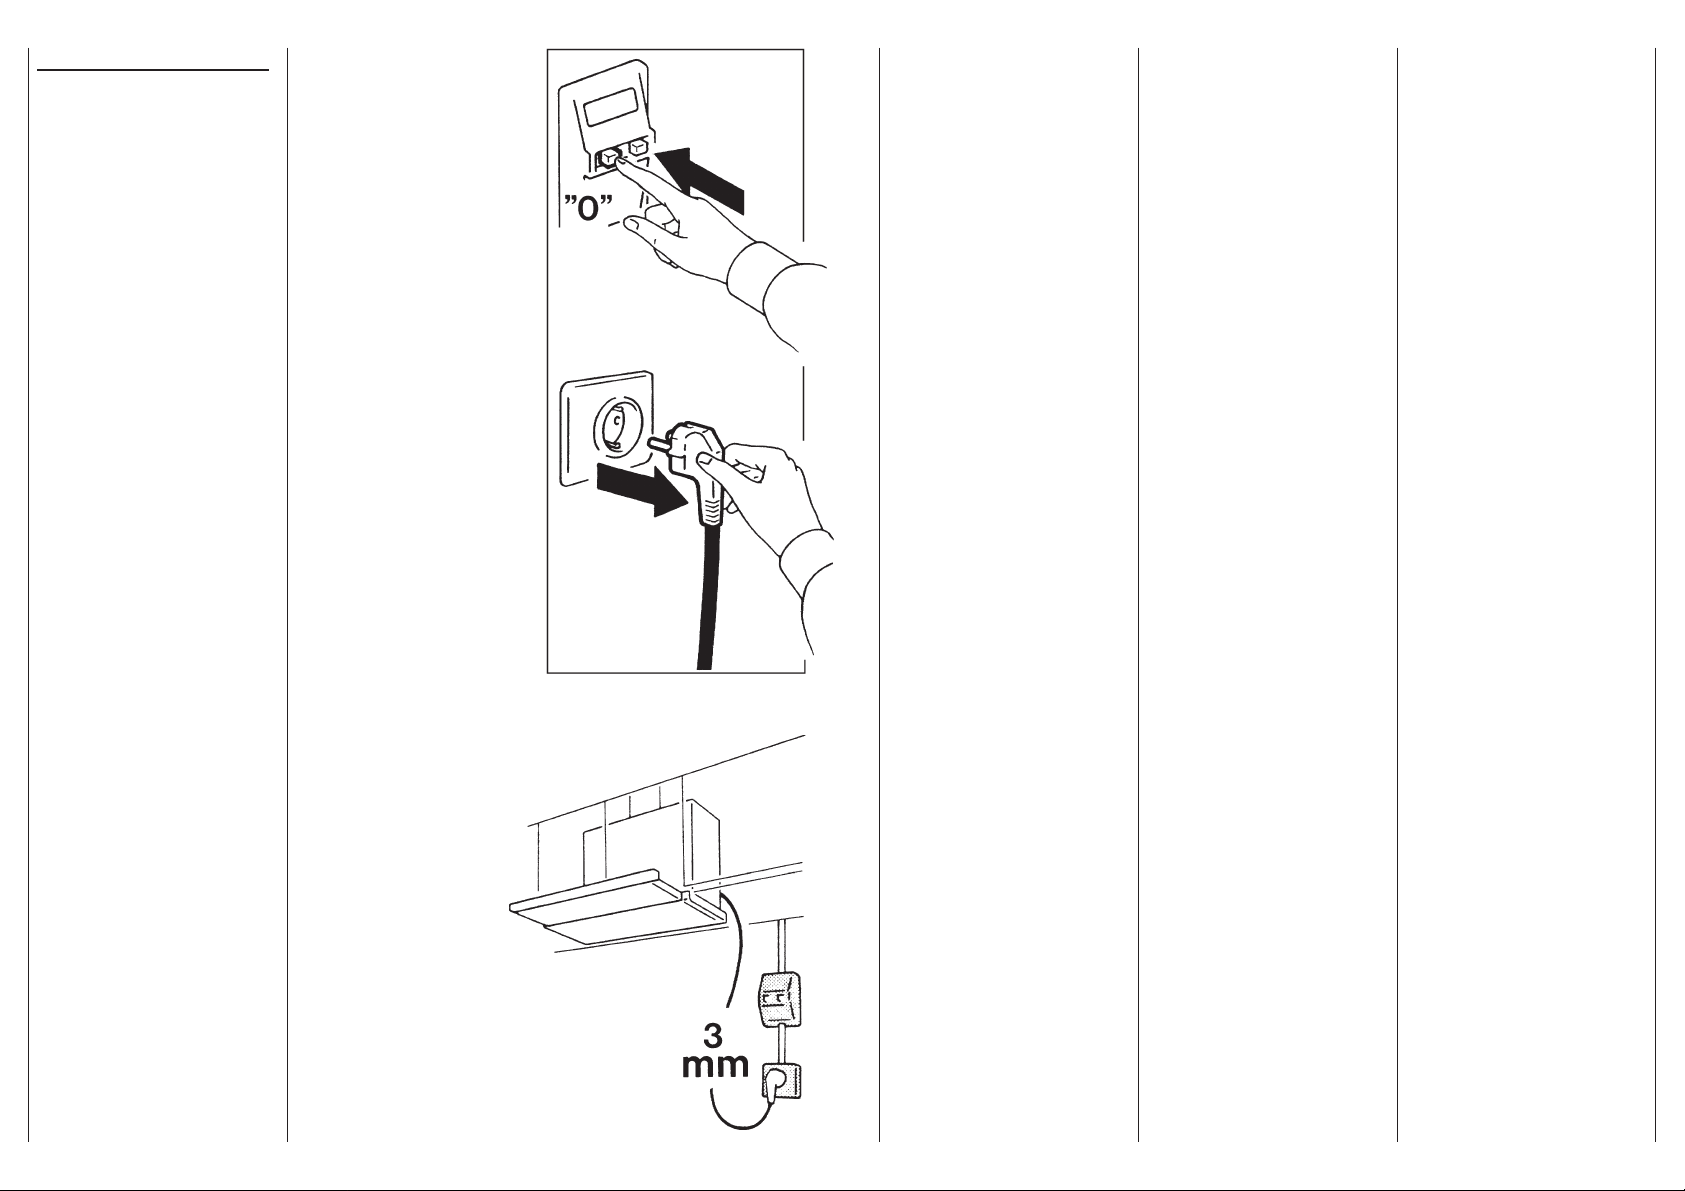
SAFETY WARNINGS
ATTENTION:
Before carrying out any
kind of maintenance or
cleaning disconnect the
hood from the mains
supply and unplug the
cooker hood.
Connect the hood to the
mains supply via a double
pole switch which has
3mm minimum clearance
between the contacts.
9
10
Page 8
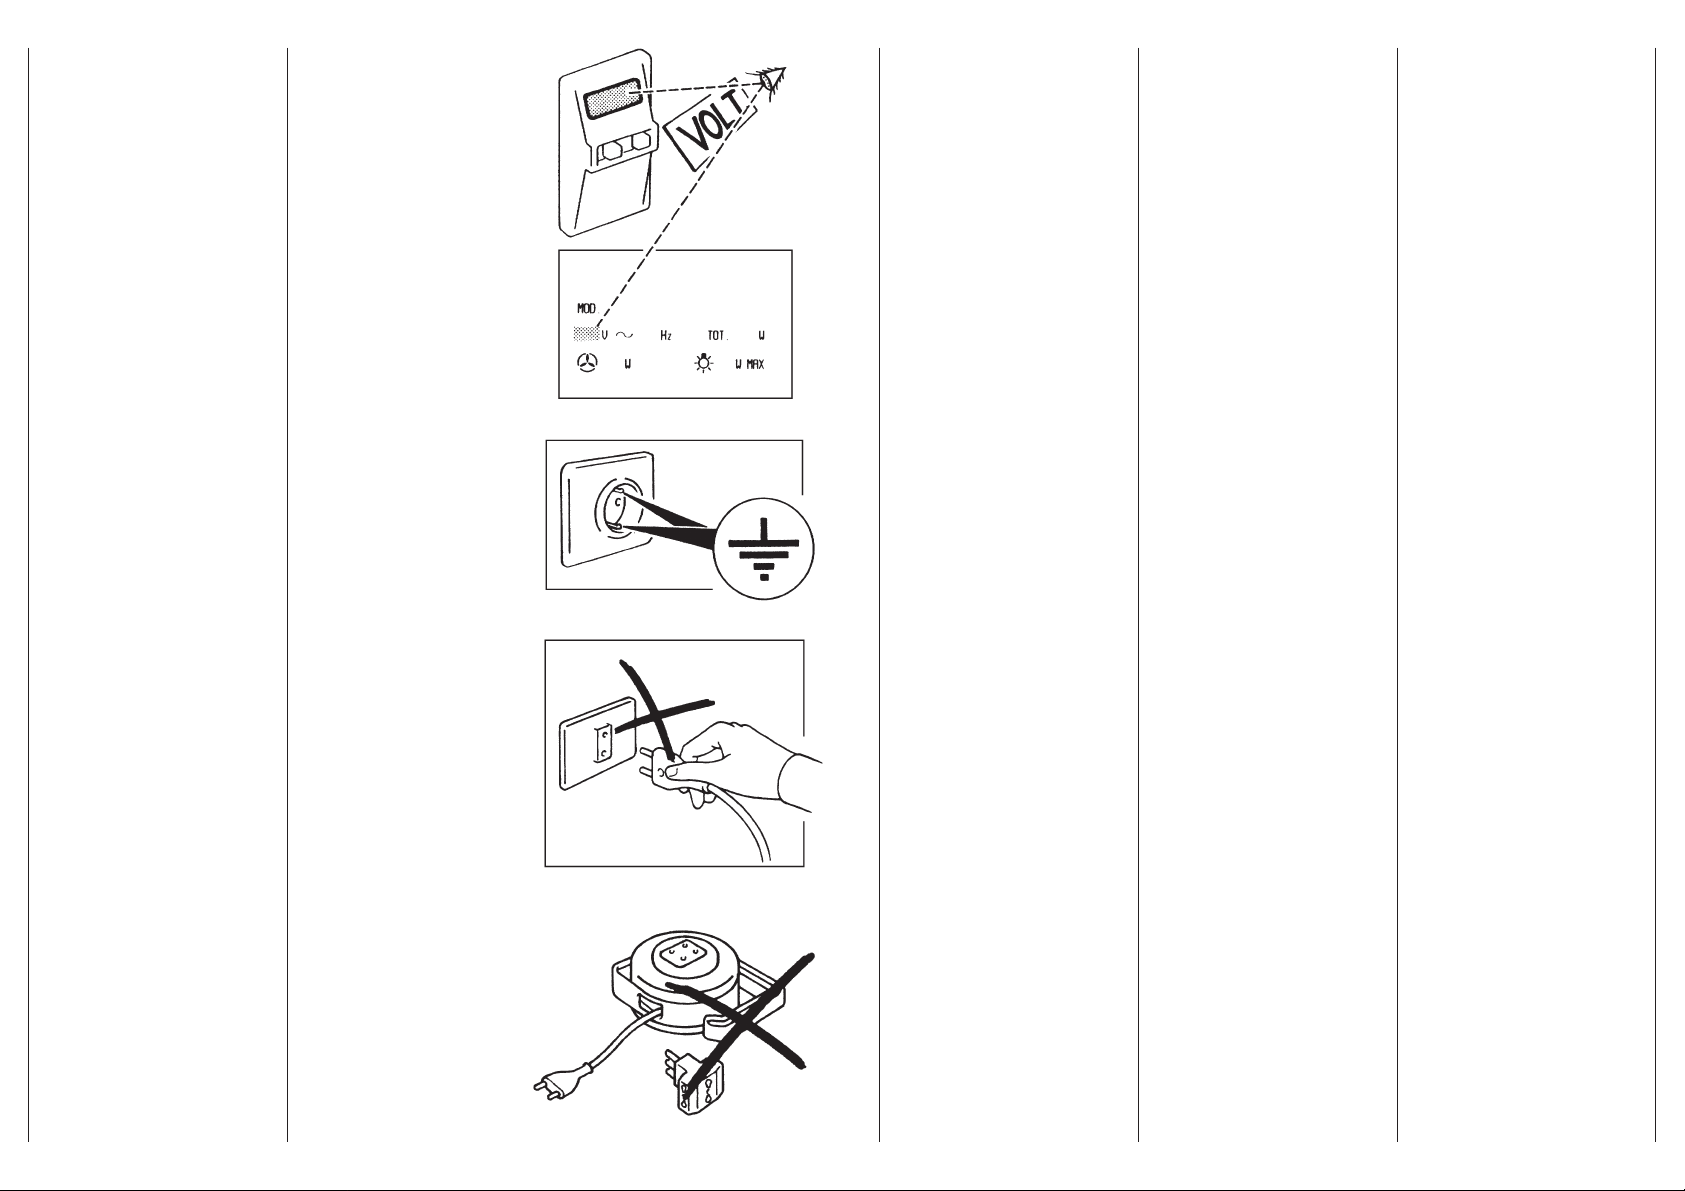
Before connecting this
appliance to the mains
supply, ensure that the
mains voltage corresponds
to the voltage on the rating
plate inside the hood.
This appliance must be
earthed.
ATTENTION:
Only use earthed plugs
or sockets.
ATTENTION:
Do not use any adapters
or extensions.
1211
Page 9
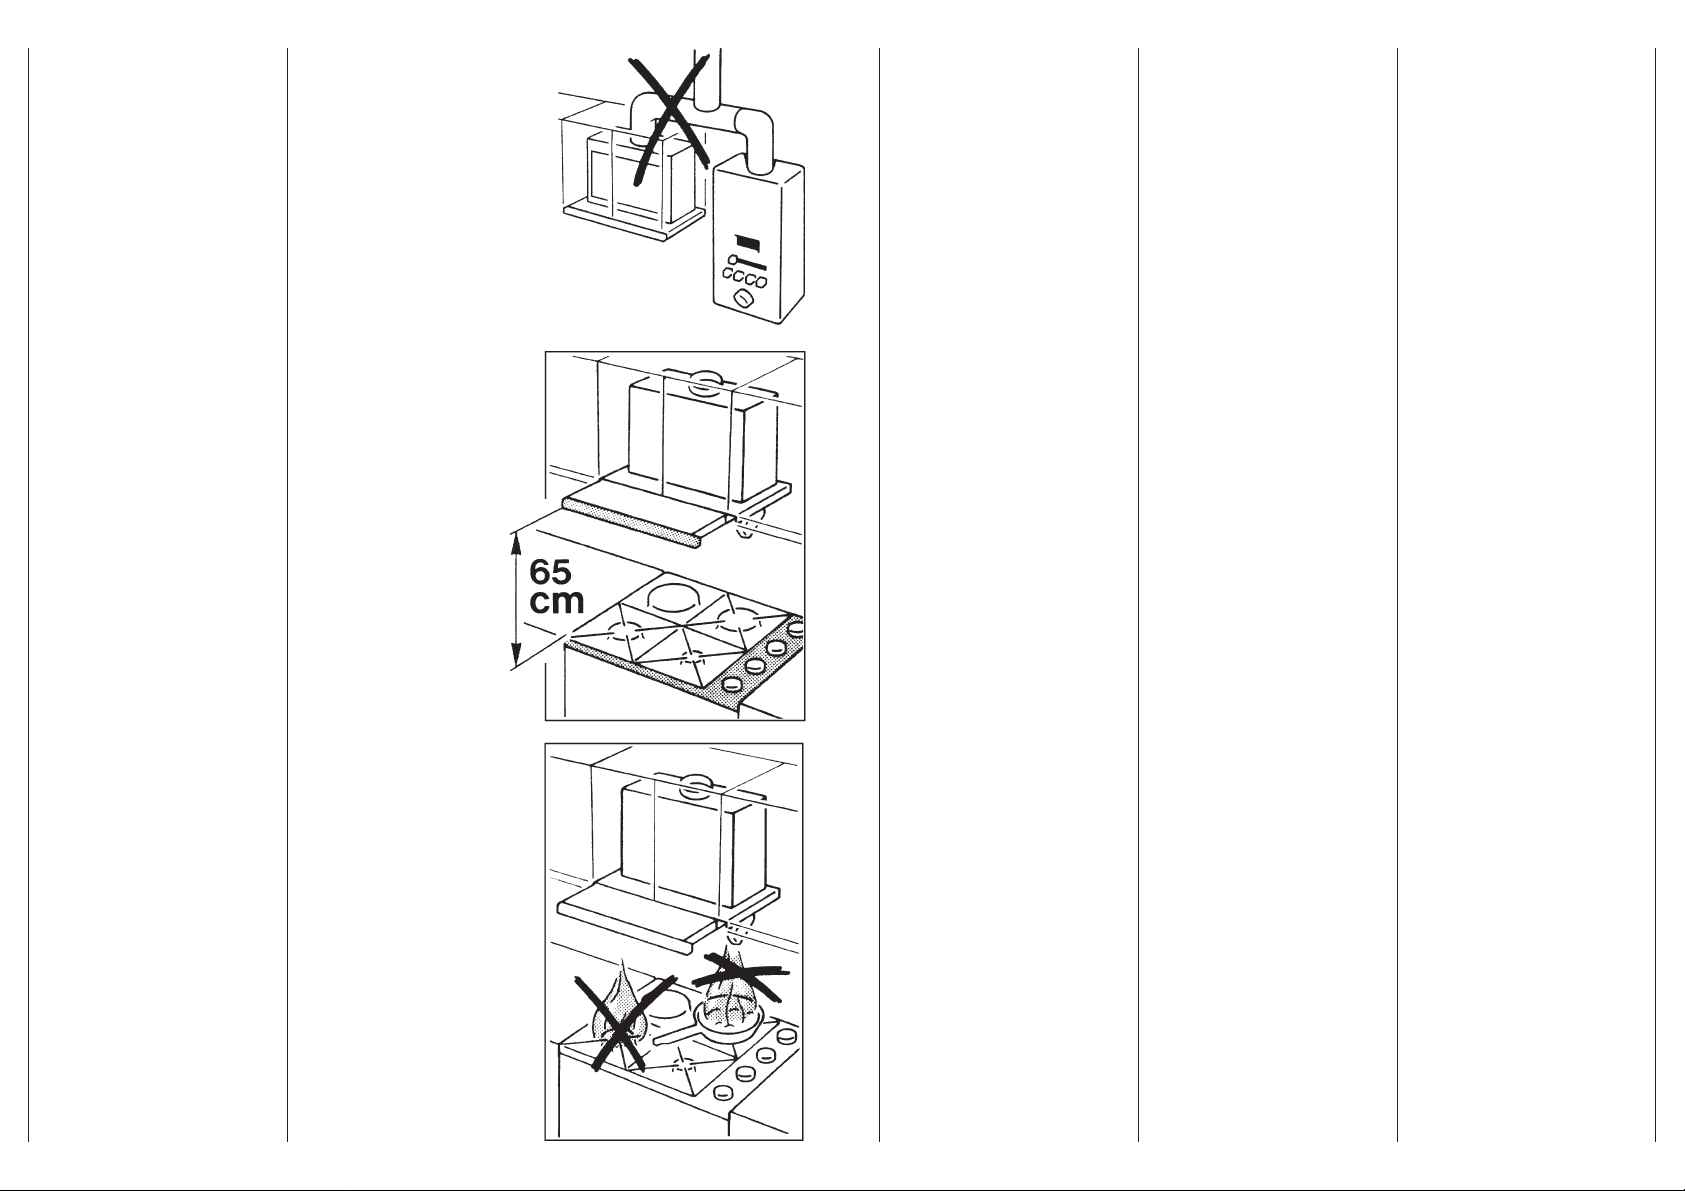
When used in the
extraction mode the cooker
hood ducting must not be
connected to a flue which
is used for exhausting
fumes from appliances
supplied with energy other
than electric such as a
central heating flue or
water heating flue.
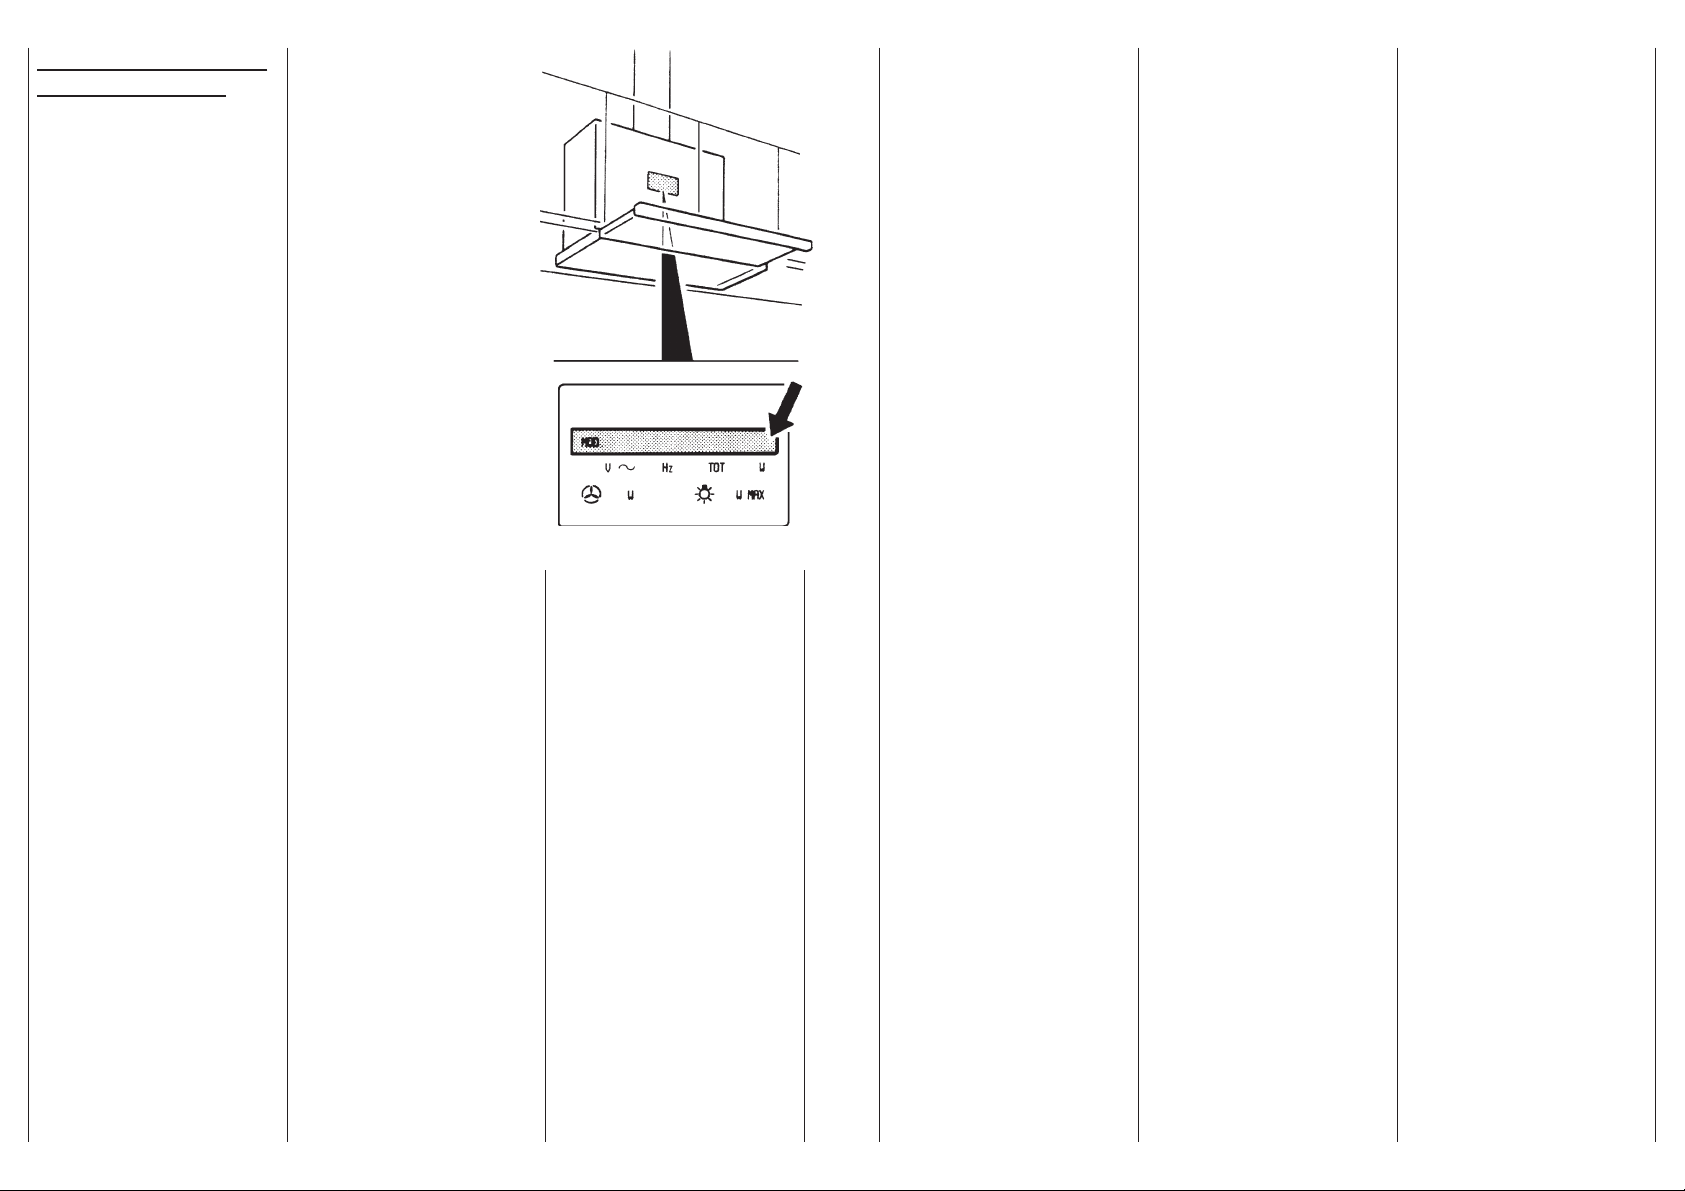
When installed, the hood
must be positioned at least
65cm above a cooking
appliance.
Never do flambè cooking
under this cooker hood.
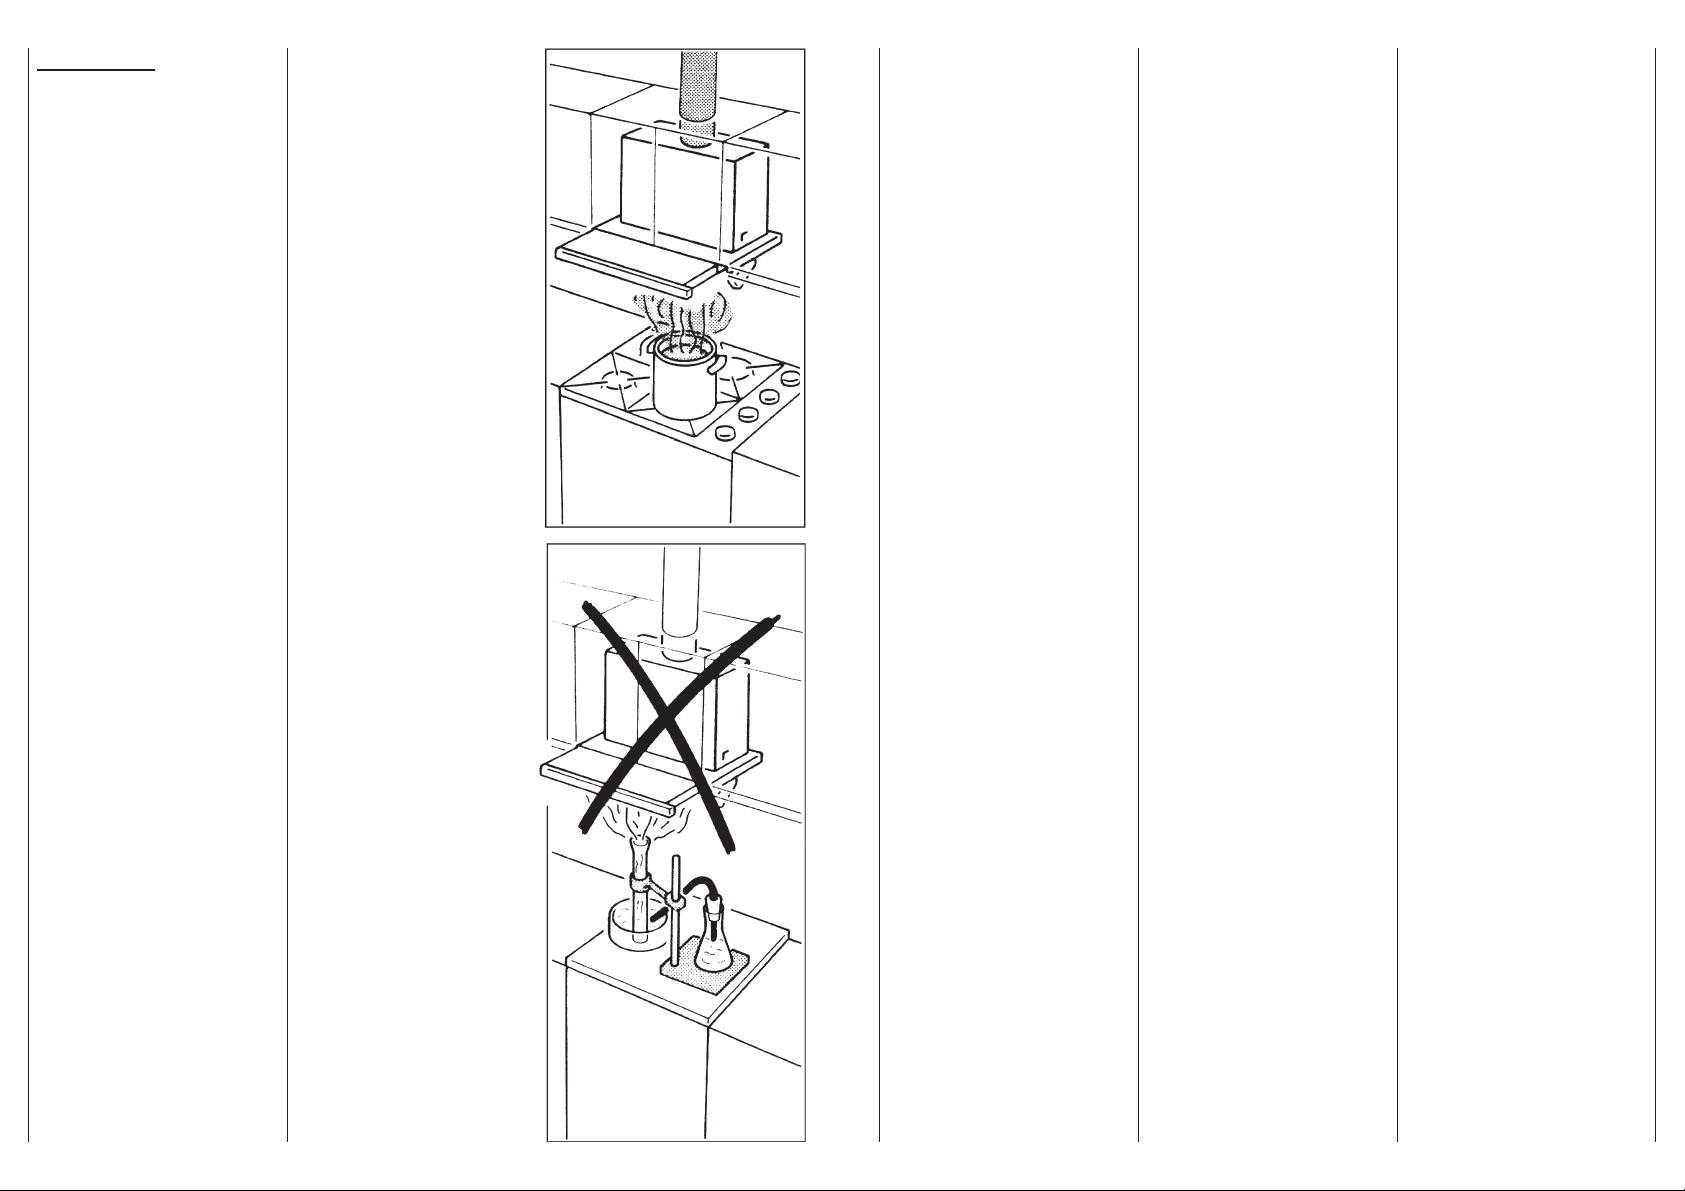
When using a gas hob in
conjunction with this
cooker hood never leave
the burners of the hob
uncovered while the hood
is in use, or when the pans
have been removed.
Switch off the gas before
removing the pan, or for
just short periods and
never leave the hob
unattended.
13 14
Page 10

Never leave frying pans
unattended during use as
overheated fat and oil may
catch fire.
If the room where the
cooker hood is to be used
contains a fuel burning
appliance such as a central
heating boiler then this
must be of the room
sealed or balanced flue
type.
If other types of flue or
appliance are fitted ensure
that there is an adequate
supply of air to the room.
The cooker hood in fact
could extract the air which
is needed for burning.
When the cooker hood and
appliances supplied with
energy other than
electricity are
simultaneously in
operation the negative
pressure in the room must
not exceed 0,04 mbar in
order to avoid a return of
the gaz emissions.
This is possible through
openings in doors,
windows, or air inlet valves
allowing fresh air to enter
the kitchen.
In any case, in connection
with the discharge of
exhaust air, the
requirements of the
authorities concerned have
to be observed.
15
16
Page 11

Always ensure that the
flame is kept at the correct
intensity to prevent the
flame from licking round
from the bottom of the pan;
this will save energy and
will avoid a dangerous
concentration of heat.
ATTENTION:
There could be a
possible fire hazard if
the grease filters are not
cleaned or replaced
when necessary and
according to these
instructions.
The grease filters and
charcoal filters should be
cleaned or replaced as
recommended by the
manufacturer or more
frequently if the hood is
used consistently for more
than 4 hours per day.
17
18
Page 12

ATTENTION:
Please read the
instruction booklet
carefully before
installing or using this
appliance.
ATTENTION:
Do not insert
hands or any other
object into the air outlet.
Do not use wet clothes or
sponges to clean the
surfaces of the cooker
hood.
19
20
Page 13

Should your cooker hood
fail to function at anytime
repairs should be carried
out by a qualified
electrician or a competent
person.
When carrying out any
kind of maintenance or in
the event that your cooker
hood stops functioning,
switch off the mains supply
and disconnect the plug
from the socket. This
appliance should be
serviced by an authorized
Service Centre, and only
genuine spare parts should
be used.
Not following this warning
could affect the safety of
your cooker hood.
2221
Page 14

DIMENSIONS
2423
Page 15

SETTING UP AND
INSTALLATION
Before unpacking the
cooker hood position the
carton with arrows pointing
upwards as illustrated.
Remove the cooker hood
and polystyrene side
protection complete from
the carton.
Insert the ducting spigot
into the aperture on the top
of the cooker hood casing.
Position the cooker hood
upside-down, and ensuring
the hood is supported
correctly open the visor
and remove the two metal
grease filters or paper
grease filter grilles. To
remove the filters press
inwardly on the actuator
bolts at either side of the
grille and remove. Cooker
hoods in 60 cm are
provided with 2 metal
filters or grilles.
2625
Page 16

The cooker hood in 90 cm
is provided with 4 grease
filters which should be
removed using the same
method as for the 60 cm
model.
Cut a rectangular hole into
the underside of the
cabinet in accordance with
the table below.
MOD.
AB
55 453 162
60 503 162
90
90
Special execution:
*
cooker hood 90 cm with
casing in 60 cm.
Cut a round hole in the
upper side of the cabinet
aligning it with the air outlet
of the cooker hood.
803 162
*
503 162
A
B
2827
Page 17

Insert the upper casing of
the hood through the hole
from the underside of the
cabinet.
If you wish to replace the
factory fitted front strip with
a personnalized strip
remove the three screws.
Remove the front strip.
Drill the new front strip
taking care to align it
correctly.
3029
Page 18

Fix the new front strip with
the screws provided.
Fasten the screws of the
butterfly quick fixing
system.
If necessary adjust the
lower assembly
horizontally by loosening
the four screws and
closing the visor.
3231
Page 19

Move the lower assembly
as necessary to align the
front with the cabinet door.
Hold the hood body
steady, open the visor and
tighten the fixing screws.
Fix the controls support
to the underside of the
cabinet using a provided
screw.
Now it is possible to install
the cabinet to the wall.
3433
Page 20

The cooker hood can be
installed in two different
ways:
RECIRCULATION
FITTING:
using cleansing charcoal
filters to purify the
contaminated air from
cooking and to recirculate
it back into the kitchen.
DUCTING FITTING:
(without cleansing charcoal
filter) to pass contaminated
air out through ducting to
the atmosphere.
RECIRCULATION
FITTING:
If the cooker hood is to be
installed in the recirculation
mode then charcoal filters
must be provided.
Insert che charcoal filters
as illustrated ensuring that
they click into position
correctly.
35
36
Page 21

Connect a suitable length
of ducting to the air outlet
on the top of the cooker
hood inside the cabinet.
The ducting should be long
enough to project through
the hole in the top of the
cabinet.
Fit the recirculation grille
over the ducting and screw
the grille to the top of the
cabinet using the screws
provided. Ensure that the
blades in the grille are
angled forwards as
illustrated.
Recycling installation is
now completed.
DUCTING FITTING
When installed in the
ducted mode the charcoal
filters are not required.
37
38
Page 22

To remove the charcoal
filters press on the two
charcoal filter catches and
remove the filters as
illustrated.
Replace the metal grease
filters or grease filter
grilles.
It is now possible to install
the ducting. Care should
be taken when selecting
the ducting to ensure it is
manufactured from a fire
retardant material to
National Standards.
Attention should be taken
when installing the ducting
to choose the shortest
possible run with the
minimum number of
bends.
The use of bends may
cause a loss of air capacity
and should be avoided
where possible.
The internal diameter of
the ducting used should be
the same than the external
diameter of the ducting
spigot. Now ducting
installation is completed.
39
40
Page 23

ELECTRICAL
CONNECTION
ALLACCIAMENTO
ELETTRICO
Before connecting this
appliance to the mains
supply, ensure that the
mains voltage corresponds
to the voltage on the rating
plate inside the hood.
WARNING:
This appliance must be
earthed.
Insert the plug in the
socket.
Verificare che la tensione
di rete corrisponda a quella
riportata sulla targhetta
delle caratteristiche
tecniche della cappa.
ATTENZIONE:
Verificare che la presa di
rete sia predisposta di
messa a terra, in caso
contrario provvedere.
Inserire quindi la spina
nell'apposita presa di rete.
Switch on the power to the
cooker hood at the socket
on the wall.
Now the cooker hood is
ready to be used.
Portare l'interruttore di
linea in posizione "1".
A questo punto
l'apparecchio di
aspirazione è pronto
all'uso.
4241
Page 24

CONTROLS
M
POS.
C
S
V
M
L
DESCRIPTION
Visor
Control box
Fan speed
selector switch
Fan motor
ON/OFF switch
Worktop lighting
ON/OFF switch
4443
Page 25

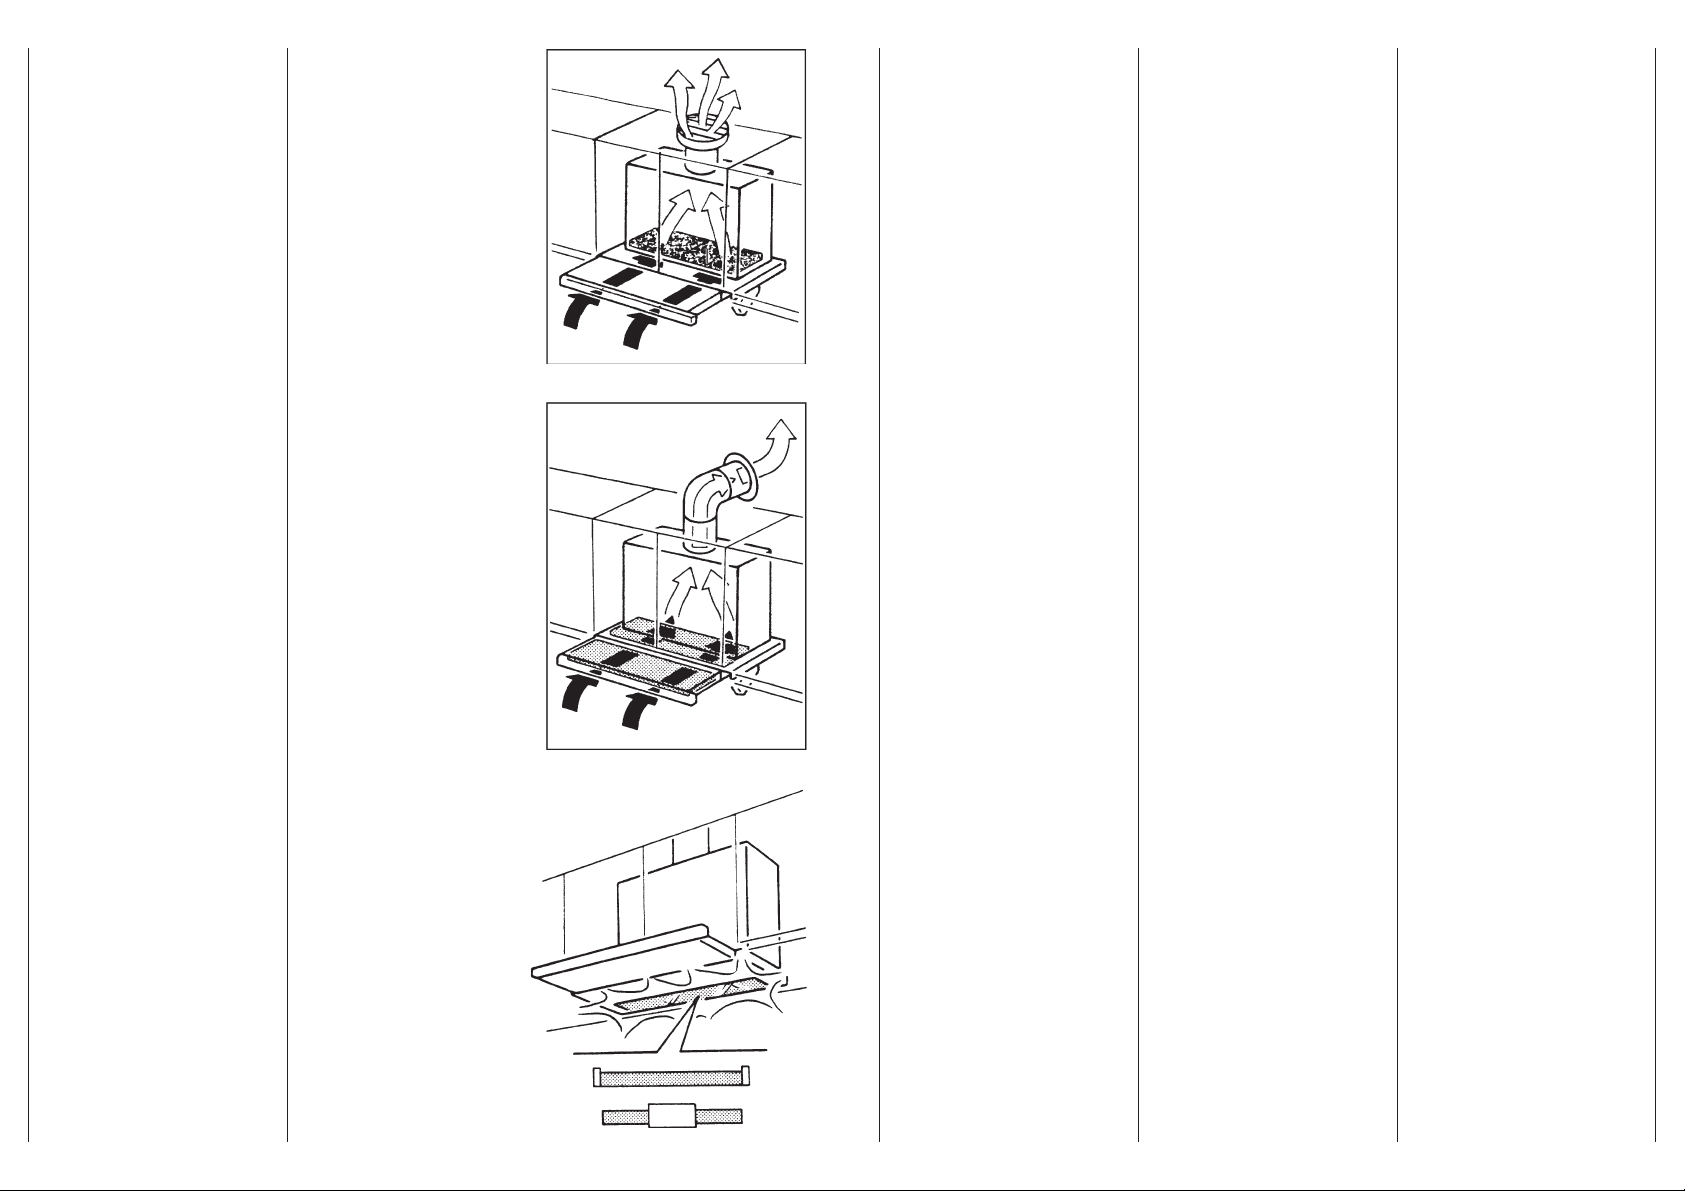
SWITCHING THE
APPLIANCE
ON AND OFF
Switch on the power to the
cooker hood at the socket
on the wall.
Lower the control box as
illustrated.
To switch on the fan slide
the switch marked "M"
to position "1".
45 46
Page 26

To select the fan speed
required, slide the switch
marked "V".
To switch on the worktop
lighting slide the switch
marked "L" to position
"1". At this point all the
functions of the cooker
hood have been
demonstrated.
If desired the control box
can be closed during
cooking.
The movement of the visor
can be used to switch the
appliance on and off if the
controls were left switched
on from the last operation.
47
48
Page 27

MAINTENANCE AND
CLEANING
To ensure the best
performance from your
cooker hood when used in
the recirculation mode
charcoal filters should be
replaced at least every
3 months.
Metal filters should be
cleaned at least every two
months. The filters may be
washed by hand in hot
water using mild detergent
or liquid soap or they can
be machine washed in a
dishwasher.
The paper filters have
saturation indicators and
the filters should be
replaced when the red dots
start to spread over the
whole surface of the filter,
or at least every 2 months.
49
50
Page 28

To replace the paper
filters, remove the grille
panels and the metal
retaining clips. Place the
new filter on the grille with
the coloured dots facing
downwards.
To replace the fluorescent
strip light or the two lamps
(60cm and 90cm cooker
hoods) proceed as follows:
Disconnect the hood from
the mains supply.
Unplug the cooker hood.
Remove the screws on the
plastic terminal near the
lighting diffuser.
51
52
Page 29

Move the glass strip until
the opposite end is free.
Pull the glass strip slightly
down.
Move the glass strip
towards one side and
remove. Replace the
fluorescent strip light or the
two lamps.
To replace the starter
remove the internal cover
as follows:
Remove the metal filters or
the metal grilles.
Loosen the two screws
and rotate the cover
upwards.
Turn the starter as shown
in the picture and replace.
ATTENTION:
For the models in 55cm
widths it is also
necessary to remove the
internal cover when
replacing the fluorescent
strip lamp or the two
lamps.
53
54
Page 30

ATTENTION:
Do not use hose pipes,
pressure washers or
cloths with a heavy
concentration of water.
Wipe the cooker hood
over with a soft cloth
wrung out in hot water
and dry with a soft clean
cloth.
55
56
 Loading...