

Gebruiksaanwijzing
User
information
Gas HobGaskookplaat
ZGS 783
BE
1

2

Het doet ons genoegen dat u voor onze apparatuur hebt gekozen.
Wij wensen u veel plezier met uw nieuwe apparaat en wij hopen dat u bij de
volgende aankoop van huishoudelijke apparatuur ons merk opnieuw in
aanmerking zult nemen.
Lees deze gebruiksaanwijzing grondig door en bewaar hem bij het apparaat
zodat hij ook in de toekomst kan worden geraadpleegd. Geef de
gebruiksaanwijzing door aan een eventuele volgende eigenaar van het apparaat.
3
Inhoud
Voor de gebruiker
Waarschuwingen en adviezen ........................................................................... 5
Uitvoering .......................................................................................................... 8
Aanwijzingen voor de gebruiker ......................................................................... 9
Het gebruik ..................................................................................................... 10
Garantie/serviceafdeling .................................................................................. 21
Voor de installateur
Technische gegevens ...................................................................................... 13
Waarschuwingen voor de installateur ............................................................... 14
Aanpassing aan verschillend gastype .............................................................. 16
Elektrische verbinding ...................................................................................... 17
Inbouw ............................................................................................................ 18
Meubelconstructie ........................................................................................... 20
Over deze gebruiksaanwijzing
Onderstaande symbolen vindt u in de tekst en hebben de volgende betekenis:
Aanwijzingen m.b.t. de veiligheid
)
Aanwijzingen m.b.t. het gebruik
Adviezen en tips
Informatie m.b.t. het milieu
Dit apparaat voldoet aan de EU-richtlijnen:
2006/95 - 89/336 - 90/396 - 93/68
en de daarbij behorende besluiten.
Deze instructies gelden enkel voor de landen waarvan het identificatiesymbool is
aangebracht op het titelblad van het instructieboekje en het apparaat zelf.
4
Nederlands
Waarschuwingen en adviezen
Deze waarschuwingen zijn bedoeld voor uw en andermans veiligheid. U wordt
geacht ze gelezen te hebben, alvorens u het apparaat installeert en/of in
gebruik neemt.
Installatie
• Het installeren en aansluiten van het
apparaat dient door een erkend
installateur te geschieden.
• Sluit het apparaat aan op het juiste
type gas, zoals vermeld op de sticker
naast de gasaansluiting van de
kookplaat.
• Tijdens het gebruik produceert de
kookplaat warmte en vocht. Zeker
tijdens een langdurig gebruik. Zorg
dan voor een goede ventilatie door de
afzuigkap in te schakelen of door een
raam open te zetten.
• Controleer het apparaat na het
uitpakken op beschadigingen.
Controleer ook het aansluitsnoer op
beschadigingen. Neem in geval van
beschadiging contact op met uw
leverancier.
• De fabrikant wijst elke aansprakelijkheid ten aanzien van schade of letsel
af, indien bovenstaande veiligheidsmaatregelen niet zijn getroffen of in
acht genomen.
Tijdens het gebruik
• Dit apparaat is bedoeld en gemaakt
voor het gebruik door volwassenen.
Het is gevaarlijk om kinderen het
apparaat te laten bedienen of als
speelgoed te laten gebruiken.
• Dit toestel is niet aangesloten op een
afvoerkanaal voor
verbrandingsgassen. Het moet
geplaatst en aangesloten worden in
overeenstemming met de geldende
voorschriften. Bijzondere aandacht
moet worden gegeven aan die punten
die betrekking hebben op de ventilatie.
• Installatie en aansluiting dienen door
een daartoe erkend installateur
uitgevoerd te worden, volgens de hem
bekende voorschriften. Bij aflevering
door de fabrikant of importeur is het
kookplateau uitsluitend geschikt voor
gebruik op aardgas. Een eventuele
ombouw voor het gebruik op
flessengas, mag alleen door een
erkend installateur gebeuren, onder
gebruikmaking van origineel, door de
fabrikant van het kookplateau geleverd
ombouwmateriaal.
• Een eventueel noodzakelijke wijziging
van de gas- en/of
elektriciteitsvoorzieningen ten behoeve
van de installatie van dit apparaat,
dienen eveneens door een erkend
installateur uitgevoerd te worden.
• Het is gevaarlijk om, in welke vorm dan
ook, dit apparaat of de eigenschappen
daarvan te veranderen.
• Gebruik nooit te kleine of onstabiel
staande pannen.
• Wees uiterst voorzichtig met olie en
vet.
• Houd tijdens het in gebruik zijn van het
kookplateau kinderen uit de buurt.
• Indien het kookplateau van een deksel
voorzien is, dan is het deksel bedoeld
voor het vrijhouden van stof in gesloten
toestand en voor het opvangen van
spatten in open toestand.
• Gebruik het deksel nergens anders
voor.
• Maak het deksel altijd schoon voor u
5
het sluit en wacht met sluiten tot de
branders afgekoeld zijn.
• Regelmatig schoonmaken, in feite na
elk gebruik, voorkomt lelijk worden van
de materiaaloppervlakken en slecht
functioneren van de branders en
eventuele bougies.
• Draai altijd eerst de vlam laag of uit
vóór u een pan van het plateau neemt.
• Overtuig u ervan dat de knoppen in de
uit-stand staan zodra u het plateau niet
meer gebruikt.
• Door het gebruik van een kooktoestel
op gas wordt et warmte en
vochtigheid geproduceerd in het
lokaal waar het toestel is opgesteld.
Waak erover dat de keuken goed
verlucht wordt waarbij u de natuurlijke
verluchting openlaat of een
mechanische voorziening aanbrengt
(mechanische dampkap).
• Een langduring en intensief gebruik
van het toestel kan een bijkomende
verluchting vereisen, bijv. door het
openen van een raam, of een
efficiëntere verluchting , bijv. door het
vermogen van de mechanische
ventilatie te verhogen, als deze
aanwezing is.
• Een brander behoort rondom te
branden. Vermijd sterke tocht. Indien,
onder normale omstandigheden, een
brander niet rondom brandt, maak de
brander dan schoon volgens de
aanwijzingen in het instruktieboekje.
Helpt dat niet, raadpleeg dan uw
installateur of de servicedienst.
• Tracht, in geval van storing of defect,
dit apparaat niet zelf te repareren.
Reparaties welke door nietdeskundige personen uitgevoerd
worden, kunnen tot schade of letsel
leiden.
• Laat inspectie-en/of herstelwerkzaamheden uitvoeren door de
Electrolux Klantenservice. Alleen
originele Electrolux-onderdelen
voldoen aan alle eisen!
Veiligheid van kinderen
• Houd tijdens het in gebruik zijn van de
kookplaat kinderen uit de buurt. Ook
na het uitschakelen blijft het apparaat
lang heet. Let op dat kinderen de
warme delen niet aanraken tijdens het
afkoelen.
• Dit apparaat mag niet gebruikt worden
door kinderen of andere personen
wiens lichamelijke, motorische of
geestelijke gesteldheid of gebrek aan
ervaring en kennis die daardoor het
apparaat niet kunnen gebruiken
zonder supervisie of instructies van
een verantwoordelijk persoon om
zeker te zijn van dat het apparaat veilig
kan worden gebruikt.
• Laat inspectie- en/of herstelwerkzaamheden uitvoeren door ELECTROLUX SERVICE en laat geen andere dan originele DISTRIPARTS onderdelen plaatsen.
Service
• Reparaties aan het apparaat mogen
alleen door vakmensen worden
uitgevoerd. Onvakkundige reparaties
kunnen tot aanzienlijke risico's leiden.
Informatie m.b.t. het milieu
Houd bij het weggooien van de ver-
pakking rekening met de veiligheid en het
milieu.
Als u een oud apparaat afdankt, maak
het dan onbruikbaar door het
aansluitsnoer af te snijden.
Het symbool op het product of
op de verpakking wijst erop dat dit
product niet als huishoudafval mag
worden behandeld. Het moet echter naar
een plaats worden gebracht waar
elektrische en elektronische apparatuur
wordt gerecycled. Als u ervoor zorgt dat
dit product op de correcte manier wordt
verwijderd, voorkomt u mogelijk voor
mens en milieu negatieve gevolgen die
6

zich zouden kunnen voordoen in geval
van verkeerde afvalbehandeling. Voor
meer details in verband met het recyclen
van dit product, neemt u het best contact
op met de gemeentelijke instanties, het
bedrijf of de dienst belast met de
verwijdering van huishoudafval of de
winkel waar u het product hebt gekocht.
Het is uiterst belangrijk dat het bij
het apparaat behorende instructieboekje bewaard blijft. Zou het apparaat door u aan iemand anders gegeven of verkocht worden, of zou het
apparaat in het huis van waaruit u
verhuist achterblijven, dan dient de
nieuwe gebruik(st)er over het instuctieboekje en de daarin opgenomen
waarschuwingen te kunnen
beschikken.
7
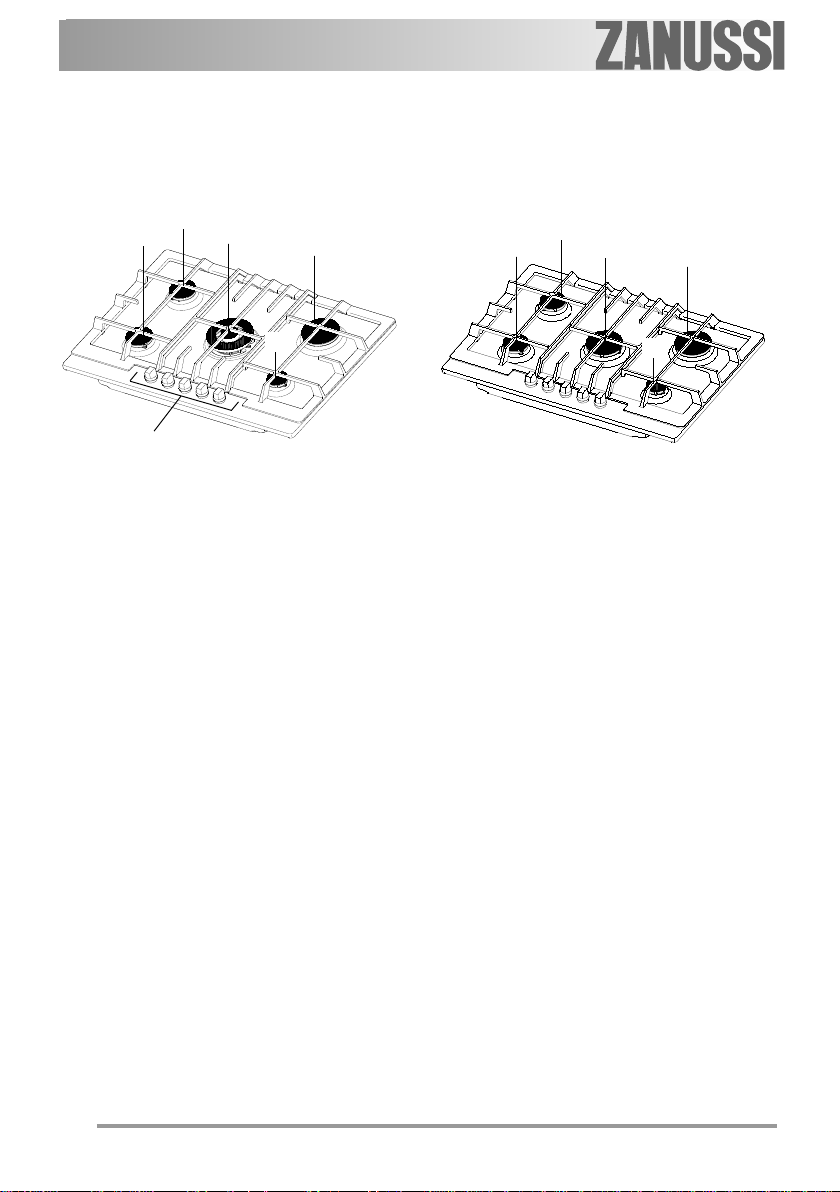
Uitvoering
2
2
4
1
5
1 Kleinbrander
2 Normaalbrander
3 Sterkbrander
4 Wokbrander
5 Bedieningsknoppen
3
2
2
3
3
1
Deze instructies gelden alleen voor de landen waarvan het identificatiesymbool is aangebracht op het titelblad van het instructieboekje en het
apparaat zelf.
8
Aanwijzingen voor de gebruiker
Bedieningsknoppen
De bedieningsknoppen van de
branders hebben drie standen:
z gesloten - uit
maximale gastoevoer
minimale gastoevoer
Waarschuwing
Druk nooit op de knop van de
brander als het branderdeksel niet
op de brander ligt. Doet u dat wel,
dan kan de ontstekingsunit z’n
zeer hoge spanning niet kwijt
hetgeen tot beschadiging van de
ontstekingsunit kan leiden.
Steek de brander altijd aan
voordat u er een pan opzet.
Geïntegreerde ontsteking
)
Steek een lucifer aan. Druk de knop
van de betreffende brander in en draai
hem linksom. Steek de brander direct
aan.
Maar houdt vervolgens de knop nog
5 seconden5 seconden
5 seconden geheel ingedrukt. Dat is
5 seconden5 seconden
nodig om de vlambeveiliging in te
schakelen. De vlam beveiliging
voorkomt, dat het gas blijft
doorstromen, als de vlam uitwaait of
uitgaat door een storing in het gasnet.
Zet vervolgens de knop in de gewenste
stand.
Om de brander uit te schakelen draait
u de knop rechtsom op de UIT "z" stand.
Wees voorzichtig als u olie of
andere vetstoffen gebruikt
(zoals bij het frituren). Olie en
vet ontbranden gemakkelijk bij
oververhitting.
LuciferontstekingLuciferontsteking
Luciferontsteking
LuciferontstekingLuciferontsteking
Steek de lucifer aan. Druk de
knop van de betreffendebrander
in en draai hem linksom. Steek
de brander direkt aan.
Zet vervolgens de knop in de
gewenste stand.
Belangrijk: Ontsteek eerst de
brander en plaats dan de pan
boven de brander.
Zet altijd eerst de brander lager
of uit voordat u de pan van de
brander neemt.
9
Het Gebruik
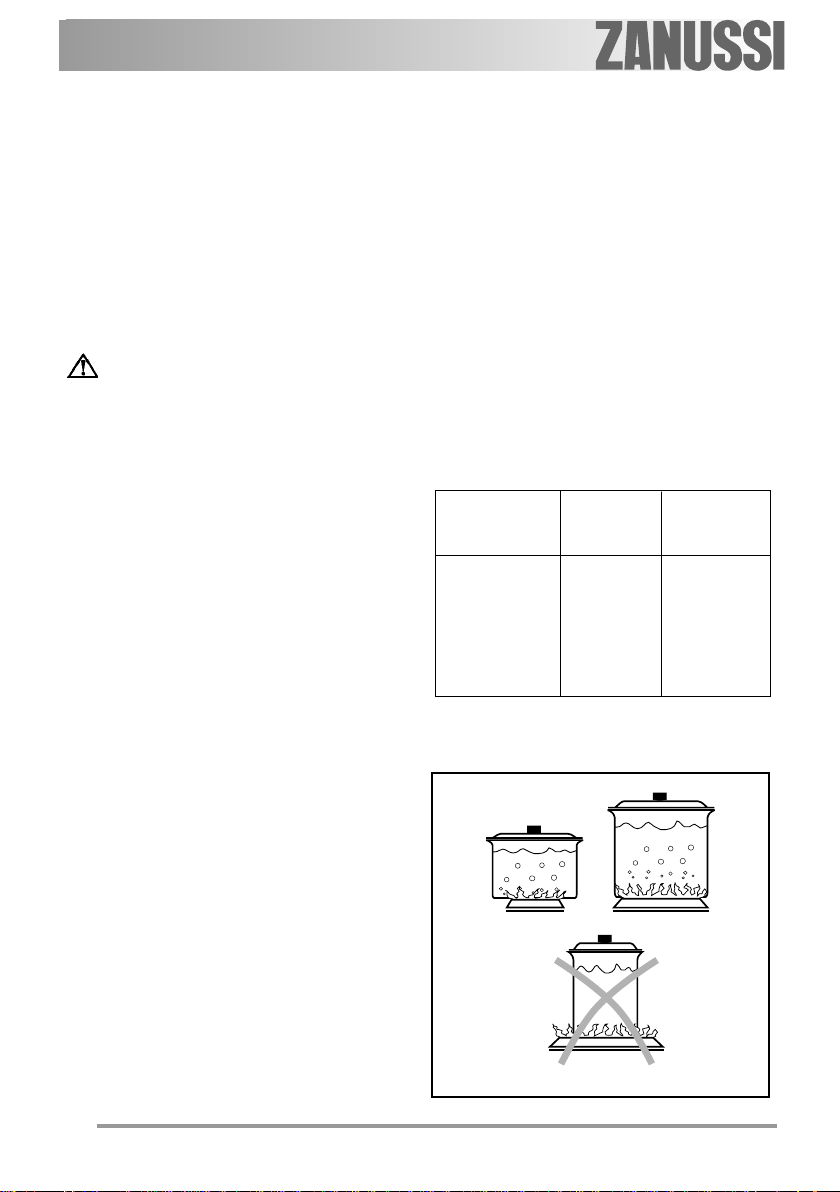
Optimaal rendement
Voor een optimaal rendement moet de
diameter van de pan aangepast zijn aan
de brander, zodat de vlammen niet langs
de zijkant uitslaan (zie tabel). Wij adviseren
ook om de vlam lager te zetten zodra het
kookpunt bereikt is.
• Gebruik alleen pannen met een vlakke
bodem.
Wees voorzichtig als u olie of
andere vetstoffen gebruikt (zoals bij het frituren). Olie en vet
ontbranden gemakkelijk bij
oververhitting.
Voor een juist gebruik van de
kookplaat
Om minder gas te verbruiken en een
beter rendement te behalen, alleen
pannen gebruiken met een platte bodem
en met afmetingen die geschikt zijn voor
de branders, zoals aangegeven in de tabel
onderaan deze pagina. Let er bovendien
op dat u, zodra een vloeistof gaat koken,
de vlam lager zet op een stand die
voldoende is om de vloeistof aan de kook
te houden.
Tijdens bereidingsmethoden
waarbij vetten of oliën gebruikt worden uw
gerechten goed in de gaten houden; deze
stoffen kunnen, wanneer ze op hoge
temperatuur gebracht worden, in brand
vliegen.
Roestvrij staal kan, als het
blootgesteld wordt aan extreme hitte,
bruin worden. Daarom raden wij langdurig
gebruik van een grillsteen, schaal van
ongeglazuurd aardewerk of pan van
gietijzer af. Vermijd het gebruik van
aluminiumfolie om de kookplaat tijdens
het gebruik te beschermen.
Vergewis u ervan dat de pannen niet
uitsteken buiten de randen van de
kookplaat en dat ze midden op de
branders staan teneinde minder gas te
verbruiken.
Zet geen onstabiele of vervormde
pannen op de branders: ze zouden om
kunnen vallen of de inhoud zou over de
rand kunnen lopen, waardoor ongelukken
kunnen ontstaan.
De pannen mogen niet op de
bedieningszone staan.
Brander minimale maximale
diameter diameter
Wok 180 mm 260 mm
Sterk 180 mm 260 mm
Normaal achter 120 mm 220 mm
voor 120mm 180 mm
Sudder 80 mm 160 mm
10
Onderhoud
Trek voordat u de kookplaat
gaat schoonmaken altijd eerst
de stekker uit het stopcontact
en laat de kookplaat afkoelen.
Voor het reinigen van de emaille delen
mag nooit een agressief middel gebruikt
worden. Maak een sopje van warm water
met afwasmiddel.
Maak zeer regelmatig de branders
schoon, verwijder voedselresten, maak
de branderringen en -deksels goed
droog met een zacht doekje voordat u ze
weer terug zet.
De pannendragers ook met een sopje
van afwasmiddel schoonmaken.
Gebruik voor het verwijderen van
lastige vlekken nooit een pannenspons
van staalwol, een agressief
schoonmaakmiddel of een pannenspons
met een harde laag. Gebruik voor het
verwijderen van hardnekkig vuil daarvoor
in de handel zijnde schoonmaakmiddelen
zonder schurende werking.
Laat geen zure of alkalische
stoffen (bijv. azijn, zout,
citroensap enz...) op de
kookplaat liggen.
De pannendragers van de
kookplaat
De pannendragers kunnen van de
kookplaat verwijderd worden zodat ze
beter kunnen worden schoongemaakt.
Wij adviseren u de gietijzeren
pannendragers niet op de kookplaat
neer te zetten om te voorkomen dat
deze bekrast wordt of beschadigd
raakt.
De pannendragers van geëmailleerd
ijzer kunnen ook in de afwasmachine
gewassen worden.
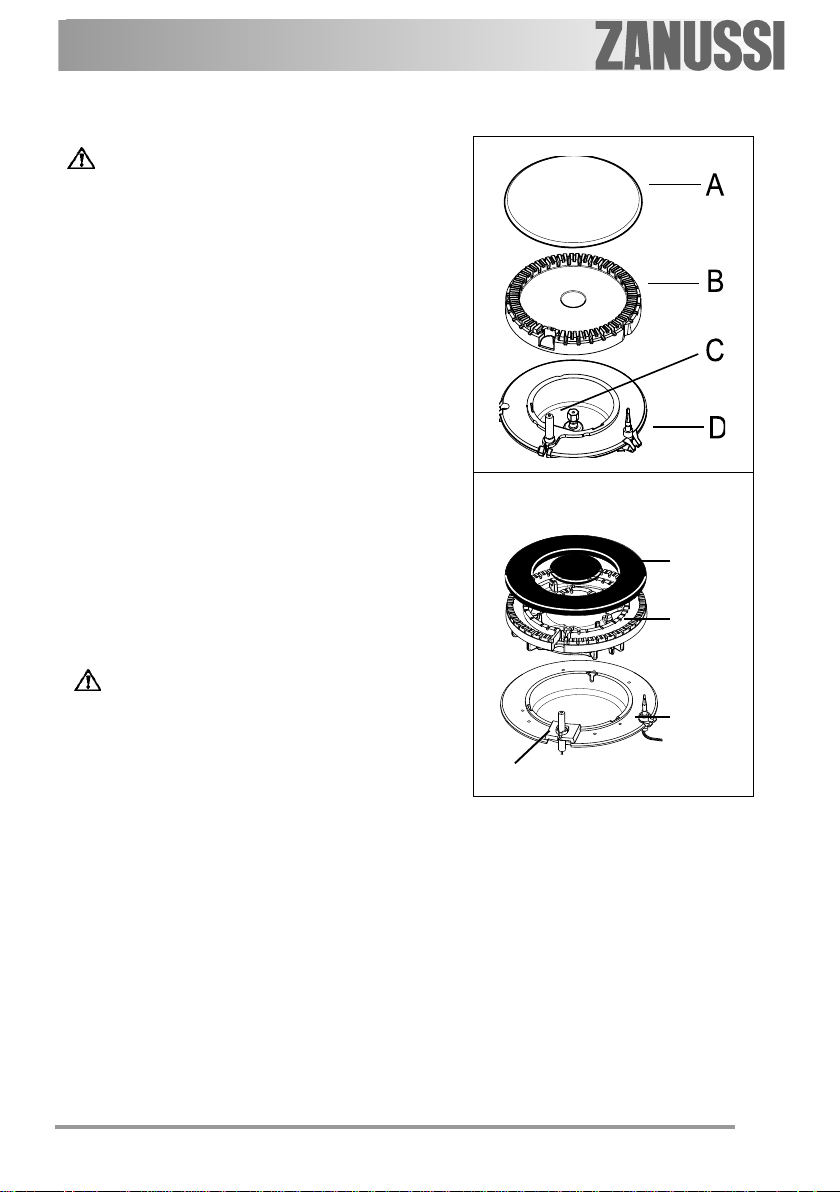
Wokbrander
C
A -Branderdeksel
B -Vlamverdeler
C -Vonkontsteking
DD
D - Vlambeveiliging
DD
A
B
D
11
Kookplaten met gietijzerenKookplaten met gietijzeren
Kookplaten met gietijzeren
Kookplaten met gietijzerenKookplaten met gietijzeren
pannendragers: plaats na hetpannendragers: plaats na het
pannendragers: plaats na het
pannendragers: plaats na hetpannendragers: plaats na het
schoonmaken de pannendragersschoonmaken de pannendragers
schoonmaken de pannendragers
schoonmaken de pannendragersschoonmaken de pannendragers
weer op hun plaats. Om ze correctweer op hun plaats. Om ze correct
weer op hun plaats. Om ze correct
weer op hun plaats. Om ze correctweer op hun plaats. Om ze correct
terug te plaatsen, plaatst u eerstterug te plaatsen, plaatst u eerst
terug te plaatsen, plaatst u eerst
terug te plaatsen, plaatst u eerstterug te plaatsen, plaatst u eerst
de zij-pannendragers en daarnade zij-pannendragers en daarna
de zij-pannendragers en daarna
de zij-pannendragers en daarnade zij-pannendragers en daarna
de middelste.de middelste.
de middelste.
de middelste.de middelste.
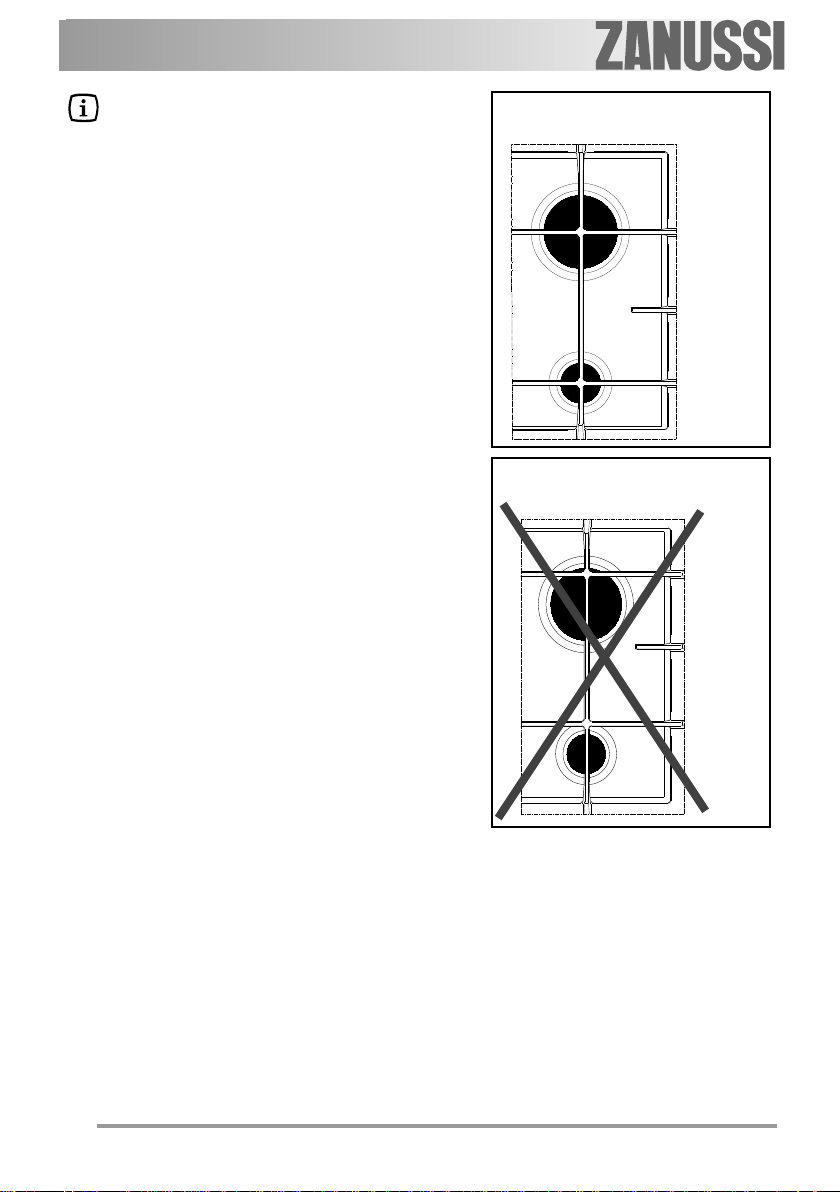
Zet de pannendragers, nadat ze
gereinigd zijn, terug op hun plaats en
controleer of ze goed staan.
Voor een juiste werking van de
branders moet u ervoor zorgen dat de
pannendragers met de concentrische
spaken op de brander staan, zoals
afgebeeld in figuur.
Vonkontsteking
De vonkontsteking, bestaand uit een
elektrode gevat in een keramisch
omhulsel, moet vrij worden gehouden van
voedselresten en vocht, omdat anders de
ontsteking niet functioneert .
Controleer of de branderring poorten
schoon zijn.
Periodiek onderhoud
Laat af en toe door een erkend
installateur of ELECTROLUX SERVICE
controleren of de gasslang en/of
gasaansluiting nog in een goede staat
verkeren.
JA
GEEN
12
Technische gegevens
Afmetingen in mm:
Inbowopening
Breedte 560 mm
Diepte 480 mm
Kookplaat
Vermogen gasbranders
Sterkbrander Aardgas 3,0 kW
LPG 2,8 kW
Wokbrander 4,0 kW
Normaalbrander 2,0 kW
Sudderbrander 1,0 kW
Breedte 744 mm
Diepte 510 mm
Aansluiting aan 230 V ~ 50 Hz
Categorie II2E+3+
Voeding gas
Aardgas G25/25 - 20/25 mbar
Apparaat klasse 3
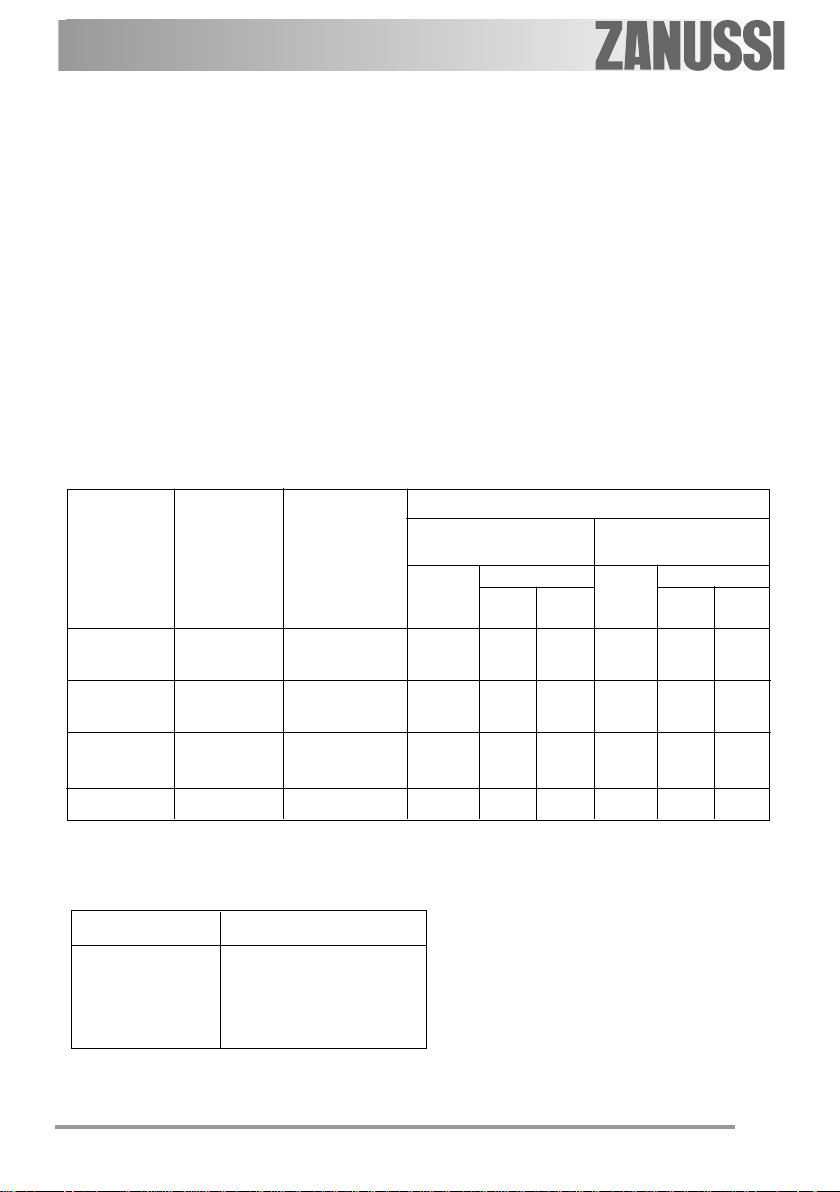
TYPE MAXIMALE MINIMALE NOMINALE AFGIFTE
BRANDER WARMTE- WARMTE-
Sudderbrander 1,0 0,33 70 0,095 0,111 50 73 71
Normaalbrander 2,0 0,45 96 0,190 0,221 71 145 143
AFGIFTE AFGIFTE AARDGAS GAS LPG
kW kW 28-30/37 mbar
Sproieres
100/mm 20 mbar 25 mbar 100/mm
3
m
/h g/h
G20 G25
Sproieres
G30 G31
Sterkbrander Aardgas 3,0 0,75 119 0,286 0,332 86 204 200
Wokbrander
LPG: 2,8
4,0 1,2 146 0,381 0,443 98 291 286
Diameters bypass
Brander Ø Bypass 1/100 mm.
Sudderbrander 28
Normaalbrander 32
Sterkbrander 42
Wokbrander 56
13
Aanwijzingen voor de installateur
De volgende gebruiksaanwijzingen zijn tot een
gekwalificeerd technicus
gericht, die de installatie
uitvoert, zodat hij de installatie
en de verbindingen op de juiste
manier kan uitvoeren, de
huidige wetten en normen in
acht nemende. Iedere
tussenkomst na aansluiting
dient te worden uitgevoerd met
afgekoppelde of uitgeschakelde stroomtoevoer.
De installatie en de elektrische
aansluiting van het apparaat
moeten door een erkend
vakman gebeuren.
• De zijwanden van de meubels
mogen niet hoger komen dat het
werkvlak van het toestel.
• Plaats het toestel niet in de buurt
van ontvlambare materialen (zoals
gordijnen, handdoeken enz.).
• De hierna volgende instructies zijn
bestemd voor de erkende
installateurs, om ervoor te zorgen
dat installatie en onderhoud
optimaal verlopen, volgens de
geldende normen. De installatie
moet conform de norm NBN D
51.003 “Installaties gevoed met
stoolgas lichter dan lucht” worden
uitgevoerd.
• Ontkoppel het kookplateau van de
stroomtoevoer. Ingeval het plateau
op de stroomtoevoer aangesloten
moet blijven, moeten alle nodige
voorzorgsmaatregelen worden
getroffen.
Monteer een afsluitkraan die erkend is
door de AGB. Starre aansluitingen
verdienen de voorkeur. Bij gebruik van een
gasslang moet een door de AGB erkende
slang met metalen omhulsel worden
gebruikt.
Bij het gebruiken van flexiebele vaste
verbindingen moet men er op letten dat de
pijpen niet kunnen worden geplet of
dichtgekneppen en niet in aanraking
komen met bewegende delen. Let hier
ook op wanneer de kookplaat wordt
gecombineerd met een oven.
Deze kookplateaus kunnen zowel
worden gevoed met gas van Slochteren
(G25) met een nominale druk van 25 mbar
als met aardgas (G20) met een nominale
druk van 20 mbar. Om te werken met deze
twee soorten gas is geen extra afstelling
nodig.
Alvorens de installatie uit te voeren
moet u nagaan of de gastoevoer volstaat
voor de correcte voeding van het plateau.
Bij maximum verbruik mag de drukdaling
maximum 5% bedragen. Deze drukdaling
is afhankelijk van volgende factoren:
- maximum debiet van de gasmeter;
- diameter en lengte van de leidingen
voor en achter de meter;
- doorgangsopeningen van de
verschillende kranen in het circuit;
- diameter van de eventuele
tussenstukken.
Belangrijk - Voor een correcte
werking, een zuinig verbruik en
een grotere levensduur van het
kookplateau moet u ervoor
zorgen dat de toevoerdruk
overeenstemt met de waarden in
de tabel.
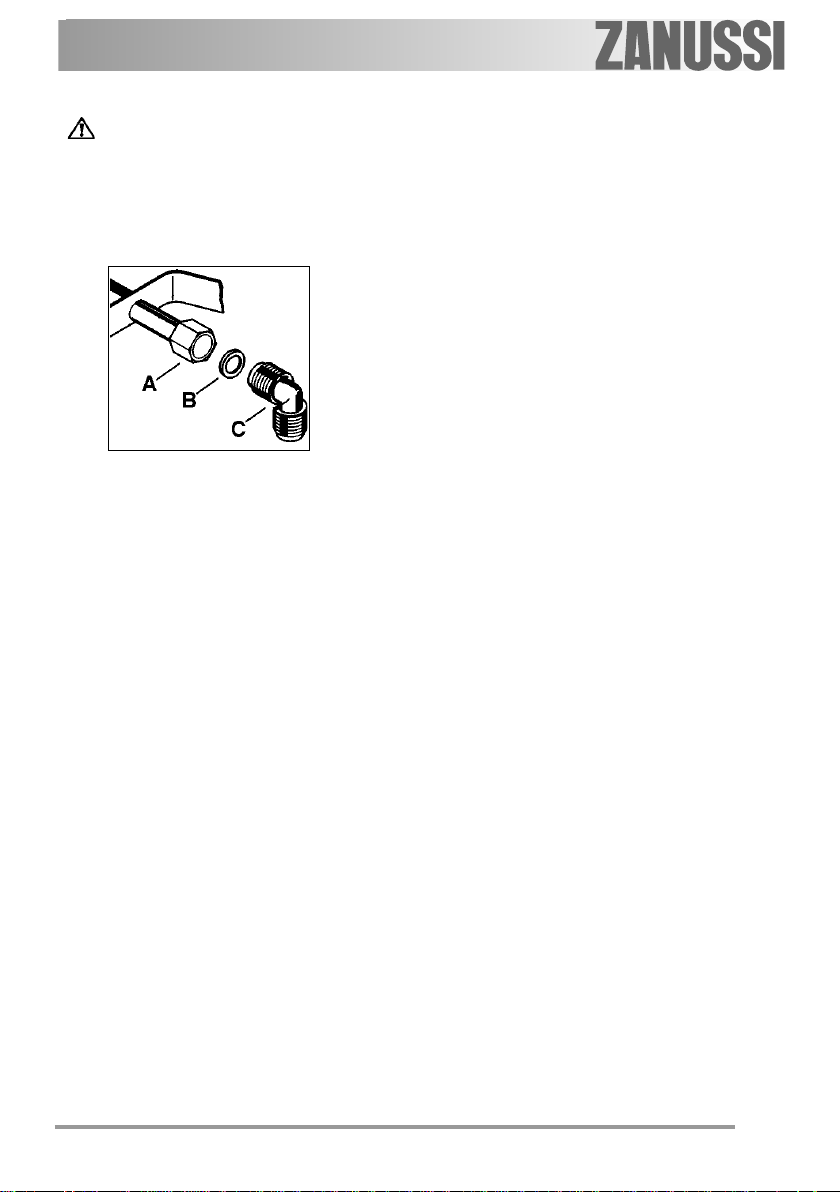
Gasaansluiting
De verstelbare aansluiting wordt door
middel van een 1/2" moer vast gezet.
Alle componenten zoals weergegeven in
de afbeelding zijn reeds in de fabriek
gemonteerd.
Om een optimaal resultaat te
garanderen, is het toestel voor vertek uit
de fabriek getest.
14
Belangrijk - Om de installatie te
voltooien, kijk altijd de perfecte
dirchtheid van de
verbindingsstukken na door een
zeepachtige oplossing te
gebruiken, nooit een vlaam.
afb. 1
A) Aansluitpijp met wartel
B) Ringetje
C) Draaibare messing
elleboog
15

Ombouw naar vloeibaar gas
Aanwijzingen m.b.t. de veiligheid
Het ingestelde type gas is aangegeven
op een sticker naast de gasaansluiting. Bij
ombouw moet de sticker worden
vervangen.
Het ombouwen van gasinstallaties
mag alleen door een erkend installateur uitgevoerd worden.
Vóór het ombouwen moet het
apparaat worden losgekoppeld van gasen stroomvoorziening: draai de gaskraan
dicht en schakel de zekeringen in de
huisinstallatie uit.
Vervangen van de sproeiers
1) Verwijder de roosters.
2) Neem het bovenste gedeelte en de
gasontstekers.
3) Met een steeksleutel van 7 schroeft U
de gassproeiers los en neemt U ze
weg, om ze te vervangen door
diegene die overeenstemmen met het
type gas (zie tabel).
4) Hermonteer de delen door dezelfde
handelingen te volgen, in
tegengestelde zin.
5) Vervang het indentificatieplaatje
(geplaatst vlakbij de gastoevoerpijp)
door het plaatje dat oveneenstemt met
het nieuwe gastype. Dit
identificatieplaatje vindt u in de
verpakking van het inspuitstuk
meegeleverd met het toestel.
Indien de gasdruk verschillend is (of
variabel) van dewelke voorzien, is het
noodzakelijk een gepaste drukregelaar te
plaatsen op de inlaattube, conform aan de
normen.
Regeling gaspitten
1) Ontsteek de brander.
2) Breng de toets op de positie van de
kleinste vlam.
16
3) Verwijder de toets.
4) Regel de bypass vijs met een dunne
schroevendraaier.
In geval van transformatie van aardgas
noor flessengas, het by-pass
schroofje van de kranen goed
vastschroeven.
In geval van transformatie van
flessengas noor aardgas, het by-pass
schroofje ongeveer 1/4 draai
losschroeven, totdat men een kleine
regelmatige vlam verkrijgt.
5) Controleer tenslotte of er geen
uitdovingen van de gaspit zijn door
snel de toets van de maximale stand
op de minimum stand te draaien.
afb. 2
afb. 3
Bypass vijs
Bypass vijs

Elektrische aansluiting
Het kookplateau is ontworpen om te
werlen bij 230 V eenfasig.
De aansluiting moet worden
uitgevoerd conform de voorwaarden en
normen, voorgeschreven door de
geldende wetgeving.
Alvorens aan te sluiten moet u
nagaan of:
1) de elektrische voeding afgestemd is
op het verbruik van het kookplateau
(zie het identificatieplaatje);
2) de bestaande elektrische toevoer
voorzien is van een aarding conform
de geldende voorschriften;
3) de meerpolige stekker of de
gebruikte schakelaar gemakkelijk
bereikbaar zijn nadat het
kookplateau gelnstalleerd is.
Bevestig een stekker aan de kabel,
aangepast aan de belasting, en sluit aan
op een beveiligd contact.
Als een directe aansluiting op het
stroomnet vereist is, moet een
meerpolige stekker worden gebruikt
met een minimum afstand tussen de
contacten van 3 mm, aangepast aan de
belasting en geldende voorschriften.
De bruine fasedraad (die
aangesloten is op de “L” clip van het
plateau) moet altijd worden aangesloten
op het fasecontact van het stroomnet.
De stroomkabel moet zo geplaatst
worden dat hij op geen enkel punt 50°C
warmer kan worden dan de
omgevingstemperatuur.
De verbindinq tussen stroomkabel
en klemmenbord is van het “Y”-type: de
stroomkabel kan dus alleen worden
vervangen met behulp van een speciaal
stuk gereedschap waarmee de
installateurs uitgerust zijn.
Wanneer de stroomkabel moet
worden vervangen, mag alleen type
H05RR-F worden gebruikt, en beide
types moeten aangepast zijn aan de
belasting en de temperatuur waarbij ze
moeten functioneren. Bovendien moet
de groen/gele aardingsdraad zo’n 2 cm
langer zijn dan de fasedraad en de
neutrale draad.
Om de klep van het klemmenbord te
openen gaat u te werk als in afb. 4-a.
afb. 4
Nulleiding
Aardleiding (groen/geel)
afb. 4-a
Vervangen van het
aansluitsnoer
Het vervangen van elektrischeHet vervangen van elektrische
Het vervangen van elektrische
Het vervangen van elektrischeHet vervangen van elektrische
bekabeling mag alleen gebeurenbekabeling mag alleen gebeuren
bekabeling mag alleen gebeuren
bekabeling mag alleen gebeurenbekabeling mag alleen gebeuren
door het technische servicedoor het technische service
door het technische service
door het technische servicedoor het technische service
center of door personeel metcenter of door personeel met
center of door personeel met
center of door personeel metcenter of door personeel met
gelijke kundigheid,gelijke kundigheid,
gelijke kundigheid,
gelijke kundigheid,gelijke kundigheid,
overeenkomstig met de huidigeovereenkomstig met de huidige
overeenkomstig met de huidige
overeenkomstig met de huidigeovereenkomstig met de huidige
bepalingen.bepalingen.
bepalingen.
bepalingen.bepalingen.
17

Inbouw en montage
N
N
744
afb. 5
Su = sudderbrander
N = normaalbrander
St = sterkbrander
W = wokbrander
W
St
Su
510
Inbouw in en bevestiging in het
werkblad
De kookplaat kan gemonteerd worden
in een werkblad met uitsnijmaten zoals
aangegeven in figuur 6. De afstand van de
uitsnede tot de achterwand moet minstens
55 mm zijn. De afstand tussen de uitsnede
en een eventuele rechter of linker zijwand
die hoger is dan de kookplaat dient
minstens 150 mm te bedragen.
De bevestiging van de kookplaat in het
werkblad dient als volgt te worden
uitgevoerd:
• plaats de bijgeleverde afdichting op de
rand van de voorkant van de uitsnede
op 86 millimeter van de zijkanten en op
10 mm van de achterkant, waarbij u
SR
SR
744
Afmentigen in millimeters
St
Su
St
510
afb. 6
18

erop let dat de uiteinden elkaar raken
zonder elkaar te overlappen (zie fig. 7);
• Plaats de kookplaat in de mal.
• Zet de kookplaat vast met de
betreffende schroeven die
meegeleverd zijn met de inspuitset
(afb. 8).
Door de trekkracht raakt de schroef de
afdichting, overblijfselen kunnen
eenvoudig verwijderd worden. De rand
van de kookplaat vormt een dubbel
labyrint dichting welke een garantie biedt
tegen vocht.
afb. 7
afdichting
afb. 8
19

Inbouwmogelijkheden
Op een keukenmeubel met
deur
Zorg er altijd voor, dat de onderzijde
van de kookplaat minimaal 20 mm
verwijderd is van onderliggende kastdelen
of voorwerpen.
Een aanbevolen oplossing ziet u in afb.
6. Het paneel onder de kookplaat moet
eenvoudig kunnen worden verwijderd,
zodat bij evt. reparatie de kookplaat kan
worden losgekoppeld.
Boven een oven
Voor de inbouwopeningen, zie afb. 6
Er zijn twee ventilatie-openingen
vereist. De afbeeldingen 10 en 11 tonen
twee mogelijke oplossingen.
De elektrische aansluitingen voor de
oven en de kookplaat moeten toegankelijk
blijven en afzonderlijk gelegd worden.
Zorg ervoor dat de onderzijde van een
bovenkast altijd minimaal 650 mm
verwijderd is van de kookplaat (afb. 6).
afb. 9
a) Afneembare plaat
b) Eventuele ruimte voor
de aansluiting
afb. 10
afb. 11
20

Garantie/serviceafdeling
België
WAARBORGVOORWAARDEN
Onze toestellen worden met de grootst mogelijke zorgvuldigheid geproduceerd.
Desondanks kan het voorkomen dat er een defect optreedt. Onze klantendienst zal dit
op verzoek herstellen, zowel binnen als buiten de waarborgtermijn. De levensduur van
het toestel wordt daardoor niet negatief beïnvloed.
Onderstaande waarborgvoorwaarden zijn gestoeld op de EU Richtlijn
99/44/EG en het Burgerlijk Wetboek. De daaruit voortvloeiende rechten blijven onverlet.
Ook de waarborgverplichtingen van de verkoper naar de eindgebruiker blijven
onaangetast.
Voor dit toestel verlenen wij waarborg volgens onderstaande voorwaarden:
1. Wij verhelpen kosteloos met inachtneming van de voorwaarden 2 tot en met
15 gebreken aan het toestel die zich openbaren binnen 24 maanden vanaf de
datum van levering aan de eindgebruiker. Deze waarborgvoorwaarden zijn niet
van toepassing in geval van professioneel of daarmee gelijk te stellen gebruik.
2. De waarborgprestatie houdt in dat het toestel kosteloos wordt teruggebracht
in de toestand die het had voor het defect optrad. Gebrekkige onderdelen
worden hersteld of vervangen. Kosteloos vervangen onderdelen worden ons
eigendom.
3. Het gebrek moet terstond gemeld worden, om mogelijke verdere schade te
voorkomen.
4. Voor een beroep op waarborg dient het aankoopbewijs met aankoop- en/of
leveringsdatum te worden overlegd.
5. De waarborg heeft geen betrekking op schade aan kwetsbare onderdelen,
zoals (vitrokeramisch) glas, kunststof, rubber, die ontstaan is door onzorgvuldig gebruik
6. De waarborg heeft geen betrekking op kleine afwijkingen van de gestelde kwa-
liteit die voor de waarde en deugdelijkheid van het toestel onbeduidend zijn.
7. De waarborg geldt evenmin voor schade veroorzaakt door:
- chemische en elektrochemische inwerking van water,
- abnormale milieuomstandigheden in het algemeen
- voor het toestel oneigenlijke bedrijfsomstandigheden
- contact met agressieve stoffen.
8. De waarborg heeft geen betrekking op gebreken door transportschade die
buiten onze verantwoordelijkheid is ontstaan, niet vakkundige installatie of
montage, verkeerd gebruik, gebrekkig onderhoud, of het niet in acht nemen
van de gebruiks- of montageaanwijzingen.
9. Het recht op waarborg vervalt wanneer het defect werd veroorzaakt door her-
stelling of ingrepen door derden die niet bevoegd of niet deskundig zijn, of
wanneer het toestel voorzien werd van toebehoren of onderdelen die niet origineel zijn en daardoor een defect veroorzaken.
21

10.Toestellen die gemakkelijk kunnen worden vervoerd dienen te worden overhan-
digd of gezonden naar onze klantendienst. Herstelling ter plaatse kan slechts
worden gevraagd voor grote of ingebouwde toestellen.
11. Indien het toestel zodanig is ingebouwd, ondergebouwd, opgehangen of ge-
plaatst dat de benodigde tijd voor het in- en uitbouwen samen meer dan 30
minuten bedraagt, dan worden de hierdoor ontstane extra kosten aan de gebruiker in rekening gebracht. Schade die ontstaat door abnormale in- of uitbouw komt ten laste van de gebruiker.
12. Indien binnen de waarborgperiode de herstelling van hetzelfde gebrek meer-
maals mislukt of de herstellingkosten disproportioneel zijn wordt in overleg met
de gebruiker een gelijkwaardige vervanging geleverd. In geval van vervanging
behouden we ons het recht voor om een vergoeding te rekenen naar rato van
de verstreken gebruiksperiode.
13. Herstelling onder waarborg heeft geen verlenging van de waarborgtermijn noch
aanvang van een nieuwe waarborgtermijn tot gevolg.
14. Op herstellingen geven wij een waarborg van 12 maanden, uitsluitend op het-
zelfde gebrek.
15. Verdere of andere rechten, in het bijzonder vergoeding van schade ontstaan
buiten het toestel, zijn uitgesloten voor zover een aansprakelijkheid niet wettelijk is vastgelegd. In geval van aansprakelijkheid zal een vergoeding de
aankoopwaarde van het toestel niet overtreffen.
Deze waarborgvoorwaarden gelden voor in België gekochte en/of in gebruik zijnde
toestellen. Indien een toestel naar het buitenland wordt gebracht dient de gebruiker na
te gaan of het toestel voldoet aan de technische voorwaarden ( o.a. spanning,
frequentie, installatievoorschriften, gassoort, klimaatomstandigheden) in het
betreffende land. Voor in het buitenland aangeschafte toestellen dient de gebruiker zich
zelf te vergewissen van de bepalingen in België. Noodzakelijke of gewenste
aanpassingen vallen niet onder de waarborg, en kunnen niet altijd worden aangebracht.
Ook na afloop van de waarborgtermijn staat onze klantendienst u ter beschikking.
Adres Klantendienst:
België
Tel: Fax:
Electrolux Home Products Belgium Consumer services 02/363.04.44 02/363.04.00
ELECTROLUX SERVICE 02/363.04.60
Bergensesteenweg 719
1502 Lembeek
E-mail: consumer.services@electrolux.be
Luxemburg
ELECTROLUX HOME PRODUCTS Consumer services 00 35242431-1 0035242 431-360
Rue de Bitbourg. 7
L-1273 Luxembourg-Hamm
E-mail: consumer-service.luxembourg@electrolux.lu
22

Europese Garantie
Dit apparaat wordt door Electrolux in elk van de achter in deze handleiding genoemde landen gedurende de in het bij het apparaat behorende garantiebewijs
genoemdeb periode of anderszins bij de wet gegarandeerd. Als u van een van deze
landen verhuist naar een ander van de hieronder genoemde landen, verhuist de
garantie op het apparaat met u mee. De volgende beperkingen zijn hierop van toepassing:
• De garantie op het apparaat begint op de datum van eerste aankoop van het
apparaat. Deze datum dient te worden aangetoond door overlegging van een
geldig, door de verkoper van het apparaat afgegeven ankoopbewijs.
• De garantie op het apparaat geldt voor dezelfde periode en in dezelfde mate voor
arbeidsloon en onderdelen als van toepassing in uw nieuwe land van vestiging op
dit specifieke model of deze specifieke serie apparaten.
• De garantie op het apparaat is persoonlijk, geldt dus voor de oorspronkelijke koper
van het apparaat en kan niet worden overgedragen op een andere gebruiker.
• Het apparaat wordt geïnstalleerd en gebruikt in overeenstemming met de door
Electrolux afgegeven instructies en wordt alleen in huis gebruikt, dat wil zeggen, het
apparaat wordt niet gebruikt voor commerciële doeleinden.
• Het apparaat wordt geïnstalleerd in overeenstemming met alle relevante voorschrif-
ten die in uw nieuwe land van vestiging van kracht zijn.
De voorwaarden van deze Europese garantie tasten geen van de aan u bij de wet
verleende rechten aan.
23

24

Thank you for selecting our applianceThank you for selecting our appliance
Thank you for selecting our appliance
Thank you for selecting our applianceThank you for selecting our appliance
We wish you lots of enjoyment with your new appliance and we hope that you will
consider our brand again when purchasing household appliances.
Please read this user manual carefully and keep it throughout the product life cycle
as a reference document. The user manual should be passed on to any future owner
of the appliance.
25

Contents
For the User
Important Safety Information ........................................................................... 27
Description of the appliance ............................................................................ 29
Operation ........................................................................................................ 30
Using the hob .................................................................................................. 31
Cleaning and Maintenance .............................................................................. 32
Declaration of guarantee terms ........................................................................ 43
For the Installer
Technical data ................................................................................................. 34
Installation ....................................................................................................... 35
Adaptation to different types of gas ................................................................. 37
Electrical Connection ....................................................................................... 38
Building In ....................................................................................................... 40
Possibilities for insertion .................................................................................. 42
Guide to Use the instructions
The following symbols will be found in the text to guide you throughout the
Instructions:
Safety Instructions
Step by step instructions for an operation
)
Hints and Tips
Environmental information
This appliance complies with the following E.E.C. Directives:
••
2006/95 2006/95
•
2006/95 (Low Voltage Directive);
••
2006/95 2006/95
••
89/33689/336
•
89/336 (Electromagnetical Compatibility Directive);
••
89/33689/336
••
90/39690/396
•
90/396 (Gas Appliances);
••
90/39690/396
••
93/68 93/68
•
93/68 (General Directives) and subsequent modifications.
••
93/68 93/68
It is very important that this instruction book should be kept safely for future
consultation. If the appliance should be sold or given to another person,
please ensure that the booklet goes together with it, so that the new owner
can know of the functions of the machine and also be aware of the warnings.
These instructions are only for the countries stated by the symbol printed on
the front cover of this instruction book.
26

English
Important safety information
This warnings has been given for the safety of you and others. We therefore
ask you to carefully read the procedures of installing and using this cooker.
Installation
z The work of installation must be
carried out by competent and qualified
installers according to the regulations
in force.
• Any modifications to the domestic
electrical mains which may be
necessary for the installation of the
appliance should be carried out only
by competent personnel.
During Operation
• This appliance has been designed for
non professional purpose in private
houses only. It is meant to cook edible
foodstuff only and must not be used
for any other purposes.
• It is dangerous to alter the specification
in any way.
• For hygiene and safety reasons, this
appliance should be kept clean at all
times. A build-up of fats or other
foodstuff could result in a fire.
• Under no circumstances should you
attempt to repair the appliance
yourself. Repairs carried out by
unexperienced persons may cause
injury or serious malfunctioning. Refer
to your local Service Centre. Always
insist on genuine spare parts.
• Ensure that all control knobs are in the
OFF position when not in use.
• Should you connect any electrical tool
to a plug near this cooking appliance,
ensure that electric cables are not in
contact with it and keep them far
enough from the heated parts of this
appliance.
• If the appliance is out of order,
disconnect it from the electric supply.
Child Safety
• This appliance has been designed to
be operated by adults and children
under supervision. Young children
must not be allowed to tamper with the
controls or play near or with the oven.
• This appliance is not intended for use
by children or other persons whose
physical, sensory or mental capabilities
or lack of experience and knowledge
prevents them from using the
appliance safely without supervision or
instruction by a responsible person to
ensure that they can use the appliance
safely.
• Accessible parts of this appliance may
become hot when it is in use. Children
should be kept away until it has
cooled.
About Installation, Cleaning and
Maintenance
z It is mandatory that all operations
required for the installation are carried
out by a qualified or competent
person, in accordance with existing
rules and regulations.
• Disconnect the appliance from the
electrical supply, before carrying out
any cleaning or manteinance work.
• Ensure a good ventilation around the
27

appliance. A poor air supply could
cause lack of oxygen.
• Ensure that the gas supply complies
with the gas type stated on the
identification label, placed near the gas
supply pipe.
• This appliance is not connected to a
combustion products evacuation
device. It must be installed and
connected in accordance with current
installation regulations. Particular
attention shall be given to the relevant
requirements regarding ventilation.
• The use of a gas cooking
appliance results in the production
of heat and moisture in the room in
which it is installed. Ensure that
the kitchen is well ventilated: keep
natural ventilation holes open or
install a mechanical ventilation
device (mechanical extractor
hood).
• Prolonged intensive use of the
appliance may call for additional
ventilation, for example opening of
a window, or more effective
ventilation, for example increasing
the level of mechanical ventilation
where present.
• Once you removed all packaging from
the appliance, ensure that it is not
damaged and the electric cable is in
perfect conditions. Otherwise, contact
your dealer before proceeding with the
installation.
• The manufacturer disclaims any
responsability should all the safety
measures not be carried out.
Environmental Information
z After installation, please dispose of
the packaging with due regard to
safety and the environment.
• When disposing of an old appliance,
make it unusable, by cutting off the
cable.
The symbol on the product or
on its packaging indicates that this
product may not be treated as household
waste. Instead it shall be handed over to
the applicable collection point for the
recycling of electrical and electronic
equipment. By ensuring this product is
disposed of correctly, you will help
prevent potential negative consequences
for the environment and human health,
which could otherwise be caused by
inappropriate waste handling of this
product. For more detailed information
about recycling of this product, please
contact your local city office, your
household waste disposal service or the
shop where you purchased the product.
Service
• Under no circumstances should you
attempt to repair the appliance
yourself. Repairs carried out by
unexperienced persons may cause
injury or serious malfunctioning. Refer
to your local Service Centre. Always
insist on genuine spare parts.
28

Description of the appliance
2
2
4
5
1 Auxiliary burner
2 Semi-rapid burner
3 Rapid burner
4 Triple crown burner
5 Control knobs
3
1
2
2
3
3
1
29

Operation
Hob burner control knobs
The symbols on the knobs mean:
z = no gas supply
= maximum gas supply
= minimum gas supply
For easier lighting, proceed before
putting a pan on the pan support.
Lighting the burners
)
To light a burner, turn the relevant
knob anticlockwise to maximum
position ( ) and push down the knob
to ignite.
After lighting the flame, keep the
knob pushed down for about 5
seconds. This will allow the
"thermocouple" to be heated and the
safety device to be switched off,
otherwise the gas supply would be
interrupted. Then, check the flame is
regular and adjust it as required.
If you cannot light the flame even
after several attempts, check the "cap"
and “crown” are in the correct position.
In the absence of electricity, ignition
can occur without the electrical device;
in this case approach the burner with a
flame, push the relevant knob down and
turn it anti-clockwise until it reaches the
"maximum" position.
To switch off burners
)
To put the flame out, turn the knob to
the symbol (z).
Take care when frying food in
hot oil or fat, as the overheated
splashes could easily ignite.
When switching on the mains, after
installation or a power cut, it is quite
normal for the spark generator to
be activated automatically.
30

Using the hob correctly
Practical hints
The burners
To ensure maximum burner
efficiency, you should only use pots and
pans with a flat bottom fitting the size of
the burner used.
Triple Crown Burner
diameter 18-26 cm
Rapid Burner
diameter 18-26 cm
Front Semi-rapid Burner
diameter 12-18 cm
Rear Semi-rapid Burner
diameter 12-22 cm
Auxiliary Burner
diameter 8-16 cm
• For easier lighting, proceed before
putting a pan on the pan support.
• Use only pans or pots with flat bottom.
• Take care when frying food in hot
oil or fat, as the overheated
splashes could easily ignite.
• If you use a saucepan which is smaller
than the recommended size, the flame
will spread beyond the bottom of the
vessel, causing the handle to overheat.
• Prolonged cooking with
potstones, earthenware pans or
cast-iron plates is inadvisable.
Also, do not use aluminium foil to
protect the top during use.
• Make sure pots do not protrude over
the edges of the cooktop and that they
are centrally positioned on the rings in
order to obtain lower gas
consumption.
• Do not place unstable or deformed
pots on the rings: they could tip over or
spill their contents, causing accidents.
• Pots must not enter the control zone.
• If the control knobs become difficult to
turn, please contact your local Service
Force Centre.
• As soon as a liquid starts boiling, turn
down the flame so that it will barely
keep the liquid simmering.
31

Cleaning and Mainteinance
Disconnect the appliance from
the electrical supply, before
carrying out any cleaning or
manteinance work.
The hob is best cleaned whilst
it is still warm, as spillage can
be removed more easily than if
it is left to cool.
This appliance cannot be
cleaned with steam or with a
steam cleaning machine.
The burners
z The burner caps and crowns can be
removed for cleaning.
z Wash the burners taps and crowns
using hot soapy water, and remove
marks with a mild paste cleaner. A
well moistened soap impregnated
steel wool pad can be used with
caution, if the marks are particularly
difficult to remove.
z After cleaning, be sure to wipe dry
with a soft cloth.
z Frequently wash the "caps" and the
"crowns" with hot soapy water,
carefully taking away any built-up of
food.
YES
The pan supports
z After cleaning, make sure that the
pan supports are correctly
positioned.
z To make burners work properly,
ensure that pan supports are placed
in a way that the arms are centred
upon the burner as shown in the
picture.
z Pay attention when replacing the
pan supports in order to avoid
damaging the hob top.
32
NO

Hobs with cast iron pan
supports: after cleaning,
place the pan supports back
on their position. In order to
carry out this operation
correctly, place the side pan
supports before the central
one.
The Hob Top
z Regularly wipe over the hob top
using a soft cloth well wrung out in
warm water to which a little wasing
up liquid has been added. Avoid the
use of the following:
- household detergent and bleaches;
- impregnated pads unsuitable for
non-stick saucepans;
- steel wool pads;
- bath/sink stain removers.
z Should the hob top become heavily
soiled, the following products are
recommended:
- For stainless steel hobs use a
proprietary stainless steel cleaner.
- For other hobs use Hob Brite or Bar
Keepers Friend.
z Do not leave acid or alkaline
substances (e.g. vinegar, salt,
lemon juice, etc.) on the cooktop.
A - Burner cap
B - Burner crown
C - Ignition candle
D - Thermocouple
Triple crown
A
B
D
The Ignition electrode
The electric ignition is obtained
through a ceramic electrode with a
metal electrode (Fig - C). Keep these
components very clean, to avoid difficult
lighting, and check that the burner
crown holes (Fig - B) are not obstructed.
C
33

Technical data
Cut out dimensions
(see chapter “Building In”)
Width: 560 mm
Depth: 480 mm
Overall dimensions
Width: 744 mm
Depth: 510 mm
Heat Input
Rapid burner Nat. Gas 3,0 kW
LPG 2,8 kW
Triple Crown burner 4,0 kW
Semi-rapid burner 2,0 kW
Auxiliary burner 1,0 kW
Electric supply: 230 V ~ 50 Hz
Category: II2E+3+
Gas supply: G20/G25 - 20/25 mbar
Appliance class: 3
BURNER NORMAL REDUCED NORMAL POWER
Auxiliary 1,0 0,33 70 0,095 0,111 50 73 71
Semi-rapid 2,0 0,45 96 0,190 0,221 71 145 143
POWER POWER
kW kW NATURALPOWER LPG
inj.
100/mm 20 mbar 25 mbar 100/mm
m3/h g/h
G20 G25
28-30/37 mbar
inj.
G30 G31
Rapid Natural Gas : 3,0 0,75 119 0,286 0,332 86 204 200
Triple crown
LPG: 2,8
4,0 1,2 146 0,381 0,443 98 291 286
By-pass diameters
Burner Ø By-pass in 1/100 mm.
Auxiliary 28
Semi-rapid 32
Rapid 42
Triple crown 56
34

Installation
z The following instructions about
installation and maintenance
must be carried out by qualified
personnel in compliance with the
regulation in force. The
regulation to be applied for this
type of installation is NBN D
5I.003 : "Installations functioning
with combustible gas lighter
than air".
z The side walls of the unit in which
the hob is going to be installed,
must not exceed the height of
the working top.
z Avoid installing the appliance in
the proximity of inflammable
materials (e.g. curtains, tea
towels etc.).
z The appliance must be
electrically disconnected before
all interventions. If any electric
supply to the appliance is
required to carry out the work,
ensure all the necessary
precautions are followed.
Gas Connection
It is indispensible that the connection
to the gas mains are carried out by
means of an AGB tap. Choose fixed
connections or use a flexible pipe in AGB
(stainless steel).
If using flexible metallic pipes, be
careful they do not come in contact with
mobile parts or they are not squeezed.
Use the same attention when the hob is
combinated with an oven.
This hob can be operated by
Slochteren gas (G25) with a nominal
pressure of 25 mbar or by natural gas
with nominal pressure of 20 mbar. No
regulation is required for use by these
two types of gas. Before fitting the
35

appliance ensure that the installation has
the correct voltage for the appliance. At
full capacity, the drop in pressure must
not exceed 5%. Such a drop in pressure
is caused by the following parameters:
- maximum capacity of meter;
- diameter and lenght of the tube in
front and behind the meter;
- section of transit of variuos tubes
positioned on the circuit;
- diameter of eventual connections.
To ensure a correct operation, a
saving of energy and the long-life of the
appliance, the voltage pressure of the
appliance must correspond to the
recommended values.
The adjustable connection is fixed to
the comprehensive ramp by means of a
threaded nut G 1/2". All the components
shown in the figure have already been
assembled in the factory.
The appliance, before leaving the
factory, has been tested in order to give
you the best results.
A) Ramp with ending nut
B) Seal
C) Adjustable connection
Important
When the final connection has been
made, it is essential that a thorough leak
test is carried out on the hob and
installation. Use some soapy water,
never a flame.
36

Adaptation to different types of gas
A. Injectors replacement
)
• Remove the pan supports.
• Remove the burner's caps and
crowns.
• With a socket spanner 7 unscrew
and remove the injectors (Fig. 1), and
replace them with the ones required
for the type of gas in use.
• Reassemble the parts, following the
same procedure backwards.
• Replace the rating label (placed near
the gas supply pipe) with the relevant
one for the new type of gas supply.
You can find this label in the package
of the injectors supplied with the
appliance.
Should the feeding gas pressure be
different or variable compared with
the required pressure, an
appropriate pressure adjuster must
be fitted on the gas supply pipe, in
compliance with the rules in force.
B. Adjustment of
)
minimum level
To adjust the minimum level of the
burners, proceed as follows:
• Light the burner.
• Turn the knob on the minimum
position.
• Remove the knob.
• With a thin screwdriver, adjust the
by-pass screw (Fig. 2). If changing
from natural gas to LPG, completely
tighten clockwise the screw, until a
small regular flame is obtained.
• Finally check the flame does not go
out when quickly turning the knob
from the maximum position to the
minimum position.
This procedure can easily be carried
out, anyhow the hob has been
positioned or built in the working top.
by-pass screw
by-pass screw
Fig. 1
Fig. 2
37

Electrical Connection
The appliance is designed to be
connected to 230 V monophase
electricity supply.
The connection must be carried out
in compliance with the laws and
regulations in force.
Before the appliance is connected:
1) check that the main fuse and the
domestic installation can support the
load (see the rating label);
2) check that the power supply is
properly earthed in compliance with the
current rules;
3) check the socket or the double
pole switch used for the electrical
connection can be easily reached with
the appliance built in the forniture unit.
The appliance is supplied with a
connection cable. This has to be
provided with a proper plug, able to
support the load marked on the
identification plate. To connect the plug
to the cable, follow the recommendation
given in Fig. 3a. The plug has to be fitted
in a proper socket.
If connecting the appliance directly
to the electric system, it is necessary
that you install a double pole switch
between the appliance and the
electricity supply, with a minimum gap
of 3 mm. between the switch contacts
and of a type suitable for the required
load in compliance with the current
rules.
The connection cable has to be
placed in order that, in each part, it
cannot reach a temperature 50°C
higher than room temperature.
The brown coloured phase cable
(fitted in the terminal block contact
marked with "L") must always be
connected to the network phase.
38

Remplacement of the voltage
cable
The connection of the voltage cable
to the appliance's terminal block is of
type "Y". This means that its
replacement requires the specific
equipment of a technician. In this case,
only cable type H05V2V2-F T90 must
be used. The cable section must be
suitable to the voltage and the working
temperature. The yellow/green earth
wire must be approximately 2 cm.
longer than the phase wires (Fig. 3-a).
To open the terminal block and
reach the terminals, proceed as
follows:
z insert the point of a screwdriver into
the visible protrunding part of the
terminal block;
z exert a light pressure and lift (Fig. 3-
b)
Fig. 3-a
Fig. 3-b
Neutral
Earth
(yellow/green))
39

Building In
SR
SR
TC
R
A
744
510
Fig. 4
A = Auxiliary burner
SR= Semi-rapid burner
R = Rapid burner
TC= Triple Crown burner
These hobs can be inserted in a
built-in kitchen unit whose depth is
between 550 and 600 mm. The hobs
dimensions are shown in Fig. 4.
The edge of the cut out must have a
minimum distance from the rear wall of
55 mm.
If there are side walls, or sides of the
furniture unit near the hob, the cut out
edges must have a minimum distance of
150 mm.
Hanging forniture units or hoods
must be placed at 650 mm. minimum
from the hob.
Fitting the hob to the worktop
SR
SR
R
R
A
744
Dimensions are given in millimeters
510
Carry out the building in of the hob
as follows:
1. Place the seals supplied with the hob
on the front edge of the cut out.
Then, place them at 86 mm from the
side edges and at 10 mm from the
rear edge, as shown in the diagram,
taking care that the seals meet
without overlapping.
40
Fig. 5

2. Place the hob in the cut out, taking
care that it is centred.
3. Fix the hob with the relevant fixing
clamps, supplied with the injectors
kit (see diagram). When the screws
have been tightened, the excess seal
can be removed.
The edge of the hob forms a double
seal which prevents the ingress of
liquids.
Fig. 6
a
a) seal
Fig.7
41

Possibilities for insertion
Kitchen unit with door
Proper arrangements must be taken
in designing the forniture unit, in order to
avoid any contact with the bottom of the
hob which can be heated when it is
operated. The recommended solution is
shown in Fig. 10. The panel fitted under
the hob should be easily removable to
allow an easy access if a technical
assistance intervention is needed.
Kitchen unit with oven
The hob recess dimensions must
comply the indication given in Figs. 11
and 12 and must be provided with
brackets to allow a continuous supply of
air. To avoid overhating, the building in
should be carried out as shown in Figs.
13 e 14. The hob's electric connection
and the oven's one must be carried out
separately, both for safety reasons and
to allow the oven to be easily taken off
the unit.
Fig. 8
a) Removable panel
b) Space for connections
42
Fig. 9
Fig. 10

Declaration of guarantee terms
Our appliances are produced with the greatest of care. However, a defect may still
occur. Our consumer services department will repair this upon request, either during
or after the guarantee period. The service life of the appliance will not, however, be
reduced as a result.
This declaration of guarantee terms is based on European Union Directive 99/44/EC and the provisions of the Civil Code. The statutory rights that
the consumer has under this legislation are not affected by this declaration
of guarantee terms.
This declaration does not affect the vendor’s statutory warranty to the end user. The
appliance is guaranteed within the context of and in adherence with the following terms:
1. In accordance with provisions laid down in paragraphs 2 to 15, we will remedy
free of charge any defect that occurs within 24 months from the date the
appliance is delivered to the first end user.
These guarantee terms do not apply in the event of use for professional or
equivalent purposes.
2. Performing the guarantee means that the appliance is returned to the condi-
tion it was in before the defect occurred. Defective parts are replaced or
repaired. Parts replaced free of charge become our property.
3. So as to avoid more severe damage, the defect must be brought to our atten-
tion immediately.
4. Applying the guarantee is subject to the consumer providing proof of purchase
showing the purchase and/or delivery date.
5. The guarantee will not apply if damage caused to delicate parts, such as glass
(vitreous ceramic), synthetic materials and rubber, is the result of inappropriate
use.
6. The guarantee cannot be called on for minor faults that do not affect the value
or the overall reliability of the appliance.
7. The statutory warranty does not apply when defects are caused by:
− a chemical or electrochemical reaction caused by water,
− abnormal environmental conditions in general,
− unsuitable operating conditions,
− contact with harsh substances.
8. The guarantee does not apply to defects due to transport which have occurred
outside of our responsibility. Nor will the guarantee cover those caused by
inadequate installation or assembly, lack of maintenance or failure to respect
the assembly instructions or directions for use.
9. Defects that result from repairs or measures carried out by people who are not
qualified or expert or defects that result from the addition of non-original
accessories or spare parts are not covered by the guarantee.
10. Appliances that are easy to transport may be delivered or sent to the consu-
mer services department. Home repairs are only anticipated for bulky
appliances or built-in appliances.
11. If the appliances are built-in, built-under, fixed or suspended in such a way that
removing and replacing them in the place where they are fitted takes more than
43

half an hour, the costs that result therefrom will be charged for. Connected
damage caused by these removal and replacement operations will be the
responsibility of the user.
12. If, during the guarantee period, repairing the same defect repeatedly is not con-
clusive, or if the repair costs are considered disproportionate, in agreement with
the consumer, the defective appliance may be replaced with another appliance
of the same value.
In this event, we reserve the right to ask for a financial contribution calculated
according to the length of time it has been used.
13. A repair under guarantee does not mean that the normal guarantee period will
be extended nor that a new guarantee period begins.
14. We give a twelve month guarantee for repairs, limited to the same defect.
15. Except in the event where liability is legally imposed, this declaration of
guarantee terms excludes any compensation for damage outside the appliance
for which the consumer wishes to assert his rights. In the event of legally
admitted liability, compensation will not exceed the purchase price paid for the
appliance.
These guarantee terms are only valid for appliances purchased and used in
Belgium. For exported appliances, the user must first make sure that they satisfy the
technical conditions (e.g.: voltage, frequency, installation instructions, etc.) for the
country concerned and that they can withstand the local climatic and environmental
conditions. For appliances purchased abroad, the user must first ensure that they meet
the qualifications required in Belgium. Non-essential or requested adjustments are not
covered by the guarantee and are not possible in all cases.
Our consumer services department is always at your disposal, even after the
guarantee period has expired.
Address for our consumer services department:
Belgium
Tel: Fax:
Electrolux Home Products Belgium Consumer services 02/363.04.44 02/363.04.00
ELECTROLUX SERVICE 02/363.04.60
Bergensesteenweg 719
1502 Lembeek
E-mail: consumer.services@electrolux.be
Grand-Duche de Luxembourg
ELECTROLUX HOME PRODUCTS Consumer services 00 35242431-1 0035242 431-360
Rue de Bitbourg. 7
L-1273 Luxembourg-Hamm
E-mail: consumer-service.luxembourg@electrolux.lu
44

European guarantee
This appliance is guaranteed by Electrolux in each of the countries listed at the back
of this user manual, for the period specified in the appliance guarantee or otherwise by
law. If you move from one of these countries to another of the countries listed below the
appliance guarantee will move with you subject to the following qualifications:
• The appliance guarantee starts from the date you first purchased the appliance
which will be evidenced by production of a valid purchase document issued by the
seller of the appliance.
• The appliance guarantee is for the same period and to the same extent for labour
and parts as exists in your new country of residence for this particular model or
range of appliances.
• The appliance guarantee is personal to the original purchaser of the appliance and
cannot be transferred to another user.
• The appliance is installed and used in accordance with instructions issued by
Electrolux and is only used within the home, i.e. is not used for commercial
purposes.
• The appliance is installed in accordance with all relevant regulations in force within
your new country of residence.
The provisions of this European Guarantee do not affect any of the rights granted to you
by law.
45

46

47

www.electrolux.be
35697-1702 07/07 R.0
48
 Loading...