

Page 1

Instruction
booklet
Electric
hob
ZEL 640
Page 2

Thank you for selecting our appliance
We wish you lots of enjoyment with your new appliance and we hope that
you will consider our brand again when purchasing household appliances.
Please read this user manual carefully and keep it throughout the product
life cycle as a reference document. The user manual should be passed
on to any future owner of the appliance.
2
Page 3
Contents
For the User
Description of the Hob ....................................................................................... 3
Important Safety Information .............................................................................. 4
Before the First Use of the Appliance ................................................................. 6
Operation .......................................................................................................... 6
Maintenance and Cleaning .............................................................................. 10
Something Not Working? ................................................................................. 11
Guarantee/Customer Service ........................................................................... 20
Service and original Spare Parts ...................................................................... 21
European Guarantee ....................................................................................... 22
For the Installer
Engineers technical data ................................................................................. 12
Electrical Connections ..................................................................................... 14
Installation ....................................................................................................... 17
Building In ....................................................................................................... 19
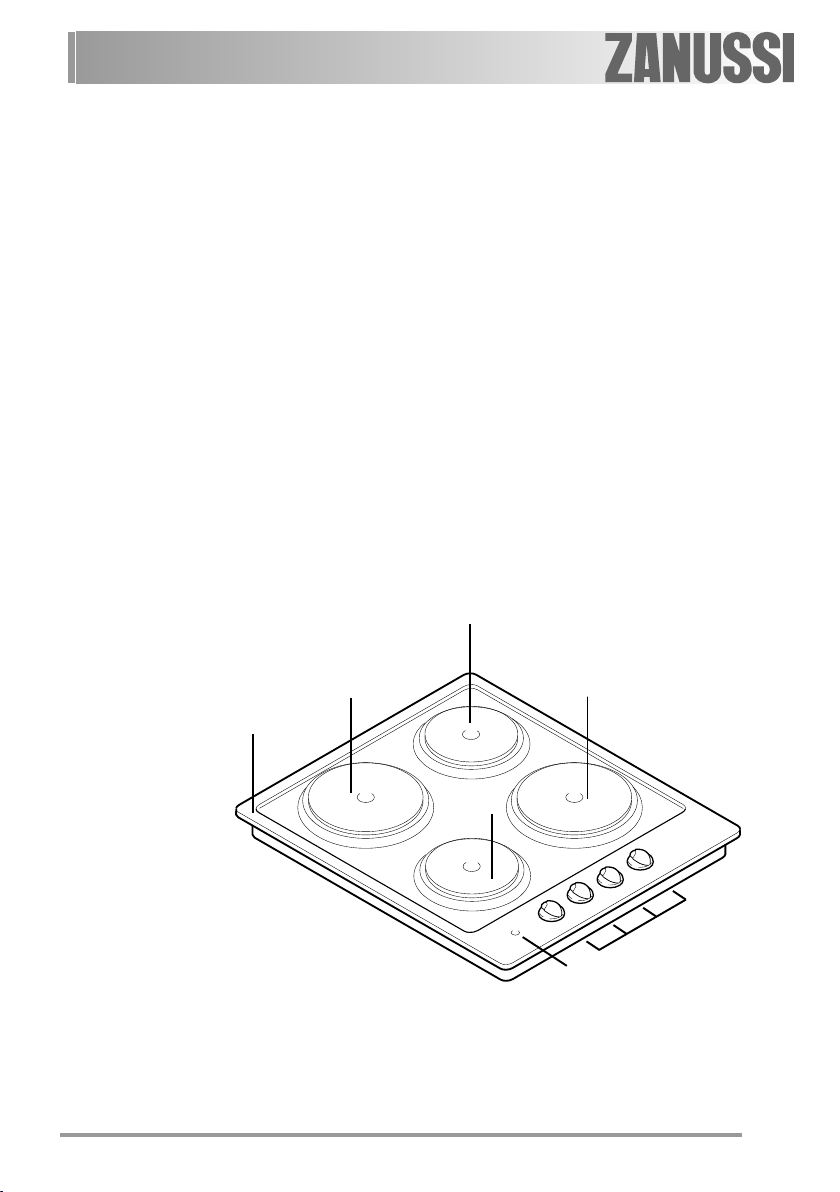
Description of the Hob
3
2
1
1. Hob Top
2. Normal Hotplate - 1500 W -180 mm dia.
3. Normal Hotplate - 1000 W - 145 mm dia.
4. Rapid Hotplate - 2000 W - 180 mm dia.
5. Rapid Hotplate - 1500 W - 145 mm dia.
6. Control Knobs
7. Electric Hotplates Control Light
4
5
6
7
3
Page 4

Important Safety Information
You MUST read these warnings carefully before installing or using the
hob. If you need assistance, contact our Customer Care Department on
08445 612 612.
Installation
• This hob must be installed by qualified
personnel, according to the
manufacturer’s instructions and to the
relevant British Standards.
• Before carrying out any operation,
make sure the appliance is
DISCONNECTED from the power
supply.
• Remove all packaging before using
the hob.
• After unpacking the appliance, make
sure it is not damaged and that the
power cable is in perfect condition.
Otherwise, contact the dealer before
using the appliance.
• The Manufacturer declines any liability
if the accident-prevention regulations
are not respected.
People safety
• This appliance must only be used by
adults. Make sure children do not
play with the appliance or touch the
controls.
• This appliance is not intended for use
by children or other persons whose
physical, sensory or mental
capabilities or lack of experience and
knowledge prevents them from using
the appliance safely without
supervision or instruction by a
responsible person to ensure that
they can use the appliance safely.
• The exposed parts of this appliance
become hot during cooking and
remain so for some time even after the
appliance is turned off. Keep children
away until the appliance has cooled.
During use
• This product is designed for non-
professional home use, for cooking
food. Do not use it for any other
purpose.
• Modifying or attempting to change
the characteristics of this product is
hazardous.
• Keep the appliance clean. Food
residuals can create the risk of fire.
• In case of faults, never try to repair the
appliance on your own. Repairs
carried out by unqualified persons
can cause damage and accidents.
Firstly, consult this handbook. If you
do not find the necessary information,
contact the nearest Service Centre.
Assistance for this appliance must be
carried out by an authorised Technical
Service Centre. Always demand the
use of original spare parts.
• After using the appliance, make sure
all the controls are in the “CLOSED”
or “OFF” position.
• Do not use steam or steam appliances
to clean the equipment.
• When using a power outlet near this
appliance, make sure the cords of
any electrical appliances being used
do not touch it and are far enough
away from its hot parts.
4
Page 5

Environmental information
• All the materials used are
environmentally friendly and
recyclable. Please make your
contribution to safeguarding the
environment by using the special
differentiated waste collection
channels.
• Appliances that are no longer used or
unusable are not worthless waste.
Through ecological disposal, various
materials used in manufacturing your
appliance can be recovered.
• Find out about the possibilities of
disposal from your specialised dealer
or local Council.
• When disposing of an old appliance,
make it unusable,by cutting off the
cable.
Guide to Use the instructionsGuide to Use the instructions
Guide to Use the instructions
Guide to Use the instructionsGuide to Use the instructions
The following symbols will be found in
the text to guide you throughout the
Instructions:
Safety Instructions
Step by step
)
instructions for an
operation
z The symbol on the product or on
its packaging indicates that this product
may not be treated as household
waste. Instead it shall be handed over
to the applicable collection point for
the recycling of electrical and
electronic equipment. By ensuring
this product is disposed of correctly,
you will help prevent potential negative consequences for the environment
and human health, which could
otherwise be caused by inappropriate
waste handling of this product. For
more detailed information about
recycling of this product, please
contact your local city office, your
household waste disposal service or
the shop where you purchased the
product.
These instructions are only valid
for countries whose identification
symbols appear on the handbook
cover and on the appliance.
Keep this instruction book for
future reference and ensure it is
passed on to any new owner.
Hints and Tips
Environmental
information
This appliance is manufactured
according to the following EEC
directives:
2006/952006/95
2006/95 EEC -
2006/952006/95
current edition.
2004/1082004/108
2004/108 EE,
2004/1082004/108
5
Page 6
Before the First Use of the Appliance
Before using the appliance
remove all packaging,
including the advertising
labels and any protective
film.
When using the hob for the first
)
time:
1) place on all the plates a pan filled
with some water;
2) switch the plates on for about 10
minutes at “maximum” position until
water inside the pans boils;
3) then, turn the control knob to
“minumum” and allow the plates to
run for approximately 20 minutes;
4) open a window for ventilation.
During this time, the plates may
smoke a little and an unpleasant
odour may be emitted. This is
absolutely normal and it is
caused by residues of
manufacturing.
Once this operation is carried out,
let the plates to cool down, then clean
them with a soft cloth soaked in warm
water.
Operation
Electric Hotplates
To switch on a hotplate, turn the
relevant control knob anticlockwise or
clockwise to the required heat setting.
The control knob is numbered 1 - 6
0 - OFF
1 - Minimum
6 - Maximum
Rapid Hotplates
The rapid hotplates are indicated by
6
Page 7

a red dot, and will heat up more quickly
than a normal plate. As the red dots are
painted on the plate, they may
deteriorate during use and even
disappear completely after a period of
time. This will not affect the
performance of the hob.
It is important to note that the
plate may smoke and produce a
slightly unpleasant odour when
used for the first time. This is quite
normal and will disappear after a
short while.
Electric Hotplates Control
Light
The Hotplates Control Light will come
on each time a cooking zone is switched
on.
Suggestions for the correct setting of the
plates are given in the following table.
OFF 0
Very Gentle 1 To keep food warm
To melt butter and chocolate.
Gentle 2 To prepare cream-sauces,
stews and milk puddings
or to fry eggs.
Slow 3 Dried vegetables, frozen
food, fruit, boiling water
or milk.
Medium 4 Boiled potatoes, fresh
vegetables, pâtés, soups,
broths, pancakes or fish.
High 5 Larger stews, meat roll, fish,
omelettes, steaks.
Fast 6 Steaks, escalopes and frying.
7
Page 8
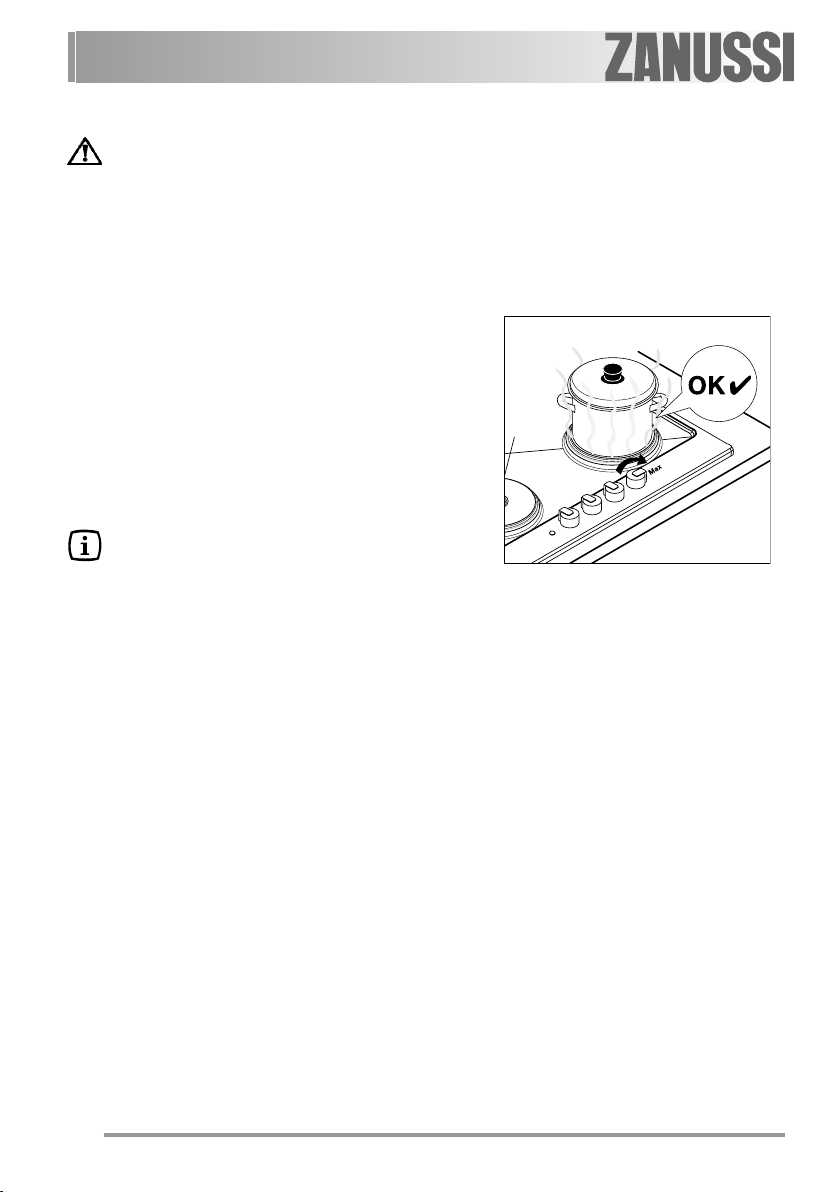
For the correct use of the hotplates
For better efficiency of the electric
hotplates and lower electricity
consumption:
• switch on the hotplates only after
placing the pots on them.
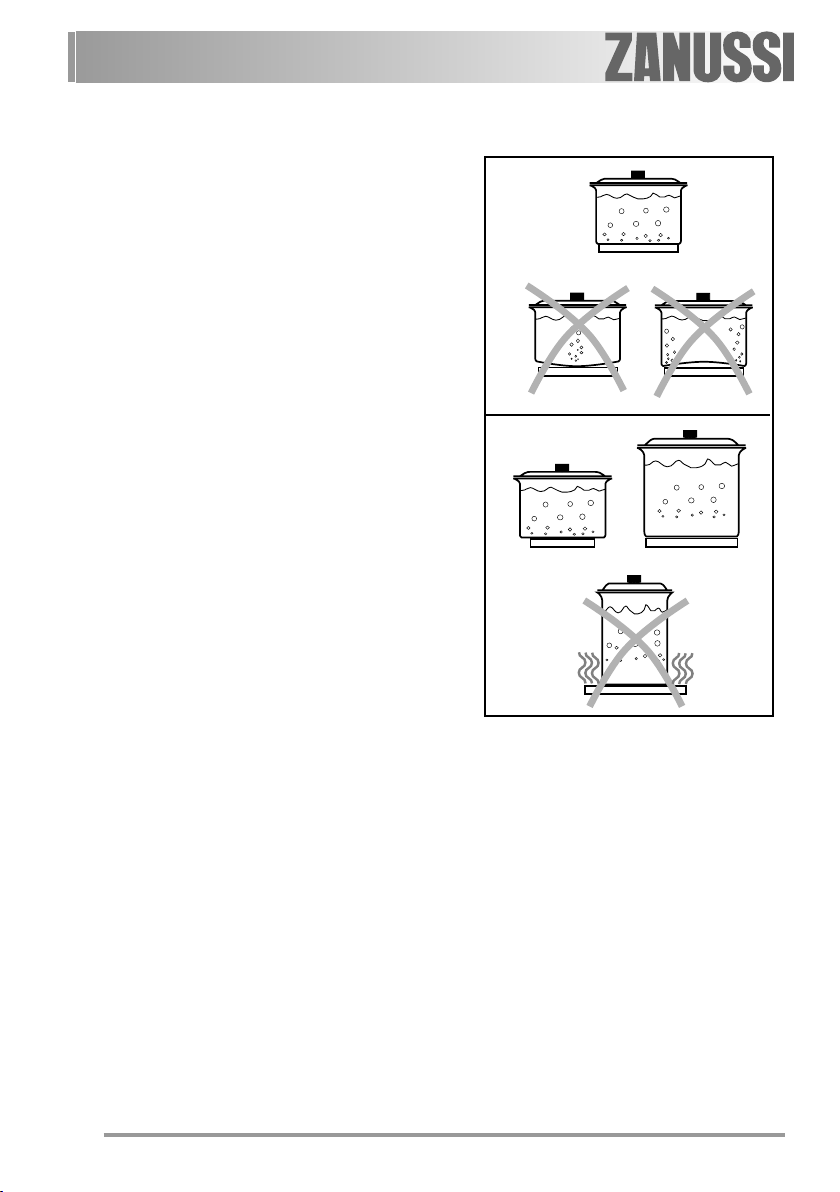
• For cooking on the electric hotplates
it is advisable to use triple-bottom
pots of the same width as the cooking
zone, or slightly larger (Figure).
• Do not use wet pots on the electric
hot-plates, and do not place wet lids
on the switched off hot-plates,
because the moisture and condensate
could damage them.
• If possible, place lids on the pots.
Copper or aluminium pots and pans
are not very suitable for cooking on
the electric hotplates, because they
can leave residues, stains and marks.
Likewise, meat grills in cast iron or
other alloys are not suitable for cooking
on the electric hotplates, because
they cause dangerous accumulation
of heat.
Also, the rough bottom can scratch
the cooktop and the material can
stain it. Possibly choose a meat grill in
stainless steel with triple bottom.
The use of glass containers is also
inadvisable, because they usually
have very uneven bottoms. Never use
plastic containers.
• Do not place unstable or deformed
pots on the hotplates because they
could tip over or spill their contents
and thus cause accidents.
• Pots must not enter the control zone.
• Make sure boiling liquids do not spill
onto the hotplates.
8
Page 9

• Do not leave a hotplate switched on
without a pot or with an empty pot.
• Do not place a pot on a cold hotplate
or leave it to cool on a switched-off
hotplate. This could cause damaging
condensation to form.
• For faster cooking and to avoid heat
dispersion, it is advisable to use flat-
bottomed pots, to ensure maximum
contact of the bottoms with the
cooking zone.
• Take care never to lean or reach over
a hot electric plate. Always point pan
handles inward or over the work
surface next to the hob to avoid
accidentally knocking over a pan as
you pass by.
• Do not use the hotplate to warm the
room.
Take care when frying food in
hot oil or fat, as the overheated
splashes could easily ignite.
The stainless steel can become
tarnished if excessively
heated. Therefore prolonged
cooking with potstones,
earthenware pans or cast-iron
plates is inadvisable. Also, do
not use aluminium foil to
protect the top during use.
9
Page 10

Maintenance and Cleaning
Before any maintenance or
cleaning can be carried out,
you must DISCONNECT the
hob from the electricity supply.
This appliance cannot be
cleaned with steam or with a
steam cleaning machine.
The hob is best cleaned whilst it is
still warm, as spillage can be removed
more easily than if it is left to cool.
The Hob Top
Regularly wipe over the hob top
using a soft cloth well wrung out in warm
water to which a little washing up liquid
has been added. Avoid the use of the
following:
- household detergent and bleaches;
- impregnated pads unsuitable for
non-stick saucepans;
- steel wool pads;
- bath/sink stain removers.
Should the hob top become heavily
soiled, the following products are
recommended:
- For stainless steal hobs use a
proprietary stainless steel cleaner.
- For other hobs use Hob Brite or Bar
Keepers Friend.
The control knobs may be removed
by carefully pulling them upward for
easier cleaning.
Do not leave acid or alkaline
substances (e.g. vinegar, salt,
lemon juice, etc.) on the
cooktop.
The Hotplates
Spills onto the actual plate should be
removed using warm water and a soft
brush, nylon or plastic scourer. To keep
the plates looking as new, hotplate
conditioner can be purchased from most
hardware stores, e.g. "4 Hob" by
HomeCare Products (follow the
manufacturer's instruction for use).
Alternatively, wipe the plates with a
drop of olive oil on a kitchen towel to
avoid rust. It is important to note that the
plate will smoke a little and produce a
slightly unpleasant odour when next
used.
Stainless steel parts: the stainless
steel spill rings may become straw
coloured with use. Use a proprietary
stainless steel cleaner to remove this
straw discolouration. This also applies to
the area around the hotplates on
stainless steel hobs.
Failure to clean and condition
hotplates may lead to rust and
corrosion forming on the surface.
10
Page 11

Something Not Working?
If the hob is not working correctly, please carry out the following checks before
contacting your local Service Force Centre.
IMPORTANT: If you call out an engineer to a fault listed below, or to repair a
fault caused by incorrect use or installation, a charge will be made even if the
appliance is under guarantee.
SYMPTOM
The plate does not heat up.
The plate is not giving satisfactory
results.
If after all these checks, your hob still
does not operate correctly, contact your
local Service Force Centre.
Please note that it will be necessary
to provide proof of purchase for any inguarantee service calls.
SOLUTION
Check that the unit is plugged in
and the electrical supply is
switched on.
Check the mains fuse has not
blown.
Check the correct control knob
has been turned.
Check the plate is clean and dry
Check the cooking pan is the
correct size for the plate.
Check the cooking pan has a flat
bottom.
Check the setting is correct for the
type of cooking.
In-guarantee customers should
ensure that the above checks have
been made as the engineer will
make a charge if the fault is not a
mechanical or electrical breakdown.
11
Page 12

Instructions for the Installer
Engineers technical data
Heating elements ratings
Rapid front left hotplate
Ø 180 mm 1500 W
Rapid back left hotplate
Ø 145 mm 1000 W
Rapid front right hotplate
Ø 145 mm 1500 W
Rapid back right hotplate
Ø 180 mm 2000 W
Total rating 6000 W
Voltage tension 230 V~ 50 Hz
Cut out dimensions
Width: 550 mm
Depth: 470 mm
Overall dimensions
Width: 580 mm
Depth: 500 mm
12
Page 13

Important safety requirements
This hob must be installed in
accordance with the IEE Wiring
Regulations (Current Edition).
Detailed recommendations are
contained in the following British
Standards Codes Of Practice: B.S. 6172/
B.S. 5440, Par. 2 and B.S. 6891 Current
Editions.
Location
This hob has been registered as a
"Class X" appliance according to Fire
Risk Regulations. Minimum distances
detailed below must be observed. The
hob may be located in a kitchen, a
kitchen/diner or bed sitting room, but not
in a bathroom or shower room.
Ensure that there is a minimum distance
of 55 mm between the rear cut out edge
and the wall.
A minimum distance of 100 mm must
be left between the side edges of the
cut out and any adjacent cabinets or
walls.
600
MIN.
The minimum distance combustible
material can be fitted above the hob in
line with the edges of the hob is 400 mm.
If it is fitted below 400 mm a space of
50 mm must be allowed from the edges
of the hob.
The minimum distance combustible
material or a cooker hood can be fitted
above the hob is 650 mm.
Dimensions are given in mm.
13
Page 14

Electrical Connections
Any electrical work required to
install this hob should be
carried out by a qualified
electrician or competent
person, in accordance with the
current regulations.
THIS HOB MUST BE
EARTHED.
The manufacturer declines any
liability should these safety measures not
be observed.
This hob is designed to be
connected to a 230 V~ 50 Hz electrical
supply.
Before switching on, make sure the
electricity supply voltage is the same as
that indicated on the hob rating plate.
The rating plate is located on the bottom
of the hob. A copy is attached on the
back cover of this book.
Before carrying out the connection,
make sure:
1) the limiter valve and the electrical
system can take the appliance load (see
the rating plate);
2) the supply system is equipped
with an efficient earth connection in
compliance with the current standards
and regulations;
3) the outlet or omnipolar switch
used for connection are easily
accessible with the appliance installed.
The appliance is not equipped with
a power cable.
A cable of section adequate for the
load must be installed on the
equipment. The type of cable must have
at least T90 temperature
characteristics. It is advisable to use the
following types of cables or others with
14
Page 15

similar characteristics: H05 V2V2-F. The
cable has three wires. The earth wire is
yellow/green and must be approx. 2 cm
longer than the phase and neutral wires
(Figure). Fit the cable with a plug
suitable for the load and connect it to a
suitable safety socket.
To connect directly to the mains, a
suitable omnipolar switch complying
with current standards and with a
contact gap of at least 3 mm must be
installed between the appliance and the
electrical system.
The yellow/green earth wire must not
be interrupted by the switch. The brown
phase wire (coming from terminal "L" on
the terminal block) must always be
connected to the power supply phase.
In any case the power cable must be
positioned in such a way that no part of
it reaches a temperature of 50°C higher
than the ambient temperature.
The cable is guided by means of
clamps fixed to the side of the cabinet,
in order to avoid any contact with the
equipment beneath the cooktop.
The Manufacturer declines any
liability if the accident-prevention
regulations are not respected.
Ensure that the hob supply cord
does not come into contact with
surfaces with temperatures higher
than 50 deg. C.
The replacement of electric
cable must be carried out
exclusively by the service force centre or by personnel with
similar competencies, in
accordance with the current
regulations.
NeutralNeutral
Neutral
NeutralNeutral
Earth (yellow/green)Earth (yellow/green)
Earth (yellow/green)
Earth (yellow/green)Earth (yellow/green)
15
Page 16

Electrical connection to the ter-
L
N
minal box
The appliance is fitted with a three
pole terminal box whose cables are
predisposed for a 230 V monophase
function (Figure).
The earth wire should be connected
to the terminal marked by the sign .
After having connected the wire to
the terminal secure it with a cable clip.
Supply Cable Specifications
For Uk use only
Connection Min. size Cable / Fuse
via Cable / flex
flex type
2
• Appliance 6 mm
Control twin and
Circuit earth
PVC/PVC 30 A
16
Page 17

Installation
The hob must be installed
according to the instructions
supplied.
The hob must be installed by
qualified personnelqualified personnel
qualified personnel to the
qualified personnelqualified personnel
relevant British Standards.
Please, ensure that, once the hob
is installed, it is easily accessible
for the engineer in the event of a
breakdown.
When the hob is first installed
Once the hob has been installed,
it is important to remove any
protective materials, which were
put on in the factory.
The manufacturer will not accept
liability, should the above
instructions or any of the other
safety instructions incorporated in
this book be ignored.
These cooktops are designed for
fitting on modular kitchen cabinets
having a depth of between 550 and 600
mm and suitable characteristics.
Fitting the Hob into the
worktop
Carry out the building in of the
)
hob as follows:
• put the seals supplied with the hob,
on the edges of the cut out, taking
care that the seals meet without
overlapping;
• place the hob in the cut out, taking
care that it is centred;
• fix the hob with the relevant fixing
clamps, supplied with the
accessories bag, as shown in the
17
Page 18

diagram. When the screws have been
tightened, the excess seal can be
removed.
The edge of the hob forms a double seal
which prevents the ingress of liquids.
Seal
18
Page 19

Building In
Building over a cupboard or drawer
If the hob is to be installed above a cupboard or drawer it will be necessary to fit a
heat resistant board below the base of the hob on the underside of the work surface.
It is also recommended to carry out the electrical connection to the hob as shown
in diagrams 1 and 2.
Building over a kitchen unit with
door
Proper arrangements must be taken in
designing the furniture unit, in order to avoid
any contact with the bottom of the hob which
can be heated when it is operated. The
recommended solution is shown in diagram
3.
The panel fitted under the hob ("a") should
be easily removable to allow easy access if
technical assistance is needed. The space
behind the kitchen unit ("b") can be used
for connections.
Dimensions are given in mm.
ON/OFF SWITCH
2
1
FLEX
OUTLET
3
ON/OFF SWITCH
FLEX
OUTLET
19
Page 20

Guarantee/Customer Service
Standard guarantee conditionsStandard guarantee conditions
Standard guarantee conditions
Standard guarantee conditionsStandard guarantee conditions
We, Zanussi-Electrolux, undertake that if within 12 months of the date of the
purchase this Zanussi-Electrolux appliance or any part thereof is proved to be
defective by reason only of faulty workmanship or materials, we will, at our option
repair or replace the same FREE OF CHARGE for labour, materials or carriage on
condition that:
· The appliance has been correctly installed and used only on the electricity supply
stated on the rating plate.
· The appliance has been used for normal domestic purposes only, and in
accordance with the manufacturer’s instructions.
· The appliance has not been serviced, maintained, repaired, taken apart or
tampered with by any person not authorised by us.
· Electrolux Service Force Centre must undertake all service work under this
guarantee.
· Any appliance or defective part replaced shall become the Company’s property.
· This guarantee is in addition to your statutory and other legal rights.
ExclusionsExclusions
Exclusions
ExclusionsExclusions
· Damage or calls resulting from transportation, improper use or neglect, the
replacement of any light bulbs or removable parts of glass or plastic.
· Costs incurred for calls to put right an appliance which is improperly installed or
calls to appliances outside the United Kingdom.
· Appliances found to be in use within a commercial environment, plus those which
are subject to rental agreements.
· Products of Electrolux manufacturer that are not marketed by Electrolux.
20
Page 21

Service and Spare PartsService and Spare Parts
Service and Spare Parts
Service and Spare PartsService and Spare Parts
In the event of your appliance requiring service, or if you wish to purchase spare
parts, please contact your local Service Force Centre by telephoning
08445 616 61608445 616 616
08445 616 616
08445 616 61608445 616 616
Your telephone call will be automatically routed to the Service Force Centre covering
your postcode area.
For the address of your local Service Force Centre and further information about
Service Force, please visit the website at
www.serviceforce.co.ukwww.serviceforce.co.uk
www.serviceforce.co.uk
www.serviceforce.co.ukwww.serviceforce.co.uk
Before calling out an engineer, please ensure you have read the details under the
heading “Something not working”
When you contact the Service Force Centre you will need to give the following
details:
1.Your name, address and postcode.
2.Your telephone number.
3. Clear concise details of the fault.
4. The model and Serial number of the appliance (found on the rating plate).
5.The purchase date.
Please note a valid purchase receipt or guarantee documentation is required for in
guarantee service calls.
Customer CareCustomer Care
Customer Care
Customer CareCustomer Care
For general enquiries concerning your Electrolux appliance, or for further information
on Electrolux products please contact our Customer Care Department by letter or
telephone at the address below or visit our website at www.electrolux.co.uk
Customer Care Department
Electrolux Major Appliances
Addington Way
Luton
Bedfordshire, LU4 9QQ
Tel: 08445 612 612 (
**
(
*) Calls may be recorded for training purposes
**
**
*)
**
21
Page 22

European Guarantee
This appliance is guaranteed by Electrolux in each of the countries listed at the back
of this user manual, for the period specified in the appliance guarantee or otherwise
by law. If you move from one of these countries to another of the countries listed
below the appliance guarantee will move with you subject to the following
qualifications:
• The appliance guarantee starts from the date you first purchased the appliance
which will be evidenced by production of a valid purchase document issued by
the seller of the appliance.
• The appliance guarantee is for the same period and to the same extent for labour
and parts as exists in your new country of residence for this particular model or
range of appliances.
• The appliance guarantee is personal to the original purchaser of the appliance
and cannot be transferred to another user.
• The appliance is installed and used in accordance with instructions issued by
Electrolux and is only used within the home, i.e. is not used for commercial
purposes.
• The appliance is installed in accordance with all relevant regulations in force
within your new country of residence.
The provisions of this European Guarantee do not affect any of the rights granted to
you by law.
22
Page 23

23
Page 24

www.zanussi.co.uk
39715-6901 02/10 R.A
 Loading...