

Page 1

Instruction booklet
Tumble Dryer
ZDE 36150W
Page 2

Thank you for selecting our appliance
We wish you lots of enjoyment with your new appliance and we hope that you will consider our
brand again when purchasing household appliances.
Please read this user manual carefully and keep it throughout the product life cycle as a reference document. The user manual should be passed on to any future owner of the appliance.
The symbols you will see on some paragraphs of this booklet have the following meaning:
The warning triangle emphasize information that is particularly important for your safety or
correct functioning of the appliance.
The information marked with this symbol provides additional instructions and practical tips
on the use ofthe appliance.
Tips and information about economical and ecological use of the machine are marked with
this symbol.
Contents
Safety information . . . . . . . . . . . . . . . . . . 3
Description of the appliance . . . . . . . . . . 5
The control panel. . . . . . . . . . . . . . . . . . . 6
Drying programmes. . . . . . . . . . . . . . . . . 7
Before the first use . . . . . . . . . . . . . . . . . 8
Drying hints . . . . . . . . . . . . . . . . . . . . . . . 8
Daily Use . . . . . . . . . . . . . . . . . . . . . . . . 10
2
Care and cleaning . . . . . . . . . . . . . . . . . 12
Something not working . . . . . . . . . . . . . 14
Technical data . . . . . . . . . . . . . . . . . . . . 16
Consumption values . . . . . . . . . . . . . . . 17
Disposal. . . . . . . . . . . . . . . . . . . . . . . . . 18
Installation . . . . . . . . . . . . . . . . . . . . . . . 19
European guarantee . . . . . . . . . . . . . . . 21
Page 3

Safety Information
In the interest of your safety and to ensure the correct use, before installing and first using
the appliance, read this user manual carefully, including its hints and warnings. To avoid
unnecessary mistakes and accidents, it is important to ensure that all people using the
appliance are thoroughly familiar with its operation and safety features. Save these
instructions and make sure that they remain with the appliance if it is moved or sold, so
that everyone using it through its life will be properly informed on appliance use and safety.
General safety
• It is dangerous to alter the specifications or attempt to modify this product
in any way.
• This appliance is not intended for use by
persons (including children) with reduced
physical, sensory or lack of experience
and knowledge, unless they have
been given supervision or instruction
concerning use of the appliance by a
person responsible for their safety.
• Make sure that small pets do not climb
into the drum. To avoid this, please
check into the drum before using.
• Any objects such as coins, safety
pins, nails, screws, stones or any other
hard, sharp material can cause extensive damage and must not be placed
into the machine.
• In order to avoid danger of fires
caused by excessive drying, do not
use appliance to dry the following
items: Cushions, quilts and the like
(these items accumulate heat).
• Items such as foam rubber (latex foam),
shower caps, waterproof textiles, rubber
backed articles and clothes or pillows fitted with foam rubber pads should not
be dried in the tumble dryer.
• Always unplug the appliance after
use, clean and maintenance. See section "Care and Cleaning".
• Under no circumstances should you
attempt to repair the machine yourself.
Repairs carried out by inexperienced
persons may cause injury or serious
malfunctioning. Contact your local
Service Centre. Always insist on genuine spare parts.
• Items that have been soiled with substances such as cooking oil, acetone,
petrol, kerosene, spot removers, turpentine, waxes and wax removers
should be washed in hot water with an
extra amount of detergent before being
dried in the tumble dryer.
• Danger of explosion: Never tumble
dry items that have been in contact
with inflammable solvents (petrol, methylated spirits, dry cleaning fluid and the
like). As these substance are volatile,
they could cause an explosion. Only
tumble dry items washed with water.
• Risk of fire: items that have been
spotted or soaked with vegetable or
cooking oil constitute a fire hazard and
should not be placed in the tumble
dryer.
• If you have washed your laundry with
stain remover you must execute an extra
rinse cycle before loading your tumble
dryer.
• Please make sure that no gas lighters
or matches have accidentally been left in
pockets of garments to be loaded into
appliance
3
Page 4

WARNING:
Never stop a tumble dry before
the end of the drying cycle unless all
items are quickly removed and spread
out so that the heat is dissipated. Risk
of fire.
Installation
• This appliance is heavy. Care should
be taken when moving it.
• When unpacking the appliance, check
that it is not damaged. If in doubt, do not
use it and contact the Service Centre.
• All packing and transit bolts must be
removed before use. Serious damage
can occur to the product and to property
if this is not adhered to. See relevant
section in the user manual.
• The final part of a tumble dryer cycle
occurs without heat ( cool down cycle )
to ensure that the items are left at a
temperature that ensures that items will
not be damaged.
• Any electrical work required to install
this appliance should be carried out by
a qualified electrician or competent
person.
• Care must be taken to ensure that
the appliance does not stand on the
electrical supply cable.
• If the machine is situated on a carpeted floor, please adjust the feet in order
to allow air to circulate freely.
• After having installed the appliance,
check that it is not pressing or standing
on its electrical supply cable.
• If the tumble dryer is placed on top of a
washing machine, it is compulsory to
use the stacking kit (optional accessory).
Use
• This appliance is designed for domestic
use. It must not be used for purposes other
than those for which it was designed.
• Only wash fabrics which are designed
to be machine dried. Follow the instructions on each garment label.
• Do not dry unwashed items in the tumble dryer.
• Do not overload the appliance. See
the relevant section in the user manual.
• Clothes which are dripping wet
should not be placed in the dryer.
• Garments which have been in contact
with volatile petroleum products should
not be machine dried. If volatile cleaning fluids are used, care should be
taken to ensure that the fluid is
removed from the garment before placing in the machine.
• Never pull the power supply cable to
remove the plug from the socket;
always take hold of the plug itself.
• Never use the tumble dryer if the
power supply cable, the control panel,
the working surface or the base are
damaged so that the inside of the tumble dryer is accessible.
Child safety
• This machine is not intended for use
by young children or infirm persons
without supervision.
• Children should be supervised to ensure
that they do not play with the appliance.
• The packaging components (e.g.
plastic film, polystyrene) can be dangerous to children - danger of suffocation! Keep them out of children’s reach
• Keep all detergents in a safe place
out of children’s reach.
• Make sure that children or pets do
not climb into the drum.
4
Page 5
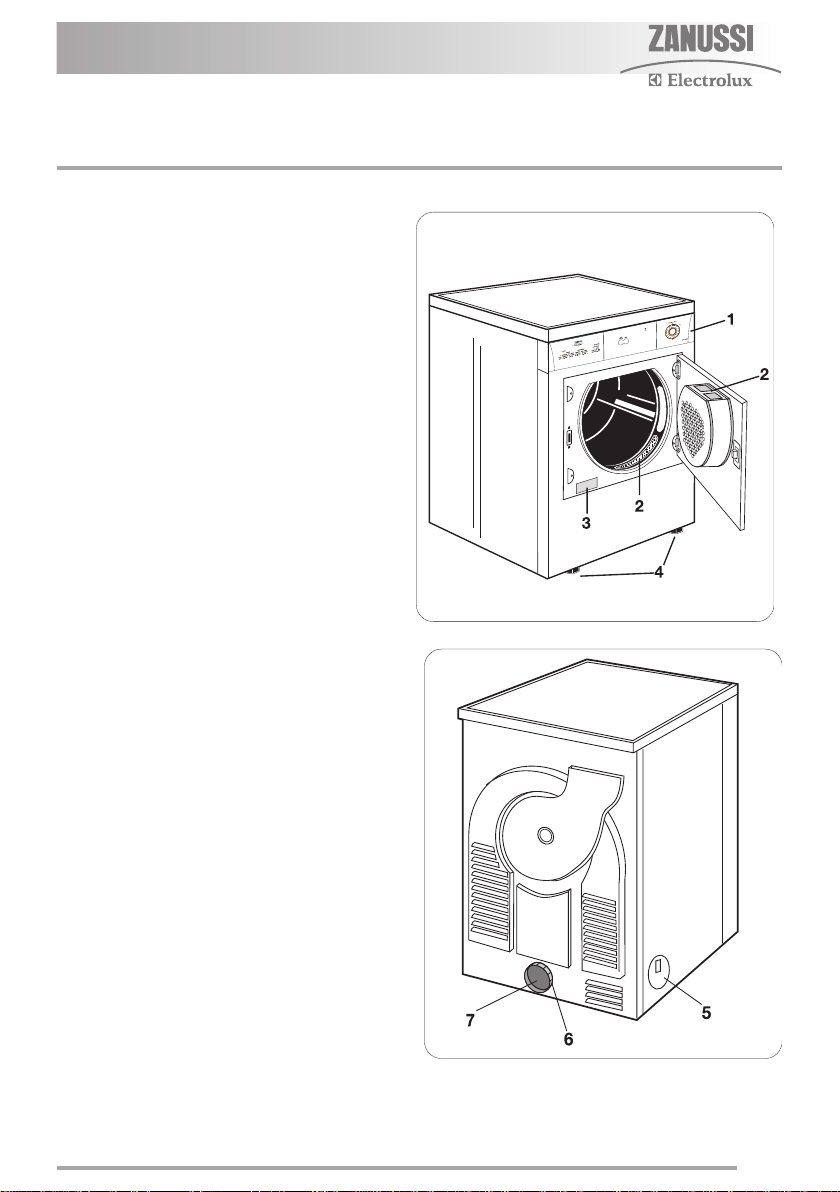
Description of the appliance
1. Control panel
2. Fluff filters
3. Rating Plate
4. Adjustable feet
5. Side vent outlets
6. Ring nut
7. Rear vent outlet
5
Page 6
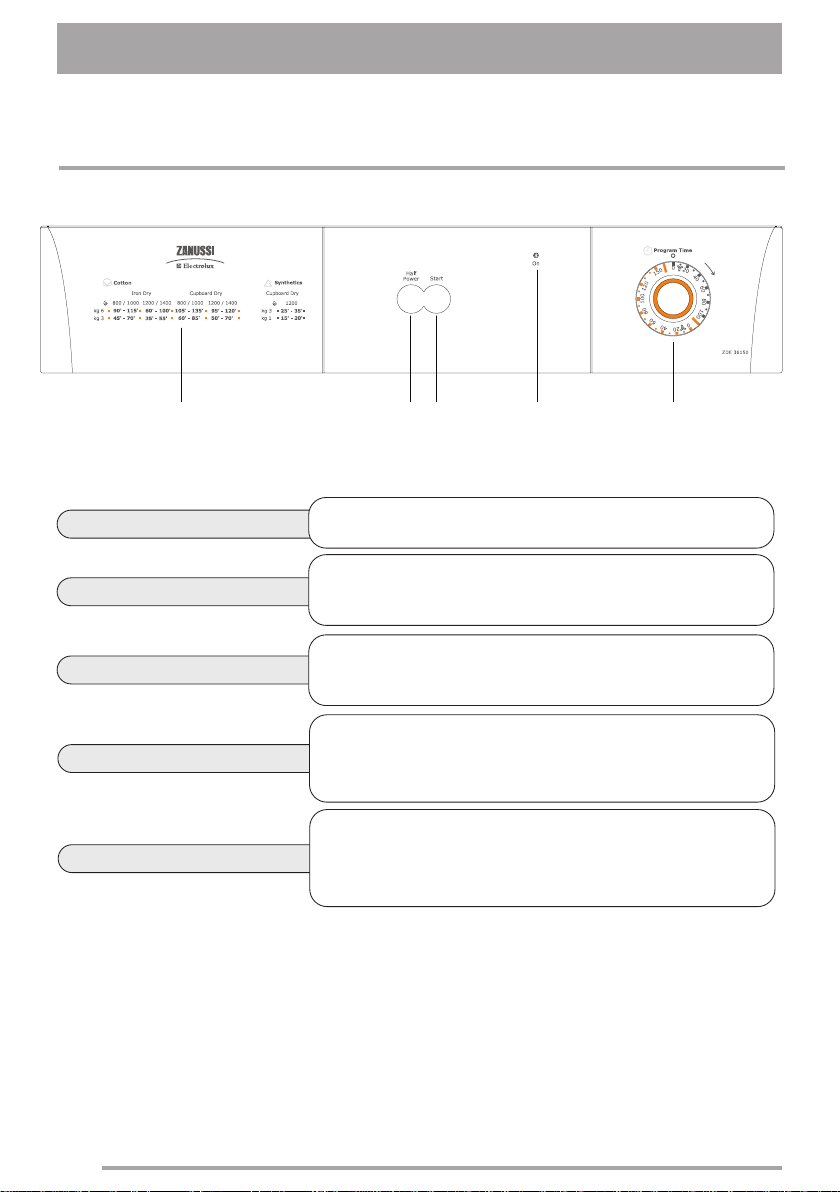
The control panel
Programme
chart
Programme chart
Mains-ON light
Half power button
Start button
Drying Time Selector Dial
button
Start
button
Mains-ON light
Time
selector dial
Half power
This will help you to select the correct programme for drying.
Comes on when the appliance is switched on and goes out
when appliance is switched off.
Pressing this button allows drying to be performed at a lower
temperature, for delicate items.
This button is used to switch the dryer on. At the end of the programme, release this button by pressing it again to switch the
dryer off.
The selector dial incorporates two drying cycles, one of up to
150 minutes at a high temperature for cotton and linen, and one
of up to 100 minutes at a low temperature for synthetic fabrics.
6
Page 7

Drying programs
Cotton Selector dial: up to 150 minutes
Degree of drying required
Cupboard
Iron dry
Degree of
spin given
rpm
800/1000
1200/1400
800/1000
1200/1400
Quantity
kg
6
3
6
3
6
3
6
3
Drying times mins
105 - 135
60 - 85
95 - 120
50 - 7 0
90 - 115
45 - 70
80 - 100
35 - 55
Synthetics Selector dial: up to 100 minutes
Degree of
Degree of drying required
Cupboard
Never overfill the drum (do not load large quilts, for example).
The laundry must be suitably spun in your washing machine before being placed in the tumble
dryer (500rpm minimum).
Drying times vary according to:
• The type of laundry
• The size of the load
• The degree of spinning prior to drying
Drying times are given as a guide only. Experience will soon enable you to estimate the drying
time needed for your usual laundry loads.
Do not start by selecting a long drying time. It is better to determine the required degree of dry-
ness by gradually increasing the drying time.
For a mixed load (cotton and resistant synthetics, for example) select the time for the most delicate fibres and increase it by 10 mins.
spin given
rpm
1200
Quantity
kg
3
1
Drying times mins
25 - 35
15 - 20
7
Page 8

Before the first use
• Ensure that the electrical connections comply with the installation instructions.
• Remove the polystryrene block and any material from the drum.
• Before using your tumble dryer for the first time, we recommend that you place a few damp
cloths inside the appliance and dry for 30 minutes.
There may be dust inside a brand new tumble dryer.
Drying hints
Before loading the laundry
Never tumble dry the following: Particularly
delicate items such as net curtains, woollen,
silk, fabrics with metal trim, nylon tights,
bulky materials such as anoraks, blankets,
eiderdowns, sleeping bags, feather quilts
and any items containing rubber foam or
materials similar to rubber foam.
• Always follow the instructions on garment
labels:
may be tumble dried
normal drying (high temperature)
delicate drying (low temperature)
do not tumble dry
• Close pillowcases and covers with fasteners
to prevent small laundry items getting tangled inside them. Close press studs, zips
and hooks and tie belts and apron strings.
• Sort laundry according to type and degree
on drying required.
• Do not over-dry laundry, this avoids creasing and saves energy.
• Avoid drying dark clothes with light coloured
fluffy items such as towels as they could
attract the fluff.
• The laundry must be thoroughly spun
before tumble drying.
• Easy-care items, too, e.g. shirts, should be
briefly pre-spun before drying (depending
on crease resistance approx. 30 seconds or
using the special brief spin programme on
your washing machine).
• Knitted textiles (knitted underwear) may
shrink a little during drying. Please do not
overdry items of this type. It is advisable to
allow for shrinkage when choosing the size
of new purchases.
• You can also put starched items into your
dryer. However, to achieve the desired
starched effect, choose the programme
“iron dry”. To remove any starch residues,
wipe out the internal drum after drying with
a moist cloth and then rub it dry.
• To avoid a static charge when drying is
completed, use either a fabric softener
when you are washing the laundry or a fabric conditioner specifically for tumble dryers.
• Remove the laundry when the dryer has finished drying.
• If individual items are still damp after drying,
set a brief post-drying time, but at least 30
minutes. This will be necessary particularly
for multilayered items (e.g. collars, pockets,
etc.).
8
Page 9

Make sure that no metal objects are left in
the laundry (e.g. hair clips, safety pins,
pins).
Button up pillowcases, close zip fasteners,
hooks and poppers. Tie any belts or long
tapes.
To avoid laundry becoming tangled: close
zips, button up duvet covers and tie loose
ties or ribbons (e.g. of aprons). Turn items
with double-layered fabrics inside out (e.g.
with cotton lined anoraks, the cotton layer
should be outermost). These fabrics will
then dry better.
Maximum loads
Recommended loads are indicated in the programme charts.
General rules:
Cotton, linen: drum full but not too tightly
packed;
Synthetics: drum no more than half full;
Delicate fabrics and woollens: drum no
more than one third full.
Try to load to the maximum capacity of the
machine as small loads are uneconomical.
Laundry weights
The following weights are indicative:
bathrobe 1200 g
napkin 100 g
quilt cover 700 g
sheet 500 g
pillow case 200 g
tablecloth 250 g
towelling towel 200 g
tea cloth 100 g
night dress 200 g
ladies’briefs 100 g
man’s work shirt 600 g
man’s shirt 200 g
man’s pyjamas 500 g
blouse 100 g
men’s underpants 100 g
9
Page 10

Daily Use
Load the laundry
Connect the appliance. Open the door
(see picture).
Place the laundry in
the drum, one item at
a time, shaking them
out as much as possible. Close the door.
Please check the
laundry does not get
caught between the
door and filter.
Drying Time
Selector Dial
The selector dial
incorporates two drying cycles, one of up
to 150 minutes at a
high temperature for
cotton and linen, and
one of up to 100 minutes at a low temperature for synthetic fabrics.
To set the machine to
the selected time, turn
the dial clockwise until
the time you want
coincides exactly with
the pointer.
NEVER attempt to
turn the dial in an
anticlockwise direction.
be shortened, stopped
or avoided, as this
could cause skin
burns or damages to
the laundry.
Additional drying
If at the end of the
programme, the laundry is still too dump,
set the dial for a further period of drying
(remembering to take
into account the cooling period).
At the end of the
programme the
selector dial must
be turned to position O, to switch the
machine off.
Half power button
suitable for use with
loads of up to 3kg!
Start
This button is used to
switch the dryer on. At
the end of the programme, release this
button by pressing it
again to switch the
dryer off.
Mains-ON light
Comes on when the
appliance is switched
on (ON/OFF button
pressed down) and
goes out when this
button is released.
10
When selecting the
drying time, you
should remember that
it includes a 10
minute cooling phase
(position on the
dial).
This phase should not
Pressing this button
allows drying to be
performed at a lower
temperature, for delicate items.
HALF POWER is only
Page 11

AUTOREVERSE
kg 5
kg 2,5
800 / 900
70' - 90'
35' - 50'
1000 / 1200
65' - 85'
30' - 45'
800 / 900
80' - 100'
55' - 70'
1000 / 1200
75' - 95'
50' - 65'
650
50' - 60'
30' - 35'
kg 2,5
kg 1
Q1110
Care and cleaning
Important:
You must DISCONNECT the appliance from the
electricity supply, before you can carry out any
cleaning or maintenance work.
External cleaning
Use only soap and water and then dry
thoroughly.
Important: do not use methylated spirit, diluents
or similar products.
Cleaning the door
Clean periodically the interior part of the door to
remove any fluff from the seals around the filter.
Accurate cleaning ensures correct drying.
The filter in the inner door must be removed for
cleaning.
Cleaning the filters
Your dryer will only function well if the filters are
clean.
The filters collect all the fluff which accumulates
during drying and they must therefore be cleaned
at the end of each programme, before removing
the laundry, with a damp cloth.
Do not be alarmed by the amount of fluff. It is not
due to excessive wear caused by the dryer. All
fabric loses fluff when drying but it goes unnoticed in the air. In a tumble dryer it simply
collects in the filter. After a while, a withish patina
due to detergent residue on laundry forms on the
filters. When this occurs, clean the filters with
warm water using a brush. Remove the filter in
the door opening as per picture (it can be
positioned with the tooth facing to the left or to
the right).
11
Page 12

Important:
Do not use the appliance without filters.
Cleaning the drum
When your laundry does not reach the desired
degree of dryness, in other words, when it turns
out either too dry or too damp, we advise you to
clean the inside of the drum with a cloth soaked
with vinegar.
This will eliminate the slight patina that has
formed in the drum (due to residues of detergent
and softeners used in the washing, and to the
lime contained in the water), which prevents the
probes from detecting the correct degree of
dryness.
12
Page 13

Something not working?
If a problem occurs, you can try to solve it yourself following the instructions below. If you call out an
engineer when one of the following problems occurs, or to repair a fault due to incorrect use, the
callout will be charged even if requested within the guarantee period.
Problem Possible cause Solution
• Mains plug disconnected • Plug in mains plug
The drier is not working
properly
The drying results are not
satisfactory
The drying cycle
exceptionally takes a long
time
• The START button has not
been depressed.
• No time programme selected • Select time programme
• Loading door open • Close loading door
• Fuse or residual current circuit
breaker in fuse box (domestic
installation) faulty
• Wrong programme selected
• Lint filter blocked • Clean lint filter
• Wrong filling quantity
• Laundry not sufficiently dried • Pre-dry laundry sufficiently
• Deposit on the drum inner surfaceor on the drum ribs
• Vented air transport disrupted
• Lint filter blocked • Clean lint filter
• Press START button
• Check fuse or residual current
circuit breaker. Faults can be
eliminated by an electrical
engineer
• Select another (time) programme for the next drying
cycle
• Observe recommended filling
quantity
• Clean drum inner surface and
drum ribs
• Straighten - air venting hose
and/or clean air venting ducts
The loading door
cannot be closed
• Lint filter not installed and/or
filter lid not locked in position
• Install lint filter and/or lock filter lid in position
13
Page 14

If you are unable to identify or solve the
S1207
problem, contact our service centre. Before
telephoning, make a note of the model, serial
number and purchase date of your machine: the
Service Centre will require this information.
Important:
If you call out an engineer to a fault listed below,
or to repair a fault caused by incorrect use or
installation, a charge will be made even if the
appliance is under guarantee.
14
Page 15

Technical data
Technical data
Dimensions
Width
Height
Depth
60 cm
85 cm
58 cm
Electrical connection
Voltage - Overall power Fuse
Depth with loading door
open
Maximum Load
Use
This appliance conforms with the following EU Directives:
– 73/23/EEC dated 19.02.1973 Low Voltage Directive
– 89/336/EEC dated 03.05.1989 EMC Directive inclusive of Amending Directive
92/31/EEC
– 93/68/EEC dated 22.07.1993 CE Marking Directive
Information on the electrical connection is given on the rating plate
on the inner edge of the appliance door
109 cm
Cotton
Synthetics
Domestic
+ 5°C + 35°C
6 kg
3 kg
15
Page 16

Consumption values
Consumption values (*)
Programme
Programme
duration
(in minutes)
Cottons Cupboard
Cottons Cupboard
Synthetics Cupboard
Max load:
1)
Cottons load: 6 kg
2)
Synthetics load: 3 kg
1)
1)
2)
Energy
consumption
(in kWh)
Revolutions
per minute
112 3,3 1000
98 2,9 1400
35 1,18 1200
The consumption values have been established
under standard conditions. They may deviate
when the machine is operated in domestic
circumstances.
16
Page 17

Disposal
Packaging materials
The materials marked with the symbol are
recyclable.
This means that they can be recycled by disposing of them properly in appropriate collection containers.
Machine
Use authorised disposal sites for your old appliance. Help to keep your country tidy!
Old appliance
The symbol on the product or on its
packaging indicates that this product may not be
treated as household waste. Instead it should be
taken to the appropriate collection point for the
recycling of electrical and electronic equipment.
By ensuring this product is disposed of correctly,
you will help prevent potential negative
consequences for the environment and human
health, which could otherwise be caused by in
appropriate waste handling of this product.For
more detailed information about recycling of this
product, please contact your local council, your
household waste disposal service or the shop
where you purchased the product.
Tips for environmental protection
To save energy and to help protect the
environment, we recommend that you follow
these hints:
• Try to load the maximum capacity of the
machine as small loads are uneconomical.
• Always load well spun laundry. The higher
the spin speed, the lower the electricity consumption and the shorter the drying times.
• Do not over-dry laundry, this avoids creasing and saves energy. Select the drying programme according to the type of laundry
and the required degree of dryness.
• To utilize the maximum load, laundry which
is to be dried ready to put away (Cupboard)
can be dried together with items to be
ironed. To do this, select the programme for
iron-dry, remove the iron-dry items at the
end of the programme and then finish-dry
the rest of the load.
• Clean the filters regularly to avoid excessive
drying times and high electricity consumption.
• Ventilate the room well. The room temperature should not exceed +35°C during drying.
17
Page 18

A
A
Installation
It is dangerous to alter the specifications or attempt to modify this product in any way.
Care must be taken to ensure that
the appliance does not stand on the
electrical supply cable.
Any electrical work required to install this
appliance should be carried out by a qualified electrician or competent person.
Important:
The appliance must not bulit-in.
Unpacking
Slide out the polythene
bag with the polystyrene
stuffing before using the
appliance Pull off adhesive
strips from inside machine
on top of drum.
Should the appliance be moved, it must be
transported vertically.
The appliance must not be installed behind a lockable
door, a sliding door or a door with a hinge on the
opposite side to that of the appliance.
Positioning
It is recommended that, for your convenience, the
machine is positioned close to your washing
machine. Whilst drying, the tumble dryer will
expel a certain amount of warm, very moist air,
and this should be removed from the room as
quickly as possible to prevent condensation. In
an extremely well ventilated room or close to an
open window, this may occur naturally. However,
in general, it is better to carry the dryer's exhaust
outside via the 100 mm diameter flexible hose
supplied with the appliance; ending either
temporarily at an open window, or permanently at
a fixed ventilation grille, fitted to an exterior wall
or window. The tumble dryer must be installed in
a clean place, where dirt does not build up. Make
sure there are no obstructing items or material
near the air-intake louvres provided at the back
(e.g. paper, rags etc.). To keep vibration and
noise to a minimum when the dryer is in use, it
should be placed on a firm, level surface. Once in
its permanent operating position, check that the
dryer is absolutely level with the aid of a spirit
level. If it is not, raise or lower the feet until it is.
The feet must never be
removed. Do not restrict
the floor clearance through
deeppile carpets, strips of
wood or similar. This might
cause heat build-up which
would interfere with the
operation of the appliance.
Important
When operating the tumble dryer, the room
temperature must not exceed 35°C, as it may
affect the performance of the appliance.
Fitting the vent hose
To simplify the installation, there is a choice of
vent outlets: one at the back, the others in the left
and right-hand side. Connect the hose to
whichever is the more convenient by pulling the
ring nut (A) from the vent outlet at the back,
screwing it on to the hose and pushing it firmly
back into place. The unused vents should now be
sealed with the special snap covers provided.
Advice: If the hose is long and the room
temperature low, the moisture might condense to
water inside the hose. This is an unavoidable
18
Page 19

natural phenomenon. To prevent this water from
GREEN & YELLOW
BROWN
CORD CLAMP
BLUE
13A
P1041
E
N
L
B
Iying in the hose or flowing back into the tumble
dryer, it is advisable to drill a small hole (dia. 3
mm) in the lowest point of the hose and to place
a small container below it.(See picture, point B).
Once connected to the
dryer, run the vent hose to
the desired outlet point,
ensuring that the run’s
overall length is less than
2 m, and that it contains
no more than two bends.
As to the outlet itself, if
you have decided on a fixed wall/window grille, a
good local builder’s merchant should be able to
supply you with the necessary fittings and
installation advice.
Important:
It is important not to
connect the vent hose to,
for example, a cooker
hood, or a chimney or flue
pipe designed to carry the
exhaust from a fuel
burning appliance.
Note that to avoid
condensation problems, it is essential that the
dryer be fitted with the flexible hose to carry its
“exhaust” at least beyond the kitchen units;
preferable outside the kitchen. In order to prevent
the appliance from overheating, it is important
that the steam exhaust is unobstructed.
Therefore, in case of a permanent hose fitted to
an exterior wall or ceiling, it must be ensured an
exhaust capacity of at least 150 m3/h. If the dryer
is fitted next to kitchen units, make sure that the
vent hose is not squashed. If the hose is partially
squashed, drying efficiency will be reduced,
resulting in longer drying times and higher energy
consumption. If the hose is completely squashed,
the safety cut-outs with which the machine is
fitted may operate. When operating the tumble
dryer, the room temperature must not be lower
than +5°C and higher than +35°C, as it may
affect the performance of the appliance.
Electrical connection
Any electrical work required to install this
appliance should be carried out by a qualified
electrician or competent person.
WARNING:
THIS APPLIANCE MUST BE EARTHED.
The manufacturer declines any liability
should this safety measure not be observed.
Important:
Should the appliance power supply cable
need to be replaced, this must be .carried out
by our Service Center.
Before switching on, make sure the electricity
supply voltage is the same as that indicated on
the appliance’s rating plate.
The appliance is supplied with a 13amp plug
fitted.
In the event of having to change the fuse in the
plug supplied, a 13amp ASTAapproved (BS1362)
fuse must be used.
Should the plug need to be replaced for any
reason, proceed as described below.
The wires in the mains lead are coloured in
accordance with the following code:
Green and Yellow - Earth
Blue - Neutral
Brown - Live
19
Page 20

Important:
The plug must be accessible after the
appliance has been installed.
Important:
The manufacturer declines any responsibility
for damage or injury through failure to
comply with the above safety precaution.
Should the appliance power supply cable
need to be replaced, this must be carried out
by our Service Centre.
Important:
The power supply cable must be accessible
after installing the machine.
Stacking kit
Aspecial stacking kit is available through your
dealer, to enable the mounting of the dyer on top
of a front loading washing machine with cover’s
depth between 48 and 60 cm.
Read carefully the instructions supplied with the kit.
Door reversal
To make it easier to load or unload the laundry
the door can be reversed.
20
Page 21

Guarantee
SINGAPORE
Electrolux SEAPte. Ltd.
No.2 Leng Kee Road
# 06-08 Thye Hong Center
Singapore 159086
Office Tel: (+65) 98188380
Fax: (+65) 64760273
Call Center Tel: (+65) 65133688
Operating Hours:
0900 to 1700 Mondays to Fridays
0900 to 1200 Saturdays
MALA YSIA
Electrolux Home Appliances Sdn. Bhd.
Axis Plaza Level 2
No.5 Jalan Penyair U1/44
Seksyen U1, 40150 Shah Alam
Selangor Darul Ehsan, Malaysia
Office Tel: (+60 3) 55691333
Fax: (+60 3) 55693976
Call Center Tel: 1 300 881122
Operating Hours:
0830 to 1730 Mondays to Fridays
0830 to 1230 Saturdays
wwwwww..eelleeccttrroolluuxx..ccoom
m
European guarantee
This appliance is guaranteed by Electrolux, in
each of the countries listed in the following page,
for the period specified in the appliance
guarantee or otherwise by law. If you move from
one of these countries to another of these
countries the appliance guarantee will move with
you subject to the following qualifications:
• The appliance guarantee starts from the
date you first purchased the appliance
which will be evidenced by production of a
valid purchase document issued by seller of
the appliance.
• The appliance guarantee is for the same
period and to the same extent for labour
and parts as exists in your country of residence for this particular model or range of
appliances.
• The appliance guarantee is personal to the
original purchaser of the appliance and cannot be transferred to another user.
• The appliance is installed and used in
accordance with instructions issued by
Electrolux and is only used within the home,
i.e. is not used for commercial purposes.
• The appliance is installed in accordance
with all relevant regulations in force within
your new country of residence.
The provisions of this European Guarantee
do not affect any of the rights granted to
you by law.
21
Page 22

ü
ü
a
AAllbbaanniia
BBeellggiiqquuee//BBeellggiiëë/
n
BBeellggiieen
Česká republika
EEeesstti
FFrraanncce
HHeellllaas
IIrreellaannd
a
IIttaalliia
LLaattvviijja
k
d
i
a
e
n
s
d
a
DDaannmmaarrk
DDeeuuttsscchhllaannd
EEssppaañña
GGrreeaatt BBrriittaaiin
Hrvatska
(
(
+35 5 4 261 450
/
+32 2 363 04 44
+420 2 61 12 61 12
+45 70 11 74 00
+49 180 32 26 622
Rr. Pjeter Bogdani Nr . 7 T irane
Bergensesteenweg 719, 1502
Lembeek
Budějovická 3, Praha 4, 140 21
Sjællandsgade 2, 7000 Fredericia
Muggenhofer Str. 135, 90429
Nürnberg
+37 2 66 50 030 Pärnu mnt. 153, 11624 Tallinn
+34 902 11 63 88
Carretera M-300, Km. 29,900
Alcalá de Henares Madrid
www.electrolux.fr
+44 8705 929 929
+30 23 10 56 19 70
+385 1 63 23 338
+353 1 40 90 753
+39 (0) 434 558500
Addington Way, Luton, Bedfordshire
LU4 9QQ
4 Limnou Str., 54627 Thessaloniki
Slavonska avenija 3, 10000 Zagreb
Long Mile Road Dublin 12
C.so Lino Zanussi, 26 - 33080
Porcia (PN)
+37 17 84 59 34 Kr. Barona iela 130/2, LV-1012, Riga
*
*
22
a
LLiieettuuvva
LLuuxxeemmbboouurrg
g
MMaaggyyaarroorrsszzáág
NNeeddeerrllaannd
ÖÖsstteerrrreeiicch
PPoollsskka
d
Norge
h
a
+370 5 2780609 Ozo 10A, LT 08200 Vilnius
+35 2 42 43 13 01
g
+36 1 252 1773
+31 17 24 68 300
+47 81 5 30 222
+43 18 66 400
Rue de Bitbourg, 7, L-1273 Hamm
H-1142 Budapest XIV,
Erzsébet királyné útja 87
Vennootsweg 1, 2404 CG - Alphen
aan den Rijn
Risløkkvn. 2 , 0508 Oslo
Herziggasse 9, 1230 Wien
+48 22 43 47 300 ul. Kolejowa 5/7, Warsaw
Page 23

ü
ü
(
(
*
*
PPoorrttuuggaal
RRoommaanniia
l
a
SScchhwweeiizz--SSuuiissssee-- SSvviizzzzeerra
SSlloovveenniijja
SSlloovveennsskko
a
o
Suomi
e
SSvveerriigge
e
TTüürrkkiiyye
Россия
+35 12 14 40 39 39
+40 21 451 20 30
a
+41 62 88 99 111
+38 61 24 25 731
+421 2 43 33 43 22
www.electrolux.fi
+46 (0)771 76 76 76
+90 21 22 93 10 25
+7 095 937 7837
Quinta da Fonte - Edificio Gonçalves
Zarco - Q 35 2774 - 518
Paço de Arcos
Str. Garii Progresului 2,
S4, 040671 RO
Industriestrasse 10, CH-5506
Electrolux Ljubljana d.o.o.
Gerbičeva 98, 1000 Ljubljana
Electrolux Slovakia s.r.o.,
Electrolux Domáce spotrebiče SK,
Seberíniho 1, 821 03 Bratislava
Electrolux Service, S:t Göransgatan
143,S-105 45 Stockholm
Tarlabașýcaddesi no : 35 Taksim
Ístanbul
129090 Москва, Олимпийский
проспект, 16, БЦ „Олимпик“
23
Page 24

www.electrolux.com
136904190 -00- 03102007
 Loading...