

Zanussi ZCE700X User Manual

ELECTRIC
COOKER
ZCE 700
INSTRUCTION BOOKLET
GB
Please read this instruction booklet before using the appliance

Important Safety Information
You MUST read these warnings carefully before installing or using the appliance. If you need
assistance, contact our Customer Care Department on 08705 727727
Installation
l This cooker must be installed by qualified personnel,
according to the manufacturers instructions and to
the relevant British Standards.
This cooker is heavy. Take care when moving it.
l Remove all packaging before using the cooker.
l Ensure that the electrical supply complies with the
type stated on the rating plate.
l Do not attempt to modify the cooker in any way.
Child Safety
l This cooker is designed to be operated by adults. Do
not allow children to play near or with the cooker.
l The cooker gets hot when it is in use. Children should
be kept away until it has cooled.
l This cooker should be kept clean at all times. A
build-up of fats or foodstuffs could result in a fire.
l Never use plastic dishes in the oven.
Never line any
part of the oven with aluminium foil.
l Always ensure that the oven vent which is located at
the centre back of the hob is left unobstructed to
ensure ventilation of the oven cavity.
l Perishable food, plastic items and areosols may be
affected by heat and should not be stored above the
cooker.
Service
l This cooker should only be repaired or serviced by an
authorised Service Engineer and only genuine
approved spare parts should be used.
l Children can also injure themselves by pulling pans
or pots off the cooker.
During Use
l This cooker is intended for domestic cooking only. It
is not designed for commercial or industrial purposes.
l Do not use this cooker if it is in contact with water.
Do not operate the cooker with wet hands.
l Ensure the control knobs are in the OFF position
when not in use.
l When using other electrical appliances, ensure the
cable does not come into contact with the hot surfaces
of the cooker.
l Never use the ceramic hob as a working space. Do
not store things on the ceramic hob.
l Never use plastic or aluminium foil dishes on the
ceramic hob.
l Unstable or misshapen pans should not be used on
the ceramic hob as unstable pans can cause an
accident by tipping or spillage.
l Never leave the cooker unattended when cooking with
oil and fats.
l The ceramic hob is shockproof, but not unbreakable!
Hard or pointed objects falling from a height can
damage the hob. If scratches or cracks are noticed,
disconnect the cooker from the electrical supply and
call you nearest Zanussi Service Force Centre.
Environmental Information
l After installation, please dispose of the packaging with
due regard to safety and the environment.
l When disposing of an old appliance, make it unusable,
by cutting off the cable.
Keep this instruction book for future reference
and ensure it is passed on to any new owner.
Storage Drawer
(available as optional)
The storage drawer is located underneath the oven cavity.
During cooking the storage drawer may become
hot if the oven is on high for a long period of time,
therefore flammable materials such as oven gloves,
tea towels, plastic aprons etc. should not be
stored in the drawer.
Oven accessories such as baking sheets, will also
become hot, therefore care should be taken when
removing these items from the drawer whilst the
oven is in use or still hot.
2

Contents
For the User
Important Safety Information 2
Description of the Cooker 4
Control Panel 5
Operation 6
Using the ceramic glass hob 8
Electric Oven 9
Before the First Use of the Oven 10
Using the Oven 10
Hints and Tips 11
Using the Conventional Oven 12
Conventional Oven Cooking Chart 13
Using the Fan Oven & Defrosting function 14
Fan Oven Cooking Chart 15
Defrosting Chart 15
Grilling 16
For the Installer
Important Safety Requirements 22
Instructions for the Installer 24
Feet Assembly 25
Splash back Assembly 25
Electrical connections 26
Cleaning the Ceramic Hob 17
Cleaning the Oven 18
Something not working 20
Service and Spare Parts 20
Guarantee Conditions 21
Guide to Use the instructions
The following symbols will be found in the text to guide
you throughout the Instructions:
Safety Instructions
F
Step by step instructions for an operation
Hints and Tips
Environmental Information
Oven Door Protection Device
All our appliances comply with the
European safety standards. Nevertheless,
in order to ensure the highest safety level,
and avoid small children to be exposed to
the heat when the appliance is operated, it
is possible to fit a special ptotection device
to the oven door. This device can be
purchased in our Service Force Centres,
specifying the relevant code (35791) and
the Product No. shown on the rating plate.
This appliance is manufactured according to
the following EEC directives:
73/23 EEC - 90/683 EEC - 93/68 EEC 89/336 EEC current edition.
3

Description of the Cooker
Ceramic hob
Control panel
Oven door handle
Oven door
Oven door window
The Oven Cavity
Grill element
Oven Light
Adjustable foot
Accessories
Grill/roasting pan
Grill trivet
Removable
handles
Telescopic shelf
Oven fan
4
supports
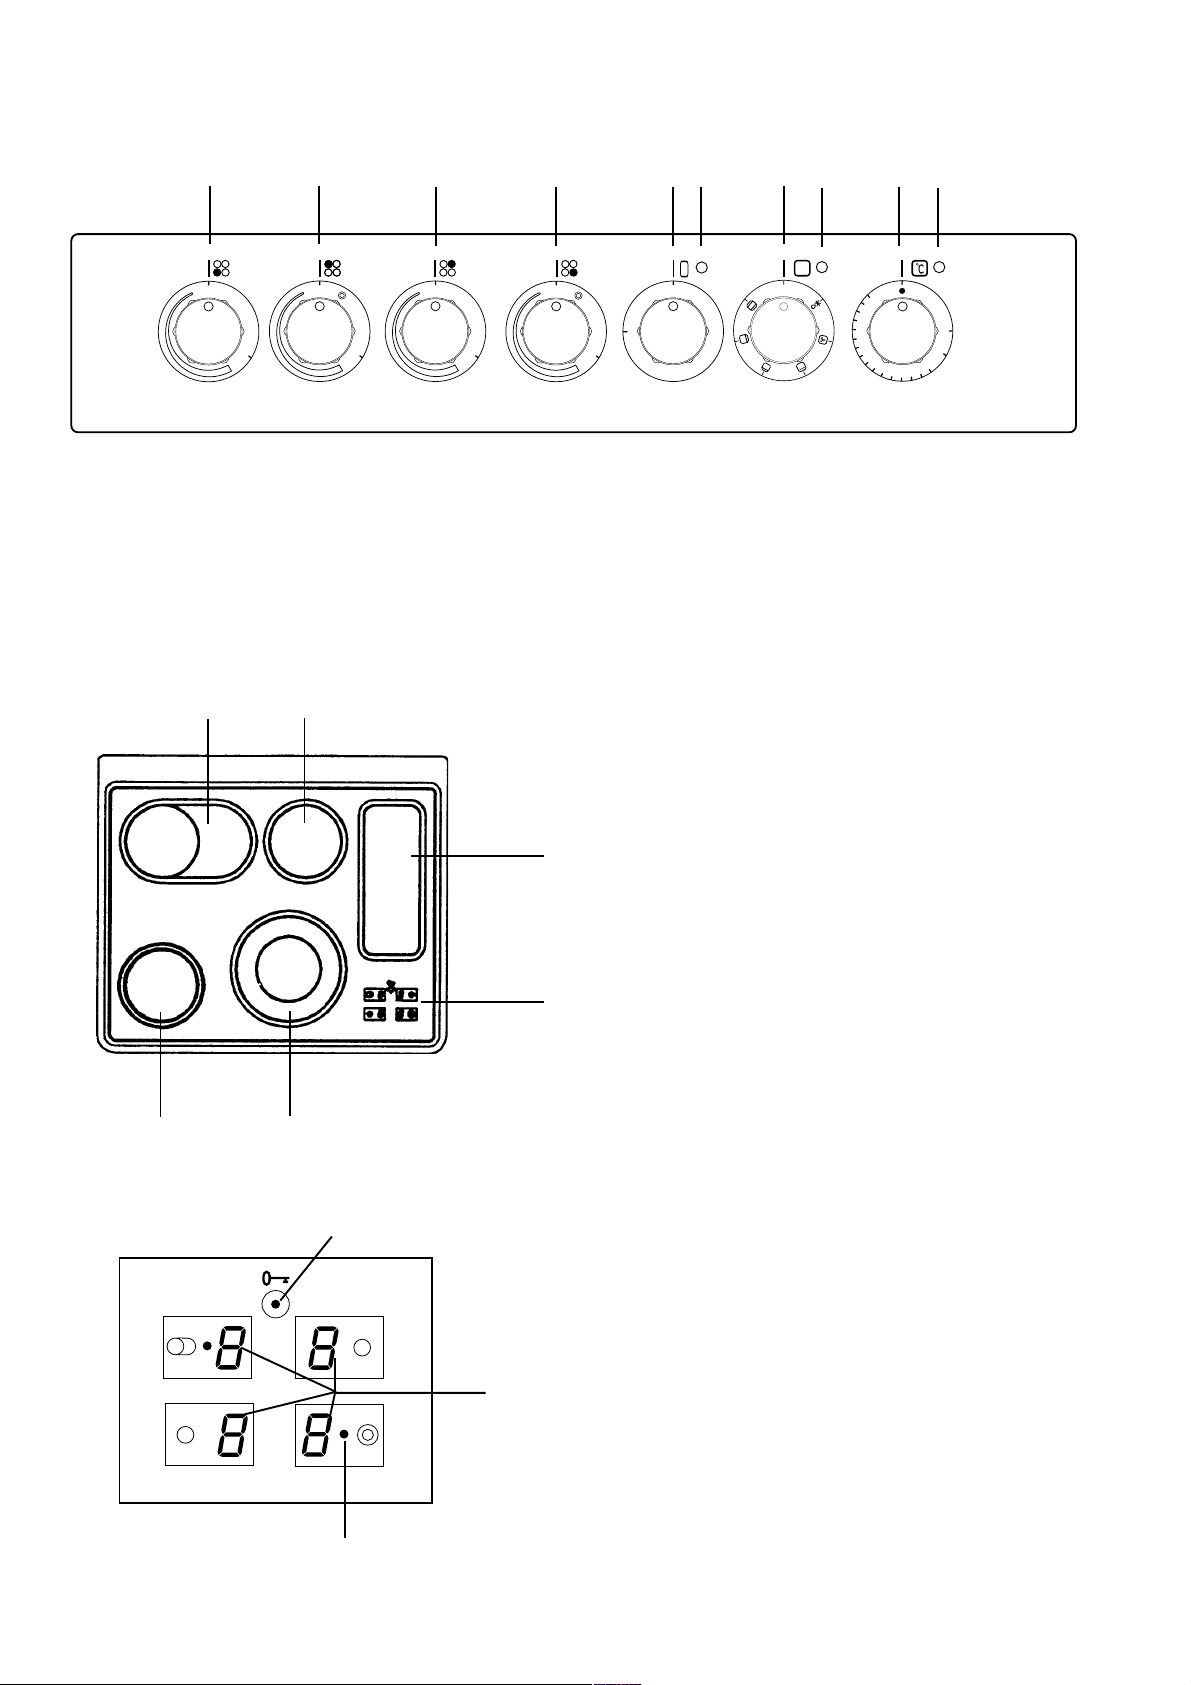
Control Panel
1
0
S
A
2934578106
0
A
1. Front left cooking zone control knob
2. Back left cooking zone control knob
3. Back right cooking zone control knob
4. Front right cooking zone control knob
5. Control knob for keep-warm zone
11 12
0
S
A
0
A
0
ON
0
50
100
250
200
150
6. Keep-warm zone Pilot Light
7. Oven function control knob
8. Oven function Pilot Light
9. Oven Thermostat control knob
10. Oven Thermostat Pilot Light
Ceramic hob cooking zones
12
13
16
11. Oval double cooking zone
12. Single cooking zone
13. Double cooking zone
14
14. Keep-warm zone
15. Display
15
Display
16. Child Safety Pilot light
FO 2532
18
17
17. Cooking zone settings
18. Double cooking zone Pilot light
5

Operation
Ceramic hob cooking zones
To switch on a cooking zone, turn the relevant control
knob clockwise to the required heat setting.
Key to control knob symbols
S = Child lock
A = Automatic heat-up
0
S
= Double zone
Display
0
1
2 - 3
4
5 - 6
7 - 8
9
When a zone is turned on, it will illuminate at various
intervals depending on the heat setting selected. Even
at the highest setting the zone will switch on and off.
This is to ensure that the surface is not over-heated.
OFF
Simmering vegetables
Fish in its own juice
Simmering potatoes or soups
Boiling large quantities of food,
stews and soups
Slow frying, making a roux
Fast frying of meat or fish
Rapid heating up of fat or water
CHEC control
The CHEC control function allows electronic control of
the zones.
CHEC control enables you to set the heat with great
precision, which means that you do not have to adjust
the heat constantly.
A
FO 2496
Control knob for single cooking zone
0
A
FO 2501
Control knob for double cooking zone
Double and oval cooking zones
Small cooking zone
l Turn the control knob to the required setting.
Large cooking zone
l Turn the control knob to . The double cooking
zone pilot light will appear in the display.
l Then turn the control knob to the required setting.
If you want to disconnect the zone, turn the control knob
to zero.
Keep-warm cooking zone
This zone is intended for keeping food warm only.
l Turn the relevant control knob to ON.
l To switch off, turn the knob to 0.
6
0
ON
FO 497
Control knob for keep-warm cooking zone
Automax
AUTOMAX supplies the zone with full heat for a specific
period, and then adjusts down to the setting you have
chosen.
l Turn the control button clockwise to A, then select
the required setting.
The display alternates between A and the setting chosen.
The period for which AUTOMAX is connected depends
on the setting chosen.
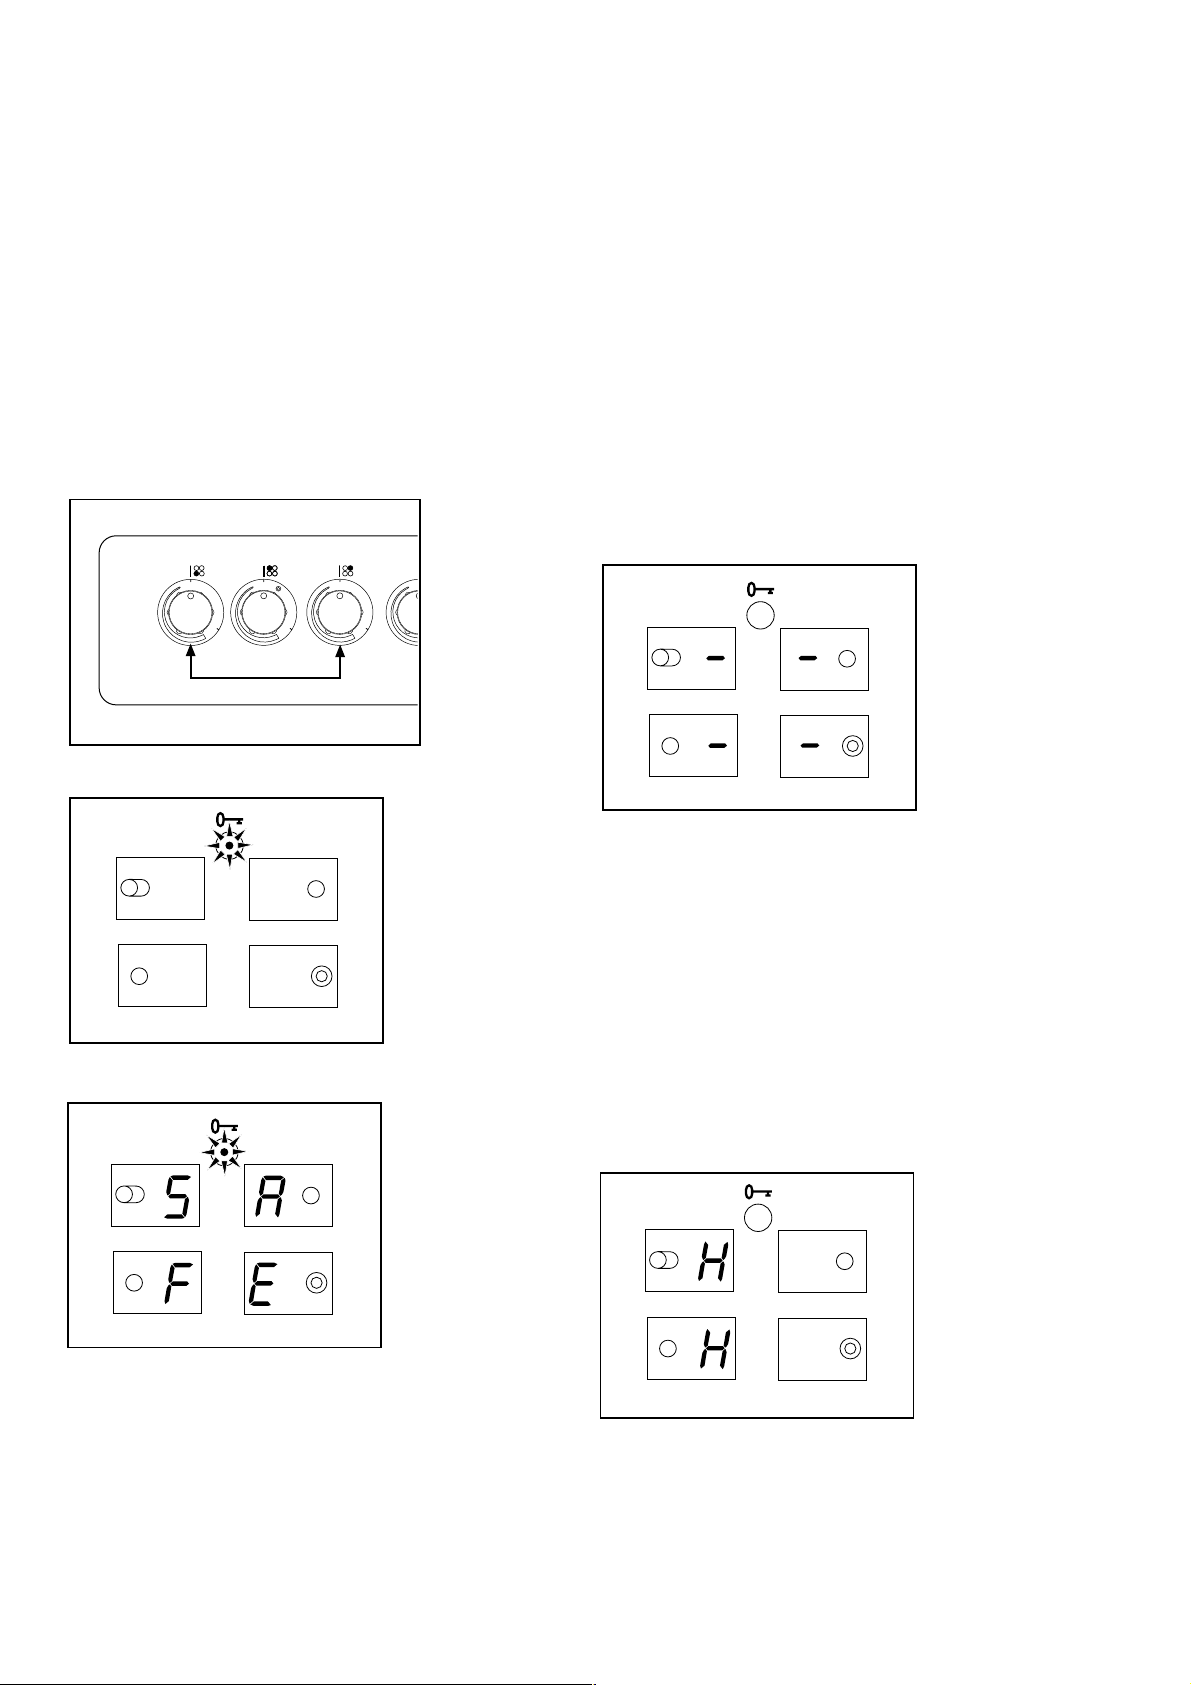
Connection of child safety
device on zones
l Turn the 2 single zone-control buttons anticlockwise
to S at the same time.
CHEC control: Autostop
If you forget to turn a cooking zone off after use, it will be
disconnected automatically after a specific period of time.
The higher the setting, the shorter the time before the
zone is disconnected.
Setting AUTOSTOP
1 6 hours
2 6 hours
3 5 hours
4 5 hours
5 4 hours
6 1½ hours
7 1½ hours
8 1½ hours
9 1½ hours
When the autostop function is activated the display will
show:
FO 2528
0
S
beide gleichzeitig auf S
0
A
0
S
A
A
The display will show:
FO 2530
When you turn on a zone the display will show:
FO 2527
The zones cannot be used.
To activate the cooking zones:
l Turn all the control buttons to 0. The zones can now
be used.
Residual heat indicator
When you switch off a zone, an H in the display indicates
that the zone is still hot. The residual heat indicator will
continue to be illuminated until the zone reaches a
temperature of approx. 50°C.
FO 2530
You can disconnect the child safety device as follows:
l Turn all the cooking zone control buttons to 0.
l Turn the 2 single zone-control buttons anticlockwise
to S at the same time.
The light under the key symbol in the display will
disappear. The zones can now be used.
FO 2526
7

Using the ceramic glass hob
Ceramic glass surface
The glass is hard, and has been tempered to withstand
heat, cold and temperature shocks. But like all glass it
is sensitive to impact. Do not stand on the ceramic glass
surface.
If scratches or cracks are noticed, disconnect
the cooker from the electrical supply and call
you nearest Zanussi Service Force Centre.
Keep all objects and materials which can melt
away from the cooking surface, e.g. plastics,
aluminium foil.
Care should be taken when preparing food or drinks
containing sugar. If anything of this nature
accidentally comes into contact with the ceramic
surface it must be scraped off immediately while
stlll hot and wiped away to avoid damage to the
surface.
Do not place any pots or pans on the hob
display, as this could damage the electronic
devices of the hob.
Energy consumption
To save energy, you should . .
- use only cooking and frying utensils with smooth, flat
bases.
- place pots and pans in position before switching on
the cooking zone.
- wherever possible, cover pots and pans with a lid.
- switch off the cooking zone a few minutes before the
end of the cooking time, in order to make use of the
residual heat.
- use the residual heat of the cooking zones for keeping
food warm or for melting.
- position pots and pans centrally on the cooking zones.
Saucepans and frying pans
Saucepans and frying pans should not be smaller than
the cooking zone, and preferably not more than 10-15
mm larger than the diameter of the cooking zone.
Always use cooking and frying utensils with smooth, flat
bases.
The bases should always be clean and dry. Cook with a
lid in place.
Check that the bases of utensils are smooth and
undamaged; bases with burrs and sharp edges will
scratch the ceramic glass surface.
To avoid scratching or damaging the ceramic cooking
surface, pots and pans should be moved on the plate by
lifting them, and not by sliding.
Utensils with aluminium and copper bases can leave
behind metallic discolorations which can only be removed
with difficulty or sometimes not at all.
8

Electric Oven
Oven Function Control Knob
Conventional cooking - The heat comes from
both the top and bottom element, ensuring even
heating inside the oven.
Bottom heating element - The heat comes from
the bottom of the oven only
Top heating element - The heat comes from the
top of the oven only
Grill - The heat comes only from the top element
Fan cooking - This function allows you to
roast or roast and bake simoultaneously using
any shelf.
Defrost setting - This function assists in
thawing of frozen food.
Thermostat Control Knob
Turn the thermostat control knob clockwise to select
temperatures between 50°C and 250°C (MAX).
0
FO 2494
50
Oven Function Control Light
The oven function control light will come on when the oven
function control knob is set.
Thermostat Control Light
The thermostat control light will come on when the
thermostat control knob is turned. The light will remain on
until the correct temperature is reached. It will then cycle
on and off to show the temperature is being maintained.
250
100
200
150
FO 2493
9
 Loading...