

Zanussi ZCE650BK User Manual
ELECTRIC
COOKERS
ZCE 650
ZCE 651
INSTRUCTION BOOKLET
GB
Please read this instruction booklet before using the appliance
Important Safety Information
You MUST read these warnings carefully before installing or using the appliance. If you need
assistance, contact our Customer Care Department on 08705 727727
Installation
• Appliances in the UK must be installed and serviced
by a competent person as stated in the Gas
Safety(Installation and Use) Regulations Current
Editionsand the IEE Wiring Regulations.
• This cooker is heavy. Take care when moving it.
• Remove all packaging before using the cooker.
•
Some parts have a shock-resistant plastic film
protection. Be sure to remove this plastic film before
you start operating the appliance and clean the parts
involved using a soft cloth wrung out in warm water
to which a little washing up liquid has been added.
• Ensure that the electrical supply complies with the
type stated on the rating plate.
• Do not attempt to modify the cooker in any way.
• The appliance has to be placed on the floor and it
cannot be placed on a base.
• The ceramic hob is shockproof, but not unbreakable!
Hard or pointed objects falling from a height can
damage the hob. If scratches or cracks are noticed,
disconnect the cooker from the electrical supply and
call you nearest Electrolux Service Force Centre.
• This cooker should be kept clean at all times. A buildup of fats or foodstuffs could result in a fire.
• Never use plastic dishes in the oven.
part of the oven with aluminium foil.
• Always ensure that the oven vent which is located at
the centre back of the hob is left unobstructed to
ensure ventilation of the oven cavity.
• Perishable food, plastic items and areosols may be
affected by heat and should not be stored above the
cooker.
Never line any
Child Safety
• This cooker is designed to be operated by adults. Do
not allow children to play near or with the cooker.
• The cooker gets hot when it is in use. Children should
be kept away until it has cooled.
• Children can also injure themselves by pulling pans
or pots off the cooker.
During Use
• This cooker is intended for domestic cooking only. It
is not designed for commercial or industrial purposes.
• Do not use this cooker if it is in contact with water.
Do not operate the cooker with wet hands.
• Ensure the control knobs are in the ‘OFF’ position
when not in use.
• Appliances become very hot with use, and retain their
heat for long periods after use. Care should be taken
to avoid touching heating elements inside the oven.
• When using other electrical appliances, ensure the
cable does not come into contact with the hot surfaces
of the cooker.
• Never use the ceramic hob as a working space. Do
not store things on the ceramic hob.
• Never use plastic or aluminium foil dishes on the
ceramic hob.
• Unstable or misshapen pans should not be used on
the ceramic hob as unstable pans can cause an
accident by tipping or spillage.
• Never leave the cooker unattended when cooking with
oil and fats.
Service
• This cooker should only be repaired or serviced by an
authorised Service Engineer and only genuine
approved spare parts should be used.
Environmental Information
• After installation, please dispose of the packaging with
due regard to safety and the environment.
• When disposing of an old appliance, make it unusable,
by cutting off the cable.
Keep this instruction book for future
reference and ensure it is passed on
to any new owner.
These instruction are only valid in the
countries whose symbols appear on this
booklet’s cover.
2

Contents
For the User For the Installer
Important Safety Information 2
Control Panel 4
Operation 5
Using the ceramic glass hob 6
Electric Oven 7
Electric Programmer 8
Before the First Use of the Cooker 10
Programming the Oven 11
Safety and Energy saving functions 14
Using the Oven 15
Using the Conventional Oven 16
Cooking Chart - Conventional Oven 17
Pizza Oven 18
Grilling 19
Defrosting 20
Cleaning the Ceramic Hob 21
Cleaning the Oven 22
Instructions for the Installer 30
Important Safety Requirements 30
Electrical connections 31
Something not working 27
Service and Spare Parts 28
Customer Care Department 28
Guarantee Conditions 29
Guide to Use the instructions
The following symbols will be found in the text to guide
you throughout the Instructions:
Safety Instructions
Step by step instructions for an operation
Hints and Tips
Environmental Information
This appliance is manufactured according to
the following EEC directives:
73/23 EEC - 90/683 EEC - 93/68 EEC 89/336 EEC current edition.
3
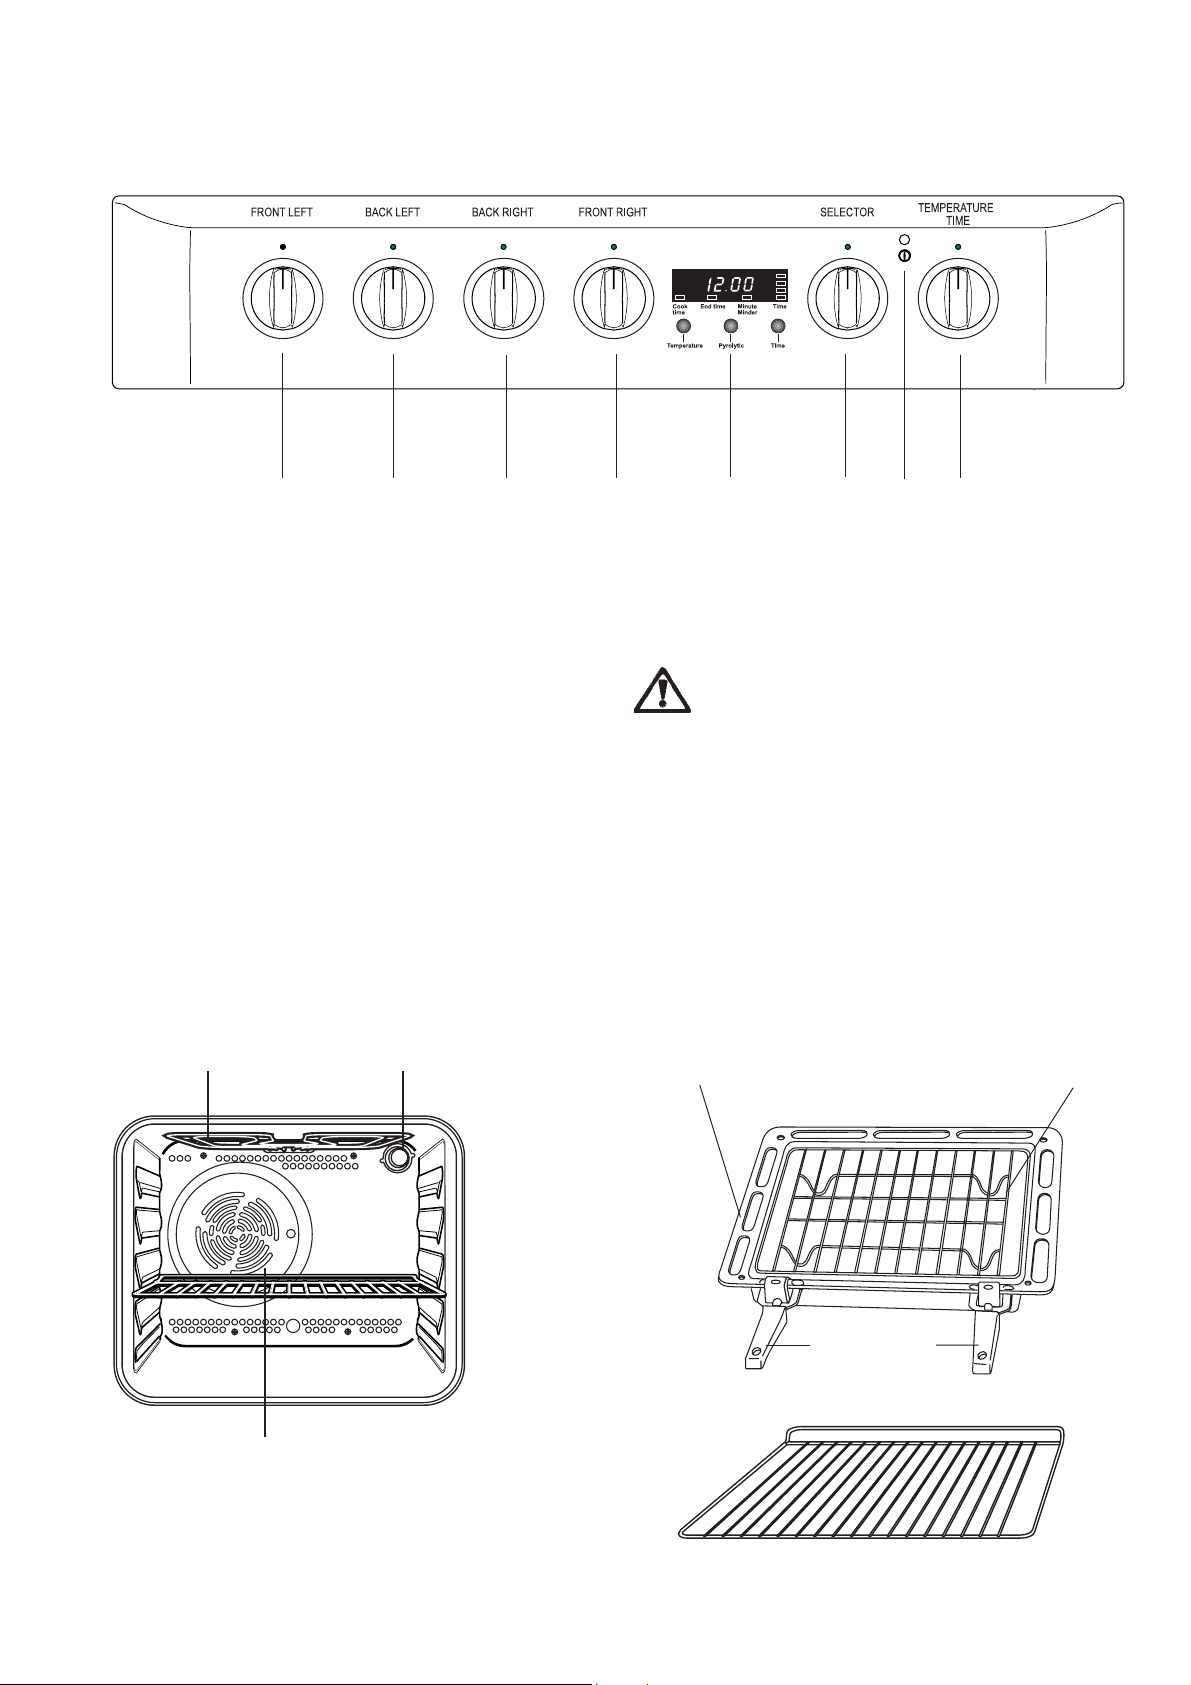
Control Panel
654321 8
7
1. Front left cooking zone control knob
2. Back left cooking zone control knob
3. Back right cooking zone control knob
4. Front right cooking zone control knob
5. Electronic Programmer
6. Oven function control knob
7. Cooker Operation Pilot Light
8. Time/Temperature control knob
The Oven Cavity
Grill element
Oven Light
Storage Drawer
The storage drawer is located underneath the oven cavity.
During cooking the storage drawer may become
hot if the oven is on high for a long period of time,
therefore flammable materials such as oven gloves,
tea towels, plastic aprons etc. should not be
stored in the drawer.
Oven accessories such as baking sheets, will also
become hot, therefore care should be taken when
removing these items from the drawer whilst the
oven is in use or still hot.
Accessories
Grill/roasting pan
Grill trivet
Removable
handles
Oven fan
2 anti-tip
shelves
4
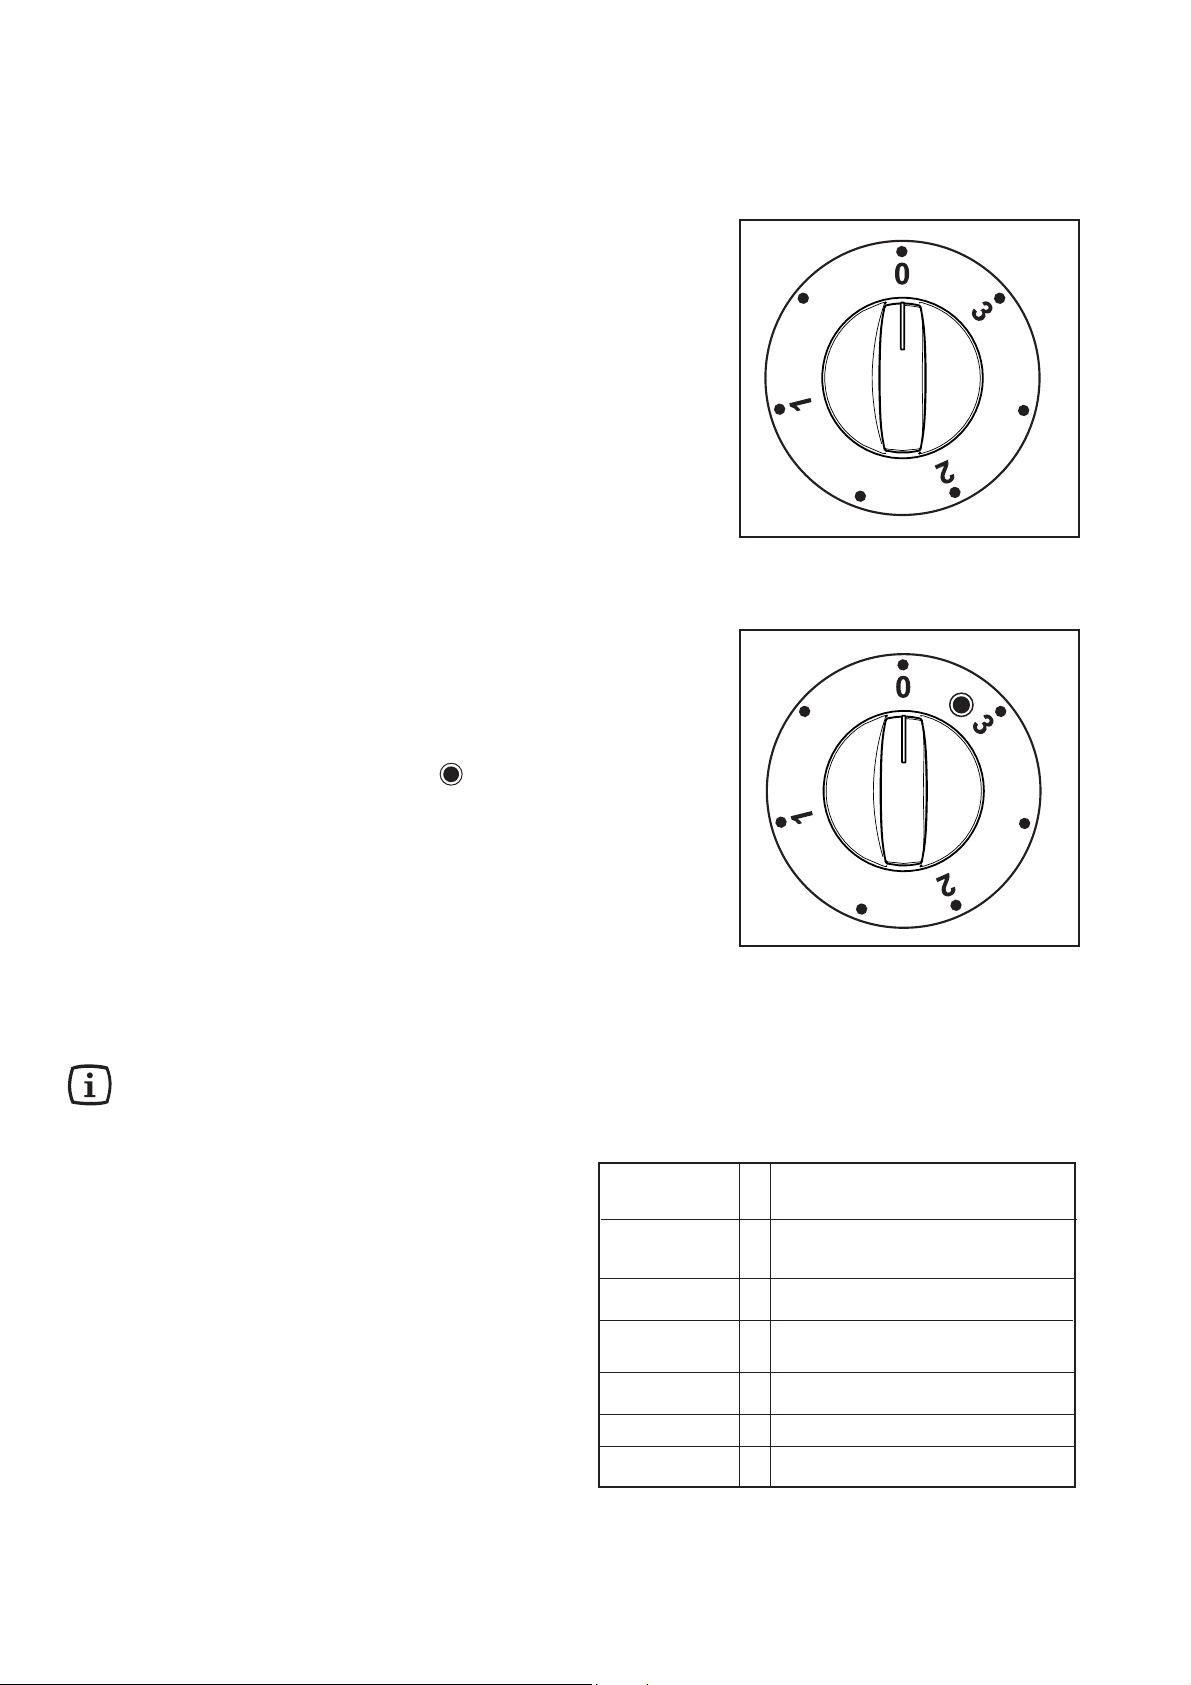
Operation
Ceramic hob cooking zones
To switch on a cooking zone, turn the relevant control knob
clockwise to the required heat setting.
The control knob is numbered 0 - 3
0 - OFF
3 - Maximum.
The hob has two types of cooking zones:
3 normal cooking zones (back left, back right
and front right)
We recommend the plates are switched to maximum (3) for
a short while to boost the cooking zone, and then adjusted
to the required setting.
2 double circuit cooking zones (front left)
The front left cooking zone has two heating elements.
Control knob for normal cooking zone
- To switch on the smaller circular cooking zone, turn
the relevant control knob clockwise to the required heat
setting.
- To switch on both heating elements, turn the control
knob clockwise to maximum heat setting (3) then turn
the knob further to nearly reach the "0" symbol. You
will hear a "click" and the wider cooking zone will switch
on. Then turn back the knob to position 3
it to the required heat setting.
Please be aware that the two heating elements will now
operate together, giving a higher power output than a
normal cooking zone.
and adjust
Residual heat indicators
The hob is fitted with four residual heat indicators
corresponding to each cooking zone. The corresponding
indicator will remain on until the temperature falls below
30°C, even after the cooking zone is switched off.
When a cooking zone is switched on, a short
buzzing may be heard. This is quite normal and
does not affect the hob operation in any way.
Mains On Light
The mains on light will come on when any function (oven
or hob) is selected.
Control knob for double circuit cooking zone
Suggestions for the correct setting of the cooking zones
are given in the following table.
OFF 0
Very Gentle • Simmering vegetables
Fish in its own juice
Cooling fan
The cooling fan operates during cooking. Air is expelled
through vents between the oven door and the control panel.
The cooling fan may run on after the oven is switched off
to keep the controls cool. This is quite normal.
The Safety Thermostat
This oven is provided with a safety thermostat. In case of
malfunctioning of the main thermostat, and consequent
over-heating, the safety device will stop the power supply
to the appliance. If this happens, call your local Service
Force Centre. Under no circumstances should you attempt
to repair the appliance yourself.
Gentle 1 Simmering potatoes or soups
Slow • Boiling large quantities
of food, stews and soups
Medium 2 Slow frying, making a sauce
High • Fast frying of meat or fish
Fast 3 Rapid heating up of fat or water
5
Using the ceramic glass hob
Ceramic glass surface
The glass is hard, and has been tempered to withstand
heat, cold and temperature shocks. But like all glass it
is sensitive to impact. Do not stand on the ceramic glass
surface.
If scratches or cracks are noticed, disconnect
the cooker from the electrical supply and call
you nearest Service Force Centre.
Keep all objects and materials which can melt
away from the cooking surface, e.g. plastics,
aluminium foil.
Care should be taken when preparing food or drinks
containing sugar. If anything of this nature
accidentally comes into contact with the ceramic
surface it must be scraped off immediately while
stlll hot and wiped away to avoid damage to the
surface.
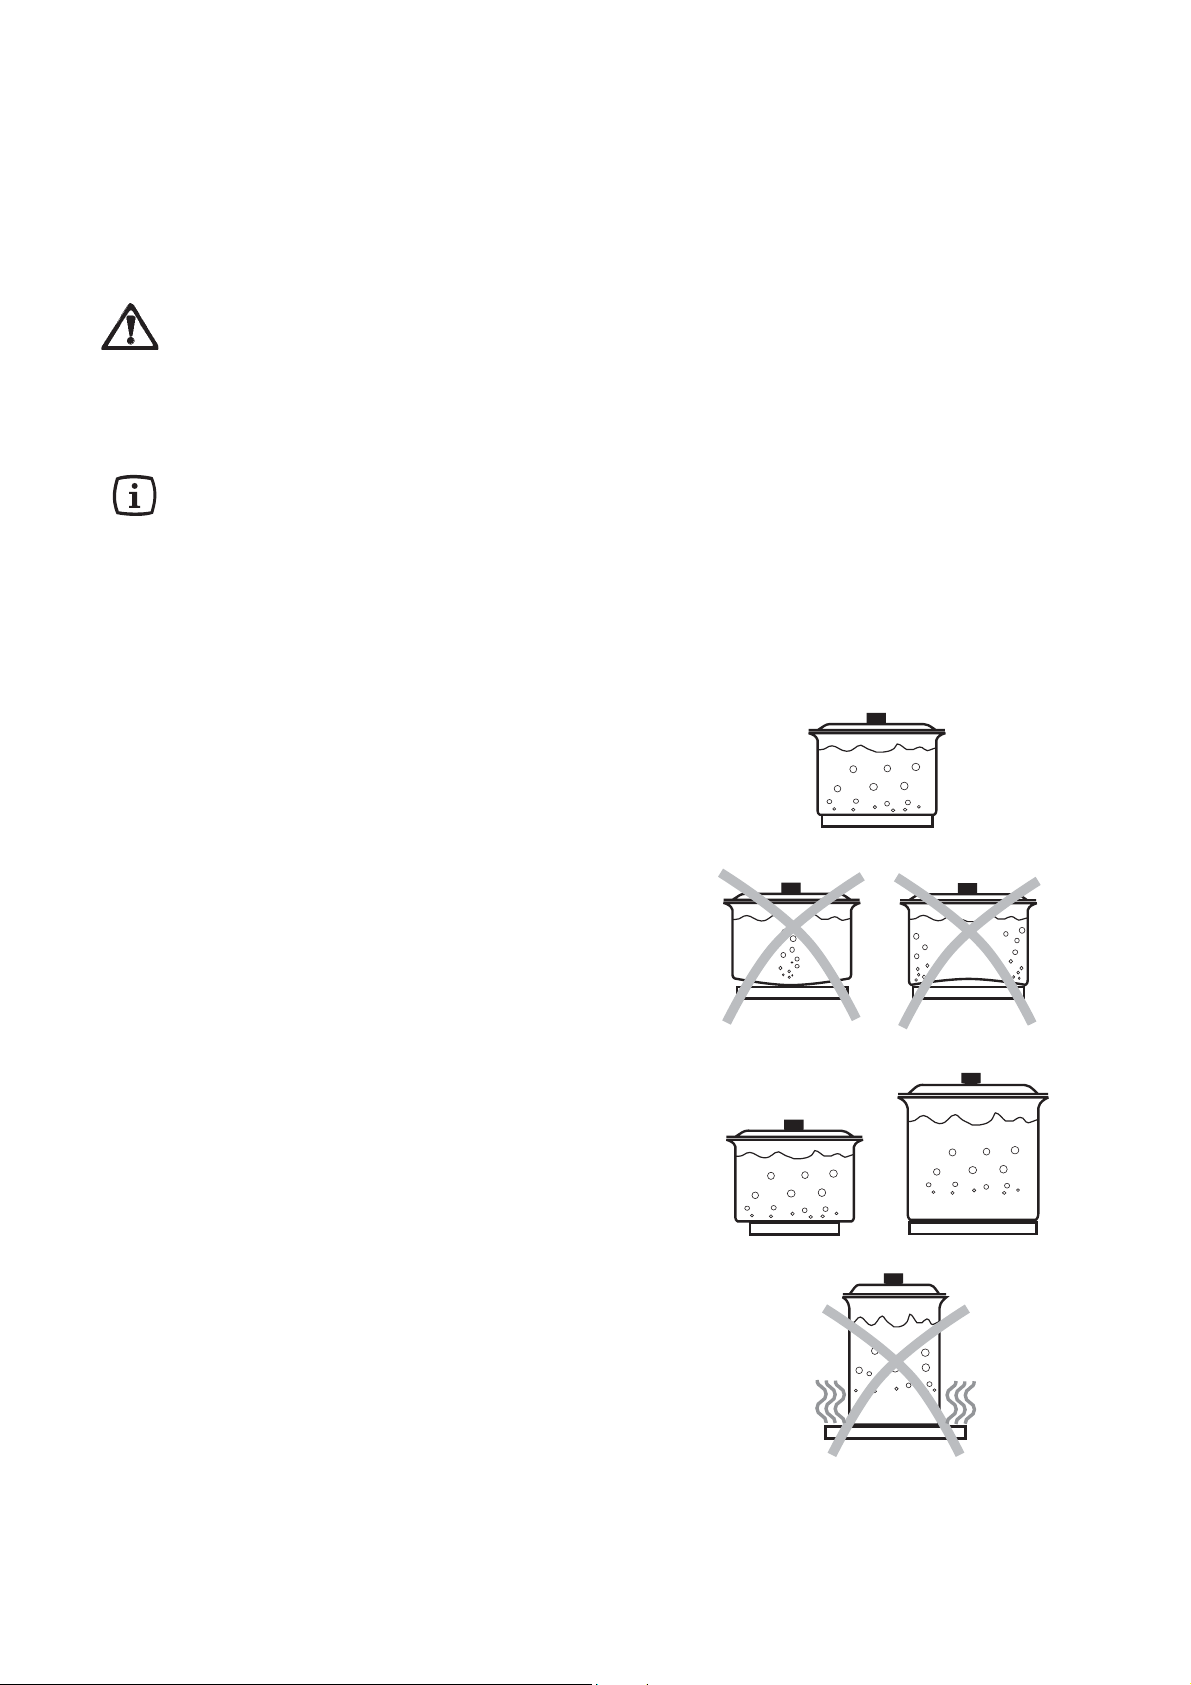
Energy consumption
To save energy, you should:
- use only cooking and frying utensils with smooth, flat
bases.
- place pots and pans in position before switching on
the cooking zone.
- wherever possible, cover pots and pans with a lid.
- switch off the cooking zone a few minutes before the
end of the cooking time, in order to make use of the
residual heat.
- use the residual heat of the cooking zones for keeping
food warm or for melting.
- position pots and pans centrally on the cooking zones.
Saucepans and frying pans
Saucepans and frying pans should not be smaller than
the cooking zone, and preferably not more than 10-15
mm larger than the diameter of the cooking zone.
Always use cooking and frying utensils with smooth, flat
bases.
The bases should always be clean and dry. Cook with a
lid in place.
Check that the bases of utensils are smooth and
undamaged; bases with burrs and sharp edges will
scratch the ceramic glass surface.
To avoid scratching or damaging the ceramic cooking
surface, pots and pans should be moved on the plate by
lifting them, and not by sliding.
Utensils with aluminium and copper bases can leave
behind metallic discolourations which can only be
removed with difficulty or sometimes not at all.
6
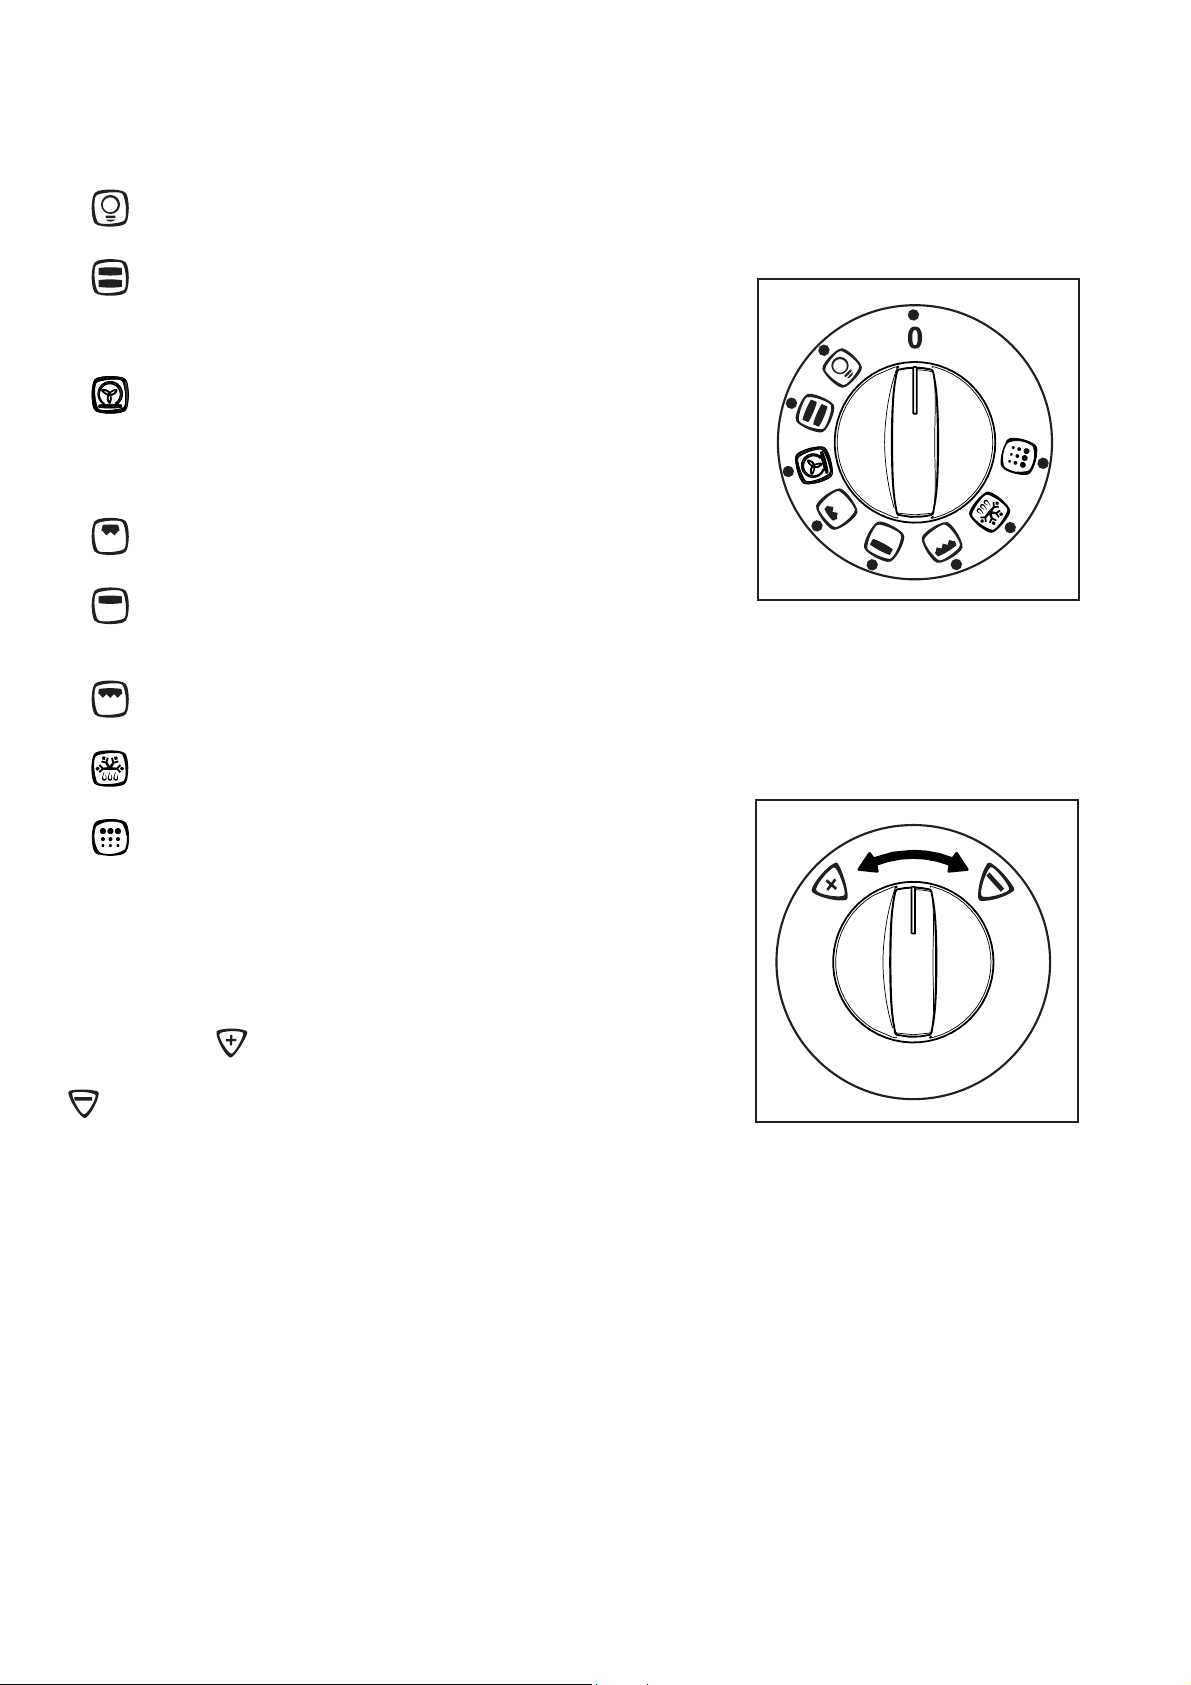
Electric Oven
Oven Function Control Knob
Oven Light - The oven light will be on without
any cooking function.
Conventional cooking - The heat comes
from both the top and bottom element, ensuring
even heating inside the oven. Pre-set
temperature: 200 °C
Pizza Oven - The bottom element provides
direct heat to the base of pizzas, quiches or
pies, while the fan ensures air is circulated to
cook the pizza toppings or pie fillings. Pre-set
temperature: 175 °C
Inner Grill - It can be used for grilling small
quantities. Pre-set temperature: 250 °C
Top heating element - The heat comes from
thetop of the oven only. Pre-set temperature:
250 °C
Full Grill - The full grill element will be on.
Pre-set temperature: 250 °C
Defrost setting -This function assists in thawing
of frozen food. Pre-set temperature: 30 °C
Pyrolytic cleaning - This special function
allows you to clean thoroughly the oven cavity.
Time/Temperature Control knob
The time/temperature control knob allows you to select
the time (minute minder, cooking duration and end of
cooking time) and temperature.
Turn it clockwise
increase the time/temperature setting. Turn it anticlockwise
and hold it in the turned position to decrease the time/
temperature setting. The count-up or count-down speed
increases the longer the knob is held in the turned
position.
and hold it in the turned position to
Mains On Light
The mains on light will come on when any function (oven
or hob) is selected.
7
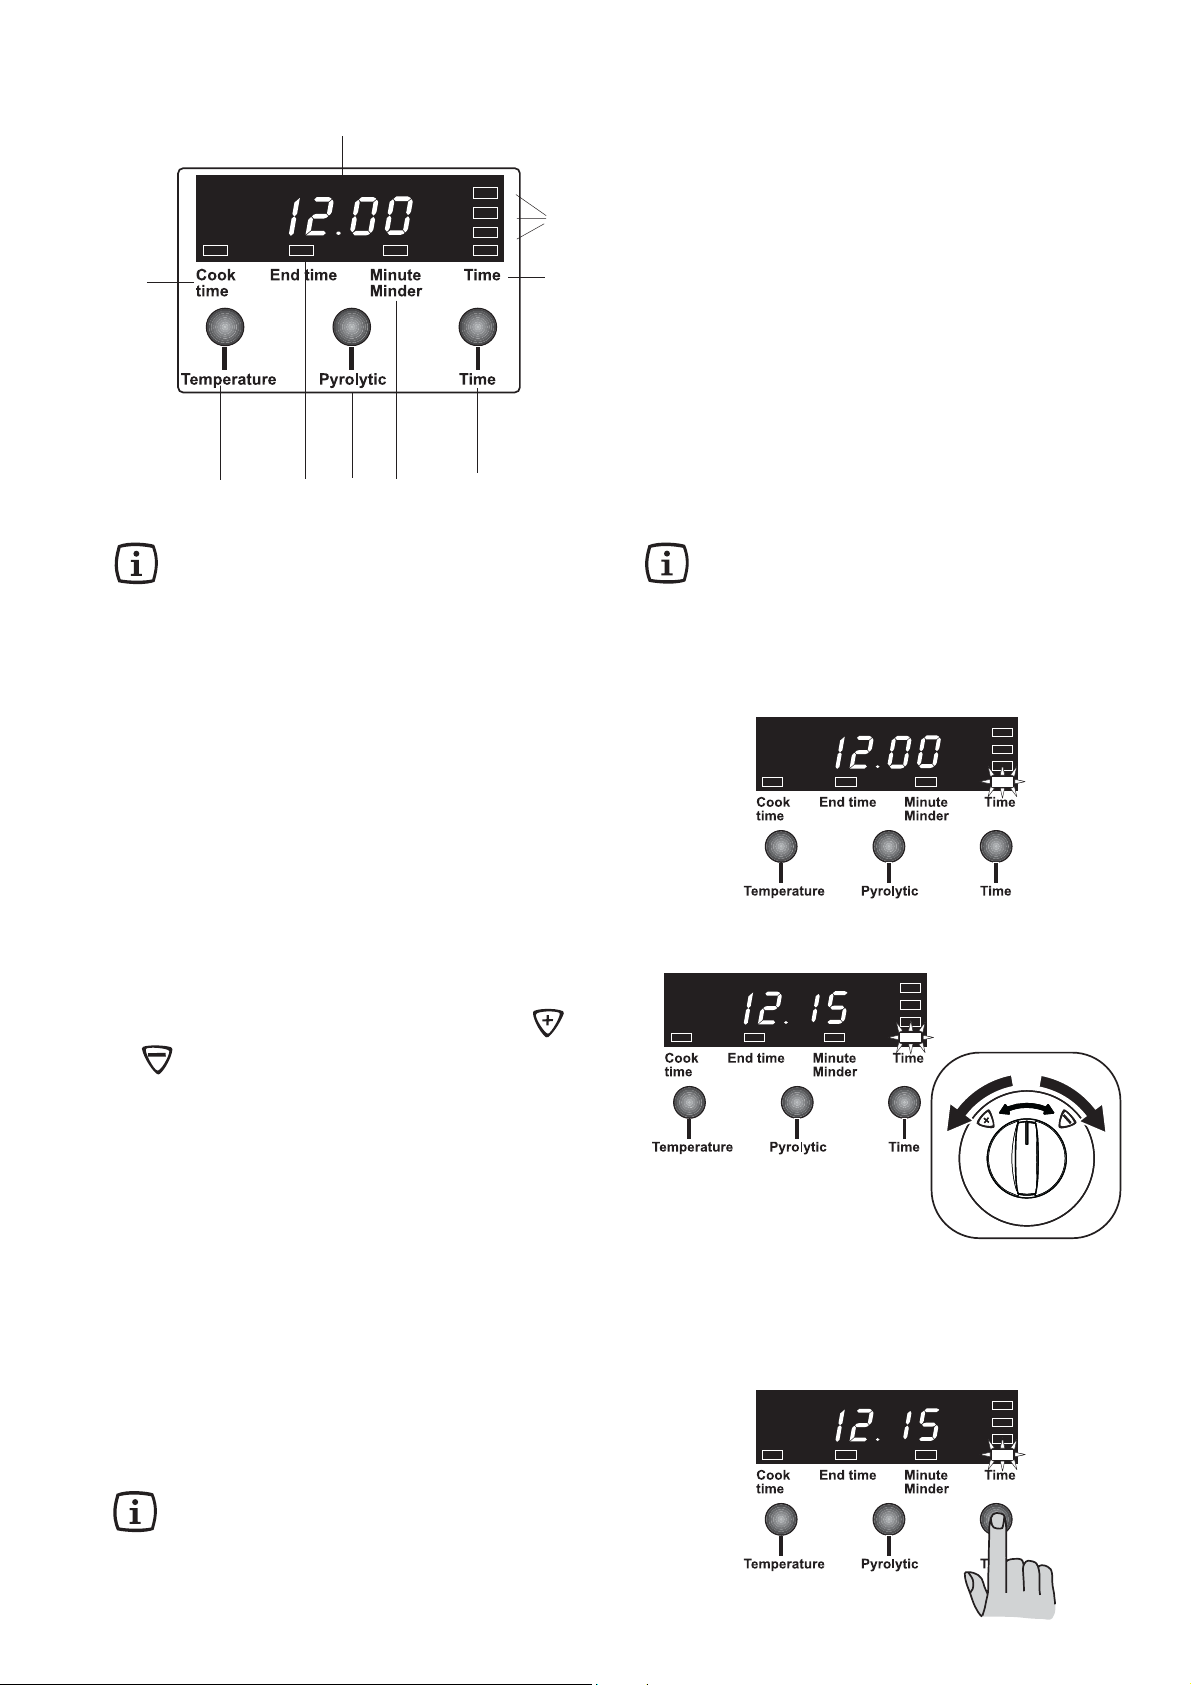
Electronic programmer
9
1. “Cook time” indicator
8
1
2
3 4576
2. "Temperature" button for displaying the temperature
inside the oven
3. “End Time” indicator
4. “Pyrolytic” button for activating the pyrolytic cleaning
cycle
5. “Minute minder” indicator
6. “Time” button for selecting the time functions
7. “Time” indicator
8. Temperature level indicators
9. Display
The oven will work only if the time of day has
been set.
However, the oven can also be operated without
any programme.
How to set the time of day
When the power supply is switched on, or after a power
failure, the display will automatically show 12.00 and the
indicator “Time” will flash in the display.
Ensure the correct time of day is set before using the
oven.
To set the correct time of day:
1. Turn the Time/Temperature control knob to or
to adjust the time in 1 minute degree step.
In case of loss of power, all the settings (time of
day, set programme or programme in operation),
will be cancelled. When the power is restored,
the numbers on the display will flash, and the timer has to be reset.
2. After the setting is carried out, wait for 5 seconds:
the “Time” indicator will go out and the display will
show the set time. The appliance is ready for use.
To reset the correct time of day:
1. Press button “Time” repeatedly to select the “Time“
function. The relevant indicator will start flashing. Then
proceed as described above.
The time of day can only be reset if no automatic
function (cook duration or end of cooking) has been
set.
8
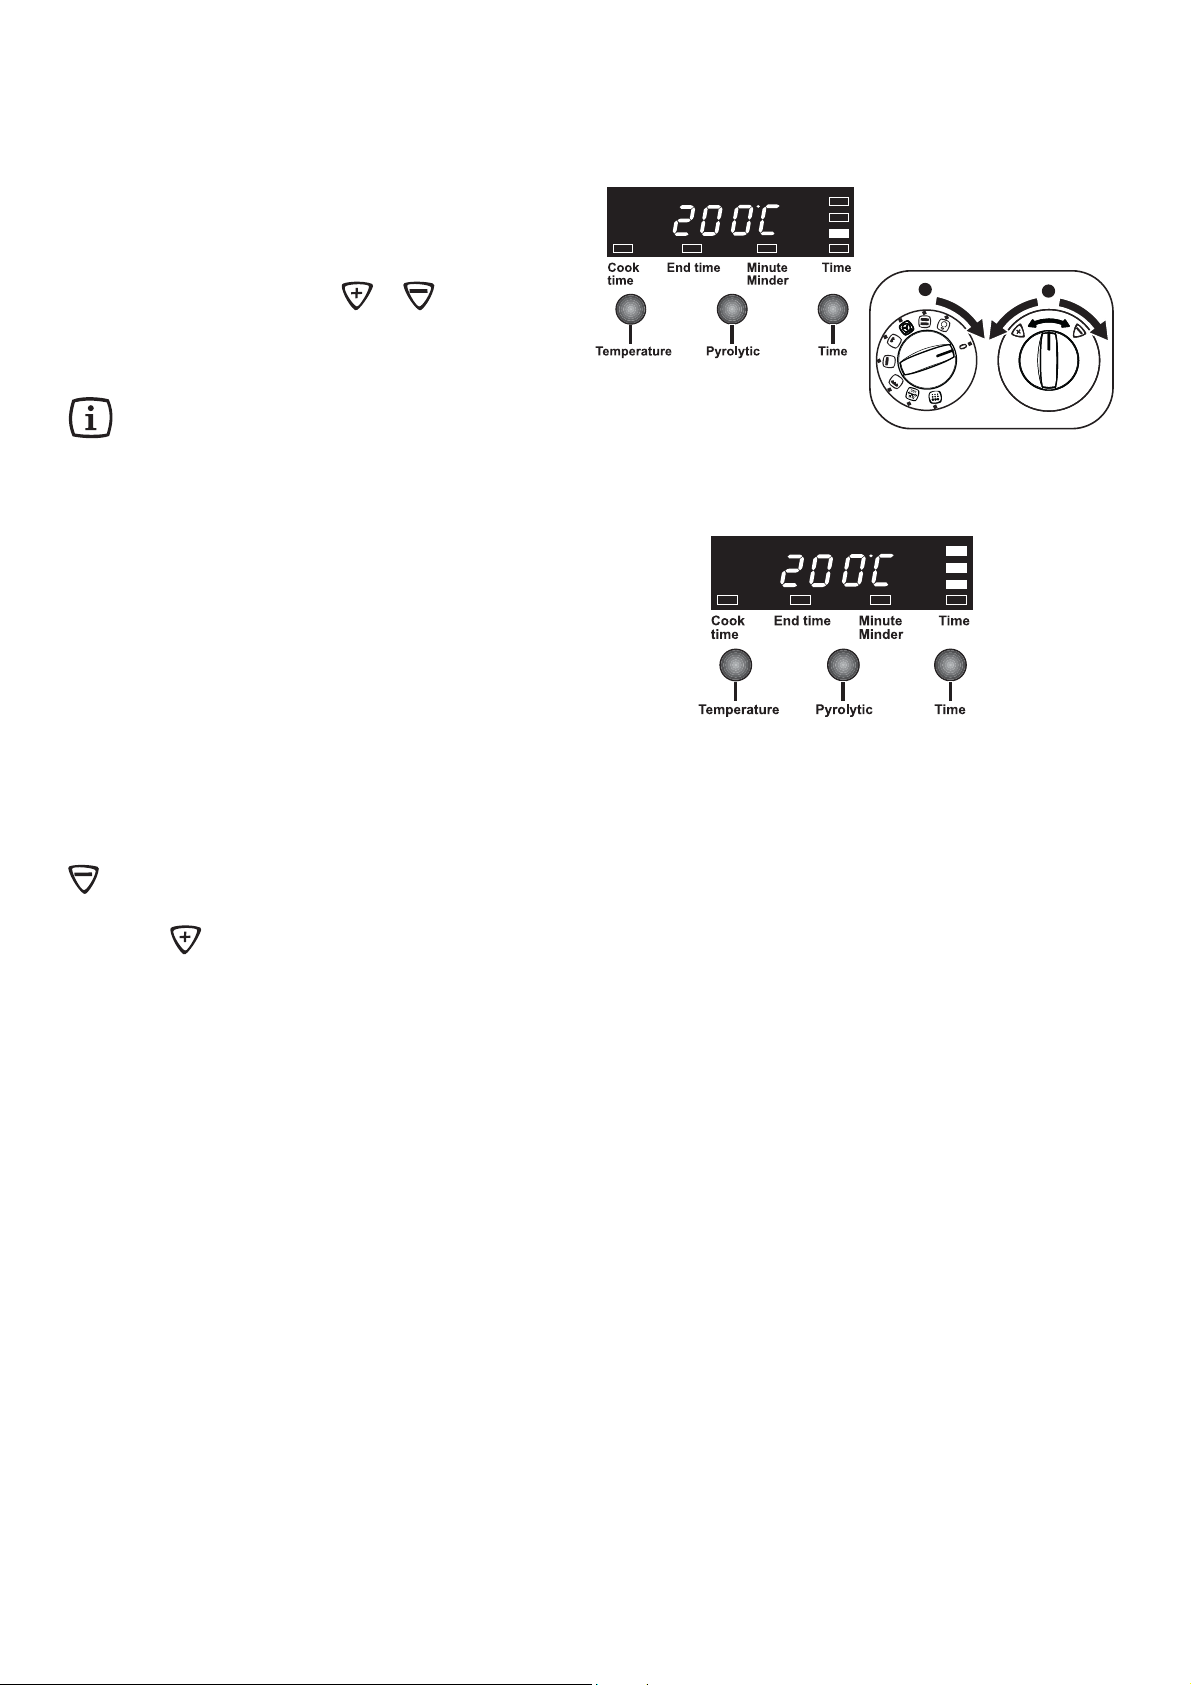
How to select a cooking function
and set the temperature
The oven has seven different cooking functions.
1. Turn the oven control knob and select the required
cooking function. Each time a cooking function is
selected, a pre-set temperature will appear in the
display.
2. If the pre-set temperature is not suitable, turn the Time/
Temperature control knob to
temperature in 5 degree steps.
After choosing the temperature, the oven starts heating
up and the temperature level indicators will light up.
Push button “Temperature” to display the
temperature inside the oven cavity.
or to adjust the
Temperature level indicators
As soon as the oven heats up, the temperature level
indicators light up, indicating the degree to which the
oven is currently heated.
When the required temperature is reached, an acoustic
alarm will sound for a short time and all the temperature
level indicators will light permanently.
After the oven is switched off, the indicators will stay on
until the temperature reaches 40 °C.
Special functions
The following functions can be activated by pressing a
button and turning the time/temperature control knob at
the same time:
- Child lock: turn the time/temperature control knob to
and press “Time” button.
- Display switched on/off: turn the time/temperature con-
trol knob to and and press “Time” button.
For further details, see chapter “Safety and Energy Saving functions”.
9
Before the First Use of the Cooker
Remove all packaging, both inside and outside
the oven, before using the oven.
Before cooking for the first time, carefully wash
the oven accessories.
Before first use, the oven should be heated without food.
During this time, an unpleasant odour may be emitted.
This is quite normal.
• Set the time of day with the electronic
This procedure should be repeated with the pizza oven
function
5-10 minutes.
programmer (see paragraph "How to set the
time of day").
• Switch the oven function control knob to
conventional cooking
with the time/temperature control knob.
• Open a window for ventilation.
• Allow the oven to run empty for approximately
45 minutes.
and full grill function for approximately
and select 250 °C
Once this operation is carried out, let the oven
cool down, then clean the oven cavity with a
soft cloth soaked in warm water to which a little
mild washing-up liquid has been added.
Using the ceramic hob for the
first time
The cooking surface should be cleaned before use to
remove any traces of the production process.
Wipe the ceramic surface and frame with a damp
cloth using warm water to which a little washing
up liquid has been added, and wipe dry.
Heating up for the first time
To check the cooking zones, briefly switch each
one on.
10
 Loading...