

Page 1

EN
User manual 2
Washer/Dryer Stand with Drawer
PDST HEC
Page 2
Contents
How to install the stand on your washing
machine _ _ _ _ _ _ _ _ _ _ _ _ _ _ _ _ _ _ _ _ _ 2
How to install the stand on your tumble dryer _ _ _ _ 4
How to install the stand on your washing machine
Warning! Do not install the stand on a washer/dryer
column.
Caution! If the washing machine is already
connected to the mains, proceed as follows:
1. pull out the plug from the mains;
2. stop water supply by closing the tap;
3. disconnect the inlet pipe and the drain pipe and get
ready to collect any water left in the machine with a
shallow basin.
Important! With a brand new washing machine, do as
follows:
1. install the stand before connecting the machine to
water and electricity mains;
2. follow the instructions to remove any transport safety
equipment.
Before you start installing the stand on your washing machine make sure you have plenty of room. Avoid working
in restricted spaces as the installation and subsequent
adjustment operations may turn out quite awkward and
difficult to carry out.
Take the stand out of its package and use the cardboard
to rest washing machine and stand on, so you wont
scratch the equipment varnish and the floor.
In the stands drawer you will find an envelope with all the
necessary material for a correct assembly.
Have ready a Phillips screwdriver to fit rear brackets to
the stand and to fit rear brackets to the machine.
The pack includes:
• 4 front rubber feet (for tumble dryer only);
• 6 rear metal brackets (4 for washing machine and, de-
pending on the model, 2 for tumble dryer);
• 6 self-tapping screws (4.2 x 13 mm);
• 1 key to adjust stand feet.
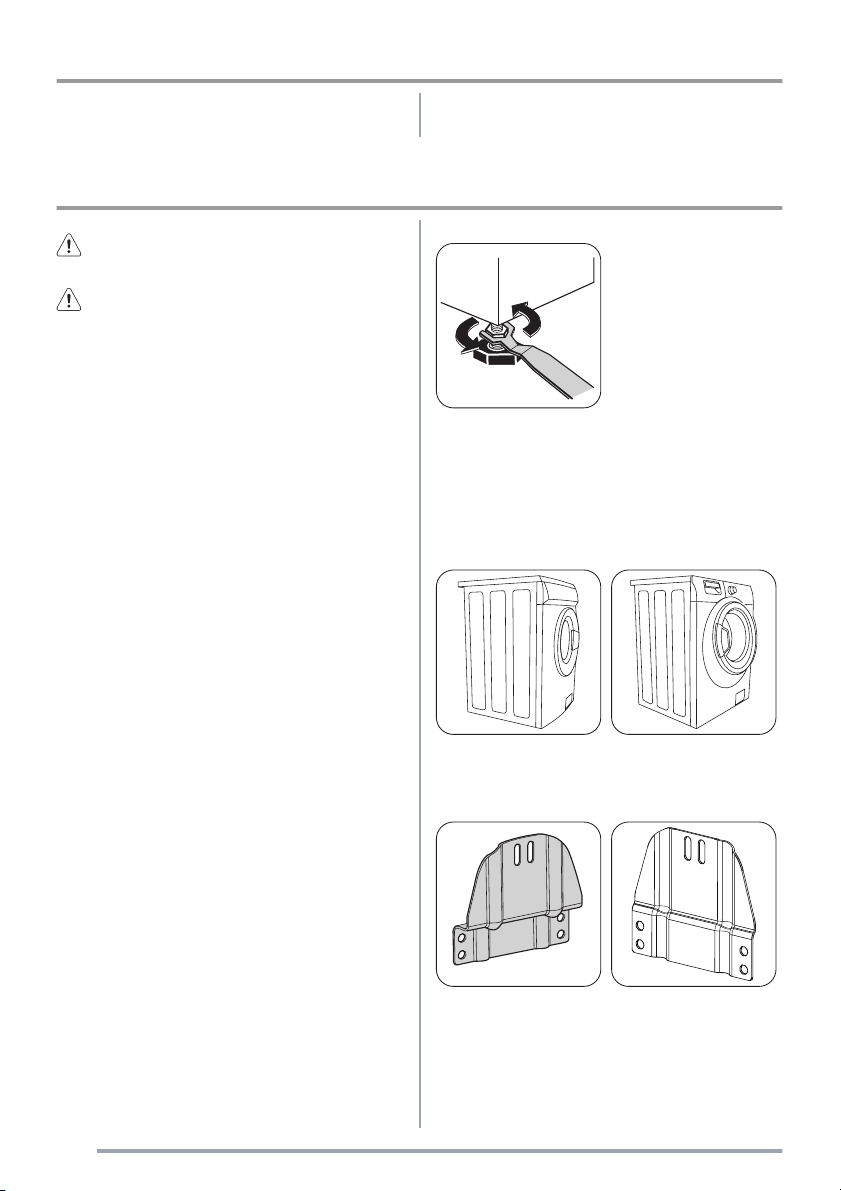
fig. 1
Proceed as follows (fig. 1):
• loosen the nuts using the key supplied with the
stand;
• adjust the feet to allow for an uneven floor;
• tighten up all check nuts.
fig. 2 fig. 3
Before picking the rear brackets you must first look at
the machines side (fig. 2 and 3).
fig. 4
Subject to change without notice
fig. 5
Important! Before starting the installation, adjust the
stand's feet in order to achieve a perfectly stable horizontal position.
2
Page 3
If the side is as shown in fig. 2, you must pick the rear
brackets as in fig. 4.
If, the side is as shown in fig. 3, you must pick the rear
brackets as in fig. 5.
fig. 6 fig. 7
Now you can proceed to fit one of the rear brackets to
the left side of the stands back using the screws supplied (fig. 6 and 7).
Lay gently the washing
machine on the detergent
compartment side (fig. 8).
fig. 8
fig. 11 fig. 12
Slide the stand under the washing machine so that its
front adjusting feet match the stands front brackets (fig.
11) and the rear bracket is positioned against the ma-
chines back (fig. 12).
Screw the rear bracket onto the machines back using one of the supplied
screws (fig. 13).
fig. 13
x5
fig. 9
Loosen the washing machines adjusting feet using the
key supplied with your washing machine, then undo 5
complete turns (fig. 9 and 10).
Important! If the feet are already partly undone, you
must first screw them on again and then undo 5 complete turns.
fig. 10
fig. 14 fig. 15
Return machine and stand to a vertical position, and
screw the other bracket onto the stand and the machines
back using the remaining supplied screws (fig. 14 and
15).
fig. 16 fig. 17
3
Page 4

The stand is now installed; check whether your washing
machines back feet rest on it (fig. 16). Otherwise undo
them using the key supplied with your washing machine
(fig. 17).
fig. 18 fig. 19
The stands drawer, with a capacity of up to 20 kg, contains two dividers; they may be taken out if you wish
(fig. 18). The drawer was designed with a special compartment inside where you can place a folding plastic
box, supplied, quite useful to store your washing laundry (fig. 19).
How to install the stand on your tumble dryer
fig. 20 fig. 21
The drawer slides on two metal runners and can easily
be pulled out to the full. Should you wish to remove the
drawer, you must pull it out completely (fig. 20) and act
on the two black plastic levers halfway through the
metal runners. Pull the right lever down and the left
lever up: the drawer will be uncoupled from the runners
and easily removed (fig. 21).
Warning! Do not place any solvent or flammable
substance into the drawer, as the fumes could be a
possible cause of fire.
Warning! Do not install the stand on a washer/dryer
column.
Caution! If the tumble dryer is already connected
to the mains, proceed as follows:
1. Pull out the plug from the mains;
2. remove the condensation tank found in the upper or
alternatively lower part of the tumble dryer (acc ording
to machine type) and empty it, if necessary;
3. Drain off any condensation water through the hose
found on the lower part of the machines back (fig. 1).
Place a mop on the floor and remove first the clamp
(A) using a pair of pliers, then the cap (B). Tilt the
machine slightly on one side. When all the water has
drained off, put the cap back onto the hose and refasten the clamp.
4
A
B
fig. 1
Important! With a brand new tumble dryer, do as follows:
1. install the stand before connecting the machine to the
mains;
2. follow the instructions to remove any transport safety
equipment.
Before you start fitting the stand to the machine make sure
you have plenty of room. Avoid working in restricted
spaces as the installation and subsequent adjustment
operations may turn out quite awkward and difficult to
carry out.
Take the stand out of its package and use the cardboard
to rest machine and stand on, so you wont scratch the
equipment varnish and the floor.
Page 5

In the stands drawer you will find an envelope with all the
necessary material for a correct assembly. Have ready a
Phillips screwdriver to fit rear brackets to the stand and
an Torx screwdriver to fit rear brackets to the machines
back.
The pack includes:
• 2 grey short rubber feet to be used for the following
tumble dryer models:
• 2 white long rubber feet to be used for the following
tumble dryer models:
fig. 2
Proceed as follows (fig. 2):
• loosen the nuts using the key supplied with the
stand;
• adjust the feet to allow for an uneven floor;
• tighten up all check nuts.
fig. 3 fig. 4
Lay the machine on its left
side, making sure you do
not damage it. Remove the
front feet (fig. 3) and replace them with the rubber
ones.
Tighten the back feet (fig.
4).
• 6 rear metal brackets (4 for washing machine and 2 for
tumble dryer) ;
• 6 self-tapping screws (4.2 x 13 mm);
• 1 key to adjust the stands feet.
Important! Before starting the installation, adjust the
stand's feet in order to achieve a perfectly stable horizontal position.
Warning! If you install the stand under an energy
saver model Class A, you must not use the tumble
dryer immediately. Please wait 8 hours at least. For more
detailed information, read the appliance user manual
carefully.
SX
fig. 5
fig. 6
5
Page 6

DX
fig. 7 fig. 8
After having removed the front brackets from the stand
(fig. 5), fit the rear brackets (fig. 6 and 7) to the stands
back, using the screws supplied (fig. 8).
fig. 9 fig. 10
Undo the two screws found left and right on the lower
part of the tumble dryer back (fig. 9). Lift the machine
and correctly place it over the stand, trying to position
first the stand against the rear brackets and then the
suction caps over the stand surface (fig. 10).
Fit the rear brackets to the machines back using the
previously removed screws (fig. 11).
fig. 12 fig. 13
The stands drawer, with a capacity of up to 20 kg, contains two dividers; they may be taken out if you wish
(fig. 12). The drawer was designed with a special compartment inside where you can place a folding plastic
box, supplied, quite useful to store your washing laundry (fig. 13).
fig. 14 fig. 15
The drawer slides on two metal runners and can easily
be pulled out to the full. Should you wish to remove the
drawer, you must pull it out completely (fig. 14) and act
on the two black plastic levers halfway through the
metal runners. Pull the right lever down and the left
lever up: the drawer will be uncoupled from the runners
and easily removed (fig. 15).
fig. 11
6
Warning! Do not place any solvent or flammable
substance into the drawer, as the fumes could be a
possible cause of fire.
Page 7

7
Page 8

132949240 - 01 - 012010
www.zanussi.com
 Loading...