

Page 1
WW
ashing machineashing machine
W
ashing machine
WW
ashing machineashing machine
TL 552 CTL 552 C
TL 552 C
TL 552 CTL 552 C
129 2208 62
Instruction manualInstruction manual
Instruction manual
Instruction manualInstruction manual
GB
Page 2
ZANUSSI TL 552 C
Before first use, remove the internal packing of your washing
machine !
Technical data
• Dry clothes loading capacity : cotton 5 kg
synthetics 2,5 kg
wool 1 kg
• Dimensions : height 850 mm
width 397 mm
depth 600 mm
• Voltage : 230 V
• Heater rating : 1950 W
• Power absorbed : 2300 W
• Spinning speed : 550 rpm
Before each wash, make sure that :
• the drain hose is correctly placed
• the water tap is turned on (fully open)
• the plug is in the wall socket
• the on/off pusbutton is on the "off" position (pressed out)
Your washing machine is ready to operate :
• lift up the lid of the machine
• open the drum with your two hands by pressing
the button A and the two flapdoors till they
disengage
• introduce the laundry into the drum ; close the
drum and the lid of the machine
Be careful : before closing the lid of your machine, make sure that the drum flapdoors are
correctly closed :
- the two flapdoors fastened
- the button A pressed out
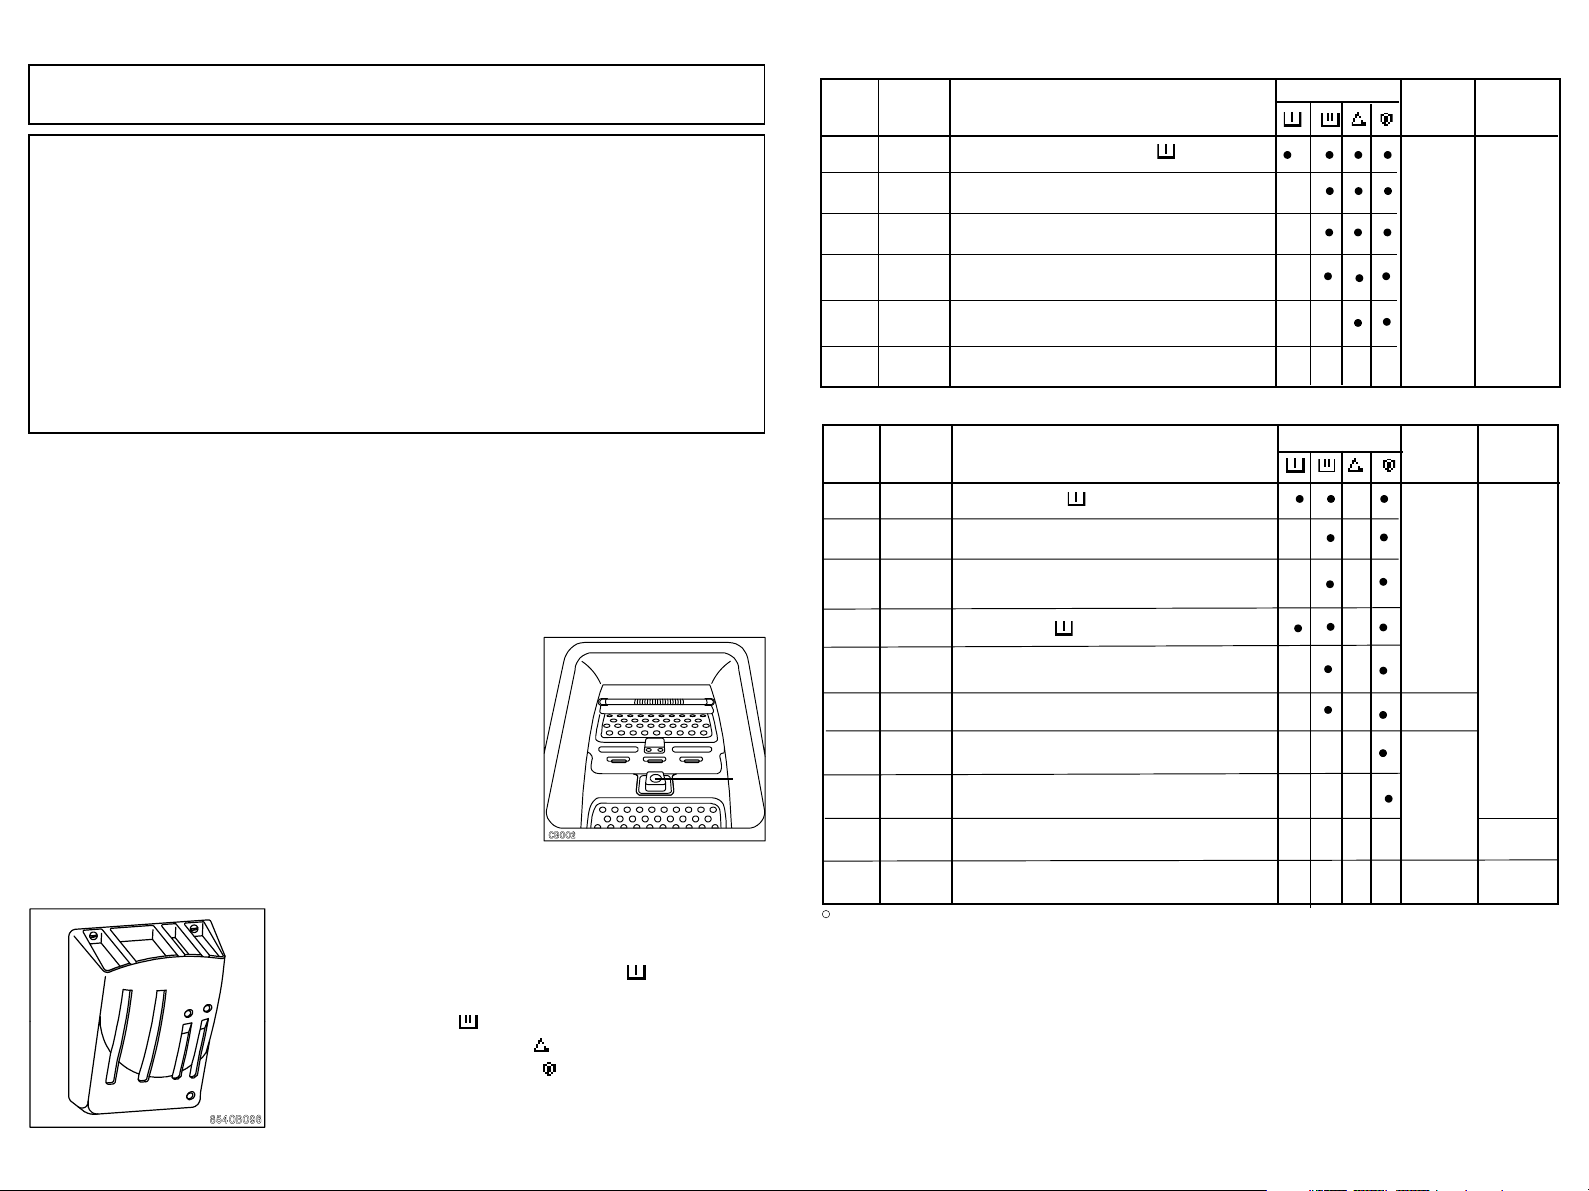
The detergent dispenser
2
1
4
3
1 Prewash powder compartment ( )
2 main wash powder and liquid detergent
compartment ( )
3 bleach compartment ( )
4 softener compartment ( )
Pour the recommended quantities of detergent
into the corresponding compartments.
Programmes
COTTON - LINENCOTTON - LINEN
COTTON - LINEN
COTTON - LINENCOTTON - LINEN
ProductsProducts
Products
Prog.Prog.
Temp.Temp.
Prog.
Temp.
Prog.Prog.
Temp.Temp.
°C°C
°C
°C°C
A
B
C
D
F
G
SYNTHETICS AND MIXEDSYNTHETICS AND MIXED
SYNTHETICS AND MIXED
SYNTHETICS AND MIXEDSYNTHETICS AND MIXED
Prog.Prog.
Prog.
Prog.Prog.
H
K
M
N
P
90
White and coloured +
90
White
60
White
40
Short programme
4 rinsings
Spinning
Temp.Temp.
Temp.
Temp.Temp.
°C°C
°C
°C°C
Synthetics +
60
J
L
Synthetics
60
Short programme
40
Delicate +
40
Deicate
40
Wool
30
3 rinsings
ProductsProducts
( )
( )
ProductsProducts
Products
ProductsProducts
Max.Max.
Max.
Max.Max.
loadload
load
loadload
5 kg
Max.Max.
Max.
Max.Max.
loadload
load
loadload
2,5 kg
1 kg
A
Q
R
S
Liquid detergent
When the selected programme is over, the machine stops automatically. The timer knob stops on
the position "I".
The wash programmes for cotton and linen automatically end by a spinning phase.
The wash programmes for synthetics end by a rinse hold to avoid the creasing of the laundry if it
is not taken away from the drum just after the wash. You can end these programmes with a short
spinning (programme R) or with a draining (programme S).
Be careful : The lid can only be opened 1 to 2 minutes after the machine has stopped.
After each wash :
• press out the on/off pushbutton ; the control lamp lights off.
• press out the pushbuttons if necessary.
• unplug the machine from the wall socket.
• turn off the water tap.
1 rinsing
Short spinning
Drain
2,5 kg
5 kg
End ofEnd of
End of
End ofEnd of
prog.prog.
prog.
prog.prog.
Spinning
End ofEnd of
End of
End ofEnd of
prog.prog.
prog.
prog.prog.
Rinse hold
Spinning
Drain
Page 3

Control panel
TL 552 C
A 60° ÷ 90° D 30° ÷ 40°
B 60° ÷ 90° F
C 40° ÷ 60° G
• choose the programme according
to the nature and the degree of soil
of the laundry.
• turn the timer knob clockwise to
select the chosen programme.
2 Select the temperature
• choose the temperature which
corresponds to the chosen programme (see the programme table)
according to the nature of the
laundry and to the fastness of the
colours.
H 40° ÷ 60° N 30° ÷ 40°
J 40° ÷ 60° P
K 30° ÷ 40° Q
L ÷ 40° R
M ÷ 40° S
Press the pushbutton
3
if necessary
• Half load pushbutton " " : if pressed
in at the beginning of a wash programme, it allows to wash
economically small quantities of
laundry, up to 2,5 kg of resistant
laundry (cotton-linen) and to 1 kg of
delicate laundry (synthetics).
This pushbutton cannot be used with
the wool programme (N).
4 Press the pushbutton " "1 Select the programme
• The programme starts. The control
lamp lights on.
Page 4

The products (see the "Washing guide" leaflet)
Prewash and main wash powder compartment
Follow the manufacturer's instructions for recommended quantities.
If the water is soft, decrease the quantity.
If the water is hard or if the laundry is very soiled or stained, increase the detergent
quantity a little. For information regarding the degree of hardness in your area, enquire
with your local authorities.
Bleach
You may use a bleach agent in all the washing programmes. However, make sure that
the fabric withstands the treatment. Bleach is automatically washed down into the
drum. Pour 1/4 to 1 glass of 12° chl bleach into compartment "c
machine on. Make sure that the level of the liquid never exceeds the max level.
Softener
Compartment allows automatic addition to the last rinse of a liquid softener.
Follow the quantities recommended on the bottle.
Make sure that the level of the liquid never exceeds the max level.
" before switching the
Cleaning the detergent dispenser
Your washing machine is equipped with a detergent dispenser located under the
lid ; it is removable in order to make its cleaning easier.
Dismantling
1 -
Turn the two screws round a quarter with a
screwdriver or a coin in order to take away the
detergent dispenser.
The detergent dispenser is very easy to remove,
you just have to slide it towards the top.
Clean the detergent dispenser under running
water with a brush or a twisted rag.
2 -
Reassembly
Reposition the detergent dispenser at its
place proceeding the opposite way.
This appliance complies with the following EC Directives :
- 72/23/EEC of 19.02.1973 - Low-Voltage Directive
- 89/336/EEC of 03.05.1989 (including Amentment Directive 92/31/EEC) EMV Directive.
Page 5

Removal of the internal packing
Fig 1
Fig 2
Fig 3
A
Fig 4
The parts protecting the inner components of the
machine during transit are red. They must all be
removed before using your machine for the first time.
These parts and their securing means should be kept
in case the machine has to be transported again.
1. Unpack the appliance. Tilt the appliance backwards.
Give to one of the back corners a quarter turn. The
appliance comes free naturally out the polystyrene
basis. Take away this basis (fig.1).
2. Open the lid of the appliance and remove the
polystyrene wedge which blocks the drum. Close the
lid (fig.2).
3. On the back part and with a spanner, remove the
two red loosened spacers (A) (fig.3).
4. The holes which are now visible must be closed with
the plugs (B) provided with the appliance (fig. 4).
5. Please ensure that these parts have been removed
from the machine and keep them in case of next
transport (fig.5).
Fig 5
B
Be careful : when the machine is installed on carpeted floor, ensure that the
carpet do not obstruct the openings, located at the base of the machine,
which are provided for ventilation.
Fig 6
If you want to keep the alignment of your appliance
with the adjacent cupboards, you have the possibility
to cut the crossbar holding the hoses located in the
back of your washing machine (fig. 6).
Electrical connection
Before you plug the appliance into the wall socket, make sure that :
• The supply voltage of the domestic wiring system
does not fluctuate by more than 10% plus or minus
from the value shown on the rating plate.
• The meter, the fuses, the supply line and the wall
socket are all suitable to carry the maximum load
required by the washing machine (2,3 kW).
The existing safety rules call for the appliance to be
connected to an efficient ground wire.
The manufacturer disclaims any liability whatsoever if
this accident prevention rule is not complied with.
This appliance complies with E.E.C. directive n° 87-308
of 06.1987 relative to radio interference suppression
and with E.E.C. directive n° 73-23 relative to electrical
safety.
The replacing of the power cord must
only be realized by the After Sales
Service.
Water connection
• The end of the water inlet hose must be connected to a cold water tap having 3/4" gas thread
spout or to a water tap having a quick-coupling connector after having introduced in the hose
ring nut a rubber sealing washer also provided with the machine.
• The curved end of the outlet hose should be inserted into a drain pipe not less than 70 cm and
not more than 1,0 m from floor level.
Make sure that the drain hose is always safely secured so that it will not become loose or fall
down from its position.
The water should drain freely and consequently, the drain hose should not be chocked or
placed in such a way as to obstruct the normal water flow.
If an extension is required, remember that it might cause a malfunction in the drain pump,
particularly if the extension has a length in excess of 1 meter or if the diameter of the extension
is smaller than the diameter of the original drain hose.
Water pressure : minimum : 5 N/cm2 (0,5 kg/cm2) - maximum : 80 N/cm2 (8 kg/cm2)
Positioning and Levelling
To enable the appliance
to be moved with ease,
it is provided with two
fixed wheels located at
the rear of the base.
Level the appliance by screwing or by
unscrewing the adjustable feet.
Accurate levelling reduces vibrations,
noises and displacement of the
washing machine during operation.
After levelling, block the adjustable
feet by tightening the collars manually
or with a screwdriver.
Cleaning the drain filter
Clean regularly the filter located at
the front bottom behind a small
flapdoor. If you wash laundry with a
lot of fluffs, clean it at each wash. Pull
down the drain hose above a
receptacle put on the floor in order
Fig. 1
- open the flapdoor covering the filter by pressing the left hand side of the filter door
(fig. 1 & 2). Place a container underneath to catch any spillage. According to the models,
complete the draining of the appliance by taking away the yellow cap and by extracting the
little hose located on the left of the filter (fig. 3).
- turn the filter anticlockwise and clean it thoroughly with running water.
- refit the filter in the guides and turn it clockwise.
- refit the little hose and the yellow cap, then close the flapdoor.
Fig. 2
Fig. 3
to empty completely the washing
machine, then :
Subject to technical alterations.
 Loading...