

Page 1

LAVADORAS
AUTOMATICAS
WASHING
MACHINES
FLS 421 C
INSTRUCCIONES
INSTRUCTIONS
35.292.431 0
Page 2
19
CONTENTS
Warnings 20
Technical specifications 21
Installation 22
Transit security bars 22
Lavelling 23
Hidraulic connection 23
Electrical connection 24
Your washing machine 25
Description of the controls 26
Operating sequence 27
Programs 29 y 30
Washing hints 31
Table of symbols 32
Maintenance 33
Servicing 35
About the symbols
The following symbols will guide you in the reading of this
instruction book.
Important information concerning the safety in
the use of your machine
Information for correct use of your machine
and to obtain the best performance
Important information concerning environment
protection
Our contribution to the protection of the
environment:
We use recycled paper.
i
Page 3

20
THESE WARNINGS ARE PROVIDED IN THE
INTEREST OF SAFETY. YOU MUST READ
THEM CAREFULLY BEFORE INSTALLING OR
USING THE APPLIANCE.
It is most important that this instruction book
should always be at hand for the user for
reference. Should the appliance be sold or
transferred to another owner, or should you move
house and leave the appliance, always ensure
that the book is left with the appliance in order that
the new owner can get to know the functioning of
the appliance and the relevant warnings.
CHECK THE APPLIANCE UPON RECEPTION
AND SHOULD ANY DAMAGE BE OBSERVED
CALL YOUR DISTRIBUTER BEFORE YOU
MAKE IT WORK.
Children must not be allowed to temper with
the controls or play with the product.
The appliance is heavy. Care should be taken
when moving it. Do NOT hold yourself on the
controls.
All packing and transit bolts must be removed
before use.
Serious damage can occur to the product and
to property if this has not been adhered to. See
relevant section (unpacking) in the instruction
booklet.
The washing machine must be unplugged
when removing the interior transit bolts. Do not
plug the appliance before finishing the removal
of the transit bolts and the fixing of the caps in
the holes where the security bolts were.
If the appliance is to stand on a carpeted floor
make sure that there is space between the
carpet and the supporting feet of the appliance
for the air to circulate freely around.
Any electrical and/or plumbing work required
to install this appliance should be carried out by
a qualified electrician and/or plumber or
competent person.
It is dangerous to alter the the specifications or
attempt to modify this product in any way.
Care must be taken to ensure that the
appliance dos not stand on the electrical supply
cable.
Only wash fabrics which are designed to be
machine washed. If in doubt, consult the
manufacturer of that item.
Before washing ensure that all pockets are
empty and buttons and zips are fastened.
Any objects such as coins, safety pins, nails,
screws, stones or any other hard, sharp
material can cause extensive damage and
must not be placed into the appliance nor left in
the pockets.
Avoid washing frayed or torn articles and treat
stains such as paint, ink, rust, and grease
before washing.
Garments which have been in contact with
volatile petroleum products should not be
machine washed. If volatile cleaning fluids are
used, care should be taken to ensure that the
garement is dry before placing in the washing
machine.
Wash small items such as socks, laces,
washable belts , etc. in a washing bag or pillow
case as it is possible for such items to slip
down between the tub and the inner drum.
Only wash the advised quantity of delicate
fabrics. Damage to the fabric can ensue if you
over-fill. Refer to the manufacturerÕs
recommendations of quantities.
Do not overload the appliance, see the relevant
WASHING PROGRAM section .
Pets have been known to climb into washing
machines. Please check your drum before use.
The glass door becomes very hot during the
wash cycle. Keep children away from the
appliance whilst it is in operation.
Before opening the door look through the
ÒwindowÓ to check if the water has been
drained. Should there be water do not open
before draining. If in doubt read section
ÒINSTRUCTIONS FOR USEÓ.
Always unplug the appliance and turn off the
water after use.
Leave the porthole slightly ajar between
washes to preserve the door seal.
Unplug the appliance before cleaning.
This product must be serviced by an authorised
Service Centre, and only genuine spare parts
should be used. Do not try to repair the
appliance yourself.
Repairs carried out by inexperienced persons
may cause injury or serious malfunctioning of
the machine. Contact your local Service
Centre. Always insist on genuine spare parts.
WARNINGS
Page 4
21
DIMENSIONS Width 60 cm
Height 85 cm
Depth 55 cm
ELECTRICAL CONNECTION Voltage 220V 50Hz
Max.Power
Absorbed 2.200 W(10A)
WATER PRESSURE Minimum 5N/cm
2
Maximum 80N/cm
2
MAXIMUM RECOMMENDED LOAD Cotton, Linen 4,5 kg
Synthetics delicate fabrics 2 kg
Wool 1 kg
SPIN SPEED
Maximum 400 r.p.m.
TECHNICAL SPECIFICATIONS
This appliance marked ÒCEÓ complies with the directives:
-89/336/CEE on electro magnetic compatibility.
-73/23/CEE on electric material designed to be used with certain power limits.
i
Page 5
22
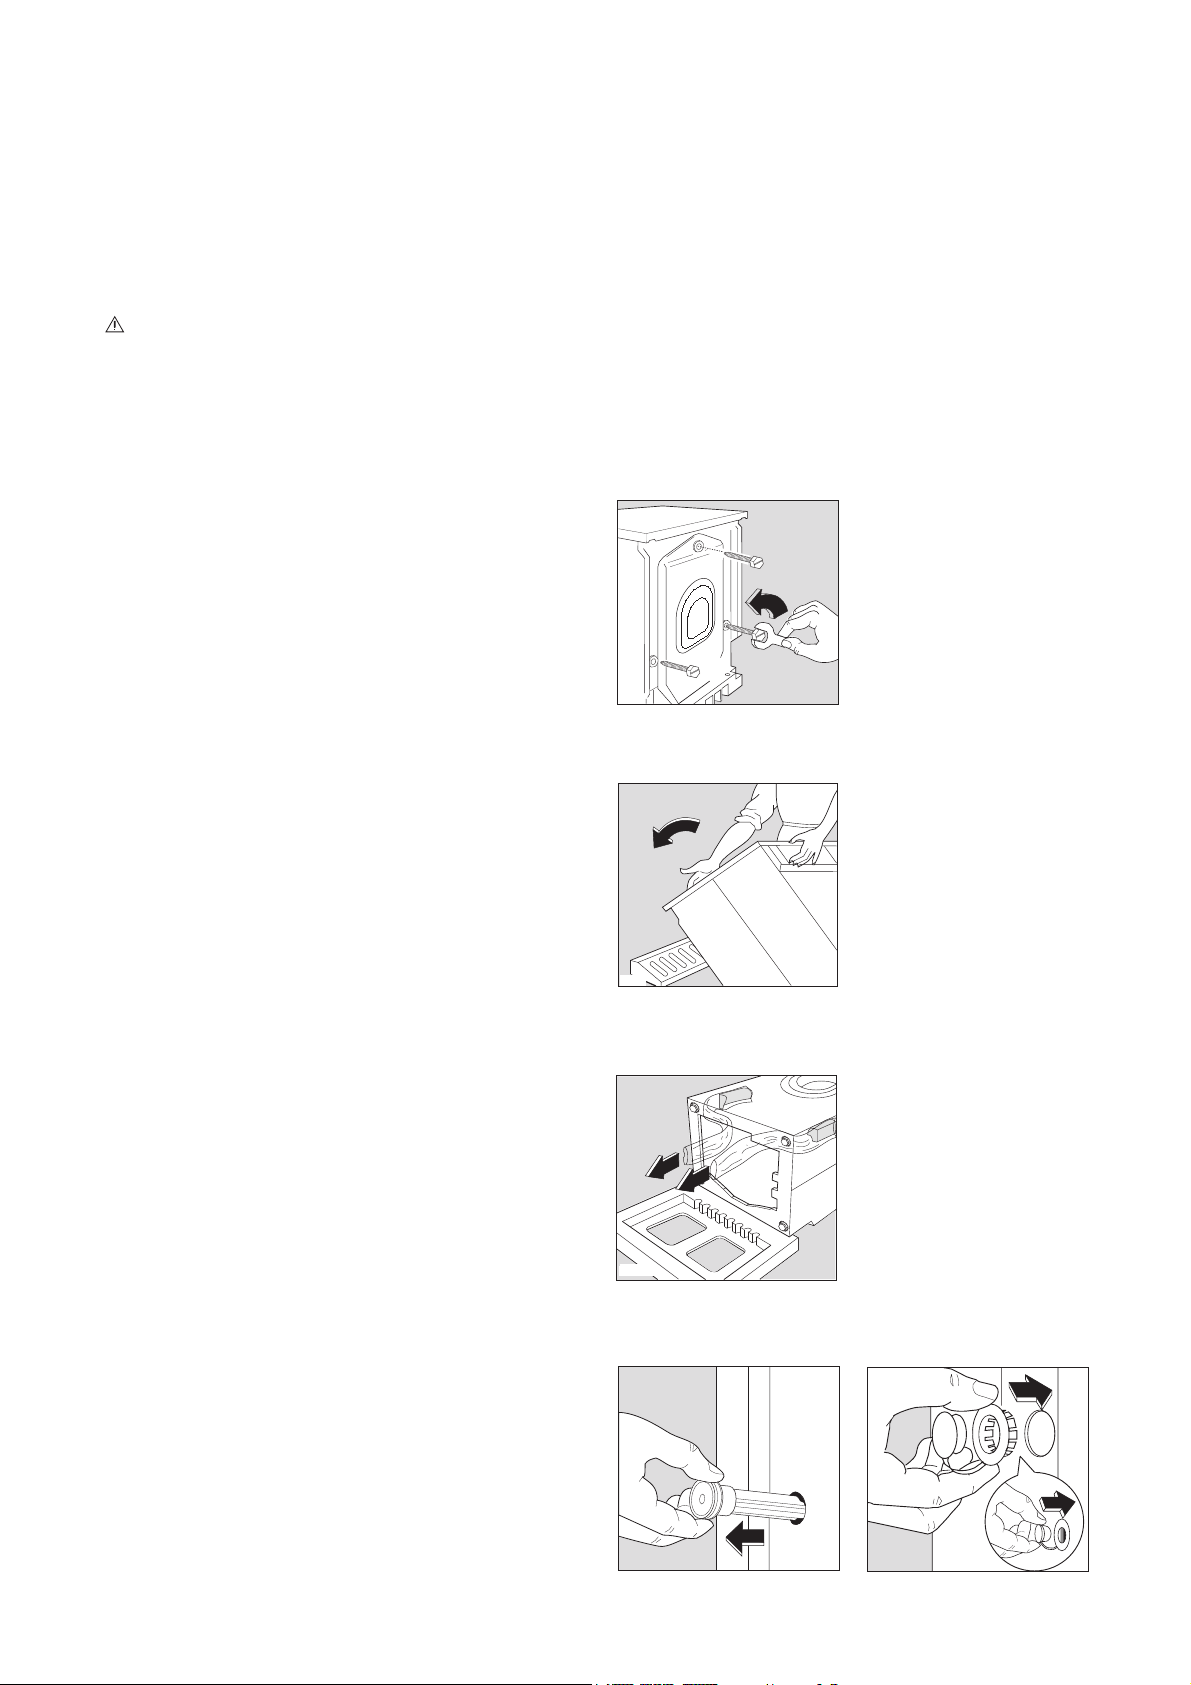
Transit security bars
Before starting the machine up, the trans-
port security bars must be removed as fol-
lows:
You are advised to keep all the transport security
bars in case the appliance has to be transported
again.
Unscrew and remove the three rear screws by
means of a key.
Lean the appliance back on the rear and fit one
of the polystyrene angles between the appliance
and the floor.
Make sure the hoses are not squashed.
arefully remove the plastic bags on the right and
the left, pulling them to the centre of the
appliance.
Place the machine in an upright position and
remove the three plastic bolts. (Fig. 4).
Plug the 3 holes with the plastic plugs which you
can find in the envelope containing the
instruction booklet. (Fig. 5).
P0287
P0018
AL009
2
1
P0001
P0002
Fig. 4 Fig. 5
Installation
Page 6
23
Levelling
Level the appliance by loosening or tightening
the feet. Once in the right position fix the feet by
pushing the nuts against the base of the case.
Accurate levelling will prevent vibration, noise
and displacement of the appliance during
operation.
Some vibration is inevitable, especially if placed
on a wooden floor. Wooden floors are
particularly susceptible to vibrations. For advice,
consult a builder. If posible always place the
appliance on a solid floor.
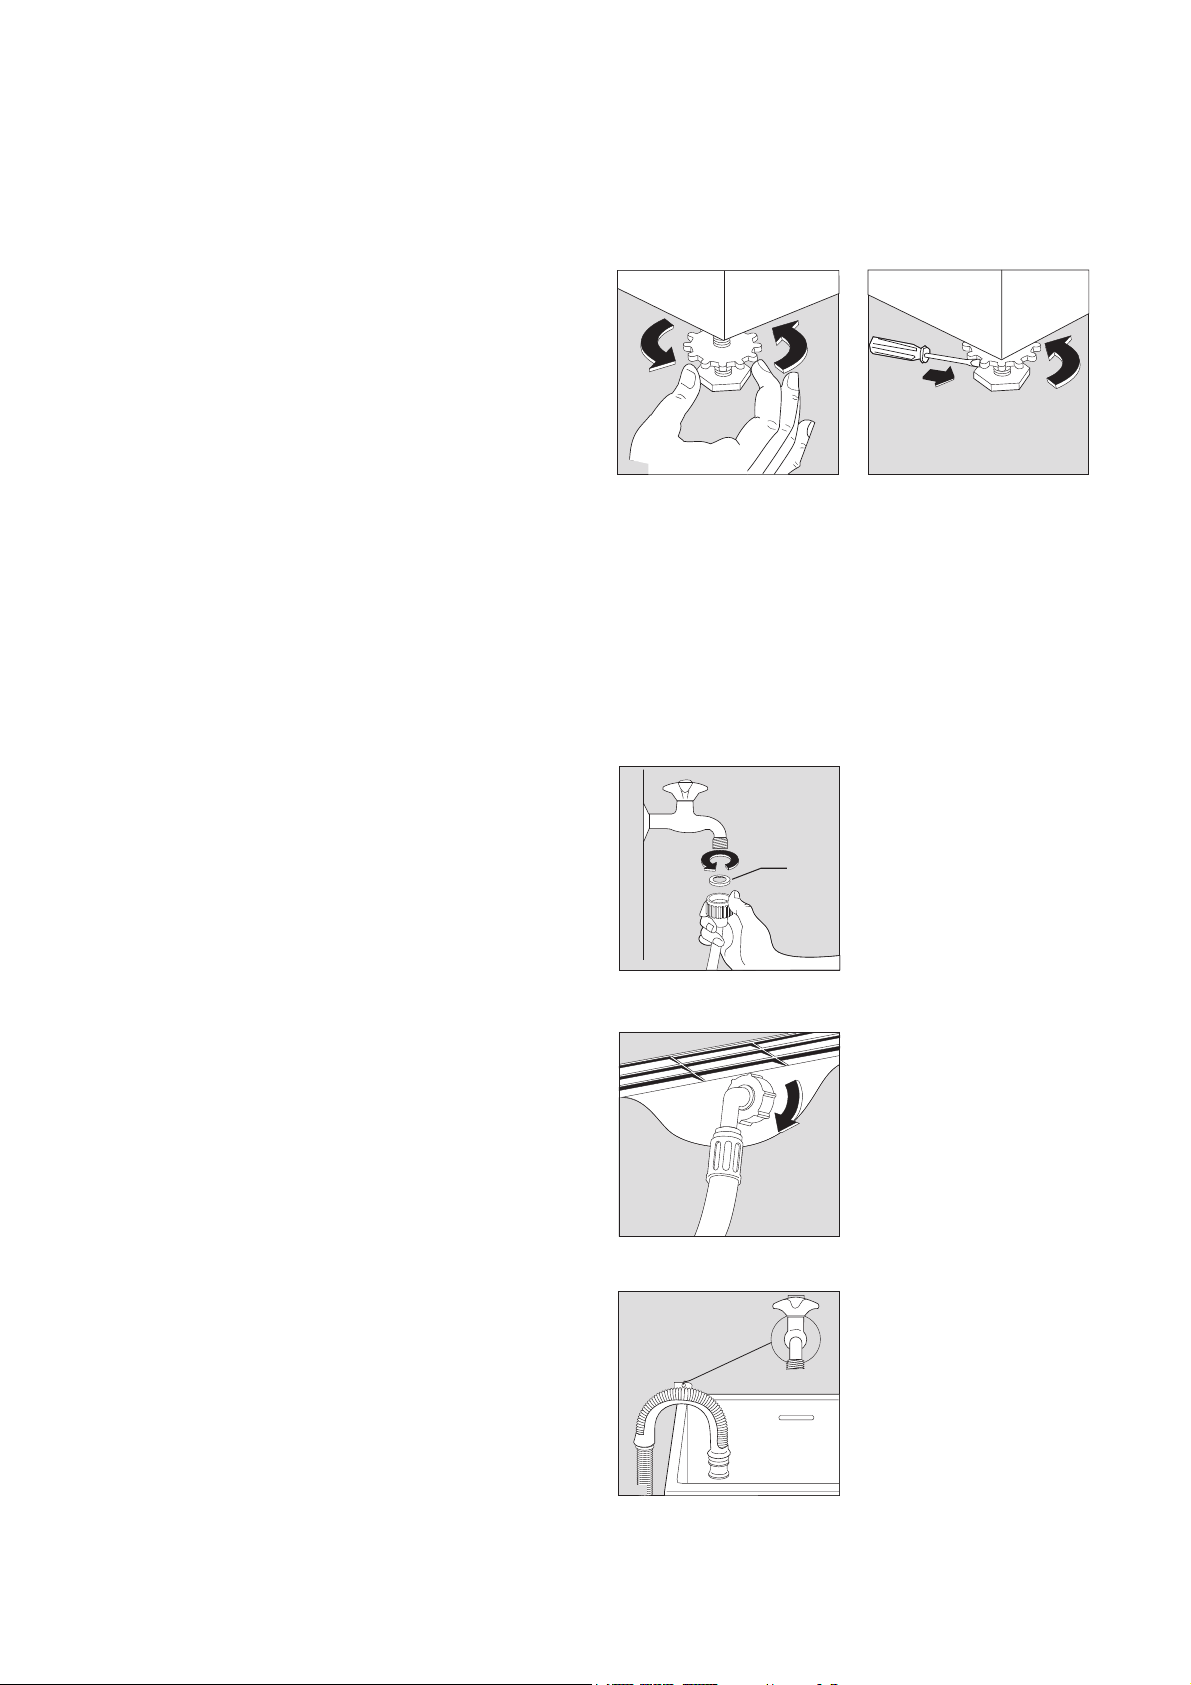
Hydraulic connection
There should be a COLD WATER tap near the
washing machine with a screwing on connection
pipe of 3/4 gas for the water supply, a sink, a
wash basin or a drainage system in the wall.
Previously check if:
Ñ it is not a hot water tap.
Ñ the running water is clean. If not, run off a
reasonable amount of water to flush out any
debris that may have collected in the pipes.
Have the permanent drainage system in the wall
checked by a plumber.
Place the enclosed rubber joint, delivered in a
plastic bag together with the appliance (A), at the
very end of the inlet hose and carefully screw the
pipe to the tap taking care not to damage the
screwdrive and fix the nut well on to the end in
order to avoid leaking.
If necessary turn the hose adequately by
unscrewing the nut at the rear of the appliance.
Now tighten the nut anew to avoid leaks. (Open
the tap and asure that it does not leak and close
it again.)
Place the discharging hose in a washbasin or
sink with the aid of the bent piece delivered
separately. The bent piece has to be entered into
the tubeÕs mouth in order to assure the support.
Aforesaid piece allows the hose to be fixed to the
wall by means of an opening on the upper part
and that way the hose does not move and its
falling is avoided.
P0254
AL013
A
P0021
P0022
P0509
Page 7

24
IMPORTANT: The distance from the floor to the
highest part of the hose should be between 60 to
90 cm. (It is advised to be between 60 and 70
cm). The hose must not be bent nor twisted to
avoid clogging. Should a prolongation of the
discharging hose be unavoidable this must
never surpass 1.5 m and must be of the same
diameter as the original hose.
Make sure the hoses are not too tense.
P0023
1,5 m. Max.
60 cm. Min.
90 cm. Max.
Electrical connections
The applicable rules for electrical
security require an adequate earthing. The plug of the appliance is provided with such a device.
Make sure your socket outlet is pr ovided with
an adquate earthing too.
The manufacturer declines any liability in
case of accidents or incicents should these
safety measures not be observed.
Before plugging the appliance make sure that:
1º the mains of your installation is the same as
on the rating plate of your appliance (the plate is
sticked to the rear of the appliance).
2º The meter, the fuses, the wiring and the
socket outlet can support the max. power
absorbed stated on the rating plate.
3º The socket base and the plug must fit in
adequately without any reducing interposition,
multiple outlets or adapters. If necessary replace
the socket outlet by an adequate one.
(Never touch the washing machine or any
electric appliance while standing on a wet floor
or being barefoot.)
Page 8

25
1 Washing powder dispenser
2 On/of lamp
3 Button
4 Temperature selector
5 Program selector
6 The door
7 Filter
8 Nivelation
The products dispenser
Symbols
Prewash
Wash
Smooth
Bleach
YOUR WASHING MACHINE
i
1
512234 6 78910111213
FLS- 421C
2
3
4
30°
5
13
1
12
2
11
3
10
90°
9
80°
8
4
70°
40°
60°
50°
7
6
5
6
7
AL020
8
Page 9

26
DESCRIPTION OF THE CONTROLS
1 2 3 4 5
512234 6 78910111213
FLS - 421C
30°
40°
50°
60°
70°
80°
90°
1
2
3
4
6
8
9
10
11
13
5
7
12
Control panel
1. Washing powder dispenser
The dispenser is provided with 4 compartments
marked with the following symbols:
Prewash: symbol shows the compartment for
the prewash detergent.
Wash: symbol shows the compartment for
the washing detergent.
Smooth: symbol shows the compartment for
the smoothing additives.
Bleach: symbol shows the compartment for
the bleaching additives.
2. On/of lamp
It lights when the appliance is operating.
3. 1/2 load button
(only for programmes 1 to 4)
Pressing this button before starting the intense
program there will be one rinse less which leads
to energy and water saving.
4. Temperature selector
This control allows you to select the temperature
of the washing cycle in accordance with the kind
of clothes to be washed.
Turn the control until the required temperature
coincides with the marker.
On the program table you will find the most
apropriate temperature for each kind of washing.
Selecting any program can be run through
with cold water. This will ensure a saving in
electricity consumption.
5. Program selector
To select the required program turn the control
clockwise until the marker on the top coincides
with the number of the required program
(reference mark on the control panel). If at any
chance you pass by the required number
NEVER TURN THE CONTROL
ANTICLOCKWISE just continue clockwise until
the required number is reached again.
Page 10

27
OPERATING SEQUENCE
1. Loading the washing machine
Load the laundry loosely, alternating large items
with small ones.
Do not overload the washing machine, but
always try to use its utmost capacity in
accordance with the type of fabric. Reduce the
quantity when washing very dirty or fluffy
laundry.
Once the machine is working and you wish to
add any item you must stop the program.
2. Dose the washing powder
Pull the handle to open the dispenser. Enter the
advised quantity of washing powder into
compartment.
For prewash use compartment.
3. Dose the additives
If you wish to use additives enter the softener in
the compartment with the symbol and the
bleacher in the compartment with the symbol
Never exceed the MAX level.
4. Select the temperature
Turn the dial clockwise to the desired
temperature.
5. Select the program
Turn the dial clockwise until the marker reaches
the desired program.
Before executing the first wash with clothes we recommend to carry out the cleaning of
the drum and the barrel by a special wash, without clothes.
1. Pour a dose of detergent in the tray department corresponding to ÒWashÓ.
2. Choose a program of 40¡ (Cotton, delicate colours).
3. Pull till the limit, from the programmer control. The light will go on and the wash will begin.
4. After the wash is finished the light will go off. Wait, at least, three minutes, after the light goes
off, before opening the door of the washing machine.
i
P0004
AL024
AL022
Page 11

28
6. Start
Before pulling the On/off knob check if:
■ The door is properly closed.
■ The appliance is plugged in.
■ The water supply tap is turned on.
■ The drain filter is tight.
■ The drain hose is adequately positioned.
Pull the program dial up to you till it klicks.
The pilot light comes on and the program will
begin.
7. Stop
The washing machine stops automatically once
the cycle is finished, the pilot goes out. Open
the door 2 to 3 minutes after the end of the
program to give the safety device time to
unlock.
Push the knob close the tap and unplug the
appliance. Leave the door ajar for a few minutes
for the steam to get out.
IMPORTANT REMARK: This appliance is
provided with a security device to avoid
opening during the cycles. Open it only
when absolutely necessary and wait 2 to 3
minutes after you have stopped the
machine to give the safety device time to
unlock.
2
P0215
2
ALO26
Page 12

29
Recommended load: max. 4,5 kg.
PROGRAM
DEGREE
OF SOIL
COMPARTMENTS
TO USE
MAXIMUN
WATER
TEMP.
POSITION
PROGRAM
DESCRIPTION
Programs for cotton and linen
PROGRAMS
FAST
COLOURS
60
2
(•)
Wash at 60¡C
4 rinses
Spin
NON-FAST
COLOURS
40 3
Wash at 40¡C
4 rinses
Spin
RINSES
4
4 rinses
Spin
ADDITIVES
SOFTENER
5
Load additif
1 rinse
Spin
SPIN
6
Drain water
Spin 2,5 min.
WHITES
with prewash
90 1
Prewash
Wash at 90¡C
4 rinses
Spin
heavy
soil
normal
soil
WHITES
without
prewash
90
2
Wash at 90¡C
4 rinses
Spin
normal
soil
normal
soil
(¥) This 60¡ programme is the reference programme for the Energy label according to the article 2,
paragraph 1 of the EEC. Directive 92/75.
Page 13

30
Programs for synthetics, mixed and wool
Recommended load: max. 2 kg (wool max. 1 kg.)
SYNTHETICS
DELICATES
40 9
Wash at 40¡C
3 rinses
Stop with water in the drum
WOOL
SILK
40 10
Wash at 40¡C
3 rinses
Stop with water in the drum
RINSES
DELICATES
11
3 rinses
Stop with water in the drum
DRAIN
13
Drain water
drum stands
still
MIXED
FABRICS
60
7
Prewash at 30¡C
Wash at 60¡C
3 rinses
Stop with water in the drum
heavy
soil
normal
soil
normal
soil
NON-FAST
COLOURS
60
8
Wash at 60¡C
3 rinses
Stop with water in the drum
normal
soil
ADDITIVES
SOFTENER
12
Load additif
1 rinse
Stop with water in the drum
PROGRAM
DEGREE
OF SOIL
COMPARTMENTS
TO USE
MAXIMUN
WATER
TEMP.
POSITION
PROGRAM
DESCRIPTION
For draining the water, once the cycle is finished, situate the timer Ç13È right in its place.
Page 14

31
Sort the laundry according to the type of fabric,
colour fastness and how dirty it is.
When washing curtains remove the hooks.
It is essential to wash new coloured items
separately when washing them for the first time.
When washing fabrics requiring different wash
temperatures together , always select the lowest
one.
White items should NOT be washed with
coloured ones.
For wool use gentle detergents only in small
quantities. Only wool marked ÔPURE NEW
WOOL WASHABLE PRESHRUNKÕ can be
washed in the machine using the wool program;
other types of wool should be washed by hand or
dry cleaned.
Some stains such as fruit, wine, grass, rust,
blood, etc. are difficult to remove and should be
treated before washing with specific products
which can be found in most household shops. In
any case they should be treated immediately ,
later on they are difficult to remove.
Damp laundry should be hung out to dry as soon
as possible after finishing the wash.
Knitwear and woollens should be dried flat, away
from direct sunlight.
On the care labels in most clothes wash code
symbols can be found which help you to select
the adequate wash program. You are advised to
observe and follow these instructions.
On the following table you will find the meaning
of the symbols.
Load the washing machine
Check the quantity you are going to wash for
each cycle.
It is rather difficult to weigh all the pieces to be
washed. We therefore advise you:
Cotton and linen: fill the drum without pressing.
Synthetic resistant : fill two thirds of the drum.
Delicates and wool: fill half the drum.
Temperatures
You are advised to wash whites at a temperature
of 60¡C. If the laundry is not very soiled this will
be enough and it is energy saving. If you want to
wash whites without temperature, you must
choose the program 2.
Coloured fabrics are advised to be washed at
40¡C although they would stand 60¡C.
When washing together dark and light colours
the temperature should not exceed 40¡C.
Synthetic white and light coloured fabrics can be
washed at 60¡C, but here also 40¡ will do if they
are not very soiled.
Dark synthetics, delicate fabrics and wool must
be washed at a temperature lower than 40¡C. If
one of the labels is marked 30¡C, select 30¡C for
the whole cycle.
WASHING HINTS
i
Page 15

32
TABLE OF SYMBOLS
i
The symbols on the labels are of great help for the wash, care and treatment.
STRONG WASH
DELICATE WASH
BLEACHING
IRONING
DRY
CLEANING
DRYING Flat On the line On clothes
hanger
High
temperature
Low
temperature
Tumble dry
Do not
tumble dry
Dry cleaning
in all solvents
Dry cleaning in
perchlorethylene,
petrol, pure alcohol,
R 111 y R 113
Dry cleaning in
petrol, pure alcohol,
R 111 y R 113
Do not
dry cleaning
Hot iron max. 200¡C Hot iron max. 150¡C Hot iron max. 100¡C
Do not iron
Bleach in cold water Do not bleach
Max. wash
temp. 95¡C
Max. wash
temp. 60¡C
Max. wash
temp. 40¡C
Max. wash
temp. 30¡C
Hand wash
Do not
wash
at all
Page 16

33
MAINTENANCE
External cleaning
Clean the exterior cabinet of the appliance with
neutral soap and water only, and then try
thoroughly.
Cleaning the dispenser drawer and
the recess
Pull the drawer to remove (slightly at first till the
stop, then pull hard).
Flush well under a fast running tab.
Clean the recess with a small brush.
Replace the drawer.
Before any maintenance or cleaning is carried out you must
DISCONNECT the appliance from the electricity supply.
AL020
P0185
The dangers of freezing
If the machine is exposed to temperatures below
0¡C, certain precautions should be taken.
Turn off the water tap and unscrew the inlet
hose.
Select a wash program and run for a few
seconds.
Position the end of the drain hose in a bowl
on the floor.
Run the draining program for a few seconds.
This way you make sure now water at all
remains in the appliance which could freeze and
thus damage it and its surroundings.
When you need to start the machine up again,
make sure that the room temperature is above
0¡C.
Page 17

34
Cleaning the filters
The drain filter
A clean filter is important for correct functioning
of the washing machine, and it should therefore
be cleaned regularly. Small objects left in the
pockets and yarn ist retained here.
Unscrew the filter completely turning it
anticlockwise.
Remove the filter and clean it under a fast
running tap.
Replace the filter turning now clockwise and
tighten it.
Attention
Never remove the unloading filter while the
washing machine is operating. Wait, always, till
the washing program is over and there is NO
WATER IN THE BARREL.
When you replace the unloading filter in its
place, make sure that it is correctly positioned
and tight, in order to avoid water leakage or that
children may take it off.
The water inlet hose filter
If it takes longer to fill up the washing machine it
is time to check the water inlet hose filter it may
be clogged. Turn off the water tap. Unscrew the
fixing nut of the inlet hose. Remove the filter from
the electrovalve and clean it with a hard bristle
brush and replace it. Screw on the nut
thoroughfully.
AL010
AL011
AL012
P0040
P0090
P0021
Page 18

35
SERVICING
The appliance does not start up
The machine does not fill
The machine empties as it fills
The machine does not drain or spin
The machine leaks or overflows
The machine vibrates or is noisy
Check if the door is closed properly.
Check if the appliance is plugged in.
Check the fuse.
Check if the program dial is in the correct
position.
Check if the water tap is on.
Check if the tap is clogged.
Check if the inlet hose is bent.
Check if the water inlet filter is clogged.
The end of the drain hose is too low (see
page. 24)
Check if the drain hose is bent or squashed.
Check if the drain filter is clogged.
Check if the selected program includes
spinning.
Too much washing powder.
Unsuitable washing powder.
Check the joints for leaks. It is rather difficult
to see the water running along a hose.
Check if all transport devices have been
removed.
Check if the appliance touches the walls or
furniture.
Check if the legs are adequately levelled
and the nuts tight.
¥
¥
¥
¥
¥
¥
¥
¥
¥
¥
¥
¥
¥
¥
¥
¥
¥
¥
Problem Possible solution
RATING PLATE
If, after above checks, there is still a fault, call
your Local Service Centre.
Please, make sure you give the purchasing date
and the Model, Product number (Prod.NoÉ) and
Serial number (Ser. NoÉ) of the appliance.
(These data will be found in the adhesive card
behind the door of clothes charging).
i
Before contacting your local Service Force Centre, check your machine against the simple
maintenance guidelines given below.
Rating plate
Mod. ..........
Prod. No. ...........
Ser. No. .........
Mod. ..........
Prod. No. ...........
P0042
Ser. No. .........
Page 19

EPESL/Z/7-1 2 3 4 5 6 7 8 9 10 11 12
 Loading...