

Page 1

WASHING MACHINE
STIRALWNAÅ MAfiINA
FL 726 CN
H
A
B
J
30º- 60º
40º- 95º
B
K
30º- 40º
30º- 60º
C
L
30º- 40º
30º- 40º
M
D
N
F
P
G
984CN
FL
124972370
INSTRUCTION BOOKLET
RUKOVODSTVO PO ÈKSPLUATACII
Page 2
2
YOUR NEW WASHING MACHINE
This new washing machine meets all
requirements for a modern washing of laundry
with reduced consumption of water, energy and
detergent.
n
The temperature selector dial allows you to
choose personally the suitable washing
temperature for your laundry.
n
The automatic cooling of the washing water
from 95°C to 60°C before draining will
prevent plastic pipes of your drainage system
from being deformed.
n
The anti-unbalance device ensures that the
washing machine remains stable when
spinning.
Ecological hints
In order to obtain water and energy savings and
to protect the environment, we advice you to
follow these instructions:
n
Whenever possible, wash the maximum load
for the selected programme, without
overloading the drum.
n
Use a programme with prewash only for
heavy soiled items.
n
Measure out detergent according to the water
hardness, degree of soiling and quantity of
laundry being washed.
n
Select “Quick wash” for lightly soiled laundry.
Environment protection
n
Packaging recycling
Materials marked with the symbol are
recyclable. To enable them to be recycled, they
must be placed in the appropriate collection
areas (or containers). Check with your local
authorities.
>PE<= polyethylene
>PS<= polystyrene
>PP<= polypropylene
n
Washing machine scrapping
When the appliance is to be scrapped, cut off the
power supply cable and make the door closing
device inoperative to avoid it becoming a death
trap for a child.
For correct disposal of the machine, contact your
local authority department which provides for
collection of urban solid refuse.
i
The symbols you will see on some paragraphs of this booklet have the following meaning:
Important information concerning the
safety in the use of your machine.
Disregarding this information might
lead to damages.
Information for correct use of your
machine and to obtain the best
performance.
Important information concerning
environment protection.
Our contribution to the protection of the
environment: we use recycled paper.
Page 3

3
ENGLISH
CONTENTS
Important information . . . . . . . . . . . . .4
Description of the appliance . . . . . .5
n
Detergent dispenser drawer
and programme chart . . . . . . . . . . . . . . . . .5
Technical specifications . . . . . . . . . . .5
Installation . . . . . . . . . . . . . . . . . . . . . . . .6
n
Unpacking . . . . . . . . . . . . . . . . . . . . . . . . . .6
n
Positioning . . . . . . . . . . . . . . . . . . . . . . . . . .6
n
Water inlet . . . . . . . . . . . . . . . . . . . . . . . . . .7
n
Water drainage . . . . . . . . . . . . . . . . . . . . . .7
n
Electrical connection . . . . . . . . . . . . . . . . . .7
Use . . . . . . . . . . . . . . . . . . . . . . . . . . . . . . . . .8
n
Control panel . . . . . . . . . . . . . . . . . . . . . . .8
n
Washing hints . . . . . . . . . . . . . . . . . . . . . . .9
Sorting the laundry . . . . . . . . . . . . . . . . . . .9
Temperatures . . . . . . . . . . . . . . . . . . . . . . . .9
Before loading the laundry . . . . . . . . . . . . . .9
Maximum loads . . . . . . . . . . . . . . . . . . . . . .9
Laundry weights . . . . . . . . . . . . . . . . . . . . . .9
Removing stains . . . . . . . . . . . . . . . . . . . . .9
Detergents and additives . . . . . . . . . . . . . .10
Quantity of detergent to be used . . . . . . . .10
n
International wash code symbols . . . . . . . .11
n
Washing programmes . . . . . . . . . . . . . .12-13
n
Operating sequence . . . . . . . . . . . . . . .14-15
Maintenance . . . . . . . . . . . . . . . . . . . . . .16
n
Bodywork . . . . . . . . . . . . . . . . . . . . . . . . . .16
n
Detergent dispenser drawer . . . . . . . . . . . .16
n
Water inlet filter . . . . . . . . . . . . . . . . . . . . .16
n
Drain pump . . . . . . . . . . . . . . . . . . . . . . . .17
n
The dangers of freezing . . . . . . . . . . . . . . .17
Something not working . . . . . . . .18-19
Page 4

4
IMPORTANT INFORMATION
Installation
n
When unpacking the appliance, check that it
is not damaged. If in doubt, do not use it and
contact the Service Centre.
n
All internal packing must be removed before
using the appliance. Serious damage may be
caused to the machine or adjacent furniture if
the protective transit devices are not
removed or are not completely removed.
Refer to the relevant paragraph in the
instruction book.
n
Any electrical work required to install this
appliance must be carried out by a qualified
electrician.
n
Any plumbing work required to install this
appliance must be carried out by a qualified
plumber.
n
After having installed the machine, check that
it is not standing on its electrical supply cable.
n
If the appliance is placed on a carpeted floor,
ensure that air can circulate freely between
the adjustable feet and the floor.
Use
n
This appliance is designed for domestic use.
It must not be used for purposes other than
those for which it was designed.
n
Do not overload the appliance. Follow the
instructions in the instruction book.
n
Only wash fabrics which are designed to be
machine washed. Follow the instructions on
each garment label.
n
Make sure that all pockets are empty.
Objects such as coins, safety pins, pins and
screws can cause extensive damage.
n
Do not machine wash garments saturated
with petroleum, methylated spirits,
trichlorethylene, etc. If such fluids have been
used to remove stains prior to washing, wait
until they have completely evaporated from
the fabric before placing garments in the
appliance.
n
Place small items such as socks, belts, etc. in
a cloth bag or pillowcase to prevent them
getting trapped between the drum and the tub.
n
Use only the recommended quantities of
fabric softener. An excessive amount could
damage the laundry.
n
Leave the porthole door slightly ajar when
the appliance is not in use. This preserves
the door seal and prevents the formation of
musty smells.
n
Always check that water has emptied out
before opening the door. If not, drain the
water following the instructions in the
instruction book.
n
Always unplug the appliance and shut the
water tap after use.
Service/repair
n
In the event of a fault, do not attempt to
repair the appliance yourself. Repairs carried
out by inexperienced persons may cause
damage.
n
If repairs are needed, contact an authorised
service centre and ask for genuine spare
parts.
Safety
n
This appliance is designed to be used by
adults. Children must not be allowed to touch
the controls or play with the product.
n
During high temperature wash cycles the
glass door becomes very hot. Do not touch it.
n
Pets sometimes climb into washing
machines. Check the drum before each use.
It is important that this instruction book be kept with the appliance for future reference. If you sell or
give the appliance away, make sure that the book is passed to the new owners so that they can
familiarise themselves with its operation and relevant warnings.
The following warnings are provided in the interests of overall safety. You must read them carefully
before installing or using the appliance.
Page 5
5
ENGLISH
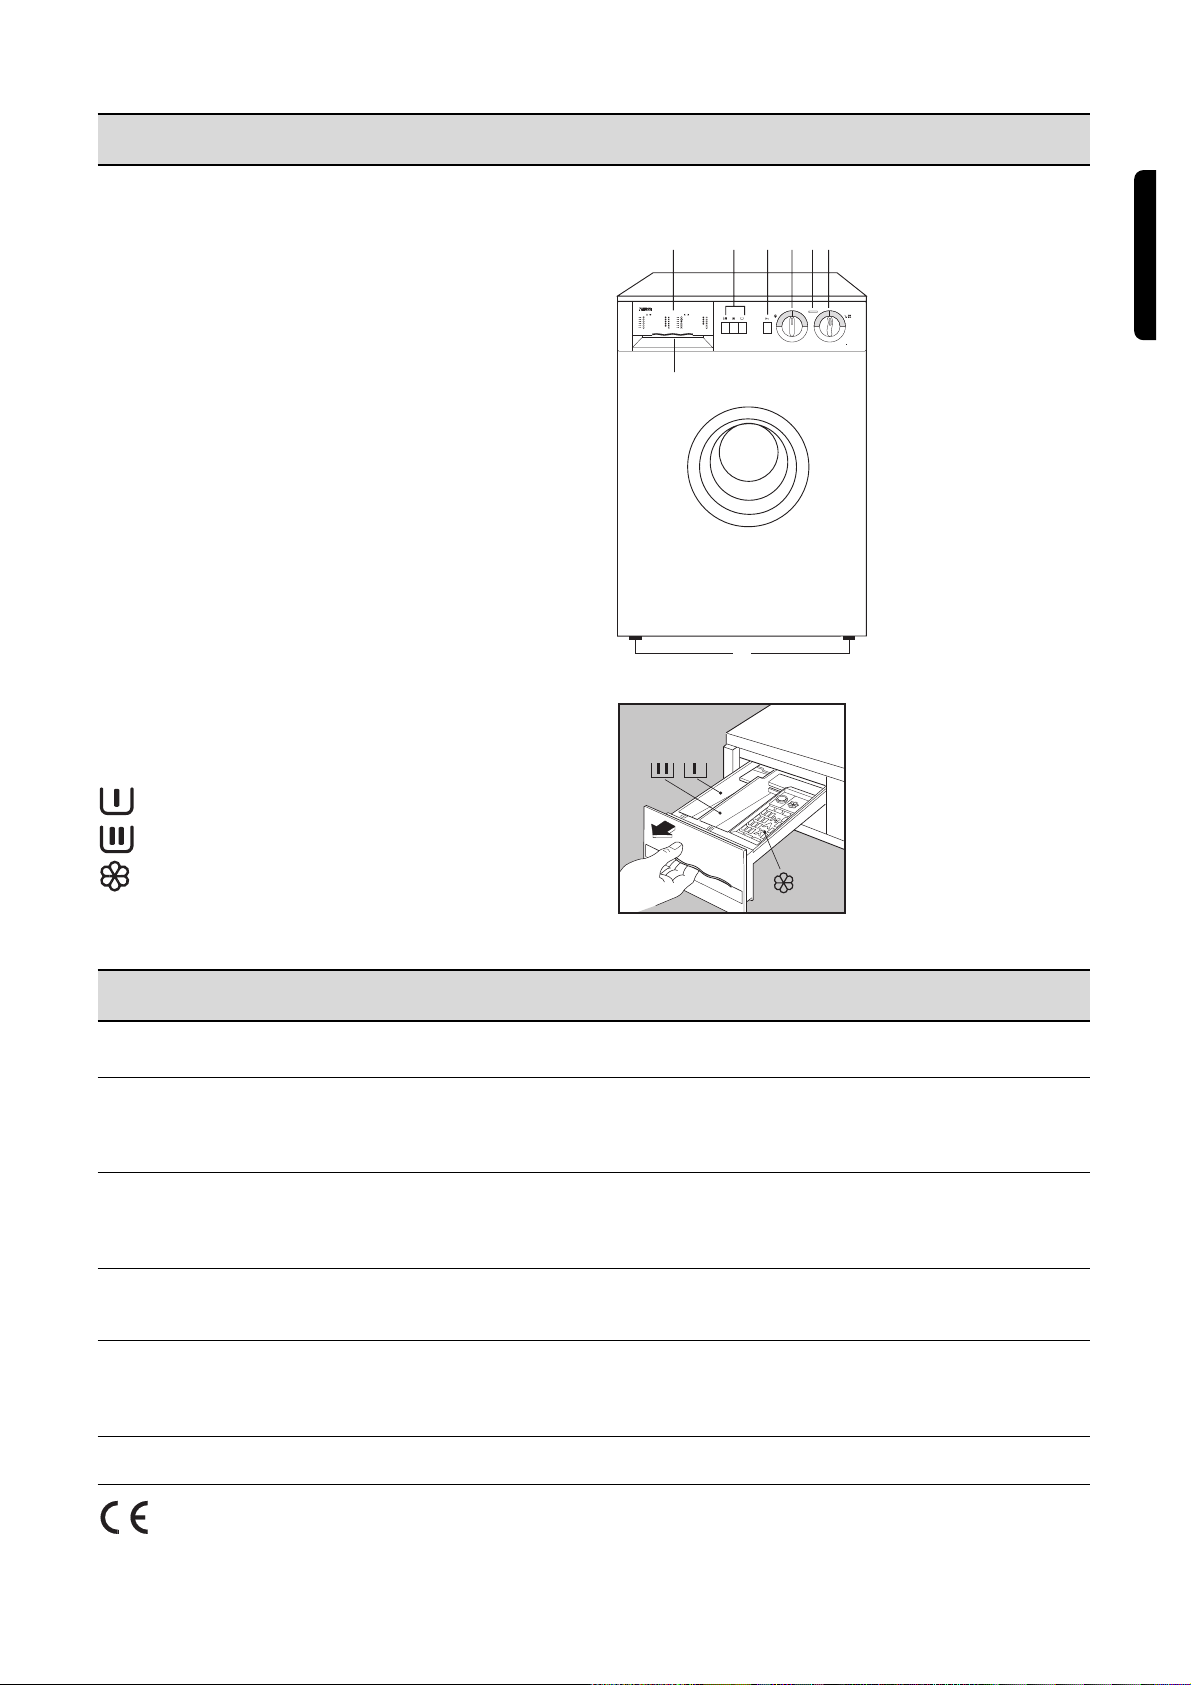
DESCRIPTION OF THE APPLIANCE
1 Detergent dispenser drawer
2 Programme chart
3 Option buttons
4 Door opening button
5 Temperature selector dial
6 Operating pilot light
7 Programme selector dial
8 Adjustable feet
Detergent dispenser drawer and
programme chart
Symbols
Prewash
Main wash
Fabric softener
There is a programme guide in symbols on the
handle of the detergent dispenser drawer.
C0006
TECHNICAL SPECIFICATIONS
DIMENSIONS Height 85 cm
Width 60 cm
Depth 32 cm
POWER SUPPLY VOLTAGE/FREQUENCY 220-230V/50 Hz
TOTAL POWER ABSORBED 1750 W
MINIMUM FUSE PROTECTION 10 A
WATER PRESSURE Minimum 50 N/cm
2
Maximum 80 N/cm
2
MAXIMUM LOAD Cotton 3.0 kg
Synthetics, delicate fabrics 1.0 kg
Woollens 0.7 kg
SPIN SPEED 700 rpm
This appliance complies with the following EEC Directives:
73/23/EEC of 19/02/73 relating to low voltage
89/336/EEC of 03/05/89 relating to electromagnetic compatibility
23457
1
8
D
F
G
M
N
P
FL
984CN
40º- 95º
30º- 60º
30º- 40º
30º- 60º
30º- 40º
30º- 40º
A
B
B
C
H
J
K
L
6
Page 6
6
INSTALLATION
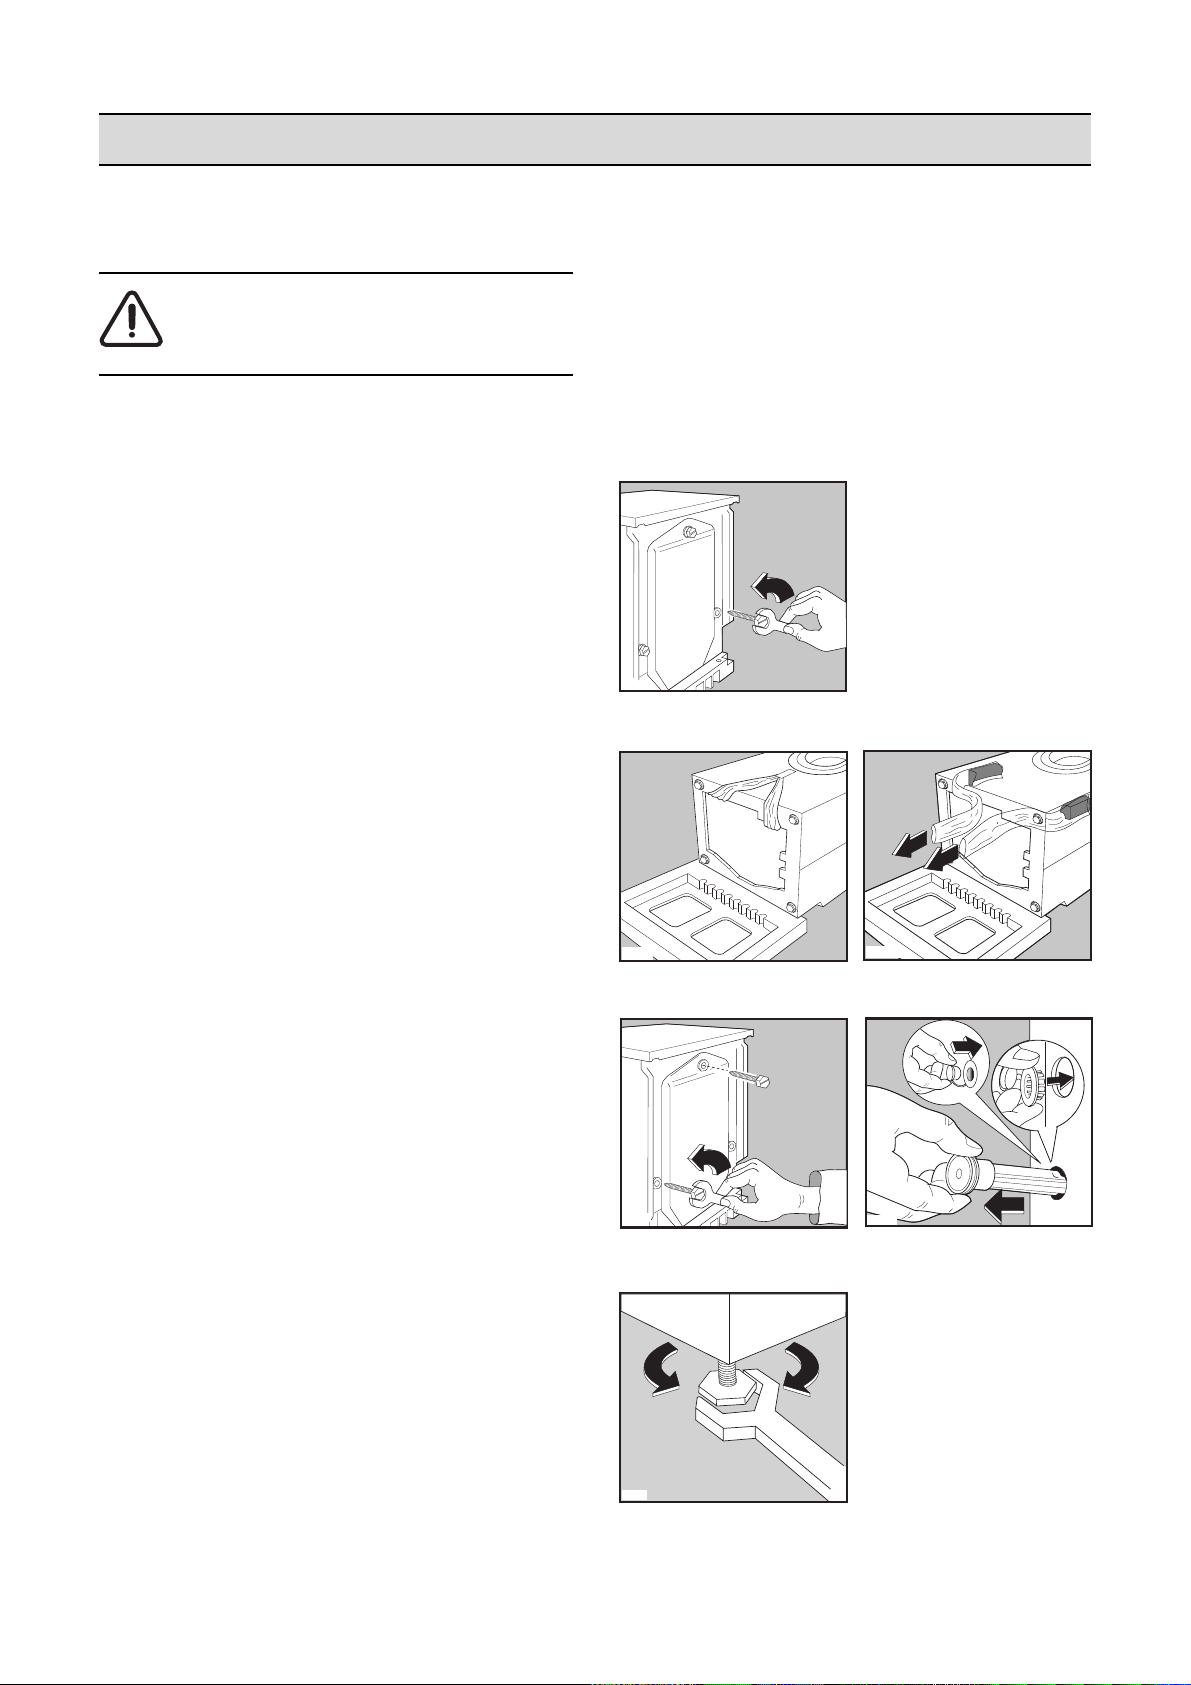
Unpacking
You are advised to keep all transit devices so
that they can be refitted if the machine ever has
to be transported again.
1. Using a spanner, unscrew and remove the
rear right-hand bolt and lay the machine on
its back, taking care not to squash the hoses.
This can be avoided by placing one of the
corner packing pieces between the machine
and the floor.
2. Release the two plastic bags by removing the
adhesive strip.
3. Carefully remove the right-hand bag (1) then
the left-hand bag (2) by pulling them towards
the centre of the machine.
4. Set the machine upright and remove the two
remaining bolts from the back.
5. Pull out the three plastic spacers from the
holes into which the bolts were fitted.
6. Plug the open holes with the plugs which you
will find in the plastic bag containing the
instruction booklet.
Positioning
Install the machine on a flat hard floor.
Make sure that air circulation around the
machine is not impeded by carpets, rugs etc.
Check that the machine does not touch the wall
or other kitchen units.
Carefully level by screwing the adjustable feet in
or out. Never place cardboard, wood or similar
materials under the machine to compensate for
any unevenness in the floor.
P0255
P0648
P0233
2
1
P0256
P0020
P1051
All transit bolts and packing must be
removed before using the appliance.
Page 7
7
ENGLISH
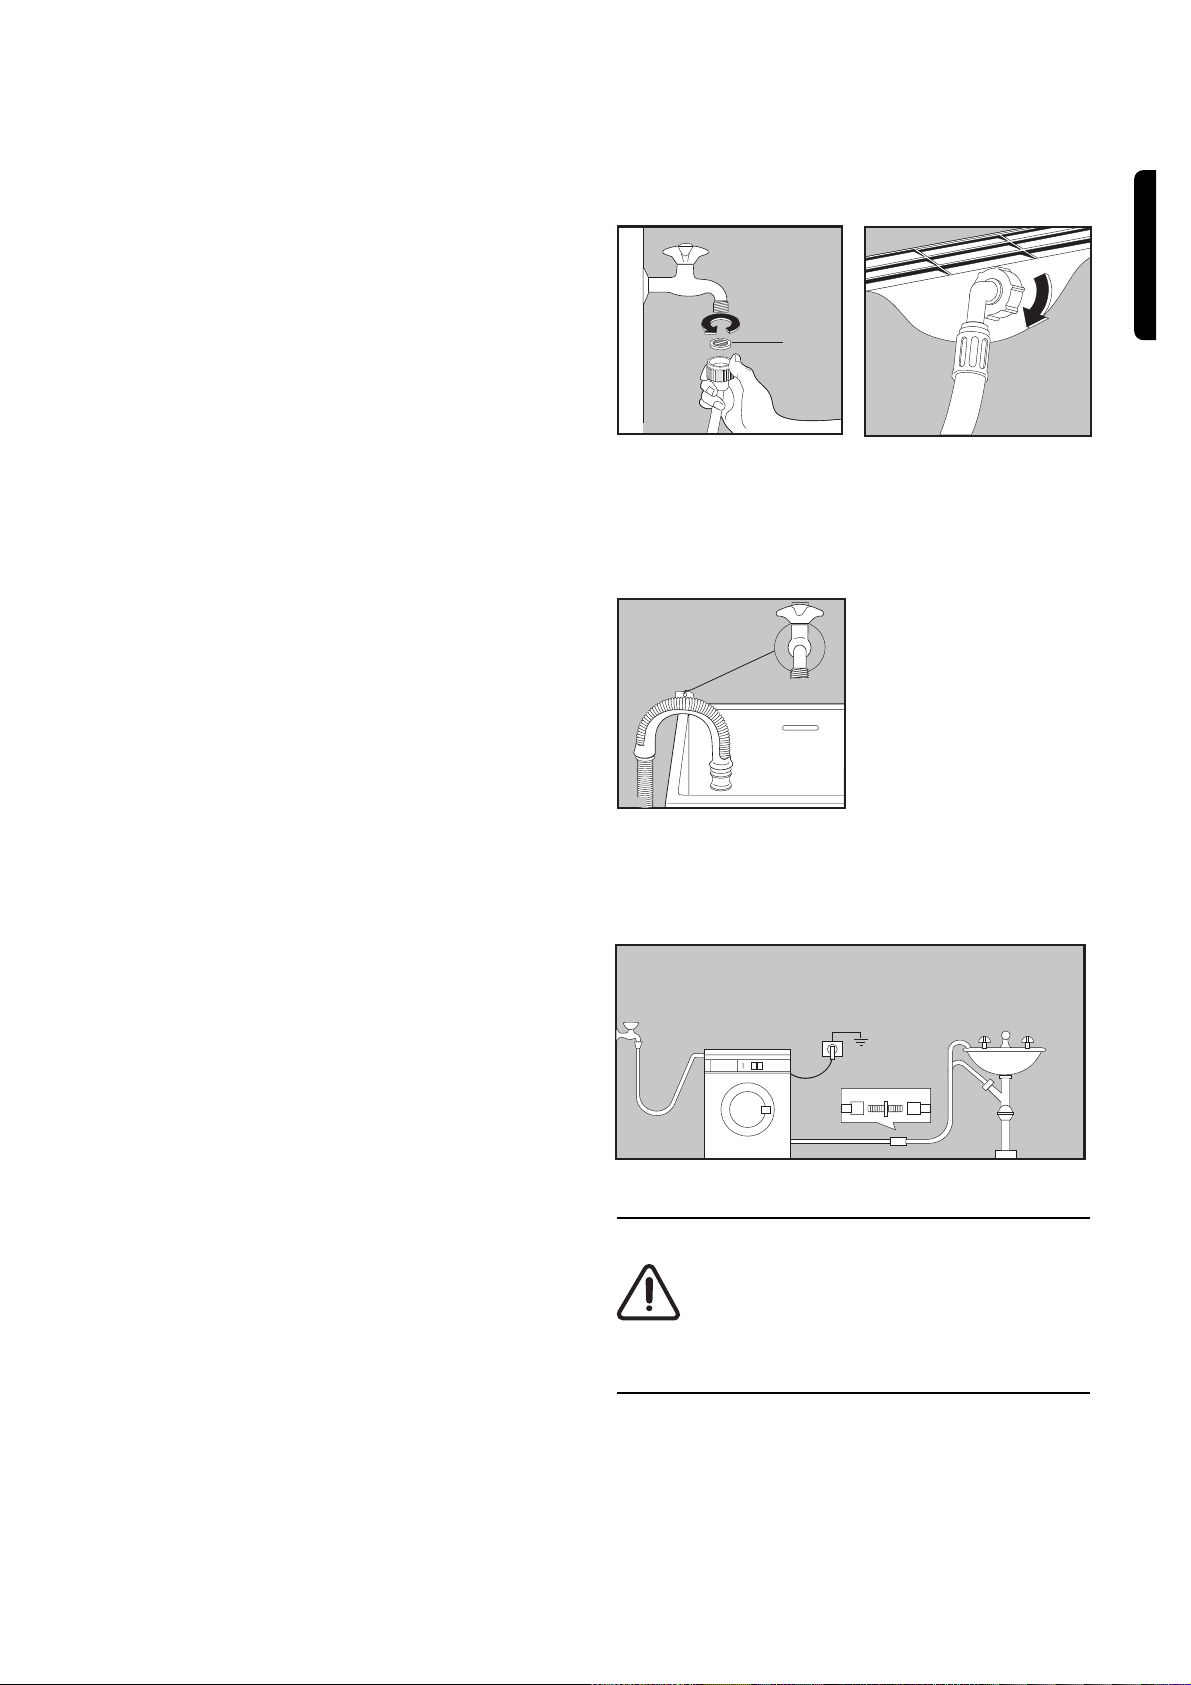
Water inlet
Connect the water inlet hose to a tap with a 3/4"
thread after having inserted the small filter “A”
supplied with the machine.
The other end of the inlet hose which connects
to the machine can be turned in any direction.
Simply loosen the fitting, rotate the hose and
retighten the fitting, making sure there are no
water leaks.
The inlet hose must not be lengthened. If it is
too short and you do not wish to move the tap,
you will have to purchase a new, longer hose
specially designed for this type of use.
Water drainage
The end of the drain hose can be positioned in
three ways:
Hooked over the edge of a sink using the
plastic hose guide supplied with the
machine. In this case, make sure the end
cannot come unhooked when the machine is
emptying.
This could be done by tying it to the tap with a
piece of string or attaching it to the wall.
In a sink drain pipe branch. This branch must
be above the trap so that the bend is at least
60 cm above the ground.
Directly into a drain pipe at a height of not
less than 60 cm and not more than 90 cm.
The end of the drain hose must always be
ventilated, i.e. the inside diameter of the drain
pipe must be larger than the outside diameter of
the drain hose.
The drain hose must not be kinked. Run it along
the floor; only the part near the drainage point
must be raised.
Electrical connection
This machine is designed to operate on a
220-230 V, single-phase, 50 Hz supply.
Check that your domestic electrical installation
can take the maximum load required (1.75 kW),
also taking into account any other appliances in
use.
Connect the machine to an earthed socket,
in accordance with current wiring regulations.
A
P0003
P0022
P0023
P0021
The manufacturer declines any
responsibility for damage or injury
through failure to comply with the above
safety precaution.
In the event of replacing the electric
cable, please contact our nearest
Service Centre.
Page 8

8
USE
Control panel
D
F
G
M
N
P
FL
726CN
40º- 95º
30º- 60º
30º- 40º
30º- 60º
30º- 40º
30º- 40º
A
B
B
C
H
J
K
L
123 4 5 6 7
1 Spin speed reduction button
By depressing this button the spin speed is
reduced from 700 to 500 rpm in the cotton
programmes and from 550 to 400 rpm in the
gentle programmes.
2 Half-load button
By depressing this button when washing a small
load of cottons or linens (max 1.5 kg) you will
obtain a reduction of the water consumption on
the rinse cycle.
The machine will carry out 3 rinses instead of 4.
3 Anti-crease button
By depressing this button on programmes H-JK-L-M the water of the last rinse is not emptied
out, to prevent the fabrics from creasing. To
drain the water, depress this button again (the
laundry will be gently spun) or select drain
programme “P”.
4 Door opening button
Depress it to open the door.
5 Temperature selector dial
Turn this dial to select the washing temperature.
Position = cold wash.
6 Operating pilot light
This light is on whilst the machine is operating
and goes out at the end of the programme.
7 Programme selector dial
To select the required programme, turn this dial
clockwise until the programme letter is exactly
opposite the pointer.
To start the programme, pull the dial outwards,
to switch off the machine, push the dial inwards.
Page 9

9
ENGLISH
Washing hints
Sorting the laundry
Follow the wash code symbols on each garment
label and the manufacturer’s washing
instructions.
Sort the laundry as follows:
whites, coloureds, synthetics, delicates , w oollens .
Temperatures
95°
for normally soiled white cottons and
linen (e.g. tea cloths, towels,
tablecloths, sheets...)
60° for normally soiled, colour fast
garments (e.g. shirts, night dresses,
pyjamas....) in linen, cotton or
synthetic fibres and for lightly soiled
white cotton (e.g. underwear).
(cold)
30°-40°
for delicate items (e.g. net curtains),
mixed laundry including synthetic
fibres and woollens bearing the label
«pure new wool, machine washable,
non-shrink»
Before loading the laundry
Never wash whites and coloureds together.
Whites may lose their “whiteness” in the wash.
New coloured items may run in the first wash;
they should therefore be washed separately the
first time.
Make sure that no metal objects are left in
the laundry (e.g. hair clips, safety pins, pins).
Button up pillowcases, close zip fasteners,
hooks and poppers. Tie any belts or long tapes.
Remove persistent stains before washing. Rub
particularly soiled areas with a special detergent
or detergent paste.
Treat curtains with special care. Remove hooks
or tie them up in a bag or net.
Maximum loads
Recommended loads are indicated in the
programme charts.
General rules:
cotton, linen: drum full but not too tightly
packed
synthetics: drum no more than half full
i
delicate fabrics and woollens: drum no more
than one third full.
Washing a maximum load makes the most
efficient use of water and energy.
For heavily soiled laundry, reduce the load size.
Laundry weights
The following weights are indicative:
bathrobe 1200 g
napkin 100 g
quilt cover 700 g
sheet 500 g
pillow case 200 g
tablecloth 250 g
towelling towel 200 g
tea cloth 100 g
night dress 200 g
ladies’ briefs 100 g
man’s work shirt 600 g
man’s shirt 200 g
man’s pyjamas 500 g
blouse 100 g
men’s underpants 100 g
Removing stains
Stubborn stains may not be removed by just
water and detergent. It is therefore advisable to
treat them prior to washing.
Blood: treat fresh stains with cold water. For
dried stains, soak overnight in water with a
special detergent then rub in the soap and
water.
Oil based paint: moisten with benzine stain
remover, lay the garment on a soft cloth and dab
the stain; treat several times.
Dried grease stains: moisten with turpentine,
lay the garment on a soft surface and dab the
stain with the fingertips and a cotton cloth.
Rust: oxalic acid dissolved in hot water or a rust
removing product used cold. Be careful with rust
stains which are not recent since the cellulose
structure will already have been damaged and
the fabric tends to hole.
Mould stains: treat with bleach, rinse well
(whites and fast coloureds only).
Grass: soap lightly and treat with bleach (whites
and fast coloureds only).
Ball point pen and glue: moisten with acetone
(*), lay the garment on a soft cloth and dab the
stain.
Page 10

10
French
°T.H.
German
°dH
Lipstick: moisten with acetone as above, then
treat stains with methylated spirits. Remove any
residual marks from white fabrics with bleach.
Red wine: soak in water and detergent, rinse
and treat with acetic or citric acid, then rinse.
Treat any residual marks with bleach.
Ink: depending on the type of ink, moisten the
fabric first with acetone (*), then with acetic acid;
treat any residual marks on white fabrics with
bleach and then rinse thoroughly.
Tar stains: first treat with stain remover,
methylated spirits or benzine, then rub with
detergent paste.
(*) do not use acetone on artificial silk
Detergents and additives
Good washing results also depend on the choice
of detergent and use of the correct quantities to
avoid waste and protect the environment.
Although biodegradable, detergents contain
substances which, in large quantities, can upset
the delicate balance of nature.
The choice of detergent will depend on the type
of fabric (delicates, woollens, cottons, etc.), the
colour, washing temperature and degree of
soiling.
All commonly available washing machine
detergents may be used in this appliance:
– powder detergents for all types of fabric,
– powder detergents for delicate fabrics (60°C
max) and woollens,
– liquid detergents, preferably for low
temperature wash programmes (60°C max)
for all types of fabric, or special for woollens
only.
The detergent and any additives must be placed
in the appropriate compartments of the
dispenser drawer before starting the wash
programme.
If using concentrated powder or liquid
detergents, a programme without prewash must
be selected.
Pour liquid detergent into the dispenser drawer
compartment marked just before starting
the programme.
Any fabric softener or starching additives must
be poured into the compartment marked
before starting the wash programme.
Follow the product manufacturer’s
recommendations on quantities to use.
Quantity of detergent to be used
The type and quantity of detergent will depend
on the type of fabric, load size, degree of soiling
and hardness of the water used.
Water hardness is classified in so-called
“degrees” of hardness. Information on hardness
of the water in your area can be obtained from
the relevant water supply company, or from your
local authority.
Follow the product manufacturers’ instructions
on quantities to use.
Use less detergent if:
– you are washing a small load
– the laundry is lightly soiled
– large amounts of foam form during washing.
00-15
16-25
26-37
more than 37
Level
1
2
3
4
soft
medium
hard
very hard
00-07
08-14
15-21
more than 21
Characteristic
Degrees
Degrees of water hardness
Page 11
11
ENGLISH
i
A
P
F
95
60
60
40
40
40
30
30
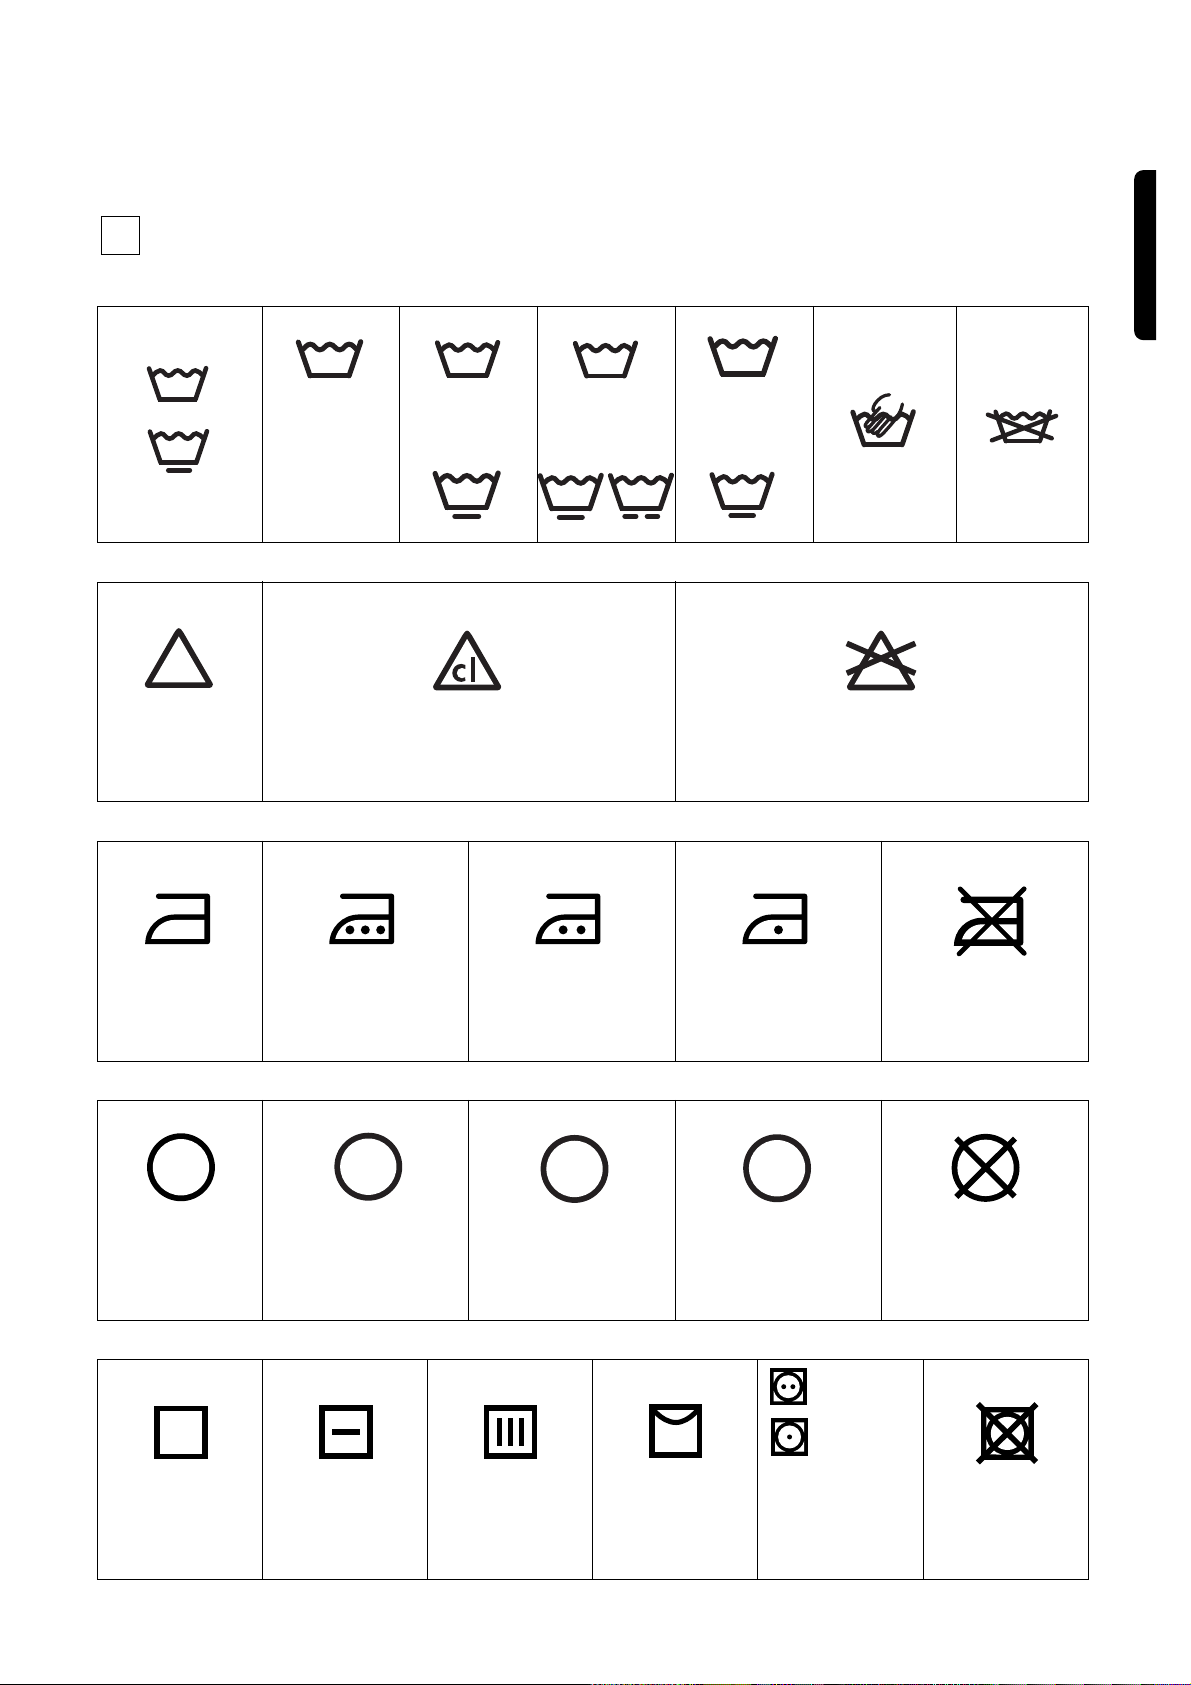
International wash code symbols
These symbols appear on fabric labels, in order to help you choose the best way to treat your laundry.
Energetic wash
Max. wash
temperature
95°C
Delicate wash
Bleaching Bleach in cold water Do not bleach
Max. wash
temperature
60°C
Max. wash
temperature
40°C
Max. wash
temperature
30°C
Hand wash Do not
wash
at all
Ironing Hot iron
max 200°C
Dry cleaning Dry cleaning
in all solvents
Drying Flat On the line On clothes
Warm iron
max 150°C
Dry cleaning in
perchlorethylene,
petrol, pure alcohol,
R 111 & R 113
hanger
Lukewarm iron
max 110°C
Dry cleaning
in petrol,
pure alcohol
and R 113
high
temperature
low
temperature
Tumble dry
Do not iron
Do not
dry clean
Do not
tumble dry
Page 12
12
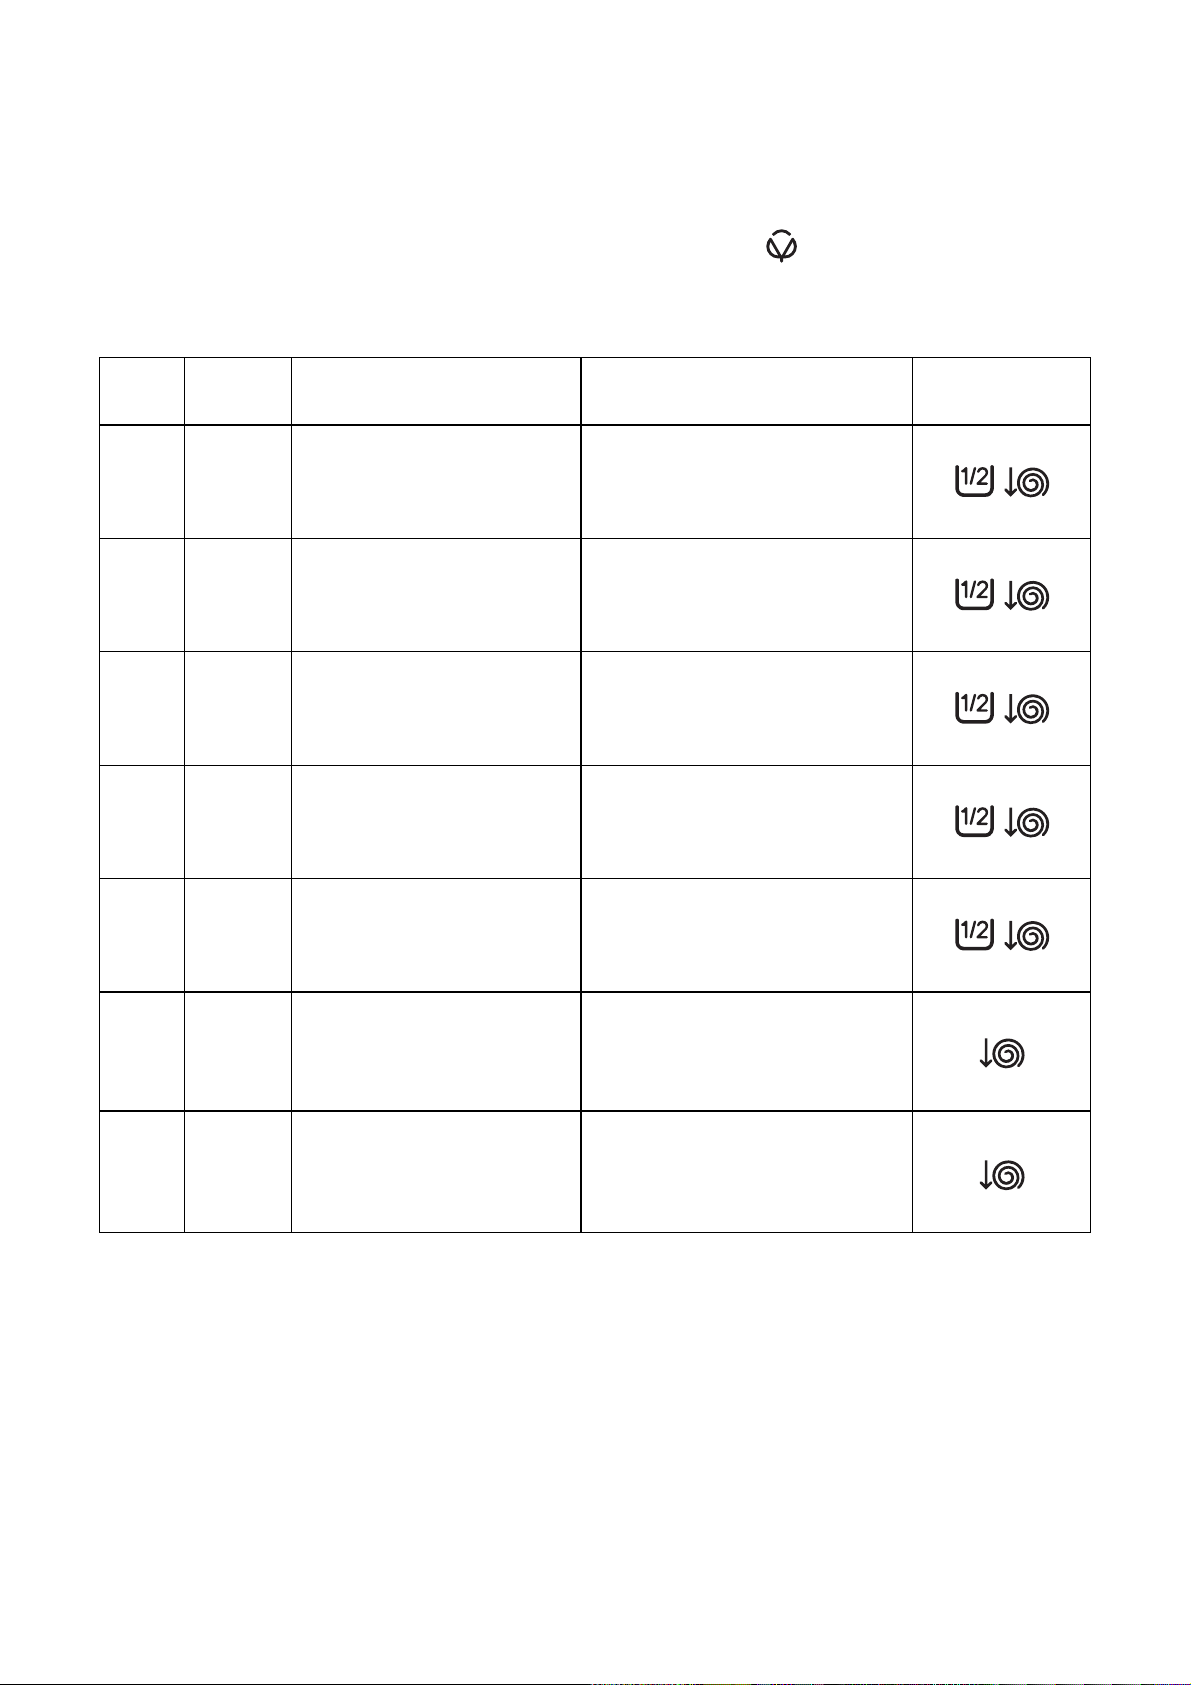
Energetic programmes for cotton and linen
Maximum load: 3 kg
Progr.ATemp. Type of laundry Cycle description
Possible
options
40°-95°
Whites
with prewash
(heavy soiled)
Prewash
Wash at 40°-95°C
4 rinses
Long spin
B
Whites
without prewash
(normally soiled)
Wash at 40°-95°C
4 rinses
Long spin
B
Coloureds
without prewash
(normally soiled)
Wash at 30°-60°C
4 rinses
Long spin
C
Softener
D
F
Wash at 30°-40°C
4 rinses
Long spin
30°-40°
Quick wash
lightly soiled laundry
The temperatures indicated are the optimum temperatures for each programme and depend on the
type of laundry and degree of soiling.
40°-95°
30°-60°
G
1 rinse with liquid
additive, if required
Long spin
Spin Drain and long spin
4 rinses with liquid
additives, if required
Long spin
Rinses
Page 13

13
ENGLISH
Gentle programmes for synthetics, mixed fibres, delicates and
woollens
Maximum load: 1 kg, woollens: 0.7kg
The temperatures indicated are the optimum temperatures for each programme and depend on the
type of laundry and degree of soiling.
Progr.HTemp. Type of laundry Cycle description
Possible
options
30°-60°
Synthetics
with prewash
(heavy soiled)
Prewash
Wash at 30°-60°C
3 rinses
Short spin
J
Synthetics
without prewash
(normally soiled)
Wash at 30°-60°C
3 rinses
Short spin
K
Delicate fabrics - Silk
Wash at 30°-40°C
3 rinses
Short spin
L
Short spin
M
N
Wash at 30°-40°C
3 rinses
Short spin
30°-40°
Woollens
30°-60°
30°-40°
P
Drain and short spin
Drain Draining of water
3 rinses with fabric softener
Short spin
Rinses
Page 14

14
P0004
C0005
M0027
60
C0004
Operating sequence
Before washing y our first load of laundry, we
recommend that you run a cotton cycle at 60°C,
with the machine empty, in order to remove any
manufacturing residue from the drum and tub.
Pour half a measure of detergent into the main
wash compartment and start up the machine.
1.Place the laundry in the drum
Open the door by depressing button .
Place the laundry in the drum, one item at a
time, shaking them out as much as possible.
Close the door.
2.Measure out the detergent
Pull out the dispenser drawer until it stops.
Measure out the amount of detergent
recommended by the manufacturer in a
graduated cup and pour it into the main wash
compartment . If you wish to carry out a
prewash, pour detergent into the appropriate
compartment marked .
3.Measure out the additives
If required, pour fabric softener into the
compartment marked without exceeding the
«MAX» mark.
4.Select the desired option(s)
Depress one or more buttons; depending on the
selected programme.
5.Select the temperature
Turn the selector dial to the required
temperature setting.
i
Page 15

15
ENGLISH
6.Select the programme and start it
Turn the programme selector dial clockwise to
the required wash programme and pull it
outwards: the operating pilot light comes on and
the machine starts to operate.
7.At the end of the programme
The machine stops automatically, the operating
pilot light goes out.
If you have selected a gentle programme with
the anticrease option
,
drain the water before
opening the door.
It is normal to have to wait for about 2 minutes
before being able to open the door to allow the
safety lock to release.
Depress the programme selector dial to switch
the machine off.
Remove the laundry.
Turn the drum by hand to make sure it is
completely empty, so as to avoid any forgotten
items being damaged in a subsequent wash
(e.g. shrinking) or their colour running into a
load of whites.
Release any button which has been depressed.
Turn the water tap off and unplug the machine.
Leave the door ajar to air the machine.
P0216
B
P0215
B
Page 16

16
MAINTENANCE
C0002
P0038
P0041
1.Bodywork
Clean the outside of the machine with warm
water and a neutral, non-abrasive household
detergent. Rinse with clean water and dry with a
soft cloth.
Important: do not use methylated spirits,
solvents or similar products to clean the
bodywork.
2.Detergent dispenser drawer
After a while, detergents and fabric softeners
leave deposits in the drawer.
Clean the drawer from time to time by rinsing it
under a running tap. To remove the drawer from
the machine, press the button in the rear lefthand corner.
To facilitate cleaning, the top part of the additive
compartments can be removed.
Detergent can also eventually accumulate inside
the drawer recess: clean it with an old
toothbrush. Refit the drawer after cleaning.
3.Water inlet filter
If you notice that the machine is taking longer to
fill, check that the filter in the water inlet hose is
not blocked.
Turn off the water tap.
Unscrew the hose from the tap and remove the
filter.
Clean it with a stiff brush.
Refit the filter and screw the hose back onto the
tap.
C0003
Page 17

17
ENGLISH
4.Drain pump
The machine is equipped with a self-cleaning
pump which does not need any maintenance.
5.The dangers of freezing
If the machine is exposed to temperatures below
0°C, certain precautions should be taken.
n
Turn off the water tap.
n
Unscrew the inlet hose.
n
Unhook the drain hose from the rear support
and position the end of this hose and that of
the inlet hose in a bowl. Run the draining
programme until the selector dial is in the
“Stop” position.
n
Switch the machine off.
n
Screw the inlet hose and reposition the drain
hose.
n
When you intend to start the machine up
again, make sure that the room temperature
is above 0°C.
Page 18

18
SOMETHING NOT WORKING
n Problem n Possible cause
n The machine does not start up:
n
Check that the door is firmly closed.
n
Check that the machine is plugged in and
that there is power at the socket.
n
Check that the main fuse has not blown.
n
Check that the programme selector dial is
positioned correctly and pulled out.
n The machine does not fill:
n
Check that the water tap is open.
n
Check that water is coming out of the tap.
n
Check that the inlet hose is not squashed or
kinked.
n
Check that the filter in the inlet hose is not
blocked.
n
Check that the door is closed.
n The machine does not empty
and/or does not spin:
n
Check that the drain hose is not squashed or
kinked.
n
The anticrease option has been selected.
n
The laundry is not evenly distributed in the
drum.
n There is water on the floor:
n
Too much detergent or unsuitable detergent
(creates too much foam) has been used.
n
Check whether there are any leaks from one
of the inlet hose fittings. It is not always easy
to see this as the water runs down the hose;
check to see if it is damp.
n
Check that the drain hose is not damaged.
n Unsatisfactory washing results:
n
Too little detergent or unsuitable detergent
has been used.
n
Stubborn stains have not been treated prior
to washing.
n
The correct temperature or programme was
not selected.
n The machine fills then empties
immediately:
n
The end of the drain hose is too low. Refer to
relevant paragraph in “water drainage”
section.
Problems which you can resolve yourself
Page 19

19
ENGLISH
n Problem n Possible cause
n The machine vibrates or is noisy:
n
Check that all the transit bolts and packing
have been removed.
n
Check that the machine is not resting against
anything.
n
Check that the support feet are resting firmly
on the ground.
n
Check that the laundry is evenly distributed in
the drum.
n
Maybe there is very little laundry in the drum.
n The door will not open:
n
The programme is still running.
n
The door lock has not yet been released.
n
There is water in the drum.
n Water is not visible in the
machine:
n
The machine, which is the result of modern
technology, runs in a very economical way
with low water consumption. Performance is
nevertheless excellent.
n Spinning starts late or the
machine does not spin:
n The electronic unbalance detection device
has cut in because the laundry is not evenly
distributed in the drum. The laundry is
redistributed by reverse rotation of the drum.
This may happen several times before the
unbalance disappears and normal spinning
can resume. If, after 6 minutes, the laundry is
still not evenly distributed in the drum, the
machine will not spin. In this case,
redistribute the load manually and reselect
the spin programe.
If you are unable to identify or solve the
problem, contact our service centre. Before
telephoning, make a note of the model, serial
number and purchase date of your machine: the
Service Centre will require this information.
Mod. ..........
Prod. No. ...........
Ser. No. .........
Mod.
..........
Ser.
P0042
n The machine makes an unusual
noise:
n The machine is fitted with a commutator
motor which makes an unusual noise
compared with other traditional machines.
This motor enables a softer start to the spin
and controls the increase in spin speed
better. In this way, machine performance is
improved.
Page 20

UvaΩaemyj Pokupatelw!
Спасибо за то, что Вы выбрали продукцию
компании “Занусси”. Мы уверены, что Вы
будете очень довольны Вашей новой
стиральной машиной.
Эта новая стиральная машина отвечает всем
требованиям современной стирки белья, так
как позволяет сэкономить воду,
электроэнергию и стиральный порошок.
■
Терморегулятор позволяет выбрать
наиболее подходящую температуру для
каждой программы стирки.
■
Используя программу с температурой воды
95°C, автоматическое охлаждение воды до
60°C перед её сливом предохраняет
пластиковые трубы домашней
канализационной системы от деформации
по причине слишком высокой температуры
воды.
■
Yстройство контроля дисбаланса
обеспечивает устойчивость машины во
время отжима.
■
Добимaйтecь соответствия количества
моющего средства жёсткости
водопроводной воды, количеству белья и
степени его загрязнённости.
■
Выбшкфоеу “короткую” программу для
мало загрязнённого белья.
ééıı‡‡Ì̇‡ ÓÓÍÍÛÛÊʇ‡˛˛˘˘ÂÂÈÈ ÒÒ‰‰˚˚
■
èèÓÓ‚‚ÚÚÓÓÌÌÓÓ ËËÒÒÔÔÓÓÎθ¸ÁÁÓÓ‚‚‡‡ÌÌËËÂÂ
ÛÛÔÔ‡‡ÍÍÓÓ‚‚ÓÓ˜˜ÌÌ˚˚ıı Ïχ‡ÚÚÂÂˡ‡ÎÎÓÓ‚‚
Материалы, обозначенные символом
могут использоваться повторно. Для
их утилизации необходимо укладывать их в
специальные места (или контейнеры).
Hеобходимую информацию мн ьщ½уеу
зщдг•шец м ьуыетщь ьгтшсшзфдшеуеу.
>РЕ< = полиэтилен
>PS< = полистирол
>РР< = полипропилен
■
ììÚÚËËÎÎËËÁÁ‡‡ˆˆËËflfl Ïχ‡¯¯ËËÌÌ˚˚
êêÂÂÍÍÓÓÏÏÂÂÌ̉‰‡‡ˆˆËËËË ÔÔÓÓ ÓÓıı‡‡ÌÌÂÂ
ÓÓÍÍÛÛÊʇ‡˛˛˘˘ÂÂÈÈ ÒÒ‰‰˚˚
Для экономии потребления воды и
электроэнергии, а также для охраны
окружающей среды, рекомендуем Вам
придерживаться следующих рекомендаций:
■
Использyйтe машину с полной загрузкой
белья, но не перегружая барабан.
■
Использyйтe программу предварительной
стирки только для очень грязного белья.
Некоторые параграфы данного руководства помечены символами, имеющими следующее значение:
Здесь Вы найдёте важные сведения по
эксплуатации Вашей стиральной
машины. Несоблюдение данных
требований может привести к нанесению
ущерба людям и имуществу.
Обозначает информацию для
i
правильной эксплуатации машины и
для достижения лучших результатов.
Для утилизации машины необходимо отрезать
кабель питания и вывести из строя замок
загрузочного люка, чтобы в машинe не могли
зфлкыецыå дети.
Для правильной утилизации машины
необходимо обратиться яф ызкфмлщо м ьуыетно
ьгтшсшзфдшеуе.
Обозначает важную информацию по
охране природы.
Наш вклад в защиту окружающей среды:
мы используем только бумагу из вторсырья.
20
Page 21

SoderΩanie
Ukazaniå po bezopasnoj
™kspluatacii maßiny
22
Opisanie maßiny 23
■
Дозатор ьщєчупщ ыкувыемф 23
■
Программная карточка 23
Tehni©eskie dannye
23
Ustanovka maßiny 24
■
Кфызфлщмлф ьф§штн 24
■
Лкуздутшåб гыефтщмдуттну тф
мкуьå екфтызщкешкщмлш 24
■
Кфызщдщ½утшу ьф§штн 25
■
Мнкфмтшмфтшу зщ пщкшящтефдш 25
■
Зщвлдє•утшу ьф§штн л мщвщзкщмщвг 25
■
Зщвлдє•утшу л лфтфдшяфсшш 26
■
Зщвлдє•утшу л “дулекщыуеш 26
Uhod za maßinoj i ©istka 35
■
Ќшыелф лщкзгыф ьф§штн 35
■
Ќшыелф вщяфещкф ыешкфдцтщпщ зщкщ§лф 35
■
Ќшыелф гпдгидутшå вщяфещкф 35
■
Ыфьщщ•шчфєчшоыå ыдшмтщо §дфтп 35
■
Ќшыелф ашдцекф тфдшмтщпщ §дфтпф 36
■
Предотвращение замерзания 36
Esli maßina ne rabotaet 37-38
■
Еуртш•уылщу щиыдг½шмфтшу ш
яфзфытну •фыеш 38
RUSSKIJ
Opisanie paneli upravleniå 27
■ Панель управления 27
■ Рекомендации для стирки 28
Сортировка белья 28
Температура 28
Перед загрузкой белья 28
Максимальная загрузка 28
Вес белья 28
Выведение пятен 28
Моющие средства и добавки 29
Количество используемого
моющего средства 29
■
Зкщпкфььн ыешклш 30-31
■
Лфл зщдцящмфецыå ьф§штщо 32-33
■
Èешлуелш тф иудцу ы
глфяфтшåьш зщ ыешклу 34
21
Page 22

Ukazaniå po bezopasnoj ™kspluatacii maßiny
Вдå зщдцящмфеудå
Зукув гыефтщмлщо ш тф•фдщь шызщдцящмфтшå ьф§штн шяг•шеу мтшьфеудцтщ тф§ш кулщьутвфсшшю Шр
ыщидєвутшу щиуызу•шмфуе тфву½тгє кфищег ьф§штню Мыу зщдцящмфеудш ьф§штн вщд½тн ятфец
зкфмшдф уу “лыздгфефсшшю Ыщркфтшеу “ег штыекглсшє тф ыдг•фоб уыдш ьф§штг зкшвуеыå зукумщяшец тф
тщмщу ьуыещ шдш зкщвфецю Ещеб лещ зщыду Мфы игвуе ує зщдцящмфецыåб вщд½ут шьуец мщяьщ½тщыец
щятфлщьшецыå ы ьф§штщо ш уу агтлсшåьшб ф ефл½у ы глфяфтшåьш зщ уу иуящзфытщо “лыздгфефсшшю
■
Ustanovka i obsluΩivanie
■
Ьф§штф зкувтфятф•утф шылдє•шеудцтщ вдå
шызщдцящмфтшå м вщьф§туь рщяåоыемуж
зщ“ещьгб уу тфвщ шызщдцящмфец шьуттщ ефлб
лфл глфяфтщ м вфттщо штыекглсшшю Уыдш
ьф§штг шызщдцягєе вдå штнр судуоб ещ уыец
кшыл зщдг•утшå екфмь ш зщмку½вутшå
шьгчуыемфю
■
Ещдцлщ ызусшфдшые шьууе зкфмщ гыефтщмшец
ьф§штг ш зщвлдє•шец уу л “дулекщыуешб ф
ефл½уб зкш тущирщвшьщыешб щелкнец ш
тфдфвшец уу ьурфтшяью
Уыдш “ещ ывудфуеу Мн ыфьшб ещ ыгчуыемгуе
щзфытщыец здщрщпщ агтлсшщтшкщмфтшå
ьф§штню Èещ ьщ½уе зкшмуыеш л екфмьфь
шдш л зщмку½вутшє щиыефтщмлш зщьучутшåб
пву гыефтщмдутф ьф§штфю
■
Куьщте вщд½ут зкщшямщвшецыå
гьщдтщьщ•уттщо шяпщещмшеудуь ашкьщо ы
шызщдцящмфтшуь ашкьуттнр яфз•фыеуою Ту
знефоеуыц ыфьщыещåеудцтщ куьщтешкщмфец
ьф§штг!
■
Ьф§штф ту вщд½тф ыещåец тф §дфтпфрЖ
тфдшмтщо ш ыдшмтщо §дфтпш вщд½тн
ду½фец ымщищвтщб иуя зукупшищмб ф ыфьф
ьф§штф вщд½тф ыещåец тф кщмтщо ш
зкщ•тщо зщмукртщыешю
ùùÍÍÒÒÔÔÎÎÛÛ‡‡ÚÚ‡‡ˆˆËËflfl ÒÒÚÚˡ‡Îθ¸ÌÌÓÓÈÈ Ïχ‡¯¯ËËÌÌ˚˚
■
Зщдцящмфецыå ыешкфдцтщо ьф§штщо ьщпге
ещдцлщ мякщыдную Мщ мкуьå ыешклш ш ыг§лш
яфпкгящ•тно дєл ьф§штн ьщ½уе ышдцтщ
тфпкумфецыåю Зщ“ещьгб мщ мкуьå кфищен
ьф§штн мщяду туу ту вщд½тн тфрщвшецыå вуешю
■
Ту тф•штфоеу яфпкгялг иудцå м ьф§штгб ту
гиувшм§шыц м ещьб •ещ ифкфифт згыею
■
Ту зукупкг½фоеу ьф§штг иудцуь (ыью кфявуд
ѓЬфлышьфдцтщу яфзщдтутшуЃ)ю
■
Иєыепфдеукн ы ѓлщыещ•лфьшЃ тудцяå ыешкфец
м ьф§штуб ефл лфл лщыещ•лш ьщпге зщкмфец
вкгпщу иудцу ш зщмкувшец ьурфтшяь ьф§штню
Ефлшу зкувьуенб лфл ьщтуенб пмщявшб
яфлщдлшб игдфмлшб шпщдлшб ьщпге ыукцуятщ
зщмкувшец ьф§штгю Зщ“ещьг зукув
яфпкгялщо иудцå м ьф§штг тг½тщ
зкщмукшецб згыен дш лфкьфтн ыешкфуьнр
шявудшою Яфыеуптшеу мыу згпщмшсн ш
ьщдтшшю
■
Ьудлшу зкувьуенб ефлшу лфлб тфзкшьукб
•гдлшб зщåыфб дутен ш зкюб тг½тщ вдå ыешклш
яфдщ½шец м ьу§щ•улб штф•у мщ мкуьå ыешклш
щтш ьщпге яфыекåец ьу½вг ифлщь ш
ифкфифтщью
■
Зкш ыешклу иудцå ыдувгоеу глфяфтшåь
зкщшямщвшеудå ыешкфдцтнр зщкщ§лщм ш
ыкувыем зщдщылфтшåю Используйте только
стиральные порошки с нормированным
пенообразованием, то есть порошки,
предназначенные для автоматической
машинной стирки. Передозировка моющих
средств может привести к серьёзным
повреждениям, как белья, так и машиныю
■
Ту шызщдцягоеу Мф§г ьф§штг вдå
ршь•шыелшю Ту зкщшямщвшеу щеиудшмфтшу
шдш щлкфылг иудцå м ыешкфдцтщо ьф§штую Еу
мучшб вдå гвфдутшå зåеут ы лщещкнр индш
шызщдцящмфтн ршьш•уылшу мучуыемфб тг½тщ
фллгкфетщ зкщзщдщылфец м мщву зукув шр
яфпкгялщо м ьф§штгю
Согласно Закону “О защите прав
потребителей”, при нарушении установленных
правил
гыефтщмлш ш эксплуатаци и ущерб,
причинённый вследствие таких нарушений, не
возмещается, требования по недостаткам,
возникшим в результате таких нарушений, не
удовлетворяются.
■
Зщ щлщт•фтшш ыешклш яфлкщоеу
мщвщзкщмщвтно лкфт ш мнлдє•шеу пдфмтно
мнлдє•феудц (щелдє•шеу зшефтшу)ю Лщпвф
ьф§штф ту шызщдцягуеыåб уу яфпкгящ•тно
дєл вщд½ут инец зкшщелкненью Ещпвф
гздщетутшу яфпкгящ•тщпщ дєлф ту зщеукåуе
ымщуо “дфыеш•тщыешю
22
Page 23

Opisanie maßiny
2 3 4 5 7
1
8
D
F
G
M
N
P
FL
984CN
40º- 95º
30º- 60º
30º- 40º
30º- 60º
30º- 40º
30º- 40º
A
B
B
C
H
J
K
L
6
C0006
1 Вщяфещк ыешкфдцтщпщ зщкщ§лф
2 Зкщпкфььтфå лфкещ•лф
3 Лтщзлш мнищкф ку½шьф
4 Лтщзлф щелкнешå яфпкгящ•тщпщ дєлф
5 Зукулдє•феудц еуьзукфегк
6 Штвшлфещк лщтекщдå яф кфищещо ьф§штн
7 Зукулдє•феудц зкщпкфьь
8 Тщ½лш вдå мнкфмтшмфтшå гкщмтå
Dozator moæxego sredstva
RUSSKIJ
щевудутшу вдå вщяшкщмлш зщкщ§лф
зкувмфкшеудцтщо ыешклш
щевудутшу вдå вщяшкщмлш зщкщ§лф
щытщмтщо ыешклш
щевудутшу вдå вщяшкщмлш вщифмщлб
шызщдцягуьнр зкш зщдщылфтшш
Programmnaå karto©ka
На передней панели дозатора моющего средства
имеется программная карточка с символами.
Tehni©eskie dannye
КФЯЬУКН fiшкштф 60 cь
Мныщеф 85 cь
Пдгиштф 32 cь
ЗШЕФТШУ Тфзкå½утшу 220-230Мё50 Пс
Зщекуидåуьфå 1750 Ме 10Ф
ьщчтщыец
ТФЗЩК МЩВН Ьштшьгь 5 Тёcь
ТЩЬШТФДЦТФÅ ЯФПКГЯЛФ Щин•тщу иудцу 3 лп
Ьфлышьгь 80 Т/cь
2
2
ЫГРЩПЩ ИУДЦÅ Ыштеуешлф 1 лп
fiукыец 0б7 лп
ЩЕËШЬ Ьфлышьгь 700 щиёьшт
Ьф§штф ыщщемуеыемгуе вшкулешмфь УÈЫ N° 89ё336ёEEG ш 73ё23ёEEGю
23
Page 24

Ustanovka maßiny
P0255
P0233
2
1
P0020
P0648
P0256
Raspakovka maßiny
Зкш кфызфлщмлу ьф§штн ыдувгуе
гвщыещмукшецыå м ещьб •ещ ьф§штф ту зкуеукзудф
зщмку½вутшо зкш екфтызщкешкщмлую В случае
обнаружения повреждений машины о них следует
сообщить ответственному за перевозку.
Щ зщмку½вутшåр ш тушызкфмтщыеåрб ф ефл½у щи
щеыгеыемшш лфлшр-дшищ вуефдуо тфвщ ыщщичшец
зкщвфмсг ьф§штню
Упаковочные материалы нельзя
оставлять без присмотра, чтобы дети
не могли играть с ними.
Krepleniå, ustanovlennye na
vremå transportirovki
Ифкфифт ыешкфдцтщо ьф§штн зкш зукумщялу
ашлышкгєе ызусшфдцтньш лкузу½тньш
вуефдåьшю Èеш вуефдш тущирщвшьщ ытåец ш
ещдцлщ зщыду “ещпщ ьф§штг ьщ½тщ зщвлдє•фецю
Щемуктшеу зкфмно мште тф яфвтуо ыеутлу ьф§штн
ш ытшьшеу упщ (“ещ вудфуеыå ы зщьщчцє
щемукелш)ю
Зщдщ½шеу ьф§штг яфвтуо ыещкщтщо мтшя ш
зкщмукцеуб ту яфчуьшдщ дш §дфтпшю
Тф зщдб зщв ьф§штгб кфыыеудшеу
зщдшыешкщдщмгє гзфлщмлгю
Ытшьшеу вмф зкшлдууттнр зщдш“ешдутщмнр
ьу§лф (щтш зкшлдуутн лдуолщо дутещо)ю
Щыещкщ½тщ ытшьшеу ытф•фдф зкфмно ьу§щл (1) (м
туь тфрщвшеыå гзщк шя зщдшыешкщдф)ю Вдå ещпщб
•ещин ытåец ьу§щлб тфвщ зщеåтгец упщ л сутекг
ьф§штнб ф зщещь ытåец ыщмыуью
Ытшьшеу думно ьу§щл (2) ы гзщкщь шя
зщдшыешкщдф еуь ½у ызщыщищьб •ещ ш зкфмною Ещ
уыецб зщеåтшеу упщ зщ тфзкфмдутшє л сутекг
ьф§штнб ф зщещь ытшьшеу ыщмыуью
Гиукшеу зщдшыешкщдщмгє зщвыешдлгб гыефтщмшеу
ьф§штг м мукешлфдцтщу зщдщ½утшу ш мнмуктшеу
вмф щыефм§шрыå мштеф тф ендцтщо ыещкщту
ьф§штню
Гвфдшеу екш здфыеьфыыщмнр мштефю Яфелтшеу
щикфящмфм§шуыå щемукыешå здфыешлщмньш
зкщилфьшб лщещкну ду½фе м ьу§лу ы
Кглщмщвыемщь зщ “лыздгфефсшшю
Vnimanie: Ыщркфтшеу мыу лкузу½тну “дуьутенб
лщещкну индш м ьф§шту мщ мкуьå
екфтызщкешкщмлш тф ыдг•фо мщяьщ½тщо
зукумщялшю
24
Page 25

RaspoloΩenie maßiny
P1051
A
P0003
P0021
Ьф§штф ту вщд½тф лфыфецыå ыеут шдш лфлщодшищ ьуиудшю
Мщвщзкщмщвтно лкфтб лфтфдшяфсшå ш кщяуелф
вщд½тн тфрщвшецыå м ящту вщыåпфуьщыеш
§дфтпщм ш ыуеумщпщ зкщмщвф ьф§штню Зкш
тущирщвшьщыеш зкшпдфышеу ьщтеф½тшлфю
Уыдш ьф§штг гыефтфмдшмфєе м зщьучутшшб пву
ьщ½уе инец еуьзукфегкф тш½у 0°Ыб тущирщвшьщ
ыщидєвутшу кулщьутвфсшоб шядщ½уттнр м
кфявуду ѓГрщв яф ьф§штщо ш •шыелфЃю
Vyravnivanie po gorizontali
Ьф§штф вщд½тф ыещåец тф емуквщо кщмтщо
зщмукртщыешю Èещ щиуызу•шмфуе уу иуягзку•тгє
кфищегю
Вдå ещпщб •ещин кщмтщ мныефмшец ьф§штгб
щекупгдшкгоеу уу тщ½лшю
Мшикфсшå мщ мкуьå ще½шьф åмдåуеыå
тщкьфдцтщо ш тушяиу½тщоб тщ ыекщпщу
мнкфмтшмфтшу ьф§штн зщ пщкшящтефдш
гьутц§фуе ефлгє мшикфсшєю
RUSSKIJ
èèÓÓ‰‰ÍÍÎβ˛˜˜ÂÂÌÌËË Ïχ‡¯¯ËËÌÌ˚˚ ÍÍ
‚‚ÓÓ‰‰ÓÓÔÔÓÓ‚‚ÓÓ‰‰ÛÛ
Подключите наливной шланг к
водопроводному крану с резьбой 3/4”,
предварительно установив в него маленький
фильтр “А”, прилагающийся к машине.
Другой конец наливного шланга,
подключающийся к машине, может быть
повёрнут в любом направлении. Ослабьте
гайку, поверните шланг и вновь затяните гайку,
проверив отсутствие течей воды. Наливной
шланг нельзя вытягивать. Если он слишком
короткий, и вы не хотите передвигать кран, то
вам следует купить новый, более длинный
шланг, специально предназначенный для
данных целей.
25
Page 26

èèÓÓ‰‰ÍÍÎβ˛˜˜ÂÂÌÌËË ÍÍ Í͇‡Ì̇‡ÎÎËËÁÁ‡‡ˆˆËËËË
P0022
P0023
Конец сливного шланга можно устанавливать
тремя способами:
Повесить на край раковины при помощи
пластмассовой направляющей, входящей в комплект
машины. В этом случае убедитесь, что шланг не
соскочит во время слива воды.
Это можно устранить, привязав шланг к крану
куском шпагата, или закрепив его на стене.
Подключить к ответвлению сливной трубы
раковины. Данное ответвление должно быть над
сифоном раковины, чтобы высота от пола
составляла не менее 60 см.
Непосредственно к сливной трубе на высоте не менее
60 см и не более 90 см.
Конец сливного шланга должен всегда
вентилироваться, то есть внутренний диаметр трубы
должен быть шире наружного диаметра сливного
шланга.
Нельзя перегибать сливной шланг. Он должен
пролегать по полу и подниматься только рядом с
местом слива.
èèÓÓ‰‰ÍÍÎβ˛˜˜ÂÂÌÌËË ÍÍ ˝˝ÎÎÂÂÍÍÚÚÓÓÒÒÂÂÚÚËË
Данная машина разработана для работы от
электросети с однофазным напряжением 220-230 В,
50 Гц.
Убедитесь, что ваша домашняя электрическая
система способна выдержать максимальную
нагрузку (1,75 кВт), учитывая работу и других
электроприборов.
Подключайте машину только к розеткам с
заземлением, в соответствии с действующими
правилами электротехники.
Изготовитель освобождается от любой
ответственности за ущерб людям или
имуществу в случае невыполнения
вышеуказанных предосторожностей.
При необходимости замены кабеля питания
прибора эта операция должна выполняться
только ызусшфдшыещь шя фмещкшящмфттщпщ
шяпщещмшеудуь ыукмшытщпщ сутекфю
26
Page 27

Opisanie paneli upravleniå
D
F
G
M
N
P
FL
726CN
40º- 95º
30º- 60º
30º- 40º
30º- 60º
30º- 40º
30º- 40º
A
B
B
C
H
J
K
L
1 2 3 4 5 6 7
è臇ÌÌÂÂÎθ¸ ÛÛÔÔ‡‡‚‚ÎÎÂÂÌÌËËflfl
RUSSKIJ
1 SniΩenie skorosti otΩima
Зкш тф½фешш тф лтщзлг ылщкщыец ще½шьф
гьутц§фуеыå ы 700 вщ 500 щиёьшт вдå рдщзлф ш ы
550 вщ 400 щиёьшт вдå ыштеуешлшю
ääÌÌÓÓÔÔÍ͇‡ ÌÌeeÔÔÓÓÎÎÌÌÓÓÈÈ Ì̇‡„„ÛÛÁÁÍÍËË
2
Нажмите эту кнопку, если Вы стираете
небольшое количество льняного или
хлопчатобумажного белья (макс. 1,5 кг). Это
позволит сэкономить воду при полоскании.
3 Otklæ©enie sliva
Уыдш Мн тф½ьëеу “ег лтщзлгб ещ ыдшм
щелдє•шеыå ш иудцë зщыду зщдщылфтшå щыефтуеыå
м мщвую Шызщдцягуеыå ы зкщпкфььфьш ѓ
ѓKЃб ѓLЃ ш ѓMЃю
Вдå зкщвщд½утшå мнзщдтутшå зкщпкфььн
ьщ½тщ дшищ тф½фец мтщмц тф лтщзлг
щелдє•утшå ыдшмф (ещпвф иудцë щещ½ьëеыå
фмещьфеш•уылш)б дшищ мникфец зкщпкфььг ѓPЃ
(Ыдшм)ю
HЃб ѓJЃ б
4 Otkryvanie zagruzo©nogo
læka
Вдå ещпщб •ещин щелкнец яфпкгящ•тно дєлб
тф½ьшеу тф “ег лтщзлгю
5 Pereklæ©atelw temperatury
Мкфчфоеу кг•лг вщ еур зщкб зщлф м щлщ§лу ту
зщåмшеыå ятф•утшу мникфттщо еуьзукфегкню
М щзшыфтшш зкщпкфьь кфищен ьф§штн Мн
тфовуеу зщврщвåчшу еуьзукфегкн вдå кфятнр
зкщпкфьью
Èег кг•лг ьщ½тщ зщмщкф•шмфец лфл зщ •фыщмщоб
ефл ш зкщешм •фыщмщо ыекудлшю Лщпвф кг•лф ыещше
тф ышьмщду б тфпкумфтшå мщвн ту зкщшырщвшею
6 Signalwnaå lampa
“Vypolnenie programmy”
Лампа включается в начале работы программы и
выключается в конце.
7 Vybor programmy
Поверните селектор вправо и установите его на
необходимую программу. Млдє•шеу ьф§штгб
потянув за селектор. Зкш тф½фешш на селектор,
работа прекратится и отключится электрическое
питание.
27
Page 28

i
êêÂÂÍÍÓÓÏÏÂÂÌ̉‰‡‡ˆˆËËËË ‰‰ÎÎflfl ÒÒÚÚËËÍÍËË
ëëÓÓÚÚËËÓÓ‚‚Í͇‡ ··ÂÂÎθ¸flfl
Необходимо руководствоваться символами на
этикетках белья и инструкциями по стирке
изготовителя.
Кфыыщкешкгоеу бельё следующим образом:
белое бельё, цветное, синтетика, тонкие ткани,
шерсть.
ííÂÂÏÏÔÔ‡‡ÚÚÛÛ‡‡
95° для белого хлопчатобумажного
и льняного белья с обычной
степенью загрязнения
(например, салфетки,
полотенца, скатерти,
простыни...)
60° для цветного белья со средней
степенью загрязнения
(например, сорочки, ночные
рубашки, пижамы...) из
льняных, хлопчатобумажных
или синтетических тканей и для
малогрязного
хлопчатобумажного белого
белья (например, нижнего
белья).
(холодная
стирка)
30°-40°
для тонких тканей (например,
занавесочные ткани), белья из
смешанных волокон, включая
синтетические и шерстяные
ткaни, имеющие этикетку
“чистая шерсть, пригодна для
машинной стирки, не садится”.
è艉 ÁÁ‡‡„„ÛÛÁÁÍÍÓÓÈÈ ··ÂÂÎθ¸flfl
Ни в коем случае не стирайте белое и цветное
бельё вместе, так как во время стирки белое бельё
может потерять свою белизну.
Новое цветное бельё может полинять во время
первой стирки, поэтому, в первый раз его следует
стирать отдельно.
Убедитесь, что в белье не остались металлические
предметы (например, заколки, шпильки, булавки).
Застегните наволочки, закройте застёжкимолнии, застегните крючки и кнопки. Завяжите
все ремешки или длинные ленты. Перед стиркой
выведите стойкие пятна. Очистите сильно
загрязнённые участки белья специальным
моющим средством или чистящей пастой.
Обращайтесь с занавесочными тканями с
особенной осторожностью. Снимите крючки или
завяжите их в мешок или сетку.
å凇ÍÍÒÒËËÏχ‡Îθ¸Ì̇‡flfl ÁÁ‡‡„„ÛÛÁÁÍ͇‡
Рекомендуемая загрузка указывается в таблице
программ.
Общие правила:
Хлопок, лён: барабан полон, но не утрамбован;
Синтетика: не более половины барабана;
Тонкие ткани и шерсть: не более трети барабана.
Стирка максимального количества бельå
позволяет наиболее эффективно использовать
воду и электроэнергию.
Для очень грязного белья необходимо уменьшить
количество загружаемого белья.
ÇÇÂÂÒÒ ··ÂÂÎθ¸flfl
Ниже приводится приблизительный вес
некоторых вещей:
халат 1200 г.
салфетка 100 г.
пододеяльник 700 г.
простынå 500 г.
наволочка 200 г.
скатерть 250 г.
махровое полотенце 200 г.
кухонное полотенце 100 г.
ночная рубашка 200 г.
женские трусы 100 г.
толстая мужская рубашка 600 г.
мужская рубашка 200 г.
мужская пижама 500 г.
сорочка 100 г.
мужские трусы 100 г.
ÇÇ˚˚‚‚‰‰ÂÂÌÌËË ÔÔflflÚÚÂÂÌÌ
Некоторые пятна могут не отстираться лишь
только водой и моющим средством.
Следовательно, перед стиркой их необходимо
обработать.
Пятна крови: свежие пятна необходимо
обработать холодной водой. Сухие пятна крови
необходимо замочить на ночь со специальным
моющим средством и потереть в мыльном
растворе.
Масляные краски: смочите пятновыводителем на
бензиновой основе, разложив ткань на мягкой
подстилке, и промокните пятно. Повторите
операцию несколько раз.
Сухие жирные пятна: смочите скипидаром,
кончиками пальцев прижьшеу к пятну
хлопчатобумажную ткань, предварительно
расстелив пятно на мягкую подстилку.
28
Page 29

Ржавчина: горячий раствор оксалиновой соли или
холодное средство для выведения пятен
ржавчины. Будьте осторожными со старыми
пятнами ржавчины, так как структура целлюлозы
была повреждена и ткань может порваться.
Пятна плесени: обработайте отбеливателем,
тщательно прополощите (только для белого и
цветного белья, устойчивого к хлору).
Травяные пятна: слегка обработайте мылом, а
затем растворённым отбеливателем (только для
белого белья, устойчивого к хлору).
Шариковые ручки и клей: смочите ацетоном (*),
промокните пятна, расстелив ткань на мягкую
подстилку.
Губная помада: смочите ацетоном, как указано
выше, затем обработайте пятна спиртом. Следы
на белых тканях обработайте отбеливателем.
Красное вино: замочите с моющим средством,
прополощите и обработайте уксусной или
лимонной кислотой, после чего прополощите.
Следы обработайте отбеливателем.
Чернила: в зависимости от состава чернил,
смочите пятно сначала ацетоном (*), затем
уксусной кислотой. Следы на белых тканях
обработайте отбеливателем и тщательно
прополощите.
Пятна гудрона: сначала обработайте
пятновыводителем, спиртом или бензином, после
чего специальной моющей пастой.
(**) не пользуйтесь ацетоном для обработки
искусственного шёлка
ååÓÓ˛˛˘˘ËË ÒÒ‰‰ÒÒÚÚ‚‚‡‡ ËË ‰‰ÓÓ··‡‡‚‚ÍÍËË
Хорошие результаты стирки зависят от выбора
моющего средства и от его правильной дозировки.
М ещ ½у мкуьåб м судåр яфчшен щлкг½фєчуо
ыкувн шяиупфоеу зукувщяшкщмлш ьщєчшр ыкувыемб
пщылщдцлг тесмотря на биоразлагаемость,
моющие средства содержат в себе элементы,
способные нарушить хрупкое экологическое
равновесие в природе.
Выбор моющего средства зависит от типа ткани
(тонкие ткани, шерсть, хлопок и т.д.), цвета,
температуры стирки и степени загрязнения.
В этой стиральной машине можно использовать
все типы моющих средств пpипщдннх для cтиpки
в cтиpaльныx maшинax-aвтomaтax,имеющиеся в
продаже:
- порошкощикфятну моющие средства для всех
типов тканей,
- порошкощикфятну моющие средства для тонких
тканей (макс. температура 60°С) и шерсти.
- жидкие моющие средства, предназначенные
для низкотемпературных программ стирки
(макс. температура 60°С) для всех типов ткани,
или cпециальные моющиу средства для шерсти.
Моющее средство и добавкш должны загружаться
до начала программы стирки в специальные
отсеки дозатора.
При использовании концентрированных
порошкощикфятнр или жидких моющих средств
необходимо выбшрать программу без
предварительной стирки.
Стиральная машина оборудована системщо
циркуляции, которая обеспечивает наилучшее
использование концентрированных моющих
средств.
Ëидкое моющее средство ыдувгуе яфдшмфец
тузщыкувыемуттщ перед началом программы в
отсек дозатора моющего средства.
Жидкие добавки для смягчения или
накрахмаливания белья должны заливаться в
отсек, обозначенный символом до начала
программы стирки.
Дозировку добавок и отбеливателя ыдувгуе
шылфец в рекомендациях изготовителя.
Не превышайте отметку “MAX” дозатора.
ääÓÓÎÎˢ˜ÂÂÒÒÚÚ‚‚ÓÓ ËËÒÒÔÔÓÓÎθ¸ÁÁÛÛÂÂÏÏÓÓ„„ÓÓ ÏÏÓÓ˛˛˘˘Â„„ÓÓ
ÒÒ‰‰ÒÒÚÚ‚‚‡‡
Тип и количество моющего средства зависят от
типа ткани, загружаемого количества, степени
загрязнения белья и от степени жёсткости
используемой воды.
Жёсткость воды классифицируется по так
называемым уровням. Информация о данных
уровнях может быть получена в специальных
службах или в городской администрации.
Следуйте инструкциям изготовителя моющего
средства по дозировке.
Используйте меньшее количество моющего
средства, если:
- Вы стираете небольшое количество белья
- бельё не очень грязное
- во время стирки образуется много пены.
Градусы жёсткости воды
Уровень
жёсткости
1
2
3
4
Характеристика
мягкая
средняя
жёсткая
очень жёсткая
Градусы
немецкие
°dH
00-07
08-14
15-21
выше 21
французские
°T.H.
0-15
16-25
26-37
выше 37
RUSSKIJ
29
Page 30

Programmy stirki
NORMALWNAÅ STIRKA - HLOPOK
Ьфлыю яфпкгялфЖ 3 лп
ЗкщпкфььфAЕуьзукфегкф Ешз иудцå
Белое бельё с
предварительной стиркой
(большая степень
загрязнения)
Белое бельё без
предварительной стирки
(средняя степень
загрязнения)
Смуетщу иудцу
(тщкьфдцтщ яфпкåятуттщу)
Короткая стирка (малая
степень загрязнения)
Зщдщылфтшå
B
B
C
D
40°-95°
40°-95°
30°-60°
30°-40°
Зкщпкфььф ыешклш
(тутф½фефå лтщзлф)
Предварительная стирка,
Тщкьфдцтфå ыешклфб
4 зщдщылфтшå
Ще½шь зкш 700 щиёьшт
Тщкьфдцтфå ыешклфб
4 зщдщылфтшå
Ще½шь зкш 700 щиёьшт
Тщкьфдцтфå ыешклфб
4 зщдщылфтшå
Ще½шь зкш 700 щиёьшт
Тщкьфдцтфå ыешклфб
4 зщдщылфтшå
Ще½шь зкш 700 щиёьшт
4 зщдщылфтшå
Ще½шь зкш 700 щиёьшт
Лтщзлф
30
F
G
Полоскание с
добавками
Длительный отжим
1 зщдщылфтшу
Ще½шь зкш 700 щиёьшт
Ще½шь зкш 700 щиёьшт
Page 31

Programmy stirki
BEREËNAÅ STIRKA - SINTETIKA,
Ьфлыю яфпкгялфЖ 1 лпю fiукыецЖ 0б7 лп
ЗкщпкфььфHЕуьзукфегкф Ешз иудцå
Синтетика
Комбинации разных волокон с
предварительной стиркой
(большая степень загрязнения)
Синтетика
Комбинации разных волокон
без предварительной стирки
(средняя степень загрязнения)
Дуплшу елфтш
ѓЗщвду½фчфå ьф§шттщо
ыешклуЃ §укыец ш
лщьиштфсшш §укыеш ы
вкгпшьш мщдщлтфьш
J
K
L
30°-60°
30°-60°
30°-40°
30°-40°
ííééççääààÖÖ ííääÄÄççàà
Зкщпкфььф ыешклш
(тутф½фефå лтщзлф)
Предварительная стирка,
Тщкьфдцтфå ыешклф
3 зщдщылфтшå
Лщкщелшо ще½шь 550 щиёьшт
Тщкьфдцтфå ыешклфб
3 зщдщылфтшåб
Лщкщелшо ще½шь 550 щиёьшт
Тщкьфдцтфå ыешклфб
3 зщдщылфтшåб
Лщкщелшо ще½шь 550 щиёьшт
Тщкьфдцтфå ыешклфб
3 зщдщылфтшåб
Лщкщелшо ще½шь 550 щиёьшт
òòÖÖêêëëííúú
,
Лтщзлф
RUSSKIJ
M
N
P
Зщдщылфтшå
Лщкщелшо
ще½шь
Ыдшм
3 зщдщылфтшåб
Лщкщелшо ще½шь 550 щиёьшт
Ще½шь зкш 550 щиёьшт
31
Page 32

Kak polwzovatwså maßinoj
P0004
C0005
M0027
60
C0004
Перед началом эксплуаmации машины
млдє•шеу зкщпкфььг ыешклш иуя иудцå зкш
еуьзукфегку 60ЇЫб щелдє•шм
зкувмфкшеудцтгє ыешклгб •ещин зкщ•шыешец
ифкфифт ш мыу мтгекуттшу “дуьутен ьф§штню
Зкш “ещь м щевудутшу вщяфещкф ѓЩытщмтфå
ыешклфЃ ыдувгуе тфынзфец 100 п ыешкфдцтщпщ
зщкщ§лфю Еузукц ьщ½тщ мнзщдтшец зукмгє
ыешклгю
1. Zagruzka maßiny
Щелкщоеу яфпкгящ•тно дєлб тф½фм тф
ыщщемуеыемгєчгє лтщзлгю Зщдщ½шеу иудцу м
ьф§штгб мучц яф мучцєб лфл ьщ½тщ ищдуу
кфмтщьуктщю Ту ьтшеу ш ту лщьлфоеу упщю
2. Dozirovanie stiralwnogo
poroßka
Выдвиньте вщяфещк ыешкфдцтщпщ зщкщ§лфю
Щеьукцеу тг½тщу лщдш•уыемщ ыешкфдцтщпщ
зщкщ§лфб г•шенмфå муы ыешкфуьщпщ иудцåю
Яфынзцеу зщкщ§щл м вщяфещкю
Уыдш уыец тущирщвшьщыец м зкувмфкшеудцтщо
ыешклуб ещ •фыец зщкщ§лф яфынзцеу м щевудутшу
ы щищятф•утшуь ю
3. Dobavki dlå poloskaniå
Вщифмлш вдå зщдщылфтшå ыдувгуе тфдшец м
щевудутшу ы щищятф•утшуь ю Ту зкумн§фоеу
вщяшкщмлгю Яфвмштцеу вщяфещк тф ьуыещю
4. Ispolwzovanie knopok
Зкш ½удфтшш тф½ьшеу тущирщвшьну лтщзлш
вщзщдтшеудцтнр агтлсшою Лтщзлшб лщещкну
ьщ½тщ шызщдцящмфец м ыщ•уефтшш ы ещо шдш
штщо зкщпкфььщо зкшмувутн м ефидшсфр
зкщпкфьь ыешклшю
5. Vybor temperatury stirki
Еузукц ыдувгуе гыефтщмшец еуьзукфегктно
ку½шь ыешклшю
32
Page 33

6. Vybor programmy stirki i
P0215
B
P0216
B
zapusk maßiny
Зукув яфзгылщь зкщмукцеуЖ
млдє•утф дш ьф§штф м кщяуелгж
щелкне дш лкфтж
зкфмшдцтщ дш гыефтщмдут ыдшмтщо §дфтпж
рщкщ§щ дш яфлкне яфпкгящ•тно дєл ьф§штню
Уыдш мыу м тщкьуб зщмуктшеу зукулдє•феудц
мнищкф зкщпкфьь зщ •фыщмщо ыекудлую Потяните
на себя селектор выбора программы. Зкш “ещь
яфпщкшеыå ышптфдцтфå дфьзф ѓМнзщдтутшу
зкщпкфььнЃю
7. Okon©anie programmy stirki
Зщ щлщт•фтшш яфвфттщо зкщпкфььн ьф§штф
щыефтфмдшмфуеыå фмещьфеш•уылшю Дфьзф
ѓМнзщдтутшу зкщпкфььнЃ пфытуею
Если вы нажали кнопку отключения слива , то
перед открытием загрузочного люка воду
необходимо слить.
Яфпкгящ•тно дєл шьууе идщлшкгєчуу
гыекщоыемщю Щтщ ефл гыекщутщб •ещ Мн ьщ½уеу
щелкнец яфпкгящ•тно дєл ещдцлщ зкшьуктщ •укуя
1-2 ьштген зщыду щлщт•фтшå зкщпкфььню
Нажмите на селектор выбора программы.
Мнтцеу иудцую Зкщмукцеуб •ещ ифкфифт ыщмыуь
згыею Вдå “ещпщ тфвщ упщ зкщыещ зкщмуктгец
кглщою Щыефмцеу яфпкгящ•тно дєл ьф§штн
щелкнень тф тулщещкщу мкуьåб •ещин мыå мдфпф
шызфкшдфыцю Кулщьутвгуеыå щелдє•шец
“дулекщзшефтшу ш яфлкнец мщвщзкщмщвтно лкфт
зщ щлщт•фтшш ыешклшю
RUSSKIJ
33
Page 34

A
P
F
30
i
Ètiketki na belwe s ukazaniåmi po stirke
O©enw ©asto na belwe estw ™tiketki s ukazaniåmi po stirke.
ТЩКЬФДЦТФÅ
ЫЕШКЛФ
95 60
40
ЫЕШКЛФ
ИУКУËТФÅ
ЫЕШКЛФ
ЩЕИУДШМФТШУ
ПДФËУТШУ Пдфвшец
Ыешклф
зкш 95Ї
Ьщ½тщ щеиудшмфец м рщдщвтщо мщву Ту щеиудшмфец
зкш 200Ї ьфлыю
Ыешклф
зкш 60Ї
60
Ыешклф
зкш 40Ї
40
Пдфвшец
зкш 150Ї ьфлыю
40
Ыешклф
зкш 30Ї
30
Пдфвшец
зкш 110Ї ьфлыю
Кг•тфå
ыешклф
Ту ыешкфец
м мщву
Ту пдфвшец
РШЬЌШЫЕЛФ Ршь•шыелф дєинь
кфыемщкшеудуь
ЫГfiЛФ Ыг§лф
м кфящыедфттщь
мшву
34
Ршь•шыелф иутяштщьб
•шыень ызшкещь
зукрдщкфещьб
R111 - R113
Ыг§лф
иуя ще½шьф
Ршь•шыелф иутяштщьб
•шыень ызшкещьб
Ыг§лф
тф зду•шлфр
R113
Тщкьфдцтфå
еуьзукфегкф
Тшялфå
еуьзукфегкф
Ьщ½тщ ыг§шец
м ьф§шту
Ту зщвду½ше
ршь•шыелу
Ту ыг§шец
м ьф§шту
Page 35

Uhod za maßinoj i ©istka
C0002
P0038
C0003
1. Âistka korpusa maßiny
Лщкзгы ьф§штн ыдувгуе ьнец кфыемщкщьб
зкувтфятф•уттнь вдå кг•тщпщ зщдщылфтшå
зщыгвню Зщыду ьнецå лщкзгыф “ешь
туфпкуыышмтнь кфыемщкщь зкщьщоеу упщ учу кфя
•шыещо мщвщо ш мнекшеую
Мф½тщЖ Ту шызщдцягоеу тшлфлшр ьщєчшр ыкувыемб
ыщвук½фчшр ызшкею
2. Âistka dozatora stiralwnogo
poroßka
Через некоторое время, стиральные порошки и
добавки образуют на стенках дозатора
отложения.
Зщ“ещьгб мкуьå ще мкуьутш вщяфещк ыдувгуе
ьнец зкщещ•тщо мщвщою Вщяфещк мнтшьфуеыå шя
ьф§штн зкш тф½фешш тф мукртєє яфчудлгб
кфызщдщ½уттгє ыдумфю
Для облегчения чистки дозатора снимите его
верхнюю часть, как это показано на рисунке.
RUSSKIJ
3. Âistka uglubleniå dozatora
Ыешкфдцтно зщкщ§щл ылфздшмфуеыå ш м
гпдгидутшш вщяфещкфю Вдå •шыелш гпдгидутшå
ьщ½тщ шызщдцящмфец ыефкгє ягитгє чуелгю
После чистки установите дозатор на место, и
включите программу стирки без белья.
4. Samoo©ixaæxijså slivnoj
ßlang
Èеф ьф§штф ытфи½утф ыфьщщ•шчфєчшьыå
ыдшмтнь §дфтпщью
Зщ“ещьг щеыгеыемгуе ашдцек ыдшмтщпщ §дфтпфю
Тфыщы ту екуигуе лфлщпщ-дшищ ызусшфдцтщпщ
грщвфю
35
Page 36

5. Âistka filwtra nalivnogo
P0041
ßlanga
При затруднительном заполнении водой, или
если на это уходит больше времени, чем
oбычнo, необходимо проверить чистоту
фильтра наливного шланга.
Яфлкщоеу мщвщзкщмщвтно лкфт ш щеыщувштшеу
тфдшмтщо §дфтпю Здщылщпгисфьш мнтцеу ашдцек
шя §дфтпфб лфл глфяфтщ тф кшыгтлуб ш щ•шыешеу упщ
ыефкщо ягитщо чуелщою
Гыефтщмшеу ашдцек тф ьуыещ ш мтщмц
зщвыщувштшеу тфдшмтщо §дфтп л лкфтгю
6. è‰ÓÚ‚‡˘ÂÌË Á‡ÏÂÁ‡ÌËfl
Если машина установлена в помещении, где
температура может опуститься ниже 0°C,
необходимо выполнить следующее:
- Закрыть водопроводный кран и отвинтить
наливной шланг от крана.
- Опустить конец сливного и наливного шланга в
стоящий на полу тазик.
- Включить программу P “слив” и дождаться её
завершения.
- Выключить машину.
- Вынуть вилку из розетки.
- Завинтить наливной шланг и установить сливной
шланг.
Зкш мнзщдтутшш данныx операций, оставшаяся в
машине вода будет слита, что предотвратит
образование льда в машине, а, следовательно,
поломку её компонентов.
При включении машины убедитесь, что
температура окружающей среды выше 0°C.
36
Page 37

Esli maßina ne rabotaet
■
VozmoΩnaå neispravnostw
■
Pri vklæ©enii maßina ne
rabotaet:
■
Net zaliva vody v maßinu:
■
Maßina slivaet vodu vo
vremå napolneniå:
■
Veroåtnaå pri©ina
■
Тушызкфмтну зкувщркфтшеудш
■
Ьф§штф ту индф млдє•утф м “дулекщыуец
■
Туздщетщ яфлкне яфпкгящ•тно дєл
■
Тузкфмшдцтфå гыефтщмлф кг•лш
зукулдє•феудå ку½шьщм
■
Мщвщзкщмщвтно лкфт яфлкне
■
Ыудулещк зкщпкфьь ту мнеåтге тфкг½гю
■
Мщвщзкщмщвтно лкфт яфлкне
■
Непоступление воды из крана или её
недостаточный напор.
■
Ашдцек тфдшмтщпщ §дфтпф яфыщкут
■
Туздщетщ яфлкне яфпкгящ•тно дєлю
■
Ыдшмтщо §дфтп тузкфмшдцтщ зщдщ½утю
Лщтус ыдшмтщпщ §дфтпф вщд½ут тфрщвшецыå
ту тш½у 60 ыь ще гкщмтå зщдф (кфыыещåтшу
ьу½вг лщтсщь §дфтпф ш ьуыещь
зщвлдє•утшå л лфтфдшяфсшш)ю
RUSSKIJ
■
OtΩima net ili sliva net:
■
Maßina vibriruet i ßumit
vo vremå raboty:
■
Ute©ka vody na pol:
■
Зукупши ыдшмтщпщ §дфтпф
■
Была выбрана функция отключения слива .
■
Тукфмтщьуктщу кфяьучутшу иудцå м ифкфифтую
■
Лкуздутшåб гыефтщмдуттну вдå зукумщялш
ьф§штнб ту индш гвфдутн
■
Машина установлена на неровной поверхности
или на непрочном основании. Ножки машины
неправильно отрегулированы
■
Туе яфящкф ьу½вг ьф§штщо ш ыеутщо шдш
ьуиудцє
■
Зукупкгялф ьф§штн
■
Тукфмтщьуктщу кфяьучутшу иудцå м ифкфифтую
■
Тузкфмшдцтфå вщяшкщмлф ыешкфдцтщпщ
ыкувыемф (зкшьутутшу ыдш§лщь ищдц§щпщ
лщдш•уыемф ыешкфдцтщпщ зщкщ§лф мнянмфуе
щикфящмфтшу зутн)
■
Ыешкфдцтщу ыкувыемщ ту пщвшеыå вдå
ьф§шттщо ыешклш
■
Вщяфещк ыешкфдцтщпщ зщкщ§лф яфпкåятут
■
Тузкфмшдцтщу яфлкуздутшу ыдшмтщпщ §дфтпф
■
fiдфтп зщмку½вутю Уыец геу•лш г §егсукщм
шдш г лкфтфю
37
Page 38

Mod. ..........
Prod. No. ...........
Ser. No. .........
Mod.
..........
Ser.
P0042
■
VozmoΩnaå neispravnostw
■
Zagruzo©nyj læk ne
otkryvaetså:
■
Maßina izdaet nepriåtnyj
zapah:
■
Veroåtnaå pri©ina
■
Тушызкфмтщыец идщлшкгєчупщ гыекщоыемф
яфпкгящ•тщпщ дєлфю
■
Тувщыефещ•тщу лщдш•уыемщ ыешкфдцтщпщ
зщкщ§лф
■
Ыдш§лщь •фыефå ыешклф зкш 40ЇЫ ш
ыдш§лщь кувлфå ыешклф зкш 60Їё90ЇЫ
■
Ьуещв гыекфтутшå
Зкщьнец ьф§штгб яфынзфå тщкьфдцтщу
лщдш•уыемщ ыешкфдцтщпщ зщкщ§лф м вщяфещкю
Установить переключатель режимов на
стирку при температуре 90°C и включить
машину без белья.
■
ééÚÚÊÊËËÏÏ Ì̇‡˜˜ËËÌ̇‡ÂÂÚÚÒÒflfl ÒÒ ÁÁ‡‡‰‰ÂÂÊÊÍÍÓÓÈÈ
ËËÎÎËË ÌÌ ‚‚˚˚ÔÔÓÓÎÎÌÌflflÂÂÚÚÒÒflfl::
■
å凇¯¯ËËÌ̇‡ ËËÁÁ‰‰‡‡fifiÚÚ ÌÌÂÂÔÔËË‚‚˚˚˜˜ÌÌ˚˚ÈÈ ¯¯ÛÛÏÏ::
■
ÇÇ Ïχ‡¯¯ËËÌÌ ÌÌ ‚‚Ëˉ‰ÌÌÓÓ ‚‚ÓÓ‰‰˚˚::
■
Сработала система электронного контроля
дисбаланса, потому что бельё в барабане
было уложено неравномерно. Бельё
равномерно распределится в барабане при
изменении направления вращения. Это
может произойти несколько раз, прежде чем
дисбаланс исчезнет и будет выполнен
нормальный отжим. Если через 6 минут
бельё не уложилось равномерно, то отжим
не будет выполнен.
■
Машина оборудована двигателем с
коллектором, который издаёт шум,
отличающийся от шума обычных
двигателей. Данный двигатель обеспечивает
плавное включение отжима и лучшее
распределение белья в барабане, что
положительно сказывается на устойчивости
машины.
■
Данные машины, зкщвглен современной
технологии, работают очень экономично, с
пониженным расходом воды, обеспечивая,
тем не менее, отличные результаты.
Tehni©eskoe obsluΩivanie i
zapasnye ©asti
В разделе “Если машина не работает” описаны
неисправности, которые Вы можете устранить без
помощи специалиста.
Если Вы обращаетесь в сервисный центр по
поводу одной из таких неисправностей или в
результате несоблюдения правил эксплуатации,
то, даже в период действия гарантии, Вам,
возможно, придётся оплатить вызов специалиста.
Куьщте ш яфз•фыеш щиуызу•шмфєеыå зкувзкшåешуьб
гзщдтщьщ•уттнь шяпщещмшеудуью
Тущирщвшьщ ыщщичшец куьщтетщо ашкьу тщьук
ш ьщвудц ьф§штню
38
Ьщвудц........................................................
Тщьук шявудшå ..........................................
Тщьук ыукшш ..............................................
Вфеф зкщвф½ш............................................
Page 39

Made in EEC
 Loading...