

English
Important Safety Information
These warnings are provided in the interest of safety. You MUST read them carefully before installing or using
the appliance.
Installation
It is mandatory that all operations required for the
installation are carried out by a qualified or competent
person, in accordance with existing rules and
regulations.
Disconnect the appliance from the electrical supply,
before carrying out any cleaning or manteinance
work.
Once you removed all packaging from the appliance,
ensure that it is not damaged and the electric cable
is in perfect conditions. Otherwise, contact your dealer
before proceeding with the installation.
The manufacturer disclaims any responsability
should all the safety measures not be carried out.
Child Safety
This appliance has been designed to be operated by
adults and children under supervision. Young children
must not be allowed to tamper with the controls or
play near or with the oven.
Accessible parts of this appliance may become hot
when it is in use. Children should be kept away until
it has cooled.
During Operation
It is most important that this instruction book should
be retained with the appliance for future reference.
Should the appliance be sold or transferred, always
ensure that the book is left with the appliance in order
that the new owner can get to know the functions of
the appliance and the relevant warnings.
This appliance has been designed for non
professional purpose in private houses only. It is
meant to cook edible foodstuff only and MUST NOT be
used for any other purposes.
It is dangerous to alter the specification in any way.
For hygiene and safety reasons, this appliance should
be kept clean at all times. A build-up of fats or other
foodstuff could result in a fire.
Under no circumstances should you attempt to repair
the appliance yourself. Repairs carried out by
unexperienced persons may cause injury or serious
malfunctioning. Refer to your local Service Centre.
Always insist on genuine spare parts.
Ensure that all control knobs are in the OFF position
when not in use.
Should you connect any electrical tool to a plug near
this cooking appliance, ensure that electric cables
are not in contact with it and keep them far enough
from the heated parts of this appliance.
If the appliance is out of order, disconnect it from the
electric supply.
Service
Under no circumstances should you attempt to repair
the appliance yourself. Repairs carried out by
unexperienced persons may cause injury or serious
malfunctioning. Refer to your local Service Centre.
Always insist on genuine spare parts.
Environmental Information
After installation, please dispose of the packaging with
due regard to safety and the environment.
When disposing of an old appliance, make it unusable,
by cutting off the cable.
MANUFACTURER:ELECTROLUX ZANUSSI S.p.A.
Viale Bologna, 298
47100 FORLÌ (Italy)
Guide to Use the instructions
The following symbols will be found in the text to guide
you throughout the Instructions:
Safety Instructions
Step by step instructions for an operation
F
Hints and Tips
Environmental information
These instructions are only for the countries
stated by the symbol printed on the front cover
of this instruction book.
25
Contents
For the User
Important Safety Information 25
Description of the appliance 26
Operation 26
Hints and tips 27
Cleaning and maintenance 27
For the Installer
Instruction for the Installer 28
Possibilities for insertion 29
Electrical connection 30
This appliance complies with the following
E.E.C. Directives:
- 73/23 - 90/683 (Low Voltage Directive);
- 89/336
- 93/68 (General Directives)
and subsequent modifications.
(Electromagnetical Compatibility Directive);
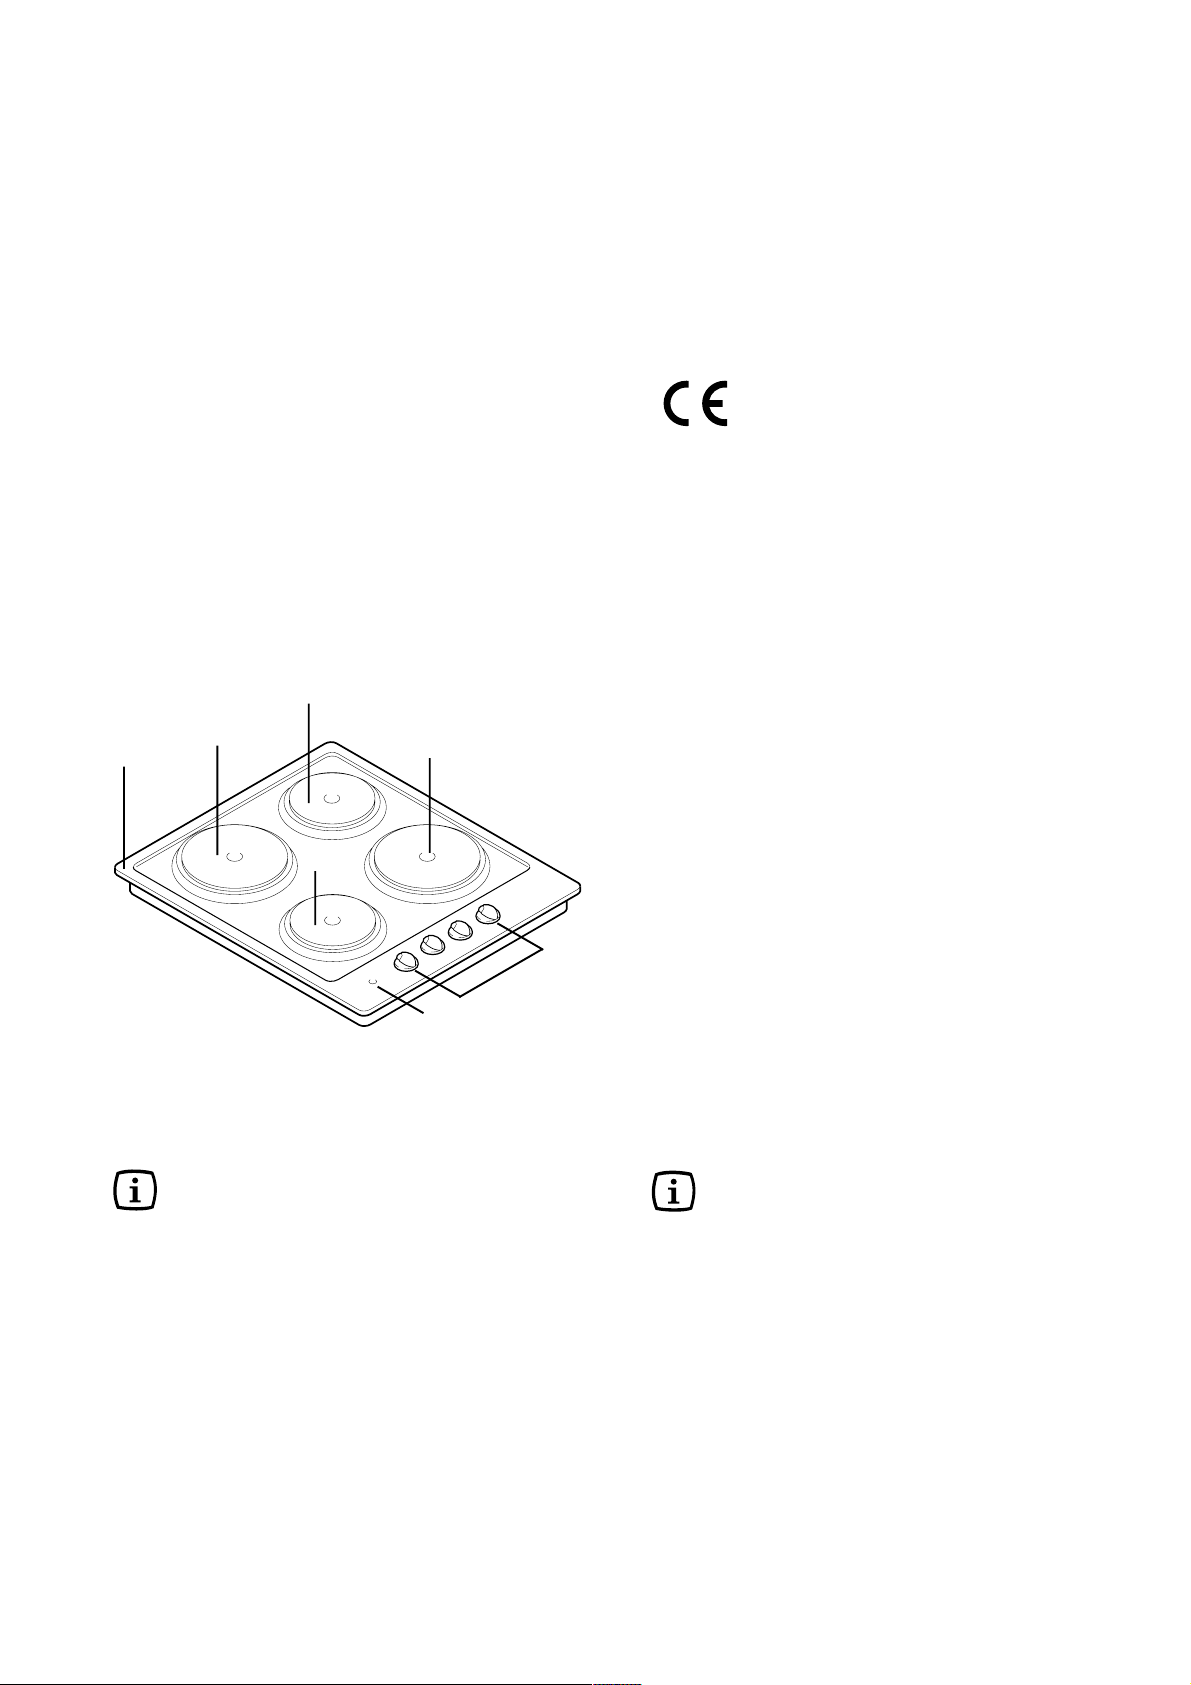
Description of the appliance
4
1
2
5
1) Hob top
2) Rapid hot plate - 180 mm Ø
3
6
7
Operation
Before the first use
Before using the hob for the first time, switch it on for
about 10 minutes at the highest position.
When using the hob for the first time, unpleasant smells,
or smell of burnt material, might be smelt: this is
absolutely normal and it is due to the evaporation of
greasy working residues and of hte dope used during
the installation. These smells will vanish after some time
of working.
Use of electric plates
3) Rapid hot plate - 145 mm Ø
4) Normal hot plate - 145 mm Ø
5) Normal hot plate - 180 mm Ø
6) Control knobs
7) Pilot light
Rapid hot Plate
This type is indicated by a red circle in the middle of the
plate.
The red circle is painted on and so will deteriorate and
may come off completely over a period of time.
A rapid plate will heat up much more quickly than a
normal plate.
Pilot lamp
The pilot light signals the connection of the electric
plate.
To switch on the plates, turn the relevant knob to the
required position.
26
Electric plate with 7 position
knob
Very low 1 To keep food hot. To melt
butter or chocolate.
The plates are regulated by a 7 position switch:
Position 0: off
Position 1: minimum disbursement of heat
Position 6: maximum disbursement of heat
In the intermediate positions, 2-3-4-5, increasing power
values are obtained.
When cooking with fats or oils maximum care
must be taken as these can self-ignite when
over-heated.
Normal and rapid plates: For best results we
advise you to initially regulate the switch to
rapid to accelerate the heating of the plate and
then turn the switch to the position most suitable
for the food to be cooked.
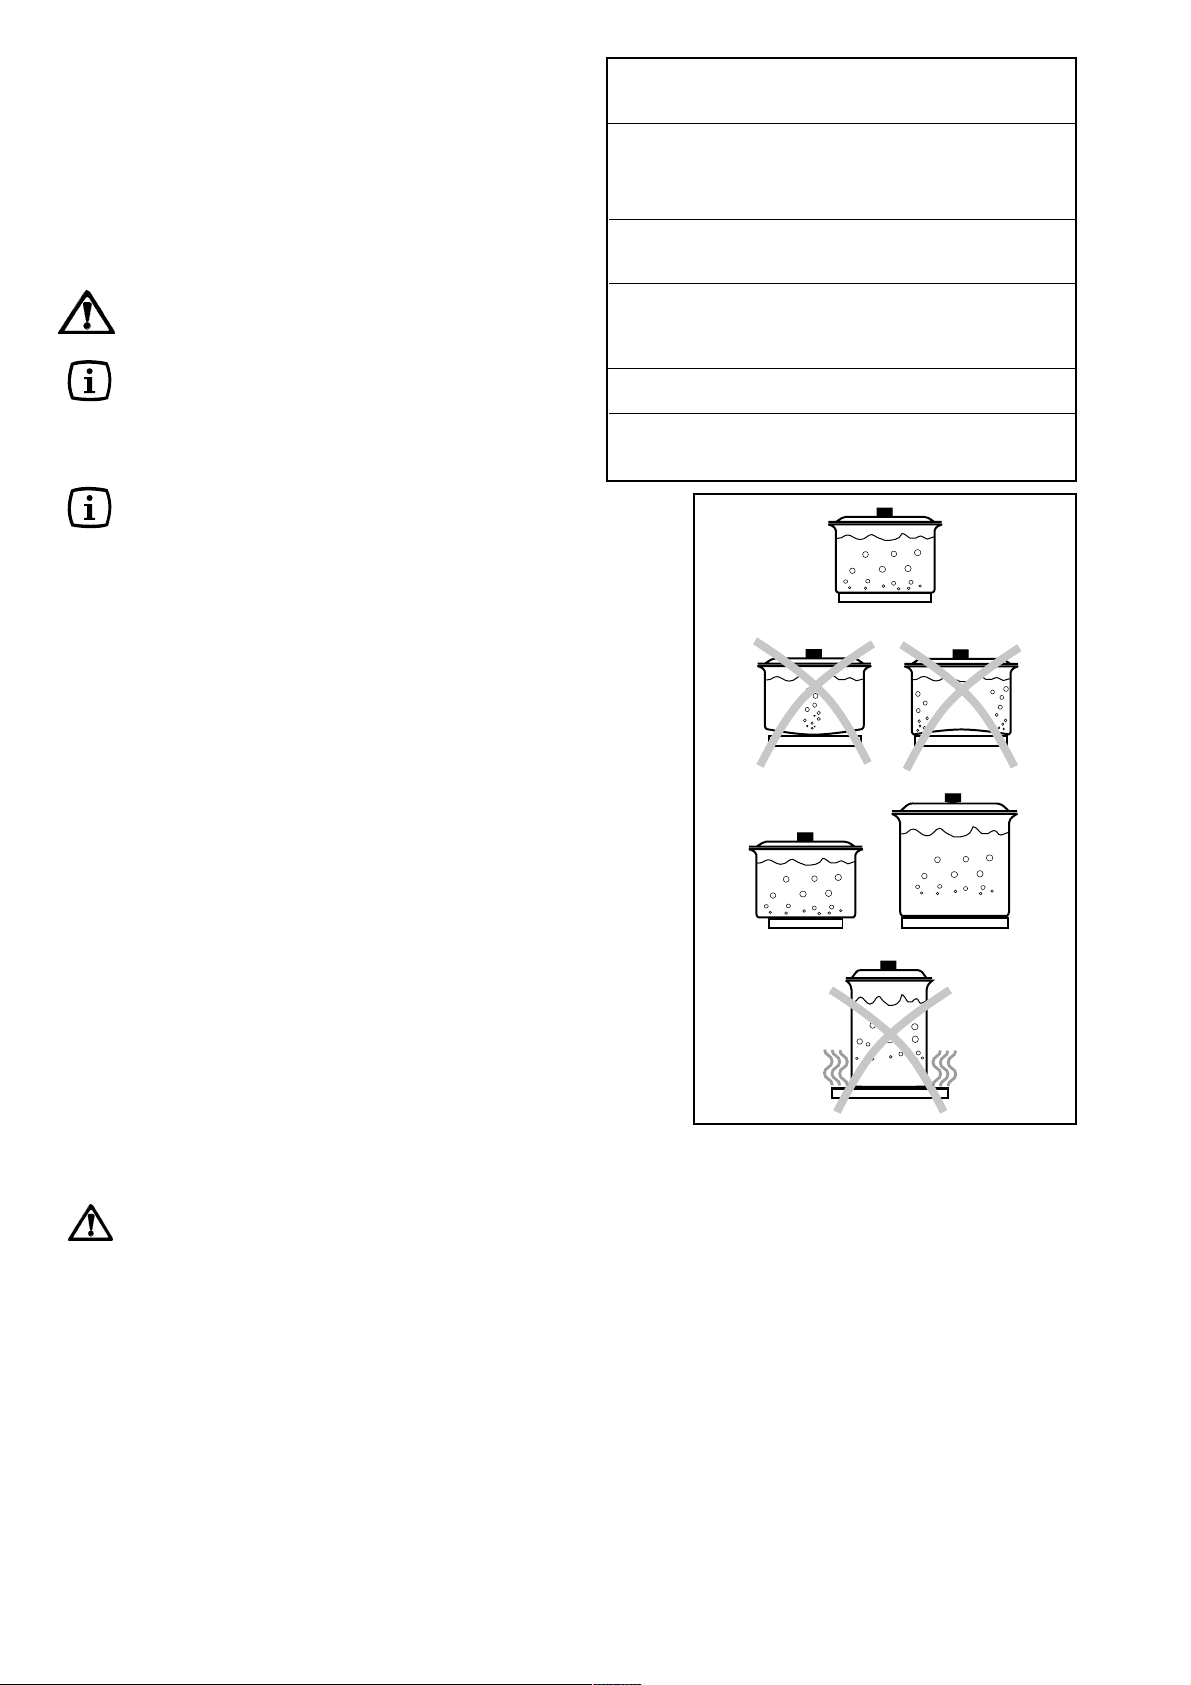
Hints and tips
Practical hints
- When cooking by electric, saucepans should have a
thick base and be perfectly flat in order to ensure total
contact with the plate and, consequently, perfect
conduction (Fig. 1).
- Occasionally, saucepans have a thin bottom and these
loose their shape over a period of time. In this manner
two of the qualities of the electric plate are lost: the
even distribution of heat and the saving of energy.
Cooking time is also lengthier. We therefore
recommend that you acquire a battery of kitchenware
specifically for use with electric plates. Furthermore,
these particular saucepans are easy to use and clean.
- Recipients in heat-resistent glass (pyrex) or in oven-
proof pottery can be placed directly on the plates if
their instructions for use are followed.
- As regards the size of the saucepans: for best results,
the plate and the saucepan should have the same
diameter. The diameter of the saucepan may be
slightly larger; a smaller diameter is not advised.
- Never leave the plates on without a saucepan! Switch
off the plate just before the end of cooking time. The
heat accumulated by the plate will finish cooking the
food and save energy.
Low 2 For the preparation of
sauces, casseroles,
puddings, fried eggs.
Moderate 3 For vegetable soups. To
thaw food, boil water or milk.
Medium 4 For potatoes, fresh
vegetables, pasta, minestrone, stocks, doughnuts, fish.
High 5 Omelettes, steak, pancakes.
Very high 6 Steak, meat in breadcrumbs,
fried food.
Fig. 1
Cleaning and maintenance
Before cleaning, disconnect the appliance.
- To ensure the long-life of the hob, we advise you to
clean it regularly. Naturally, before cleaning the plates,
allow them to cool.
- Do not acquire the bad habit of wiping over the plates
with a damp cloth whilst they are still hot. Although
they will stand up to such teatment, fragments of the
cloth could remain. The plates and their bases can,
however, be cleaned occasionally using fine
sandpaper.
- The base of the plates in special steel will stay
impeccable if cleaned with hot water and vinigar. We
advise you to grease the surface of the plates from
time to time with a non-acid fat (cooking oil, sewing
machine oil or vaseline). Products for care and
maintenance are available commercially.
- Clean the control panel with a damp cloth, do not
use abrasive products. The knobs can be removed
by lifting to facilitate cleaning.
- The enamelled part of the hob can be cleaned with
warm water and detergent.
- Although the enamel will tollerate acids, we advise
you to quickly remove splashes of vinigar, lemon and
all acid substances.
- Also immediately remove all residue of fat or other
to avoid any incrustation. If incrustations have formed
leave the crust immersed in hot water. Never use
metal brushes, knives or similar objects which could
scratch the enamel. Avoid using acid detergents.
Clean steel hobs with specific detergents.
27

Instruction for the Installer
231
580
500
4
Insertion and assembly
The hobs can be installed in a kitchen unit with an
opening for insertion of the dimensions illustrated in Fig.
2.
Technical Data
1) Rapid hot plate 180 mm Ø 2,0 kW
2) Normal hot plate 145 mm Ø 1,0 kW
3) Normal hot plate 180 mm Ø 1,5 kW
4) Rapid hot plate 145 mm Ø 1,5 kW
Total energy 6,0 kW
Voltage 230 V - 50 Hz
Hob recess dimensions
Length 550 mm.
Width 470 mm.
55 min.
The appliance is of type X and has been designed to
be built into or fitted next to the unit according to the
regulations in force (I.E.C. 335.2.6). The side walls of
the unit must not exceed the height of the hob. Avoid
installing the appliance in the proximity of inflammable
materials (e.g. curtains, tea towels, etc.).
The fixture of the hob to the unit must be carried
F
out as follows:
l Position the relevant sealings, supplied, on the edge
of the opening predisposed for installation, taking
care that the edges meet without overlapping;
l Install the hob in the opening of the unit taking care
in centring.
l Fix the hob with the appropriate clips (Fig. 3).
The edge of the hob forms a double labyrinth seal which
provides a total guarantee against the infiltration of
liquids.
Fig. 2
Fig. 3
FO 2098
FO 0199
a) Seal
470
30
550
a
28
650 mm
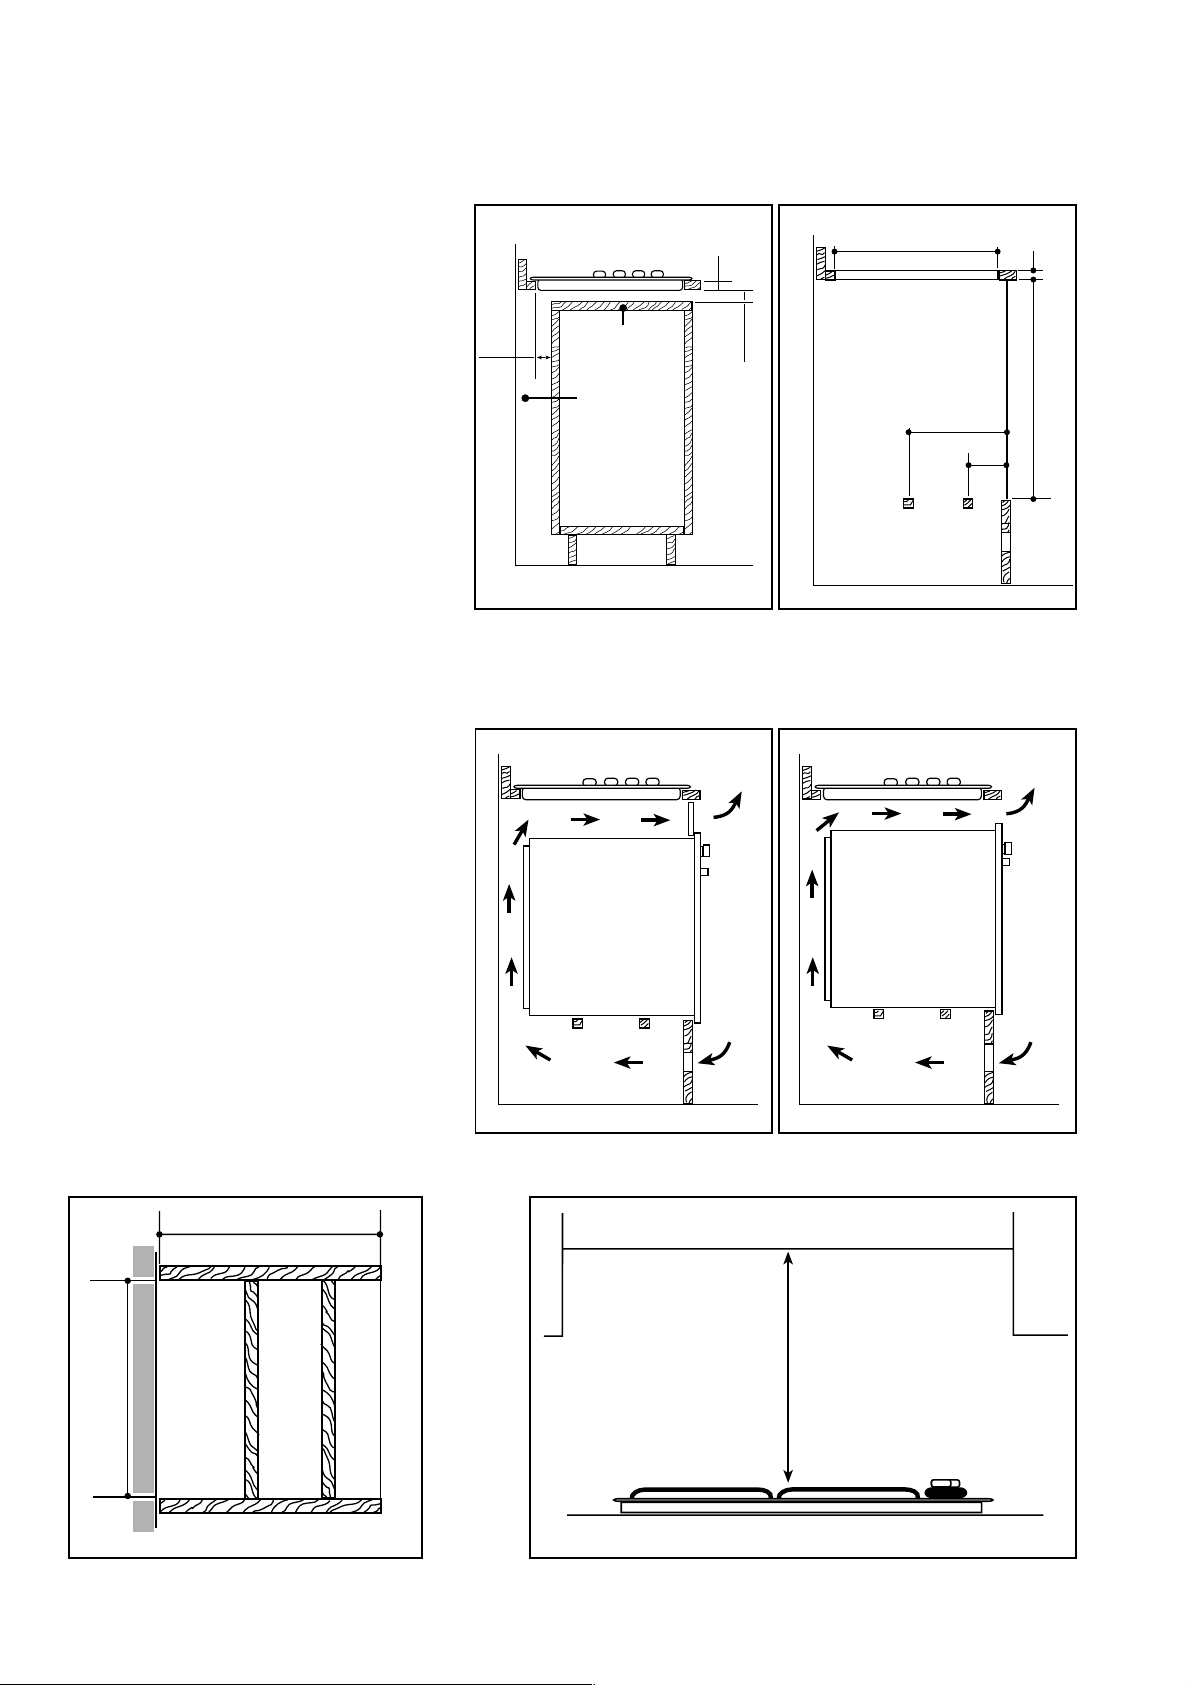
Possibilities for insertion
Kitchen unit with door
Proper arrangements must be taken in
designing the forniture unit, in order to avoid
any contact with the bottom of the hob which
can be heated when it is operated. The
recommended solution is shown in Fig. 4.
The panel fitted under the hob should be
easily removable to allow an easy access if
a technical assistance intervention is
needed.
Kitchen unit with oven
The hob recess dimensions must comply
the indication given in Figs. 5 and 6 and
must be provided with brackets to allow a
continuous supply of air.
To avoid overhating, the building in should
be carried out as shown in Figs. 7 e 8.
The hob's electric connection and the oven's
one must be carried out separately, both for
safety reasons and to allow the oven to be
easily taken off the unit.
In case a hood with lenght of 600 mm. is
fitted over the hob, the hanging furniture
units beside the hood must be placed at 550
mm. minimum from the hob, to allow the
fitting and the correct use of the lid, if
required (fig. 9).
Fig. 4
80
30
a
Fig. 5
20 min
b
FO 2166 FO 0947
a) Removable panel
b) Space possibly useful for connections
Fig. 6
120 cm
Fig. 7
2
470
380
140
30
591
50 cm
2
Fig. 8
FO 0198
560 min.
550 min.
FO 0939
Fig. 9
FO 2099
180 cm
2
FO 0938
360 cm
2
29
Electrical connection
The connection must be carried out in conformity with
the regulations and dispositions of the laws in force.
Before connecting ensure that:
l the limiter valve and the electrical mains can
support the voltage of the appliance (see label).
l the power supply is correctly earthed according to
regulations in force.
l the omnipolar interrupter used can be easily
reached once the appliance has been installed.
The appliance is not supplied with a cable suitable for
the existing power suply. Use a cable Type HO5RR-F
/ H05V2V2 (T90) with sections suitable for the charge
of a normalized plug.
The cable must be fitted with three conductors. The
earth wire is coloured yellow/green. If a direct
connection to the mains is required an omnipolar
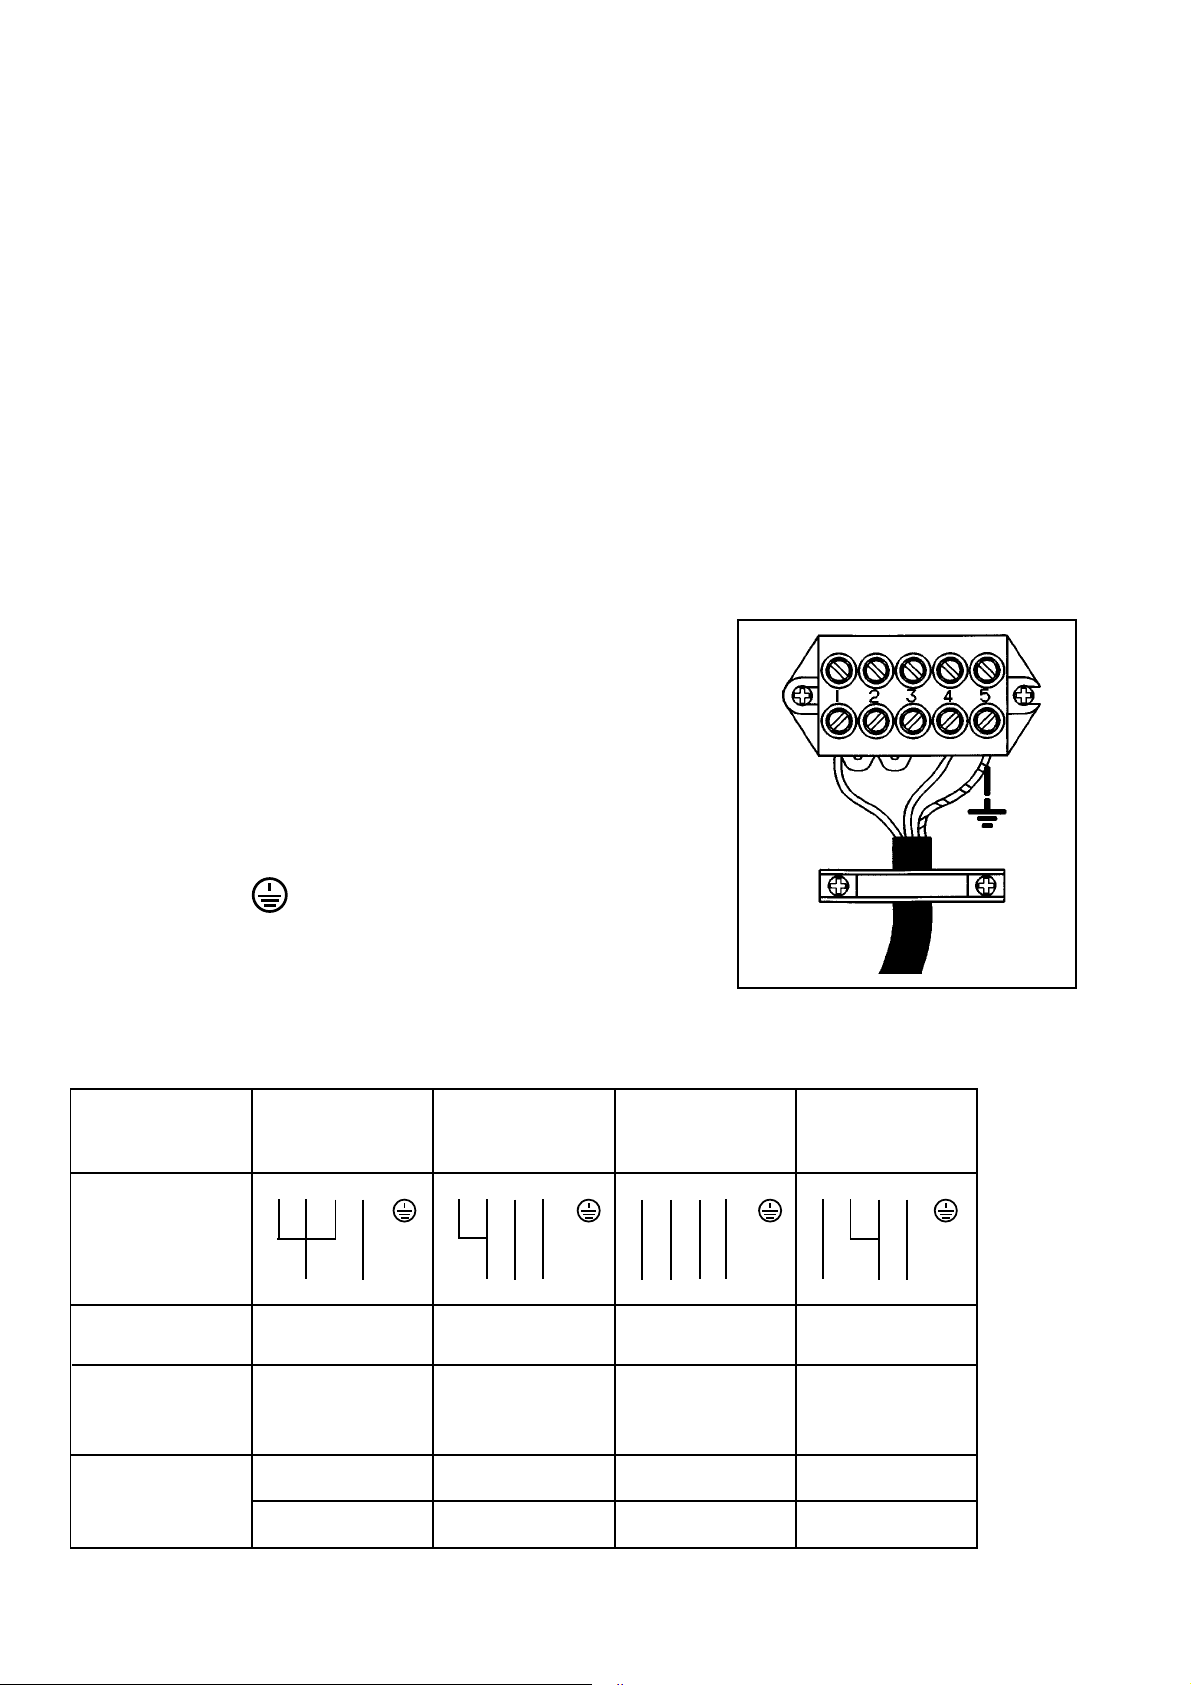
Electrical connection to the
terminal board
The appliance is fitted with a five pole terminal box
whose cables are predisposed for a 230 V monophase
function (Fig. 10).
In case of a different voltage, carry out the connection
as shown in Fig. 11.
The earth wire should be connected to the terminal
interrupter with a minimum opening of 3 mm between
contacts should be interposed between the appliance
and the supply. The yellow/green earth wire must not
be interrupted by the interrupter. The supply cable
must be positioned in such a way that it will at no point
reach a temperature 50° C above that of room temperature. After connection try out the heating elements
by allowing them to function for about three minutes.
The manufacturer declines all responsibility if the
accident prevention regulations are not respected.
marked by the sign After having connected the
wire to the terminal secure it with a cable clip.
Fig. 10
FO 0488
FIG. 11 - CHOICE OF CONNECTION CABLE AND FUSE GUAGE (in Amps)
Type of Monophase Triphase Triphase Y Biphase Y
connection 3f. + neutre 2f. + neutre
3
4
2
3
1
4
21
1
Connection
cable with
terminal box
R
R
Network
tension 230 V
S
~
S
230 V
T
~
RTS
400 V~ 3N 400 V~ 2N
Heating
element 230 V 230 V 230 V 230 V
tension
4
3
2
N
1
3
4
2
RS
N
All-electric
cooker
30
3 X 2,5 mm 4 X 1,5 mm 5 X 1,5 mm 4 X 1,5 mm
24 A 13 A 13 A 13 A
GUARANTEE - SPARE PARTS (only for BENELUX)
When calling for repairs during the period of guarantee
ofthe appliance, the original invoice or receipt must be
shown or sent together with the appliance to be repaired.
General conditions of guarantee
1 The manufacturer guarantees the appliance indicated
on the relative invoice for a period of one year from
the date of purchase. In case of a fault during this
period if caused bya defect in materials and/or
construction, the client is entitled to repair free of
charge.
1a Concerning vacuum cleaners for domestic use, the
total periodof guarantee is two years. Accessories
are subject to a direct usage, consequently these
articles are excluded from the guarantee.
2 The manufacturer guarantees technical assistance
and repairsfor one year. Spare parts fitted during
repair are also covered by a one year guarantee from
the date of repair. In case of fault during this period,
as a direct result of the repair work carried out or
caused by the new parts fitted on such occasion, the
client is entitled to repair free of charge. The execution
of repairs does not prolong the total period of
guarantee covering the appliance.
3 Technical Assistance at domicile will be provided
only for large apparatus which are difficult to transport
such as: washing machines, spin-driers,
dishwashers,refrigerators, freezers (vertical or
horizontal), ovens, cookers and built-in appliances.
3a The above-mentioned conditions are also valid for
refrigerators for caravens on condition that they are
situated within the national boundaries and are
accessible by roads open to traffic. Furthermore, at
the time of the intervention the appliance and its
owner, or the person so authorized, must be present
at the place agreed upon for the intervention.
4 If, in the opinion of the manufacturer, the appliance
as described in point 3 must be transported to a
Technical Assistance laboratory, the transportation
will be carried out as established by the manufacturer,
at his expense and under his responsibility.
5 All appliances not mentioned under points 3 and 3a,
includingappliances having the same functional
characteristics but whose transport is easy, must be
sent to the Technical Assistance or taken to them.
Throughout the period of guarantee the cost of
return transportation will be taken care by the
manufacturer.
6 If during the period of guarantee a disfunction occurs
due to a defect which cannot be repaired, the
appliance will be replaced free of charge.
Extension of the guarantee
7 For motorcompressors of refrigerators/ freezers
(excluding the starting device and thermal interrupter)
a decreasing guarantee of 20% per year for a period
of five years from the date of purchase of the appliance
indicated on the relative invoice with repairs free of
charge throughout the entire period under guarantee.
On completion of the total period of guarantee the
cost of travel, workmanship and eventual spare
parts will be at the expense of the client.
Exclusion from guarantee
8 The free execution of work for the repair and/ or
substitution as set out above will not apply if:
- The purchase invoice or receipt indicating the date
of purchase and the identification of the appliance
cannot be presented or was not sent with the
appliance to be repaired;
- The appliance is used for purposes other than those
of the domestic nature for which it was made;
- The appliance was not installed, handled or used in
conformity with the indications in the instruction
manual or in the modalities for use;
- The appliance has been repaired or modified
incorrectly by unqualified personnel.
8a If the appliance has been built-in, underinserted,
suspendedor installed in such a way that the time
required to move it and put it back in position
exceeds thirty minutes in total, the extra expenditures
occurred will be billed to the owner of the appliance.
8b ln case of deterioration due to an irregular installation
carried out in agreement with the owner of the
appliance, the manufacturer and the technical
assistance decline all responsibility.
8c Damage such as scratches, knocks or breakage of
movable or dismountable units which were not
notified to the manufacturer at the time of delivery
are not covered by the guarantee.
Important notice
This appliance has been made to be safe. Inadequate
repairs can nonetheless compromise this safety. To
avoid such problems and to prevent any eventual
damage we advise you to have repairs carried out
exclusively by qualified personnel.We advise you to
have repairs or maintenance carried out by the retailer
or the local Electrolux
Service and to request
only original spare
parts.
Belgium
Bergensesteenweg 719 / B - 1520 Halle (Lembeek)
Repairing to customer's house:
Tel.: 02-3630444
Fax.: 02-3630400
Spare parts:
Tel.: 02-3630555
Fax.: 02-3630500
Luxembourg
7, Rue de Bitbourg / L-1273 Luxembourg-Hamm
Customer care:
Tel.: 42 43 11
Fax: 42 43 13 60
31

35673-3402 11/01
Grafiche MDM - Forlì
 Loading...