

Page 1

Ceramic glass hob
Table de cuisson vitrocéramique
Glaskeramische kookplaat
Installation and Operating
Instructions
Instructions de montage et mode
d’emploi
Montage- en gebruiksaanwijzing
822 924 914-A-090904-01
EHP 663K
g
f
l
Page 2

Dear Customer,
Please read these user instructions carefully and
keep them to refer to later.
Please pass the user instructions on to any future
owner of the appliance.
The following symbols are used in the
text:
1 Safety instructions
Warning! Information that affects your personal safety.
Important! Information that prevents damage
to the appliance.
3 Useful tips and hints
2 Environmental information
2
Page 3

Contents
Operating Instructions . . . . . . . . . . . . . . . . . . . . . . . . . . . . . . . . . . . . . . . . . . . . . . . . . . . . . . . . . . . . . 4
Safety instructions . . . . . . . . . . . . . . . . . . . . . . . . . . . . . . . . . . . . . . . . . . . . . . . . . . . . . . . . . . . . . . . . . . . . 4
Description of the Appliance . . . . . . . . . . . . . . . . . . . . . . . . . . . . . . . . . . . . . . . . . . . . . . . . . . . . . . . . . . . . 5
Cooking surface layout . . . . . . . . . . . . . . . . . . . . . . . . . . . . . . . . . . . . . . . . . . . . . . . . . . . . . . . . . . . . . . . . . . 5
Assignment of ring switches. . . . . . . . . . . . . . . . . . . . . . . . . . . . . . . . . . . . . . . . . . . . . . . . . . . . . . . . . . . . . . 5
Control Knobs . . . . . . . . . . . . . . . . . . . . . . . . . . . . . . . . . . . . . . . . . . . . . . . . . . . . . . . . . . . . . . . . . . . . . . 6
Residual heat indicator . . . . . . . . . . . . . . . . . . . . . . . . . . . . . . . . . . . . . . . . . . . . . . . . . . . . . . . . . . . . . . . 6
Operating the appliance . . . . . . . . . . . . . . . . . . . . . . . . . . . . . . . . . . . . . . . . . . . . . . . . . . . . . . . . . . . . . . . . 6
Setting the heat setting. . . . . . . . . . . . . . . . . . . . . . . . . . . . . . . . . . . . . . . . . . . . . . . . . . . . . . . . . . . . . . . . . . 6
Tips on Cooking and Frying . . . . . . . . . . . . . . . . . . . . . . . . . . . . . . . . . . . . . . . . . . . . . . . . . . . . . . . . . . . . . 7
Cookware . . . . . . . . . . . . . . . . . . . . . . . . . . . . . . . . . . . . . . . . . . . . . . . . . . . . . . . . . . . . . . . . . . . . . . . . . . . . 7
Energy saving . . . . . . . . . . . . . . . . . . . . . . . . . . . . . . . . . . . . . . . . . . . . . . . . . . . . . . . . . . . . . . . . . . . . . . . . . 7
Examples of cooking applications . . . . . . . . . . . . . . . . . . . . . . . . . . . . . . . . . . . . . . . . . . . . . . . . . . . . . . . . . 8
Cleaning and Care . . . . . . . . . . . . . . . . . . . . . . . . . . . . . . . . . . . . . . . . . . . . . . . . . . . . . . . . . . . . . . . . . . . . 9
What to do if … . . . . . . . . . . . . . . . . . . . . . . . . . . . . . . . . . . . . . . . . . . . . . . . . . . . . . . . . . . . . . . . . . . . . . . . 10
Disposal . . . . . . . . . . . . . . . . . . . . . . . . . . . . . . . . . . . . . . . . . . . . . . . . . . . . . . . . . . . . . . . . . . . . . . . . . . . . . 11
Installation Instructions . . . . . . . . . . . . . . . . . . . . . . . . . . . . . . . . . . . . . . . . . . . . . . . . . . . . . . . . . . . . 12
Service. . . . . . . . . . . . . . . . . . . . . . . . . . . . . . . . . . . . . . . . . . . . . . . . . . . . . . . . . . . . . . . . . . . . . . . . . . . . . 13
3
Page 4

Operating Instructions
1 Safety instructions
3
Please comply with these instructions. If you
do not, any damage resulting is not covered
by the warranty.
5 This appliance conforms with the following EU
Directives:
– 73/23/EEC dated 19.02.1973 Low Voltage Direc-
tive
– 89/336/EEC dated 03.05.1989 EMC Directive in-
clusive of Amending Directive 92/31/EEC
– 93/68/EEC dated 22.07.1993 CE Marking Directive
Correct use
• This appliance should be used only for normal domestic cooking and frying of food.
• The appliance must not be used as a work surface
or as a storage surface.
• Additions or modifications to the appliance are not
permitted.
• Do not place or store flammable liquids, highly inflammable materials or fusible objects (e.g. plastic
film, plastic, aluminium) on or near the appliance.
Children’s safety
• Small children must be kept away from the appliance.
• Only let bigger children work on the appliance under supervision.
• Cables from electrical appliances must not touch
the hot surface of the appliance or hot cookware.
• Overheated fats and oils can ignite quickly. When
cooking with fat or oil (e.g. chips) do not leave the
appliance unattended.
• Switch the cooking zones off after each use.
Safety when cleaning
• For cleaning, the appliance must be switched off
and cooled down.
• For safety reasons, the cleaning of the appliance
with steam jet or high-pressure cleaning equipment is not permitted.
How to avoid damage to the appliance
• The glass ceramic can be damaged by objects falling onto it.
• The edge of the glass ceramic can be damaged by
being knocked by the cookware.
• Cookware made of cast iron, cast aluminium or
with damaged bottoms can scratch the glass ceramic if pushed across the surface.
• Objects that melt and things that boil over can
burn onto the glass ceramic and should be removed straightaway.
• Do not use the cooking zones with empty cookware or without cookware.
General safety
• The appliance may only be installed and connected by trained, registered service engineers.
• Built-in appliances may only be used after they
have built in to suitable built-in units and work surfaces that meet standards.
• In the event of faults with the appliance or damage
to the glass ceramic (cracks, scratches or splits),
the appliance must be switched off and disconnected from the electrical supply, to prevent the
possibility of an electric shock.
• Repairs to the appliance must only be carried out
by trained registered service engineers.
Safety during use
• Remove stickers and film from the glass ceramic.
• There is the risk of burns from the appliance if used
carelessly.
4
Page 5
Description of the Appliance
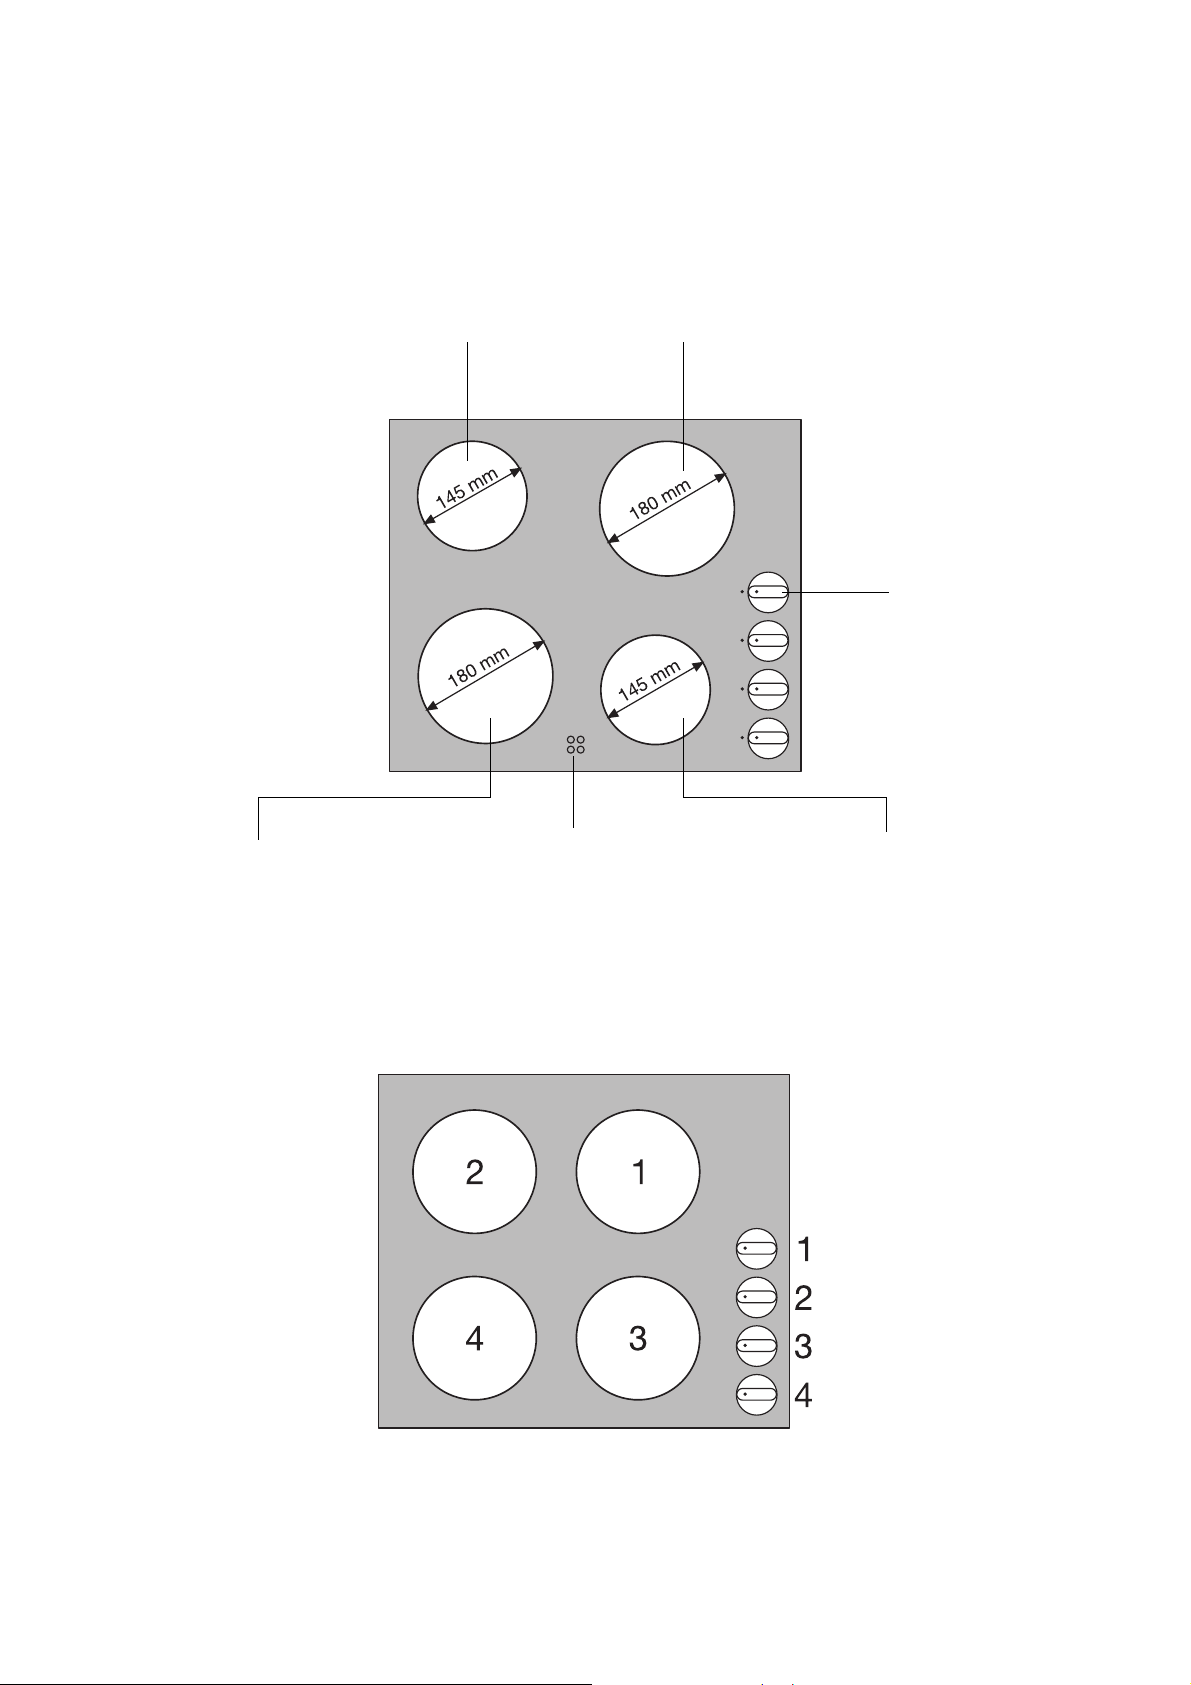
Cooking surface layout
Singlecooking zone
1200W
Singlecooking zone
1700W
Hob Cooking
Zone Control
Knobs
Singlecooking zone
1700W
Residual heat indicator
Assignment of ring switches
Singlecooking zone
1200W
5
Page 6
Control Knobs
The cooking power can be set anywhere between
level 1 and 12.
1 lowest power
12 highest power
0 Off position
Residual heat indicator
The residual heat indicator lights up, as soon as the
corresponding cooking zone is hot.
1 Danger! Risk of burns from residual heat. Af-
ter being switched off, the cooking zones need
some time to cool down. Look at the residual
heat indicator.
2 Residual heat can be used for melting and
keeping food warm.
Operating the appliance
When a cooking zone is switched on, it may
3
hum briefly. This is a characteristic of all ceramic glass cooking zones and does not impair either the function or the life of the
appliance.
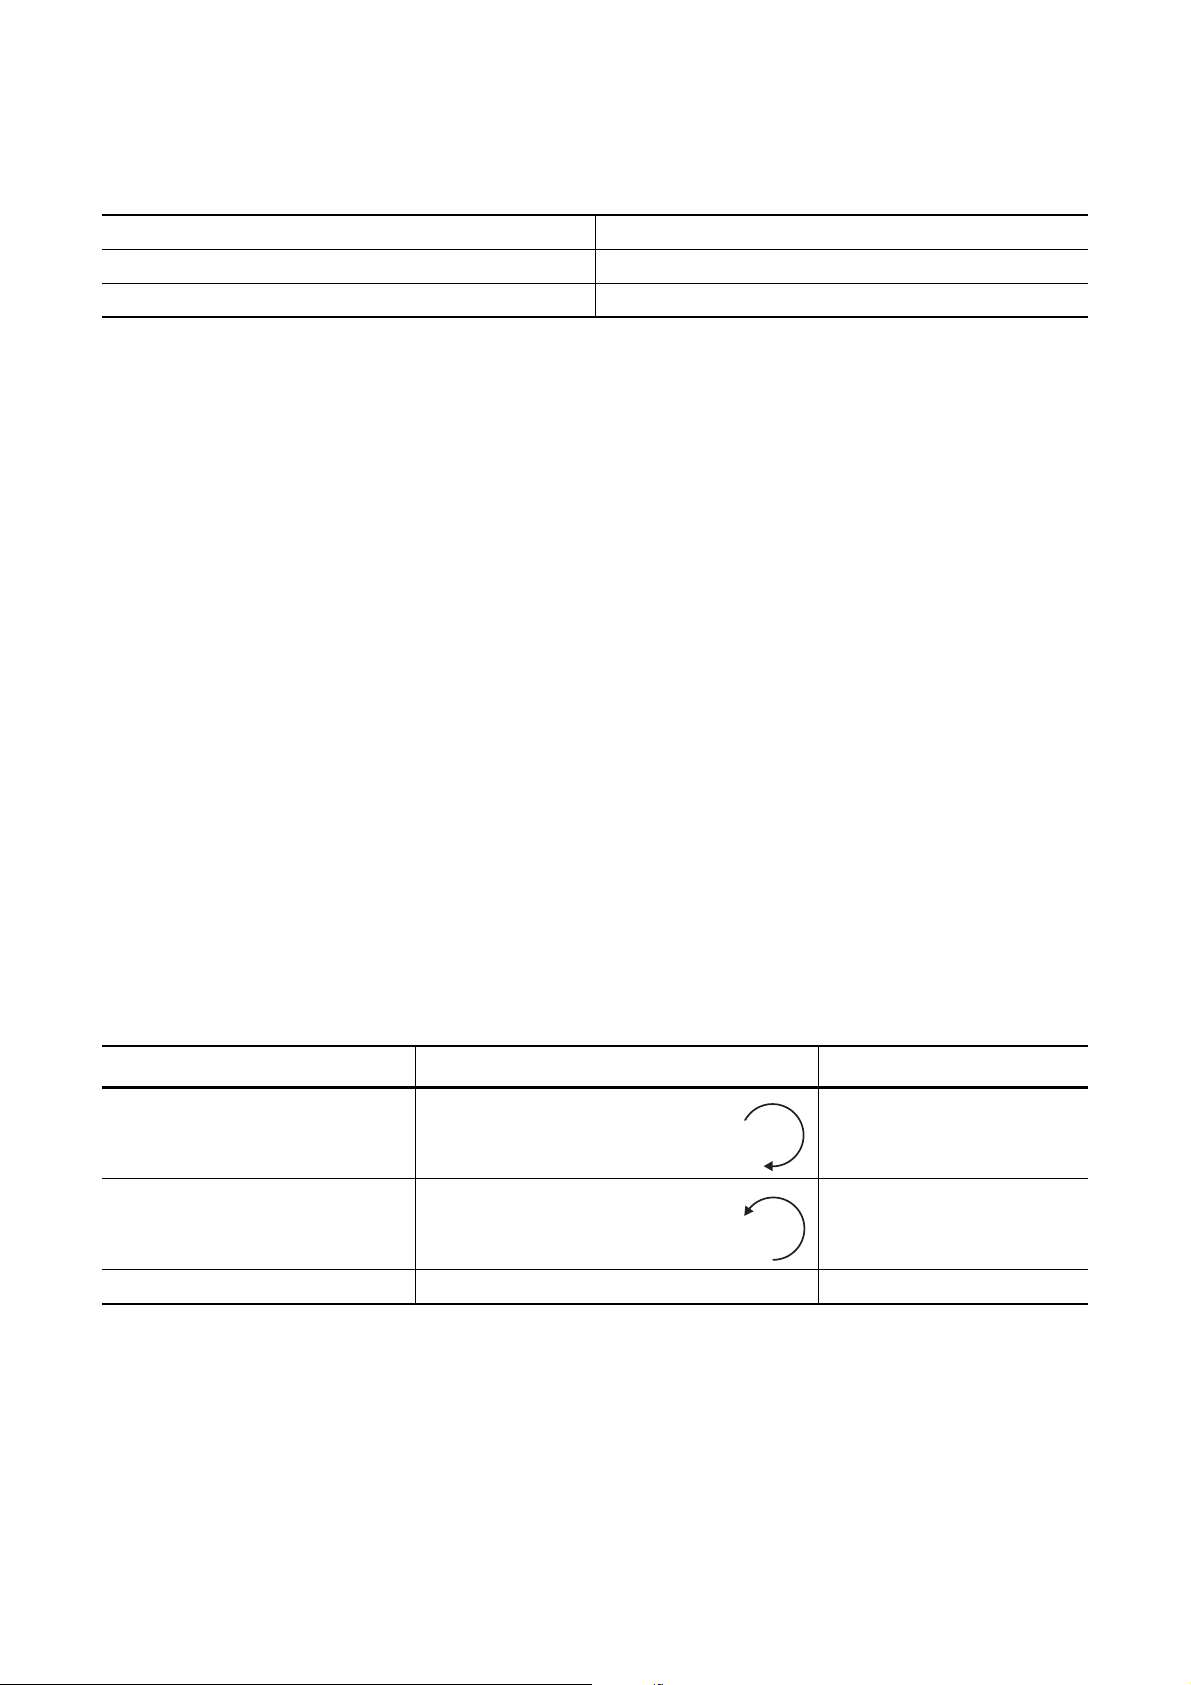
Setting the heat setting
Heat setting Ring control knob Knob setting
To increase
To r e duc e
switch off 0
turn clockwise
turn anti-clockwise
1 - 12
12 - 1
1. When boiling water/searing food, select a high
heat setting.
2. As soon as steam forms or the fat or oil is hot, set a
lower heat setting.
3. To end the cooking process, turn to the Off position.
6
Page 7
Tips on Cooking and Frying
Information on acrylamides
3
According to the latest scientific knowledge,
intensive browning of food, especially in products containing starch, can constitute a health
risk due to acrylamides. Therefore we recommend cooking at the lowest possible temperatures and not browning foods too much.
Cookware
• You can recognise good cookware from the bottoms of the pans. The bottom should be as thick
and flat as possible.
• Cookware made of enamelled steel or with aluminium or copper bottoms can leave discolorations on
the glass ceramic surface which are difficult or impossible to remove.
Energy saving
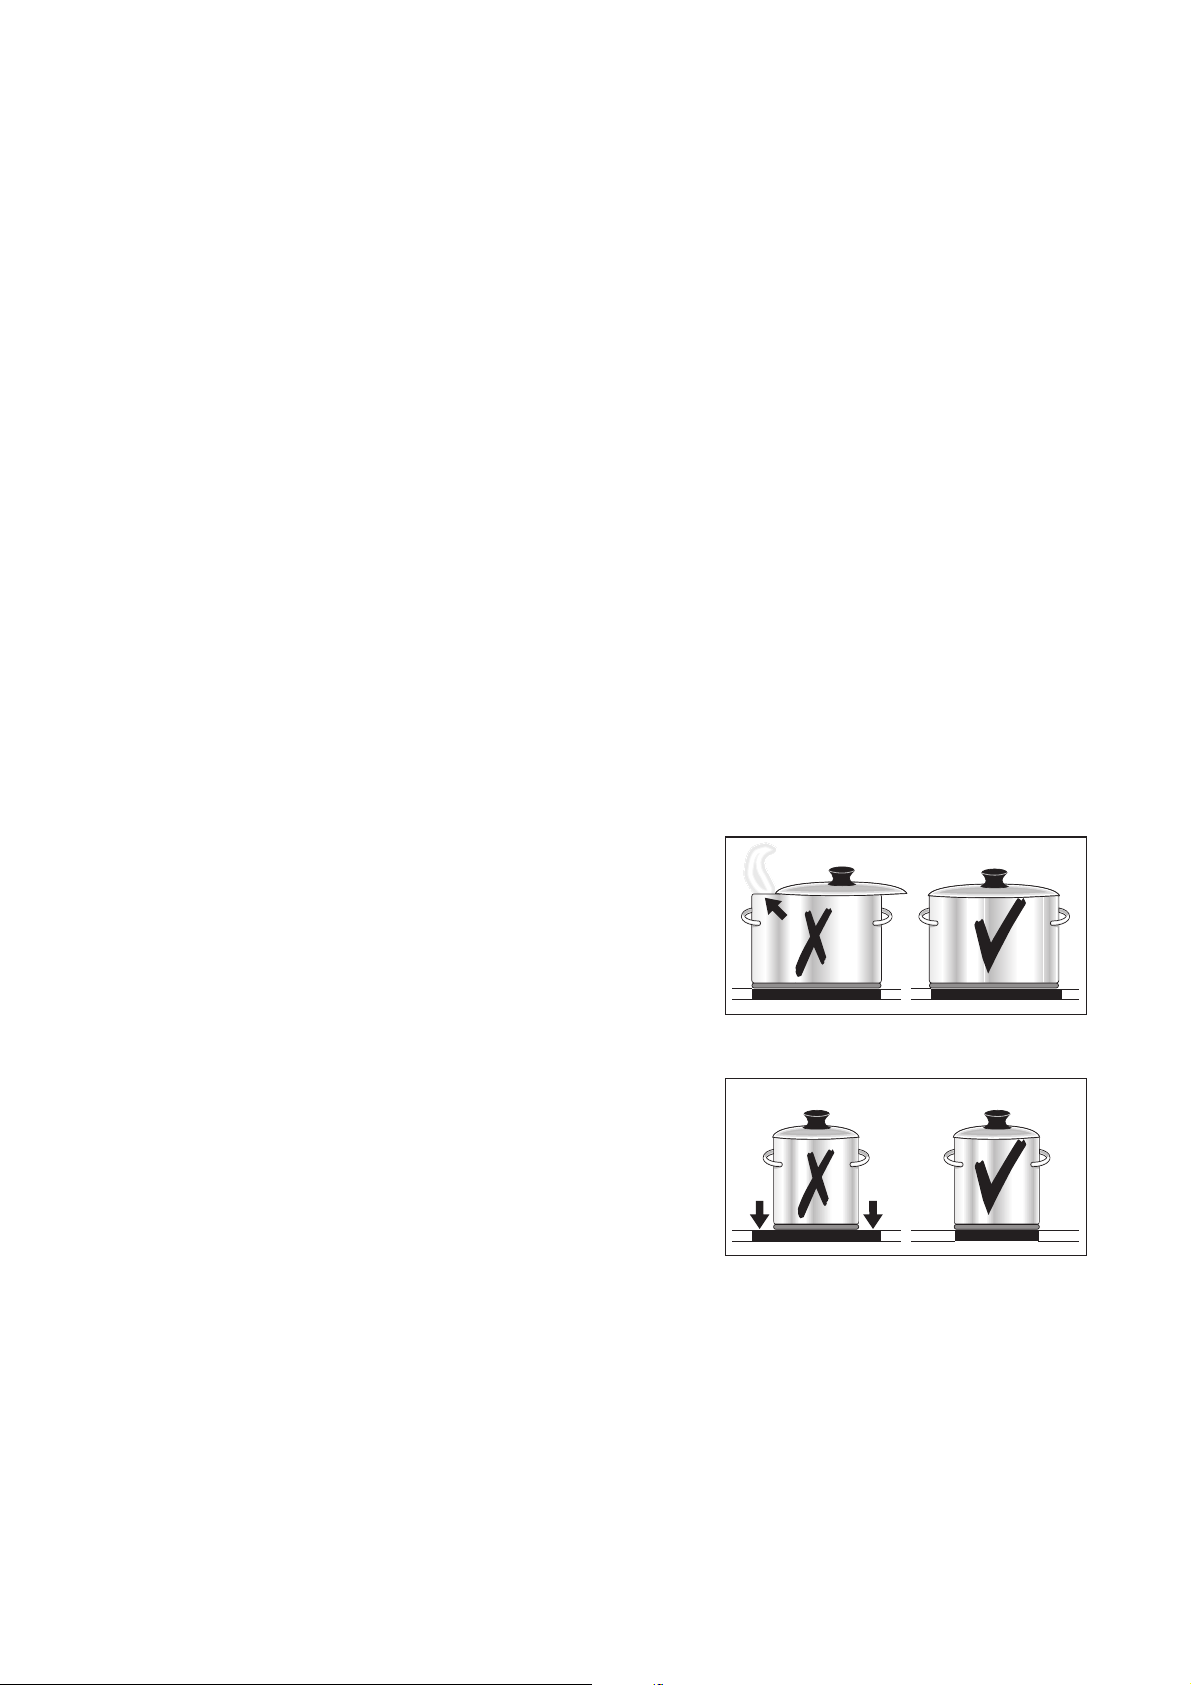
2 Always place cookware on the cooking zone
before it is switched on.
2 If possible, always place lids on the pans.
2 Switch cooking zones off before the end of the
cooking time, to take advantage of residual
heat.
2 Bottom of pans and cooking zones should be
the same size.
7
Page 8
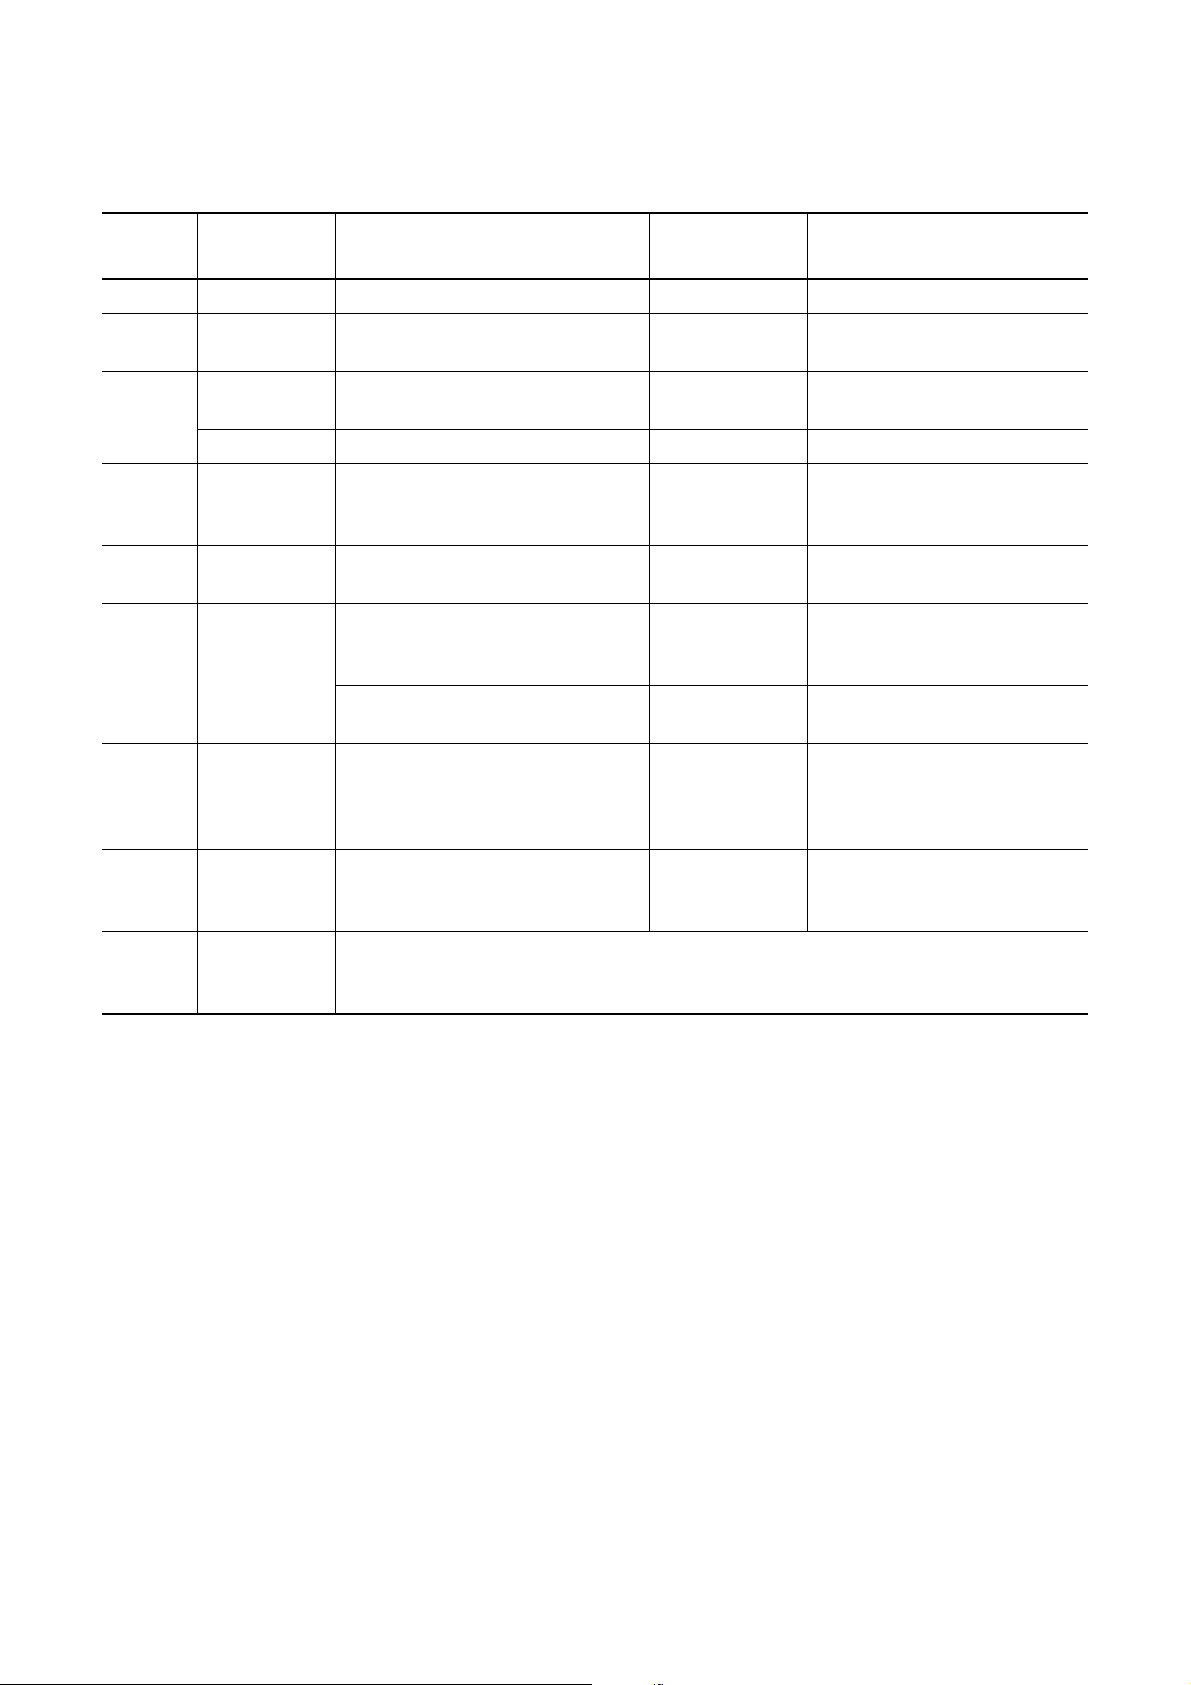
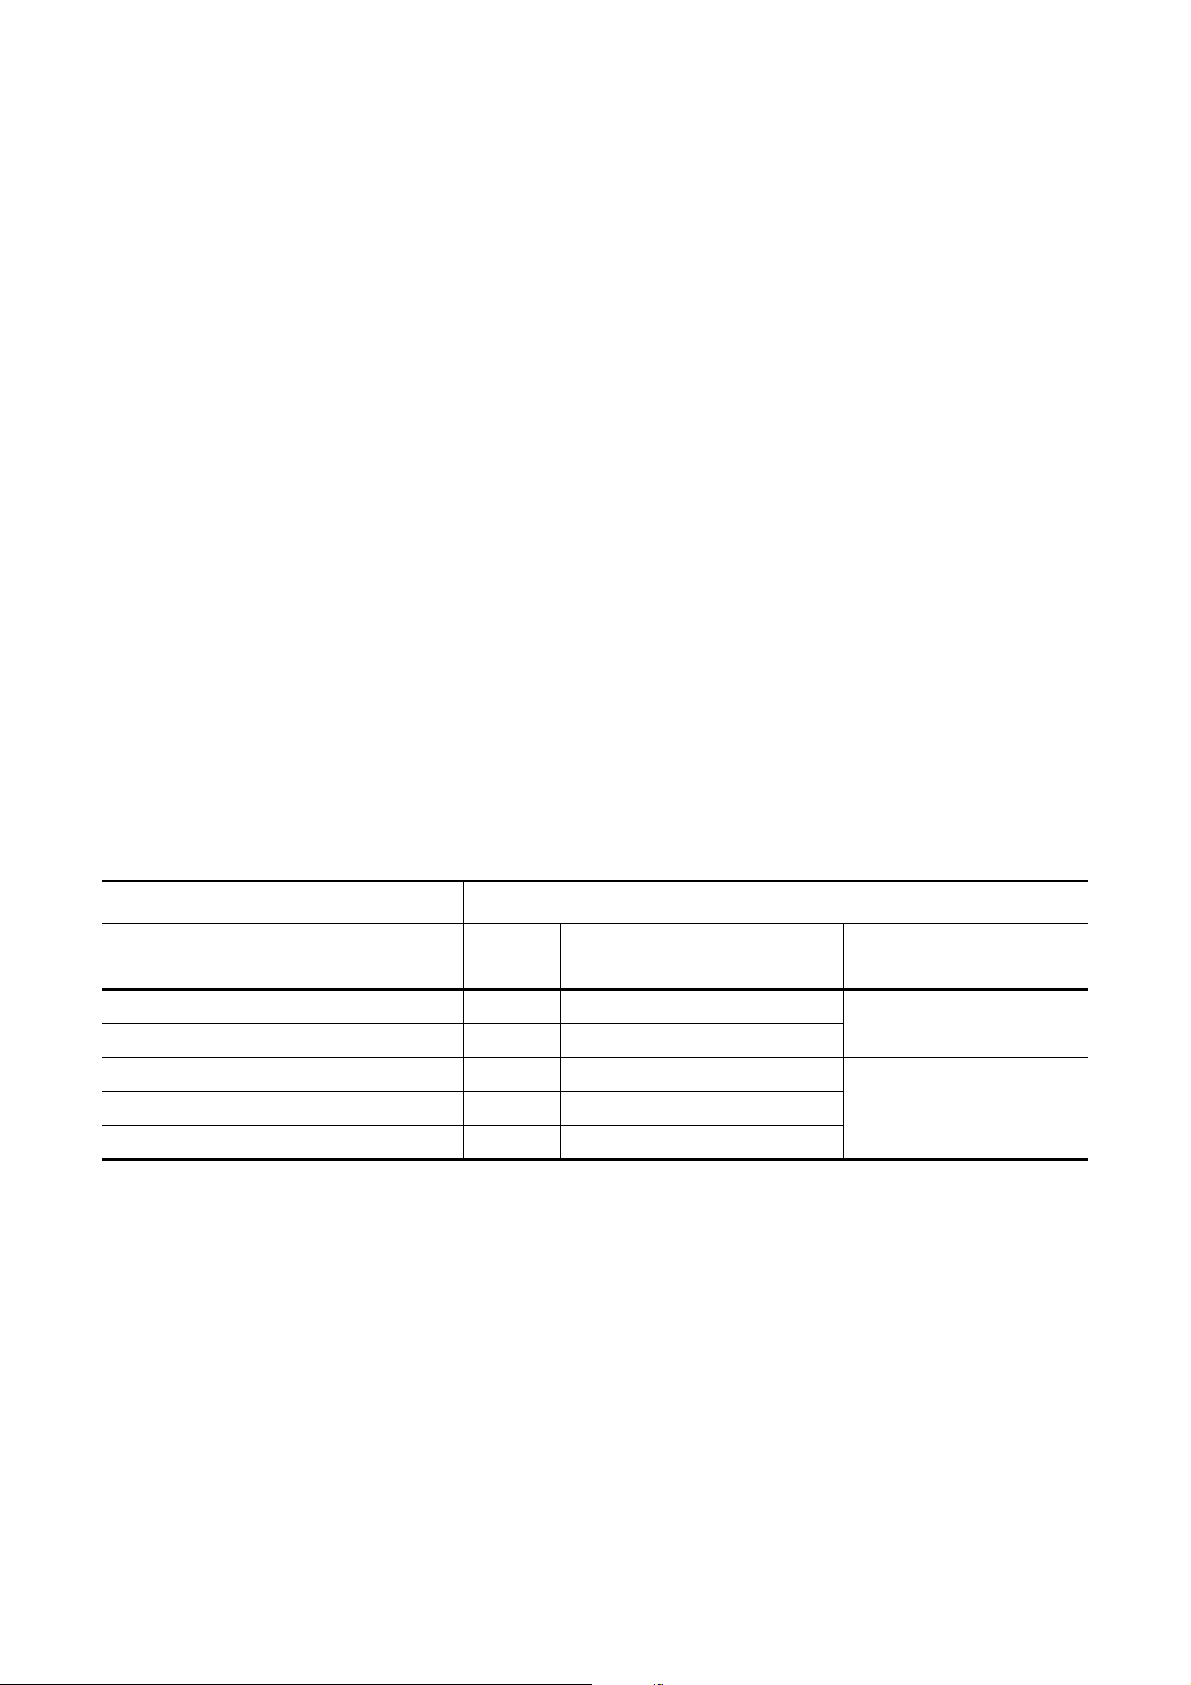
Examples of cooking applications
The information given in the following table is for guidance only.
Heat
setting
0 Residual heat, Off position
1
1-3
3-5
4-6
5-7 Boiling
8-9
Cooking-
process
Keeping
food warm
Melting
Solidifying Fluffy omelettes, baked eggs 10-40 mins. Cook with lid on
Simmering
on low heat
Steaming
Braising
Gentle
Frying
Keeping cooked foods warm as required Cover
melting butter, chocolate, gelatine
Simmering rice and milk-based
Heating up ready-cooked meals
Steaming vegetables, fish
Cooking larger quantities of food,
Frying escalopes, veal cordon
bleu, cutlets, rissoles, sausages,
liver, roux, eggs, pancakes,
suitable for Cooking time Tips/Hints
Hollandaise sauce,
dishes
braising meat
Steaming potatoes 20-60 mins.
stews and soups
doughnuts
5-25 mins. Stir occasionally
Add at least twice as much
25-50 mins.
20-45 mins.
60-150 mins.
Steady frying Turn halfway through cooking
liquid as rice, stir milk dishes
part way through cooking
With vegetables add only a lit-
tle liquid (a few tablespoons)
Use only a little liquid, e. g.:
max.
¼ l water for
750 g potatoes
Up to 3 l liquid plus ingredi-
ents
10-11
11-12
Heavy
Frying
Boiling
Searing
Deep frying
Hash browns, loin steaks, steaks,
Flädle (pancakes for garnishing
soup)
Boiling large quantities of water, cooking pasta, searing meat (goulash, pot roast),
5-15 mins.
per pan
deep frying chips
Turn halfway through cooking
8
Page 9
Cleaning and Care
1
Take care! Risk of burns from residual heat.
Let the appliance cool down.
1 Warning! Sharp objects and abrasive cleaning
materials will damage the appliance. Clean
with water and washing up liquid.
1 Warning! Residues from cleaning agents will
damage the appliance. Remove residues with
water and washing up liquid.
Cleaning the appliance after each
use
1. Wipe the appliance with a damp cloth and a little
washing up liquid.
2. Rub the appliance dry using a clean cloth.
Removing deposits
1. Place a scraper on the glass ceramic surface at an
angle.
2. Remove residues by sliding the blade over the surface.
3. Wipe the appliance with a damp cloth and a little
washing up liquid.
4. Rub the appliance dry using a clean cloth.
Type of dirt
sugar, food containing sugar yes ---
plastics, tin foil yes ---
limescale and water rings --- yes
fat splashes --- yes
shiny metallic discolorations --- yes
*Scrapers and cleaners for glass ceramic and stainless steel
can be purchased in specialist shops
immedi-
ately
when the appliance has
cooled down
3 Remove stubborn residues with a cleaner for
glass ceramic or stainless steel.
3 Scratches or dark stains on the glass ceramic
that cannot be removed do not however affect
the functioning of the appliance.
Remove
using
a scraper*
cleaner for glass ceramic
or stainless steel*
9
Page 10

What to do if …
Problem Possible cause Remedy
The cooking zones are not functioning.
The residual heat indicator is not
displaying anything
If you are unable to remedy the problem by following the above suggestions, please contact
your dealer or the Customer Care Department.
The desired heat setting is not set. Set the heat setting.
The fuse in the house’s electrical
wiring (fuse box) has been tripped.
The cooking zone was only on for a
short time and is therefore not hot
1 Warning! Repairs to the appliance are only to
be carried out by qualified service engineers.
Considerable danger to the user may result
from improper repairs.
3 If the appliance has been wrongly operated,
the visit from the customer service technician
or dealer may not take place free of charge,
even during the warranty period.
Check the fuse.
If the fuses trip a number of times,
please call an authorised electrician.
If the cooking zone is supposed to
be hot, call the Customer Service
Department.
10
Page 11

Disposal
2
Packaging material
The packaging materials are environmentally
friendly and can be recycled. The plastic components are identified by markings, e.g. >PE<,
>PS<, etc. Please dispose of the packaging
materials in the appropriate container at the
community waste disposal facilities.
2 Old appliance
Please dispose of your old appliance in line
with the guidelines for disposal in your community.
11
Page 12

Installation Instructions
Safety instructions
The laws, ordinances, directives and standards in
force in the country of use are to be followed (safety
regulations, proper recycling in accordance with the
regulations, etc.)
Installation may only be carried out by a qualified
electrician.
The minimum distances to other appliances are to be
observed.
Drawers may only be installed with a with protective floor directly under the appliance.
The cut surfaces of the work top are to be protected
against moisture using a suitable sealant.
The sealant seals the appliance to the work top with
no gap.
Do not use silicon sealant between the appliance
and the work top.
Avoid installing the appliance next to doors and under windows. Otherwise hot cookware may be
knocked off the rings when doors and windows are
opened.
1 WARNING!
Risk of injury from electrical current.
• The electrical mains terminal is live.
• Make electrical mains terminal free of voltage.
• Observe connection schematic.
• Observe electrical safety rules.
• Ensure anti-shock protection through correct in-
stallation by a qualified electrician.
• The appliance must be connected to the electrical
supply by a qualified electrician.
1 IMPORTANT!
Risk of injury from electrical current.
Loose and inappropriate plug and socket connections can make the terminal overheat.
• Have the clamping joints correctedly installed by a
qualified electrician.
• Use strain relief clamp on cable.
• In the event of single-phase or two-phase connec-
tion, the appropriate mains cable of type H05BB-F
Tmax 90° (or higher) must be used.
• If this appliance’s mains cable is damaged, it must
be replaced by a special cable (type H05BB-F
Tmax 90°; or higher). The latter is available from
the Customer Care Department.
A device must be provided in the electrical installation which allows the appliance to be disconnected
from the mains at all poles with a contact opening
width of at least 3 mm.
Suitable isolation devices include line protecting cutouts, fuses (screw type fuses are to be removed from
the holder), earth leakage trips and contactors.
12
Page 13

Service
In the event of technical faults, please first check
whether you can remedy the problem yourself with
the help of the operating instructions (section “What
to do if…”).
If you were not able to remedy the problem yourself,
please contact the Customer Care Department or
one of our service partners.
In order to be able to assist you quickly, we require
the following information:
– Model description
– Product number (PNC)
– Serial number (S No.)
(for numbers see rating plate)
– Ty pe o f f au l t
– Any error messages displayed by the appliance
– three digit letter-number combination for glass ce-
ramic
So that you have the necessary reference numbers
from your appliance at hand, we recommend that
you write them in here:
Model description: .....................................
PNC: .....................................
S No: .....................................
13
Page 14

Chère cliente, cher client,
Veuillez lire attentivement la notice d’utilisation dans
son intéralité et la conserver pour pouvoir le consulter ultérieurement.
Veuillez la transmettre à l’éventuel propriétaire ultérieur de l’appareil.
Les symboles suivants sont utilisés dans
ce document :
1 Consignes de sécurité
Avertissement : conseils pour votre sécurité
personnelle.
Avertissement ! Pour éviter d'endommager
l'appareil
3 Conseils généraux et pratiques
2 Informations environnementales
14
Page 15

Sommaire
Notice d'utilisation . . . . . . . . . . . . . . . . . . . . . . . . . . . . . . . . . . . . . . . . . . . . . . . . . . . . . . . . . . . . . . . . . 16
Sécurité . . . . . . . . . . . . . . . . . . . . . . . . . . . . . . . . . . . . . . . . . . . . . . . . . . . . . . . . . . . . . . . . . . . . . . . . . . . . . 16
Description de l'appareil . . . . . . . . . . . . . . . . . . . . . . . . . . . . . . . . . . . . . . . . . . . . . . . . . . . . . . . . . . . . . . . 17
Equipement du plan de cuisson . . . . . . . . . . . . . . . . . . . . . . . . . . . . . . . . . . . . . . . . . . . . . . . . . . . . . . . . . . . 17
Position des commandes des zones de cuisson . . . . . . . . . . . . . . . . . . . . . . . . . . . . . . . . . . . . . . . . . . . . . . 17
Commande des zones de cuisson . . . . . . . . . . . . . . . . . . . . . . . . . . . . . . . . . . . . . . . . . . . . . . . . . . . . . . 18
Voyant indiquant la chaleur résiduelle . . . . . . . . . . . . . . . . . . . . . . . . . . . . . . . . . . . . . . . . . . . . . . . . . . . . 18
Utilisation de l’appareil . . . . . . . . . . . . . . . . . . . . . . . . . . . . . . . . . . . . . . . . . . . . . . . . . . . . . . . . . . . . . . . . .18
Sélectionner le niveau de cuisson . . . . . . . . . . . . . . . . . . . . . . . . . . . . . . . . . . . . . . . . . . . . . . . . . . . . . . . . . 18
Conseils de cuisson . . . . . . . . . . . . . . . . . . . . . . . . . . . . . . . . . . . . . . . . . . . . . . . . . . . . . . . . . . . . . . . . . . . 19
Plats de cuisson . . . . . . . . . . . . . . . . . . . . . . . . . . . . . . . . . . . . . . . . . . . . . . . . . . . . . . . . . . . . . . . . . . . . . . . 19
Economie d’énergie . . . . . . . . . . . . . . . . . . . . . . . . . . . . . . . . . . . . . . . . . . . . . . . . . . . . . . . . . . . . . . . . . . . . 19
Exemples d’utilisation pour la cuisson . . . . . . . . . . . . . . . . . . . . . . . . . . . . . . . . . . . . . . . . . . . . . . . . . . . . . . 20
Nettoyage et entretien . . . . . . . . . . . . . . . . . . . . . . . . . . . . . . . . . . . . . . . . . . . . . . . . . . . . . . . . . . . . . . . . . 21
Que faire si … . . . . . . . . . . . . . . . . . . . . . . . . . . . . . . . . . . . . . . . . . . . . . . . . . . . . . . . . . . . . . . . . . . . . . . . . 22
Protection de l’environnement. . . . . . . . . . . . . . . . . . . . . . . . . . . . . . . . . . . . . . . . . . . . . . . . . . . . . . . . . . . 23
Instructions d'installation . . . . . . . . . . . . . . . . . . . . . . . . . . . . . . . . . . . . . . . . . . . . . . . . . . . . . . . . . . 24
Service après-vente . . . . . . . . . . . . . . . . . . . . . . . . . . . . . . . . . . . . . . . . . . . . . . . . . . . . . . . . . . . . . . . . 25
15
Page 16

Notice d'utilisation
1 Sécurité
3
Pour ne pas perdre le bénéfice de la garantie
en cas de panne, veuillez observer ces recom-
mandations.
5 Cet appareil est conforme aux directives CE
suivantes :
– directive 73/23/CEE du 19.02.1973 basse tension
– directive 89/336/CEE du 03.05.1989 relative à la
compatibilité électromagnétique (CEM) y compris
la directive de révision 92/31/CEE
– directive 93/68/CEE du 22.07.1993 relative à la
certification CE
Utilisation réglementaire
• Cet appareil est uniquement destiné à l’usage do-
mestique habituel et pour faire cuire et rôtir des aliments.
• L’appareil ne peut en aucun cas servir de plan de
travail ou de support.
• Ne pas procéder à des transformations ou à modi-
fications de l’appareil.
• Ne pas placer de liquides susceptibles de brûler,
de matériaux facilement inflammables ou d’objets
susceptibles de fondre (par ex. du papier aluminium, des matières synthétiques ou de l’aluminium) sur ou à promité de l’appareil.
Sécurité enfants
• Eviter systématiquement que les enfants en bas
âge s’approchent de l’appareil.
• Les enfants plus âgés ne doivent être autorisés à
utiliser l’appareil qu’accompagnés et sous surveillance.
Consignes générales de sécurité
• Le montage et le branchement de l’appareil sont
du ressort exclusif de spécialistes agréés.
• Les appareils encastrables ne peuvent être mis en
fonctionnement qu’après avoir été montés dans
des armoires et des plans de travail homologués et
adaptés.
• En cas de panne de l’appareil ou de dommages à
la vitrocéramique (cassures, fêlures ou déchirures), mettre l’appareil hors et débranchez-le pour
éviter un éventuel choc électrique.
• Le montage et le branchement de l’appareil sont
du ressort exclusif de spécialistes agréés.
Précautions d’utilisation.
• Retirer les étiquettes et les films protecteurs de la
vitrocéramique.
• Attention aux risques de brûlures lors de l’utilisation de l’appareil.
• S’assurer que les câbles d’appareils électriques
n’entrent pas en contact avec les surfaces brûlantes de l’appareil ou les récipients brûlants.
• Les graisses et les huiles surchauffées peuvent rapidement s’enflammer. Surveiller constamment les
mets cuits avec de la graisse ou de l’huile (par ex.
des frites).
• Mettre les foyers hors fonctionnement après chaque utilisation.
Précautions de nettoyage
• Mettre l’appareil hors fonctionnement et le laisser
refroidir avant de le nettoyer.
• Pour des raisons de sécurité, il est interdit de nettoyer l’appareil avec un jet à vapeur ou un appareil
à haute pression.
Comment éviter d’endommager
l’appareil
• Des objets peuvent endommager la vitrocéramque
en tombant.
• Les plats de cuisson peuvent endommager la vitrocéramique en heurtant le bord.
• Les plats de cuisson en fonte ou pourvus d’un
fonds abîmé peuvent érafler la vitrocéramique lorsqu’on les déplace.
• Les objets susceptibles de fondre ou les produits
ayant débordé peuvent se consumer sur la vitrocéramique et doivent par conséquent être immédiatement enlevés.
• Ne pas placer de plats de cuisson vides sur les zones de cuisson et ne pas mettre ces dernières en
fonctionnement sans récipient.
16
Page 17

Description de l'appareil
Equipement du plan de cuisson
Zone de cuisson
1200W
Zone de cuisson
1700W
Commande plaques
de cuisson
Zone de cuisson
1700W
Indicateurs de chaleur résiduelle
Zone de cuisson
1200W
Position des commandes des zones de cuisson
17
Page 18

Commande des zones de cuisson
Vous pouvez régler graduellement la puissance de
cuisson de 1 à 12.
1 puissance minimale
12 puissance maximale
0 Position Arrêt
Voyant indiquant la chaleur résiduelle
Le voyant indiquant la chaleur résiduelle s’allume
dès que la zone de cuisson correspondante est
chaude.
1 Avertissement ! Risque de brûlure dû à la
chaleur résiduelle. Lorsque zones de cuisson
sont désactivées, il faut un peu de temps
avant qu’elles refroidissent. Surveillez le
voyant de chaleur résiduelle.
2 Vous pouvez utiliser la chaleur résiduelle pour
faire fondre des ingrédients ou pour conserver
les aliments au chaud.
Utilisation de l’appareil
A l'enclenchement du foyer, celui-ci peut
3
émettre un bref ronflement. Ceci est une caractéristique des foyers vitrocéramiques et
n'influence ni le fonctionnement ni la durée de
vie de l'appareil.
Sélectionner le niveau de cuisson
Niveau de cuisson Commande des zones de cuisson
augmenter
réduire
tournez dans le sens des
aiguilles d’une montre
tournez dans le sens des
aiguilles d’une montre
Position de la comman-
de
1 - 12
12 - 1
désactiver positionnez sur Arrêt 0
1. Pour démarrer la cuisson/faire frire, sélectionnez
un niveau de cuisson élevé.
2. Dès l’apparition de vapeur ou dès que la graisse
est chaude, diminuez le niveau de cuisson.
18
3.Lorsque la cuisson est terminée, positionnez la
commande sur arrêt.
Page 19

Conseils de cuisson
Plats de cuisson
• Le type de fond des plats de cuisson détermine ou
non leur bonne qualité. Le fond doit être aussi plat
et épais que possible.
• Les plats de cuisson avec fond en émail, en aluminium ou en cuivre peuvent laisser des traces sur
les plaques en vitrocéramique difficilement nettoyables ou même impossibles à enlever.
Economie d’énergie
2 Il est impératif de placer les plats de cuisson
avant d’activer la zone de cuisson.
2 Si possible, recouvrez toujours les récipients
avec leur couvercle.
2 Eteignez la zone de cuisson avant la fin de la
cuisson afin de bénéficier de la chaleur résiduelle.
2 Veillez à ce que le fond du plat de cuisson cor-
responde à la dimension de la zone de cuisson.
19
Page 20

Exemples d’utilisation pour la cuisson
Les valeurs indiquées dans le tableau suivant sont indicatives.
Niveau de
cuisson
0 Chaleur restante, en position
1
1-3
3-5 Faire gonfler
4-6
5-7 Cuire à l’eau
8-9
Type de
cuisson
Conserver
au chaud :
Faire fondre
Conserver une omelette norvégienne, royale 10-40 min Couvrez-la avec un couvercle
Cuire à l’étu-
vée
Cuire à la va-
peur
Faire cuire
à feu doux
Conserver des plats cuits au
de la sauce hollandaise,
faire fondre du beurre, du choco-
Faire gonfler du riz ou des plats à
Faire réchauffer des plats cuisi-
Cuire des légumes ou du poisson
Cuire de la viande à l’étouffée
Faire cuire des pommes de terre
Faire cuire des quantités assez
importantes d’aliments, ragoûts
des escalopes, des cordons
bleus, des steaks de viande hâ-
chée, des saucisses, du foie, des
roux, des œufs, des gâteaux aux
œufs, faire frire des beignets.
adapté à Durée Remarques/conseils
chaud
lat, de la gélatine
base de riz
nés
à la vapeur
à l’étuvée
et soupes
si nécessaire les recouvrir
5-25 min Remuez de temps en temps
Versez au moins le double de
25-50 min
20-45 min
20-60 min
60-150 min
cuisson
continue
quantité d’eau que de riz, re-
muez le riz au lait de temps en
temps.
Pour les légumes, utilisez jus-
te un peu d’eau (quelques
cuillères à soupe)
Utilisez juste un peu d’eau,
par ex. max.
750 g de pommes de terre
Jusqu’à 3 l d’eau plus les in-
Retournez de temps en
¼ l d’eau pour
grédients
temps
10-11
11-12
Faire cuire
à tempé-ra-
ture élevée
Porter à
ébullition
Faire revenir
Faire frire
des beignets de pommes de terre, des rognons, des steaks, des
galettes
Porter des quantités importantes d’eau à ébullition, faire revenir de la viande
(goulasch, bœuf brais), faire frire des pommes frites
5-15 min
poêle pro
Retournez de temps en
temps
20
Page 21

Nettoyage et entretien
1
Attention ! Risque de brûlure dû à la chaleur
résiduelle.
Laissez refroidir l’appareil.
1 Attention ! Les produits de nettoyage agres-
sifs ou abrasifs endommagent l’appareil. Nettoyez l’appareil avec de l’eau et de la lessive.
1 Attention ! Les restes de produits de nettoya-
ge endommagent l’appareil. Nettoyez les restes avec de l’eau et un produit de nettoyage.
Nettoyez l’appareil après chaque utilisation
1. Nettoyez l’appareil à l’aide d’un chiffon humide et
un peu de produit de nettoyage.
2. Séchez l’appareil avec un chiffon propre.
Enlever les salissures
1. Placez le grattoir de nettoyage obliquement par
rapport à la surface de la vitrocéramique.
2. Enlevez les salissures en faisant glisser la lame.
3. Nettoyez l’appareil à l’aide d’un chiffon humide et
un peu de produit de nettoyage.
4. Séchez l’appareil avec un chiffon propre.
immé-
Type de salissure
Sucre, mets contenant du sucre oui ---
Matériaux en plastique, feuilles en aluminium
Bords calcaires et d’eau --- oui
Burette à graisse --- oui
Colorations métalliques luisantes --- oui
*grattoir de nettoyage, produit de nettoyage de vitrocérami-
que ou d’acier inoxydable sont
disponibles dans les magasins spécialisés.
diate-
ment
oui ---
lorsque l’appareil a
refroidi
3 Nettoyez les salissures tenaces à l’aide d’un
produit de nettoyage pour vitrocéramique ou
acier inoxydable.
3 Même s’il n’est plus possible de faire disparaî-
tre les égratignures ou les taches sombres sur
la vitrocéramique, cela n’a aucune influence
sur le fonctionnement de l’appareil.
enlevez
avec
Grattoir de
nettoyage*
Produit de nettoyage de
vitrocéramique ou d’acier
inoxydable*
21
Page 22

Que faire si …
Symptôme Cause possible Solution
Les zones de cuisson ne fonctionnent pas.
L’indicateur de chaleur résiduelle
ne s'affiche pas
Si les indications ci-dessus ne vous permettent
pas de remédier au problème, veuillez vous
adresser au service après-vente de votre magasin vendeur.
Le degré de cuisson n’est pas sélectionné
Le fusible de sécurité de l’installation domestique (disjoncteur) s’est
déclenché.
La zone de cuisson fonctionne seulement depuis peu et n’est par conséquent pas encore chaude
1 Avertissement ! Le montage et le branche-
ment de l’appareil sont du ressort exclusif de
spécialistes agréés. Des réparations inadéquates peuvent s’avérer très dangereuses
pour l’utilisateur.
3 En cas d’erreur de manipulation de la part de
l’utilisateur, le déplacement du technicien du
service après-vente ou du vendeur peut être
facturé même en cours de garantie.
Sélectionné le degré de cuisson
Vérifiez le fusible.
Si les fusibles sautent plusieurs
fois, veuillez contacter un électricien agréé.
Si la zone de cuisson est chaude,
contactez le service après-vente.
22
Page 23

Protection de l’environnement
2
Elimination du matériel d’emballage
Les matériaux d’emballage sont écologiques
et recyclables. Les matières plastiques portent
un signe distinctif, par ex. >PE<, >PS<, etc.
Eliminez les matériaux d’emballage en fonction de leur signe distinctif dans les containeurs prévus à cet effet sur le site de collecte
de votre commune.
2 Appareils usagés
Eliminez votre appareil usagé conformément à
la réglementation en vigueur dans votre lieu de
résidence.
23
Page 24

Instructions d'installation
Sécurité
L’utilisateur est tenu de respecter la législation, la réglementation, les lignes directrices et les normes en
vigueur dans son pays de résidence (dispositions relatives à la sécurité, recylage conforme et réglementaire, etc.).
Le montage relève de la compétence exclusive de
spécialistes.
Respectez l’espacement minimal requis par rapport
aux autres appareils.
Seuls des tiroirs pourvus d’un fond de protection
peuvent être installés directement sous l’appareil.
Protégez l’appareil de l’humidité en placant un joint
d’étanchéité dans les rainures du plan de travail.
Le joint comble les fentes entre le plan de travail et
l’appareil.
N’utilisez pas de masse d’étanchéité en silicone entre le plan de travail et l’appareil.
Eviter de monter l’appareil à proximité d’une porte
ou sous une fenêtre. Autrement, l’ouverture d’une
porte ou d’un battant de fenêtre peuvent arracher le
plat de cuisson posé sur la plaque de cuisson.
Des dispositifs de protection appropriés sont par
exemple les disjoncteurs, les fusibles (les fusibles
vissés doivent être retirés de leur socle), les disjoncteurs différentiels et les contacteurs.
1 Avertissement!
Danger de blessure due au courant électrique.
• La borne de raccordement est sous tension.
• Isolez la borne de raccordement au secteur.
• Respectez le schéma de raccordement.
• Respectez les régles de sécurité électrotechni-
ques.
• Assurez vous lors de l’installation qu’il n’y ait pas
de possibilité de contact.
• Le raccordement électrique relève de la compétence d’un électricien.
1 ATTENTION!
Le courant électrique peut provoquer des
dommages.
Des raccordements mal ajustés ou incorrects peuvent provoquer une surchauffe de la borne.
• Installez correctement les jonctions par serrage.
• Délestez le câble.
• Pour les raccordements 1 ou 2 phases, utilisez res-
pectivement un câble approprié de type H05BB-F
T de max. 90° (ou de plus grande capacité).
• En cas d’endommagement du câble de raccorde-
ment de l’appareil, remplacez impérativement ce
dernier par un câble spécifique (de type H05BB-F
Tmax. 90° ou de plus grande capacité). Ce type de
câble est disponible auprès du service après-vente.
Au niveau de l'installation électrique, prévoir un dispositif qui permette de couper cet appareil du secteur sur tous les pôles avec une ouverture des
contacts d'au moins 3 mm.
24
Page 25

Service après-vente
En cas de problèmes techniques, vérifiez d’abord s’il
ne vous est pas possible de réparer vous-même le
dysfonctionnement à l’aide de la notice d’utilisation
(chapitre „Que faire, si...“).
Si vous ne parvenez pas à réparer le dysfonctionnement, veuillez contacter notre Consumer Services.
Pour pouvoir vous dépanner dans les plus brefs délais, nous nécessitons les informations suivantes :
– Désignation du modèle
– Numéro du produit (PNC)
– Numéro de série (S-No.)
(ces chiffres se trouvent sur la plaque signalétique)
– Type de dysfonctionnement
– eventuellement le message d’erreur affiché par
l’appareil
– Vitrocéramique avec une combinaison de lettres et
de trois chiffres
Pour pouvoir accéder rapidement aux numéros
d’identification de l’appareil, nous vous recommandons de les consigner à cet endroit.
Désignation du modèle .....................................
PNC : .....................................
S-No : .....................................
25
Page 26

Geachte klant,
Lees deze gebruiksaanwijzing zorgvuldig door en
bewaar de gebruiksaanwijzing zodat deze later kan
worden geraadpleegd.
Geef deze gebruiksaanwijzing door aan een eventuele volgende eigenaar van het apparaat.
De volgende symbolen worden in de
tekst gebruikt:
1 Veiligheidsvoorschriften
Waarschuwing! Aanwijzingen ten behoeve
van uw persoonlijke veiligheid.
Let op! Aanwijzingen om beschadiging van
het apparaat te voorkomen.
3 Aanwijzingen en praktische tips
2 Milieu-informatie
26
Page 27

Inhoud
Gebruiksaanwijzing . . . . . . . . . . . . . . . . . . . . . . . . . . . . . . . . . . . . . . . . . . . . . . . . . . . . . . . . . . . . . . . .28
Veiligheidsvoorschriften . . . . . . . . . . . . . . . . . . . . . . . . . . . . . . . . . . . . . . . . . . . . . . . . . . . . . . . . . . . . . . . . 28
Beschrijving van het apparaat . . . . . . . . . . . . . . . . . . . . . . . . . . . . . . . . . . . . . . . . . . . . . . . . . . . . . . . . . . . 29
Uitrusting kookplaat . . . . . . . . . . . . . . . . . . . . . . . . . . . . . . . . . . . . . . . . . . . . . . . . . . . . . . . . . . . . . . . . . . . . 29
Indeling kookzoneschakelaar . . . . . . . . . . . . . . . . . . . . . . . . . . . . . . . . . . . . . . . . . . . . . . . . . . . . . . . . . . . . . 29
Kookzoneschakelaar . . . . . . . . . . . . . . . . . . . . . . . . . . . . . . . . . . . . . . . . . . . . . . . . . . . . . . . . . . . . . . . . . 30
Restwarmte-indicatie. . . . . . . . . . . . . . . . . . . . . . . . . . . . . . . . . . . . . . . . . . . . . . . . . . . . . . . . . . . . . . . . . 30
Bediening van het apparaat . . . . . . . . . . . . . . . . . . . . . . . . . . . . . . . . . . . . . . . . . . . . . . . . . . . . . . . . . . . . . 30
Kookstand instellen. . . . . . . . . . . . . . . . . . . . . . . . . . . . . . . . . . . . . . . . . . . . . . . . . . . . . . . . . . . . . . . . . . . . . 30
Tips voor koken en braden . . . . . . . . . . . . . . . . . . . . . . . . . . . . . . . . . . . . . . . . . . . . . . . . . . . . . . . . . . . . . 31
Pannen . . . . . . . . . . . . . . . . . . . . . . . . . . . . . . . . . . . . . . . . . . . . . . . . . . . . . . . . . . . . . . . . . . . . . . . . . . . . . . 31
Energiebesparing . . . . . . . . . . . . . . . . . . . . . . . . . . . . . . . . . . . . . . . . . . . . . . . . . . . . . . . . . . . . . . . . . . . . . . 31
Toepassingsvoorbeelden voor het koken . . . . . . . . . . . . . . . . . . . . . . . . . . . . . . . . . . . . . . . . . . . . . . . . . . . . 32
Reiniging en onderhoud . . . . . . . . . . . . . . . . . . . . . . . . . . . . . . . . . . . . . . . . . . . . . . . . . . . . . . . . . . . . . . . . 33
Wat is er aan de hand als …. . . . . . . . . . . . . . . . . . . . . . . . . . . . . . . . . . . . . . . . . . . . . . . . . . . . . . . . . . . . . 34
Afvalverwerking. . . . . . . . . . . . . . . . . . . . . . . . . . . . . . . . . . . . . . . . . . . . . . . . . . . . . . . . . . . . . . . . . . . . . . . 34
Montageaanwijzing . . . . . . . . . . . . . . . . . . . . . . . . . . . . . . . . . . . . . . . . . . . . . . . . . . . . . . . . . . . . . . . .35
Service. . . . . . . . . . . . . . . . . . . . . . . . . . . . . . . . . . . . . . . . . . . . . . . . . . . . . . . . . . . . . . . . . . . . . . . . . . . . . 36
27
Page 28

Gebruiksaanwijzing
1 Veiligheidsvoorschriften
3
Neem deze aanwijzingen in acht, omdat an-
ders bij eventuele schade het recht op garan-
tie vervalt.
5 Dit apparaat is in overeenstemming met de
volgende EG-richtlijnen:
– 73/23/EEG van 19.02.1973 Laagspanningsrichtlijn
– 89/336/EEG van 03.05.1989 EMC-richtlijn inclu-
sief aangepaste richtlijn 92/31/EEG
– 93/68/EEG van 22.07.93 CE-markeringsrichtlijn
Gebruik volgens de voorschriften
• Dit apparaat mag alleen in het huishouden worden
gebruikt voor het koken, braden en bakken van levensmiddelen.
• Het apparaat mag niet worden gebruikt als werk-
blad of aanrecht.
• Het is niet toegestaan het appaat om te bouwen of
te veranderen.
• Brandbare vloeistoffen, licht ontvlambare materia-
len of smeltbare voorwerpen (bijv. folie, kunststof,
aluminium) niet op het apparaat of in de direct omgeving daarvan plaatsen of opbergen.
Veiligheid voor kinderen
• Houd kleine kinderen altijd uit de buurt van het ap-
paraat.
• Grotere kinderen mogen alleen onder begeleiding
en toezicht met het apparaat werken.
Algemene veiligheid
• Het apparaat mag alleen worden gemonteerd en
aangesloten door een erkend elektro-installateur.
• Inbouwapparaten mogen alleen worden gebruikt
nadat deze zijn ingebouwd in voorgeschreven,
passende inbouwkasten en werkbladen.
• Bij storingen aan het apparaat of beschadiging van
het glaskeramiek (breuken, sprongen resp. scheuren) moet het apparaat worden uitgeschakeld en
worden losgekoppeld van het elektriciteitsnet, om
gevaar op elektrische schokken te voorkomen.
• Reparaties aan het apparaat mogen alleen worden
uitgevoerd door vakmensen.
• Wanneer u onoplettend bent tijdens het werken
met het apparaat, bestaat er risico op verbranding.
• De snoeren van elektrische apparaten mogen niet
tegen het hete apparaatoppervlak resp. hete pannen aankomen.
• Oververhit vet en olie is licht ontvlambaar. Laat het
apparaat niet zonder toezicht achter wanneer u
kookt met vet of olie (bijv. patat bakken).
• De kookzones moeten na ieder gebruik worden uitgeschakeld.
Veiligheid bij het schoonmaken
• Voor het schoonmaken moet het apparaat zijn uitgeschakeld en afgekoeld.
• Uit veiligheidsoverwegingen is het niet toegestaan
het apparaat met een stoom- of een hogedrukreiniger schoon te maken.
Voorkoming van beschadiging van
het apparaat
• Het glaskeramiek kan worden beschadigd door
vallende voorwerpen.
• Door stoten met pannen kan de rand van het glaskeramiek beschadigd raken.
• Pannen van gietijzer of gietaluminium of pannen
met een beschadigde bodem kunnen bij het verschuiven het glaskeramiek bekrassen.
• Voorwerpen die kunnen smelten en gerechten die
kunnen overkoken, kunnen inbranden op het glaskeramiek en moeten direct worden verwijderd.
• De kookzones mogen niet worden gebruikt als er
geen pan of een lege pan op staat.
Veiligheid tijdens het gebruik
• Verwijder stickers en folies van het glaskeramiek.
28
Page 29

Beschrijving van het apparaat
Uitrusting kookplaat
Eénkringskookzone
1200W
Eénkringskookzone
1700W
Kookzoneschakelaar
Eénkringskookzone
1700W
Restwarmte-indicatie
Indeling kookzoneschakelaar
Eénkringskookzone
1200W
29
Page 30

Kookzoneschakelaar
Het kookvermogen is in gebied 1 tot 12 traploos instelbaar.
1 laagste vermogen
12 hoogste vermogen
0 Uit-stand
Restwarmte-indicatie
De restwarmte-indicatie gaat branden, zodra de betreffende kookzone heet is.
1 Waarschuwing! Verbrandingsgevaar door
restwarmte. Na het uitschakelen duurt het nog
enige tijd voordat de kookzones zijn afgekoeld. Houd rekening met de restwarmte.
2 Restwarmte kan worden gebruikt voor het
smelten en warm houden van gerechten.
Bediening van het apparaat
Bij het inschakelen van een kookzone kan
3
deze kort zoemen. Dat is een eigenschap van
alle glaskeramische kookzones en heeft geen
negatieve invloed op het functioneren of de levensduur van het apparaat.
Kookstand instellen
Kookstand Kookzoneschakelaar
verhogen
verlagen
rechtsom draaien
linksom draaien
Instelling van de schake-
laar
1 - 12
12 - 1
uitschakelen in de Uit-stand draaien 0
1. Voor het tot koken brengen / aanbraden een hoge
kookstand kiezen.
2. Zodra stoom ontwikkelt of het vet heet is, een la-
gere kookstand instellen.
3. Om te stoppen met koken terugdraaien naar de
uit-stand.
30
Page 31

Tips voor koken en braden
3
Aanwijzing met betrekking tot
acrylamide
Volgens de laatste wetenschappelijke inzichten kan een intensieve bruining van levensmiddelen, met name bij zetmeelhoudende
producten, een gevaar voor de gezondheid
door acrylamide veroorzaken. Om die reden
adviseren wij levensmiddelen zoveel mogelijk
bij lage temperaturen te bereiden en de gerechten niet te veel te bruinen.
Pannen
• Goede pannen herkent u aan de panbodem. Die
moet zo dik en vlak mogelijk zijn.
• Pannen van email of met een aluminium of koperen
bodem kunnen verkleuringen op het glaskeramische vlak achterlaten. Deze verkleuringen kunnen
slechts met moeite of helemaal niet meer worden
verwijderd.
Energiebesparing
2 Plaats de pan al voor het inschakelen op de
kookzone.
2 Sluit pannen, indien mogelijk, altijd af met een
deksel.
2 Schakel de kookzones al voor het einde van
de kooktijd uit, om gebruik te maken van de
restwarmte.
2 De grootte van de panbodem moet overeen-
komen met de grootte van de kookzone.
31
Page 32

Toepassingsvoorbeelden voor het koken
De gegevens in de volgende tabel dienen slechts als richtlijn.
Kook-
stand
0 nawarmte, uit-stand
1
1-3
3-5 Wellen
4-6
5-7 Koken
8-9
Kookproces Geschikt voor Duur Aanwijzingen/tips
Warm hou-
den
Smelten
Stollen Schuimomelet, bouillon met ei 10-40 min. Met deksel bereiden
Stomen
Stoven
Zacht
braden
Warm houden van gare gerechten Naar behoefte Afdekken
Hollandaisesaus,
smelten van boter, chocolade, ge-
latine
Wellen van rijst en melkgerechten
Verhitten van kant-en-klaarge-
rechten
Stoven van groente, vis
Vlees sudderen
Koken van aardappels 20-60 min.
Koken van grotere hoeveelhe-
den, eenpansgerechten en soep
Schnitzel, cordon bleu, karbona-
de, gehaktballen, braadworst, le-
ver, roux, eieren, omelets,
oliebollen
5-25 min. Tussendoor omroeren
Minimaal dubbele hoeveel-
25-50 min.
20-45 min.
60-150 min.
Voortdurend
bakken
heid vloeistof aan de rijst toe-
voegen, melkgerechten
tussendoor roeren
Bij groente weinig vocht toe-
voegen (een paar eetlepels)
Weinig vloeistof gebruiken,
bijvoorbeeld: max.
per 750 g aardappels
Tot 3 l v loe i s tof p l us i n gre-
diënten
Tussendoor keren
¼ l water
10-11
11-12
Sterk
braden
Aan de kook
brengen
Aanbra den
Frituren
Aardappel koekjes, lende-
stukken, steaks, pannenkoeken
Aan de kook brengen van grotere hoeveelheden water, pasta koken, aanbraden van
vlees (goulash, stoofvlees), frituren van patates frites
5-15 min.
per pan
Tussendoor keren
32
Page 33

Reiniging en onderhoud
1
Voorzichtig! Verbrandingsgevaar door restwarmte.
Laat het apparaat afkoelen.
1 Let op! Bijtende en schurende schoonmaak-
middelen beschadigen het apparaat. Schoonmaken met water en handafwasmiddel.
1 Let op! Resten van schoonmaakmiddelen be-
schadigen het apparaat. Verwijder resten met
water en handafwasmiddel.
Reinig het apparaat na ieder gebruik
1. Maak het apparaat schoon met een vochtige doek
en een klein beetje handafwasmiddel.
2. Wrijf het apparaat droog met een schone doek.
Verwijder verontreinigingen
1. Plaats een glasschraper schuin op het glaskeramische vlak.
2. Verwijder verontreinigingen door de schraper over
het oppervlak te laten glijden.
3. Maak het apparaat schoon met een vochtige doek
en een klein beetje handafwasmiddel.
4. Wrijf het apparaat droog met een schone doek.
Soort vervuiling direct bij afgekoeld apparaat met
Suiker, suikerhoudende gerechten ja ---
Kunststoffen, aluminiumfolies ja ---
Kalk- en watersporen --- ja
Vetspatten --- ja
metaalachtig glanzende verkleuringen --- ja
*Glasschrapers en speciale schoonmaakmiddelen voor glas-
keramiek of roestvrij staal zijn verkrijgbaar in de vakhandel.
3 Hardnekkige verontreinigingen verwijderen
met een speciaal schoonmaakmiddel voor
glaskeramiek of roestvrij staal.
verwijderen
Glasschraper*
Speciaal schoonmaak-
middel voor glaskeramiek
of roestvrij staal*
3 Krassen of donkere vlekken in het glaskera-
miek kunnen niet meer worden verwijderd, zij
hebben echter geen invloed op het functioneren van het apparaat.
33
Page 34

Wat is er aan de hand als …
Storing Mogelijke oorzaak Oplossing
De kookzones functioneren niet De gewenste kookstand is niet in-
gesteld
De zekering in de huisinstallatie
(stoppenkast) is doorgebrand.
De restwarmte-indicatie geeft niets
aan
Wanneer u de storing niet kunt verhelpen met de
hierboven gegeven aanwijzingen, neem dan contact op met uw vakhandel of met onze service-afdeling.
De kookzone is slechts kort gebruikt en is daarom nog niet heet
1 Waarschuwing! Reparaties aan het apparaat
mogen alleen door vakmensen worden uitgevoerd. Onvakkundige reparaties kunnen tot
aanzienlijke risico's voor de gebruiker leiden.
3 Bij een onjuiste bediening wordt het bezoek
van de servicetechnicus ook tijdens de garantieperiode in rekening gebracht.
Kookstand instellen
Zekering controleren.
Als de zekeringen meerdere malen
doorbranden, neem dan contact op
met een erkend elektricien.
Neem contact op met de klantenservice wanneer de kookzone toch
heet is.
Afvalverwerking
Verpakkingsmateriaal
2
De verpakkingsmaterialen zijn niet schadelijk
voor het milieu en herbruikbaar. De kunststoffen hebben de volgende aanduidingen, bijv.
>PE<, >PS<, enz. Verwijder de verpakkingsmaterialen in overeenstemming met de aanduiding bij de gemeentelijke inzamelplaatsen
in de daarvoor bestemde containers.
2 Oud apparaat verwijderen
Verwijder afgedankte apparatuur conform de
in uw woonplaats geldende richtlijnen.
34
Page 35

Montageaanwijzing
Veiligheidsvoorschriften
De in het land van gebruik geldende wetten, verordeningen, richtlijnen en normen moeten in acht worden
genomen (veiligheidsvoorschriften, vakkundige recycling volgens de voorschriften, enzovoort).
De montage mag alleen worden uitgevoerd door een
vakman.
De minimale afstanden tot andere apparaten moeten
worden aangehouden.
Laden mogen alleen met een beschermende bodem direct onder het apparaat worden gemonteerd.
De snijvlakken van het werkblad moeten met een geschikt dichtingsmateriaal worden beschermd tegen
vocht.
De dichting zorgt voor een naadloze aansluiting tussen apparaat en werkblad.
Tussen het apparaat en het werkblad mag geen siliconendichtmiddel worden aangebracht.
Voorkom het plaatsen van het apparaat direct naast
deuren of onder ramen. Openklappende deuren en
openspringende ramen kunnen anders het kookgerei
van de kookplaat stoten.
Geschikte scheidingsinrichtingen zijn bijv. automatische zekeringen (schroefzekeringen moeten uit de
fitting geschroefd worden), aardlekschakelaar en veiligheidsschakelaars.
1 WAARSCHUWING!
Risico op verwonding door elektrische stroom.
• Op de netaansluitklem staat spanning.
• Netaansluitklem spanningvrij maken.
• Houd u aan het aansluitschema.
• Houd u aan de veiligheidsvoorschriften met be-
trekking tot elektrotechniek.
• Garandeer de contactbescherming door vakkundige inbouw.
• Laat de elektrische aansluiting uitvoeren door een
erkend installateur.
1 LET OP!
Beschadigingen door elektrische stroom.
Loszittende en onvakkundig aangebrachte stekkerverbindingen kunnen oververhitting van de aansluiting veroorzaken.
• Klemaansluitingen vakkundig uitvoeren.
• Zorg ervoor dat het snoer niet wordt belast door
trekken.
• Bij een aansluiting met 1- of met 2-fasen dient
steeds de juiste en passende netaansluitng van het
type H05BB-F Tmax 90° (of hoger) te worden ingezet.
• Als de aansluitkabel van dit apparaat beschadigd
is, moet deze door een speciale aansluitkabel (type
H05BB-F Tmax 90°; of hoger) worden vervangen.
Deze is verkrijgbaar bij de service-dienst.
In de elektrische installatie moet een inrichting worden aangebracht, die het mogelijk maakt het apparaat met een contactopeningswijdte van min. 3 mm
met alle polen van het net te scheiden.
35
Page 36

Service
Controleer bij technische storingen eerst of u met
behulp van de gebruiksaanwijzing (hoofdstuk „Wat te
moet doen als…“) het probleem zelf kunt oplossen.
Wanneer u het probleem niet kunt oplossen, neemt u
contact op met onze service-afdeling.
Om u snel te kunnen helpen, hebben wij de volgende
gegevens nodig:
– Modelaanduiding
– Productnummer (PNC)
– Serienummer (S-No.)
(u vindt deze nummers op het typeplaatje)
– Soort storing
– Eventuele foutmelding die het apparaat aangeeft
– cijfer- of lettercombinatie bestaande uit drie posi-
ties, van de glaskeramische industrie
Om ervoor te zorgen dat u de benodigde nummers
van uw apparaat bij de hand heeft, raden wij u aan
deze hier te noteren:
Modelaanduiding: .....................................
PNC: .....................................
S-No: .....................................
36
Page 37

Assembly / Montage
37
Page 38

38
Page 39

Rating Plate / Plaque signalétique / Typeplaatje
39
Page 40

Subject to change without notice
Sous réserve de modifications
822 924 914-A-090904-01 Wijzigingen voorbehouden
The Electrolux Group. The world´s No.1 choice.
The Electrolux Group is the world´s largest producer of powered appliances for kitchen, cleaning and outdoor use. More than 55 million Electrolux Group products
(such as refrigerators, cookers, washing machines, vacuum cleaners, chain saws and lawn mowers) are sold each year to a value of approx. USD 14 billion in more
than 150 countries around the world.
 Loading...