

Page 1
Page 2

SYSTEM REQUIREMENTS (Mac)
Mac OS® X 10.4.11 or later
2.0GHz Intel Core Duo or faster
Minimum 4GB of systemt RAM
TABLE OF CONTENTS
1
........................
1
........................
2
........................
2
........................
3
........................
5
........................
6
........................
9
........................
10
........................
10
........................
14
........................
16
........................
17
........................
17
.......................
18
.......................
19
.......................
SYSTEM REQUIREMENTS (Windows)
Windows XP (Service Pack 2 or later) or Vista
3.2GHz Pentium 4 or faster
Minimum 4GB of system RAM
What is included in the CGO2-GB
System Requirementments (Windows)
System Requirementments (Mac)
Technical Specications
Introduction
Overview
Safety warnings
Warranty
About the quickstart manual
Mounting on QX1
Powering the CGO2-GB
Basic Operation
CGO2-GB APP Interfaces
Tansferring le
CGO2GB SMARTPHONE FPV APP
Trouble shooting guide
1
Page 3

INTRODUCTION
CGO2-GB can be remotely controlled by Yuneec FREE iOS
and Android smart phone applications without the use of
extra components.
TECHNICAL SPECIFICATIONS
Dimensions LxWxH:
Weight:
Working Voltage:
Wireless Frequency Range:
Lens Sensor:
Field of view:
Pitch Axis Control:
Eective Pixels:
White Balance:
Focusing System:
Storage Temperature:
Working Temperature:
74x100x128mm (with lens)
167g (without transfer board)
12V
5745MHz---5825MHZ
16M
155°
0~80°
16 million pixels
Automatic white balance
Fixed Focus
-20°C- 60°C
0°C-50°C
CGO2-GB is a high-resolution gimbal camera specically
developed by Yuneec for small UAVs. The compact and
light-weight CGO2-GB is suitable for high quality rst
person view (FPV) for an array of ying platforms. CGO2-GB
includes long range and low-latency digital Wi-Fi video link,
providing users with a high denition, portable real-time
video solution.
2
Page 4

OVERVIEW
5.8 Ghz Wi-Fi Antenna
LED indicator:
-Red LED solid: Power On
-Green LED solid: Get Ready
-Green and Blue LEDs ash alternatively:
Video/Photo taking
-Yellow LED ashes: T card error
-Red LED ashes: Wi error
Illustration A:
Camera
3
Illustration B:
Roll axis arm
Weight balancing part
Pitch axis arm
Yaw axis
Page 5
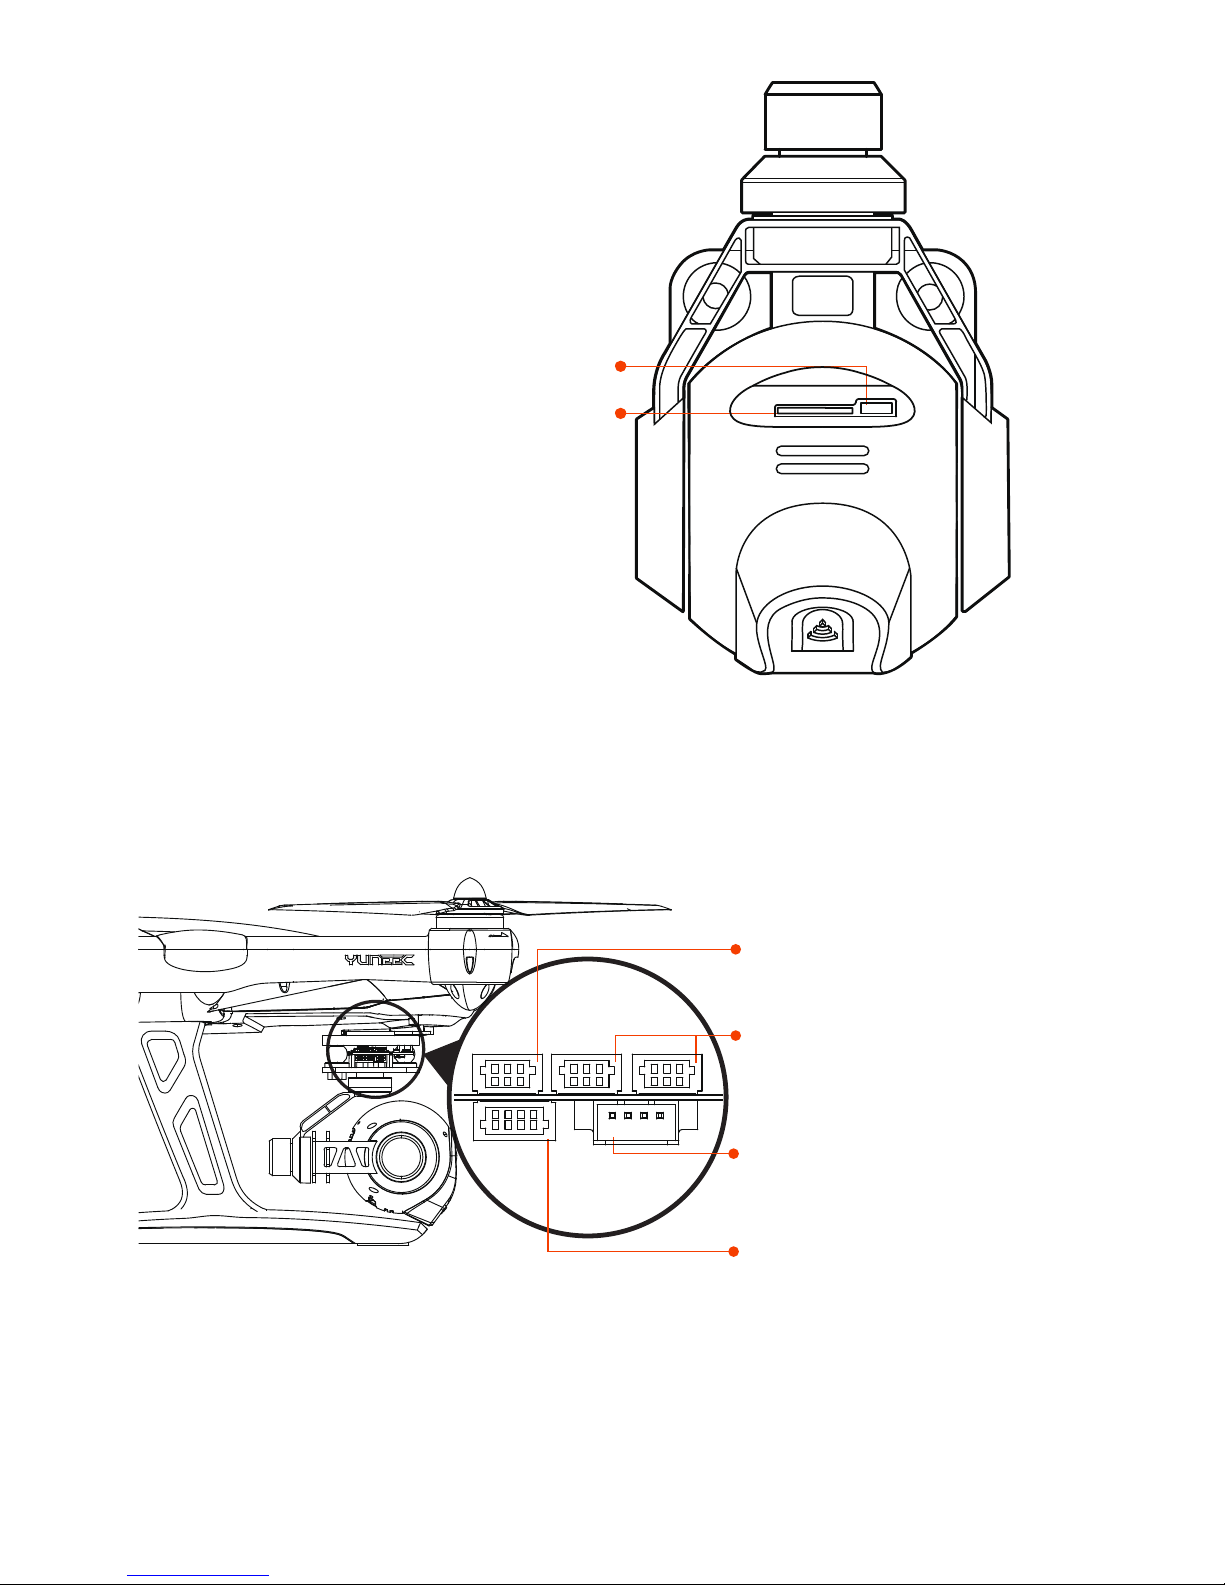
Illustration C:
NOTE:T Card Storage should
be more than 4GB or CGO2GB
will failed in recording.
Illustration D:
CGO2-GB Control cable slot
(3 pin cable from QX1 )
Camera power cable slot
(Cable from CGO2-GB)
UART
PWM slot
5pin MICRO USB
T card slot
4
Page 6
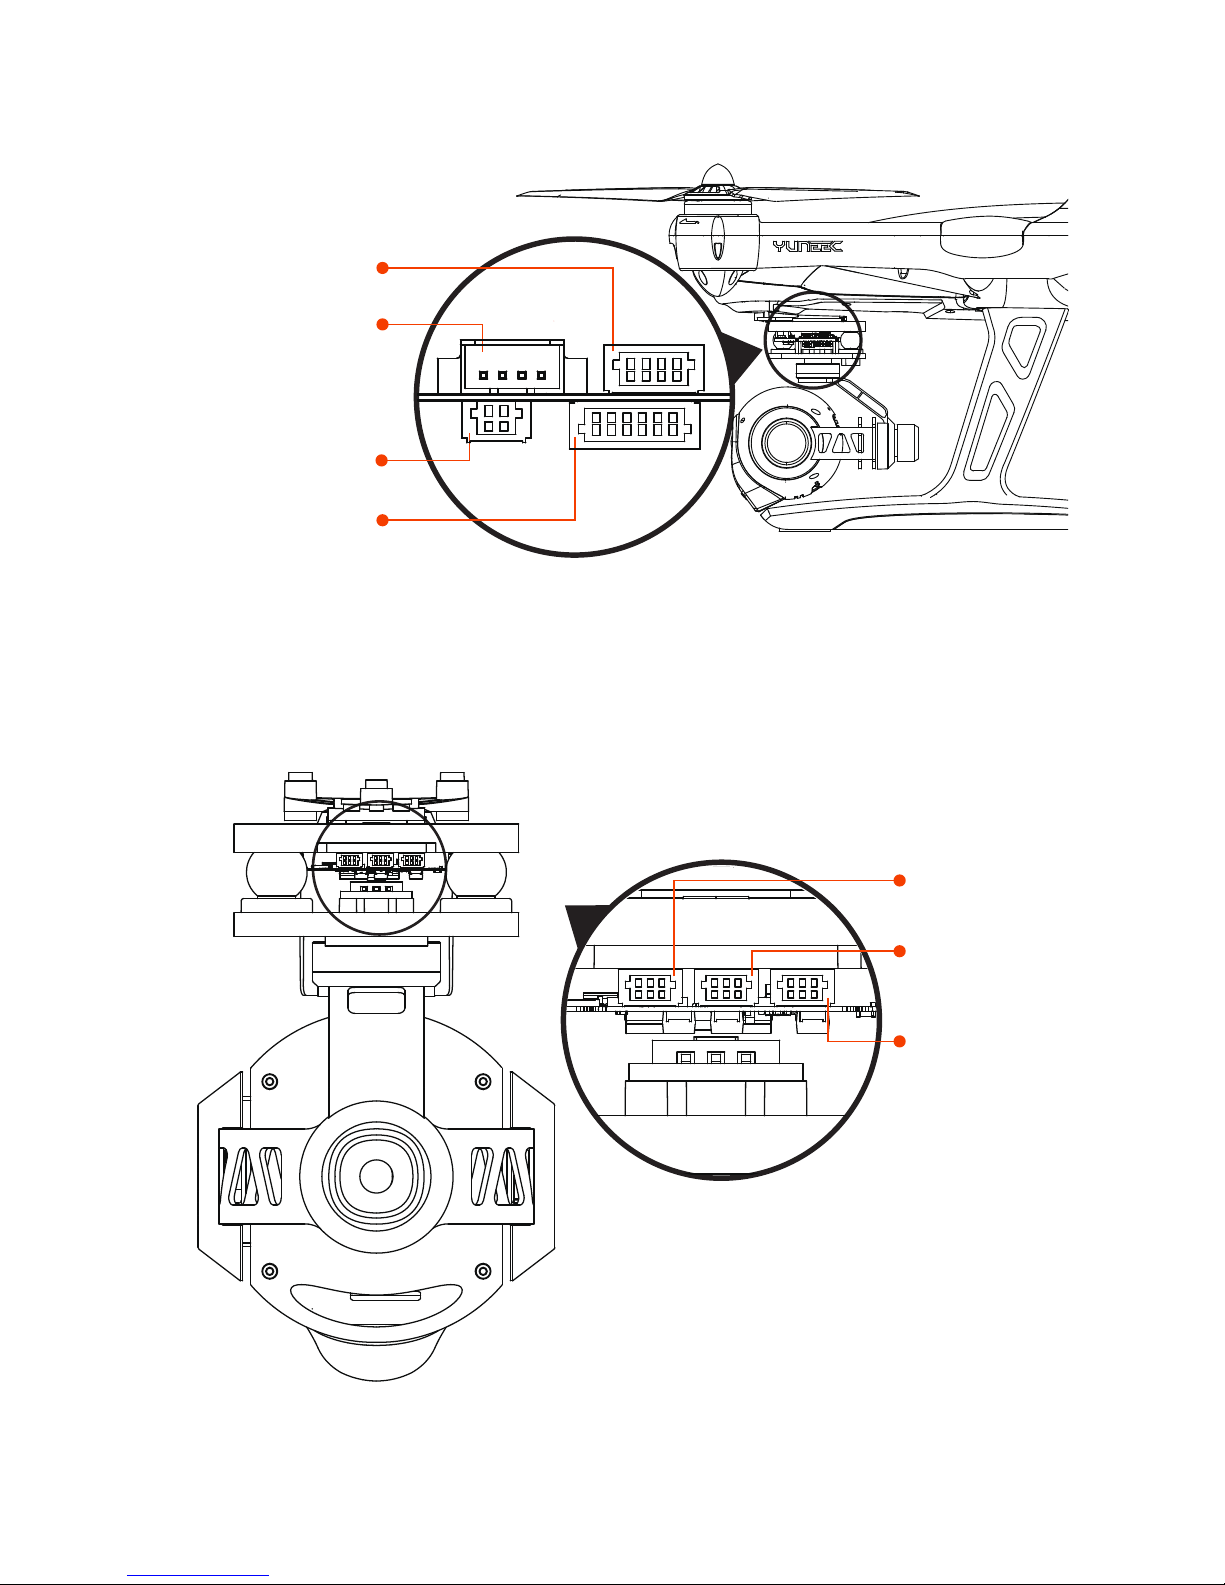
Illustration E:
potentiometer cable slot
gyro cable slot
SR12S cable slot
CGO2-GB power cable slot
(2 pin cable from QX1 )
5
Yaw motor
control cable slot
Roll motor
control cable slot
Pitch motor
control cable slot
Page 7

What is included in the CGO2-GB
Mounting on QX1
Illustration F:The entire CGO2-GB includes a camera, a
gimbal and internal 5.8Ghz wi antenna.
Mounting CGO2-GB to QX1
Step.1 Mounting CGO2-GB transfer board to the QX1
with 3 socket head cap screws (ST2.5*10).
Illustration G:
CGO2-GB
transfer board
Gimbal
Camera
Internal 5.8Ghz
Wi Antenna
6
Page 8

Step.2 Slide the CGO2-GB onto the transfer board as
shown until it locks.
Illustration H:Transfer board mounted to QX1
Illustration I:
7
Page 9

Basic Operation:
Powering the CGO2-GB
After mounting CGO2-GB, plug in the “CGO2-GB power
cable” to the CGO2-GB power cable slot (Illustration E)
and the “CGO2-GB control cable” to the CGO2-GB control
cable slot (Illustration D) .
Note: The CGO2-GB does not contain any battery pack. It
is directly powered from the QX1.
Illustration L: Powering on the QX1
Illustration J:
6 pin
Cable slot
Control cable
(3 pin Cable from QX1 )
CGO2-GB power cable
(2 pin Cable from QX1 )
8
Page 10

To Power ON:
Turn on the power button on QX1 to “ON”, Red LED
indicates CGO2GB has been successfully powed on,
30-40s later, when the Red LED turns into Green LED, it
indicates that wi for CGO2GB is ready.
To Power OFF:
Turn o the power button on QX1 to “OFF”.
Access to WiFi:
When the Green LED is on, customers can use 5.8G device
to search for CGO2GB’s SSID. The initial password is:
1234567890.
Video/Photo:
Press the VIDEO/PHOTO button on mobile App or remote
controller.
Turn on the power button to “ON”
9
Page 11

CGO2-GB APP Interfaces
The CGO2-GB keeps
vibrating after
initializing.
CGO2-GB may not be
mounted securely to
the transfer board.
Make sure the CGO2-GB
is slided onto the transfer
board until it locks .
Otherwise, the center of
gravity will be incorrect.
TROUBLESHOOTING GUIDE
WHAT WHY SOLUTION
Interface A:
VIEW PHOTO/VIDEO
ABOUT
SETTINGS RESETVF POWER
SD CARD STORAGE
TAKE PHOTO, START/STOP RECORDING
START/STOP RECORDING
10
Page 12

TRANSFERRING FILES
Follow the steps to transfer video and photo les to a
computer:
CGO2-GB does not
respond to control
inputs and LEDs
ashes in RED.
CGO2-GB may not have
positive connection
via yaw axle cable.
Check CGO2-GB yaw axle
control cable, if necessary
try reconnecting and
cycling the power on/o.
The gyro board
harness may have
disconnected from
the GB2 GB control
board.
Check the connection
between the gyro
board and the GB2 GB
control board.
CGO2-GB can not
be powered on.
CGO2-GB control
harness may not be
connected into the
correct port.
If using GB2 GB with
QX1, be sure to connect
the power cable from
QX1 to the slot on
CGO2-GB.
The CGO2-GB does
not function or
respond.
CGO2-GB may have
been moved during
initialization.
Cycle the QX1
power on/o by
switching on/o.
CGO2-GB failed in
turning back to the
front
11
Page 13

Using an USB cable:
Using Micro card:
1. Download the Free CGO2-GB App to your smartphone or
tablet at the Apple App Store or Google Play.
CGO2GB SMARTPHONE FPV APP
1. Turn o the power switch on QX1.
2. Connect CGO2-GB to the computer using the included
USB cable.
3. Double click ‘My Computer’, locate and double click
‘Removable Disk’.
4. Double click ‘DCIM’ folder icon to view all Photo and
Video les.
5. Copy your precious les to the computer.
1. Turn o the power switch on QX1.
2. Take the T card out of CGO2-GB and insert it in the T card
slot of your computer.
3. Double click ‘My Computer’, locate and double click
‘Removable Disk’.
4. Double click ‘DCIM’ folder icon to view all Photo and Video
les.
5. Copy your precious les to the computer.
12
Page 14

2. Power on CGO2-GB (turn on the “ON/OFF” button on QX1).
3. Open your device’s Wi-Fi settings and connect to the
CGO2-GB_****** network.
4. Enter the password ‘key’ located on the CGO2-GB.
5. Open the CGO2-GB App on your smartphone or tablet.
Now, you will be able to control the CGO2-GB with your
smartphone or tablet, plus adjust settings.
it to a collection point designated by local authorities. Some
collection points accept products for free. The separate
collection and recycling of your product at the time of
disposal will help conserve natural resources and ensure
that it is recycled in a manner that protects human health
and the environment.
SAFETY WARNINGS
Federal Communications Commission (FCC) Interference
Statement
This device complies with part 15 of the FCC Rules.
Operation is subject to the following two conditions:
This symbol means that according to the local
laws and regulations your product should
be disposed of separately from household waste.
When this product reaches its end of life, take
13
Page 15

(1) This device may not cause harmful interference
(2) this device must accept any interference received,
including interference that may cause undesired
operation.
This equipment has been tested and found to comply with
the limits for a Class B digital device, pursuant to part 15 of
the FCC Rules. These limits are designed to provide
reasonable protection against harmful interference in a
residential installation. This equipment generates, uses
and can radiate radio frequency energy and, if not
installed and used in accordance with the instructions,
may cause harmful interference to radio communications.
However, there is no guarantee that interference will not
occur in a particular installation. If this equipment does
cause harmful interference to radio or television
reception, which can be determined by turning the
equipment o and on, the user is encouraged to try to
correct the interference by one or more of the following
measures:
—Reorient or relocate the receiving antenna.
—Increase the separation between the equipment and
receiver.
—Connect the equipment into an outlet on a circuit
dierent from that to which the receiver is connected.
—Consult the dealer or an experienced radio/TV
technician for help.
14
Page 16

Keep CGO2-GB out of the reach of any liquid.
Age Recommendation: Not for children under 14 years.
This not a toy.
Note: Any changes or modications not expressly
approved by the party responsible for compliance could
void the user's authority to operate the equipment.
RF exposure warning· The equipment complies with FCC
RF exposure limits set forth for an uncontrolled environment.The equipment must not be co-located or operating
in conjunction with any other antenna or transmitter.
15
IC Radiation Exposure Statement for Canada
This device complies with Industry Canada licence-exempt RSS standard(s). Operation is subject to the
following two conditions:
(1) this device may not cause interference
2) this device must accept any interference, including
interference that may cause undesired operation of the
device.
Le présent appareil est conforme aux CNR d'Industrie
Canada applicables aux appareils radio exempts de
licence. L'exploitation est autorisée aux deux conditions
suivantes :
(1) l'appareil ne doit pas produire de brouillage
(2) l'utilisateur de l'appareil doit accepter tout brouillage
radioélectrique subi, même si le brouillage est susceptible
d'en compromettre le fonctionnement.
Page 17

WARRANTY
Limited Warranty:
Yuneec warrants that for a period of one (1) year from original
date of purchase, the product will be free from defects in
materials and workmanship under normal use. In the event
of a defect, please contact Yuneec Customer Support
(www.Yuneec.com) for assistance. Yuneec’s sole obligation
under this warranty will be, at its option, to repair or replace
the product. This warranty does not apply to products
damaged by misuse, accident, water damage, or normal
wear and tear. Yuneec disclaims all other expressed or
implied warranties or conditions. To the extent not prohibited by law, in no event will Yuneec be liable for any loss of
data, revenue or prot, or for any special, indirect, consequential, incidental or punitive damages, however caused, arising
16
16
RF exposure warning
This equipment must be installed and operated in
accordance with provided instructions and the antenna(s)
used for this transmitter must be installed to provide a
separation distance of at least 20 cm from all persons and
must not be co-located or operating in conjunction with
any other antenna or transmitter. End-users and installers
must be provide with antenna installation instructions and
transmitter operating conditions for satisfying RF
exposure compliance.
Page 18

ABOUT THE QUICK START MANUAL
Yuneec reserves the right to update manuals, quick start
guides and warranty information at any time. For the latest
manual and quick start information, as well as warranty information, please visit
yuneec.com
out of or related to the use of or inability to use the product,
even if Yuneec has been advised of the possibility of such
damages. In no event will Yuneec’s liability exceed the
amount paid by you for the product. Some jurisdictions do
not allow limitations on how long an implied warranty lasts,
or the exclusion or limitation of incidental or consequential
damages, so the above limitations or exclusions may not
apply to you. This warranty gives you specic legal rights, and
you may also have other rights, which vary by jurisdiction.
17
Page 19

Copyright 2014 Yuneec
 Loading...