

Page 1
Required Equipment
• Ion meter or pH/mV meter.
• W ash bottle w ith distill ed or d ei onized wat er.
• Several clean beakers.
• 1 mL, 10 mL and 10 0 m L pip ettes.
Required Solutions
• Reference Fill Solution YSI #400423
• 1000 ppm Nitrate Stan dard YSI #400426
• 100 ppm Nitrate Standard YSI #400425
• Ionic Strength Adjustor (ISA) YSI #400424
Overview
The YSI 400421 Nitrate Ion Selective Electrode is a
combination electrode (includes both reference and sensing
half c ells i n one b od y housing ) for meas ur ing nitr at e i on (NO
activity in aqueous s am pl es .
• Technology: Replaceable Polymer/P VC M em brane
(Replacement Nitrate Sensor Module YSI #400422)
• Size and material:
Body (Epoxy)—12 mm OD x 155mm L
Cap (ABS) —16 m m OD x 5 7 m m L
Cable (Coax type) – 100cm
BNC Connector
• Reference: Double-junction, Ag/AgCl, ceramic pin junction,
refillable, amm onium sulf ate electr ol yt e
• Features: Replaceable Sensor Modules
• Range: 0.4-62, 00 0 mg/L
• Reproducibility: ±2%
• Slope: -54 to -59 mv/decade @ 25°C typical
• pH range: 2.5-11
• Operating Temperature: 0 to 50°C
• Interferences: few, ClO
• Applications/Notes: V ery popul ar f or environm ental,
industrial, agriculture, food/beverage
-
, ClO
4
-
, I-, F-
3
-
)
3
Electrode Preparat io n
1. This electrode performs better when the reference
junction is kept wetted during transit and storage.
However the sensor module is best stored and
transp orted dry. T heref ore, the electr ode is shipped with
a Module Blank that must be removed prior to use.
Unscrew the cap of the storage solution bottle (Soaker
Bottle) and remove the electrode. Unscrew the Module
Blank and replac e it with a sensor modu le prior to use.
The M odul e Bl ank c an be r etain ed f or l ong t er m st or age.
Caution: Do not touch the PVC sensor membrane
with your fingers.
2. Filling the electrode with electrolyte - the reference
(outer) chamber must be filled with Reference Fill
Solution and remain open during testing:
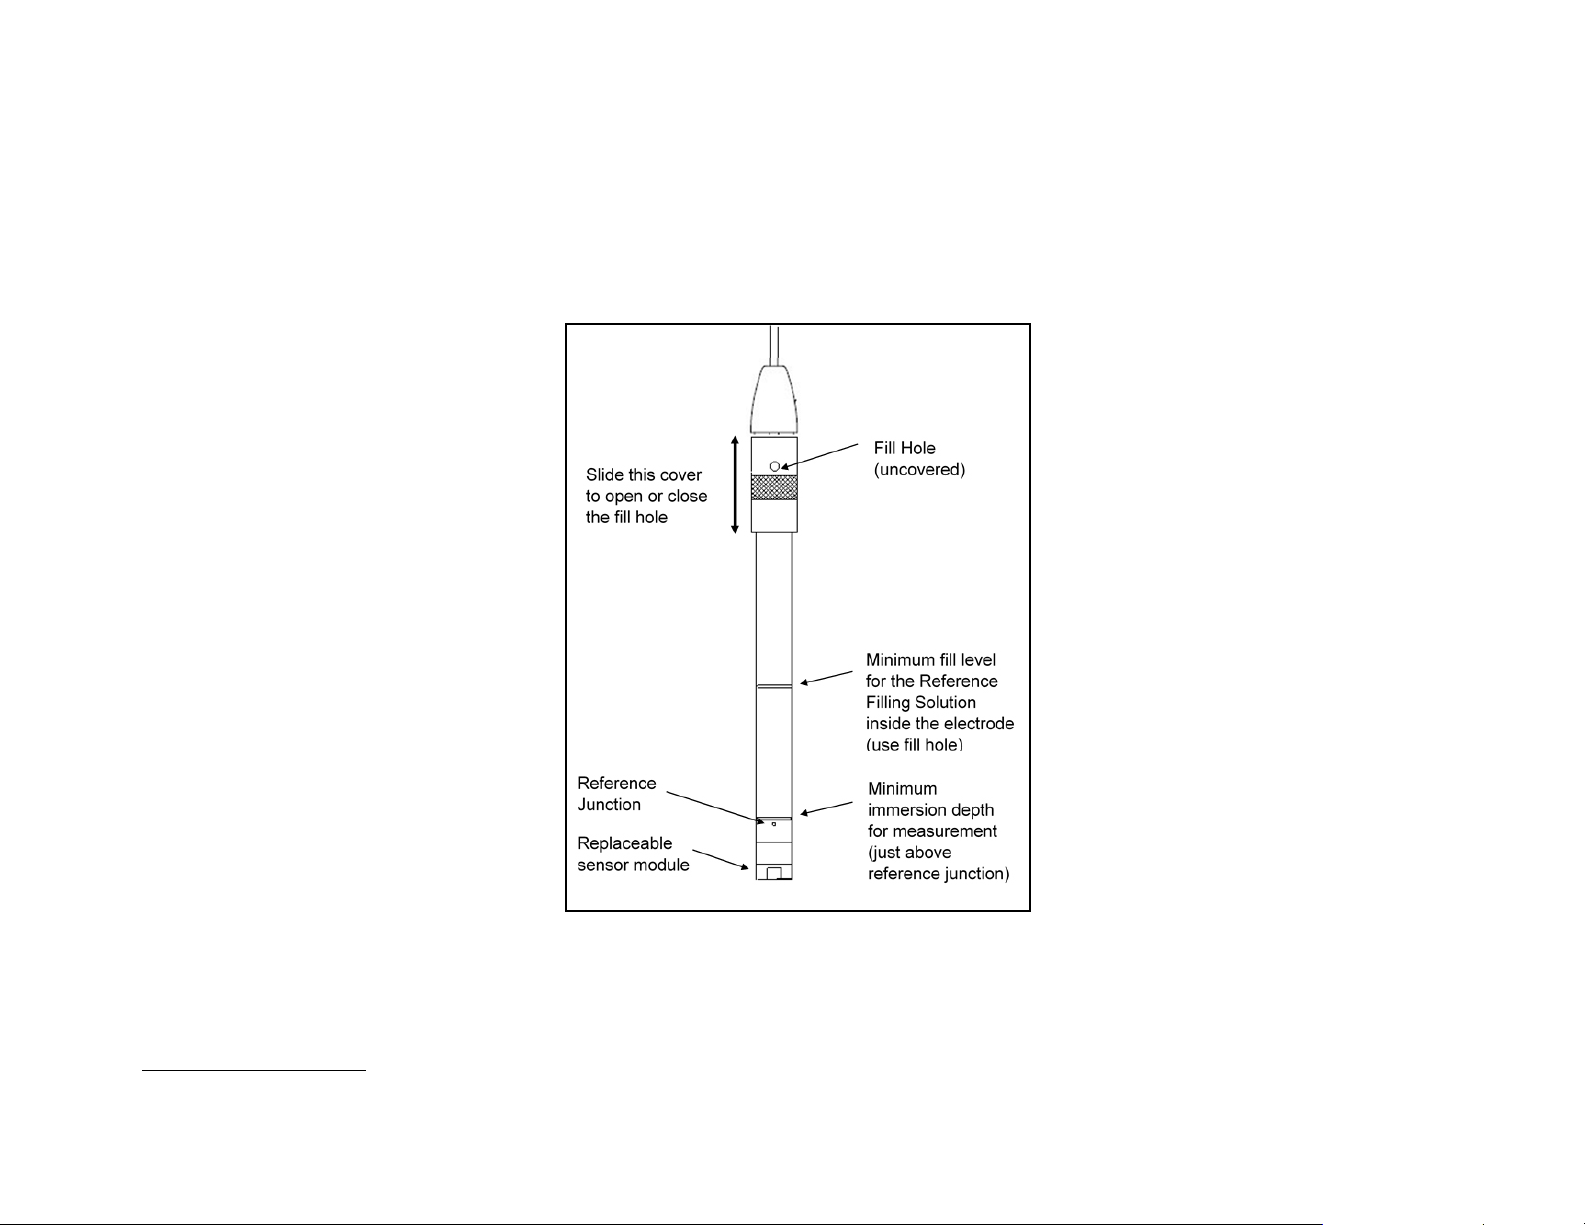
a) Slide the sleeve of the electrode FastFil cap down to
uncover the fill hole. (see fig. 1)
b) Shake the electrode downward like a thermometer to
remove any air bubbles trapped inside.
c) The surface of the Reference Fill Solution in the
refer ence chamber mus t b e ab ov e the inner junc t i on.
This is approximately 3" from the electrode tip.
3. Rinse the electrode with Dl water, blot dry. Do not rub
dry.
4. Soak the elec trode in Dl water f or 10 minutes, then i n a
diluted Nitrate Standard Solution for two hours prior to
calibration or use.
Electrode Diag ram (fig. 1)
Checking Electrode Operation (Slope)
1. Connect the el ectrode to the meter . Pl ace 1 00 mL D l wate r
into a 150 mL beak er. Add 2 mL Nitrate ISA to the Dl water
and stir thoroughly.
2. Set the function switch to the mV mode.
3. Rinse the el ectr od e with Dl w ater , blot dr y and plac e in th e
solution prepared in step 2.
4. Pipet 1 m L of 1000 ppm Ni trat e Stand ard into t he be aker.
Stir th oroughly, then r ec ord the potent ial (
stable reading is displayed.
5. Pipette 10 mL of the s ame st and ard i nto th e sam e beak er .
Stir th oroughly. When a s table r ead i ng is display ed , record
the potential (E
6. The dif ferenc e between the first and th e second potential
readings (E
normal range for the slope is -56±4 mV at 25 °C .
) in mV.
2
) is defined as the electrode slope. The
2-E1
E
) in mV wh en a
1
Troubleshooting
If the electrode slope is not within the normal range, the
follow in g procedure m ay restor e the el ectrod e.
1. Soak the electrode in a diluted standard solution for 2
hours before use.
2. Repeat "C hecking Elec trode Operati on" procedure ag ain.
Note: A ll st and ard s olutions s houl d be pr epar ed f resh . For
best performance use ISA in all solutions.
Periodically check the Reference Fill Solution level in the
refer ence chamber of the electrode. Th e s olut ion level m us t be
higher than the inner junction which is visible as a white
ceramic pin on the inner body.
If the electrode slope is still outside the normal range after this
procedure, you must replace the sensing module.
Reading a Sample with the Elect rod e
Various procedures may be used to determine the
concentration of a sample. The most common is the Direct
Calibration method, which is described below . Contact YSI’s
technical service department for details of other methods.
In Dir ect Cal ibrati on a s eries of stand ard s oluti ons of d iff ering
concent rations are us ed to c alibr ate the electr ode. Th en each
sample requires only a single meter reading, which is
compar ed with the c alibration r eadings to obt ain the samp le
concentration. ISA is added to all solutions to ensure the
samples and the standards have the same ionic strength.
Set up:
1. Prepare the electrode as described in "Electrode
Prepar ati on" and " C h ec k in g E l ec trode Operation". Connect
the electrode to the meter.
2. Prepar e two st andard s olut ions th at diff er in c oncentr atio n
by a factor of ten and bracket the expected sample
concentration range. For example, if your expected sample
concent ration is 5 mg/L N itrate, you sh ould use a 1 mg/L
low Standard Solution and a 10 mg/L high Standard
Solution.
Page 2
NOTE: Temperature compensation is not typical of ISE
measurements - for best per f or m ance, try to ens ure that
the standards are within 5 to 10°C of the sample.
Measurement:
If using a meter with direct concentration reading capability
(see the meter instruction manual for specific information):
1. Place 1 00 mL of the low stan dard into a 150 mL be aker.
Add 2 mL of ISA. Stir thoroughly.
2. Rinse electrode with Dl water, blot dry and place in the
beaker. Wait for a stable reading, and then adjust the
meter to display the value of the standard. Refer to th e
meter's instruction manual for the meter adjustment
procedure.
3. Measure 100 mL of the high standard into a second 150
mL beaker. Add 2 mL of ISA and stir.
4. Rinse electrode with Dl water, blot dry and place in the
second b eaker . Wait for a s tabl e readin g, an d then adjus t
the meter to display the value of the second standard.
5. Pipette 100 m L of samp l e into a 150 mL beak er. A dd 2 mL
of ISA. Stir thoroughly.
6. Rinse electrode with Dl water, blot dry and place in the
sampl e beaker. W ait f or a stabl e reading and th e sampl e
concent r at i on w il l be dis p l ay ed on the met er.
7. Determ ine the s ample conc entration us ing the c alibratio n
curve prep ared in Step 6 ab o ve.
Electrode Storage
Short Term (over night or the weekend):
Rinse the el ectr ode thor oughl y with Dl wat er and pl ace the tip
in a diluted standard solution between measurements. Slide
the FastFil sleeve to close the fill hole.
Refill the reference before putting the electrode back into
service.
Long Term:
Refill the electr ode with R eferenc e Filling S olution an d close
the fill hole. Remove the sensing element and store in the
glass vial or replace the cap to protect the sensing element.
Follow procedures in "Electrode Preparation" and "Checking
Electrode Operation" before using the electrode again.
Electrode Cleaning
Cleaning should only be attempted if troubleshooting methods
fail. The PVC membrane is a delicate sensor and should not
be brushed or otherwise contacted. It can be rinsed vigorously
under warm water to remove debris. Soaking for 10-15
minutes in DI water might be useful in extracting other
contaminants.
Recondition the electrode by soaking in a low standard
soluti on im m ed iately aft er an y cl ean ing meth od.
Warranty Statement
The YSI TruLine Nitrate ISE is w arrant ed for nine (9) months
from date of purchase by the end user against defects in
materials and workmanship. Within the warranty period, YSI
will rep air or replac e, at its sol e discr etion, f ree of char ge, any
product that YSI determines to be covered b y this war r anty.
To exerc ise this war ranty, c all your local YSI representative, or
contact YSI Cust omer Service in Yell ow Springs, Ohio at +1
937 767-7241, 800-897-4151, [email protected] or visit ysi.com
(Support tab). Send the product and proof of purchase,
transportation prepaid, to the Authorized Service Center
select ed by YSI . Repair or replac ement w ill be m ade and th e
product returned, transportation prepaid. Repaired or replaced
products ar e warran ted f or the bal anc e of the ori ginal warr ant y
period, or at least 90 days from date of repair or replacement.
LIMITAT ION OF WARR A NTY
This W arr anty does not app l y to any YSI produc t d am ag e or
failure caused by:
1) failure to install, operate or use the product in
accord ance with YSI's wr it t en ins tructi ons ;
2) abuse or misus e of the product ;
3) failure to main t ain the product in ac cordanc e wi th YSI 's
written ins tructions or stan d ard in dustry pr oc edu re;
4) any improper repairs to the product;
5) use by you of defect i ve or im pr oper components or p arts
in servicing or repairing the product;
6) modificati on of th e product in any w a y not e xpressl y
authorized by YSI.
THIS WARRANTY IS IN LIEU OF ALL OTHER
WARRANTIES, EXPRESSED OR IMPLIED, INCLUDING
ANY WARRANTY OF MERCHANTABILITY OR FITNESS
FOR A PARTICULAR PURPOSE. YSI's LIABILIT Y UNDER
THIS WARRANTY IS LIMITED TO REPAIR OR
REPLACEMENT O F THE PRODUCT, AND THIS SHALL BE
YOUR SOLE AND EXCLUSIVE REMEDY FOR ANY
DEFECTIVE PRODUCT COVERED BY THIS W ARRANTY.
IN NO EVENT SHALL YSI BE LIABLE FOR ANY SPECIAL,
INDIRECT, INCIDENTAL OR CONSEQUENTIAL DAMAGES
RESULTING FROM ANY DEFECTIVE PRODUCT COVERED
BY THIS WARRANTY.
1725 Brannum Lane
Yellow Springs, OH
Tel: +1 937-767-7241
DOCUMENT ID: 400421MAN FEB2016C
YSI
800-765-4974
ysi.com
 Loading...