

Page 1
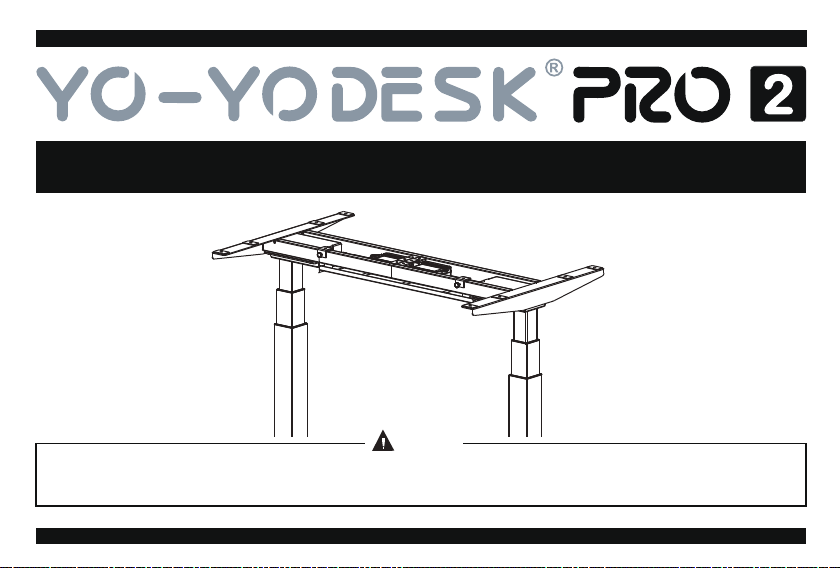
Assembly Manual
CAUTION
Please read all instructions carefully before using this product. Retain this manual for future reference. The specifications of this product
may vary slightly from the illustrations and are subject to change without notice.
Page 2
SAFETY & WARNING INFORMATION:
1
!
WARNING
Read the entire instruction manual before you start installation and assembly.1.
This product is not intended for use by young children without supervision.2.
This product contains small items that could be a choking hazard if swallowed. Keep these items away from children.3.
This product is intended for indoor use only. Using this product outdoors could lead to product failure and personal injury.4.
This product can be used by children from 8 years old (supervised) to Adult. Users with disabilities or lack of experience and operating
5.
knowledge should be supervised and given careful instruction prior to using this product. The desktop should never be sat on and children
should be prohibited from having unsupervised contact with the product.
If the supply cord is damaged, it must be replaced by the manufacturer, its service agent or a similarly qualified person in order to avoid a hazard.6.
Faliure to comply with or observe all assembly, safety & operation instructions & warnings regarding the use of this
product may result in serious bodily injury.
CAUTION
Place the product away from corrosive gas, water and dusty environments. DO NOT disassemble all the components, otherwise, it will
exclude you from the warranty.
®
STANDING DESK MEGASTORE
+44 01793 575 082
Delta 606, Swindon, Wiltshire SN5 7XF
Page 3
ELECTRICAL SAFETY INSTRUCTIONS:
The product is powered by electricity. In order to avoid burns, fire and electric shock, please read the instructions carefully.
Don't clean the product with water while the power is still connected.
Never operate the system if it's in moist environment or its electrical components have contact with liquids.
Don't disassemble or replace components while the power is still connected.
Don't operate the system if the control box makes noise or odor. Alterations of the given power unit and control box aren't allowed.
Never operate the system with a damaged cord or plug. Please contact your local provider to replace the damaged parts.
OTHER SAFETY INSTRUCTIONS:
Clear up all obstacles within the height adjustment range.
Don't leave the cords or plug unorganized in order to prevent tripping hazards.
Any attempts to reconstruct the desk frame aren't allowed.
Don't add anything to the adjustable junctions of the desk frame.
Outdoor use is prohibited.
®
STANDING DESK MEGASTORE
+44 01793 575 082
Delta 606, Swindon, Wiltshire SN5 7XF
2
Page 4
3
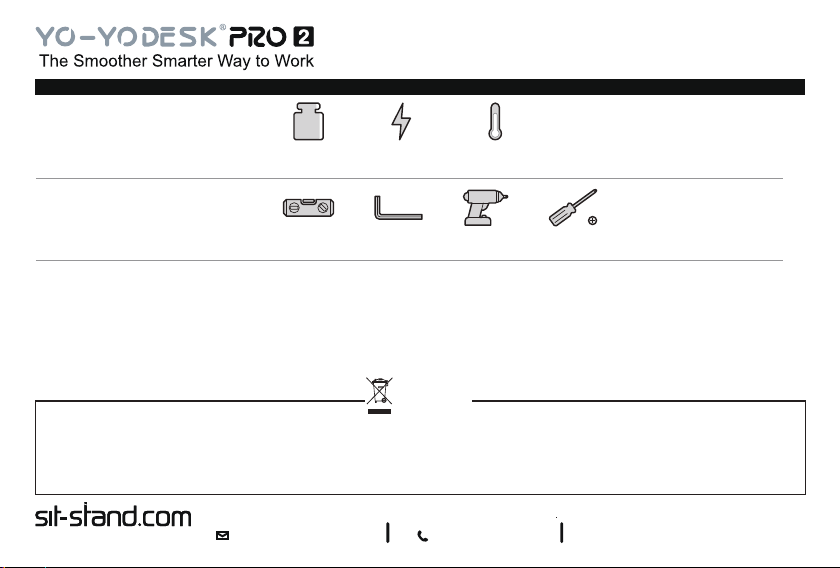
DESK SPECIFICATIONS:
TOOLS YOU WILL NEED:
Weight Capacity
100kg (220lbs)
Bubble Level
Power Input
(100~240V)
(Included)
Operation Temperature
(-5°C~+40°C)
Phillips ScrewdriverDrillAllen Key
IMPORTANT:
Ensure that you have received all parts according to the component checklist prior to installation. If any parts are missing or faulty, check
with your local country provider.
+44 333 22 00 375
DISPOSAL
This marking indicates that this product should not be disposed with other household wastes throughout the EU. To prevent possible
harm to the environment or human health from uncontrolled waste disposal, recycle it responsibly to promote the sustainable reuse of
material resources. To return your used device, please use the return and collection systems or contact the retailer where the product
was purchased. They can take this product for environmental safe recycling.
®
STANDING DESK MEGASTORE
+44 01793 575 082
Delta 606, Swindon, Wiltshire SN5 7XF
Page 5
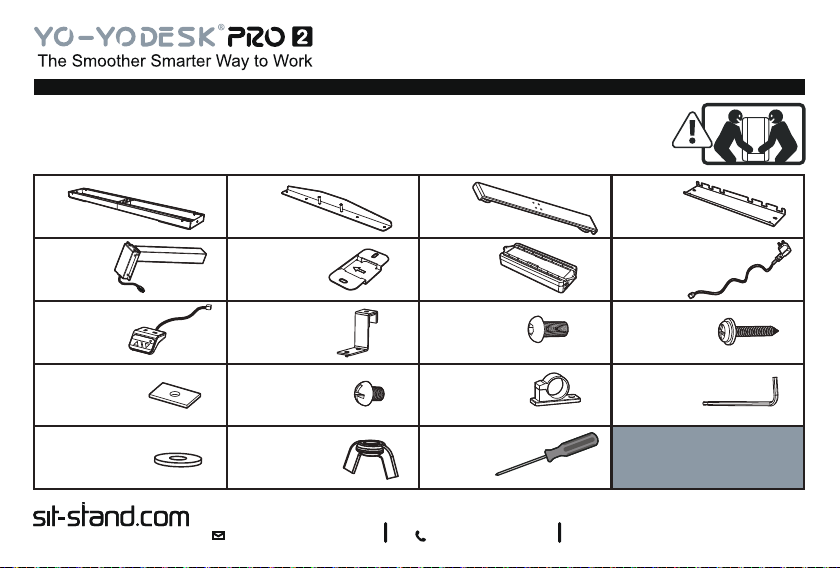
ASSEMBLY KIT:
Estimated time to assemble the desk 1 hour 30mins. Two people are recommended to assemble the desk.
4
A (x1)
Crossbar
E (x2)
Lifting Column
I (x1)
Control Panel
M (x10)
Rubber Pad
Q (x4)
Washer
STANDING DESK MEGASTORE
B (x2)
Side Bracket
F (x1)
Fixing Plate
J (x2)
Hook
N (x6)
Phillips Head Screw
R (x4)
Wing Nut
®
C (x2)
Foot
G (x1)
Control Box
K (x20)
Hex Head Screw
O (x3)
Cable Clip
S (x1)
Screwdriver
+44 01793 575 082
D (x1)
Cable Management Tray
H (x1)
Power Plug
L (x12)
Phillips Head Screw
P (x2)
Allen Key
Delta 606, Swindon, Wiltshire SN5 7XF
Page 6
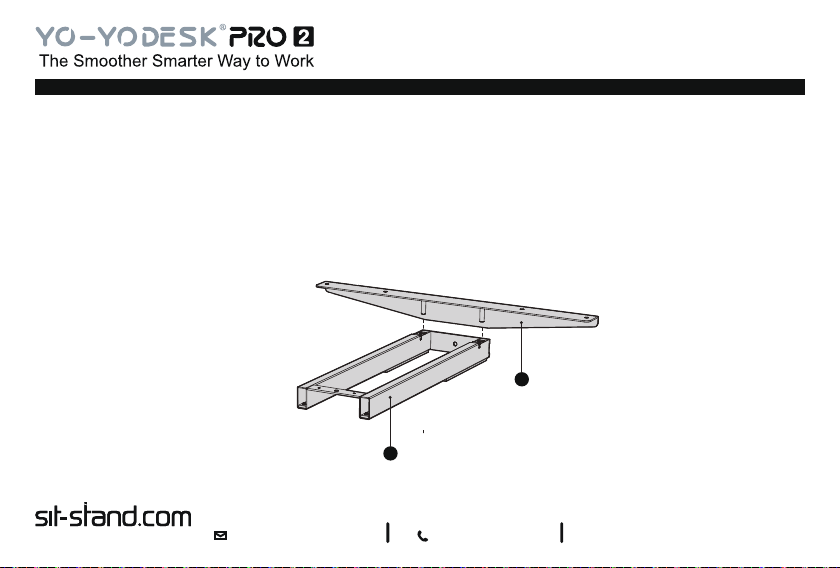
Attaching Side Brackets: STEP 1
• Please prepare a spacious area for installation, and put a shipping blanket on the area to prevent scratches on the floor and the frame.
• Unpack the crossbar, and carefully place it on the floor. Attach the side bracket
• Repeat the same process to assemble the other side bracket.
Note: The drawings of both of the crossbar and side brackets are the frontside of the components. Please make sure the crossbar and
side brackets keep facing up while installation, which is convenient for the further steps.
A
®
STANDING DESK MEGASTORE
to the end of the crossbar.Please don't screw it now.
Shipping
Blanket
B
+44 01793 575 082
Delta 606, Swindon, Wiltshire SN5 7XF
5
Page 7
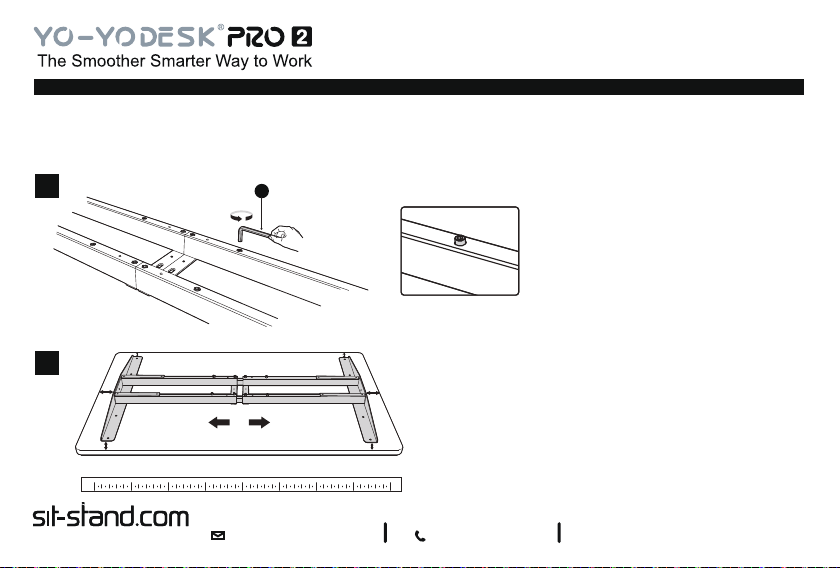
Drilling Mounting Holes: STEP 2
6
i
ii
35
STANDING DESK MEGASTORE
P
0 35
®
Loosen the hex head screws that fix the
adjustable junction, but don't completely
take out the screws.
• Place the assembled frame on the back of the tabletop.
• Ensure that the frame is placed in the center of the table.
• Then adjust the frame to suit the size of the tabletop.
When adjusting the frame position, please make sure it
doesn't exceed the range of silk screen printing.
+44 01793 575 082
Delta 606, Swindon, Wiltshire SN5 7XF
Page 8
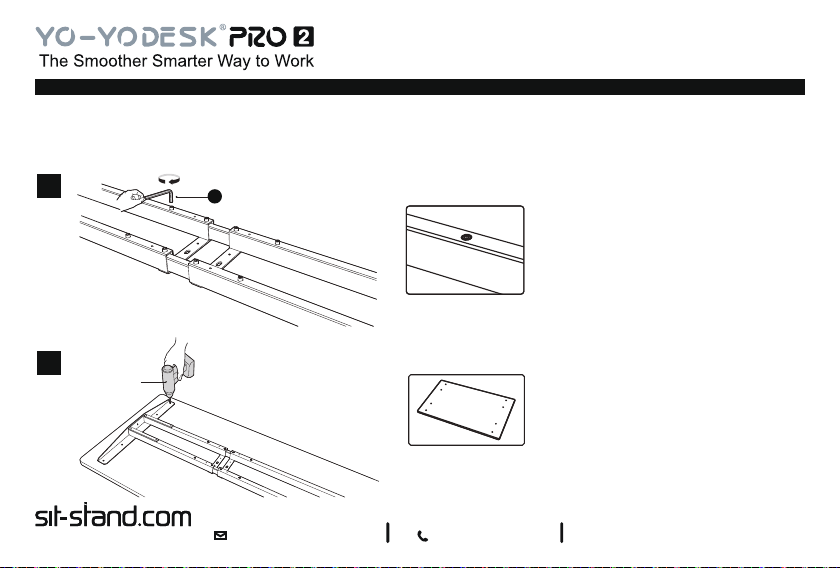
Drilling Mounting Holes: STEP 2
7
iii
iiii
STANDING DESK MEGASTORE
Drill
P
®
+44 01793 575 082
Retighten all the hex head screws
to finish the adjustment.
After tightening the screws, use a drill to
make mounting holes on the backside of the
tabletop through the 8 mounting holes on
the side brackets.
Note: The depth of the mounting holes
shouldn't over 3mm.
Delta 606, Swindon, Wiltshire SN5 7XF
Page 9
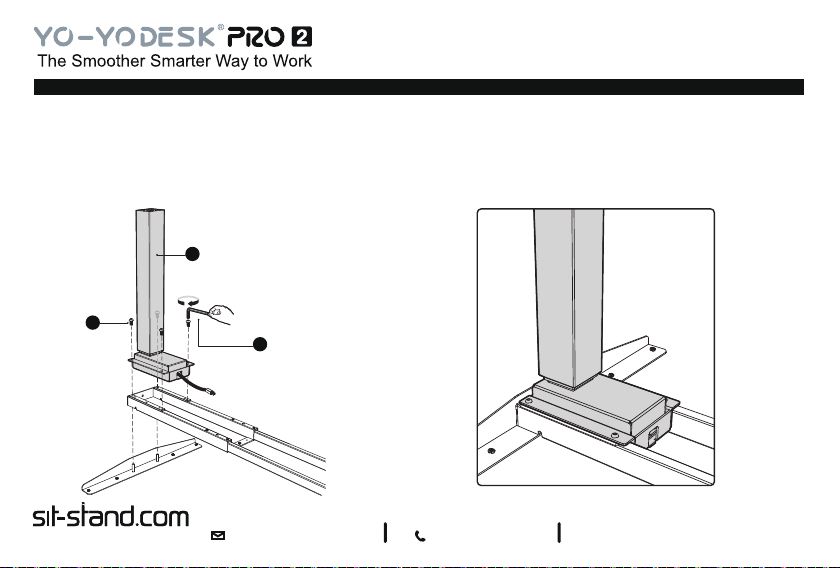
Assembling the Lifting Columns: STEP 3
• Remove the tabletop for further installation.
• Insert the two lifting columns into the two ends of the crossbar with the heads of the lifting columns facing inward. Make sure the
mounting holes on the lifting columns completely align with the screw holes on the crossbar.
• Fix the lifting column and the side bracket with crossbar using
i
• Repeat the same process to assemble the other lifting column.
E
K
P
4 K screws with the P allen key.
ii
®
STANDING DESK MEGASTORE
+44 01793 575 082
Delta 606, Swindon, Wiltshire SN5 7XF
8
Page 10
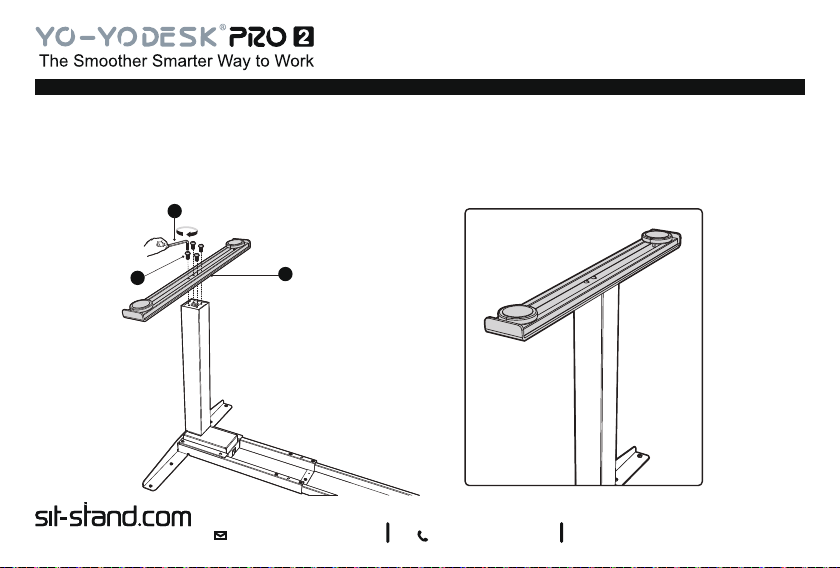
Assembling the Feet: STEP 4
• Place the foot on the bottom of the lifting column. Align the mounting holes on the foot with the screw holes on the lifting column.
• Fix the foot using 4 K screws with the P allen key.
• Repeat the same process to assemble the other foot.
P
9
K
STANDING DESK MEGASTORE
®
C
+44 01793 575 082
Delta 606, Swindon, Wiltshire SN5 7XF
Page 11
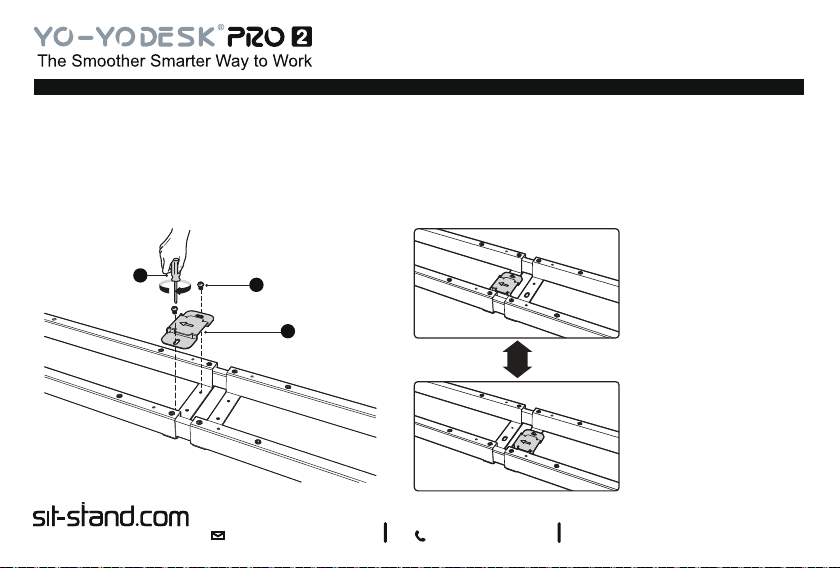
Assembling the Fixing Plate: STEP 5
• Align the mounting holes on the fixing plates with the screw holes as shown.
• Attach the fixing plate on the center of the crossbar with 2 N screws using a S Screwdriver.
Note: The arrow on the fixing plate indicates the direction of sliding in the control box. Follow the direction of the arrow to mount
i
the control box in the next step.
10
S
ii
STANDING DESK MEGASTORE
N
®
F
OR
+44 01793 575 082
The fixing plate can be
attached to either of
the right side and the
left side.
Delta 606, Swindon, Wiltshire SN5 7XF
Page 12
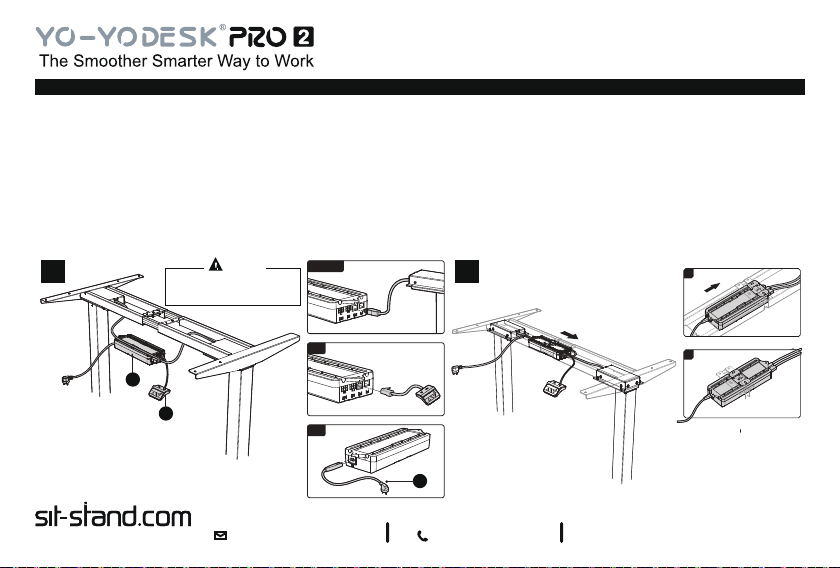
Connecting Cords and Attaching the Control Box: STEP 6
i. Turn over the desk frame with the crossbar facing up. At least two people are required when turning over the desk frame.
• Connect the two motor cords to the two ports on the right marked "M1" and "M2".
• Connect the controller cord to either of the two ports on the right marked "P2".
• Insert the power cord in the port on the left.
iii
ii. Align the fixing plate with the right end of the control box's slot. Slide the control box into the fixing plate from the left until the
control box can't be moved the attachment is complete.
11
i ii
iiii
G
CAUTION
If only one person turns over
the desk frame, serious bodily
injuries might occur.
I
Note: Please make sure the slot on the
control box is facing upward. There is no
corresponding relation between the two
motor ports and the two lifting columns.
®
STANDING DESK MEGASTORE
M1&M2
P2
AC
I
+44 01793 575 082
1
2
Delta 606, Swindon, Wiltshire SN5 7XF
Page 13
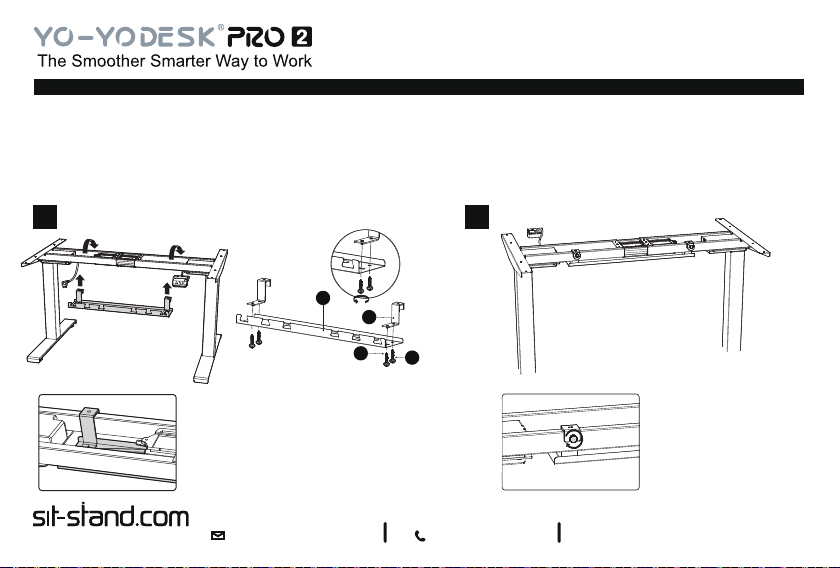
Assembling the Cable Management Tray: STEP 7
i. Fix the hooks to the cable management tray with screws, tighten all the screws.
ii. Tighten the knobs on the tray hangers.
i
i ii
D
J
Q
R
Hang the cable management tray on
the crossbar as shown.
®
STANDING DESK MEGASTORE
+44 01793 575 082
12
Delta 606, Swindon, Wiltshire SN5 7XF
Page 14
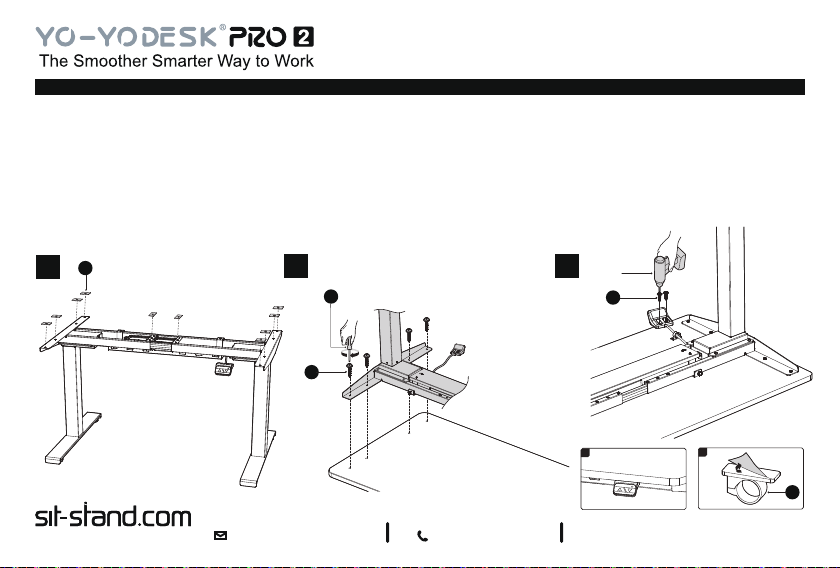
Assembling the Desktop: STEP 8
i. Attach the M rubber pad to the surface of the crossbar on the ten positions as shown.
ii. • Align the previously drilled screw holes with the mounting holes on the crossbar. Insert and tighten the 4 L screws from below.
• Repeat the same process to tighten the other side of the desktop.
iii
iii.
• Attach the controller to the desktop with 2 L screws using a driller.
• Stick the adhesive O cable clip under desk to organize cords.
M
i
ii iii
S
L
Drill
L
13
STANDING DESK MEGASTORE
®
+44 01793 575 082
1
Delta 606, Swindon, Wiltshire SN5 7XF
2
O
Page 15
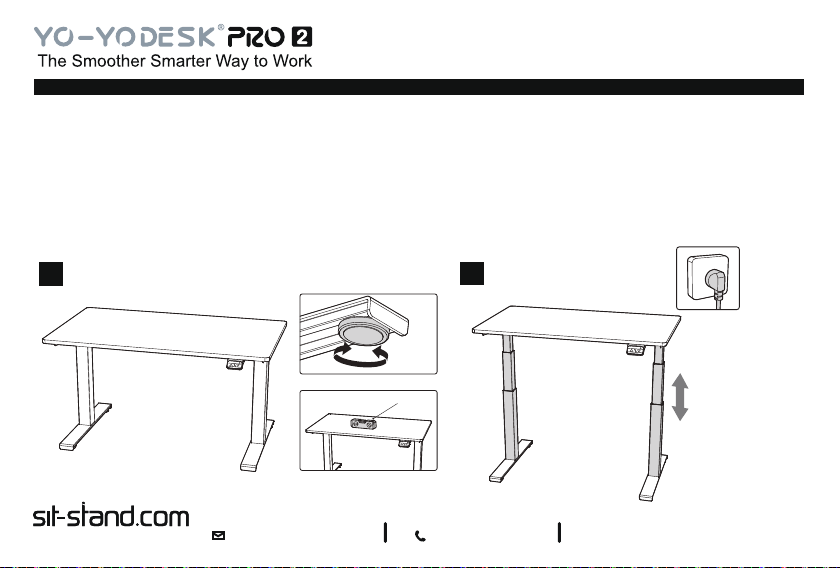
Low Profile Adjustment: STEP 9
i. There are two adjustable foot pads under each foot. If the floor isn't even, simply turn the pad to adjust the height to make
the desk stable.
Tip: Use a bubble level to check if the desktop is even.
i
ii. Connect the desk to power. You can now use the sit-stand desk.
Note: We have another manual of the digital controller for detailed instruction. Please check the Digital Control Panel For Electric
Height Adjustable Desk User Guide.
i
STANDING DESK MEGASTORE
Bubble Level
®
ii
+44 01793 575 082
Delta 606, Swindon, Wiltshire SN5 7XF
14
 Loading...