


Product may vary slightly from the item pictured.
COMPLIES WITH EUROPEAN STANDARD EN957-1+6 CLASS HC
21/06/2006 VERSION II
INSTRUCTION
MANUAL
INSTRUCTION
MANUAL
T
782
YORK T782 TM / 01
YORK T782 TREADMILL
SAFETY GUIDELINES:
Before beginning any exercise program, you should consult with your doctor.
It is recommended that you undergo a complete physical examination.
The instruction must be read in full before assembly and / or use of this product.
WARNING - YOU ARE RESPONSIBLE FOR YOUR OWN SAFETY
- THIS LIST IS NOT EXHAUSTIVE.
Assemble and operate YORK T782 TREADMILL on a solid, level surface.
Always allow a clear space measuring 1m wide and 2m long directly behind
YORK T782TREADMILL.
The safety level of this equipment can only be maintained only if it is
regularly examined for wear and tear.
It is important that you keep these instructions for further reference.
The treadmill will not operate without the safety key.
You will need at least one person to help you with assembly.
Parents and others in charge of children should be aware of their responsibility,
because the natural play instinct and the fondness of experimenting of children can
lead to situations and behavior for which the training equipment is not intended.
If children are allowed to use the equipment, their mental and physical development
and above all their temperament should be taken into account.
They should be controlled and instructed in the correct use of the equipment.
The equipment is under no circumstances suitable as a children’s toy.
Always use the product on a level surface, ensure that the product is stable before use.
The treadmill running mat will not stop immediately if any object becomes caught in the
mat or rollers - IN AN EMERGENCY: Pull the safety key cord to remove the safety key.
This product is provided with a safety key. The treadmill will not operate without the
safety key inserted. The safety key should be attached to the user via the cord and clip.
If for any reason the user falls the cord will pull the safety key from the treadmill and
the treadmill will begin to decelerate.
In an emergency take hold of the handrails and place your feet on the side
platforms provided, once you are stable pull out the safety key, the treadmill will begin
to decelerate until it stops.
A safety key is fitted in case of need for an emergency stop.
Use of the safety key is to clip the key to the body to shut off the treadmill
automatically when falling.
Always check that any pins / fixings are tight and secure before use and /
or after adjustment.
Keep hands away from moving parts.
Replace defective components immediately, and / or keep the equipment
out of use until it is repaired.
Never overload the equipment - the maximum user load is displayed on the product label.
The weight limit for this treadmill is 330lbs ( 150kgs ).
Wear proper workout clothing: Do not wear loose clothing.
Do not wear shoes with leather soles or high heels. Tie all long hair back.
Always wear suitable clothing and footwear e.g. tracksuit / shorts / training shoes.
Remove all personal jeweler before exercising.
Never use the equipment in any other manner other than the ways explained in these
instructions and / or any wall-chart supplied.
Use only the adjustment settings as described in the instructions. Always use the correct
adjustment pin / fixing.
Don’t rock the unit from side to side.

YORK T782 TM / 02
Care should be taken when mounting and dismounting the unit.
Components such as pulleys, bearings, and cables are always more susceptible to wear.
Special attention should be taken to inspect these components before use.
Do not place any liquids on any parts of the treadmill.
Do not use water bottle in areas where high humidity may cause condensation to drip
onto the treadmill.
To prevent shock, keep all electrical components, such as the motor, cord and switch
away from water.
Ensure that adjustment devices are not left projecting as they may interfere with people.
Never leave any adjustment devices projecting from the product.
Do not use any accessories that aren’t specifically recommended by the manufacturer,
these might cause injuries or cause the unit to fail.
Work within your recommended exercise level, do NOT work to exhaustion.
Injuries to health may result from incorrect or excessive training.
If you feel any pain or abnormal symptoms, STOP YOUR WORKOUT IMMEDIATELY.
Consult your physician immediately.
Turn off the treadmill while adjusting or working near the rear roller.
After eating, allow 1-2 hours before exercising as this will help to prevent muscle strain.
TAKE CARE TO PROTECT CARPETS AND FLOOR in case of leakages. This product is a
machine and contains moving parts which have been greased / lubricated and could leak.
TAKE CARE TO PROTECT CARPETS AND FLOOR
SHOULD YOU REQUIRE ANY ASSISTANCE REGARDING THIS PRODUCT PLEASE CONTACT YORK DIRECTLY.
HELP LINE (8:30am- 16:30pm)
U.K.
AUSTRALIA
YORK BARBELL (U.K.) LTD.
YORK WAY, DAVENTRY,
NORTHANTS, NN11 4YB ENGLAND
TEL: (01327) 701-824
FAX: (01327) 706-704
E-MAIL: helpdesk@yorkfitness.co.uk
HELP LINE (8:00am- 16:00pm)
YORK BARBELL (AUST.) LTD.
UNIT 1, LOT 2, SWAFFHAM ROAD,
MINTO, N.S.W. 2566 AUSTRALIA
TEL: (02) 9603-8444
FAX: (02) 9603-8555
E-MAIL: service@yorkfitness.com.au
F I T N E S S
F I T N E S S
U.S.A.
YORK BARBELL USA.
3300 BOARD ROAD.
YORK, PA 17402
TEL: +1-717-767-6481
FAX: +1-717-764-0416
E-MAIL: info@yorkbarbell.com
HELP LINE (8:00am- 17:00pm)
F I T N E S S
WARNING: Stop Treadmill before Folding.
WARNING: Unplug the Power Cable before Maintenance.
WARNING: This appliance must be EARTHED.---IMPORTANT
YORK T782 is designed for the use and enjoyment of the serious trainer as well as
the dedicated user. By following the above precautions and using good judgement and
common sense, you will have a safe and pleasurable exercise regimen with YORK T782.
TOOLS REQUIRED
The tool enclosed in the carton are two allen keys.
CARE AND MAINTENANCE
No wet cleaning of electrical components - Unplug before any care and maintenance.
Use a warm damp cloth with mild detergent to keep your YORK T782 clean.
The safety level of the equipment can be maintained only if it is regularly examined
for damage and wear. This includes any ropes, pulleys, nuts, bolts, moving parts bushes,
chains, wheels, bearings & points etc.
Components such as pulleys, bearings and cables are always more susceptible to wear.
Special attention should be taken to inspect all of these parts before use.
Always replace damaged / worn components with original pars from the manufacturer.
INTRODUCTION
YORK T782 TREADMILL has been designed and constructed to provide trouble free usage
and enjoyable exercise. You can greatly improve your understanding of the benefits of exercising
by carefully reading the instructions given in this manual.
Please familiarize yourself with the maintenance advice provided for you.
SPECIFICATIONS
HANDLE BAR WITH FOAM GRIP
MAIN FRAME
FOUR WHEELS
TRANSPORTATION
SYSTEM ALLOWS
YOU TO MOVE
THE TREADMILL
EASILY WHEN
FOLDED
HANDLE BAR
POST
10 PROGRAMS - SPEED INTERVAL,
AEROBIC, WEIGHT LOSS, HILL CLIMB,
TARGET TIME, TARGET DISTANCE,
TARGET CALORIES, HRC SPEED,
HRC ELEVATION & FITNESS TEST
COMPUTER SHOWS
PULSE, DISTANCE, TIME,
CALORIES, ELEVATION
& SPEED
SAFETY
KEY
MAT ADJUSTING BOLTS-ADJUST MAT TENSION &
TO CENTRALIZE MAT
RUNNING MAT
FOLD TREADMILL UP AND STAND
VERTICALLY AGAINST A WALL FOR STORAGE
POWER SUPPLY: AC 230V, 50Hz
SPEED CONTROL : PUSH BUTTON
ELEVATION: POWER INCLINE 0% ~12%
SPEED RANGE: 0 ~ 16 KPH
CLASS HC: Domestic Use / Minimum Accuracy
SHOULD YOU REQUIRE ANY ASSISTANCE REGARDING THIS PRODUCT PLEASE CONTACT YORK DIRECTLY.
*
*
YORK T782 TM / 03
ELEVATION
ADJUSTMENT SWITCH
SPEED
ADJUSTMENT SWITCH
MAGAZINE
RACK
NON SLIP FOOTPAD
WE RECOMMEND YOU HAVE SOMEONE TO ASSIST YOU IN LIFTING AND
ASSEMBLING YOUR YORK T782 TREADMILL.
FOLLOW THESE INSTRUCTIONS CAREFULLY AND IT WILL MAKE IT EASIER
FOR YOU TO ASSEMBLE YOUR YORK T782 TREADMILL.
GENERAL
ASSEMBLY INSTRUCTIONS
1.
Ask someone to help you remove all the parts and packaging materials on the top of your
YORK T782 treadmill from the carton and place them on the floor carefully.
SHOULD YOU REQUIRE ANY ASSISTANCE REGARDING THIS PRODUCT PLEASE CONTACT YORK DIRECTLY.
*
*
2.
Fold the main frame up gently and stand it in the
carton base as shown.
Remove the handle bar posts and packaging
materials from the carton base and place them
on the floor carefully.
Ask s
base
omeone to help you hold the treadmill on
each side and lift it out from the carton
carefully.
o not lift the treadmill out of the
carton from the motor end as your
fingers may get squashed !!
Product may vary slightly from the item pictured.
3.
SENSOR
WIRE
SOCKET
MIDDLE
WIRE
PLUG
LEFT
HANDLE BAR
POST
Rest the left handle bar post beside the main frame
and close to the handle bar mounting bracket as
shown.
Connect the sensor wire socket to the middle wire plug
protruding from the base of the left handle bar post.
NOTE: TAKE CARE to ensure the wires are
connected as tightly as possible.
NOTE: TAKE CARE
YORK T782 TM / 04
MAIN
FRAME
CARTON
BASE
1.
2.

SHOULD YOU REQUIRE ANY ASSISTANCE REGARDING THIS PRODUCT PLEASE CONTACT YORK DIRECTLY.
*
*
4.
6.
5.
LEFT
HANDLE
BAR POST
Insert the left front handle bar post into the handle
post mounting bracket fully.
bar
NOTE: TAKE CARE to ensure the hook facing outward
on the mounting bracket is fitted into the slot
on the inside of the left handle bar post securely.
Secure the left handle bar post to the mounting bracket
by using three allen head bolts and star washers.
NOTE: Do not fully tighten the bolts until you have
completed the assembly.
X6
5581-113
5581-05
Insert the right front handle bar post into the handle
bar mounting bracket and secure, using three allen
head bolts and star washers.
NOTE: DO NOT FULLY TIGHTEN THE BOLTS UNTIL YOU HAVE COMPLETED THE ASSEMBLY .NOTE:
HANDLE
BAR
MOUNTING
BRACKET
TAKE CARE to ensure the cable does not get
trapped when you attach the left handle bar
post.
A.
B.
Release the lock handle fitted on the left hand side
of rear stabilizer with your left hand and fold down
the main frame to the floor gently with your right
hand.
YORK T782 TM / 05
SHOULD YOU REQUIRE ANY ASSISTANCE REGARDING THIS PRODUCT PLEASE CONTACT YORK DIRECTLY.
*
*
8.
Attach the console base onto the handle bar
fixing brackets as shown.
NOTE: TAKE CARE to ensure the hooks on the
handle bar fixing brackets are fitted into
the slot holes on the console base
support securely.
TAKE CARE to ensure the cable does not
get trapped when you attach the console
base.
7.
9.
X4
Slide the middle cable through the slot hole on
the side of console base carefully.
Secure the console base to the handle bar
posts by using four allen head bolts and star
washers.
NOTE: Do not tighten all of the bolts until the
computer console has been secured.
5581-108 5581-05
10.
Secure the top computer console onto the console
base support by using two allen head bolts and
star washers.
X4
5581-38
5581-37
Rest the computer console on the console
base carefully as shown.
Connect the middle wire plug, that comes out
from the side of console base to the computer
socket on the left hand side of the computer
console as tight as you can.
Connect the incline adjustment cable socket,
that comes out from the side of console base
to the computer plug on the left hand side of
the computer console as tight as you can.
Connect the speed adjustment cable socket, that
comes out from the side of console base to
the computer plug on the right hand side of the
computer console as tight as you can.
HANDLE BAR
POST
YORK T782 TM / 06
CONSOLE
BASE SUPPORT
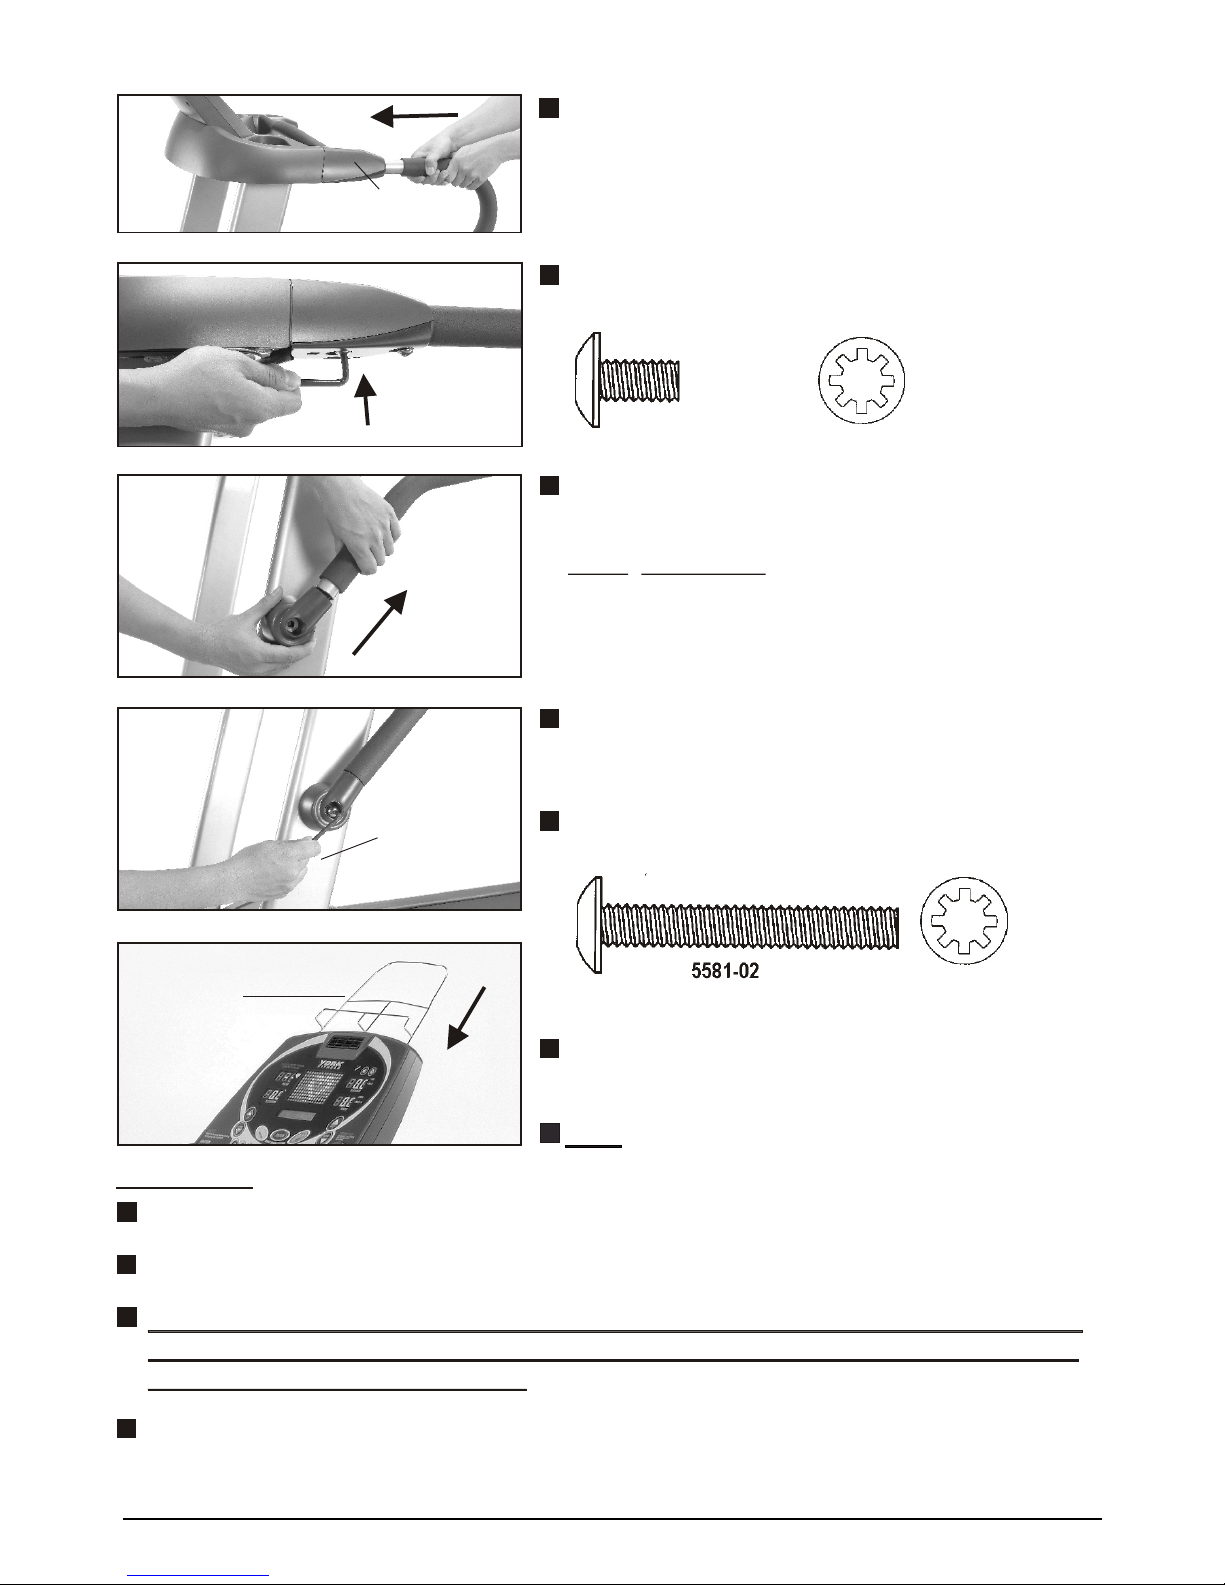
11.
12.
13.
Attach the left handle bar to the handle bar mounting
tube as shown.
Attach the handle bar side cover into the end of
handle bar securely as shown.
NOTE: TAKE CARE to ensure you fit the ribs ( inside
of the handle bar side cover ) into the slot on
the end of the handle bar securely.
NOW tighten all the bolts that you have fitted.NOW
Secure the left handle bar to the handle bar mounting
tube by using two allen head bolts and star washers.
RECHECK
Recheck that all of the bolts are tightened securely for your safety and comfort.
Plug the power cable into a suitable AC outlet (220~240 Volt 50Hz).
Before you use the treadmill for the first time turn on the power switch, connect
the magnetic safety key and then allow the treadmill to run for 10 minutes or so
without anyone on the treadmill.
Before you use the treadmill for the first time turn on the power switch, connect
the magnetic safety key and then allow the treadmill to run for 10 minutes or so
without anyone on the treadmill.
Check that the mat is tightened properly and runs smoothly.
SHOULD YOU REQUIRE ANY ASSISTANCE REGARDING THIS PRODUCT PLEASE CONTACT YORK DIRECTLY.
*
*
14.
15
Secure the handle bar side cover to the left handle
bar post by using one allen head bolt and star
washer.
Repeat the same assembly procedures to attach the
right handle bar.
Attach the magazine reading rack to the top of the
computer console assembly as shown.
X2
5581-108 5581-05
X1
5581-02
5581-05
HANDLE BAR
MOUNTING TUBE
LEFT
HANDLE BAR
POST
MAGAZINE
READING
RACK
YORK T782 TM / 07

OPERATING INSTRUCTIONS
The following procedure has been proven to be the safest and easiest method of mounting
the treadmill.
For your protection, carefully read and follow these simple steps:
1. Be sure the treadmill is positioned on a flat, level surface.
2. Make sure the magnetic safety key is not attached then plug in the treadmill power cable to a
suitable power socket and switch on at the socket.
3. Turn on the treadmill power switch, which is located near where the power cable attaches to
the treadmill.
4. Straddle the running mat with your feet firmly planted on the right and left staging platforms.
Stand close enough so you can extend your arms to touch all the buttons on the console.
CAUTION: Do not stand on the mat yet.
5. Insert the safety key.
6. Follow the instructions shown on the main display of the computer console” TO OPERATE “
STARTING YOUR EXERCISE
Stand on the running mat.
Once you have selected your workout, the treadmill will slowly increase its speed to
the desired levels.
Continue to grip the handles until you are walking / running normally.
After gaining stability and confidence, you may release your grip on the handrails and let your
arms swing freely and naturally at your side.
NOTE: Walking straight on the treadmill is aided by focussing on a stationary object across
the room in front of you.
Walk as if you were approaching that object.
IN AN EMERGENCY
In an emergency take hold of the handrails and place your feet on the side platforms provided,
once you are stable, pull out the safety key. The treadmill will then begin to decelerate
until it stops.
not
TO OPERATE
SHOULD YOU REQUIRE ANY ASSISTANCE REGARDING THIS PRODUCT PLEASE CONTACT YORK DIRECTLY.
*
*
YORK T782 TM / 08

HOW TO GET OFF THE TREADMILL
The following procedure has been proven to be the safest and easiest method of
dismounting the treadmill.
For your protection, carefully read and follow these simple steps.
1. Turn the treadmill to the lowest speed.
2. Firmly grip the handles to support yourself.
3. Remove your trailing foot from the walking platform and place it on the foot pad on the
side of the treadmill.
This is very easy to do because the natural movement of walking will have shifted your
weight onto the foot that just stepped forward.
4. Shift your weight to the stationary foot on the foot pad, and remove the other foot from
the walking platform and place it on the other foot pad.
You should now be in the starting position.
5. Press the STOP key to stop the treadmill and disconnect the safety key then unplug
treadmill from the power outlet when finished.
SHOULD YOU REQUIRE ANY ASSISTANCE REGARDING THIS PRODUCT
PLEASE CONTACT YORK DIRECTLY.
IN AN EMERGENCY
In a emergency take hold of the handrails and place your feet on the side rails provided,
once you are stable, pull out the safety key. The treadmill will then begin to decelerate
until it stops.
P
AUS
EP
AUS
E
S
T
OP
S
T
OP
HELP LINE (8:30am- 16:30pm)
U.K.
AUSTRALIA
YORK BARBELL (U.K.) LTD.
YORK WAY, DAVENTRY,
NORTHANTS, NN11 4YB ENGLAND
TEL: (01327) 701-824
FAX: (01327) 706-704
E-MAIL: helpdesk@yorkfitness.co.uk
HELP LINE (8:00am- 16:00pm)
YORK BARBELL (AUST.) PTY. LTD.
UNIT 1, LOT 2, SWAFFHAM ROAD,
MINTO, N.S.W. 2566 AUSTRALIA
TEL: (02) 9603-8444
FAX: (02) 9603-8555
E-MAIL: service@yorkfitness.com.au
F I T N E S S
F I T N E S S
U.S.A.
YORK BARBELL USA.
3300 BOARD ROAD.
YORK, PA 17402
TEL: +1-717-767-6481
FAX: +1-717-764-0416
E-MAIL: info@yorkbarbell.com
HELP LINE (8:00am- 17:00pm)
F I T N E S S
YORK T782 TM / 09
Use a warm damp cloth with mild detergent to keep your YORK T782 treadmill clean.
Do not clean between the mat and running board---The silicone lubricant is needed for
smooth movement of the mat.
CARE AND MAINTENANCE
Pay particular attention to the fixing knobs and make sure they are tight.
If in doubt do not use the treadmill and contact our helpline.
Check parts for wear before use.
Always replace the mat if worn and any other defective parts.
TAKE CARE TO PROTECT CARPETS AND FLOOR in case of leakages. This product is a
machine and contains moving parts which have been greased / lubricated and could leak.
TAKE CARE TO PROTECT CARPETS AND FLOOR
WARNING: Stop Treadmill before Folding.
WARNING: Unplug the Power Cable before Maintenance.
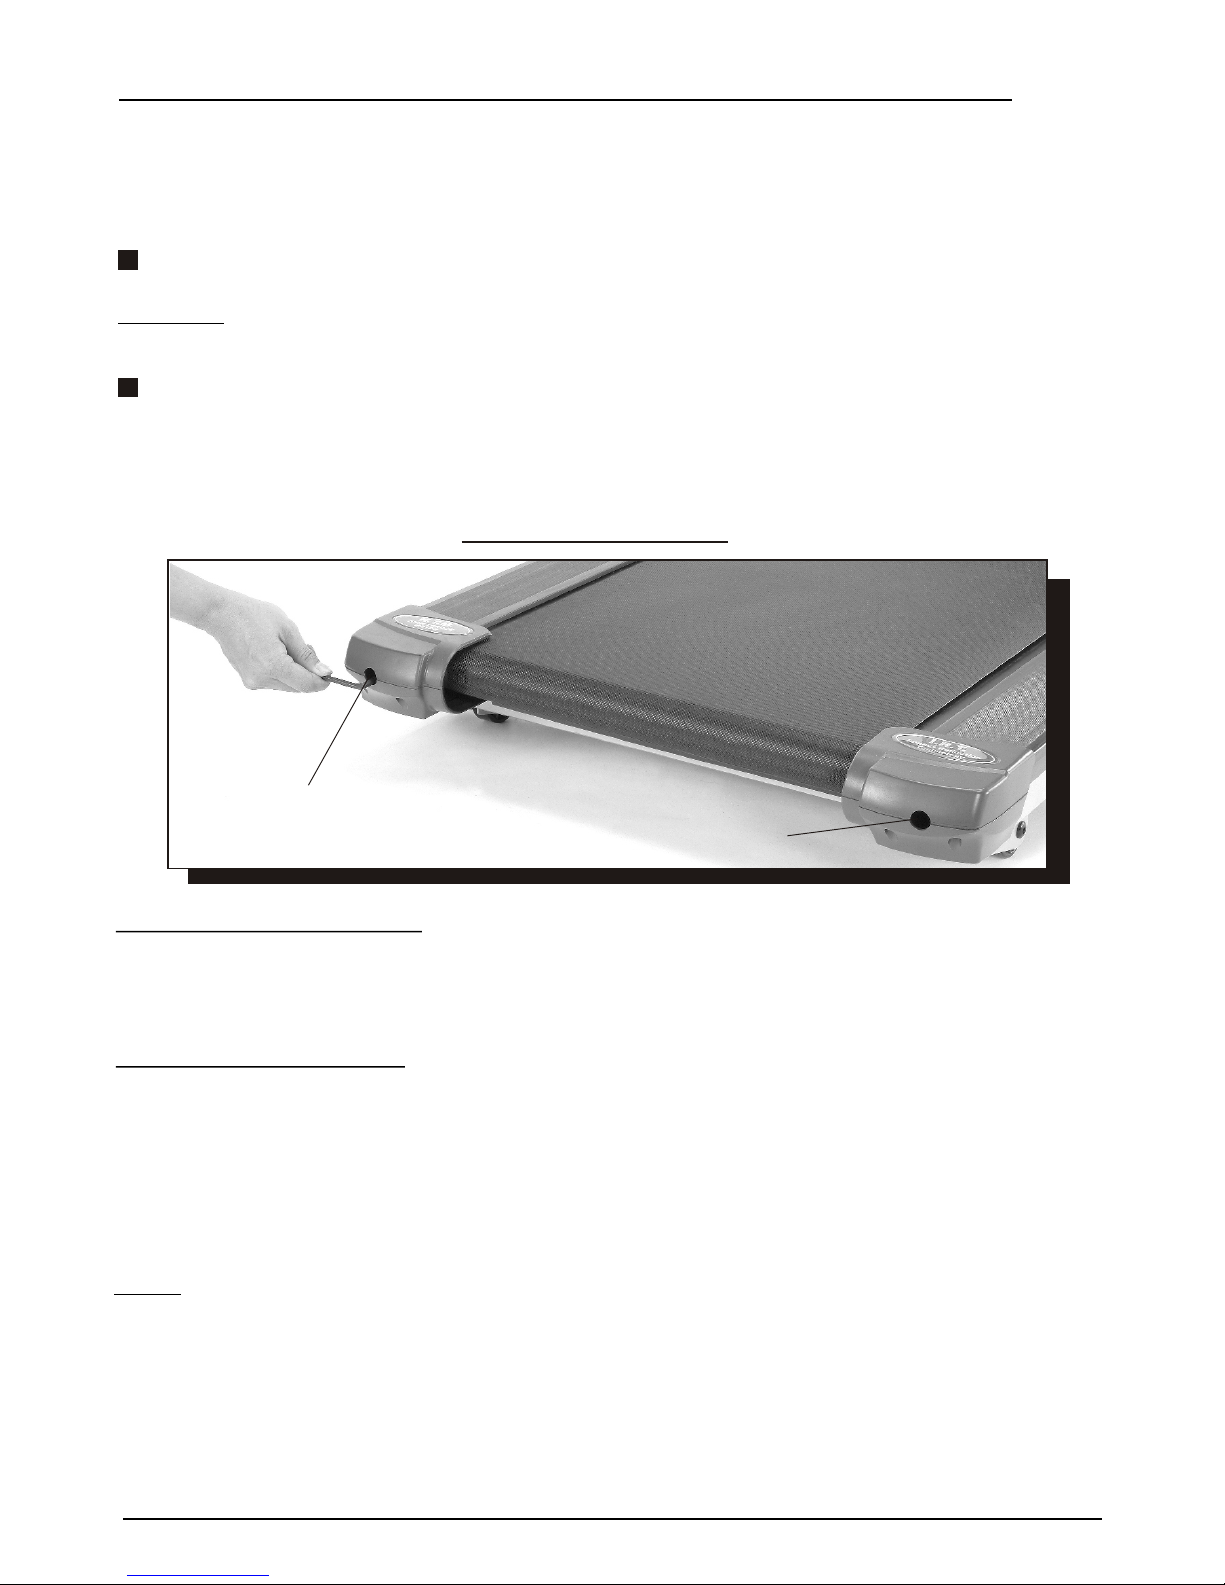
MAT ADJUSTMENT BOLTS
- USE ALLEN KEY TO ADJUST MAT AS INSTRUCTED BELOW.
SHOULD YOU REQUIRE ANY ASSISTANCE REGARDING THIS PRODUCT PLEASE CONTACT YORK DIRECTLY.
*
*
HOW TO ADJUST THE MAT ALIGNMENT AND TENSION
MAT MOVES TO RIGHT
If your mat tends to move to the right, then adjust the right screw by turning it a turn clockwise.
We recommend adjustments of a turn only at a time, then test each time.
If your mat continues to move to the right, simply adjust the left adjustment screw, by turning
a turn counterclockwise, test after each adjustment.
MAT MOVES TO LEFT
If your mat tends to move to the left, then the adjustment of the right screw is necessary by
turning it counterclockwise.
We recommend adjustments of turn only at a time, then test each time.
If the mat continues to move to the left, simply adjust the left adjustment screw, by turning
turn clockwise, then test each time.
The alignment and tension of the mat (walking surface) has been set prior to shipping.
Should improper tracking of the mat occur (walking surface moving too far to the right or the left
on the platform) or if you find that the mat slips when you get on, these problems can be corrected
as follows:
Locate the adjustment screws on the end of the main frame.
CAUTION: Adjust the mat when the treadmill is running at the lowest speed.
Keep others away from the treadmill.
Connect the safety key and set to the lowest speed.
TEST: Allow the mat to run for several minutes and watch to see if it runs in the center position
correctly. If the mat does not run in the center position, carry out the steps for:
”MAT MOVES TO LEFT” or “MAT MOVES TO RIGHT”.
Be sure that you adjust by “ a turn only each time” to avoid over correcting.
NOTE: For most people, one of your legs is stronger than the other and the treadmill mat may
tend to track to that side because of the extra pressure exerted by your stronger leg.
If this occurs then either dismount the treadmill and allow the mat to track back to the
middle, or exert pressure to the side of the mat with the other leg to track the mat back
to the middle.
Or adjust the mat to compensate following the instructions for the mat moves to the right
or left.
YORK T782 TM / 10
MAT TOO LOOSE
If your mat appears to be loose, simply tighten both screws by an equal amount
( 1/2 a turn clockwise at a time ) then test.
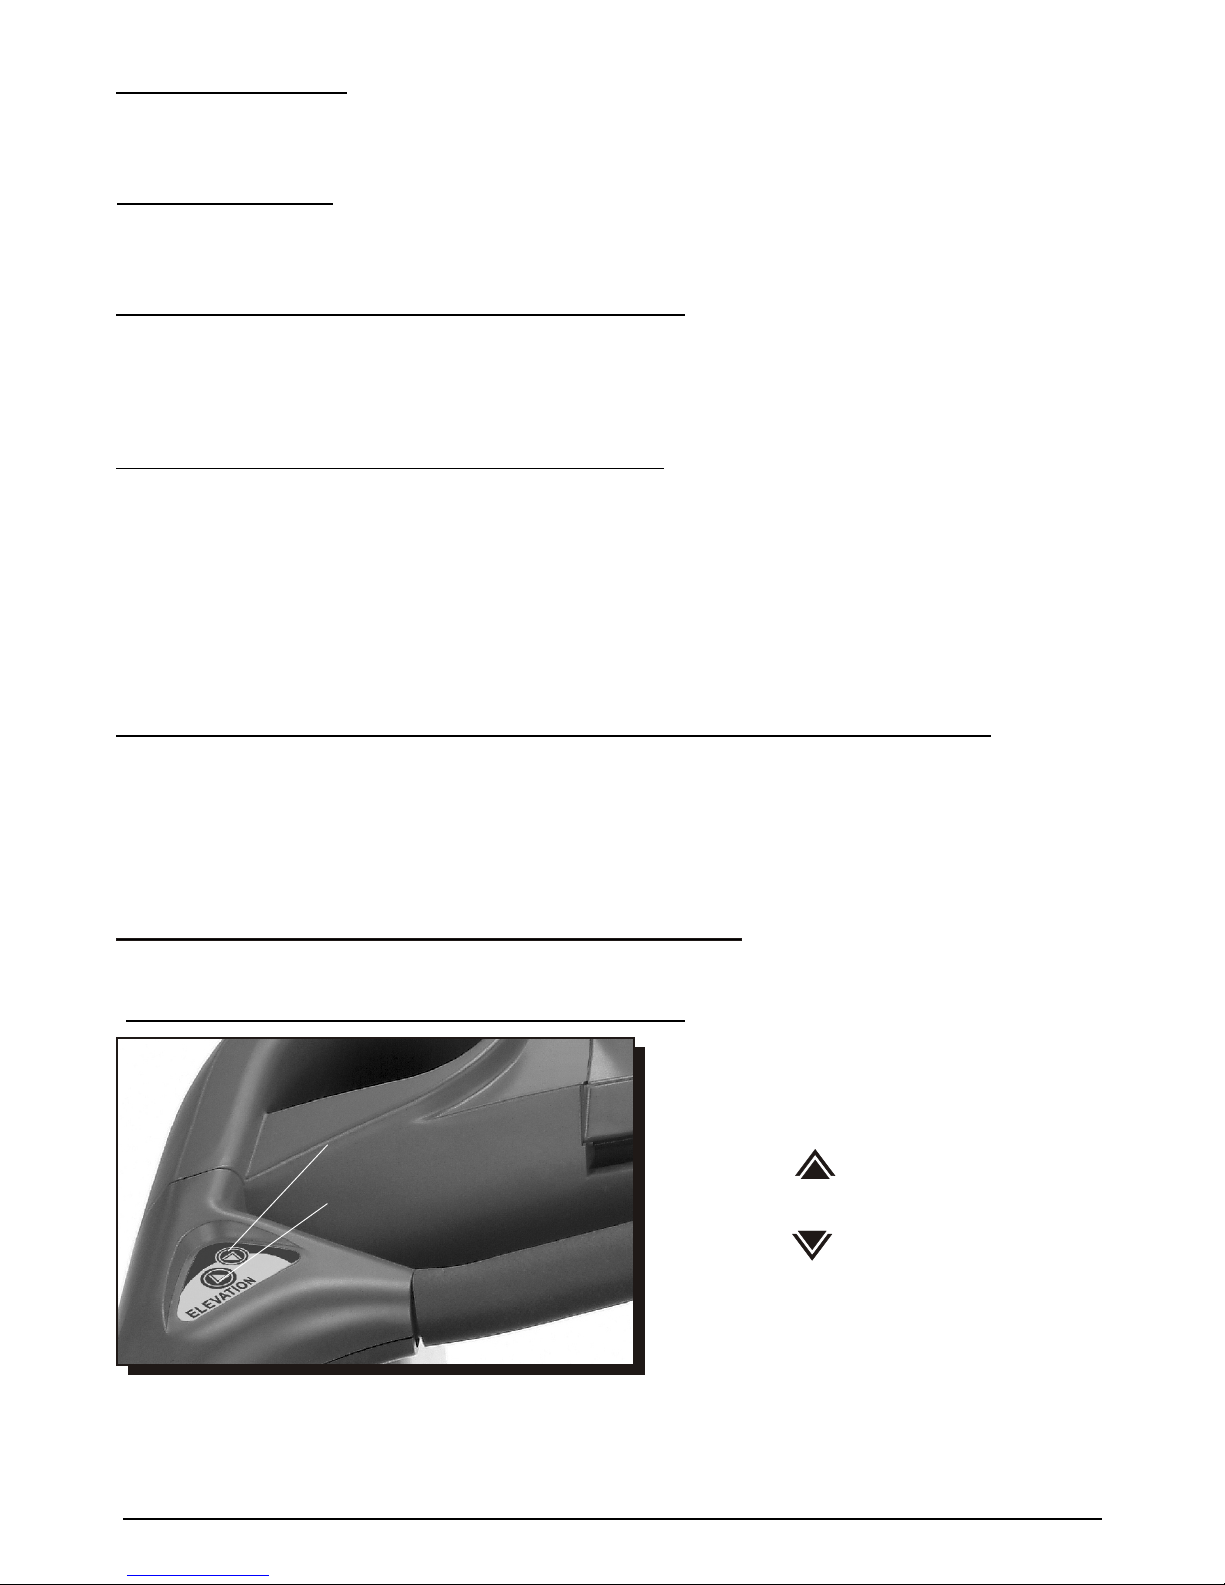
Press for elevation “UP”
HOW TO ADJUST THE ELEVATION
MAT STICKY (DOES NOT RUN SMOOTHLY)
You may feel after a period of time (depending on how often you use the machine)
that the mat feels sticky.
We recommend you apply a light covering of Silicone between the mat and the running board.
This procedure may be repeated as necessary.
MAT TOO TIGHT
If it appears tight, simply loosen both screws by an equal amount
( 1/2 a turn anti-clockwise at a time ) then test.
We recommend that you use the following:
Lube-N-Walk Treadmill Lubrication Kit ( CODE: 5520 ) comes complete with instructions,
Available from your local Sports Retailer or contact YORK for your closest dealer.
Lube-N-Walk Treadmill Lubrication Kit ( CODE: 5520 )
HOW TO CHECK THE RUNNING MAT FOR PROPER LUBRICATION
- Disconnect the main power supply.
- Fold the treadmill up into the storage position.
- Feel the white back surface of the running mat.
If the surface is slick to the touch, then no further lubrication is required.
If the surface is dry to the touch, apply a suitable silicone lubricant.
WALKING MAT AND DECK LUBRICATION
This treadmill is equipped with a pre-lubricated, maintenance deck system. The mat/deck friction
may play a major role in the function and life of your treadmill, this requires periodic lubrication.
We recommend a periodic inspection of the deck. If the deck appears worn, please contact
our service department.
We recommend lubrication of the deck according to the following timetable:
Light use ( less than 3 hours per week ) every 8 months
Medium use ( 3-5 hours per week ) every 4 months
Heavy use ( more than 5 hours per week ) every 2 months
Press for elevation “DOWN”
1. Find the elevation switch located on the
left handle bar.
2. Press the top part of the switch for
elevation “ ” UP.
3. Press the bottom part of the switch of
elevation “ ” DOWN.
4. Press either the top or the bottom of the
switch for your desired incline level,
then simply release the switch when
you feel comfortable.
SHOULD YOU REQUIRE ANY ASSISTANCE REGARDING THIS PRODUCT PLEASE CONTACT YORK DIRECTLY.
*
*
YORK T782 TM / 11

SHOULD YOU REQUIRE ANY ASSISTANCE REGARDING THIS PRODUCT PLEASE CONTACT YORK DIRECTLY.
*
*
COMPUTER INSTRUCTIONS
Your computer is ideal for monitoring your performance and setting yourself targets.
You can monitor closely your improving condition and cardiovascular fitness.
USING THE MAGNETIC KEY
IMPORTANT: The treadmill will not work if the magnetic safety key is not in place.
Before starting the treadmill, attach the key to the computer, then attach the clip on the other end
to your clothing (above the waist). If this key is pulled out whilst you are running on the treadmill
then the mat will stop turning.
When the treadmill is not in use you should remove the safety key and store it somewhere
safe, away from the treadmill. This will prevent any unauthorised use of the treadmill.
Store the safety key in a safe place OUT OF REACH OF CHILDREN.
SAFETY
OUT OF REACH OF CHILDREN.
F I T N E S S
SPEE D
INTE RVAL
SPEE D
INTE RVAL
AERO BICAERO BIC
WEIG HT
LOSS
WEIG HT
LOSS
HILL
CLIM B
HILL
CLIM B
TARGET
TIME
TARGET
TIME
TARGET
DISTAN CE
TARGET
DISTAN CE
TARGET
CALO RIES
TARGET
CALO RIES
HRC
SPEE D
HRC
SPEE D
HRC
ELEVATI ON
HRC
ELEVATI ON
FITN ESS
TEST
FITN ESS
TEST
D NCEIS
TAD NCEIS
TA
SP EDE
SP EDE
PUL
E
S
PUL
E
S
MKMK
I
LEM
I
LEM
K
M/HK
M/
H
M
ILE / H
M
ILE / H
%%
EIE
L
VA
T ONEIE
L
VA
T O
N
ND
OW
ND
OW
0
1
2
3
4
5
6
7
8
P
AUSEP
AUSE
P
S
T
O
P
S
T
O
Q
U
K
T
A TI
C
S RQ
U
K
T
A TI
C
S R
STA
R
TSTA
R
T
CAUTIONCAUTION
To fold treadmill, the running To fold treadmill, the running
deck must be at 0% elevationdeck must be at 0% elevation
SAFETYSAFETY
Hold the handrail when starting
or
stopping the
t
adm
ll.
re i
Hold the handrail when starting
or
stopping the
t
adm
ll.
re i
RA
O
G
R
A
M
HEA
R
T
T
E
C
O
N
T
R
L P
RO
W
IR
LES C
H G
Y
E S T
E N OLO
RA
O
G
R
A
M
HEA
R
T
T
E
C
O
N
T
R
L P
RO
W
IR
LES C
H G
Y
E S T
E N OLO
UPUP
ASF
T
ASF
T
SLO
W
SLO
W
9
E HO HANDRAI
IN
MERGENCY - LD L
RDPULL
THE CO
TO STOP
T
READM L
HE T
IL .
E HO HANDRAI
IN
MERGENCY - LD L
RDPULL
THE CO
TO STOP
T
READM L
HE T
IL .
EM
E
RG
C
Y
TOEN
S
PEM
E
RG
C
Y
TOEN
S
P
SAFETY KEY
SAFETY KEY
A
:
W
RNING
W N
IN SE R Y KHEN OT U
EMOVE SAFET EY
N
ST E O
T
O
A D
OR
U F
R C
O
IL R .
EA
H F CH
D
EN
A
:
W
RNING
W N
IN SE R Y KHEN OT U
EMOVE SAFET EY
N
ST E O
T
O
A D
OR
U F
R C
O
IL R .
EA
H F CH
D
EN
EN
T
EREN
T
ER
YORK T782 TM / 12
DISPLAY VALUES
DISPLAY
RESOLUTION RANGE INCREMENT
PULSE
ELEVATION ( % )
DISTANCE ( Miles )
DISTANCE ( Km )
SPEED ( Miles / H )
SPEED ( Km / H )
TIME
CALORIES
40 - 240
0 - 12
00.1 - 99.0
00.1 - 99.0
00.6 -10.0
01.0 -16.0
00:01 - 99:00
1 - 999
1
1%
0.1
0.1
0.1
0.1
00.01
1
SHOULD YOU REQUIRE ANY ASSISTANCE REGARDING THIS PRODUCT PLEASE CONTACT YORK DIRECTLY.
*
*
YORK T782 TM / 13
SPEED ADJUSTMENTS There are three ways to adjust the speed during workout:
1. Pressing FAST and SLOW will adjust the speed by increments
of 0.1Km/H. Press and hold these buttons to speed up or down faster.
2. During the workout you can enter the speed using the number buttons.
If the speed adjustment increment is large, it is quicker and easier to
use the number buttons to adjust the speed.
3. Press the arrow up / arrow down keys on the right side of the
handlebars they will also adjust the speed by increments of 0.1Km/H.
For example, to change from 3 Km/H to 8 Km/H: Press the number 8
button once, or press and hold the FAST button or the arrow up key
until the speed display shows 8 Km/H.
ELEVATION ADJUSTMENTS
There are 2 ways to adjust the elevation:
1. Pressing the UP and DOWN buttons on the front of the console.
2. Pressing the arrow up / arrow down buttons on the left side of
the handlebars.
The buttons will adjust the elevation by increments of 1%.
In addition, the treadmill will automatically adjust it’s elevation during
the following two workout programs: HRC by Elevation (8), and
Fitness Test (9).
The elevation may be adjusted while the running belt is not moving.
However, during the program setup mode, the elevation can not be
adjusted.
PULSE FUNCTION This treadmill features wireless heart rate monitoring, the most advanced
technology to date for an accurate read out of your heart beat.
To use the wireless pulse monitoring system, you must wear the heart rate
transmitter chest strap so that the contact surface is next to your skin,
directly under your heart, to pick up the pulse signals from your heart.
Please note that some fibers used in clothes (e.g. polyester, polyamide)
create static electricity which may prevent a reliable heart rate
measurement. Also note that mobile phones, televisions and other
electrical appliances form an electro-magnetic field around them, which
may also cause problems in heart rate measurement.
PAUSE FUNCTION When the STOP button is pressed during a workout, the program is
suspended. The large display window will flash “WORKOUT PAUSED”.
After the running belt has come to a complete stop, the dot matrix display
window will count down from 2:59. During pause mode, only the
START and STOP buttons will function.
If START is pressed within three minutes of the pause mode being
activated, the treadmill will bring the running mat movement back to the
speed at which the treadmill was running when it was paused. The
workout values will resume counting and the program continues where
it left off.
If STOP is pressed during the pause mode, the program will end.
After three minutes, if no button is pressed, the treadmill will
automatically end the workout program.
P
AU
S
EP
AU
S
E
T
S OPT
S OP
U
K
AQ I C
ST R
T
U
K
AQ I C
ST R
T
T
STA
R
T
STA
R
AUSP EAUSP E
STOP
STOP
AUS
P EAUS
P E
STOP
STOP
Q
UIC
K
S
TA
R
T
Q
UIC
K
S
TA
R
T
T
S
TAR
T
S
TAR

SHOULD YOU REQUIRE ANY ASSISTANCE REGARDING THIS PRODUCT PLEASE CONTACT YORK DIRECTLY.
*
*
YORK T782 TM / 14
END OF WORKOUT STATS When you have completed your workout or if you have ended your
workout, the display will report your workout stats. After the running mat
has come to a complete stop, the message center will display total time,
total distance, total calories and average speed, twice. Then the display
will go into idle mode, ready for the next user workout setup.
If you wish to skip the workout stats report, simply press the STOP
button, which will skip the display to the idle mode.
UNIT CONVERSION To change from kilometers to miles, or miles to kilometers, you must be
in the idle mode where the display shows PICK PROG OR PRESS START.
Follow the steps below to make the unit conversion.
1. Simultaneously press both the STOP and SLOW buttons
together.
2. The message center will display Km to Mi or Mi to Km.
3. Simply press the START button to confirm.
Once you have begun your workout, the speed unit will have changed the
measurement unit accordingly.
PRESET PROGRAMS
QUICK START Once the power is turned on and the safety key is secured in place, simply
press the quick start button. The treadmill will start at 1.0 Km/H. You may
increase or decrease the speed or elevation at any time during your workout.
To end the workout, simply press the STOP button to stop
the treadmill. During the workout, the time will count up.
1. Turn the power on.
2. Check the safety key is secured to the treadmill and that the clip is secured
to your clothing.
3. Press START to begin the workout.
Once the power is on and
the safety key is secured in
place, simply press the start
button, and after three seconds
count down the treadmill will
start and maintain the
running mat at 1Km/H.
SPEED PROGRAMS Once the power is turned on and the safety key is secured in place, press
the number buttons 0 or 1 to choose one of the two pre-set speed programs,
SPEED INTERVAL or AEROBIC. The large display screen will prompt you
to set up a workout duration and intensity level based on the maximum
speed value. Once you have made your selection, press the START key
to activate the treadmill.
During the workout, the treadmill will automatically adjust the speed
according to the pre-set program setting. You can adjust the speed if the
preset speed is not appropriate. The remaining program will scale up or
down accordingly. During the workout, you may adjust the elevation level at
will. To end the workout, simply press the STOP button to stop the
treadmill. During the workout, the time counts down from the target workout
time set.
1. Turn the power on.
2. Check that the safety key is secured to the treadmill and that the clip is
secured to your clothing.
3. Press 0 to select the SPEED INTERVAL program or press 1 to
select the AEROBIC program.
4. The display will show the program selected.
5. Press ENTER to confirm your selection.
6. Use the numeric buttons to input the workout duration.
7. Press ENTER to confirm.
8. Use the numeric buttons to input the intensity level based on the
maximum speed.
9. Press ENTER to confirm.
10. Press START to begin the workout.
UP
A
S
EUP
A
S
E
ST
P
OSTPO
P
A
U
S
EP
A
U
S
E
S
T
OPS
T
OP
P
A
US
EP
A
US
E
T
S
O
PT
S
O
P
S
P
A
U E
S
P
A
U E
STOPSTOP
ENT E
RENT E
R
N
EE
T R
N
EE
T R
NE
TE
R
NE
TE
R
0
1
Q
UC
K
S
TA
RI T
Q
UC
K
S
TA
RI T
STARTSTART
Q
UC K
S
TA
RI T
Q
UC K
S
TA
RI T
T
S
TART
S
TAR
AQU
ICK ST R
T
AQU
ICK ST R
T
TS
TARTS
TAR

ELEVATION PROGRAMS
Once the power is turned on and the safety key is secured in place, press t
he number buttons 2 or 3 to choose one of the two pre-set elevation programs,
WEIGHT LOSS or HILL CLIMB. The large display screen will prompt you to
set up a workout duration and intensity level based on the maximum elevation
value. Once you have made your selection, press the START key to
activate the treadmill.
During the workout, the treadmill will automatically adjust the elevation
according to the pre-set program setting. You can still adjust the elevation
if the preset level is not appropriate. The remainder of the program will
scale up or down accordingly. During the workout, you may adjust the
speed level at will. To end the workout, simply press the stop button to stop
the treadmill. During the workout, the time counts down from the target
workout time set.
1. Turn the power on.
2. Check the safety key is secured to the treadmill and that the clip is
secured to your clothing.
3. Press 2 to select the WEIGHT LOSS program or press 3 to select
the HILL CLIMB program.
4. The display will show the program selected.
5. Press ENTER to confirm your selection.
6. Use the numeric buttons to input the workout duration.
7. Press ENTER to confirm.
8. Use the numeric buttons to input the intensity level based on the
maximum elevation.
9. Press ENTER to confirm.
10. Press START to begin the workout.
TARGET TRAINING PROGRAMS
The users have the option to customise the workout based on setting
training targets for time, distance, or calories. Once the power is turned on
and the safety key is secured in place, press the number 4 button to set the
training target based on time or the number 5 button to set the training
target based on distance, or the number 6 button to set the training target
based on calories. The large screen display will prompt you to set up a
workout target value. Once you have made your selection, press the
START key to activate the treadmill.
During the workout, you may adjust the speed and/or elevation at will. To
end the workout, simply press the stop button to stop the treadmill. During
the workout, the target training value will be displayed on the dot matrix
display window.
1. Turn the power on.
2. Check the safety key is secured to the treadmill and that the clip is
secured to your clothing
3. Press 4 to select target time, 5 to select target distance or 6 to
select target calories.
4. The display will show the program selected.
5. Press ENTER to confirm your selection.
6. Use the numeric buttons to input the training target value.
7. Press ENTER to confirm.
8. Press START to begin the workout.
SHOULD YOU REQUIRE ANY ASSISTANCE REGARDING THIS PRODUCT PLEASE CONTACT YORK DIRECTLY.
*
*
E
N
T
E
R
E
N
T
E
R
N E
E T
R
N E
E T
R
E
N
TE
RE
N
TE
R
N
EE T R
N
EE T R
EN
TE
REN
TE
R
2
3
4
5
6
Q
U C
KS
T
A
R
I TQ
U C
KS
T
A
R
I T
EN
E
/
T R
EN
E
/
T R
TS
ARTTS
ART
YORK T782 TM / 15
QUICK
STA
R
T
QUICK
STA
R
T
STA
RT
STA
RT
Q
UIC
K
S
T
A
R
T
Q
UIC
K
S
T
A
R
T
S
T
ARTS
T
ART
QUIC
K ST
A
RTQUI C
K ST
A
RT
ST
T
AR
ST
T
AR

SHOULD YOU REQUIRE ANY ASSISTANCE REGARDING THIS PRODUCT PLEASE CONTACT YORK DIRECTLY.
*
*
HEART RATE CONTROL (HRC) PROGRAMS
The user has the option to customise their heart rate control programs based
on their target heart rate value. Once the power is turned on and the safety
key is secured in place, you may press the number 7 button to select the
HRC program adjusted by speed or the number 8 button to select the HRC
program adjusted by elevation. The large display screen will prompt you to
set up the workout step by step. Once you have made your selection, press
the START button to activate the treadmill.
The user also has the option to set up their warm up speed and warm up time.
During the warm up mode, the target heart rate training function will not be
in operation.
After the warm up mode has finished the treadmill will automatically adjust
by elevation or speed (depending on which program is chosen) to reach and
maintain the user's target heart rate. During the workout mode, the user can
adjust the speed or elevation. During the workout, the time counts down
from the total time which includes the warm up time + the workout time +
the cool down time.
At the end of the workout time, the treadmill will automatically go into cool
down mode. Cool down mode is pre-set for 4 minutes. In the first two
minutes, the speed and elevation will be reduced by 50%. In the last two
minutes, the speed and elevation will be reduced by another 50%. To end the
workout, simply press STOP to stop the treadmill.
To use the heart rate control programs, the user must wear the wireless
transmitter chest strap.
To determine your correct target heart rate, please refer to the section on
“CALCULATING YOUR TARGET HEART RATE”.
1. Turn the power on.
2. Check that the safety key is secured to the treadmill and that the clip is
secured to your clothing.
3. Press 7 to select the HRC program adjusted by speed changes or
press 8 to select the HRC program adjusted by elevation changes.
4. The display will show the program selected.
5. Press ENTER to confirm your selection.
6. Use the numeric buttons to input your age.
7. Press ENTER to confirm.
8. Use the numeric buttons to input the workout time.
9. Press ENTER to confirm.
10. Use the numeric buttons to input a target heart rate.
11. Press ENTER to confirm.
12. Use the numeric buttons to input a warm up time.
13. Press ENTER to confirm.
14. Use the numeric buttons to input a warm up speed.
15. Press ENTER to confirm.
16. Press START to begin the workout.
ENT
E
R
ENT
E
R
E
NT
E
R
E
NT
E
R
EN
TE
REN
TE
R
7
8
E
NT
E
R
E
NT
E
R
NE
T
E
R
NE
T
E
R
N EE T R
N EE T R
YORK T782 TM / 16
Q
UC
K STA
I R
T
Q
UC
K STA
I R
T
S
TART
S
TART
QU
ICK
STAR
T
QU
ICK
STAR
T
STARTSTART

SHOULD YOU REQUIRE ANY ASSISTANCE REGARDING THIS PRODUCT PLEASE CONTACT YORK DIRECTLY.
*
*
CALCULATING YOUR TARGET HEART RATE
The most common method for calculating your target heart rate is to
find your maximum heart rate first. The standard formula for finding
your maximum heart rate = 220 minus your age.
FITNESS TEST PROGRAM
The Fitness Test is a motivational program designed to determine the user's
physical fitness level. During the workout, the user will not be able to adjust
the speed or elevation. The program will increase the workout intensity level.
And based on the actual heart rate picked up from the transmitter and the
age user input, the treadmill computer will be able to assess the user's
physical fitness level.
You DO NOT want to workout at your maximum heart rate. You want to
workout in your target heart rate zone. Your target heart rate zone is a
percentage of your maximum heart rate. The American Heart Association
recommends working out at a target heart rate zone of between 60% - 75%
of your maximum heart rate. If you are just beginning an exercise program,
exercise near or below the lower limit of your target zone.
Lower limit of target zone = maximum heart rate x 0.60
Upper limit of target zone = maximum heart rate x 0.75
For example: User age 30
Max HR (maximum heart rate) = 220 30 = 190
60% of max HR = 190 x .60 = 114
75% of max HR = 190 x .75 = 142
(If you look at the chart to the left, you will note for age 30, your 60%-75%
heart rate values are 114 and 142.)
If you have not been exercising on a regular basis, it is recommended that
you start off slowly, and use the lowest value (60%) as your target heart rate
to begin with. If you find this pace too difficult to maintain, go to a lower
target heart rate. As you become stronger, you may want to increase your
target heart rate.
To use the fitness test program, the user must wear the wireless transmitter
chest strap. If the treadmill does not pick up the transmitters heart rate
signal, this program will not function.
1. Turn the power on.
2. Check that the safety key is secured to the treadmill and that the clip is
secured to your clothing.
3. Press 9 to select the Fitness Test program
4. The display will show the program selected.
5. Press ENTER to confirm your selection.
6. Use the numeric buttons to input your age.
7. Press ENTER to confirm.
8. Press START to begin the workout.
TARGET HEART RATE
Age Target Zone
( 60% - 75% )
20 120 150
25 117 - 146
30 114 - 142
35 111 - 138
40 108 - 135
45 105 - 131
50 102 - 127
55 99 - 123
60 96 - 120
65 93 - 116
70 90 - 113
9
ENT E
RENT E
R
N
E
E
T
R
N
E
E
T
R
YORK T782 TM / 17
UC
K
AQ I S T
R
T
UC
K
AQ I S T
R
T
STARTSTART

SHOULD YOU REQUIRE ANY ASSISTANCE REGARDING THIS PRODUCT PLEASE CONTACT YORK DIRECTLY.
*
*
YORK T782 TM / 18
POSITIONING THE CHEST TRANSMITTER
It is recommended that you wear the transmitter against your bare skin to ensure
flawless operation.
However if you wish to wear the transmitter over a shirt, moisten the shirt well under
the rubber electrodes.
Attach the adjustable elastic strap to the transmitter.
THE KEY TO FLAWLESS OPERATION IS TO WET THE RUBBER ELECTRODE
AREAS WELL.
The transmitter should be positioned next to your skin with the logo facing forwards in the
middle of the chest, just below the breast.
NOTE: If you have difficulty obtaining a good regular heart rate reading, please check the belt,
which may need adjusting. The rubber electrodes must be flat against the skin, and the
belt must be in the correct position on the chest---Not too low!!
Check the electrodes are wet.
Moisten the rubber electrodes on the underside of the belt as shown.
Water or saliva can be used.
The transmitter is activated automatically when on the body and is deactivated automatically
when removed.
Adjust the strap to ensure a secure but comfortable fit.
Check that the belt is clean, with no accumulated sweat or dirt.
CARE AND MAINTENANCE
Thoroughly wipe the transmitter, and allow the elastic strap to dry after each use.
Store your chest transmitter in a cool dry place.
o
Do not expose your chest transmitter to extreme temperatures above 122
o o o
Fahrenheit (50 C) or below 14 Fahrenheit (-10 C).
Do not expose your chest transmitter to direct sunlight for extended periods such as
leaving it in a car.

SHOULD YOU REQUIRE ANY ASSISTANCE REGARDING THIS PRODUCT PLEASE CONTACT YORK DIRECTLY.
*
*
TROUBLE SHOOTING
WHEN TO CALL FOR HELP
This treadmill is designed with user safety as the number one priority. In the event of an
electrical failure, the treadmill will shut off automatically to prevent user injury and to prevent
damage to expensive components such as the motor.
When you encounter unusual behaviour from the treadmill, simply turn the power switch off and
on to reset the treadmill.
This should clear incidental errors and prepare the treadmill for normal operation again.
If, after you have reset the treadmill by turning the power switch off and on again, the treadmill
is still not operational, then it is time to call the helpline.
NO SIGNAL ON THE CONSOLE LCD WINDOWS
If there is no signal on the monitor, even after you have switched the treadmill off and on again
to reset, check the communication cable between monitor and motor controller.
First, make sure the connections are good and that the cable is not pinched or damaged.
If defective, ask your dealer for a replacement cable.
Error 1: Speed Sensor error
Error 1 occurs when the console is not picking up the motor speed signal.
In other words, when the motor speed is not correctly fed back to the controller
console, the treadmill will shut off to protect the user and Error 1 will be displayed
on the console. Please see the Trouble Shooting Guide for further instruction.
When trouble shooting this error, do not stand on the running mat.
When you report Error 1 to the service center, make sure you note down
the circumstantial details.
1. Is the motor operational? For example, if the motor is not working when you push
the start button, Error 1 displays immediately.
Motor and running mat do not move.
2. If the treadmill was running, then it stopped and showed Error 1,
then the motor is operational.
3. If the motor is operational, did the treadmill stop at low speeds
( 1.0 - 1.5 KPH ) or high speeds ( 10 KPH - 12 KPH )
and
Trouble Shooting Guide
REPLACING THE TRANSMITTER BATTERY
Unscrew the battery hatch with a coin and
remove the old battery. Ensure that the new
battery is inserted into the hatch correctly with
the plus sign facing the battery hatch.
Check that rubber gasket is clean, correctly fitted
and not damaged, then close the hatch securely.
The transmitter utilizes a 3 volt 2032 cell.
YORK T782 TM / 19

SHOULD YOU REQUIRE ANY ASSISTANCE REGARDING THIS PRODUCT PLEASE CONTACT YORK DIRECTLY.
*
*
Error 3: Safety Key error
Error 3 occurs when the safety key is not in positive contact with the console.
Check for positive contact of the safety key to the console.
Error 4: Power Circuit Trip
If you see Error 4 displayed, this means the power circuit within the treadmill has been
broken. Call your dealer for service. Do not try and use the treadmill again until it
has been repaired.
Error 5: Elevation / Incline Motor error
If you see Error 5 displayed, there is a problem with the elevation motor.
There could be a number of causes:
1.The motor is overloaded or overheated. Turn the treadmill off for one hour
and then try again.
2.There is a problem with the cable connections. Re-check all the wires and cables
that were connected during assembly, making sure they are not loose or pinched,
and then turn the power off and on again to reset.
If after trying the above 2 steps Error 5 is still displayed, call you dealer for service.
Error 6, Error 7, Error 10 : Computer Failure
If you see Error 6, Error 7 or Error 10 displayed there is a computer error. This cannot
be fixed by the user. Please call your dealer for service.
Error 8: Fold Frame
If you see Error 8 displayed, the treadmill has been folded when the power is still
turned on. Simply turn the power off and on again to reset.
Error 2: Over Speed error
Error 2 occurs when the actual mat speed is faster than the speed displayed on the
console. If this occurs, the treadmill will shut off automatically.
Error 2 can be caused during handling of the treadmill. If you see Error 2 when you first
turn the power on, simply turn the power off and on again to reset.
Error 2 can also be caused by the user pushing very hard on the running mat, causing
it to go quicker than the speed displayed. Simply turn the power off and on again
to reset.
If turning the power on and off doesn't reset the error and Error 2 is still displayed, call
your dealer for service. Do not try and use the treadmill again until it has been repaired.
YORK T782 TM / 20

SHOULD YOU REQUIRE ANY ASSISTANCE REGARDING THIS PRODUCT PLEASE CONTACT YORK DIRECTLY.
*
*
Error 40 : Over Acceleration
Error 41 : Over Acceleration
Error 40 is displayed when the treadmill accelerates faster than normal. The treadmill
will shut off automatically. Simply turn the power off and on again to reset.
If turning the power on and off doesn't reset the error and Error 40 is still displayed,
call your dealer for service. Do not try and use the treadmill
The same as Error 40, but it occurs at the beginning of the workout.
Please see instructions above.
Error 11: Communication Failure
Error 22: Over Voltage
Error 23: Under Voltage
Error 11 is displayed when the treadmill cannot send information from the controller to
the console. Re-check all the wires and cables that were connected during assembly,
making sure they are not loose or pinched, and then turn the power off and on again to
reset. If E11 is still displayed, call your dealer for service.
Error 22 occurs when the AC input voltage is too high to operate the treadmill normally.
Check the AC input voltage.
Error 23 occurs when the AC input voltage is too low to operate the treadmill normally.
Check the AC input voltage.
YORK T782 TM / 21
TROUBLE SHOOTING GUIDE
Problem
Potential Cause
Corrections
1. Not plugged in.
2. Safety key not inserted.
3. House circuit breaker tripped.
4. Treadmill circuit breaker tripped.
5. On / Off switch on “OFF”.
1. Plug into grounded outlet.
2. Insert the safety key into the console.
3. Reset or replace fuse.
4. Reset the circuit breaker.
If happens again, lubricate the deck to
reduce friction between mat and deck.
5. Turn On / Off switch to “ON”.
Treadmill will not start.
1. Running mat not tight enough.
2. Drive mat not tight enough
1. Adjust running mat tension.
2. Adjust drive mat tension.
Running mat slips.
1. Insufficient lubrication
2. Running mat too tight / too loose
1. Apply silicone lubricant.
2. Adjust running mat tension.
Running mat hesitates
when stepped on.
Running mat tension uneven
across the rear roller.
Center the running mat.Running mat is off
center.

SHOULD YOU REQUIRE ANY ASSISTANCE REGARDING THIS PRODUCT PLEASE CONTACT YORK DIRECTLY.
*
*
ERROR 1 CODE
This is a safety feature that can stop the treadmill from functioning. This error can occur
because the computer is not receiving the correct information from the speed sensor located
near the motor. As a precaution the computer stops the treadmill until it begins to receive
the correct feedback.
By performing a few simple checks, the error can be cleared quickly and easily,
and the treadmill can be ready for use.
The treadmill does not
move and displays
“E1”
Switch off the treadmill at
the mains, and then switch
it on again.
If “E1” still shows
switch off and push the
running mat round
(1 cycle) using your feet.
Then switch back on.
If “E1” still shows,
then UNPLUG from the
mains and check all of the
wire connections made
during the assembly.
(SEE BOLD PRINT)
UNPLUG
If the treadmill still does
not move, then please
contact the helpline.
Doing this may reset the
program error, and the treadmill
will be ready to use.
This should reset the sensor,
and the treadmill will be ready
to use.
Once the cables have been
checked, turn on the treadmill
again. This should eradicate
the problem.
1.
2.
3.
When assembling, there are several cables that need to be connected.
It is very common for these cables to look like they are connected
when they are in fact not fully connected.
Make sure that these cables are connected as tightly as possible.
The connections may have come apart whilst assembling the treadmill.
YORK T782 TM / 22

FITNESS
Many things contribute to fitness and well being but the most important factor is the condition of
your heart and lungs and how efficient they are in delivering oxygen via your blood to your
muscles. Your muscles use this oxygen to provide enough energy for daily activity.
This is called aerobic activity (with oxygen).
When you are fit your heart and lungs work well and efficiently.
This means your heart will not have to work so hard. It will pump a lot fewer times per minute so
reducing the wear and tear on your heart.
This in turn reduces the chances of your suffering heart disease.
Fitness also helps you control your weight and reduces the effects of aging and stress.
You come across the need for fitness continually in everyday life.
When you are fit you can walk briskly up hills and stairs without being too out of breath once at
the top you recover quickly.
As you can see there are great advantages in being fit.
HOW TO IMPROVE YOUR FITNESS
Like any muscle in your body your heart can be strengthened by systematic physical exercise
which requires an increased blood flow and heart rate.
You can measure your heart rate by taking a pulse reading.
Your heart of pulse rate corresponds directly to your exertion level and exercise efficiency.
To improve your fitness in a safe and effective way you need to exercise at a high enough level to
improve your aerobic fitness.
The area between these 2 levels is called the target zone.
It is important to exercise at the right intensity to stay within this zone.
For the best results you should exercise within the target zone and gradually increase the
duration. Ideally you should aim to exercise (within zone) for at least 15-20 minutes continuously,
3-4 times per week.
CAUTION
DO NOT TRY TO DO TOO MUCH TO QUICKLY START GRADUALLY AND BUILD UP.
IF YOU BECOME ILL, IF YOU ARE UNDER DOCTOR CARE, OR OVER 35-40 AND NOT CURRENTLY
TAKING REGULAR EXERCISE THEN WE WOULD ADVISE YOU NOT TO START TO EXERCISE
WITHOUT CONSULTING YOUR DOCTOR.
EXERCISE GUIDE
SHOULD YOU REQUIRE ANY ASSISTANCE REGARDING THIS PRODUCT PLEASE CONTACT YORK DIRECTLY.
*
*
YORK T782 TM / 23

TARGET ZONE
THIS IS HOW YOUR PULSE SHOULD BEHAVE DURING GENERAL FITNESS EXERCISE.
REMEMBER TO WARM UP AND COOL DOWN FOR A FEW MINUTES.
PULSE
RATE
MAXIMUM PULSE RATE
85% OF MAX.
55% OF MAX.
RESET PULSE
COOL DOWN LEVEL
COOL DOWN
TIME
WARM UP
70% OF MAX.
EXERCISE SO THAT YOUR PULSE STAYS IN
THIS RATE FOR AT LEAST 15-20 MINUTES
HEART ZONE SELECTION GUIDELINES
In order to set your personal target heart zone, you will need to:
- Calculate your maximum heart rate.
- Select a zone based on your current fitness level.
Calculating your maximum heart rate
The standard method for calculating heart rate training zone is based on estimating maximum
heart rate using the formula 220 minus the persons age in years. Some practitioners believe
that a woman estimated maximum heart rate can be calculated more accurately by using 226
instead of 220.
The important issue with all estimating calculations is that in reality they can vary by plus or
minus 15 bpm and at best are only an indication of actual results.
Estimated Maximum Heart Rate = 220 - Age (Year)
SHOULD YOU REQUIRE ANY ASSISTANCE REGARDING THIS PRODUCT PLEASE CONTACT YORK DIRECTLY.
*
*
YORK T782 TM / 24

SELECTING THE ZONE
If you have not exercised for some time begin your exercise program in the Healthy Heart Zone.
Start for the first few weeks, and gradually progress up to the zone that meets your personal
fitness goal.
ZONE 5.- RED LINE - 90 to 100% of Max Heart Rate.
For professional supervised athletes only.
ZONE 4.- ANAEROBIC THRESHOLD - 80 to 89% of Max Heart Rate.
This is the zone in which to improve anaerobic threshold. Exercising I this zone requires a high
degree of fitness, and should not be used by those who are unfit.
ZONE 3.- AEROBIC - 70 to 79% of Max Heart Rate.
Progress to this zone if your goal is to improve your aerobic conditioning.
ZONE 2.- WEIGHT MANAGEMENT - 60 to 69% of Max Heart Rate.
If you already exercise regularly with the aim of losing body fat, exercise in this zone.
ZONE 1.- HEALTHY HEART - 50 to 59% of Max Heart Rate.
If you are a beginner with the goal of improving overall fitness, losing weight or reducing stress,
exercise in this zone.
HEART RATE
200
180
160
140
120
100
80
60
200
180
160
140
120
100
80
60
20 30 40 50 60 70 AGE
N
AER
O
C
T
HRE
H
O
L
D
Z
ONE
-
0
%
M
H
A B
I
S
80
9
R
D
-L
N O
E
9
1
0
%
H
R
R
E I E
Z N
0
-
0
M
H M
A A
G
E
T
N
0
-70
M R
W
EIG
T
N EM N
Z
O E
6
%
H
A
R
O
I
C N
E
7 -
8
0%
HR
E B
ZO
0 M
E
A
L
HY
H
EA
T Z
O
E
0 6
0
% MH
H T R
N
5
R
Maximum Heart Rate (MHR) = 220 - AGE
HEART RATE
TARGET ZONE
Healthy Heart Weight Loss Aerobic Anaerobic Red line
50 - 59% 60 - 69% 70 - 79% 80 - 89% 90 - 100%
155 65 78 - 93 94 - 109 110 - 124 125 - 139 140 - 155
160 60 80 - 96 97 - 112 113 - 128 129 - 144 145 - 160
165 55 83 - 99 100 - 116 117 - 132 133 - 148 149 - 165
170 50 85 - 102 103 - 119 120 - 136 137 - 153 154 - 170
175 45 88 - 105 106 - 123 124 - 140 141 - 157 158 - 175
180 40 90 - 108 109 - 126 127 - 144 145 - 162 163 - 180
185 35 93 - 111 112 - 129 130 - 147 148 - 166 167 - 185
190 30 95 - 114 115 - 133 134 - 152 153 - 171 172 - 190
195 25 98 - 117 118 - 137 138 - 156 157 - 175 175 - 195
200 20 100 - 120 121 - 140 141 - 160 161 - 180 181 - 200
205 <18 101 - 121 122 - 141 142 - 162 162 - 182 183 - 205
Percentage of Max Heart Rate (Beats per Minute)
Max
HR
Age
SHOULD YOU REQUIRE ANY ASSISTANCE REGARDING THIS PRODUCT PLEASE CONTACT YORK DIRECTLY.
*
*
YORK T782 TM / 25

SHOULD YOU REQUIRE ANY ASSISTANCE REGARDING THIS PRODUCT PLEASE CONTACT YORK DIRECTLY.
*
*
HOW TO MONITOR YOUR HEART RATE DURING EXERCISE
Now that you know where your training zone is, you’ll have to monitor yourself to be sure you’re
'
in it. Here is a simple rule, if you can t hold a conversation without gasping for breath you are
probably above your training zone.
To know precisely where you’re working - making sure you’re getting all the benefits We recommend you check your heart rate periodically throughout your workout.
You can use the electronic pulse monitor which will count and display your heart rate for you.
CONTROL YOUR PULSE RATE TO KEEP WITHIN ZONE
How hard you exercise affects your pulse rate, it is determined by two things:
1. Rate: How fast you exercise.
e.g. The speed you cycle, run or step.
2
THE PULSE RATE RULES
If your pulse rate is too low exercise faster or increase load.
If your pulse rate is too high exercise slower or decrease load.
If your pulse rate goes up towards the end of your exercise, you are trying to exercise for too
long, shorten the time.
If your pulse rate does not quickly return to normal after exercise (5-10 minutes) you are not
giving your body a chance to recover, reduce how often you exercise.
REMEMBER - GENERAL FITNESS IS BEST IMPROVED BY INCREASING HOW LONG
YOU EXERCISE RATHER THAN BY HOW HARD.
. Load: The resistance against which you exercise.
e.g. The tension you apply on a cycle or stepper, or the incline set on a treadmill.
YORK T782 TM / 26

HOW LONG TO EXERCISE?
To qualify as a true aerobic exercise with all the benefits we're mentioned, you must maintain
your heart rate within your training zone for at least 12 uninterrupted minutes.
If you exercise longer than 60 minutes the benefits are reduced and the risk of injury is increased.
If you're just starting out on a new exercise program we're commend you stay at the 12 minute
minimum for at least a week. When you feel you're ready to go longer, increase your time no
more than 10% a week. Don't push yourself too hard.
You should never feel exhausted during or following exercise.
TEST YOUR FITNESS LEVEL AND CHECK YOUR PROGRESS
You can use your computer to control your exercise intensity and to monitor your progress.
The time it takes for your pulse to return to normal, after exercise, is an indicator of
your fitness level.
During the first minute of your cool-down phase you will experience a drop in your pulse rate.
The bigger the drop in that minute -- the fitter you are.
TO CHECK YOUR PROGRESS:
1. Monitor your pulse rate the moment you end the aerobic phase of your workout and note your
pulse rate.
2. Begin slowing down for the cool down phase.
3. After 60 seconds note the rate again.
The bigger the drop in that minute-the fitter you are.
To check your progress repeat this test every few weeks using the same duration and exercise
intensity each time.
Keep a record of the results to help you monitor your progress.
SHOULD YOU REQUIRE ANY ASSISTANCE REGARDING THIS PRODUCT PLEASE CONTACT YORK DIRECTLY.
*
*
YORK T782 TM / 27

DESCRIPTION
YORK T782 TM / 28
116116
112112
9393
114114
9999
101101
106106
115115
107107
108108
55
2323
2222
2020
2121
3030
2727
2929
2828
66
2626
44
3232
77
66
55
1515
1919
1010
2525
2424
1818
1010
1313
1717
1616
3131
3939
77
66
55
4545
4646
4444
4848
3636
9898
3737
3434
3333
3535
3939
7272
6969
6969
7474
7575
7373
8383
8282
8181
1818
7676
7979
7878
8080
7777
6161
8484
8686
9090
8585
8787
8888
55
66
5757
3939
5252
3737
5555
55
6363
6262
6161
66
6060
5454
5858
5959
7171
3939
123123
127127
126126
125125
6666
6464
6767
6565
6868
3939
124124
7070
120120
9292
66
4444
77
55
113113
103103
5656
105105
9494
122122
55
111111
109109
55
108108
5353
5353
8989
2323
110110
1818
9797
2323
7575
104104
3939
104104
3939
3939
4343
121121
3737
102102
9898
9696
1010
6969
100100
9595
1818
88
118118
2323
117117
1414
11
1111
1212
44
99
3939
66
3838
5050
4141
66
5151
4242
119119
9191
77
22
4949
77
6262
33
4444

PARTS LIST
YORK T782 TM / 29
KEY NO. PART NO. PART FIG. REF. NO. Q'TY(PCS) DESCRIPTION
FRONT STABILIZER END CAP ( R )
N20807811 10
FRONT STABILIZER END CAP ( L )
M8 NYLON LOCKNUT
156714
56716 1
5581-05
5581-06
W30800811
CABLE TIE MOUNT
1 MAIN FRAME
6190614 5581-132
M4 X 10mm MACHINE SCREW
2 FRONT STABILIZER RUBBER FOOT
SNAP BUSHING
MAIN FRAME SIGNAL CABLE (1920mm )
2
M8 STAR WASHER ( t=0.8mm )
52865
5
6
MOVING WHEEL
M8 FLAT WASHER ( t=1.6mm )
5581-04
W10801611 16
4
SD20401011
1
14048
12
56764
23
5581-09
50811
62108
1
5581-12
9
10 5581-10
8
13 5581-13
15 5581-133
11 5581-131
12
M8 X 55mm ALLEN HEAD BOLT
3 5581-130 61926 2 FRONT MOVING WHEEL BUSHING
2SC108055112 5581-02
7
4
5581-08
5581-07
1 BASE FRAME1 5581-129 61804
17 5581-17
6 RUNNING BOARD CUSHION PAD
M5 X 15mm MACHINE SCREW18
56703 2 FOOT PLATFORM FIXING PLATE
5581-134 SD20501511
52549
32
16 5581-16
20 5581-135 61936
1 LOCK PIN FIXING BRACKET
21 5581-21 56819
1 LOCK PIN
1 LOCK PIN SPRING
13 M4 X 8mm MACHINE SCREW
22 5581-22
23 5581-23 SD10400811
56793
24 5581-24 1 LOCK PIN RELEASE CABLE56832

YORK T782 TM / 30
KEY NO. PART NO. PART FIG. REF. NO. Q'TY(PCS) DESCRIPTION
37 5581-37 W11002011
5581-25 56780
28 5581-28
36 5581-36
38
56817
32 5581-32 53437
56785
2 REAR MOVING WHEEL BUSHING
29 5581-29 SC4087011
1 LOCK HANDLE SLEEVE
1 M8 X 70mm ALLEN HEAD BOLT
1 M8 X50mm ALLEN HEAD BOLT
30 5581-30
31 5581-31 SC4085011
56743
2 TRACK SLIDER
33 5581-136 61876
1 LOCK HANDLE RUBBER STOP
1 INCLINE MECHANISM - WELDED
2 CONNECTION TUBE BUSHING
34 5581-137
35 5581-35 50708
61908
1 INCLINE FIXED SHAFT
5 M10 FLAT WASHER ( t=2mm )
2 M8 X 30mm ALLEN HEAD BOLT
41 5581-41 61816 1 LEFT H FRAME SUPPORT - WELDED
5581-38 SC1083011
5581-39 SD1040641
40 5581-40 61818
39
26 5581-26
2 MAIN FRAME BOTTOM FOOT STOP25
1 LOCK RELEASE HANDLE
18 M4 X 6mm MACHINE SCREW
1 LEFT H FRAME ASSEMBLY
56774
56775
1 LOCK RELEASE LEVER27 5581-27
46 5581-46
42 2 BASE FRAME FIX BUSHING
1 LOCK PIN ( FRONT )
44 5581-44
5581-138
43 5581-139
M8 X 45mm ALLEN HEAD BOLT
61928
6
45 5581-45 56883
SC1084511
56852
RIGHT H FRAME ASSEMBLY1
2 MOVING WHEEL SHAFT SLEEVE
52830 2 INCLINE MOVING WHEEL
47 5581-47 56640
2 H FRAME PIVOT SLEEVE49 5581-49 56886
1 RIGHT H FRAME SUPPORT - WELDED48 5581-48 56688

YORK T782 TM / 31
KEY NO. PART NO. PART FIG. REF. NO. Q'TY(PCS) DESCRIPTION
52a 5581-53 56762 1 INCLINE MOTOR
52b 5581-54 54378 1 INCLINE MOTOR NUT
52c 5581-55 56778 1 INCLINE MOTOR SCREW SHAFT NUT
50 5581-50 56804
1 INCLINE MOTOR ASSEMBLY
51 5581-51 56724
52 5581-52
2 H FRAME END CAP
2 BASE FRAME FIX BUSHING
56662
54 5581-57 50828
2 SIGNAL CABLE, EXT - PCB ( 270mm )
55 5581-58 N21009511
2 INCLINE HEX HEAD FIXING NUT
1 M10 NYLON LOCKNUT
1 M10 X 50mm HEX HEAD BOLT
56 5581-140
57 5581-60 SI1105
56788
58 5581-61 EI002
1 POWER ON/OFF SWITCH
59 5581-62 EC002
1 AC POWER CABLE INLET
1 CIRCUIT BREAKER
SA1083011
60 5581-63
61 5581-64
EP002
5581-66 N10806511
64 5581-67 SK1082011
63 M8 HEX HEAD LOCKNUT1
M8 X 20mm FRINGE HEAD BOLT4
62 5581-65 SA1084011 2 M8 X 40mm HEXAGON HEAD BOLT
2 M8 X 30mm HEXAGON HEAD BOLT
53 5581-56 56812 2 SIGNAL CABLE, EXT - KEY ( 200mm )
61884 1 DC MOTOR FIXING BRACKET
1 SPEED SENSOR W/ CABLE
67 5581-70 SA1082011
1 DC MOTOR ( 1.5HP )
2 M8 X 20mm HEXAGON HEAD BOLT
6 M5 X 10mm MACHINE SCREW
68 5581-142
69 5581-72 SD10501011
52995
1 MOTOR COVER
71 5581-74 56622
2 M5 SPRING WASHER ( t=1.3 mm )
1 CONTROLLER / CIRCUIT BOARD
1 RUNNING BOARD
72 5581-143
73 5581-144 61927
61924
W20501321
54042
70 5581-73
66 5581-69
65 5581-141

YORK T782 TM / 32
KEY NO. PART NO. PART FIG. REF. NO. Q'TY(PCS) DESCRIPTION
8 M6 X 25mm MACHINE SCREWSD106251174 5581-77
75 5581-78 W10601611
1 RUNNING MAT
76 5581-79 56825
8 M6 FLAT WASHER ( t=1.6mm )
2 RUNNING BOARD METAL GUARD
1 DRIVE BELT - RIBBED
77 5581-80
78 5581-81 52864
56739
79 5581-145 61852
1 REAR ROLLER ASSEMBLY
80 5581-83 W40801511
1 FRONT ROLLER ASSEMBLY
2 M8 CURVE WASHER
2 SIDE FOOT PLATFORM
81 5581-84
82 5581-85 56701
56618
83 5581-86 56728
1 LEFT BOTTOM REAR END CAP
84 5581-87 56729
4 SINGLE - BACK SPONGE RUBBER
1 LEFT TOP REAR END CAP
1 RIGHT TOP REAR END CAP
85 5581-88
86 5581-89 56740
56733
87 5581-90 56741
2 M6 X 10mm MACHINE SCREW
88 5581-91 SA1086511
1 RIGHT BOTTOM REAR END CAP
2 M8 X 65mm HEXAGON HEAD BOLT
89 5581-92 SD10601011
96a 5581-100 56773 1 FRONT HANDLE BAR
96b 5581-149 61937 1 FOAM GRIP
6 M4 X 20mm MACHINE SCREW90 5581-93 SD20402011
91 5581-94 56831
1 COMPUTER CONSOLE
92 5581-95 56884
2 CYLINDER
4 CYLINDER FIXING SLEEVE
1 CONSOLE BASE
93 5581-146
94 5581-97 56873
62124
95 5581-147 61828
96 5581-148 61882
1 CONSOLE FIXING SUPPORT - WELDED
1 FRONT HANDLE BAR ASSEMBLY
57659 1 FRONT MAIN FRAME BACK COVER97 5581-102

YORK T782 TM / 33
KE Y N O. PART NO . P AR T F IG. REF . N O. Q 'TY (P CS ) D ES CRIP TIO N
109 a 5 581-1 15 56851 1 H ANDL E BA R
109 b 5 581-11 6 56 863 1 HAND LE BAR FOA M GR IP
566 56
1 RIG HT HA NDLE BAR POST
8 M8 X 15 mm A LLEN HEAD BOLT108 5581-113 SC1081 5
107 5581-154 6 1834
99 5581 -104 567 94
98 5581 -103 SC 10802011 2 M8 X 20m m AL LEN HEAD BOLT
1 RIG HT HA NDLE BAR TOP COVE R
100 5581-105 5 6795
1 LEF T HANDL E BAR TOP COVE R
1 LEF T HANDL E BAR BOTT OM C OVER
1 RIG HT HA NDLE BAR BOTTOM COV ER
101 5581-106
102 5581-107 5 6797
567 96
103 5581-150 5 2817
8 M2.3 X 6mm PHILLIP S HE AD SC REW
104 5581-151 W30 40041 1
4 EXT - SW ITCH KEY
6 8.5m m x 4 .3mm x 0.45mm STA R WA SHER
1 LEF T HANDL E BAR POST
105 5581-152
106 5581-153 6 1832
SE2020 0621
2 HAN DLE BAR ASS EMB LY
110 5581-117 5 7660 1 R EAR M AIN FRA ME B ACK C OVER
109 5581-114
111 5581-118 5 6855
6 M8 X 50 mm A LLEN HEAD BOLT
112 5581-119 5 6644
2 HAN DLE BAR SIDE COV ER
1 MAG AZIN E READING RACK
113 5581-120 SC1085 0
568 96 2 FR ONT STA BILIZ ER RU BBER FOO T
SB1040 0611 4 M4 x 6mm C OUNT ERSU NK M ACHIN E SC REW
619 07 1 BA SE FR AME CABLE JACK ET
SD1050 1021 2 M5 x 10m m MA CHIN E SCR EW
SC1080 3021 2 M8 x 30m m AL LEN H EAD BOLT
SC1080 5521 2 M8 X 55m m AL LEN HEA D BO LT
1 FILTER
122
127 5581-166 5 6789
4 M3 X 6m m PH ILLIP S HEAD SCR EW
126 M3 SPRING W ASHE R ( t= 0.8 m m )
125 5581-164 SG10 300641
558 1-165 W203008 11 4
528 80 4 CU SCRE W SL EEVE
124 5581-163 5 6705 1 C HOKE
558 1-161
123 5581-162
1 COM PUTER CAB LE ( 400m m )114 5581-121 5 6690
115 5581-122 5 6766
116 5581-155 5 2957
1 MID DLE W IRE ( 1150 mm )
1 SAF ETY KEY
558 1-158
120 5581-159
117 5581-156
118 5581-157
121 5581-160
119

YORK T782 TM / 34

YORK T782 TM / 35
YORK BARBELL LIMITED WARRANTY INFORMATION
York Barbell Ltd warrants this product to be free from defects in workmanship and material
under normal use and conditions from the date of original purchase. This excludes normal
wear and tear and is applicable to the original purchaser with sales receipt as proof of
purchase.
The warranty period varies according to the type of product, model or parts concerned and
may vary according to country. Please request full warranty details from the York office in
your location (see below).
This warranty covers the product for home/domestic use only and not for commercial or
rental usage.
York Barbell Ltd will not be responsible for damages or failures that occur as a result of
improper assembly, adjustment or failure to operate the product as detailed in the manual.
This warranty does not cover accidental damage, misuse, abuse, lack of reasonable care for
the product, freight damage or alterations or repairs not made by York Barbell Ltd or a
recommended service centre.
During the warranty period, York Barbell will at no additional charge replace parts or repair
the product if it becomes defective, malfunctions or otherwise fails to conform to this
warranty under usual, non commercial use.
In repairing the product, York Barbell Ltd may replace defective parts and reserves the right
to use serviceable used parts that are equivalent to new parts in performance.
In the unlikely event of a problem occurring, please contact your local York Barbell authorised
dealer. Please have your proof of purchase ready.
If the problem cannot be fixed by sending parts, you will need to arrange to send the goods to
a York authorised repair centre. You must prepay any shipping charges and you are
responsible for insuring any product or part shipped or returned. Returns will not be
accepted without written authorisation by York Customer Service Department.
It is strongly recommended that you complete the warranty card enclosed
with your product and return it to your authorized local YORK dealer.
WARRANTY REGISTRATION
HELP LINE (8:30am- 4:30pm)
U.K.
AUSTRALIA
YORK BARBELL (U.K.) LTD.
YORK WAY, DAVENTRY,
NORTHANTS, NN11 4YB ENGLAND
TEL: (01327) 701-824
FAX: (01327) 706-704
E-MAIL: helpdesk@yorkfitness.co.uk
HELP LINE (8:00am- 4:00pm)
HELP LINE (8:30am- 4:30pm)
CANADA
TAIWAN
HELP LINE (9:00am- 6:00pm)
YORK BARBELL CO. LTD.
1450 S. SERVICE ROAD WEST,
OAKVILLE (TORONTO), ONTARIO,
CANADA L6L 5T7
TEL: (905) 827-6362
FAX: (905) 827-9593
YORK FITNESS (TAIWAN) LTD.
ROOM A2 4F, NO.51, GONG-YI ROAD,
SEC. 2, TAICHUNG CITY, TAIWAN
TEL: +886-4-2319-3448
FAX: +886-4-2319-3449
E-MAIL: yorktwn@ms25.hinet.net
YORK BARBELL (AUST.) PTY. LTD.
UNIT 1, LOT 2, SWAFFHAM ROAD,
MINTO, N.S.W. 2566 AUSTRALIA
TEL: (02) 9603-8444
FAX: (02) 9603-8555
E-MAIL: service@yorkfitness.com.au
F I T N E S S
F I T N E S S
F I T N E S S
F I T N E S S
Authorized Dealer
U.S.A.
YORK BARBELL USA.
3300 BOARD ROAD.
YORK, PA 17402
TEL: +1-717-767-6481
FAX: +1-717-764-0416
E-MAIL: info@yorkbarbell.com
HELP LINE (8:00am- 5:00pm)
F I T N E S S
The warranty for York T782 Treadmill for
Frame is lifetime, Motor is 10 years and All components is 1 year

YORK T782 TM / 36
IMPORTANT: Please complete and return this page, with a copy of your receipt, to your local York dealer within 14 days.
Alternatively, you can register your warranty on-line - please visit www.yorkfitness.com
WARRANTY REGISTRATION
YOUR WARRANTY IS ONLY VALID IF YOU CAN PROVIDE PROOF OF THE ORIGINAL PURCHASE.
This can be the receipt, invoice, delivery note or internet confirmation.
Where from (name of retailer)? _______________________________________________________________________
Which product did you buy? _________________________________________________________________________
Date Purchased _____________________________ Serial / Batch No _______________________________
Name (Mr/Miss/Mrs)_________________________________________________________________________________
Address __________________________________________________________________________________________
_______________________________________________________________ Postcode __________________________
Telephone Number ____________________________________
E-mail address _______________________________________
Any other comments
This information will be held by York Barbell Ltd and will not be passed onto third parties. Please tick this box if you would not like to
receive further information from York Barbell
Please help us to improve our products and services by answering the following questions:
How did you buy this product?
Over the internet
Other, please specify
In a shop
Mail order catalogue
Why did you choose this product (tick all that apply)?
Discounted price
York brand name
Best specification at the price you wanted to pay
Word of mouth recommendation
Sales staff recommendation
Received as a present
What prompted you to buy fitness equipment (tick all
that apply)?
Replacing old equipment
Saw an advert with big price savings
Medical advice
Thought it was about time to get fit
Want to look good
Did you search the web before buying this product?
Yes
No
Do you have access to a PC at home?
Yes
No
Were you aware of York before you bought this product?
Yes
No
How would you rate the product you have just
purchased (1 = poor, 10 = excellent)?
Quality
Looks
Usability
Instruction manual
Ease of assembly
How old are you?
Under 18
18 29
30-39
40-49
50+
On average, how many times a week do you
exercise / work out?
0
1 - 2
2 - 3
4 or more
Are you a member of a gym or fitness club?
Yes
No

PLACE
STAMP
HERE
F I T N E S S

Part
No.
Q'ty
Part Description
Unit Price
Total
Total value of order
PARTS ORDER FORM
Enclose a check or money order
with this form for replacement parts.
Date of purchase
Name of location where purchased
Model number
Last name, First name
Telephone number
Address City State Zip/Postcode
Send your order to:
YORK BARBELL (AUST.) PTY. LTD.
UNIT 1, LOT 2, SWAFFHAM ROAD,
MINTO N.S.W. 2566
AUSTRALIA
YORK BARBELL (U.K.) LTD.
YORK WAY,
DAVENTRY, NORTHANTS,
ENGLAND, NN11 4YB

PLACE
STAMP
HERE
F I T N E S S
PLACE
STAMP
HERE
PLACE
STAMP
HERE
 Loading...