

Page 1

User Manual
SMS Bridge
Global Monitoring System
YORK Marine, Controls/ – the people to talk to
Page 2

User Manual
Table of Contents
Introduction............................................................................................................................. 3
Requirements ......................................................................................................................... 5
Installation .............................................................................................................................. 6
Configuration .......................................................................................................................... 7
Operation.............................................................................................................................. 11
Troubleshooting.................................................................................................................... 12
Document Revision Record.................................................................................................. 15
User Manual
YORK Marine, Controls
Jens Juuls Vej 28, 8260 Viby J, Denmark
Phone: +45 87 36 35 00
Web: www.yorkref.com
Table of Contents YORK Marine, Controls
Revision 1.3 · Updated: 070507 Author: Marc Anderson · Owner: RS
Project : SMS Bridge Page 2 of 15
File: e:\york\sms bridge\manual\smsbridge-manual_13.doc
Copyright
YORK Marine ApS
All Rights Reserved
Page 3
User Manual
Introduction
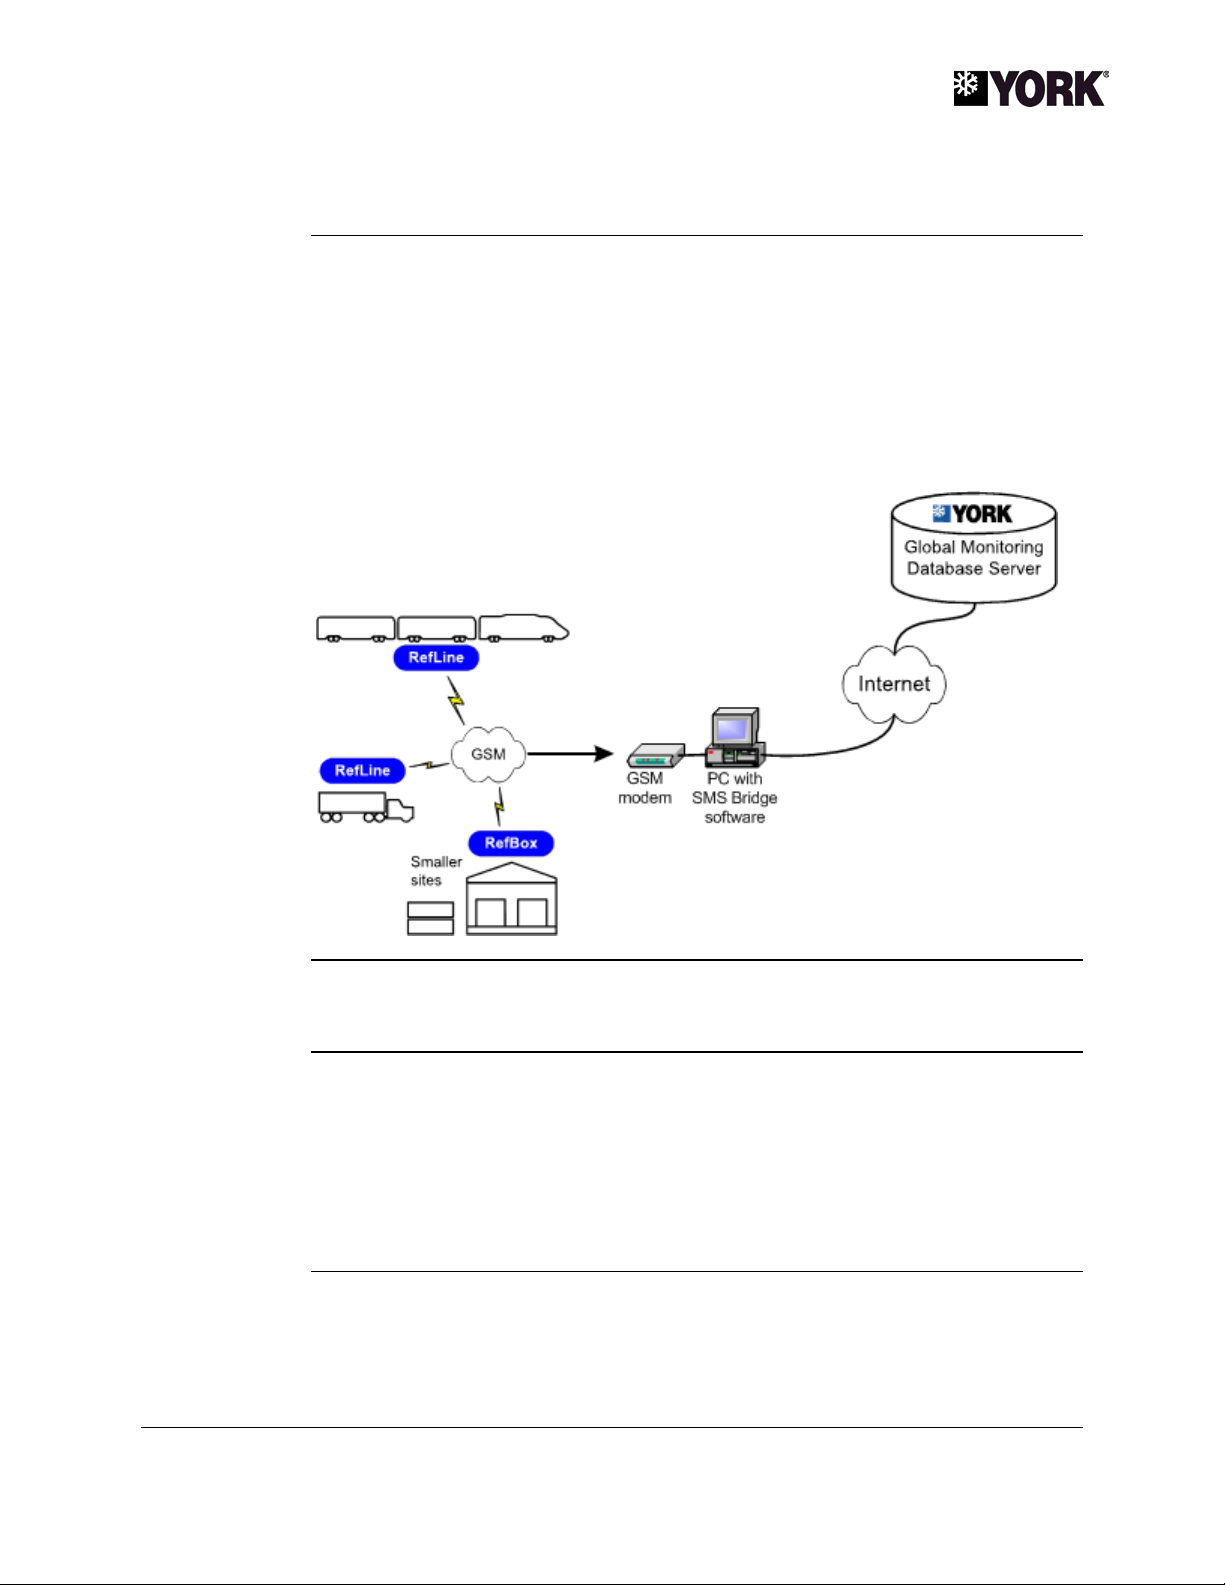
System overview
The SMS Bridge provides an economical means of transmitting reefer monitoring
data to the YORK Global Monitoring Server (GMS). Instead of sending SMS
messages directly to the GMS server in Denmark, your monitoring systems send
them to the SMS Bridge. The SMS Bridge relays the messages to the GMS server
via the Internet, reducing the cost of data transmission.
The SMS Bridge is intended for use with the YORK RefLine and RefBox reefer
monitoring systems. It consists of a GSM modem and a software application for a
Windows 2000 or XP PC.
Purpose of this
document
Included items
Introduction YORK Marine, Controls
Revision 1.3 · Updated: 070507 Author: Marc Anderson · Owner: RS
Project : SMS Bridge Page 3 of 15
File: e:\york\sms bridge\manual\smsbridge-manual_13.doc
This document describes how to install and use the SMS Bridge.
The SMS Bridge comes with the following items:
• GSM dual band 900/1800 MHz modem
• Universal input 12 V DC power supply
• GSM 900 / 1800 MHz antenna
• 1 m modem data cable
• CD-rom with SMS Bridge application
• User manual
Continued on next page
Page 4
User Manual
Introduction, Continued
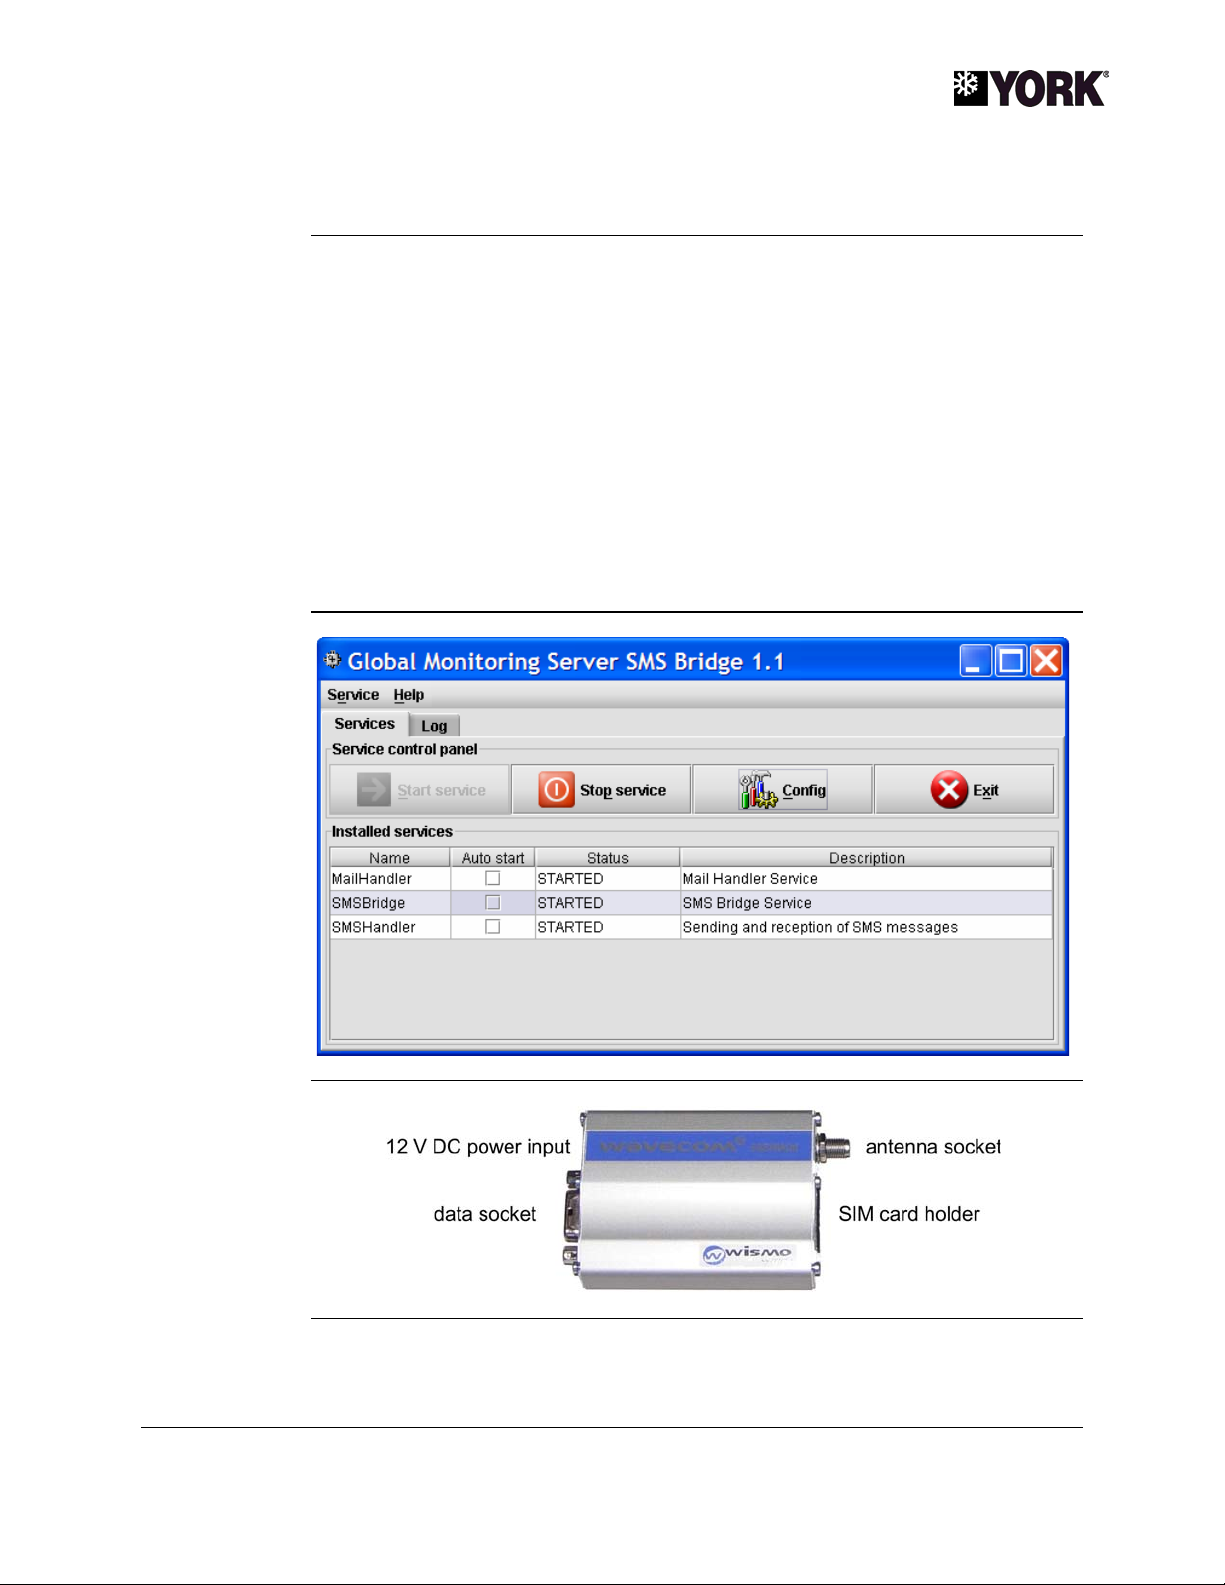
Services
Main screen
The SMS Bridge application consists of three following components, or services.
• MailHandler service
Sends system related e-mails, for example if the GSM modem loses it’s
registration on the GSM network. This is an optional service for your
convenience.
• SMSHandler service
Receives SMS messages from the GSM modem and delivers them to the
SMSBridge service. Required for operation.
• SMSBridge service
Transfers SMS messages to the Global Monitoring Server over the Internet.
Required for operation.
GSM modem
Introduction YORK Marine, Controls
Revision 1.3 · Updated: 070507 Author: Marc Anderson · Owner: RS
Project : SMS Bridge Page 4 of 15
File: e:\york\sms bridge\manual\smsbridge-manual_13.doc
Page 5

User Manual
Requirements
Computer
GSM service
Internet
connection
The SMS Bridge runs on Windows 2000 and XP personal computers. The computer
must have an RS-232 serial (COM) port for connection of the GSM modem or a
serial port adaptor.
The SMS Bridge receives data over the GSM mobile phone network via SMS text
messages. This requires a GSM account and SIM card (not included).
More information about the GSM system, including coverage maps, is available from
www.gsmworld.com
provider.
Note: Verify that the GSM provider supports text messaging through “circuitswitched” core network services rather than “packet switched” services.
The SMS Bridge requires an ISDN or faster connection to the Internet. If the Internet
connection is not “always on”, it must be capable of automatic log on.
. To obtain GSM service, consult with a local GSM mobile phone
E-mail account
on SMTP server
An e-mail address is required by the MailHandler service to send system messages.
This function is an optional convenience and not required for data relay.
Note: The current version of the SMS Bridge does not support password
authentication. The MailHandler service does not work if your SMTP email server
requires authentication to send outgoing mail.
Requirements YORK Marine, Controls
Revision 1.3 · Updated: 070507 Author: Marc Anderson · Owner: RS
Project : SMS Bridge Page 5 of 15
File: e:\york\sms bridge\manual\smsbridge-manual_13.doc
Page 6

User Manual
Installation
Before you begin
Software
installation
Before installing the modem and software:
• Verify that the PC has an RS-232 serial (COM) port. If no serial port is available, a
USB to serial port adaptor may be used.
• Verify that a GSM signal is present at the PC location. You can check for a signal
using a mobile phone.
• Make a note of the SIM card PIN code and the GSM service provider’s SMS
message center number.
• Ask your system administrator to provide the SMTP host name and whether the
SMTP server requires password authentication.
Install the SMS Bridge software on the PC as follows.
Step Action
1 Save your work and close all applications.
2 Insert the included CD-ROM in the disk drive.
3 Double-click the installation file (GMSSMSBridge-x_x) to start the
installation process.
4 Follow the setup wizard instructions to complete the installation.
Modem setup
Software removal
Setup and connect the GSM modem as follows. Note! Do not apply power to the
modem without first connecting the antenna.
Step Action
1 Connect the 9-pin plug of the serial cable to a serial port on the PC.
Connect the other plug to the modem.
2 Press in the SIM card release button and remove the SIM card holder.
Place the SIM card in the holder and insert the holder back in the
modem.
3 Connect the GSM antenna to the modem. Lead the antenna to a
convenient location, remove the tape, and press the antenna firmly to
the mounting surface.
4 Plug the output from the included power supply into the modem’s DC
input socket.
5 Verify that the antenna is connected to the modem, then connect the
power supply to AC power.
6 Verify that the modem LED is lit.
To uninstall the SMS Bridge application, select Uninstall SMS Bridge from the
Global Monitoring Server folder in your program list
Installation YORK Marine, Controls
Revision 1.3 · Updated: 070507 Author: Marc Anderson · Owner: RS
Project : SMS Bridge Page 6 of 15
File: e:\york\sms bridge\manual\smsbridge-manual_13.doc
Page 7

User Manual
Configuration
Service startup
By default, the services do not automatically start when the application is launched.
To start a service, you click it’s name and then click the Start service button. To
avoid this step, select the Auto start option for each service as shown below.
Mail handler
configuration
Configure the MailHandler as follows.
Step Action
1 Click MailHandler in the main screen.
2 Click the Config button. The configuration screen opens.
3 SMTP host: Enter the host name of the SMTP server used to send e-
mail. Your system administrator can provide this information.
4 From e-mail: Enter the “from” e-mail address.
Continued on next page
Configuration YORK Marine, Controls
Revision 1.3 · Updated: 070507 Author: Marc Anderson · Owner: RS
Project : SMS Bridge Page 7 of 15
File: e:\york\sms bridge\manual\smsbridge-manual_13.doc
Page 8

User Manual
Configuration, Continued
Mail handler configuration (continued)
Step Action
5 From name: Enter a name to identify the sender as the SMS Bridge
system. The receiver sees this name in the inbox.
6 Administrator e-mail: Enter the address for person monitoring the
system.
7 Click Save configuration to save the changes.
8 Click the Test button to send a test message from the SMS Bridge to the
administrator.
9 Close the configuration screen and start the service.
SMS bridge
configuration
The SMS Bridge is pre-configured with the settings that are required for most
applications. If the service does not start, verify the settings as described below.
Step Action
1 Click SMSBridge in the main screen.
2 Click the Config button. The configuration screen opens.
3 Log interface host: This is the host name for the GMS log interface.
The setting to use is logif.reefers-online.com.
In rare cases it may be necessary to enter the IP address for the
interface. The IP address is currently 195.249.110.24 but is subject to
change.
4 Log interface port: The value for this setting is 10000.
5 Close the window and start the service. The service is functioning
correctly if STARTED appears in the Status field.
Continued on next page
Configuration YORK Marine, Controls
Revision 1.3 · Updated: 070507 Author: Marc Anderson · Owner: RS
Project : SMS Bridge Page 8 of 15
File: e:\york\sms bridge\manual\smsbridge-manual_13.doc
Page 9

User Manual
Configuration, Continued
SMS Handler
configuration
Configure the SMSHandler as follows.
Step Action
1 Click SMSHandler in the main screen.
2 Click the Config button. The configuration screen opens.
3 SIM PIN code: Enter the PIN code for the SIM card.
NOTE: Verify that the PIN code is correct! The SMSHandler transmits
the PIN code to the modem three times, which may result in blocking of
the SIM card if the code is incorrect. See Troubleshooting if the SIM card
is blocked.
The PIN code field is not used if SIM card’s PIN code request is
disabled.
Continued on next page
Configuration YORK Marine, Controls
Revision 1.3 · Updated: 070507 Author: Marc Anderson · Owner: RS
Project : SMS Bridge Page 9 of 15
File: e:\york\sms bridge\manual\smsbridge-manual_13.doc
Page 10

User Manual
Configuration, Continued
SMS Handler configuration (continued)
Step Action
4 COM port: Enter the number of the COM port to which the GSM modem
is connected.
If using a USB to Serial Port adaptor, to find the port number right-click
My Computer, click Manage, click Device Manager, and double-click
Ports (COM & LPT) in the list of devices. The port number should be
shown in parenthesis after the device name.
5 Baud rate: Select 115200.
6 SMS service center: Enter the phone number of the SMS service center
of your GSM provider.
7 Receive status reports: When selected, the SMS handler handles
status reports when sending SMS messages. Status reports are not
displayed.
8 GSM char set: Select GSM.
9 Click Save configuration to save the changes.
10 Click Start service to initialize the modem. After a few moments, the
modem’s LED starts to blink to indicate the modem has successfully
logged on to the GSM network.
Configuration YORK Marine, Controls
Revision 1.3 · Updated: 070507 Author: Marc Anderson · Owner: RS
Project : SMS Bridge Page 10 of 15
File: e:\york\sms bridge\manual\smsbridge-manual_13.doc
Page 11

User Manual
Operation
Starting the SMS
Bridge
Normal operation
After the system has been installed and configured as described in the previous
sections, start the SMS Bridge as follows. If the Auto Start option is selected, no user
intervention is required.
Step Action
1 Start the computer. The SMS Bridge launches automatically on start-up.
Should you need to launch the SMS Bridge manually, select SMS
Bridge from the Global Monitoring Server folder in your program list.
2 If you have not selected the Auto Start option, start the services by
clicking the service name and then clicking the Start service button.
3 Refer to the troubleshooting section if a service fails to start.
Once the SMSHandler and SMSBridge services are started, the modem is logged on
to the GSM network (indicated by flashing of the LED), the SMS Bridge is
operational. For uninterrupted operation, it is recommended that the computer be left
on.
Note that your RefLine/RefBox systems must be configured with the number for the
SMS Bridge.
RefLine/RefBox
configuration
To configure RefLine and/or RefBox systems, use the Service Tool to change the
phone number in the WEB server phone number field of the Basic tab to the
number for the SMS Bridge. Please refer to the RefLine or RefBox user manual.
Operation YORK Marine, Controls
Revision 1.3 · Updated: 070507 Author: Marc Anderson · Owner: RS
Project : SMS Bridge Page 11 of 15
File: e:\york\sms bridge\manual\smsbridge-manual_13.doc
Page 12

User Manual
Troubleshooting
Monitoring
activity
The log function allows you to monitor system activity. To view the log, click the Log
tab. To make the log scroll up as new messages appear, select the Auto scroll
option.
Log detail
Log messages are divided into seven levels of detail from Finest to Severe.
Selecting a detail level causes the log to display that level and those below it. For
example, selecting the Info level displays Info, Warning, and Severe messages, but
not Config, Fine, Finer, or Finest messages.
• Finest: All activity, including low-level modem commands
• Finer: Very detailed activity
• Fine: Detailed activity
• Config: Modem configuration activity
• Info: General activity
• Warning: All errors
• Severe: Critical errors
To monitor the system for errors, set the message level to Warning or Severe.
Continued on next page
Troubleshooting YORK Marine, Controls
Revision 1.3 · Updated: 070507 Author: Marc Anderson · Owner: RS
Project : SMS Bridge Page 12 of 15
File: e:\york\sms bridge\manual\smsbridge-manual_13.doc
Page 13

User Manual
Troubleshooting, Continued
MailHandler
SMSBridge
Use the table below to troubleshoot problems with the MailHandler service.
Problem Likely Cause Solution
Error message “Details:
[host name]”
Error message “Details:
553 Authentication is
required...”
Use the table below to troubleshoot problems with the SMSBridge service.
Problem Likely Cause Solution
Error Starting
Incorrect SMTP host
name
Mail server requires user
authentication
No connection to Internet Refer to system
System unable to resolve
log interface host name
Get host name from
system administrator.
The MailHandler is not
compatible with the
server. Use log to monitor
system directly.
administrator or ISP
Enter IP address in log
interface host field.
SMSHandler
Use the table below to troubleshoot problems with the SMSHandler service.
Problem Likely Cause Solution
Error starting and servere
log message:
AT+CPIN=[PIN] failed
Error starting and severe
log message: SIM CARD
FAILURE
Incorrect PIN code Change PIN code in
configuration dialog
SIM card locked due to
attempt to configure with
incorrect PIN code
Missing SIM card Place SIM card in modem
Defective SIM card Verify by testing modem
Place SIM card in a
mobile phone and unlock
with the card’s PUK code.
with a different SIM card
or testing the card in a
mobile phone.
Continued on next page
Troubleshooting YORK Marine, Controls
Revision 1.3 · Updated: 070507 Author: Marc Anderson · Owner: RS
Project : SMS Bridge Page 13 of 15
File: e:\york\sms bridge\manual\smsbridge-manual_13.doc
Page 14

User Manual
Troubleshooting, Continued
SMSHandler (continued)
Problem Likely Cause Solution
Error starting and severe
log message: Unable to
open specified com port
Error starting and severe
log message: Modem
activity query failed
Service starts, modem
LED flashes but test
messages fail
Service starts but LED
does not flash
Wrong COM port Select correct COM port
in configuration dialog
Modem cable not
connected
Modem cable not
connected
Wrong BAUD rate Select correct BAUD
Defective modem Contact YORK service
Missing or wrong service
center number
Poor GSM signal Verify that modem
Defective modem Contact YORK service
Check connections
Check connections
setting (115200) in
configuration dialog
Enter the SMS service
center number for the
GSM provider in the
configuration dialog.
antenna is connected and
that there is a good signal
E-mail error
messages
Use the table below to troubleshoot the most common errors generated by the
MailHandler service.
Problem Likely Cause Solution
GMS modem loses
registration on GSM
network
Restart of GSM modem
fails
Poor GSM signal Allow modem to re-
register. If problem
persists, verify that
modem antenna is
connected and that there
is a good signal
SIM card removed from
modem
Cable disconnected or
USB adaptor moved
Modem power failure Check connections to
Defective modem Contact YORK service
Replace SIM card
Check cable connections
between modem and PC.
If using a USB to Serial
Port adaptor, verify port
assignment.
modem power supply
Troubleshooting YORK Marine, Controls
Revision 1.3 · Updated: 070507 Author: Marc Anderson · Owner: RS
Project : SMS Bridge Page 14 of 15
File: e:\york\sms bridge\manual\smsbridge-manual_13.doc
Page 15

User Manual
Document Revision Record
Rev. Date Author Brief description of change Pages affected
1.0 8 aug 2003 PCL Original issue of this document all
1.1 26 may 2004 PCL GSM modem baud rate added 1
1.2 23 mar 2005 PCL Not released
1.3 07 may 2007 MA General revision and update all
Document Revision Record YORK Marine, Controls
Revision 1.3 · Updated: 070507 Author: Marc Anderson · Owner: RS
Project : SMS Bridge Page 15 of 15
File: e:\york\sms bridge\manual\smsbridge-manual_13.doc
 Loading...