

Page 1
INSTALLATION
MANUAL
CONTENTS
GENERAL . . . . . . . . . . . . . . . . . . . . . . . . . . . . . . . . . . . . .5
SAFET Y C ON S ID E RA T IONS. . . . . . . . . . . . . . . . . . . . . .5
INSPECTION. . . . . . . . . . . . . . . . . . . . . . . . . . . . . . . . . . .5
REFERENCE. . . . . . . . . . . . . . . . . . . . . . . . . . . . . . . . . . .5
APPROVALS. . . . . . . . . . . . . . . . . . . . . . . . . . . . . . . . . . .5
NOMENCLATURE . . . . . . . . . . . . . . . . . . . . . . . . . . . . . .6
INSTALLATION. . . . . . . . . . . . . . . . . . . . . . . . . . . . . . . .10
OPERATION . . . . . . . . . . . . . . . . . . . . . . . . . . . . . . . . . .33
START-UP (COOLING). . . . . . . . . . . . . . . . . . . . . . . . . .37
NORMAL MAINTENANCE . . . . . . . . . . . . . . . . . . . . . . .39
®
SINGLE PACKAGE AIR CONDITIONERS AND
SINGLE PACKAGE ELECTRIC UNITS
DM090, 120 and 150
7-1/2 TO 12-1/2 TON
(380V, 3 Phase, 60 HZ)
TROUBLESHOOTING . . . . . . . . . . . . . . . . . . . . . . . . . .39
See following pages for a complete Table of Contents.
NOTES, CAUTIONS AND WARNINGS
The installer should pay particular attention to the words:
NOTE, CAUTION, and WARNING. Not es
clarify or make the installation easier. Cautions
to prevent equipment damage. Warnings
installer that personal injury and/or equipment damage
may result if installation procedure is not handled properl y.
are intended to
are given
are given to alert
CAUTION: READ ALL SAFETY GUIDES BEFORE YOU
BEGIN TO INSTALL YOUR UNIT.
SA VE THIS MANUAL
035-17311-002-A-0803
Page 2

TABLE OF CONTENTS
035-17311-002-A-0803
GENERAL . . . . . . . . . . . . . . . . . . . . . . . . . . . . . . . . . . . . . . 5
SAFETY CONSIDERATIONS . . . . . . . . . . . . . . . . . . . . . . .5
INSPECTION . . . . . . . . . . . . . . . . . . . . . . . . . . . . . . . . . . . .5
REFERENCE . . . . . . . . . . . . . . . . . . . . . . . . . . . . . . . . . . . .5
APPROVALS . . . . . . . . . . . . . . . . . . . . . . . . . . . . . . . . . . . . 5
NOMENCLATURE . . . . . . . . . . . . . . . . . . . . . . . . . . . . . . . 6
INSTALLATION . . . . . . . . . . . . . . . . . . . . . . . . . . . . . . . . . 10
INSTALLATION SAFETY INFORMATION . . . . . . . . . . . . . 10
PRECEDING INSTALLATION . . . . . . . . . . . . . . . . . . . . . . . 10
LIMITATIONS . . . . . . . . . . . . . . . . . . . . . . . . . . . . . . . . . . . . 10
LOCATION . . . . . . . . . . . . . . . . . . . . . . . . . . . . . . . . . . . . . . 11
RIGGING AND HANDLING . . . . . . . . . . . . . . . . . . . . . . . . . 11
CLEARANCES . . . . . . . . . . . . . . . . . . . . . . . . . . . . . . . . . . . 12
DUCTWORK . . . . . . . . . . . . . . . . . . . . . . . . . . . . . . . . . . . . 15
DUCT COVERS . . . . . . . . . . . . . . . . . . . . . . . . . . . . . . . . . . 15
CONDENSATE DRAIN . . . . . . . . . . . . . . . . . . . . . . . . . . . . 16
COMPRESSORS . . . . . . . . . . . . . . . . . . . . . . . . . . . . . . . . . 16
FILTERS . . . . . . . . . . . . . . . . . . . . . . . . . . . . . . . . . . . . . . . 16
THERMOSTAT WIRING . . . . . . . . . . . . . . . . . . . . . . . . . . . 17
POWER AND CONTROL WIRING . . . . . . . . . . . . . . . . . . . 17
POWER WIRING DETAIL . . . . . . . . . . . . . . . . . . . . . . . . . . 17
OPTIONS/ACCESSORIES . . . . . . . . . . . . . . . . . . . . . . . . . 21
ELECTRIC HEAT ACCESSORIES . . . . . . . . . . . . . . . . . . . . . 21
ELECTRIC HEAT OPTION . . . . . . . . . . . . . . . . . . . . . . . . . . . 21
MOTORIZED OUTDOOR DAMPER . . . . . . . . . . . . . . . . . . . . 21
ECONOMIZER . . . . . . . . . . . . . . . . . . . . . . . . . . . . . . . . . . . .22
POWER EXHAUST . . . . . . . . . . . . . . . . . . . . . . . . . . . . . . . . .22
RAIN HOOD . . . . . . . . . . . . . . . . . . . . . . . . . . . . . . . . . . . . . . 22
ECONOMIZER AND POWER EXHAUST SET POINT
ADJUSTMENTS AND INFORMATION . . . . . . . . . . . . . . . 22
MINIMUM POSITION ADJUSTMENT . . . . . . . . . . . . . . . . . . .22
ENTHALPY SET POINT ADJUSTMENT . . . . . . . . . . . . . . . . . 22
POWER EXHAUST DAMPER SET POINT (WITH OR
WITHOUT POWER EXHAUST) . . . . . . . . . . . . . . . . . . . . . . .22
INDOOR AIR QUALITY AQ . . . . . . . . . . . . . . . . . . . . . . . . . . . 22
PHASING . . . . . . . . . . . . . . . . . . . . . . . . . . . . . . . . . . . . . . . 24
BLOWER ROTATION . . . . . . . . . . . . . . . . . . . . . . . . . . . . . 24
BELT TENSION . . . . . . . . . . . . . . . . . . . . . . . . . . . . . . . . . . 24
AIR BALANCE . . . . . . . . . . . . . . . . . . . . . . . . . . . . . . . . . . . 31
CHECKING AIR QUANTITY . . . . . . . . . . . . . . . . . . . . . . . . 31
METHOD ONE . . . . . . . . . . . . . . . . . . . . . . . . . . . . . . . . . . . . .31
METHOD TWO . . . . . . . . . . . . . . . . . . . . . . . . . . . . . . . . . . . .31
SUPPLY AIR DRIVE ADJUSTMENT . . . . . . . . . . . . . . . . . 32
OPERATION . . . . . . . . . . . . . . . . . . . . . . . . . . . . . . . . . . . 33
SEQUENCE OF OPERATIONS OVERVIEW . . . . . . . . . . . 33
COOLING SEQUENCE OF OPERATION . . . . . . . . . . . . . . 34
CONTINUOUS BLOWER . . . . . . . . . . . . . . . . . . . . . . . . . . . . .34
INTERMITTENT BLOWER . . . . . . . . . . . . . . . . . . . . . . . . . . .34
NO OUTDOOR AIR OPTIONS . . . . . . . . . . . . . . . . . . . . . . . .34
ECONOMIZER WITH SINGLE ENTHALPY SENSOR - . . . . .34
ECONOMIZER WITH DUAL ENTHALPY SENSORS - . . . . . .34
ECONOMIZER WITH POWER EXHAUST - . . . . . . . . . . . . . .34
MOTORIZED OUTDOOR AIR DAMPERS - . . . . . . . . . . . . . .34
COOLING OPERATION ERRORS . . . . . . . . . . . . . . . . . . . . .35
HIGH-PRESSURE LIMIT SWITCH . . . . . . . . . . . . . . . . . . . . .35
LOW-PRESSURE LIMIT SWITCH . . . . . . . . . . . . . . . . . . . . . .35
FREEZESTAT . . . . . . . . . . . . . . . . . . . . . . . . . . . . . . . . . . . . .35
LOW AMBIENT COOLING . . . . . . . . . . . . . . . . . . . . . . . . . . . .35
SAFETY CONTROLS . . . . . . . . . . . . . . . . . . . . . . . . . . . . . 35
COMPRESSOR PROTECTION . . . . . . . . . . . . . . . . . . . . . 35
FLASH CODES . . . . . . . . . . . . . . . . . . . . . . . . . . . . . . . . . . . .36
RESET . . . . . . . . . . . . . . . . . . . . . . . . . . . . . . . . . . . . . . . . . . .36
ELECTRIC HEATING SEQUENCE OF OPERATIONS . . . 36
ELECTRIC HEATING OPERATION ERRORS . . . . . . . . . . 36
TEMPERATURE LIMIT . . . . . . . . . . . . . . . . . . . . . . . . . . . . . .36
SAFETY CONTROLS . . . . . . . . . . . . . . . . . . . . . . . . . . . . . . .36
LIMIT SWITCH (LS) . . . . . . . . . . . . . . . . . . . . . . . . . . . . . . . . .36
FLASH CODES . . . . . . . . . . . . . . . . . . . . . . . . . . . . . . . . . . . .36
RESET . . . . . . . . . . . . . . . . . . . . . . . . . . . . . . . . . . . . . . . . . . .36
ELECTRIC HEAT ANTICTPATOR SETPOINTS . . . . . . . . . 36
START-UP (COOLING) . . . . . . . . . . . . . . . . . . . . . . . . . . 37
PRESTART CHECK LIST . . . . . . . . . . . . . . . . . . . . . . . . . . 37
OPERATING INSTRUCTIONS . . . . . . . . . . . . . . . . . . . . . . 37
POST START CHECK LIST . . . . . . . . . . . . . . . . . . . . . . . . 37
CHARGING THE UNIT . . . . . . . . . . . . . . . . . . . . . . . . . . . 37
NORMAL MAINTENANCE . . . . . . . . . . . . . . . . . . . . . . . . 39
GENERAL . . . . . . . . . . . . . . . . . . . . . . . . . . . . . . . . . . . . . . 39
FILTERS . . . . . . . . . . . . . . . . . . . . . . . . . . . . . . . . . . . . . . . . . .39
MOTORS . . . . . . . . . . . . . . . . . . . . . . . . . . . . . . . . . . . . . . . . .39
OUTDOOR COIL . . . . . . . . . . . . . . . . . . . . . . . . . . . . . . . . . . .39
TROUBLESHOOTING . . . . . . . . . . . . . . . . . . . . . . . . . . 39
PREDATOR® FLASH CODES . . . . . . . . . . . . . . . . . . . . . . 39
COOLING TROUBLESHOOTING GUIDE . . . . . . . . . . . . . . 41
2 Unitary Products Group
Page 3

035-17311-002-A-0803
LIST OF FIGURES
Fig. # Pg.#
1 UNIT SHIPPING BRACKET . . . . . . . . . . . . . . . . . . . . 10
2 CONDENSER COVERING . . . . . . . . . . . . . . . . . . . . 10
3 COMPRESSOR SECTION . . . . . . . . . . . . . . . . . . . . . 10
4 PREDATOR
®
COMPONENT L OCATION . . . . . . . . . 11
5 UNIT 4 POINT LOAD . . . . . . . . . . . . . . . . . . . . . . . . . 12
6 UNIT 6 POINT LOAD . . . . . . . . . . . . . . . . . . . . . . . . . 12
7 UNIT CENTER OF GRAVITY . . . . . . . . . . . . . . . . . . . 12
8 UNIT DIMENSIONS . . . . . . . . . . . . . . . . . . . . . . . . . . 13
9 BOTTOM DUCT OPENINGS (FROM ABOVE) . . . . . 14
10 REAR DUCT DIMENSIONS . . . . . . . . . . . . . . . . . . . . 14
11 PREDATOR
12 SUNLINE™ TO PREDATOR
®
ROOF CURB DIMENSIONS . . . . . . . . 15
®
TRANSITION ROOF
CURBS . . . . . . . . . . . . . . . . . . . . . . . . . . . . . . . . . . . . 15
Fig. #
Pg.#
13 SIDE PANELS WITH HOLE PLUGS . . . . . . . . . . . . . 16
14 RETURN DOWNFLOW PLENUM WITH PANEL . . . 16
15 DISCHARGE PANEL IN PLACE . . . . . . . . . . . . . . . . 16
16 CONDENSATE DRAIN . . . . . . . . . . . . . . . . . . . . . . . 16
17 ELECTRONIC THERMOSTAT FIELD WIRING . . . . 18
18 FIELD WIRING 24 VOLT THERMOSTAT . . . . . . . . . 18
19 FIELD WIRING DISC ONNECT . . . . . . . . . . . . . . . . . 19
20 ENTHALPY SET POINT CHART . . . . . . . . . . . . . . . . 23
21 HONEYWELL ECONOMIZER CONTROL W7212 . . 23
22 BELT ADJUSTMENT . . . . . . . . . . . . . . . . . . . . . . . . . 24
23 DRY COIL DELTA P . . . . . . . . . . . . . . . . . . . . . . . . . 32
24 BASIC TROUBLESHOOTING FLOWCHART . . . . . . 40
Unitary Products Group 3
Page 4

LIST OF TABLES
035-17311-002-A-0803
Tbl.# Pg.#
1 UNIT VOLTAGE LIMITATIONS . . . . . . . . . . . . . . . . . 11
2 UNIT TEMPERATURE LIMITATIONS . . . . . . . . . . . . 11
3 UNIT WEIGHTS . . . . . . . . . . . . . . . . . . . . . . . . . . . . . 12
4 6 POINT LOAD WEIGHT . . . . . . . . . . . . . . . . . . . . . . 12
5 4 POINT LOAD WEIGHT . . . . . . . . . . . . . . . . . . . . . . 12
6 UNIT CLEARANCES . . . . . . . . . . . . . . . . . . . . . . . . . 13
7 CONTROL WIRE SIZES . . . . . . . . . . . . . . . . . . . . . . .17
8 ELECTRICAL DATA - DM090 (7-1/2 TON) WITHOUT
POWER C O N VE N IE N C E O U T L E T . . . . . . . . . . . . . .19
9 ELECTRICAL DATA - DM090 (7-1/2 TON) WITH
POWER C O N VE N IE N C E O U T L E T . . . . . . . . . . . . . .19
10 ELECTRICAL DATA - DM120 (10 TON) WITHOUT
POWER C O N VE N IE N C E O U T L E T . . . . . . . . . . . . . .20
11 ELECTRICAL DATA - DM120 (10 TON) WITH POWER
CONVE NIE N C E OU T L E T . . . . . . . . . . . . . . . . . . . . .20
12 ELECTRICAL DATA - DM150 (12-1/2 TON) WITHOUT
POWER C O N VE N IE N C E O U T L E T . . . . . . . . . . . . . .20
13 ELECTRICAL DATA - DM150 (12-1/2 TON) WITH
POWER C O N VE N IE N C E O U T L E T . . . . . . . . . . . . . .20
14 PHYSICAL DATA . . . . . . . . . . . . . . . . . . . . . . . . . . . . 21
15 MINIMUM SUPPLY AIR CFM . . . . . . . . . . . . . . . . . . . 21
16 SUPPLY AIR LIMITATIONS . . . . . . . . . . . . . . . . . . . . 24
17 7-1/2 TON STANDARD MOTOR DOWN SHOT
BLOWER PERFORMANCE . . . . . . . . . . . . . . . . . . . 25
18 7-1/2 TON OPTIONAL MOTOR DOWN SHOT
BLOWER PERFORMANCE . . . . . . . . . . . . . . . . . . . 25
19 10 TON STANDARD MOTOR DOWN SHOT
BLOWER PERFORMANCE . . . . . . . . . . . . . . . . . . . 26
Tbl.#
20 10 TON OPTIONAL MOTOR DOWN SHOT
BLOWER PERFORMANCE . . . . . . . . . . . . . . . . . . . 26
21 12-1/2 TON STANDARD MOTOR DOWN SHOT
BLOWER PERFORMANCE . . . . . . . . . . . . . . . . . . . 27
22 12-1/2 TON OPTIONAL MOTOR DOWN SHOT
BLOWER PERFORMANCE . . . . . . . . . . . . . . . . . . . 27
23 7-1/2 TON STANDARD MOTOR SIDE SHOT
BLOWER PERFORMANCE . . . . . . . . . . . . . . . . . . . 28
24 7-1/2 TON OPTIONAL MOTOR SIDE SHOT
BLOWER PERFORMANCE . . . . . . . . . . . . . . . . . . . 28
25 10 TON STANDARD MOTOR DOWN SHOT
BLOWER PERFORMANCE . . . . . . . . . . . . . . . . . . . 29
26 10 TON OPTIONAL MOTOR DOWN SHOT
BLOWER PERFORMANCE . . . . . . . . . . . . . . . . . . . 29
27 12-1/2 TON STANDARD MOTOR SIDE SHOT
BLOWER PERFORMANCE . . . . . . . . . . . . . . . . . . . 30
28 12-1/2 TON OPTIONAL MOTOR SIDE SHOT
BLOWER PERFORMANCE . . . . . . . . . . . . . . . . . . . 30
29 INDOOR BLOWER SPECIFICATIONS . . . . . . . . . . . 31
30 ADDITIONAL STATIC RESISTANCE . . . . . . . . . . . . 33
31 MOTOR SHEAVE DATUM DIAMETERS . . . . . . . . . . 33
32 ELECTRIC HEAT LIMIT SETTING . . . . . . . . . . . . . . 36
33 ELECTRIC HEAT ANTICIPATOR SETPOINTS . . . . 36
34 7.5 TON STANDARD EFFICIENCY SUPERHEAT
CHARGING . . . . . . . . . . . . . . . . . . . . . . . . . . . . . . . . 37
35 10 TON STANDARD EFFICIENCY SUPERHEAT
CHARGING . . . . . . . . . . . . . . . . . . . . . . . . . . . . . . . . 38
36 12.5 TON STANDARD EFFICIENCY SUPERHEAT
CHARGING . . . . . . . . . . . . . . . . . . . . . . . . . . . . . . . . 38
37 UNIT CONTROL BOARD FLASH CODES . . . . . . . . 40
Pg.#
4 Unitary Products Group
Page 5
035-17311-002-A-0803
GENERAL
YORK Predator® units are single package air conditioners
designed for outdoor installation on a rooftop or slab and for
non-residential use. These units can be equipped with factory
or field installed electric heaters for heating applications.
These units are completely assembled on rigid, permanently
attached base rails. All piping, refrigerant charge, and electrical wiring is factory installed and tested. The units require
electric power and duct connections. The electric heaters
have nickel-chrome elements and utilize single-point power
connection.
SAFETY CONSIDERATIONS
Due to system pressure, moving parts, and electrical components, installation and servicing of air conditioning equipment
can be hazardous. Only qualified, trained service personnel
should install, repair, or service this equipment. Untrained
personnel can perform basic maintenance functions of cleaning coils and filters and replacing filters.
Observe all precautions in the literature, labels, and tags
accompanyi ng the equipment whenever working on air conditioning equipment. Be sure to follow all other applicable
safety precautions and codes.
REFERENCE
Additional information is available in the following reference
forms:
• General Installation - DM090 - 150, 035-17311-002
• Pre-start & Post-start Check List - 035-18466-000
• Econ om izer Accessory Downflow Factory Installed, 035-18286-000
Downflow Field Inst alled, 035-18285-000
Horizontal Field Installed, 035-18287-000
• Motorized O utdoor Air Damper 035-18283-000
• Manual Outdoor Air Damper (0-100%) 035-18282-000
• Manual Outdoor Air Damper (0-35%) 035-18281-000
• Elect ric Heater Accessory 035-17291-001
• Unit Renewa l Par ts List 035-17288-000
All forms referenced in this instruction may be ordered from:
Stand ard Register
T o ll Free Fax: (877) 379-7920
T o ll Free Phone: (877) 318-9675
APPROVALS
Design certifie d by CSA as fol lows :
Wear safety glasses and work gloves. Use quenching cloth
and have a fire extinguisher available during brazing operations.
INSPECTION
As soon as a unit is received , it should be in spected fo r poss ible damage during transit. If damage is evident, the extent of
the damage should be noted on the carrier’s freight bill. A
separate request for inspection by the carrier’s agent should
be made in writi ng.
This furnace is not to be used for temporary heating
of buildings or structures under construction.
Before performing service or maintenance operations on unit, turn off main power switch to unit. Electrical shock could cause personal injury. Improper
installation, adjustment, alteration, service or maintenance can cause injury or property damage. Refer
to this manual. For assistance or additional information consult a quali fi ed installer, service agency.
1. For use as a cooling only unit, cooling uni t with supplemental elect ri c heat or a forced air furnace.
2. For outdoor installation only.
3. For installation on combustible material and may be
installed dir ectly on combustible flooring or, in the U.S.,
on wood flooring or Class A, Class B or Class C roof covering materials .
This product must be installed in strict compliance
with the enclosed installation instructions and any
applicable local, state, and national codes including,
but not limited to, building, electrical, and mechanical
codes.
Incorrect installation may create a condition where the
operation of the product could cause personal injury
or property damage.
The installer should pay particular attention to the words:
NOTE, CAUTION, and WARNING. NOTES are intended to
clarify or make the installation easier. CAUTIONS are given
to prevent equipment dam age. WARNINGS are given to alert
installer that personal injury and/or equipment damage may
result if inst allation procedure i s not handled properly.
Unitary Products Group 5
Page 6
NOMENCLATURE
6½ - 12½ Ton Predator Model Number Nomenclature
035-17311-002-A-0803
D M C00
Product Category
D = Air Cond., Single Package
Product Identifier
M = R-22 Standard Efficiency
Nominal Cooling Capacity - MBH
090 = 7-½ Ton
120 = 10 Ton
150 = 12-½ Ton
Heat Type & Nominal Heat Capacity
C00 = Cooling Only. Suitable for field installed electric heat
Electric Heat Options
E09 = 9 kW Electric Heat
E18 = 18 kW Electric Heat
E24 = 24 kW Electric Heat
E36 = 36 kW Electric Heat
E54 = 54 kW Electric Heat
Voltage
3 = 380-3-60
AA 3090
A3A
Product Generation
3 = Third Generation
Installation Options
A = No Options Installed
B = Option 1
C = Option 2
D = Options 1 & 2
E = Option 3
F = Option 4
G = Options 1 & 3
H = Options 1 & 4
J = Options 1, 2 & 3
K = Options 1, 2 & 4
L = Options 1, 3 & 4
M = Options 1, 2, 3 & 4
N = Options 2 & 3
P = Options 2 & 4
Q = Options 2, 3 & 4
R = Options 3 & 4
S = Option 5
T = Options 1 & 5
U = Options 1, 3 & 5
V = Options 1, 4 & 5
W = Options 1, 3, 4 & 5
X = Options 3 & 5
Y = Options 4 & 5
Z = Options 3, 4 & 5
Additional Options
(See Next Page)
Options
1 = Disconnect
2 = Non-Pwr’d Conv Outlet
3 = Smoke Detector S. A.
4 = Smoke Detector R. A.
5 = Pwr’d Conv Outlet
Airflow
A = Standard Motor
B = Standard Motor/Economizer/Barometric Relief (Downflow only)
C = Standard Motor/Economizer/Power Exhaust (Downflow only)
D = Standard Motor/Motorized Damper (Downflow only)
E = Standard Motor/Horizontal Economizer (No Barometric Relief or Power Exhaust)
F = Standard Motor/Slab Economizer/Power Exhaust (Downflow only)
G = Standard Motor/Slab Economizer/Barometric Relief (Downflow only)
L = Standard Motor/BAS Ready Econ (NoBASController)/Barometric Relief w/2" Pleated Filters (Downflow only)
M = Standard Motor/BAS Ready Econ (NoBASController)/Power Exhaust w/2" Pleated Filters (Downflow only)
N = High Static Motor
P = High Static Motor/Economizer/Barometric Relief (Downflow only)
Q = High Static Motor/Economizer/Power Exhaust (Downflow only)
R = High Static Motor/Motorized Damper (Downflow only)
S = High Static Motor/Horizontal Economizer (No Barometric Relief or Power Exhaust)
T = High Static Motor/Slab Economizer/Power Exhaust (Downflow only)
U =High Static Motor/Slab Economizer/Barometric Relief (Downflow only)
Y = High Static Motor/BAS Ready Econ (NoBASController)/Barometric Relief w/2" Pleated Filters (Downflow only)
Z = High Static Motor/BAS Ready Econ (NoBASController)/Power Exhaust w/2" Pleated Filters (Downflow only)
6 Unitary Products Group
Page 7

035-17311-002-A-0803
NOMENCLA TURE, ADDITO NAL OPTIONS:
AA None
AB Phase Monitor
AC Coil Guard
AD Dirty Filter Switch
AE Phase Monitor & Coil Guard
AF Phase Monitor & Dirty Filter Switch
AG Coil Guard & Dirty Filter Switch
AH Phase Monitor, Coil Guard, & Dirty Filter Switch
CA CPC Controller with Dirty Filter Switch & Air Proving Switch
CB CPC Controller, DFS, APS & Phase Monitor
CC CPC Controller, DFS, APS & Coil Guard
CD CPC Controller, DFS, APS, Phase Monitor , & Coil Guard
CE CPC Controller, DFS, APS & Tech nico at Cond. Coil
CF CPC Controller, DFS, APS, Technicoat Cond. Coil, & Phase Monitor
CG CPC Controller, DFS, APS, Technicoat Cond. Coil, & Coil Guard
CH CPC Controller, DFS, APS, Technicoat Cond. Coil, Phase Monitor, & Coil Guard
CJ CPC Controller, DFS, APS & Te ch nico at Evap. Coil
CK CPC Controller, DFS, APS, Technicoat Evap. Coil, & Phase Monitor
CL CPC Controller, DFS, APS, Technicoat Evap. Coil, & Coil Guard
CM CPC Controller, DFS, APS, Technico at Evap. Coil, Phase Monitor, & Coil Guard
CN CPC Controller, DFS, APS & Technicoat Evap. & Cond Coils
CP CPC Controller, DFS, APS, Technicoat Evap. & Cond Coils, & Phase Monitor
CQ CPC Controller, DFS, APS, Technicoat Evap. & Cond Coils, & Coil Guard
CR CPC Controller, DFS, APS, Technicoat Cond Coils, Phase Monitor, & 2” Pleated Filters
CV CPC Controller, DFS, APS, & 2” Pleated Filters
CX CPC Controller, DFS, APS, Technicoat Evap. & Cond Coils, Phase Monitor, Coil Guard
HA Hon ey w e ll Exc e l 10 C on troller with Dirty Fil ter Sw it ch & Air Pr ov in g Swit ch
HB Honeywe ll Excel 10 Controller, DFS, APS & Phase Monitor
HC Honeywell Excel 10 Controller, DFS, APS & Coil Guard
HD Honeywell Excel 10 Controller, DFS, APS, Phase Monitor, & Coil Guard
HE Honeywe ll Excel 10 Controller, DFS, APS & Technicoat Cond. Coil
HF Honeywell Excel 10 Controller, DFS, APS, Technicoat Cond. Coil, & Phase Monito r
HG Honeywell Excel 10 Controller, DFS, APS, Techn icoa t Cond. Coi l, & Coil Guard
HH Honeywell Excel 10 Controller, DFS, APS, Technicoat Con d. Coil, Phas e Monit or, & Coil Guard
HJ Honeywe ll Excel 10 Contro ller, DFS, APS & Technicoat Evap. Coil
HK Honeywell Excel 10 Controller, DFS, APS, Technicoat Evap. Coil, & Phase Monitor
HL Honeywell Excel 10 Controller, DFS, APS, Technicoat Evap. Coil, & Coil Guard
HM Honeywell Excel 10 Controller, DFS, APS, Technicoat Evap. Coil, Phase Monitor, & Coil Guard
Unitary Products Group 7
Page 8

HN H oneyw ell Exce l 10 Controller, DFS, APS & Technicoat Evap. & Cond Coils
HP Honeywell Excel 10 Controller, DFS, APS, Technicoat Evap. & Cond Coils, & Phase Monitor
HQ Honeywell Excel 10 Controller, DFS, APS, Technicoat Evap. & Cond Coils, & Coil Guard
HR Honeywell Excel 10 Controller, DFS, APS, Technicoat Evap. & Cond Coils, Phase Monitor, & Coil Guard
JA Johnson UNT Controller with Dirty Filter Switch & Air Proving Switch
JB Johnson UNT Controller, DFS, APS & Phase Monitor
JC Johnson UNT Controller, DFS, APS & Coil Guard
JD Johnson UNT Controller, DFS, APS, Phase Monitor, & Coil Guard
JE Johnson UNT Controller, DFS, APS & Technico at Cond. Coil
JF Johnson UNT Contro ller, DFS, APS, Technicoat Cond. Coi l, & Phase Mon itor
JG Johnson UNT Controller, DFS, APS, Technicoat Con d. Coil, & Coil Guard
JH Johns on UNT Contro ller, DFS, APS, Technicoat Cond. Coil, Phase Monitor, & Coil Guard
JJ Johnson UNT Controller, DFS, APS & Technicoat Evap. Coil
JK Johnson UNT Controller, DFS, APS, Technicoat Evap. Coil, & Phase Monitor
JL Johnson UNT Controller, DFS, APS, Technicoat Evap. Coil, & Coil Guard
JM Johnson UNT Controller, DFS, APS, Technicoat Evap. Coil, Phase Monitor, & Coil Guard
JN Johnson UNT Controlle r, DFS, APS & Technicoat Evap. & Cond Coils
JP Johnson UNT Controller, DFS, APS, T echnicoat Evap. & Cond Coils, & Phase Monitor
JQ Johnson UNT Controller, DFS, APS, Technicoat Evap. & Cond Coils, & Coil Guard
JR Johnson UNT Controller, DFS, APS, Technicoat Evap. & Cond Coils, Phase Monitor, & Coil Guard
NA Novar ETC-3 Controller with Dirty Filter Switch & Air Proving Switch
NB Novar ETC-3 Controller, DFS, APS & Phase Monitor
NC Novar ETC-3 Controller, DFS, APS & Coil Guard
ND Novar ETC-3 Controller, DFS, APS, Phase Monitor, & Coil Guard
NE Novar ETC-3 Controller, DFS, APS & Technicoat Cond. Coil
NF Novar ETC-3 Controller, DFS, APS, Technicoat Cond. Coil, & Phase Monitor
NG Novar ETC-3 Controller, DFS, APS, Technicoat Cond. Coil, & Coil Guard
NH Novar ETC-3 Controller, DFS, APS, Technicoat Cond. Coil, Phase Monitor, & Coil Guard
NJ Novar ETC-3 Controller, DFS, APS & Technicoat Evap. Coil
NK Novar ETC-3 Cont rol ler, DFS, APS, Technicoa t Evap. Coil, & Phase M onito r
NL Novar ETC-3 Controlle r, DFS, APS, Technicoat Evap. Coi l, & Coil Guard
NM Novar ETC-3 Controller, DFS, APS, Technicoat Evap. Coi l, Phase Mo nitor, & Coil Guard
NN Novar ETC-3 Controller, DFS, APS & Technicoat Evap. & Cond Coils
NP Novar ETC-3 Controller, DFS, APS, Technicoat Evap. & Cond Coils, & Phase Monitor
NQ Novar ETC-3 Controller, DFS, APS, Technicoat Evap. & Cond Coils, & Coil Guard
NR Novar ETC-3 Controller, DFS, APS, Technicoat Evap. & Cond Coils, Phase Monitor, & Coil Guard
TA Technicoat Condenser Coil
TB Technicoat Condenser C oil & Phase Monitor
TC Technicoat Condenser Coil & Coil Guard
TD Technicoat Condenser Coil & Dirty Filter Switch
035-17311-002-A-0803
8 Unitary Products Group
Page 9

035-17311-002-A-0803
TE Technicoat Condenser Coil, Phase Monitor, & Coil Guard
TF Technicoat Condenser Coil, Phase Monitor, & Dirty Filter Switch
TG T echnicoat Condenser Coil, Coil Guard , & Dirty Filter Swit ch
TH Technicoat Condenser Coil, Phase Monitor, Coil Guard, & Dirty Filter Switch
TJ Technicoat Evaporator Coil
TK Technicoat Evaporator Coil & Phase Monitor
TL Technicoat Evaporator Coil & Coil Guard
TM Technicoat Evaporator Coil & Dirty Filter Switch
TN Technicoat Evaporator Coil, Phase Monitor, & Coil Guard
TP Technicoat Evaporator Coil, Phase Monitor, & Dirty Filter Switch
TQ Technicoat Evaporator Coil, Coil Guard, & Dirty Filter Switch
TR Technicoat Evaporator Coil, Phase Monitor, Coil Guard, & Dirty Filter Switch
TS Technicoat Evaporator & Condenser Coils
TT Technicoa t Evaporator & Condenser Coils & Phase Monitor
TU Technicoat Evaporator & Condenser Coils & Coil Guard
TV Technicoat Evaporator & Condenser Coils & Dirty Filter Switch
TW Technicoat Evaporator & Condenser Coils, Phase Monitor, & Coil Guard
TX Technicoat Evaporator & Co ndenser Coils, Phas e Monitor, & Dirty Filter Switch
TY Technicoat Evaporator & Co ndenser Coils, Coil Guard, & Dirty Filter Switch
TZ Technicoat Evaporat or & Conden ser Coils, Phase Moni tor, C oil Guar d, & Dirty Filter Switch
Unitary Products Group 9
Page 10
035-17311-002-A-0803
INSTALLATION
INSTALLATION SAFETY INFORMATION
Read these instructions before continuing this appliance
installation. This is an outdoor combination heating and cooling unit. The installer must assure that these instructions are
made available to the consumer and with instructions to
retain them for future reference.
1. Install this furnace only in a location and posi ti on as
specified on Page 11 of these instructions.
2. This equipment is not to be used for tempor ary heating
of building s or st ructures under construction.
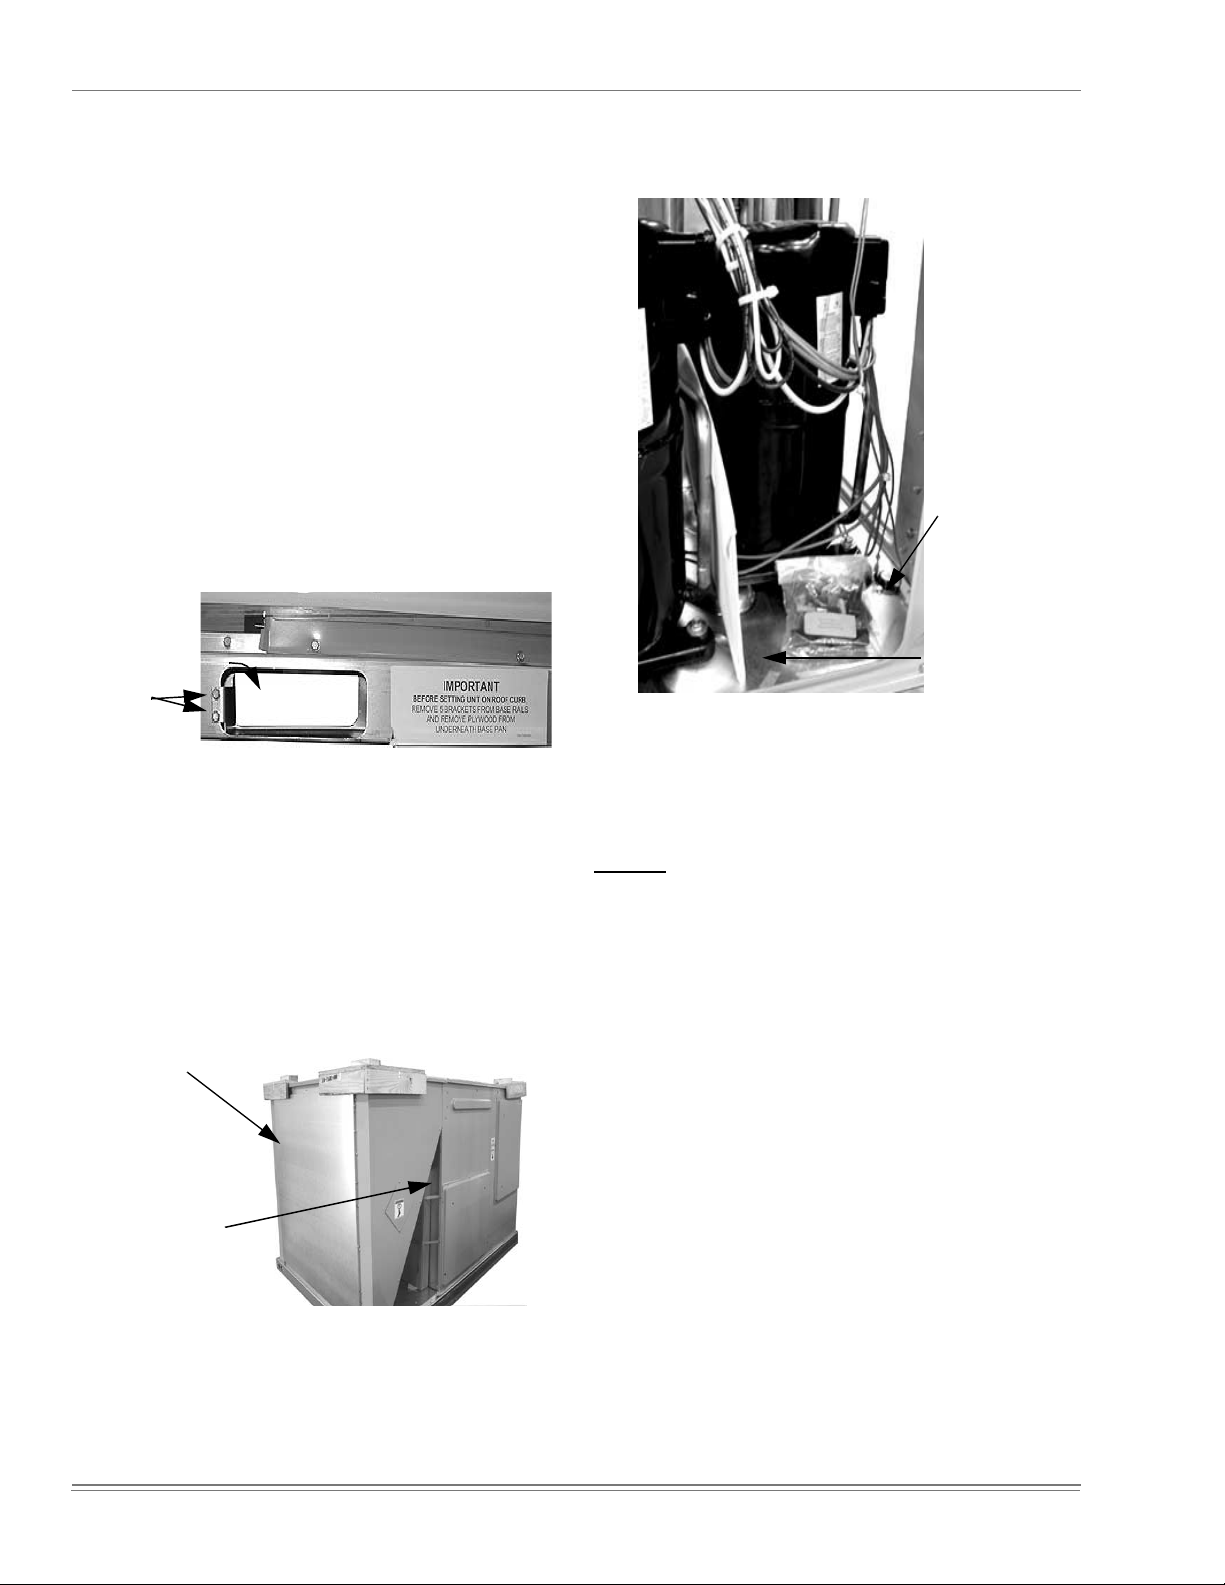
PRECEDING INSTALLATION
1. Remove the two screws holdi ng the bra ckets in the f ront,
rear and compressor side fork-lift slots.
Bracket
Screws
Turn down
Toolless
Doorknobs
Installation
Instruction
Packet
FIGURE 3 - COMPRESSOR SECTION
FIGURE 1 - UNIT SHIPPING BRACKET
2. Turn each bracket toward the ground and the protective
plywood cov e rin g w ill d ro p to the gr ound.
3. Remove the condenser coil external protective covering
prior to operati on.
4. Remove the toolless doorknobs and instruction packet
prior to installation.
Condenser
Coil External
Protective
Covering
Barometric
Relief Hood in
Shipping Location (if included)
FIGURE 2 - CONDENSER COVERING
LIMITATIONS
These units must be installed in accordance with the following:
In U.S.A.
1. National Electrical Code, ANSI/NFPA No. 70 - Latest
2. Local building codes, and
3. Local plumbing and waste water codes, and
4. Other applicable local codes.
Refer to Tables 1 & 2 for unit appli cation data.
If components are to be added to a unit to meet local codes,
they are to be installed at the dealer’s and/or customer’s
expense.
Size of unit for propos ed installation should be based on heat
loss/heat gain calculation made according to the methods of
Air Conditioning Contractors of America (ACCA).
:
Edition
10 Unitary Products Group
Page 11

035-17311-002-A-0803
Terminal block for
hi-voltage connection
Simplicity™ Control board
w/screw connector
for T-stat wiring and
network connection
Disconnect location
(optional disconnect switch)
Filter access (2” throw-away)
Filter drier (solid
core)
Second model nameplate inside hinged
access panel
Dual stage
cooling for
max. com fort
Compressor #2
access (highefficiency compressor with
crankcase heater
Base rails w/forklift slots (3 sides)
and lifting holes)
Tool-less door
latch
Side entry power
and control wiring
knockouts
FIGURE 4 - PREDATOR® COMPONENT LOCATION
TABLE 1: UNIT VOLTAGE LIMITATIONS
Power Rating Minimum Maximum
380 350 418
TABLE 2: UNIT TEMPERATURE LIMITATIONS
Temperature Min. Max.
Wet Bulb T emperature (°F) of A i r on
Evaporator Coil
Dry Bulb Temperature (°F) of A ir o n
Condenser Coil
*.
A low ambient accessory is available for operation
57 72
*
0
125
down to - 20°F.
LOCATION
Use the following guidelines to select a suitable location for
these units:
1. Unit is designed for outdoor installation only.
2. Condenser coils must have an unlimited supply of air.
Where a choice of location is possible, positi on the unit
on either north or east side of building.
3. Suitable for mounting on roof curb.
Condenser
section
Belt-drive
blower motor
Slideout motor
& blower
assembly for
easy access
adjustment &
service
Compressor #1 access (highefficiency compressor w/
crankcase heater))
Slide-out drain pan
with steel 3/4” FPT
Roof curbs in eight- and fourteen-inch
heights. Roof curbs for transitioning from
York Sunline™ footprint to the DM
Series footprint are also available
(field-installed accessory)
connection
4. For ground level install ation, use a level concret e slab
with a minimum thickness of 4 inches. The length and
width should be at least 6 inches greater than the unit
base rails. Do not tie slab to the building foundation.
5. Roof structures must be able t o supp ort the weight of the
unit and its options/accessories. Unit must be installed
on a solid, level roof curb or appropriate angle iron
frame.
6. Maintain level tolerance to 1/2” across the entire width
and length of unit.
RIGGING AND HANDLING
Exercise care when moving the unit. Do not remove any
packaging until the unit is near the place of installation. Rig
the unit by attaching chain or cable slings to the lifting holes
provided in the base rails. Spreader bars, whose length
exceeds the largest dimension across the unit, MUST be
used across the top of the unit.
If a unit is to be installed on a roof curb other than a
YORK roof curb, gasketing must be applied to all
surfaces that come in contact with the unit underside.
Unitary Products Group 11
Page 12
Before lifting, make sure the unit weight is distributed equall y on the riggin g cables so it wil l lift evenly.
Units may be moved or lifted with a forklift. Slotted openings
in the base rails are prov ided for this purpose.
035-17311-002-A-0803
TABLE 4: 6 POINT LOAD WEIGHT
Model
Location (lbs.)
ABCDEF
DM090
158 142 128 187 207 230
DM120 168 151 136 198 219 244
DM150 180 161 145 212 235 262
*.
Weights inc lude largest ga s he at op tion.
*
LENGTH OF FORKS MUST BE A MINIMUM OF 60
INCHES.
All panels must be secured in place when the unit is
lifted.
The condenser coils should be protected from rigging cable damage with plywood or other suitable
material.
L E F T
A
F R O N T
CB
TABLE 5: 4 POINT LOAD WEIGHT
Model
ABCD
DM090
230 197 287 336
DM120 245 209 305 357
DM150 262 224 327 382
*.
Weights inc lude largest ga s he at op tion.
L E F T
A
B
Location (lbs.)
C
E
F
FIGURE 6 - U NIT 6 POI N T LOAD
*
F R O N T
D
D
FIGURE 5 - UNIT 4 POINT LOAD
TABLE 3: UNIT WEIGHTS
Model
DM090 1056 1051
DM120
DM150 1200 1195
Econ. 85 84
w/ PE 150 148
Elec. Heat
*.
†.
Shipping Weight
2
Weights include largest gas heat option.
54kW heater.
*
1121 1116
49 49
Operating Weight
(lb.)
†
(lb.)
FIGURE 7 - UNIT CENTER OF GRAVITY
CLEARANCES
All units require particular clearances for proper operation
and service. Installer must make provisions for adequate
ventilation ai r in accordance with appli cable provisions of the
local building codes. Refer to Table 6 for clearances required
for combustible construction, servicing, and proper unit operation.
47 1/2"
LEFT
12 Unitary Products Group
25 1/2"
FRONT
Page 13
035-17311-002-A-0803
A
Do not permit overhanging structures or shrubs to
obstruct condenser air discharge outlet, combustion
air inlet or vent outlets.
3 0 - 1 1 / 3 2
5 0 - 3 / 4
P o w e r
E n t r y
Ø 2 - 1 / 2
C o n t r o l
E n t r y
Ø 7 / 8
4 - 1 / 4
3 0 - 3 / 1 6
5 9
L E F T
2 4 - 3 / 1 6
FIGURE 8 - UNIT DIMENSIONS
TABLE 6: UNIT CLEARANCES
*
Top
Front
†
Rear
*.
Units must be installed outdoors. Overhanging structure or shrubs should not obstr uct condenser air discharg e ou tlet.
†.
T o remove the slide-out drain pan, a rear clearance of
sixty in ches is required. If space is unavailable, the
drain pan can be removed through the fr ont by sepa rating the corner wall.
‡.
Units ma y be i nst al le d on com bu st ib le fl oo rs ma de f rom
wood or cl ass A, B or C roof covering materials.
DETAIL A
72” Right 12”
36”
36”
G a s P i p e I n l e t
Bottom
Left
1 7 - 3 / 1 6
‡
6 - 3 / 1 6
36”
0”
P o w e r
E n t r y
Ø 2 - 1 / 2
C o n v e n i e n c e
P o w e r
O u t l e t
E n t r y
Ø 7 / 8
2 7
F o r D r a i n
D i m e n s i o n s
S e e D e t a i l B
8 9
F R O N T
F o r B a s e r a i l
D i m e n s i o n s
S e e D e t a i l
NOTE: A one-inch clearance must be provided between
any combustible material and the supply ductwork
for a distance of 3 feet from the unit.
DETAIL B
3 - 3 / 4
2 - 3 / 8
3 - 9 / 1 6
DETAIL C
5 - 1 / 4
1 7 - 1 3 / 1 6
V i e w o f W a l l A c r o s s f r o m C o i l
B a s e
P a n
5 - 3 / 8
Unitary Products Group 13
Page 14

035-17311-002-A-0803
6
.
32-11/16
6-13/16
6-13/16
Return
Air
18
27-1/2
Bottom
Condensate
Entry
FRONT
63-1/2
21-3/16
19-3/16
17-3/16
LEFT
7-1/8
14-
23/32
16-3/8
18-1/16
19-5/8
FIGURE 9 - BOTTOM DUCT OPENINGS (FROM ABOVE)
Supply
Air
21
Bottom
Power, Control
Convenience
Outlet Wiring
Entries
and
24
6-13/16
Bottom Gas
Supply Entry
12-15/1
1 8 - 1 / 4
5 - 5 / 3 2
FIGURE 10 - REAR DUCT DIMENSIONS
2 8 - 1 / 4
S u p p l y
A i r
D o t P l u g s
R e t u r n
A i r
1 8 - 1 / 4
P a t c h P l a t e
F o r S l i d e - O u t
D r a i n P a n
2 - 3 1 / 3 2
3 1 - 1 1 / 1 6
2 8 - 1 / 4
1 8 - 1 / 1 6
14 Unitary Products Group
Page 15

035-17311-002-A-0803
DUCTWORK
Ductwork should be designed and sized according to the
methods in Manual D of the Air Conditioning Contractors of
America (ACCA) or as recommended by any other recognized authority such as ASHRAE or SMACNA.
A closed return duct system should be used. This will n ot
preclude use of economizers or outdoor fresh air intake. The
supply and return air duct connections at the unit should be
made wit h fl exib le joints to minim iz e noi s e.
The supply and return air duct systems should be designed
for the CFM and static press ure requi rement s of the job. They
should NOT be sized to match the dimensions of the duct
connections on t he unit.
Refer to 9 for bottom air duct openings. Refer to Figure 10 for
rear air duct openings.
8 0 - 5 / 8
2 0
2 0
6
DUCT COVERS
Units are shipped with the side duct openings covered and a
covering over the bottom of the unit. For bottom duct application, no duct cover changes are necessary. For side duct
application, remove the side duct covers and install over the
bottom duct openings. The panels removed from the side
duct connecti ons are designed to be reused by securing each
panel to its respective downflow opening. But keep in mind
that the supply panel is installed with the painted surface UP,
facing the heat exchanger, while the return panel is installed
with the painted surface DOWN, facing the downflow duct
opening. The supply panel is secured with the bracket
(already in place from the facto ry) and two screws. I t’s a snug
fit for the panel when sliding it between the heat exchanger
and unit bottom, but there is room. The return panel is
secured with four screws .
R I G H T
I N S U L A T E D D E C K U N D E R
C O N D E N S E R S E C T I O N
S U P P L Y
2 T Y P .
3 0
5 0 - 1 / 2
R E T U R N
FIGURE 11 - PREDATOR® ROOF CURB DIMENSIONS
5 0 - 1 / 2
7 6 - 5 / 8
F R O N T
3 0 - 1 / 2
R E T U R N
9 4
2 T Y P
8 o r 1 4
I N S U L A T E D D E C K U N D E R
C O M P R E S S O R S E C T I O N
F R O N T
2 3
4
S U P P L Y
5 9 - 1 / 4
6 4 - 1 / 4
8 0 - 5 / 8
1 0
R I G H T
2 6
FIGURE 12 - SUNLINE™ TO PREDATOR® TRANSITION ROOF CURBS
Unitary Products Group 15
Page 16

When fastening ductwork to side duct flanges on
unit, insert screws through duct flanges only. DO
NOT insert screws through casing. Outdoor ductwork must be insulated and water-proofed.
FIGURE 13 - SIDE PANELS WITH HOLE PLUGS
Note orientation. Panel is “insulation” side up.
035-17311-002-A-0803
CONDENSATE DRAIN
The side condensate drain is reversible and maybe re-oriented to the rear of the cabinet to facilitate condensate piping. A condensate drain connection is available through the
base pan for piping inside the roof curb. Trap the connection
per Figure 16. The trap and drain lines should be protected
from freezing.
Plumbing must conform to local codes. Use a sealing compound on male pipe threads. Install condensate drain line
from the 3/4 inch NPT female connection on the unit to an
open drain.
O P T I O N A L C O I L
G U A R D
3 " M i n i m u m
FIGURE 14 - RETURN DOWNFLOW PLENUM WITH
PANEL
FIGURE 16 - CONDENSATE DRAIN
COMPRESSORS
The comp ress ors are moun te d on e las tom er in sula tor s. T he
mounting bolt s have been fully tightened fo r shi pping.
Do not loosen the compressor mounting bolts.
FILTERS
Two-inch filters are supplied with each unit. One-inch filters
may be used with no modification to the filter racks. Filters
must always be installed ahead of evaporator coil and must
be kept clean or replaced with same size and type. Dirty filters reduce the capacity of the unit and result in frosted coils
or safety shutdown. All units use four (4) 20”x25”x2” filters.
The unit should not be operated without filters properly
installed.
Make sure that panel latches are properly positioned
FIGURE 15 - DISCHARGE PANEL IN PLACE
on the unit to maintain an airtight seal.
16 Unitary Products Group
Page 17

035-17311-002-A-0803
THERMOSTAT WIRING
The thermostat should be located on an inside wall approximately 56 inches above the floor where it will not be subject
to drafts, sun exposure or heat from electrical fixtures or
appliances. Follow the manufacturer's instructions enclosed
with thermostat for general installation procedure. Seven (7)
color-coded, insulated wires should be used to connect the
thermostat to the unit. Refer to Table 7 for control wire sizing
and maximum length.
TABLE 7: CONTROL WIRE SIZES
Wire Size
18 AWG
*.
From the unit to the thermostat and back to the unit.
Maximu m L en gt h
150 Feet
*
POWER AND CONTROL WIRING
Field wiring to the unit, fuses, and disconnects must conform
to provisions of National Electrical Code (NEC), ANSI/NFPA
No. 70 – Latest Edition (in U.S.A.), current Canadian Electrical Code C221, and/or local ordinances. The unit must be
electrically grounded in accordance with NEC and CEC as
specified above and/or local codes.
Voltage tolerances which must be maintained at the compressor terminals during starting and running conditions are
indicated on the unit Rating Plate and Table 1.
The internal wiring harnesses furnished with this unit are an
integral part of the design certified unit. Field alteration to
comply with electrical codes should not be required. If any of
the wire supplied wi th the unit must be replaced, replacement
wire must be of the type shown on th e wiring diagram and the
same minimum gauge as the replaced wire.
A disconnect must be utilized for these units. Factory
installed disconnects are available. If installing a disconnect
(field supplied or York International
refer to Figure 4 for the recommended mounting location.
supplied accessory),
Avoid damage to internal components if drilling
holes for disconnect mounting.
NOTE: Since not all local codes allow the m ounting of a dis-
connect on the unit, please confirm compliance with
local code before mounting a disconnect on the unit.
Electrical line must be sized properly to carry the load. USE
COPPER CONDUCTORS ONLY. Each unit must be wired
with a separate branch circuit fed directly from the meter
panel and properl y fused.
Refer to Figures 17, 18 and 19 for typical field wiring and to
the appropriate unit wiring diagram mounted inside control
doors for control ci rcuit and power wiring infor ma ti on.
When connecting electrical power and control wiring
to the unit, water-proof connectors must be used so
that water or moisture cannot be drawn into the unit
during normal operation. The above water-proofing
conditions will also apply when installing a field supplied disconnect switch.
POWER WIRING DETAIL
Units are factory wired for the voltage shown on the unit
nameplate. Refer to Electrical Data Tables 8 through 13 size
power wiring, fuses, and disconnect switch.
Power wiring is brought into the unit through the side of the
unit or the basep an inside the curb.
Unitary Products Group 17
Page 18

035-17311-002-A-0803
2
T H E R M O S T A T
T E R M I N A L S
R C
R H
Y 1
Y 2
W 1
W 2
G
C
X 1
X 3
X 4
A 1
A 2
T
T
1
E l e c t r o n i c p r o g r a m m a b l e T h e r m o s t a t 2 E T 0 7 7 0 0 1 0 0 2 4 ( i n c l u d e s s u b b a s e ) .
T e r m i n a l s A 1 a n d A 2 p r o v i d e a r e l a y o u t p u t t o c l o s e t h e o u t d o o r
e c o n o m i z e r d a m p e r s w h e n t h e t h e r m o s t a t s w i t c h e s t o t h e s e t - b a c k p o s i t i o n .
1
T O R E M O T E S E N S O R
2 E T 0 4 7 0 1 3 2 4 I F U S E D
2
FIGURE 17 - ELECTRONIC THERMOSTAT FIELD WIRING
U N I T T E R M I N A L S
S T R I P T B 1
R
Y 1
Y 2
W 1
W 2
G
C
X
O C C
2 4 V o l t
T r a n s f o r m e r
T - S T A T
W 1
W 2
Y 1
G
Y 2
C
R H
R C
W 1
W 2
Y 1
O C C
M I N P O S
Y 2
S D
FIGURE 18 - FIELD WIRING 24 VOLT THERMOSTAT
G
R E M O T E
U N I T C O N T R O L
B O A R D
X
R
C
18 Unitary Products Group
Page 19

035-17311-002-A-0803
Y
RLALR
AFLA
1.5 2 1.5 2 1.5 2 1.5 2 1.5 2
ea. ea. ea. HP HP HP HP HP HP HP HP HP HP
None -- -- 20.7 21.7 22.9 23.9 25 25 25 30
2TP04520950 5.6 8.5 20.7 21.7 22.9 23.9 25 25 25 30
2TP04521850 11.3 17.2 25.3 26.6 28.1 29.3 30 30 30 30
2TP04522450 15 22.8 32.4 33.6 35.1 36.4 35 35 40 40
2TP04523650 21.3 32.4 44.3 45.6 47.1 48.3 45 50 50 50
* Maximum HACR breaker of the same AMP size is applicable.
0.0
Max
Fuse*
Size
(Amps)
Max Fuse*
Size
w/Power
Exhaust
3.1 4.1 2.2
ActualKWHeater
Amps
Min.
Circuit
Ampacity
(Amps)
380
7.1 54.0 0.8
MCA
w/Power
Exhaust
(Amps)
Pwr
Exh
Motor
Pwr
Conv
Outlet
Electric Heater
Model No.
FLA FLA
Voltage
Compressors
OD Fan
Motors
Supply
Blower
Motor FLA
AFLA
T E R M I N A L B L O C K T B 1
G R O U N D
L U G
F A C T O R Y O R F I E L D
S U P P L I E D D I S C O N N E C T
T H R E E
P H A S E
P O W E R
S U P P L
FIGURE 19 - FIELD WIRING DISCONNECT
TABLE 8: ELECTRICAL DATA - DM090 (7-1/2 TON) WITHOUT POWER CONVENIENCE OUTLET
TABLE 9: ELECTRICAL DATA - DM090 (7-1/2 TON) WITH POWER CONVENIENCE OUTLE T
Voltage
Unitary Products Group 19
Compressors
RLALR
ea. ea. ea. HP HP HP HP HP HP HP HP HP HP
380
7.1 54.0 0.8
Maximum HACR breaker of the same AMP size is applicable.
*
OD Fan
Motors
Motor FLA
Supply
Blower
1.5 2 1.5 2 1.5 2 1.5 2 1.5 2
3.1 4.1 2.2 6.3
Motor
Pwr
Pwr
Exh
Conv
Outlet
FLA FLA
Electric Heater
Model No.
None -- -- 27 28 29.2 30.2 30 35 35 35
2TP04520950 5.6 8.5 27 28 29.2 30.2 30 35 35 35
2TP04521850 11.3 17.2 33.2 34.5 36 37.2 35 35 40 40
2TP04522450 15 22.8 40.2 41.5 43 44.2 45 45 45 45
2TP04523650 21.3 32.4 52.2 53.5 55 56.2 60 60 60 60
Actual
KW
Heater
Amps
Min.
Circuit
Ampacity
(Amps)
MCA
w/Power
Exhaust
(Amps)
Fuse*
(Amps)
Max
Size
Max Fuse*
Size
w/Power
Exhaust
Page 20

035-17311-002-A-0803
AFLA
AFLA
AFLA
A
TABL E 10: ELECTRICAL DATA - DM120 (10 TON) WI THOUT POWER CONVENIENCE OUTLET
Voltage
Compressors
RLALR
ea. ea. ea. HP HP HP HP HP HP HP HP HP HP
11.5 75.0 1.6
380
* Maximum HACR breaker of the same AMP size is applicable.
OD Fan
Motors
Supply
Blower Motor
FLA
2 3 2323232 3
4.1 5.3 2.2
Pwr
Exh
Motor
FLA FLA
Pwr
Conv
Outlet
0.0
Min. Circuit
Electric Heater
Model No.
None -- -- 33.2 34.4 35.4 36.6 40 45 45 45
2TP04521850 11.3 17.2 33.2 34.4 35.4 36.6 40 45 45 45
2TP04522450 15 22.8 33.6 35.1 36.4 37.9 40 45 45 45
2TP04523650 21.3 32.4 45.6 47.1 48.3 49.8 50 50 50 50
2TP04525450 33.8 51.4 69.3 70.8 72.1 73.6 70 80 80 80
ActualKWHeater
Amps
Ampacity
(Amps)
MCA
w/Power
Exhaust
(Amps)
Fuse*
(Amps)
TABL E 11: ELECTRICAL DATA - DM120 (10 TON) WITH POWER CONVENIENCE OUTLET
Voltage
Compressors
RLALR
ea. ea. ea. HP HP HP HP HP HP HP HP HP HP
11.5 75.0 1.6 4.1 5.3 2.2 6.3
380
*
Maximum HACR breaker of the same AMP size is applicable.
OD Fan
Motors
Supply
Blower Motor
FLA
2 3 2323232 3
Pwr
Exh
Conv
Motor
Outlet
FLA FLA
Heater
Amps
Min. Circuit
Ampacity
(Amps)
Pwr
Electric Heater
Model No.
None -- -- 39.5 40.7 41.7 42.9 50 50 50 50
2TP04521850 11.3 17.2 39.5 40.7 41.7 42.9 50 50 50 50
2TP04522450 15 22.8 41.5 43 44.2 45.7 50 50 50 50
2TP04523650 21.3 32.4 53.5 55 56.2 57.7 60 60 60 60
2TP04525450 33.8 51.4 77.2 78.7 79.9 81.4 80 80 80 90
Actual
KW
MCA
w/Power
Exhaust
(Amps)
Fuse*
(Amps)
Max
Size
Max
Size
Max Fuse*
Size
w/Power
Exhaust
Max Fuse*
Size
w/Power
Exhaust
TABLE 12: ELECTRICAL DATA - DM150 (12-1/2 TON) WITHOUT POWER CONVENIENCE OUTLET
Voltage
Compressors
RLALR
ea. ea. ea. HP HP HP HP HP HP HP HP HP HP
380
9.6 79.0 1.6
* Maximum HACR breaker of the same AMP size is applicable.
OD Fan
Motors
Supply
Blower
Motor FLA
3 5 3535353 5
5.3 8.1 2.2
Pwr
Exh
Conv
Outlet
Motor
FLA FLA
Pwr
Min.
Electric Heater
Model No.
None -- -- 30.1 32.9 32.3 35.1 35 40 40 40
2TP04521850 11.3 17.2 30.1 32.9 32.3 35.1 35 40 40 40
0.0
2TP04522450 15 22.8 35.1 38.6 37.9 41.4 40 40 40 45
2TP04523650 21.3 32.4 47.1 50.6 49.8 53.3 50 60 50 60
2TP04525450 33.8 51.4 70.8 74.3 73.6 77.1 80 80 80 80
ActualKWHeater
Amps
Circuit
Ampacity
(Amps)
MCA
w/Power
Exhaust
(Amps)
Max
Fuse*
Size
(Amps)
TABL E 13: ELECTRICAL DATA - DM150 (12-1/2 TON) WI TH POWER CONVENIENCE OUTLET
Voltage
380
*
Compressors
RLALRAFL
ea. ea. ea. HP HP HP HP HP HP HP HP HP HP
9.6 79.0 1.6 5.3 8.1 2.2 6.3
Maximum HACR breaker of the same AMP size is applicable.
OD Fan
Motors
Supply
Blower Motor
FLA
3 5 35353535
Pwr
Exh
Conv
Motor
Outlet
FLA FLA
Pwr
Electric Heater
Model No.
None -- -- 36.4 39.2 38.6 41.4 45 45 45 50
2TP04521850 11.3 17.2 36.4 39.5 38.7 42.2 45 45 45 50
2TP04522450 15 22.8 43 46.5 45.7 49.2 45 50 50 50
2TP04523650 21.3 32.4 55 58.5 57.7 61.2 60 60 60 70
2TP04525450 33.8 51.4 78.7 82.2 81.4 84.9 80 90 90 90
Actual
KW
Heater
Amps
Min. Circuit
Ampacity
(Amps)
MCA
w/Power
Exhaust
(Amps)
Max
Fuse*
Size
(Amps)
Max Fuse*
Size
w/Power
Exhaust
Max Fuse*
Size
w/Power
Exhaust
20 Unitary Products Group
Page 21

035-17311-002-A-0803
TABLE 14: PHYSICAL DATA
Evaporator
Blower
Evaporator
Coil
Condenser
Fan
(2 per Unit)
Condenser
Coil
(2 per unit)
Refrigerant
Charge
Compressors
Air Filters
DM
DM
DM
DM
DM
Component
Models
090 120 150
Blower, Centrifuga l (Dia. X Wd. in.) 15 x 15 15 x 15 15 x 15
Motor, Stan dard (HP) 1-1/2 2 3
Motor, Optional (HP) 2 3 5
Rows 2 2 3
Fins per Inch 15 15 15
Height (in.) 32 40 40
2
Face Area (ft.
Propeller Dia. (in., each) 24 24 24
Motor (HP, each) 1/3 3/4 3/4
CFM, Nominal (each) 3400 4400 4400
Rows (each) 1 1 2
Fins per Inch 20 20 20
Height (in. each) 28 44 44
Face Area (ft.
System 1 (lb./o z. ) 4/12 6/12 10/12
System 2 (lb./oz.) 4/6 6/12 9/8
Quantity 222
Size (Wd. x Ht. x Thickness in.) 25x20x2 25x20x2 25x20x2
Number Per Unit 4 4 4
each)
2
each)
Type Recip Recip Recip
10.6 13.2 13.2
9.2 14.5 14.5
OPTIONS/ACCESSORIES
ELECTRIC HEAT ACCESSORIES
Electric heaters are available as field installed accessories.
Refer to electric heat instructions for installation. These heaters mount in the he at compartment with the heating elements
extending into the supply air chamber. All electric heaters are
fused and intended for use with single point power supply.
ELECTRIC HEAT OPTION
The factory-installed heaters are wired for single point power
supply. Power supply need only be brought into the single
point termin al bl ock.
These CSA approved heaters are located within the central
compartment of the unit with the heater elements extending
into the supply air chamber.
Fuses are suppli ed, where required, by the factory . Some kW
sizes require fuses and other do not. Refer to Table 15 for
minimum CFM lim itations and to Tables 8 t hrough 13 for el ectrical data.
TABLE 15: MINIMUM SUPPLY AIR CFM
Heater Unit Model Size, Nominal Tons
kW Voltage
9
18 2250 3000 3750
24 2250 3000 3750
36 2250 3000 3750
54 N/A 3000 3750
380
MOTORIZED OUTDOOR DAMPER
The Motorized Outdoor Damper can be a factory installed
option or a field installed accessory. If factory installed, refer
to the instructions included with the outdoor air hood to complete the assembly. Field installed Motorized Outdoor
Damper accessories include complete instructions for installation.
7.5 10 12.5
Minimum Supply Air CFM
2250 N/A N/A
Unitary Products Group 21
Page 22

035-17311-002-A-0803
ECONOMIZER
The Economizer can be a factory installed option or a field
installed accessory. If factory installed, refer to the instructions included with the outdoor air hood to complete the
assembly. Field installed Economizer accessories include
complete instructions for installation.
There are two Economizer options:
1. Down Flow application with barometric relief hood
standard.
2. Horizontal Flo w application that requires the purchase of
a barometric relief hood.
POWER EXHAUST
The Power Exhaust can be a factory installed option or a field
installed accessory. If factory installed, refer to the instructions included with the outdoor air hood to complete the
assembly. Field installed Power Exhaust accessories include
complete instructions for installation.
The Power Exhaust factory installed option is for Down Flow
application only.
There are two field in stalled Power Exhaust accessories:
1. Down Flow application.
2. Horizontal Flo w application that requires the purchase of
a barometric relief hood.
RAIN HOOD
All of the hood components, including the filters, the gasketing and the hardware for assembling, are packaged and
located between the condenser coil section and the main unit
cabinet, if the unit has factory installed options. If field
installed accessories are being installed all parts necessary
for the installation comes in the accessory .
ON position and then OFF or energize and de-energize
termi na ls “R ” to “G”.
• With the thermostat set to the indoor fan ON position or
terminals “R” to “G” ener gized, turn the Minimum Position Adjusting scr ew (l ocated on the damper control
module) counterclockwise until the desired mini m um
damper position has been attained.
ENTHALPY SET POINT ADJUSTMENT
The enthalpy set point may now be set by selecting the
desired set point shown in the Enthalpy Set Point Adjustment
Figure 20. Adjust as follows:
• For a single enthalpy operation carefully turn the set
point adjusting screw (found on the damper control mod ule) to the "A", "B", "C" or "D" setting corresponding to
the lettered curve of the Enthalpy Set Point Adjustment
Figure 20.
• For a dual enthal py operati on, car efull y turn the set point
adjusting screw fully clockwise past the "D" setting.
POWER EXHAUST DAMPER SET POINT (WITH OR WITHOUT POWER EXHAUST)
• With no power exhaust option, adjust the Exhaust Air
Adjustment Screw fully clockwise. This will allow 2nd
stage cooling to operate.
• With power exh aust option, each buildi ng pressurization
requirement will be different. The point at which the
power exhaust comes on is dete rmined by the economizer damper position (Percent Open). The Exhaust Air
Adjustment Screw should be set at the Percent Open of
the economizer damper at which the power exhaust is
needed. It can be set from 0 to 100% dampe r open.
INDOOR AIR QUALITY AQ
ECONOMIZER AND POWER EXHAUST SET POINT
ADJUSTMENTS AND INFORMATION
Remove the top rear access panel from the unit. Locate the
economizer control module, where the following adjustments
will be made.
Indoor Air Quality (indoor sensor input): Terminal AQ accepts
a +2 to +10 Vdc signal with respect to the (AQ1) terminal.
When the signal is below it's set point, the act uator is allowed
to modulate normally in accordance with the enthalpy and
mixed air sensor inputs. When the AQ signal exceeds it's set
point setting and there is no call for free cooling, the actuator
is proportionat ely modulated from the 2 to 10 Vdc signal, with
2 Vdc corresponding to full closed and 10 Vdc corresponding
to full open. When there is no call for free coolin g, the damper
position is limited by the IAQ Max damper position setting.
Extreme care must be exercised in turning all set
point, maximum and minimum damper positioning
adjustment screws to prevent twisting them off.
When the signal exceeds it's set point (Demand Control Ven-
tilation Set Point) setting and there is a call for free cooling,
the actuator modulates from the minimum position to the full
open position based on the highest call from either the mixed
MINIMUM POSITION ADJUSTMENT
• Check that the damper blades move smoothly wi thout
binding; care fully turn the Minimum Position Adjust
screw (found on the damper control module) fully clockwise and then set the t hermostat indoor fan switch t o the
air sensor input or the AQ voltage input.
• Optional CO
• Optional CO
Space Sensor Kit Part # 2AQ04700324
2
Sensor Kit Part # 2AQ04700424
2
Replace the top rear access panel on the unit.
22 Unitary Products Group
Page 23

035-17311-002-A-0803
CONTROL
CURVE
A
B
C
D
CONTROL POINT
APPROX.
0
F (0C)
AT 50% RH
73 (23)
70 (21)
67 (19)
63 (17)
45
(7)
40
(4)
35
(2)
50
(10)
110
100
95
85
55
(13)
60
(16)
90
(29)
(32)
80
(27)
75
(24)
70
(21)
65
(18)
A
(35)
(38)
105
(41)
(43)
B
C
D
40
35
(2)
(4)45(7)
APPROXIMATE DRY BULB TEMPERATURE - 0F (0C)
FIGURE 20 - ENTHALPY SET POINT CHART
Exhaust Air
Adjustment
Screw
Exhaust Air LED
Damper Min.
Position
Screw
Indoor Air Quality
Max. Adjustment
Screw
Indoor Air Quality
LED
Indoor Air Quality
Min. Adjustment
Screw
Free Cooling LED
Economizer Enthalpy
Set Point Adjustment
Screw
SO+ SO
50
(10)55(13)
N
N1
P1
P
T1
T
AQ1 AQ
SR
SR+
65
70
60
(21)
(16)
(18)
EXH
Set
EXH
Min
Pos
IAQ
Max
IAQ
IAQ
Min
Free
Cool
BC
A
D
C
D
75
(24)80(27)
A
B
95
105
85
(29)
90
(32)
100
(38)
(35)
TR TR1
24
Vac
HOT
(41)
24
Vac
COM
110
(43)
+
1
3
EF EF1
2
5
4
FIGURE 21 - HONEYWELL ECONOMIZER CONTROL W7212
Unitary Products Group 23
Page 24

PHASING
Predator® units are properly phased at the factory. Check for
proper compressor rotation. If the blower or compressors
rotate in the wrong direction at st art-up, the electr ical connection to the unit is misphased. Change the phasing of the Field
Line Connection at the factory or field supplied disconnect to obtain proper rotation. (Scroll compressors operate in
only one direction. If the scroll is drawing low amperage, has
similar suction and discharge pressures, or producing a high
noise level, the scroll is misphased.)
Scroll compressors require proper rotation to operate correctly. Units are properly phased at the factory. Do not change the internal wiring to make the
blower condenser fans, or compressor rotate correctly.
035-17311-002-A-0803
A
C*
* NEVER LOOSEN
A
B
SPAN LENGTH
DEFL. FORCE
A
BLOWER ROTATION
Check for proper supply air blower rotation. If the blower is
rotating backwards, the line voltage at the unit point of power
connection is misphased (See ‘PHASING’).
TABLE 16: SUPPLY AIR LIMITATIONS
Unit Size Minimum Maximum
090
120 3000 5000
150 3750 6250
2250 3750
BELT TENSION
The tension on the belt should be adjusted as shown in
Figure 22.
FIGURE 22 - BELT ADJUSTMENT
Procedure for adjusting belt tension:
1. Loosen six nuts (top and bottom) A.
2. Adjust by turning (B).
3. Ne ver loosen nuts (C).
4. Use belt tension checker to apply a perpendicular
force to one belt at the mid point of the span as
shown. Deflection distance of 4mm (5/32”) is
obtained.
To determine the deflection distance from normal
position, use a straight edge from sheave to sheave
as reference line. The recommended deflection
force is as fo llo w s :
Tension new belts at the max. deflection force recommended for the belt section. Check the belt tension at least two times during the first 24 hours of
operation. Any retensioning should fall between the
min. and max. deflection force values.
5. After adjusting retighten nuts (A).
24 Unitary Products Group
Page 25

035-17311-002-A-0803
††
W
†
BHP CFM
††
W
TABLE 17: 7-1/2 TON STANDARD MOTOR DOWN SHOT BLOWER PERFORMANCE*
**
††
BHP CFM
W
ESP
0.2
TURNS OPEN
‡
CFM
012345
††
BHP CFM
W
- - - 3715 1573 1.69 3634 1434 1.54 3431 1265 1.36 3218 901 0.97 3024 976 1.05
††
W
BHP CFM
††
W
BHP CFM
0.4 3650 1657 1.78 3510 1490 1.60 3320 1313 1.41 3079 1145 1.23 2832 810 0.87 2586 860 0.92
0.6 3334 1522 1.63 3146 1351 1.45 2910 1169 1.25 2621 1005 1.08 2307 706 0.76 - - -
0.8 2903 1352 1.45 2622 1167 1.25 2404 1013 1.09 2054 858 0.92 - - - - - -
1.0 2356 1159 1.24 - - - - - - - - - - - - - - -
*.
Blowe r performance for gas heat includes maximum number of heat tubes available for each tonnage.
†.
Blowe r performance includes two-inch throwaway filters.
‡.
ESP (External Static Pressure) given is that available for the supply and return air duct system. All internal resistances have been
deducted from the total static pressure of the blower.
**.
“Tur ns Open” refers to the setting of the variable pitch motor sheave, where “0 Turns Open” is fully closed.
††.
W = Watts
††
W
†
BHP CFM
††
W
TABLE 18: 7-1/2 TON OPTIONAL MOTOR DOWN SHOT BLOWER PERFORMANCE*
**
††
BHP CFM
W
ESP
0.2
0.4
TURNS OPEN
‡
CFM
012345
††
BHP CFM
W
- - - - - - - - - - - - 3992 1904 2.04 3798 1679 1.80
- - - - - - - - - 3930 2017 2.16 3734 1786 1.92 3486 1552 1.66
††
W
BHP CFM
††
W
BHP CFM
0.6 - - - - - - 3947 2176 2.33 3670 1895 2.03 3394 1641 1.76 3084 1401 1.50
0.8
- - - 4138 2384 2.56 3623 2009 2.15 3323 1742 1.87 2971 1477 1.58 2591 1236 1.33
1.0 4126 2430 2.61 3643 2145 2.30 3224 1820 1.95 2889 1569 1.68 2466 1306 1.40 - - -
3613 2238 2.40 3143 1921 2.06 2748 1621 1.74 2369 1385 1.49 - - - - - -
1.2
1.4 3099 2039 2.19 2636 1714 1.84 2195 1424 1.53 - - - - - - - - -
258618331.97---------------
1.6
*.
Blowe r performance for gas heat includes maximum number of heat tubes available for each tonnage.
†.
Blowe r performance includes two-inch throwaway filters.
‡.
ESP (External Static Pressure) given is that available for the supply and return air duct system. All internal resistances have been
deducted from the total static pressure of the blower.
**.
“Tur ns Open” refers to the setting of the variable pitch motor sheave, where “0 Turns Open” is fully closed.
††.
W = Watts
BHP
BHP
Unitary Products Group 25
Page 26

035-17311-002-A-0803
TABLE 19: 10 TON STANDARD MOTOR DOWN SHOT BLOWER PERFORMANCE*
**
††
BHP CFM
W
ESP
0.2
TURNS OPEN
‡
CFM
012345
††
BHP CFM
W
- - - - - - - - - 3896 1639 1.76 3688 1453 1.56 3447 1268 1.36
††
W
BHP CFM
††
W
BHP CFM
†
††
W
BHP CFM
††
W
0.4 4040 2076 2.23 4005 1934 2.07 3790 1698 1.82 3569 1508 1.62 3333 1330 1.43 3057 1147 1.23
0.6 3890 2006 2.15 3697 1790 1.92 3427 1550 1.66 3152 1356 1.45 - - - - - -
0.8 3620 1882 2.02 3324 1629 1.75 2972 1380 1.48 - - - - - - - - -
1.0 3227 1708 1.83 - - - - - - - - - - - - - - -
*.
Blower performance for gas h eat includes maximum number of heat tubes available for each to nnage.
†.
Blower performance includes two-inch throwaway filters.
‡.
ESP (External Static Pressure) given is that available for the supply and return air duct system. All internal resistances have be en
deduct ed from the total static pressure of the blower.
**.
“Turns Open” refe rs to the setti ng of the varia bl e pit ch mot or sh eave , whe r e “0 Turns Open” is fu lly close d .
††.
W = Watts
TABLE 20: 10 TON OPTIONAL MOTOR DOWN SHOT BLOWER PERFORMANCE*
TURNS OPEN
‡
ESP
CFM
4965 3485 3.74 4875 3150 3.38 4613 2739 2.94 4322 2374 2.55 4156 2106 2.26 3907 1860 1.99
0.4
012345
††
W
BHP CFM
††
W
BHP CFM
††
W
BHP CFM
**
††
BHP CFM
W
†
††
W
BHP CFM
††
W
0.6 4876 3416 3.66 4651 2997 3.21 4359 2582 2.77 4038 2220 2.38 3860 1966 2.11 3590 1724 1.85
4713 3291 3.53 4387 2823 3.03 4077 2417 2.59 3719 2059 2.21 3541 1827 1.96 3242 1584 1.70
0.8
1.0 4476 3116 3.34 4084 2632 2.82 3768 2245 2.41 3365 1892 2.03 3197 1691 1.81 - - -
4165 2898 3.11 3741 2427 2.60 3432 2070 2.22 - - - - - - - - -
1.2
1.4 3779 2646 2.84 3359 2212 2.37 3069 1895 2.03 - - - - - - - - -
3319 2372 2.54 - - - - - - - - - - - - - - -
1.6
*.
Blower performance for gas h eat includes maximum number of heat tubes available for each to nnage.
†.
Blower performance includes two-inch throwaway filters.
‡.
ESP (External Static Pressure) given is that available for the supply and return air duct system. All internal resistances have be en
deduct ed from the total static pressure of the blower.
**.
“Turns Open” refe rs to the setti ng of the varia bl e pit ch mot or sh eave , whe r e “0 Turns Open” is fu lly close d .
††.
W = Watts
BHP
BHP
26 Unitary Products Group
Page 27

035-17311-002-A-0803
††
W
†
BHP CFM
††
BHP
W
TABLE 21: 12-1/2 TON STANDARD MOTOR DOWN SHOT BLOWER PERFORMANCE*
TURNS OPEN
‡
ESP
CFM
0.4
5078 3630 3.89 4809 3103 3.33 4594 3053 3.27 4360 2478 2.66 4090 2093 2.24 3812 1798 1.93
012345
††
W
BHP CFM
††
W
BHP CFM
††
W
BHP CFM
**
††
BHP CFM
W
0.6 4865 3456 3.71 4584 2961 3.17 4349 2912 3.12 4106 2318 2.49 3814 1964 2.11 - - -
0.8 4642 3284 3.52 4356 2828 3.03 4089 2776 2.98 3840 2137 2.29 - - - - - -
1.0 4408 3114 3.34 4124 2705 2.90 3815 2647 2.84 - - - - - - - - -
1.2 4164 2947 3.16 3889 2592 2.78 - - - - - - - - - - - -
1.4 391027872.99---------------
*.
Blowe r performance for gas heat includes maximum number of heat tubes available for each tonnage.
†.
Blowe r performance includes two-inch throwaway filters.
‡.
ESP (External Static Pressure) given is that available for the supply and return air duct system. All internal resistances have been
deducted from the total static pressure of the blower.
**.
“Tur ns Open” refers to the setting of the variable pitch motor sheave, where “0 Turns Open” is fully closed.
††.
W = Watts
††
W
†
BHP CFM
††
BHP
W
TABLE 22: 12-1/2 TON OPTIONAL MOTOR DOWN SHOT BLOWER PERFORMANCE*
TURNS OPEN
‡
ESP
CFM
5994 5400 5.79 5565 4369 4.69 5488 4169 4.47 5264 3599 3.86 4990 3085 3.31 4738 2812 3.02
0.4
012345
††
W
BHP CFM
††
W
BHP CFM
††
W
BHP CFM
**
††
BHP CFM
W
0.6 5824 5216 5.59 5368 4186 4.49 5289 3991 4.28 5049 3437 3.69 4763 2937 3.15 4491 2655 2.85
5641 5022 5.39 5170 4012 4.30 5076 3807 4.08 4822 3272 3.51 4528 2790 2.99 4235 2497 2.68
0.8
1.0 5444 4819 5.17 4971 3846 4.12 4847 3618 3.88 4584 3103 3.33 4286 2644 2.83 3969 2340 2.51
5233 4609 4.94 4771 3687 3.95 4604 3426 3.67 4335 2933 3.15 4035 2499 2.68 - - -
1.2
1.4 5009 4394 4.71 4571 3537 3.79 4346 3233 3.47 4074 2762 2.96 3777 2356 2.53 - - -
4771 4174 4.48 4370 3395 3.64 4074 3040 3.26 3802 2590 2.78 - - - - - -
1.6
1.8 4520 3951 4.24 4169 3262 3.50 3786 2850 3.06 - - - - - - - - -
4255 3728 4.00 3966 3137 3.36 - - - - - - - - - - - -
2.0
2.2 3976 3505 3.76 3763 3020 3.24 - - - - - - - - - - - -
*.
Blowe r performance for gas heat includes maximum number of heat tubes available for each tonnage.
†.
Blowe r performance includes two-inch throwaway filters.
‡.
ESP (External Static Pressure) given is that available for the supply and return air duct system. All internal resistances have been
deducted from the total static pressure of the blower.
**.
“Tur ns Open” refers to the setting of the variable pitch motor sheave, where “0 Turns Open” is fully closed.
††.
W = Watts
Unitary Products Group 27
Page 28

035-17311-002-A-0803
TABLE 23: 7-1/2 TON STANDARD MOTOR SIDE SHOT BLOWER PERFORMANCE*
**
††
BHP CFM
W
ESP
0.4
TURNS OPEN
‡
CFM
012345
††
BHP CFM
W
- - - - - - 3736 1476 1.58 3487 1284 1.38 3231 1109 1.19 3001 970 1.04
††
W
BHP CFM
††
W
BHP CFM
†
††
W
BHP CFM
††
BHP
W
0.6 - - - 3572 1514 1.62 3389 1339 1.44 3094 1151 1.23 2764 972 1.04 2446 824 0.88
0.8 3422 1558 1.67 3179 1364 1.46 2889 1164 1.25 2554 985 1.06 - - - - - -
1.0 2891 1347 1.44 2372 1088 1.17 2050 922 0.99 - - - - - - - - -
1.2 2017 1051 1.13 - - - - - - - - - - - - - - -
*.
Blower performance for gas h eat includes maximum number of heat tubes available for each to nnage.
†.
Blower performance includes two-inch throwaway filters.
‡.
ESP (External Static Pressure) given is that available for the supply and return air duct system. All internal resistances have been
deduct ed from the total static pressure of the blower.
**.
“Turns Open” refe rs to the setti ng of the varia bl e pit ch mot or sh eave , whe r e “0 Turns Open” is fu lly close d .
††.
W = Watts
TABLE 24: 7-1/2 TON OPTIONAL MOTOR SIDE SHOT BLOWER PERFORMANCE*
**
††
BHP CFM
W
ESP
0.4
TURNS OPEN
‡
CFM
012345
††
BHP CFM
W
- - - - - - - - - - - - - - - 3910 1726 1.85
††
W
BHP CFM
††
W
BHP CFM
†
††
W
BHP CFM
††
BHP
W
0.6 - - - - - - - - - - - - 3857 1842 1.98 3597 1430 1.53
0.8
- - - - - - - - - 3804 1957 2.10 3503 1689 1.81 3172 1430 1.53
1.0 - - - - - - 3774 2088 2.24 3406 1778 1.91 3032 1497 1.61 2248 1143 1.23
1.2
- - - - - - 3327 1866 2.00 2926 1578 1.69 2160 1217 1.31 - - -
1.4 - - - 3270 1971 2.11 2537 1544 1.66 2043 1296 1.39 - - - - - -
3196 2077 2.23 2460 1651 1.77 - - - - - - - - - - - -
1.6
1.8 242617681.90---------------
*.
Blower performance for gas h eat includes maximum number of heat tubes available for each to nnage.
†.
Blower performance includes two-inch throwaway filters.
‡.
ESP (Exte rna l S t a tic P res sur e ) giv en is that av ai la ble f or the su pp ly a nd ret u rn ai r duct sys t em. Al l int er nal r es is tan ce s ha ve be en
deduct ed from the total static pressure of the blower.
**.
“Turns Open” refe rs to the setti ng of the varia bl e pit ch mot or sh eave , whe r e “0 Turns Open” is fu lly close d .
††.
W = Watts
28 Unitary Products Group
Page 29

035-17311-002-A-0803
TABLE 25: 10 TON STANDARD MOTOR DOWN SHOT BLOWER PERFORMANCE*
**
††
BHP CFM
W
ESP
0.2
TURNS OPEN
‡
CFM
012345
††
BHP CFM
W
- - - - - - - - - 3896 1639 1.76 3688 1453 1.56 3447 1268 1.36
††
W
BHP CFM
††
W
BHP CFM
†
††
W
BHP CFM
††
BHP
W
0.4 4040 2076 2.23 4005 1934 2.07 3790 1698 1.82 3569 1508 1.62 3333 1330 1.43 3057 1147 1.23
0.6 3890 2006 2.15 3697 1790 1.92 3427 1550 1.66 3152 1356 1.45 - - - - - -
0.8 3620 1882 2.02 3324 1629 1.75 2972 1380 1.48 - - - - - - - - -
1.0 322717081.83---------------
*.
Blowe r performance for gas heat includes maximum number of heat tubes available for each tonnage.
†.
Blowe r performance includes two-inch throwaway filters.
‡.
ESP (External Static Pressure) given is that available for the supply and return air duct system. All internal resistances have been
deducted from the total static pressure of the blower.
**.
“Tur ns Open” refers to the setting of the variable pitch motor sheave, where “0 Turns Open” is fully closed.
††.
W = Watts
TABLE 26: 10 TON OPTIONAL MOTOR DOWN SHOT BLOWER PERFORMANCE*
TURNS OPEN
‡
ESP
CFM
0.4
4965 3485 3.74 4875 3150 3.38 4613 2739 2.94 4322 2374 2.55 4156 2106 2.26 3907 1860 1.99
4876 3416 3.66 4651 2997 3.21 4359 2582 2.77 4038 2220 2.38 3860 1966 2.11 3590 1724 1.85
0.6
012345
††
W
BHP CFM
††
W
BHP CFM
††
W
BHP CFM
**
††
BHP CFM
W
†
††
W
BHP CFM
††
BHP
W
0.8 4713 3291 3.53 4387 2823 3.03 4077 2417 2.59 3719 2059 2.21 3541 1827 1.96 3242 1584 1.70
4476 3116 3.34 4084 2632 2.82 3768 2245 2.41 3365 1892 2.03 3197 1691 1.81 - - -
1.0
1.2 4165 2898 3.11 3741 2427 2.60 3432 2070 2.22 - - - - - - - - -
3779 2646 2.84 3359 2212 2.37 3069 1895 2.03 - - - - - - - - -
1.4
1.6 331923722.54---------------
*.
Blowe r performance for gas heat includes maximum number of heat tubes available for each tonnage.
†.
Blowe r performance includes two-inch throwaway filters.
‡.
ESP (External Static Pressure) given is that available for the supply and return air duct system. All internal resistances have been
deducted from the total static pressure of the blower.
**.
“Tur ns Open” refers to the setting of the variable pitch motor sheave, where “0 Turns Open” is fully closed.
††.
W = Watts
Unitary Products Group 29
Page 30

035-17311-002-A-0803
††
W
†
BHP CFM
††
BHP
W
---
TABLE 27: 12-1/2 TON STANDARD MOTOR SIDE SHOT BLOWER PERFORMANCE*
TURNS OPEN
‡
ESP
CFM
0.4
0.6
0.8
5003 3490 3.74 4647 2988 3.20 4380 2636 2.83 4030 2257 2.42
1.0
4724 3290 3.53 4363 2875 3.08 4012 2505 2.69
1.2
4428 3040 3.26
1.4
*.
Blower performance for gas h eat includes maximum number of heat tubes available for each to nnage.
†.
Blower performance includes two-inch throwaway filters.
‡.
ESP (External Static Pressure) given is that available for the supply and return air duct system. All internal resistances have be en
012345
††
BHP CFM
W
------
---
---
5220 3395 3.64 4942 2980 3.20 4657 2608 2.80 4358 2230 2.39 4007 1890 2.03
4944 3194 3.43 4661 2806 3.01 4378 2572 2.76 4016 2057 2.21
††
W
BHP CFM
††
W
BHP CFM
5201 3162 3.39 4966 2796 3.00 4681 2405 2.58 4355 2054 2.20
---------------
**
††
BHP CFM
W
------
---------
deduct ed from the total static pressure of the blower.
**.
“Turns Open” refe rs to the setti ng of the varia bl e pit ch mot or sh eave , whe r e “0 Turns Open” is fu lly close d .
††.
W = Watts
TABLE 28: 12-1/2 TON OPTIONAL MOTOR SIDE SHOT BLOWER PERFORMANCE*
**
††
BHP CFM
W
ESP
TURNS OPEN
‡
CFM
01 2 345
††
W
BHP CFM
††
W
BHP CFM
††
W
BHP CFM
†
††
W
BHP CFM
††
BHP
W
0.4 - - - 6447 5315 5.70 6207 4760 5.1046 5966 4205 4.51 5717 3716 3.98 5470 3307 3.55
0.6 - - - 6110 4917 5.27 5965 4464 4.79 5740 4023 4.31 5430 3501 3.75 5126 3054 3.28
0.8 - - - 5772 4519 4.85 5741 4274 4.58 5503 3821 4.10 5162 3294 3.53 4849 2870 3.08
1.0 6235 5521 5.92 5628 4407 4.73 5474 4048 4.34 5244 3611 3.87 4882 3101 3.33 4530 2667 2.86
1.2 5881 5137 5.51 5384 4205 4.51 5248 3854 4.13 4941 3387 3.63 4589 2906 3.12 4225 2502 2.68
1.4 5695 4950 5.31 5123 3996 4.29 5014 3670 3.94 4651 3178 3.41 4284 2716 2.91 3858 2280 2.45
1.6 5471 4728 5.07 4919 3828 4.11 4732 3460 3.71 4365 2983 3.20 3951 2516 2.70 3491 2058 2.21
1.8 5242 4514 4.84 4656 3611 3.87 4438 3240 3.47 3998 2740 2.94 3618 2316 2.48 - - -
2.0 4954 4231 4.54 4339 3380 3.62 3905 2861 3.07 3631 2497 2.68 - - - - - -
2.2 4585 3934 4.22 4022 3149 3.38 - - - - - - - - - - - -
2.4 421736373.90----- - ---------
2.6 384833403.58----- - ---------
*.
Blower performance for gas h eat includes maximum number of heat tubes available for each to nnage.
†.
Blower performance includes two-inch throwaway filters.
‡.
ESP (External Static Pressure) given is that available for the supply and return air duct system. All internal resistances have be en
deduct ed from the total static pressure of the blower.
**.
“Turns Open” refe rs to the setti ng of the varia bl e pit ch mot or sh eave , whe r e “0 Turns Open” is fu lly close d .
††.
W = Watts
NOTES FOR TABLE 17 THROUGH TABLE 28:
• Blower performance includes dry coil and two-inch
filters.
• Blower performance for gas heat includes the maximum
number of heat tubes available for each tonnage.
• ESP (Ext ernal Static Pressure) gi ven is that available for
the supply and return air duct system. All internal resistances have b een de duct ed fro m the tot al st ati c pressu re
of the blower.
30 Unitary Products Group
Page 31

035-17311-002-A-0803
TABLE 29: INDOOR BLOWER SPECIFICATIONS
MODEL
DM090
DM120
DM150
HP R PM Eff. SF Fram e Datum Dia. (in.) B ore (in. ) Model Datum Dia. (in. ) Bore (in.) Model
1-1/2 1725 80% 1.15 56 3.4 - 4.4 7/8 1VM50 9.0 1 AK94 A57
2 1725 80% 1.15 56 3.4 - 4.4 7/8 1VM50 7.5 1 AK79 A55
2 1725 80% 1.15 56 3.4 - 4.4 7/8 1VM50 8.5 1 AK89 A56
3 1725 80% 1.15 56 3.4 - 4.4 7/8 1VM50 7.0 1 AK74 A54
3 1725 80% 1.15 56 3.4 - 4.4 7/8 1VM50 7.0 1 AK74 A54
5 172 5 87% 1.15 184T 4.3 - 5.3 1 1/8 1VP56 6.7 1 BK77 BX55
MOTOR MOTOR SHEAVE BLOWER SHEAVE
BELT
AIR BALANCE
Start the supply air blower motor. Adjust the resistances in both the supply and the return air duct systems to balance the air
distribution throughout the conditioned space. The job specifications m ay require that this balanci ng be done by someone other
than the equipment installer .
CHECKING AIR QUANTITY
METHOD ONE
1. Remove the dot plugs from the d uct pa nel (for loca tion of
the dot plugs see Figure 10).
2. Insert eight-inches of 1/4 inch metal tubing into the airflow on both sides of the indoor coil.
NOTE: The tubes must be inserted and held in a position
perpendicular to the air flow so that velocity pressure will not af fect the static pressu re readings.
3. Use an Inclined Manometer or Magnehelic to det ermine
the pressure dro p across a dry evaporat or coi l. Si nce the
moisture on an evaporator coil can vary greatly, measuring the pressure drop across a wet coil under field conditions could be inaccu rate. To assure a dry coil, the
compressors shou ld be de- activated while the test is
being run.
NOTE: De-energize the compressors bef ore taking any test
measurement s to assure a dry evaporator coil .
4. The CFM through the unit can be determined from the
pressure drop indicat ed by the manometer by ref erring to
Figure 23. In order to obtain an accurate measurement,
be certain that the air filters are clean.
5. To adj ust Measured CFM to Required CFM, see ’SUPPLY AIR DRIVE ADJUSTMENT’.
6. After readings have been obtained, remove the tubes
and replace the dot plugs.
METHOD TWO
1. Drill two 5/16 inc h hole s, one in the return air duct as
close to the inlet of the uni t as possible, and another in
the supply air duct as close to the outlet of the unit as
possible.
2. Using the whole drilled in step 1, insert eight inches of
1/4 inch metal tubing into the airflow of the return and
supply air ducts of the unit.
NOTE: The tubes m ust be inserted and held in position per-
pendicular to the airflow so that velocity pressure
will not affect the st atic pressure rea dings.
3. Use an Inclined Manometer or Magnehelic to determine
the pressure drop across the unit. This is the External
Static Pressure (ESP). In order to obtain an accurate
measurement, be cert ain that the air filter s are clean.
4. Determine the number of turns the variable motor
sheave is open.
5. Select the correct blower performance table for the unit
from Tables 17 - 28. T ables are presented for hori zontal
and downflow configuration.
6. Determine the unit Measured CFM from the Blower Performance Table, External Static Pressure and the number of turns the variable motor sheave is open.
7. To adj ust Measured CFM to Required CFM, see ’SUPPL Y AIR DRIVE ADJUSTMENT’.
8. After reading has been obtained, remove the tubes and
seal holes.
NOTE: With the addition of field installed accessories
repeat this procedure.
Failure to properly adjust the total system air quantity can result i n extensive blower damage.
Failure to properly adjust the total system air quantity can result in extensive blower damage.
Unitary Products Group 31
Page 32

035-17311-002-A-0803
FIGURE 23 - DRY COIL DELTA P
SUPPLY AIR DRIVE ADJUSTMENT
Before making any blower speed changes review
the installation for any installation errors, leaks or
undesirable systems effects that can result in loss of
airflow.
Even small changes in blower speed can result in
substantial changes in static pressure and BHP.
BHP and AMP draw of the blower motor will
increase by the cube of the blower speed. Static
pressure will increase by the square of the blower
speed. Only qualified personnel should make blower
speed changes, strictly adhering to the fan l aws.
At unit start-up, the measured CFM may be higher or lower
than the required CFM. To achieve the required CFM, the
speed of the drive may have adjusted by changing the datum
diameter (DD) of the variable pitch motor sheave as
described below:
EXAMPLE
A 12.5 ton unit was selected to deliver 4,000 CFM with a 3
HP motor, but the unit is delivering 3,800 CFM. The variable
pitch motor sheave is set at 2 turns open.
Use the equation to determine the required DD for the new
motor sheave,
4,000 CFM
(
3,800 CFM
Use Table 31 to locate the DD nearest to 4.21 in. Close the
sheave to 1 turn open.
New BHP
= (Speed increase) • BHP at 3,800 CFM
= (Spee d inc rease) • Original BHP
= New BHP
• 4.0 in. = 4.21 in.
)
3
3
Required CFM
(
Measured CFM
Use the following tables and the DD calculated per the above
equation to adjust the motor variable pitch she ave.
32 Unitary Products Group
• Existing DD = New DD
)
New motor Amps
= (Spee d inc rease) • Amps at 3,800 CFM
= (Spee d inc rease) • Original Amps
= New Amps
3
3
Page 33

035-17311-002-A-0803
TABLE 30: ADDITIONAL STATIC RESISTANCE
CFM
Cooling Only
*
Economizer†
‡
Electric Heat KW
9 18243654
2300 0.08 0.02 0.07 0.08 0.09 0.10 0.13
2500 0.09 0.02 0.08 0.09 0.10 0.11 0.14
2700 0.11 0.03 0.09 0.10 0.12 0.13 0.16
2900 0.12 0.03 0.10 0.11 0.13 0.14 0.18
3100 0.14 0.03 0.12 0.13 0.15 0.16 0.20
3300 0.16 0.03 0.13 0.14 0.17 0.18 0.22
3500 0.18 0.04 0.15 0.16 0.19 0.20 0.24
3700 0.20 0.04 0.17 0.18 0.21 0.22 0.26
3900 0.23 0.04 0.19 0.20 0.23 0.24 0.28
4100 0.25 0.04 0.21 0.22 0.25 0.26 0.31
4300 0.28 0.05 0.23 0.24 0.28 0.29 0.34
4500 0.30 0.05 0.25 0.26 0.30 0.31 0.37
4700 0.33 0.05 0.28 0.29 0.33 0.34 0.40
4900 0.36 0.05 0.30 0.31 0.35 0.37 0.43
5100 0.39 0.06 0.33 0.34 0.38 0.40 0.46
5300 0.42 0.06 0.35 0.37 0.41 0.43 0.49
5500 0.45 0.06 0.38 0.40 0.44 0.46 0.53
5700 0.48 0.06 0.41 0.43 0.47 0.49 0.56
5900 0.52 0.07 0.44 0.46 0.50 0.53 0.59
6100 0.56 0.07 0.47 0.49 0.53 0.56 0.62
6300 0.60 0.07 0.50 0.53 0.56 0.59 0.65
*.
Add these resistance values to the available static resistance in the respective Blower Performance Tables.
†.
Deduct these resi stance values fro m the avail able external static pressure shown in the respective Blo wer Perfor mance Table.
‡.
The pressure drop through the economizer is greater for 100% outdoor air than for 100% return air. If the resistance of the return
air duct system is less than 0.25 IWG, the unit will deliver less CFM during full economizer operation.
†
TABLE 31: MOTOR SHEAVE DATUM DIAMETERS
1VM50x7/8
(1-1/2, 2 & 3 HP Motor)
Turns Open
0 4.4 1 5.3
1/2 4.3 1-1/2 5.2
1 4.2 2 5.1
1-1/2 4.1 2-1/2 5.0
2 4.0 3 4.9
2-1/2 3.9 3-1/2 4.8
3 3.8 4 4.7
3-1/2 3.7 4-1/2 4.6
4 3.6 5 4.5
4-1/2 3.5 5-1/2 4.4
5 3.4 6 4.3
Datum
Diameter
1VP56x1-1/8
(5 HP Motor)
Turns Open
Datum
Diameter
OPERATION
SEQUENCE OF OPERATIONS OVERVIEW
For the Predator® series of units, the the rmostat makes a circuit between "R" and "Y1" for the first stage of cooli ng.
The call is passed to the Unit Control Board (UCB), which
then determines whet her the requested operation is available
and, if so, which components to energize.
When the "W1" call is sensed, the indoor air blower is energized following a speci fied heating delay.
If at any time a call for both heating and cooling are present,
the heating operation will be performed. If operating, the cooling system is halted as with a completion of a call for cooling.
Heating always takes priority.
Unitary Products Group 33
Page 34

035-17311-002-A-0803
COOLING SEQUENCE OF OPERATION
CONTINUOUS BLOWER
By setting the room thermost at fan switch to "ON," the suppl y
air blower will operate continuously.
INTERMITTENT BLOWER
With the room thermostat fan switch set to "AUTO" and the
system switch set to either the "AUTO" or "HEAT" settings,
the blower is energiz ed whenever a cooling or heating operation is requested. The blower is energized after any specified
delay associated with the operation.
When energized, the indoor blower has a minimum run time
of 30 seconds. Additionally, the indoor blower has a delay of
10 seconds between operati ons.
NO OUTDOOR AIR OPTIONS
When the thermostat calls for the first stage of cooling, the
low-voltage control circuit from “R” to “Y1” and “G” is completed. The UCB energizes the economizer (if installed and
free cooling is available) or the first available compressor
and the condenser fans. For first stage cooling, compressor
#1 is energized. If compressor #1 is unavailable, compressor
#2 is energized. After completing the specified fan on delay
for cooling, the UCB will energize the blower motor.
pleted. The UCB energizes the blower motor (if the fan switch
on the room thermostat is set in the "AUTO" position) and
drives the economizer dampers from fully closed to their minimum position. If the enthalpy of the outdoor air is below the
set point of the enthalpy controller (previously determined),
"Y1" energizes the economizer. The dampers will m odulate to
maintain a constant supply air temperature as monitored by
the discharge air sensor. If the outdoor air enthalpy is above
the set point, "Y1" energizes compressor #1.
When the therm ostat calls for " second-stage" cooling, the low
voltage control circuit from "R" to "Y2" is completed. The UCB
energizes th e first availabl e compressor. If the ent halpy of the
outdoor air is below the set point of the enthalpy controller
(i.e. first stage has energized the economizer), "Y2" will energize compressor #1. If the outdoor air is above the set point,
"Y2" will energize com pressor #2.
Once the thermostat has been satisfied, it will de-energize
“Y1” and “Y2”. If the compressors have satisfied their minimum run times, the compressors and condenser f ans are deenergized. Otherwise, the unit operates each cooling system
until the minimum run times for the compressors have been
completed. Upon the final compressor de-energizing, the
*
blower is stopped following the elapse of the fan off delay for
cooling, and the eco nomizer damper goes to the closed position. If the unit is in continues fan operation, the economizer
damper goes to the minimum position.
When the thermostat calls for the second stage of cooling,
the low-voltage control circuit from “R” to “Y2” is completed.
The control board energizes the first available compressor. If
free cooling is being used for the first stage of cooling, compressor #1 is energized. If compressor #1 is active for first
stage cooling or the first compressor is locked-out, compressor #2 is energized. In free-cooling mode, if the call for the
second stage of cooling continues for 20 minutes, compressor #2 is energized, provided it has not been locked-out.
If there is an initial call for both stages of coolin g, the UCB will
delay energizing compressor #2 by 30 seconds in order to
avoid a power rush.
Once the thermostat has been satisfied, it wil l de-energize Y1
and Y2. If the compressors have satisfied their minimum run
times, the compressors and condenser fans are de-energized. Otherwise, the unit operates each cooling system until
the minimum run times for the compressors have been completed. Upon the final compressor de-energizing, the blower
is stopped f ollowing the elapse of the fan off del ay for cooling.
* To be available, a compressor must not be locked-out due
to a high or low-pressure switch or freezestat trip and the
Anti-Short Cycle Delay (ASCD) must have elapsed.
ECONOMIZER WITH SINGLE ENTHALPY SENSOR -
ECONOMIZER WITH DUAL ENTHALPY SENSORS -
The operation with the dual enthalpy sensors is identical to
the single sensor except that a second enthalpy sensor is
mounted in the return air. This return air sensor allows the
economizer to choose between outdoor air and return air,
whichever has the lowest enthalpy value, to provide maximum operating efficiency.
ECONOMIZER WITH POWER EXHAUST -
A unit equipped with an economizer (single or dual enthalpy)
and a power exhaust operates as specified above with one
addition. The power exhaust motor is energized 45 seconds
after the actuator position exceeds the exhaust fan set point
on the economizer control. When the power exhaust is operating, the second stage of mechanical cooling will not operate. As always, the "R" to "G" connection provides minimum
position but does not provide power exhaust operat ion.
MOTORIZED OUTDOOR AIR DAMPERS -
This system operation is the same as the units with no outdoor air options with one exception. When the "R" to "G" circuit is complete, the motorized damper drives open to a
position set by the thumbwheel on the damper motor. When
the "R" to "G" circuit is opened, the damper spring returns
fully close d .
When the room thermostat calls for "first-stage" cooling, the
low voltage control circuit from "R" to "G" and "Y1" is com-
34 Unitary Products Group
Page 35

035-17311-002-A-0803
COOLING OPERATION ERRORS
Each cooling system is monitored for operation outside of the
intended parameters. Errors are han dled as described below.
All system errors override minimum run times for compressors.
HIGH-PRESSURE LIMIT SWITCH
During cooling operation, if a high-pressure limit switch
opens, the UCB will de-energize the associated compressor,
initiate the ASCD (Anti-short cycle delay), and, if the other
compressor is idle, stop the condenser fans. If the call for
cooling is still present at the conclusion of the ASCD, the
UCB will re-energize the halted compressor.
Should a high-pressure switch open three times within two
hours of operat ion, the UCB will lock-out the associated compressor and flash a code (see 37). If the other compressor is
inactive, the condenser fans will be de-ene rgized.
LOW-PRESSURE LIMIT SWITCH
The low-pressure limit switch is not monitored during the initial 30 seconds of a cooling system's operation. For the following 30 seconds, the UCB will monitor the low-pressure
switch to ensure it closes. If the low-p ressure sw itch fails to
close after the 30-second monitoring phase, the UCB will deenergize the associated compressor, initiate the ASCD, and,
if the other compressor is idle, stop the condenser fans.
Once the low-pressure switch has been proven (closed during the 30-second monitor period described above), the UCB
will monitor the low-pressure limit switch for any openings. If
the low-pressure switch opens for greater than 5 seconds,
the UCB will de-energize the associated compressor, initiate
the ASCD, and, if the other compressor is idle, stop the condenser fans.
LOW AMBIENT COOLING
To determine when to operat e in low ambient mode, the UCB
has a pair of terminals connected to a temperature-activated
switch set at 45ºF. When the low ambient switch is closed
and the thermostat is cal li ng for cooling, the UCB will operate
in the low ambient mode.
Low ambient mode ope rates the compressor s in this manner:
10 minutes on, 5 minutes off. The indoor blower is operated
throughout the cycle. The 5-minute off period is necessary to
defrost the indoor coi l.
Low ambient mode always begins with compressor operation. Compressor minimum run time may extend the minutes
of compressor operation. The defrost cycle will begin immediately following the elapse of the minimum run time.
When operating in low ambient mode, the UCB will not lockout the compressors due to a freezestat trip. However, a
freezestat trip will de-energize the associated compressor. If
the call for cooling is still present at the end of the ASCD and
the freezest at has closed, the unit will resu me operation.
SAFETY CONTROLS
The unit control board monitors the following inputs for each
cooling system:
1. A suction line freezestat to prot ect against low evaporator temperatures due to a low air fl ow or a lo w retu rn ai r
temperature, (opens at 26 ± 5 ° F and resets at 38 ± 5°F).
2. A high-pressure switch to prote ct against excessive discharge pressures due to a blocked condenser coil or a
condenser motor failure, (opens at 405 ± 10 psig or 440
± 10 psig depending on unit model).
3. A low-pressure switch to protect against loss of refrigerant charge, (opens at 7 ± 3 psig or 22 ± 5 psig) .
If the call for cooling is still present at the conclusion of the
ASCD, the UCB will re-energize the halted compressor.
Should a low-pressure switch open three times within one
hour of operation, the UCB will lock-out the associated compressor and flash a code (37). If the other compressor is inactive, the condenser fans will be de-energized.
FREEZESTAT
During cooling operation, if a freezestat opens, the UCB will
de-energize the associated compressor, initiate the ASCD,
and, if the other compressor is idle, stop the condenser fans.
If the call for cooling is still present at the conclusion of the
ASCD, the UCB will re-energize the halted compressor.
Should a freezestat open three times within two hours of
operatio n, the UCB w ill lock-out the associate d compresso r
and flash a code (37). If the other compressor is inactive, the
condenser fans will be de-energized.
Unitary Products Group 35
The above pressure switches are hard-soldered to the unit.
The refrigeration systems are independently monitored and
controlled. On any fault, only the associated system will be
affected by any saf ety/ prevent ive acti on. The oth er refrige ran t
system will continue in operation unless it is affected by the
fault as well.
The unit control board monitors the temperature limit switch
of electric heat units and the temperature limit switch and the
gas valve of gas furnace units.
COMPRESSOR PROTECTION
In addition to the external pressure snitches, the compressors also have inherent (internal) protection. If there is an
abnormal temperature rise in a compressor, the protector will
open to shut down the compressor. The UCB incorporates
features to minimize compressor wear and damage. An Anti-
Short Cycle Delay (ASCD) is utilized to prevent operation of
Page 36

035-17311-002-A-0803
a compressor too soon after its previous run. Additionally, a
minimum run time is imposed any time a compressor is energized.
The ASCD is initiat ed on unit start-up and on any compressor
reset or lock-out.
FLASH CODES
The UCB will initiate a flash code associated with errors
within the system. Refer to UNIT CONTROL BOARD FLASH
CODES 37.
RESET
Remove the call for cooling, by raising thermostat setting
higher than the conditioned space temperature. This resets
any pressure or freez estat flash codes.
ELECTRIC HEATI NG SEQUENCE OF OPERATIONS
The following sequence describes the operation of the electric heat section.
Two-s tage heating:
a. Upon a call for first stage heat by the thermostat, the
heater relay (RA) wi ll be energized. After completing
the specified fan on delay for heating, the UCB will
energize the blower motor. If the second stage of
heat is required, heater relay (RB) will be energized.
After completing the specified fan on delay for heating, the UCB will energize the blower motor.
b. The thermostat will cycle the electric heat to satisfy
the heating requirements of the conditioned space.
ELECTRIC HEATING OPERATI ON ERRORS
TEMPERATURE LIMIT
If the UCB senses zero volts from the high temperature limit,
the indoor blower motor is imm ediately energized.
This limit is monitored regardless of unit operation status, i.e.
the limit is monitored at all times.
If the temperature limit opens three times within one hour, it
will lock-on the indoor blower motor and a flash code is initiated (See Table 37).
Limit Setting Table 32. It resets automatically. The limit switch
operates when a high temperature condition, caused by inadequate supply air flow occurs, thus shutting down the heater
and energizing the blower.
TABLE 32: ELECTRIC HEAT LIMIT SETTING
LIMIT
UNIT (TONS) VOLTAGE HEATER kW
7.5
7.5, 10, 12.5 18 150
7.5, 10, 12.5 24 150
7.5, 10, 12.5 34 150
10, 12.5 54 130
380
9150
SWITCH
OPENS °F
FLASH CODES
The UCB will initiate a flash code associated with errors
within the system. Refer to UNIT CONTROL BOARD FLASH
CODES Table 37.
RESET
Remove the call for heating by lowering the thermostat setting lower than the conditioned space temperature.This
resets any flash codes.
ELECTRIC HEAT ANTICTPATOR SETPOINTS
It is important that the anticipator setpoint be correct. Too
high of a setting will result in longer heat cycles and a greater
temperature swing in the conditioned space. Reducing the
value below the correct setpoint will give shorter “ON” cycles
and may result in the lowering of the temperature within the
conditioned space. Refer to Table 33 for the required electric
heat anticipator setting.
TABLE 33: ELECTRIC HEAT ANTICIPATOR
SETPOINTS
SETTING, AMPS
W1 W2
0.13 0.1
SAFETY CONTROLS
The UCB monitors the temperature limit switch of electric
heat units.
The control circuit includes the following safety controls:
LIMIT SWITCH (LS)
This control is located inside the heater compartment and is
set to open at the temperature indicated in the Electric Heat
36 Unitary Products Group
Page 37

035-17311-002-A-0803
START-UP (COOLING)
PRESTART CHECK LIST
After instal lation has been completed:
1. Check the electrical supply voltage being supplied . Be
sure that it is the same as listed on the unit nameplate.
2. Set the room thermostat to the off position.
3. Turn unit electrical power on.
4. Set the room thermostat fan switch t o on.
5. Check indoor blower rotation.
• If blower rotation is in the wrong direction. Refer to
Phasing Section in general information section.
• Check blower drive belt tension.
6. Check the unit supply air (CFM).
7. Measure evaporator fan motor's am p draw.
8. Set the room thermostat fan switch t o off.
9. Turn unit electrical power off.
OPERATING INSTRUCTIONS
1. Turn unit electrical power on.
NOTE: Prior to ea ch cooling season, t he crankcase heaters
must be energized at least 10 hours before the system is put into operation.
2. Set the room thermostat setting to lower than the room
temperature.
3. First stage compressors will energize after the built-in
time delay (five minutes).
4. The second stage of the thermost at wil l energize seco nd
stage compre ssor if needed.
POST START CHECK LIST
1. Verify proper system pressures for both circuits.
2. Measure the temperature drop across the evaporator
coil.
CHARGING THE UNIT
These units should be charged using the superheat method.
Super heat charging data is shown in Tables 34 thru 36.
When charging each system, superheat data should be taken
at the compressor i nlet.
TABLE 34: 7.5 TON STANDARD EFFICIENCY SUPERHEAT CHARGING
Superheat at Compressor Suction (°F)
Outdoor
Temp (°F)
55 57 59 61 63 65 67 69 71 73 75
65 10.6 13.5 16.3 19.1 22.0 24.8 27.7 29.1 30.5 32.0 33.4
70 8.4 11.1 13.8 16.5 19.3 22.0 24.7 26.5 28.4 30.2 32.0
75 6.1 8.7 11.3 13.9 16.6 19.2 21.8 24.0 26.2 28.4 30.6
80 - 6.4 8.9 11.4 13.9 16.3 18.8 21.4 24.0 26.6 29.2
85 - - 6.4 8.8 11.1 13.5 15.9 18.9 21.9 24.8 27.8
90 - - 5.8 7.9 10.1 12.2 14.3 17.2 20.2 23.1 26.1
95 - - 5.3 7.1 9.0 10.8 12.7 15.6 18.5 21.5 24.4
100 - - - 6.3 7.7 9.0 10.4 13.5 16.6 19.7 22.8
105 - - - 5.5 6.4 7.3 8.1 11.4 14.6 17.9 21.2
110 - - - - 5.1 5.5 5.9 9.3 12.7 16.1 19.5
115 -------7.2 10.8 14.3 17.9
Airflow = 3000 CFM
Indoor WB Temp (°F)
Unitary Products Group 37
Page 38

035-17311-002-A-0803
TABLE 35: 10 TON STANDARD EFFICIENCY SUPERHEAT CHARGING
Superheat at Compressor Suction (°F)
Outdoor
Temp (°F)
55 57 59 61 63 65 67 69 71 73 75
65 19.6 20.8 22.0 23.2 24.4 25.6 26.9 28.4 29.9 31.4 32.9
70 14.4 16.0 17.5 19.0 20.5 22.0 23.5 25.4 27.3 29.2 31.0
75 9.3 11.1 12.9 14.7 16.6 18.4 20.2 22.4 24.7 26.9 29.1
80 - 6.3 8.4 10.5 12.6 14.8 16.9 19.5 22.0 24.6 27.2
85 - - - 6.3 8.7 11.1 13.6 16.5 19.4 22.4 25.3
90 - - - 5.6 7.8 9.9 12.0 15.0 17.9 20.8 23.7
95 - - - - 6.8 8.7 10.5 13.4 16.3 19.3 22.2
100 - - - - 5.3 6.7 8.1 10.8 13.5 16.2 18.9
105 - - - - - - 5.7 8.1 10.6 13.1 15.5
110 - - - - - - - 5.5 7.7 10.0 12.2
115 - - - - - - - - - 6.9 8.9
Airflow = 4000 CFM
Indoor WB Temp (°F)
TABLE 36: 12.5 TON STANDARD EFFICIENCY SUPERHEAT CHARGING
Superheat at Compressor Suction (°F)
Outdoor
Temp (°F)
55 57 59 61 63 65 67 69 71 73 75
65 33.6 34.2 34.7 35.3 35.9 36.4 37.0 37.3 37.5 37.8 38.0
70 29.6 30.4 31.1 31.9 32.7 33.4 34.2 34.7 35.3 35.8 36.3
75 25.6 26.6 27.5 28.5 29.5 30.5 31.4 32.2 33.0 33.8 34.6
80 21.6 22.8 24.0 25.1 26.3 27.5 28.6 29.7 30.8 31.8 32.9
85 17.6 19.0 20.4 21.7 23.1 24.5 25.9 27.2 28.5 29.9 31.2
90 11.6 13.4 15.2 16.9 18.7 20.5 22.3 24.3 26.3 28.3 30.3
95 5.6 7.8 10.0 12.1 14.3 16.5 18.7 21.3 24.0 26.7 29.4
100 - 6.1 7.8 9.4 11.1 12.8 14.5 17.5 20.6 23.7 26.7
105 - - 5.5 6.7 7.9 9.1 10.3 13.8 17.2 20.7 24.1
110 - - - - - 5.4 6.1 10.0 13.8 17.6 21.5
115 - - - - - - - 6.2 10.4 14.6 18.8
Airflow = 5000 CFM
Indoor WB Temp (°F)
38 Unitary Products Group
Page 39

035-17311-002-A-0803
NORMAL MAINTENANCE
Prior to any of the following maintenance procedures, shut off all power to the unit to prevent personal inju r y.
Periodic maintenance normally consists of changing or cleaning filters.
GENERAL
FILTERS
Inspect once a month. Replace disposable or clean permanent type as necessary. DO NOT replace permanent type
with disposable.
MOTORS
Indoor fan and outdoor fan motor s are permanent ly lubr icat ed
and require no maintena nce.
OUTDOOR COIL
Dirt should not be allowed to accumulate on the outdoor coil
surface or other parts in the air circuit. Cleaning should be as
often as necessary to keep coil clean. Use a brush, vacuum
cleaner attachment, or other suitable means. If water is used
to clean coil, be sure power to the unit is shut off prior to
cleaning. Service access is provided in the front and rear
condenser compartment panels to provide improved access
to the condenser coils.
TROUBLESHOOTING
Troubleshooting of components may require opening the electrical control box with the power connected to the unit. Use extreme care when
working with live circuits! Check the unit nameplate for the correct line voltage and set the voltmeter to the correct range before making any
connections with line terminals.
When not necessary, shut off all electric power to the
unit prior to any of the following maintenance procedures so as to prevent personal injury.
Label all wires prior to disconnection when servicing
controls. Wiring errors can cause improper and dangerous operation which could cause injury to person
and/or damage unit c om ponents. Verify proper operation after servi cing.
PREDATOR® FLASH CODES
Various flash codes are utilized by the unit control board
(UCB) to aid troubleshooting. Flash codes are distinguished
by the short on and off cycle used (approximately 200ms on
and 200ms off). To show normal operation, the control board
flashes a 1 second on, 1 second off “heartb eat ” during normal
operation. This is to verify that the UCB is functioning correctly. Do not confuse this with an error flash c ode. To prevent
confusion, a 1-flash, flash code is not used.
Do not remove service panels or attempt to clean
the interior of the condenser section when the unit
is powered and/or operating. Shut off all power to
the unit prior to cleaning or maintenance of the
condenser section internals.
NOTE: Exerc ise care when cleaning the coil so that the coil
fins are not damaged. Do not permit the outdoor air
discharge to be obstructed by overhanging structures of shrubs .
Unitary Products Group 39
Current alarms are flashed on the UCB LED. The alarm history can be checked by pressing and releasing the ALARMS
button on the UCB. The UCB will cycle through the last five
(5) alarms, m ost recent to old est, separating each alarm flash
code by approximately 2 seconds.
In some cases, it may be necessary to “zero” the ASCD for
the compressors in order to perfor m troubleshooting. To reset
all ASCDs for one cycle, press and release the UCB TEST
button once.
Page 40

TABLE 37: UNIT CONTROL BOARD FLASH CODES
Flash Code Description
On Steady
Heart Beat Normal Operation
1 Flash Not Applicable
2 Flashes
3 Flashes
4 Flashes
5 Flashes LPS1 - Compressor Lock out
6 Flashes LPS2 - Compressor Lock out
7 Flashes FS1 - Compressor Lock out
8 Flashes FS2 - Compressor Lock out
9 Flashes
10 Flashes
11 Fl ash e s
12 Flashes Fan Overload Switch Trip - Not Applicable On This Unit *
13 Flashes Compressor Held Off Due To Low Voltage*
14 Flashes
OFF
*.
These flash codes do not represent alarms.
Control Failure - Replace Control
Control waiting ASCD
*
HPS1 - Compressor Lock out
HPS2 - Compressor Lock out
Ignition Control Locked Out/
Ignition Control Failure / Limit Switch Trip / No Jumper Plug in Heat Section
Compressors Locked Out On Low
Outdoor Ai r Temperatur e
*
Compressors Locked Out Because The
Economiz er Is Using Free Cooli ng
EEPROM Storage Failure (Control Failure)
No Power or Control Failur e
035-17311-002-A-0803
*
Monitor
Monitored
Systems
Problem?
Trip/Failure
Turn off ID
Blower Motor
No No
Yes
Yes
No
Programming?
Yes
Program
Unit
Control
Board
No
Fan on
>30 secs?
Yes
Lossof Call
for ID Blo w er ?
No
No
FIGURE 24 - BASIC TROUBLESHOOTING FLOWCHART
Call for
Heating?
Yes
Call for
Heat
Energize ID
Blower Motor
Yes
Fan off
>10 secs?
Yes
Call for
ID Blower?
No
Loss o f
Yes
Call for
Heating?
No
Call for
Cooling?
No
No
Loss of Call
for Cooling?
Heat Off
Call for 2nd
Stage
Cooling
No
Yes
Yes
First
Stage?
Yes
Call for 1st
Stage
Cooling
Cool Off
40 Unitary Products Group
Page 41

035-17311-002-A-0803
COOLING TROUBLESHOOTING GUIDE
On calls for cooling, if the compressors are operating but the
supply air blower motor does not energize aft er a short delay
(the room thermost at fan switch is in the “AUT O” position):
1. Turn the thermostat fan switc h to the ON position. If the
supply air blow er motor does not energize, go to Step 3.
2. If the blower motor runs with the fan switch i n the ON
position but wil l not run after the first compressor has
energized when the f an swit ch is in the AUTO position,
check the room thermostat for contact between R and G
in the AUTO position during calls for cooling.
3. If the supply air blower motor does not energize when
the fan switch is set to ON, check that line voltage is
being supplied to the contacts of the M3, contactor, and
that the contactor is pulled in. Check for loose wiring
between the contactor and the supply air blower motor.
4. If M3 is pulled in and voltage is supplied to M3, lightly
touch the supp ly ai r blower mot or housi ng. I f it is hot , the
motor may be off on int ernal protection. Cancel any
thermostat c alls and set the f an switch to AUT O. W ai t f or
the internal overload to reset. Test again when cool.
5. If M3 is not pulled in, check for 24 volts at the M3 coi l. If
24 volts are pre sent at M3 but M3 is not pulled in,
replace the cont actor.
6. Failing the above, if there is l ine voltage supplied at M3,
M3 is pulled in, and the suppl y air blower mot or stil l does
not operate, replace the motor.
7. If 24 volts is not present at M3, check that 24 volts is
present at the UCB supply ai r blower motor terminal,
“FAN”. If 24 volts is present at the FAN, check for loose
wiring between the UCB and M3.
8. If 24 volts is not present at the “FAN” termin al, check for
24 volts fro m the room thermostat. If 24 volt s are not
present from the room thermostat, check for the following:
a. Proper operation of the room thermostat (contact
between R and G with the fan switch i n the ON position and in the AUTO position during operation
calls).
b. Proper wiring between the room thermostat and the
UCB, and
c. Loose wiring from the room thermostat to the UCB
9. If 24 volts i s presen t at t he room ther most at bu t not at the
UCB, check for proper wiring between the thermostat
and the UCB, i.e. that the ther m ostat G terminal is connected to the G terminal of the UCB, and for loose wiring.
10. If the thermostat and UCB are properly wired, replace
the UCB.
On calls for cooling, the supply air blower motor is operating
but compressor #1 is not (the room ther m ostat fan switch is in
the “AUTO” position):
1. If installed, check th e positi on of the economizer blades.
If the blades are open, the economizer is providing free
cooling and the compres sors will not immediately operate. If both stages of cooling are requested simul taneously and the economizer provides free cooling,
following a short delay com pressor #1 will be energize d
unless it is locked out . If com pressor #1 is locked out,
compressor #2 is energi zed. Compressor #2 is always
energized in place of compressor #1 when compresso r
#1 is requested but locked out.
2. If no economizer is installed or the economizer is not
opening to provide free cooling and compressor #1 does
not energize on a call for cooling, check for line voltage
at the compressor cont actor, M1, and that the contactor
is pulled in. Check for loose wi ri ng between the contactor and the compressor.
3. If M1 is pulled in and voltage is suppli ed at M1, lightly
touch the compressor housing. If it is hot, the compressor may be off on inhere nt pr otection. Cancel any calls
for cooling and wait for the i nternal overload to reset .
Test again when cool.
4. If M1 is not pulled in, check fo r 24 volts at the M1 coil. If
24 volts are prese nt and M1 is not pulled in, replace the
contactor.
5. Failing the above, if voltage is supplied at M1, M1 is
pulled in, and the comp ressor still does not operate,
replace the compressor.
6. If 24 volts is not present at M1, chec k for 24 volts at the
UCB terminal, C1. If 24 volts is present, check for loose
wiring between C1 and the compressor contactor.
7. If 24 volts is not present at the C1 termi nal, check for 24
volts from the room thermostat at the UCB Y1 terminal .
If 24 volt s is no t prese nt fr om the room thermost a t, chec k
for the following:
a. 24 volts at the thermostat Y1 ter m inal
b. Proper wiring between the room thermostat and the
UCB, i.e. Y1 to Y1, Y2 to Y2, and
c. Loose wiring from the room thermostat to the UCB
8. If 24 volts is present at the UCB Y1 terminal, t he com pressor may be out due to an open high-pressur e switch,
low-pressure switch, or freezestat. Check for 24 volts at
the HPS1, LPS1, and FS1 terminals of the UCB. If a
switch has opened, there should be a voltage potential
between the UCB terminals, e.g. if LPS1 has opened,
there will be a 24-volt potential between the LPS1 terminals.
9. If 24 volts is present at the UCB Y1 terminal and none of
the protection switc hes have open ed, the UCB m ay hav e
Unitary Products Group 41
Page 42

035-17311-002-A-0803
locked out the compress or f or repeat trips. The UCB
should be flashing an alarm code. If not, press and
release the ALARMS button on the UCB. The UCB will
flash the last five alarms on the LED. If the compressor
is locked out, cancel any call for cooling. This will r eset
any compressor lock outs.
NOTE: While the above step will reset any lockouts, com-
pressor #1 may be held off for the ASCD. See the
next step.
10. If 24 volts is pr esent at the UCB Y1 term inal and none of
the switches are open and the comp ressor is not locked
out, the UCB may have the compressor in an ASCD.
Check the LED for an indication of an ASCD cycl e. The
ASCD should time out within 5 minutes. Press and
release the TEST button to reset all ASCDs.
1 1. If 24 volts is present at the UCB Y1 terminal and the
compressor is not out due to a protective switch trip,
repeat trip lock out, or ASCD, the economizer terminals
of the UCB may be improper ly wired. Check for 24 volts
at the Y1 “OUT” terminal of the UCB. If 24 volts is
present, trace the wiri ng from Y1 “OUT” for incorrect wiring. If 24 volts is not present at the Y1 “OUT” terminal,
the UCB must be replaced.
12. For units without economizers: If 24 volts is present at
the Y1 OUT terminal, check for 24 volts at the Y1
“ECON” terminal. If 24 volts is not present, check for
loose wiring from the Y1 “OUT” terminal to the Mate-NLock plug, the jumper in the Mate-N-Lock plug, and in
the wiring from the Mate-N-Lock plug to the Y1 “ECON”
terminal.
13. For units with economizers: If 24 volts is prese nt at the
Y1 “OUT” terminal, check for 24 volts at the Y1 “ECON”
terminal. If 24 volts is not present, check for loose wiring
from the Y1 “OUT” terminal to the Mate-N-Lock plug, a
poor connection bet ween the UCB and economizer
Mate-N-Lock plugs, loose wiring from the Mate-N-Lock
plug to the economizer, back to the Mate-N-Lock plug,
and from the Mate-N-Lock plug t o the Y1 “ECON” terminal. If nothing is found, the econ omiz er contr ol may ha ve
faulted and is failing to return the 24-volt “call” to the Y1
“ECON” terminal even though th e economizer is not providing free c ooling . To test, disconnect the Ma te-N- Locks
and jumper between the WHITE and YELLOW wires of
the UCB’s Mate-N-Loc k plug. If compressor #1 energizes, there is a fault in the economizer wiring or the
economizer control.
14. The UCB can be programmed to lock out compressor
operation during fr ee cooling and in low ambient conditions. These options are not enabled by default. Local
York distri butors can test the UCB for this progra mmi ng.
15. If none of the above corrected the error, test the integrity
of the UCB. Disconnect the C1 terminal wire an d jumper
it to the Y 1 terminal. DO NOT jump the Y1 to C1 termi nals. If the compressor engages, the UCB has faulted.
16. If none of the above correct the error, replace the UCB.
On calls for the second stage of cooling, the supply air blower
motor and compr essor #1 are operati ng but compressor #2 is
not (the room thermostat fan switch is in the “AUTO” position):
1. If installed, check the posit ion of t he economize r blades.
If the blades are open, t he econom izer is providing free
cooling. If the second stage of cooling is requested, following a short delay, compressor #1 will be energized
unless it is locked out. Typically, compressor #2 is energized only during free cooling if the call for the second
stage of cooli ng persists for 20 minu tes.
2. Compressor #2 will not energize sim ult aneously with
compressor #1 if a cal l f or both stages of cooling is
received. The UCB delays compressor #2 by 30 seconds to prevent a power surge. If after the delay compressor #2 does not ener gize on a second stage call for
cooling, check for line voltage at the compr e ssor contactor, M2, and that the contactor is pulled in. Check for
loose wiring between the contactor and the compressor.
3. If M2 is pulled in and voltage is supplied at M2, lightly
touch the compressor housing. If it is hot, the compr e ssor may be off on inher ent protection. Cancel any cal ls
for cooling and wait f or the internal overload to reset.
Test again when cool.
4. If M2 is not pulled in, check for 24 volts at the M2 coil. If
24 volts is present and M2 is not pulled in, replace the
contactor.
5. Failing the above, if voltage is supplied at M2, M2 is
pulled in, and the compressor still does not operate,
replace the compres sor.
6. If 24 volts is not present at M2, check for 24 volts at the
UCB terminal, C2. If 24 volts are present, check for
loose wiring between C2 and th e com pressor contactor.
7. If 24 volts is not present at the C2 terminal, check for 24
volts from the room thermostat at the UCB Y2 terminal.
If 24 volt s is n ot pres ent from t he room thermos tat, ch eck
for the following:
a. 24 volts at the thermostat Y2 terminal
b. Proper wiring between the room thermostat and the
UCB, i.e. Y1 to Y1, Y2 to Y2, and
c. Loose wiring from the room thermostat to the UCB
8. If 24 volts is present at the UCB Y2 terminal, the compressor ma y be out du e to an ope n high- pr essure switch ,
low-pressur e swit ch, or freezest at. Check for 24 volts at
the HPS2, LPS2, and FS2 terminals of the UCB. If a
switch has opened, t here should be a voltage potent ial
between the UCB terminals, e.g. if LPS2 has opened,
there will be 24 volts of potential between the LPS2 te rminals.
42 Unitary Products Group
Page 43

035-17311-002-A-0803
9. If 24 volts is present at the UCB Y2 terminal and none of
the protect ion s witche s ha ve opened, t he UCB m ay have
locked out the compr essor for repeat trips . The UCB
should be flashing a code. If not, press and release the
ALARMS button on the UCB. The UCB will flas h the last
five alarms on the LED. If the com pressor is locked out,
remove any call for cooling at the thermostat or by disconnecting t he thermost at wiring at the Y2 UCB t erminal.
This will reset any compressor lock outs.
NOTE: While the above step will reset any loc k outs, c om-
pressor #1 will be held off for the ASCD, and compressor #2 may be held off for a portion of the
ASCD. See the next step.
10. If 24 volts is present at the UCB Y2 t erminal and none of
the switches are open and the compressor is not locked
out, the UCB may have the compressor in an ASCD.
Check the LED for an indication of an ASCD cycle. The
ASCD should time out within 5 minutes. Press and
release the TEST button t o reset all ASCDs.
1 1. The UCB can be programmed to lock out compressor
operation during free cooling and in low ambient conditions. These opt ions are not enabled by default . Local
York distributors can test the UCB for this programming.
12. If none of the ab ove corrected the error, test the integri ty
of the UCB. Disconnect the C2 terminal wire and j umper
it to the Y2 terminal. DO NOT jump the Y2 to C2 terminals. If the compressor engages, the UCB has faulted.
13. If none of the above correct the err or, replace the UCB.
On a call for cooling, the supply air blower motor and compressor #2 are operating but compressor #1 is not (the room
thermostat fan switch is in the “AUTO” posi tion):
1. Compressor #2 is energized in place of compressor #1
when compressor #1 is unav ail able for cooling call s.
Check the UCB for alarms i ndicating that compressor #1
is locked out. Press and re lease the ALARMS button if
the LED is not flashing an alar m.
2. Check for line voltage at the compressor contact or, M1,
and that t he cont ac tor i s pul led i n. Che ck for l oose wi ring
between the contactor and the compressor.
3. If M1 is pulled in and voltage is supplied at M1, lightly
touch the compressor housing. If it is hot, the compressor may be off on inher ent protection. Cancel any calls
for cooling and wait for the internal overload to reset.
Test again when cool.
4. If M1 is not pulled in, check for 24 volts at the M1 coi l. If
24 volts is present and M1 is not pulled in, replace the
contactor.
5. Failing the above, if voltage is supplied at M1, M1 is
pulled in, and the comp ressor still does not operate,
replace the compressor.
6. If 24 volts is not present at M1, chec k for 24 volts at the
UCB terminal, C1. If 24 volts is present, check for loose
wiring between C1 and the compressor contactor.
7. If 24 volts is not present at the C1 termi nal, check for 24
volts from the room thermostat at the UCB Y1 terminal .
If 24 volts are not present at the UCB Y1 terminal, the
UCB may have faulted. Check for 24 volts at the Y1
ECON terminal. If 24 volts is not present at Y1 “ECON” ,
the UCB has faulted. The UCB should de-energize all
compressors on a loss of cal l for the first stage of cooling, i.e. a loss if 24 volts at the Y1 terminal.
8. If 24 volts are present at the UCB Y1 terminal, t he com pressor may be out due to an open high-pressur e switch,
low-pressure switch, or freezestat. Check for 24 volts at
the HPS1, LPS1, and FS1 terminals of the UCB. If a
switch has opened, there should be a voltage potential
between the UCB terminals, e.g. if LPS1 has opened,
there will be a 24-volt potential between the LPS1 terminals.
9. If 24 volts is present at the UCB Y1 terminal and none of
the protection switc hes have open ed, the UCB m ay hav e
locked out the compres sor for repeat trips. The UCB
should be flashing a code. If not, press and release the
ALARMS button on the UCB. The UCB will flash the la st
five alarms on the LED. If the compressor is locked out,
remove any call for cooling. This will reset any compressor lock outs.
NOTE: While the above step will reset any lock outs, com-
pressor #2 will be held off for the ASCD, and compressor #1 may be held off for a portion of the
ASCD. See the next step.
10. If 24 volts is pr esent at the UCB Y1 te rminal and none of
the switches are open and the compressor is not locked
out, the UCB may have the compresso r in an ASCD.
Check the LED for an indicati on of an ASCD cycle. The
ASCD should time out within 5 minutes. Press and
release the TEST button to reset all ASCDs.
1 1. If 24 volts is present at the UCB Y1 terminal and the
compressor is not out due to a prot ective switch trip,
repeat trip lock out , or ASCD, the economizer terminals
of the UCB may be improperly wired. Check for 24 volts
at the Y1 “OUT” terminal of the UCB. If 24 volts is
present, trace the wiri ng fr om Y1 “OUT” for incorrect wiring. If 24 volts is not present at the Y1 “OUT” terminal,
the UCB must be replaced.
12. For units without economizers: If 24 volts is pres ent at
the Y1 “O UT ” terminal, che ck fo r 2 4 v ol ts at th e Y 1
“ECON” terminal. If 24 volts is not present, check for
loose wiring from the Y1 “OUT” termi nal to the Mate-NLock plug, the jumper in the Mate-N-Lock plug, and in
the wiring from the Mate-N-Loc k plug to the Y1 “ECON”
terminal.
For units with economizers:If 24 volts is present at the
Y1 “OUT” terminal, check fo r 24 vol ts at the Y1 “ECON”
Unitary Products Group 43
Page 44

terminal. If 24 vol ts i s not pres ent, chec k for loo se wiring
from the Y1 “OUT” terminal to the Mate-N-Lock plug, a
poor connection between the UCB and economizer
Mate-N-Lock plugs, loose wiring from the Mate-N-Lock
plug to the economiz er, back to the Mate-N-Lock plug,
and from the Mate-N-L ock plug to the Y1 “ECON”
terminal. The eco nomizer control may have fault ed and
is not returning the 24 vol ts to the Y1 “ECON” terminal
even though the economizer is not providing free
cooling. To test the economizer control, disconnect the
Mate-N-Locks and jumper between the WHITE and
YELLOW wires of the UCB’s Mate-N-Lock plug.
13. The UCB can be programmed to lock out compressor
operation during fr ee cooling and in low ambient condi tions. These options are not enabled by default. They
can be checked by local York distributors.
14. If none of the above corrected the error, test the integrit y
of the UCB. Disconnect th e C1 termin al wire and ju mper
it to the Y1 terminal. DO NOT jump the Y1 to C1 terminals. If the compressor engages, the UCB has faulted.
15. If none of the above correct the error, replace the UCB.
Subject to change without notice. Printed in U.S.A. 035-17311-002-A-0803
Copyright © by Unitary Products Group 2003. All rights reserved. Supersedes: 035-17311-001-A-1202
Unitary 5005 Norman
Products York OK
Group Drive 73069
 Loading...