

Page 1

User’s
Yokogawa Electric Corporation
Manual
Model DX2004/DX2008/DX2010/DX2020/
DX2030/DX2040/DX2048
Daqstation DX2000
Operation Guide
IM 04L42B01-02E
7th Edition
Page 2

User Registration
Thank you for purchasing YOKOGAWA products.
We invite you to register your products in order to receive the most up to date product
information. To register, visit the following URL.
http://www.yokogawa.com/ns/reg/
PRS 108-02E
Page 3

Contents
Safety Precautions .....................................................................................................................................................4
Handling Precautions of the DX .................................................................................................................................5
Handling Precautions of the External Storage Medium (CF Card) ............................................................................
Checking the Contents of the Package ......................................................................................................
Style number
Protection of Environment ......................................................................................................
Conventions Used in
Opening the Electronic Manuals ................................................................................................................................7
Revision History .........................................................................................................................................................7
Introduction to Functions .............................................................................................................................................8
Measured Items
Data Storage Function ...............................................................................................................................................8
Display Function ........................................................................................................................................................8
Other Functions
DAQST
DX System Conguration ..........................................................................................................................................9
T
erminology ...............................................................................................................................................................9
Names of Parts ............................................................................................................................................................10
DX2000 W
Turning the Power ON/OFF .........................................................................................................................................13
Turning the Power ON ......................................................................................................
urning the Power OFF ...........................................................................................................................................13
T
Basic Operation
Panel Keys .......................................................................................................
Display .....................................................................................................................................................................14
Display on the Status Display Section .....................................................................................................................15
Run Modes ..............................................................................................................................................................16
Entering V
Changing the Date/T
Operation Example in the Setting Mode: Changing the Input Range ......................................................................
Operation Example in the Basic Setting Mode: Changing the Scan Interval ...........................................................22
Inserting/Removing a CF Card ......................................................................................................
Saving the Setup Data .............................................................................................................................................26
Loading the Setup Data ...........................................................................................................................................27
Setting the Input Range and
Setup Example 1: Temperature Measurement Channel ..........................................................................................28
Setup Example 2: Flow Rate Measurement Channel and Alarm .............................................................................29
Setting the Display ......................................................................................................................................................30
Setup Example 3: Assigning Channels to Groups ...................................................................................................30
Setup Example 4: Setting the Time Scale ......................................................................................................
Setting the Data Storage
Setup Example 5: Continuously Record Measured Data and Automatically Save ..................................................32
Setup Example 6: Saving Measured Data at the Specied Time ............................................................................35
Customizing the Operation .........................................................................................................................................36
Setup Example 7: Assigning the Screen Image Data Storage Function to the USER key ......................................36
Setup Example 8: Registering Frequently Used Screens to the Favorite Key ........................................................37
, release number, and rmware version number of the DX2000 ..........................................................6
...................................7
This Manual .............................................................................................................................7
......................................................................................................
.........................................................................................................................................................8
ANDARD ........................................................................................................................................................8
orkow ........................................................................................................................................................12
...........................................................................................................................................................14
alues and Characters ..............................................................................................................................16
ime ..........................................................................................................................................18
Alarm ............................................................................................................................28
.............................................................................................................................................32
...................................................8
.......................................13
........................................................14
..........................24
...............5
19
.........31
5
IM 04L42B01-02E
1
Page 4

Contents
Operation ......................................................................................................................................................................39
Starting Memory Sampling ......................................................................................................................................39
Stopping Memory Sampling .....................................................................................................................................39
Switching the
Writing the Message “START” ......................................................................................................
Connecting to an Ethernet Network ..........................................................................................................................
Trend Display, Digital Display, and Bar Graph Display ......................................................................40
...........................41
43
Setup Example 9: Monitoring the DX on a PC Browser ..........................................................................................43
Setup Example 10: Automatically Transferring the Measured Data File to an FTP Server .....................................46
Using DAQSTANDARD ................................................................................................................................................48
Displaying the Measured Data on DAQSTANDARD ...............................................................................................48
Installation and Wiring ................................................................................................................................................49
Installation Location ......................................................................................................
...........................................49
Installation Procedure ..............................................................................................................................................50
Input Signal Wiring ...................................................................................................................................................52
Optional
Serial Interface .......................................................................................................
Connecting to the VGA
Terminal Wiring ..........................................................................................................................................55
Alarm Output
and /F2) .......................................................................................................
Remote Control Input
Pulse Input
24 VDC
Terminal (/A1, /A2, /A3, /A4, and /A5), FAIL Output Terminal, and Status Output Terminal (/F1
.......................................................61
Terminal (/R1) .................................................................................................................61
Terminal (/PM1) ...............................................................................................................................61
Transmitter Power Supply Output Terminal (/TPS4 and /TPS8) ...........................................................61
..................................................61
Connector (/D5) ..................................................................................................................62
Connecting to the USB Port (/USB1) .......................................................................................................................63
Connecting to the Ethernet Port ..............................................................................................................................63
Power Supply Wiring ...............................................................................................................................................64
Recommended Replacement Periods for W
orn Parts Maintenance ......................................................................66
Setup Items and Default Values .................................................................................................................................67
Setup Items in Setting Mode and Their Default Values ...........................................................................................69
Setup Items in Basic Setting Mode and Their Default Values ..................................................................................83
Daqstation DX2000 User’s Manual (Electronic Manual Provided on the Accompanying CD)
Chapter 1 Overview of Functions
Chapter 2 Common Operations
Chapter 3 Measurement Channels and Alarms
Chapter 4 Switching Operation Screens
Chapter 5 Operations for Changing the Displayed Contents
Chapter 6 Saving and Loading Data
Chapter 7 Customizing Actions Using the Event Action and Remote Control Functions (/R1 and /PM1 Options)
Chapter 8 Security Function
Chapter 9 Computation and Report Functions (/M1 and /PM1 Options)
Chapter 10 External Input Channels (/MC1 Option)
Chapter 11 Troubleshooting
Chapter 12 Maintenance
Chapter 13 Specications
Daqstation DX1000/.N/DX2000 Communication Interface User’s Manual
(Electronic Manual Provided on the Accompanying CD)
Chapter 1 Using the Ethernet Interface
Chapter 2 Using the Serial Interface
Chapter 3
Commands
Chapter 4 Responses
Chapter 5 Status Reports
Chapter 6 Specications
2
IM 04L42B01-02E
Page 5

Thank you for purchasing the Daqstation DX2000 (DX).This
manual describes the basic operating procedures and installation
and wiring procedures of the DX2000. To ensure correct use,
please read this manual and the manuals below thoroughly before
beginning operation.
Paper Manual
Manual Title Manual No.
DX2000 Operation Guide IM 04L42B01-02E
This manual. It is also provided in the CD.
Control of Pollution Caused by the Product IM 04L41B01-91C
Gives a description of pollution control.
Electronic Manuals Provided on the Accompanying CD
Manual Title Manual No.
DX2000 Operation Guide IM 04L42B01-02E
This is the electronic version of the paper manual.
DX2000 User’s Manual IM 04L42B01-01E
Describes how to use the DX2000. The communication and
network functions, custom display functions, and some of the
options are excluded.
DX1000/DX1000N/DX2000
Multi Batch (/BT2) User’s Manual
Describes how to use the multi batch function (/BT2 option
DX1000/DX1000N/DX2000 Custom
Display User’s Manual
Describes how to use the custom display function.
DX1000/DX1000N/DX2000 Advanced
Security Function (/AS1) User’s Manual
Describes how to use the advanced security function
(/AS1 option).
DX1000/DX1000N/DX2000 IM 04L41B01-17E
Communication Interface User’s Manual
Describes how to use the communication functions using the
Ethernet and serial interfaces.
DX1000/DX1000N/DX2000
EtherNet/IP Communication Interface
User’s Manual
Describes how to use communication functions through the
EtherNet/IP interface.
DX1000/DX1000N/DX2000
PROFIBUS-DP (/CP1) Communication
Interface User’s Manual
Describes how to use communication functions through the
PROFIBUS-DP interface (/CP1 option).
IM 04L41B01-03E
IM 04L41B01-04E
IM 04L41B01-05EN
IM 04L41B01-18E
IM 04L41B01-19E
Notes
• The contents of this manual are subject to change without
prior notice as a result of continuing improvements to the
instrument’s performance and functions.
• Every effort has been made in the preparation of this manual
to ensure the accuracy of its contents. However, should you
have any questions or find any errors, please contact your
nearest YOKOGAWA dealer.
• Co
pying or reproducing all or any part of the contents of this
manual without YOKOGAWA’s permission is strictly prohibited.
• The TCP/IP
concerning the TCP/IP software have been developed/
created by YOKOGAWA based on the BSD Networking
Software, Release 1 that has been licensed from the Regents
of the University of California
software of this product and the document
Revisions
1st Edition: December 2005
2nd Edition: October 2006
3rd Edition: April 2007
4th Edition: December 2007
5th Edition: November 2008
).
6th Edition: March 2010
7th Edition: December 2010
Trademarks
• vigilantplant, DAQSTATION, Daqstation, and DXAdvanced are
registered trademarks of Yokogawa Electric Corporation.
• Microsoft and Windows are registered trademarks or trademarks
of Microsoft Corporation in the United States and/or other
countries.
• Adobe and
Adobe Systems Incorporated.
• Kerberos is a trademark of the Massachusetts Institute of
Technology (MIT).
• Company and product names that appear in this manual are
registered trademarks or trademarks of their respective holders.
• The company and product names used in this manual are not
accompanied by the registered trademark or trademark symbols
(® and ™).
Acrobat are registered trademarks or trademarks of
DAQST
7th Edition: December 2010 (YK)
All Rights Reserved, Copyright © 2005, Yokogawa Electric Corporation
IM 04L42B01-02E
ANDARD Manuals
All manuals other than IM 04L41B01-66EN are contained in the
DAQSTANDARD CD.
Manual Title Manual No.
DAQSTANDARD Viewer User’s Manual IM 04L41B01-63EN
DAQSTANDARD Hardware Configurator
User’s Manual
DAQSTANDARD DX-P Hardware
Configurator User’s Manual
Installing DAQSTANDARD IM 04L41B01-66EN
IM 04L41B01-64EN
IM 04L41B01-65EN
3
Page 6

“Handle with care.” To avoid injury and damage to
the instrument, the operator must refer to the
explanation in the manual.
Protective ground terminal
Functional ground terminal (do not use this terminal
as a protective ground terminal.)
Alternating current
Direct current
ON (power)
OFF (power)
Safety Precautions
• This instrument conforms to IEC safety class I (provided with
terminal for protective grounding), Installation Category II, and
EN61326-1 (EMC standard), Measurement Category II (CAT II)*.
*
Measurement category II (CAT II) applies to measuring
circuits connected to low voltage installation, and electrical
instruments supplied with power from fixed equipment such as
electric switchboards.
This instrument is an EN61326-1 (EMC standard) class
•
instrument (for use in commercial, industrial, or business
environments).
The general safety precautions described here must be
•
observed during all phases of operation. If the DX is used in a
anner not described in this manual, the DX safety features may
m
be impaired. Yokogawa Electric Corporation assumes no liability
for the customer’s failure to comply with these requirements.
The DX is designed for indoor use.
About This Manual
•
• Please pass this manual to the end user
store this manual in a safe place.
• Read this manual thoroughly and have a clear understanding of
the product before operation.
• This manual explains the functions of the product. It does not
guarantee that the product will suit a particular purpose of the
user.
• Precautions Rel
the Product
The following safety symbols are used on the product and in this
manual.
• For the protection and safe use of the product and the system in
which this product is incorporated, be sure to follow the instructions
and precautions on safety that are stated in this manual whenever
you handle the product. Take special note that if you handle the
product in a manner that violates these instructions, the protection
functionality of the product may be damaged or impaired. In such
cases, YOKOGAWA does not guarantee the quality, performance,
function, and safety of product.
When installing protection and/or safety circuits such as lightning
•
protection devices and equipment for the product and control
system or designing or installing separate protection and/or
safety circuits for fool-proof design and fail-safe design of the
processes and lines that use the product and the control system,
the user should implement these using additional devices and
equipment.
If you are replacing parts or consumable items of the product,
•
make sure to use parts specified by YOKOGAWA.
• This product is not designed or manufactured to be used in
critical applications that directly affect or threaten human lives.
Such applications include nuclear power equipment, devices
using radioactivity
navigation facilities, aviation facilities, and medical equipment.
If so used, it is the user’s responsibility to include in the system
additional equipment and devices that ensure personnel safety.
Do not modify this product.
•
4
ated to the Protection, Safety, and Alteration of
, railway facilities, aviation equipment, air
A
. We also ask you to
WARNING
• Use the Correct Power Supply
Ensure that the source voltage matches the voltage of the power
supply before turning ON the power. In the case of a desktop
type, ensure that it is within the maximum rated voltage range of
the provided power cord before connecting the power cord.
Use the Correct Power Cord and Plug (Desktop Type)
•
T
o prevent electric shock or fire, be sure to use the power cord
supplied by YOKOGAWA. The main power plug must be plugged
into an outlet with a protective earth terminal. Do not disable this
protection by using an extension cord without protective earth
grounding.
The power cord is designed for use with this instrument. Do not
use the power cord with other instruments.
Connect the Protective Grounding Terminal
•
Make sure to connect the protective grounding to prevent
electric shock before turning ON the power
The power cord that comes with the desktop type is a three-
prong type power cord. Connect the power cord to a properly
grounded three-prong outlet.
Do Not Impair the Protective Grounding
•
Never cut off the internal or external protective grounding wire or
disconnect the wiring of the protective grounding terminal. Doing
so invalidates the protective functions of the instrument and
poses a potential shock hazard.
Do Not Operate with Defective Protective Grounding
•
Do not operate the instrument if the protective grounding might
be defective. Also, make sure to check them before operation.
• Do Not Operate in an Explosive Atmosphere
Do not operate the instrument in the presence of flammable
liquids or vapors. Operation in such an environment constitutes
a safety hazard.
Prolonged use in a highly dense corrosive gas (H
will cause a malfunction.
• Do Not Remove Covers
The cover should be removed by YOKOGA
personnel only. Opening the cover is dangerous, because some
areas inside the instrument have high voltages.
Ground the Instrument before Making External Connections
•
Connect the protective grounding before connecting to the item
under measurement or control unit.
• Damage to the Protection
Operating the instrument in a manner not described in this
manual may damage the instrument’s protection.
.
S, SOx, etc.)
2
WA’s qualified
CAUTION
This instrument is a Class A product. Operation of this instrument
in a residential area may cause radio interference, in which case
the user is required to take appropriate measures to correct the
interference.
Exemption from Responsibility
•
• YOKOGA
those stated in the WARRANTY that is provided separately.
• YOKOGAW
or damage, direct or indirect, caused by the user or any
unpredictable defect of the product.
• Handling Precautions of the Software
• YOKOGA
accompanying this product except those stated in the
WARRANTY that is provided separately.
Use the software on a single PC.
•
• Y
use the software on another PC.
• Copying the software for any purposes other than backup is
strictly prohibited.
WA makes no warranties regarding the product except
A assumes no liability to any party for any loss
WA makes no warranties regarding the software
ou must purchase another copy of the software, if you are to
IM 04L42B01-02E
Page 7

• Please store the original media containing the software in a safe
Name plate
SUFFIX
SUPPLY
FREQUENCY
NO.
STYLE
H S
MODEL
/H5[ ]
D: Power cord UL, CSA st’d
F: Power cord VDE st’d
R: Power cord SAA st’d
J: Power cord BS st’d
H: Power cord GB st’d
Null (/H5): Only for /P1 model (without power cord)
place.
• Reverse engineering, such as decompiling of the software, is
strictly prohibited.
• No portion of the software supplied by YOKOGA
WA may be
transferred, exchanged, or sublet or leased for use by any third
party without prior permission by YOKOGAWA.
Handling Precautions of the DX
• Use care when cleaning this instrument, especially its plastic
parts. Use a soft dry cloth. Do not use organic solvents, such
as benzene or thinner, or other cleansers. They may cause
discoloring and deformation.
ep electrically charged objects away from the signal terminals.
Ke
•
If you do, the DX may malfunction.
• Do not apply volatile chemicals to the display, panel keys, etc.
Do not allow rubber and vinyl products to remain in contact
with the DX for long periods of time. If you do, the DX may
malfunction.
When not in use, make sure to turn OFF the power switch.
•
• If there are any symptoms of trouble such as strange odors or
smoke coming from the DX, immediately turn OFF the power
switch and the power supply source.
Then, contact your nearest
YOKOGAWA dealer.
Handling Precautions of the External Storage Medium (CF Card)
• Use caution in the handling of the external storage medium as it
is a delicate product.
• Write operation to storage media may fail under hightemperature or low-temperature environments. If you are using
the DX in a low-temperature environment (around 10°C or
less), use the DX after the warm-up time (at least 30 minutes)
has elapsed. If you are using the DX under a high-temperature
environment (around 40°C or more), it is recommended that the
external storage medium be inserted into the drive when saving
the data and be removed after the data storage operation is
finished.
Remove t
•
he storage medium from the drive when turning the DX
ON/OFF.
• Touching the compact flash section when static electricity is built
up on the human body can lead to erroneous operation.
• For the general handling precautions of the external storage
medium, see the instruction manual that came with the external
storage medium.
CAUTION
• Do not eject the external storage medium while the access
indicator is illuminated. This can damage the data.
• Do not access the storage medium in a place with vibrations or
shock. The storage medium or drive may malfunction.
Checking the Contents of the Package
Unpack the box and check the contents before operating the
instrument. If some of the contents are not correct or missing or
if there is physical damage, contact the dealer from which you
purchased them.
DX2000
A name plate is located on the top panel of the DX (side panel on
models with the /H5[ ] option). Check that the model name and
suffix code given on the name plate match those on your order.
NO. (Instrument Number)
When contacting the dealer from which you purchased the
instrument, please give them the instrument number.
MODEL
DX2004 Daqstation DX2000 4ch, 125 ms (Fast sampling mode 25 ms)
DX2008 Daqstation DX2000 8ch, 125 ms (Fast sampling mode 25 ms)
DX2010 Daqstation DX2000 10ch, 1 s (Fast sampling mode 125 ms)
DX2020 Daqstation DX2000 20ch, 1 s (Fast sampling mode 125 ms)
DX2030 Daqstation DX2000 30ch, 1 s (Fast sampling mode 125 ms)
DX2040 Daqstation DX2000 40ch, 1 s (Fast sampling mode 125 ms)
DX2048 Daqstation DX2000 48ch, 1 s (Fast sampling mode 125 ms)
Internal memory
size
External storage media -4 With CF card
Language -2 English/German/French, deg F, and DST
Options /A1 Alarm output 2 points
and SUFFIX Code
Model Suffix Code
-3 Standard memory (400 MB)
*1 /A1, /A2, /A3, /A4, /A5, and /F2 cannot be specified together.
*2 /A5 and /F1 cannot be specified together.
*3 /C2, /C3, and /CP1 cannot be specified together.
*4 /F1 and /F2 cannot be specified together.
*5
*6 /N2 can be specified only for DX2010, DX2020, DX2030, DX2040 and DX2048.
*7 /TPS4, /TPS8, /A5 and /F2 cannot be specified together.
*8 If /TPS8 is specified, /A4 and /F1 cannot be specified together.
*9 /KB1 and /KB2 cannot be specified together.
*10 If /KB1 is specified, a remote control terminal (438227) is included.
*11 If /PM1 is specified, /A5, /F2, /M1, and /R1 cannot be specified together.
The combination of /A2/F1 and the combination of /A4/TPS8 cannot be specified together.
*12 /MC1 can be specified only for the DX2010, DX2020, DX2030, DX2040, and DX2048.
*13 /BT2 can only be specified for the DX2010, DX2020, DX2030, DX2040, and DX2048.
Optional
code
(English version of DAQSTANDARD included)
/A2 Alarm output 4 points
/A3 Alarm output 6 points
/A4 Alarm output 12 points
/A5 Alarm output 24 points
/C2 RS-232 interface
/C3 RS-422/485 interface
/D5 VGA output
/F1 FAIL/status output
/F2 FAIL + alarm output 22 points
/H2 Clamped input terminal (detachable)
/H5[ ] Desktop type
/M1 Mathematical functions (including the report function)
/N1 Cu10, Cu25 RTD input/3 leg isolated RTD
/N2 3 leg isolated RTD
/N3 Extended input type (PR40-20, Pt50, etc.)
/P1 24 VDC/AC power supply
/R1 Remote control
/TPS4 24-VDC transmitter power supply (4 loops)
/TPS8 24-VDC transmitter power supply (8 loops)
/KB1 Easy Text Entry (with input terminal)
/KB2 Easy Text Entry (without input terminal)
/USB1 USB interface
/PM1 Pulse input (including remote control and mathematical
function)
/CC1 Calibration correction function
/MC1 External input function
/BT2 Multi batch function
/CP1 PROFIBUS-DP
/AS1 Advanced security function
*11
*3
*2*4*8
*
5
*6
*11
*3
Description
*1
*1*11
*1
*1*8*11
*1*2*7*11
*3
*1*4*7*11
*5
*12
*13
*9*10
*11
*7
*7*8*11
*9
IM 04L42B01-02E
5
Page 8

9
ID No.
1 2 43
6
7
5
32
MB
8. One of these power cord types is supplied
according to the instrument’s suffix code
/H5F
/H5D
/H5R
/H5H/H5J
MODEL
FREQUENCY
NO.
SUFFIX
SUPPLY
STYLE
H
2 2
S
Style number
Release number
Standard Accessories
The standard accessories below are supplied with the instrument.
Check that all contents are present and undamaged.
No. Name Part Number/
9 Remote control
terminal
Model
438227 1 Remote controller.
Qty. Notes
Supplied only for
models with the /KB1
option. With two AA
alkaline batteries and
labels for the remote
control terminal.
Optional Accessories (Sold Separately)
The following optional accessories are available for purchase
separately. If you make an order, make sure that all contents
are present and undamaged. For information about ordering
accessories, contact the dealer from which you purchased the DX.
No. Name Model Minimum Notes
1 CF card 772093 1 512 MB
2 CF card adapter 772090 1 –
3 Shunt resistor 415920 1 250 Ω ± 0.1%
(for screw input terminal)
4 Shunt resistor
(for clamped input
terminal)
5 Mounting brackets B9900BX 2 –
6 Door lock key B8706FX 1 –
7 Remote control terminal 438227 1 Remote
8 Validation document – 1 Electronic file
772094 1 1 GB
772095 1 2 GB
415921 1 100 Ω ± 0.1%
415922 1 10 Ω ± 0.1%
438920 1 250 Ω ± 0.1%
438921 1 100 Ω ± 0.1%
438922 1 10 Ω ± 0.1%
Q’ty
controller
No. Name Part Number/
1 Terminal screws E9655FX 5 M4 (spares)
2 Mounting brackets B9900BX 2 For panel mounting
3 Door lock key B8706FX 2 –
4 DAQSTANDARD DXA120 1 CD. Contains the
5 DX2000 Operation
Guide (this manual)
DXA120 Installing
DAQSTANDARD
Control of Pollution
Caused by the
Product
6 User’s Manuals
for the DX1000/
DX1000N/DX2000
7 CF card B8706NQ 1 128 MB (The size and
8 Power cord A1006WD 1 Supplied only for
6
Model
IM 04L42B01-02E
IM 04L41B0166EN
IM 04L41B01-91C
B8706ZZ 1 CD. Contains the
A1009WD 1 Supplied only for
Qty. Notes
1 A4 size
1
1
A1024WD 1 Supplied only for
A1054WD 1 Supplied only for
A1064WD 1 Supplied only for
Except for the /H5[ ]
models.
software and user’s
manuals.
PDF file of the user’s
manual.
model may change.)
models with the /H5D
option. Maximum
rated voltage: 125 V
models with the /H5F
option. Maximum
rated voltage: 250 V
models with the /H5R
option. Maximum
rated voltage: 250 V
models with the /H5J
option. Maximum
rated voltage: 250 V
models with the /H5H
option. Maximum
rated voltage: 250 V
Style number, release number, and firmware
version number of the DX2000
Style number: This is the DX2000 hardware number that is
indicated on the name plate.
Release number: This is the DX2000 firmware number that is
Example:
Fi
rmware version number: This number is displayed on the DX2000
indicated on the name plate. The number
corresponds to the integer part of the firmware
version number
.
If the firmware version number is 2.01, the release
number is 2.
system information screen. For the procedure,
see section 2.5, “Viewing the DX Information” in
the DX2000 User’s Manual (IM 04L42B01-01E).
IM 04L42B01-02E
Page 9
Protection of Environment
Control of Pollution Caused by the Product
For details, see the Control of Pollution Caused by the Product
(IM04L41B01-91C).
Proper Disposal of This Product
This is an explanation of how to dispose of this product based
on Waste Electrical and Electronic Equipment (WEEE), Directive
2002/96/EC. This directive is only valid in the EU.
Marking
•
This product complies with the WEEE Directive (2002/96/EC)
marking requirement.
The label (see below) indicates that you must not discard this
electrical/electronic product in domestic household waste.
• Product Category
With reference to the equipment types in the WEEE directive
Annex 1, this product is classified as a “Monitoring and Control
instrumentation” product.
Do not dispose in domestic household waste.
To return unwanted products, contact your local Y
Europe B. V. office.
okogawa
Conventions Used in This Manual
• This manual covers information regarding DX2000s that have a
suffix code for language “-2” (English).
• For details on how to set the language, see section 2.6,
“Changing the Language” in the DX2000 User’
04L42B01-01E).
Unit
K: Denotes 1024. Example: 768 KB (file size)
k: Denotes 1000.
s Manual (IM
Opening the Electronic Manuals
The accompanying CD contains PDF files of the manuals. When
you load the CD into the CD-ROM drive on your PC, a startup
screen appears. Click the manual title to open the respective
manual.
If the startup screen does not appear, double-click DX_manual in
My Computer, and open the manuals in the English directory.
Revision History
The contents of this manual corresponds to the DX with release
number 4 and style number 3. For details on the functions that
have been added or changed, see “DX’s Version and Functions
Described in This Manual” in the DX2000 User’s Manual (IM
04L42B01-01E).
Edition DX Description
2
3
4
5
6
7
Version 1.11
Version 1.21
Release number 2
(Version 2.0x)
Style number 2
Same as edition 3
Release number 3
(Version 3.0x)
Style number 3
Release number 4
(version 4.0x)
Style number 3
Same as edition 6
Additions and improvements to
functionality.
Additions and improvements to
functionality.
NEMA4 compliance.
Additions and improvements to
functionality.
Changed the direction of the
clamp input terminal (/H2 option).
Additions and improvements to
functionality.
Changed the boot ROM.
Additions and improvements to
functionality. Internal memory
suffix code -3 has been added,
and -1 and -2 have been removed.
Additions and improvements to
explanations.
The following markings are used in this manual.
Improper handling or use can lead to injury to the user or damage
to the instrument. This symbol appears on the instrument to
indicate that the user must refer to the user’s manual for special
instructions. The same symbol appears in the corresponding place
in the user’s manual to identify those instructions. In the manual,
the symbol is used in conjunction with the word “WARNING” or
“CAUTION.”
WARNING
Calls attention to actions or conditions that could cause serious or
fatal injury to the user, and precautions that can be taken to prevent
such occurrences.
CAUTION
Calls attentions to actions or conditions that could cause light
injury to the user or damage to the instrument or user’s data, and
precautions that can be taken to prevent such occurrences.
Note
Calls attention to information that is important for proper operation
of the instrument.
Indicates after this mark reference to related procedure or
explanation.
Bold characters
Indicates character strings that appear on the screen and the
operation keys.
IM 04L42B01-02E
7
Page 10

Introduction to Functions
DX
Measurement input
Ethernet
Automatic data transfer to an FTP server
CF card
FTP server
Internal memory
Trend display
Numeric (digital) display
Overview displayBar graph display
Measured Items
You can connect DC voltage, thermocouple, RTD, and ON/OFF input and measure
various values such as temperature and flow rate. The DX samples the input signals at
the scan interval to obtain the measured values. The fastest scan interval is 25 ms on
the DX2004 and DX2008 and 125 ms on the DX2010, DX2020, DX2030, DX2040, and
DX2048.
Up to four alarm conditions can be set for each measurement channel.
Data Storage Function
There are two methods of recording measured data. One is to record the measured data
continuously, and the other is to record only when certain events occur such as alarms.
The measured data is recorded to the internal memory at a specified interval. The data in
the internal memory can be stored to a CF card automatically or manually. By connecting
to a network via the Ethernet interface, the measured data can also be automatically
transferred to an FTP server on a network.
Display Function
Measured data can be displayed as trends, numeric values, and bar graphs for each
group. In addition, the overview display can be used to display and monitor all channels
on a single screen.
8
Other Functions
Computation Function (option) Various types of computation can be performed by
FAIL/status output function (option) Outputs an alarm when the DX fails. The function
Remote control function (option) A specified action is executed when a remote input
Security function Enables only registered users can operate the
Communication function The Ethernet interface can be used to monitor the
DAQSTANDARD
The accompanying software program, DAQSTANDARD, can be used to display the
measured data, convert the measured data format, and create DX setup data.
assigning equations to computation channels.
also monitors the DX status such as the remaining
amount of internal memory and outputs alarms.
signal is applied to the terminal on the rear panel.
DX. The function can also be used to prohibit key
operation.
DX using a Web browser and transmit e-mail when
an event occurs such as an alarm. In addition,
data of devices on the network can be loaded and
displayed using the Modbus protocol.
IM 04L42B01-02E
Page 11
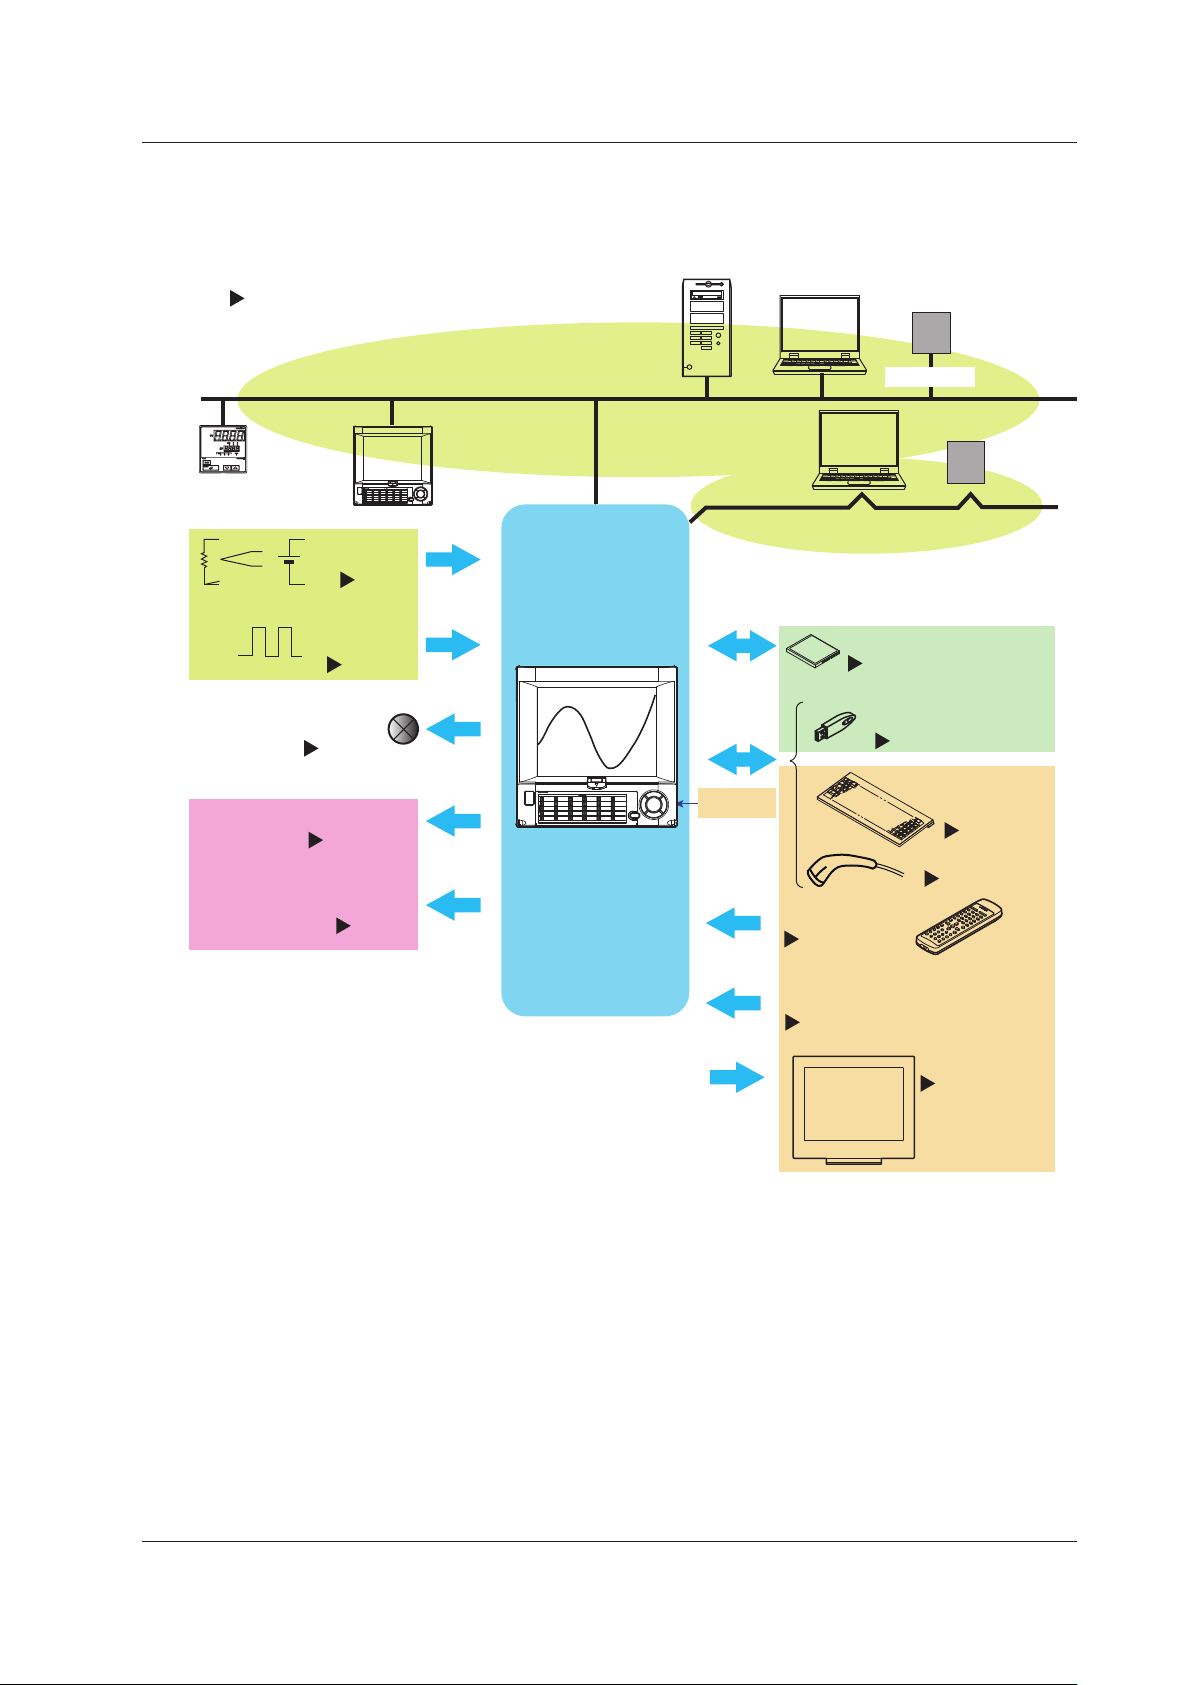
Ethernet
USB port*
Alarm output*
Sec 3.5-3.8
Transmitter power supply*
Page 61
PC
DX2000
RecorderTemperature
controller
FAIL/status output*
Sec. 2.9
USB flash memory
Sec. 2.12
Keyboard
Sec. 2.11
Monitor*
Page 62
Measurement
input
Sec. 3.3
Pulse input*
Sec. 3.10
Remote input*
Sec. 7.1
Remote Terminal*
Sec. 2.10
CF card
Page 24
Keys
Communication Interface User’s Manual
EtherNet/IP Communication Interface User’s Manual
PROFIBUS-DP Communication Interface User’s Manual
PLC (programmable
logic controller)
EtherNet/IP
†
Serial
communication*
RS-232, RS-422/485, or PROFIBUS-DP*
†
PLC
PC
Sec. 2.11
Barcode reader
†
*: Option
†: Release number 3 or later
Introduction to Functions
DX System Configuration
The DX can be used to configure a system as shown below.
Referenced sections are of the DX2000 User’s Manual.
Referenced pages are of this manual.
Terminology
• Memory sample
The operation of recording measured data.
• Memory start
The operation of starting memory sampling.
• Memory stop
The operation of stopping memory sampling.
• Display data
The waveform data shown on the DX display. The data recorded at the sampling
interval for the displayed data.
• Event data
Measured data recorded at a sampling interval separate from that of the display data.
IM 04L42B01-02E
9
Page 12

Names of Parts
POWER
CF CARD
USB
Key panel opened
Front cover opened
LCD
Display various operation
displays such as the trend
display as well as setup
displays.
Power indicator
Illuminates in red when the
power is turned ON. Illuminates
in green while memory
sampling is in progress.
Power switch
USB port
A USB port conforming to Rev.
1.1.
Remote control sensor
(/KB1 and /KB2 options)
Receives infrared light from the
remote control terminal.
Front cover (Key panel)
Open the front cover by pulling
the cover while holding down
the tab at the center of the
upper section of the cover.
CF card slot
CF card access indicator
CF card eject button
Used when ejecting the CF
card.
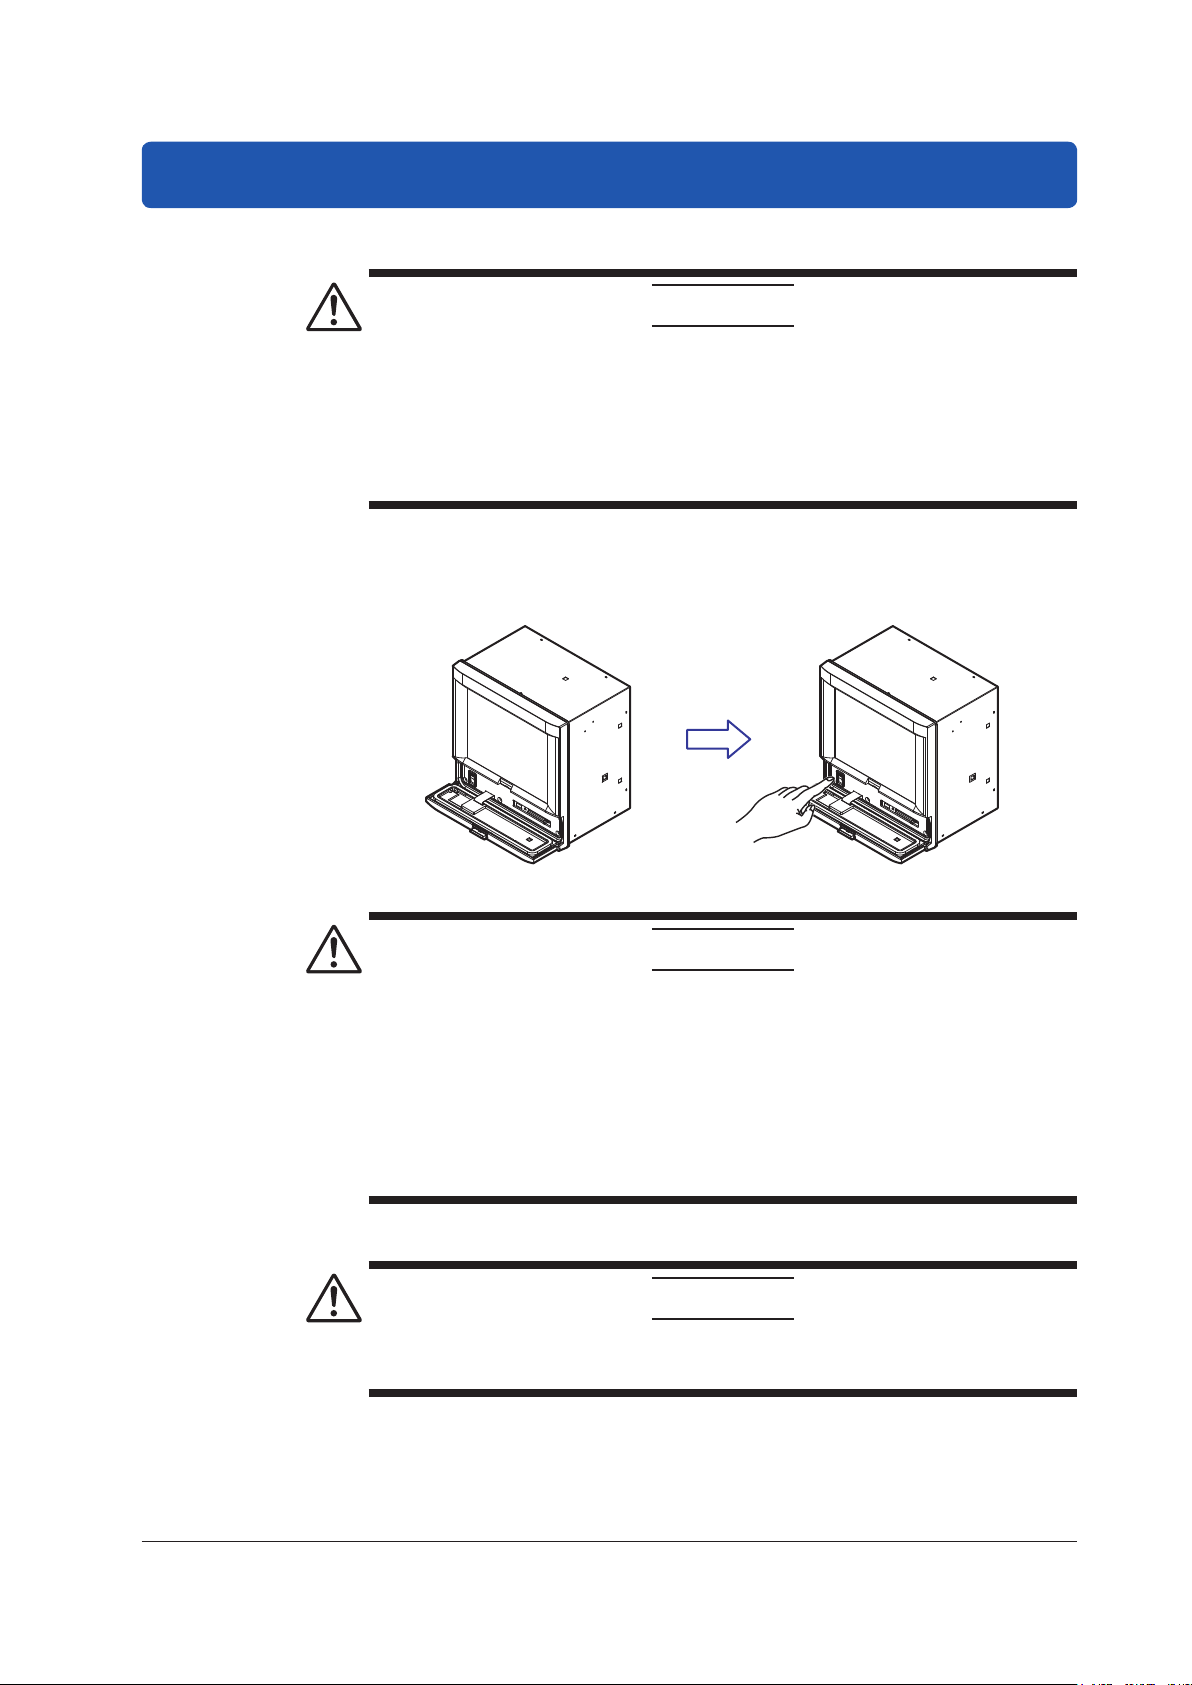
Key panel cover
Open the cover by pinching the
left tab and pulling forward.
Label (front of the key panel cover)
Write arbitrary labels for your
convenience.
Door lock key (included)
Insert the pin in the left hole to lock.
Insert the pin in the right hole to unlock.
When closing the front cover, press
the front cover in until the tab at the
center of the upper section of the
cover is all the way up. If the front
cover is not closed completely, the
water and dust proof capability may
be impaired.
CAUTION
Lock key
Front View
10
IM 04L42B01-02E
Page 13
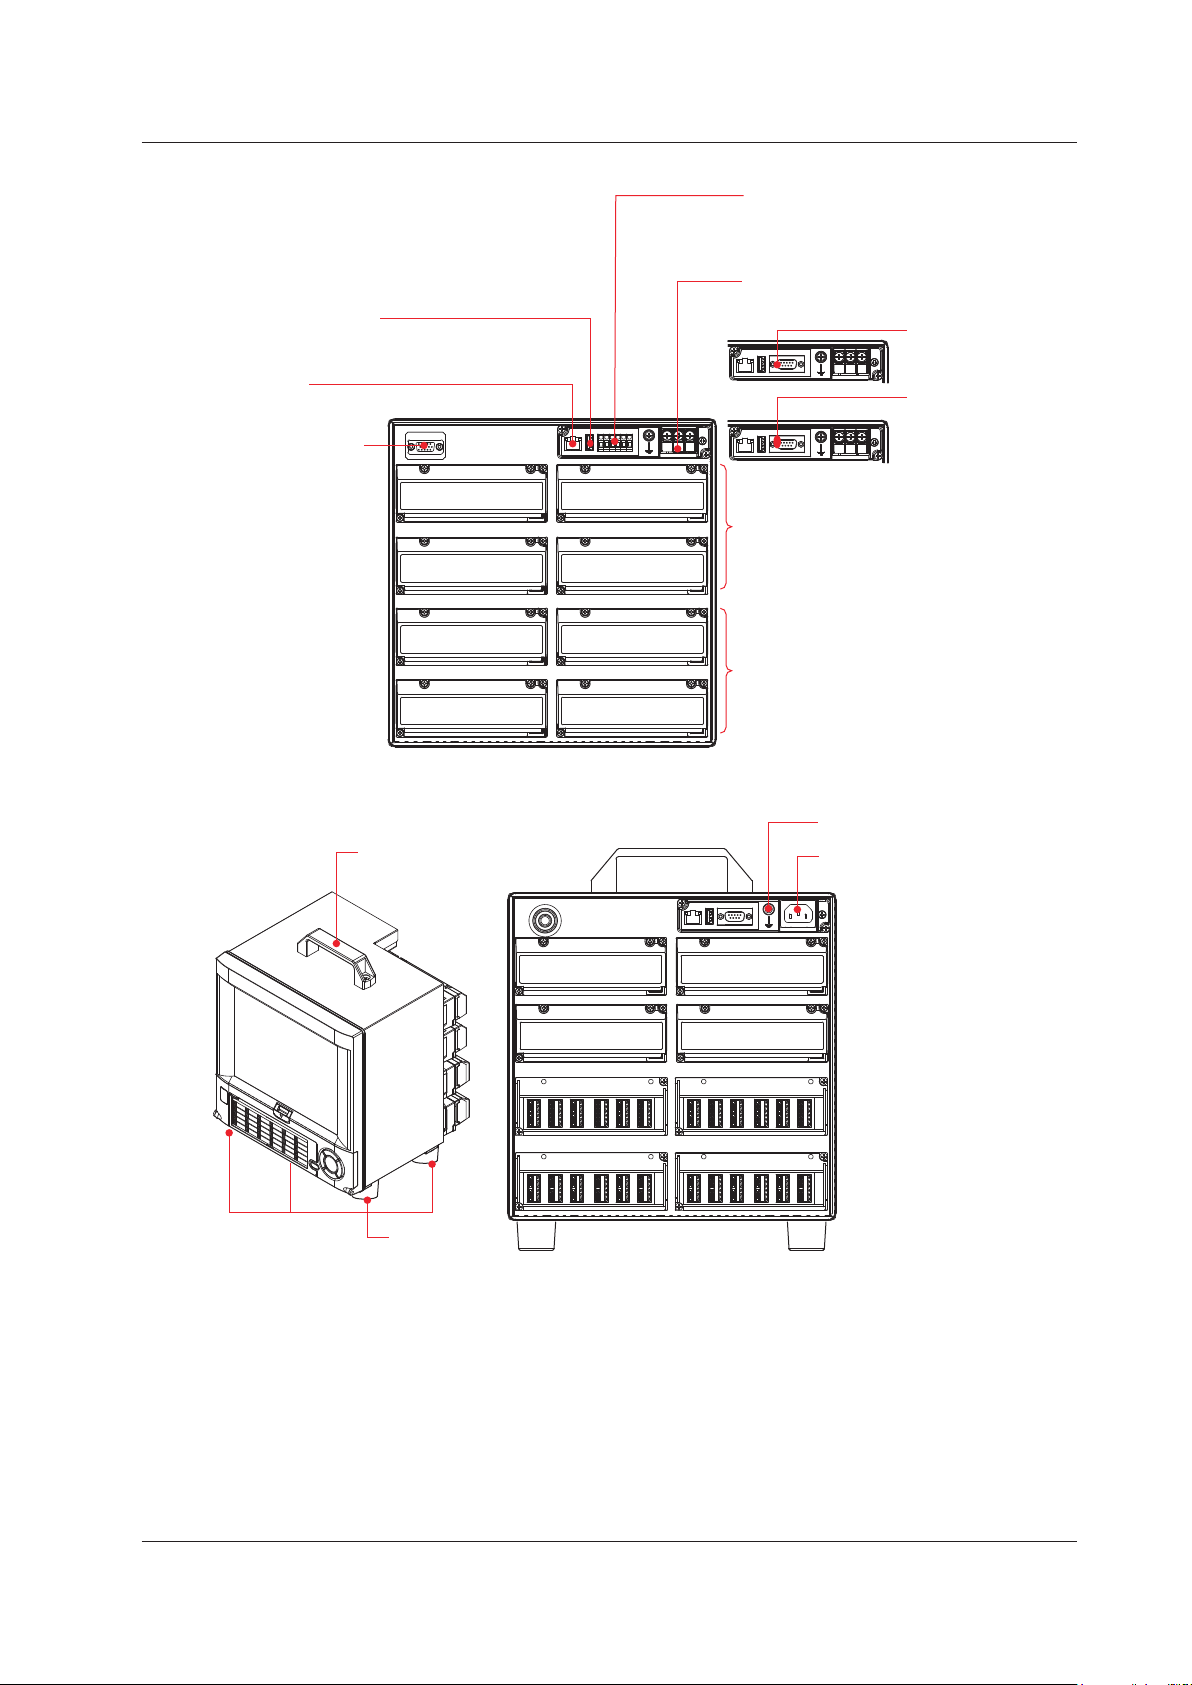
Rear Panel
VGA output connector
(/D5 option)
A connector for an
external monitor.
Ethernet port
A 10Base-T port.
USB port (/USB1 option)
A USB port conforming to
Rev. 1.1.
Optional terminals (/A[ ], /F[ ],
/R1, /TPS[ ], and /PM1 options)
Connect optional input/output
signal wires.
Serial interface port
(/C3 option)
A RS-422A/485 interface
connector.
Serial interface port
(/C2 option)
A RS-232 interface
connector.
Input terminals (screw terminals
or clamped terminals (/H2 option))
Connect input signal wires from the
measured item.
Power supply terminal and
protective earth terminal.
PROFIBUS-DP port
(/CP1 option)
PROFIBUS connector.
Power connector
Handle
Feet
Functional ground terminal
Names of Parts
Desktop Type (/H5[ ] Option)
IM 04L42B01-02E
11
Page 14
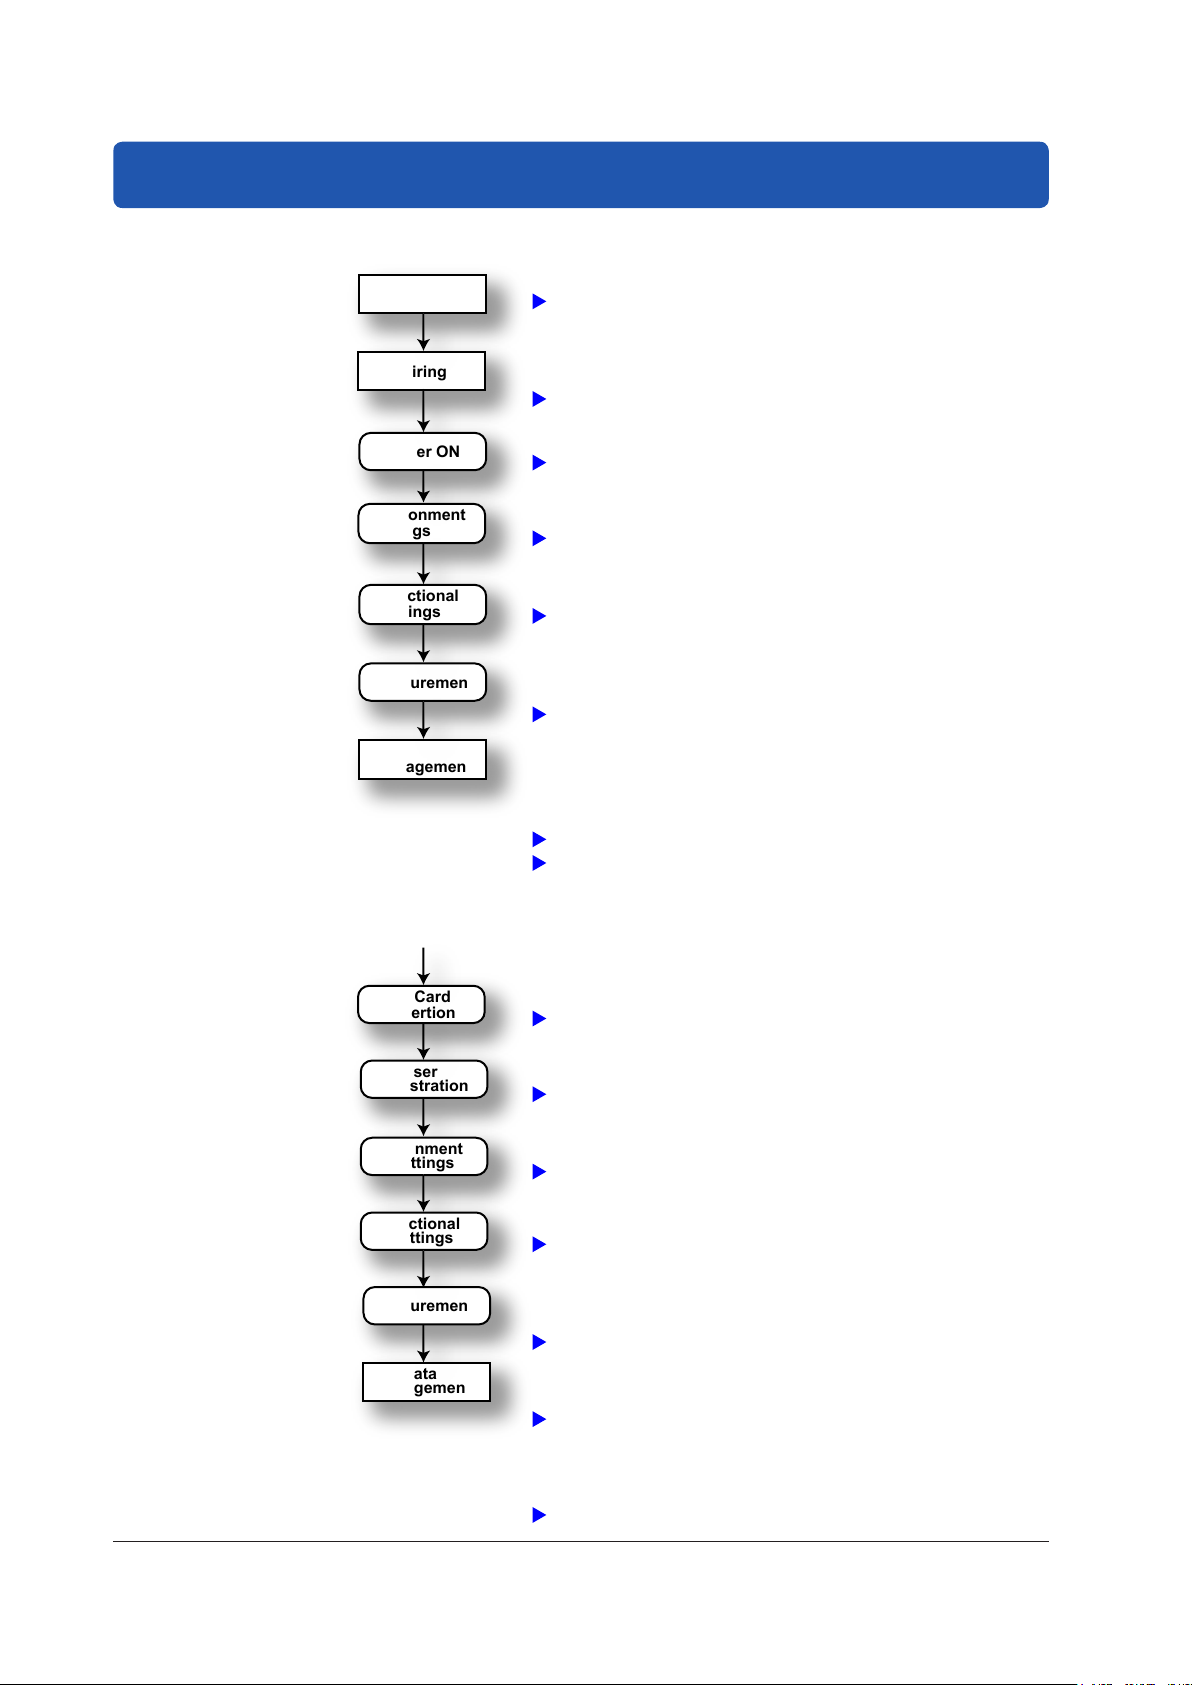
DX2000 Workflow
Installation
Wiring
Power ON
Environmental
Settings
Functional
Settings
Measurement
Data
Management
Install the DX.
Page 49 and subsequent pages
Connect input/output wires to the terminals and connectors on the
rear panel, and connect the power cord.
Page 52 and subsequent pages
Turn the power ON.
Page 13
Set the date/time, load the CF card, and so on.
Page 18 and 24
Set measurement functions.
Page 19 and subsequent pages, page 28 and subsequent pages
Start the measurement. Perform operations such as switching the
screen and writing messages. Save the measured data.
Page 39 and subsequent pages
Check and manage the measured data.
Use the accompanying software program, DAQSTANDARD, to display
the measured data and convert the measured data to Excel, Lotus, and
ASCII formats.
Page 48
DAQSTANDARD Viewer User’s manual (IM 04L41B01-63EN)
User
Registration
Environmental
Settings
Functional
Settings
Measurement
Data
Management
CF Card
Insertion
Register the users who will operate the DX.
Advanced Security Function (/AS1 option) User’s Manual
(IM04L41B01-05EN)
Check the measured data, and attach approval information
to the measured data file.
Advanced Security Function (/AS1 option) User’s Manual
(IM04L41B01-05EN)
You can also attach approval information to the measured data file
by using the accompanying software program, DAQSTANDARD.
DAQSTANDARD Viewer User’s Manual (IM 04L41B01-63EN)
Set the date/time.
Page 18
Insert a CF card into the DX.
Page 24
Set measurement functions.
Page 19 and subsequent pages, page 28 and subsequent pages
Start the measurement. Perform operations such as switching
the screen and writing messages. Save the measured data.
Page 39 and subsequent pages
When using the DX for the first time, carry out the following procedure.
12
On a DX with advanced security (/AS1 option; release number 4 or later), carry out the
following procedure after turning the DX on.
IM 04L42B01-02E
Page 15
Turning the Power ON/OFF
Turning the Power ON
Before turning ON the power switch, check that
• The power cord/wires are connected correctly to the DX.
• The DX is connected to the correct power supply (see page 6
If the input wires are connected in parallel with other devices, do not turn ON/OFF
the power switch of the DX or another device during operation. This can have
adverse ef
1.
2.
After performing a self-test for a few seconds, the operation screen appears.
3.
CAUTION
4).
fects on the measured values.
Open the operation cover.
Turn ON the power switch.
Close the operation cover.
• If nothing is displayed when the power switch is turned ON, turn OFF the
•
If an error message is displayed on the screen, take measures
• T
Turning the Power OFF
Before turning OFF the power switch, check that the external storage medium is
not being accessed.
1.
2.
3.
CAUTION
power switch and check the points listed above one more time. After checking
the points, turn ON the power switch again. If the DX still does not work, it is
probably a malfunction. Contact your nearest YOKOGAWA dealer for repairs.
according to the
description in chapter 11, “Troubleshooting” in the DX2000 User’s Manual.
urn ON the power switch, let the DX warm up for at least 30 minutes, and then
start the measurements.
CAUTION
Open the operation cover.
Turn OFF the power switch.
Close the operation cover.
IM 04L42B01-02E
13
Page 16

Basic Operation
LCD
Key panel
Soft keys
Selects the menu that is
displayed at the bottom of the
screen.
START/STOP key
Memory start/stop.
ESC key
Cancels an operation.
USER key
Executes the assigned
operation.
Favorite key
Displays the operation screen (up to
eight screens) that are registered to
the key.
MENU key
Switches between the operation
mode and setting mode.
FUNC key
• Displays the soft key menu in operation mode.
• Hold down this key at least 3 s in the setting mode to switch from the setting
mode to the basic setting mode.
DISP/ENTER key and four arrow
keys (up, down, left, and right)
Switches the operation screen.
Selects and enters setup items.
DISP/ENTER key
Up arrow key
Right arrow key
Down arrow key
Left arrow key
Character/Number input keys
Enters characters and numbers.
Status display section
Shows the display name, date/time, data
recording, alarm icon, etc.
Data display section
Shows the measured data and the functional setup
display.
For the waveform display and numeriuc display, see
section 4.2, in the DX2000 user’s Manual (IM
04L42B01-01E). For details on how to set the scale,
see section 5.7, in the DX2000 user’s Manual (IM
04L42B01-01E).
ScaleWaveform display Numeric display
Panel Keys
14
Display
IM 04L42B01-02E
Page 17
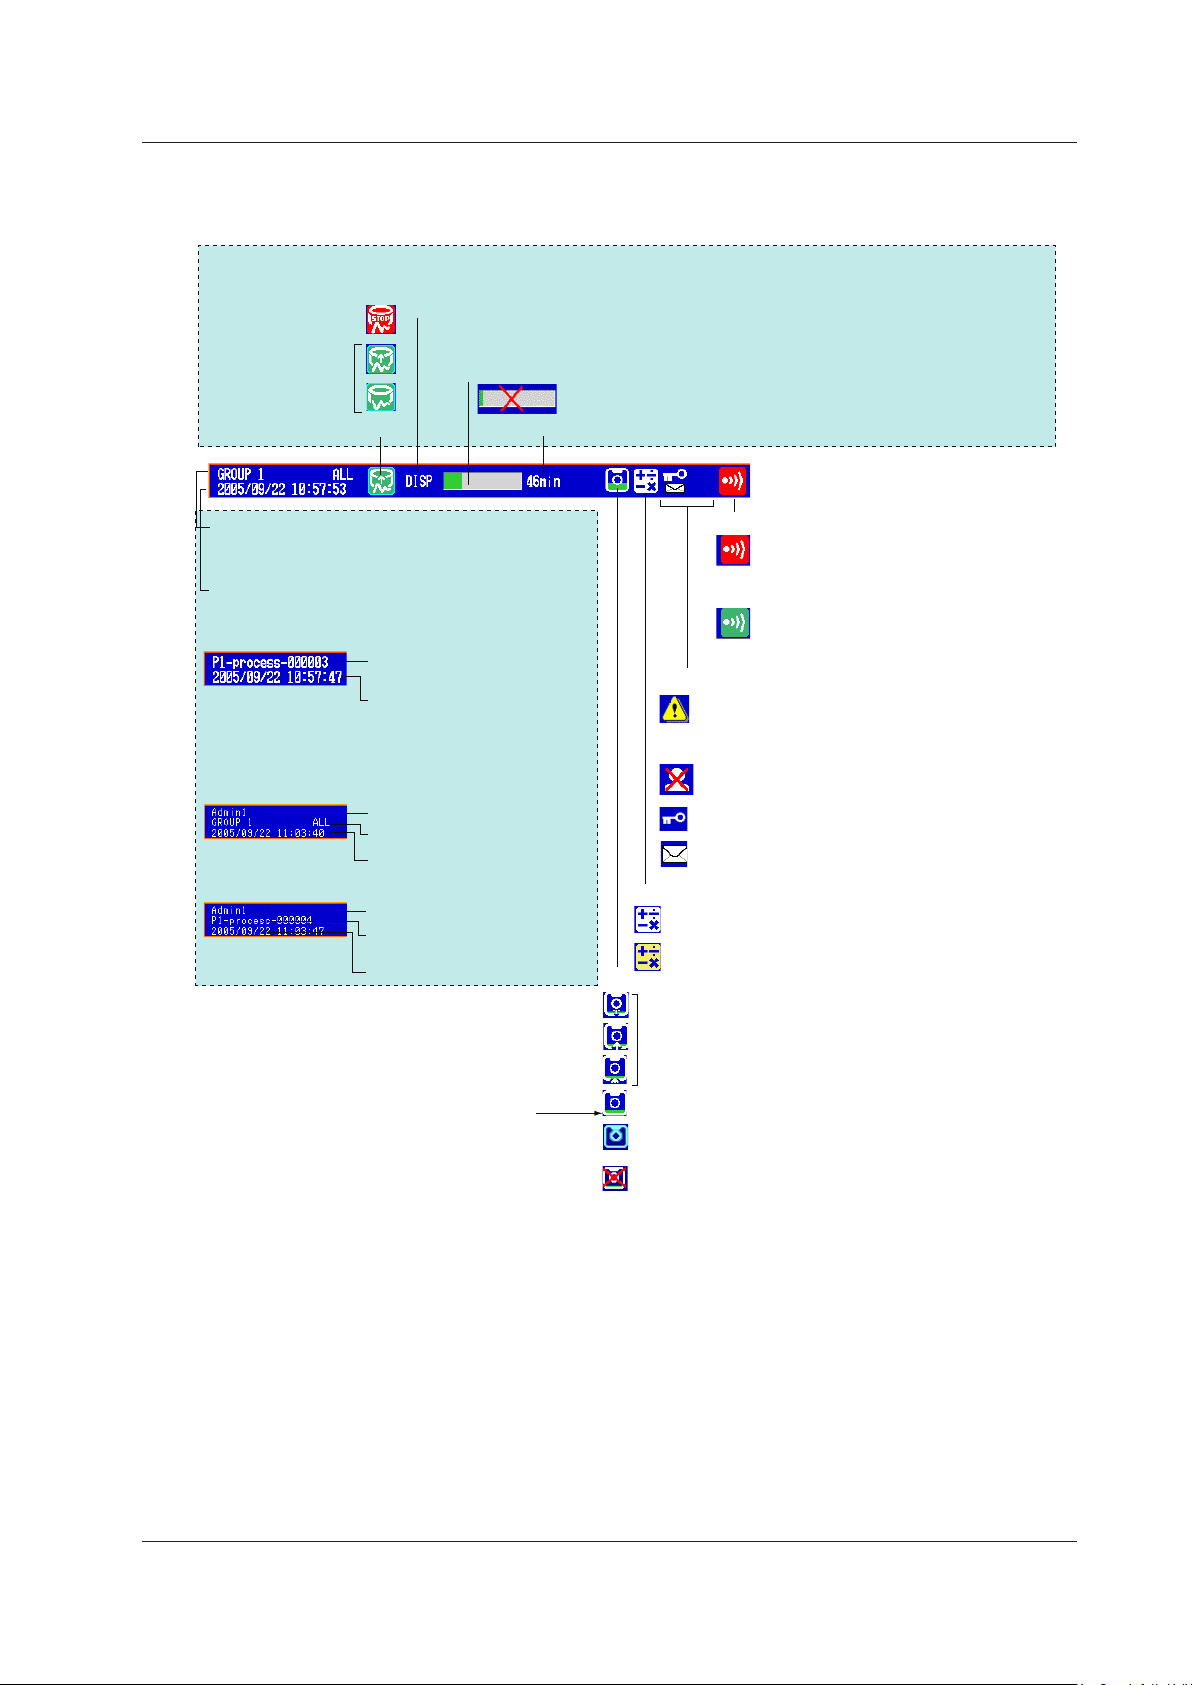
Memory sampling status
Error in internal memory.
Contact your nearest YOKOGAWA dealer for repairs.
The status assigned to the status output
(/F1 or /F2 option) is occurring.
CF card icon
Keys are locked.
E-mail transmission is enabled.
White icon: Computation in progress
Yellow icon: Computation dropout occurred
The green level display indicates the amount of
CF card used. If Media FIFO* is not enabled and
the free space on the CF card falls below 10%,
the level indicator changes to red.
* See section 1.4, in the DX1000/DX1000N User’s
Manual. Media FIFO is a function available on
release number 2 or later.
If the “batch number-lot number” exceeds 20
characters, the “date and time” position is used to
display the “batch number-lot number.”
Memory sampling icon
Memory sampling
stopped
Memory sampling
in progress
Batch name (shown alternately
with the display name)
Name of the user logged in
Batch name (shown alternately
with the display name)
Date and time
Displayed in yellow while the time is being corrected.
Display name or group name
For all channel display on the trend display,
“ALL” is displayed.
Data type
DISP: Display data
EVENT: Event data
Memory sampling progress
Displays the progress using a green bar graph. The frame indicates the file save
interval (display data) or the data length (event data).
Displays the remaining memory sampling time for the left bar graph.
When using the login function
When using the batch function
Alarm icon
Status icon
Computation icon (/M1 or /PM1 option)
Date and time
Name of the user logged in
When using the login and batch functions
Date and time
Date and time
Display name
(Red)
(Green)
CF card is being accessed.
Waiting.
Light blue icon: CF card in the slot is not
recognized. Remove and reset it.
CF card error.
Carry out the procedure below to reset the CF card icon to
normal.
• Remove the CF card, and then reinsert it.
• Replace the CF card with a normal one.
• Format the CF card on the DX (the data on the CF card
will be erased).
User Locked Icon (/AS1 option)
Displayed when the user is locked.
Displayed when any alarm is activated.
Blinks when there are alarms that are
occurring but have not been acknowledged.
All alarms have been released after they
have occurred, but there are alarms that
have not been acknowledged.
Basic Operation
Display on the Status Display Section
The following information is displayed in the status display section.
IM 04L42B01-02E
15
Page 18

Power ON
Basic setting mode
MENU key
or ESC key
DISP/ENTER
key
DISP/ENTER
key
ESC key
Setting menu
display
Basic setting
menu display
Setup display
Operation display
Setup display
Setting mode
Operation mode
MENU key
MENU key
or ESC key
Mode Transition Diagram
End menu > DISP/ENTER or
ESC > DISP/ENTER
(release number 3 or later)
Hold down FUNC
for 3 s or
Basic Setting Mode
> DISP/ENTER
(release number 3
or later)
On a DX with advanced security
(/AS1 option; release number 4 or later):
MENU key or ESC key > DISP/ENTER
or
End menu > DISP/ENTER
DISP/ENTER key and four arrow
keys (up, down, left, and right)
Character/Number input keys
Basic Operation
Run Modes
Entering Values and Characters
The DX has three modes.
Mode Description
Operation mode A mode for performing measurements.
Setting mode A mode in which input range, measurement method, and so on
are configured. Settings can be changed when memory sampling
is in progress excluding some items.
Basic setting mode A mode used to set basic items such as the scan interval and
storage format of measured data. On a DX with advanced
security (/AS1 option; release number 4 or later), the login
settings can be changed during memory sampling.
* For further details on the basic setting mode and setting mode, see page 67.
Carry out the steps given in the following pages. It will help you to understand the DX
operation.
The character/number input keys and DISP/ENTER key are used to set the date/time,
set the display span of the input range, set the tag, set the message string, enter the
password, etc.
16
IM 04L42B01-02E
Page 19

Input status of the A/a/1 soft key
Input status of the Ins soft key
Entering Values
When a window for entering a value appears, enter the value by performing the following
key operation.
• Left and right arrow keys:
• Character/Number input keys: Enters a value.
The following soft key appears when it can be used.
• Space soft key: Enters a space.
Entering Character Strings
When a window for entering a character string appears, enter it by performing the
following key operation.
• Left and right arrow keys:
• Character/Number input keys: Enters a character string.
The character to be entered is determined by the number of times the A/a/1 soft key and
the character/number input key is pressed. The character types that can be entered vary
depending on the item being set.
Basic Operation
Selects the input position.
Selects the input position.
• Space soft key: Enters a space.
• Del soft key: Deletes the character at the cursor.
• Bs soft key: Deletes the character before the cursor.
• Ins soft key: Selects insert or overwrite.
Insert and overwrite mode toggles each time the Ins soft key is
pressed. The selected mode is shown on the right side of the soft
key display section.
•
A/a/1 soft key:
Selects uppercase alphabet (A), lowercase alphabet (a), or value (1).
The character type that you can enter changes each time you press
the A/a/1 soft key. The selected character type is shown on the right
side of the soft key display section.
IM 04L42B01-02E
17
Page 20
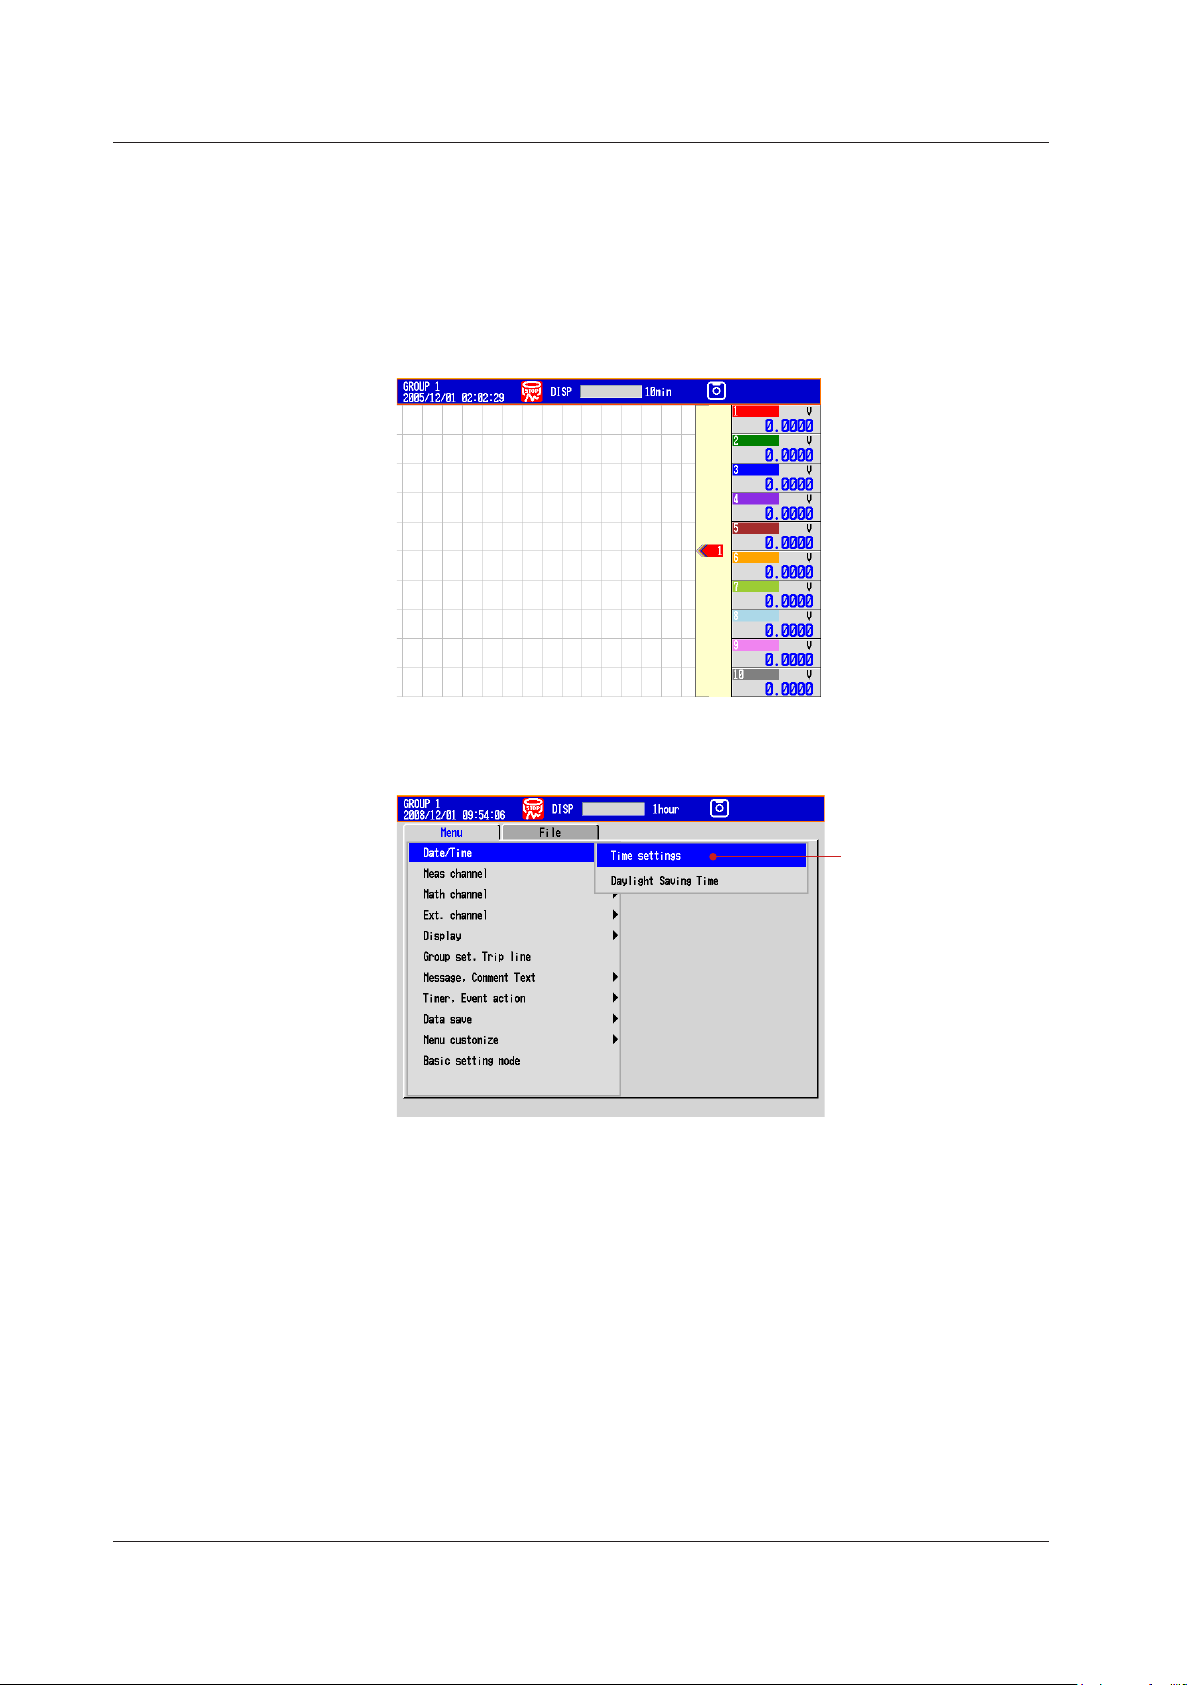
Select Time settings.
Basic Operation
The contents of the screens in the operation examples below may change depending on
which options are installed and how the settings are configured.
On a DX with advanced security (/AS1 option; release number 4 or later) you must first
insert the CF card into the slot (see page 24).
Changing the Date/Time
In this example, we will change the date to the 14th. After carrying out this step, reset the
time to the correct date/time.
Display the operation mode screen.
1.
Press MENU once to display the setting menu.
2.
Press the down arrow key once. The cursor moves to Date/Time.
3.
Press the right arrow key once.
4.
5.
Press DISP/ENTER once to open the Time set window.
18
IM 04L42B01-02E
Page 21
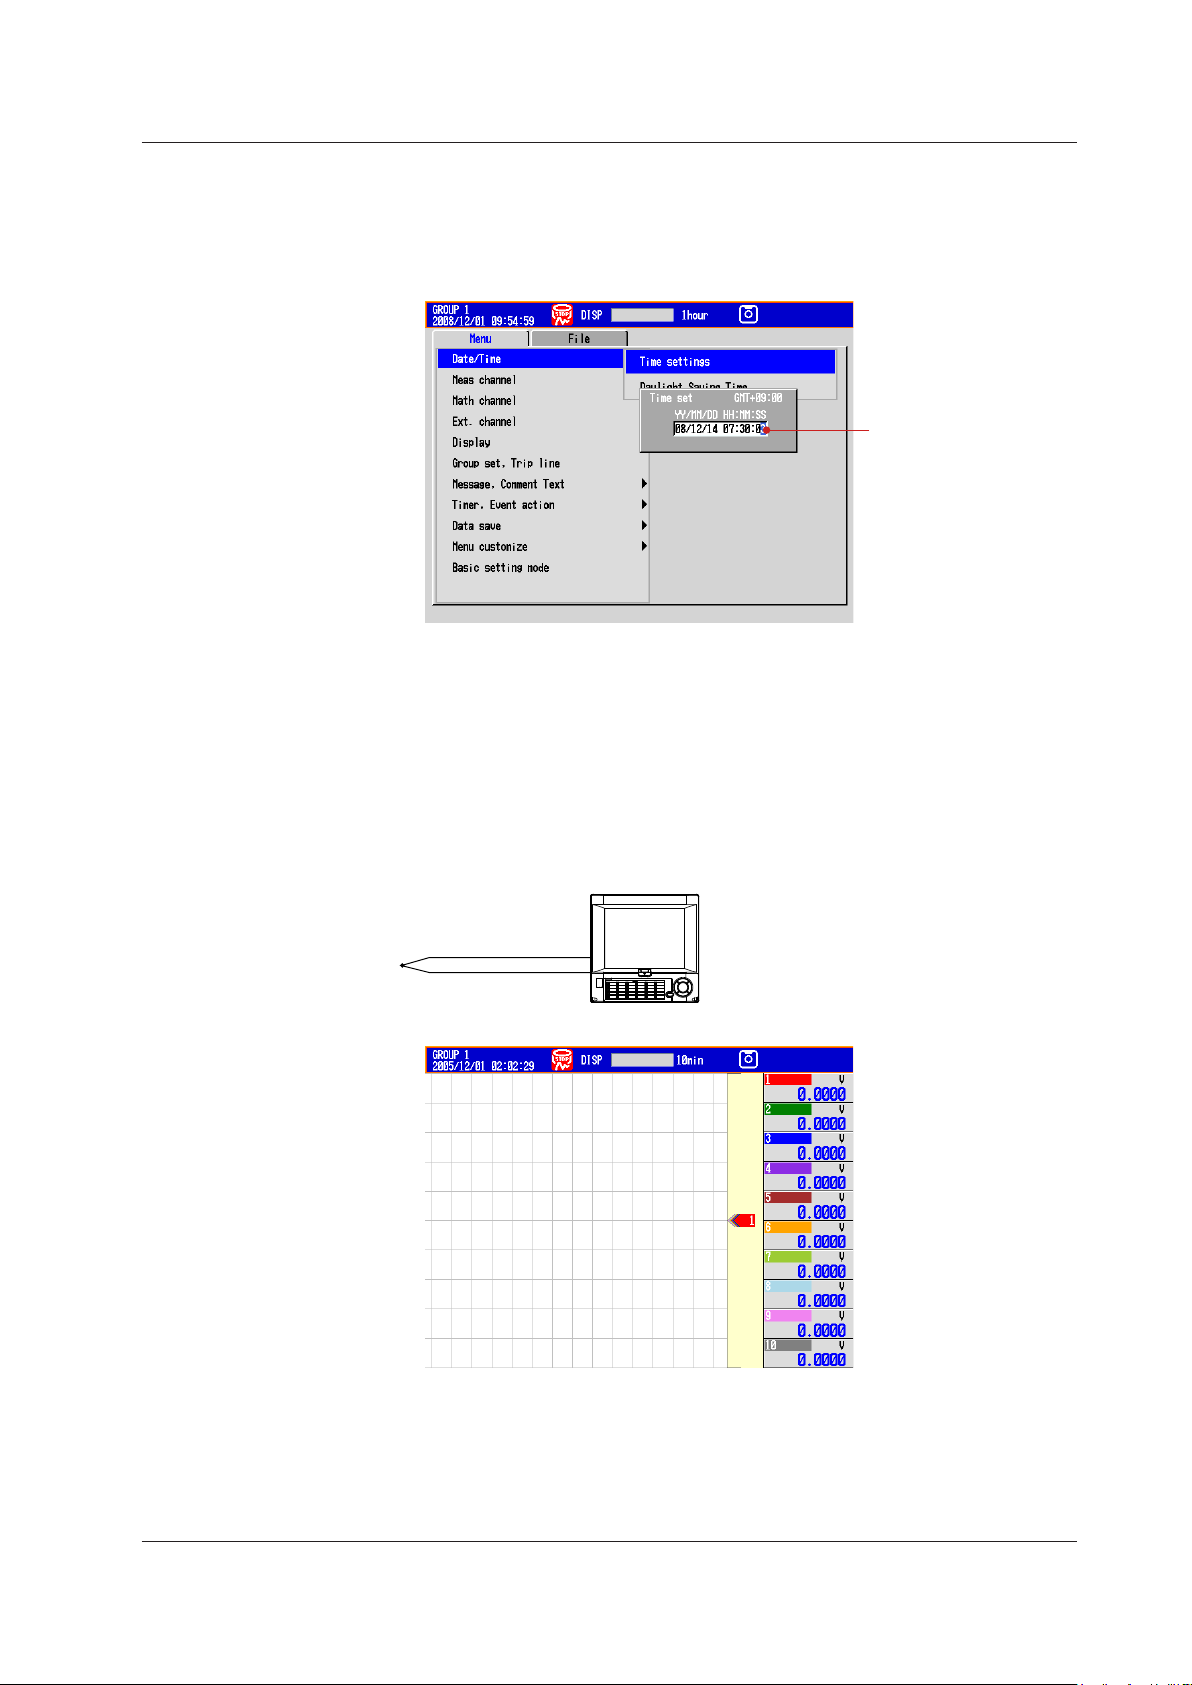
Set the date to 14.
Display the Time set
window.
Type T
thermocouple
Channel 2
DX2000
6.
Select the input position: Left and right arrow keys
Change the value: Character/Number input keys
Enter the input: DISP/ENTER
Cancel the setting: Press ESC
before pressing DISP/ENTER
Basic Operation
.
Press ESC twice or MENU once to return to the operation mode screen.
7.
On a DX with advanced security (/AS1 option; release number 4 or later):
Press ESC twice or MENU once to display a confirmation screen. To return to the
operation mode screen, select Yes, and press DISP/ENTER once.
Operation complete.
Operation Example in the Setting Mode: Changing the Input Range
Set the input range of channel 2 to thermocouple type T and 0.0 to 400.0°C.
Display the operation mode screen.
1.
IM 04L42B01-02E
Press MENU once to display the setting menu.
2.
19
Page 22
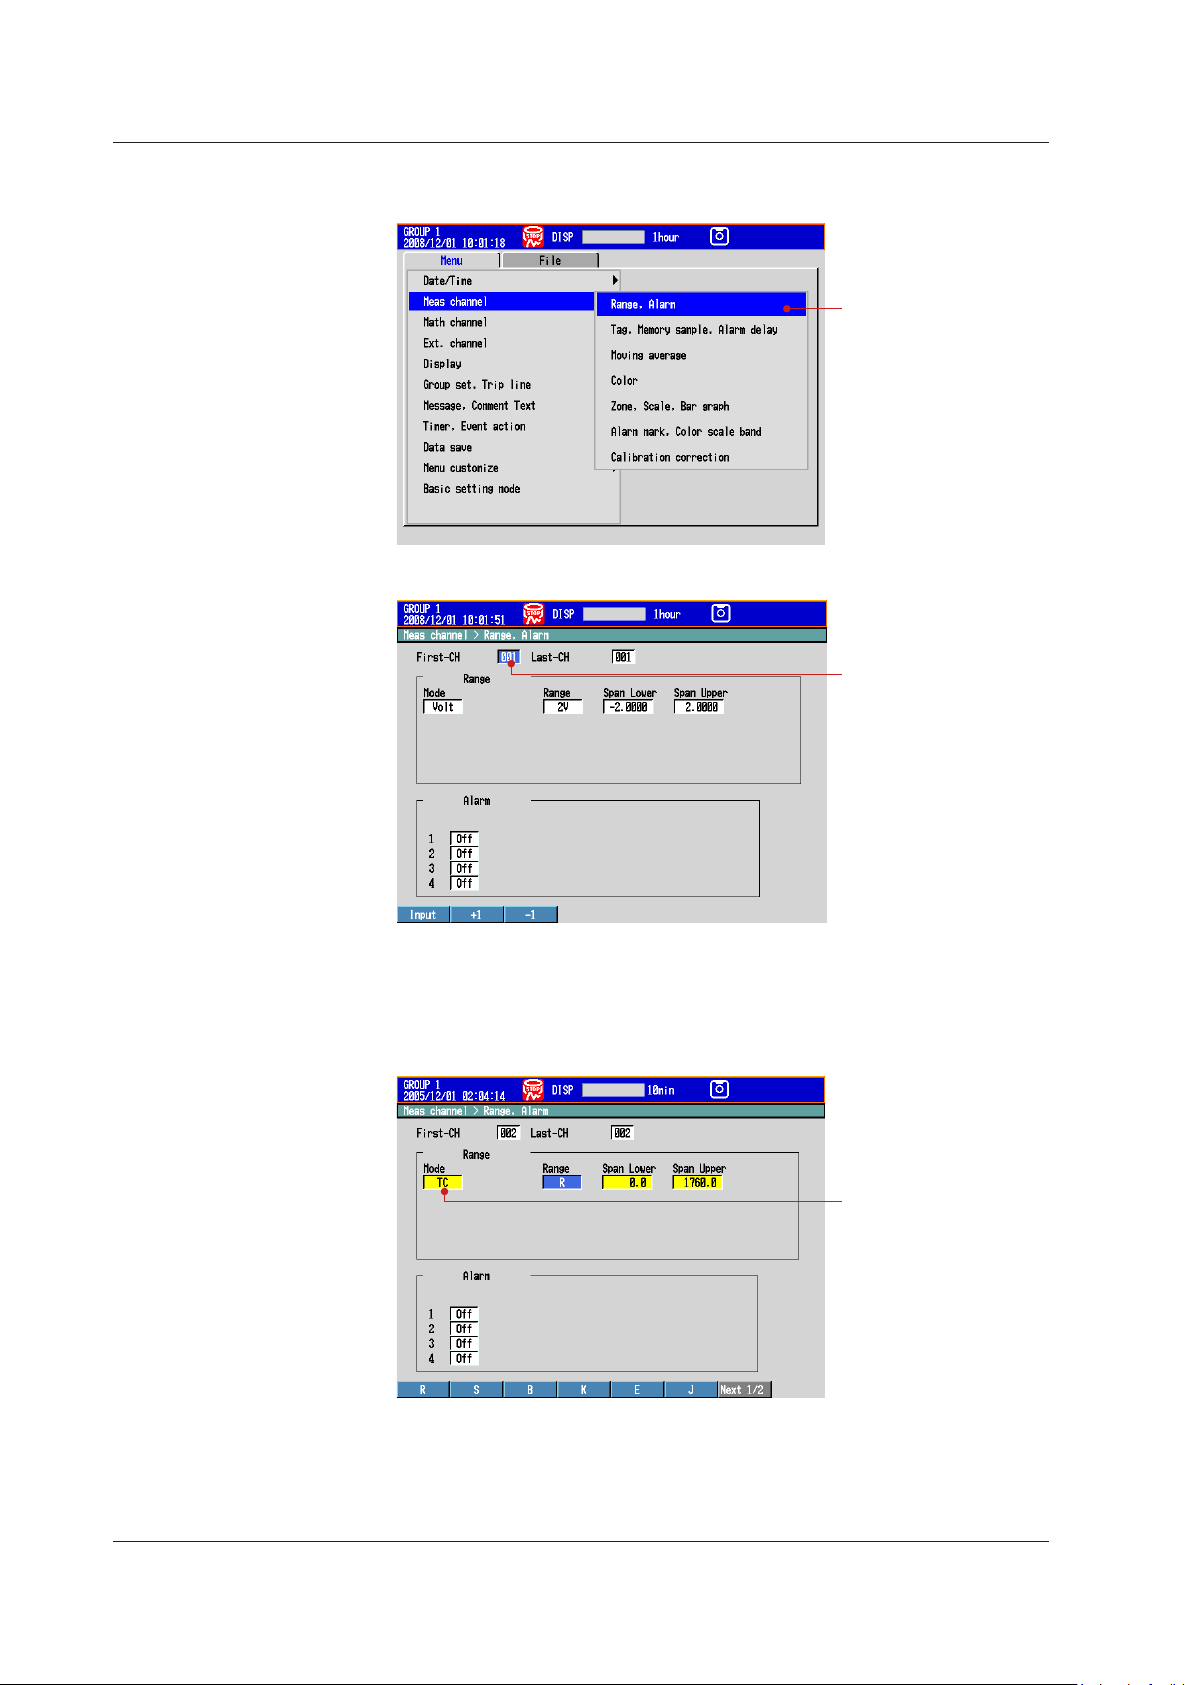
Select Range, Alarm.
Select First-CH.
Select TC.
Basic Operation
Press the down arrow key twice to select Meas channel.
3.
Press the right arrow key once.
4.
Press DISP/ENTER once.
5.
6.
7.
8.
Press the +1 soft key once to set First-CH and Last-CH to 2.
Press the down arrow key once to move the cursor to Mode.
Press the TC soft key once. The cursor moves to Range, and the changed items
are displayed in yellow.
20
Press the Next soft key.
9.
10.
Press the T soft key once. The cursor moves to Span Lower.
IM 04L42B01-02E
Page 23
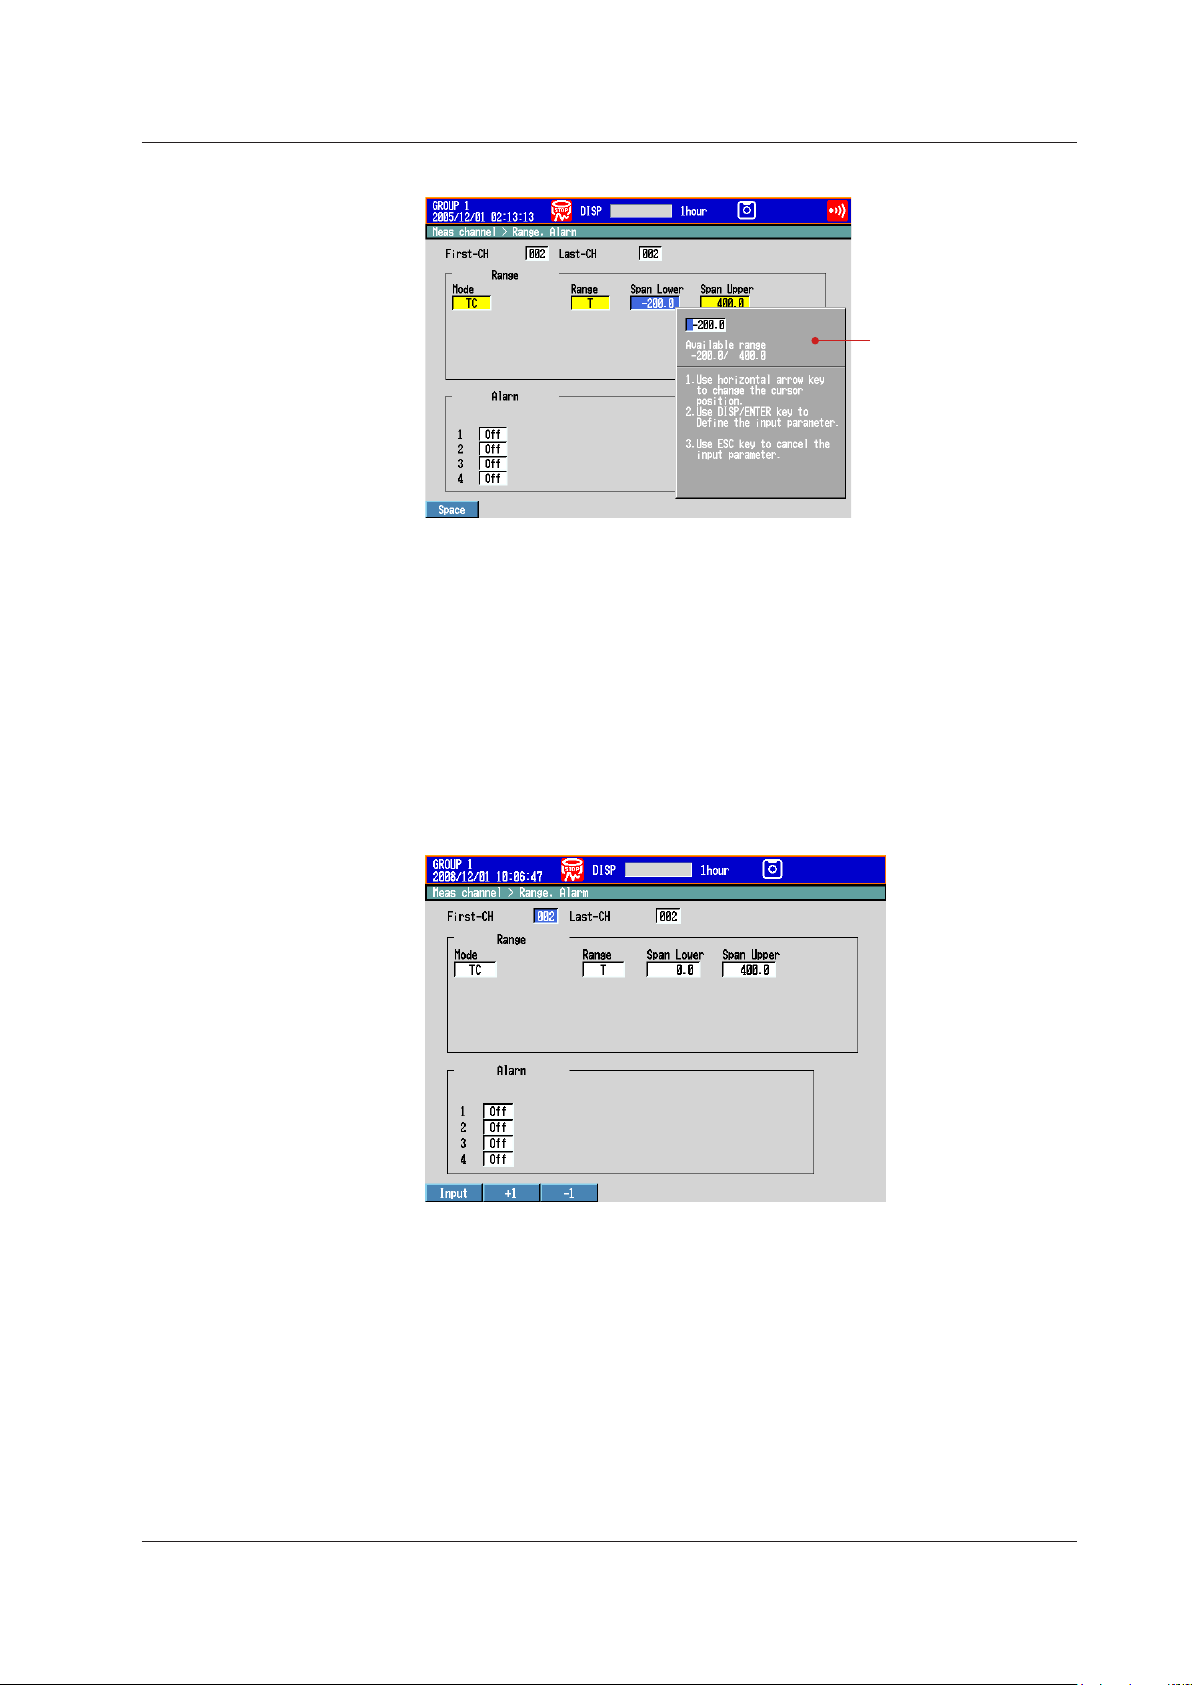
Press the Input soft key once.
Display the span lower
setting window.
11.
Basic Operation
12.
Select the digit: Left and right arrow keys
Change the value: Character/Number input keys
Delete the value: Space soft key
Cancel the setting: Press ESC
13.
14.
See step 12 for the procedure.
15.
Enter 0.0 in the Span Lower box.
before pressing DISP/ENTER
.
Press DISP/ENTER once. The cursor moves to Span Upper.
Enter 400.0 in the Span Upper box.
Press DISP/ENTER once. The changed items are entered, and the cursor returns
to First-CH. The changed items change from yellow to white.
IM 04L42B01-02E
Press ESC three times or MENU twice to return to the operation mode screen.
16.
On a DX with advanced security (/AS1 option; release number 4 or later):
Press ESC three times or MENU twice to display a confirmation screen. To return
to the operation mode screen, select Yes, and press DISP/ENTER once.
Operation complete.
21
Page 24
Type T
thermocouple
Channel 2
Measures every 2 s
DX2000
Display the basic setting
mode menu
Alternatively, you can
execute the following
procedure to switch to
Basic Setting mode.
Use the up or down arrow
key to select Basic setting
mode on the Menu tab,
and press DISP/ENTER.
A confirmation window will
appear. Select Yes, and
press DISP/ENTER.
Basic Operation
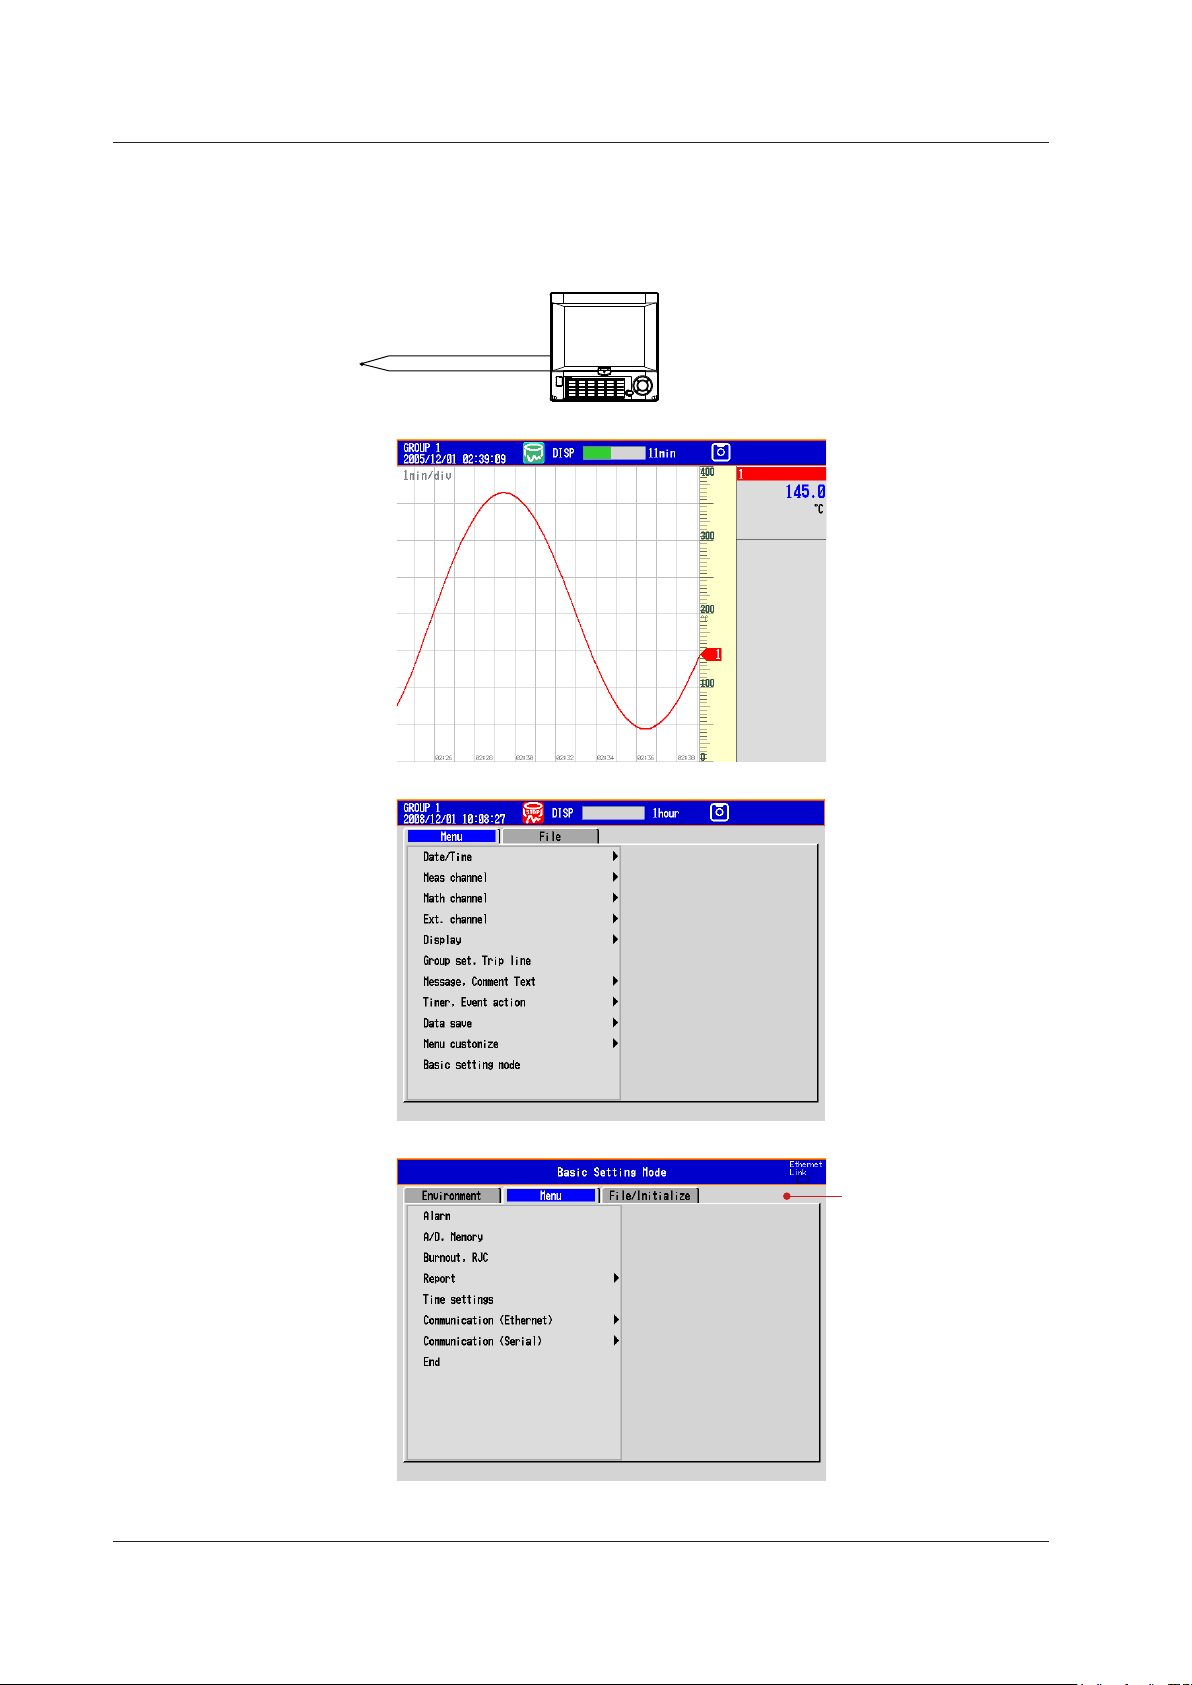
Operation Example in the Basic Setting Mode: Changing the Scan Interval
In this example, we will change the scan interval. Here, the scan interval on the DX2010
is changed to 2 s. The selectable scan intervals are different on the DX2004 and
DX2008, but the procedure is the same.
Display the operation mode screen.
1.
2.
3.
Press MENU once to display the setting menu.
Hold down FUNC for at least 3 s.
22
Press the down arrow key twice to select A/D, Memory.
4.
IM 04L42B01-02E
Page 25
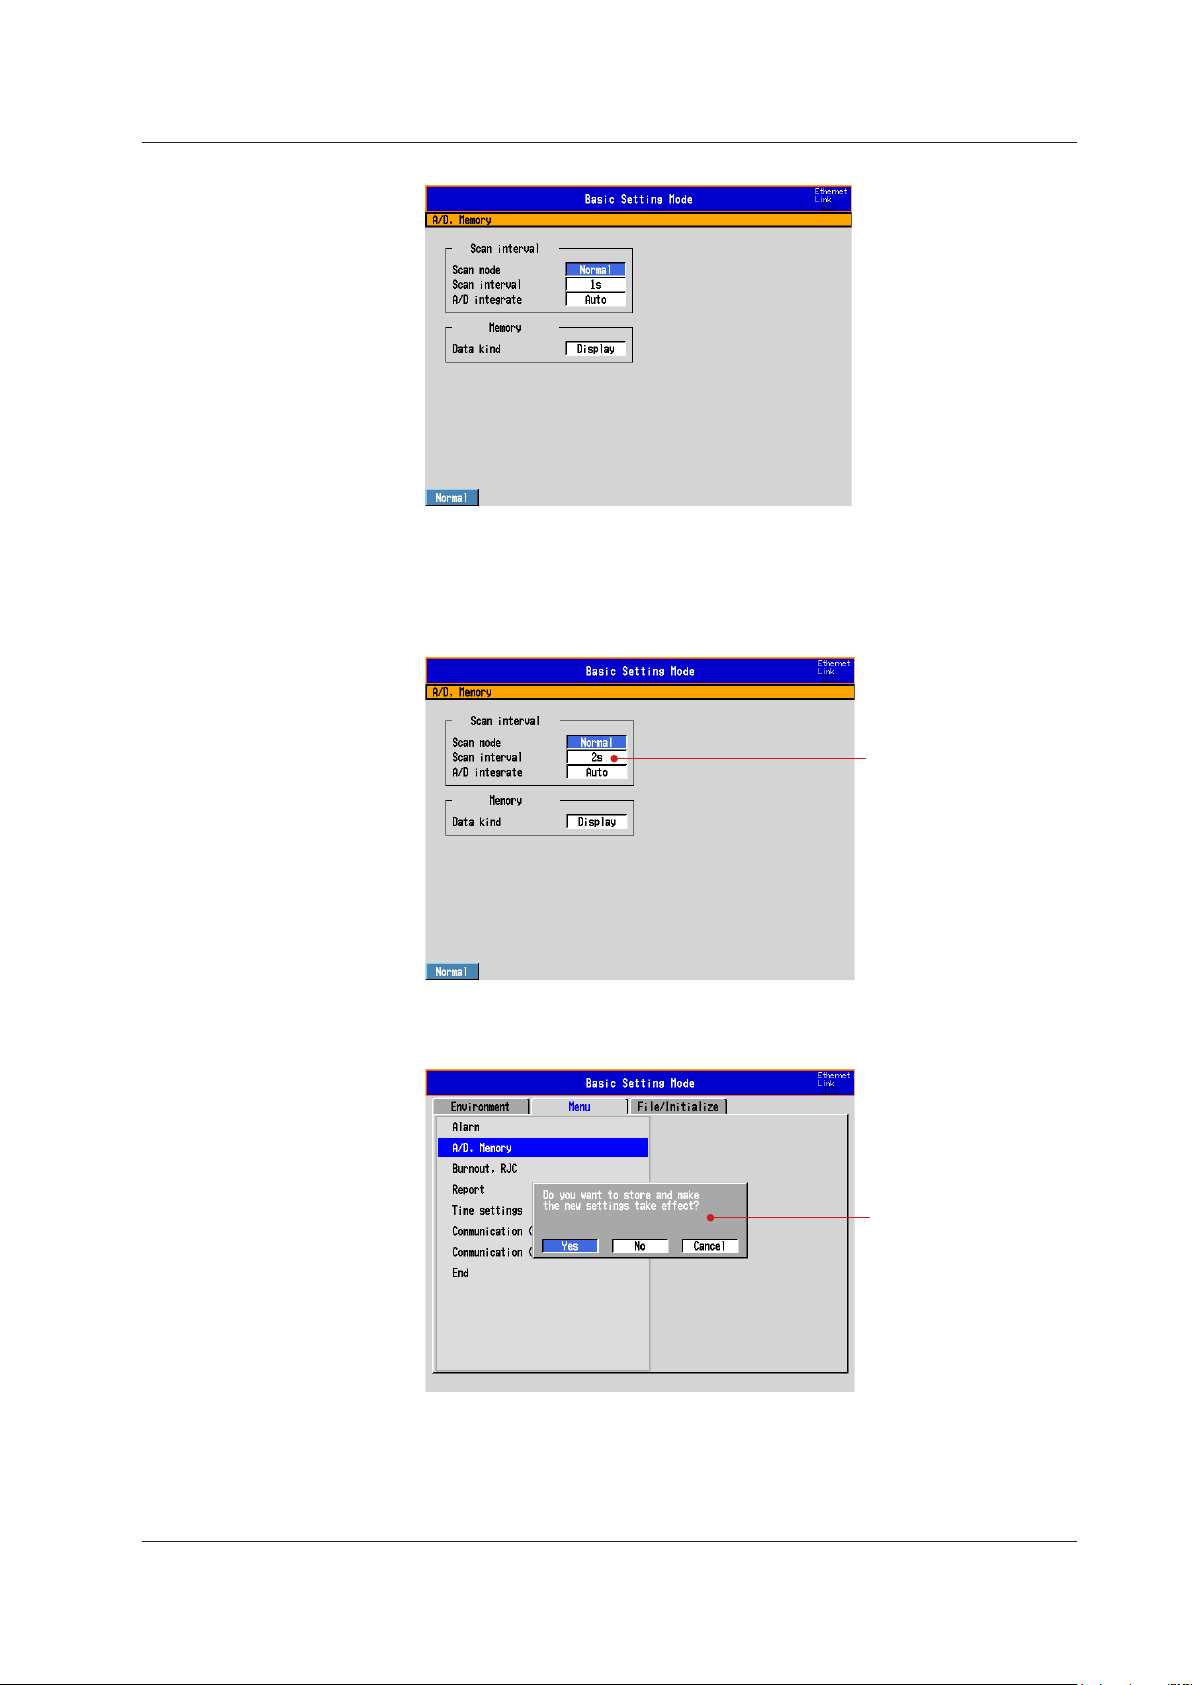
5.
Set the scan interval to 2 s.
Display the confirmation
window.
6.
7.
Cancel the setting: Press ESC before pressing DISP/ENTER.
8.
Basic Operation
Press DISP/ENTER once.
Press the down arrow key once to move the cursor to Scan interval.
Press the 2s soft key once. The cursor moves to A/D integrate, and the changed
item is displayed in yellow.
Press DISP/ENTER once. The changed items are entered, and the cursor returns
to Scan mode.
9.
10.
Press ESC once to return to the basic setting mode menu.
Press ESC once more.
Alternatively, use the
up or down arrow key
to select
End
, and press
DISP/ENTER
.
IM 04L42B01-02E
Press DISP/ENTER once. The settings are saved, and the DX returns to the
11.
operation mode screen.
Discard the changes: Select No and press
Do not end the basic setting mode: Select Cancel and press
Operation complete.
DISP/ENTER.
DISP/ENTER.
23
Page 26
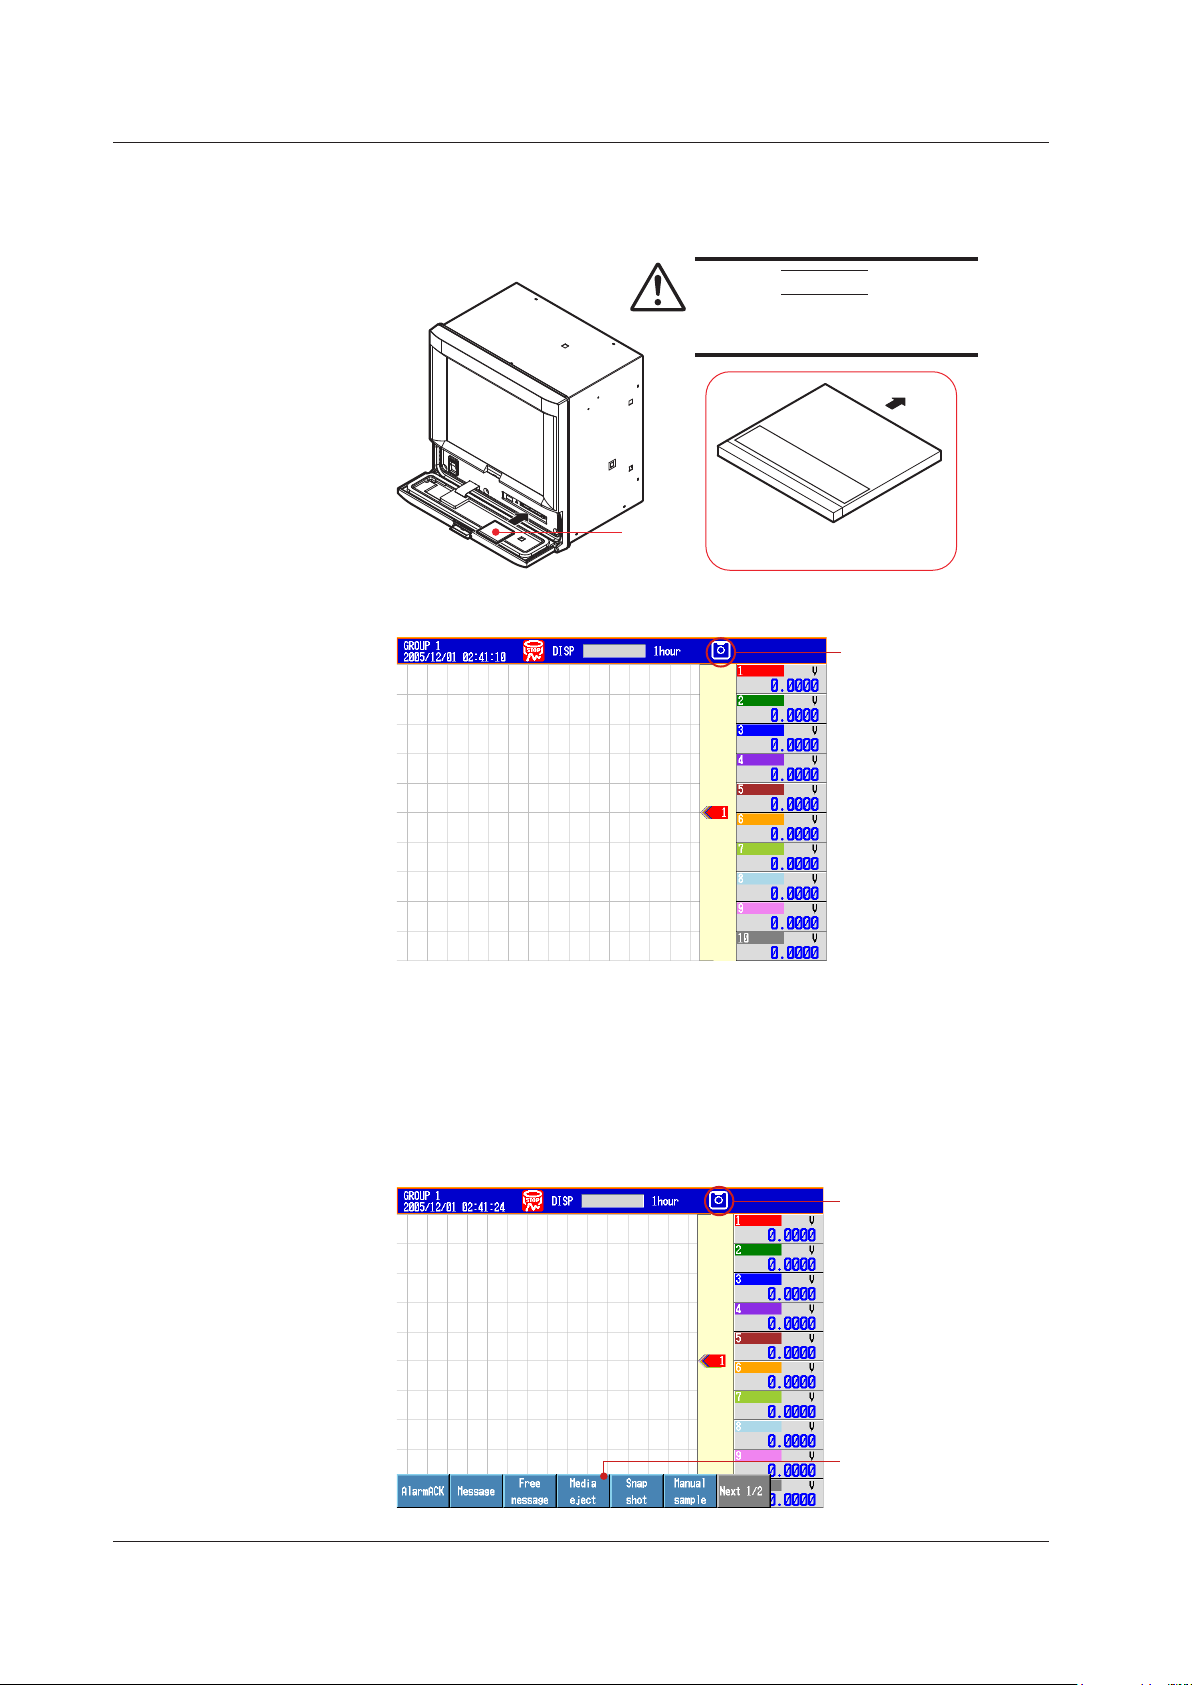
CF card
With the label “This side up”
facing up
This side up
CAUTION
Forcing the CF card into the slot with
the upside down may cause damage.
Displays the storage
media icon.
Storage media icon
Media eject
Basic Operation
Inserting/Removing a CF Card
Inserting a CF Card
Open the operation cover.
1.
Insert the CF card into the slot.
2.
3.
Operation complete.
Removing a CF Card
<Operations in the Operation Mode>
1.
2.
Close the operation cover.
Press FUNC once.
Press the Media eject soft key once.
24
IM 04L42B01-02E
Page 27
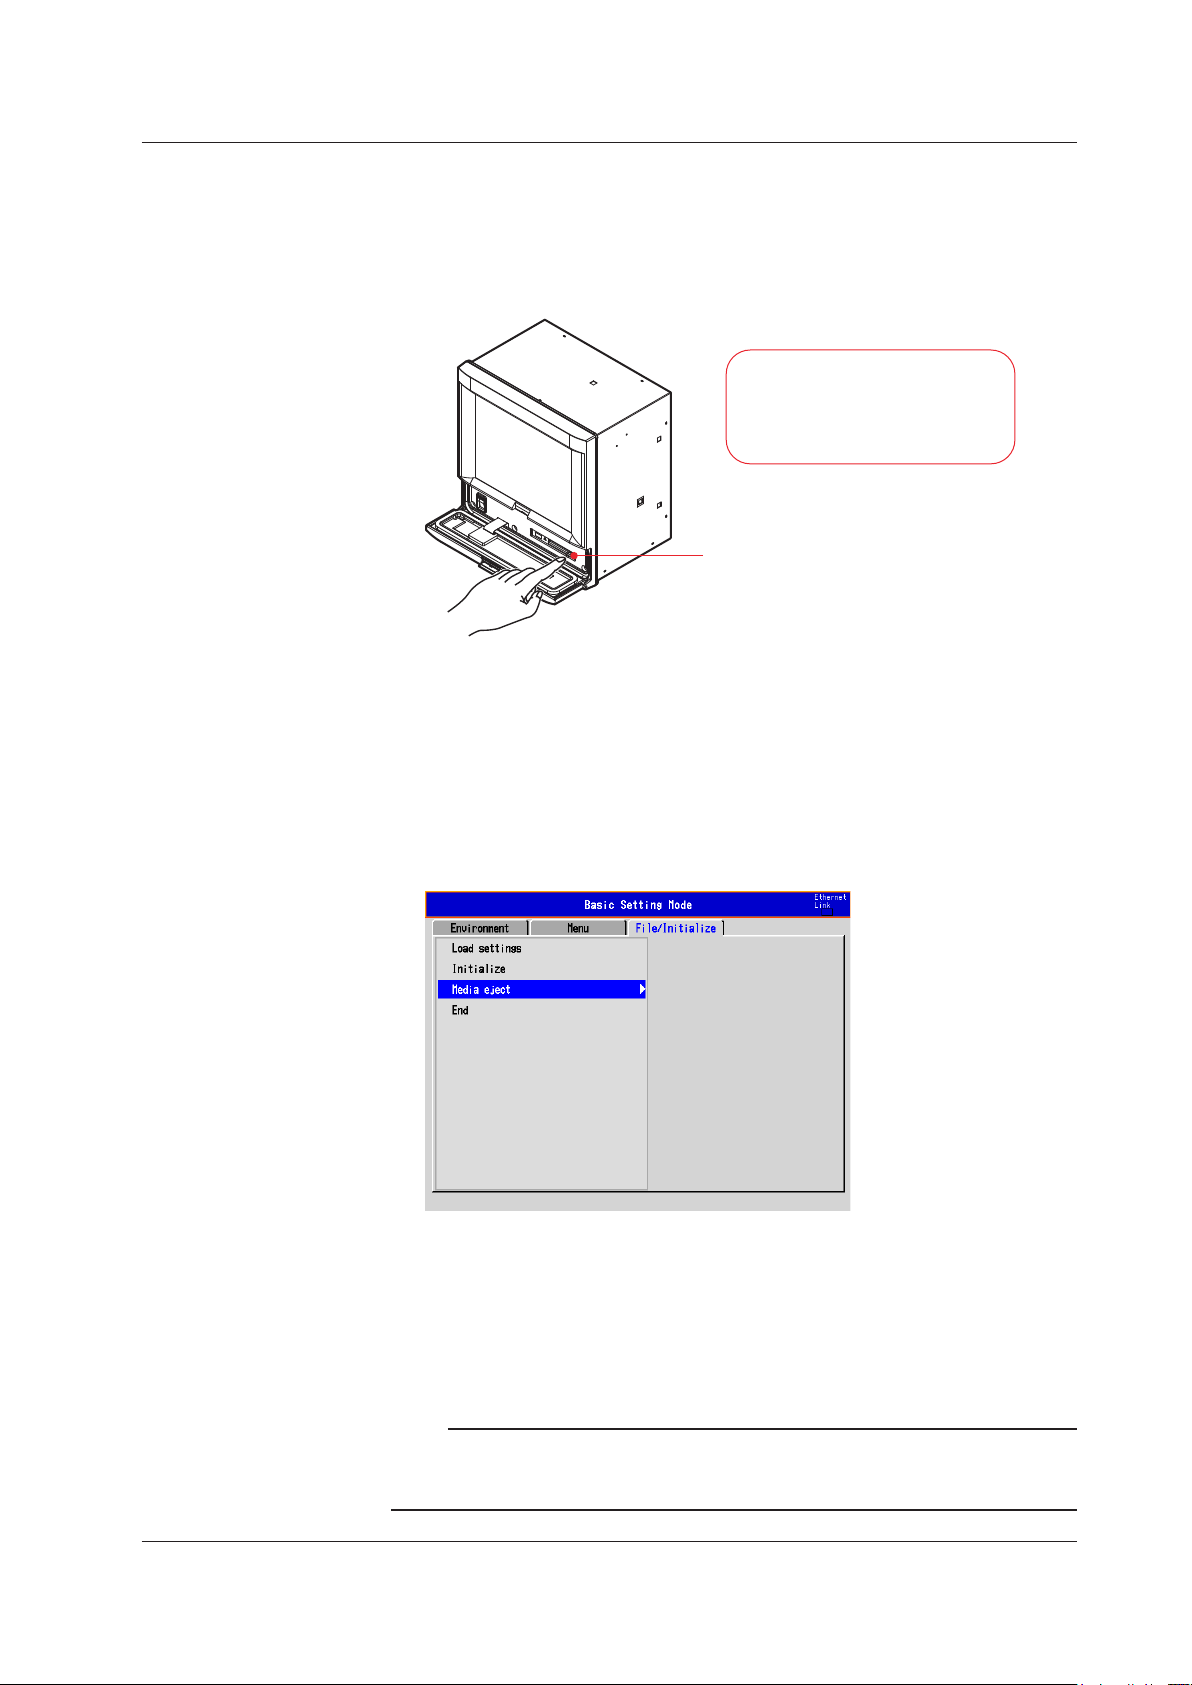
3.
Eject button
Press the eject button in until it clicks.
The eject button stops at depressed
position. Pinch the left and right side
of the CF card and remove it.
4.
5.
6.
Operation complete.
Basic Operation
Press the CF soft key once. The message “Media can be removed safely”
appears.
Open the operation cover.
Press the CF card eject button. When you eject the CF card, the CF card icon
disappears.
Close the operation cover.
<Operation in the Basic Setting Mode>
1.
The message “Media can be removed safely” appears.
2.
3.
4.
Press MENU (to switch to setting mode), hold down FUNC for 3 s (to switch to
basic setting mode), select the File/Initialize tab > Media eject > CF *, and press
DISP/ENTER.
* Select CF if you have a choice between CF and
USB
.
Open the operation cover.
Press the CF card eject button. Remove the CF card.
Close the operation cover.
IM 04L42B01-02E
Operation complete.
Note
If you remove the CF card without carrying out the media eject procedure, the message “Media
was removed compulsorily” appears. Remove the CF card by carrying out the procedure above
to prevent damaging the data that is stored.
25
Page 28
Select Save settings.
Basic Operation
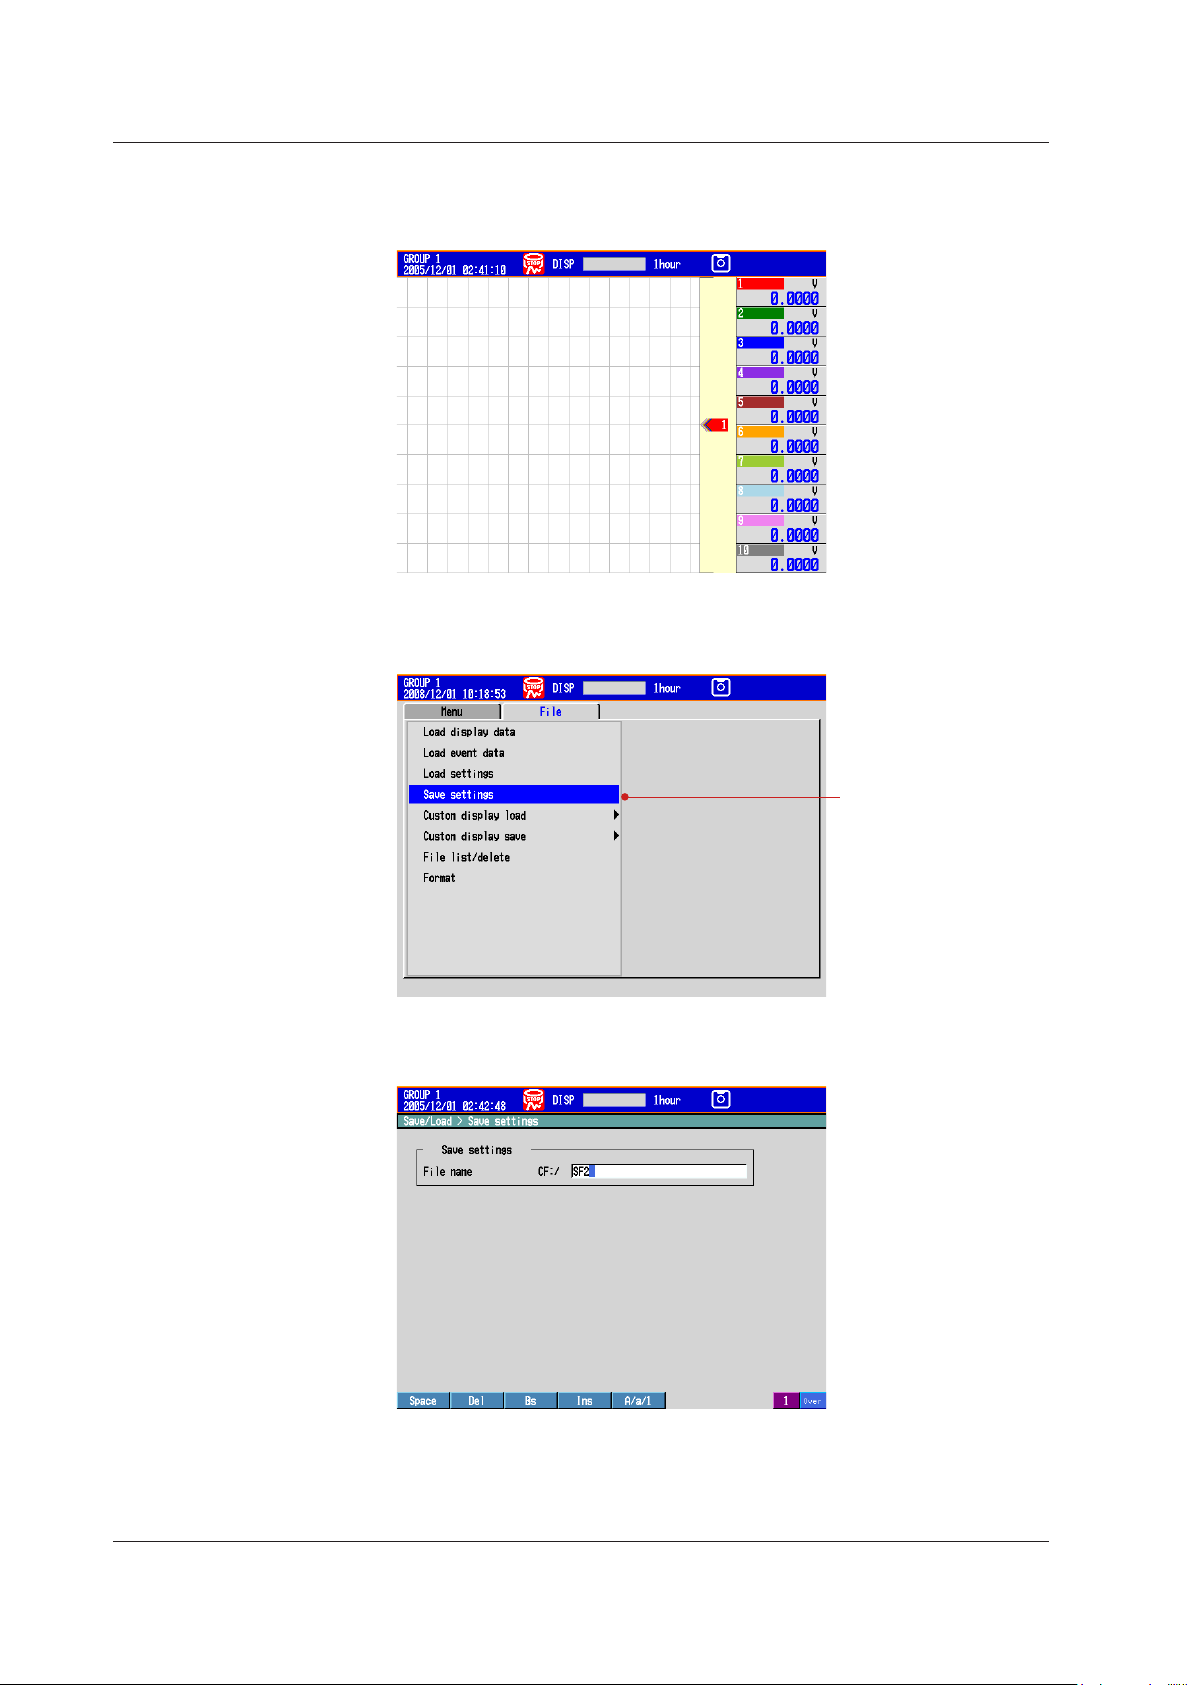
Saving the Setup Data
In this example, we will save the setup data to a file named “SF2” on the CF card.
1.
2.
3.
4.
Display the operation mode screen.
Press MENU once to display the setting menu.
Press the right arrow key once to select the File tab.
Press the down arrow key four times.
5.
6.
For the input procedure, see “Entering Values and Characters” on page 16.
Press DISP/ENTER once.
Enter “SF2” for the file name.
26
Press DISP/ENTER once. The message “Data are being saved to media”
7.
appears, and the setup data is saved.
Press ESC or MENU twice to return to the operation mode screen.
8.
On a DX with advanced security (/AS1 option; release number 4 or later):
IM 04L42B01-02E
Page 29
Select Load settings
To move to a lower
directory, select the
directory, and press
DISP/ENTER.
To move to a higher
directory, press ESC.
Basic Operation
Press ESC or MENU twice to display a confirmation screen. To return to the
operation mode screen, select Yes, and press DISP/ENTER once.
Operation complete.
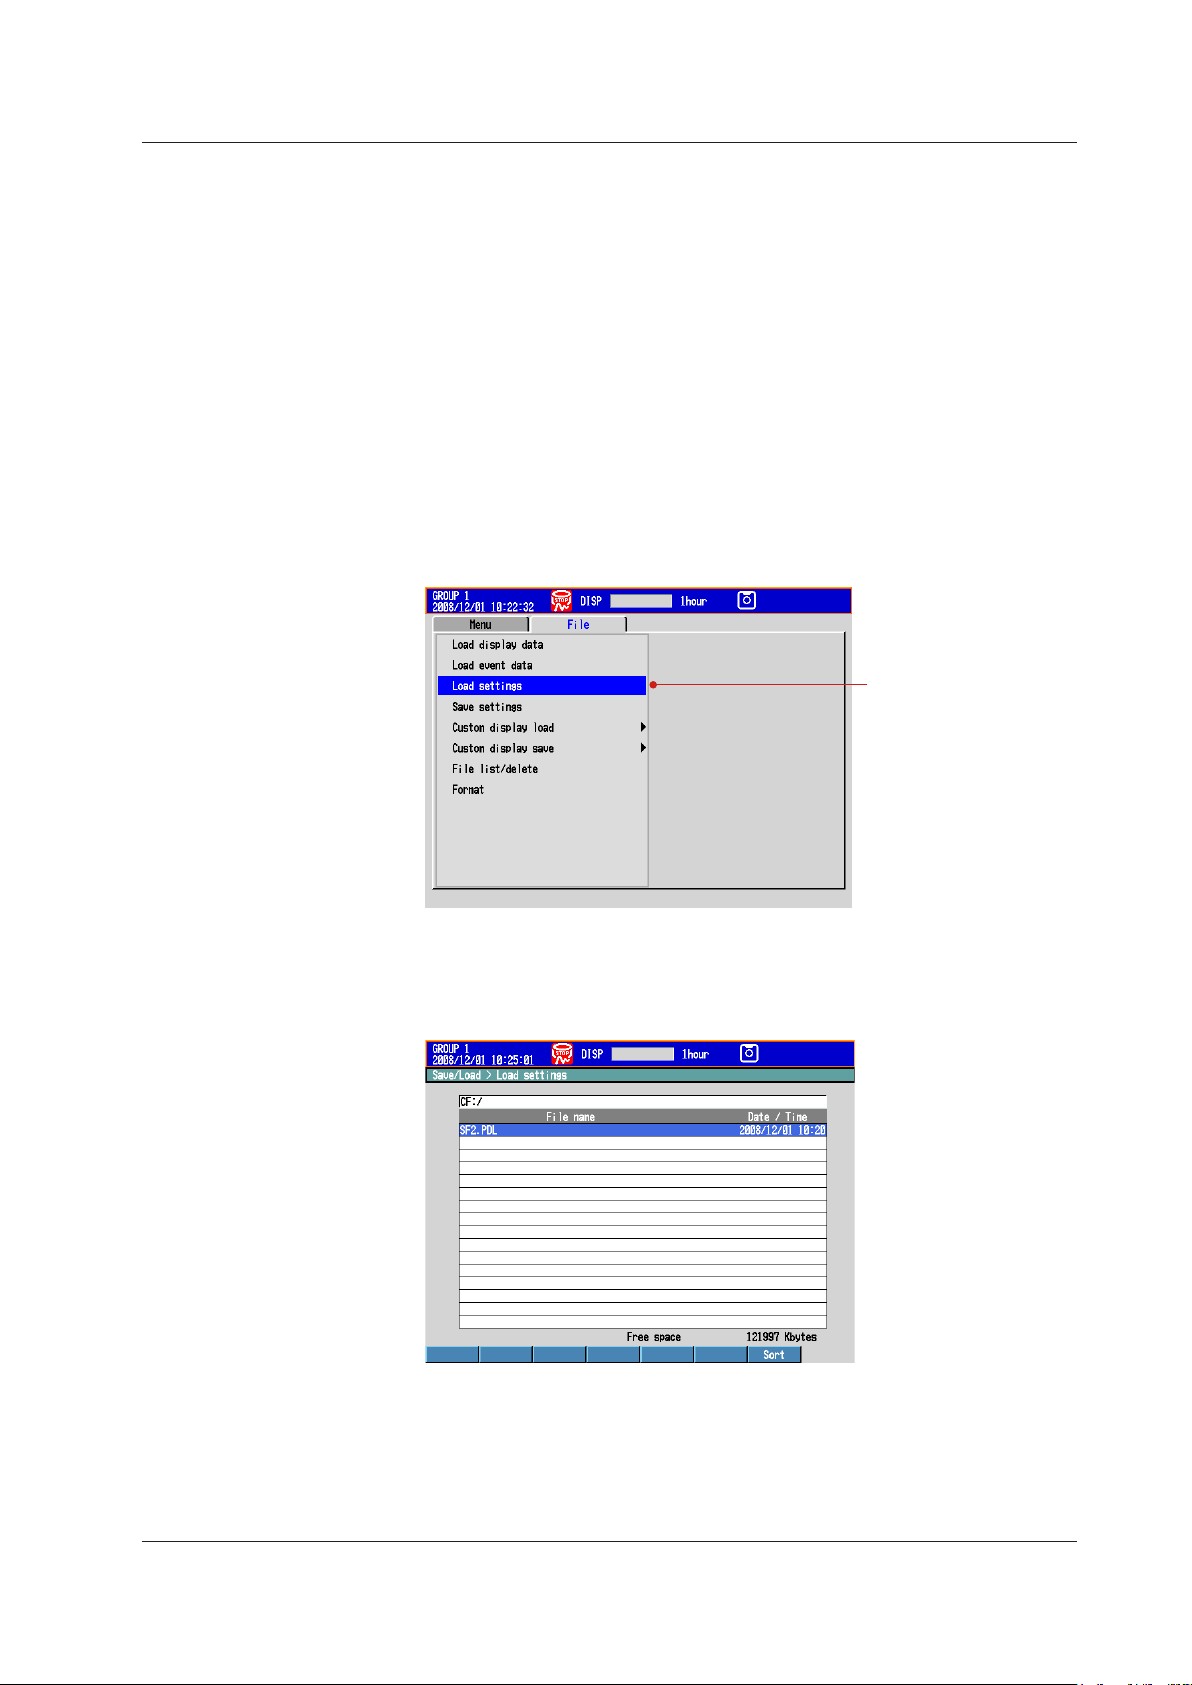
Loading the Setup Data
In this example, we will load the setup data “SF2” from the CF card and update the DX
settings.
This procedure only loads the setup data that the DX uses for setting mode.To load the
setup data for both setting mode and basic setting mode, press MENU, hold down FUNC
for 3 s, select the File/Initialize tab > Load settings, and press DISP/ENTER.
Display the operation mode screen.
1.
Press MENU once to display the setting menu.
2.
Press the right arrow key once to select the File tab.
3.
Press the down arrow key three times.
4.
IM 04L42B01-02E
Press DISP/ENTER once to select the root directory (CF:/).
5.
Press DISP/ENTER once to display the files in the root directory.
6.
Select the file SF2 using the up and down arrow keys.
7.
Press DISP/ENTER once. The message “File is being loaded from media”
8.
appears, and the setup data is loaded. The DX automatically returns to the
operation mode screen.
Operation complete.
27
Page 30
Setting the Input Range and Alarm
Type T
thermocouple
Channel 1
0.0 to 200.0°C
DX2000
1
4
3
2
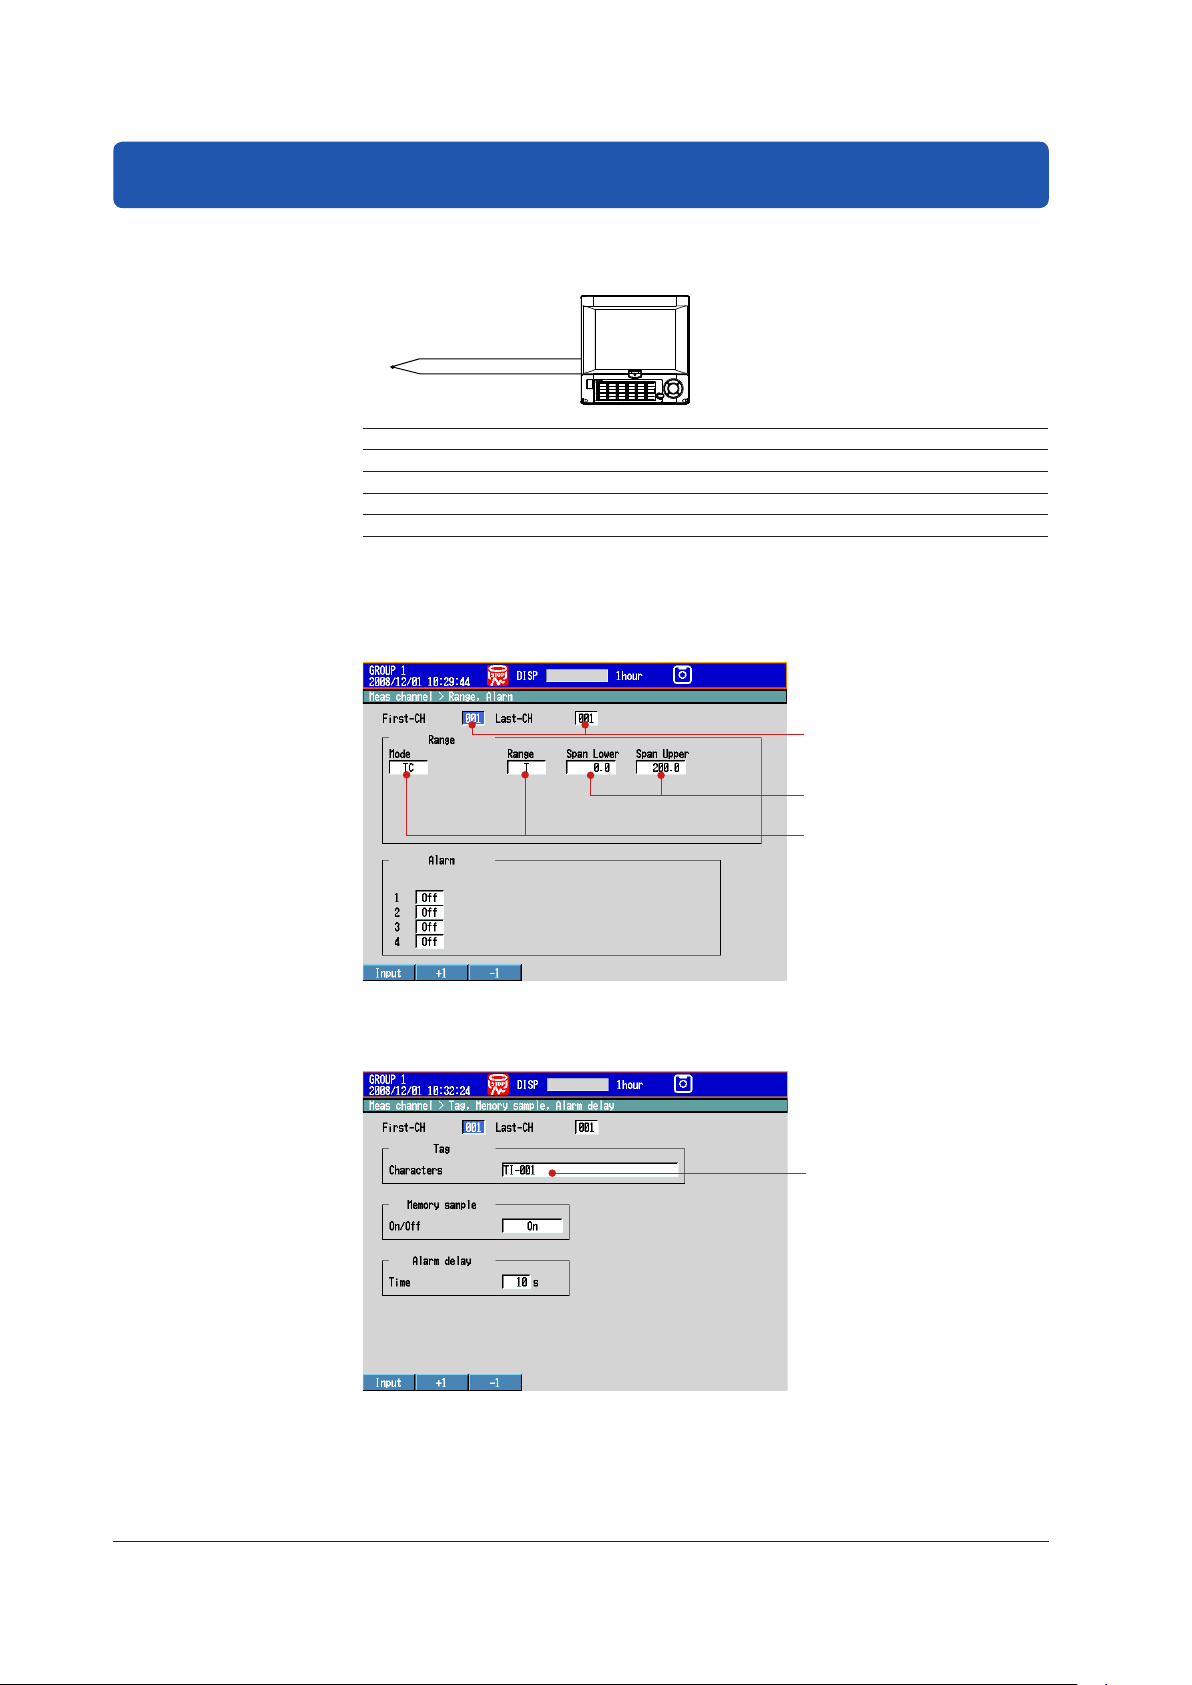
Setup Example 1: Temperature Measurement Channel
Setup Item Description Number in the Figure
Channel Use channel 1. 1
Tag TI-001 2
Sensor Type T thermocouple 3
Input range 0.0 to 200.0°C 4
(1) Input Range
Press MENU (to switch to setting mode).
Select the Menu tab > Meas channel > Range, Alarm.
(2) Tag
Select the Menu tab > Meas Channel > Tag, Memory sample, Alarm delay.
28
Operation complete.
IM 04L42B01-02E
Page 31

DX2000
Flowmeter Channel 2
4 - 20 mA
Convert to 1-5 V with a shunt resistor
1
5
4
3
2
Setting the Input Range and Alarm
Setup Example 2: Flow Rate Measurement Channel and Alarm
Setup Item Description Number in the Figure
Channel Use channel 2. 1
Tag FI-002 2
Input signal 1-5V 3
Input range 0.0 to 500.0 L/H 4
Alarm condition Output an alarm if the measured value is
less than or equal to 120.0 L/H.
Output destination: Relay contact (I03)
(1) Input Range and Alarm
Press MENU (to switch to setting mode).
Select the Menu tab > Meas Channel > Range, Alarm.
5
(2) Tag
Select the Menu tab > Meas Channel > Tag, Memory sample, Alarm delay.
IM 04L42B01-02E
Operation complete.
29
Page 32
Setting the Display
Channel 1
Group 1
Channel 2
1
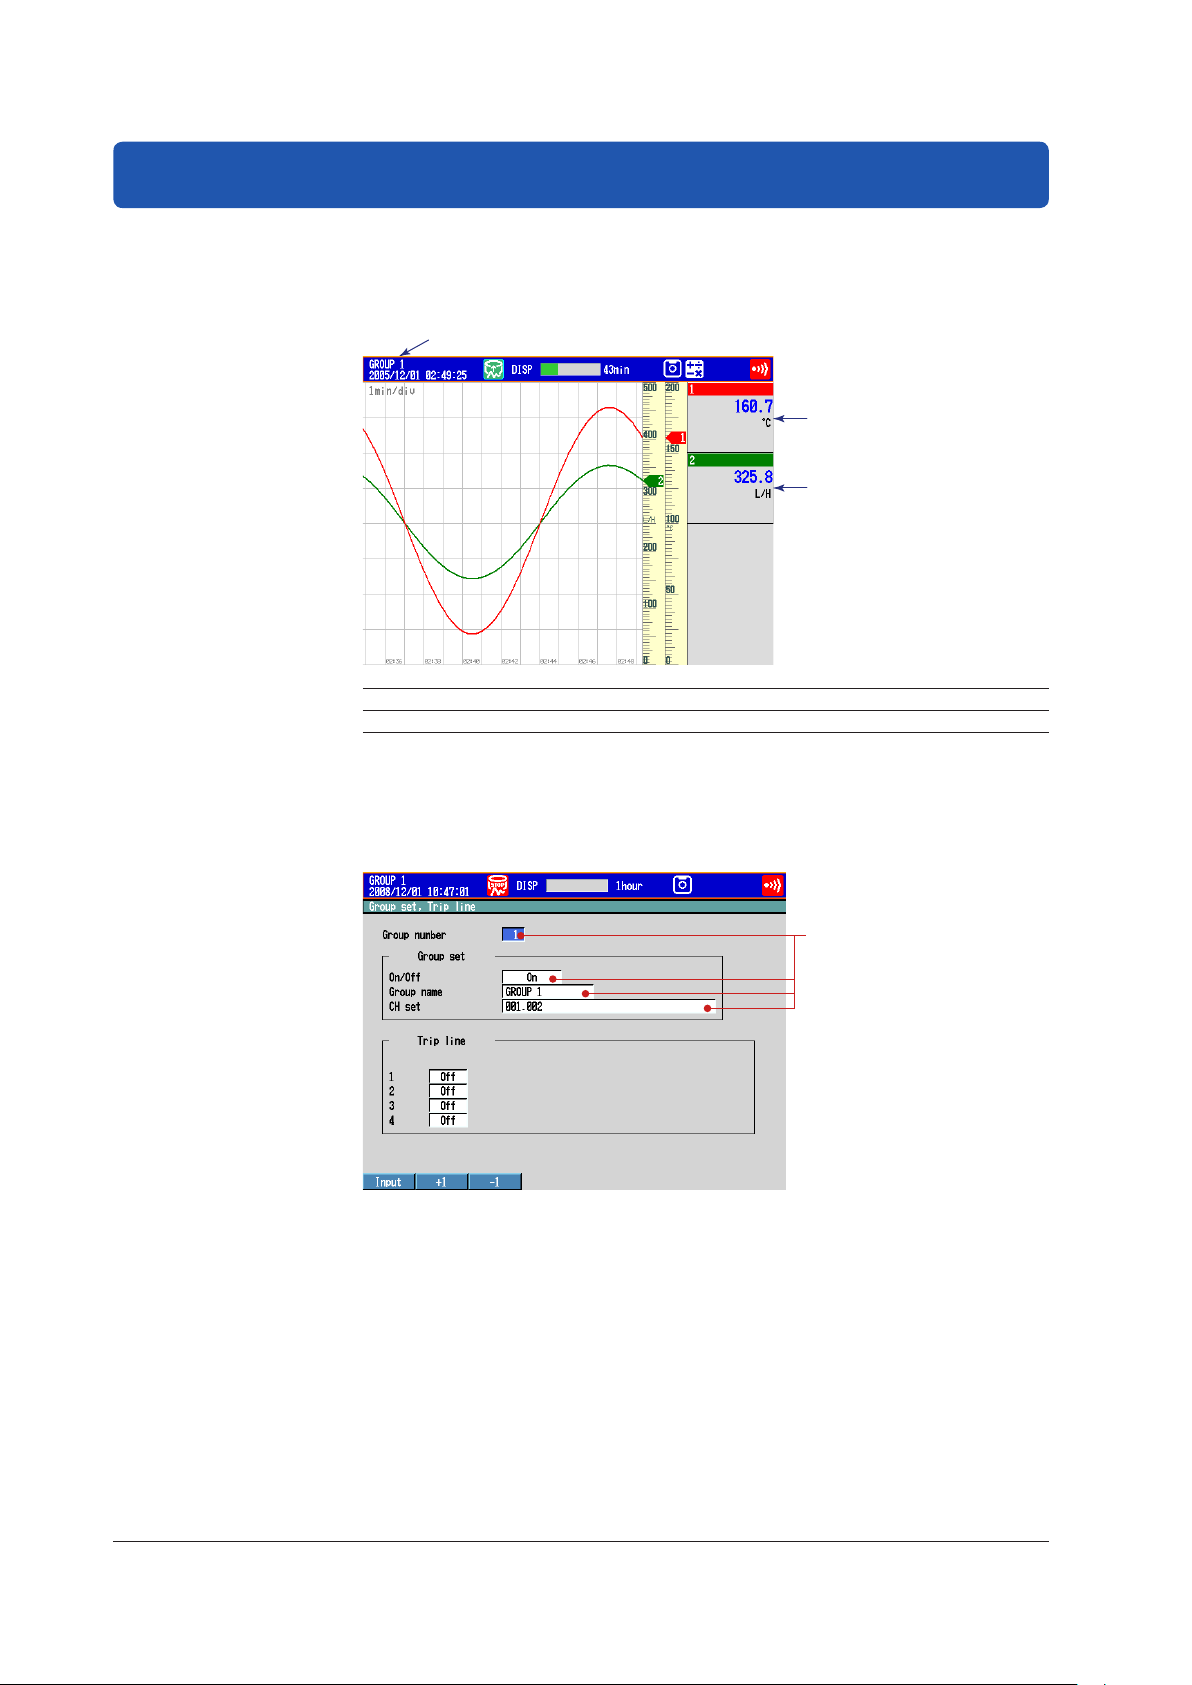
Setup Example 3: Assigning Channels to Groups
In this example, we will assign channels 1 and 2 to group 1.
Setup Item Description Number in the Figure
Group Assign channel 1 and 2 to group 1. 1
(1) Group
Press MENU (to switch to setting mode), and select the Menu tab > Group set, Trip
line.
Operation complete.
30
IM 04L42B01-02E
Page 33
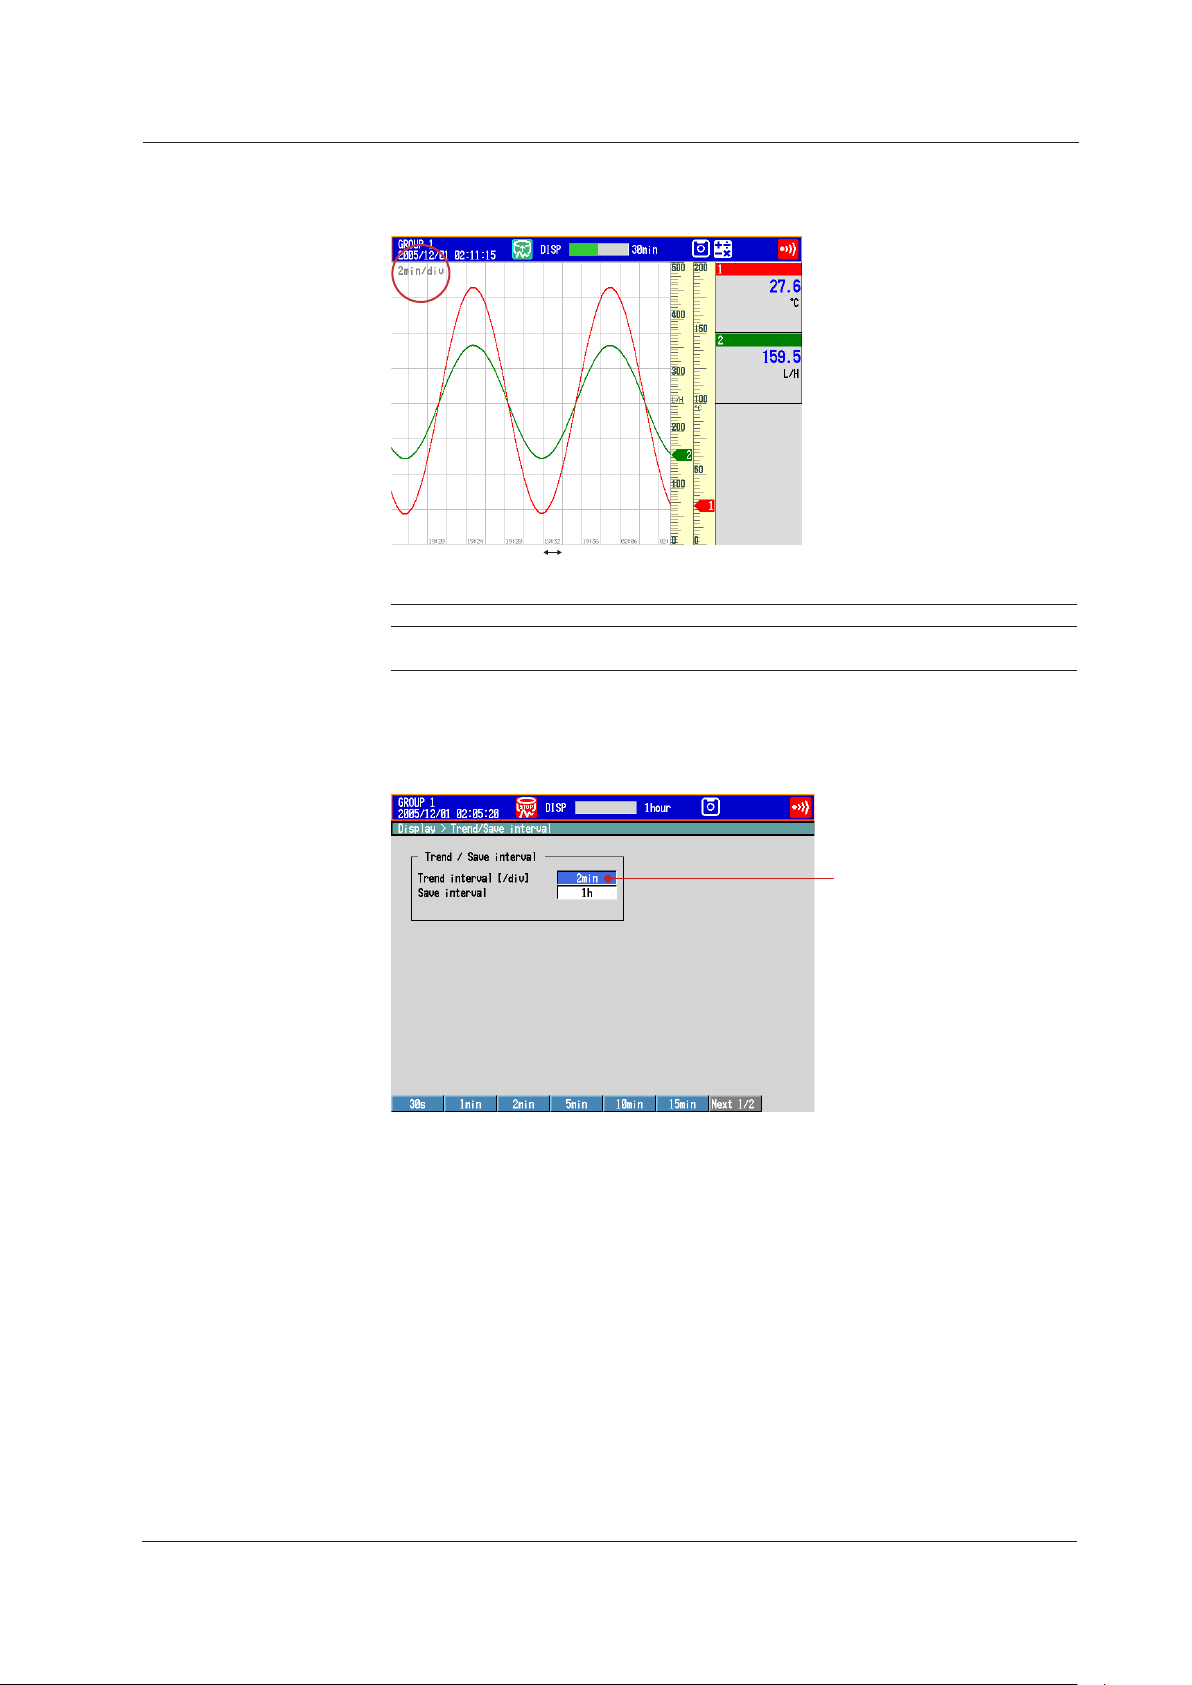
Setup Example 4: Setting the Time Scale
The sampling interval (the time
corresponding to 1 dot) is 4 s
when the trend interval is 2 min.
30 dots × 4 s = 2 min
30 dots/div
1
Set the time per division of the trend waveform to 2 minutes.
Setup Item Description Number in the Figure
Trend interval Set the time per division to 2 minutes.
The waveform is updated at every 4 s.
Setting the Display
1
(1) Trend Interval
Press MENU (to switch to setting mode), and select the Menu tab > Display > Trend/
Save interval.
Operation complete.
IM 04L42B01-02E
31
Page 34
Setting the Data Storage
Channel 1
Automatically save to
the CF card periodically.
Channel 2
2
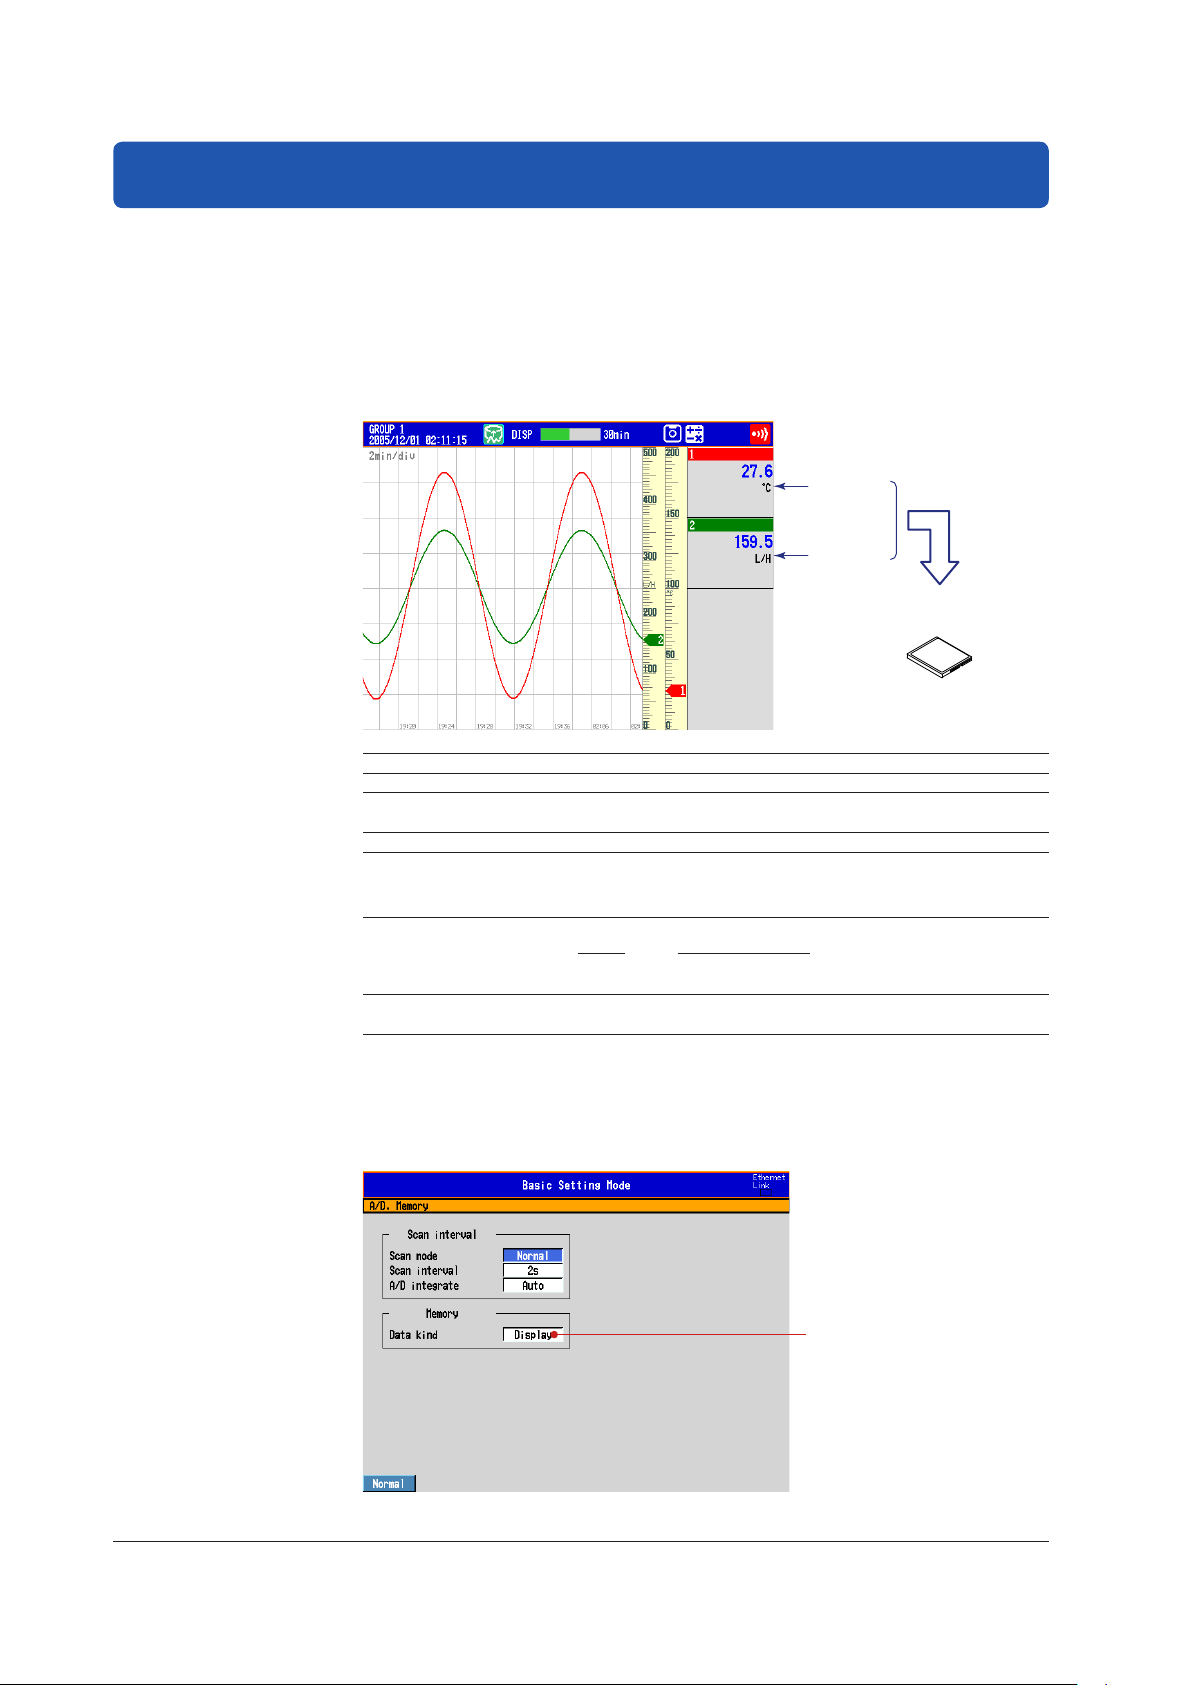
Setup Example 5: Continuously Record Measured Data and Automatically Save
In this example, we will continuously record and save the measured data of channel 1
and 2.
For the procedure to set the channel, see “Setting the Input Range and Alarm” on page
28.
For the procedure to set groups, see “Setting the Display” on page 30.
Setup Item Description Number in the Figure
Source channels Channel 1 (TI-001) and channel 2 (FI-002) 1
Data to be recorded Continuously record the display data from the start of the
Data storage method Automatically store every 24 hours. 3
Sampling interval 4 seconds. Set using the trend interval.
Data file name Add “sample” to the file name. 5
Save Destination
Directory
measurement.
Sampling interval = (trend interval setting)/30 dots
* 40 dots when the trend interval is set to 5 or 10 seconds.
Example: 000123_sampleYYMMDD_HHMMSS.DAD
DATA-101 6
↑ ↑
Sequential number Date/Time of the first recorded data
*
2
4
(1) Data to be Recorded
Press MENU (to switch to setting mode), hold down FUNC for 3 s (to switch to basic
setting mode).
Select the Menu tab > A/D, Memory.
32
IM 04L42B01-02E
Page 35
3
1
Setting the Data Storage
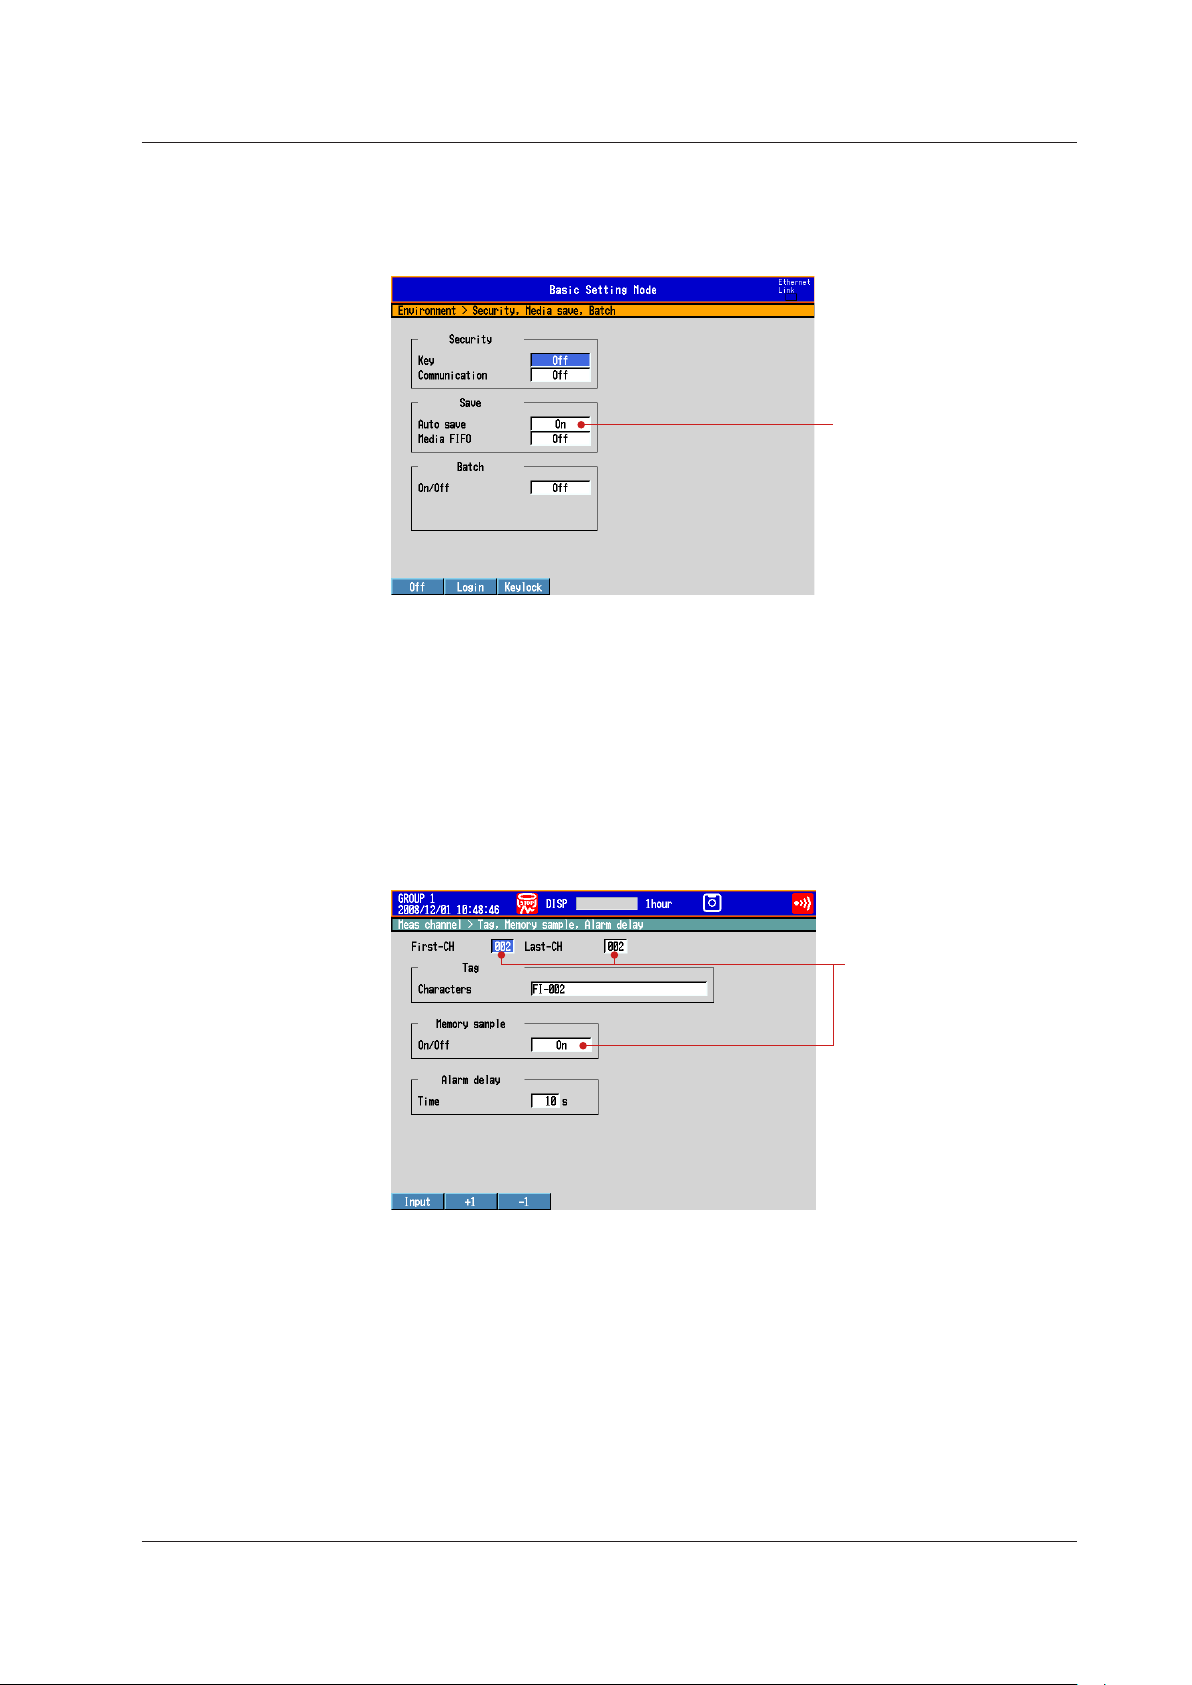
(2) Method of Storing to the CF Card (Auto Save ON/OFF)
Press MENU (to switch to setting mode), hold down FUNC for 3 s (to switch to basic
setting mode).
Select the Environment tab > Security, Media save, Batch.
(3) Save the Settings
Press ESC to return to the basic setting menu.
1.
Press ESC once more.
2.
The window appears for you to confirm the saving of the settings.
Select Yes and press DISP/ENTER.
3.
The DX returns to the operation mode screen.
(4) Channels to Be Recorded
Press MENU (to switch to setting mode).
Select the Menu tab > Meas Channel > Tag, Memory sample, Alarm delay.
IM 04L42B01-02E
33
Page 36
Setting the Data Storage
4
3
5
6
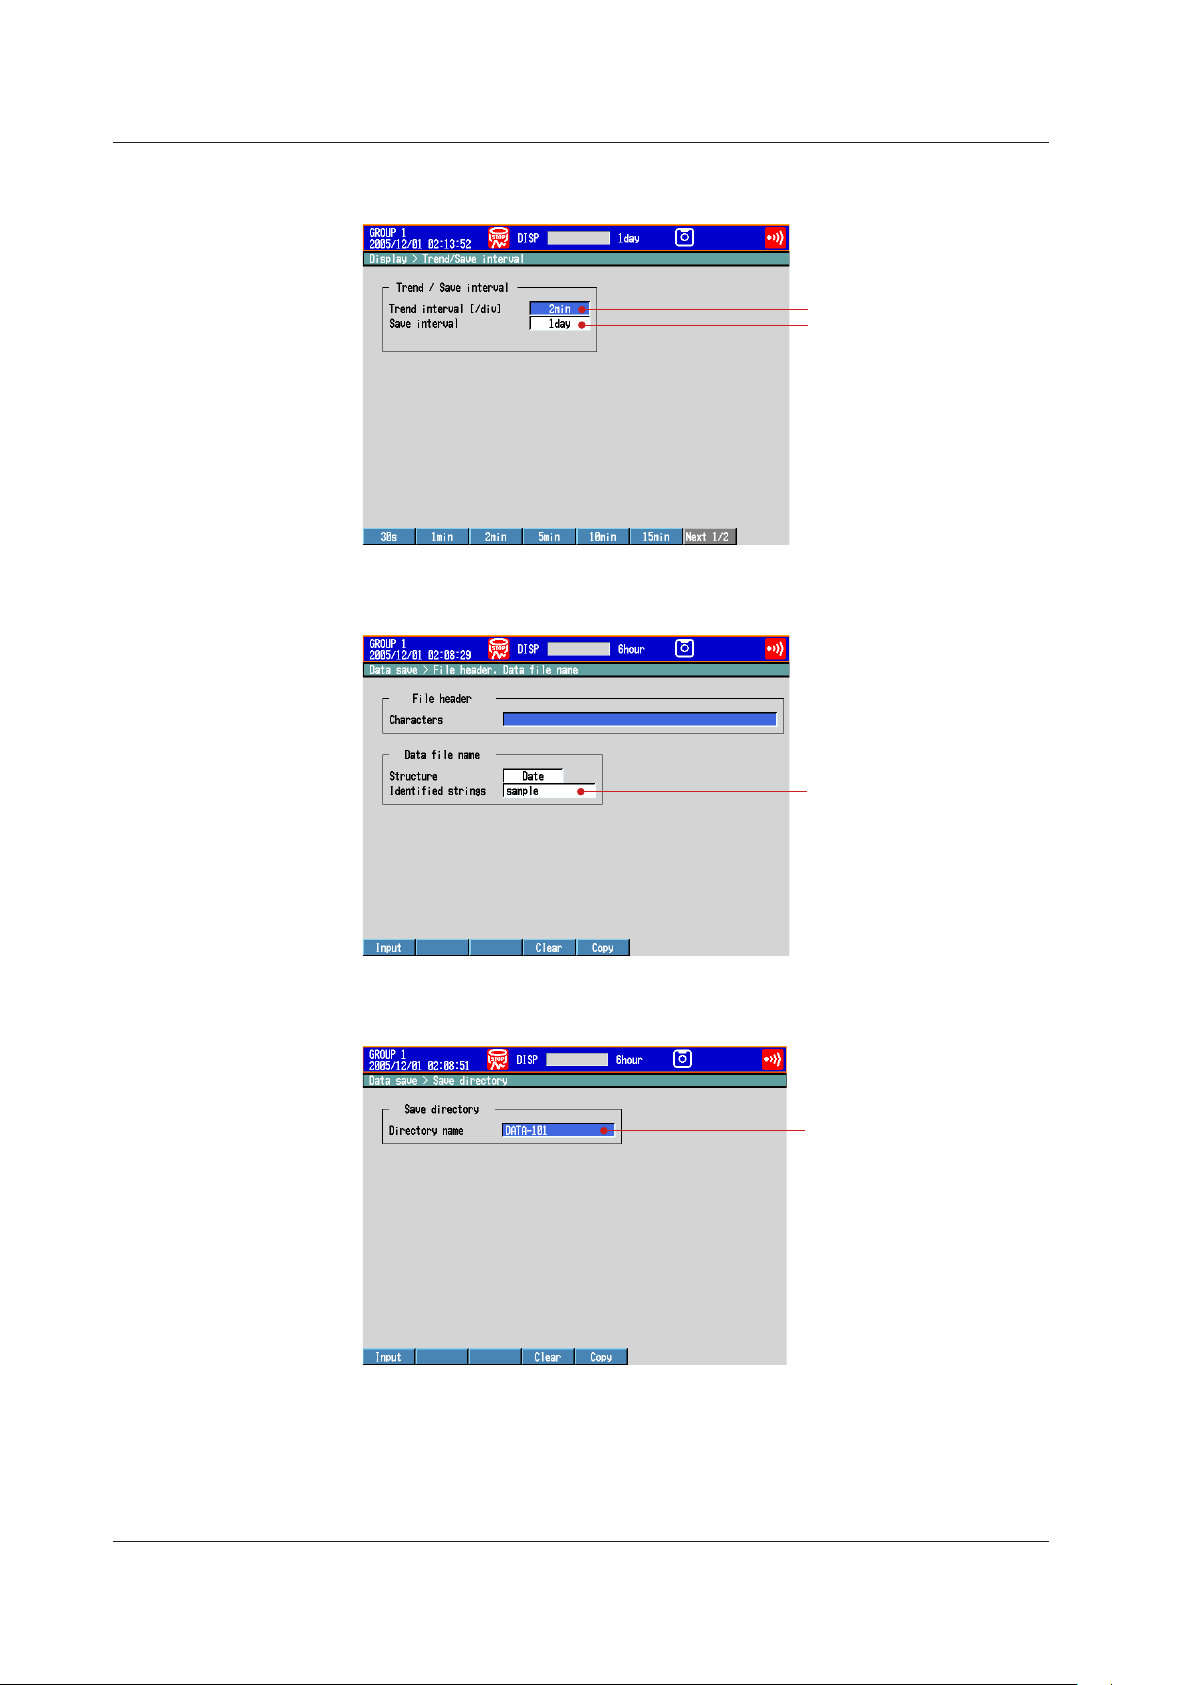
(5) Interval for Saving the Data to the CF Card
Select the Menu tab > Display > Trend/Save interval.
(6) Data File Name
Select the Menu tab > Data save > File header, Data le name.
(7) Save Destination Directory (within the CF Card)
Select the Menu tab > Data save > Save directory.
34
Operation complete.
IM 04L42B01-02E
Page 37
Setup Example 6: Saving Measured Data at the Specified Time
Every hour 0
DX2000
Automatically save
to the CF card
7 5
6
12
11
10
8 4
2
1
9 3
7
8
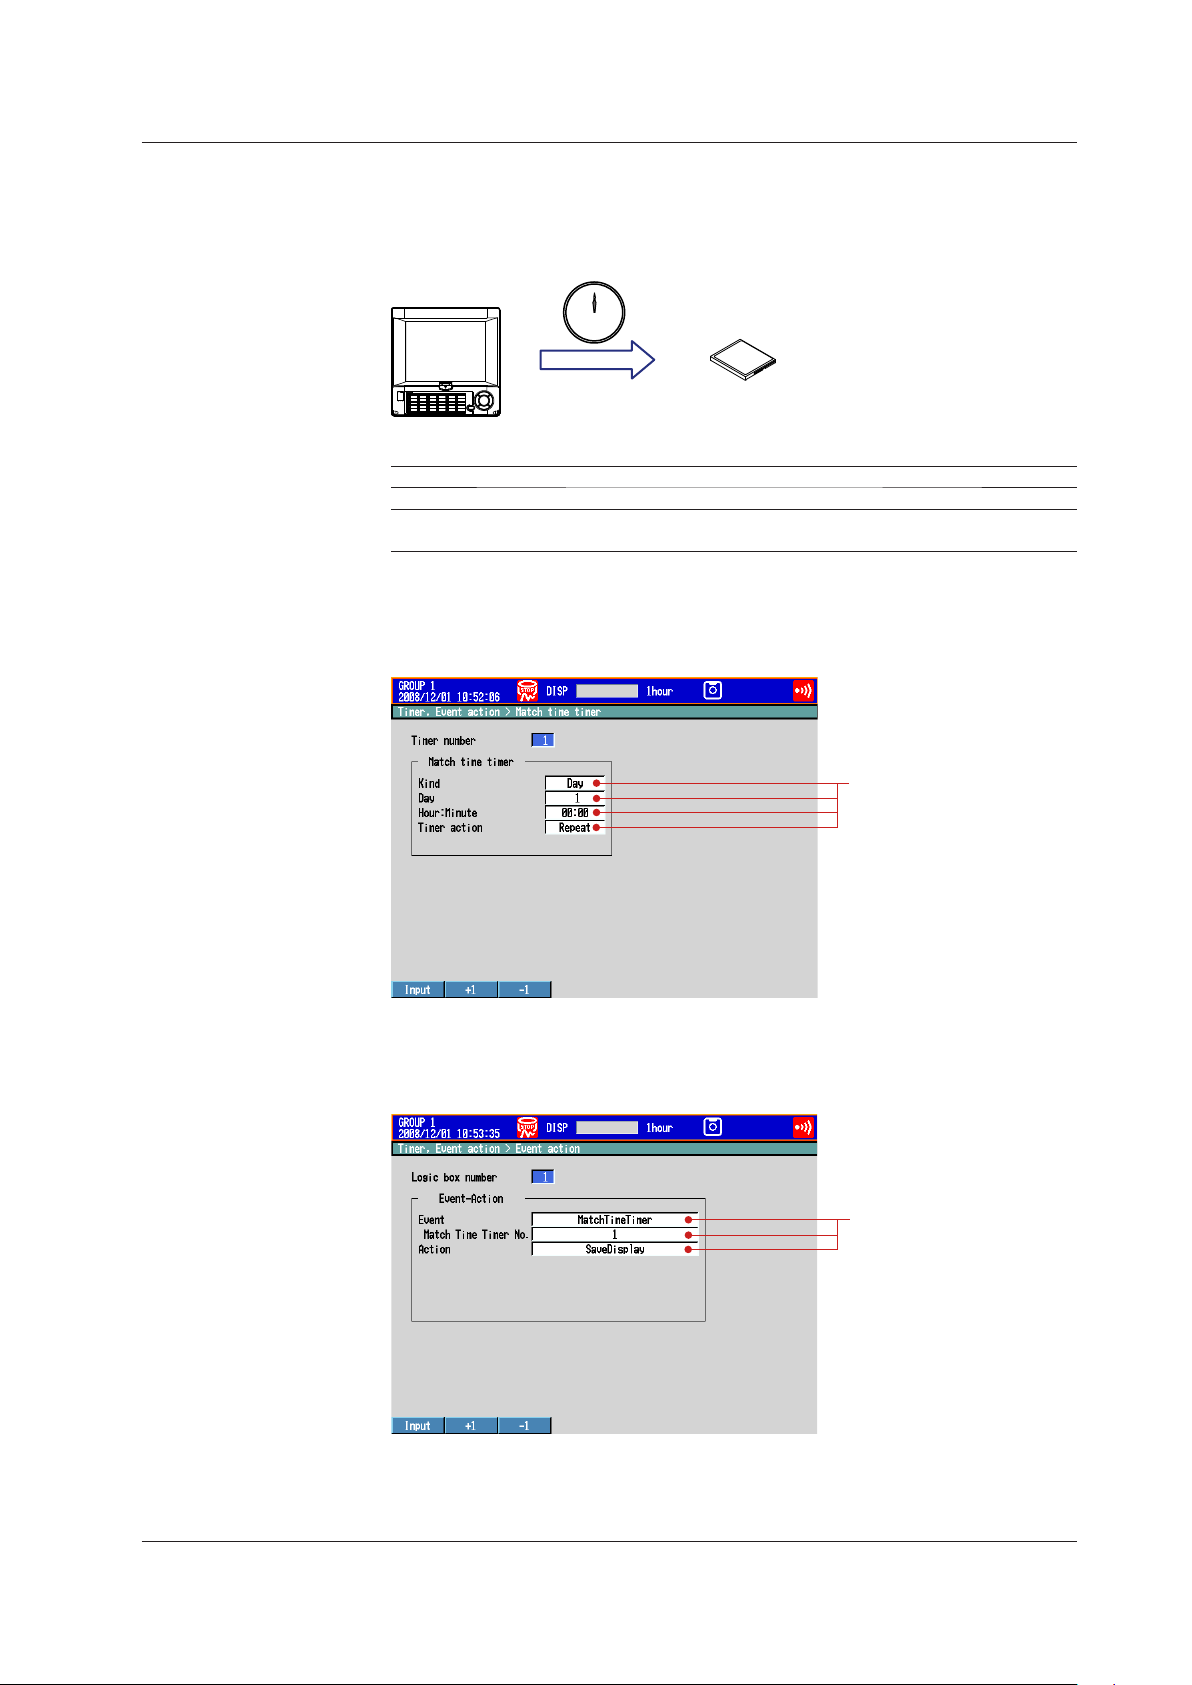
Using the settings of Setup Example 5, we will save the measured data once at hour 0
every day.
All settings other than those listed below are the same as Setup Example 5.
Setup Item Description Number in the Figure
Data storage time Save the data once at hour 0 every day. 7
Data storage method Automatically save the measured data at
the specified time.
(1) Setting the Time
Press MENU (to switch to setting mode).
Select the Menu tab > Timer, Event action > Match time timer.
Setting the Data Storage
8
(2) Specifying the Data Storage
Press MENU (to switch to setting mode).
Select the Menu tab > Timer, Event action > Event action.
IM 04L42B01-02E
Operation complete.
35
Page 38

Customizing the Operation
USER key
1
Setup Example 7: Assigning the Screen Image Data Storage Function to the USER key
In this example, we will set the DX so that the displayed screen image data can be saved
to the CF card by pressing the USER key. This function is called snapshot. The extension
of snapshot data files is .png.
Setup Item Description Number in the Figure
Event action Save the screen image data of the DX
using the USER key.
1
(1) Assigning an Action to the USER Key
Press MENU (to switch to setting mode), and select the Menu tab > Timer, Event
action > Event action.
Operation complete.
36
IM 04L42B01-02E
Page 39
Favorite key
Favorite key
Favorite key
Example when three screens are
registered to the Favorite key
Favorite key
Favorite key
Show the registration list
window.
Customizing the Operation
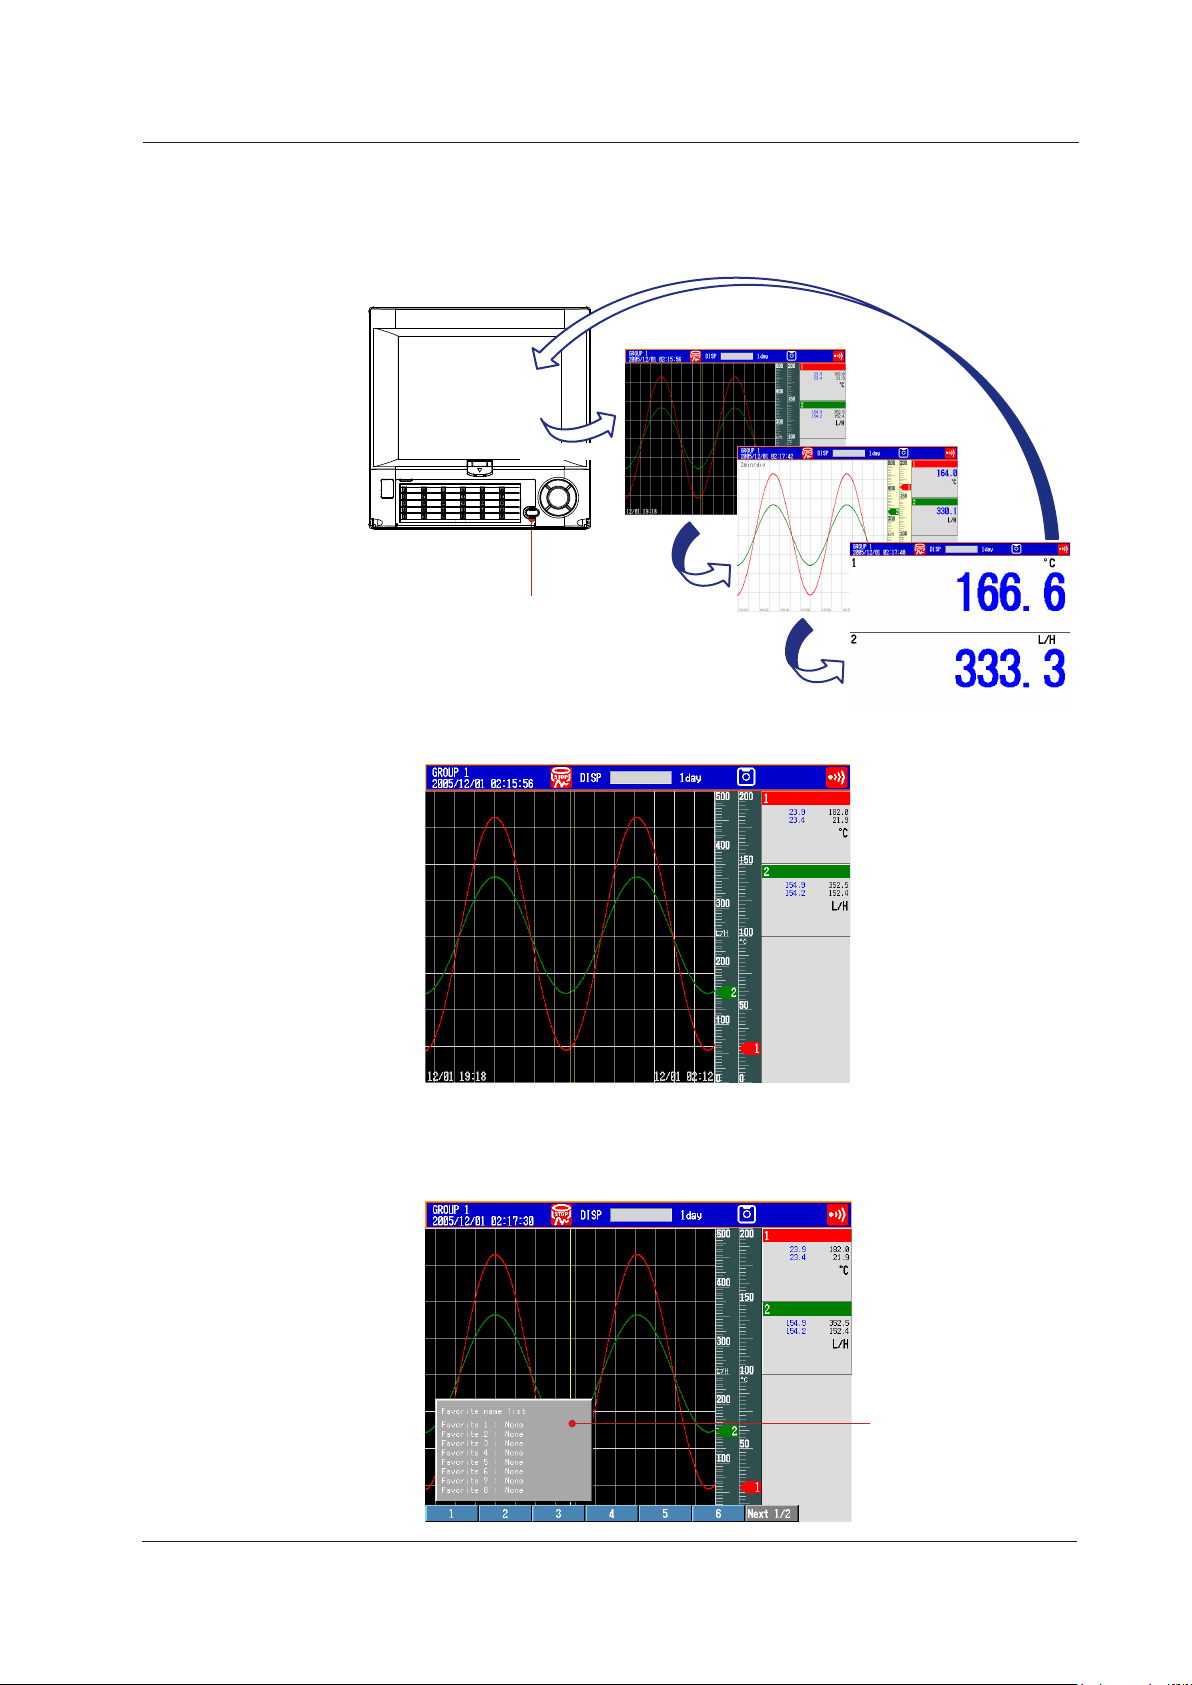
Setup Example 8: Registering Frequently Used Screens to the Favorite Key
Up to eight operation mode screens that are frequently used can be registered to the
Favorite key. This enables you to monitor the operation by using only the Favorite key.
This feature is convenient when comparing data such as historical trends.
Display the screen to be registered.
1.
Press FUNC once to display the FUNC key menu.
2.
Press the Next soft key to display Favorite regist.
3.
Press the Favorite regist soft key to display the registration list window.
4.
IM 04L42B01-02E
37
Page 40

Customizing the Operation
Show the window for
entering the display name.
Press the favorite number (1 to 8) soft key.
5.
Press the Regist soft key.
6.
Enter the screen name.
7.
Select the digit: Left and right arrow keys
Enter characters: Character/Number input keys
Delete a character: Del soft key or
Cancel the setting: Press ESC before pressing DISP/ENTER
For the input procedure, see “Entering Values and Characters” on page 16.
Press DISP/ENTER once.
8.
Repeat steps 1 to 8 to register up to eight screens.
9.
Bs soft key
.
Operation complete.
38
IM 04L42B01-02E
Page 41

Operation
START key
Memory sampling progress
DISP: Display data
EVENT: Event data
Recording data
Display the confirmation
window.
Stop memory sampling.
Starting Memory Sampling
Press START once.
1.
On a DX with advanced security (/AS1 option; release number 4 or later) display
the start recording screen
Memory sampling starts.
* This is because the Batch function is enabled upon shipment from the factory.
*
. With START selected, press DISP/ENTER once.
Operation complete.
Stopping Memory Sampling
Press STOP once.
1.
Select Mem+Math or Memory using the left and right arrow keys.
2.
Memory: Stops memory sampling.
Mem+Math: Stops memory sampling and computation (option).
On models without the computation function (option), the confirmation message
“Do you want to stop data storage?” appears. Select Yes
3.
Press DISP/ENTER once.
.
IM 04L42B01-02E
Operation complete.
39
Page 42

Operation
DISP/ENTER key
Down arrow key
Right arrow key
Left arrow key
Up arrow key
Select DIGITAL > GROUP 1.
Digital display
Group number
Switching the Trend Display, Digital Display, and Bar Graph Display
Press DISP/ENTER once to show the display selection menu.
1.
Press the down arrow key to select TREND, DIGITAL, or BAR.
2.
Press the right arrow key once to display the sub menu. To close the sub menu
3.
that you opened, press the left arrow key.
Press the down arrow key to select the group.
4.
Press DISP/ENTER once to show the operation display of the selected group. To
5.
close the menu without switching the display, press ESC.
Operation complete.
40
Press the down arrow key when the trend, digital, or bar graph is displayed to switch the
display in the order trend, digital, bar graph, trend, and so on. Press the up arrow key
to switch the display in reverse order. Press the right arrow key or the left arrow key to
switch the group.
IM 04L42B01-02E
Page 43

Writing the Message “START”
Show the message
registration window.
Registering the Word “START” in Message Number 1
On a DX with advanced security (/AS1 option; release number 4 or later), this operation
is only available when memory sampling is stopped.
Press MENU (to switch to setting mode), and select the Menu tab > Message,
1.
Comment > Message > DISP/ENTER
Press 1-10 soft key.
2.
The message, “Message numbers 1-10 can also be used for free message” appears. Press
DISP/ENTER.
Press the down arrow key. With message 1 selected, press the Input soft key.
3.
Enter “START”.
Operation
.
Select the digit: Left and right arrow keys
Enter characters: Character/Number input keys
Delete a character: Del soft key or
Cancel the setting: Press ESC before pressing DISP/ENTER
For the input procedure, see “Entering Values and Characters” on page 16.
4.
5.
On a DX with advanced security (/AS1 option; release number 4 or later):
Press ESC three times or MENU twice to display a confirmation screen. To return
Bs soft key
.
Press DISP/ENTER.
Press ESC three times or MENU twice to return to the operation mode screen.
to the operation mode screen, select Yes, and press DISP/ENTER.
IM 04L42B01-02E
Operation complete.
41
Page 44

Show the message
registration window.
1 soft key
Shows the message
(time, message, and
message mark).
Also recorded to the
internal memory.
Operation
Writing Message Number 1 “START”
This operation can be carried out while memory sampling is in progress. The message is
displayed on the trend display. Show the trend display first.
Press FUNC (display the FUNC key menu), press the Message soft key, and
1.
press the 1 - 10 soft key.
Press the 1 soft key.
2.
Operation complete.
42
IM 04L42B01-02E
Page 45

Connecting to an Ethernet Network
DX2000
PC
Ethernet
HUB
1
Setup Example 9: Monitoring the DX on a PC Browser
In this example, we will connect the PC and the DX via hub in a one-to-one relationship
and display and monitor the DX screen on a browser on the PC.
DX
Setup Item Description Number in the Figure
IP address 192.168.1.101 1
Subnet mask 255.255.255.0
Web server function Monitor from a Web browser on the PC
using operator page.
Access to the DX Display the Web page and do not set
access privileges.
2
3
PC
Setup Item Description Number in the Figure
IP address 192.168.1.100 4
Subnet mask 255.255.255.0
(1) IP Address of the DX
Press MENU (to switch to setting mode), hold down FUNC for 3 s (to switch to basic
setting mode).
Select the Menu tab > Communication (Ethernet) > IP address, Host settings.
IM 04L42B01-02E
43
Page 46

2
2
3
Connecting to an Ethernet Network
(2) Enabling the Web Server Function on the DX
Select the Menu tab > Communication (Ethernet) > Server > Server.
(3) Display the DX Screen on the PC
Select the Menu tab > Communication (Ethernet) > Web page.
(4) Save the Settings
Press ESC twice to return to the basic setting menu.
1.
Press ESC once more.
2.
The window appears for you to confirm the saving of the settings.
Select Yes and press DISP/ENTER.
3.
The DX returns to the operation mode screen.
44
IM 04L42B01-02E
Page 47

4
Connecting to an Ethernet Network
(5) Setting the PC
Set the IP address and subnet mask on the PC.
(6) Checking the Connection
Send the command below from the PC and check that a correct response is returned.
Send
>ping 192.168.1.101
Response example
>Reply from 192.168.1.101: bytes=32 time<10ms TTL=255
(7) Displaying the DX Screen on the Browser
1.
2.
http://192.168.1.101/operator.htm
3.
Start the browser on the PC.
Enter the following URL.
Check that the DX screen appears.
IM 04L42B01-02E
Operation complete.
45
Page 48

Connecting to an Ethernet Network
DX
Measurement input
Ethernet
Automatic data transfer to an FTP server
CF card
FTP server
Internal
memory
1
2
Automatically obtain the
DNS server information.
Automatically register the
DX host name to the DNS
server.
3
Setup Example 10: Automatically Transferring the Measured Data File to an FTP Server
In this example, we will configure the DX so that the measured data is automatically
transferred to an FTP server on the network when the measured data is automatically
saved to the CF card. To automatically transfer the measured data files and report files,
the auto saving of the measured data must be configured in advance (see “Data storage
method” of the setup example 5).
This example assumes that the following network environment is used: DHCP enabled,
automatically obtain the DNS server information, and automatically register the DX host
name to the DNS server. Set the parameters according to your network environment.
Setup Item Description Number in the Figure
Host name DAQSTATION1 1
Obtain the IP address Obtain automatically (DHCP) 2
Type of data to be transferred Acquired measured data 3
FTP server Server name abcdefg.co.jp 4
Port number 21
Login name FTPUSER1
Password a1234
(1) Host Settings and IP Address of the DX
Press MENU (to switch to setting mode), hold down FUNC for 3 s (to switch to basic
setting mode). and select the Menu tab > Communication (Ethernet) > IP address,
Host settings.
(2) Data to Be Transferred to the FTP Server
Select the Menu tab > Communication (Ethernet) > FTP client > FTP transfer le.
46
IM 04L42B01-02E
Page 49
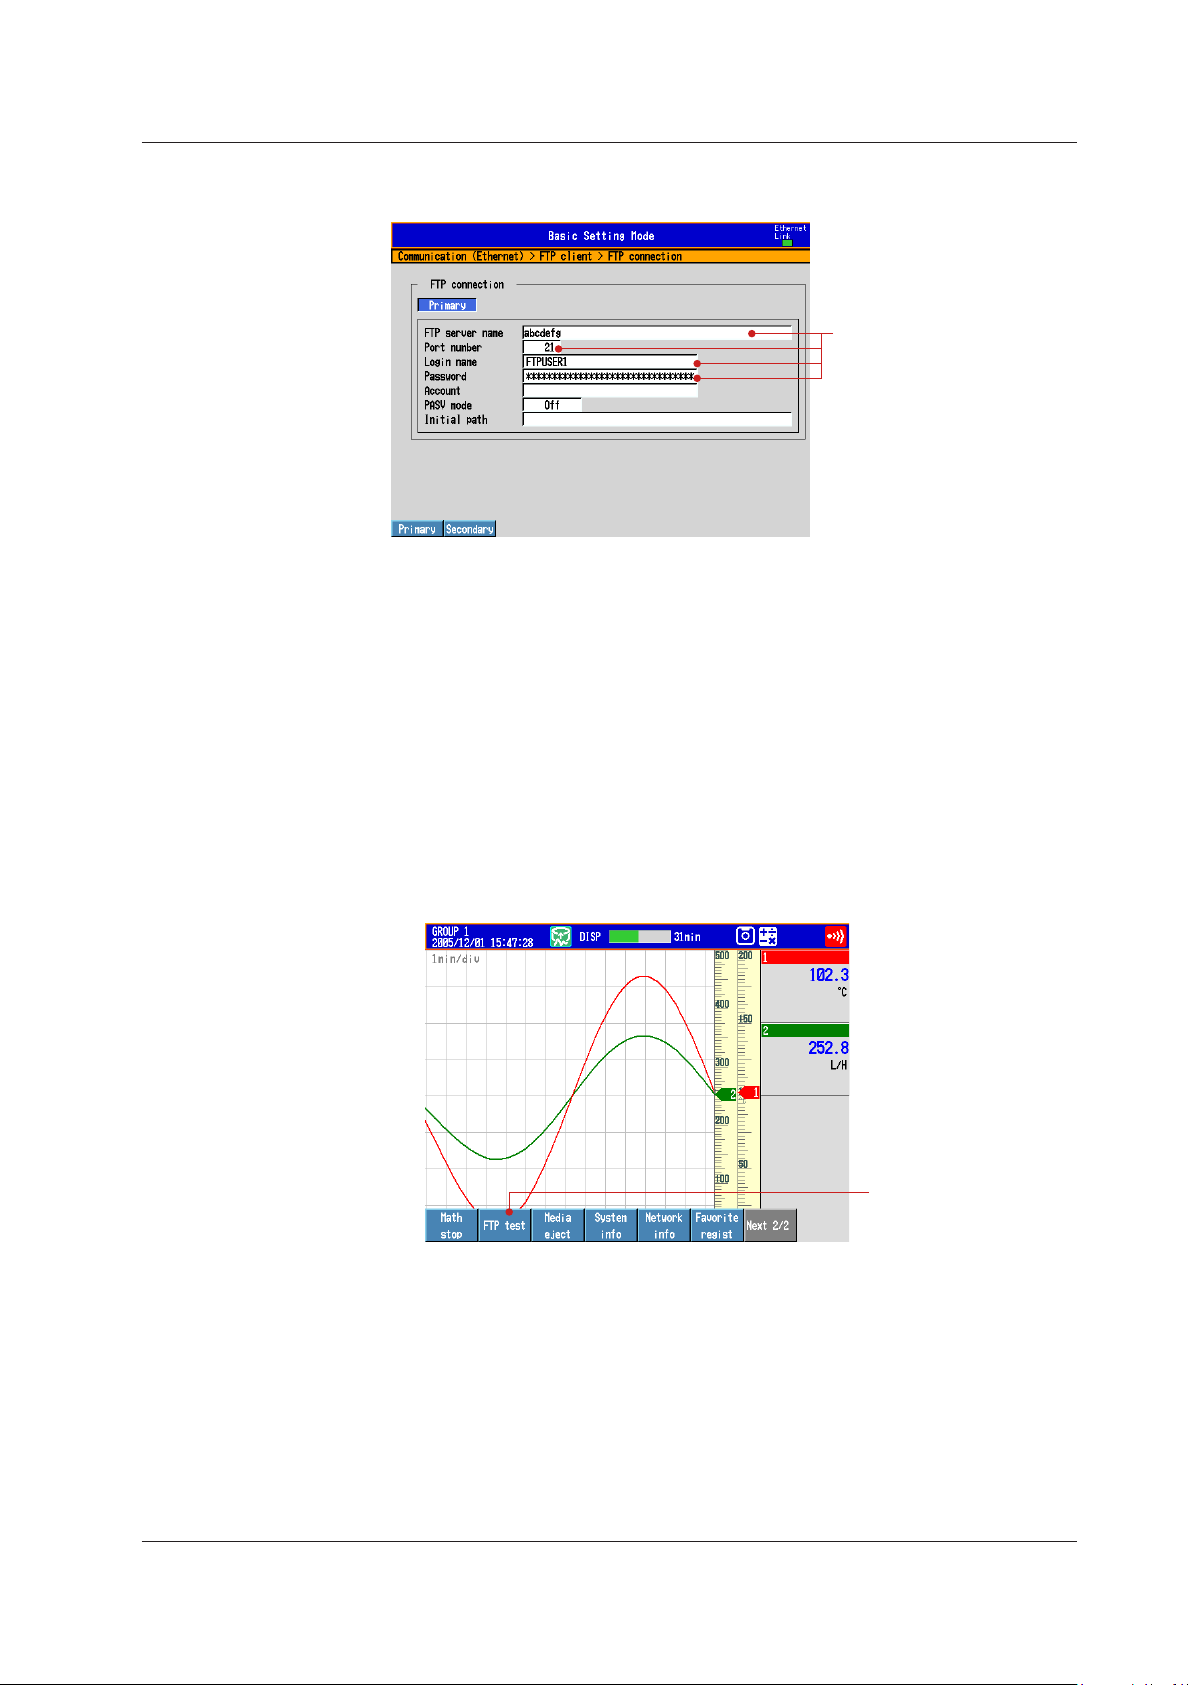
4
FTP test soft key
Connecting to an Ethernet Network
(3) Connected setting FTP Server
Select the Menu tab > Communication (Ethernet) > FTP client > FTP connection.
(4) Save the Settings
Press ESC three times to return to the basic setting menu.
1.
Press ESC once more.
2.
The window appears for you to confirm the saving of the settings.
Select Yes and press DISP/ENTER.
3.
The DX returns to the operation mode screen.
Operation complete.
Executing a File Transfer Test
1.
2.
3.
Press FUNC once to display the FUNC key menu.
Press the Next soft key until FTP test is displayed, and then press the FTP test
soft key.
Press the Primary soft key once. The messages “FTP test is being executed” and
“Execution is complete” are displayed. The test file (FTP_TEST.TXT) is sent to the
FTP server.
IM 04L42B01-02E
Operation complete.
Transferring the Data Files
When you start memory sampling, the measured data file is transferred to the FTP server
when the data is saved to the CF card.
47
Page 50
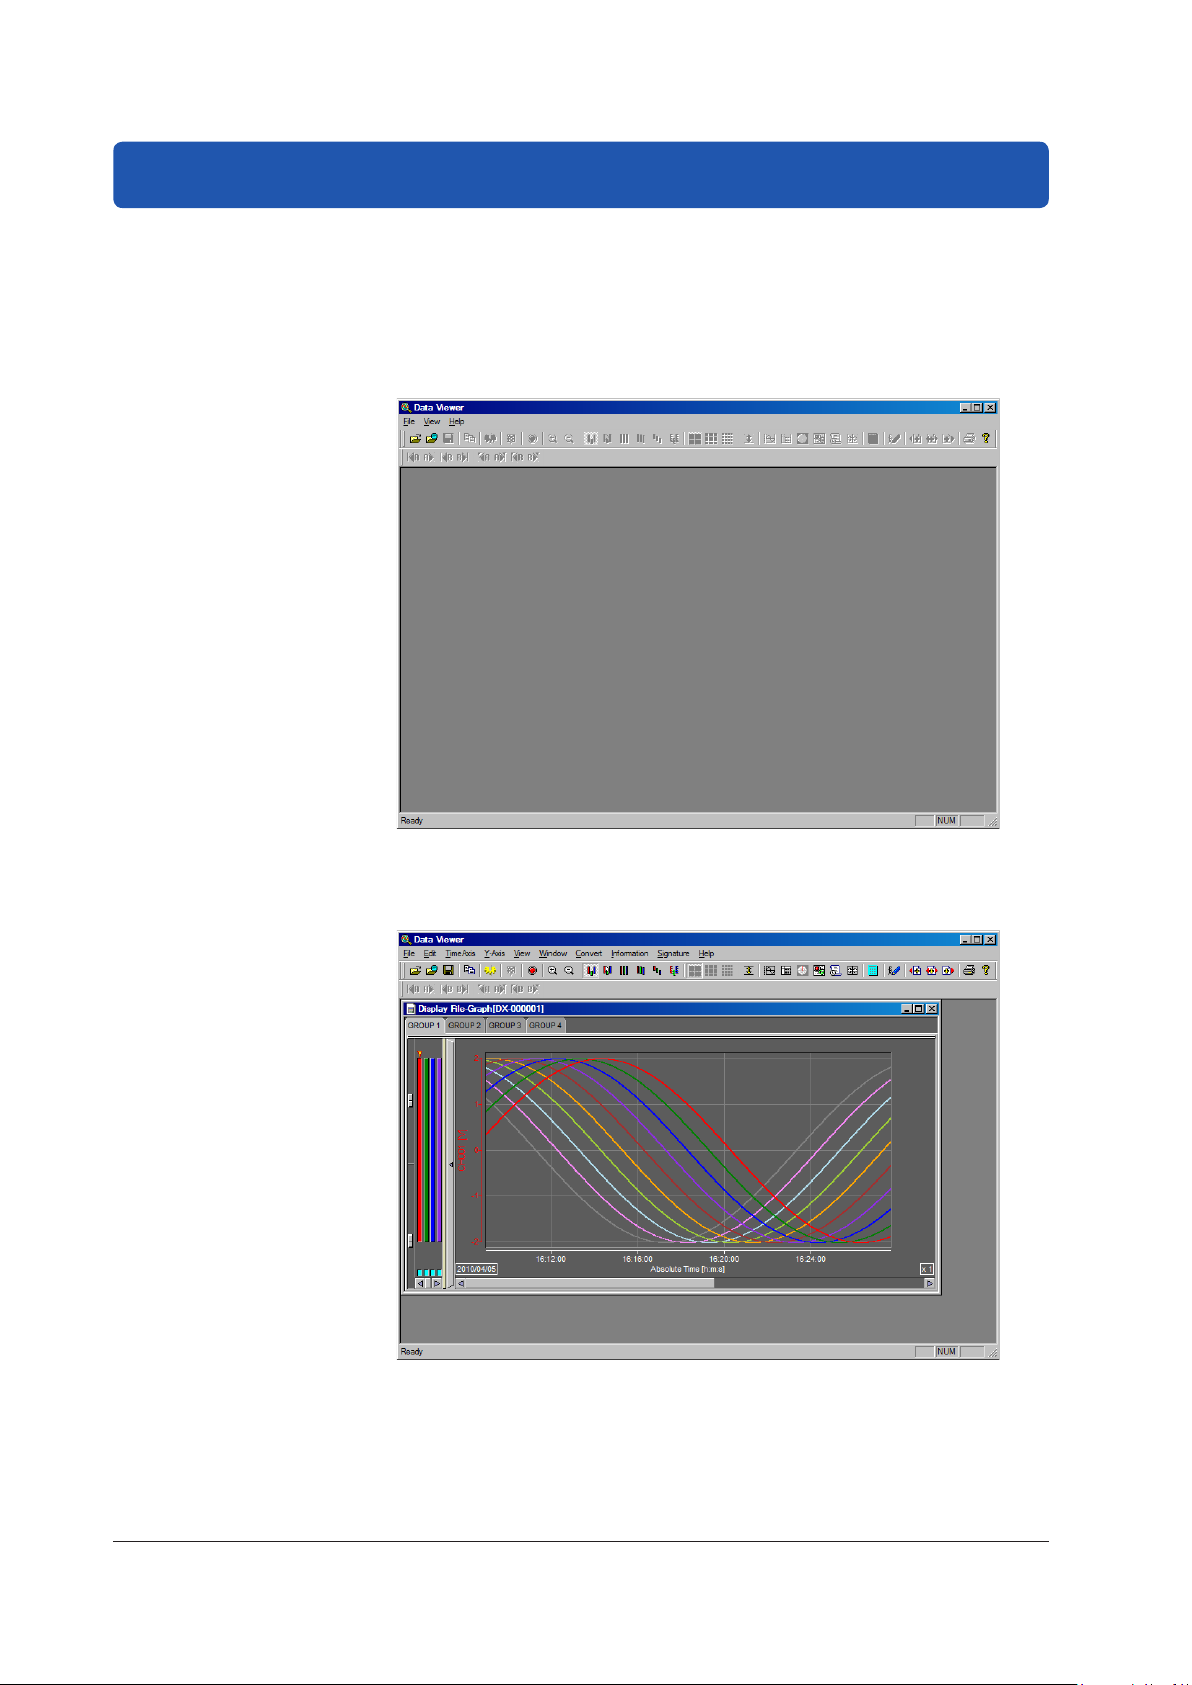
Using DAQSTANDARD
Displaying the Measured Data on DAQSTANDARD
In this example, we will display the measured data using the accompanying software
program, DAQSTANDARD.
Insert the CF card containing the measured data file into the PC that has
1.
DAQSTANDARD installed.
Start DAQSTANDARD Viewer.
2.
3.
4.
The data is displayed.
Operation complete.
From the File menu, choose Open.
In the Open dialog box, select the desired file, and click Open.
48
IM 04L42B01-02E
Page 51

Installation and Wiring
Installation and Wiring
Installation Location
Install the DX indoors in a location that meets the following conditions.
• Instrumentation Panel
The DX is designed to be installed in an instrumentation panel except for the desktop
• Well-Ventilated Location
To prevent overheating, install the DX in a well-ventilated location. For the panel cut
• Minimum Mechanical Vibrations
Choose an installation location with the minimum mechanical vibration. Installing the
• Horizontal
Install the DX horizontally (However, the DX can be inclined up to 30 degrees
type.
dimensions when arranging multiple DXs, see the page 51. Follow the panel cut
dimensions providing adequate space between instruments when other instruments
are arranged on the panel. For the desktop type, we recommend that a space of at
least 50 mm be provided around the left, right, and top panels of the DX.
DX in a location with large mechanical vibration not only causes adverse effects on
the mechanism but also may hinder normal recording.
backwards for panel mounting).
Note
Condensation may occur if the DX is moved to another place where the ambient temperature is
higher, or if the temperature changes rapidly. In addition, measurement errors will result when
using thermocouples. If this happens, let the DX adjust to the new environment for at least one
hour before using it.
Do not install the DX in the following places.
• Outdoors
• In Direct Sunlight or Near Heat Sources
Install the DX in a place with small temperature uctuations near room temperature
(23°C). Placing the DX in direct sunlight or near heat appliances can cause adverse
effects on the internal circuitry.
• Where an Excessive Amount of Soot, Steam, Moisture, Dust, or
Corrosive Gases Are Present
Soot, steam, moisture, dust, and corrosive gases will adversely affect the DX. Avoid
such locations.
• Near Strong Magnetic Field Sources
Do not bring magnets or instruments that produce electromagnetic elds close to the
DX. Operating the DX in strong magnetic elds can cause errors in the measurements.
• Where the Viewing of the Display Is Poor
The DX uses a TFT color LCD for the display. Therefore, viewing of the display from
an extreme angle is difcult. Install the DX so that the user can view the display from
the front.
IM 04L42B01-02E
49
Page 52

Bezel
Correct
Panel
Rubber gasket
Incorrect: Gasket entangled
Panel
Rubber gasket
Bezel
Screw temporarily
Fixed
Front
Panel
Panel
Mounting
brackets
Mounting brackets
Torque driver
(flat blade)
Attachment screw
DX case
In contact with
each other
(The figure shows the case when the mounting brackets
are used on the top and bottom of the case.)
Attachment
screw
Installation and Wiring
Installation Procedure
Installation Procedure (Panel Mount Type)
Use a steel panel of thickness 2 mm to 26 mm.
Insert DX from the front of the panel.
1.
Mount the DX to the panel using the mounting brackets that come with the
2.
package as shown in the figure below.
• Use two brackets to support the top and bottom or the left and right sides of
he case (remove the seal that is covering the holes for the mounting brackets
t
beforehand).
• The proper torque for tightening the mounting screws is 0.7 to 0.9 N•m.
• Mount the DX to the rack according to the procedure below.
• First, attach the two mounting brackets and temporarily fasten the
attachment screws.
• Next, x the DX in place by tightening the attachment screws with the
appropriate torque. When the DX is approximately perpendicular to the
panel as you fasten the screws, press the mounting bracket against the
case so that they are in contact with each other
.
Panel Mounting Diagram
CAUTION
• Tightening the screws too much can deform the case or damage the bracket.
• Be careful not to insert foreign objects or tools through the holes for the
mounting brackets in the case.
• Make sure the rubber gasket is af
between the main unit and the panel. Affixing the gasket incorrectly will result in
failure to achieve sufficient dust and water proof performance.
fixed so that it does not become entangled
50
Note
To achieve sufficient dust and water proof performance, mount the DX in the middle of the
panel cut out.
IM 04L42B01-02E
Page 53
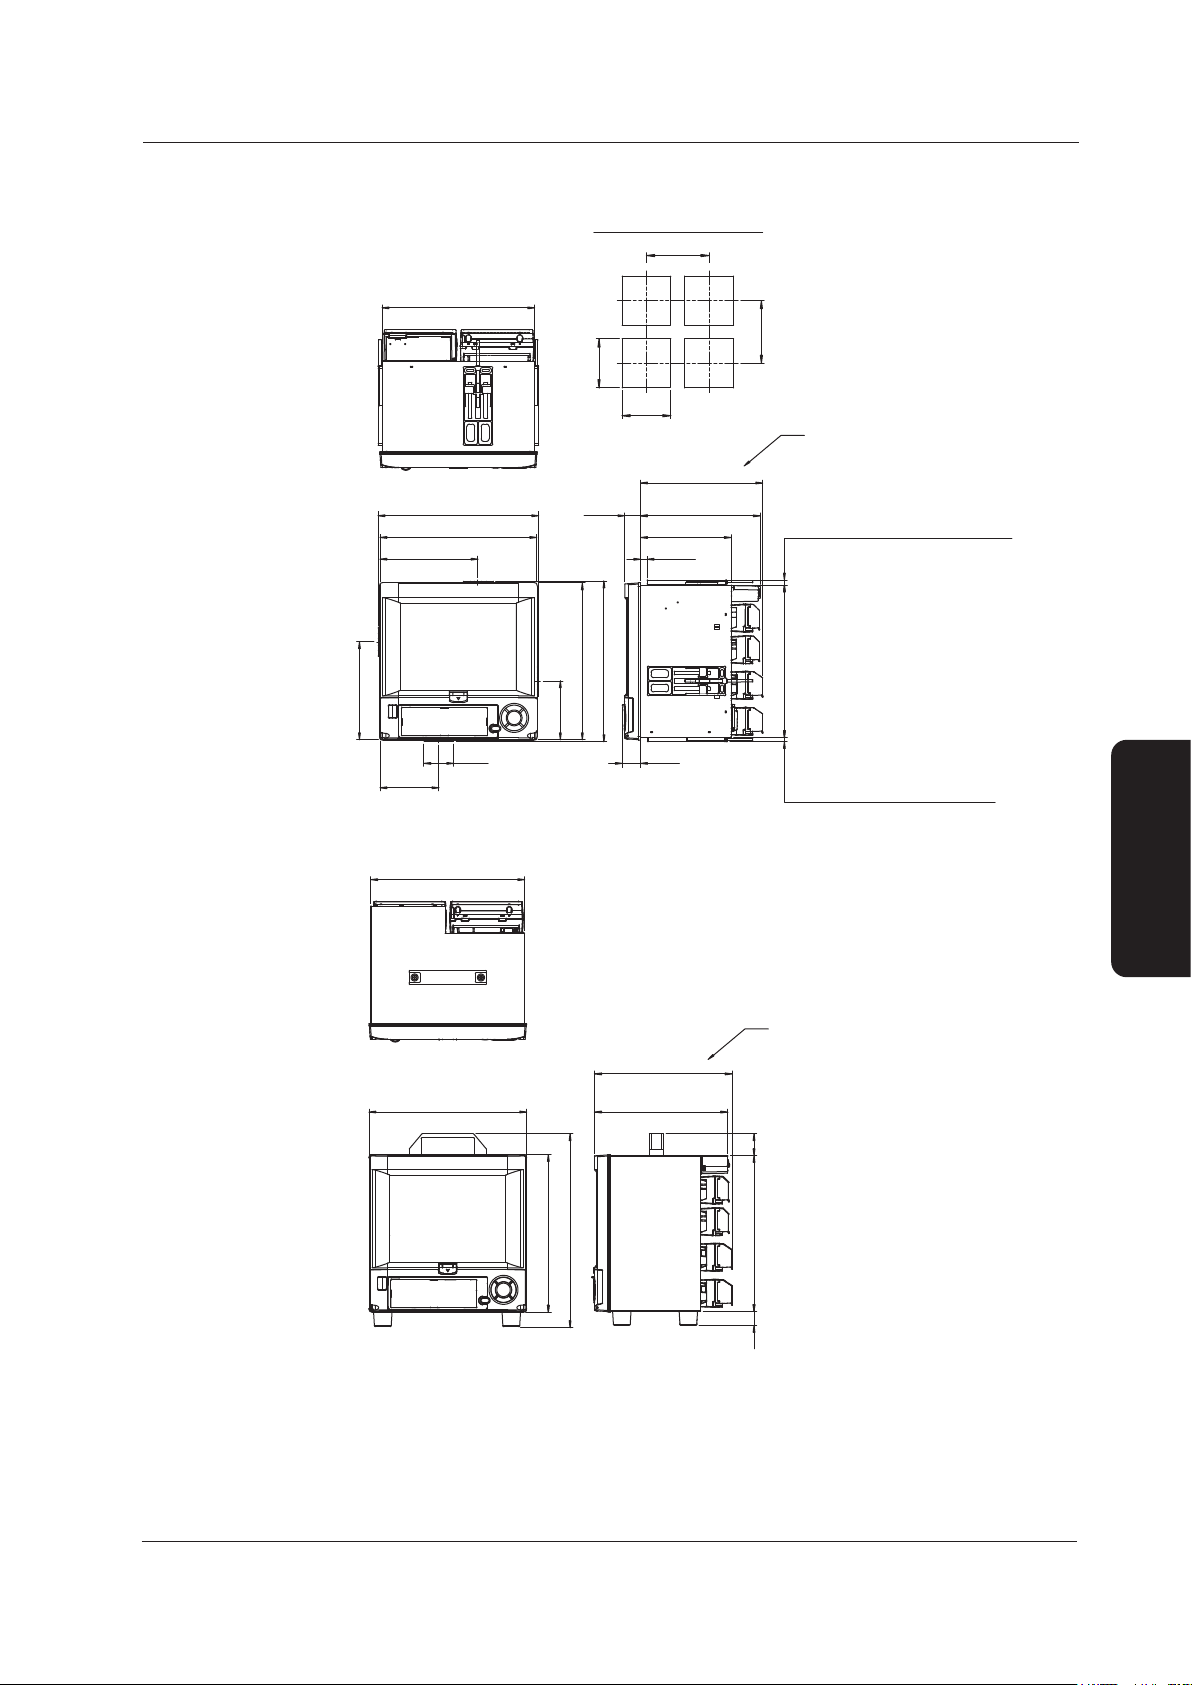
Installation and Wiring
External Dimensions and Panel Cut Dimensions
(14.17)
(11.06)
(14.21)
(11.06)
Unit: mm (approx. inch)
Unless otherwise specified, tolerance
is ±3% (however, tolerance is ±0.3 mm
when below 10 mm).
280.2 (11.03)
180 (7.09)
108
(4.25)
54.6
(2.15)
32.1
27.3
(1.07)
2–26
168 (6.61)
221.6 (8.72)
226 (8.90) max.
(Dimensions before attaching
the mounting bracket)
(When the /H2 or /PM1
option is installed)
(Allowable panel thickness)
(Dimensions after attaching
the mounting bracket)
288 (11.33)
295.2 (11.62)
360 min.
361 min.
180 (7.09)
108
288 (11.33)
280.2 (11.03) 9.4
(0.37)
7.5
(0.29)
295.2 (11.62)
Panel cut dimensions
281
+2
0
281
+2
0
289.6 (11.40) 245.1 (9.65)
282.5 (11.12)
253.3 (9.97) max.
25
289.7 (11.41)
287.8 (11.33) 40
(1.57)
352.8 (13.89)
(When the /H2 or /PM1
option is installed)
Unit: mm (approx. inch)
Unless otherwise specified, tolerance
is ±3% (however, tolerance is ±0.3 mm
when below 10 mm).
Panel Mount Type
Installation and Wiring
Desktop Type (/H5[ ] Option)
IM 04L42B01-02E
51
Page 54
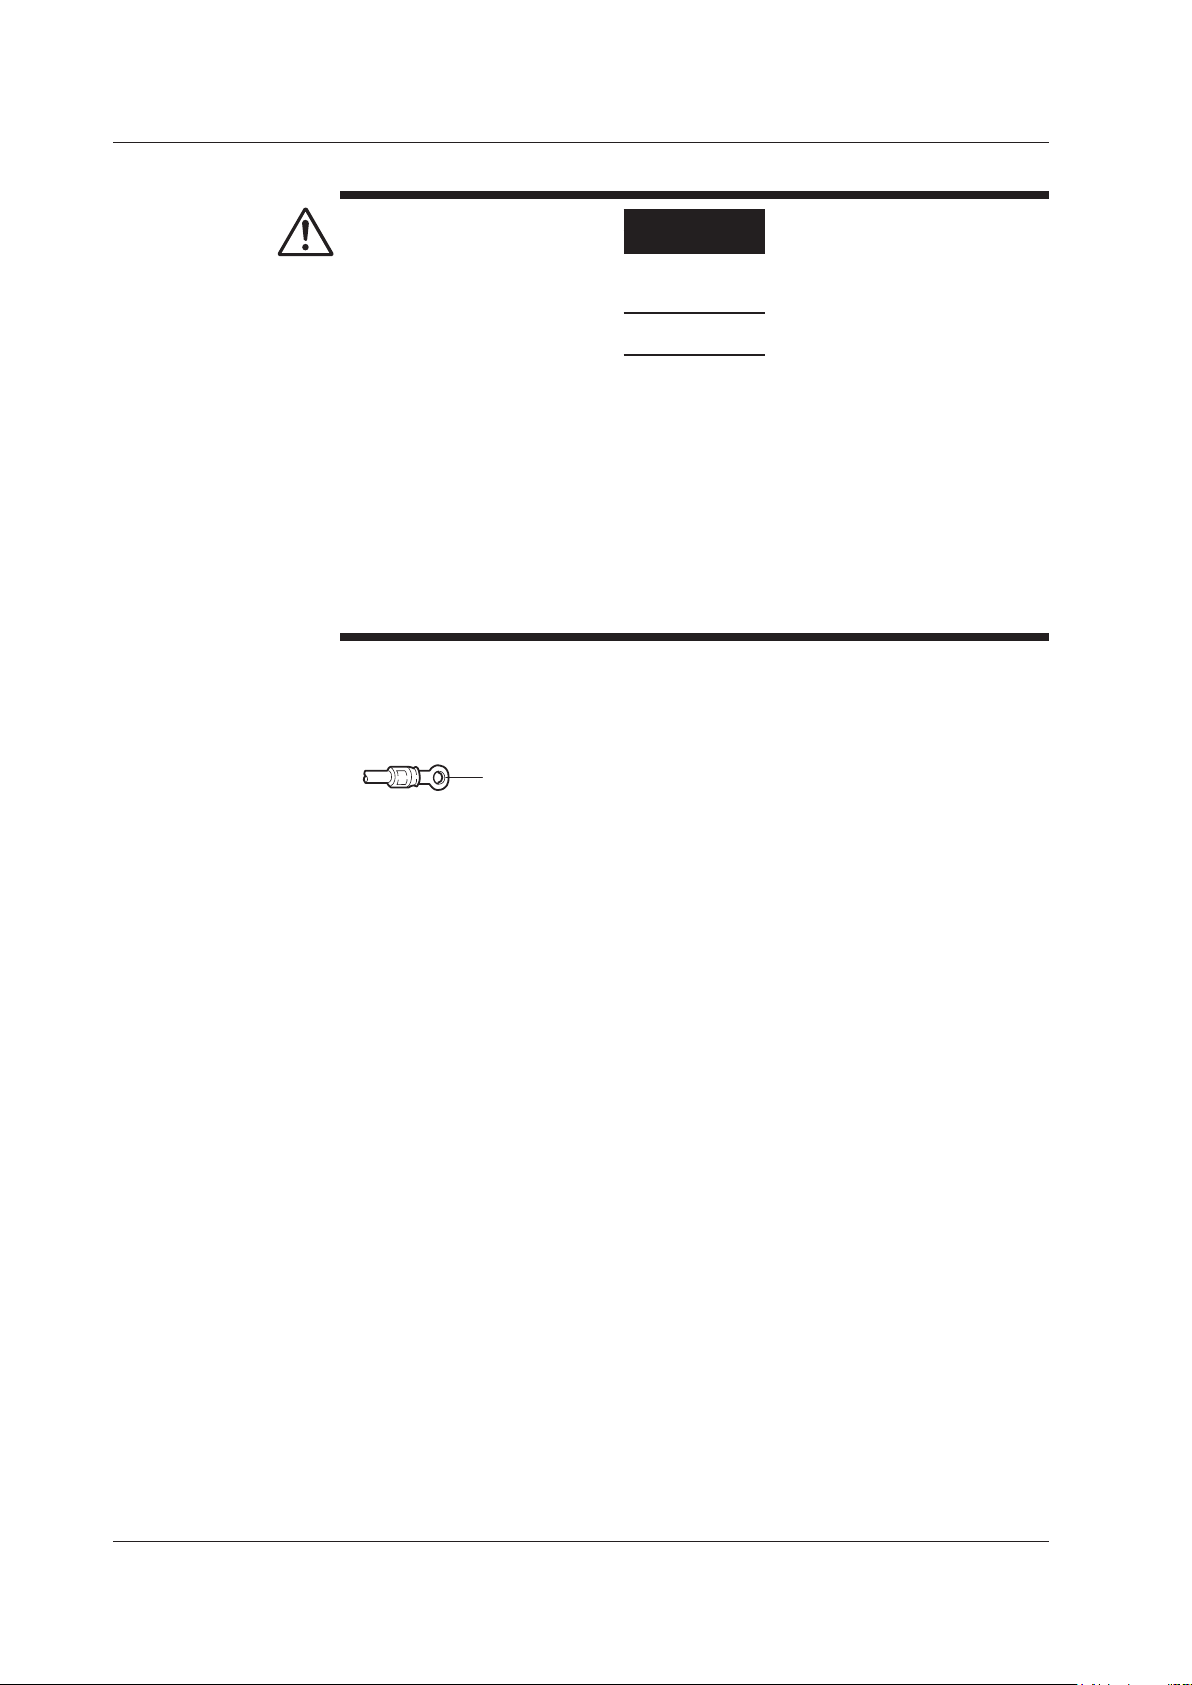
Installation and Wiring
Crimp-on lug with insulation sleeves (for 4 mm screws)
Input Signal Wiring
Precautions to Be Taken While Wiring
52
WARNING
• To prevent electric shock while wiring, ensure that the power supply source is
turned OFF.
CAUTION
• If a strong tension is applied to the cable wired to the DX, the terminals of the DX
and/or the cable can be damaged. In order to prevent tension from being applied
directly on the terminals, fasten all wiring cables to the rear of the mounting
panel.
•
To prevent fire, use signal wires having a temperature rating of 70°C or more.
• Do not apply a voltage exceeding the following value to the input terminals.
Otherwise, damage to the DX may result.
• Maximum input voltage: ±60 VDC
• Maximum common mode voltage: ±60 VDC (under measurement category II
conditions)
• The DX is a product of installation category II.
Take the following precautions when wring the input signal cables.
When using a screw terminal, we recommend that you use a crimp-on lug
with an insulation sleeve (designed for 4-mm screws).
When using a clamp terminal (/H2), we recommend that you use the
following kind of cable:
• Conductive cross-sectional area: 0.08 mm2 to 1.5 mm2 (AWG 28 to 16)
• Length of the stripped section of the wire: Approx. 7 mm
Take measures to prevent noise from entering the measurement circuit.
• Move the measurement circuit away from the power cable (power circuit) and ground
circuit.
• It is desirable that the object being measured does not generate noise. However
this is unavoidable, isolate the measurement circuit from the object. Also, ground the
object being measured.
Shielded wires should be used to minimize noise caused by electrostatic induction.
•
Connect the shield to the ground terminal of the DX as necessary (make sure you are
not grounding at two points).
To minimize noise caused by electromagnetic induction, twist
•
wires at short, equal intervals.
• Make sure to earth ground the protective ground terminal through minimum resistance
(less than 100 Ω).
the measurement circuit
When using internal reference junction compensation on the thermocouple
input, take measures to stabilize the temperature at the input terminal.
• Always use the terminal cover.
• Do not use thick wires which may cause large heat dissipation (cross sectional area of
0.5 mm
• Make sure that the ambient temperature remains reasonably stable. Large
temperature uctuations can occur if a nearby fan turns ON or OFF.
2
or less recommended).
Connecting the input wires in parallel with other devices can cause signal
degradation, affecting all connected devices. If you need to make a parallel
connection, then
• Turn the burnout detection function OFF.
• Ground the instruments to the same point.
• Do not turn ON or OFF another instrument during operation. This can have adverse
effects on the other instruments.
• RTDs cannot be wired in parallel.
, if
IM 04L42B01-02E
Page 55

Installation and Wiring
Wiring Procedure
Input
terminal
block
1
2
3
4
DX2004 DX2008 DX2010 DX2020 DX2030 DX2040 DX2048
1–4 1–4 1–10 1–10 1–10 1–10 1–12
5–8 11–20 11–20 11–20 13–24
21–30 21–30 25–36
31–40 37–48
Channel Assignments by Model
Input terminal block 1
Input terminal block 2
Input terminal block 3
Input terminal block 4
+/A
/b
CH1
CH2
CH3
CH4
CH5
CH6
CH7
CH8
CH9
CH10
CH1
CH2
CH3
CH4
CH5
CH6
CH7
CH8
CH9CH11
CH10CH12
–/B
+/A
/b
–/B
CH3 CH1
CH4 CH2
CH5 CH3 CH1
CH6 CH4 CH2
CH9 CH7
CH10
CH11
CH12
CH8
CH5 CH3 CH1
CH6 CH4 CH2
CH9 CH7
CH10
CH8
/b
+/A
–/B
/b
+/A
–/B
/b
+/A
–/B
+/A
/b
CH1
CH2
CH3
CH4
–/B
Screw terminal
Input terminal block 1 of
the DX2004 and DX2008
Input terminal block 1 of
the DX2010, DX2020,
DX2030, and DX2040
Input terminal block 1 of
the DX2048
Clamp terminal
A terminal cover is screwed in place on the measuring input terminal block on the rear
panel. A label indicating the terminal arrangement is affixed to the cover.
Turn OFF the DX and remove the terminal cover.
1.
Connect the signal wires to the terminals.
2.
R
ecommended torque for
tightening the screws
Replace the terminal cover and fasten it with screws. The proper torque for
3.
tightening the screws is 0.6 N
Note
Input signal wires of diameter less than or equal to 0.3 mm may not be secured firmly for
clamped terminals (/H2). Fold over the conducting section of the wire, for example, to make
sure that the wire is securely connected to the clamped terminal.
Arrangement of the Input Terminals
Installation and Wiring
Screw terminals 0.9 to 1.0 N•m
Clampted terminals 0.22 to 0.25 N•m
•
m.
IM 04L42B01-02E
53
Page 56
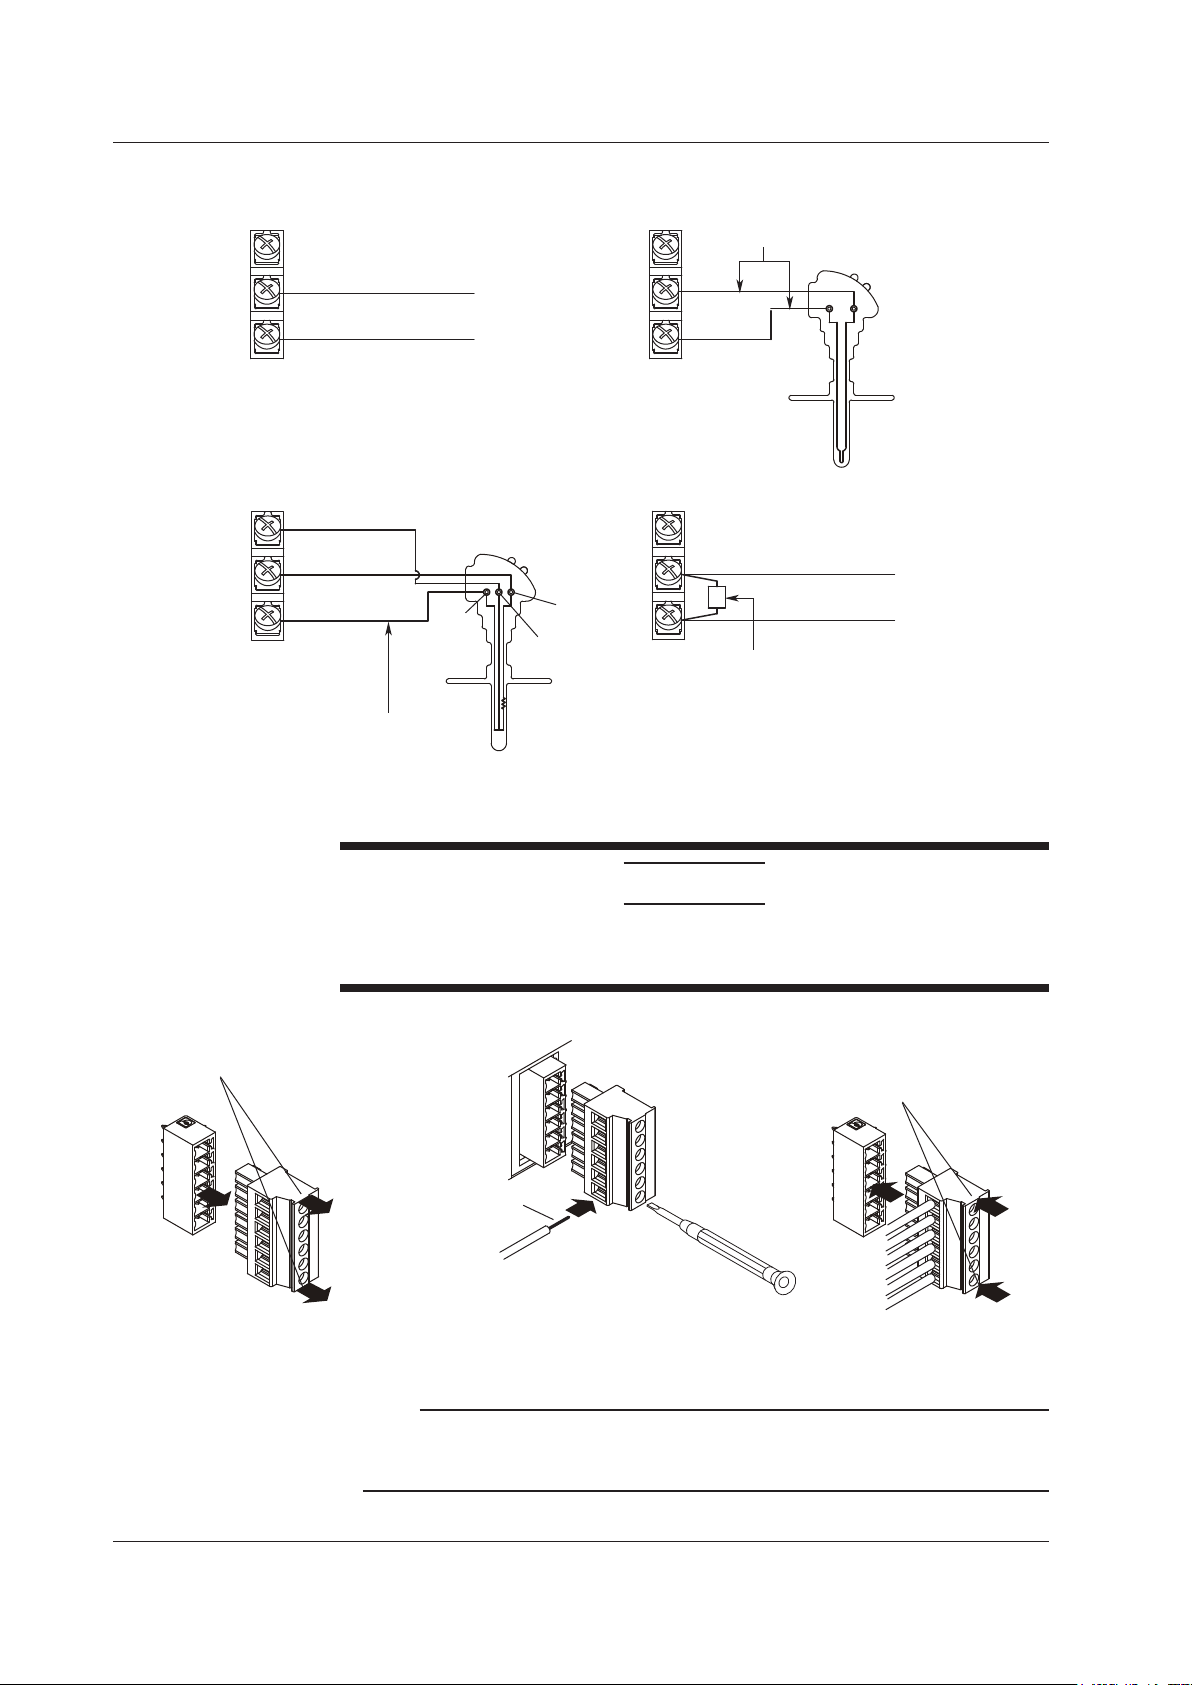
Installation and Wiring
–
+
+
–
DC voltage input
TC input
DC voltage input/DI (ON/OFF) input
RTD input
DC current input
DC current input
Shunt resistor
Example: For 4 to 20 mA input, use a
shunt resistor of 250 Ω ± 0.1%.
–
+
–
+
–
+
A
B
b
Lead wire resistance per wire of
10 Ω or less. Make the resistance
of the three wires equal.
Compensating leadwire
A
b
B
Remove the terminal block
Hold both ends of the terminal
block and pull straight.
Input signal wire
First, loosen the screw at the front using a flat-blade
screwdriver. Insert the input signal wire into the slit on the
left side of the terminal block, and fasten the screw at the front.
Recommended wire size
0.08 to 1.5 mm
2
(AWG 28 to 16)
Recommended
length of stripped
wire: 7 mm
Connect the wires
Flat-blade
screwdriver
Connect the terminal block
Hold both ends of the terminal block,
align with the connector on the DX
side, and push the terminal block into
the connector.
Wiring Screw Terminals
Wiring Clamped Terminals
54
CAUTION
As of August, 2007, the direction of the terminal blocks for the clamp input terminals
(/H2 option) has changed. To use clamp input terminal blocks wired for use with
previous YOKOGAWA recorders, rewire them to match the DX.
Note
RTD input terminals A and B are isolated on each channel. Terminal b is shorted internally
across all channels. However, terminal b is also isolated on each channel on models with the
/N1 option (Cu10, Cu25 RTD input/3 leg isolated RTD) and /N2 option (3 leg isolated RTD).
IM 04L42B01-02E
Page 57

Installation and Wiring
Optional Terminal Wiring
Crimp-on lug with insulation sleeves (for 4-mm screws)
WARNING
• To prevent electric shock while wiring, ensure that the power supply source is
turned OFF.
• If
a voltage of more than 30 VAC or 60 VDC is to be applied to the output terminals,
use ring-tongue crimp-on lugs with insulation sleeves on all terminals to prevent the
wires from slipping out when the screws become loose. Furthermore, use doubleinsulated wires (dielectric strength of 2300 VAC or more) for the signal wires on which
a voltage of more than 30 VAC or 60 VDC is to be applied. For all other wires, use
basic insulated wires (dielectric strength of 1390 VAC). To prevent electric shock,
attach the terminal cover after wiring and make sure not to touch the terminals.
• Use the following circuit voltage for the connection to the alarm/FAIL/status
output terminal.
• When the connection is to Mains Circuits (primary AC power source circuits):
• When the connection is to circuits derived from Mains Circuits (secondary
(Mains Circuits voltage is less than 300 V, and connection must be used by
• To prevent fire, use signal wires having a temperature rating of 70°C or more.
• If a strong tension is applied to the cable wired to the DX, the terminals of the DX
and/or the cable can be damaged. In order to prevent tension from being applied
directly on the terminals, fasten all wiring cables to the rear of the mounting panel.
• Do not short the transmitter power supply output terminal or apply external
voltage to it. If you do, the DX may malfunction.
• When using the transmitter power supply output terminal, do not use current that
exceeds the maximum output current (25 mADC). If you do, the DX may malfunction.
• Do not short the VIDEO OUT terminal or apply external voltag
the DX may malfunction.
Installation and Wiring
CAUTION
150 V or less
circuits): 250 V or less
isolation transformer.)
e to it. If you do,
Precautions to Be Taken While Wiring
Wiring Procedure
IM 04L42B01-02E
Note
For remote control wiring, use shielded wires to reduce noise. Connect the shield to the
functional ground terminal or the ground terminal of the DX.
It is recommended that crimp-on lug with insulation sleeves (designed
for 4-mm screws) be used when connecting wires to the optional input
terminals.
As shown in the figure on next page, the optional terminal block is located on the rear panel. The
optional terminal block is provided on the DX when an option that requires input/output is installed
such as the alarm output relay (/A[ ] option), FAIL/status output relay (/F1 or /F2 option), and
remote control function (/R1 option), etc. A terminal cover is screwed in place on the measuring
input terminal block. A label indicating the terminal arrangement is affixed to the cover.
Turn OFF the DX and remove the terminal cover.
1.
Connect the signal wires to the terminals. The recommended torque for tightening
2.
the screws is 0.9 to 1.0 N•m
Replace the terminal cover and fasten it with screws. The proper torque for
3.
tightening the screws is 0.6 N•m.
55
Page 58

Installation and Wiring
Optional terminal block 1
Optional terminal block 2
Optional terminal block 3
Optional terminal block 4
Description of Symbols
1 to 8: Terminal number
C: Common
See page 61.
NC: Normally closed
C: Common
NO: Normally opened
See page 61.
NC
Remote control input
Alarm output, FAIL, Status
H and L: See page 61.
Pulse input
+ and –: See page 61.
Transmitter power supply
Symbols such as “NC”: Terminal functions
A terminal that is not used. (With a screw)
A terminal that is not used. (Without screw)
1
Options That Use Option Terminal Block 1 Only
(To next page)
These options can come with /TPS4 or /TPS8.
In that case, the option terminal block 4, or option terminal blocks 3 and 4 are installed.
For the terminal arrangement for /TPS4 and /TPS8, see page 57.
02 0104 03
NC
C
NO
NC
C
NO
NC
C
NO
NC
C
NO
NC
C
NO
NC
C
NO
NC
C
NO
NC
C
NO
NC
C
NO
NC
C
NO
NC
C
NO
NC
C
NO
NC
C
NO
NC
C
NO
NC
C
NO
NC
C
NO
NC
C
NO
NC
C
NO
NC
C
NO
NC
C
NO
NC
C
NO
NC
C
NO
NC
C
NO
NC
C
NO
NC
C
NO
NC
C
NO
NC
C
NO
NC
C
NO
NC
C
NO
NC
C
NO
NC
C
NO
NC
C
NO
02 01
02 0104 0306 05
C
1
2
8
7
6
5
4
3
C
1
2
8
7
6
5
4
3
C
1
2
8
7
6
5
4
3
02 0104 0306 05
02 01
C
1
2
8
7
6
5
4
3
NC
C
NO
NC
C
NO
02 01
02 0104 03
02 0104 03
02 0104 0306 05
/A1 /A2 /A3
/A1/R1 /A2/R1 /A3/R1
/R1 /A1 /F1 /A2 /F1
Alarm
output
Alarm
output
Alarm
output
Alarm
output
Alarm
output
Alarm
output
Alarm
output
Alarm
output
Remote
control
input
Remote
control
input
Remote
control
input
Remote
control
input
FAIL
Status
FAIL
Status
Arrangement of the Optional Terminals
56
IM 04L42B01-02E
Page 59

Installation and Wiring
(From previous page)
02 01
C
1
2
8
7
6
5
4
3
NC
C
NO
NC
C
NO
NC
C
NO
NC
C
NO
C
1
2
8
7
6
5
4
3
02 0104 03
NC
C
NO
NC
C
NO
NC
C
NO
NC
C
NO
NC
C
NO
NC
C
NO
NC
C
NO
NC
C
NO
02 01
/F1 /A1 /F1 /R1 /A2 /F1 /R1
Alarm
output
Alarm
output
Remote
control
input
Remote
control
input
FAIL
Status
FAIL
Status
FAIL
Status
NC
C
NO
NC
C
NO
Pulse
input
Pulse
input
02 0104 03
NC
C
NO
NC
C
NO
02 01
C
HLHLH
L
1
2
5
4
3
Alarm
output
Alarm
output
Alarm
output
NC
C
NO
NC
C
NO
02
7 68
02 01
C
HLHLH
L
1
2
5
4
3
NC
C
NO
NC
C
NO
02 7 68
C
HLHLH
L
1
2
5
4
3
7 68
C
1
2
8
7
6
5
4
3
Remote
control
input
Remote
control
input
Pulse
input
Remote
control
input
Pulse
input
Remote
control
input
Pulse
input
Remote
control
input
Remote
control
input
NC
C
NO
NC
C
NO
NC
C
NO
NC
C
NO
FAIL
FAIL
Status
FAIL
Status
Status
/F1 /R1 /A1 /PM1 /A2 /PM1
/A1 /F1 /PM1 /PM1 /F1 /PM1
NC
C
NO
NC
C
NO
C
HLHLH
L
1
2
5
4
3
7 68
C
HLHLH
L
1
2
5
4
3
7 68
/TPS4
+
+
-+-+-
-
+
+
-+-+-
-
+
+
-+-+-
-
4
/TPS8
3
4
4
3
4
Transmitter power supply
Transmitter power supply
Transmitter power supply
Installation and Wiring
IM 04L42B01-02E
57
Page 60

Installation and Wiring
/A4 /A4 /R1
/A3 /PM1
C
HLHLH
L
1
2
5
4
3
7 68
C
HLHLH
L
1
2
5
4
3
7 68
NC
C
NO
NC
C
NO
NC
C
NO
NC
C
NO
NC
C
NO
NC
C
NO
02 0104 0306 05
NC
C
NO
NC
C
NO
NC
C
NO
NC
C
NO
NC
C
NO
NC
C
NO
12 1114 1316 15
NC
C
NO
NC
C
NO
NC
C
NO
NC
C
NO
NC
C
NO
NC
C
NO
12 1114 1316 15
/A3 /F1 /PM1
NC
C
NO
NC
C
NO
NC
C
NO
NC
C
NO
NC
C
NO
NC
C
NO
12 1114 1316 15
/A3 /F1
NC
C
NO
NC
C
NO
NC
C
NO
NC
C
NO
NC
C
NO
NC
C
NO
NC
C
NO
NC
C
NO
12 1114 1316 15
/A3 /F1 /R1
NC
C
NO
NC
C
NO
NC
C
NO
NC
C
NO
NC
C
NO
NC
C
NO
NC
C
NO
NC
C
NO
12 1114 1316 15
NC
C
NO
NC
C
NO
NC
C
NO
NC
C
NO
NC
C
NO
NC
C
NO
12 1114 1316 15
NC
C
NO
NC
C
NO
NC
C
NO
NC
C
NO
NC
C
NO
NC
C
NO
C
1
2
8
7
6
5
4
3
02 0104 0306 05
C
1
2
8
7
6
5
4
3
02 0104 0306 05
1
1
2
2
1
2
1
2
1
2
1
2
1
2
Options That Use Option Terminal Blocks 1 and 2
These options can come with /TPS4 or /TPS8.
In that case, the option terminal block 4, or option terminal blocks 3 and 4 are installed.
For the terminal arrangement for /TPS4 and /TPS8, see page 57.
NC
C
NO
NC
C
NO
Pulse
input
Alarm
output
Alarm
output
Alarm
output
Alarm
output
Alarm
output
Alarm
output
Alarm
output
Alarm
output
Remote
control
input
Remote
control
input
Pulse
input
Remote
control
input
Remote
control
input
FAIL
Status
FAIL
Status
FAIL
Status
58
IM 04L42B01-02E
Page 61

Installation and Wiring
/A4 /PM1
/A4 /F1 /R1
NC
C
NO
NC
C
NO
NC
C
NO
NC
C
NO
NC
C
NO
NC
C
NO
22 2124 2326 25
NC
C
NO
NC
C
NO
NC
C
NO
NC
C
NO
NC
C
NO
NC
C
NO
12 1114 1316 15
/A4 /F1
NC
C
NO
NC
C
NO
NC
C
NO
NC
C
NO
NC
C
NO
NC
C
NO
22 2124 2326 25
NC
C
NO
NC
C
NO
NC
C
NO
NC
C
NO
NC
C
NO
NC
C
NO
22 2124 2326 25
NC
C
NO
NC
C
NO
NC
C
NO
NC
C
NO
NC
C
NO
NC
C
NO
22 2124 2326 25
NC
C
NO
NC
C
NO
NC
C
NO
NC
C
NO
NC
C
NO
NC
C
NO
NC
C
NO
NC
C
NO
12 1114 1316 15
NC
C
NO
NC
C
NO
NC
C
NO
NC
C
NO
NC
C
NO
NC
C
NO
12 1114 1316 15
NC
C
NO
NC
C
NO
NC
C
NO
NC
C
NO
C
1
2
8
7
6
5
4
3
/A4 /F1 PM1
NC
C
NO
NC
C
NO
NC
C
NO
NC
C
NO
NC
C
NO
NC
C
NO
12 1114 1316 15
C
HLHLH
L
1
2
5
4
3
7 68
C
HLHLH
L
1
2
5
4
3
7 68
Options That Use Option Terminal Blocks 1, 2, and 3
1
2
1
2
1
2
1
3
3
3
3
2
13
2
These options can come with /TPS4.
In that case, the option terminal block 4 is installed.
For the terminal arrangement for /TPS4, see page 57.
Pulse
input
Alarm
output
Alarm
output
Alarm
output
Alarm
output
Alarm
output
Alarm
output
Alarm
output
Alarm
output
Remote
control
input
Pulse
input
Remote
control
input
FAIL
Status
FAIL
Status
FAIL
Status
Installation and Wiring
IM 04L42B01-02E
59
Page 62

Installation and Wiring
/F2
/A5 /R1
NC
C
NO
NC
C
NO
NC
C
NO
NC
C
NO
NC
C
NO
NC
C
NO
22 2124 2326 25
NC
C
NO
NC
C
NO
NC
C
NO
NC
C
NO
NC
C
NO
NC
C
NO
12 1114 1316 15
/A5
NC
C
NO
NC
C
NO
NC
C
NO
NC
C
NO
NC
C
NO
NC
C
NO
22 2124 2326 25
NC
C
NO
NC
C
NO
NC
C
NO
NC
C
NO
NC
C
NO
NC
C
NO
32 3134 3336 35
NC
C
NO
NC
C
NO
NC
C
NO
NC
C
NO
NC
C
NO
NC
C
NO
32 3134 3336 35
NC
C
NO
NC
C
NO
NC
C
NO
NC
C
NO
NC
C
NO
NC
C
NO
32 3134 3336 35
NC
C
NO
NC
C
NO
NC
C
NO
NC
C
NO
NC
C
NO
NC
C
NO
32 3134 3336 35
NC
C
NO
NC
C
NO
NC
C
NO
NC
C
NO
NC
C
NO
NC
C
NO
22 2124 2326 25
NC
C
NO
NC
C
NO
NC
C
NO
NC
C
NO
NC
C
NO
NC
C
NO
22 2124 2326 25
NC
C
NO
NC
C
NO
NC
C
NO
NC
C
NO
NC
C
NO
NC
C
NO
12 1114 1316 15
NC
C
NO
NC
C
NO
NC
C
NO
NC
C
NO
NC
C
NO
NC
C
NO
02 0104 0306 05
NC
C
NO
NC
C
NO
NC
C
NO
NC
C
NO
NC
C
NO
NC
C
NO
02 0104 0306 05
NC
C
NO
NC
C
NO
NC
C
NO
NC
C
NO
NC
C
NO
NC
C
NO
12 1114 1316 15
C
1
2
8
7
6
5
4
3
C
1
2
8
7
6
5
4
3
/F2 /R1
NC
C
NO
NC
C
NO
NC
C
NO
NC
C
NO
NC
C
NO
NC
C
NO
12 1114 1316 15
NC
C
NO
NC
C
NO
NC
C
NO
NC
C
NO
NC
C
NO
NC
C
NO
02 0104 03
NC
C
NO
NC
C
NO
NC
C
NO
NC
C
NO
NC
C
NO
NC
C
NO
02 0104 03
13
2
4
Options That Use Option Terminal Blocks 1, 2, 3, and 4
1
2
1
2
1
2
1
2
3
4
3
4
3
4
3
4
Alarm
output
Alarm
output
Alarm
output
Alarm
output
Alarm
output
Alarm
output
Alarm
output
Alarm
output
Alarm
output
Alarm
output
Alarm
output
Alarm
output
Alarm
output
Alarm
output
Alarm
output
Alarm
output
Remote
control
input
Remote
control
input
FAIL
Status
FAIL
Status
60
IM 04L42B01-02E
Page 63

Installation and Wiring
C
NC
NO
Output format: Relay contact
Contact rating: 250 VAC (50/60 Hz)/3 A,
250 VDC/0.1 A (for resistor load)
Withstand voltage: 1600 VAC at 50/60 Hz for one
minute (between output terminals
and the ground terminal)
NO C NC NO C NC NO C NC
NO C NC NO C NC NO C NC
FAIL
output
(/F1, /F2)
Other
output
(/F1, /F2)
During normal
operation
When a failure
occurs
When power is
turned OFF
During normal
operation
When specified
status occurs
When power is
turned OFF
C
C
1
1~ 8
2
3
4
5
6
7
8
• Transistor input (open collector)
Internal circuit
• Relay contact input
(voltage-free contact)
C
1
2
3
4
5
6
7
8
Withstand voltage: 1000 VDC for one minute between input terminals and the ground terminal
Input format:
Photocoupler isolation
Shared common (C)
Allowable input voltage:
5 VDC
5 V
Contact closed at 200 Ω or less
Contact open at 100 kΩ or greater
ON voltage: 0.5 V or less (30 mADC)
Leakage current when turned OFF:
0.25 mA or less
H
L
H
L
H
L
H
L
H
L
H
L
H
8 7 6
678
L
Withstand voltage: 1000 VDC for one minute between input terminals and the ground terminal
Input format:
Photocoupler isolation
Shared common (L)
Allowable input voltage:
5 V
Internal circuit
•Transistor input (open collector)
• Relay contact input
(voltage-free contact)
Contact closed at 200 Ω or less
Contact open at 100 kΩ or greater
ON voltage: 0.5 V or less (30 mADC)
Leakage current when turned OFF:
0.25 mA or less
30 VDC
–
+
+
–
Transmitter
Current
DX
Transmitter power
supply output terminal
Input terminal
Shunt resistor: 250 Ω
To reduce noise, use a shielded cable for wiring.
Connect the shield to the functional ground
terminal or the ground terminal of the DX.
Note
2
1 3
4 5
6
7
9
8
2 RD (Received Data): Received data from the PC. Input signal to the DX.
3 SD (Send Data): Transmitted data to the PC. Output signal from the DX.
5 SG (Signal Ground): Signal ground.
7 RS (Request to Send): Handshaking signal when receiving data from the PC. Output signal
from the DX.
8 CS (Clear to Send): Handshaking signal when transmitting data to the PC. Input signal to
the DX.
* Pins 1, 4, 6, and 9 are not used.
(male)
RxD/TxD-P: Positive data input/output.
CNTR-P: RTS (needed when using a repeater).
DGND: Ground.
VP +5V: +5 V.
RxD/TxD-N: Negative data input/output.
* Pins 1, 2, 7, and 9 are not used.
** The DX does not have a built-in terminator. If you need to terminate the cable at the
DX, use a terminated connector.
5 4 3 2 1
9 8 7 6
(female)
3
4
5
6
8
Installation and Wiring
Alarm Output Terminal (/A1, /A2, /A3, /A4, and /A5), FAIL Output Terminal, and Status Output Terminal (/F1 and /F2)
Remote Control Input Terminal (/R1)
Pulse Input Terminal (/PM1)
Serial Interface
IM 04L42B01-02E
24 VDC Transmitter Power Supply Output Terminal (/TPS4 and /TPS8)
Connect the DX to the transmitter as shown below.
Connecting to the RS-232 Connector (/C2)
Connecting to the PROFIBUS-DP Connector (/CP1)
61
Page 64

FG (Frame Ground) Frame ground of the DX.
SG (Signal Ground) Signal ground.
SDB (Send Data B) Send data B (+).
SDA (Send Data A) Send data A (–).
RDB (Received Data B) Receive data B (+).
RDA (Received Data A) Receive data A (–).
FG SG SDB SDA RDB RDA
Electric
potential
of the shield
Two-wire system
Shield
FG SG SDB SDA RDB RDA
Electric
potential
of the shield
Four-wire system
Shield
Recommended length of stripped wire: 9 mm. Recommended tightening torque: 0.4-0.5 N•m.
Cable
There are two types of cables available, the four-wire cable and the two-wire cable (used only for the Modbus protocol).
The cable should meet the following specifications.
• Type: Shielded twisted pair cable: 3 pairs 24 AWG or more (four-wire),
2 pair 24 AWG or more (two-wire)
• Characteristic impedance: 100 Ω
• Capacitance: 50 pF/m
• Total cable length: Up to 1.2 km
!
VIDEO OUT(VGA)
Installation and Wiring
6
11
1
5
15
10
D-Sub 15-pin receptacle
Connecting to the RS-422/485 (/C3)
Connecting to the VGA Connector (/D5)
CAUTION
• Connect the cable after turning OFF the DX and the monitor.
• Do not short the VIDEO OUT terminal or apply external voltage to it. If you do,
the DX may malfunction.
VGA Output Terminal
The DX display can be output to a monitor through the RGB output. Connectable
monitors are VGA monitors or multi-sync monitors capable of displaying VGA.
Specifications of the VGA Output Terminal
Pin No. Signal Name Specifications
1 Red 0.7 Vp-p
2 Green 0.7 Vp-p
3 Blue 0.7 Vp-p
62
4 –
5 –
6 GND
7 GND
8 GND
9 –
10 GND
11 –
12 –
13 Horizontal sync
signal
14 Vertical sync signal Approx. 60 Hz, TTL
15 –
Approx. 31.5 kHz, TTL
negative logic
negative logic
IM 04L42B01-02E
Page 65

Installation and Wiring
Connecting to the Monitor
POWER
CF CARD
USB port
USB port
RearFront
Ethernet port
Indicator
Do not connect an Ethernet cable whose plug does
not comply with FCC specifications. If you do, the
DX may malfunction.
CAUTION
Turn OFF the DX and the monitor.
1.
Connect the DX and the monitor using an analog RGB cable.
2.
Turn ON the power to both the DX and the monitor. The DX screen is displayed
3.
on the monitor.
Note
• When the DX is turned ON, a VGA signal is always output from the VIDEO OUT terminal.
• The monitor screen may flicker if the DX or another instrument is brought close to the
monitor.
• The edge of the screen may drop out depending on the monitor type.
Installation and Wiring
Connecting to the USB Port (/USB1)
The USB port complies with Rev. 1.1.
Connecting to the Ethernet Port
Checking the Connection/Communication Status
You can check the connection status of the Ethernet interface with the indicators that are
located above the Ethernet connector of the DX.
Indicator Connection Status of the Ethernet Interface
Illuminated (green) The Ethernet interface is electrically connected.
Blinking (red) Transmitting data.
Off The Ethernet interface is not electrically connected.
IM 04L42B01-02E
Checking the Connection on the DX Display
• Checking the Connection at the status indication section of the DX display
You can check the connection status of the Ethernet interface on the Ethernet Link
indicator located on the right side of the status display section of the basic setting
mode display. The basic setting menu appears by pressing MENU to display the
setting menu followed by FUNC for approximately 3 s.
• Checking the Connection Status in the Display Section in the Upper
Right Corner of the Communication Log Display of the DX
You can check the connection status of the Ethernet interface on the Link indicator on
the display section in the upper right corner of the communication log display.
Indicator Connection Status of the Ethernet Interface
Illuminated (green) The Ethernet interface is electrically connected.
Off The Ethernet interface is not electrically connected.
63
Page 66

Power cord
Functional ground terminal
Protective grounding cord
NL
AC~
60VA MAX50/60Hz
100-240V
Note
Do not wire the protective grounding
cord to the functional ground terminal.
24V DC
24V AC 50/60Hz 45VA MAX
28VA MAX
Other than /P1 /P1
(24 VDC/AC power supply)
Installation and Wiring
Power Supply Wiring
Panel Mount Type, or Desktop Type with /P1 Option (Models with /H5 and /P1 Options)
Precautions to Be Taken While Wiring the Power Supply
Make sure to follow the warnings below when wiring the power supply. To prevent electric
shock and damage to the DX, observe the following warnings.
WARNING
• To prevent electric shock when wiring, ensure the main power supply is turned OFF.
• To prevent the possibility of fire, use 600 V PVC insulated wire (AWG20 to 16) or
an equivalent wire for power wiring.
• Make sure to earth ground the protective earth terminal through a grounding
resistance less than 100 Ω before turning ON the power
• Use crimp-on lug with insulation sleeves (for 4-mm screws) for power supply
wires and protective grounding wires.
• To prevent electric shock, make sure to close the transparent
power supply wires.
ke sure to provide a power switch (double-pole type) on the power supply line in
• Ma
order to separate the DX from the main power supply. Put an indication on this switch
as the breaker on the power supply line for the DX and indications of ON and OFF.
Switch specifications
Steady-state current rating: 1
A or more (other than /P1), 3
Inrush current rating: 60 A or more (other than /P1), 70 A or more (/P1).
Use a switch complies with IEC60947-1, 3.
• Connect a fuse (between 2 A and 15 A) to the power line. Use a fuse approved
by CSA (for the use in North America) or VDE (for the use in Europe).
• Do not add a switch or fuse to the ground line.
.
cover for the
A or more (/P1).
Use a power supply that meets the following conditions:
Item Other than /P1 /P1
Rated supply voltage 100 to 240 VAC 24 VDC/AC
Allowable power supply voltage range 90 to 132, 180 to 264 VAC 21.6V to 26.4 VDC/AC
Rated power supply frequency 50/60 Hz 50/60 Hz (for AC)
Allowable power supply frequency range 50/60 Hz ± 2% 50/60 Hz ± 2% (for AC)
Maximum power consumption 74 VA (100 V)/100 VA (240 V) 45 VA (for DC), 70VA (for AC)
Note
Do not use a supply voltage in the range 132 to 180 VAC, as this may have adverse effects on
the measurement accuracy.
Wiring Procedure
1.
2.
Turn OFF the power to the DX and open the transparent power terminal cover.
Wire the power cord and the protective ground cord to the power supply terminals.
Use ring-tongue crimp-on lugs (designed for 4 mm screws). The proper torque for
tightening the screw is 1.4 to 1.5 N•m (12.4 to 13.2 inch•lbs).
64
Replace the power terminal cover, and fasten it with screws.
3.
IM 04L42B01-02E
Page 67
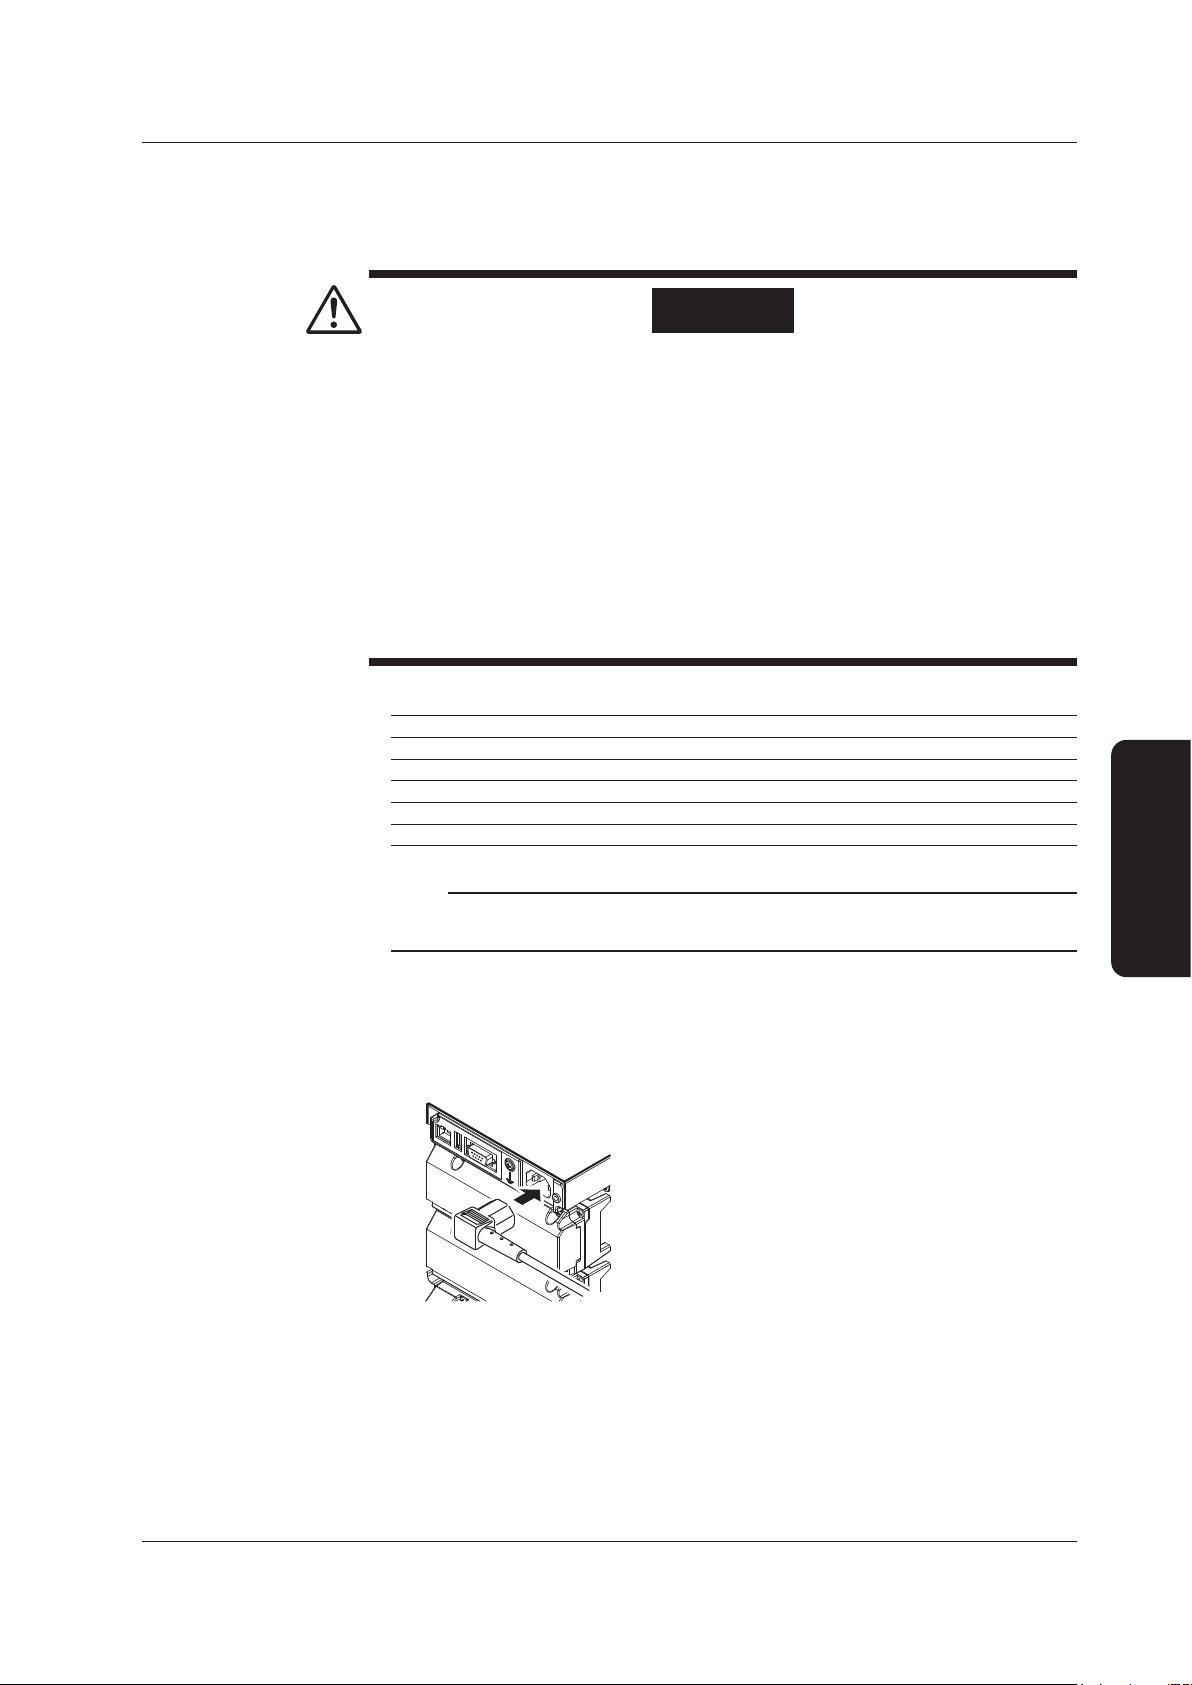
Installation and Wiring
Desktop Type (/H5[ ] Option)
Precautions to Be Taken While Connecting the Power Supply
Make sure to follow the warnings below when connecting the power supply. To prevent
electric shock and damage to the DX, observe the following warnings.
WARNING
• Before connecting the power cord, ensure that the source voltage matches the
rated supply voltage of the DX and that it is within the maximum rated voltage
range of the provided power cord.
•
Connect the power cord after checking that the power switch of the DX is turned
.
OFF
• To prevent electric shock or fire, be sure to use the power cord
YOKOGAWA.
• Make sure to perform protective earth grounding to prevent electric shock.
Connect the power cord of the desktop type to a three-prong power outlet with a
protective earth terminal.
• Do not use an extension cord without protective earth ground. Otherwise, the
protection function will be compromised.
Use a power supply that meets the following conditions:
Item Condition
Rated supply voltage 100 to 240 VAC
Allowable power supply voltage range 90 to 132, 180 to 264 VAC
Rated power supply frequency 50/60 Hz
Allowable power supply frequency range 50/60 Hz ± 2%
Maximum power consumption 74 VA (100V) and 100 VA (240 V)
Installation and Wiring
supplied by
Note
Do not use a supply voltage in the range 132 to 180 VAC, as this may have adverse effects on
the measurement accuracy.
Connection Procedure
1.
2.
3.
Check that the power switch is OFF.
Connect the power cord plug to the power connector on the rear panel. (Use the
power cord that comes with the package.)
Check that the power outlet meets the conditions given in the table above and
that the supply voltage is within the maximum rated voltage range of the power
cord that comes with the package. Then, connect the other end of the power cord
to the power outlet. The AC outlet must be of a three-prong type with a protective
earth ground.
IM 04L42B01-02E
65
Page 68

Recommended Replacement Periods for Worn Parts Maintenance
To preserve the reliability of the DX and to use the DX in a good condition for an
extended time, it is recommended that periodic replacements be made on parts. The
replacement parts may change to accommodate preventive maintenance over extended
time. Be sure to check with your nearest YOKOGAWA dealer.
The following table shows the recommended replacement period for expendable parts.
The replacement period shown here applies when the recorder is used under standard
operating conditions. For the actual replacement period, consider the actual conditions
of use. Replacement of parts will be carried out by a YOKOGAWA engineer or an
engineer certified by YOKOGAWA. Contact your nearest YOKOGAWA dealer when such
replacement is necessary.
Item
LCD 5 years Back Light Unit B9968PA 1
Battery 10 years Battery Assembly B9900BR 1
Dust and water
proof strip
Aluminum
electrolytic capacitor
* Replacement period at the upper limit of the normal operating temperature (50°C)
The replacement period varies depending on the operating temperature and the specifications of the DX.
The lower the operating temperature, the longer is the replacement period. For example, if the operating
temperature is 30°C, it may be possible to use the parts for more than 10 years.
Replacement
period
5 years Packing B8706FY 1
5 years Key Case Assembly B8706BM 1 English specifications
5 years Key Case Assembly B8706BY 1 Japanese specifications
5 years* Power Supply Assembly – 1
5 years* AD Assembly Depends on the model
Name Part No.
Quantity
Used
Notes
Note
• The LCD replacement period indicates the half life of the brightness when the brightness
is set to the factory default setting. The half life is shortened as the brightness is set
higher. The deterioration of brightness varies depending on the condition of use, and its
determination is subjective. Consider these facts for determining the actual replacement
period.
• The color of the LCD may become yellowish as time elapses. The discoloration tends to
progress faster as the brightness is set higher.
66
IM 04L42B01-02E
Page 69
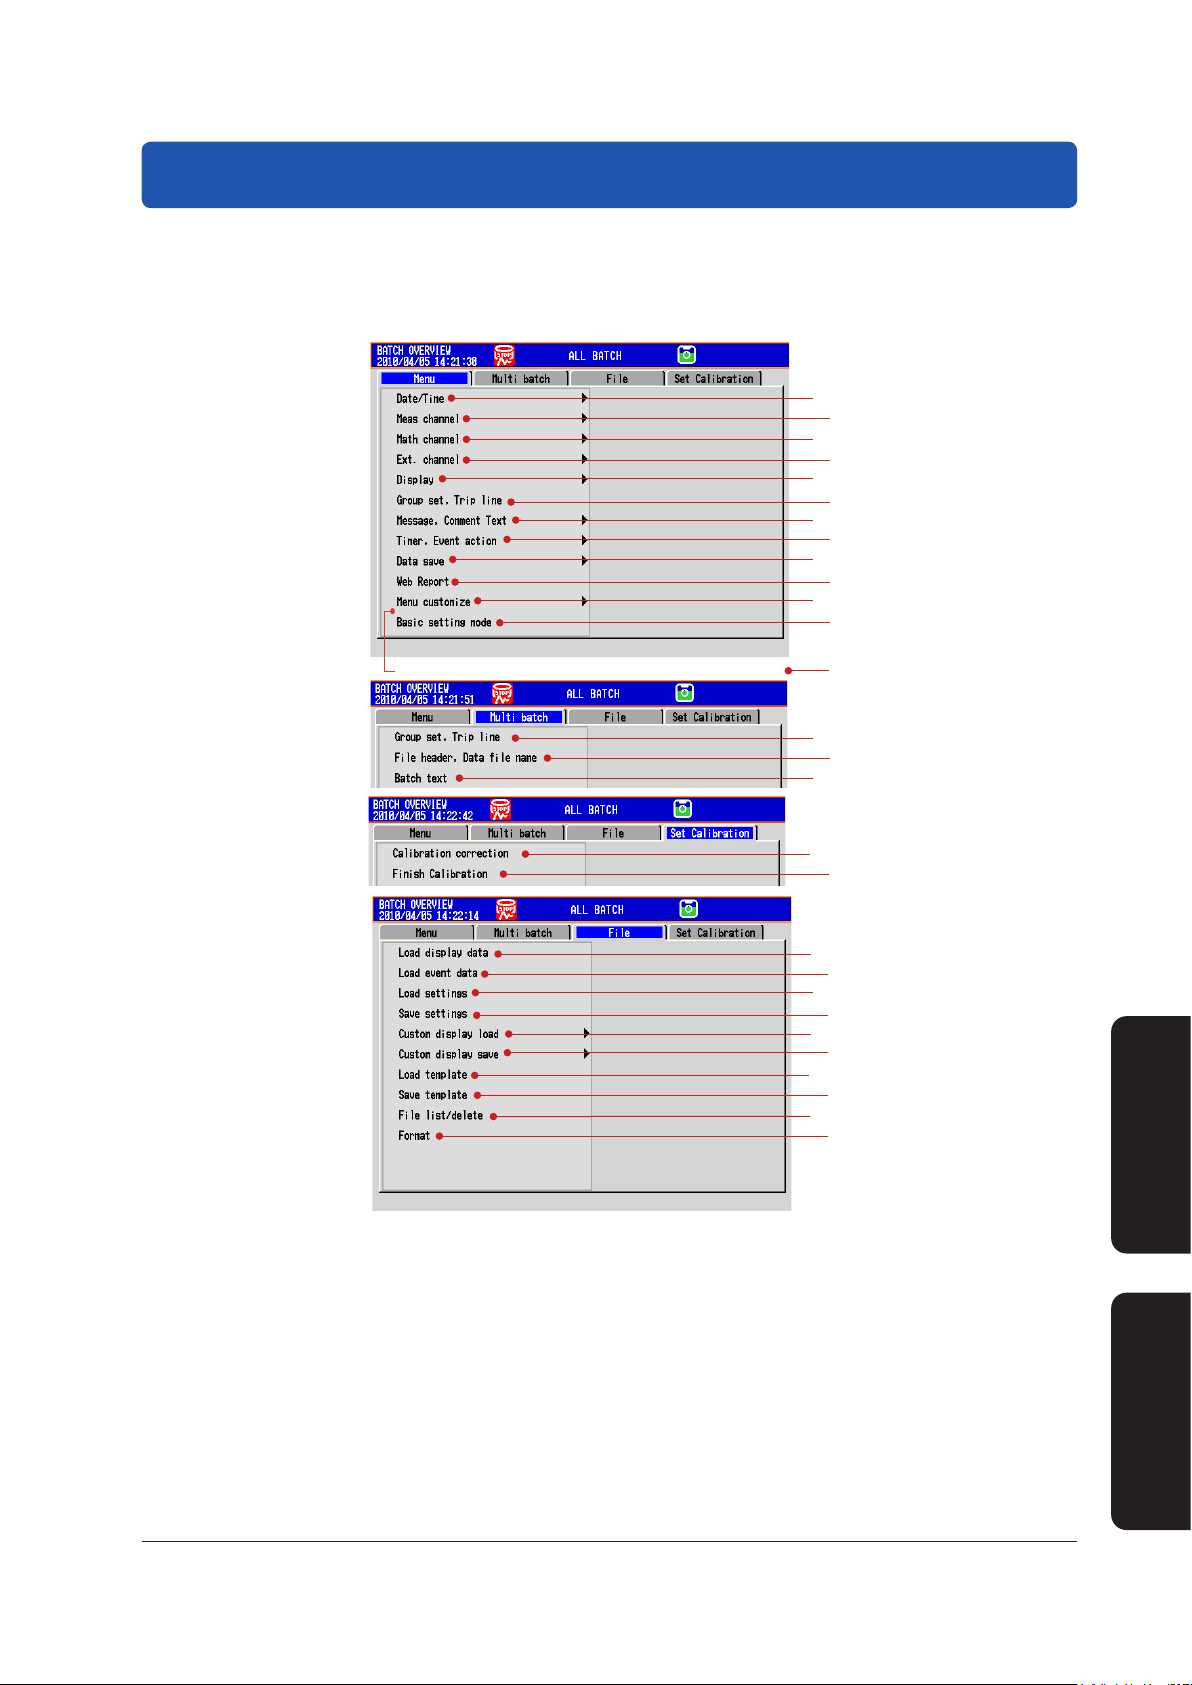
Installation and Wiring
Recommended Replacement
Periods for Worn Parts
Setup Items and
Default Values
Setup Items and Default Values
Page 69
Page 69 to 71
Page 72 to 73
*
Page 74
*
Page 75
Page 76
Pages 76 to 78
Page 79
Page 79
*
Page 80
Page 80
Page 81
*
Page 81
*
Page 81
*
Page 76
End: On models with advanced security (/AS1 option)
Page 80
*
Page 81
*
Page 81
*
Page 81
Page 81
Page 82
Page 82
Page 82
Page 82
Page 82
*
Page 82
*
Page 82
Page 82
The setup items and the default values in the setting mode are listed below. Enter the
settings that you are using in the Setting column for your convenience.
Setting mode menu
*: Options
IM 04L42B01-02E
67
Page 70
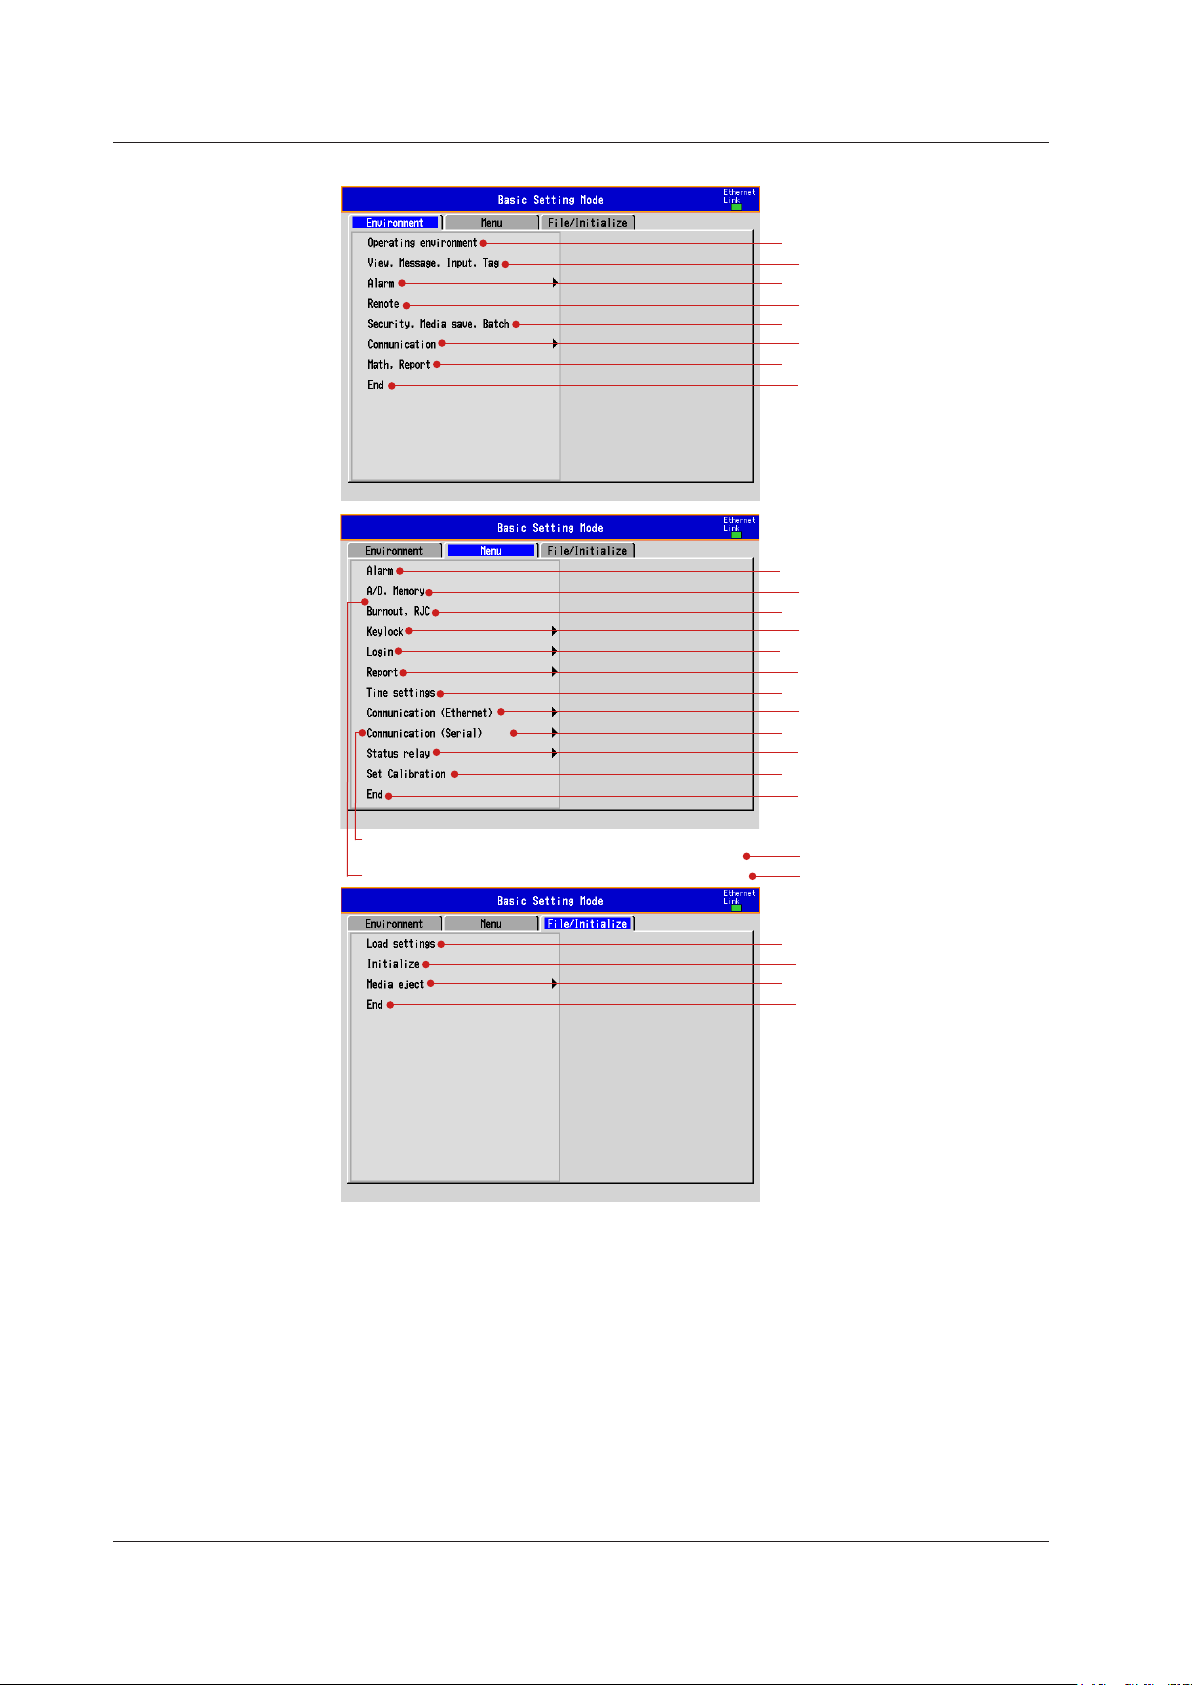
Page 83
Page 83
Page 83
Page 83
*1
Page 84
Page 84
Page 84
*1
Page 84
Communication (PROFIBUS-DP):
On models with the PROFIBUS-DP Interface (/CP1 option).
Signature: On models with advanced security (/AS1 option)
Page 85
Page 85
Page 85
Page 86
*2
Pages 86 to 87
*2
Page 88
*1
Page 88
Page 89 to 92
Page 93
*1
Page 94
*1
Page 94
Page 95
Page 95
Page 95
Page 95
Page 94
Page 93
*1
Page 85
*1
Setup Items and Default Values
Basic setting mode menu
68
1: Options
2: Displayed when the function is enabled in the Environment settings.
IM 04L42B01-02E
Page 71

Installation and Wiring
Recommended Replacement
Periods for Worn Parts
Setup Items and
Default Values
Setup Items in Setting Mode and Their Default Values
This section uses the following notations in tables.
*1: This indicates functions that are available for release number 2 or later.
*2: This indicates functions that are available for release number 3 or later.
*3: This indicates functions that are available for release number 4 or later.
Setup Items and Default Values
Menu tab
Date/Time > Time settings
Setup Item Selectable Range or Selections Default Value Setting
Time set – 2008/01/01
Date/Time > Daylight Saving Time
Setup Item Selectable Range or Selections Default Value Setting
Use/Not Use/Not Not
Start time > Month JAN/FEB/MAR/APR/MAY/JUN/JUL/AUG/SEP/
Start time > Day order 1st/2nd/3rd/4th/Last 2nd
Start time > Day of the week SUN/MON/TUE/WED/THU/FRI/SAT SUN
Start time > Hour of the day Numerical value 2
End time > Month JAN/FEB/MAR/APR/MAY/JUN/JUL/AUG/SEP/
End time > Day order 1st/2nd/3rd/4th/Last 1st
End time > Day of the week SUN/MON/TUE/WED/THU/FRI/SAT SUN
End time > Hour of the day Numerical value 1
Meas channel > Range, Alarm
Setup Item Selectable Range or Selections Default Value Setting
First-CH, Last-CH
Range > Mode
Mode=Volt
Range
Span Lower
Span Upper
Mode=TC
Range
Span Lower
Span Upper
Mode=RTD
Range
Span Lower
Span Upper
Mode=Scale
Type
Range
Span Lower
Span Upper
Scale Lower
Scale Upper
Unit
Mode=Delta
Type
Range
Span Lower
Span Upper
Ref.CH
*2
*2
00:00:00
MAR
OCT/NOV/DEC
NOV
OCT/NOV/DEC
Channel number
Skip/Volt/TC/RTD/Scale/Delta/DI/
1-5V/Sqrt
20mV/60mV/200mV/2V/6V/20V/50V
Depends on the range.
Depends on the range.
R/S/B/K/E/J/T/N/W/L/U/WRe
(Options may add additional settings.)
Depends on the range.
Depends on the range.
Pt/JPt (Options may add additional settings.)
Depends on the range.
Depends on the range.
Volt/TC/RTD/DI
Depends on the type.
Depends on the range.
Depends on the range.
–30000 to 30000, decimal position: 0 to 4
–30000 to 30000, decimal position: 0 to 4
6 characters or less
Volt/TC/RTD/DI
Depends on the type.
Depends on the range.
Depends on the range.
Meas channel number
001
Volt
2V
–
–
R
–
–
Pt
–
–
Volt
–
–
–
0.00
200.00
–
Volt
–
–
–
–
IM 04L42B01-02E
69
Page 72

Setup Items and Default Values
Setup Item Selectable Range or Selections Default Value Setting
Mode=DI
Range
Span Lower
Span Upper
Mode=1-5V
Range
Span Lower
Span Upper
Scale Lower
Scale Upper
Unit
Low-cut
Mode=Sqrt
Range
Span Lower
Span Upper
Scale Lower
Scale Upper
Unit
Low-cut
Low-cut value
Alarm
1, 2, 3, 4
Type
Value
Relay
Number
Detect
Level/Cont
0, 1
0, 1
1-5V
0.800 to 5.200
0.800 to 5.200
–30000 to 30000, decimal position :0 to 4
–30000 to 30000, decimal position :0 to 4
6 characters or less
On/Off
20mV/60mV/200mV/2V/6V/20V/50V
Depends on the range.
Depends on the range.
–30000 to 30000, decimal position: 0 to 4
–30000 to 30000, decimal position: 0 to 4
6 characters or less
On/Off
0.0 to 5.0
On/Off
H:High/L:Low/h:delta H/l:delta L/R:rate H/
r:rate L/T:delayH/t:delayL
Numerical value
On/Off
I01/.../I06, I11/.../I16, I21/.../I26,
I31/.../I36 (Depends on the option.)
S01/S02/S03/.../S29/S30
On/Off
Level
0
1
1-5V
1.000
5.000
0.00
200.00
–
Off
–
–
0.00
200.00
–
Off
0.5
Off
H
–
Off
I01
On
Meas channel > Tag, Memory sample, Alarm delay
Setup Item Selectable Range or Selections Default Value Setting
Without /AS1
First-CH, Last-CH Channel number 001
Tag > Comment
Tag > No.
*2
*2
32 characters or less
16 characters or less –
*2
–
Memory sample > On/Off On/Off On
Alarm delay > Time 1 to 3600 10
With /AS1
*3
The First-CH, Last-CH, Tag, and Memory sample items are the same as on a DX without the /AS1 option.
Alarm delay > Time 1 to 3600 when the unit is seconds. 1 to 24 when
10
the unit is hours.
Alarm delay > Unit Hour/Sec Sec
Meas channel > Moving average
Setup Item Selectable Range or Selections Default Value Setting
First-CH, Last-CH Channel number 001
Moving average > On/Off On/Off Off
Moving average > Count 2 to 400 2
70
IM 04L42B01-02E
Page 73

Installation and Wiring
Recommended Replacement
Periods for Worn Parts
Setup Items and
Default Values
Setup Items and Default Values
Meas channel > Color
Setup Item Selectable Range or Selections Default Value Setting
Group of channel 001-010, etc Depends on the model.
Color Red/Green/Blue/B.violet/Brown/Orange/
Y.green/Lightblue/Violet/Graly/Lime/Cyan/
Darkblue/Yellow/Lightgray/Purple/Black/Pink/
L.brown/L.green/Darkgray/Olive/DarkCyan/
S.green (24 colors)
Red to Gray
Meas channel > Zone, Scale, Bar graph
Setup Item Selectable Range or Selections Default Value Setting
First-CH, Last-CH Channel number 001
Zone > Lower
Zone > Upper
Scale > Position
Scale > Division
Bar graph > Base position
Bar graph > Division
0 to 95
5 to 100
Off/1/2/3/4/5/6/7/8/9/10
4/5/6/7/8/9/10/11/12/C10
Normal/Center/Lower
4/5/6/7/8/9/10/11/12
*1
/Upper
0
100
1
*1
10
Normal
10
Meas channel > Partial
Setup Item Selectable Range or Selections Default Value Setting
First-CH, Last-CH Channel number 001
On/Off On/Off Off
Expand 1 to 99% 50
Boundary Span Lower+1digit to Span Upper-1digit 0.0000
Meas channel > Alarm mark, Color scale band
Setup Item Selectable Range or Selections Default Value Setting
First-CH, Last-CH Channel number 001
Alarm mark > Mark kind
Alarm mark > Indicate on Scale
Alarm mark > Alarm mark color > Alarm 1
Alarm mark > Alarm mark color > Alarm 2
Alarm mark > Alarm mark color > Alarm 3
Alarm mark > Alarm mark color > Alarm 4
Color scale band > Band area
Color scale band > Color
Color scale band > Display position > Lower
Color scale band > Display position > Upper
Meas channel > Calibration correction
Setup Item Selectable Range or Selections Default Value Setting
First-CH, Last-CH Channel number 001
Number of set points Off/2/3/4/5/6/7/8/9/10/11/12/13/14/15/16 Off
1 to n > MES val
1 to n > True val
Alarm/Fixed
On/Off
Red/Green/.../S.green (24 colors)
Same as Alarm 1
Same as Alarm 1
Same as Alarm 1
Off/In/Out
*2
Auto
/Red/Green/.../S.green (24 colors)
Measuring range
Measuring range
Value in the measuring range/measured value
Measuring range
Alarm
Off
Red
Orange
Orange
Red
Off
Lime
0.0000
0.0100
–
–
IM 04L42B01-02E
71
Page 74

Setup Items and Default Values
Math channel > Calculation expression, Alarm
Setup Item Selectable Range or Selections Default Value Setting
First-CH, Last-CH Channel number 101
Math range > Math On/Off
Math range > Calculation expression
Math range > Span Lower
Math range > Span Upper
Math range > Unit
Math alarm
1, 2, 3, 4
Type
Value
Relay On/Off
Number
Detect
On/Off
120 characters or less
–9999999 to 99999999, decimal position: 0 to 4
–9999999 to 99999999, decimal position: 0 to 4
6 characters or less
On/Off
H:High/L:Low/T:delayH/t:delayL
Numerical value
On/Off
I01/.../I06, I11/.../I16, I21/.../I26,
I31/.../I36 (Depends on the option.)
S01/S02/S03/.../S29/S30
On/Off
Off
–
–200.00
200.00
–
Off
–
–
Off
I01
On
Math channel > Constant
Setup Item Selectable Range or Selections Default Value Setting
Number of constant K01 to K60 K01
Value –9.9999E+29 to –1.0000E–30, 0,
1.0000E–30 to –9.9999E+29
1
Math channel > Tag, Memory sample, Alarm delay
Setup Item Selectable Range or Selections Default Value Setting
First-CH, Last-CH Channel number 101
Tag > Comment
Tag > No.
Memory sample > On/Off On/Off On
Alarm delay > Time 1 to 3600 10
*2
*2
32 characters or less –
16 characters or less –
Math channel > TLOG, Rolling average
Setup Item Selectable Range or Selections Default Value Setting
First-CH, Last-CH Channel number 101
TLOG > Timer type
TLOG > Timer No.
TLOG > Sum scale
TLOG > Reset
Rolling average > On/Off
Rolling average > Interval
Rolling average > Number of
samples
*2
Timer/Match T
1/2/3/4
1/2/3/.../11/12 (on models with the /BT2 multi
batch option)
Off, /s, /min, /h
On/Off
On/Off
1s/2s/3s/4s/5s/6s/10s/12s/15s/20s/30s/
1min/2min/3min/4min/5min/6min/10min/12min/
15min/20min/30min/1h
1 to 1500
*2
Timer
1
Off
Off
Off
10s
1
Math channel > Color
Setup items and values are the same as those for measurement channels, except the channel numbers.
Math channel > Zone, Scale, Bar graph
Setup items and values are the same as those for measurement channels, except the channel numbers.
Math channel > Partial
Setup items and values are the same as those for measurement channels, except the channel numbers.
Math channel > Alarm mark, Color scale band
Setup items and values are the same as those for measurement channels, except the channel numbers.
72
IM 04L42B01-02E
Page 75

Installation and Wiring
Recommended Replacement
Periods for Worn Parts
Setup Items and
Default Values
Setup Items and Default Values
Math channel > Math start action
Setup Item Selectable Range or Selections Default Value Setting
Math start action > Math start Off/Start/Rst+St Start
IM 04L42B01-02E
73
Page 76

Setup Items and Default Values
Ext. channel > Range, Alarm
Setup Item Selectable Range or Selections Default Value Setting
First-CH, Last-CH Channel number 201
Ext. range > On/Off
Ext. range > Span Lower
Ext. range > Span Upper
Ext. range > Unit
Ext. alarm
1, 2, 3, 4
Type
Value
Relay On/Off
Number
Detect
On/Off
–30000 to 30000, decimal position: 0 to 4
–30000 to 30000, decimal position: 0 to 4
6 characters or less
On/Off
H:High/L:Low/T:delayH/t:delayL
Numerical value
On/Off
I01/.../I06, I11/.../I16, I21/.../I26,
I31/.../I36 (Depends on the option.)
S01/S02/S03/.../S29/S30
On/Off
Off
–200.00
200.00
–
Off
–
–
Off
I01
On
Ext. channel > Color
Setup items and values are the same as those for measurement channels, except the channel numbers.
Ext. channel > Zone, Scale, Bar graph
Setup items and values are the same as those for measurement channels, except the channel numbers.
Ext. channel > Partial, Alarm mark, Color scale band
Setup items and values are the same as those for measurement channels, except the channel numbers.
74
IM 04L42B01-02E
Page 77

Installation and Wiring
Recommended Replacement
Periods for Worn Parts
Setup Items and
Default Values
Setup Items and Default Values
Display > Trend (Circular)/Save interval
Setup Item Selectable Range or Selections Default Value Setting
Trend/Save interval
Trend interval [/div]
Save interval
Second interval [/div]
Circular/Save interval
Time per revolution [/rev]
Save interval
Offset time
*2
5s
/10s*2/15s/30s/1min/2min/5min/10min/15min/
20min/30min/1h/2h/4h/10h (Depends on the model.)
10min to 31day (Depends on the trend interval.)
*2
5s
/10s*2/15s/30s/1min/2min/5min/10min/15min/
20min/30min/1h/2h/4h/10h (Depends on the model.)
20min/30min/1h/2h/6h/8h/12h/16h/1day/
2day/1week/2week/4week
10min to 31day (Depends on the time per revolution.)
Off/1h to 23h (Depends on the time per revolution.)
1min
1h
1min
1day
1h
Off
Display > Trend (Circular), Bar graph, LCD, Monitor
Setup Item Selectable Range or Selections Default Value Setting
Trend
Trend > Direction
Trend > Trend clear
Trend > Message direction
Trend > Scale > Digit
Trend > Scale > Value indicator
Trend > Trend line
Trend > Grid
Circular
Circular > Full circle action
Circular > Trend line
Circular > Grid
Bar graph > Direction Horizontal/Vertical Vertical
LCD > Brightness
LCD > Backlight saver > Mode
LCD > Backlight saver > Saver time
LCD > Backlight saver > Restore
Monitor > Background > Display
Monitor > Background > Historical trend
Monitor > Scroll time
Monitor > Jump default display
Horizontal/Vertical/Wide/Split
On/Off
Horizontal/Vertical
Normal/Fine
Mark/Bargraph
1/2/3
Auto/4/5/6/7/8/9/10/11/12
Allclear/Divclear
1/2/3
Auto/4/5/6/7/8/9/10/11/12
1/2/3/4/5/6
Off/Dimmer/Timeoff
1min/2min/5min/10min/30min/1h
Key, Key+Alarm
White/Black
White/Cream/Black/Lightgray
5s/10s/20s/30s/1min
Off/1min/2min/5min/10min/20min/30min/1h
Horizontal
Off
Horizontal
Normal
Mark
2
Auto
Allclear
2
Auto
2
Off
1h
Key+Alarm
White
Black
10s
Off
Display > Annunciator
Setup Item Selectable Range or Selections Default Value Setting
Annunciator position 1 to 80 1
On/Off On/Off Off
Channel Channel number 001
Level 1 /2/3/4/All 1
Comment txt block No. 1 to 100 1
Display > FAVORITE Key action
Setup Item Selectable Range or Selections Default Value Setting
Action History/Favorite Favorite
Group display Current/Saved Saved
Time axis zoom Current/Saved Saved
IM 04L42B01-02E
*2
*2
75
Page 78

Setup Items and Default Values
Group set, Trip line
Setup Item Selectable Range or Selections Default Value Setting
Group number 1/2/3/.../35/36 1
Group set > On/Off
Group set > Group name
Group set > CH set
Trip line > 1
Trip line > 2
Trip line > 3
Trip line > 4
Trip line > Position
Trip line > Color
Trip line > Line width
On/Off
16 characters or less
39 characters or less
On/Off
On/Off
On/Off
On/Off
0 to 100
Red/Green/.../S.green (24 colors)
1/2/3
Group 1 to 4: On
Group 5 to 36: Off
GROUP1 etc.
Depends on the model.
Off
Off
Off
Off
50
1:Red, 2:Green
3:Blue, 4:Yellow
2
Message, Comment Text*2 > Message
Setup Item Selectable Range or Selections Default Value Setting
Message No. 1-10/11-20/21-30/31-40/41-50/51-60/
61-70/71-80/81-90/91-100
1 to 100 32 characters or less –
11-20
*3
Message, Comment Text > Comment text fields
Setup Item Selectable Range or Selections Default Value Setting
Coment txt field no 1 to 200 1
Text info 32 characters or less –
Message, Comment Text > Comment text block
Setup Item Selectable Range or Selections Default Value Setting
Coment txt block no 1 to 100 1
Line > 1 > Comment txt field no 1 to 200 1
Line > 2 > Comment txt field no 1 to 200 1
Line > 3 > Comment txt field no 1 to 200 1
Line > 4 > Comment txt field no 1 to 200 1
Line > 5 > Comment txt field no 1 to 200 1
*2
*2
Timer, Event action > Timer
Setup Item Selectable Range or Selections Default Value Setting
Timer No. 1/2/3/4
1/2/3/.../11/12 (on models with the /BT2 multi
batch option)
Mode Off/Relative/Absolute Off
Relative > Interval
Relative > Reset at Math Start
Absolute > Interval
Absolute > Ref.time
00:01 to 24:00
On/Off
1min/2min/3min/4min/5min/6min/10min/
12min/15min/20min/30min/1h/2h/3h/4h/
6h/8h/12h/24h
0 to 23
*2
1
01:00
On
1h
0:00
76
IM 04L42B01-02E
Page 79

Installation and Wiring
Recommended Replacement
Periods for Worn Parts
Setup Items and
Default Values
Setup Items and Default Values
Timer, Event action > Match time timer
Setup Item Selectable Range or Selections Default Value Setting
Timer number 1/2/3/4
1/2/3/.../11/12 (on models with the /BT2 multi
batch option)
*2
1
Kind Off/Day/Week/Month Off
Day 1 to 31 (varies depending on the month) 1
Day of the week SUN/MON/TUE/WED/THU/FRI/SAT SUN
Hour 00:00 to 23:59 00:00
Timer action Single/Repeat Repeat
Timer, Event action > Event action
Setup Item Selectable Range or Selections Default Value Setting
Logic box number 1/2/3/.../39/40 1
Event None/Remote/Relay/Switch/Timer/
Matchtime/Alarm/UserKey/
EventLevelSwitch
Relay-Off*3/Switch-Off*3/Alarm-Off*3/
EventLevelSwitch-Off
*2
/EventEdgeSwitch*2/
*3
Remote > Remote number 1/2/3/4/5/6/7/8 1
Relay > Relay number I01/.../I06, I11/.../I16, I21/.../I26, I31/.../I36,
(Depends on the option.)
I01/.../I06, I11/.../I16, I21/.../I26, I31/.../I36,
(Depends on the option.)
Switch > Switch No. S01/S02/S03/.../S29/S30 S01
Timer > Timer No. 1/2/3/4
1/2/3/.../11/12 (on models with the /BT2 multi
batch option)
*2
MatchTimeTimer > Match Time Timer No. 1/2/3/4
EventLevelSwitch > Event Switch No
EventEdgeSwitch > Event Switch No
Relay-Off > Relay number
Switch-Off > Switch No.
*3
*3
*2
*2
EventLevelSwitch-Off > Event Switch No
1/2/3/.../11/12 (on models with the /BT2 multi
batch option)
1/2/3/.../29/30 1
1/2/3/.../29/30 1
I01/.../I06, I11/.../I16, I21/.../I26, I31/.../I36
(Depends on the option.)
S01/S02/S03/.../S29/S30 S01
*3
1/2/3/.../30 1
*2
None
I01
1
1
I01
IM 04L42B01-02E
77
Page 80

Setup Items and Default Values
Setup Item Selectable Range or Selections Default Value Setting
Action
Message > Message No.
Message > Write to
Message > Group number
Group > Group number
FavoriteDisplay > Action
FavoriteDisplay > Select
> Favorite Screen No
*2
CommentDisplay
> Comment Txt Block No
Flag > Flag number
TimerReset > Timer No.
PanelLoad > Setting file number
MemoryStart/Stop, MemoryStart, MemoryStop,
Trigger (not selectable on a DX with the /AS1
*3
), AlarmACK, AlarmDisplayReset*2,
option
MathStart/Stop, MathStart, MathStop,
MathReset, SaveDisplay, SaveEvent, Message,
Snapshot, DisplayRate1/2, ManualSample,
TimerReset, DisplayGroupChange,
FavoriteDisplay*2, CommentDisplay*2, Flag,
PanelLoad (not selectable on a DX with the /AS1
option*3), TimeAdjust (Depends on the events,
etc)
1 to 100
All/Select
1/2/3/.../35/36
*2
1/2/3/.../35/36
Key/Select
1/2/3/4/5/6/7/8
*2
1 to 100
1/2/3/4/5/6/7/8
1/2/3/4
1/2/3/.../11/12 (on models with the /BT2 multi
batch option)
*2
1/2/3
Group
1
All
1
1
Key
1
1
1
1
1
The following menus appear when the multi batch function
MemoryStart/Stop > Target Action
MemoryStart/Stop > Select
> Batch Group No
MemoryStart > Target Action
MemoryStart > Select
> Batch Group No
MemoryStop > Target Action
MemoryStop > Select
> Batch Group No
SaveDisplay > Target Action
SaveDisplay > Select
> Batch Group No
SaveEvent > Target Action
SaveEvent > Select
> Batch Group No
MathReset > Target Action
MathReset > Select
> Batch Group No
Message > Message No.
Message > Write to
Message > Select
> Batch Group No
> Display Group No
Message > All
> Batch Group No
DisplayGroupChange
> Batch Group No
DisplayGroupChange
> Display Group No
All/Select
1/2/3/.../11/12 (varies depending on settings)
All/Select
1/2/3/.../11/12 (varies depending on settings)
All/Select
1/2/3/.../11/12 (varies depending on settings)
All/Select
1/2/3/.../11/12 (varies depending on settings)
All/Select
1/2/3/.../11/12 (varies depending on settings)
All/Select
1/2/3/.../11/12 (varies depending on settings)
1 to 100
All/Select
1/2/3/.../11/12 (varies depending on settings)
1/2/3/.../11/12
1/2/3/.../11/12 (varies depending on settings)
1/2/3/.../11/12 (varies depending on settings)
1/2/3/.../11/12
*2
is in use.
All
1
All
1
All
1
All
1
All
1
All
1
1
All
1
1
1
1
1
78
IM 04L42B01-02E
Page 81

Installation and Wiring
Recommended Replacement
Periods for Worn Parts
Setup Items and
Default Values
Setup Items and Default Values
Data save > File header, Data file name
Setup Item Selectable Range or Selections Default Value Setting
File header > Characters 50 characters or less –
Data file name > Structure Date/Serial/Batch Date
Data file name > Identified strings 16 characters or less –
Data save > Save directory
Setup Item Selectable Range or Selections Default Value Setting
Directory name 20 characters or less DATA0
Data save > Event data
Setup Item Selectable Range or Selections Default Value Setting
Without /AS1
Sample rate 25ms/125ms/250ms/500ms/1s/2s/5s/10s/30s/
60s/120s/300s/600s/15min
*2
/20min*2/30min
(Depends on the model.)
Mode Free/Single/Repeat Free
Data length 10min to 31day (Depends on the sample rate.) 1h
Pre-trigger 0/5/25/50/75/95/100 0
Trigger signal > Key On/Off On
With /AS1
*3
The Sample rate and Data length items are the same as on a DX without the /AS1 option.
Mode Fixed at Free Free
There are no Pre-trigger or Trigger signal > Key items.
1s
*2
Data save > Manual sample
Setup Item Selectable Range or Selections Default Value Setting
Manual sample number 001 to 120 001
On/Off On/Off On
Channel Channel number 001
Data save > Batch text
Setup Item Selectable Range or Selections Default Value Setting
Text field number 1 to 24
Text field > Title of field
Text field > Characters
Web Report
Setup Item Selectable Range or Selections Default Value Setting
Web Report No 1/2/3/4/5/6/7/8/9/10 1
On/Off On/Off Off
Title 64 characters or less –
Item > 1 to 10 On/Off Off
Item > 1 to 10 > Report CH R01/R02/.../R60 R01
Item > 1 to 10 > Value Max/Min/Ave/Sum/Inst Sum
Item > 1 to 10 > Name 16 characters or less –
*2
20 characters or less
30 characters or less
*2
1
–
–
IM 04L42B01-02E
79
Page 82

Setup Items and Default Values
Menu customize
Setup Item Selectable Range or Selections Default Value Setting
Function menu Select/Hide/View/Transfer –
Display menu Separate/Select/Hide/View/Transfer –
End (/AS1 option)
Setup Item Selectable Range or Selections Default Value Setting
End Yes/No –
Basic setting mode
Setup Item Selectable Range or Selections Default Value Setting
Entering basic setting mode. ... Yes/No –
*3
*2
80
IM 04L42B01-02E
Page 83

Installation and Wiring
Recommended Replacement
Periods for Worn Parts
Setup Items and
Default Values
Setup Items and Default Values
Multi batch tab
Group set, Trip line > Group set
Setup Item Selectable Range or Selections Default Value Setting
First Batch Group No, Last Batch Group No. 1/2/3/4/5/6/7/8/9/10/11/12 (varies
Display Group No 1/2/3/4/5/6/7/8/9/10/11/12 1
Set Display Group > On/Off
Set Display Group > Group name
Set Display Group > CH set
Trip line
1, 2, 3, 4
Position
Color
Line Width
File header, File name
Setup Item Selectable Range or Selections Default Value Setting
First Batch Group No, Last Batch Group No. 1/2/3/.../11/12 (varies depending on settings) 1
File header > Characters 50 characters or less –
Data file name > Structure Date/Serial/Batch Date
Data file name > Identified strings 16 characters or less –
Data save > Batch text
Setup Item Selectable Range or Selections Default Value Setting
First Batch Group No, Last Batch Group No. 1/2/3/.../11/12 (varies depending on settings) 1
Text field number 1 to 24 1
Text field > Title of field 20 characters or less –
Text field > Characters 30 characters or less –
*2
*2
1
depending on settings)
On/Off
16 characters or less
39 characters or less
On/Off
0 to 100
Red/Green/.../S.green (24 colors)
1/2/3
*2
*2
Off
BATCH-1, etc.
Depends on the model.
Off
50
1:Red, 2:Green
3:Blue, 4:Yellow
2
End (/AS1 option)
Setup Item Selectable Range or Selections Default Value Setting
End Yes/No –
Set Calibration Tab
Setup Item Selectable Range or Selections Default Value Setting
Calibration correction Same as Meas channel > Calibration correction
Finish Calibration > Next calibration due Year, month, and date –
Finish Calibration > Execute – –
End (/AS1 option)
Setup Item Selectable Range or Selections Default Value Setting
End Yes/No –
File tab
Load display data
Setup Item Selectable Range or Selections Default Value Setting
Kind CF/USB CF
Load event data
Setup Item Selectable Range or Selections Default Value Setting
Kind CF/USB CF
*3
*3
*3
*2
IM 04L42B01-02E
81
Page 84

Setup Items and Default Values
Load settings
Setup Item Selectable Range or Selections Default Value Setting
Kind CF/USB CF
Save settings
Setup Item Selectable Range or Selections Default Value Setting
Kind CF/USB CF
File name 32 characters or less –
Custom display load > Select
Setup Item Selectable Range or Selections Default Value Setting
Display No. Internal 1 to Internal 3, External 1 to External 25 Internal 1
File selection screen – –
Custom display load > All
Setup Item Selectable Range or Selections Default Value Setting
Directory selection screen – –
Custom display save > Select
Setup Item Selectable Range or Selections Default Value Setting
Display No. Internal 1 to Internal 3, External 1 to External 25 Internal 1
File name 32 characters or less –
Custom display save > All
Setup Item Selectable Range or Selections Default Value Setting
Directory name 20 characters or less –
*2
*2
*2
*2
File list/delete (Delete is not available on DXs with the /AS1 option.*3)
Setup Item Selectable Range or Selections Default Value Setting
Kind CF/USB CF
Load template
Setup Item Selectable Range or Selections Default Value Setting
Report Kind Hour, Day, Week, Month, Hour+Day, Day+Week,
Save template
Setup Item Selectable Range or Selections Default Value Setting
Report Kind Hour, Day, Week, Month, Hour+Day, Day+Week,
Template data save > File name 32 characters or less –
*3
–
Day+Month
*3
–
Day+Month
Format (Without /AS1)
Setup Item Selectable Range or Selections Default Value Setting
Kind CF/USB CF
Format > Volume name 11 characters or less –
End (/AS1 option)
Setup Item Selectable Range or Selections Default Value Setting
End Yes/No –
82
*3
IM 04L42B01-02E
Page 85

Installation and Wiring
Recommended Replacement
Periods for Worn Parts
Setup Items and
Default Values
Setup Items and Default Values
Setup Items in Basic Setting Mode and Their Default Values
This section uses the following notations in tables.
*1: This indicates functions that are available for release number 2 or later.
*2: This indicates functions that are available for release number 3 or later.
*3: This indicates functions that are available for release number 4 or later.
Environment tab
*2
Operating environment
Setup Item Selectable Range or Selections Default Value Setting
Tag/Channel Tag/Channel Tag
Language English/Japanese/German/French/Chinese English
Remote Controller ID Off/0/1/.../30/31 Off
Temperature C/F C
Decimal Point Type
Basic setting mode Menu display
View, Message, Input, Tag
Setup Item Selectable Range or Selections Default Value Setting
View > Trend type
View > Partial
View > Trend rate switching
Message > Write group
Message > Power-fail message
Message > Change message
Input > Value on over-range Free/Over Over
Tag Basic settings > Tag No. Use/Not
Alarm > Action
Setup Item Selectable Range or Selections Default Value Setting
No logging On/Off Off
Annunciator mode
Sequence
Time off color
*2
*2
*2
*2
*2
*2
*2
Point/Comma Point
On/Off On
T-Y/Circular
On/Off
On/Off
Common/Separate
On/Off
On/Off
*2
Use/Not Not
On/Off
ISA-A-4/ISA-A/ISA-M
White/Green
T-Y
Off
Off
Common
Off
Off
Off
ISA-A
Green
Alarm > Level/Color
Setup Item Selectable Range or Selections Default Value Setting
Level 1-2-3-4/1-4-2-3/1-4-3-2 1-2-3-4
Color > 1
Color > 2
Color > 3
Color > 4
Remote
Setup Item Selectable Range or Selections Default Value Setting
Level 1-2-3-4/1-4-2-3/1-4-3-2 1-2-3-4
Remote Input > 1
Remote Input > 2
Remote Input > 3
Remote Input > 4
Remote Input > 5
Remote Input > 6
Remote Input > 7
Remote Input > 8
IM 04L42B01-02E
*2
Red/Yellow/Orange/Pink
Red/Yellow/Orange/Pink
Red/Yellow/Orange/Pink
Red/Yellow/Orange/Pink
*2
N.O/N.C
N.O/N.C
N.O/N.C
N.O/N.C
N.O/N.C
N.O/N.C
N.O/N.C
N.O/N.C
Red
Red
Red
Red
N.O
N.O
N.O
N.O
N.O
N.O
N.O
N.O
83
Page 86

Setup Items and Default Values
Security, Media save, Batch
Setup Item Selectable Range or Selections Default Value Setting
Without /AS1
Security > Key
Security > Communication
Save > Auto save
Save > Media FIFO
*1
Batch > On/Off
Batch > Lot-No. digit
Batch > Auto increment
Batch operation qty
With /AS1
*3
*2
Off/Login/Keylock
Off/Login
On/Off
On/Off
On/Off/MultiBatch
*2
Off/4/6/8
On/Off
2/3/4/5/6/7/8/9/10/11/12
Off
Off
On
Off
Off (With /AS1, On)
6
On
4
Security > Key Login Login
Security > Communication Off/Login Off
Security > Multi login On/Off Off
Security > Password management On/Off Off
The Save items are the same as on a DX without the /AS1 option.
The Batch items are the same as on a DX without the /AS1 option.
Communication > Service port
Setup Item Selectable Range or Selections Default Value Setting
FTP 1 to 65535 21
HTTP 1 to 65535 80
SNTP 1 to 65535 123
Modbus 1 to 65535 502
Communication > POP3 Details
*2
Setup Item Selectable Range or Selections Default Value Setting
POP Before SMTP > Send delay [second] 0/1/2/3/4/5/6/7/8/9/10 2
POP3 Login PLANE/APOP PLAIN
Communication > FTP Server Details
*2
Setup Item Selectable Range or Selections Default Value Setting
Output Directory Format MS-DOS/UNIX MS-DOS
Math, Report
Setup Item Selectable Range or Selections Default Value Setting
Math > Value on Error
Math > Value on Overflow > SUM, AVE
Math > Value on Overflow > MAX, MIN, P-P
Report > Report select > 1
Report > Report select > 2
Report > Report select > 3
Report > Report select > 4
Report > File type
Report > Use Template
*3
+Over/–Over
Error/Skip/Limit
Over/Skip
Max/Min/Ave/Sum/Inst
Off/Max/Min/Ave/Sum/Inst
Off/Max/Min/Ave/Sum/Inst
Off/Max/Min/Ave/Sum/Inst
Separate/Combine/Separate2
Use/Not
+Over
Skip
Over
Ave
Max
Min
Sum
*3
Separate
Not
End
Setup Item Selectable Range or Selections Default Value Setting
Do you want to store and
make the new settings take effect?
Yes/No/Cancel –
84
IM 04L42B01-02E
Page 87

Installation and Wiring
Recommended Replacement
Periods for Worn Parts
Setup Items and
Default Values
Setup Items and Default Values
Menu tab
*2
Alarm
Setup Item Selectable Range or Selections Default Value Setting
Basic setting
*3
Reflash
Rate of change > Decrease
Rate of change > Increase
Indicator
On/Off/On-1s
1 to 32
1 to 32
Hold/Nonhold
/On-2s
*3
Off
1
1
Nonhold
Switch, Relay
Internal Switch > AND
Relay > AND
Relay > Action
Relay > Hold
Relay > Relay Action on ACK
None/S01/S01-S02/.../S01-S29/S01-S30
None/I01/I01-I02/.../I01-I35/I01-I36
Energize/De_energ
Hold/Nonehold
*1
Normal/Reset
None
None
Energize
Nonhold
Normal
Hysteresis
Meas CH > High/Low
Meas CH > Delta High/Low
Math CH > High/Low
Ext. CH > High/Low
0.0 to 5.0
0.0 to 5.0
0.0 to 5.0
0.0 to 5.0
0.5
0.0
0.0
0.0
A/D, Memory
Setup Item Selectable Range or Selections Default Value Setting
Without /AS1
Scan interval > Scan mode
Normal > Scan interval
Normal/Fast
125ms/250ms(DX2004, DX2008)
1s/2s/5s(DX2010, DX2020, DX2030, DX2040,
DX2048)
Normal > A/D integrate
†
Fast
> Scan interval
Auto/50Hz/60Hz/100ms
25ms (DX2004, DX2008)
125ms (DX2010, DX2020, DX2030, DX2040,
DX2048)
†
Fast
> A/D integrate
Memory > Data kind Display/E+D/Event Display
With /AS1
*3
600Hz
The Scan interval items are the same as on a DX without the /AS1 option.
Memory > Data kind Display/Event Display
†: You cannot select this option on a DX with external input channels (/MC1) or when the multi batch function (/BT2) is in use.
Normal
125ms
1s
Auto
25ms
125ms
600Hz
Signature (/AS1 option)
Setup Item Selectable Range or Selections Default Value Setting
Process type Batch/Continue Batch
Sign from recorder Off/Sign1/Sign1+2/Sign1+2+3 Off
Signature at batch stop On/Off Off
FTP transfer at signing On/Off Off
Burnout, RJC
Setup Item Selectable Range or Selections Default Value Setting
First-CH, Last-CH Channel number 001
Burnout set > Mode Off/Up/Down Off
RJC > Mode
RJC > Volt
IM 04L42B01-02E
*3
Internal/External
–20000 to 20000µV
Internal
0
85
Page 88
Setup Items and Default Values
Keylock (Without /AS1)
Setup Item Selectable Range or Selections Default Value Setting
Password 8 characters or less –
Key action > START
Key action > STOP
Key action > MENU
Key action > USER
Key action > DISP/ENTER
Key action > FAVORITE
Media/USB > External media
Media/USB > Load settings
Action of Function > AlarmACK
Action of Function > Message/Batch
Action of Function > Math
Action of Function > Data save
Action of Function > E-mail/FTP
Action of Function > Time set
Action of Function > Display Function
Free/Lock
Free/Lock
Free/Lock
Free/Lock
Free/Lock
Free/Lock
Free/Lock
Free/Lock
Free/Lock
Free/Lock
Free/Lock
Free/Lock
Free/Lock
Free/Lock
Free/Lock
Free
Free
Free
Free
Free
Free
Free
Free
Free
Free
Free
Free
Free
Free
Free
Login > Basic settings
Setup Item Selectable Range or Selections Default Value Setting
Without /AS1
Auto logout Off/1min/2min/5min/10min Off
Operation without Login Off/Display Off
With /AS1
Auto logout Off/1min/2min/5min/10min Off
Operation without Login Off/Display Off
User ID Use/Not Use
Password retry frequency 3/5/Off 3
Root password > Password 20 characters or less ????????
*3
Login > Admin settings
Setup Item Selectable Range or Selections Default Value Setting
Without /AS1
Admin number 1 to 5 1
Mode
User name
Password
With /AS1
*3
Admin number 1 to 5 1
Mode Off/Key/Web/Key+Comm Off
User name 20 characters or less Admin1 etc.
User ID 8 characters or less –
Password 20 characters or less ????????
Password expire Off/1month/3month/6month Off
Off/Key/Web/Key+Comm
20 characters or less
*3
20
characters or less
Off
Admin1 etc.
????????
86
IM 04L42B01-02E
Page 89

Installation and Wiring
Recommended Replacement
Periods for Worn Parts
Setup Items and
Default Values
Login > User settings
Setup Item Selectable Range or Selections Default Value Setting
Without /AS1
User number 1 to 30 1
Mode
User name
Password
Authority of user
With /AS1
User number 1 to 90 1
Mode Off/Key/Comm/Web/Key+Comm Off
User name 20 characters or less User1 etc.
User ID 8 characters or less –
Password 20 characters or less ????????
Password expire Off/1month/3month/6month Off
Authority of user Off/1/2/3/4/5/6/7/8/9/10 Off
Login > Authority of user > Key action, Media
Setup Item Selectable Range or Selections Default Value Setting
Without /AS1
Authority of user 1/2/3/4/5/6/7/8/9/10 1
Key action > START
Key action > STOP
Key action > MENU
Key action > USER
Key action > DISP/ENTER
Key action > FAVORITE
Media/USB > External media
Media/USB > Load settings
Authority of user
Action of Function > AlarmACK
Action of Function > Message/Batch
Action of Function > Math
Action of Function > Data save
Action of Function > E-mail/FTP
Action of Function > Time set
Action of Function > Display Function
With /AS1
The Authority of user, Key action, and Media/USB items are the same as on a DX without the /AS1 option.
Actions > AlarmACK Free/Lock Free
Actions > Message/Batch Free/Lock Free
Actions > Math Free/Lock Free
Actions > Data save Free/Lock Free
Actions > E-mail/FTP Free/Lock Free
Actions > Time set Free/Lock Free
Actions > Display Function Free/Lock Free
Action > Calibration Free/Lock Free
Sign record > Signature1 Free/Lock Free
Sign record > Signature2 Free/Lock Free
Sign record > Signature3 Free/Lock Free
Setup Items and Default Values
Off/Key/Comm/Web/Key+Comm
20 characters or less
*3
20
characters or less
*3
Off/1/2/3/4/5/6/7/8/9/10
Free/Lock
Free/Lock
Free/Lock
Free/Lock
Free/Lock
Free/Lock
Free/Lock
*2
Free/Lock
1/2/3/4/5/6/7/8/9/10
Free/Lock
Free/Lock
Free/Lock
Free/Lock
Free/Lock
Free/Lock
*3
Free/Lock
Off
User1 etc.
????????
Off
Free
Free
Free
Free
Free
Free
Free
Free
1
Free
Free
Free
Free
Free
Free
Free
IM 04L42B01-02E
87
Page 90

Setup Items and Default Values
Report > Basic settings
Setup Item Selectable Range or Selections Default Value Setting
Report kind Off/Hour/Day/Hour+Day/Day+Week/Day+Month Off
Date 1 to 28 1
Day of the week (Day+week) SUN/MON/TUE/WED/THU/FRI/SAT SUN
Time (hour) 0 to 23 0:00
Report > Report settings
Setup Item Selectable Range or Selections Default Value Setting
Report channel number R01/R02/R03/.../R59R60 R01
On/Off On/Off Depends on the model
Channel Channel number 001 etc.
Sum scale Off, /s, /min, /h, /day /s
Time settings
Setup Item Selectable Range or Selections Default Value Setting
Time zone (HHMM)
Time deviation limit
Date format
Calender display > 1st weekday
–1300 to 1300
Off/10s/20s/30s/1min/2min/3min/4min/5min
Y/M/D, M/D/Y, D/M/Y, D.M.Y
*2
SUN/MON MON
900
30s
Y/M/D
88
IM 04L42B01-02E
Page 91

Installation and Wiring
Recommended Replacement
Periods for Worn Parts
Setup Items and
Default Values
Setup Items and Default Values
Communication (Ethernet) > IP-address, Host settings
Setup Item Selectable Range or Selections Default Value Setting
DHCP Use/Not Not
DNS accession Use/Not Use
Host-name register Use/Not Use
Fixed IP-address > IP-address
Fixed IP-address > Subnet mask
Fixed IP-address > Default gateway
Host settings > Host name 64 characters or less –
Host settings > Domain name 64 characters or less –
0.0.0.0 to 255.255.255.255
0.0.0.0 to 255.255.255.255
0.0.0.0 to 255.255.255.255
0.0.0.0
0.0.0.0
0.0.0.0
Communication (Ethernet) > DNS settings
Setup Item Selectable Range or Selections Default Value Setting
Server search order > Primary
Server search order > Secondary
Domain suffix search order > Primary
Domain suffix search order > Secondary
0.0.0.0 to 255.255.255.255
0.0.0.0 to 255.255.255.255
64 characters or less
64 characters or less
0.0.0.0
0.0.0.0
–
–
Communication (Ethernet) > Keep alive, Application time out
Setup Item Selectable Range or Selections Default Value Setting
Keep alive On/Off On
Application time out > On/Off
Application time out > Time
On/Off
1 to 120 (min)
Off
1
Communication(Ethernet) > Server > Server modes
Setup Item Selectable Range or Selections Default Value Setting
FTP Use/Not Use
Web Use/Not Use
SNTP Use/Not Not
Modbus Use/Not Not
EtherNet/IP
Communication(Ethernet) > Server > Allowed Modbus clients
Setup Item Selectable Range or Selections Default Value Setting
Use/Not Use/Not Not
Client number 1/2/3/4/5/6/7/8/9/10 1
On/Off On/Off Off
Communication (Ethernet) > Web page
Setup Item Selectable Range or Selections Default Value Setting
Without /AS1
Page type Operator/Monitor Operator
Page type=Operator
Web page > On/Off
Web page > Access control
Web page > Command
Page type=Monitor
Web page > On/Off
Web page > Access control
With /AS1
Page type Operator/Monitor Operator
Page type=Operator
Web page > On/Off On/Off Off
Web page > Access control Off/Admin Off
The items when Page type is set to Monitor are the same as on a DX without the /AS1 option.
*2
*1
*2
*3
Use/Not Not
*2
On/Off
Off/Admin
Use/Not
On/Off
Off/Admin/User
Off
Off
Not
Off
Off
IM 04L42B01-02E
89
Page 92

Setup Items and Default Values
Communication (Ethernet) > E-Mail > Basic settings
Setup Item Selectable Range or Selections Default Value Setting
SMTP server name
Port number
*2
Security
SMTP authorization > User name
(when Auth is selected)
SMTP authorization > Password
(when Auth is selected)
*3
*3
64 characters or less
0 to 65535
*2
Off/PbS
/Auth
*3
32 characters or less –
32 characters or less –
–
25
Off
Communication (Ethernet) > E-Mail > Recipients
Setup Item Selectable Range or Selections Default Value Setting
Recipient 1 150 characters or less –
Recipient 2 150 characters or less –
Sender 64 characters or less –
Communication (Ethernet) > E-Mail > POP3 settings
*2
Setup Item Selectable Range or Selections Default Value Setting
POP3 Server name 64 characters or less –
Port number 0 to 65535 110
Login name 32 characters or less –
Password 32 characters or less ******...***
Communication (Ethernet) > E-Mail > Alarm settings
Setup Item Selectable Range or Selections Default Value Setting
Recipient 1 On/Off Off
Recipient 2 On/Off Off
Active Alarms > Alarm 1
Active Alarms > Alarm 2
Active Alarms > Alarm 3
Active Alarms > Alarm 4
Include INST
Include source URL
Subject
Header 1
Header 2
Send alarm action
*2
Include tag/ch in Subject
*2
On/Off
On/Off
On/Off
On/Off
On/Off
On/Off
32 characters or less
64 characters or less
64 characters or less
Off
Off
Off
Off
Off
Off
Alarm_summary
–
–
On+Off/On On+Off
On/Off Off
Communication (Ethernet) > E-Mail > Scheduled settings
Setup Item Selectable Range or Selections Default Value Setting
Recipient 1
Interval
Ref.time
Recipient 2
Interval
Ref.time
Include INST
Include source URL
Subject
Header 1
Header 2
On/Off
1h/2h/3h/4h/6h/8h/12h/24h
00:00 to 23:59
On/Off
1h/2h/3h/4h/6h/8h/12h/24h
00:00 to 23:59
On/Off
On/Off
32 characters or less
64 characters or less
64 characters or less
Off
24h
00:00
Off
24h
00:00
Off
Off
Periodic_data
–
–
90
IM 04L42B01-02E
Page 93

Installation and Wiring
Recommended Replacement
Periods for Worn Parts
Setup Items and
Default Values
Setup Items and Default Values
Communication (Ethernet) > E-Mail > System settings
Setup Item Selectable Range or Selections Default Value Setting
Recipient 1
Recipient 2
Include source URL
Subject
Header 1
Header 2
On/Off
On/Off
On/Off
32 characters or less
64 characters or less
64 characters or less
Off
Off
Off
System_warning
–
–
Communication (Ethernet) > E-Mail > Report settings
Setup Item Selectable Range or Selections Default Value Setting
Recipient 1
Recipient 2
Include source URL
Subject
Header 1
Header 2
On/Off
On/Off
On/Off
32 characters or less
64 characters or less
64 characters or less
Off
Off
Off
Report_data
–
–
Communication (Ethernet) > FTP client > FTP transfer file
Setup Item Selectable Range or Selections Default Value Setting
Without /AS1
FTP transfer file > Disp&Event data
FTP transfer file > Report
FTP transfer file > Snapshot
Transfer wait time > Disp&Event data
Transfer wait time > Report
With /AS1
FTP transfer file > Disp&Event data On/Off Off
FTP transfer file > Report On/Off Off
FTP transfer file > Snapshot On/Off Off
FTP transfer file > Setting On/Off Off
The Transfer wait time items are the same as on a DX without the /AS1 option.
*3
*2
*2
On/Off
On/Off
On/Off
0 to 120 min
0 to 120 min
Off
Off
Off
0
0
Communication (Ethernet) > FTP client > FTP connection
Setup Item Selectable Range or Selections Default Value Setting
FTP connection Primary/Secondary Primary
FTP server name 64 characters or less –
Port number 0 to 65535 21
Login name 32 characters or less –
Password 32 characters or less ******...***
Account 32 characters or less –
PASV mode On/Off Off
Initial path 64 characters or less –
Communication (Ethernet) > SNTP client
Setup Item Selectable Range or Selections Default Value Setting
SNTP client > Use/Not Use/Not Not
SNTP client > Server name 64 characters or less –
SNTP client > Port number 0 to 65535 123
SNTP client > Access interval Off/1h/8h/12h/24h 8h
SNTP client > Access reference time 00:00 to 23:59 00:00
SNTP client > Access timeout 10s/30s/90s 30s
SNTP client > Time adjust on Start action On/Off Off
IM 04L42B01-02E
91
Page 94

Setup Items and Default Values
Communication (Ethernet) > Modbus client > Basic settings
Setup Item Selectable Range or Selections Default Value Setting
Basic settings > Read cycle 125ms/250ms/500ms/1s/2s/5s/10s 1s
Basic settings > Retry interval Off/10s/20s/30s/1min/2min/5min/10min/
20min/30min/1h
2min
Communication (Ethernet) > Modbus client > Modbus server settings
Setup Item Selectable Range or Selections Default Value Setting
Server number 1-8/9-16 1-8
Port
Modbus server name
Unit
No.
0 to 65535
64 characters or less
Auto/Fixed
0 to 255
502
–
Auto
1
Communication (Ethernet) > Modbus client > Command settings
Setup Item Selectable Range or Selections Default Value Setting
Client command number 1-8/9-16 1-8
1 to 16
First
Last
Server
Regi.
Type
Off/R/R-M/W/W-M/E-M
Depends on the command type.
Depends on the command type.
1/2/3/.../15/16
Numerical value
INT16/UINT16/INT32_B/INT32_L/UINT32_B/
UINT32_L/FLOAT_B/FLOAT_L
*3
Off
–
–
1
30001
INT16
Communication (Ethernet) > Modbus client > Auto settings
Automatically assigns MW100s to the DX.
Communication (Ethernet) > Password management > KDC connection (/AS1 option)
Setup Item Selectable Range or Selections Default Value Setting
KDC connection Primary/Secondary Primary
KDC server name 64 characters or less –
Port number 0 to 65535 88
Communication (Ethernet) > Password management > Certification key (/AS1 option)
Setup Item Selectable Range or Selections Default Value Setting
Host principal 20 characters or less –
Realm name 64 characters or less –
Password 20 characters or less –
Encryption AES128/AES256/ARC4 AES128
*3
*3
92
IM 04L42B01-02E
Page 95

Installation and Wiring
Recommended Replacement
Periods for Worn Parts
Setup Items and
Default Values
Setup Items and Default Values
Communication (Serial) > Basic settings
Setup Item Selectable Range or Selections Default Value Setting
Without /AS1
Baud rate 1200/2400/4800/9600/19200/38400 9600
Data length 7/8 8
Parity Odd/Even/None Even
Handshaking Off:Off/XON:XON/XON:RS/CS:RS Off:Off
Address 1 to 99 1
Protocol Normal/Modbus/Modbus-M Normal
With /AS1
The baud rate, data length, parity, handshaking, address items are the same as on a DX without the /AS1 option.
Protocol Normal/Modbus/Modbus-M/Barcode Normal
*3
Communication (Serial) > Modbus master > Basic settings
Setup Item Selectable Range or Selections Default Value Setting
Read cycle 125ms/250ms/500ms/1s/2s/5s/10s 1s
Timeout 125ms/250ms/500ms/1s/2s/5s/10s/1min 1s
Retrials Off/1/2/3/4/5/10/20 1
Inter-block delay Off/5ms/10ms/15ms/45ms/100ms Off
Auto recovery Off/1min/2min/5min/10min/20min/30min/1h 2min
Communication (Serial) > Modbus master > Command settings
Setup Item Selectable Range or Selections Default Value Setting
Master command number 1-8/9-16 1-8
1 to 16
First
Last
Addr.
Regi.
Type
Communication (PROFIBUS-DP)
Setup Item Selectable Range or Selections Default Value Setting
Node Address 0 to 125 3
Off/R/R-M/W/W-M/E-M
Depends on the command type.
Depends on the command type.
1 to 247
Numerical value
INT16/UINT16/INT32_B/INT32_L/UINT32_B/
UINT32_L/FLOAT_B/FLOAT_L
*2
*3
Off
–
–
1
30001
INT16
IM 04L42B01-02E
93
Page 96

Setup Items and Default Values
Status relay
Setup Item Selectable Range or Selections Default Value Setting
Without /AS1
Fail relay Fail/Status relay Fail
Status relay Fail/Status relay Status relay
With /AS1
Fail relay Fail/Status relay/Mem. sample/Invalid user/Login Fail
Status relay Fail/Status relay/Mem. sample/Invalid user/Login Status relay
Status Relay > Status Relay Details
Setup Item Selectable Range or Selections Default Value Setting
Memory/Media status On/Off Off
Measurement error On/Off Off
Communication error On/Off Off
Memory stop On/Off Off
*2
Alarm
Set Calibration
Setup Item Selectable Range or Selections Default Value Setting
Use/Not Use/Not Not
Notification 1 to 10 1
Renotification 10min/30min/1h/8h/24h 1h
*3
*3
On/Off Off
*3
End
Setup Item Selectable Range or Selections Default Value Setting
Do you want to store and
make the new settings take effect?
Yes/No/Cancel –
94
IM 04L42B01-02E
Page 97

Installation and Wiring
Recommended Replacement
Periods for Worn Parts
Setup Items and
Default Values
Setup Items and Default Values
File/Initialize tab
*2
Load settings
Setup Item Selectable Range or Selections Default Value Setting
Without /AS1
Load settings > Kind CF/USB CF
Initialize > Kind Clear 1/Clear 2/Clear 3 Clear 3
Media eject CF/USB –
With /AS1
Load settings > All settings > Kind CF/USB CF
Load settings > Login info only > Kind CF/USB CF
Load settings > Other settings > Kind CF/USB CF
Initialize > Kind Clear 1/Clear 2/Clear 3/Clear 4 Clear 3
Media eject CF/USB –
*3
End
Setup Item Selectable Range or Selections Default Value Setting
Do you want to store and
make the new settings take effect?
Yes/No/Cancel –
IM 04L42B01-02E
95
 Loading...