

Page 1

3600 SERIES
FERTILIZER TOOLBAR
FOR SELF PROPELLED SPRAYERS
OPERATOR’S MANUAL
PART IDENTIFICATION
YETTER MANUFACTURING CO.
FOUNDED 1930
Colchester, IL 62326-0358
Toll free: 800/447-5777
309/776-3222 (Fax)
Website: www.yetterco.com
E-mail: info@yetterco.com
Page 2

FOREWORD
You’ve just joined an exclusive but rapidly
growing club.
For our part, we want to welcome you to the
group and thank you for buying a Yetter product.
We hope your new Yetter products will help you
achieve both goals-increase your productivity and
increase your efficiency so that you may generate
more profit.
This operator’s manual has been designed into
four major sections: Foreword, Safety
Precautions, Installation Instructions and Parts
Breakdown.
This SAFETY ALERT SYMBOL
indicates important safety messages in
the manual. When you see this
symbol, be alert to the possibility of
PERSONAL INJURY and carefully
read the message that follows.
The word NOTE is used to convey information
that is out of context with the manual text. It
contains special information such as
specifications, techniques and reference
information of a supplementary nature.
The word IMPORTANT is used in the text when
immediate damage will occur to the machine due
to improper technique or operation. Important will
apply to the same information as specified by
note only of an immediate and urgent nature.
It is the responsibility of the user to read the
operator’s manual and comply with the safe and
correct operating procedure and to lubricate and
maintain the product according to the
maintenance schedule in the operator’s manual.
The user is responsible for inspecting his
machine and for having parts repaired or
replaced when continued use of the product
would cause damage or excessive wear to the
other parts.
It is the user’s responsibility to deliver his
machine to the Yetter dealer who sold him the
product for service or replacement of defective
parts, which are covered by the warranty policy.
If you are unable to understand or follow the
instructions provided in this publication, consult
your local Yetter dealer or contact:
YETTER MANUFACTURING CO.
309/776-4111
800/447-5777
309/776-3222 (FAX)
Website: www.yetterco.com
E-mail: info@yetterco.com
WARRANTY
Yetter Manufacturing warrants all products manufactured and sold by it against defects in material. This
warranty being expressly limited to replacement at the factory of such parts or products as shall appear to
be defective after inspection. This warranty does not obligate the Company to bear cost of labor in
replacement of parts. It is the policy of the Company to make improvements without incurring obligations to
add them to any unit already sold. No warranty is made or authorized to be made, other than herein set
forth. This warranty is in effect for one year after purchase.
Dealer ___________________________________________________
Yetter Manufacturing warrants its own products only and cannot be responsible for damages to
equipment on which mounted.
2
Page 3
SAFETY PRECAUTIONS
You can make your farm a safer place to live and work if you observe the safety precautions given. Study these
precautions carefully and insist those working with you and for you follow the precautions.
Finally, remember this an accident is usually caused by someone’s carelessness, neglect or oversight.
A brief description of signal words that may be used in this manual:
CAUTION: Used as a general reminder of good safety practices or to direct attention to unsafe practices.
WARNING: Denotes a specific potential hazard.
DANGER: Denotes the most serious specific potential hazard.
CAUTION
Consult your implement and tractor operator’s manual for correct and safe operating practices. Be aware of towed
implement width and allow safe clearance.
CAUTION: SAFETY SIGNS
Safety decals are placed on the implement to alert the operator and others to the risk of personal injury or unsafe
operation during normal operations and servicing.
1. The safety decals must be kept clean and in good condition to ensure that they are legible.
2. Safety decals must be replaced if they are missing or illegible.
3. When components are replaced during repair or servicing, check that the new components include the necessary
safety signs.
4. Replacement safety decals may be obtained from your local dealer.
WARNING
Read these instructions carefully to acquaint yourself with the Equipment. Working with unfamiliar equipment can lead
to accidents.
Never park the equipment on a steep incline or leave the equipment running unattended.
Never clean, lubricate or adjust a machine that is in motion.
Always check that straps are secure.
Make sure latches are in pinned position when moving equipment.
Do not allow children to operate this equipment.
Do not allow riders on the equipment, trailer and/or pick-up.
Use speed and caution dictated by the terrain being traversed. Do not operate on any slope steep enough to cause
tipping or loss of control.
Read and understand the operator’s manual and require all other persons who will operate the equipment to do the
same.
If operating on public roadways, where legal, be certain all lighting is operating properly and observe all traffic laws.
Beware of increased stopping distances and control effort when operating with implements attached.
Be familiar with all controls and be prepared to stop equipment quickly in an emergency.
FAILURE TO HEED MAY RESULT IN PERSONAL INJURY OR DEATH.
3
Page 4
ASSEMBLY
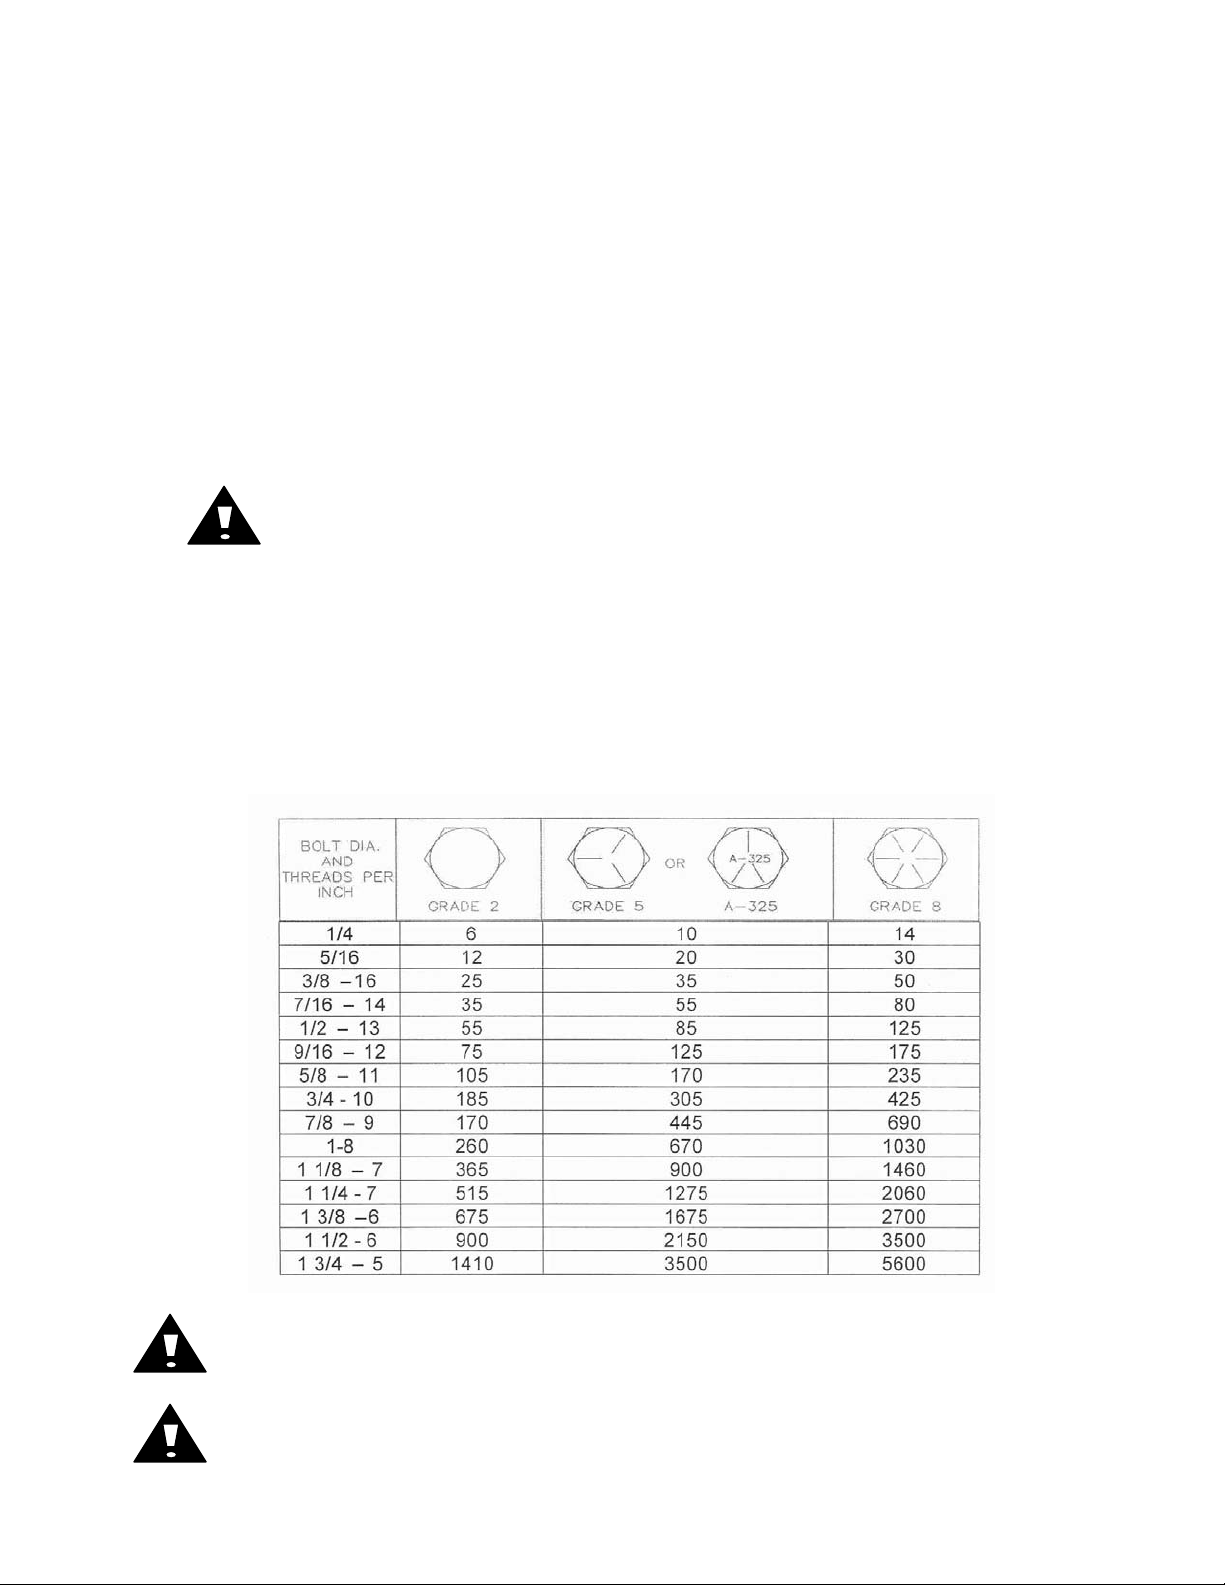
BOLT TORQUE
Mounting bolts and hardware
Before operating the FERTILIZER TOOLBAR for the first time, check to be sure that all
hardware is tight. Check all hardware again after approximately 50 hours of operation
and at the beginning of each planting season.
All hardware used on the FERTILIZER TOOLBAR is Grade 5 unless otherwise noted.
Grade 5 cap screws are marked with three radial lines on the head. If hardware must be
replaced, be sure to replace it with hardware of equal size, strength and thread type.
Refer to the torque values chart when tightening hardware.
Important: Over tightening hardware can cause as much damage as when
under tightening. Tightening hardware beyond the recommended range can
reduce its shock load capacity.
The chart below is a guide for proper torque. Use it unless a specified torque is called out
elsewhere in the manual.
Torque is the force you apply to the wrench handle or the cheater bar, times the length of the
handle or bar.
Use a torque wrench whenever possible.
The following table shows torque in ft. lbs. for coarse thread hardware.
Lubricate all bearings and moving parts as assembled and make certain that they work freely.
WARNING: Never work around the toolbar/implement while in a raised position without using
so may lead to personal injury.
4
safety lockups.
CAUTION: The FERTILIZER TOOLBAR and its attachments are very heavy. Pay extra attention
to lifting techniques while handling and or maneuvering the opener during assembly. Failure to do
Page 5
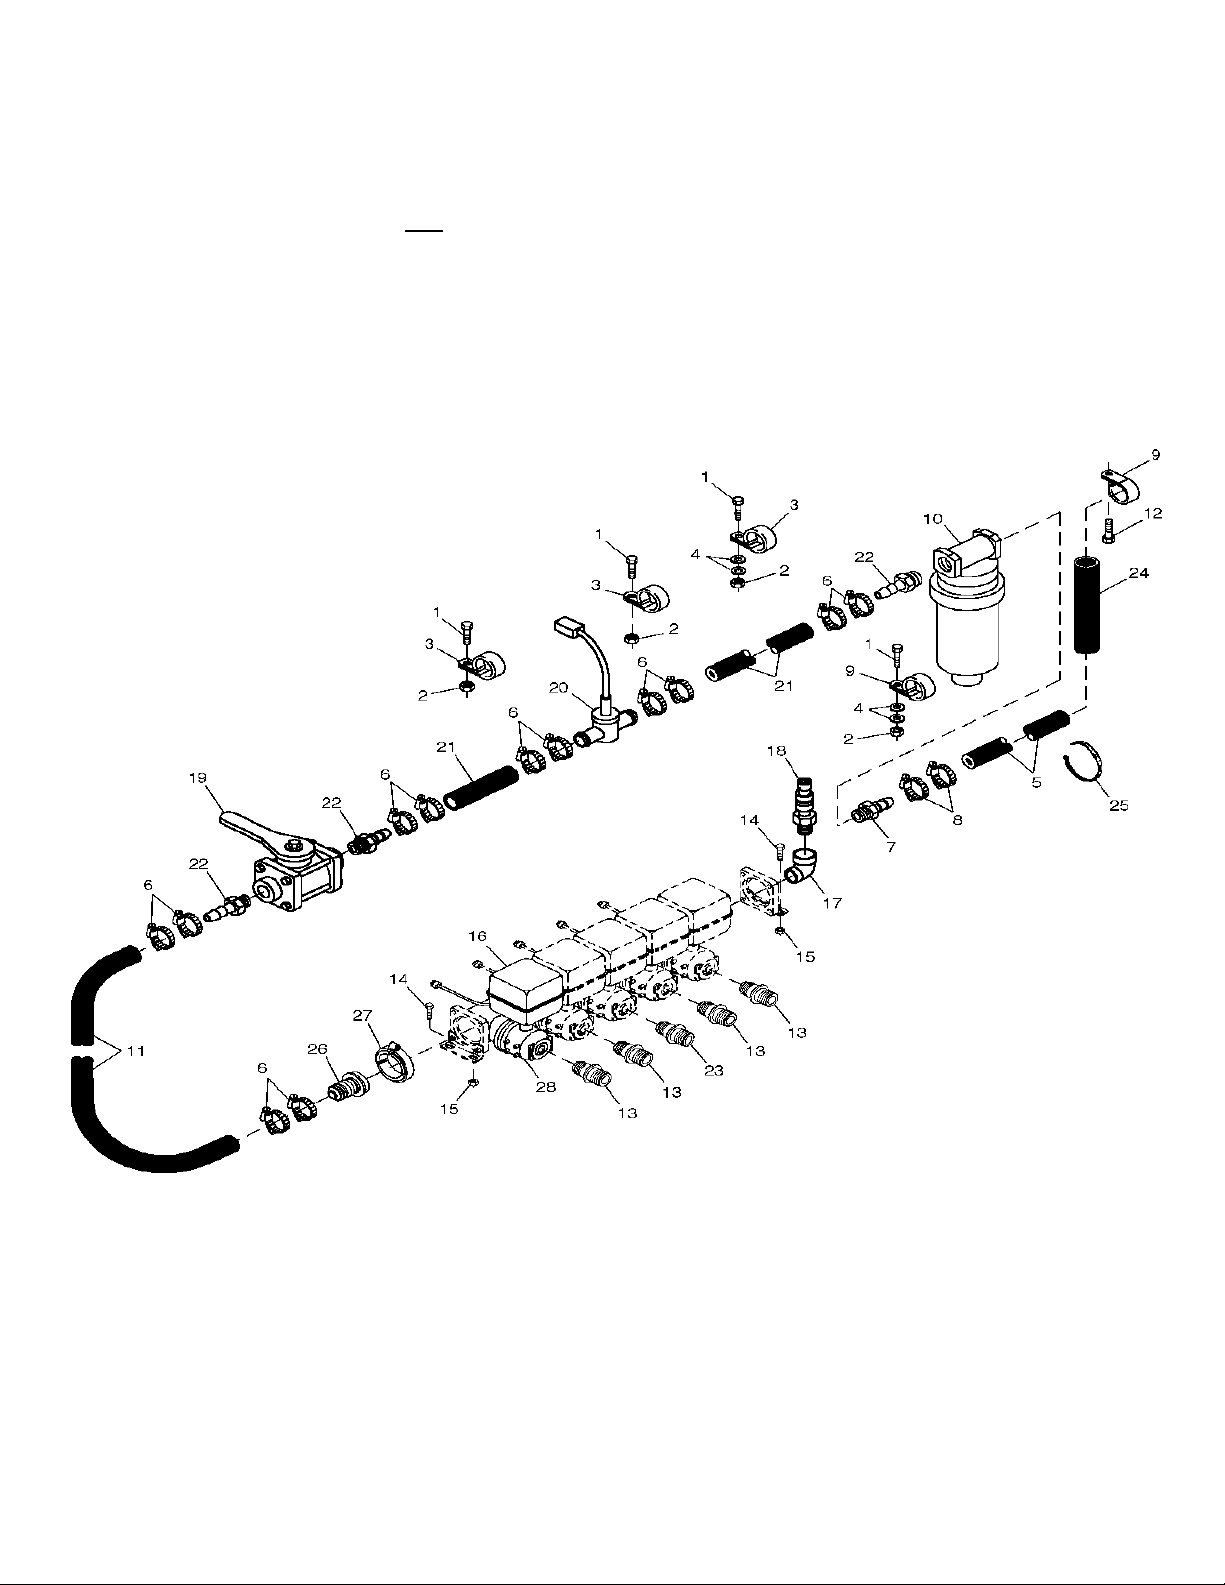
JD 4710/4720 SELF-PROPELLED SPRAYER FERTILIZER TOOLBAR
SELF-PROPELLED SPRAYER FERTILIZER TOOLBAR
Suggested list of items not
- Solution Filter, Flow Meter, Valves, Hoses, Quick Coupler and Fittings
provided by YETTER Manufacturing Co.
5
Page 6
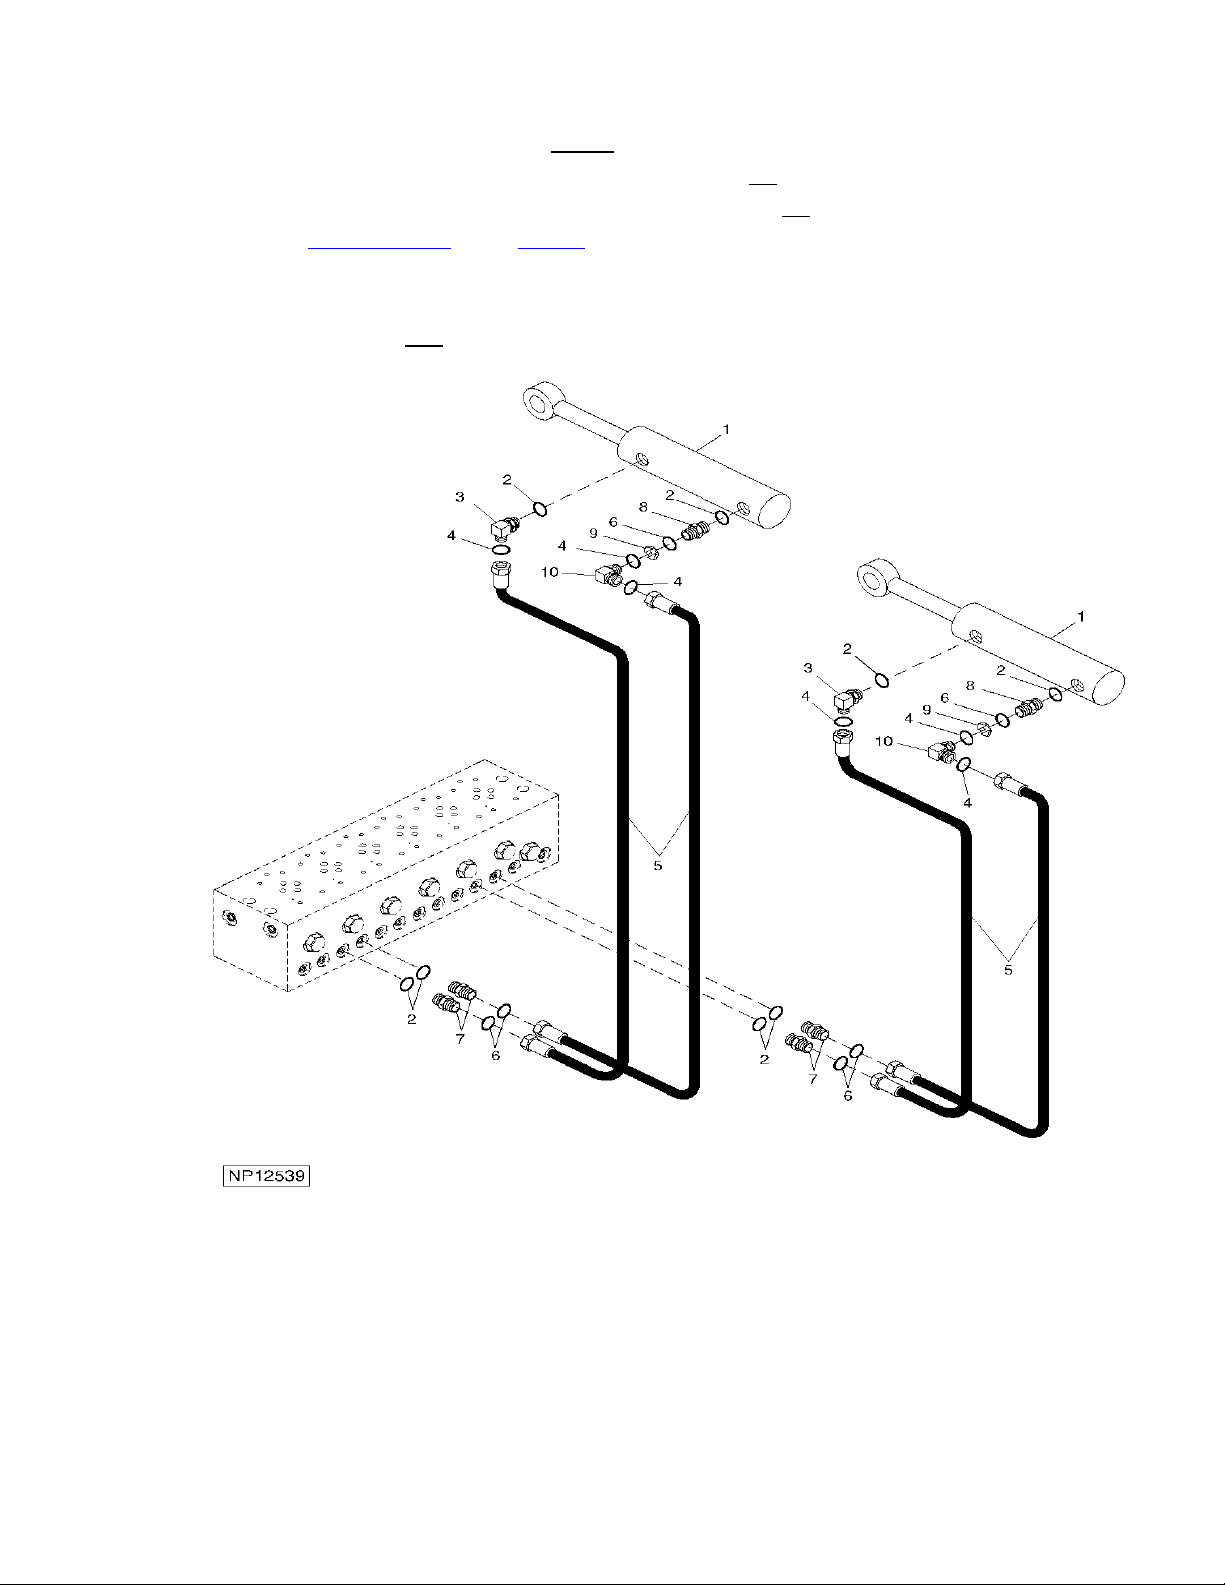
SELF-PROPELLED SPRAYER FERTILIZER TOOLBAR
-Numbered labels 1-12, quantity 3 sets
-Plugs JD #38H1445 for hydraulic hoses, quantity 20
-Caps JD #38H1414 for hydraulic manifold, quantity 12
-Hydraulic hose-4@127
” and 4@97” with end to fit JD#38H1159 adapter,
#T77814 O-ring and end to fit –6 JIC.
Suggested list of items not
provided by YETTER Manufacturing Co.
6
Page 7

SELF-PROPELLED SPRAYER FERTILIZER TOOLBAR
-Numbered labels 1-8, quantity 2 sets to
Identify the foam marker hoses.
Suggested list of items not provided by YETTER Manufacturing Co.
• Wiring Harness
• 37 Pin female receptacle quantity 01
• 37 Pin male connector quantity 02
• Sensor connector JD# 57M7796 quantity 01
• Flow meter connector JD# 57M7257 quantity 01
• 3 Pin weather pack connector quantity = # of section
• Control valves
Yetter Manufacturing Company reserves the right to alter equipment specifications without notice or obligation. Yetter Manufacturing
Company offers the information contained in this guide in good faith. However, the use of the information provided is beyond the
control of Yetter Manufacturing Company and in no case shall Yetter Manufacturing Company or any seller of its products be
responsible for any damages that may occur from the use of this information. The user shall assume all such risks. Due to the
equipment and specifications involved, the possibility of error does exist. If you discover such an error, please notify Yetter
Manufacturing Company as soon as possible so that it can be corrected. This list was compiled from customer suggestions based on
their individual needs and preferences.
7
Page 8

PARTS IDENTIFICATION
8
Page 9

PARTS IDENTIFICATION
9
Page 10

PARTS IDENTIFICATION
10
Page 11

PARTS IDENTIFICATION
IMPORTANT: When the toolbar is in the folded position the lock pin 3600-345 must not bind in
the wing stop plate 3600-344. The pin must be adjusted with shims and correctly positioned by
moving the pin assembly on the slotted holes of the 3600-223 pin lock bracket. When the lock pin
is not being held down with the transport lock striker 3600-204, the spring should be to pull the
lock pin up out of the lock plate. Use never-seize to aid the pin to move freely.
11
Page 12

PARTS IDENTIFICATION
12
Page 13

PARTS IDENTIFICATION
13
Page 14

PARTS IDENTIFICATION
14
Page 15

PARTS IDENTIFICATION
15
Page 16

PARTS IDENTIFICATION
16
Page 17

LIGHT KIT LOCATIONS
17
Page 18

SAFETY
WARNING: Before performing any work on a sprayer, be sure to clean and
neutralize the sprayer.
CAUTION: Pesticides are hazardous and can poison causing serious injury or
death to you or others. During application of hazardous pesticides, pesticide
residue can build up on the inside or outside of the machine. Clean machine according to
use instructions of hazardous pesticides. Refer to product label.
TROUBLESHOOTING
COMPONENT
Solution System
High low flow valve
Boom section shut off valves
Check valves
Boom and suction strainers
Hose clamps
Solution hoses
SprayStar Monitor
Wiring harness
Flow meter
Pressure transducer
Plumbing
Boom plumbing
Nozzle bodies
Nozzle tips
Nozzle screens
CHECK FOR
Leaks/corroded/operation
Leaks/corroded/operation
Leaks/corroded/operation
Leaks/plugged/ripped
Loose/worn/missing
Collapsed/worn
Worn/Broken/corroded
Clean/Calibrate
Leaks/performance/calibrate
Leaks/corroded
Leaks/cracks/corroded
Calibrate/worn
Plugged/missing/ripped
MAINTENANCE
1. After washing, spray machine down with Spray Master Equipment coating (N205703-U.S.,
N207338-CAN.) to protect from chemicals and allow for future ease of cleaning.
2. Add 20-30 gallons of appropriate solution mixture of RV antifreeze for the desired temperatures.
18
Page 19

NOTES
19
Page 20

Our name
Is getting known
Just a few years ago, Yetter products were sold primarily to the
Midwest only. Then we embarked on a program of expansion and
moved into the East, the South, the West and now north into Canada.
We’re even getting orders from as far away as Australia and Africa.
So, when you buy Yetter products . . .you’re buying a name that’s
recognized. A name that’s known and respected. A name that’s
become a part of American agriculture and has become synonymous
with quality and satisfaction in the field of conservation tillage.
Thank you.
YETTER MANUFACTURING CO.
Colchester, IL 62326-0358 • 309/776-4111
Toll Free 800/447-5777
Fax 309/776-3222
Website: WWW.YETTERCO.COM
E-MAIL: INFO@YETTERCO.COM
2565-691_REV_A • 03/09
20
 Loading...