

Page 1

Floppy Disk, CompactFlash™ Microdrive™, SmartMedia™,
MemoryStick SDMemoryCard MultiMediaCard™ Reader/Writer
Internal 7 in 1 Drive
Model YD-8V03
User’s Manual
This product and manual are intended for persons
who have expert knowledge about the personal
computer (PC).
Before connecting the product to your PC, read the
manuals of the PC and its motherboard carefully. If
you have any question, contact the store from w hich
you purchased the product.
Copyright © 2002 Y-E Data, Inc. All Rights Reserved.
149369-02 Rev. A
August 2002
Page 2

Internal 7 in 1 Drive User ’s Manual 149369-02 Rev. A
Important instructions for use of the Internal 7 in 1 Drive
This product usually comes built in a PC. If you install or remove the product from
your PC by yourself, read the manual for the PC and pay much attention so as not to
suffer an electric shock.
Before building the Internal 7 in 1 Drive in your PC, read through this
manual. The driver software may have to be installed in advance.
Before turning the power to the PC on or off, re move all me dia from the
product.
Caution
Prohibition
This product is precision equipment. So do not drop the product, give
a strong impact to it, or install it in locations exposed to heavy
vibrations or high temperatures; doing so may cause the product
breakdown.
Do not disassemble or modify the product. Disassembly or
modification may cause a breakdown, fire, or electric shock.
Do not use or store the product in wet locations. The entry of liquid
into the product may result in a breakdown, fire, or electric shock.
Do not insert any media oth er than specified ones. T he insertion of a
metal piece such as a coin o r clip may lead to a breakdown, f ire, or
electric shock.
Do not remove the media from the product wh en its access LED lamp
stays illuminated.
This product is intended for being used in general electric equipment.
Do not use it in equipment (aerospace equipment, atomic power
control system, traffic-related equipment, transportation equipment,
industrial robot, combustion equipment, various safety devices, lifesupport system, etc.) that special quality and reliability are required, or
that may threaten the human life or cause injury to the human body.
z It is prohibited by the copyright law to reproduce the whole or part of this software
and User’s Manual and rent the software, without permission of the copyright holder.
z
We bear no liability for any pecuniary losses and lost profits resulting from use of the
software included with this product, and any claims from third parties.
z
This software cannot be us ed on other than specified equipment.
The specifications of this software are subject to change without notice.
z
z
We assume no responsibility for any breakdown and damage caused by misuse,
troubles from other equipment, undue repairs or modifications.
z If this product should have any defect attributable to manufacture, we will exchange it
with a new one, but cannot take on any more responsibility.
Illustrative pictures in this manual may differ from the PC’s actual screens.
CompactFlash is a registered trademark of SanDisk Corporation.
IBM is a registered trademark of IBM Corporation.
, SmartMedia is a registered trademark of Toshiba Corporation.
MultiMediaCard is a trademark of Infineon Technologies AG and licensed MultiMediaCard Association.
SD Logo is a trademark.
Microsoft Windows is a registered trademark of Microsoft Corporation.
, SONY and Memory Stick is a registered trademark of SONY Corporation.
Y-E Data is a registered trademark of Y-E Data, Inc.
Other company names and product names in this manual are trademarks or registered trademarks of their
respective compa nie s.
Page 2 August 2002
Page 3

Internal 7 in 1 Drive User ’s Manual 149369-02 Rev. A
Contents
1.
1. ABOUT THIS MANUAL (SUPPLEMENTARY REMARKS).............................................. 4
1.1.
2.
2. OVERVIEW ........................................................................................................................ 4
2.2.
3.
3. FEATURES OF THE INTERNAL 7 IN 1 DRIVE................................................................ 5
3.3.
3.1. C
3.2. C
3.3. E
3.4. P
4.
4. HOW TO ATTACH.............................................................................................................. 8
4.4.
4.1. H
4.2. H
4.3. H
5.
5. BEFORE USE .................................................................................................................. 10
5.5.
6.
6. HOW TO INSTALL........................................................................................................... 10
6.6.
6.1. H
6.2. H
6.3. H
7.
7. HOW TO OPERATE THE INTERNAL 7 IN 1 DRIVE...................................................... 18
7.7.
7.1. H
7.2. I
OMPATIBLE OSES..................................................................................................... 5
OMPATIBLE STORAGE MEDIA..................................................................................... 6
XTERIOR FEATURES.................................................................................................. 7
ACKAGE CONTENT................................................................................................... 7
ANDLING NOTES....................................................................................................... 8
OW TO MOUNT THE INTERNAL 7 IN 1 DRIVE IN EQUIPMENT......................................... 8
OW TO CONNECT THE CABLES .................................................................................. 9
OW TO INSTALL DRIVER SOFTWARE......................................................................... 10
OW TO CHANGE THE DRIVE LETTER (REFERENCE INFORMATION).............................. 14
OW TO UNINSTALL THE DRIVER SOFTWARE.............................................................. 17
OW TO OPERATE THE FLOPPY DISK DRIVE................................................................ 18
NSERTING THE MEMORY CARD ................................................................................. 18
7.2.1.
Inserting the SmartMedia card....................................................................... 18
7.2.2.
7.2.3.
7.2.4.
7.3. H
8.
8. RESTRICTION ................................................................................................................. 22
8.8.
9.
9. PRODUCT SPECIFICATION........................................................................................... 24
9.9.
9.1. P
9.2. E
9.3. E
9.4. A
10.
10. ABOUT INQUIRIES ....................................................................................................... 27
10.10.
Inserting the MemoryStick.............................................................................. 19
Inserting the MultiMediaCard and SDMemoryCard....................................... 19
Inserting the CompactFlash card and Microdrive........................................... 20
OW TO OPERATE ON WINDOWS .............................................................................. 20
HYSICAL SPECIFICATIONS....................................................................................... 24
LECTRICAL SPECIFICATIONS ................................................................................... 24
NVIRONMENT SPECIFICATIONS................................................................................ 25
TTACHED USB CABLE SPECIFICATIONS................................................................... 26
Page 3 August 2002
Page 4

Internal 7 in 1 Drive User ’s Manual 149369-02 Rev. A
1.
1. About this manual (Supplementary remarks)
1.1.
This manual is intended for customers who specialize in the assembly of build-to-order
(BTO) PCs and other PCs.
If you are an end user, give great attention to the following items when using this product &
manual.
• Thoroughly r ead t he ma nuals of your PC an d its mother board.
• Before mounting the product in your PC, be sure to turn off the power to the PC and
remove the PC’s power cord from the wall outlet. (Recent PCs still remain internally
live even after terminating W i n do ws.)
• When connecting the USB cable supplied with this product to the motherboard,
firstly read the manual for the motherboard to learn the position and pin
configuration of t he USB connector.
Connecting the USB cable to a non-USB connector or to a wrong USB connector
position may result in a serious breakdown of not only this product but also other
equipment and the P C.
2.
2. Overvi ew
2.2.
The Internal 7 in 1 Drive combines a 3.5-inch floppy disk drive and USB (Universal Serial
Bus)-compliant card reader/writers for SmartMedia, MemoryStick, SDMemoryCard,
MultiMediaCard, Microdrive and CompactFlash cards. The floppy disk drive is to be
connected to the floppy disk controller built in your PC. The card reader/writers are to be
connected to the USB port of the PC. To use the Internal 7 in 1 Drive, the following
requirements must be met: your PC is equipped with the USB port; the OS installed in the
PC supports USB; and t he driver software for the Internal 7 in 1 Drive is installed i n t he PC.
Page 4 August 2002
Page 5

Internal 7 in 1 Drive User ’s Manual 149369-02 Rev. A
3.
3. Features of the Internal 7 in 1 Drive
3.3.
1) Hardware can be used by connecting a USB connector, a FDD connector and a power
supply connector for flo ppy dis k driv e, and so ft ware ca n be used on ly by inst al lin g dev ic e
driver software.
2) A low-profile floppy disk drive is adopted. So the Internal 7 in 1 Drive can be installed in
the space that 1 inch-he ight floppy disk drive can fit in.
3) The Internal 7 in 1 Drive supports the Floppy Disks formatt ed at 1.44MB/720KB.
4) Internal 7 in 1 Drive is a built-in unit. The reboot of Internal 7 in 1 Dr ive by extraction and
insertion of a cable and the sep aratio n from a system is d ifficu lt. Therefore, I nternal 7 in 1
Drive has the USB Interface disconnect SW in the front bezel.
5) The Internal 7 in 1 Drive can be used in extensive environments: Windows X P, Windows
2000, Windows Me, Windows 9 8, and Windows 98 Second Edition.
3.1.
3.1. Compatible Oses
3.1.3.1.
PC OS Driver software
Windows
NOTE:
1) When you use OS of Windows 2000, although attached CD-ROM can also install the
driver software before Service Pack 3, in order to use it in the optimal environment,
Windows XP This product works with the standard dr iver in
Windows. Install the drive label driver from
the CD-ROM to use this product with the
special drive la bels.
Windows 2000 Install the driver software from the CD-ROM
after installing Windows 2000 Service Pack 3.
Windows Me This product works with the standard driver in
Windows. Install the drive label driver from
the CD-ROM to use this product with the
special drive la bels.
Windows 98
Windows 98 Second Editio n
Install the driver sof t ware from the CD-ROM.
We recommend you to install Service Pack 3. Moreover, if Servi ce Pack 3 is installed,
please re-install the driver software from CD-ROM.
Page 5 August 2002
Page 6

Internal 7 in 1 Drive User ’s Manual 149369-02 Rev. A
3.2.
3.2. Compatible storage media
3.2.3.2.
Slot Compatible media
Floppy disk DOS-formatted Fl oppy Disk between 2HD 1.44MB and 2DD
720KB are supported.
CompactFlash DOS-formatted memory cards are supported. I/O cards
such as modem, LAN, and PHS cards are not supported.
Microdrive We have checked the operation of IBM Type II Microdrives
of up to 1 GB.
When using an IBM Microdrive, remove other memory
cards. The Microdrive requires more power than other
memory cards, if with other memory cards at the same time,
an error may occur due to a shortage of power.
SmartMedia DOS-formatted memory cards between 2 MB and 128 MB
are supported. Only 3.3 V cards (including indicated as 3 V)
are supported. 5 V cards are not supported.
You can use SmartMedia cards with an ID, but the ID
feature is not supported. Music data and other protected file
types with anti-piracy functions are not supported. ROM
cards are not supported.
MemoryStick Sticks between 4 MB and 128 MB are supported. Magic
Gate cards (white) are supported, but the Magic Gate
feature is not supported, so music data and other protected
file types with anti-piracy functions are not supported.
I/O cards that are not me mory such as GPS cards are not
available.
SDMemoryCard Cards between 8 MB and 128 MB are available. Cards of
256 MB and 512 MB are planned to be supported in the
future. The Secure Digital feat ure is not supp orted, so music
data and other protected file types with anti-piracy functions
are not supported.
SD I/O cards and SD Combo cards are not available.
MultiMediaCard Cards between 8 MB and 128 MB are available. Cards of
256 MB and 512 MB are planned to be supported in the
future. The Secure Digital feat ure is not supp orted, so music
data and other protected file types with anti-piracy functions
are not supported.
SD I/O cards and SD Combo cards are not available.
NOTE:
1) In this manual, the above six types of me di a are generically called memory cards.
2) W hen using a Microdrive, do not use other memory cards at the same time because of
its large power consu m pt ion.
3) Memory Sticks, MultiMediaCards, and SD Memory Cards use the same slot, so you
cannot use them at the same ti me.
4) Only DOS format is supported. Memory cards formatted not in DOS format are not
available.
Page 6 August 2002
Page 7

Internal 7 in 1 Drive User ’s Manual 149369-02 Rev. A
3.3.
3.3. Exterior features
3.3.3.3.
Slot to insert a floppy disk in
FDD Access LED
USB Interface
disconnect SW
Slot to insert a
CompactFlash card in
Memory Card Access LED
USB B connector to fit the USB cable in
Power connector for
the floppy disk drive
Tapped holes used to mount Internal 7 in
1 Drive to PC
Eject button for unloading the FD
Slot to insert a SmartMedia card in
Slot to insert a MemoryStick / SDMemoryCard card in
Connector to connect the FDD interface cable to
[Important] For mounting on the PC, consult the manuals supplied with your PC and its motherboard.
3.4.
3.4. Package Content
3.4.3.4.
Internal 7 in 1 Drive USB cable Driver CD-ROM
NOTE: Floppy Disks or Me mory cards are not included. P urchase them separatel y.
Page 7 August 2002
Page 8

Internal 7 in 1 Drive User ’s Manual 149369-02 Rev. A
4.
4. How to attach
4.4.
4.1.
4.1. Handling notes
4.1.4.1.
The Internal 7 in 1 Driv e should maintain the n e xt not es about handling.
• When you carry this product, pl ease be sure to have the portion that the side fixes.
• Please atta ch by turning a label up.
• When you place a product, please do not carry out sideways or downward.
• Before working the inside of a computer, in order to avoid the danger of an electric
shock, and damage, please be sure to carry out after pulling out the power supply
plug of a computer.
(Please keep 5 seconds after pulling out a power supply plug.)
• Since the inside of a computer is worked, please fully perform the measure against
static electricity.
4.2.
4.2. How to mount the Internal 7 in 1 Drive in equipment
4.2.4.2.
1) Please turn off the USB Interface disconnect SW switch in the front of Internal 7 in 1
Drive.
2) Insert the Internal 7 in 1 Driv e into an FDD bay of your P C. (If an FDD is a lready inst all ed,
dismount it in advance.)
3) Align the tapped ho les on t he sides o f the Interna l 7 in 1 Driv e with t he PC-sid e mount ing
holes.
4) Secure the Internal 7 in 1 Drive with four M3 x 4mm long screws. (If you use screws
longer than 4 mm, the inner parts of th is product may interfere w ith the m, thus ca using a
problem.)
• Tightening torque: 40~60cN/m, (4~6kgf/cm)
• Recommended screw leng t h: M3 x 4 mm long screws
(It is assumed that the PC-side bracket is 0.5 to 1 mm thick.)
(Screw-in depth on the Internal 7 in 1 Drive side: MAX.4m m)
Page 8 August 2002
Page 9

Internal 7 in 1 Drive User ’s Manual 149369-02 Rev. A
)
)
r
4.3.
4.3. How to connect the cables
4.3.4.3.
1) Connect the 5-pin connector of the USB cable (the interface’s int ernal cable) to the U SB
terminal inside the motherb oard.
• Pay attention to the direction of installation. See the reference illustration be low.
2) Connect the FDD power connector of the PC to the Internal 7 in 1 Drive’s power
connector.
3) Connect the FD D 34-pin connector of the PC to the Internal 7 in 1 Drive’s FDD interface
connector.
No.4 Black (GROUND)
No.5 Black (SHIELD)
USB 5-pinconnecto
Internal USB terminal
No.3 Green (+DATA
No.2 White (-DATA)
No.1 Red (VCC
*For the pin configuration, refer to
the board concerned.
USB B connector
FDD power connector
PIN No.1
FDD I/F connector
Page 9 August 2002
Page 10

Internal 7 in 1 Drive User ’s Manual 149369-02 Rev. A
5.
5. Before use
5.5.
If the Internal 7 in 1 Drive is already built before OS is installed, on installation about
Windows 2000, 98, and 98SE, the memory cards are treated as other devices and do not
operate, but this is normal. About Windows XP and Me, removab le d is k icon i s displayed.
• Before using the Internal 7 in 1 Drive, install the driver software after the USB
Interface disconnect SW is OFF. When adding the Internal 7 in 1 Drive to the PC
equipped with an OS, install the Internal 7 in 1 Drive driver software by starting up its
installer software before building t he I nt ernal 7 in 1 Drive hardware into the PC.
• If the hardware is built in before execution of the installer, when the hardware
wizard appears, be sure to “cancel” the wizard, and then start up the installer. The
floppy disk drive operates with the OS-standard driver, so it is unnecessary to install the
driver software for the FDD.
• There are four types of driver software: for Windows XP, and for Windows 2000, and for
Windows Me, and for Windows 98, and Windows 98 Second Ed it ion.
[Important]
If an earlier version of driver software or the driver sof tware for our USB He xa Media
Drive is installed, uninstall it before installing the Internal 7 in 1 Drive driver. The
Internal 7 in 1 Drive driver is compatible with the USB Hexa Media Drive. (Both
operate with the same driver.) For the method of uninstalling driver software, refer
to Paragraphs 6.3 “How to uninstall the driver software.”
6.
6. How to install
6.6.
6.1.
6.1. How to install driver software
6.1.6.1.
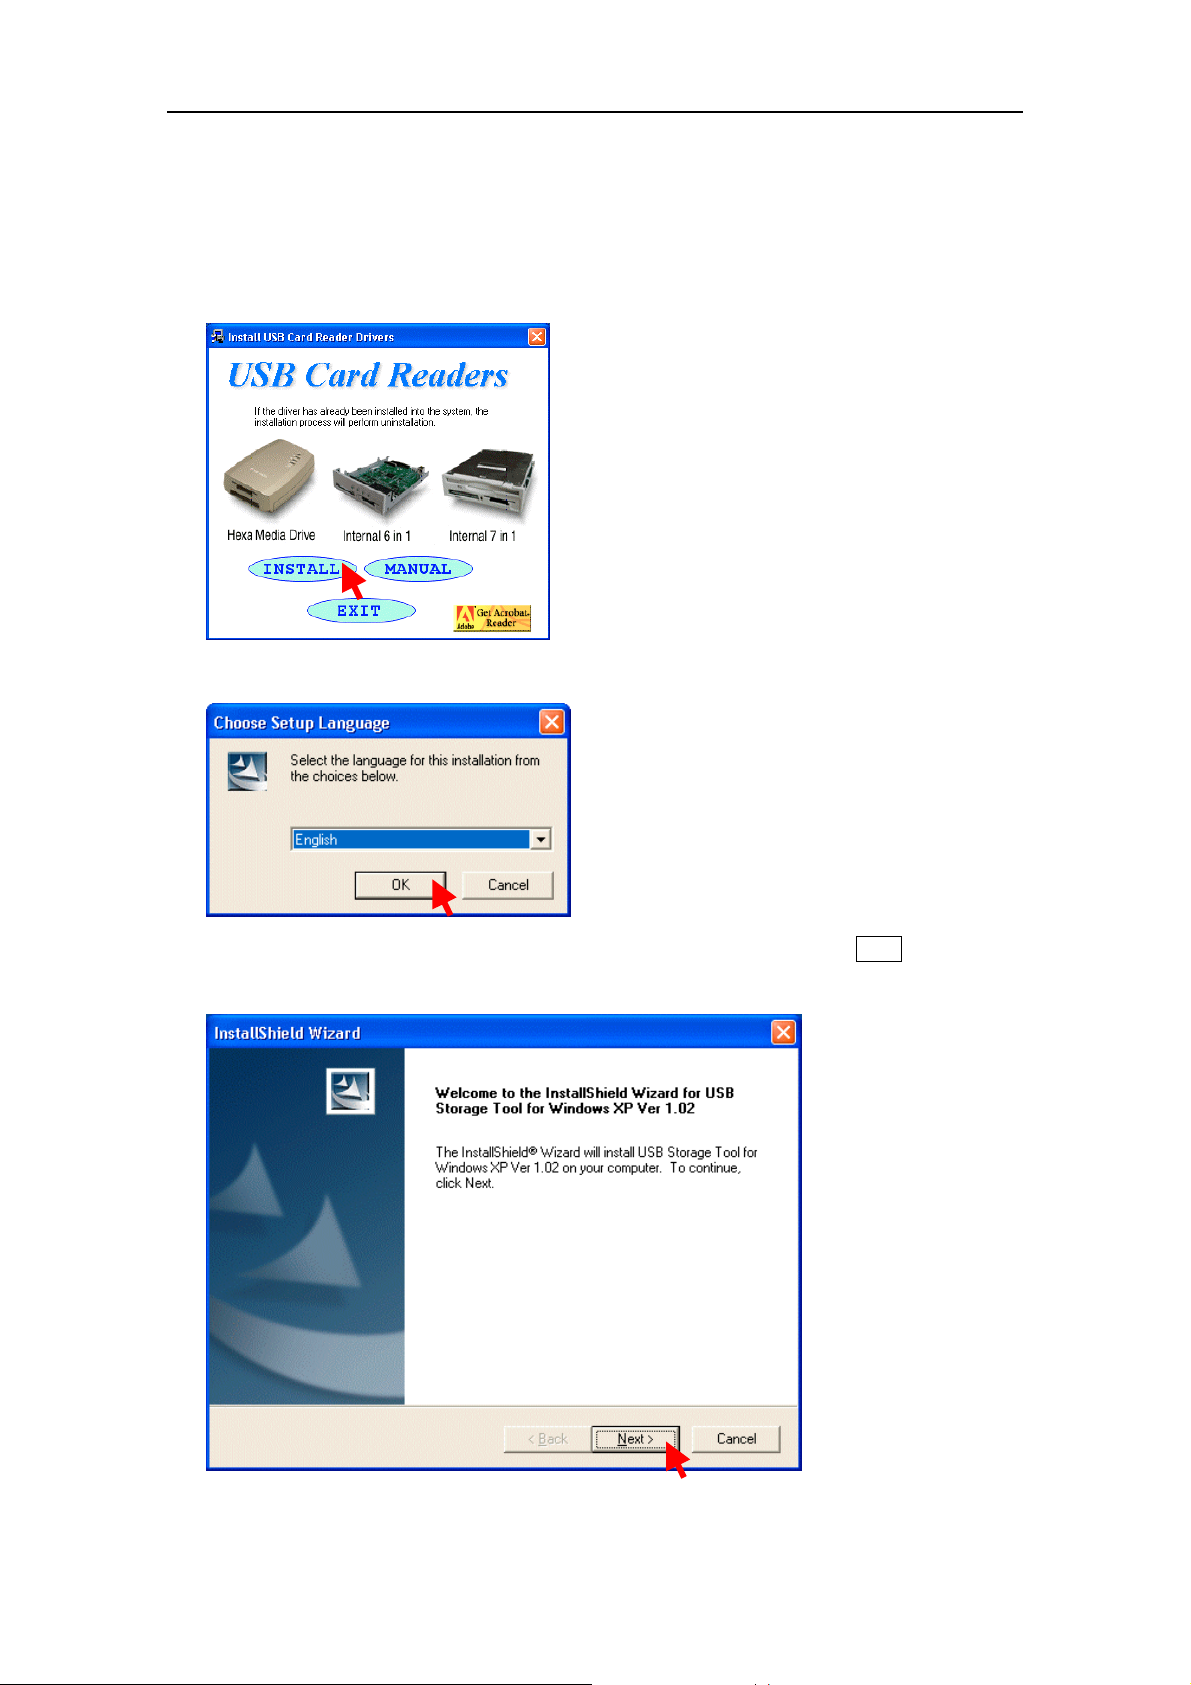
CD-ROM corresponds to Windows XP, 2000, Me, 98 and 98SE. Insert the driver CD-ROM
into the PC. Then the installer will automatically start up. Installer identifies the OS version,
and starts up the installer software. The procedure of installation on Windows XP is as
follows. The procedure on other OS is almost same.
1) Before starting Windows, confirm the USB Interface disconnect SW of Internal 7 in 1
Drive is OFF.
2) S tart up Windows and log in w ith t he user name that is given Administrator privileges.
Page 10 August 2002
Page 11
Internal 7 in 1 Drive User ’s Manual 149369-02 Rev. A
3) Insert the driver CD-ROM into the PC. Then the installer will automatically start up. The
installer identifies the OS version, and starts up the installer software. When Install.exe
does not start up automatically, open the CD-ROM in the My Computer folder, and
double-click on the Install icon to start. Please click [INSTALL], if an installer displays.
4) Please push the [OK] but t on.
5) Descriptions about the method of installation are shown. Click on the Next button to go
to the next step. Begin installing the driver files.
Page 11 August 2002
Page 12
Internal 7 in 1 Drive User ’s Manual 149369-02 Rev. A
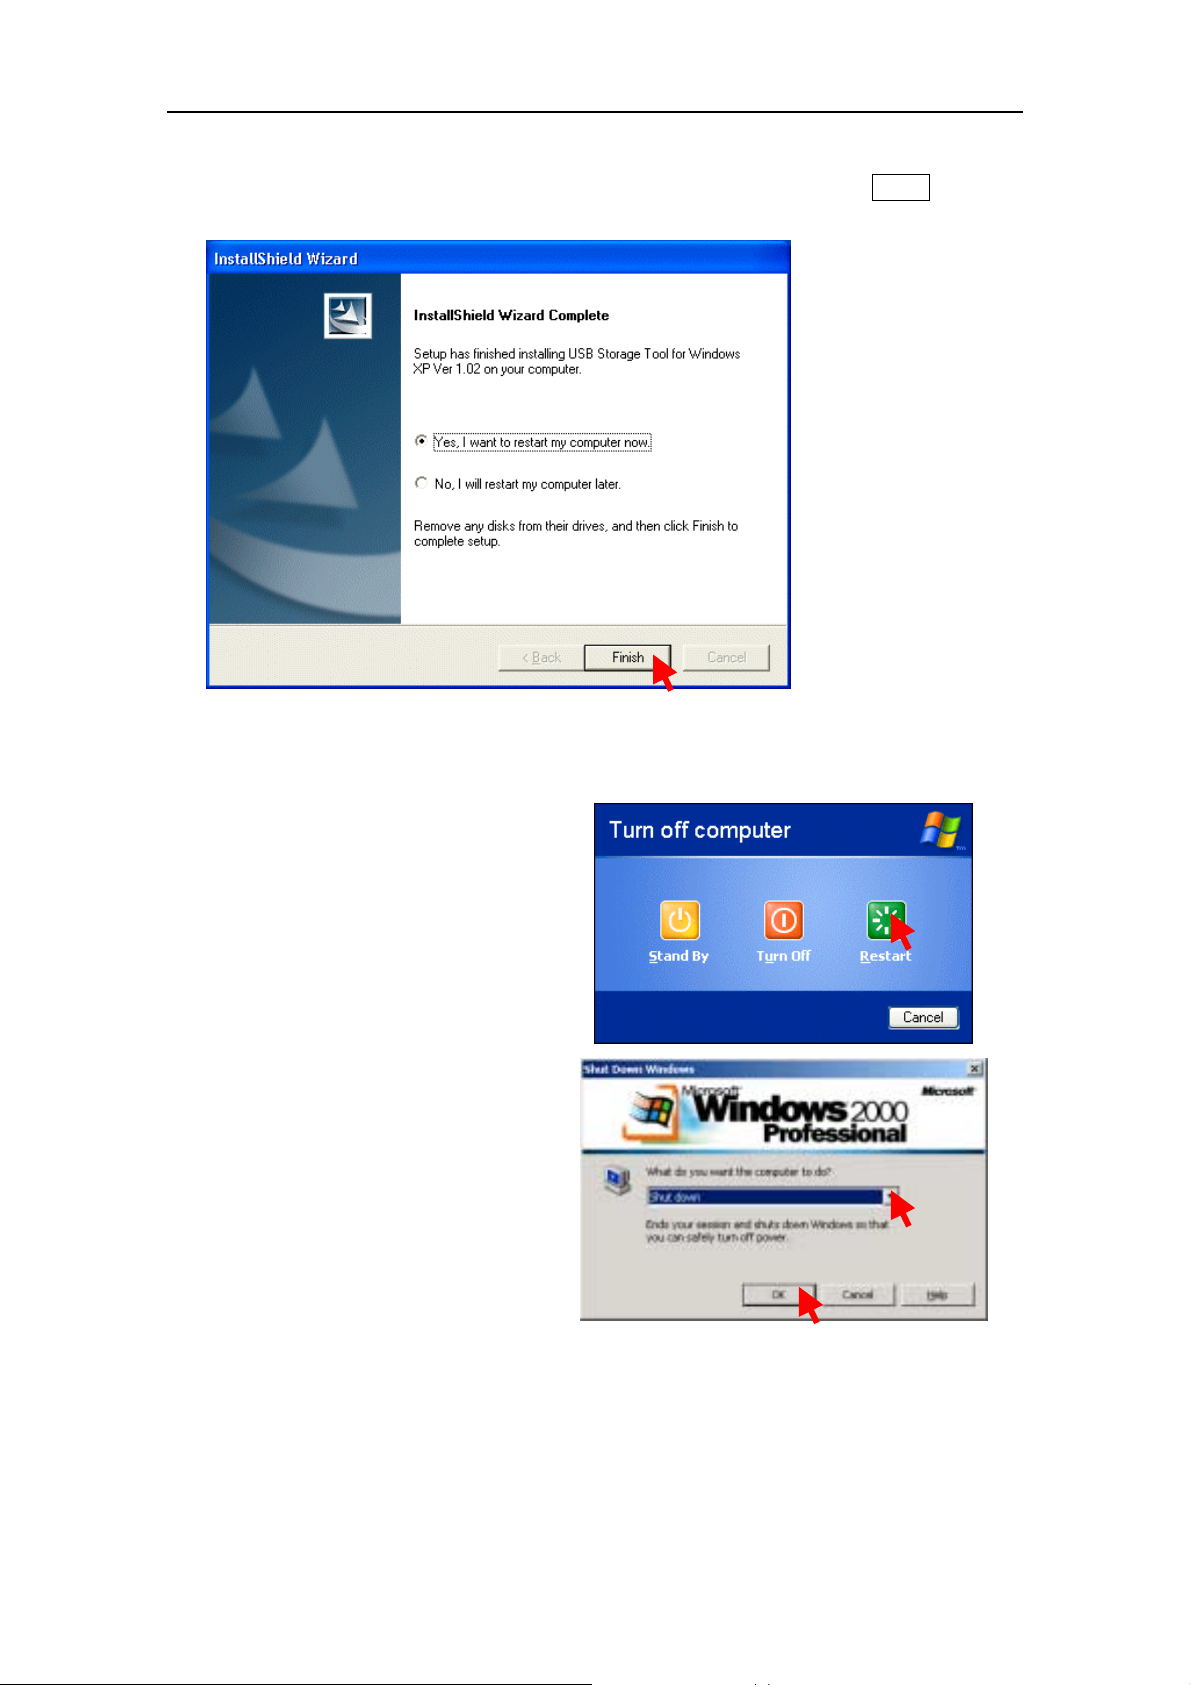
6) Installing the files of the driver software is complete now. Click on the Finish
button to
exit the installer.
7) In order to make Windows detect the Internal 7 in 1 Drive, it is necessary to restart your
PC following based on It em 6) or choose of [Restart] from a start menu as below.
In the case of Windows XP
Choose [Turn off computer] from a start
menu and choose [Restart] from [Turn
off computer] menu.
In the case of Windows 2000, Me,
98, 98SE
(The display has quoted Windows 2000.)
Choose [Shut Down Windows] from a
start menu and choose [Restart] from
[Shut Down Windows] menu.
8) Please log in by t he account that has Administrator authority again.
Page 12 August 2002
Page 13
Internal 7 in 1 Drive User ’s Manual 149369-02 Rev. A
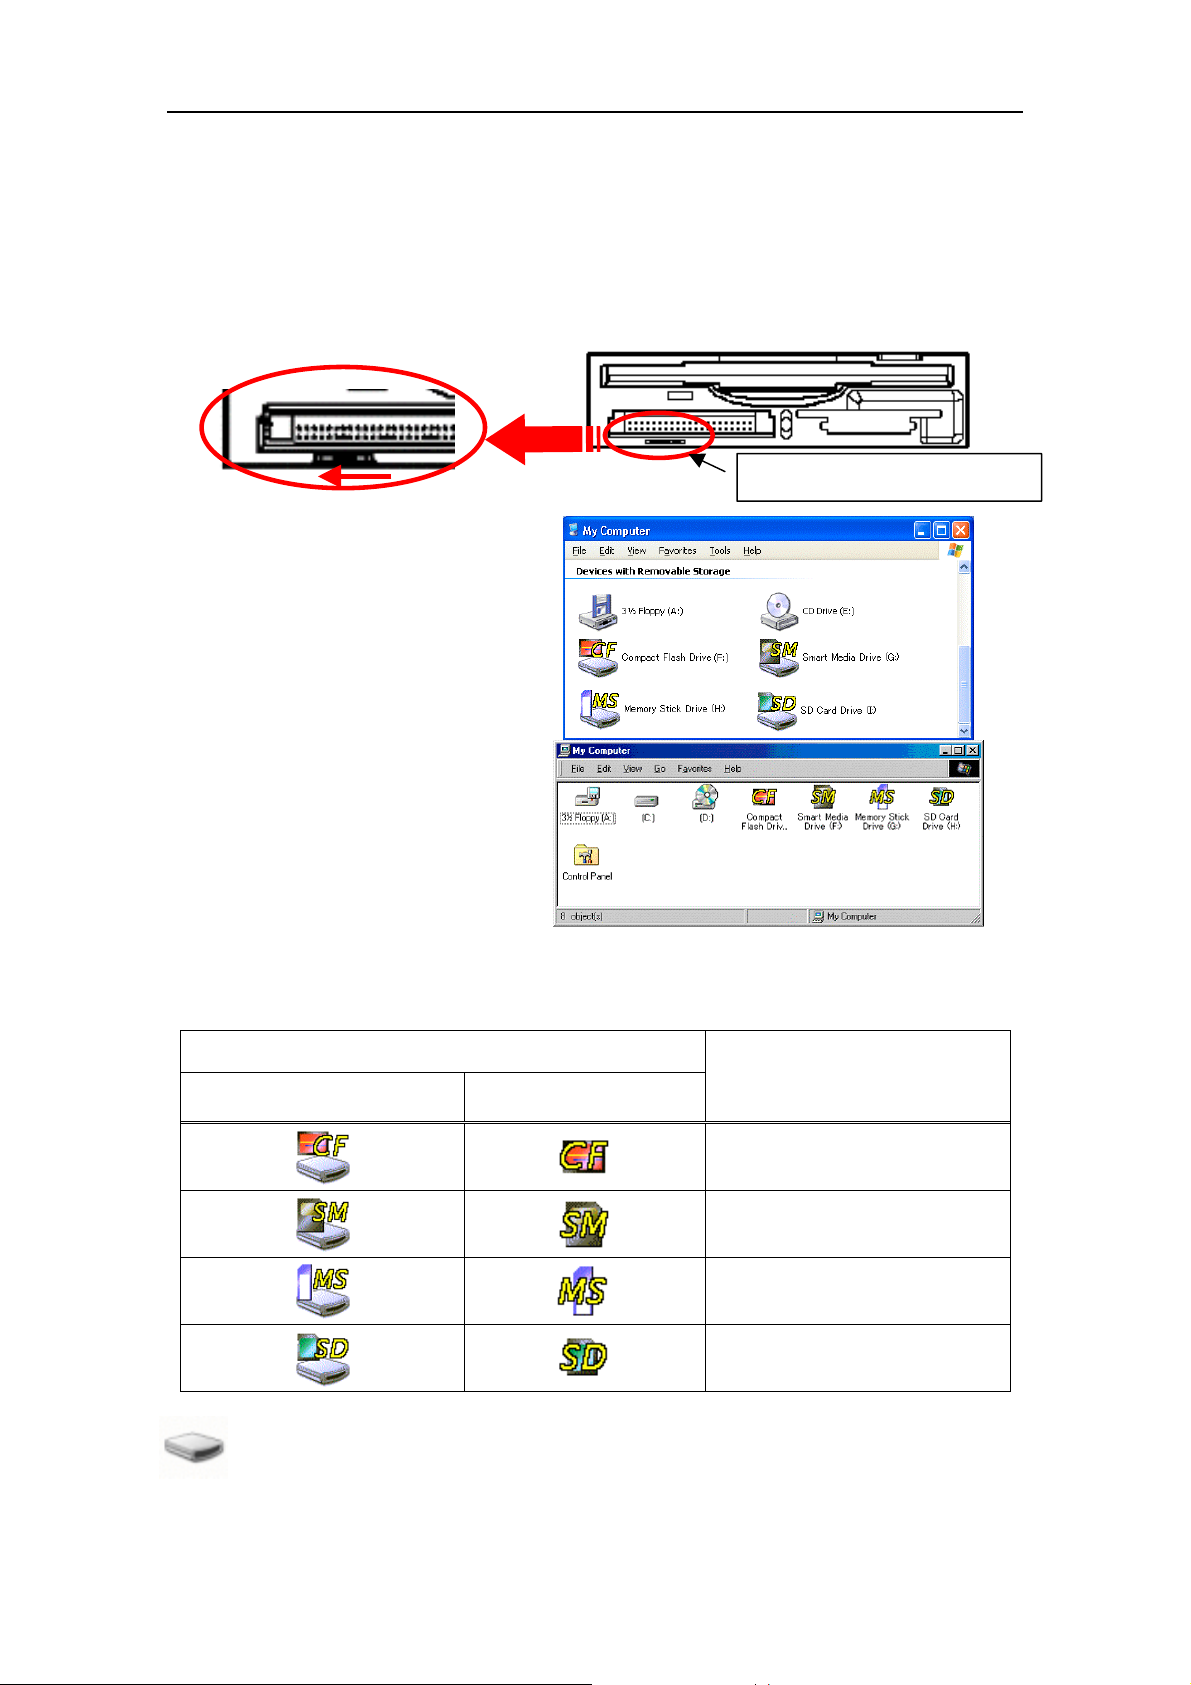
9) Please turn on "USB ON" the USB Interface disconnect SW of Internal 7 in 1 Drive.
Windows automatically recognizes Internal 7 in 1 Drive, and the addition of new
hardware is performed. If the my computer folder is opened after ending, four icons are
added as shown in the following figure. In addition, a drive letter (E: F: etc.) changes
according to the environment of user's PC.
USB ON 1 0
USB Interface disconnect SW
In the case of Windows XP S P1
In the case of Windows 2000, Me,
98, 98SE
(The display has quoted Windows 2000.)
10) If one icon is selected and d ouble-clicked, the file on memory card w ill be d isplayed and
be accessed.
Icon
In the case of
Windows XP SP1
In the case of Windows
2000, Me, 98, 98SE
Corresponding Memory Card
CompactFlash
Microdrive
SmartMedia
MemoryStick
SDMemoryCard
MultiMediaCard
: In case of such OS before Windows XP SP1, the icon of a left figure displays.
Page 13 August 2002
Page 14
Internal 7 in 1 Drive User ’s Manual 149369-02 Rev. A
6.2.
6.2. How to change the drive letter (Reference information)
6.2.6.2.
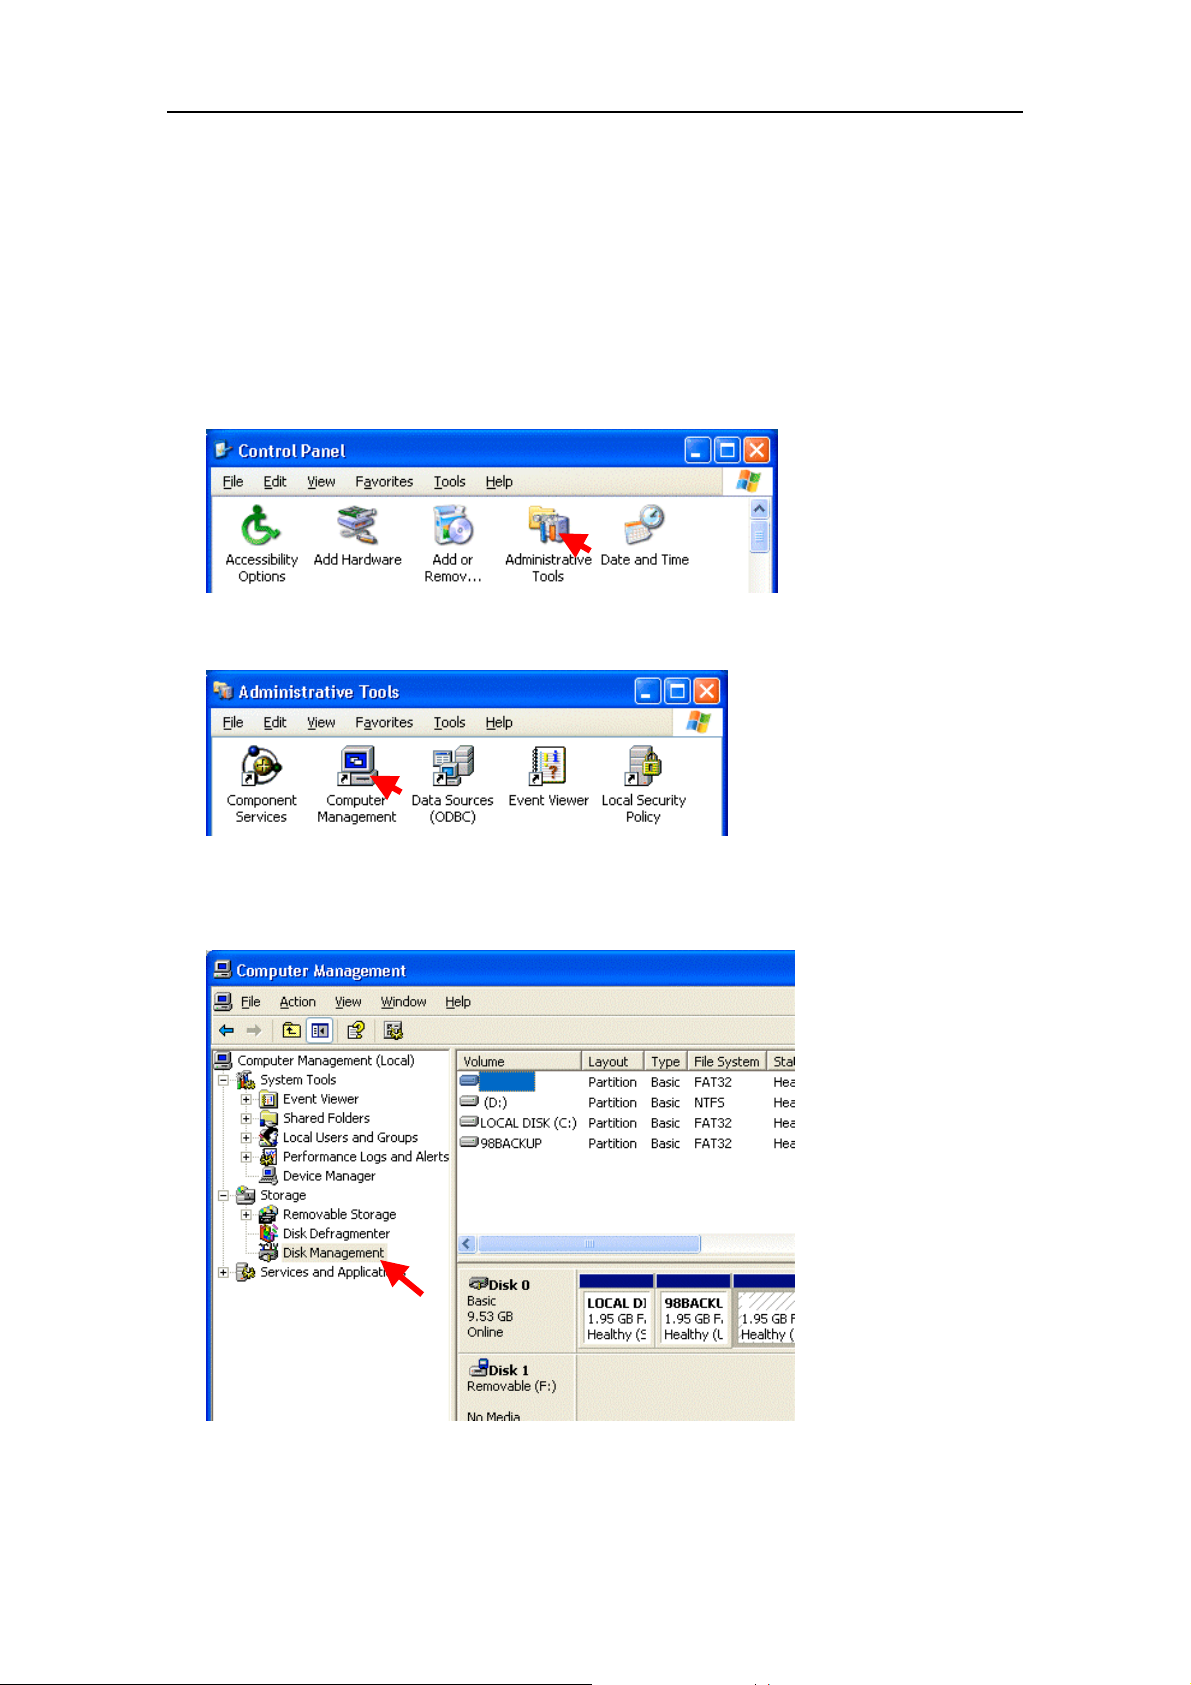
Installing the Internal 7 in 1 Drive may change the drive letters (E, F, etc.) of the CD-ROM
drive and other drives. In this case, you can change the drive letters of the memory card
reader/writers by setting in the Computer Management menu. The procedure for changing
the drive letter is described bel ow.
1) In the Control Pa nel windows, double-cl ick on the Administrative Tools icon to open it.
2) In the Administrative Tools, double-click on the Computer Management icon to open it.
3) Select the Disk Management in the Storage folder, and the information about the disks
will be shown on the right.
Page 14 August 2002
Page 15
Internal 7 in 1 Drive User ’s Manual 149369-02 Rev. A
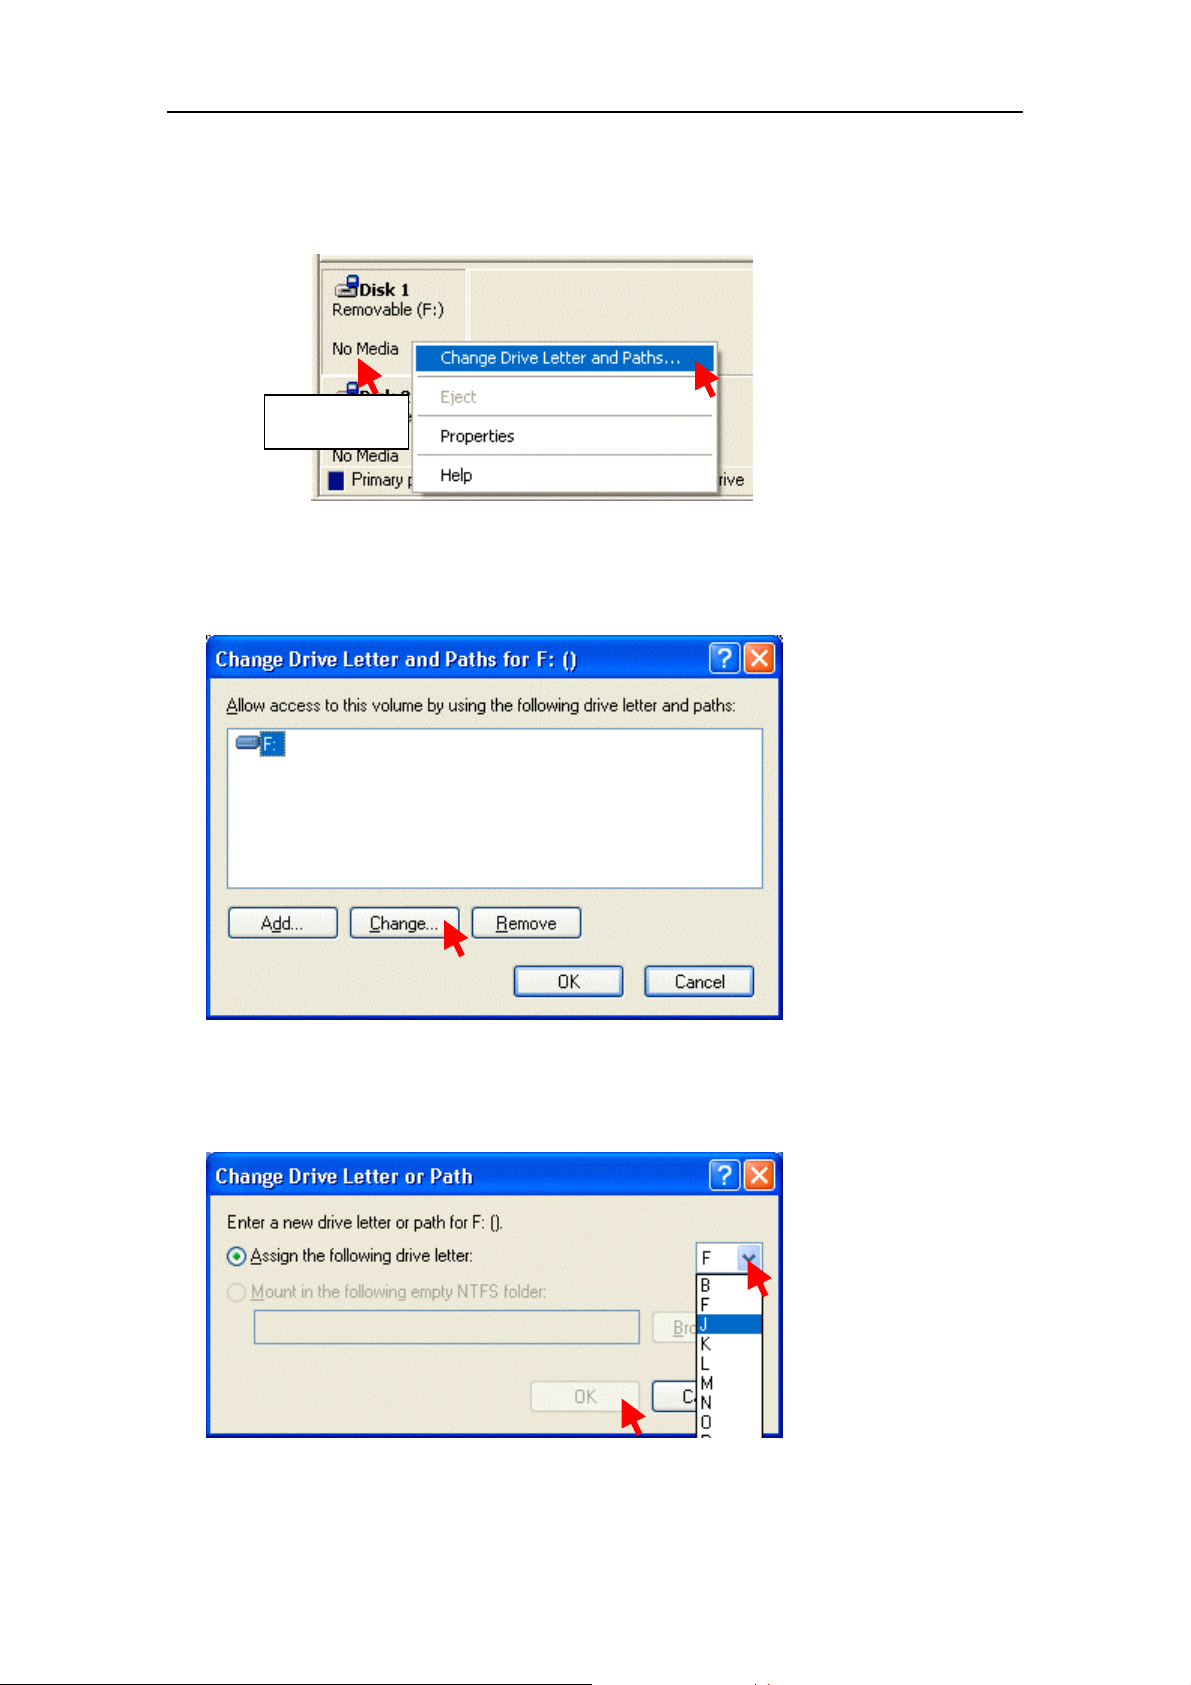
4) Right-click on the disk of whic h the driv es lett er you want to change, and in the di splayed
menu, select and click on [ Change Drive Letter and Path s…] .
Right-click
5) The following window for changing the drive letter will be displayed. Click on
[Change…].
6) In the following window for edit ing, set a des ired dr ive lett er and c lick on the [ OK] butt on.
In this example, the drive let ter of the CompactFlash card drive is set to J.
Page 15 August 2002
Page 16
Internal 7 in 1 Drive User ’s Manual 149369-02 Rev. A
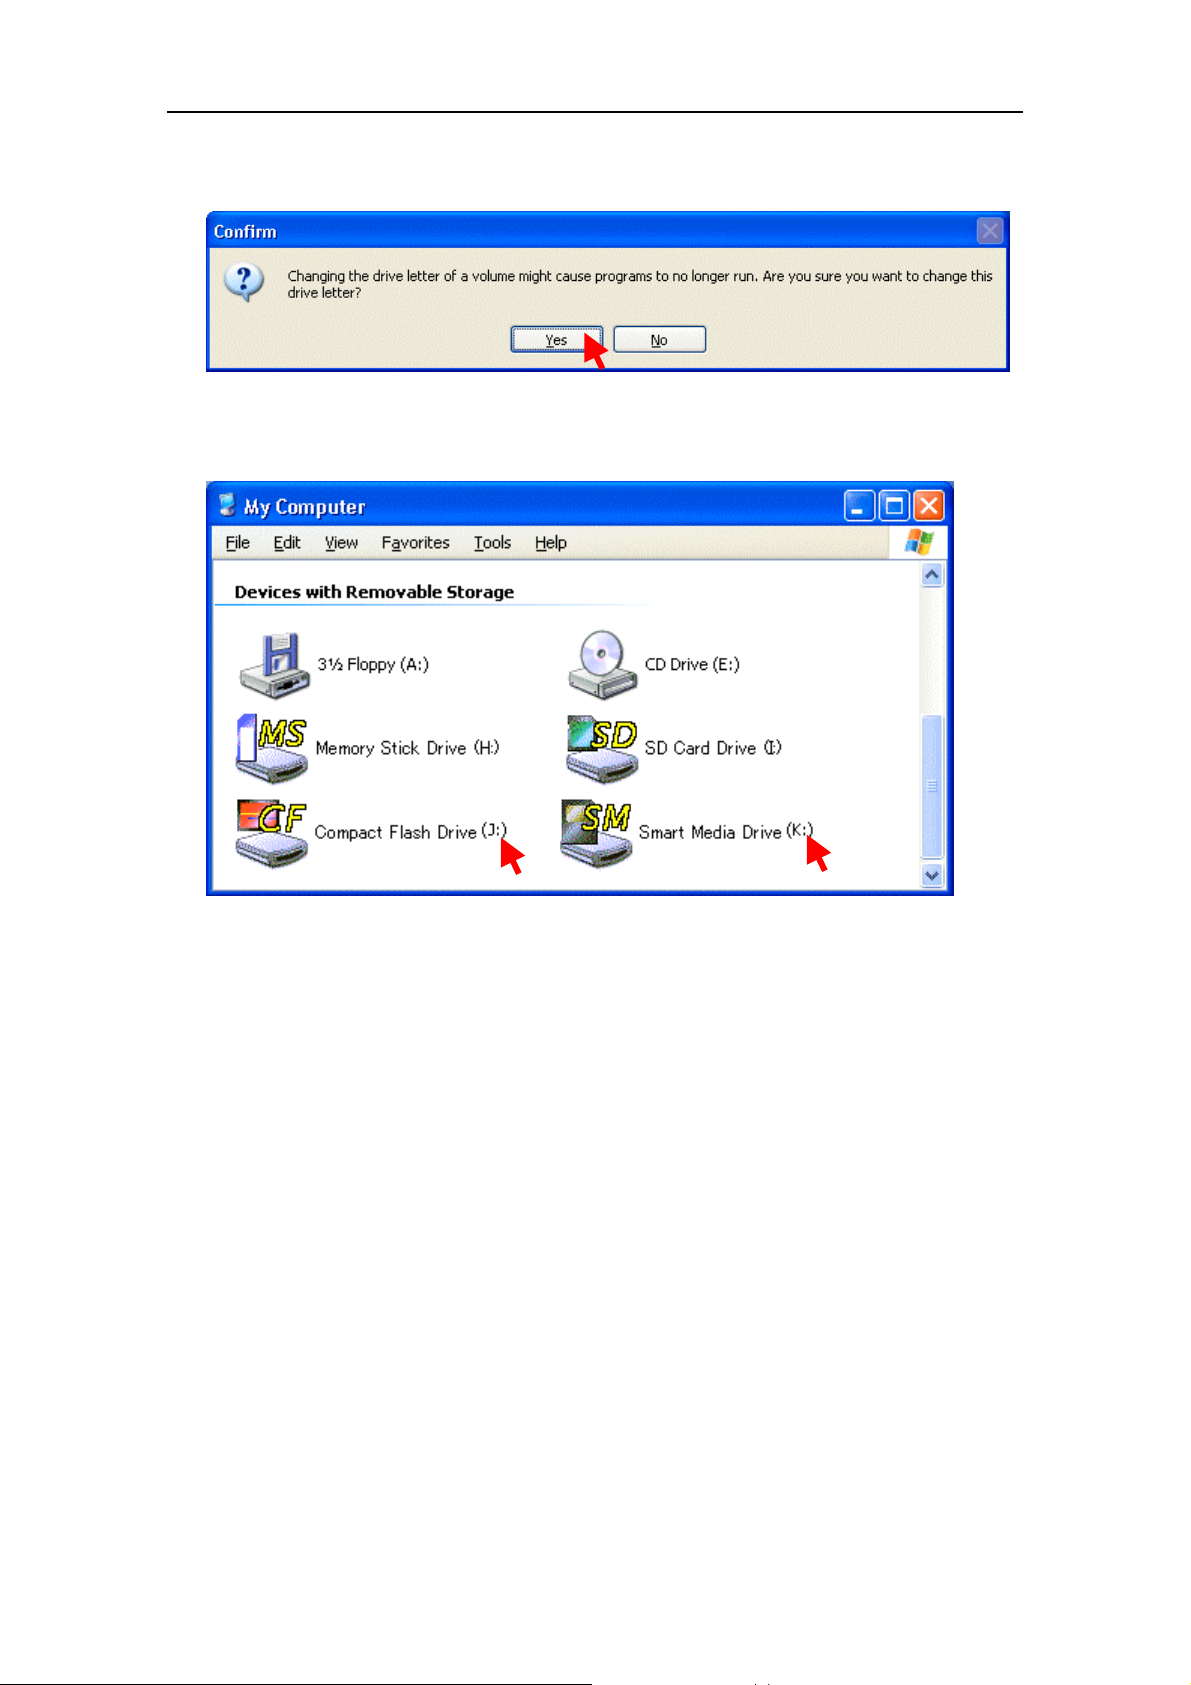
7) The followin g confirmation dialog box w il l appear. Click on the [Yes] button.
8) When the My Computer is opened, the change is reflected. In the this example, the
CompactFlash and S m art M edia card drives are set to J and K, respect ively.
Page 16 August 2002
Page 17
Internal 7 in 1 Drive User ’s Manual 149369-02 Rev. A
6.3.
6.3. How to uninstall the driver software
6.3.6.3.
When updating the driver software, it is necessary to uninstall the existing driver software
before installing new driver software. To uninstall, comply with the following procedure.
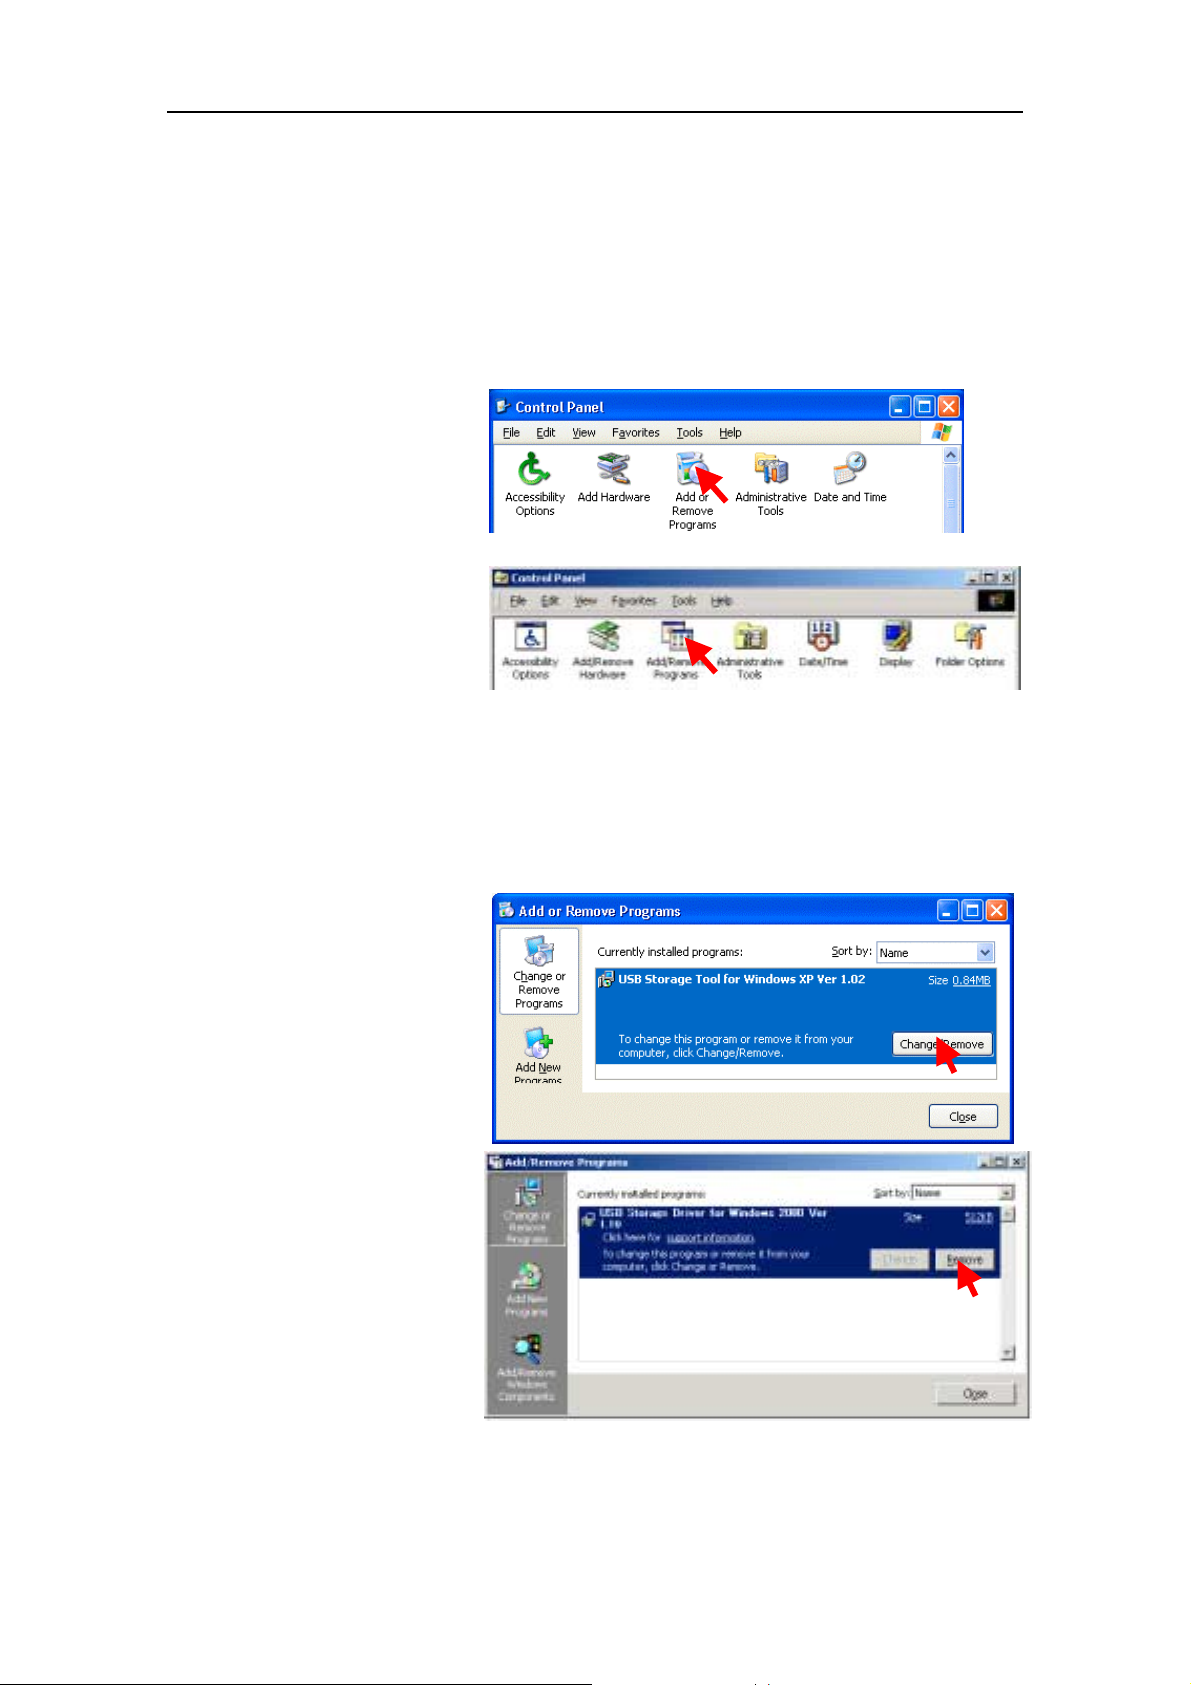
1) Double-click on the Add/Remove Programs icon in the Control Panel to open the
appropriate window.
In the case of Windows XP
In the case of Windows 2000,
Me, 98, 98SE
(The display has quoted Windows 2000.)
2) In the Add/Remove Programs window, the list of applications installed is displayed. In
this list, USB Storage Tool for Windows XP, and click on the [Remove] button. Then the
uninstaller for the driver will start up. Operate in accordance with the instructions shown
on the screen, and the driv er will be uninstalled.
In the case of Windows XP
In the case of Windows 2000,
Me, 98, 98SE
(The display has quoted Windows 2000.)
Page 17 August 2002
Page 18
Internal 7 in 1 Drive User ’s Manual 149369-02 Rev. A
7.
7. How to operate the Internal 7 in 1 Drive
7.7.
7.1.
7.1. How to operate the floppy disk drive
7.1.7.1.
The Internal 7 in 1 Drive’s floppy disk drive is the standard 3.5-inch floppy disk drive, so it
can be operated in the same manner t hat a general simple floppy disk driv e is operated.
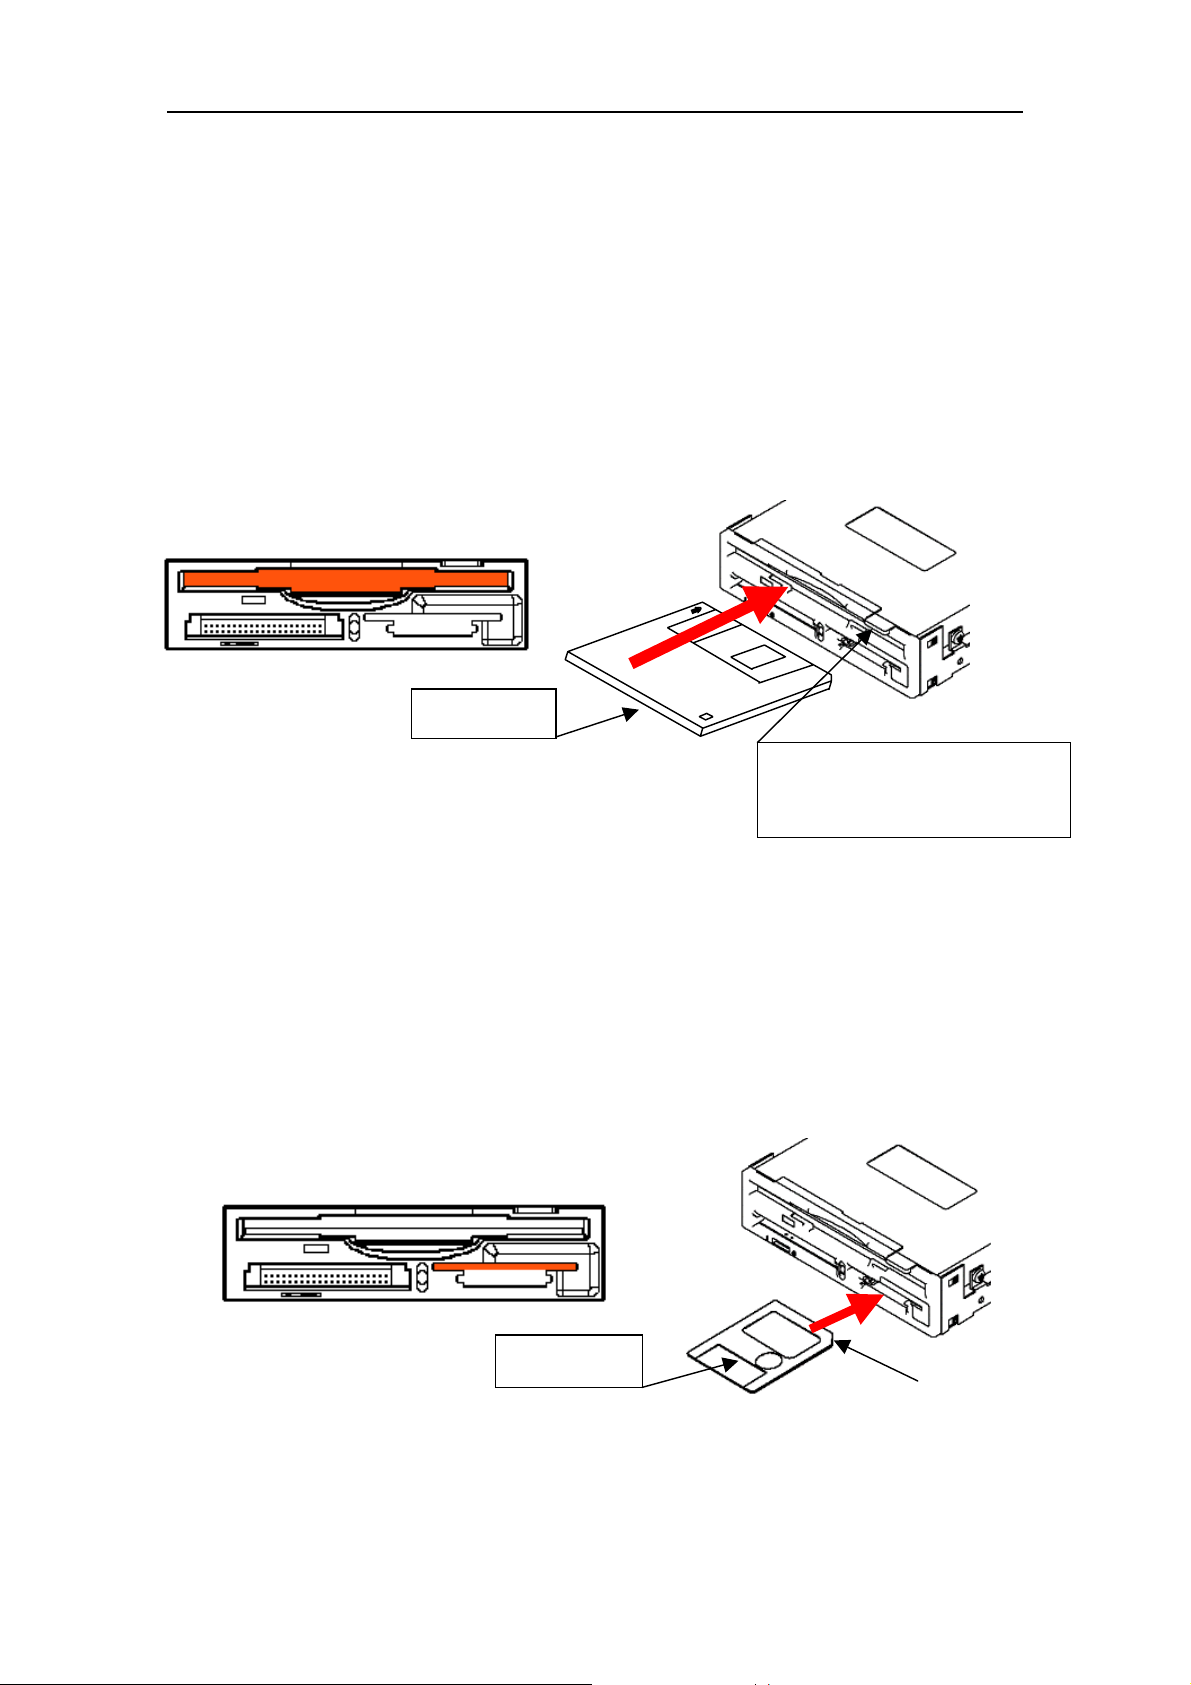
1) Inserting the floppy di sk
The floppy disk should be inserted into the floppy disk slot located in the upper part of
the Internal 7 in 1 Drive. When inserting the floppy disk, push it in as far as it will go.
When the floppy disk is inserted correctly, it will click and the Eject button for unloading
will pop out.
Floppy disk
Floppy disk Eject button
When a flop py disk is i nserted, t he
button pops out.
7.2.
7.2. Inserting the memory card
7.2.7.2.
7.2.1.
7.2.1.
7.2.1.7.2.1.
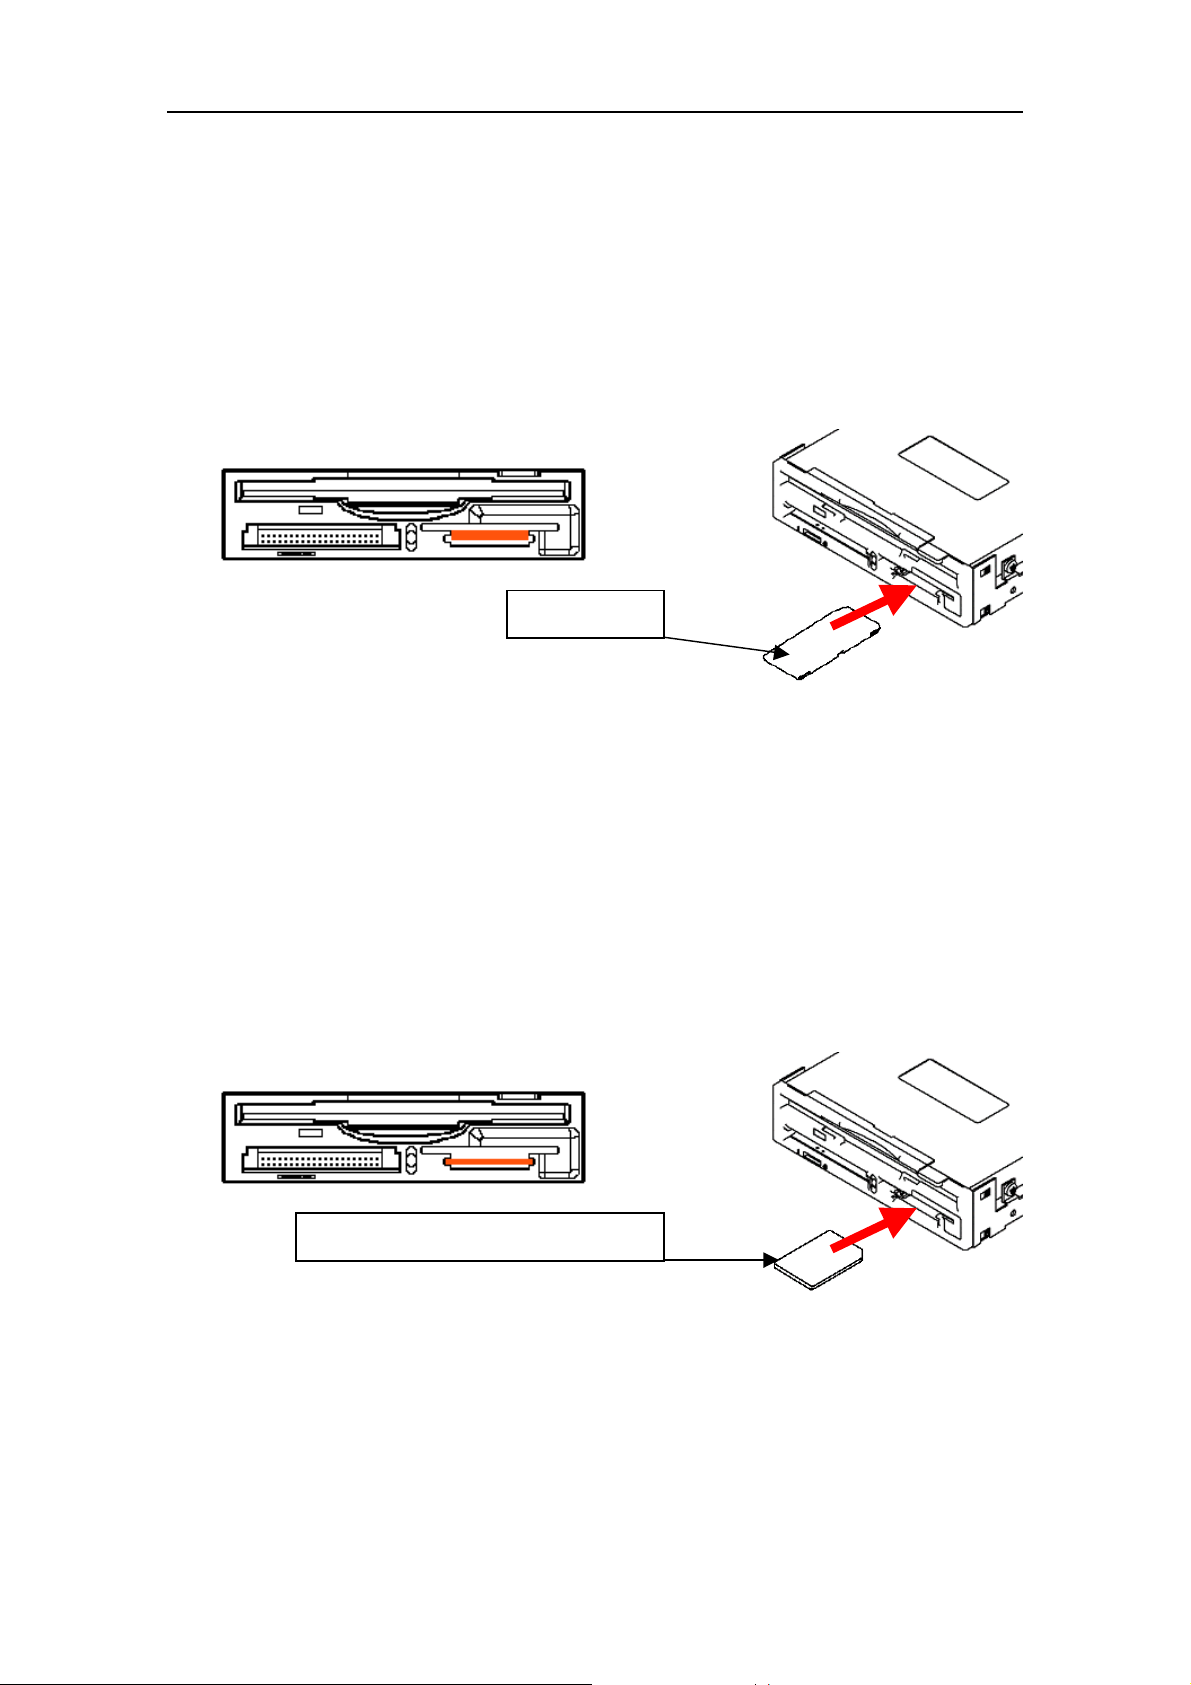
The SmartMedia card operat es as a USB-interfaced removable di sk.
1) Inserting the SmartMe dia card
The SmartMedia card should be inserted into the SmartMedia card slot located in the
right -hand part of the Internal 7 in 1 Drive. When inserting the card, push it in with the
golden contact side up as far as it will go. When the card is inserted correctly, it is
protruded by about 5 mm. The card slot is so designed that the card cannot be inserted
except in the right orientation.
Inserting the SmartMedia card
SmartMedia
[Important] Insert wit h t he golden contact up.
Page 18 August 2002
Notch
Page 19
Internal 7 in 1 Drive User ’s Manual 149369-02 Rev. A
7.2.2.
7.2.2. Inserting the MemoryStick
7.2.2.7.2.2.
The MemoryS t ick operate as a USB-interfaced re mov able disk.
1) Inserting the Me moryStick
The MemoryStick shou ld be inserted into the Me moryS t ick / SDMemoryCard slot located
in the right-hand part of the Internal 7 in 1 Drive. When inserting the card, push it in as
far as it will go. The card slot is so designed that the card cannot be inserted except in
the right orientation.
MemoryStick
7.2.3.
7.2.3. Inserting the MultiMediaCard and SDMemoryCard
7.2.3.7.2.3.
The MultiMediaCard a nd SDMemoryCard operate a s a U SB-interfaced removable d is k.
1) Inserting the Multi M ediaCard, and SDMemoryCard
The MultiMediaCard, and SDMemoryCard should be inserted into the MemoryStick /
SDMemoryCard slot located in the right-hand part of the Internal 7 in 1 Drive. When
inserting the card, push it in as far as it w ill g o. The car d slot i s so de signed t hat the card
cannot be inserted except in t he right orientation.
MultiMediaCard or SDMemoryCard
Page 19 August 2002
Page 20
Internal 7 in 1 Drive User ’s Manual 149369-02 Rev. A
7.2.4.
7.2.4. Inserting the CompactFl ash card and Microdriv e
7.2.4.7.2.4.
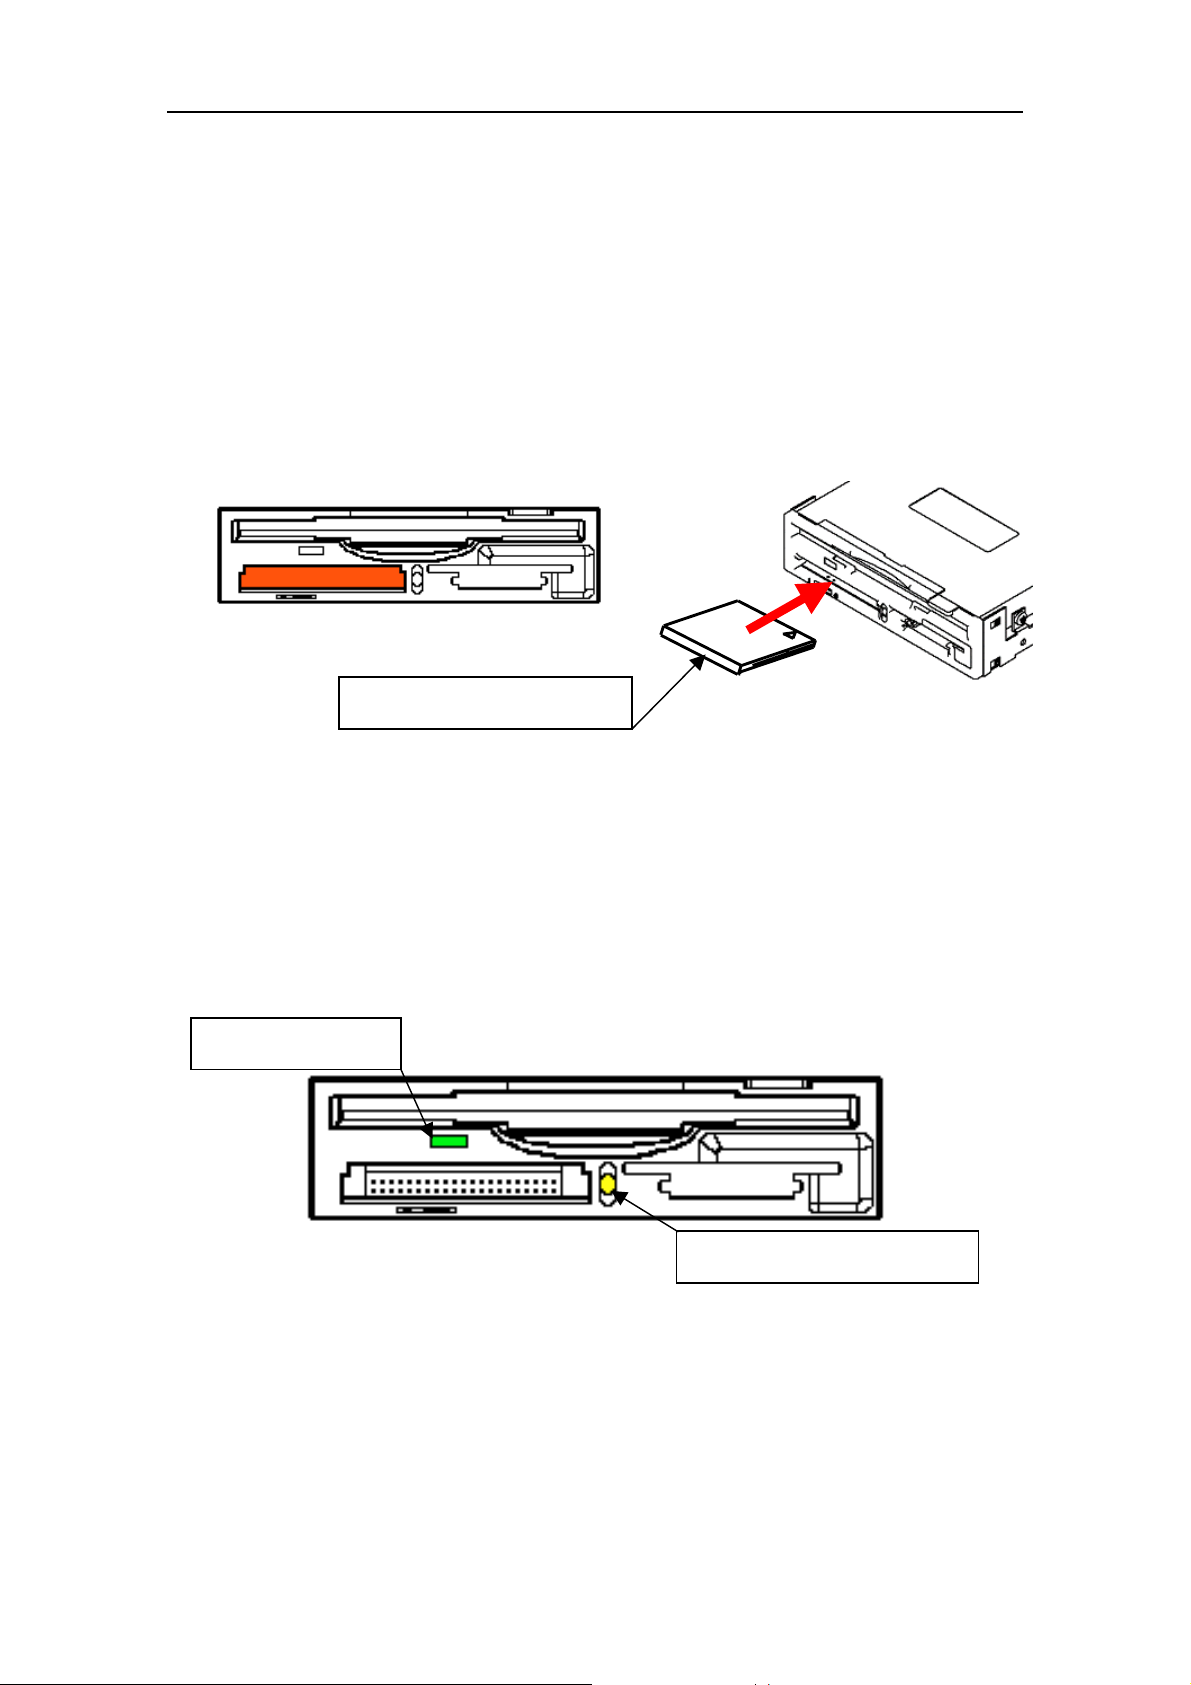
The CompactFlash card and Microdrive operate s as a U SB-interfaced removable disk.
1) Inserting the CompactFlash card and Mcirodrive
The CompactFlash card and Mcirodrive should be inserted into the CompactFlash card
slot located in the left-hand part of the Internal 7 in 1 Drive. When inserting the card,
push it in as far as it will go. When the card is inserted correctly, it is protruded by about
8 mm. The card slot is so designed that the card cannot be inserted except in the right
orientation.
CompactFlash or Mcirodrive
7.3.
7.3. How to operate on Windows
7.3.7.3.
1) Inserting the Media (Floppy Disk, Memory Card….etc)(Mount)
If media are inserted in Internal 7 in 1 Drive, the floppy disk will turn on FDD access
LED, the memory card will turn on acces s LED, and access will become possible.
FDD Access LED
USB ON 1 0
Memory Card Acces s LED
2) Removing the Media (Fl oppy Disk, Memory Card….etc)
Make sure that a file on the media is not being used by an application or being copied,
then remove the media. Even if the copy operation looks complete on the screen, the
media is sometimes being accessed. Before removing the media, check to see if the
Page 20 August 2002
Page 21
Internal 7 in 1 Drive User ’s Manual 149369-02 Rev. A
access LED stays out. If you remove the media during access, the blue screen may be
shown or the data on the media may be destroyed.
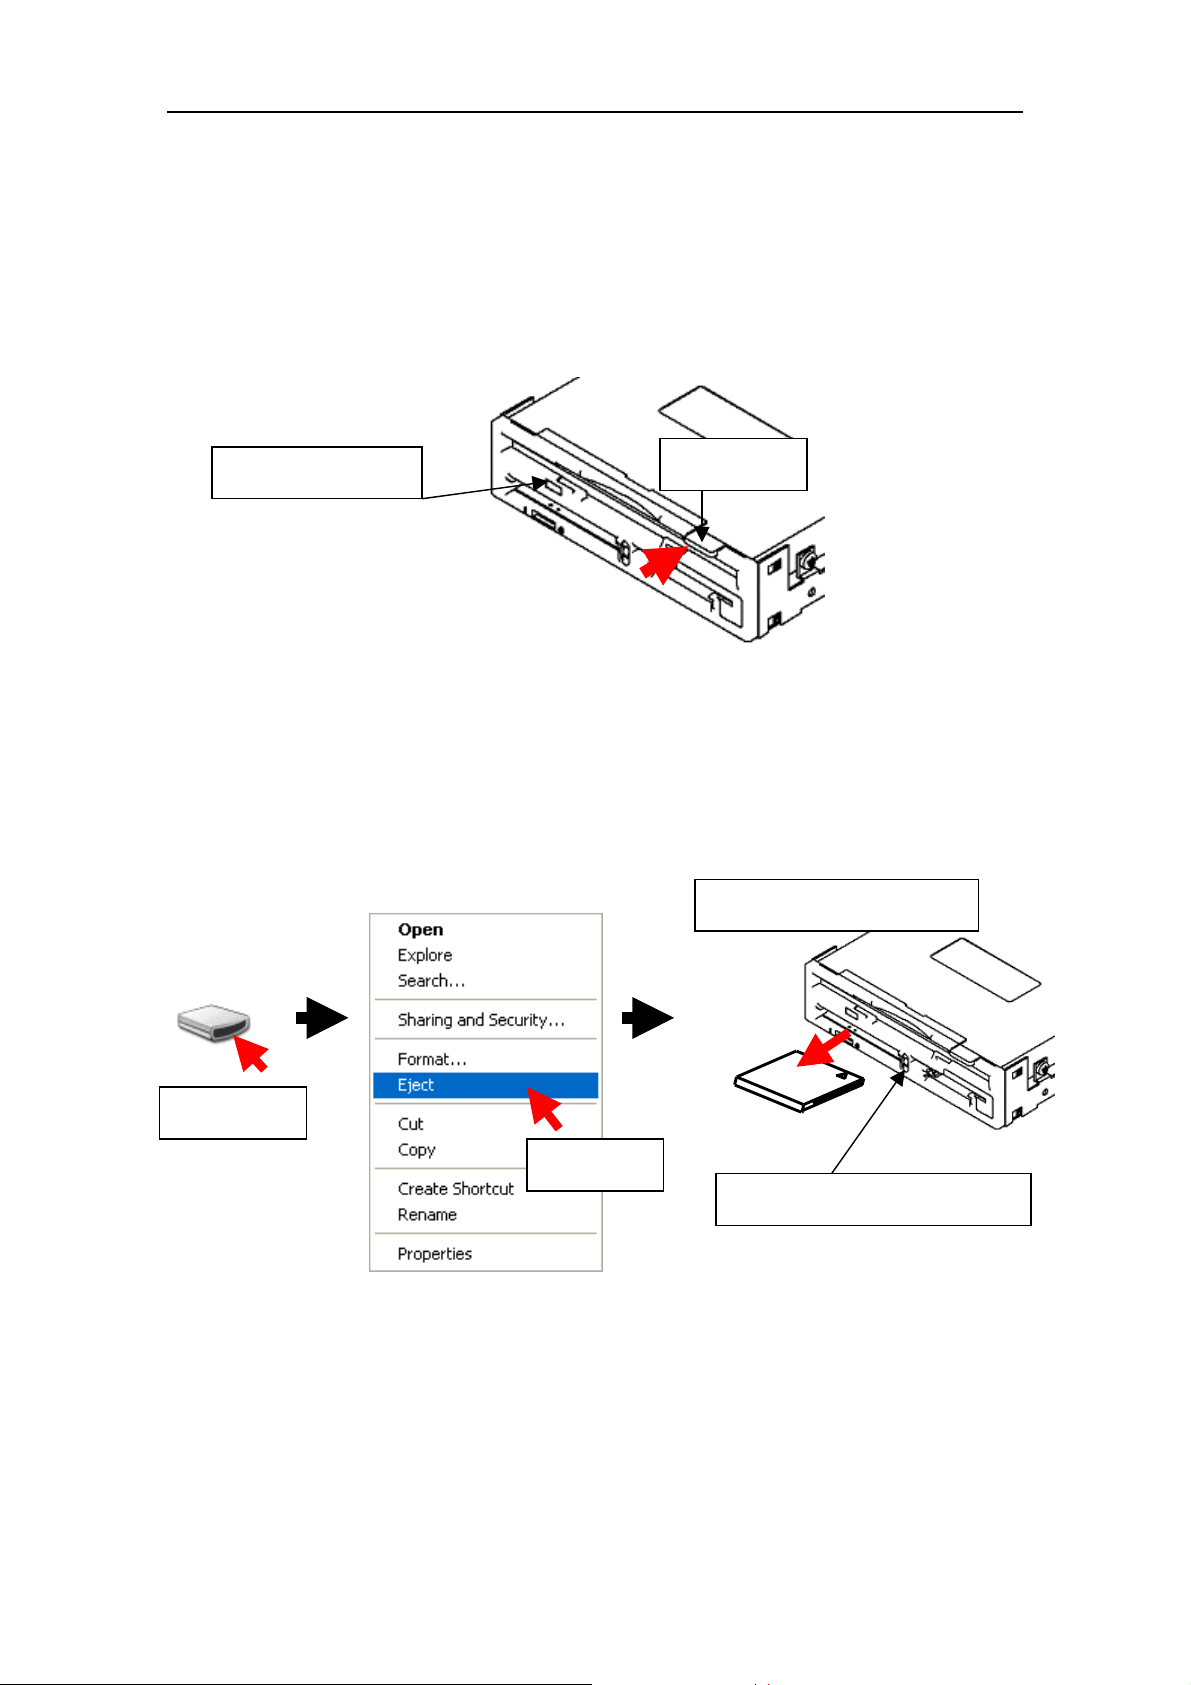
• Removing the floppy disk
Removing the floppy disk
Removing the floppy diskRemoving the floppy disk
When removing the floppy disk, make sure the access LED is not illuminated, then press
the Eject button to remove.
FDD Access LED
• Removing the memory card
Removing the memory card
Removing the memory cardRemoving the memory card
Eject button
Make sure that a file on the media is not being used by an application or being copied,
then remove the media. When you take out memory card safely, Please perform a right
click by the icon of the removable disk chosen from my computer. [Eject] is clicked from a
menu. After it performs extraction operation and an access LED checks putting out lights,
a finger pinches and draws out memory card.
take out memory card
right click
left click
access LED putting out lights
[Important]
When writing to a memory card in W indo ws XP an d 2000, an acces s to the c ard may
be caused by a delayed write operation even after the access LED goes out. For
safety purposes, wait about 30 seconds after the access LED becomes unlit, then
remove the media.
Page 21 August 2002
Page 22
Internal 7 in 1 Drive User ’s Manual 149369-02 Rev. A
8.
8. Restriction
8.8.
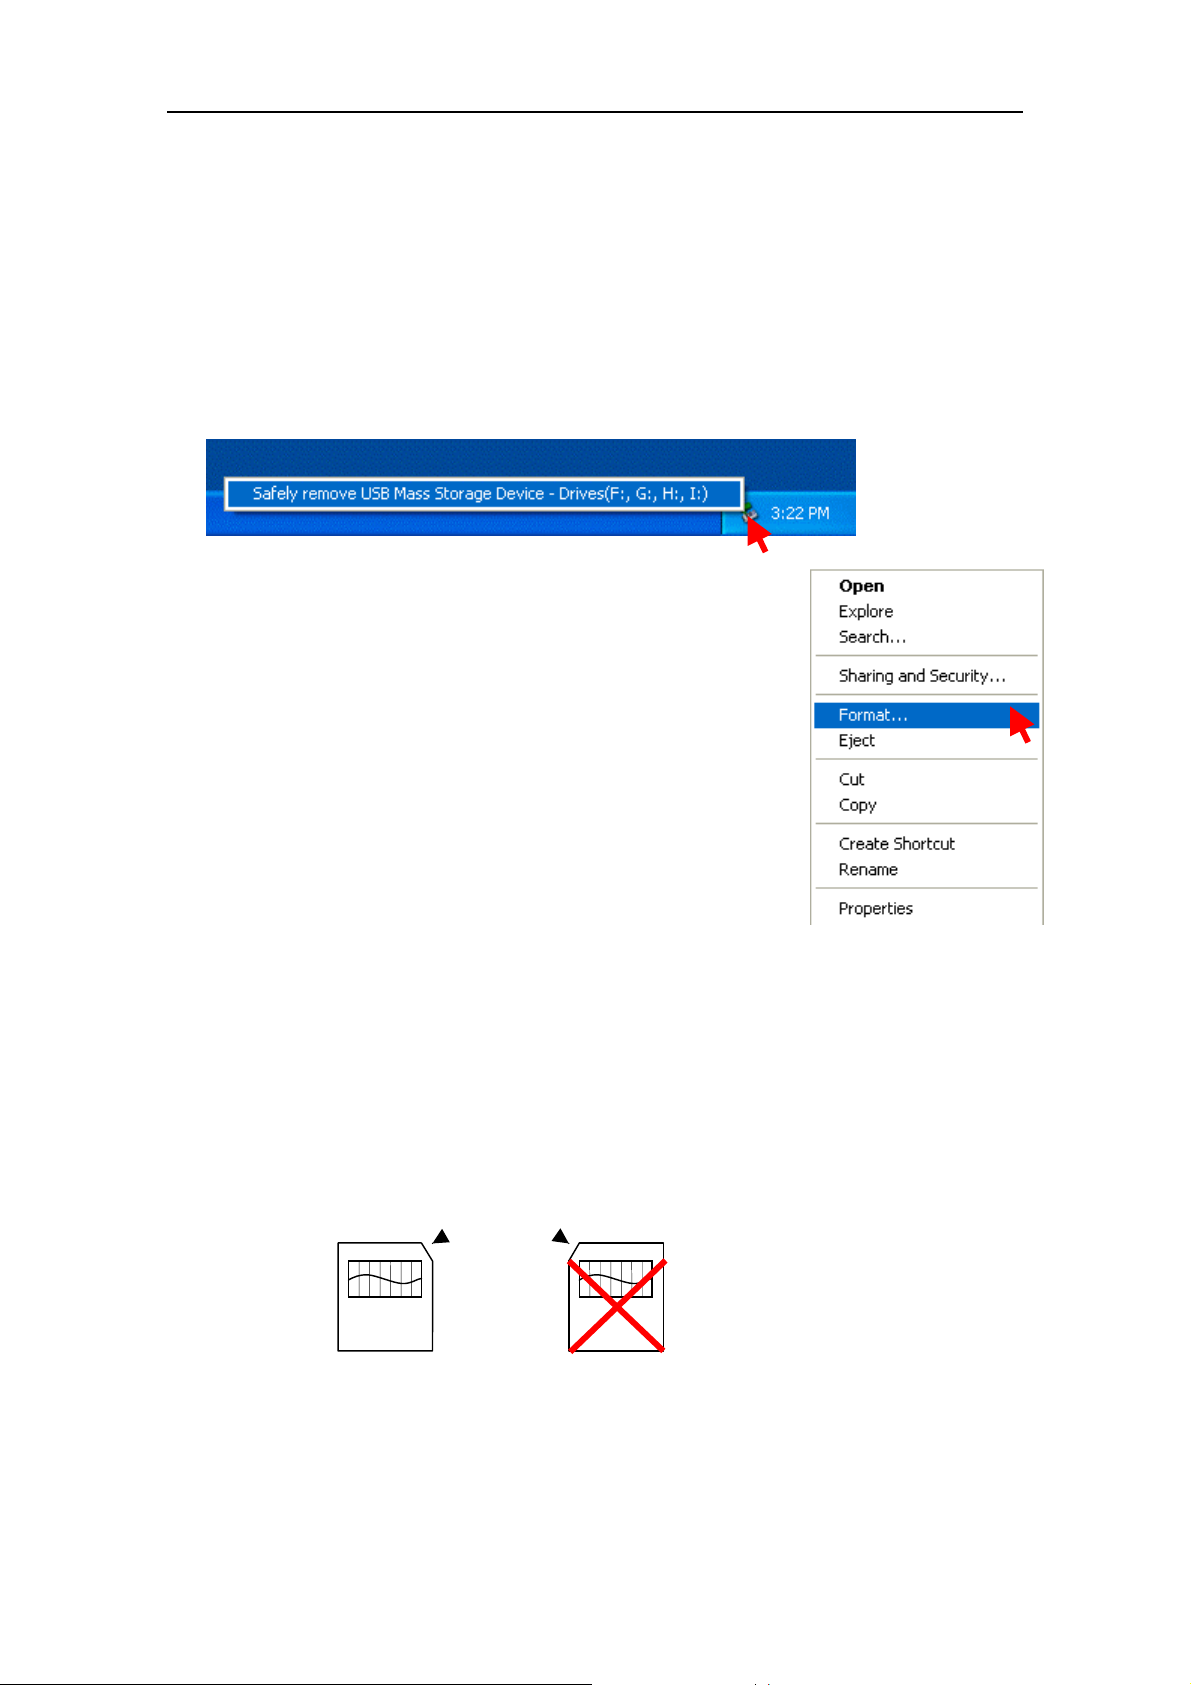
1) Precautions for use in Windows XP, 2000, and Me
Windows XP, 2000 and Me shows t he icon for disconnection in its task tray, but this icon
should not be used to disconnect. If you disconnect the Internal 7 in 1 Drive by clicking
on the icon, it’s memory card reader/w riters c ann ot be use d any mor e until Windows XP,
2000 and Me is restarted.
2) Media formatting
To format a media, right-click on the appropriate drive icon in
the My Computer, and select [Format] in the displayed menu.
If you use a digital camera, take notice that when a media is
formatted in Windows, the media sometimes comes not to be
recognized by your digital camera because of different
specification in the formatting. The memory cards must be
formatted with your digital camera.
3) Standby
The Internal 7 in 1 Drive support s the standby function based on the PC-2000 standard,
not all PCs’ standby function. So, if the standby operation of your PC causes any
problem, do not use the function.
During standby, do not insert or remove the media.
4) Usable SmartMedia card
The Internal 7 in 1 Drive supports 3.3-volt and 3-volt SmartMedia cards, not the old 5volt type.
3.3V and 3V type 5V type
[Important] The Internal 7 in 1 Drive is so designed that the 5-volt SmartMedia card
cannot be inserted. Do not insert it by force.
Page 22 August 2002
Page 23

Internal 7 in 1 Drive User ’s Manual 149369-02 Rev. A
5) SmartMedia card handling
If the contact area of a SmartMedia card is dirty, a read error may be caused. Keep the
contact area clean.
6) SmartMedia card with ID
The Internal 7 in 1 Drive does not supp ort the I D infor mation of the S martMed ia card, but
allows you to use any SmartMedia card with ID as a usual me dia.
7) Restrictions on t he DOS mode
When in the DOS mode, the only floppy disk drive can operate. The SmartMedia and
CompactFlash card reader/writers do not operate in the DOS mode. To use those
reader/writers, start up Windows.
8) Antivirus software
When memory-resident antivirus so ftw are runs in y our PC, the PC may co me to operate
unusually slowly or hang up. In this case, uncheck the media of the Tri-Media in the
anti-virus software.
9) Floppy disk drive interface cable
The floppy disk drive interface should be connected to the floppy disk controller on the
PC’s motherboard by a 34-pin ribbon cable. The 34-pin ribbon cable usually has two
connectors to be connected with floppy disk drives. The floppy disk drive connected to
the connector on the cable end is drive A, and the drive connected to the intermediate
connector of the cable is drive B. For a PC with only one floppy disk drive, connect the
drive to the connector on the cable end.
Computer side
Drive B:
Drive A:
[Important] No 34-pin cable is supplied with this product. Be careful not to
connect the cable reversely.
10) BIOS settings for the floppy disk drive
When setting the PC’s BIOS, set the fl oppy di s k drive to legacy 3.5-inc h 1.44-MB. So me
PCs provide 3-mode support by their BIOS. However, if your PC is used with Windows,
do not use 3-mode support. The use of 3-mode support may disable normal access to
the drive under Windows.
Page 23 August 2002
Page 24

Internal 7 in 1 Drive User ’s Manual 149369-02 Rev. A
9.
9. Product specification
9.9.
9.1.
9.1. Physical Specifications
9.1.9.1.
Description Specification
Size
(Excluding
101.6 ±0.4
mm (W)
X 25.4±0.5
mm (H)
X 155 ±1
mm (D)
protrusion)
Drive Unit
Weight 342 g (TYP)
Color (Standard) Front Panel: Pearl White
9.2.
9.2. Electrical Specifications
9.2.9.2.
Description
FDD USB Card Reader
Specification
USB Specification FULL SPEED(12Mbps)
Power Supply Voltage
DC5V±5%
Current Consumption 830mA(Max)
*1
DC 4.75 V to 5.25 V
500 mA (Max)
*2
Regulations UL, cUL, CE, FCC-Class B, VCCI Cl ass B
Access LED
*1 Test Condition Power Supply Voltage = DC 5.0 V, Disk : The general disk.
*2 Without using MicroDrive.
FDD is Green color, USB Card reader is Yellow
color. light on when access.
Page 24 August 2002
Page 25

Internal 7 in 1 Drive User ’s Manual 149369-02 Rev. A
9.3.
9.3. Environment Specifications
9.3.9.3.
Description In operating In non-operating
Temperature
5 - 40
℃
-30 - 60
℃
Relative Humidity 30 - 80 %RH No condensation
Maximum Wet Bulb T emperature
29
℃
--------
9.8 m/s2 (10 - 200 Hz)
(1.0G)
Vibration
Sweep Time: 5.6 minutes
Test time: 10 minutes
(each direction)
Direction of Sweep: XYY’
4.9 m/s
2
(200 - 500 Hz)
19.6 m/s
(10 to 500 Hz)
(2.0G)
2
(0.5G)
Shock
Direction of Shock: XYY’
Electrostatic Discharge
49 m/s
(1 1 ms Half Sine)
(5.0 G)
2
980 m/s
(1 1 ms Ha lf Si ne)
(100G)
IEC 61000-4-2 level 2 Comp l i ant (
2
contact discharge
IEC 61000-4-2 level 3 Compl i ant(air discharge)
Page 25 August 2002
)
Page 26
Internal 7 in 1 Drive User ’s Manual 149369-02 Rev. A
9.4.
9.4. Attached USB cable specifications
9.4.9.4.
Description Specification
USB Connector USB Type B Connector
5 PIN Connector
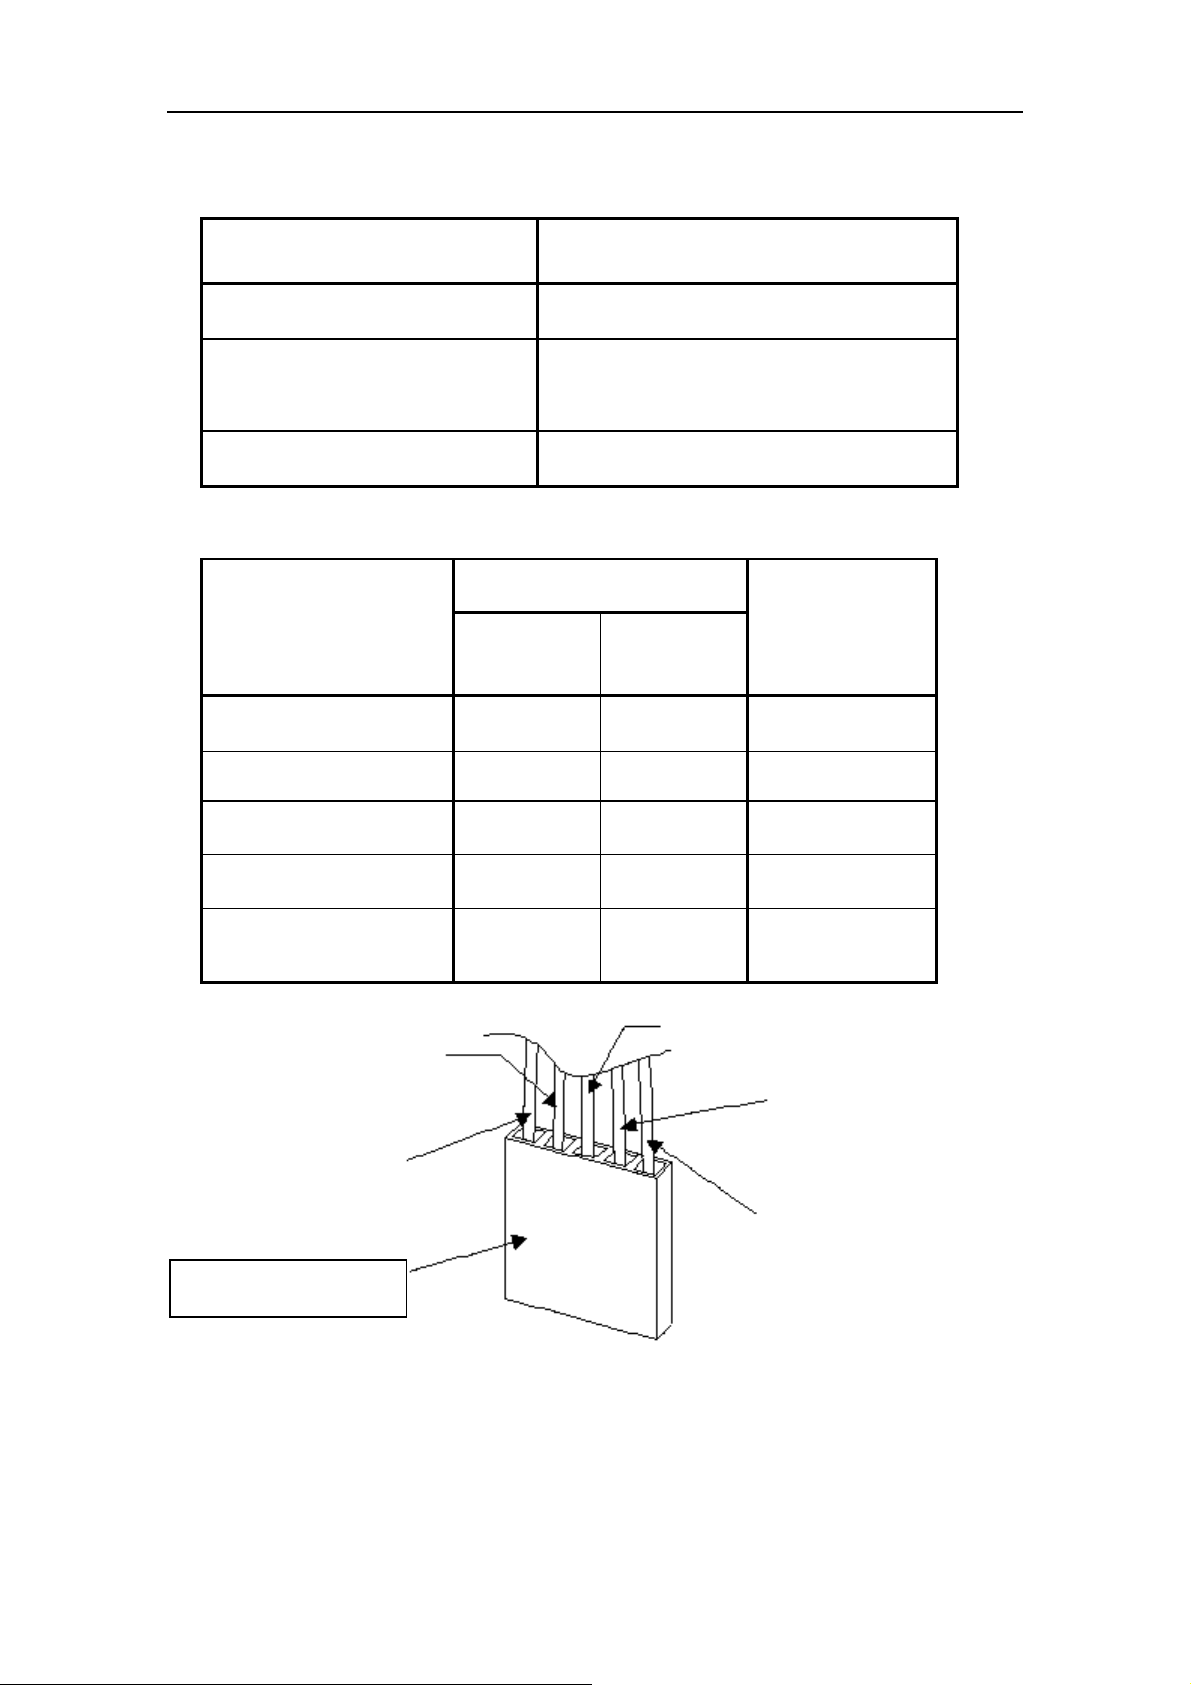
Cable length 70cm
5 PIN CONNECTOR PINPOUT
USB Connector Pin No.
Signal name
1 VCC (Red) 1
2-DATA(White)2
3 +DATA (Green) 3
4 GROUND (Black) 4
Plug Shell Shield (Black) 5
Housing: RE-05 (JST) or Equivalent
Terminal: RF-SC2210 (JST) or Eq uivalent
(Lead Wire)
Electric wire
color
5 Pin Connector
No.3 Green (+DATA)
No.4 Black (GROUND)
No.2 White (-DATA)
No.5 Black (SHIELD)
No.1 Red (VCC)
USB 5PIN Connect or
[Important]
Before connecting, make sure the pin configuration is in agreement with that on the
PC side, consult i ng t he manual for your PC.
Page 26 August 2002
Page 27

Internal 7 in 1 Drive User ’s Manual 149369-02 Rev. A
10.
10. About inquiries
10.10.
Inquiries should be directed to the store from which you purchased the
product or any store that is provided on the package.
Page 27 August 2002
 Loading...