

Page 1

Wireless
Security Camera
User
Manual
YATWI N
Smart Home Version 2.3
Welcome
Please read this manual carefully before using and keep it
properly for future reference.
Thank you for purchasing YATWIN Wireless Security Camera.
Here you will find useful information about the camera’s
installation, operation, features and functions as well as
information to aid in troubleshooting.
Important Security Warning
In order to keep your YATWI N ca mera secure and pr event
unauthorized access, please make sure to follow the steps
below:
• Always make sure that your camera has the latest
firmware.
• Always change the default password for your camera.
Always ensure tha t your password is at least 8-10 characters
long and contains a combination of lowercase characters,
uppercase characters as well as numbers.
panel.
The camer a’s in dica tor light status:
- Ligh t is solid green and steady:
The camera is connected to the network and work normally.
- Light is green and blinking quickly:
The camera is connecting to the network or ready
- The light goes out:
The camera isn’t connected to the network.
1.2 APP Download
You need the “EyeCloud ” app to set up your
camera.
To download the EyeCloud
app for Android, scan QR code or search for
EyeCloud on Google Play.
To download the EyeCloud app for iOS, scan
the QR code or sea rch for EyeCloud on App
Store.
1.3 Register
Install the EyeCloud app and click “Register Now”. Creat e and
input user name and password to finish registration.
2. Camera Access Setup
This sect ion of the guide will provide the user with
information on how to setup access to the camera through
any of the following methods:
1.2 Wi-Fi Connection
For purposes of this guide, we will use Android, although
both apps have the similar interface. (
differ slightly f rom the screenshots below)
(1) Enter the EyeCloud app, tap the + icon on the home
age, tap “Scan QR Code” to scan the QR code on the
bottom of the camera. After scanning successfully, tap
“Wireless In stallation ”.
The A pp Int er face may
1. Getting Started
1.1 Device Overview
The diagram below shows the camera’s profile and rear
Note: If you can not scan the QR code, please tap
“Oth er”, ta p “IP camera”, ta p “Wireless Inst allatio n” to
proceed WiFi configuration.
(2) Please power on th e camera and wait for about 30
seconds. The camera will rotate t o perform a self-test
Page 2

and t he camera indicator light will blink. The camera
will say “W ireles s con figu ratio n is waitin g”.
NOTE: If t he indicator light doesn’t blink and no v oice comes
fr om camera, please unplug the power , wait a few seconds,
and plug it again or reset t he camera to f act ory default
settings by holding the r eset butt on for 5 seconds, then it will
say "reset completed” , and t he dev ice will reboot.
NOTE:Please do NOT connect the network cable during
wireless inst allation .
NOTE:This camera supports 802.1 1b/g/ n 2.4GHz WI-Fi band
(5GHz WiFi is c ur r ently not supported).
(3) After you hear “W ireles s con figu ration is waitin g”,
tap“There is voice prompt”, ta p “send”.
the bot tom stic ker of the camera to link the c amera; Next,
input t he password, and then confirm
(5) Change your camera’s default password.
After adding the c amera successfully, tap your ca mera view,
please change your camera’s default password. Input a new
password and tap “Submit”.
After you confirm the new password, please wait patiently
for a moment, then you will h ave ac cess t o th e camera.
Note: The password length is between 8 and 31
characters.
NOTE : If th e page t o change password doesn’t pop up, you
can change your password in the “Set ting” ( For more
details, please refer to 4.2 Set ting your ca m e r a ).
(4) Check your WiFi rout er’s name and password to make
sure that information is correct. After confirming the
information, please tap “OK”, your phone will send sound
waves to search for the camera, wait a few seconds and the
camera will speak “Wireless connection success”. Then wait
for a moment, it will pop up the page to add camera, then
tap “ADD CAMERA”
NOTE: Please make sure the phone and camera are under
the same Wi-Fi. Wi-Fi pass words with special charac ters ,
li k e @, $ , # , etc. are not supported
NO TE : Please place t he phone close to t he c amera and turn
the phone v olume up to maximum.
NOTE: If the APP page don’t pop up the page “ADD
CAMERA”, but the c amera prompts
success
wait patiently for 20 seconds t o add the camera. If you still
can’t add it, please retur n to t he A dd Camera page, tap
tap “ Other”, tap “I P Camera", tap ” Manually a dd " t o link
the c amera
Manually add the camera:
First, please input camera's UID (15 digit s, which can be
found on the bottom of t he camera), or scan the QR code on
and the camera indicat or light is solid green, please
Wireles s connnection
+,
2.2 Wired Connection
(1) Please power on the camera, and connect a network
cable to the camera and router.
NOTE: When you connect the Ethernet cable successfully,
light is on. (If the lights don’t blink or stay on, please use
another Ethernet cable t o tr y again.)
NOTE: Please make sure the phone and camera are
plugged into t he same rout er (LAN).
(2) Open your EyeCloud app, tap the + icon on the home
age, tap “Scan QR Code” to scan the QR code on the bottom
of the camera. After scanning successfully, tap “Sear ch in
LAN”, tap “LAN cable is connected”, you will find all the
available cameras in the same router (the same LAN) and tap
“Add Camera”.
NO TE : The binding page will pop up af ter about 20
seconds. I f it does not pop up, then please return t o the A dd
camera page, tap
“Ma nually add” to link the camera. To manually add the
+, tap “Other”, tap “IP C amera", tap
Page 3
camera, pl ease refer to 2.1. 4.
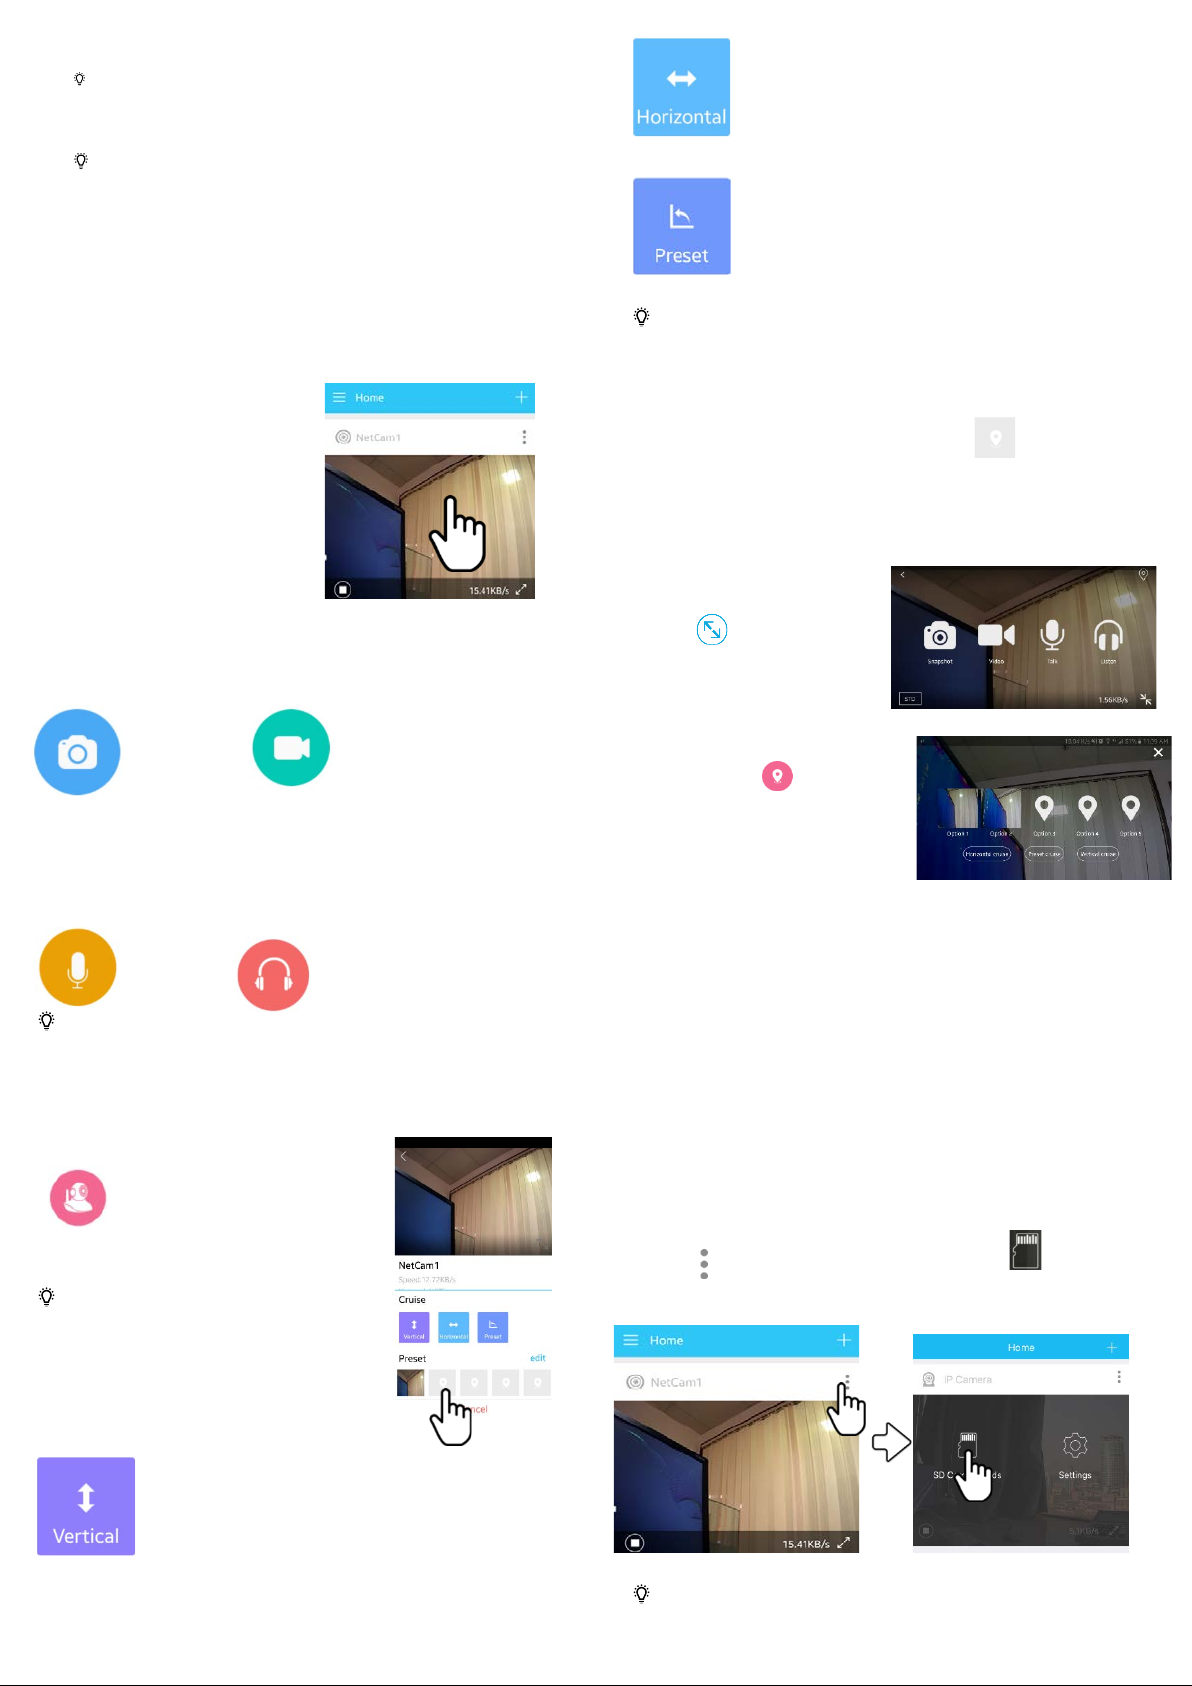
"Vertical" cruise: Tap " Ve r t ic a l" button and
rotating.
"Preset": When the camera is rotating, tap
NO TE: If the camera has been added successf ully, it
can be added via the same way by other users (wit h a
different Eyecloud account).
NOTE: Cameras that hav e been added successf ully in
this account will not be searched again, if y ou want to
re-search for your camera, you need t o delete t he added
camera first. To delete t he camera, please ref er to 4
C amera setti ng
"Horizontal" cruise: Tap " Horizontal"
button and the camera will rotate
horizontally in the range of 355°. Tap the
"Horizontal" button aga in and it will stop
the "Preset" button and it will return
quickly to original position and stop
rotating.
3. Viewing Your Camera
Once setup successfully, the
camera can be accessed
remotely by smartphones (iOS
& Android), tablets, and PCs.
Now let's learn how to use it on
your mobile devices:
Tap the center of the camera to
enter your camera view.
3.1 Snapshot and Record
Tap snapshot/Record video, as shown be low.
Snapshot Record
3.2 Talkback and Listen
Tap talk/listen and dynamic icons will appear on the bottom
left corner of the screen, if you want to cancel the function,
then t ap the icon again.
Talkback Listen
NOTE: When y ou pr ess t he Talk icon, please make sure
y our smartphon e is in the different room than your camera,
as it will cause too much feedback if they are t oo c lose.
3.3 Auto-Cruise and Pre-set Position Bookmarks
Tap Pan-Tilt icon to use Cruise and
Pres et functio n
NOTE: Due to diff erent soft ware
versions, if you can’t see the above
head icon, please swipe t he func tion
icon left from the right edge with one
finger.
(1) Cruise function
NOTE: "Vertical" cruise and " Horizontal" cruise c an work at
the same time.
(2) Preset function
Method 1:
As shown the picture on the right, tap the “location”
icon to bookmark your favorite locations (up
to 5).
When the camera view is other position, tap your pre-set
position icon and t he camera w ill quickly switch to the
position you bookmarked.
Method 2:
Tap on the bottom
right corner of the
camera view and t he screen
will rotate.
Tap screen and tap the top
right corner icon, as
shown on the right.
Then ta p Option 1-Option 5 to
bookmark your favorite
location. As shown right
picture
(Long press the icon to delete the bookmarks).
3.4 Night Vision
Infrared night vision (12 I R light beads). The night vision has a
working r ange of 10 meters.
3.5 Pan/Tilt Control
With two rotating platform of 355° horizontal & 80° vertical
rotation range, you can control your camera view by sliding
up, down, left and right in the middle of the camera view
screen.
3.6 Playback
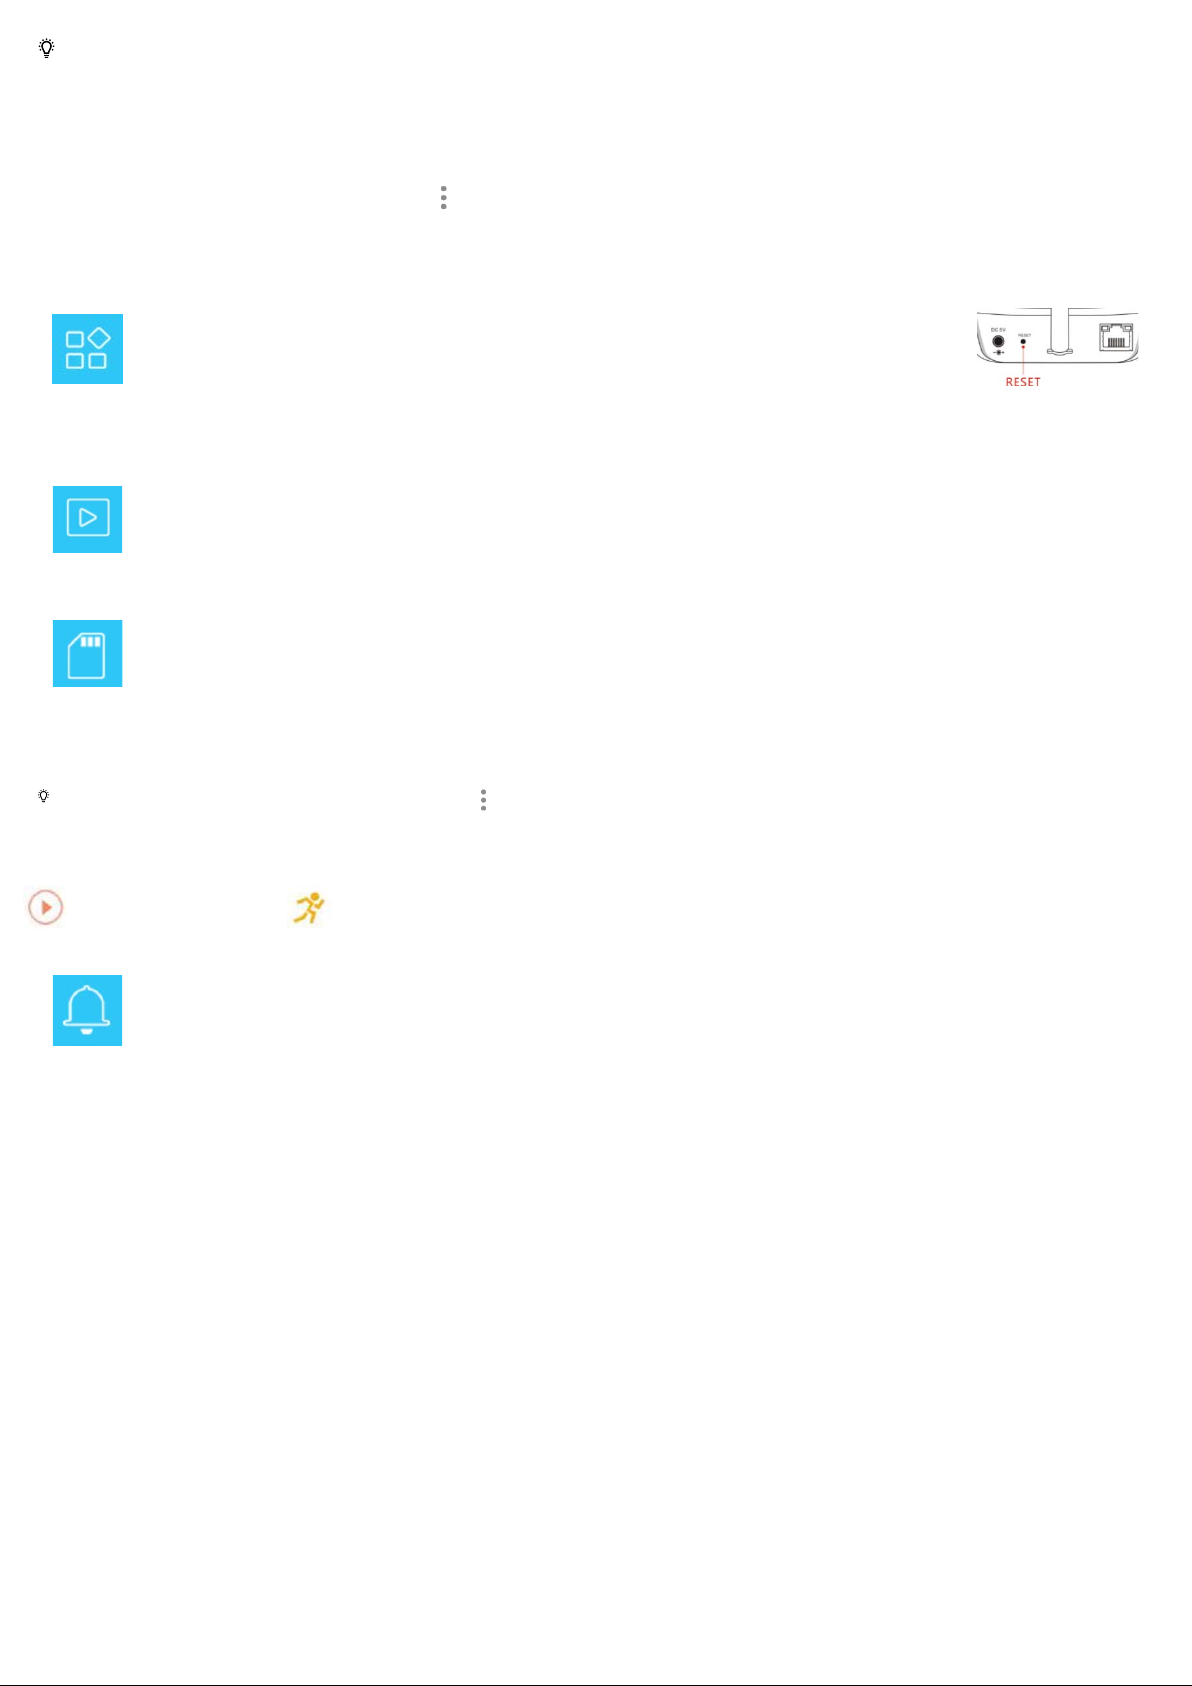
Tap icon as shown below, and tap SD Card
Records icon. You can see your record list.
the camera will rot ate vert ically in the
range of 80°. Tap the " Vert ical" button
ag ain and it will stop rotating.
NOTE: Before using “SD card reco rds”, please insert the
Micro SD card (face up) into the camera.
Page 4
The camera support s Class 10 or higher speed micro SD
?
interface, adjust the picture
Card (max imum 128GB) .
4. Setting Your Camera
your sister to download the APP and send your sister the
camera UID and password, your sister can access to the
camera in US.
already, then t he password will be new password.)
(If y ou have changed the default password
On the home screen of the APP, tap the icon in the
right, go access the Settings.
You will get the following menus:
4.1 Camera Setting
You can see the camera’s basic information,
rename your camera, set up a different Wi-Fi
connection, modify the camera password,
upg rad e firmwar e, and delete the added camera.
4.2 Video Viewing Setting
You ca n setup Night Visio n Mod e, horizont al and
vertical mirror view, light mode, brightness and
contrast.
4.3 SD Card Recording Setting
You can check SD card capacity and setup
Schedule Recording, Motion Detection
Recording or No R ecording ; Record Sound or not,
or Format SD card.
(I t is r ec ommended t hat you for mat t he S D c ar d before rec or ding
video t o t he S D c ar d)
NOTE: In the home screen of t he APP, ta p icon in the
right to go to SD Card Records.
You can see y our recording v ideo: (A s shown below)
Schedule Recording Motion Detection Recording
4.4 Alarm Setting
You ca n turn on/off the Motion Detection
Alarm, Sensitivity and Alarm Schedule.
NOTE: When the motion detec tion alarm is on, y our
app can receive a notification as soon as a motion is detect ed.
5. FAQs/Troubleshooting
Q: How to Setup mo re EyeCloud accounts to access to the
camera?
A: If you have connected the camera to network successfully,
then your family want to access to the camera too, please try
the following way:
Share the camera ID and passwor d with your family.
Require them to download the EyeCloud app and open it, tap
the + on home pag e, t ap I P Ca mera, t ap “Input Manually”,
and enter the camera UID manually
bottom of the camera)
the camera, input the camera password, and t hen confirm.
(Note: The camera supports 4 end users adding camera and
accessing it at the same time. )
For example, If I set up this camera at home in the UK, will
my sister hav e access to the camera in the USA?
Yes, please refer to manually input way above, please require
. Or scan the QR code on the bottom of
(y ou c an find it on the
Q: How to upgrade my c amera firmware?
A: you can find it on Setting > Camera Setting > upgrade
firmware
Q: If I forget the camera p assword, how to reset camera
back to factory default setting?
A: Please power on the camera, press
and hold the reset button on the back
of the ca mera for 5 seconds. Release
your hand after you hear the voice saying “Reset Complete”.
And then connect the camera to the network again.
Q: Why can’t I connect to Wi-Fi? Do you have some tips?
A: (1) The camera can only supports a 2.4G frequency signal,
and 802.11b/g/n Wi-Fi network.
(2) The network is not stable, try later. Make sure your Wi-Fi
signal is strong.
(3) The Wi-Fi password should be less than 16 letters or
number and doesn’t support spec ial characters, like @, $,
#, !, (, ), etc. You may need to change the password (to only
let ters a nd numbers)
(4) Please restart your mobile phone or change mobile
phones.
(5) Please try restarting your route r.
(6) Please try using another Wi-Fi account.
(7) Please upgrade to the latest firmware.
(8) Please upgrade the APP to the latest version.
Q: My camera has been connected to Wi-Fi before, but I
forget my camera password. So I reset the camera. But it
can’t con nect Wi-Fi anymore. Any tips?
A: Please choose “Setting” and delete the camera. And then
try to connect Wi-Fi and add the camera again.
Q: Why I can’t log into the EyeCloud APP
A: Please try to re-register a new account and login again.
Please bind your email in order to reset it when you forget
the password.
Q: How t o b ind my Email?
A: Tap “Me” icon, then tap the “Account&Security” icon, tap
“Recovery Email”, enter your E-mail address, then log in your
Email to verify.
Q: Can I use the camera outdoors?
A: This camera is for indoor use only, the working
temperature is from -10℃ to 50℃. It is not waterproof,
dustproof. We don’t suggest using it outdoors.
Q: What to do if camera’s picture is blurred?
A: (1) Login the camera's
quality to HD mode;
(2) Clean the camera lens with a cotton swab or
microfiber cloth.
Page 5

Q : Why No vision at night time?
A: (1) Check if the IR function is enabled or not
(2)Check if t he I R LE Ds are on or not (they glow red when
on);
(3) Reset the camera back to factory settings;
(4) Upgrade the camera to the latest firmware.
Q: Why No motion detection picture?
A: Sorry, ONLY motion detection video and notification.
6. Return policy and warranty
(1) 30-Day Return
YATWIN CAMER A can be returned for either a refund or a
replacement of the same item with in 30 d ays of receiv ing
the item.
(2) 12-Month Warranty for Quality-Related Issues
(3) Lifetime Technical Support.
(4) Warranty service does not include the following
situations:
* Lost or stolen products.
* Damaged by human factors.
For more warranty info and return policy, please con tact us.
7. Customer Support
For detailed operational instructions, please refer to the User
Manual included with your purchase.
Many of the setup and installation sections below have
corresponding videos on YouTube.
To view setup videos for many of the steps outlined in this
guide, go to http://www.yatwintech.com
For access to the quick start guide and other support
information, to contact YATWI N support, please do one of
the following:
• Call YATWI N Support +86 177 2263 7756
• E-mail: [email protected]
• Skype: tonyxiong1012
• We Cha t :177 2263 7756
This user manual is for ref erence only. Slight dif ferenc es may be
found in the user inter face. A ll the designs and software her e are
subject t o change without prior wr itt en notic e. A ll trademarks and
registered t rademarks ment ione d are the pr operties of t heir
respectiv e owner s.
 Loading...