

Page 1

MagneTek
VCD 723
Product Guide
Page 2

Manual Contents
Revision
History
Related
Documents List
The following table shows all pages that have been revised since the f irst issue of
this manual.
Revision Affected Pages
Date
9/15/93 Initial
The following publications provide additional information on the VCD 723
drives. Each is a vailable from MagneTek. Please use the form provided at the
back of this manual to place your order.
● Maintenance Guide TM 6723-10
● PCDU Guide TM 6723-20
● MicroTrac® LAN Network Guide TM 6723-30
Additional copies of this manual can also be ordered by specifying the VCD 723
Product Guide (TM 6723).
9/15/93
Revision History
i
Page 3

Warranty
ii
9/15/93
Page 4

Warranty
Warranty
Standard products manufactured by MagneTek are warranted to be free from
defects in workmanship and material for a period of one year from date of
shipment and any products which are defectiv e in w orkmanship or material will
be repaired or replaced, at MagneTek's option, at no charge to the Buyer. Final
determination as to whether a product is actually defective rests with MagneTek.
The obligation of MagneTek hereunder shall be limited solely to repair or
replace, at MagneTek's discretion, products that fall within the foregoing
limitations, and shall be conditioned upon receipt by MagneTek or written notice
of any alleged defects or deficiency promptly after discovery and within the
warranty period, and in the case of components or units purchased by
MagneTek, the obligations of MagneTek shall not exceed the settlement that
MagneTek is able to obtain from the supplier thereof. No products shall be
returned to MagneTek without its prior consent. Products which MagneTek
consents to have returned shall be shipped prepaid f.o.b. MagneTek's factory.
MagneTek cannot assume responsibility or accept inv oices for unauthorized
repairs to its components, even though defective. The life of the products of
MagneTek depends, to a large extent, upon the usage thereof, and MAGNETEK
MAKES NO WARRANTY AS TO FITNESS OF ITS PRODUCTS FOR THE
SPECIFIC APPLICATIONS BY THE BUYER NOR AS TO PERIOD OF
SERVICE UNLESS MAGNETEK SPECIFICALLY AGREES OTHERWISE
IN WRITING AFTER THE PROPOSED USAGE HAS BEEN MADE
KNOWN TO IT.
Limitation
Of Liability
THE FOREGOING WARRANTY IS EXCLUSIVE AND IN LIEU OF ALL
OTHER WARRANTIES, EXPRESSED OR IMPLIED, INCLUDING, BUT
NOT LIMITED T O, ANY WARRANTY OF MERCHANTABILITY OR OF
FITNESS FOR A PARTICULAR PURPOSE AND BUYER HEREBY
WAIVES ANY AND ALL CLAIMS THEREFORE.
IN NO EVENT SHALL MAGNETEK BE LIABLE FOR LOSS OF PROFIT,
INDIRECT, CONSEQUENTIAL OR INCIDENTAL DAMAGES WHETHER
ARISING OUT OF WARRANTY, BREACH OF CONTRACT OR TORT.
9/15/93
Warranty
iii
Page 5

Manual Contents
Table of
Contents
Page
Introduction........................................................................................................1
How To Use This Manual .............................................................................1
Controls and Indicators .................................................................................1
Safety Statements ..........................................................................................2
How To Contact MagneTek ..........................................................................2
Drive Description ..........................................................................................3
Ratings and Specifications.............................................................................5
System Considerations ................................................................................12
Installation and Start-up................................................................................15
Pre-Installation Considerations ...................................................................15
Physical Installation ....................................................................................15
Electrical Connection ..................................................................................19
Pre-Power Check .........................................................................................25
Drive Start-up .............................................................................................27
Operation..........................................................................................................31
Controls and Indicators ...............................................................................31
Start-up Operation ......................................................................................32
General Operation .......................................................................................34
Parameter Functions ....................................................................................35
Monitor Functions .......................................................................................36
Error Handling/Reporting ...........................................................................36
Non-Volatile RAM-Access .........................................................................40
Load Defaults Function ...............................................................................42
Upload/Download of Program or Parameters ............................................43
Hex Monitor ................................................................................................49
iv
Table of Contents
Troubleshooting/Maintenance.......................................................................51
Fault and Error Conditions ..........................................................................51
Troubleshooting Flowcharts.........................................................................59
Diode and Transistor Module Resistance Test ...........................................73
Spare Parts List ............................................................................................75
Appendices ........................................................................................................78
VCM Motor/PG (Digital Tachometer) Connection ...................................78
Motor Parameters ........................................................................................81
Node, Channel and Subchannel Assignments ............................................84
Glossary...........................................................................................................103
9/15/93
Page 6

Manual Contents
List of
Illustrations
List of Tables
Figure
Number Title Page
1 Typical MicroTrac System Diagram.............................................. 14
2 VCD 723 Dimensions .................................................................... 16
3 VCD 723 Basic Interconnection Diagram..................................... 20
4 VCD 723 External Connections Diagram...................................... 21
5 Proper Grounding of Three VCD 723 Drives................................ 25
6 Voltage Selection in 460V VCD 723, 15HP and Above............... 26
7 Local Control Display Unit (LCDU)............................................. 31
8 VCD 723 to IBM PC Compatible Computer Interconnect
Diagram .......................................................................................... 43
Table
Number Title Page
1 Motor Control Specifications.......................................................... 5
2 Terminal I/O Specifications ............................................................ 9
3 Digital Feedback Tachometer Connector CA1 Terminal
Specifications.................................................................................. 11
4 Summary of Option Cards.............................................................. 11
5 Closed Loop Connectors and Wire Sizes for Terminal
Screws ............................................................................................. 23
6 Wire Sizing for Main Circuit.......................................................... 23
7 Function Number Assignments...................................................... 34
8 Standard Error and Fault Descriptions........................................... 51
9 AC MicroTrac Circuit Card Test Points ........................................ 72
10 Diode Module Resistances ............................................................. 73
11 Transistor Module Resistances....................................................... 74
12 Spare Parts List - 230 Volt Drives................................................... 75
13 Spare Parts List - 460 Volt Drives................................................... 76
14 Connection of VCM........................................................................ 78
15 TB1 - PG (Digital Tachometer) Connection.................................. 79
16 Connections on PG (Digital Tachometer) Card ............................. 79
9/15/93
List of Illustrations
v
Page 7

Introduction
1
How To Use
This Manual
Controls and
Indicators
Status LEDs
MagneTek has made this product guide an easy to use reference. To help you use
this manual, we have provided the following guides:
● The top of each page has an identification of the section. For example, notice
that at the top of this page appears. This identifies
the page as part of Section 1, Introduction. There are four sections in this
manual: Introduction, Installation and Start-Up, Operation and
Troubleshooting/ Maintenance.
● Each section is organized into one or more major subject headings. These are
the main topics covered in that section. You will recognize major subject
headings by their distinctive appearances. The next line illustrates an example:
This is an example of a major subject heading from Section 3.
Each major subject heading may have one or more minor topics that are
covered. The next line illustrates an e xample:
This is a minor topic covered under “Controls and Indicators.”
Each minor topic may have one or more descripti v e headings. These identify
items covered within the minor topic. The next line illustrates an e xample:
Introduction
1
Ready
This is a descriptive heading covered under “Status LEDs.”
At the bottom of each page is the name of the first major subject heading
covered on that page. The page number and re vision date are also included.
For example, at the bottom of this page, the information indicates that “How
to Use This Manual” is the first major subject heading. It was last revised
September 15, 1993.
Using the information on the top of the page to find the section, the bottom of
the page to find the major subject heading and the left margin to f ind the
minor topics and descriptive headings, you can easily page through the
manual to find the information you need.
A table of contents is also included. The Table of Contents can be used to
locate section and major topics. A glossary is provided to define terms which
may be unfamiliar .
9/15/93
How To Use This Manual
1
Page 8

1
Introduction
Safety
Statements
How To Contact
MagneTek
In addition to notes, the following types of precautionary statements appear in
this manual.
IMPORTANT
A statement of conditions which should be observed during driv e
setup or operation to ensure dependable service.
CAUTION
A statement of conditions which must be observed to prev ent
undesired equipment faults or degraded drive system
performance.
W ARNING
A statement of conditions which MUST BE OBSER VED to
prevent personal injury or serious equipment damage.
For additional information, contact any MagneTek Representative, Authorized
Distributor , or our Technical Support Staff at:
MagneTek
16555 West Ryerson Road
New Berlin, WI 53151
(800) 541-0939 (414) 782-0200
FAX: (414) 782-1283
2
Safety Statements
9/15/93
Page 9

Introduction
1
Drive
Description
P erformance
Flexibility
The MicroTrac name is used to describe MagneTek's family of digital system
drives and the compatible products used to create systems. This manual
describes the MicroTrac compatible VCD 723 AC motor drive.
The VCD 723 is a high performance, sine-coded, Pulse Width Modulated
(PWM) AC motor drive which genera tes an adjustable three phase output for
complete speed or torque control of a compatible AC induction motor. The
VCD 723 can maintain a 150% current overload for 60 seconds with automatic
stall prevention and v oltage boost to prevent nuisance tripping during load or line
side transient conditions. The VCD 723 will not induce any voltage line
notching distortion to the utility line and maintains a displacement power factor
of approximately 0.98 throughout its speed range.
The VCD 723 drive is totally software configurable to the application through a
high level graphical language, called Programmable Application Control (PAC).
PA C provides complete flexibility without having to make hardware
adjustments. Interface to other equipment is provided with local Input/Output
(I/O) or a high speed Local Area Network (LAN). Use of the LAN means that a
single coaxial cable eliminates multiple conductor cables and provides high
noise immunity. Extensive diagnostic and setup capability are provided thr ough
two control/display units. The Local Control/Display Unit (LCDU) is mounted
flush with the drive co v er and consists of a Liquid Crystal Displa y (LCD) with
two lines of sixteen alphanumeric characters, fi v e pushbuttons, and fiv e status
Light Emitting Diodes (LED’ s). The LCDU can be used for all setup functions
and many diagnostics. The Portable Control/Display Unit (PCDU) is an optional
hand-held device that can be plugged into any MicroTrac compatible drive and
used for all the same functions as the LCDU plus some advanced diagnostics.
The PCDU has two lines of sixteen alphanumeric characters and a thirty-key
keypad.
9/15/93
Accuracy
The distributed control architecture of the MicroT rac system means that each
drive performs its o wn regulation calculations synchronized to a common high
accuracy crystal master. Thus, even minute crystal drift will not affect multiple
drive tracking. This allo ws a MicroTrac system to maintain the drift between
sections to 0.00% at steady state. The fully digital nature of the regulation
means that an individual drive can maintain a 0.00% average dif ference between
set and actual speed from no-load to full-load when using digital tachometer
speed feedback. Digital setup and performance assure exact process line and
finished product duplication shift to shift and month to month. Speeds, tensions,
ratios, draws, limits, ranges, alarms, and other control parameters can be set as
percentages or exact numerical values via keypad or thumbwheel switches with
up to six digits of resolution. Parameters are entered and displayed in plain and
understandable English. The drive can be completely set up prior to actual
running and changes can be made during operation. Keypad entry of changed
parameters, protected memory, and factory default values allow the operator to
modify data with minimum risk to the process.
Drive Description
3
Page 10

1
Introduction
Useability
Versatility
The VCD 723 drive is composed of several major components. The base
component is the MagneTek VCD 703 drive, with special software. To this is
added the MicroTrac circuit card, which provides gr aphical PAC programming
environment, LAN communications and e xtra local I/O. The other components
are the Local and Portable Control/Display Units, which allow user friendly
interface for drive setup and provides extensive diagnostic capabilities. In
addition, optional circuit cards can be added for expanded local I/O capabilities
and added functionality.
The VCD 723 can be set up to operate in one of two major modes based on the
level of regulation ena bled. The first mode allows the driv e to run as if it were a
VCD 703 drive, b ut the input for the constants come from the PAC environment
instead of from the Digital Operator . In addition to utilizing the speed control
logic of the VCD 703 drive to control the motor, this mode adds the extra I/O
capabilities that are present on the MicroTrac circuit card. This also allo ws f or
all of the advantages and flexibility of utilizing the PAC programming language.
In this mode, the inputs and outputs on the VCD 723 behave in the same way
that they would hav e had this been a VCD 703 drive, however , the An, Bn, Cn,
Dn, On, Sn, and Un constants are entered via the PA C environment.
The second major operating mode of the VCD 723 has the VCD 703 drive
operate as a slave to the MicroTrac circuit card. In this mode, the PAC
programmer has complete freedom in how the motor should be controlled,
including which inputs/outputs should perform a specific function.
Characteristics
The VCD 723 is mounted in a NEMA 1 wall mount enclosure, with other
power/control components required for VCD/VCM interconnection.
When properly installed, operated and maintained, the VCD 723 can provide
years of troublefree service. It is important that the person who operates,
inspects, or maintains this equipment thoroughly read and understand this
manual before proceeding.
4
Drive Description
9/15/93
Page 11

Ratings and Specifications
Control Specifications
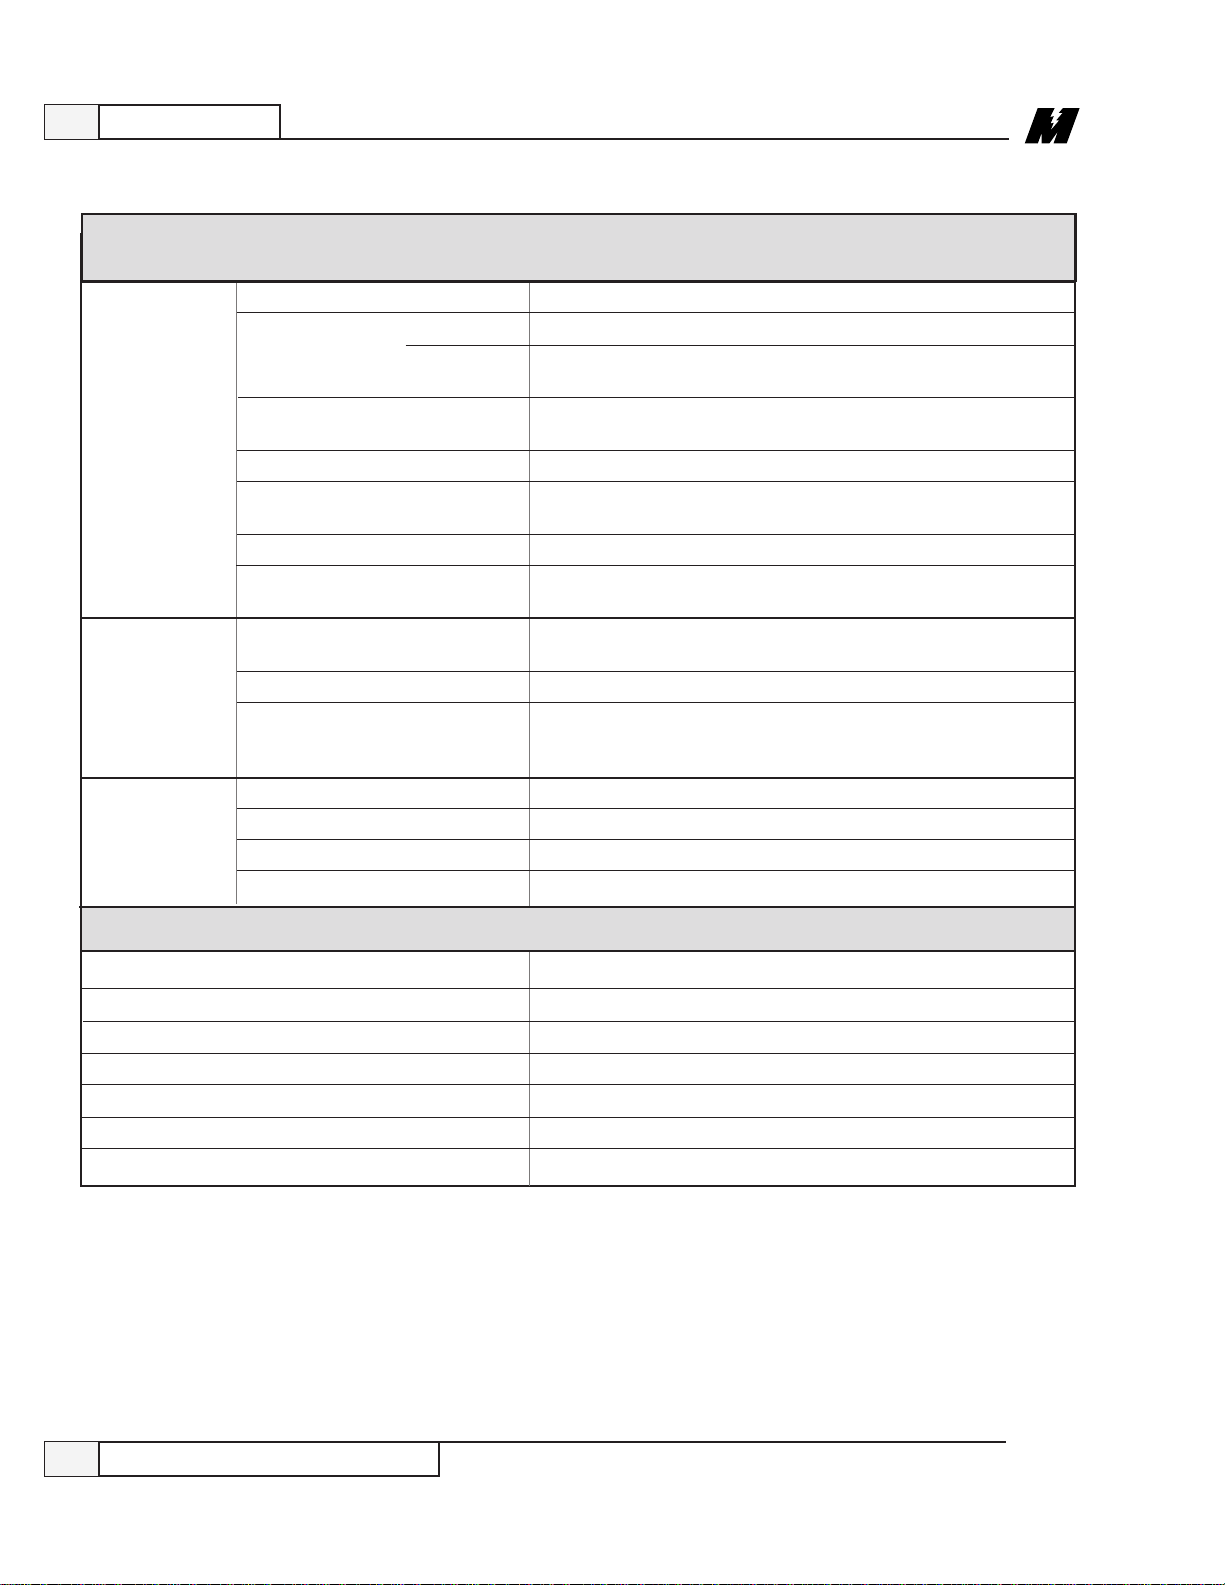
Table 1. Motor Control Specifications
SECTION A. 208/230V
Drive
Introduction
1
Model
General
Use Capacity HP 3 5 7.5 10 15 20 30 50
Circuit Breaker (MCCB)
Rating A
Low
Noise
Opera-
(1)
tion
Rated Output Voltage 180V
Overload Current
Rating
Voltage/Frequency 3-Phase 208V, 50Hz 208/230V, 60Hz
Allowable
Input
Power
Fluctuation
VCD 723-
Input
Current A 11 18 26 35 53 70 97 106 140 211
Continuous Rated
Current A
Capacity HP 3 5 7.5 10 15 20 30
Continuous Rated
Current A
Motor HP 3 5 7.5 10 15 20 25 30 40 50
Model
VCD 723-
V ±10%
F ± 5%
A003 A005 A7P5 A010 A015 A020 A030 A050
9.6 16 24 32 48 64 96 160
20 30 50 60 100 100 150 300
A003 A005 A7P5 A010 A015 A020 A030 N/A
7.68 12.8 19.2 25.6 38.4 51.2 76.8
150% for one minute
(2)
Motor (VCM)
Capacity
Model VMA___ 003 005 7P5 010 015 020 025 030 040 050
Rated Speed rpm 1750 rpm (4-pole, 60Hz)
Rated Voltage 3-phase 190 VAC
Rated Current A 9.6 16.0 22.8 29.4 44.0 57.0 69.0 82.0 120 148
Rated
Torque
2
WK
Frame No. 182T 184T 213T 215T 254T 256T 284T 286T 324T 326T
HP 3 5 7.5 10 15 20 25 30 40 50
(KW) (2.2) (3.7) (5.5) (7.5) (11) (15) (18.5) (22) (30) (37)
lb-ft 9 15 22.5 30 45 60 75 90 120 150
2
lb-ft
0.183 0.264 0.543 0.680 1.253 1.617 3.260 4.050 5.96 7.5
See notes on page 8.
9/15/93
Ratings and Specifications
5
Page 12

1
Introduction
Table 1. Motor Control Specifications - Continued
SECTION B1. 380/415/460V; 3-60 HP
Drive
Model
General
Use Capacity HP 1 3 5 10 15 20 30 40 60
Circuit Breaker (MCCB) 5
Rating A
Low
Noise
Opera-
(1)
tion
Rated Output Voltage 360V
Overload Current
Rating
Voltage/Frequency 3-Phase 380/415/460V, 50/60Hz
Allowable
Input
Power
Fluctuation
VCD 723-
Input
Current A 2.82 5 9 14 18 26 35 42 53 70 97 106
Continuous Rated
Current A
Capacity HP 1 3 5 10 15 20 30 40 60
Continuous Rated
Current A
Motor HP 1 3 5 7.5 10 15 20 25 30 40 50 60
Model
VCD 723-
B001 B003 B005 B010 B015 B020 B030 B040 B060
2.56 4.8 8 16 24 32 48 64 96
10 20 30 50 60 100 100 150
B001 B003 B005 B010 B015 B020 B030 B040 B060
2.05 3.84 6.4 12.8 19.2 25.6 38.4 51.2 76.8
150% for one minute
V ±10%
F ± 5%
(2)
Motor (VCM)
Capacity
Model VMB___ 001 003 005 7P5 010 015 020 025 030 040 050 060
Rated Speed rpm 1750 rpm (4-pole, 60Hz)
Rated Voltage 3-phase 380 VAC
Rated Current A 1.63 4.8 8 11.4 14.7 22 28.5 34.5 41 60 74 82
Rated
Torque
2
WK
Frame No. 143T 182T 184T 213T 215T 254T 256T 284T 286T 324T 326T 364T
HP 1 3 5 7.5 10 15 20 25 30 40 50 60
(KW) (0.7) (2.2) (3.7) (5.5) (7.5) (11) (15) (18.5) (22) (30) (37) (45)
lb-ft 3 9 15 22.5 30 45 60 75 90 120 150 180
2
lb-ft
0.074 0.183 0.264 0.543 0.680 1.253 1.617 3.260 4.050 5.960 7.500 9.340
See notes on page 8.
6
Ratings and Specifications
9/15/93
Page 13

Introduction
Table 1. Motor Control Specifications - Continued
SECTION B2. 380/415/460V; 75-400 HP
Drive
Model
General
Use Capacity HP 75 100 150 200 250 300 400
VCD 723-
Input
Current A 141 211 246 330 374 496 663
Motor HP
B075 B100 B150 B200 B250 B300 B400
75 100 150 200 250 300 400
1
Continuous Rated
Current A
Circuit Breaker (MCCB)
Rating A
Rated Output Voltage 360V
Overload Current
Rating
Voltage/Frequency 3-Phase 380/415/460V, 50/60Hz
Allowable
Input
Power
Fluctuation
Capacity
Model VMB___ 075 100 150 200 250 300 400
Rated Speed rpm 1750 rpm (4-pole, 60Hz)
Rated Voltage 3-phase 380 VAC
Rated Current A 103 142 206 272 338 398 525
Rated
Torque
2
WK
V ± 10%
F ± 5%
HP 75 100 150 200 250 300 400
(KW) (55) (75) (110) (160) (185) (220) (300)
lb-ft 225 300 450 600 750 900 1200
2
lb-ft
128 165 224 300 340 450 600
225 300 400 600 600 800 1000
150% for one minute
Motor (VCM)
11.77 17.6 37.0 69.58 74.22 88.14 97.42
(2)
Frame No. 365T 404T 444T 445T 447T 449T 449T
See notes on page 8.
9/15/93
Ratings and Specifications
7
Page 14
1
Introduction
Table 1. Motor Control Specifications - Continued
SECTION C. All VCD 723’s
SECTION C. ALL GPD 503s (CONTINUED)
Control Method Digital flux vector, Sine-coded PWM
Speed Control
Control Speed Reference Digital Operator reference: 0.01 Hz (12 bits)
Characteristics Setting Resolution Analog reference: 0.06 Hz/60Hz (10 bits)
Auto Speed Reference Signal 0 to +10 VDC (20k Ω), or 4 to 20 mA (250 Ω)
Range 1:1000 operation possible even at stall
Precision Digital ref.: ± 0.01% (–10 to +40°C, +14 to +140°F)
Analog ref.: ± 0.1% (25 ± 10°C, 77 ± 50°F)
Accel / Decel Time 0 to 3000 sec (resolution: 0.1 sec.)
Torque Limit Setting range: 0 to 300%. Forward/Reverse set independently
Selectable Functions Multi-step speed operation (9 steps max.), S-curve accel/decel,
Inverter Overcurrent, overvoltage, cooling fin overheat, undervoltage,
Protective Motor Overload, overheat, overspeed
Functions
Environmental
Conditions Storage Temperature
Rated speed 1750 rpm (4 poles)
Pulse Generator 1024 ppr (standard) Higher rates are available.
Thermistor Standard
Load Connection Direct coupling or belt drive
Insulation Type Class F
Ambient Temperature –20 to +40°C (–4 to +104°F)
Location Indoor
System Excessive speed deviation, open-phase detection, continuous
Ambient Temperature –10 to +45°C (+14 to +113°F)
(See Note 4)
Humidity 90% RH (no condensation)
Vibration 1 G at less than 20 Hz, up to 0.2 G at 20 to 50 Hz.
SECTION D. All VCM’s
(Accel / Decel times set independently)
zero speed control, servo lock, arbitrary torque detection, etc.
cooling fan failure, grounding, etc.
operation during momentary power loss (immediate stop at end
of programmed ride-thru time, 2 sec. max.)
–20 to +60°C (–4 to +140°F)
SECTION D
(See Note 3)
NOTES:
(1) Low noise operation can be selected by setting of Sn-09 : 0XXX = General Use (low carrier frequency – 2.08 kHz);
1XXX = Low Noise Operation (high carrier frequency - 12.5 kHz). Rated current is 80% of General Use rated current.
(2) 100% reference current is Continuous Rated Current for Low Noise Operation or General Use.
(3) For a drive rated 230V 5HP or less, or 460V 3HP or less, standard max. ride-thru time is 1 sec (1000 msec). The
max. ride-thru time can be extended to 2 sec (2000 msec) by adding an optional external mounting capacitor unit.
(4) Temperature during shipping. Storing in this temperature for a long period may deteriorate main circuit capacitor.
8
Ratings and Specifications
9/15/93
Page 15

Introduction
1
Terminal
Functions and
Control Signal
Specifications
There are various types of I/O available in the VCD 723. The terminal I/O
specifications are listed in Table 2. The digital feedback tachometer connector
specifications are listed in Table 3. A diagram of these connections can be found
in Figure 4.
Table 2. Terminal I/O Specifications
TERMINAL FUNCTION DESCRIPTION
1,2,4,5,6,7,8
3
9,10
11
12
13
14
15
16
17
18,19,20
21,22
23,24
25,26
27
Logic inputs
Logic inputs
Logic output,
normally open
relay contact
Logic input
common
Shield tie point
Analog input
Analog input
Analog input
power supply
Analog input
Analog input
common
Logic output,
form C relay
contact
Analog output
Current monitor
analog output
Logic outputs,
open collector
Open collector
output common
The input is off (logic 0) when the input is open, and on
(logic 1) when the input is connected to Logic Input
Common (0V). If input is from a relay contact, the
contact rating must be: 30 VDC min
100 mA min
If input is from an open collector, the rating must be:
35 VDC min
100 mA min
This is always used for external fault generation. This
input cannot be reassigned. The SN12 constant can be
used to set this input to Normally Open or Normally
Closed. If Normally Open is selected, a fault is indicated
when the contact closes and if Normally Closed is
selected an open contact indicates the fault.
Normally open relay contact.
Contact capacity: 250 VAC at 1A or below.
30 VDC at 1A or below.
Common (0V) for use in wiring Logic Inputs.
Shield sheath tie point which is connected to Chassis
Common.
Non-isolated 0 to 10 VDC analog input. Input has 20K
ohms of impedance. Resolution is 10 bits.
Non-isolated 4 to 20 mA analog input. Input has 250
ohms of impedance. Resolution is 10 bits.
Control power supply for analog input: +15 VDC at 20
mA max.
Non-isolated 0 to 10 VDC analog input. Input has 20K
ohms of impedance. Resolution is 10 bits.
Common (0V) for use in wiring analog inputs.
18 is Normally Open, 19 is Normally Closed, and 20 is
Common. Contact Capacity: 250 VAC at 1A or below.
30 VDC at 1A or below.
Non-isolated 0 to 11 VDC analog output. Maximum
sourcing current is 2 mA. 21 is positive with respect to
22. Resolution is 8 bits.
Non-isolated analog output. Approximately 5 VDC at
rated output current.
Photocoupler isolated output. Capacity of +48 VDC
max at 50 mA max.
Common (0V) for use in wiring multi-function open
collector outputs.
9/15/93
Ratings and Specifications
9
Page 16

1
Introduction
Table 2. Terminal I/O Specifications - Continued
TERMINAL FUNCTION DESCRIPTION
28,29
30
31
32
51
52
53
54
55,56
57
58
59,60,61,62
63
64
65,66,67,68
69
70
71,72,73,74
Connector
CA1
Logic outputs,
open collector
Motor
thermistor input
Motor
thermistor input
common
Shield tie point
+10VREF
output
-10VREF
output
I/O common
Shield tie point
Analog outputs
I/O common
Shield tie point
Analog input
I/O common
Shield tie point
Analog input
I/O common
Shield tie point
Digital
Tachometer
inputs
Digital
Tachometer
Connector
Photocoupler isolated output. Capacity of +48 VDC
max at 50 mA max.
Motor temperature feedback.
Common (0V) for use in wiring motor thermistor input.
Shield sheath tie point which is connected to Chassis
Common.
Reference voltage output for use with MicroTrac card
analog inputs. 10 mA max capacity.
Reference voltage output for use with MicroTrac card
analog inputs. 10 mA max capacity.
Common (0V) for use with MicroTrac card I/O.
Shield sheath tie point which is connected to Chassis
Common.
Non-isolated -10 to +10 VDC analog outputs.
Maximum sourcing current is 2 mA. Resolution is
12 bits.
Common (0V) for use with MicroTrac card I/O.
Shield sheath tie point which is connected to Chassis
Common.
Non-isolated differential analog input. Input has over
100K ohms of impedance. Resolution is 12 bits. Input
voltage range is -600 to +600 mV when terminals 60 (+)
and 61 (-) are used. Input voltage range is -10 to +10
VDC when terminals 59 (+) and 62 (-) are used.
Common (0V) for use with MicroTrac card I/O.
Shield sheath tie point which is connected to Chassis
Common.
Non-isolated differential analog input. Input has over
100K ohms of impedance. Resolution is 12 bits. Input
voltage range is -600 to +600 mV when terminals 66 (+)
and 67 (-) are used. Input voltage range is -10 to +10
VDC when terminals 65 (+) and 68 (-) are used.
Common (0V) for use with MicroTrac card I/O.
Shield sheath tie point which is connected to Chassis
Common.
The quadrature encoder A (terminal 71), /A (terminal
72), B (terminal 73), and /B (terminal 74) signals are
connected here. There is 100 ohms of impedance
between each pair of encoder input signals. Input
differential voltage of 5 VDC max. The maximum
input frequency is 300KHz.
Isolated +12 VDC power supply to quadrature encoder
and quadrature encoder signal inputs.
10
Ratings and Specifications
9/15/93
Page 17

Introduction
Table 3. Digital Feedback Tachometer Connector
CA1 Terminal Specifications
TERMINAL FUNCTION DESCRIPTION
1
Option Cards
1
2
3,4,5,6
7
Isolated power
supply
Isolated power
supply
common
Digital
Tachometer
inputs
Shield tie point
Isolated power supply for digital tachometer: +12 VDC
at 200 mA max.
Common (0V) for digital tachometer isolated power
supply.
The quadrature encoder A (terminal 3), /A (terminal 4),
B (terminal 5), and /B (terminal 6) signals are connected
here. There is 560 ohms of impedance between each
signal pair, pair A and /A and pair B and /B. Input
differential voltage of 5 VDC max. The maximum input
frequency is 300KHz.
Shield sheath tie point which is connected to Chassis
Common.
There are various option cards a vailable to provide additional capability. The
option cards are each described in detail in a separate User Reference Sheet. A
summary of available option cards is contained in Table 4.
Table 4. Summary of Option Cards
9/15/93
OPTION CARD FUNCTION
Analog Monitor, AO-8 Has two analog output channels with 8 bit resolution. Each output
voltage is from 0 to +10 VDC and is non-isolated.
Analog Monitor, AO-12 Has two analog output channels with 12 bit resolution. Each output
voltage is from 0 to +10 VDC and is non-isolated.
Digital Output, DO-8 Has six photocoupler output channels with a single common. Also
has two independent relay contact output channels.
Torque Control, TRQ-A Closes the torque control loop for higher accuracy torque control.
Ratings and Specifications
11
Page 18

1
Introduction
System
Considerations
When operating in a system application, the VCD 723 can be used with other
MagneTek devices with which it will communicate by means of the MicroT rac
Local Area Network (LAN). Refer to Figure 1 for a typical MicroTrac System.
Each of the following remote devices (board or assembly) is descr ibed in detail
in a separate User Reference Sheet.
● Remote Display Controller LAN Node PCB (RDC) – This board provides
a means for the MicroTrac system to have system operating parameters
displayed at locations remote from the MicroTrac drive. The RDC
communicates with the drive through the LAN. A single RDC can support
up to 31 Remote Display Units (RDUs). By means of a Portable
Display/Control Unit (PCDU), the RDC allows the selected display for each
RDU to be changed at anytime.
● Remote Display Unit (RDU) – Designed for mounting in a panel cutout, the
RDU provides a two-line LED display (16 character alphanumeric, and 5-1/2
digit numeric). Consisting of a terminal, the information on its display is
transmitted by a Remote Display Controller LAN Node PCB.
● Remote Keyboard Assembly – Designed for mounting on a panel with or
near a Remote Display Unit, the Remote Keyboard allows initiation of RDU
display changes without the need for a Portable Display/Control Unit.
● Remote I/O [Input/Output] Controller LAN Node PCB (RIO) – This
board provides a means for the MicroTrac system to have inputs or outputs at
locations remote from the drive. The RIO communicates with the drive
through the LAN. A single RIO can support up to 6 Remote I/O boards,
using any combination of the following:
1. Remote Logic I/O PCB (LOGI/O) – This board provides remote logic
signal input/output capability for the MicroTrac system. It is connected
to a Remote I/O Controller LAN Node PCB for communication with the
drive.
2. Remote Analog I/O PCB (ANI/O) – This board provides remote analog
signal input/output capability for the MicroTrac system. It is connected
to a Remote I/O Controller LAN Node PCB for communication with the
drive.
3. Remote Thumbwheel Switch I/O PCB (TWIO) – This board provides
remote thumbwheel switch input/output capability for the MicroTrac
system. It can support up to 9 Thumbwheel Switch Assemblies. This
board is connected to a Remote I/O Controller LAN Node PCB for
communication with the drive.
12
System Considerations
9/15/93
Page 19

Introduction
● Remote Programmable Logic Controller (PLC) Interface – Available for
a variety of PLCs. These devices allow bi-directional communication via the
MicroTrac LAN between dri ves and the PLC. Both logic and numeric data
can be transferred.
● Remote Power Supply – The Remote Power Supply produces control level
voltages for use by a Remote LAN Node PCB or a Remote Display Unit.
● Remote Serial Communication Controller LAN Node PCB (RSC) – This
board provides a means for the MicroTrac system to have input from or
output to other equipment that uses RS-232 serial communication. The RSC
communicates with the drive through the LAN.
1
9/15/93
System Considerations
13
Page 20

1
MicroTrac
Drive
DRIVE
CONTROL
UNIT
REMOTE
INPUT/OUTPUT
CONTROLLER
PCB (RI/O)
REMOTE
PLC INTER-
FACE
REMOTE
COMMUNICATIONS
CONTROLLER
PCB (RSC)
REMOTE
DISPLAY
CONTROLLER
PCB (RDC)
DISPLAY #1
REMOTE
DISPLAY
UNIT (RDU)
DISPLAY #2
PERSONAL
COMPUTER
PROGRAMMABLE
LOGIC
CONTROLLER (PLC)
RS-232 OR
RS-422
RS-485
DISPLAY #3
DISPLAY #4
UP TO 9 BANKS OF
6 DIGITS
PCDU
MESSAGE
SELECT
+1 8 8 8 8 8
8 8 8 8 8 8
+1 8 8 8 8 8
THUMB
WHEELS
8 ISOLATED LOGIC
I/O MODULES
7 NON-ISOLATED
LOGIC OUTPUTS
16 NON-ISOLATED
LOGIC INPUTS
4 ISOLATED ANALOG
I/O MODULES
7 NON-ISOLATED
ANALOG OUTPUTS
4 NON-ISOLATED
ANALOG OUTPUTS
4 NON-ISOLATED
ANALOG INPUTS
REMOTE
THUMBWHEEL
INPUT/OUTPUT
PCB
(TWI/O)
REMOTE
ANALOG
INPUT/OUTPUT
PCB
(ANI/O)
UP TO 6 REMOTE INPUT/OUTPUT PCBS
UP TO 31 REMOTE
DISPLAY UNITS
KEYBOARD
REMOTE
LOGIC
INPUT/OUTPUT
PCB
(LOGI/O)
KEYBOARD
ENABLE
2.5 million bits/second
93 Ohm
Terminator
93 Ohm
Terminator
LOCAL
I/O
RG 62/U Coaxial Cable
1 2 3 D C
4 5 6 D N
7
8 9
0
N E
•
LA-8
LOCAL
I/O
LOCAL
I/O
MicroTrac
Drive
DRIVE
CONTROL
UNIT
MicroTrac
Drive
DRIVE
CONTROL
UNIT
+
-
Introduction
14
System Considerations
Figure 1. Typical MicroTrac System Diagram
9/15/93
Page 21

Installation and Start-up
2
Pre-installation
Considerations
Receipt of
Shipment
Unpacking
Repacking
Location of the VCD 723 is important to achieve proper performance and
normal operating life. The unit should be installed in an area where it will be
protected from the following:
● Direct sunlight, rain or extreme (condensing) moisture.
● Corrosive gases or liquids.
● Vibration, airborne dust or metallic particles.
All equipment is tested against defect at the factory. Any damages or shortages
evident when the equipment is receiv ed must be reported immediately to the
commercial carrier who transported the equipment. Assistance, if required, is
available from your MagneTek representative. Always refer to the order number ,
equipment description, and serial number when contacting MagneTek.
Remove the protective shipping material from around the equipment. Remove
all packing material. Inspect for loose wiring. Make sure all contact wedges and
other shipping devices hav e been remo ved.
For long periods of storage, equipment should be covered to prevent corrosion,
and should be placed in a clean, dry , location. If possible, equipment should be
stored in its original crating. Periodic inspection should be made to ensure that
the equipment is dry and that no condensation has accumulated. The equipment
warranty does not cover damage due to improper storage. Assistance, if
required, is available from your MagneTek representative.
Physical
Installation
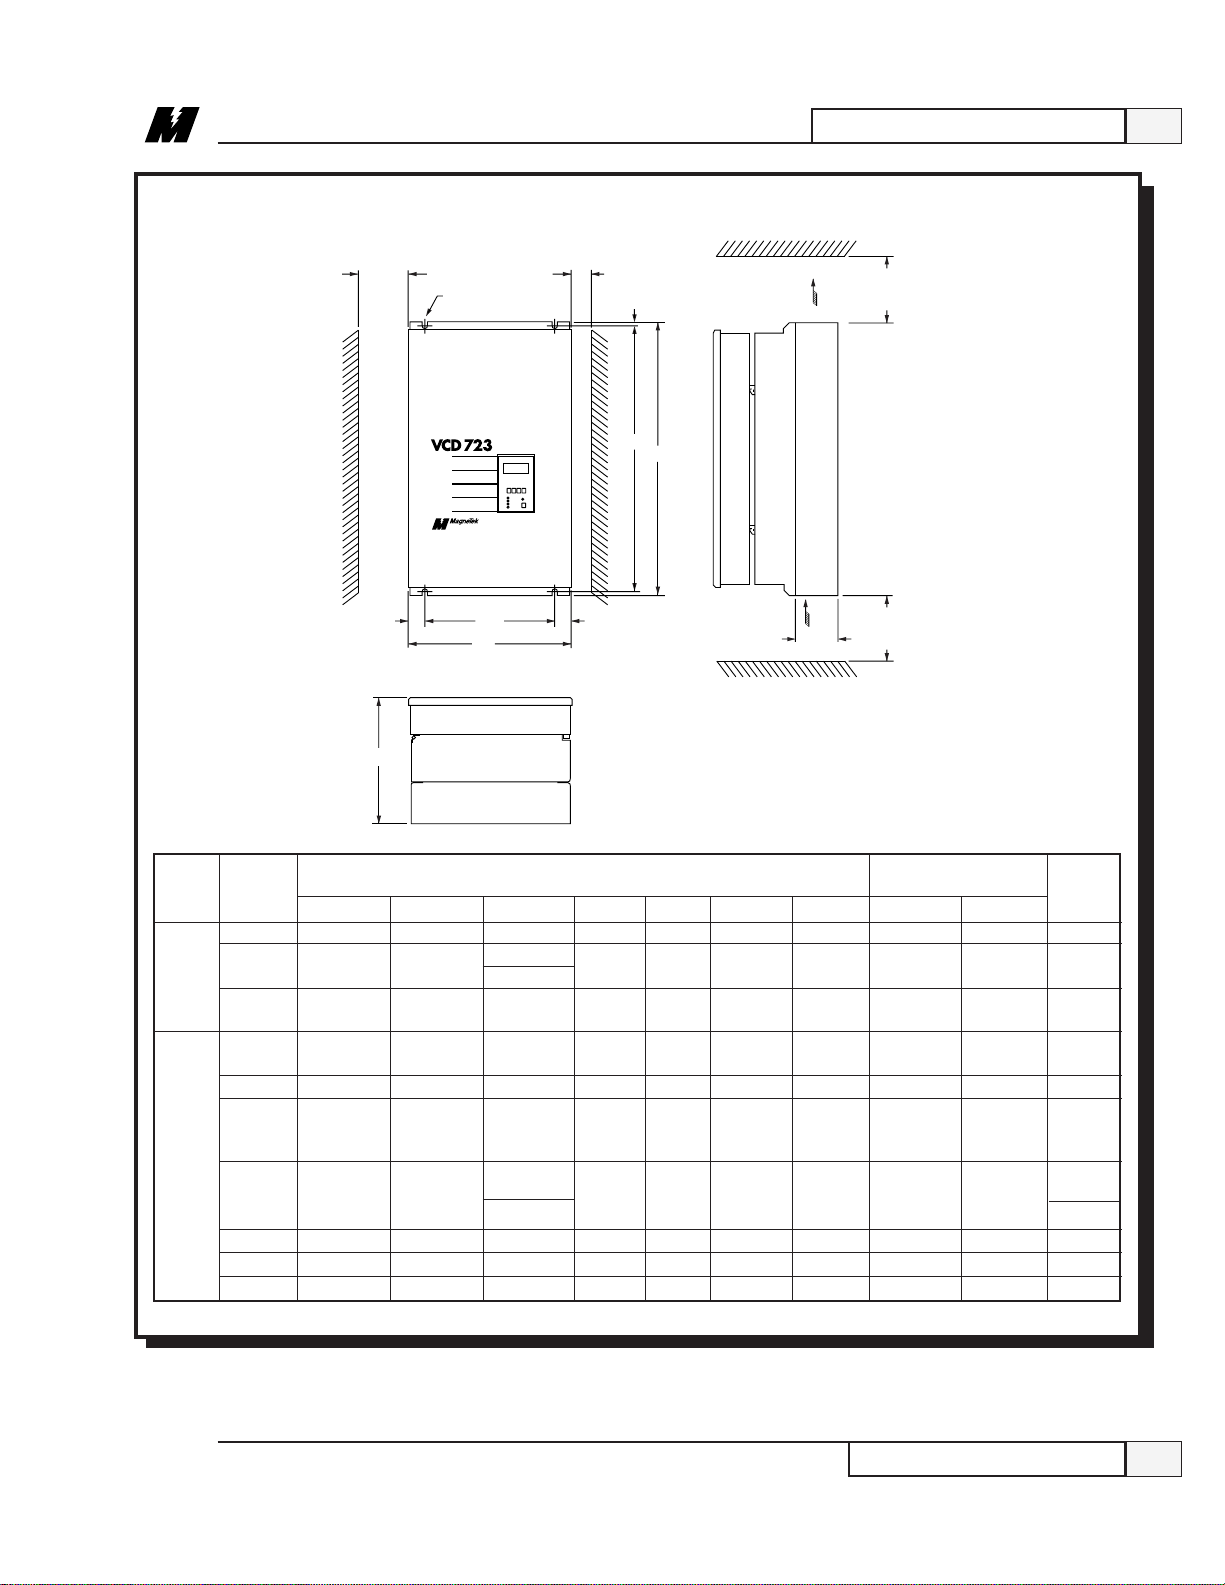
For effecti ve cooling as well as proper maintenance, the VCD 723 must be
installed vertically. Use the holes provided on the back of the driv e for
installation. There MUST be a MINIMUM 6 inch clearance above and below
the VCD 723 enclosure. A MINIMUM 3 inch clearance is required on the left
side of the VCD 723 enclosure. See Figure 2 for physical dimensions.
9/15/93
Pre-installation Considerations
15
Page 22

2
D
BOTTOM VIEW
W1
A
W
A
3.15
MAX. SCREW SIZE
SEE COLUMN “C”
MIN. 1.2
H
B
H1
FRONT VIEW
6.00 MIN.
AIR
6.00 MIN.
K
SIDE VIEW
COVER
AIR
LA-12
VCD 723 Standard Protected Chassis
Installation and Startup
ENCLOSURE DIMENSIONS MTG HOLE DIMENSIONS
INPUT HP (kW)
H W D A B C K H1 W1
208 / 5 (3.7)
3 (2.2)
230V
7.5 (5.5)
10 (7.5)
380 / 3 (2.2) 13.94 (354) 8.05 (204) 8.66 (220) .48 (12) .39 (10)
415 /
460V 5 (3.7)
10 (7.5)
11.97 (304) 8.05 (204) 8.86 (225) .48 (12) .39 (10)
13.94 (354) 8.05 (204) 10.04 (255) .48 (12) .39 (10)
13.94 (354) 8.05 (204) 10.04 (255) .48 (12) .39 (10)
IN INCHES (mm) IN INCHES (mm)
1/4
-20 (M6) 1.57 (40) 11.22 (285) 7.09 (180) 21 (10)
1/4
-20 (M6) 1.57 (40) 13.19 (335) 7.09 (180) 27 (12)
1/4
-20 (M6) 1.57 (40) 13.19 (335) 7.09 (180) 27 (12)
1/4
-20 (M6) 1.57 (40) 13.19 (335) 7.09 (180) 27 (12)
WEIGHT
LBS. (KG)
16
Figure 2. VCD 723 Dimensions (Sheet 1 of 3)
Physical Installation
Note: Consult Factory for Shipping Weights.
9/15/93
Page 23
D
BOTTOM VIEW
W1
A
W
A
MIN.
4.00
(100)
MAX. SCREW SIZE
SEE COLUMN “C”
MIN.
1.20
(30)
H
B
H1
FRONT VIEW
MIN.
6.00
(152)
AIR
MIN.
6.00
(152)
K
SIDE VIEW
AIR
VCD 723 Standard Protected Chassis
LA-13
Installation and Start-up
2
INPUT HP (kW)
15 (11) 19.69 (500) 9.84 (250) 10.04 (255) .96 (25) .30 (7.5)
208 / 20 (15)
230V 30 (22) 10.04 (255)
40 (30)
50 (37)
15 (11)
20 (15)
380 / 30 (22) 21.65 (550) 12.80 (325) 10.04 (255) 1.19 (30) .30 (7.5)
415 / 40 (30)
460V 50 (37) 28.54 (725) 13.78 (350) 11.02 (280) 1.97 (50) .30 (7.5)
60 (45)
75 (55)
100 (75) 36.42 (925) 22.64 (575)
150 (110) 12.99 (330) 234 (106)
200 (160) 53.54 (1360) 23.62 (600) 17.72 (450)
300 (220) 57.09 (1450) 37.40 (950) 17.12 (435)
400 (300) 63.00 (1600) 37.80 (960) 17.72 (450)
H W D A B C K H1 W1
21.65 (550) 12.80 (325)
31.50 (800) 18.70 (475) 11.02 (280) 1.97 (50) .39 (10)
19.69 (500) 9.84 (250) 10.04 (255) .96 (25) .30 (7.5)
ENCLOSURE DIMENSIONS MTG HOLE DIMENSIONS
IN INCHES (mm) IN INCHES (mm)
9.65 (245)
11.02 (280)
.96 (25) .30 (7.5)
1.97 (50) .49 (12.5) 7/16
1.97 (50)
3.94 (100)
4.13 (105)
.69 (17.5)
.98 (25)
.98 (25)
Note: Consult Factory for Shipping Weights.
Figure 2. VCD 723 Dimensions (Sheet 2 of 3)
1/4
(M6) 4.11 (104) 19.09 (485) 7.87 (200) 52 (24)
1/4
(M6)
3.37 (86) 21.06 (535) 10.83 (275) 76 (35)
7/16
(M10) 4.30 (109) 30.71 (780) 14.76 (375) 105 (48)
1/4
(M6) 2.58 (66) 19.09 (485) 7.87 (200) 54 (25)
1/4
(M6)
3.37 (86) 21.06 (535) 10.43 (265) 76 (35)
3/8
(M8)
4.14 (105) 27.76 (705) 9.84 (250) 105 (48)
(M10)
4.30 (109) 35.43 (900) 18.70 (475)
1/2
(M12) 5.90 (150) 52.16 (1325) 21.65 (550) 379 (172)
1/2
(M12) 4.05 (103) 55.12 (1400) 29.53 (750) 797 (362)
1/2
(M12) 4.05 (103) 61.02 (1550) 29.53 (750) 905 (411)
WEIGHT
LBS. (KG)
199 (90)
9/15/93
Physical Installation
17
Page 24

2
U
KEYWAY
U
N–W
C
2F
BA
V MIN.
TERMINAL BOX FOR
TACHOMETER AND
THERMISTOR
TERMINAL BOX FOR
MOTOR AND
BLOWER
VCM Motor - Foot Mount
LA-14
D
EE
4 HOLES
"H" DIA.
Installation and Start-up
ALL DIMENSIONS IN INCHES
HP FRAME
182T
3
184T
5
213T
7.5
215T
10
254T
15
256T
20
284T
25
286T
30
324T
40
326T
50
364T
60
365T
75
405T
100
444T
150
445T
200
447T
300
449T
400
* DIMENSION TOLERANCES
DIM. D TOL. DIM. U TOL.
UP TO + .00 UP TO + .0000
8.00 – .03 1.5000 – .0005
OVER + .00 OVER + .000
8.00 – .06 1.5000 – .001
BA C D * E 2F H
4.50
20.50
2.75
4.50
21.50
2.75
5.25
24.26
3.50
5.25
25.76
3.50
6.25
29.25
4.25
6.25
31.00
4.25
7.00
32.50
4.75
7.00
34.00
4.75
8.00
34.63
5.25
8.00
36.13
5.25
9.00
41.94
5.88
9.00
42.94
5.88
10.00
45.62
6.63
11.00
48.25
7.50
11.00
50.25
7.50
11.00
54.00
7.50
11.00
67.75
7.50
3.75
3.75
4.25
4.25
5.00
5.00
5.50
5.50
6.25
6.25
7.00
7.00
8.00
9.00
9.00
9.00
9.00
4.50
5.50
5.50
7.00
8.25
10.00
9.50
11.00
10.50
12.00
11.25
12.25
13.75
14.50
16.50
20.00
22.00
.406
.406
.406
.406
.531
.531
.531
.531
.656
.656
.657
.657
.828
.828
.828
.828
.828
FRAME
180
210
250
280
320
360
400
440
U *
1.1250
1.3750
1.625
1.875
2.125
2.375
2.875
3.375
V
2.50
3.12
3.75
4.38
5.00
5.75
7.00
8.25
N-W
2.75
3.38
4.00
4.62
5.25
5.88
7.25
8.50
U
Keyway
.250 x .125
.312 x .156
.375 x .188
.500 x .250
.500 x .250
.625 x .312
.750 x .375
.875 x .438
18
Physical Installation
Figure 2. VCD 723 Dimensions (Sheet 3 of 3)
9/15/93
Page 25

Installation and Start-up
2
Electrical
Connection
All basic connections are shown in Figure 3 and the drive’s external connection
locations are shown in Figure 4. Most of the control I/O are shown in a gener al
fashion for an example of proper wiring. Because of the flexibility of the VCD
723, many of the control functions (i.e., R UN, Speed Reference, etc.) are not
permanently assigned to a specific I/O point. The function that many of the I/O
points serve is dependent upon the designer. See schematic and interconnection
diagrams for specific connections.
It is very important that voltage isolation be maintained with all the I/O points
which are not already isolated. For example, the analog outputs are not isolated.
Therefore, if an analog output is driving a meter movement, then the movement
must be in reference to the VCD 723 I/O common and not to any other common
(i.e., earth common). On the other hand, if the analog output is connected to a
non-isolated analog input of some test equipment, then analog isolation is
necessary. The analog isolation must be performed with components not
supplied with the VCD 723.
9/15/93
Electrical Connection
19
Page 26

2
Installation and Start-up
LCDU
Pulse Generator Connection
20
Electrical Connection
Ground Connection
MicroTrac/Inverter Connection
LA-15
Figure 3. VCD 723 Basic Interconnection Diagram
9/15/93
Page 27

Installation and Start-up
Pulse Generator
(CA1)
PCDU
MicroTrac LAN
I/O Terminals 1-32
(See figure below
for numbering order)
I/O Terminals 50-74
LA-16
11 12 13 14 15 16 17
1 2 3 4 5 6 7 8
18 19 20
32 9 10
25 26 27 28 29 30
21 22 23 24 31
The connection of control circuit terminals 1 to 32 do not follow the terminal numbering
order. See the following figure for correct wiring (printed on the PC board).
2
9/15/93
Figure 4. VCD 723 External Connections Diagram
Electrical Connection
21
Page 28

2
Installation and Start-up
Wire Sizes and
Connections
Ensure that wire size and disconnect devices conform to the installation
contractor’ s dra wings and to all applicable codes. Refer to Tables 5 and 6 for
proper wire sizes and interconnecting information.
CAUTION
● Use only factory supplied installation instructions to install
dynamic braking resistors. Failure to do so may cause
equipment damage or personnel injury.
● Use 600 volt vinyl-sheathed wire or equi valent. Wire size
should be determined considering ampacity and codes.
● Never connect A C main power to output terminals T1(U),
T2(V), and T3(W).
● NEVER allow wire leads to contact the VCD 723
enclosure. Short-circuit may result.
● NEVER connect power factor correction capacitors or
noise filter to VCD 723 output.
● Size of control wire must be suitable for Class I circuits.
● Use only closed loop (ring lug) connectors sized for the
selected wire gauge. The connectors are to be installed
using the correct crimp tool recommended by the connector
manufacturer .
Observe the following precautions when making wiring connections:
● Separate the leads used for control I/O (i.e., the signals on terminals 1
through 32, terminals 51 through 76, connector CA1, etc.) from those used
for the power signals (i.e., L1(R), L2(S), L3(T), T1(U), T2(V), T3(W)). Do
not run these two groups in the same conduit or wire trough.
● Provide shielded and twisted leads as indicated on the schematic and
interconnection diagrams. Connect shield sheath AT THE VCD 723 END
ONLY. The far end should be dressed neatly and left unconnected. Twisted
shielded pair wire should be used for long runs.
● Lead length should NOT EXCEED 164 feet (50 meters).
● The contact output control leads from terminals 9, 10, 18, 19, and 20 must be
separated from the other control leads.
● If the drive is being used in a LAN, use a BNC “T” connector to connect the
LAN coaxial cable to the drive.
22
Electrical Connection
9/15/93
Page 29

Installation and Start-up
Table 5. Closed Loop Connectors and Wire SIzes for Terminal Screws
2
WIRE SIZE TERMINAL CLOSED LOOP
AWG mm
20 0.5
18 0.75
16 1.25
14 2
12 3.5
10 5.5
8 8
2
SCREW SIZE CONNECTOR
M3.5 1.25 - 3.5
M4 1.25 - 4
M4 2 - 4
M5 2 - 5
M4 3.5 - 4
M5 3.5 - 5
M4 5.5 - 4
M5 5.5 - 5
M5 8 - 5
M6 8 - 6
6 14 M6 14 - 6
4 22 M8 22 - 8
1 38 M8 38 - 8
1 38 38 - 10
2/0 60 60 - 10
3/0 80 80 - 10
M10
4/0 100 100 - 10
4/0 100 100 - 10
MCM300 150 150 - 12
M12
MCM400 200 200 - 12
Table 6. Wire Sizing for Main Circuit
DRIVE WIRE SIZE
MODEL TERMINAL
VCD 723- TERMINAL SYMBOL SCREW SIZE AWG MM
SECTION A. 208/230 V
A003, L1(R), L2(S), L3(T), N, B1/P, B2, T1(U), T2(V), T3(W) M4 12 - 10 3.5 - 5.5
A005
A7P5, L1(R), L2(S),L3(T), N, B1/P, B2,T1(U),T2(V),T3(W) M5 10 - 8 5.5 - 8
A010
A015 L1(R), L2(S), L3(T), P1, P3, T1(U), T2(V), T3(W), N M6 8 - 6 8 - 14
A020 L1(R), L2(S), L3(T), P1, P3, T1(U), T2(V), T3(W), N M8 8 - 4 8 - 22
9/15/93
G(E) M4 14 - 10 2 - 5.5
G(E) M5 14 - 10 2 - 5.5
G(E) M8 14 - 10 2 - 5.5
l1(r), l2(s) M4 20 - 14 0.5 - 2
G(E) M8 14 - 10 2 - 5.5
Electrical Connection
2
23
Page 30

2
Installation and Start-up
Table 6. Wire Sizing for Main Circuit - Continued
DRIVE WIRE SIZE
MODEL TERMINAL
VCD 723- TERMINAL SYMBOL SCREW SIZE AWG MM
SECTION A. 208/230 V (Continued)
A025, L1(R), L2(S), L3(T), P1, P3, T1(U), T2(V), T3(W), N M8 4 - 2 22 - 38
A030
A040, L1(R), L2(S), L3(T), P1, P3, T1(U), T2(V), T3(W), N M10 1 - 4/0 38 - 100
A050
B001, L1(R), L2(S), L3(T), N, B1/P, B2, T1(U), T2(V), T3(W) M4 12 - 10 3.5 - 5.5
B003
B005, L1(R), L2(S), L3(T), N, B1/P, B2, T1(U), T2(V), T3(W) M4 12 - 10 3.5 - 5.5
B010
B015, L1(R), L2(S), L3(T), N, B1/P, B2, T1(U), T2(V), T3(W), P3 M5 10 - 8 5.5 - 8
B020
B030 L1(R), L2(S), L3(T), N, P1,P3, T1(U), T2(V), T3(W) M6 8 - 6 8 - 14
B040, L1(R), L2(S), L3(T), N, P1, P3, T1(U), T2(V), T3(W) M8 4 - 3 22 - 38
B060
B075, L1(R), L2(S), L3(T), N, P1, P3, T1(U), T2(V), T3(W) M10 1 - 4/0 38 - 100
B100,
B150
B200, L1(R), L2(S), L3(T), N, P1, P3, T1(U), T2(V), T3(W) M12 4/0 - MCM400 100 - 200
B250
B300, L1(R), L2(S), L3(T), N, P1, P3, T1(U), T2(V), T3(W) M12 MCM650 x 2P 325 x 2P
B400
G(E) M8 14 - 10 2 - 5.5
l1(r), l2(s) M4 20 - 14 0.5 - 2
G(E) M8 14 - 10 2 - 5.5
l1(r), l2(s) M4 20 - 14 0.5 - 2
SECTION B. 380/415/460V
G(E) M4 14 - 10 2 - 5.5
G(E) M5 14 - 10 2 - 5.5
G(E) M8 14 - 10 2 - 5.5
l1(r), l2200(s200), l2 400(s400), x, y M4 20 - 14 0.5 - 2
G(E) M8 14 - 10 2 - 5.5
l1(r), l2200(s200), l2 400(s400), x, y M4 20 - 14 0.5 - 2
G(E) M8 14 - 10 2 - 5.5
l1(r), l2200(s200), l2 400(s400), x, y M4 20 - 14 0.5 - 2
G(E) M8 14 - 10 2 - 5.5
l
1(r), l2 200(s200), l2 400(s400), x, y M4 20 - 14 0.5 - 2
G(E) M8 14 - 10 2 - 5.5
l1(r), l2200(s200), l2 400(s400), x, y M4 20 - 14 0.5 - 2
G(E) M8 14 - 10 2 - 5.5
1(r), l2 200(s200), l2 400(s400), x, y M4 20 - 14 0.5 - 2
l
2
24
Electrical Connection
9/15/93
Page 31

Installation and Start-up
CORRECT CORRECT NOT
ACCEPTABLE
GROUND
POLE
GROUND
POLE
GROUND
POLE
LA-10
2
Grounding
The VCD 723 must be solidly grounded using the main circuit ground terminal
G (E).
● Ground wire resistance should be 100 ohms or less.
● NEVER ground the VCD 723 in common with welding machines, motors,
or other large current electrical equipment. Run the ground lead in a separate
conduit from leads for large current electrical equipment.
● Use ground lead size listed in table 6, and make the length as short as
possible.
● Where several VCD 723 dri v es are used side b y side, all should be grounded
directly, or daisy chained to earth ground (see Figure 5). DO NOT FORM A
LOOP WITH THE GROUND LEADS.
Pre-Po wer
Check
Figure 5. Proper Grounding of Three VCD 723 Drives
CAUTION
To prevent damage to the drive, the following checks must be
performed before applying input power.
❏ Make sure wires are properly connected.
❏ Verify ground connections to the drive.
❏ Disconnect motor from its load. To ensure safety, prior to test operation,
disconnect the coupling or belt which connects the motor with the machine
so that motor operation is isolated. If an operation must be performed while
the motor is directly connected to the machine, use great care to avoid an y
possible hazardous condition.
❏ For 460V, 15HP and above verify that the power voltage select connector in
the VCD 723 is positioned correctly for the input power line voltage (see
Figure 6). Voltage is preset to 460V at the factory . Reposition if required.
❏ Check that all mechanical connections inside VCD 723 are tight.
9/15/93
Pre-Power Check
25
Page 32

2
Installation and Start-up
200V 380V 440V
220/ 400/ 460V
230V 415V
FUSE
•
•
•
•
Figure 6. Voltage Selection in 460V VCD 723, 15HP and Abo ve
❏ Remove any excess packing material.
❏ Check that all shipping devices and relay wedges ha v e been r emo ved.
Manually operate all contactors and relays to ensure that they move freely.
❏ Verify that all electrical connections are secure.
❏ Verify that all transformers are connected for proper voltage, according to the
drive system schematic diagram.
❏ Verify that the PG-X tachometer card is installed.
❏ Verify the EPROM inserted in the VCD 703 control board is labeled
according to the drawings supplied.
❏ Verify that all connections are made per the schematic.
❏ Verify that the three phase power connections are secure.
CAUTION
Verify that incoming power IS NOT connected to the drive's
output terminals. (Terminals T1, T2, and T3). Improper
connection will cause severe damage to the drive when
energized.
26
Pre-Power Check
9/15/93
Page 33

Drive Start-up
Installation and Start-up
❏Verify the motor, blower, thermistor, and PG (Digital Tachometer) wiring for
proper voltage and phase sequence. If the motor is a MagneTek Vector
Control Motor (VCM), then see the appendix for proper wiring. If the motor
is not a MagneTek VCM, then see the manufacturer supplied drawings.
❏Apply three phase input power to the drive.
❏Verify that the “CHARGE” lamp inside the drive is lit.
❏The first message that will be displayed on the Local Control Display Unit is
the following:
Verifying the
CRC-16. Wait . . .
This is an indication that the CPU is verifying the program loaded in its
memory is valid. The check takes approximately 5 seconds. After the check,
one of a number of messages will be displayed.
❏When the program and non-volatile memory is valid, the following message
will be displayed on the Local Control Display Unit:
2
Powered Up
and Ready
In addition, the Ready LED will be lit.
❏The following is a list of abnormal display conditions that may occur, and
the actions necessary to correct the situation:
● If there is an invalid program in memory, then the following message
will be displayed on the Local Control Display Unit:
Select BAUD rate
19200 UP,DWN,ENT
If this occurs, a new program must be uploaded into memory. See Section 3
for the proper program upload procedure.
● Check that no faults are indicated on the drive’s display. A fault is
indicated by the Fault LED being lit and a fault message appearing on the
Local Control Display Unit. See Section 3 for more detailed information
regarding fault reporting and clearing.
9/15/93
Drive Start-up
27
Page 34

2
Installation and Start-up
●As part of the program’s start-up procedure, the validity of the nonvolatile
parameters are checked. If the values are invalid, the following message is
displayed on the Local Control display Unit:
BAD NVRAM CRC
ENT FOR DEFAULTS
If this occurs, press the ENT key. The factory programmed default values
will then be loaded into non-volatile memory.
❏The parameter values should be checked for proper settings. The settings
will be shown on the Function list supplied with the order documentation.
Refer to Section 3 to find the operating procedure necessary to view and
change parameter values. These parameter values include the following:
●Speed Reference Setting Constants (i.e., Main Speed Reference, Jog
Speed Reference).
●Application Constants (i.e., Accel Time, Decel Time, Forward Side
Torque Limit).
●Control Constants (i.e., Speed Reference Input Limit, Pulse Generator
Pulses Per Motor Revolution, Motor Overload Detection starting Current).
●Motor Constants (i.e., Base Speed, Number of Motor Poles, Motor Rated
Current, Rated Slip Frequency).
●Order Constants (i.e., Select Control with or without Pulse Generator
Feedback, Select Control with or without motor thermistor).
●System Constants (i.e., MagneTek Vector Control Motor Selection,
Input/Output Function Assignments, Control Behavior Selections, Carrier
Frequency Selection).
●Any other values that may be job specific (i.e., Empty Roll Diameter for
winder applications, Follower Pulse Generator Pulses Per Revolution).
❏Check the Pulse Generator’s (PG) rotation.
●Select the parameter to view the PG Feedback (function number 604).
●Manually rotate the shaft counter clockwise, as viewed from the shaft end.
Verify that the displayed PG feedback is positive.
If the display does not change from “0”, check the PG cable connections.
If the problem persists, check for pulses at test points “PA” and “PB” on
the right-hand side of the PG-X card, with an oscilloscope.
If the PG feedback shows a negative sign (“-”), reverse the polarity by
reversing the wiring between the A and B channels. This is accomplished
by switching the wire labeled A+ with wire labeled B+, then switching
wire labeled A- with wire labeled B-.
28
Drive Start-up
9/15/93
Page 35

Installation and Start-up
●Manually rotate the shaft clockwise, as viewed from the shaft end. Verify
that the displayed PG feedback is negative (“-”).
❏Check the motor rotation.
●Check that the drive is in the forward rotation mode.
●Start the motor at a slow speed by using the JOG input if one is present.
Check that the motor accelerates smoothly and that the speed feedback is
the same as the speed reference.
●If the motor does not accelerate smoothly or oscillates, check or perform
the following:
❶Reverse any two motor leads.
IMPORTANT
If leads are reversed, re-identify and record the fact that the leads
were reversed.
2
❷If the speed feedback does not read the same as the speed reference,
verify that the pulse generator’s Pulse Per Revolution constant
(function number 46) is set to the proper value for your pulse
generator.
❸Again start the motor at a slow speed by using the JOG input if one is
present. If instability is still present, check for a noise related
problem:
Program the drive for open loop mode by disabling the Pulse
Generator input.
Start the motor at low speed again by using the JOG input if one is
present. If instability disappears, the problem is noise related.
Program the drive for closed loop mode by enabling the Pulse
Generator input.
❹To verify that noise is the source of the problem, perform the
following:
Change the drive constant, which changes the carrier frequency, from
2.08 KHz to 12.5 KHz.
9/15/93
● Using the LCDU change the appropriate constants.
● Using the LCDU save the changes to NVRAM.
Drive Start-up
29
Page 36

2
Installation and Start-up
● Power the drive down long enough for the charge light to go out.
● Power up the drive.
Run the drive at low speed by using the JOG input if one is present. If
instability increases, the problem is noise related.
Return the carrier frequency to its original setting.
❺If it has been determined that noise is the source of the problem, check
for grounding problems:
Motor must be grounded.
Drive must be grounded.
Check shield connections.
Power leads from the line and to the motor should be isolated from the
pulse generator signals.
Par ameter
Verification
External power supply connections for tachometer common should be
isolated from the earth ground.
External signals, if used, should be isolated from earth ground.
❻If noise is not the problem (instability is not related to carrier
frequency), contact MagneTek Service about adjusting regulator
constants.
❏Perform a motor test run. The test run should be in both the forward and
reverse direction.
❏Connect the motor coupling, or belt, to the load.
❏Verify once again that the VCD 723 parameter values are set to their proper
values. Refer to section 3 to find the operating procedure necessary to view
and change parameter values.
❏Record any parameter values that were changed from their factory default
values.
❏Operate the drive using external control signal inputs shown on the system
schematic and verify proper operation.
30
Drive Start-up
9/15/93
Page 37

Operation
2 Line - 16 Character LCD Display
LA-17
ESC ENT
READY
RUN
TORQUE LIMIT
OVERLOAD
FAULT
RST
3
Controls and
Indicators
Accessible through the front cover of the VCD 723 are local controls and
indicators. Figure 7 shows the Local Control Display Unit.
9/15/93
Status LEDs
Ready
Run
Torque Limit
Overload
Figure 7. Local Control Display Unit (LCDU)
At the top of the LCDU is a liquid crystal display . Two lines of sixteen
alphanumeric characters can be displayed. This allows for English language
legends and units while entering or viewing data.
There are fiv e light emitting diodes on the LCDU. These are used as a quick
indication of the drive’s status.
Indicates that the drive is ready to operate.
Drive is controlling motor speed.
Drive is demanding more torque than is a vailable.
Motor current is in the overload region.
Controls and Indicators
31
Page 38

3
Operation
Fault
Local Control
Display Unit
(LCDU)
ESC
Up Arrow
Indicates that a drive fault exists. The Fault/Error Code List (see Table 8 located
in the Troubleshooting/Maintenance section) defines what conditions the drive
will recognize as faults.
IMPORTANT
Clearing a Fault from the Fault List is NOT THE SAME as
resetting the fault. Some faults are transient in nature and require
no further action after clearing the fault from the Fault List.
Others require additional action to allow the drive to continue to
run. See the Fault/Error Code List for further details.
All status lights are under the control of the application specific software. The
PAC program for this drive must be consulted to determine the actual meaning
for each light.
There are five keypad keys on the LCDU. These allow for the entry and viewing
of data. They can also be used for operating the drive.
Allows you to “back out” of an operation. For example, if a mistake is made
while entering numerical data, the ESC key can be pressed before the data is
entered, allowing the operator to start over.
Scrolls to the next higher number. The number may be a specific function
number or the modification of the value of a parameter.
Down Arrow
ENT
RST
Start-up
Operation
Scrolls to the next lower number. The number may be a specific function
number or the modification of the value of a parameter.
Completes an operation. It may be pressed to enter a modified parameter’s
value, or to go “deeper into” a function.
Used to clear the fault list. There are other methods that can be used to clear the
fault list, but this key provides a shortcut. Any time this key is pressed, the fault
list will be cleared. Depending on the nature of the fault and the PAC program
loaded, this button can also clear the fault condition as well as the record of the
fault.
An optional Portable Control Display Unit (PCDU) can be plugged into a
telephone style jack at the side of the VCD 723 drive (reference figure 4). If
your drive is equipped with this option, refer to the PCDU guide provided with
the unit for operating procedures.
❏After applying power, the first message displayed on the Local Control
Display Unit is the following:
Verifying the
CRC-16. Wait...
32
Start-up Operation
9/15/93
Page 39

Operation
This is an indication that the CPU is verifying the program loaded in
memory is valid. The check takes approximately 5 seconds. After the
check, one of a number of messages will be displayed.
❏When the program and non-volatile memory are valid, the following
message will be displayed on the Local Control Display Unit:
Powered Up
and Ready
In addition, the Ready LED will be lit.
❏The following is a list of abnormal display conditions that may occur, and the
actions necessary to correct the situation:
If there is an invalid program in memory, then the following message will
•
be displayed on the Local Control Display Unit:
Select BAUD rate
19200 UP,DWN,ENT
3
If this occurs, a new program must be uploaded into memory. The
program upload procedure is explained later in this section.
A fault condition may have occurred, in which case a fault message will
•
be displayed. An example of a fault message would be as follows:
Divide by Zero
F103 Blk:00170
A fault message is always displayed in this fashion. The top line of the
LCDU display contains a description of the fault. The bottom line of the
LCDU display contains the Fault assigned number and other information
that will help determine the cause of the fault. In the example given
above, the extra information shows which PAC block was being executed.
If the block number is 0000 the fault occurred in the kernel code. When
the fault is related to the MicroTrac LAN, instead of the PAC block
number, a Local Area Network Node number will appear (i.e., Node:002),
which will identify the device on the MicroTrac LAN with which the fault
is associated.
9/15/93
Start-up Operation
33
Page 40

3
Operation
When a fault message is displayed, the source of the fault should be
corrected. After the fault source is corrected, the fault may be cleared by
pressing the RST key on the LCDU.
As part of the program’ s startup procedure, it checks the validity of the
•
parameters that are stored in non-volatile memory. If the values are
inv alid, then the following message is displayed on the Local Control
Display Unit:
BAD NVRAM CRC
ENT FOR DEFA ULTS
If this occurs, press the ENT key. The factory programmed default values
will then be loaded into non-volatile memory.
General
Operation
After the drive has powered up and the display is showing “Powered Up and
Ready”, or a fault number, the LCDU can be used to enter new values for
parameters, monitor drive functions, and perform certain drive diagnostics. Every
operation that the LCDU performs is called a “function”. Each function is
assigned a unique number . Function numbers and descriptions are listed in Table 7.
Table 7. Function Number Assignments
Function
Number Description
000 Fault Display/Clear
1 to 599 PAC Dependent Parameter Values
600-799 PAC Dependent Monitor Only Values
800 Error Display
801 Modify Fault and Error Declarations
802-899 Reserved for Advanced Fault and Error Control
900-979 Reserved for Diagnostics and Tests
980 (P) PAC Block Trace Monitor
981-991 Reserved for Diagnostics and Tests
992 (L) Upload/Download of Program or Parameters
993 (P) Reset All Non-Volatile RAM
994 Save/Restore Non-Volatile RAM Parameters
995 Load Defaults
996-998 Reserved for Diagnostics and Tests
999 Hex Monitor
34
General Operation
(P) These functions are only available through use of the optional Portable Control Display
Unit (PCDU).
(L) These functions are only available through use of the Local Control Display Unit (LCDU).
9/15/93
Page 41

Operation
3
Parameter
Functions
The functions numbered 1 through 599 are reserved for settable parameters. The
function numbers for these settable parameters depend on the PAC program,
although some function numbers may be standardized. Examples of settable
parameters are Accel Times, Regulator Gains, and Rated Speed.
The following steps explain how to modify a given parameter v alue via the
LCDU display:
❏ Press the Up or Down Arro w k eys to select the desired function number.
The display shows a description of the function on the top line, and the
present value, units, and function number on the bottom line.
TA CH COUNTS
1024. PPR P068
❏ Press the ENT key to allo w the currently displayed parameter to be modified.
After the ENT key is pressed, a prompt will be given to indicate that the
modify mode is active.
TA CH COUNTS
1024. PPR EDIT
❏ Press the Up or Down ke ys to change the value of the parameter . The least
significant digit of the parameter will be changed by 1 for ev ery k eypress.
Holding the key down will result in an auto repeat of the k eypress. If a
minimum or maximum limit is exceeded for the parameter value, then the
message “vLIMv” or “^LIM^” will be displayed, respectively.
❏ At this point, the ENT key or the ESC key may be pressed.
Press the ENT key to accept the currently entered value for the displa yed
parameter . If the value is within the minimum and maximum limits for the
parameter, it is accepted and the modify prompt disappears. If the value has
exceeded a limit when the ENT key is pressed, the limit is accepted and the
modify prompt disappears.
A modified parameter is retained only as long as power is applied. Function
#994 is used to save the ne w value in nonvolatile memory .
Press the ESC key to exit the modify mode without changing the parameter
value. The modify prompt will disappear and the original value will return.
9/15/93
Parameter Functions
35
Page 42

3
Operation
Monitor
Functions
Error Handling/
Reporting
Functions numbered 600 through 799 are reserved for parameters that may be
viewed, but not modif ied. The function n umbers for these displayable
parameters depend on the PA C program, although some function n umbers may
be standardized. Examples of displayable parameters are Speed Feedback,
Actual Motor RPM, and Inv erter Output Current.
The following steps explain how to display a given parameter via the LCDU
display:
❏ Press the Up or Down Arro w k eys to select the desired function number .
The display shows a description of the function on the top line, and the
present value, units, and function number on the bottom line.
SPEED
0.000 PU M600
The drive has two methods for reporting errors and f aults. Each condition may
utilize one, both, or neither of the reporting methods.
1. The most conventional method is called f ault reporting. Each occurrence of a
fault is recorded in an area of memory called the Fault List. At the moment a
fault condition occurs, the red FAULT light will light and a unique fault
number will appear on the LCDU. The Fault List stores the 16 oldest faults
and stops recording faults as soon as the list is filled. This list is erased when
the drive is powered down or reset. Whether or not the driv e stops or
continues to run is dependent on the way the particular fault is implemented
within the PA C diagram. Most standard f aults are set so tha t the drive will
stop if a fault occurs.
36
Monitor Functions
2. The second method is called error reporting. Each occurrence of an error is
recorded in an area of memory called the Error List. Error reporting differs
from fault reporting in several respects. First, at the moment an err or
condition occurs, the red FA ULT light will NOT light and a unique error
number will NOT appear on the LCDU. Second, the Error List stores the 16
most recent errors and always overwrites the oldest error when the list is
filled. Third, the Error List is stored in Non-Volatile Memory and is retained
when the drive is powered down or reset. Lastly, the driv e operation is NOT
affected when an error condition occurs.
9/15/93
Page 43

Operation
3
F ault Reporting
(F0)
Function number “0” is used to display and clear the Fault List. The following
steps explain how to display and clear faults via the LCDU display:
❏ Press the Up or Down Arro w k eys to select the desired function number, 0.
The display shows a description of the function on the top line, and the
action that may be performed on the bottom line.
DISPLAY FAULTS
(press ENT) F000
❏ Press the ENT key. If there are no faults in the list, then a no fault message
will be displayed.
No Faults
(press ESC)
If there are faults in the list, then a top of fault list message will be displayed.
TOP OF FLT LIST
RST clears all
❏ Press the Down Arro w k ey to view the faults in the list. For e xample:
MATH UNDERFLOW
F102 Blk:00702
The top line describes the fault, and the bottom line displays the fault code
along with the PA C block that w as executing when the fault occurred. A
PA C block number of “00000” indicates that the f ault w as declared by the
Kernel software and not by the execution of a PA C block.
The oldest fault is on the top of the list. Therefore, pressing the Down
Arrow key displays a newer fault, and pressing the Up Arrow key displays
an older fault. The end of the list is reached when the Down Arro w k ey is
pressed enough times and the end of fault list is displayed.
END OF FLT LIST
Press INC
❏ Press the ESC key to return to the function entry mode.
DISPLAY FAULTS
(press ENT) F000
❏ Press the RST key at any time to clear all of the f aults currentl y stored in the
fault list. The FAULT light will be turned off and the list will be cleared.
9/15/93
Error Handling/Reporting
37
Page 44

3
Operation
Error Reporting
(F800)
Function number 800 is used to display the Error List. The following steps
explain how to display errors via the LCDU display:
❏ Press the Up or Down Arro w k eys to select the desired function number,
800. The display shows a description of the function on the top line, and the
action that may be performed on the bottom line.
VIEW ERROR LIST
(press ENT) F800
❏ Press the ENT key. If there are no errors in the list, then a no error message
will be displayed.
No ERRORS yet
(press ESC)
If there are errors in the list, then the first error in the list will be displayed.
❏ Press the Down Arro w k ey to view the errors in the list. For example:
MATH UNDERFLOW
05:35:12 *B00702
The top line describes the error, and the bottom line displays the elapsed time
since the error occurred along with the PA C block that w as being executed.
The elapsed time is a measurement of how long the drive has been powered
up since the error occurred. There are two formats in which the elapsed time
will be displayed; HH:MM:SS (for hours, minutes, and seconds) if the error
occurred within 24 hours, and DDD-HH:MM (for days, hours, and minutes)
if the error occurred more than 24 hours ago.
The “*” character before the B on the bottom line marks a fixed entry in the
error list. Only that one error list entry will display the “*” character . There
is no start to the error list since it may be overwritten at any time. The “*”
character is used to show when one complete loop of the error list has been
viewed.
38
Error Handling/Reporting
9/15/93
Page 45

Operation
A PA C block number of “00000” indicates that the error w as declared b y the
Kernel software and not by the execution of a PA C block.
The newest error is on the top of the list. Pressing the Up Arro w key
displays a newer error , and pressing the Down Arrow ke y displays an older
error. When the end (or star t) of the list is reached, pressing the
corresponding Down (or Up) Arrow k ey will loop to the start (or end) of the
list.
❏ Press the ESC key to return to the function entry mode.
VIEW ERROR LIST
(press ENT) F800
3
F ault and Error
Report Setup
(F801)
Function number 801 is used to indicate which conditions should be reported as
a fault, an error, or both. The list of possible conditions is referred to as the
disposition list. The following steps explain how to display and modify the
disposition list via the LCDU display:
❏ Press the Up or Down Arro w k eys to select the desired function number,
801. The display shows a description of the function on the top line, and the
action that may be performed on the bottom line.
MODIFY DISP LIST
(press ENT) F801
❏ Press the ENT key. The last accessed condition will be displayed. For
example:
DIVIDE BY ZERO
#017 Error Fault
The top line contains a description of the condition. The bottom line
contains the condition number and how the condition should be reported
when it occurs.
9/15/93
❏ Press the Up or Down Arro w k eys until the condition that is to be modified is
displayed. For example:
MATH OVERFLOW
#101 Error Fault
Error Handling/Reporting
39
Page 46

3
Operation
❏ Press the ENT key to modify how the condition is to be reported. A modify
prompt will appear to indicate that keypresses will now affect how this
condition is reported.
❏ Press the Up or Down Arro w k eys to cycle through all of the combinations
of disposition. The combinations of disposition are that the condition not be
reported (neither Error nor Fault appear), be reported only as an Error (only
Error appears), be reported only as a Fault (only Fault appears), or report the
condition as both an Error and a Fault (both Error and Fault appear).
❏ At this point, the ENT key or the ESC key may be pressed.
Press the ENT key to accept the currently entered disposition combination
for the displayed condition. The modify prompt will disappear .
Press the ESC key to exit the modify mode without changing the disposition
for the displayed condition. The modify prompt will disappear and the
original disposition combination will return.
❏ Press the ESC key after all modif ications are made to return to the function
entry mode.
Non-Volatile
RAM-Access
(T994)
MODIFY DISP LIST
(press ENT) F801
Every parameter the driv e uses has three areas in memory associated with it.
First, there is an active memory area (RAM) where the value is stored and used
by the run-time software. Second, there is a read-only memory area (R OM)
where the factory-set default value is permanently stored. Last, there is an area
in non-volatile memory (NVRAM) where the value is saved and remembered for
the next power up or reset. This multi-level approach makes it possible to return
to the last set of “stable” parameters in tuning of the active drive parameters.
Function number 994 is used to transfer parameter values between the nonvolatile memory area and the activ e memory area. The following steps explain
how to copy data to or from the non-v olatile memory area:
❏ Press the Up or Down Arro w k eys to select the desired function number, 994.
The display shows a description of the function on the top line, and the action
that may be performed on the bottom line.
NVRAM ACCESS
(press ENT) T994
40
Non-Volatile RAM-Access
9/15/93
Page 47

Operation
❏ Press the ENT key. A message will appear that will state the actions that
may be performed.
UP:Rest DN:Save
NV->RAM RAM->NV
❏ At this point, the ESC key, the Up Arro w k ey , or the Down Arrow ke y may
be pressed.
Press the ESC key to return to the function entry mode without performing
any value transfers.
NVRAM ACCESS
(press ENT) T994
Press the Up Arrow key to restore the parameter values in the active memory
area (RAM) from the values in the last sav ed memory area (NVRAM). A
message will appear showing that the restore is taking place. This will be
followed by a message explaining that the restoration is complete. Press the
ESC key to return to the function entry mode.
3
Restoring data
Restore is done,
press ESC key.
Press the Down Arrow k e y to save the parameter values in the active
memory area (RAM) to the last saved memory area (NVRAM). A message
will appear explaining that the save is complete. Press the ESC k ey to return
to the function entry mode.
Save completed,
press ESC key.
9/15/93
Non-Volatile Ram-Access
41
Page 48

3
Operation
Load Defaults
Function
(T995)
Every parameter in the driv e has a f actory-set def ault value that is loaded when
the drive is powered up for the first time. These default values may not be
optimal values for a specific application; however, they will allow the dr ive to
function properly . It is possib le to reload these def ault parameter values. For
instance, when the drive is operating erratically and is suspected that one or more
parameters were improperly set.
Function number 995 is used to transfer the factory-set default values to the
parameter values in the active memory area. The following steps explain ho w to
load default values to the acti ve memory area:
❏ Press the Up or Down Arro w k eys to select the desired function number,
995. The display shows a description of the function on the top line, and the
action that may be performed on the bottom line.
LOAD DEFAULTS
(press ENT) T995
❏ Press the ENT key. A message will appear that will state the actions that
may be performed.
IF SURE (enter)
ELSE (ESC) T995
❏ At this point, the ESC key or the ENT ke y may be pressed.
Press the ESC key to return to the function entry mode without performing
any value transfers.
LOAD DEFAULTS
(press ENT) T995
Press the ENT key to load the factory-set default values into the active
parameter values. A message will appear explaining that the loading of the
default values is complete. Press the ESC ke y to return to the function entry
mode.
Defaults loaded,
press ESC key.
42
Load Defaults Function
9/15/93
Page 49

Operation
3
Upload/
Download
of Program or
Parameters
(T992)
The VCD 723 has the ability to pass program and parameter information
between the drive’s memory and a computer with a serial port. The direction of
data flow is defined as Upload (from the computer to the drive) or Download
(from the drive to the computer). Figure 8 shows the electrical connections
required to connect the serial port of the VCD 723 to the serial port (COM1) of
an IBM PC™ compatible computer. The PC utilized must hav e a serial port and
disk drive.
9 TO 25 PIN
CONVERTER
(P/N 50210702)
DB25 TO RJ12
CONVERTER
(P/N 46503027-0010)
COM 1
IBM PC
COMPATIBLE
RJ12 CABLE
(P/N 05P00211-0043)
VCD 723
ISOLATED
RS232 PORT
LA-11
Figure 8. VCD 723 to IBM PC Compatible Computer Interconnect
Diagram
In addition to the electrical connections, a serial communications program must
be utilized by the computer to access data through the serial port. A serial
communications program which supports the Y Modem Batch file transfer
protocol, such as ProComm™ or Qmodem™ must be installed on the PC. The
Y Modem Batch file transfer protocol is the protocol that must be used when
communicating with the VCD 723. In uploading and downloading of files, the
drive beha v es lik e a bulletin board service to the PC. A file upload means that a
file is sent from the PC to the driv e. A file download means that a file is sent
from the drive to the PC.
There are two file types associated with upload and do wnload. One is the PAC
program file (i.e., the file with the .PRG extension). The other is the par ameter
file (i.e., the file with the .PAR extension). The PA C program file is the file that
contains the executable instructions that determines the application
characteristics of the drive. The parameter f ile is a file of all the parameter
settings of a drive at the time the .PAR file was captured (from a previous
parameter download).
9/15/93
Upload/Download of Program/Parameters
43
Page 50

3
Operation
Program upload is defined as the process of a computer sending the VCD 723
drive a ne w PAC program (i.e., the .PRG file) through the drive’s serial port .
This process may be required when upon application of power the drive finds
that the PA C program loaded into memor y is invalid. This process may also be
used when it is desired to change the PA C program from w hat w as previously
loaded. Some of the steps shown below are skipped when the PAC program in
memory is found to be invalid upon application of power.
Program download is defined as the process of the VCD 723 drive sending a
computer its PA C program (i.e., the .PRG file) through the drive’s serial port.
This process can be used for memory backup.
Parameter upload is defined as the process of a computer sending the VCD 723
drive all of its settable parameters (i.e., the .PAR file). This process can be used
to set up the drive with a set of tuned constants.
Parameter download is defined as the process of the VCD 723 drive sending a
computer all of its settable parameter values (i.e., the .PAR file). This process
can be used for memory backup. A parameter download is the only data transfer
process that can occur while the drive is in RUN mode.
The VCD 723 can not be in RUN mode while an upload or a program download
is occurring. Furthermore, the PA C program stops executing while the upload or
program download is happening.
Function number 992 is used to upload and download PAC programs and
parameters. The following steps explain how to perform an upload or download:
❏ Press the Up or Down Arro w k eys to select the desired function number,
992. The display shows a description of the function on the top line, and the
action that may be performed on the bottom line.
UPLOAD/DOWNLOAD
(press ENT) T992
❏ Press the ENT key. A message will appear that will state the actions that may
be performed.
DRIVE —> PC
UP, DOWN, or ENT
44
❏ At this point, the ESC key, the Up Arrow key , or the Down Arrow ke y may be
pressed.
Upload/Download of Program/Parameters
9/15/93
Page 51

Operation
Press the ESC key to return to the function entry mode without performing
any data transfers.
UPLOAD/DOWNLOAD
(press ENT) T992
Press the Up Arrow key to select an upload operation.
DRIVE <— PC
UP, DOWN, or ENT
Press the Down Arrow k e y to select a download operation.
DRIVE —> PC
UP, DOWN, or ENT
❏ Press the ENT key to accept the Upload or Do wnload selection. A message
will appear that will state the actions that may be performed.
3
PARAMETER xfer
UP, DOWN, or ENT
❏ At this point, the ESC key, the Up Arrow key , or the Down Arrow ke y may
be pressed.
Press the ESC key to return to the function entry mode without performing
any data transfers.
UPLOAD/DOWNLOAD
(press ENT) T992
Press the Up Arrow key to select transfer of the program.
PROGRAM xfer
UP, DOWN, or ENT
Press the Down Arrow k e y to select transfer of the par ameters.
9/15/93
PARAMETER xfer
UP, DOWN, or ENT
Upload/Download of Program/Parameters
45
Page 52

3
Operation
❏ Press the ENT key to accept the given selection. A message will appear that
will state the actions that may be performed.
Select BAUD rate
19200 UP,DWN,ENT
❏ Press the Up or Down Arro w k eys to select the desired baud rate. Pressing
the Up arrow will increase the baud rate and pressing the Do wn arrow key
will decrease the baud rate (19,200 is the maximum baud rate).
❏ Press the ENT key to accept the displayed baud rate. The VCD 723 will
begin the selected file transfer.
CAUTION
When the program transfer begins it must be completed
because the existing program is erased.
❏ Initiate a Y Modem Batch file transfer from the PC (i.e., for ProComm users
press the <PgUp> key for an upload or press the <PgDn> key for a
download, and select the YMODEM Batch mode).
❏ Depending on the direction and type of file transfer, one of several sequences
will occur .
For a Program Upload:
A message will appear explaining that permanent storage memory is being
•
erased.
Erasing the
FLASH ROMs
A message will appear explaining that the VCD 723 is attempting to start
•
the program transfer .
Start UPLOAD
of Program
46
Upload/Download of Program/Parameters
9/15/93
Page 53

Operation
At this time, the VCD 723 is waiting to communicate with the PC. When
•
the transfer begins, a message will appear showing how much of the
transfer has already taken place. For a baud rate of 19200, the transfer
will take approximately fi v e minutes. The completion percent number
counts up as more data is transferred.
Completion:
23%
In addition, the lights on the LCDU will appear to bubble up showing that
the transfer is taking place.
When the transfer is complete, non-volatile memory needs to be
•
initialized. A message will appear explaining what to do.
BAD NVRAM CRC
ENT FOR DEFA ULTS
Press the ENT key. This will load the programmed default v alues into the
•
active parameter area and into the non-v olatile memory area and begin
execution of the PAC program.
3
❏ For a Program Download:
A message appears explaining that the VCD 723 is attempting to start the
•
program transfer.
At this time, the VCD 723 is waiting to communicate with the PC. When
•
the transfer begins, a message will appear showing how much of the
transfer has already taken place. For a baud rate of 19200, the transfer
will take approximately ten minutes. The completion percent number
counts up as more data is transferred.
Powered Up
and Ready
Start DOWNLOAD
of Program
Completion:
23%
9/15/93
Upload/Download of Program/Parameters
47
Page 54

3
Operation
In addition, the lights on the LCDU will appear to bubble up showing that
the transfer is taking place.
Downloads generally take longer than uploads because the do wnload
transfers all memory locations while an upload only transmits the active
portion of memory.
When the transfer is complete, the function entry mode will return.
•
UPLOAD/DOWNLOAD
(press ENT) T992
❏ For a Parameter Upload:
A message appears explaining that the VCD 723 is attempting to start the
•
parameter transfer .
Start UPLOAD
of Parameters
At this time, the VCD 723 is waiting to communicate with the PC. When
•
the transfer begins, a message will appear showing how much of the
transfer has already taken place. For a baud rate of 19200, the transfer will
take approximately 30 seconds. The completion percent number counts up
as more data is transferred.
Completion:
23%
In addition, the lights on the LCDU will appear to bubble up showing that
the transfer is taking place.
When the transfer is complete, the function entry mode will return.
•
UPLOAD/DOWNLOAD
(press ENT) T992
48
Upload/Download of Program/Parameters
9/15/93
Page 55

❏ For a Parameter Download:
A message appears explaining that the VCD 723 is attempting to start the
•
parameter transfer .
Start DOWNLOAD
of Parameters
At this time, the VCD 723 is waiting to communicate with the PC. When
•
the transfer begins, a message will appear showing how much of the
transfer has already taken place. For a baud rate of 19200, the transfer
will take approximately 30 seconds. The completion percent number
counts up as more data is transferred.
Completion:
23%
In addition, the lights on the LCDU will appear to bubble up showing that
the transfer is taking place.
Operation
3
Hex Monitor
(T999)
When the transfer is complete, the function entry mode will return.
•
UPLOAD/DOWNLOAD
(press ENT) T992
Function number 999 is used to directly view memory values. A memory map is
required, and as such, it is reserved for use by MagneTek personnel.
DCU HEX MONITOR
(press ENT) T999
9/15/93
Hex Monitor
49
Page 56

3
Operation
50
9/15/93
Page 57

Troubleshooting/Maintenance
4
Fault and Error
Conditions
ERROR/FAULT PROBABLE CAUSE CORRECTIVE ACTION
17, DIVIDE BY ZERO
21, WATCHDOG TRIP
22, RSRVD INTERRUPT
30, MEMORY ACCESS
31, SEVERE CODE FLT
32, CODE FAULT
33, HARDWARE FAULT
An error or fault condition is an indication of abnormal behavior. Table 8 lists all of the
standard type errors and faults that might arise, and suggestions on what actions need to
be performed to correct the problem. In addition to the errors and faults listed, the PA C
program may contain more application specific errors and faults; refer to the order
documentation for a list of these errors and faults. Use the procedures in Section 3 to
view the errors and faults that may be present. Once action has been performed to
remove the cause of the fault, use the procedures listed in section 3 to clear the faults.
Table 8. Standard Error and Fault Descriptions
A division by the number zero has
occurred.
A problem with either hardware or
software has occurred on the
MicroTrac circuit card.
Check the PAC diagram for any
denominators that may be zero. The
fault display will show which PAC
block was executing at the time of the
fault.
Refer to troubleshooting chart 13.
96, WEB BREAK
97, OVERSPEED
98, TACH LOSS
99, REVERSE TACH
100, NOT-A-NUMBER
101, MATH OVERFLOW
102, MATH UNDERFLOW
103, F.P. DIVIDE BY ZERO
104, SIGN ERROR
The continuous web has broken.
Command value is too high.
➊ Broken tach wires.
❷ Loose connector.
❸ Tach failure - belt loss?
Tach connected backwards.
A mathematical error has occurred.
Verify all speed parameter settings (i.e.
pulses per revolution, motor rated
speed, etc.). Whenever changing
parameter settings the following
procedure must be followed:
➊ Correct the setting.
❷ Use function 994 to transfer the
data from RAM to NVRAM.
❸ Turn power off.
❹ When the charge light is off, then
turn power on.
Verify wiring to the tachometer.
Reverse tachometer A signals with
tachometer B signals. For example,
switch wire labeled A+ with wire
labeled B+, then switch wire labeled
A- with wire labeled B-.
Check the PAC diagram for the
possible cause. The fault display will
show which PAC block was executing
at the time of the fault.
9/15/93
Fault and Error Conditions
51
Page 58

4
Troubleshooting/Maintenance
Table 8. Standard Error and Fault Descriptions - Continued
ERROR/FAULT PROBABLE CAUSE CORRECTIVE ACTION
113, MISSING PCU
121, DP RAM ERROR
260, ITERATION T/O
261, OUT OF SEQUENCE
262, BYTE TIMEOUT
263, WRONG FILE TYPE
264, NULL BLK EXPECTD
The MicroTrac is running but not
communicating with the processor on
the Power Conversion Unit circuit card.
The cable between the MicroTrac card
and the inverter is bad. The Dual Port
RAM on the MicroTrac card is bad.
Upload/Download protocol detected,
too many retries.
Upload/Download protocol block
sequence is not contiguous.
Upload/Download protocol more than
one second has elapsed between block
byte transmission or reception.
Upload/Download protocol
unrecognized file extension.
Upload/Download protocol partial null
block was sent.
Refer to troubleshooting chart 13.
Replace the cable between the
MicroTrac card and the drive.
Replace MicroTrac circuit card.
➊ Check serial port cable wiring and
connections.
❷ Check software executing on PC.
➊ Check serial port cable wiring and
connections.
❷ Check software executing on PC.
➊ Check serial port cable wiring and
connections.
❷ Check software executing on PC.
Use one of the proper file extensions
when using Upload or Download (i.e.,
.PAC or .PRG).
➊ Check serial port cable wiring and
connections.
❷ Check software executing on PC.
265, USER CANCELLED
266, UNEXPECTD NL BLK
267, WRONG S-REC TYPE
268, BAD S-REC CHECK
269, BAD, S-REC ENDREC
52
Fault and Error Conditions
Upload/Download protocol user abort.
Upload/Download protocol, a null
block was not expected.
Upload/Download protocol only S2
and S8 records are OK.
Upload/Download protocol S record
did not verify.
Upload/Download protocol END
record did not verify.
The Y Modem transfer was cancelled
by the user. This occurs when the ESC
key is pressed on the LCDU or when
the user cancels it through use of the
communications software executing on
the PC.
➊ Check serial port cable wiring and
connections.
❷ Check software executing on PC.
➊ Check serial port cable wiring and
connections.
❷ Check software executing on PC.
➊ Check serial port cable wiring and
connections.
❷ Check software executing on PC.
➊ Check serial port cable wiring and
connections.
❷ Check software executing on PC.
9/15/93
Page 59

Troubleshooting/Maintenance
Table 8. Standard Error and Fault Descriptions - Continued
ERROR/FAULT PROBABLE CAUSE CORRECTIVE ACTION
4
270, FILE TOO LARGE
271, WRONG FILENAME
272, NO MEMORY HERE
274, MOTOR RUNNING
275, NOT PARAM FILE
276, FLASH PRG 00 ERR
Upload/Download protocol filesize is
greater than one gigabyte.
Upload/Download protocol given
parameter .PAR filename does not
match the PAC program .PRG
filename.
Upload/Download protocol memory
check did not pass after an S-record
write.
Upload/Download was attempted
while the Motor is in the RUN mode.
Upload/Download parameter .PAR file
had an invalid (no sync) S0 record.
Can't program a byte in the FLASH
ROM to all logic 0.
None of the files used will ever be this
size, so check the validity of the file
under question.
Check for the proper filenames.
➊ Verify S-record writes to available
memory.
❷ The FLASH ROM IC's may need
to be replaced.
❸ The MicroTrac card may need to
be replaced.
Stop the motor before attempting an
Upload or a Download.
➊ Check serial port cable wiring and
connections.
❷ Check software executing on PC.
➊ The FLASH ROM IC's may need
to be replaced.
❷ The MicroTrac card may need to
be replaced.
277, FLASH PRG FF ERR
278, FLASH VERIFY ERR
700, I MAIN P U VLT
701, I CTRL P U VLT
702, MC CONTACTOR OFF
9/15/93
Can't program a byte in the FLASH
ROM to all logic 1.
A byte in the FLASH ROM did not
program correctly.
Drive declared a main power under
voltage. This occurs two seconds after
detection of low voltage.
Drive declared the control circuit
power to be under the acceptable
voltage level during operation.
Drive declared that the main circuit
magnetic contactor does not operate
correctly.
➊ The FLASH ROM IC's may need
to be replaced.
❷ The MicroTrac card may need to
be replaced.
➊ The FLASH ROM IC's may need
to be replaced.
❷ The MicroTrac card may need to
be replaced.
Check incoming power.
Control power supply may be bad.
Check connections to main circuit
contactor.
Fault and Error Conditions
53
Page 60

4
Troubleshooting/Maintenance
Table 8. Standard Error and Fault Descriptions - Continued
ERROR/FAULT PROBABLE CAUSE CORRECTIVE ACTION
703, BRAKE TRANSISTOR
704, BRAKE RESIST HOT
706, THERMISTOR OPEN
707, TRANSMIT ERROR
712, EXT FLT T INPUT
720, OPEN INV TACH
721, INV OVERSPEED
Drive declared that the braking
transistor is malfunctioning.
Drive declared that the brake resistor
unit overheated.
Drive declared that the connection to
the motor thermistor is disconnected.
Drive declared that the transmission
between the VCD 723 and the remote
operator was not established within 5
seconds after the power supply was
turned on.
Drive declared that a transmission
error occurred 2 seconds after
transmission was established between
the VCD 723 and the remote operator.
Drive detected that its pulse generator
input is open.
Drive declared an overspeed.
Replace braking transistor or gate drive
board.
Wait for resistor to cool. Check
application requirements for braking
capacity.
Verify proper wiring to the thermistor.
If properly wired, then use the spare
thermistor.
Verify that the correct version of
EPROM's are installed in the VCD 723.
This error indicates that the inverter
portion of the drive is programmed as a
VCD 703.
Verify that the correct version of
EPROM's are installed in the VCD 723.
This error indicates that the inverter
portion of the drive is programmed as a
VCD 703.
Verify wiring to PG-X circuit card CA-1
connector.
Verify all speed parameter settings (i.e.
pulses per revolution, motor rated
speed). Whenever changing parameter
settings the following procedure must
be followed:
➊ Correct the setting.
❷ Use function 994 to transfer the
data from RAM to NVRAM.
❸ Turn power off.
❹ When the charge light is off, then
turn power on.
722, INV SPEED ERROR
741, BASE BLOCK CKT
742, SHADOW RAM FLT
743, NVRAM CHKSUM ERR
744, INV MCU Q/D FLT
54
Fault and Error Conditions
Drive detected a probable speed error.
Drive detected a control circuit failure.
Drive detected that its NVRAM is bad.
Drive detected that the constants in its
non-volatile memory are not valid.
Drive detected that its CPU A/D
converter has failed.
Replace the inverter control circuit card.
Replace the inverter control circuit card.
Confirm that all parameters are within
allowable ranges. If they are, then
replace the inverter control circuit card.
Replace the inverter control circuit card.
9/15/93
Page 61

Troubleshooting/Maintenance
Table 8. Standard Error and Fault Descriptions - Continued
ERROR/FAULT PROBABLE CAUSE CORRECTIVE ACTION
4
745, OPTION CARD CONN
751, DSP P CKT FLT
752, OPTION A/D FLT
753, MISSING DCU
754, INV MODEL ERROR
760, DPRAM CHECKSUM
Drive detected that its optional card
connector has failed.
Drive detected that its Digital Signal
Processor (DSP) peripheral circuitry
has failed.
Drive declared that the A/D converter
on its High Accuracy Torque Control
option card has failed.
Drive has not received a software
handshake from the MicroTrac circuit
card.
Drive declared that the model number
is wrong.
Drive declared that the checksum
validating the constants in the Dual
Port RAM (between the MicroTrac
card and the inverter) is incorrect.
Replace the inverter control circuit card
or the connecting cable.
Replace the inverter control circuit
card.
Replace the inverter control circuit
card.
➊ Cycle power off and on.
❷ Replace the cable between the
MicroTrac card and the drive.
❸ Replace MicroTrac circuit card.
Replace the inverter control circuit
card.
Verify all of the constant settings.
Replace the MicroTrac circuit card.
Whenever changing parameter settings
the following procedure must be
followed:
➊ Correct the setting.
❷ Use function 994 to transfer the
data from RAM to NVRAM.
❸ Turn power off.
❹ When the charge light is off, then
turn power on.
761, DPRAM CONST. ERR
9/15/93
Drive declared that a constant in the
Dual Port RAM (between the
MicroTrac card and the inverter) is out
of range.
Verify all of the lettered constant
settings. Whenever changing parameter
settings the following procedure must
be followed:
➊ Correct the setting.
❷ Use function 994 to transfer the
data from RAM to NVRAM.
❸ Turn power off.
❹ When the charge light is off, then
turn power on.
Fault and Error Conditions
55
Page 62

4
Troubleshooting/Maintenance
Table 8. Standard Error and Fault Descriptions - Continued
ERROR/FAULT PROBABLE CAUSE CORRECTIVE ACTION
762, KVA SETTING ERR
763, SETTING ERROR
764, SN15-18 SET ERR
Drive declared that the KVA setting is
out of range.
Drive declared that a constant in the
Dual Port RAM (between the
MicroTrac card and the inverter) is out
of range.
Drive declared that one or more of the
constants SN15, SN16, SN17, SN18,
are invalid.
Verify the KVA setting constant SN01.
Whenever changing parameter settings
the following procedure must be
followed:
➊ Correct the setting.
❷ Use function 994 to transfer the
data from RAM to NVRAM.
❸ Turn power off.
❹ When the charge light is off, then
turn power on.
Verify all of the lettered constant
settings. Whenever changing parameter
settings the following procedure must
be followed:
➊ Correct the setting.
❷ Use function 994 to transfer the
data from RAM to NVRAM.
❸ Turn power off.
❹ When the charge light is off, then
turn power on.
➊ Verify the settings of the constants
SN15, SN16, SN17, SN18.
❷ Verify data relationship (SN15,
SN16, SN17, SN18).
Whenever changing parameter settings
the following procedure must be
followed:
➊ Correct the setting.
❷ Use function 994 to transfer the
data from RAM to NVRAM.
❸ Turn power off.
❹ When the charge light is off, then
turn power on.
765, TRQ SELECT ERR
56
Fault and Error Conditions
Drive declared the Torque control
mode selection is in error.
Verify the settings of the constants that
affect the Torque control. Whenever
changing parameter settings the
following procedure must be followed:
➊ Correct the setting.
❷ Use function 994 to transfer the
data from RAM to NVRAM.
❸ Turn power off.
❹ When the charge light is off, then
turn power on.
9/15/93
Page 63

Troubleshooting/Maintenance
Table 8. Standard Error and Fault Descriptions - Continued
ERROR/FAULT PROBABLE CAUSE CORRECTIVE ACTION
4
766, INV NV RAM ERR
767, OUT OF RANGE
768, OVERCURRENT
769, BUS OVERVOLTAGE
Drive has declared an error in writing
to its non-volatile RAM.
Drive declared a value is out of range.
Drive has detected that the output
current exceeds 200% of the transistor
rated current.
Drive has detected that the DC bus
voltage is high. The detection level is
approximately 400V for a 230V rated
unit; 800V for a 460V rated unit.
Replace the inverter control circuit
card. Whenever changing parameter
settings the following procedure must
be followed:
➊ Correct the setting.
❷ Use function 994 to transfer the
data from RAM to NVRAM.
❸ Turn power off.
❹ When the charge light is off, then
turn power on.
Verify all of the lettered constant
settings. Whenever changing parameter
settings the following procedure must
be followed:
➊ Correct the setting.
❷ Use function 994 to transfer the
data from RAM to NVRAM.
❸ Turn power off.
❹ When the charge light is off, then
turn power on.
Refer to troubleshooting chart 7.
Refer to troubleshooting chart 5.
770, INV. OVERLOAD
771, INVERTER HOT
772, BLOWN FUSE
773, OPEN LOAD PHASE
774, INV HARDWARE FLT
775, MOTOR OVERLOAD
9/15/93
Drive detected that the Drive overload
protection has tripped.
Drive detected that the fin temperature
has exceeded 90 degrees C (194
degrees F) +/-5 degrees.
DC Bus fuse has cleared.
Drive detected an opening in the
wiring from the inverter to the motor.
Drive detected a fault in its control
circuit hardware.
Drive detected that the motor overload
protection has tripped.
Refer to troubleshooting chart 8.
Refer to troubleshooting chart 10.
Check for a short circuit in the output.
Check for problems in the drive to
motor wiring.
Replace the inverter control circuit
card.
Refer to troubleshooting chart 8.
Fault and Error Conditions
57
Page 64

4
Troubleshooting/Maintenance
Table 8. Standard Error and Fault Descriptions - Continued
ERROR/FAULT PROBABLE CAUSE CORRECTIVE ACTION
776, MOTOR HOT
777, TRANSIENT P LOSS
778, SPEED DEVIATION
779, INVERTER FAN
800, LAN HARDWARE ERR
801, MAX. LAN RETRIES
802, ILLEGAL MSG TYPE
Drive detected that the motor overheat
temperature has been exceeded.
Drive detected low voltage, but
momentary power loss ride-thru is
enabled, and momentary power loss
ride-thru time (constant CN19) has not
been exceeded yet.
Drive detected excessive speed
deviation.
Drive detected that its cooling fan has
failed.
The Local Area Network (LAN)
hardware is not operting properly.
A directed LAN message was not
received by the given network node
number after trying several times.
A directed LAN message was received
by the VCD 723 from the given node,
nd the message content is not one of
the supported message data types.
➊ Verify constant CN14 and CN15
settings.
❷ Refer to troubleshooting chart 10.
Verify incoming power.
Verify speed related constants.
➊ Look for cooling fan obstructions.
❷ Replace cooling fan.
Check BNC ”T” Connector.
Check 95Ω termination resistors.
Replace the MicroTrac circuit card.
Verify that the given node number is
connected to the same coaxial cable
(the MicroTrac LAN) as the VCD 723,
and that it is operational.
➊ Verify that the given node number
is operating properly.
❷ Verify that the LAN is operating
properly.
803, BROADCAST MISSED
804, DIRECTED MISSED
805, LAN - NO TX ROOM
806, LAN - NO RX ROOM
58
Fault and Error Conditions
A broadcast message from the given
node was not received by the VCD 723
within the allotted time, and one was
expected.
A directed message from the given
node was not received by the VCD 723
within the allotted time, and one was
expected.
Not enough memory is allocated in the
MicroTrac memory to store all of the
LAN messages that need to be
transmitted.
Not enough memory is allocated in the
MicroTrac memory to store and
process all of the LAN messages that
have been received.
Verify that the given node number is
connected to the same coaxial cable
(the MicroTrac LAN) as the VCD 723,
and that it is operational.
Verify that the given node number is
connected to the same coaxial cable
(the MicroTrac LAN) as the VCD 723,
and that it is operational.
Contact MagneTek. The software on
the MicroTrac circuit card needs to be
changed.
Contact MagneTek. The software on
the MicroTrac circuit card needs to be
changed.
9/15/93
Page 65

Troubleshooting/Maintenance
4
Troubleshooting
Flowcharts
If the VCD 723 malfunctions, locate the cause and take corrective action by
following the flowcharts in this section.
A. TROUBLESHOOTING MOTOR SYMPTOMS
Motor Does Not Rotate................................................................... Chart 1
Motor Stalls During Operation ....................................................... Chart 2
Motor Does Not Rotate at Set Speed.............................................. Chart 3
Motor Hunting................................................................................. Chart 4
B. TROUBLESHOOTING FOR FAULT CONDITIONS
Overvoltage ...................................................................................... Chart 5
Blown Fuse....................................................................................... Chart 6
Overcurrent....................................................................................... Chart 7
Overload ........................................................................................... Chart 8
Underload......................................................................................... Chart 9
Inverter Overheated........................................................................ Chart 10
Control Function Error................................................................... Chart 11
External Fault ................................................................................. Chart 12
Power Supply Verification ............................................................. Chart 13
W ARNING
Oscilloscope chassis may be at voltages potentially hazardous
to life if not properly grounded. If oscilloscope is used to
measure high voltage waveforms, use only a dual channel
oscilloscope in the differential mode with X100 probes.
Always connect oscilloscope chassis to earth ground.
W ARNING
Voltages dangerous to life exist when equipment is open and
energized. Do not work alone.
CAUTION
To prevent equipment damage al w ays remove incoming threephase power before test equipment is connected or remov ed.
Never disconnect or connect the wiring while the power is
applied.
9/15/93
Troubleshooting Flowcharts
59
Page 66

4
Troubleshooting/Maintenance
Chart 1. Motor Does Not Rotate
YES
(CONTROL
BY DIGITAL
OPERATOR)
LAMP
NO
DIGITAL
OPERATOR
ASSEMBLY
IS FAULTY.
REPLACE.
RUN
ON?
NO
(CONTROL BY
EXT. INPUTS)
"CHARGE" LAMP
ON MAIN PC BOARD
ACROSS TERMINALS
L1(R), L2(S), AND L3(T)?
NO
LIT?
YES
RATED VOLTAGE
YES
FAULT CODE
SHOWN ON
LCDU?
REFERENCE PAC DIAGRAMS
FOR LOGIC INPUTS; RUN,
STOP AND E-STOP.
NO
CHECK
EXTERNAL
CIRCUITS
FOR
PROBLEM
AND
REPAIR.
NO
YES
NO
CHECK CIRCUIT
BREAKER, MAGNETIC
CONTACTOR AND
INPUT POWER.
GO TO APPROPRIATE
CHART, 5 THRU 13
AND TABLE 8.
60
Troubleshooting Flowcharts
PROPER SPEED
REFERENCE INPUT?
PER PAC DIAGRAM
YES
CONSULT FACTORY
NO
CHECK EXTERNAL
CIRCUITS FOR
PROBLEM AND
REPAIR.
9/15/93
Page 67

Troubleshooting/Maintenance
Chart 2. Motor Stalls During Operation
4
LOAD
INERTIA
LARGE?
YES
NO
ACCELERATION TIME
TOO SHORT?
NO
LOAD TORQUE
TOO HIGH?
NO
YES
CHECK IF SPECIAL
MOTOR IS USED.
LARGE MOTOR
TERMINAL
VOLTAGE DROP?
NO
YES
YES
WITH DRIVE IN
STOPPED CONDITION,
EXTEND ACCELERATION TIME BY
REPROGRAMMING
PER PAC DIAGRAM.
- USE LARGER WIRE
BETWEEN DRIVE
AND MOTOR.
- SHORTEN WIRING
DISTANCE BETWEEN
DRIVE AND MOTOR.
9/15/93
- DECREASE LOAD
INERTIA.
- EXTEND ACCELERATION TIME BY
REPROGRAMMING
PER PAC DIAGRAM.
- DECREASE LOAD
TORQUE.
- REPLACE DRIVE
WITH ONE OF LARGER
CAPACITY.
Troubleshooting Flowcharts
61
Page 68

4
Troubleshooting/Maintenance
Chart 3. Motor Does Not Rotate At Set Speed
CORRECT MOTOR FOR
USE WITH DRIVE?
YES
PROPER CONNECTIONS
FROM VCD 723 TO
MOTOR AND PG?
YES
PROPER SPEED
REFERENCE INPUT?
PER PAC DIAGRAM.
YES
CHECK PARAMETER
SETTINGS PROPER
FOR APPLICATION?
YES
NO
NO
NO
NO
CONSULT MAGNETEK
ABOUT MOTOR
SELECTION.
CHECK CONNECTIONS
FOR PROBLEM AND
REPAIR.
CHECK EXTERNAL
CIRCUITS FOR
PROBLEM AND
REPAIR.
CHECK SETTINGS;
REPROGRAM
AS REQUIRED.
CONSULT
MAGNETEK.
62
Troubleshooting Flowcharts
NO
IS PG
POWER SUPPLY
NORMAL?
YES
NO
MECHANICAL SYSTEM
IS PG
OUTPUT SIGNAL
NORMAL?
EXCESSIVE
CHATTER?
CONSULT
MAGNETEK.
YES
NO
YES
CHECK FOR
PROBLEM IN MOTOR,
MECHANICAL SYSTEM
OR BRAKE.
9/15/93
Page 69

Chart 4. Motor Hunting
Troubleshooting/Maintenance
4
PROPER PHASE SEQUENCE
OF CONNECTIONS
FROM DRIVE TO MOTOR?
YES
ALL PARAMETER SETTINGS
RELATED TO ASR
PROPER FOR APPLICATION?
YES
WITH DRIVE IN STOPPED
CONDITION, REDUCE APPLICABLE
ASR PROPORTIONAL GAIN
SETTING.
DOES MOTOR STILL
HUNT?
YES
NO
NO
NO
CHECK CONNECTIONS
FOR PROBLEM AND
REPAIR.
CHECK SETTINGS;
REPROGRAM
AS REQUIRED.
DETERMINE THE
OPTIMUM SETTING FOR
WHICH THE MOTOR
WILL NOT HUNT.
VERIFY TACHOMETER
SIGNALS FOR
CORRECT WAVEFORM.
9/15/93
EXCESSIVE
MECHANICAL SYSTEM
CHATTER?
YES
ERRONEOUS
OPERATION DUE
TO NOISE?
CONSULT
MAGNETEK.
NO
NO
CHECK FOR
YES
PROBLEM IN MOTOR,
MECHANICAL SYSTEM
OR BRAKE.
REDUCE ASR OUTPUT
LAG TIME BY
SMALL AMOUNTS UNTIL
AMOUNT OF CHATTER
IS ACCEPTABLE.
Troubleshooting Flowcharts
63
Page 70

4
Troubleshooting/Maintenance
Chart 5. Overvoltage (ou) Fault Indication
DOES OV TRIP
OCCUR ONLY
DURING DECEL-
ERATION?
NO
ERRONEOUS
OPERATION DUE
TO NOISE?
NO
IS DC BUS
VOLTAGE
CORRECT?
YES
YES
NO
IS INPUT AC SUPPLY
VOLTAGE CORRECT?
YES
NO
REMOVE NOISE SOURCE:
• CONNECT SURGE
SUPPRESSOR TO RELAY
AND MAGNETIC CONTACTOR COILS.
• PROVIDE LINE FILTER
TO REMOVE NOISE ON
INPUT POWER LINE.
DECREASE TO
PROPER VOLTAGE
RANGE.
WITH DRIVE IN
STOPPED CONDITION,
INCREASE DECELERATION TIME BY
REPROGRAMMING
PER PAC DIAGRAM.
DOES OV TRIP
STILL OCCUR
DURING DECEL-
ERATION?
YES
YES
CONTROL SIGNALS TO
BASE DRIVE PCB ARE
FAULTY. REPLACE
CONTROL PCB.
64
Troubleshooting Flowcharts
ADD BRAKING OPTION,
OR REPLACE DRIVE
WITH ONE OF LARGER
CAPACITY.
NO
IS BRAKING
OPTION
INSTALLED?
YES
CHECK LOAD
INERTIA
REQUIREMENTS.
9/15/93
Page 71

Troubleshooting/Maintenance
Chart 6. Blown Fuse (FU) Fault Indication
DISCONNECT LEADS FROM
OUTPUT TERMINALS
T1(U), T2(V) AND T3(W).
4
ARE MOTOR WINDINGS
SHORTED (T1 TO T2,
T2 TO T3, OR T3 TO T1)?
NO
ARE VCD 723 PHASES
SHORTED TO GROUND?
T1(U), T2(V), T3(W)
TO G(E).
NO
CHECK POWER TRANSISTORS
(SEE TABLE 10).
ARE TRANSISTORS
DAMAGED?
NO
YES
YES
YES
MOTOR
IS FAULTY.
LOCATE AND
REMOVE SHORT.
REPLACE
DAMAGED POWER
TRANSISTORS.
9/15/93
DRIVE
IS FAULTY.
WARNING
DO NOT REPLACE DC BUS FUSE WITHOUT
FIRST CHECKING OUTPUT TRANSISTORS.
Troubleshooting Flowcharts
65
Page 72

4
Troubleshooting/Maintenance
DOES OC TRIP
OCCUR, OR MAIN CIR-
CUIT CONTACTOR
TRIP, WHEN POWER
IS TURNED ON?
YES
CHECK POWER
TRANSISTORS
(SEE TABLE 10).
ARE TRANSISTORS
DAMAGED?
NO
Chart 7. Overcurrent (
DOES OUTPUT
CURRENT EXCEED
200% OF RATING?
NO
NO
YES
MACHINE JAMMED
REPLACE
DAMAGED POWER
TRANSISTORS.
YES
OR MOTOR
FAILURE?
NO
oC
) Fault Indication
WITH VCD 723 IN STOPPED CONDITION, INCREASE ACCELERATION
TIME BY REPROGRAMMING PER PAC
DIAGRAM, IF OC TRIP OCCURS ONLY
DURING ACCELERATION.
OTHERWISE, REDUCE LOAD.
YES
CLEAR JAM, OR
REPLACE MOTOR.
DISCONNECT WIRING
FROM OUTPUT TERMINALS
T1, T2 AND T3 AND
CHECK LOAD IMPEDANCE.
WITH VCD 723 IN STOPPED
CONDITION, INCREASE
ACCELERATION TIME BY
REPROGRAMMING PER PAC
DIAGRAM.
66
DOES OC TRIP
STILL OCCUR?
NO
MOTOR STARTED BY CONTACTS
WIRED BETWEEN VCD 723
AND MOTOR?
NO
ERRONEOUS OPERATION
DUE TO NOISE?
NO
CONTROL PCB OR BASE
DRIVE PCB IS FAULTY.
REPLACE FAULTY BOARD.
Troubleshooting Flowcharts
YES
YES
YES
DECREASE
LOAD INERTIA.
- REWIRE TO ELIMINATE MOTOR
FULL VOLTAGE STARTING.
- REPLACE DRIVE WITH
ONE OF LARGER CAPACITY.
REMOVE NOISE SOURCE:
• CONNECT SURGE SUPPRESSOR
TO RELAY AND MAGNETIC CONTACTOR COILS.
• PROVIDE LINE FILTER TO
REMOVE NOISE ON INPUT
POWER LINE.
9/15/93
Page 73

Troubleshooting/Maintenance
Chart 8. Overload (oL) Fault Indication
4
LOAD TOO LARGE
(MOTOR OVERHEATED)?
NO
IS VCD 723 CAPACITY
FACTORY SET
CORRECTLY?
YES
IS CORRECT
CURRENT RATING
DISPLAYED?
YES
DISCONNECT WIRING FROM
OUTPUT TERMINALS T1(U),
T2(V) AND T3(W). IS OL
STILL INDICATED?
YES
NO
NO
YES
NO
DECREASE LOAD
WITHIN RATING.
CONSULT
FACTORY.
WITH DRIVE IN
STOPPED CONDITION,
REPROGRAM PER PAC
DIAGRAM.
CHECK MOTOR
AND LOAD.
9/15/93
ERRONEOUS OPERATION
DUE TO NOISE?
NO
CONTROL PCB,
OR BASE DRIVE
PCB IS FAULTY.
REPLACE FAULTY BOARD.
YES
REMOVE NOISE SOURCE:
• CONNECT SURGE
SUPPRESSOR TO RELAY
AND MAGNETIC CONTACTOR COILS.
• PROVIDE LINE FILTER
TO REMOVE NOISE ON
INPUT POWER LINE.
Troubleshooting Flowcharts
67
Page 74

4
Troubleshooting/Maintenance
Chart 9. Underload (
IS INPUT AC
SUPPLY
CORRECT?
YES
IS THERE
AT LEAST 450VDC
(FOR 460V VCD 723) OR
225VDC (FOR 230V VCD 723)
ON THE DC BUS?
YES
NO
NO
uU
) Fault Indication
- INCREASE VOLTAGE
WITHIN PROPER RANGE.
- CHECK WIRING BETWEEN
MAIN AC CONTACTOR
AND DRIVE.
DRIVE
IS FAULTY.
ERRONEOUS OPERATION
DUE TO NOISE?
NO
CONTROL PCB OR BASE
DRIVE PCB IS FAULTY.
REPLACE FAULTY BOARD.
YES
REMOVE NOISE SOURCE:
• CONNECT SURGE
SUPPRESSOR TO RELAY
AND MAGNETIC CONTACTOR COILS.
• PROVIDE LINE FILTER
TO REMOVE NOISE ON
INPUT POWER LINE.
68
Troubleshooting Flowcharts
9/15/93
Page 75

Troubleshooting/Maintenance
4
Chart 10. Inverter Overheated (
IS AMBIENT
TEMPERATURE
45°C (113°F)
OR GREATER?
NO
IS HEAT SINK
CLEAN?
YES
INTERNAL
COOLING FAN
STOPPED?
NO
YES
NO
YES
oH
) Fault Indication
REDUCE AMBIENT
TEMPERATURE.
CLEAN HEAT
SINK.
REPLACE
COOLING FAN.
ERRONEOUS OPERATION
DUE TO NOISE?
NO
CONTROL PCB OR BASE
DRIVE PCB IS FAULTY.
REPLACE FAULTY BOARD.
YES
REMOVE NOISE SOURCE:
• CONNECT SURGE
SUPPRESSOR TO RELAY
AND MAGNETIC CONTACTOR COILS.
• PROVIDE LINE FILTER
TO REMOVE NOISE ON
INPUT POWER LINE.
9/15/93
Troubleshooting Flowcharts
69
Page 76

4
Troubleshooting/Maintenance
Chart 11. Control Function Error (
TURN OFF POWER. AFTER
"CHARGE" LAMP ON MAIN
PC BOARD GOES OUT,
TURN POWER BACK ON.
IS
CPF
INDICATED?
STILL
NO
YES
CPF
) Fault Indication
1. CHECK THAT ALL DRIVE
HARNESS CONNECTORS,
AND CONTROL BOARD
MOUNTED PCB's, ARE
FIRMLY SEATED.
2. CHECK THAT CPU AND
EPROM ARE INSERTED
SECURELY.
3. CHECK THAT NO NOISE
SOURCE IS PRESENT.
4. REPROGRAM PER PAC
DIAGRAM USING
FACTORY RESET CODES.
5. CHECK Sn-01 AND Sn-02
FOR PROPER VALUES.
70
DRIVE IS OK.
RETURN TO NORMAL
OPERATION.
Troubleshooting Flowcharts
IS
CPF
NO
INDICATED?
STILL
YES
SELF-DIAGNOSIS FUNCTION
HAS DETECTED FAILURE IN
THE CPU OR PERIPHERAL
COMPONENTS.
REPLACE THE CONTROL PCB,
OR APPROPRIATE CONTROL
MOUNTED PCB.
9/15/93
Page 77

Troubleshooting/Maintenance
4
Chart 12. External Fault (
IS AN EXTERNAL FAULT SIGNAL
PRESENT (CLOSED CIRCUIT
BETWEEN TERMINAL 3 AND
11; OR OPEN CIRCUIT
BETWEEN TERMINAL 11
AND WHICHEVER TERMINAL
(5-8) HAS BEEN PROGRAMMED
FOR EXT. FAULT INPUT)?
NO
CONTROL PCB IS
FAULTY. REPLACE.
YES
EF
) Indication
FAULT HAS OCCURRED
IN CIRCUITS OUTSIDE
THE DRIVE.
TROUBLESHOOT AND
CORRECT.
9/15/93
Troubleshooting Flowcharts
71
Page 78

4
Troubleshooting/Maintenance
Chart 13. Power Supply Verification
ARE SUPPLIES ON
TEST POINTS PER
TABLE 9?
NO
CHECK VOLTAGE BETWEEN
TERMINAL 15 (+15V) AND
17 (COMMON) ON
DRIVE FOR +15 VDC.
NO
REPLACE DRIVE
POWER SUPPLY.
YES
YES
REPLACE MICROTRAC
CIRCUIT CARD.
REPLACE CABLE
BETWEEN MICROTRAC
CIRCUIT CARD AND
DRIVE.
72
Table 9. AC MicroTrac Circuit Card T est Points
TP1 - TP13 For use by MagneTek Engineering
TP14 Analog Input 0 (+/-10 VDC)
TP15 Analog Input 1 (+/-10 VDC)
TP16 Analog Output 0 (+/-10 VDC)
TP17 Analog Output 1 (+/-10 VDC)
TP18 +10VREF
TP19 -10VREF
TP20 -15 VDC Supply
TP21 +5 VDC Supply
TP22 +15 VDC Supply
TP23 +24 VDC Supply
TP24 Power Supply Common
TP25 Power Supply Common
Troubleshooting Flowcharts
9/15/93
Page 79

Troubleshooting/Maintenance
4
Diode and
Transistor
Module
Resistance T est
Diode Module
Measure the resistance across the module terminals with a volt-ohm meter. Set
the meter at the X1 range. The measured resistance should be within the values
listed in Table 10.
RESISTANCE TEST FOR 3Ø CONVERTER MODULES (BRIDGE RECT)
●
●
●
P +
▲ ▲ ▲
L
1
L
2
L
3
●
●
●
▲ ▲ ▲
●
●
●
N –
VOM RESISTANCE SCALE R x 1
+ IS THE POSITIVE POLARITY LEAD*
- IS THE NEGATIVE POLARITY LEAD
*THE VOM RED LEAD IS NOT NECESSARILY THE POSITIVE POTENTIAL IN THE RESISTANCE MODE.
FOR THESE TESTS THE + LEAD REFERS TO THE POSITIVE POTENTIAL. MAKE SURE YOU KNOW
WHICH POLARITY YOU HAVE ON YOUR VOM.
Table 10. Diode Module Resistances
+ – NORMAL ABNORMAL
+ – NORMAL ABNORMAL
ON ON (OHMS) (OHMS)
ON ON (OHMS) (OHMS)
L1 P
L2 P
L3 P 10 to 50 0 or INFINITE
N L1
N L2
N L3
READING READING
READING READING
+ – NORMAL ABNORMAL
+ – NORMAL ABNORMAL
ON ON (OHMS) (OHMS)
ON ON (OHMS) (OHMS)
L1 N
L2 N
L3 N INFINITE LESS THAN
P L1 1M
P L2
P L3
P N MAGNITUDE 0 or INFINITE
READING READING
READING READING
OF CAP
CHARGE TO
INFINITE
9/15/93
Diode and Transistor Module Resistance Test
73
Page 80

4
Troubleshooting/Maintenance
Transistor
Module
Measure the resistance across the module terminals with a volt-ohm meter. Set
the meter to the X1 range. The measured resistance should be within the values
listed in Table 11.
RESISTANCE TEST FOR 3Ø TRANSISTOR MODULES
C
1A
G
1A
G
2A
▲ ▲ ▲
E
1A
●
C
2A C
▲ ▲ ▲
E
2A
T1 (Aφ)
VOM RESISTANCE SCALE R x 1
+ IS THE POSITIVE POLARITY LEAD*
- IS THE NEGATIVE POLARITY LEAD
C
1B
●
G
1B
E
1B
●
2B
G
2B
●
E
2B
T2 (Bφ)
C
1C
●
G
1C
E
1C
●
C
2C
G
2C
●
E
2C
T3 (Cφ)
P +
N –
*THE VOM RED LEAD IS NOT NECESSARILY THE POSITIVE POTENTIAL IN THE RESISTANCE MODE.
FOR THESE TESTS THE + LEAD REFERS TO THE POSITIVE POTENTIAL. MAKE SURE YOU KNOW
WHICH POLARITY YOU HAVE ON YOUR VOM.
**OR 0.3 TO 0.7 ON DIGITAL METER SET TO DIODE DROP SCALE.
Table 11. Transistor Module Resistances
+ – NORMAL ABNORMAL
+ – NORMAL ABNORMAL
ON ON (OHMS) (OHMS)
ON ON (OHMS) (OHMS)
P+ T1
P+ T2
P+ T3
T1 N- INFINITE 0
T2 NT3 N-
T1 P+
T2 P+
T3 P+ 5** to 50 0 or INFINITE
N- T1
N- T2
N- T3
READING READING
READING READING
+ – NORMAL ABNORMAL
+ – NORMAL ABNORMAL
ON ON (OHMS) (OHMS)
ON ON (OHMS) (OHMS)
G1A T1
G1B T2 LESS
G1C T3 INFINITE
G2A N- THAN
G2B NG2C N- 1M
T1 G1A
T2 G1B LESS
T3 G1C INFINITE
N- G2A THAN
N- G2B
N- G2C 1M
READING READING
READING READING
74
Diode and Transistor Module Resistance Test
9/15/93
Page 81

Troubleshooting/Maintenance
4
Spare Parts List
Table 12. Spare Parts List - 230 Volt Drives
Description Qty/Drive Part Number
Transistor Module
3HP 1 50207804
5HP 1 50207805
7.5HP 3 50207806
10HP 3 50207807
15HP 3 50207808
20HP 3 50207809
30HP 6 50207810
Diode Module
3HP and 5HP 1 50207822
7.5HP 1 50207823
10HP 1 50207824
15HP 1 50173962
20HP and30HP 3 50184816
Control Board
3HP thru 30HP 1 50207937
50HP 1 50207918
Gate Driver Board
3HP 1 50207943
5HP 1 50207944
7.5HP 1 50207945
10HP 1 50207946
15HP and 20HP 1 50207947
30HP 1 50207948
Power Supply Board
3HP thru 10HP 1 50207964
Cooling Fan
3HP thru 7.5HP 1 50207966
10HP thru 30HP 1 50207919
50HP 2 50207919
Fuse, DC Bus
3HP 1 50184828
5HP 1 50184829
7.5HP and 10HP 1 50184830
15HP 1 50184831
Fuse
20HP 1 50207974
Fuse, DC Bus
30HP 1 50184859
50HP 1 50184890
AC MicroTrac Board
3HP thru 50HP 1 46S03034-0010
AC MicroTrac Local Display
3HP thru 50HP 1 46S03035-0010
9/15/93
Spare Parts List
75
Page 82

4
Troubleshooting/Maintenance
Table 13. Spare Parts List - 460 Volt Drives
Description Qty/Drive Part Number
Transistor Module
3HP 1 50207812
5HP 3 50207813
10HP 3 50207814
15HP 3 50207815
20HP 3 50207816
30HP 3 50207817
40HP and 60HP 6 50207818
75HP and 100HP 6 50207907
150HP 12 50207908
200HP 12 50207909
Diode Module
3HP 1 50207825
5HP and 10HP 1 50207826
15HP 1 50184817
20HP 1 50207827
30HP 1 50184818
40HP and 60HP 3 50207828
75HP and 100HP 6 50207914
150HP 9 50207914
Main Diode Circuit
200HP 6 50207915
Control Board
3HP thru 40HP 1 50207937
60HP thru 200HP 1 50207918
Gate Driver Board
10HP 1 50207954
15HP and 20HP 1 50207955
30HP 1 50207956
40HP 1 50207957
60HP 1 50207958
75HP 1 50207960
100HP 1 50207961
150HP 1 50207962
200HP 1 50207963
Power Supply Board
3HP thru 10HP 1 50207965
Control Board
300HP and 400HP 1 50207918
3HP 1 50207952
5HP 1 50207953
76
Spare Parts List
9/15/93
Page 83

Table 13. Spare Parts List - 460 Volt Drives - Continued
Description Qty/Drive Part Number
Main Drive Board
Sub Drive Board
Main Diode Circuit
Cooling Fan
3HP thru 10HP 1 50207966
15HP and 20HP 1 50207967
40HP thru 200HP 2 50207919
Fan Unit
300HP and 400HP 3 50207929
Troubleshooting/Maintenance
300HP 1 50207917
400HP 1 50207916
300HP 3 50207925
400HP 3 50207926
300HP 6 50207915
400HP 9 50207915
30HP 1 50207919
4
Fuse, DC Bus
3HP 1 50207850
5HP and 10HP 1 50207851
Fuse
15HP and 20HP 1 50207968
30HP and 40HP 1 50207969
60HP 1 50207970
75HP 1 50207971
100HP 1 50207972
150HP 1 50173998
200HP 1 50207973
AC MicroTrac Board
3HP thru 400HP 1 46S03034-0010
AC MicroTrac Local Display
3HP thru 400HP 1 46S03035-0010
9/15/93
Spare Parts List
77
Page 84

Appendices
T1
T9
T12
T5
T2
T3
T7
VCM Motor/PG
Connection
The vector control motor (VCM) windings must be connected to the VCD 723
as shown in the following table and illustration.
Table 14. Connection of VCM
CONNECTION T1 T2 T3
Parallel
Star
T1
T1 T2 T3
&&&
T7 T8 T9
CONNECT ALL
TOGETHER
T4 - T5 - T6 -
T10 - T11 - T12
T10
T2
T8
T11
T6
T4
T3
The VCM contains two thermistors. Connect only one thermistor (VCM leads
M1 & M11) to the VCD 723. The other thermistor (leads M2 & M22) is a spare.
78
VCM Motor/PG Connection
9/15/93
Page 85

Pulse Generator connections are shown in the following tables.
Table 15. TB1 - PG Connection
TB1 EPC BEI
FUNCTION TERMINAL MODEL 755A
+12V (200mA) 1 White Red
0V 2 Black Black
A+ 3 Red Yellow
A– 4 Green Wht/Yel
B+ 5 Brown Blue
B– 6 Yellow Wht/Blue
SHIELD 7 Shield Green
(1) For PG, EPC Model 755A (provided as standard), Orange and Blue
wires are not used.
(1)
MODEL E25
Appendices
Table 16. Connectors on PG Card
CONNECTOR FUNCTION TERMINAL WIRE
NO. ARRANGEMENT
CA1 For Pulse
Generator
CA2 For Pulse
Monitor
1 2 3
4 5
6 7 8
6 7 8
4 5
1 2 3
(2) Top view (from pin connections).
(2)
SIZE
18 GA
(0.75 mm2)
18 GA
(0.75 mm2)
9/15/93
VCM Motor/PG Connection
79
Page 86

Appendices
RED
115VAC
X1
X2
*
Tied off (if shown paired) and insulated.
For VCM frame sizes 180 & 210, the blower motor should be connected as
shown in the following illustration.
MOTOR
MOTOR
ORANGE
BLUE
YELLOW
RED
BLACK
YELLOW
ORANGE
BLACK
BLUE
X1
X2
*
230VAC
*
*
80
VCM Motor/PG Connection
9/15/93
Page 87

Motor
Parameters
Appendices
Parameter
Calculation
Required Motor
Data For
Calculation
Calculation
Method
This procedure must be performed if the motor to be used with the VCD 723
Drive is NOT a MagneTek VCM induction AC vector motor. This calculation is
to be used for SPEED CONTROL MODE ONLY with tachometer feedback
(PG). When the application requires torque control, motor parameters should be
set and adjusted by using the tuning procedure.
This information is usually located on the motor nameplate, except for the noload current. If the motor manufacturer is unable to supply this information, use
30% for the dn-07 data value.
Motor Output (HP) : HP
Motor Voltage (V) : V
Motor Rated Speed (RPM): N
Motor Base Speed (RPM): N
m
R
S
No. of Poles: pp
Full Load Amps (FLA): I
No-Load Amps (NLA): I
FLA
NLA
dn-XX Calculation:
(1) dn-01 Base Speed
dn-01 = See Table A
9/15/93
(2) dn-02 Top Speed
(a) For constant torque applications
dn-02 = dn-01
(b) For constant HP applications
dn-02 = Top Speed (dn-02 ≤ 2 • dn-01)
(3) dn-03 No. of Poles
dn-03 = pp (See Table A)
(4) dn-04 No-Load Voltage: V
NL
dn-04 = VNL(See Table B)
(5) dn-05 Torque producing current: IT
dn-05 =
√( I
FLA
)2– ( I
NLA
2
)
Motor Parameters
81
Page 88

Appendices
(6) dn-06 Slip Frequency: SF
dn-06 =
(7) dn-07 Magnetizing Current: IM
dn-07 =
(IM = 30% if no-load current not available)
(8) dn-08 thru dn-18 = Factory default values acceptable
(9) Cn-09 (PG Constant) = PPR of Tachometer (Pulses Per
Revolutions)
Table A. Base Speed
fl Poles dn-01
60 4 1750 RPM
50 4 1450 RPM
60 6 1150 RPM
60 8 850 RPM
V
(
V
I
dn-05
M
NL
NLA
2 NS– N
)
[
x 100%
R
x 60
N
]
S
Table B. No-Load Voltage (V)
Vm V
230V 210V
460V 420V
NL
82
Motor Parameters
(10) Optional Adjustments
On-02: 0110
Disable thermistor and rotor heat model
On-03: 1010
Disable overvoltage protection when
Dynamic Braking Option is installed.
9/15/93
Page 89

Sample
Calculation
Appendices
Motor Data
Calculate dn-XX’s
Motor Output: HP = 15
Motor Voltage: V
Motor Rated Speed: N
Motor Base Speed: N
No. of Poles: pp = 4
Full Load Amps: I
No-Load Amps: I
dn-01 (NR) = 1750
dn-02 (N
dn-03 (pp) = 4
dn-04 (V
dn-05 = 38 dn-05 =
dn-06 = 1.5 V
) = 1750
S
) = 210
NL
dn-05 = √(39.4)
dn-05 = 37.5 ≈ 38
dn-06 =
= 230V
M
= 1763 RPM
R
= 1800 RPM
S
= 39.4 A
FLA
= 12.0 A
NLA
√( I
(
V
M
NL
FLA
)
)2– ( I
2
2 NS– N
– (12)
[
N
NLA
2
S
R
2
)
x 60
]
9/15/93
dn-06 =
dn-06 = 1.48 ≈ 1.5
dn-07 = 31.6 I
dn-07 =
dn-07 =
dn-07 = 31.6%
(
230 2 1800 – 1763
)
210 1800
NLA
dn-05
12
38
[
x 100%
x 100%
Motor Parameters
x
60
]
83
Page 90

Appendices
Node, Channel
and Subchannel
Assignments
Every device in a MicroTrac system is identified with a Node number , a Channel
number, and a Subchannel number, regardless of whether the device uses the
Local Area Network or not. These identifiers hav e different significance for each
device and some devices may not need all three fields to provide a unique
identification. This appendix lists each device type relating to the VCD 723, and
describes the significance of each field for that de vice.
VCD 723
Constants
CN-09 Settings
CN-09 sets the digital tach pulses per revolution. This is normally set for either
1024 or 2500 PPR depending upon the type of tach used on the motor.
DN-01 thru DN-18 Settings
DN-01 thru DN-18 set the motor constants per the following tables:
CONSTANT DESCRIPTION INITIAL VALUE UNITS
Dn-01 MOTOR BASE SPEED 1750 RPM
Dn-02 MOTOR MAXIMUM SPEED 1750 RPM
Dn-03 NUMBER OF MOTOR POLES 4 ~
Dn-04 MOTOR NO LOAD VOLTAGE PER TABLE VAC
Dn-05 MOTOR RATED PRIMARY CURRENT PER TABLE AAC
Dn-06 RATED SLIP FREQUENCY PER TABLE HZ
Dn-07 EXCITATION CURRENT REFERENCE PER TABLE %
Dn-08 PRIMARY RESISTANCE, USED WITH OPT TRQ BOARD PER TABLE %
Dn-09 LEAKAGE COEFFICIENT, USED WITH OPT TRQ BOARD PER TABLE %
Dn-10 MOTOR IRON LOSS PER TABLE %
Dn-11 MOTOR MACHINERY LOSS PER TABLE %
Dn-12 SECONDARY CIRCUIT TIME CONSTANT PER TABLE MSEC
Dn-13 LEAKAGE SAT COEF, USED WITH OPT TRQ BOARD 1.20 ~
Dn-14 ROTOR HEAT GAIN 0.00 ~
Dn-15 ROTOR HEAT TIME CONSTANT 30 MIN
Dn-16 IRON CORE SATURATION COMP COEFFICIENT 1 0.5 ~
Dn-17 IRON CORE SATURATION COMP COEFFICIENT 2 0.75 ~
Dn-18 MOTOR OVERHEAT TEMPERATURE 155 °C
84
Node, Channel and Subchannel Assignments
9/15/93
Page 91

Appendices
DN-01 Thru DN-18 Motor Setting Constants
RTD VCM HP Dn-04 Dn-05 Dn-06 Dn-07 Dn-08 Dn-09 Dn-10 Dn-11 Dn-12
MTR MODEL
VAC NO.
VMA003 3 175 8.03 1.57 51.6 5.1 8.77 6.7 0.4 138
VMA005 5 175 13.34 1.37 56.1 4.0 8.39 6.6 0.3 140
VMA7P5 7.5 175 19.94 1.83 37.4 3.3 8.05 3.4 0.6 143
VMA010 10 175 26.24 1.67 33.5 2.7 6.62 3.2 0.7 171
VMA015 15 175 39.07 1.33 28.4 3.3 5.84 1.4 1.0 212
190 VMA020 20 175 52.11 1.17 24.7 2.9 5.86 1.4 0.8 268
VMA025 25 180 63.32 1.03 29.1 2.1 5.84 1.5 1.0 264
VMA030 30 180 75.61 1.13 27.2 1.9 5.32 1.3 0.8 255
VMA040 40 175 108.0 0.67 34.6 1.5 9.68 1.3 1.0 154
VMA050 50 175 133.7 0.67 30.9 1.4 8.63 1.2 0.8 165
VMA003 3 210 6.80 1.37 61.0 4.7 9.86 7.4 0.4 116
VMA005 5 215 11.00 1.23 71.2 3.6 9.86 7.6 0.3 118
VMA7P5 7.5 215 16.26 1.67 44.2 3.0 8.21 3.9 0.6 135
VMA010 10 215 21.45 1.20 39.8 2.4 7.05 3.7 0.7 162
VMA015 15 215 31.92 1.20 34.1 2.9 6.23 1.6 1.0 176
230 VMA020 20 215 42.55 1.07 29.3 2.5 6.20 1.5 0.8 247
VMA025 25 215 53.16 0.93 33.1 1.9 6.21 1.6 1.0 240
VMA030 30 215 63.54 1.00 30.5 1.8 5.73 1.4 0.8 263
VMA040 40 215 85.36 0.60 28.1 1.3 6.52 1.6 1.0 230
VMA050 50 215 109.04 0.60 36.7 1.2 8.90 1.4 0.8 163
VMB003 3 350 4.02 1.57 51.6 5.1 8.77 6.7 0.4 139
VMB005 5 355 6.58 1.37 57.7 3.9 8.39 6.7 0.3 140
VMB7P5 7.5 350 9.97 1.83 37.4 3.3 8.05 3.4 0.6 143
VMB010 10 355 12.94 1.67 34.5 2.7 6.62 3.3 0.7 171
VMB015 15 350 19.54 1.33 28.4 3.3 5.84 1.4 1.0 212
VMB020 20 355 25.69 1.17 25.4 2.8 5.86 1.4 0.8 268
VMB025 25 360 31.66 1.03 29.1 2.1 5.84 1.5 1.0 264
VMB030 30 360 37.80 1.13 27.2 1.9 5.32 1.3 0.8 255
380 VMB040 40 355 53.23 0.67 35.6 1.4 9.68 1.3 1.0 154
VMB050 50 355 65.90 0.67 31.8 1.3 8.63 1.3 0.8 165
VMB060 60 360 75.16 0.80 26.0 1.3 4.70 1.2 1.2 309
VMB075 75
VMB100 100
VMB150 150
VMB200 200
VMB300 300
VMB400 400
VMB003 3 425 3.34 1.37 62.5 4.6 9.86 7.6 0.4 116
VMB005 5 430 5.50 1.23 71.2 3.6 9.86 7.6 0.3 118
VMB7P5 7.5 425 8.25 1.67 43.1 3.0 8.49 3.8 0.6 135
VMB010 10 430 10.72 1.20 40.0 2.4 7.05 3.7 0.7 162
VMB015 15 425 16.15 1.20 33.3 3.0 6.23 1.6 1.0 176
VMB020 20 430 21.28 1.07 29.3 2.5 6.20 1.5 0.8 247
VMB025 25 435 26.29 0.93 33.9 1.9 6.21 1.7 1.0 240
VMB030 30 435 31.41 1.00 31.2 1.7 5.73 1.5 0.8 263
460 VMB040 40 435 42.19 0.60 28.8 1.2 6.52 1.6 1.0 230
VMB050 50 435 53.89 0.60 37.6 1.2 8.86 1.4 0.8 163
VMB060 60 440 61.60 0.73 30.2 1.2 4.88 1.3 1.2 271
VMB075 75
VMB100 100
VMB150 150
VMB200 200
VMB300 300
VMB400 400
Consult MagneTek
Consult MagneTek
9/15/93
Node, Channel and Subchannel Assignments
85
Page 92

Appendices
ON-01 Setting
ON-01 is factory set for 0000 and should not be changed. This enables the
inverter f ault circuit which detects tac h connection.
ON-02 Setting
ON-02 is factory set for 0010. This determines whether the in v erter utilizes the
motor thermistor or not:
0000 = Control with thermistor
0010 = Control without thermistor
SN-01 Settings
SN-01 sets the capacity of the VCD 723 per the following table. SN-01 can be
set either by using a numo block to write the decimal value to [260-101-0] or by
using the geth block to write the hex value to [723-101-~]. If SN-09 is set for
low noise operation, the values shown for continuous current must be reduced
by 20%. SN-01automatically determines the setting of CN-19.
RATED VCD MODEL HP Sn-01 Sn-01 CONTINUOUS POWER
INPUT NO. HEX DEC RATED LOSS RIDE
VAC CURRENT THRU
TIME (CN-19)
VCD 723-A003 3 03 03 9.6 1.00
VCD 723-A005 5 04 04 16 2.00
VCD 723-A7P5 7.5 05 05 24 2.00
230 VCD 723-A010 10 06 06 32 2.00
VCD 723-A015 15 07 07 48 2.00
VCD 723-A020 20 08 08 64 2.00
VCD 723-A030 30 0A 10 96 2.00
VCD 723-A050 50 0C 12 160 2.00
VCD 723-B003 3 23 35 4.8 1.00
VCD 723-B005 5 24 36 8 2.00
VCD 723-B010 10 26 38 16 2.00
VCD 723-B015 15 27 39 24 2.00
VCD 723-B020 20 28 40 32 2.00
VCD 723-B030 30 2A 42 48 2.00
460 VCD 723-B040 40 2B 43 64 2.00
VCD 723-B060 60 2D 45 76.8 2.00
VCD 723-B075 75 2E 46 128 2.00
VCD 723-B100 100 2F 47 165 2.00
VCD 723-B150 150 31 49 224 2.00
VCD 723-B200 200 33 51 300 2.00
VCD 723-B300 300 35 53 450 2.00
VCD 723-B400 400 36 54 600 2.00
86
Node, Channel and Subchannel Assignments
9/15/93
Page 93

Appendices
SN-02 Setting
SN-02 is factory set for “FFF” hex (4095 DEC) and should not be changed. This
determines that the DN-XX constants are used to define the motor rather than the
VCD 723 factory preset values.
SN-09 Settings
SN-09 is set to match the input voltage and the in verter carrier frequency as
follows:
SN-09 230/460 200/400 LOW HIGH
VAC VAC CARRIER CARRIER
FREQUENCY FREQUENCY
0000 X X
0001 X X
1000 X X
1001 X X
If set for high carrier frequency (low noise operation), the continuous current
rating of the VCD 723 is reduced by 20%. The VCD 723 overload curve is
automatically changed.
SN-12 Settings
SN-12 determines the reaction of the drive to the status of the contact connected
to terminal 3 of the VCD 723. Terminal 3 is always the external fault input and
normally would be used as an E-stop input. In the following table, “N.O.” means
the contact closes on a fault:
SN-12 N.O. N.C.
CONTACT CONTACT
0100 X
0101 X
SN-15, 16, 17 & 18 Settings
SN-15 thru SN-18 are set to15 decimal (of hex). This determines that the logic
input terminals 5 thru 8 are read by the DCU only. In other words, they hav e no
direct effect on the inverter.
SN-20, 21, 22, 23 & 24 Settings
SN-20 thru SN-24 are set to 15 decimal (of hex). This configures the normally
open relay contact (terminals 9 & 10) and the four open collector outputs
(terminals 25, 26, 28 & 29) for control by the DCU.
SN-30 Settings
SN-30 is set for 0100 and should not be changed. This configures the VCD 723
for the torque control mode rather than the speed control mode.
9/15/93
Node, Channel and Subchannel Assignments
87
Page 94

Appendices
Node 260 (Dual Port Ram) Assignments
CHAN SUB PAC
CHAN BLOCK DESCRIPTION
TYPE
0 ~ NUMO TORQUE REFERENCE. RANGE IS 0 TO +/- 1.0
1 0 LOGO RUN
1 1 LOGO REVERSE
1 2 LOGO BASEBLOCK ON
1 3 LOGO NOT USED
1 4 LOGO EXTERNAL ERROR (CONTROLLED BY SN-31)
1 5 LOGO RESET FAULTS
1 6 LOGO USE ACCEL/DECEL TIME 2
1 7 LOGO ACCEL/DECEL PROHIBITED (SPEED HOLD)
2 0 LOGO APPLY INITIAL CURRENT TO MOTOR
2 1 LOGO RESET INTEGRAL CHANNEL OF AUTOMATIC SPEED REGULATOR (ASR)
2 2 LOGO NOT USED
2 3 LOGO ACCEL/DECEL CONTROL INACTIVE (ALLOW STEP CHANGES)
2 4 LOGO CONTROLS RELAY CONTACT LOGIC OUTPUT (TERM 9&10)
2 5 LOGO CONTROLS OPEN COLLECTOR LOGIC OUTPUT (TERM 25)
2 6 LOGO CONTROLS OPEN COLLECTOR LOGIC OUTPUT (TERM 26)
2 7 LOGO CONTROLS OPEN COLLECTOR LOGIC OUTPUT (TERM 28)
3 ~ NUMO SPEED REFERENCE TO ASR (RANGE IS 0 TO +/- 1.0922)
4 ~ NUMO TORQUE COMPENSATION TO BE ADDED TO THE OUTPUT OF THE ASR
5 ~ NUMO EXTERNAL MAGNETIC FLUX REFERENCE
6 ~ NUMO ASR PROPORTIONAL GAIN. USED ONLY IF BIT 1 OF SN-30 IS SET TO 1
7 ~ NUMO REGENERATIVE TORQUE LIMIT. ACCEPTABLE RANGE IS 0 TO 3.0
8 0 LOGO SELECTS MICROTRAC TO CONTROL ANALOG OUTPUT (TERM 21 & 22)
8 1 LOGO SELECTS MICROTRAC TO CONTROL AO-08 OPTIONAL CH-1 OUTPUT
8 2 LOGO SELECTS MICROTRAC TO CONTROL AO-08 OPTIONAL CH-2 OUTPUT
8 3 LOGO SELECTS MICROTRAC TO CONTROL AO-12 OPTIONAL CH-1 OUTPUT
8 4 LOGO SELECTS MICROTRAC TO CONTROL AO-12 OPTIONAL CH-2 OUTPUT
8 5 LOGO SELECTS MICROTRAC TO CONTROL DO-08 OPTIONAL DIGITAL OUTPUTS
8 6 LOGO NOT USED
8 7 LOGO NOT USED
9 0 LOGO NOT USED
9 1 LOGO NOT USED
9 2 LOGO NOT USED
9 3 LOGO NOT USED
9 4 LOGO NOT USED
9 5 LOGO NOT USED
9 6 LOGO NOT USED
9 7 LOGO CONTROLS OPEN COLLECTOR LOGIC OUTPUT (TERM 29)
10 ~ NUMO CONTROLS ANALOG OUTPUT (TERM 21&22). 1 = +11.0 VDC, -1 = -11.0 VDC
88
Node, Channel and Subchannel Assignments
9/15/93
Page 95

Appendices
Node 260 (Dual Port Ram) Assignments - Continued
CHAN SUB PAC
CHAN BLOCK DESCRIPTION
TYPE
11 0 LOGO CONTROLS DO-08 LOGIC OUTPUT BIT 0
11 1 LOGO CONTROLS DO-08 LOGIC OUTPUT BIT 1
11 2 LOGO CONTROLS DO-08 LOGIC OUTPUT BIT 2
11 3 LOGO CONTROLS DO-08 LOGIC OUTPUT BIT 3
11 4 LOGO CONTROLS DO-08 LOGIC OUTPUT BIT 4
11 5 LOGO CONTROLS DO-08 LOGIC OUTPUT BIT 5
11 6 LOGO CONTROLS DO-08 LOGIC OUTPUT BIT 6
11 7 LOGO CONTROLS DO-08 LOGIC OUTPUT BIT 7
12 ~ NUMO CONTROLS AO-08 ANALOG OUTPUT CH 1. +1 = +11 VDC
13 ~ NUMO CONTROLS AO-08 ANALOG OUTPUT CH 2. +1 = +11 VDC
14 ~ NUMO CONTROLS AO-12 ANALOG OUTPUT CH 1. +1 = +11 VDC, -1 = -11 VDC
15 ~ NUMO CONTROLS AO-12 ANALOG OUTPUT CH 2. +1 = +11 VDC, -1 = -11 VDC
50 0 LOGI DRIVE RUNNING
50 1 LOGI AT ZERO SPEED
50 2 LOGI REVERSE OPERATION
50 3 LOGI FAULT RESET HAS BEEN INPUTTED
50 4 LOGI SPEED COINCIDENCE AS SET BY Cn-02 AND Cn-03 DETECTED
50 5 LOGI INVERTER READY
50 6 LOGI A MINOR FAULT HAS OCCURRED
50 7 LOGI A MAJOR FAULT HAS OCCURRED
51 0 LOGI SPEED REF FROM DCU NOT WITHIN ACCEPTABLE RANGE
51 1 LOGI LAST POWER LOSS/MOMENTARY STOP NOT WITHIN RIDE THROUGH
RANGE
51 2 LOGI REMOTE OPERATION (INVERTER RECOGNIZES THAT MICROTRAC IS IN
CONTROL)
51 3 LOGI NOT USED
51 4 LOGI NOT USED
51 5 LOGI NOT USED
51 6 LOGI NOT USED
51 7 LOGI NOT USED
52 0 LOGI OVERCURRENT (OR GROUNDING) DETECTED ALARM
52 1 LOGI DC BUS OVERVOLTAGE TRIP ALARM
52 2 LOGI INVERTER OVERLOADED ALARM
52 3 LOGI INVERTER OR BRAKING RESISTOR OVERHEATED OR BRAKING
TRANSISTOR FAULT
52 4 LOGI OVERSPEED FAULT DETECTED ALARM
52 5 LOGI BLOWN FUSE ALARM
52 6 LOGI LOAD OPEN PHASE ALARM
52 7 LOGI EXTERNAL ERROR ALARM
9/15/93
Node, Channel and Subchannel Assignments
89
Page 96

Appendices
Node 260 (Dual Port Ram) Assignments - Continued
CHAN SUB PAC
CHAN BLOCK DESCRIPTION
TYPE
53 0 LOGI HARDWARE ERROR DETECTED (RAM CHECK OR BASEBLOCK CHECK)
ALARM
53 1 LOGI MOTOR OVERLOAD ALARM
53 2 LOGI MOTOR OVERTEMPERATURE ALARM
53 3 LOGI IN MOMENTARY STOP (MOMENTARY STOP IS A POWER LOSS OF LESS
THAN 2 SEC) ALARM
53 4 LOGI POWER FAILURE DETECTED (EITHER MAIN OR CONTROL POWER OR MC
CONT. OFF) ALARM
53 5 LOGI OVERSPEED DEVIATION (INCLUDING STARTING STALL) ALARM
53 6 LOGI TACH OR THERMISTOR CABLE DISCONNECTED ALARM
53 7 LOGI COOLING FAN FAULT ALARM
54 ~ NUMI SPEED REFERENCE (RANGE IS 0 TO +/- 1.0922)
55 ~ NUMI PRIMARY FREQUENCY REFERENCE (RANGE IS 0 TO +/- 1.0922)
56 ~ NUMI SPEED FEEDBACK (RANGE IS 0 TO +/- 1.0922). FILTERING SET BY Sn-34.
57 ~ NUMI TORQUE REFERENCE (RANGE IS 0 TO +/- 1.0)
58 ~ NUMI OUTPUT CURRENT (RANGE IS 0 TO +3.276)
59 ~ NUMI OUTPUT VOLTAGE REFERENCE (RANGE IS 0 TO +3.276)
60 ~ NUMI ANALOG INPUT (PIN 13 OR 14). +10 VDC OR 20 MA = 1
61 ~ NUMI ANALOG INPUT (PIN 16). +10 VDC = 1
62 0 LOGI INVERTER MAIN BOARD TERMINAL 1
62 1 LOGI INVERTER MAIN BOARD TERMINAL 2
62 2 LOGI INVERTER MAIN BOARD TERMINAL 3 (DEDICATED TO THE FUNCTION OF
EXTERNAL FAULT). Sn-12 DETERMINES WHETHER INPUT IS NORMALLY
OPEN OR CLOSED.
62 3 LOGI INVERTER MAIN BOARD TERMINAL 4
62 4 LOGI INVERTER MAIN BOARD TERMINAL 5
62 5 LOGI INVERTER MAIN BOARD TERMINAL 6
62 6 LOGI INVERTER MAIN BOARD TERMINAL 7
62 7 LOGI INVERTER MAIN BOARD TERMINAL 8
63 ~ NUMI KVA CONSTANT (CONFIRMATION OF SN-01 SETTING)
64 0 LOGI INVERTER OPTIONAL CARD A CONNECTED (SPEED FEEDBACK OPTION)
64 1 LOGI INVERTER OPTIONAL CARD B CONNECTED (EXCLUSIVE USE OPTION)
64 2 LOGI INVERTER OPTIONAL CARD C CONNECTED (REFERENCE, TRANSMISSION
OPTIONS)
64 3 LOGI INVERTER OPTIONAL CARD D CONNECTED (MONITOR OPTION)
64 4 LOGI PERSONAL COMPUTER CONNECTED
64 5 LOGI 1=575 VOLT SYSTEM. 0=230/460 VOLT SYSTEM
64 6 LOGI 1=460 VOLT SYSTEM. 0=230 VOLT SYSTEM
64 7 LOGI 1=BI-POLAR TRANSISTOR DEVICES. 0=IGBT DEVICES
65 ~ NUMI OPTION A MODEL CODE
90
Node, Channel and Subchannel Assignments
9/15/93
Page 97

Appendices
Node 260 (Dual Port Ram) Assignments - Continued
CHAN SUB PAC
CHAN BLOCK DESCRIPTION
TYPE
66 ~ NUMI OPTION B MODEL CODE
67 ~ NUMI OPTION C MODEL CODE
68 ~ NUMI OPTION D MODEL CODE
69 ~ NUMI DC BUS VOLTAGE (FOR A 460 VAC SYSTEM, 1 PU = 800 VOLTS)
70 ~ NUMI MOMENTARY LOWERING VOLTAGE DEPTH VALUE
71 0 LOGI MAIN POWER UNDERVOLTAGE FAULT
71 1 LOGI CONTROL POWER UNDERVOLTAGE FAULT
71 2 LOGI MC CONTACTOR OFF
71 3 LOGI BRAKING TRANSISTOR FAULT
71 4 LOGI BRAKING RESISTOR OVERHEAT FAULT
71 5 LOGI NOT USED
71 6 LOGI THERMISTOR OPEN FAULT
71 7 LOGI CP-213 TRANSMISSION ERROR FAULT
72 0 LOGI NOT USED
72 1 LOGI NOT USED
72 2 LOGI EXTERNAL FAULT (TRANSMISSION INPUT)
72 3 LOGI EXTERNAL FAULT (TERMINAL #3)
72 4 LOGI EXTERNAL FAULT (TERMINAL #5)
72 5 LOGI EXTERNAL FAULT (TERMINAL #6)
72 6 LOGI EXTERNAL FAULT (TERMINAL #7)
72 7 LOGI EXTERNAL FAULT (TERMINAL #8)
73 0 LOGI PULSE GENERATOR LEADS OPEN FAULT
73 1 LOGI OVERSPEED FAULT
73 2 LOGI ESTIMATED SPEED ERROR FAULT
73 3 LOGI NOT USED
73 4 LOGI NOT USED
73 5 LOGI NOT USED
73 6 LOGI NOT USED
73 7 LOGI NOT USED
75 0 LOGI NOT USED
75 1 LOGI BASE BLOCK CIRCUIT FAULT
75 2 LOGI NVRAM OR SRAM FAULT
75 3 LOGI NVRAM BCC ERROR FAULT
75 4 LOGI MCU A/D CONVERTER FAULT
75 5 LOGI FAULTY CONNECTION OF OPTION CONNECTOR
75 6 LOGI NOT USED
75 7 LOGI NOT USED
76 0 LOGI NOT USED
76 1 LOGI DSP PERIPHERAL FAULT
9/15/93
Node, Channel and Subchannel Assignments
91
Page 98

Appendices
Node 260 (Dual Port Ram) Assignments - Continued
CHAN SUB PAC
CHAN BLOCK DESCRIPTION
TYPE
76 2 LOGI OPTION CARD A/D CONVERTER FAULT
76 3 LOGI TRANSMISSION OPTIONAL CARD FAULT
76 4 LOGI INVERTER MODEL CODE ERROR
76 5 LOGI MCU MUTUAL DIAGNOSIS FAULT
76 6 LOGI TORQUE CONTROL CARD A/D ERROR
76 7 LOGI NOT USED
78 0 LOGI UNDERVOLTAGE DETECTION ALARM
78 1 LOGI OVERVOLTAGE DURING STOPPING ALARM
78 2 LOGI MOTOR OVERLOAD ALARM
78 3 LOGI INVERTER OVERLOAD ALARM
78 4 LOGI NOT USED
78 5 LOGI COOLING FAN FAULT ALARM
78 6 LOGI INVERTER OVERHEAT PREDICTION ALARM
78 7 LOGI LOAD CIRCUIT FAULT ALARM
79 0 LOGI NOT USED
79 1 LOGI OPERATION SEQUENCE INPUT ALARM (2-WIRE)
79 2 LOGI EXTERNAL FAULT (TRANSMISSION OPTION)
79 3 LOGI EXTERNAL FAULT (TERMINAL 3)
79 4 LOGI EXTERNAL FAULT (TERMINAL 5)
79 5 LOGI EXTERNAL FAULT (TERMINAL 6)
79 6 LOGI EXTERNAL FAULT (TERMINAL 7)
79 7 LOGI EXTERNAL FAULT (TERMINAL 8)
80 0 LOGI BUS TRANSMISSION FAULT (CP-213)
80 1 LOGI NOT USED
80 2 LOGI NOT USED
80 3 LOGI EXCESSIVE SPEED DEVIATION
80 4 LOGI NOT USED
80 5 LOGI NOT USED
80 6 LOGI NOT USED
80 7 LOGI NOT USED
81 ~ NUMI INVERTER ROM NUMBER
82 ~ NUMI OPTIONAL ROM NUMBER
83 ~ NUMI TORQUE FEEDBACK
84 ~ NUMI SPEED DETECTION COUNTER VALUE
85 ~ NUMI TRACE SAMPLING TIME
92
Node, Channel and Subchannel Assignments
9/15/93
Page 99

Appendices
Node 260 (Dual Port Ram) Assignments - Continued
CHAN SUB PAC INITIAL
CHAN BLOCK DESCRIPTION VALUE
TYPE
101 ~ NUMO Sn-01 KVA SELECT
102 ~ NUMO Sn-02 (SELECTS PRE PROGRAMMED PATTERNS OF Cn
CONSTANTS)
103 00-03 LOGO BITS 0-3 SET Sn-03 0000
103 04-07 LOGO BITS 4-7 SET Sn-04 0011
105 00-03 LOGO BITS 0-3 SET Sn-05 0001
105 04-07 LOGO BITS 4-7 SET Sn-06 0000
107 00-03 LOGO BITS 0-3 SET Sn-07 0000
107 04-07 LOGO BITS 4-7 SET Sn-08 0000
109 00-03 LOGO BITS 0-3 SET Sn-09 0000
109 04-07 LOGO BITS 4-7 SET Sn-10 0111
111 00-03 LOGO BITS 0-3 SET Sn-11 0000
111 04-07 LOGO BITS 4-7 SET Sn-12 0100
113 00-03 LOGO BITS 0-3 SET Sn-13 0101
113 04-07 LOGO BITS 4-7 SET Sn-14 1101
115 ~ NUMO Sn-15 (SELECTS FUNCTION TO BE PERFORMED BY INPUT NO. 5) 03
116 ~ NUMO Sn-16 (SELECTS FUNCTION TO BE PERFORMED BY INPUT NO. 6) 04
117 ~ NUMO Sn-17 (SELECTS FUNCTION TO BE PERFORMED BY INPUT NO. 7) 06
118 ~ NUMO Sn-18 (SELECTS FUNCTION TO BE PERFORMED BY INPUT NO. 8) 08
119 ~ NUMO Sn-19 (SELECTS FUNCTION FOR ANALOG INPUT TERMINAL 16) 00
120 ~ NUMO Sn-20 (SELECTS FUNCTION FOR OUTPUT NO. 1) 00
121 ~ NUMO Sn-21 (SELECTS FUNCTION FOR OUTPUT NO. 2) 01
122 ~ NUMO Sn-22 (SELECTS FUNCTION FOR OUTPUT NO. 3) 02
123 ~ NUMO Sn-23 (SELECTS FUNCTION FOR OUTPUT NO. 4) 06
124 ~ NUMO Sn-24 (SELECTS FUNCTION FOR OUTPUT NO. 5) 0D
127 00-03 LOGO BITS 0-3 SET Sn-27 0000
127 04-07 LOGO BITS 4-7 SET Sn-28 0000
130 00-03 LOGO BITS 0-3 SET Sn-30 0000
130 04-07 LOGO BITS 4-7 SET Sn-31 0100
132 00-03 LOGO BITS 0-3 SET Sn-32 0001
132 04-07 LOGO BITS 4-7 SET Sn-33 WHICH IS NOT USED WITH MICROTRAC 0000
134 00-03 LOGO BITS 0-3 SET Sn-34 0001
134 04-07 LOGO BITS 4-7 SET Sn-35 WHICH IS NOT USED WITH MICROTRAC 0000
9/15/93
Node, Channel and Subchannel Assignments
93
Page 100

Appendices
Node 260 (Dual Port Ram) Assignments - Continued
CHAN SUB PAC INITIAL UNITS
CHAN BLOCK DESCRIPTION VALUE
TYPE
201 ~ NUMO Cn-01 (ZERO SPEED LEVEL) 2.00 %
202 ~ NUMO Cn-02 (SPEED COINCIDENCE LEVEL) 100 %
203 ~ NUMO Cn-03 (SPEED COINCIDENCE DEADBAND) 2.00 %
204 ~ NUMO Cn-04 (SPEED DEVIATION) 10.00 %
205 ~ NUMO Cn-05 (SPEED REFERENCE INPUT LIMIT) 109.00 %
206 ~ NUMO Cn-06 (MINIMUM SPEED LIMIT) 2.00 %
207 ~ NUMO Cn-07 (ASR FILTER #1) 4 MSEC
208 ~ NUMO Cn-08 (EXCITATION TIMER?) 0.0 SEC
209 ~ NUMO Cn-09 (PULSE GENERATOR CONSTANT) 600 PPR
210 ~ NUMO Cn-10 (SPEED LIMIT BIAS) 20.00 ◆ %
211 ~ NUMO Cn-11 (EMERGENCY TORQUE COMPENSATION?) 0.0 %
212 ~ NUMO Cn-12 (NOT USED)
213 ~ NUMO Cn-13 (FEEDER RESISTANCE, i.e. LINE IMPEDANCE) 0.0 %
214 ~ NUMO Cn-14 (MOTOR OVERLOAD DETECTION STARTING 110 %
CURRENT)
215 ~ NUMO Cn-15 (MOTOR OVERLOAD OPERATION TIME) 60 SEC
216 ~ NUMO Cn-16 (OVERSPEED DETECTION LEVEL) 120 %
217 ~ NUMO Cn-17 (PUV DETECTION LEVEL) 210/430 VAC
218 ~ NUMO Cn-18 (DISCONNECTED TACH CABLE DETECTION 1.00 SEC
TIME)
219 ~ NUMO Cn-19 (MOMENTARY POWER LOSS RIDE THROUGH 1.00 ■ SEC
TIME)
220 ~ NUMO Cn-20 (NUMBER OF AUTO RESTART ATTEMPTS) 0 ~
221 ~ NUMO Cn-21 (STOP TIMER) 0.0 SEC
222 ~ NUMO Cn-22 (ASR PROPORTIONAL GAIN 2) 20 ~
223 ~ NUMO Cn-23 (ASR PROPORTIONAL GAIN SELECTION LEVEL) 0.00 %
224 ~ NUMO Cn-24 (ZERO SERVO GAIN) 5 ~
225 ~ NUMO Cn-25 (ZERO SERVO COMPLETION WIDTH) 10 PULSE
226 ~ NUMO Cn-26 (S-CURVE TIME 2) 0.0 SEC
227 ~ NUMO Cn-27 (TORQUE REFERENCE FILTER) 0 MSEC
228 ~ NUMO Cn-28 (MOTOR TEMP RISE DETECTION LEVEL) 80 °C
229 ~ NUMO Cn-29 (MOTOR TEMPERATURE?) 0 ~
233 ~ NUMO Cn-33 (TORQUE DETECTION LEVEL 1) 100 %
234 ~ NUMO Cn-34 (TORQUE DETECTION LEVEL 2) 100 %
◆ -Initial value dependent on setting of Sn-02. Value shown is for Sn-02 setting of 0F hex.
■ -Initial value dependent on setting of Sn-01.
94
Node, Channel and Subchannel Assignments
9/15/93
 Loading...