

Yarvik Manual
Manual Manuál Наръчник
Handleiding Manuál Manual
Anleitung Manual Руководство
Manuel Manuell Посібник користувача
Manual Håndbok Οδηγίες Χρήσης
Manuale Priročnik
Manual Priručnik
Instrukcja obs ługi Leírás
file:///Volumes/Product_Data/TAB07-210/Sent_artwork/Manual/internet2/Yarvik/Manual/index.html[07-08-13 10:35:03]
Yarvik Tablet Manual
Index
SELECT LANGUAGE
1 Prior to first use
2 Tablet Startup
3 Android Home Screen
3.1 Adding widgets and shortcuts to your Home Screen
3.2 Setting a Wallpaper
3.3 Application Menu
4 Setting up your Yarvik Tablet
4.1 Settings Menu
4.2 WiFi & Bluetooth
4.3 Sound
4.4 Display
4.5 Apps
4.6 Storage & MicroSD/USB Drive Access
4.7 Language & input
4.8 Date & time
5 Apps
6 GNU/GPL Licensing Information
7 Warranty Statement
8 Important Information
1 Prior to first use
Dear user,
Thank you for purchasing our product.
To ensure you a quick and convenient use of your new Yarvik Tablet, please read these instructions carefully
prior to use.
file:///Volumes/Product_Data/TAB07-210/Sent_artwork/Manual/internet2/Yarvik/Manual/manual_en.html[07-08-13 10:35:11]
Yarvik Tablet Manual
We hope you will absolutely enjoy your Yarvik Tablet for the longest time possible!
Please note: • Your Yarvik Tablet is a high precision electronic product, do not try to disassemble the
Tablet, as this will void your warranty and may result in malfunctioning of the device;
• Avoid strong beating of or to the product;
• Avoid using the Tablet in a high or low temperature environment, or in any environment
where the device can get in contact with moisture, dust or magnetic fields;
• Do not expose the Tablet to strong sunlight for an extended period of time;
• Don’t operate the touch screen of the Tablet with sharp objects, as this may result in
scratching the screen surface;
• Using connected headphones on the Tablet for too long and/or setting the audio volume
up too high when using headphones may cause serious hearing damage;
• Do not cross the road, drive a motor vehicle or bicycle while using the Tablet with
headphones to avoid traffic accidents;
• Only use permitted batteries, chargers and accessories with your Yarvik Tablet. The use
of any other products with the Tablet can be dangerous and may violate the warranty
regulations;
• Only use a slightly wet cotton cloth to clean the Tablet, and only use water to wetten the
cotton cloth. The Tablet should not be cleaned with any sort of (glass) cleaning aid.
You may go ahead and use your Yarvik Tablet right out of the box, without charging the battery first.
It is best for the battery to first run on the charge left in it, and to be fully recharged once it’s completely
drained for the first time.
If the Tablet isn’t switching on right out of the box, the battery is already completely drained and you should
ofcourse recharge it first.
Return to index
2 Tablet Startup
When you first power on your Yarvik Tablet, you will be presented the startup sequence.
The very first startup may take a while, approximately 2-3 minutes.
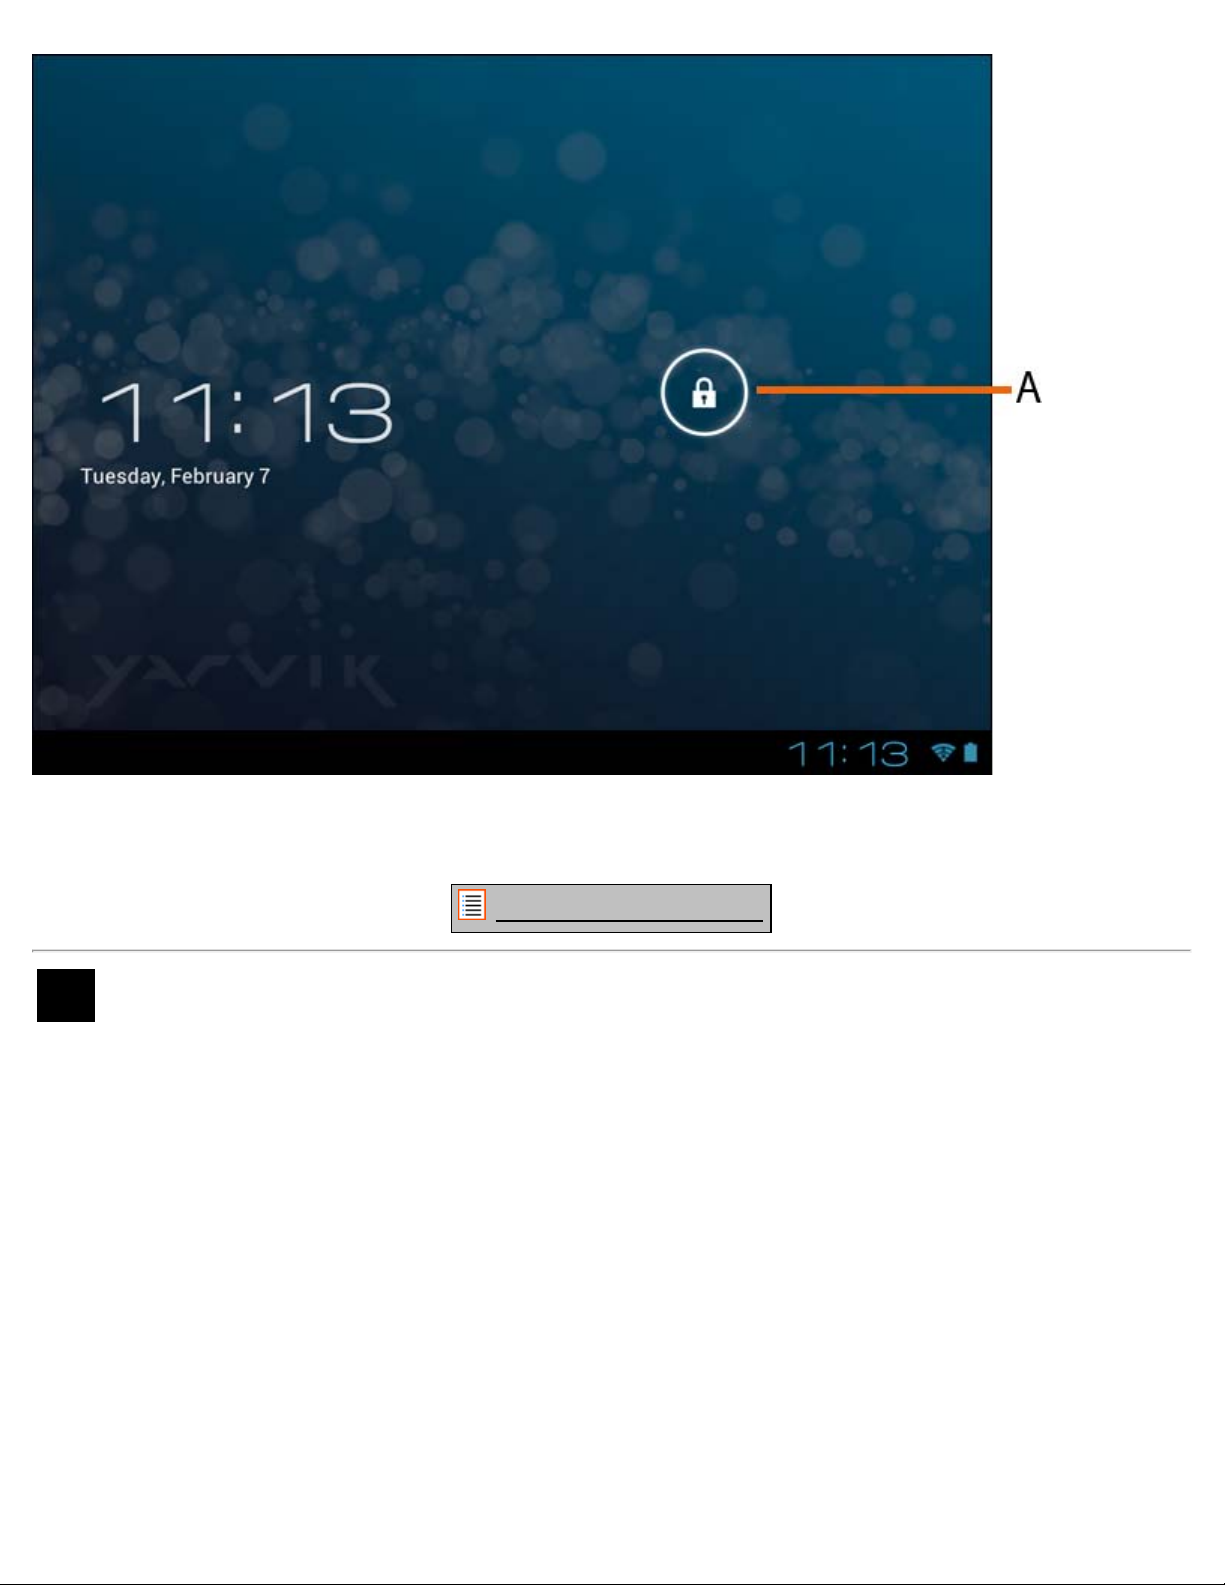
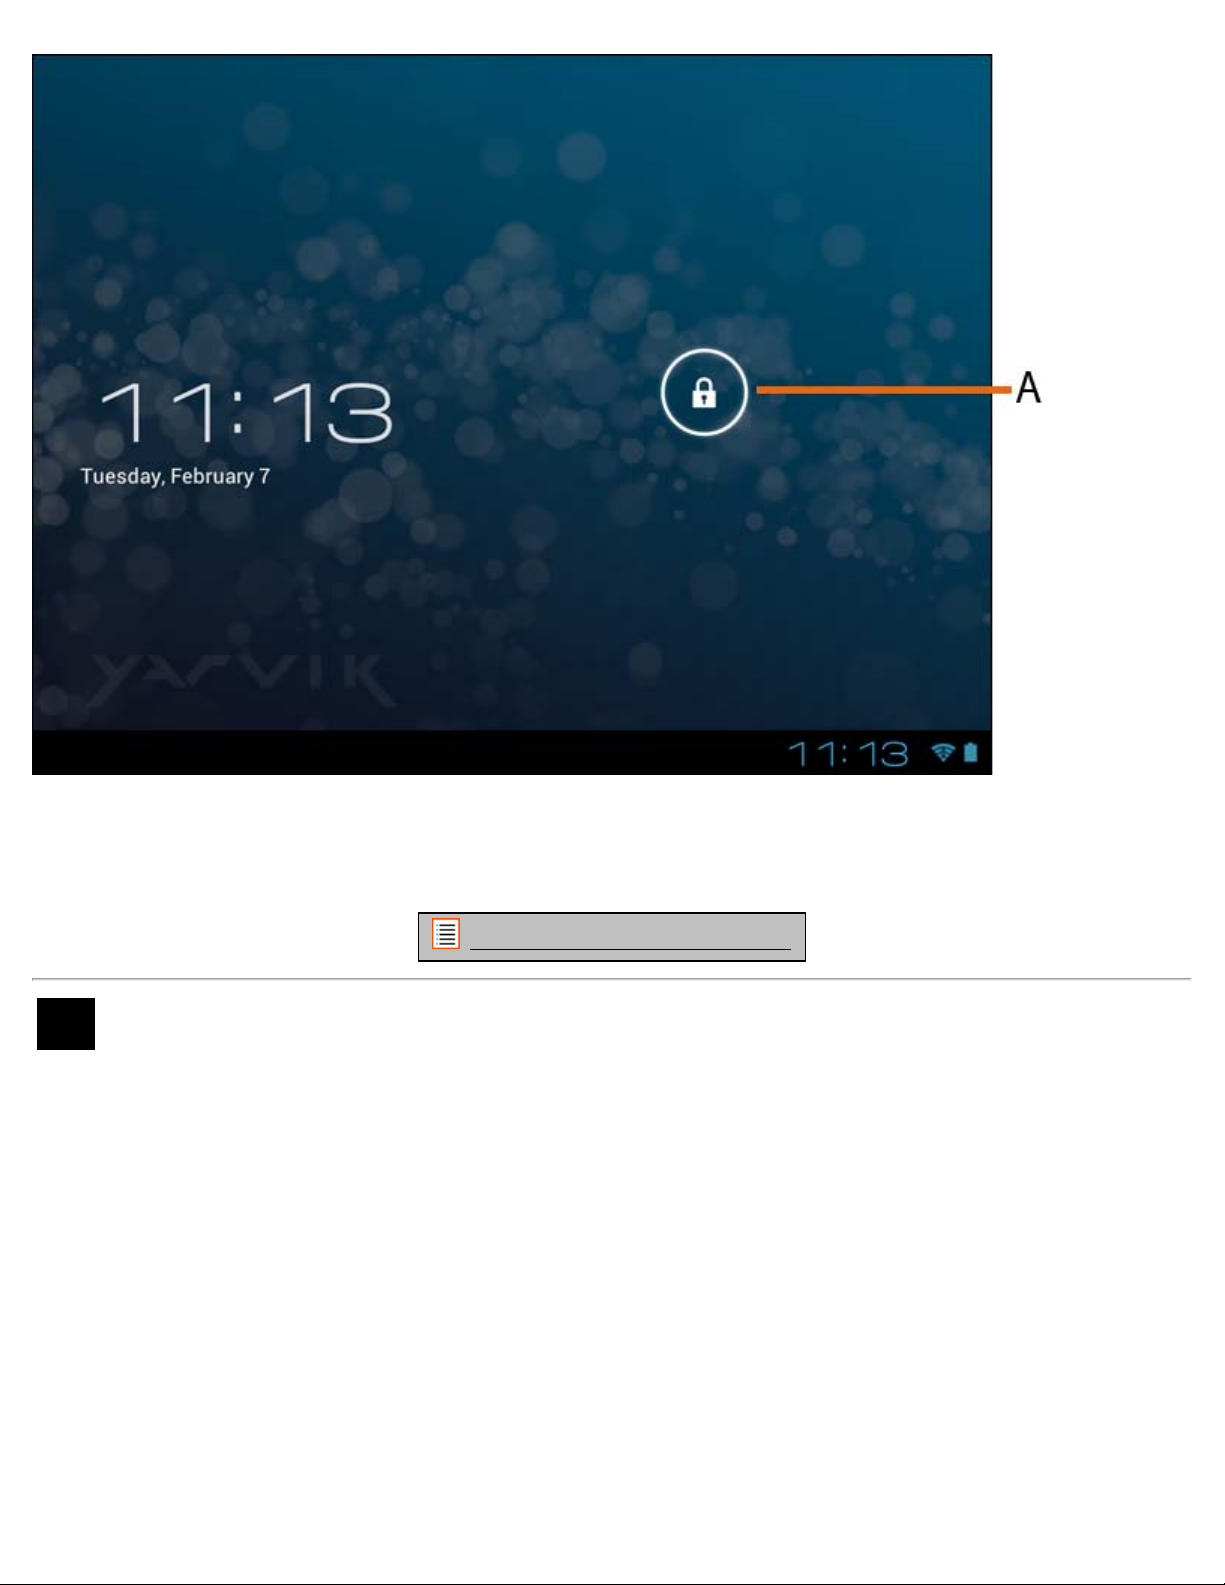
After the startup sequence the Tablet has completed starting up and you will be presented the Android Lock
Screen.
file:///Volumes/Product_Data/TAB07-210/Sent_artwork/Manual/internet2/Yarvik/Manual/manual_en.html[07-08-13 10:35:11]
Yarvik Tablet Manual
Android Lock Screen
Slide the lock bar (A) to the right to unlock the Tablet. You will then be taken to the Android Home Screen.
Return to index
3 Android Home Screen
file:///Volumes/Product_Data/TAB07-210/Sent_artwork/Manual/internet2/Yarvik/Manual/manual_en.html[07-08-13 10:35:11]

Yarvik Tablet Manual
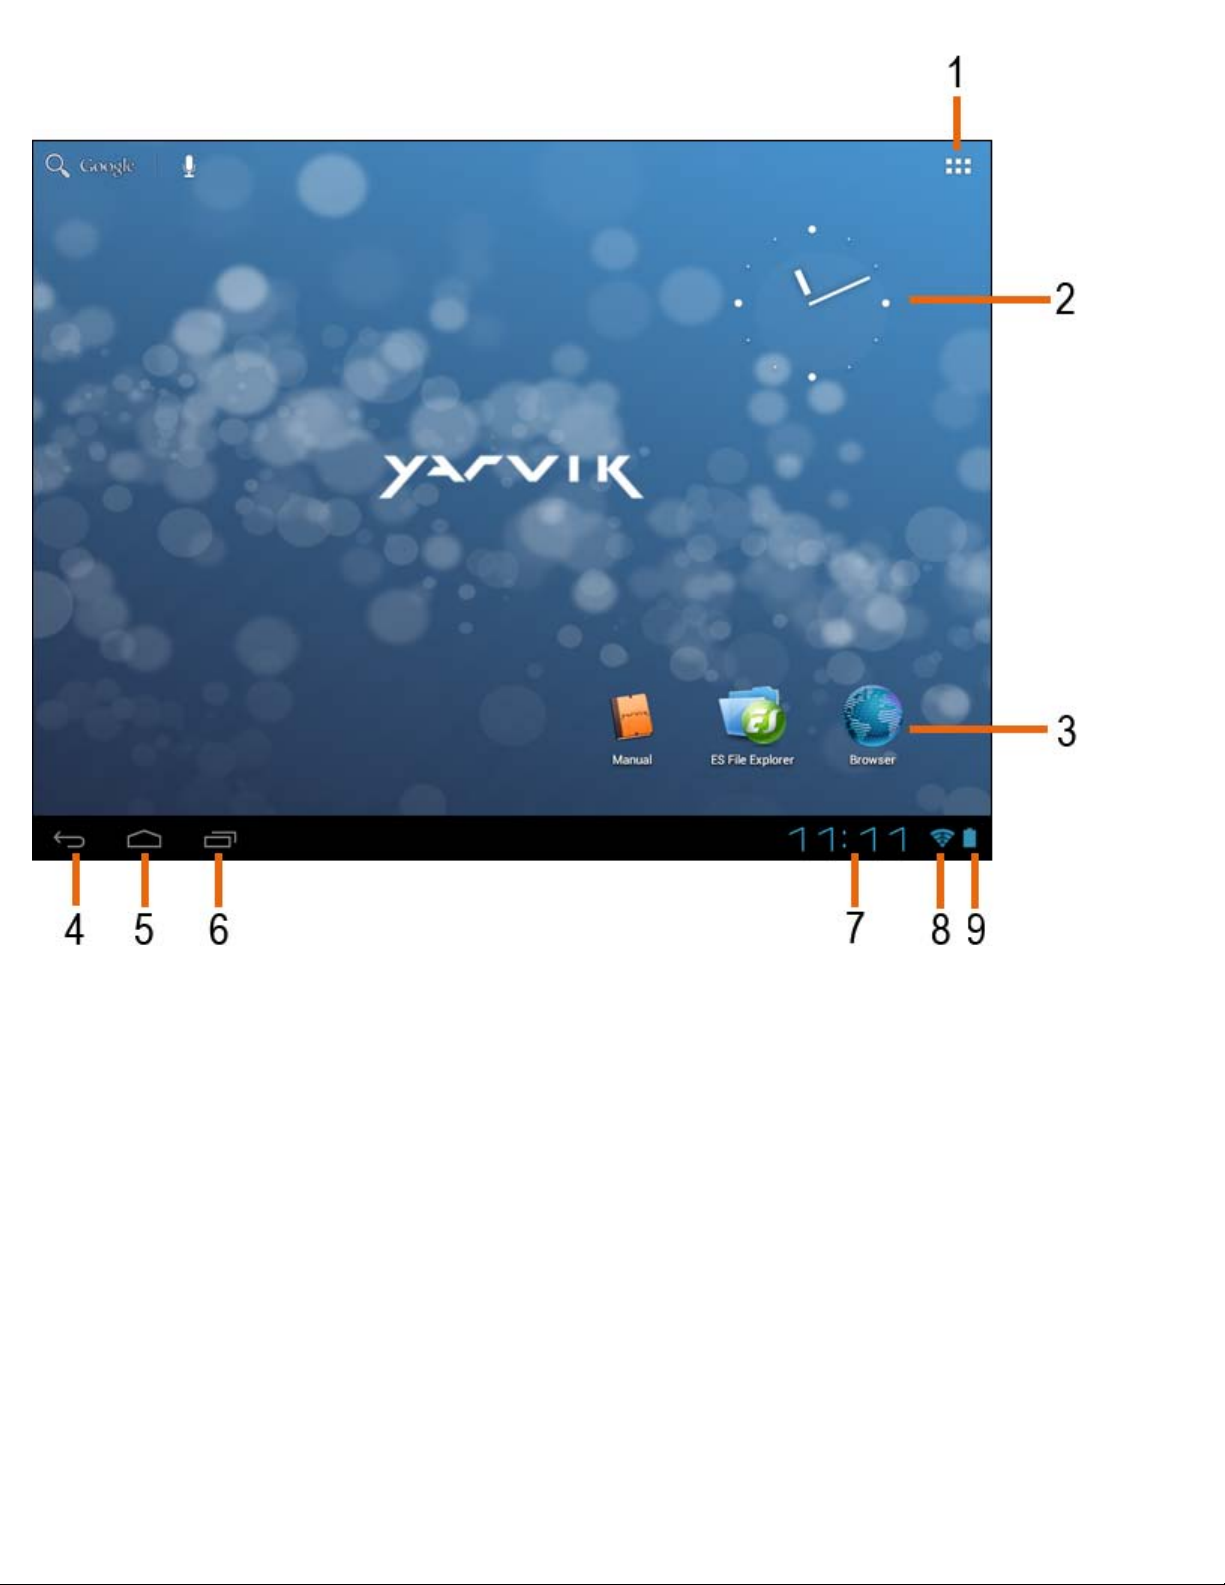
Android Home Screen
On the bottom of the Tablet’s screen you can always find the status bar.
The status bar contains both system information and function buttons.
1 - App and widget menu (can be located in the bottom center of the home screen on some models)
2 - Widget (analog clock)
3 - App Shortcuts
4 - Back button - brings you back to the previous screen, or previous website when using the Browser
5 - Home - brings you back to the Android Home Screen
6 - Multitask button
7 - System Time
8 - Wi-Fi Signal Indicator
9 - Battery Level Indicator
The home screen consists of multiple pages which can be accessed by swiping the home screen left/right.
file:///Volumes/Product_Data/TAB07-210/Sent_artwork/Manual/internet2/Yarvik/Manual/manual_en.html[07-08-13 10:35:11]
Yarvik Tablet Manual
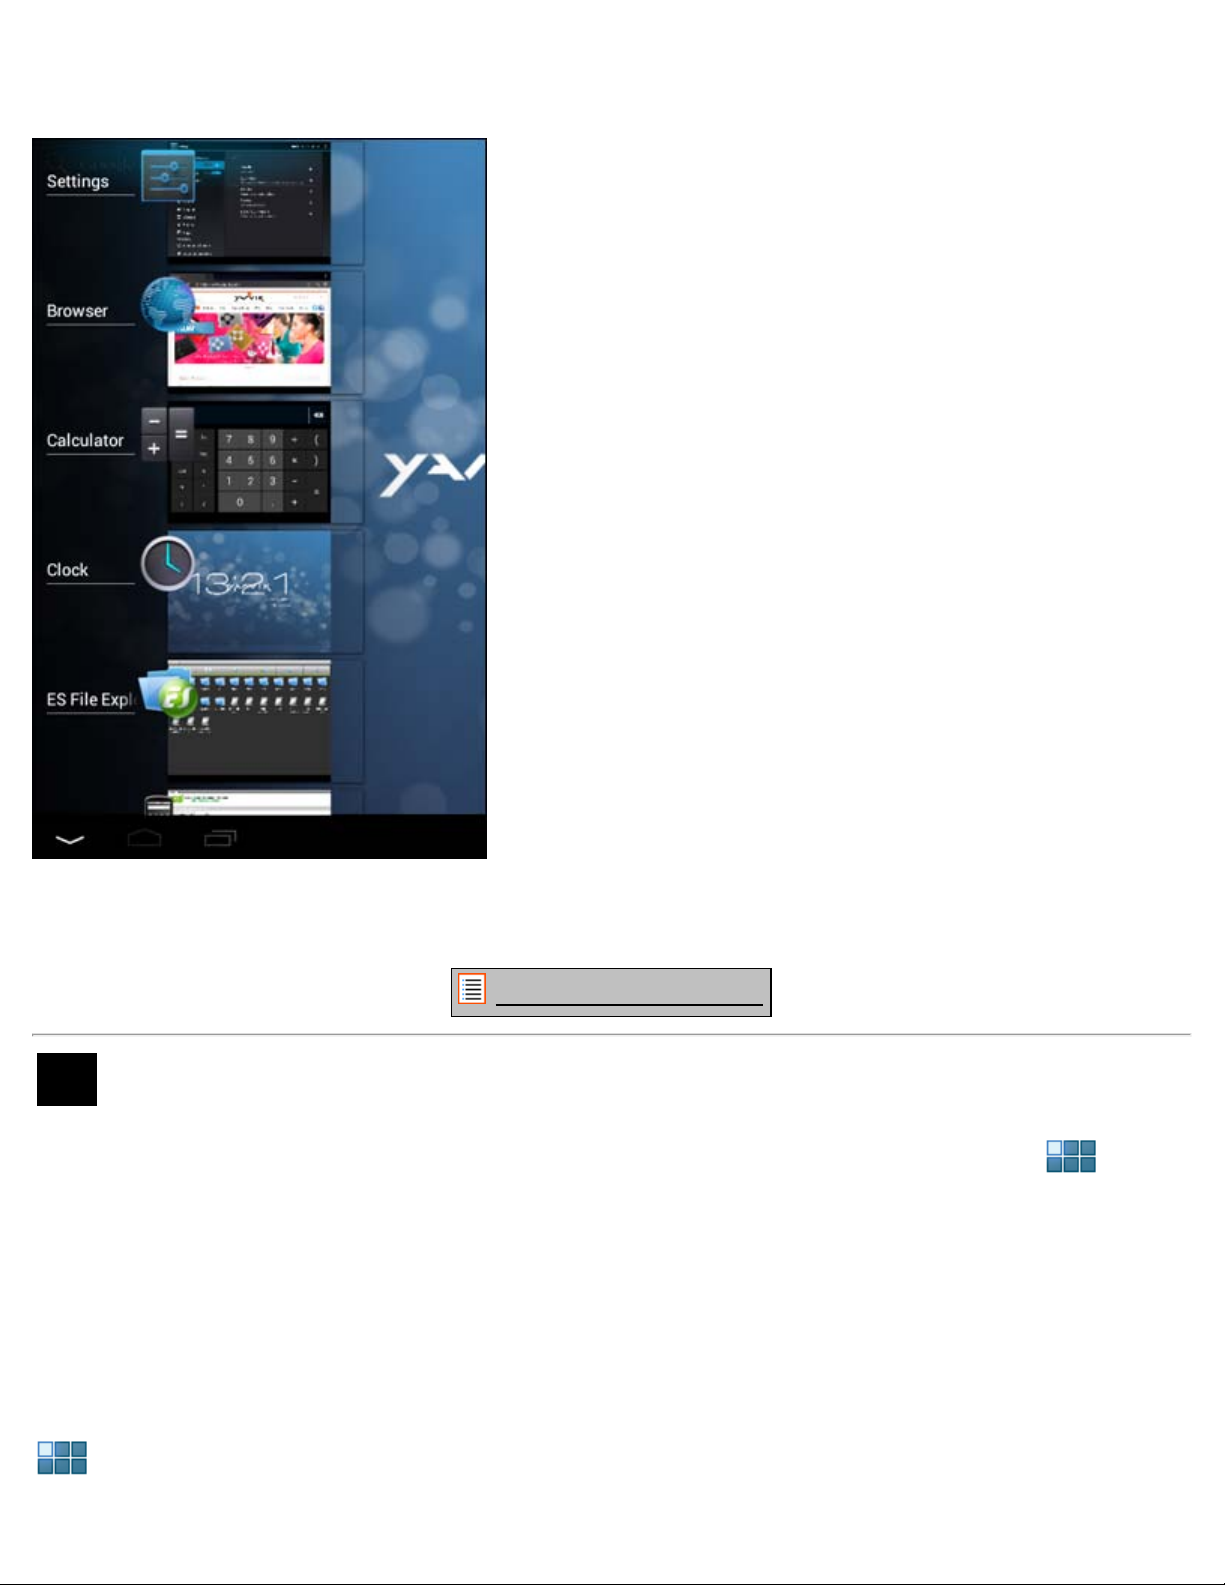
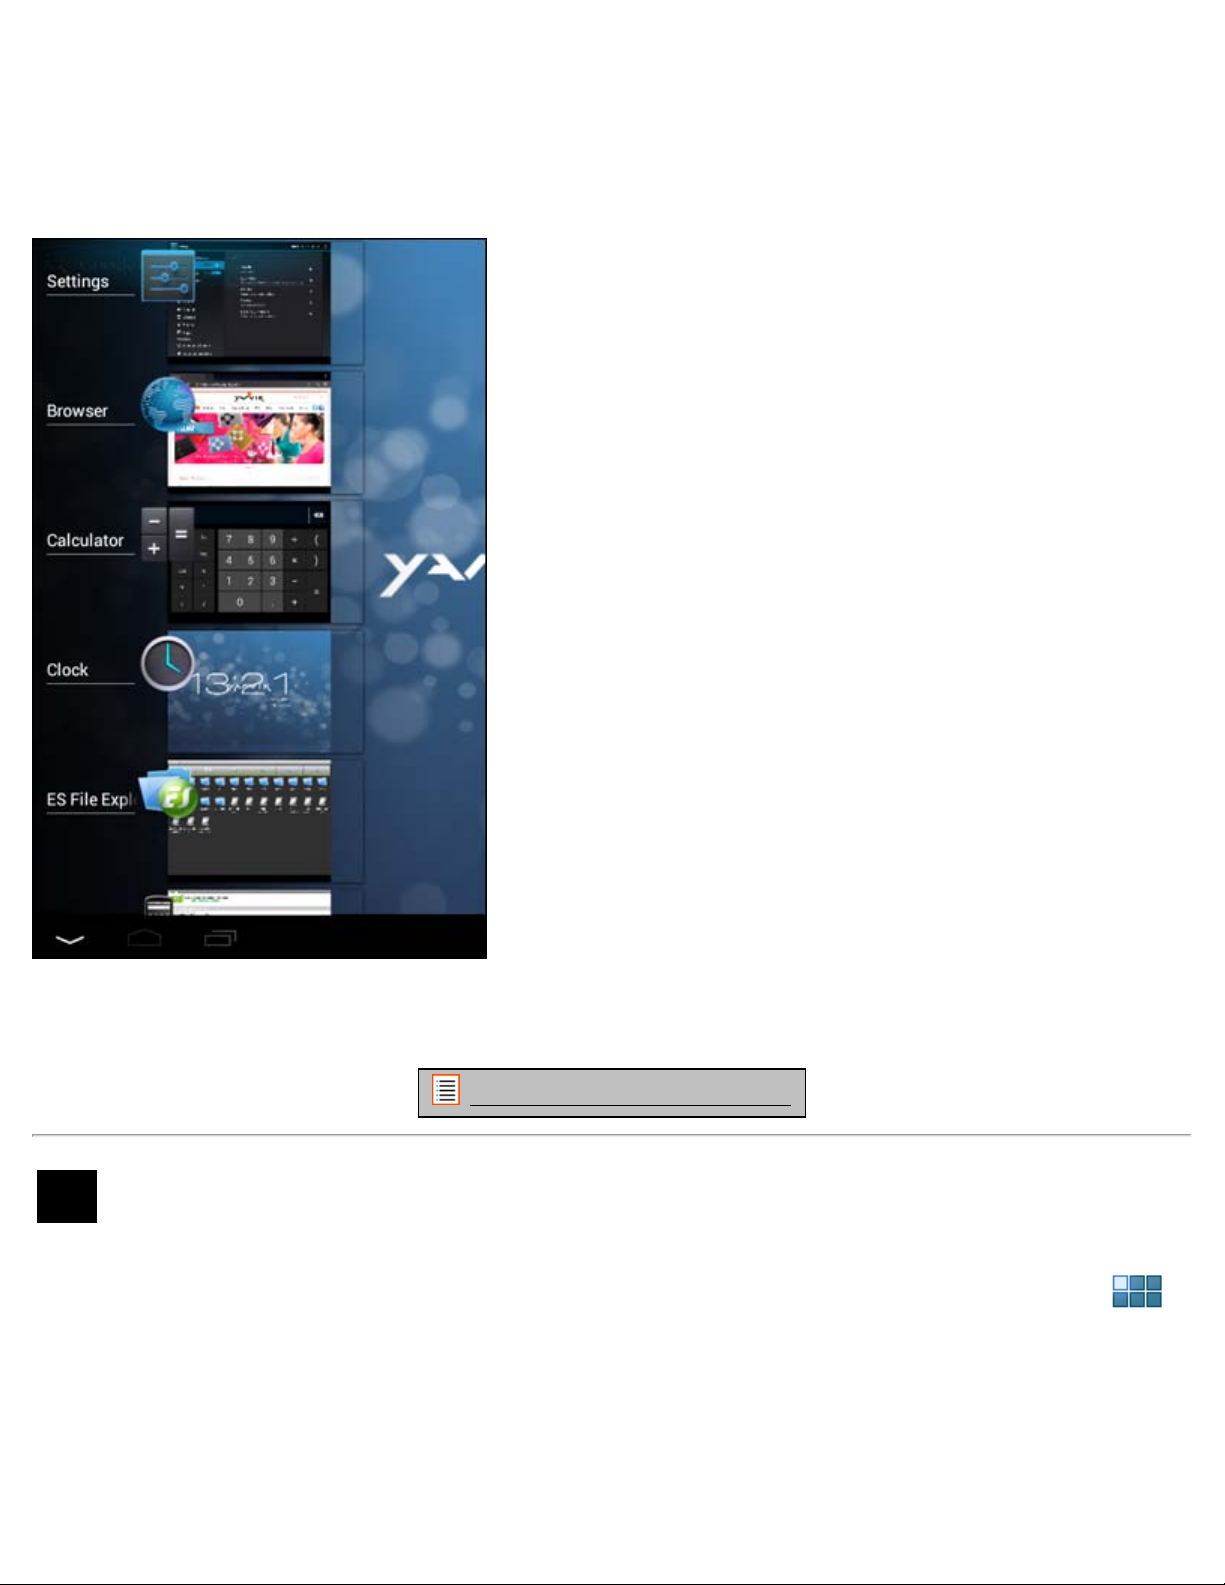
To see what apps are running in the background, you can access the multitasking view by pressing the
multitask button (6).
Click on a running app in the multitask view to quickly switch to it. You can close running apps by long
pressing it and clicking "Remove from list".
Return to index
3.1 Adding widgets and shortcuts to your Home Screen
To add a widget, press the app and widget button in the top right corner of your Home Screen:
In the following screen, you can find all the installed apps and widgets, both seperately viewable by pressing
"Apps" or "Widgets" on top of the screen respectively.
Press "Widgets" to view all available widgets. When showing all widgets, you can swipe the screen to
browse to the next page (if available).
Press and hold the desired widget to have the Home Screen show up and release the widget to any empty
spot on the home screen.
To add a shortcut to any app, press the app and widget button in the top right corner of your Home Screen:
file:///Volumes/Product_Data/TAB07-210/Sent_artwork/Manual/internet2/Yarvik/Manual/manual_en.html[07-08-13 10:35:11]
Yarvik Tablet Manual
In the following screen, you can find all the installed apps and widgets, both seperately viewable by pressing
"Apps" or "Widgets" on top of the screen respectively.
Press "Apps" to view all installed apps.
Press and hold the desired app to have the home screen show up and release the shortcut to any empty
spot on the Home Screen.
To remove widgets and/or app shortcuts from your Home Screen, press and hold them and drag them to the
appeared "Remove" dustbin icon on top of your Home Screen.
Return to index
3.2 Setting a Wallpaper
To change the Home Screen wallpaper, press and hold the Home Screen until the “Select Wallpaper from”
menu comes up.
You can choose from "Live Wallpapers" (animated wallpapers), "Super-HD Player" (photo/video gallery) or
"Wallpapers" (default static images).
Return to index
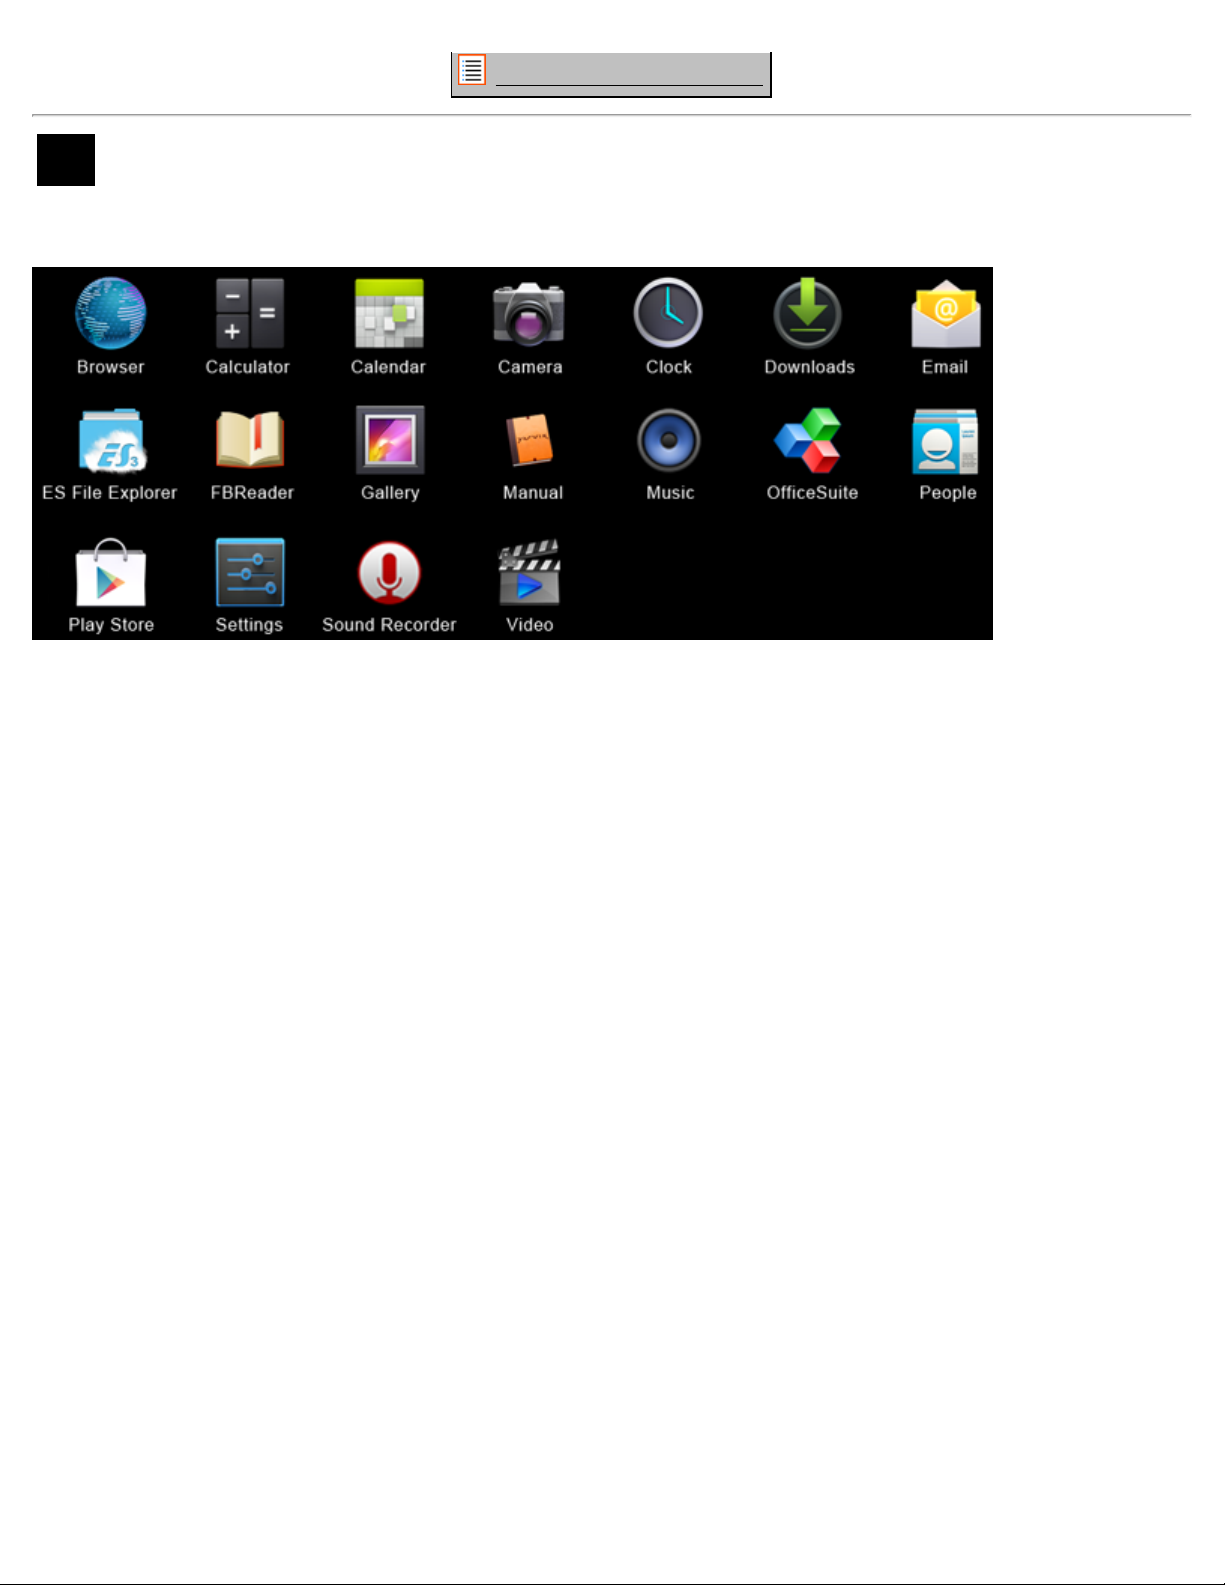
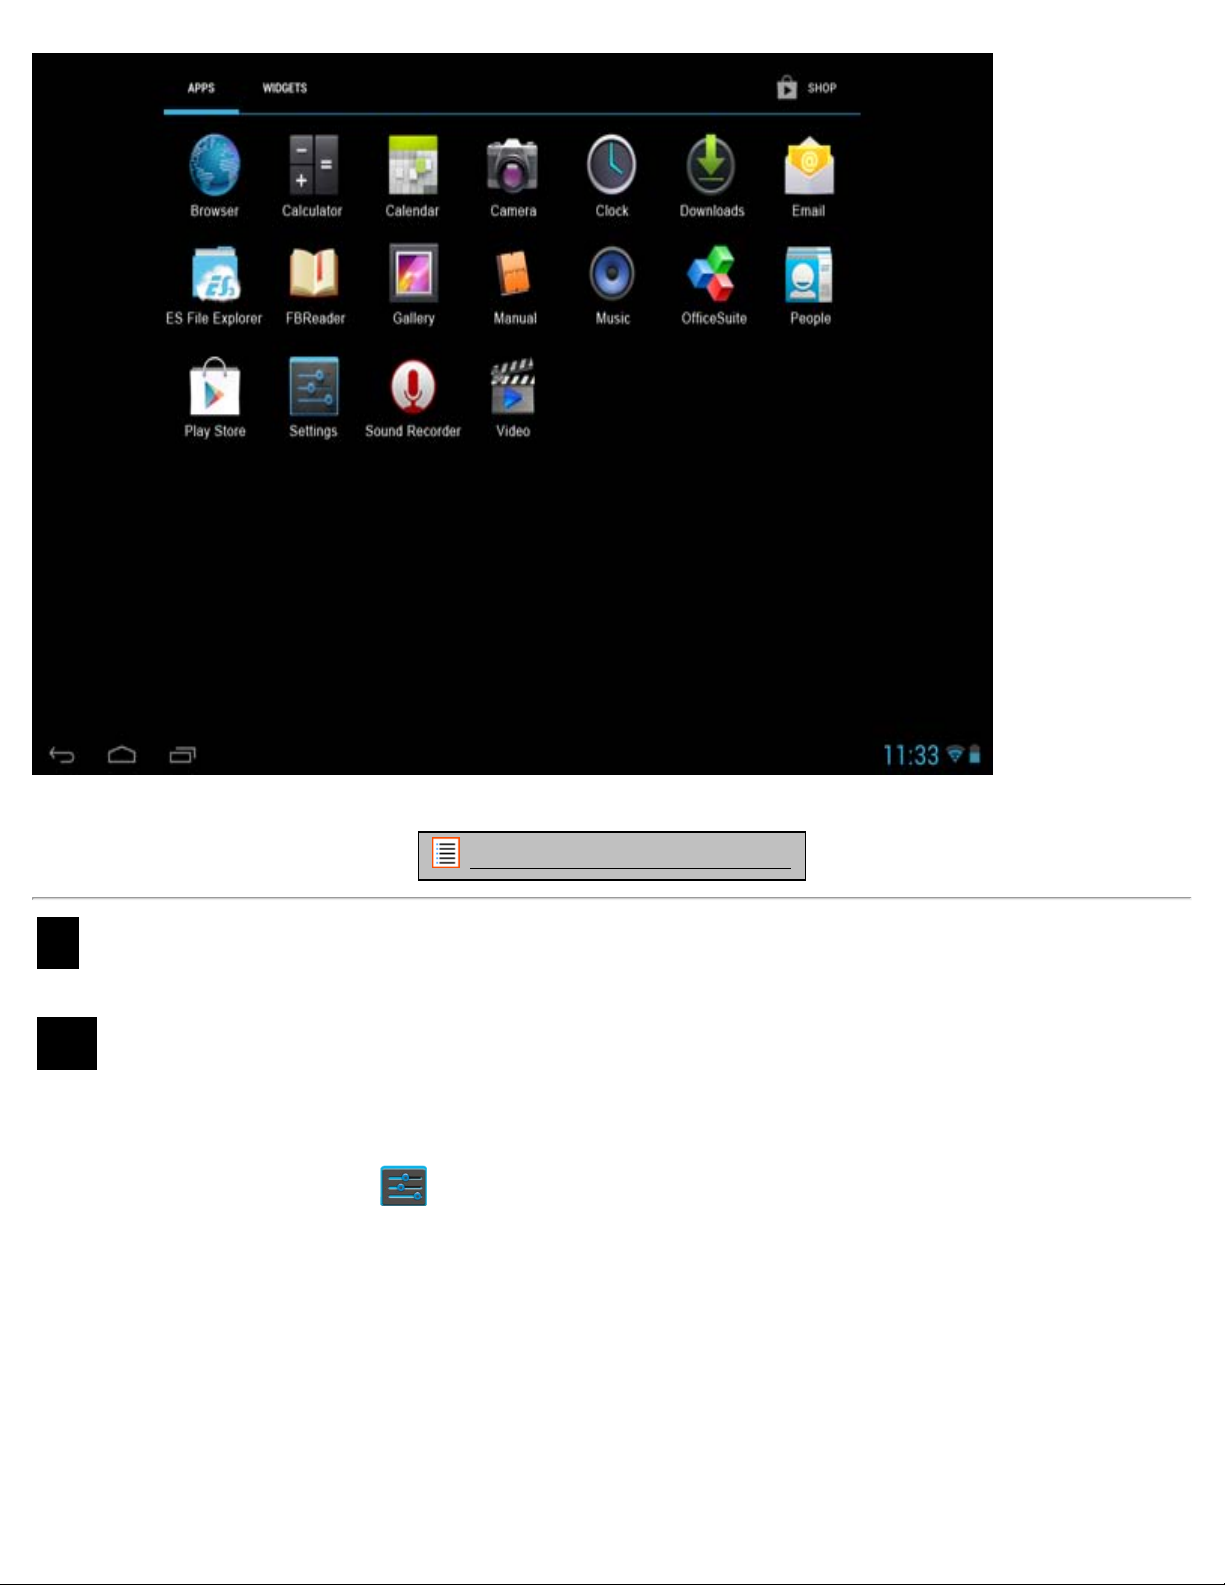
3.3 Application Menu
Press the app and widget button in the top right corner of your Home Screen:
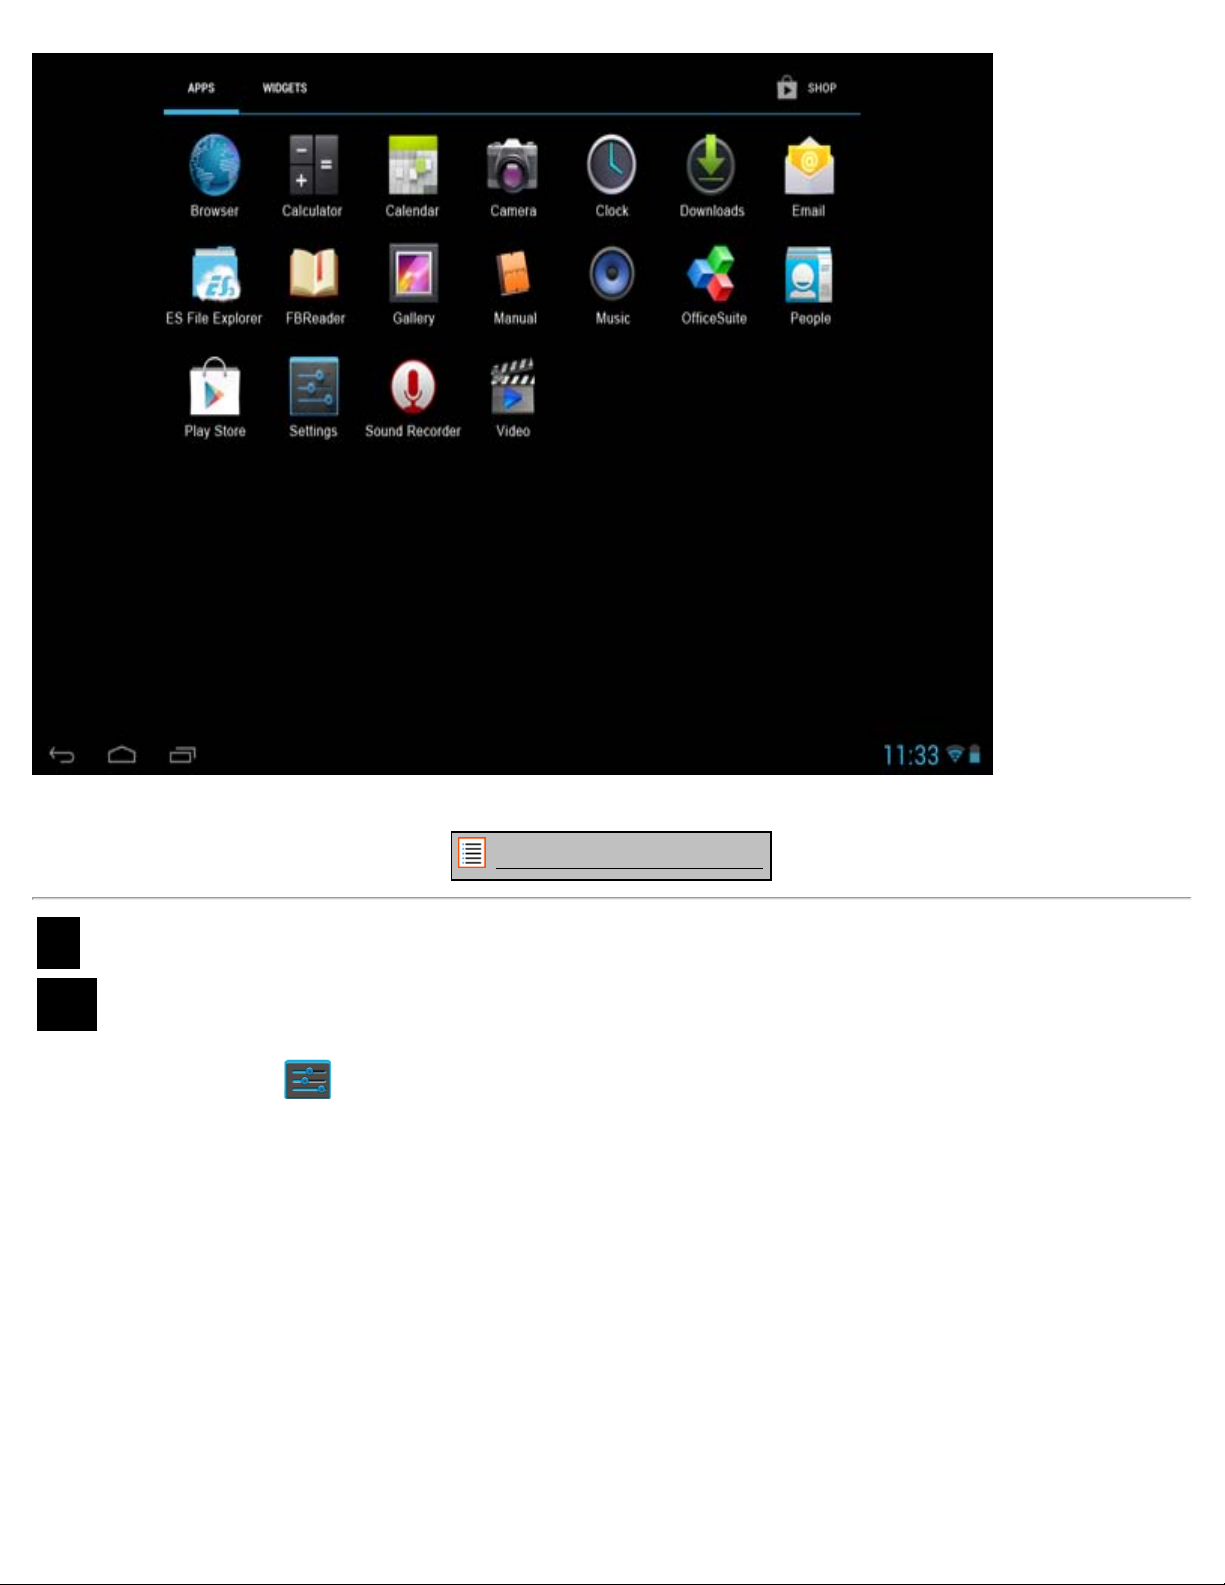
When the system displays the widgets, press "Apps" to view all installed apps.
Here you can find all the pre-installed programs or “apps” as well as additional apps that you install.
You can launch any app by just pressing the corresponding icon.
file:///Volumes/Product_Data/TAB07-210/Sent_artwork/Manual/internet2/Yarvik/Manual/manual_en.html[07-08-13 10:35:11]
Yarvik Tablet Manual
Application Screen
Return to index
4 Setting up your Yarvik Tablet
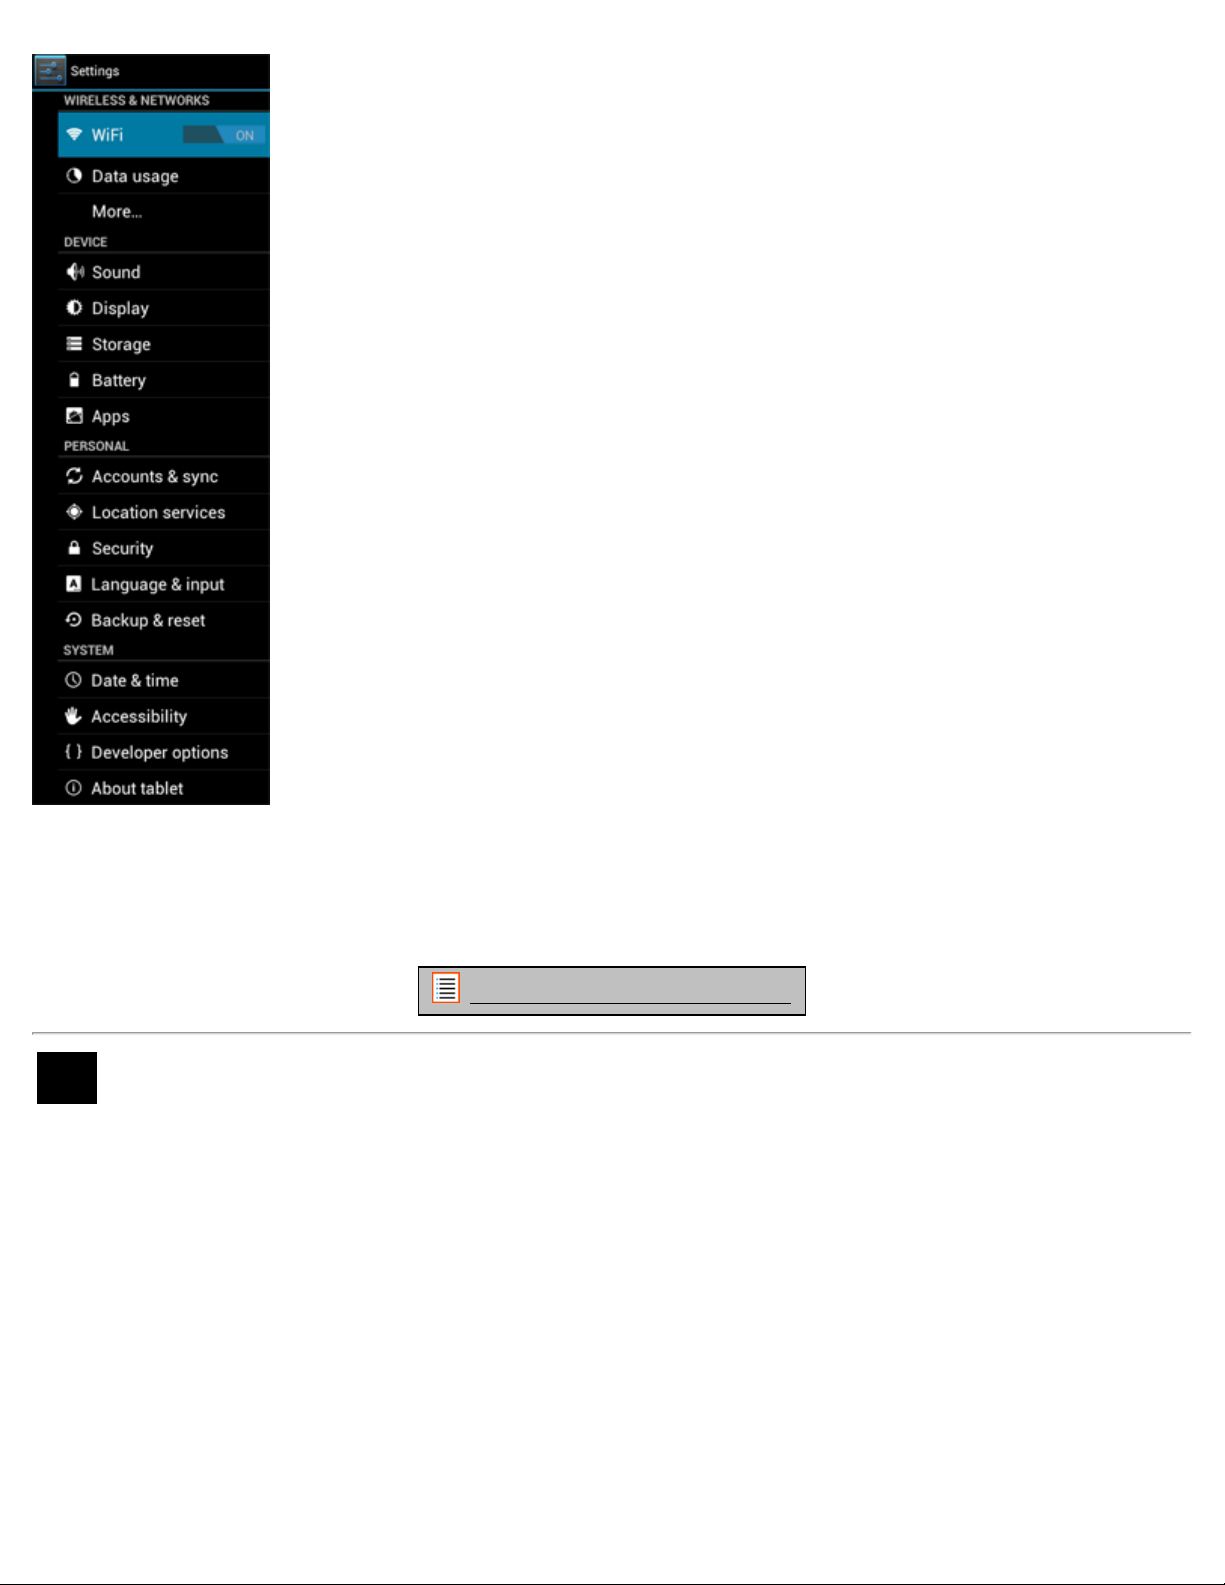
4.1 Settings Menu
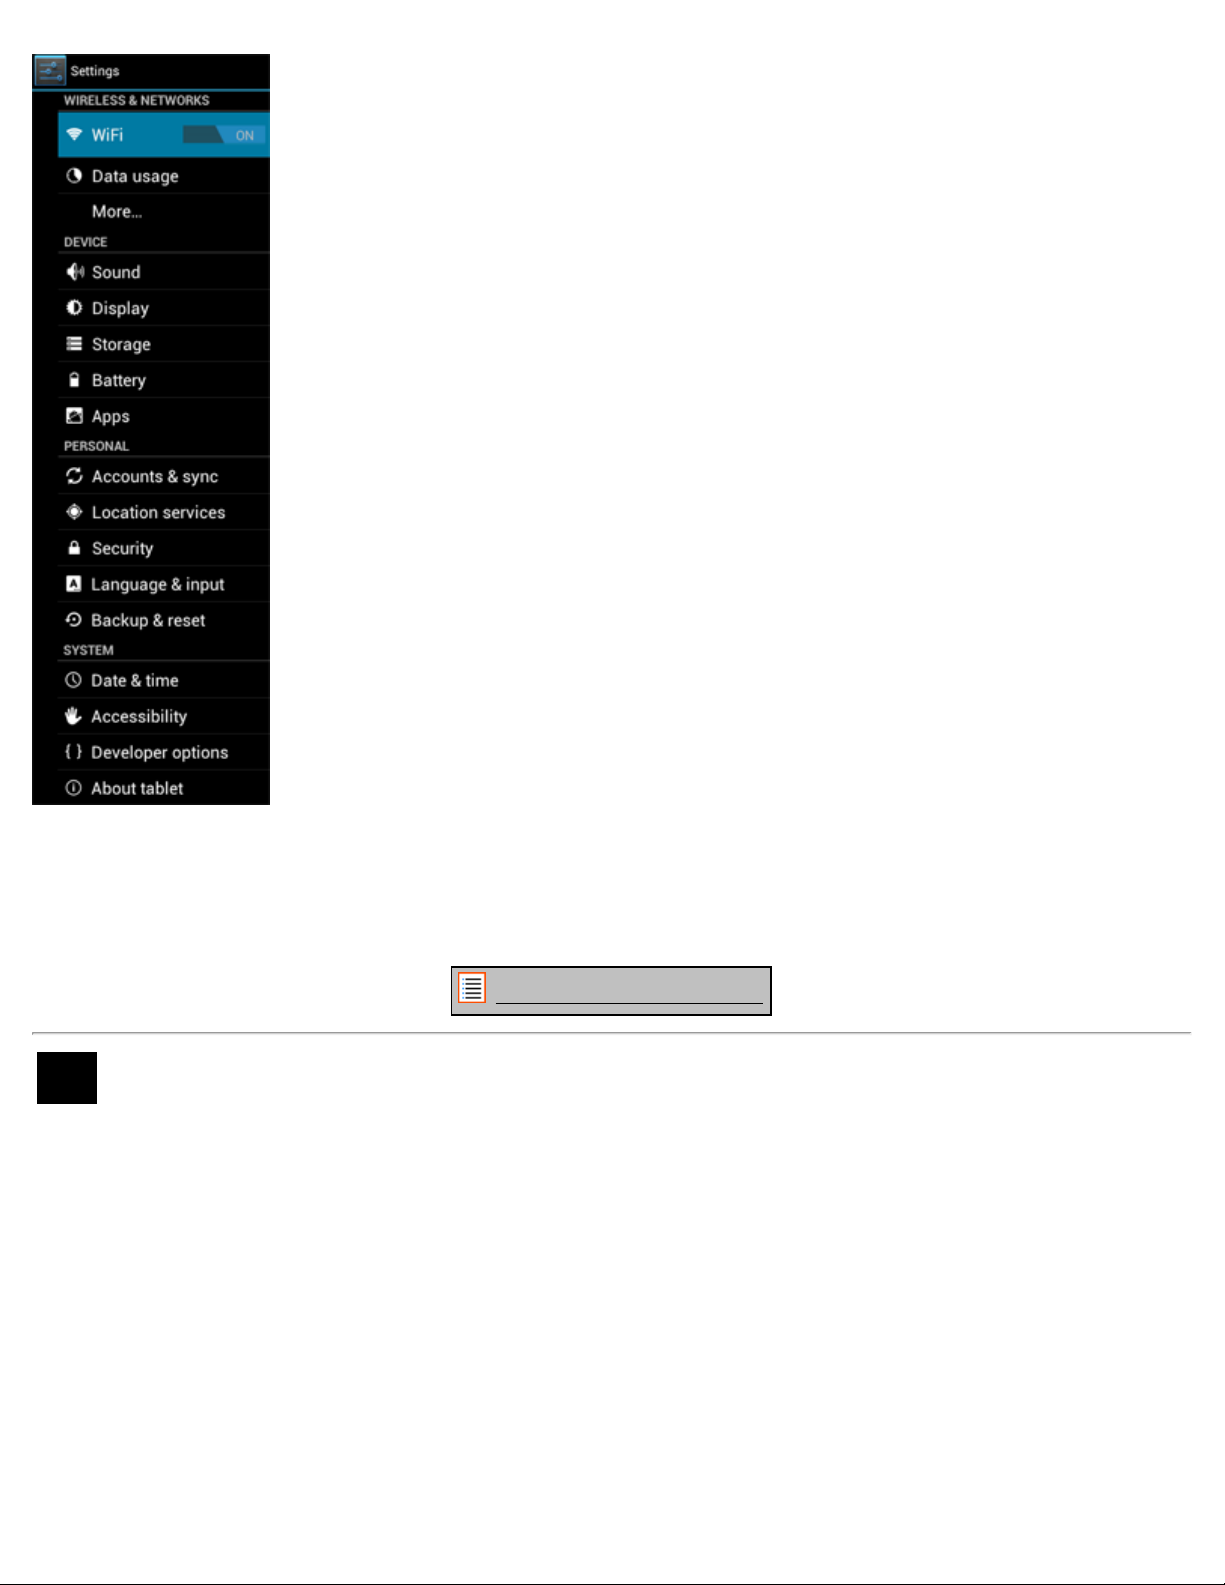
Press the Settings icon in the Application Menu to enter the Settings menu. In the Settings menu you
can find the options to set up your Yarvik Tablet.
file:///Volumes/Product_Data/TAB07-210/Sent_artwork/Manual/internet2/Yarvik/Manual/manual_en.html[07-08-13 10:35:11]
Yarvik Tablet Manual
Settings Menu
We will go through the most important parts:
Return to index
4.2 WiFi & Bluetooth
Wi-Fi
Set up a connection with a wireless Wi-Fi network.
Slide the On/Off button to "On" to activate Wi-Fi.
file:///Volumes/Product_Data/TAB07-210/Sent_artwork/Manual/internet2/Yarvik/Manual/manual_en.html[07-08-13 10:35:11]
Yarvik Tablet Manual
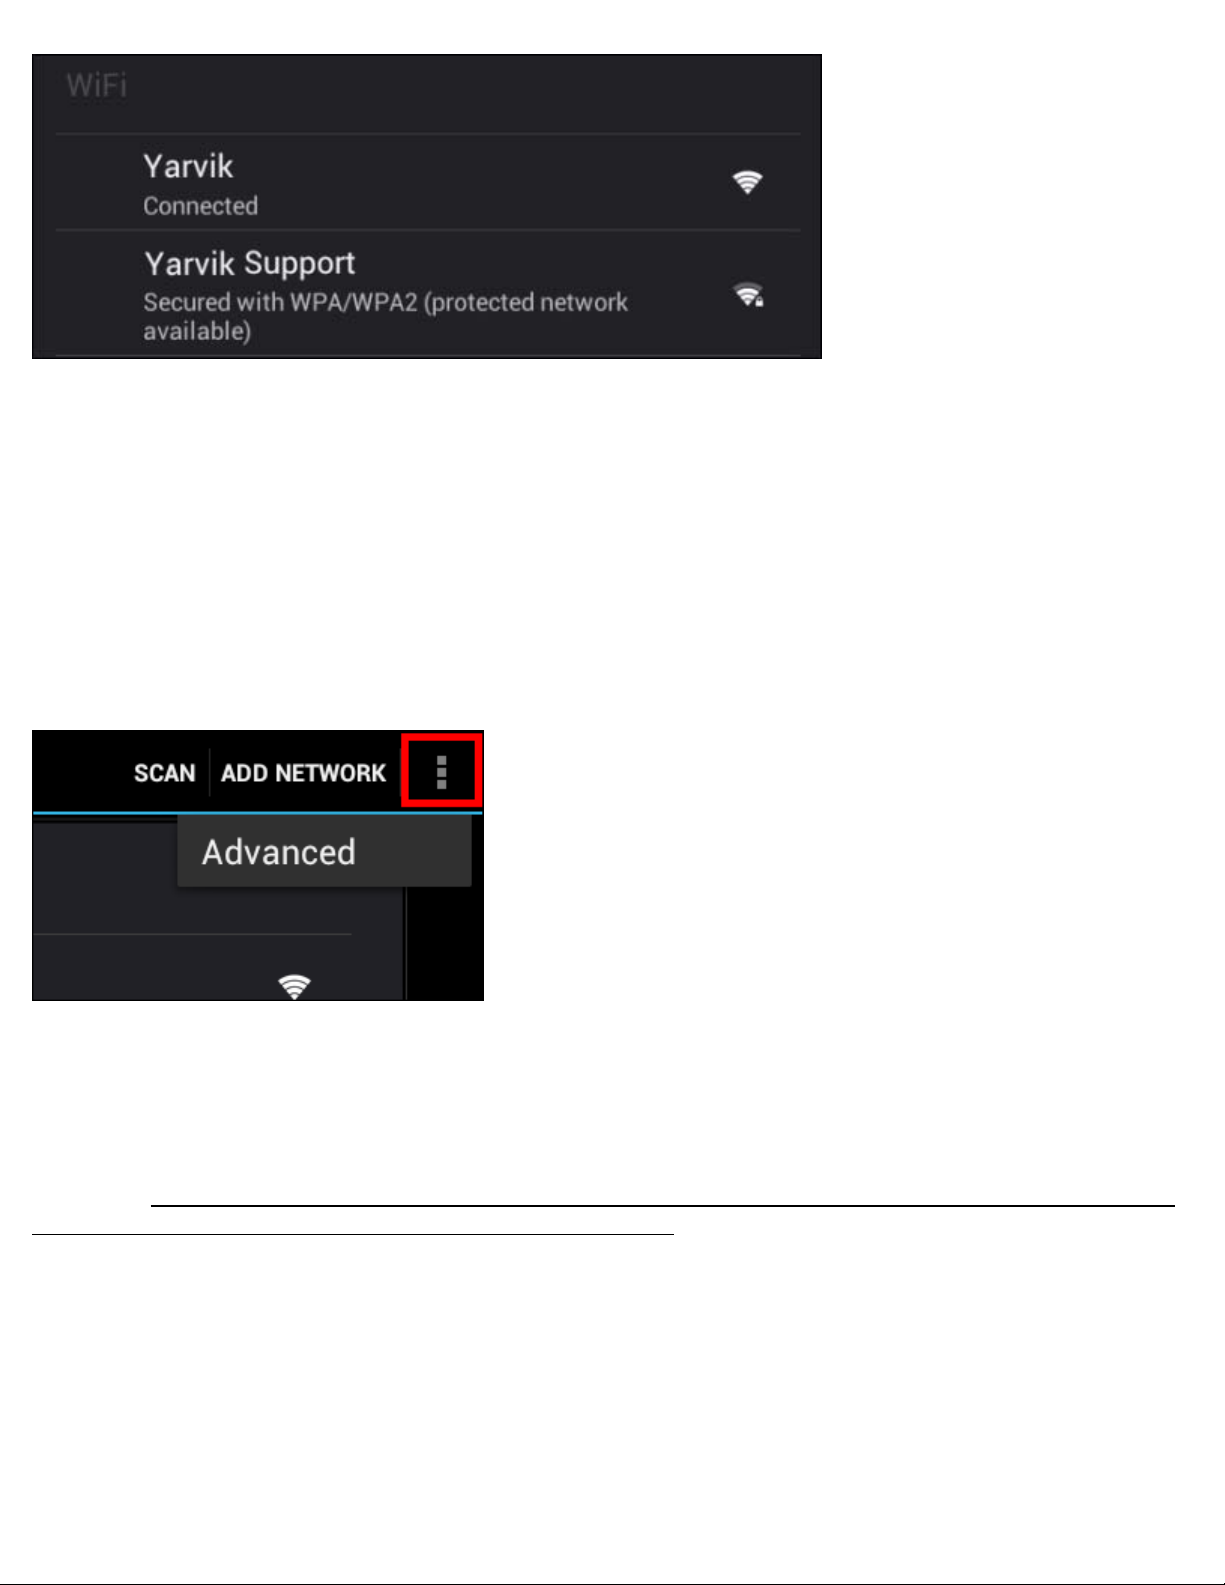
The available Wi-Fi networks appear in the network list at the right screen. Tap the network of your choice. If
the network is secured, you’re prompted to enter the network security key.
Press the “Connect” button and the Tablet is connecting to the network.
Once “Connected” appears underneath the network name and the wireless reception icon is shown in the
bottom status bar, you’re successfully connected to the wireless network.
Viewing your Yarvik Tablet's Wi-Fi MAC address
While in the Wi-Fi settings screen, click on the menu button in the top right corner.
Press "Advanced" in the unfolding menu.
Your Wi-Fi MAC address is displayed in the following "Advanced Wi-Fi" screen under "MAC address".
Bluetooth (
only applies to Yarvik models with Bluetooth - please consult the technical specifications on
the box of your product to determine if Bluetooth is present).
Use Bluetooth for connecting with Bluetooth compatible peripherals, like mice, keyboards, speakers and
headphones.
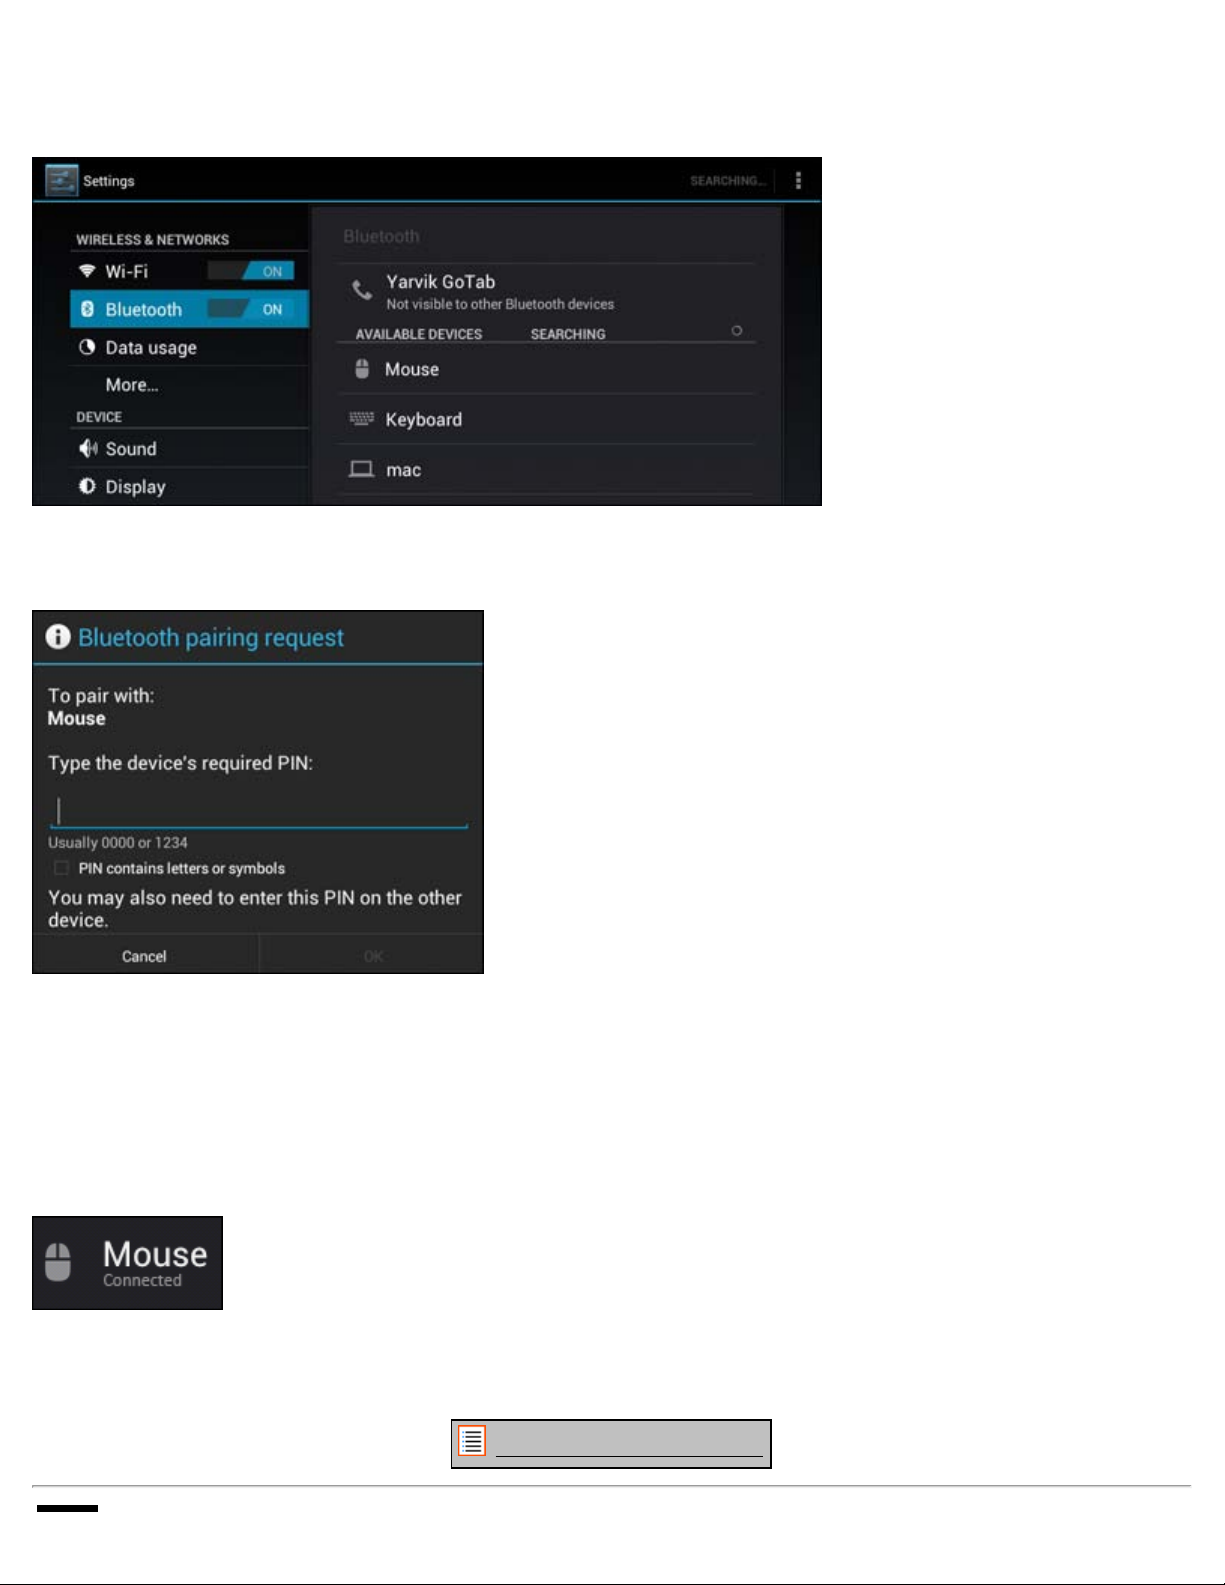
Slide the Bluetooth On/Off button to "On" to activate Bluetooth.
Once activated, your Yarvik Tablet tablet will automatically start searching for nearby Bluetooth devices. You
can always manually search for Bluetooth devices by clicking "Search for Devices" in the top right corner of
the screen.
It may be required for the to be connected peripherals to be put in "pairing mode". Please refer to the
file:///Volumes/Product_Data/TAB07-210/Sent_artwork/Manual/internet2/Yarvik/Manual/manual_en.html[07-08-13 10:35:11]
Yarvik Tablet Manual
instructions manual of the concerning peripherals for this.
All discovered devices will appear in the "Available Devices" list:
Click on the discovered Bluetooth device to pair your Yarvik Tablet tablet with it.
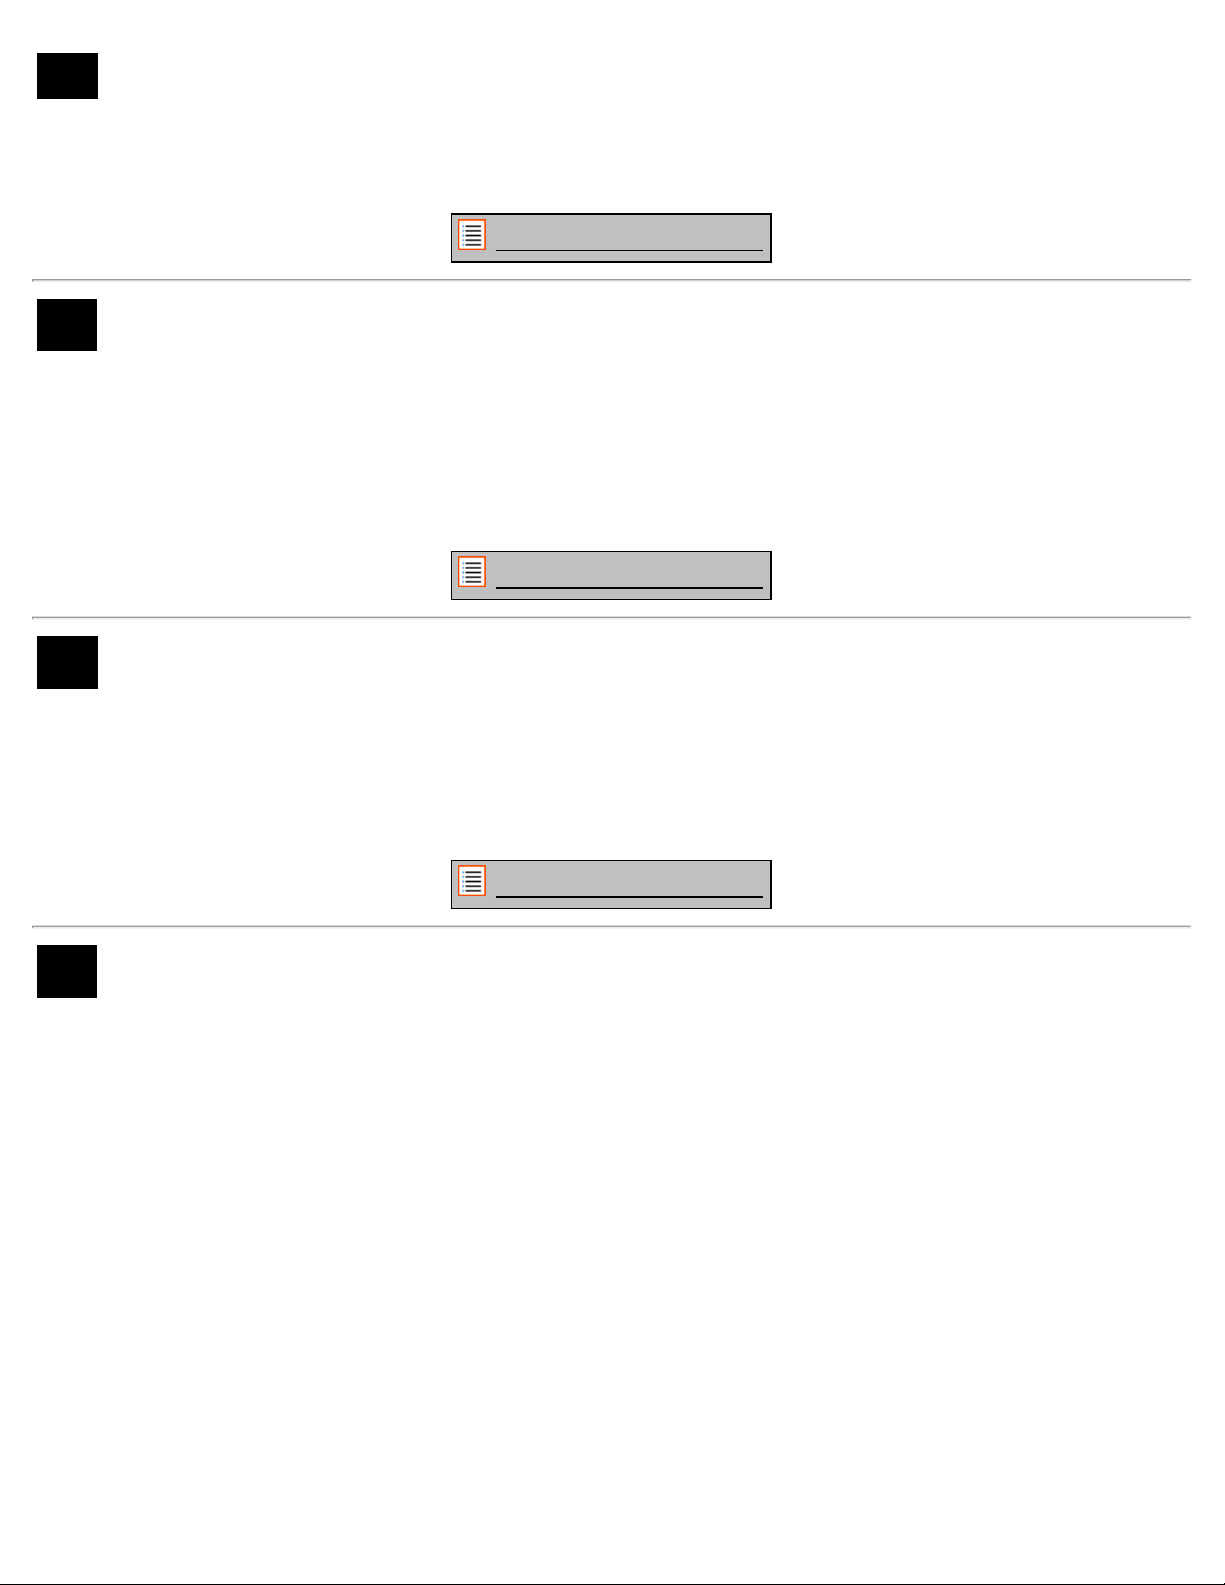
The "Bluetooth pairing request" window will appear:
Most Bluetooth devices require a pin code to connect. This code usually is 0000 or 1234. Please refer to the
instructions manual of your Bluetooth device if the pin code is different.
After you have entered the correct pin code, press "OK".
Your Yarvik Tablet tablet will now start pairing with your Bluetooth device, and after a few seconds the
connection will be completed, showing a "Connected" message underneath the concerning Bluetooth device
in the "Available Devices" list:
You can connect multiple Bluetooth devices to your Yarvik Tablet tablet for use at the same time (e.g.
mouse and keyboard).
Return to index
file:///Volumes/Product_Data/TAB07-210/Sent_artwork/Manual/internet2/Yarvik/Manual/manual_en.html[07-08-13 10:35:11]
Yarvik Tablet Manual
4.3 Sound
Here you can change the audio volume of the Tablet, otherwise possible via the volume buttons on the
Tablet itself and the volume buttons in the top status bar.
Return to index
4.4 Display
Here you can change the brightness of the display, font sizes and the auto sleep time.
Please note that the higher the display brightness, the higher the energy consumption. This will drain your
battery substantially faster.
If you don’t want the display to auto rotate as you tilt the Tablet, you can enable/disable this functionality in
the Auto-rotate screen setting.
Return to index
4.5 Apps
Here you can manage applications that are installed on your Yarvik Tablet.
You can click apps that you have installed to see the app info and uninstall them if needed by using the
“Uninstall” button.
Please note that the preinstalled default applications (like e.g. the calculator) cannot be uninstalled.
Return to index
4.6 Storage & MicroSD/USB Drive Access
Shows you the internal memory information. When a MicroSD card is present, you can also find the memory
information of the inserted card here.
Connecting your Yarvik Tablet to a PC or Mac by USB
You can connect your Yarvik Tablet to a PC or Mac using the provided USB cable.
When connected to a computer, you can access the Tablet's internal memory and, if present, an inserted
MicroSD card as standard USB Mass Storage Device.
Please refer to the printed Quick Start Guide of your Yarvik Tablet to determine the tablet's USB slave port.
Connect the USB cable to the USB slave port of your Yarvik Tablet and to a free USB port on your computer.
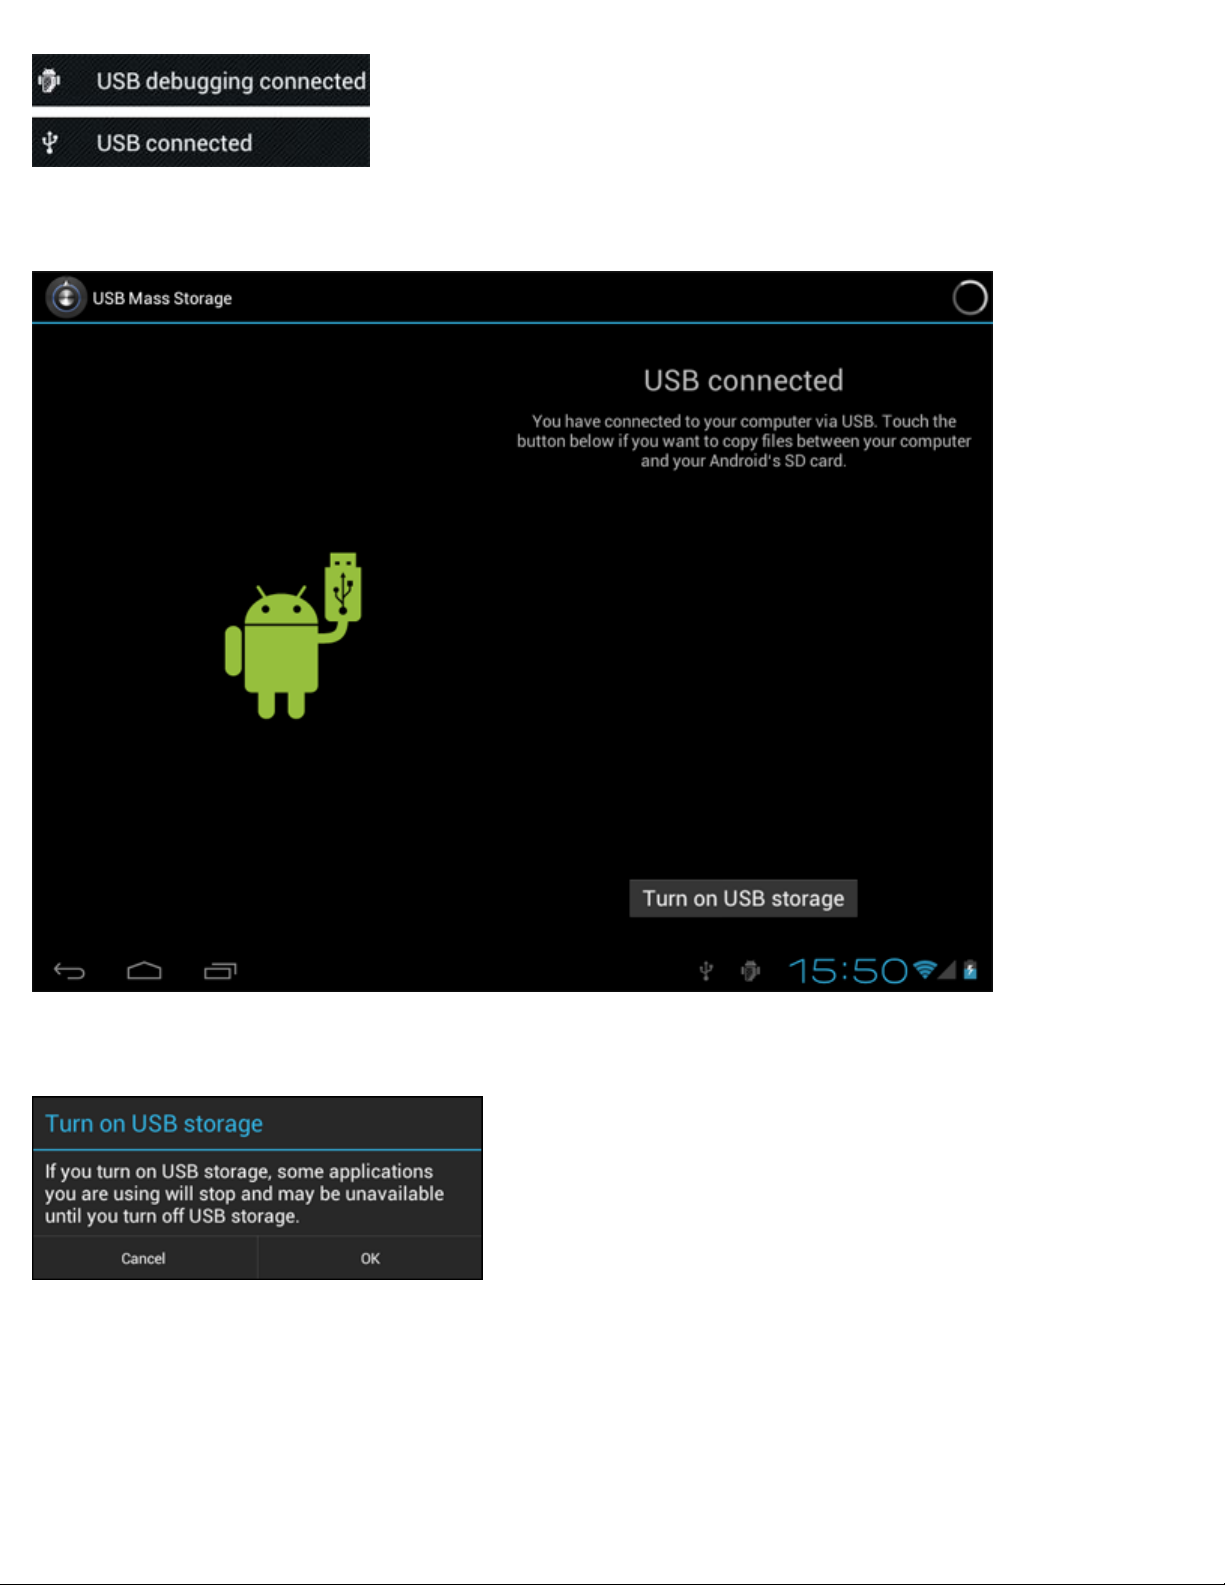
In the bottom right of your Tablet's screen, two messages will appear shortly after each other:
file:///Volumes/Product_Data/TAB07-210/Sent_artwork/Manual/internet2/Yarvik/Manual/manual_en.html[07-08-13 10:35:11]
Yarvik Tablet Manual
Once the second message "USB connected" appears, click on it.
The following screen will appear:
Click on the button "Turn on USB storage".
A notification window will appear:
Click on "OK" to confirm.
The internal memory of your Yarvik Tablet will now appear as Mass Storage Drive in your computer's file
system, and can be used e.g. to copy files from and to your Yarvik Tablet.
If you have a MicroSD card in your tablet, the card will be recognized by the computer as a second Mass
Storage Drive.
To stop using the Mass Storage Device function, click on the "Turn off USB storage" button and remove the
file:///Volumes/Product_Data/TAB07-210/Sent_artwork/Manual/internet2/Yarvik/Manual/manual_en.html[07-08-13 10:35:11]
Yarvik Tablet Manual
USB cable.
Note: There are no hardware drivers needed to access the Yarvik Tablet's memory. In the case your
computer prompts for any driver installation, you can simply ignore it.
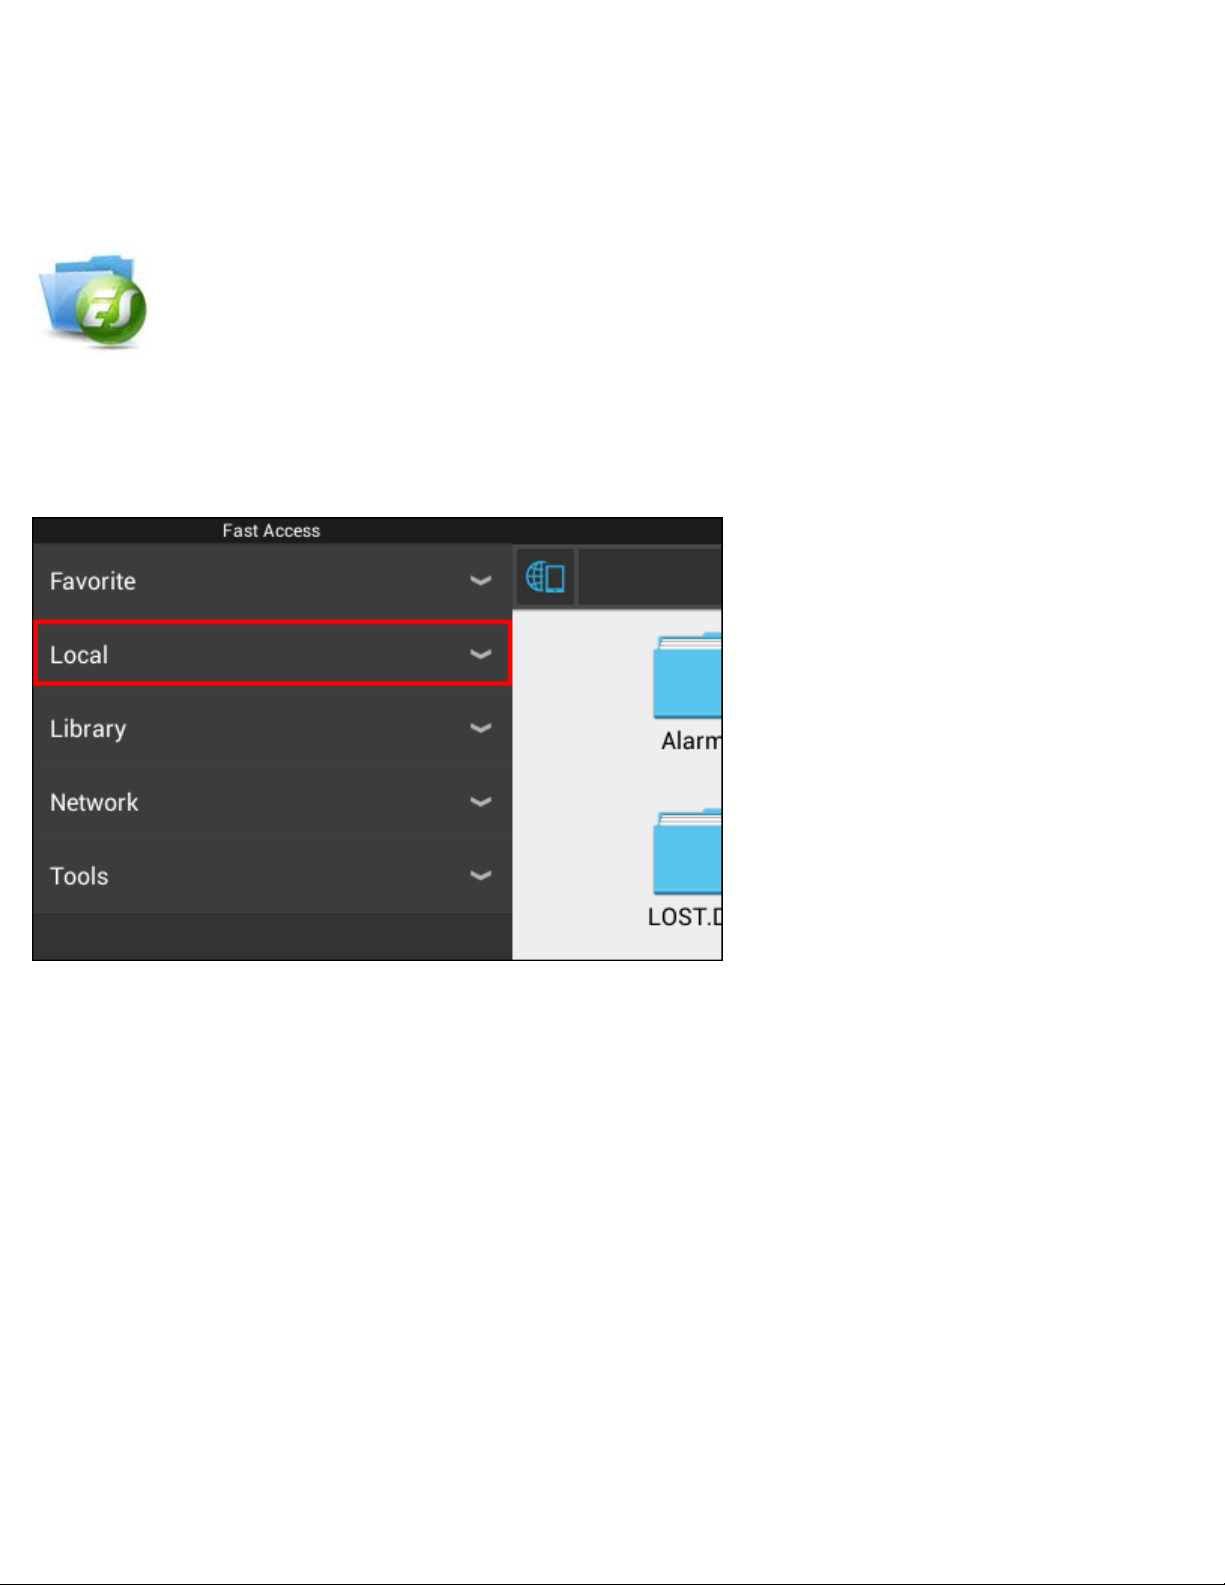
Access your MicroSD card or USB drive in ES File Explorer
If you have inserted a MicroSD card or USB drive in your Yarvik Tablet tablet, you can access its contents as
following:
Open the ES File Explorer app and click on Local in the left "Fast Access" menu.
The Local list now unfolds, and shows all memory locations of the device.
The MicroSD card is usually one of the lowest options in de Local list, called external_sd in the below
example:
file:///Volumes/Product_Data/TAB07-210/Sent_artwork/Manual/internet2/Yarvik/Manual/manual_en.html[07-08-13 10:35:11]

Yarvik Tablet Manual
Please note that the name of the MicroSD card may differ. Other names like sd-ext or ext-sd may be used
by your device.
When you have inserted a USB drive via the USB host port/adapter, this drive will become available as (in
the above example) usb_storage.
The name for the USB drive may also differ.
Return to index
4.7 Language & input
Use “Select language” to select the display language of your Yarvik Tablet. This applies to all the screen
texts in the entire system.
Under “Android keyboard” you may setup the onscreen keyboard of your Tablet.
Return to index
4.8 Date & time
Here you can setup the date and the time for your Yarvik Tablet.
file:///Volumes/Product_Data/TAB07-210/Sent_artwork/Manual/internet2/Yarvik/Manual/manual_en.html[07-08-13 10:35:11]
Yarvik Tablet Manual
Return to index
5 Apps
The Yarvik Tablet will come with pre installed Apps (see below examples).
Browser
The webbrowser for viewing web sites.
Calculator
Calculator with simple scientific features.
Calendar
Calendar app for making and viewing appointments.
Camera
For making pictures and recording video with the built-in camera.
Clock
A simple alarm clock.
Downloads
Shows both current and and archived downloads from the Browser application.
Email
Email client for sending and receiving email.
ES File Explorer
File Explorer to browse/open the folders and documents on your Yarvik device.
Please see caption 4.6 for additional information.
FBReader
Ebook Reader supporting epub, fb2 and (partially) mobipocket formats.
Gallery
Picture viewer. The Gallery application also plays video files. Please refer to the technical specifications of
your Yarvik model for compatible file formats.
file:///Volumes/Product_Data/TAB07-210/Sent_artwork/Manual/internet2/Yarvik/Manual/manual_en.html[07-08-13 10:35:11]
Yarvik Tablet Manual
Manual
This Yarvik digital user manual.
Music
Music/audio player. Please refer to the technical specifications of your Yarvik model for compatible
music/audio formats.
OfficeSuite
MobiSoft OfficeSuite Viewer. Opens Word, Excel, PowerPoint and PDF files.
People
Address book application for contacts.
Play Store
App Market to download free or paid apps for Android.
Requires (free) Google account registration.
Settings
The menu to set up your Yarvik device.
Sound Recorder
To record and playback voice notes/audio.
Video
Video player. Please refer to the technical specifications of your Yarvik model for compatible video formats.
* Application appearance (name and/or icon) and availability may vary.
Return to index
6 GNU/GPL Licensing Information
Please consult the legal information available on your Yarvik Tablet under Settings – About tablet – Legal
information (internet connection required) or visit http://source.android.com/source/licenses.html
information.
for more
Return to index
7 Warranty Statement
Yarvik offers a 2 Year Comfort Warranty for all of its products.
Please visit yarvik.com/service
for further information.
Return to index
file:///Volumes/Product_Data/TAB07-210/Sent_artwork/Manual/internet2/Yarvik/Manual/manual_en.html[07-08-13 10:35:11]
Yarvik Tablet Manual
8 Important Information
Wireless LAN-Regulatory information
Depending on the model, the wireless LAN built-in into tablet devices can only be used in the following
countries: Austria, Belgium, Bulgaria, Czech Republic, Denmark, Finland, France, Germany, Greece,
Hungary, Iceland, Ireland, Italy, Luxembourg, the Netherlands, Norway, Poland, Portugal, Romania,
Slovakia, Slovenia, Spain, Sweden, Switzerland, Turkey and the United Kingdom.
Conditions of use
When using the IEEE 802.11b/g/n Wireless LAN standard, channels 1 to 13 (2.4 GHz...2.4835 GHz) are
selectable for both indoor and outdoor use, however with restrictive conditions applying in France, Italy and
Norway, as follows:
• France: When using this product indoor, all channels can be used without restrictions. Outdoor only
channels 1 to 6 are allowed. This means that in Peer-to-Peer, the WLAN feature can only be used outside if
the peer sets up the communication on an authorized channel (i.e., between 1 & 6). In infrastructure mode,
please make sure the access point is configured to a channel from 1 to 6 before setting up the connection.
• Italy: Use of the RLAN network is governed: Disposal of Old Electrical & Electronic
- with respect to private use, by the Legislative Decree of 1.8.2003, no. 259 (“Code of Electronic
Communications”). In particular Article 104 indicates when the prior obtainment of a general authorization is
required and Art. 105 indicates when free use is permitted;
- with respect to the supply to the public of the WLAN access to telecom networks and services, by the
Ministerial Decree 28.5.2003, as amended, and Art. 25 (general authorization for electronic communications
networks and services) of the Code of electronic communications.
• Norway: Use of this radio equipment is not allowed in the geographical area within a radius of 20 km from
the centre of Ny-Ålesund, Svalbard.
WEEE Symbol Information
Correct Disposal of This product (Waste Electrical & Electronic Equipment).
(Applicable in the European Union and other European countries with separate collection systems).
This marking shown on the product or its literature indicates that it should not be disposed with other
household wasted at the end of its working life. To prevent possible harm to the environment or human
health from uncontrolled waste disposal, please separate this from other types of wastes and recycle it
responsibly to promote the sustainable reuse of material resources.
file:///Volumes/Product_Data/TAB07-210/Sent_artwork/Manual/internet2/Yarvik/Manual/manual_en.html[07-08-13 10:35:11]
Yarvik Tablet Manual
Household users should contact either the retailer where they purchased this product, or their local
government office, for details of where and how they can take this item for environmentally safe recycling.
Business users should contact their supplier and check the terms and conditions of the purchase contract.
This product should not be mixed with other commercial wastes of disposal.
Disposal of waste batteries (applicable in the European Union and other European countries with
separate collection systems)
Either of the symbols shown next may appear on the battery or on the packaging to indicate that the battery
provided with this product shall not be treated as household waste. On certain batteries this symbol might be
used in combination with a chemical symbol. The chemical symbols for mercury (Hg) or lead (Pb) are added
if the battery contains more than 0.0005% mercury or 0.004% lead. By ensuring these batteries are disposed
of correctly, you will help prevent potentially negative consequences for the environment and human health
which could otherwise be caused by inappropriate waste handling of the battery. The recycling of the
materials will help to conserve natural resources. In case of products that for safety, performance or data
integrity reasons require a permanent connection with an incorporated battery, this battery should be
replaced by qualified service staff only. To ensure that the battery will be treated properly, hand over the
product at end-of-life to the applicable collection point for the recycling of electrical and electronic
equipment.
For all other batteries, please view the section on how to remove the battery from the product safely. Hand
the battery over to the applicable collection point for the recycling of waste batteries. For more detailed
information about recycling of this product or battery, please contact your local Local government Office,
your household waste disposal service or the shop where you purchased the product.
When travelling to and within the United States of America, please be aware that the U.S. Department of
Transportation (DOT) recently published new regulations that apply to passengers travelling with lithium
metal batteries and lithium-ion batteries.
For detailed information, visit http://safetravel.dot.gov/whats_new_batteries.html
.
Safety Information
Yarvik Tablet Tablet device
• Yarvik is not responsible for any interference that you may experience or that may be caused when
operating this device.
• Warning: We strongly advise to connect this device to a earthed wall socket when charging.
file:///Volumes/Product_Data/TAB07-210/Sent_artwork/Manual/internet2/Yarvik/Manual/manual_en.html[07-08-13 10:35:11]
Yarvik Tablet Manual
• Opening or dismantling the main unit or any of its accessories, for whatever reason, could lead to damages
that are not covered by the guarantee.
• To avoid electrical shock, do not open the cabinet. Refer servicing to qualified personnel only.
• To prevent fire or shock hazard, do not expose your tablet device or any of its accessories to rain or
moisture.
• Do not use or store your tablet device in a location subject to heat sources, such as radiators or air ducts;
direct sunlight; excessive dust; moisture or rain; mechanical vibration or shock; strong magnets or speakers
that are not magnetically shielded; excessively high and low temperatures; and high humidity.
• Turning off your tablet device with the power button does not disconnect the device completely from mains
voltage. To disconnect it completely, unplug the AC adapter or the power cord from mains. The socket-outlet
shall be installed near the equipment and shall be easily accessible.
• Audio and picture distortion may occur if this equipment is positioned in close proximity to any equipment
emitting electromagnetic radiation.
• This apparatus is also designed for IT power system with phase to phase voltage 230V, for customers in
Norway.
• Observe the following precautions to provide adequate air circulation and to ensure normal reliable
operation:
- Do not use the tablet device and/or the AC adapter while covered or wrapped in cloth. Ensure the AC
adapter operates in a clear environment.
- Turn off the tablet device before putting the device into a bag or a carrying case.
• Do not use your tablet device directly on your lap. The temperature of the base of the unit will rise during
normal operation and over time could result in discomfort or burns.
• Do not use your tablet device while walking. Listening to music with headphones or watching the LCD
screen while walking may lead to an unexpected accident and result in personal injuries.
• Using connected headphones on the tablet device for too long and/or setting the audio volume up too high
when using headphones may cause serious hearing damage.
• Avoid strong beating of or to the product.
• Don’t operate the touch screen of the tablet device with sharp objects, as this may result in scratching the
screen surface.
• Only use permitted batteries, chargers and accessories with your tablet device. The use of any other
products with the device can be dangerous and may violate the warranty regulations.
• Only use a slightly wet cotton cloth to clean the device, and only use water to wetten the cotton cloth. The
tablet device should not be cleaned with any sort of (glass) cleaning aid.
file:///Volumes/Product_Data/TAB07-210/Sent_artwork/Manual/internet2/Yarvik/Manual/manual_en.html[07-08-13 10:35:11]

Yarvik Tablet Manual
Wireless functionality
• If radio interference with other devices occurs while using your tablet device, do not use the wireless
functionality. Use of the wireless functionality may cause a malfunction of the devices, resulting in an
accident.
• In some situations or environments, the use of the wireless functionality might be restricted by the
proprietor of the building or responsible representatives of the organization, for example on board airplanes,
in hospitals or in any other environment where the risk of interference with other devices or services is
perceived or identified as harmful. If you are uncertain about the policy applying to the use of wireless
functionality in a specific organization or environment, you are encouraged to first ask for authorization prior
to switching it on. Consult your physician or the manufacturer of personal medical devices (pacemakers,
hearing aids, etc.) regarding any restrictions on the use of wireless functionality.
• If using wireless functionality near a pacemaker, make sure it is at least 19 inches / 50 cm away from the
pacemaker.
• Due to the transmission and reception properties of wireless communications, data can occasionally be lost
or delayed. This can be due to the variation in radio signal strength that results from changes in the
characteristics of the radio transmission path. Yarvik will not be held responsible for damages of any kind
resulting from the delays or errors in data transmitted or received via wireless functionality, or failure of
wireless functionality to transmit or receive such data.
• If the equipment does cause harmful interference to radio/TV reception, which can be determined by turning
the equipment off and on, the user is encouraged to try to correct the interference by one or more of the
following measures: reorient or relocate the receiving antenna, increase the distance between the sender
and the receiver, consult the dealer or an experienced radio/TV technician for help. Yarvik will not be
responsible for any radio/TV interference nor for any other undesired effect.
Wireless LAN Security
Creating security settings for the Wireless LAN is extremely important. Yarvik assumes no responsibility for
any security problems that may arise from the use of the Wireless LAN.
Battery pack
Do not charge the battery pack in any way other than as described in the Start guide or as designated by
Yarvik in writing.
AC adapter
• It is highly recommended that you use a genuine Yarvik AC adapter supplied by Yarvik for your product.
• This AC adapter is intended for use with the tablet device IT products only.
• Do not place the AC adapter in contact with your skin. Remove the AC adapter away from your body if it
file:///Volumes/Product_Data/TAB07-210/Sent_artwork/Manual/internet2/Yarvik/Manual/manual_en.html[07-08-13 10:35:11]
Yarvik Tablet Manual
becomes warm and causes discomfort.
RoHS
This products has been certified as RoHS Compliant.
Dimensions, specifications, images & illustrations
All dimensions, specifications, images and illustrations are subject to change without prior notice.
YARVIK.COM
Return to index
file:///Volumes/Product_Data/TAB07-210/Sent_artwork/Manual/internet2/Yarvik/Manual/manual_en.html[07-08-13 10:35:11]

Yarvik Tablet Manuál
Rejstřík
SELECT LANGUAGE
1 Před prvním použitím
2 Spuštění Tablet
3 Domovská obrazovka Androidu
3.1 Přidávání nástrojů a zástupců na domovskou obrazovku
3.2 Nastavení tapety
3.3 Nabídka aplikace
4 Nastavení zařízení Yarvik Tablet
4.1 Nabídka nastavení
4.2 Wi-Fi a Bluetooth
4.3 Zvuk
4.4 Displej
4.5 Aplikace
4.6 Pamět' a přístup k MicroSD kartě / jednotce USB
4.7 Jazyk a zadávání
4.8 Datum a čas
5 Aplikace
6 Informace o licencích GNU / GPL
7 Záruka
8 Important Information
1 Před prvním použitím
Vážený uživateli,
Děkujeme vám za zakoupení tohoto výrobku.
Abychom zajistili rychlé a pohodlné používání nového tabletu Yarvik Tablet, přečtěte si prosím před použitím
tohoto výrobku řádně tyto pokyny.
Doufáme, že s tímto tabletem Yarvik Tablet budete po co nejdelší dobu spokojeni!
file:///Volumes/Product_Data/TAB07-210/Sent_artwork/Manual/internet2/Yarvik/Manual/manual_cz.html[07-08-13 10:35:25]
Yarvik Tablet Manuál
Upozornění: • Tablet Yarvik Tablet je velmi přesné elektronické zařízení, proto se jej nepokoušejte
rozmontovávat. Podobné jednání vede ke ztrátě záruky a může způsobit poruchu zařízení;
• Zařízení chraňte před silnými nárazy;
• Tablet Tablet nepoužívejte při vysokých nebo nízkých teplotách, případně v jakémkoli
jiném prostředí, kde se může zařízení dostat do kontaktu s vlhkostí, prachem nebo
magnetickým polem;
• Tablet Tablet nevystavujte po delší dobu silnému slunečnímu záření;
• Dotykovou obrazovku zařízení Tablet neovládejte ostrými předměty, protože může dojít k
poškrabání povrchu obrazovky;
• Používání připojených sluchátek k tabletu Tablet po příliš dlouhou dobu, případně
nastavení hlasitosti zvuku u sluchátek příliš vysoko, může způsobit vážné poškození
sluchu;
• Při nošení sluchátek připojených k zařízení Tablet nepřecházejte silnici, neřiďte motorové
vozidlo ani nejezděte na kole, předejdete tak dopravním nehodám.;
• Pro zařízení Yarvik Tablet používejte pouze povolené baterie, nabíječky a příslušenství.
Použití jakýchkoli jiných typů výrobků se zařízením Tablet vede k pozbytí záruky a může být
nebezpečné.;
• Čištění zařízení Tablet provádějte pouze ve vodě zlehka namočenou bavlněnou utěrkou.
Zařízení Tablet se nesmí čistit jakýmkoli čisticím přípravkem (ani na sklo).
Zařízení Yarvik Tablet můžete začít používat okamžitě po vyjmutí z krabice, aniž byste museli nejprve
nabíjet baterii.
Ideální pro provoz baterie je zapnout zařízení s připojenou nabíječkou a po prvním vybití nechat baterii zcela
nabít.
Pokud nelze zařízení Tablet přímo po vyjmutí z krabice zapnout, baterie je vybita a je třeba ji nejprve nabít.
Návrat do rejstříku
2 Spuštění tabletu Tablet
Po prvním zapnutí tabletu Yarvik Tablet vám bude představen postup spuštění.
Úplně první zapnutí může trvat o něco déle, přibližně 2-3 minuty.
Poté, co se dokončí spuštění tabletu Tablet, spustí se a představí se zamykací obrazovka Androidu.
file:///Volumes/Product_Data/TAB07-210/Sent_artwork/Manual/internet2/Yarvik/Manual/manual_cz.html[07-08-13 10:35:25]
Yarvik Tablet Manuál
Zamykací obrazovka Androidu
Tažením lišty zámku (A) doprava zamkněte Tablet. Následně se dostanete na domovskou obrazovku
Androidu.
Návrat do rejstříku
3 Domovská obrazovka Androidu
file:///Volumes/Product_Data/TAB07-210/Sent_artwork/Manual/internet2/Yarvik/Manual/manual_cz.html[07-08-13 10:35:25]
Yarvik Tablet Manuál
Domovská obrazovka Androidu
Dole na obrazovce Tablet se nachází stavová lišta.
Stavová lišta obsahuje jak systémové informace, tak i funkční tlačítka.
1 - Nabídka aplikací a pomůcek (u některých modelů se může nacházet na domovské stránce dole
uprostřed)
2 - Nástroj (analogové hodiny)
3 - Zástupci aplikací
4 - Tlačítko zpět – návrat na předchozí obrazovku nebo, pokud používáte prohlížeč, na předchozí webovou
stránku.
5 - Domů – návrat zpět na domovskou obrazovku Androidu
6 - Multifunkční tlačítko
7 - Systémový čas
8 - Ukazatel Wi-Fi signálu
9 - Indikátor stavu baterie
Domovská obrazovka se skládá z několika stránek, které lze otevřít posunutím obrazovky doleva nebo
file:///Volumes/Product_Data/TAB07-210/Sent_artwork/Manual/internet2/Yarvik/Manual/manual_cz.html[07-08-13 10:35:25]
Yarvik Tablet Manuál
doprava.
Stisknutím a přidržením požadovaného nástroje na domovské obrazovce vyvolejte jeho zobrazení a pusťte
Pokud si přejete zjistit, které aplikace jsou spuštěny na pozadí, můžete spustit multifunkční náhled stisknutím
multifunkčního tlačítka (6).
Na tuto aplikaci rychle přepnete kliknutím na spuštěnou aplikaci v multifunkčním náhledu. Spuštěné aplikace
můžete vypnout dlouhým stisknutím a kliknutím na „Remove from list“ („Odebrat ze seznamu“).
Návrat do rejstříku
Přidávání nástrojů a zkratek a zástupců na domovskou
3.1
obrazovku
Nástroj přidáte stisknutím aplikace a tlačítka pro nástroj v pravém horním rohu domovské obrazovky:
Na následující obrazovce naleznete všechny nainstalované aplikace a nástroje, které je možné jednotlivě
zobrazit stisknutím v horní části příslušné obrazovky položky „Apps“ („Aplikace“), případně „Widgets“
(„Nástroje“).
Stisknutím položky „Widgets“ („Nástroje“) zobrazíte všechny dostupné nástroje. Během prohlížení nástrojů je
možné klepnutím na obrazovku přejít na další stránku (je-li k dispozici).
file:///Volumes/Product_Data/TAB07-210/Sent_artwork/Manual/internet2/Yarvik/Manual/manual_cz.html[07-08-13 10:35:25]
Yarvik Tablet Manuál
jej na jakékoli prázdné místo na domovské obrazovce.
Zástupce přidáte k jakékoli aplikaci stisknutím požadované aplikace a tlačítka pro nástroj v pravém horním
rohu domovské obrazovky:
Na následující obrazovce naleznete všechny nainstalované aplikace a nástroje, které je možné jednotlivě
zobrazit stisknutím v horní části příslušné obrazovky položky „Apps“ („Aplikace“), případně „Widgets“
(„Nástroje“).
Stisknutím „Apps“ („Aplikace“) zobrazíte všechny nainstalované aplikace.
Stisknutím a přidržením požadované aplikace vyvoláte její zobrazení na domovské obrazovce, pusťte
zástupce na jakékoli prázdné místo domovské obrazovky.
Nástroje anebo zástupce aplikace vyjmete z domovské obrazovky jejich stisknutím a přidržením a následným
přesunutím do zobrazené ikony koše pomocí „Remove“ („Vyjmout“) nahoře na domovské obrazovce.
Návrat do rejstříku
3.2 Nastavení tapety
Tapetu domovské obrazovky změníte stisknutím a přidržením domovské obrazovky, dokud se nevyvolá
nabídka „Select Wallpaper from“ („Vybrat tapetu z“).
Můžete zvolit „Live Wallpapers“ („Živé tapety“), tedy animované tapety, „Super-HD Player“ („Super-HD
přehrávač“), pro galerii fotografií nebo videí, případně „Wallpapers“ („Tapety“), tedy výchozí statické obrázky.
Návrat do rejstříku
3.3 Nabídka aplikací
Stiskněte aplikaci a tlačítko pro nástroj v pravém horním rohu domovské obrazovky:
Jakmile systém zobrazí nástroje, stisknutím „Apps“ („Aplikace“) zobrazíte nainstalované aplikace.
Zde naleznete všechny předem nainstalované programy nebo „aplikace“ a také další aplikace, které jste
nainstalovali.
Jakoukoli aplikaci je možné spustit stisknutím odpovídající ikony.
file:///Volumes/Product_Data/TAB07-210/Sent_artwork/Manual/internet2/Yarvik/Manual/manual_cz.html[07-08-13 10:35:25]
Yarvik Tablet Manuál
Obrazovka aplikací
Návrat do rejstříku
4 Nastavení tabletu Yarvik Tablet
Nabídka
4.1
Settings
(Nastavení)
Stisknutím ikony nastavení v domovské obrazovce Android nebo prostřednictvím aplikační obrazovky vstupte
do nabídky Settings (Nastavení)
tabletur Yarvik Tablet.
. V nabídce Settings (Nastavení) naleznete možnosti pro nastavení
file:///Volumes/Product_Data/TAB07-210/Sent_artwork/Manual/internet2/Yarvik/Manual/manual_cz.html[07-08-13 10:35:25]
Yarvik Tablet Manuál
Nabídka Settings (Nastavení)
Ukážeme si ty nejdůležitější části:
Návrat do rejstříku
4.2 Wi-Fi a Bluetooth
Připojení nastavte pomocí bezdrátové Wi-Fi sítě.
Přetažením tlačítka Vypnout/Zapnout na „On“ („Zapnout“) aktivujete Wi-Fi.
file:///Volumes/Product_Data/TAB07-210/Sent_artwork/Manual/internet2/Yarvik/Manual/manual_cz.html[07-08-13 10:35:25]

Yarvik Tablet Manuál
V seznamu sítí na pravé obrazovce se zobrazí dostupné Wi-Fi sítě. Klepněte na požadovanou síť. Pokud je
síť zabezpečena, budete vyzváni k zadání klíče zabezpečení sítě.
Stiskněte tlačítko „Connect“ („Připojit“). Zařízení Tablet se připojí k síti.
Jakmile se zobrazí pod názvem sítě „Connected“ („Připojeno“) a dole na stavové liště se objeví ikona příjmu
bezdrátové sítě, jste úspěšně připojeni k bezdrátové síti.
Zobrazení adresy MAC Wi-Fi sítě tabletu Yarvik Tablet
V obrazovce pro nastavení Wi-Fi sítě klikněte v pravém horním rohu na tlačítko nabídky.
V otevřené nabídce stiskněte „Advanced“ („Rozšířené“).
Adresa MAC Wi-Fi sítě se zobrazí na následující obrazovce „Advanced Wi-Fi“ („Rozšířené Wi-Fi“) pod
položkou „MAC address“ („Adresa MAC“).
Bluetooth (
týká se pouze modelů Yarvik, které jsou vybaveny rozhraním Bluetooth - informaci, zda je
váš produkt vybaven rozhraním Bluetooth, najdete na obalu v sekci technických specifikací).
Rozhraní Bluetooh umožňuje propojení s periferiemi, které podporují standard Bluetooth, jako jsou myši,
klávesnice, reproduktory a sluchátka.
Bluetooth aktivujete přetažením tlačítka Bluetooth On/Off (Zap/Vyp) do polohy "On" (Zap).
Po aktivaci spustí tablet Tablet od společnosti Yarvik automatické vyhledávání Bluetooth zařízení, která se
nacházejí poblíž. Bluetooth zařízení je možné také vyhledávat ručně v pravém horním rohu obrazovky
file:///Volumes/Product_Data/TAB07-210/Sent_artwork/Manual/internet2/Yarvik/Manual/manual_cz.html[07-08-13 10:35:25]

Yarvik Tablet Manuál
kliknutím na "Search for Devices" (Vyhledat zařízení).
U periferních zařízení, která mají být připojena, může být vyžadováno uvedení do "režimu spárování". Tento
požadavek ověřte v návodu k obsluze odpovídajícího periferního zařízení.
Všechna nalezená zařízení se zobrazí v seznamu "Available Devices" (Dostupná zařízení):
Bloetooth zařízení spárujete s tabletem Tablet od společnosti Yarvik kliknutím na toto zařízení.
Zobrazí se okno "Bluetooth pairing request" (Požadavek na Bluetooth spárování):
Většina Bluetooth zařízení vyžaduje k připojení zadání PIN kódu. Tento kód je obvykle nastaven na 0000
nebo 1234. Pokud je PIN kód jiný, naleznete jej v návodu k obsluze Bluetooth zařízení.
Po zadání správného PIN kódu stiskněte "OK".
Tento tablet Tablet od společnosti Yarvik se nyní začne párovat s Bluetooth zařízením, po několika
sekundách se připojení dokončí, následně se pod odpovídajícím Bluetooth zařízením v seznamu "Available
Devices" (Dostupná zařízení) zobrazí hlášení "Connected" (Připojeno):
K tabletu Tablet od společnosti Yarvik je možné připojit více Bluetooth zařízení, a využívat je tak současně
(například myš a klávesnici).
file:///Volumes/Product_Data/TAB07-210/Sent_artwork/Manual/internet2/Yarvik/Manual/manual_cz.html[07-08-13 10:35:25]

Yarvik Tablet Manuál
Návrat do rejstříku
4.3 Sound (Zvuk)
Zde je možné změnit nastavení hlasitosti zařízení Tablet. Nastavení je také možné změnit prostřednictvím
tlačítek hlasitosti na samotném zařízení Tablet a pomocí tlačítek hlasitosti ve stavové liště umístěné nahoře.
Návrat do rejstříku
4.4 Display (Displej)
Zde je možné změnit jas displeje, velikost písma a automatickou dobu spánku.
Upozorňujeme, že čím vyšší jas displeje nastavíte, tím vyšší bude spotřeba energie. Baterie se tak vybije
podstatně rychleji.
Pokud si nepřejete, aby se displej automaticky otáčel po naklonění tabletu Tablet, je možné povolit, případně
zakázat tuto funkci v nastavení obrazovky Auto-rotate (Automatické otočení).
Návrat do rejstříku
4.5 Apps (Aplikace)
Zde je možné spravovat aplikace, které jste nainstalovali do tabletu Yarvik Tablet.
Můžete klinutím na nainstalovanou aplikaci zobrazit informace o aplikaci a v případě potřeby je odinstalovat
pomocí tlačítka „Uninstall“ („Odinstalovat“).
Upozorňujeme, že předem nainstalované výchozí aplikace (například kalkulačku) není možné odinstalovat.
Návrat do rejstříku
4.6 Pamět' a přístup k MicroSD kartě / jednotce USB
Zobrazuje informace o vnitřní paměti. Pokud je přednastavena MicroSD karta, informace o paměti vložené
paměťové karty je možné nalézt zde.
Připojení tabletu Yarvik Tablet k počítači nebo k Mac pomocí USB
Tento tablet Yarvik Tablet je možné připojit k počítači nebo k Mac pomocí dodaného USB kabelu.
Po připojení k počítači můžete otevřít vnitřní paměť tabletu Tablet a, pokud je k dispozici, vloženou MicroSD
kartu jako standardní velkokapacitní paměťové zařízení USB.
Kde se nachází podřízený (slave) USB port, zjistíte v Rychlé příručce spuštěním dodávané k tomuto tabletu
Yarvik Tablet. Připojte USB kabel k podřízenému USB portu tabletu Yarvik Tablet a k volnému USB portu
počítače.
Vpravo dole na obrazovce tabletu Tablet se krátce po sobě zobrazí dvě zprávy:
file:///Volumes/Product_Data/TAB07-210/Sent_artwork/Manual/internet2/Yarvik/Manual/manual_cz.html[07-08-13 10:35:25]

Yarvik Tablet Manuál
Pokud si přejete ukončit používání funkcí velkokapacitní paměťové zařízení, klikněte na tlačítko „Turn off
Jakmile se zobrazí druhá zpráva „USB connected“ („USB je připojeno“), klikněte na ni.
Zobrazí se následující obrazovka:
Klikněte na tlačítko „Turn on USB storage“ („Otevřít paměť USB“).
Zobrazí se okno s oznámením:
Potvrďte kliknutím na „OK“.
Vnitřní paměť tohoto tabletu Yarvik Tablet se nyní v souborovém systému počítače zobrazí jako
velkokapacitní paměťový disk. Lze ji využívat například ke kopírování souborů z tabletu Yarvik Tablet a na
něj.
Pokud je v tabletu MicroSD karta, počítač ji rozpozná jako druhý velkokapacitní paměťový disk.
file:///Volumes/Product_Data/TAB07-210/Sent_artwork/Manual/internet2/Yarvik/Manual/manual_cz.html[07-08-13 10:35:25]

Yarvik Tablet Manuál
USB storage“ („Zavřít USB paměť“) a vyjměte USB kabel.
Poznámka: K přístupu do paměti tabletu Yarvik Tablet se nevyžadují žádné ovladače hardwaru. Pokud vás
počítač vyzve k instalaci jakéhokoli ovladače, výzvu jednoduše ignorujte.
Přístup do MicroSD karty nebo jednotky USB v aplikaci ES File Explorer (ES správce
souborů)
Pokud jste vložili MicroSD kartu nebo jednotku USB do tabletu od společnosti Yarvik, můžete přejít na jejich
obsah následujícím způsobem:
Otevřete aplikaci ES File Explorer (ES správce souborů) a klikněte na možnost Local (Místní) v nabídce
"Fast Access" („Rychlý přístup“) vlevo.
Touto akcí rozbalíte seznam Local (Místní), v němž jsou zobrazena všechna paměťová umístění zařízení.
MicroSD karta bývá obvykle jednou z nejníže umístěných položek seznamu; v příkladu níže je označena jako
external_sd:
file:///Volumes/Product_Data/TAB07-210/Sent_artwork/Manual/internet2/Yarvik/Manual/manual_cz.html[07-08-13 10:35:25]

Yarvik Tablet Manuál
Mějte na paměti, že název MicroSD karty se může lišit. V případě vašeho zařízení může být použit například
název sd-ext nebo ext-sd.
Jakmile vložíte jednotku USB do hostitelského portu/adaptéru USB, tato jednotka se zpřístupní jako (viz výše
uvedený příklad) usb_storage.
Název jednotky USB se může též lišit.
Návrat do rejstříku
4.7 Language & input (Jazyk a zadávání)
Pomocí volby „Select language“ („Vybrat jazyk“) vyberte jazyk displeje tabletu Yarvik Tablet. Toto nastavení
se použije na všechny texty obrazovky v celém systému.
Na „Android keyboard“ („Klávesnici Android“) je možné pro tablet Tablet nastavit klávesnici na obrazovce.
Návrat do rejstříku
4.8 Date & time (Datum a čas)
Zde je možné nastavit datum a čas pro tablet Yarvik Tablet.
file:///Volumes/Product_Data/TAB07-210/Sent_artwork/Manual/internet2/Yarvik/Manual/manual_cz.html[07-08-13 10:35:25]

Yarvik Tablet Manuál
Návrat do rejstříku
5 Apps (Aplikace)
Tablet od společnosti Yarvik se dodává s již nainstalovanými aplikacemi (příklady jsou uvedeny níže).
Browser (Prohlížeč)
Internetový prohlížeč pro prohlížení webových stránek.
Calculator (Kalkulačka)
Kalkulačka s některými jednoduchými vědeckými funkcemi.
Calendar (Kalendář)
Aplikace kalendáře pro vytváření a prohlížení schůzek.
Camera (Fotoaparát)
Pořizování fotografií a nahrávání videí pomocí zabudovaného fotoaparátu.
Clock (Hodiny)
Jednoduchý budík.
Downloads (Stažené položky)
Zobrazuje jak aktuální, tak i archivované stažené položky z aplikace Browser (Prohlížeč).
Email (E-mail)
E-mailový klient pro odesílání a přijímání e-mailů.
ES File Explorer (ES správce souborů)
Správce souborů k prohlížení a otevírání složek a dokumentů v tomto zařízení Yarvik.
Další informace najdete v sekci 4.6.
FBReader (Čtečka elektronických knih)
Čtečka elektronických knih podporující formáty epub, fb2 a (částečně) mobipocket.
Gallery (Galerie)
Prohlížeč obrázků. Aplikace Gallery (Galerie) rovněž přehrává videosoubory. Seznam podporovaných
formátů souborů najdete v technických specifikacích svého tabletu Yarvik.
file:///Volumes/Product_Data/TAB07-210/Sent_artwork/Manual/internet2/Yarvik/Manual/manual_cz.html[07-08-13 10:35:25]

Yarvik Tablet Manuál
Manual (Příručka)
Jedná se o tuto digitální uživatelskou příručku od společnosti Yarvik.
Music (Hudba)
Přehrávač hudby/zvuků. Seznam podporovaných formátů hudebních/zvukových souborů najdete v
technických specifikacích svého tabletu Yarvik.
OfficeSuite
Prohlížeč MobiSoft OfficeSuite. Otevírá soubory Word, Excel, PowerPoint a soubory ve formátu PDF.
People (Lidé)
Adresářová aplikace pro ukládání kontaktů.
Play Store (Obchod s aplikacemi)
Obchod s aplikacemi slouží ke stahování bezplatných nebo placených aplikací pro operační systém Android.
Je vyžadována bo placených aplikací pro operační systém (bezplatná) registrace Google účtu.
Settings (Nastavení)
Nabídka k nastavení zařízení Yarvik.
Sound Recorder (Záznam zvuku)
K nahrávání a přehrávání hlasových poznámek/zvuku.
Video (Video)
Přehrávač videa. Seznam podporovaných formátů videosouborů najdete v technických specifikacích svého
tabletu Yarvik.
* Vzhled aplikace (název a/nebo ikona) a dostupnost se mohou lišit.
Návrat do rejstříku
6 Informace o licencích GNU / GPL
Podívejte se na právní informace, které jsou k dispozici pro tablet Yarvik Tablet v části Settings (Nastavení) –
About tablet (O tomto zařízení)– Legal information (Právní informace) (vyžadováno internetové připojení)
nebo navštivte http://source.android.com/source/licenses.html
, kde se dozvíte další informace.
Návrat do rejstříku
7 Záruka
Na všechny produkty společnosti Yarvik se vztahuje 2letá záruka.
Na adrese yarvik.com/service
najdete další informace.
Návrat do rejstříku
file:///Volumes/Product_Data/TAB07-210/Sent_artwork/Manual/internet2/Yarvik/Manual/manual_cz.html[07-08-13 10:35:25]

Yarvik Tablet Manuál
8 Important Information
Wireless LAN-Regulatory information
Depending on the model, the wireless LAN built-in into tablet devices can only be used in the following
countries: Austria, Belgium, Bulgaria, Czech Republic, Denmark, Finland, France, Germany, Greece,
Hungary, Iceland, Ireland, Italy, Luxembourg, the Netherlands, Norway, Poland, Portugal, Romania,
Slovakia, Slovenia, Spain, Sweden, Switzerland, Turkey and the United Kingdom.
Conditions of use
When using the IEEE 802.11b/g/n Wireless LAN standard, channels 1 to 13 (2.4 GHz...2.4835 GHz) are
selectable for both indoor and outdoor use, however with restrictive conditions applying in France, Italy and
Norway, as follows:
• France: When using this product indoor, all channels can be used without restrictions. Outdoor only
channels 1 to 6 are allowed. This means that in Peer-to-Peer, the WLAN feature can only be used outside if
the peer sets up the communication on an authorized channel (i.e., between 1 & 6). In infrastructure mode,
please make sure the access point is configured to a channel from 1 to 6 before setting up the connection.
• Italy: Use of the RLAN network is governed: Disposal of Old Electrical & Electronic
- with respect to private use, by the Legislative Decree of 1.8.2003, no. 259 (“Code of Electronic
Communications”). In particular Article 104 indicates when the prior obtainment of a general authorization is
required and Art. 105 indicates when free use is permitted;
- with respect to the supply to the public of the WLAN access to telecom networks and services, by the
Ministerial Decree 28.5.2003, as amended, and Art. 25 (general authorization for electronic communications
networks and services) of the Code of electronic communications.
• Norway: Use of this radio equipment is not allowed in the geographical area within a radius of 20 km from
the centre of Ny-Ålesund, Svalbard.
WEEE Symbol Information
Correct Disposal of This product (Waste Electrical & Electronic Equipment).
(Applicable in the European Union and other European countries with separate collection systems).
This marking shown on the product or its literature indicates that it should not be disposed with other
household wasted at the end of its working life. To prevent possible harm to the environment or human
health from uncontrolled waste disposal, please separate this from other types of wastes and recycle it
responsibly to promote the sustainable reuse of material resources.
file:///Volumes/Product_Data/TAB07-210/Sent_artwork/Manual/internet2/Yarvik/Manual/manual_cz.html[07-08-13 10:35:25]

Yarvik Tablet Manuál
Household users should contact either the retailer where they purchased this product, or their local
government office, for details of where and how they can take this item for environmentally safe recycling.
Business users should contact their supplier and check the terms and conditions of the purchase contract.
This product should not be mixed with other commercial wastes of disposal.
Disposal of waste batteries (applicable in the European Union and other European countries with
separate collection systems)
Either of the symbols shown next may appear on the battery or on the packaging to indicate that the battery
provided with this product shall not be treated as household waste. On certain batteries this symbol might be
used in combination with a chemical symbol. The chemical symbols for mercury (Hg) or lead (Pb) are added
if the battery contains more than 0.0005% mercury or 0.004% lead. By ensuring these batteries are disposed
of correctly, you will help prevent potentially negative consequences for the environment and human health
which could otherwise be caused by inappropriate waste handling of the battery. The recycling of the
materials will help to conserve natural resources. In case of products that for safety, performance or data
integrity reasons require a permanent connection with an incorporated battery, this battery should be
replaced by qualified service staff only. To ensure that the battery will be treated properly, hand over the
product at end-of-life to the applicable collection point for the recycling of electrical and electronic
equipment.
For all other batteries, please view the section on how to remove the battery from the product safely. Hand
the battery over to the applicable collection point for the recycling of waste batteries. For more detailed
information about recycling of this product or battery, please contact your local Local government Office,
your household waste disposal service or the shop where you purchased the product.
When travelling to and within the United States of America, please be aware that the U.S. Department of
Transportation (DOT) recently published new regulations that apply to passengers travelling with lithium
metal batteries and lithium-ion batteries.
For detailed information, visit http://safetravel.dot.gov/whats_new_batteries.html
.
Safety Information
Yarvik Tablet Tablet device
• Yarvik is not responsible for any interference that you may experience or that may be caused when
operating this device.
• Warning: We strongly advise to connect this device to a earthed wall socket when charging.
file:///Volumes/Product_Data/TAB07-210/Sent_artwork/Manual/internet2/Yarvik/Manual/manual_cz.html[07-08-13 10:35:25]

Yarvik Tablet Manuál
• Opening or dismantling the main unit or any of its accessories, for whatever reason, could lead to damages
that are not covered by the guarantee.
• To avoid electrical shock, do not open the cabinet. Refer servicing to qualified personnel only.
• To prevent fire or shock hazard, do not expose your tablet device or any of its accessories to rain or
moisture.
• Do not use or store your tablet device in a location subject to heat sources, such as radiators or air ducts;
direct sunlight; excessive dust; moisture or rain; mechanical vibration or shock; strong magnets or speakers
that are not magnetically shielded; excessively high and low temperatures; and high humidity.
• Turning off your tablet device with the power button does not disconnect the device completely from mains
voltage. To disconnect it completely, unplug the AC adapter or the power cord from mains. The socket-outlet
shall be installed near the equipment and shall be easily accessible.
• Audio and picture distortion may occur if this equipment is positioned in close proximity to any equipment
emitting electromagnetic radiation.
• This apparatus is also designed for IT power system with phase to phase voltage 230V, for customers in
Norway.
• Observe the following precautions to provide adequate air circulation and to ensure normal reliable
operation:
- Do not use the tablet device and/or the AC adapter while covered or wrapped in cloth. Ensure the AC
adapter operates in a clear environment.
- Turn off the tablet device before putting the device into a bag or a carrying case.
• Do not use your tablet device directly on your lap. The temperature of the base of the unit will rise during
normal operation and over time could result in discomfort or burns.
• Do not use your tablet device while walking. Listening to music with headphones or watching the LCD
screen while walking may lead to an unexpected accident and result in personal injuries.
• Using connected headphones on the tablet device for too long and/or setting the audio volume up too high
when using headphones may cause serious hearing damage.
• Avoid strong beating of or to the product.
• Don’t operate the touch screen of the tablet device with sharp objects, as this may result in scratching the
screen surface.
• Only use permitted batteries, chargers and accessories with your tablet device. The use of any other
products with the device can be dangerous and may violate the warranty regulations.
• Only use a slightly wet cotton cloth to clean the device, and only use water to wetten the cotton cloth. The
tablet device should not be cleaned with any sort of (glass) cleaning aid.
file:///Volumes/Product_Data/TAB07-210/Sent_artwork/Manual/internet2/Yarvik/Manual/manual_cz.html[07-08-13 10:35:25]

Yarvik Tablet Manuál
Wireless functionality
• If radio interference with other devices occurs while using your tablet device, do not use the wireless
functionality. Use of the wireless functionality may cause a malfunction of the devices, resulting in an
accident.
• In some situations or environments, the use of the wireless functionality might be restricted by the
proprietor of the building or responsible representatives of the organization, for example on board airplanes,
in hospitals or in any other environment where the risk of interference with other devices or services is
perceived or identified as harmful. If you are uncertain about the policy applying to the use of wireless
functionality in a specific organization or environment, you are encouraged to first ask for authorization prior
to switching it on. Consult your physician or the manufacturer of personal medical devices (pacemakers,
hearing aids, etc.) regarding any restrictions on the use of wireless functionality.
• If using wireless functionality near a pacemaker, make sure it is at least 19 inches / 50 cm away from the
pacemaker.
• Due to the transmission and reception properties of wireless communications, data can occasionally be lost
or delayed. This can be due to the variation in radio signal strength that results from changes in the
characteristics of the radio transmission path. Yarvik will not be held responsible for damages of any kind
resulting from the delays or errors in data transmitted or received via wireless functionality, or failure of
wireless functionality to transmit or receive such data.
• If the equipment does cause harmful interference to radio/TV reception, which can be determined by turning
the equipment off and on, the user is encouraged to try to correct the interference by one or more of the
following measures: reorient or relocate the receiving antenna, increase the distance between the sender
and the receiver, consult the dealer or an experienced radio/TV technician for help. Yarvik will not be
responsible for any radio/TV interference nor for any other undesired effect.
Wireless LAN Security
Creating security settings for the Wireless LAN is extremely important. Yarvik assumes no responsibility for
any security problems that may arise from the use of the Wireless LAN.
Battery pack
Do not charge the battery pack in any way other than as described in the Start guide or as designated by
Yarvik in writing.
AC adapter
• It is highly recommended that you use a genuine Yarvik AC adapter supplied by Yarvik for your product.
• This AC adapter is intended for use with the tablet device IT products only.
• Do not place the AC adapter in contact with your skin. Remove the AC adapter away from your body if it
file:///Volumes/Product_Data/TAB07-210/Sent_artwork/Manual/internet2/Yarvik/Manual/manual_cz.html[07-08-13 10:35:25]

Yarvik Tablet Manuál
becomes warm and causes discomfort.
RoHS
This products has been certified as RoHS Compliant.
Dimensions, specifications, images & illustrations
All dimensions, specifications, images and illustrations are subject to change without prior notice.
YARVIK.COM
Návrat do rejstříku
file:///Volumes/Product_Data/TAB07-210/Sent_artwork/Manual/internet2/Yarvik/Manual/manual_cz.html[07-08-13 10:35:25]

Наръчник Yarvik Tablet
Индекс
SELECT LANGUAGE
1 Преди първоначална употреба
2 Tablet Стартиране
3 Начален екран на Android
3.1 Добавяне на графични компоненти и преки пътища във вашия
Начален екран
3.2 Задаване на тапет
3.3 Меню приложения
4 Настройка на вашия Yarvik Tablet
4.1 Меню настройки
4.2 WiFi и Bluetooth
4.3 Звук
4.4 Дисплей
4.5 Приложения
4.6 Съхранениe и достъп до MicroSD/USB памет
4.7 Език и въвеждане
4.8 Дата и час
5 Приложения
6 GNU/GPL Лицензионна информация
7 Гаранционно изложение
8 Important Information
1 Преди първоначална употреба
Уважаеми потребител,
Благодарим ви за закупуването на нашия продукт.
За да осигурите бързото и удобно ползване на вашия нов Yarvik Tablet, моля, прочетете внимателно
file:///Volumes/Product_Data/TAB07-210/Sent_artwork/Manual/internet2/Yarvik/Manual/manual_bg.html[07-08-13 10:35:39]

Наръчник Yarvik Tablet
инструкциите преди употребата му.
Надяваме се, че ще се радвате вашия Yarvik Tablet възможно най-дълго!
Моля
отбележете:
• Вашият Yarvik Tablet е прецизен електронен продукт, не разглобявайте Tablet, тъй
като това ще наруши вашата гаранция и може да доведе до неизправности на
продукта;
• Избягвайте силните удари на или върху продукта;
• Избягвайте използването на Tablet при високи или ниски температури, или в среда,
където устройството може да влезе в контакт с влага, прах или магнитни полета;
• Не излагайте Tablet на силна слънчева светлина за дълъг период от време;
• Не използвайте сензорният екран на Tablet с остри предмети, тъй като това може да
доведе до надраскване на повърхността на екрана;
• Използването на слушалките, свързани към Tablet за дълго време и/или настройка
на силата на звука прекалено силно със слушалки може да причини сериозно
увреждане на слуха;
• Не пресичайте път, не карайте моторно превозно средство или велосипед, докато
използвате Tablet със слушалки, за да избегнете трафик инциденти;
• Използвайте с вашия Yarvik Tablet, само одобрени батерии, зарядни устройства.
Употребата на други продукти с Tablet може да бъде опасно и може да анулира
гаранцията;
• Използвайте само леко навлажнен памучен плат, за да почистите Tablet и
използвайте само вода за овлажняване на памучния плат. Tablet не трябва да бъде
почистван с каквито и да е (стъкло) почистващи препарати.
Можете да започнете да използвате своя
първоначално да зареждате батерията.
Най-добре за батерията е първо да изразходвате нейния заряд и да я заредите напълно, след като е
била изтощена напълно за първи път.
Ако Tablet не се включва веднага след изваждане от кутията, батерията е вече напълно изтощена и
разбира се, вие първо трябва да я заредите.
Yarvik Tablet веднага щом го извадите от кутията, без
Връщане към
индекса
2 Tablet Стартиране
Когато за първи път включите вашия Yarvik Tablet, ще бъдете преведен през първоначалната
настройка.
file:///Volumes/Product_Data/TAB07-210/Sent_artwork/Manual/internet2/Yarvik/Manual/manual_bg.html[07-08-13 10:35:39]

Наръчник Yarvik Tablet
Първото стартиране може да отнеме доста, приблизително 2-3 минути.
След първоначалното стартиране и настройка Tablet отваря Екран за заключване на Android.
Екран за заключване на Android
Плъзнете лентата за заключване (A) надясно, за да отключите Tablet. След това ще бъдете
пренасочен към началния екран на Android.
Връщане към
индекса
3 Начален екран на Android
file:///Volumes/Product_Data/TAB07-210/Sent_artwork/Manual/internet2/Yarvik/Manual/manual_bg.html[07-08-13 10:35:39]

Наръчник Yarvik Tablet
Начален екран на Android
В долната част на екрана на Tablet винаги можете да намерите лентата за състояние.
Лентата за състояние съдържа системна информация и функционални бутони.
1 - Меню приложения и графични елементи (може да бъде намерено долу в средата на началния
екран на някои модели)
2 - Графичен елемент (аналогов часовник)
3 - Кратки пътища към приложения
4 - Бутон Назад - връща ви обратно към предишния екран, или предишния уебсайт, когато използвате
Браузъра
5 - Начало - връща ви обратно към Началния екран на Android
6 - Многофункционален бутон
7 - Системен час
8 - Индикатор за Wi-Fi сигнал
9 - Индикатор за заряд на батерията
Началният екран съдържа много страници, които могат да бъдат достъпни чрез плъзгане на началния
file:///Volumes/Product_Data/TAB07-210/Sent_artwork/Manual/internet2/Yarvik/Manual/manual_bg.html[07-08-13 10:35:39]

Наръчник Yarvik Tablet
екран наляво/надясно.
За да видите какви приложения работят във фонов режим, можете да влезете в многозадачен режим
като натиснете многофункционалния бутон (6).
Щракнете върху работещо приложение в многозадачен режим, за да превключите бързо към него.
Можете да затворите работещо приложение като натиснете продължително и щракнете върху
"Remove from list" („Отстрани от списъка”);.
Връщане към
индекса
Добавяне на графични компоненти и преки пътища във
3.1
вашия Начален екран
За да добавите графичен елемент, натиснете бутона за приложение и графични елементи в горния
десен ъгъл на началния екран:
В следващия екран можете да намерите всички инсталирани приложения и графични елементи,
видими отделно с натискане съответно на "Apps" („Приложения”) или "Widgets" („Графичини
file:///Volumes/Product_Data/TAB07-210/Sent_artwork/Manual/internet2/Yarvik/Manual/manual_bg.html[07-08-13 10:35:39]

Наръчник Yarvik Tablet
елементи”) в горната част на екрана.
Натиснете "Widgets" („Графични елементи”), за да видите всички налични графични елементи. Когато
показвате всички графични елементи, можете да прелистите екраните, за да прегледате следващата
страница (ако има).
Натиснете и задръжте искания графичен елемент, за да се покаже Началния екран и освободете
графичния елемент на което и да е свободно пространство на Началния екран.
За да добавите кратък път към което и да е приложение, натиснете бутона за приложение и графични
елементи в горния десен ъгъл на началния екран:
В следващия екран можете да намерите всички инсталирани приложения и графични елементи,
видими отделно с натискане съответно на "Apps" („Приложения”) или "Widgets" („Графичини
елементи”) в горната част на екрана.
Натиснете "Apps" („Приложения”), за да видите всички налични приложения.
Натиснете и задръжте исканото приложение, за да се покаже Началния екран и краткия път на което и
да е свободно пространство на Началния екран.
За да отстраните графичен елемент и/или кратък път към приложение от своя Начален екран,
натиснете и ги задръжте, а след това ги изтеглете до иконата на кошчето "Remove" („Отстраняване”) в
горната част на вашия Начален екран.
Връщане към
индекса
3.2 Задаване на тапет
За да смените тапета на вашия Начален екран, натиснете и задръжте Началния екран, докато не се
появи менюто „Select Wallpaper from” („Избор на тапет от”).
Можете да изберете между "Live Wallpapers" („Живи тапети”) (анимирани тапети), "Super-HD Player"
(„Super-HD плейър”) (фото/видео галерия) или "Wallpapers" („Тапети”) (статични изображения по
подразбиране).
Връщане към
индекса
3.3 Меню приложения
Натиснете бутона за приложение и графични елементи в горния десен ъгъл на началния екран:
Когато системата визуализира графичните елементи, натиснете "Apps" („Приложения”), за да видите
всички инсталирани приложения.
Тук можете да намерите всички предварително инсталирани програми или “apps” („Приложения”),
както и допълнителните приложения, които сте инсталирани вие.
Можете да стартирате всяко приложение като натиснете съответната икона.
file:///Volumes/Product_Data/TAB07-210/Sent_artwork/Manual/internet2/Yarvik/Manual/manual_bg.html[07-08-13 10:35:39]

Наръчник Yarvik Tablet
Екран Приложения
Връщане към
индекса
4 Настройка на вашия Yarvik Tablet
4.1 Меню настройки
Натиснете иконата Настройки в менюто Приложения, за да влезете в менюто Настройки. В меню
Настройки можете да намерите опциите за настройка на вашия Yarvik Tablet.
file:///Volumes/Product_Data/TAB07-210/Sent_artwork/Manual/internet2/Yarvik/Manual/manual_bg.html[07-08-13 10:35:39]

Наръчник Yarvik Tablet
Меню настройки
Ще преминем през най-важните части:
Връщане към
индекса
4.2 WiFi и Bluetooth
Настройка на връзка към безжична Wi-Fi мрежа.
Плъзнете бутона Вкл/Изкл към "On" („Вкл”), за да активирате Wi-Fi.
file:///Volumes/Product_Data/TAB07-210/Sent_artwork/Manual/internet2/Yarvik/Manual/manual_bg.html[07-08-13 10:35:39]

Наръчник Yarvik Tablet
Наличните Wi-Fi млежи се появяват в списъка с мрежи в десния екран. Натиснете върху мрежата по
ваш избор. Ако мрежата е защитена ще бъдете поканен да въведете ключ за мрежова защита.
Натиснете бутона „Connect” („Свързване”) и Tablet се свързва към мрежата.
След като „Connected” („Свързан”) се появи под името на мрежата и иконата за безжична свързаност
се покаже в лентата за състояние отдолу, вие сте се свързали успешно към безжичната мрежа.
Преглед на вашия Yarvik Tablet's Wi-Fi MAC адрес
Докато сте в екрана за Wi-Fi настройки, щракнете върху бутона за менюто в горния десен ъгъл.
Натиснете "Advanced" („Разширени”) в разгърнатото меню.
Машият Wi-Fi MAC адрес се показва в следния екран "Advanced Wi-Fi" („Разширени Wi-Fi”) в "MAC
address" („МАС адрес”).
Bluetooth
Bluetooth (
приложимо само за модели Yarvik с Bluetooth - моля, направете справка с
техническите спецификации на кутията на вашия продукт, за да разберете дали той има
Bluetooth).
Използвайте Bluetooth за свързване с Bluetooth съвместими периферни устройства, като мишки,
клавиатури, високоговорители и слушалки.
Плъзнете бутона Bluetooth On/Off (Вкл/Изк), за да активирате ("On") Bluetooth.
file:///Volumes/Product_Data/TAB07-210/Sent_artwork/Manual/internet2/Yarvik/Manual/manual_bg.html[07-08-13 10:35:39]

Наръчник Yarvik Tablet
След като бъде активиран, вашият таблет Yarvik Tablet автоматично ще стартира търсене на близки
Bluetooth устройства. Винаги можете да търсите ръчно Bluetooth устройства като щракнете "Search for
Devices" (Търсене на устройства) в горния десен ъгъл на екрана.
Може да е необходимо с цел свързване на периферия, устройството да бъде поставено в "режим
свързване".Моля, относно това, направете справка в наръчника с инструкции на съответното
периферно устройство.
Всички намерени устройства ще бъдат показани в списъка "Available Devices" (Налични устройства):
Щракнете върху намереното Bluetooth устройства, за да свържете своята таблет Yarvik Tablet с него.
Ще се отвори прозорец "Bluetooth pairing request" (Заявки за Bluetooth свързване):
Повечето Bluetooth устройства изискват пин код за осъществяване на свързване.Този код обикновено
е 0000 или 1234. Ако пин кодът е различен, моля, направете справка в инструкциите за експлоатация
на своето Bluetooth устройство.
След като сте въвели правилният пин код, натиснете "OK".
Вашият таблет Yarvik Tablet ще стартира процедура за свързване с вашето Bluetooth устройство, а
след няколко секунди, връзката ще бъде осъществена, показвайки съобщение "Connected" (Свързан)
под съответното Bluetooth устройство в списъка "Available Devices" (Налични устройства).
file:///Volumes/Product_Data/TAB07-210/Sent_artwork/Manual/internet2/Yarvik/Manual/manual_bg.html[07-08-13 10:35:39]

Наръчник Yarvik Tablet
Към вашия таблет Yarvik Tablet можете да свържете няколко Bluetooth устройства, които да
използвате едновременно (напр. Мишка и клавиатура).
Връщане към
индекса
4.3 Звук
Тук можете да смените своите настройки за сила на звука на Tablet, можете да направите това и чрез
бутоните за сила на звука на Tablet и чрез бутоните за сила на звука в горната лента за състояние.
Връщане към
индекса
4.4 Дисплей
Тук можете да смените яркостта на дисплея, големината на шрифта и времето за автоматично
заспиване.
Моля, отбележете, че по-голямата яркост на дисплея, води до по-висока консумация на енергия.
Това ще източи заряда на вашата батерията по-бързо.
Ако не искате дисплея да се върти автоматично, когато завъртате своя Tablet, можете да
активирате/дезактивирате тази функционалност в екрана за настройки Auto-rotate (Автоматично
въртене).
Връщане към
индекса
4.5 Приложения
Тук можете да управлявате приложенията, които са инсталирани на вашия Yarvik Tablet.
Можете да щракнете върху приложение, което искате да бъде инсталирано, за да видите
информация за него и да го деинсталирате, ако е необходимо като използвате бутона „Uninstall”
(„Деизнсталиране”).
Моля, отбележете, че предварително инсталираните приложения по подразбиране (като напр.
калкулатор) не могат да бъдат деинсталирани.
Връщане към
индекса
4.6 Съхранениe и достъп до MicroSD/USB памет
file:///Volumes/Product_Data/TAB07-210/Sent_artwork/Manual/internet2/Yarvik/Manual/manual_bg.html[07-08-13 10:35:39]

Наръчник Yarvik Tablet
Показва информация за вътрешната памет. Когато е вкарана MicroSD карта, можете да намерите
информация за вкараната карта тук.
Свързване на вашия Yarvik Tablet към компютър - PC или Mac чрез USB
Можете да свържете вашия Yarvik Tablet към компютър - PC или Mac чрез USB кабел.
Когато свързвате към компютър, можете да влезете във вътрешната памет на Tablet и, ако има
такава, във вкараната MicroSD карта като към стандартно USB устройство за съхранение на данни.
Моля, направете справка в разпечатания Наръчник за бърз старт на вашия Yarvik Tablet, за да
определите подчинения USB порт на таблета. Свържете USB кабела към USB подчинения порт на
вашия Yarvik Tablet и към свободен USB порт на вашия компютър.
В долния десен ъгъл на вашия Tablet екран за кратко едно след друго ще се появят две съобщения:
След като се появи второто съобщение "USB connected" („USB е свързан”), щракнете върху него.
Появява се следния екран:
Щракнете върху бутона "Turn on USB storage" („Включване на USB памет”);.
Ще се появи прозорец за съобщение:
file:///Volumes/Product_Data/TAB07-210/Sent_artwork/Manual/internet2/Yarvik/Manual/manual_bg.html[07-08-13 10:35:39]

Наръчник Yarvik Tablet
Щракнете върху "OK", за да потвърдите.
Сега вътрешната памет на вашия Yarvik Tablet ще се появи като Устройство за съхранение на данни
във файловата система на вашия компютър и може да бъде използван, напр. за копиране на файлове
от и към вашия Yarvik Tablet.
Ако във вашия таблет имате MicroSD карта, тя ще бъде разпозната от компютъра като второ
устройство за съхранение на данни.
За да спрете ползването на функцията Устройство за съхранение на данни, щракнете върху бутона
"Turn off USB storage" („Изключване на USB съхранение на данни) и отстранете USB кабела.
Забележка: Не са необходими хардуерни драйвери за достъп до паметта на Yarvik Tablet. В случай,
че вашия компютър пита за инсталация на драйвери, можете да ги игнорирате.
Имате достъп до своята MicroSD карта или USB памет в ES File Explorer
Ако сте включили MicroSD карта или USB памет в таблета Yarvik, можете да прегледате
съдържанието им както следва:
Отворете приложението ES File Explorer (ES мениджър за файлове) и щракнете върху Local
(Локални) в менюто "Fast Access" („Бърз достъп”) отляво.
Списъкът Local (Локални) се разтваря и показва всички местоположения с памет в устройството.
MicroSD картата обичайно е една от най-долните опции от списъка Local (Локални), наречена
file:///Volumes/Product_Data/TAB07-210/Sent_artwork/Manual/internet2/Yarvik/Manual/manual_bg.html[07-08-13 10:35:39]

Наръчник Yarvik Tablet
external_sd в списъка по-долу:
Моля имайте предвид, че името на MicroSD картата може да се различава. От вашето устройство
може да се използват други имена като sd-ext или ext-sd .
Когато сте вкарали USB диск чрез USB хост порт/адаптер, този диск ще бъде наличен като (в
примера по-горе) usb_storage.
Името за USB диска може да се различава.
Връщане към
индекса
4.7 Език и въвеждане
Използвайте „Select language” („Избор на език”), за да изберете език за дисплея на вашия Yarvik
Tablet. Това се прилага на всички екранни текстове в цялата система.
В „Android keyboard” („Клавиатура на Android”) можете да настроите екранната клавиатура на вашия
Tablet.
Връщане към
индекса
file:///Volumes/Product_Data/TAB07-210/Sent_artwork/Manual/internet2/Yarvik/Manual/manual_bg.html[07-08-13 10:35:39]

Наръчник Yarvik Tablet
Файл мениджър за преглед/отваряне на папки и документи на вашето устройство Yarvik.
4.8 Дата и час
Тук можета да настроите датата и часа на вашия Yarvik Tablet.
Връщане към
индекса
5 Приложения
Таблетът Yarvik ще бъде доставен с предварително инсталирани Apps (Приложения) (вижте
примерите по-долу).
Browser (Браузър)
Уеб браузърът за преглед на уеб сайтове.
Calculator (Калкулатор)
Калкулатор с прости научни функции.
Calendar (Календар)
Приложението Календар за преглед на срещи.
Camera (Камера)
За заснимане на снимки и запис на видео с вградената камера.
Clock (Часовник)
Прост будилник.
Downloads (Изтегляния)
Показва едновременно вашите текущи и архивирани изтегляния от приложението Browser.
Email (Имейл)
Имейл клиент за изпращане и получаване на имейл съобщения.
ES File Explorer (ES мениджър за файлове)
file:///Volumes/Product_Data/TAB07-210/Sent_artwork/Manual/internet2/Yarvik/Manual/manual_bg.html[07-08-13 10:35:39]

Наръчник Yarvik Tablet
Моля за допълнителна информация, вижте точка 4.6.
FBReader (Четец за електронни книги)
Четец за електронни книги, поддържащ формати epub, fb2 и (частично) mobipocket.
Gallery (Галерия)
Приложение за преглед на снимки. Приложението Gallery (Галерия) възпроизвежда и видео файлове.
Моля, за съвместимите формати, направете справка с техническите спецификации на вашия модел
Yarvik.
Manual (Наръчник)
Този Yarvik цифров наръчник на потребителя.
Music (Музика)
Музикален/аудио плейър. Моля, направете справка с техническите спецификации на вашия модел
Yarvik за съвместимите музикални/аудио формати.
OfficeSuite (Офис пакет)
MobiSoft OfficeSuite програми за преглед. Отваря Word, Excel, PowerPoint и PDF файлове.
People (Хора)
Приложение с адресна книга за контакти.
Play Store (App Market)
Стартирайте приложението App Market, за да изтеглите безплатни или платени приложения за
Android.
Изисква регистрация за (безплатен) Google акаунт.
Settings (Настройки)
Меню за настройка на вашето устройство Yarvik.
Sound Recorder (Звуков рекордер)
За запис и възпроизвеждане на гласови бележки/аудио.
Video (Видео)
Видео плейър. Моля, направете справка с техническите спецификации на вашия модел Yarvik за
съвместими видео формати.
* Изгледът на приложението (име и/или икона) и наличността му може да се различават.
Връщане към
индекса
6 GNU/GPL Лицензионна информация
Моля, консултирайте се с правната информация, налична на вашия Yarvik Tablet в Settings
(Настройки) – About tablet (Относно таблета) – Legal information (Правна информация)
(необходима е Интернет връзка) или за повече информация, посетете
http://source.android.com/source/licenses.html
file:///Volumes/Product_Data/TAB07-210/Sent_artwork/Manual/internet2/Yarvik/Manual/manual_bg.html[07-08-13 10:35:39]
.

Наръчник Yarvik Tablet
Връщане към
индекса
7 Гаранционно изложение
Yarvik предлага 2 годишна гаранция Комфорт за всички свои продукти.
Моля, за допълнителна информация, посетете yarvik.com/service
.
Връщане към
индекса
8 Important Information
Wireless LAN-Regulatory information
Depending on the model, the wireless LAN built-in into tablet devices can only be used in the following
countries: Austria, Belgium, Bulgaria, Czech Republic, Denmark, Finland, France, Germany, Greece,
Hungary, Iceland, Ireland, Italy, Luxembourg, the Netherlands, Norway, Poland, Portugal, Romania,
Slovakia, Slovenia, Spain, Sweden, Switzerland, Turkey and the United Kingdom.
Conditions of use
When using the IEEE 802.11b/g/n Wireless LAN standard, channels 1 to 13 (2.4 GHz...2.4835 GHz) are
selectable for both indoor and outdoor use, however with restrictive conditions applying in France, Italy and
Norway, as follows:
• France: When using this product indoor, all channels can be used without restrictions. Outdoor only
channels 1 to 6 are allowed. This means that in Peer-to-Peer, the WLAN feature can only be used outside if
the peer sets up the communication on an authorized channel (i.e., between 1 & 6). In infrastructure mode,
please make sure the access point is configured to a channel from 1 to 6 before setting up the connection.
• Italy: Use of the RLAN network is governed: Disposal of Old Electrical & Electronic
- with respect to private use, by the Legislative Decree of 1.8.2003, no. 259 (“Code of Electronic
Communications”). In particular Article 104 indicates when the prior obtainment of a general authorization is
required and Art. 105 indicates when free use is permitted;
- with respect to the supply to the public of the WLAN access to telecom networks and services, by the
Ministerial Decree 28.5.2003, as amended, and Art. 25 (general authorization for electronic communications
networks and services) of the Code of electronic communications.
• Norway: Use of this radio equipment is not allowed in the geographical area within a radius of 20 km from
the centre of Ny-Ålesund, Svalbard.
file:///Volumes/Product_Data/TAB07-210/Sent_artwork/Manual/internet2/Yarvik/Manual/manual_bg.html[07-08-13 10:35:39]

Наръчник Yarvik Tablet
WEEE Symbol Information
Correct Disposal of This product (Waste Electrical & Electronic Equipment).
(Applicable in the European Union and other European countries with separate collection systems).
This marking shown on the product or its literature indicates that it should not be disposed with other
household wasted at the end of its working life. To prevent possible harm to the environment or human
health from uncontrolled waste disposal, please separate this from other types of wastes and recycle it
responsibly to promote the sustainable reuse of material resources.
Household users should contact either the retailer where they purchased this product, or their local
government office, for details of where and how they can take this item for environmentally safe recycling.
Business users should contact their supplier and check the terms and conditions of the purchase contract.
This product should not be mixed with other commercial wastes of disposal.
Disposal of waste batteries (applicable in the European Union and other European countries with
separate collection systems)
Either of the symbols shown next may appear on the battery or on the packaging to indicate that the battery
provided with this product shall not be treated as household waste. On certain batteries this symbol might be
used in combination with a chemical symbol. The chemical symbols for mercury (Hg) or lead (Pb) are added
if the battery contains more than 0.0005% mercury or 0.004% lead. By ensuring these batteries are disposed
of correctly, you will help prevent potentially negative consequences for the environment and human health
which could otherwise be caused by inappropriate waste handling of the battery. The recycling of the
materials will help to conserve natural resources. In case of products that for safety, performance or data
integrity reasons require a permanent connection with an incorporated battery, this battery should be
replaced by qualified service staff only. To ensure that the battery will be treated properly, hand over the
product at end-of-life to the applicable collection point for the recycling of electrical and electronic
equipment.
For all other batteries, please view the section on how to remove the battery from the product safely. Hand
the battery over to the applicable collection point for the recycling of waste batteries. For more detailed
information about recycling of this product or battery, please contact your local Local government Office,
your household waste disposal service or the shop where you purchased the product.
file:///Volumes/Product_Data/TAB07-210/Sent_artwork/Manual/internet2/Yarvik/Manual/manual_bg.html[07-08-13 10:35:39]

Наръчник Yarvik Tablet
When travelling to and within the United States of America, please be aware that the U.S. Department of
Transportation (DOT) recently published new regulations that apply to passengers travelling with lithium
metal batteries and lithium-ion batteries.
For detailed information, visit http://safetravel.dot.gov/whats_new_batteries.html
.
Safety Information
Yarvik Tablet Tablet device
• Yarvik is not responsible for any interference that you may experience or that may be caused when
operating this device.
• Warning: We strongly advise to connect this device to a earthed wall socket when charging.
• Opening or dismantling the main unit or any of its accessories, for whatever reason, could lead to damages
that are not covered by the guarantee.
• To avoid electrical shock, do not open the cabinet. Refer servicing to qualified personnel only.
• To prevent fire or shock hazard, do not expose your tablet device or any of its accessories to rain or
moisture.
• Do not use or store your tablet device in a location subject to heat sources, such as radiators or air ducts;
direct sunlight; excessive dust; moisture or rain; mechanical vibration or shock; strong magnets or speakers
that are not magnetically shielded; excessively high and low temperatures; and high humidity.
• Turning off your tablet device with the power button does not disconnect the device completely from mains
voltage. To disconnect it completely, unplug the AC adapter or the power cord from mains. The socket-outlet
shall be installed near the equipment and shall be easily accessible.
• Audio and picture distortion may occur if this equipment is positioned in close proximity to any equipment
emitting electromagnetic radiation.
• This apparatus is also designed for IT power system with phase to phase voltage 230V, for customers in
Norway.
• Observe the following precautions to provide adequate air circulation and to ensure normal reliable
operation:
- Do not use the tablet device and/or the AC adapter while covered or wrapped in cloth. Ensure the AC
adapter operates in a clear environment.
- Turn off the tablet device before putting the device into a bag or a carrying case.
• Do not use your tablet device directly on your lap. The temperature of the base of the unit will rise during
normal operation and over time could result in discomfort or burns.
• Do not use your tablet device while walking. Listening to music with headphones or watching the LCD
screen while walking may lead to an unexpected accident and result in personal injuries.
file:///Volumes/Product_Data/TAB07-210/Sent_artwork/Manual/internet2/Yarvik/Manual/manual_bg.html[07-08-13 10:35:39]

Наръчник Yarvik Tablet
• Using connected headphones on the tablet device for too long and/or setting the audio volume up too high
when using headphones may cause serious hearing damage.
• Avoid strong beating of or to the product.
• Don’t operate the touch screen of the tablet device with sharp objects, as this may result in scratching the
screen surface.
• Only use permitted batteries, chargers and accessories with your tablet device. The use of any other
products with the device can be dangerous and may violate the warranty regulations.
• Only use a slightly wet cotton cloth to clean the device, and only use water to wetten the cotton cloth. The
tablet device should not be cleaned with any sort of (glass) cleaning aid.
Wireless functionality
• If radio interference with other devices occurs while using your tablet device, do not use the wireless
functionality. Use of the wireless functionality may cause a malfunction of the devices, resulting in an
accident.
• In some situations or environments, the use of the wireless functionality might be restricted by the
proprietor of the building or responsible representatives of the organization, for example on board airplanes,
in hospitals or in any other environment where the risk of interference with other devices or services is
perceived or identified as harmful. If you are uncertain about the policy applying to the use of wireless
functionality in a specific organization or environment, you are encouraged to first ask for authorization prior
to switching it on. Consult your physician or the manufacturer of personal medical devices (pacemakers,
hearing aids, etc.) regarding any restrictions on the use of wireless functionality.
• If using wireless functionality near a pacemaker, make sure it is at least 19 inches / 50 cm away from the
pacemaker.
• Due to the transmission and reception properties of wireless communications, data can occasionally be lost
or delayed. This can be due to the variation in radio signal strength that results from changes in the
characteristics of the radio transmission path. Yarvik will not be held responsible for damages of any kind
resulting from the delays or errors in data transmitted or received via wireless functionality, or failure of
wireless functionality to transmit or receive such data.
• If the equipment does cause harmful interference to radio/TV reception, which can be determined by turning
the equipment off and on, the user is encouraged to try to correct the interference by one or more of the
following measures: reorient or relocate the receiving antenna, increase the distance between the sender
and the receiver, consult the dealer or an experienced radio/TV technician for help. Yarvik will not be
responsible for any radio/TV interference nor for any other undesired effect.
Wireless LAN Security
file:///Volumes/Product_Data/TAB07-210/Sent_artwork/Manual/internet2/Yarvik/Manual/manual_bg.html[07-08-13 10:35:39]

Наръчник Yarvik Tablet
Creating security settings for the Wireless LAN is extremely important. Yarvik assumes no responsibility for
any security problems that may arise from the use of the Wireless LAN.
Battery pack
Do not charge the battery pack in any way other than as described in the Start guide or as designated by
Yarvik in writing.
AC adapter
• It is highly recommended that you use a genuine Yarvik AC adapter supplied by Yarvik for your product.
• This AC adapter is intended for use with the tablet device IT products only.
• Do not place the AC adapter in contact with your skin. Remove the AC adapter away from your body if it
becomes warm and causes discomfort.
RoHS
This products has been certified as RoHS Compliant.
Dimensions, specifications, images & illustrations
All dimensions, specifications, images and illustrations are subject to change without prior notice.
file:///Volumes/Product_Data/TAB07-210/Sent_artwork/Manual/internet2/Yarvik/Manual/manual_bg.html[07-08-13 10:35:39]

Наръчник Yarvik Tablet
YARVIK.COM
Връщане към
индекса
file:///Volumes/Product_Data/TAB07-210/Sent_artwork/Manual/internet2/Yarvik/Manual/manual_bg.html[07-08-13 10:35:39]

Yarvik Tablet Handleiding
Index
SELECT LANGUAGE
1 Voor het eerste gebruik
2 Tablet Start
3 Android Home scherm
3.1 Widgets en snelkoppelingen toevoegen aan uw Home scherm
3.2 Achtergrond instellen
3.3 Menu Applicaties
4 Uw Yarvik Tablet instellen
4.1 Instellingen menu
4.2 WiFi & Bluetooth
4.3 Geluid
4.4 Scherm
4.5 Apps
4.6 Opslag & MicroSD/USB-stick toegang
4.7 Taal & toetsenbord
4.8 Datum & tijd
5 Apps
6 GNU/GPL Licentie informatie
7 Garantieverklaring
8 Important Information
1 Voor het eerste gebruik
Geachte gebruiker,
Bedankt dat u ons product hebt aangeschaft.
Lees deze instructies zorgvuldig voor gebruik, zodat u uw Yarvik Tablet snel en goed kunt gebruiken.
We hopen dat u lang kunt genieten van uw Yarvik Tablet!
file:///Volumes/Product_Data/TAB07-210/Sent_artwork/Manual/internet2/Yarvik/Manual/manual_nl.html[07-08-13 10:35:54]

Yarvik Tablet Handleiding
Let op : • Uw Yarvik Tablet is een fijngevoelig elektronisch product. Probeer de Tablet niet uit elkaar
te halen. Hierdoor vervalt uw garantie en het kan leiden tot het disfunctioneren van het
apparaat;
• Vermijd klappen op of tegen het product;
• Gebruik de Tablet niet in een omgeving met hoge of lage temperatuur of in een omgeving
waar het apparaat in contact kan komen met vocht, stof of magnetische velden;
• Stel de Tablet niet voor langere tijd bloot aan sterk zonlicht;
• Gebruik het touch screen van de Tablet niet met scherpe objecten, dit kan het
schermoppervlak beschadigen;
• Gebruik de aangesloten koptelefoon op de Tablet niet te lang en zet het volume niet te
hard, dit kan leiden tot ernstige gehoorschade;
• Voorkom verkeersongelukken en gebruik de Tablet niet terwijl u een motorvoertuig of een
fiets bestuurt;
• Gebruik alleen toegestane accu's, opladers en accessoires voor uw Yarvik Tablet. Het
gebruik van andere producten kan gevaarlijk zijn en kan de garantievoorwaarden schenden;
• Maak de Tablet schoon met een vochtige katoenen doek en gebruik alleen water om de
doek nat te maken. De Tablet mag niet gereinigd worden met een (glas) reiniger.
U kunt de Yarvik Tablet direct gebruiken, zonder de accu eerst op te laden.
Het is het beste voor de accu om deze eerst leeg te maken en deze daarna volledig op te laden.
Als de Tablet niet direct aan gaat als u deze uit de doos haalt, dan is de accu al volledig leeg en dient u deze
eerst geheel op te laden.
Terug naar index
2 Tablet Start
Als u uw Yarvik Tablet voor het eerst opstart, krijgt u een opstartscherm te zien.
De eerste keer opstarten kan even duren, gemiddeld 2 tot 3 minuten.
Als het opstartscherm verdwijnt, is de Tablet helemaal opgestart en krijgt u het Android
Vergrendelingsscherm te zien.
file:///Volumes/Product_Data/TAB07-210/Sent_artwork/Manual/internet2/Yarvik/Manual/manual_nl.html[07-08-13 10:35:54]

Yarvik Tablet Handleiding
Android Vergrendelingsscherm
Verschuif de vergrendelingsbalk (A) naar rechts om de Tablet te ontgrendelen. U wordt dan naar het Android
Home scherm geleid.
Terug naar index
3 Android Home scherm
file:///Volumes/Product_Data/TAB07-210/Sent_artwork/Manual/internet2/Yarvik/Manual/manual_nl.html[07-08-13 10:35:54]

Yarvik Tablet Handleiding
Android Home scherm
De statusbalk is altijd te vinden onderin het Tablet scherm.
In de statusbalk vindt u systeeminformatie en functieknoppen.
1 - Menu Apps en widgets (bevindt zich in het midden onder het Home scherm op sommige modellen)
2 - Widget (analoge klok)
3 - App-snelkoppelingen
4 - Terug knop - brengt u terug naar het vorige scherm of de vorige website, als u de browser gebruikt
5 - Home - brengt u terug naar het Android Home scherm
6 - Multitask-knop
7 - Systeemtijd
8 - Indicator Wi-Fi signaal
9 - Indicator accuniveau
Het Home scherm bestaat uit meerdere pagina's die kunnen worden geopend door over het scherm naar
links of rechts te vegen.
file:///Volumes/Product_Data/TAB07-210/Sent_artwork/Manual/internet2/Yarvik/Manual/manual_nl.html[07-08-13 10:35:54]

Yarvik Tablet Handleiding
Om te bekijken welke apps op de achtergrond worden uitgevoerd, kunt u met de multitask-knop (6) de
multitask-weergave openen.
Klik op een actieve app in de multitask-weergave om snel naar deze app over te gaan. U kunt actieve apps
sluiten door deze apps ingedrukt te houden en te klikken op "Remove from list" (Uit lijst verwijderen).
Terug naar index
3.1 Widgets en snelkoppelingen toevoegen aan uw Home scherm
Om een widget toe te voegen, drukt u op de App/widget-knop rechtsboven in het Home scherm:
In het volgende scherm kunt u alle geïnstalleerde apps en widgets vinden. U kunt ze ook afzonderlijk
bekijken door te drukken op "Apps" of "Widgets" bovenin het scherm.
Druk op "Widgets" om alle beschikbare widgets te bekijken. Wanneer alle widgets worden weergegeven,
kunt u over het scherm vegen om naar de volgende pagina te gaan (indien beschikbaar).
Druk op de gewenste widget totdat het Home scherm verschijnt en laat de widget los op een lege plek op het
beginscherm.
Om een snelkoppeling aan een app toe te voegen, drukt u op de knop app en widget rechtsboven in het
file:///Volumes/Product_Data/TAB07-210/Sent_artwork/Manual/internet2/Yarvik/Manual/manual_nl.html[07-08-13 10:35:54]

Yarvik Tablet Handleiding
Home scherm:
In het volgende scherm kunt u alle geïnstalleerde apps en widgets vinden. U kunt ze ook afzonderlijk
bekijken door te drukken op "Apps" of "Widgets" bovenin het scherm.
Druk op "Apps" om alle geïnstalleerde apps te bekijken.
Druk op de gewenste app totdat het Home scherm verschijnt en laat de snelkoppeling los op een lege plek
op het Home scherm.
Om widgets en/of apps van uw Home scherm te verwijderen, drukt u er op en houdt u deze vast. Sleep het
item vervolgens naar het icoontje van de prullenbak bovenin het Home scherm.
Terug naar index
3.2 Een achtergrond instellen
Om de achtergrond van het Home scherm te wijzigen, houdt u het Home scherm ingedrukt tot het menu
“Select Wallpaper from” ("Achtergrond selecteren uit") verschijnt.
U kunt kiezen uit "Live Wallpapers" (achtergrond met animatie), "Super-HD Player" (foto/video-gallerij) of
"Wallpapers" (standaard statische afbeeldingen).
Terug naar index
3.3 Menu Applicaties
Druk op de App/widget-knop rechtsboven in het Home scherm:
Zodra het systeem de widgets weergeeft, drukt u op "Apps" om alle geïnstalleerde apps te bekijken.
Hier kunt u de voorgeïnstalleerde programma's of “apps” vinden, maar ook andere apps die u zelf
geïnstalleerd hebt.
Start een app op door op het icoontje te klikken.
file:///Volumes/Product_Data/TAB07-210/Sent_artwork/Manual/internet2/Yarvik/Manual/manual_nl.html[07-08-13 10:35:54]

Yarvik Tablet Handleiding
Terug naar index
4 Uw Yarvik Tablet instellen
Instellingen
4.1
menu
Klik op het Instellingen icoontje in het Applicatie scherm om naar het Instellingen menu te gaan. In het
Instellingen menu vindt u de opties om uw Yarvik Tablet in te stellen.
file:///Volumes/Product_Data/TAB07-210/Sent_artwork/Manual/internet2/Yarvik/Manual/manual_nl.html[07-08-13 10:35:54]

Yarvik Tablet Handleiding
Instellingen Menu
We nemen de belangrijkste onderdelen door:
Terug naar index
4.2 WiFi & Bluetooth
Stel een verbinding in met een draadloos Wi-Fi netwerk.
Schuif de Wi-Fi aan/uit-knop op "AAN" om Wi-Fi te activeren.
file:///Volumes/Product_Data/TAB07-210/Sent_artwork/Manual/internet2/Yarvik/Manual/manual_nl.html[07-08-13 10:35:54]

Yarvik Tablet Handleiding
De beschikbare Wi-Fi-netwerken verschijnen in de netwerklijst in het rechtervenster. Selecteer het netwerk
van uw keuze. Als het netwerk beveiligd is, dient u eerst een wachtwoord in te voeren.
Selecteer de knop “Connect” ("Verbinden") en de Tablet maakt verbinding met het netwerk.
Zodra “Connected” ("Verbonden") onder de netwerknaam verschijnt en het icoontje van draadloze ontvangst
in de onderste statusbalk verschijnt, bent u verbonden met het draadloze netwerk.
Uw Yarvik Tablet's Wi-Fi MAC-adres bekijken
Klik in het scherm Wi-Fi-instellingen rechtsboven op de menuknop.
Druk op "Advanced" (Geavanceerd) in het menu dat wordt uitgevouwen.
Uw Wi-Fi MAC-adres wordt weergegeven in het volgende scherm "Advanced Wi-Fi" (Geavanceerde WiFi-
instellingen) onder "MAC address" (MAC-adres).
Bluetooth (
alleen van toepassing op modellen van Yarvik met Bluetooth - raadpleeg de technische
specificaties op de doos van uw product om te bepalen of Bluetooth aanwezig is).
Gebruik Bluetooth om verbinding te maken met Bluetooth-compatibele randapparatuur, zoals muizen,
toetsenborden, luidsprekers en hoofdtelefoons.
Schuif de Bluetooth aan/uit-knop op "AAN" om Bluetooth te activeren.
Wanneer geactiveerd, zal de Yarvik Tablet tablet automatisch beginnen met het zoeken naar dichtbijzijnde
Bluetooth-apparaten. U kunt ook altijd handmatig zoeken naar Bluetooth-apparaten door op "Apparaten
zoeken" rechtsboven in het scherm te klikken.
file:///Volumes/Product_Data/TAB07-210/Sent_artwork/Manual/internet2/Yarvik/Manual/manual_nl.html[07-08-13 10:35:54]

Yarvik Tablet Handleiding
Het kan nodig zijn om de te verbinden apparatuur in "pairingstand" te zetten. Raadpleeg hiervoor de
handleiding van de betreffende randapparatuur.
Alle gevonden apparaten zullen verschijnen in de "Beschikbare apparaten"-lijst:
Klik op het gevonden Bluetooth-apparaat om uw Yarvik Tablet tablet ermee te pairen.
Het "Bluetooth-koppelingsverzoek" venster verschijnt:
De meeste Bluetooth-apparaten vereisen een pincode om te kunnen verbinden. Deze code is doorgaans
0000 of 1234. Raadpleeg de handleiding van de betreffende randapparatuur, wanneer de pincode anders
mocht zijn.
Wanneer u de juiste pincode heeft ingevoerd, druk op "OK".
Uw Yarvik Tablet tablet zal nu de pairing met het Bluetooth-apparaat beginnen, en na enkele seconden zal
de verbinding zijn gemaakt, waarbij een "Verbonden"-bericht onder het betreffende Bluetooth-apparaat in de
"Beschikbare apparaten"-lijst komt te staan:
U kunt meerdere Bluetooth-apparaten tegelijkertijd met uw Yarvik Tablet tablet gebruiken (b.v. muis en
toetsenbord).
file:///Volumes/Product_Data/TAB07-210/Sent_artwork/Manual/internet2/Yarvik/Manual/manual_nl.html[07-08-13 10:35:54]

Yarvik Tablet Handleiding
Terug naar index
4.3 Geluid
Hier kunt u het volume van de Tablet aanpassen. Hiervoor kunt u ook de volumeknoppen op de Tablet zelf
gebruiken en de volumeknoppen in de bovenste balk.
Terug naar index
4.4 Scherm
Hier kunt u de helderheid van het display, de grootte van lettertypen en de auto slaapstand wijzigen.
Let op: des te helderder het scherm, des te meer energie verbruikt wordt. Hierdoor is uw accu veel sneller
leeg.
Als u niet wilt dat het scherm automatisch meedraait als u de Tablet kantelt, schakel deze functionaliteit dan
uit in het Auto-rotatie instellingenscherm.
Terug naar index
4.5 Apps
Hier kunt u geïnstalleerde applicaties beheren.
Klik op de geïnstalleerde apps om de informatie te bekijken en deïnstalleer ze met behulp van de “Uninstall”
("Deïnstalleren") knop.
Let op: voorgeïnstalleerde standaardapplicaties (zoals de calculator) kunnen niet gedeïnstalleerd worden.
Terug naar index
4.6 Opslag & MicroSD/USB -stick toegang
Toont informatie over het interne geheugen. Als een MicroSD-kaart aanwezig is, ziet u hier ook de informatie
over de kaart.
Uw Yarvik Tablet via USB op een PC of Mac aansluiten
Met de meegeleverde USB-kabel kunt u de Yarvik Tablet op een PC of Mac aansluiten.
Zodra het apparaat is aangesloten op een computer kunt u het interne geheugen van de Tablet openen en,
indien aanwezig, een geplaatste MicroSD-kaart als standaard USB-apparaat voor massaopslag openen.
Raadpleeg de bij uw Yarvik Tablet geleverde gids Aan de slag om te bepalen wat de USB slave-poort van de
tablet is. Sluit de USB-kabel aan op de USB slave-poort van uw Yarvik Tablet en op een vrije USB-poort van
uw computer.
Rechtsonder in het scherm van uw Tablet verschijnen vlak achter elkaar twee berichten:
file:///Volumes/Product_Data/TAB07-210/Sent_artwork/Manual/internet2/Yarvik/Manual/manual_nl.html[07-08-13 10:35:54]

Yarvik Tablet Handleiding
Zodra het tweede bericht "USB connected" (USB verbonden) verschijnt, klikt u hier op.
Het volgende scherm verschijnt:
Klik op de knop "Turn on USB storage" (USB-opslag inschakelen).
Er verschijnt een berichtvenster:
Klik op "OK" om te bevestigen.
Het interne geheugen van uw Yarvik Tablet verschijnt nu als apparaat voor massaopslag in het
bestandssyteem van uw computer en kan bijvoorbeeld worden gebruikt voor het kopiëren van bestanden van
en naar uw Yarvik Tablet.
Als u een MicroSD-kaart in uw tablet hebt geplaatst, wordt de kaart door de computer herkend als een
tweede apparaat voor massaopslag.
file:///Volumes/Product_Data/TAB07-210/Sent_artwork/Manual/internet2/Yarvik/Manual/manual_nl.html[07-08-13 10:35:54]

Yarvik Tablet Handleiding
Om de functie van apparaat voor massaopslag te stoppen, klikt u op de knop "Turn off USB storage" (USB-
opslag uitschakelen) en verwijdert u de USB-kabel.
NB: Er is geen hardwarestuurprogramma nodig voor toegang tot het geheugen van de Yarvik Tablet. In het
geval dat uw computer vraagt om de installatie van een stuurprogramma, kunt u dit gewoon negeren.
Benader uw MicroSD-kaart of USB-stick in ES File Explorer
Als u een MicroSD-kaart of USB-stick hebt geplaatst in uw Yarvik Tablet, kunt u de inhoud als volgt openen:
Open de ES File Explorer (verkenner) en klik op Local (lokale map) in het menu "Fast Access" (snelle
toegang) links.
De lokale map Local wordt nu geopend en laat alle geheugenlocaties van het apparaat zien.
De MicroSD-kaart is meestal een van de laagste opties in de lijst, genaamd external_sd in het onderstaande
voorbeeld:
file:///Volumes/Product_Data/TAB07-210/Sent_artwork/Manual/internet2/Yarvik/Manual/manual_nl.html[07-08-13 10:35:54]

Yarvik Tablet Handleiding
Houd er rekening mee dat de naam van de MicroSD-kaart anders kan zijn. Andere namen zoals sd-ext of
ext-sd kunnen door uw apparaat worden gebruikt.
Wanneer u een USB-station hebt geplaatst in de USB host-poort/adapter, wordt dit station weergegeven als
(in het voorbeeld hierboven) usb_storage.
De naam voor het USB-station kan ook afwijken.
Terug naar index
4.7 Taal & toetsenbord
Gebruik “Select language” ("Selecteer Taal") om de displaytaal voor uw Yarvik Tablet te selecteren. Dit is
van toepassing op alle teksten op het scherm.
Gebruik “Android keyboard” ("Android toetsenbord") om het onscreen toetsenbord van uw Tablet te
installeren.
Terug naar index
4.8 Datum & tijd
Hier kunt u de datum en tijd instellen van uw Yarvik Tablet.
file:///Volumes/Product_Data/TAB07-210/Sent_artwork/Manual/internet2/Yarvik/Manual/manual_nl.html[07-08-13 10:35:54]

Yarvik Tablet Handleiding
Terug naar index
5 Apps
De Yarvik Tablet wordt geleverd met vooraf geïnstalleerde apps (zie voorbeelden hieronder).
Browser
De webbrowser om websites te bekijken.
Calculator
Calculator met wat eenvoudige wetenschappelijke functies.
Kalender
Kalender app om afspraken te maken en te bekijken.
Camera
Voor het maken van foto’s en video’s opnemen met de ingebouwde camera.
Klok
Een eenvoudige klok met alarm.
Downloads
Laat u de huidige en gearchiveerde downloads van de Browser-applicatie zien.
E-mail
E-mail client voor het verzenden en ontvangen van e-mail.
ES File Explorer
Bestandsverkenner om mappen en documenten op uw Yarvik tablet te bekijken/openen. Zie hoofdstuk 4.6
voor meer informatie.
FBReader
E-reader met ondersteuning van epub, fb2 en (gedeeltelijk) mobipocket formaten.
Fotogalerie
Fotoviewer. De fotogalerie speelt ook videobestanden af. Raadpleeg de technische specificaties van uw
file:///Volumes/Product_Data/TAB07-210/Sent_artwork/Manual/internet2/Yarvik/Manual/manual_nl.html[07-08-13 10:35:54]

Yarvik Tablet Handleiding
Yarvik-model voor compatibele bestandsformaten.
Handleiding
Deze Yarvik digitale handleiding.
Muziek
Muziek/audio-speler. Raadpleeg de technische specificaties van uw Yarvik-model voor compatibele
bestandsformaten.
OfficeSuite
MobiSoft OfficeSuite Viewer. Opent Word, Excel, PowerPoint en PDF bestanden.
Mensen
Adresboek voor uw contacten.
Play Store
App Markt voor het downloaden van gratis of betaalde apps voor Android.
Vereist (gratis) Google accountregistratie.
Instellingen
Het menu om uw Yarvik-apparaat in te stellen.
Geluidsrecorder Spraaknotities/audio opnemen en afluisteren.
Video
Videoplayer. Raadpleeg de technische specificaties van uw Yarvik-model voor compatibele videoformaten.
* Applicatievormgeving (naam en/of pictogram) en beschikbaarheid kunnen variëren.
Terug naar index
6 GNU/GPL Licentie informatie
Lees de juridische informatie die beschikbaar is op uw Yarvik Tablet via Instellingen - Over tablet - Juridische
informatie (internetverbinding vereist) of bezoek http://source.android.com/source/licenses.html
informatie.
voor meer
Terug naar index
7 Garantieverklaring
Yarvik biedt een 2 jaar Comfort garantie voor al haar producten.
Kijk op yarvik.com/service
voor meer informatie.
Terug naar index
file:///Volumes/Product_Data/TAB07-210/Sent_artwork/Manual/internet2/Yarvik/Manual/manual_nl.html[07-08-13 10:35:54]

Yarvik Tablet Handleiding
8 Important Information
Wireless LAN-Regulatory information
Depending on the model, the wireless LAN built-in into tablet devices can only be used in the following
countries: Austria, Belgium, Bulgaria, Czech Republic, Denmark, Finland, France, Germany, Greece,
Hungary, Iceland, Ireland, Italy, Luxembourg, the Netherlands, Norway, Poland, Portugal, Romania,
Slovakia, Slovenia, Spain, Sweden, Switzerland, Turkey and the United Kingdom.
Conditions of use
When using the IEEE 802.11b/g/n Wireless LAN standard, channels 1 to 13 (2.4 GHz...2.4835 GHz) are
selectable for both indoor and outdoor use, however with restrictive conditions applying in France, Italy and
Norway, as follows:
• France: When using this product indoor, all channels can be used without restrictions. Outdoor only
channels 1 to 6 are allowed. This means that in Peer-to-Peer, the WLAN feature can only be used outside if
the peer sets up the communication on an authorized channel (i.e., between 1 & 6). In infrastructure mode,
please make sure the access point is configured to a channel from 1 to 6 before setting up the connection.
• Italy: Use of the RLAN network is governed: Disposal of Old Electrical & Electronic
- with respect to private use, by the Legislative Decree of 1.8.2003, no. 259 (“Code of Electronic
Communications”). In particular Article 104 indicates when the prior obtainment of a general authorization is
required and Art. 105 indicates when free use is permitted;
- with respect to the supply to the public of the WLAN access to telecom networks and services, by the
Ministerial Decree 28.5.2003, as amended, and Art. 25 (general authorization for electronic communications
networks and services) of the Code of electronic communications.
• Norway: Use of this radio equipment is not allowed in the geographical area within a radius of 20 km from
the centre of Ny-Ålesund, Svalbard.
WEEE Symbol Information
Correct Disposal of This product (Waste Electrical & Electronic Equipment).
(Applicable in the European Union and other European countries with separate collection systems).
This marking shown on the product or its literature indicates that it should not be disposed with other
household wasted at the end of its working life. To prevent possible harm to the environment or human
health from uncontrolled waste disposal, please separate this from other types of wastes and recycle it
responsibly to promote the sustainable reuse of material resources.
file:///Volumes/Product_Data/TAB07-210/Sent_artwork/Manual/internet2/Yarvik/Manual/manual_nl.html[07-08-13 10:35:54]

Yarvik Tablet Handleiding
Household users should contact either the retailer where they purchased this product, or their local
government office, for details of where and how they can take this item for environmentally safe recycling.
Business users should contact their supplier and check the terms and conditions of the purchase contract.
This product should not be mixed with other commercial wastes of disposal.
Disposal of waste batteries (applicable in the European Union and other European countries with
separate collection systems)
Either of the symbols shown next may appear on the battery or on the packaging to indicate that the battery
provided with this product shall not be treated as household waste. On certain batteries this symbol might be
used in combination with a chemical symbol. The chemical symbols for mercury (Hg) or lead (Pb) are added
if the battery contains more than 0.0005% mercury or 0.004% lead. By ensuring these batteries are disposed
of correctly, you will help prevent potentially negative consequences for the environment and human health
which could otherwise be caused by inappropriate waste handling of the battery. The recycling of the
materials will help to conserve natural resources. In case of products that for safety, performance or data
integrity reasons require a permanent connection with an incorporated battery, this battery should be
replaced by qualified service staff only. To ensure that the battery will be treated properly, hand over the
product at end-of-life to the applicable collection point for the recycling of electrical and electronic
equipment.
For all other batteries, please view the section on how to remove the battery from the product safely. Hand
the battery over to the applicable collection point for the recycling of waste batteries. For more detailed
information about recycling of this product or battery, please contact your local Local government Office,
your household waste disposal service or the shop where you purchased the product.
When travelling to and within the United States of America, please be aware that the U.S. Department of
Transportation (DOT) recently published new regulations that apply to passengers travelling with lithium
metal batteries and lithium-ion batteries.
For detailed information, visit http://safetravel.dot.gov/whats_new_batteries.html
.
Safety Information
Yarvik Tablet Tablet device
• Yarvik is not responsible for any interference that you may experience or that may be caused when
operating this device.
• Warning: We strongly advise to connect this device to a earthed wall socket when charging.
file:///Volumes/Product_Data/TAB07-210/Sent_artwork/Manual/internet2/Yarvik/Manual/manual_nl.html[07-08-13 10:35:54]

Yarvik Tablet Handleiding
• Opening or dismantling the main unit or any of its accessories, for whatever reason, could lead to damages
that are not covered by the guarantee.
• To avoid electrical shock, do not open the cabinet. Refer servicing to qualified personnel only.
• To prevent fire or shock hazard, do not expose your tablet device or any of its accessories to rain or
moisture.
• Do not use or store your tablet device in a location subject to heat sources, such as radiators or air ducts;
direct sunlight; excessive dust; moisture or rain; mechanical vibration or shock; strong magnets or speakers
that are not magnetically shielded; excessively high and low temperatures; and high humidity.
• Turning off your tablet device with the power button does not disconnect the device completely from mains
voltage. To disconnect it completely, unplug the AC adapter or the power cord from mains. The socket-outlet
shall be installed near the equipment and shall be easily accessible.
• Audio and picture distortion may occur if this equipment is positioned in close proximity to any equipment
emitting electromagnetic radiation.
• This apparatus is also designed for IT power system with phase to phase voltage 230V, for customers in
Norway.
• Observe the following precautions to provide adequate air circulation and to ensure normal reliable
operation:
- Do not use the tablet device and/or the AC adapter while covered or wrapped in cloth. Ensure the AC
adapter operates in a clear environment.
- Turn off the tablet device before putting the device into a bag or a carrying case.
• Do not use your tablet device directly on your lap. The temperature of the base of the unit will rise during
normal operation and over time could result in discomfort or burns.
• Do not use your tablet device while walking. Listening to music with headphones or watching the LCD
screen while walking may lead to an unexpected accident and result in personal injuries.
• Using connected headphones on the tablet device for too long and/or setting the audio volume up too high
when using headphones may cause serious hearing damage.
• Avoid strong beating of or to the product.
• Don’t operate the touch screen of the tablet device with sharp objects, as this may result in scratching the
screen surface.
• Only use permitted batteries, chargers and accessories with your tablet device. The use of any other
products with the device can be dangerous and may violate the warranty regulations.
• Only use a slightly wet cotton cloth to clean the device, and only use water to wetten the cotton cloth. The
tablet device should not be cleaned with any sort of (glass) cleaning aid.
file:///Volumes/Product_Data/TAB07-210/Sent_artwork/Manual/internet2/Yarvik/Manual/manual_nl.html[07-08-13 10:35:54]

Yarvik Tablet Handleiding
Wireless functionality
• If radio interference with other devices occurs while using your tablet device, do not use the wireless
functionality. Use of the wireless functionality may cause a malfunction of the devices, resulting in an
accident.
• In some situations or environments, the use of the wireless functionality might be restricted by the
proprietor of the building or responsible representatives of the organization, for example on board airplanes,
in hospitals or in any other environment where the risk of interference with other devices or services is
perceived or identified as harmful. If you are uncertain about the policy applying to the use of wireless
functionality in a specific organization or environment, you are encouraged to first ask for authorization prior
to switching it on. Consult your physician or the manufacturer of personal medical devices (pacemakers,
hearing aids, etc.) regarding any restrictions on the use of wireless functionality.
• If using wireless functionality near a pacemaker, make sure it is at least 19 inches / 50 cm away from the
pacemaker.
• Due to the transmission and reception properties of wireless communications, data can occasionally be lost
or delayed. This can be due to the variation in radio signal strength that results from changes in the
characteristics of the radio transmission path. Yarvik will not be held responsible for damages of any kind
resulting from the delays or errors in data transmitted or received via wireless functionality, or failure of
wireless functionality to transmit or receive such data.
• If the equipment does cause harmful interference to radio/TV reception, which can be determined by turning
the equipment off and on, the user is encouraged to try to correct the interference by one or more of the
following measures: reorient or relocate the receiving antenna, increase the distance between the sender
and the receiver, consult the dealer or an experienced radio/TV technician for help. Yarvik will not be
responsible for any radio/TV interference nor for any other undesired effect.
Wireless LAN Security
Creating security settings for the Wireless LAN is extremely important. Yarvik assumes no responsibility for
any security problems that may arise from the use of the Wireless LAN.
Battery pack
Do not charge the battery pack in any way other than as described in the Start guide or as designated by
Yarvik in writing.
AC adapter
• It is highly recommended that you use a genuine Yarvik AC adapter supplied by Yarvik for your product.
• This AC adapter is intended for use with the tablet device IT products only.
• Do not place the AC adapter in contact with your skin. Remove the AC adapter away from your body if it
file:///Volumes/Product_Data/TAB07-210/Sent_artwork/Manual/internet2/Yarvik/Manual/manual_nl.html[07-08-13 10:35:54]

Yarvik Tablet Handleiding
becomes warm and causes discomfort.
RoHS
This products has been certified as RoHS Compliant.
Dimensions, specifications, images & illustrations
All dimensions, specifications, images and illustrations are subject to change without prior notice.
YARVIK.COM
Terug naar index
file:///Volumes/Product_Data/TAB07-210/Sent_artwork/Manual/internet2/Yarvik/Manual/manual_nl.html[07-08-13 10:35:54]

Yarvik Tablet Manuál
Register
SELECT LANGUAGE
1 Pred prvým použitím
2 Spustenie Tablet
3 Domáca obrazovka Android
3.1 Pridávanie miniaplikácií a odkazov na domácu obrazovku
3.2 Nastavenie tapety
3.3 Ponuka aplikácií
4 Nastavenie vášho Yarvik Tablet
4.1 Ponuka Nastavenia
4.2 Wi-Fi a Bluetooth
4.3 Zvuk
4.4 Zobrazenie
4.5 Aplikácie
4.6 Prístup k pamäti a MicroSD/USB mechanike
4.7 Jazyk a vstup
4.8 Dátum a čas
5 Aplikácie
6 Licenčné informácie GNU/GPL
7 Záručné podmienky
8 Important Information
1 Pred prvým použitím
Vážený používateľ,
Ďakujeme vám za kúpu nášho výrobku.
Aby ste zabezpečili rýchle a pohodlné používanie vášho nového tabletu Yarvik Tablet prečítajte si, prosím,
pred použitím tieto pokyny.
Dúfame, že si svoj tablet Yarvik Tablet budete čo najdlhšie absolútne vychutnávať!
file:///Volumes/Product_Data/TAB07-210/Sent_artwork/Manual/internet2/Yarvik/Manual/manual_sk.html[07-08-13 10:36:08]

Yarvik Tablet Manuál
Vezmite do
úvahy:
• Váš tablet Yarvik Tablet je vysokopresný elektronický výrobok, nepokúšajte sa ho
rozoberať, pretože to bude viesť k zrušeniu záruky a môže to viesť k poruche zariadenia.
• Vyhnite sa silným nárazom na výrobok.
• Tablet nepoužívajte v prostredí s vysokými alebo nízkymi teplotami, ani v prostredí, kde
môže výrobok prísť do kontaktu s vlhkosťou, prachom alebo magnetickým poľom.
• Tablet nevystavujte dlhšiemu silnému slnečnému žiareniu.
• Dotykovej obrazovky Tablet sa nedotýkajte ostrými predmetmi, pretože by ste mohli
poškriabať povrch obrazovky.
• Príliš dlhé používanie slúchadiel s Tablet a/alebo príliš vysoký hlasitosť pri používaní
slúchadiel môže spôsobiť vážne poškodenie sluchu.
• Počas používania Tablet so slúchadlami neprechádzajte cez cestu, nešoférujte motorové
vozidlo ani nejazdite na bicykli, aby ste sa vyhli dopravnej nehode.
• so svojim Yarvik Tablet používajte iba povolené batérie, nabíjačky a príslušenstvo.
Používanie iných výrobkov s Tablet môže byť nebezpečné a môže porušiť záručné
podmienky.
• Na čistenie Tablet používajte iba mierne navlhčenú bavlnenú látku, ktorú navlhčite iba
vodou. Tablet nesmiete čistiť žiadnym čistiacim prostriedkom (na sklo).
Svoj Yarvik Tablet môžete začať používať okamžite vybraní zo škatule, bez potreby nabitia batérie.
Pri prvom spustení je lepšie použiť výrobok na zvyšnom nabití batérie a úplne ju nabiť až po jej úplnom
vybití.
Ak sa Tablet nedá zapnúť okamžite po vybraní zo škatule, batéria je úplne vybitá a vy by ste ju najskôr mali
nabiť.
Návrat k registru
2 Spustenie Tablet
Pri prvom spustení Yarvik Tablet sa vám predstaví sekvencia spustenia.
Úplne prvé spustenie môže chvíľu trvať, približne 2-3 minúty.
Po sekvencii spustenia je Tablet úplne spustený a predstaví sa vám uzamknutá obrazovka Android.
file:///Volumes/Product_Data/TAB07-210/Sent_artwork/Manual/internet2/Yarvik/Manual/manual_sk.html[07-08-13 10:36:08]

Yarvik Tablet Manuál
Uzamknutá obrazovka Android
Posuňte lištu uzamknutia (A) smerom hore a odomknite Tablet. Potom prejdete na domácu obrazovku
Android.
Návrat k registru
3 Domáca obrazovka Android
file:///Volumes/Product_Data/TAB07-210/Sent_artwork/Manual/internet2/Yarvik/Manual/manual_sk.html[07-08-13 10:36:08]

Yarvik Tablet Manuál
Domáca obrazovka Android
Na dolnej strane obrazovky Tablet môžete vždy nájsť stavovú lištu.
Stavová lišta obsahuje systémové informácie a funkčné tlačidlá.
1 - Ponuka aplikácií a miniaplikácií (pri niektorých modeloch sa môže nachádzať v strede dole na domácej
obrazovke)
2 - Miniaplikácia (analógové hodiny)
3 - Odkazy na aplikácie
4 - Tlačidlo Späť – prenesie vás späť na predchádzajúcu obrazovku alebo predchádzajúcu internetovú
stránku pomocou prehliadača
5 - Domov – prenesie vás späť na domácu obrazovku Android
6 - Viacúlohové tlačidlo
7 - Systémový čas
8 - Indikátor signálu Wi-Fi
9 - Kontrolka nabitia batérie
Domáca obrazovka pozostáva z viacerých strán, do ktorých môžete vstúpiť švihnutím na domácej obrazovke
file:///Volumes/Product_Data/TAB07-210/Sent_artwork/Manual/internet2/Yarvik/Manual/manual_sk.html[07-08-13 10:36:08]

Yarvik Tablet Manuál
doľava/doprava.
Ak sa chcete pozrieť, ktoré aplikácie sú spustené v pozadí, môžete vojsť do zobrazenia viacerých úloh
stlačením viacúlohového tlačidla (6).
Ak chcete rýchlo prepnúť na spustenú aplikáciu, kliknite na ňu v zobrazení viacerých úloh. Spustené
aplikácie môžete zatvoriť, ich dlhším stlačením a kliknutím na „Remove from“ („Odstrániť z“).
Návrat k registru
3.1 Pridávanie miniaplikácií a odkazov na domácu obrazovku
Ak chcete pridať miniaplikáciu, stlačte tlačidlo aplikácie a miniaplikácie v pravom hornom rohu na domácej
obrazovke:
Na nasledovnej obrazovke nájdete všetky nainštalované aplikácie a miniaplikácie. Oboje môžete zobraziť
samostatne, stlačením „Apps“ („Aplikácie“) alebo „Widgets“ („Miniaplikácie“) na hornej strane obrazovky.
Stlačte „Widgets“ („Miniaplikácie“) a pozrite si všetky dostupné miniaplikácie. Pri zobrazení všetkých
miniaplikácií môžete švihnúť na obrazovke a pozrieť si nasledujúcu stranu (ak je k dispozícii).
Stlačte a podržte požadovanú miniaplikáciu a zobrazí sa domáca obrazovka, potom miniaplikáciu pustite na
akékoľvek voľné miesto na domácej obrazovke.
file:///Volumes/Product_Data/TAB07-210/Sent_artwork/Manual/internet2/Yarvik/Manual/manual_sk.html[07-08-13 10:36:08]

Yarvik Tablet Manuál
Ak chcete pridať odkaz na ktorúkoľvek aplikáciu, stlačte tlačidlo aplikácie a miniaplikácie v pravom hornom
rohu na domácej obrazovke:
Na nasledovnej obrazovke nájdete všetky nainštalované aplikácie a miniaplikácie. Oboje môžete zobraziť
samostatne, stlačením „Apps“ („Aplikácie“) alebo „Widgets“ („Miniaplikácie“) na hornej strane obrazovky.
Stlačte „Apps“ („Aplikácie“) a pozrite si všetky nainštalované aplikácie.
Stlačte a podržte požadovanú aplikáciu a zobrazí sa domáca obrazovka, potom aplikáciu pustite na
akékoľvek voľné miesto na domácej obrazovke.
Ak chcete z domácej obrazovky odstrániť odkazy na miniaplikácie a/alebo aplikácie, stlačte ich a podržte a
potom ich potiahnite do zobrazenej ikony koša „Remove“ („Odstrániť“) na hornej strane domácej obrazovky.
Návrat k registru
3.2 Nastavenie tapety
Ak chcete zmeniť tapetu domácej obrazovky, stlačte a podržte domácu obrazovku, až kým sa nezobrazí
ponuka „Select Wallpaper from“ („Vybrať tapetu z“).
Môžete si vybrať z možností „Live Wallpapers“ („Živé tapety“) (animované tapety), „Super-HD Player“
(„Super HD prehrávač“) (galéria s fotografiami/videami) alebo „Wallpapers“ („Tapety“) (východiskový statický
obrázok).
Návrat k registru
3.3 Ponuka aplikácií
Stlačte tlačidlo aplikácie a miniaplikácie v pravom hornom rohu na domácej obrazovke:
Keď systém zobrazí miniaplikácie, stlačte „Apps“ („Aplikácie“) a pozrite si nainštalované aplikácie.
Tu si nájdete vopred nainštalované programy alebo „aplikácie“ a ďalšie aplikácie, ktoré ste si nainštalovali vy.
Ktorúkoľvek aplikáciu môžete spustiť jednoduchým stlačením príslušnej ikony.
file:///Volumes/Product_Data/TAB07-210/Sent_artwork/Manual/internet2/Yarvik/Manual/manual_sk.html[07-08-13 10:36:08]

Yarvik Tablet Manuál
Obrazovka s aplikáciami
Návrat k registru
4 Nastavenie vášho Yarvik Tablet
Ponuka
4.1
Settings
(Nastavení)
Ak chcete vojsť do ponuky nastavení stlačte ikonu Settings (Nastavenia) na domácej obrazovke Android
alebo na obrazovke aplikácie. V ponuke Settings (Nastavenia) nájdete možnosti nastavenia vášho Yarvik
Tablet.
file:///Volumes/Product_Data/TAB07-210/Sent_artwork/Manual/internet2/Yarvik/Manual/manual_sk.html[07-08-13 10:36:08]

Yarvik Tablet Manuál
Ponuka Settings (Nastavenia)
Prejdeme si najdôležitejšími časťami:
Návrat k registru
4.2 Wi-Fi a Bluetooth
Nastavenie pripojenia s bezdrôtovou sieťou Wi-Fi.
Ak chcete aktivovať Wi-Fi, posuňte vypínač do polohy „On“ („Zap.“).
file:///Volumes/Product_Data/TAB07-210/Sent_artwork/Manual/internet2/Yarvik/Manual/manual_sk.html[07-08-13 10:36:08]

Yarvik Tablet Manuál
Na pravej obrazovke v zozname sietí sa zobrazia dostupné Wi-Fi siete. Poklepte na sieť podľa vlastného
výberu. Ak je sieť zabezpečená, budete vyzvaní na zadanie bezpečnostného hesla siete.
Stlačte tlačidlo „Connect“ („Pripojiť“) a Tablet sa pripojí k sieti.
K bezdrôtovej sieti ste úspešne pripojení, keď sa pod názvom siete zobrazí „Connected“ („Pripojené“) a na
dolnej stavovej lište sa zobrazí ikona bezdrôtového príjmu.
Zobrazenie MAC adresy vašej Wi-Fi na zariadení Tablet spoločnosti Yarvik
Keď ste na obrazovke Settings (Nastavenia) Wi-Fi, kliknite na tlačidlo ponuky v pravom hornom rohu.
V rozbalenej ponuke kliknite na „Advanced“ („Pokročilé“).
Vaša MAC adresa Wi-Fi sa zobrazí na nasledovnej obrazovke „Advanced Wi-Fi“ („Pokročilé Wi-Fi“) v časti
„MAC address“ („MAC adresa“).
Bluetooth (
vzťahuje sa iba na modely Yarvik s funkciou Bluetooth - to, či sa v zariadení nachádza
Bluetooth nájdete v technických informáciách na škatuli vášho výrobku).
Bluetooth používajte na pripojenie s periférnymi zariadeniami, ktoré sú kompatibilné s Bluetooth, ako sú
napríklad myši, klávesnice, reproduktory a slúchadlá.
Ak chcete aktivovať Bluetooth, posuňte vypínač Bluetooth On/Off (Zap/Vyp) do polohy „On“ (Zap.).
Po aktivovaní začne váš tablet Tablet Yarvik automaticky vyhľadávať Bluetooth zariadenia v blízkosti.
Bluetooth zariadenia môžete stále vyhľadať manuálne kliknutím na „Search for Devices“ (Vyhľadať
zariadenie) v pravom hornom rohu na obrazovke.
file:///Volumes/Product_Data/TAB07-210/Sent_artwork/Manual/internet2/Yarvik/Manual/manual_sk.html[07-08-13 10:36:08]

Yarvik Tablet Manuál
Na pripojenie periférnych zariadení budete možno musieť prejsť do „režim párovania“. Postup, ako to
spraviť, nájdete v návode na použitie príslušných periférnych zariadení.
Všetky objavené zariadenia sa objavia v zozname „Available Devices“ (Dostupné zariadenia):
Kliknite na objavené Bluetooth zariadenie a spárujte s ním svoj tablet Tablet Yarvik.
Zobrazí sa okno „Bluetooth pairing request“ (Požiadavka na spárovanie s Bluetooth):
Väčšina Bluetooth zariadení si vyžaduje na pripojenie PIN kód. Vo väčšine prípadov je tento kód 0000 alebo
1234. Ak je PIN kód iný, obráťte sa prosím na návod na použitie vášho zariadenia Bluetooth.
Po zadaní správneho PIN kódu stlačte „OK“.
Váš tablet Tablet Yarvik sa teraz začne párovať so zariadením Bluetooth. Pripojenie sa niekoľkých
sekundách dokončí a pod príslušným zariadením Bluetooth v zozname „Available Devices“ (Dostupné
zariadenia) sa zobrazí sa správa „Connected“ (Pripojené):
k svojmu Tablet Yarvik môžete pripojiť viacero zariadení Bluetooh a používať ich naraz (napr. myš a
klávesnicu).
Návrat k registru
file:///Volumes/Product_Data/TAB07-210/Sent_artwork/Manual/internet2/Yarvik/Manual/manual_sk.html[07-08-13 10:36:08]

Yarvik Tablet Manuál
4.3 Sound (Zvuk)
Tu môžete meniť hlasitosť Tablet, inak je to možné aj pomocou tlačidiel hlasitosti na samotnom Tablet a
tlačidiel hlasitosti na hornej stavovej lište.
Návrat k registru
4.4 Display (Zobrazenie)
Tu môžete zmeniť jas displeja, veľkosť písma a čas automatického spánku.
Nezabudnite, že čím vyšší je jas displeja, tým vyššia je spotreba energie. Toto vašu batériu vybije o dosť
rýchlejšie.
Ak nechcete, aby sa zobrazenie po naklonení Tablet automaticky otočilo, môžete túto funkciu
aktivovať/deaktivovať v nastavení Auto-rotate screen (Automatické otočenie obrazovky).
Návrat k registru
4.5 Apps (Aplikácie)
Tu môžete spravovať aplikácie, ktoré sú nainštalované vo vašom Yarvik Tablet.
Môžete kliknúť na aplikácie, ktoré ste si nainštalovali a pozrieť si informácie o aplikáciách a ak je to potrebné,
môžete ich odinštalovať pomocou tlačidla „Uninstall“ („Odinštalovať“).
Nezabudnite, že vopred nainštalované východiskové aplikácie (ako napríklad kalkulačka) nie je možné
odinštalovať.
Návrat k registru
4.6 Storage - Prístup k pamäti a MicroSD/USB mechanike
Zobrazí informácie o internej pamäti. Ak sa v zariadení nachádza karta MicroSD, môžete tu nájsť aj
informácie o pamäti vloženej karty.
Pripojenie vášho Yarvik Tablet k počítaču alebo Mac pomocou USB
Svoj Yarvik Tablet môžete pripojiť k počítaču alebo Mac pomocou dodaného USB kábla.
Po pripojení k počítaču môžete vojsť do internej pamäte Tablet a ak sa tam nachádza, môžete použiť
vloženú kartu MicroSD ako štandardné veľkokapacitné pamäťové USB zariadenie.
Pre určenie USB portu tabletu sa obráťte na vytlačený Stručný návod na obsluhu vášho Yarvik Tablet. USB
kábel pripojte k USB portu vášho Yarvik Tablet a k voľnému USB portu na vašom počítači.
V pravom dolnom rohu obrazovky na vašom Tablet sa krátko po sebe zobrazia dve správy:
file:///Volumes/Product_Data/TAB07-210/Sent_artwork/Manual/internet2/Yarvik/Manual/manual_sk.html[07-08-13 10:36:08]

Yarvik Tablet Manuál
Keď sa zobrazí druhá správa „USB connected“ („USB pripojené“); kliknite na ňu.
Zobrazí sa nasledovná obrazovka:
Kliknite na tlačidlo „Turn on USB storage“ (Zapnúť USB pamäť“).
Zobrazí sa okno s oznámením:
Kliknite na „OK“ a potvrďte ho.
Interná pamäť vášho Yarvik Tablet sa teraz zobrazí ako veľkokapacitné pamäťové zariadenie v systéme
súborov vášho počítača a vy ju môžete používať napr. na kopírovanie súborov z a do vášho Yarvik Tablet.
Ak máte vo vašom tablete kartu MicroSD, bude rozpoznaná počítačom ako druhé veľkokapacitné pamäťové
zariadenie.
Ak chcete prestať používať veľkokapacitné pamäťové zariadenie, kliknite na tlačidlo „Turn off USB storage“
file:///Volumes/Product_Data/TAB07-210/Sent_artwork/Manual/internet2/Yarvik/Manual/manual_sk.html[07-08-13 10:36:08]

Yarvik Tablet Manuál
(„Vypnúť USB pamäť“) a odpojte USB kábel.
Poznámka: Na prístup k pamäti Yarvik Tablet nie sú potrebné žiadne hardvérové ovládače. V prípade, že
vás váš počítač vyzve na inštaláciu ovládača, môžete to jednoducho ignorovať.
Prístup k vašej karte MicroSD alebo USB mechanike v aplikácii ES File Explorer
Ak ste do svojho tabletu Yarvik vložili MicroSD kartu alebo USB mechaniku, môžete do ich obsahu vstupovať
nasledovne:
Otvorte aplikáciu ES File Explorer (ES prehliadač súborov) a kliknite na Local (Miestne) v ľavej ponuke
"Fast Access" („Rýchly prístup“).
Zoznam Local (Miestne) sa teraz otvorí a zobrazí všetky pamäťové umiestnenia zariadenia.
MicroSD karta je zvyčajne jednou z najnižších možností v zozname Local (Miestne), s názvom external_sd
v príklade nižšie:
file:///Volumes/Product_Data/TAB07-210/Sent_artwork/Manual/internet2/Yarvik/Manual/manual_sk.html[07-08-13 10:36:08]

Yarvik Tablet Manuál
Nezabudnite, že názov MicroSD karty sa môže líšiť. Vaše zariadenie môže použiť iné názvy, ako napríklad
sd-ext alebo ext-sd.
Po vložení USB mechaniky cez USB hostiteľský port/adaptér bude táto mechanika k dispozícii ako (v
príklade vyššie) usb_storage.
Aj názov USB mechaniky sa môže líšiť.
Návrat k registru
4.7 Language & input (Jazyk a vstup)
Pomocou „Select language“ („Vybrať jazyk“) vyberte jazyk zobrazenia vášho Yarvik Tablet. Toto sa vzťahuje
na texty všetkých obrazoviek v celom systéme.
V položke „Android keyboard“ („Klávesnica Android“) môžete nastaviť obrazovkovú klávesnicu vášho Tablet.
Návrat k registru
4.8 Date & time (Dátum a čas)
Tu môžete nastaviť dátum a čas pre váš Yarvik Tablet.
file:///Volumes/Product_Data/TAB07-210/Sent_artwork/Manual/internet2/Yarvik/Manual/manual_sk.html[07-08-13 10:36:08]
 Loading...