


Yarvik smartphone manual
Manual
Handleiding
Anleitung
Manuel
Manual
Manuale
Manual
Instrukcja obs ługi
Manuál
Manuál
Manual
Manuell
Håndbok
Priročnik
Priručnik
Leírás
Наръчник
Manual
Руководство
Посібник користувача
Οδηγίες Χρήσης
file:///Volumes/Product_Data/SMP53-210/R&D/HTML%20Manual/index.html[01-02-13 17:15:36]
Yarvik smartphone manual
Index
SELECT LANGUAGE
1 Prior to first use
2 Smartphone Startup
3 Android Home
Screen
3.1 Adding widgets and
shortcuts to your Home
Screen
3.2 Setting a Wallpaper
3.3 Application Menu
4 Setting up your
Smartphone
4.1 Settings Menu
4.2 WiFi & Bluetooth
4.3 Audio Profiles
4.4 Display
4.5 Apps
4.6 Storage & MicroSD
memory Access
4.7 Language & input
4.8 Date & time
5 Apps
6 Phone Calls
7 Messaging
8 Warranty Statement
9 GNU/GPL Licensing
Info
10 Important
Information
file:///Volumes/Product_Data/SMP53-210/R&D/HTML%20Manual/manual_en.html[01-02-13 17:15:49]

Yarvik smartphone manual
1 Prior to first use
Dear user,
Thank you for purchasing our product.
To ensure you a quick and convenient use of your new Yarvik Smartphone, please read these
instructions carefully prior to use.
We hope you will absolutely enjoy your Yarvik Smartphone for the longest time possible!
Please note:
• Your Yarvik Smartphone is a
high precision electronic
product, do not try to
disassemble the Smartphone,
as this will void your warranty
and may result in
malfunctioning of the device;
• Avoid strong beating of or to
the product;
• Avoid using the Smartphone
in a high or low temperature
environment, or in any
environment where the device
can get in contact with
moisture, dust or magnetic
fields;
• Do not expose the
Smartphone to strong sunlight
for an extended period of time;
• Don’t operate the touch
screen of the Smartphone with
sharp objects, as this may
result in scratching the screen
surface;
• Using connected headphones
on the Smartphone for too long
and/or setting the audio volume
up too high when using
headphones may cause
serious hearing damage;
• Do not cross the road, drive a
motor vehicle or bicycle while
using the Smartphone with
headphones to avoid traffic
accidents;
file:///Volumes/Product_Data/SMP53-210/R&D/HTML%20Manual/manual_en.html[01-02-13 17:15:49]
Yarvik smartphone manual
• Only use permitted batteries,
chargers and accessories with
your Yarvik Smartphone. The
use of any other products with
the Smartphone can be
dangerous and may violate the
warranty regulations;
• Only use a slightly wet cotton
cloth to clean the Smartphone,
and only use water to wetten
the cotton cloth. The
Smartphone should not be
cleaned with any sort of (glass)
cleaning aid.
You may go ahead and use your Yarvik Smartphone right out of the box, without charging the battery
first.
It is best for the battery to first run on the charge left in it, and to be fully recharged once it’s completely
drained for the first time.
If the Smartphone isn’t switching on right out of the box, the battery is already completely drained and you
should of course recharge it first.
Return to index
Smartphone
2
Startup
When you first power on your Yarvik Smartphone, you will be presented the startup sequence.
The very first startup may take a while, approximately 2-3 minutes.
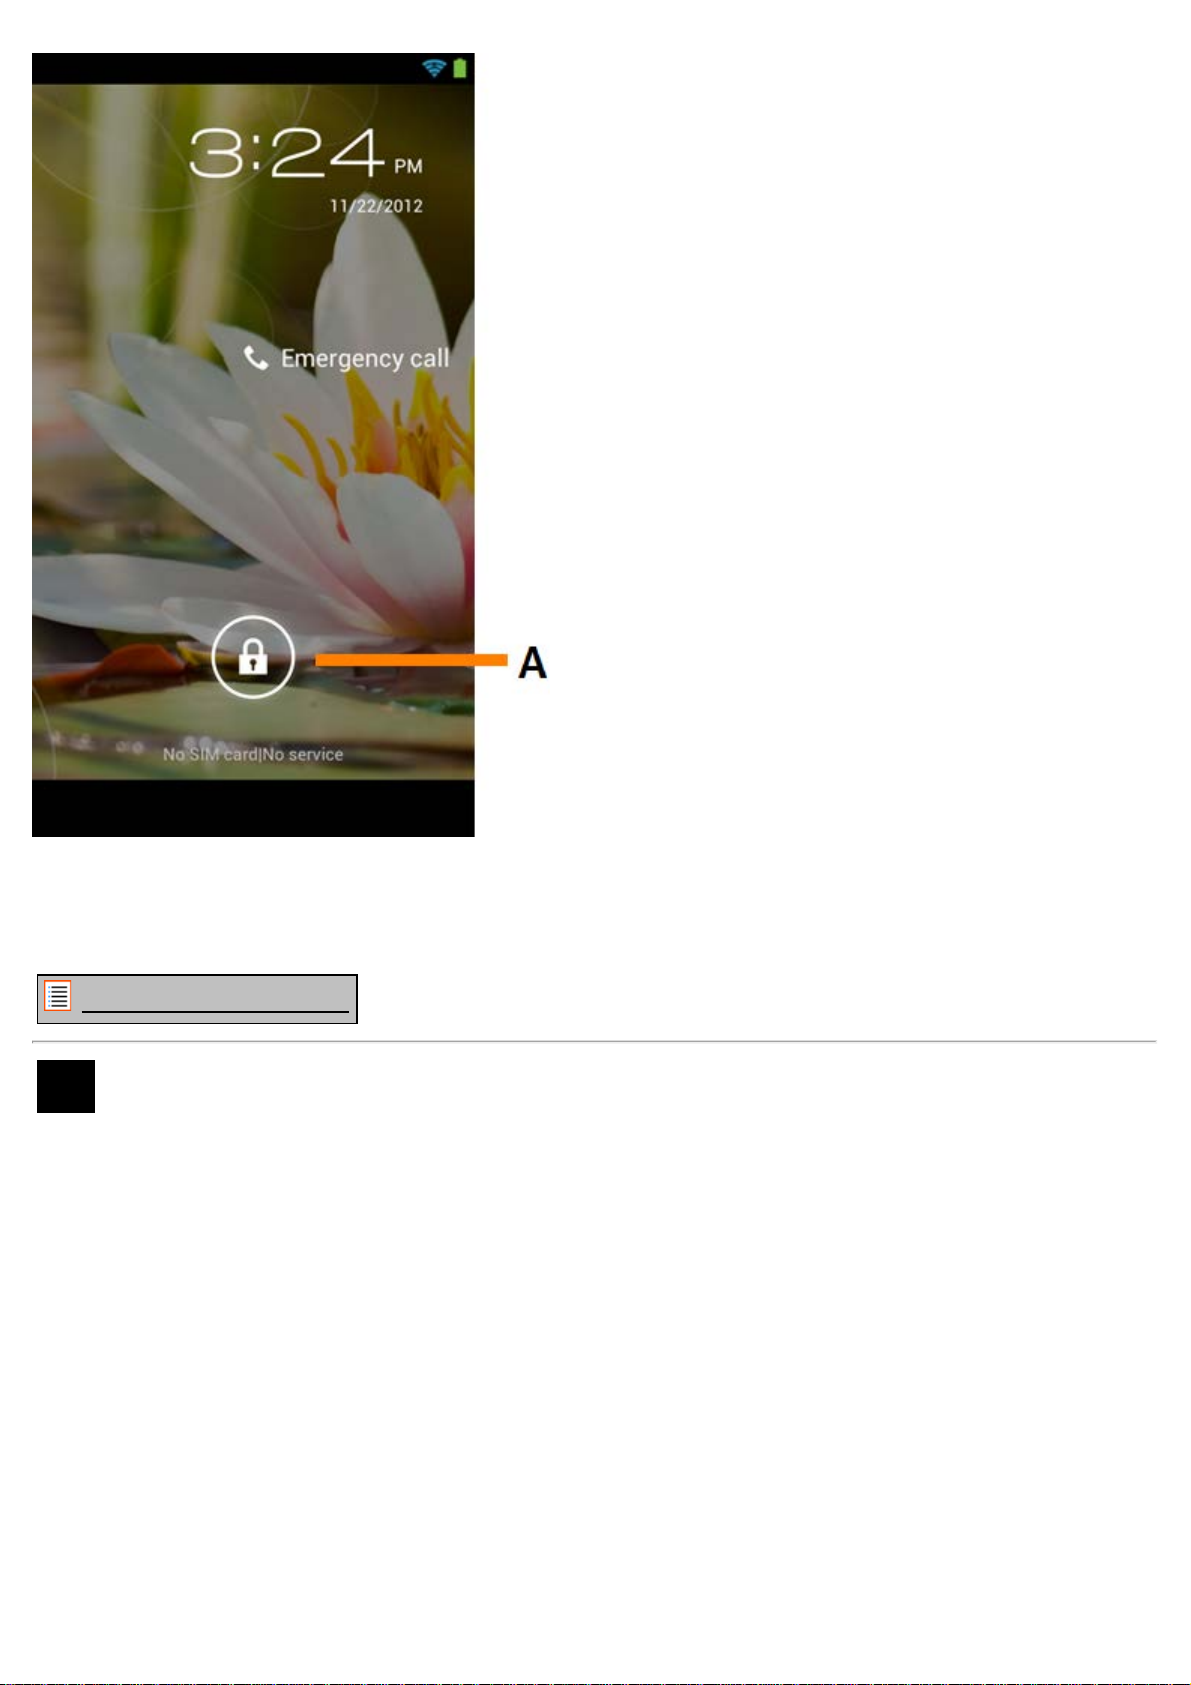
After the startup sequence the Smartphone has completed starting up and you will be presented the
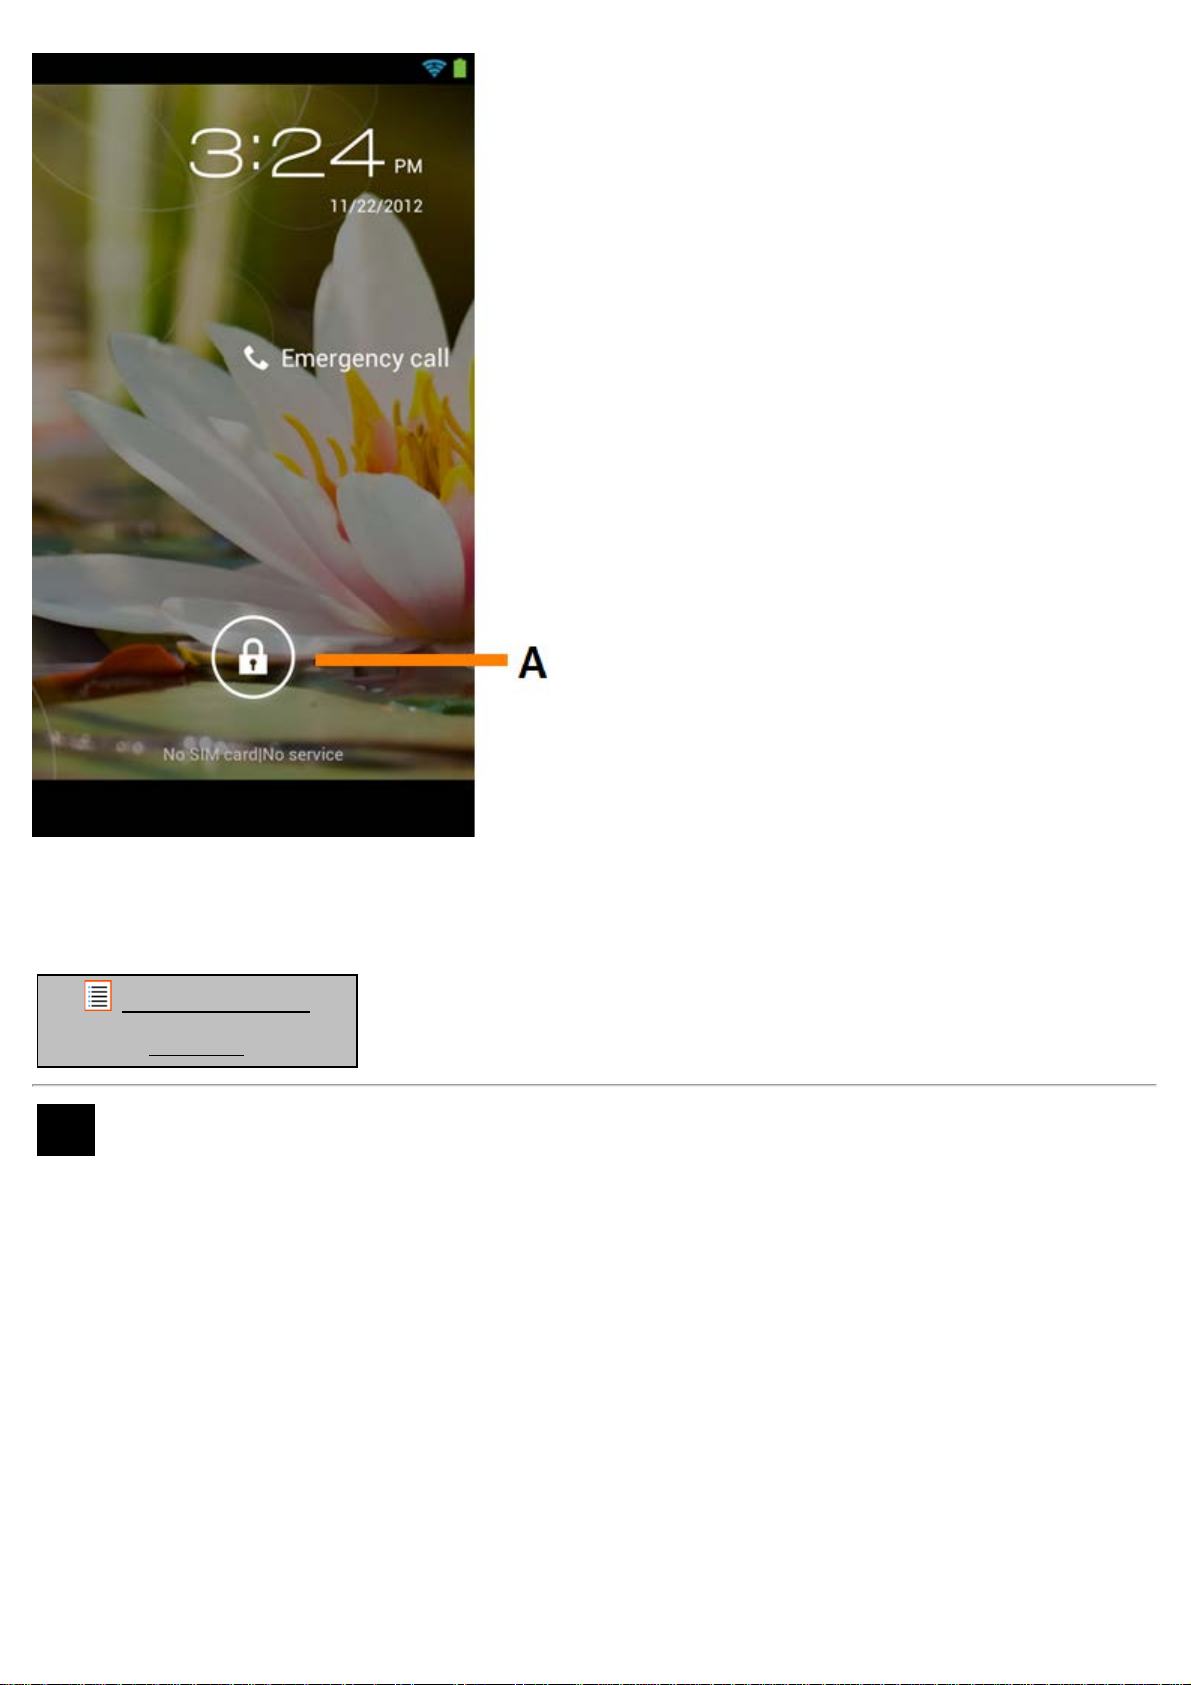
Android Lock Screen.
file:///Volumes/Product_Data/SMP53-210/R&D/HTML%20Manual/manual_en.html[01-02-13 17:15:49]
Yarvik smartphone manual
Android Lock Screen
Slide the lock bar (A) to the right to unlock the Smartphone. You will then be taken to the Android Home
Screen.
Return to index
3 Android Home Screen
file:///Volumes/Product_Data/SMP53-210/R&D/HTML%20Manual/manual_en.html[01-02-13 17:15:49]

Yarvik smartphone manual
Android Home Screen
On top of the Smartphone’s screen you can always find the status bar.
The status bar displays system information, while the lower menu bar contains the function buttons.
1 - Wi-Fi Signal Indicator
2 - Cellular network reception for SIM1 and SIM2 and Battery Level Indicator
3 - System Time
4 - App Shortcuts
5 - Widget (analog clock)
6 - Back button - brings you back to the previous screen, or previous website when using the Browser
7 - Home - brings you back to the Android Home Screen
8 - App and widget menu
9 - Multitask button
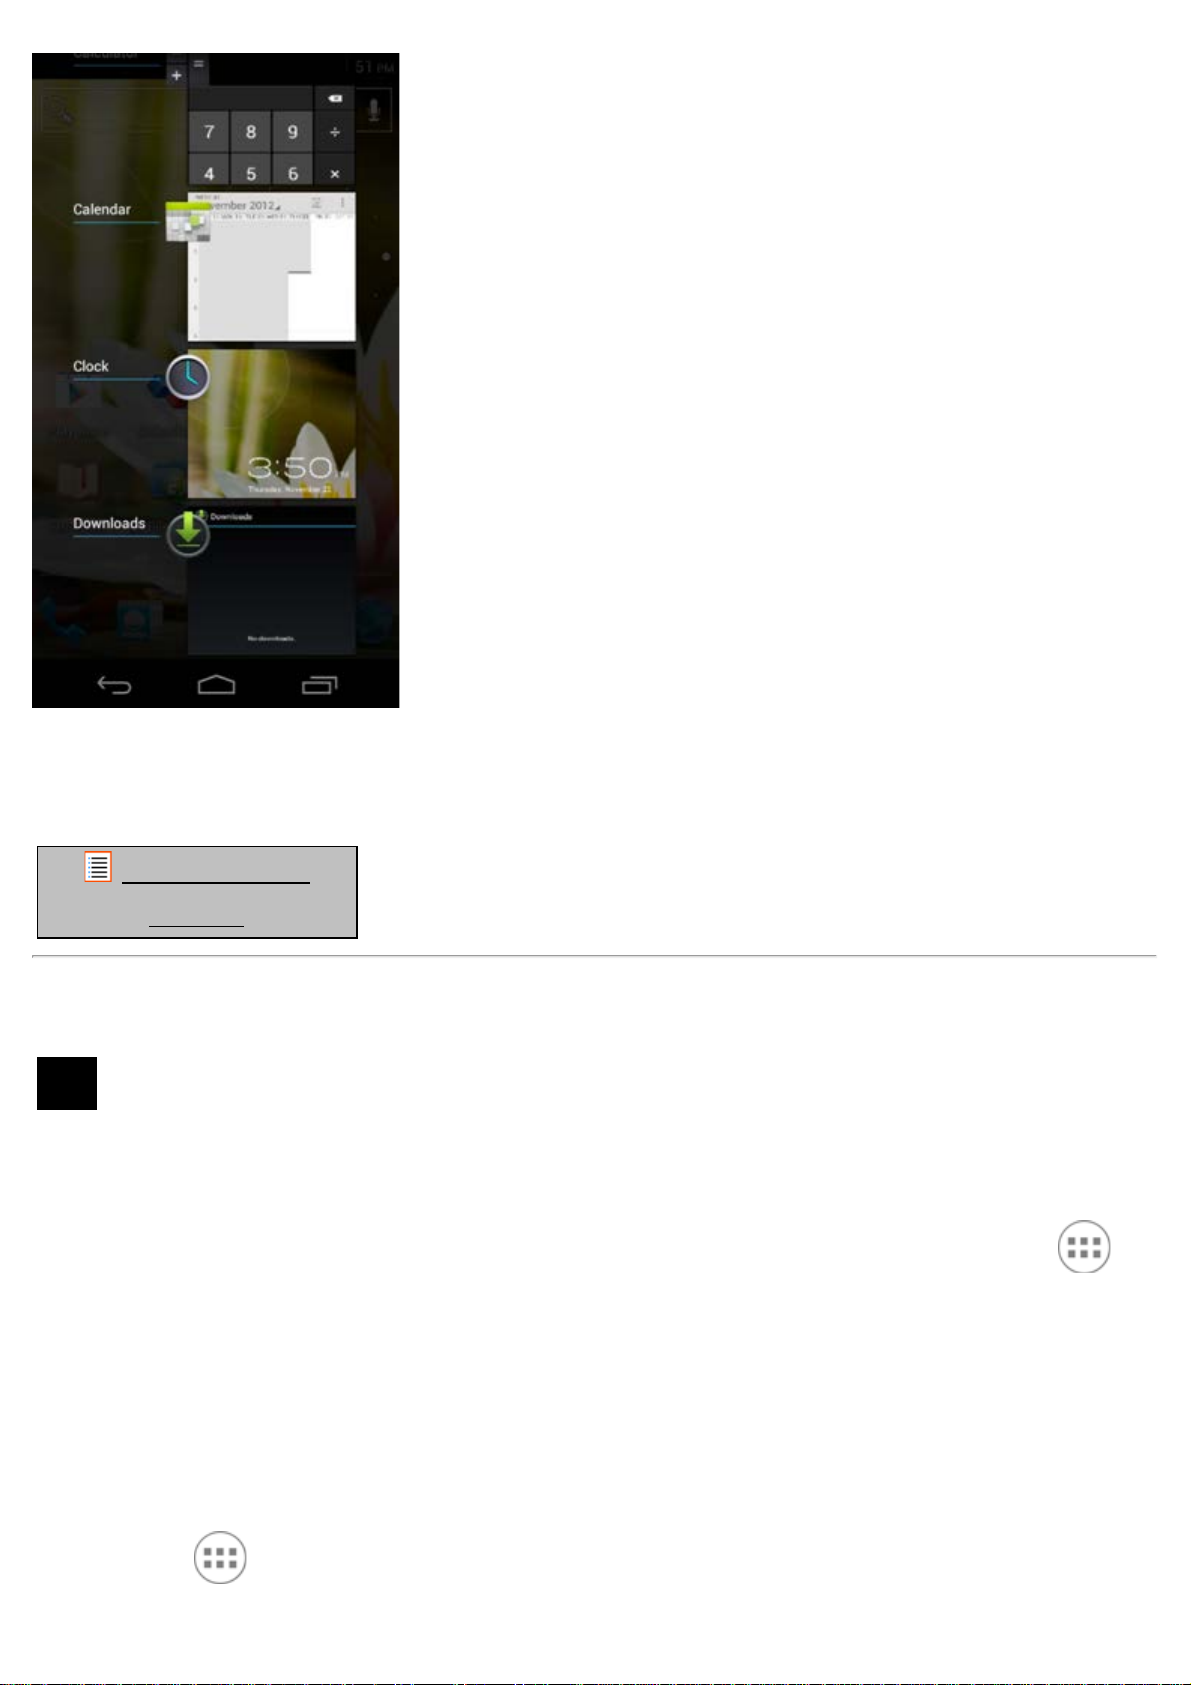
The home screen consists of multiple pages which can be accessed by swiping the home screen
left/right.
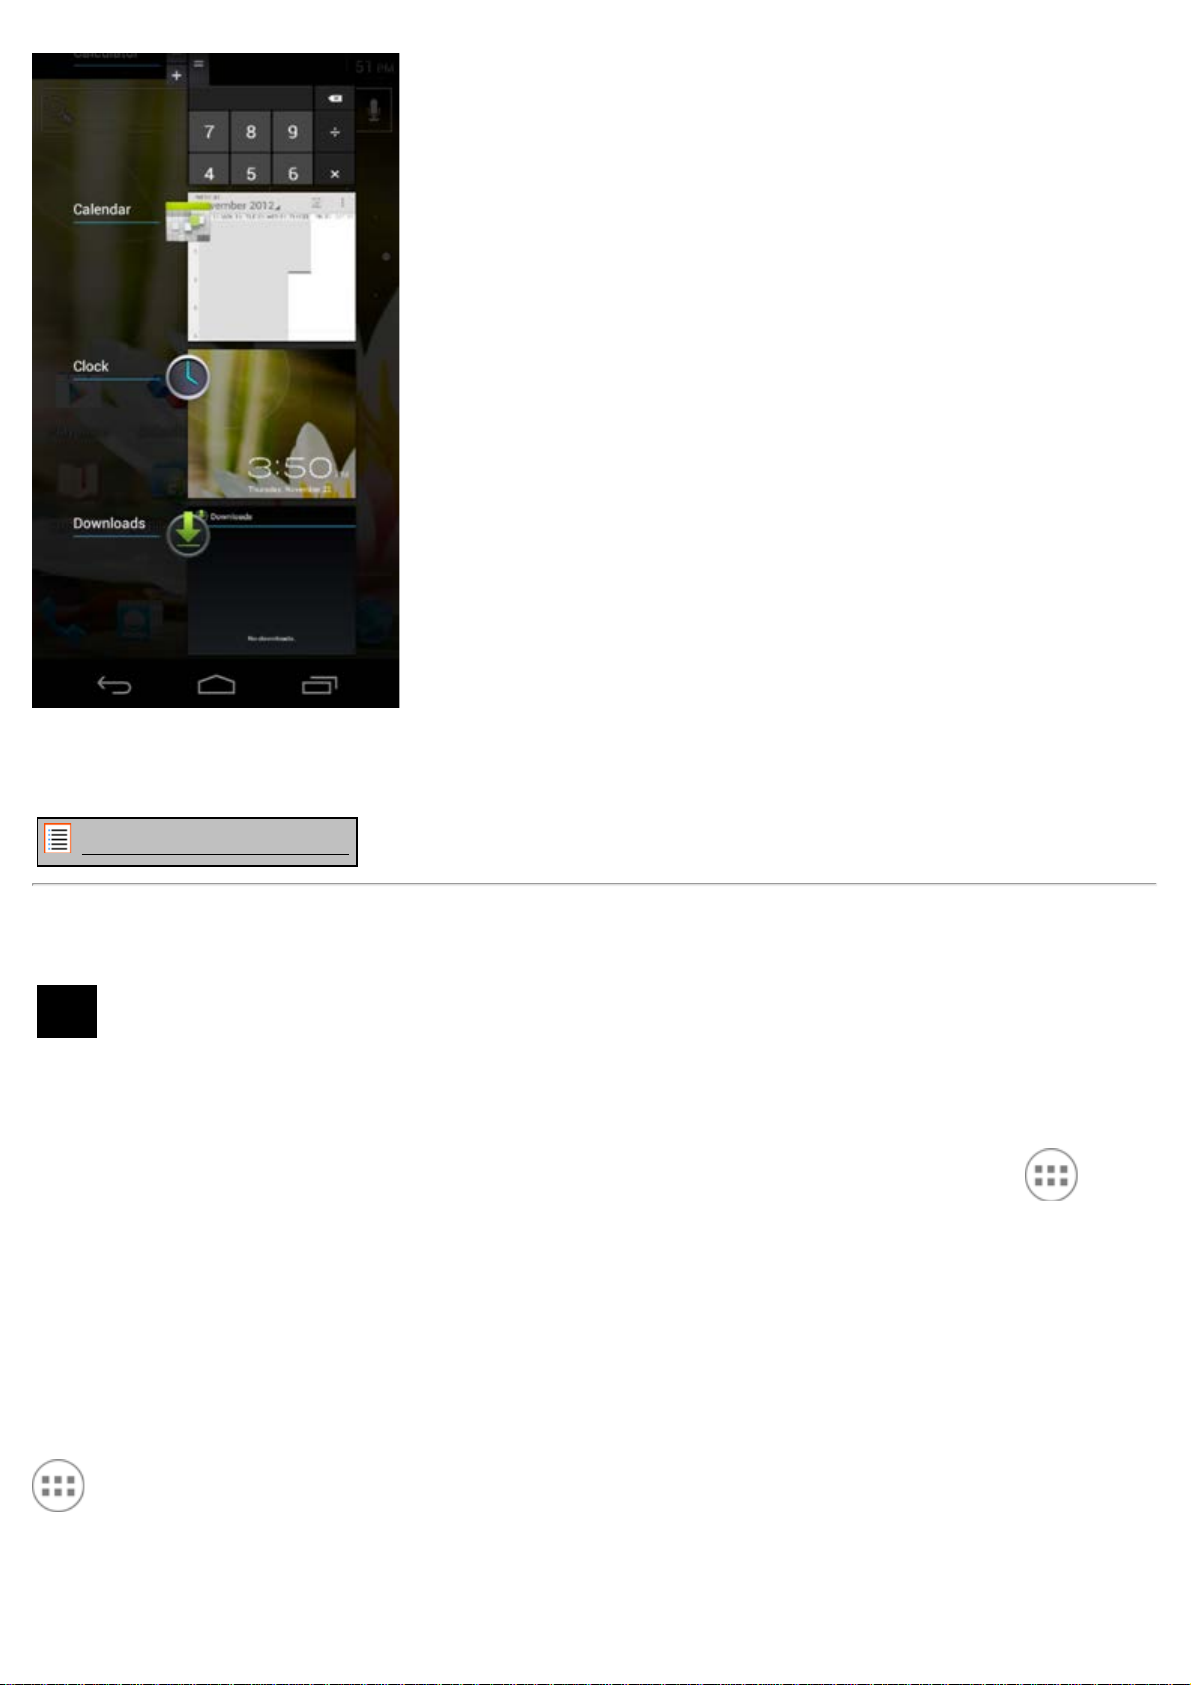
To see what apps are running in the background, you can access the multitasking view by pressing the
multitask button (9).
file:///Volumes/Product_Data/SMP53-210/R&D/HTML%20Manual/manual_en.html[01-02-13 17:15:49]
Yarvik smartphone manual
Click on a running app in the multitask view to quickly switch to it. You can close running apps by long
pressing it and clicking "Remove from list".
Return to index
Adding widgets
and
3.1
shortcuts to
your
Home Screen
To add a widget, press the app and widget button in the bottom center of your Home Screen:
In the following screen, you can find all the installed apps and widgets, both seperately viewable by
pressing "Apps" or "Widgets" on top of the screen respectively.
Press "Widgets" to view all available widgets. When showing all widgets, you can swipe the screen to
browse to the next page (if available).
Press and hold the desired widget to have the Home Screen show up and release the widget to any
empty spot on the home screen.
To add a shortcut to any app, press the app and widget button in the bottom center of your Home Screen:
In the following screen, you can find all the installed apps and widgets, both seperately viewable by
pressing "Apps" or "Widgets" on top of the screen respectively.
file:///Volumes/Product_Data/SMP53-210/R&D/HTML%20Manual/manual_en.html[01-02-13 17:15:49]
Yarvik smartphone manual
Press "Apps" to view all installed apps.
Press and hold the desired app to have the home screen show up and release the shortcut to any empty
spot on the Home Screen.
To remove widgets and/or app shortcuts from your Home Screen, press and hold them and drag them to
the appeared "Remove" dustbin icon on top of your Home Screen.
Return to index
Setting a
3.2
Wallpaper
To change the Home Screen wallpaper, press and hold the Home Screen until the “Select Wallpaper
from” menu comes up.
You can choose from "Live Wallpapers" (animated wallpapers), "Gallery" (photo/video gallery) or
"Wallpapers" (default static images).
Return to index
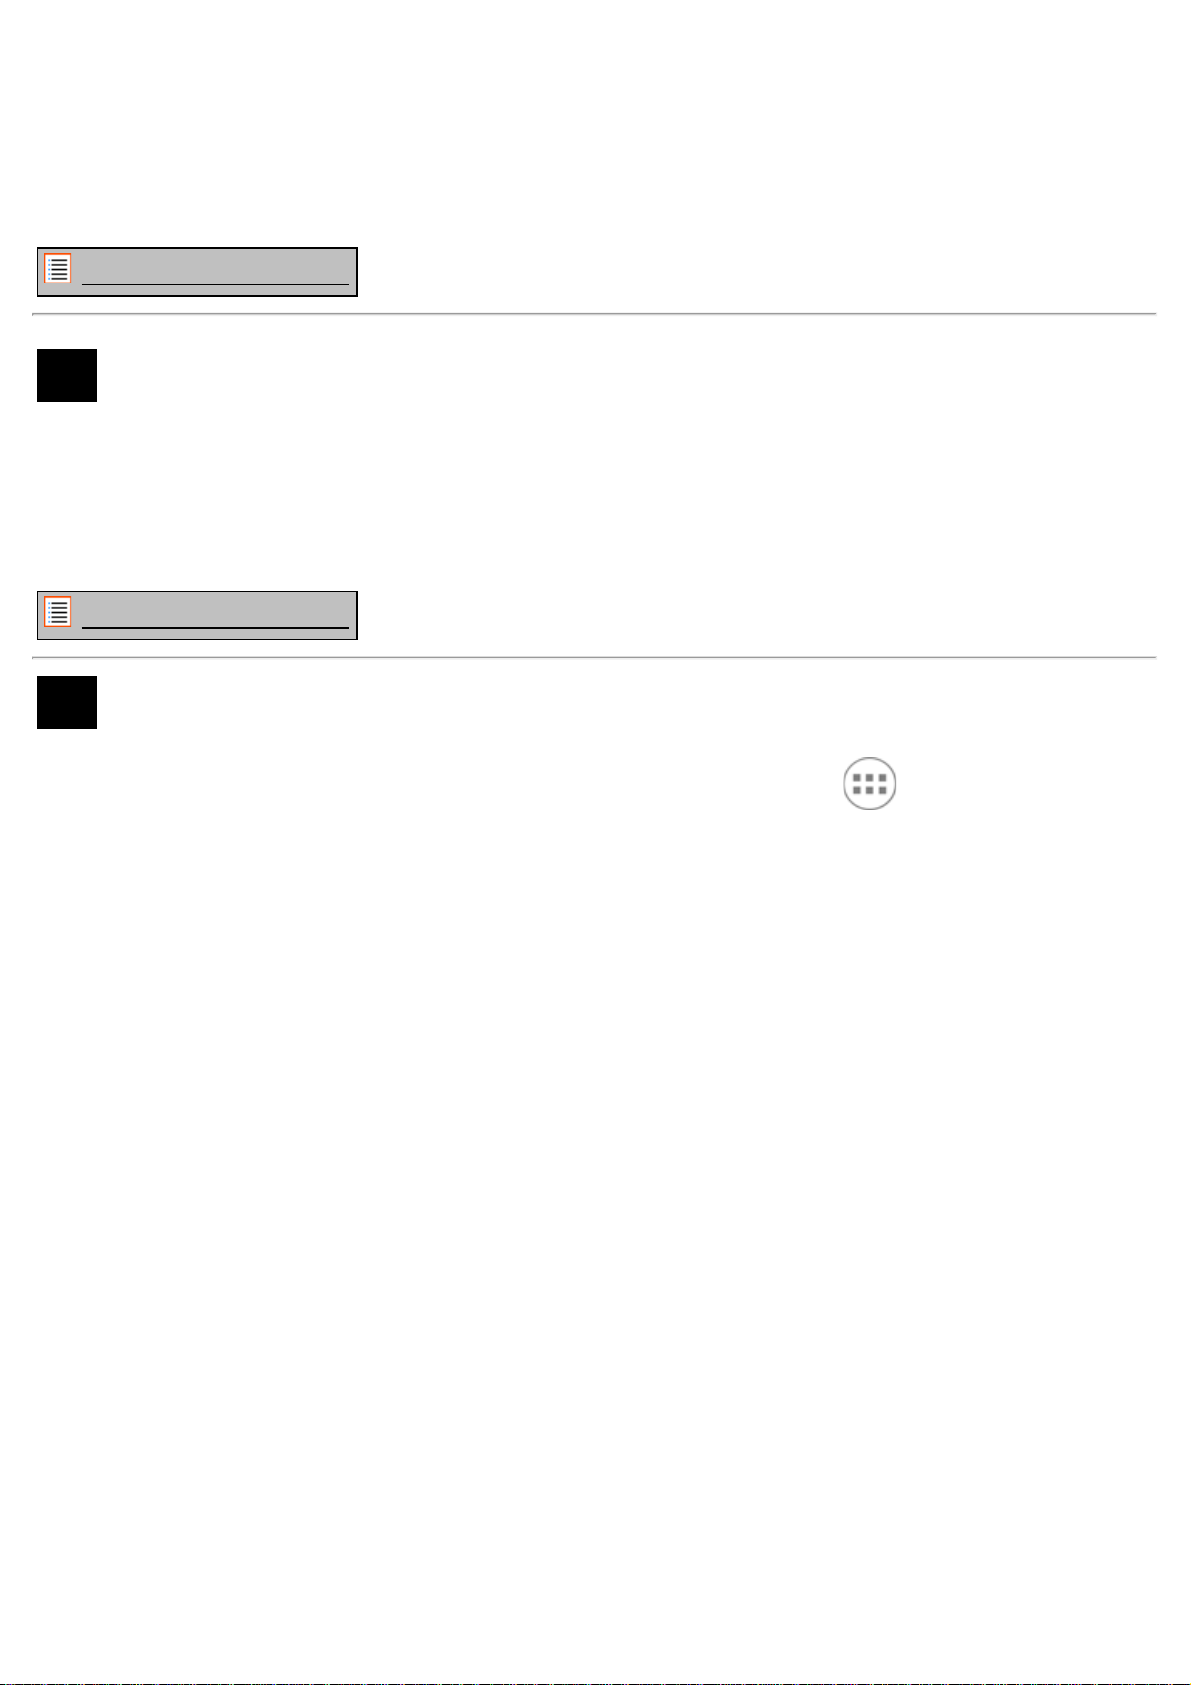
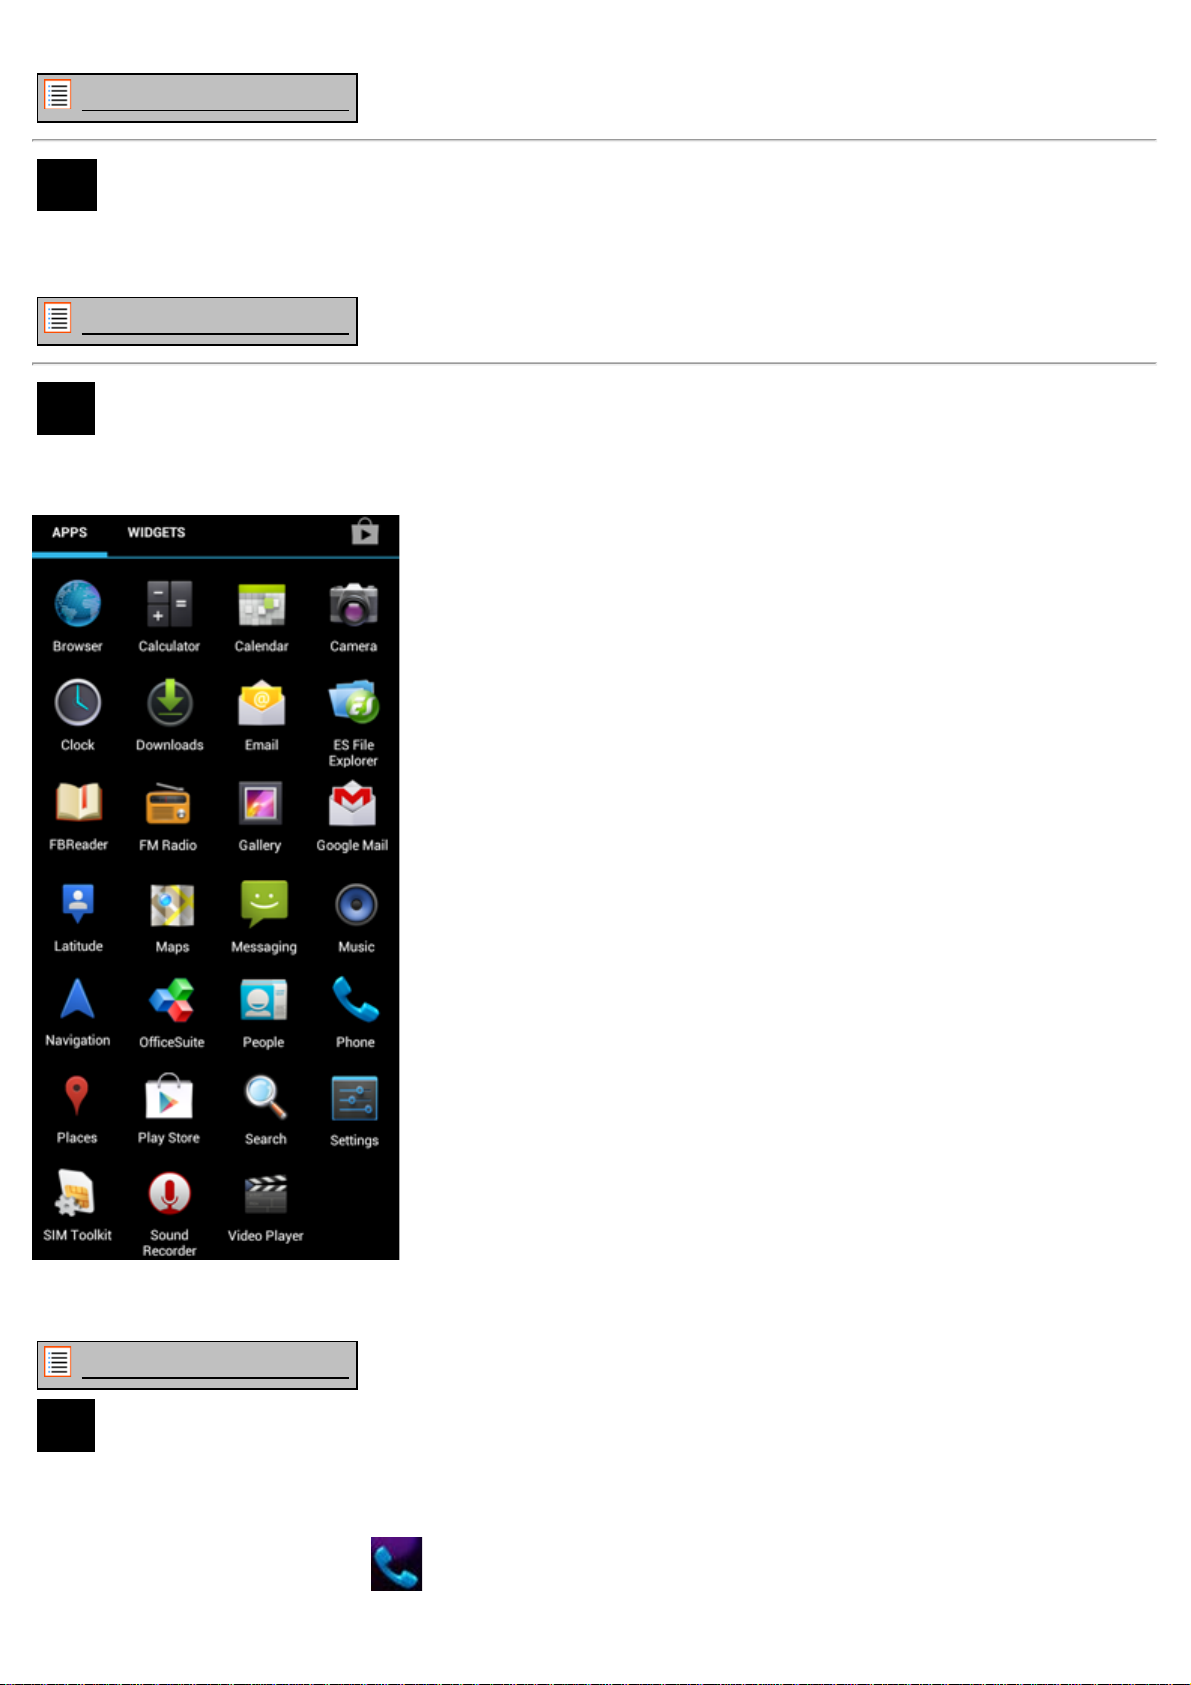
3.3 Application Menu
Press the app and widget button in the bottom center of your Home Screen:
When the system displays the widgets, press "Apps" to view all installed apps.
Here you can find all the pre-installed programs or “apps” as well as additional apps that you install.
You can launch any app by just pressing the corresponding icon.
file:///Volumes/Product_Data/SMP53-210/R&D/HTML%20Manual/manual_en.html[01-02-13 17:15:49]
Yarvik smartphone manual
Application Screen
Return to index
Setting up your
4
Yarvik
Smartphone
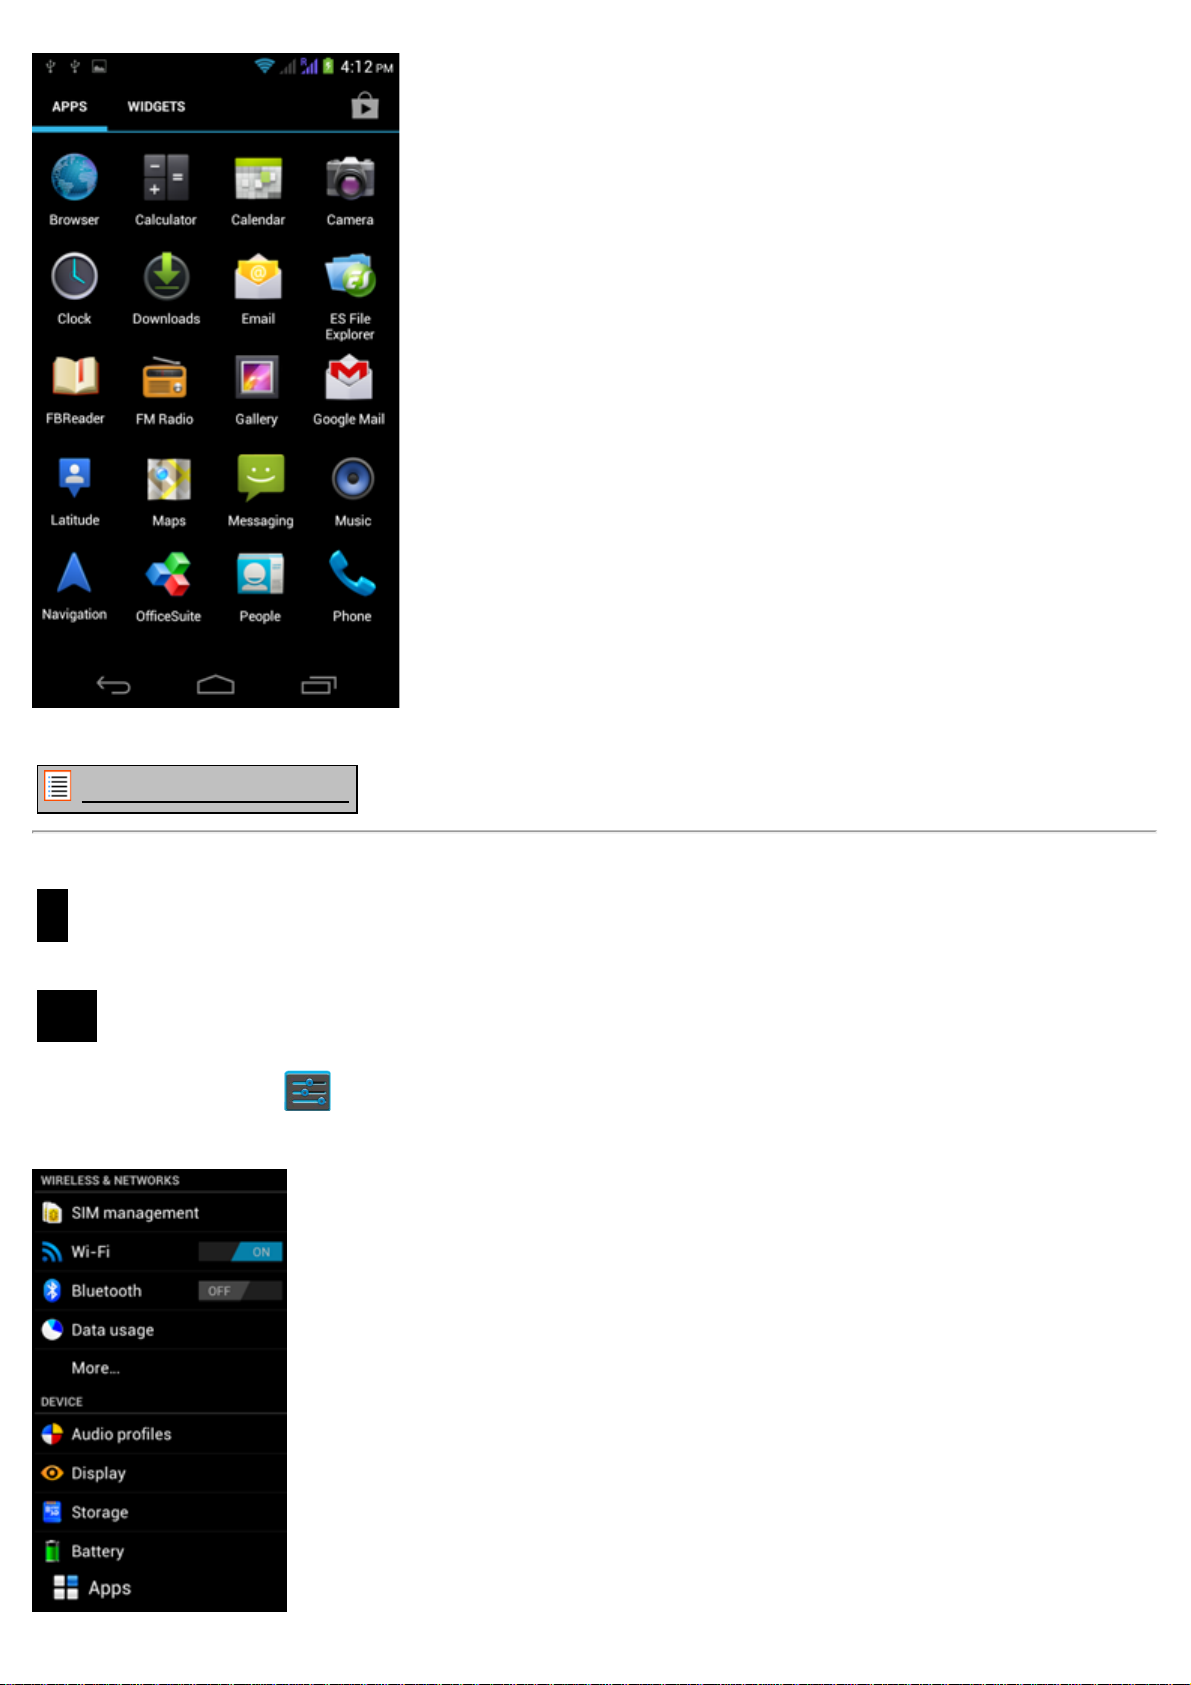
4.1 Settings Menu
Press the Settings icon in the Application Menu to enter the Settings menu. In the Settings menu you
can find the options to set up your Yarvik Smartphone.
file:///Volumes/Product_Data/SMP53-210/R&D/HTML%20Manual/manual_en.html[01-02-13 17:15:49]
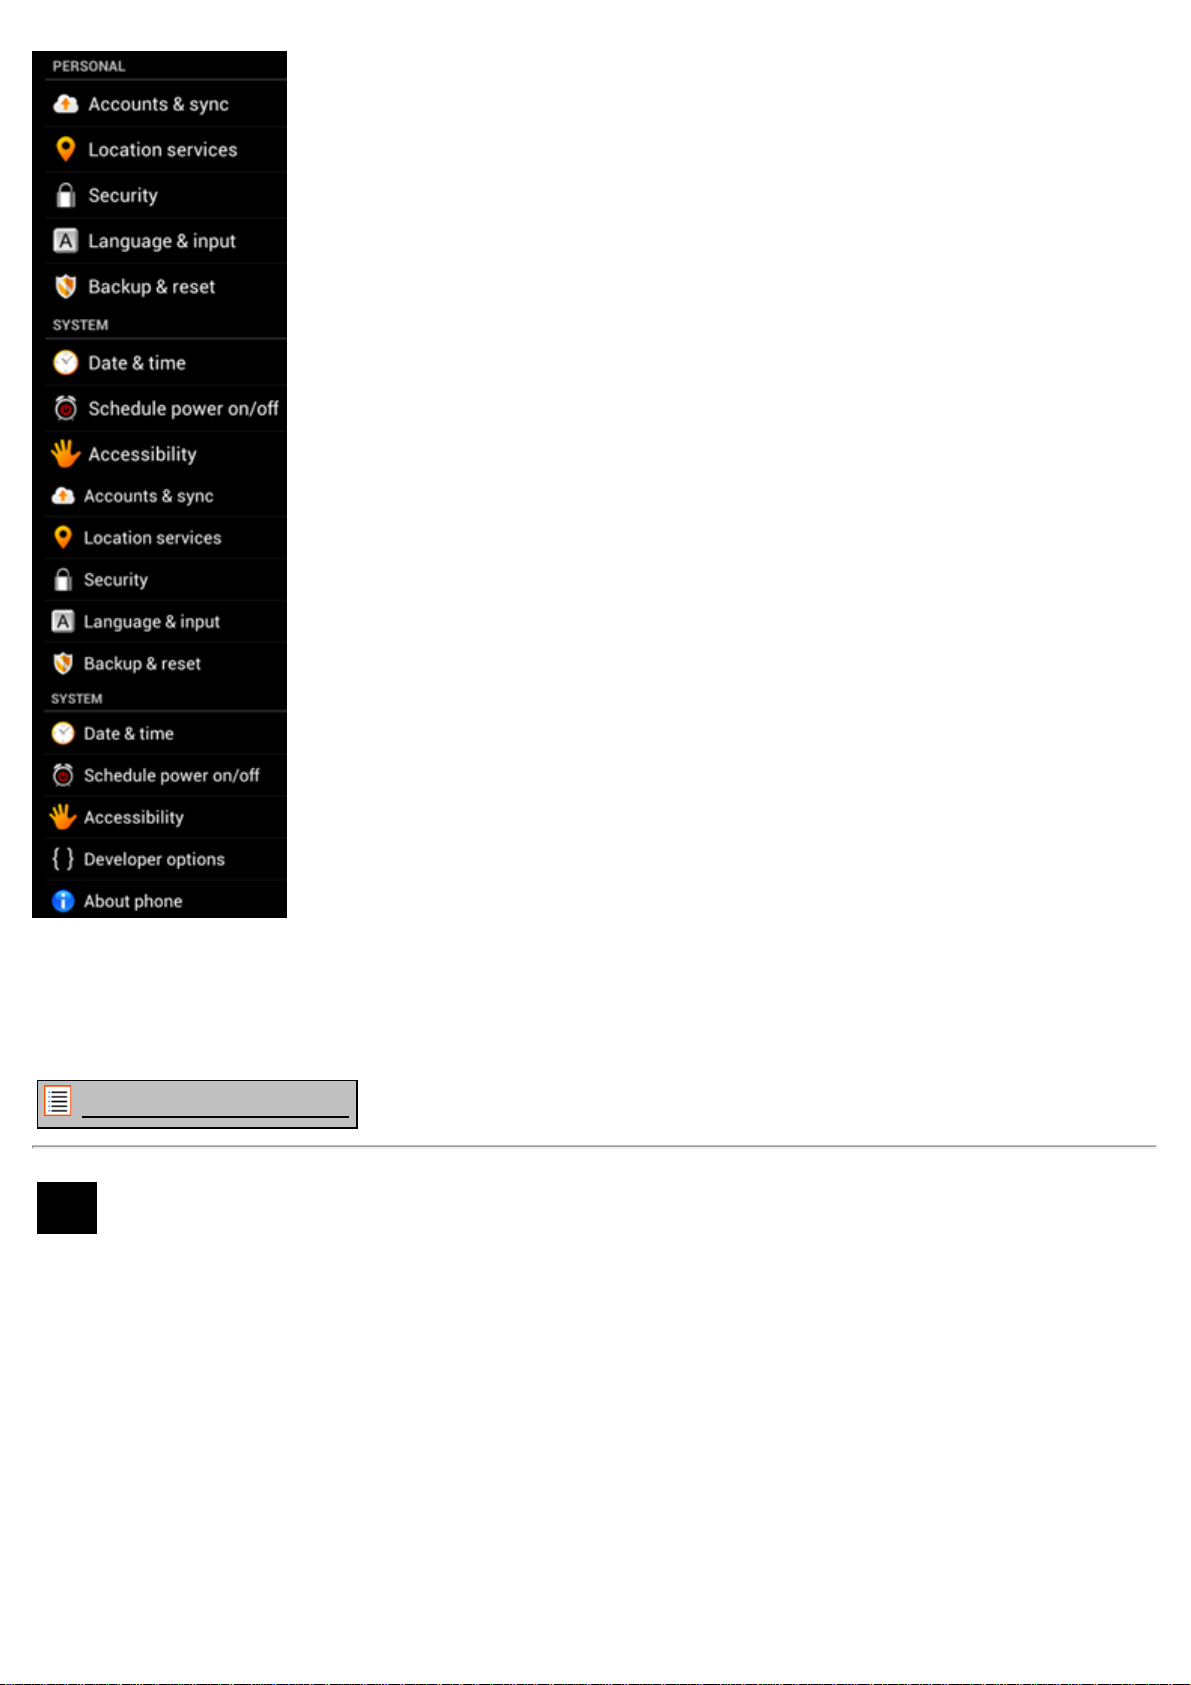
Yarvik smartphone manual
Settings Menu
We will go through the most important parts:
Return to index
WiFi &
4.2
Bluetooth
Wi-Fi
Set up a connection with a wireless Wi-Fi network.
Slide the On/Off button to "On" to activate Wi-Fi.
file:///Volumes/Product_Data/SMP53-210/R&D/HTML%20Manual/manual_en.html[01-02-13 17:15:49]
Yarvik smartphone manual
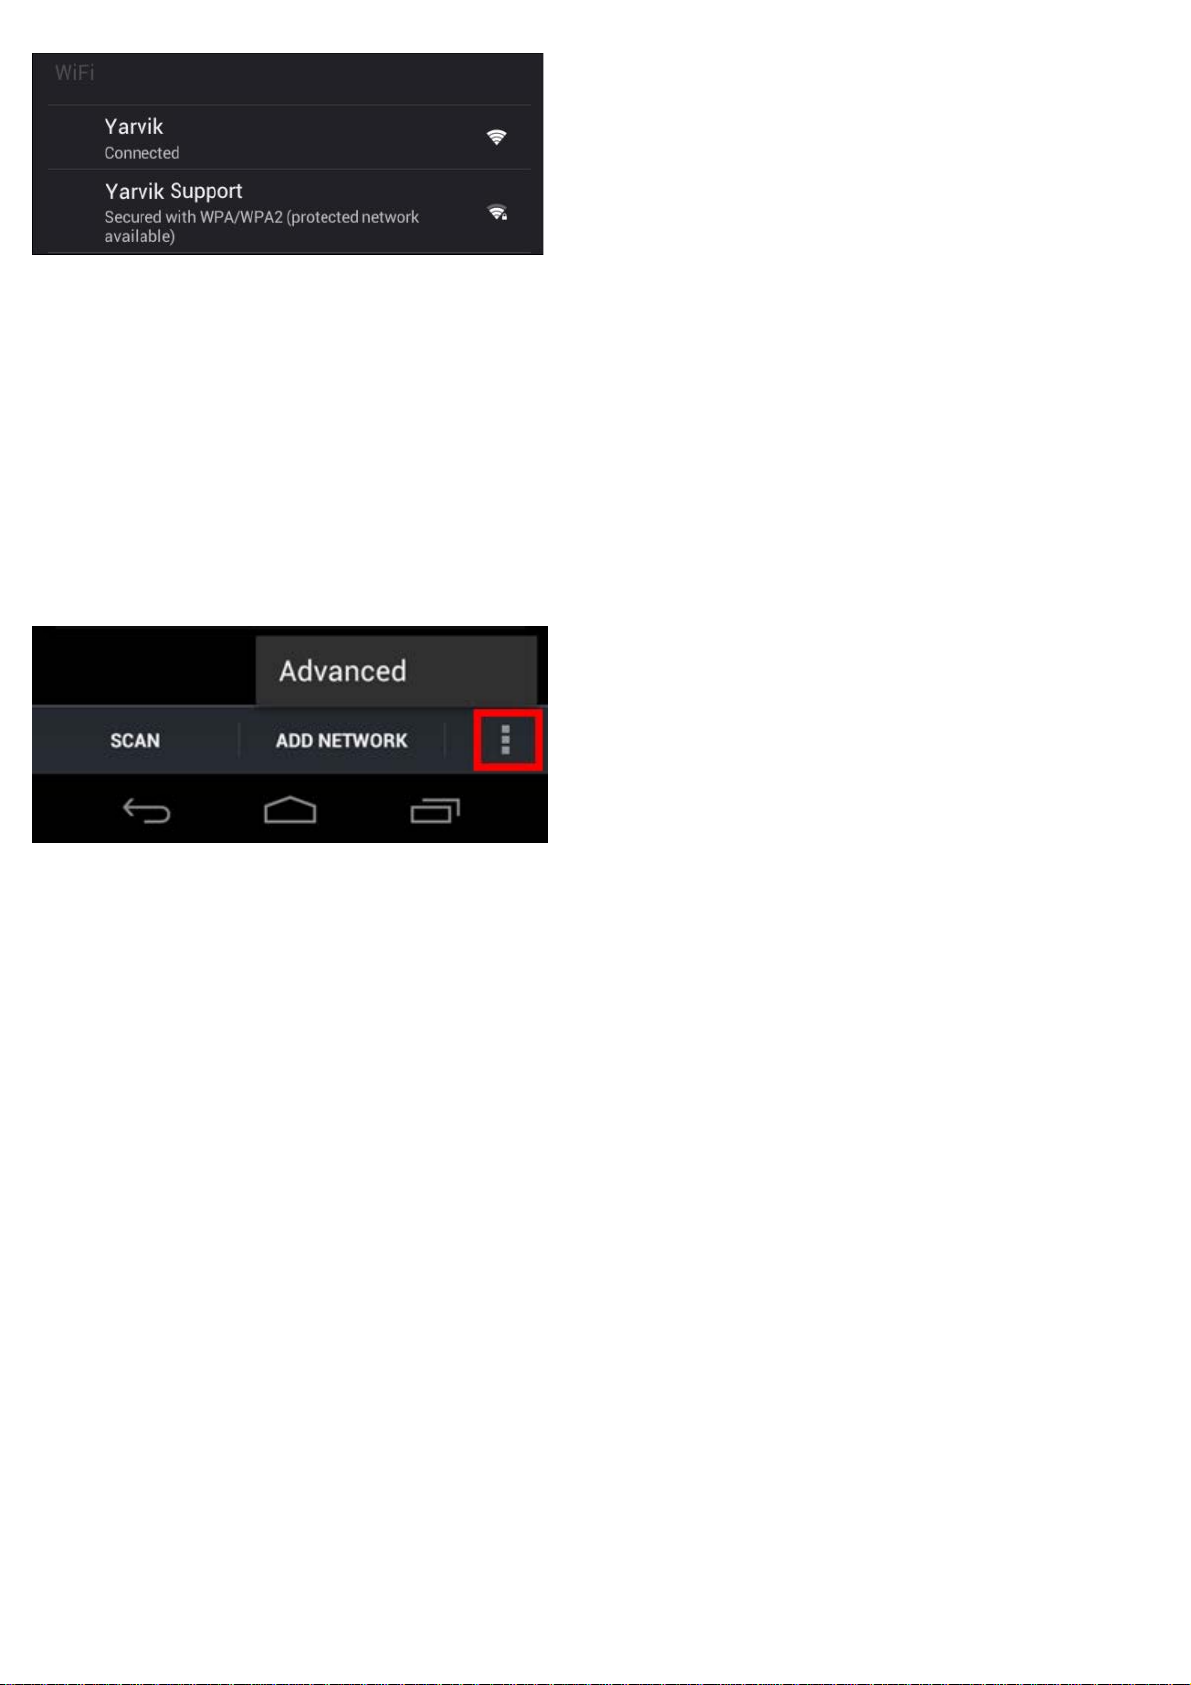
The available Wi-Fi networks appear in the network list at the right screen. Tap the network of your
choice. If the network is secured, you’re prompted to enter the network security key.
Press the “Connect” button and the Smartphone is connecting to the network.
Once “Connected” appears underneath the network name and the wireless reception icon is shown in the
bottom status bar, you’re successfully connected to the wireless network.
Viewing your Yarvik Smartphone's Wi-Fi MAC address
While in the Wi-Fi settings screen, click on the menu button in the bottom right corner.
Press "Advanced" in the unfolding menu.
Your Wi-Fi MAC address is displayed in the following "Advanced Wi-Fi" screen under "MAC address".
Bluetooth
Your Yarvik Smartphone is equipped with a built-in Bluetooth module for connecting with Bluetooth
compatible peripherals, like keyboards, speakers and headphones, but also with Bluetooth handsfree
headsets and carkits.
Slide the Bluetooth On/Off button to "On" to activate Bluetooth.
Once activated, your Yarvik Smartphone will automatically start searching for nearby Bluetooth devices.
You can always manually search for Bluetooth devices by clicking "Search for Devices" in the top right
corner of the screen.
It may be required for the to be connected peripherals to be put in "pairing mode". Please refer to the
instructions manual of the concerning peripherals for this.
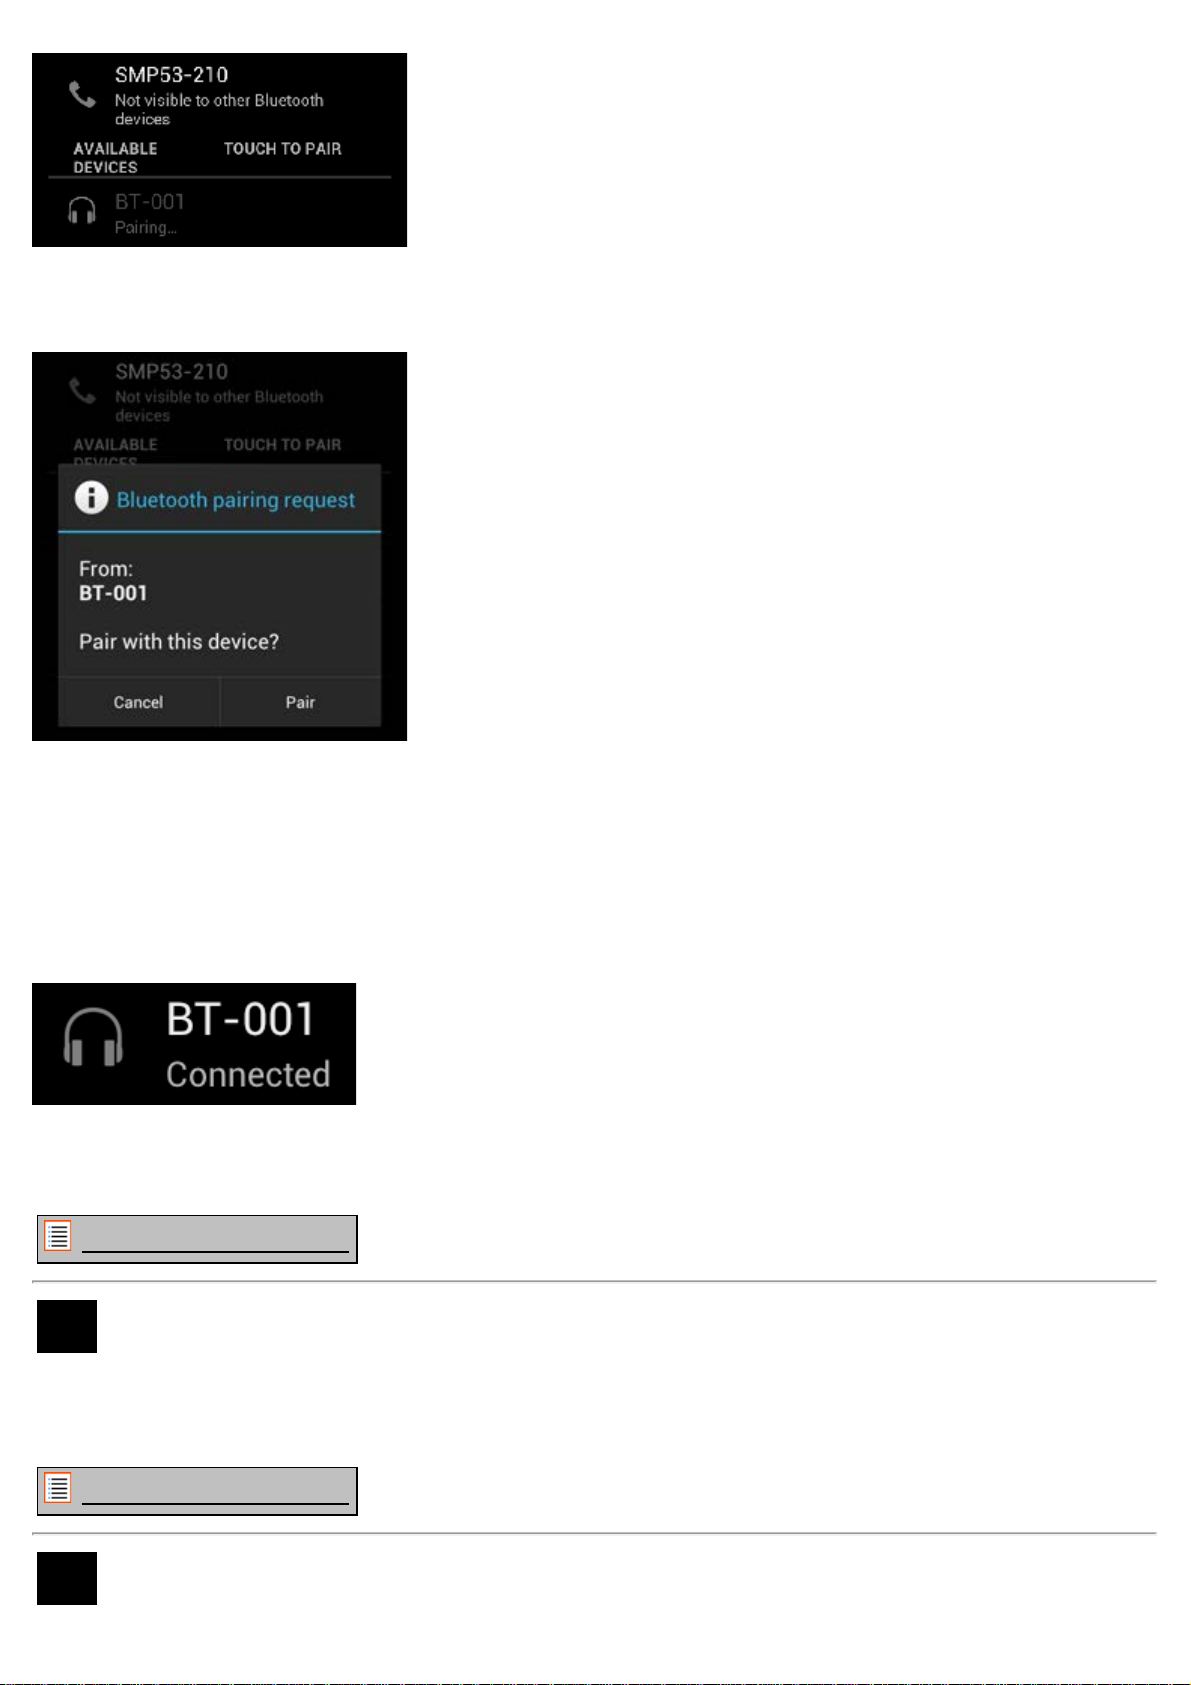
All discovered devices will appear in the "Available Devices" list:
file:///Volumes/Product_Data/SMP53-210/R&D/HTML%20Manual/manual_en.html[01-02-13 17:15:49]
Yarvik smartphone manual
Click on the discovered Bluetooth device to pair your Yarvik Smartphone with it.
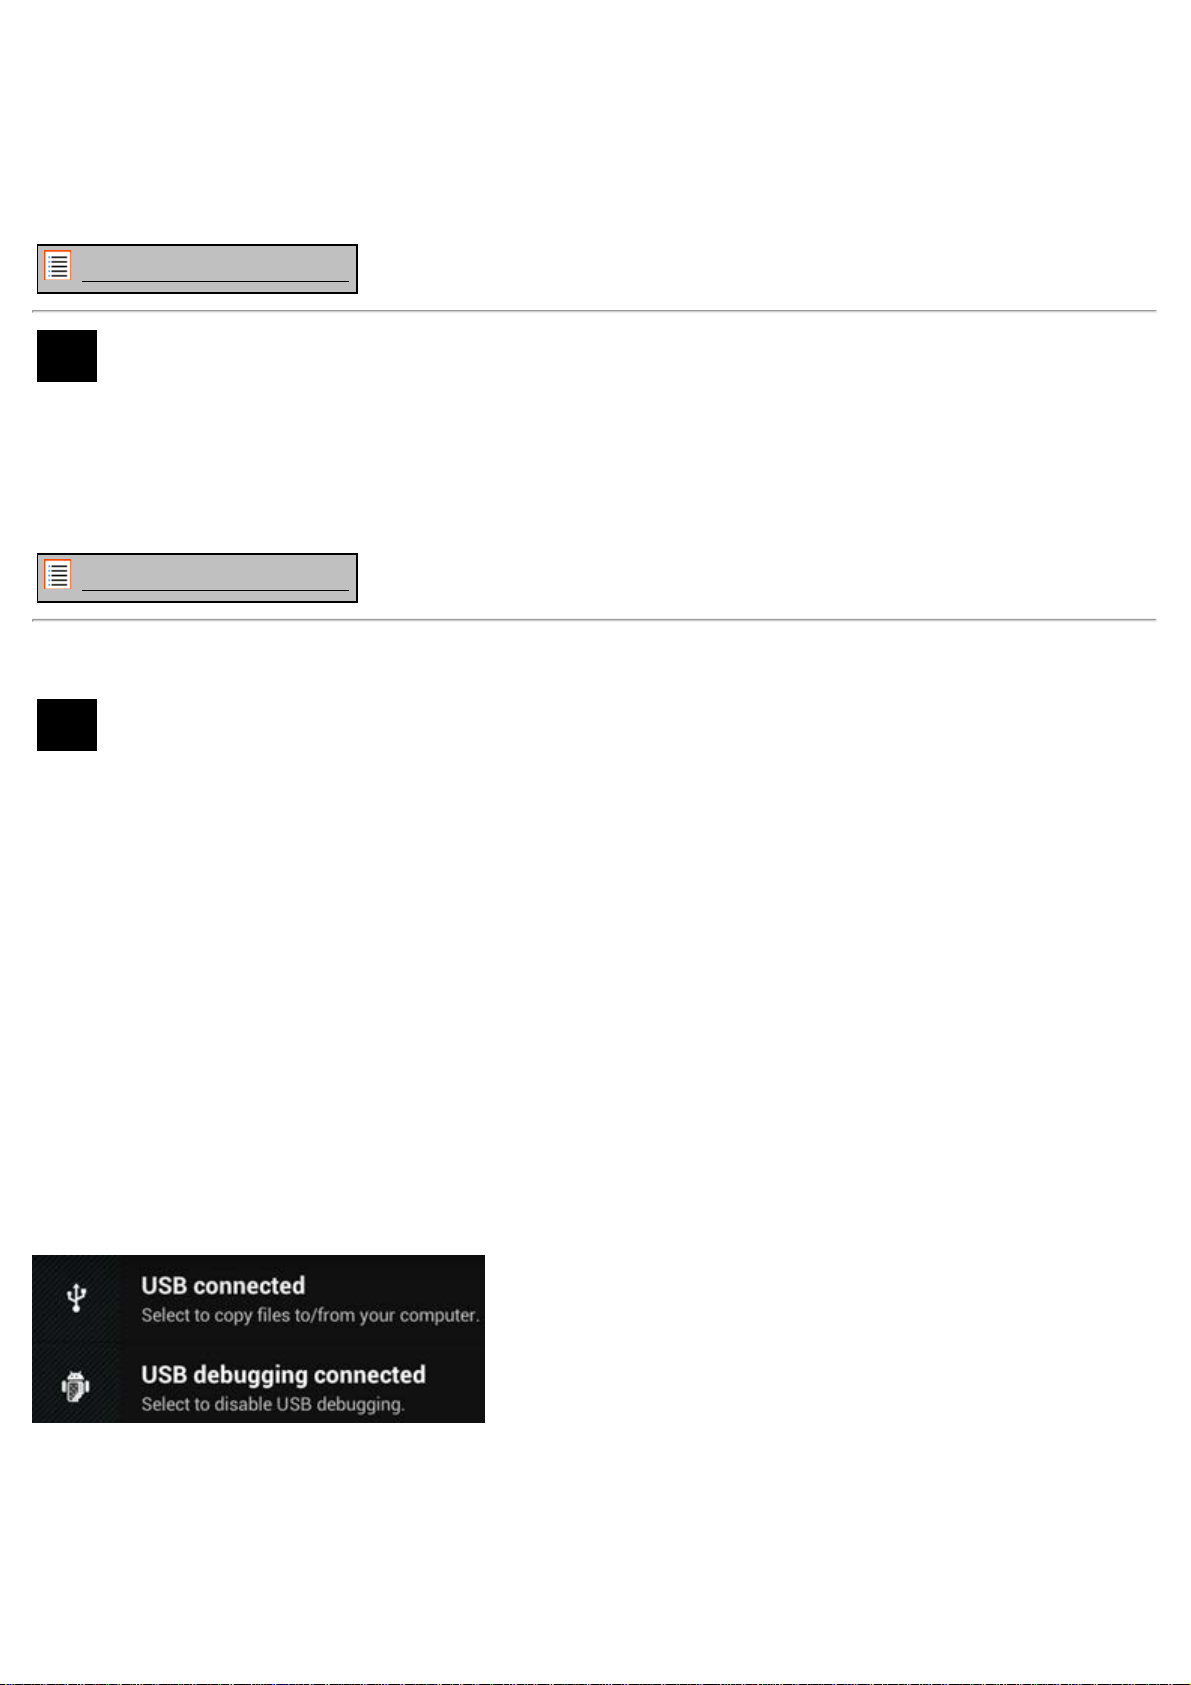
The "Bluetooth pairing request" window will appear:
Most Bluetooth devices require a pin code to connect. This code usually is 0000 or 1234. Please refer to
the instructions manual of your Bluetooth device if the pin code is different.
After you have entered the correct pin code, press "OK".
Your Yarvik Smartphone will now start pairing with your Bluetooth device, and after a few seconds the
connection will be completed, showing a "Connected" message underneath the concerning Bluetooth
device in the "Available Devices" list:
You can connect multiple Bluetooth devices to your Yarvik Smartphone for use at the same time (e.g.
headset and keyboard).
Return to index
4.3 Audio Profiles
Here you can change the audio volume of the Smartphone, like only vibration or vibration and ring
notification for incoming calls/messages.
Return to index
4.4 Display
file:///Volumes/Product_Data/SMP53-210/R&D/HTML%20Manual/manual_en.html[01-02-13 17:15:49]
Yarvik smartphone manual
Here you can change the brightness of the display, font sizes and the auto sleep time.
Please note that the higher the display brightness, the higher the energy consumption. This will drain your
battery substantially faster.
If you don’t want the display to auto rotate as you tilt the Smartphone, you can enable/disable this
functionality in the Auto-rotate screen setting.
Return to index
4.5 Apps
Here you can manage applications that are installed on your Yarvik Smartphone.
You can click apps that you have installed to see the app info and uninstall them if needed by using the
“Uninstall” button.
Please note that the preinstalled default applications (like e.g. the calculator) cannot be uninstalled.
Return to index
Storage &
MicroSD
4.6
memory
Access
Shows you the internal memory information. When a MicroSD card is present, you can also find the
memory information of the inserted card here.
Connecting your Yarvik Smartphone to a PC or Mac by USB
You can connect your Yarvik Smartphone to a PC or Mac using the provided USB cable.
When connected to a computer, you can access the Smartphone's internal memory and, if present, an
inserted MicroSD card as standard USB Mass Storage Device.
Please refer to the printed Quick Start Guide of your Yarvik Smartphone to determine the location of the
Smartphone's USB port. Connect the USB cable to the USB port of your Yarvik Smartphone and to a free
USB port on your computer.
In the top side of your Smartphone's screen, two messages will appear shortly after each other:
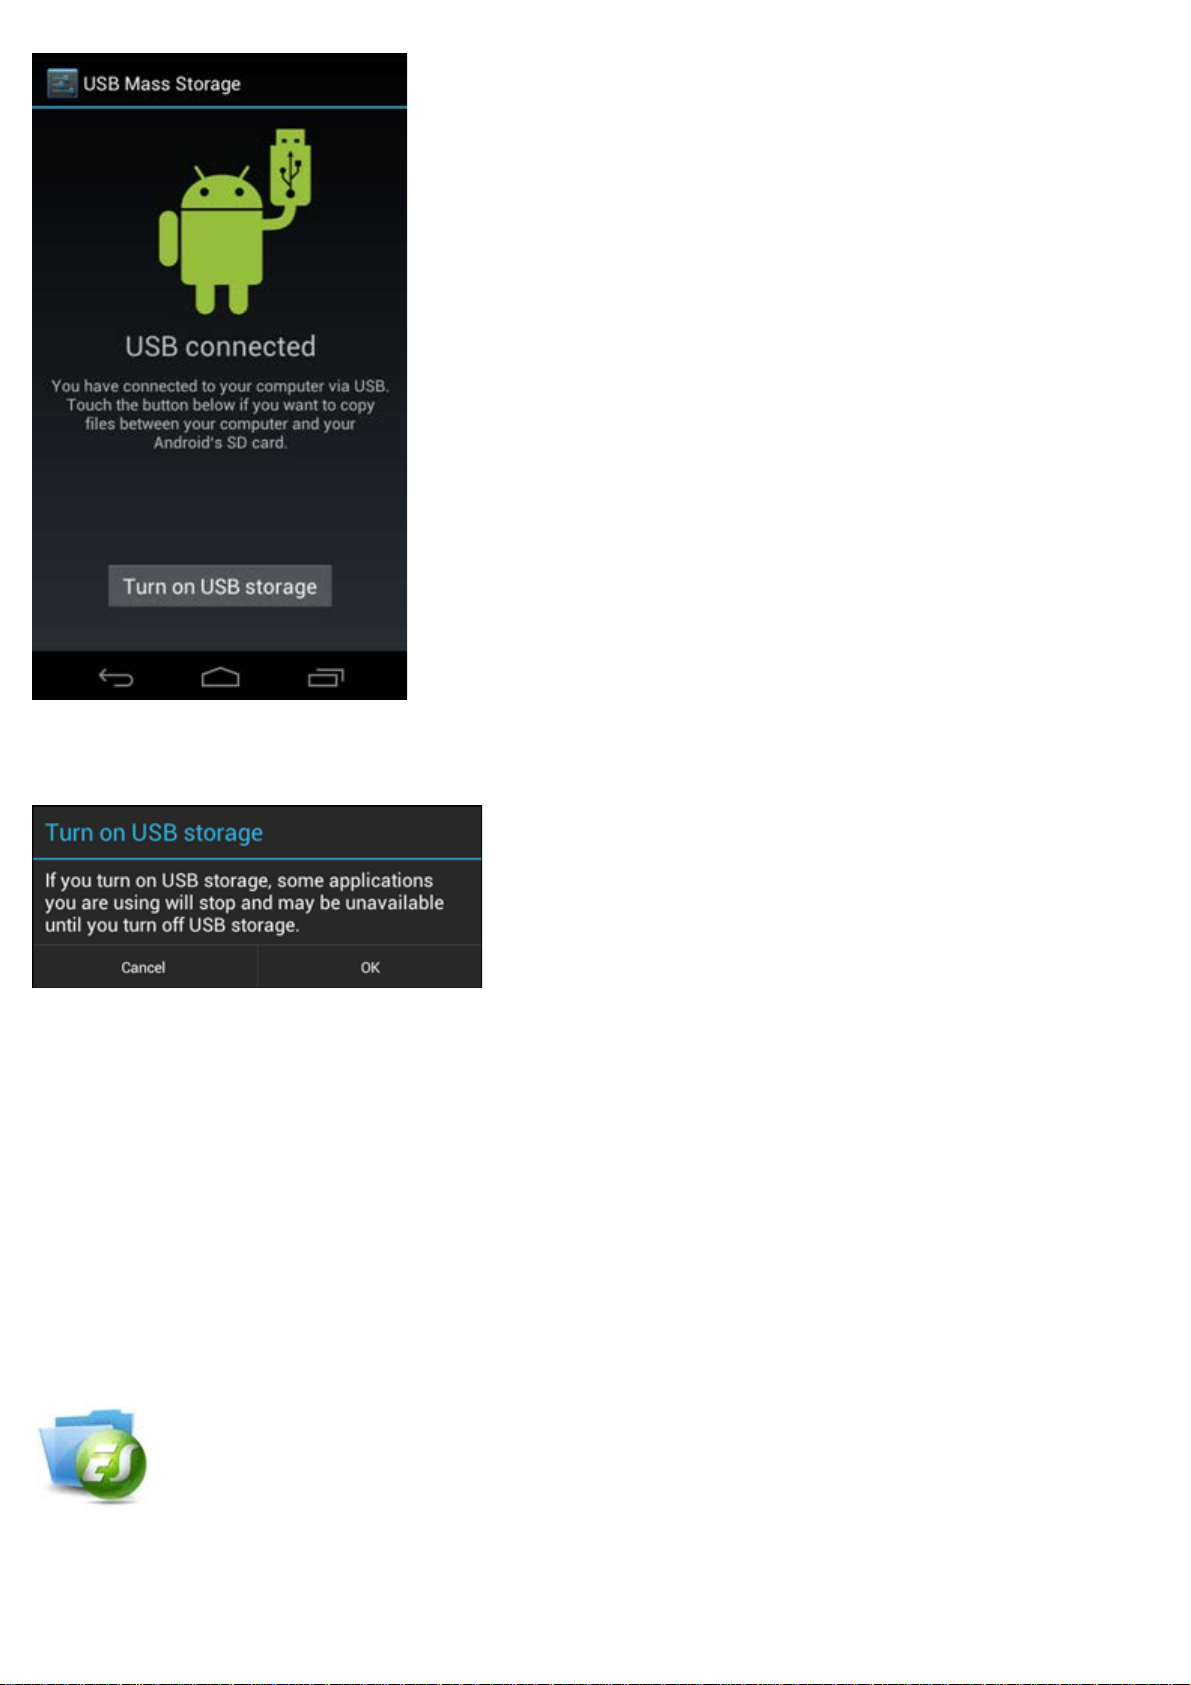
Once the second message "USB connected" appears, click on it.
The following screen will appear:
file:///Volumes/Product_Data/SMP53-210/R&D/HTML%20Manual/manual_en.html[01-02-13 17:15:49]
Yarvik smartphone manual
Click on the button "Turn on USB storage".
A notification window will appear:
Click on "OK" to confirm.
The internal memory of your Yarvik Smartphone will now appear as Mass Storage Drive in your
computer's file system, and can be used e.g. to copy files from and to your Yarvik Smartphone.
If you have a MicroSD card in your Smartphone, the card will be recognized by the computer as a second
Mass Storage Drive.
To stop using the Mass Storage Device function, click on the "Turn off USB storage" button and remove
the USB cable.
Note: There are no hardware drivers needed to access the Yarvik Smartphone's memory. In the case
your computer prompts for any driver installation, you can simply ignore it.
Access your MicroSD card
in ES File Explorer
If you have inserted a MicroSD card in your Yarvik Smartphone, you can access its contents as following:
file:///Volumes/Product_Data/SMP53-210/R&D/HTML%20Manual/manual_en.html[01-02-13 17:15:49]
Yarvik smartphone manual
Open the ES File Explorer app and click on the Favorites button (with the blue star icon).
The Favorites menu now unfolds. Click on the "root" icon labeled with "/":
You will now reach the "root" of the Smartphone's file system, containing several files and folders.
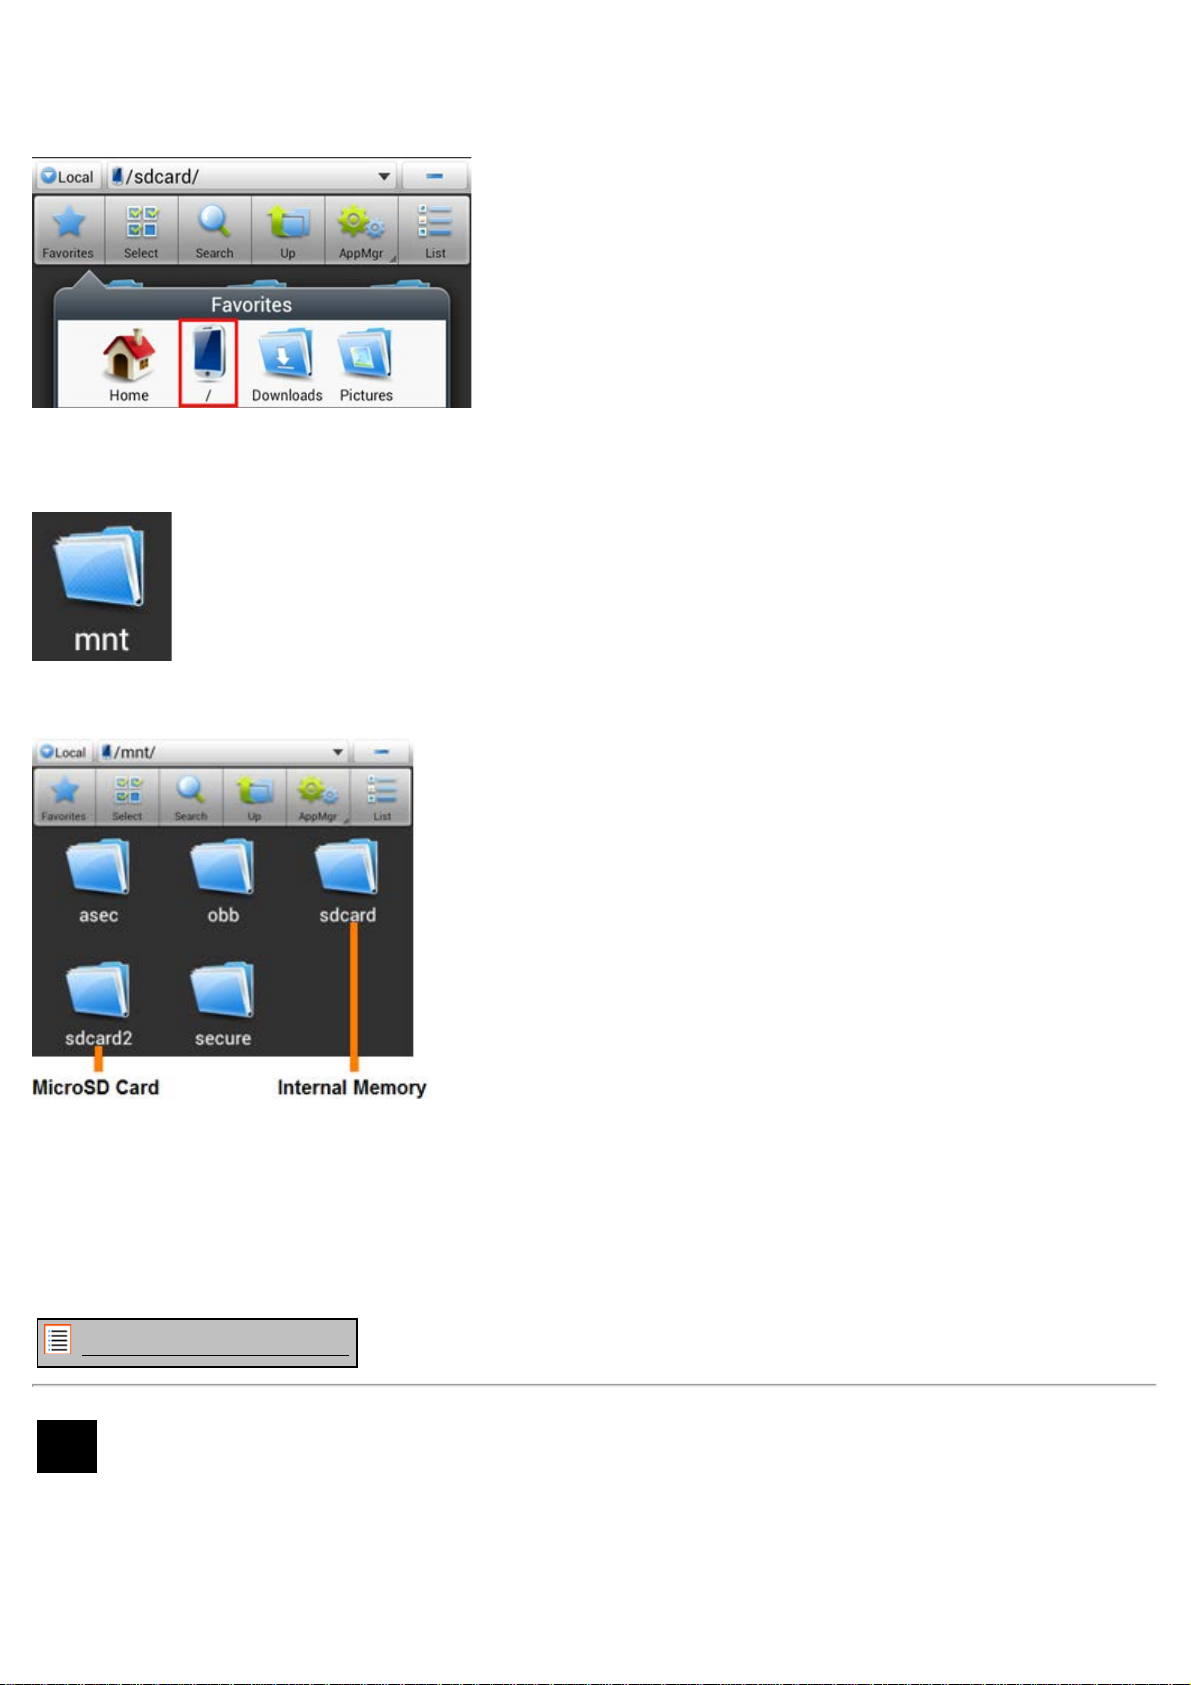
Locate and click on the "mnt" folder:
The "mnt" folder now opens, showing several folders:
The "sdcard" folder is the internal memory of your Yarvik Smartphone.
The "sdcard2" folder is your MicroSD card (when inserted in the Smartphone's MicroSD slot).
You can, when available, also use the microsd2 shortcut in the earlier mentioned Favorites menu for
quick access to your MicroSD card memory.
Return to index
Language &
4.7
input
Use “Select language” to select the display language of your Yarvik Smartphone. This applies to all the
screen texts in the entire system.
Under “Android keyboard” you may setup the onscreen keyboard of your Smartphone.
file:///Volumes/Product_Data/SMP53-210/R&D/HTML%20Manual/manual_en.html[01-02-13 17:15:49]
Yarvik smartphone manual
Return to index
4.8 Date & time
Here you can setup the date and the time for your Yarvik Smartphone.
Return to index
5 Apps
The Yarvik Smartphone will come with pre-installed Apps (see below examples):
The appearance of app icons may change without prior notice.
Return to index
6 Phone Calls
Making phone calls
To make a phone call with your Yarvik Smartphone, open the "Phone" application from your application
menu or Android home screen:
file:///Volumes/Product_Data/SMP53-210/R&D/HTML%20Manual/manual_en.html[01-02-13 17:15:49]
Yarvik smartphone manual
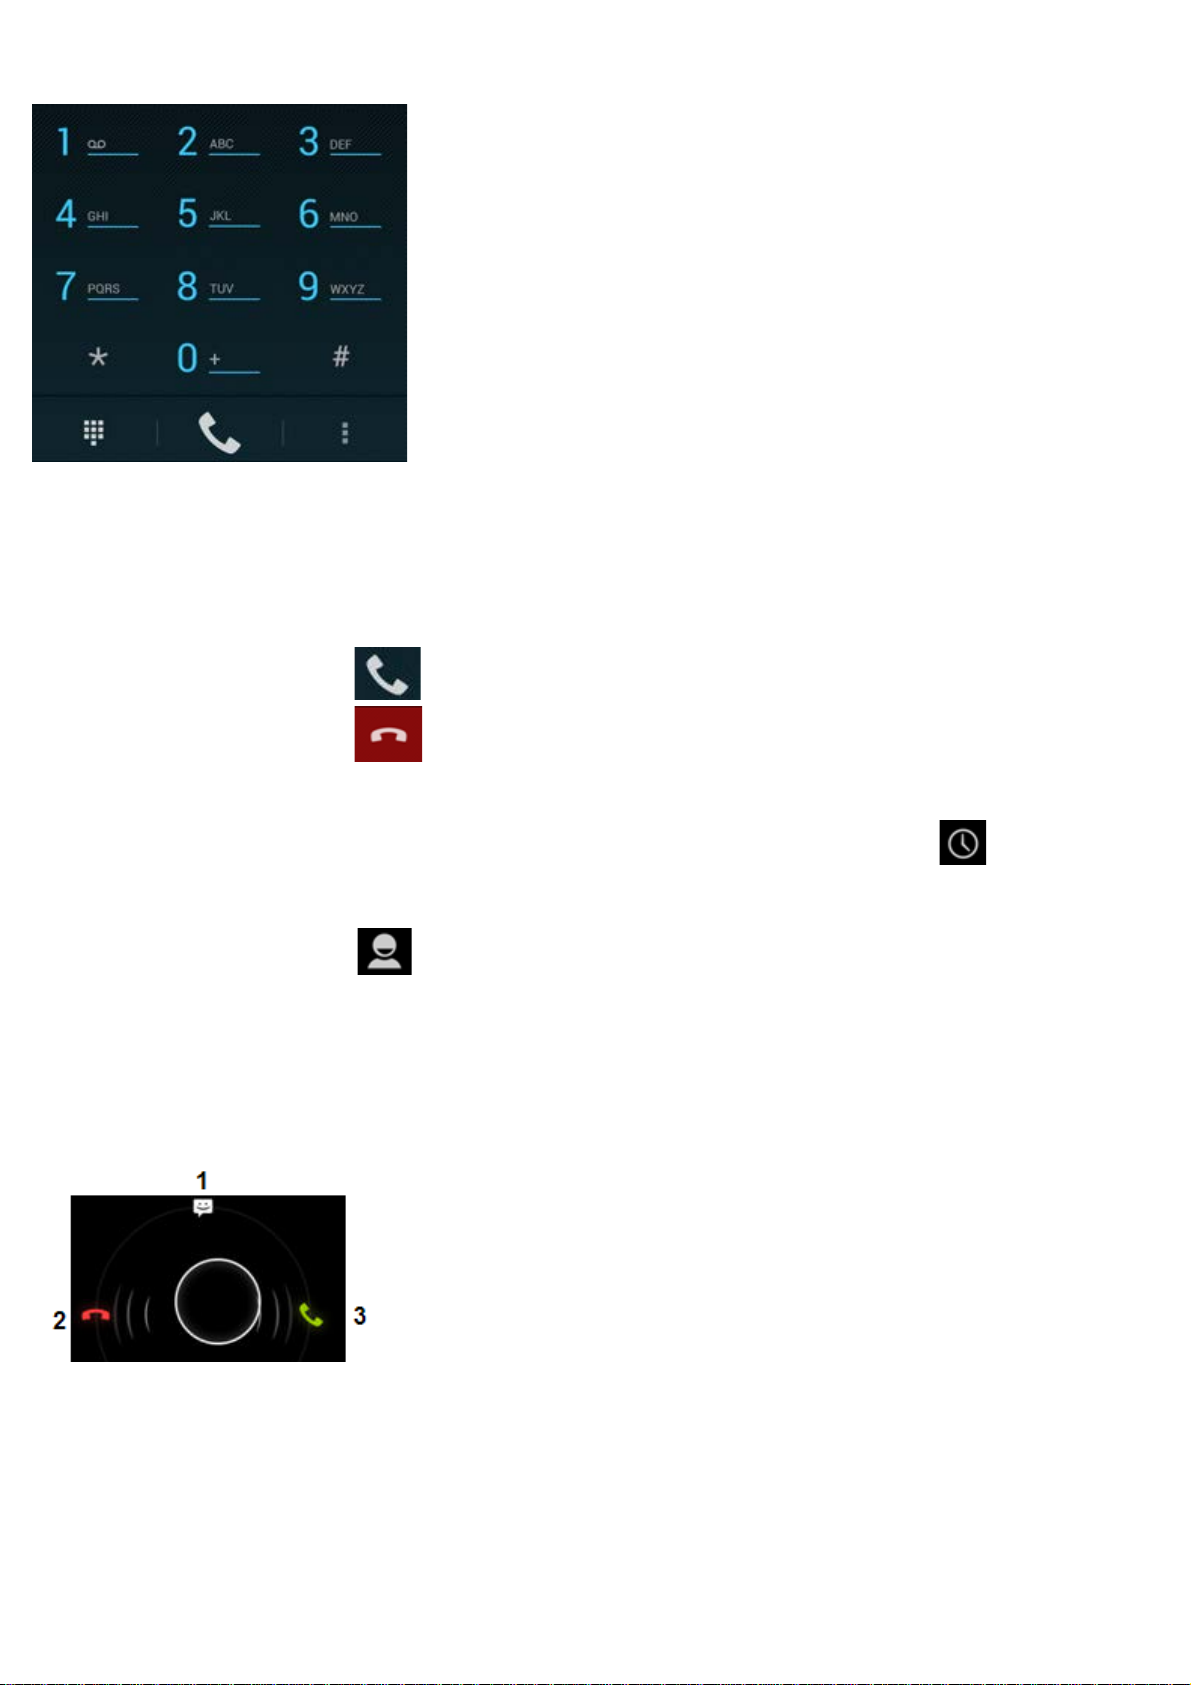
Use the numeric phone keypad to enter the telephone number.
Phone keypad.
To make international phone calls, requiring the '+' prefix, press and hold the '0' on the keypad until the '+'
appears.
Press the call handling button to engage the phone call.
Press the call handling button
to disengage the phone call.
You can also make phone calls directly from your contacts from within the "People" application.
Recent calls are stored in the Call Log screen, accessible by pressing the Log button
in the top of
Phone screen.
Your contacts (from the earlier mentioned "People" app) can also be accessed directly from within the
Phone screen by pressing the
button.
Incoming phone calls
When you receive a phone call on your Yarvik Smartphone, you will be presented with 3 options:
1 - Slide the circle up to ignore the incoming phone call and send an automated repsonse by text
message;
2 - Ignore the incoming phone call;
3 - Answer the incoming phone call.
Options during a phone call
file:///Volumes/Product_Data/SMP53-210/R&D/HTML%20Manual/manual_en.html[01-02-13 17:15:49]

Yarvik smartphone manual
1 - Show the phone keypad (e.g. for DTMF option menu's);
2 - Enable/disable loud speaker function;
3 - Mute microphone;
4 - Put phone call on hold;
5 - Menu with more options: add an additional phone call (conversation call) or record the phone call.
Call forwarding
You can set the call forwarding feature to forward all incoming phone calls to a specific phone number.
In the "Phone" app , press the menu button and select "Call settings".
Select "Voice call", in which you can choose for "Call forwarding" to adjust your forwarding options.
Caller ID/Call waiting
With the Caller ID function of your Yarvik Smartphone, you can choose whether you want to send your
number along with outgoing phone calls.
To adjust this, start the "Phone" app
call" - "Additional settings" - "Caller ID".
Within this same menu you can also enable/disable incoming phone calls when already engaged in a
phone conversation.
, press the menu button and select "Settings" - "Voice
Return to index
7 Messaging
Your Yarvik Smartphone is capable of sending SMS and MMS messages. Please refer to your mobile
service provider for involved costs and additional costs for sending messages to or from foreign countries.
Sending SMS/MMS messages
Open the "Messaging" application
file:///Volumes/Product_Data/SMP53-210/R&D/HTML%20Manual/manual_en.html[01-02-13 17:15:49]
from your Android home screen or application menu.
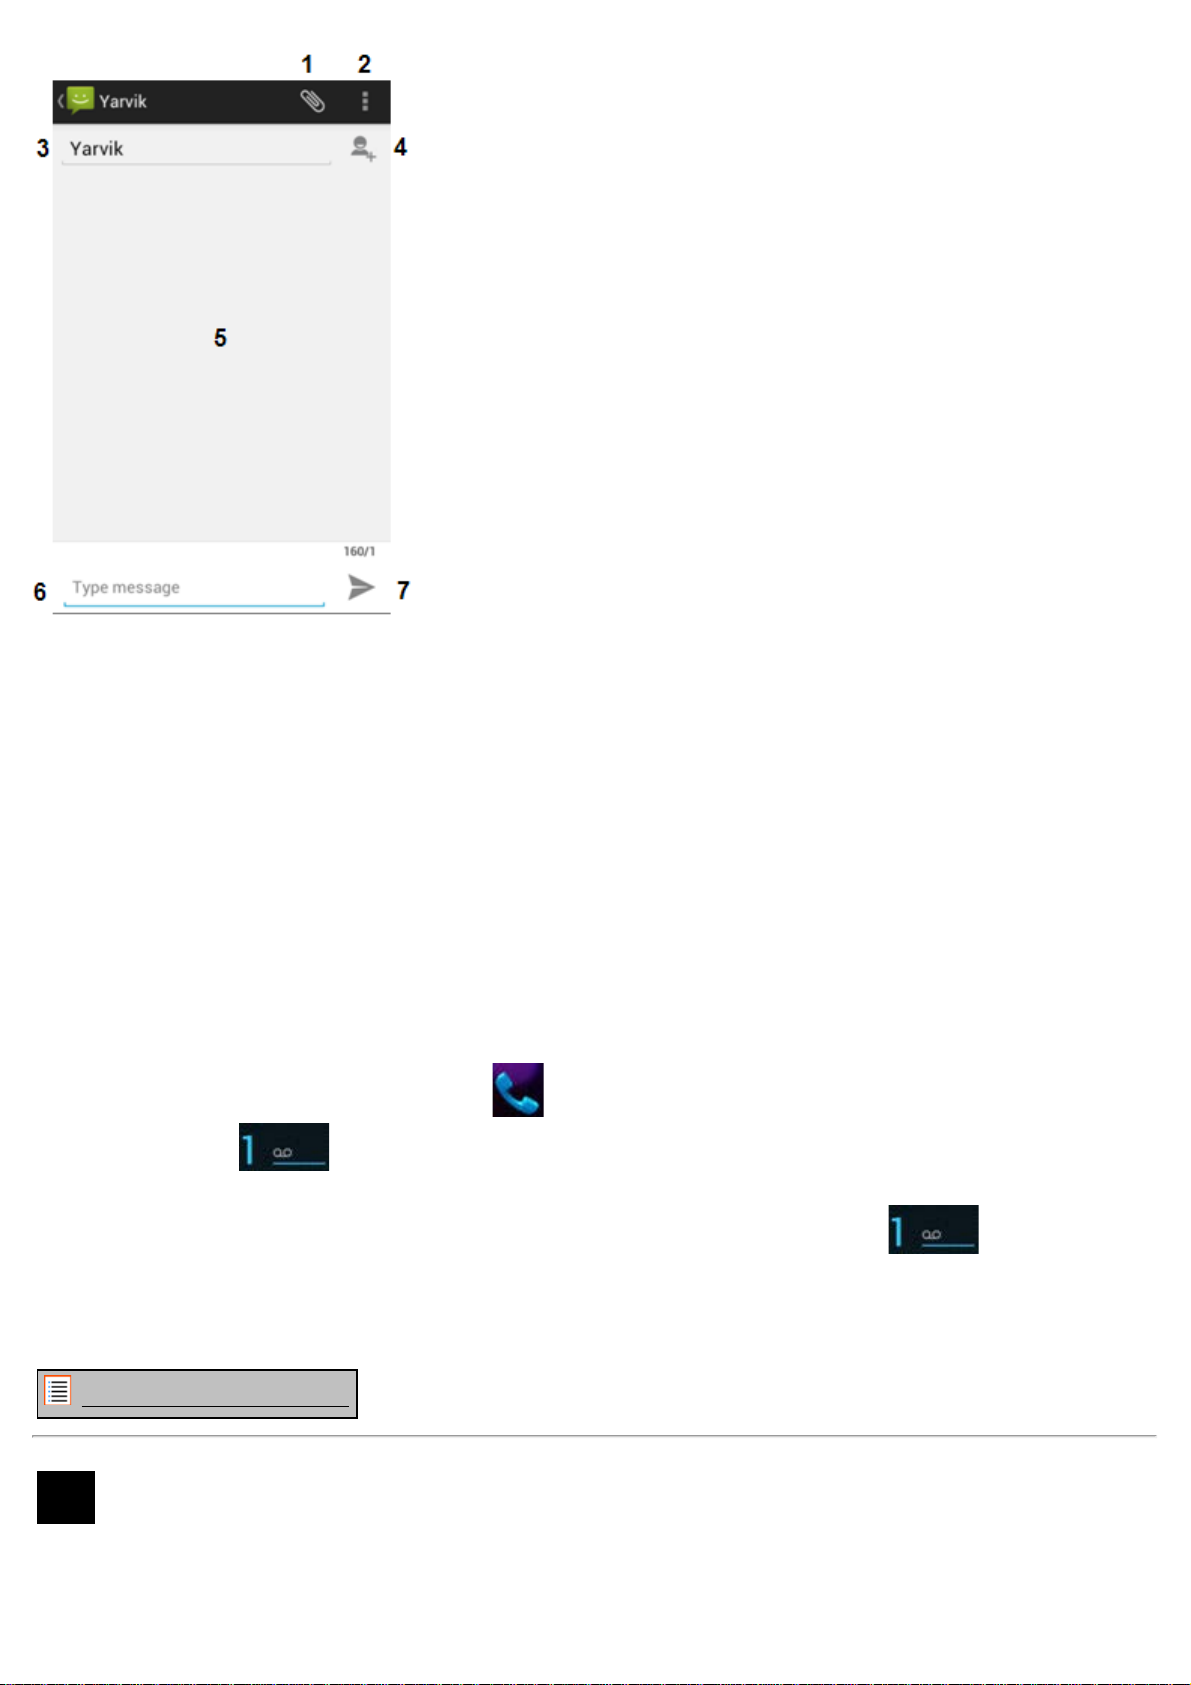
Yarvik smartphone manual
Messaging application.
1 - Add attachments like pictures, audio and video's. Messages with attachment are automatically
considered MMS messages;
2 - Message settings menu;
3 - Recipient field;
4 - Add recipient;
5 - Message conversation overview;
6 - Message input;
7 - Send message button.
Set voicemail number/playback voicemail messages
To set your voicemail service number in your Yarvik Smartphone, open the "Phone" application from your
application menu or Android home screen:
Press and hold the button on the phone keypad. The option screen "Add number" will appear. In
the Voicemail options you can select the voicemail settings and enter your voicemail service number.
Once the voicemail service number has been set, you can subsequently use the
your voicemail box by pressing and holding it.
button to call to
Return to index
Warranty
8
Statement
Yarvik warrants that the product purchased by Customer shall be free from defects in workmanship or
file:///Volumes/Product_Data/SMP53-210/R&D/HTML%20Manual/manual_en.html[01-02-13 17:15:49]

Yarvik smartphone manual
materials for a period of 2 years from the date of purchase by Customer. If, at any time during the
warranty period, the product has a defect in workmanship or material, Customer should return the product
to the dealer where the product has been purchased. Dealer shall repair or replace it (at Yarvik's sole
option) within a reasonable period of time. An original invoice is required as proof of the purchase date.
Yarvik's option with respect to this matter shall be final.
This warranty does not cover defects or malfunctions resulting from software transfers, misuse, abusive
operation, tampering, negligence, improper use, insufficient care or any act beyond the control of Yarvik.
IMPORTANT:
latest stable firmware available for this specific model, at the time the unit was manufactured. Yarvik will
not provide support to products that have otherwise been modified by the end user, nor does Yarvik
support programming modifications to the firmware and software used in its products, and if any such
modifications have been made, all warranties shall be automatically void.
To avoid invalidating the warranty offered hereunder, Customer should use only the official software,
applications and upgrades available from Yarvik's website at www.yarvik.com.
No other software or firmware should be used, as such use will automatically void all warranties and
support. Yarvik does not support the use of any software or firmware other than the software or firmware
that was installed on the product by the manufacturer or that is available from Yarvik's official web site at
www.yarvik.com. Yarvik explicitly declines to respond to any inquiries regarding unauthorized
modifications, unauthorized software, and unauthorized firmware.
When you buy a Smartphone from Yarvik, your Smartphone will be provided to you with the
Return to index
GNU/GPL
9
Licensing
Information
Please consult the legal information available on your Yarvik Smartphone under Settings – About
Smartphone – Legal information (internet connection required) or visit
http://source.android.com/source/licenses.html
for more information.
Return to index
Important
10
Information
Wireless LAN-Regulatory information
Depending on the model, the wireless LAN built-in into Smartphone devices can only be used in the
following countries: Austria, Belgium, Bulgaria, Czech Republic, Denmark, Finland, France, Germany,
Greece, Hungary, Iceland, Ireland, Italy, Luxembourg, the Netherlands, Norway, Poland, Portugal,
Romania, Slovakia, Slovenia, Spain, Sweden, Switzerland, Turkey and the United Kingdom.
Conditions of use
When using the IEEE 802.11b/g/n Wireless LAN standard, channels 1 to 13 (2.4 GHz...2.4835 GHz) are
file:///Volumes/Product_Data/SMP53-210/R&D/HTML%20Manual/manual_en.html[01-02-13 17:15:49]

Yarvik smartphone manual
selectable for both indoor and outdoor use, however with restrictive conditions applying in France, Italy
and Norway, as follows:
• France: When using this product indoor, all channels can be used without restrictions. Outdoor only
channels 1 to 6 are allowed. This means that in Peer-to-Peer, the WLAN feature can only be used
outside if the peer sets up the communication on an authorized channel (i.e., between 1 & 6). In
infrastructure mode, please make sure the access point is configured to a channel from 1 to 6 before
setting up the connection.
• Italy: Use of the RLAN network is governed: Disposal of Old Electrical & Electronic
- with respect to private use, by the Legislative Decree of 1.8.2003, no. 259 (“Code of Electronic
Communications”). In particular Article 104 indicates when the prior obtainment of a general authorization
is required and Art. 105 indicates when free use is permitted;
- with respect to the supply to the public of the WLAN access to telecom networks and services, by the
Ministerial Decree 28.5.2003, as amended, and Art. 25 (general authorization for electronic
communications networks and services) of the Code of electronic communications.
• Norway: Use of this radio equipment is not allowed in the geographical area within a radius of 20 km
from the centre of Ny-Ålesund, Svalbard.
WEEE
Symbol
Information
Correct Disposal of This product (Waste Electrical & Electronic Equipment).
(Applicable in the European Union and other European countries with separate collection systems).
This marking shown on the product or its literature indicates that it should not be disposed with other
household wasted at the end of its working life. To prevent possible harm to the environment or human
health from uncontrolled waste disposal, please separate this from other types of wastes and recycle it
responsibly to promote the sustainable reuse of material resources.
Household users should contact either the retailer where they purchased this product, or their local
government office, for details of where and how they can take this item for environmentally safe recycling.
Business users should contact their supplier and check the terms and conditions of the purchase
contract. This product should not be mixed with other commercial wastes of disposal.
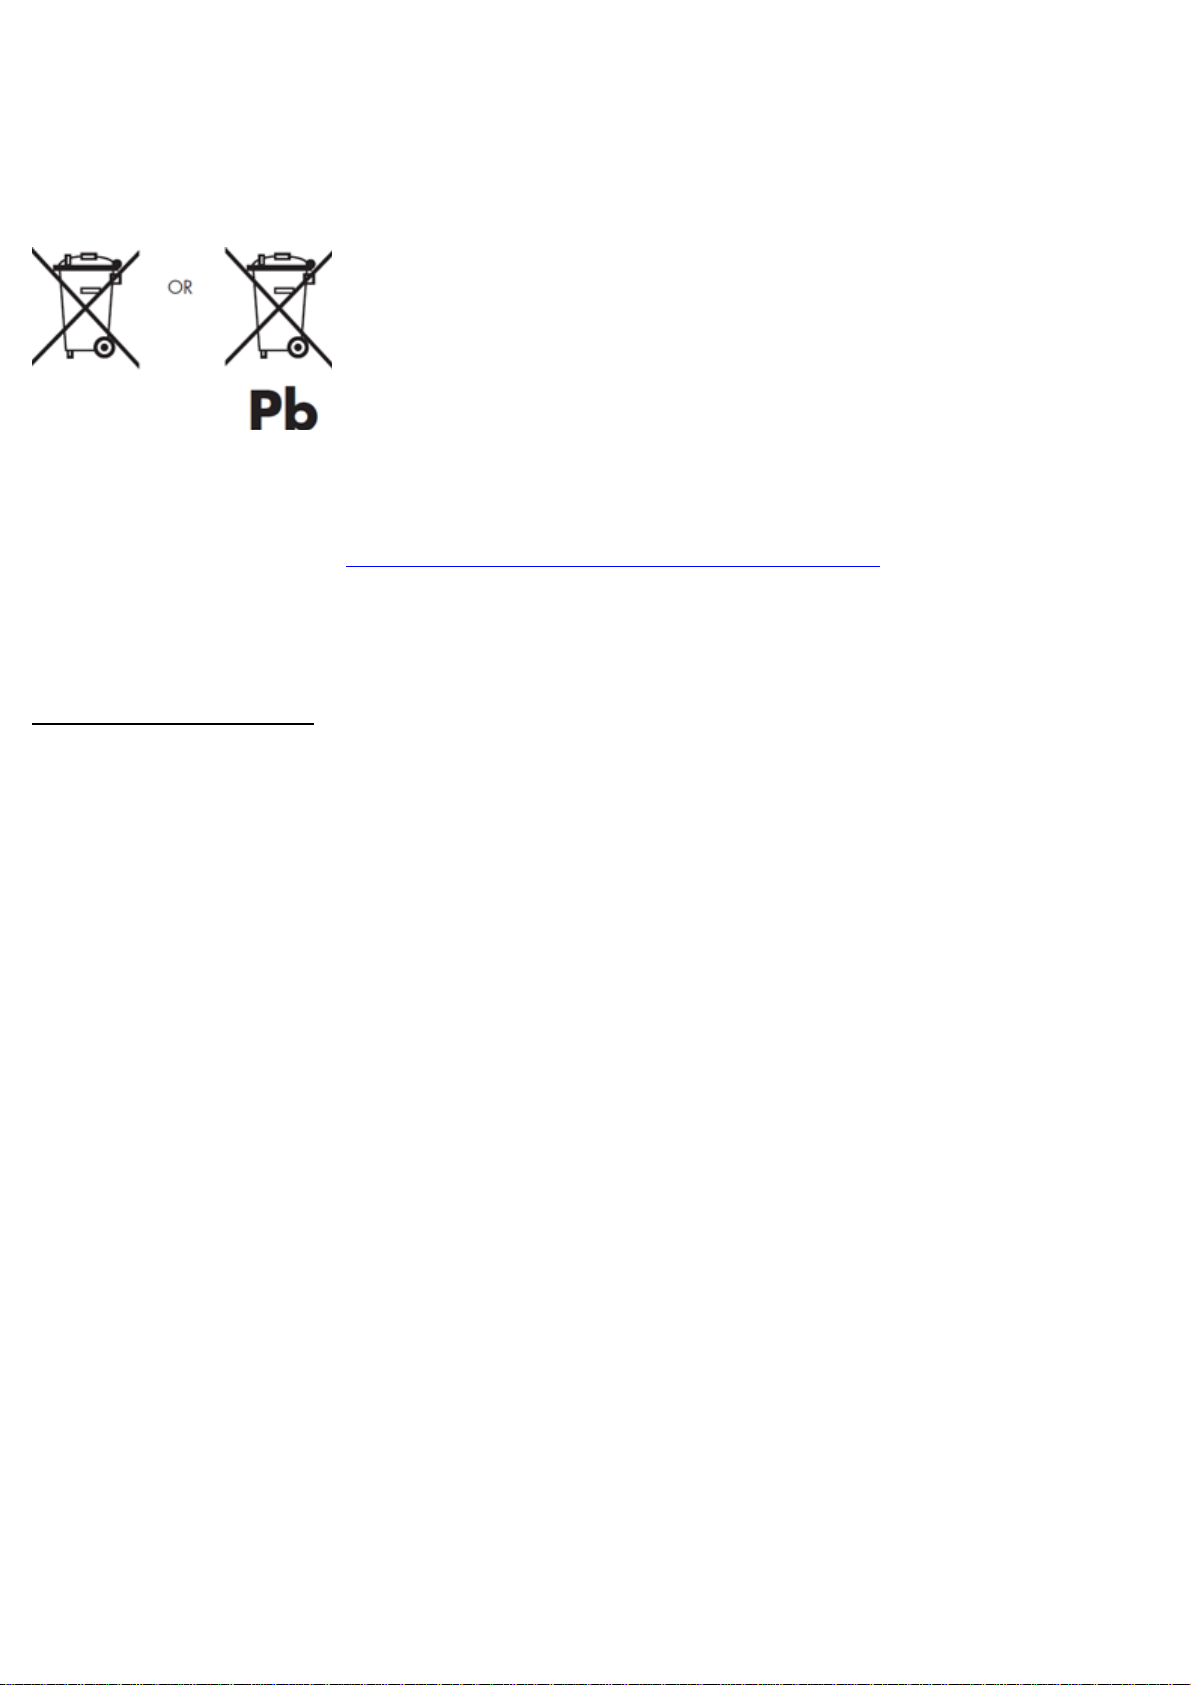
Disposal of waste batteries (applicable in the European Union and other European countries with
separate collection systems)
Either of the symbols shown next may appear on the battery or on the packaging to indicate that the
battery provided with this product shall not be treated as household waste. On certain batteries this
symbol might be used in combination with a chemical symbol. The chemical symbols for mercury (Hg) or
lead (Pb) are added if the battery contains more than 0.0005% mercury or 0.004% lead. By ensuring
these batteries are disposed of correctly, you will help prevent potentially negative consequences for the
environment and human health which could otherwise be caused by inappropriate waste handling of the
battery. The recycling of the materials will help to conserve natural resources. In case of products that for
safety, performance or data integrity reasons require a permanent connection with an incorporated
battery, this battery should be replaced by qualified service staff only. To ensure that the battery will be
treated properly, hand over the product at end-of-life to the applicable collection point for the recycling of
file:///Volumes/Product_Data/SMP53-210/R&D/HTML%20Manual/manual_en.html[01-02-13 17:15:49]
Yarvik smartphone manual
electrical and electronic equipment.
For all other batteries, please view the section on how to remove the battery from the product safely.
Hand the battery over to the applicable collection point for the recycling of waste batteries. For more
detailed information about recycling of this product or battery, please contact your local Local government
Office, your household waste disposal service or the shop where you purchased the product.
When travelling to and within the United States of America, please be aware that the U.S. Department of
Transportation (DOT) recently published new regulations that apply to passengers travelling with lithium
metal batteries and lithium-ion batteries.
For detailed information, visit http://safetravel.dot.gov/whats_new_batteries.html
.
Safety Information
Yarvik Smartphone device
• Yarvik is not responsible for any interference that you may experience or that may be caused when
operating this device.
• Warning: This apparatus must be earthed.
Opening or dismantling the main unit or any of its accessories, for whatever reason, could lead to
damages that are not covered by the guarantee.
• To avoid electrical shock, do not open the cabinet. Refer servicing to qualified personnel only.
• To prevent fire or shock hazard, do not expose your Smartphone device or any of its accessories to rain
or moisture.
• Do not use or store your Smartphone device in a location subject to heat sources, such as radiators or
air ducts; direct sunlight; excessive dust; moisture or rain; mechanical vibration or shock; strong magnets
or speakers that are not magnetically shielded; excessively high and low temperatures; and high
humidity.
• Turning off your Smartphone device with the power button does not disconnect the device completely
from mains voltage. To disconnect it completely, unplug the AC adapter or the power cord from mains.
The socket-outlet shall be installed near the equipment and shall be easily accessible.
• Audio and picture distortion may occur if this equipment is positioned in close proximity to any
equipment emitting electromagnetic radiation.
• This apparatus is also designed for IT power system with phase to phase voltage 230V, for customers in
Norway.
• Observe the following precautions to provide adequate air circulation and to ensure normal reliable
operation:
- Do not use the Smartphone device and/or the AC adapter while covered or wrapped in cloth. Ensure the
file:///Volumes/Product_Data/SMP53-210/R&D/HTML%20Manual/manual_en.html[01-02-13 17:15:49]

Yarvik smartphone manual
AC adapter operates in a clear environment.
- Turn off the Smartphone device before putting the device into a bag or a carrying case.
• Do not use your Smartphone device directly on your lap. The temperature of the base of the unit will rise
during normal operation and over time could result in discomfort or burns.
• Do not use your Smartphone device while walking. Listening to music with headphones or watching the
LCD screen while walking may lead to an unexpected accident and result in personal injuries.
• Using connected headphones on the Smartphone device for too long and/or setting the audio volume up
too high when using headphones may cause serious hearing damage.
• Avoid strong beating of or to the product.
• Don’t operate the touch screen of the Smartphone device with sharp objects, as this may result in
scratching the screen surface.
• Only use permitted batteries, chargers and accessories with your Smartphone device. The use of any
other products with the device can be dangerous and may violate the warranty regulations.
• Only use a slightly wet cotton cloth to clean the device, and only use water to wetten the cotton cloth.
The Smartphone device should not be cleaned with any sort of (glass) cleaning aid.
Wireless functionality
• If radio interference with other devices occurs while using your Smartphone device, do not use the
wireless functionality. Use of the wireless functionality may cause a malfunction of the devices, resulting
in an accident.
• In some situations or environments, the use of the wireless functionality might be restricted by the
proprietor of the building or responsible representatives of the organization, for example on board
airplanes, in hospitals or in any other environment where the risk of interference with other devices or
services is perceived or identified as harmful. If you are uncertain about the policy applying to the use of
wireless functionality in a specific organization or environment, you are encouraged to first ask for
authorization prior to switching it on. Consult your physician or the manufacturer of personal medical
devices (pacemakers, hearing aids, etc.) regarding any restrictions on the use of wireless functionality.
• If using wireless functionality near a pacemaker, make sure it is at least 19 inches / 50 cm away from the
pacemaker.
• Due to the transmission and reception properties of wireless communications, data can occasionally be
lost or delayed. This can be due to the variation in radio signal strength that results from changes in the
characteristics of the radio transmission path. Yarvik will not be held responsible for damages of any kind
resulting from the delays or errors in data transmitted or received via wireless functionality, or failure of
wireless functionality to transmit or receive such data.
• If the equipment does cause harmful interference to radio/TV reception, which can be determined by
turning the equipment off and on, the user is encouraged to try to correct the interference by one or more
of the following measures: reorient or relocate the receiving antenna, increase the distance between the
sender and the receiver, consult the dealer or an experienced radio/TV technician for help. Yarvik will not
be responsible for any radio/TV interference nor for any other undesired effect.
Wireless LAN Security
file:///Volumes/Product_Data/SMP53-210/R&D/HTML%20Manual/manual_en.html[01-02-13 17:15:49]
Yarvik smartphone manual
Creating security settings for the Wireless LAN is extremely important. Yarvik assumes no responsibility
for any security problems that may arise from the use of the Wireless LAN.
Battery pack
Do not charge the battery pack in any way other than as described in the Start guide or as designated by
Yarvik in writing.
AC adapter
• It is highly recommended that you use a genuine Yarvik AC adapter supplied by Yarvik for your product.
• This AC adapter is intended for use with the Smartphone device IT products only.
• Do not place the AC adapter in contact with your skin. Remove the AC adapter away from your body if it
becomes warm and causes discomfort.
RoHS
This products has been certified as RoHS Compliant.
YARVIK.COM
Return to index
file:///Volumes/Product_Data/SMP53-210/R&D/HTML%20Manual/manual_en.html[01-02-13 17:15:49]

Yarvik smartphone manual
Index
SELECT LANGUAGE
1 Voor het eerste
gebruik
2 Smartphone Start
3 Android Home
scherm
3.1 Widgets en
snelkoppelingen
toevoegen
3.2 Achtergrond
instellen
3.3 Applicatiemenu
4 Uw smartphone
instellen
4.1 Instellingenmenu
4.2 WiFi & Bluetooth
4.3 Audioprofielen
4.4 Scherm
4.5 Apps
4.6 Opslag & MicroSD
toegang
4.7 Taal & toetsenbord
4.8 Datum & tijd
5 Apps
6 Telefoongesprekken
7 Berichten
8 Garantieverklaring
9 GNU/GPL
Licentieinfo
10 Important
file:///Volumes/Product_Data/SMP53-210/R&D/HTML%20Manual/manual_nl.html[01-02-13 17:16:02]

Yarvik smartphone manual
Information
1 Voor het eerste gebruik
Geachte gebruiker,
Bedankt dat u ons product hebt aangeschaft.
Lees deze instructies zorgvuldig voor gebruik, zodat u uw Yarvik Smartphone snel en goed kunt
gebruiken.
We hopen dat u lang kunt genieten van uw Yarvik Smartphone!
Let op:
• Uw Yarvik Smartphone is een
fijngevoelig elektronisch
product. Probeer de
Smartphone niet uit elkaar te
halen. Hierdoor vervalt uw
garantie en het kan leiden tot
het disfunctioneren van het
apparaat;
• Vermijd klappen op of tegen
het product;
• Gebruik de Smartphone niet
in een omgeving met hoge of
lage temperatuur of in een
omgeving waar het apparaat in
contact kan komen met vocht,
stof of magnetische velden;
• Stel de Smartphone niet voor
langere tijd bloot aan sterk
zonlicht;
• Gebruik het touch screen van
de Smartphone niet met
scherpe objecten, dit kan het
schermoppervlak beschadigen;
• Gebruik de aangesloten
koptelefoon op de Smartphone
niet te lang en zet het volume
niet te hard, dit kan leiden tot
ernstige gehoorschade;
• Voorkom verkeersongelukken
en gebruik de Smartphone niet
terwijl u een motorvoertuig of
een fiets bestuurt;
file:///Volumes/Product_Data/SMP53-210/R&D/HTML%20Manual/manual_nl.html[01-02-13 17:16:02]
Yarvik smartphone manual
• Gebruik alleen toegestane
accu's, opladers en
accessoires voor uw Yarvik
Smartphone. Het gebruik van
andere producten kan
gevaarlijk zijn en kan de
garantievoorwaarden
schenden;
• Maak de Smartphone schoon
met een vochtige katoenen
doek en gebruik alleen water
om de doek nat te maken. De
Smartphone mag niet gereinigd
worden met een (glas) reiniger.
U kunt de Yarvik Smartphone direct gebruiken, zonder de accu eerst op te laden.
Het is het beste voor de accu om deze eerst leeg te maken en deze daarna volledig op te laden.
Als de Smartphone niet direct aan gaat als u deze uit de doos haalt, dan is de accu al volledig leeg en
dient u deze eerst geheel op te laden.
Terug naar
index
Smartphone
2
Start
Als u uw Yarvik Smartphone voor het eerst opstart, krijgt u een opstartscherm te zien.
De eerste keer opstarten kan even duren, gemiddeld 2 tot 3 minuten.
Als het opstartscherm verdwijnt, is de Smartphone helemaal opgestart en krijgt u het Android
Vergrendelingsscherm te zien.
file:///Volumes/Product_Data/SMP53-210/R&D/HTML%20Manual/manual_nl.html[01-02-13 17:16:02]
Yarvik smartphone manual
Android Vergrendelingsscherm
Verschuif de vergrendelingsbalk (A) naar rechts om de Smartphone te ontgrendelen. U wordt dan naar
het Android Home scherm geleid.
Terug naar
index
3 Android Homescherm
file:///Volumes/Product_Data/SMP53-210/R&D/HTML%20Manual/manual_nl.html[01-02-13 17:16:02]

Yarvik smartphone manual
Android Homescherm
De statusbalk is altijd te vinden bovenin het Smartphone scherm.
In de statusbalk vindt u systeeminformatie en functieknoppen.
1 - Indicatie Wi-Fi-signaal
2 - Mobiel telefoonsignaal voor SIM1 en SIM2 en indicatie batterijniveau
3 - Systeemtijd
4 - App-snelkoppelingen
5 - Widget (analoge klok)
6 - Terug knop - brengt u terug naar het vorige scherm of de vorige website, als u de browser gebruikt
7 - Home - brengt u terug naar het Android Homescherm
8 - App en widget menu
9 - Multitaskknop
Het Home scherm bestaat uit meerdere pagina's die kunnen worden geopend door over het scherm naar
links of rechts te vegen.
Om te bekijken welke apps op de achtergrond worden uitgevoerd, kunt u met de multitask-knop (9) de
multitask-weergave openen.
file:///Volumes/Product_Data/SMP53-210/R&D/HTML%20Manual/manual_nl.html[01-02-13 17:16:02]
Yarvik smartphone manual
Klik op een actieve app in de multitask-weergave om snel naar deze app over te gaan. U kunt actieve
apps sluiten door deze apps ingedrukt te houden en te klikken op "Remove from list" (Uit lijst
verwijderen).
Terug naar
index
Widgets en
snelkoppelingen
3.1
toevoegen aan
uw Home
scherm
Om een widget toe te voegen, drukt u op de App/widget-knop rechtsboven in het Home scherm:
In het volgende scherm kunt u alle geïnstalleerde apps en widgets vinden. U kunt ze ook afzonderlijk
bekijken door te drukken op "Apps" of "Widgets" bovenin het scherm.
Druk op "Widgets" om alle beschikbare widgets te bekijken. Wanneer alle widgets worden weergegeven,
kunt u over het scherm vegen om naar de volgende pagina te gaan (indien beschikbaar).
Druk op de gewenste widget totdat het Home scherm verschijnt en laat de widget los op een lege plek op
het beginscherm.
Om een snelkoppeling aan een app toe te voegen, drukt u op de knop app en widget rechtsboven in het
Home scherm:
file:///Volumes/Product_Data/SMP53-210/R&D/HTML%20Manual/manual_nl.html[01-02-13 17:16:02]
 Loading...