

Page 1

Yarvik smartphone manual
Manual
Handleiding
Anleitung
Manuel
Manual
Manuale
Manual
Instrukcja obs ługi
Manuál
Manuál
Manual
Manuell
Håndbok
Priročnik
Priručnik
Leírás
Наръчник
Manual
Руководство
Посібник користувача
Οδηγίες Χρήσης
Page 2

Yarvik smartphone manual
Index
SELECT LANGUAGE
1 Prior to first use
2 Smartphone Startup
3 Android Home
Screen
3.1 Adding widgets and
shortcuts to your Home
Screen
3.2 Setting a Wallpaper
3.3 Application Menu
4 Setting up your
Smartphone
4.1 Settings Menu
4.2 WiFi & Bluetooth
4.3 Audio Profiles
4.4 Display
4.5 Apps
4.6 Storage & MicroSD
memory Access
4.7 Language & input
4.8 Date & time
5 Apps
6 Phone Calls
7 Messaging
8 Warranty Statement
9 GNU/GPL Licensing
Info
10 Important
Page 3

Yarvik smartphone manual
Information
1 Prior to first use
Dear user,
Thank you for purchasing our product.
To ensure you a quick and convenient use of your new Yarvik Smartphone, please read these instructions
carefully prior to use.
We hope you will absolutely enjoy your Yarvik Smartphone for the longest time possible!
Please note:
• Your Yarvik Smartphone is a
high precision electronic
product, do not try to
disassemble the Smartphone, as
this will void your warranty and
may result in malfunctioning of
the device;
• Avoid strong beating of or to
the product;
• Avoid using the Smartphone in
a high or low temperature
environment, or in any
environment where the device
can get in contact with moisture,
dust or magnetic fields;
• Do not expose the Smartphone
to strong sunlight for an
extended period of time;
• Don’t operate the touch screen
of the Smartphone with sharp
objects, as this may result in
scratching the screen surface;
• Using connected headphones
on the Smartphone for too long
and/or setting the audio volume
up too high when using
headphones may cause serious
hearing damage;
Page 4

Yarvik smartphone manual
• Do not cross the road, drive a
motor vehicle or bicycle while
using the Smartphone with
headphones to avoid traffic
accidents;
• Only use permitted batteries,
chargers and accessories with
your Yarvik Smartphone. The
use of any other products with
the Smartphone can be
dangerous and may violate the
warranty regulations;
• Only use a slightly wet cotton
cloth to clean the Smartphone,
and only use water to wetten the
cotton cloth. The Smartphone
should not be cleaned with any
sort of (glass) cleaning aid.
You may go ahead and use your Yarvik Smartphone right out of the box, without charging the battery first.
It is best for the battery to first run on the charge left in it, and to be fully recharged once it’s completely
drained for the first time.
If the Smartphone isn’t switching on right out of the box, the battery is already completely drained and you
should of course recharge it first.
Return to index
Smartphone
2
Startup
When you first power on your Yarvik Smartphone, you will be presented the startup sequence.
The very first startup may take a while, approximately 2-3 minutes.
After the startup sequence the Smartphone has completed starting up and you will be presented the Android
Lock Screen.
Page 5
Yarvik smartphone manual
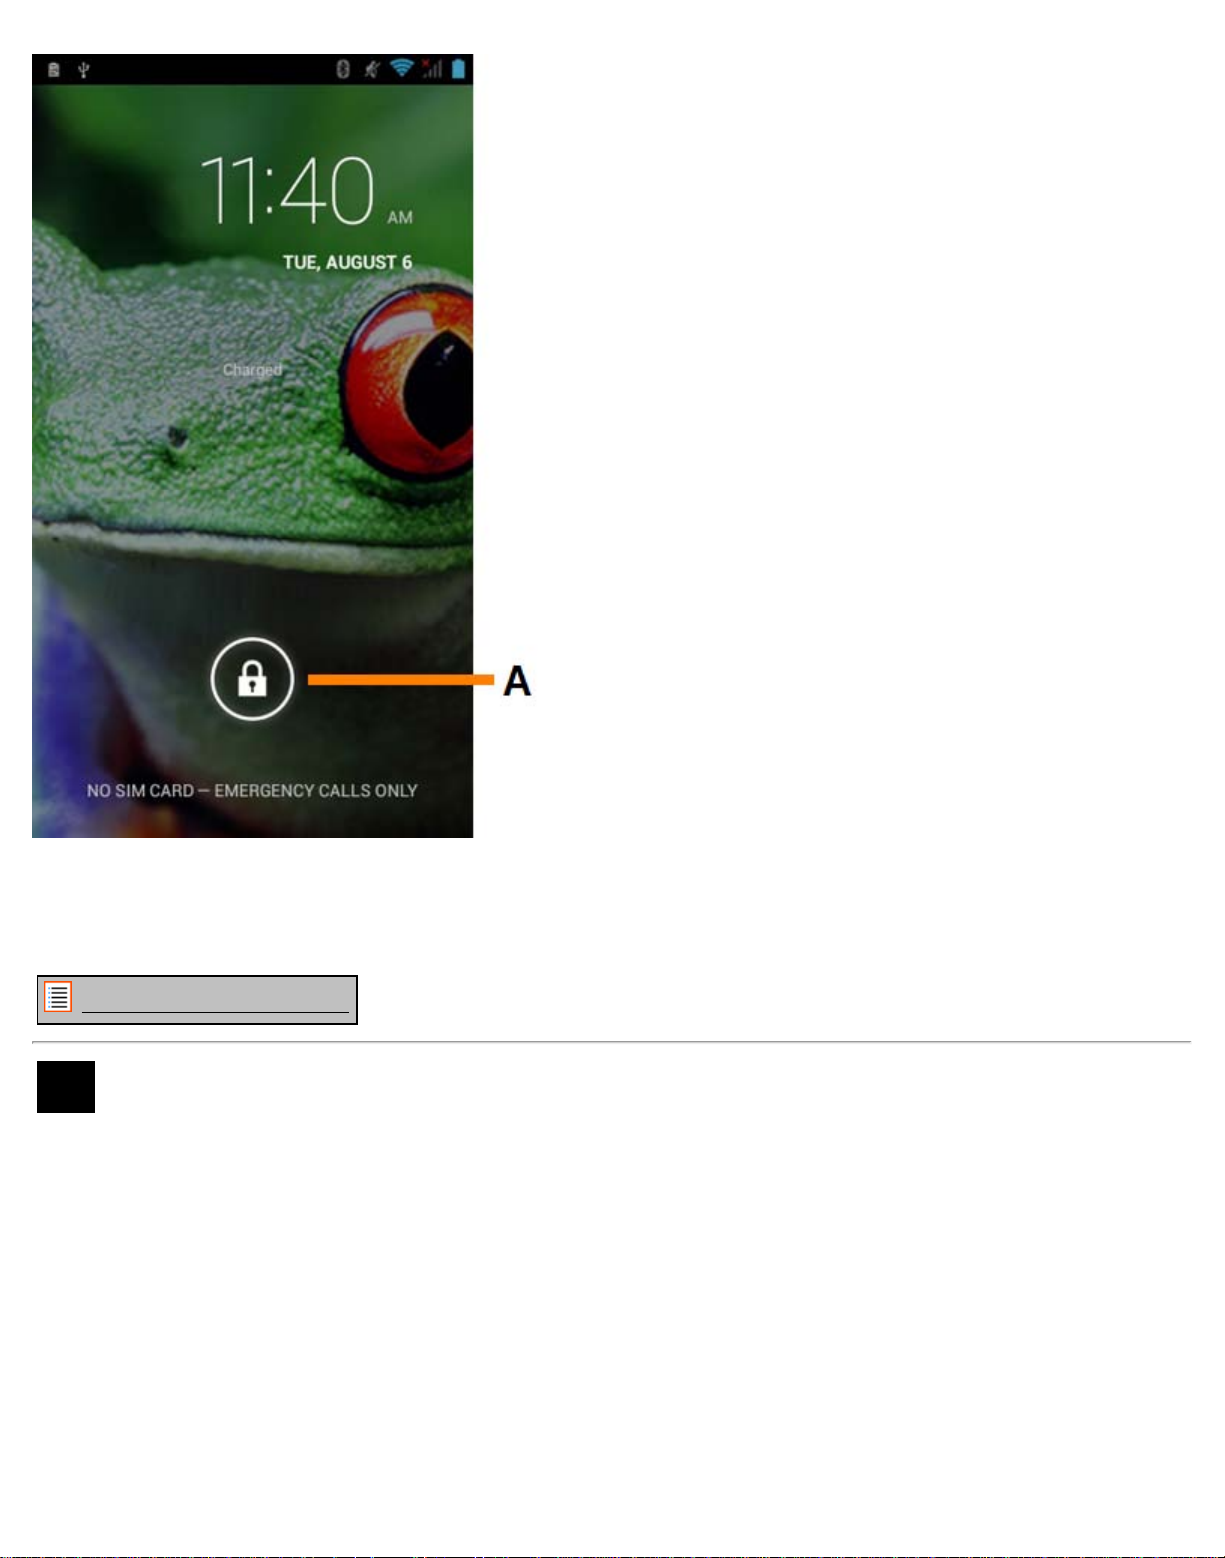
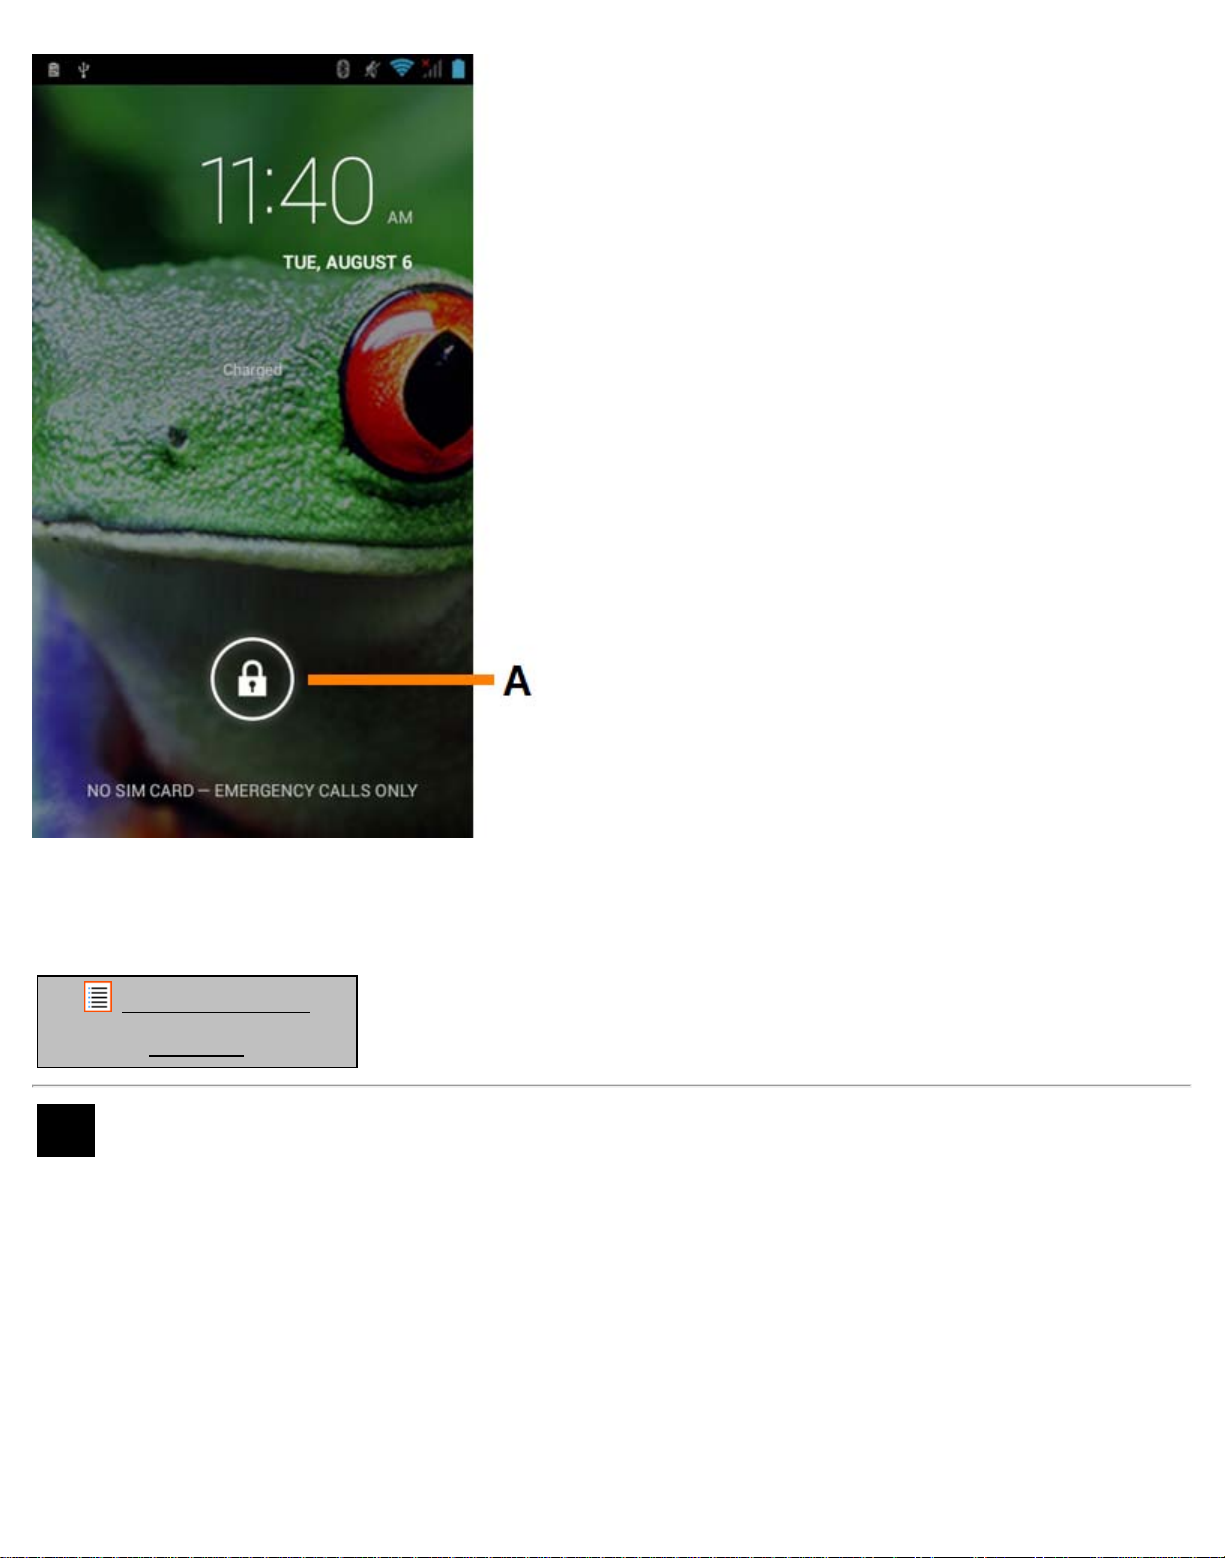
Android Lock Screen
Slide the lock bar (A) to the right to unlock the Smartphone. You will then be taken to the Android Home
Screen.
Return to index
3 Android Home Screen
Page 6
Yarvik smartphone manual
Android Home Screen
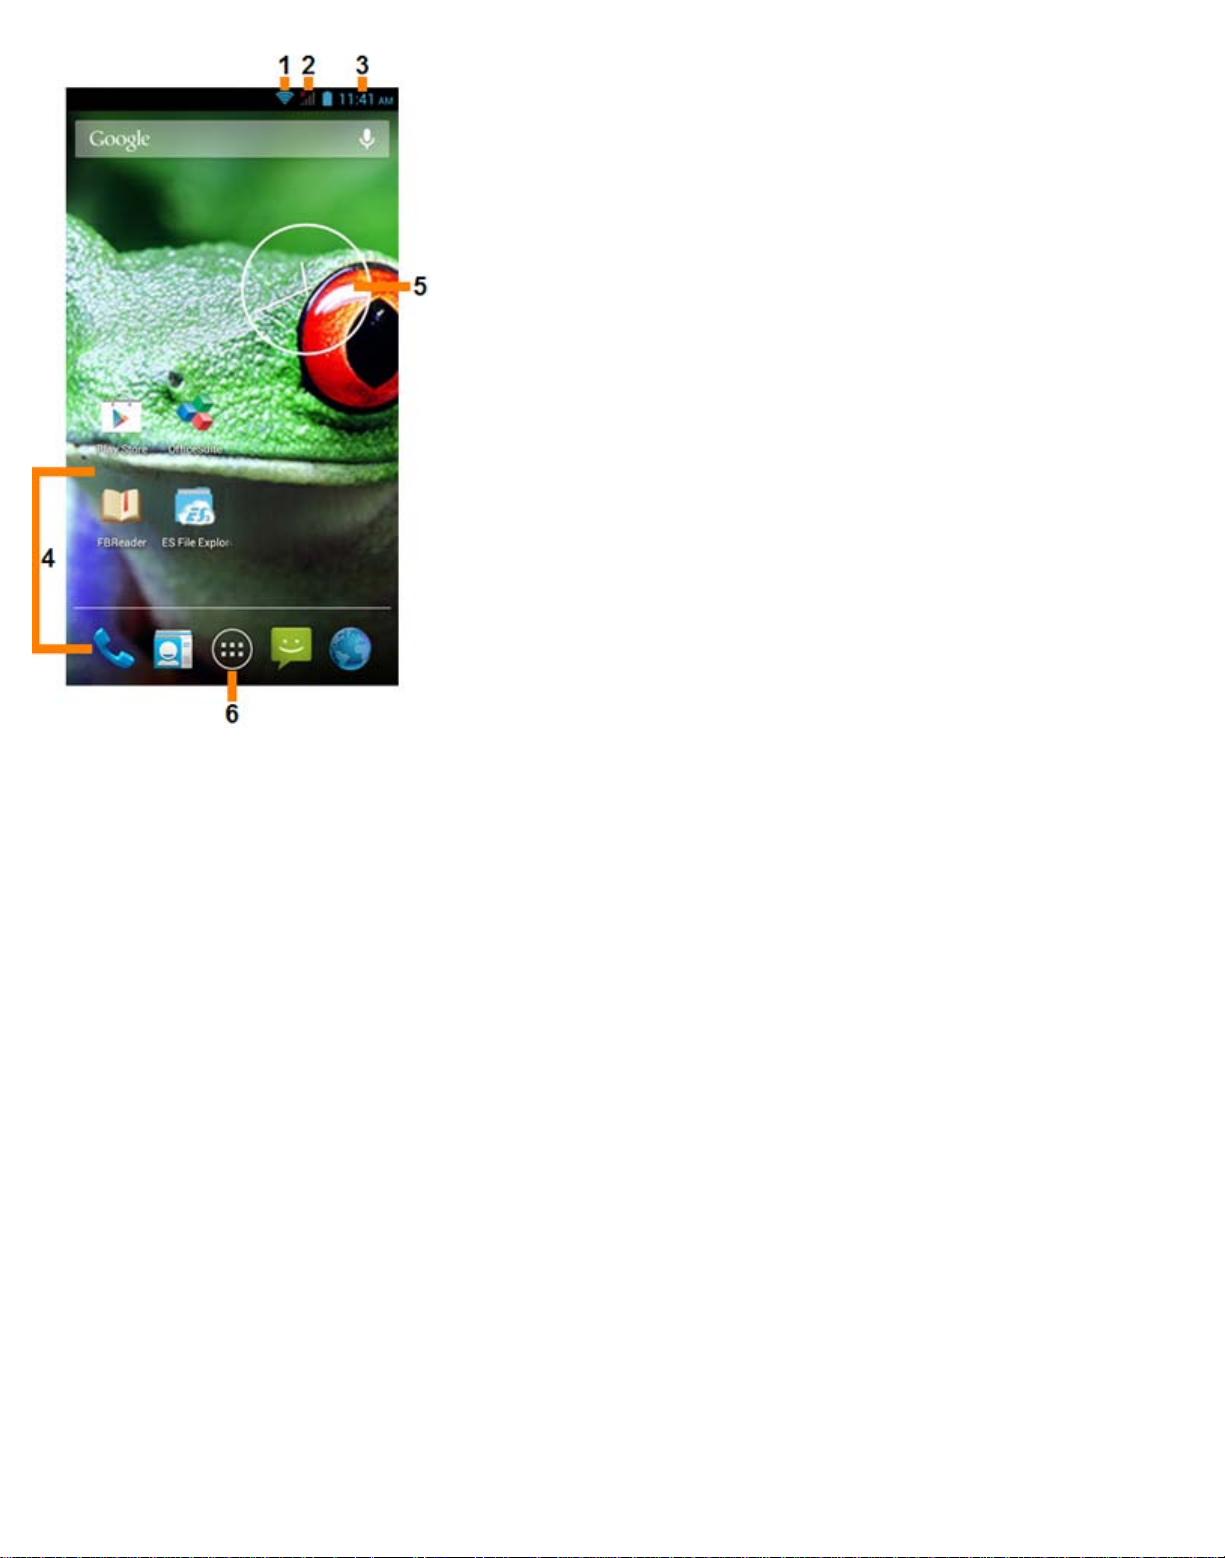
On top of the Smartphone’s screen you can always find the status bar.
The status bar displays system information, while the lower menu bar contains the function buttons.
1 - Wi-Fi Signal Indicator
2 - Cellular network reception for SIM1 and SIM2 and Battery Level Indicator
3 - System Time
4 - App Shortcuts
5 - Widget (analog clock)
6 - App and widget menu
The home screen consists of multiple pages which can be accessed by swiping the home screen left/right.
To see what apps are running in the background, you can access the multitasking view by pressing the
multitask button (9).
Page 7
Yarvik smartphone manual
Click on a running app in the multitask view to quickly switch to it. You can close running apps by long
pressing it and clicking "Remove from list".
Return to index
Adding widgets
and
3.1
shortcuts to
your
Home Screen
To add a widget, press the app and widget button in the bottom center of your Home Screen:
In the following screen, you can find all the installed apps and widgets, both seperately viewable by pressing
"Apps" or "Widgets" on top of the screen respectively.
Press "Widgets" to view all available widgets. When showing all widgets, you can swipe the screen to
browse to the next page (if available).
Press and hold the desired widget to have the Home Screen show up and release the widget to any empty
spot on the home screen.
To add a shortcut to any app, press the app and widget button in the bottom center of your Home Screen:
Page 8
Yarvik smartphone manual
In the following screen, you can find all the installed apps and widgets, both seperately viewable by pressing
"Apps" or "Widgets" on top of the screen respectively.
Press "Apps" to view all installed apps.
Press and hold the desired app to have the home screen show up and release the shortcut to any empty
spot on the Home Screen.
To remove widgets and/or app shortcuts from your Home Screen, press and hold them and drag them to the
appeared "Remove" dustbin icon on top of your Home Screen.
Return to index
Setting a
3.2
Wallpaper
To change the Home Screen wallpaper, press and hold the Home Screen until the “Select Wallpaper from”
menu comes up.
You can choose from "Live Wallpapers" (animated wallpapers), "Gallery" (photo/video gallery) or
"Wallpapers" (default static images).
Return to index
3.3 Application Menu
Press the app and widget button in the bottom center of your Home Screen:
When the system displays the widgets, press "Apps" to view all installed apps.
Here you can find all the pre-installed programs or “apps” as well as additional apps that you install.
You can launch any app by just pressing the corresponding icon.
Page 9
Yarvik smartphone manual
Application Screen
Return to index
Setting up your
4
Yarvik
Smartphone
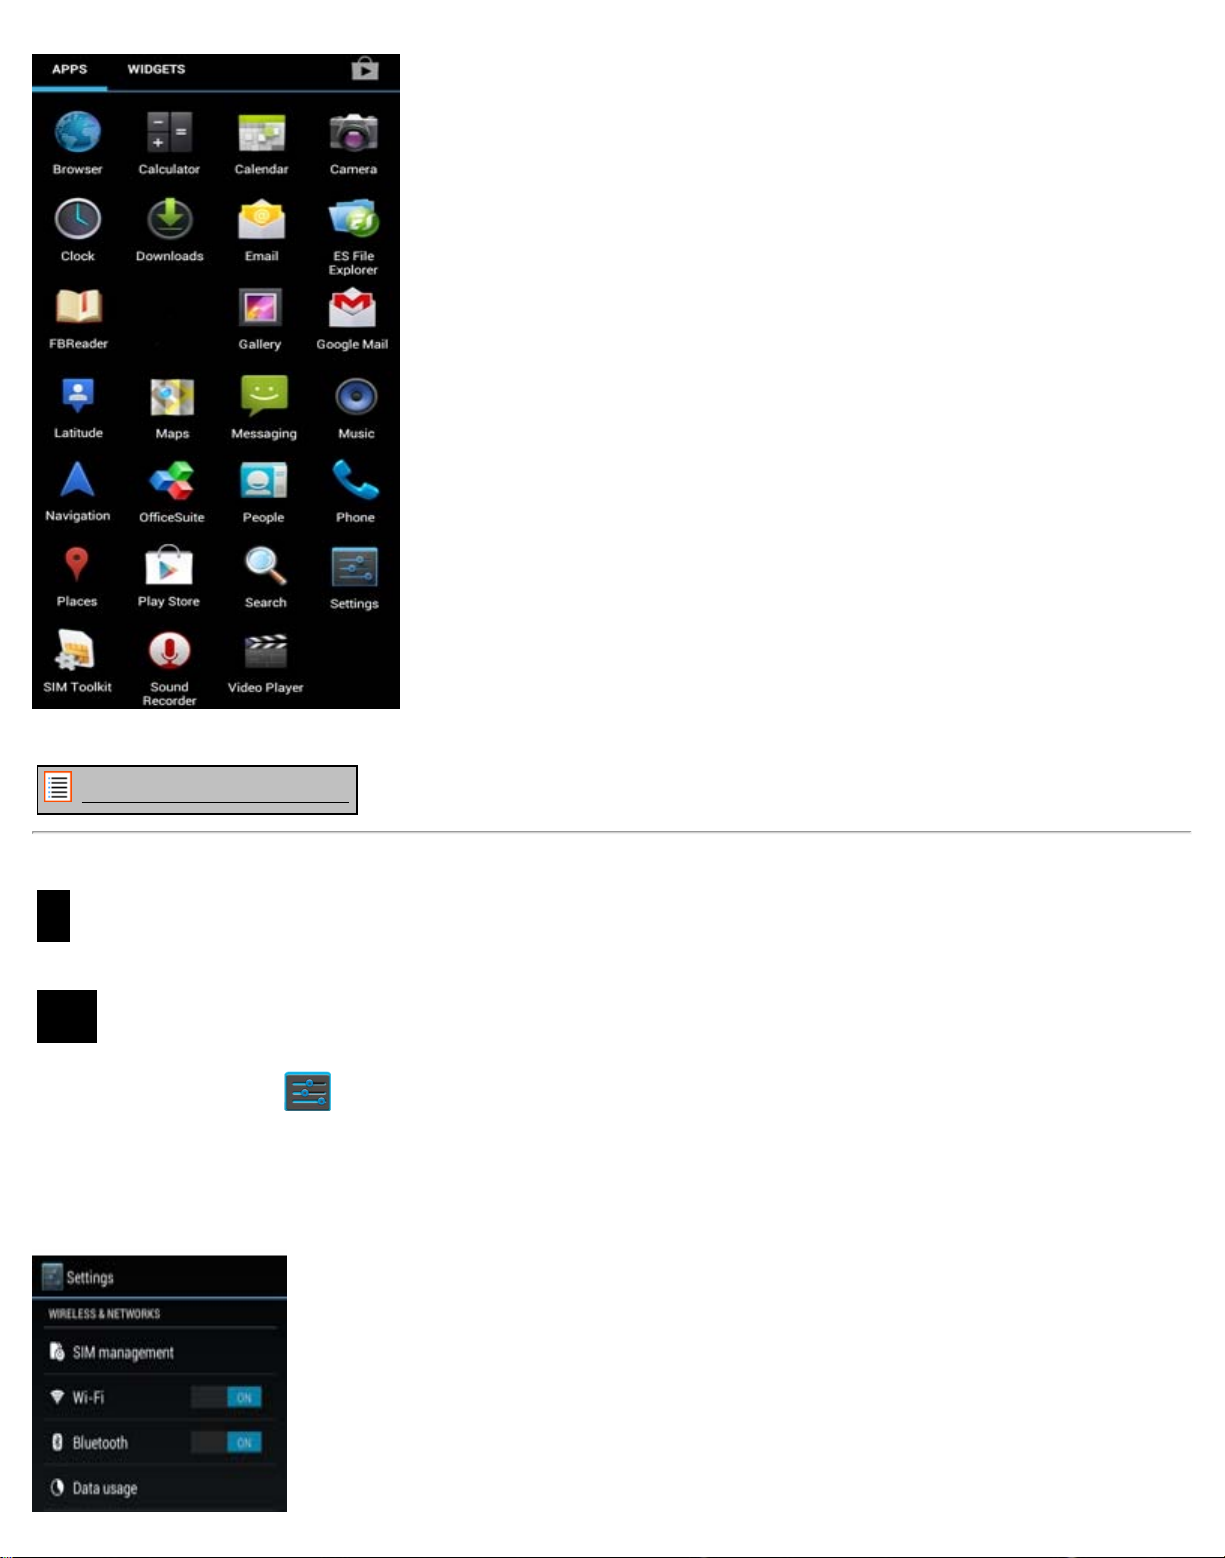
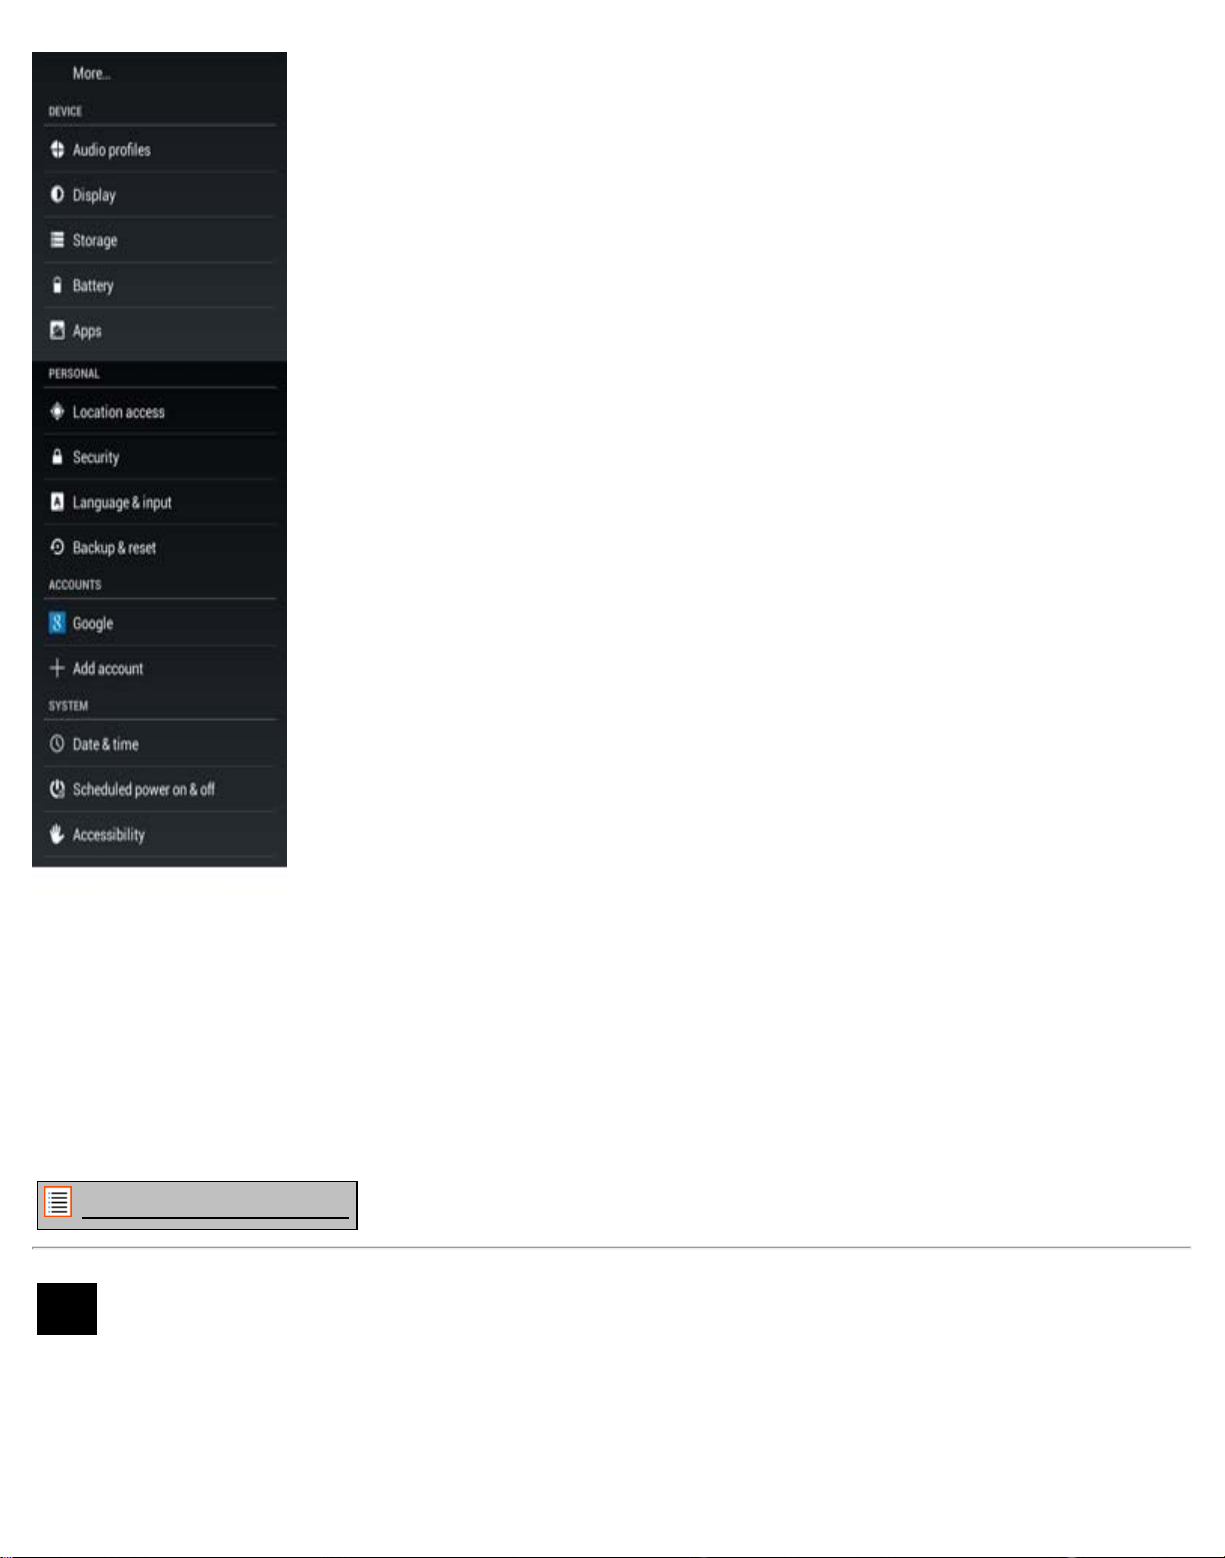
4.1 Settings Menu
Press the Settings icon in the Application Menu to enter the Settings menu. In the Settings menu you
can find the options to set up your Yarvik Smartphone.
Page 10
Yarvik smartphone manual
Settings Menu
We will go through the most important parts:
Return to index
WiFi &
4.2
Bluetooth
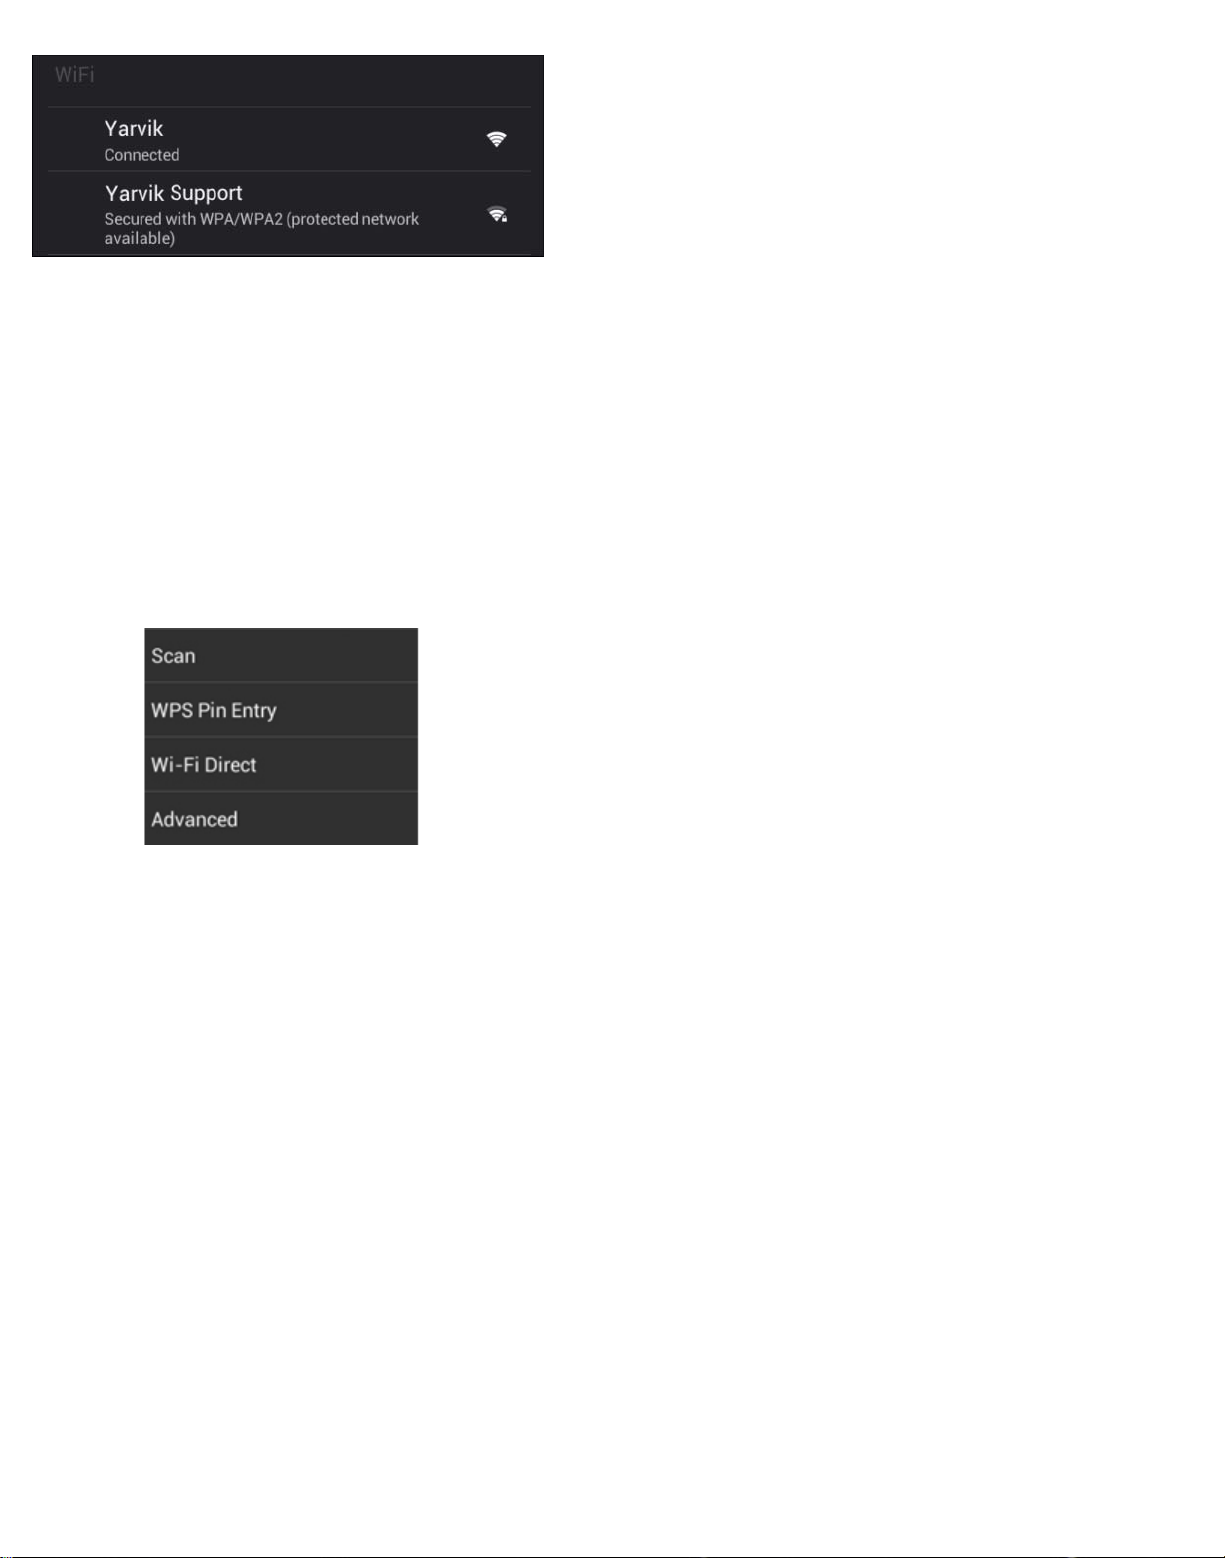
Wi-Fi
Set up a connection with a wireless Wi-Fi network.
Slide the On/Off button to "On" to activate Wi-Fi.
Page 11
Yarvik smartphone manual
The available Wi-Fi networks appear in the network list at the right screen. Tap the network of your choice. If
the network is secured, you’re prompted to enter the network security key.
Press the “Connect” button and the Smartphone is connecting to the network.
Once “Connected” appears underneath the network name and the wireless reception icon is shown in the
bottom status bar, you’re successfully connected to the wireless network.
Viewing your Yarvik Smartphone's Wi-Fi MAC address
While in the Wi-Fi settings screen, click on the menu button in the bottom right corner.
Press "Advanced" in the unfolding menu.
Your Wi-Fi MAC address is displayed in the following "Advanced Wi-Fi" screen under "MAC address".
Bluetooth
Your Yarvik Smartphone is equipped with a built-in Bluetooth module for connecting with Bluetooth
compatible peripherals, like keyboards, speakers and headphones, but also with Bluetooth handsfree
headsets and carkits.
Slide the Bluetooth On/Off button to "On" to activate Bluetooth.
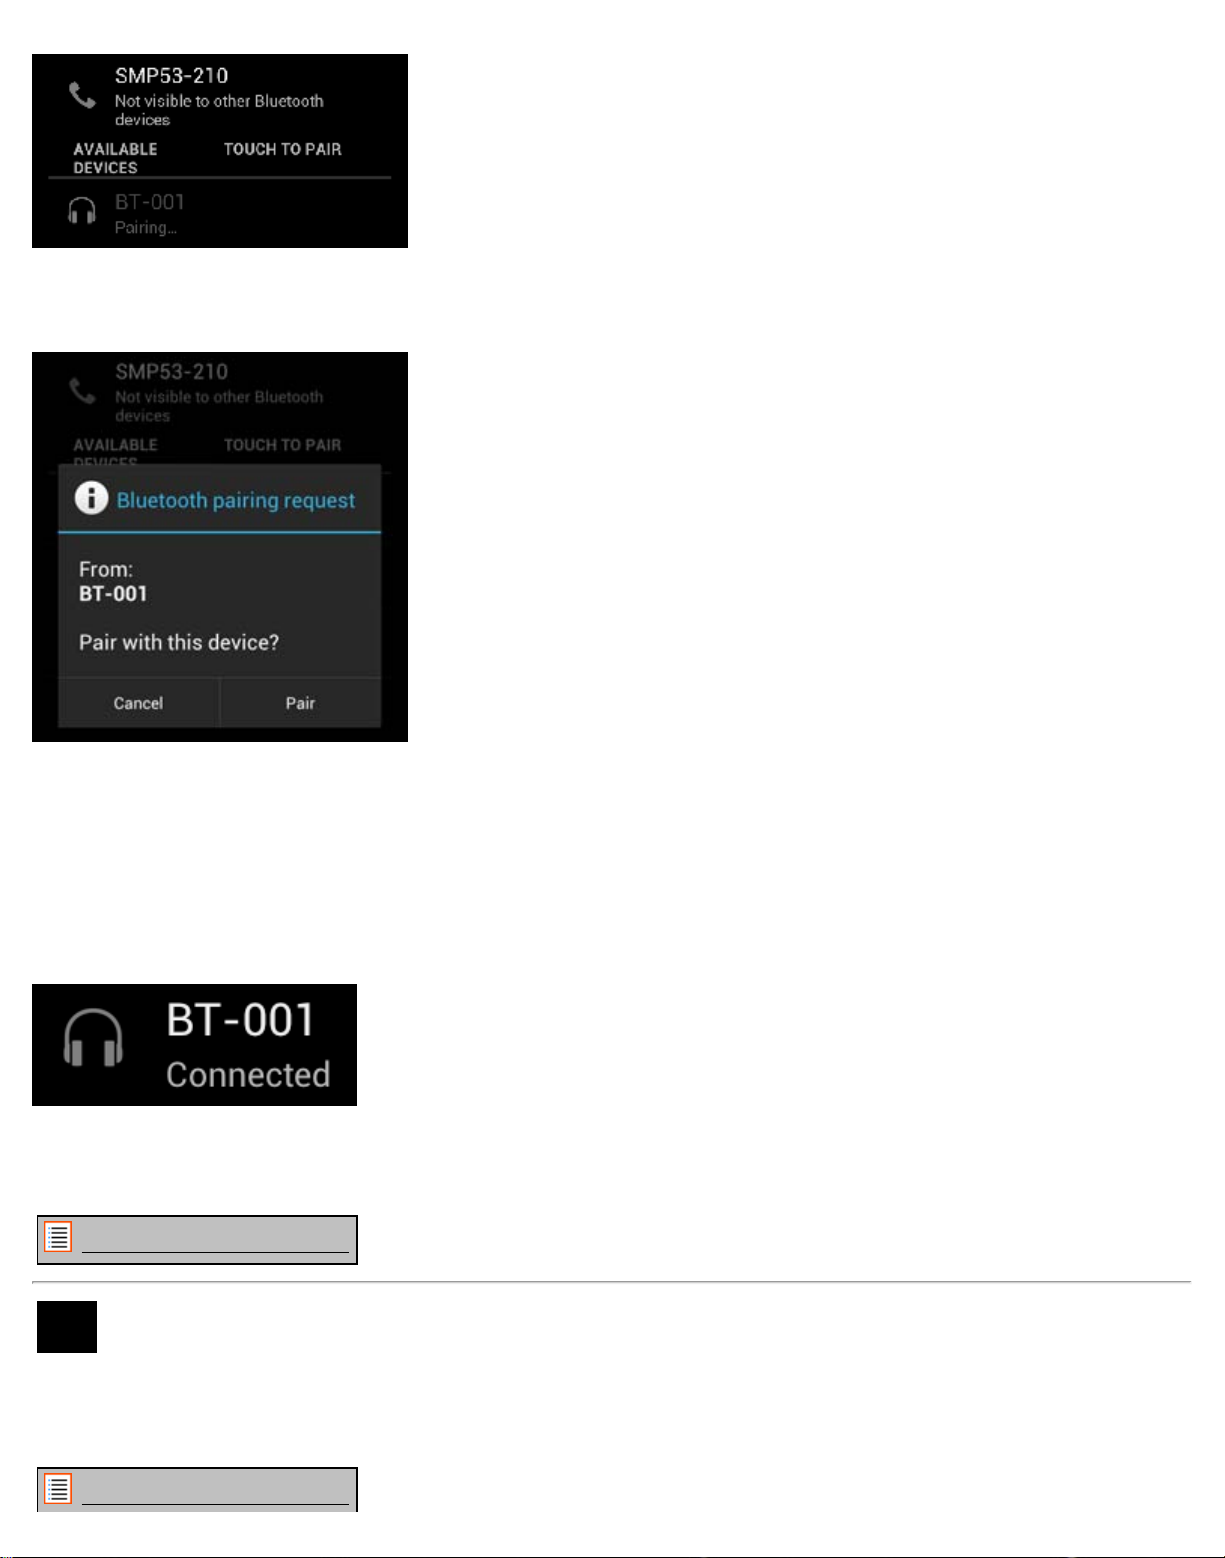
Once activated, your Yarvik Smartphone will automatically start searching for nearby Bluetooth devices. You
can always manually search for Bluetooth devices by clicking "Search for Devices" in the top right corner of
the screen.
It may be required for the to be connected peripherals to be put in "pairing mode". Please refer to the
instructions manual of the concerning peripherals for this.
All discovered devices will appear in the "Available Devices" list:
Page 12
Yarvik smartphone manual
Return to index
Click on the discovered Bluetooth device to pair your Yarvik Smartphone with it.
The "Bluetooth pairing request" window will appear:
Most Bluetooth devices require a pin code to connect. This code usually is 0000 or 1234. Please refer to the
instructions manual of your Bluetooth device if the pin code is different.
After you have entered the correct pin code, press "OK".
Your Yarvik Smartphone will now start pairing with your Bluetooth device, and after a few seconds the
connection will be completed, showing a "Connected" message underneath the concerning Bluetooth device
in the "Available Devices" list:
You can connect multiple Bluetooth devices to your Yarvik Smartphone for use at the same time (e.g.
headset and keyboard).
Return to index
4.3 Audio Profiles
Here you can change the audio volume of the Smartphone, like only vibration or vibration and ring
notification for incoming calls/messages.
Page 13
Yarvik smartphone manual
4.4 Display
Here you can change the brightness of the display, font sizes and the auto sleep time.
Please note that the higher the display brightness, the higher the energy consumption. This will drain your
battery substantially faster.
If you don’t want the display to auto rotate as you tilt the Smartphone, you can enable/disable this
functionality in the Auto-rotate screen setting.
Return to index
4.5 Apps
Here you can manage applications that are installed on your Yarvik Smartphone.
You can click apps that you have installed to see the app info and uninstall them if needed by using the
“Uninstall” button.
Please note that the preinstalled default applications (like e.g. the calculator) cannot be uninstalled.
Return to index
Storage &
MicroSD
4.6
memory
Access
Shows you the internal memory information. When a MicroSD card is present, you can also find the memory
information of the inserted card here.
Connecting your Yarvik Smartphone to a PC or Mac by USB
You can connect your Yarvik Smartphone to a PC or Mac using the provided USB cable.
When connected to a computer, you can access the Smartphone's internal memory and, if present, an
inserted MicroSD card as standard USB Mass Storage Device.
Please refer to the printed Quick Start Guide of your Yarvik Smartphone to determine the location of the
Smartphone's USB port. Connect the USB cable to the USB port of your Yarvik Smartphone and to a free
USB port on your computer.
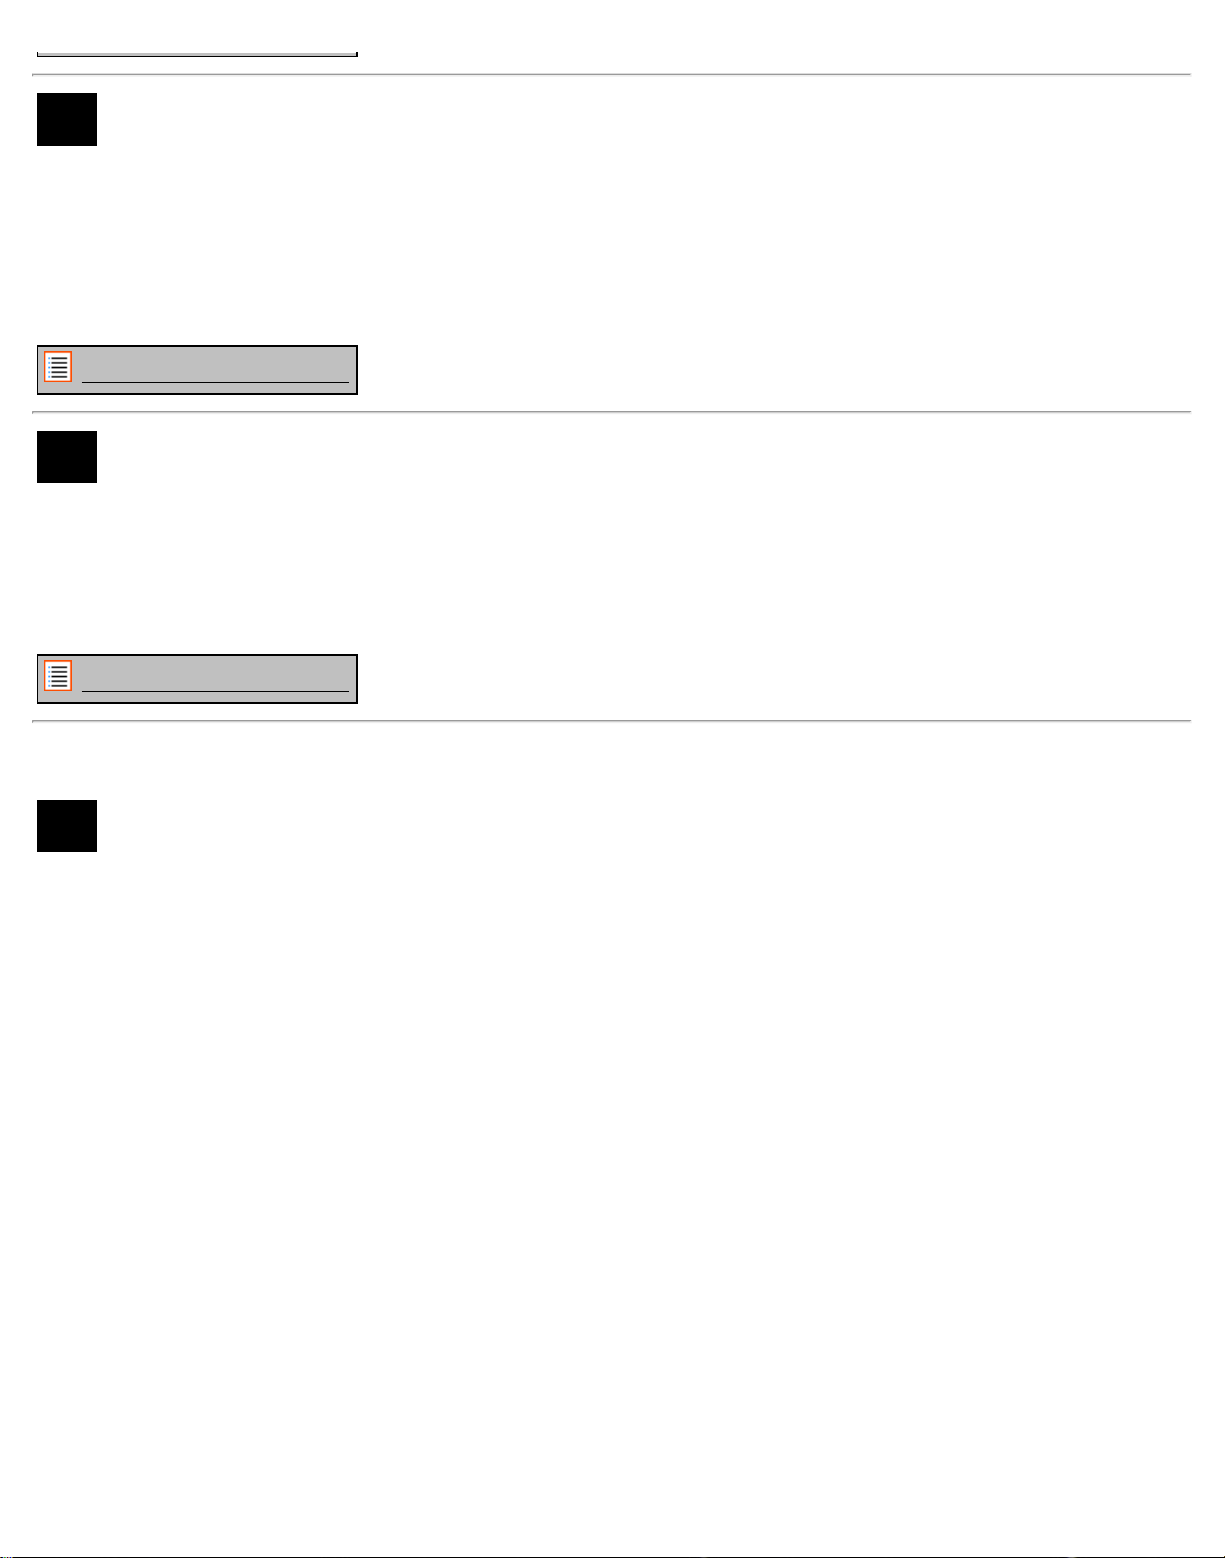
In the top side of your Smartphone's screen, two messages will appear shortly after each other:
Page 14
Yarvik smartphone manual
Once the second message "USB connected" appears, click on it.
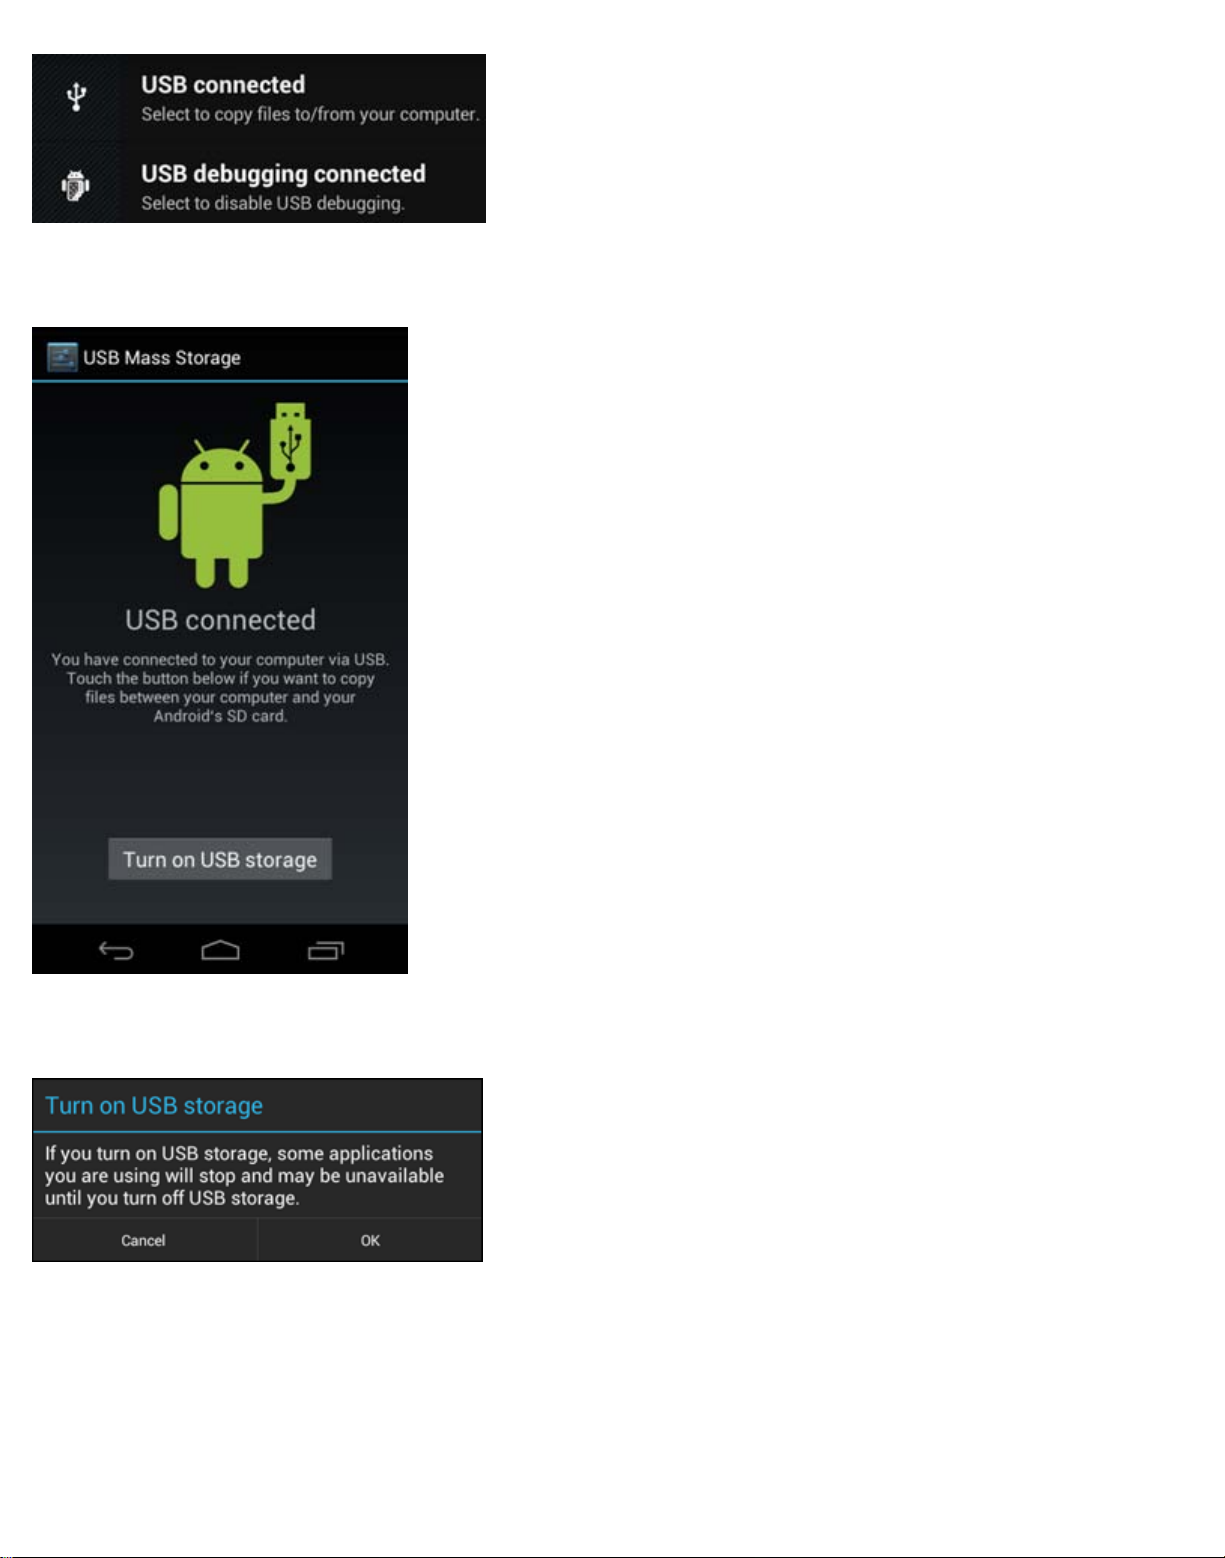
The following screen will appear:
Click on the button "Turn on USB storage".
A notification window will appear:
Click on "OK" to confirm.
The internal memory of your Yarvik Smartphone will now appear as Mass Storage Drive in your computer's
file system, and can be used e.g. to copy files from and to your Yarvik Smartphone.
If you have a MicroSD card in your Smartphone, the card will be recognized by the computer as a second
Mass Storage Drive.
To stop using the Mass Storage Device function, click on the "Turn off USB storage" button and remove the
USB cable.
Page 15

Yarvik smartphone manual
Note: There are no hardware drivers needed to access the Yarvik Smartphone's memory. In the case your
computer prompts for any driver installation, you can simply ignore it.
Access your MicroSD card
in ES File Explorer
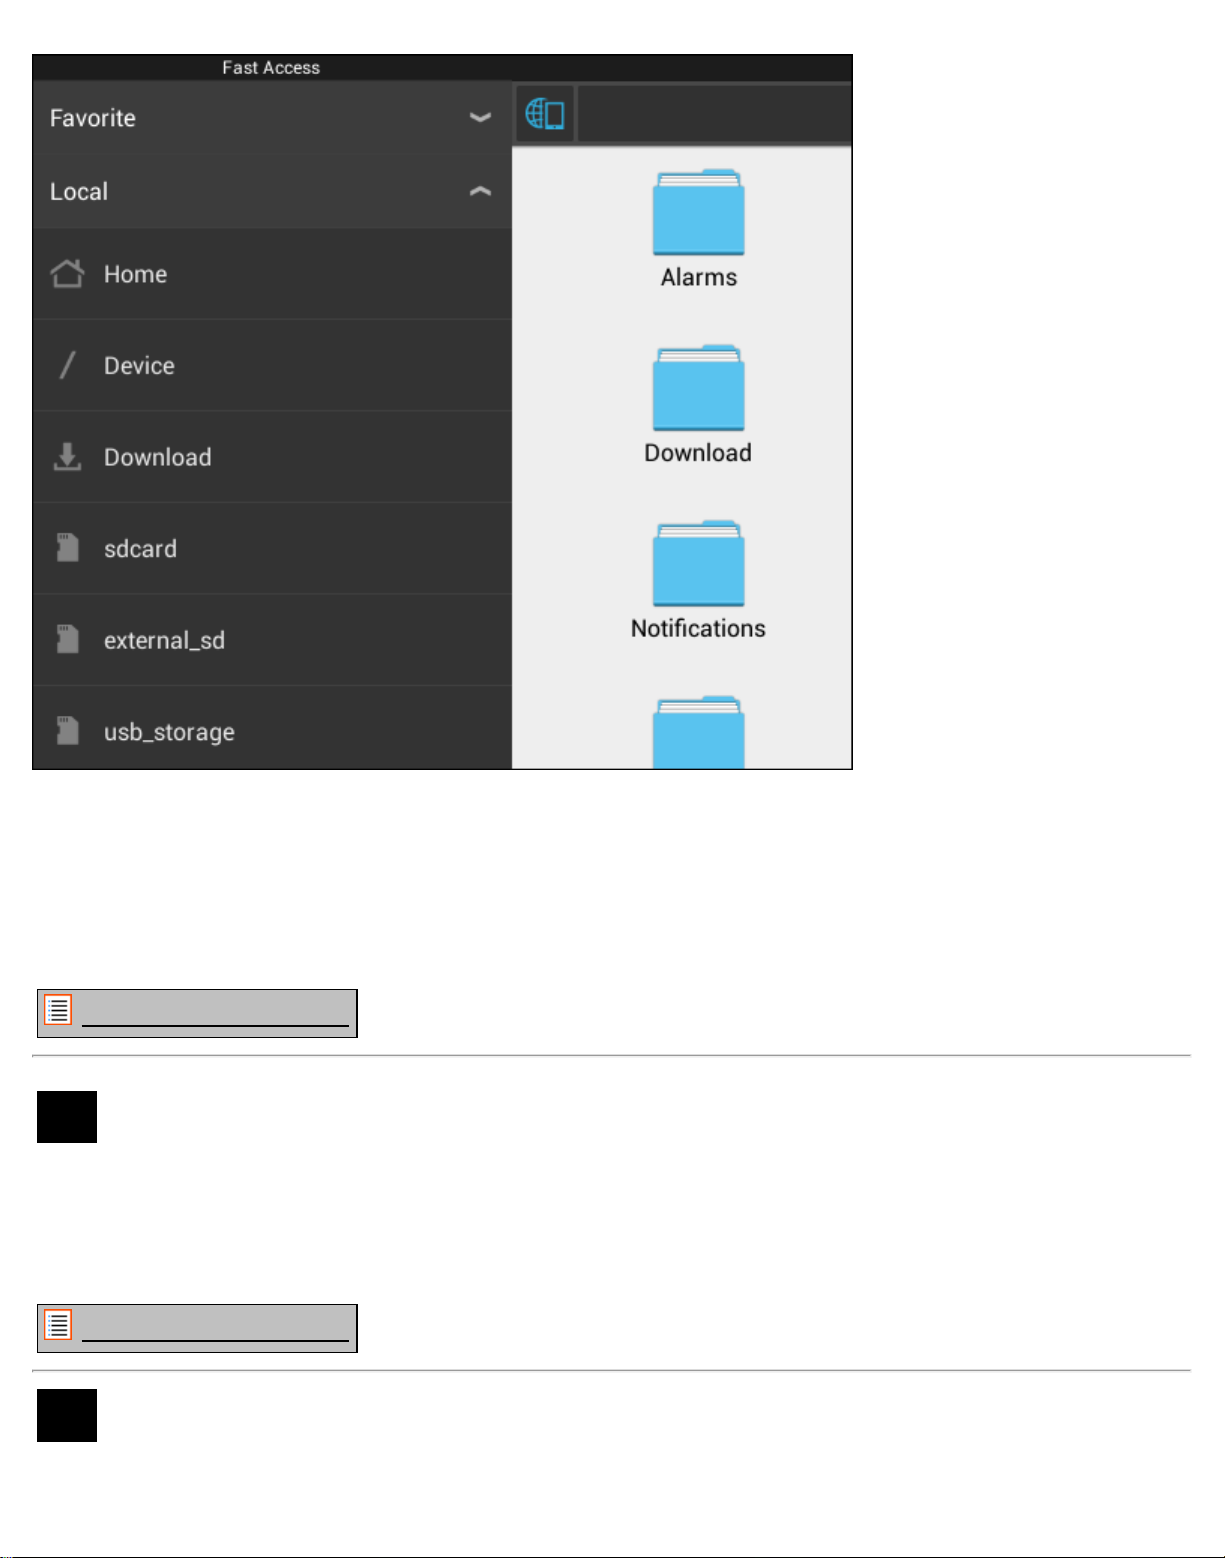
Open the ES File Explorer app and click on Local in the left "Fast Access" menu.
The Local list now unfolds, and shows all memory locations of the device.
The MicroSD card is usually one of the lowest options in de Local list, called external_sd in the below
example:
Page 16
Yarvik smartphone manual
Please note that the name of the MicroSD card may differ. Other names like sd-ext or ext-sd may be used
by your device.
When you have inserted a USB drive via the USB host port/adapter, this drive will become available as (in
the above example) usb_storage.
The name for the USB drive may also differ.
Return to index
Language &
4.7
input
Use “Select language” to select the display language of your Yarvik Smartphone. This applies to all the
screen texts in the entire system.
Under “Android keyboard” you may setup the onscreen keyboard of your Smartphone.
Return to index
4.8 Date & time
Here you can setup the date and the time for your Yarvik Smartphone.
Page 17
Yarvik smartphone manual
Return to index
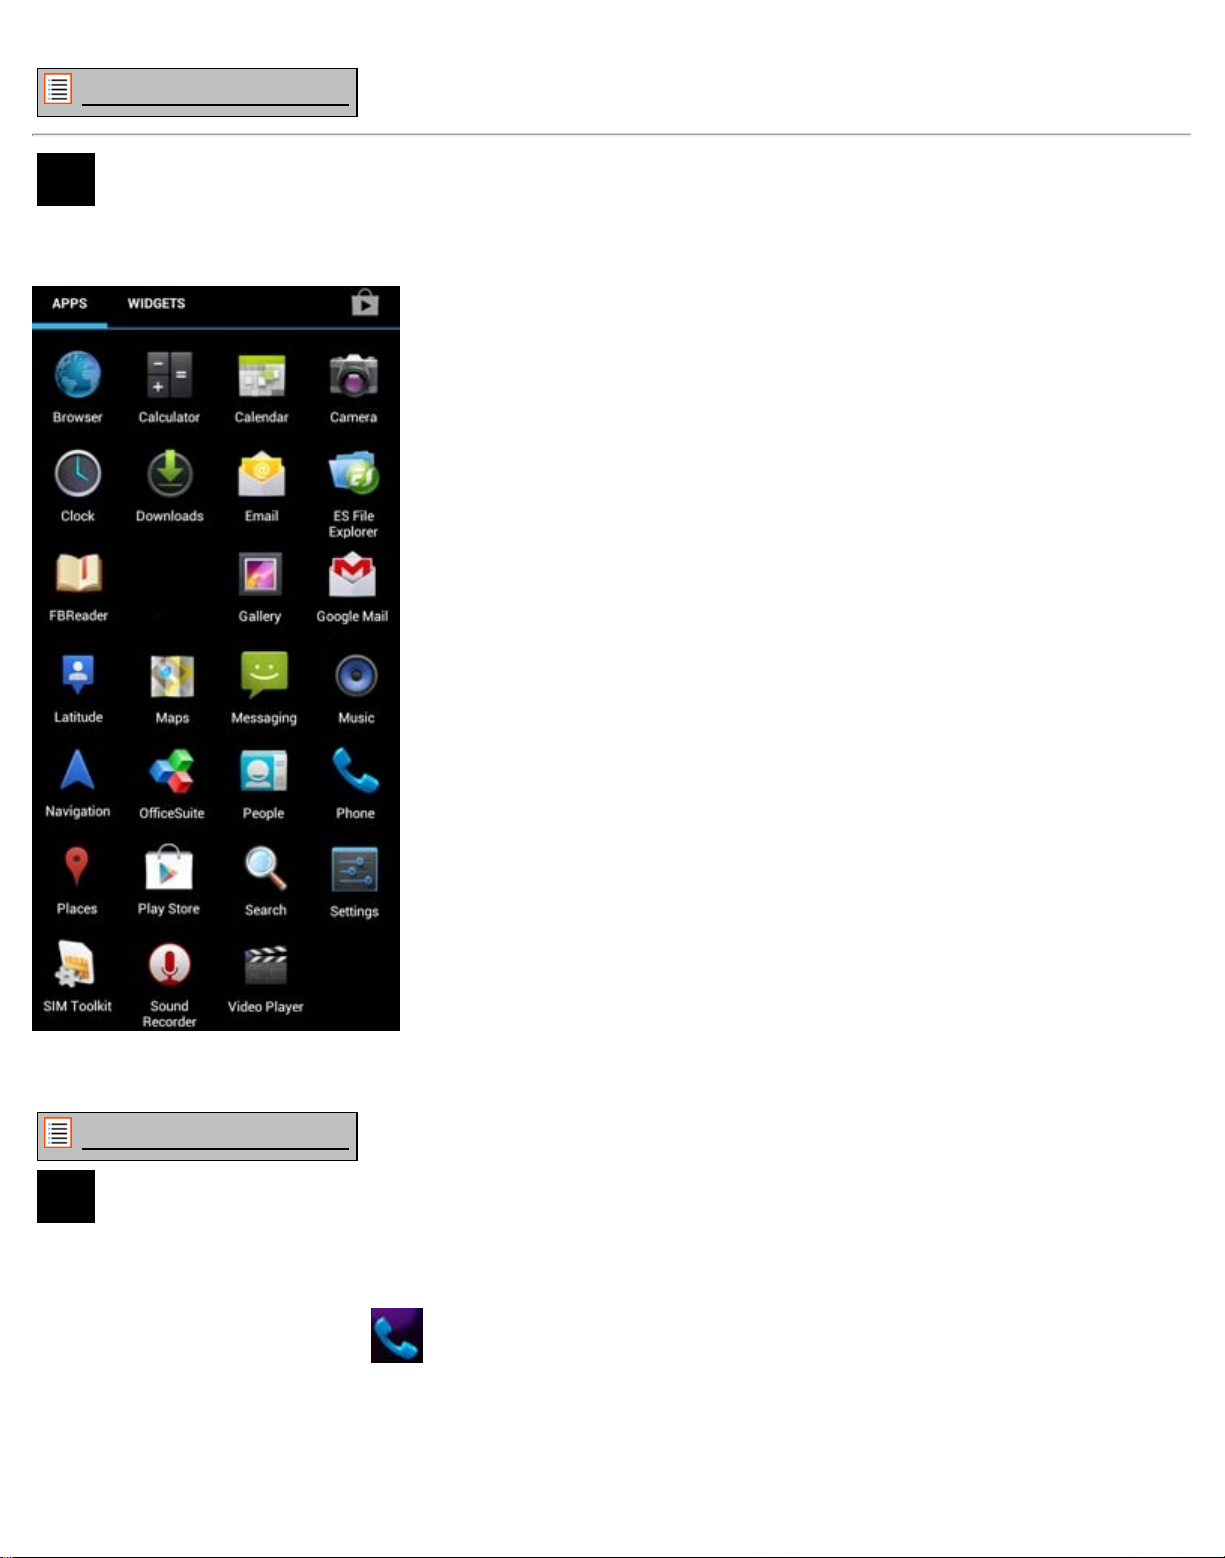
5 Apps
The Yarvik Smartphone will come with pre-installed Apps (see below examples):
The appearance of app icons may change without prior notice.
Return to index
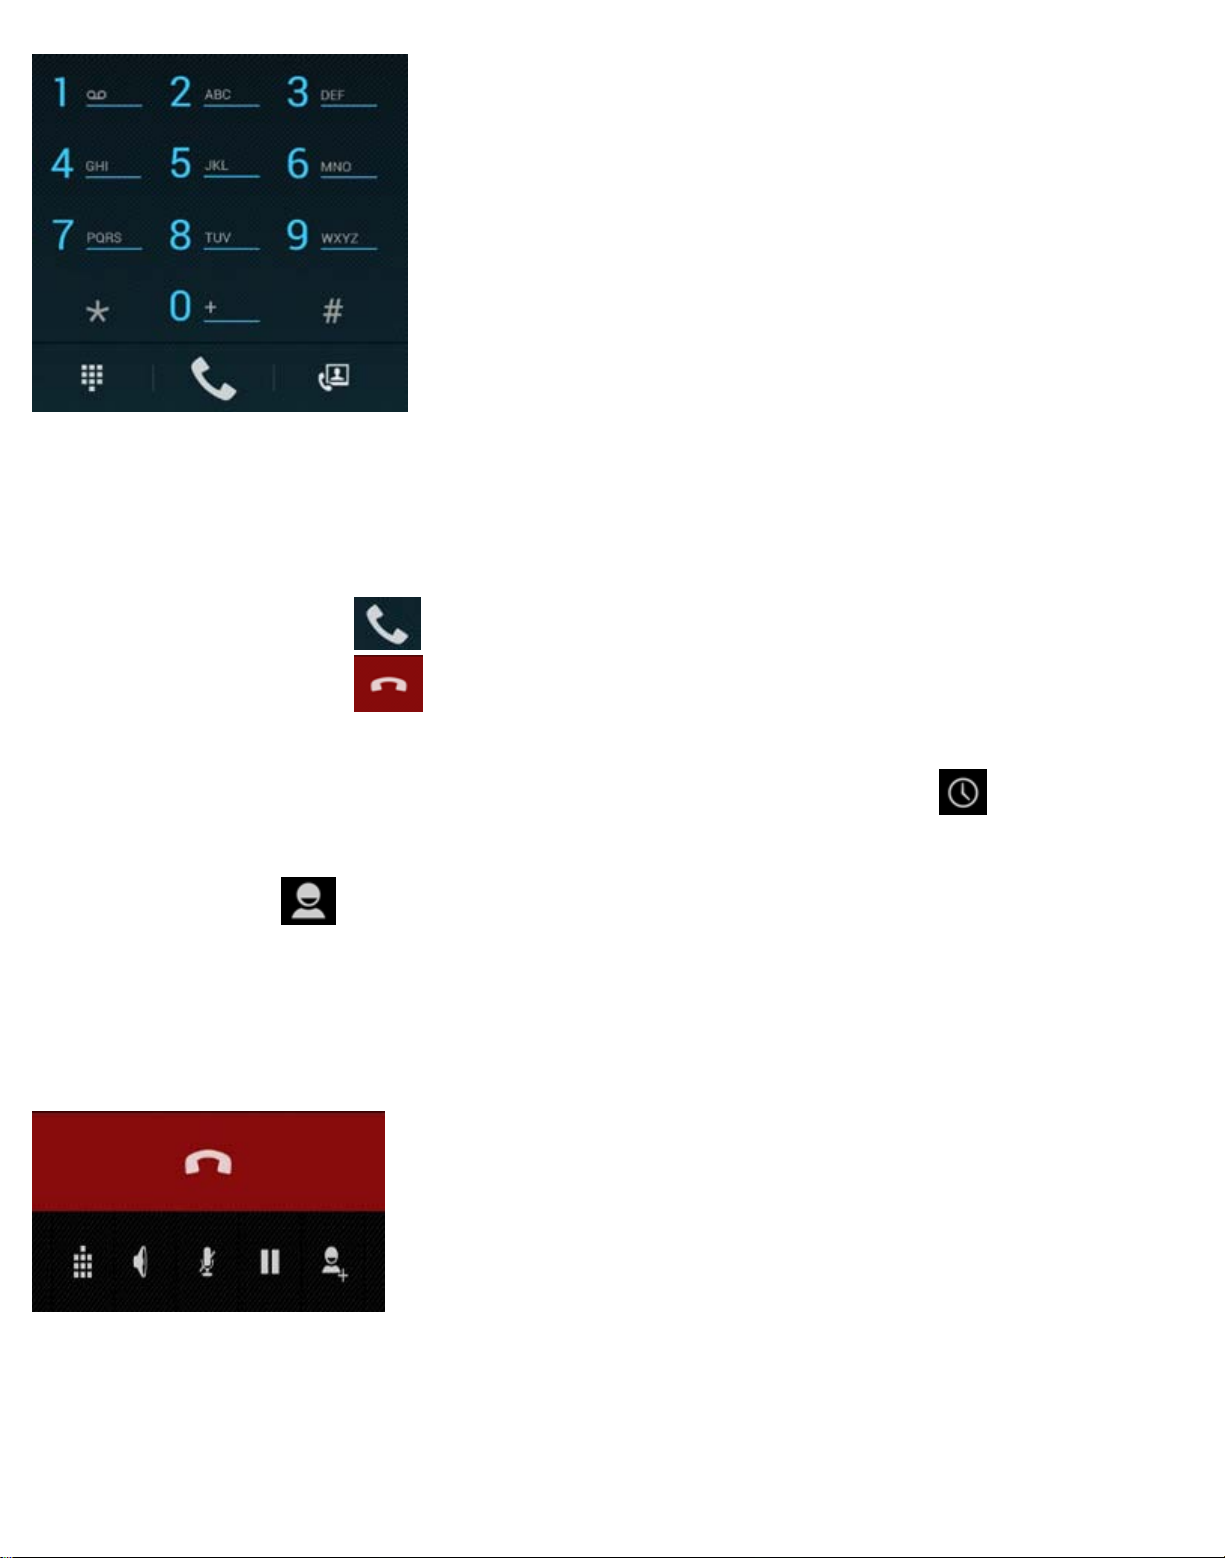
6 Phone Calls
Making phone calls
To make a phone call with your Yarvik Smartphone, open the "Phone" application from your application
menu or Android home screen:
Use the numeric phone keypad to enter the telephone number.
Page 18
Yarvik smartphone manual
Phone keypad.
To make international phone calls, requiring the '+' prefix, press and hold the '0' on the keypad until the '+'
appears.
Press the call handling button to engage the phone call.
Press the call handling button
to disengage the phone call.
You can also make phone calls directly from your contacts from within the "People" application.
Recent calls are stored in the Call Log screen, accessible by pressing the Log button
in the top of
Phone screen.
Your contacts (from the earlier mentioned "People" app) can also be accessed directly from within the Phone
screen by pressing the
button.
Incoming phone calls
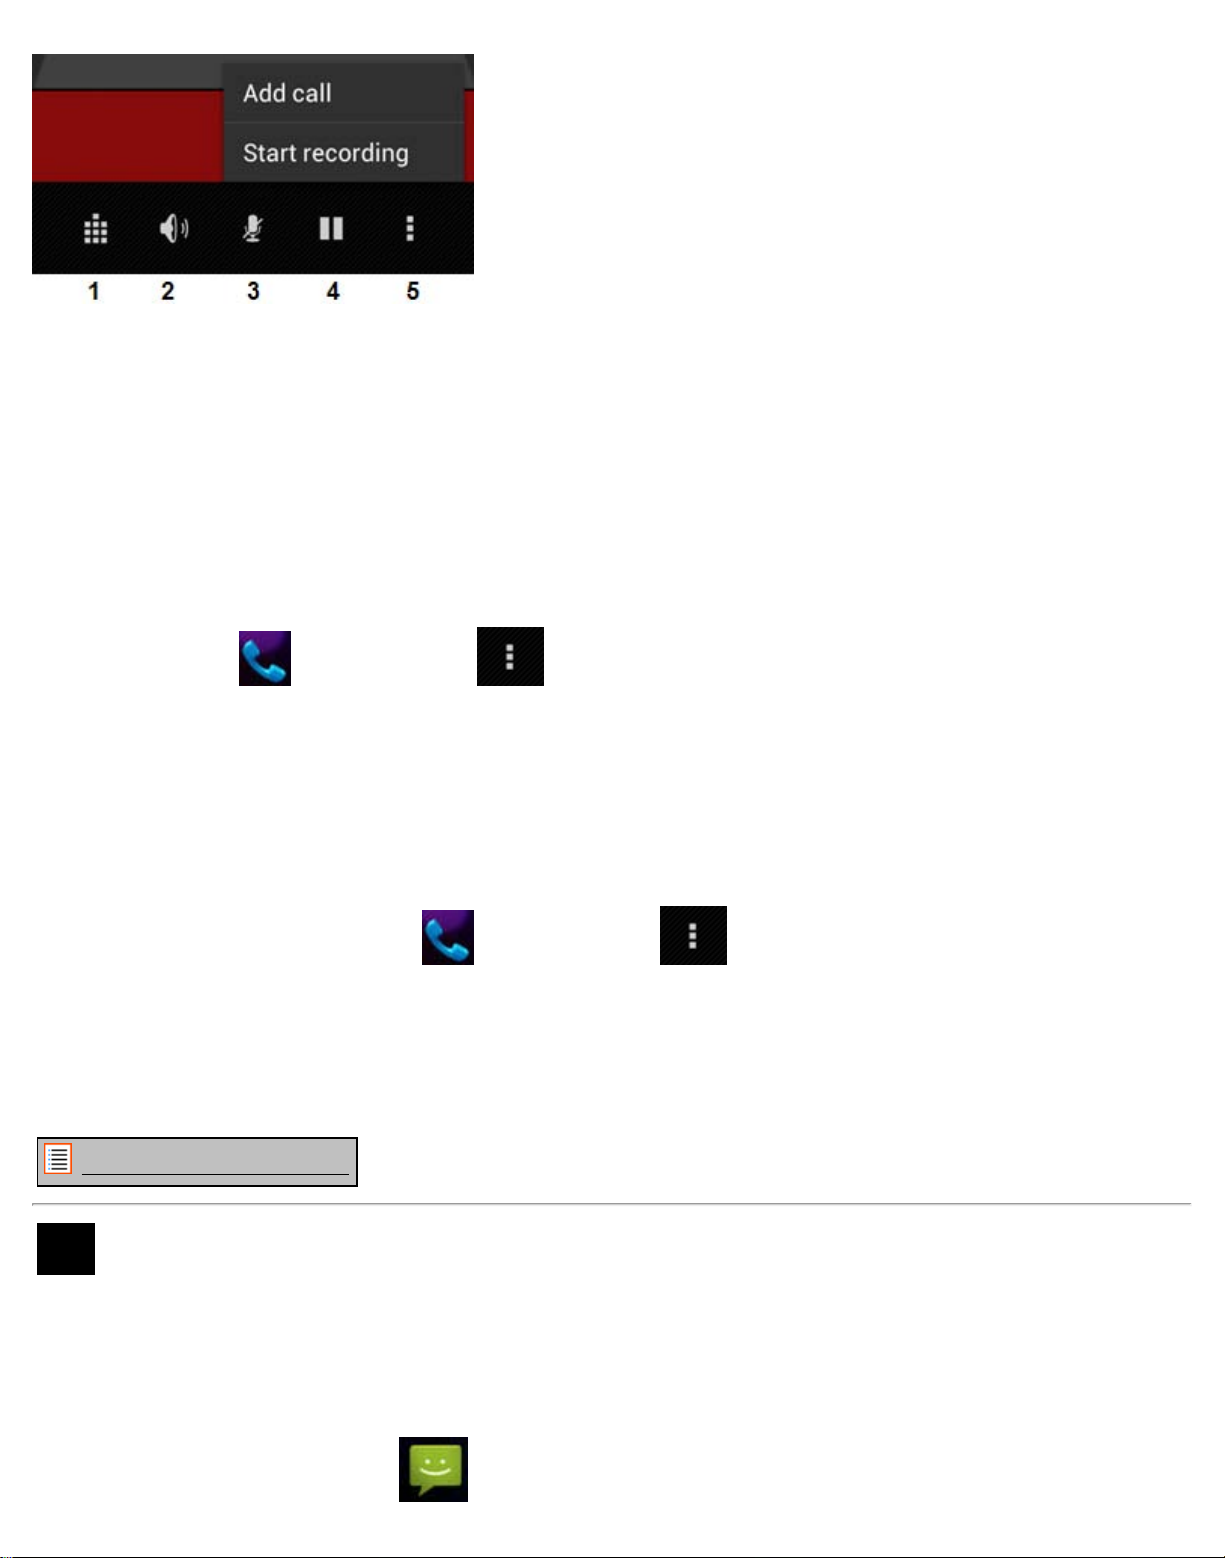
When you receive a phone call on your Yarvik Smartphone, you will be presented with 3 options:
Options during a phone call
Page 19
Yarvik smartphone manual
1 - Show the phone keypad (e.g. for DTMF option menu's);
2 - Enable/disable loud speaker function;
3 - Mute microphone;
4 - Put phone call on hold;
5 - Menu with more options: add an additional phone call (conversation call) or record the phone call.
Call forwarding
You can set the call forwarding feature to forward all incoming phone calls to a specific phone number.
In the "Phone" app , press the menu button and select "Call settings".
Select "Voice call", in which you can choose for "Call forwarding" to adjust your forwarding options.
Caller ID/Call waiting
With the Caller ID function of your Yarvik Smartphone, you can choose whether you want to send your
number along with outgoing phone calls.
To adjust this, start the "Phone" app
"Additional settings" - "Caller ID".
Within this same menu you can also enable/disable incoming phone calls when already engaged in a phone
conversation.
, press the menu button and select "Settings" - "Voice call" -
Return to index
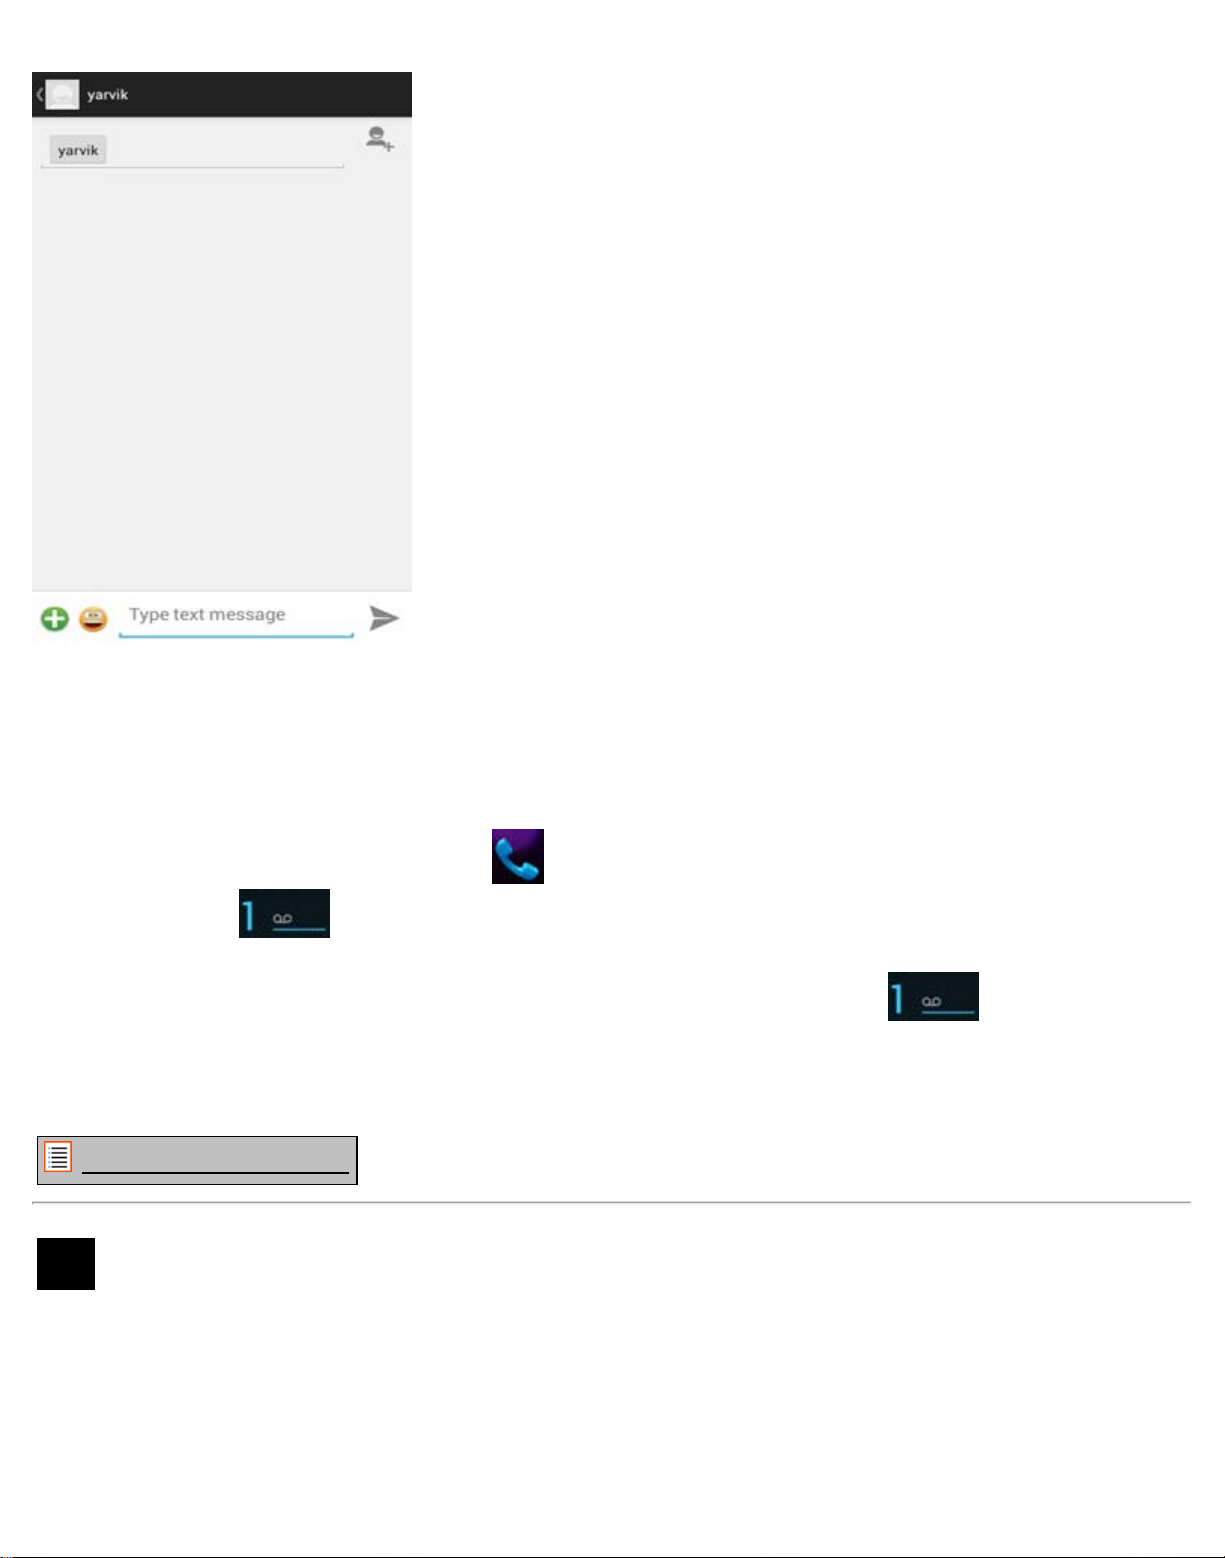
7 Messaging
Your Yarvik Smartphone is capable of sending SMS and MMS messages. Please refer to your mobile
service provider for involved costs and additional costs for sending messages to or from foreign countries.
Sending SMS/MMS messages
Open the "Messaging" application
from your Android home screen or application menu.
Page 20
Yarvik smartphone manual
Messaging application.
Set voicemail number/playback voicemail messages
To set your voicemail service number in your Yarvik Smartphone, open the "Phone" application from your
application menu or Android home screen:
Press and hold the button on the phone keypad. The option screen "Add number" will appear. In the
Voicemail options you can select the voicemail settings and enter your voicemail service number.
Once the voicemail service number has been set, you can subsequently use the
your voicemail box by pressing and holding it.
button to call to
Return to index
Warranty
8
Statement
Yarvik warrants that the product purchased by Customer shall be free from defects in workmanship or
materials for a period of 2 years from the date of purchase by Customer. If, at any time during the warranty
period, the product has a defect in workmanship or material, Customer should return the product to the
dealer where the product has been purchased. Dealer shall repair or replace it (at Yarvik's sole option) within
a reasonable period of time. An original invoice is required as proof of the purchase date. Yarvik's option with
respect to this matter shall be final.
Page 21
Yarvik smartphone manual
This warranty does not cover defects or malfunctions resulting from software transfers, misuse, abusive
operation, tampering, negligence, improper use, insufficient care or any act beyond the control of Yarvik.
IMPORTANT: When you buy a Smartphone from Yarvik, your Smartphone will be provided to you with the
latest stable firmware available for this specific model, at the time the unit was manufactured. Yarvik will not
provide support to products that have otherwise been modified by the end user, nor does Yarvik support
programming modifications to the firmware and software used in its products, and if any such modifications
have been made, all warranties shall be automatically void.
To avoid invalidating the warranty offered hereunder, Customer should use only the official software,
applications and upgrades available from Yarvik's website at www.yarvik.com.
No other software or firmware should be used, as such use will automatically void all warranties and support.
Yarvik does not support the use of any software or firmware other than the software or firmware that was
installed on the product by the manufacturer or that is available from Yarvik's official web site at
www.yarvik.com. Yarvik explicitly declines to respond to any inquiries regarding unauthorized modifications,
unauthorized software, and unauthorized firmware.
Return to index
GNU/GPL Licensing
9
Information
Please consult the legal information available on your Yarvik Smartphone under Settings – About
Smartphone – Legal information (internet connection required) or visit
http://source.android.com/source/licenses.html
for more information.
Return to index
Important
10
Information
Wireless LAN-Regulatory information
Depending on the model, the wireless LAN built-in into Smartphone devices can only be used in the
following countries: Austria, Belgium, Bulgaria, Czech Republic, Denmark, Finland, France, Germany,
Greece, Hungary, Iceland, Ireland, Italy, Luxembourg, the Netherlands, Norway, Poland, Portugal, Romania,
Slovakia, Slovenia, Spain, Sweden, Switzerland, Turkey and the United Kingdom.
Conditions of use
When using the IEEE 802.11b/g/n Wireless LAN standard, channels 1 to 13 (2.4 GHz...2.4835 GHz) are
selectable for both indoor and outdoor use, however with restrictive conditions applying in France, Italy and
Norway, as follows:
Page 22

Yarvik smartphone manual
product at end-of-life to the applicable collection point for the recycling of electrical and electronic
• France: When using this product indoor, all channels can be used without restrictions. Outdoor only
channels 1 to 6 are allowed. This means that in Peer-to-Peer, the WLAN feature can only be used outside if
the peer sets up the communication on an authorized channel (i.e., between 1 & 6). In infrastructure mode,
please make sure the access point is configured to a channel from 1 to 6 before setting up the connection.
• Italy: Use of the RLAN network is governed: Disposal of Old Electrical & Electronic
- with respect to private use, by the Legislative Decree of 1.8.2003, no. 259 (“Code of Electronic
Communications”). In particular Article 104 indicates when the prior obtainment of a general authorization is
required and Art. 105 indicates when free use is permitted;
- with respect to the supply to the public of the WLAN access to telecom networks and services, by the
Ministerial Decree 28.5.2003, as amended, and Art. 25 (general authorization for electronic communications
networks and services) of the Code of electronic communications.
• Norway: Use of this radio equipment is not allowed in the geographical area within a radius of 20 km from
the centre of Ny-Ålesund, Svalbard.
WEEE
Symbol
Information
Correct Disposal of This product (Waste Electrical & Electronic Equipment).
(Applicable in the European Union and other European countries with separate collection systems).
This marking shown on the product or its literature indicates that it should not be disposed with other
household wasted at the end of its working life. To prevent possible harm to the environment or human
health from uncontrolled waste disposal, please separate this from other types of wastes and recycle it
responsibly to promote the sustainable reuse of material resources.
Household users should contact either the retailer where they purchased this product, or their local
government office, for details of where and how they can take this item for environmentally safe recycling.
Business users should contact their supplier and check the terms and conditions of the purchase contract.
This product should not be mixed with other commercial wastes of disposal.
Disposal of waste batteries (applicable in the European Union and other European countries with
separate collection systems)
Either of the symbols shown next may appear on the battery or on the packaging to indicate that the battery
provided with this product shall not be treated as household waste. On certain batteries this symbol might be
used in combination with a chemical symbol. The chemical symbols for mercury (Hg) or lead (Pb) are added
if the battery contains more than 0.0005% mercury or 0.004% lead. By ensuring these batteries are disposed
of correctly, you will help prevent potentially negative consequences for the environment and human health
which could otherwise be caused by inappropriate waste handling of the battery. The recycling of the
materials will help to conserve natural resources. In case of products that for safety, performance or data
integrity reasons require a permanent connection with an incorporated battery, this battery should be
replaced by qualified service staff only. To ensure that the battery will be treated properly, hand over the
Page 23

Yarvik smartphone manual
equipment.
• Observe the following precautions to provide adequate air circulation and to ensure normal reliable
For all other batteries, please view the section on how to remove the battery from the product safely. Hand
the battery over to the applicable collection point for the recycling of waste batteries. For more detailed
information about recycling of this product or battery, please contact your local Local government Office,
your household waste disposal service or the shop where you purchased the product.
When travelling to and within the United States of America, please be aware that the U.S. Department of
Transportation (DOT) recently published new regulations that apply to passengers travelling with lithium
metal batteries and lithium-ion batteries.
For detailed information, visit http://safetravel.dot.gov/whats_new_batteries.html
.
Safety Information
Yarvik Smartphone device
• Yarvik is not responsible for any interference that you may experience or that may be caused when
operating this device.
• Warning: This apparatus must be earthed.
Opening or dismantling the main unit or any of its accessories, for whatever reason, could lead to damages
that are not covered by the guarantee.
• To avoid electrical shock, do not open the cabinet. Refer servicing to qualified personnel only.
• To prevent fire or shock hazard, do not expose your Smartphone device or any of its accessories to rain or
moisture.
• Do not use or store your Smartphone device in a location subject to heat sources, such as radiators or air
ducts; direct sunlight; excessive dust; moisture or rain; mechanical vibration or shock; strong magnets or
speakers that are not magnetically shielded; excessively high and low temperatures; and high humidity.
• Turning off your Smartphone device with the power button does not disconnect the device completely from
mains voltage. To disconnect it completely, unplug the AC adapter or the power cord from mains. The
socket-outlet shall be installed near the equipment and shall be easily accessible.
• Audio and picture distortion may occur if this equipment is positioned in close proximity to any equipment
emitting electromagnetic radiation.
• This apparatus is also designed for IT power system with phase to phase voltage 230V, for customers in
Norway.
Page 24

Yarvik smartphone manual
operation:
- Do not use the Smartphone device and/or the AC adapter while covered or wrapped in cloth. Ensure the
AC adapter operates in a clear environment.
- Turn off the Smartphone device before putting the device into a bag or a carrying case.
• Do not use your Smartphone device directly on your lap. The temperature of the base of the unit will rise
during normal operation and over time could result in discomfort or burns.
• Do not use your Smartphone device while walking. Listening to music with headphones or watching the
LCD screen while walking may lead to an unexpected accident and result in personal injuries.
• Using connected headphones on the Smartphone device for too long and/or setting the audio volume up
too high when using headphones may cause serious hearing damage.
• Avoid strong beating of or to the product.
• Don’t operate the touch screen of the Smartphone device with sharp objects, as this may result in
scratching the screen surface.
• Only use permitted batteries, chargers and accessories with your Smartphone device. The use of any other
products with the device can be dangerous and may violate the warranty regulations.
• Only use a slightly wet cotton cloth to clean the device, and only use water to wetten the cotton cloth. The
Smartphone device should not be cleaned with any sort of (glass) cleaning aid.
Wireless functionality
• If radio interference with other devices occurs while using your Smartphone device, do not use the wireless
functionality. Use of the wireless functionality may cause a malfunction of the devices, resulting in an
accident.
• In some situations or environments, the use of the wireless functionality might be restricted by the
proprietor of the building or responsible representatives of the organization, for example on board airplanes,
in hospitals or in any other environment where the risk of interference with other devices or services is
perceived or identified as harmful. If you are uncertain about the policy applying to the use of wireless
functionality in a specific organization or environment, you are encouraged to first ask for authorization prior
to switching it on. Consult your physician or the manufacturer of personal medical devices (pacemakers,
hearing aids, etc.) regarding any restrictions on the use of wireless functionality.
• If using wireless functionality near a pacemaker, make sure it is at least 19 inches / 50 cm away from the
pacemaker.
• Due to the transmission and reception properties of wireless communications, data can occasionally be lost
or delayed. This can be due to the variation in radio signal strength that results from changes in the
characteristics of the radio transmission path. Yarvik will not be held responsible for damages of any kind
resulting from the delays or errors in data transmitted or received via wireless functionality, or failure of
wireless functionality to transmit or receive such data.
• If the equipment does cause harmful interference to radio/TV reception, which can be determined by turning
the equipment off and on, the user is encouraged to try to correct the interference by one or more of the
following measures: reorient or relocate the receiving antenna, increase the distance between the sender
Page 25

Yarvik smartphone manual
and the receiver, consult the dealer or an experienced radio/TV technician for help. Yarvik will not be
responsible for any radio/TV interference nor for any other undesired effect.
Wireless LAN Security
Creating security settings for the Wireless LAN is extremely important. Yarvik assumes no responsibility for
any security problems that may arise from the use of the Wireless LAN.
Battery pack
Do not charge the battery pack in any way other than as described in the Start guide or as designated by
Yarvik in writing.
AC adapter
• It is highly recommended that you use a genuine Yarvik AC adapter supplied by Yarvik for your product.
• This AC adapter is intended for use with the Smartphone device IT products only.
• Do not place the AC adapter in contact with your skin. Remove the AC adapter away from your body if it
becomes warm and causes discomfort.
RoHS
This products has been certified as RoHS Compliant.
SAR
This product meets applicable national SAR limits of 2.0 W/kg.
For more information regarding the Specific Absorption Rate (SAR) please visit the following website:
www.sar-tick.com
.
When carrying the product or using it while worn on your body, either use an approved accessory such as a
holster or otherwise maintain a distance of 1.5cm from the body to ensure compliance with RF exposure
requirements. Note that the product may be transmitting even if you are not making a phone call.
Dimensions, specifications, images & illustrations
All dimensions, specifications, images and illustrations are subject to change without prior notice.
Page 26
Yarvik smartphone manual
YARVIK.COM
Return to index
Page 27

Yarvik smartphone manual
Index
SELECT LANGUAGE
1 Voor het eerste
gebruik
2 Smartphone Start
3 Android Home
scherm
3.1 Widgets en
snelkoppelingen
toevoegen
3.2 Achtergrond
instellen
3.3 Applicatiemenu
4 Uw smartphone
instellen
4.1 Instellingenmenu
4.2 WiFi & Bluetooth
4.3 Audioprofielen
4.4 Scherm
4.5 Apps
4.6 Opslag & MicroSD
toegang
4.7 Taal & toetsenbord
4.8 Datum & tijd
5 Apps
6 Telefoongesprekken
7 Berichten
8 Garantieverklaring
9 GNU/GPL
Page 28

Yarvik smartphone manual
Licentieinfo
10 Important
Information
1 Voor het eerste gebruik
Geachte gebruiker,
Bedankt dat u ons product hebt aangeschaft.
Lees deze instructies zorgvuldig voor gebruik, zodat u uw Yarvik Smartphone snel en goed kunt gebruiken.
We hopen dat u lang kunt genieten van uw Yarvik Smartphone!
Let op:
• Uw Yarvik Smartphone is een
fijngevoelig elektronisch product.
Probeer de Smartphone niet uit
elkaar te halen. Hierdoor vervalt
uw garantie en het kan leiden tot
het disfunctioneren van het
apparaat;
• Vermijd klappen op of tegen
het product;
• Gebruik de Smartphone niet in
een omgeving met hoge of lage
temperatuur of in een omgeving
waar het apparaat in contact kan
komen met vocht, stof of
magnetische velden;
• Stel de Smartphone niet voor
langere tijd bloot aan sterk
zonlicht;
• Gebruik het touch screen van
de Smartphone niet met scherpe
objecten, dit kan het
schermoppervlak beschadigen;
• Gebruik de aangesloten
koptelefoon op de Smartphone
niet te lang en zet het volume
niet te hard, dit kan leiden tot
ernstige gehoorschade;
Page 29

Yarvik smartphone manual
• Voorkom verkeersongelukken
en gebruik de Smartphone niet
terwijl u een motorvoertuig of
een fiets bestuurt;
• Gebruik alleen toegestane
accu's, opladers en accessoires
voor uw Yarvik Smartphone. Het
gebruik van andere producten
kan gevaarlijk zijn en kan de
garantievoorwaarden schenden;
• Maak de Smartphone schoon
met een vochtige katoenen doek
en gebruik alleen water om de
doek nat te maken. De
Smartphone mag niet gereinigd
worden met een (glas) reiniger.
U kunt de Yarvik Smartphone direct gebruiken, zonder de accu eerst op te laden.
Het is het beste voor de accu om deze eerst leeg te maken en deze daarna volledig op te laden.
Als de Smartphone niet direct aan gaat als u deze uit de doos haalt, dan is de accu al volledig leeg en dient u
deze eerst geheel op te laden.
Terug naar
index
2 Smartphone Start
Als u uw Yarvik Smartphone voor het eerst opstart, krijgt u een opstartscherm te zien.
De eerste keer opstarten kan even duren, gemiddeld 2 tot 3 minuten.
Als het opstartscherm verdwijnt, is de Smartphone helemaal opgestart en krijgt u het Android
Vergrendelingsscherm te zien.
Page 30
Yarvik smartphone manual
Android Vergrendelingsscherm
Verschuif de vergrendelingsbalk (A) naar rechts om de Smartphone te ontgrendelen. U wordt dan naar het
Android Home scherm geleid.
Terug naar
index
3 Android Homescherm
Page 31

Yarvik smartphone manual
Android Homescherm
De statusbalk is altijd te vinden bovenin het Smartphone scherm.
In de statusbalk vindt u systeeminformatie en functieknoppen.
1 - Indicatie Wi-Fi-signaal
2 - Mobiel telefoonsignaal voor SIM1 en SIM2 en indicatie batterijniveau
3 - Systeemtijd
4 - App-snelkoppelingen
5 - Widget (analoge klok)
6 - App en widget menu
Het Home scherm bestaat uit meerdere pagina's die kunnen worden geopend door over het scherm naar
links of rechts te vegen.
Om te bekijken welke apps op de achtergrond worden uitgevoerd, kunt u met de multitask-knop (9) de
multitask-weergave openen.
Page 32

Yarvik smartphone manual
Klik op een actieve app in de multitask-weergave om snel naar deze app over te gaan. U kunt actieve apps
sluiten door deze apps ingedrukt te houden en te klikken op "Remove from list" (Uit lijst verwijderen).
Terug naar
index
Widgets en
snelkoppelingen
3.1
toevoegen aan
uw Home
scherm
Om een widget toe te voegen, drukt u op de App/widget-knop rechtsboven in het Home scherm:
In het volgende scherm kunt u alle geïnstalleerde apps en widgets vinden. U kunt ze ook afzonderlijk
bekijken door te drukken op "Apps" of "Widgets" bovenin het scherm.
Druk op "Widgets" om alle beschikbare widgets te bekijken. Wanneer alle widgets worden weergegeven,
kunt u over het scherm vegen om naar de volgende pagina te gaan (indien beschikbaar).
Druk op de gewenste widget totdat het Home scherm verschijnt en laat de widget los op een lege plek op het
beginscherm.
Om een snelkoppeling aan een app toe te voegen, drukt u op de knop app en widget rechtsboven in het
Page 33

Yarvik smartphone manual
Home scherm:
In het volgende scherm kunt u alle geïnstalleerde apps en widgets vinden. U kunt ze ook afzonderlijk
bekijken door te drukken op "Apps" of "Widgets" bovenin het scherm.
Druk op "Apps" om alle geïnstalleerde apps te bekijken.
Druk op de gewenste app totdat het Home scherm verschijnt en laat de snelkoppeling los op een lege plek
op het Home scherm.
Om widgets en/of apps van uw Home scherm te verwijderen, drukt u er op en houdt u deze vast. Sleep het
item vervolgens naar het icoontje van de prullenbak bovenin het Home scherm.
Terug naar
index
Achtergrond
3.2
instellen
Om de achtergrond van het Home scherm te wijzigen, houdt u het Home scherm ingedrukt tot het menu
“Select Wallpaper from” ("Achtergrond selecteren uit") verschijnt.
U kunt kiezen uit "Live Wallpapers" (achtergrond met animatie), "Galerij" (foto/video-gallerij) of "Wallpapers"
(standaard statische afbeeldingen).
Terug naar
index
3.3 Applicatiemenu
Druk op de App/widget-knop rechtsboven in het Home scherm:
Zodra het systeem de widgets weergeeft, drukt u op "Apps" om alle geïnstalleerde apps te bekijken.
Hier kunt u de voorgeïnstalleerde programma's of “apps” vinden, maar ook andere apps die u zelf
geïnstalleerd hebt.
Start een app op door op het icoontje te klikken.
Page 34

Yarvik smartphone manual
Applicatiescherm
Terug naar
index
Uw smartphone
4
instellen
4.1 Instellingenmenu
Klik op het Instellingen icoontje in het Applicatie scherm om naar het Instellingen menu te gaan. In het
Instellingen menu vindt u de opties om uw Yarvik Smartphone in te stellen.
Page 35

Yarvik smartphone manual
Instellingenmenu
We nemen de belangrijkste onderdelen door:
Terug naar
index
WiFi &
4.2
Bluetooth
Wi-Fi
Stel een verbinding in met een draadloos Wi-Fi netwerk.
Page 36

Yarvik smartphone manual
Schuif de Wi-Fi aan/uit-knop op "AAN" om Wi-Fi te activeren.
De beschikbare Wi-Fi-netwerken verschijnen in de netwerklijst in het rechtervenster. Selecteer het netwerk
van uw keuze. Als het netwerk beveiligd is, dient u eerst een wachtwoord in te voeren.
Selecteer de knop “Connect” ("Verbinden") en de Smartphone maakt verbinding met het netwerk.
Zodra “Connected” ("Verbonden") onder de netwerknaam verschijnt en het icoontje van draadloze ontvangst
in de onderste statusbalk verschijnt, bent u verbonden met het draadloze netwerk.
Uw Yarvik Smartphone's Wi-Fi MAC-adres bekijken
Klik in het scherm Wi-Fi-instellingen rechtsonder op de menuknop.
Druk op "Advanced" (Geavanceerd) in het menu dat wordt uitgevouwen.
Uw Wi-Fi MAC-adres wordt weergegeven in het volgende scherm "Advanced Wi-Fi" (Geavanceerde WiFi-
instellingen) onder "MAC address" (MAC-adres).
Bluetooth
Uw Yarvik smartphone is uitgerust met een ingebouwde Bluetooth-module voor het verbinden met draadloze
Bluetooth-compatibele randapparatuur, zoals toetsenborden, speakers en hoofdtelefoons.
Schuif de Bluetooth aan/uit-knop op "AAN" om Bluetooth te activeren.
Wanneer geactiveerd, zal de Yarvik smartphone automatisch beginnen met het zoeken naar dichtbijzijnde
Bluetooth-apparaten. U kunt ook altijd handmatig zoeken naar Bluetooth-apparaten door op "Apparaten
zoeken" rechtsboven in het scherm te klikken.
Het kan nodig zijn om de te verbinden apparatuur in "pairingstand" te zetten. Raadpleeg hiervoor de
handleiding van de betreffende randapparatuur.
Alle gevonden apparaten zullen verschijnen in de "Beschikbare apparaten"-lijst:
Page 37

Yarvik smartphone manual
bellen als notificatie voor inkomende oproepen/berichten.
Klik op het gevonden Bluetooth-apparaat om uw Yarvik smartphone ermee te pairen.
Het "Bluetooth-koppelingsverzoek" venster verschijnt:
De meeste Bluetooth-apparaten vereisen een pincode om te kunnen verbinden. Deze code is doorgaans
0000 of 1234. Raadpleeg de handleiding van de betreffende randapparatuur, wanneer de pincode anders
mocht zijn.
Wanneer u de juiste pincode heeft ingevoerd, druk op "OK".
Uw Yarvik smartphone zal nu de pairing met het Bluetooth-apparaat beginnen, en na enkele seconden zal
de verbinding zijn gemaakt, waarbij een "Verbonden"-bericht onder het betreffende Bluetooth-apparaat in de
"Beschikbare apparaten"-lijst komt te staan:
U kunt meerdere Bluetooth-apparaten tegelijkertijd met uw Yarvik smartphone gebruiken (b.v. headset en
toetsenbord).
Terug naar
index
4.3 Audioprofielen
Hier kunt u het audiovolume van de smartphone aanpassen, zoals bijvoorbeeld alleen vibreren, vibreren en
Page 38

Yarvik smartphone manual
Terug naar
index
4.4 Scherm
Hier kunt u de helderheid van het display, de grootte van lettertypen en de auto slaapstand wijzigen.
Let op: des te helderder het scherm, des te meer energie verbruikt wordt. Hierdoor is uw accu veel sneller
leeg.
Als u niet wilt dat het scherm automatisch meedraait als u de Smartphone kantelt, schakel deze
functionaliteit dan uit in het Auto-rotatie instellingenscherm.
Terug naar
index
4.5 Apps
Hier kunt u geïnstalleerde applicaties beheren.
Klik op de geïnstalleerde apps om de informatie te bekijken en deïnstalleer ze met behulp van de “Uninstall”
("Deïnstalleren") knop.
Let op: voorgeïnstalleerde standaardapplicaties (zoals de calculator) kunnen niet gedeïnstalleerd worden.
Terug naar
index
Opslag &
4.6
MicroSD
toegang
Toont informatie over het interne geheugen. Als een MicroSD-kaart aanwezig is, ziet u hier ook de informatie
over de kaart.
Uw Yarvik Smartphone via USB op een PC of Mac aansluiten
Met de meegeleverde USB-kabel kunt u de Yarvik Smartphone op een PC of Mac aansluiten.
Zodra het apparaat is aangesloten op een computer kunt u het interne geheugen van de Smartphone
openen en, indien aanwezig, een geplaatste MicroSD-kaart als standaard USB-apparaat voor massaopslag
openen.
Raadpleeg de bij uw Yarvik Smartphone geleverde gids Aan de slag om te bepalen wat de USB slave-poort
van de smartphone is. Sluit de USB-kabel aan op de USB slave-poort van uw Yarvik Smartphone en op een
vrije USB-poort van uw computer.
Page 39

Yarvik smartphone manual
Rechtsonder in het scherm van uw Smartphone verschijnen vlak achter elkaar twee berichten:
Zodra het tweede bericht "USB connected" (USB verbonden) verschijnt, klikt u hier op.
Het volgende scherm verschijnt:
Klik op de knop "Turn on USB storage" (USB-opslag inschakelen).
Er verschijnt een berichtvenster:
Klik op "OK" om te bevestigen.
Het interne geheugen van uw Yarvik Smartphone verschijnt nu als apparaat voor massaopslag in het
bestandssyteem van uw computer en kan bijvoorbeeld worden gebruikt voor het kopiëren van bestanden van
en naar uw Yarvik Smartphone.
Als u een MicroSD-kaart in uw smartphone hebt geplaatst, wordt de kaart door de computer herkend als een
tweede apparaat voor massaopslag.
Page 40

Yarvik smartphone manual
Om de functie van apparaat voor massaopslag te stoppen, klikt u op de knop "Turn off USB storage" (USBopslag uitschakelen) en verwijdert u de USB-kabel.
NB: Er is geen hardwarestuurprogramma nodig voor toegang tot het geheugen van de Yarvik Smartphone.
In het geval dat uw computer vraagt om de installatie van een stuurprogramma, kunt u dit gewoon negeren.
Benader uw MicroSD-kaart of
USB-stick in ES File Explorer
Open de ES File Explorer (verkenner) en klik op Local (lokale map) in het menu "Fast Access" (snelle
toegang) links.
De lokale map Local wordt nu geopend en laat alle geheugenlocaties van het apparaat zien.
De MicroSD-kaart is meestal een van de laagste opties in de lijst, genaamd external_sd in het onderstaande
voorbeeld:
Page 41

Yarvik smartphone manual
Houd er rekening mee dat de naam van de MicroSD-kaart anders kan zijn. Andere namen zoals sd-ext of
ext-sd kunnen door uw apparaat worden gebruikt.
Wanneer u een USB-station hebt geplaatst in de USB host-poort/adapter, wordt dit station weergegeven als
(in het voorbeeld hierboven) usb_storage.
De naam voor het USB-station kan ook afwijken.
Terug naar
index
Taal &
4.7
toetsenbord
Gebruik “Select language” ("Selecteer Taal") om de displaytaal voor uw Yarvik Smartphone te selecteren. Dit
is van toepassing op alle teksten op het scherm.
Gebruik “Android keyboard” ("Android toetsenbord") om het onscreen toetsenbord van uw Smartphone te
installeren.
Terug naar
index
Page 42

Yarvik smartphone manual
4.8 Datum & tijd
Het maken van telefoongesprekken
Hier kunt u de datum en tijd instellen van uw Yarvik Smartphone.
Terug naar
index
5 Apps
De Yarvik Smartphone wordt geleverd met de volgende voorgeïnstalleerde Apps (zie voorbeelden
hieronder):
Het uiterlijk van de appiconen kan veranderen zonder voorafgaande kennisgeving.
Terug naar
index
6 Telefoongesprekken
Page 43

Yarvik smartphone manual
Om een telefoongesprek met uw Yarvik smartphone te maken, opent u de "Telefoon" applicatie vanaf uw
applicatiescherm of Android homescherm:
Gebruik het numerieke telefoontoetsenbord om een telefoonnummer in te voeren.
Telefoontoetsenbord.
Om internationale telefoongesprekken te voeren welke de '+'-prefix gebruiken, houdt de '0'-toets ingedrukt
tot het '+'-teken verschijnt.
Druk op de toets om een uitgaande oproep te starten.
Druk tijdens een gesprek op de toets
om de oproep te beëindigen.
U kunt tevens direct telefoongesprekken starten vanuit uw contactpersonen vanuit de "Personen"-applicatie.
Recente oproepen worden opgeslagen in het logscherm, welke te benaderen is via het logicoon
bovenin het telefoonscherm.
Uw contactpersonen (uit de eerder genoemde "Personen" app) kunnen ook direct vanuit het telefoonscherm
benaderd worden door op de knop te drukken.
Inkomende telefoongesprekken
Wanneer u een inkomende oproep ontvangt op uw Yarvik smartphone, dan heeft u 3 mogelijkheden:
Page 44

Yarvik smartphone manual
Opties tijdens een telefoongesprek
1 - Toon het telefoontoetsenbord (b.v. voor DTMF-keuzemenu's);
2 - Schakel de luidspreker in/uit;
3 - Demp de microfoon (ruggespraak);
4 - Zet het gesprek in de wacht;
5 - Menu met meer opties: voeg een telefoongesprek toe (conferentiegesprek) of neem het gesprek op.
Gesprekken doorschakelen
U kunt deze functie gebruiken om alle inkomende oproepen door te schakelen naar een specifiek
telefoonnummer.
In de "Telefoon" app
Selecteer "Spraakoproep", waarin u voor "Doorschakelen" kunt kiezen.
Beller ID/wisselgesprek
Met de beller ID functie van uw Yarvik Smartphone, kiest u of u uw telefoonnummer wilt meezenden bij
uitgaande oproepen.
Om dit aan te passen, start u de "Telefoon" app
"Instellingen" - "Spraakoproep" - "Extra instellingen" - "Beller ID".
Vanuit ditzelfde menu kunt u ook opgeven of u wisselgesprekken wilt kunnen ontvangen wanneer u reeds in
gesprek bent.
, kiest u voor de menu knop en kiest u voor "Instellingen".
, drukt u op de menu knop en kiest u voor
Terug naar
index
7 Berichten
Page 45

Yarvik smartphone manual
Uw Yarvik smartphone kan SMS- en MMS-berichten versturen. Raadpleeg a.u.b. de informatie van uw
mobiele aanbieder voor de kosten van het versturen van berichten vanuit en naar het buitenland.
SMS-/MMS-berichten versturen
Open de "Berichten" applicatie
vanuit het Android homescherm of applicatiemenu.
Berichten applicatie
Voicemailnummer instellen/voicemailberichten afluisteren
Om uw voicemailnummer in uw Yarvik smartphone in te stellen, open de "Telefoon" applicatie vanuit het
Android homescherm of applicatiemenu:
Houdt de knop op het telefoontoetsenbord ingedrukt. Het optiescherm "Nummer toevoegen" zal
verschijnen. In de voicemailopties kunt u de voicemailinstellingen en het voicemailnummer opgeven.
Wanneer het voicemailnummer is ingesteld, dan kunt u voortaan de
van de voicemailbox door deze ingedrukt te houden.
knop gebruiken voor het bellen
Terug naar
index
Page 46

Yarvik smartphone manual
8 Garantieverklaring
Yarvik garandeert dat het product dat door de Klant gekocht is gedurende 2 jaar na aankoopdatum vrij blijft
van fabricage- of materiaalfouten. Als gedurende deze garantieperiode zich toch defecten voor doen die te
maken hebben met de fabricage of het materiaal, dan dient de Klant het product terug te brengen naar de
dealer die het product verkocht heeft. De dealer repareert of vervangt (keuze is uitsluitend aan Yarvik) het
product binnen een redelijk tijdsbestek. Hiervoor is een originele factuur nodig als aankoopbewijs. Yarvik's
opinie hierin is doorslaggevend.
Deze garantie geldt niet voor fouten of storingen die zich voordoen als een gevolg van softwareoverdracht,
misbruik, abusievelijk gebruik, nalatigheid, verkeerd gebruik, slechte zorg of enige andere oorzaak die buiten
Yarvik ligt.
BELANGRIJK:
specifieke model beschikbaar is, op het moment dat het product geproduceerd is. Yarvik biedt geen
ondersteuning aan producten die door de eindgebruiker op een andere manier gewijzigd zijn en Yarvik
ondersteunt ook geen wijzigingen in de firmware en software die op de producten gebruikt wordt. Als dit het
geval is, vervalt per direct alle garantie.
Om te voorkomen dat de garantie vervalt, gebruikt de Klant alleen officiële software, applicaties en upgrades
die verkrijgbaar zijn via de website van Yarvik, www.yarvik.com.
Geen andere software of firmware dient gebruikt te worden, aangezien in dat geval direct alle garanties en
ondersteuning vervallen. Yarvik ondersteunt het gebruik van software of firmware die niet door Yarvik
gefabriceerd of geleverd is via de officiële website, www.yarvik.com, niet. Yarvik weigert nadrukkelijk te
reageren op aanvragen met betrekking tot niet-geautoriseerde wijzigingen, niet-geautoriseerde software en
niet-geautoriseerde firmware.
Als u een smartphone van Yarvik koopt, krijgt u de laatste stabiele firmware die voor dit
Terug naar
index
GNU/GPL Licentie
9
informatie
Lees de juridische informatie die beschikbaar is op uw Yarvik Smartphone via Instellingen - Over de telefoon
- Juridische informatie (internetverbinding vereist) of bezoek http://source.android.com/source/licenses.html
voor meer informatie.
Terug naar
index
Important
10
Information
Wireless LAN-Regulatory information
Page 47

Yarvik smartphone manual
Depending on the model, the wireless LAN built-in into Smartphone devices can only be used in the
following countries: Austria, Belgium, Bulgaria, Czech Republic, Denmark, Finland, France, Germany,
Greece, Hungary, Iceland, Ireland, Italy, Luxembourg, the Netherlands, Norway, Poland, Portugal, Romania,
Slovakia, Slovenia, Spain, Sweden, Switzerland, Turkey and the United Kingdom.
Conditions of use
When using the IEEE 802.11b/g/n Wireless LAN standard, channels 1 to 13 (2.4 GHz...2.4835 GHz) are
selectable for both indoor and outdoor use, however with restrictive conditions applying in France, Italy and
Norway, as follows:
• France: When using this product indoor, all channels can be used without restrictions. Outdoor only
channels 1 to 6 are allowed. This means that in Peer-to-Peer, the WLAN feature can only be used outside if
the peer sets up the communication on an authorized channel (i.e., between 1 & 6). In infrastructure mode,
please make sure the access point is configured to a channel from 1 to 6 before setting up the connection.
• Italy: Use of the RLAN network is governed: Disposal of Old Electrical & Electronic
- with respect to private use, by the Legislative Decree of 1.8.2003, no. 259 (“Code of Electronic
Communications”). In particular Article 104 indicates when the prior obtainment of a general authorization is
required and Art. 105 indicates when free use is permitted;
- with respect to the supply to the public of the WLAN access to telecom networks and services, by the
Ministerial Decree 28.5.2003, as amended, and Art. 25 (general authorization for electronic communications
networks and services) of the Code of electronic communications.
• Norway: Use of this radio equipment is not allowed in the geographical area within a radius of 20 km from
the centre of Ny-Ålesund, Svalbard.
WEEE
Symbol
Information
Correct Disposal of This product (Waste Electrical & Electronic Equipment).
(Applicable in the European Union and other European countries with separate collection systems).
This marking shown on the product or its literature indicates that it should not be disposed with other
household wasted at the end of its working life. To prevent possible harm to the environment or human
health from uncontrolled waste disposal, please separate this from other types of wastes and recycle it
responsibly to promote the sustainable reuse of material resources.
Household users should contact either the retailer where they purchased this product, or their local
government office, for details of where and how they can take this item for environmentally safe recycling.
Business users should contact their supplier and check the terms and conditions of the purchase contract.
This product should not be mixed with other commercial wastes of disposal.
Page 48

Yarvik smartphone manual
Disposal of waste batteries (applicable in the European Union and other European countries with
separate collection systems)
Either of the symbols shown next may appear on the battery or on the packaging to indicate that the battery
provided with this product shall not be treated as household waste. On certain batteries this symbol might be
used in combination with a chemical symbol. The chemical symbols for mercury (Hg) or lead (Pb) are added
if the battery contains more than 0.0005% mercury or 0.004% lead. By ensuring these batteries are disposed
of correctly, you will help prevent potentially negative consequences for the environment and human health
which could otherwise be caused by inappropriate waste handling of the battery. The recycling of the
materials will help to conserve natural resources. In case of products that for safety, performance or data
integrity reasons require a permanent connection with an incorporated battery, this battery should be
replaced by qualified service staff only. To ensure that the battery will be treated properly, hand over the
product at end-of-life to the applicable collection point for the recycling of electrical and electronic
equipment.
For all other batteries, please view the section on how to remove the battery from the product safely. Hand
the battery over to the applicable collection point for the recycling of waste batteries. For more detailed
information about recycling of this product or battery, please contact your local Local government Office,
your household waste disposal service or the shop where you purchased the product.
When travelling to and within the United States of America, please be aware that the U.S. Department of
Transportation (DOT) recently published new regulations that apply to passengers travelling with lithium
metal batteries and lithium-ion batteries.
For detailed information, visit http://safetravel.dot.gov/whats_new_batteries.html
.
Safety Information
Yarvik Smartphone device
• Yarvik is not responsible for any interference that you may experience or that may be caused when
operating this device.
• Warning: This apparatus must be earthed.
Opening or dismantling the main unit or any of its accessories, for whatever reason, could lead to damages
that are not covered by the guarantee.
• To avoid electrical shock, do not open the cabinet. Refer servicing to qualified personnel only.
• To prevent fire or shock hazard, do not expose your Smartphone device or any of its accessories to rain or
moisture.
• Do not use or store your Smartphone device in a location subject to heat sources, such as radiators or air
Page 49

Yarvik smartphone manual
ducts; direct sunlight; excessive dust; moisture or rain; mechanical vibration or shock; strong magnets or
speakers that are not magnetically shielded; excessively high and low temperatures; and high humidity.
• Turning off your Smartphone device with the power button does not disconnect the device completely from
mains voltage. To disconnect it completely, unplug the AC adapter or the power cord from mains. The
socket-outlet shall be installed near the equipment and shall be easily accessible.
• Audio and picture distortion may occur if this equipment is positioned in close proximity to any equipment
emitting electromagnetic radiation.
• This apparatus is also designed for IT power system with phase to phase voltage 230V, for customers in
Norway.
• Observe the following precautions to provide adequate air circulation and to ensure normal reliable
operation:
- Do not use the Smartphone device and/or the AC adapter while covered or wrapped in cloth. Ensure the
AC adapter operates in a clear environment.
- Turn off the Smartphone device before putting the device into a bag or a carrying case.
• Do not use your Smartphone device directly on your lap. The temperature of the base of the unit will rise
during normal operation and over time could result in discomfort or burns.
• Do not use your Smartphone device while walking. Listening to music with headphones or watching the
LCD screen while walking may lead to an unexpected accident and result in personal injuries.
• Using connected headphones on the Smartphone device for too long and/or setting the audio volume up
too high when using headphones may cause serious hearing damage.
• Avoid strong beating of or to the product.
• Don’t operate the touch screen of the Smartphone device with sharp objects, as this may result in
scratching the screen surface.
• Only use permitted batteries, chargers and accessories with your Smartphone device. The use of any other
products with the device can be dangerous and may violate the warranty regulations.
• Only use a slightly wet cotton cloth to clean the device, and only use water to wetten the cotton cloth. The
Smartphone device should not be cleaned with any sort of (glass) cleaning aid.
Wireless functionality
• If radio interference with other devices occurs while using your Smartphone device, do not use the wireless
functionality. Use of the wireless functionality may cause a malfunction of the devices, resulting in an
accident.
• In some situations or environments, the use of the wireless functionality might be restricted by the
proprietor of the building or responsible representatives of the organization, for example on board airplanes,
in hospitals or in any other environment where the risk of interference with other devices or services is
perceived or identified as harmful. If you are uncertain about the policy applying to the use of wireless
functionality in a specific organization or environment, you are encouraged to first ask for authorization prior
to switching it on. Consult your physician or the manufacturer of personal medical devices (pacemakers,
Page 50

Yarvik smartphone manual
hearing aids, etc.) regarding any restrictions on the use of wireless functionality.
• If using wireless functionality near a pacemaker, make sure it is at least 19 inches / 50 cm away from the
pacemaker.
• Due to the transmission and reception properties of wireless communications, data can occasionally be lost
or delayed. This can be due to the variation in radio signal strength that results from changes in the
characteristics of the radio transmission path. Yarvik will not be held responsible for damages of any kind
resulting from the delays or errors in data transmitted or received via wireless functionality, or failure of
wireless functionality to transmit or receive such data.
• If the equipment does cause harmful interference to radio/TV reception, which can be determined by turning
the equipment off and on, the user is encouraged to try to correct the interference by one or more of the
following measures: reorient or relocate the receiving antenna, increase the distance between the sender
and the receiver, consult the dealer or an experienced radio/TV technician for help. Yarvik will not be
responsible for any radio/TV interference nor for any other undesired effect.
Wireless LAN Security
Creating security settings for the Wireless LAN is extremely important. Yarvik assumes no responsibility for
any security problems that may arise from the use of the Wireless LAN.
Battery pack
Do not charge the battery pack in any way other than as described in the Start guide or as designated by
Yarvik in writing.
AC adapter
• It is highly recommended that you use a genuine Yarvik AC adapter supplied by Yarvik for your product.
• This AC adapter is intended for use with the Smartphone device IT products only.
• Do not place the AC adapter in contact with your skin. Remove the AC adapter away from your body if it
becomes warm and causes discomfort.
RoHS
This products has been certified as RoHS Compliant.
SAR
This product meets applicable national SAR limits of 2.0 W/kg.
For more information regarding the Specific Absorption Rate (SAR) please visit the following website:
Page 51

Yarvik smartphone manual
www.sar-tick.com.
When carrying the product or using it while worn on your body, either use an approved accessory such as a
holster or otherwise maintain a distance of 1.5cm from the body to ensure compliance with RF exposure
requirements. Note that the product may be transmitting even if you are not making a phone call.
Dimensions, specifications, images & illustrations
All dimensions, specifications, images and illustrations are subject to change without prior notice.
YARVIK.COM
Return to index
Page 52

Yarvik smartphone manual
Inhalt
SELECT LANGUAGE
1 Vor dem ersten
Gebrauch
2 Erstes Einschalten
des Smartphones
3 Android
Startbildschirm
3.1 Hinzufügen von
Widgets und
Verknüpfungen zum
Startbildschirm
3.2 Festlegen eines
Hintergrundes
3.3 Anwendungsmenü
4 Einrichten des
Smartphones
4.1 Menü Settings
(Einstellungen)
4.2 WiFi und Bluetooth
4.3 Audio Profiles
4.4 Display
4.5 Apps
4.6 Storage (Speicher)
und Zugriff auf den
MicroSD-Speicher
4.7 Language & input
(Sprache & Eingabe)
4.8 Date & time (Datum
& Uhrzeit)
Page 53

Yarvik smartphone manual
5 Apps
6 Telefonate
7 Messaging
(Nachrichten)
8 Garantieerklärung
9 GNU/GPL-
Lizenzinformationen
10 Important
information
1 Vor dem ersten Gebrauch
Sehr geehrte Benutzerin, sehr geehrter Benutzer,
vielen Dank, dass Sie sich zum Kauf unseres Produkts entschieden haben!
Lesen Sie diese Anleitung sorgfältig durch, um Ihr neues Yarvik Smartphone schnell und mühelos
verwenden zu können.
Wir hoffen, dass Sie an Ihrem Yarvik Smartphone sehr lange Freude haben!
Bitte beachten:
• Das Yarvik Smartphone ist ein
hochpräzises elektronisches
Produkt. Versuchen Sie nicht,
das Smartphone zu zerlegen, da
dies zum Erlöschen der
Garantie und zu Fehlfunktionen
des Geräts führt.
• Vermeiden Sie
Schlageinwirkung oder ein
Herunterfallen des Produkts.
• Verwenden Sie das
Smartphone nicht in
Umgebungen mit hohen oder
niedrigen Temperaturen, und
vermeiden Sie den Kontakt mit
Feuchtigkeit, Staub oder
Magnetfeldern.
• Setzen Sie das Smartphone
Page 54

Yarvik smartphone manual
nicht für einen längeren
Zeitraum starker
Sonneneinstrahlung aus.
• Bedienen Sie den
Touchscreen nicht mit spitzen
Gegenständen, da er zerkratzt
werden könnte.
• Längeres Verwenden von
Kopfhörern mit dem
Smartphone bzw. eine zu hohe
Lautstärke der Kopfhörer kann
zu schweren Hörschädigungen
führen.
• Um Verkehrsunfälle zu
vermeiden, überqueren Sie nicht
die Straße, führen Sie keine
Motorfahrzeuge oder fahren Sie
nicht Fahrrad, während Sie das
Smartphone mit Kopfhörern
verwenden.
• Verwenden Sie mit dem Yarvik
Smartphone nur die zulässigen
Akkus, Ladegeräte und
Zubehör. Die Verwendung
anderer Produkte mit dem
Smartphone kann
Gefährdungen verursachen und
die Garantiebedingungen
verletzen.
• Reinigen Sie das Smartphone
ausschließlich mit einem
Baumwolltuch, das mit Wasser
leicht angefeuchtet wurde. Das
Smartphone darf nicht mit
Reinigungsmitteln gereinigt
werden.
Das Yarvik Smartphone ist sofort nach dem Auspacken einsatzbereit und muss nicht zuerst aufgeladen
werden.
Der Akku sollte zunächst mit seiner ursprünglichen Ladung verwendet und vollständig entladen werden,
bevor er zum ersten Mal aufgeladen wird.
Wenn sich das Smartphone nach dem Auspacken nicht einschalten lässt, ist der Akku bereits vollständig
entladen und muss in diesem Fall zunächst aufgeladen werden.
Page 55

Yarvik smartphone manual
Zurück zum
Inhalt
Erstes
2
Einschalten des
Smartphones
Nach dem ersten Einschalten des Yarvik Smartphones durchläuft dieser eine Startsequenz.
Der erste Start kann mit ca. 2-3 Minuten einige Zeit in Anspruch nehmen.
Nach der Startsequenz ist das Smartphone einsatzbereit, und es wird der Android Sperrbildschirm
angezeigt.
Android Sperrbildschirm
Ziehen Sie das Sperrsymbol (A) nach rechts, um das Smartphone zu entsperren. Anschließend wird der
Android Startbildschirm angezeigt.
Zurück zum
Inhalt
Page 56

Yarvik smartphone manual
3 Android Startbildschirm
Android Startbildschirm
Am oberen Rand des Smartphone-Bildschirms wird die Statusleiste angezeigt.
Die Statusleiste enthält Systeminformationen, die Menüleiste darunter die Funktionsschaltflächen.
1 – WLAN-Signalanzeige
2 – Mobilfunknetz-Empfang für SIM1 und SIM2 und Akku-Ladestandsanzeige
3 – Systemzeit
4 – App-Verknüpfungen
5 – Widget (analoge Uhr)
6 – App- und Widget-Menü
Der Startbildschirm besteht aus mehreren Seiten, die durch Wischgesten nach links bzw. rechts durchblättert
werden können.
Die im Hintergrund ausgeführten Apps können Sie anzeigen, indem Sie mit der Multitasking-Schaltfläche (9)
die Multitasking-Ansicht aufrufen.
Page 57

Yarvik smartphone manual
Um schnell zu einem ausgeführten App zu wechseln, tippen Sie in der Multitasking-Ansicht auf dieses. Sie
können ausgeführte Apps schließen, indem Sie diese gedrückt halten und auf „Remove from list“ („Aus Liste
entfernen“) tippen.
Zurück zum
Inhalt
Hinzufügen von
Widgets
und
3.1
Verknüpfungen
zum
Startbildschirm
Um Widgets hinzuzufügen, halten Sie die App- und Widget-Schaltfläche gedrückt, die sich am unteren Rand
des Startbildschirms in der Mitte befindet:
Im anschließenden Bildschirm sehen Sie alle installierten Apps und Widgets. Diese können auch getrennt
angezeigt werden, wenn Sie am oberen Bildschirmrand auf „Apps“ bzw. „Widgets“ drücken.
Drücken Sie auf „Widgets“, um alle verfügbaren Widgets anzuzeigen. In der Anzeige aller Widgets können
Sie mit einer Wischgeste zur nächsten Seite wechseln (sofern vorhanden).
Page 58

Yarvik smartphone manual
Halten Sie das gewünschte Widget gedrückt, um den Startbildschirm aufzurufen und das Widget dort an
einer leeren Stelle abzulegen.
Um Verknüpfungen für Apps hinzuzufügen, halten Sie die App- und Widget-Schaltfläche gedrückt, die sich
am unteren Rand des Startbildschirms in der Mitte befindet:
Im anschließenden Bildschirm sehen Sie alle installierten Apps und Widgets. Diese können auch getrennt
angezeigt werden, wenn Sie am oberen Bildschirmrand auf „Apps“ bzw. „Widgets“ drücken.
Drücken Sie auf „Apps“, um alle installierten Apps anzuzeigen.
Halten Sie die gewünschte App gedrückt, um den Startbildschirm aufzurufen und die Verknüpfung dort an
einer leeren Stelle abzulegen.
Um Widgets bzw. App-Verknüpfungen vom Startbildschirm zu entfernen, halten Sie diese gedrückt und
ziehen sie zum angezeigten „Remove“-Papierkorbsymbol („Entfernen“) am oberen Rand des
Startbildschirms.
Zurück zum
Inhalt
Festlegen eines
3.2
Hintergrundes
Halten Sie zum Ändern des Hintergrundbildes den Startbildschirm gedrückt, bis das Menü „Select Wallpaper
from“ („Hintergrund auswählen“) angezeigt wird.
Sie können aus „Live Wallpapers“ („Live-Hintergründe“, animierte Hintergründe), „Super-HD Player“ („SuperHD Player“, Foto-/Videogalerie) oder „Wallpapers“ („Hintergründe“, statische Standardbilder) auswählen.
Zurück zum
Inhalt
3.3 Anwendungsmenü
Drücken Sie die App- und Widget-Schaltfläche, die sich am unteren Rand des Startbildschirms in der Mitte
befindet:
Wenn das System die Widgets anzeigt, drücken Sie „Apps“, um alle installierten Apps anzuzeigen.
Hier finden Sie die vorinstallierten Programme oder „Apps“ sowie zusätzliche, von Ihnen installierte Apps.
Die Apps werden durch Drücken des entsprechenden Symbols geöffnet.
Page 59

Yarvik smartphone manual
Anwendungsbildschirm
Zurück zum
Inhalt
Einrichten des
4
Yarvik
Smartphones
Menü Settings
4.1
(Einstellungen)
Drücken Sie im Anwendungsmenü auf das Symbol , um das Menü „Settings“ („Einstellungen“)
aufzurufen. Das Menü Settings (Einstellungen) enthält Optionen für die Einrichtung des Yarvik Smartphones.
Page 60

Yarvik smartphone manual
Menü Settings (Einstellungen)
Die wichtigsten Abschnitte werden im Folgenden behandelt:
Zurück zum
Inhalt
Wi-Fi und
4.2
Bluetooth
Page 61

Yarvik smartphone manual
Wi-Fi
Richten Sie eine Verbindung zu einem WLAN ein.
Schieben Sie die An/Aus-Schaltfläche auf „ON“ („AN“), um die WLAN-Funktion zu aktivieren.
Die verfügbaren WLAN-Netzwerke werden in der Netzwerkliste rechts im Bildschirm angezeigt. Tippen Sie
auf das gewünschte Netzwerk. Bei einem gesicherten Netzwerk werden Sie zur Eingabe des
Netzwerkschlüssels aufgefordert.
Drücken Sie die Schaltfläche „Connect“ (Verbinden). Das Smartphone stellt eine Verbindung zu dem
Netzwerk her.
Sobald unter dem Netzwerknamen die Meldung „Connected“ („Verbunden“) sowie in der unteren Statusleiste
das WLAN-Empfangssymbol angezeigt wird, sind Sie mit dem WLAN verbunden.
Anzeigen der WLAN-MAC-Adresse des Yarvik Smartphones
Klicken im Bildschirm der WLAN-Einstellungen auf die Menü-Schaltfläche in der unteren rechten Ecke.
Drücken Sie im Popup-Menü auf „Advanced“ („Erweitert“).
Die MAC-Adresse des WLAN-Adapters wird im eingeblendeten Bildschirm „Advanced Wi-Fi“ („WLAN-
Einstellungen erweitert“) unter „MAC address“ („MAC-Adresse“) angezeigt.
Bluetooth
Das Yarvik Smartphone ist mit einem integrierten Bluetooth-Modul für den Anschluss Bluetooth-fähiger
Peripheriegeräte ausgestattet, wie z. B. Tastaturen, Lautsprecher und Kopfhörer sowie Bluetooth-Headsets
und Freisprechanlagen für das Auto.
Schieben Sie die An-/Aus-Schaltfläche auf „On“ („An“), um Bluetooth zu aktivieren.
Nach der Aktivierung sucht das Yarvik Smartphone automatisch nach Bluetooth-Geräten in der Nähe. Sie
können die Suche nach Bluetooth-Geräten auch jederzeit manuell ausführen, indem Sie in der oberen
Page 62

Yarvik smartphone manual
rechten Ecke des Bildschirms „Search for Devices“ („Nach Geräten suchen“) antippen.
Um die Peripheriegeräte mit dem Smartphone verbinden zu können, müssen sich diese im „Pairing-Modus“
befinden. Weitere Informationen hierzu können Sie der Bedienungsanleitung des entsprechenden
Peripheriegeräts entnehmen.
Alle erkannten Geräte werden in der Liste „Available Devices“ („Verfügbare Geräte“) angezeigt:
Klicken Sie auf das gewünschte Bluetooth-Gerät, um das Yarvik Smartphone mit diesem zu verbinden.
Daraufhin öffnet sich das Fenster „Bluetooth pairing request“ („Bluetooth-Kopplungsanforderung“):
Die meisten Bluetooth-Geräte fragen einen PIN-Code für die Verbindung ab. Dieser Code lautet
üblicherweise 0000 oder 1234. Schlagen Sie bei einem anderen PIN-Code in der Bedienungsanleitung des
Bluetooth-Geräts nach.
Wenn Sie den richtigen PIN-Code eingegeben haben, drücken Sie „OK“.
Das Yarvik Smartphone nimmt nun den Pairing-Vorgang mit dem Bluetooth-Gerät auf. Die Verbindung wird
nach wenigen Sekunden hergestellt, und in der Liste „Available Devices“ („Verfügbare Geräte“) wird unter
dem entsprechenden Bluetooth-Gerät die Meldung „Connected“ („Verbunden“) angezeigt:
Sie können mehrere Bluetooth-Geräte gleichzeitig mit dem Yarvik Smartphone verbinden und verwenden (z.
B. Headset und Tastatur).
Zurück zum
Page 63

Yarvik smartphone manual
Inhalt
4.3 Audio Profiles
Hier können Sie die Lautstärke des Smartphone-Tons für eingehende Anrufe und Nachrichten einstellen, z.
B. nur Vibration oder Vibration und Klingeln.
Zurück zum
Inhalt
4.4 Display
Hier können Sie die Helligkeit des Bildschirms, die Schriftgrößen und das Zeitlimit für den Ruhezustand
ändern.
Bitte beachten Sie, dass der Energieverbrauch umso höher ist, je heller der Bildschirm ist. Hierdurch wird
der Akku wesentlich schneller entladen.
Wenn der Bildschirm nicht automatisch mit dem Smartphone mitdrehen soll, können Sie diese Funktion in
der Einstellung Auto-rotate screen (Bildschirm automatisch drehen) ändern.
Zurück zum
Inhalt
4.5 Apps
Hier können Sie die Anwendungen verwalten, die auf dem Yarvik Smartphone installiert sind.
Tippen Sie auf die installierten Apps, um die zugehörigen Informationen anzuzeigen, oder deinstallieren Sie
sie mit der Schaltfläche „Uninstall“ („Deinstallieren“), falls gewünscht.
Beachten Sie, dass vorinstallierte Standardanwendungen (z. B. der Rechner) nicht deinstalliert werden
können.
Zurück zum
Inhalt
Storage
(Speicher)
4.6
und Zugriff
auf den
MicroSDSpeicher
Page 64

Yarvik smartphone manual
Zeigt Informationen über den internen Speicher an. Wenn eine MicroSD-Karte eingelegt ist, sind die
entsprechenden Speicherinformationen ebenfalls hier zu finden.
Anschließen des Yarvik Smartphones an einem PC oder Mac über USB
Sie können das Yarvik Smartphone über das mitgelieferte USB-Kabel an einen PC oder Mac anschließen.
Nachdem die Verbindung zum Computer hergestellt wurde, können Sie von dort auf den internen Speicher
des Smartphones bzw. auf eine gegebenenfalls eingelegte MicroSD-Karte wie auf ein normales USBMassenspeichergerät zugreifen.
Die Lage des USB-Anschlusses am Smartphone können Sie der gedruckten Schnellstartanleitung für das
Yarvik Smartphone entnehmen. Schließen Sie das USB-Kabel an den USB-Anschluss des Yarvik
Smartphones und an einen freien USB-Anschluss des Computers an.
Am oberen Bildschirmrand des Smartphones werden in kurzer Folge zwei Meldungen angezeigt:
Sobald die zweite Meldung „USB connected“ („USB-Verbindung“) angezeigt wird, klicken Sie auf diese.
Der folgende Bildschirm wird angezeigt:
Tippen Sie auf die Schaltfläche „Turn on USB storage“ („USB-Speicher aktivieren“).
Ein Meldefenster wird eingeblendet:
Page 65

Yarvik smartphone manual
Tippen Sie zur Bestätigung auf „OK“.
Der interne Speicher des Yarvik Smartphones wird nun im Dateisystem des Computers als
Massenspeichergerät angezeigt und kann z. B. für die Übertragung von Dateien vom und zum Yarvik
Smartphone verwendet werden.
Wenn sich eine MicroSD-Karte im Smartphone befindet, wird diese vom Computer als zweites
Massenspeichergerät erkannt.
Um die Massenspeichergerätfunktion zu deaktivieren, tippen Sie auf die Schaltfläche „Turn off USB storage“
(„USB-Speicher deaktivieren“), und ziehen Sie das USB-Kabel ab.
Hinweis: Für den Zugriff auf den Yarvik Smartphone-Speicher sind keine Hardwaretreiber erforderlich. Wenn
Sie in einer Computermeldung zur Treiberinstallation aufgefordert werden, können Sie dies einfach
ignorieren.
Zugriff auf die MicroSD-Karte
mit dem ES File Explorer
Öffnen Sie die App ES File Explorer (ES Datei Explorer) und klicken Sie links im Menü „Fast Access
(Schneller Zugriff)“ auf Local (Lokale).
Die nun geöffnete Liste Local (Lokale) enthält alle Speicherorte für das Gerät.
Die MicroSD-Karte wird in der Regel weit unten in der Liste Local (Lokale) aufgeführt, in diesem Beispiel
unter dem Namen external_sd:
Page 66

Yarvik smartphone manual
Inhalt
Bitte beachten Sie, dass der Name der MicroSD abweichen kann. Andere Namen, wie z. B. sd-ext oder
ext-sd sind für das Gerät ebenfalls möglich.
Wenn ein USB-Laufwerk über den USB-Host-Anschluss verbunden ist, wird es (im oben angezeigten
Beispiel) als usb_storage verfügbar.
Der Name für das USB-Laufwerk kann ebenfalls abweichen.
Zurück zum
Inhalt
Language &
4.7
input (Sprache
& Eingabe)
Über „Select language“ („Sprache auswählen“) können Sie die Sprache für das Display des Yarvik
Smartphones bestimmen. Diese gilt für alle Bildschirmtexte im gesamten System.
Unter „Android keyboard“ („Android-Tastatur“) können Sie die Bildschirmtastatur des Smartphones
einrichten.
Zurück zum
Page 67

Yarvik smartphone manual
Date & time
4.8
(Datum &
Uhrzeit)
Hier können Sie das Datum und die Uhrzeit für das Yarvik Smartphone einstellen.
Zurück zum
Inhalt
5 Apps
Das Yarvik Smartphone wird mit vorinstallierten Apps ausgeliefert (siehe nachstehende Beispiele):
Das Erscheinungsbild der App-Symbole kann sich ohne Vorankündigung ändern.
Zurück zum
Inhalt
Page 68

Yarvik smartphone manual
6 Telefonate
Telefonieren
Um mit dem Yarvik Smartphone zu telefonieren, öffnen Sie die Anwendung „Phone“ („Telefon“)im
Anwendungsmenü oder auf dem Android Startbildschirm:
Geben Sie die Telefonnummer auf der numerischen Telefontastatur ein.
Telefontastatur
Um Auslandsgespräche mit der Vorwahl „+“ zu führen, halten Sie auf der Tastatur die „0“ gedrückt, bis das
„+“ eingeblendet wird.
Drücken Sie Schaltfläche
Drücken Sie Schaltfläche
Mit der App „People“ („Kontakte“) können Sie Telefonate direkt von Ihren Kontakten aus führen.
Die letzten Anrufe sind im Bildschirm Call Log (Anruf-Protokoll) gespeichert, der über die Schaltfläche Log
(Protokoll) an der Oberseite des Phone-Bildschirms (Telefon-Bildschirms) aufgerufen werden kann.
Ihre Kontakte aus der zuvor genannten App „People“ („Kontakte“) können im Bildschirm Phone (Telefon)
auch direkt über die Schaltfläche aufgerufen werden.
Eingehende Anrufe
um den Hörer für den Anruf abzuheben.
um den Hörer nach dem Anruf aufzulegen.
Wenn auf dem Yarvik Smartphone ein Anruf eingeht, stehen Ihnen 3 Möglichkeiten zur Verfügung:
Page 69

Yarvik smartphone manual
Optionen während eines Telefonats
1 - Telefontastatur (z. B. für Auswahlmenüs per Tonwahl)
2 - Lautsprecherfunktion aktivieren/deaktivieren
3 - Mikrofon stummschalten
4 - Telefonat in die Warteschleife legen
5 - Menü mit weiteren Optionen: Zusätzliches Telefonat (Konferenzschaltung) oder Anruf aufzeichnen
Anrufweiterleitung
Mit dem Einrichten der Weiterleitungsfunktion können Sie alle eingehenden Anrufe an eine bestimmte
Rufnummer weiterleiten.
Drücken Sie in der App „Phone“ („Telefon“)
auf die Menüschaltfläche , und wählenSie „Call
settings“ (Anrufeinstellungen) aus.
Wählen Sie „Voice call“ („Anruf“) aus. Dort können Sie über „Call forwarding“ („Anrufweiterleitung“) die
Weiterleitungsoptionen ändern.
Caller ID (Anruferkennung)/Call waiting (Anruf bei besetzt)
Mit der Yarvik Smartphone-Funktion Caller ID (Anruferkennung) können Sie bestimmen, ob Ihre Rufnummer
bei ausgehenden Telefonaten mit übertragen werden soll.
Um die Einstellung zu ändern, starten Sie die App „Phone“ („Telefon“)
Menüschaltfläche
, und wählen Sie „Settings“ („Einstellungen“) – „Voice call“ („Anruf“) – „Additional
, drücken Sie die
settings“ („Erweiterte Einstellungen“) – „Caller ID“ („Anruferkennung“) aus.
In demselben Menü können Sie auch die Annahme eingehender Anrufe für den Fall aktivieren bzw.
Page 70

Yarvik smartphone manual
deaktivieren, dass Sie sich bereits in einem Telefongespräch befinden.
Zurück zum
Inhalt
Messaging
7
(Nachrichten)
Mit dem Yarvik Smartphone können Sie SMS- und MMS-Nachrichten versenden. Wenden Sie sich an Ihren
Mobilfunkanbieter, um Informationen zu den Standardtarifen und zu zusätzlichen Kosten bei der Versendung
bzw. dem Empfang im oder in das Ausland zu erhalten.
Versenden von SMS/MMS-Nachrichten
Öffnen Sie die App „Messaging“ im Android Startbildschirm oder im Anwendungsmenü.
Messaging-Anwendung (Nachrichten)
Einstellen der Mailbox-Nummer/Abhören von Mailbox-Nachrichten
Um die Nummer Ihres Mailbox-Dienstes in das Yarvik Smartphone einzugeben, öffnen Sie die App „Phone“
(„Telefon“) im Anwendungsmenü oder im Android Startbildschirm:
Page 71

Yarvik smartphone manual
Halten Sie die Schaltfläche auf der Telefontastatur gedrückt. Auf dem Popup-Bildschirm wird „Add
number“ („Nummer hinzufügen“) angezeigt. In den Mailbox-Optionen können Sie die Mailbox-Einstellungen
auswählen und die Nummer des Mailbox-Dienstes angeben.
Nachdem die Nummer des Mailbox-Dienstes eingerichtet wurde, können Sie Ihre Mailbox zukünftig anrufen,
indem Sie die Schaltfläche
gedrückt halten.
Zurück zum
Inhalt
8 Garantieerklärung
Yarvik garantiert für einen Zeitraum von 2 Jahren ab dem Kaufdatum, dass das vom Kunden erworbene
Produkt frei von material- und herstellungsbedingten Fehlern ist. Wenn zu einem beliebigen Zeitpunkt
innerhalb des Garantiezeitraums ein material- oder herstellungsbedingter Fehler des Produkts auftritt, ist das
Produkt vom Kunden an den Händler zurückzugeben, bei dem das Produkt erworben wurde. Der Händler
repariert oder ersetzt dieses (in alleinigem Ermessen von Yarvik) innerhalb eines angemessenen Zeitraums.
Als Nachweis des Kaufdatums ist ein Kaufbeleg im Original vorzulegen. Es gilt ausschließlich Yarviks
Entscheidung in dieser Angelegenheit.
Diese Garantie erstreckt sich nicht auf Mängel oder Fehlfunktionen, die sich aus der Übertragung von
Software, falscher Handhabung, grobem Umgang, Manipulation, Fahrlässigkeit, unsachgemäßer
Verwendung, ungenügender Sorgfalt oder jedweder anderen Handlung ergeben, die Yarvik nicht zu
vertreten hat.
WICHTIG:
stabilen Firmware, die zum Zeitpunkt der Herstellung des Geräts für das betreffende Modell verfügbar war.
Yarvik bietet keine Unterstützung für Produkte an, die vom Endbenutzer anderweitig geändert wurden, noch
unterstützt Yarvik Programmänderungen an der in seinen Produkten verwendeten Firmware und Software.
Falls solche Änderungen vorgenommen wurden, erlischt automatisch jegliche Garantie.
Um ein Verfallen der hier dargelegten Garantieansprüche zu vermeiden, ist der Kunde gehalten, nur die
offizielle Software sowie Anwendungen und Upgrades zu nutzen, die auf der Website von Yarvik unter
www.yarvik.com verfügbar sind.
Die Verwendung jeglicher anderer Software oder Firmware ist untersagt und führt zum Erlöschen der
Garantie- und Supportansprüche. Yarvik unterstützt in keinem Fall die Verwendung jeglicher anderer
Software oder Firmware als derjenigen Software oder Firmware, die vom Hersteller auf dem Produkt
installiert wurde oder auf der offiziellen Website von Yarvik unter www.yarvik.com verfügbar ist. Yarvik lehnt
eine Beantwortung von Fragen bezüglich nicht genehmigter Änderungen, nicht genehmigter Software und
nicht genehmigter Firmware ausdrücklich ab.
Beim Erwerb eines Smartphones von Yarvik erhalten Sie das Smartphone mit der aktuellsten
Zurück zum
Inhalt
Page 72

Yarvik smartphone manual
GNU/GPL-
9
Lizenzinformationen
Rufen Sie die rechtlichen Hinweise auf dem Yarvik Smartphone unter Settings – About device – Legal
information (Einstellungen – Über das Smartphone – Rechtliche Hinweise; hierzu ist eine Internetverbindung
erforderlich) auf, oder besuchen Sie http://source.android.com/source/licenses.html
Informationen zu erhalten.
, um weitere
Zurück zum
Inhalt
Important
10
Information
Wireless LAN-Regulatory information
Depending on the model, the wireless LAN built-in into Smartphone devices can only be used in the
following countries: Austria, Belgium, Bulgaria, Czech Republic, Denmark, Finland, France, Germany,
Greece, Hungary, Iceland, Ireland, Italy, Luxembourg, the Netherlands, Norway, Poland, Portugal, Romania,
Slovakia, Slovenia, Spain, Sweden, Switzerland, Turkey and the United Kingdom.
Conditions of use
When using the IEEE 802.11b/g/n Wireless LAN standard, channels 1 to 13 (2.4 GHz...2.4835 GHz) are
selectable for both indoor and outdoor use, however with restrictive conditions applying in France, Italy and
Norway, as follows:
• France: When using this product indoor, all channels can be used without restrictions. Outdoor only
channels 1 to 6 are allowed. This means that in Peer-to-Peer, the WLAN feature can only be used outside if
the peer sets up the communication on an authorized channel (i.e., between 1 & 6). In infrastructure mode,
please make sure the access point is configured to a channel from 1 to 6 before setting up the connection.
• Italy: Use of the RLAN network is governed: Disposal of Old Electrical & Electronic
- with respect to private use, by the Legislative Decree of 1.8.2003, no. 259 (“Code of Electronic
Communications”). In particular Article 104 indicates when the prior obtainment of a general authorization is
required and Art. 105 indicates when free use is permitted;
- with respect to the supply to the public of the WLAN access to telecom networks and services, by the
Ministerial Decree 28.5.2003, as amended, and Art. 25 (general authorization for electronic communications
networks and services) of the Code of electronic communications.
• Norway: Use of this radio equipment is not allowed in the geographical area within a radius of 20 km from
the centre of Ny-Ålesund, Svalbard.
Page 73

Yarvik smartphone manual
WEEE
Symbol
Information
Correct Disposal of This product (Waste Electrical & Electronic Equipment).
(Applicable in the European Union and other European countries with separate collection systems).
This marking shown on the product or its literature indicates that it should not be disposed with other
household wasted at the end of its working life. To prevent possible harm to the environment or human
health from uncontrolled waste disposal, please separate this from other types of wastes and recycle it
responsibly to promote the sustainable reuse of material resources.
Household users should contact either the retailer where they purchased this product, or their local
government office, for details of where and how they can take this item for environmentally safe recycling.
Business users should contact their supplier and check the terms and conditions of the purchase contract.
This product should not be mixed with other commercial wastes of disposal.
Disposal of waste batteries (applicable in the European Union and other European countries with
separate collection systems)
Either of the symbols shown next may appear on the battery or on the packaging to indicate that the battery
provided with this product shall not be treated as household waste. On certain batteries this symbol might be
used in combination with a chemical symbol. The chemical symbols for mercury (Hg) or lead (Pb) are added
if the battery contains more than 0.0005% mercury or 0.004% lead. By ensuring these batteries are disposed
of correctly, you will help prevent potentially negative consequences for the environment and human health
which could otherwise be caused by inappropriate waste handling of the battery. The recycling of the
materials will help to conserve natural resources. In case of products that for safety, performance or data
integrity reasons require a permanent connection with an incorporated battery, this battery should be
replaced by qualified service staff only. To ensure that the battery will be treated properly, hand over the
product at end-of-life to the applicable collection point for the recycling of electrical and electronic
equipment.
For all other batteries, please view the section on how to remove the battery from the product safely. Hand
the battery over to the applicable collection point for the recycling of waste batteries. For more detailed
information about recycling of this product or battery, please contact your local Local government Office,
your household waste disposal service or the shop where you purchased the product.
When travelling to and within the United States of America, please be aware that the U.S. Department of
Transportation (DOT) recently published new regulations that apply to passengers travelling with lithium
metal batteries and lithium-ion batteries.
Page 74

Yarvik smartphone manual
For detailed information, visit http://safetravel.dot.gov/whats_new_batteries.html.
scratching the screen surface.
Safety Information
Yarvik Smartphone device
• Yarvik is not responsible for any interference that you may experience or that may be caused when
operating this device.
• Warning: This apparatus must be earthed.
Opening or dismantling the main unit or any of its accessories, for whatever reason, could lead to damages
that are not covered by the guarantee.
• To avoid electrical shock, do not open the cabinet. Refer servicing to qualified personnel only.
• To prevent fire or shock hazard, do not expose your Smartphone device or any of its accessories to rain or
moisture.
• Do not use or store your Smartphone device in a location subject to heat sources, such as radiators or air
ducts; direct sunlight; excessive dust; moisture or rain; mechanical vibration or shock; strong magnets or
speakers that are not magnetically shielded; excessively high and low temperatures; and high humidity.
• Turning off your Smartphone device with the power button does not disconnect the device completely from
mains voltage. To disconnect it completely, unplug the AC adapter or the power cord from mains. The
socket-outlet shall be installed near the equipment and shall be easily accessible.
• Audio and picture distortion may occur if this equipment is positioned in close proximity to any equipment
emitting electromagnetic radiation.
• This apparatus is also designed for IT power system with phase to phase voltage 230V, for customers in
Norway.
• Observe the following precautions to provide adequate air circulation and to ensure normal reliable
operation:
- Do not use the Smartphone device and/or the AC adapter while covered or wrapped in cloth. Ensure the
AC adapter operates in a clear environment.
- Turn off the Smartphone device before putting the device into a bag or a carrying case.
• Do not use your Smartphone device directly on your lap. The temperature of the base of the unit will rise
during normal operation and over time could result in discomfort or burns.
• Do not use your Smartphone device while walking. Listening to music with headphones or watching the
LCD screen while walking may lead to an unexpected accident and result in personal injuries.
• Using connected headphones on the Smartphone device for too long and/or setting the audio volume up
too high when using headphones may cause serious hearing damage.
• Avoid strong beating of or to the product.
• Don’t operate the touch screen of the Smartphone device with sharp objects, as this may result in
Page 75

Yarvik smartphone manual
• Only use permitted batteries, chargers and accessories with your Smartphone device. The use of any other
products with the device can be dangerous and may violate the warranty regulations.
• Only use a slightly wet cotton cloth to clean the device, and only use water to wetten the cotton cloth. The
Smartphone device should not be cleaned with any sort of (glass) cleaning aid.
Wireless functionality
• If radio interference with other devices occurs while using your Smartphone device, do not use the wireless
functionality. Use of the wireless functionality may cause a malfunction of the devices, resulting in an
accident.
• In some situations or environments, the use of the wireless functionality might be restricted by the
proprietor of the building or responsible representatives of the organization, for example on board airplanes,
in hospitals or in any other environment where the risk of interference with other devices or services is
perceived or identified as harmful. If you are uncertain about the policy applying to the use of wireless
functionality in a specific organization or environment, you are encouraged to first ask for authorization prior
to switching it on. Consult your physician or the manufacturer of personal medical devices (pacemakers,
hearing aids, etc.) regarding any restrictions on the use of wireless functionality.
• If using wireless functionality near a pacemaker, make sure it is at least 19 inches / 50 cm away from the
pacemaker.
• Due to the transmission and reception properties of wireless communications, data can occasionally be lost
or delayed. This can be due to the variation in radio signal strength that results from changes in the
characteristics of the radio transmission path. Yarvik will not be held responsible for damages of any kind
resulting from the delays or errors in data transmitted or received via wireless functionality, or failure of
wireless functionality to transmit or receive such data.
• If the equipment does cause harmful interference to radio/TV reception, which can be determined by turning
the equipment off and on, the user is encouraged to try to correct the interference by one or more of the
following measures: reorient or relocate the receiving antenna, increase the distance between the sender
and the receiver, consult the dealer or an experienced radio/TV technician for help. Yarvik will not be
responsible for any radio/TV interference nor for any other undesired effect.
Wireless LAN Security
Creating security settings for the Wireless LAN is extremely important. Yarvik assumes no responsibility for
any security problems that may arise from the use of the Wireless LAN.
Battery pack
Do not charge the battery pack in any way other than as described in the Start guide or as designated by
Yarvik in writing.
Page 76

Yarvik smartphone manual
AC adapter
• It is highly recommended that you use a genuine Yarvik AC adapter supplied by Yarvik for your product.
• This AC adapter is intended for use with the Smartphone device IT products only.
• Do not place the AC adapter in contact with your skin. Remove the AC adapter away from your body if it
becomes warm and causes discomfort.
RoHS
This products has been certified as RoHS Compliant.
SAR
This product meets applicable national SAR limits of 2.0 W/kg.
For more information regarding the Specific Absorption Rate (SAR) please visit the following website:
www.sar-tick.com
.
When carrying the product or using it while worn on your body, either use an approved accessory such as a
holster or otherwise maintain a distance of 1.5cm from the body to ensure compliance with RF exposure
requirements. Note that the product may be transmitting even if you are not making a phone call.
Dimensions, specifications, images & illustrations
All dimensions, specifications, images and illustrations are subject to change without prior notice.
YARVIK.COM
Return to index
Page 77

Yarvik smartphone manual
téléphoniques
Index
SELECT LANGUAGE
1 Avant la première
utilisation
2 Démarrage du
Smartphone
3 Page d'accueil
Android
3.1 Ajouter des widgets
et des raccourcis sur
votre page d'accueil
3.2 Choisir un fond
d'écran
3.3 Menu d'applications
4 Configuration de
votre Smartphone
4.1 Menu de
configuration
4.2 WiFi et Bluetooth
4.3 Profils audio
4.4 Affichage
4.5 Applications
4.6 Stockage et accès
mémoire MicroSD
4.7 Affichage de la
langue
4.8 Date et heure
5 Applications
6 Appels
Page 78

Yarvik smartphone manual
7 Messagerie
8 Déclaration de
garantie
9 Informations de
licence GNU/GPL
10 Important
information
1 Avant la première utilisation
Madame, Monsieur,
Nous vous remercions d'avoir choisi ce produit.
Pour garantir une utilisation rapide et pratique de votre Smartphone Yarvik, veuillez lire attentivement ces
instructions avant son utilisation.
Nous vous souhaitons de profiter pleinement, et le plus longtemps possible, de cet appareil.
Remarque :
• Votre Smartphone Yarvik est
un appareil électronique de
haute précision. N'essayez pas
de le démonter car cela
annulera la garantie et peut
causer un dysfonctionnement de
l'appareil.
• Évitez toute choc ou chute de
l'appareil.
• Évitez d'utiliser l'appareil dans
un environnement à température
basse ou élevée ou tout autre
environnement dans lequel il
peut entrer en contact avec
l'humidité, la poussière ou les
champs magnétiques.
• N'exposez pas l'appareil
pendant une longue période à
une forte exposition au soleil.
• N'utilisez pas d'objet pointu sur
Page 79

Yarvik smartphone manual
l'écran tactile car cela pourrait
provoquer des rayures.
• L'utilisation prolongée de
l'appareil avec un casque et/ou
avec le volume élevé peut
causer des pertes auditives
sévères.
• Pour éviter un accident de la
circulation, ne traversez pas la
route, ne conduisez pas de
véhicule motorisé ou ne roulez
pas à vélo lors de l'utilisation de
cet appareil avec un casque.
• Utilisez seulement des
batteries, chargeurs et
accessoires destinés à cet
appareil. L'utilisation de tout
autre accessoire avec cet
appareil peut être dangereuse et
peut annuler toutes les
conditions de garanties.
• Utilisez seulement un chiffon
en coton légèrement humidifié à
l'eau pour nettoyer l'appareil.
L'appareil ne doit pas être
nettoyé avec n'importe quel
produit nettoyant.
Vous pouvez utiliser votre appareil dès la sortie de l'emballage sans avoir à charger la batterie.
Il est recommandé, lors de la première utilisation, d'utiliser d'abord l'énergie restant dans la batterie puis de la
recharger complètement.
Si l'appareil ne s'allume pas dès sa sortie de l'emballage, la batterie est déjà complètement vidée et vous
devez donc d'abord la recharger.
Retour à l'index
Démarrage du
2
Smartphone
Une présentation s'affichera au premier démarrage de l'appareil.
Le premier démarrage peut prendre environ 2 à 3 minutes.
Après cette présentation, le démarrage est terminé et l'écran de verrouillage Android s'affichera.
Page 80

Yarvik smartphone manual
Écran de verrouillage Android
Glissez la barre de verrouillage (A) vers la droite pour déverrouiller l'appareil. Puis la page d'accueil Android
s'affichera.
Retour à l'index
3 Page d'accueil Android
Page 81

Yarvik smartphone manual
Page d'accueil Android
Vous trouverez la barre d'état en haut de l'écran de l'appareil.
La barre d'état affiche les informations du système et la barre de menu située en bas de l'écran contient les
touches de fonction.
1 - Indicateur de signal WiFi
2 - Réception du réseau cellulaire pour SIM1 et SIM2 et indicateur du niveau de batterie
3 - Heure du système
4 - Raccourcis des applications
5 - Widget (horloge analogique)
6 - Menu d'application et de widgets
La page d'accueil se compose de plusieurs pages accessibles en faisant défiler la page d'accueil de gauche
à droite.
Pour visualiser les applications fonctionnant en arrière-plan, vous pouvez accéder à l'affichage multitâche en
appuyant sur le bouton multitâche (9).
Page 82

Yarvik smartphone manual
Pour effectuer un changement rapide, cliquez sur une application en cours dans l'affichage multitâche. Vous
pouvez fermer une application en cours en appuyant longtemps sur celle-ci et en cliquant sur « Remove from
list » (supprimer de la liste).
Retour à l'index
Ajouter des
widgets et
3.1
des raccourcis
sur votre
page d'accueil
Pour ajouter un widget, appuyez sur le bouton d'applications et de widgets en bas au milieu de votre page
d'accueil :
Dans l'écran suivant, vous trouverez tous les widgets et applications installés qui sont visibles
individuellement en appuyant respectivement sur « Apps » ou sur « Widgets » en haut de l'écran.
Appuyez sur « Widgets » pour visualiser tous les widgets disponibles. Lorsqu'ils sont tous affichés, vous
pouvez faire glisser l'écran pour passer à la page suivante (le cas échéant).
Appuyez longuement sur le widget souhaité pour afficher la page d'accueil et le coller à un emplacement
vide de la page d'accueil.
Page 83

Yarvik smartphone manual
Pour ajouter un raccourci à une application, appuyez sur le bouton d'applications et de widgets en bas au
milieu de la page d'accueil :
Dans l'écran suivant, vous trouverez tous les widgets et applications installés qui sont visibles
individuellement en appuyant respectivement sur « Apps » ou sur « Widgets » en haut de l'écran.
Appuyez sur « Apps » pour visualiser toutes les applications installées.
Appuyez longuement sur l'application souhaitée pour afficher la page d'accueil et coller le raccourci à un
emplacement vide de la page d'accueil.
Pour supprimer des widgets et/ou des raccourcis d'applications de votre page d'accueil, appuyez longuement
dessus et faites-les glisser dans l'icone corbeille « Remove » (supprimer) qui apparaîtra en haut de la page
d'accueil.
Retour à l'index
Choisir un fond
3.2
d'écran
Pour modifier le fond d'écran de la page d'accueil, appuyez longuement sur la page d'accueil jusqu'à ce que
le menu « Select Wallpaper from » (sélectionner fond d'écran à partir de) apparaisse.
Vous pouvez sélectionner un fond d'écran à partir de « Live Wallpapers » (fonds d'écran animés), « Gallery »
(galerie de photos et vidéos) ou « Wallpapers » (images fixes par défaut).
Retour à l'index
Menu
3.3
d'applications
Appuyez sur le bouton d'applications et de widgets en bas au milieu de votre page d'accueil :
Lorsque le système affiche les widgets, appuyez sur « Apps » pour visualiser toutes les applications
installées.
Vous trouverez tous les programmes ou « apps » (applications) préinstallés ainsi que les applications
supplémentaires que vous aurez vous-même installées.
Il suffit d'appuyer sur l'icone correspondant pour lancer l'application.
Page 84

Yarvik smartphone manual
Écran d'applications
Retour à l'index
Configuration de
votre
4
Smartphone
Yarvik
Menu de
4.1
configuration
Appuyez sur l'icone dans le menu d'applications pour accéder au menu de configuration. Dans le menu
« Settings » (paramètres), vous trouverez les options pour configurer votre Smartphone Yarvik.
Page 85

Yarvik smartphone manual
Menu de configuration
Voici un aperçu des principaux paramètres :
Retour à l'index
WiFi et
4.2
Bluetooth
WiFi
Page 86

Yarvik smartphone manual
Installez une connexion avec un réseau WiFi sans fil.
Faites glisser le bouton marche/arrêt en appuyant sur « On » (marche) pour activer la WiFi.
Les réseaux WiFi disponibles apparaissent dans la liste située à droite de l'écran. Entrez le nom du réseau
de votre choix. Si le réseau est sécurisé, vous devez entrer la clé de sécurité.
Appuyez sur le bouton « Connect » (connexion) et le Smartphone se connectera au réseau.
Vous êtes connecté au réseau sans fil après que « Connected » (connecté) s'affiche sous le nom du réseau
et que l'icone de réception sans fil apparaît dans la barre d'état située en bas de l'écran.
Affichage de l'adresse MAC WiFi
Dans l'écran des paramètres WiFi, cliquez sur la touche menu située dans le coin inférieur droit.
Appuyez sur « Advanced » (avancé) dans le menu déroulant.
Votre adresse MAC WiFi s'affiche dans l'écran « Advanced WiFi » (WiFi avancée) suivant sous « MAC
address » (adresse MAC).
Bluetooth
Votre Smartphone Yarvik est équipé d'un module Bluetooth intégré pour la connexion à des périphériques
compatibles Bluetooth : clavier, haut-parleur, casque, kit mains libres et kit véhicule.
Faites glisser le bouton marche/arrêt Bluetooth en appuyant sur « On » pour activer la Bluetooth.
Après activation, votre Smartphone Yarvik se mettra automatiquement à chercher les périphériques
Bluetooth à proximité. Vous pouvez rechercher manuellement les périphériques Bluetooth en cliquant sur «
Search for Devices » (Rechercher les périphériques) dans le coin supérieur droit de l'écran.
Il peut être nécessaire de mettre l'appareil en « pairing mode » (mode d'appairage). Pour plus d'informations,
veuillez consulter le manuel d'instructions pour les périphériques concernés.
Tous les périphériques détectés apparaîtront dans la liste « Available Devices » (Périphériques détectés) :
Page 87

Yarvik smartphone manual
Cliquez sur le périphérique Bluetooth détecté pour apparier votre Smartphone Yarvik à celui-ci.
La fenêtre « Bluetooth pairing request » (demande d'appariement Bluetooth) apparaîtra :
La plupart des périphériques Bluetooth nécessitent un code PIN pour se connecter. Ce code est
généralement 0000 or 1234. Veuillez consulter le manuel d'instructions de votre appareil Bluetooth si le code
PIN est différent.
Après avoir saisi le code PIN, appuyez sur « OK ».
Votre Smartphone Yarvik va maintenant s'appairer avec votre périphérique Bluetooth et, au bout de quelques
secondes, la connexion sera faite et un message « Connected » (connecté) sous le périphérique Bluetooth
correspondant s'affichera dans la liste des « Available Devices » (périphériques disponibles) :
vous pouvez connecter plusieurs périphériques Bluetooth à votre Smartphone Yarvik pour une utilisation
simultanée (par exemple casque et clavier).
Retour à l'index
4.3 Profils audio
Cette fonction vous permet de régler le volume sonore de l'appareil ainsi que le mode vibreur ou la
notification par vibration et sonnerie pour les appels/messages entrants.
Page 88

Yarvik smartphone manual
Retour à l'index
4.4 Affichage
Cette fonction vous permet de changer la luminosité de l'écran, la taille de police et le temps de veille
automatique.
Attention, plus l'écran est lumineux, plus la consommation d'énergie est importante. La batterie se
déchargera donc plus rapidement.
Si vous ne souhaitez pas le pivotement automatique de l'écran lorsque vous inclinez l'appareil, vous pouvez
activer/désactiver cette fonctionnalité dans le paramètre « Auto-rotate screen » (pivotement automatique de
l'écran).
Retour à l'index
4.5 Applications
Cette fonction vous permet de gérer vos applications installées sur votre Smartphone Yarvik.
Vous pouvez cliquer sur les applications que vous avez installées pour voir les informations correspondantes
et les désinstaller, le cas échéant, en utilisant le bouton « Uninstall » (désinstaller)
Attention, il est impossible de désinstaller les applications préinstallées par défaut (par exemple la
calculette).
Retour à l'index
Stockage et
accès
4.6
mémoire
MicroSD
Cette fonction vous permet d'afficher les informations sur la mémoire interne. Lorsqu'une carte MicroSD est
insérée dans l'appareil, vous y trouverez également les informations de cette mémoire.
Connexion USB à un PC ou un Mac
Vous pouvez raccorder votre Smartphone Yarvik à un PC ou à un Mac à l'aide du câble USB fourni.
Lorsqu'il est connecté à un ordinateur, vous pouvez accéder à la mémoire interne du Smartphone et, le cas
échéant, de la carte microSD insérée en tant que périphérique USB de stockage de masse standard.
Veuillez consulter le guide de démarrage rapide imprimé de votre Smartphone Yarvik afin de déterminer
l'emplacement du port USB de l'appareil. Branchez le câble USB au port USB de votre Smartphone Yarvik et
à un port USB disponible sur votre ordinateur.
En haut de l'écran de l'appareil, deux messages apparaîtront l'un à la suite de l'autre :
Page 89

Yarvik smartphone manual
Après apparition du second message « USB connected » (USB connecté), cliquez dessus.
L'écran suivant apparaîtra :
Cliquez sur le bouton « Turn on USB storage » (Démarrer le stockage USB).
Une fenêtre de notification apparaîtra :
Cliquer « OK » pour confirmer.
La mémoire interne de l'appareil s'affichera en tant périphérique de stockage de masse dans le système de
fichiers de votre ordinateur et peut être utilisée par exemple pour copier les fichiers depuis et vers votre
Smartphone Yarvik.
Si vous avez une carte MicroSD dans votre Smartphone, la carte sera reconnue par l'ordinateur en tant que
second lecteur de stockage de masse.
Pour arrêter d'utiliser cette fonction, cliquez sur le bouton « Turn off USB storage » (arrêter le stockage USB)
Page 90

Yarvik smartphone manual
et retirez le câble USB.
Remarque : aucun pilote matériel n'est requis pour accéder à la mémoire de votre Smartphone Yarvik. Si
votre ordinateur vous invite à installer le pilote, vous pouvez l'ignorer.
Accéder à votre carte MicroSD
dans l'explorateur de fichier
ES
Ouvrez l'application ES File Explorer (explorateur de fichier ES) et cliquez sur Local (local) dans le menu «
Fast Access » (accès rapide).
La liste Local (local) se déroule maintenant et affiche tous les emplacements de mémoire de l'appareil.
La carte MicroSD card est généralement l'une des options situées les plus en bas de la liste Local, appelées
external_sd dans l'exemple ci-dessous :
Page 91

Yarvik smartphone manual
Veuillez noter que le nom de la carte MicroSD peut varier d'un appareil à l'autre. D'autres noms tels que sdext ou ext-sd peuvent être utilisés par votre appareil.
Si vous avez inséré un lecteur USB via l'adaptateur/port hôte USB, ce lecteur deviendra disponible en tant
que usb_storage, comme dans l'exemple ci-dessous.
Le nom du lecteur USB peut également varier.
Retour à l'index
Sélection de la
4.7
langue
Utilisez « Select language » (choix de la langue) pour choisir la langue sur votre appareil. Cette fonction
s'applique à tout le texte d'écran de l'ensemble du système.
Dans « Android keyboard » (clavier Android), vous pouvez installer le clavier à l'écran de votre Smartphone.
Retour à l'index
4.8 Date et heure
Cette fonction vous permet de régler l'heure et la date de votre appareil.
Page 92

Yarvik smartphone manual
Retour à l'index
5 Applications
Le Smartphone Yarvik est livré avec des applications préinstallées (cf. exemples ci-dessous).
L'affichage des icones d'applications peut être modifié sans préavis.
Retour à l'index
Appels
6
téléphoniques
Passer un appel téléphonique
Pour passer un appel avec votre Smartphone Yarvik, ouvrez l'application « Phone » (téléphone) à partir de
votre menu d'application ou de la page d'accueil Android :
Utilisez le clavier numérique du téléphone pour entrer le numéro.
Page 93

Yarvik smartphone manual
Clavier du téléphone.
Pour passer un appel international nécessitant le préfixe +, appuyez longuement sur « 0 » sur le clavier
numérique jusqu'à ce que "+" apparaisse.
Appuyez sur la touche de gestion des appels pour lancer l'appel.
Appuyez sur la touche de gestion des appels
pour cesser l'appel.
Vous pouvez également passer des appels téléphoniques directement à partir de vos contacts dans
l'application « People » (personnes).
Les appels récents sont conservés dans l'écran « Call Log » (historique des appels) accessibles en appuyant
sur le bouton « Log » (connexion)
en haut de l'écran.
Vos contacts (depuis l'application « People » mentionnée précédemment) sont directement accessibles
depuis l'écran du téléphone en appuyant sur la touche .
Appels entrants
Lorsque vous recevez un appel sur votre Smartphone Yarvik, 3 options vous seront proposées :
Options lors d'un appel
Page 94

Yarvik smartphone manual
1 - Afficher le clavier numérique du téléphone (par exemple pour les menus d'options DTMF)
2 - Activer/désactiver la fonction haut-parleur
3 - Désactiver le micro
4 - Mettre un appel en attente
5 - Menu avec plus d'options : ajouter un appel supplémentaire (conversation téléphonique) ou enregistrer
l'appel.
Transfert d'appels
Vous pouvez définir la fonction de transfert d'appel pour transférer tous les appels entrants vers un autre
numéro.
Dans l'application
settings » (paramètres d'appels).
Sélectionner « Voice call » pour sélectionner le « transfert d'appels » et modifier les options de transfert.
Identifiant du correspondant/appel en attente
Grâce à la fonction de l'identifiant du correspondant, vous pouvez choisir si vous souhaitez que votre numéro
s'affiche lors de vos appels sortants.
Pour modifier cette option, démarrez l'application
du menu et sélectionnez « Settings » (paramètres) - « Voice call » (appel vocal) - « Additional settings »
(paramètres supplémentaires) - « Caller ID » (identifiant du correspondant).
Dans ce menu, vous pouvez également activer/désactiver les appels entrants lorsque vous avez déjà en
conversation avec un correspondant.
« Phone » (téléphone), appuyez sur la touche du menu et sélectionnez « Call
« Phone » (téléphone), appuyez sur la touche
Retour à l'index
7 Messagerie
Votre Smartphone Yarvik peut envoyer des SMS et des MMS. Veuillez consulter votre fournisseur de
services mobiles pour obtenir des informations sur les tarifs standard et les coûts supplémentaires lors de
l'envoi de messages vers et depuis des pays étrangers.
Page 95

Yarvik smartphone manual
Envoi de SMS/MMS
Ouvrez l'application « Messaging » (messagerie)
d'applications.
depuis la page d'accueil Android ou le menu
Application de la messagerie.
Paramétrer le numéro/les messages de la boîte vocale
Pour paramétrer le numéro d'accès à la boîte vocale dans votre Smartphone Yarvik, ouvrez l'application «
Phone » depuis le menu d'applications ou la page d'accueil Android :
Appuyer longuement sur la touche sur le clavier de votre téléphone. « Add number » (ajouter
numéro) apparaîtra sur l'écran Options. Dans les options de la boîte vocale, vous pouvez sélectionner les
paramètres et entrer le numéro d'accès à votre messagerie vocale.
Après réglage du numéro d'accès à la boîte vocale, vous pouvez ensuite utiliser la touche
appeler votre boîte vocale en maintenant la touche appuyée.
pour
Retour à l'index
Déclaration de
8
garantie
Page 96

Yarvik smartphone manual
Yarvik garantit que le produit acheté par le client est exempt de défauts de matériaux et de fabrication,
pendant une période de deux ans à compter de la date d'achat du produit par le client. Si, à tout moment
pendant la période de garantie, le produit présente un défaut de fabrication ou un défaut matériel, le client
doit retourner le produit au magasin où il a été acheté. Le distributeur doit le réparer ou le remplacer (à la
seule discrétion de Yarvik) dans un délai raisonnable. La facture originale sera requise comme preuve de la
date d'achat. La décision finale reviendra à Yarvik.
Cette garantie ne couvre pas les défauts ou dysfonctionnements résultant de transferts de logiciels, d'une
mauvaise utilisation, d'une exploitation abusive, d'une altération, d'une négligence, d'une utilisation
inappropriée, d'un mauvais soin ou de tout acte en dehors du contrôle de Yarvik.
IMPORTANT :
micrologiciel disponible pour ce modèle, au moment de la fabrication de l'appareil. Yarvik ne fournira aucune
assistance aux produits qui ont été modifiés autrement par l'utilisateur final ni aucune modification de
programmation au micrologiciel ou logiciel utilisé dans ses produits, et si ces modifications ont été faites,
toutes les garanties seront considérées comme nulles de plein droit.
Pour éviter l'annulation de la garantie offerte aux termes des présentes, le client doit utiliser uniquement le
logiciel officiel ainsi que les applications et mises à jour mis à disposition sur le site Internet www.yarvik.com.
Aucun autre logiciel ou micrologiciel ne doit être utilisé sinon cela annulera automatiquement toutes les
garanties et l'assistance client. Yarvik ne prend pas en charge l'utilisation d'un autre logiciel ou micrologiciel
que celui installé sur l'appareil par le fabricant ou celui disponible sur le site Internet officiel de Yarvik
www.yarvik.com. Yarvik refuse explicitement de répondre à toute demande concernant des modifications,
logiciels et micrologiciels non autorisés.
lorsque vous achetez un Smartphone Yarvik, l'appareil vous sera fourni avec le dernier
Retour à l'index
Informations de
9
licence GNU/GPL
Veuillez consulter les informations légales disponibles sur votre Smartphone Yarvik dans « Settings »
(Paramètres) - « About Smartphone » (À propos de l'appareil) - « Legal information » (Informations légales)
(connexion Internet requise) ou le site http://source.android.com/source/licenses.html
d'informations.
pour plus
Retour à l'index
Important
10
Information
Wireless LAN-Regulatory information
Depending on the model, the wireless LAN built-in into Smartphone devices can only be used in the
following countries: Austria, Belgium, Bulgaria, Czech Republic, Denmark, Finland, France, Germany,
Greece, Hungary, Iceland, Ireland, Italy, Luxembourg, the Netherlands, Norway, Poland, Portugal, Romania,
Page 97

Yarvik smartphone manual
Slovakia, Slovenia, Spain, Sweden, Switzerland, Turkey and the United Kingdom.
Either of the symbols shown next may appear on the battery or on the packaging to indicate that the battery
Conditions of use
When using the IEEE 802.11b/g/n Wireless LAN standard, channels 1 to 13 (2.4 GHz...2.4835 GHz) are
selectable for both indoor and outdoor use, however with restrictive conditions applying in France, Italy and
Norway, as follows:
• France: When using this product indoor, all channels can be used without restrictions. Outdoor only
channels 1 to 6 are allowed. This means that in Peer-to-Peer, the WLAN feature can only be used outside if
the peer sets up the communication on an authorized channel (i.e., between 1 & 6). In infrastructure mode,
please make sure the access point is configured to a channel from 1 to 6 before setting up the connection.
• Italy: Use of the RLAN network is governed: Disposal of Old Electrical & Electronic
- with respect to private use, by the Legislative Decree of 1.8.2003, no. 259 (“Code of Electronic
Communications”). In particular Article 104 indicates when the prior obtainment of a general authorization is
required and Art. 105 indicates when free use is permitted;
- with respect to the supply to the public of the WLAN access to telecom networks and services, by the
Ministerial Decree 28.5.2003, as amended, and Art. 25 (general authorization for electronic communications
networks and services) of the Code of electronic communications.
• Norway: Use of this radio equipment is not allowed in the geographical area within a radius of 20 km from
the centre of Ny-Ålesund, Svalbard.
WEEE
Symbol
Information
Correct Disposal of This product (Waste Electrical & Electronic Equipment).
(Applicable in the European Union and other European countries with separate collection systems).
This marking shown on the product or its literature indicates that it should not be disposed with other
household wasted at the end of its working life. To prevent possible harm to the environment or human
health from uncontrolled waste disposal, please separate this from other types of wastes and recycle it
responsibly to promote the sustainable reuse of material resources.
Household users should contact either the retailer where they purchased this product, or their local
government office, for details of where and how they can take this item for environmentally safe recycling.
Business users should contact their supplier and check the terms and conditions of the purchase contract.
This product should not be mixed with other commercial wastes of disposal.
Disposal of waste batteries (applicable in the European Union and other European countries with
separate collection systems)
Page 98

Yarvik smartphone manual
provided with this product shall not be treated as household waste. On certain batteries this symbol might be
used in combination with a chemical symbol. The chemical symbols for mercury (Hg) or lead (Pb) are added
if the battery contains more than 0.0005% mercury or 0.004% lead. By ensuring these batteries are disposed
of correctly, you will help prevent potentially negative consequences for the environment and human health
which could otherwise be caused by inappropriate waste handling of the battery. The recycling of the
materials will help to conserve natural resources. In case of products that for safety, performance or data
integrity reasons require a permanent connection with an incorporated battery, this battery should be
replaced by qualified service staff only. To ensure that the battery will be treated properly, hand over the
product at end-of-life to the applicable collection point for the recycling of electrical and electronic
equipment.
For all other batteries, please view the section on how to remove the battery from the product safely. Hand
the battery over to the applicable collection point for the recycling of waste batteries. For more detailed
information about recycling of this product or battery, please contact your local Local government Office,
your household waste disposal service or the shop where you purchased the product.
When travelling to and within the United States of America, please be aware that the U.S. Department of
Transportation (DOT) recently published new regulations that apply to passengers travelling with lithium
metal batteries and lithium-ion batteries.
For detailed information, visit http://safetravel.dot.gov/whats_new_batteries.html
.
Safety Information
Yarvik Smartphone device
• Yarvik is not responsible for any interference that you may experience or that may be caused when
operating this device.
• Warning: This apparatus must be earthed.
Opening or dismantling the main unit or any of its accessories, for whatever reason, could lead to damages
that are not covered by the guarantee.
• To avoid electrical shock, do not open the cabinet. Refer servicing to qualified personnel only.
• To prevent fire or shock hazard, do not expose your Smartphone device or any of its accessories to rain or
moisture.
• Do not use or store your Smartphone device in a location subject to heat sources, such as radiators or air
ducts; direct sunlight; excessive dust; moisture or rain; mechanical vibration or shock; strong magnets or
speakers that are not magnetically shielded; excessively high and low temperatures; and high humidity.
• Turning off your Smartphone device with the power button does not disconnect the device completely from
Page 99

Yarvik smartphone manual
mains voltage. To disconnect it completely, unplug the AC adapter or the power cord from mains. The
socket-outlet shall be installed near the equipment and shall be easily accessible.
• Audio and picture distortion may occur if this equipment is positioned in close proximity to any equipment
emitting electromagnetic radiation.
• This apparatus is also designed for IT power system with phase to phase voltage 230V, for customers in
Norway.
• Observe the following precautions to provide adequate air circulation and to ensure normal reliable
operation:
- Do not use the Smartphone device and/or the AC adapter while covered or wrapped in cloth. Ensure the
AC adapter operates in a clear environment.
- Turn off the Smartphone device before putting the device into a bag or a carrying case.
• Do not use your Smartphone device directly on your lap. The temperature of the base of the unit will rise
during normal operation and over time could result in discomfort or burns.
• Do not use your Smartphone device while walking. Listening to music with headphones or watching the
LCD screen while walking may lead to an unexpected accident and result in personal injuries.
• Using connected headphones on the Smartphone device for too long and/or setting the audio volume up
too high when using headphones may cause serious hearing damage.
• Avoid strong beating of or to the product.
• Don’t operate the touch screen of the Smartphone device with sharp objects, as this may result in
scratching the screen surface.
• Only use permitted batteries, chargers and accessories with your Smartphone device. The use of any other
products with the device can be dangerous and may violate the warranty regulations.
• Only use a slightly wet cotton cloth to clean the device, and only use water to wetten the cotton cloth. The
Smartphone device should not be cleaned with any sort of (glass) cleaning aid.
Wireless functionality
• If radio interference with other devices occurs while using your Smartphone device, do not use the wireless
functionality. Use of the wireless functionality may cause a malfunction of the devices, resulting in an
accident.
• In some situations or environments, the use of the wireless functionality might be restricted by the
proprietor of the building or responsible representatives of the organization, for example on board airplanes,
in hospitals or in any other environment where the risk of interference with other devices or services is
perceived or identified as harmful. If you are uncertain about the policy applying to the use of wireless
functionality in a specific organization or environment, you are encouraged to first ask for authorization prior
to switching it on. Consult your physician or the manufacturer of personal medical devices (pacemakers,
hearing aids, etc.) regarding any restrictions on the use of wireless functionality.
• If using wireless functionality near a pacemaker, make sure it is at least 19 inches / 50 cm away from the
pacemaker.
Page 100

Yarvik smartphone manual
• Due to the transmission and reception properties of wireless communications, data can occasionally be lost
or delayed. This can be due to the variation in radio signal strength that results from changes in the
characteristics of the radio transmission path. Yarvik will not be held responsible for damages of any kind
resulting from the delays or errors in data transmitted or received via wireless functionality, or failure of
wireless functionality to transmit or receive such data.
• If the equipment does cause harmful interference to radio/TV reception, which can be determined by turning
the equipment off and on, the user is encouraged to try to correct the interference by one or more of the
following measures: reorient or relocate the receiving antenna, increase the distance between the sender
and the receiver, consult the dealer or an experienced radio/TV technician for help. Yarvik will not be
responsible for any radio/TV interference nor for any other undesired effect.
Wireless LAN Security
Creating security settings for the Wireless LAN is extremely important. Yarvik assumes no responsibility for
any security problems that may arise from the use of the Wireless LAN.
Battery pack
Do not charge the battery pack in any way other than as described in the Start guide or as designated by
Yarvik in writing.
AC adapter
• It is highly recommended that you use a genuine Yarvik AC adapter supplied by Yarvik for your product.
• This AC adapter is intended for use with the Smartphone device IT products only.
• Do not place the AC adapter in contact with your skin. Remove the AC adapter away from your body if it
becomes warm and causes discomfort.
RoHS
This products has been certified as RoHS Compliant.
SAR
This product meets applicable national SAR limits of 2.0 W/kg.
For more information regarding the Specific Absorption Rate (SAR) please visit the following website:
www.sar-tick.com
.
When carrying the product or using it while worn on your body, either use an approved accessory such as a
holster or otherwise maintain a distance of 1.5cm from the body to ensure compliance with RF exposure
requirements. Note that the product may be transmitting even if you are not making a phone call.
 Loading...