


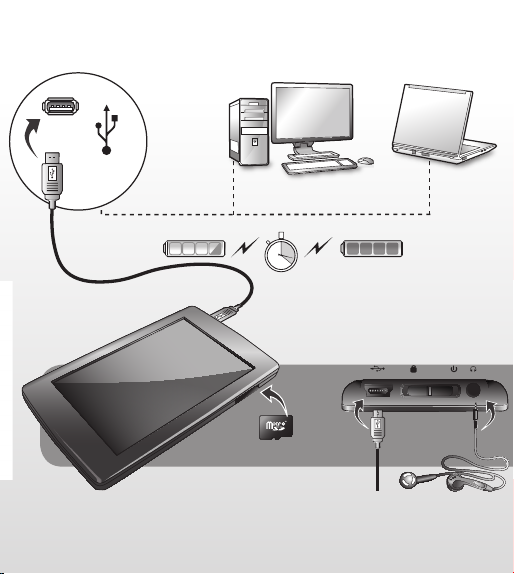
USB port
100%
approx
10%
*
* Optional,
SD card not included
USB port
10%
approx
*
* Optional,
SD card not included
100%

USB

Englisch
Starting the player
Power on: Slide and hold the player’s power
switch to the
3 seconds to power on.
Power off: Slide and hold the power switch to
the
power off. The system will power off automatically when the battery is depleted.
Lock/Unlock
In any mode, slide the power switch to the
position to lock the player in order to prevent
unintended operation.
Operating instructions:
Music
Choose the “Music” option in the main menu;
then click the corresponding icon to enter into
Music interface.
Function description:
In the “Play list”, you can search for les/folders
by clicking / ; then select the songs you
want to play by clicking the le name or .
Options: Current play (Resume play)/All music/
Artist/Album/My Favorite/Record/Dir List/
MediaLib Update
Remark: you can click to add the chosen
item to your favourites folder after conrmation.
During music playback, click to enter a
submenu; there are 5 options:
a.
Repeat mode: Once/Repeat/All/All Repeat/Intro.
b. Play mode: In Order/Shufe.
c. MSEQ: 3D/Bass/LEQ.
d. EQ Sel: Normal/MSEQ/Rock/Pop/Classic/
Bass/Jazz/User EQ.
e. User EQ setup: Slide the ball up and down to
adjust the numeric value.
position for approximately
position for approximately 3 seconds to
Click /
Click / to jump to the previous/next
song; press and hold to scan backward/forward
through the song.
Click
A-B replay
When playing music, click the
The screen will display the letter “A-”. Conrm
this as the starting point of the replay segment
by clicking the
“B” will appear. Conrm the ending point of the
replay segment and the replay icon A-B is set.
Replay between A and B will now begin. Click
the
Lyrics synchronisation
When a song is being played that is in the same
folder as the corresponding lyrics le (.LRC), the
lyrics will automatically be shown in the Music
mode interface. The player supports lyrics les
in LRC format.
Lyrics can be added as follows:
1. Choose an MP3 or WMA le, for example
2. Download a lyrics le from the Internet.
3. Rename the lyrics le to match the name of
4.
5. Start playback of the music le. The lyrics will
to adjust the volume.
to play, and click
icon again to cancel A-B replay.
“lovemusic.mp3”.
Lyrics les have the le name extension LRC,
for example “lovemusic-2007.lrc”.
the corresponding music le, for example
“lovemusic.lrc”.
Copy both les into the same folder on the player.
be displayed on the screen in synch with the
music as it is being played. Click the screen
and hold for about 2 seconds; the lyrics will
disappear.
to pause playback.
icon once.
icon once again, and point

Video
Choose the “Video” option in the main menu;
then click the corresponding icon to enter the
Video interface.
1. Click
to adjust the window size.
2. Click
item; click and hold to rewind or fast forward.
3.
Click
4. Click
5. Click
can quit to listen to music. Switch back to
video mode and click
playing the rest of the video you were watching
Remark: You can click
le after conrmation.
Photo
Choose the “Photo” option in the main menu.
The “Flash” folder will appear on the screen.
Click it to enter the Photo interface.
1. Click
2. Click the selected picture name to view it.
3. Click
4. Click
Remark: Click
conrm before it is actually deleted.
eBook
Choose the “eBook” option in the main menu.
The “Flash” folder will appear on the screen.
Click it to enter the eBook interface.
1. Click
2. Click
to select previous or next
/
to play; click again to pause playback.
to adjust the volume.
/
to set the break point. Then you
again to continue
to delete the chosen
to select previous/next picture.
/
to zoom in/out.
/
to rotate the picture.
/
to delete. You will be asked to
to turn the pages.
/
to display the sub-menus:
a. Page jump
Click
to adjust the numeric value. Click “yes/no” for
nal conrmation.
b. Bookmark
Click “Bookmark” to add a bookmark so you
can nd a particular location again more easily.
c. Loadmark
Click “Loadmark” and select the bookmark; this
will take you directly to the bookmark you saved.
d. Delmark
Double-click the mark you want to delete.
e. Set font
.
There are 3 options: Font small, Font mid,
Font big. Double-click to choose.
f. Set color
There are 3 options: Green, Blue, Red.
Double-click to choose.
g. Browser mode
There are 2 options: Auto mode, Manual mode.
Double-click to choose.
h. Flip time
There are 5 options: 10s, 15s, 20s, 25s, 30s.
Double-click to choose
3. Click to quit the read mode.
Remark: Click to delete. You will be asked to
conrm before it is actually deleted.
Radio
Choose the “Radio” option in the main menu,
and then click the corresponding icon to enter
the Radio interface.
1. Click
2. Click
to adjust the digits. Click
/
to adjust the volume.
/
to display the sub-menus:
/
a. Manual search: click “ / ” to search
for stations manually.
b. Auto search: Broadcast stations will be
searched and saved automatically.
c. Preset mode: Select and listen to your
previously saved stations.
d. Stereo switch: Double-click to switch
between stereo and mono.
a. Reception area: Double-click to switch
between China/Japan/USA/Europe.
4. Click , and then click to save.
Click to turn pages.
5. Click saved station; then click to delete
the saved station. You will be asked to
conrm before it is actually deleted.
6. FM recording
Click to enter the FM recording interface.
a. Click to start recording.
b. Click to pause, and click again to
continue recording.
c. Click to stop recording.
d. Click to set the quality and volume.
7. Click to quit.
Record
Choose the “Record” option in the main menu,
and then click the corresponding icon to enter
the Record interface. For further instructions
please refer to FM recording.
Other
Choose the “Other” option in the main menu,
and then click the corresponding icon to enter
the Other interface.
1. StopWatch: Click “Start” to start, and click
“Pause” to pause (this function can also be
accessed by clicking “ ”). Click “Clear” to
clear the recording.
2. Calendar: Click to adjust the digit: year or
month. click / to adjust the numeric
value.
3. Explorer: All les and folders will be shown.
Settings
Choose the “Settings” option in the main menu,
and then click the corresponding icon to enter
the Settings interface.
1. Display setting
There are 5 options: Light time, Brightness,
Light mode, Move style, Photo browse. Doubleclick the option to conrm your choice.
a. Light time
There are 6 options: 5s, 10s, 15s, 20s, 30s,
Always on.
b. Brightness
There are 5 options: One, Two, Three, Four, Five.
c. Light mode
There are 2 options: All dark, Penumbra.
d. Move style
There are 5 options: Left In Right Out, Double
Move, Up In Down Out, Transps, Scale.
e. Photo browse
There are 4 options: Turn off, 5 sec, 10 sec, 15 sec.
2. System setting
There are 4 items: Upgrade, Restorable, Calibration
OK, Tilt sensor.
a. Upgrade
When clicked, the rmware will be scanned
automatically and you will be told whether you
need to upgrade.

b. Restorable
Click to restore all options. The “Restorable?”
dialogue will pop up for conrmation. If you click
“yes”, everything will be restored to the factory
default settings.
c. Calibration OK
Click every white “+” on the screen twice. The
calibration will be performed and exit automatically. Remark: Calibration can only be saved
after a normal power off.
3. Time Setting
There are 2 options: Time and Date.
a. Click “Time” to enter the time setting interface. Click
and minute. Click “yes” to save, or click “no”
to cancel.
b. Click “Date” to enter the date setting interface. Click
month and day. Click “yes” to save, or click “no”
to cancel.
4. Language
This player supports multiple languages.
Double-click for conrmation.
5. System information
Show product name, Major version ID, Hardware
ID, Local memory size, Card memory size, etc.
6. Auto shutdown time
There are 6 options: 3 minutes, 5 minutes,
10 minutes, 15 minutes, 20 minutes, No automatic shutdown. Double-click to conrm.
(left/right) to set the hour
/
(left/right) to set the year,
/
microSD card operations
1. Insert microSD card
Insert the microSD card into the player.
To remove the microSD card, press it in. It will
then pop out.
2. Connect microSD card to PC
With the microSD card inserted, 2 movable disks
will be shown in “my PC”. You can now use the
disk just like any other portable disk.
3. Operations when there is no connection to PC
Enter “Explorer” interface, then you can choose
between “ash Memory” and “ MicroSD”.
Double-click “ MicroSD”. All the les saved on the
card will be displayed. Double-click again to play.
Deutsch
Einschalten des Players
Einschalten: Zum Einschalten halten Sie den
Ein-/Aus-Schalter des Players etwa 3 Sekunden
in der
-Stellung.
Ausschalten: Zum Ausschalten halten Sie den
Ein-/Aus-Schalter etwa 3 Sekunden in der
-Stellung. Das System schaltet sich automatisch
aus, wenn der Akku leer ist.
Sperren/Entsperren
Schieben Sie den Ein-/Aus-Schalter zur
-Stellung, um zu verhindern, dass der Player
unbeabsichtigt bedient wird.
Bedienung:
Musik
Wählen Sie im Hauptmenü die Option „Musik“
aus. Klicken Sie dann auf das entsprechende
Symbol, um die Musik-Oberäche aufzurufen.

Beschreibung der Funktionen:
In der „Wiedergabeliste“, können Sie durch
einen Klick auf bzw.
Ordnern suchen und dann die gewünschten
Titel auswählen, indem Sie auf den Dateinamen
oder auf klicken.
Optionen: Aktuelles Spiel (Spiel fortsetzen)/Gesamte Musik/Künstler/Album/Meine Favoriten/
Aufnahme/Verzeichnis/Medienbibliothek
aktualisieren.
Anmerkung: Sie können auf
das ausgewählte Element nach der Bestätigung
Ihrem Favoriten-Ordner hinzuzufügen.
Kicken Sie während der Musikwiedergabe auf
, um zu einem Untermenü zu wechseln; dort
stehen 5 Optionen zur Verfügung:
a. Wiederhol-Modus: Einmalig/Wiederholen/Alle
einmalig abspielen/Alle wiederholen/Intro
b. Wiedergabemodus: Nach Reihenfolge/Zufäl-
lige Wiedergabefolge
c. PlayFx: 3D/Bass/Automatische Lautstärke
d. Equalizer: Normal/PlayFx/Rock/Pop/Klassik/
Bass/Jazz/Equalizer (benutzerdef.)
e. Equalizer (benutzerdef.): Schieben Sie die
Kugel auf- und abwärts, um den Zahlenwert
zu ändern.
Klicken Sie auf bzw. , um die Lautstärke
zu regeln.
Klicken Sie auf bzw. , um zum vorherigen oder nächsten Titel zu springen; halten Sie
diese Funktion gedrückt, um einen Rücklauf
oder Vorlauf im Titel durchzuführen.
Klicken Sie zur Wiedergabe auf , und zum
Anhalten der Wiedergabe auf .
nach Dateien und
klicken, um
A-B-Wiederholung
Klicken Sie bei der Musikwiedergabe einmal
auf das Symbol . Auf dem Bildschirm wird
der Buchstabe „A-“ angezeigt. Bestätigen
Sie diesen als Anfangspunkt für den zu
wiederholenden Abschnitt, indem Sie erneut
auf das Symbol
der Punkt „B“ angezeigt. Bestätigen Sie den
Endpunkt des zu wiederholenden Abschnitts.
Das Wiederholungssymbol A-B ist festgelegt.
Die Wiederholung zwischen A und B wird nun
begonnen. Klicken Sie erneut auf das Symbol
, um die A-B-Wiederholung abzubrechen.
Synchronisierung der Songtexte
Wenn ein Song abgespielt wird, der sich in demselben Ordner wir die zugehörige Songtextdatei
(.LRC), bendet, wird der Songtext automatisch
auf der Oberäche des Musik-Modus angezeigt.
Der Player unterstützt Songtexte im LRCFormat.
Songtexte lassen sich wie folgt hinzufügen:
1. Wählen Sie eine MP3- oder WMA-Datei aus,
z. B. „lovemusic.mp3“.
2. Laden Sie eine Songtext-Datei aus dem Internet herunter. Songtext-Dateien haben die
Dateinamenerweiterung LRC, zum Beispiel
„lovemusic-2007.lrc“.
3.
Benennen Sie die Songtext-Datei so um, dass
sie mit dem Namen der zugehörigen Musikdatei
übereinstimmt, z. B. in „lovemusic.lrc“.
4. Kopieren Sie beide Dateien in denselben
Ordner auf dem Player.
5. Starten Sie die Wiedergabe der Musikdatei.
Die Songtexte werden synchron mit der
gerade gespielten Musik am Bildschirm an-
klicken. Daraufhin wird

gezeigt. Wenn Sie etwa 2 Sekunden lang auf
den Bildschirm klicken, werden die Songtexte
ausgeblendet.
Video
Wählen Sie im Hauptmenü die Option „Video“
aus. Klicken Sie dann auf das entsprechende
Symbol, um die Video-Oberäche aufzurufen.
1. Klicken Sie auf , um die Fenstergröße
anzupassen.
2. Klicken Sie auf
herige oder nächste Element auszuwählen.
Zum schnellen Rück- oder Vorlauf die Funktion geklickt halten.
3. Klicken Sie auf , um die Wiedergabe
zu starten, und klicken Sie erneut, um die
Wiedergabe anzuhalten.
4. Klicken Sie auf
Lautstärke zu regeln.
5. Klicken Sie auf
spunkt zu setzen. Sie können dann anhalten,
um Musik zu hören. Schalten Sie zum VideoModus zurück und klicken Sie erneut auf
um die Wiedergabe fortzusetzen und das
restliche Video zu betrachten.
Anmerkung: Klicken Sie auf , um die ausgewählte Datei nach der Bestätigung zu löschen.
Foto
Wählen Sie im Hauptmenü die Option „Foto“
aus. Der „Flash“-Ordner wird auf dem Bildschirm
angezeigt. Klicken Sie hierauf, um die FotoOberäche aufzurufen.
1. Klicken Sie auf
herige oder nächste Bild auszuwählen.
bzw. , um das vor-
bzw. , um die
um einen Unterbrechung-
bzw. , um das vor-
2. Klicken Sie auf den Namen des ausgewählten
Bildes, um dieses anzuzeigen.
3. Klicken Sie auf
herauszuzoomen.
4. Klicken Sie auf
drehen.
Anmerkung: Klicken Sie zum Löschen auf .
Vor dem eigentlichen Löschen werden Sie zu
einer Bestätigung aufgefordert.
eBook
Wählen Sie im Hauptmenü die Option „eBook“
aus. Der „Flash“-Ordner wird auf dem Bildschirm
angezeigt. Klicken Sie hierauf, um die eBookOberäche aufzurufen.
1. Klicken Sie auf
den Seiten zu blättern.
2. Klicken Sie auf , um die Untermenüs
anzuzeigen:
a. Seite überspringen
Klicken Sie auf
wechseln. Klicken Sie auf
Zahlenwert zu ändern. Klicken Sie zur endgültigen Bestätigung auf „Ja/Nein“.
b. Lesezeichen
Klicken Sie auf „Lesezeichen“, um ein
Lesezeichen hinzuzufügen und eine bestimmte
Stelle besser wiederzunden.
c. Lesezeichen laden
Klicken Sie auf „Lesezeichen laden“, und wählen
Sie das Lesezeichen aus. Hierdurch wechseln
Sie direkt zum gespeicherten Lesezeichen.
d. Lesezeichen löschen
Doppelklicken Sie auf das zu löschende
Lesezeichen.
bzw.
um herein- oder
bzw. , um das Bild zu
bzw. , um zwischen
bzw. , um die Ziffer zu
bzw. , um den

e. Schriftgröße
Hier stehen 3 Optionen zur Verfügung: Kleine
Schrift, Mittlere Schrift, Große Schrift.
Doppelklicken Sie, um eine Auswahl zu treffen.
f. Schriftfarbe
Hier stehen 3 Optionen zur Verfügung: Grün,
Blau, Rot. Doppelklicken Sie, um eine Auswahl
zu treffen.
g. Browse-Modus
Hier stehen 2 Optionen zur Verfügung: Automatik-Modus, Manuell-Modus. Doppelklicken Sie,
um eine Auswahl zu treffen.
h. Umblätterzeit
Hier stehen 5 Optionen zur Verfügung: 10 s, 15
s, 20 s, 25 s, 30 s. Doppelklicken Sie, um eine
Auswahl zu treffen.
3. Klicken Sie auf , um den Lesemodus zu
beenden.
Anmerkung: Klicken Sie zum Löschen auf .
Vor dem eigentlichen Löschen werden Sie zu
einer Bestätigung aufgefordert.
Radio
Wählen Sie im Hauptmenü die Option „Radio“
und klicken Sie dann auf das entsprechende
Symbol, um die Radio-Oberäche aufzurufen.
1. Klicken Sie auf
Lautstärke zu regeln.
2. Klicken Sie auf , um die Untermenüs
anzuzeigen:
a. Manuelle Suche: Klicken Sie zur manuellen
Sendersuche auf
b. Automatische Suche: Die Radiosender wer-
den automatisch gesucht und gespeichert.
bzw. , um die
bzw. .
aus,
c. Presetmodus: Wählen Sie zum Anhören die
zuvor gespeicherten Sender aus.
d. Stereoton Ein/Aus: Doppelklicken Sie
hierauf, um zwischen Stereo und Mono
umzuschalten.
a. FM Empfangsbereich: Doppelklicken Sie
hierauf, um zwischen China/Japan/USA/
Europa zu wechseln.
4. Klicken Sie auf , und klicken zum
Speichern dann auf . Klicken Sie auf ,
um zwischen den Seiten zu blättern.
5. Klicken Sie auf den gespeicherten
Sender. Klicken Sie dann auf , um den
gespeicherten Sender zu löschen. Vor dem
eigentlichen Löschen werden Sie zu einer
Bestätigung aufgefordert.
6. FM-Tonaufnahme
Klicken Sie auf , um die Oberäche für
FM-Tonaufnahmen aufzurufen.
a. Klicken Sie auf , um die Aufnahme zu
starten.
b. Klicken Sie zum Anhalten auf , und
klicken Sie wieder auf , um die Aufnahme
fortzusetzen.
c. Klicken Sie auf , um die Aufnahme zu
beenden.
d. Klicken Sie auf , um die Aufnahmequalität
und -lautstärke einzustellen.
7. Klicken Sie zum Beenden auf .
Aufnahme
Wählen Sie im Hauptmenü die Option
„Aufnahme“ aus, und klicken Sie dann auf das
entsprechende Symbol, um die Aufnahme-

Oberäche aufzurufen. Weitere Hinweise nden
Sie unter „FM-Tonaufnahme“.
Weitere Funktionen
Wählen Sie im Hauptmenü die Option „Weitere
Funktionen“ aus, und klicken Sie dann auf das
entsprechende Symbol, um die Oberäche für
weitere Funktionen aufzurufen.
1. Stoppuhr: Klicken Sie auf „Start“, um zu
beginnen, und auf „Pause“, um anzuhalten
(für diese Funktion können Sie auch auf
klicken). Klicken Sie auf „Löschen“, um die
Aufzeichnung zu löschen.
2. Kalender: Klicken Sie auf , um die Ziffer zu
wechseln: Jahr oder Monat. Klicken Sie auf
bzw. , um den Zahlenwert zu ändern.
3. Explorer: Es werden alle Dateien und Ordner
angezeigt.
Settings
Wählen Sie im Hauptmenü die Option „Settings“ aus, und klicken Sie dann auf das
entsprechende Symbol, um die Oberäche der
Einstellungen aufzurufen.
1. Display
Hier stehen 5 Optionen zur Verfügung: Beleuchtungszeit, Helligkeit, Hintergrundlicht-Modus,
Bewegungsstil, durch Fotos browsen.
Doppelklicken Sie auf die Option, um Ihre
Auswahl zu bestätigen.
a. Beleuchtungszeit
Hier stehen 6 Optionen zur Verfügung: 5 s, 10 s,
15 s, 20 s, 30 s, Immer Ein.
b. Helligkeit
Hier stehen 5 Optionen zur Verfügung: Ebene 1,
Ebene 2, Ebene 3, Ebene 4, Ebene 5.
c. Hintergrundlicht-Modus
Hier stehen 2 Optionen zur Verfügung: Komplett
dunkel, Halbdunkel.
d. Bewegungsstil
Hier stehen 5 Optionen zur Verfügung: Links Ein
Rechts Aus, Doppel-Bewegung, Oben Ein Unten
Aus, Transp, Skalieren.
e. Durch Fotos browsen
Hier stehen 4 Optionen zur Verfügung:
Aus, 5 s, 10 s, 15 s.
2. Systemeinstellungen
Hier stehen 4 Einträge zur Verfügung: FirmwareAktualisierung, Wiederherstellbar, Kalibrierung
OK, Tilt sensor.
a. Firmware-Aktualisierung
Nach einem Klick auf diese Option wird die
Firmware automatisch überprüft, und Sie werden
informiert, ob eine Aktualisierung erforderlich ist.
b. Wiederherstellbar
Klicken Sie auf diesen Eintrag, um alle
Einstellungen zurückzusetzen. Im Dialogfeld
„Wiederherstellbar?“ werden Sie zur Bestätigung
aufgefordert. Wenn Sie auf „Ja“ klicken,
werden die Standardeinstellungen ab Werk
wiederhergestellt.
c. Kalibrierung OK
Klicken zweimal auf jedes weiße „+“ auf dem
Bildschirm. Die Kalibrierung wird automatisch
durchgeführt und beendet. Anmerkung: Die
Kalibrierung wird nur bei einem normalen
Ausschalten gespeichert.

3. Zeit einstellen
Hier stehen 2 Optionen zur Verfügung: Zeit
und Datum.
a. Klicken Sie auf „Zeit“, um die Uhrzeit-
Oberäche aufzurufen. Klicken Sie auf
bzw.
(links/rechts), um die Stunden
und Minuten einzustellen. Klicken Sie zum
Speichern auf „Ja“ oder zum Abbrechen
auf „Nein“.
b. Klicken Sie auf „Datum“, um die Datums-
Oberäche aufzurufen. Klicken Sie auf
bzw.
(links/rechts), um das Jahr, den
Monat und den Tag einzustellen. Klicken Sie
zum Speichern auf „Ja“ oder zum Abbrechen
auf „Nein“.
4. Sprache
Dieser Player unterstützt mehrere Sprachen.
Doppelklicken Sie zur Bestätigung der Auswahl.
5. Systeminfos
Zeigt Produktnamen, Hauptversion-ID,
Hardware-ID, Speicherkapazität, Kapazität von
Speicherkarte usw. an.
6. Automatische Abschaltzeit
Hier stehen 6 Optionen zur Verfügung: 3
Minuten, 5 Minuten, 10 Minuten, 15 Minuten,
20 Minuten, Kein automatisches Ausschalten.
Doppelklicken Sie zur Bestätigung.
Verwendung von microSD-Karten
1. Einlegen der microSD-Karte
Schieben Sie die microSD-Karte in den Player
ein. Um die microSD-Karte zu entnehmen,
drücken Sie sie leicht ein. Sie wird dann
ausgeworfen.
2. Anschließen der microSD-Karte an einen PC
Bei eingelegter microSD-Karte werden
unter „Arbeitsplatz“ zwei Wechseldatenträger
angezeigt. Sie können den Datenträger nun wie
jeden anderen Datenträger verwenden.
3. Betrieb ohne Verbindung zu einem PC
Öffnen Sie die „Explorer“-Oberäche. Dort
können Sie zwischen „Flash-Speicher“ und
„miniSD-Karte“ wählen. Doppelklicken Sie auf
„miniSD-Karte“. Alle auf der Karte gespeicherten
Dateien werden angezeigt. Doppelklicken Sie,
um eine Wiedergabe zu beginnen.
Nederlands
De speler starten
Inschakelen: Schuif de aan/uit-knop naar
houd deze ca. 3 seconden vast om de speler
aan te zetten.
Uitschakelen: Schuif de aan/uit-knop naar
en houd deze ca. 3 seconden vast om de speler
uit te zetten. Het apparaat wordt automatisch
uitgeschakeld als de batterij leeg is.
Vergrendelen/ontgrendelen
In elke modus kan de aan/uit-knop naar
worden geschoven om de speler te vergrendelen zodat functies niet onbedoeld kunnen
worden geactiveerd.
Bedieningsinstructies:
Muziek
Kies de optie “Muziek” in het hoofdmenu; klik
vervolgens op het bijbehorende pictogram om
naar het venster Muziek te gaan.
en

Beschrijving van de functies:
In de “Afspeellijst” kunt u zoeken naar bestanden/mappen door te klikken op / ;
selecteer de nummers die u wilt afspelen door
te klikken op de bestandsnaam of .
Opties: Speelt, (doorgaan met afspelen)/Alle
muziek/Artiesten/Album/Mijn favorieten/Opname/Lijst/Vernieuw de mediabibliotheek
Opmerking: u kunt op klikken om het
gekozen item na bevestiging aan uw map met
favorieten toe te voegen.
Klik tijdens het afspelen van muziek op
om een submenu te openen; er zijn 5 opties:
a. Herhaal: Eenmaal afspelen/Eenmaal
herhalen/Alles afspelen/Alles herhalen/Intro.
b. Afspeel: Volgordeafsp/Willekeurig.
c. PlayFx: 3D/Bass/Volume Equalizer.
d. EQ kiezen: Normaal/PlayFx/Rock/Pop/
Klassiek/Bass/Jazz/EQ wijzigen.
e. EQ wijzigen: Schuif de schakelaar omhoog
en omlaag om de numerieke waarde te
wijzigen.
Klik op /
Klik op
liedje te gaan; houd deze knoppen ingedrukt om
vooruit/achteruit door het liedje te zoeken.
Klik op
het afspelen te pauzeren.
A-B opnieuw afspelen
Klik tijdens het afspelen van muziek eenmaal
op het pictogram . Op het scherm verschijnt
de letter “A-”. Bevestig dit als startpunt van het
gedeelte dat u opnieuw wilt afspelen door nogmaals op
Bevestig het eindpunt van het opnieuw af te
spelen gedeelte en de optie A-B is ingesteld.
om het volume aan te passen.
/ om naar het vorige/volgende
om af te spelen en klik op
te drukken en punt “B” verschijnt.
om
Het gedeelte van de track tussen A en B wordt
nu opnieuw afgespeeld. Klik nogmaals op het
pictogram
te annuleren.
Synchronisatie van songteksten
Wanneer een liedje wordt afgespeeld dat
in dezelfde map staat als het bijbehorende
songtekstbestand (.LRC), dan wordt de
songtekst automatisch weergegeven in het
venster Muziek. De speler ondersteunt songtekstbestanden in LRC-formaat.
Songteksten kunnen als volgt worden toegevoegd:
1. Kies een MP3- of WMA-bestand, bijvoor-
2. Download een songtekst van het internet.
3. Hernoem het songtekstbestand tot de naam
4. Kopieer beide bestanden naar dezelfde map
5. Speel het muziekbestand af. De songtekst
Video
Kies de optie “Video” in het hoofdmenu; klik
vervolgens op het bijbehorende pictogram in het
venster Video.
1. Klik op
om opnieuw afspelen van A-B
beeld “lovemusic.mp3”.
Songtekstbestanden hebben de extensie
LRC, bijvoorbeeld “lovemusic-2007.lrc”.
van het bijbehorende muziekbestand,
bijvoorbeeld “lovemusic.lrc”.
op de speler.
wordt synchroon met de muziek weergegeven op het scherm. Klik ongeveer
2 seconden op het scherm om de songtekst
te laten verdwijnen.
om de grootte van het venster
aan te passen.

2. Klik op
item te selecteren; houd de knop ingedrukt
om sneller vooruit of achteruit te spoelen.
3. Klik op
om het afspelen te pauzeren.
4. Klik op
passen.
5. Klik op
Nu kunt u stoppen om naar muziek te
luisteren. Ga terug naar de videomodus en
klik weer op
die u aan het kijken was, af te spelen.
Opmerking: u kunt op
kozen bestand na bevestiging te verwijderen.
Foto
Kies de optie “Foto” in het hoofdmenu. De map
“Flash” verschijnt op het scherm. Klik hierop om
naar het Foto-venster te gaan.
1. Klik op
te selecteren.
2. Klik op de naam van de geselecteerde foto
om deze te bekijken.
3. Klik op
4. Klik op
Opmerking: klik op
U wordt om bevestiging gevraagd voordat de
foto denitief wordt gewist.
Tekst
Kies de optie “Tekst” in het hoofdmenu. De map
“Flash” verschijnt op het scherm. Klik hierop om
naar het venster Tekst te gaan.
1. Klik op
om het vorige of volgende
/
om af te spelen; klik nogmaals
om het volume aan te
/
om het breekpunt in te stellen.
om de rest van de video
klikken om het ge-
om de vorige/volgende foto
/
om in of uit te zoomen.
/
om de foto te draaien.
/
om de foto te wissen.
om de pagina’s om te slaan.
/
2. Klik op
a. Blz. overspringen
Klik op
Klik op
te passen. Klik op “ja/nee” ter bevestiging.
b. Bladwijzer
Klik op “Bladwijzer” om een bladwijzer toe
te voegen zodat u een bepaalde locatie
gemakkelijk terug kunt vinden.
c. Bladwz afs
Klik op “Bladwz afs” en selecteer de bladwijzer;
zo komt u direct bij de bladwijzer die u hebt
opgeslagen.
d. Bladwijzer wissen
Dubbelklik op de markering die u wilt wissen.
e. Letterformaat
Er zijn 3 opties: Kleine letter, middelgrote letter,
grote letter. Kies het gewenste formaat door er
op te dubbelklikken.
f. Letterkleur
Er zijn 3 opties: groen, blauw, rood. Kies de
gewenste optie door er op te dubbelklikken.
g. Browsemodus
Er zijn 2 opties: Automodus, Handmatige
modus. Kies de gewenste optie door er op te
dubbelklikken.
h. Automatisch bladeren
Er zijn 5 opties: 10s, 15s, 20s, 25s, 30s. Kies de
gewenste optie door er op te dubbelklikken.
3. Klik op om de leesmodus te sluiten.
Opmerking: klik op om het item te wissen.
U wordt om bevestiging gevraagd voordat het
item denitief wordt gewist.
om de submenu’s weer te geven:
om de cijfers aan te passen.
/
om de numerieke waarde aan
/

FM-radio
Kies de optie “FM-radio” in het hoofdmenu
en klik op het bijbehorende pictogram om het
venster FM-radio te openen.
1. Klik op
passen.
2. Klik op
a. Handmatig zoeken: klik op “
handmatig naar zenders te zoeken.
b. Automatisch opzoeken: zenders worden
automatisch gezocht en opgeslagen.
c. Reserve modus: selecteer en luister naar uw
eerder opgeslagen radiozenders.
d. Stereo schak: dubbelklik om te wisselen
tussen stereo en mono.
a. Ontvangstbereik: dubbelklik om te wisselen
tussen China/Japan/U.S.A./Europa.
4. Klik op , en klik vervolgens op om
op te slaan. Klik op om van pagina te
veranderen.
5. Klik op de opgeslagen zender; klik vervolgens
op om het bewaarde radiostation te
wissen. U wordt om bevestiging gevraagd
voordat het item denitief wordt gewist.
6. FM opname
Klik op om naar het venster FM opname
te gaan.
a. Klik op om de opname te starten.
b. Klik op om te pauzeren en klik nogmaals
op om verder te gaan met opnemen.
c. Klik op om de opname te stoppen.
d. Klik op om de kwaliteit en het volume van
om het volume aan te
/
om de submenu’s weer te geven:
/
” om
de opname in te stellen.
7 KLik op om af te sluiten.
Opname
Kies de optie “Opname” in het hoofdmenu en
klik op het bijbehorende pictogram om het venster Opname te openen. Zie het gedeelte “FM
opname” voor meer informatie over opnemen.
Overig
Kies de optie “Overig” in het hoofdmenu en klik
op het bijbehorende pictogram om het venster
Overig te openen.
1. Stopwatch: Klik op “Start” om te starten en
klik op “Pauze” om te pauzeren (deze functie
kan ook worden geactiveerd door te klikken
op “ ”). Klik op “Wissen” om de opname te
wissen.
2. Kalender: Klik op om het cijfer aan te
passen: jaar of maand. Klik op / om de
numerieke waarde aan te passen.
3. Navigatie: Alle bestanden en mappen worden
weergegeven.
Instellingen
Kies de optie “Instellingen” in het hoofdmenu
en klik op het bijbehorende pictogram om het
venster Instellingen te openen.
1. Display
Er zijn 5 opties: verlichtingstijd, helderheid,
verlichting, beweging, fotobrowser. Dubbelklik
op de optie om uw keuze te bevestigen.
a. Verlichtingstijd
Er zijn 6 opties: 5s, 10s, 15s, 20s, 30s, altijd aan.
b. Helderheid
Er zijn 5 opties: één, twee, drie, vier, vijf.

c. Verlichting
Er zijn 2 opties: volledig donker, half donker.
d. Beweging
Er zijn 5 opties: van links naar rechts, dubbel
bewegen, van boven naar beneden, transposities, schaal.
e. Fotobrowser
Er zijn 4 opties: uit, 5 sec, 10 sec, 15 sec.
2. Systeeminstelling
Er zijn 4 opties: upgrade, herstellen, kalibratie
OK, Tilt sensor.
a. Upgrade
Zodra op Upgrade wordt geklikt, wordt de
rmware automatisch gescand en ziet u of een
upgrade nodig is.
b. Herstellen
Klik hierop om alle opties te herstellen. Het dialoogvenster “Herstellen?” verschijnt en u wordt
om bevestiging gevraagd. Als u op “Ja” klikt,
worden de standaardinstellingen hersteld.
c. Kalibratie OK
Klik tweemaal op elke witte “+” op het scherm.
De kalibratie wordt uitgevoerd en automatisch
afgesloten. Opmerking: de kalibratie kan
alleen worden opgeslagen na een normale
uitschakeling van de speler.
3. Tijd instellen
Er zijn 2 opties: tijd en datum.
a. Klik op “Tijd” om naar het venster Tijd instellen te gaan. Klik op
het uur en de minuten in te stellen. Klik op “Ja”
om op te slaan of klik op “nee” om te annuleren.
/
(links/rechts) om
b. Klik op “Datum” om naar het venster Datum
instellen te gaan. Klik op
om jaar, maand en dag in te stellen. Klik op “Ja”
om op te slaan of klik op “nee” om te annuleren.
4. Taal
Deze speler ondersteunt meerdere talen.
Dubbelklik ter bevestiging.
5. Systeeminformatie
Weergave van productnaam, hoofdversie ID,
hardware ID, lokaal geheugen, kaartgeheugen,
enz.
6. Auto uitschakeltijd
Er zijn 6 opties: 3 minuten, 5 minuten, 10
minuten, 15 minuten, 20 minuten, niet auto
uitzetten. Dubbelklik ter bevestiging.
microSD-kaart
1. De microSD-kaart plaatsen
Plaats de microSD-kaart in de speler. Druk de
microSD-kaart in de speler om de kaart weer
te verwijderen. De kaart wordt dan naar buiten
geschoven.
2. microSD-kaart met pc gebruiken
Wanneer de microSD-kaart in de pc is geplaatst,
worden 2 verwisselbare schijven weergegeven in
“mijn computer”. U kunt de kaart nu gebruiken
als elke andere verwisselbare schijf.
3. Functies wanneer er geen verbinding met
een pc is
Open het venster “Navigatie”. U kunt nu kiezen
tussen “ash geheugen” en “microSD”. Dubbelklik op “microSD”. Alle bestanden die op de
kaart staan, worden weergegeven. Dubbelklik
nogmaals om de bestanden af te spelen.
/
(links/rechts)

Française
Mise en marche du lecteur
Marche : faites glisser l’interrupteur
d’alimentation du lecteur et maintenez-le sur la
position
pendant environ 3 secondes.
Arrêt : faites glisser l’interrupteur d’alimentation
et maintenez sur la position
3 secondes. Le système s’éteindra automatiquement au déchargement de la batterie.
Verrouillage/déverrouillage
Quel que soit le mode, faites glisser
l’interrupteur d’alimentation sur la position
pour verrouiller le lecteur an d’éviter toute
erreur de manipulation.
Mode d’emploi :
Musique
Sélectionnez l’option « Musique » dans le menu
principal, puis cliquez sur l’icone correspondant
pour accéder à l’interface Musique.
Description de la fonction :
Dans la « liste de lecture », vous pouvez rechercher des chiers/répertoires en cliquant sur
/ , puis sélectionnez les chansons que vous
souhaitez écouter en cliquant sur le nom du
chier ou sur .
Options : lecture en cours (poursuivre la lecture)/
Toute la musique/Artiste/Album/Mes favoris/
Enregistrement/Liste de répertoires/Mise à jour
de la bibliothèque
Remarque : vous pouvez cliquer sur
ajouter l’élément sélectionné à votre répertoire
de favoris après conrmation.
Pendant la lecture, cliquez sur
à un sous-menu. Il existe 5 options :
pendant environ
pour accéder
pour
a. Répétition : Une seule lecture/Répéter/Tout/
Tout répéter/Intro.
b. Réglage de lecture : Dans l’ordre/Aléatoire.
c. PlayFx : 3D/BASS/Volume auto.
d. Égaliseur : Mode normal/PlayFx/Rock/Pop/
Classique/Bass/Jazz/Personnel.
e. Égaliseur personnel : Faites glisser la
boule de haut en bas pour régler la valeur
numérique.
Cliquez sur
Cliquez sur
précédente/suivante, appuyez longtemps pour
reculer/avancer dans la chanson.
Cliquez sur
interrompre la lecture.
Rediffusion A-B
Lors de la lecture, cliquez une fois sur l’icone
. La lettre « A » clignote sur l’écran. Conrmez
qu’il s’agit du point de début du segment à
répéter en cliquant de nouveau sur l’icone
puis le point « B » se met à clignoter. Conrmez
pour dénir le point de n du segment à répéter
et l’icone de relecture A-B est paramétré. La
relecture du segment entre A et B peut commencer. Cliquez à nouveau sur l’icone
annuler la relecture A-B.
Synchronisation des paroles
Lors de la lecture d’une chanson située dans
le même dossier que le chier de paroles
correspondant (. LRC), les paroles s’afcheront
automatiquement dans l’interface Mode de
musique. Le lecteur prend en charge le chier
paroles au format LRC.
Il est possible d’ajouter les paroles de la façon
suivante :
pour régler le volume.
/
/ pour passer à la chanson
pour lire et cliquez sur pour
pour

1. Sélectionnez un chier MP3 ou WMA, par
exemple « lovemusic.mp3 ».
2. Téléchargez un chier paroles depuis Internet.
Les chiers Paroles ont un nom de chier
avec une extension LRC, par exemple «
lovemusic-2007.lrc ».
3. Renommez le chier Paroles de manière à
correspondre au nom du chier musique correspondant, par exemple « lovemusic.lrc ».
4. Copiez les deux chiers dans le même
répertoire sur le lecteur.
5. Démarrez la lecture du chier audio. Les
paroles s’afcheront à l’écran en synchronisation avec la musique qui est en train d’être
lue. Cliquez sur l’écran et appuyez pendant 2
secondes, les paroles s’afcheront.
Vidéo
Sélectionnez l’option « Vidéo » dans le menu
principal, puis cliquez sur l’icone correspondant
pour accéder à l’interface Vidéo.
1. Cliquez sur
fenêtre.
2. Cliquez sur
l’élément précédent ou suivant, cliquez
longtemps pour revenir en arrière ou en avant.
3. Cliquez sur
pour interrompre la lecture.
4. Cliquez sur
5. Cliquez sur
Quittez la vidéo pour écouter de la musique.
Revenez au mode vidéo en cliquant de
nouveau sur
Remarque : Vous pouvez cliquer sur
pour supprimer le chier sélectionné après
conrmation.
pour régler la taille de la
pour sélectionner
/
pour lire, cliquez à nouveau
pour régler le volume.
/
pour régler le point de n.
pour poursuivre la lecture.
Photo
Sélectionnez l’option « Photo » dans le menu principal, le chier « Flash » s’afchera à l’écran. Cliquez
sur ce chier pour accéder à l’interface Photo.
1. Cliquez sur
l’image précédente ou suivante.
2. Cliquez sur le nom de l’image sélectionnée
pour la visualiser.
3. Cliquez sur
l’image.
4. Cliquez sur
Remarque : Cliquez sur
Vous devrez alors conrmer pour qu’elle soit
réellement supprimée.
eBook
Sélectionnez l’option « eBook » dans le menu
principal. Le chier « Flash » s’afchera à
l’écran. Cliquez sur ce chier pour accéder à
l’interface eBook.
1. Cliquez sur
pages.
2. Cliquez sur
a. Saut de page
Cliquez sur
des chiffres. Cliquez sur
valeur numérique. Cliquez sur « Oui/Non » pour
conrmer une dernière fois.
b. Marque-page
Cliquez sur « Marque-page » pour ajouter un
favori et accéder plus facilement à un emplacement spécique.
c. Chargement du signet
Cliquez sur « Chargement du signet » et sélec-
pour sélectionner
/
pour agrandir ou réduire
/
pour pivoter l’image.
/
/
/
pour supprimer.
pour faire tourner les
pour afcher les sous-menus :
pour effectuer le réglage
/
pour régler la

tionnez le marque-page, Cela vous permettra
d’être dirigé directement au favori que vous avez
enregistré.
d. Suppression d’un signet
Double-cliquez sur le signet que vous souhaiter
supprimer.
e. Police
Il existe 3 options : petite taille, taille moyenne,
grande taille. Double-cliquez pour sélectionner.
f. Couleur
Il existe 3 options : vert, bleu, rouge. Doublecliquez pour sélectionner.
g. Mode de navigation
Il existe 2 options : mode auto, mode manuel.
Double-cliquez pour sélectionner.
h. Feuilletage auto
Il existe 5 options : 10 s, 15 s, 20 s, 25 s, 30 s.
Double-cliquez pour sélectionner.
3. Cliquez sur pour quitter le mode lecture.
Remarque : Cliquez sur pour supprimer.
Vous devrez alors conrmer pour qu’il soit réellement supprimé.
Radio FM
Sélectionnez l’option « Radio FM » dans le menu
principal, puis cliquez sur l’icone correspondant
pour accéder à l’interface Radio FM.
1. Cliquez sur
2. Cliquez sur
a. Recherche manuelle : cliquez sur «
pour rechercher manuellement une station.
b. Balayage auto : le système recherchera et
sauvegardera automatiquement les stations
d’émission.
pour régler le volume.
/
pour afcher les sous-menus :
/
c. Mode programme : sélectionnez et écoutez
vos stations enregistrées précédemment.
d. Marche/arrêt stéréo : double-cliquez pour
passer du mode stéréo au mode mono.
a. Zone de réception : double-cliquez pour
sélectionner Chine/Japon/États-Unis/Europe.
4. Cliquez sur , puis cliquer sur pour
mémoriser. Cliquez sur pour faire tourner
les pages.
5. Cliquez sur la station mémorisée, puis cliquez
sur pour supprimer la station mémorisée.
Vous devrez alors conrmer sa suppression.
6. Enregistrement du son FM
Cliquez sur pour accéder à l’interface Enregistrement du son FM.
a. Cliquez sur pour commencer
l’enregistrement.
b. Cliquez sur pour interrompre
l’enregistrement et cliquez de nouveau sur
pour poursuivre l’enregistrement.
c. Cliquez sur pour arrêter l’enregistrement.
d. Cliquez sur pour régler la qualité et le
volume.
7. Cliquez sur pour quitter.
Enregistrement
Sélectionnez l’option « Enregistrement » dans
le menu principal, puis cliquez sur l’icone
»
correspondant pour accéder à l’interface
Enregistrement. Pour plus d’instructions, veuillez
consulter la partie Enregistrement du son FM.

Divers
Sélectionnez l’option « Divers » dans le menu
principal, puis cliquez sur l’icone correspondant
pour accéder à l’interface Divers.
1. Chronomètre : cliquez sur « Marche » pour
démarrer, puis cliquez sur « Pause » pour
interrompre (possibilité d’accéder à cette
fonction en cliquant sur « »). Cliquez sur «
Annuler » pour annuler l’enregistrement.
2. Calendrier : cliquez sur pour effectuer le
réglage des chiffres : année et mois. cliquez
sur / pour régler la valeur numérique.
3. Navigation : tous les chiers et répertoires
s’afcheront.
Réglages
Sélectionnez l’option « Réglages » dans le menu
principal, puis cliquez sur l’icone correspondant
pour accéder à l’interface Réglages.
1. Réglage de l’écran
Il existe 5 options : temps d’éclairage, luminosité, mode d’éclairage, style de mouvement,
navigation des photos. Double-cliquez sur
l’option pour conrmer votre choix.
a. Temps d’éclairage
Il existe 6 options : 5 s, 10 s, 15 s, 20 s, 30 s,
toujours en marche
b. Luminosité
Il existe 5 options : niveau I, niveau II, niveau III,
niveau IV, niveau V.
c. Mode d’éclairage
Il existe 2 options : écran complètement noir,
écran très sombre.
d. Style de mouvement
Il existe 5 options : Entrée à gauche et sortie
vers la droite, double mouvement, Entrée en
haut et sortie en bas, Transps, Échelle.
e. Navigation des photos
Il existe 4 options : arrêt, 5 s, 10 s, 15 s.
2. Réglage du système
Il existe 4 options : Mise à niveau, Restaurer,
Calibrage OK, Détecteur G.
a. Mise à niveau
Lorsque vous cliquez dessus, le système
analysera automatiquement le rmware et
vous informera si vous devez effectuer une
mise à jour.
b. Restaurer
Cliquez pour restaurer toutes les options. La
boîte de dialogue « Restaurer ? » s’afchera
automatiquement en vous demandant de
conrmer. Si vous cliquez sur « Oui », tout le
système sera restauré et remis en réglage usine.
c. Calibrage OK
Cliquez deux fois sur chaque « + » blanc afché
à l’écran. Le système effectuera le calibrage et
quittera automatiquement cette fonction. Remarque : le calibrage est seulement mémorisé
après un arrêt normal.
3. Réglage heure
Il existe 2 options : Réglage heure et Réglage
jour.
a. Cliquez sur « Réglage heure » pour accéder
à l’interface Réglage heure. Cliquez sur
(gauche/droite) pour régler les heures et les
minutes. Cliquez sur « Oui » pour mémoriser ou
sur « Non » pour annuler.
b. Cliquez sur « Réglage jour » pour accéder
à l’interface Réglage jour. Cliquez sur
/
/

(gauche/droite) pour régler l’année, le mois et le
jour. Cliquez sur « Oui » pour mémoriser ou sur «
Non » pour annuler.
4. Sélection de la langue
Ce lecteur existe en plusieurs langues. Doublecliquez pour conrmer.
5. Info système
Afcher le nom du produit, le n° de version principale, le n° de matériel, la taille de la mémoire
principale, la taille de la carte de mémoire, etc.
6. Temps de fermeture automatique
Il existe 6 options : 3 minutes, 5 minutes,
10 minutes, 15 minutes, 20 minutes, pas de
fermeture auto. Double-cliquez pour conrmer.
Fonctionnement de la carte microSD
1. Insérez la carte microSD.
Insérez la carte microSD dans le lecteur. Pour
retirer la carte microSD, appuyez dessus. Elle
sortira automatiquement.
2. Raccordez la carte microSD à l’ordinateur.
Après avoir inséré la carte microSD, 2
périphériques s’afcheront dans « mon PC ».
Vous pouvez maintenant utiliser ce périphérique
comme n’importe quel autre périphérique
portable.
3. Fonctionnement sans raccordement à
l’ordinateur
Accédez à l’interface « Navigation » puis
sélectionnez « Mémoire ash » ou « microSD ».
Double-cliquez sur « microSD ». Tous les chiers
mémorisés sur la carte s’afcheront. Pour
visualiser, double-cliquez une fois de plus.
Español
Encendido del reproductor
Encendido: deslice y coloque el interruptor
de encendido y apagado del reproductor en la
posición
durante aproximadamente
3 segundos para encenderlo.
Apagado: deslice y coloque el interruptor de
encendido y apagado en la posición
aproximadamente 3 segundos para apagarlo.
El sistema se apagará automáticamente cuando
la batería se agote.
Bloqueo/desbloqueo
En cualquier modo, deslice el interruptor de
encendido y apagado hasta la posición para
bloquear el reproductor para evitar un
funcionamiento no deseado.
Instrucciones de funcionamiento:
Música
Seleccione la opción “Música” en el menú
principal; a continuación haga clic en el icono
correspondiente para acceder a la interfaz Música.
Descripción de la función:
En la “Lista de reproducción” puede buscar
archivos o carpetas haciendo clic en
y, a continuación, seleccionando las canciones
que desee reproducir haciendo clic sobre el
nombre del archivo o .
Opciones: Reproducción actual (Continuar
reproducción)/Toda la música/Artista/Álbum/
Mi favorito/Grabación/Directorio/Actualizar
biblioteca de medios
Observación: puede hacer clic en
añadir el elemento elegido a su carpeta de
favoritos tras realizar la conrmación.
/
durante
para

Durante la reproducción de música, haga clic
en
para acceder a un submenú. Aparecerán
cinco opciones:
a. Modo repetir: Una vez/Repetir/Todo/Repetir
todo/Introducción.
b. Modo de reproducción: En orden/Aleatorio.
c. MSEQ: 3D/Graves/Volumen ecualizador.
d. Seleccionar Ecualizador: Normal/MSEQ/
Rock/Pop/Clásica/Graves/Jazz/Ecualizador
usuario.
e. Conguración usuario Ecualizador: deslice la
bola hacia arriba y hacia abajo para ajustar el
valor numérico.
Haga clic en
Haga clic en
terior/siguiente; mantener pulsado para explorar
hacia detrás/hacia delante por la canción.
Haga clic en
para pausar la reproducción.
Reproducción A-B
Durante la reproducción de música, haga clic
una vez en el icono . La pantalla mostrará la
letra “A-”. Conrme que este será el punto de
inicio del segmento de reproducción haciendo
clic en el icono
punto “B”. Conrme el punto nal del segmento
de reproducción y quedará jado el icono de
reproducción A-B. Comenzará la reproducción
entre los puntos A y B. Haga clic en el icono
de nuevo para cancelar la reproducción A-B.
Sincronización de archivo de letras
Cuando se reproduce una canción que se
encuentra en la misma carpeta que el archivo
de letras (.LRC) correspondiente, las letras se
mostrarán automáticamente en la interfaz del
para ajustar el volumen.
/
/ para ir a la canción an-
para reproducir, y haga clic en
otra vez, y aparecerá el
Modo música. El reproductor admite archivos
de letras en formato LRC.
Las letras pueden añadirse de la siguiente forma:
1. Seleccione un archivo MP3 o WMA, como
por ejemplo “músicaesta.mp3”.
2. Descargue un archivo de letras de Internet.
Los archivos de letras tienen la extensión de
archivo LRC, como por ejemplo “músicaesta-2007.lrc”.
3. Cambie el nombre del archivo de letras para
que coincida con el nombre del archivo de
música correspondiente, como por ejemplo
“músicaesta.lrc”.
4. Copie ambos archivos en la misma carpeta
del reproductor.
5. Inicie la reproducción del archivo de música.
Las letras se mostrarán en la pantalla
sincronizadas con la reproducción de la
música. Haga clic en la pantalla y mantenga
pulsado durante dos segundos, y las letras
desaparecerán.
Vídeo
Seleccione la opción “Vídeo” en el menú principal;
a continuación haga clic en el icono correspondiente para acceder a la interfaz Vídeo.
1. Haga clic en
la ventana.
2. Haga clic en
el elemento anterior o siguiente; haga clic y
mantenga pulsado para rebobinar o avanzar
rápidamente.
3. Haga clic en
de nuevo para pausar la reproducción.
4. Haga clic en
volumen.
para ajustar el tamaño de
para seleccionar
/
para reproducir; haga clic
para ajustar el
/

5. Haga clic en
pausa. A continuación podrá salir para
escuchar música. Cambie de nuevo al modo
de vídeo y haga clic en
seguir reproduciendo el resto del vídeo que
estaba visualizando.
Observación: Puede hacer clic en
nar el archivo elegido tras la conrmación.
Foto
Seleccione la opción “Foto” en el menú
principal; Aparecerá en la pantalla la carpeta
“Flash”. Haga clic en ella para acceder a la
interfaz de Foto.
1. Haga clic en
imagen anterior o siguiente.
2. Haga clic en la imagen seleccionada para
verla.
3. Haga clic en
4. Haga clic en
Observación: Haga clic en
Antes de eliminarla de forma denitiva, se le
pedirá que conrme.
eBook
Seleccione la opción “eBook” en el menú
principal; Aparecerá en la pantalla la carpeta
“Flash”. Haga clic en ella para acceder a la
interfaz de eBook.
1. Haga clic en
2. Haga clic en
a. Salto de página
Haga clic en
Haga clic en
para denir el punto de
para seleccionar la
/
para ampliar/alejar.
/
para girar la imagen.
/
para pasar de página.
/
para mostrar los submenús:
para ajustar los dígitos.
/
para ajustar el valor
/
de nuevo para
para elimi-
para eliminarla.
numérico. Haga clic en “Sí/No” para conrmar
de forma denitiva.
b. Favorito
Haga clic en “Favorito” para añadir un marcador
de forma que pueda encontrar una ubicación
determinada más tarde fácilmente.
c. Cargar favorito
Haga clic en “Cargar favorito” y seleccione el
favorito. De esta forma accederá directamente
al favorito que haya guardado.
d. Suprimir favorito
Haga doble clic sobre el favorito que desee
eliminar.
e. Configurar fuente
Existen tres opciones: Fuente pequeña, Fuente
mediana, Fuente grande. Haga doble clic para
seleccionar el tamaño de fuente.
f. Configurar color
Existen tres opciones: Verde, Azul, Rojo. Haga
doble clic para seleccionar el color.
g. Modo navegador
Existen dos opciones: Modo auto, Modo
manual. Haga doble clic para seleccionar la
opción.
h. Tiempo de cambio de página
Existen cinco opciones: 10 seg, 15 seg, 20 seg,
25 seg, 30 seg. Haga doble clic para seleccionar
el tiempo de cambio de página.
3. Haga clic en para salir del modo lectura.
Observación: Haga clic en para eliminar.
Antes de realizar la eliminación de forma denitiva, se le pedirá que conrme.
Radio
Seleccione la opción “Radio” en el menú
principal, y a continuación haga clic en el icono

correspondiente para acceder a la interfaz
de Radio.
1. Haga clic en
volumen.
2. Haga clic en
a. Búsqueda manual: haga clic en “ / ”
para buscar emisoras de forma manual.
b. Autobúsqueda: las emisoras se buscarán y
guardarán de forma automática.
c. Modo predeterminado: le permite selec-
cionar y escuchar las emisoras que haya
almacenado anteriormente.
d. Cambiar estéreo: haga doble clic para
cambiar entre estéreo y mono.
a. Área de recepción: haga doble clic para
cambiar entre China/Japón/EE.UU./Europa.
4. Haga clic en y, a continuación, haga clic
en para guardar. Haga clic en para
pasar de página.
5. Haga clic en una emisora guardada; a
continuación haga clic en para eliminar
la emisora guardada. Antes de eliminarla de
forma denitiva, se le pedirá que conrme.
6. Grabación FM
Haga clic en para acceder a la interfaz de
grabación de FM.
a. Haga clic en para iniciar el proceso de
grabación.
b. Haga clic en para pausarlo, y haga clic
en de nuevo para seguir grabando.
c. Haga clic en para detener el proceso de
grabación.
para ajustar el
/
para mostrar los submenús:
d. Haga clic en para denir las opciones de
calidad y de volumen.
7. Haga clic en para salir.
Grabación
Seleccione la opción “Grabación” en el menú
principal, y a continuación haga clic en el icono
correspondiente para acceder a la interfaz de
Grabación. Si desea obtener más instrucciones,
consulte Grabación FM.
Funciones adicionales
Seleccione la opción “Funciones adicionales”
en el menú principal, y a continuación haga clic
en el icono correspondiente para acceder a la
interfaz de Funciones adicionales.
1. Cronómetro: haga clic en “Inicio” para ponerlo en marcha y en “Pausa” para pausarlo
(a esta función también puede accederse
haciendo clic en “ ”). Haga clic en “Borrar”
para borrar la grabación.
2. Calendario: Haga clic en para ajustar los
dígitos: año o mes. Haga clic en /
para ajustar el valor numérico.
3. Navegador: Se mostrarán todos los archivos
y carpetas.
Configuración
Seleccione la opción “Conguración” en el
menú principal, y a continuación haga clic en el
icono correspondiente para acceder a la interfaz
de Conguración.
1. Conguración pantalla
Existen cinco opciones: Tiempo de luz, Brillo,
Modo de luz, Estilo de movimiento, Navegación

de fotografías. Haga doble clic sobre la opción
para conrmar su elección.
a. Tiempo de luz
Existen seis opciones: 5 seg, 10 seg, 15 seg,
20 seg, 30 seg, Siempre encendido.
b. Brillo
Existen cinco opciones: Uno, Dos, Tres, Cuatro,
Cinco.
c. Modo de luz
Existen dos opciones: Todo oscura, Penumbra.
d. Estilo de movimiento
Existen cinco opciones: Entrada izquierda salida
derecha, Movimiento doble, Entrada arriba
salida abajo, Transposición, Escala.
e. Navegación de fotografías
Existen cuatro opciones: Apagar, 5 seg,
10 seg, 15 seg.
2. Conguración sistema
Existen cuatro opciones: Actualización,
Restauración, Calibración OK, Sensor G.
a. Actualización
Cuando se hace clic en esta opción, se
comprueba el rmware y se le indicará si debe
realizar la actualización del mismo.
b. Restauración
Haga clic en esta opción para restaurar la
conguración original de fábrica. Aparecerá el
cuadro de diálogo “¿Restaurar?” solicitándole
su conrmación. Si hace clic en “Sí”, se restablecerá toda la conguración predeterminada
de fábrica.
c. Calibración OK
Haga clic en las signos “+” blancos de la pantalla dos veces. Se realizará la calibración y la
pantalla se cerrará automáticamente. Ob
servación: La calibración solo puede guardarse
después de realizar un apagado normal.
3. Ajuste de hora
Existen dos opciones: Fecha y Hora.
a. Haga clic en “Hora” para acceder a la interfaz
de ajuste de hora. Haga clic en
(izquierda/derecha) para denir la hora y los
minutos. Haga clic en “Sí” para guardar, o en
“No” para cancelar.
b. Haga clic en “Fecha” para acceder a la
interfaz de ajuste de fecha. Haga clic en
(izquierda/derecha) para denir el año, el mes y
el día. Haga clic en “Sí” para guardar, o en “No”
para cancelar.
4. Idioma
Este reproductor incluye varios idiomas. Haga
doble clic para conrmar.
5. Información del sistema
Muestra el nombre del producto, el Id. de
versión principal, el Id. del hardware, el tamaño
de la memoria local, el tamaño de memoria de
la tarjeta, etc.
6. Tiempo de apagado automático
Existen seis opciones: 3 minutos, 5 minutos,
10 minutos, 15 minutos, 20 minutos, No hay
apagado automático. Haga doble clic para
conrmar.
Operaciones con la tarjeta microSD
1. Introducción de la tarjeta microSD
/
/

Introduzca la tarjeta microSD en el reproductor.
Para extraer la tarjeta microSD, presiónela y
se expulsará.
2. Conexión de la tarjeta microSD con el PC
Cuando la tarjeta microSD esté introducida
aparecerán dos discos extraíbles en “Mi PC”.
Podrá utilizar el disco de la misma forma que
cualquier otro disco portátil.
3. Operaciones mientras la tarjeta no está
conectada con el PC
Acceda a la interfaz del “Navegador” y podrá
elegir entre “Memoria Flash” y “microSD”. Haga
doble clic en “microSD”. Se mostrarán todos
los archivos guardados en la tarjeta. Haga doble
clic de nuevo para reproducirlos.
Polski
Uruchamianie odtwarzacza
Włączanie: Aby włączyć odtwarzacz, przesuń
wyłącznik odtwarzacza do pozycji
przez około 3 sekundy.
Wyłączanie: Aby wyłączyć odtwarzacz, przesuń
wyłącznik odtwarzacza do pozycji
przez około 3 sekundy. Urządzenie wyłączy się
automatycznie, gdy bateria będzie wyczerpana.
Blokowanie/odblokowanie
W każdym trybie, przesuń wyłącznik do pozycji ,
aby zablokować odtwarzacz w celu zapobieżenia
niezamierzonemu działaniu.
Instrukcje dotyczące obsługi:
Muzyka
Wybierz opcję „Muzyka” w menu głównym; następnie
kliknij odpowiednią ikonę, aby przejść do interfejsu
opcji Muzyka.
i przytrzymaj
i przytrzymaj
Opis funkcji:
Opcja „Lista odtwarzania” umożliwia wyszukiwanie
plików/folderów poprzez kliknięcie
następnie wybierz utwory, które chcesz odtworzyć,
klikając ich tytuł lub .
Opcje: Odtwarzanie bieżące (Wznów odtwarzanie)/
Wszystkie muzyczne/Wykonawca/Album/Moje
ulubione/Zapis/Lista katalogów/Aktualizacja biblioteki
multimediów
Uwaga: możesz kliknąć , aby dodać wybrany element do folderu ulubionych po potwierdzeniu.
W czasie odtwarzania muzyki kliknij , aby przejść
do podmenu; dostępnych jest 5 opcji:
a. Tryb powtarzania: Jeden raz/Powtarzaj/Wszyst-
kie/Powtarzaj wszystkie/Wstęp.
b. Tryb odtwarzania: W kolejności/Losowo.
c. MSEQ: 3D/Basy/LEQ.
d. Wybierz korektor: Normalne/MSEQ/Rock/Pop/
Klasyczna/Basy/Jazz/Korektor użytkownika.
e. Konfiguracja korektora użytkownika: Przesuwaj
okrągły suwak w górę i w dół, aby ustawić wartość
numeryczną.
Kliknij
Kliknij
następnego utworu; Wciśnij i przytrzymaj, aby
rozpocząć przeszukiwanie do tyłu/do przodu w
obrębie utworu.
Kliknij , aby odtworzyć, a następnie kliknij ,
aby wstrzymać odtwarzanie.
Powtarzanie A-B
Odtwarzając muzykę, kliknij raz ikonę . Na ekranie
wyświetlona zostanie litera „A-”. Potwierdź ten punkt
jako punkt początkowy powtarzania klikając ponownie
ikonę ; wyświetlona zostanie litera „B”. Potwierdź
punkt końcowy powtarzania – ikona powtarzania A-B
, aby wyregulować poziom głośności.
/
/ , aby przejść do poprzedniego/
/
;

zostanie ustawiona. Powtarzanie między punktami
A i B zostanie rozpoczęte. Ponownie kliknij ikonę ,
aby anulować powtarzanie A-B.
Synchronizacja tekstu
W czasie odtwarzania utworu, dla którego w tym
samym katalogu znajduje się plik z tekstem (.LRC),
tekst będzie wyświetlany automatycznie w interfejsie
trybu Muzyka. Odtwarzacz obsługuje pliki z tekstem
w formacie LRC.
Tekst może zostać dodany w następujący sposób:
1. Wybierz plik MP3 lub WMA, na przykład
„lovemusic.mp3”.
2. Pobierz z Internetu plik z tekstem. Pliki z tekstem mają
rozszerzenie LRC, na przykład „lovemusic-2007.lrc”.
3. Zmień nazwę pliku z tekstem, aby była taka sama
jak odpowiadającego mu pliku muzycznego, na
przykład „lovemusic.lrc”.
4. Skopiuj oba pliki do tego samego folderu w pamięci
odtwarzacza.
5. Rozpocznij odtwarzanie pliku muzycznego. Tekst
będzie wyświetlany na ekranie w sposób zsynchronizowany z odtwarzanym utworem. Kliknij ekran i
przytrzymaj przez około 2 sekundy; Tekst przestanie
być wyświetlany.
Wideo
Wybierz opcję „Wideo” w menu głównym; następnie
kliknij odpowiednią ikonę, aby przejść do interfejsu
opcji Wideo.
1. Kliknij , aby ustawić rozmiar okna.
2. Kliknij
następny element; kliknij i przytrzymaj, aby
przewinąć do tyłu lub do przodu.
3. Kliknij , aby odtworzyć; kliknij ponownie,
aby wstrzymać odtwarzanie.
/
, aby wybrać poprzedni lub
4. Kliknij
głośności.
5. Kliknij , aby ustawić punkt przerwania. Teraz
możesz przerwać słuchanie muzyki. Przełącz z
powrotem do trybu wideo i kliknij ponownie ,
aby kontynuować odtwarzanie reszty pliku wideo.
Uwaga: klikając
potwierdzeniu.
Zdjęcia
Wybierz opcję „Zdjęcia” w menu głównym; na ekranie
wyświetlony zostanie folder „Flash”. Kliknij go, aby
przejść do interfejsu opcji Zdjęcia.
1. Kliknij
zdjęcie.
2. Kliknij nazwę wybranego zdjęcia, aby je wyświetlić.
3. Kliknij
4. Kliknij
Uwaga: kliknij , aby skasować. Przed skasowaniem
konieczne będzie potwierdzenie tego działania.
eBook
Wybierz opcję „eBook” w menu głównym; na ekranie
wyświetlony zostanie folder „Flash”. Kliknij go, aby
przejść do interfejsu opcji eBook.
1. Kliknij
2. Kliknij
a. Pomiń stronę
Kliknij
/
/
Nie”, aby potwierdzić ostatecznie.
b. Zakładka
Kliknij opcję „Zakładka”, aby dodać zakładkę; w ten
sposób ponowne odnalezienie określonego miejsca
, aby wyregulować poziom
/
możesz usunąć wybrany plik po
, aby wybrać poprzednie/następne
/
, aby przybliżyć/oddalić.
/
, aby obrócić zdjęcie.
/
, aby przewracać strony.
/
, aby wyświetlić podmenu:
, aby wybrać wartości cyfrowe. kliknij
, aby wybrać wartości liczbowe. Kliknij „Tak/

będzie łatwiejsze.
c. Pobierz znacznik
Kliknij „Pobierz znacznik”, aby wybrać zakładkę;
umożliwi to przejście bezpośrednio do miejsca
ustawienia zakładki.
d. Usuń znacznik
Kliknij dwukrotnie znacznik, który chcesz usunąć.
e. Ustaw czcionkę
Dostępne są 3 opcje: Mała czcionka, Średnia czcionka, Duża czcionka. Kliknij dwukrotnie, aby wybrać.
f. Ustaw kolor
Dostępne są 3 opcje: Zielony, Niebieski, Czerwony.
Kliknij dwukrotnie, aby wybrać.
g. Tryb przeglądarki
Dostępne są 2 opcje: Tryb automatyczny, Tryb ręczny.
Kliknij dwukrotnie, aby wybrać.
h. Czas pomijania
Dostępnych jest 5 opcji: 10 sek., 15 sek., 20 sek.,
25 sek., 30 sek.. Kliknij dwukrotnie, aby wybrać.
3. Kliknij , aby opuścić tr yb czytania.
Uwaga: kliknij , aby skasować. Przed skasowaniem
konieczne będzie potwierdzenie tego działania.
Radio
Wybierz opcję „Radio” w menu głównym; następnie
kliknij odpowiednią ikonę, aby przejść do interfejsu
opcji Radio.
1. Kliknij
głośności.
2. Kliknij , aby wyświetlić podmenu:
a. Wyszukiwanie ręczne: kliknij „ / ”, aby
rozpocząć ręczne wyszukiwanie stacji.
b. Wyszukiwanie automatyczne: stacje nadające sygnał
będą wyszukiwane i zapisywane automatycznie.
/
, aby wyregulować poziom
c. Tryb ustawienia wstępnego: wybier z i odsłuchuj
uprzednio zapisane stacje.
d. Przełącz stereo: kliknij dwukrotnie przełącznik
stereo/mono.
a. Obszar odbioru: kliknij dwukrotnie, aby przełączyć
między Chiny/Japonia/USA/Europa.
4. Kliknij , a następnie kliknij , aby zapisać.
Kliknij , aby przewracać strony.
5. Kliknij zapisaną stację; a następnie kliknij ,
aby usunąć zapisaną stację. Przed skasowaniem
konieczne będzie potwierdzenie tego działania.
6. Zapis FM
Kliknij , aby przejść do interfejsu zapisu FM.
a. Kliknij , aby rozpocząć zapis.
b. Kliknij , aby wstrzymać, a następnie ponownie
kliknij , aby kontynuować zapis.
c. Kliknij , aby zatrzymać zapis.
d. Kliknij , aby ustawić poziom jakości i głośności.
7. Kliknij , aby zakończyć.
Zapis
Wybierz opcję „Zapis” w menu głównym; następnie
kliknij odpowiednią ikonę, aby przejść do interfejsu
opcji Zapis. Szczegółowe instrukcje znajdują się w
części na temat zapisu FM.
Inne
Wybierz opcję „Inne” w menu głównym; następnie
kliknij odpowiednią ikonę, aby przejść do interfejsu
opcji Inne.
1. Stoper: Kliknij „Start”, aby rozpocząć; kliknij
„Wstrzymanie”, aby wstrzymać (dostęp do tej
funkcji można także uzyskać klikając „ ”). Kliknij
„Wyczyść”, aby usunąć zapis.

2. Kalendar z: Kliknij , aby ustawić cyfry: rok lub
miesiąc. Kliknij / , aby ustawić wartości
numeryczne.
3. Eksplorator: wyświetlone zostaną wszystkie pliki i
foldery.
Ustawienia
Wybierz opcję „Ustawienia” w menu głównym,
następnie kliknij odpowiednią ikonę, aby przejść do
interfejsu opcji Ustawienia.
1. Ustawienie wyświetlania
Dostępnych jest 5 opcji: Czas podświetlenia, Jasność,
Tryb podświetlenia, Styl przejścia, Przeglądanie zdjęć.
Kliknij dwukrotnie opcję, aby potwierdzić wybór.
a. Czas podświetlenia
Dostępnych jest 6 opcji: 5 sek., 10 sek., 15 sek.,
20 sek., 30 sek., Zawsze wł.
b. Jasność
Dostępnych jest 5 opcji: Jeden, Dwa, Trzy, Cztery, Pięć.
c. Tryb podświetlenia
Dostępne są 2 opcje: Wszystkie ciemne, Półmrok.
d. Styl przejścia
Dostępnych jest 5 opcji: Z lewej do prawej, Podwójnie,
Z góry na dół, Przenikanie, Skalowanie.
e. Przeglądanie zdjęć
Dostępne są 4 opcje: Wyłącz, 5 sek., 10 sek., 15 sek.
2. Ustawienia systemowe
Dostępne są 4 elementy: Aktualizacja, Z możliwością
przywrócenia, Kalibracja OK, Czujnik grawitacyjny.
a. Aktualizacja
Po kliknięciu oprogramowanie firmowe zostanie
automatyczne przeskanowane i wyświetlony zostanie
komunikat informujący o konieczności przeprowadzenia
ewentualnej aktualizacji.
b. Z możliwością przywrócenia
Kliknij, aby przywrócić ustawienia wszystkich opcji.
Okno dialogowe „Z możliwością przywrócenia?”
zostanie wyświetlone w celu potwierdzenia. Klikając
opcję „Tak”, wszystkie ustawienia zostaną przywrócone
do domyślnych wartości fabrycznych.
c. Kalibracja OK
Kliknij dwukrotnie każdy biały znak „+” znajdujący
się na ekranie. Kalibracja zostanie przeprowadzona i
zakończona automatycznie. Uwaga: wyniki kalibracji
mogą zostać zapisane tylko po standardowym
wyłączeniu.
3. Ustawienie godziny
Dostępne są 2 opcje: Czas i Data.
a. Kliknij opcję „Czas”, aby przejść do interfejsu
ustawień czasu. Kliknij
aby ustawić godziny i minuty. Kliknij „Tak”, aby zapisać
lub „Nie”, aby anulować.
b. Kliknij „Data”, aby przejść do interfejsu ustawień
daty. Kliknij
/
rok, miesiąc i dzień. Kliknij „Tak”, aby zapisać lub
„Nie”, aby anulować.
4. Język
Odtwarzacz obsługuje wiele języków. Kliknij dwukrotnie,
aby potwierdzić.
5. Informac je systemowe
Pokaż nazwę produktu, Identyfikator wersji głównej,
Identyfikator sprzętu, Rozmiar pamięci lokalnej, Rozmiar
karty pamięci itp.
6. Czas automat ycznego wyłączania
Dostępnych jest 6 opcji: 3 minuty, 5 minut, 10 minut,
(w lewo/w prawo),
/
(w lewo/w prawo), aby ustawić

15 minut, 20 minut, Bez wyłączania automatycznego.
Kliknij dwukrotnie, aby potwierdzić.
Obsługa karty microSD
1. Wkładanie kart y microSD
Włóż kartę microSD do odtwarzacza. Dociśnij kartę
microSD, aby ją wyjąć. Karta wysunie się z gniazda.
2. Podłączanie kart y microSD do komputera
Po podłączeniu karty microSD, 2 dyski przenośne
zostaną pokazane w oknie eksploratora „Mój
komputer”. Można z nich korzystać tak jak z każdego
innego dysku przenośnego.
3. Działania bez podłączenia do komputera
Przejdź do interfejsu „Eksplorator” – dostępne są dwie
opcje „Pamięć flash” i „Karta TF”. Kliknij dwukrotnie
„Karta TF”. Wyświetlone zostaną pliki zapisane na
karcie. Ponownie kliknij dwukrotnie, aby odtwarzać.
Český
Spuštění přehrávače
Zapnutí: Přehrávač zapnete přesunutím vypínacího
tlačítka přehrávače na polohu
po dobu přibližně 3 sekund.
Vypnutí: Přehrávač vypnete přesunutím vypínacího
tlačítka přehrávače na polohu
po dobu přibližně 3 sekund. Pokud je baterie vybita,
systém se automaticky vypne.
Zamknutí/odemknutí
V jakémkoli režimu zamkněte přehrávač přetažením
vypínacího tlačítka na polohu , aby se předešlo
náhodnému provozu.
Návod k obsluze:
Hudba
V hlavní nabídce zvolte možnost „Hudba“; poté kliknutím na odpovídající ikonu vstupte do rozhraní
a jeho přidržením
a jeho přidržením
Hudba.
Popis funkcí:
V „Seznamu přehrávání“ můžete vyhledávat soubory
nebo složky kliknutím na
vybírat skladby, které si přejete přehrát, kliknutím
na název souboru nebo na .
Možnosti: Aktuální přehrávání (Pokračovat v
přehrávání)/ Veškerá hudba/Umělec/Album/
Mé oblíbené/Nahrávání/Seznam adresáře disku/
Aktualizace knihovny médií
Poznámka: kliknutím na
přidat zvolenou položku do složky oblíbených.
V průběhu přehrávání hudby kliknutím na
vstupte do podnabídky; k dispozici je 5 možností:
a. Režim opakování: Jednou/Opakovat/Vše/Opako-
vat vše/Pouze začátek.
b. Režim přehrávání: Za sebou/Náhodně.
c. MSEQ: 3D/Basy/LEQ.
d. Výb. EKV: Standardní/MSEQ/Rock/Pop/Klasická
hudba/Basy/Jazz/ Ekvalizér uživatele.
e. Uživatelské nastavení ekvalizéru: Rolováním
kuličkou nahoru a dolů upravte číselné hodnoty.
Kliknutím na
/
Kliknutím na
/
další skladbu; stisknutím a přidržením projíždíte
skladbou vpřed/zpět.
Kliknutím na
na
Opakování A-B
V průběhu přehrávání hudby klikněte jednou na
ikonu . Na obrazovce se zobrazí písmeno „A-“.
Potvrďte tento úsek jako počáteční bod opakování
opětovným kliknutím na ikonu , poté se zobrazí
bod „B“. Po potvrzení koncového bodu úseku opakování se nastaví ikona opakování A-B. Nyní se spustí
opakování mezi body A a B. Opětovným kliknutím
na ikonu
spustíte přehrávání, kliknutím
přehrávání pozastavíte.
zrušíte opakování A-B.
; poté můžete
/
je možné po potvrzení
upravíte hlasitost.
přeskočíte na předchozí/

Synchronizace textu
Přehrává-li se soubor, který je umístěn ve stejné
složce jako odpovídající soubor s textem (.LRC),
text se automaticky zobrazí v rozhraní režimu
Hudba. Přehrávač podporuje soubory s texty ve
formátu LRC.
Texty je možné přidat následujícím způsobem:
1. Zvolte MP3 nebo WMA soubor, například „lovemusic.mp3“.
2. Stáhněte si z internetu soubor s textem.
Soubory s textem jsou zakončeny příponou LRC,
například „lovemusic-2007.lrc“.
3. Přejmenujte soubor s textem tak, aby název
hudebního souboru odpovídal názvu
odpovídajícího hudebního souboru, například
„lovemusic.lrc“.
4. Kopírování dvou souborů do stejné složky na
přehrávači.
5. Spuštění přehrávání hudebního souboru. Text
se zobrazí v průběhu přehrávání na obrazovce
synchronizovaně s hudbou. Klikněte na obrazovku a přidržte ji po dobu 2 sekund; text zmizí
Video
Zvolte možnost „Video“ v hlavní nabídce; poté
kliknutím na odpovídající ikonu vstupte do rozhraní
Videa.
1. Kliknutím na
2. Kliknutím na /
další položku; kliknutím a přidržením přetáčíte
rychle vpřed.
3. Kliknutím na
opětovným kliknutím pozastavíte přehrávání.
4. Kliknutím na
5. Kliknutím na
Poté je možné opustit tuto volbu a pokračovat
upravte velikost okna.
zvolte předchozí nebo
spustíte přehrávání;
upravíte hlasitost.
/
nastavíte bod zastavení.
v přehrávání. Přepněte zpět na režim videa a
opětovným kliknutím na
přehrávání zbývající části videa.
Poznámka: Kliknutím na
odstranit zvolený soubor.
Fotograe
Zvolte možnost „Fotograe“ v hlavní nabídce. Na
obrazovce se zobrazí složka „Flash“. Kliknutím na
tuto složku vstoupíte do rozhraní Fotograe.
1. Kliknutím na
2. Prohlédněte si snímek kliknutím na jeho název.
3. Kliknutím na
4. Kliknutím na
Poznámka: Kliknutím
Před vymazáním snímku budete vyzváni k potvrzení
Vašeho rozhodnutí.
Elektronická kniha
Zvolte možnost „Elektronická kniha“ v hlavní nabídce. Na obrazovce se zobrazí složka „Flash“. Kliknutím
na knihu vstoupíte do rozhraní Elektronické knihy.
1. Kliknutím na
2. Kliknutím na
a. Přeskočit stranu
Kliknutím na
na
potvrzení provedete po kliknutí na „ano/ne“.
b. Záložka
Kliknutím na „Záložka“ přidáte záložku. Ta Vám
usnadní najít jednodušeji již shlédnuté pasáže.
c. Nahrát záložku
Klikněte na „Nahrát záložku“ a zvolte záložku; budete
/
další snímek.
/
/
/
/
upravíte číselnou hodnotu. Konečné
/
pokračujte v
je možné po potvrzení
zvolte předchozí nebo
náhled přiblížíte či oddálíte.
snímek otočíte.
provedete odstranění.
otočíte stránku.
zobrazíte podnabídky:
upravíte čísla. Kliknutím

přesměrování přímo na uloženou záložku.
d. Odstranit záložku
Klikněte dvakrát na záložku, kterou si přejete
odstranit.
e. Nastavit písmo
K dispozici jsou 3 možnosti: Malé písmo, Střední
písmo, Velké písmo. Dvojím kliknutím zvolte
možnost.
f. Nastavit barvu
K dispozici jsou 3 možnosti: Zelená, Modrá, Červená.
Dvojím kliknutím zvolte možnost.
g. Režim prohlížeče
K dispozici jsou 2 možnosti: Automatický režim,
Ruční režim. Dvojím kliknutím zvolte možnost.
h. Čas otočení stránky
K dispozici je 5 možností: 10 s, 15 s, 20 s, 25 s, 30 s.
Dvojím kliknutím zvolte možnost
3. Kliknutím na opustíte režim čtení.
Poznámka: Kliknutím provedete odstranění.
Před vymazáním snímku budete vyzváni k potvrzení
Vašeho rozhodnutí.
Rádio
Zvolte možnost „Rádio“ v hlavní nabídce, poté
kliknutím na odpovídající ikonu vstupte do rozhraní
Rádia.
1. Kliknutím na
2. Kliknutím na
a. Ruční hledání: kliknutím na „ / “ vyhledáte
stanice ručně.
b. Automatické hledání: Rozhlasové stanice se
vyhledají a uloží automaticky.
c. Přednastavený režim: Zvolte a poslouchejte
dříve uložené stanice.
upravíte hlasitost.
/
zobrazíte podnabídky:
d. Přepínání sterea: Dvojím kliknutím přepínáte
mezi stereofonním a monofonním zvukem.
a. Oblast příjmu: Dvojím kliknutím přepínáte mezi
Čínou/Japonskem/USA/Evropou.
4. Klikněte , poté kliknutím na proveďte
uložení. Kliknutím na otáčíte strany.
5. Klikněte na uloženou stanici; poté kliknutím na
odstraňte uložené stanice. Před vymazáním
snímku budete vyzváni k potvrzení Vašeho
rozhodnutí.
6. Nahrávání FM
Kliknutím na vstupte do rozhraní Nahrávání FM.
a. Kliknutím na spustíte nahrávání.
b. Kliknutím na nahrávání pozastavíte,
opětovným kliknutím na pokračujete v
přehrávání.
c. Kliknutím na zastavíte nahrávání.
d. Kliknutím na nastavíte kvalitu a hlasitost.
7. Kliknutím na opustíte nahrávání.
Nahrávání
Zvolte možnost „Nahrávání“ v hlavní nabídce, poté
kliknutím na odpovídající ikonu vstupte do rozhraní
Nahrávání. Další pokyny naleznete v Nahrávání FM.
Další
Zvolte možnost „Další“ v hlavní nabídce, poté
kliknutím na odpovídající ikonu vstupte do rozhraní
Další.
1. Stopky: Kliknutím na „Start“ stopky spustíte,
kliknutím na „Pozastavit“ stopky pozastavíte
(tuto funkci lze provést také kliknutím na „ “).
Kliknutím na „Vymazat“ vymažete nahrávání.
2. Kalendář: Kliknutím na upravíte čísla: rok

a měsíc. Kliknutím na / upravíte číselné
hodnoty.
3. Explorer: Zobrazí se všechny soubory a složky.
Nastavení
Zvolte možnost „Nastavení“ v hlavní nabídce, poté
kliknutím na odpovídající ikonu vstupte do režimu
Nastavení.
1. Nastavení displeje
K dispozici je 5 možností: Doba osvětlení, Jas, Režim
osvětlení, Styl pohybu, Prohlížeč fotograí. Dvojím
kliknutím na možnost potvrdíte výběr.
a. Doba osvětlení
K dispozici je 6 možností: 5 s, 10 s, 15 s, 20 s, 30 s,
Vždy zapnuto.
b. Jas
K dispozici je 5 možností: Jeden, Dva, Tři, Čtyři, Pět.
c. Režim osvětlení
K dispozici jsou 2 možnosti: Vše tmavé, Polostín.
d. Styl pohybu
K dispozici je 5 možností: Levá dovnitř Pravá ven,
Dvojí pohyb, Nahoru dovnitř Dolů ven, Přesun,
Potažení.
e. Prohlížeč fotograí
K dispozici jsou 4 možnosti: Vypnout, 5 s, 10 s, 15 s.
2. Systémová nastavení
K dispozici jsou 4 položky: Aktualizovat, Obnovit,
Kalibrace OK, Gravitační senzor.
a. Aktualizovat
Po kliknutí se automaticky prohledá rmware, v
případě, že je třeba provést aktualizaci, budete o
tom vyrozuměni.
b. Obnovit
Kliknutím obnovíte všechny možnosti. Zobrazí se
dialogové okno „Obnovit?“ pro potvrzení. Pokud
kliknete na „ano“, vše se obnoví do výchozích
továrních nastavení.
c. Kalibrace OK
Na obrazovce dvakrát klikněte na každé bílé
znaménko „+“. Provede se kalibrace a automaticky
opustí rozhraní. Poznámka: Kalibraci je možné uložit
pouze po standardním vypnutí.
3. Nastavení času
K dispozici jsou 2 možnosti: Čas a Datum.
a. Kliknutím na „Čas“ vstoupíte do rozhraní nastavení
času. Kliknutím na
tavíte hodiny a minuty. Kliknutím na „ano“ nastavení
uložíte, kliknutím na „ne“ nastavení zrušíte.
b. Kliknutím na „Datum“ vstoupáte do rozhraní
nastavení data. Kliknutím na
doprava) nastavíte rok, měsíc a den. Kliknutím na
„ano“ nastavení uložíte, kliknutím na „ne“ nastavení
zrušíte.
4. Jazyk
Tento přehrávač podporuje více jazyků. Dvojím
kliknutím výběr potvrdíte.
5. Systémové informace
Zobrazí se název výrobku, hlavní ID verze, ID hardwaru, velikost lokální paměti, velikost paměťové
karty atd.
6. Čas automatického vypnutí
K dispozici je 6 možností: 3 minuty, 5 minut,
10 minut, 15 minut, 20 minut, Nevypínat
automaticky. Dvojím kliknutím potvrdíte výběr.
/
(doleva/doprava) nas-
(doleva/
/

Činnost microSD karty
1. Vložení microSD karty
Vložte microSD kartu do přehrávače. MicroSD
kartu vyjmete tak, že jí zamáčknete dovnitř. Karta
poté vyskočí.
2. Připojení microSD karty k počítači
Po vložení microSD karty se v „Můj počítač“ zobrazí
2 vyjímatelné disky. Tento disk můžete používat
stejným způsobem jako ostatní disky.
3. Činnosti, které jsou k dispozici, pokud není
připojení k počítači
Vstupte do rozhraní „Explorer“, poté zvolte možnost
„Paměť Flash“ nebo „M icroSD“. Dvakrát klik něte na
„MicroSD“. Zobrazí se všechny soubory uložené na
kartě. Opětovným kliknutím spustíte přehrávání.

facebook.com/yarvik
twitter.com/yarvikce
forum.yarvik.com
YARVIK.COM
 Loading...