

Page 1
Operator’s Manual
High Pressure Washer
Model 3000C
IMPORTANT:
READ SAFETY RULES AND INSTRUCTIONS CAREFULLY
CUB CADET P.O. BO X 368023 CLEVELAND, OHIO 44136-9722 [www.cubcadet.com]
FORM NO. 770-10451
(9/00)
Page 2

CONTENTS
Overview ......................................................................3
Safe Operation Practices .............................................3
Assembly Instructions ..................................................5
Operating Instructions ..................................................7
Using the Accessories .................................................9
Working with Detergents ..............................................10
Shut Down and Clean-Up ............................................11
Taking a Break .............................................................11
Winterizing and Long-Term Storage ............................12
Cleaning Tips ...............................................................12
Optional Cleaning Accessories ....................................13
Troubleshooting ...........................................................14
Warranty ......................................................................16
2
Page 3
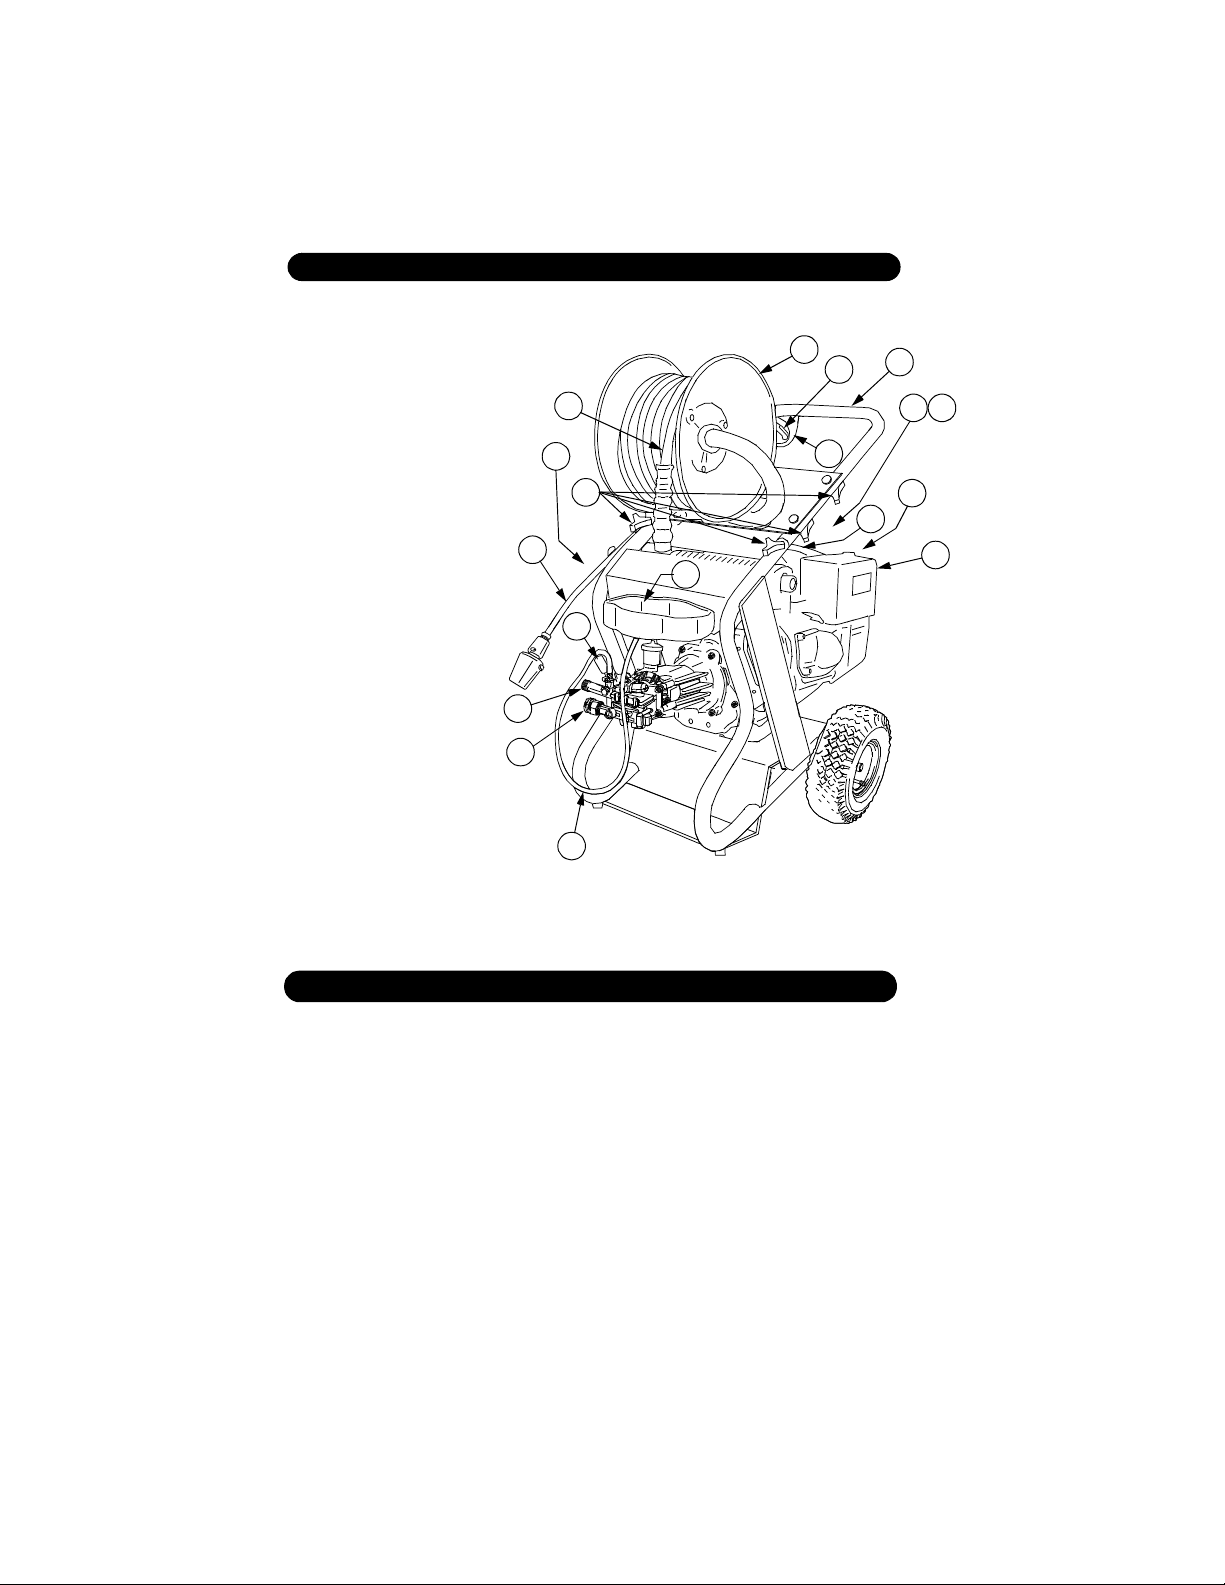
MODEL 2500C OVERVIEW
Specifications
Engine
Water volu me
Operating pressure
Item Description
Water inlet
1.
Detergent tray w/screw
2.
Knob Assembly (six)
3.
Oil fill cap (not seen)
4.
High pressure hose
5.
Detergent suction tube
6.
w/filter
Handle
7.
Hose Reel Ass’y.
8.
Trigger gun safety lock
9.
Trigger gun
10.
Pull start (not seen)
11.
Gas tank
12.
Throttle (not seen)
13.
Choke (not seen)
14.
Wand w/adjustable
15.
spray nozzle
16.
High pressure outlet
17.
Engine Air Cleaner
18.
Pressure Control
10.0 HP Kohler Command
3.0 GPM
3000 PSI
16
8
9
5
4
10
3
7
14
13
11
12
15
17
2
18
1
6
SAFE OPERATION PRACTICES — NEVER!
Never point nozz le at people or animals.
Never drink alcohol or use drugs while operating this equipment.
Never spray electrical connections, electrical outlets or fixtures.
Never add fuel with the engine running or operate where fuel has been spilled.
Never touch hot surfaces or allow accessories to contact hot surfaces.
Never operate in an enclosed space, exhaust fumes are dangerous.
Never operate near utilities with open flames.
Never operate without the water tu rned on and never use hot water.
3
Page 4

SAFE OPERATION PRACTICES – Read First!
Safety Warnings
When using this product basic precautions
should always be followed:
• Read all the instructions before using the
product.
• FIRE HAZARD! Do not add fuel with the
engine running. Do not operate if fuel
has been spilled. Instead move the
machine to a different location and avoid
creating sparks.
• Operate and fuel machine in a well
ventilated area, free of devices featuring
an open pilot or flame such as boilers,
water heaters, etc.
• High pressure jets can be dangerous if
subject to misuse. The jet must not be
directed at persons, animals, electrical
devices or the machine itself.
• Wear safety goggles.
• Do not use acids, solvents, or any other
flammable material in this product.
These products can cause physical
injuries to the operator and irreversible
damage to the machine. If you have
further questions regarding the use of
recommended cleaning detergent,
please call your Cub Cadet dealer.
• The machine has hot surfaces which can
cause burns. Operate the unit in a safe
environment and away from children.
• Do not allow the high pressure hose to
come into contact with the muffler guard.
• Do not leave the machine running
unattended.
• Learn how to stop the machine and
release pressure quickly. Be thoroughly
familiar with the controls.
• Stay alert — watch what you are doing.
• Do not operate the product when
fatigued or under the influence of alcohol
or drugs.
• Do not stand on unstable surfaces.
Stand with both feet balanced at all
times.
• The Gun Safety Lock PREVENTS the
trigger from accidentally being engaged.
This safety feature DOES NOT lock the
trigger in the on position.
Water Supply
(Cold Water Only)
• Water hose must be at least 3/4 inch in
diameter.
• Flow rate of water supply must not fall
below 2.5 GPM (gallons per minute).
• Flow rate can be determined by running
the water for one minute into an empty
5-gallon container.
• The water supply temperature must not
exceed 104°F/40°C.
• Never use the pressure washer to draw
in water contaminated with solvents, e.g.
paint thinners, gasoline, oil, etc.
• Always prevent debris from being drawn
into the unit by using a clean water
source.
We strongly recommend that this high
pressure washer not be left running for
periods of 5 minutes or longer without
the trigger gun being engaged.
This high pressure washer is equipped
with thermal protection to extend the
life of your pressure washer. The
thermal protector will automatically
activate at a predetermined
temperature ejecting hot water before
resetting. This ensures that the pump
does not become damaged.
Caution
• Follow the maintenance instructions
specified in the manual.
• This machine has been designed
for use with cleaning detergent
supplied or recommended by the
manufacturer. The use of other
cleaning detergents may affect the
operation of the machine and void
the warranty.
4
Page 5
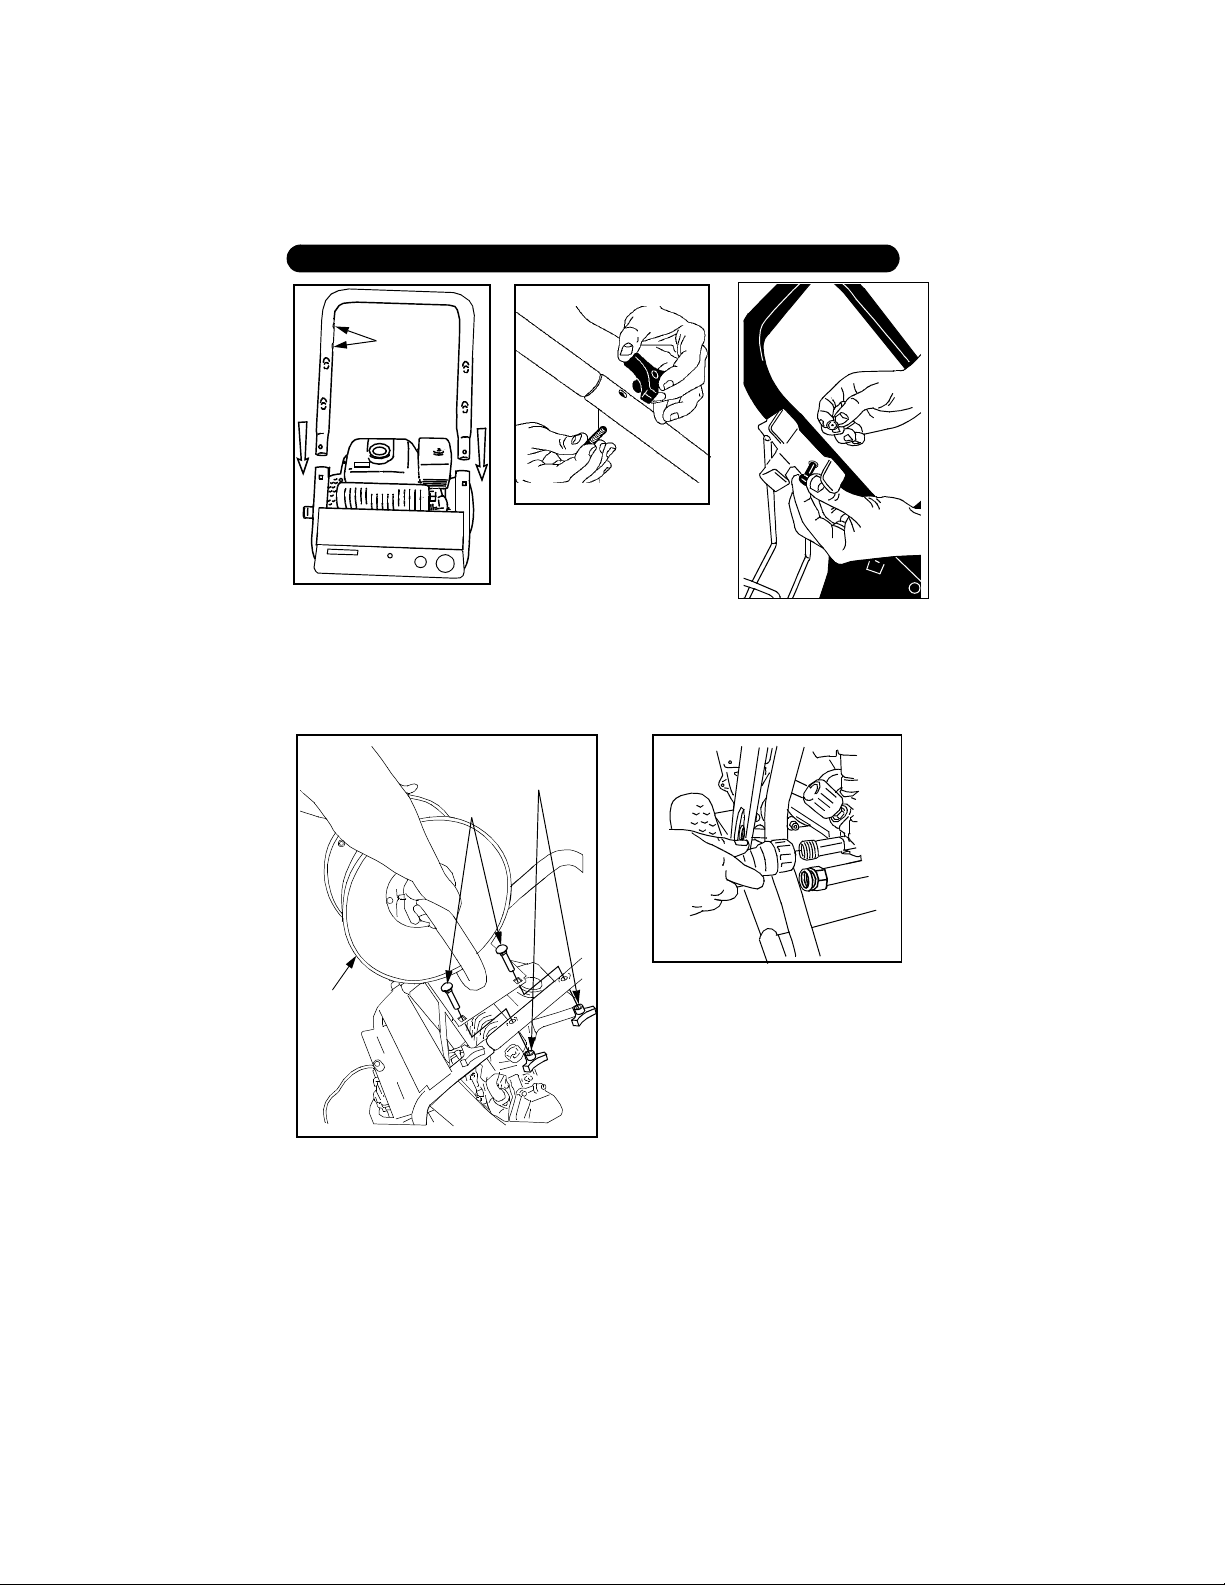
ASSEMBLY INSTRUCTIONS
Side
Holes
Step2 Align holes, insert
bolt from bottom and
tighten with knob from the
top (both sides).
Step1
rear of the unit (engine
end), position the handle so
that the side holes are to
the right. Slide the handle
into the frame.
Standing at the
Carriage
Bolts
Wing
Nuts
Step3 Position the hose
& gun holder to align with
the holes in the right side of
the handle and fasten with
two screws and nuts.
Hose
Reel
Ass’y.
Step4 Route the hose of the reel ass’y.
through the center of the handle and
position the reel ass’y. to align with the four
holes in the handle. Insert the four carriage
bolts and securt with the wing nut knobs.
Step5 Connect the hose from the reel
ass’y. to the high pressure outlet.
Step6 Follow the graphic instructions
provided with the hose reel ass’y., to
complete the following assembly steps:
• Install the Reel Ass’y. Handle
• Connect the High Pressure Hose to the
fitting of the Reel Ass’y.
• Secure the High Pressurt Hose to the
Reel Ass’y.
5
Page 6

M
E
H
C
M
E
H
C
Step4 Attach the touch-less nozzle to
the spray wand.
Step5 Attach the spray wand to the
trigger gun.
Step6 Attach the high pressure hose to
the trigger gun.
6
Page 7

OPERATING INSTRUCTIONS
Important ! Do not r un the engine w ith a hi gh or low oil lev el as th is can cau se
engine damage. If you have further questions regarding the engine, please
refer to the engine’s operating manual included with the unit.
oil
level
Step2 Fill gas tank with
Step1 Check oil level. Oil
level should be to the point
of overflow on the oil filler
neck. Be sure the machine
is level when checking the
oil level. (Refer to the
engine’s operating manual
for seasonal grades.)
unleaded gasoline.
Step5 Connect garden hose to the cold
water source and turn water on.
Step3 Connect garden
hose to unit’s water inlet.
Step6 Trigger the gun to eliminate
trapped air. Wait for a steady flow of water
to emerge from the spray nozzle.
7
Page 8

OPERATING INSTRUCTIONS - continued
Choke Lever
Fuel
Valve
On
Step7
fuel shut-off valve to the
“ON” position.
Turn the engine
Step8 Move the choke
lever to the “CLOSED”
position (warm engine,
leave the choke lever in the
“OPEN” position.
Throttle
Control
Step9 Place the throttle
control midway between
the “SLOW” and “FAST”
positions.
Step10 Turn the engine
On/Off switch to the “On”
position.
Step11 Pull the starter handle. If the engine
fails to start after 3 pulls squeeze the trigger
gun to release pressure, and repeat step 11.
Step12 Adjust pressure control to
desired setting.
8
Page 9

USING THE ACCESSORIES
The touch-less nozzle is positioned in either the high pressure cleaning, or low pressure
chemical, setting by turning the nozzle tip.
High Pressure Cleaning
Turn the nozzle tip to align the high pressure icons with the nozzle collar notch. The spray
pattern is determined by the position of the nozzle’s internal v alve. To deter mine the s pray
pattern, point the gun in a safe direction and momentarily depress the trigger while
observing the spray pattern. To change the spray pattern, rotate the gun barrel/ spray
wand approximately 60° to 90° to either the left o r right and retest f or spray pattern. I f the
spray pattern has not changed, return the gun barrel / wand to the original position; then
rotate 60° to 90° in the opposite direction and retest. This should give you the alternate
spray pattern. Once the valve position is set and the gun trigger is depressed, the
spray pattern will be maintained regardless of the position of the gun barrel/spray wand.
High pressure
fan spray
High pressure
pecil jet
Fan Spray
Pencil Jet
The pencil jet spray (0°) should be used for
stubborn dirt
The high pressure fan spray (25°) should be
used for cleaning over a large surf ace area .
Collar Notch
Low Pressure Detergent Cleaning
Turn the nozzle tip to align the low pressure chemical icon with the nozzle collar notch.
Low pressure detergent
application “CHEM” position
The low pressure chemical setting is used
for the application of approved detergents.
C
H
E
M
Rotating Spray Nozzle
This nozzle features a 0° pencil jet which rotates 360° for max imum dirt cutting action,
effectively increasing cleaning performance up to 50%. This nozzle combines the cleaning
performance of a 0° pencil jet with the surface coverage of a wide angle nozzle. Not
recommended for soft materials, siding, painted surfaces, decks or autos.
WARNING: TO AVOID SERIOUS INJURY, NEVER POINT SPRAY
NOZZLE AT YOURSELF, OTHER PERSONS OR ANIMALS
9
Page 10

WORKING WITH DETERGENT
Detergents can only be applied in the “low” setting.
M
E
H
C
Suction
Tube
Step1 To apply deter-
gents the touch-less nozzle
must be set to the low pressure “CHEM” position.
Step2 Connect the suc-
tion tube to the fitting on the
pump
Step3 Slid e the detergent
tray into the frame slot.
Secure the tray to the frame
by fastening the screw.
Step4 Fill a container with Cub Cadet
detergent and place the container in the
detergent tray. Place the filter end of
detergent suction tube into the container.
Be sure to adjust the filter by turning it to
the desired detergent intake.
For best results see Cleaning Tips on
pages 12 & 13 for specific information
on how to clean different surfaces.
Always Use Cub Cadet Detergents for
Best Results.
Cub Cadet biodegradable detergents are
specially formulated to protect the environment and your pressure washer. The
special formulas will not clog the suction
tube filter and will protect the internal parts
of the pressure washer for a longer life. For
Cub Cadet Detergents, check your local
Cub Cadet dealer. If you need help locating a dealer in your area, contact the
Customer Dealer Referral Line by calling:
1-877-835-7841
Step5 With the engine running, pull
trigger to operate unit: Liquid detergent is
drawn into the unit and mixed with water.
Apply detergent to work area. Do not allow
detergent to dry on surface.
One gallon container of the following Cub
Cadet detergents are available:
• Vehicle Wash Part No. KR-9103501
• Deck Wash Part No. KR-9103502
• Degreaser Part No. KR-9103503
• All Purpose Part No. KR-9103504
Cleaner
Caution
Never use:
• Bleach, Chlorine products and other
corrosive chemicals
• Liquids containing solvents (i.e., paint
thinners, gasoline, oils)
• Tri-sodium phosphate products
• Ammonia products
• Acid-based products
These chemicals will harm the unit and
will damage the surface being cleaned.
10
Page 11

SHUTTING DOWN & CLEAN-UP
Step2 Move the
Remove det-
Step1
ergent suction tube
from container and
insert into one gallon
of fresh water. Siphon
water at low pressure
for one minute.
trottle control leve r to
the “SLOW” position
and allow engine to
idle 30-60 seconds.
Turn the engine on/
off switch to the
“OFF” position.
Step3 Turn the
engine fuel shut-off
valve to the “OFF”
position
Step4 Turn off the
water source.
Step5 Press trig-
ger to release water
pressure.
Step6 Disconnect
the high pressure
hose from the high
pressure outlet.
Step7 Disconnect
the garden hose
from the water inlet
on the unit.
TAKING A BREAK... five minutes or more
Step1
trottle control lever to
the “SLOW” position
and allow engine to
idle 30-60 seconds.
Turn the engine on/
off switch to the
“OFF” position.
Move the
Step2 Turn the
engine fuel shut-off
valve to the “OFF”
position
Step3 Press trig-
ger to release water
pressure.
11
Step8 Engage the
gun safety lock.
Step4 Engage the
gun safety lock.
Page 12

WINTERIZING AND LONG-TERM STORAGE
1. Disconnect all water connections.
2. Start the machine for a few seconds,
until the water which had remained in
the pump exits. Turn off immediately.
3. Drain the gas and oil from the engine.
4. Do not allow high pressure hose to
become kinked.
5. Store the machine and accessories in
a room which does not reach freezing
temperatures. The machine should
not be placed near an open flame i.e.
furnace, hot water heater etc.
Caution: Failure to follow the above
directions will result in damage to the pump
assembly and accessories.
CLEANING TIPS
Deck Cleaning
(with or without detergent)
Pre-rinse deck and surrounding area with
fresh water. If using Cub Cadet Deck
Wash, place detergent suction tube directly
into cleaning solution and apply to surface
at low pressure. For best results, limit your
work area to smaller sections of
approximately 25 square feet. Allow Cub
Cadet Deck Wash to remain on surface 1-3
minutes. Do not allow detergent to dry on
surface. Rinse at high pressure in a long
sweeping motion keeping the spray noz zle
approximately 6 inches from the cleaning
surface. Always clean from top to bottom
and from left to right. When moving on to a
new section of the cleaning surface, be
sure to overlap the previous section to
eliminate stop marks and ensure a more
even cleaning result.
Caution: Do not use rotating nozzle spray
wand on wood surface as it may cause
damage.
House Siding
(with or without detergent)
Pre-rinse cleaning surface with fresh water.
If using Cub Cadet All Purpose Cleaner,
place detergent suction tube directly into
cleaning solution and apply to surface at
low pressure (for best results, limit your
work area to sections of approximately 6
feet and always apply detergent from
bottom to top). Allow Cub Cadet All
Purpose Cleaner to remain on surface 1-3
minutes. Do not allow detergent to dry on
surface, if surface appears to be drying,
simply wet down surface with fresh water.
Rinse at high pressure from top to bottom
in an even sweeping motion keeping the
spray nozzle approximately 6 inches from
the cleaning surface.
Caution: Do not use rotating nozzle spray
wand on siding as it may cause damage.
Cement Patios,
Brick and Stone
(with or without detergent)
Pre-rinse cleaning surface with fresh water.
If using Cub Cadet All Purpose Cleaner,
place detergent suction tube directly into
cleaning solution and apply to surface at
low pressure. For best results, limit your
work area to smaller sections of
approximately 25 square feet. Allow Cub
Cadet All Purpose Cleaner to remain on
surface 1-3 minutes. Do not allow
detergent to dry on surface. Rinse at high
pressure in a sweeping motion keeping the
spray nozzle approximately 3-6 inches from
the cleaning surface. Always clean from top
to bottom and from left to right.
For removing extremely stubborn stains,
use the Cub Cadet Rotating Nozzle Spray
Wand.
Cars, Boats & Motorcycles
(with or without detergent)
Pre-rinse vehicle with fresh water. If using
Cub Cadet Vehicle Wash, place detergent
suction tube directly into cleaning solution
and apply to surface at low pressure. For
best results, clean one side of vehicle at a
time and always apply detergent from
bottom to top, do not allow detergent to dry
on surface. Rinse at high pressure in a
sweeping motion keeping the spray nozzle
approximately 8 inches from the cleaning
surface (distance should increase when
rinsing pin-striping or other sensitive
surfaces). Always clean from top to bottom
and from left to right. For best results, wipe
surface dry with a chamois or soft dry cloth.
Caution: Do not use rotating nozzle spray
wand on vehicles as it may cause damage.
12
Page 13

CLEANING TIPS - c ontinued
Barbecue Grills, Outdoor
Power Equipment &
Gardening Tools
(with or without detergent)
Pre-rinse cleaning surface with fresh
water. If using Cub Cadet All Purpose
Cleaner or Degreaser, place detergent
suction tube directly into cleaning
solution and apply detergent at low
pressure. Allow Cub Cadet detergent to
remain on surface 1-3 minutes. Do not
allow detergent to dry on surface. Rinse
at high pressure keeping the spray
nozzle approximately 6 inches from the
cleaning surfa ce. For remov ing extremely
stubborn dirt, it may be necessary to
move the spray nozzle even c loser to the
surface for greate r dirt cutting action. To
remove caked on mud from garbage
cans, lawn mower blades, wheel barrels
or other non-sensitive metal surfaces,
you may want to use the Cub Cadet
Rotating Nozzle Spray Wand.
Caution: Do not use rotating nozzle spray
wand on cloth, plastic or other sensitive
surfaces as it may cause damage.
Patio & Lawn Furniture
(with or without detergent)
Pre-rinse furniture and surrounding area
with fresh water. If using Cub Cadet All
Purpose Cleaner, place detergent suction
tube directly into cleaning solution and
apply to surface at low pressure. Allow Cub
Cadet All Purpose Cleaner to remain on
surface 1-3 minutes. Do not allow
detergent to dry on surface. Rinse at high
pressure in a sweeping motion keeping the
spray nozzle approximately 6 inches from
the cleaning surface. For best results,
clean from top to bottom and from left to
right. Caution: Do not use rotating nozzle
spray wand on patio or lawn furniture as it
may cause damage.
Recommendations
• Before cleaning any surface an
inconspicuous area should be cleaned to
test spray pattern and distance for
maximum cleaning results.
• If painted surfaces are pealing or
chipping, use extreme caution as
pressure washer may remove the loose
paint from the surface.
Use extreme caution when cleaning decks,
siding, and other sensitive surfaces as the
pencil jet may cause damage if not used
correctly.
OPTIONAL CLEANING ACCESSORIES
To further enhance your cleaning capabilities, optional cleaning accessories are available
from your local Cub Cadet dealer:
• Rotating Nozzle - Pro Part No. KR-9103403
• 30 Ft. Extension Hose - Pro Part No. KR-9103007
• Hose Reel/Steel - Pro Part No. KR-9103054
• Water Filter - Pro Part No. KR-9103151
If you need help locating a dealer in your area, contact the Customer Dealer Referral Line
by calling:
1-877-835-7841
13
Page 14

TROUBLESHOOTING
Symptom Cause Solution
Engine will not start
For additional engine
problems refer to the
engine owners
manual.
No gasoline. Fill gas tank.
Low oil level. Add oil.
Choke is not in correct
position.
Engine throttle is not in
correct position.
Pressure built up in the
high pressure washer.
The fuel valve not in the
right position.
The engine switch is not in
the correct position
Slide choke lever to “CHOKE”
position.
Position th e th r o ttle to “FAST”.
Squeeze the trigger to release the
pressure.
Turn the fuel valve “ON”.
Turn the engine switch “ON”.
Unit does not reach
high pressure.
Output pressure
varies high and low.
Diameter of garden hose is
too small.
Water supply is restricted. Check garden hose for kinks, leaks
Not eno u g h inlet water s u ppl y Open water source full force.
Water inlet filter is clogged. Remove filter and rinse out in warm
Spray nozzle is in low pressure “CHEM” position.
Not enough i nlet wa ter suppl y. Turn water on full force. Check garden
Pump is sucking air . Check that hoses and fittings are air
Water inlet filter is clogged. Remove filter and rinse out in warm
Discharge nozzle is
obstructed.
Calcified gun, hose or
spray wand.
Replace with a 3/4 inch garden
hose.
and blockage.
water.
Turn spray nozzle tip to high
pressure position.
hose for kinks, leaks or blockage.
tight. Turn off machine and purge
pump by squeezing trigger gun until
a steady flow of water emerges
through the nozzle.
water.
Blow out or remove debris with a
fine needle.
Run distilled vinegar through
detergent suction tube.
14
Page 15

TROUBLESHOOTING - continued
Symptom Cause Solution
No detergent. Detergent suction tube not
Garden hose
connection leaks.
Touch-less nozzle or
Spray wand leaks.
Pump is noisy. Pump is sucking air. Check that hoses and fittings are air
Water leaks from
pump (up to 10 drops
per minute is
permissible).
Oil Drip. Oil seals are damaged or
properly connected to the
machine.
Detergent is too thick. Dilute detergent, for best results
The filter is closed. Open the filter by turning it to the
Filter on detergent suction
tube is clogged.
Damaged or clogged
detergent suction tube.
Spray nozzle is in high
pressure position.
Discharge nozzle is
obstructed.
Loose fittings. Tighten fittings.
Missing/worn rubber
washer.
Nozzle or spray wand not
properly attached.
Broken o-ring or plastic
insert.
Loose fittings. Check that all fittings are tight.
Thermal protection device
has been activated.
Water seals are damaged
or worn.
worn.
Check connection.
use Cub Cadet detergent.
desired detergent intake.
Run warm water through filter to
remove debris.
Remove obstruction or replace
detergent suction tube.
Turn spray nozzle tip to low
pressure position.
Blow out or remove debris with a
fine needle.
Insert new washer.
Tighten connections.
Contact your local Cub Cadet
dealer.
tight. Turn off machine and purge
pump by squeezing trigger gun until
a steady flow of water emerges
through the nozzle.
Thermal protection device will
automatically reset.
Contact your local Cub Cadet
dealer.
Contact your local Cub Cadet
dealer.
• If you encounter any additional difficulties not listed, please contact your local Cub
Cadet dealer.
15
Page 16

MANUFACTURER’S LIMITED WARRANTY
for COMMERCIAL PRESSURE WASHERS
(COMMERCIAL LINE)
The limited warranty set forth below is given by CUB CADET COMMERCIAL with respect to
new merchandise purchased and use d in th e Unit ed States, its posse ssio ns and ter ritori es.
CUB CADET COMMERCIAL warrants this product against defects in material and
workmanship for a period of two (2) years
original purchase and will, at its option, repair or replace
defective in material or workmanship. This limited warranty shall only apply if this product has
been operated and maintained in accordance with the Operator’s Manual furnished with the
product, and has not been subject to misuse, abuse, neglect, accident, improper mai nt enance,
improper storage or handling, freezing, use of improper chemicals, alterations, vandalism,
theft, fire, water, or damage because of other peril or natural disaster. Damage resulting from
the installation or use of any accesso ry or attachment not approved by Cub Cadet for use wit h
the product(s) covered by this manual will void your warranty as to any resulting damages.
The following parts and accessories are subject to separate terms as follows: Limited
Warranty: 90-day free replacement for defects in materials and/or workmanship on hoses,
hose reels, spray wands, brushes, no zzles and/ or simil ar approved accessor ies.
HOW TO OBTAIN SERVICE: Warranty service is available, WITH PROOF OF
PURCHASE, THROUGH YOUR LOCAL AUTHORIZED CUB CADET or CUB CADET
COMMERCIAL DEALER. To locate the dealer in your area, please check for a listing in
the Yellow Pages or contact CUB CADET by calling 877-835-7841 or writing to PO BOX
368023, Cleveland, Ohio 44136-9723.
This limited warranty does not provide coverage in the following cases:
(a) Routine maintenance items such as lubricants, filters, tune-ups, or adjustments.
(b) Equipment setup, normal wear parts or components.
(c) CUB CADET COMMERCIAL doe s not extend any warranty for products sold or
exported outside of the United States, its possessions, and territories.
No implied warranty, including any implied warranty of merchantability or fitness for a
particular purpose, applies after the applicable period of express written warranty above.
No other express warranty or guaranty, whether written or oral, except as mentioned
above, given by any person or entity, including the dealer with respect to any product
shall bind CUB CADET COMMERCIAL. During the period of the Wa rranty, the exclusive
remedy is repair or replacement of the p roduct as set forth above. (Some states do not
allow limitations on how long an implied warranty lasts, so the above may not apply to you.)
The provisions as set forth in this Warranty provide th e sole and exclusive remedy
arising for the sale. CUB CADET COMMERCIAL shall not be liable for incidental or
consequential loss or damages including, without limitation to, any claim for loss of
profits, loss of savings or revenue, loss of the use of the equipment or any
associated equipment, facilities or service, downtime, the claims or costs of third
parties including customers, and injury to property, and further including expenses
incurred for substitute or replacement property care services, for transportation or
for related expenses, or for rental expenses to temporarily replace a warranted
product. (Some states do not allow the exclusion or limitation of incidental or
consequential damages, so the above exclusion may not apply to you.)
In no event shall recovery of any kind be greater than the amount of the purchase price of
the product sold. Alteration of the safety features of the product shall void this warranty.
You assume the risk and liability for loss, damage, or injury to you and your property and/
or to others and their property arising out of use or misuse or inability to use this product.
This limited warranty shall not extend to anyone other than the original purchaser or original lessee,
or the person for whom it was purchased as a gift.
HOW STATE LAW RELATES to this WARRANTY: This limited warranty gives you
specific legal rights, and you may also have other rights which vary from state to state.
for commercial users, commencing on the date of
, free of charge, any part found to be
 Loading...