

Page 1

Safety • Assembly • Operation • Maintenance • Troubleshooting • Engine • Parts Lists • Warranty
A O A AL
YaRD-MaN
22-inch Rotary Mower- Model 26M
READ SAFETY RULES AND iNSTRUCTiONS CAREFULLY BEFORE OPERATION
Warning: Thisunit isequippedwithaninternalcombustionengineandshouldnot beusedon or nearany unimprovedforest-covered,brush-
coveredor grass-coveredlandunlesstheengine'sexhaustsystemisequippedwithasparkarrestermeetingapplicablelocalorstatelaws(if any).
If a sparkarresterisused,it shouldbemaintainedineffectiveworkingorderbythe operator.IntheStateofCaliforniatheaboveisrequiredbylaw
(Section4442ofthe CaliforniaPublicResourcesCode).Otherstatesmayhavesimilarlaws.Federallawsapplyonfederallands.Asparkarrester
forthe mufflerisavailablethroughyournearestengineauthorizedservicedealeror contacttheservicedepartment,RO.Box361131Cleveland,
Ohio44136-0019.
PRINTEDIN U.S.A.
MTD LLC, P.O. BOX 361131 CLEVELAND, OHiO 44136-0019
iMPORTANT
FORMNO.769-02298A
2/28/2006
Page 2
This Operator's Manual is an important part of your new lawn mower, it will help you assemble,
prepare and maintain the unit for best performance. Please read and understand what it says.
Table of Contents
Slope Gauge ....................................................... 3
Safe Operation Practices ................................... 4
Setup and Adjustment ....................................... 6
Operating Your Lawn Mower .............................. 8
Maintaining Your Lawn Mower ......................... 10
Trouble Shooting .............................................. 12
Off-Season Storage and Safety Labels .......... 13
Finding and Recording Model Number
BEFOREYOUBEGINASSEMBLINGYOURNEW
EQUIPMENT,pleaselocatethe modelplateonthe
equipmentand copythe informationtothe sample
modelplateprovidedtothe right.Youcanlocatethe
modelplateby standingat the operatingpositionand
lookingdownatthe rearofthe deck.This information
willbe necessaryto usethe manufacturer'sweb
site,to obtainassistancefromthe CustomerSup-
port Department,orwhencontactingan authorized
servicedealer.
Engine Appendix .............................................. 14
Engine Safe Operation Practices ................. 14
Operating Your Engine .................................. 16
Maintaining Your Engine ............................... 18
Parts List ........................................................... 22
Warranty ............................................ Back Cover
YaRD-MaN
www.yardman.com 330-220-4683
P. O. BOX 361131
CLEVELAND,OH 44136
800-800-731 0
J
Customer Support
Please do/VOTreturn the unit to the retailer from which it was purchased, without first
contacting Customer Support.
If you havedifficultyassemblingthis productor haveany questionsregardingthecontrols, operation,or maintenanceof this
unit,youcan seek helpfrom the experts. Choosefrom the optionsbelow:
• Visit us on the web atwww.yardman.corn
• Call a CustomerSupport Representativeat1=800=800=7310.
2
Page 3
O
o
1=
o
>:.
(13
O3
(13
(13
O-
O
O
(--
O5
E
O
(13
(13
o3
(13
O-
O
o3
(13
E
(]3
(13
o
(13
C5
('5
O3
O5
(13
t"b
(13
O9
o5
(13
O-
O
O3
-5
O3
O
O
E
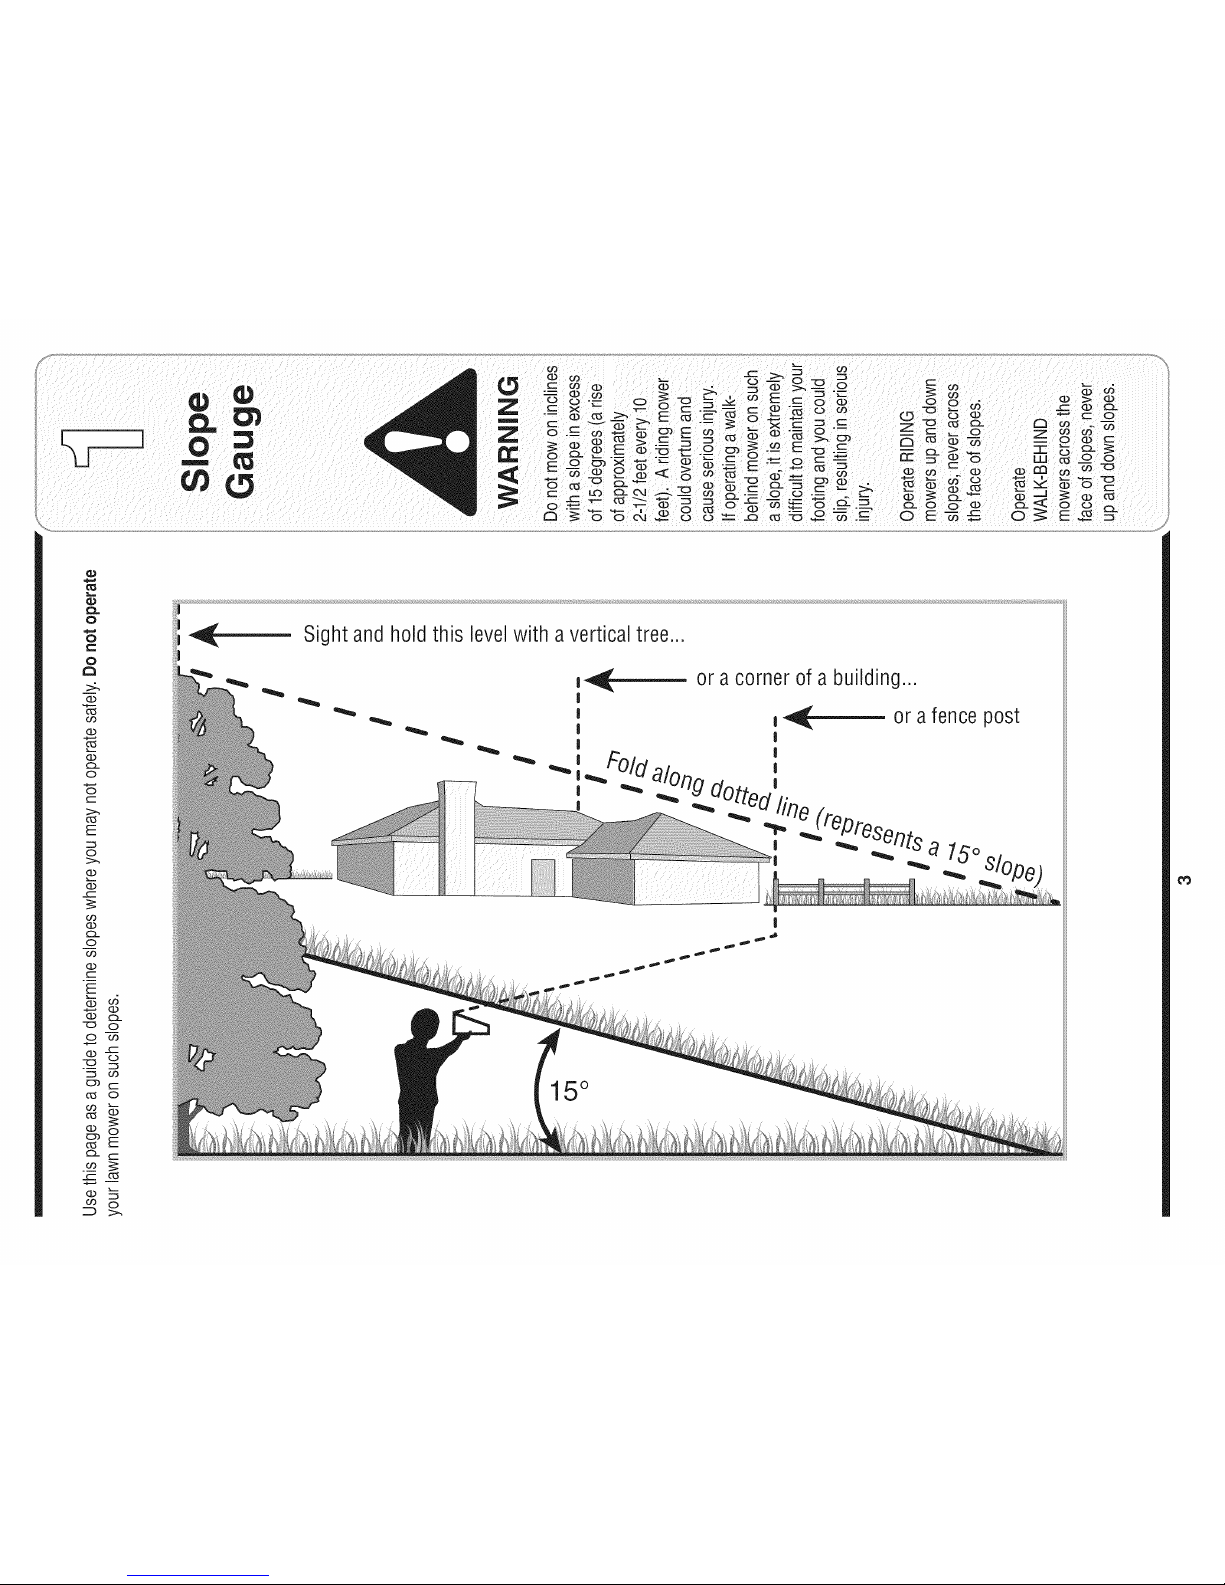
Sightandhold this levelwith averticaltree...
also
I
15°
Page 4
WARNING: EngineExhaust,some of its constituents, andcertain vehiclecompo-
nentscontain or emit chemicals knownto Stateof Californiato cause cancer and
birth defects or other reproductiveharm.
DANGER: This machinewas built to beoperatedaccordingto the rulesfor safe operationin this
manual.As with any type of powerequipment,carelessnessor error onthe part ofthe operatorcan
result in seriousinjury.This machine is capable of amputatinghands andfeet andthrowingobjects.
Failureto observethe followingsafety instructionscould resultin serious injuryor death.
RNING
This symbol points
out important safety
instructionswhich, if
notfollowed, could
endangerthe personal
i safety and/or property
ofyourselfandothers.
Readand follow all
instructionsinthis man-
ualbeforeattempting to
operatethis machine.
Failureto complywith
these instructionsmay
resultin personalinjury.
i When youseethis
symbol.
HEED iTS WARNING
Your
i Flesponsibility
I Restrictthe use
i of this power machine
to personswho read.
understand
and followthewarnings
and instructions
in this manual
andon the machine.
Children
Tragicaccidentscanoccurifoperatorisnotalertto presence
ofchildren.Childrenare oftenattractedtomowerand mowing
activity.Theydo notunderstandthe dangers.Neverassume
thatchildrenwill remainwhereyoulastsawthem.
1. Keepchildrenoutof the mowingareaand underwatchful
careof a responsibleadultotherthanthe operator.
2. Bealert andturnmoweroffif achildentersthearea.
3. Beforeandwhilemovingbackwards,lookbehindanddown
forsmallchildren.
4. Useextremecare whenapproachingblind corners,
doorways,shrubs,trees,or otherobjectsthatmayobscure
yourvisionofa childwhomayrunintothe mower.
5. Keepchildrenawayfromhotor runningengines.Theycan
sufferburnsfroma hotmuffler.
6. Neverallowchildrenunder14yearsoldto operatea power
mower.Children14yearsoldandovershouldreadand
understandoperationinstructionsandsafetyrulesinthis
manualandshouldbetrainedandsupervisedbya parent.
General Operation
1. Readthis operator'smanualcarefullyin its entiretybefore
attemptingtoassemblethismachine.Read,understand,
andfollowall instructionsonthe machineandin the
manual(s)beforeoperation.Becompletelyfamiliarwith
thecontrolsandthe properuseof this machinebefore
operatingit.Keepthis manualin asafeplaceforfuture
andregularreferenceandfororderingreplacementparts.
2. Thismachineisa precisionpieceof powerequipment,
nota plaything.Therefore,exerciseextremecautionat all
times.Yourunithas beendesignedto performonejob: to
mowgrass.Do notuseit for anyotherpurpose.
3. Neverallow childrenunder14yearsoldto operatethis
machine.Children14yearsoldandovershouldreadand
understandthe instructionsinthis manualandshould
betrainedandsupervisedbya parent.Onlyresponsible
individualswhoarefamiliarwiththese rulesof safe
operationshouldbeallowedto usethis machine.
4. Thoroughlyinspectthe areawherethe equipmentisto
beused.Removeall stones,sticks,wire,bones,toysand
otherforeignobjectswhichcouldbetripped overor picked
upandthrownbythe blade.Thrownobjectscancause
seriouspersonalinjury.Planyourmowingpatternto avoid
dischargeof materialtowardroads,sidewalks,bystanders
andthe like.Also,avoiddischargingmaterialagainsta
wallorobstructionwhichmaycausedischargedmaterial
toricochetbacktowardtheoperator.
5. Tohelpavoidbladecontactora thrownobjectinjury,
stayinoperatorzone behindhandlesandkeepchildren,
bystanders,helpers,and petsat least75feet frommower
whileit is inoperation.Stop machineifanyoneenters
area.
6. Alwayswearsafetyglassesor safetygogglesduringopera-
tionandwhileperforminganadjustmentor repairtoprotect
youreyes.Thrownobjectswhich ricochetcancauseserious
injurytothe eyes.
7. Wearsturdy,rough-soledworkshoesandclose-fitting
slacksandshirts. Shirtsandpantsthatcoverthe armsand
legsandsteel-toedshoesare recommended.Neveroperate
thismachinein barefeet,sandals, slipperyor lightweight
(e.g.canvas)shoes.
8. Do notputhandsorfeet nearrotatingpartsor undercutting
deck.Contactwithbladecan amputatehandsandfeet.
9. A missingor damageddischargecovercancause blade
contactor thrownobject injuries.
10.Manyinjuriesoccuras a resultofthe mowerbeing pulled
overthefoot duringafall causedby slippingortripping.
Do notholdontothe mowerifyouarefalling;releasethe
handleimmediately.
11.Neverpullthe mowerbacktowardyouwhileyouare
walking.Ifyoumustbackthe mowerawayfromawallor
obstructionfirstlookdownand behindtoavoidtrippingand
thenfollowthesesteps:
a. Stepbackfrommowertofully extendyourarms.
b. Besureyouare wellbalancedwithsurefooting.
c. Pullthe mowerbackslowly,no morethanhalfway
towardyou.
d. Repeatthesestepsas needed.
12.Donotoperatethe mowerwhileunderthe influenceof
alcoholordrugs.
13.Donotengage theself-propelledmechanismon unitsso
equippedwhilestartingengine.
14.Thebladecontrolhandleis asafetydevice.Neverattempt
tobypassitsoperation.Doingso makesthesafetydevice
inoperativeandmayresult inpersonalinjurythrough
contactwiththe rotatingblade.Thebladecontrolhandle
mustoperateeasily in bothdirectionsandautomatically
returntothe disengagedpositionwhenreleased.
15.Neveroperatethe mowerinwetgrass.Alwaysbesureof
yourfooting. A slipand fallcancauseseriouspersonal
injury.If youfeelyouare losingyourfooting,releasethe
bladecontrolhandleimmediatelyandthe bladewillstop
rotatingwithinthreeseconds.
16.Mowonlyin daylightor goodartificiallight.Walk,neverrun.
17.Stopthe bladewhencrossinggraveldrives,walksor roads.
18.Iftheequipmentshouldstartto vibrateabnormally,stopthe
engineandcheckimmediatelyfor the cause.Vibrationis
generallya warningoftrouble.
19.Shutthe engineoff andwait untilthe bladecomesto a
completestopbeforeremovingthe grasscatcheror unclog-
gingthechute.
Thecuttingbladecontinuesto rotatefora fewseconds
4
Page 5
after theengineisshutoff. Neverplaceanypart ofthe body
inthebladearea untilyouare surethe bladehasstopped
rotating.
20. Neveroperatemowerwithoutpropertrailshield,discharge
cover,grasscatcher,bladecontrolhandle,or othersafety
protectivedevicesin placeandworking.Neveroperate
mowerwithdamagedsafetydevices.Failuretodo socan
resultin personalinjury.
21. Mufflerandenginebecomehotandcan causeaburn.Do
nottouch.
22.Onlyuseparts andaccessoriesmadefor thismachineby
manufacturer.Failuretodo socanresult inpersonalinjury.
23. Ifsituationsoccurwhicharenotcoveredinthis manual,
usecareand goodjudgment.Contactyourdealerfor
assistance.Telephone1-800-800-7310for the nameofyour
nearestdealer.
Slope Operation
Slopesare amajorfactorrelatedto slipandfallaccidentswhich
can resultinsevereinjury.Operationonslopesrequiresextra
caution.Ifyoufeeluneasyon aslope,donotmowit.Foryour
safety,usetheslopegaugeincludedaspartofthis manualto
measureslopesbeforeoperatingthisunitona slopedor hilly
area.Iftheslopeisgreaterthan15degrees,donotmowit.
Do:
1. Mowacrossthe faceofslopes; neverup anddown.
Exerciseextremecautionwhenchangingdirectionon
slopes.
2. Watchfor holes,ruts,rocks, hiddenobjects,or bumpswhich
can causeyouto slipor trip. Tallgrasscanhideobstacles.
3. Alwaysbesureof yourfooting.A slip andfall cancause
seriouspersonalinjury.If youfeelyouarelosingyour
balance,releasethebladecontrolhandleimmediately,and
the bladewill stoprotatingwithin 3seconds.
Do Not:
1. Donot mowneardrop-offs,ditchesorembankments,where
you couldloseyour footingorbalance.
2. Donot mowslopesgreaterthan 15degreesasshownon
the slopegauge.
3. Donot mowon wetgrass.Unstablefootingcouldcause
slipping.
Service
Safe HandlingOf Gasoline:
1. To avoidpersonalinjuryorpropertydamageuseextreme
care inhandlinggasoline.Gasolineisextremelyflammable
andthevaporsare explosive.Seriouspersonalinjurycan
occurwhengasolineis spilledonyourselforyourclothes
whichcanignite.
2. Wash yourskin andchangeclothesimmediately.
3. Useonly anapprovedgasolinecontainer.
4. Neverfillcontainersinsidea vehicleoron atruckor trailer
bedwitha plasticliner.Alwaysplacecontainersonthe
groundawayfromyourvehiclebeforefilling.
5. Removegas-poweredequipmentfromthetruck ortrailer
andrefuelit on theground.If thisis notpossible,thenrefuel
suchequipmentonatrailerwitha portablecontainer,rather
thanfroma gasolinedispensernozzle.
6. Keepthe nozzlein contactwiththe rimof thefueltank or
containeropeningat alltimesuntilfuelingis complete.Do
notuseanozzlelock-opendevice.
7. Extinguishallcigarettes,cigars,pipesand othersources
of ignition.
8. Neverfuelmachineindoorsbecauseflammablevaporswill
accumulatein thearea.
9. Neverremovegascap oradd fuelwhileengineishot or
running. Allowengineto coolatleasttwominutesbefore
refueling.
10.Neveroverfillfueltank. Filltankto nomorethan Y2inch
belowbottomoffiller neckto provideforfuelexpansion.
11.Replacegasolinecapandtightensecurely.
12.Ifgasolineis spilled,wipeitoff theengineand equipment.
Moveunitto anotherarea.Wait5 minutesbeforestarting
engine.
13.Neverstorethe machineorfuel containernearanopen
flame,sparkor pilot lightas onawater heater,space
heater,furnace,clothesdryer,orothergas appliances.
14.Toreducefire hazard,keepmowerfreeofgrass, leaves,
orotherdebrisbuild-up.Cleanupoil orfuelspillageand
removeanyfuel soakeddebris.
15.Allowamowerto coolat least5 minutesbeforestoring.
GeneralService:
1. Neverrunanengineindoorsorin apoorlyventilatedarea.
Engineexhaustcontainscarbonmonoxide,anodorlessand
deadlygas.
2. Beforecleaning,repairing,orinspecting,makecertainthe
bladeandall movingpartshavestopped.Disconnectthe
sparkplugwireandgroundagainsttheengineto prevent
unintendedstarting.
3. Checkthebladeandenginemountingboltsatfrequent
intervalsfor propertightness.Also,visuallyinspectbladefor
damage(e.g.,bent,cracked,worn)Replacebladewiththe
originalequipmentmanufacture's(O.E.M.)bladeonly,listed
inthismanual."Useof partswhichdo notmeetthe original
equipmentspecificationsmayleadto improperperformance
andcompromisesafety!"
4. Mowerbladesaresharpandcancut.Wrapthebladeor wear
gloves,anduseextracautionwhenservicingthem.
5. Keepallnuts,bolts,andscrewstightto besurethe equip-
mentis insafeworkingcondition.
6. Nevertamperwithsafetydevices.Checktheirproperopera-
tionregularly.
7. Afterstrikingaforeignobject,stopthe engine,discon-
nectthesparkplugwireandgroundagainsttheengine.
Thoroughlyinspectthemowerforanydamage.Repairthe
damagebeforestartingandoperatingthemower.
8. Neverattempttomakeawheelorcuttingheightadjustment
whiletheengineis running.
9. Grasscatchercomponents,dischargecover,andtrail
shieldaresubjecttowear anddamagewhichcould expose
movingpartsor allowobjectsto bethrown.Forsafety
protection,frequentlycheckcomponentsandreplaceim-
mediatelywithoriginal equipmentmanufacturer's(O.E.M.)
partsonly,listedinthis manual."Useof partswhich do
notmeetthe originalequipmentspecificationsmayleadto
improperperformanceandcompromisesafety!"
10.Donotchangetheenginegovernorsettingor overspeedthe
engine.Thegovernorcontrolsthe maximumsafeoperating
speedoftheengine.
11.Maintainorreplacesafetylabels,asnecessary.
12.Observeproperdisposallawsand regulations.Improper
disposaloffluidsand materialscanharmtheenvironment.
WARNING
Thissymbol points
out importantsafety
instructionswhich, if
notfollowed,could
endangerthe personal
safety and/or property
ofyourself andothers.
Readand followall
instructions inthisman-
ual before attemptingto
operatethis machine.
Failureto comply with
these instructionsmay
result in personalinjury.
Whenyousee this
symbol.
HEED iTS WARNING
Your
Responsibility
Restrictthe use
ofthis powermachine
to personswho read.
understand
and followthe warnings
and instructions
inthis manual
and on the machine.
5
Page 6
T_:_ X
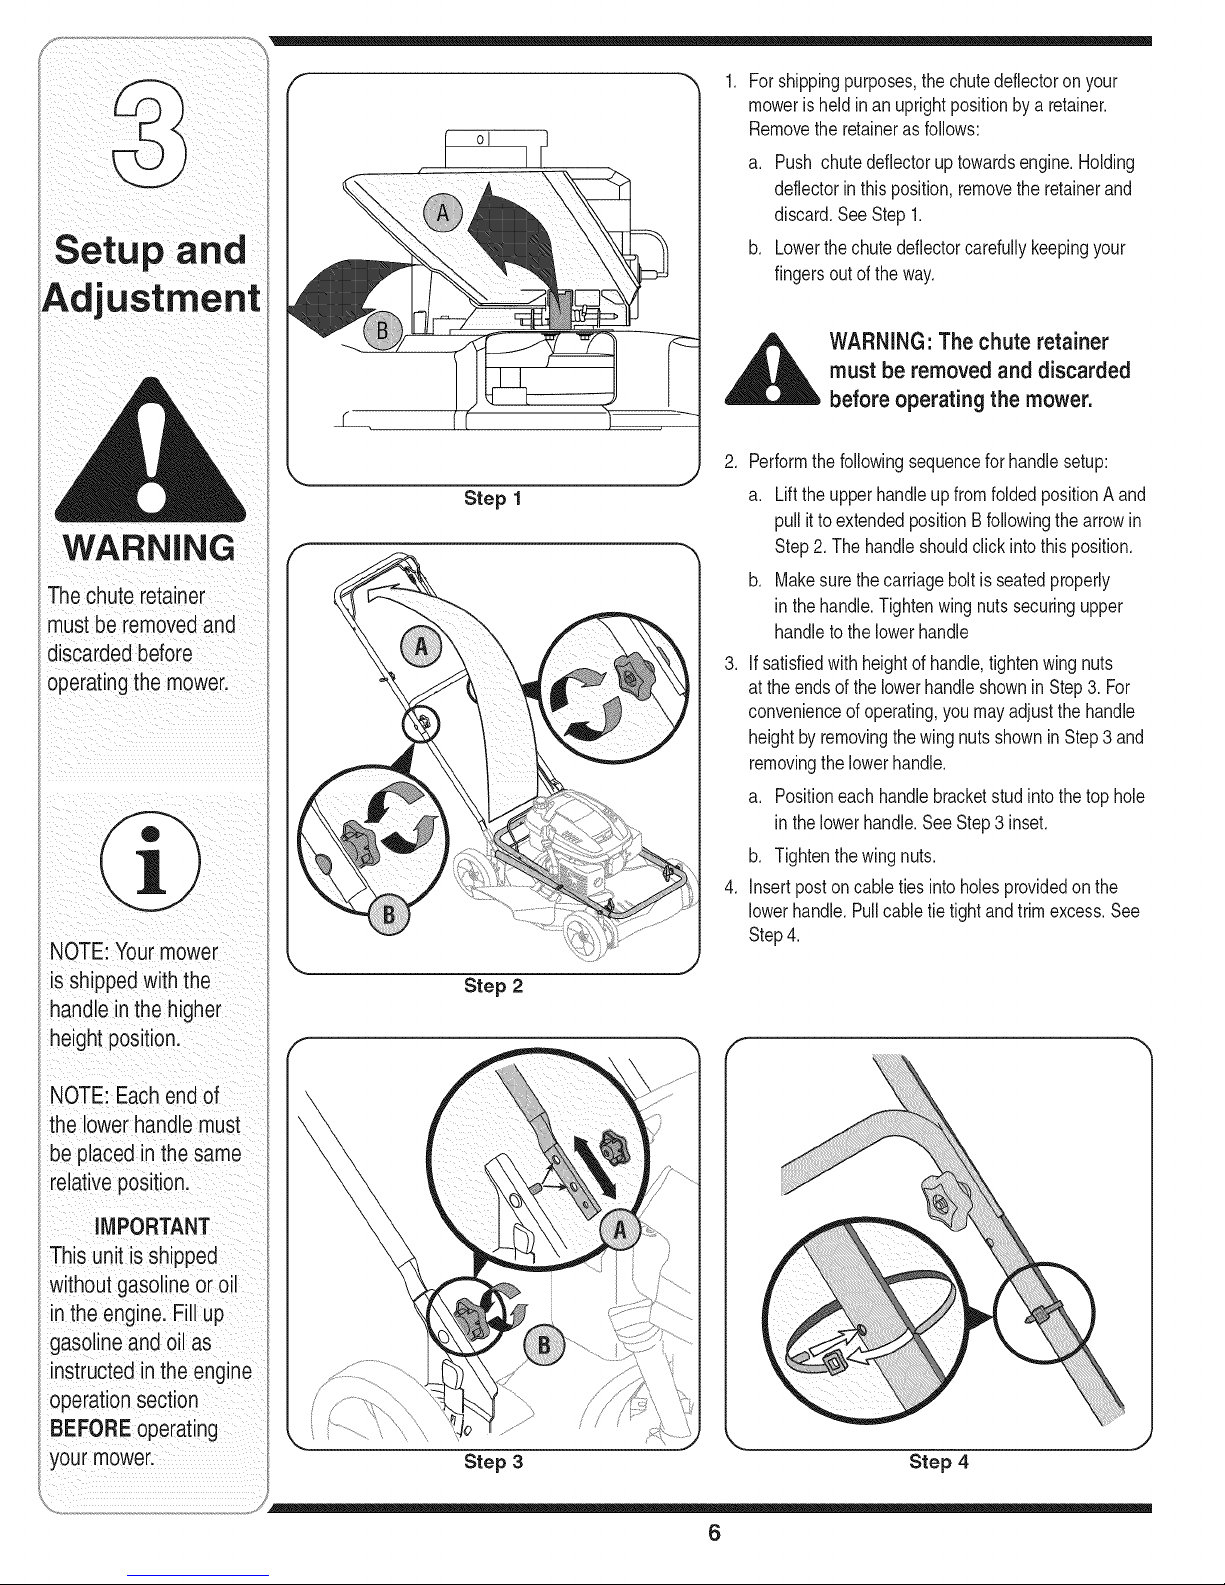
f 1. For shippingpurposes,thechutedeflectoron your
mowerisheldinan uprightpositionbya retainer.
Removetheretaineras follows:
a. Push chutedeflectoruptowardsengine.Holding
deflectorinthisposition,removetheretainerand
discard.SeeStep 1.
b. Lowerthechutedeflectorcarefullykeepingyour
fingersoutof theway.
discarded before
operatingthe moWer.
NOTE:Your mower
sshippedwith the
handlein the higher
height position.
Step 1
Step 2
,_ WARNING: The chute retainer
must be removed and discarded
before operating the mower.
.
Performthefollowingsequenceforhandlesetup:
a. Liftthe upperhandleupfromfoldedpositionAand
pullitto extendedpositionBfollowingthearrowin
Step2. Thehandleshouldclickinto thisposition.
b. Makesurethecarriageboltis seatedproperly
in thehandle.Tightenwingnutssecuringupper
handletothe lowerhandle
3. If satisfiedwithheightof handle,tightenwingnuts
atthe endsof thelowerhandleshownin Step3. For
convenienceof operating,youmayadjustthehandle
heightby removingthewing nutsshownin Step3 and
removingthelowerhandle.
a. Positioneachhandlebracketstudintothetop hole
in thelowerhandle.SeeStep3 inset.
b. Tightenthewingnuts.
4. Insertpostoncabletiesintoholesprovidedon the
lowerhandle.Pullcabletie tightandtrimexcess.See
Step4.
f
NOTE: Eachendof
the lower handle must
beplaced in the same
relativeoosition.
IMPORTANT
This unit isshipped
without gasolineor oil
in the engine. Fill up
gasoline and oil as
instructedintheengine
operation section
BEFOREoperating
your mower.
Step 3 Step 4
6
Page 7
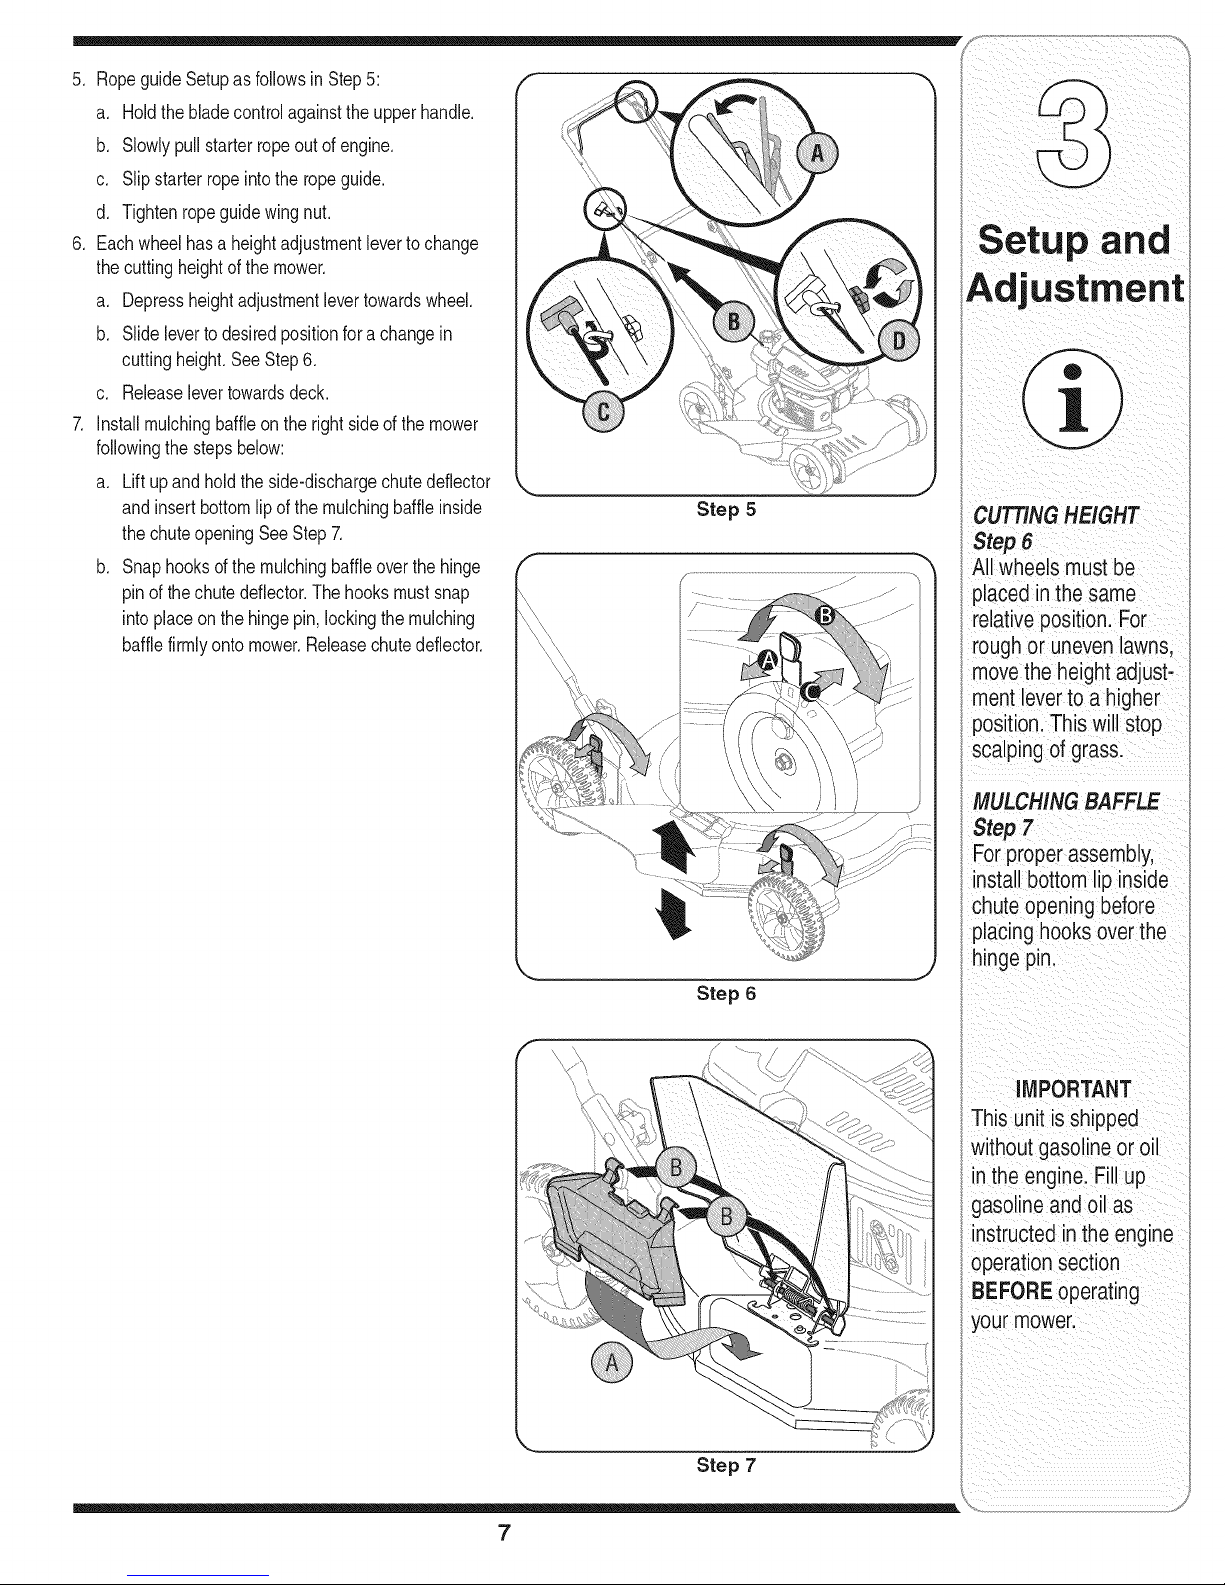
5. RopeguideSetupasfollowsinStep5:
a. Holdthebladecontrolagainsttheupperhandle.
b. Slowlypullstarterropeoutof engine.
c. Slipstarterropeintothe ropeguide.
d. Tightenropeguidewingnut.
6. Eachwheelhasa heightadjustmentlevertochange
thecuttingheightofthe mower.
a. Depressheightadjustmentlevertowardswheel.
b. Slidelevertodesiredpositionfora changein
cuttingheight.SeeStep6.
c. Releaselevertowardsdeck.
7. Installmulchingbaffleonthe rightsideofthemower
followingthestepsbelow:
a. Lift upandholdthe side-dischargechutedeflector
andinsertbottomlipof themulchingbaffleinside
thechuteopeningSeeStep7.
b. Snaphooksd the mulchingbaffleoverthe hinge
pinofthe chutedeflector.Thehooksmustsnap
intoplaceon thehingepin, lockingthemulching
bafflefirmlyontomower.Releasechutedeflector.
Step 5
CUTTINGHEIGHT
Step 6
Allwheels must be
placedinthesame
relativeposition. For
roughor unevenlawns,
movethe heightadjust-
mentleverto a higher
position,Thiswill stop
scalping of grass.
Step 6
MULCHING BAFFLE
Step 7
Forproperassembly,
installbottom lipinside
chute opening before
placinghooks overthe
hingepin.
iMPORTANT
Thisunit isshipped
without gasoline or oil
in the engine.Fill up
gasolineandoil as
instructedinthe engine
operationsection
BEFOREoperating
yourmower.
Step 7
7
Page 8
WARNING
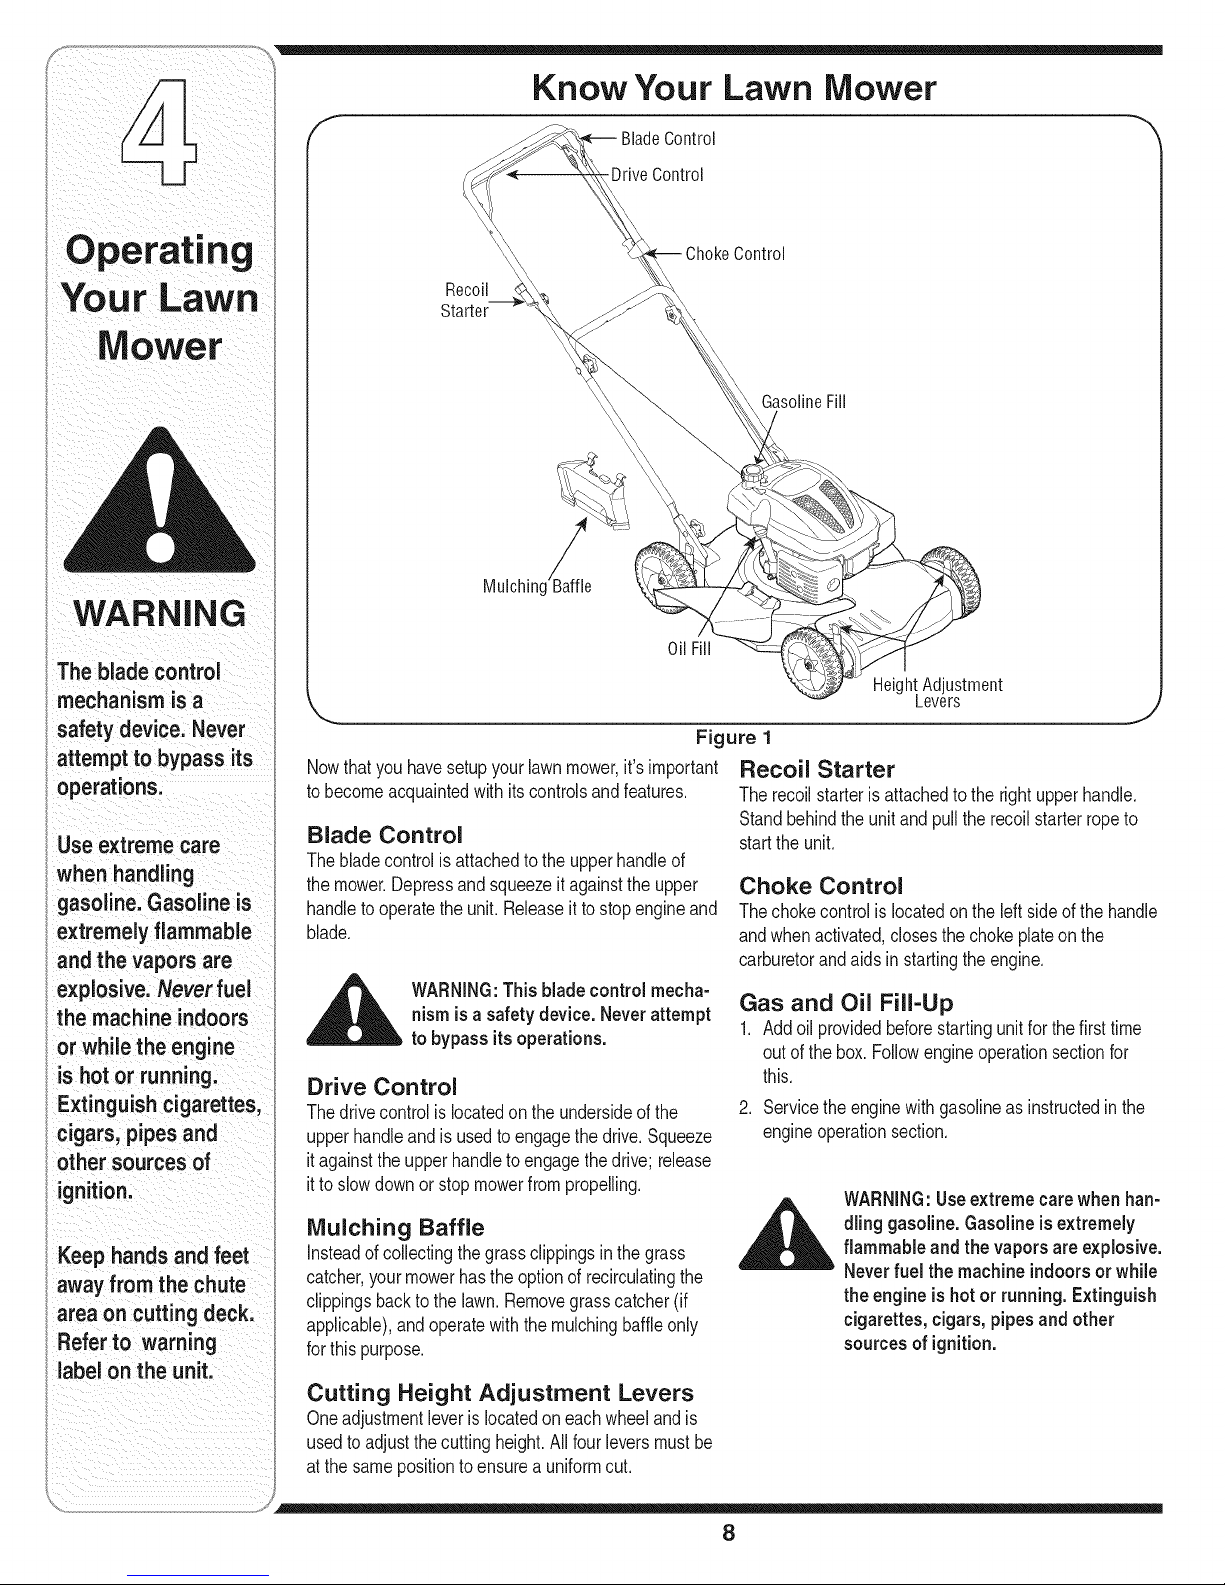
Know Your Lawn Mower
Control
Drive Control
Control
Recoil
Starter
GasolineFill
Mulching
The blade control
mechanism is a
safety device. Never
attempt to bypass its
operations.
I Use extreme care
when handling
gasoline.Gasoline is
extremely flammable
and the vapors are
explosive. Never fuel
the machine indoors
or while the engine
is hot or running.
Extinguish cigarettes,
cigars, pipes and
other sources of
ignition.
Keep hands and feet
away from the chute
area on cutting deck.
Referto warning
label onthe unit.
Figure 1
Nowthatyouhavesetupyourlawnmower,it'simportant
tobecomeacquaintedwith itscontrolsandfeatures.
Blade Control
Thebladecontrolis attachedtothe upperhandleof
themower.Depressand squeezeitagainsttheupper
handletooperatetheunit. Releaseittostopengineand
blade.
,__ WARNING:Thisblade control mecha-
nism isasafetydevice. Neverattempt
to bypass itsoperations.
Drive Control
Thedrivecontrolislocatedonthe undersideofthe
upperhandleand isusedtoengagethe drive.Squeeze
itagainstthe upperhandleto engagethedrive; release
itto slowdownor stopmowerfrompropelling.
Mulching Baffle
insteadof collectingthegrassclippingsinthegrass
catcher,yourmowerhas theoptionof recirculatingthe
clippingsbacktothe lawn.Removegrasscatcher(if
applicable),andoperatewiththe mulchingbaffleonly
forthispurpose.
Cutting Height Adjustment Levers
Oneadjustmentleveris locatedon eachwheelandis
usedto adjustthecuttingheight.All fourleversmustbe
atthe samepositiontoensurea uniformcut.
Height Adjustment
Levers
Recoil Starter
Therecoilstarteris attachedtotherightupperhandle.
Standbehindthe unitand pullthe recoilstarterropeto
startthe unit.
Choke Control
Thechokecontrolislocatedonthe leftsideofthe handle
andwhenactivated,closesthe chokeplateonthe
carburetorandaidsin startingtheengine.
Gas and Oil Fill-Up
1. Addoilprovidedbeforestartingunitfor thefirsttime
outof thebox.Followengineoperationsectionfor
this.
2. Servicethe enginewithgasolineasinstructedinthe
engineoperationsection.
__L ARNING:Useextremecarewhenhan-
dling gasoline.Gasolineis extremely
flammableand the vapors areexplosive.
Neverfuel the machine indoorsor while
the engine is hot or running. Extinguish
cigarettes, cigars, pipesandother
sources of ignition.
8
Page 9
,,,
_ ARNING:Theoperationof any lawn if
mowercanresult inforeign objects
being thrownintothe eyes,whichcan
damageyoureyesseverely.Always
wearsafetyglasseswhileoperating
the mower,or whileperforming any
adjustmentsor repairson it.
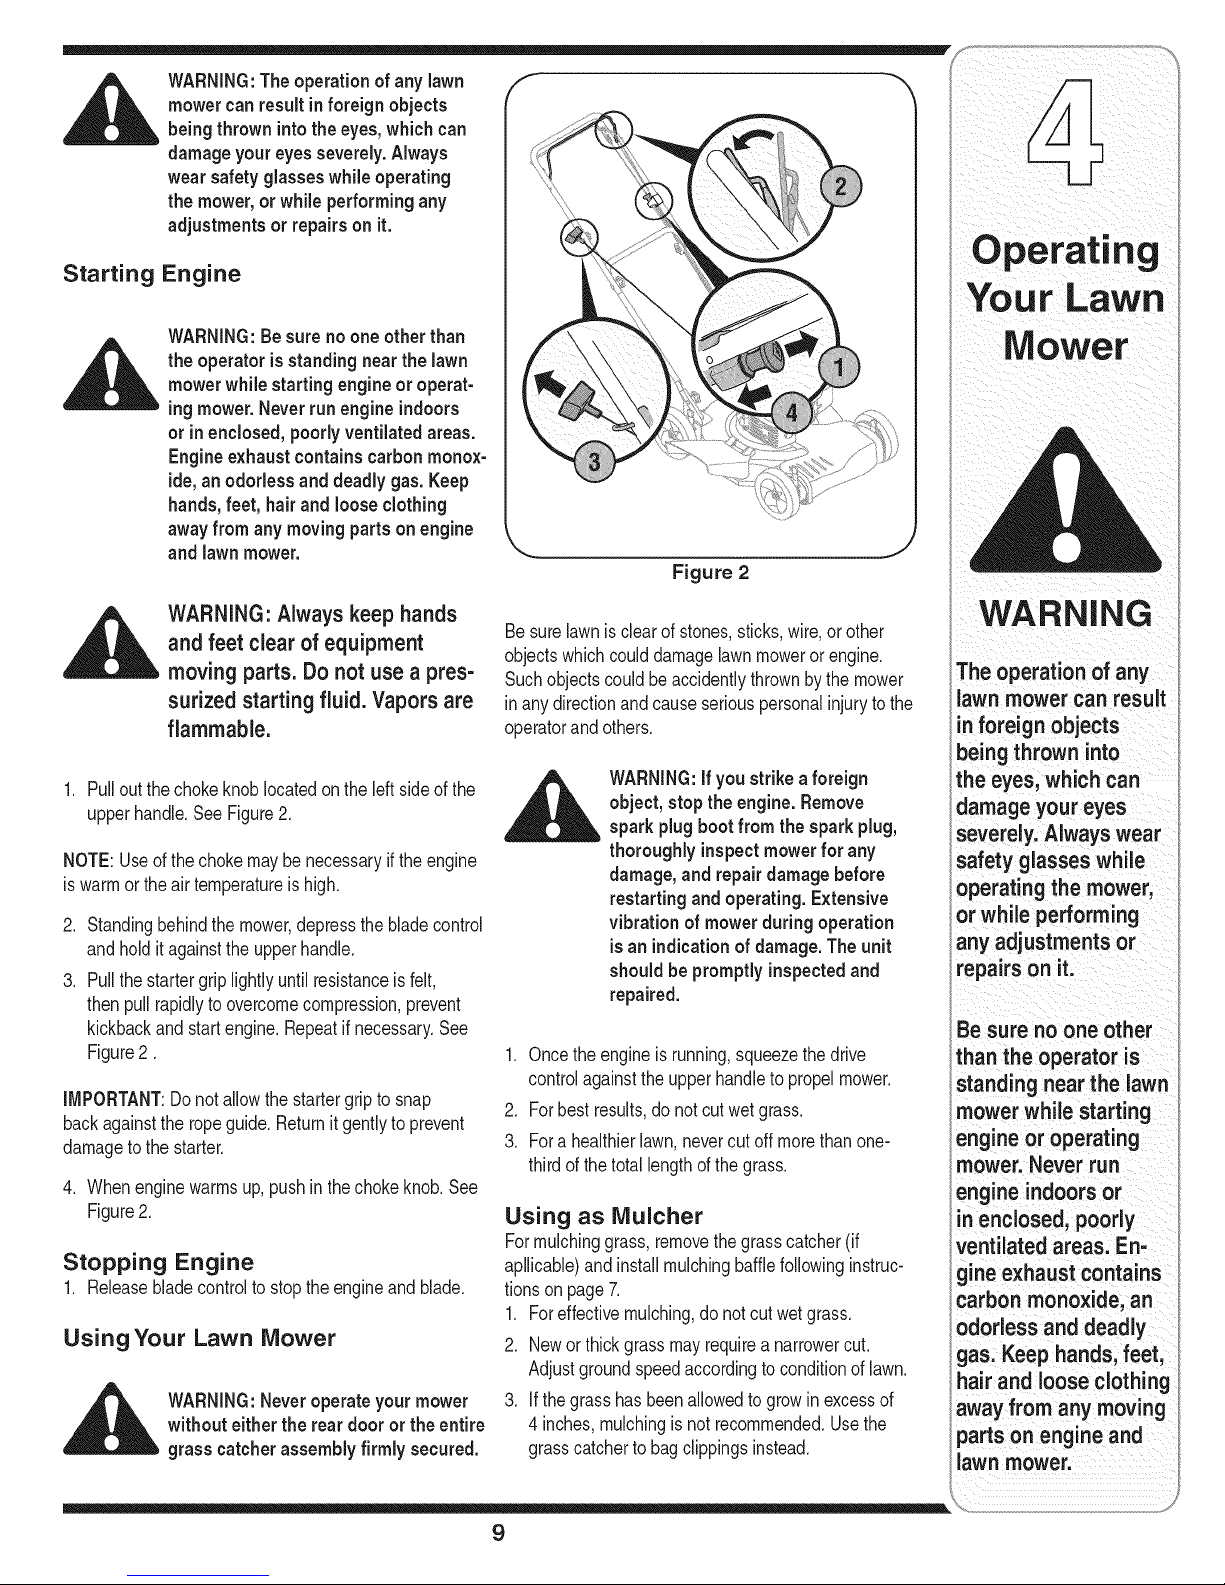
Starting Engine
WARNING:Besureno one otherthan
,_i_ theoperatorisstandingnearthe lawn
mowerwhilestartingengine or operat-
ingmower.Neverrun engineindoors
orin enclosed,poorly ventilatedareas.
Engine exhaustcontainscarbon monox-
ide,an odorlessand deadly gas. Keep
hands, feet,hair and loose clothing
awayfrom any moving partson engine
and lawnmower.
WARNING:Alwayskeep hands
and feet clear of equipment
movingparts. Do not use a pres-
surized startingfluid. Vaporsare
flammable.
1. Pullout thechokeknob locatedon theleftsideof the
upperhandle.SeeFigure2.
NOTE:Useof thechokemaybe necessaryiftheengine
iswarmor theair temperatureishigh.
2. Standingbehindthe mower,depressthebladecontrol
and holditagainstthe upperhandle.
3. Pullthe startergriplightlyuntilresistanceisfelt,
thenpullrapidlytoovercomecompression,prevent
kickbackandstartengine.Repeatif necessary.See
Figure2.
IMPORTANT:Donotallowthestartergriptosnap
backagainsttheropeguide.Returnitgentlyto prevent
damagetothe starter.
4. Whenenginewarmsup,pushinthechokeknob.See
Figure2.
Stopping Engine
1. Releasebladecontrolto stoptheengineand blade.
UsingYour Lawn Mower
_ ARNING:Neveroperate your mower
without eitherthe rear door orthe entire
grass catcher assembly firmly secured.
Figure 2
Besurelawnisclearofstones,sticks,wire,orother
objectswhichcoulddamagelawnmoweror engine.
Suchobjectscouldbeaccidentlythrownbythemower
inanydirectionandcauseseriouspersonalinjuryto the
operatorandothers.
WARNING:ifyou strike aforeign
object,stopthe engine.Remove
spark plug boot from the spark plug,
thoroughly inspectmowerfor any
damage,and repair damagebefore
restartingandoperating.Extensive
vibration ofmowerduring operation
isan indicationofdamage.The unit
should be promptly inspectedand
repaired.
1. Oncetheengineisrunning,squeezethedrive
controlagainsttheupperhandleto propelmower.
2. Forbest results,do notcut wetgrass.
3. Fora healthierlawn,nevercut offmorethan one-
thirdof thetotallengthofthe grass.
Using as Mulcher
Formulchinggrass,removethegrasscatcher(if
apllicable)andinstallmulchingbafflefollowinginstruc-
tionsonpage7.
1. Foreffectivemulching,do notcut wetgrass.
2. Newor thick grassmayrequirea narrowercut.
Adjustgroundspeedaccordingtoconditionoflawn.
3. If thegrasshasbeenallowedto growinexcessof
4 inches,mulchingisnot recommended.Usethe
grasscatcherto bagclippingsinstead.
Mower
WARNING
The operation of any
lawn mower can result
inforeign objects
being thrown into
the eyes, which can
damage your eyes
severely. Always wear
safety glasseswhile
operating the mower,
or while performing
any adjustments or
repairs on it.
Be sureno one other
than the operator is
standing near the lawn
mower while starting
engine or operating
mower. Never run
engine indoorsor
n enclosed, poorly
ventilated areas. En-
gineexhaust contains
carbon monoxide, an
odorless and deadly
gas. Keep hands,feet,
hair and loose clothing
away from any moving
partson engine and
lawn mower.
9
Page 10

A ,vavs
disconnectspark
plugl and ground
performingany type
f
Figure 3
General Recommendations
1. Alwaysobservesafetyruleswhen performing
anymaintenance.
2. Thewarrantyonthislawnmowerdoesnot cover
itemsthathavebeensubjectedto operatorabuse
ornegligence.Toreceivefullvaluefromwarranty,
operatormustmaintainthelawn moweras
instructedhere.
3. Changingofengine-governedspeedwillvoid
enginewarranty.
4. Alladjustmentsshouldbecheckedat leastonce
eachseason.
5. Periodicallycheckallfastenersand makesurethese
aretight.
Lubrication
1. Lubricatepivotpointson thebladecontrolanddrive
controlatleastoncea seasonwithlightoil. These
controlsmustoperatefreelyinbothdirections.See
Figure3.
2. Lubricatethewheelsatleastoncea seasonwith
lightoil (ormotoroil). If wheelsareremovedforany
reason,lubricatesurfaceof thepivotarm andinner
surfaceof thewheelwithlightoil. SeeFigure3.
3. Lubricatethetorsionspringandpivotpointoneach
endofthe sidemulchingplug/chutedeflectorperiodi-
callywithlightoil to preventrust.SeeFigure3.
4. Thetransmissionispre-lubricatedand sealedatthe
factoryanddoesnot requirelubrication.
5. Followtheenginemaintenancesectionforlubrication
scheduleandinstructionforenginelubrication.
Deck Care
1. Disconnectsparkplugboot.Draingasolinefrom lawn
mower,or placea pieceof plasticunderthegascap.
2. Tip mowersothat itrestsonthe housing.Keepthe
sidewiththe aircleanerfacingup. Holdmowerfirmly.
WARNING:Nevertip the mowermore
than 90 degrees in anydirections and
do not leavethe mower tipped for any
length of time. Oil can drain intothe
upper part of the enginecausinga
starting problem.
3. Scrapeandcleantheundersideofthedeckwitha
suitabletool.Donotspraywithwater.
4. Putthemowerbackonitswheelsontheground.If
youhadput plasticunderthe gascapearlier,make
sureto removeitnow.
disconnect spark plug, andground
against engine beforecleaning,
lubricatingor doing any kind of
maintenanceon your machine.
Wedo not rec0mmend
i
the use ofa pressure
_bL ARNING:Alwaysstopengine,
washerorgarden
hoseto clean
uniLThese maycause
damage to e ectriC
compOnentSspindles
pulleys;bearingS,or
the enginel The use
of water Willresult in
shorten edlife and
reduceServiceability,
Engine Care
1. Maintainoillevelasinstructedintheenginemainte-
nancesection.
.
Serviceaircleanerevery25 hoursundernormal
conditions.Cleaneveryfewhoursunderextremely
dustyconditions.Refertotheenginemaintenance
section.
3. Cleansparkplugand resetthegaponcea season.
Checktheenginemaintenancesectionforcorrect
plugtypeandgapspecifications.
4. Cleanengineregularlywitha clothorbrush.Keepthe
coolingsystem(blowerhousingarea)cleanto permit
properaircirculation.Removeall grass,dirtand
combustibledebrisfrommufflerarea.
10
Page 11

Blade Care
__lk ARNING:Whenremovingcutting
1. Disconnectsparkplugbootfrom sparkplug.Turn
moweron itssidemakingsurethattheairfilterand
thecarburetorareup.
2. Removebolt,bladebellsupport,blade,andblade
adapterfromthe enginecrankshaft.SeeFigure4.
3. The bladecanbe sharpenedwitha fileor on a grind-
ing wheel.Donotattempttosharpenthebladewhile
it is stillon themower.Whensharpeningblade,follow
originalangleofgrind.Grindcuttingedgesequallyto
keepbladebalanced.
4. Removebladefromtheadapterfortestingbalance.
Balancethebladeona roundshaftscrewdriverto
check.Removemetalfromthe heavysideuntil it
balancesevenly.
_ WARNING:Anunbalanced bladewill
5. Lubricatetheenginecrankshaftandthe innersurface
ofthe bladeadapterwithlightoil.Slidethe blade
adapterontotheenginecrankshaft.Placetheblade
on theadaptersuchthatthesideofthe blademarked
"Bottom"(orwithpartnumber)facesthe groundwhen
themoweris in theoperatingposition.Makesurethat
bladeisalignedandseatedon bladeadapterflanges.
6. Placebladebellsupportonthe blade.Alignnotches
on thebladebell supportwithsmallholesin blade.
Replacehexboltandtightenhexboltto torque:450
in.Ibs. rain.,600 in.Ibs.max.
Toensuresafeoperationofyourmower,periodically
checkthe bladeboltfor correcttorque.
bladefor sharpeningor replacement,
protectyourhandswitha pairof heavy
gloves or usea heavy ragto hold blade.
causeexcessivevibration whenrotating
athigh speeds, it maycausedamage
to mower,and could break causing
personalinjury.
Belt Care
1. Removethefrontdrivecoverbyslidingoffthe
two plasticrivetson eachside ofthecoverwitha
screwdriver.SeeFigure5.
2. Loosenscrewholdingbelttensionspringto trans-
mission.SeeFigure5 inset.Donot removescrew
completely.As youloosenit, tensiononthebelt willbe
released.
.
Pushtransmissionup a littleandslidebelt offthe
transmissionpulley.Lift mowertoaccessbeltfrom
undersideofmower.Slidebeltoff ofenginepulleyand
aroundtheblade.SeeFigure6.
Figure 4
Figure 5
Figure 6
4. Replacewithnewbelt,workingaroundblade.Make
surebelt isfirmlyseatedonenginepulleywhile
pullingfromtheothersideand slidingitaroundthe
transmissionpulley.Tightenscrewloosenedearlier
tosecurebelt tensionspringtothetransmission.
Reassemblefrontdrivecover.
_ _ i i i iii _ _ ii _i ii ii
Maintaining
You r LaWn
MOwer
WARNING
When removing
the cutting blade
for sharpening or
replacement or
when sliding the belt
around it, protect
your hands with a
pair of heavy gloves
or use a heavy rag to
hold the blade.
An unbalanced blade
will cause excessive
vibrationwhen rotat-
ing at high speeds. It
may cause damage
to mower, and could
break causing per-
sonal injury.
11
Page 12

Problem Cause Remedy
En inef Istostart 1 Badecontro d sengaged 1 Engagebadecontro
g a ....
2. Sparkplugbootdisconnected. 2. Connectwireto sparkplug•
3. Fueltankemptyorstalefuel• 3. Filltankwithclean,freshgasoline•
Trouble
4. CHOKEnotactivated• 4 Chokeengineas instructed-in
a t ug. OperatingYourLawnMower.
Shootin 2. F ulysparkpl 5. Clean,adjustgap orreplace
6. Blockedfuel line. 6. Cleanfuelline.
7. Engineflooded. 7. Waitafewminutestorestart.
Engineruns erratic 1. Sparkplugbootloose. 1. Connectand tightenspark
plugboot.
2. Blockedfuel lineor stalefuel. 2. Cleanfuelline;fill tankwithclean,
freshgasoline.
3. Ventingascapplugged. 3. Clearvent.
4. Waterordirt infuelsystem. 4. Drainfueltank. Refillwith
freshfuel.
Forrepairsbeyond section.
the minor adjust- 6. UnitrunningwithCHOKEapplied. 6. PushCHOKEknobin.
ments listed here,
5. Dirty aircleaner. 5. Referto enginemaintenance
contact an authorized Engineoverheats 1. Engineoillevellow. 1. Fillcrankcasewithproperoil.
service dealer. 2. Airflowrestricted. 2. Removebower housing
andclean.
Occasional skips 1. Sparkpluggaptooclose. 1. Adjustgapto.030".
(hesitates)at
highspeed
Idles oorl 1 Sparkpug foued fauty or gap 1 Resetgapto 030" or repace
P Y •
toowide. sparkplug.
2. Dirty aircleaner. 2. Referto enginemaintenance
secton.
Excessive 1. Cuttingbladelooseor unbalanced. 1. Tightenbladeandadapter.
Vibration Balanceblade.
2. Bentcuttingblade. 2. Seean authorizedservicedealer.
Mowerwill
mulch rass(If wat unti aterto cut
Equpped) 2 Excessivel h h rass 2 Mowonceata h ghcutt ngheght
not I 1. Wetgrass. 1. Donotmowwhengrassiswet;
g
Y g g " " thenmowagainat desiredheight
I ormakeanarrowercuttingpath.
3 Dull blade
• " 3. Sharpenor replaceblade.
Unevencut 1. Wheelsnotpositionedcorrectly. 1. Placeall fourwheelsinsame
heightposition.
2. Dull blade. 2. Sharpenorreplaceblade.
MowerwillRot 1. Belt notinstalledproperly. 1. Checkbeltfor properpulleyinstal-
If r I atonandmovement
se pope I
'% ..........
2. Debrs c oggng drveoperaton. 2. Stopengne,dsconnectsparkpug
I bootandcleanoutdebris.
3. Damagedorworn belt. 3. Inspectandreplacebelt.
12
Page 13

Off-Season Storage
Thefollowingstepsshouldbetakento prepareyourlawn
mowerforstorage.
1. Cleanandlubricatemowerthoroughlyasdescribedin
thelubricationinstructions.
2. We donotrecommendtheuseofapressurewasher
or gardenhoseto cleanyour unit.
3. Referto enginemanualforcorrectengine
storageinstructions.
Safety Labels Found On Your Lawn Mower
4. Coatmower'scuttingbladewithchassisgreaseto
preventrusting.
5. Storemowerina dry,cleanarea.Donotstorenext
tocorrosivematerials,suchas fertilizer.
Whenstoringanytypeof powerequipmentin a poorly
ventilatedor metalstorageshed,careshouldbetaken
torust-prooftheequipment.Usinga lightoil or silicone,
coattheequipment,especiallycablesandall moving
partsofyourlawnmowerbeforestorage.
_i _i i _iii i__ i iii ii_
engine.Readand follow Operating Instructions before running 1
Gasoline is flammable. Allow engine to cool at least /
2 minutes before refueling.
Engines emit carbon monoxide. DO NOT run in enclosed
area.
DONOTremove safety
(or any) labels from
mower for any reason.
J
13
Page 14
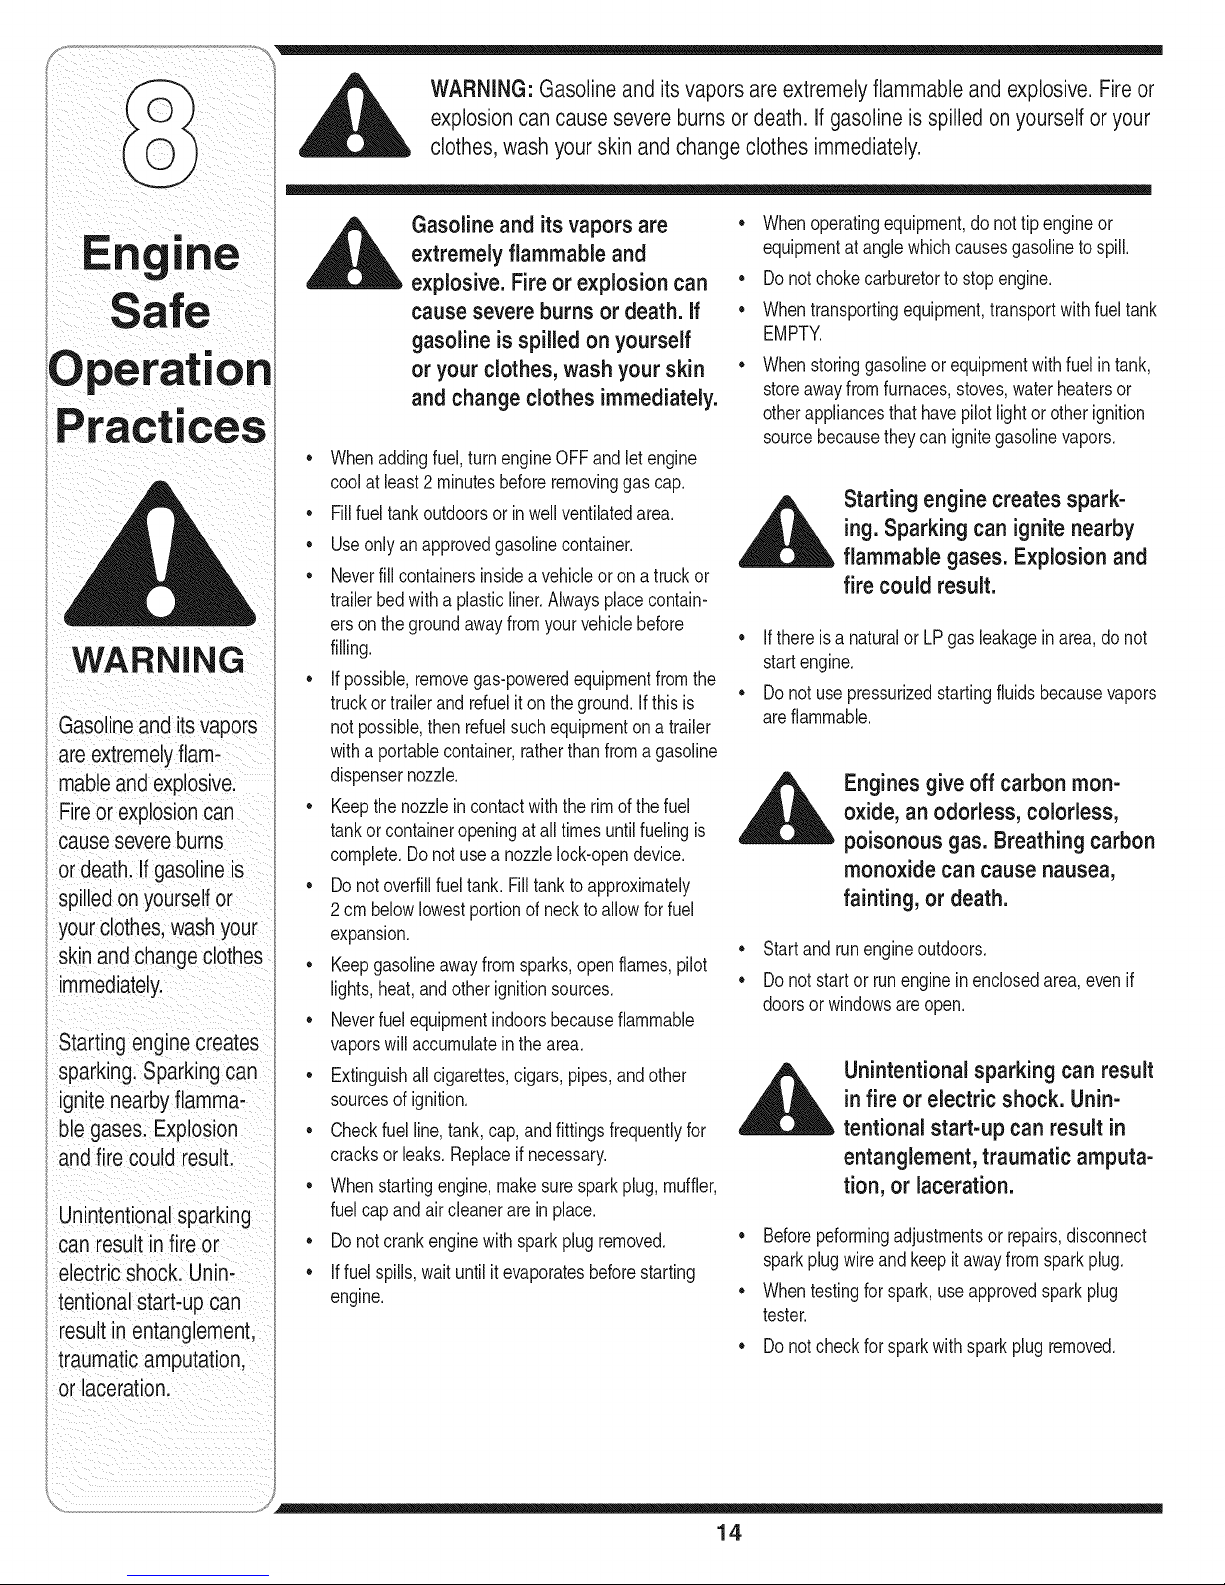
WARNING: Gasoline and itsvaporsare extremely flammable and explosive.Fireor
explosioncancausesevereburnsordeath. Ifgasoline is spilled onyourselfor your
clothes,wash yourskin and change clothes immediately.
WARNING
Gasolineand itsvapors
areextremelyflam-
mableand explosive.
, Fireor explosioncan
causesevereburns
i ordeath.If gasolineis
spilledon yourselfor
yourclothes,washyour
I skinand changeclothes
_immediately.
i Starting enginecreates
i sparking.Sparkingcan
I ignite nearbyflamma-
I
b e gases. Explosion
and fire could result.
Unintentionalsparking
can resultin fireor
electric shock. Unin-
tentional start-up can
result in entanglement,
:raumaticamputation,
or laceration.
Gasolineand its vaporsare
extremely flammable and
explosive.Fire or explosioncan
cause severe burns or death. If
gasoline isspilled on yourself
or yourclothes, washyour skin
and change clothes immediately.
Whenaddingfuel,turnengineOFFandletengine
coolat least2 minutesbeforeremovinggascap.
o
Fillfueltankoutdoorsor inwellventilatedarea.
o
Useonlyanapprovedgasolinecontainer.
o
Neverfillcontainersinsideavehicleor ona truck or
trailerbedwitha plasticliner.Alwaysplacecontain-
ersonthe groundawayfromyourvehiclebefore
filling.
• Ifpossible,removegas-poweredequipmentfromthe
truckor trailerandrefuelit on theground.Ifthis is
notpossible,thenrefuelsuchequipmentona trailer
witha portablecontainer,ratherthanfroma gasoline
dispensernozzle.
• Keepthenozzlein contactwiththerimof thefuel
tankorcontaineropeningat alltimesuntilfueling is
complete.Donotusea nozzlelock-opendevice.
• Donotoverfillfueltank. Filltankto approximately
2 cmbelowlowestportionof necktoallowforfuel
expansion.
• Keepgasolineawayfromsparks,openflames,pilot
lights,heat,andother ignitionsources.
• Neverfuelequipmentindoorsbecauseflammable
vaporswillaccumulatein the area.
• Extinguishallcigarettes,cigars,pipes,andother
sourcesofignition.
• Checkfuelline,tank,cap,andfittingsfrequentlyfor
cracksor leaks.Replaceif necessary.
• Whenstartingengine,makesuresparkplug,muffler,
fuelcap andaircleanerarein place.
• Donotcrankenginewithsparkplugremoved.
• Iffuelspills,waituntilit evaporatesbeforestarting
engine.
• Whenoperatingequipment,donottipengineor
equipmentatanglewhichcausesgasolineto spill.
• Donotchokecarburetorto stopengine.
• Whentransportingequipment,transportwithfueltank
EMPTY.
Whenstoringgasolineorequipmentwithfuelin tank,
storeawayfromfurnaces,stoves,waterheatersor
otherappliancesthathavepilotlightorotherignition
sourcebecausetheycanignitegasolinevapors.
,_ Starting engine creates spark-
ing. Sparking can ignite nearby
__ flammable gases. Explosion and
fire could result.
• IfthereisanaturalorLPgasleakageinarea,donot
startengine.
• Donotusepressurizedstartingfluidsbecausevapors
areflammable.
_ ngines give off carbon mon-
oxide, an odorless, colorless,
poisonous gas.Breathing carbon
monoxide can cause nausea,
fainting, or death.
• Startandrunengineoutdoors.
• Donotstartor runengineinenclosedarea,evenif
doorsor windowsare open.
__ nintentional sparking can result
infire or electric shock. Unin-
tentional start-up can result in
entanglement, traumatic amputa-
tion, or laceration.
• Beforepeformingadjustmentsorrepairs,disconnect
sparkplugwireand keepitawayfromsparkplug.
• Whentestingforspark,useapprovedsparkplug
tester.
• Donotcheckforsparkwithsparkplug removed.
14
Page 15

Runningengine produces heat.
Engineparts, especially muffler,
become extremely hot. Severe
thermal burns canoccur on
contact. Combustibledebris,
suchas leaves, grass, brush, etc.,
cancatchfire.
• Allowmuffler,enginecylinder,andfinstocool before
touching.
• Keepchildrenawayfromhot or runningengines.They
can sufferburnsfroma hot muffler.
Removeaccumulatedcombustiblesfrommufflerand
cylinderarea.
_ Rotating engine partscan
Operateequipmentwithguardsin place.
Keephandsandfeetawayfromrotatingparts.
contactor entangle hands, feet,
hair, clothing,or accessories.
Traumaticamputation or severe
lacerationcan result.
• Tieuplonghairand removejewelry.
Donotwearloose-fittingclothing,danglingdraw-
stringsoritemsthatcouldbecomecaught.
,__ Rapid retraction of starter cord
• Whenstartingengine,pullcordslowlyuntilresis-
tanceisfelt,thenpullrapidly.
• Removeall externalequipment/engineloadsbefore
startingengine.
• Directcoupledequipmentcomponentssuchas,but
notlimitedto blades,impellers,pulleys,sprockets,
etc.,mustbesecurelyattached.
Safety Label Location
Thislabelwarnsyouof potentialhazardsthat can
causeseriousinjury.Readitcarefully.SeeFigure1for
explanationof symbols.
If thelabelcomesoffor becomeshardto read,contact
thedealerfor replacement.
(kickback) will pull hand and
arm toward engine faster than
you can let go. Brokenbones,
fractures, bruisesor sprains
could result.
WARNING
Runningengine
produces heat.Engine
parts,especiallymuf-
fler, become extremely
hot. Severethermal
burnscan occuron
contact.Combustible
debris,suchas leaves,
grass,brush,etc.,can
catch fire.
International Symbols and Meanings
A
SafetyAlert
ReadOwner's
Manual
Hot Surface
UnleadedFuel Start Run
Figure 1
15
ToxicFumes GasolineIs
Flammable
Rotatingengineparts
can contactorentangle
hands,feet. hair.cloth-
ing,or accessories.
Traumaticamputation
orseverelaceration
can result.
Rapidretractionof
startercord (kickback)
will pull handand
armtowardengine
fasterthan you can
let go. Broken bones.
fractures, bruisesor
sprainscould result.
Page 16

IMPORTANT:Thisengine
isshippedwithoutgaso-
lineoroil inthe engine.
Runningthe enginewith
insufficientoil cancause
seriousenginedamage
andvoidthe engine
warranty.
Know Your Engine
f Fuel Cap
Air Cleaner
Starter
Grip
Oil Fiii Cap
Oil Drain
Mufflel Spark Plug
:!P65Eng!neSh°w ,
Figure9-1:Themajorcomponentsoftheengine.Theshroudonyourenginemaydiffer.
Readthissectionbeforestartingyourlawnmowerengine.Comparetheillustrationsin Figure9-1withyour lawn
mowerenginetofamiliarizeyourselfwiththe locationofvariouscontrolsandadjustments.
Pre-Operation Check
Oil Recommendations
IMPORTANT:Usingnon-
detergentoilor2-stroke
engineoilcouldshorten
the engine'sservicelife.
Besureto checkthe
engineon a levelsurface
withthe enginestopped.
IMPORTANT:Thisengineis shippedwithoutgasolineor
oil intheengine.Runningthe enginewithinsufficientoil
cancauseseriousenginedamageandvoidthe engine
warranty.
• Beforestartingengine,fillwithoil. Donotover-fill.Oil
capacityisabout20oz.
Usea 4-stroke,oran equivalenthighdetergent,
premiumqualitymotoroilcertifiedto meetorexceed
U.S.automobilemanufacturer'srequirementsforservice
classificationSG,SE Motoroils classifiedSG,SF will
showthis designationon thecontainer.
SAE10W-30is recommendedforgeneral,alltem-
peratureuse.If singleviscosityoil isused,selectthe
appropriateviscosityfor theaveragetemperaturein your
areafromthechartto theright.
m30
20w40, 20w50 _ _ _ _
t I iv
15w40, 15w50=m=_ ==== mmm _ ====hb,,
®,
10w40 ______
10w30 __mm=__m
V
(°C}-30 ° -20° -10° 0° 10° 200 300 400
(°F)-20o 0o 200 400 600 80° 1000
Ambient Temperature
1. SingleViscosity
2. MultiViscosity
IMPORTANT:Using nondetergent oil or 2-stroke
engineoil couldshortenthe engine'sservicelife.
16
Page 17

Check Oil Level
iMPORTANT:Besure to checkthe engine ona level
surfacewith the engine stopped.
1. Removetheoilfillercapandwipethedipstickclean,
Figure9-2.
.
Insertthe dipstickintothe oil fillerneck, butdo not
screwit in.
3.
If thelevelislow,slowlyaddoil tothe upperlimiton
thedipstick.
4. Tightendipstickfirmlybeforestartingengine.
iMPORTANT:Donot overfill. Overfilling with oil may
causesmoking,hardstarting, spark plugfouling, or
oil saturation of air cleaner.
Fuel Recommendations
Useautomotivegasoline(Unleadedor Iowleadedto
minimizecombustionchamberdeposits).Neverusean
oil/gasolinemixtureordirtygasoline.Avoidgettingdirt,
dust,or waterinthe fueltank.
_ ARNING:Gasoline isextremelyflam-mableand is explosiveunder certain
conditions.
Refuel ina well-ventilatedarea with theengine
stopped. Do not smoke or allow flames or sparks
inthe areawhere the engineisrefueledor where
gasoline is stored.
Donot overfill thefuel tank (thereshouldbenofuel
inthe filler neck). Afterrefueling, makesure thetank
cap isclosed properlyand securely.
Be careful not to spill fuel when refueling. Spilled
fuel or fuel vapormayignite.If anyfuel is spilled,
makesure the areaisdry beforestarting the engine.
Avoidrepeatedorprolongedcontact with skin or
breathing of vapor.
Check Fuel Level
1. Cleanaroundfuelfill beforeremovingcaptofuel.
2. Filltankto approximatelyoneinchbelowlowest
portionof necktoallowforfuelexpansion.Becareful
notto overfill.
iMPORTANT:Before refueling,allow engineto cool
two minutes.
Starting The Engine
_ ARNING:Alwayskeephandsand
1. Pulloutthechokeknoblocatedontheleft sideofthe
upperhandle,Figure9-3.
feet clearofequipmentmoving parts.
Donot useapressurizedstarting fluid.
Vaporsare flammable.
Figure9-2:Checkingtheoil level.
Figure9-3:Startingthe mower.(Yourmowermaydifferfrom
thatshown)
2. Standingbehindthemower,depressthebladecontrol
handleandholditagainstthe upperhandle.
3. Pullthe startergriplightlyuntilresistanceisfelt,
thenpull rapidlytoovercomecompression,prevent
kickbackandstartengine.Repeatif necessary.
iMPORTANT:Donot allow thestartergripto snap
back against the rope guide. Return itgently to
preventdamageto the starter.
4. Whenenginewarmsup, pushinthe chokeknob.
Stopping The Engine
1. Releasethebladecontrolhandle.
Your
WARNING
A!way keophandsaod
feet clear ofequipment
moving Parts,Do not usea
Pressurizedstarting fluid,
Vaporsareflammable,
IMPORTANT:Donot
allowthe starter gripto
snapbackagainst the
engine. Returnitgently
....................
starter.
NOTE:Useof the chokemaynot be necessary if the
engine iswarm or the air temperature is high.
17
Page 18

_ ARNING:Shut off theenginebefore
IMPORTANT:Ifenginemustbe tippedto transport
equipmentorto inspector removegrass,keepspark
plugsideof engineup.Transportingor tippingengine
sparkplugdownmaycausesmoking,hardstarting,
sparkplugfouling,or oil saturationof aircleaner.
performing any maintenance.To
prevent accidental start-up, disconnect
the spark plug boot.
Maintenance Schedule
f
Tasks
First5hours
Eachuseor
every5 hours
Everyseason Everyseason
Periodicinspectionandadjustmentof theengineis
essentialifhighlevelperformanceisto bemaintained.
Regularmaintenancewillalso ensurealongservicelife.
Therequiredserviceintervalsandthe kindof mainte-
nanceto be performedare describedin thetable below.
Followthehourlyor calendarintervals,whicheveroccur
first.Morefrequentserviceis requiredwhenoperatingin
adverseconditions.
Everyseason
or 25 hours or50hours
or 100hours
ServiceDates_
Shut off the engine
any maintenance;To
preventaccidental
start,upi disconnect
Beforetippingengine
or equipment to
drain oil, drain fuel
fromtank by running
;ngine until fuel tank
; empty;
ChangeEngine
Oil
ServiceAir
Cleaner
Service Spark
Plug
CleanAround
Muffler
1 Servicemorefrequentlywhenusedindustyareas.
v"
ff Ifoperatingunderheavyloador highambienttemperature.
i
v"
v"
Oil Change
IMPORTANT:Be suretocheckengineona levelsurface
withtheenginestopped.Drainthe oilwhilethe engineis
stillwarmto assurerapidandcompletedraining.
IMPORTANT
Besureto check
engineon
Plug
surface with the engine
stopped: Draintheoil
while theengine iSstili
warm to assure rapid
and Completedraining:
Oil Service
• Checkoillevelregularly.
• Besurecorrectoillevelismaintained.Checkevery
5 hoursordaily beforestartingengine.Seeoil
i
checkingprocedureintheOperationsection.
Figure 5
Removeoilfill capanddrainoilby eitherremoving
drainplugor turningmoweronitsside (aircleanerside
up)andallowingoilto drainintoa suitablecontainer.
SeeFigure5.
__IL WARNING:Beforetipping engineor
2. Reinstallthedrainplug(if removed),andtightenit
securely.
3. Refillwiththe recommendedoil (see Operation
section)andchecktheoil level.See Figure5.
4. Reinstalltheoilfillcapsecurely.
equipmentto drain oil, drain fuel from
tank byrunningengineuntil fuel tank is
empty.
18
Page 19

IMPORTANT:Usedmotoroilmaycauseskincancer
if repeatedlyleft incontactwiththe skinforprolonged
periods.Althoughthisis unlikelyunlessyouhandleused
oilon a dailybasis,itis stilladvisabletothoroughlywash
yourhandswithsoapandwateras soonas possible
afterhandlingusedoil.
NOTE:Pleasedisposeofusedmotoroil in a mannerthat
iscompatiblewiththeenvironment.We suggestyoutake
itin a sealedcontainertoyourlocalservicestationfor
reclamation.Donot throwit inthe trashor pouriton the
ground.
PaperElement
Air Cleaner Service
Adirty aircleanerwill restrictairflowtothe carburetor.
Topreventcarburetormalfunction,servicetheaircleaner
regularly.Servicemorefrequentlywhenoperatingthe
enginein extremelydustyareas.
_ ARNING:Neveruse gasolineorlow
IMPORTANT:Neverrunthe enginewithouttheair
cleaner.Rapidenginewearwillresult.
1. Removethewingboltandtheaircleanercover.
Removethe elementsandseparatethem.SeeFigure
6.Carefullycheckbothelementsforholesortears
andreplaceif damaged.
2. Foamelement:Washtheelementin a solutionof
householddetergentandwarmwater,thenrinse
thoroughly,or washin nonflammableorhighflash
pointsolvent.Allowtheelementto drythoroughly.
Soakthe elementin cleanengineoil andsqueezeout
theexcessoil. Theenginewill smokeduringinitial
start-upif toomuchoil is left inthefoam.
3. Paperelement: Taptheelementlightlyseveraltimes
ona hardsurfaceto removeexcessdirt,or blow
compressedair throughthefilterfromtheinsideout.
Nevertry tobrushthedirt off; brushingwillforce
dirtintothefibers.Replacethepaperelementif it is
excessivelydirty.
Spark Plug Service
__IL ARNING:DONOTcheckfor spark
flash pointsolventsfor cleaningthe
air cleanerelement.Afire or explosion
couldresult.
with spark plugremoved.DONOT
crank enginewith spark plugremoved.
Foam
Figure 6
Figure 7
,_ WARNING:ifthe engine hasbeen
2. Visuallyinspectthesparkplug.Discardthesparkplug
ifthereisapparentwear,or ifthe insulatoriscracked
orchipped.Cleanthe sparkplugwitha wirebrushifit
isto be reused.
3. Measurethepluggapwitha feelergauge.Correctas
necessarybybendingsideelectrode.SeeFigure8.
Thegapshouldbe:0.030in.
running,the muffler will bevery hot. Be
careful not to touch the muffler.
WARNING
Never use gasoline
or lowflash pointsol-
ventsfor cleaning the
air cleaner element.
Afire or explosion
could result.
DO NOTcheck for
spark with spark plug
removed. DO NOT
crankengine with
spark plug removed.
if the engine has
been running, the
muffler will be very
hot. Be careful not to
touch the muffler.
Toensureproperengineoperation,thesparkplugmust
be properlygappedand freeofdeposits.
1. Removethe sparkplugbootanduseasparkplug
wrenchtoremovetheplug.SeeFigure7.
19
Page 20

f
Electrode
4. Checkthatthe sparkplugwasheris in goodcondition
andthreadthe sparkplugin byhandto preventcross-
threading.
5. Afterthe sparkplugisseated,tightenwitha sparkplug
wrenchtocompressthewasher.
NOTE:Wheninstallinga newsparkplug,tighten1/2turn
afterthesparkplugseatstocompressthewasher.When
reinstallinga usedsparkplug, tighten1/8-1/4turnafterthe
sparkplugseatsto compressthewasher.
WARNING
Accumulationof
debrisaround muffler
Couldcauseafire.
inspect and
,, ,, 0.030 in.
Figure 8
IMPORTANT:The sparkplugmustbe securelytightened.
Animproperlytightenedsparkplugcanbecomeveryhot
J
andmaydamagetheengine.
Clean Engine
If theenginehas beenrunning,allowitto coolfor atleast
halfanhourbeforecleaning.Periodicallyremovegrass
anddirtbuild-upfromengine.Cleanfingerguardand
aroundmuffler.Cleanwitha brushorcompressedair.
IMPORTANT: Do not spray engine with water to clean
because water could contaminate fuel. Using a garden
hose or pressure washing equipment can also force
water into the air cleaner or muffler opening. Water in
the air cleaner will soak the paper element, and water
that passes through the element or muffler can enter the
cylinder, causing damage.
_ ARNING:Accumulationof debris
around muffler could cause a fire.
Inspect and cleanbefore every use.
iMPORTANT
Donotsprayengine
with watertOclean
becauseWatercould
contaminatefuel:
Usinga gardenhose
or pressurewashing
equipmentcan also
force water into the
aircleaner Ormuffler
oPeninglWater in the
air cleanerWillsoak
the paperelemenL
andwater that passes
through the element
or muffler Canenter
the cylinderi causing
i
20
Page 21

Enginesstoredover30 daysneedtobedrainedof fuel
topreventdeteriorationandgumfromforminginfuel
Storage
systemoron essentialcarburetorparts.Ifthe gasolinein
yourenginedeterioratesduringstorage,youmayneedto
havethecarburetor,andotherfuelsystemcomponents,
servicedorreplaced.
1. Removeall fuelfromtankby runningengineuntilit
stopsfromlackof fuel.
2. Changeoil.SeeOilChangesection.
3. Removesparkplugandpourabout1/2anounceof
engineoil intocylinder.Replacesparkplugandcrank
slowlyto distributeoil.
4. Cleangrassanddebrisfromaroundengine,under
fingerguard,and under,aroundandbehindmuffler.
Touchupanydamagedpaint,andcoatotherareas
thatmayrustwitha lightfilmof oil.
5. Storeina clean,dryandwell ventilatedareaaway
fromanyappliancethatoperateswitha flameor
pilotlight,suchas a furnace,waterheater,or clothes
dryer.Alsoavoidanyareawitha sparkproducing
electricmotor,orwherepowertoolsareoperated.
6. If possible,alsoavoidstorageareaswithhighhumid-
ity,becausethatpromotesrustandcorrosion.
7. Keepthe enginelevelin storage.Tiltingcancause
fuelor oil leakage.
Removing From Storage
1. Checkyourengineas describedinthePre-Operation
Checksectionofthis manual.
2. If thefuelwasdrainedduringstoragepreparation,fill
thetankwithfreshgasoline.Ifyou keepa container
ofgasolineforrefueling,makecertainitcontainsonly
freshfuel.Gasolineoxidizesanddeterioratesover
time,causinghardstarting.
3. If thecylinderwascoatedwithoil duringstorage
preparation,theenginewill smokebrieflyat startup.
Thisisnormal.
21
Page 22

Model 261Vl
) _
J
\\
"\\
'_\\\\\
i
J"\_ i
jJ \\_.\
iL41J --_-,
\
.J
j_
_J
22
Page 23

1. 747-1214 DriveControl
2. 747-1161A BladeControl
3. 746-04300 BladeControlCable
4. 746-04304 DriveControlCable
5. 749-1092A UpperHandle
6. 710-1205 EyeBolt
7. 720-0279 WingNut, 1/4-20
8. 732-1026 SpringLever
9. 687-02139 PivotArmAssembly
10. 710-1174 CarriageBolt,5/16-18x 2.0
11. 712-04064 FlangeLockNut,1/4-20
12. 720-04072 Star Knob
13. 749-04037 LowerHandle
14. 725-0157 CableTie
15. 17098 HingeClip
16. 731-04019 TrailShield
17. 710-0599 HexScrew,1/4-20x.500
18. 682-3064 HandleBracketAssy- RH
19. 736-0741 BellWasher,.760x 1.25x.041
20. 712-04065 LockNut,3/8-16
21. 682-3065 HandleBracketAssembly- LH
22. 687-02046 22" DeckAssembly
23. 710-0654A HexWasherScr., 3/8-16x 1.0
24. 754-04100 V-Belt,3Lx32.90
25. 782-0585A ForwardHeightAdj.Plate- LH
26. 728-0199 Rivet
27. 750-04407 SleeveSpacer,.550IDx 2.22
28. 716-0198 RetainerRing
29. 618-04375 TransmissionAssy.Comp.
30. 750-04406A SleeveSpacer,.550IDx 8.51
31. 731-04636 TransmissionCover
32. 748-04016A BladeAdapter
33. 742-0742A 22" MulchingBlade
34. 736-0524B BellBladeSupport
35. 710-1044 HexCapScrew,3/8-24x 1.5
36. 782-0584 ForwardHght.Adj.Plate- RH
37. 741-0710 Sly.Bearing,.502x.627x 1.00
38. 710-0216 HexCapScrew,3/8-16x.75
39. 720-0426 AdjustmentKnob
40. 748-0455 BearingSupport
41. 731-04643 WheelDustCover
42. 715-0221 Pin
43. 717-1762 SpurGear 14T-RH
717-1761 SpurGear14T-LH
44. 732-04049 Ext.Spring,.47ODx2.50
45. 634-04100 FrontWheel 8 x 1.8
46. 747-0710 HingePin
47. 732-1014 TorsionSpring
48. 731-1034B SideDischargeAssembly
49. 736-0270 BellWasher,.265IDx.75OD
50. 17032A DeflectorChuteAdapter
51. 741-0751 HeightAdjustmentBearing
52. 687-02051 RearHgt.Adj.LeverAssembly
53. 687-02140 FrontLeverAssembly- LH
687-02141 FrontLeverAssembly-RH
54. 687-02094 RearPivotArmAssembly
55. 738-1173 ShoulderScrew,3/8-16
56. 716-0865 SnapRing.500
57. 734-04087 RearWheel8x 1.8
58. 631-04045 MulchingBaffle
59. 748-0390 BearingSupportSpacer
60. 731-05401 EngineShroud(Yellow)
61. 710-04577 MachineScrew,M4X.7
62. 746-04295 ChokeCable
63. 710-0606 HexScrew,1/4-20x 1.50
_FACTORY PARTS
iiii_i_ii__!_i!_II__i!i _:i_iiii_i!_il_i_
To order replacement
parts,contact
,8oo;8oo,731o
wwwimtdproduCts:com:
IMPORTANT
Fora properworking
machine,use Factory
ApprovedParts.
V-BELTS arespecially
designedto engage
anddisengage safely.
A substitute (non OEM)
V-Beltcanbe danger-
ousby not disengaging
completely.
23
Page 24

Engine 1P65
21-
@
o
@
........24
--7
25
17
iJ
Q
14-
8
24
Page 25

1. 951-10337 FuelTank
2. 951-10336 FlywheelShroud
3. 951-10335 RubberFuelTankMountingWasher
4. 951-10334 Oil FillerTubeAssembly
5. 951-10333 DipstickAssembly
6. 951-10406 CylinderHeadComplete
7. 951-10407 ShortBlockAssembly
8. 951-10320 StopSwitchandBrakeAssembly
9. 951-10319 RecoilSpringandPulleyAssembly
10. 951-10314 PushRodKit
11. 951-10313 ValveKit
12. 951-10370 Oil DrainPlugandWasherAssembly
13. 951-10367 IgnitionCoil
14. 951-10309 CarburetorAssembly
15. 951-10307 FlywheelKey
16. 951-10405 Air CleanerHousingAssemblyComplete
17. 951-10304 MufflerStudAssembly
18. 951-10363 FuelLineKit- Inc.hoses,clamps&filter
19. 951-10358 FuelFilter
20. 951-10300 FuelCapAssembly
21. 951-10299 RecoilStarterAssembly
22. 951-10298 Air CleanerKit
23. 951-10297 Air CleanerThumbScrew
24. 951-10404 MufflerGuard
25. 951-10403 Muffler
26. 951-10402 MufflerGasket/HeatShield
27. 951-10293 GovernorReturnSpring
28. 951-10292 SparkPlug
- 952Z1P65FU Engine- Complete
- 951-10325 CarburetorKit- Major
- 951-10322 CarburetorKit- Minor
ii i _iI_ ii
x x
- 951-10409 GasketKit- Complete
- 951-10410 GasketKit- External
- 951-10351 SparkArrestor
NOTE:Illustratedpartswithoutanumericcall-outarenotservicablecomponents.
25
Page 26
MTD LLC (MTD), The United States Environment Protection Agency (U. S. EPA)
Emission Control System Warranty Statement
(Owner's Defect Warranty Rights and Obligations)
TheU.S. EPAandMTDarepleasedtoexplaintheemissionscontrolsystemwarrantyonyour modelyear2005and latersmalloff-roadengine.
Newsmalloff-roadenginesmustbedesigned,builtandequippedtomeetthestringentanti-smogstandards.MTDmustwarrantytheemission
controlsystemonyour engineforthe periodoftimelistedbelow,providedtherehasbeennoabuse,neglector impropermaintenanceof yoursmall
off-roadengine.
Youremissioncontrolsystemmayincludepartssuchas thecarburetor,aircleaner,ignitionsystem,exhaustsystem,andotherassociatedemis-
sion-relatedcomponents.
Whereawarrantableconditionexists,MTDwill repairyoursmalloff-roadengineat nocostto yourincludingdiagnosis,partsandlabor.
MANUFACTURER'S WARRANTY COVERAGE:
Thisemissionscontrolsystemiswarrantedfortwoyears.If anyemission-relatedpartonyourengineisdefective,thepartwill be repairedor
replacedbyMTD.
OWNER'S WARRANTY RESPONSiBiLiTiES:
Asthe smalloff-roadengineowner,youare responsiblefor theperformanceofthe requiredmaintenancelistedinyourOwner'sManual.MTD
recommendsthatyouretainall yourreceiptscoveringmaintenancesonyoursmalloff-roadengine,butMTDcannotdenywarrantysolelyforthe
lackofreceiptsor foryourfailureto ensuretheperformanceto all scheduledmaintenance.
Asthe smalloff-roadengineowner,youshouldhoweverbeawarethatMTDmaydenyyour warrantycoverageifyoursmalloff-roadengineor part
hasfaileddue toabuse,neglect,impropermaintenanceor unapprovedmodifications.
Youare responsibleforpresentingyoursmalloff-roadenginetoan AuthorizedMTDServiceDealeras soonas a problemexists.Thewarranted
repairsshouldbe completedina reasonableamountof time,notto exceed30 days.
If youhaveanyquestionsregardingyourwarrantyrightsand responsibilities,you shouldcontacta MTDServiceRepresentativeat 1-800-800-7310
andaddressisMTDLLC,EO.Box361131,ClevelandOH,44136-0019.
DEFECTS WARRANTY REQUIREMENTS FOR 1995 AND LATER SMALL OFF=ROAD ENGINES:
Thissectionappliesto 1995andlatersmalloff-roadengines.Thewarrantyperiodbeginsonthe datetheengineorequipmentisdeliveredtoan
ultimatepurchaser.
(a) GeneralEmissionsWarrantyCovera_
MTDmustwarranttothe ultimatepurchaserandeachsubsequentpurchaserthatthe engineis:
(1)Designed,built,andequippedso asto conformwithallapplicableregulationsadoptedbytheAir ResourcesBoardpursuantto itsauthorityin
Chapters1and2,Part5, Division26of theHealthandSafetyCode;and
(2) Freefromdefectsinmaterialsandworkmanshipthatcausethefailureofa warrantedparttobe identicalinall materialrespectstothepartas
describedintheenginemanufacturer'sapplicationforcertificationforaperiodoftwoyears.
.(b)The warrantyonemissions-relatedpartswillbe interpretedasfollows:
(1)Anywarrantedpartthatisnot scheduledforreplacementasrequiredmaintenanceinthewritteninstructionsrequiredbySubsection(c)
mustbewarrantedforthewarrantyperioddefinedinSubsection(a)(2).If anysuchpartfailsduringthe periodofwarrantycoverage,it mustbe
repairedor replacedbyMTDaccordingto Subsection(4)below.Any suchpartrepairedor replacedunderthewarrantymustbewarrantedfor
theremainingwarrantyperiod.
(2)Anywarrantedpartthat isscheduledonlyfor regularinspectioninthewritteninstructionsrequiredbySubsection(c)mustbewarrantedfor
thewarrantyperioddefinedinSubsection(a)(2).A statementinsuchwritteninstructionstotheeffectof"repairor replaceasnecessary"will
notreducetheperiodof warrantycoverage.Anysuchpart repairedor replacedunderwarrantymustbe warrantedforthe remainingwarranty
period.
(3) Anywarrantedpartthat whichisscheduledforreplacementas requiredmaintenanceinthewritteninstructionsrequiredbySubsection(c)
mustbewarrantedfortheperiodof timepriortothe firstscheduledreplacementpointfor thatpart.Ifthe partfailspriortothefirst scheduled
replacement,thepart mustbe repairedor replacedby MTDaccordingtoSubsection(4) below.Anysuchpartrepairedorreplacedunder
warrantymustbewarrantedforthe remainderof theperiodpriorto thefirstscheduledreplacementpointforthepart.
(4) Repairorreplacementofany warrantedpartunderthe warrantyprovisionsofthisarticlemustbe performedatnochargetotheownerata
warrantystation.
(5) Notwithstandingtheprovisionsof Subsection(4)above,warrantyservicesorrepairsmustbeprovidedatall MTDdistributioncentersthat
arefranchisedto servicethesubjectengines.
(6) Theownermustnot bechargedfordiagnosticlaborthatleadstothe determinationthata warrantedpartisinfact defective,providedthat
suchdiagnosticworkisperformedata warrantystation.
EPA-1
Page 27

(7)Theenginemanufactureris liablefordamagesto otherenginecomponentsproximatelycausedbya failureunderwarrantyof anywarranted
part.
(8) Throughouttheengine'swarrantyperioddefinedinSubsection(a)(2),MTDwillmaintainasupplyofwarrantedpartssufficienttomeetthe
expecteddemandforsuchparts.
(9) Anyreplacementpartmaybe usedin theperformanceofanywarrantymaintenanceor repairsandmustbe providedwithoutchargetothe
owner.Suchusewillnot reducethewarrantyobligationsof MTD.
(10)Add-onormodifiedpartsthatarenotexemptedbytheAir ResourcesBoardmaynotbeused.The useof anynon-exemptedadd-onor
modifiedpartsshallbegroundsfordisallowingawarrantyclaimmadeinaccordancewiththisarticle.The enginemanufacturershallnotbe
liableunderthisarticletowarrantfailuresof warrantedpartscausedbythe useof non-exemptedadd-onor modifiedpart.
(c)MTDwillincludea copyofthe followingemissionwarrantypartslistwitheachnewengine,usingthoseportionsofthelistapplicabletothe
e__&gine.
(1)FuelMeteringSystem
•Coldstartenrichmentsystem(softchoke)
•Carburetorandinternalparts
•FuelPump
(2)Air InductionSystem
•Aircleaner
•Intakemanifold
(3) IgnitionSystem
•Sparkplug(s)
•MagnetoIgnitionSystem
(4)ExhaustSystem
(5) MiscellaneousItemsUsedinAboveSystem
•Vacuum,temperature,position,timesensitivevalvesandswitches
•Connectorsandassemblies
EPA-1
Page 28

MANUFACTURER'S LiMiTED WARRANTY FOR
Thelimitedwarrantysetforthbelowisgivenby MTDLLCwithrespectto
newmerchandisepurchasedandusedin the UnitedStates,itsposses-
sionsandterritories.
"MTD"warrantsthisproductagainstdefectsin materialandworkmanship
fora periodof two(2) yearscommencingonthedateoforiginalpurchase
andwill,atits option,repairor replace,freeofcharge,anypartfoundto
bedefectiveinmaterialsorworkmanship.Thislimitedwarrantyshallonly
applyif this producthasbeenoperatedandmaintainedinaccordance
withtheOperator'sManualfurnishedwiththeproduct,andhasnotbeen
subjectto misuse,abuse,commercialuse,neglect,accident,improper
maintenance,alteration,vandalism,theft,fire,water,ordamagebecause
ofotherperilor naturaldisaster.Damageresultingfromthe installationor
useof anypart,accessoryorattachmentnotapprovedbyMTDfor use
withtheproduct(s)coveredbythis manualwillvoidyourwarrantyasto
anyresultingdamage.
Normalwearpartsarewarrantedto befreefromdefectsinmaterialand
workmanshipfora periodof thirty(30)daysfromthe dateof purchase.
Normalwearpartsinclude,butare notlimitedto itemssuchas: batteries,
belts,blades,bladeadapters,grassbags,riderdeckwheels,seats,snow
throwerskidshoes,shaveplates,augerspiralrubberandtires.
HOWTOOBTAINSERVICE:Warrantyserviceisavailable,WITH
PROOFOFPURCHASE,throughyourlocalauthorizedservicedealer.To
locatethedealerin yourarea,checkyourYellowPages,orcontactMTD
LLCat RO.Box361131,Cleveland,Ohio44136-0019,or call1-800-800-
7310or logon toourWebsiteatwww.mtdproducts.com.
Thislimitedwarrantydoesnot providecoverageinthefollowingcases:
a. Logsplitterpumps,valves,andcylindershavea separateone
yearwarranty.
b. Routinemaintenanceitemssuchaslubricants,filters,blade
sharpening,tune-ups,brakeadjustments,clutch adjustments,
deckadjustments,andnormaldeteriorationof theexteriorfinish
duetouse orexposure.
c. Servicecompletedbysomeoneotherthananauthorizedservice
dealer.
d.
MTDdoesnotextendany warrantyforproductssoldor
exportedoutsideofthe UnitedStates,its possessionsand
territories,exceptthosesoldthroughMTD'sauthorized
channelsofexportdistribution.
e.
f.
ReplacementpartsthatarenotgenuineMTDparts.
Transportationchargesand servicecalls.
No impliedwarranty, includinganyimpliedwarranty of merchant-
ability of fitness for a particularpurpose,applies afterthe applicable
periodof expresswritten warranty aboveas to the partsas identi-
fied. Noother expresswarranty, whether written or oral, exceptas
mentionedabove,given by any personor entity,includingadealer
or retailer,with respect to anyproduct,shallbind MTD.Duringthe
periodof the warranty, the exclusiveremedyisrepairor replacement
of the productas setforth above.
Theprovisionsas setforth inthis warrantyprovidethe soleand
exclusiveremedyarising from the sale.MTDshallnot be liable
for incidentalorconsequentialloss or damageincluding,without
limitation, expensesincurredfor substituteorreplacement lawncare
servicesor for rentalexpensesto temporarily replaceawarranted
product.
Somestatesdo not allowtheexclusionorlimitationofincidentalor
consequentialdamages,or limitationson howlonganimpliedwarranty
lasts,sothe aboveexclusionsor limitationsmaynotapplyto you.
Innoeventshall recoveryof anykind begreaterthantheamountof the
purchasepriceof theproductsold.Alterationof safety features of the
productshall void this warranty. Youassumetheriskandliabilityfor
loss,damage,orinjurytoyouandyourpropertyand/ortoothersandtheir
propertyarisingout ofthe misuseorinabilityto usetheproduct.
Thislimitedwarrantyshallnotextendto anyoneotherthanthe original
purchaseror tothe personforwhomitwaspurchasedasa gift.
HOWSTATELAWRELATESTOTHISWARRANTY: Thislimitedwar-
rantygivesyouspecificlegalrights,andyoumayalso haveotherrights
whichvaryfromstateto state.
IMPORTANT:OwnermustpresentOriginalProofofPurchasetoobtain
warrantycoverage.
MTD LLC, P.O. BOX 361131 CLEVELAND, OHIO 44136=0019; Phone: 1=800=800=7310
 Loading...