Page 1
Page 2
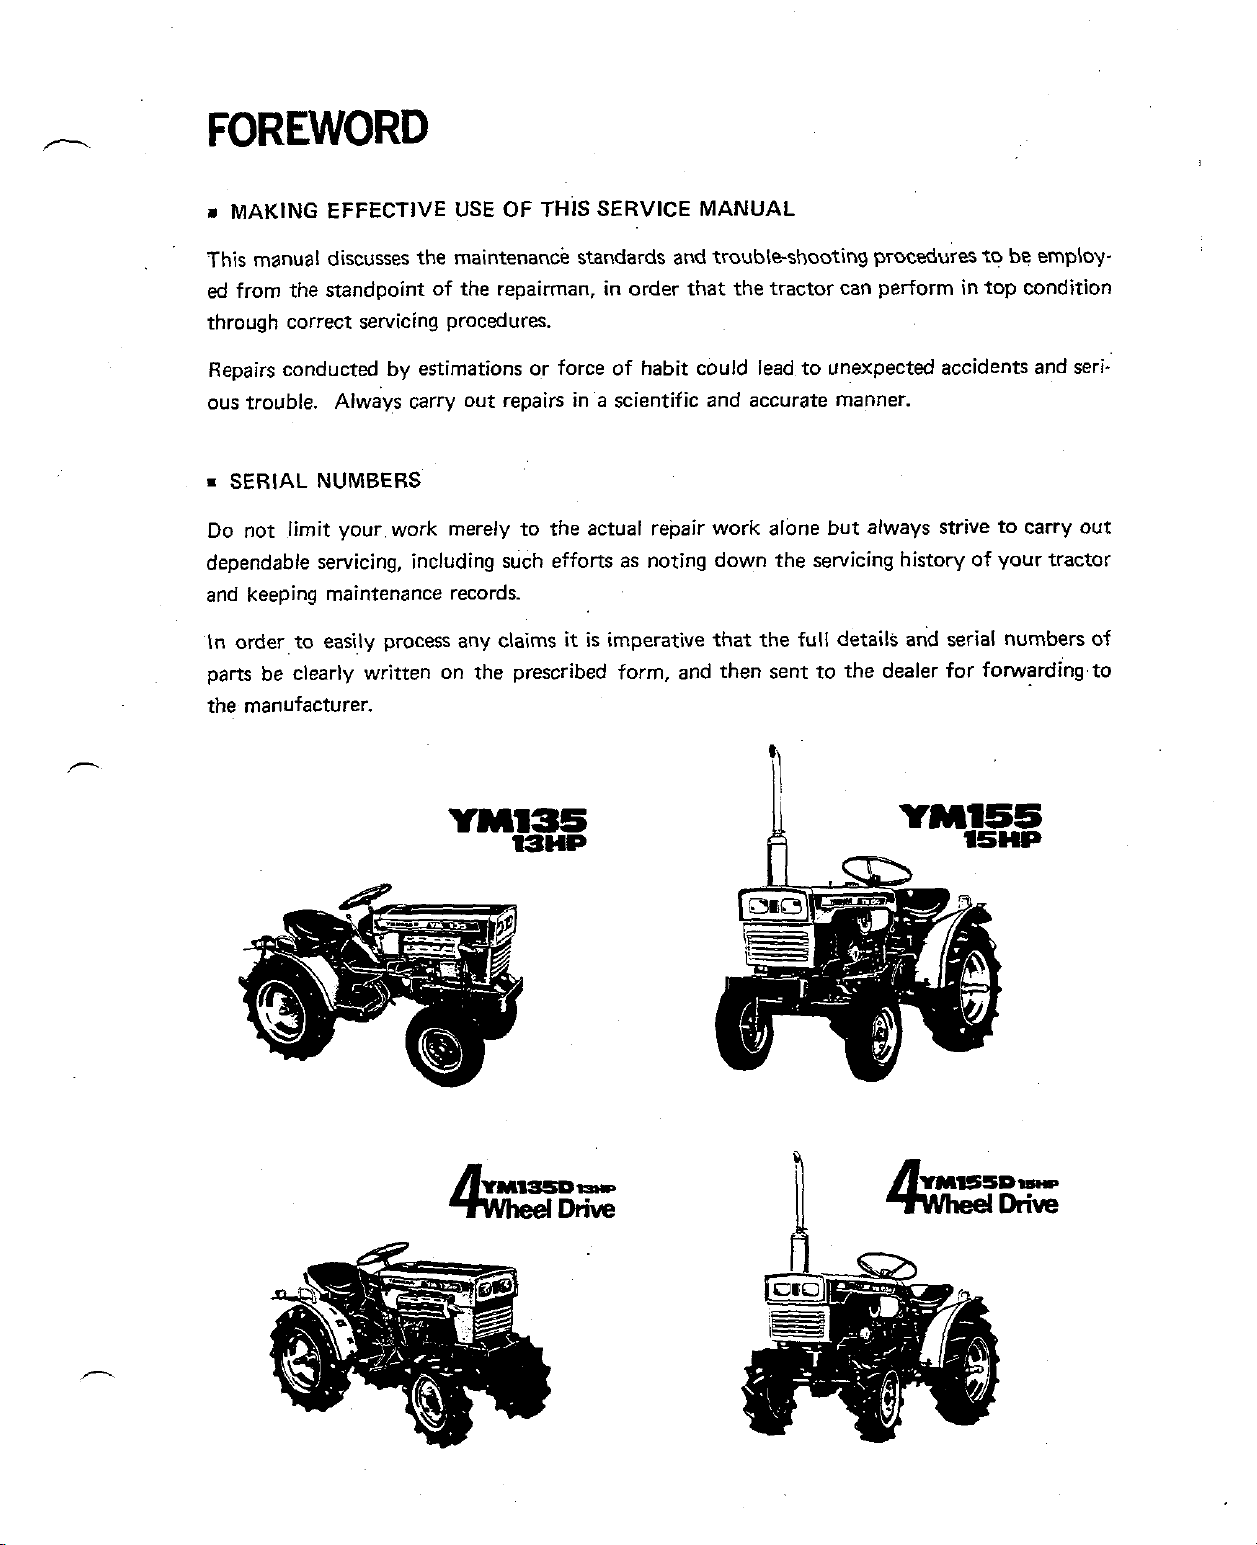
1
MAKING EFFECTIVE
USE
OF
THIS SERVICE MANUAL
This manual discusses the maintenance standards and
ed
from the standpoint of the repairman, in order that the tractor can perform in top condition
through correct servicing procedures.
Repairs conducted by estimations or force of habit could lead to unexpected accidents and seri-
ous trouble. Always carry out repairs in
=
SERIAL NUMBERS
Do not limit your work merely to the actual repair work alone but always strive to carry out
dependable servicing, including such efforts
and keeping maintenance records.
In order to easily process any claims
parts be clearly written on the prescribed form, and then sent to the dealer for forwarding to
the manufacturer.
a
scientific and accurate manner.
as
noting down the servicing history of your tractor
it
is imperative that the full details and serial numbers of
troubleshooting procedures to be employ-
/p,&s-
Drive
Page 3
CONTENTS
I
.
Nomenclature
.
I
I
Specifications
1
.
Specifications
2
Power train
Power train (1)
Power train
Power train
Power train
3
.
Transmission sectional view
4
.
Electric wiring diagram
.
Fuel system
5
6
.
Engine lubricating system
.
Cooling system
7
.
Transmission lubelhydraulic system
8
Ill
.
Tractor separation
IV . .Disassembly sequence
V . Engine disassembly
VI . Engine construction and maintenance
1
.
Cylinder liners 35
.
Pinons
2
.
Piston rings
3
.
Piston pin
4
.
Connecting rods
5
.
Crankshaft
6
.
7
Camshaft 43
8 . Cylinder head 45
9
.
Combustion chambers
10 . Rocker arm assembly
11 . Injection pump and injection valve
12
Governor
13 . Lubricating oil pump
.
14 Cwling system
15 . Gears
16. Oil seals. O-rings and ball bearings
VII . Engine assembly
VI
I I
.
1
.
Governor linkage
2
Valve clearance
3
.
Fuel injection timing
.
Fan belt tension
4
.
Air venting (bleeding)
5
6 . Other measurements and inspections
IX . Electrical equipment
1
.
Battev
2
.
Governor & current limiter
.....................
....................
....................
....................
.....................
Engine adjustments
.....................
................
.................
..................
...................
.................
(2)
.................
(3)
.................
(4)
.................
...........
............
...................
............
.................
.....
.............
............
.............
.................
..................
................
...................
.................
.............
..............
.......
..............
.................
.......
...............
............
................
.................
..............
................
..............
......
............
...........
.
10
10
11
12
13
14
15
17
17
18
18
19
20
31
35
36
37
38
39
40
46
48
48
53
53
54
54
54
55
61
61
61
62
63
63
64
65
65
67
5
5
1
3
.
Inspection and characteristics
4 . Cautions during handling and assembly
5 . Instructions for disassembly and assembly
6 . Maintenance and inspection
7
.
Starter motor
.
Thermostart (optional)
8
.
9 Turn signal lights (optional) 77
10
.
Water temperature indicator light
11 . Engine lube oil pressure
12 . Horn
.
13
.
74
X . Tractor construction and maintenance
1
.
2
3 . Brake
.
4
5 . Steering
.
6
XI . Tractorassembly
1
.
2
2-10 Reversellst speed shift shaft
2-1 1
2-12 Gear shaft lever assembly
2-13 P.T.O. reduction shaft assembly
2-14 Connecting shaft assembly
2-15 P.T.O. shaft assembly
2-16 Differential lock shaft
2-17
2-18 Differential device 120,
2-18 (a) Disassembly
2-18
2-19 Cam
......................
Lights
Safety start switch
Clutch and relevant items
Transmission and related items
......................
Hydraulic lift device
Front axle and rear axle
General assembly
Transmission assembly
2-1 P.T.O. driving shaft assembly
2-2
'P.T.o.
2-3 Front P.T.O. shaft assembly
(YM135D . YM155D)
2-4 Front P.T.O. shift shaft assembly
(YM135D . YM155D)
2-5 Driven shaft assembly
2-6 Counter shaft assembly
2-7 Low-high shift shaft assembly
2-8 Main change shaft assembly
2-9 The fork of the
shaft assembly
assembly
Main shaft and transmission front
cover assembly
Final reduction pinion and rear
axle shaft assembly 118
(b) Assembly
..................
.....................
...............
..............
.....................
..............
...............
fork shaft assembly
2ndl3rd speed shift
.............
................
.............
.............
...............
.
differential lock assembly
..........
.....
...
...........
.............
...........
........
.............
............
.........
.............
............
......
.......
..........
..........
..........
.........
......
.......
........
.....
.......
..........
aisembly
.....
...........
...........
.....
.
69
70
71
a1
72
78
78
.
79
89
90
93
95
103
103105
105
106
107
107
108
109
110
110
Ill
112
113
114
115
115
116
117
12
122
122
77
77
78
78
79
83
Page 4
3 . Front axle assembly
3-1 Front axle assembly (YM155D
YM135D)
3-2
Front axle assembly (YM155. YM135)
3-3 Front axle assembly (YM155D.
.
YM135Dl
3-4
Differential device assembly (YM155D
YM135D. front axle)
4 . Center pin assembly
4-1 For YM155D & YM135D
4-2 For YM155 & YM135
5 . Brake drum assembly
6 . Hydraulic system assembly
6.1 Cylinder head assembly
62 Lifting shaft.
hydraulic piston rod assembly
6-3 Control valve assembly
6-4
Hydraulic control fork. hydraulic
control lever assembly
6-5 Auto-return rod. operator's seat
bracket assembly
6-6 Slow return valve assembly
n
6-7 Lift arm assembly
68
Operational precaution polnts
.............
.
................
...............
..........
.............
.......
.........
.............
..........
.........
lift
arms.
liff
crank.
.....
.........
.........
............
.......
............
.....
.
.
XI1 . Tractor adjustments
XI
II
.
Tractor trouble-shooting
1 . Engine and related items
2
Electrical system
.
Brake system
3
4
.
Clutch and related item
5
.
Transmission and related items
6
.
P.T.O.
and related items
7
.
Hydraulic system
8
.
Steering and suspension system
XIV . Regular inspections
XV . Tightening torque ratings
XVI
.
Maintenance equipment and tools
.................
...............
...........
...........
...............
...........
...........
...........
........
.......
.......
.......
.
.
141
142
143
145
745
746
147
147
148
149
150
151
153
Page 5
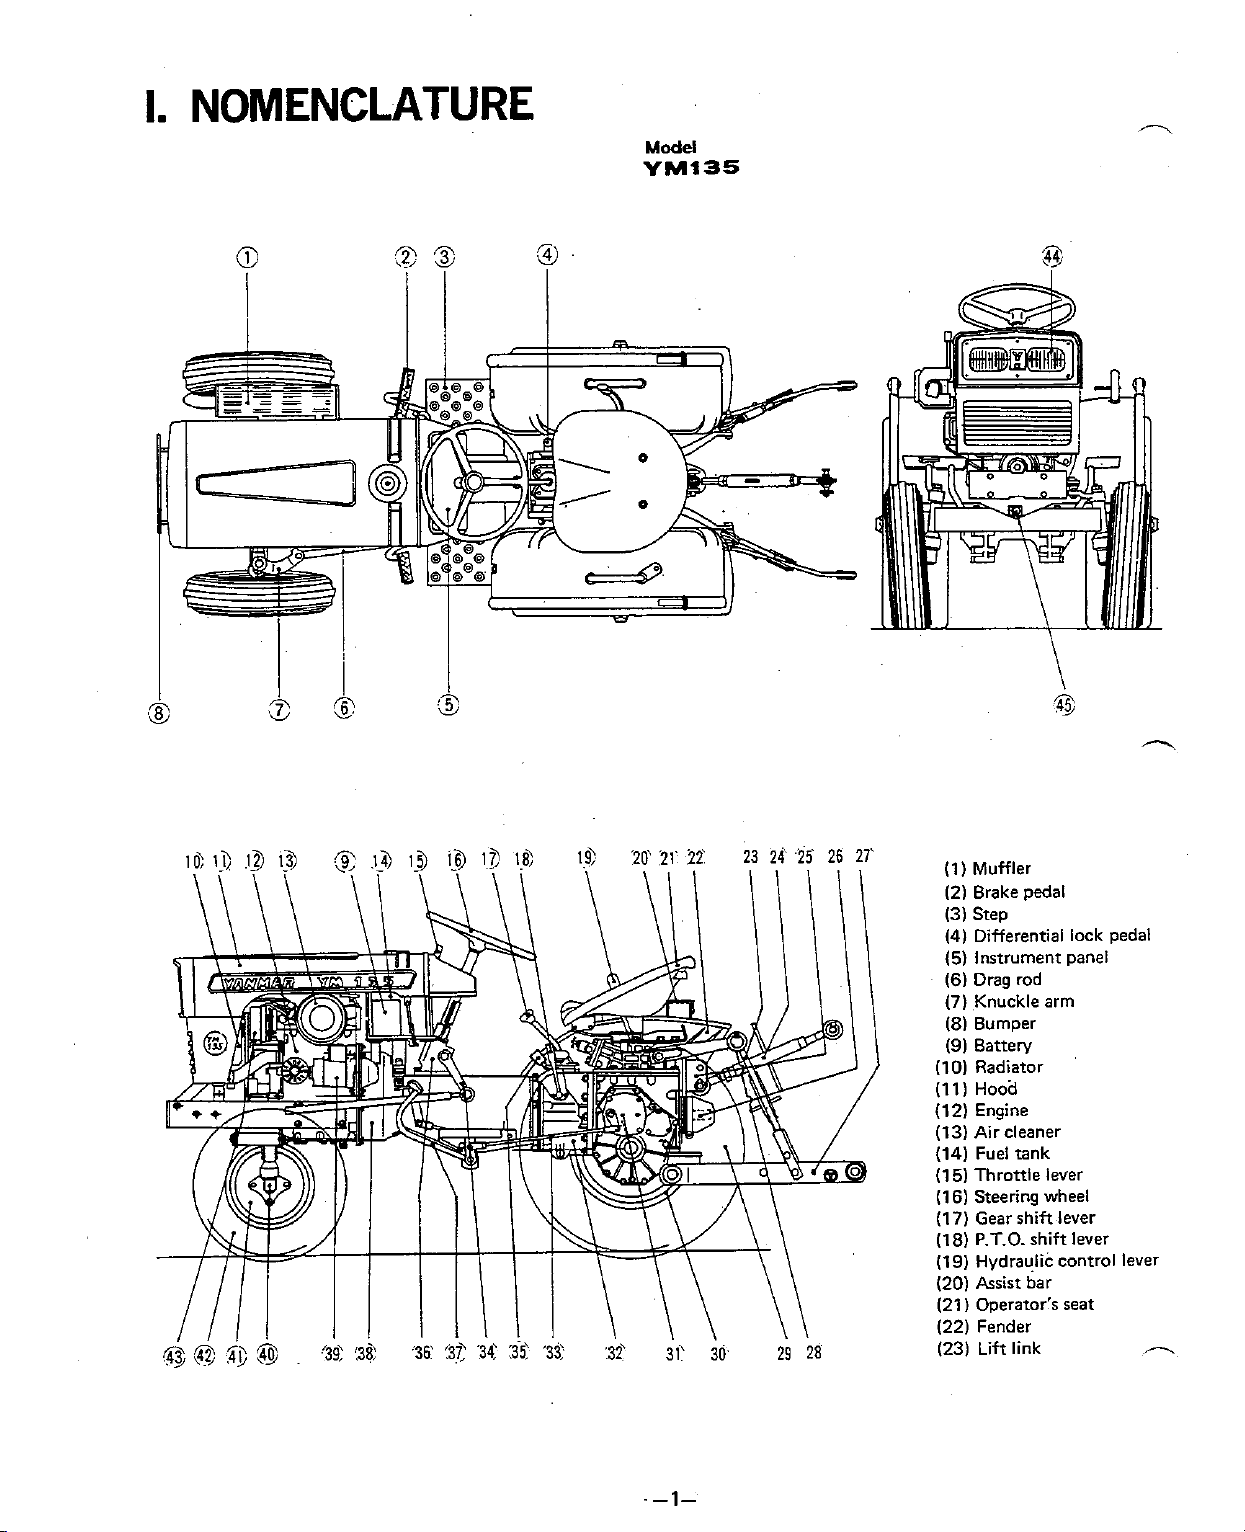
I.
NOMENCLATURE
Model
YM135
(1) Muffler
(2) Brake pedal
(31 Step
(4) Differential lock pedal
(5) Instrument panel
(6)
Drag rod
(7)
Knuckle arm
(8) Bumper
(9) Battery
(101 Radiator
(111 Hood
(12) Engine
(13) Air cleaner
(14) Fuel tank
(15) Throttle lever
(16) Steering wheel
(17) Gear shift lever
P.T.O.
(18)
(19) Hydraulic control lever
(20) Assist bar
)
(21
(22) Fender
(23) Lift link
shift lever
Operator's seat
Page 6
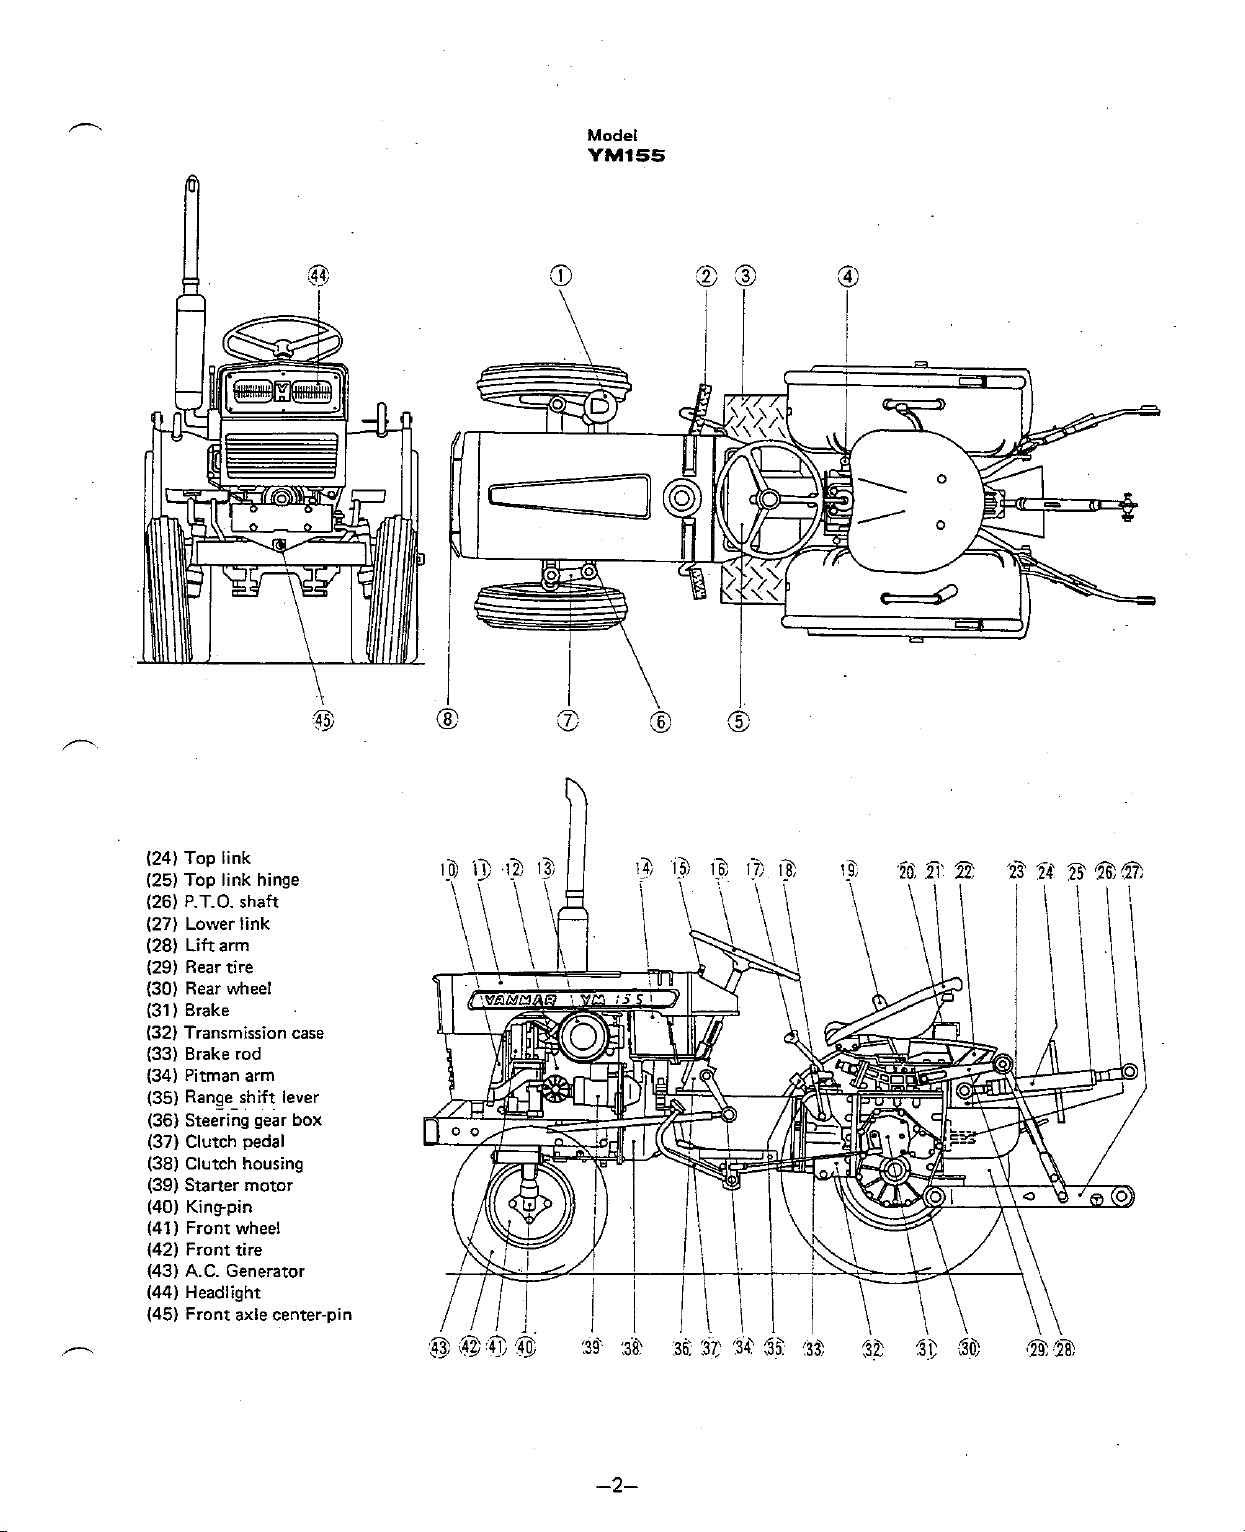
Model
YM155
(24) Top link
(25) Top link hinge
(26)
P.T.O. shaft
(27)
Lower link
(28) Lift arm
(29) Rear tire
(30) Rear wheel
(31 ) Brake
(32) Transmission case
(33) Brake rod
(34) Pitman arm
(35) Range
..
-
shift . lever
(36) Steering gear box
(37) Clutch pedal
(38) Clutch housing
(39) Starter motor
(40) Kingpin
(41
Front wheel
(42) Front tire
(43) A.C. Generator
(44) Headlight
(45) Front axle center-pin
Page 7
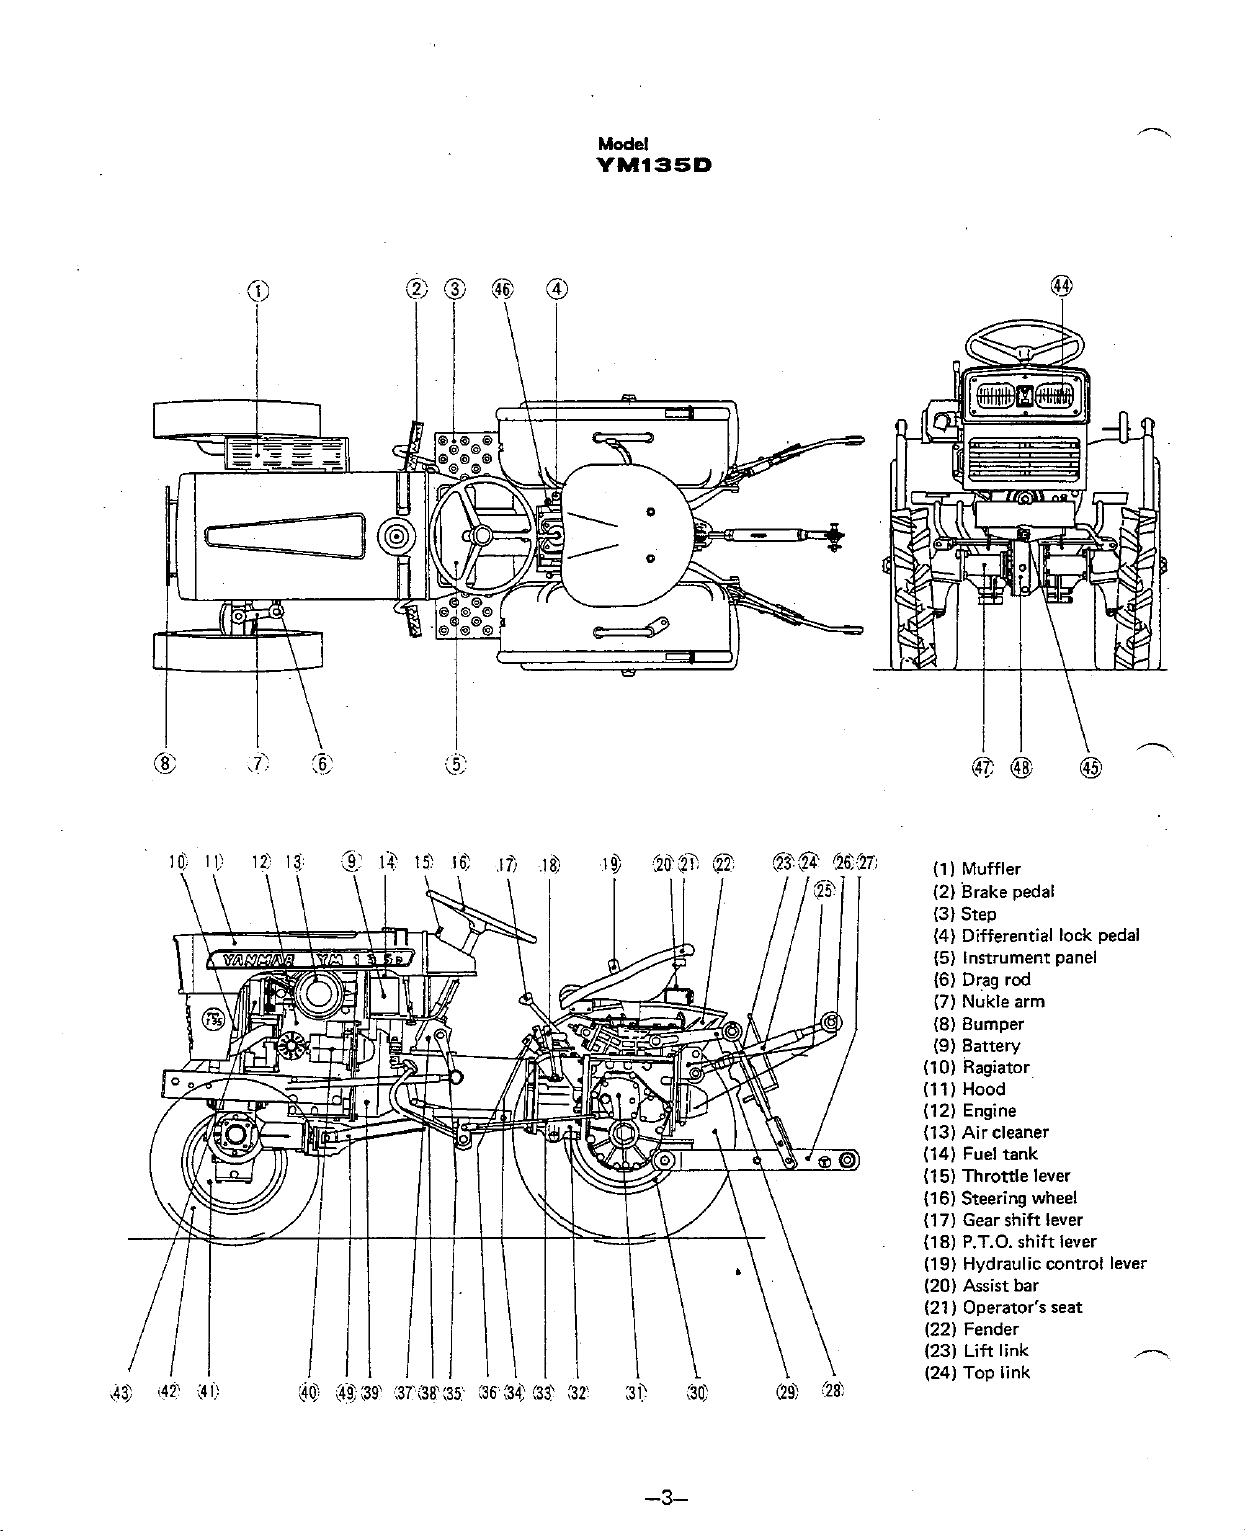
Model
YM135D
(1) Muffler
(2) Brake pedal
(3) Step
(4) Differential lock pedal
(5)
Instrument panel
(6) Drag rod
(7)
Nukle arm
(8) Bumper
(9)
Battew
(10) Ragiator,
(1 1 ) Hood
(12) Engine
(13) Air cleaner
(14) Fuel tank
(15) Throttle lever
(16) Steering wheel
(17) Gear shift lever
(18) P.T.O. shift lever
(19) Hydraulic control lever
(20) Assist bar
)
Operator's seat
(21
(22) Fender
(23) Lift link
(24) Top link
A
Page 8
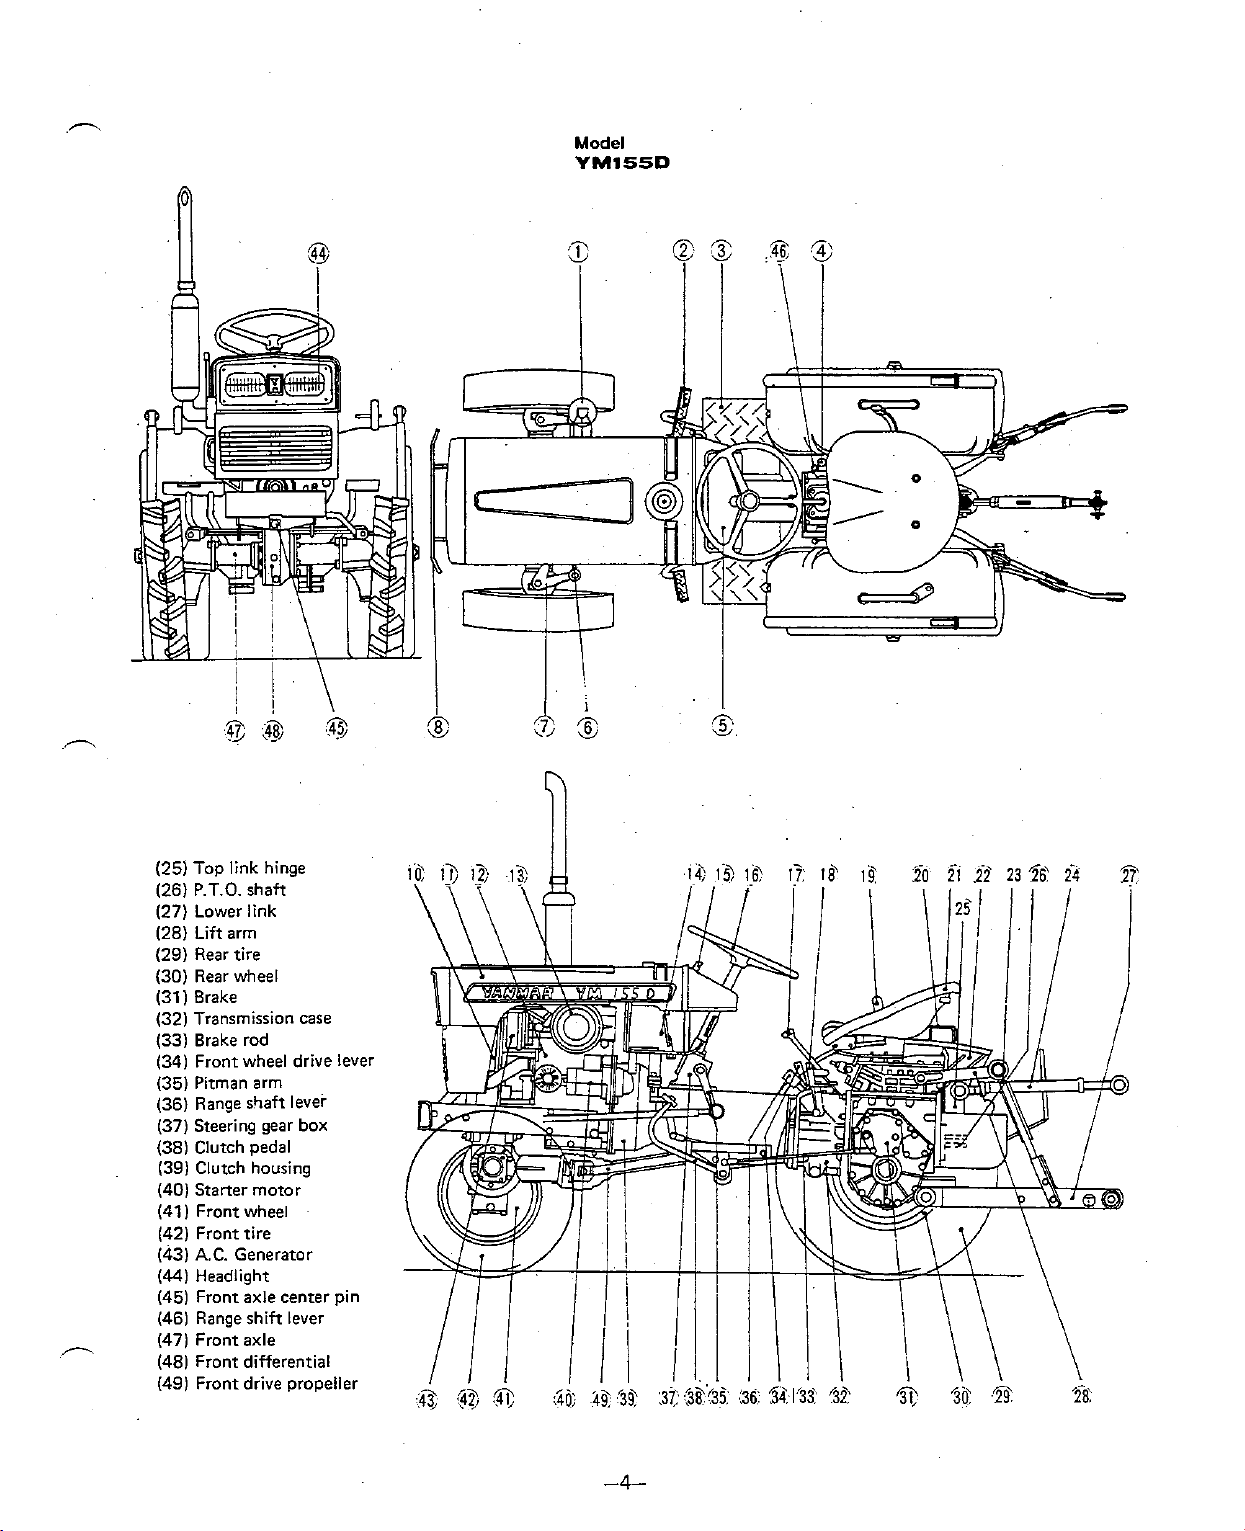
Model
YM155D
(25) Top link hinge
(26) P.T.O. shaft
(27) Lower link
(281 Lift arm
(291 Rear tire
(30) Rear wheel
(31
1
Brake
(32) Transmission case
(331 Brake rod
(34) Front wheel drive lever
(35) Pitman arm
(36) Range shaft lever
(37) Steering gear box
(38) Clutch pedal
(39)
Clutch housing
(401 Starter motor
(41 I Front wheel
(42) Front tire
(43)
A.C.
Generator
(44)
Headlight
(45) Front axle center pin
(461 Range shift lever
(47) Front axle
(48) Front differential
(49) Front drive propeller
Page 9
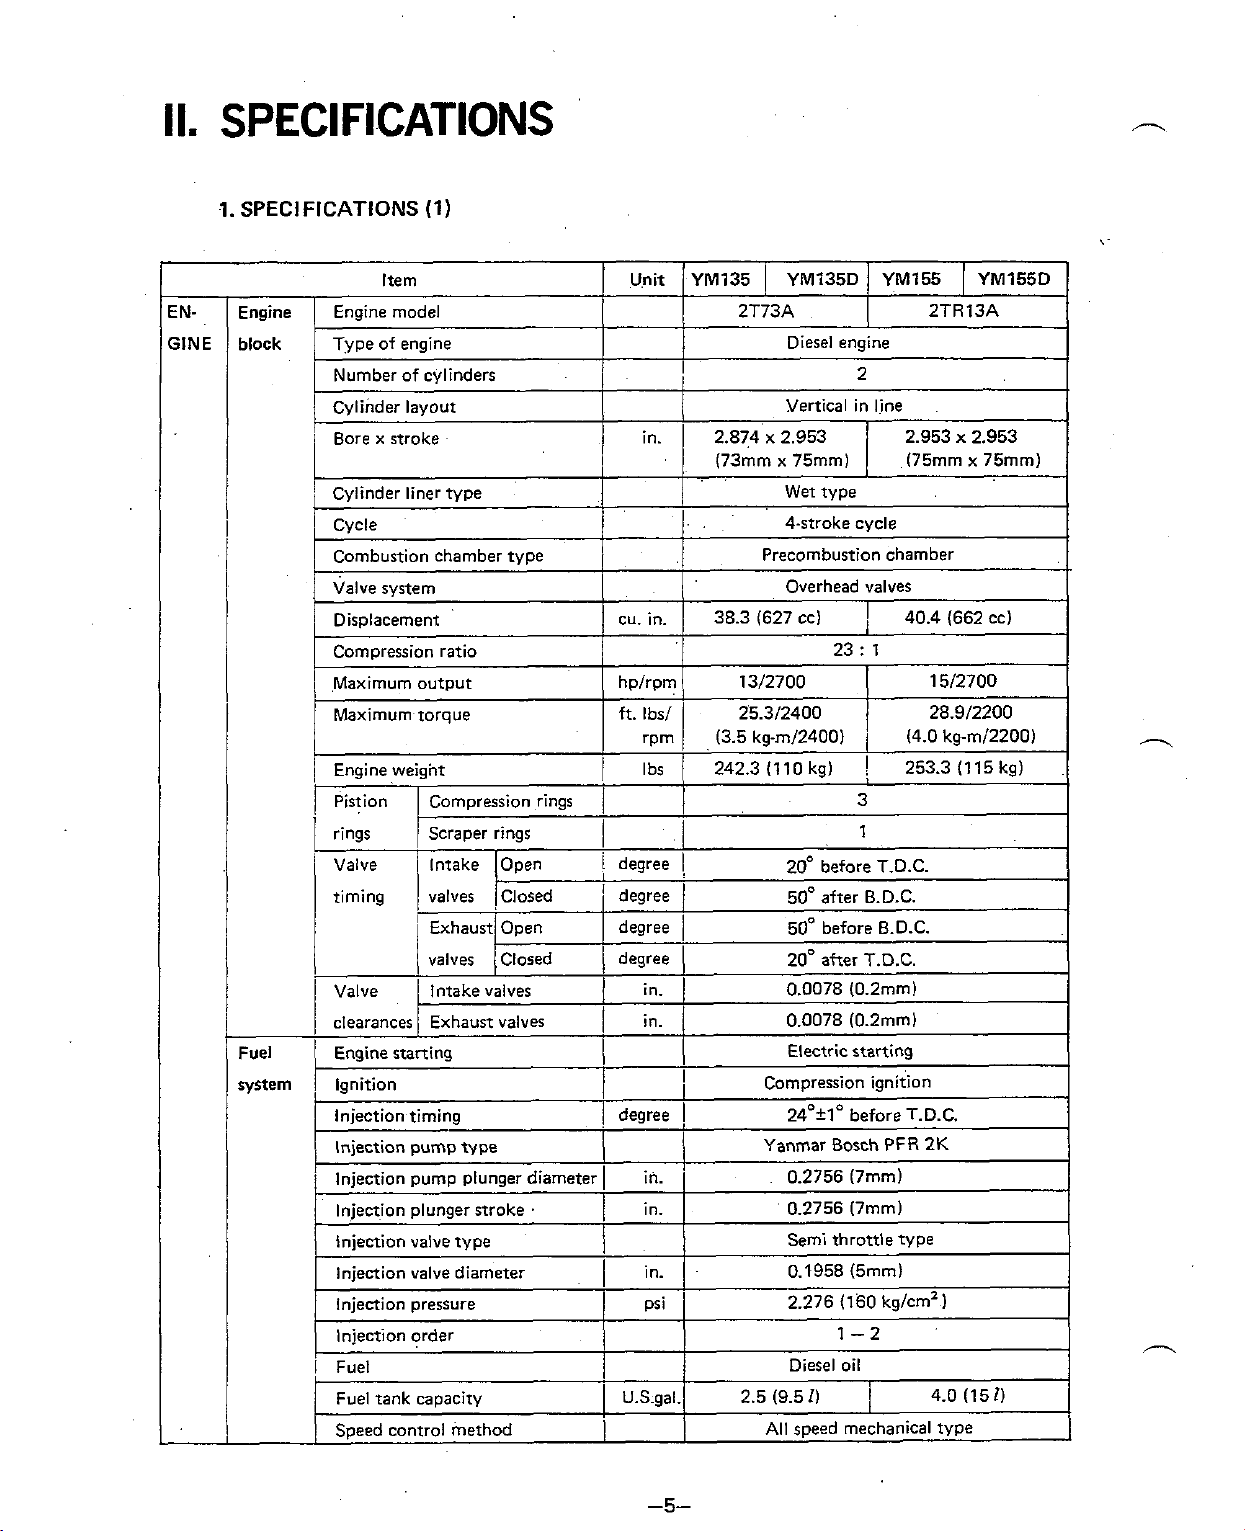
II.
SPECIFICATIONS
1.
SPECIFICATIONS
(1)
1
ENGlNE
I
block
I
L
Fuel
system
I
Item
Type of engine
Number of cylinders
Cylinder layout
i
Bore
stroke
Cylinder liner type
I
~vcle
Combustion chamber type
Valve system
Displacement
Comoression ratio
(
Maximum output
Maximum torque
[ngine weight
/
Pistion I Compression rings
rings
Valve
t~ming
Valve
clearances
Engine starting
Ignition
Pi
lnjection timing
Injection pump
1
Injection pump plunger diameter
Injection plunger stroke
Injection valve type
Injection valve diameter
lnjectlon pressure
Injection order
I
Fuel
Fuel tank capaciry
Speed control method
/
Scraper rings
Intake
valves
Exhaust
valves
i
Intake valves
Exhaust valves
Open
Closed
Open
Closed
type
.
I
Unit / YM735 I YM735D I YM155 I YM155D
2T73A Engine model
I
2.874 x 2.953 2.953
jn
I
I I
1
173mm x 75mml
I
1
cu. in.
hplrpm
"'
1
1
I
degree
/
degree
I
degree
/
degree
1
FL
lbs
~n.
in.
38.3 (627
13/2700
25.312400 28.912200
1
(3.5 krml2400)
1
242.3(llOkgI
I
I
/
/
1 1
I
.
In.
~n.
<
I
I
1
1
~n.
psi
U.S.ga1. 2.5 (9.5
Diesel engine
2
Vertical in line
I
I
Wet type
4-stroke cvcle
Precombustion chamber
Overhead valves
cc)
I
23 : 1
1
!
3
1
20' before T.D.C.
50' after B.D.C.
50' before B.D.C.
20° after T.D.C.
0.0078
0.0078 (0.2mm)
Electric starting
Compression ignition
24'f
Yanmar Bosch
0.2756 (7mml
0.2756 (7mml
Semi throttle
0.1958 (5mm)
2.276 (160 kglcm2
Diesel oil
All speed mechanical type
(0.2mm)
lo
before T.D.C.
1-2
1)
2TR13A Engine
x
2.953
(75mm x 75mml
40.4 (662 cc)
1512700
14.0 k~-m/2200)
253.3(115kg)
PFR
2K
type
1
4.0
(152)
1
I
Page 10
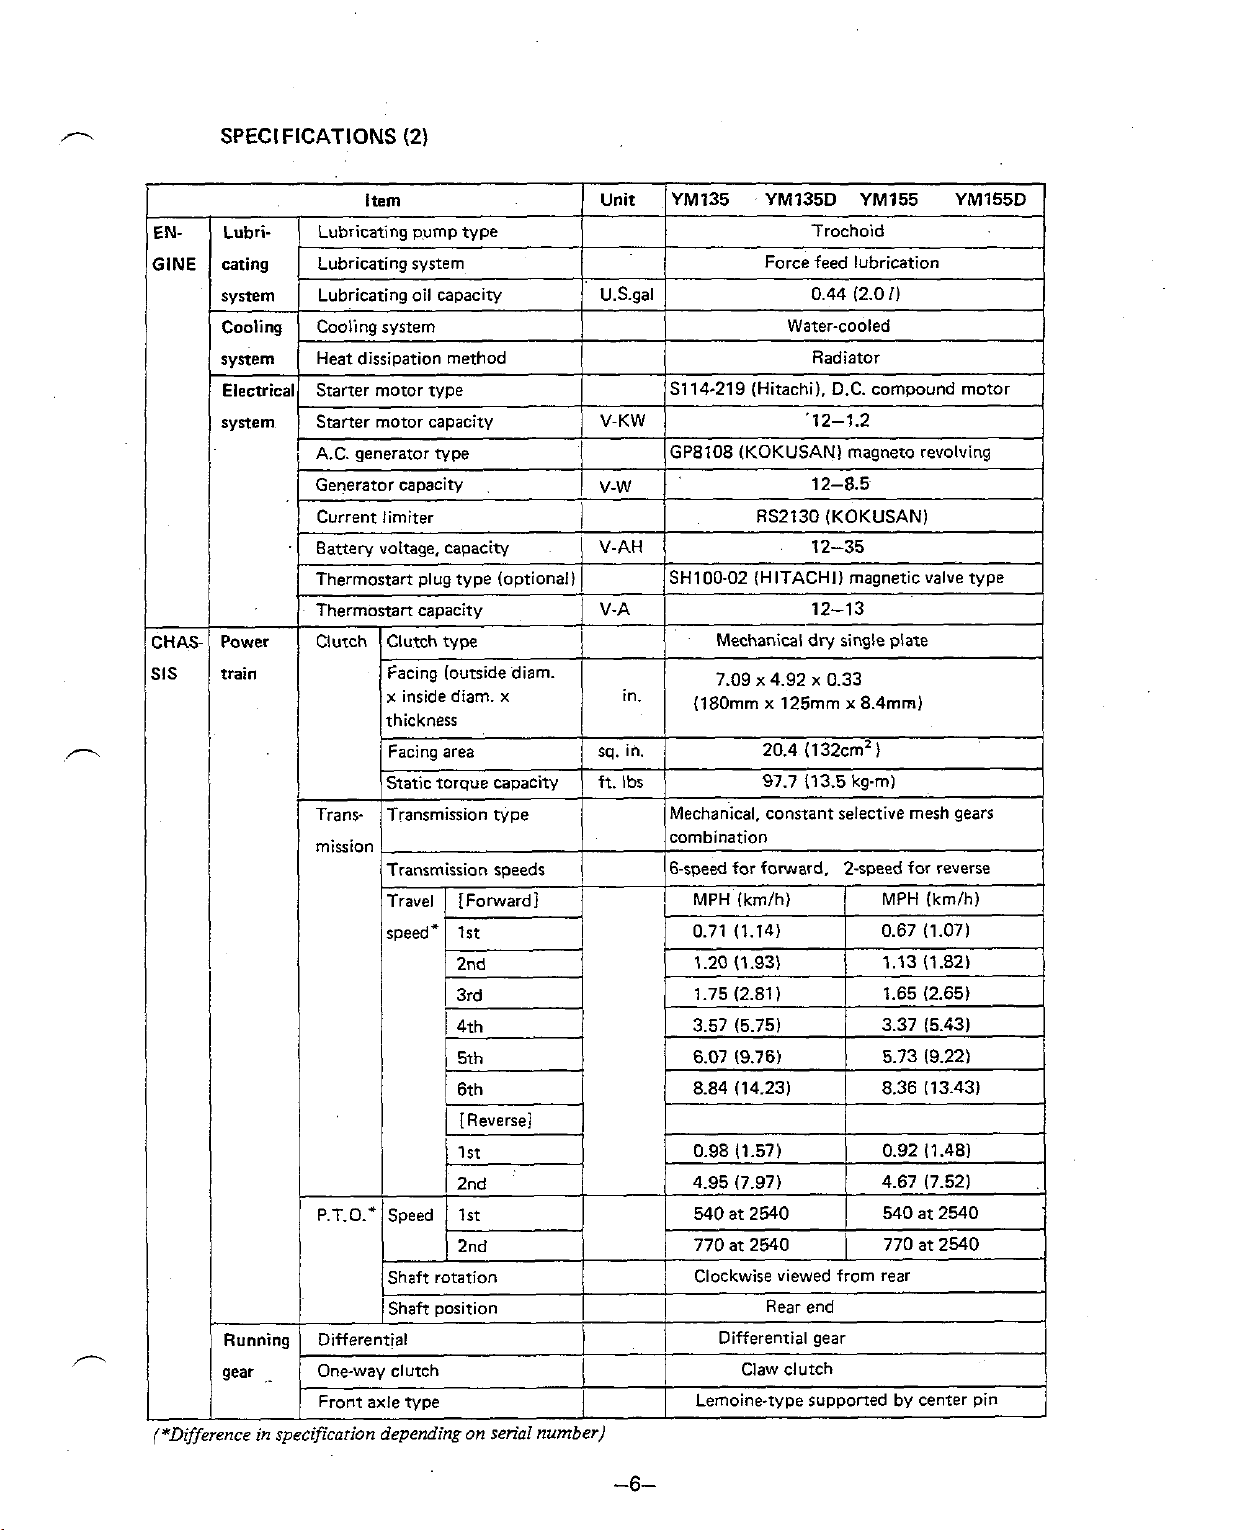
A
SPECIFICATIONS
(2)
1
EN-
!61NE
I
Lubri-
cating
system
Cooling
system
Electrical
system
I I
CHAS-
SIS
Power
train
Item
Lubricating pump type
Lubricatins system
.
Lubricating oil capacity
Cooling system
Heat dissipation method
Starter motor type
Starter motor capacity
I
A.C. generator type
Generator capacity
Current limiter
Battery voltage,
Thermostart plug type (optionall
Thermostan
Clutch
Transmission
capaciw
capacity
Clutch type
Fac~ng (outside diam.
x
inside diam.
thickness
Facing area
Static
torsue capacitv
Transmission type
Transmission
Travel [Forwardl
speed* 1st
x
meeds
1
Unit IYM135 YM135D YM155 YM155D
Trochoid
Force feed lubrication
1
1
1
U.S.ga1
V-KW
V-W
V-AH
V-A
In.
sq. in.
ft.
Ibs
0.44 (2.0
Water-cooled
Radiator
S114-219 (Hitachi), D.C. compound motor
'12-1.2
(GP8108 (KOKUSAN) magneto revolving
12-8.5
RS2130 (KOKUSANI
12-35
SH100-02 (HITACHI) magnetic valve type
12-13
Mechanical dry single plate
x
4.92 x 0.33
7.09
(180mm x 125mm x 8.4mrn)
20.4 (132cm2
97.7 (13.5 kg-m)
Mechanical. constant selective mesh gears
combination
6-speed for forward, 2-speed for reverse
I
1
MPH (kmlhl MPH (kmlh)
0.71 (1.14)
)
1
1)
0.67 (1.071
1
I
r'\
(*Difference in specificarion depending on serial number)
Page 11
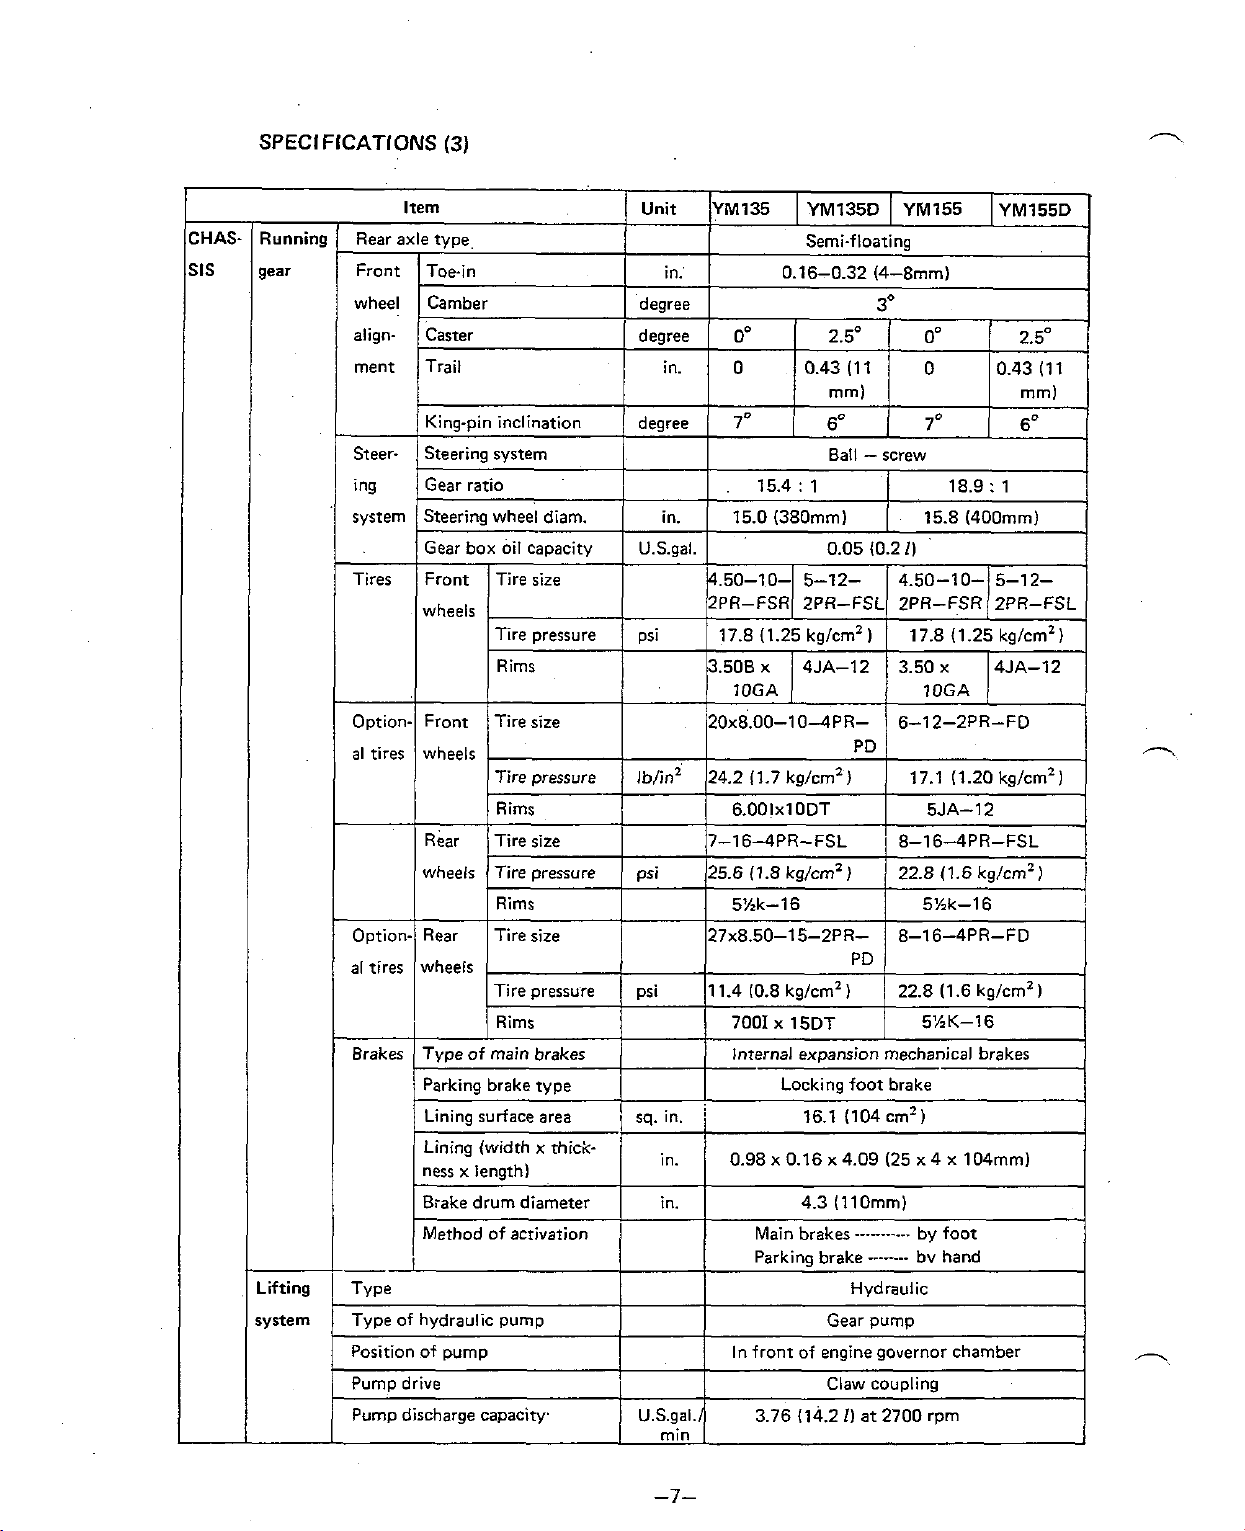
CHASSIS
I
Running
gear
/
Item
Rear axle type
Front
wheel
alignment
Steer- 1 Steering svstem Ball - screw
Ing
system
Tires
Option- Front Tire size /20x8.00-10-4PR-
/
al
I
Toe-in
Camber
Caster
Trail
/
King-pin inclination
Gear ratio
Steering wheel diam.
Gear box oil capacity
Front
wheels
tires I wheels
I I
Tire size
Tire pressure
Rims
I
Tire pressure
Rims 5JA-12
Unit
degree
degree
(
degree
U.S.ga1.
psi
/
lb/in2 124.2 11.7 kg/cm2)
YM135
in.
0'
in.
in.
0
(
7O
15.0
4.50-102PR-FSR
17.8 (1.25 kg/cm2
3.506 x / 4JA-12
lOGA
I
0.16-0.32
1
15.4
:
(380mm)
2PR-FSL
5-12-
YM135D
Semi-floating
2.5O
0.43 (1 1
mm)
6"
1
0.05 (0.2 1)
PD
YM155
(4-8mm)
3O
o0
0
1
7O
18.9 : 1
15.8 (400mm)
4.50-10ZPR-FSR
17.8 (1.25
)
3.50 x 14JA-12
1
10GA
1
6-12-2PR-FD
/
1
17.1 11.20 kg/cm2)
YM755D
2.5"
0.43 (1 1
mm)
1
6O
5-12-
2PR-FSL
kg/cm2)
.
-
-
1
1
system
I I
wheels Tire pressure ( psi 125.6 (1.8 kg/cm2)
Rims
I
option-/ Rear I Tire size
al tires
-
Brakes
I
I
Type Hydraulic
Type of hydraulic pump
Position of pump
/
Purno drive
1
Pump discharge capacity.
wheels PD
Tire pressure psi 11.4
Rims 7001 x 15DT 5%K-16
Type of main brakes Internal expansion mechanical brakes
Parking brake type
Lining surface area
Lining (width x thickness x length)
Brake drum diameter
Method of activation Main brakes by foot
i
sq. in. 16.1 (104 cm2)
1
4
I
1
~.S.gal.j 3.76 (14.2 1) at 2700 rpm
I
5Xk-16
127~8.50-15-~PR- 1 8-16-4PR-FD
(0.8 kg/cm2
Locking foot brake
~n. 0.98 x 0.16 x 4.09 (25 x 4 x 104mm)
in.
Parking brake bv hand
/
In front of engine governor chamber
1
1
4.3 (IlOmm)
Gear pump
Claw couolino
1
22.8 (1.6 kg/cm2)
1
5Zk-16
22.8 (1.6 kg/cm2)
I
-
-
I
I
Page 12
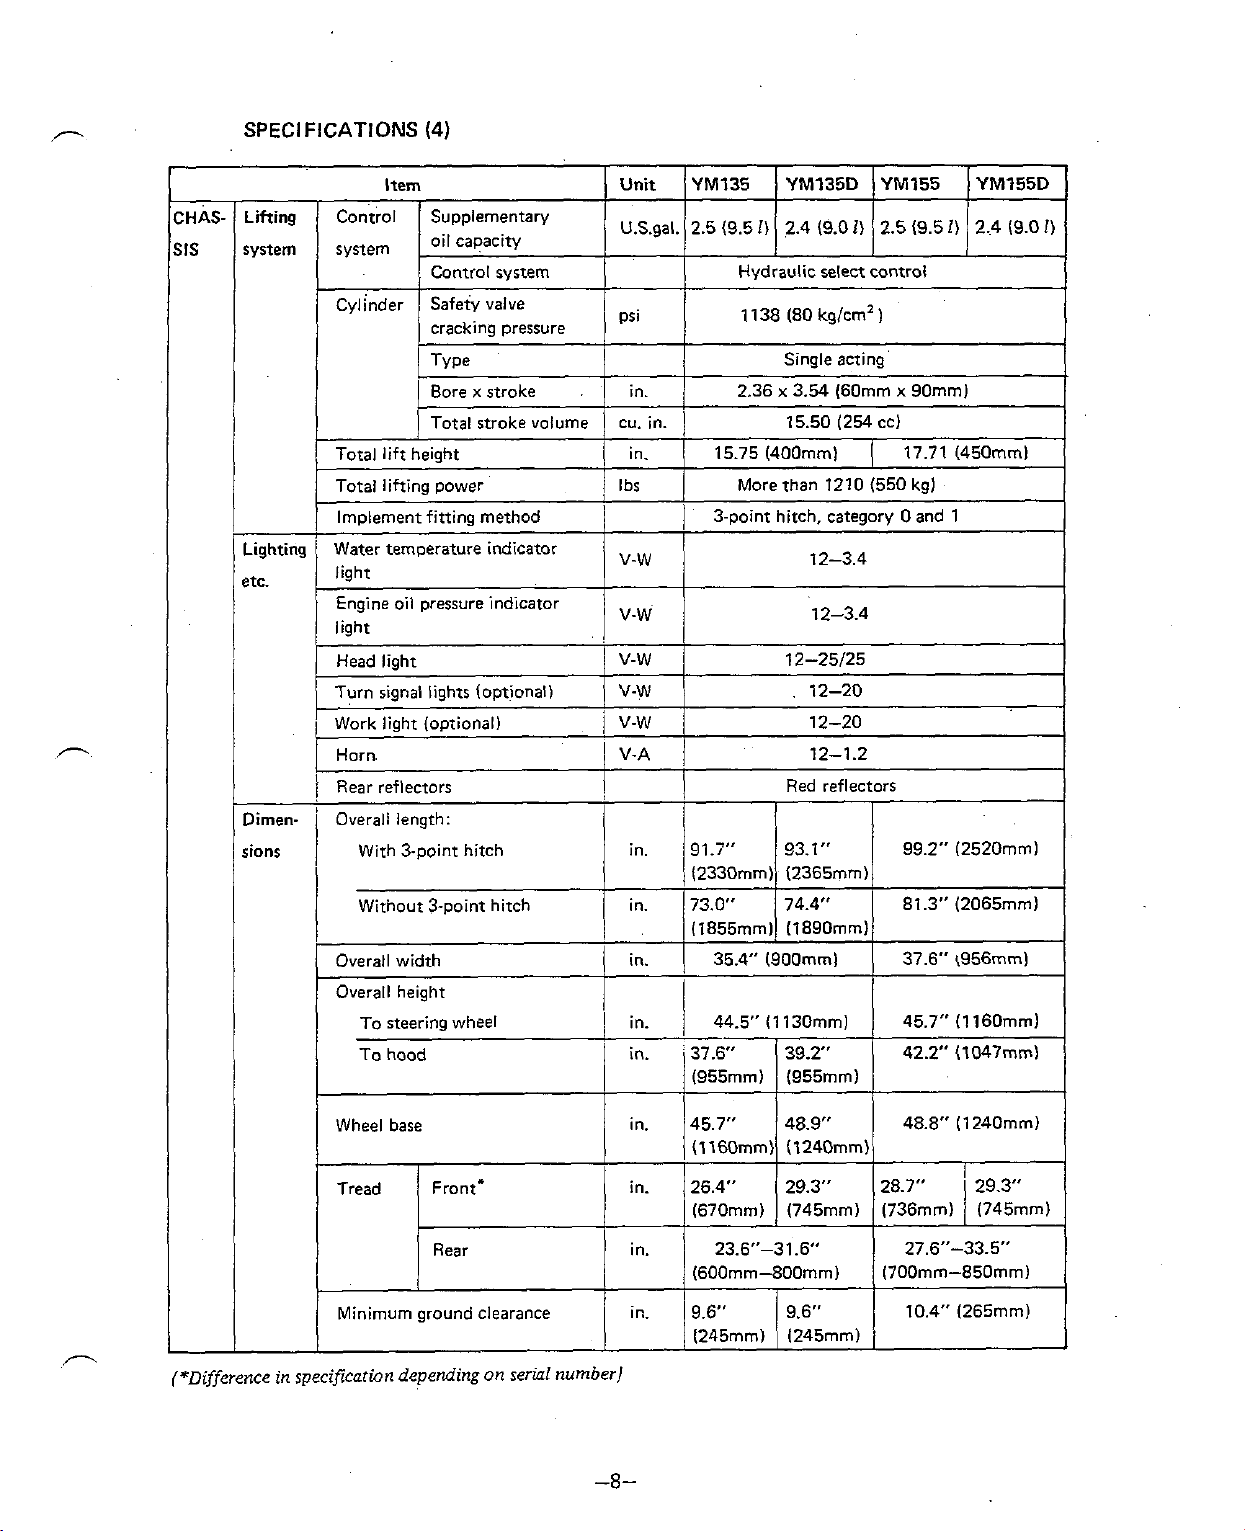
/-.
SPEC1 FICATIONS
(4)
,--
With
3-point
(*Difference in specification depending on serial number)
hitch
99.2"
l2520rnml
Page 13
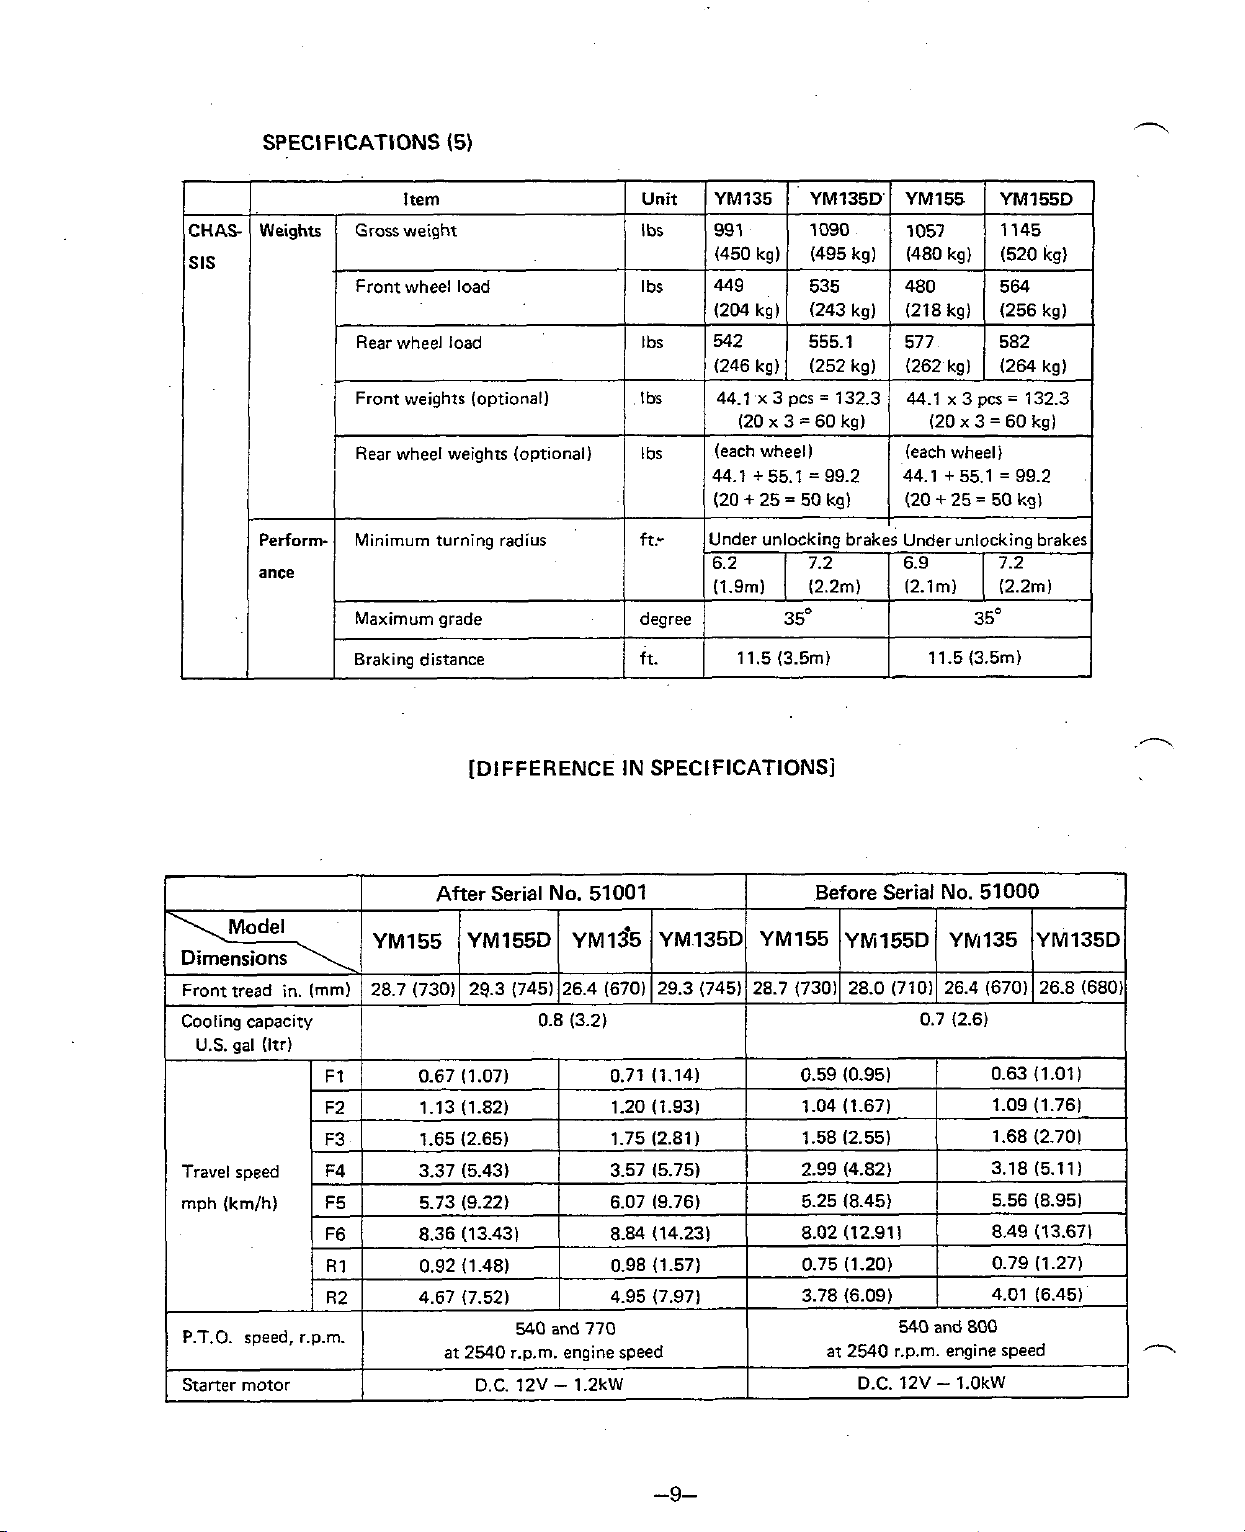
SPECIFICATIONS
(5)
ance
Maximum grade
Braking distance
[DIFFERENCE IN SPEClFlCATlONSj
degree
ft.
6.2
(1.9m)
11.5 (3.5171)
35O
7.2
(2.2m)
6.9
(2.lm)
11.5
7.2
(2.2ml
35O
(3.5m)
.-
P.T.O.
speed, r.p.m.
Page 14
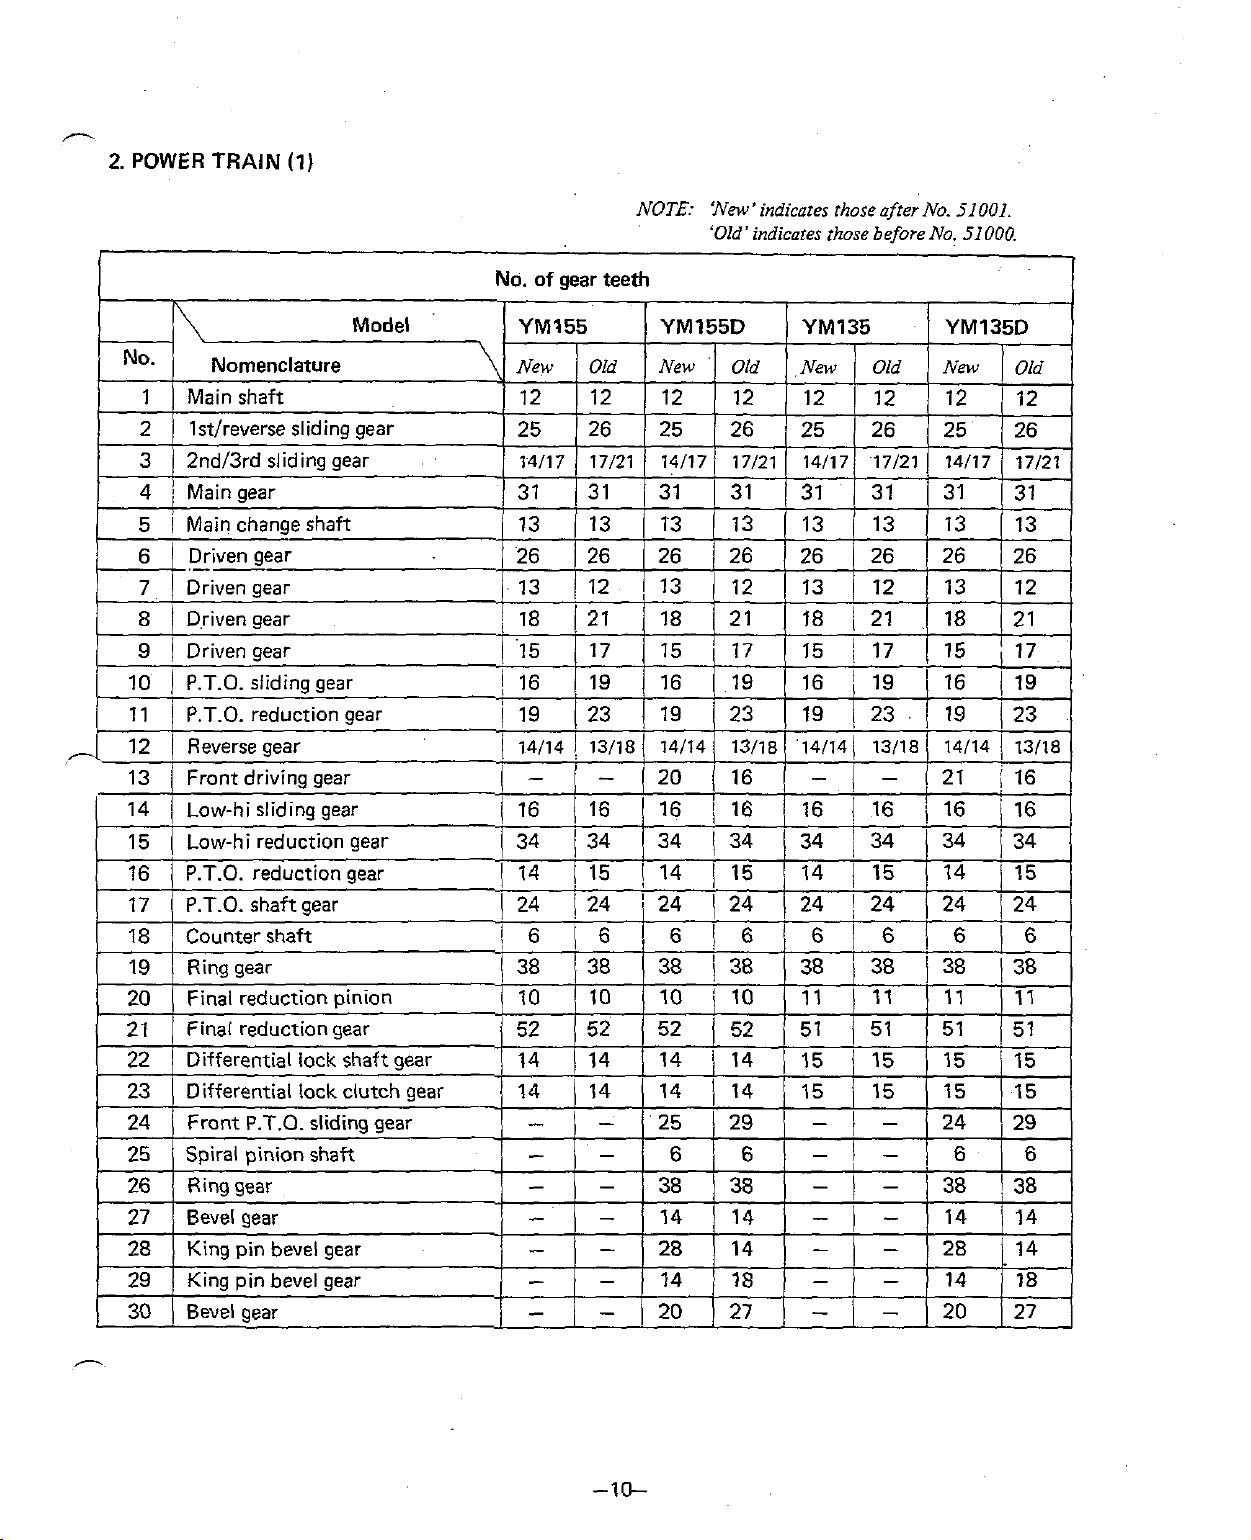
,--.
2.
POWER
TRAIN
(1)
No.
of
sear
NOTE: 'New 'indicates those after No.
'Old' indicates those before No.
teeth
51
51
001.
000.
1
Page 15
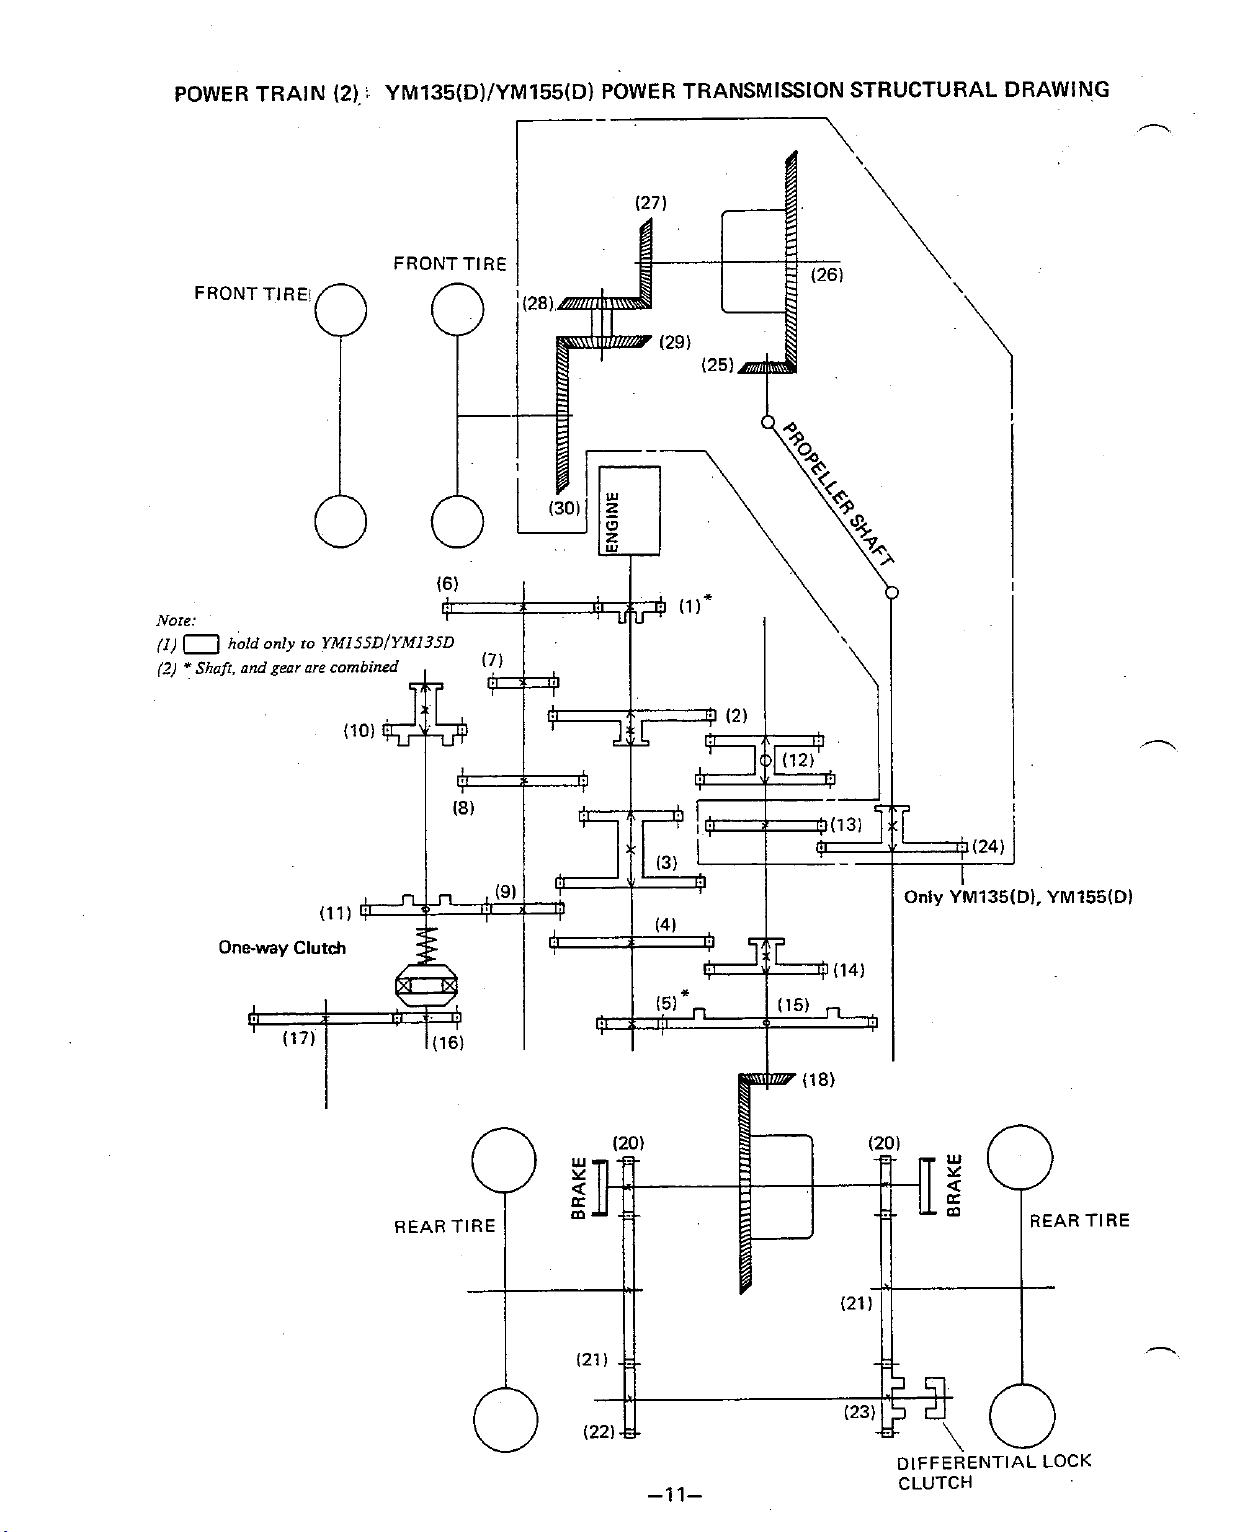
POWER TRAIN
Nore:
(I)
0
hold only
(2)
*
Shofi. nnd
geor
(2).
,
YM135(D)IYM155(D) POWER TRANSMISSION STRUCTURAL DRAWING
FRONT TIRE
ro
YMISZDIYM135D
are
combined
,--.
I
DIFFERENTIAL
LOCK
Page 16
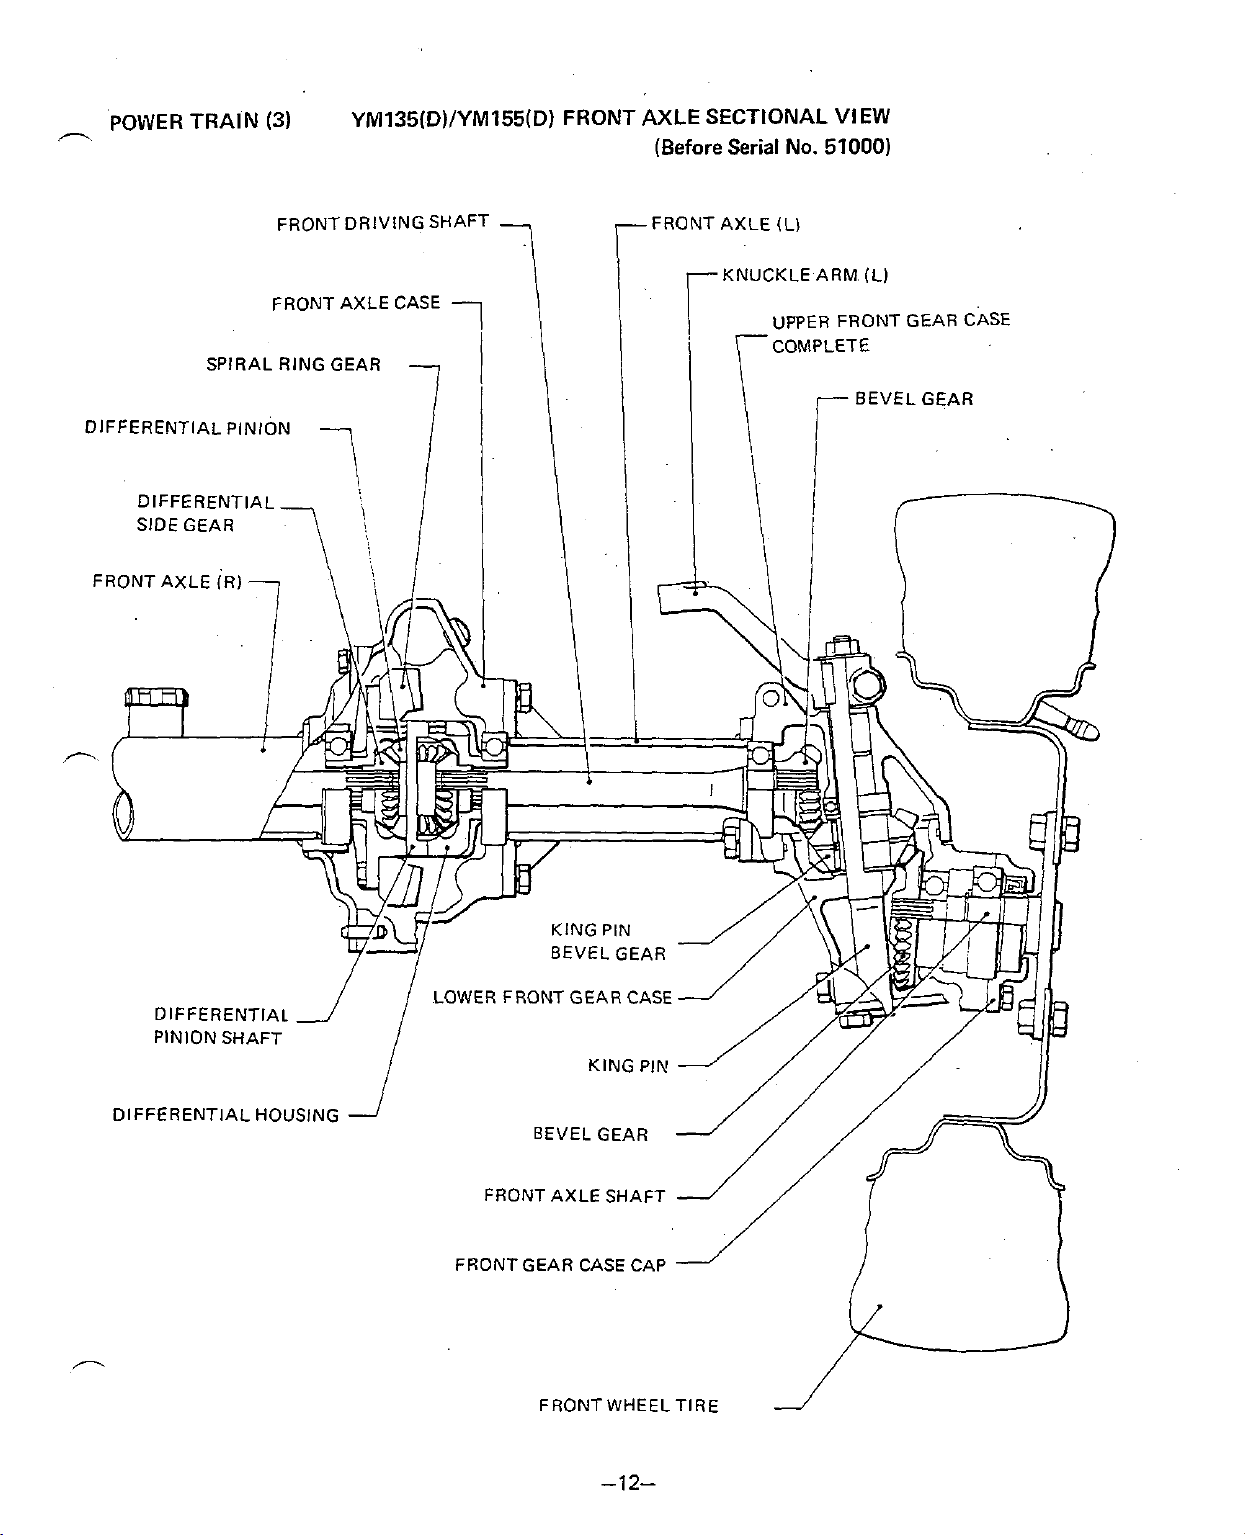
POWER TRAIN
n
DIFFERENTIAL PINION
DIFFERENTIAL
SIDE GEAR
(3)
FRONT DRIVING SHAFT
FRONT AXLE CASE
YM135(D)/YM155(D) FRONT AXLE SECTIONAL VIEW
(Before Serial No. 51000)
-7
KNUCKLE ARM. (L)
BEVEL GEAR
DIFFERENTIAL
PINION SHAFT
DIFFERENTIAL HOUSING
LOWER FRONT GEAR CASE
BEVEL GEAR
FRONT AXLE SHAFT
FRONT GEAR CASE CAP
FRONT
WHEELTIRE
2
Page 17
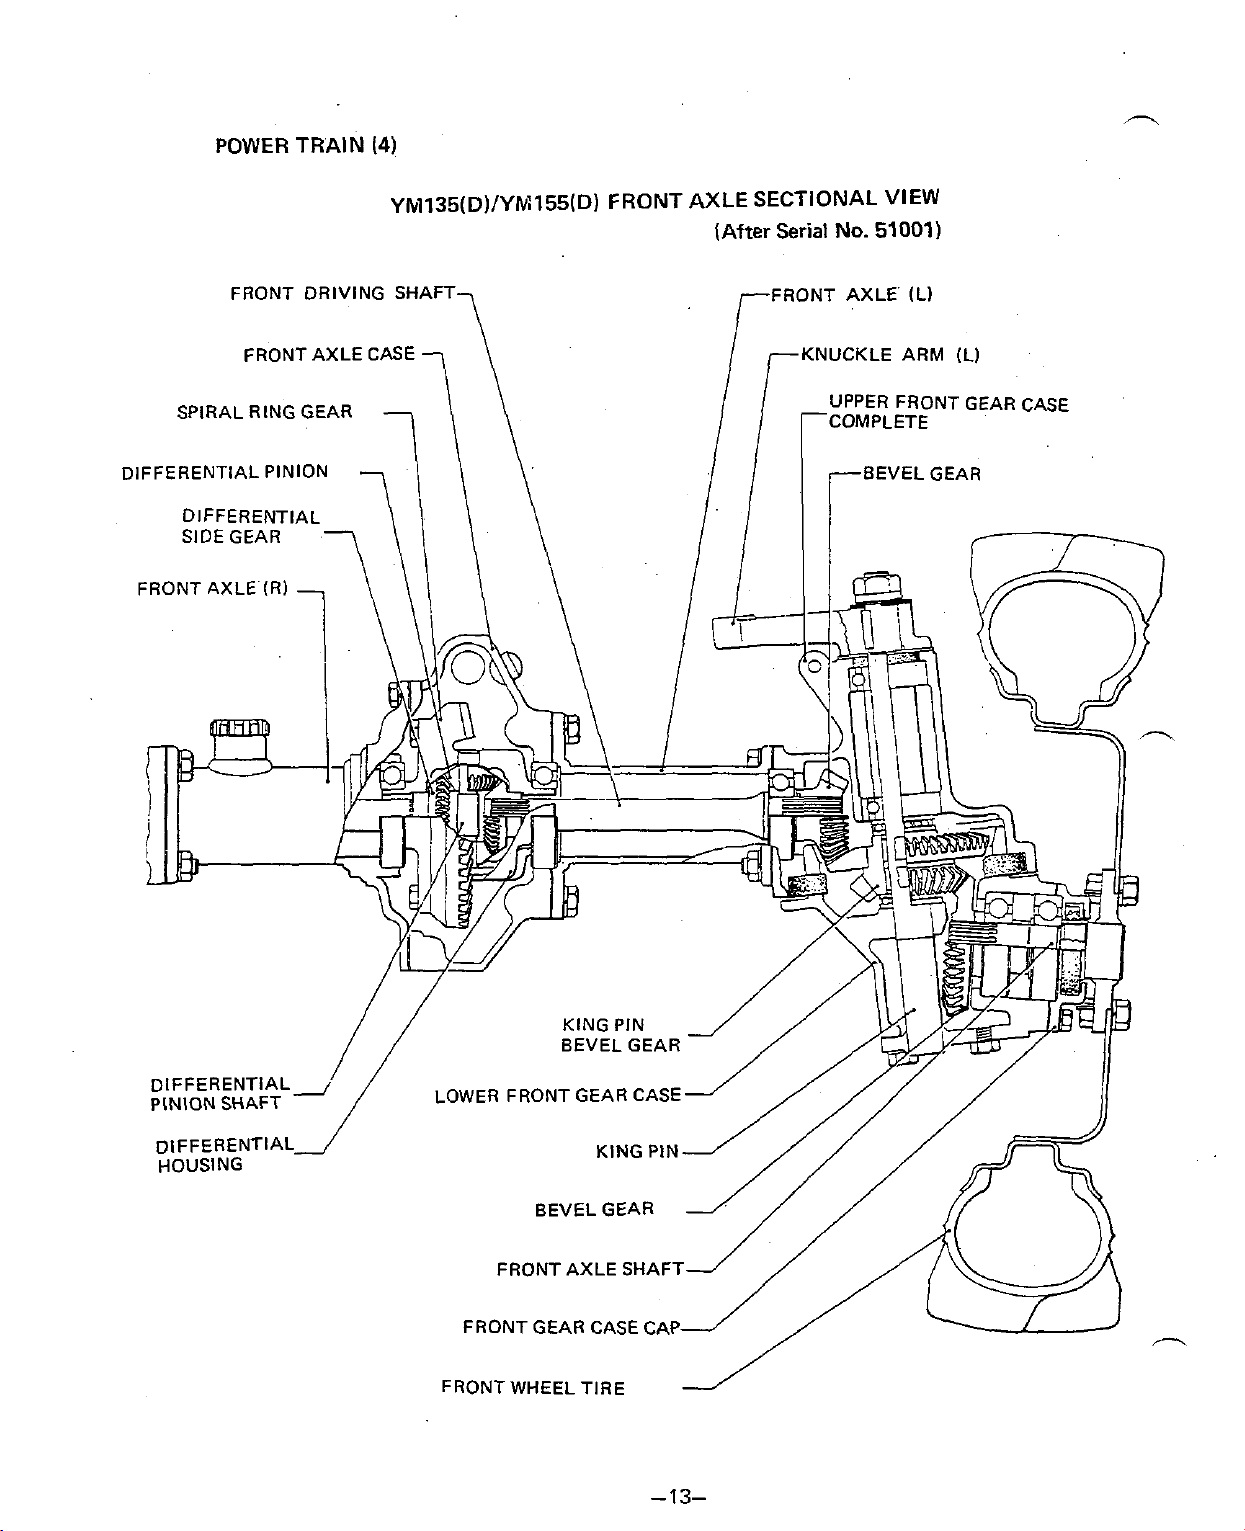
POWER TRAIN
(4)
Yhl135(D)/YrV:155(D) FRONT
FRONT DRIVING SHAFT
FRONT
AXLE
CASE
7
7
\
AXLE
SECTIONAL
IAfter Serial No. 51001)
FRONT AXLE
r
i
rKNUCKLE ARM
VIEW
(L)
(L)
FRONT
WHEEL
TIRE
J'
Page 18
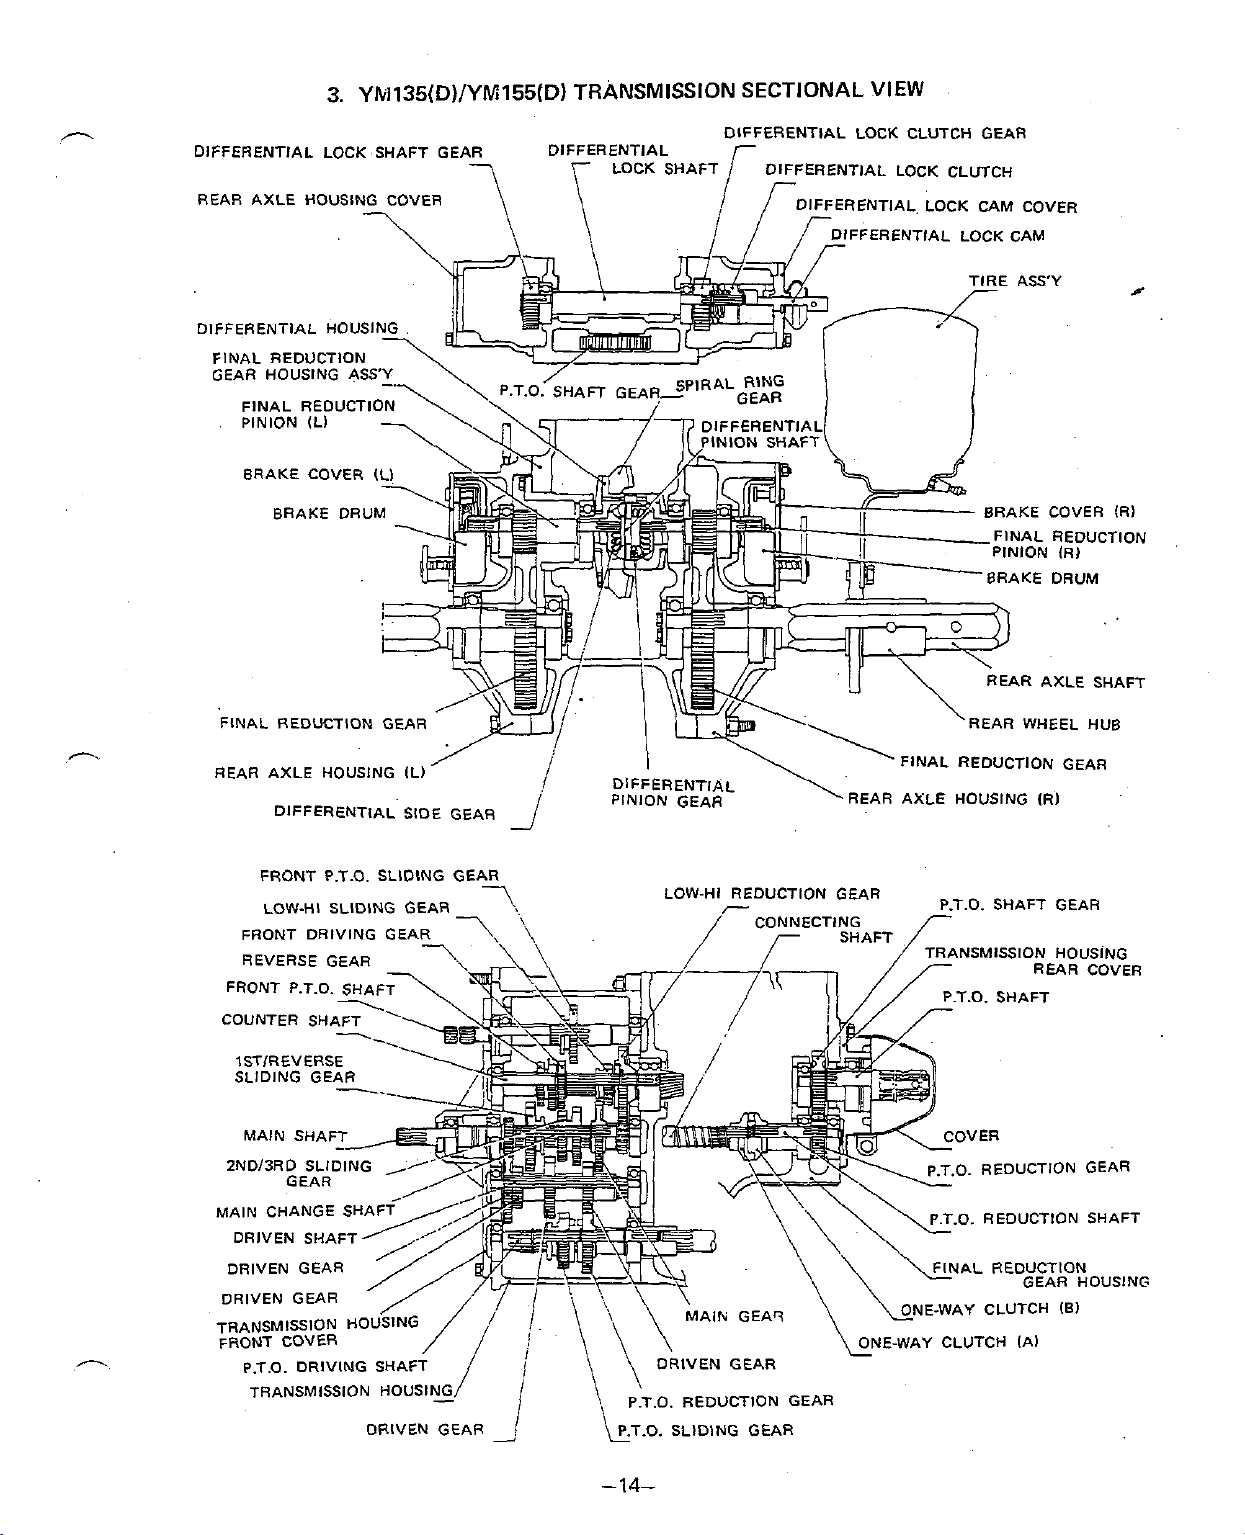
3. Yh1135(D)/YM155(D)
DIFFERENTIAL HOUSl
FINAL REDUCTION
GEAR HOUSING ASS
FINAL
REDUCTI
PINION (Ll DIFFERENTIAL
BRAKE COVER
(
TRANSMISSION SECTIONAL VIEW
INION SHAFT
DIFFERENTIAL LOCK CLUTCH GEAR
DIFFERENTIAL, LOCK CAM COVER
FFERENTIAL LOCK CAM
#'
BRAKE COVER (Rl
FINAL REDUCTION
EAR AXLE SHAFT
FINAL REDUCTION GEAR REAR WHEEL HUB
REAR AXLE HOUSING
FRONT P.T.O. SLIDING GEAR
LOW-HI SLIDING GEAR
FRONT DRIVING GEA
REVERSE GEAR
COUNTER SHAFT
1STlREVERSE
MAIN CHANGE S
DRIVEN SHAFT
DRIVEN GEAR AL REDUCTION
DRIVEN GEAR
IL)
LOW-HI REDUCTION GEAR
FINAL REDUCTION GEAR
REAR AXLE HOUSING IRI
NSMlSSlON HOUSING
P.T.O. SHAFT
0.
.O. REDUCTION SHAFT
E-WAY CLUTCH 10)
REAR COVER
REDUCTION GEAR
GEAR HOUSING
P.T.O. DRIVING SHAFT
TRANSMISSION HOUSING
.O. REDUCTION GEAR
Page 19
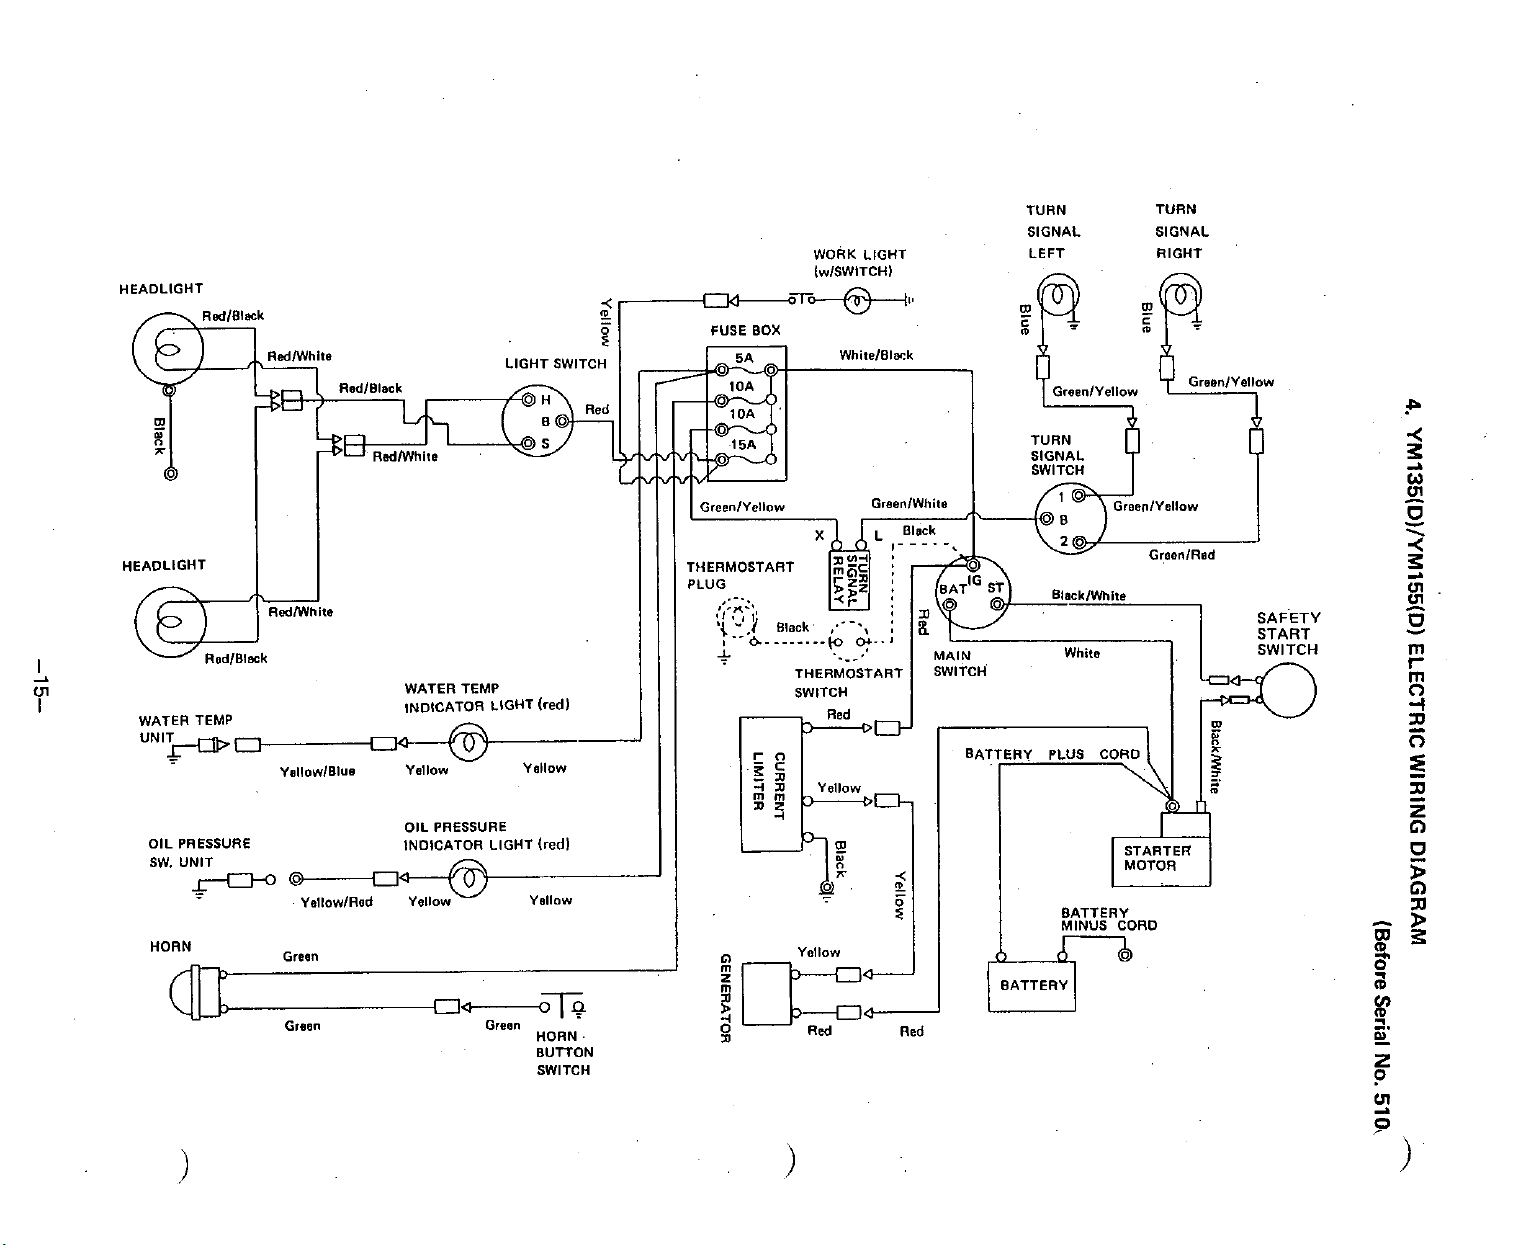
HEADLIGHT
WATER TEMP
LIGHT SWITCH
WATER TEMP
~NDICATOR LIGHT
TURN TURN
SIGNAL SIGNAL
WORK LIGHT LEFT RIGHT
(redl
OIL PRESSURE
Graan
BUTTON
SWITCH
Page 20
Page 21
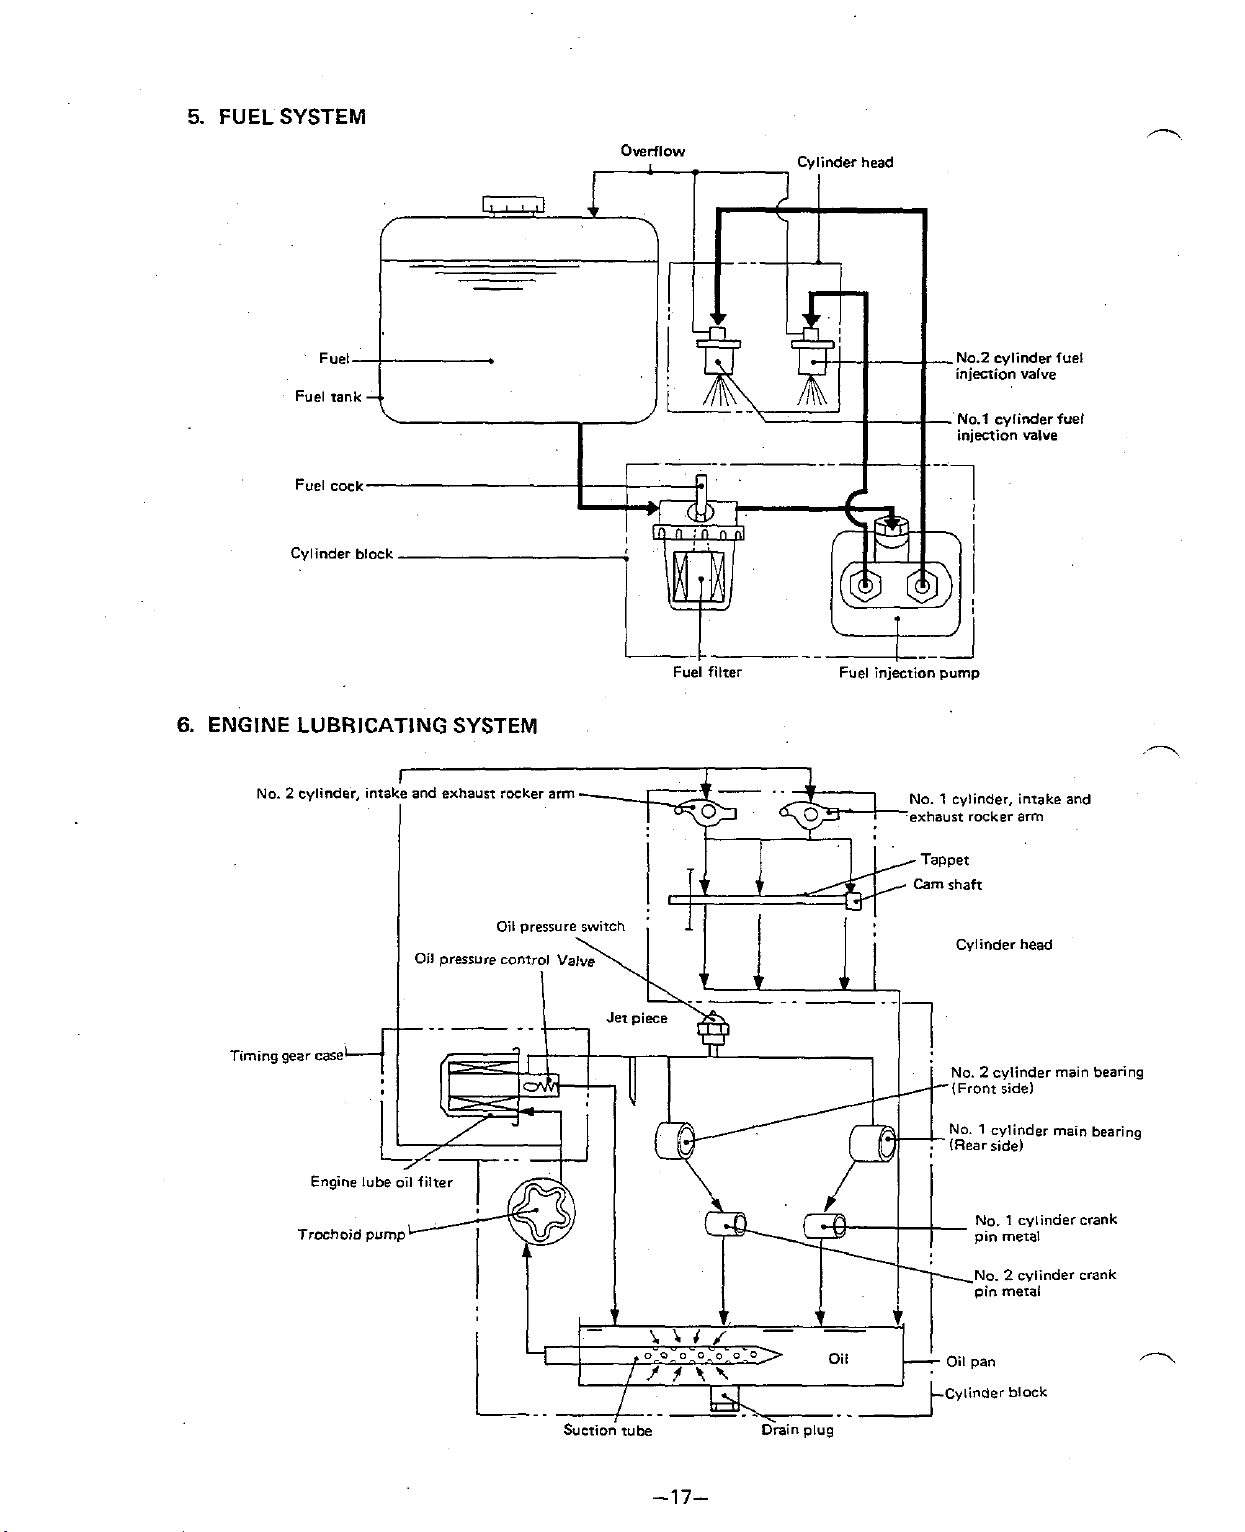
5.
FUEL SYSTEM
6.
ENGINE LUBRICATING SYSTEM
No.
2
cylinder, ontake and exhaust rocker arm
I
I
Timing gear
case
Trochoid
pump
No.
1
cylinder. intake and
exhaust rocker arm
Cylinder head
No. 2 cylinder main bearing
NO.
1
cylinder main bearing
No.
1
cylindercrank
No.
2
cylinder crank
Suction
tube
-17-
.
Drain
Oil Oil pan
plug
R
Cylinder block
Page 22
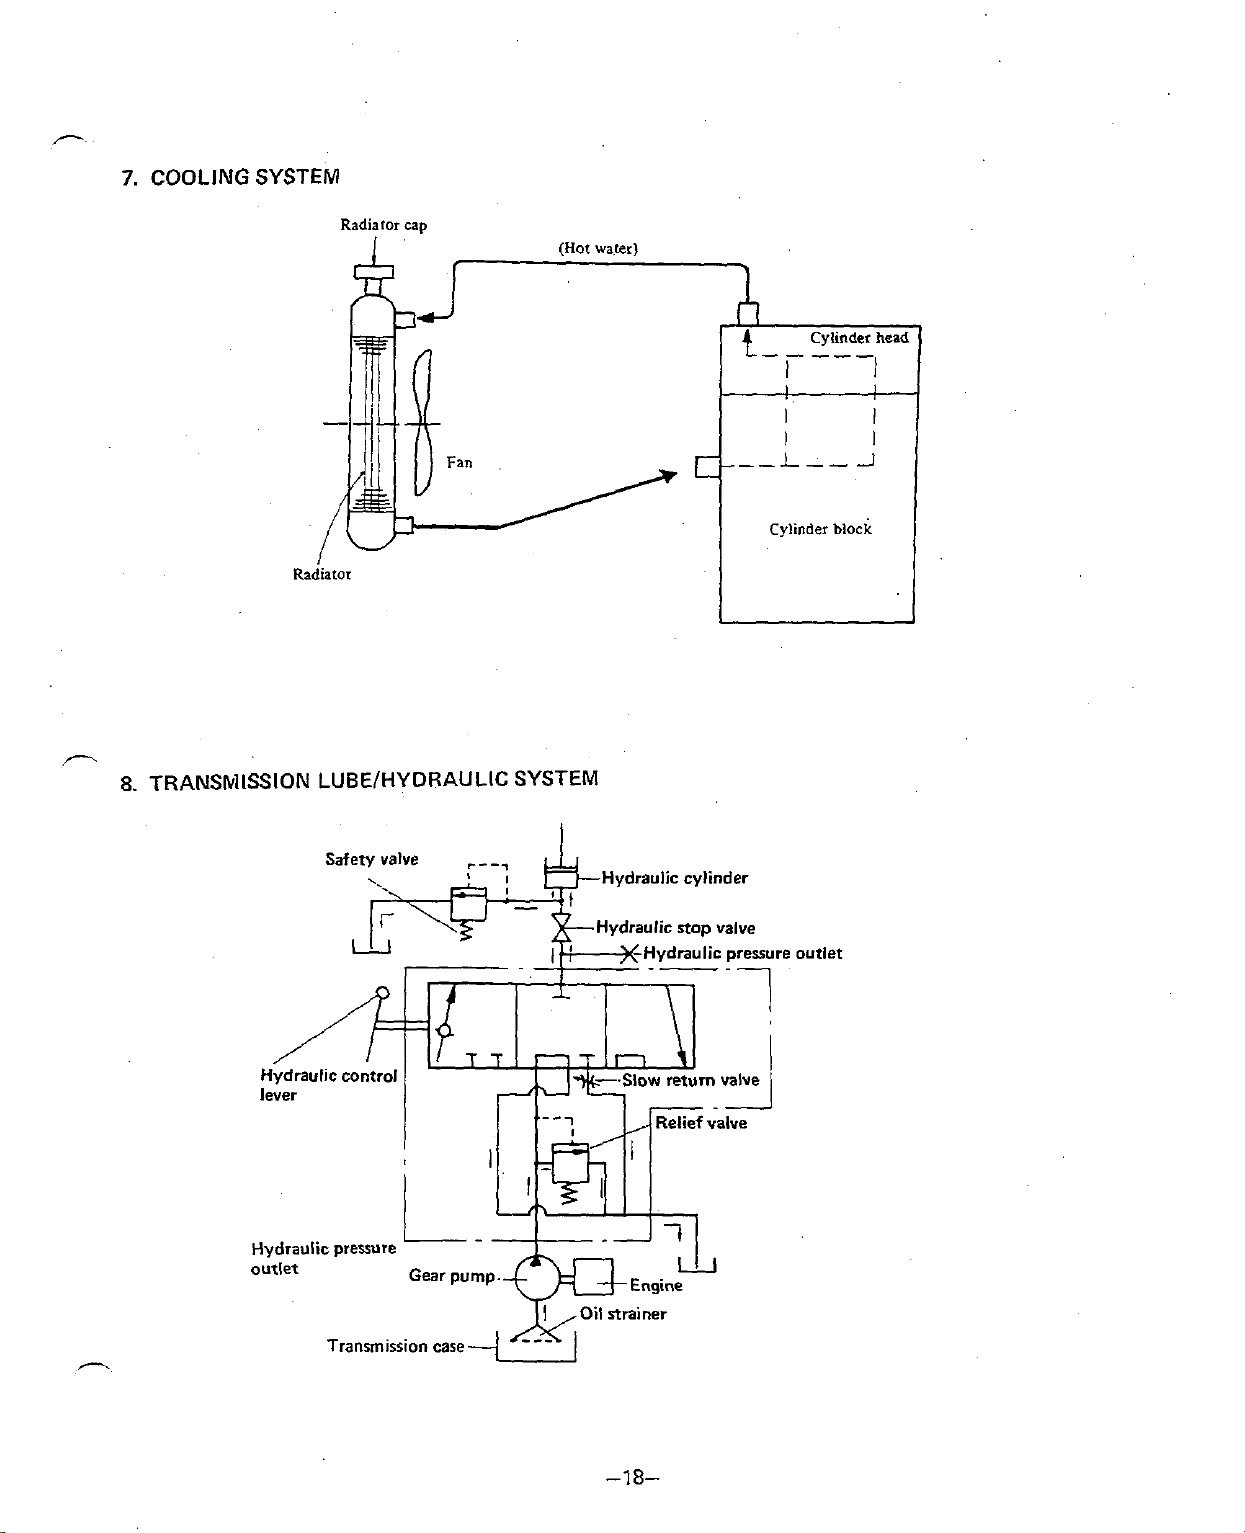
7.
COOLING SYSTEM
r-
Radiator
cap
47
Radiator
8.
TRANSkllSSION LUBEIHYDRAULIC SYSTEM
(Hot
water)
14
Cylinder block
I
Cylinder
heaq
/
Hydraulic control
lever
Hydraulic
outlet
prn-tlr-
Transmission case
L.-.J
urar
pump-
Hydraulic cylinder
Hydraulic stop valve
11
Oil strainer
Page 23
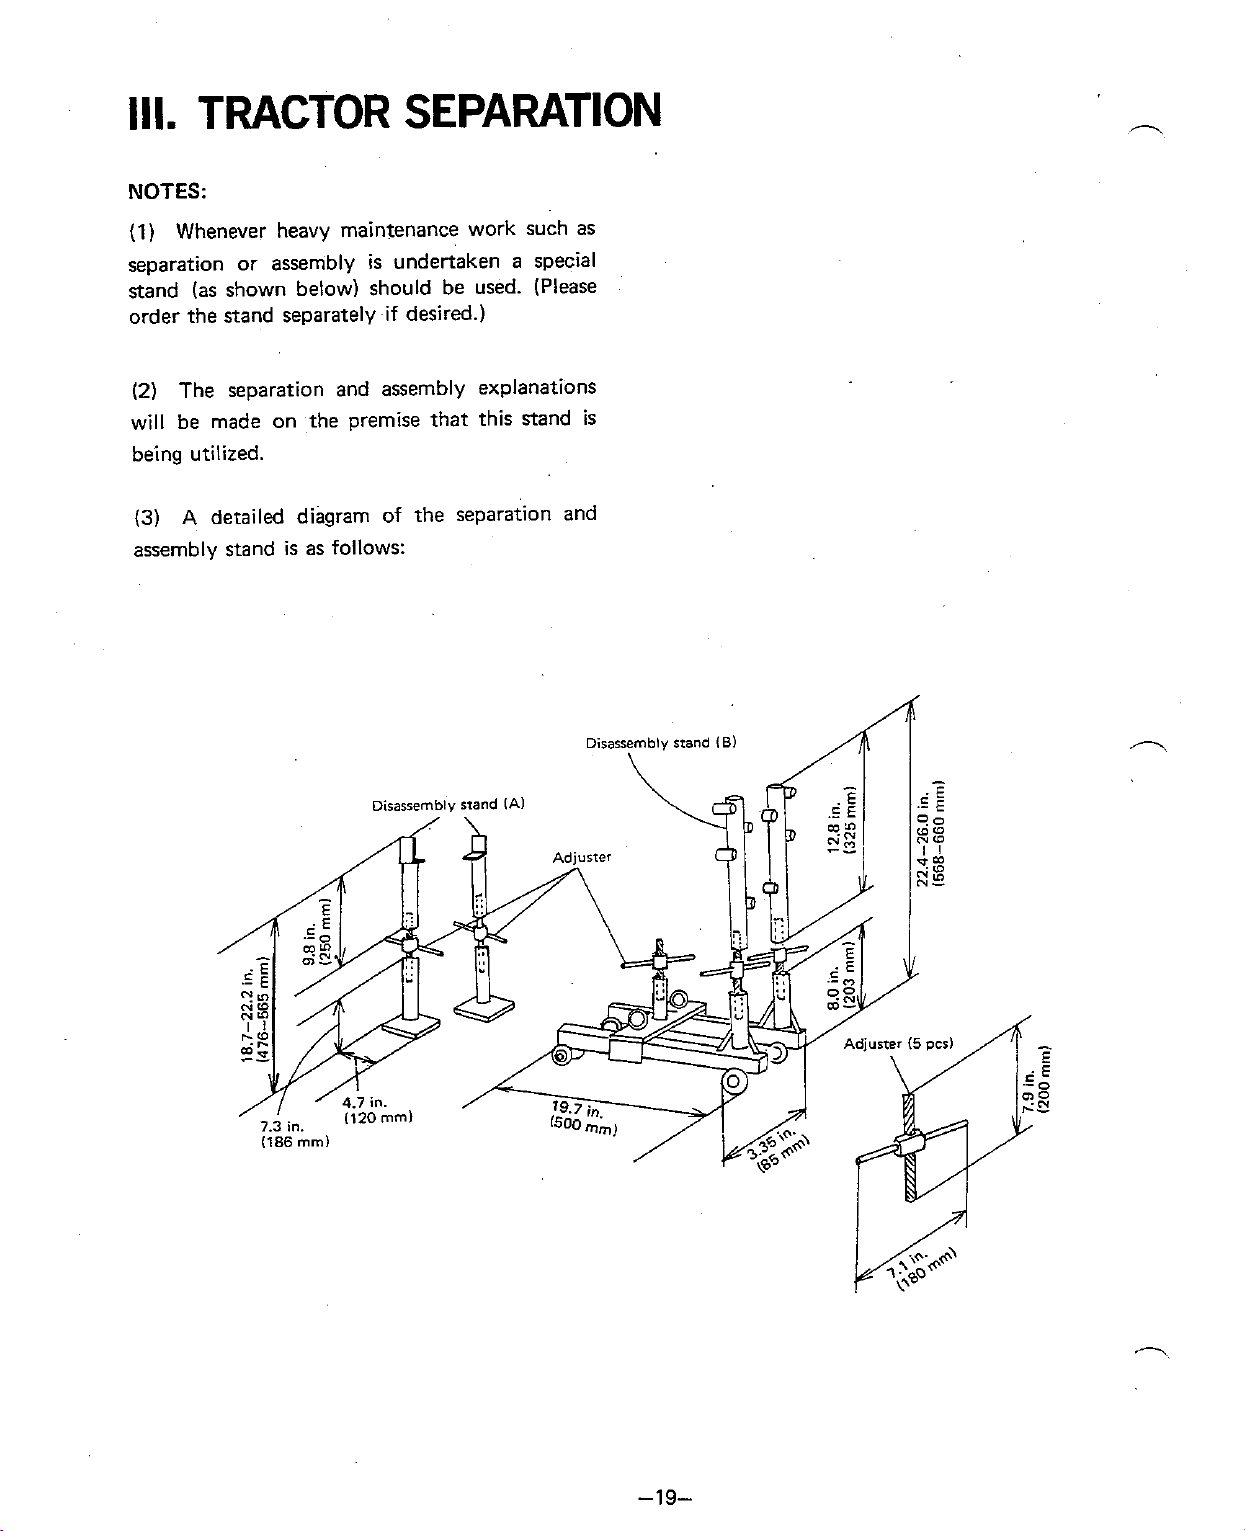
Ill.
NOTES:
(1)
separation or assembly
stand (as shown below) should be used. (Please
order the stand separately if desired.)
(2)
will be made on the premise that this stand is
being utilized.
(3)
assembly stand is as follows:
TRACTOR
Whenever heavy maintenance work such as
The separation and assembly explanations
A
detailed diagram of the separation and
SEPARATION
is
undertaken a special
Page 24
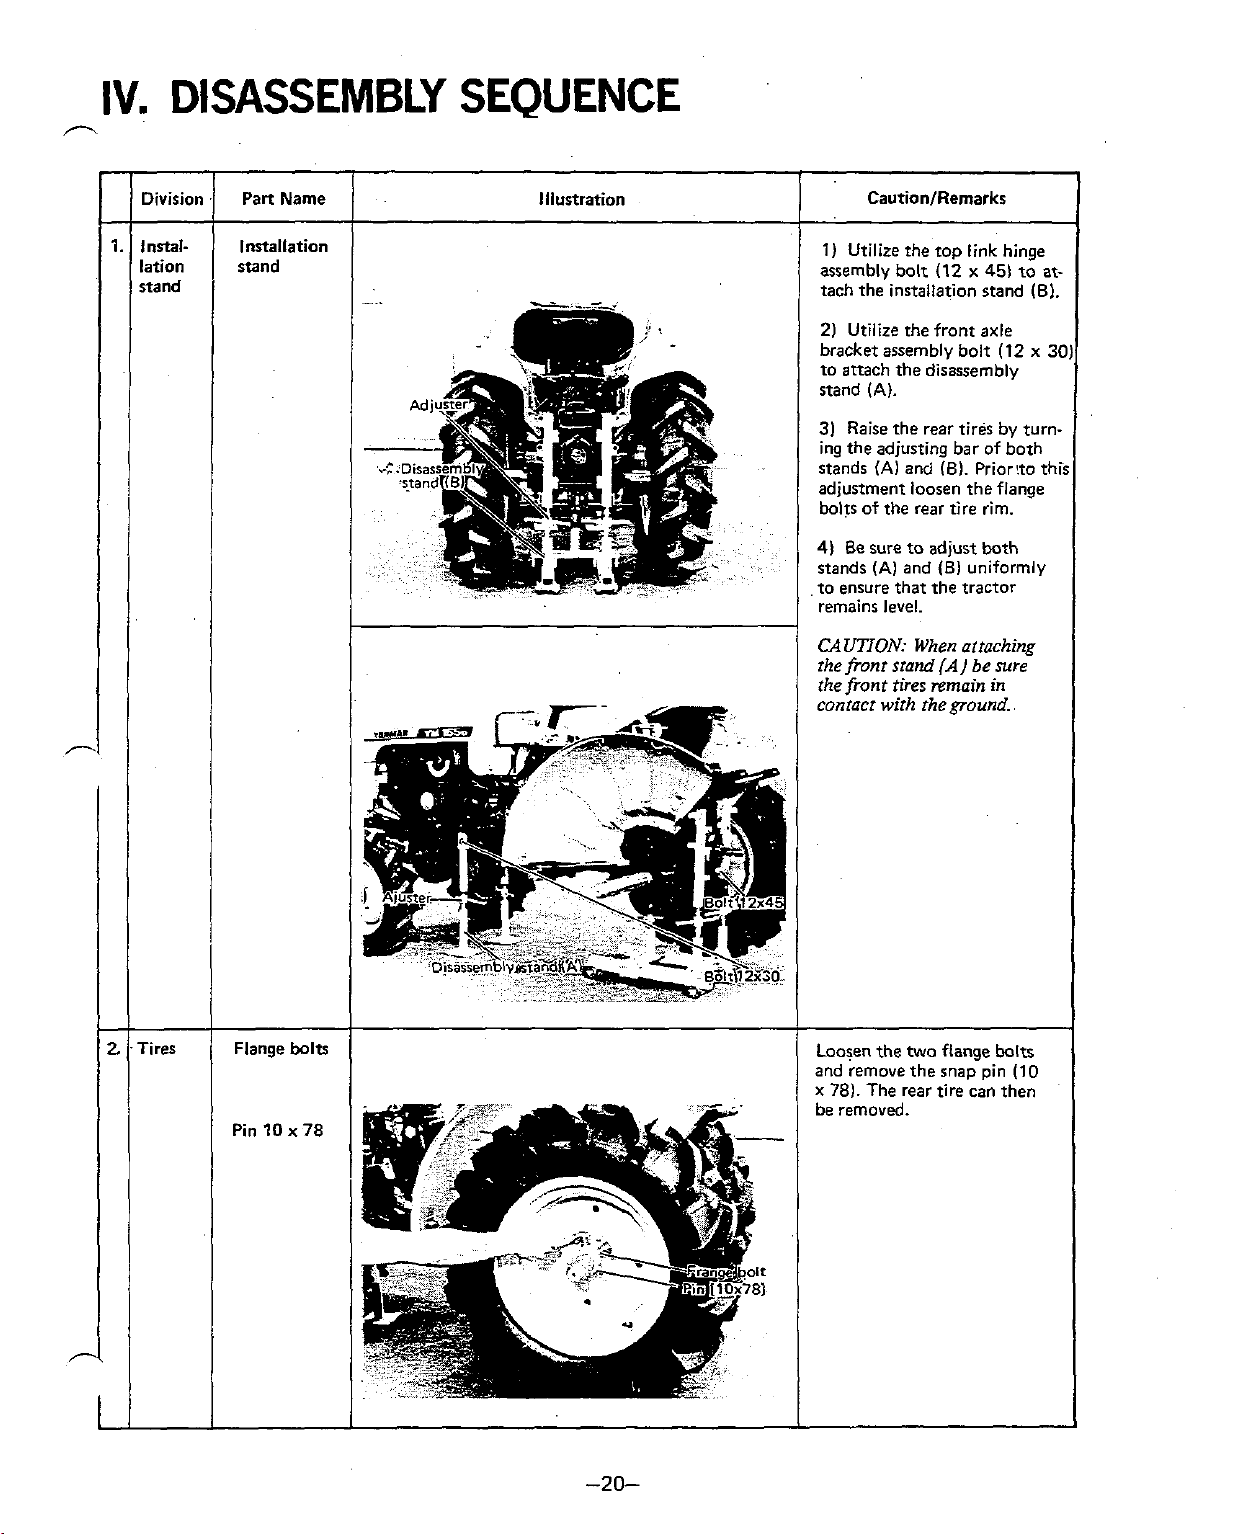
IV.
Division
DISASSEMBLY SEQUENCE
I
Pan Name
7.
Installation
stand
Installation
stand
/
1) Utilize the top link hinge
(12
x
assembly bolt
1
tach the installation stand
I
2)
Utilize the front axle
bracket assembly bolt (12 x
to attach the disassembly
(A).
stand
3) Raise the rear tires by turning the adjusting bar of both
(A) and (B). Prior!to this
stands
adjustment loosen the flange
bolts of the rear tire rim.
4)
Be sure to adjust both
(A1 and (BI uniformly
stands
to ensure that the tractor
remains level.
CAUTION:
the front stand
the
front
contact with
When attaching
tires
theground.
451
(A]
be
amain in
sure
to at-
(B).
30)
1
1
I
2
I~im
/
Flange bolts
Loosen the two flange bolts
and remove the snap pin (10
I
x
78).
The rear tire can then
be removed.
Page 25
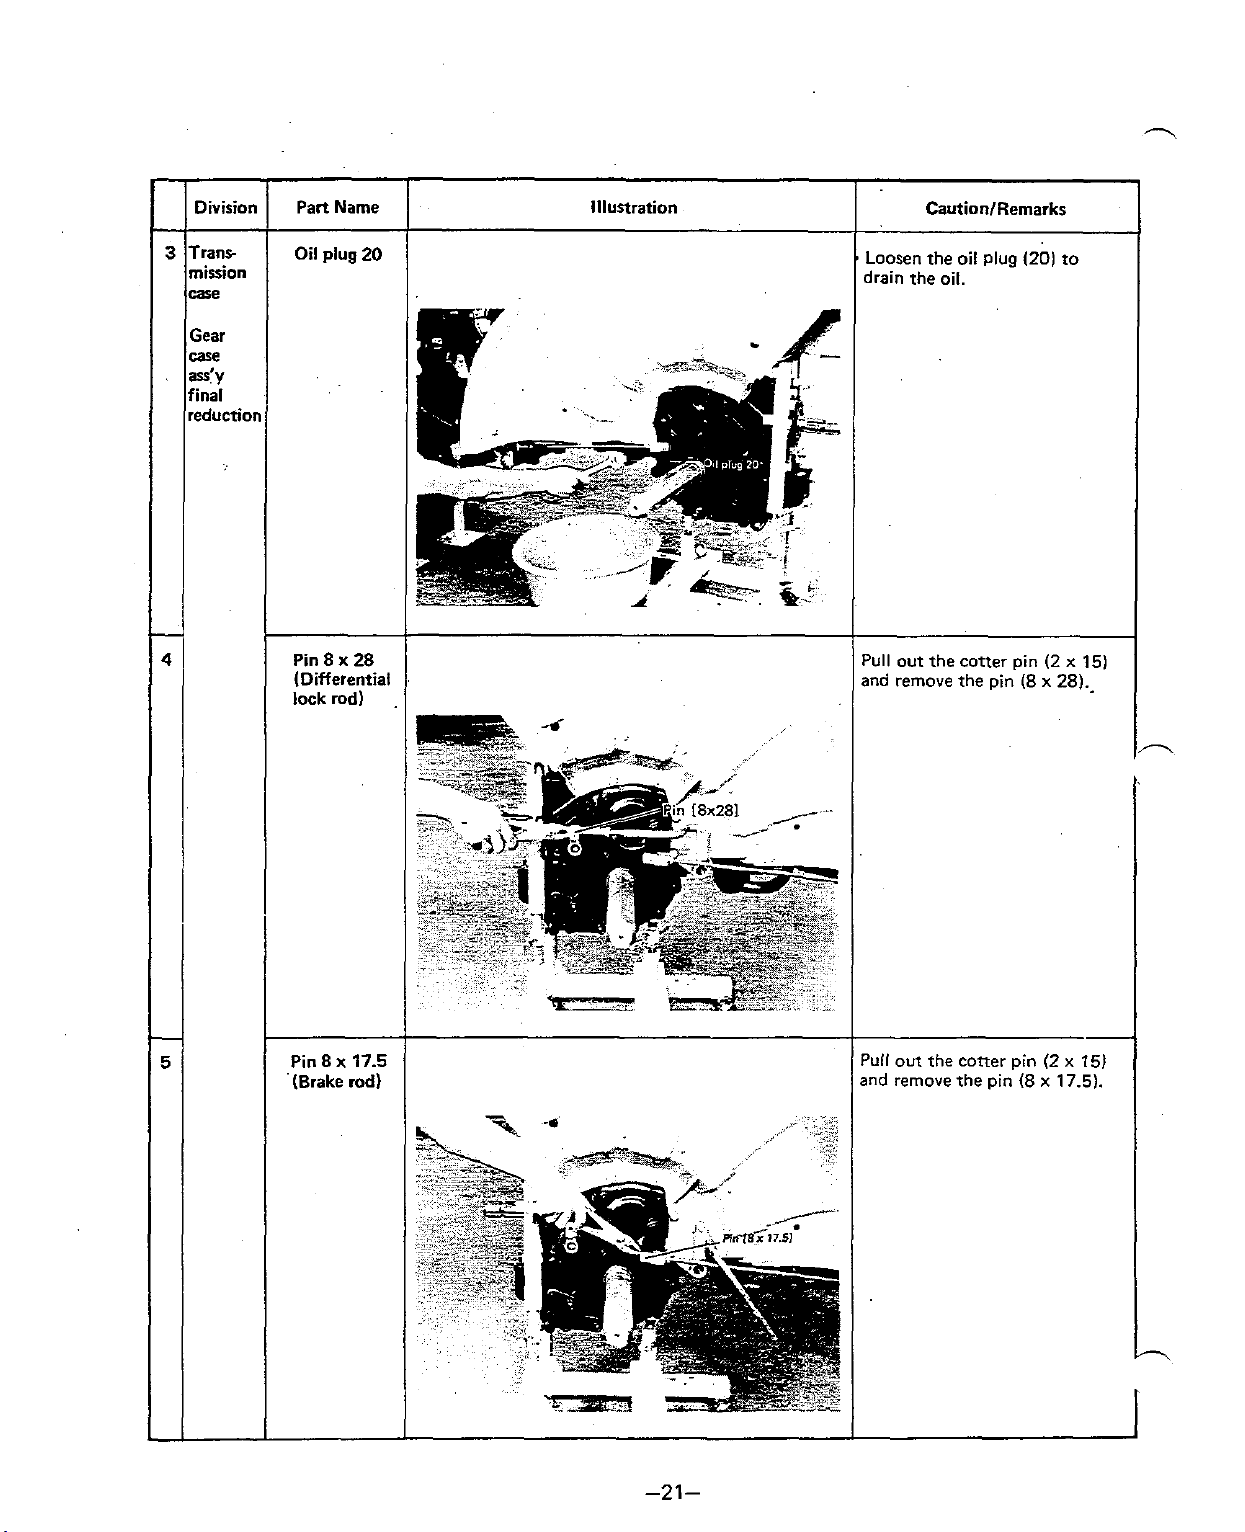
3
-
4
Division
Transmission
case
Gear
case
='Y
final
reduction
Part Name
Oil plug
Pin
(Differential
lock rod)
20
8
x
28
Illustration
CautionlRemarks
Loosen the oil plug
drain the oil.
t
Pull
out the cotter pin (2
and
remove the pin (8
I201
x
to
x
281.-
I
151
A
-
5
Pin
8
x
17.5
(Brake rod)
Pull out the cotter pin (2
and remove the pin (8
x
x
151
17.5).
1
Page 26
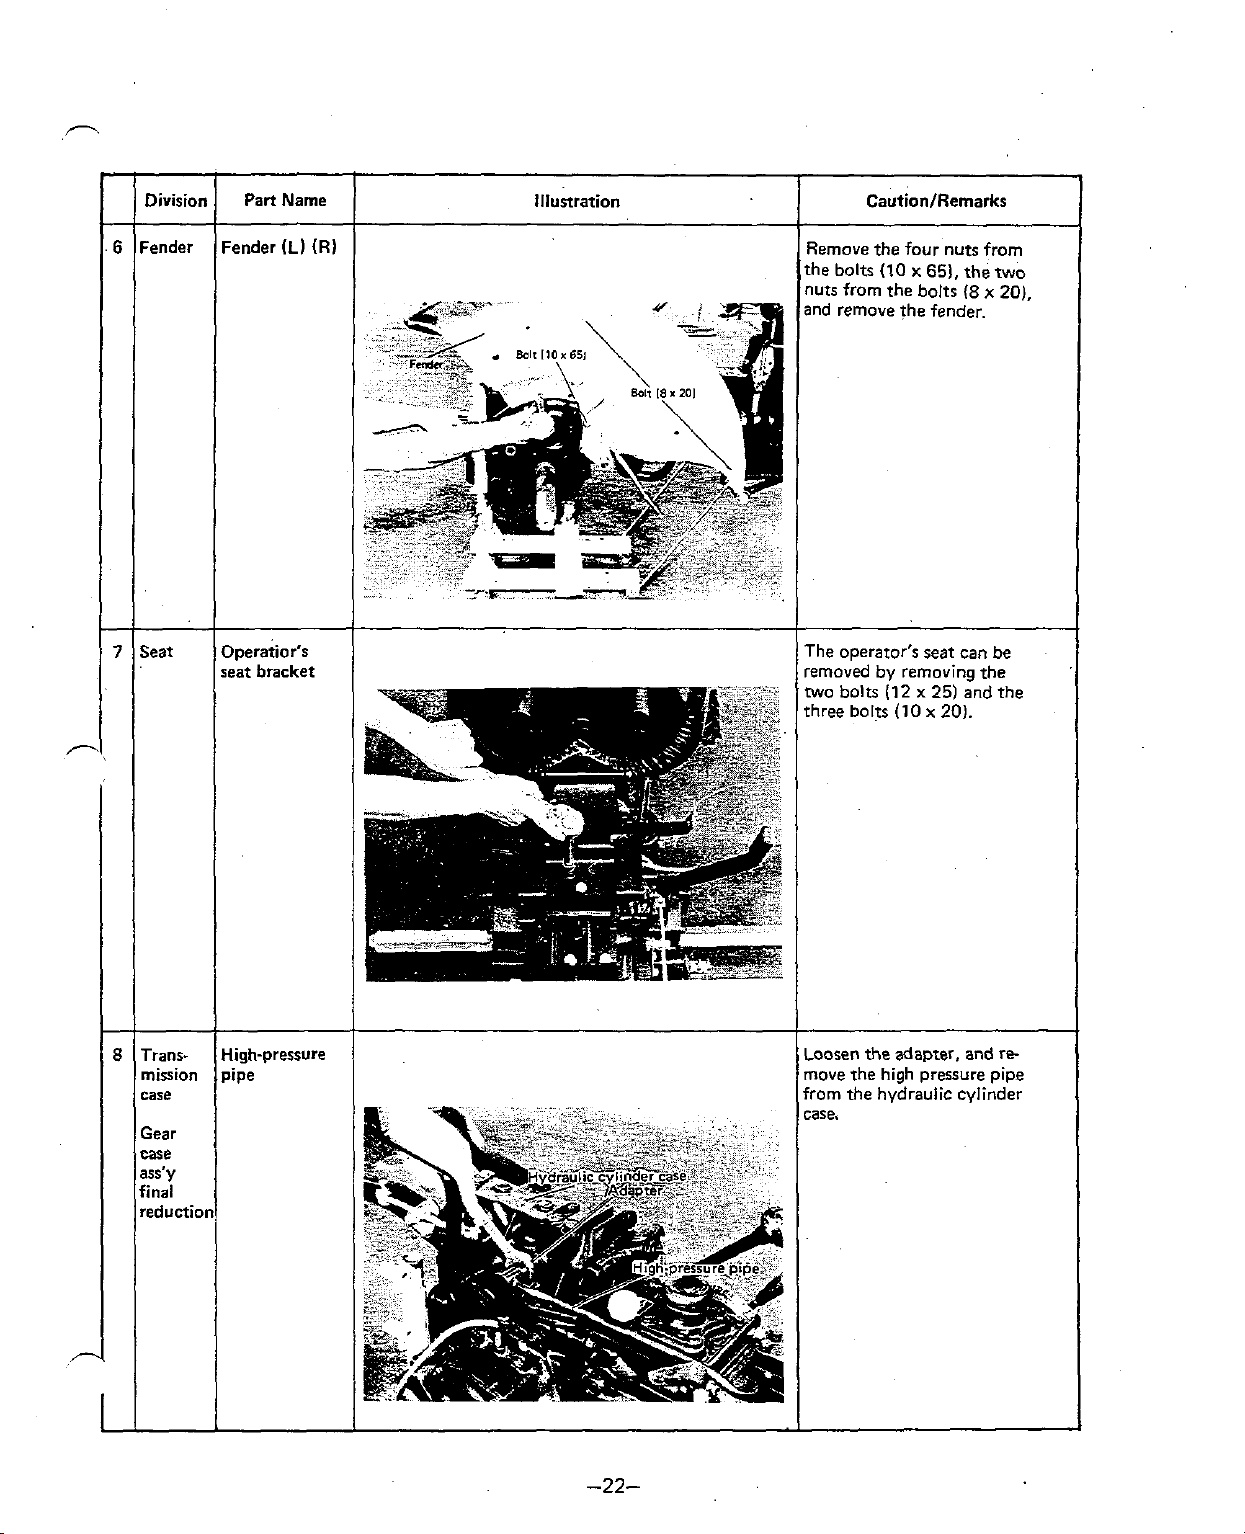
7
Seat
Opera&ores
seat bracket
lllunration
CautionIRernarks
Remove the four nuts from
the bolts
nuts from the bolts
and remove the fender.
The operator's seat can be
removed
two bolts
three bolts
(10
x
651,
the two
(8
x 20).
by removinq the
I12
x
25)
x
and the
201.
(10
I
8
Trans-
mission
case
Gear
final
High-pressure
pipe
I
Loosen the adapter, and remove the high pressure pipe
from the hvdraulic cvlinder
Page 27
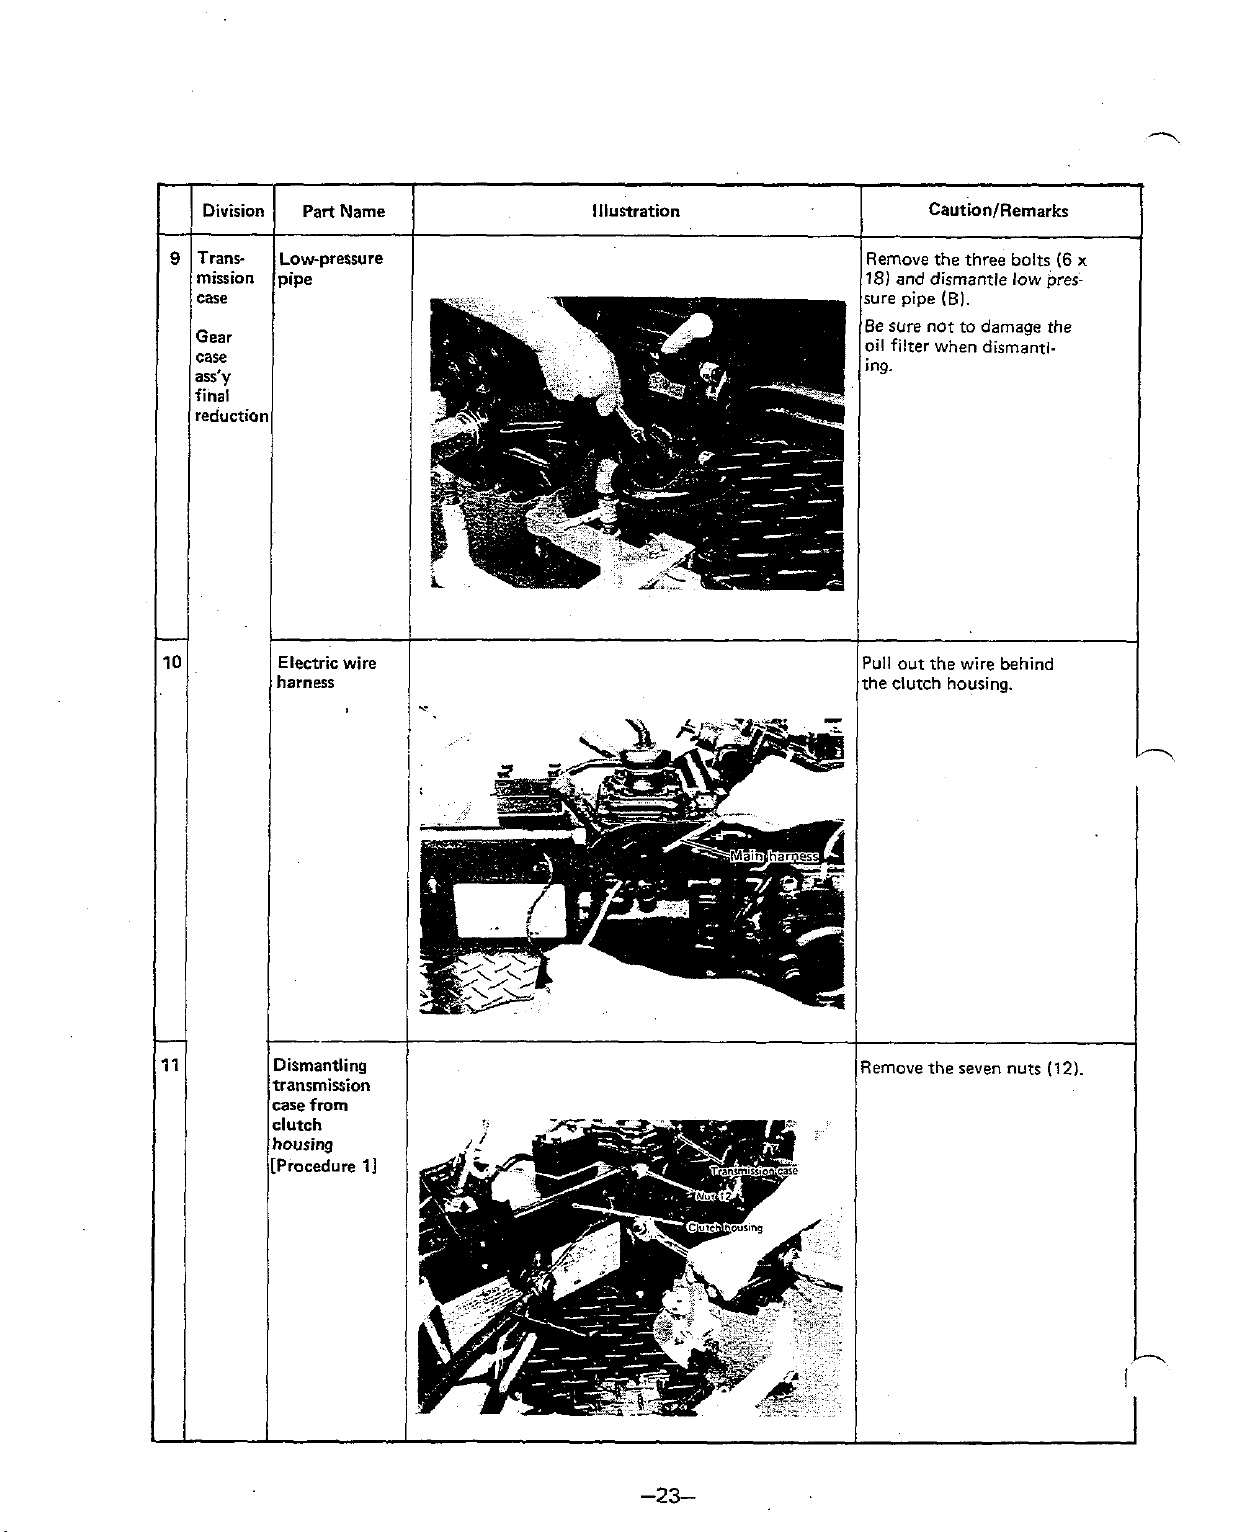
I
-
9
Division
Tranr
mission
case
Gear
case
ass'y
final
reduction
Part Name
Low-pressure
pipe
Electric wire
harness
Illustration CautionIRemarks
Remove the three bolts
181
and dismantle low pres-
sure pipe
Be sure
oil filter when dismantling.
I
Pull out the
the clutch housing.
(B).
not
to damage
wire
behind
(6
the
x
Dismantling
transmission
case from
clutch
housing
[Procedure
Remove the seven nuts
(12).
Page 28
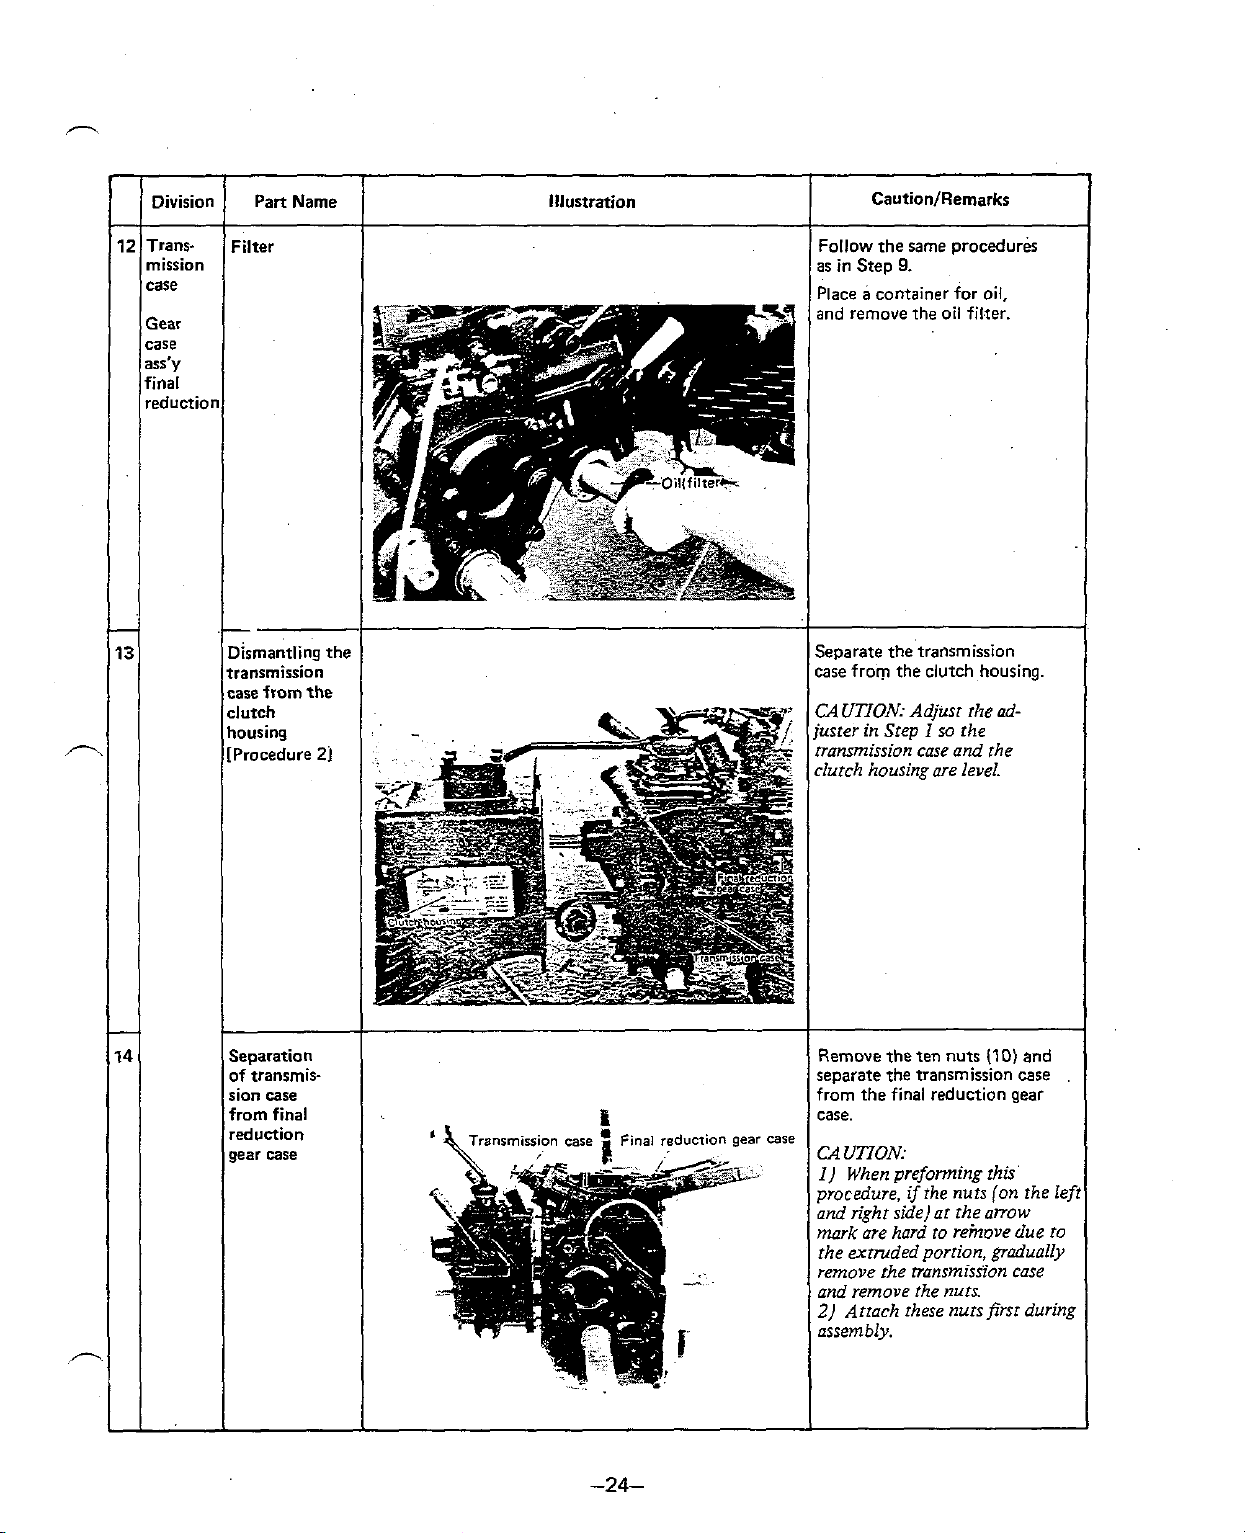
-
n
v
72
-
13
Division
Transmission
case
Gear
case
ass'y
final
reduction
Part
Name
Filter
Dismantling the
transmission
case from the
clutch
housing
[Procedure
23
1
Illustration
..
CautionIRemarks
Follow the same proceduri
as
in Step
Place a container for oil,
and remove the oil filter.
Separate the transmission
case from the clutch housing.
CAUTION:
juster in Step
mansmission case and the
clurch housing are level.
9.
Adjusr rhe
I
so
the
ad-
-
14
A
Separation
of transmission case
from final
reduction
gear case
Remove the ten nuts
separate the transmission case
from the final reduction gear
case.
CA
VnON:
I)
When preforming this'
if
procedure,
and right side) at the arrow
mark are hard to remove due to
rhe exnuded porrion, gradually
remove
and remove the
2)
Arrach these nurs firsr during
assembly.
the nuts (on rhe left
rhe
transmission case
nurs.
(10)
and
Page 29
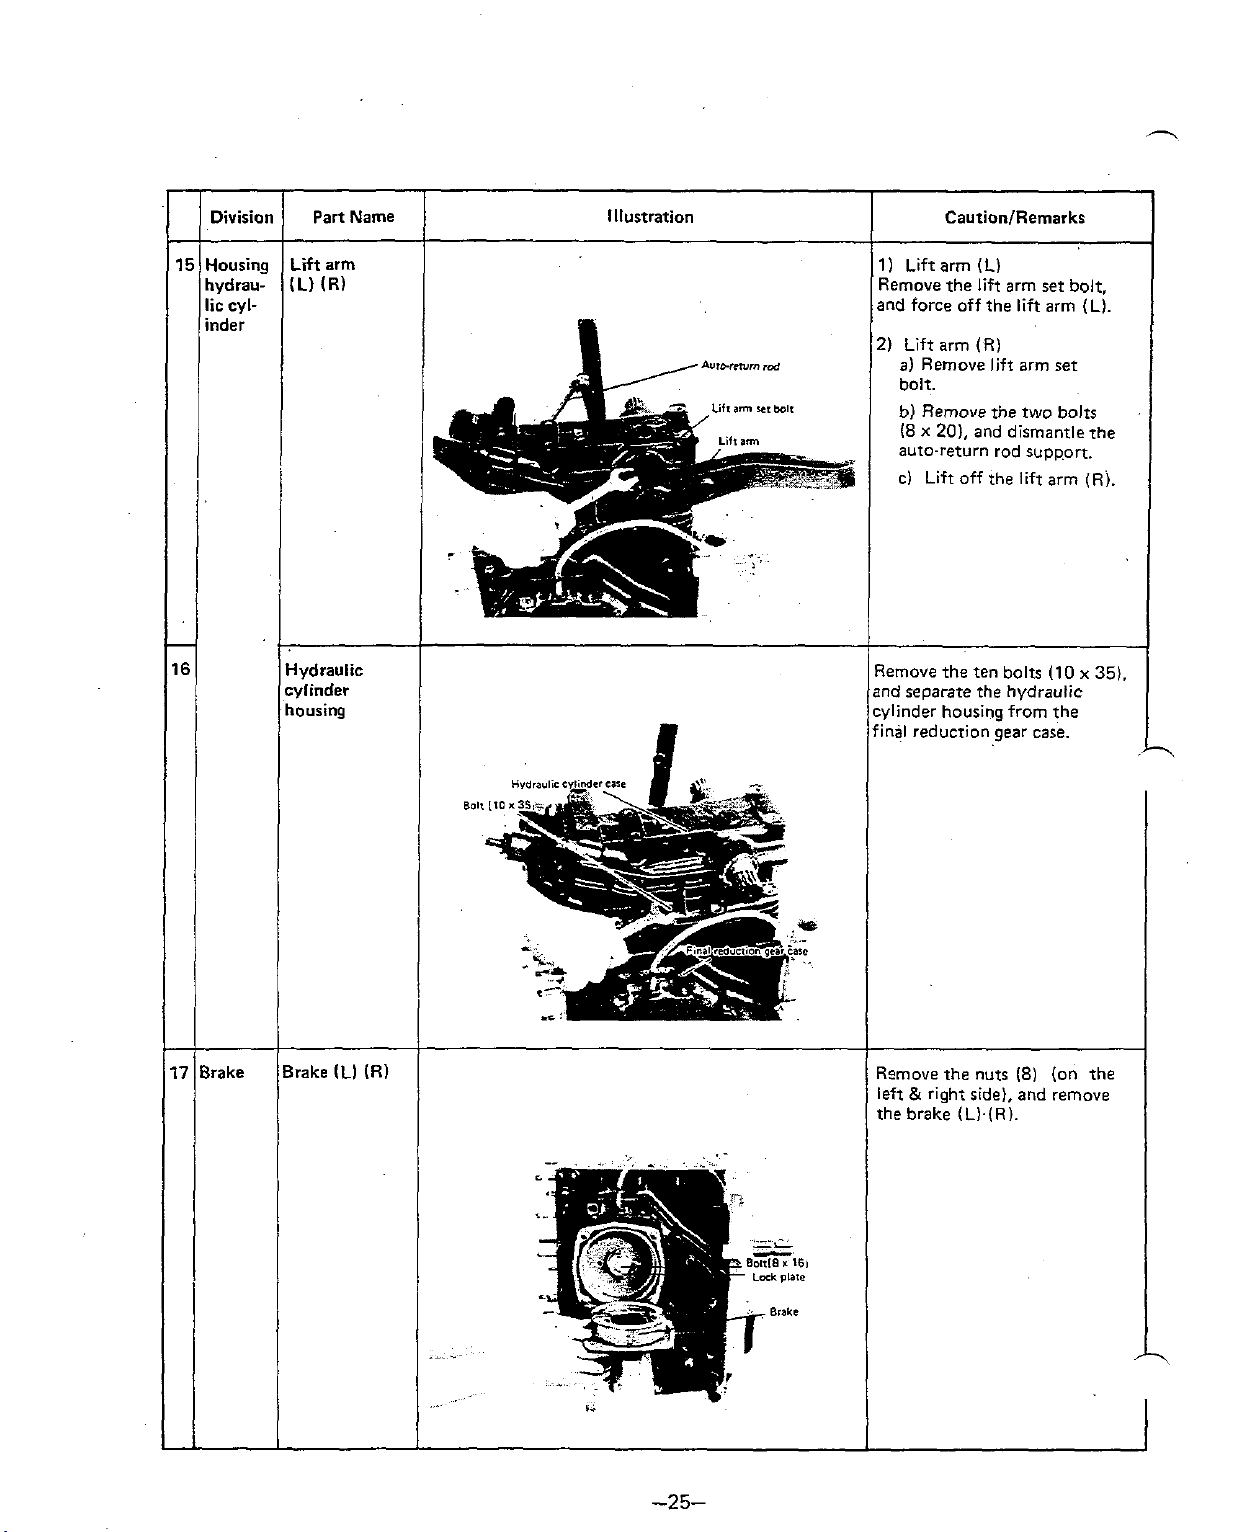
-
16
15
Division
Housing
hydraulic
cyl-
inder
Part Name
Lii
arm
(L)
(R)
Hydraulic
cylinder
housing
Illustration
Lilt
an
rr
CautionIRemarks
11 Lift arm
Remove the lift arm set bolt,
and force off the
21 Lift arm (R)
a) Remove lift arm set
bolt.
b)
(8 x 201, and dismantle the
auto-return rod support.
CI
Remove the ten bolts
and separate the hydraulic
cylinder housing from the
final reduction gear case.
(L)
lift
arm (L).
Remove the two bolts
Lift off the lift arm (Ri.
(10
x
35).
L
77
Brake
I
Brake
ILI
(R)
.ip
.~
.-
IS0
.
..
Rsmove the nuts 18) (on the
&
right side), and remove
left
the brake
.
-
(L).(Rl.
Page 30
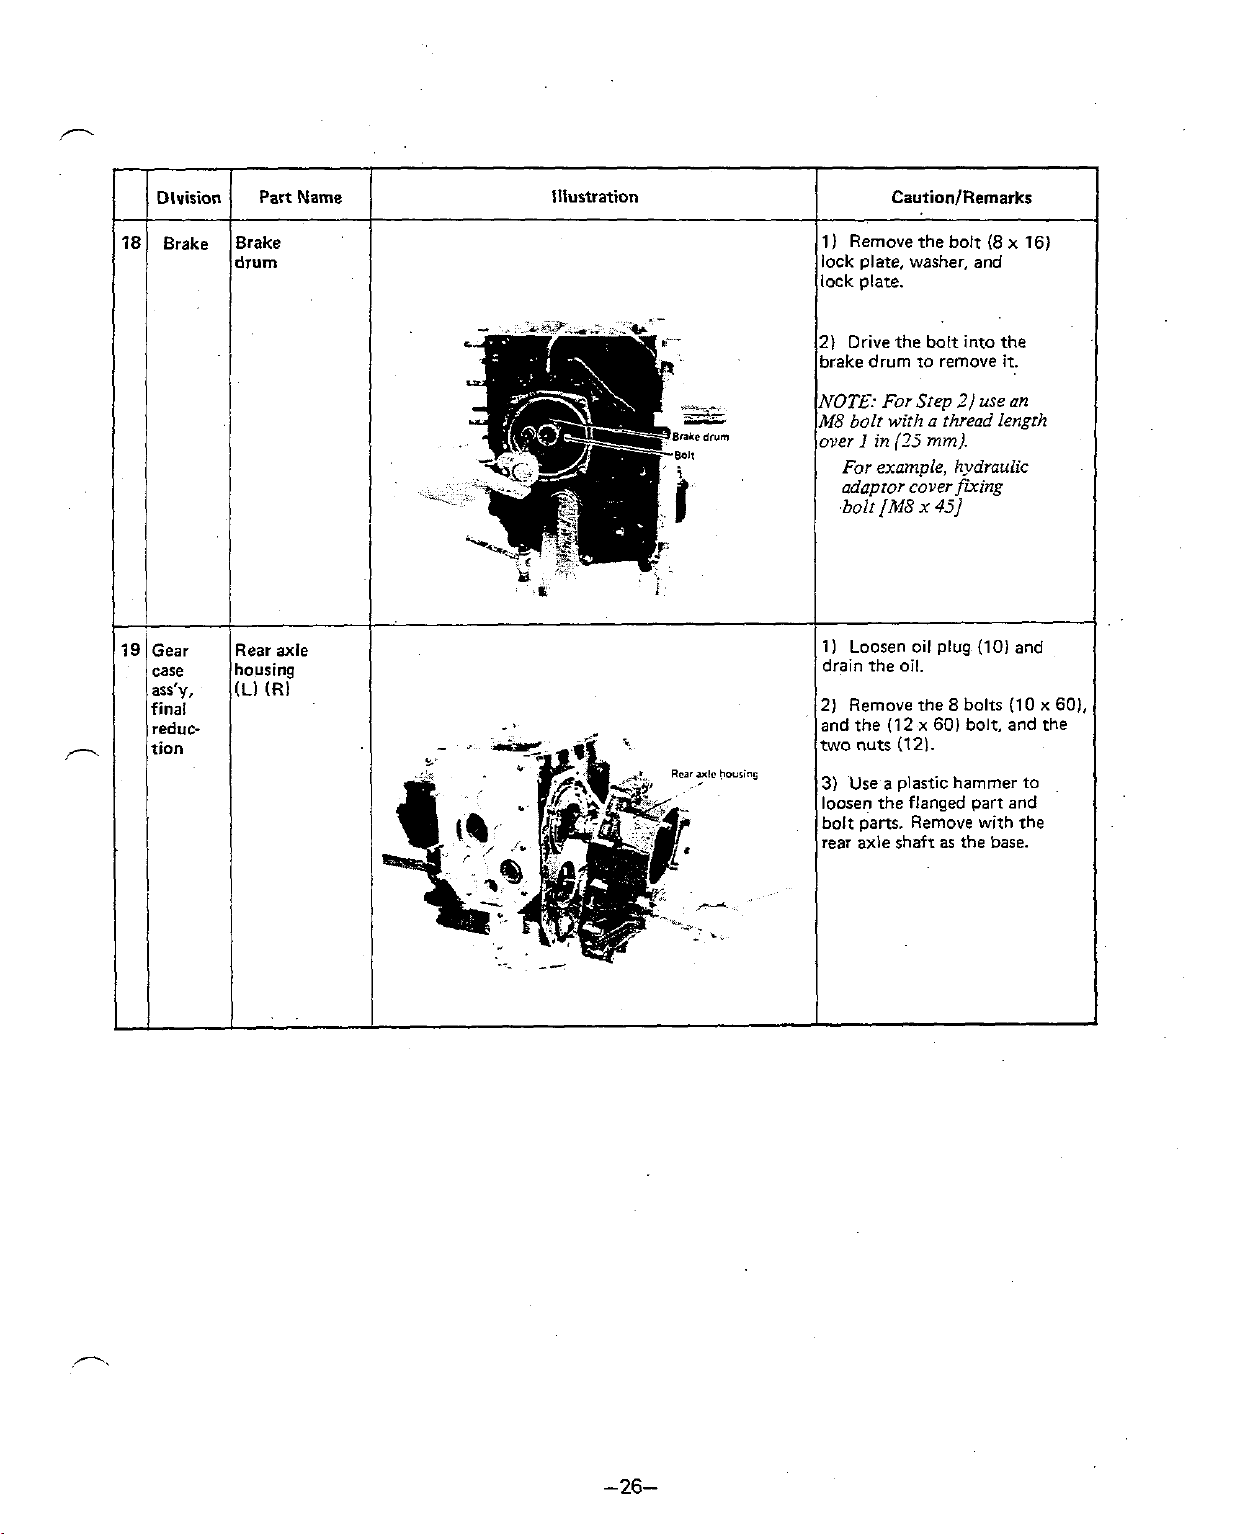
Dlvision
Part
Name
Illustration
Caution/Remarks
78
79
Brake
Gear
case
ass'y,
final
reduction
Brake
drum
Rear axle
housing
(L1
(R1
-
,
. -*<c*:.*:
;..
:-*
.-
1) Remove the bolt (8 x
lock plate, washer, and
lock plate.
2)
Drive the bolt into the
brake drum to remove
NOT&-:
M8
over
2)
and the (12 x 60) bolt. and the
two nuts
3)
loosen the flanged part and
bolt pans. Remove with rhe
rear
For Step
bolr wit17 a thread length
1
in
(25
For example, i7ydraulic
adapror cover firing
bolr
/M8
11 Loosen oil plug (101 and
drain the oil.
Remove the 8 bolts (10 x 60).
Use a plastic hammer to
axle shaft as the base.
x
(121.
2)
mm).
451
use
16)
it.
an
.
.
Page 31

-
ivision
ood,
lenric
arts
ngine
Irn
-
~
~~
Part Name
Iood ass'y
lain wire
harness
lour meter
cable
YM155D.
'M755 only1
lecornpres-
on lever
Illustration
Battery
plus
4
'L
.%
cord
-
Banery
ground
cord
2
WION:
J
Before remo~,ing the main
>ire harness, first dismantle
barrev plus
he
barrev grouild cord.
he
'I
Wl~eiz remorin: the main
?ire harness, it is recommeizdd for ease of handlinc not to
emove the coni~ecrion in
he instrument
72
2:>
Main
(+I
panel.
wire
cord and
hainerr
-
F.
0.
filter
----
:~el cock
Hour
merer
cable
-.
.--
--=
b>
Decornpresrion
lull out the bolt
nd remsve the fuel cock.
-:.-.
-+>
lever'\-,
(MB
x.70).
-
~
I..
Page 32

I
I
Division Pan Name Illustration CautiontRemarks
I
High-pressure
pipe
Remove the 3 bolts
and take out the low-pressure
pipe
(A).
Remove the 4 bolts
and take out the highpretsure pipe.
(6
(6
x
x
45)
45)
124
1
r;.
l~uel oil tank
4
nuts
(8)
Loosen the
remove the fuel oil tank
band. and dismantle the
1
fuel
oil
tank.
1
NOTE:
I]
Remove rhe cock ass)
wirh the fuel oil rank
connected.
2)
Phoro shows the procedure
for rhe
is different from
YMI3j(D],
procedure remains the same.
YMIjj(D),
bur rhe disassemblin~
to
rhe fuel rank
thar of rhe
I
Page 33

-
25
-
26
Division
instrument
panel
Steering
illustration
CautionIRernarks
Remove the instrument pinel
in the following sequence:
1) Steering wheel cap
!
2) Lock nut (14 x 1.5)
3)
Steering wheel
4)
Fuse
box,
5) Current limter, 4 screws
(6 x 16)
6) Remove the instrument
panel without removing the
main wire harness.
When removing the drag-rod,
use two plastic hammers
and strike the
fromboth sides.
end
2 screws (5 x 10)
pitman arm
27
Front
drive
Remove the propeller shaft
in the following order:
1)
Loosen the hose band and
shift the setting rubber backward.
2) Remove the 4 bolts (6 x 10).
and remove the propeller shaft
cover.
3)
Take out the 4 bolts (6 x 16)
to shift the propeller shaft cover
supporter
4)
remove the propeller shaft.
(A)
Remove the 4 bolts
backward.
(8
x
20) to
Page 34

1)
Jack up the front axle
bracket top and raise
the
front tires from the ground.
21 Remove the 4 bolts
and
remove the front tires.
(1
.41 Take out the castle nut
and extract the center
5)
Remove the front axle.
NOTE:
procedure for
YMI35D,
Photo shows the
YMI55D
but the same dis-
pin.
and
assembling procedure is
used for the
YM155
and
2
x 2
(16)
Page 35

V.
ENGINE DISASSEMBLY
Complete disassembly of the engine should be
carried out in the following sequence:
Item
1
Radiator
and
air
cleaner
Illurnation
21 Detach radiator
31 Detach radiator with
assemblv.
Explanation
coolant from radiator and cylinder
hose.
fronr
axle
as
an
'.
\
11
Drain
Cylinder
2
i
I
I
!
head
4
21 Remove
31 Detach
41 Remove air cleaner
51 Detach
61
71
81
forget the nut in
91 Remove cylinder head gasket.
lube oil.
fan
generarar
fuel
Detach
rocker
Remove push
Remove
cylinder head nuts. (Do not
belt.
and
starter motor.
and
rocker
and lube oil piper.
arm assembly.
rods.
the intake rkanifold.1
arm
cover.
-
-
..
.
Page 36

2)
Remove
crankshaft
crank
gear
by
the
drives.
31
Nore: me hydraulic
Do
Detsh
gem unir
gear case but me removed as
When otsembling, remove rhe
hydraulic pump
gem unir to make firring
not
gear
using
use
a
c&.
ere
nor derachedfrom rhe
pulley.
two dot
gear
puller.
pump
nnd rnchomerer
md
rnchomerer
Remove
screw-
o
unir.
easier.
21
Check the thicknerr
31
Remove
the
lube
and
oil
dipstick.
number
of
the
Page 37

21
Remove
under
31
Derach
lube
ail inlet tube.
41
Remove
rad
Caution: Cleorly
1)
Remove
which is No.
ir
No. 2 pisfon
the bolrr
cover
of
bolts.
mark
fo? later reference
1
pisron
(5pcrI.
cylinder block.
and
which
2)
Remove
using a gear puller.
31
Remove
hydraulic
lube oil
pump
pump.
driven
gear.
Page 38

Item
lllunration
Explanation
8
Crankshaft
,'--
I
11
Remove
21
Remove
Caution:
main
beariog
crankshaft
Be
curem
bem'ng
not
housiog.
to
drop
the thrust
-
1
,'
.
.
11
Remove
Camshaft
9
21
31
weights.
Remove
Remove
stopper.
camshaft.
tappets.
Remove
the
bearing
Page 39

VI. ENGINE CONSTRUCTION AND MAINTENANCE,
1.
CYLINDER LINERS The
Cylinder liners must provide a good fit with pistons and piston rings, provide good heat dissipation, and must also have ample wear resistance
2TR13A, 2T73A
engine employs wet type
cylinder liners made of special cast iron.
(1)
Visual Inspection
The cylinder liner should be replaced when there
rust,
are visible scratches, traces of
(2)
Inspecting
by
Testing Equipment
or corrosion.
-
1.
2.
3.
cylinder liner
I
Roundness
Projection
cylinder liner
Item
Inner diameter of
YM135(D)
YM155(DI
of
Standard dimension
2.8740-2.8752
(73+0.030
0)
29527-2.9539
(75+0.030,
0
Within
0.0008 (0.021
0.0019-0.0051
10.05-0.131
Replacement limit
0.0066 (0.171
(0.17)
0.0066
0.0039 (0.1)
-
T&ng equipment
Cylinder gauge
Cylinder gauge
Dial gauge
[Unit: in
lrnmll
n
NOTES:
Measure the inner diameter of the cylinder liner in the
(I)
shaft
and in the direction of the piston at the following phces: a) at the upper part of
the liner
and c)
(2)
mined by
(3)
inder liner and also to provide
[l.I811.in (30
mm) below the rop of the linerj, b)
at the lower pan of the liner.
Whether the roundness of the cylinder liner
is
within the allowable
studying the differences in readings obtained in Item
The cylinder liner projection is necessaty in order to reduce distortion
a
good
fit
with the gasket when the cylinder head is
tightened. Accordingly, check to see that the required projection
axial
direction of the crank-
at
the center of the liner,
limits
1.
is
provided.
is deter-
of
the cyl-
Page 40

(3)
Replacing Cylinder Liners C) Replace the liner rubber packings with a
new one.
Cylinder liners
visual inspection and inspection by testing
-
ment
are replaced in the following procedure:
-
judged to be unacceptable by
equip-
d) Coat the liner with water-proofing paint.
Remove the cylinder liner and insert a
e)
new liner.
After
it
f)
has been inserted, inspect
the procedures previously described to ascertain that there is no contraction of the liner.
2.
PISTONS
it
using
Cyl.
A
Extmct the cylinder liner with
a)
liner replacer.
Clean the grooves provided for the rubber
b)
packing of the liner.
Item
1.
Outer
piston
YM135lDl
YM155(01
liner
replacer
diameter
of
a
cy1inde.r
Standard dimension
2.8697-2.8709
173-0.078
-0.109
I
2.9484-29496
-OD78
(75-o.io91
The oval type pistons are made from
terial
sipation properties.
(1)
Check the pistons for scoring or cracks. Also
check the piston ring grooves for chips or any
wear in their edges.
(2)
Replacement limit
-0.0078 (-0.21
-0.0078 (-0.21
LOW-X
ma-
(Aluminum alloy) which has good heat dis-
Visual inspection
Inspecting by Testing Equipment
[Unit:
in
(rnrnll
Testing equipment
Micromerer
2
Clearance
h
pinon
between
and cylinder
0.0063-0.0068
10.1MI-0.173)
0.01 18
(0.31
Page 41

r
3.
Item
Piston
ring
clearance:-
grooves
Standard dimension
Replacement limit
Testing
equipment
Thickness gauge(
(3)
Replacing Pistons
No.
No.
No.
No.
1
2
3
4
0.0019-0.0033
(0.050-0.0851
0.0008-0.0022
(0.020-0.0551
0.0008-0.0022
(0.020-0.0551
0.0008-0.0022
(0.020-0.0551
0.0078 (0.2)
0.0079
10.2)
0.0079 (0.2)
0.0059 (0.151
NOTES:
Measure rhe outer diameter of the piston at the piston skirt section, at right angles
(I)
lrris of the piston pin
to the
Mensure the clearance between the piston and the cylinder liner by comparing the
(2)
outer diameter
is the difference between the minimum clearance figure obtained
of the piston.
of
the piston and the inner diameter of the cylinder liner. The clearance
and
the outerdimneter
(3.1) Disassembly
Detach the two piston pin retaining rings;
a)
Heat up the piston to 176" - 212°F (80"
b)
-
100°C):
Remove the piston pin by tapping
C)
it
with
a lead bar and a hammer.
(3.2) Assembly
e
Fit in one of the piston pin retaining rings;
a)
Heat up the piston to
.b)
-
100°C); No.2 & 3 Taper face type:
176"
-
212°F (80"
C) Fit the piston pin in position;
Fit in the remaining piston pin retaining
d)
ring.
After assembly check to make sure that the piston
and connecting rod move freely.
3.
PISTON RINGS
The piston rings have
Teflon@ coatings in order
to achieve good break-in properties.
The piston rings are as follows:
No.1 ring Barrel face type:
Provides and maintains good sealing properties and carbon crush-
ing properties; also prevents carbon sticking. Is chrome plated to
achieve good wear-resisting properties.
Provides and maintains good sealing properties and oil scraping
effects.
No.4 Bevel cutter type:
An oil ring, in which the empha-
sis is upon oil scraping effects, is
used.
Page 42

(1
)
Visual l nspection
Check rings for uneven wear or abnormal wear.
(2)
lnspecting by Testing Equipment
1.
Item
Piston ring
grooves
and
clearance
Standard dimension Replacement
ring
[Refer
to section on pistons]
livit
1
Testing equipment
lll&tion
!
[Unir: in immll
7
2
Piston ring
clearance:-
No.
NO.
NO.
NO.
2
3
4
1
end
0.0078-0.0157
(0.2-0.4)
NOTES:
To measure rhe pisron ring end clenrance, rhe cylinder liner
(I)
table, rhe ring is fitred in rhe skirr section, and after mnking sure that rhe ring is nor
rhe end clenrnnce is mensured with a rhickness gauge.
askew,
When rhe pisron rings are being firred in rhe pisron, be sure rhat the marking on
(2)
the ring is facing up.
4.
PISTON PIN
(1)
Visual Inspection
Check to
make
sure that there are no traces of
scoring, or uneven wear.
(2)
lnspecting by Testing Equipment
0.0591
11.5)
Thickness gauge
is
placed on a nufnce
I,
Item [Sandatddime~ion( Replacement limit I Testing equipment
[Unit: in imm)]
(
IllMration
1
Page 43

5.
CONNECTING
RODS
(1)
Visual Inspection
The
connecting
big end sides have square cuts. The small
bushings are made of sintered copper and lead
alloy, and the large end side has kelrnet bearings.
rods
are
sramp
forged, and the
end
The bushings are checked to see whether there
any scoring or peeling.
(2)
Inspecting by Testing Equipment
is
Page 44

Item
Standarddimemion
Replacement limif
Testing equipment
Illurnation
6.
('Refer
Connecting
ilde
play
to
Note below)
rod
0.0Q59-0.0138
10.15-0.35)
Thickness
gauge
NOTES:
To replace the small end bushings, press-fir in new bushings.
(1)
operation be sure
sure the inner diameters afrer rhe new bushings have been
diamerer is roo small,
bushings
into position, be sure to align rhe oil passages of the bushings with those of rhe
rhar there is no peeling or contraction of the bushings.
press-fitred in position If the
it
should be corrected, using a reamer. When press-firrng new
connecting rod.
The clearance referred to in Irem 3 above is rhe difference befween rhe outer
(2)
diameter of
the piston pin and rhe inner diameter of the bushings obtained by measure-
ments.
During rhe
Mea-
The measurements referred ro in Irem 4 above are to be raken afrer righren-
(3)
ing rhe connecringrod bolrs to a rorque of 33 - 36 ft-lb (4.5 - 5.0 kg-m).
(4);
The clearance referred to in Irem 5 above is rhe difference benveen rhe inner
diameter of rhe big end bearing and the outer diameter
measurements conducted using an oil
the case of Item 4, rhe measuremenrs are to be raken after the bolrs have been
As in
tightened
(5
afrer
to the prescribed rorque
The measuremenn refwed ro in Item 6 are ro be taken using a thickness gauge,
psr securing the connecting rods ro rhe crankshafrs and tighrening rhe bolts to
clemce gauge and/or a cylinder gouge.
0.f
rhe prescribed rorque and rhen moving the connectingrod ro one side
Ar least 75% of rhe roral area of the crankshafr bushings musr be in contact wirh
(6)
irselx
balance weights.
6.
CRANKSHAFT
the crankshaft
Extra overlap
The crankshaft used in the engine
a solid
two-
and pin sections, for increased durability of the
is
throw type, stamp forged and equipped with crankshaft.
the crankshafr obtained by
is
provided at the journal sections
n
Page 45

(1)
Visual inspection
Check the crankshaft visually
of
there are any traces
(2)
Inspecting
by
scoring, marring,
Testing Equipment
to
see whether
or
cracks.
Tming
equipment
Micrometer
Micrometer
.
Unit: in
.
lllustGtion
.
.
.lrnm)
Dial
gauge
Cylinder
gauge
1
I
-.<
,
Page 46

NOTES:
After conducting the measurements given in Irem I above, be sure to mensure the
(I)
clearance
tion on measurements on the connecting rods for
(2)
crankshnfr
the machining
supporting
between the crank pin bearings and the crank pin. (Refer to Item 5 in the sec-
the prescribed dimensions).
If, after measuring the crankshaft for deflection, it is found that machining of the
is
necessmy, do not forget to adjust the filler sections of the crank pins a.fter
is
completed. Measure the deflection by placing the crankshafi on a
stand
(3)
Irem 5
will
be the difference between Item 2 and Item 4 obtained through mea-
surements
Measuring of end play is conducted after the crankshaft has been fined into posi-
(4)
tion as prescribed
The roundness of the main bushings is checked by measuring the inner diameter
(5)
two directions at right a@es to each other and comparing the two readings obtained.
in
Page 47

(3)
Replacing theMain Bushing
7.
CAMSHAFT
Whenever the readings for the main bushings exceed the repairable limit, they must be replaced.
When fitting the main bushings in the main bushings housing and cylinder block,
observe the fol-
lowing points:
a) To extract and insert bushings, always
use the bushings removing and installing tools.
When inserting new bushings, be sure that
b)
the oil passages are aligned.
After the new bushings have been install-
C)
ed, measure the inner diameter of the main
bushingto check that they are properly aligned,
not contracted.
and
A
single, integrated camshaft, incorporating the in-
is
take and exhaust cams, and the fuel cam,
used.
The fuel cam has straight flank and convex curves
while the intake and exhaust cams have parabolic
acceleration curves, in order to reduce the shock
of inertia force, this also serves to effectively
re
duce noise.
(1)
Visual Inspection
Check the crankshaft for marring or uneven wear.
Be sure that the supporting function correctly,
and that no abnormal noises are generated.
(2)
Inspecting
by
Testing Equipment
Unit:
in
imhl
A
for
distortion
1.6505--1.6515
Page 48

outer
diameter
camshaft bearing
and cylinder block:
of
Unit:
in
(rn
NOTES:
To conduct the measurements referred to in Irem I above, the camshaft
(1)
is
secured
to a supporting stand, and the amount of run-out is measured using a dialgauge.
The cam journal clearance referred to in Irem 3 is the difference in the read-
(2)
ings obtained by measuremenrs of the two components taken using a micrometer
and a cylinder.
Valve timing and fuel injection timing is shown below
(3)
T.D.C.
7
B.D.C.
The clearance between the rappers
(4)
is
the difference benveen the readings for the components taken using a micro-
and
tappet guides referred to in Item 6 above
meter and a cylinder gauge.
Replacement of the camshaft ball bearing
(5)
is
conducted by first removing the old
bearing by a puller and press-fitting the new ones in position
Page 49

8.
CYLINDER HEAD
A
cylinder head integrating two cylinders into
one and made by high precision quality casting
is
used.
Both the intake ports and the exhaust ports are
integrated in the cylinder head, and overall engine
design and construction has been simplified by
eliminating manifolds.
Item
1
Inner diameter
valve guider (after
assembly)
2.
Outer
diameter
of valve Remr
standsrd
Intake:
of
0.2755-0.2761
(7+0.015)
Exhaust:
0.2763-0.2775
!
(7+0.020
0.2736-0.2740
1
17-o.040
dimemion
+O
+0.050)
-0.050)
Replacement limit
0.0031 (0.08)
-0.0039 (-0.1)
(1)
Visual Inspection
The
surface
are any traces of coolant
of the head
is
checked
or
gas
to
leakage. ~h~
side of the head is checked to ascertain that
not clogged up anywhere by accumulated debris
is
and that there
(2)
Inspecting
Testing equipment
Wire gauge
Micrometer
[Check thor rhe reading
wrhm the standard
no corrosion.
by
Testing Equipment
lllunmion
is
dimension]
see
Unit:
if
there
in
in.
it
(mm)
is
1
3. Wearance
valve guide and
valve stem
4.
5.'
6.
seat width:
Valve
Intake
Exhaust
Amount of
sinkage
Valve springs:
Inclination
Free length
beween
valve
Intake:
0.~15-0.0025
(0.040-0.0651
Exhaust:
0,001 7-0.0027
(0.045--0.070)
0.0696 (1.771
-
-
1.4370 136.5)
0.0059 10.151
0.0984 (2.5)
0.0197 (0.51
2 degrees
1.6142
(41)
b-
Caiipen
lCalipen
Calipers
7.
Valve reat angle.
!
intakelexhaurt
90 degrees
Page 50

NOTES:
Measure the inner diameter of the valve guides after they have been fitted
(I)
into position A press must be used to
press-fir the valveguides into position when they
are replaced
is
If there
should be increased
Before the intake
insufficient clearance between the valve guides and the valve stems, clearance
to rhe prescribed dimension by usinga reamer.
&
exhrmst valves are installed, coat the valve stems with lub oil.
The width of the valve sears
(2)
is
measured by a pair ofcalipers, and
if
corrections are
necessq, the prescribed valve curter must be used.
Ouzer diameter
Inzoke
(3233.1) 1.0590-1.0669
Exhausr
of
volve:
(2 7iU.1) 1.2559-1.263
7
After the valve seats have been dressed using the seat cutters, the valves are lapped.
i) Lapping should be done by using valve lapping compound powder.
ii) The finishing of the seat should be done by oil lapping.
iii) When fitting the valves back in position, do nor mix up
inder with those of the No.
2
cylinder. All valves are marked prior to shipment
the valves for No. I cyl-
from the factow whether they are intake or exhaust valves,' and also whether
they are for the No.
1
or No. 2 cylinders.
ICI
IB)
15'
(CI
65-75Ocl;trer
cuner
Seat
width
0.0696
mml
Valve
seat
cuner
9.
COMBUSTION CHAMBERS
n
The combustion chambers consist of Yanmar's
patented special swirl type pre-combustion
cham-
(1.77
(1)
Visual Inspection
Check the combustion chambers to see that the
bers. They improve combution performance and injection ports are not clogged or that carbon de-
contribute to achieving low fuel consumption. posits have not formed.
in.
Page 51

(2)
Points to Bear in Mind in Assembling the a) Chamber packing
Combustion Chambers
When assembling the combustion chamber, carry
out the work in the following sequence. Note
that the front chamber has front and rear sides.
b) Front chamber
C) Chamber packing
d)
Rear chamber
e) Teflon@ gasket
Page 52

10. ROCKER ARM ASSEMBLY
Independent rocker arm supports are provided
for each of the cylinders. Lubrication of the
is
rocker arm
-
lube oil fed under pressure from the lube oil
carried out by forced lubrication
pump.
1.:
2..
-
Outer
of
rocker
i
shaft
Inner
of
rocker
bushing
Item
diameter
arm
diameter
arm
Standard
0.5504--0.5511
,14-0.018
0.5518-0.5525
'14~.026'
dimension
0)
iQ.034
Replacement
-0.0039 (-0.11
0.0039 10.1)
limit
(1) Visual Inspection
Check the rocker arm support, the shaft, and the
rocker arm bushings for cracks.
(2)
Inspecting by Testing Equipment
Teting
equipment
Micrometer
Cylinder
gauge
Illustration
.. .
Unit:
in
(mml
3.
4.
t
Clearance
rocker
and
of
bushings
Length
rods
arm
inner
rocker
beween
shaft
diameter
arm
of
push
NOTES:
(I)
placed rhey should again be press-firred. After they have been fitted, measure them
to be sure rhey me nor
(2)
(3)
11.
n
INJECTION PUMP AND INJECTION
VALVE
An
integrated.fuel pump, a Bosch
manufactured by Yanmar,
0.OW6-0.0020
(0.016-0.052)
6.5157 (165.51
The rockers
0.0059 (0.15)
-0.0787 (-2)
am
bushings are press-fitted in position and when rhey are to be re-
noocked nor
Calipers
is
there imy coniracrion
Place the push rod on a surface table to check rhem for straghmess.
Align the oil-port when replacing bushings
and No. 2 cylinders.
The nozzles are of semi-throttle type, to achieve
PFR2K
is
used for the No.
type
1
lower combustion noise (low rpm knocking)
out impairing engine starting performance.
with-
Page 53

(1)
Inspecting by Testing Equipment
lOOOst
(at
rpml
of
cam shaft
2T73A.
22ccl
lWkt
(at
1350
1250
(2)
Disassembly, Assembly, Adjusting
(2.1)
Fuel Injection Valves
The injection valves are built as shown in
a)
the illustration below.
Valve
Adjusting shim
Valve
Valve
spring reminer
holder
body
spring shoe
Fuel
valve
injection
S'Y
Page 54

b) Injection pressure
is
adjusted by vary:
ing the thickness of the adjusting shims. Every
0.0039 in. (0.1
imately
142- psi (10 kg/cm2) variation in/ the
mm) of shims provides approx-
pressure.
Be sure to use shims which have holes in their
centers.
[Adjusting Shim]
Injection condition
mm
C)
The injection pressure 2,276 psi (160 kg/ (2.2) Fuel Injection Pump
0.5
11 025053420
11025053430
cm2) is of course important, but be sure to
check the fuel is injected correctly as shown
below: inder.
-
DISASSEMBLY SEQUENCE
Measure the injection volume of each cyl-
a)
Measure the pressure to be generated.
b)
(more than 7,112.5
Whenever any of the plungers have to be
c)
psi1500 kg/cm2
)
replaced because of wear, the disassembly and
assembly work is carried out in the following
sequence.
Plunger diameter and cam
lift:
0.2756 in x 0.2756 in (7oi x 7 mm)
-
[NO.
1
CYLINDER]
J.
Plunger guide roller pin
2.
Plunger guide roller Delivery valve
3.
Plunger guide Plunger
4.
Plunger position adjusting shim
5.
Plunger and plunger spring retainer
6.
Plunger spring
7.
Plunger spring retainer
8.
Fuel control pinion
9.
Delivery valve holder
(A)
Fuel control pinion (A)
Plunger spring retainer Iuqperl
Plungw spring retainer (lower
Plunger position adjusting shim
.Delivery
barrel
valve
packing
spring
sea
Delivery valve holder
uel injection pump
ars'y
Page 55

O-ring, for delivery valve holder
10.
11. Delivery valve spring
12. Delivery valve
Delivery valve seat (including packing)
13.
A~T
venting
boll
14. Plunger barrel
15. Plunger barrel packing
[NO. 2 CYLINDER]
16. Fuel control pinion screw (Check scribed line)
17. Plunger guide roller pin
18. Same procedure as
19. Sleeve
20. Same procedure as
21. Fuel control pinion (8)
22.
Rack.
(3
to
7).
(8 to 151
Fud control pinion
Plunger
guide
mllcr
Runger
uel control
Rungr
guide
nck
guide
dler
roller (inner)
(outer)
-
When disassembling the fuel injection pump, do
not
mix-up the parts for the No. 1 cylinder and
2
No.
on different trays.
cylinder. Keep the pam for each~cylinder
[Points to Bear in Mind in Assembly]
Do not mix up components for the No.
(1)
2
cylinder and No.
cylinder.
-
1
Page 56

During assembly, clean each component be
(2)
fore fitting into position.
(3)
After assembly, make sure that the rack
moves freely without resistance.
Be sure to align all assembly markings and
(4)
scribed lines.
ASSEMBLY
[NO.
1
CYLINDER1
1.
Plunger barrel packing
2.
Plunger barrel
Delivery valve seat and packing
3.
4. Delivery valve
5. Delivery valve holder O-ring. (Torque: 30-32.6
6.
~eliv'ery valve holder
Rack (Make sure that the rack
7.
Fuel control pinion (A). (Line up alignment marks.)
8.
Plunger spring retainer. (Check which side should be
9.
10. Plunger spring
Plunger (Line up alignment marks)
11.
12.
Plunger spring lower retainer
Plunger position adjusting shim. (Adjust the plunger
13.
to close the port of barrel by the
pre-fit volume
is
0.098" (2.5 mm).)
is
fined in the correct direction.)
shim(s) in which
SEQUENCE
ft.lbs/4-4.'5 kg-m)
up.)
14. Plunger guide
15. Plunger guide roller
[NO. 2 CYLINDERJ
Fuel control pinion
16.
17. Plunger barrel
Same procedure
18.
19. Fuel control sleeve. (Line up scribed lines on control pinion IB) and sleeve.)
20. Same procedure as 9 to 15.
21. Rocker pin
(B). (Line up alignment marks on rack and control pinion.)
as
13 to 6.
ntrol
-
Page 57

After assembling the fuel injection pump, measure the rack motion resistance. Motion resistance
should be less than
by
a
spring scale,'?r when rack is placed in the
vertical position
its
full distance of travel freely by
12.
GOVERNOR
The speed control system consists of a mechan-
ical, centrifugal weight, all-speed governor. The
governor weights are fitted to
draulic oil pump drive device. By a sleeve
at the end of the hydraulic oil pump motion
Item
0.132
it
should be capable of moving
Standarddime~ion
lbs
(60
g), measured
its
own weight.
a
gear on the hy-
Replacement limit
travel through the governor lever and
move the rack of the fuel pump. In addition, this
engine is equipped with a
increase the amount of fuel supplied as neces-
sary.
13.
LUBRICATING OIL PUMP
(1)
Pump
A
pump.
[Inspecting
TeRing
trochoid pump
by
equipment
is
used for the lub;icating oil
Testing Equipmentj
rt'orque spring to
lllunration
!inkage to
i
Unir:
in
lmml
~..
Clearance between
outer
r01or and
body
Clearance
body and
ouxer rotors
Claarance between
outer rotor and
inner
rotor
between
inner.
0.0020-0.0041
10.050-0.105)
0.0024-0.0039
10.1 0-0.061
0.0020--0.0041
10.050-0.105)
0.0059 (0.15)
0.0051 10.13)
10.1 51
0.0059
Thickness
Square gauge
Thickness
Thickness
gauge
gauge
gauge
i
!
I
,
.
i
*.
.
&-
'..
,.
.c
,
.
:
..
a.
A
1
i
i
!
i
L
-53-
Page 58

(2) Lube Oil Pressure
Oil pressure control valve:
21.34--35.56 psi (1.5-2.5 kg/cm2)
Oil filter by-pass pressurevalve activating pressure:
17.07-1 1.38 psi
Lube oil pressure control valve
(120.2 kg/crn2
is
fitted on lube
)
oil filter.
14. COOLING SYSTEM
(1) Radiator
Backlash
Item
The radiator
cm2
).
Apply pressure to the cooling system to
test whether there are any leaks in the
is
pressurized at 12.8 psi
(0.9
kg/
svstem.
15. GEARS
(1)
Measuring Backlash
Fit each of the gears in position, and measure
their respective backlash readings.
Unir:
in.
(mml
\
Standarddimension
0.0031-0.0063
(0.08-0.161
RePImment
0.01
18
(0.31
limit
Testing
equipment
Dial
gauge
Fuse
Mircomerer
IlluRration
a
(2) Visual Inspection
Check the gear tooth faces for pitting and if any
gear shows severe pitting replace
(3)
Tachometer Gear Unit (only model 2TR13A
it.
engine)
Check to make sure that the gear unit functions
smoothly.
16. OIL SEALS, O-RINGS AND BALL BEARINGS
(1) Oil Seals
o
Crankshaft - fined on both ends
-
Flywheel side
Gear side
o
Decompression shaft
o
Regulator handle shaft
(3)
Bal! Bearings
o
Camshaft
o
Hydraulic pumpdriven gear shaft
-
main bearing housing
gear case
Page 59

Chapter V covered maintenance and servicing of
various parts of the engine. During engine
assem-
bly the following points should be observed:
(1)
All packings should be replaced with new
ones.
All residues of the old packings should be completely removed.
(2)
All packings should be coated with appro
priate sealants.
Refer to the following charts for tightening
(3)
torque specifications. Note, however, that toque
specifications for the more important bolts and
nuts will be provided in the sections on their
as-
sembly.
A
Effective diam-
eter
of bolt
M5
M6
M8
MlO
~12'
M14
M16
M18
MZO
B
Width
aoorr
bolts and
0.3150 in. ( 8mm)
0.3937 in.
0.5118 in. 03 mml
0.6693 in. (17 mm)
0.7480 in. (19 mm)
0.8661 in. (22 mml
0.9449 in. (24 mm)
1.0630 in. (27 mml
1.1811 in. (30 mml
3)
Camshaft rtoper
Take care not to get front and
.of
thrun bearing mixed
nuts
flats of
HO
mml
'
screw
up:
C
4T (Mild steel)
2.2 - 2.9 ft.lbr . (0.3 - 0.4 kg-ml
3.6 - 5.1 ftlbr (0.5 - 0.7 kg-ml
9 - 12 ft.lbr (1.3 - 1.7 kg-ml
18 - 24 ftlbr (2.5 - 3.2 kg-ml
33 -43 ftlbs (4.5 -6.0 kg-ml
51 - 61 ft.lbs 17.0 - 8.5 kg-ml
80 - 1OOft.lbs (11 - 14 kpml
116- 137ft.lbr (16 - 19 kg-m)
159 - 195ft.lbr (22 - 27 kpml
rear
sides
D
7T
(Hard
Reel)'
5.8 -8.7 ft.
17- 22 ft.lbr (2.3 -3.0 kg-m)
33 -43 ft.lbr (4.5 -6.0 kg-ml
58 - 72 ft.lbr (8.0 - 10 kpm)
87 - 108fr.lba
12%- 152ft.lbr (17.- 21 kg-m)
174- 210ft.lbs (24
239 - 297 nlbr 133 - 41 kpm)
Ibr (0.8 - 1.2 kpm)
d2
-
15 kg-m)
-
29
kg-m)
Remark
I
2) Main bearing housing
Ascertain that crankshaft
Crankshaft side gap
turns readily
Page 60

Cylinder block
flywheel end below.
11 Pinon assemblies
luring a pinon ring
is
stood
on
(No.
1
insertion
its end with
&
No.
2)
tool!
dl Mark on
large-boss end
md
(Match
cap
is
aligned with
same mark1
Page 61

2)
Align matching
markson
the
Hydraulic
pump
drive gear
Page 62

Fuel
oil'pump:
0
Fit rack to notch and attach pump
0
Insert injection timing control shims
to prescribed thickness.
be
The following should
0
Lube oil pipe;
poirnr on the cylinder black
TWO
0
Lube oil pressure witch
0
Lube oil dipstick
2)
Coat
oil real with lubeoil, and push-fit
the crankshaft
damage lip section of oil real.
3)
Lube oil pressure control
lube oil filter.
4)
V-pulley: to crankshaft
5)
Hour meter gear unit
V-pulley. raking care not to
done before the
valve
and
6)
Hydraulic pump
Page 63

Item
Description
Tishtening torque
ft-lhr
lkg-rnl
:
IlluRration
8.
Adjusting
amount of
fuel injection
9.
Cylinder head
11 Loosen the injection control
to the point where governor lever will
not come into contact with
lever is moved all the way in the increase
direction,
21
bolt and move linkage all the way in the
increase direction. i.e.. to the left, and
then tighten coupling bolt
31 Align mark on the rack with datum
level of pump by moving injection
control shaft
41 Lock injection control.
51
61 Anach fuel injection pump cover.
1) Fit gasket, taking carethat rhe
correct side
be visible).
21
31 Cylinder head
41 Rocker arm assembly
5)
[Looren the adjustment screw before
atiaching the rocker arm1
i.e., to the left).
Loosen
the governor linkage coupling
towards thegear care.
Attach rupplementlry oil inlet
is
up
(Side with strips should
Push
rods.
Lube oil pipe.
(locren
it
even when
.
.
114-116
(15.5-16.01
1_
Page 64

-
10.
Item
Valve clearance
d-iption
1)
No. 1 cylinder (flywheel ridecylinderl
is set to the TDC where there ir comprer-
rion.
[The TDC where there
the point when the stamped mark of the
crankrhaftlv-pulley is aligned with the
Pointer of the gear
intake
nor
exhaust valves move.)
2) The adjusting screw is loosened, clear-
ance is adjusted to 0.0078 in. 10.2 mm)
(for both intake and exhausti, and after
adjustment, tightened
3)
The valves for No. 2 cylinder are also
adjusted to clearances of 0.0078 in (0.2
mml after turning the engine exactly 180
from the TDC
there is comprerrion.
for
is
compression is
case,
and neither
once
again.
No. 1 cylinder where
Tightenirg torque
ft.lbr
kg-mi
lllunration
'Y
.
,-.
11.
Radiator
11
A.C. geneator
2) Cooling fan
[The fan belt should be rightened to the
point where
the fingers 0.4-0.6 in (10-15 mmi at
point midway beween The generator
pulley and rhe
31 Radiator front axle bracket
41 Starter motor
5) Air cleaner
6) Exhausr muffler
it
may be pressed down
fan
shaft.]
by
a
Page 65

VIII. ENGINE ADJUSTMENTS
This chapter will discuss those places which
quire adjustment after the engine has been assem- vidual components, refer to Chapter
bled.
Governor
Governor
weight
spring.
re
For detailed servicing and adjustments of indi-
1.
GOVERNOR LINKAGE
V.
Remove the fuel pump chamber cover.
(1)
Remove the cap nut and loosen the lock
(2)
nut.
Lightly move the governor lever as far to the
(3)
left as possible so that the fuel injection rack
touches the fuel injection limiting shaft.
Free the governor lever. At the same time
(4)
screw the fuel injection limiting shaft in.
Lock the fuel injection limiting shaft when
(5)
is
the end of the punched mark on the rack
up with the datum lever of the pump.
(6)
Attach the fuel pump chamber cover.
lined
limitingghaft
2.
VALVE CLEARANCE
No. 1
(1)
to the
(This is done
the crankshaft pulley with the indication pointer on the gear case.)
(2) The valve clearance adjusting screws are
loosened.
(3) A thickness gauge 0.0078 in. (0.2 mm)
serted and the adjusting screws are adjusted so
that both intake and exhaust valves have tha
amount of clearance, and then the adjustir.,
screws are locked.
cylinder (flywheel side cylinder)
TDC
position where there
by
lining up the stamped mark on
is
compression.
is
set
is
in-
sann
Page 66

44) The flywheel
from this position clockwise (that. is, the TDC
position at which there
other cylinder).
(5) The procedures described in (2) and (3) are
repeated for No. 2 cylinder to adjust the valve
clearances to 0.0078 in. (0.2 mm).
is
now turned exactly 180"
is
compression in the
3.
FUEL
The timing of the injections from the fuel pump
delivery valve is checked in the following order
with fuel being fed to the fuel pump by
oiler.
(1) The No. 1 cylinder
tion where there
(2)
The flywheel
small increments.
(3)
The flywheel is stopped at the very moment
that fuel
(4) The angle between the stamped mark on the
crankshaft V-pulley and the indicating pointer on
the gear case at the time fuel
checked.
Correct fuel injection delivery timing is when
(5)
the stamped marking and the pointer are lined
up, which
INJECTION TIMING
a
is
set to the TDC posi-
is
compression.
is
moved back and forth in.
is
discharged from the delivery .valve.
is
discharged
is
24 degree before TDC.
hand
is
If the fuel injection timing
(6)
timing is adjusted by removing the
if
it
is
ahead, add the shim(s).
Every 0.0039 in. (0.1 mm) shim provides approx-
imately 1
I
degree of variation.
Overlap
is
lagging, the
shim(s), and
1
Page 67

4.
FAN
BELT
Loosen the charging generator mounting bolt and.
the belt adjusting bolt, and adjust
tension so that there is 0.4
mm) of play at a point midway between the fan
pulley and the generator pulley, and then tighten
each of the bolts.
TENSION
the fan belt
-
0.6 in. (10 to
15
(3)
Carry out the same procedure given in
with the air venting plug
14)
Loosen the
in the same manner as described in
lease any air.
Loosen the injection valve side of the fuel
(5)
injection pipes.
air
venting plug of the fuel pump
(B).
(2)
(2)
to re-
5.
AIR
VENTING
1
Put fuel into the fuel tank.
Loosen the air venting plug
(2)
filter, allow fuel to flow from
fuel flowing out
tighten the air venting plug.
(Bleeding)
is
free of air bubbles, and then
(A)
of the fuel
!he plug until the
Page 68

(6)
Put the shift levers in neutral, the throttle
lever in running position, move the decompression
lever, and then turn the engine with the
motor.
(7)
As soon as fuel starts reaching the No. 1 and
No. 2 cylinders from the injection valve side,
ghten the fuel injection pipes for each cylinder.
(8)
Move the decompression lever once again
a
and turn the starter motor. If
is
which indicates injection
is
the venting
6.
OTHER MEASUREMENTS AND INSPECTIONS.
compteted.
taking place
spurting sound
.starter
is
heard,
ti-
Lube oil pressure: 21.34-35.56 psi
(1)
2.5
kglcm'
Attach a pressure gauge to the fitting of the lube
oil pressure switch and measure lube oil pressure.
'7
I
,
(2)
Top clearance: 0.030-0.022 in. (0.67+0.1
mm)
Extract the
a)
front), insert fuse rod through nozzle mount-
ing port, and turn flywheel.
Squash the fusebetween the cylinder head
b)
and the piston crown.
Measure the thickness of the squashed
C)
fuse using a micrometer.
combution chamber (rear and
)
(1.5-
Page 69

IX. ELECTRICAL EQUIPMENT
The Model YM155(D)/YM135(D) tractors are
fitted with the following electrical systems:
(1) Starting system
(2) Charging system
(3) Lighting system
(4)
Safety system
1.
BATTERY
(1)
Specifications
-
Model
Capacity
Voltage
Electrolyte
specific
Charging current
Item
gravify
nglne
01
pressure
ater temperature
Specifications
Y60-S4LP - YM155.155D
Y60-S4P - YM135.135D
35AH (20-hour rate1
12V
1.260/68~~ (20'~) at full
charge
3.5A
(2)
Battery Description
The open circuit voltage of a battery measured
across its terminals is
and neither the size of the battery nor its number
of plates has anything to do with its voltage.
The capacity of a battery is the amount of electricity that can be discharged from a fully
battery at a constant flow until
discharged terminal voltage.
There are two ways of expressing
2.0
-
2.15 volts per cell,
charg*
it
reaches its ra
the capacity
Page 70

of a battery: by
capacity (AH) or
ity
(WH). Generally speaking, the 'Ampere
Hour Capacity'
its
'Ampere Hour' electrical
its
'Watt Hour' electrical capac-
is
used.
sulfation will ensue, and
it
will no longer be
possible to recharge the battery.
Electrical capacity (AH)
=
discharge current
(A) x hours of dis-
charge
(H) required
for battery to reach
discharged terminal
voltage
The capacity of a battery will vary according to
its
discharge current rate, the ambient temperature during discharge, and the time and manner
in which the battery
is
used.
The capacity will also vary according to the
temperature of the electrolyte during discharge.
The higher the temperature, the larger the capac-
ity; and the lower the temperature, the lower the
capacity.
-
When starting the engine, the battery discharges
at a very high current flow rate. Accordingly,
can be readily understood that starting
difficult when the ambient temperature is very
low, because the capacity of the battery
ed. In addition, the viscosity of the engine oil
also increases as the temperature drops.
is
is
lower-
it
more
Too
low
&rrm
b) Specific Gravity
level
OMrfilled
The specific gravity of the electrolyte of a bat-
(3)
Inspection of the Battery
a)
Electrolyte Capacity
tery varies according to the temperature.
The specific gravity should be adjusted to the
specific gravity at
68°F
120°C).
The water content of the electrolyte will
evaporate during use, or will be reduced in
is
volume because of electrolysis. If there
sufficient electrolyte, the
it
sustain damage, and
there
battery
is
is
too much, the
electrolyte will overflow and damage the body
and other parts of the tractor.
According1y;the level of the electrolyte in the
battery should be inspected regularly, and re-
plenished with distilled water when insuffi-
M
cient. The level of the electrolyte should be
sufficient so that the separators of the plates
,
in-
liable to
Specific
gravity
1.260
1.220
1.160
1.090
1.080'
1.050
100%
75
50
25
10
0
Condition
Charged
Usable
limit
Discharged
Fully
discharged
condition
Usable
ar
it.
Recharge
immediately.
are not exposed.
Use
If
the plates are exposed to the atmosphere,
a hydrometer to get the specific gravity
reading:
Page 71

Insert the hydrometer into one of the battery
holes and
suckx~p enough electrolyte into the
glass tube so that the float moves freely. Be
sure to hold the glass tube vertically; the read-
is
ing at (A)
the specific gravity
11
Rotating
21
Operational rotation
3)
Allowable
4)
Charging
51
Rotation
charging
(2)
'Structure
direction
rotation
perofrmance
for
initial
Clockwise
1000
12,000
Moie
mm
than
than
rpm
1500
(viewed
-
5000
8.5A114
rpm
fmm
rpm
at
flywheel
4000
ridel
rpm
Name: 8-8 pole magneto revolving type genera-
tor
Components:
a) Stator (armature windings)
i) Each coil is connected in series. Wire
conductors are wound around an 8 pole
armature core.
A
2.
GENERATOR & CURRENT LIMITER
(1)
Specifications
Generator:
Current limiter:
GP8108 (KOKUSAN)
RS
2130 (KOKUSAN)
An aluminum die cast plate has recti-
ii)
fying diodes attached to
it.
b) Flywheel
The throttled plate flywheel has a ferrite mag-
net attached to
it,
and the pulley, shaft and
bearings are pressed in.
(3)
Connecting Diagram
Connecting Diagram (GP8108, RS21301
Page 72

-
(4)
Description of Motions
Circuit Without the Current Limiter Operated and Too Much Charging
Current Flowing
Whirel
Circuit With the Current Limiter Operated and Too Little Charging
Current Flowing
AC electricity, generated by the generator, is rec-
/--
..
t~fled in a full wave to DC electricity [red cord:
positive
through four diodes.
than the battery voltage,
(+);
and black cord: negative
When
it
it
is charged into the
becomes higher
-
(-11
Current
ilmiter
7f
-
-
,
!
Swlxch
Banen,
12V35AH
Head
Starter
(load)
lamp
and
motor
%
of an AC
Red
-
I
battery. When the current being charged increases with the high speed applied,
waveform generated is cut to adjust the current
being charged by the action of resistors and zener
diodes in the current limiter.
Page 73

3.
INSPECTION AND CHARACTERISTICS
(1)
Performance test of the generator coupling
with current limiter connected as shown on
D.
67.
Condition between
charge current
of
voltage
terminal
battery
Normal
1) More than 7A at 14V lwirhout
Current limiter1
21 7-2A at 14-15.W lwith
current limiter)
(2) Separate inspection of generator
(Refer to diagram on p. 72)
[On
Performance]
Approx. more than 28V. DC
Abnormal
11 Current: more than 7A
Voltage: more
21 No charging current
31 Charging current noted
but voltage of
terminal is
Approx. less than 28V.
than 15.5V
battery
Iw
Causes
Current limiter is not
operating properly.
Current limiter and
generator are not
Operating properly.
Battery
OC
11 Diode is bad
21 Open circuit in armature
between lead (red)
Dicde A-lead (red)
continuiw
No
Page 74

3.
[Inruration resistance1
at:
500V
Mesa tester
Lead (red)-grounding
Normal
More than
3~fi
Abnormal
Less than 3Ma
Causer
Bad insulation at armature
coil
Rotating
Flywheel rotated
I
4.
A
I
1.
2.
3. DO not tighten belt too tight
4.
1
5.
6.
7.
8.
1
''
10.
Condition
of
the Flywheel
Normal
Magnetic rtresi felt 8 times Per
1
rotation. Rotates comparatively
Abnormal
1
Noire accompanies rotation
No magnetic
Light rotation flywheel
CAUTIONS DURING HANDLING AND ASSEMBLY
Cautions
DO not improperly wire
Confirm
DO
Avoid shocks
the flywheel
Do
00
(engine operation must always be under specified wind
speed condition by coaling fan)
Do not
During arrernbly and disassembly. the shaft tightening
torque:
Use
reolacement of bearina
Ure genuine Yanmar parts for the replacement of
generamrdiodes
I+) & I-),
not operate at
and
not hang lead wire
not operate out of the specified asrembly condition
pour
water into the generator unit
250
kgcm to
rated or genuine Yanmar part for the
to
banev.
and coloring of leads
less
than the specified speed
large stresses
300
on
kgcm.
the peripheral of
/
/
I
Resulting Problems
Short-circuit
1)
Burning of generator diode
2)
Burning of generator coil
3) Burnina of current limiter
Burning of generator coil
Failure of current limiter
Broken pulley & bearing of generator
Distortion of
Break
of
lead wire
Burning of current limiter & generator
Short-circuits
Damage to bearing
Damager to flywheel by the loosening of
SCI~WI
Damages to bearings
Burning of diodes
stress is felt.
of
battery
the flywheel
of generator
Causer
/
Bearing is bad
Distortion of the flywheel
Lowering. or failure of
magnetic energy of
i
'
I
/
I
I
I
1
Page 75

5.
INSTRUCTIONS FOR DISASSEMBLY
AND ASSEMBLY
(Refer to diagram on p.
[Disassembly]
(1)
Remove hexagon nut (c);
(with attaching the top of the shaft ("side);
do not put stress on the flywheel)
(2)
Dismantle the flywheel (a);
(lightly tap the top of the shaft with
wooden hammer)
(3)
Separate the lead wire from each diode ter-
minal
(A,
6,
C,
D)
with a soldering iron;
(do not apply the soldering iron to the terminals for a long time or
diodes)
72)
it
will damage the
a
(1)
Do not keep the unit in storage under dusty,
damp, and high temperature conditions.
In case dust, dirt, water, oil, etc. are
(2)
posited on the generator and lead connections,
clean the necessary parts before use.
Keep the appropriate belt tension, to avoid
(3)
belt slippage.
[Current Limiter]
This is used coupled with the generator. Refer to
the section on the generator, for the specifications, diagram, and handling instructions.
Current limiter forms one unit contained in resin
mold. In the case of a failure, replace current
limiter
as
a unit.
de-
Remove the set screws
(4)
diodes.
(5)
Remove the set screw (d), and remove
armature coil
[Assembly]
Follow the instructions above reversely.
6.
MAINTENANCE AND INSPECTION
(el.
(h),
and proceed to
[Inspection of Current Limiter]
Checkthecontinuity between the red lead
black lead with a tester.
No
continuity
Lead Iblack)
I
an-
Page 76

Set
-.
screw
id1
7
Flywheel (a1
OC (+I
red
ENERATOR IGP8108)
7.
STARTER
(1)
Specifications
Manufacturer
I
Manufacturer's code
Yanmar'r code
Out~ut/weisht kW/lbs (kWIkq1
Mesh
method
Light running Terminal voltage
Lock torque
I
Tvoe
of clutch
Pinion Diametric pitch
MOTOR
Speed (rpm1 Over 7000 Over 6000
Terminal voltage (Vl/current (Al
Torque 1k9-m1
Spring tension
Standard lengthlwearlimit in. lmml
Item
(Vllcurrent (Al
or
module/No. of
gear
teeth 10
-
Before serial
HlTACHl
1
S114-196
I
124060-77010
1
1.0111.2211.015.1~
(
51lerr than 330 Slless than 540
Over 6.50 ft-lb
(Over 0.9
DPm
111
/
3.52 1bs (1.6kg)
1
0.63010.157 (16141
Specifisationr
No.
51000
kg-ml
l~fter serial
I
I
1
S114-219
124060-7701 1
1.2113.2 (1.3161
Over 11.56
(Over
I
1
No.
c
c
c
1.6 kpm)
c
c
c
c
51001
I
ft-lb
I
Page 77

Outer
diamerer 1.575 in10.079
in
I40 mm12 mml
,---.
(2)
Description of Starter Motor
The major components of the starter motor are
the magnetic switch section, the motor proper
section, and the pinion section. The magnetic
switch section has a plunger which activates
a
shift lever to engage and disengage the pinion,
and also open and close the main contacts to
start and stop the starter motor.
The over-running clutch
is
provided in order to
cut off the motive power from the engine when
the engine starts up.
0.4909-0.4902 inl0.4932-0.4921
-0.032 mrn112.5+0.027 mm
'12.5-~.~5~ rnm
(3)
Inspection and Maintenance
o
a) Pinion
The pinion will spring out when the
1)
is
magnetic switch
Push the pinion that has sprung out
21
closed.
towards the motor to eliminate any axial
play, and measure the clearance between the
end of the pinion and the pinion stopper.
in.
If
the clearance I is incorrect,
it
should be
corrected by removing and refitting the
justing plate of the magnetic switch mount.
ad-
Page 78

b) Brushes
Put the brushes in their respective brush
holder and measure the spring tension with
a spring balancer. Tension should be more
than 3.52 lbs (1.6 kg).
2) Length of Brushes
-
..
.
should be between 0.0197-0.0315 in.
0.8 mm). Be sure to bevel the edges of the
bar segments.
0.0197 -0.0315
(0.5
-
(0.5-
in.
0.8mm)
I
Bevel
wment
I
,--.
c) Armature
Standard brush length .is 0.630 in. (16
If any of them are worn out by more than
0.157 in. (4 mm), it should be replaced with
a
new one.
After replacing, check that the new brush
moves smoothly in the brush holder, and
that the end of the brush makes even contact with the commutator surface. If the
contact is uneven, correct
3) Brush Holder Continuity Test
Carry out a continuitytest between the in-
sulated brush holder and the ground.
There should be no continuity.
1)
Measuring Shaft Straightness
Place the shaft upon an end supporting
stand, and measure the straightness of the
shaft.
it.
mm).
4) Ground Test
Check conductivity between the commuta-
tor and the
cated, there
. .
5)
Insulation Test
Shorts in the armature coil are checked
a
with
is
an iron piece applied to the armature
core and the armature while the latter
is
rotated. If the iron piece starts vibrating
or "growling!',
is
a
short, and that replacement
&aft
is
"growler tester." A "growler tester"
If conductivity
a
short, so replace.
it
is
an indication that there
is
is
indi-
necessary.
/-.
it
is
If
(0.08 mm),
2)
If the surface
be polished using
If
(0.2 mm),
lathe.
3)
The amount of under-cut of the insulation
(mica between commutator bar segments)
distorted by more than 0.0031 in.
it
should be corrected.
Commutator
is
burnt or pitted,
#500-+600 sandpaper.
it
is out-of-round by more than 0.0078 in.
it
should be turned down on
Depth of Mica between Commutator
Bars
it
should
a
d) Field Coil
1)
Continuity Test
Check the continuity between the terminals
is
of the field coil. If there
it
is
an indication that there
the winding, so
2) . Ground Test
Check the continuity between either of the
terminals of the field coil and the yoke.
If there
field coil
therefore defective.
is
it
should be replaced.
continuity,
is
grounded somewhere and
no continuity,
is
a
break in
it
means that the
is
Page 79

e) Magnetic Switch
Continuity Test for Shunt CoilISeries
1)
Coil
Continuity of the shunt coil
a
taking
reading between its S-terminal and
is
checked by
the body of the magnetic switch.
is
no continuity, then there is a break in
the shunt coil winding.
Switch
\
-
-
If
there
is
Continuity of the series coil
checked
between the S-terminal and the M-terminal.
If
there is no continuity, there is a
in the series coil winding.
f)
Performance Test
1)
Connections for Continuity Measurement of Dimension
2)
No-Load Performance Test
I.
break
Battery
Q
@
Battery
0
Switch
/n
v
1
Stamr motor
The diagram above shorn connections to
be
made
for
dimension
the purpose of measuring
I.
'
s
M
Starcer motor
N~Ioad performance
using
the
Readinas obtained mu- meet rated
circuitry shown above.
ten
is conducted
V:
A:
DC
voltmeter
DC
ammeter
(25A1
Page 80

A
8.
THERMOSTART
(1
Specifications
Votage
Current flow
(Optional)
Specifications
SH10002 LHitachil
magnetic
valve
type
Setting thermostart switch to OFF posi-
e)
tion will switch off the electricity and the heater will cool off. This will close the ball valve.
f)
Fuel will cease to flow. Fuel is stored in
header tank, and
gravity.
(3)
Using the Thermostart
Throttle lever
a)
b)
Decompression lever
is
fed to thermostart plug by
is
set to STOP position.
is
operated.
(2)
Description of the Thermostart
The thermostan is a starting aid for use in low
It
ambient temperatures.
in the intake manifold to warm the air intake and
improve starting qualities. Thethermostart, unlike
glow plugs,
-
of the engine during operation and therefore pro-
vides outstanding durability, and since
tricity requirement is lower than that of glow
plugs, the load on the battery
Fuel
is
not exposed to the combustion heat
ignites and burns fuel
is
reduced.
--
Ball
valve
t eater
Terminal
coil
\
its
elec-
Clutch pedal
C)
tor is operated for five seconds (until lube oil
indicating light goes out).
Restore decompression lever to position
d)
providing compression.
Open the throttle about halfway.
e)
f) Press the thermostart switch for
seconds. OR
i) Turn the main switch to the
position for
Then turn the starter motor.
ii)
As soon as the engine starts up, switch off
g)
the thermostart, and of course, remove your
hand from the starter key switch (the main
switch will automatically move from the
START to the ON position).
is
depressed, and starter mo-
5
-
10
seconds.
5 - 10
"TS"
a) Thermostan switch
activates the heater coil.
b) Valve stem moves. This opens the ball
valve.
Fuel flows through ball valve, and volatil-
c)
izes because of heat from heater coil.
Volatilized fuel is ignited by ignitor.
d)
is
set to ON. This
Main Switch
Page 81

9
TURN SIGNAL LIGHTS (OPTIONAL)
Description of the Water Temperature System
(2)
(1) Specifications
Flasher relay
(2) Description of the Turn Signal. Lights
The turn signal light system
12V-23W heat band snap type
is
composed of the
:
turn signal switch, the flasher relay, and the signal
lights.
The flasher relay, a heat band snap
type,.opens
and closes a pair of contact points through expansion
rejulting from a rise in temperature of a
heat band.
Turn
nTurn
0
signal switch
signal light
i
IL)
-
A sensor consisting of a substance with a high
heat expansion rate
and goes
248"
Therefore,
F
(120°C).
ON
when the water temperature reaches
it
is
fitted at the tip of the unit,
is
quite normal for the water temperature indicator light to stay off even if the
starting switch
is
set to the
ON
position, as long
as the engine is cold.
11.
ENGINE LUBE OIL PRESSURE INDICA-
TOR LIGHT
(1 ) Specifications
1
tern
I
Oil prersur~rwitch
Lube
oil
indicator light..
pressure
I
Activating pressure 2.W psi I1 kg/cm21
Specnflcattons
.
.
12v - 3.4.w.
. .
1
I
Flasher relay1 (60--120lmin.)
I
J
Banew
10. WATER TEMPERATURE INDICATOR
LIGHT
(1) Specifications
Item
Water temperature
indicator light
Water temperature
sensor unit:
~ctivating temperatire
Electrical capacity
Specificadons
12V-3.4 W
ON
at 24~~i5.4~~
(120°u0c)
OFF at ~33.6~i5.4~~)
11 12°u0~1
12V-7A
(2)
Description of the Lube Oil Pressure In.
dicator Light
As described earlier in Chapter
Chapter
VII, Section 11, the lube oil pressure reg-
V,
Section 13 and
ulating valve, which is fitted inside the lube oil
filter (cartridge type)
56 psi (1.5
-
2.5 kg/cm2), while the relief valve
is set to activate at a pressure of 17.07
psi
(1
2
0.2 kg/cm2
The lube oil switch
is
adjusted to 21.34 - 35.
-
11.38
1.
is
fitted in the lower part of
the cylinder block, to the left of the lube pipe.
It is activated when the lube oil pressure drops,
which simultaneously turns on the indicator light.
The oil pressure forces the diaphragm ,upwards.
to open the contact points, so that when pressure
is
normal, the indicator light remains
..
OFF.
..
When the oil pressure drops, the contact points
close to allow electricity to flow to turn
indicator light.
Thus, when the starting switch
ON
position, the indicator light goes ON since.
.
..
. .
. .
is
moved to the
ON
. .. .
thk
Page 82

there
is
no oil pressure, but once the engine starts
up and pressure rises, the light will
go
OFF.
13.
LIGHTS
(1) Headlights
12. HORN
(1) Specifications
/--
(2)
Horn
Description of the Horn
Lube
12V-1.2A
oil
pressure
1
The headlights are high-low beam dual
ment bulbs. Switching between low and high
beams
(2)
The work light
fender.
14.
The safety start switch
safety of the tractor and prevention of accidents.
When the clutch pedal
the clutch, the safety switch incorporated in the
starter motor system circuit closes to facilitate
starting of the tractor.
is
accomplished by the lighting switch.
-
Headlights: 12V
Work Light (Optional)
is
Work light:
SAFETY START SWITCH
12V - 20W
25W125W
fitted to the rear part of the left
is
. .
is
provided for added
depressed, disengaging
fila-
When the horn button is depressed, electricity
flows through the coil of the horn, the core of
the coil
towards the core, and the diaphragm that
coupled to the plate moves and opens the contact
points. The flow of current
Through a repetition of this cycle, the vibrator
vibrates to generate sound.
is
magnetized, the moving plate is drawn
is
therefore cut off.
Moving plate
I
Diaphragm
core
J
Adjusting nut
is
Page 83

X.
1.
TRACTOR CONSTRUCTION AND MAINTENANCE
CLUTCH
AND
RELEVANT
ITEMS
The clutch serves to engage or disengage the power generated by the engine with the power train,
and also
se~es as a shock absorber the
power train and the engine from being subjected
excessive loads.
to
The clutch fitted on this tractor is a dry, single
type.diaphragm clutch.
plate
with light pressure and
It
can be operated
it
provides positive en-
gaging and disengaging of the motive power, yet
it
is
also endowed with more than ample dura-
bility and capacity.
(1)
Specifications
(2)
Operating Principle
When the clutch pedal is depressed, the bearing
is
sleeve
moved through a clutch pedalPconsisting
of the clutch rod, the clutch release shaft, and the
clutch shift yoke.
The release bearing moves the diaphragm spring
(release lever), weakening the
prekure
of
the diaphragm spring, to disengage the motive power of
the engine from the power train.
The torsion springs serve to prevent chattering or
jerks when starting, and also smoothen the trans-
mission of torque.
7.09
Damper
x
4.92
x
wring
0.33
plate
in.
(180 x 125
x
8.4
mm)
Pressure
plate
,-
;
Page 84

-
3)
ence.
o
Check the torsion springs for wear or breakage.
0
Check the damper plate for wear.
o
Check the splines for wear.
0
Check the pressure plate for distortion of
Visual Inspection friction surface, scratches, or ridge forma-
tions.
o
Check the friction disc for traces
glazing, burning, discoloring, or oil adher-
of
scoring,
o
Check the release bearing for traces of burning or looseness.
Page 85

(4)
Inspecting
Item
1.
Friction disc
thicknerr
2.
Depth of rivet
!head
3.
'~hicknerr of
assembled clutch
dbc:
[When assembled]
I[UnderpresrureI
4.
Disc play: Axial Within
Radial
Friction
5.
flatness
6.
flatness
7.
8.
of rotations between main drive
shaft and disc
splines
9.
end diametei
10.
of flywheel
/pilot
11.
ween
and pilot
bushings
12.
disc
Pressure plate
Flywheel flatnen Within
Play in direction
Main drive shaft
Inner diameter
Clearance bet-
drive**
Clutch release
lever height
by
Testing Equipment
Standard
specification
0.13-0.14
13.51*1.11
0.06 11.5)
0.32-0.34
18.4S.3)
0.31 17.8)
0.01 10.3) 0.03 10.7)
-
Within
0.003 10.07)
0.003 10.07)
I
0~003-0.W7
10~07~0~17)
0.5880--0.5887
115-0.M7
-0.065)
0.5892-0.5899
115-0.016
-0.034)
O.DOO5-0.0019
10.013-0.M91
!
cYM155, YM155D1
1.34--1.42
134-361
[YM135, YM135D1
1.42-1.50
136-38)
Replacement limit
0.012 10.3)
0.29 17.4)
-
Within
0.016 10.41
0.008 10.2)
0.008 10.2)
I
0.012 10.3)
-
-
1
0012
i
Lea
than
I
than
than
1.26
1.50
1.34
1.61
132)
More than
138)
Less
134)
More
141
Calipen
/Calipers
1
I
Calipen
IDial gauge
Dial gauge
I
Dial gauge
Dial gauge
1
Micym~
Cylinder gauge
I
Block gauge
I
a
/:
.71
-
Unit: inch lmml
Illustration
Page 86

NOTES:
Measure the height
(I)
of
the release lever
(diaphragm
spring
ring).
Ixem
12
above,
in
Page 87

the following manner:
Insert a 0.331 in
.ij
Attach the clutch cover
iij
The height from the face
iiij
be measured with a pair of calipers and a
The clearance referred to in Item 21 above.is adjusfed after the total stroke of the
(21
clutch
pedal and the clutch pedal play have been properly adjusted.
2.
TRANSMISSION AND RELATED ITEMS
The motive power of the engine is transmitted to
the transmission via the clutch.
(8.4
mmj blockgauge in place of the friction disc.
to
the flywheel face and properly tighten
of
the flywheel to the tip of the release lever should
smighr scale.
The Model
are capable of being operated in a wide range of
speeds, (six forward speeds and two reverse
speeds), through the combination of its gear shift
lever and. range shift lever. In addition, in con-
junction with
operating speeds are available for the power take
off.
A
one-way clutch
shaft which is an extension of the
shaft, so that if
implement side, this load is completely disen-
gaged from the transmission side
sideration contributing to safer operation.
YM135(D) and YM155(D) tractors
its
speed shifting system, two
is
provided on the connecting
a
sudden load
P.T.O.
is
applied from the
-
driving
another con-
Page 88

,-.
(1)
Specifications
NOTE: /New]
=
Afrer
SeriolNo.
51001:
/Old/ =Before Serial No.
51000.
Page 89

Page 90

(2)
Visual Inspection and the final reduction gear housing.
Check to see that there are no traces of
(1)
oil leakage or cracks in the transmission
ing.
(2)
Check to see that there are no traces of
oil leakage or cracks in the rear axle housing
[Servicing Standard for Transmission Section;
hous-
(3)
Check the gears for uneven wear, chipped
teeth or cracks.
(3)
Inspecting
Refer to the instructions and detailed drawings
in Section
the transmission.
by
Testing Equipment
2,
Chapter XI for details on assembling
[Unit: inch (mm1l
No.
1. ([~eedle bearing in main shaft1
Outer diameter of
shaft
Inner diameter of main shaft
Item
maln change
1
Clearance
I
2. [Reverse
Outer diameter of metal
Inner diameter of reverse gear
Clearance
Outer diameter of
lnner diameter of metal
gear1
countershaft
Standard specification
I
0.5902-0.5906 (15_gol1)
After the Serial No.51001
0.8270-0.8276 (212::;:)
Before the Ser~al ~0.51000
0.8257-0.8265 (21100:gi)
After the Serial No.51001
1
Before the Serial No.51000
1
0.9826-0.9835 i251#%$
0.9843-0.9851
/
0.0008-0.0025 (0.020-0.062)
/
0.7869-0.7874 (20-0,013)
/
0.7882-0.7890 (20+0.020)
(25+Eo21)
0
M.041
Replacement limit
I
1
0.006 (0.1 51
I
0.006 (0.151
1
0.01 18 (0.3)
Testing equipment
Micrometer
Cytinder gauge
Micrometer
Cylinder gauge
Micrometer
Cylinder gauge
,--.
3. 1 [Lowhi reduction gear341
lnner diameter of low-hi
reduction gear
I
I
I I
Clearance
I
Outer diameter of connecting
shaft
-
Inner diameter of bushing 0.3939-0.3945
1
/
I
,
0.9843-0.9851 125
0.0003-0.0016 (0.007-0.041)
0.3920-0.3924
0.0001 -0.001 0 (0.003-0.025)
M.021)
,lo$::$:)
(lo$:$;:)
1
1
1
0.008 (0.2)
0.01 18 (0.3)
Micrometer
Cylinder gauge
1
Micrometer
Cylinder gauge
I
Page 91

5. Backlash for all spur gears
7
6. Deflection for all shafts, except
differential lock shah
Standard specification
0.006-0.012 10.15-0.3)
Replacement
1
0.02 (0.5)
limit
Testing equipment
Dial gauge
Calipers
Thickness of shift fork tip
Clearance
1
.-
8. Outer d~ameter of fork shafts
llnner diameter of shift forks
-
Free length of shift fork springs
9.
Fitted load of shift fork springs
Fitted length of shift fork spring!
10. Free length of low-hi shift fork
spring
Fitted load of low-hi shift fork
spring
Fitted length of low-hi
fork spring
(countershaft) and spiral ring
shift
-
11.66-14.44
0.4528-0.4724 (11.5-12)
15.50-21.32
lbs (5.29-6.55 kg)
lbs 17.03-9.67 kg)
I
8.33 lbs (3.78 kg)
9.04 lbs (4.1 kg)
1
Calipers
Micrometer
Cylinder gauge
Calipers
Calipers
Dial gauge
pinion and ring gear
13. Backlash of differential
pinion and differential sidegears
pinion
Clearance
pinion liner
a: adjusting shims: 0.004 and
0.012 (0.1 and 0.3)
0.004-0.008 (0.1 -0.21 0.020
10.5)
Dial gauge
Dial gauge
Cylinder gauge
Micrometer
Calipers
Page 92

No. Item
16.IThickness of the differential
side gear spacers
17.
Outer diameter of metal
22 x 27 x 22.5
I
Standard specification
I
0.035 (0.91
0.039
(1.0)
0.043 (1.1)
0.047 (1.2)
1.0609-1.0622 (27$:00230)
[Unit: inch immjl
I
~eplac&e"t limit I Testing equipment
I
1
0.028 (0.71
0.031 (0.8)
0.035 (0.9)
0.039 (1.0)
I
.
I
Cali~ers
Micrometer
(
lnner diameter of the different-
ial housing
Clearance
I!
18.
Outer diameter of the final
reduction pinion
lnner diameter of metal
22 x 27 x 22.5
Clearance
--
19.
P.T.O. shah deflection (at tip)
Play in direction of rotation
20.
between all
splines
NOTES:
[I)
ball bearings and needle bearings. If there is any looseness, or
heard when turned, or
Particular care shouki be taken
nor cracked or chipped.
gears and shaft
Check to see that rhere is no looseness between the inner and outer faces of the
1.0630-1.0638 (27
0.0008-0.0029 (0.020-0.074)
0.8641-0.8654 (2250,053)
0.8661-0.8674 (222031
0.0007-0.0033 (0.020-0.086)
if
it does nor turn smoothly, replace.
in
the case of needle bearings to see that the rollers are
+0.021)
0.020
I
0.012 (0.3)
0.012 (0.3)
0.012 (0.3)
0.012 (0.3)
if
any abnonnal noises are
Cylinder gauge
I
Micrometer
Cylinder gauge
Dial gauge
--
I
--
If the gears have any uneven wear, galling, or scoring, they should
(2)
replaced.
ltem 11 through 16 refer to measurements
(4)
of the differential assembly; ltem 12 is carried
at
a
out
point 90" from the axial direction of the
motive power rotation shaft. Adjustments should
be made in the following manner:
When the =me drive pinion is reversed,
i)
use the shims that were fined initially.
When using a new ring gear and pinion:
ii)
a)
Insert shims [(two sizes are available:
0,004, 0.012 in.
transmission ,case and the
front cover
(0.1, 0.3 mm)] between the
transminion case
so that there
is
no space
on
the 0.004, 0.012 in. (0.1, 0.3 mm)] between the
be
repaired or
A
Counter
shaft
arzy
counter shaft.
Fit the differential assembly into the
b)
final reduction gear case.
C)
Insert shims [(two
sizes
are available:
Page 93

baii bearing 6207 (right hand) and the circlip 72 so that the backlash (Item 11)
0.005 - 0.007 in. (0.13 - 0.18 mm).
At this time take care to see that there
d)
is
no space between the differential housing
and the ball bearing 6207 (both sides), the
differential bearing case and the ball bearing
6207 (left hand).
Measure the clearance C between the
e)
final reduction gear case and differential
bearing case, and insert the shims:
0.004 in. (0.1 mm) between the final reduction gear case and differential bearing case.
-
C - C
is.
+
.
Transmission
Shims
0.004. 0.012
10.1, 0.3
rnm)
in.
case
[Detail
A1
Angular
ball
bearing
-
/
~i'fferential
Differential
3.
BRAKE
The brake serves not only to bring the tractor to
a halt when in motion, but the left and right
brakes of the tractor operate independently of
each other and allow the operator to negotiate
tight turns. The brake shaft of the tractor
fitted behind the differential lock shaft and
hermetically sealed to prevent water from enter-
is
ing when the tractor
The brakes are the internal expansion, mechanical
type. Foot pressure forces the brake linings
against the brake drum to brake the tractor. The
used in irrigated fields.
assembly
housing
1s
1s
-
-
A-
,
Page 94

brake linings/shoes are of the leading-trailing
type, and the same amount of braking force is
produced for both forward and reverse motion.
(1
)
Specifications
The parking brake consists of a locking device
coupled to the foot brake.
Item
Type
Method
Activation
Location
Functioning
-
Lining
Brake design
Brake adjustments
Parking brake
(2)
Inspecting and Maintenance
Specifications
internal expansion mechanical
Anchor pin method
Foot pressure
Reduction pinion
Independent function for left and right sides (may be
Specical woven material
Leading-trailing shoes
Accomplished by adjusting length of the brake
Locking of the foot brakes
brakei
rod
coupled as needed)
Unit:
inch
(mm)
Page 95

NOTES:
The left and right brake linings are interchangeable, and it
(I)
rotate them from rime to time
In adjusting the brakes, adjust the play by extending or reducing the length of the
(2)
rumbuckle on the broke rod.
to have even brake wear.
is
a good practice to
Always make sure that the play
3
are interlocked and used to bring the machine to
forces for the
which
is
4.
HYDRAULIC LIFT DEVICE
The hydraulic
left
extremely dangerous.
lift
device is for handling imple-
=nd
right side will be uneven and the tractor will pull to one side,
is
the same for each side. Otherwise,
rnents. The hydraulic oil is the same oil used for
the transmission, and contributes greatly to re-
duced maintenance cost since the operator does
not have to maintain various types of lube oils.
socalled single-action type hydraulic system
The
lifts implements hydraulically but allows them to
be lowered by the force of their own weight.
a
halt
or to ,reduce speed, the braking
if
the brakes
Page 96

A
(1)
Specifications
3.76 US gals (14.2 illmin. at RPMs of 2700
(2)
Inspection and Maintenance
Chapter
the hydraulic system.
.
.
1.
2. lnner diameter of the lifting shaft
3.
-
X,
Section 6 for details on assembling
Item
Relief valve pressure (safety
valve pressure)
bushings (left
Outer diameter of the lifting shaft 1.1795-1.1803
(left side)
/Clearance (left side)
Inner diameter of the lifting
shaft bushings (right side)
Outer diameter of the lifting
shaft (right side)
Clearance (right side)
side1 0 (30+0.0251
I
Standard specification
1138 psi
1.1811-1.1803
(30-0.020) -0.041
1
0.0008-0.0026 (0.020-0.0661
1.3780-1.3795
(35+0.0391 0
1.3756-1.3770
(3510.059)
0.001 0-0.0039 (0.025-0.0981 0.016 (0.4)
(80 kglcm2
0.025
Replacement limit
/
0.016 (0.4)
Unit: inch (mm
Testing equipment No.
Cylinder gauge
Micrometer
I
Cylinder gauge
Micrometer
--
Page 97

I
~o.1 ltem
I
Standard specification
Unit: inch imr
/
Replacement limit / Testing equipment
h
I
Hydraulic cylinder bore
pp
Outer diameter of hydraulic
piston
Clearance
5.
Lifting capacity at
lower link
NOTES:
The components of the hydraulic equipme?? are fitted selectively and are precision
(1)
finished by lapping, thus when they have been disassembled for maintenance, rhe
ingpoinrs should be borne in mind..
i) Do not interchange spool;
Check beforehand the number of hydraulic pressure Udj~~hng shims firred, and
ii)
make sure
When assembling, components such as Orings should ahwys be replaced.
iii)
(2)
When assembling hydraulic cylinder:
Be sure
to align the assembly guide marks on rhe lift shaft, lift crank, and lift arms.
the
tip of
the correct number are used in assembly.
2.3622-2.3661
/
(60';')
-
2.3598-2.361 0
(60-0.060 -0.030)
0.0012-0.0063 (0.030-0.16)
More than
(550
kg)
1210
lbs
0.012 (0.3)
follow-
cylinder
Micrometer
gauge
I
Make sure that each section of the system functions properly as it is assembled.
(3)
Also check rhe working pressure of rhe safety valve with a pressure gauge after the final
assembly has been complered
5.
STEERING
The steering system
must provide excellent steer-
ing performance during operation. This tractor
has a ball-nut type steering system.
Page 98

Column
bush
(1)
Specifications
I
Tractor model
TVP~
I
Gear ratio
Angle of motion of center shaft
Sector gear module
I
No. of teeth of sector aear on full circle basis
Worm lead
I
Direction of twist of the worm aear
Gear oil
Oil capacity
Outer diameter of steering wheel
Steering wheel play
Item
-
-
Ball
ioint
Oust
cover
-7
Unit: inch (mm)
Specifications
YM155, YM155D
Ball-screw
1
18.9:l
2
x
430
degrees
3.5
~~
~
I
I
I
I
I
15
.
.
0.344 (8.731
Left
-~
SAE
0.05
US gals
.
1
#SO
or eauivalent
(0.2
1)
15.75 (400)
1.17-2.0 (30-50)
YM735, YM135D
Ball-screw
1
15.4:1
2 x 410
degrees
3
I
13
.
I
-
0.313 17.9381
I
I
eft
I
0.05
.
US gals
14.96 (380)
1.17-2.0 (30-50)
m)
I
I
1
(0.2 1)
(2)
Inspection and Maintenance
The steering gear box
heavy use, and there
assemble
Backlash adjustment can be done by varying the
-
number of adjusting shims fitted on the side of
the gear box.
Steering play adjustment can be done by adjusting the backlash of the gears.
it
for maintenance work.
is
capable of withstanding
is
rarely any need to dis-
By turning the screw to the right, the amount of
play can be reduced. (The standard position
the screw
at which the screw suddenly becomes hard to
turn.)
is
a quarter-turn back from the point
fSr
NOTES:
(1)
Check wherher the drag rod
Check whether rhe ball joints function smoothly.
(2)
is
bent.
Page 99

6.
FRONT AXLE AND REAR AXLE
go over irregular depressions and mounds, and
it
The front axle is a Lemoine type axle supported also provides good steering qualities. Other fea-
dy a center pin.
of the tractor on an even keel when travelling vides high ground clearance and
It
serves to keep the front end tures of the Lemoine type axle are that
it
it
pro-
is rugged and
over rough terrain where the left and right wheels therefore very durable.
h
Page 100

(1-1
Front
Axle
Specifications
Unit: inch(mm)
/-.
NOTE:
(1-2)
Rear Axle
Rear axle type
Tread adjustment
Tire size: Standard
Optional
Standard air pressure:
Standard
Optional
The figures
in
brackets
Specifications
Half-floating type
4-stage:
7-16-4PR F.L.S
27 x 8.50-15PR P.D (Turf tire)
25.6 psi (1.8
11.4 psi (0.8 kg/cm" (Turf tire)
[I
are for purrs before Serial No.
YM1351YM735D
23.6-31.5 in (600-800 mm)
kg/cm2)
51000.
YM155/YM155D
Half-floating type
4-stage: 27.6-33.5 in (700-850 mm)
8-16-4PR F.S.L.
8-16-4PR F.D (Turf tire)
psi(l.6 kg/cm2)
22.8
psi(l.6 kg/cm2 1 (Turf tire)
22.8
 Loading...