

Page 1

RX-V340
RTL
AV Receiver
OWNER’S MANUAL
MANUAL DE INSTRUCCIONES
Page 2
1 To assure the finest performance, please read this
manual carefully. Keep it in a safe place for future
reference.
2 Install this sound system in a well ventilated, cool,
dry, clean place — away from direct sunlight, heat
sources, vibration, dust, moisture, and/or cold.
Allow ventilation space of at least 30 cm on the top,
20 cm on the left and right, and 20 cm on the back
of this unit.
3 Locate this unit away from other electrical
appliances, motors, or transformers to avoid
humming sounds.
4
Do not expose this unit to sudden temperature
changes from cold to hot, and do not locate this unit
in a environment with high humidity (i.e. a room with
a humidifier) to prevent condensation inside this unit,
which may cause an electrical shock, fire, damage to
this unit, and/or personal injury.
5 Avoid installing this unit where foreign object may
fall onto this unit and/or this unit may be exposed
to liquid dripping or splashing. On the top of this
unit, do not place:
– Other components, as they may cause damage
and/or discoloration on the surface of this unit.
–
Burning objects (i.e. candles), as they may cause
fire, damage to this unit, and/or personal injury.
– Containers with liquid in them, as they may fall
and liquid may cause electrical shock to the
user and/or damage to this unit.
6 Do not cover this unit with a newspaper, tablecloth,
curtain, etc. in order not to obstruct heat radiation.
If the temperature inside this unit rises, it may
cause fire, damage to this unit, and/or personal
injury.
7 Do not plug in this unit to a wall outlet until all
connections are complete.
8 Do not operate this unit upside-down. It may
overheat, possibly causing damage.
9 Do not use force on switches, knobs and/or cords.
10 When disconnecting the power cord from the wall
outlet, grasp the plug; do not pull the cord.
11 Do not clean this unit with chemical solvents; this
might damage the finish. Use a clean, dry cloth.
12 Only voltage specified on this unit must be used.
Using this unit with a higher voltage than specified
is dangerous and may cause fire, damage to this
unit, and/or personal injury. YAMAHA will not be
held responsible for any damage resulting from use
of this unit with a voltage other than specified.
CAUTION: READ THIS BEFORE OPERATING YOUR UNIT.
13
To prevent damage by lightning, disconnect the power
cord from the wall outlet during an electrical storm.
14 Do not attempt to modify or fix this unit. Contact
qualified YAMAHA service personnel when any
service is needed. The cabinet should never be
opened for any reasons.
15 When not planning to use this unit for long periods
of time (i.e. vacation), disconnect the AC power
plug from the wall outlet.
16 Be sure to read the “TROUBLESHOOTING” section
on common operating errors before concluding that
this unit is faulty.
17 Before moving this unit, press STANDBY/ON to set
this unit in standby mode, and disconnect the AC
power plug from the wall outlet.
18
VOLTAGE SELECTOR (General model only)
The VOLTAGE SELECTOR on the rear panel of this
unit must be set for your local main voltage
BEFORE plugging into the AC main supply.
Voltages are 110V-120V, 220V-240V AC, 50/60 Hz.
This unit is not disconnected from the AC power
source as long as it is connected to the wall outlet,
even if this unit itself is turned off. This state is called
standby mode. In this state, this unit is designed to
consume a very small quantity of power.
IMPORTANT
Please record the serial number of this unit in the
space below.
MODEL:
Serial No.:
The serial number is located on the rear of the unit.
Retain this Owner’s Manual in a safe place for future
reference.
WARNING
TO REDUCE THE RISK OF FIRE OR ELECTRIC
SHOCK, DO NOT EXPOSE THIS UNIT TO RAIN
OR MOISTURE.
FOR CANADIAN CUSTOMERS
To prevent electric shock, match wide blade of plug to
wide slot and fully insert.
This Class B digital apparatus complies with Canadian
ICES-003.
CAUTION
Page 3

1
English
INTRODUCTION
PREPARATION
BASIC
OPERATION
ADVANCED
OPERATION
ADDITIONAL
INFORMATION
CONTENTS
INTRODUCTION
CONTENTS ............................................................ 1
FEATURES ............................................................. 2
GETTING STARTED ............................................ 3
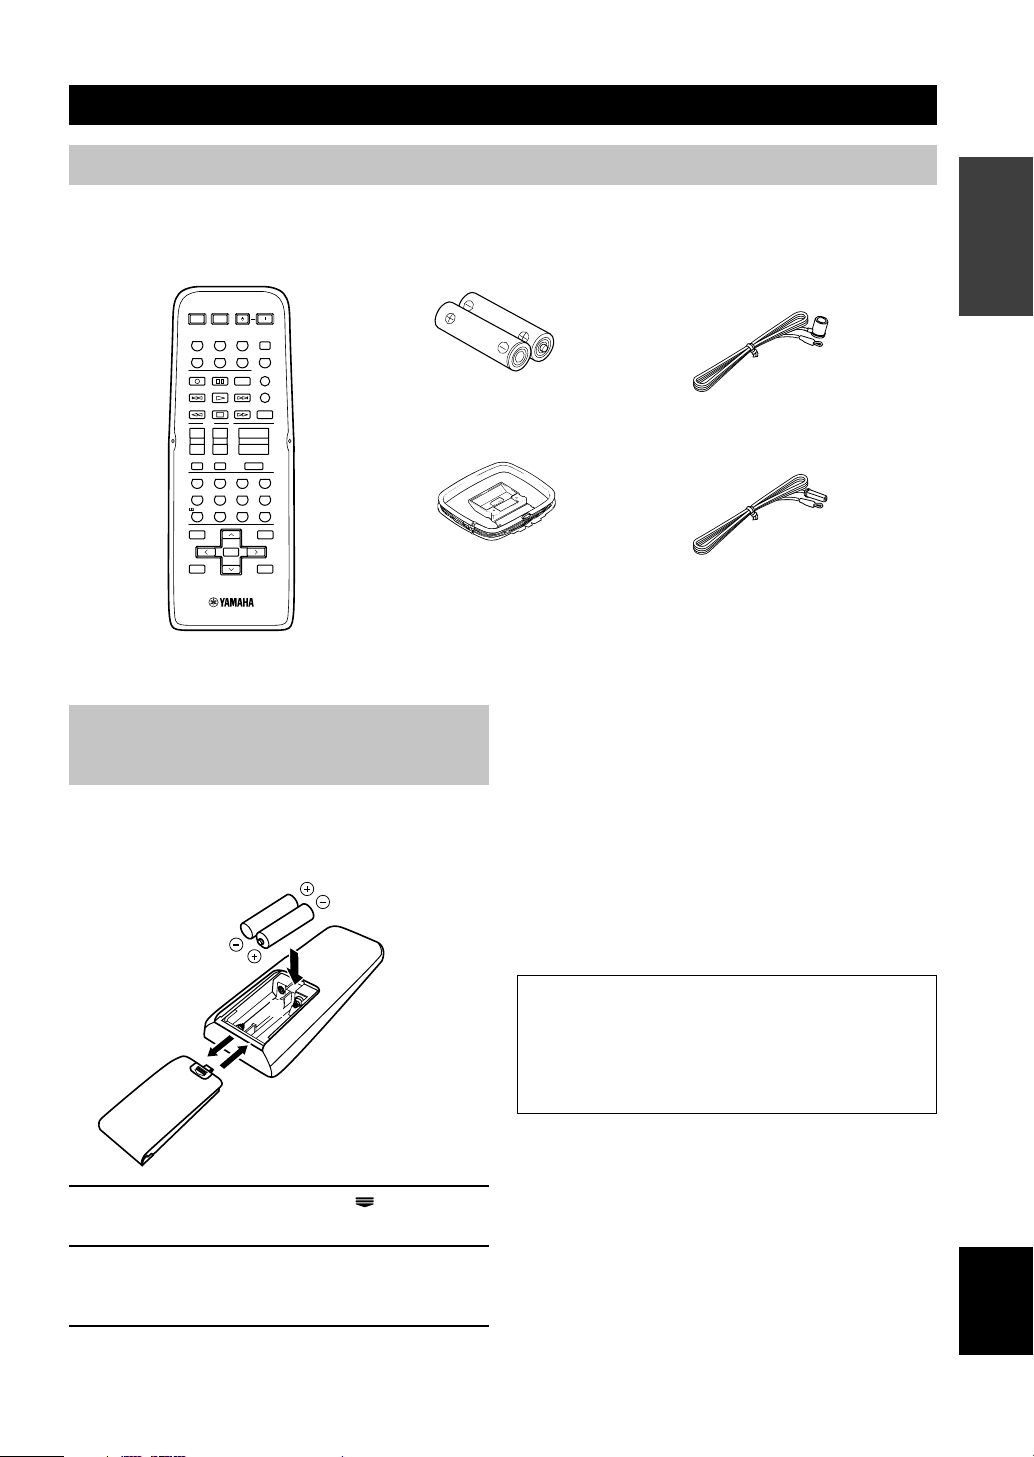
Supplied accessories .................................................. 3
Installing batteries in the remote control ...................3
CONTROLS AND FUNCTIONS ......................... 4
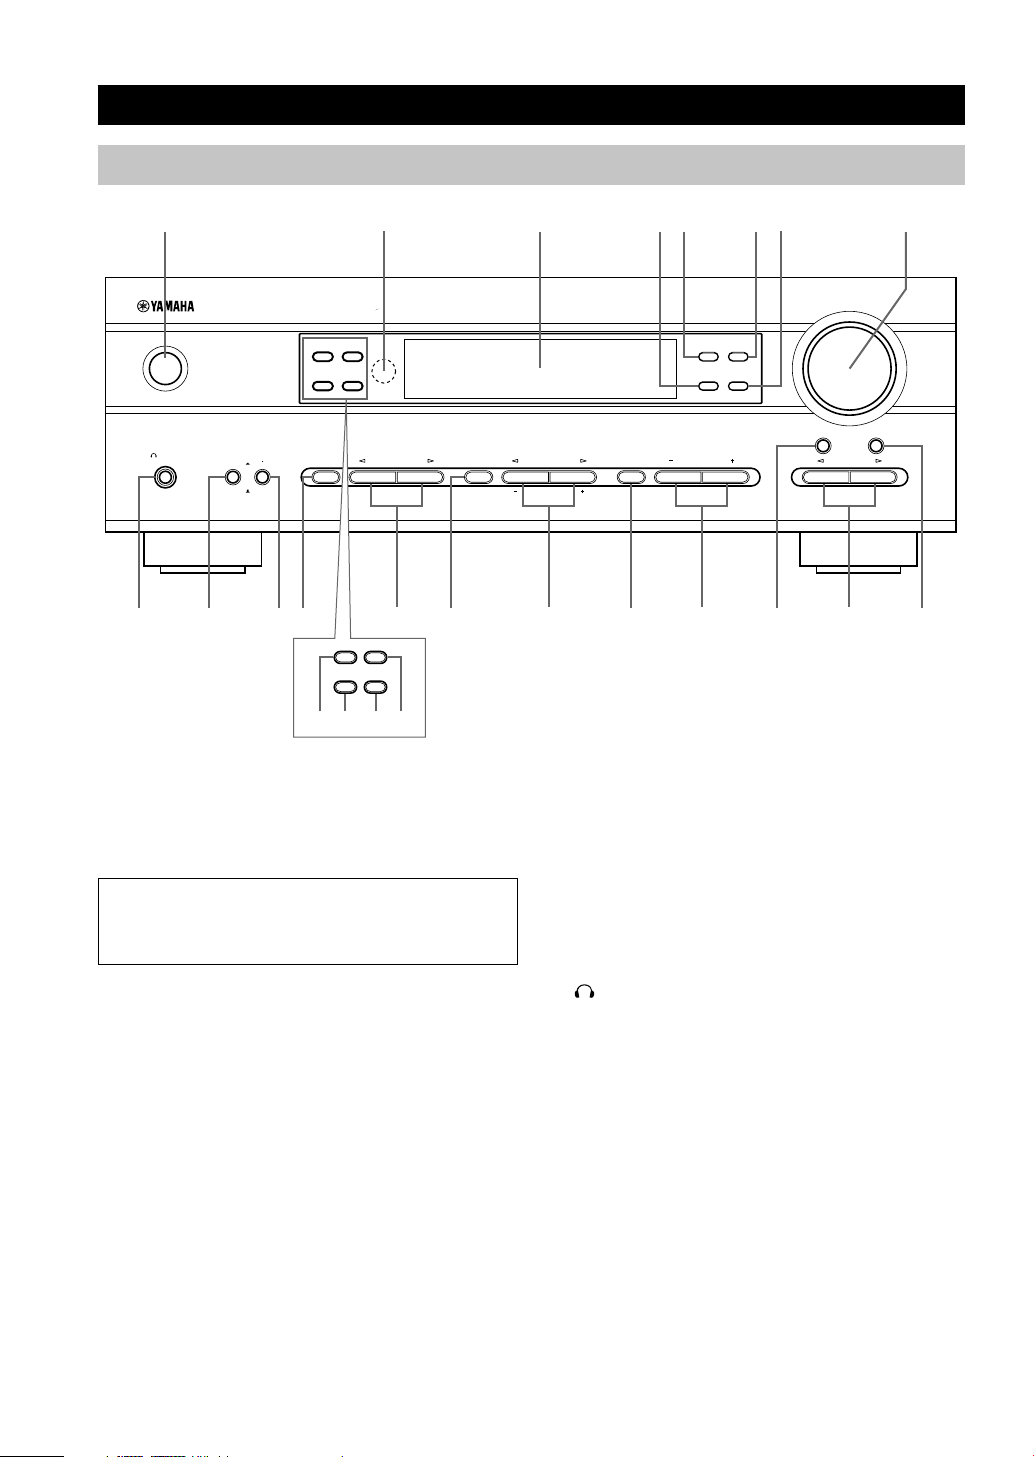
Front panel ................................................................. 4
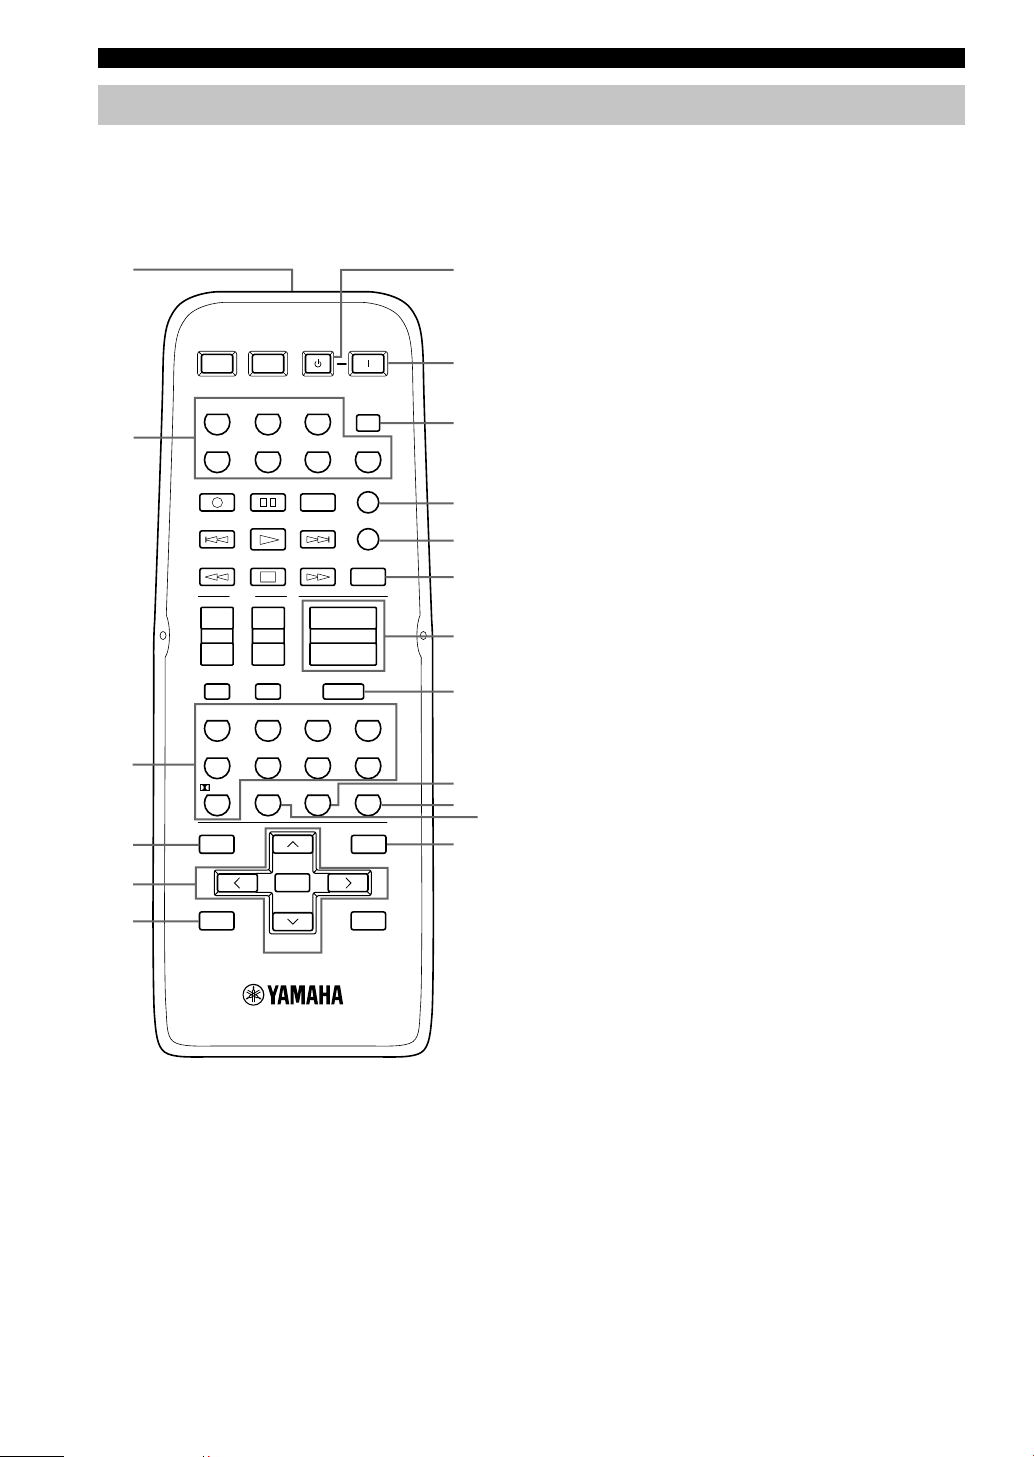
Remote control .......................................................... 6
Front panel display .................................................... 8
PREPARATION
CONNECTIONS .................................................... 9
Before connecting components ................................. 9
Connecting video components ................................ 10
Connecting audio components ................................ 11
Connecting the antennas .......................................... 12
Connecting an external decoder .............................. 13
Connecting the speakers ..........................................14
Connecting the power supply cords ........................ 17
Turning on the power .............................................. 17
BASIC SYSTEM SETTINGS ............................. 18
Using the basic menu .............................................. 18
Setting the unit to match your speaker system ........ 20
Setting speaker output levels (SP LEVEL) ............. 20
BASIC OPERATION
PLAYBACK .......................................................... 21
Input modes and indications .................................... 23
Selecting a sound field program ..............................24
DIGITAL SOUND FIELD PROCESSING (DSP)
............................................................................ 27
Understanding sound fields ..................................... 27
Hi-Fi DSP programs ................................................27
CINEMA-DSP ...................................................... 28
Sound design of CINEMA-DSP ............................. 28
CINEMA-DSP Programs ........................................ 28
Sound field effects ................................................... 30
TUNING ................................................................ 31
Presetting stations .................................................... 32
Selecting a preset station ......................................... 34
SLEEP TIMER ..................................................... 35
RECORDING ....................................................... 36
ADVANCED OPERATION
SET MENU ........................................................... 37
Set menu list ............................................................ 37
Adjusting the items on the set menu ....................... 37
SOUND 1 SPEAKER SET (speaker mode settings)
............................................................................. 38
SOUND 2 SP DISTANCE (speaker distance) ........ 40
SOUND 3 LFE LEVEL .......................................... 40
SOUND 4 D. RANGE (dynamic range) ................. 40
SOUND 5 CENTER GEQ
(center graphic equalizer) .................................... 41
SOUND 6 HP TONE CTRL
(headphone tone control) ....................................41
INPUT 1 I/O ASSIGN (input/output assignment) .. 41
INPUT 2 INPUT MODE (initial input mode) ........ 41
OPTION 1 DISPLAY SET ...................................... 42
OPTION 2 MEM. GUARD (memory guard) ......... 42
OPTION 3 AUDIO MUTE ..................................... 42
REMOTE CONTROL FEATURES ................... 43
Control area ............................................................. 43
Setting the manufacturer code .................................44
Controlling other components .................................45
SETTING THE SPEAKER LEVELS ................ 46
Adjusting the volume during playback ................... 46
Using the test tone ................................................... 46
ADDITIONAL INFORMATION
SOUND FIELD PROGRAM PARAMETER
EDITING .......................................................... 47
Changing parameter settings ................................... 47
Digital sound field parameter descriptions .............. 48
TROUBLESHOOTING....................................... 49
GLOSSARY .......................................................... 53
SPECIFICATIONS .............................................. 55
Page 4

2
Manufactured under license from Dolby Laboratories.
“Dolby”, “Pro Logic”, and the double-D symbol are
trademarks of Dolby Laboratories.
FEATURES
Multi-mode digital sound field processing
◆ Dolby Pro Logic/Dolby Pro Logic II decoder
◆ Dolby Digital/Dolby Digital + Matrix 6.1 Decoder
◆ DTS/DTS + Matrix 6.1 Decoder
◆ CINEMA DSP: Combination of YAMAHA DSP
technology and Dolby Pro Logic, Dolby Digital or
DTS
◆ Virtual CINEMA DSP
◆ SILENT CINEMA DSP
Sophisticated AM/FM Tuner
◆ 40-Station random access preset tuning
◆ Automatic preset tuning
◆ Preset station shifting capability (Preset editing)
Other features
◆ 96 kHz/24-bit D/A converter
◆ Set menu for optimizing this unit for your Audio/
Video system
◆ Test tone generator for easier speaker balance
adjustment
◆ 6-channel external decoder input
◆ Optical and coaxial digital audio signal jacks
◆ Sleep timer
◆ Remote control with preset manufacturer codes
“DTS” and “DTS Digital Surround” are registered
trademarks of Digital Theater Systems, Inc.
Built-in 5-channel power amplifier
◆ Minimum RMS output power
(0.1% THD, 1 kHz, 6Ω)
[U.S.A. and Canada models]
Main: 70 W + 70 W
Center: 70 W
Rear: 70 W + 70 W
[Other models]
Main: 60 W + 60 W
Center: 60 W
Rear: 60 W + 60 W
■ About this manual
• y indicates a tip for your operation.
• Some operations can be performed by using either the buttons on the main unit or on the remote control. In cases
when the button names differ between the main unit and the remote control, the button name on the remote control is
given in parentheses.
• This manual is printed prior to production. Design and specifications are subject to change in part for the reason of
the improvement in operativity ability, and others. In this case, the product has priority.
Page 5
3
English
INTRODUCTION
Installing batteries in the remote control
Insert the batteries in the correct direction by aligning the
+ and – marks on the batteries with the polarity markings
(+ and –) inside the battery compartment.
1 Press the part marked with a and slide off
the battery compartment cover.
2 Insert the two batteries supplied (AA, R06,
UM-3) according to the polarity markings on
the inside of the battery compartment.
3 Slide the cover back on so that it snaps into
place.
■ Notes on batteries
• Change all of the batteries if you notice a decrease in
the operating range of the remote control.
• Do not use old batteries together with new ones.
• Do not use different types of batteries (such as alkaline
and manganese batteries) together. Read the packaging
carefully as these different types of batteries may have
the same shape and color.
• If the batteries have leaked, dispose of them
immediately. Avoid touching the leaked material or
letting it come into contact with clothing, etc. Clean the
battery compartment thoroughly before installing new
batteries.
If the remote control is without batteries for more than
2 minutes, or if exhausted batteries remain in the
remote control, the contents of the memory may be
cleared. When the memory is cleared, insert new
batteries, set up the manufacturer code and program
any acquired functions that may have been cleared.
AM loop antenna (Europe, U.K., Australia and
Singapore models)
Indoor FM antenna
(U.S.A., Canada, China,
Korea and General models)
Batteries (2)
(AA, R06, UM-3)
Remote control
GETTING STARTED
Supplied accessories
After unpacking, check that the following parts are contained.
SYSTEM
POWER
STANDBY
POWERAVPOWERTVPOWER
TV
ENTER
+10
09
STEREO
6.1/5.1
NIGHT
/DTS
8765
MOVIE2MOVIE1TV THTRMUSIC
432
1
ENTERTAINMENT
ROCKJAZZHALL
V-AUXVCRD-TV/CBLDVD
SLEEPTUNERMD/CD-RCD
TV
AMP
CODE SET
MUTE
INPUTMUTE
REC
6CH INPUT
AUDIO
DISC SKIP
VOLUME
+–+
–
+
–
CHVOL
SET MENU
SELECT
PRESET/CH
A/B/C/D/E
LEVEL
MENU
TEST
RETURN
DISPLAY
TITLE
+
–
1
3
2
Page 6
4
CONTROLS AND FUNCTIONS
Front panel
1 STANDBY/ON
Turns the unit on, or sets it in standby mode. When you
turn the unit on, you will hear a click and there will be a 4
to 5-second delay before it can reproduce sound.
Standby mode
In this mode, the unit uses a small amount of power in
order to receive infrared-signals from the remote
control.
2 Remote control sensor
Receives signals from the remote control.
3 Front panel display
Shows information about the operational status of the
unit.
4 TUNING MODE (AUTO/MAN’L MONO)
Switches the tuning mode between automatic and manual.
5 PRESET/TUNING (EDIT)
Switches the function of PRESET/TUNING l / h
between selecting a preset station number and tuning (the
colon (:) turns on or off).
This button is also used to exchange the assignment of
two preset stations with each other.
6 FM/AM
Switches the reception band between FM and AM.
7 MEMORY (MAN’L/AUTO FM)
Stores the current station in memory.
8 VOLUME
Controls the output level of all audio channels.
This does not affect the OUT (REC) level.
9
SILENT (PHONES jack)
Allows you to enjoy DSP effects when listening with
headphones.
Inserting the plug from your headphones into the
PHONES jack does not affect the sound output from the
speakers. If you wish to stop the signal output to the
speakers, press SPEAKERS ON/OFF so that it is in the
OFF position.
0 SPEAKERS ON/OFF
Turns on or off the speakers that you selected by
SPEAKERS A/B.
q SPEAKERS A/B
Selects the set of main speakers connected to the A or B
terminals.
(U.K. and Europe models only)
VOLUME
STANDBY
/ON
MODE START
PTY SEEK
RDS MODE/FREQ EON
AUTO/MAN`L MONO MAN`L/AUTO FM
TUNING MODE MEMORY
EDIT
PRESET/TUNING FM/AM
SILENT
PHONES
SPEAKERS
AON
BOFF
EFFECT
PRESET/TUNING
SET MENU
A/B/C/D/E
NEXT
PROGRAM
STEREO
BASS/TREBLE
CONTROL
INPUT
6CH INPUTINPUT MODE
12 543 67 8
y
a s fd
MODE START
RDS MODE/FREQ
PTY SEEK
EON
9 0 q w r iute po
Page 7

5
English
INTRODUCTION
w STEREO (EFFECT)
Switches between normal stereo and DSP effect
reproduction. When you select STEREO, the unit mixes
down all Dolby Digital and DTS signals (except the LFE
channel) as well as those 2-channel signals without
effects, to the main left and right speakers.
e PROGRAM l / h
Select the DSP program.
r A/B/C/D/E
Selects preset station groups A to E when the unit is in
tuner mode.
NEXT
Selects the set menu mode when the unit is not in tuner
mode.
t PRESET/TUNING l / h
Select preset station numbers 1 to 8 when a colon (:) is
displayed in the front panel display.
Select the tuning frequency when a colon (:) is not
displayed when the unit is in tuner mode.
SET MENU –/+
Adjust settings on the set menu when the unit is not in
tuner mode.
y CONTROL
Switches between Bass (low-frequency response) control
mode and Treble (high-frequency response) control mode.
u BASS/TREBLE –/+
Increase or decrease low/high-frequency response when
the unit is in Bass/Treble control mode. The sound
changes 2dB each time you press one of these buttons.
Control range: –10 to +10dB.
i INPUT MODE
Sets the priority for the types of input signals (AUTO,
DTS, ANALOG) received when one component is
connected to two types of input jacks. You cannot set
priority for an audio sources if you have selected 6CH
INPUT as the input source.
o INPUT l / h
Selects the input source you want to listen to or watch.
p 6CH INPUT
Selects the audio source connected to the 6CH INPUT
jacks. This selection takes priority over sources selected
with INPUT (or the input selector buttons on the remote
control).
(U.K. and Europe models only)
a RDS MODE/FREQ
Press this button when the unit is receiving an RDS
station, to cycle the display mode among PS mode,
PTY mode, RT mode, CT mode (if the station offers
those RDS data service) and/or frequency display
mode in turn.
s PTY SEEK MODE
Press this button to set the unit in the PTY SEEK
mode.
d PTY SEEK START
Press this button to begin searching for a station after
the desired program type has been selected in the PTY
SEEK mode.
f EON
Press this button to select a radio program type
(NEWS, INFO, AFFAIRS, SPORT) to tune in
automatically.
CONTROLS AND FUNCTIONS
Page 8
6
SYSTEM
POWER
STANDBY
POWER
AV
POWERTVPOWER
TV
ENTER
+10
09
STEREO /DTS
8765
MOVIE2MOVIE1TV THTRMUSIC
432
1
ENTERTAINMENT
ROCKJAZZHALL
V-AUXVCRD-TV/CBLDVD
SLEEPTUNERMD/CD-RCD
TV
AMP
CODE SET
MUTE
INPUTMUTE
REC
6CH INPUT
AUDIO
DISC SKIP
VOLUME
+
–
+
–
+
–
CHVOL
SET MENU
SELECT
PRESET/CH
A/B/C/D/E
LEVEL
MENU
TEST
RETURN
DISPLAY
TITLE
+
–
6.1/5.1
NIGHT
2
1
3
5
6
4
7
q
0
8
9
w
e
r
i
y
u
t
Remote control
1 Infrared emitter
Outputs infrared control signals. Aim this emitter at the
component you want to operate.
2 Input selector buttons
Select the input source and set the remote control to
operate the selected source component.
3 DSP program
Select DSP programs when the remote control is in AMP
mode. Press one of these buttons repeatedly to select a
DSP program within a program group.
4 LEVEL
Selects the effect speaker channel to adjust.
5 Multi control section
Used to change and implement settings.
6 TEST
Outputs a test tone for use when adjusting the speaker
levels.
7 STANDBY
Sets this unit in standby mode.
8 SYSTEM POWER
Turns on the power of the unit.
9 SLEEP
Sets the sleep timer.
0 6CH INPUT
Selects the audio source connected to the 6CH INPUT
jacks.
q CODE SET
Used to set up manufacturer codes (see page 44).
w AMP
Switches control from a previously selected component
by using the input selector buttons to this unit.
e VOLUME +/–
Increases or decreases the volume level.
CONTROLS AND FUNCTIONS
This section describes the controls and functions of the
remote control when it is set in AMP mode. Please make
sure to select AMP mode before beginning operation.
Page 9
7
English
INTRODUCTION
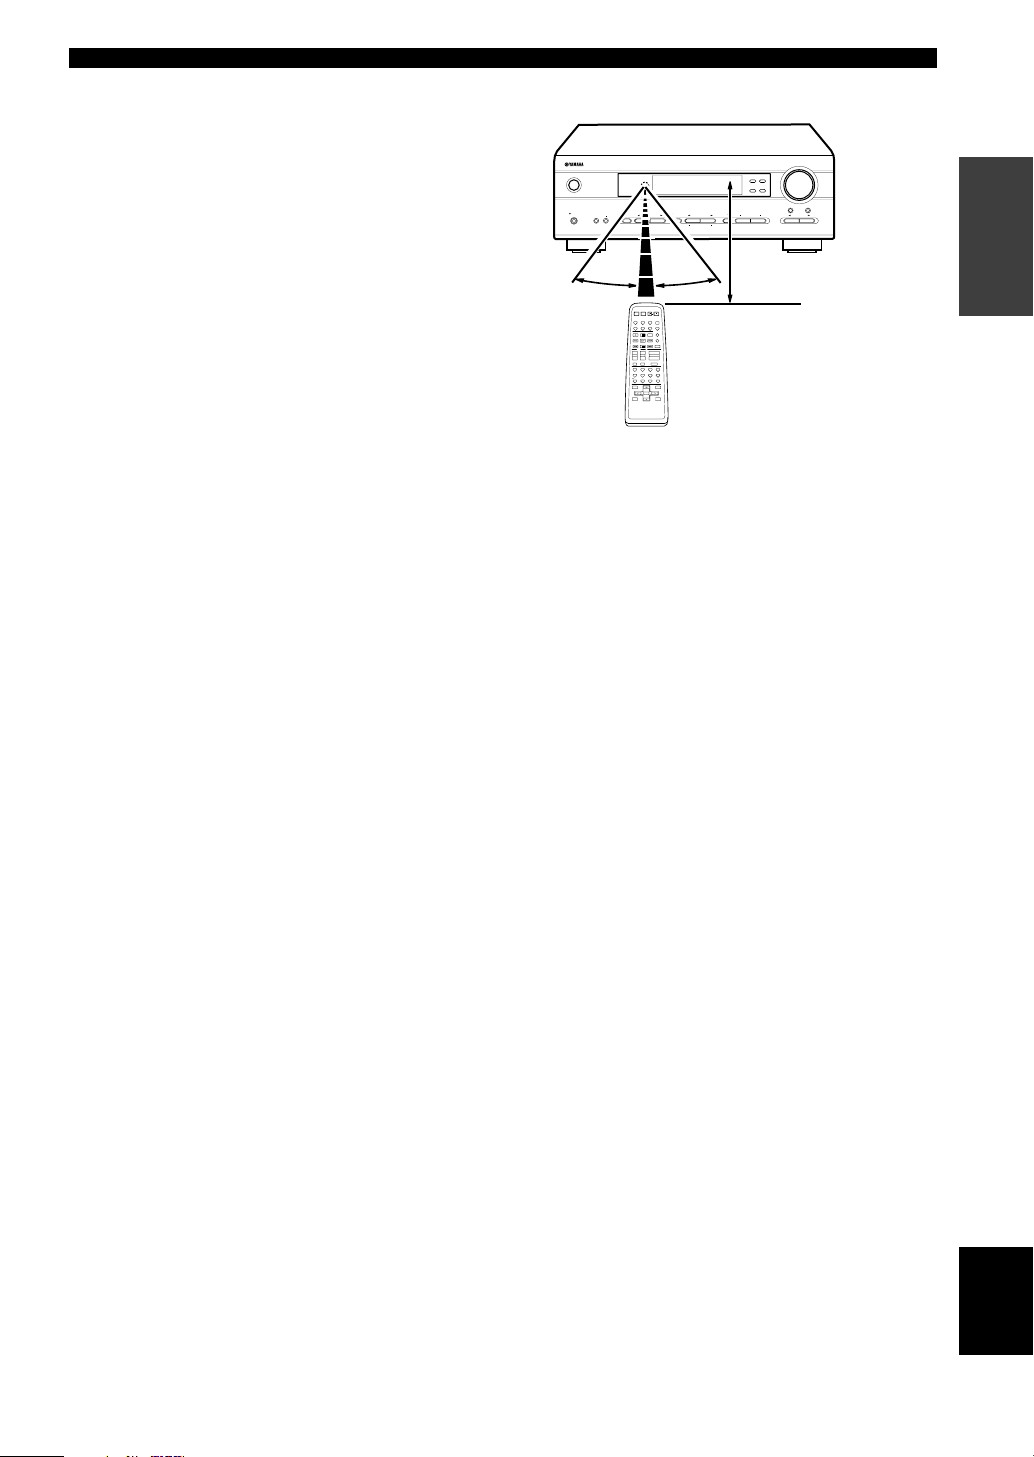
Approximately 6 m (20 feet)
■ Using the remote control
The remote control transmits a directional infrared beam.
Be sure to aim the remote control directly at the remote
control sensor on the main unit during operation.
■ Handling the remote control
• Do not spill water or other liquids on the remote
control.
• Do not drop the remote control.
• Do not leave or store the remote control in the
following types of conditions:
– high humidity or temperature such as near a heater,
stove or bath;
– dusty places; or
– in places subject to extremely low temperatures.
VOLUME
STANDBY
/ON
AUTO/MAN`L MONOMAN`L/AUTO FM
TUNING MODE MEMORY
EDIT
PRESET/TUNINGFM/AM
SILENT
PHONES
SPEAKERS
AON
BOFF
EFFECT
PRESET/TUNING
SET MENU
A/B/C/D/E
NEXT
PROGRAM
STEREO
BASS/TREBLE
CONTROL
INPUT
6CH INPUTINPUT MODE
SYSYTEM
POWER
STANDBY
POWERAVPOWERTVPOWER
TV
ENTER
+10
09
STEREO
MATRIX 6.1
SELECT- /DTS
8765
1 -
MOVIE THTR - 2MONO MOVIETV SPORTS
432
1
ENTERTAINMENT
ROCKJAZZHALL
V-AUXVCRD-TV/CBLDVD
SLEEPTUNERMD/CD-RCD
TV
AMP
CODE SET
MUTE
INPUTMUTE
REC
6CH INPUT
AUDIO
DISC SKIP
VOLUME
+–+–+
–
CHVOL
SET MENU
SELECT
PRESET/CH
A/B/C/D/E
LEVEL
MENU
TEST
RETURN
DISPLAY
TITLE
+
–
30° 30°
CONTROLS AND FUNCTIONS
r MUTE
Mutes the sound. Press again to restore the audio output
to the previous volume level.
t 6.1/5.1
Switches on or off the Dolby Digital + Matrix 6.1 or DTS
+ Matrix 6.1 decoder.
y STEREO
Switches between normal stereo and DSP effect
reproduction. When you select STEREO the unit mixes
down all Dolby Digital and DTS signals (except the LFE
channel) as well as those 2-channel signals without effect
sounds, to the main left and right speakers.
u NIGHT
Sets the unit in night listening mode.
i SET MENU
Selects the set menu mode.
Page 10
8
V-AUXVCR
D-TV/CBL
DVD
MD/CD-R
TUNER CD
MATRIX
DIGITAL
PL
PL
PCM
SILENT
DSP
HiFi
NIGHT
VIRTUAL
AUTO
STEREO
SLEEP
VOLUME
MUTE
MEMORYTUNED
L C R
RLLFE RC RR
~~~~~~~~~~~~~~
dB
ft
CTRTPTYPS
HOLDPTYEON
13
45
8
7
62
90qw yer uiop
a
t
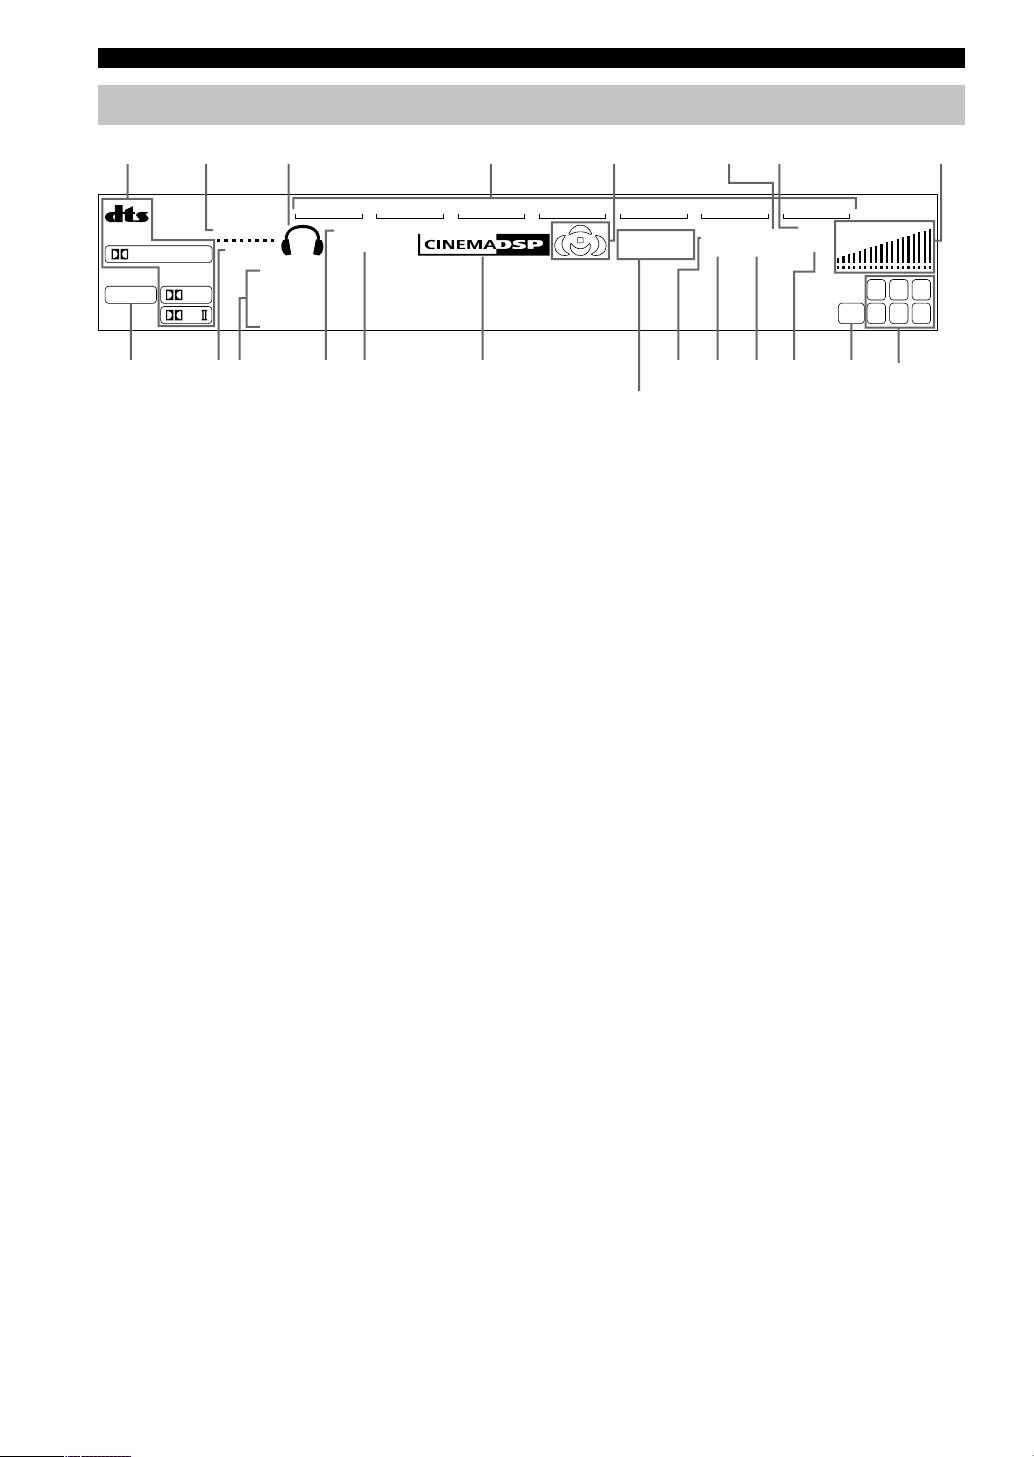
1 Processor indicators
The indicators for the various decoders light up when the
decoders are in use.
2 VIRTUAL indicator
Lights up when using Virtual CINEMA DSP.
3 Headphones indicator
Lights up when headphones are connected to the
headphone jack.
4 Input source indicator
Highlights the current input source with a cursor.
5 Sound field indicator
Displays the sound field management the unit is using
when you listen to a DSP sound field program.
6 AUTO indicator
Shows that this unit is in the automatic tuning mode.
7 MUTE indicator
Flashes while the MUTE function is on.
8 VOLUME level indicator
Indicates the volume level.
9 PCM indicator
Lights up when this unit is reproducing PCM (pulse code
modulation) digital audio signals.
0 SILENT indicator
Lights up when headphones are connected and the digital
sound field processor is on.
q Multi-information display
Shows the current DSP program name and other
information when you are adjusting or changing settings.
w NIGHT indicator
Lights up when the unit is set to night listening mode.
e HiFi DSP indicator
Lights up when you select a Hi-Fi DSP sound field
program.
r CINEMA DSP indicator
Lights up when you select a CINEMA DSP sound field
program.
t STEREO indicator
Lights up when the unit is receiving a strong signal from
a FM stereo broadcast while the “AUTO” indicator is lit.
y TUNED indicator
Lights up when this unit is tuned to a radio station.
u MEMORY indicator
Flashes to show a station can be stored in memory.
i SLEEP indicator
Lights up while the sleep timer is on.
o LFE indicator
Lights up when the input signal contains an LFE signal.
p Input channel indicator
The indicators for the appropriate sound channels light up
when a digital signal from a source is played back.
a RDS indicator (U.K. and Europe models only)
The name(s) of the RDS data offered by the currently
received RDS station light(s) up.
EON indicator lights up when an RDS station that offers
the EON data service is being received.
PTY HOLD indicator lights up while searching for
stations in the PTY SEEK mode.
Front panel display
(U.K. and Europe models only)
CONTROLS AND FUNCTIONS
Page 11
9
English
PREPARATION
CONNECTIONS
Before connecting components
CAUTION
Do not connect this unit or other components to the
mains power until all connections between the
components have been completed.
• Be sure all connections are made correctly, that is to
say L (left) to L, R (right) to R, “+” to “+” and “–” to
“–”. Some components require different connection
methods and have different jack names. Refer to the
operation instructions for each component you wish to
connect to this unit.
• After you have completed all connections, check them
again to make sure they are correct.
• The jack names correspond to the names on the input
selector.
■ Connecting to digital jacks
This unit has digital jacks for direct transmission of
digital signals through either a coaxial or fiber optic
cable. You can use the digital jacks to input PCM, Dolby
Digital and DTS bitstreams. Use digital connections if
you wish to enjoy the multi-channel sound track of DVD
material, etc. with DSP effects. Both digital input jacks
are acceptable for 96 kHz sampling digital signals.
Note
• The OPTICAL jack on this unit conform to the EIA standard.
If you use a fiber optic cable that does not conform to this
standard this unit may not function properly.
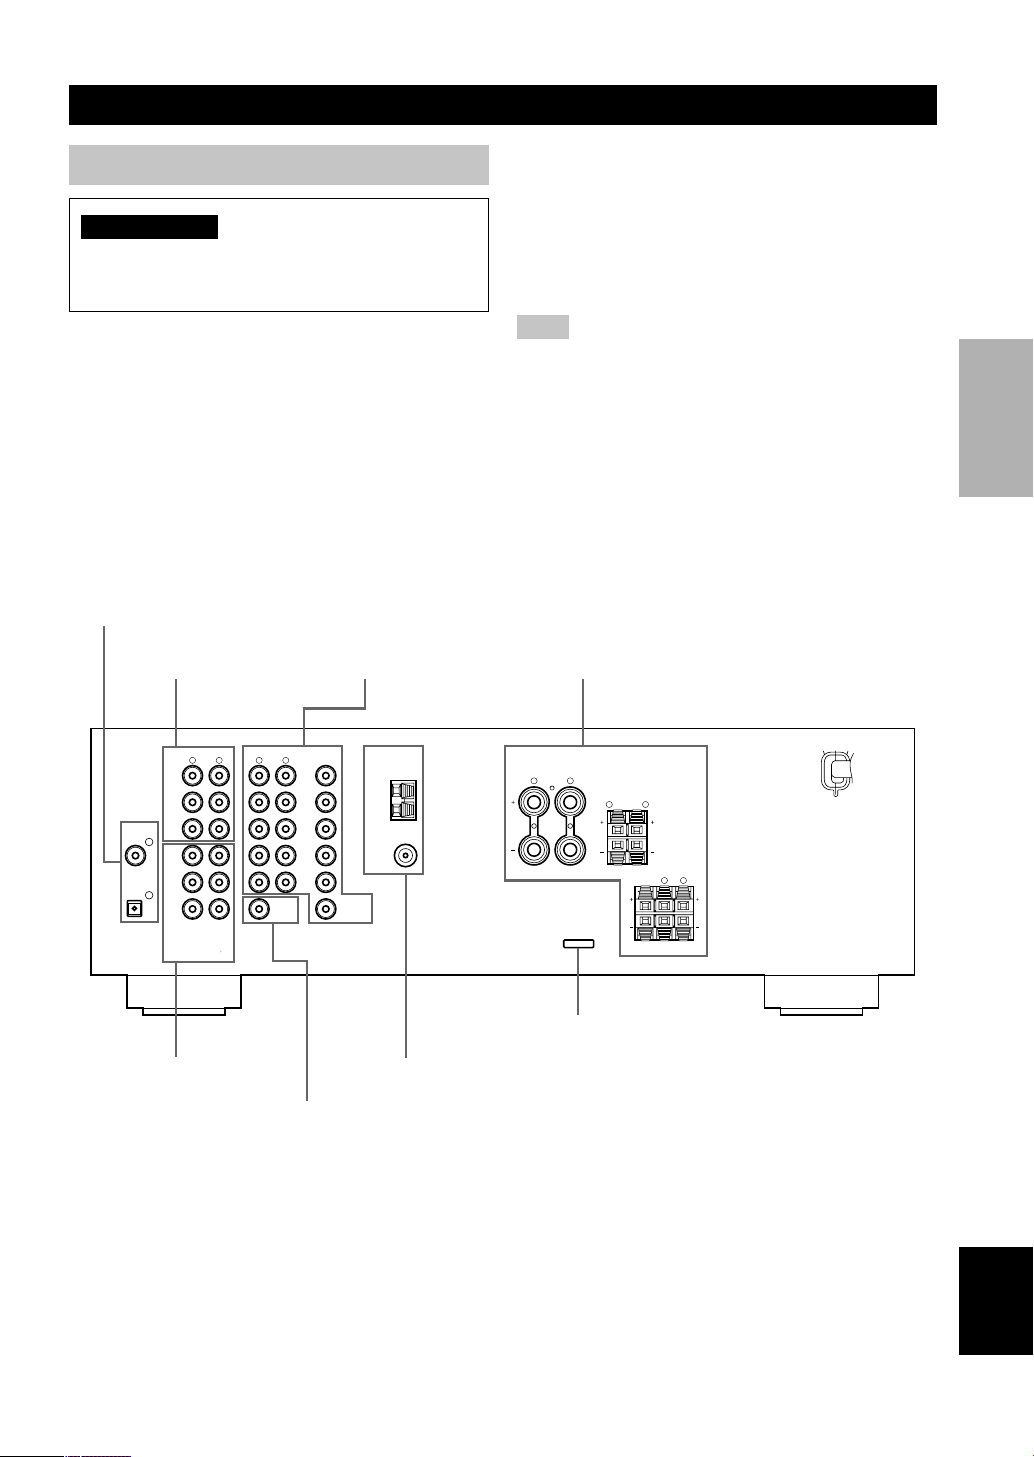
6CH INPUT jacks
(page 13)
DIGITAL INPUT jacks
(pages 9 – 11)
Antenna input terminals
(page 12)
Speaker terminals
(page 16)
Video component jacks
(page 10)
Audio component jacks
(page 11)
SUBWOOFER OUTPUT
jack (page 16)
This jack is reserved for factory use.
Do not connect any equipment to this jack.
AUDIO
LR
2
1
AUDIO VIDEO TUNER SPEAKERS
CLASS 2 WIRING
LR
LR
LR
LR
CD DVD
AM
MAIN
A
MAIN
REAR
(
SURROUND
)
CENTER
B
ANT
GND
FM
ANT
IN
(PLAY)
MAIN
DVD
CD
DIGITAL
INPUT
SUB
WOOFER CENTER
SUB
WOOFER
MONITOR
OUT
SURROUND
OPTICAL
COAXIAL
OUT
(REC)
MD
/CD-R
D-TV
/CBL
V-AUX
IN
VCR
OUT
6CH INPUT OUTPUT
75Ω UNBAL.
MAIN A OR B : 6Ω MIN./SPEAKER
CENTER : 6Ω MIN./SPEAKER
REAR
: 6Ω MIN./SPEAKER
Page 12
10
AUDIO
LR
2
1
AUDIO VIDEO TUNER
LR
CD DVD
AM
ANT
GND
FM
ANT
IN
(PLAY)
MAIN
DVD
CD
DIGITAL
INPUT
SUB
WOOFER
CENTER
SUB
WOOFER
MONITOR
OUT
SURROUND
OPTICAL
COAXIAL
OUT
(REC)
MD
/CD-R
D-TV
/CBL
V-AUX
IN
VCR
OUT
6CH INPUT OUTPUT
75Ω UNBAL.
VIDEO
INPUT
AUDIO
OUTPUT
LR
AUDIO
INPUT
LR
O
OPTICAL
OUTPUT
VIDEO
OUTPUT
AUDIO
OUTPUT
LVR
V V
AUDIO
OUTPUT
L R
VIDEO
OUTPUT
V
AUDIO
OUTPUT
L R
VIDEO
OUTPUT
V
V
VIDEO
INPUT
VIDEO
OUTPUT
O
L
R
V
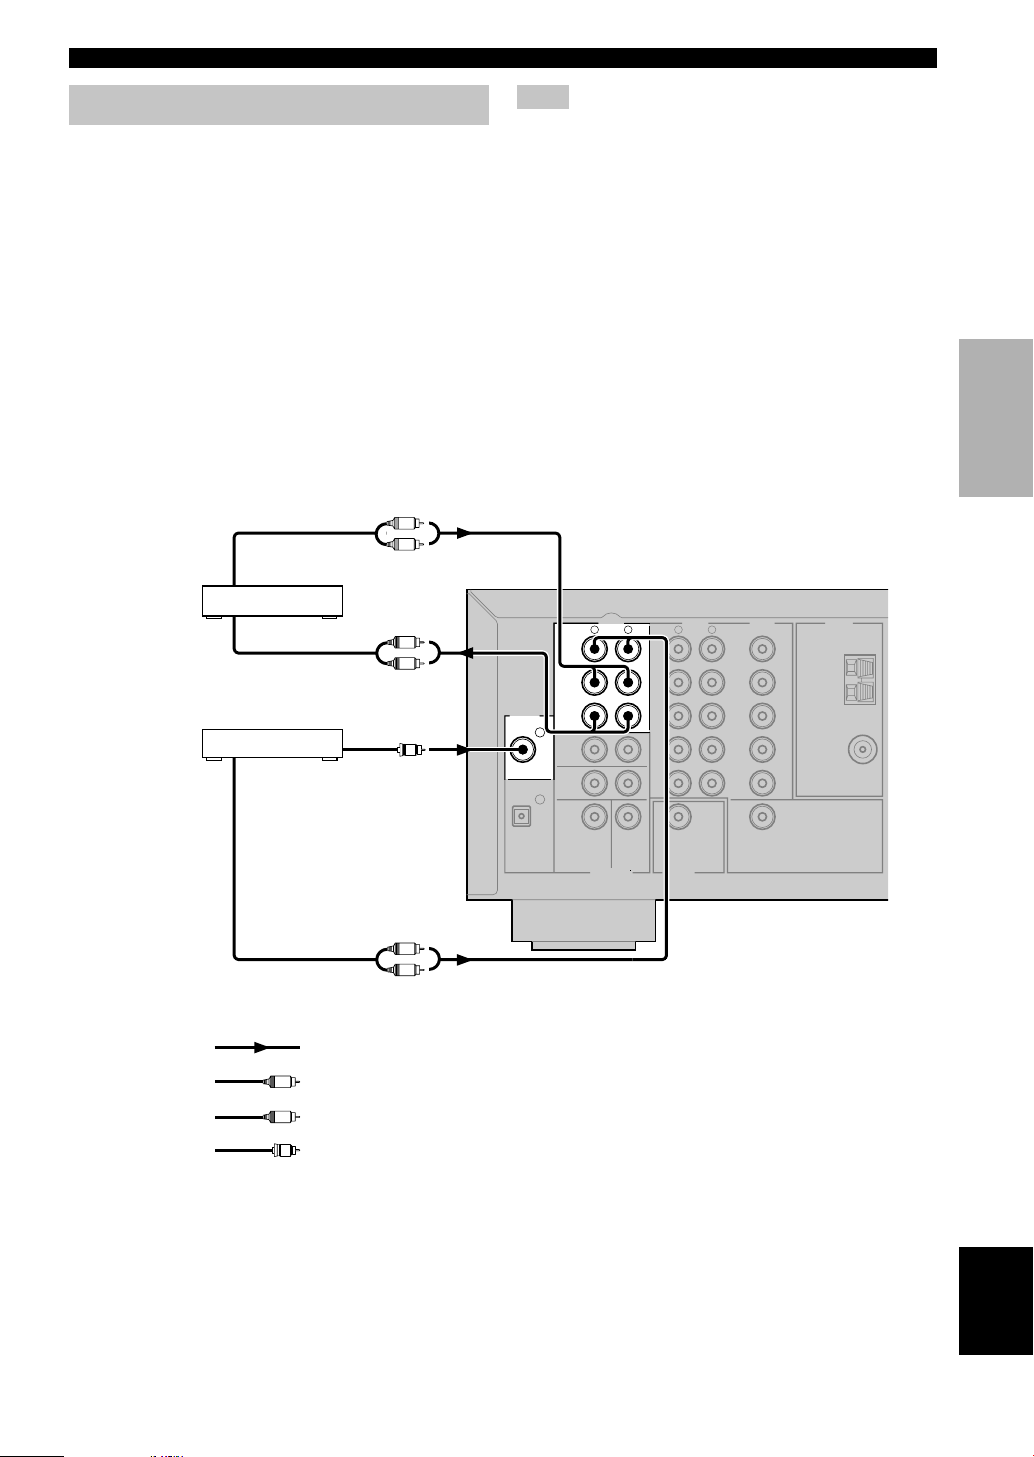
Connecting video components
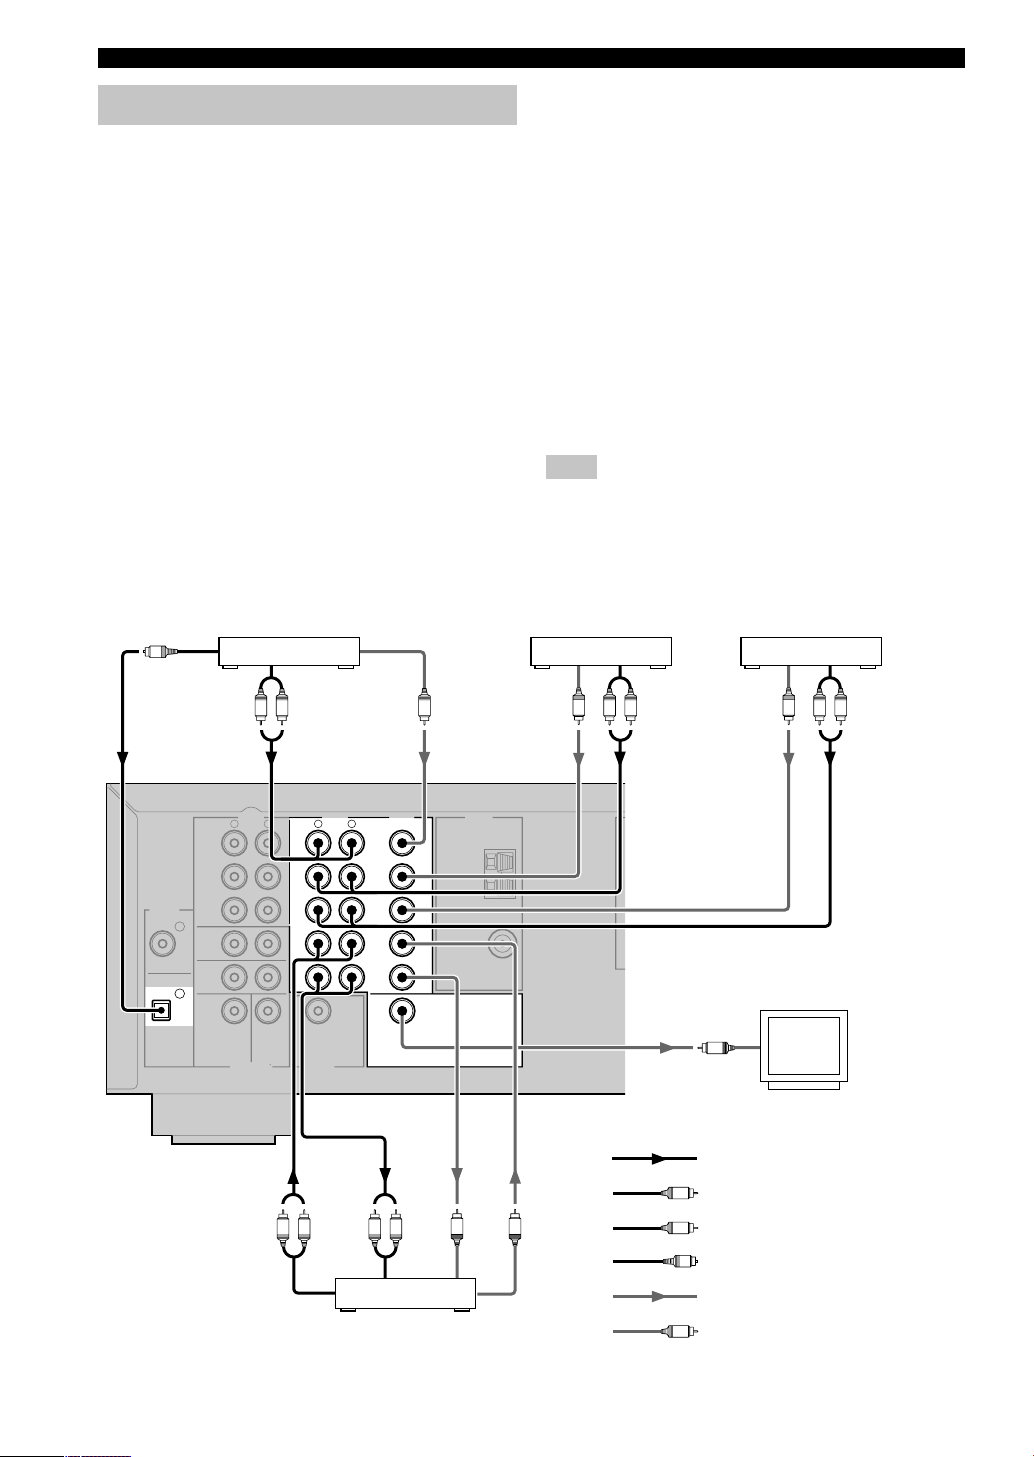
■ Connecting a video monitor
Connect the video input jack on your video monitor to the
MONITOR OUT VIDEO jack.
■ Connecting a DVD player
Connect the optical digital audio signal output jack on
your component to the DIGITAL INPUT jack and
connect the video signal output jack on the component to
the VIDEO jack on this unit.
y
• Use the AUDIO jacks on this unit for a video component
which does not have optical digital output jack. However,
multi-channel reproduction cannot be obtained with audio
signals input from the AUDIO jacks.
■ Connecting a digital TV/cable TV
Connect the video signal output jack on your component
to the VIDEO jack on this unit.
Connect the audio signal output jacks on the component
to the AUDIO jacks on this unit.
■ Connecting another video component
Connect the video signal output jack on your component
to the VIDEO jack on this unit.
Connect the audio signal output jacks on the component
to the AUDIO jacks on this unit.
■ Connecting a recording component
Connect the audio signal input jacks on your video
component to the AUDIO OUT jacks on this unit. Then
connect the video signal input jack on the video
component to the VIDEO OUT jack on this unit for
picture recording.
Connect the audio signal output jacks on your component
to the AUDIO IN jacks on this unit. Then connect the
video signal output jack on the component to the VIDEO
IN jack on this unit to play a source from your recording
component.
Note
• Once you have connected a recording component to this unit,
keep its power turned on while using this unit. If the power is
off, this unit may distort the sound from other components.
indicates right analog cables
indicates left analog cables
indicates audio signal direction
Video monitor
VCR
DVD player
TV/digital TV/
cable TV
CONNECTIONS
Another video
component
indicates optical cables
indicates video signal direction
indicates video cables
Page 13
11
English
PREPARATION
Connecting audio components
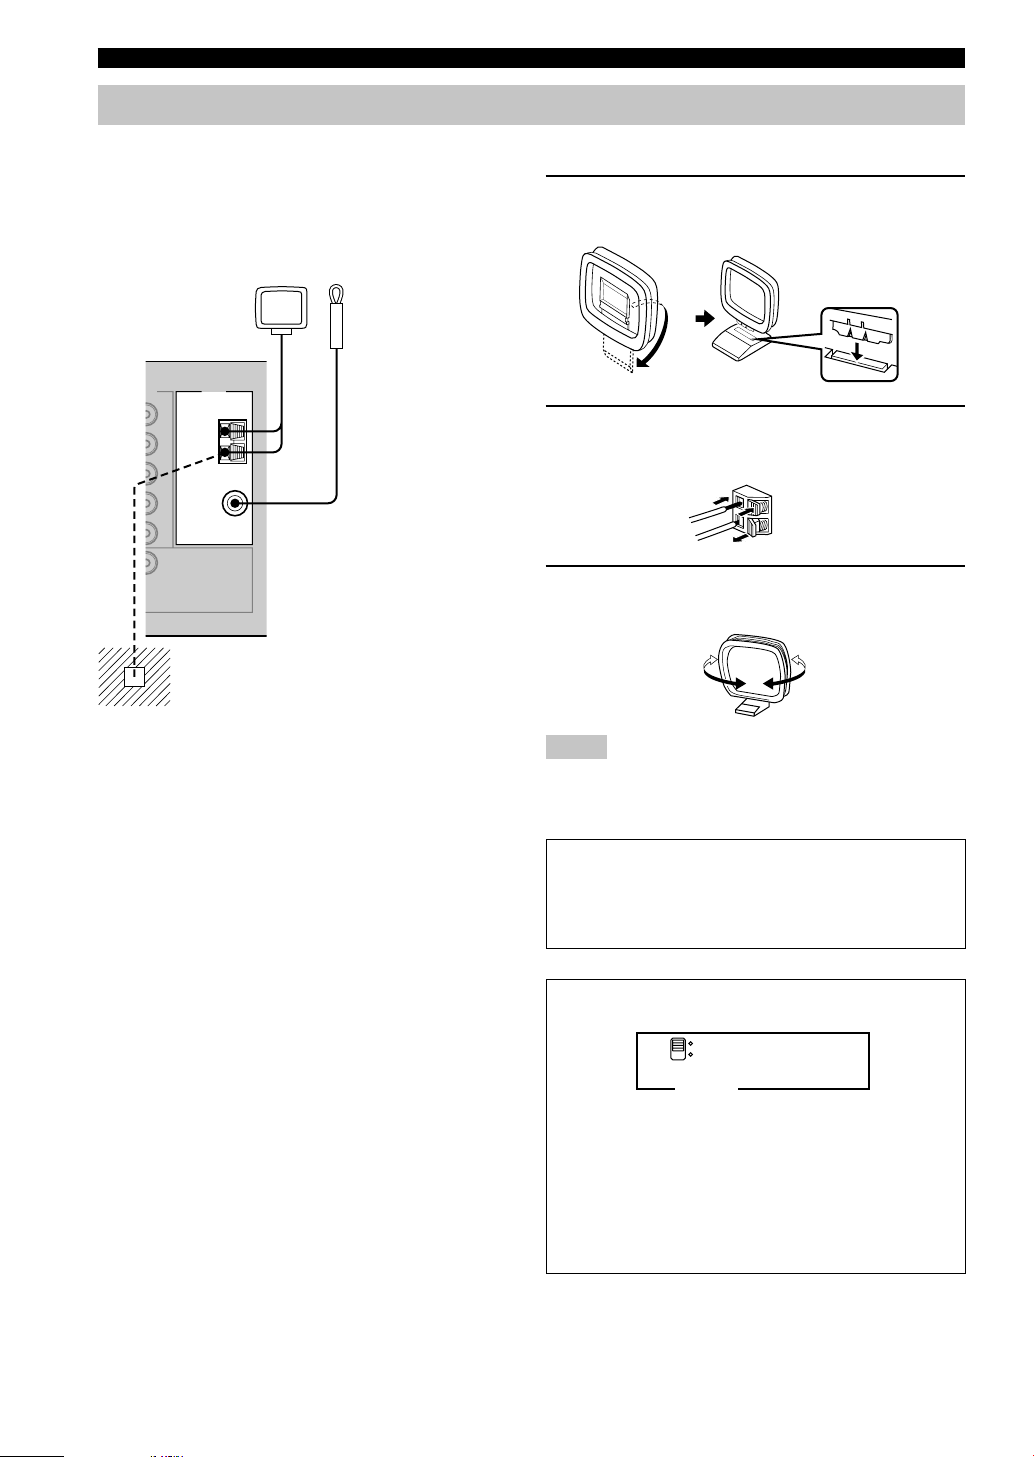
■ Connecting a CD player
Connect the coaxial digital output jack on your CD player
to the DIGITAL INPUT CD jack on this unit.
y
• Use the AUDIO jacks on this unit to connect to a CD player
that does not have a COAXIAL DIGITAL OUTPUT jack, or
to record from CD players.
■ Connecting a CD recorder or MD
recorder
Connect the input jacks on your CD recorder or MD
recorder to the MD/CD-R OUT (REC) jacks.
Connect the output jacks on your CD recorder or MD
recorder to the MD/CD-R IN (PLAY) jacks to play a
source from your recording component.
indicates right analog cables
indicates left analog cables
indicates signal direction
CD player
indicates coaxial cables
CD recorder or
MD recorder
CONNECTIONS
AUDIO
LR
2
1
AUDIO VIDEO TUNER
LR
CD DVD
AM
ANT
GND
FM
ANT
IN
(PLAY)
MAIN
DVD
CD
DIGITAL
INPUT
SUB
WOOFER
CENTER
SUB
WOOFER
MONITOR
OUT
SURROUND
OPTICAL
COAXIAL
OUT
(REC)
MD
/CD-R
D-TV
/CBL
V-AUX
IN
VCR
OUT
6CH INPUT OUTPUT
75Ω UNBAL.
C
L
R
AUDIO
INPUT
L
R
AUDIO
OUTPUT
L
R
AUDIO
OUTPUT
L
R
COAXIAL
OUTPUT
C
Note
• Once you have connected a recording component to this unit,
keep its power turned on while using this unit. If the power is
off, this unit may distort the sound from other components.
Page 14
12
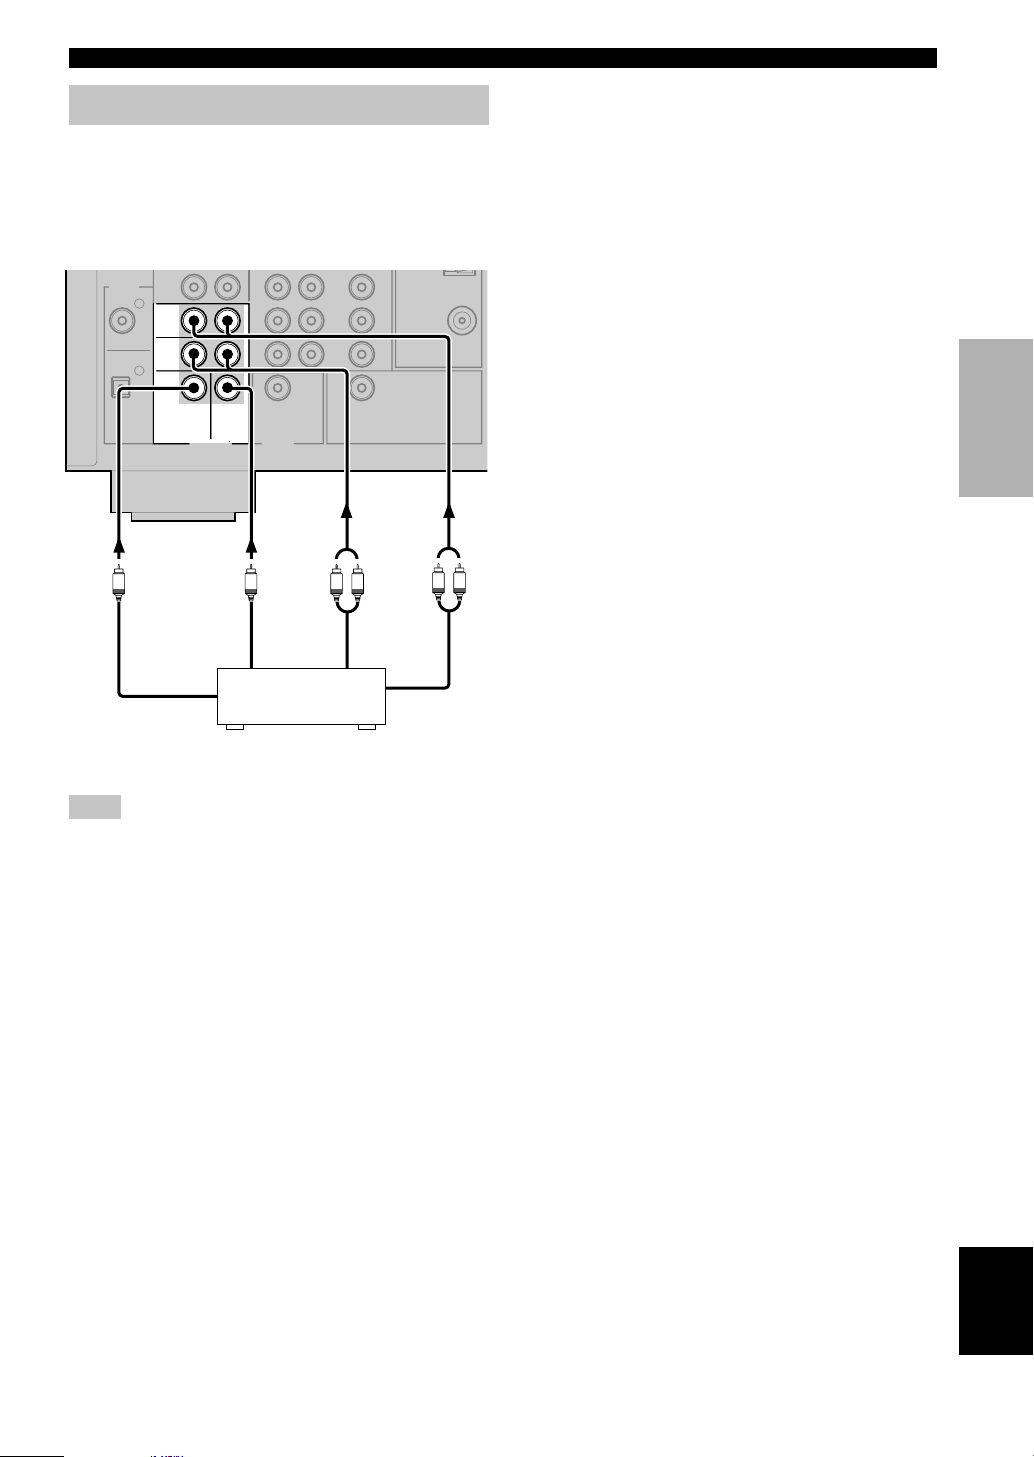
■ Connecting the AM loop antenna
1 Set up the AM loop antenna, then connect it
to the terminals on this unit.
2 Press and hold the tab to insert the AM loop
antenna lead wires into the AM ANT and
GND terminals.
3 Orient the AM loop antenna for the best
reception.
Notes
• The AM loop antenna should be placed away from this unit.
• The AM loop antenna should always be connected, even if an
outdoor AM antenna is connected to this unit.
A properly installed outdoor antenna provides clearer
reception than an indoor one. If you experience poor
reception quality, an outdoor antenna may improve the
quality. Consult the nearest authorized YAMAHA
dealer or service center about the outdoor antennas.
FREQUENCY STEP switch
(General model only)
Because the inter-station frequency spacing differs in
different areas, set the FREQUENCY STEP switch
(located on the rear panel) according to the frequency
spacing in your area.
North, Central and South America: 100 kHz/10 kHz
Other areas: 50 kHz/9 kHz
Before setting this switch, disconnect the AC power
plug of this unit from the AC outlet.
Ground (GND terminal)
For maximum safety and minimum
interference, connect the antenna GND
terminal to a good earth ground. A good
earth ground is a metal stake driven into
moist earth.
Indoor FM
antenna
(included)
AM loop antenna
(included)
Connecting the antennas
Both AM and FM indoor antennas are included with this
unit. In general, these antennas should provide sufficient
signal strength.
Connect each antenna correctly to the designated
terminals.
CONNECTIONS
EO TUNER
AM
ANT
GND
FM
ANT
MONITOR
OUT
75Ω UNBAL.
50 kHz/ 9kHz
100 kHz/10kHz
FM/AM
FREQUENCY STEP
Page 15
13
English
PREPARATION
Connecting an external decoder
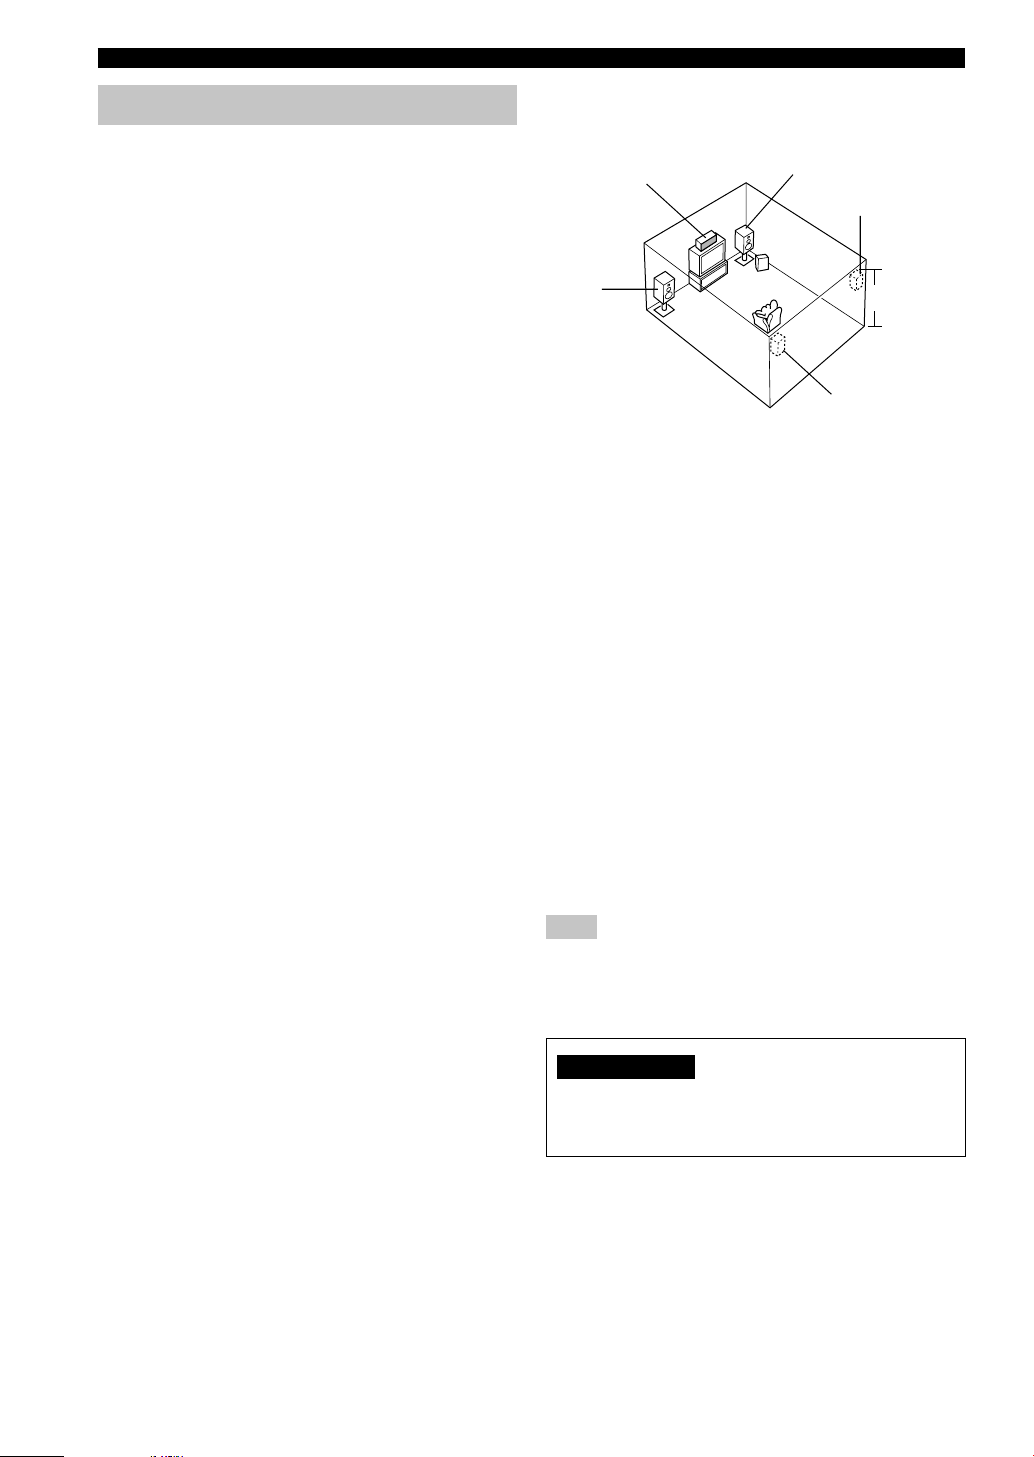
This unit is equipped with 6 additional input jacks (MAIN
left and right, CENTER, SURROUND left and right and
SUBWOOFER) for discrete multi-channel input from a
component equipped with a multi-channel decoder and 6
channel output jacks such as a DVD/SACD player.
Note
• When you select 6CH INPUT as the input source, the unit
automatically turns off the digital sound field processor, and
you cannot use DSP programs.
CONNECTIONS
DVD/SACD player
2
1
FM
ANT
MAIN
DVD
CD
DIGITAL
INPUT
SUB
WOOFER
CENTER
SUB
WOOFER
MONITOR
OUT
SURROUND
OPTICAL
COAXIAL
OUT
(REC)
/CD-R
V-AUX
IN
VCR
OUT
6CH INPUT OUTPUT
75Ω UNBAL.
L R
LR
SUBWOOFER MAIN
CENTER SURROUND
SUBWOOFER MAIN
CENTER SURROUND
Page 16
14
Connecting the speakers
■ Speakers
This unit has been designed to provide the best soundfield quality with a 5-speaker system, using main left and
right speakers, rear left and right speakers and a center
speaker. If you use different brands of speakers (with
different tonal qualities) in your system, the tone of a
moving human voice and other types of sound may not
shift smoothly. We recommend that you use speakers
from the same manufacturer or speakers with the same
tonal quality.
The main speakers are used for the main source sound
plus effect sounds. They will probably be the speakers
from your present stereo system. The rear speakers are
used for effect and surround sounds. The center speaker is
for the center sounds (dialog, vocals, etc.).
The main speakers should be high-performance models
and have enough power-handling capacity to accept the
maximum output of your audio system. The other
speakers do not have to be equal to the main speakers. For
precise sound localization, however, it is ideal to use the
models of equivalent performance with the main
speakers.
Use of a subwoofer expands your sound field
It is also possible to further expand your system with the
addition of a subwoofer. The use of a subwoofer is
effective not only for reinforcing bass frequencies from
any or all channels, but also for reproducing the LFE
(low-frequency effect) channel with high fidelity when
playing back Dolby Digital or DTS signals. The
YAMAHA Active Servo Processing Subwoofer System is
ideal for natural and lively bass reproduction.
CONNECTIONS
■ Speaker placement
Refer to the following diagram when you place the
speakers.
Main speakers
Place the main left and right speakers an equal distance
from the ideal listening position. The distance between
each speaker and each side of the video monitor should
also be the same.
Center speaker
Align the front face of the center speaker with the front
face of your video monitor. Place the speaker as close to
the monitor as possible (such as directly over or under the
monitor) and centrally between the main speakers.
Rear speakers
Place these speakers behind your listening position,
facing slightly inwards, about 1.8 m (6 feet) above the
floor.
Subwoofer
The position of the subwoofer is not so critical, because
low bass sounds are not highly directional. However, it is
better to place the subwoofer near the main speakers.
Turn it slightly toward the center of the room to reduce
wall reflections.
Note
• If you do not use any of effect speakers (rear and/or center),
change the settings of “SOUND 1 SPEAKER SET” items at
the set menu to direct signals to other terminals you have
connected speakers to.
CAUTION
Use magnetically shielded speakers. If these speakers
still create interference with the monitor, place the
speakers away from the monitor.
Main
speaker (L)
1.8 m (6 feet)
Rear speaker (L)
Rear speaker (R)
Subwoofer
Main speaker (R)
Center speaker
Page 17
15
English
PREPARATION
10 mm (3/8”)
Red: positive (+)
Black: negative (–)
Banana plug
CONNECTIONS
12
■ Connections
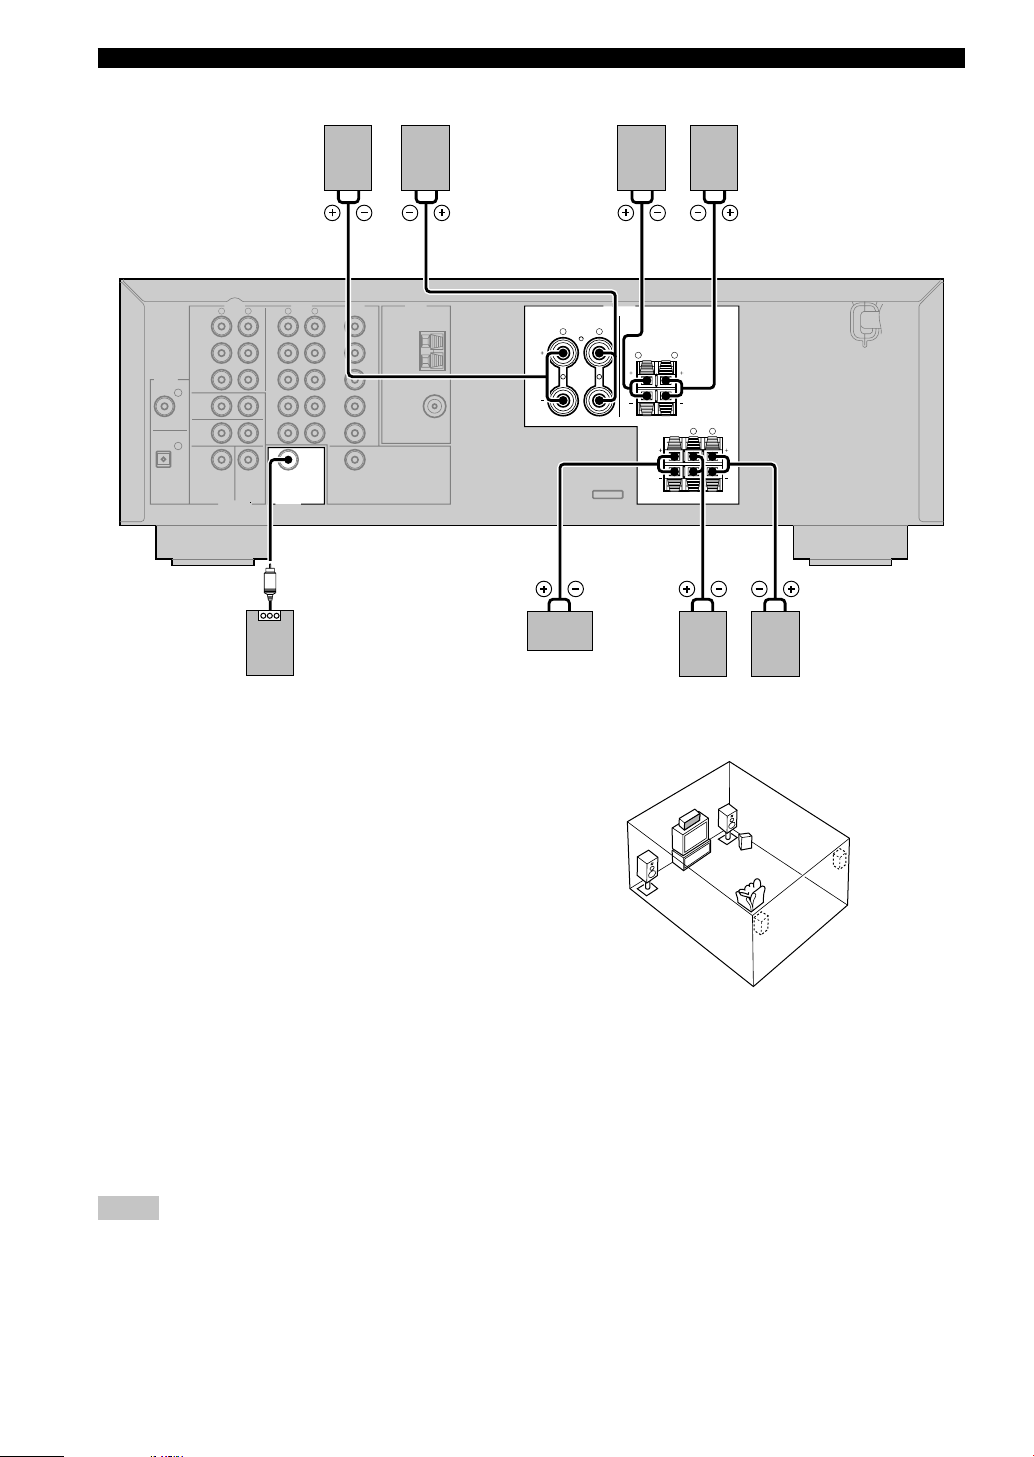
Be sure to connect the left channel (L), right channel (R), “+” (red) and “–” (black) in accordance with the markers on
this unit, the speakers, and the speaker cables. If the connections are faulty, no sound will be heard from the speakers,
and if the polarity of the speaker connections is incorrect, the sound will be unnatural and lack bass.
CAUTION
• Use speakers with the specified impedance shown on the rear panel of this unit.
• Do not let the bare speaker wires touch each other or any metal part of this unit. This could damage this unit and/
or the speakers.
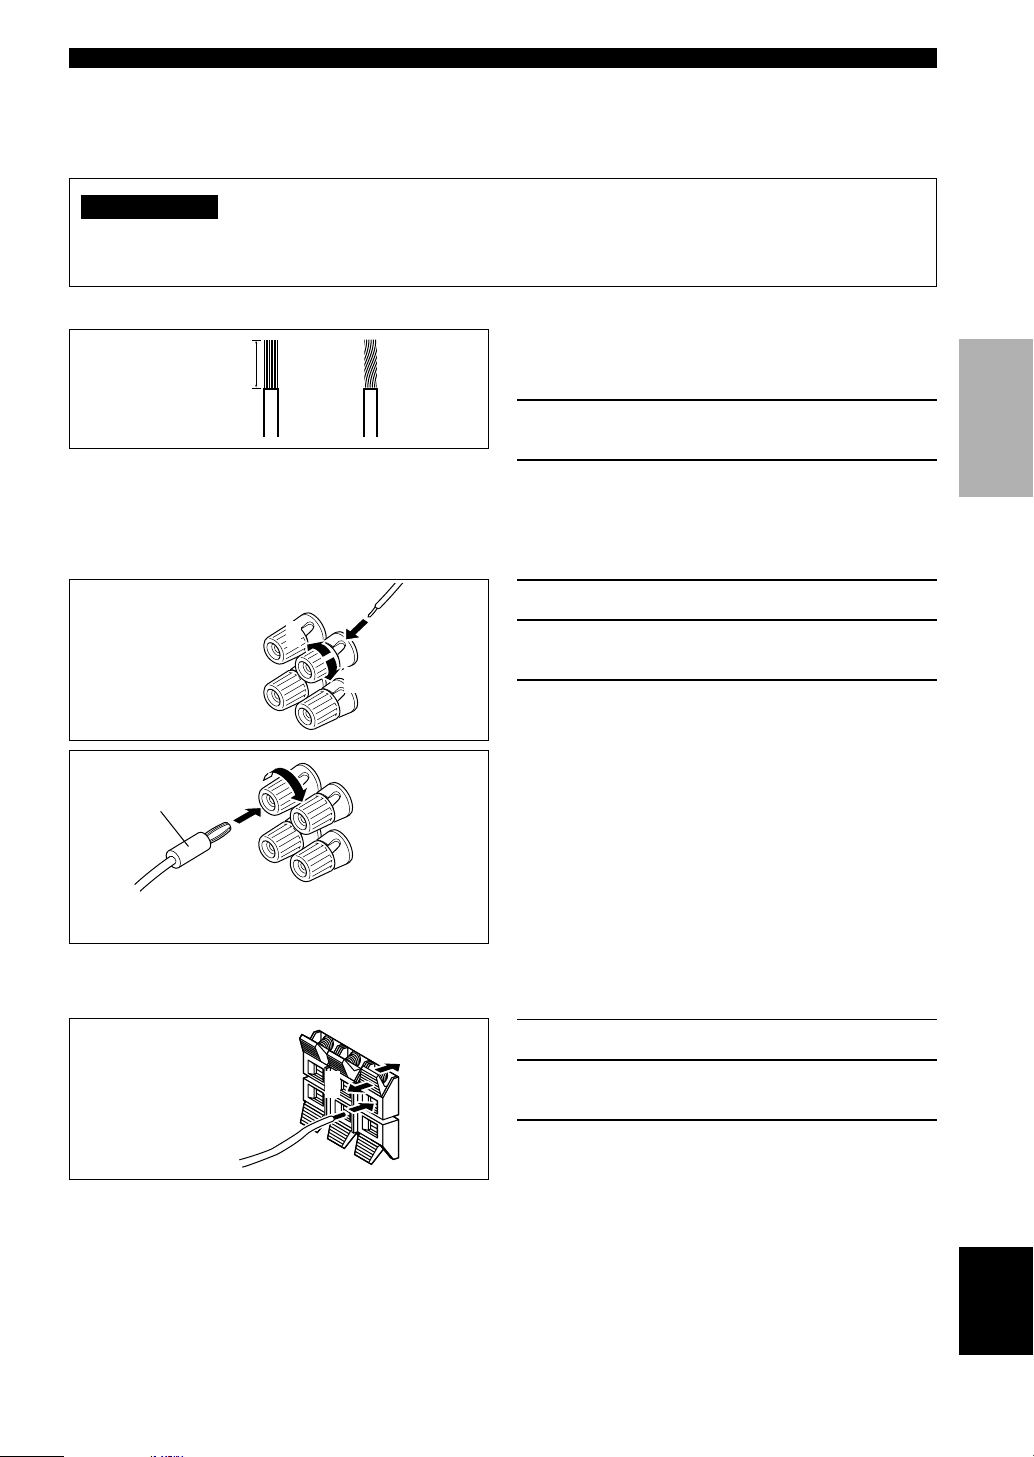
A speaker cord is actually a pair of insulated cables
running side by side. One cable is colored or shaped
differently, perhaps with a stripe, groove or ridge.
1 Remove approximately 10 mm (3/8”) of
insulation from each of the speaker cables.
2 Twist the exposed wires of the cable
together to prevent short circuits.
1 Unscrew the knob.
2 Insert one bare wire into the hole in the side
of each terminal.
3 Tighten the knob to secure the wire.
y
(With the exception of U.K., Europe, Korea, and Singapore
models)
• You can also use banana plug connectors. First, tighten the
knob and then insert the banana plug connector into the end of
the corresponding terminal.
1 Press and open the tab.
2 Insert one bare wire into the hole of each
terminal.
3 Release the tab to secure the wire.
(With the exception of U.K., Europe, Korea, and
Singapore models)
Connecting to the MAIN A SPEAKERS terminals
3
1
2
Red: positive (+)
Black: negative (–)
Connecting to the MAIN B, CENTER and REAR SPEAKERS terminals
1
2
3
Page 18
16
Subwoofer
system
Main B speaker
Center
speaker
Right
Rear speaker
SUBWOOFER jack
When using a subwoofer with built-in amplifier, including the YAMAHA Active Servo Processing Subwoofer System,
connect the input jack of the subwoofer system to this jack. This unit will direct low bass signals distributed from the
main, center and/or rear channels to this jack in accordance with your SPEAKER SET selections. The LFE (lowfrequency effect) signals generated when Dolby Digital or DTS is decoded are also directed to this jack in accordance
with your SPEAKER SET selections.
Notes
• The cut-off frequency of the SUBWOOFER jack is 90 Hz.
• If you do not use a subwoofer, allocate the signals to the main left and right speakers by changing the setting of “SOUND 1
SPEAKER SET” item “1D BASS” on the set menu to MAIN.
• Use the control on the subwoofer to adjust its volume level. You can also adjust the volume level by using this unit’s remote control
(see “SETTING THE SPEAKER LEVELS” on page 46).
Right Left
Main A speaker
Right Left Left
MAIN SPEAKERS terminals
You can connect up to two speaker systems to these
terminals. When using only one speaker system, connect
it to either of the MAIN A or the MAIN B terminals.
REAR SPEAKERS terminals
A rear speaker system can be connected to these
terminals.
CENTER SPEAKER terminals
A center speaker can be connected to these terminals.
CONNECTIONS
The diagram shows the speaker layout in the listening
room.
AUDIO
LR
2
1
AUDIO VIDEO TUNER SPEAKERS
CLASS 2 WIRING
LR
LR
LR
LR
CD DVD
AM
MAIN
A
MAIN
REAR
(
SURROUND
)
CENTER
B
ANT
GND
FM
ANT
IN
(PLAY)
MAIN
DVD
CD
DIGITAL
INPUT
SUB
WOOFER CENTER
SUB
WOOFER
MONITOR
OUT
SURROUND
OPTICAL
COAXIAL
OUT
(REC)
MD
/CD-R
D-TV
/CBL
V-AUX
IN
VCR
OUT
6CH INPUT OUTPUT
75Ω UNBAL.
MAIN A OR B : 6Ω MIN./SPEAKER
CENTER : 6Ω MIN./SPEAKER
REAR
: 6Ω MIN./SPEAKER
3
65
21
4
1
2
4
3
6
5
Page 19
17
English
PREPARATION
Connecting the power supply cords
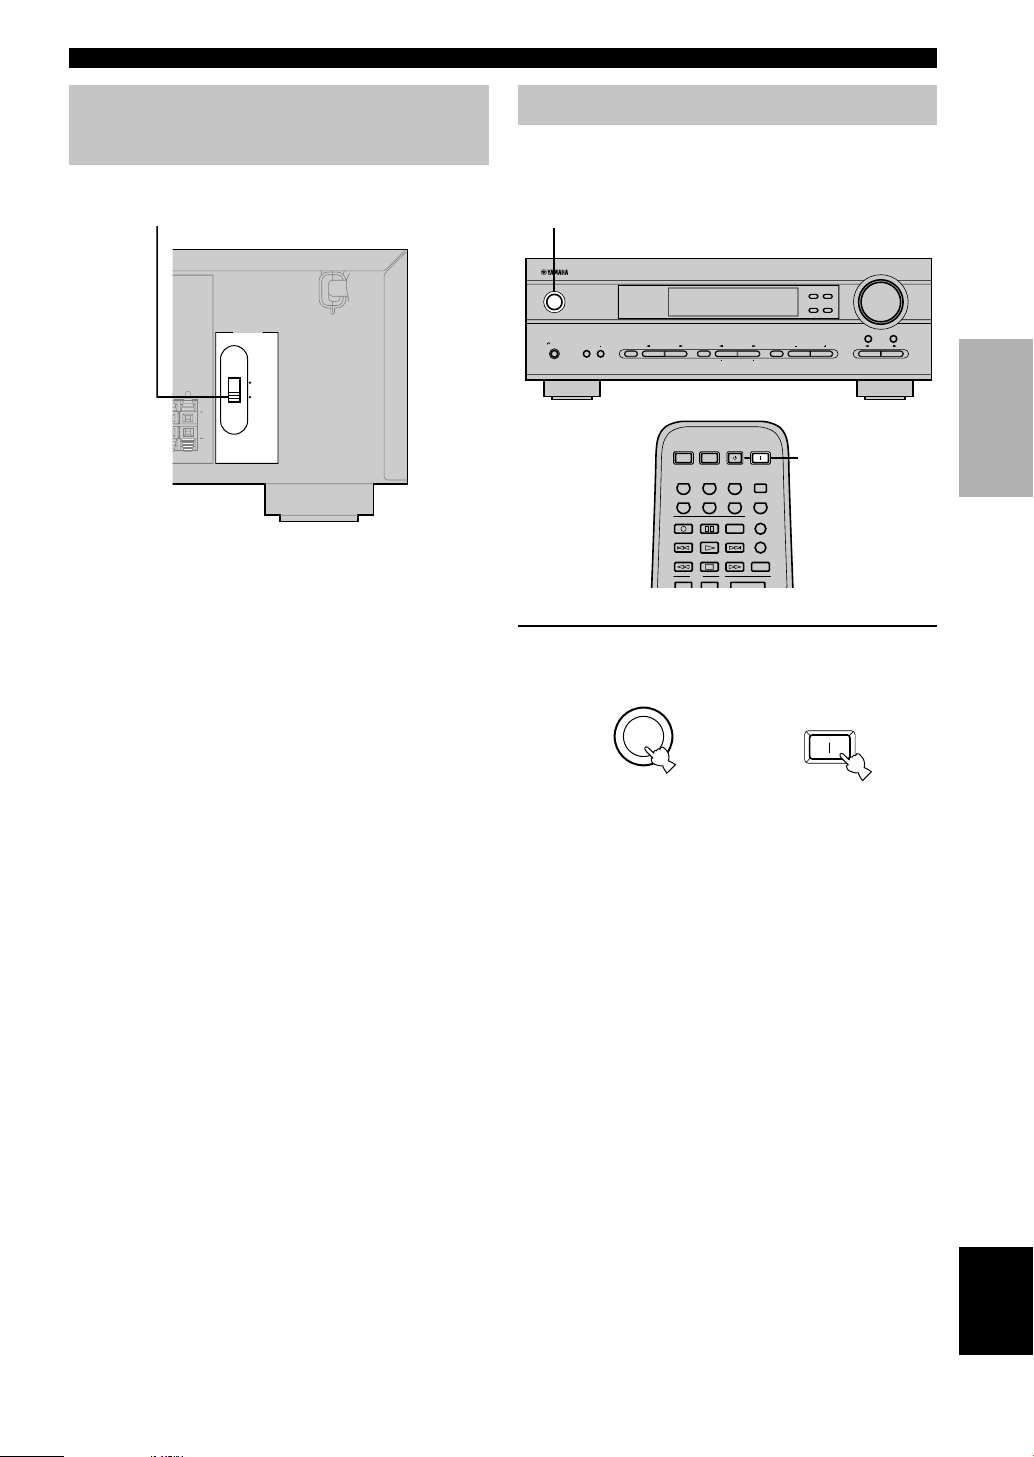
■ Connecting the AC power cord
Plug in this unit to a wall outlet.
■ VOLTAGE SELECTOR
(General model only)
The VOLTAGE SELECTOR on the rear panel of this unit
must be set for your local main voltage BEFORE
plugging into the AC main supply. Voltages are 110V120V/220V-240V AC, 50/60 Hz.
VOLTAGE SELECTOR
Turning on the power
When all connections are complete, turn on the power of
this unit.
1 Press STANDBY/ON (SYSTEM POWER on
the remote control) to turn on the power of
this unit.
The level of the main volume, and then the current
DSP program name appear on the front panel
display.
or
Remote control
Front panel
(General model)
CONNECTIONS
L
REAR
U
RROUND
)
110V-120V
220V-240V
N
./SPEAKER
N
./SPEAKER
VOLTAGE
SELECTOR
VOLUME
STANDBY
/ON
AUTO/MAN`L MONO MAN`L/AUTO FM
TUNING MODE MEMORY
EDIT
PRESET/TUNING FM/AM
SILENT
PHONES
SPEAKERS
AON
BOFF
EFFECT
PRESET/TUNING
SET MENU
A/B/C/D/E
NEXT
PROGRAM
STEREO
BASS/TREBLE
CONTROL
INPUT
6CH INPUTINPUT MODE
1
SYSTEM
POWER
STANDBY
POWER
AV
POWERTVPOWER
TV
V-AUXVCRD-TV/CBLDVD
SLEEPTUNERMD/CD-RCD
TV
AMP
CODE SET
REC
6CH INPUT
AUDIO
DISC SKIP
1
STANDBY
/ON
POWER
SYSTEM
Page 20
18
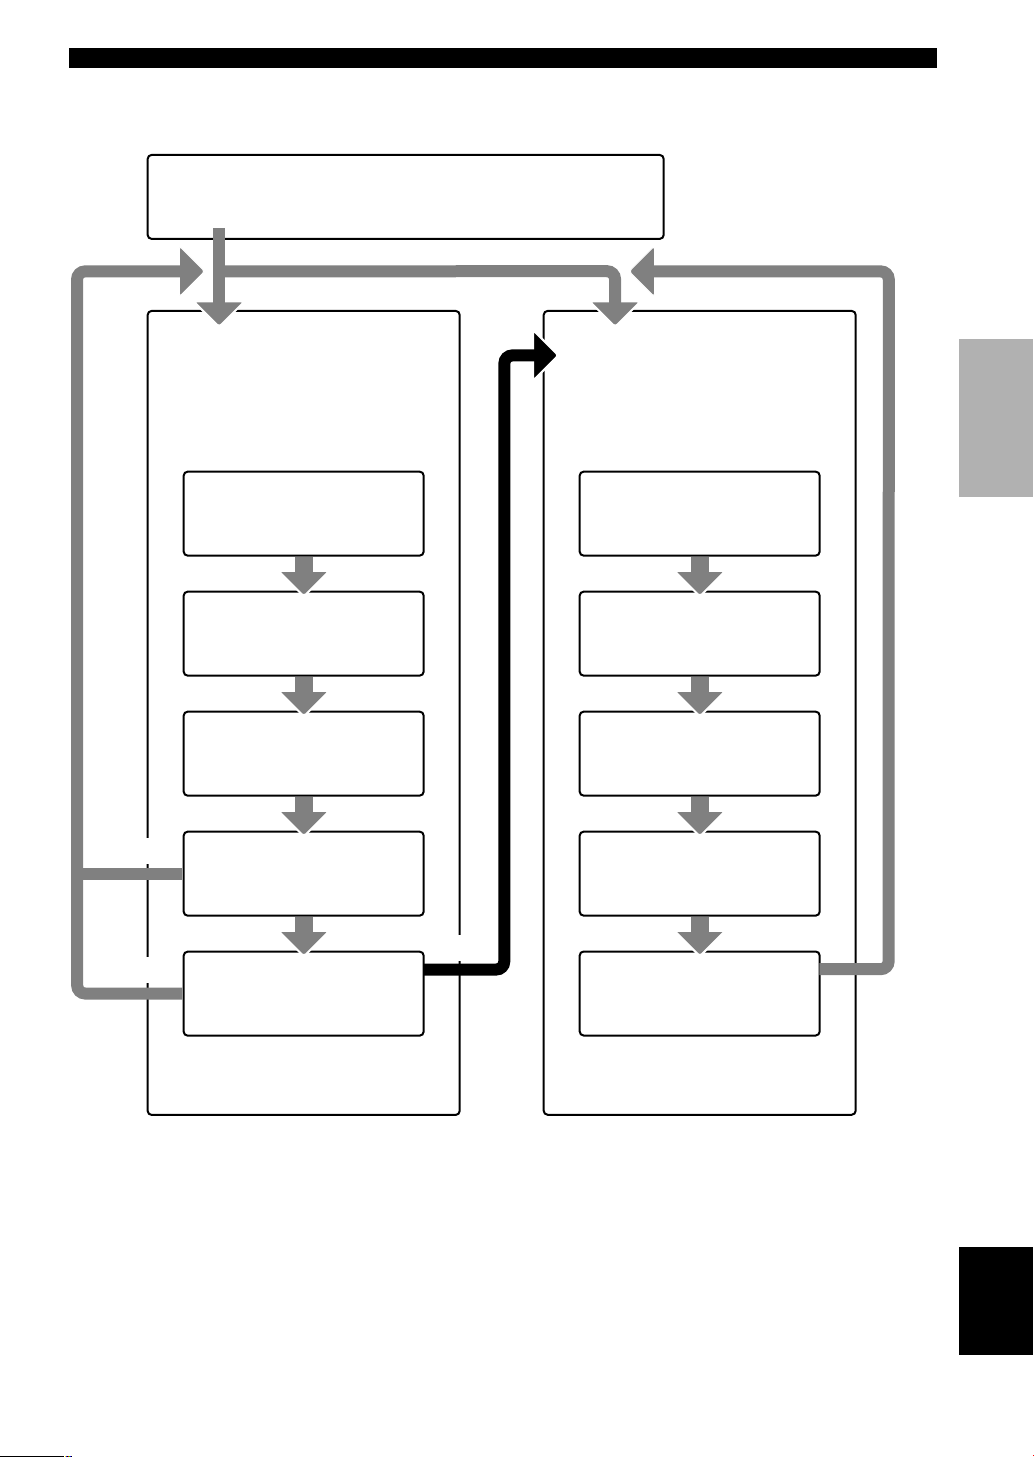
Using the basic menu
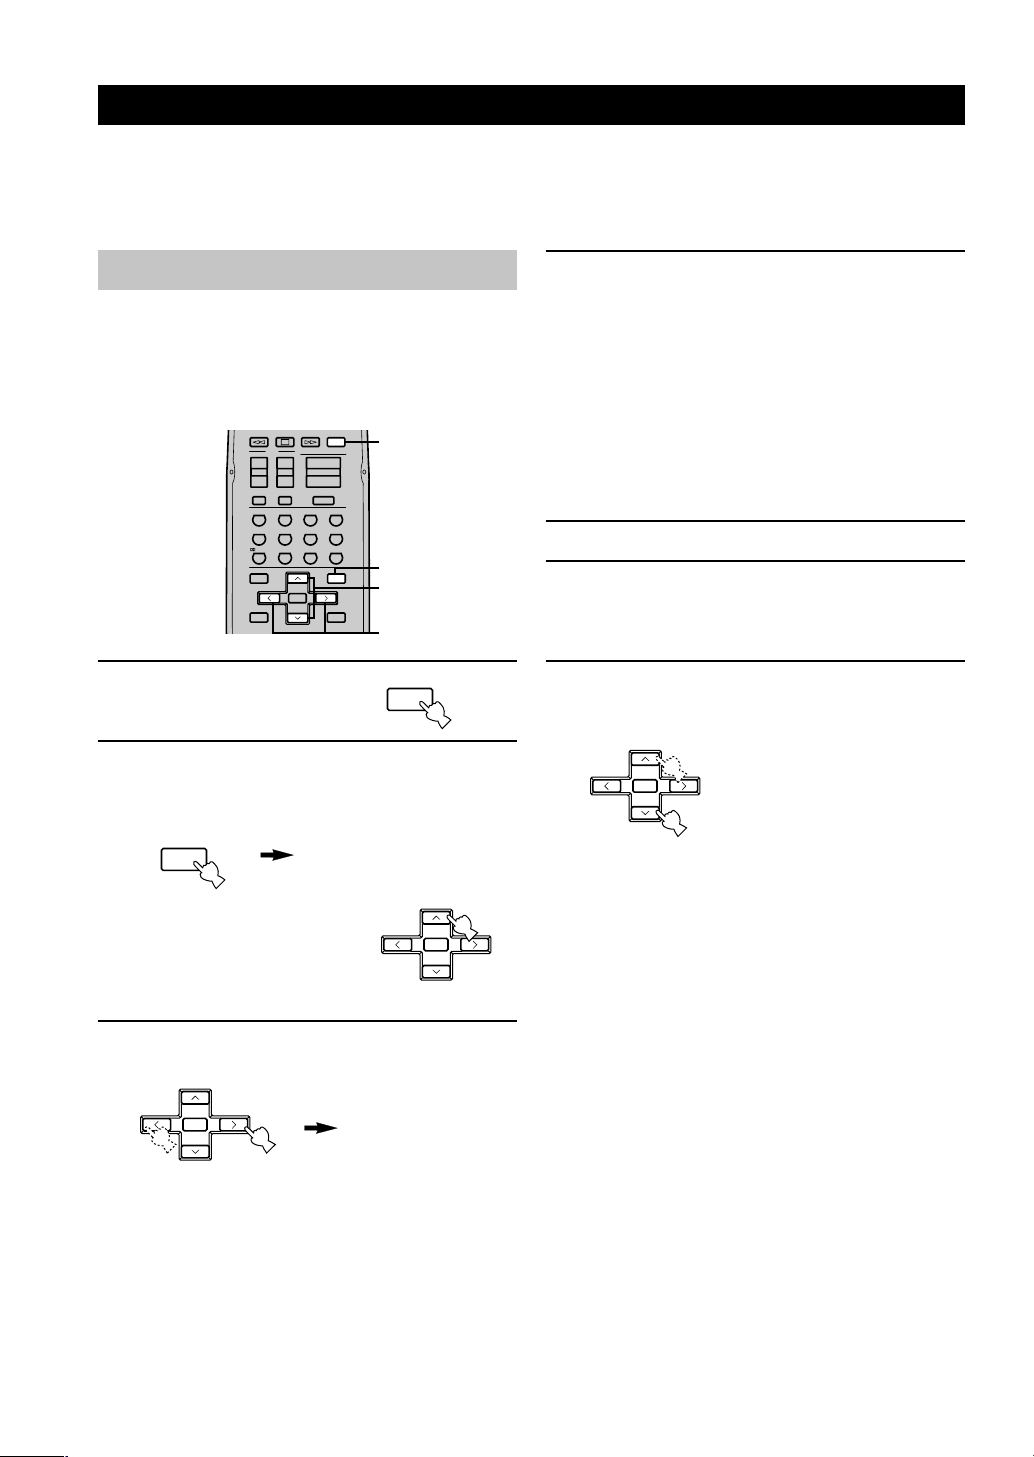
Use the remote control to make adjustments.
• Press SPEAKERS A/B on the front panel to select the
main speakers you want to use, and set SPEAKERS
ON/OFF to the ON position.
• Make sure you disconnect headphones from this unit.
1 Press AMP.
2 Press SET MENU.
“BASIC MENU” appears on the front panel display,
as shown here.
If the front panel display
changes to show anything
other than “BASIC MENU”,
press u until it displays
“BASIC MENU”.
3 Press j / i to enter into the BASIC menu.
The front panel display changes as shown here:
BASIC SYSTEM SETTINGS
The “BASIC” menu allows you to set some of the basic “SOUND” menu parameters with a minimum of effort. If you
wish to configure the unit more precisely to suit your listening environment, use the more detailed parameters from the
“SOUND” menu instead of those under the “BASIC” menu (See page 38). Altering any parameters in the BASIC menu
will reset all parameters in the “SOUND” menu.
ENTER
+10
09
STEREO
6.1/5.1
NIGHT
/DTS
8765
MOVIE2MOVIE1TV THTRMUSIC
432
1
ENTERTAINMENT
ROCKJAZZHALL
TV
AMP
MUTE
INPUTMUTE
VOLUME
+–+
–
+
–
CHVOL
SET MENU
SELECT
PRESET/CH
A/B/C/D/E
LEVEL
MENU
TEST
RETURN
DISPLAY
TITLE
+
–
2
4,7
3,5
1
SET MENU
A/B/C/D/E
MENU
SELECT
+
–
PRESET/CH
4 Press u / d to change the display to the
setting you want to alter.
SETUP
Changes the speaker and amplifier settings to suit the
size of the room you are using. Refer to “Setting the
unit to match your speaker system” on page 20 for
more information.
SP LEVEL
Adjusts the output levels of the speakers.
Refer to “Setting speaker output levels” on page 20
for more information.
5 Press j / i to enter the desired setting mode.
6 Change the unit settings to suit your
listening environment. When you have
finished, the unit will automatically return to
the basic menu.
7 Press u / d to exit from the set menu.
The front panel display changes in the following
order:
BASIC MENU
SELECT
+
–
PRESET/CH
1 SETUP
SELECT
+
–
PRESET/CH
↑
BASIC
↓↑
SOUND
↓↑
INPUT
↓↑
OPTION
↓
Exit
Exit
AMP
Page 21
English
19
PREPARATION
SET MENU
BASIC SOUND INPUT OPTION
1 SETUP
Press j / i to alter the settings for each
parameter. Use d to move to the next
setting.
2 SP LEVEL
Press j / i to adjust the balance
between each speaker and the left main
speaker. Use d to move to the next
setting.
1 ROOM
Choose from S/M/L.
2 SUBWOOFER
Choose either of YES/NONE.
3 SPEAKERS
Choose from 2/3/4/5 spk.
4 SET/CANCEL
Choose either of SET/CANCEL.
5 CHECK OK:
Choose either of YES/NO.
1 L-R
Adjust the balance between the main
left and right speakers.
2 C
Adjust the balance between the main
left and center speakers.
3 RL
Adjust the balance between the main
left and rear left speakers.
4 RR
Adjust the balance between the rear
left and rear right speakers.
SET
BASIC SYSTEM SETTINGS
NO
YES
CANCEL
• After altering the “1 SETUP” parameters, readjust the output levels of the speakers at “2 SP LEVEL”.
• See pages 37 – 42 for a detailed explanation of the “SOUND”, “INPUT” and “OPTION” menus.
5 SWFR
Adjust the balance between the main
left speaker and the subwoofer.
Page 22
20
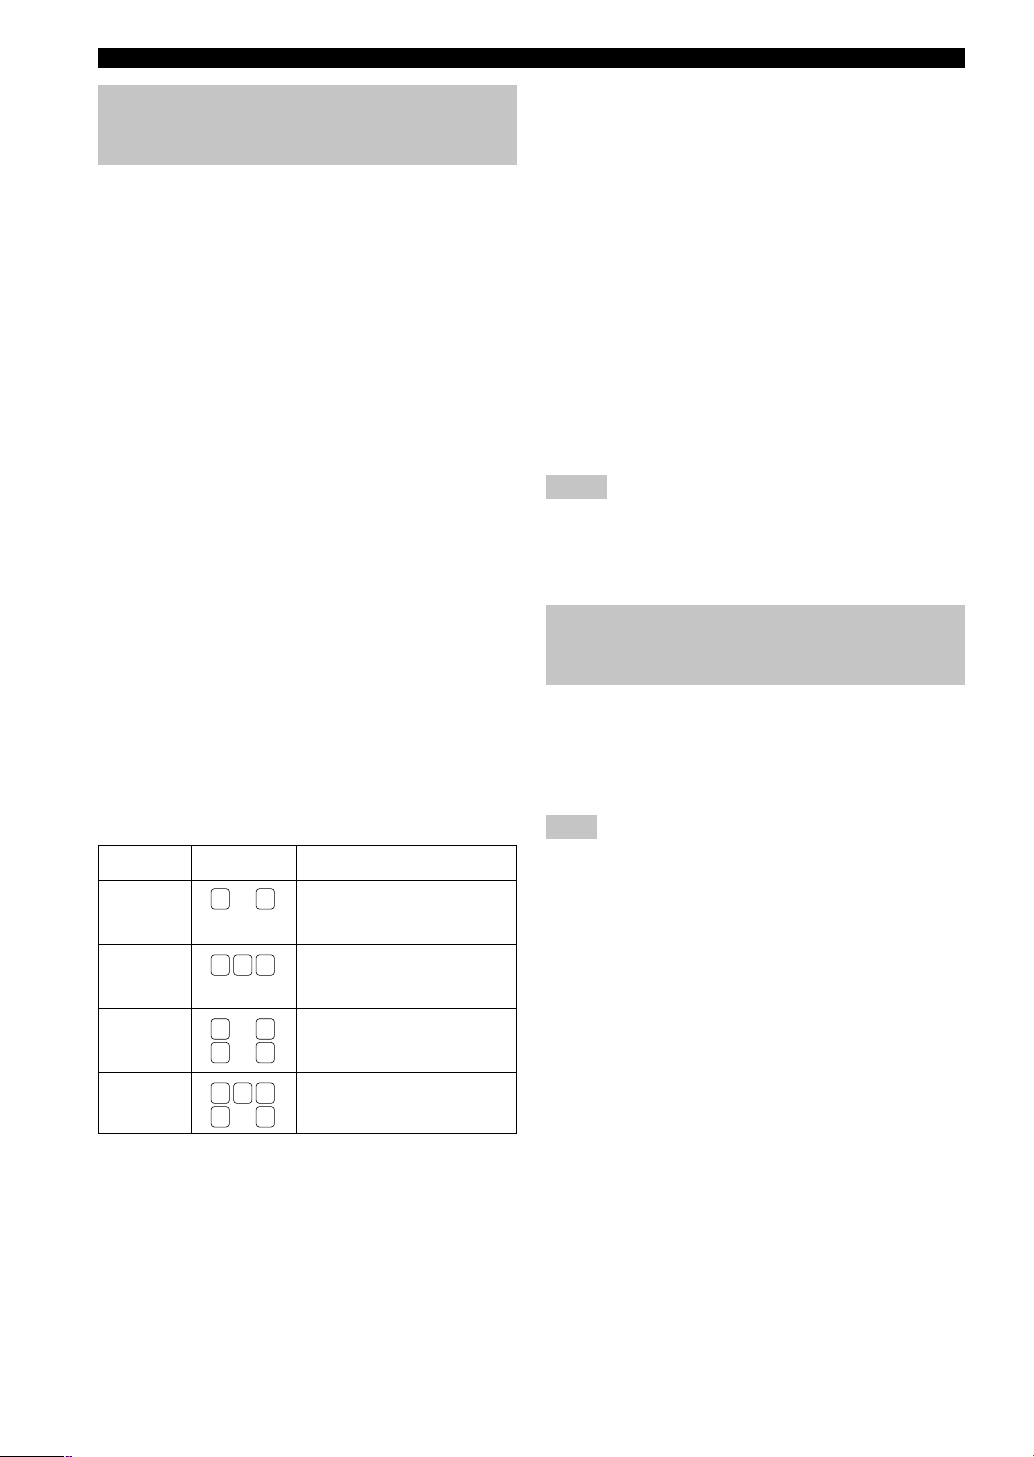
Setting the unit to match your speaker system
Follow the instructions below to set the amplifier output
to match the size of your room and speakers. Press u / d
to cycle through parameters 1 through 4, and j / i to alter
the parameter setting.
Factory default settings are highlighted.
1 ROOM
Settings: S, M, L
Select the size of the room you have installed your
speakers in. Roughly speaking, the room sizes are
defined as follows:
[U.S.A. and Canada models]
S: 16ft. x 3ft., 200sq.ft. (4.8 x 4m, 20m
2
)
M: 20ft. x 16ft., 300sq.ft. (6.3 x 5.0m, 30m2)
L: 26ft. x 19ft., 450sq.ft. (7.9 x 5.8m, 45m2)
[Other models]
S: 3.6m x 2.8m, 10m
2
M: 4.8m x 4.0m, 20m
2
L: 6.3m x 5.0m, 30m
2
2 SUBWOOFER
Settings: YES, NONE
Select YES if you have a subwoofer in your system,
or NONE if you do not.
3 SPEAKERS
Settings: 2, 3, 4, 5 (spk)
Select the number of speakers you wish to use in your
speaker configuration. This number does not include
your subwoofer.
BASIC SYSTEM SETTINGS
4 SET or CANCEL
Select SET to confirm the changes you made to the
above three settings. The unit will output a test tone to
the speakers (see 5). Alternatively, select CANCEL
to exit this menu without altering any of the unit
settings.
5 Use the test tone to check the speaker levels.
When you select SET in 4, the display changes to
“CHECK: TestTone”, and the unit outputs a test tone
to each of the speakers in turn. When the test tone
begins, the display changes to “CHECK OK?--YES”.
If the volume of the test tone varies between speakers,
press j / i to change the display to “NO”. The unit
will automatically enter the “2 SP LEVEL” mode.
If the test tone is output at the same volume from all
of the speakers, select “CHECK OK: YES”. Press d
to exit from the SETUP menu.
Notes
• The unit cycles the test tone around each of the speakers in
turn twice.
• The indicator of the speaker currently outputting the test tone
flashes on the front panel display.
Setting speaker output levels (SP LEVEL)
Use this menu to compare and adjust the test tone output
from each speaker to the output from the left main (or left
rear) speaker so that the volume level for all speakers is
identical. Press u / d to select a speaker, then adjust the
balance using j / i.
Note
• The unit outputs the test tone from the selected speaker and
the left main (or left rear) speaker in turn. The indicator of the
speaker currently outputting the test tone flashes on the front
panel display.
1 L-R
Adjusts the balance between the main left and right
speakers.
2 C
Adjusts the balance between the main left and center
speakers.
3 RL
Adjusts the balance between the main left and rear
left speakers.
4 RR
Adjusts the balance between the rear left and rear
right speakers.
5 SWFR
Adjust the balance between the main left speaker and
the subwoofer.
Setting
2spk
3spk
4spk
5spk
Display
L R
L C R
L R
RL RR
L C R
RL RR
Speaker
Main L/Main R
Main L/Center/Main R
Main L/Main R/Rear L/
Rear R
Main L/Center/Main R/
Rear L/Rear R
Page 23
English
21
BASIC
OPERATION
PLAYBACK
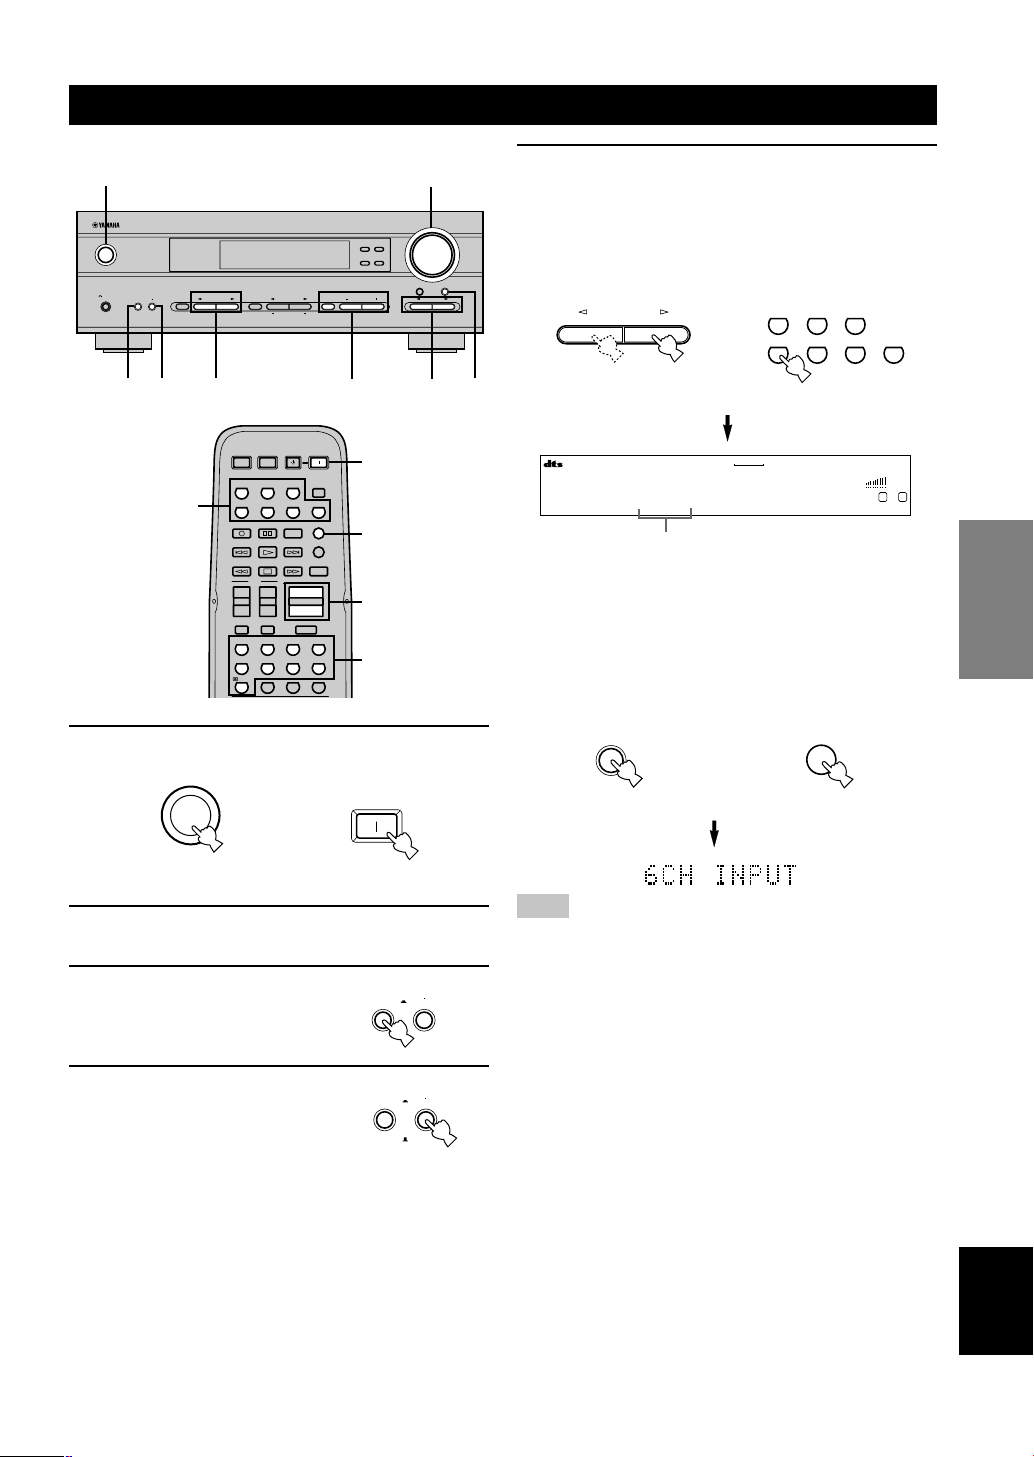
1 Press STANDBY/ON (SYSTEM POWER on
the remote control) to turn on the power.
2 Turn on the video monitor connected to this
unit.
3 Press and set SPEAKERS
ON/OFF inward (ON).
4 Press and set SPEAKERS
A/B inward (A) or outward
(B) to select the main
speakers you want to use.
5 Press INPUT l / h repeatedly (one of the
input selector buttons on the remote control)
to select the input source.
The selected input source name and input mode
appear on the front panel display for a few seconds.
To select the audio source connected to the 6CH
INPUT jacks
• Select the input to which the video source component is
connected before selecting an audio source.
Press 6CH INPUT until “6CH INPUT” appears on the
front panel display.
Note
• If “6CH INPUT” is shown on the front panel display, no other
source can be played. To select another input source, first
press 6CH INPUT so that “6CH INPUT” disappears from the
front panel display.
STANDBY
/ON
POWER
SYSTEM
or
or
Remote control
Remote control
Front panel
Front panel
Selected input source
6CH INPUT
6CH INPUT
Remote control
Front panel
or
VOLUME
STANDBY
/ON
AUTO/MAN`L MONO MAN`L/AUTO FM
TUNING MODE MEMORY
EDIT
PRESET/TUNING FM/AM
SILENT
PHONES
SPEAKERS
AON
BOFF
EFFECT
PRESET/TUNING
SET MENU
A/B/C/D/E
NEXT
PROGRAM
STEREO
BASS/TREBLE
CONTROL
INPUT
6CH INPUTINPUT MODE
1
7
7
8
5
34 5
SYSTEM
POWER
STANDBY
POWER
AV
POWERTVPOWER
TV
ENTER
+10
09
STEREO
6.1/5.1
NIGHT
/DTS
8765
MOVIE2MOVIE1TV THTRMUSIC
432
1
ENTERTAINMENT
ROCKJAZZHALL
V-AUXVCRD-TV/CBLDVD
SLEEPTUNERMD/CD-RCD
TV
AMP
CODE SET
MUTE
INPUTMUTE
REC
6CH INPUT
AUDIO
DISC SKIP
VOLUME
+–+
–
+
–
CHVOL
7
8
5
1
5
V-AUXVCR
D-TV/CBL
DVD
MD/CD-R
TUNER CD
VOLUME
L R
DVD AUTO
V-AUXVCRD-TV/CBLDVD
SLEEPTUNERMD/CD-RCD
SPEAKERS
AON
BOFF
SPEAKERS
AON
BOFF
INPUT
Page 24
22
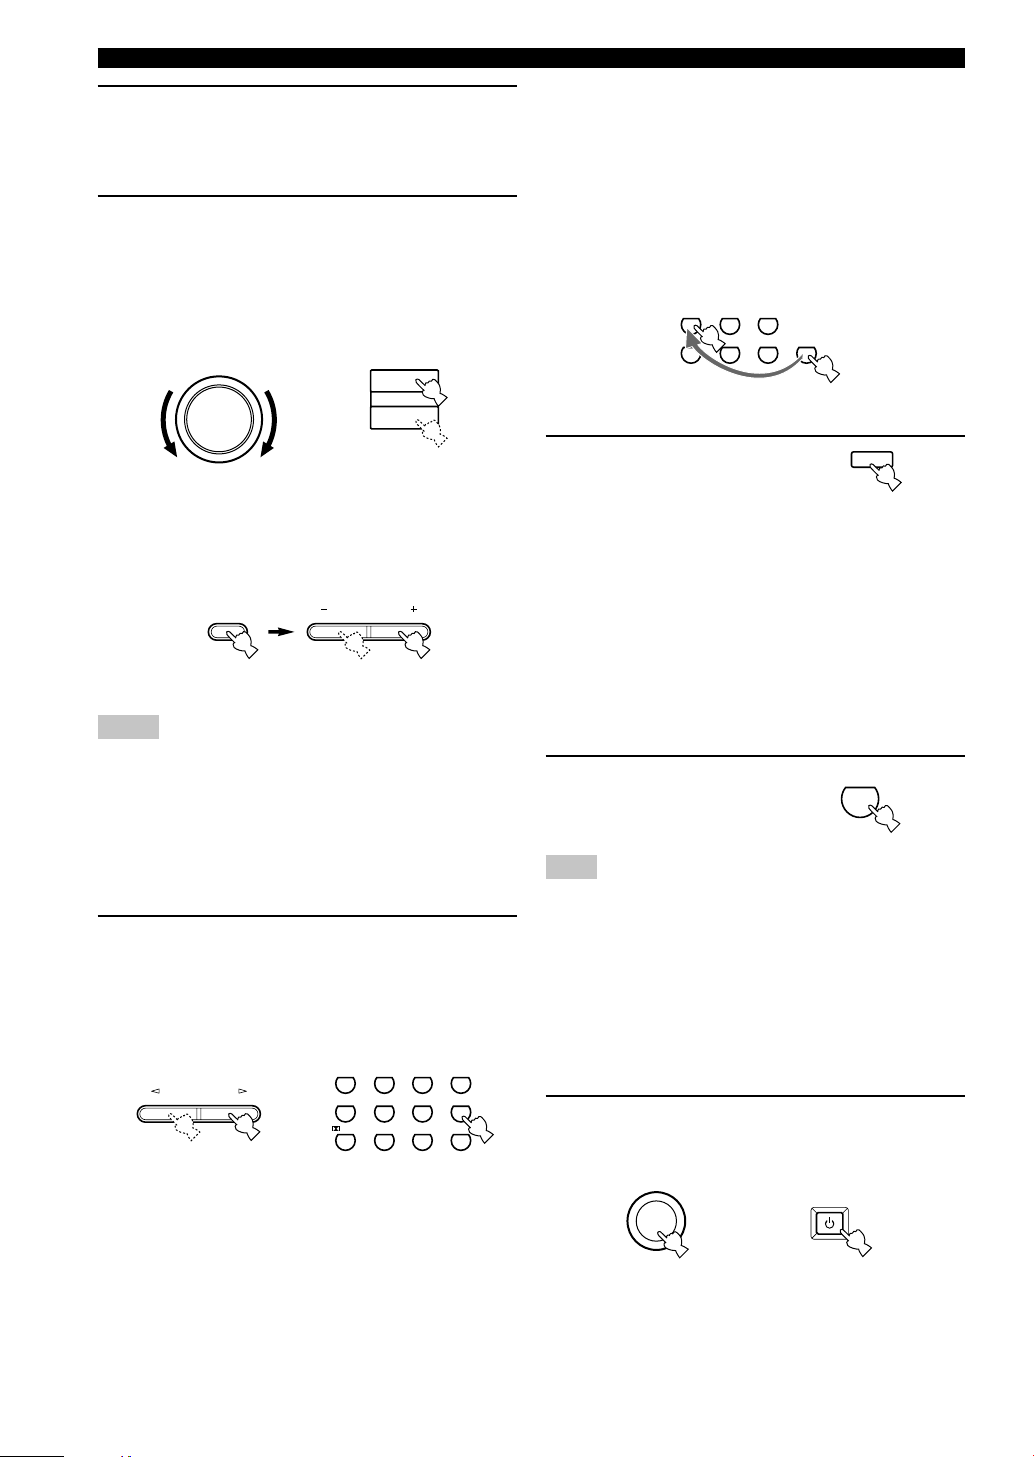
■ BGV (background video) function
The BGV function allows you to view images from a
video source together with sounds from an audio source.
For example, you can enjoy listening to classical music
while watching beautiful scenery from a video source on
the video monitor.
Select a source from the video group, then select a source
from the audio group using the input selector buttons on
the remote control.
■ To mute the sound
Press MUTE on the
remote control.
To resume audio output, press
MUTE again.
y
• You can change the amount by which the unit reduces the
volume in “OPTION 3 AUDIO MUTE” in the set menu.
• You can also cancel mute by pressing VOLUME +/–, etc.
• During muting, the MUTE indicator flashes on the front panel
display.
■ Night listening mode
This mode reproduces dialogue clearly while reducing the
volume of loud sound effects for easier listening at low
volumes or at night.
Press NIGHT on the
remote control.
Press NIGHT once more to
return to normal reproduction.
Note
• Setting the unit in standby mode cancels night listening mode.
y
• You can use night listening mode with any of the sound field
programs.
• The NIGHT indicator on the front panel display lights when
the unit is in night listening mode.
• Night listening mode may vary in effectiveness depending on
the input source and surround sound settings you use.
■ When you have finished using this unit
Press STANDBY/ON (STANDBY on the
remote control) to set this unit in standby
mode.
6 Start playback or select a broadcast station
on the source component.
Refer to the operation instructions for the
component.
7 Adjust the volume to the desired level.
The volume level is displayed digitally.
Example: –70 dB
Control range: VOLUME MUTE (minimum) to
0 dB (maximum)
The volume level indicator also shows the current
volume level as a bar graph.
If desired, use CONTROL and BASS/TREBLE –/+.
These controls only effect the sound from the main
speakers.
Notes
• If you increase or decrease the high-frequency or the lowfrequency sound to an extreme level, the tonal quality from the
center and rear speakers may not match that of the main left
and right speakers.
• If you have connected a recording component to the VCR
OUT, or MD/CD-R OUT jacks, and you notice distortion or
low volume during playback from other components, try
turning the recording component on.
8 Select a DSP program if desired.
Use PROGRAM l / h (DSP program buttons on
the remote control) to select a DSP program. See
pages 27 – 30 for details about DSP programs.
When using the remote control, press AMP before
selecting a DSP program.
VOLUME
Front panel
or
Remote control
or
Front panel Remote control
STANDBY
/ON
or
STANDBY
Front panel
Remote control
MUTE
VOLUME
+
–
PROGRAM
ENTER
+10
09
STEREO
6.1/5.1
NIGHT
/DTS
8765
MOVIE2MOVIE1TV THTRMUSIC
432
1
ENTERTAINMENT
ROCKJAZZHALL
V-AUXVCRD-TV/CBLDVD
SLEEPTUNERMD/CD-RCD
PLAYBACK
BASS/TREBLE
CONTROL
NIGHT
0
Front panel
Page 25
English
23
BASIC
OPERATION
Input modes and indications
This unit is equipped with 2 types of input jacks for the
CD and DVD sources only. You can select the type of
input signals you wish to use.
Each time you turn on the unit power, the input mode is
set to the “INPUT 2 INPUT MODE” setting defined in
the set menu.
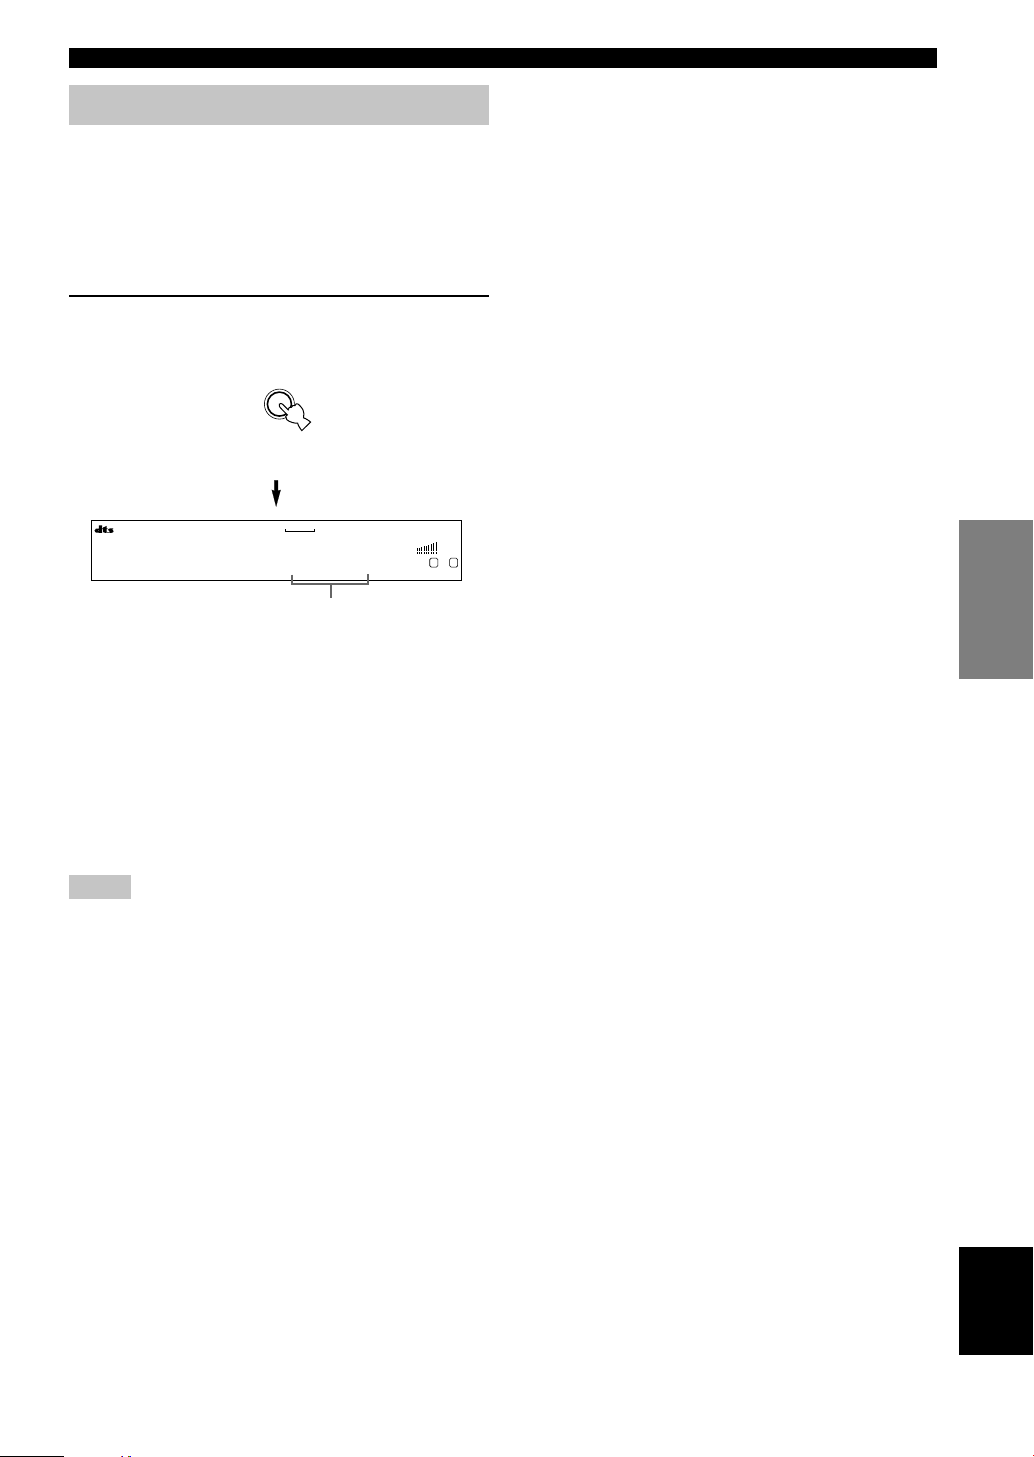
Press INPUT MODE repeatedly until the
desired input mode is shown on the front
panel display.
AUTO: In this mode, the input signal is selected
automatically as follows:
1) Digital signal
2) Analog signal
DTS: In this mode, only digital input signals
encoded with DTS are selected, even if the
unit is receiving another signal
simultaneously.
ANALOG: In this mode, only analog input signals are
selected, even the unit is receiving digital
signals at the same time.
Notes
• When AUTO is selected, this unit automatically determines
the type of signal. If it detects a Dolby Digital or DTS signal,
the decoder automatically switches to the appropriate setting.
• When playing a disc encoded with Dolby Digital or DTS on
some LD or DVD players, there is a delay in sound output for
a moment when playback resumes after a search, because the
unit must select the digital signal again.
• When playing a LD source that has not been digitally
recorded, the unit may not output any sound for some LD
players. In this case, set the input mode to ANALOG.
Front panel
Input mode
■ Notes on digital signals
The digital input jacks of this unit can handle 96 kHz
sampling digital signals. Note the following when a
digital signal with a sampling frequency greater than 48
kHz is input to this unit:
• You cannot use any DSP programs.
• The unit will output sound as 2-channel stereo from the
main left and right speakers only. Therefore, you
cannot adjust the level of the effect speakers while
listening to such a source.
■ Notes on playing DTS-CD/LDs
• If the digital output data of the player has been
processed in any way, the unit may not be able to
perform DTS decoding even if there is a digital
connection between this unit and the player.
• If you play a source encoded with a DTS signal and set
the input mode to ANALOG, the unit may reproduce
the noise of an unprocessed DTS signal. In this case,
connect the source to a digital input jack on this unit
and set the input mode to AUTO or DTS.
• If you switch the input mode to ANALOG while
playing a source encoded with a DTS signal, the unit
does not output any sound.
• If you play a source encoded with a DTS signal with
the input mode set to AUTO;
– The unit automatically switches to the DTS-
decoding mode (The “t” indicator lights up)
after detecting the DTS signal. When playback of
the DTS source is completed, the “t” indicator
may flash. While this indicator is flashing, the unit
can only reproduce DTS source. If you want to play
a normal PCM source immediately, change the input
mode back to AUTO.
– When the input mode is set to AUTO and a search
or skip operation is performed during playback of a
DTS source, the “t” indicator may flash. If this
state continues for longer than 30 seconds, the unit
will automatically switch from “DTS-decoding”
mode to PCM digital signal input mode. The “t”
indicator will turn off.
PLAYBACK
V-AUXVCR
D-TV/CBL
DVD
MD/CD-R
TUNER CD
VOLUME
L R
DVD AUTO
INPUT MODE
Page 26
24
Selecting a sound field program
You can enhance your listening experience by selecting a
DSP program. For details about each program, see pages
27 – 30.
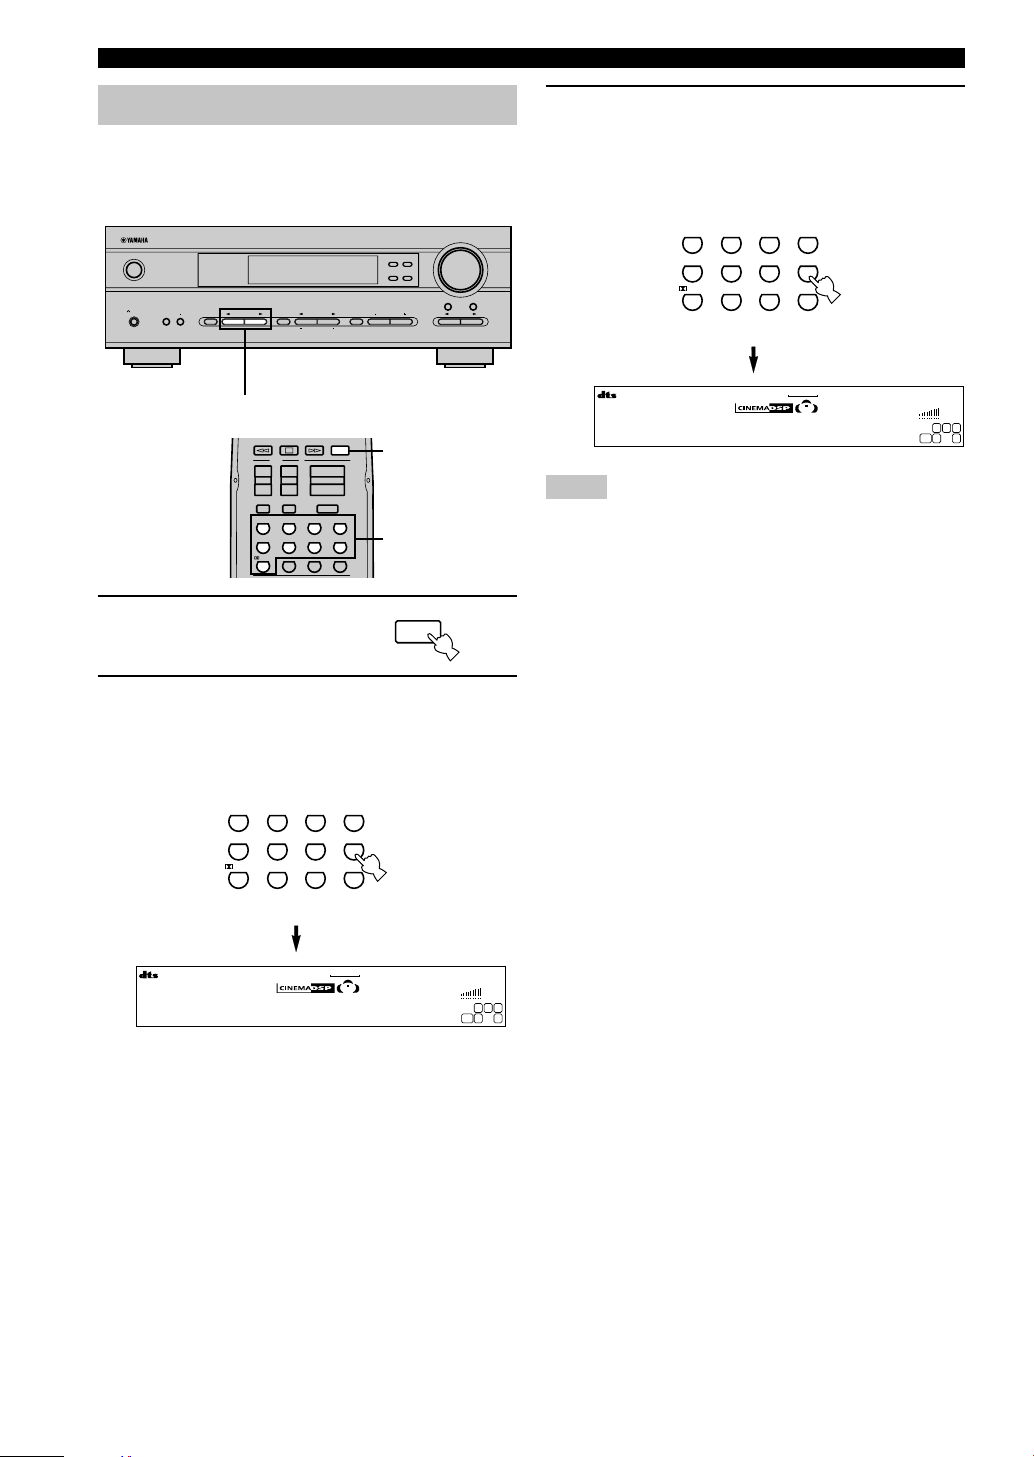
1 Press AMP.
2 Press one of the numeric buttons on the
remote control to select the desired
program.
The name of the selected program appears on the
front panel display.
AMP
3 After selecting the desired program, press
the same button repeatedly to cycle through
sub-programs if available.
Example: Pressing MOVIE 2 repeatedly
switches the sub-program between
“Adventure” and “General”.
Notes
• There are 9 programs with sub-programs available with this
unit. However, the selection depends on the input signal
format and not all sub-programs can be used with all input
signal formats.
• You cannot use the digital sound field processor with a source
connected to the 6CH INPUT jacks of this unit or when the
unit is reproducing a digital source with a sampling frequency
greater than 48 kHz.
• The acoustics of your listening room affect the DSP program.
Minimize the sound reflections in your room to maximize the
effect created by the program.
• When you select an input source, this unit automatically
selects the last DSP program used with that source.
• When you set this unit in standby mode, it stores the current
source and DSP program in memory and automatically selects
them when you turn on the power again.
• If the unit receives a Dolby Digital or DTS signal when the
input mode is set to AUTO, the DSP program (No. 7–9)
automatically switches to the appropriate decoding program.
• When the unit is reproducing a monaural source with PRO
LOGIC or PRO LOGIC/Enhanced, or PRO LOGIC II Movie,
no sound is output from the main and rear speakers. Sound can
only be heard from the center speaker. (If “1A CENTER” on
the set menu is set to NON, the center channel sound is output
from the main speakers.)
y
• You can also select DSP program by pressing PROGRAM
l / h on the front panel.
• Select a program based on your listening preference. Program
names are just for reference.
VOLUME
STANDBY
/ON
AUTO/MAN`L MONO MAN`L/AUTO FM
TUNING MODE MEMORY
EDIT
PRESET/TUNING FM/AM
SILENT
PHONES
SPEAKERS
AON
BOFF
EFFECT
PRESET/TUNING
SET MENU
A/B/C/D/E
NEXT
PROGRAM
STEREO
BASS/TREBLE
CONTROL
INPUT
6CH INPUTINPUT MODE
PROGRAM l / h
ENTER
+10
09
STEREO
6.1/5.1
NIGHT
/DTS
8765
MOVIE2MOVIE1TV THTRMUSIC
432
1
ENTERTAINMENT
ROCKJAZZHALL
TV
AMP
MUTE
INPUTMUTE
VOLUME
+–+
–
+
–
CHVOL
2,3
1
ENTER
+10
09
STEREO
6.1/5.1
NIGHT
/DTS
8765
MOVIE2MOVIE1TV THTRMUSIC
432
1
ENTERTAINMENT
ROCKJAZZHALL
ENTER
+10
09
STEREO
6.1/5.1
NIGHT
/DTS
8765
MOVIE2MOVIE1TV THTRMUSIC
432
1
ENTERTAINMENT
ROCKJAZZHALL
PLAYBACK
V-AUXVCR
D-TV/CBL
DVD
MD/CD-R
TUNER CD
VOLUME
L C R
RLLFE RR
Adventure
V-AUXVCR
D-TV/CBL
DVD
MD/CD-R
TUNER CD
VOLUME
L C R
RLLFE RR
General
Page 27
English
25
BASIC
OPERATION
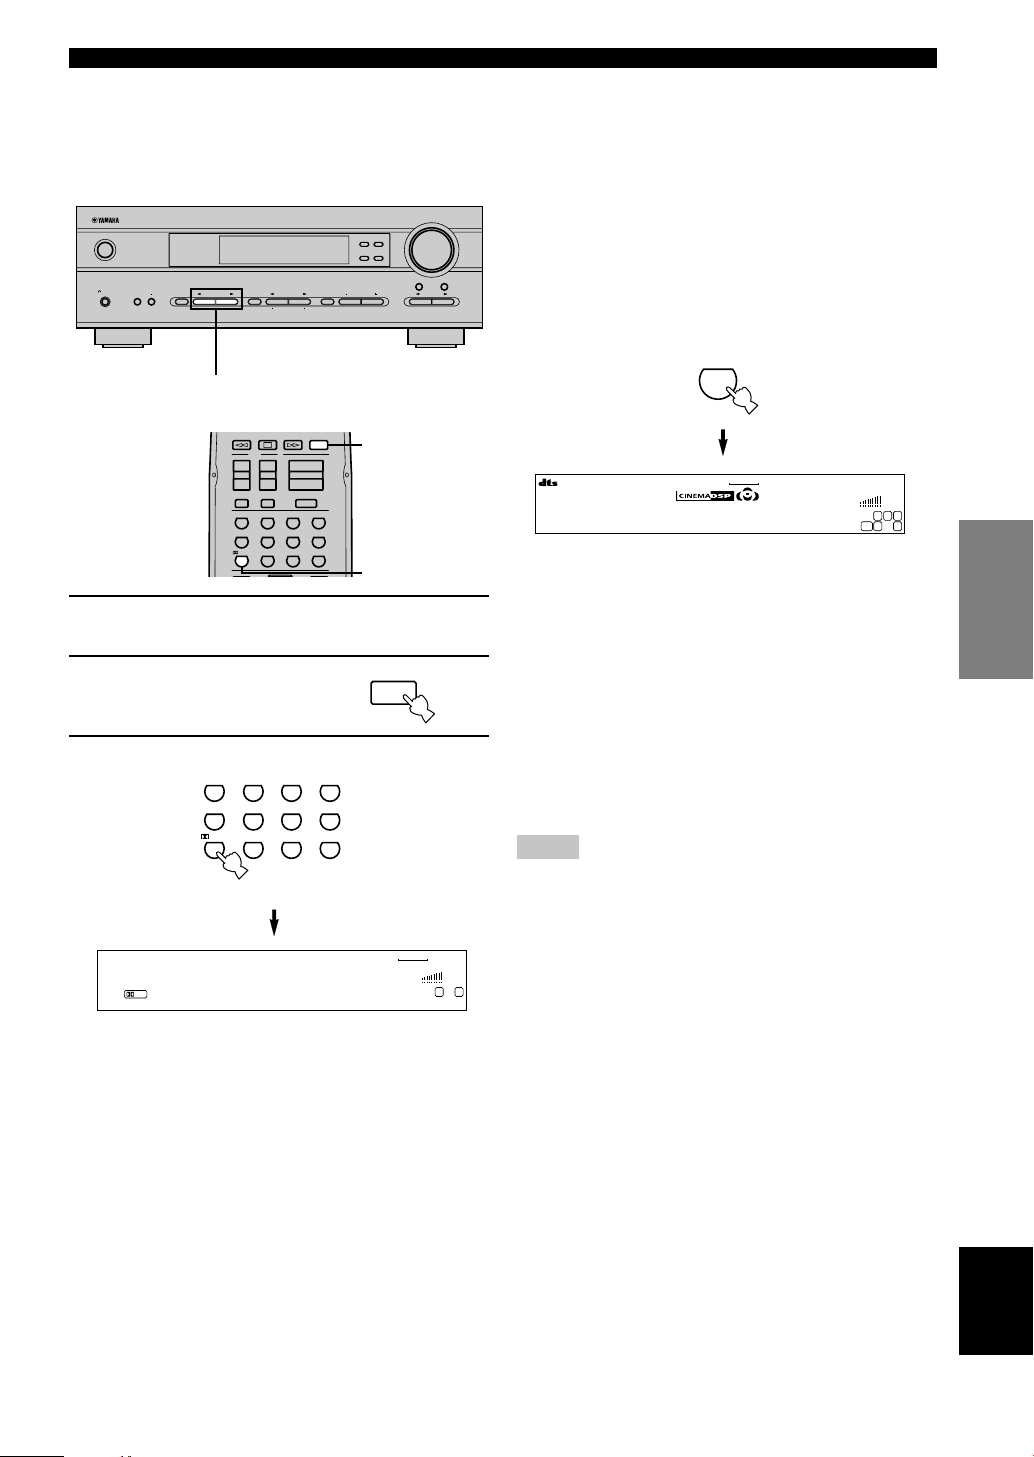
The display cycles as follows each time you press q/
DTS:
PRO LOGIC→PRO LOGIC Enhanced→PRO LOGIC II
Movie→PRO LOGIC II Music→PRO LOGIC→....
y
• You can select PRO LOGIC, PRO LOGIC Enhanced, PRO
LOGIC II Movie, and PRO LOGIC II Music by pressing
PROGRAM l / h on the front panel repeatedly.
■ Playing Dolby Digital EX or DTS ES
material
Press 6.1/5.1 to turn on the Dolby Digital + Matrix 6.1 or
DTS + Matrix 6.1 decoder.
The display changes AUTO → Matrix6.1 → OFF each
time 6.1/5.1 is pressed.
AUTO: This mode automatically switches Dolby
Digital + Matrix 6.1 and DTS + Matrix 6.1
depending on the signal. Virtual rear center
speaker does not work for 5.1 channel
sources.
Matrix 6.1: This setting produces 6-channel playback of
the input source using the Matrix 6.1
decoder. The virtual rear center speaker can
be used when playing a 5.1-channel source.
OFF: Virtual rear center speaker does not work in
this setting.
Notes
• Some 6.1-channel compatible discs do not have a signal (flag)
that this unit can automatically detect. Select “Matrix 6.1” to
play these kinds of discs with 6.1-channel sound.
• 6.1-channel playback is not possible even if you press 6.1/5.1
in the following cases:
1 When effects are turned off.
2 When the source connected to the 6CH INPUT jacks is
being played.
3 When the unit is reproducing a Dolby Digital KARAOKE
source.
4 When headphones are connected to the PHONES jack.
• The input mode resets to AUTO when you turn the unit power
off.
■ Selecting PRO LOGIC or PRO LOGIC II
You can listen to 2-channel sources decoded into five
discrete channels by selecting PRO LOGIC or PRO
LOGIC II in program No. 9.
1 Select a 2-channel source and start playback
on the source component.
2 Press AMP.
3 Press q/DTS.
AMP
VOLUME
STANDBY
/ON
AUTO/MAN`L MONO MAN`L/AUTO FM
TUNING MODE MEMORY
EDIT
PRESET/TUNING FM/AM
SILENT
PHONES
SPEAKERS
AON
BOFF
EFFECT
PRESET/TUNING
SET MENU
A/B/C/D/E
NEXT
PROGRAM
STEREO
BASS/TREBLE
CONTROL
INPUT
6CH INPUTINPUT MODE
PROGRAM l / h
ENTER
+10
09
STEREO
6.1/5.1
NIGHT
/DTS
8765
MOVIE2MOVIE1TV THTRMUSIC
432
1
ENTERTAINMENT
ROCKJAZZHALL
TV
AMP
MUTE
INPUTMUTE
VOLUME
+–+
–
+
–
CHVOL
SET MENU
LEVEL
3
2
ENTER
+10
09
STEREO
6.1/5.1
NIGHT
/DTS
8765
MOVIE2MOVIE1TV THTRMUSIC
432
1
ENTERTAINMENT
ROCKJAZZHALL
6.1/5.1
+10
(Example)
PLAYBACK
V-AUXVCR
D-TV/CBL
DVD
MD/CD-R
TUNER CD
MATRIX
VOLUME
L C R
RLLFE RR
Matrix 6.1
V-AUXVCR
D-TV/CBL
DVD
MD/CD-R
TUNER CD
PL
VOLUME
L R
PRO LOGIC
Page 28
26
Notes
• If you turn off the sound effects, no sound is output from the
center speaker or rear speakers.
• If you turn off the sound effects while the unit is reproducing
sound from a Dolby Digital or DTS signal, the dynamic range
of the signal is automatically compressed and the unit will mix
the sounds of the center and rear speaker channels and output
them from the main speakers.
• The volume may be greatly reduced when you turn off the
sound effects or if you set “SOUND 4 D. RANGE (dynamic
range)” on the set menu to MIN. In this case turn on the sound
effect.
y
• During stereo reproduction, you can display information such
as the type, format and sampling frequency of the signal input
from the components connected to this unit.
(While playing a source)
1 Press AMP.
2 Press d to display the information about the
input signal.
(Format): The display shows the signal format. When the
unit cannot detect a digital signal it
automatically switches to analog input.
in: The display shows the number of input signal
source channels, as follows: For multi-channel
soundtrack such as front 3 channels, rear 2
channels and LFE, the display shows “3/2/
LFE”.
fs: The display shows the sampling frequency.
When the unit is unable to detect the sampling
frequency “Unknown” shows in the front panel
display.
rate: The display shows the bit rate. When the unit is
unable to detect the bit rate “Unknown” shows
in the front panel display.
flg: The display shows the flag - data encoded in a
DTS or Dolby Digital signal that causes this
unit to automatically switch to the appropriate
decoder for playback.
■ Virtual CINEMA DSP
With Virtual CINEMA DSP, you can enjoy all DSP
programs without rear speakers. It creates virtual speakers
to reproduce a natural sound field.
You can listen to virtual CINEMA DSP by setting “1C
REAR LR” in the set menu to NON. Sound field
processing changes to VIRTUAL CINEMA DSP
automatically.
Note
• This unit is not set in the virtual CINEMA DSP mode even if
“1C REAR LR” is set to NON in the following cases:
– when the 5ch Stereo, DOLBY DIGITAL, Pro Logic, Pro
Logic II, or DTS program is selected;
– when the sound effect is turned off;
– when 6CH INPUT is selected as the input source;
– when a digital signal with a sampling frequency greater
than 48 kHz is input to this unit;
– when using the test tone; or
– when connecting the headphones.
■ SILENT CINEMA DSP
You can enjoy a powerful sound field similar to what you
could expect from actual speakers through headphones,
with SILENT CINEMA DSP. You can listen to SILENT
CINEMA DSP by connecting your headphones to the
PHONES jack while the digital sound field processor is
on. The “SILENT” indicator lights up on the front panel
display. (When sound effects are off, the unit reproduces
the source in normal stereo.)
To listen to sounds with headphones only, press
SPEAKERS ON/OFF to turn off the output of all the
speakers.
Notes
• This feature is not available when 6CH INPUT is selected or
the unit is receiving a digital signal with a sampling frequency
greater than 48 kHz.
• The sound from the LFE channel will be mixed and output
from the headphones.
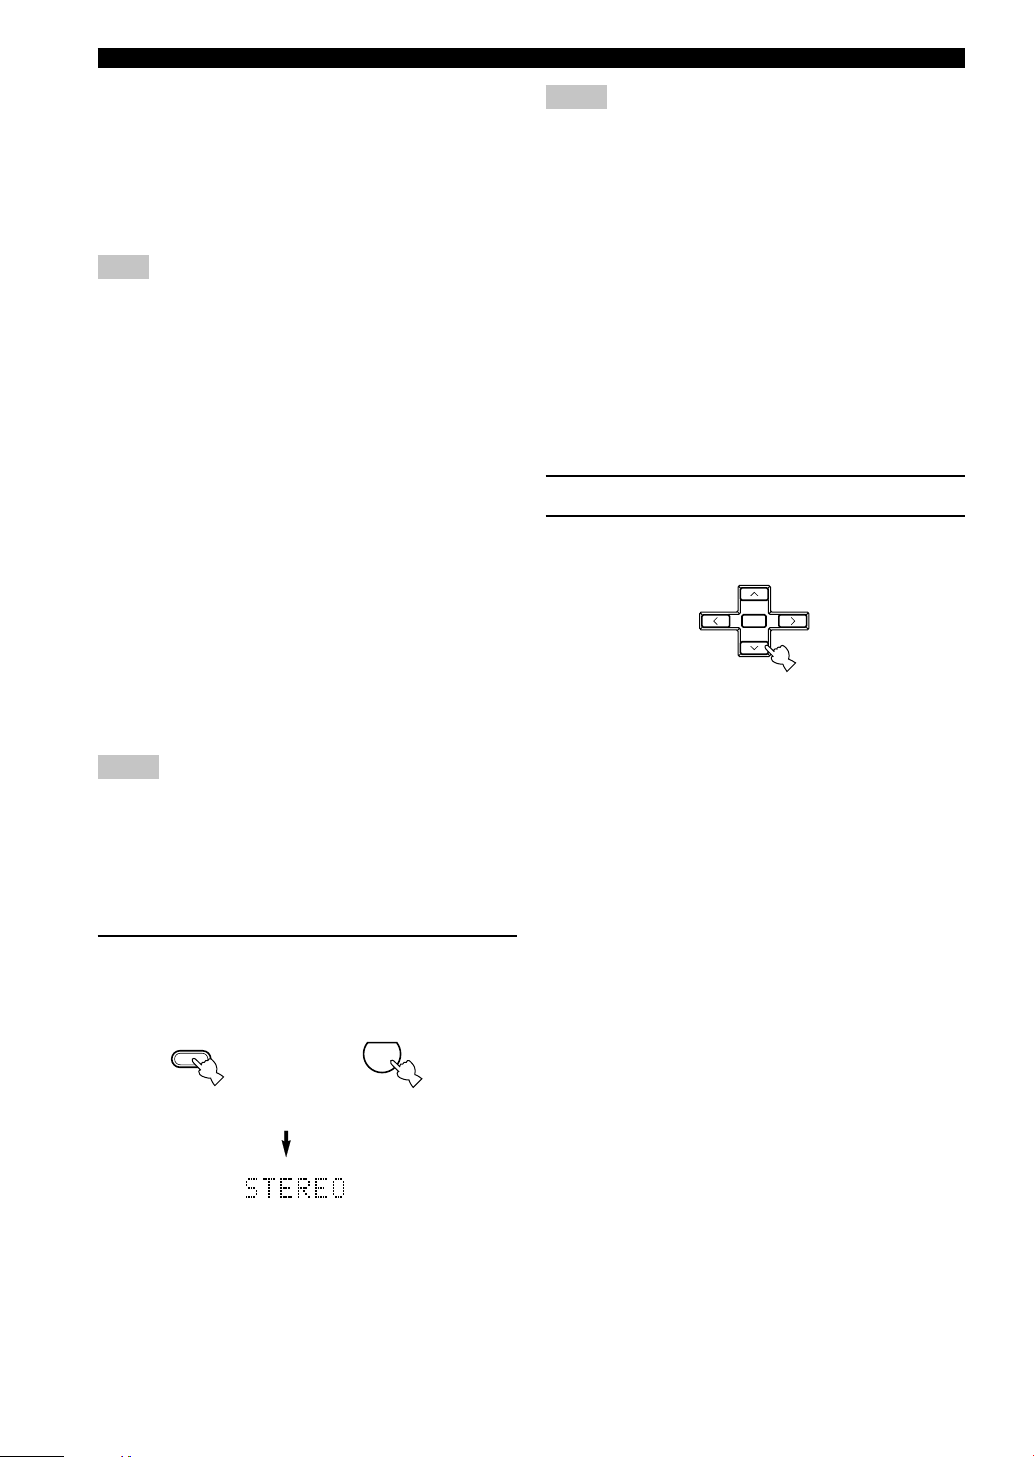
■ Normal stereo reproduction
Press STEREO to turn off the sound effect
for normal stereo reproduction.
Press STEREO again to turn the sound effect back
on.
STEREO
ENTER
Front panel
or
Remote control
SELECT
PRESET/CH
+
–
EFFECT
STEREO
PLAYBACK
Page 29
English
BASIC
OPERATION
27
DIGITAL SOUND FIELD PROCESSING (DSP)
Understanding sound fields
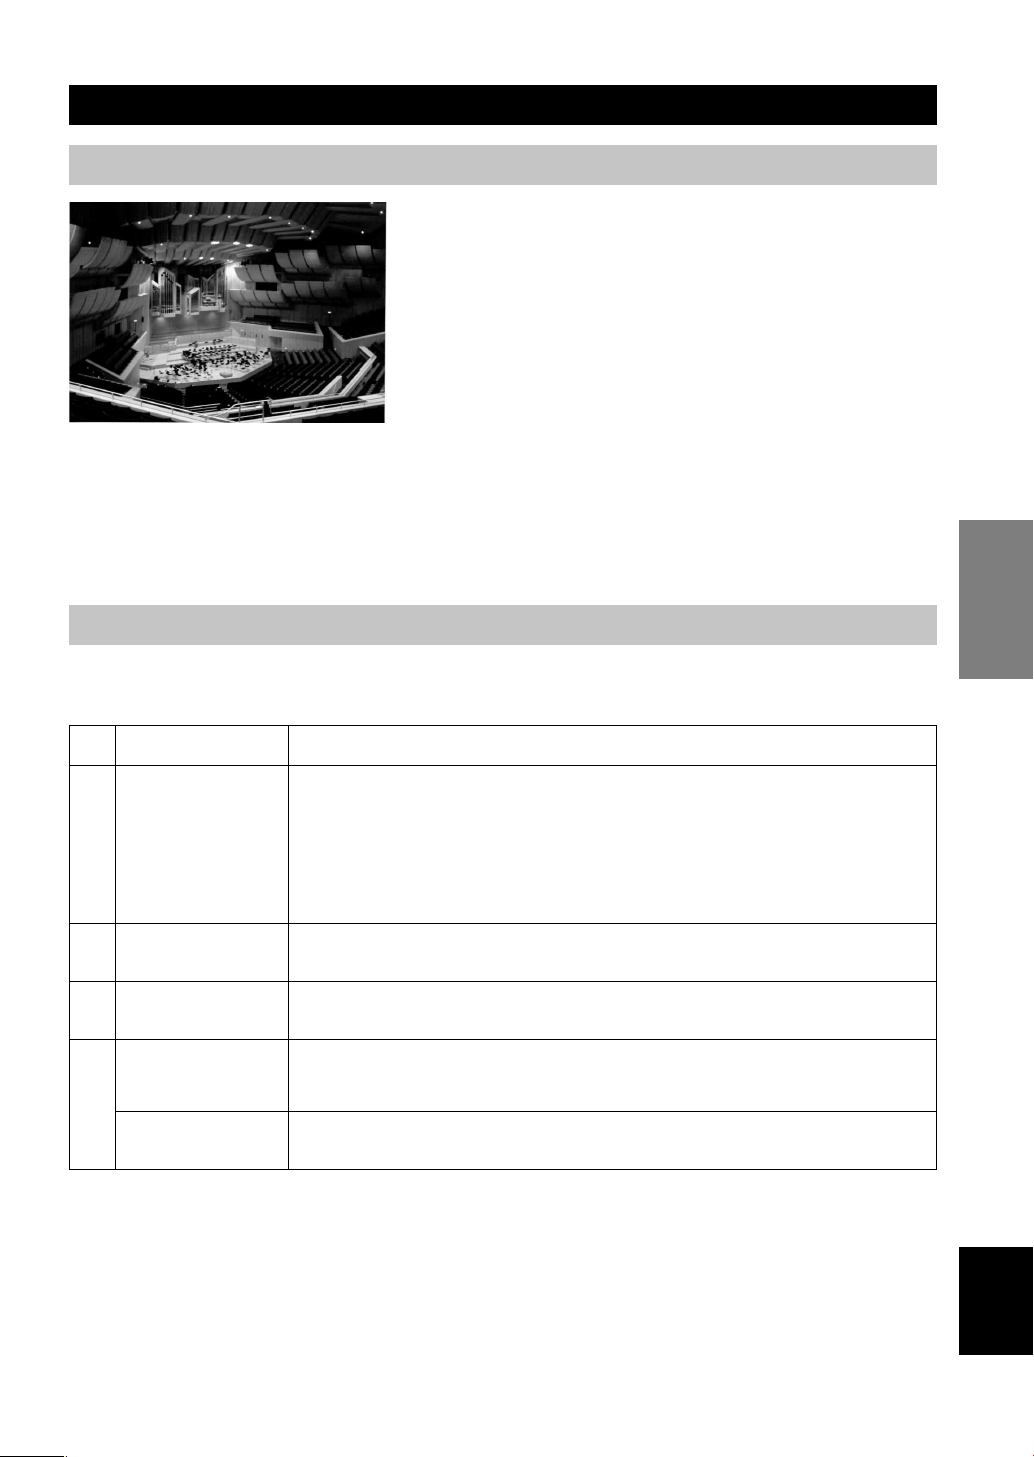
A sound field is defined as the “characteristic sound reflections of a
particular space.” In concert halls and other music venues, we hear
early reflections and reverberations as well as the direct sound
produced by the artist(s). The variations in the early reflections and
other reverberations among the different music venues is what gives
each venue its special and recognizable sound quality.
YAMAHA sent teams of sound engineers all around the world to
measure the sound reflections of famous concert halls and music
venues, and collect detailed sound field information such as the
direction, strength, range, and delay time of those reflections. Then
we stored this enormous amount of data in the ROM chips of this
unit.
■ Recreating a sound field
Recreating the sound field of a concert hall or an opera house requires localizing the virtual sound sources in your
listening room. The traditional stereo system that uses only two speakers is not capable of recreating a realistic sound
field. YAMAHA’s DSP requires four effect speakers to recreate sound fields based on the measured sound field data.
The processor controls the strength and delay time of the signals output from the four effect speakers to localize the
virtual sound sources and fully encompass the listener.
Hi-Fi DSP programs
The following list gives you a brief description of the sound fields produced by each of the DSP programs. Keep in
mind that most of these are precise digital recreations of actual acoustic environments.
No.
1
2
3
4
Program
CONCERT HALL
(except China
model)
HALL IN CHINA
(China model only)
JAZZ CLUB
ROCK CONCERT
ENTERTAINMENT/
Disco
ENTERTAINMENT/
5ch Stereo
Features
A large round concert hall with a rich surround effect. Pronounced reflections from all directions
emphasize the extension of sounds. The sound field has a great deal of presence, and your virtual
seat is near the center, close to the stage.
An large, extremely famous concert hall in China with approx. 650 seats on the first floor and
approx. 500 seats on the second floor. The clear sound field of this gorgeous and majestic hall is
suited especially for classic music. Your virtual seat is near the center on the first floor.
This is the sound field at stage front in “The Bottom Line”, a famous New York jazz club, that
seats up to 300 people. Its wide left to right seating arrangement offers a real and vibrant sound.
The ideal program for lively, dynamic rock music. The data for this program was recorded at LA’s
“hottest” rock club. The listener’s virtual seat is at the center-left of the hall.
This program recreates the acoustic environment of a lively disco in the heart of a big city. The
sound is dense and highly concentrated. It is also characterized by a high-energy, “immediate”
sound.
Using this program increases the listening position range. This is a sound field suitable for
background music at parties, etc.
Page 30
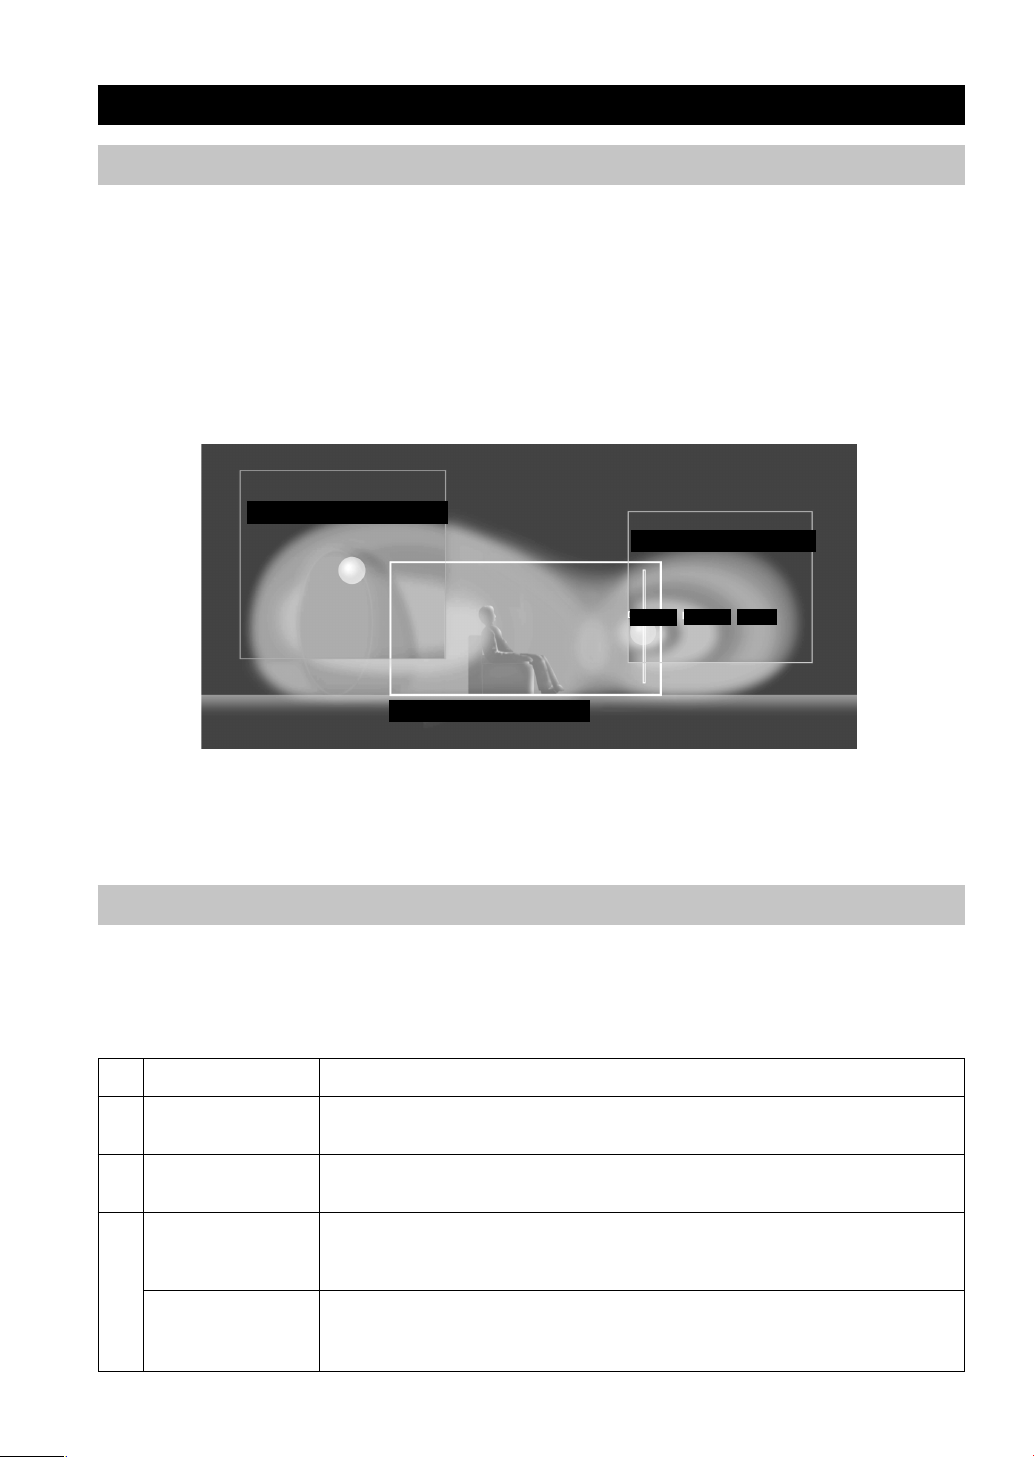
28
CINEMA-DSP
Sound design of CINEMA-DSP
Filmmakers intend for the dialog to be located right on the screen, the effect sound a little farther back, the music spread
even farther back, and the surround sound around the listener. Of course, all of these sounds must be synchronized with
the images on the screen.
CINEMA-DSP is an upgraded version of YAMAHA DSP specially designed for movie soundtracks. CINEMA-DSP
integrates the DTS, Dolby Digital, and Dolby Pro Logic surround sound technologies with YAMAHA DSP sound field
programs to provide a surround sound field. It recreates comprehensive movie sound design in your audio room. In
CINEMA-DSP sound field programs, YAMAHA’s exclusive DSP processing is added to the Main left and right, and
Center channels, so the listener can enjoy realistic dialogue, depth of sound, smooth transition between sound sources,
and a surround sound field that goes beyond the screen.
When a DTS or Dolby Digital signal is detected, the CINEMA-DSP sound field processor automatically chooses the
most suitable sound field program for that signal.
L SURROUND SOUND FIELD
R SURROUND SOUND FIELD
PRESENCE SOUND FIELD
DIALOG
EFFECT
MUSIC
In addition to the DSP, this unit is equipped with a variety of precise decoders; Dolby Pro Logic decoder for Dolby
Surround sources, Dolby Pro Logic II decoder for Dolby Surround and 2-channel sources, Dolby Digital/DTS decoder
for multi-channel sources and Dolby Digital + Matrix 6.1 or DTS + Matrix 6.1 decoder for adding a rear center channel
(the rear center channel is outputted from virtual rear center speaker). You can select CINEMA-DSP programs to
optimize these decoders and the DSP sound patterns depending on the input source.
CINEMA-DSP Programs
The following list gives you a brief description of the sound fields produced by each of the DSP programs. Keep in
mind that most of these are precise digital recreations of actual acoustic environments. Select the DSP program that you
feel sounds best regardless of the name and description given for it below.
■ For audio-video sources: No. 4 to 6
No.
4
5
6
Program
ENTERTAINMENT/
Game
MUSIC VIDEO
TV THEATER/
Mono Movie
TV THEATER/Variety/
Sports
Features
This program adds a deep and spatial feeling to video game sounds.
This program lends an enthusiastic atmosphere to the sound, giving you the feeling you are at an
actual jazz or rock concert.
This program is provided for reproducing monaural video sources (such as old movies). The
program produces the optimum reverberation to create sound depth using only the presence sound
field.
Though the presence sound field is relatively narrow, the surround sound field employs the sound
environment of a large concert hall. This effect enhances the experience of watching various TV
programs such as news, variety shows, music programs or sports programs.
Page 31
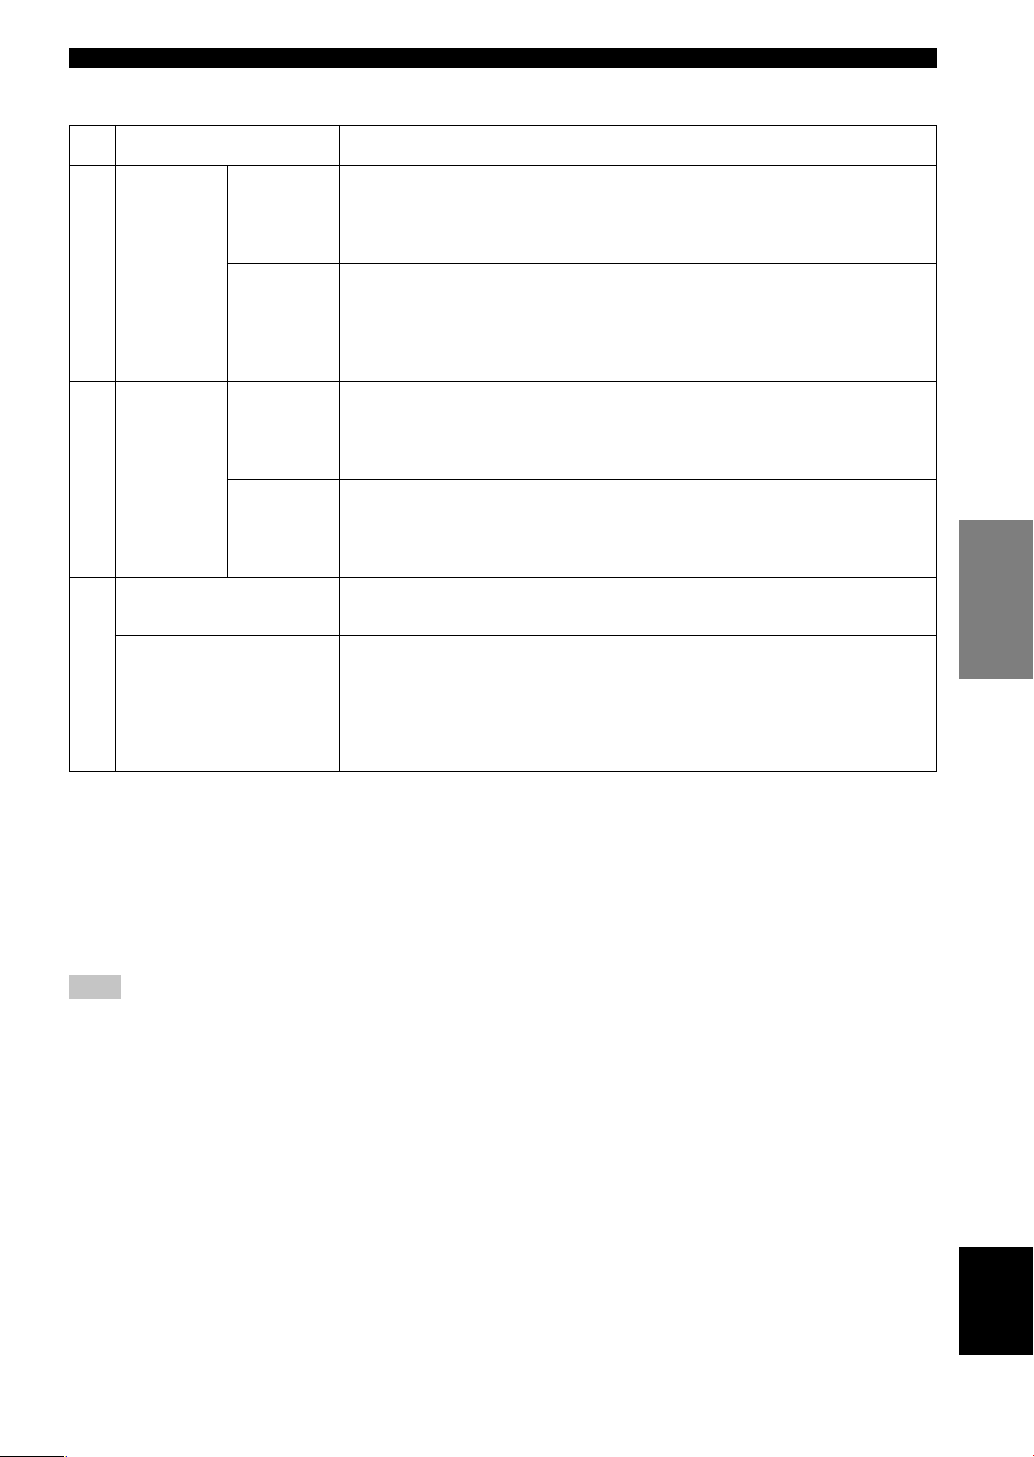
English
BASIC
OPERATION
29
■ For movie programs
No.
7
8
9
Features
This program creates the extremely wide sound field of a 70-mm movie theater. It
precisely reproduces the source sound in detail, making both the video and the sound field
incredibly real. This is ideal for any kind of video source encoded with Dolby Surround,
Dolby Digital or DTS (especially large-scale movie productions).
This program clearly reproduces dialog and sound effects in the latest sound form of
science fiction films, thus creating a broad and expansive cinematic space amid the
silence. You can enjoy science fiction films in a virtual-space sound field that includes
Dolby Surround, Dolby Digital and DTS-encoded software employing the most advanced
techniques.
This program is ideal for precisely reproducing the sound design of the newest 70-mm and
multichannel soundtrack films. The sound field is made to be similar to that of the newest
movie theaters, so the reverberations of the sound field itself are restrained as much as
possible.
This program is for reproducing sounds from 70-mm and multichannel soundtrack films,
and is characterized by a soft and extensive sound field. The presence sound field is
relatively narrow. It spatially spreads all around and toward the screen, restraining the
echo effect of conversations without losing clarity.
The built-in decoder reproduces source sounds and sound-effects precisely.
No DSP effect is applied in this program.
This program ideally simulates the multi-surround speaker systems of the 35-mm film
theaters. Dolby Pro Logic decoding, Dolby Digital decoding or DTS decoding and digital
sound field processing create precise effects without altering the original sound orientation.
The surround effects produced by this sound field wrap around the viewer naturally from
the back to the left and right, and toward the screen.
MOVIE
THEATER 1
MOVIE
THEATER 2
Spectacle
Sci-Fi
Adventure
General
Program
Straight Decode
Enhanced Mode
CINEMA-DSP
Straight Decode
This unit is equipped with various precise decoders;
• Dolby Digital/DTS decoder for multi-channel reproduction of the original sound
• Dolby Pro Logic/Pro Logic II decoder for multi-channel reproduction of 2-channel sources
Select any of the Straight Decode modes in Program 9 (except for the sub-program “Enhanced”) to use any of these
decoders for reproducing the original sound without any sound effects added. In this case, no DSP effect is applied and
the DSP indicator turns off.
Note
• When playing a monaural source with a CINEMA DSP program, the source signal is directed to the center channel, and the main
and rear speakers output effect sounds.
Page 32

30
Sound field effects
The 6-channel soundtracks found on 70-mm film produce precise sound field localization and rich, deep sound without
using matrix processing. This unit’s MOVIE THEATER programs provide the same quality of sound and sound
localization that 6-channel soundtracks do. The built-in Dolby Digital or DTS decoder brings the professional-quality
sound designed for movie theaters into your home. With this unit’s MOVIE THEATER programs, you can use Dolby
Digital or DTS technology to recreate a dynamic sound that gives you the feeling of being in a public theater.
■ Dolby Digital/DTS + DSP sound field effect
These programs use YAMAHA’s tri-field DSP processing
on each of the Dolby Digital or DTS signals for the front,
left surround, and right surround channels. This
processing enables this unit to reproduce the immense
sound field and surround expression of a Dolby Digitalor DTS-equipped movie theater without sacrificing the
clear separation of all channels.
■ Dolby Digital/DTS + Matrix 6.1 + DSP sound field effect
These programs provide you with the maximum experience of the spacious surround effects by adding an extra rear
center DSP sound field created from the virtual rear center speaker.
■ Dolby Pro Logic + DSP sound field effect
Most movie material has 4-channel (left, center, right, and
surround) sound information encoded by Dolby Surround
matrix processing and stored on the left and right tracks.
These signals are processed by the Dolby Pro Logic
decoder. The MOVIE THEATER programs are designed
to recreate the spaciousness and delicate nuances of
sound that tend to be lost in the encoding and decoding
processes.
■ Dolby Pro Logic II
Dolby Pro Logic II decodes Dolby Surround software into 5 discrete full-range channels (3 channels in front and 2
channels in rear). There are 2 modes; MOVIE for movies and MUSIC for 2-channel audio sources.
Surround DSP
sound field
Right surround DSP
sound field
Presence DSP
sound field
Left surround DSP
sound field
Presence DSP
sound field
CINEMA-DSP
Page 33
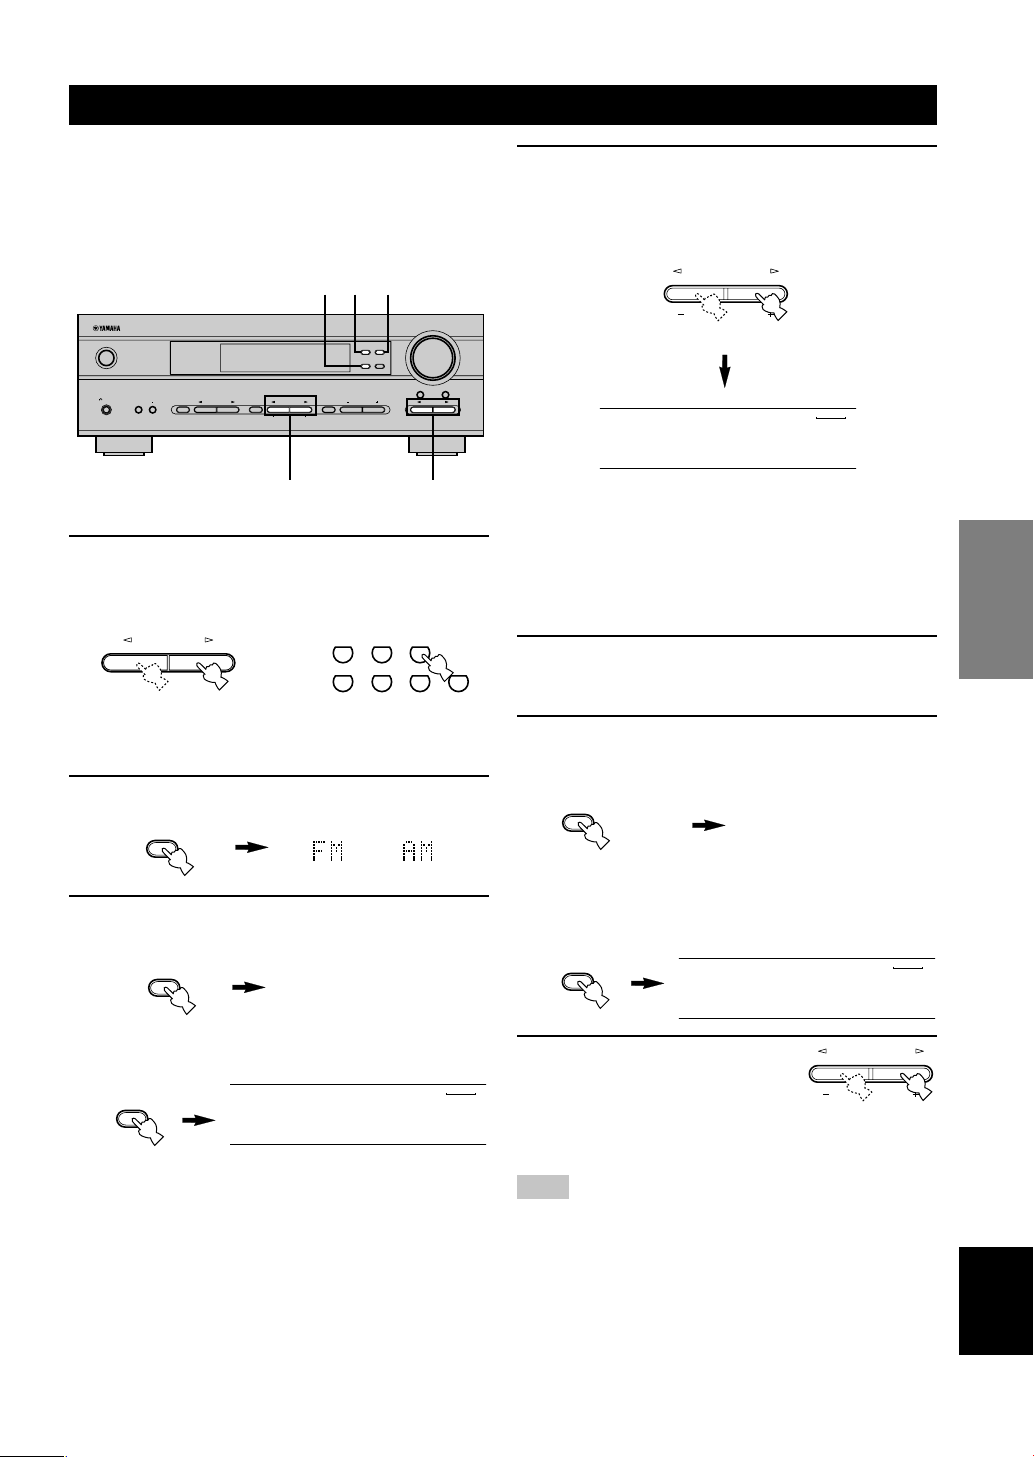
English
BASIC
OPERATION
31
TUNING
4 Press PRESET/TUNING l / h once to begin
automatic tuning.
Press h to tune in to a higher frequency, or press l
to tune in to a lower frequency.
When the unit is tuned in to a station, the “TUNED”
indicator lights up and the frequency of the station
received is shown on the front panel display.
■ Manual tuning
If the signal from the station you are trying to select is
weak, you must tune in to it manually.
1 Select TUNER and the reception band
following steps 1 and 2 described in
“Automatic tuning” at left.
2 Press TUNING MODE (AUTO/MAN’L MONO)
until the “AUTO” indicator disappears from
the front panel display.
If the colon (:) appears on the front panel display,
press PRESET/TUNING (EDIT) to turn it off.
3 Press PRESET/TUNING
l / h to tune in to the
desired station manually.
Hold down the button to
continue searching.
Note
• Manually tuning in to an FM station will automatically change
the reception mode to monaural to increase the signal quality.
There are 2 methods of tuning; automatic and manual.
Automatic tuning is effective when station signals are
strong and there is no interference.
■ Automatic tuning
1 Press INPUT l / h (TUNER on the remote
control) to select TUNER as the input source.
2 Press FM/AM to select the reception band.
“FM” or “AM” appears on the front panel display.
3 Press TUNING MODE (AUTO/MAN’L MONO)
so that the “AUTO” indicator lights up on the
front panel display.
If the colon (:) appears on the front panel display,
press PRESET/TUNING (EDIT) to turn it off.
or
Lights up
or
Front panel Remote control
Disappears
VOLUME
STANDBY
/ON
AUTO/MAN`L MONO MAN`L/AUTO FM
TUNING MODE MEMORY
EDIT
PRESET/TUNING FM/AM
SILENT
PHONES
SPEAKERS
AON
BOFF
EFFECT
PRESET/TUNING
SET MENU
A/B/C/D/E
NEXT
PROGRAM
STEREO
BASS/TREBLE
CONTROL
INPUT
6CH INPUTINPUT MODE
233
4
1
V-AUXVCRD-TV/CBLDVD
SLEEPTUNERMD/CD-RCD
FM/AM
AUTO/MANUAL MONO
TUNING MODE
AUTO
EDIT
PRESET/TUNING
V-AUXVCR
D-TV/CBL
DVD
MD/CD-R
TUNER
AUTO
TUNED
A AM 1440 kHz
PRESET/TUNING
SET MENU
V-AUXVCR
D-TV/CBL
DVD
MD/CD-R
TUNER
AUTO
TUNED
A AM 1530 kHz
AUTO/MANUAL MONO
TUNING MODE
AUTO
EDIT
PRESET/TUNING
V-AUXVCR
D-TV/CBL
DVD
MD/CD-R
TUNER
TUNED
A AM 1440 kHz
PRESET/TUNING
SET MENU
INPUT
Page 34
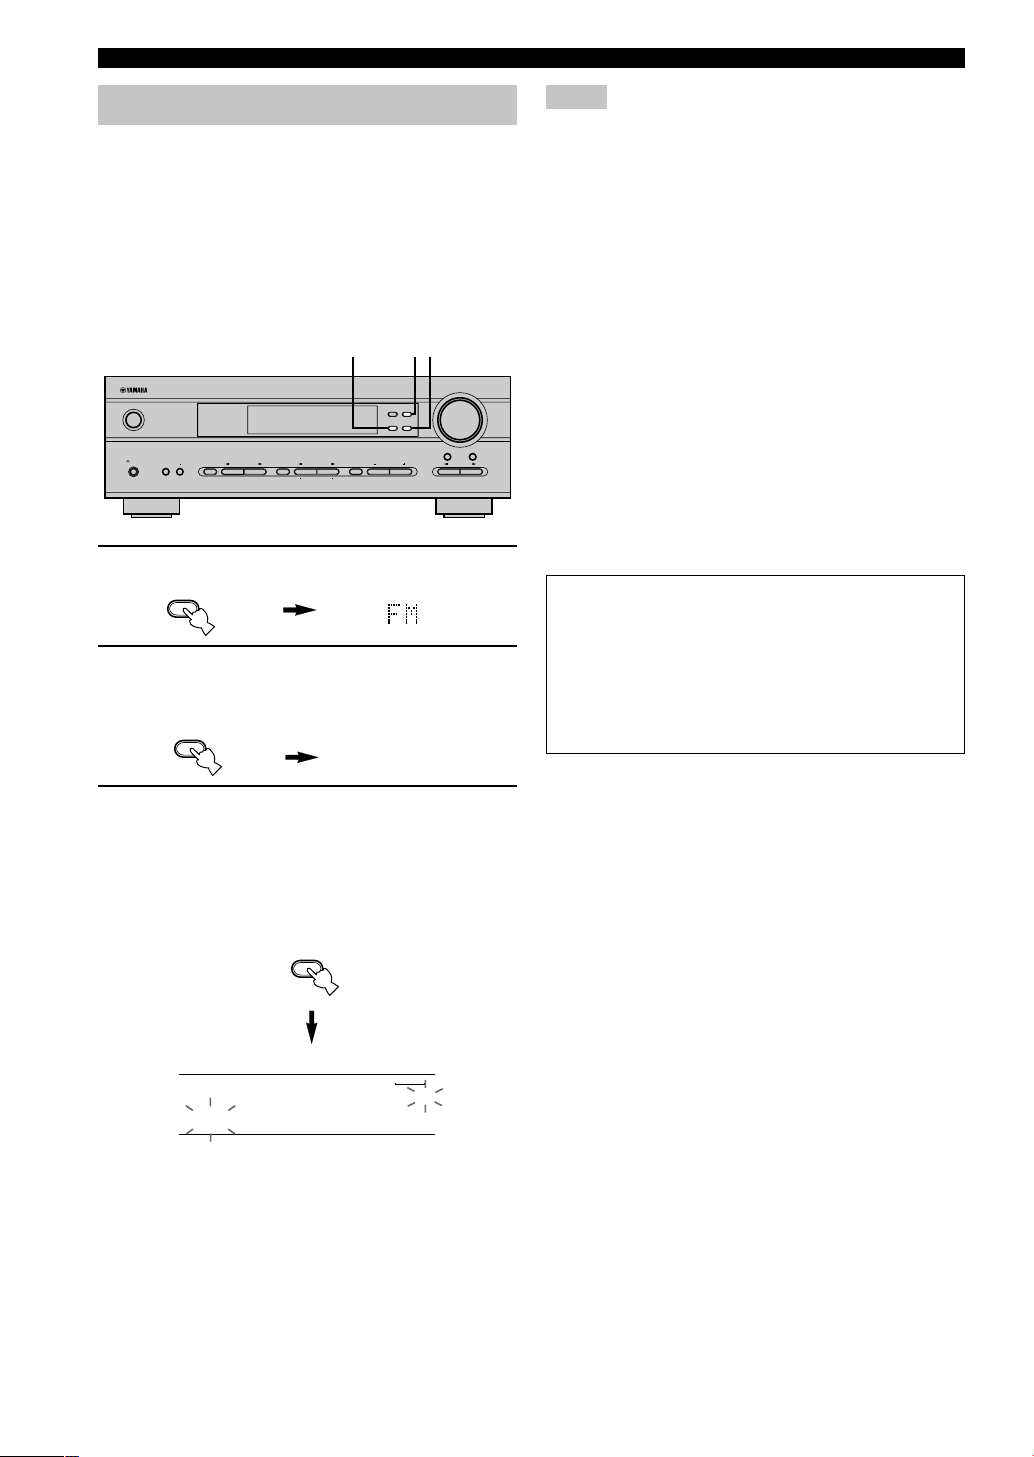
32
Presetting stations
■ Automatically presetting stations (for FM
stations)
You can use the automatic preset tuning feature to store
FM stations. This function enables the unit to
automatically tune in to FM stations with strong signals,
and to store up to 40 (8 stations x 5 groups) of those
stations in order. You can then recall any preset station
easily by selecting the preset number.
1 Press FM/AM to select the FM band.
2 Press TUNING MODE (AUTO/MAN’L MONO)
until the “AUTO” indicator lights up on the
front panel display.
3 Press and hold MEMORY (MAN’L/AUTO FM)
for at least 3 seconds.
The preset number and the “MEMORY” and
“AUTO” indicators flash. After about 5 seconds,
automatic preset tuning starts, beginning at the
frequency currently displayed and moving toward the
higher frequencies.
When automatic preset tuning is completed, the front
panel display shows the frequency of the last preset
station.
AUTO
Lights up
Notes
• Any stored station data existing under a preset number is
cleared when you store a new station under that preset number.
• If the number of the received stations does not reach E8,
automatic preset tuning has automatically stopped after
searching all stations.
• Only FM stations with sufficient signal strength are stored
automatically by automatic preset tuning. If the station you
want to store is weak in signal strength, tune in to it manually
in the monaural mode, and store it by following the procedure
described in “Manually presetting stations” on page 33.
Automatic preset tuning options
You can select the preset number from which this unit
will store FM stations and/or begin tuning toward lower
frequencies. After pressing MEMORY in step 3:
1. Press A/B/C/D/E and PRESET/TUNING l / h to
select the preset number under which the first station
will be stored. Automatic preset tuning will stop when
stations have all been stored up to E8.
2. Press PRESET/TUNING (EDIT) to turn off the colon
(:) and then press PRESET/TUNING l to begin
tuning toward lower frequencies.
Memory back-up
The memory back-up circuit prevents the stored data
from being lost even if this unit is set in standby mode,
the power cord is disconnected from the AC outlet, or
the power supply is temporarily cut due to power
failure. However, if the power is cut for more than one
week, the preset stations may be cleared. If so, store
the stations again.
TUNING
VOLUME
STANDBY
/ON
AUTO/MAN`L MONO MAN`L/AUTO FM
TUNING MODE MEMORY
EDIT
PRESET/TUNING FM/AM
SILENT
PHONES
SPEAKERS
AON
BOFF
EFFECT
PRESET/TUNING
SET MENU
A/B/C/D/E
NEXT
PROGRAM
STEREO
BASS/TREBLE
CONTROL
INPUT
6CH INPUTINPUT MODE
1 32
FM/AM
AUTO/MANUAL MONO
TUNING MODE
MAN`L/AUTO FM
MEMORY
V-AUXVCR
D-TV/CBL
DVD
MD/CD-R
TUNER
AUTO
MEMORY
A1:FM 89.9 MHz
Page 35
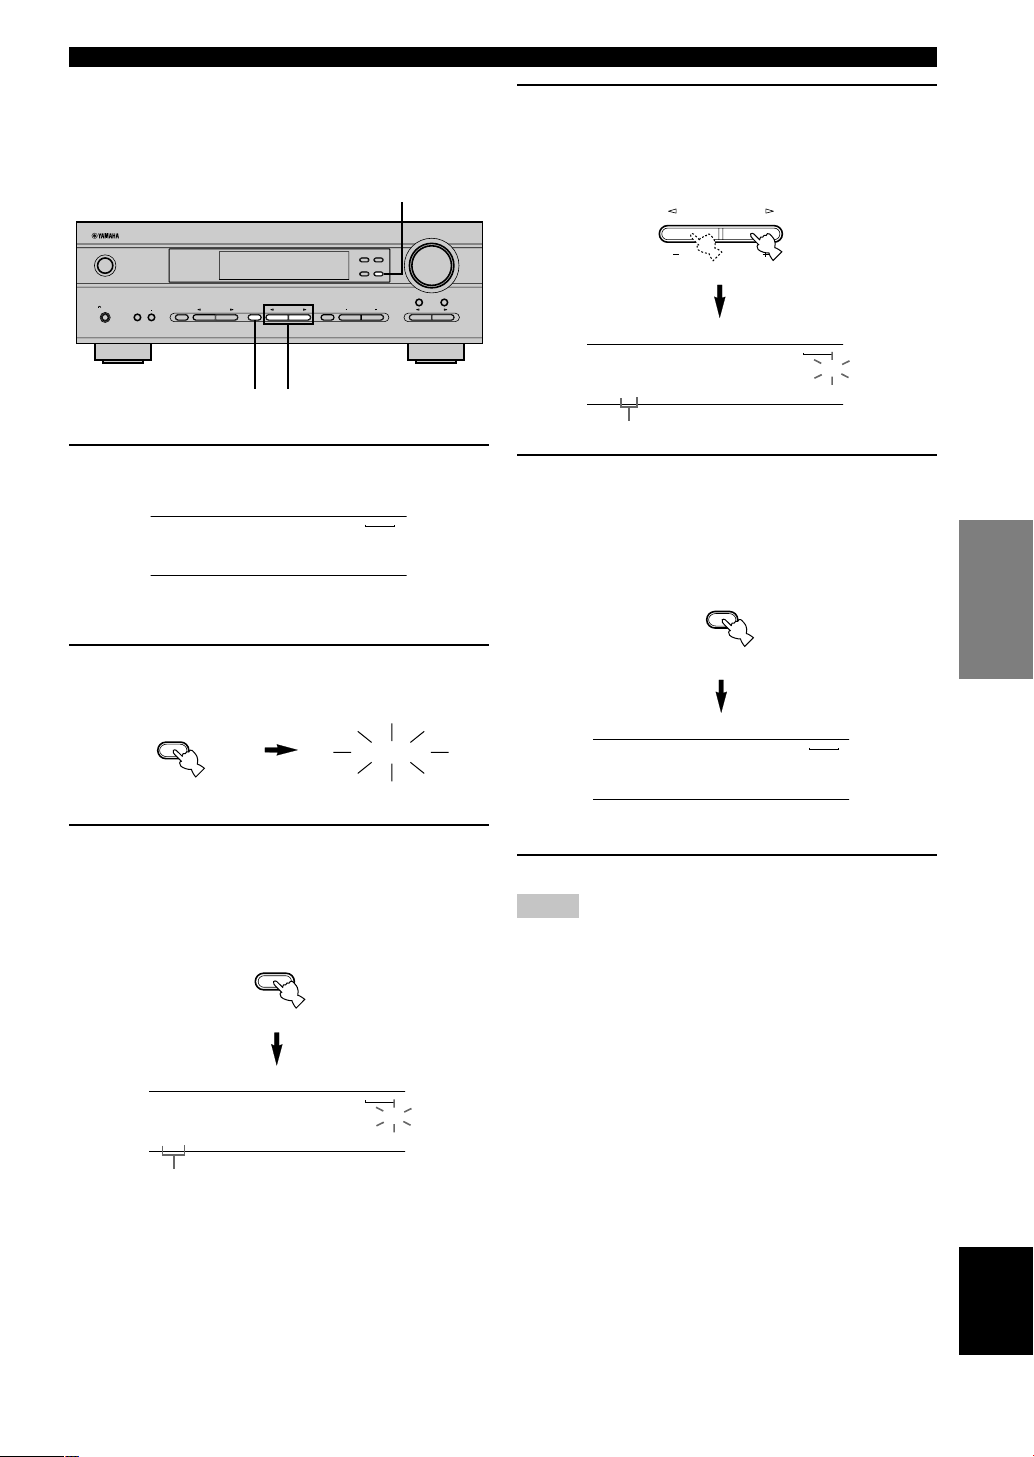
English
BASIC
OPERATION
33
4 Press PRESET/TUNING l / h to select a
preset station number (1 to 8) while the
“MEMORY” indicator is flashing.
Press h to select a higher preset station number.
Press l to select a lower preset station number.
5 Press MEMORY (MAN’L/AUTO FM) on the
front panel while the “MEMORY” indicator is
flashing.
The station band and frequency appear on the front
panel display with the preset group and number you
have selected.
Shows the displayed station has been stored as C3.
6 Repeat steps 1 to 5 to store other stations.
Notes
• Any stored station data existing under a preset number is
cleared when you store a new station under that preset number.
• The reception mode (stereo or monaural) is stored along with
the station frequency.
■ Manually presetting stations
You can store up to 40 stations (8 stations x 5 groups)
manually.
1 Tune in to a station.
See page 31 for tuning instructions.
When tuned to a station, the front panel display
shows the frequency of the station received.
2 Press MEMORY (MAN’L/AUTO FM).
The “MEMORY” indicator flashes for about
5 seconds.
3 Press A/B/C/D/E repeatedly to select a preset
station group (A to E) while the “MEMORY”
indicator is flashing.
The group letter appears. Check that the colon (:) is
showing on the front panel display.
Flashes
TUNING
Preset group
Preset number
VOLUME
STANDBY
/ON
AUTO/MAN`L MONO MAN`L/AUTO FM
TUNING MODE MEMORY
EDIT
PRESET/TUNING FM/AM
SILENT
PHONES
SPEAKERS
AON
BOFF
EFFECT
PRESET/TUNING
SET MENU
A/B/C/D/E
NEXT
PROGRAM
STEREO
BASS/TREBLE
CONTROL
INPUT
6CH INPUTINPUT MODE
2,5
43
V-AUXVCR
D-TV/CBL
DVD
MD/CD-R
TUNER
TUNED
A AM 1440 kHz
MAN`L/AUTO FM
MEMORY
MEMORY
A/B/C/D/E
NEXT
V-AUXVCR
D-TV/CBL
DVD
MD/CD-R
TUNER
MEMORYTUNED
C :AM 1440 kHz
PRESET/TUNING
SET MENU
V-AUXVCR
D-TV/CBL
DVD
MD/CD-R
TUNER
MEMORYTUNED
C3:AM 1440 kHz
V-AUXVCR
D-TV/CBL
DVD
MD/CD-R
TUNER
TUNED
C3:AM 1440 kHz
MAN`L/AUTO FM
MEMORY
Page 36
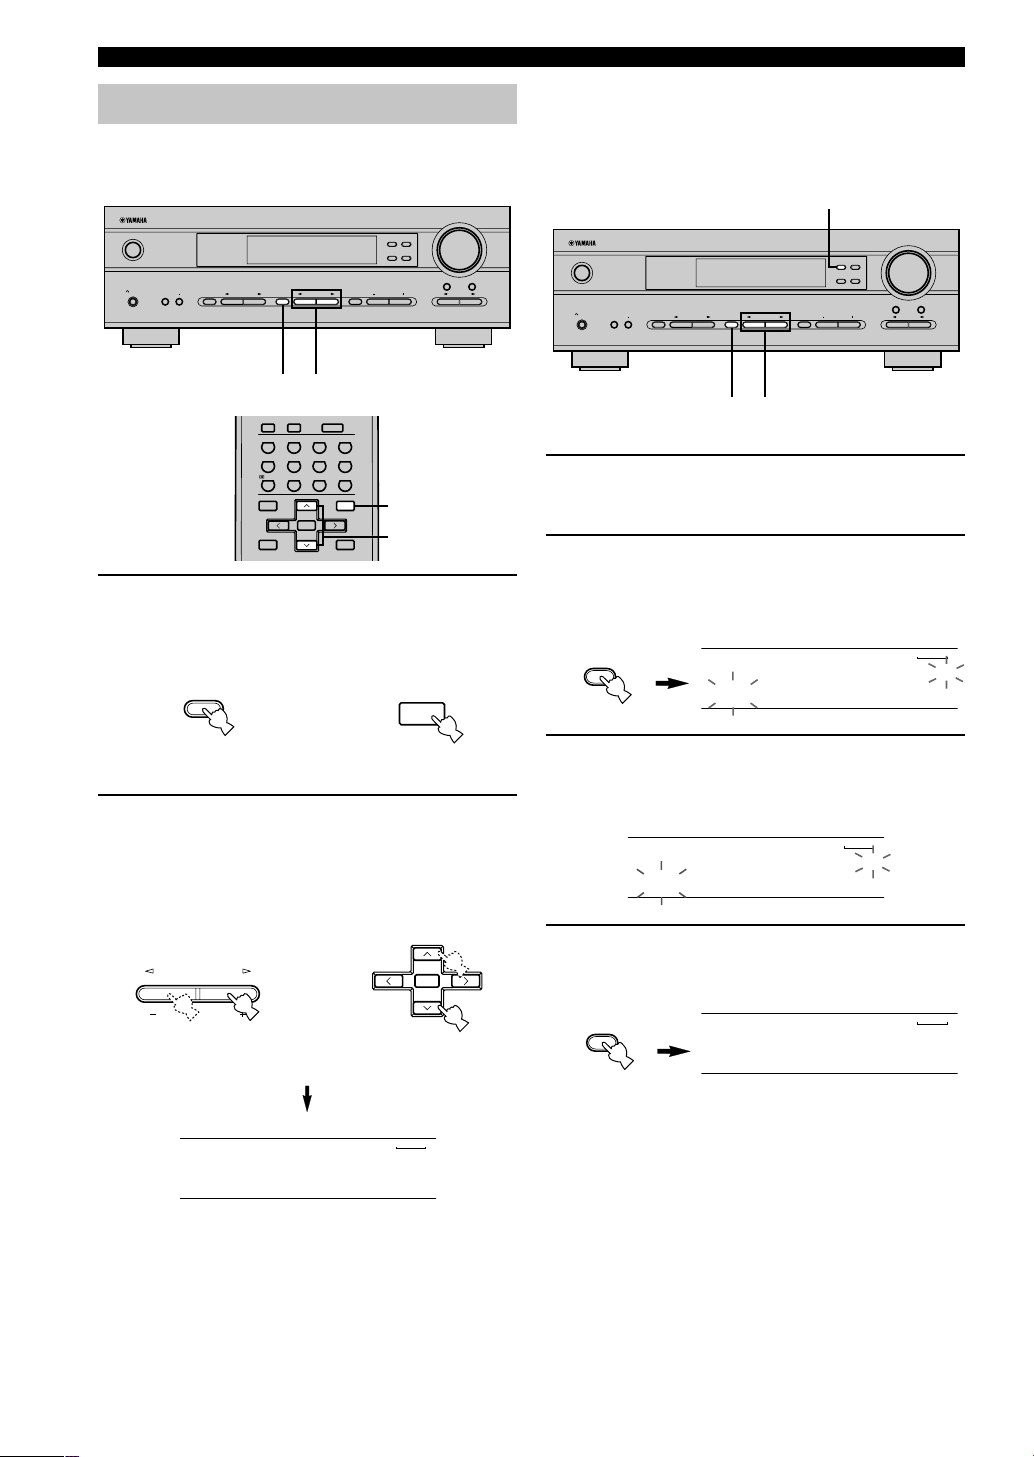
34
■ Exchanging preset stations
You can exchange the assignment of two preset stations.
The example below describes the procedure for
exchanging preset station “E1” with “A5”.
1 Select preset station “E1” by using the
A/B/C/D/E and PRESET/TUNING l / h.
See “Selecting a preset station” at left.
2 Press and hold PRESET/TUNING (EDIT) for
at least 3 seconds.
“E1” and the “MEMORY” indicator flash on the
front panel display.
3 Select preset station “A5” by using the
A/B/C/D/E and PRESET/TUNING l / h.
“A5” and the “MEMORY” indicator flash on the
front panel display.
4 Press PRESET/TUNING (EDIT) again.
The stations stored at the two preset assignments are
exchanged.
Selecting a preset station
You can recall any desired station simply by selecting the
preset station number under which it was stored.
1 Press A/B/C/D/E (A/B/C/D/E on the remote
control) to select the preset station group.
The preset group letter appears on the front panel
display and changes each time you press A/B/C/D/E.
2 Press PRESET/TUNING l / h (PRESET u /
d on the remote control) to select a preset
station number (1 to 8).
The preset group and number appear on the front
panel display along with the station band and
frequency, and the “TUNED” indicator lights up.
Shows the exchange of stations has been
completed.
Front panel
Remote control
or
Front panel
Remote control
or
TUNING
V-AUXVCR
D-TV/CBL
DVD
MD/CD-R
TUNER
TUNED
C3:AM 1440 kHz
VOLUME
STANDBY
/ON
AUTO/MAN`L MONO MAN`L/AUTO FM
TUNING MODE MEMORY
EDIT
PRESET/TUNING FM/AM
SILENT
PHONES
SPEAKERS
AON
BOFF
EFFECT
PRESET/TUNING
SET MENU
A/B/C/D/E
NEXT
PROGRAM
STEREO
BASS/TREBLE
CONTROL
INPUT
6CH INPUTINPUT MODE
21
ENTER
+10
09
STEREO
6.1/5.1
NIGHT
/DTS
8765
MOVIE2MOVIE1TV THTRMUSIC
432
1
ENTERTAINMENT
ROCKJAZZHALL
MUTE
INPUTMUTE
SET MENU
SELECT
PRESET/CH
A/B/C/D/E
LEVEL
MENU
TEST
RETURN
DISPLAY
TITLE
+
–
2
1
A/B/C/D/E
NEXT
SET MENU
A/B/C/D/E
MENU
PRESET/TUNING
SET MENU
SELECT
+
–
PRESET/CH
VOLUME
STANDBY
/ON
AUTO/MAN`L MONO MAN`L/AUTO FM
TUNING MODE MEMORY
EDIT
PRESET/TUNING FM/AM
SILENT
PHONES
SPEAKERS
AON
BOFF
EFFECT
PRESET/TUNING
SET MENU
A/B/C/D/E
NEXT
PROGRAM
STEREO
BASS/TREBLE
CONTROL
INPUT
6CH INPUTINPUT MODE
2,4
1,31,3
EDIT
PRESET/TUNING
V-AUXVCR
D-TV/CBL
DVD
MD/CD-R
TUNER
MEMORYTUNED
E1:FM 87.5 MHz
V-AUXVCR
D-TV/CBL
DVD
MD/CD-R
TUNER
MEMORYTUNED
A5:FM 90.6 MHz
EDIT
PRESET/TUNING
V-AUXVCR
D-TV/CBL
DVD
MD/CD-R
TUNER
MEMORY
EDIT E1-A5
Page 37
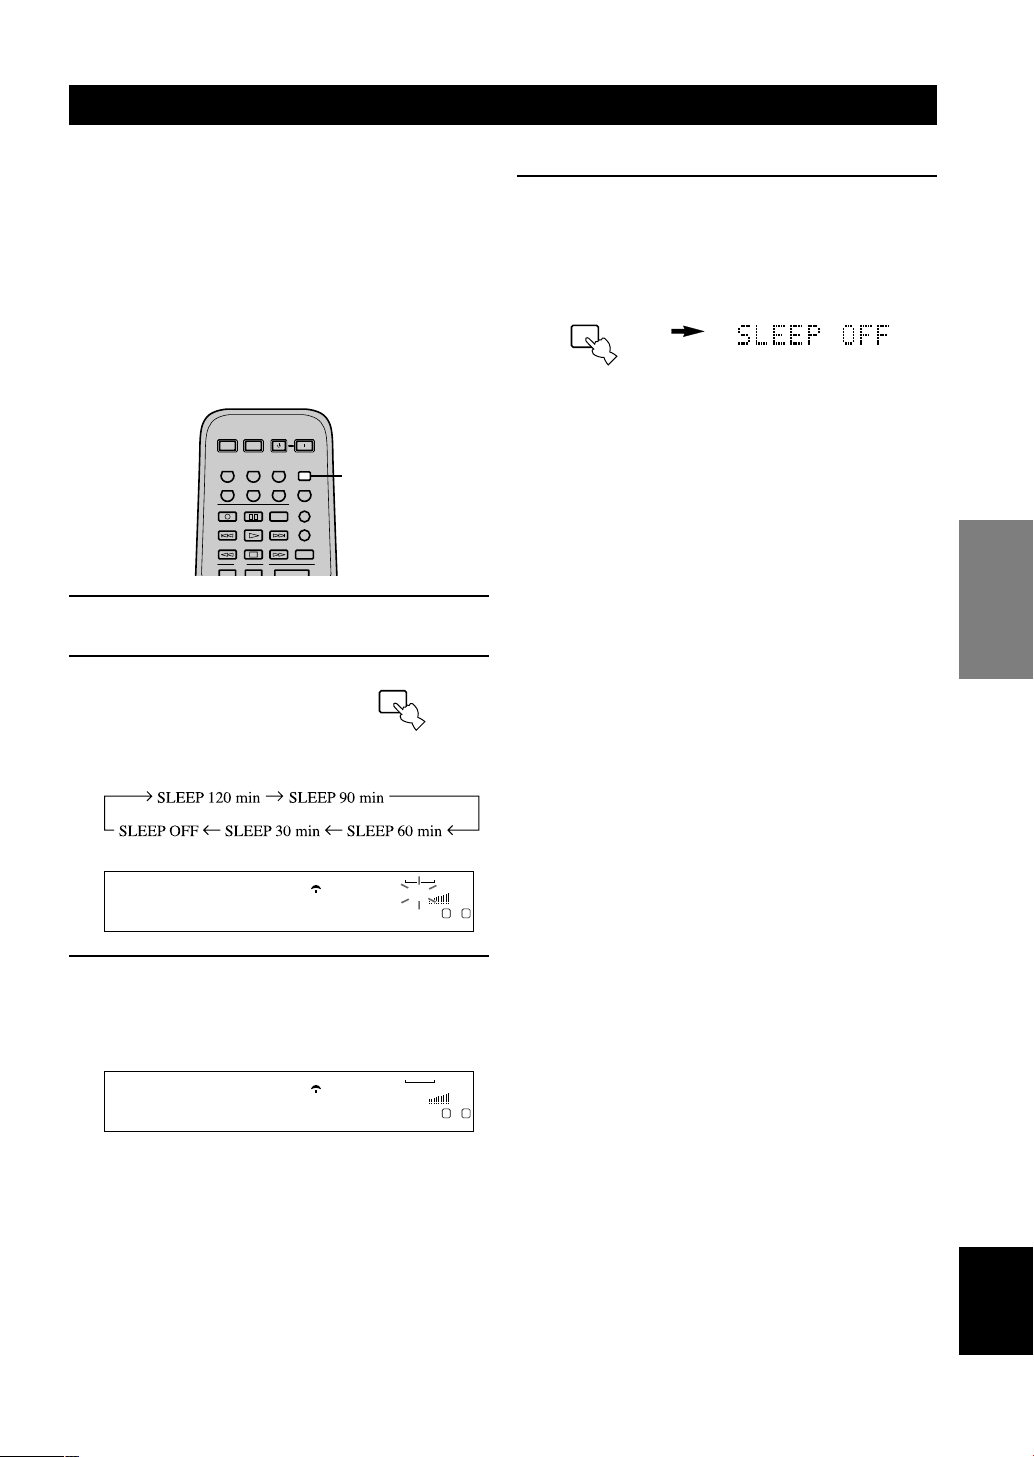
English
BASIC
OPERATION
35
Use this feature to automatically set this unit in standby
mode after the amount of time you have set. The sleep
timer is useful when you are going to sleep while this unit
is playing or recording a source.
The sleep timer can only be set with the remote control.
y
• By connecting a commercially available timer to this unit, you
can also set a wake-up timer. Refer to the operation
instructions of the timer.
■ Setting the sleep timer
1 Select a source and start playback on the
source component.
2 Press SLEEP repeatedly
to set the amount of time.
Each time you press SLEEP,
the front panel display changes
as shown below.
3 The “SLEEP” indicator lights up on the front
panel display soon after the sleep timer has
been set.
The display then returns to the previous indication.
SLEEP TIMER
■ Canceling the sleep timer
Press SLEEP repeatedly until “SLEEP OFF”
appears on the front panel display.
After a few seconds, “SLEEP OFF” disappears, the
“SLEEP” indicator goes off and the display returns
to the previous indication.
y
• The sleep timer setting can also be canceled by setting this
unit in standby mode by using STANDBY on the remote
control (or STANDBY/ON on the front panel) or by
disconnecting the AC power cord from the AC outlet.
SYSTEM
POWER
STANDBY
POWER
AV
POWERTVPOWER
TV
V-AUXVCRD-TV/CBLDVD
SLEEPTUNERMD/CD-RCD
TV
AMP
CODE SET
REC
6CH INPUT
AUDIO
DISC SKIP
2
SLEEP
SLEEP
V-AUXVCR
D-TV/CBL
DVD
MD/CD-R
TUNER CD
DSP
HiFi
SLEEP
VOLUME
L R
ROCK CONCERT
V-AUXVCR
D-TV/CBL
DVD
MD/CD-R
TUNER CD
DSP
HiFi
SLEEP
VOLUME
L R
SLEEP 120min
Page 38
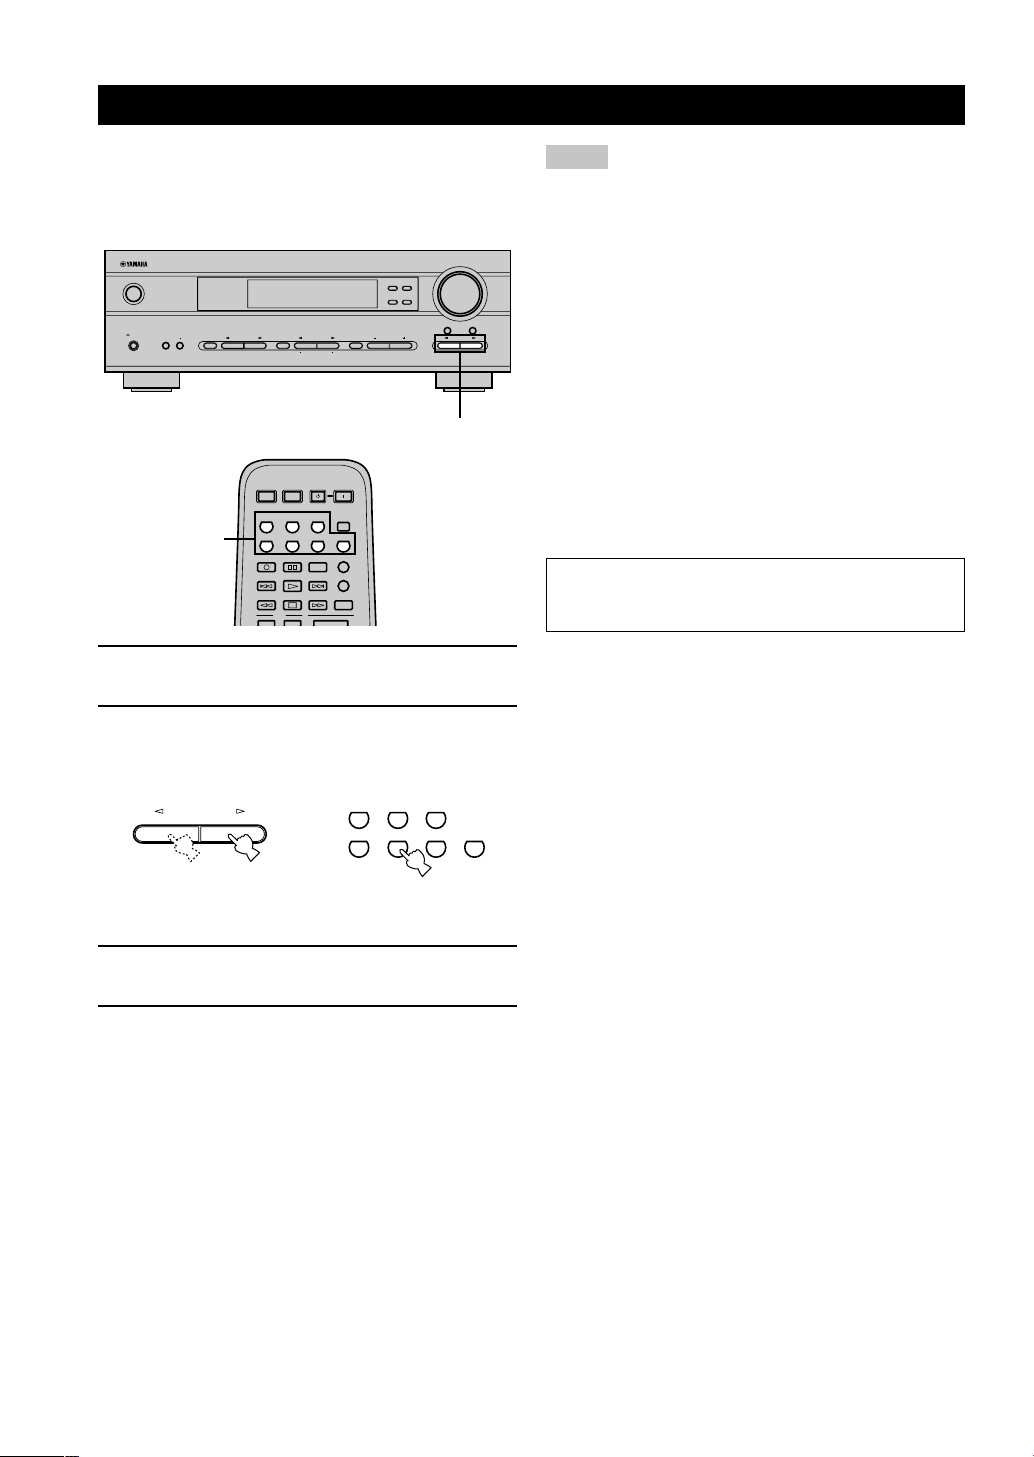
36
Recording adjustments and other operations are
performed on other recording components. Refer to the
operation instructions for these components for details on
their operation .
1 Turn on the power of this unit and all
connected components.
2 Select the source component you want to
record from.
3 Start playback (or select a broadcast station)
on the source component.
4 Start recording on the recording component.
Front panel Remote control
or
RECORDING
Notes
• Do a test recording before you start an actual recording.
• When this unit is set in standby mode, you cannot record
between the components connected to it.
• DSP programs and volume, bass, and treble settings do not
affect the recorded material.
• You cannot record from a source connected to the 6CH
INPUT jacks on this unit.
• Input sources are not output to the same OUT (REC) channel.
(For example, the signal input from VCR IN is not output to
VCR OUT.)
• You cannot record audio signals from a source connected to
the DIGITAL INPUT jack on this unit because the signals
from the DIGITAL INPUT jack and analog input jacks are
independent. Please connect a source to the analog in jacks if
you wish to record from the analog out jacks.
• Check the copyright laws in your country if you wish to
record from records, CDs, radio, etc. Recording of
copyrighted material may infringe copyright laws.
If you playback a video source that uses scrambled or
encoded signals to prevent it from being dubbed, the
picture itself may be disturbed due to those signals.
■ Special considerations when recording
DTS material
The DTS signal is a digital bitstream. Attempting to
digitally record the DTS bitstream will result in noise
being recorded. Therefore, if you want to use this unit to
record sources that have DTS signals recorded on them,
the following considerations and adjustments need to be
made.
For LDs, DVDs and CDs encoded with DTS, follow the
operating instructions of your player to set it to output an
analog signal, if it is compatible with the DTS format.
VOLUME
STANDBY
/ON
AUTO/MAN`L MONO MAN`L/AUTO FM
TUNING MODE MEMORY
EDIT
PRESET/TUNING FM/AM
SILENT
PHONES
SPEAKERS
AON
BOFF
EFFECT
PRESET/TUNING
SET MENU
A/B/C/D/E
NEXT
PROGRAM
STEREO
BASS/TREBLE
CONTROL
INPUT
6CH INPUTINPUT MODE
2
SYSTEM
POWER
STANDBY
POWER
AV
POWERTVPOWER
TV
V-AUXVCRD-TV/CBLDVD
SLEEPTUNERMD/CD-RCD
TV
AMP
CODE SET
REC
6CH INPUT
AUDIO
DISC SKIP
2
V-AUXVCRD-TV/CBLDVD
SLEEPTUNERMD/CD-RCD
INPUT
Page 39
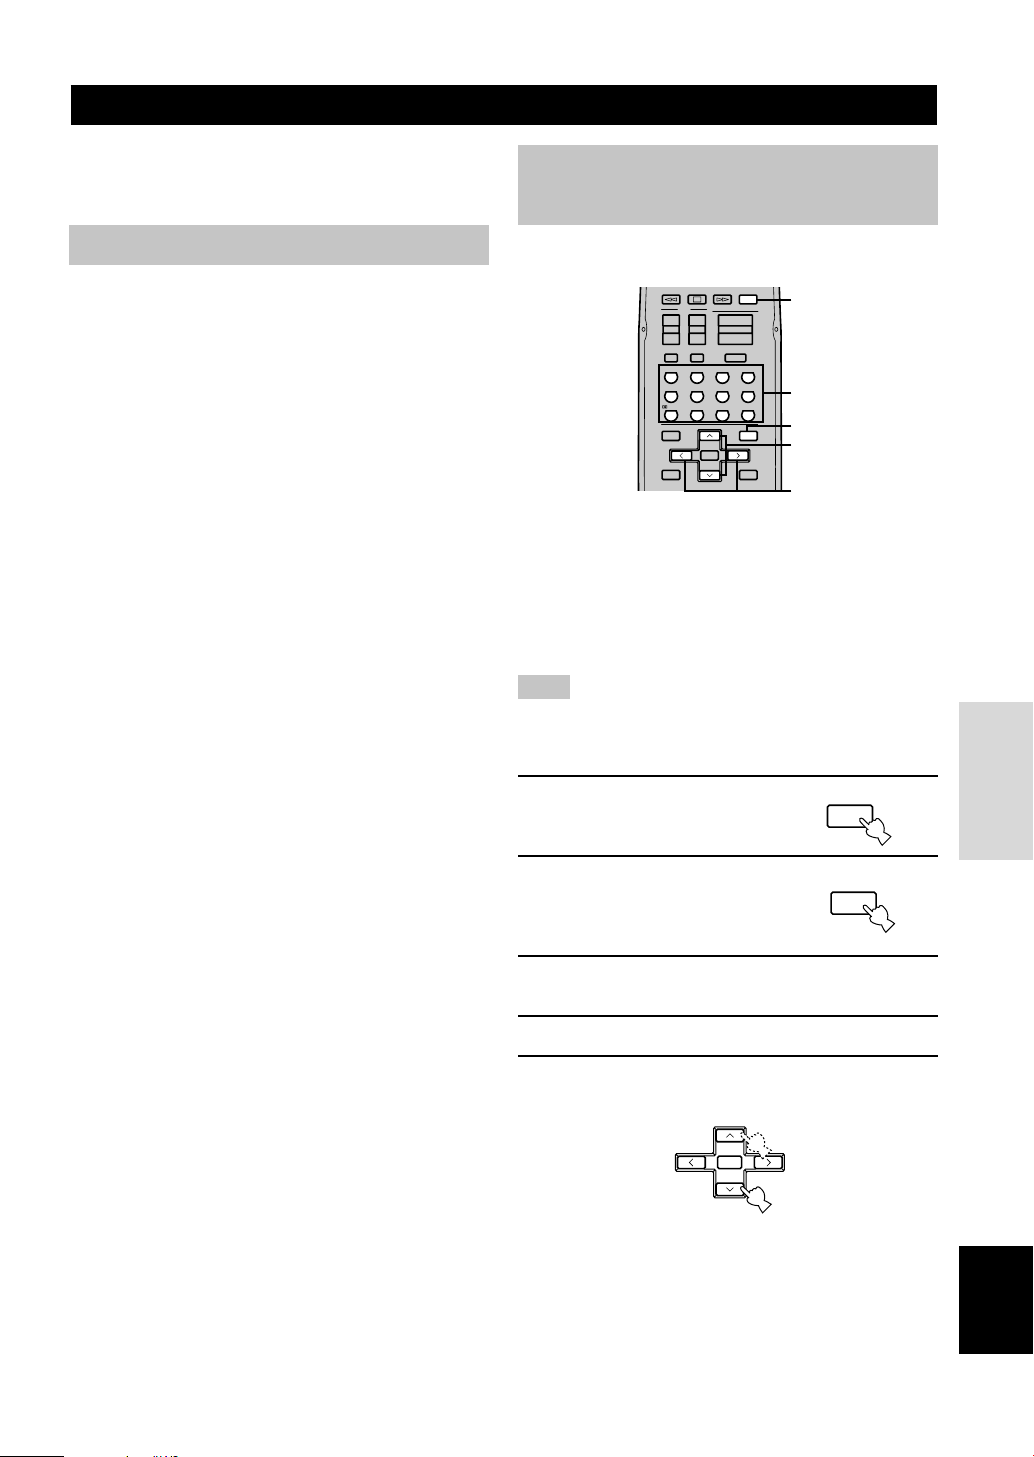
37
English
ADVANCED
OPERATION
Adjusting the items on the set menu
Use the remote control to make adjustments.
y
• You can change set menu parameters while the unit is
reproducing sound.
• You can use NEXT and SET MENU +/– on the front panel to
change these settings, if the unit is not set to TUNER mode.
Press NEXT to select the category or field you wish to change,
and SET MENU +/– to change the parameters.
Note
• You cannot change some set menu parameters while the unit is
in night listening mode.
1 Press AMP.
2 Press SET MENU to enter
the set menu.
3 Press u / d repeatedly to select the desired
menu.
4 Press j / i to enter the selected menu.
5 Press u / d repeatedly to select the item
you want to adjust.
y
• By pressing SET MENU repeatedly, you can select items in
the same order as when pressing d.
AMP
SET MENU
You can set the following parameters on the set menu to
obtain a better sound from the unit. Change the settings to
reflect the needs of your listening environment.
Set menu list
The set menus are divided by use and function into the 4
categories listed here.
■ BASIC
The BASIC area contains the basic parameters that you
must set before using this unit. It consists of the following
menus. See pages 18 – 20 for a detailed explanation.
1 SETUP
2 SP LEVEL (Speaker level)
■ SOUND
The SOUND area contains parameters for altering sound
output. It consists of the following menus that you can
use to alter the quality and tone of the sound output by the
system.
1 SPEAKER SET
2 SP DISTANCE (Speaker distance)
3 LFE LEVEL (Low frequency effect level)
4 D. RANGE (Dynamic range)
5 CENTER GEQ (Center graphic equalizer)
6 HP TONE CTRL (Headphone tone control)
■ INPUT
The INPUT area contains parameters concerned with
signal input. It consists of the following menus that you
can use to change the assignment of input jacks.
1 I/O ASSIGN
2 INPUT MODE
■ OPTION
This is a supplementary set up menu provided for your
convenience. It consists of the following menus that you
can use to change display brightness, protect existing
settings, and perform other non-essential functions.
1 DISPLAY SET
2 MEM. GUARD
3 AUDIO MUTE
• In the descriptions for each item from the following page, the
default setting is indicated in bold.
SET MENU
A/B/C/D/E
MENU
SELECT
+
–
PRESET/CH
+10
9
STEREO
6.1/5.1
NIGHT
/DTS
8765
MOVIE2MOVIE1TV THTRMUSIC
432
1
ENTERTAINMENT
ROCKJAZZHALL
TV
AMP
MUTE
INPUTMUTE
VOLUME
+–+
–
+
–
CHVOL
SET MENU
SELECT
PRESET/CH
A/B/C/D/E
LEVEL
MENU
TEST
RETURN
DISPLAY
TITLE
+
–
0
ENTER
2
3,5,8
4,6,7
1
8
Page 40
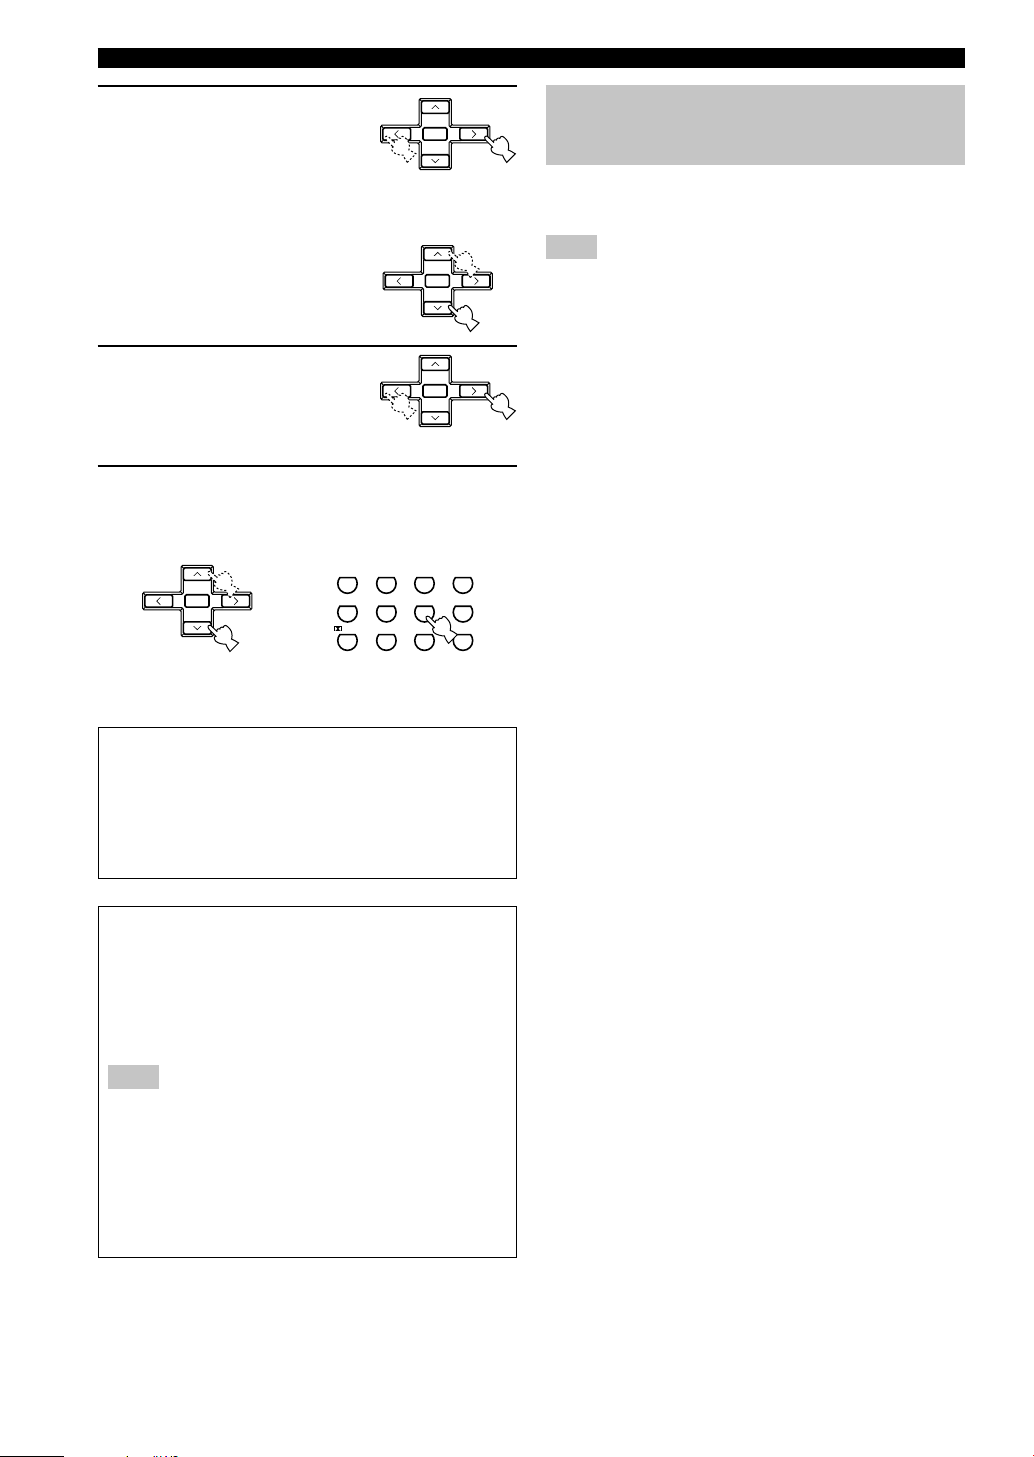
38
6 Press j / i once to enter
the setup mode of the
selected item.
The last setting you adjusted
appears on the front panel
display.
Depending on the menu item,
press u/d to select a sub
item.
7 Press j / i repeatedly to
change the menu item
setting.
8 Press u / d repeatedly until the menu
disappears or just press one of the DSP
program group buttons to exit from the set
menu.
Memory back-up
The memory back-up circuit prevents the stored data
from being lost even if this unit is in standby mode.
However, if the power cord is disconnected from the
AC outlet, or the power supply is cut for more than
one week, the stored data will be lost. If this happens,
adjust the items again.
The BASIC and SOUND menus
The “BASIC” menu allows you to easily set the
“SOUND 1 SPEAKER SET” and “SOUND 2 SP
DISTANCE” parameters. It is not necessary to reset
any of the parameters in the “BASIC” menu, but you
can access more detailed parameters in the “SOUND”
menu if you wish.
Note
• After altering parameters in the “SOUND” menu, if you
select “BASIC 1 SETUP” and then select “SET”, the
parameters from the “SOUND” menu alter in response to
any changes you make in “BASIC 1 SETUP”. Do not enter
the “BASIC 1 SETUP” menu unless you wish to change
these settings. If you accidentally enter the “BASIC 1
SETUP” menu, select CANCEL to return to the “BASIC”
menu. (page 19)
SELECT
+
–
PRESET/CH
SELECT
+
–
PRESET/CH
SELECT
+
–
PRESET/CH
SOUND 1 SPEAKER SET
(speaker mode settings)
Use this feature to select suitable output modes for your
speaker configuration.
Note
• Some menu item settings have no effect when the unit is
reproducing a source with a digital signal sampling frequency
greater than 48 kHz.
■ 1A CENTER (center speaker mode)
If you add a center speaker to your speaker configuration,
this unit can provide better dialog localization for several
listeners and superior synchronization of sound and
images.
Choices: LRG (large), SML (small), NON (none)
LRG
Select this if you have a large center speaker. The unit
directs the entire range of the center channel signal to the
center speaker.
SML
Select this if you have a small center speaker. The unit
directs the low-frequency signals (90 Hz and below) of
the center channel to the speakers selected with “1D
BASS”.
NON
Select this if you do not have a center speaker. The unit
directs all of the center channel signal to the main left and
right speakers.
or
ENTER
+10
09
STEREO
6.1/5.1
NIGHT
/DTS
8765
MOVIE2MOVIE1TV THTRMUSIC
432
1
ENTERTAINMENT
ROCKJAZZHALL
SELECT
+
–
PRESET/CH
SET MENU
Page 41

39
English
ADVANCED
OPERATION
■ 1B MAIN (main speaker mode)
Choices: LARGE, SMALL
LARGE
Select this if you have large main speakers. The unit
directs the entire range of the main left and right channel
signals to the main left and right speakers.
SMALL
Select this if you have small main speakers. The unit
directs the low-frequency signals (90 Hz and below) of
the main channel to the speakers selected with “1D
BASS”.
■ 1C REAR LR (rear speaker mode)
Choices: LRG (large), SML (small), NON (none)
LRG
Select this if you have large rear left and right speakers or
if a rear subwoofer is connected to the rear speakers. The
entire range of the rear channel signal is directed to the
rear left and right speakers.
SML
Select this if you have small rear left and right speakers.
The low-frequency signals (90 Hz and below) of the rear
channel are directed to the speakers selected with “1D
BASS”.
NON
Select this if you do not have rear speakers.
y
• This unit is set in the virtual CINEMA DSP mode when you
select NON for “1C REAR LR”.
■ 1D BASS (bass out mode)
LFE signals carry low-frequency effects when this unit
decodes a Dolby Digital or DTS signal. Low-frequency
signals are defined as 90 Hz and below. The Lowfrequency signals can be directed to both main left and
right speakers, and to the subwoofer (subwoofer can be
used for both stereo reproduction and the DSP program).
Choices: SWFR (subwoofer), MAIN, BOTH
SWFR
Select this if you use a subwoofer. The unit directs the
LFE signals to the subwoofer.
MAIN
Select this if you do not use a subwoofer. The unit directs
LFE signals to the main speakers.
BOTH
The unit directs LFE signals to the subwoofer. Lowfrequency signals designated to the main channels in
accordance with other speaker mode settings are directed
to both main speakers and the subwoofer.
Note
• When you select MAIN for “1D BASS”, the unit directs the
low-frequency signals (90 Hz and below) of the main channel
to the main speakers even if you select SMALL for the main
speaker mode.
SET MENU
Page 42
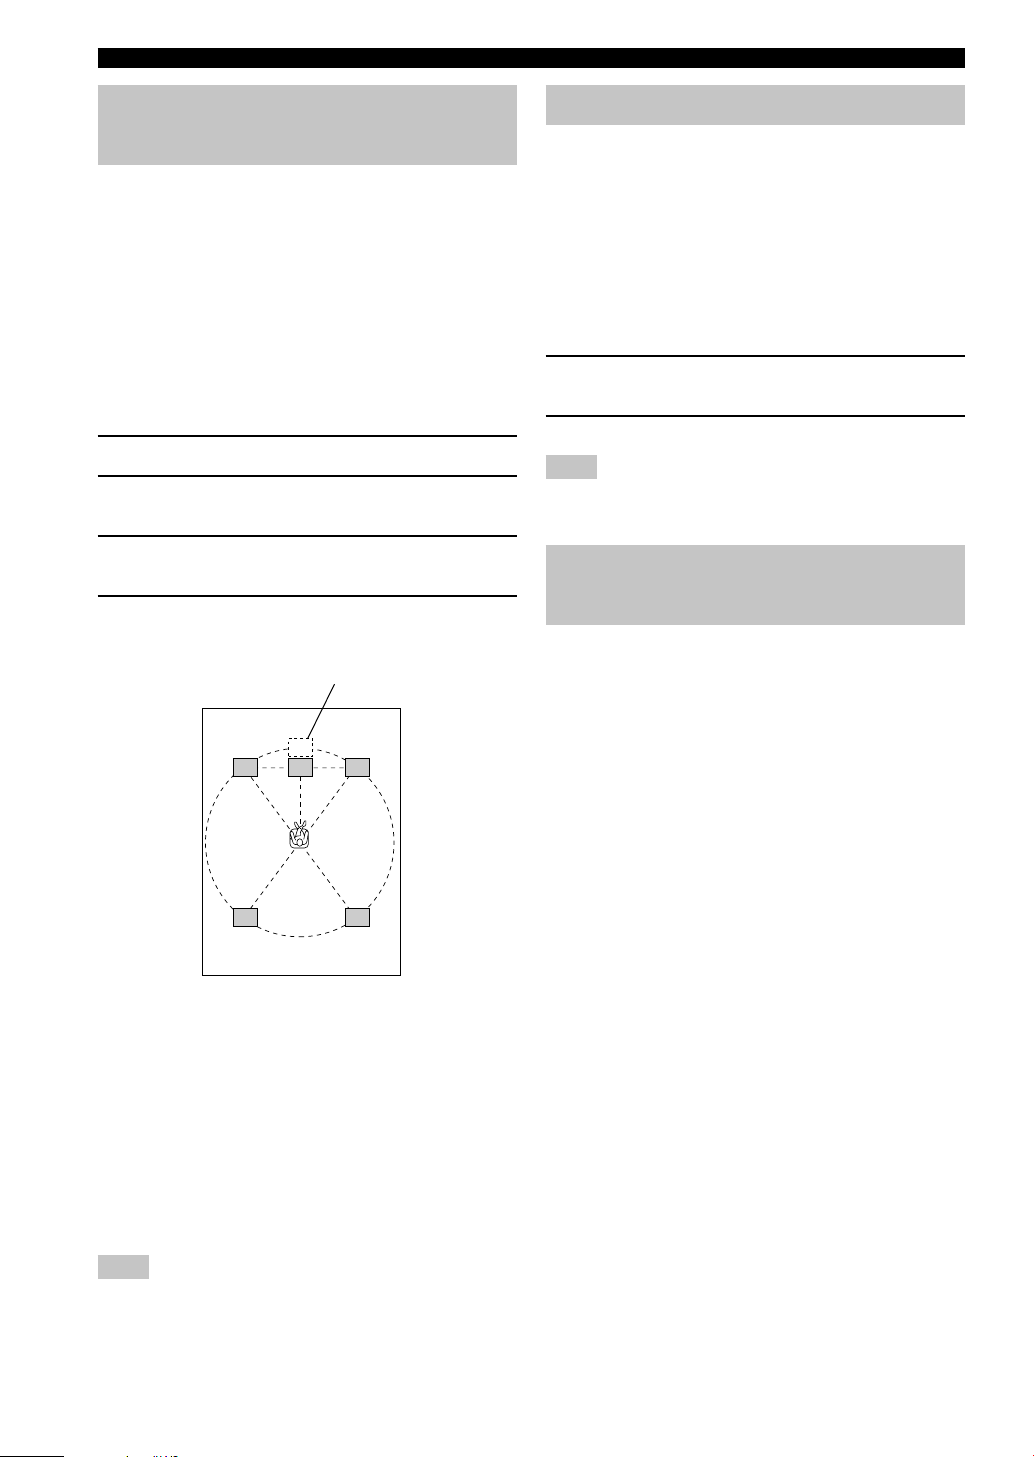
40
SOUND 2 SP DISTANCE
(speaker distance)
Use this feature to adjust the delay applied to center
channel sounds. This feature works when there is sound
output from the center speakers with a source such as
Dolby Digital or DTS. Ideally, the center speaker should
be the same distance from the main listening position as
the left and right main speakers. However, in most home
situations, the center speaker is placed in line with the
main speakers. By delaying the sound from the center
speaker, you can adjust the apparent distance from the
center speaker to the main listening position to make it
seem the same as the distance between the listening
position and main left and right speakers.
1 Press u / d to select “UNIT”.
2 Press j / i to select the unit “meters” or
“feet” to be used in setting.
3 Press u / d to select the speaker for which
you want to adjust the delay.
4 Press j / i to set the delay.
Press i for higher values and j for lower values.
■ Setting by “meters”
Control range: 0.3 to 24.00 m (for main L/R,
center, rear L/R)
Initial settings: 3.00 m (for main L/R, center,
rear L/R)
■ Setting by “feet”
Control range: 1 to 80 ft (for main L/R, center,
rear L/R)
Initial settings: 10.0 ft (for main L/R, center,
rear L/R)
Note
• No delay will be set if you set the same distance for the main
L/R, center and rear L/R.
SOUND 3 LFE LEVEL
Use this feature to adjust the output level of the LFE
(low-frequency effect) channel when playing back a
Dolby Digital or DTS signal. The LFE signal carries lowfrequency special effect sound which is only added to
certain scenes.
Control range:
SPEAKER ............ –20 to 0 dB
HEADPHONE ..... –20 to 0 dB
Initial setting: 0 dB
1 Press u / d to select the item to be
adjusted.
2 Press j to adjust the LFE level.
Note
• Adjust the LFE level according to the capacity of your
subwoofer or headphones.
SOUND 4 D. RANGE
(dynamic range)
Use this feature to adjust the dynamic range. This setting
is effective only when the unit is decoding Dolby Digital
signals.
Choices: MAX, STD (standard), MIN (minimum)
MAX
Select MAX for feature films.
STD
Select STD for general use.
MIN
Select MIN for listening to sources at low volume levels.
SET MENU
L
C
C
R
RL
RR
Center speaker image
Page 43

41
English
ADVANCED
OPERATION
SOUND 5 CENTER GEQ (center
graphic equalizer)
Use this feature to adjust the built-in 5-band graphic
equalizer so that the center speaker tonal quality matches
that of the left and right main speakers. You can select the
100 Hz, 300 Hz, 1 kHz, 3 kHz, or 10 kHz frequencies.
Control range (dB): –6 to +6
Initial setting: 0 dB for 5-band
1 Press d to select a higher frequency and u
to select a lower frequency.
2 Press j / i to adjust the level of that
frequency.
Note
• You can monitor the center speaker sound while adjusting this
parameter by using the test tone. Press TEST before starting
the foregoing procedure. Once you begin this procedure, the
test tone remains at the center speaker and you can hear how
the sound changes as you adjust the various frequency levels.
To stop the test tone, press TEST.
SOUND 6
HP TONE CTRL
(headphone tone control)
Use this feature to adjust the level of the bass and treble
when you are using headphones.
Control range (dB):
BASS .................... –6 to +3
TRBL (treble) ....... –6 to +3
Initial setting:
BASS .................... 0 dB
TRBL .................... 0 dB
INPUT 1 I/O ASSIGN (input/
output assignment)
You can assign jacks according to the component to be
used if this unit’s DIGITAL INPUT jack settings
(component names for jacks) differ from those of the
component. This lets you to change the jack assignment
and effectively connect more components.
Once assigned, select that component with INPUT l / h
(or the input selector buttons on the remote control).
■ 1A for OPTICAL INPUT jack
Choices: (1) DVD, MD/CD-R, CD, VCR, V-AUX,
D-TV/CBL
■ 1B for COAXIAL INPUT jack
Choices: (2) CD, VCR, V-AUX, D-TV/CBL,
DVD, MD/CD-R
Note
• When you connect a component to both the COAXIAL and
OPTICAL jacks, priority is given to the input signals from the
COAXIAL jack.
INPUT 2 INPUT MODE
(initial input mode)
Use this feature to designate the input mode for sources
connected to the DIGITAL INPUT jacks when you turn
this unit on (see page 23 for details about the input
mode).
Choices: AUTO, LAST
AUTO
Select this setting to allow the unit to automatically detect
the type of input signal and select the appropriate input
mode.
LAST
Select this setting to set this unit to automatically select
the last input mode used for the respective sources.
SET MENU
Page 44

42
OPTION 1 DISPLAY SET
■ DIMMER
Use this to adjust the brightness of the front panel display.
Control range: –4 to 0
OPTION 2 MEM. GUARD
(memory guard)
Use this feature to prevent accidental changes to settings
on the unit.
Choices: ON, OFF
Select ON to protect the following features:
• All set menu items
• Main, center, rear speakers, and subwoofer levels
• DSP program parameters
Notes
• When this item is set to ON, you cannot use the test tone.
• When this item is set to ON, you cannot select any other set
menu items.
OPTION 3 AUDIO MUTE
Adjusts the amount by which the MUTE function reduces
the output volume.
Choices: MUTE, –50dB, –20dB
MUTE
Completely halts all output of sound.
–50dB
Reduces the volume of the present sound output by 50dB.
–20dB
Reduces the volume of the present sound output by 20dB.
SET MENU
Page 45
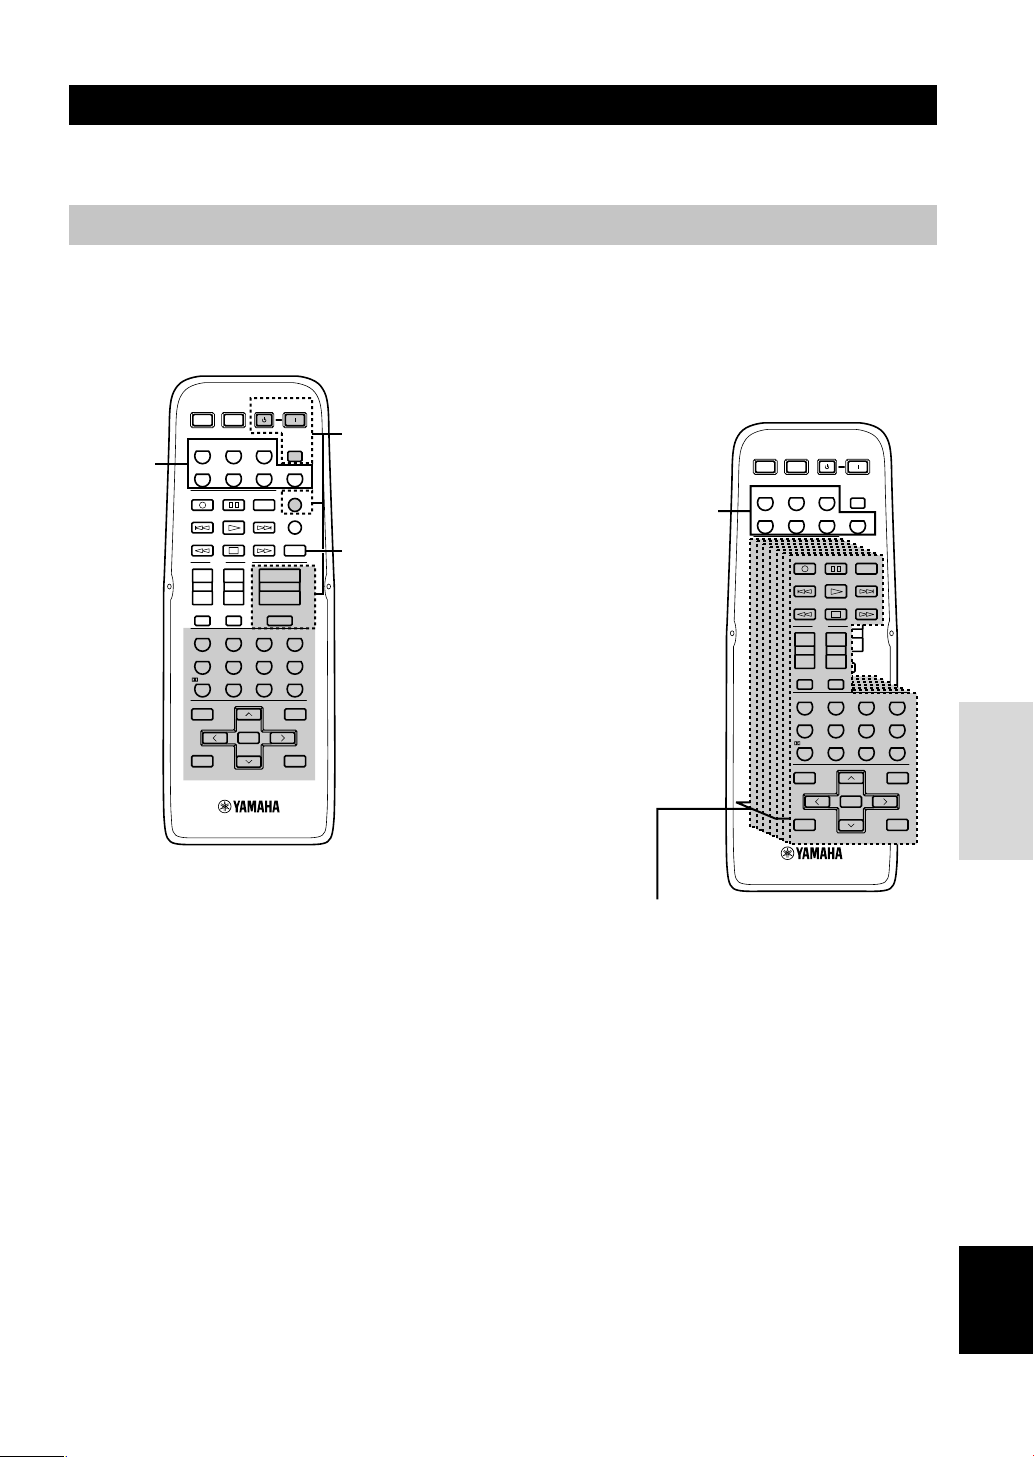
43
English
ADVANCED
OPERATION
REMOTE CONTROL FEATURES
In addition to controlling this unit, the remote control can operate other A/V components made by YAMAHA and other
manufacturers. To control other components, you must set up the remote control with the manufacturer codes.
Control area
■ Controlling this unit
The shaded areas below can be used to control this unit
when the AMP mode is selected. Press AMP to select the
AMP mode.
Input selector buttons switch the
control area for each component.
Component control area
You can control up to 7 different components. You can set up
manufacturer code.
Input selector
buttons
The buttons in the
dotted lines (SYSTEM
POWER, STANDBY,
SLEEP, 6CH INPUT,
VOLUME +/– and
MUTE) function in
any mode.
■ Controlling other component
The shaded areas below can be used to control other
components. Each button has a different function
depending on the selected components. Select the
component to be controlled by pressing an input selector
button.
SYSTEM
POWER
STANDBY
POWER
AV
POWERTVPOWER
TV
V-AUXVCRD-TV/CBLDVD
SLEEPTUNERMD/CD-RCD
MUTE
6CH INPUT
VOLUME
+
–
ENTER
+10
09
STEREO /DTS
8765
432
1
ENTERTAINMENT
ROCKJAZZHALL
TV
INPUTMUTE
REC
AUDIO
DISC SKIP
+–+
–
CHVOL
SET MENU
SELECT
PRESET/CH
A/B/C/D/E
LEVEL
MENU
TEST
RETURN
DISPLAY
TITLE
+
–
6.1/5.1
NIGHT
TV THTR MOVIE1 MOVIE2MUSIC
SYSTEM
POWER
STANDBY
POWER
AV
POWERTVPOWER
TV
ENTER
+10
09
STEREO /DTS
8765
432
1
ENTERTAINMENT
ROCKJAZZHALL
V-AUXVCRD-TV/CBLDVD
SLEEPTUNERMD/CD-RCD
TV
AMP
CODE SET
MUTE
INPUTMUTE
REC
6CH INPUT
AUDIO
DISC SKIP
VOLUME
+
–
+
–
+
–
CHVOL
SET MENU
SELECT
PRESET/CH
A/B/C/D/E
LEVEL
MENU
TEST
RETURN
DISPLAY
TITLE
+
–
TV THTR MOVIE1 MOVIE2MUSIC
6.1/5.1
NIGHT
Press AMP to control
this unit.
Page 46
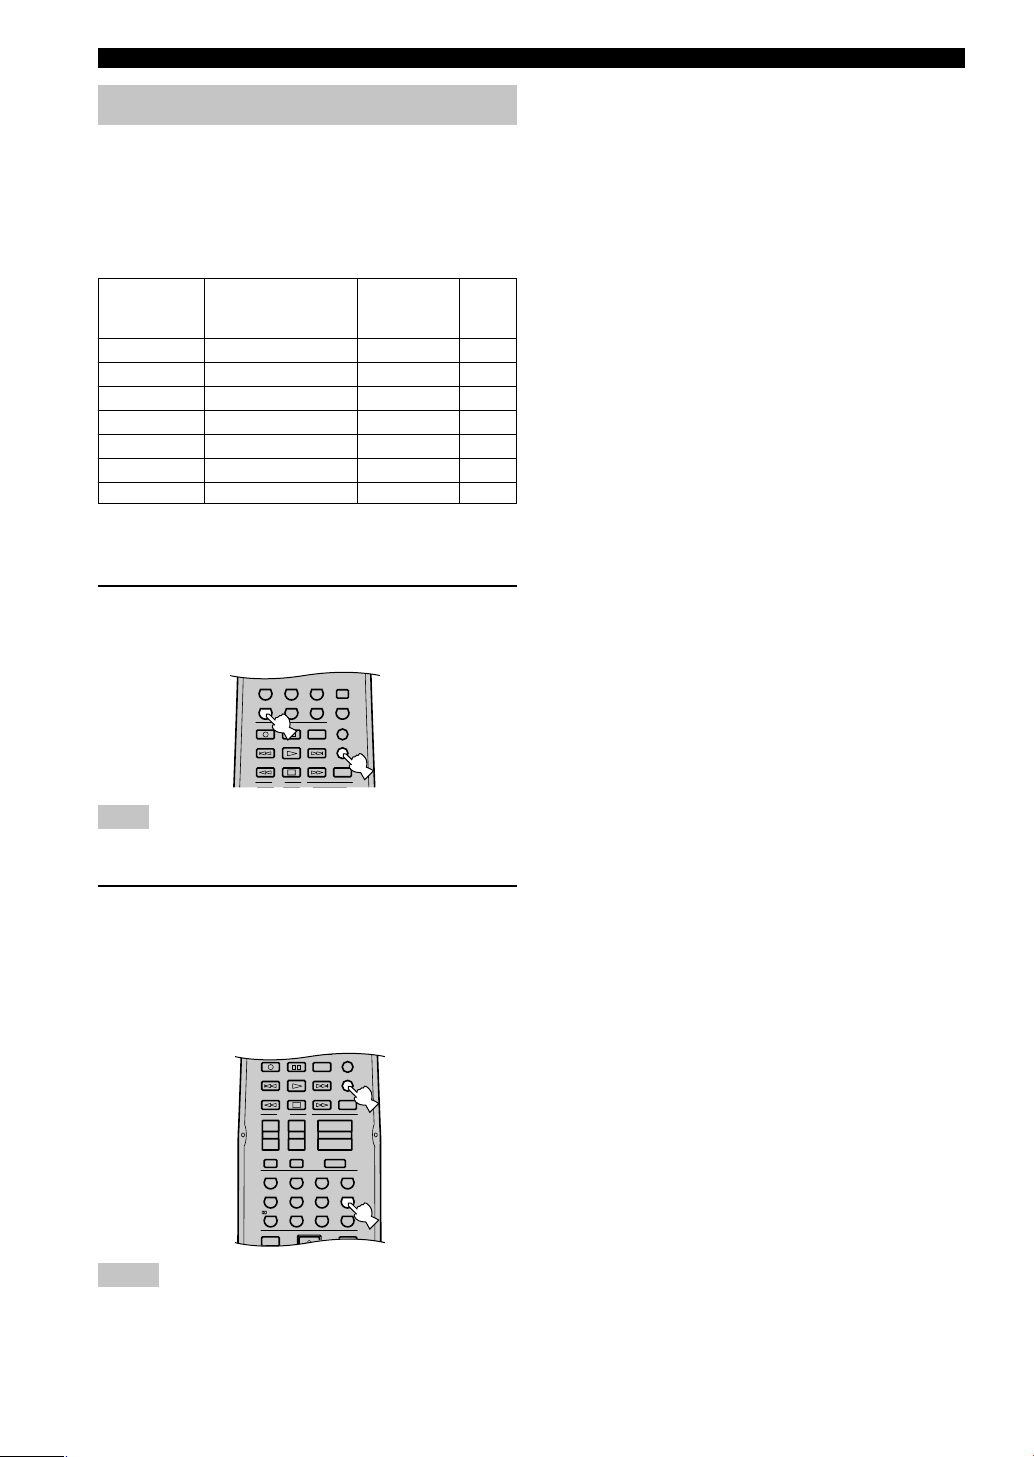
44
Setting the manufacturer code
You can control other components with the remote
control by setting the appropriate manufacturer code.
The following table shows factory-set component controls
(Library: component category) and the manufacturer code
for each.
1 Press and hold CODE SET. With CODE SET
depressed, press an input selector button to
select the component you want to set up.
Note
• You must press and hold CODE SET throughout this
procedure.
2 With CODE SET depressed, use the numeric
buttons to enter the 3 digit code of your
component’s manufacturer.
• Refer to the LIST OF MANUFACTURER’S
CODES at the end of this manual.
• To reset the code, enter the factory-set code for
each component shown in the above table.
Notes
• If the manufacturer of your component has more than one
code, try each of them until you find the correct one.
• You can only assign one manufacturer code to each input
selector button.
Component
control
(buttons)
CD
MD/CD-R
TUNER*
1
DVD
D-TV/CBL*
2
V-AUX
VCR
Component category
(Library)
CD player
CD recorder
Tuner
DVD player
–
–
–
Manufacturer
YAMAHA
YAMAHA
YAMAHA
YAMAHA
–
–
–
Code
199
499
Fixed
699
–
–
–
REMOTE CONTROL FEATURES
ENTER
+10
09
STEREO /DTS
8765
432
1
ENTERTAINMENT
ROCKJAZZHALL
TV
AMP
CODE SET
MUTE
INPUTMUTE
REC
6CH INPUT
AUDIO
DISC SKIP
VOLUME
+–+
–
+
–
CHVOL
SET MENU
LEVEL
MENU
TITLE
TV THTR MOVIE1 MOVIE2MUSIC
6.1/5.1
NIGHT
V-AUXVCRD-TV/CBLDVD
SLEEPTUNERMD/CD-RCD
TV
AMP
CODE SET
REC
6CH INPUT
AUDIO
DISC SKIP
*1You can control this unit and other Yamaha tuners only.
*
2
You can only set TV manufacturer codes for the D-TV/CBL
buttons.
Page 47
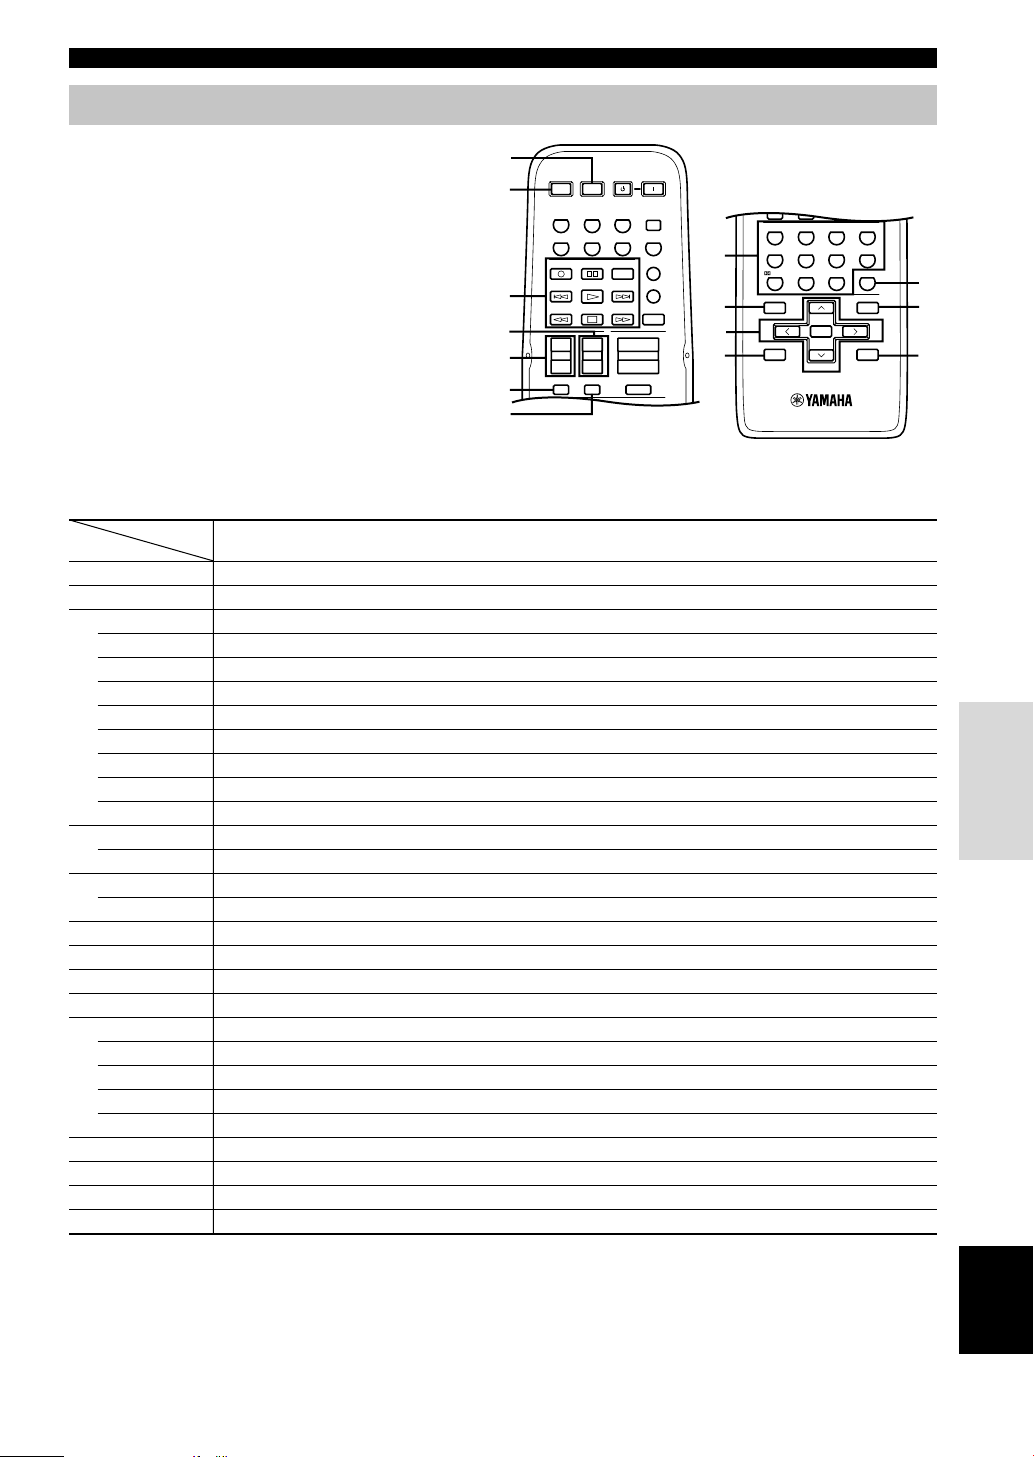
45
English
ADVANCED
OPERATION
Controlling other components
You can operate other components if you have set the
manufacturer code for your component in the remote
control. Note, however, that some buttons may not
operate the component correctly.
Once you select an input source, the remote control
switches to the mode for operating the component.
*1This button functions only when the original remote control of the component has a POWER button.
*
2
These buttons can operate your TV without switching the input if the manufacturer code is set in D-TV/CBL.
*
3
These buttons can operate your VCR without switching the input to VCR if the manufacturer code is set in VCR.
1 AV POWER
2 TV POWER
3
REC/DISC SKIP
w
e
r
AUDIO
d
t
y
a
4 TV CH +
TV CH –
5 TV VOL +
TV VOL –
6 TV MUTE
7 TV INPUT
8 1-9, 0, +10
9 TITLE
0 PRESET/CH u
PRESET/CH d
PRESET/CH j
PRESET/CH i
SELECT
q RETURN
w ENTER
e MENU
r DISPLAY
DVD player
*1
Power
*2
TV power
Disc skip
Play
Search backward
Search forward
Audio
Pause
Skip backward
Skip forward
Stop
*2
TV channel up
*2
TV channel down
*2
TV volume up
*2
TV volume down
*2
TV mute
*2
TV input
Numeric buttons
Title
Up
Down
Left
Right
Select
Return
Title/Index
Menu
Display
VCR
*1
Power
*2
TV power
Rec
Play
Search backward
Search forward
Pause
Stop
*2
TV channel up
*2
TV channel down
*2
TV volume up
*2
TV volume down
*2
TV mute
*2
TV input
Numeric buttons
VCR channel up
VCR channel down
Enter
TV, digital/cable TV
*3
VCR power
*2
TV power
*3
VCR rec
*3
VCR play
*3
VCR search backward
*3
VCR search forward
*3
VCR pause
*3
VCR stop
TV channel up
TV channel down
TV volume up
TV volume down
TV mute
TV input
Numeric buttons
Enter
CD player
*1
Power
*2
TV power
Disc skip
Play
Search backward
Search forward
Pause
Skip backward
Skip forward
Stop
*2
TV channel up
*2
TV channel down
*2
TV volume up
*2
TV volume down
*2
TV mute
*2
TV input
Numeric buttons
Index
Menu
Display
CD/MD recorder
*1
Power
*2
TV power
Rec (MD)
Play
Search backward
Search forward
Pause
Skip backward
Skip forward
Stop
*2
TV channel up
*2
TV channel down
*2
TV volume up
*2
TV volume down
*2
TV mute
*2
TV input
Numeric buttons
Index
Display
Tuner
*1
Power
*2
TV power
*2
TV channel up
*2
TV channel down
*2
TV volume up
*2
TV volume down
*2
TV mute
*2
TV input
Preset stations (1-8)
Preset up
Preset down
A/B/C/D/E
SYSTEM
POWER
STANDBY
POWER
AV
POWERTVPOWER
TV
ENTERTAINMENT
ROCKJAZZHALL
V-AUXVCRD-TV/CBLDVD
SLEEPTUNERMD/CD-RCD
TV
AMP
CODE SET
MUTE
INPUTMUTE
REC
6CH INPUT
AUDIO
DISC SKIP
VOLUME
+
–
+
–
+
–
CHVOL
ENTER
+10
09
STEREO /DTS
8765
432
1
ENTERTAINMENT
ROCKJAZZHALL
MUTE
SET MENU
SELECT
PRESET/CH
A/B/C/D/E
LEVEL
MENU
TEST
RETURN
DISPLAY
TITLE
+
–
6.1/5.1
NIGHT
TV THTR MOVIE1
MOVIE2
MUSIC
2
3
4
5
6
7
1
8
9
q
e
w
0
r
REMOTE CONTROL FEATURES
Page 48
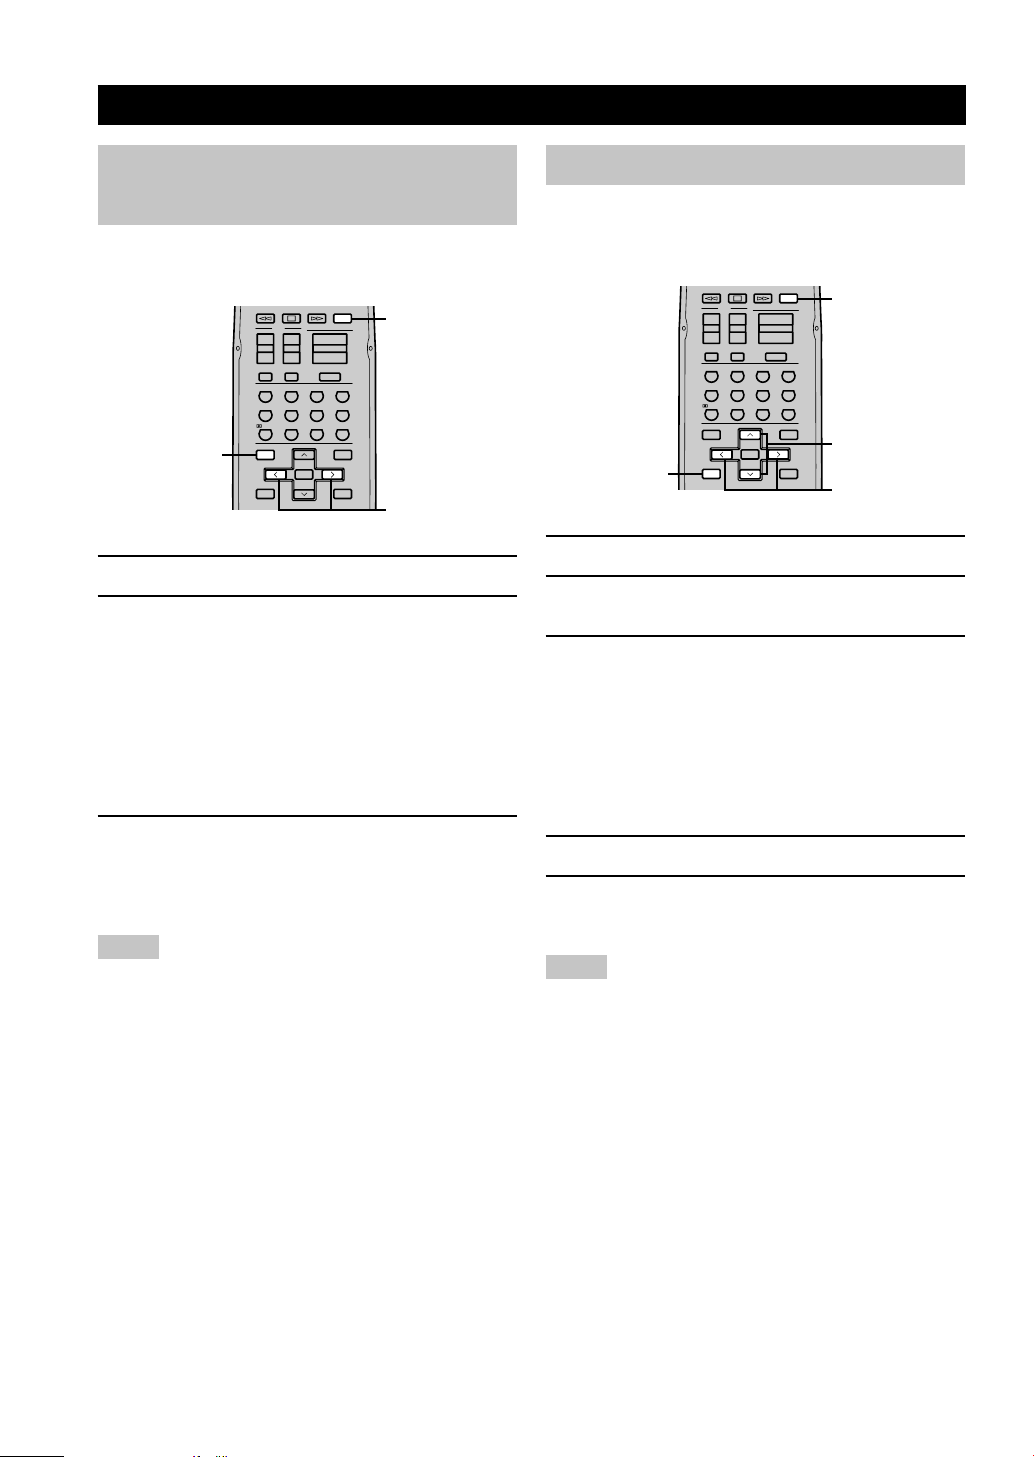
46
Using the test tone
Use the test tone to set speaker levels so that the volume
from each speaker is identical when heard from your
listening position.
1 Press AMP.
2 Press TEST.
The unit will output a test tone.
3 Press u / d repeatedly to select a speaker
to adjust.
Each time you press d, the unit will cycle through
the speakers in the following order:
TEST LEFT (main L)→TEST CENTER (center)→
TEST RIGHT (main R)→TEST R SUR. (rear R)→
TEST L SUR. (rear L)→TEST SUBWOOFER
(subwoofer)→.....
(Press u to cycle the speakers in the reverse order.)
4 Press j / i to adjust speaker volumes.
5 Press TEST when you have completed your
adjustment.
The test tone halts.
Notes
• You cannot enter test mode if headphones are connected to the
PHONES jack. Remove the headphones from the PHONES
jack.
• You cannot adjust speaker volumes if the “SOUND 1
SPEAKER SET” parameter on the set menu is set to NON.
• You cannot adjust the subwoofer level if the “1D BASS”
parameter in “SOUND 1 SPEAKER SET” in the set menu is
set to MAIN.
• If you select “BASIC 1 SETUP” in the set menu and then
select “SET”, speaker levels change in response to any
changes you make in “BASIC 1 SETUP”.
y
• Depending on the source the unit is reproducing, the speaker
levels set with the test tone may not be to your liking. If this is
the case, adjust the speaker levels while listening to the
source.
SETTING THE SPEAKER LEVELS
Adjusting the volume during playback
You can adjust the volume of the speakers while listening
to sound playback.
1 Press AMP.
2 Press LEVEL repeatedly to select the
speaker you want to adjust.
The unit cycles through the speakers in the following
order each time you press LEVEL:
MAIN L→CENTER→MAIN R→
R SUR. (rear R)→L SUR. (rear L)→
SWFR (subwoofer)→.....
y
• Pressing LEVEL once opens the level display. Press u / d at
this time to select a speaker.
3 Press j / i to adjust the speaker volume.
• The center and rear speakers can be adjusted by a
maximum of –10dB ~ +10dB.
• The main speakers and subwoofer can be adjusted
by a maximum of –20dB ~ 0dB.
Notes
• You cannot adjust speaker levels if the “SOUND 1 SPEAKER
SET” parameter in the set menu is set to NON.
• You cannot adjust the subwoofer level if the “1D BASS”
parameter in “SOUND 1 SPEAKER SET” in the set menu is
set to MAIN.
• If you use LEVEL to adjust speaker levels, the speaker levels
you previously set with the test tone will also change.
• If you select “BASIC 1 SETUP” in the set menu and then
select “SET”, speaker levels change in response to any
changes you make in ”BASIC 1 SETUP”.
ENTER
+10
09
STEREO
6.1/5.1
NIGHT
/DTS
8765
MOVIE2MOVIE1TV THTRMUSIC
432
1
ENTERTAINMENT
ROCKJAZZHALL
TV
AMP
MUTE
INPUTMUTE
VOLUME
+–+
–
+
–
CHVOL
SET MENU
SELECT
PRESET/CH
A/B/C/D/E
LEVEL
MENU
TEST
RETURN
DISPLAY
TITLE
+
–
3
1
2
ENTER
+10
09
STEREO
6.1/5.1
NIGHT
/DTS
8765
MOVIE2MOVIE1TV THTRMUSIC
432
1
ENTERTAINMENT
ROCKJAZZHALL
TV
AMP
MUTE
INPUTMUTE
VOLUME
+–+
–
+
–
CHVOL
SET MENU
SELECT
PRESET/CH
A/B/C/D/E
LEVEL
MENU
TEST
RETURN
DISPLAY
TITLE
+
–
3
4
1
2,5
Page 49
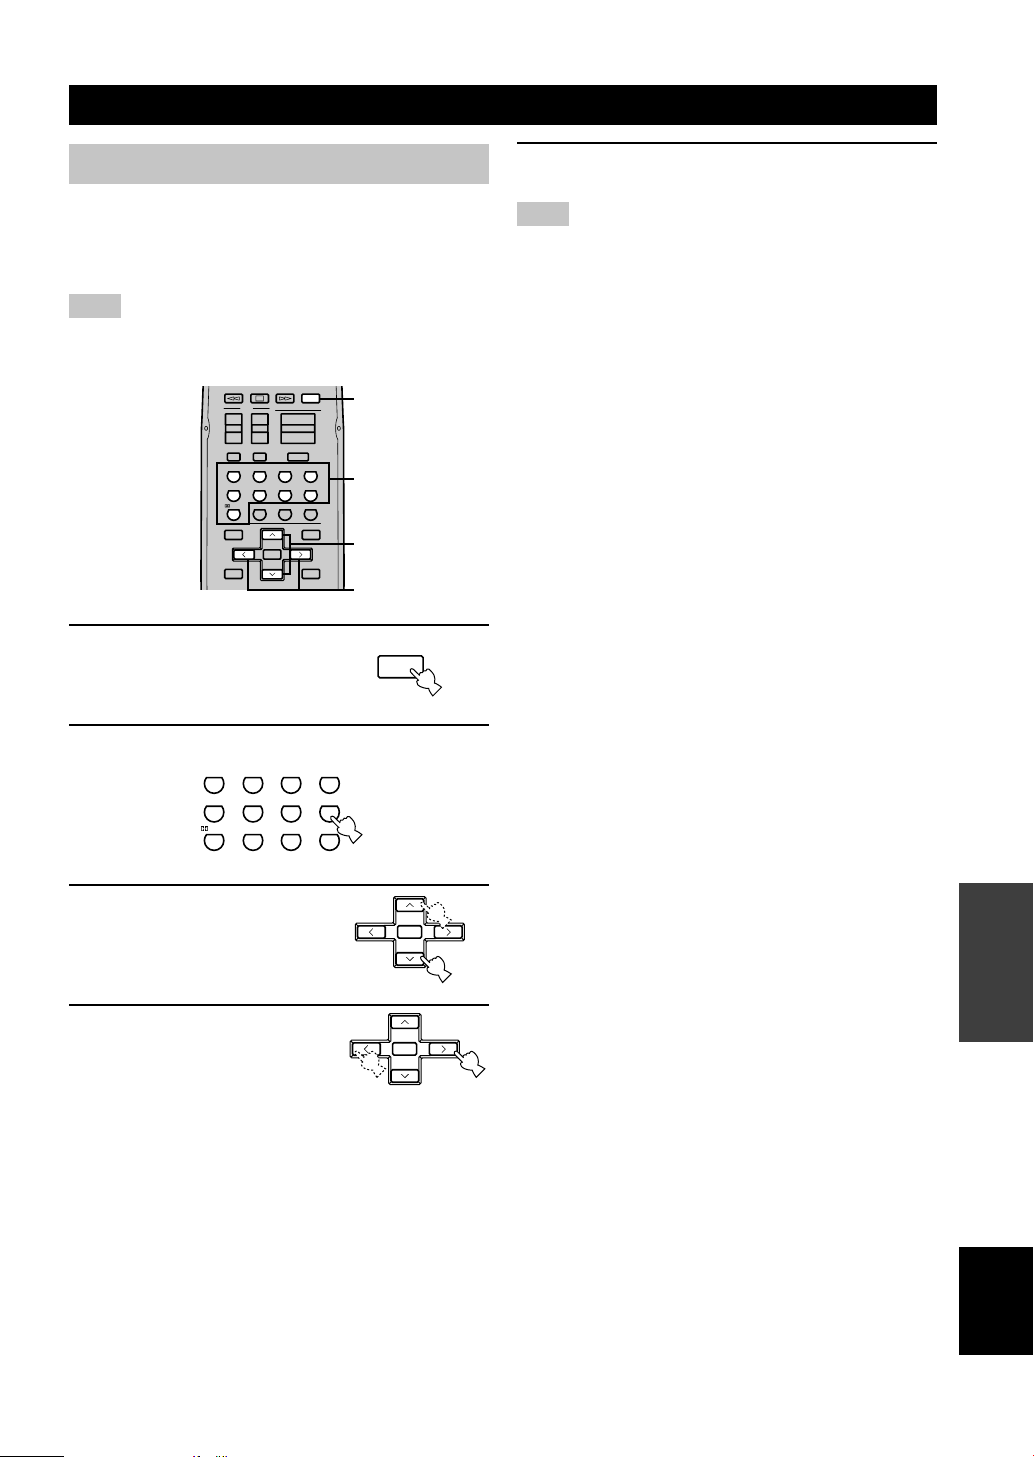
47
English
ADDITIONAL
INFORMATION
SOUND FIELD PROGRAM PARAMETER EDITING
Changing parameter settings
The initial sound field program settings will provide you
with an excellent listening experience as they are. It is not
necessary to alter these settings, but you can create an
original listening environment by doing so.
Note
• The editable parameters vary depending on the sound field
program you select. Refer to the explanation for the parameter.
1 Press AMP.
2 Select a sound field program.
3 Press u / d to select the
parameter you want to
change.
4 Press j / i to change the
parameter setting.
ENTER
+10
09
STEREO
6.1/5.1
NIGHT
/DTS
8765
MOVIE2MOVIE1TV THTRMUSIC
432
1
ENTERTAINMENT
ROCKJAZZHALL
TV
AMP
MUTE
INPUTMUTE
VOLUME
+–+
–
+
–
CHVOL
SET MENU
SELECT
PRESET/CH
A/B/C/D/E
LEVEL
MENU
TEST
RETURN
DISPLAY
TITLE
+
–
2
3
4
1
AMP
ENTER
+10
09
STEREO
6.1/5.1
NIGHT
/DTS
8765
MOVIE2MOVIE1TV THTRMUSIC
432
1
ENTERTAINMENT
ROCKJAZZHALL
SELECT
+
–
PRESET/CH
SELECT
+
–
PRESET/CH
5 Repeat steps 2 – 4 if you wish to alter other
parameters.
Note
• You cannot alter these parameters if the “OPTION 2 MEM.
GUARD” parameter in the set menu is set to ON. Change this
setting to OFF if you wish to alter any other parameters.
Page 50

48
Digital sound field parameter descriptions
You can adjust the values of certain digital sound field parameters so the sound fields are recreated accurately in your
listening room. Not all of the following parameters are found in every program.
■ DSP LEVEL
Function: This parameter adjusts the level of all the DSP effect sounds within a narrow range.
Description: Depending on the acoustics of your listening room, you may want to increase or decrease the DSP
effect level relative to the direct sound.
Control Range: –6 dB to +3 dB
■ DELAY
Function: Adjusts the time difference between the beginning of the sound from the main speakers and the
beginning of the sound effect from the rear speakers. The larger the value, the later the sound effect is
generated.
Control range: 1 to 99 ms (Control range varies depending on the input source and the DSP program you use.)
For 5ch Stereo
Function: These parameters adjust the volume level for each channel in 5-channel stereo mode.
Control range: 0 to 100%
■ CT LEVEL (Center level)
■ RL LEVEL (Rear left level)
■ RR LEVEL (Rear right level)
For PRO LOGIC II Music
■ PANORAMA
Function: Extends the front stereo image to include the surround speakers for a wraparound effect.
Choices: OFF/ON, initial setting is OFF.
■ DIMENSION
Function: Gradually adjusts the soundfield either towards the front or towards the rear.
Control range: –3 (towards the rear) to +3 (towards the front), initial setting is STD (standard).
■ CT WIDTH (Center width)
Function: Adjusts the center image from all three front speakers to varying degrees. A larger value adjusts the
center image towards the main left and right speakers.
Control range: 0 (center channel sound is output only from center speaker) to 7 (center channel sound is output only
from main left and right speakers), initial setting is 3.
SOUND FIELD PROGRAM PARAMETER EDITING
Page 51
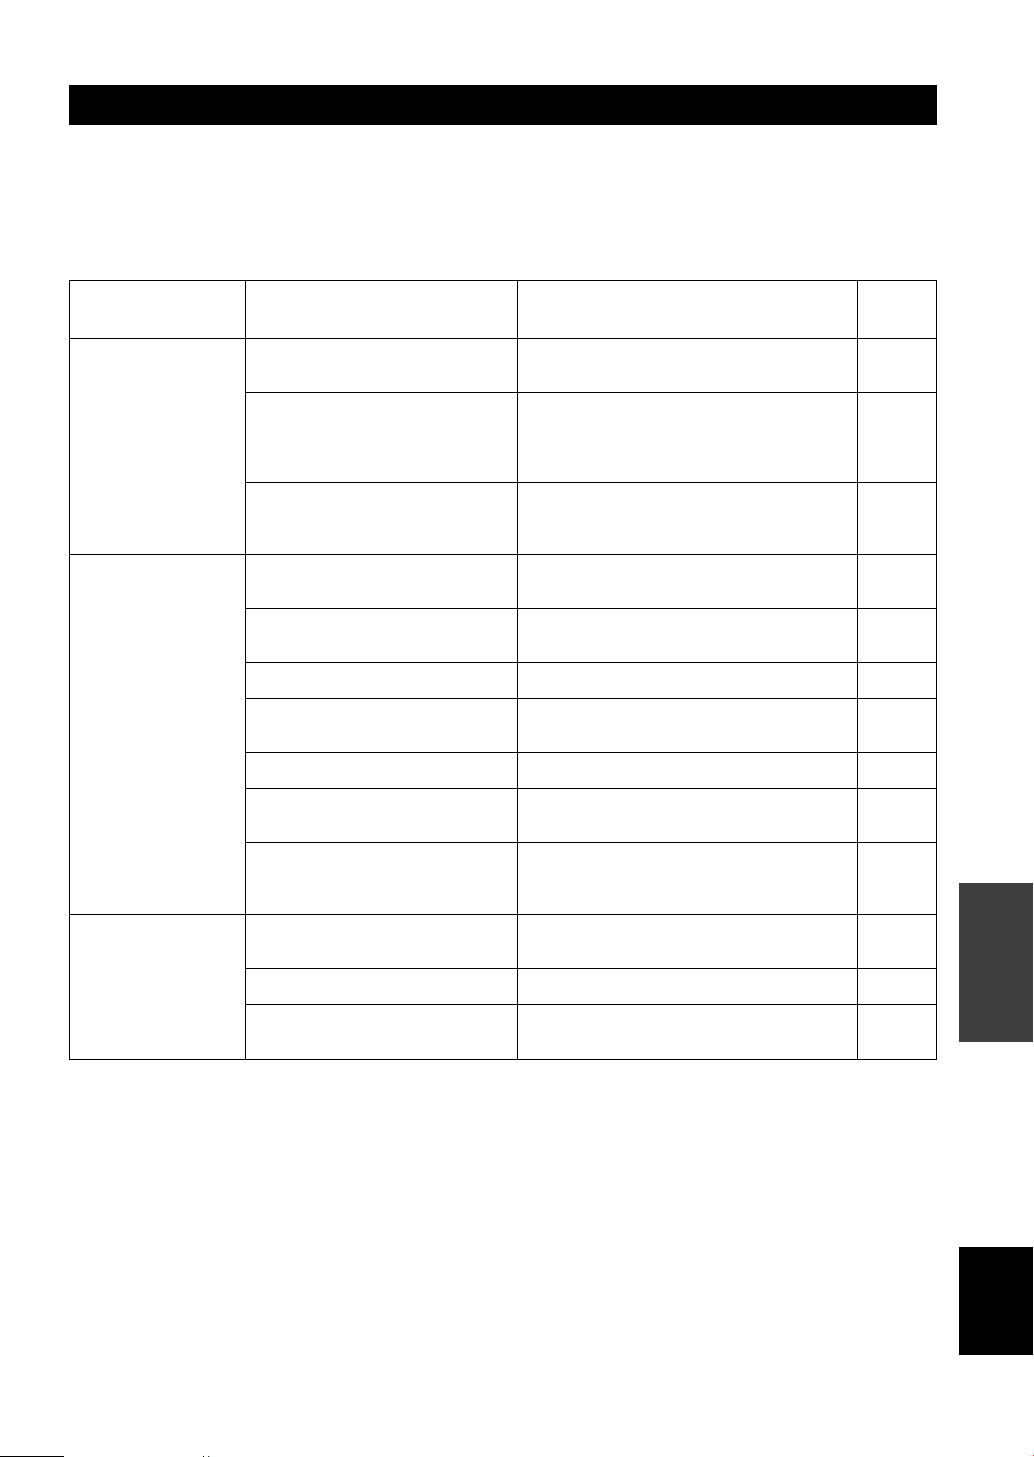
49
English
ADDITIONAL
INFORMATION
TROUBLESHOOTING
Refer to the chart below when this unit does not function properly. If the problem you are experiencing is not listed
below or if the instruction below does not help, set this unit to standby mode, disconnect the power cord, and contact the
nearest authorized YAMAHA dealer or service center.
■ General
Problem
This unit fails to turn
on when STANDBY/
ON (or SYSTEM
POWER) is pressed,
or enters in standby
mode soon after the
power has been
turned on.
No sound.
The sound suddenly
goes off.
Cause
The power cord is not connected or the
plug is not completely inserted.
The protection circuitry has been
activated.
This unit has been exposed to a strong
external electric shock (such as lightning
and strong static electricity).
Incorrect input or output cable connections.
No appropriate input source is selected.
The speaker connections are not secure.
The main speakers have not been selected
properly.
The volume is turned down.
The sound is muted.
Digital signals which this unit cannot
reproduce are being received from a
source component e.g.; a CD-ROM.
The protection circuit has been activated
because of a short circuit, etc.
The sleep timer has turned the unit off.
The sound is muted.
Remedy
Connect the power cord firmly.
Make sure all speaker wire connections on this unit
and on all speakers are secure and that the wire for
each connection is not touching anything other than
its respective connection.
Set this unit in standby mode, disconnect the power
cord, plug it back in after 30 seconds, then use it
normally.
Connect the cables properly. If the problem persists,
the cables may be defective.
Select an appropriate input source with INPUT l /
h or 6CH INPUT (or the input selector buttons).
Secure the connections.
Press and set SPEAKERS ON/OFF to ON, and select
the proper main speakers with SPEAKERS A/B.
Turn up the volume.
Press MUTE or any operation buttons on the unit to
cancel mute and adjust the volume.
Play a source whose signals this unit can reproduce.
Check the speaker wires are not touching each other
and then turn the unit back on.
Turn on the power, and play the source again.
Press MUTE or any operation buttons on the unit to
cancel a mute and adjust the volume.
Refer to
page
–
15 – 16
–
9 – 16
21
15 – 16
21
22
–
–
–
–
–
Page 52
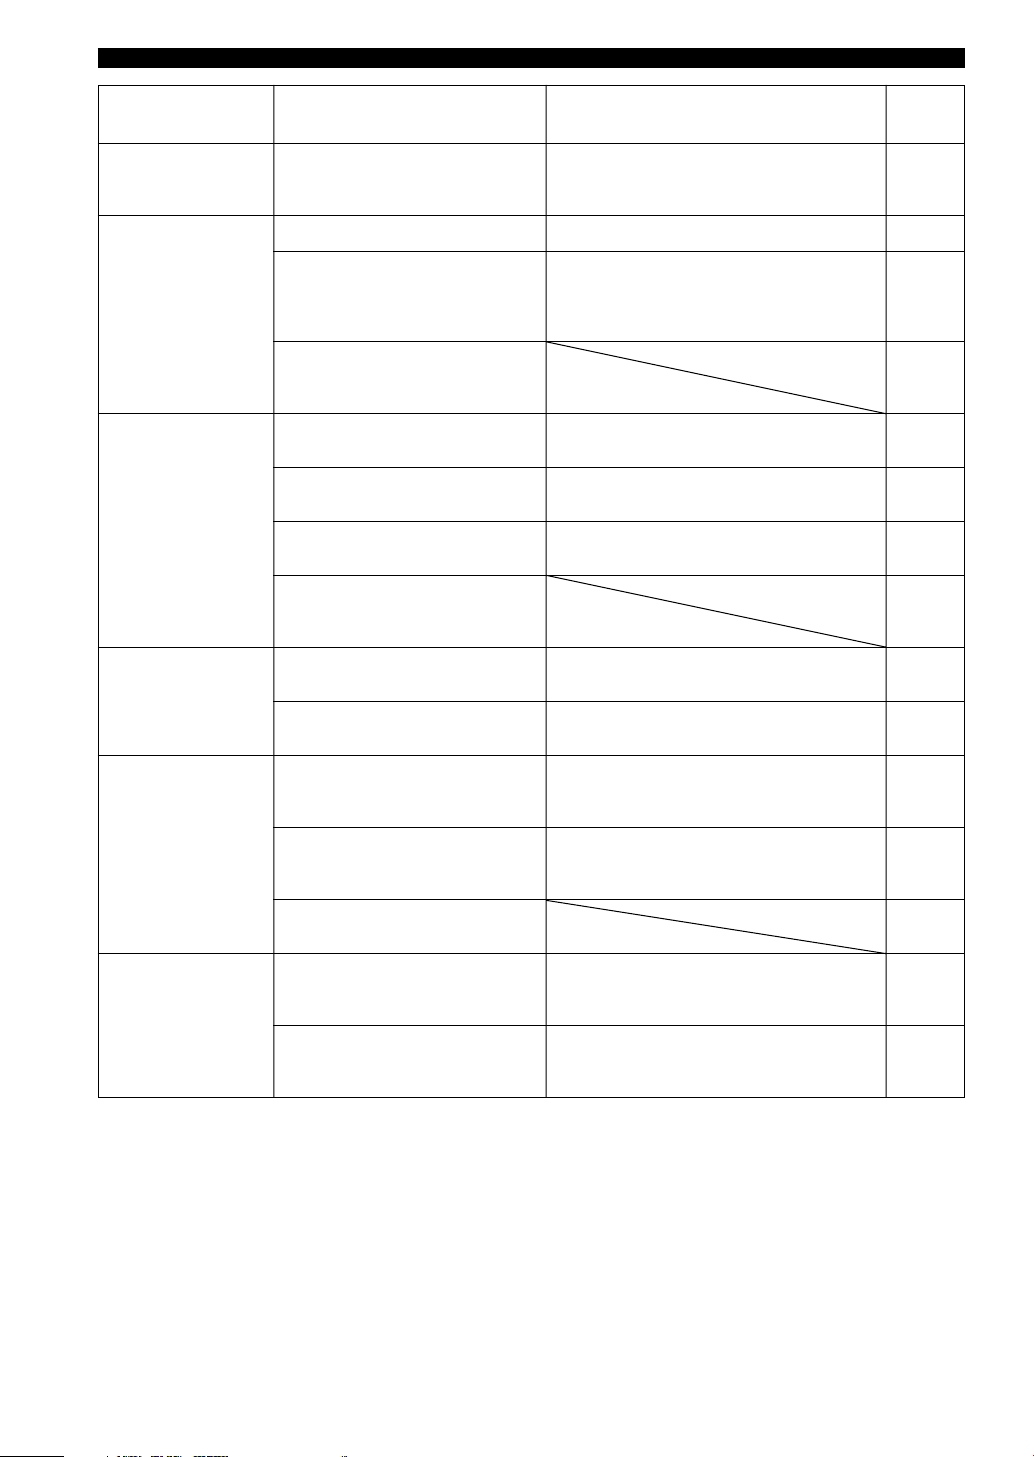
50
Problem
No sound / weak
sound from particular
speakers.
No sound from the
effect speakers.
No sound from the
center speaker.
No sound from the
rear speakers.
No sound from the
subwoofer.
Poor bass
reproduction.
Cause
Incorrect cable connections.
The sound effect is switched off.
A Dolby Surround, Dolby Digital or DTS
decoding DSP program is being used with
material not encoded with Dolby
Surround, Dolby Digital or DTS.
A digital signal with a sampling
frequency of greater than 48 kHz is input
to this unit.
The output level of the center speaker is
set to minimum.
“SOUND 1A CENTER” on the set menu
is set to NON.
One of the Hi-Fi DSP programs (1 to 4)
has been selected (except for 5ch Stereo).
The source encoded with a Dolby Digital
or DTS signal does not have a center
channel signal.
The output level of the rear speakers is set
to minimum.
A monaural source is being played with
program 9.
“SOUND 1D BASS” on the set menu is
set to MAIN when a Dolby Digital or
DTS signal is being played.
“SOUND 1D BASS” on the set menu is
set to SWFR or MAIN when a 2-channel
source is being played.
The source does not contain low bass
signals (90 Hz and below).
“SOUND 1D BASS” on the set menu is
set to SWFR or BOTH and your system
does not include a subwoofer.
The speaker mode settings (main, center
or rear) on the set menu does not match
your speaker configuration.
Remedy
Connect the cables properly. If the problem persists,
the cables may be defective.
Press STEREO to turn it on.
Select another DSP program.
Raise the level of the center speaker.
Select the appropriate mode for your center speaker.
Select another DSP program.
Raise the output level of the rear speakers.
Select another DSP program.
Select SWFR or BOTH.
Select BOTH.
Select MAIN.
Select the appropriate position for each speaker based
on the size of the speakers in your configuration.
Refer to
page
15
–
24 – 29
–
46
38
24 – 29
–
46
24 – 29
39
39
–
39
38 – 39
TROUBLESHOOTING
Page 53
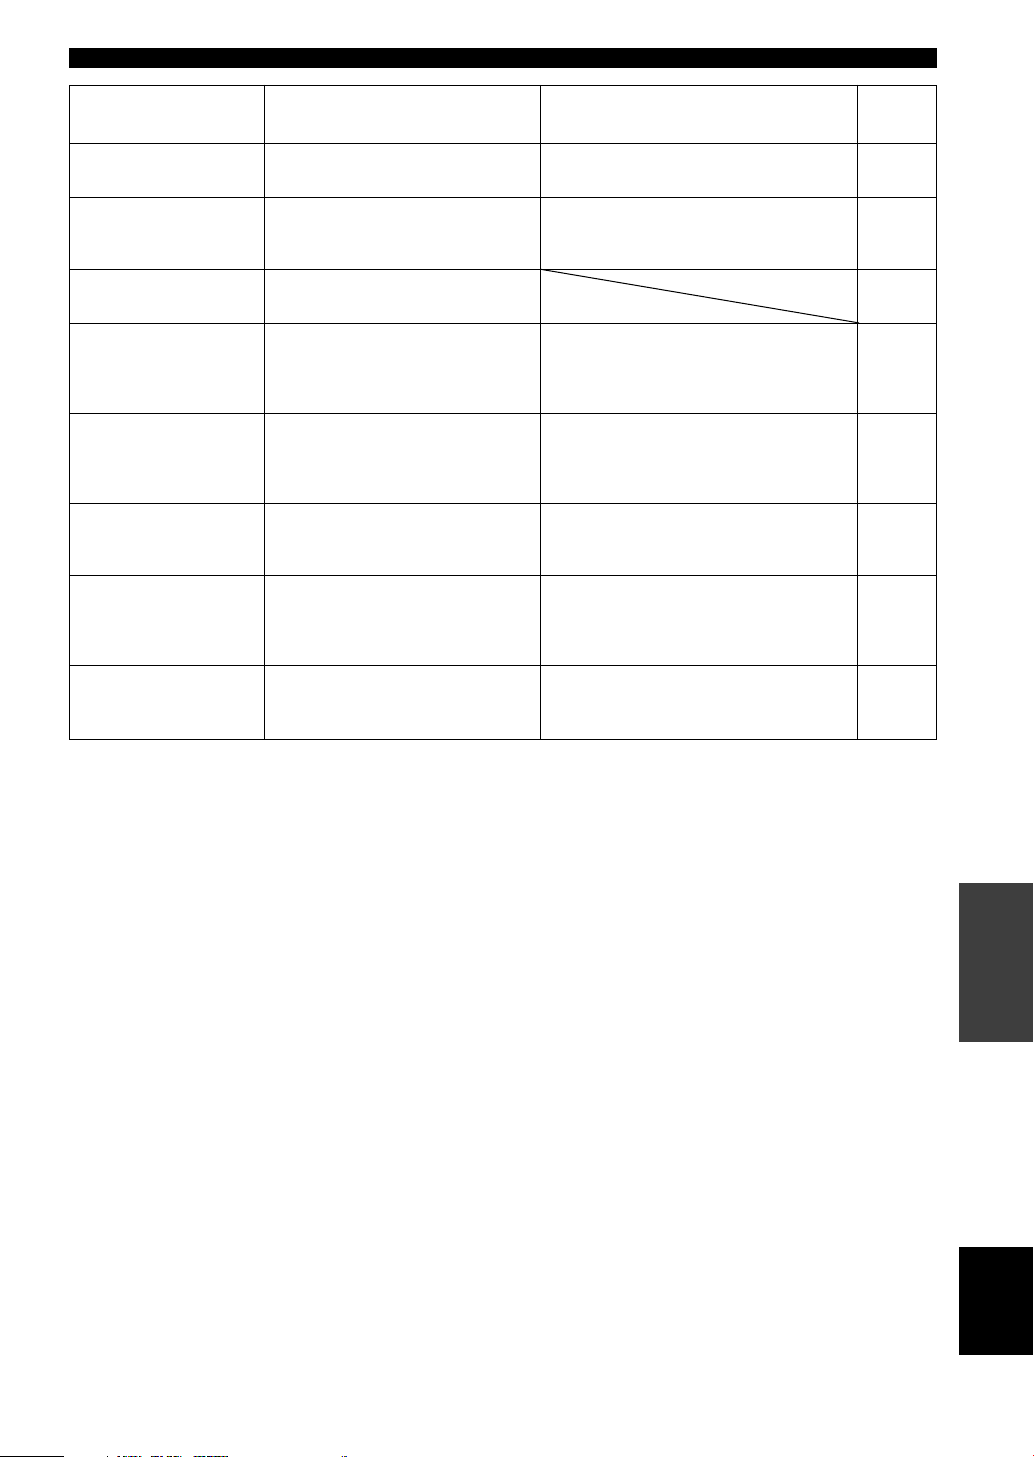
51
English
ADDITIONAL
INFORMATION
Problem
A “humming” sound can
be heard.
The volume level cannot
be increased, or the
sound is distorted.
The sound effect cannot
be recorded.
The sound field
parameters and some
other settings on the
unit cannot be changed.
The unit does not
operate properly.
“CHECK SP WIRES”
appears on the front
panel display.
There is noise interference from digital or
high-frequency
equipment, or this unit.
The unit suddenly turns
into standby mode.
Cause
Incorrect cable connections.
The component connected to the OUT
(REC) jacks of this unit is turned off.
It is not possible to record the sound effect
with a recording component.
“OPTION 2 MEM. GUARD” in the set
menu is set to ON.
The internal microcomputer has been
frozen by an external electric shock (such
as lightning or excessive static electricity)
or by a power supply with low voltage.
The speaker cables are short circuited.
This unit is too close to the digital or highfrequency equipment.
The internal temperature has become too
high and the overheat protection circuitry
has been activated.
Remedy
Firmly connect the audio plugs. If the problem
persists, the cables may be defective.
Turn on the power to the component.
Set “OPTION 2 MEM. GUARD” in the set menu
to OFF.
Disconnect the AC power cord from the outlet
and then plug it in again after about 30 seconds.
Make sure all speaker cables are connected
correctly.
Move this unit further away from such
equipment.
Wait until the unit cools down and then turn it
back on.
Refer to
page
–
–
–
–
–
–
–
–
TROUBLESHOOTING
Page 54
52
■ Tuner
FM stereo reception is
noisy.
There is distortion, and
clear reception cannot
be obtained even with a
good FM antenna.
The desired station
cannot be tuned in with
the automatic tuning
method.
Previously preset
stations can no longer
be tuned in.
The desired station
cannot be tuned in with
the automatic tuning
method.
There are continuous
crackling and hissing
noises.
There are buzzing and
whining noises
(especially in the
evening).
Problem
FM
AM
Cause
The characteristics of FM stereo
broadcasts may cause this problem
when the transmitter is too far away or
the antenna input is poor.
There is multipath interference.
The station is too weak.
The unit has been disconnected for a
long period.
The signal is weak or the antenna
connections are loose.
Noises result from lightning,
fluorescent lamps, motors, thermostats
and other electrical equipment.
A TV set is being used nearby.
Remedy
Check the antenna connections.
Try using a high-quality directional FM
antenna.
Use the manual tuning method.
Adjust the antenna position to eliminate
multipath interference.
Use a high-quality directional FM antenna.
Use the manual tuning method.
Re-store the stations.
Tighten the AM loop antenna connections and
orient it for best reception.
Use the manual tuning method.
Use an outdoor antenna and a ground wire.
This will help somewhat, but it is difficult to
eliminate all noise.
Move this unit away from the TV.
Refer to
page
12
31
–
–
31
32
–
31
12
–
■ Remote control
Problem
The remote control does
not work nor function
properly.
Cause
Wrong distance or angle.
Direct sunlight or lighting (from an
inverter type of fluorescent lamp, etc.) is
striking the remote control sensor of this
unit.
The batteries are weak.
The manufacture code has not correctly
set.
Even if the manufacturer code is correctly
set, there are some models that do not
respond to the remote control.
Remedy
The remote control will function within a
maximum range of 6 m (20 feet) and no more
than 30 degrees off-axis from the front panel.
Reposition this unit.
Replace all batteries with new ones.
Set the code correctly.
Try setting another code of the same manufacturer.
Refer to
page
7
–
3
44
44
–
TROUBLESHOOTING
Page 55

53
English
ADDITIONAL
INFORMATION
GLOSSARY
■ Dolby Surround
Dolby Surround uses a 4 channel analog recording system
to reproduce realistic and dynamic sound effects: 2 main
left and right channels (stereo), a center channel for
dialog (monaural), and a rear channel for special sound
effects (monaural). The rear channel reproduces sound
within a narrow frequency range.
Dolby Surround is widely used with nearly all video tapes
and laser discs, and in many TV and cable broadcasts as
well. The Dolby Pro Logic decoder built into this unit
employs a digital signal processing system that
automatically stabilizes the volume on each channel to
enhance moving sound effects and directionality.
■ Dolby Digital
Dolby Digital is a digital surround sound system that
gives you completely independent multi-channel audio.
With 3 front channels (left, center, and right), and 2 rear
stereo channels, Dolby Digital provides 5 full-range audio
channels. With an additional channel especially for bass
effects, called LFE (low frequency effect), the system has
a total of 5.1 channels (LFE is counted as 0.1 channel).
By using 2-channel stereo for the rear speakers, more
accurate moving sound effects and surround sound
environment are possible than with Dolby Surround. The
wide dynamic range (from maximum to minimum
volume) reproduced by the 5 full-range channels and the
precise sound orientation generated using digital sound
processing provide listeners with previously unheard of
excitement and realism.
With this unit, any sound environment from monaural up
to a 5.1-channel configuration can be freely selected for
your enjoyment.
■ Matrix 6.1
The unit incorporates Matrix 6.1 decoder for Dolby
Digital and DTS multi-channel software that enables 6.1channel reproduction by adding the rear center channel to
existing 5.1-channel format. (The rear center channel is
created from rear left and right channels, and outputted
from virtual rear center speaker.) With this additional
channel, you can experience more dynamic and realistic
moving sound especially with scenes with “fly-over ” and
“fly-around ” effects.
■ Dolby Pro Logic II
Dolby Pro Logic II is an improved technique used to
decode vast numbers of existing Dolby Surround
software. This new technology enables a discrete 5channel playback with 2 main left and right channels, 1
center channel, and 2 rear left and right channels (instead
of only 1 rear channel for conventional Pro Logic
technology). A music mode is also available for 2-channel
sources in addition to the movie mode.
■ DTS (Digital Theater Systems) Digital
Surround
DTS digital surround was developed to replace the analog
soundtracks of movies with a 6-channel digital sound
track, and is now rapidly gaining popularity in movie
theaters around the world. Digital Theater Systems Inc.
has developed a home theater system so that you can
enjoy the depth of sound and natural spatial
representation of DTS digital surround in your home.
This system produces practically distortion-free 6-channel
sound (technically, a left, right and center channels, 2 rear
channels, plus an LFE 0.1 channel as a subwoofer, for a
total of 5.1 channels).
■ LFE 0.1 channel
This channel is for the reproduction of low bass signals.
The frequency range for this channel is 20 Hz to 120 Hz.
This channel is counted as 0.1 because it only enforces a
low frequency range compared to the full-range
reproduced by the other 5 channels in a Dolby Digital or
DTS 5.1 channel systems.
■ CINEMA DSP
Since the Dolby Surround and DTS systems were
originally designed for use in movie theaters, their effect
is best felt in a theater having many speakers and
designed for acoustic effects. Since home conditions,
such as room size, wall material, number of speakers, and
so on, can differ so widely, it’s inevitable that there are
differences in the sound heard as well. Based on a wealth
of actually measured data, YAMAHA CINEMA DSP uses
YAMAHA original sound field technology to combine
Dolby Pro Logic, Dolby Digital and DTS systems to
provide the visual and audio experience of movie theater
in the listening room of your own home.
■ SILENT CINEMA
YAMAHA has developed a natural, realistic sound effect
DSP algorithm for headphones.
Parameters for headphones have been set for each sound
field so that accurate representations of all the sound field
programs can be enjoyed using headphones.
■ Virtual CINEMA DSP
YAMAHA has developed a virtual CINEMA DSP
algorithm that allows you to enjoy DSP sound field
surround effects even without any rear speakers by using
virtual rear speakers.
It is even possible to enjoy virtual CINEMA DSP using a
minimal 2-speaker system that does not include a center
speaker.
Page 56

54
■ PCM (Linear PCM)
Linear PCM is a signal format under which an analog
audio signal is digitized, recorded and transmitted without
using any compression. This is used as a method of
recording CDs and DVD audio. The PCM system uses a
technique for sampling the size of the analog signal per
very small unit of time. Standing for “pulse code
modulation”, the analog signal is encoded as pulses and
then modulated for recording.
■ Sampling frequency and number of
quantized bits
When digitizing an analog audio signal, the number of
times the signal is sampled per second is called the
sampling frequency, while the degree of fineness when
converting the sound level into a numeric value is called
the number of quantized bits.
The range of rates that can be played back is determined
based on the sampling rate, while the dynamic range
representing the sound level difference is determined by
the number of quantized bits. In principle, the higher the
sampling frequency, the wider the range of frequencies
that can be played back, and the higher the number of
quantized bits, the more finely the sound level can be
reproduced.
GLOSSARY
Page 57

55
English
ADDITIONAL
INFORMATION
SPECIFICATIONS
FM SECTION
• Tuning Range
[U.S.A. and Canada models] ............................ 87.5 to 107.9 MHz
[Other models] .............................................. 87.50 to 108.00 MHz
• 50 dB Quieting Sensitivity (IHF, 100% mod.)
Mono/Stereo ........................ 2.0 µV (17.3 dBf) /25 µV (39.2 dBf)
• Selectivity (400 kHz) ............................................................... 70 dB
• Signal to Noise Ratio (IHF)
Mono/Stereo .............................................................. 76 dB/70 dB
• Harmonic Distortion (1 kHz)
Mono/Stereo ................................................................. 0.2%/0.3%
• Stereo Separation (1 kHz) ....................................................... 42 dB
• Frequency Response ........................... 20 Hz to 15 kHz +0.5, –2 dB
AM SECTION
• Tuning Range ......................................... 530/531 to 1710/1611 kHz
• Usable Sensitivity ............................................................. 300 µV/m
GENERAL
• Power Supply
[U.S.A. and Canada models] ............................... AC 120 V/60 Hz
[Australia model] ................................................. AC 240 V/50 Hz
[U.K., Europe and Singapore models] ................ AC 230 V/50 Hz
[Korea model] ...................................................... AC 220 V/60 Hz
[China model] ...................................................... AC 220 V/50 Hz
[General model] .................... AC 110-120 V/220-240 V, 50/60 Hz
• Power Consumption
[U.S.A. and Canada models] .................................. 210 W/280 VA
[Other models] ..................................................................... 210 W
Standby Mode ........................................................... 0.8 W or less
• Dimension (W x H x D) ................................... 435 x 151 x 322 mm
(17-1/8” x 5-15/16” x 12-11/16”)
• Weight ................................................................. 8 kg (17 lbs 10 oz)
*Specifications are subject to change without notice.
AUDIO SECTION
• Minimum RMS Output Power for Main, Center, Rear
1 kHz, 0.1% THD, 6 Ω
[U.S.A. and Canada models] ................................................. 70 W
[Other models] ....................................................................... 60 W
1 kHz, 0.7% THD, 6 Ω
[U.S.A. and Canada models] ................................................. 75 W
[U.K., Europe, Australia and Korea models] ......................... 65 W
• DIN Standard Output Power
[Europe model]
1 kHz, 0.7% THD, 4 Ω .......................................................... 75 W
• Maximum Power (EIAJ)
[China, Korea and General models]
1 kHz, 10% THD, 6 Ω ........................................................... 80 W
• Dynamic Power (IHF, 6/4/2 Ω)
[U.S.A. and Canada models] ................................... 85/100/115 W
[Other models] ........................................................... 75/95/105 W
• Frequency Response
CD, etc. to Main L/R .............................. 10 Hz to 100 kHz, –3 dB
• Total Harmonic Distortion
1 kHz, 30 W, 6 Ω, Main L/R .................................................0.06%
• Signal to Noise Ratio (IHF-A Network)
CD (250 mV, shorted) to Main L/R, Effect Off .............. h100 dB
• Residual Noise (IHF-A Network)
Main L/R ................................................................ 150 µV or less
• Channel Separation (1 kHz/10 kHz)
CD, etc. (5.1 kΩ terminated) to Main L/R ........ h60 dB/h45 dB
• Tone Control (Main L/R)
BASS Boost/Cut .................................................... ±10 dB/100 Hz
TREBLE Boost/Cut ............................................... ±10 dB/20 kHz
• Phones Output ........................................................... 300 mV/470 Ω
• Input Sensitivity
CD, etc. ...................................................................150 mV/47 kΩ
6CH INPUT ............................................................ 150 mV/47 kΩ
• Output Level
OUT (REC) ........................................................... 150 mV/1.2 kΩ
OUTPUT SUBWOOFER ............................................. 4 V/1.2 kΩ
VIDEO SECTION
• Video Signal Type ...................................................... NTSC or PAL
• Composite Video Signal Level ...................................... 1 Vp-p/75 Ω
• Signal to Noise Ratio ........................................................... h50 dB
• Frequency Response (MONITOR OUT)
............................................................... 5 Hz to 10 MHz, –3 dB
Page 58

LIST OF MANUFACTURER’S CODES
LISTA DE CÓDIGOS DE FABRICANTES
製造廠家編碼表
TV
Yamaha 299 292
Admiral 292 293
Aiwa 294 276 283 284
Akai 295 296
Alba 296
AOC 297
Bell&Howell 292
Bestar 298
Blaupunkt 229 222
Blue sky 298
Brandt 223
Brocsonic 297
Bush 296
Clatronic 298
Craig 224
Croslex 225
Curtis Mathis 297 226
Daewoo 297 298 224 227 228
Daytron 239
Dual 298
Emerson 297 224 239 232
Ferguson 223 265 266
First line 298
Funai 277 278
Fisher 295 233
Fraba 298
GE 293 297 234 235 236
LG/Goldstar 297 298 239 237
Goodmans 296 298 223
Grundig 229 238 249
Hitachi 297 239 242 243 285
ICE 296
Irradio 296
Itt/Nokia 244 245
JC Penny 293 297 234 237
JVC 296 246 247 286
Kendo 298
KTV 297 239
Loewe 298 248
LXI 293 297 225 226 233
Magnavox 297 225 239
Matsui 295
Mitsubishi 299 297 259 287
NEC 297 252 282
Nokia 244 245
Nokia Oceanic 245
Nordmende 265 266
Onwa 296
Panasonic 234 235 236 253 288 211
Philco 297 225 239
Philips 225
Pioneer 226 235 254 255 268
Portland 297 256
Quasar 234 235
Radio Shack 299 293 297
RCA 293 297 234 256 257 258
SABA 223 269 265 266
Samsung 297 239 248 262 275
Sanyo 295 233 279 272 273 274 212
Schneider 296
Scott 297
Sharp 292 239 232 213
Siemens 229
Signature 292
Sony 263 214
Sylvania 297 225
Telefunken 269 264 265 266
Thomson 223 266
Toshiba 292 226 267 215
Videch 297 242
Wards 297 239 232
VCR
Yamaha 399 392 393 394
Admiral 395
Aiwa 396 397 398 329
Akai 322 323 324
Audio Dynamic 392 394
Bell&Howell 393
Blaupunkt 325 326
Brocsonic 327
Bush 322
Canon 325 328
CGM 396 332
Citizen 396
Craig 396
Curtis Mathis 397 328 333
Daewoo 328 334 335
DBX 392 394
Dimensia 333
Emerson 327 334
Fisher 393 336
Funai 397
GE 328 333 387
LG/Goldstar 396 388
Goodmans 334 337
Grundig 332 338
Hitachi 325 333 349 342 343
Instant Replay 325 328
Itt/Nokia 393
JC Penny 392 393 394 328 333 349
JVC 392 394 344 345 346 347
Kendo 396
Kenwood 392 394 396
Loewe 396 337
Luxor 395
LXI 393 396 397 336 349
Magnavox 325 326 328
Marantz 392 394
Marta 396
Matsui 396
Memorex 328 336
Minolta 333 349
Mitsubishi 399 344 348 359 352 353
Multitech 397 348 354
NEC 392 394 344 383
Nokia 393 395
Nokia Oceanic 395
Okano 323
Olympic 325 328
Orion 327
Panasonic 325 328 355 378 384 385 386
Pentax 333 349
Philco 325 328
Philips 325 326 328 337 356 357
Phonola 337
Pioneer 325
Quasar 325 328
RCA/PROSCAN 325 326 328 333 335 349 358 369
Realistic 393 397 328 336 359 362
Samsung 354 358 363 364 365 366
Sansui 394
Sanyo 393 336 367
Page 59

Schneider 337
Scott 399 335 336 348 359 352 354
358
Seleco 322
Sharp 395 362 382
Siemens 393
Signature 2000 395 397
Sony 368 379 372 373 374 375
Sylvania 397 325 326 328
Symphonic 397
Tandberg 334
Tashiro 396
Tatung 392 394
Teac 392 394 397
Technics 325 328
Telefunken 376 377
Thorn 393 396
Toshiba 335 369 389
Universum 396 327 376
W.WHouse 396
Wards 395 396 336 362
DVD player
Yamaha 699 622 623 647
DENON 623 624
Funai 625
HITACHI 626
JVC 627
KENWOOD 628
Mitsubishi 629
Onkyo 632 633 634
Panasonic 623 635
Philips 699 647
Pioneer 636 637 638
RCA 639
Samsung 642
Sharp 643
Sony 644
Toshiba 634
LG/GOLD STAR 645
THOMSON 646
MD Recorder
Yamaha 599
CD player
Yamaha 199
CD Recorder
Yamaha 499
Page 60

YAMAHA ELECTRONICS CORPORATION, USA 6660 ORANGETHORPE AVE., BUENA PARK, CALIF. 90620, U.S.A.
YAMAHA CANADA MUSIC LTD. 135 MILNER AVE., SCARBOROUGH, ONTARIO M1S 3R1, CANADA
YAMAHA ELECTRONIK EUROPA G.m.b.H. SIEMENSSTR. 22-34, 25462 RELLINGEN BEI HAMBURG, F.R. OF GERMANY
YAMAHA ELECTRONIQUE FRANCE S.A. RUE AMBROISE CROIZAT BP70 CROISSY-BEAUBOURG 77312 MARNE-LA-VALLEE CEDEX02, FRANCE
YAMAHA ELECTRONICS (UK) LTD. YAMAHA HOUSE, 200 RICKMANSWORTH ROAD WATFORD, HERTS WD1 7JS, ENGLAND
YAMAHA SCANDINAVIA A.B. J A WETTERGRENS GATA 1, BOX 30053, 400 43 VÄSTRA FRÖLUNDA, SWEDEN
YAMAHA MUSIC AUSTRALIA PTY, LTD. 17-33 MARKET ST., SOUTH MELBOURNE, 3205 VIC., AUSTRALIA
Printed in China WB14580
Page 61

documentation manual, user maintenance, brochure, user reference, pdf manual
This file has been downloaded from:
User Manual and User Guide for many equipments like mobile phones, photo cameras, monther board, monitors, software, tv, dvd, and othes..
Manual users, user manuals, user guide manual, owners manual, instruction manual, manual owner, manual owner's, manual guide,
manual operation, operating manual, user's manual, operating instructions, manual operators, manual operator, manual product,
 Loading...