

Page 1
Page 2

SPECIAL MESSAGE SECTION
This product utilizes batteries or an external power supply (adapter).
DO NOT connect this product to any power supply or adapter other
than one described in the manual, on the name plate, or specifically
recommended by Yamaha.
WARNING: Do not place this product in a position where anyone could
walk on, trip over ,or roll anything over power or connecting cords of any
kind. The use of an extension cord is not recommended! IF you must use
an extension cord, the minimum wire size for a 25' cord (or less ) is 18
AWG. NOTE: The smaller the AWG number ,the larger the current
handling capacity. For longer extension cords, consult a local electrician.
This product should be used only with the components supplied or; a
cart, rack, or stand that is recommended by Yamaha. If a cart, etc., is
used, please observe all safety markings and instructions that accompany the accessory product.
SPECIFICATIONS SUBJECT TO CHANGE:
The information contained in this manual is believed to be correct at the
time of printing. However, Yamaha reserves the right to change or
modify any of the specifications without notice or obligation to update
existing units.
This product, either alone or in combination with an amplifier and headphones or speaker/s, may be capable of producing sound levels that
could cause permanent hearing loss. DO NOT operate for long periods
of time at a high volume level or at a level that is uncomfortable. If you
experience any hearing loss or ringing in the ears, you should consult
an audiologist.
IMPORTANT: The louder the sound, the shorter the time period before
damage occurs.
NOTICE:
Service charges incurred due to a lack of knowledge relating to how a
function or effect works (when the unit is operating as designed) are not
covered by the manufacturer’s warranty, and are therefore the owners
responsibility. Please study this manual carefully and consult your
dealer before requesting service.
ENVIRONMENT AL ISSUES:
Yamaha strives to produce products that are both user safe and environmentally friendly. We sincerely believe that our products and the
production methods used to produce them, meet these goals. In keeping with both the letter and the spirit of the law, we want you to be
aware of the following:
Battery Notice:
This product MAY contain a small non-rechargeable battery which (if
applicable) is soldered in place. The average life span of this type of
battery is approximately five years. When replacement becomes
necessary, contact a qualified service representative to perform the
replacement.
This product may also use “household” type batteries. Some of these
may be rechargeable. Make sure that the battery being charged is a
rechargeable type and that the charger is intended for the battery
being charged.
When installing batteries, do not mix batteries with new, or with batteries of a different type. Batteries MUST be installed correctly. Mismatches or incorrect installation may result in overheating and battery
case rupture.
Warning:
Do not attempt to disassemble, or incinerate any battery. Keep all
batteries away from children. Dispose of used batteries promptly and
as regulated by the laws in your area. Note: Check with any retailer of
household type batteries in your area for battery disposal information.
Disposal Notice:
Should this product become damaged beyond repair, or for some
reason its useful life is considered to be at an end, please observe all
local, state, and federal regulations that relate to the disposal of products that contain lead, batteries, plastics, etc. If your dealer is unable
to assist you, please contact Yamaha directly.
NAME PLATE LOCATION:
The name plate is located on the bottom of the product. The model
number, serial number, power requirements, etc., are located on this
plate. You should record the model number, serial number, and the
date of purchase in the spaces provided below and retain this manual
as a permanent record of your purchase.
Model
Serial No.
Purchase Date
PLEASE KEEP THIS MANUAL
92-BP
FCC INFORMATION (U.S.A.)
1. IMPORTANT NOTICE: DO NOT MODIFY THIS UNIT!
This product, when installed as indicated in the instructions contained in this manual, meets FCC requirements. Modifications not
expressly approved by Yamaha may void your authority, granted
by the FCC, to use the product.
2. IMPORTANT: When connecting this product to accessories and/
or another product use only high quality shielded cables. Cable/s
supplied with this product MUST be used. Follow all installation
instructions. Failure to follow instructions could void your FCC
authorization to use this product in the USA.
3. NOTE: This product has been tested and found to comply with
the requirements listed in FCC Regulations, Part 15 for Class “B”
digital devices. Compliance with these requirements provides a
reasonable level of assurance that your use of this product in a
residential environment will not result in harmful interference with
other electronic devices. This equipment generates/uses radio
frequencies and, if not installed and used according to the instructions found in the users manual, may cause interference harmful
to the operation of other electronic devices. Compliance with FCC
* This applies only to products distributed by YAMAHA CORPORATION OF AMERICA.
regulations does not guarantee that interference will not occur in
all installations. If this product is found to be the source of interference, which can be determined by turning the unit “OFF” and
“ON”, please try to eliminate the problem by using one of the
following measures:
Relocate either this product or the device that is being affected by
the interference.
Utilize power outlets that are on different branch (circuit breaker
or fuse) circuits or install AC line filter/s.
In the case of radio or TV interference, relocate/reorient the antenna. If the antenna lead-in is 300 ohm ribbon lead, change the
lead-in to co-axial type cable.
If these corrective measures do not produce satisfactory results,
please contact the local retailer authorized to distribute this type
of product. If you can not locate the appropriate retailer, please
contact Yamaha Corporation of America, Electronic Service Division, 6600 Orangethorpe Ave, Buena Park, CA90620
The above statements apply ONLY to those products distributed
by Yamaha Corporation of America or its subsidiaries.
Page 3

PRECAUTIONS
PLEASE READ CAREFULLY BEFORE PROCEEDING
* Please keep these precautions in a safe place for future reference.
WARNING
Always follow the basic precautions listed below to avoid the possibility of serious injury or even death from electrical shock,
short-circuiting, damages, fire or other hazards. These precautions include, but are not limited to, the following:
• Do not open the instrument or attempt to disassemble the internal parts
or modify them in any way. The instrument contains no user-serviceable
parts. If it should appear to be malfunctioning, discontinue use immediately and have it inspected by qualified Yamaha service personnel.
• Do not expose the instrument to rain, use it near water or in damp or wet
conditions, or place containers on it containing liquids which might spill
into any openings.
• If the AC adaptor cord or plug becomes frayed or damaged, or if there is
a sudden loss of sound during use of the instrument, or if any unusual
smells or smoke should appear to be caused by it, immediately turn off
the power switch, disconnect the adaptor plug from the outlet, and have
the instrument inspected by qualified Yamaha service personnel.
• Use the specified adaptor (PA-3B) only. Using the wrong adaptor can result in damage to the instrument or overheating.
• Before cleaning the instrument, always remove the electric plug from the
outlet. Never insert or remove an electric plug with wet hands.
• Check the electric plug periodically and remove any dirt or dust which
may have accumulated on it.
CAUTION
Always follow the basic precautions listed below to avoid the possibility of physical injury to you or others, or damage to the
instrument or other property. These precautions include, but are not limited to, the following:
• Do not place the AC adaptor cord near heat sources such as heaters or
radiators, and do not excessively bend or otherwise damage the cord,
place heavy objects on it, or place it in a position where anyone could
walk on, trip over, or roll anything over it.
• When removing the electric plug from an outlet, always hold the plug
itself and not the cord.
• Do not connect the instrument to an electrical outlet using a multipleconnector. Doing so can result in lower sound quality, or possibly cause
overheating in the outlet.
• Remove the adaptor plug from the outlet when the instrument is not to be
used for extended periods of time, or during electrical storms.
• All batteries should be inserted in conformity with the +/– polarity markings. Failure to do so might result in overheating, fire, or battery fluid leakage.
• Always replace all batteries at the same time. Do not use new batteries
together with old ones. Also, do not mix battery types, such as alkaline
batteries with manganese batteries, or batteries from different makers, or
different types of batteries from the same maker, since this can cause
overheating, fire, or battery fluid leakage.
• If the instrument is not to be in use for an extended period of time, remove
the batteries from it, in order to prevent possible fluid leakage from the
battery.
• Before connecting the instrument to other electronic components, turn off
the power for all components. Before turning the power on or off for all
components, set all volume levels to minimum.
• Do not expose the instrument to excessive dust or vibrations, or extreme
cold or heat (such as in direct sunlight, near a heater, or in a car during the
day) to prevent the possibility of panel disfiguration or damage to the
internal components.
• Do not use the instrument near other electrical products such as televisions, radios, or speakers, since this might cause interference which can
affect proper operation of the other products.
• Do not place the instrument in an unstable position where it might accidentally fall over.
• Before moving the instrument, remove all connected adaptor and other
cables.
• When cleaning the instrument, use a soft, dry cloth. Do not use paint
thinners, solvents, cleaning fluids, or chemical-impregnated wiping cloths.
Also, do not place vinyl or plastic objects on the instrument, since this
might discolor the panel or keyboard.
• Do not rest your weight on, or place heavy objects on the instrument, and
do not use excessive force on the buttons, switches or connectors.
• Use only the stand/rack specified for the instrument. When attaching the
stand or rack, use the provided screws only. Failure to do so could cause
damage to the internal components or result in the instrument falling over.
• Do not operate the instrument for a long period of time at a high or uncomfortable volume level, since this can cause permanent hearing loss. If
you experience any hearing loss or ringing in the ears, consult a physician.
Yamaha cannot be held responsible for damage caused by improper use or modifications to the instrument, or data that is lost or destroyed.
Always turn the power off when the instrument is not in use.
Make sure to discard used batteries according to local regulations.
(4)
1
Page 4
○○○○○○○○○○○○○○○○○○○○○○○○○○○○○○○○○○○○○○○○○○○○○○○○○○○○○○○○○○○○○○○○
Congratulations!
You are the proud owner of a fine electronic keyboard. The Yamaha PSR-130 PortaTone
combines the most advanced tone generation technology with state-of-the-art digital electronics
and features to give you stunning sound quality with maximum musical enjoyment.
In order to make the most of your P ortaTone’s features and e xtensive perf ormance potential, we
urge you to read the manual thoroughly while trying out the various features described. Keep the
manual in a safe place for later reference.
○○○○○○○○○○○○○○○○○○○○○○○○○○○○○○○○○○○○○○○○○○○○○○○○○○○○○○○○○○○○○○○○
PSR-130’s Main Features
● 110 voices cov ering a wide v ariety of exceptionally realistic sounds with AWM technology.
● Dynamic, versatile rhythms and accompaniment with 80 music Styles.
● 20 Songs cover a wide variety of musical styles for listening or playing along with
when using the Minus One function.
● 20 Jam Tracks provide specially programmed rhythms and chord progressions for
playing along with.
● One Touch Setting automatically selects an appropr iate Voice for playing with the
Song/Jam Track/Style you select. (120 x 10 different types.)
The illustration as shown in this owner’s manual are for instructional purposes only, and may appear somewhat
different from those on your instrument.
2
Page 5
○○○○○○○○○○○○○○○○○○○○○○○○○○○○○○○○○○○○○○○○○○○○○○○○○○○○○○○○○○○○○○○○
Contents
The Music Stand......................................................................................................... 3
Button/Switch Names and Functions.......................................................... 4
Using Headphones (PHONES/AUX OUT jack)............................................................... 4
Power Requirements............................................................................................. 5
■ Using an AC Power Adaptor ..................................................................................... 5
■ Using Batteries........................................................................................................ 5
The PSR-130’s Basic operations.................................................................... 6
1 Turn On the PSR-130.............................................................................................6
Volume Control ........................................................................................................... 6
2 Turn On the Voice Guide ....................................................................................... 6
3 Selecting a SONG/JAM TRACK/STYLE or VOICE............................................... 7
Play a Selected Song............................................................................................ 8
Select a Song ........................................................................................................... 8
Using the Minus One Function............................................................................ 9
Tempo Control ............................................................................................................ 9
Play a Selected Voice .......................................................................................... 10
Select a Voice......................................................................................................... 10
About the Drum Kit ............................................................................................... 11
Play Along With the Selected Styles .......................................................... 12
Select a Style.......................................................................................................... 12
■ About Multi Fingering ............................................................................................. 14
Play Along With the Jam Tracks.................................................................... 15
Using the One Touch Setting.......................................................................... 16
■ Jam Track Chord Progression List ........................................................................... 17
Troubleshooting..................................................................................................... 18
Song Scores ................................................................................................................. 19
Specifications .............................................................................................................. 29
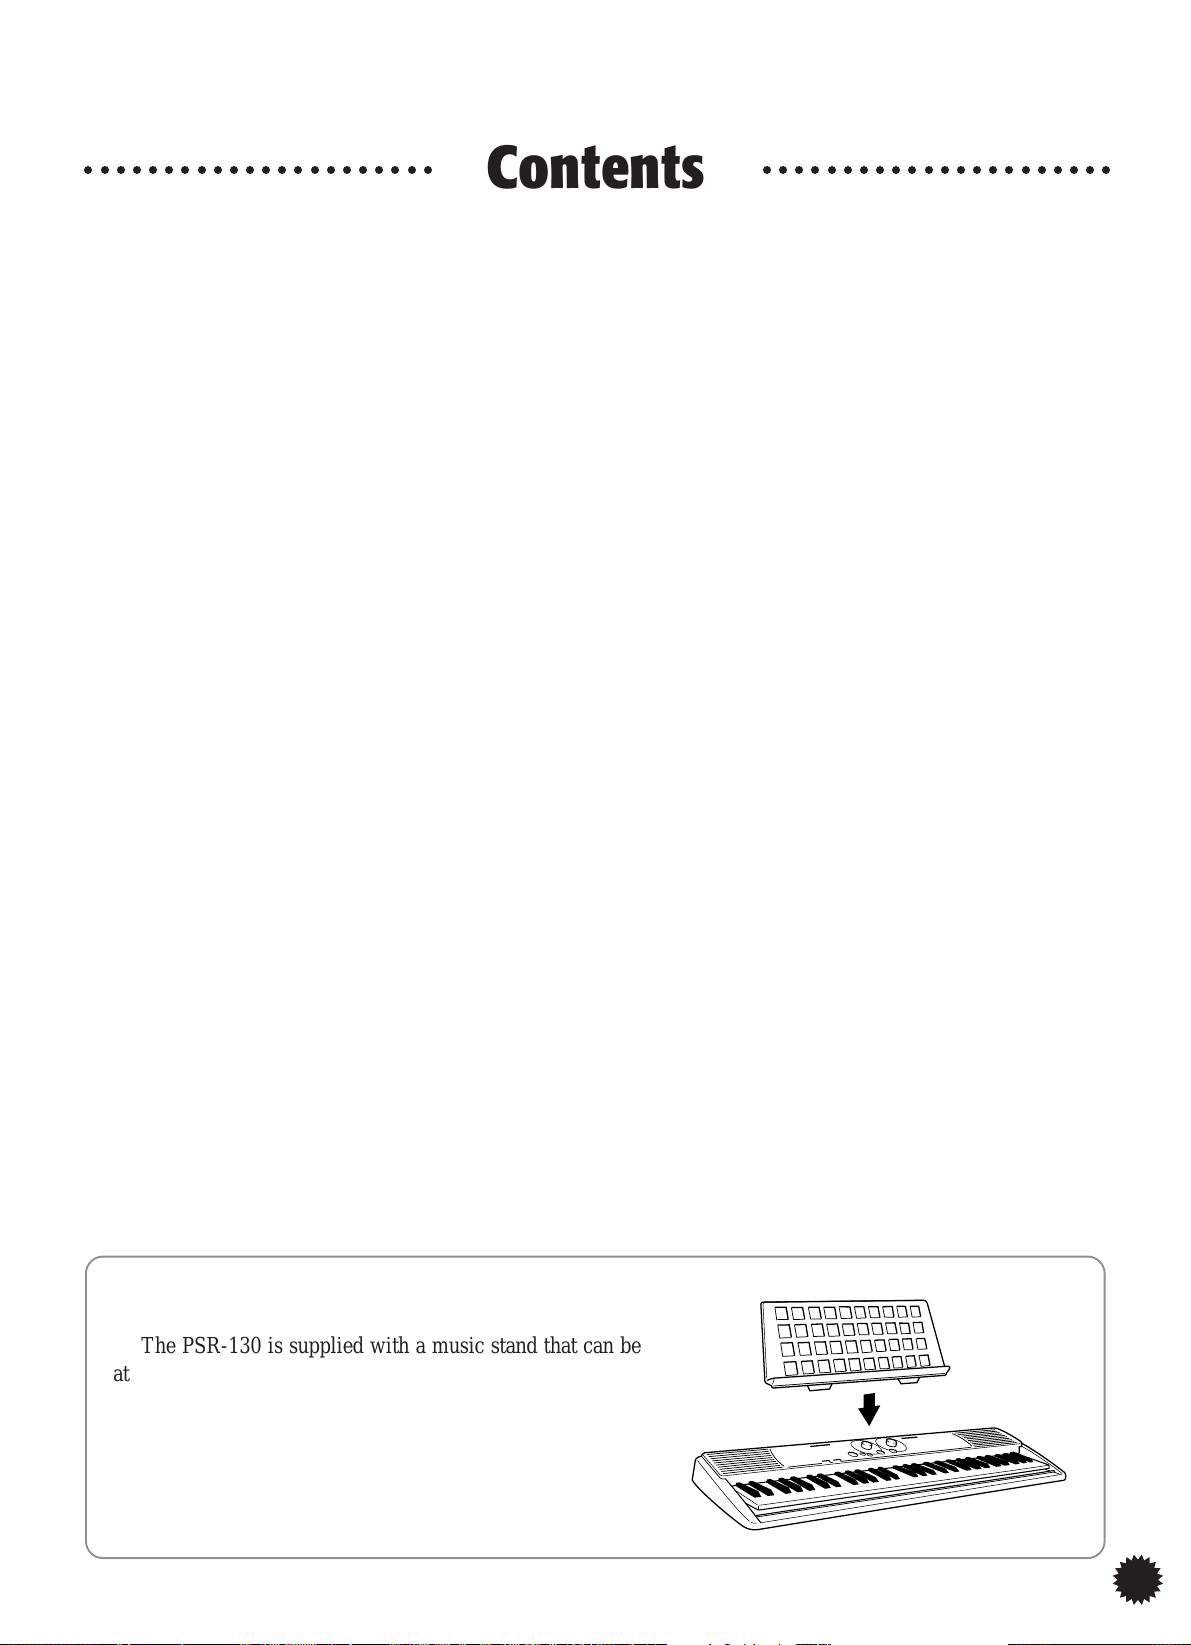
The Music Stand
The PSR-130 is supplied with a music stand that can be
attached to the instrument by inserting it into the slot at the
rear of the control panel.
3
Page 6
,,,,,,,,,,,,,,,,,,,,,
,
y
S
R
S
R
R
R
N
O
X
X
R
B
A
B
U
A
O
N
N
yyyyyyyyyyyyyyyyyyyyy
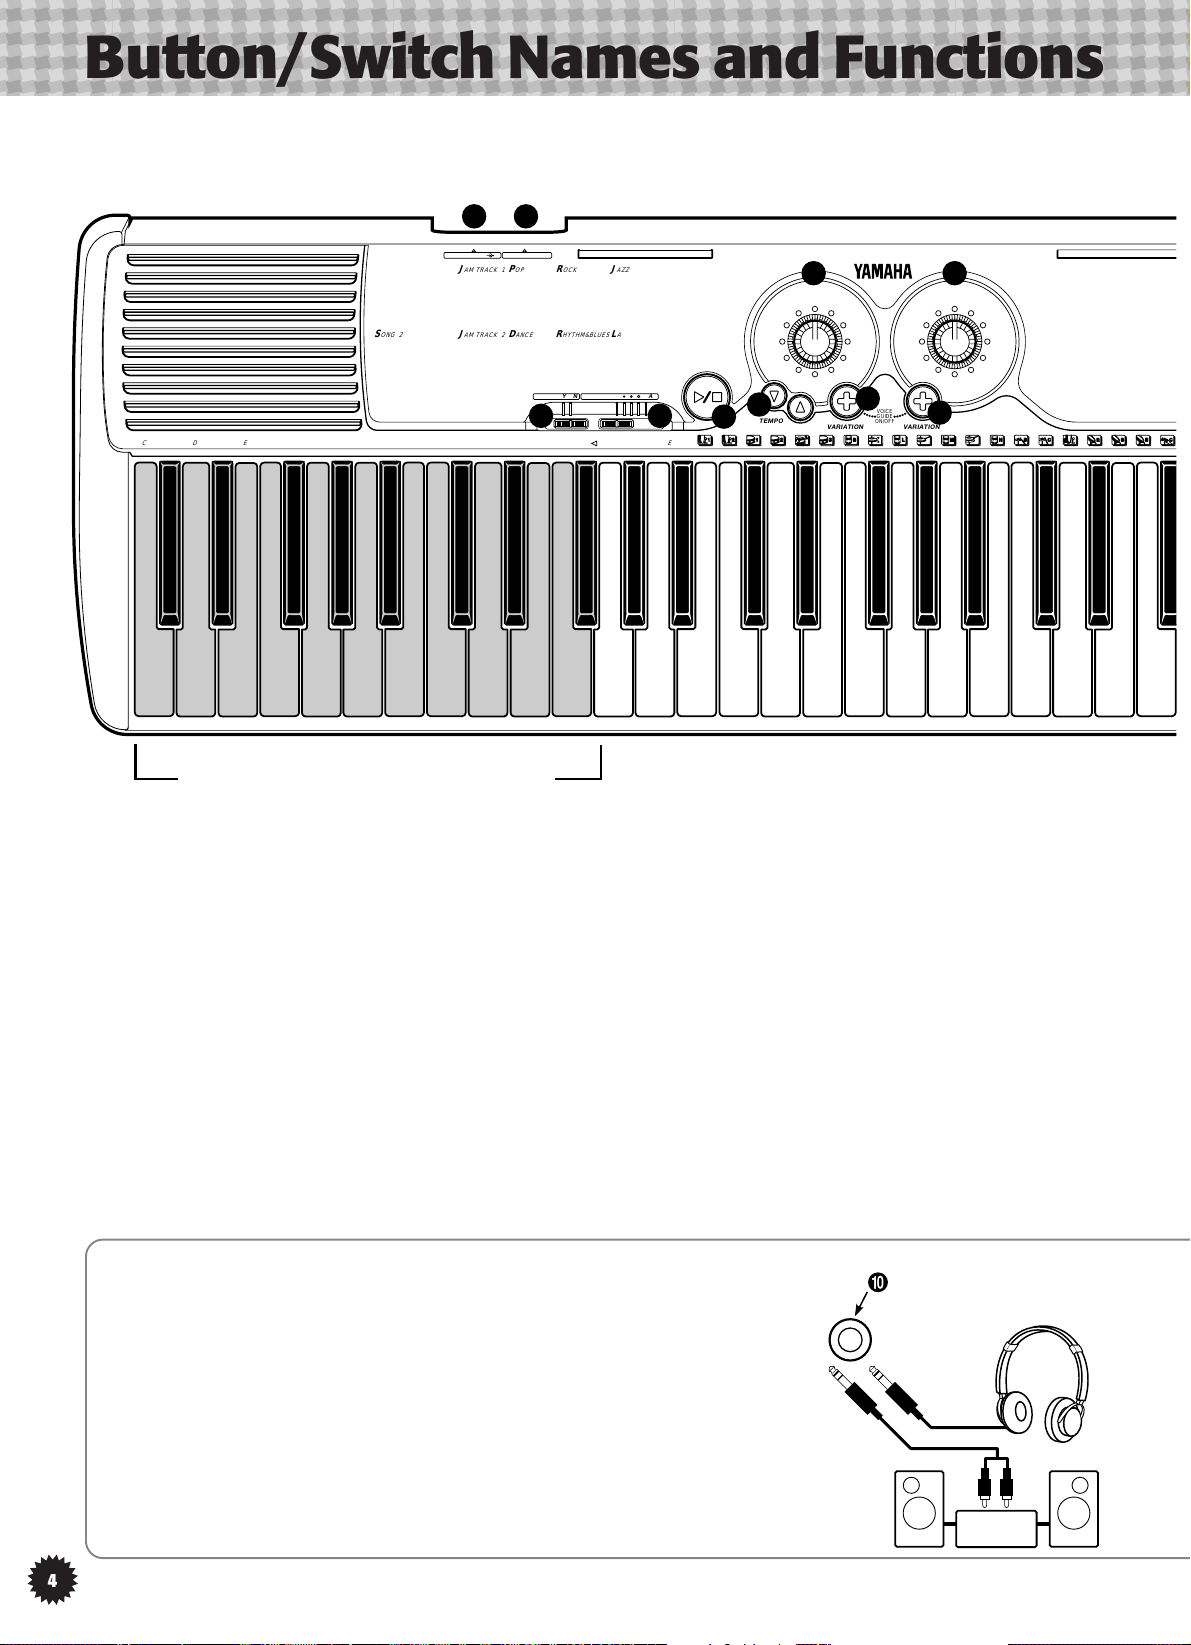
Button/Switch Names and Functions
9 10
DC IN 10 -12V + –PHONES/AUX OUT
J
CDE
F G A B C D E F AUTO ACCOMPANIMENT
S
ONG 1
1
ORIGINAL SONG 1
2
ORIGINAL SONG 2
3
OH! SUSANNA
4
LA CUCARACHA
5
SUR LE PONT D' AVIGNON
6
LONDONDERRY AIR
7
DECK THE HALLS
8
O, VRENELI
9
HOUSE OF THE RISING SUN
10
TROIKA
S
ONG 2
ORIGINAL SONG 3
1
BEAUTIFUL DREAMER
2
WALTZ OF THE FLOWERS
3
TANNENBAUM
4
SYMPHONY #40
5
THE LAST ROSE
6
OF SUMMER
SILENT NIGHT
7
AIR ON THE G STRING
8
AULD LANG SYNE
9
SONG OF JOY
10
AM TRACK 1POPROCK
JAZZ BLUES
8BEAT POP
1
1
JAZZ WALTZ
DETROIT POP
2
2
FUSION
16BEAT POP
3
3
BOSSA NOVA
POP ROCK
4
4
SAMBA
POP SHUFFLE
5
5
TANGO
FOLKROCK
6
6
SKA
POP BALLAD
7
7
COUNTRY
8BEAT LIGHT
8
8
MARCH
16BT BALLAD
9
9
NEW AGE
6/8 ROCK
10
10
J
AM TRACK 2
D
ANCERHYTHM&BLUES
DANCE
HIP HOP
1
1
RAP
DANCE SHFL 1
2
2
FUNK
DANCE SHFL 2
3
3
SOUL BALLAD
RAP
4
4
MINOR BLUES
HOUSE
5
5
HEAVY METAL
GROUNDBEAT
6
6
BOOGIE
DISCO
7
7
WOOGIE
DISCO SOUL
8
ROCK&ROLL
DISCO POP
8
9
R&B
EUROBEAT
9
10
SLOW ROCK
10
STAND BY ON VOLUME MIN MAX
1
8BEAT ROCK
1
ROCK SHUFFLE
2
ROCK POP
3
HEAVY METAL
4
ROCK BALLAD
5
ROCK -A-BALLAD
6
BOOGIE WOOGIE
7
ROCK BOOGIE
8
ROCK&ROLL
9
TWIST
10
R&B 1
1
R&B 2
2
R&B BALLAD
3
FUNK 1
4
FUNK 2
5
SOUL BALLAD 1
6
SOUL BALLAD 2
7
GOSPEL 1
8
GOSPEL 2
9
6/8 BLUES
10
J
AZZ
SWING
1
SWING WALTZ
2
BEPOP
3
MODERN JAZZ
4
BIG BAND
5
JAZZ WALTZ
6
JAZZ BALLAD
7
RAGTIME
8
DIXIELAND
9
FUSION
10
L
ATIN
SAMBA
1
CHA CHA
2
BOSSA NOVA
3
SLOW BOSSA
4
MAMBO
5
RHUMBA
6
TANGO
7
SALSA
8
BEGUINE
9
MERENGUE
10
C
OUNTRY&CARIBBEAN
BLUEGRASS
1
COUNTRY
2
COUNTRY ROCK
3
COUNTRY SHUFFLE
4
COUNTRY BALLAD
5
COUNTRY WALTZ
6
SKA
7
SOCA
8
REGGAE
9
CALYPSO
10
O
THERS
FOXTROT
1
JIVE
2
SLOW FOX
3
PASODOBLE
4
VIEN WALTZ
5
START/
STOP
2
6
7
8
9
10
SHOWTUNE
MARCH
POLKA
WALTZ
STOP ACMP
3
5 7
SONG/
JAM TRACK/ STYLE
SONG 1
OTHERS
COUNTRY
&CARIBBEAN
LATIN
JAZZ POP
RHYTHM
&BLUES
4
TEMPO
TRACK 1
ROCK
VARIATION VARIATION
SONG 2
JAM
TRACK 2
DANCE
VOICE
PIANO
ONE TOUCH
SETTING
SPLIT
VOICE
ECHO
JAM
VOICE
HARMONY
VOICE
SUSTAIN
6
VOICE
GUIDE
ON/OFF
VOICE
SYNTHESIZER
8
GUITAR
WIND
ORGAN/
STRINGS
ENSEMBLE
PERCUSSION/
BASS
P
IANO
PIANO
1
HONKY-TONK
2
PIANO PAD
3
E PIANO 1
4
E PIANO 2
5
E PIANO 3
6
E PIANO 4
7
HARPSICHORD
8
HARPSI CPL
9
CLAVI
10
G
UITAR
CLASSIC
1
GUITAR
FOLK GUITAR
2
12STR GUITAR
3
JAZZ GUITAR 1
4
JAZZ GUITAR 2
5
E GUITAR
6
MUTE
7
GUITAR
DISTORTION
8
GUITAR PAD 1
9
GUITAR PAD 2
10
W
IND
TRUMPET
1
TROMBONE
2
HORN
3
BRASS SECTION
4
ALTO SAX
5
TENOR SAX
6
PICCOLO
7
FLUTE
8
PAN FLUTE
9
CLARINET
10
O
RGAN
E ORGAN 1
1
E ORGAN 2
2
CHURCH ORGAN
3
16+2 ORGAN
4
16+4 ORGAN
5
HARMONICA
6
ACCORDION
7
S
TRINGS
VIOLIN
8
HARP
9
BANJO
10
E
N
ST
1
BR
2
O
3
ST
4
SY
5
VI
6
BR
7
BR
8
SA
9
SA
10
P
E
D
1
VI
2
M
3
SY
4
B
A
E
5
M
6
7
SL
8
W
SY
9
10
SY
Auto Accompaniment (C1~F
11
1 STANDBY/ON Switch (page 6)
11
This switch is used to turn the instrument ON or
OFF.
##
#2)
##
44
4 TEMPO ▼/▲ Button (page 9)
44
This button controls the tempo (speed of the
song) of the SONG/JAM TRACK or accompaniment.
22
2 VOLUME Control (page 6)
22
This slider adjusts the volume of the PSR-130.
55
5 SONG/JAM TRACK/STYLE Dial
55
(page 8, 12, 15)
33
3 START/STOP
33
This button is used to start/stop playback of the
>>
>/■ Button (page 9, 13, 16)
>>
Rotate the dial to select a SONG/JAM TRACK/
STYLE category.
SONG/JAM TRACK or accompaniment.
66
6 SONG/JAM TRACK/STYLE Variation [+] But-
66
ton (page 8, 12, 15)
This button is used to select one of the SONG/
JAM TRACK/STYLE variations.
Using Headphones (PHONES/AUX OUT jack)
For private practicing and playing without disturbing others, connect a set
of stereo headphones (Yamaha HPE-3/150 (optional) etc.) to the rear panel
0 PHONES/AUX OUT jack. Sound from the b uilt-in speaker system is automatically cut off when you insert the headphone plug into this jack.
You can also use this jack to connect the PortaTone to a stereo or other
audio system and listen to the PSR-130 from the audio system’s speak ers. (Use
a stereo phone m pin plug when connecting.)
PHONES/AUX OUT
Stereo
System
Jack
4
Page 7
,,,,,,,,,,,,,,,,,,,,
,
y
OPEN
T
T
Y
A
A
Y
Y
Y
yyyyyyyyyyyyyyyyyyyy
Power Requirements
Your PSR-130 can run either on batteries or on
normal household current.
SEMBLE
RINGS 1
RASS ENSEMBLE
RCHESTRA HIT
RINGS 2
NTH STRINGS
IOLIN+STRINGS
RASS+TRUMPET
RASS+SAX
X+FLUTE
X+CLARINET
RCUSSION
RUM KIT
IBRAPHONE
ARIMBA
NTH CELESTA
SS
BASS
UTE BASS
LAP BASS
OOD BASS
NTH BASS 1
NTH BASS 2
S
YNTHESIZER
H
ARMONY VOICE
S
1
SQUARE
2
SAWTOOTH
3
ANALOG LEAD
4
FANTASIA 1
5
FANTASIA 2
6
CRYSTAL
7
DARK MOON
8
SYNTH BRASS
9
SYNTH LEAD 1
10
SYNTH LEAD 2
S
USTAIN VOICE
1
PIANO
2
E PIANO
3
HARPSICHORD
4
CHURCH
ORGAN
5
CLASSIC
GUITAR
6
FOLK GUITAR
7
STRINGS
8
VIBRAPHONE
9
HARP
10
BANJO
1
PIANO
2
E PIANO
3
HARPSICHORD
4
E ORGAN
5
VIOLIN
6
STRINGS
7
MARIMBA
8
TRUMPET
9
HORN
10
FLUTE
E
CHO VOICE
1
PIANO
2
E PIANO
3
HARPSICHORD
4
CLASSIC
GUITAR
5
FOLK
GUITAR
6
JAZZ GUITAR
7
E GUITAR
8
HARP
9
VIBRAPHONE
10
MARIMBA
PLIT VOICE
BASS
1
/PIANO
BASS
2
/E PIANO
BASS
3
/ORGAN
BASS
4
/GUITAR
BASS
5
/VIBES
6
BASS
/BRASS
7
PIANO
/GUITAR
8
PIANO
/FLUTE
9
PIANO
/VIBES
10
PIANO
/HARMONICA
PSR-130
77
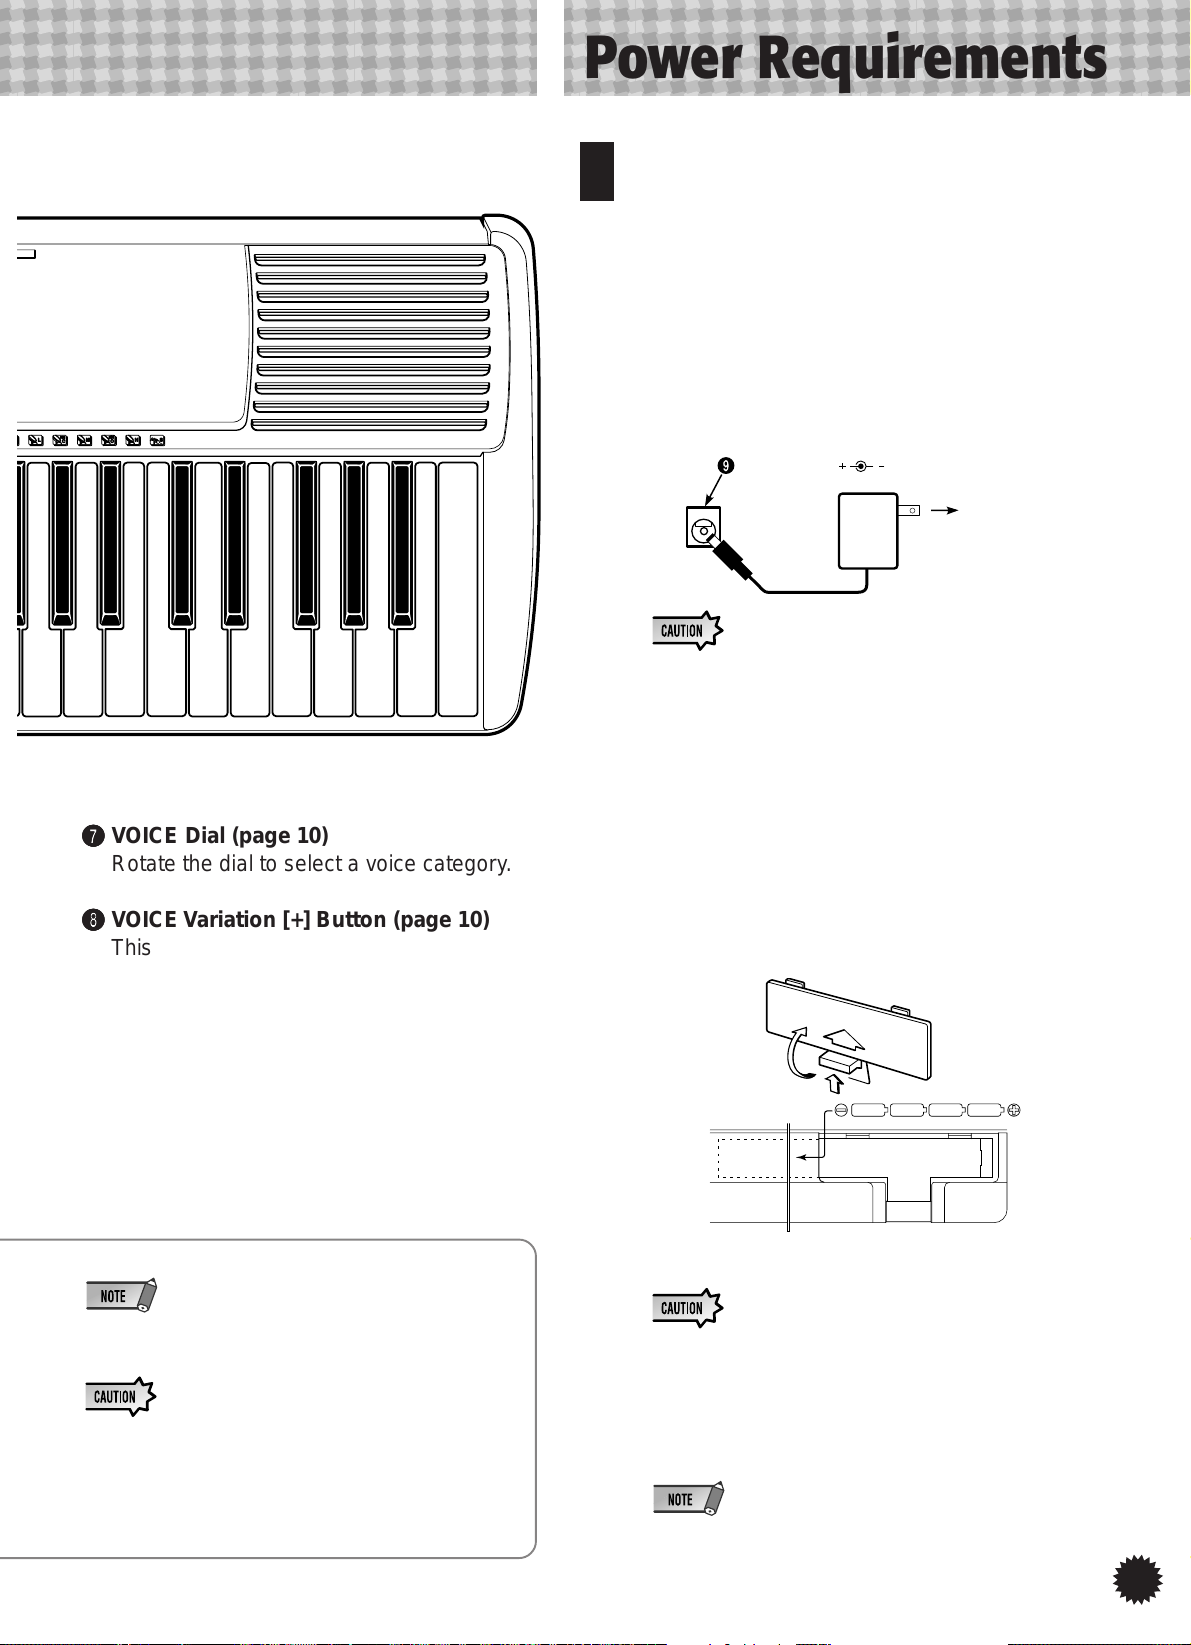
7 VOICE Dial (page 10)
77
Rotate the dial to select a voice category.
88
8 VOICE Variation [+] Button (page 10)
88
This button is used to select one of the VOICE
variations.
■ Using an AC Power Adaptor
Use the optional PA-3B Power Adaptor.
1 Plug the adaptor’s connector into the 9 DC IN 10-
12V jack on the back of the PSR-130.
2 Plug the adaptor into a convenient wall outlet.
DC IN 10-12V
• Use only the optional Yamaha PA-3B adaptor. Damage
caused by the use of any other AC adaptors will not be
covered by the manufacturer’s warranty.
■ Using Batteries
Jack
Wall outlet
PA-3B
1 T urn the PSR-130 upside-down and place it on a soft
cloth. Remove the battery compartment lid.
2 Insert four “AA” size batteries as shown in the illus-
tration, making sure that the positive and negative
terminals are properly aligned.
• When you use headphones be careful not to damage your
hearing by playing with a volume that is too high.
• T o prevent unwanted damage to the instrument and ex-
ternal audio equipment make sure that the volume is
turned down on the PortaTone and any external audio
devices and, all devices are turned off before making
any connections.
3 Replace the lid.
• Replace Worn Batteries as Soon as Possible.
When the batteries run low and the battery voltage drops
below a certain level, the instrument may not sound or function properly. As soon as this happens, replace them with
a complete set of four new “AA” size batteries. Never mix
old and new or different types of batteries (e.g. alkaline
and manganese).
• When the AC P ower Adaptor is used, the instrument will operate on AC power, even when batteries are installed.
5
Page 8
,,,,,,,,,,,,,,,,,,,,,
,
y
VOLUME MIN MAX
yyyyyyyyyyyyyyyyyyyyy
The PSR-130’s Basic operations
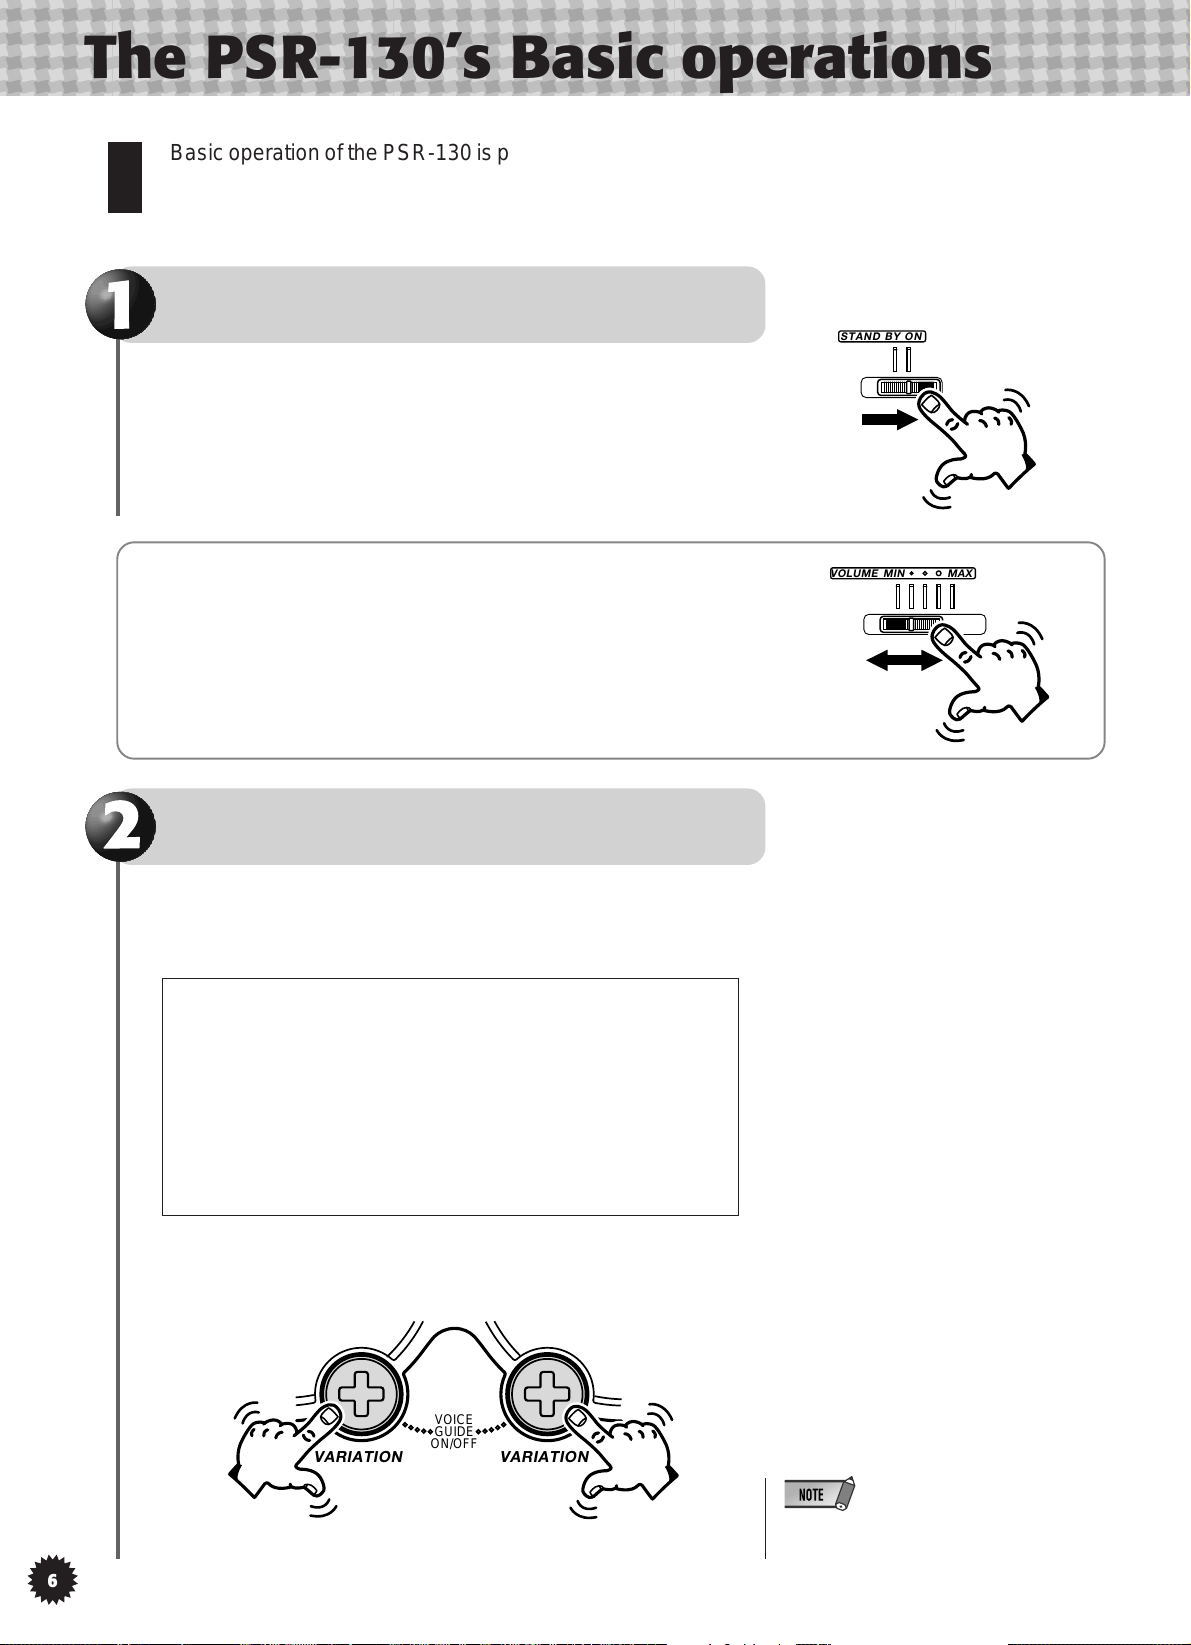
Basic operation of the PSR-130 is performed with the two Dials and two V ARIATION [+] buttons.
Turn On the PSR-130
STAND BY ON
Slide the ST AND BY/ON switch to the “ON” position, po wer
will be supplied to the instrument.
Volume Control
Sliding the VOLUME control slider to the left (MIN), decreases the
volume level. Sliding it to the right (MAX) increases the volume level.
Turn On the Voice Guide
When the Voice Guide is “ON” and you select a Song/Jam
Track/Style, Voice category or Variation, the Voice Guide announces the selected variation with a verbal “one”, “two”, “three”.
Until you are more familiar with the PSR-130’s operation, it
is probably a good idea to use the instrument’ s V oice Guide.
• When the Voice Guide is “ON”
A verbal guide will announce the variation number when a
category or variation is selected.
• When the Voice Guide is “OFF”
A click will sound when a variation is selected.
To turn the Voice Guide on, simultaneously press both the
SONG/JAM TRACK/STYLE VARIATION [+] button and the
VOICE VARIATION [+] button.
VOICE
GUIDE
ON/OFF
VARIATION VARIATION
T o turn the Voice Guide off, press both VARIATION [+] b uttons
6
once again.
• The Voice Guide is always switched “OFF”
when the instrument is turned on.
Page 9
,,,,,,,,,,,,,,,,,,,,
,
y
yyyyyyyyyyyyyyyyyyyy
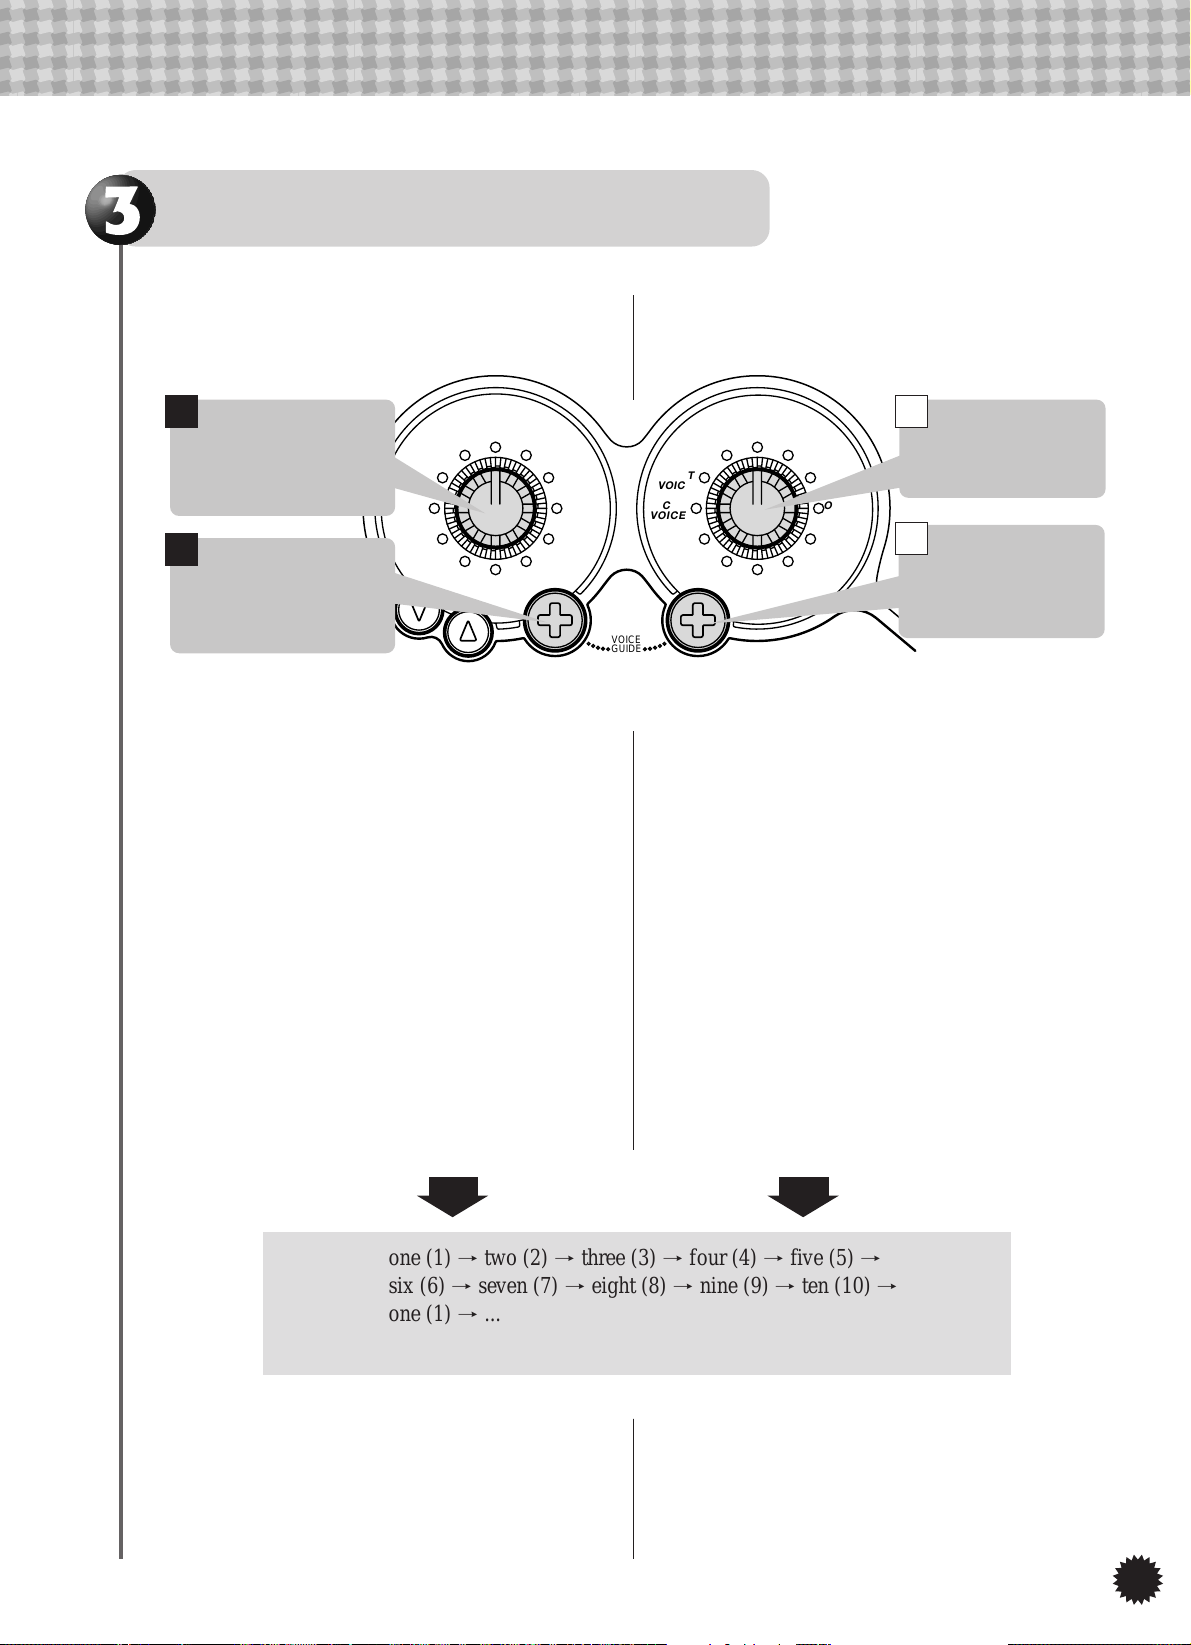
Selecting a SONG/JAM TRACK/STYLE or VOICE
Select a SONG/JAM TRACK/STYLE
1
Rotate the SONG/
JAM TRACK/STYLE
Dial to select one of the
categories.
2
Press the SONG/
JAM TRACK/STYLE
OTHERS
COUNTRY
&CARIBBEAN
LATIN
JAZZ POP
RHYTHM
&BLUES
V ARIATION [+] button
to select a variation.
TEMPO
ex.) T o select the “4 : RAP” variation in the STYLE
list’s “D ANCE” category...
z Rotate the SONG/JAM TRACK/STYLE Dial
to select the “DANCE” category.
As you rotate the Dial (progressing one category
at a time), the Voice Guide will announce the current Variation number of the selected category.
SONG/
JAM TRACK/ STYLE
SONG 1
SONG 2
TRACK 1
DANCE
ROCK
VARIATION VARIATION
JAM
JAM
TRACK 2
Select a VOICE
VOICE
VOICE
PIANO
SYNTHESIZER
GUITAR
WIND
ORGAN/
STRINGS
ENSEMBLE
PERCUSSION/
BASS
VOICE
GUIDE
ON/OFF
ONE TOUCH
SETTING
SPLIT
VOICE
ECHO
VOICE
HARMONY
VOICE
SUSTAIN
ex.) To select the “10 : CLARINET” variation in
the VOICE list’s “WIND” category...
z Rotate the VOICE Dial and select the “WIND”
category.
As you rotate Dial (progressing one category at a
time), the Voice Guide will announce the current
Variation number of the selected category.
1
Rotate the VOICE
Dial to select one of the
categories.
2
Press the VOICE
VARIATION [+] button to select a variation.
x Press the SONG/J AM TRA CK/STYLE VARIA-
TION [+] button until you hear the Voice Guide
announce “FOUR”.
Every time you press the SONG/JAM TRACK/
STYLE VARIATION [+] button the Variations
will change in the following order,
one (1) m two (2) m three (3) m four (4) m five (5) m
six (6) m seven (7) m eight (8) m nine (9) m ten (10) m
one (1) m ...
and the Voice Guide will announce each change.
For further operations, refer to the sections listed below.
“Play a Selected Song” (page 8)
“Play Along With the Selected Styles” (page 12)
“Play Along With the Jam Tracks” (page 15)
x Press the VOICE VARIATION [+] button until
you hear the Voice Guide announce “TEN”.
Every time you press the VOICE VARIATION
[+] button the Variations will change in the following order,
For further operations, refer to the “Play a Selected Voice”
section. (page 10)
7
Page 10
,,,,,,,,,,,,,,,,,,,,,
,
y
yyyyyyyyyyyyyyyyyyyyy
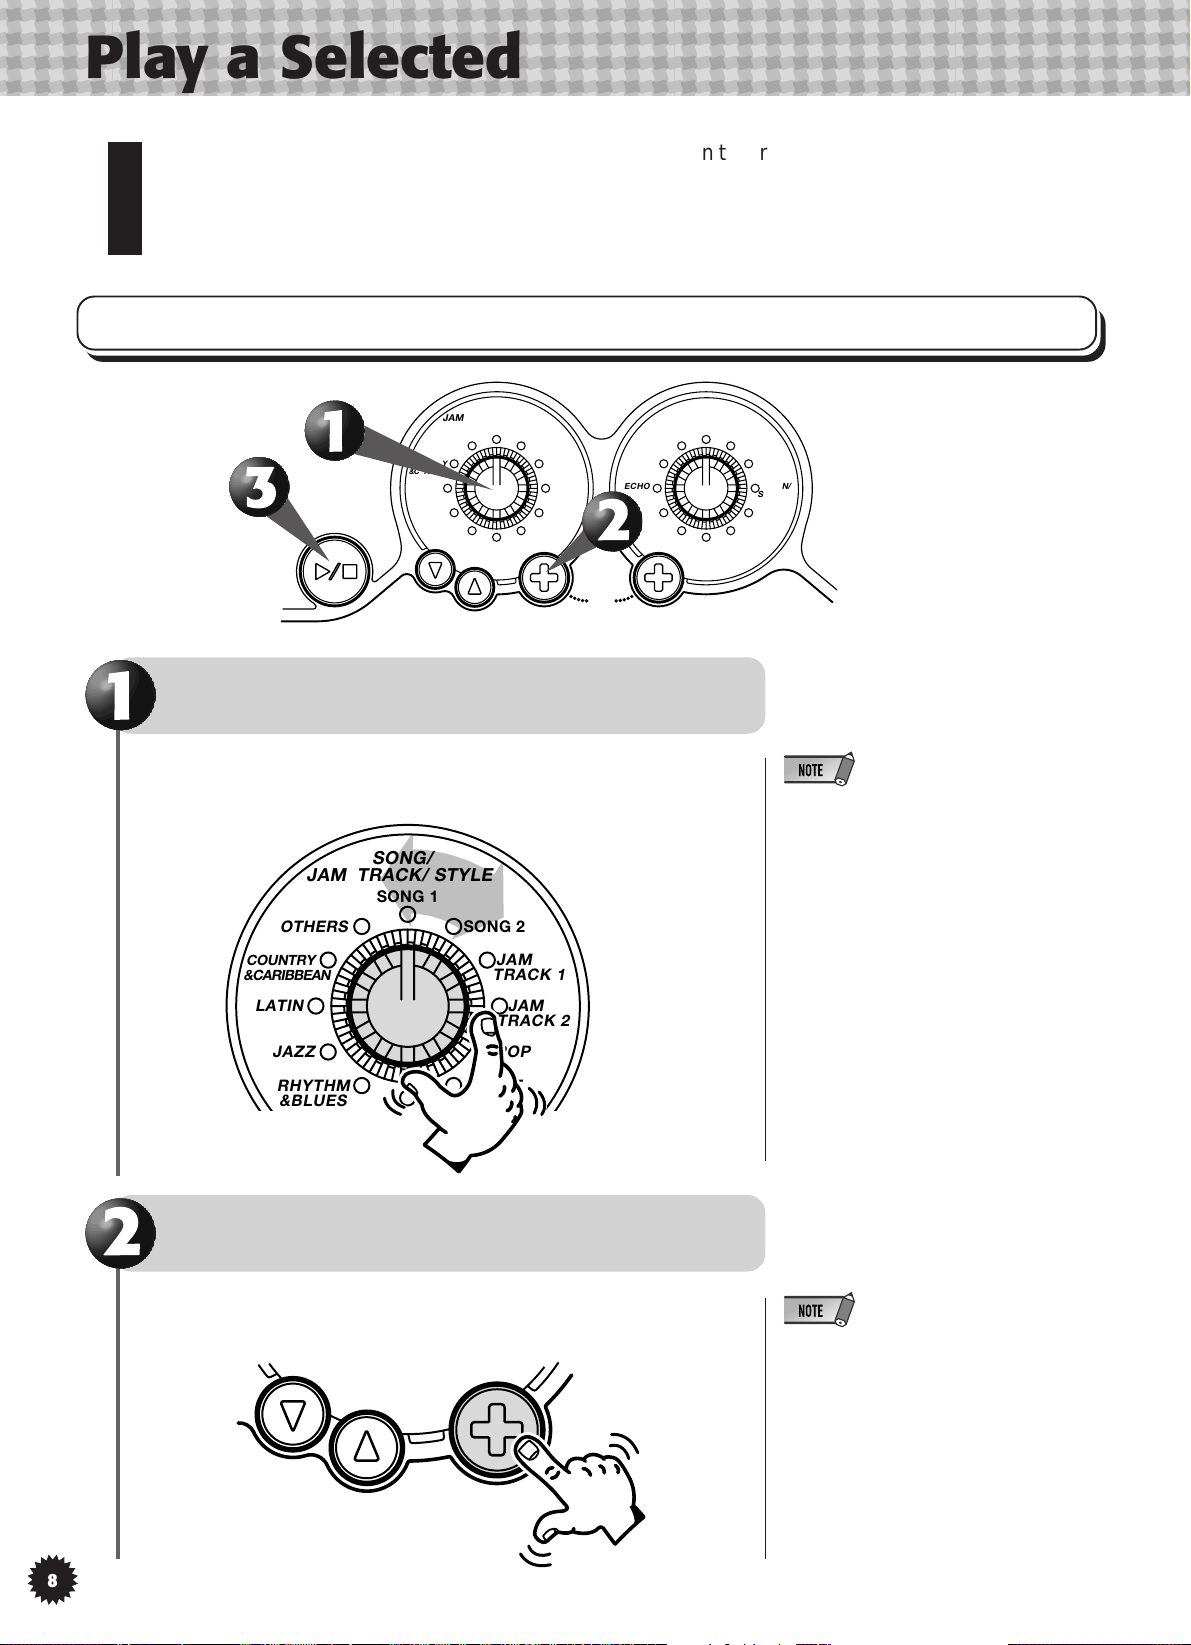
Play a Selected Song
Your PSR-130 contains 20 different Songs. Y ou can listen to , or pla y along with one of the songs
by selecting the “SONG 1” or “SONG 2” category using the SONG/JAM TRACK/STYLE Dial.
The currently selected Song will play when playback is started. Refer to the Song Scores on
page 19 and try playing the melody along with the song.
Select a Song
SONG/
JAM TRACK/ STYLE
START/
STOP
SONG 1
OTHERS
COUNTRY
&CARIBBEAN
LATIN
JAZZ POP
RHYTHM
&BLUES
ROCK
TEMPO
SONG 2
JAM
TRACK 1
JAM
TRACK 2
DANCE
VARIATION VARIATION
VOICE
GUIDE
ON/OFF
ONE TOUCH
SETTING
SPLIT
VOICE
ECHO
VOICE
HARMONY
VOICE
SUSTAIN
VOICE
Select the SONG/JAM TRACK/STYLE
“SONG 1” or “SONG 2” category.
Rotate the SONG/JAM TRACK/STYLE Dial to select the
“SONG 1” or “SONG 2” category. (page 7)
JAM TRACK/ STYLE
OTHERS
COUNTRY
&CARIBBEAN
LATIN
JAZZ POP
RHYTHM
&BLUES
SONG/
SONG 1
ROCK
SONG 2
JAM
TRACK 1
JAM
TRACK 2
DANCE
VOICE
PIANO
SYNTHESIZER
GUITAR
WIND
ORGAN/
STRINGS
ENSEMBLE
PERCUSSION/
BASS
• All SONG/JAM TRA CK/STYLE/VOICE variations for all categories are set to “one (1)”
when the instrument is turned on.
Select a Variation.
Press the SONG/JAM TRACK/ STYLE VARIA TION [+] but-
ton to select a variation. (page 7)
ROCK
TEMPO
VARIATION
8
• T urning the Voice Guide “on” (page 6) makes
it easier to select a Variation.
Page 11
,,,,,,,,,,,,,,,,,,,,
,
y
yyyyyyyyyyyyyyyyyyyy
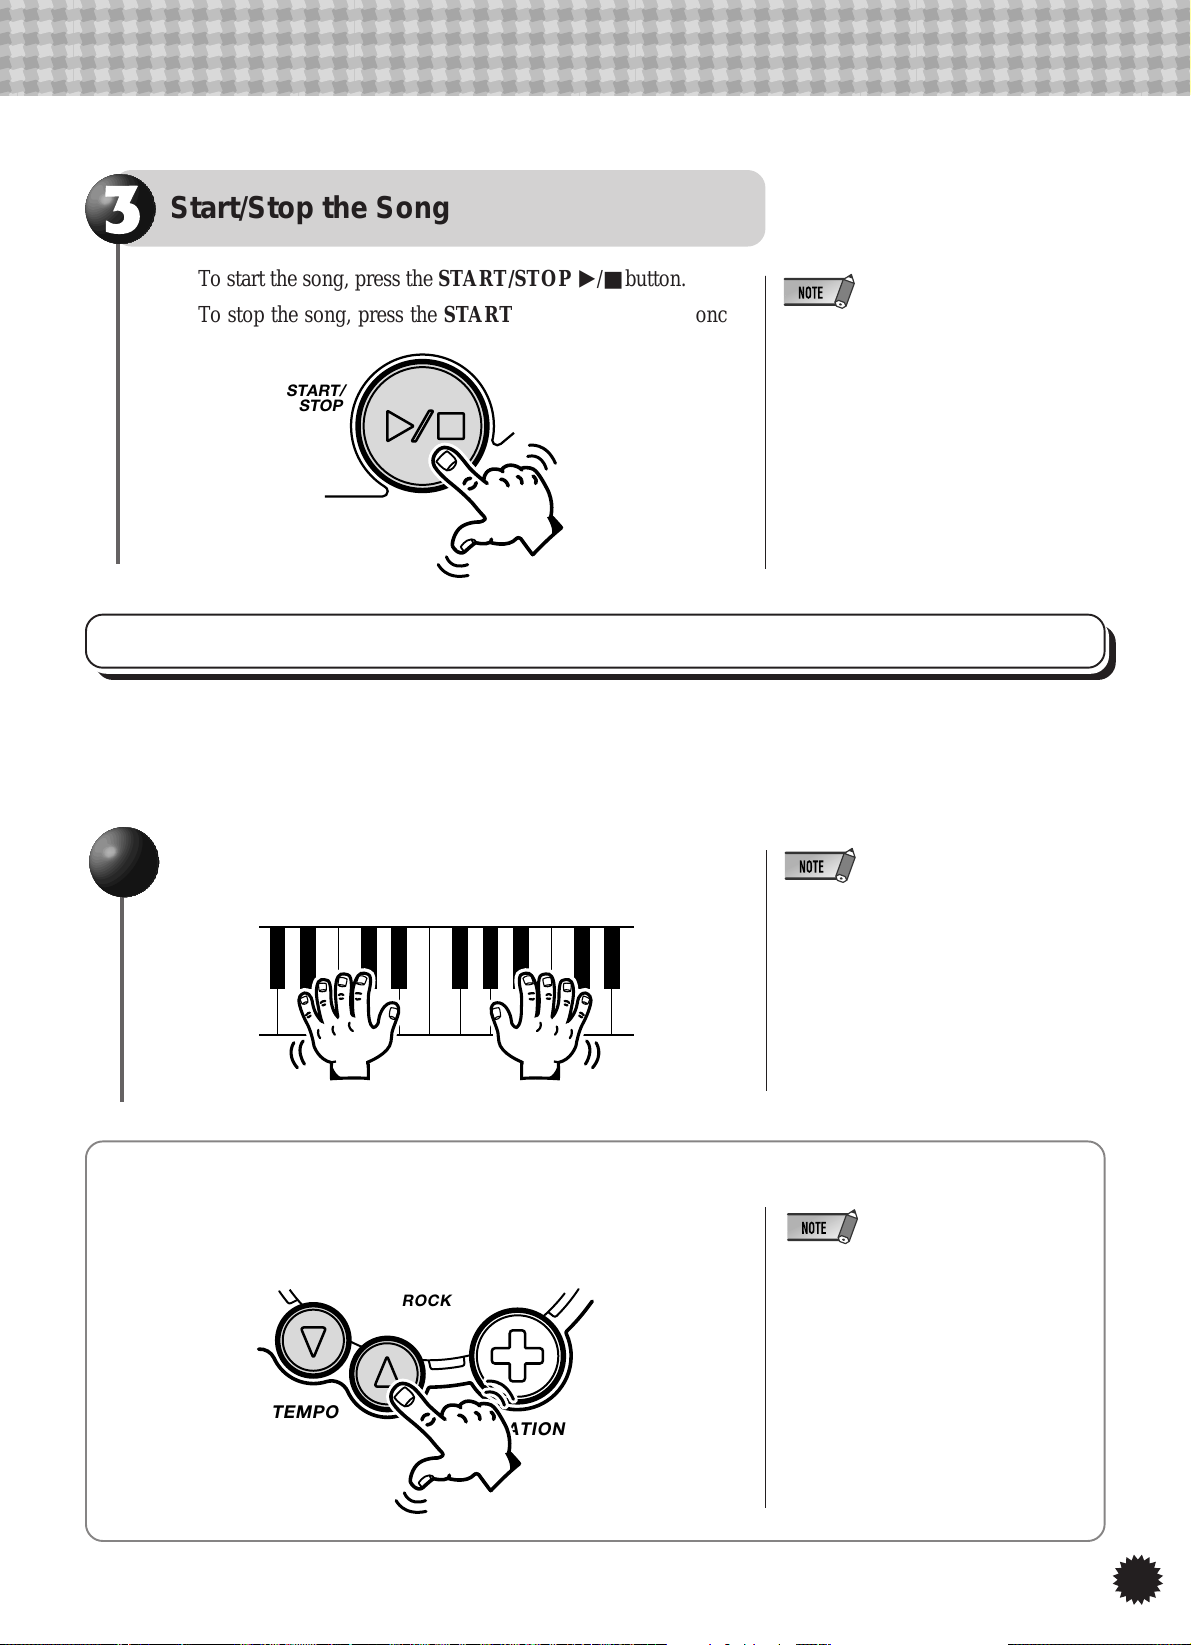
Start/Stop the Song
To start the song, press the START/STOP >/■ button.
To stop the song, press the START/STOP >/■ button once
again.
START/
STOP
• If you change the position of the SONG/JAM
TRACK/STYLE Dial during song playback,
the new selection will start from the next measure.
Using the Minus One Function
Minus One, as the name implies, takes away the melody part of the Song, allowing you to play
that part yourself.
To help you play the “missing” melody, refer to the scores on page 19-28.
Start the song, play on the keyboard and the song’s melody
part will be automatically muted.
• If you stop playing for one measure, the
melody will start to play again.
• When the V OICE Dial is set to “ONE TOUCH
SETTING: variation 1”, the same voice as
the Song’s melody will automatically be selected.
Tempo Control
Press the TEMPO ▲ button to increase the song’s speed. Press the
TEMPO ▼ button to decrease the song’s speed.
ROCK
TEMPO
VARIATION
• If you want to set the tempo back to its
original default setting, press both TEMPO
▲/▼
buttons
• Holding down either the
TEMPO button will continuously increase
or decrease the speed.
• The TEMPO range is from 40 to 240 beats
per minute.
• Each SONG/JAM TRACK/STYLE has
been given a default or standard tempo
which is set when accompaniment is
stopped and the song is selected.
simultaneously.
▲
or the
▼
9
Page 12

,,,,,,,,,,,,,,,,,,,,,
,
y
yyyyyyyyyyyyyyyyyyyyy
Play a Selected Voice
Your PSR-130 features 110 high quality V oices created using A WM (Adv anced Wa v e Memory).
The selected voice, using the operation below, can be played on the keyboard. Try playing
some of the Voices.
Select a Voice
SONG/
JAM TRACK/ STYLE
START/
STOP
SONG 1
OTHERS
COUNTRY
&CARIBBEAN
LATIN
JAZZ POP
RHYTHM
&BLUES
ROCK
TEMPO
VARIATION VARIATION
SONG 2
JAM
TRACK 1
JAM
TRACK 2
DANCE
VOICE
GUIDE
ON/OFF
ONE TOUCH
SETTING
SPLIT
VOICE
ECHO
VOICE
HARMONY
VOICE
SUSTAIN
VOICE
Select a VOICE Category.
Rotate the VOICE Dial to select one of the categories from
within “PIANO”, “GUITAR”, ... “SPLIT VOICE”. (page 7)
VOICE
ONE TOUCH
SETTING
SPLIT
VOICE
ECHO
VOICE
HARMONY
VOICE
SUSTAIN
VOICE
PIANO
SYNTHESIZER
GUITAR
WIND
ORGAN/
STRINGS
PERCUSSION/
BASS
VOICE
PIANO
SYNTHESIZER
GUITAR
WIND
ORGAN/
STRINGS
ENSEMBLE
PERCUSSION/
BASS
• All SONG/JAM TRA CK/STYLE/VOICE variations for all categories are set to “one (1)”
when the instrument is turned on.
• For more information on the VOICE Dial’s
“ONE TOUCH SETTING” categor y, refer to
page 16.
Select a Variation
Press the VOICE VARIATION [+] button to select a varia-
tion. (page 7)
SYNTHESIZER
VARIATION
10
• T urning the Voice Guide “on” (page 6) makes
it easier to select a Variation.
Page 13

,,,,,,,,,,,,,,,,,,,,
,
y
yyyyyyyyyyyyyyyyyyyy
Play the Voice
• When you want to play on the entire keyboard,
Select a Voice you like and try playing along with a song.
Also, by repeating steps 1 and 2, you can select different voices
to play along with.
Within the 110 Voices, the following voice types are also available.
◆ Dual Voices (ex. BRASS + TRUMPET, etc.)
Feature two Voices mixed together in a layer for rich ensemble sounds.
◆ PERCUSSION Voices
Let you play various drum and percussion sounds from the keyboard. Refer to the
Percussion Assignment List shown below.
without a Auto Accompaniment, set the SONG/
JAM TRACK/STYLE Dial to the “SONG 1”,
“SONG 2”, “JAM TRACK 1” or , “JAM TRA CK 2”
category.
• The PSR-130’s maximum polyphony is 12 notes .
Dual/Harmony/Echo voices, etc., produce multiple notes at the same time so, fewer note may
be available.
◆ HARMONY Voices
Add an additional one-, two-, or three-note harmony to the original Voice.
◆ ECHO Voices
Have an echo effect that adds delayed repeats to the original Voice.
◆ SPLIT Voices
Two voices that can be played separately from a different range of the keyboard.
Left Voice
F2 C3 C4 C5B2G2 A2 D3 E3 F3 G3 A3 B3 D4 E4 F4 G4 A4 B4C1 C2D1 E1 F1 G1 A1 B1 D2 E2 C6D5 E5 F5 G5 A5 B5
• You can only play one note at a time with Harmony Voices. If sev eral notes are play ed together , only the last note
played will be heard. Also, when a STYLE, SONG or JAM TRACK is not being pla yed bac k, the basic k e y for the
harmony is always C. When a STYLE is played or the Stopped Accompaniment (page 13) function is active, the
harmony changes according to the chord played with the left hand (page 14). When a SONG or JAM TRACK is
played back, the harmony changes according to the chord progression of the SONG or JAM TRACK.
Right Voice
About the Drum Kit
If you select V ariation “1 : DR UM KIT” from the “PERCUSSION/B ASS” V OICE category , you
can play the following percussion voices from the keyboard.
Hi Hat Closed
Hi Hat Open
Hi Hat Pedal
Rim Shot
Snare Drum 1
F2 C3 C4 C5B2G2 A2 D3 E3 F3 G3 A3 B3 D4 E4 F4 G4 A4 B4C1 C2D1 E1 F1 G1 A1 B1 D2 E2 C6D5 E5 F5 G5 A5 B5
Tom Mid
Tom Low
Bass Drum 1
Bass Drum 2
Snare Drum 2
Tom Bass
Snare Drum 3
Tom High
Splash Cymbal
Synth Tom Bass
Synth Bass Drum
Synth Snare Drum
Crash Cymbal
Synth Rim Shot
Synth Tom Mid
Synth Tom Low
Synth Tom High
Splash Cymbal Mute
Synth Hi Hat Open
Synth Hi Hat Close
Crash Cymbal Mute
11
Page 14

,,,,,,,,,,,,,,,,,,,,,
,
y
yyyyyyyyyyyyyyyyyyyyy
Play Along With the Selected Styles
Your PSR-130 features 80 different rh ythm/accompaniment styles (A uto Accompaniment). The
Auto Accompaniment function eff ectively splits the ke yboard into two sections. According to the
chords you play in the section to the left of “< A UT O A CCOMPANIMENT” (printed on the panel
above the keyboard), bass and chord accompaniment is produced automatically.
Select a STYLE you like, and play along with the Auto Accompaniment.
Select a Style
SONG/
JAM TRACK/ STYLE
START/
STOP
SONG 1
OTHERS
COUNTRY
&CARIBBEAN
LATIN
JAZZ POP
RHYTHM
&BLUES
ROCK
TEMPO
VARIATION VARIATION
SONG 2
JAM
TRACK 1
JAM
TRACK 2
DANCE
VOICE
GUIDE
ON/OFF
ONE TOUCH
SETTING
SPLIT
VOICE
ECHO
VOICE
HARMONY
VOICE
SUSTAIN
VOICE
Select a SONG/JAM TRACK/STYLE
category.
Rotate the SONG/JAM TRACK/STYLE Dial to select one
of the categories from within “POP”, “DANCE”, ...”OTHERS”.
(page 7)
JAM TRACK/ STYLE
OTHERS
COUNTRY
&CARIBBEAN
LATIN
JAZZ POP
RHYTHM
&BLUES
SONG/
SONG 1
ROCK
SONG 2
JAM
TRACK 1
JAM
TRACK 2
DANCE
VOICE
PIANO
GUITAR
WIND
ORGAN/
STRINGS
ENSEMBLE
PERCUSSION/
BASS
SYNTHESIZER
• All SONG/JAM TRA CK/STYLE/VOICE variations for all categories are set to “one (1)”
when the instrument is turned on.
Select a Variation
Press the SONG/J AM TRACK/STYLE VARIA TION [+] but-
ton to select a variation. (page 7)
ROCK
TEMPO
12
VARIATION
• When the VOICE Dial is set to its “ONE
TOUCH SETTING” position and a STYLE is
selected, an appropriate Voice is automatically selected for playing along with the
STYLE you select. (page 16)
• T urning the Voice Guide “on” (page 6) makes
it easier to select a Variation.
Page 15

,,,,,,,,,,,,,,,,,,,,
,
y
yyyyyyyyyyyyyyyyyyyy
Start the Auto Accompaniment
When you play a chord in the AUTO ACCOMPANIMENT
(left-hand) section of the keyboard, the rhythm/accompaniment
will simultaneously start (Syncro Start). The accompaniment will
play according to the selected style and the chords you play with
your left hand.
The PSR-130’s Auto Accompaniment function generates accompaniment with Multi Fingering operation. For more information, refer to page 14.
Y ou can also start the accompaniment by pressing the ST ART/
STOP >/■ button. In this case, the rhythm accompaniment will
start first, the bass and chord accompaniment will start when you
play a chord in the Auto Accompaniment section of the keyboard.
• You can change Voices during playback.
• If you change the position of the SONG/JAM
TRACK/STYLE Dial during playback, the
new selection will start from the next measure.
• If you select V ariation 10 “ST OP ACMP” from
the STYLE’s “OTHERS” category and start
the accompaniment, the metronome will
sound, and chords played in the Auto Accompaniment section of the keyboard will
produce the bass and chord accompaniment.
(Stop Accompaniment)
Play a Melody Along With the Auto
Accompaniment
While playing a chord with your left hand, use your right hand
to play a melody in the right-hand section of the keyboard, along
with the accompaniment.
Stop the Auto Accompaniment
Press the ST AR T/STOP >/■ button, a simple ending will be
played and the accompaniment will stop.
START/
STOP
• To adjust the tempo of the accompaniment
to a more comfortable speed, refer to page
9 “Tempo Control”.
• When the accompaniment is stopped, the
Auto Accompaniment is automatically set to
Synchro stand-by.
13
Page 16

,,,,,,,,,,,,,,,,,,,,,
,
y
yyyyyyyyyyyyyyyyyyyyy
■ About Multi Fingering
Multi Fingering is the manner in which you finger (play) chords for the Auto Accompaniment.
With Multi Fingering, you can play chords using either the “Single Finger” (simplified fingering) or “Fingered” (conventional playing) methods. The PSR-130 will “understand” what chord you indicate and then
automatically generate the accompaniment.
Multi Fingering is automatically set when the PSR-130 is turned on. Howev er , you can set the Auto Accompaniment to function exclusively in either the Single Finger or Fingered mode.
• To set the Single Finger mode
Turn the power off, the hold down the VOICE VARIA TION [+] button and turn the power on.
• To set the Fingered mode
Turn the po wer off, the hold do wn the SONG/JAM TRACK/STYLE VARIA TION [+] button and turn the
power on.
• To return to the Multi Fingering mode again
Turn the power off and on once again, returns the PSR-130 to Multi Fingering operation.
◆ Single Finger
Using up to three fingers, you can play major , minor, se venth and minor sev enth chords with the Auto
Accompaniment.
Playing Single Finger Chords
CM
• Major (M), press the root note of the
chord.
Cm
C
7
Cm
7
• As long as chords are played within the Auto Accompaniment
section of the keyboard, the accompaniment will automatically
be produced regardless of the octave in which the chord is
played. For example; playing C1 (lowest C) or C2 (next higher
C) will produce exactly the same auto accompaniment.
• Root keys shown on the keyboard.
• Minor (m), press the root note together with any black key to the left
of it.
• Seventh (7), press the root note together with any white key to the left
of it.
• Minor Seventh (m7), press the root
note together with any white and black
key to the left of it (three keys altogether).
CDEFGABCDEF
Chord Name (Root Key)
◆ Fingered
Playing chords in the Auto Accompaniment section of the keyboard, accompaniment is produced according to the selected style and the chords played.
Variations for a C chord
C
C
7
CM
Csus
( )
7
( )
4
C sus
7
Cdim
CmM
C1+2+5
4
7
7
( )
• Notes in parentheses are optional; the chords will be recognized without them.
• If the chord is inverted (i.e. C-E-G is played as G-E-C), it will
still be recognized as a C chord. Ho wev er , there are exceptions
to the rule under the following conditions.
• For augmented and diminished 7 chords, the low est note
is recognized as the root.
• 7th flatted 5th chords may be play ed with the lowest note
as the root or the 7th.
• Minor 6th and 1+2+5 chords are recognized only in root
position.
• In the Fingered mode, simultaneously pressing any three consecutive notes will cancel the chord function and allow the rhythm
pattern to continue.
Cm
Cm
7
Cm
( )
5
7
( )
C aug
7
5
C
7
Cm
6
( )
14
Page 17

,,,,,,,,,,,,,,,,,,,,
,
y
yyyyyyyyyyyyyyyyyyyy
Play Along With the Jam Tracks
The PSR-130 contains 20 different Jam Tracks. The Jam Track patterns let you use the entire
keyboard to “jam” or play along with a variety of dynamic rhythm styles and chord changes.
Select a Jam Track you like and try playing along.
When you play along with the Jam Track, refer to the “Jam Track Chord Progression List” on page 17.
SONG/
JAM TRACK/ STYLE
START/
STOP
SONG 1
OTHERS
COUNTRY
&CARIBBEAN
LATIN
JAZZ POP
RHYTHM
&BLUES
ROCK
TEMPO
VARIATION VARIATION
SONG 2
JAM
TRACK 1
JAM
TRACK 2
DANCE
VOICE
GUIDE
ON/OFF
ONE TOUCH
SETTING
SPLIT
VOICE
ECHO
VOICE
HARMONY
VOICE
SUSTAIN
VOICE
SYNTHESIZER
Select either the JAM TRACK 1 or JAM TRACK
2 category from SONG/JAM TRACK/STYLE.
Rotate the SONG/JAM TRACK/STYLE Dial to select ei-
ther the JAM TRACK 1 or JAM TRACK 2 category. (page 7)
JAM TRACK/ STYLE
OTHERS
COUNTRY
&CARIBBEAN
LATIN
JAZZ POP
RHYTHM
&BLUES
SONG/
SONG 1
ROCK
SONG 2
JAM
TRACK 1
JAM
TRACK 2
DANCE
VOICE
PIANO
GUITAR
WIND
ORGAN/
STRINGS
ENSEMBLE
PERCUSSION/
BASS
• All SONG/JAM TRA CK/STYLE/VOICE variations for all categories are set to “one (1)”
when the instrument is turned on.
Select a Variation
Press the SONG/JAM TRACK/STYLE VARIA TION [+] but-
ton to select a variation. (page 7)
ROCK
TEMPO
VARIATION
• When the V OICE Dial is set to “ONE TOUCH
SETTING: variation 1”, and a JAM TRACK
is selected, an appropriate V oice is automatically selected for playing the J am Track with.
(page 16)
• T urning the Voice Guide “on” (page 6) makes
it easier to select a Variation.
15
Page 18

,,,,,,,,,,,,,,,,,,,,,
,
y
,
y
yyyyyyyyyyyyyyyyyyyyy
Start/Stop the Jam Track
Just as in the STYLE section, press the START/STOP >/■ but-
ton, and the JAM TRACK will begin to play. Try playing along with
the accompaniment.
START/
STOP
The selected Jam Track pattern will repeat its chord progression
indefinitely. (Refer to the “Jam Track Chord Progression List” on
page 17.)
• If you change the position of the SONG/
JAM TRACK/ STYLE Dial in the middle
of Jam Track playback, the new selection will start from the next measure.
T o stop the Jam T rack, press the ST ART/ST OP >/■ button again,
a simple ending will be played and Jam Track playback will stop.
,,,,,,,,,,,,,,,,,,,,,
yyyyyyyyyyyyyyyyyyyyy
Using the One Touch Setting
Your PSR-130 contains a total of 80 different Styles, 20 Songs, and 20 Jam Tracks, each containing 10 different voice settings appropriate for the selected Style/Song/Jam Track.
If you rotate the V OICE Dial to the ONE T OUCH SETTING position, the PSR-130 will automatically select an appropriate Voice for playing with the SONG/JAM TRACK/STYLE that you select.
Rotate the VOICE Dial to the ONE T OUCH SETTING posi-
tion and, an appropriate Voice (melody voice) for the SONG/JAM
TRACK/STYLE you selected, will automatically be selected for
you to play along with.
Also, ten more setting variations can be accessed by pressing
the VOICE VARIA TION [+] button.
ONE TOUCH
SETTING
SPLIT
VOICE
ECHO
VOICE
HARMONY
VOICE
SUSTAIN
VOICE
VOICE
PIANO
SYNTHESIZER
GUITAR
PERCUSSION/
BASS
WIND
ORGAN/
STRINGS
ENSEMBLE
16
VARIATION
Page 19

,,,,,,,,,,,,,,,,,,,,
,
y
yyyyyyyyyyyyyyyyyyyy
■ Jam Track Chord Progression List
● JAM TRACK 1
JAZZ BLUES (q=160)
C7
l
F7
l
Dm7
l
JAZZ W ALTZ (q=192)
C7
l
C7
l
F7
l
C7
l
G7
l
C7
l
FUSION (q=128)
Dm7
l
BOSSA NOVA (q=160)
Em7
l
SAMBA (q=112)
C F Gl Ô
l
TANGO (q=124)
E7
l
SKA (q=160)
Am
l
COUNTRY (q=120)
C
l
C
l
F7
l
Ô
l
G7
l
Ô
l
Ô
l
Ô
l
Ô
l
Ô
l
Ô
l
Ô
l
Eb7
l
Ô
l
Ô
l
F
l
F
l
C7
l
C7
l
C7 A7l Dm7 G7
l
Ô
l
Ô
l
Ô
l
Ô
l
G#7
l
Ô
l
G7
l
Dm7
l
Ô
l
Am
l
Dm
l
C
l
C G7
l
Ô
l
A7
l
Ô
l
Ô
l
Ô
l
Ô
l
G7
l
Ô
l
Ô
l
Db7
l
Ô
l
Ô
l
Ô
l
G7
l
C
l
● JAM TRACK 2
DANCE (q=120)
l
l
Am7
l
l
Dm7
Ô
l
Ô
l
l
l
Em7
Am7
Ô
l
Ô
l
l
l
l
RAP (q=116)
Am7
l
Ô
l
Ô
l
Ô
l
l
l
l
FUNK (q=92)
C7
l
F7
l
C7
l
F7
l
l
l
l
l
l
SOUL BALLAD (q=104)
l
l
l
G7
l
C
Am
Dm7
Ô
l
Ô
l
Ô
l
Ô
l
Ô
l
Ô
l
Ô
l
Gaug
l
Ô
l
Ô
l
Ô
l
Ô
l
l
l
l
l
l
MINOR BLUES (q=144)
Am
l
l
l
l
Dm
E
Ô
l
Ô
l
Ô
l
Ô
l
Am
l
Am
l
Ô
l
Ô
l
Ô
l
l
l
l
l
HEAVY METAL (q=120)
C
l
Ô
l
Bb
l
C
l
l
l
BOOGIE WOOGIE (q=136)
C
l
F
l
l
l
l
G
l
ROCK & ROLL (q=144)
C
l
Ô
l
Ô
l
F
l
Am
l
Ô
l
C
l
C
l
F
l
Ô
l
Ô
l
G
l
G
l
l
l
l
l
MARCH (q=116)
C
l
NEW AGE (q=84)
C
l
Ô
l
Ô
l
G7
l
C#
l
C
l
C
l
R & B (q=136)
C7
l
l
l
SLOW ROCK (q=88)
C
l
l
l
F7
Am7
G7 F7l C7
l
F
l
l
G7
l
l
17
Page 20

,,,,,,,,,,,,,,,,,,,,,
,
y
yyyyyyyyyyyyyyyyyyyyy
Troubleshooting
Problem Possible Cause Solution
When the PSR-130 is turned on,
a buzzing sound is produced.
The sound is distorted and sometimes cuts out.
Not all notes are heard when
playing a number of notes simultaneously .
The sound of the Voice changes
from note to note.
Power is flowing into the PSR-130
Battery power is low.
There is a limit to the number of
notes that can be played at a single
time.
The AWM tone generation method
uses multiple recordings (samples)
of an instrument across the range of
the keyboard; thus, the actual sound
of the Voice may be slightly different
from note to note.
This is normal and not the result of
a defect
Replace the batteries.
The PSR-130 has a maximum polyphony limit of 12 note. That includes notes that are not only played
on the keyboard but notes produced
by Style, Song, and A uto Accompaniment functions. Therefore, if the
total number of notes simultaneously
produced exceeds the limit, some
notes will be cut off or not sound at
all. (page 11)
This is normal and not the result of
a defect
18
Page 21

Song Scores
SONG 1 1
ORIGINAL SONG 1
SONG 1 2
ORIGINAL SONG 2
19
Page 22

SONG 1 3
OH! SUSANNA
S. C. Foster
SONG 1 4
LA CUCARACHA
Mexican Folk Song
20
Page 23

SONG 1 5
SUR LE PONT D’AVIGNON
French Folk Song
SONG 1 6
LONDONDERRY AIR
Irish Folk Song
21
Page 24

SONG 1 7
DECK THE HALLS
Sacred Song
SONG 1 8
O , VRENELI
Swiss Folk Song
22
Page 25

SONG 1 9
HOUSE OF THE RISING SUN
American Folk Song
SONG 1 10
TROIKA
Russian Folk Song
23
Page 26

SONG 2 1
ORIGINAL SONG 3
(D.S. time straight)
SONG 2 2
BEAUTIFUL DREAMER
S. C. Foster
24
Page 27

SONG 2 3
WALTZ OF THE FLOWERS
Tchaikovsky
(D.S. time repeat)
SONG 2 4
TANNENBAUM
German Folk Song
25
Page 28

SONG 2 5
SYMPHONY NO. 40
Mozart
SONG 2 6
THE LAST ROSE OF SUMMER
T. Moore
26
Page 29

SONG 2 7
SILENT NIGHT
F. Gruber
SONG 2 8
AIR ON THE G STRING
J. S. Bach
27
Page 30

SONG 2 9
AULD LANG SYNE
Scottish Folk Song
SONG 2 10
SONG OF JOY
Beethoven
28
Page 31

Specifications
Keyboards 61 standard-size keys (C1—C6) with touch response.
Voice AWM 110 voices
Style 100 (including 20 Jam Tracks)
Song 20
Auto Accmpaniment Multi Fingering (Single Finger / Fingerd)
Controls STAND BY/ON Switch, VOLUME Control, START/STOP >/■ Button, TEMPO s/t
Button, SONG/JAM TRACK/STYLE Dial, SONG/JAM TRACK/STYLE VARIATION [+]
Button, VOICE Dial, VOICE VARIATION [+] Button
Rear Panel Jack DC IN 10-12V Jack, PHONES/AUX OUT Jack
Amplifiers 4 W (when using PA-3B power adaptor)
1.5 W (when using batteries)
Speakers 10 cm (3-15/16”) x 2, 4 Ω
Rated Power Supply YAMAHA PA-3B power adaptor (sold separately)
Four “AA” size/R6P/SUM-3 (1.5V) batteries (sold separately)
Power Consumption 8 W (when using PA-3B AC power adaptor)
Dimensions (W x D x H) 895 x 287 x 106 mm (35-1/4” x 11-1/3” x 4-1/8”)
Weight 3.4 kg (7 lbs. 8 oz.) (w/o batteries)
Optional Accessories AC Power Adaptor : PA-3B
Headphones : HPE-3/150
Keyboard Stand : L-2C
29
Page 32

Entsorgung leerer Batterien (nur innerhalb Deutschlands)
Leisten Sie einen Beitrag zum Umweltschutz. Verbrauchte Batterien oder
Akkumulatoren dürfen nicht in den Hausmüll. Sie können bei einer
Sammelstelle für Altbatterien bzw. Sondermüll abgegeben werden.
Informieren Sie sich bei Ihrer Kommune.
The serial number of this product may be found on the bottom of the unit.
You should note this serial number in the space provided below and retain
this manual as a permanent record of your purchase to aid identification
in the event of theft.
Model No. PSR-130
Serial No.
Page 33

For details of products, please contact your nearest Yamaha or the
authorized distributor listed below.
Pour plus de détails sur les produits, veuillez-vous adresser à Yamaha
ou au distributeur le plus proche de vous figurant dans la liste suivante.
Die Einzelheiten zu Produkten sind bei Ihrer unten aufgeführten Niederlassung und bei Yamaha Vertragshändlern in den jeweiligen
Bestimmungsländern erhältlich.
Para detalles sobre productos, contacte su tienda Yamaha más cercana
o el distribuidor autorizado que se lista debajo.
NORTH AMERICA
CANADA
Yamaha Canada Music Ltd.
135 Milner Avenue, Scarborough, Ontario,
M1S 3R1, Canada
Tel: 416-298-1311
U.S.A.
Yamaha Corporation of America
6600 Orangethorpe Ave., Buena Park, Calif. 90620,
U.S.A.
Tel: 714-522-9011
MIDDLE & SOUTH AMERICA
MEXICO
Yamaha De Mexico S.A. De C.V.,
Departamento de ventas
Javier Rojo Gomez No.1149, Col. Gpe Del
Moral, Deleg. Iztapalapa, 09300 Mexico, D.F.
Tel: 686-00-33
BRASIL
Yamaha Musical Do Brasil LTDA.
Ave. Reboucas 2636, São Paulo, Brasil
Tel: 011-853-1377
PANAMA
Yamaha De Panama S.A.
Edificio Interseco, Calle Elvira Mendez no.10,
Piso 3, Oficina #105, Ciudad de Panama, Panama
Tel: 507-69-5311
OTHER LATIN AMERICAN COUNTRIES
AND CARIBBEAN COUNTRIES
Yamaha Music Latin America Corp.
6101 Blue Lagoon Drive, Miami, Florida 33126,
U.S.A.
Tel: 305-261-4111
EUROPE
THE UNITED KINGDOM
Yamaha-Kemble Music (U.K.) Ltd.
Sherbourne Drive, Tilbrook, Milton Keynes,
MK7 8BL, England
Tel: 01908-366700
IRELAND
Danfay Ltd.
61D, Sallynoggin Road, Dun Laoghaire, Co. Dublin
Tel: 01-2859177
GERMANY/SWITZERLAND
Yamaha Europa GmbH.
Siemensstraße 22-34, 25462 Rellingen,
F.R. of Germany
Tel: 04101-3030
AUSTRIA
Yamaha Music Austria
Schleiergasse 20, A-1100 Wien Austria
Tel: 0222-60203900
THE NETHERLANDS
Yamaha Music Nederland
Kanaalweg 18G, 3526KL, Utrecht, The Netherlands
Tel: 030-2828411
BELGIUM
Yamaha Music Belgium
Keiberg Imperiastraat 8, 1930 Zaventem, Belgium
Tel: 02-7258220
FRANCE
Yamaha Musique France,
Division Claviers
BP 70-77312 Marne-la-Vallée Cedex 2, France
Tel: 01-64-61-4000
ITALY
Yamaha Musica Italia S.P.A.,
Home Keyboard Division
Viale Italia 88, 20020 Lainate (Milano), Italy
Tel: 02-935-771
SPAIN
Yamaha-Hazen Electronica Musical, S.A.
Jorge Juan 30, 28001, Madrid, Spain
Tel: 91-577-7270
PORTUGAL
Valentim de Carvalho CI SA
Estrada de Porto Salvo, Paço de Arcos 2780 Oeiras,
Portugal
Tel: 01-443-3398/4030/1823
GREECE
Philippe Nakas S.A.
Navarinou Street 13, P.Code 10680, Athens, Greece
Tel: 01-364-7111
SWEDEN
Yamaha Scandinavia AB
J. A. Wettergrens Gata 1
Box 30053
S-400 43 Göteborg, Sweden
Tel: 031 89 34 00
DENMARK
YS Copenhagen Liaison Office
Generatorvej 8B
DK-2730 Herlev, Denmark
Tel: 44 92 49 00
FINLAND
Warner Music Finland OY/Fazer Music
Aleksanterinkatu 11, P.O. Box 260
SF-00101 Helsinki, Finland
Tel: 0435 011
NORWAY
Narud Yamaha AS
Grini Næringspark 17
N-1345 Østerås, Norway
Tel: 67 14 47 90
ICELAND
Skifan HF
Skeifan 17 P.O. Box 8120
IS-128 Reykjavik, Iceland
Tel: 525 5000
OTHER EUROPEAN COUNTRIES
Yamaha Europa GmbH.
Siemensstraße 22-34, 25462 Rellingen, F.R. of
Germany
Tel: 04101-3030
AFRICA
Yamaha Corporation,
International Marketing Division
Nakazawa-cho 10-1, Hamamatsu, Japan 430
Tel: 053-460-2312
MIDDLE EAST
TURKEY/CYPRUS
Yamaha Europa GmbH.
Siemensstraße 22-34, 25462 Rellingen,
F.R. of Germany
Tel: 04101-3030
OTHER COUNTRIES
Yamaha Corporation,
International Marketing Division
Nakazawa-cho 10-1, Hamamatsu, Japan 430
Tel: 053-460-2312
ASIA
HONG KONG
Tom Lee Music Co., Ltd.
11/F., Silvercord Tower 1, 30 Canton Road,
Tsimshatsui, Kowloon, Hong Kong
Tel: 730-1098
INDONESIA
PT. Yamaha Music Indonesia (Distributor)
PT. Nusantik
Gedung Yamaha Music Center, Jalan Jend. Gatot
Subroto Kav. 4, Jakarta 12930, Indonesia
Tel: 21-520-2577
KOREA
Cosmos Corporation
#131-31, Neung-Dong, Sungdong-Ku, Seoul
Korea
Tel: 02-466-0021~5
MALAYSIA
Yamaha Music Malaysia, Sdn., Bhd.
16-28, Jalan SS 2/72, Petaling Jaya, Selangor,
Malaysia
Tel: 3-717-8977
PHILIPPINES
Yupangco Music Corporation
339 Gil J. Puyat Avenue, P.O. Box 885 MCPO,
Makati, Metro Manila, Philippines
Tel: 819-7551
SINGAPORE
Yamaha Music Asia Pte., Ltd.
Blk 17A Toa Payoh #01-190 Lorong 7
Singapore 1231
Tel: 354-0133
TAIWAN
Kung Hsue She Trading Co., Ltd.
No. 322, Section 1, Fu Hsing S. Road,
Taipei 106, Taiwan. R.O.C.
Tel: 02-709-1266
THAILAND
Siam Music Yamaha Co., Ltd.
865 Phornprapha Building, Rama I Road,
Patumwan, Bangkok 10330, Thailand
Tel: 2-215-3443
THE PEOPLE’S REPUBLIC OF CHINA
AND OTHER ASIAN COUNTRIES
Yamaha Corporation,
International Marketing Division
Nakazawa-cho 10-1, Hamamatsu, Japan 430
Tel: 053-460-2317
OCEANIA
AUSTRALIA
Yamaha Music Australia Pty. Ltd.
17-33 Market Street, South Melbourne, Vic. 3205,
Australia
Tel: 3-699-2388
NEW ZEALAND
Music Houses of N.Z. Ltd.
146/148 Captain Springs Road, Te Papapa,
Auckland, New Zealand
Tel: 9-634-0099
COUNTRIES AND TRUST
TERRITORIES IN PACIFIC OCEAN
Yamaha Corporation,
International Marketing Division
Nakazawa-cho 10-1, Hamamatsu, Japan 430
Tel: 053-460-2317
[PK] 8
Downloaded from:
HEAD OFFICE Yamaha Corporation, Electronic Musical Instrument Division
Nakazawa-cho 10-1, Hamamatsu, Japan 430
Tel: 053-460-3273
Page 34

M.D.G., EMI Division © 1997 Yamaha Corporation
VZ29000 707POCP1.4-01A0 Printed in Japan
Downloaded from:
Page 35

documentation manual, user maintenance, brochure, user reference, pdf manual
This file has been downloaded from:
User Manual and User Guide for many equipments like mobile phones, photo cameras, monther board, monitors, software, tv, dvd, and othes..
Manual users, user manuals, user guide manual, owners manual, instruction manual, manual owner, manual owner's, manual guide,
manual operation, operating manual, user's manual, operating instructions, manual operators, manual operator, manual product,
 Loading...