

Page 1

N S -U 4 0 P
Natural Sound Satellite Speaker Package
Enceintes satellites 2 voies à suspension acoustique naturelle
G
OWNER’S MANUAL
MODE D’EMPLOI
BEDIENUNGSANLEITUNG
BRUKSANVISNING
MANUALE DI ISTRUZIONI
MANUAL DE INSTRUCCIONES
GEBRUIKSAANWIJZING
Page 2
See page 3 on how to connect the speakers to your amplifier or receiver.
Veuillez vous réferer à la page 3 pour plus de pécision sur la façon de connecter les enceintes à votre
amplificateur ou votre récepteur.
Lesen Sie auf Seite 3, wie Lautsprecher an Ihren Verstärker oder Receiver anzuschließen sind.
Se sida 3 angående hur man kopplar högtalarna till förstärkaren eller receivern.
Vedi pagina 3 riguardo alle istruzioni sul collegamento degli altoparlanti al vostro amplificatore o
ricevitore.
Vea la página 3 para información sobre como conectar los altavoces a su amplificador o receptor.
Zie blz. 3 voor details over het aansluiten van de luidsprekers op uw versterker of tuner/versterker.
White broken line
Ligne blanche interrompue
Unterbrochen weißen Linie
Vit bruten rand
Linea bianca rotta
Línea blanca interrumpida
Witte onderbroken lijn
Front speaker
Enceinte avant
Front Lautsprecher
Främre högtalare
Altoparlante frontale
Altavoz delantero
Voorluidspreker
(L) (R)
Center speaker
Enceinte centrale
Center Lautsprecher
Mitthögtalare
Front speaker
Enceinte avant
Front Lautsprecher
Främre högtalare
Altoparlante frontale
Altavoz delantero
Voorluidspreker
Altoparlante centrale
Altavoz central
Middenluidspreker
FRONT L
Multichannel amplifier/receiver
Amplificateur/récepteur multivoies
Multikanal-Verstärker/-Receiver
Multikanalsförstärkare/receiver
Amplificatore/ricevitore multicanale
Amplificador/receptor multicanal
Meerkanaals versterker of tuner
/versterker
(L) (R)
REAR L
ANTENNA
ANALOG
R L
FM
PC IN
75
Ω UNBAL.
AUX 1
IN
GND
AUX 2
IN
AM
REC
OUT
SUB
WOOFER
OUTPUT
R L
DIGITAL
SPEAKERS
+–
USB
L
FRONT
COAX
R
IN
PC
OPT
IN
CENTER
6Ω MIN.
SPEAKER
/
+–
AUX 1
OPT IN
L
REAR
OPT
OUT
R
CENTER
FRONT L
SPEAKERS
L
FRONT
R
CENTER
REAR L
L
REAR
R
CLASS 2 WIRIN G
+–
FRONT R
CENTER
6Ω MIN .
/
SPEAKER
+–
REAR R REAR R
FRONT R
Rear speaker
Enceinte arrière
Hinterer Lautsprecher
Bakre högtalare
Altoparlante posteriore
Altavoz trasero
Achterluidspreker
Rear speaker
Enceinte arrière
Hinterer Lautsprecher
Bakre högtalare
Altoparlante posteriore
Altavoz trasero
Achterluidspreker
Page 3
Cautions
English
Setting up the speakers
Please read the following operating precautions before
use. YAMAHA will not be held responsible for any
damage and/or injury caused by not following the
cautions below.
● To assure the finest performance, please read this
manual carefully. Keep it in a safe place for future
reference.
● To prevent the enclosure from warping or discoloring, do
not place the speakers where they will be exposed to
direct sunlight or excessive humidity.
● Do not place the speakers where they are liable to be
knocked over or struck by falling objects. Stable
placement will also ensure better sound performance.
● Placing the speakers on the same shelf or rack as the
turntable can result in feedback.
● Any time you note distortion, reduce the volume control
on your amplifier to a lower setting. Never allow your
amplifier to be driven into “clipping”. Otherwise the
speakers may be damaged.
● When using an amplifier with a rated output power
higher than the nominal input power of the speakers,
care should be taken never to exceed the speakers’
maximum input.
● Do not attempt to clean the speakers with chemical
solvents as this might damage the finish. Use a clean,
dry cloth.
● Secure placement or installation is the owner’s
responsibility.
YAMAHA shall not be liable for any accident caused
by improper placement or installation of speakers.
This speaker package is designed to be suitable for use in a
home theater sound system.
The included five full-range satellite speakers are all the
same models. When using these speakers in a home
theater sound system, assign them to two front speakers,
one center speaker and two rear speakers respectively.
Recommended speaker placement
Before making connections, place all speakers in their
respective positions. The positioning of the speakers is
important because it controls the overall sound quality of
your audio system.
Place the speakers depending on your listening position by
following the instructions below.
* The speakers can be mounted on a wall. (See the next
page.)
Front speakers: On both sides of and at approximately
the same height as the TV (or computer
monitor).
Rear speakers: Behind your listening position or on
both sides of the listening room.
Normally, set the rear speakers at
positions higher than your ears when
you sit at the listening position.
Center speaker: Precisely between the front speakers.
* When mounting the center speaker
on the monitor, see the ne xt page .
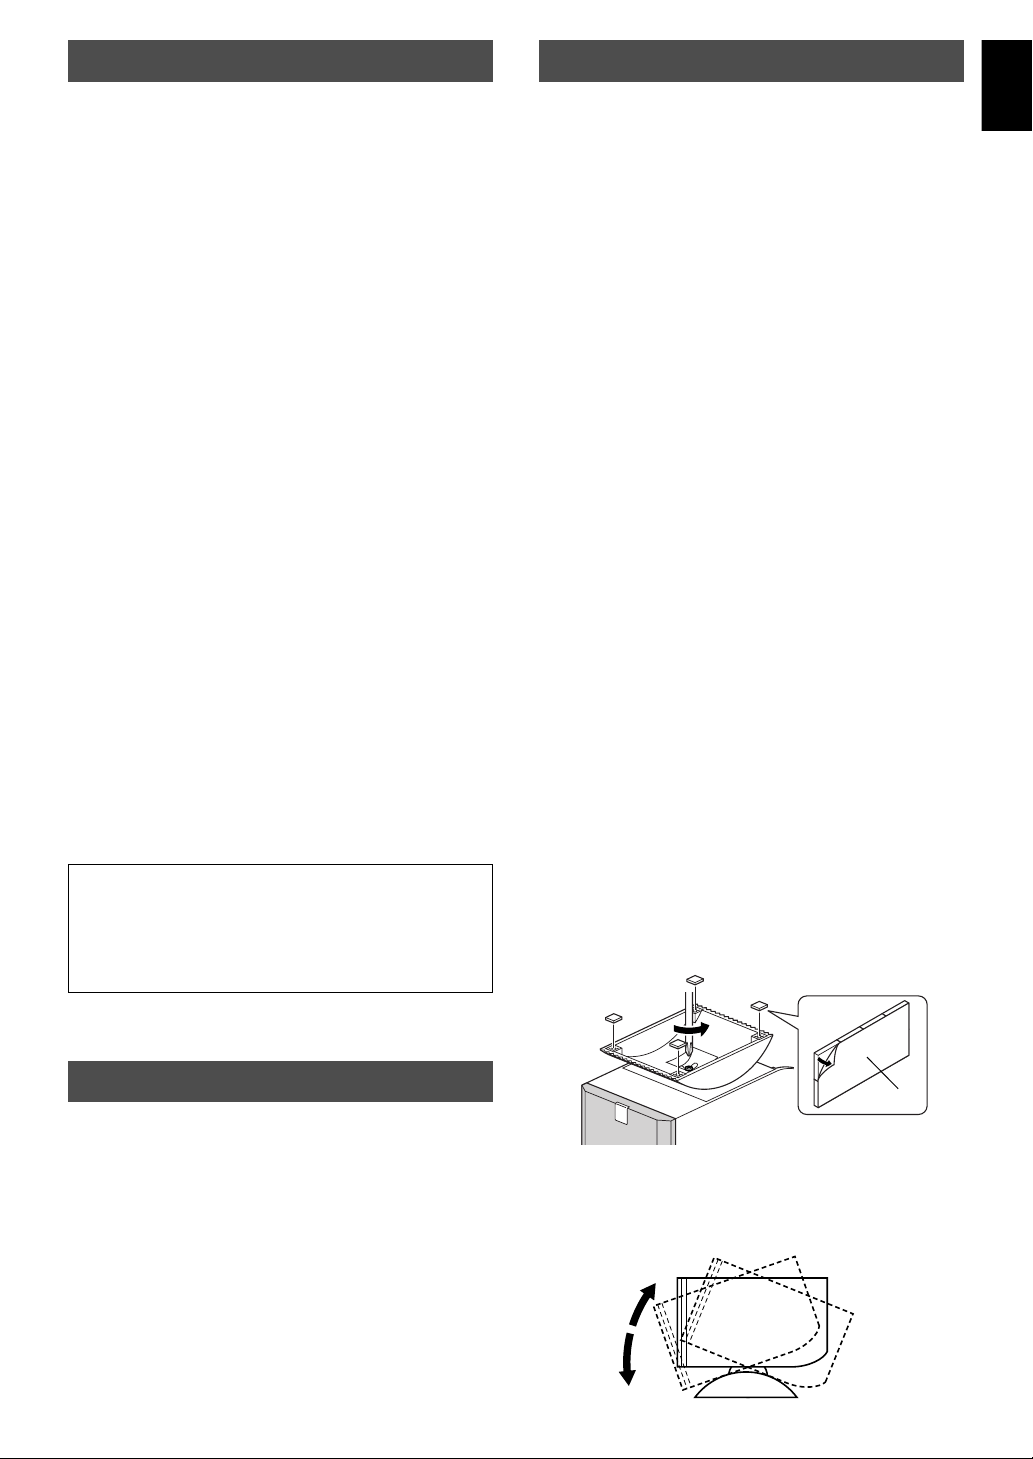
m Adjusting the front angle of the speakers
The front angle of the speakers can be adjusted as shown
below.
These speakers feature a magnetically shielded design,
but there is still a chance that placing them too close to a
TV or a computer monitor might impair picture color.
Should this happen, move the speakers away from the
TV or the computer monitor.
Unpacking
After unpacking, check that the following parts are included.
● Satellite speaker x 5
● Accessories
●
Speaker cable (3m) x 3
●
Speaker cable (7m) x 2
●
Cable holder x 1
●
Pad x 20
●
Fastener x 1
1 Loosen the screw on the bottom of the speaker stand.
* Attach the supplied nonskid pads at the four corners
on the bottom of the stand to prevent the speaker from
moving by vibrations.
Pads
2 Adjust the speaker angle on the stand as you prefer, and
then tighten the screw.
E-1
Page 4

m Mounting the speakers on a wall
The speakers can also be hung on the wall.
Fasten screws into a firm wall or wall support as shown in
the figure, and hang the slits on the rear of the speaker on
the protruding screws.
* Make sure that the screws are securely caught by the
slits.
Tapping screw (4 mm)
(Available in hardware stores)
Note
Do not place the speaker on top of the monitor with an
inclination of more than 10 degrees.
10&
10&
Min.
4 mm
20 mm
50 mm
Wall/ wall
support
Warning
● Each speaker weighs 0.3 kg (0.6 lbs.). Do not mount them
on thin plywood or a wall with soft surface material. If
mounted, the screws may come out of the flimsy surface
and the speakers may fall. This could damage the speakers
and cause personal injury.
● Do not install the speakers on a wall with nails, adhesives,
or any other unstable hardware. Long-term use and
vibrations may cause them to fall.
● To avoid accidents resulting from tripping over loose
speaker cables, fix them to the wall.
m Placing the center speaker on top of the
monitor
A speaker used for the center speaker can be placed on top
of the monitor. Follow one of the two procedures below for
placing a speaker on top of the monitor.
Placing the center speaker on top of the monitor
with the speaker stand attached to the speaker
In this method, you need to fix the speaker cable on the
monitor by using the provided cable holder to prevent the
speaker from falling.
1 Remove the backing sheet from the holder, and attach
the holder on top of the monitor by pressing it down
forcibly. (The top of the monitor must be cleaned
beforehand.)
Cable holder
2 Tie the speaker cable to the holder firmly with a provided
vinyl-coated wire (which is originally used for bundling
the speaker cables) as shown below.
Placing the center speaker on top of the monitor
by using the provided fastener
First remove the stand from the speaker, and attach the
provided fastener at the bottom of the speaker and on top of
the monitor to prevent the speaker from falling.
* This is the recommended method for placing a speaker
on top of the monitor. If discoloration of picture occurs, or
you need the speaker stand to adjust the speaker angle
on top of the monitor, you can select the following
method.
Fastener
Vinyl-coated wire
Note
Though this speaker is a magnetically shielded type, there
may be some influence on the monitor picture depending on
the type of monitor or the placement of the speaker. In such a
case, place the speaker further apart from the monitor until
there is no influence on the monitor picture.
E-2
Page 5

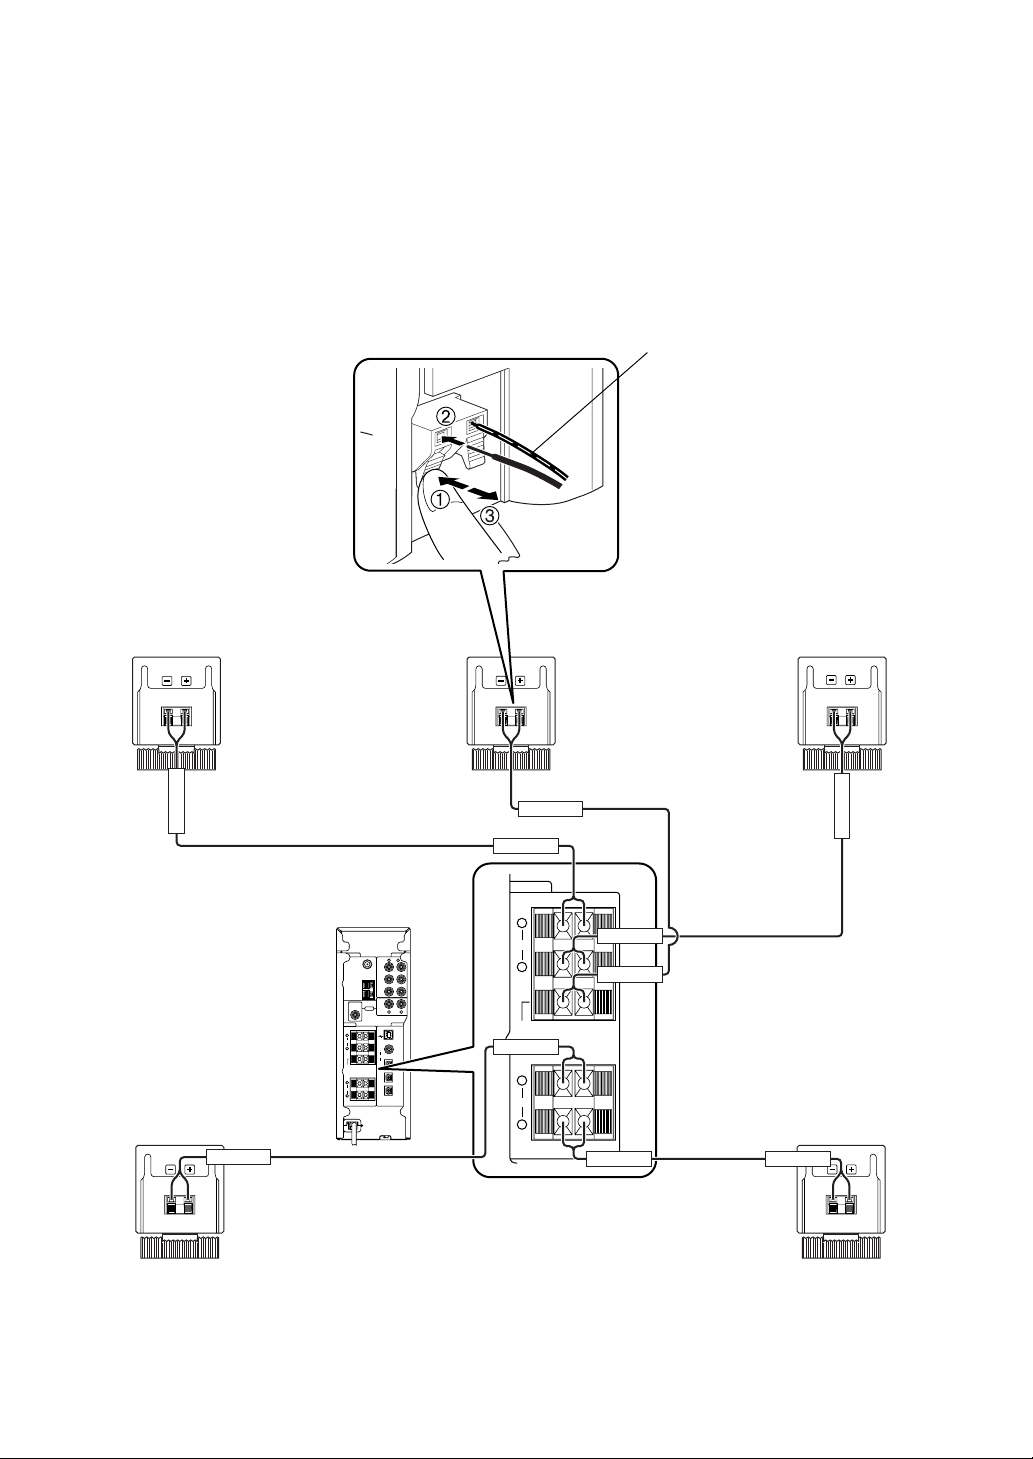
Connection to your amplifier
English
Specifications
(See the figure inside the front cover.)
Before making connections, make sure that the
amplifier is switched off.
Notes on connections
● Connect the push-type input terminals at the rear of the
speakers to the speaker output terminals of your
amplifier with the provided speaker cables.
● One side of the speaker cable has a white broken line.
Connect the (+) terminals on both the amplifier and the
speakers using the side with a white broken line.
Connect the (–) terminals on both components using the
side with no line.
● Connect one speaker to the left (marked L) terminals of
your amplifier, and the other speaker to the right
(marked R) terminals, making sure not to reverse the
polarity (+, –). If one speaker is connected with reversed
polarity, the sound will be unnatural and lack bass.
● The provided speaker cables have labels marked
FRONT L, FRONT R, CENTER, REAR L or REAR R.
Connect each speaker cable to the corresponding
speaker.
● When using this speaker system connecting with a
multichannel amplifier (RP-U200 etc.), also be sure to
use a subwoofer (YST-SW45 etc.). Moreover, set the
multichannel amplifier or a DVD player etc. which sends
signals to the amplifier in the “small speaker mode”. If it
is set in the “large speaker mode”, the speakers may
reproduce distorted sounds due to excessive input of low
frequency signals, or the speakers may be damaged.
Type............................................ Full range speaker system
Magnetically shielded type
Driver..................................................... 5 cm (2”) cone type
Nominal Input Power .................................................. 15W
Maximum Input Power ................................................ 50W
Impedance ......................................................................4Ω
Frequency Response................................. 120 Hz–25 kHz
Sensitivity .................................................................. 82 dB
Dimensions (W x H x D)........... 70 mm x 95 mm x 118 mm
(2-3/4” x 3-3/4” x 4-5/8”)
Weight ......................................................... 0.3 kg (0.6 lbs.)
Accessories
Speaker cable (3m) x 3
Speaker cable (7m) x 2
Cable holder x 1
Pad x 20
Fastener x 1
* Please note that all specifications are subject to change
without notice.
How to Connect:
1 Press and hold the terminal’s tab, as shown in the
figure.
2 Insert the bare wire end properly into the terminal hole.
[Remove approx. 10 mm (3/8”) insulation from the
speaker cable.]
3 Release your finger from the tab to allow it to lock
securely on the cable’s wire end.
* Test the firmness of the connection by pulling lightly on
the cable at the terminal.
Notes
● Do not let the bare wires touch each other as this could
damage the speaker or the amplifier, or both of them.
● Insert the speaker cables into the terminal holes securly,
taking care not to let the bare wires touch both (+) and (–)
terminals. If the cables are not inserted securly, it may
cause noises or no sound from the speakers, or damage the
speakers.
● Insert the bare wires only into the terminal holes. If the
insulated (vinyl) part of the cable is inserted, no sound will
be reproduced from the speaker.
● Fix the speaker cables to avoid catching your hands or feet
on the loose cables.
E-3
Page 6

YAMAHA ELECTRONICS CORPORATION, USA 6660 ORANGETHORPE AVE., BUENA PARK, CALIF. 90620, U.S.A.
YAMAHA CANADA MUSIC LTD. 135 MILNER AVE., SCARBOROUGH, ONTARIO M1S 3R1, CANADA
YAMAHA ELECTRONIK EUROPA G.m.b.H. SIEMENSSTR, 22-34, 25462 RELLINGEN, BEI HAMBURG, F.R. OF GERMANY
YAMAHA ELECTRONIQUE FRANCE S.A. RUE AMBROISE CROIZAT BP70 CROISSY-BEAUBOURG 77312 MARNE-LA-VALLEE CEDEX02, FRA NCE
YAMAHA ELECTRONICS (UK) LTD. YAMAHA HOUSE, 200 RICKMANSWORTH ROAD WATFORD, HERTS WD1 7JS, ENGLAND
YAMAHA SCANDINAVIA A.B. J A WETTERGRENS GATA 1, BOX 30053, 400 43 VASTRA FRÖLUNDA, SWEDEN
YAMAHA MUSIC AUSTRALIA PTY, LTD. 17-33 MARKET ST., SOUTH MELBOURNE, 3205 VIC ., AU STRALIA
Printed in China V740580
Page 7

documentation manual, user maintenance, brochure, user reference, pdf manual
This file has been downloaded from:
User Manual and User Guide for many equipments like mobile phones, photo cameras, monther board, monitors, software, tv, dvd, and othes..
Manual users, user manuals, user guide manual, owners manual, instruction manual, manual owner, manual owner's, manual guide,
manual operation, operating manual, user's manual, operating instructions, manual operators, manual operator, manual product,
 Loading...